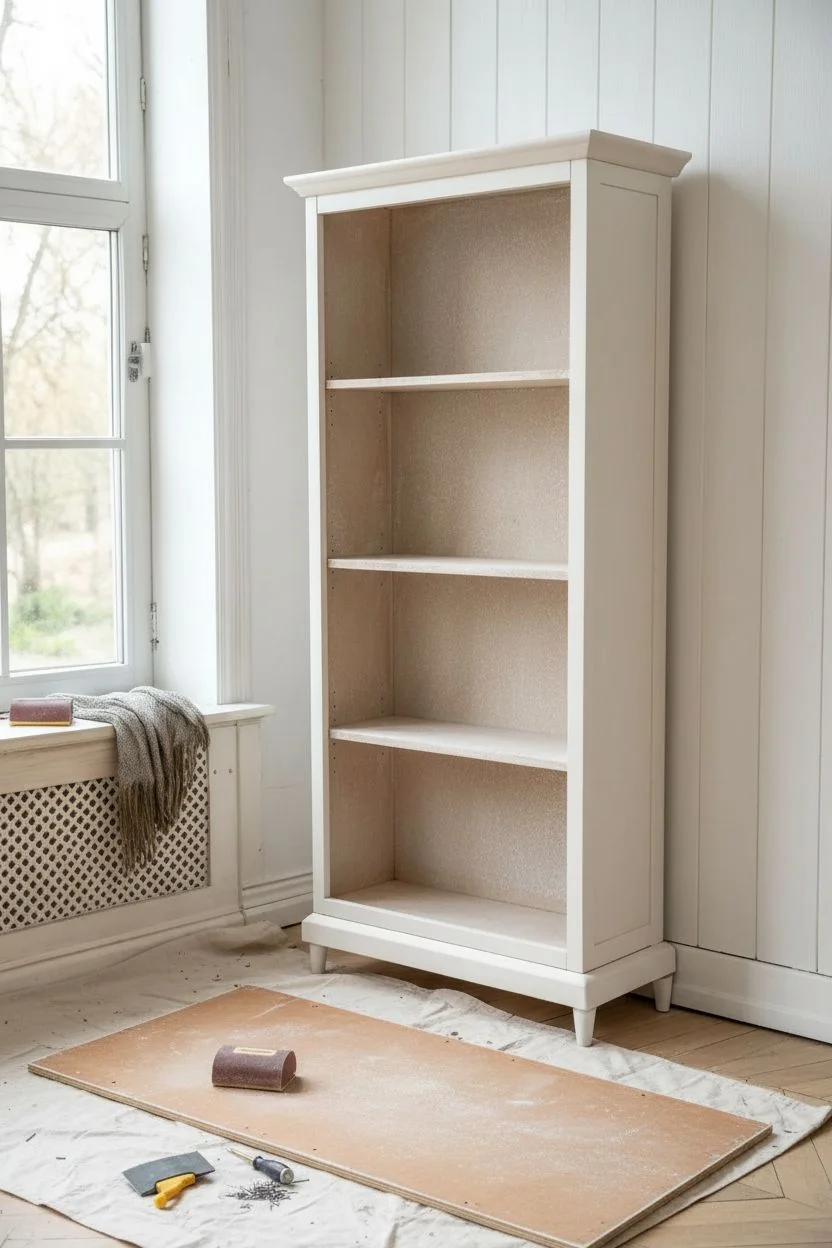
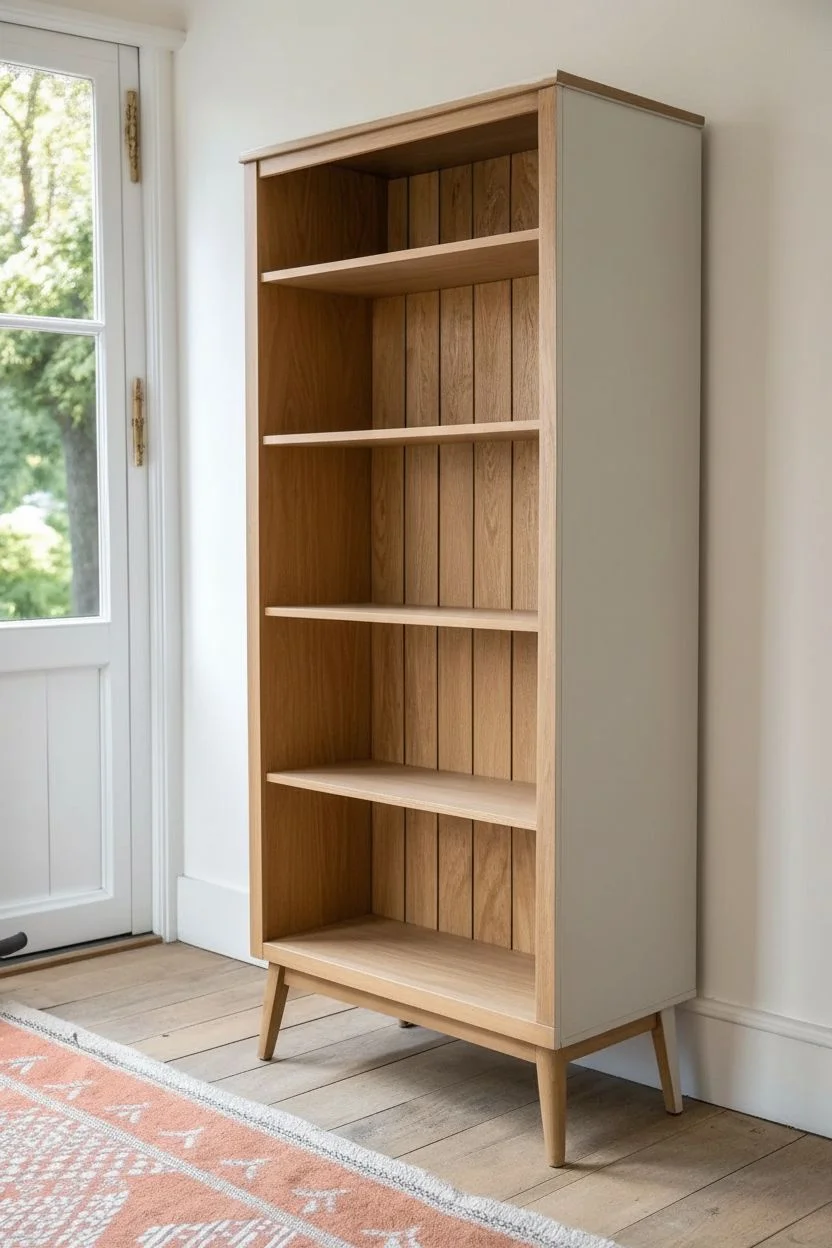
A plain bookshelf can feel like background noise, but a hand-painted bookcase turns into a real statement piece fast. I’m sharing my favorite ideas—some classic, some a little wild—so you can pick a look that fits your room and your creative mood.
Classic Crisp White Bookcase Refresh
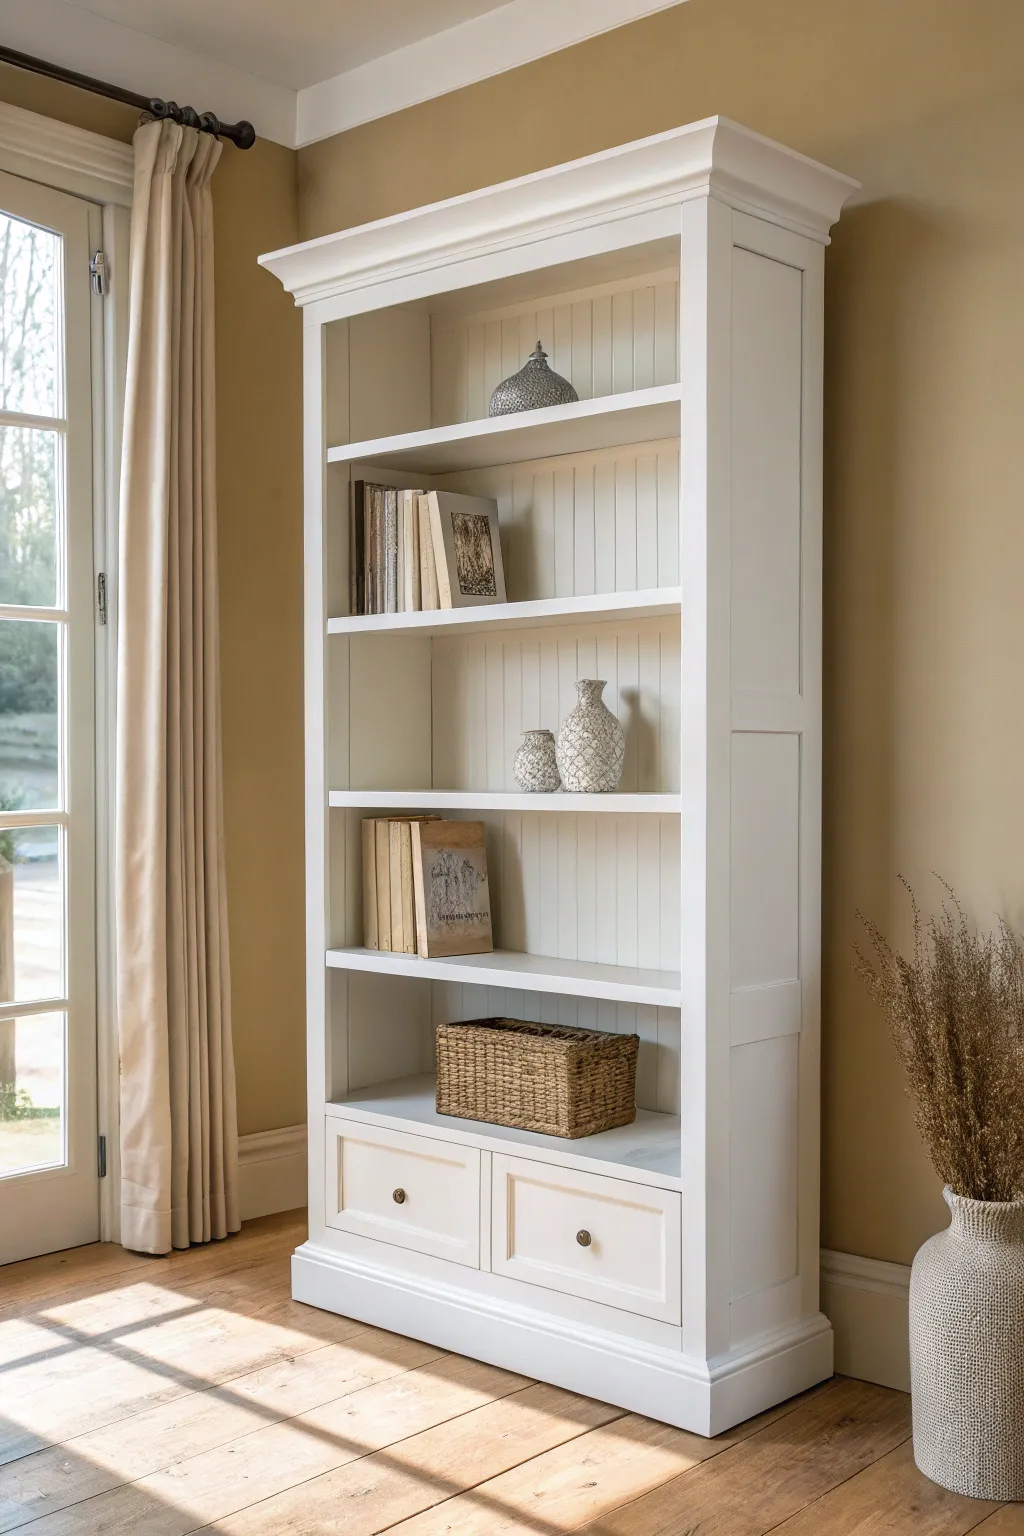
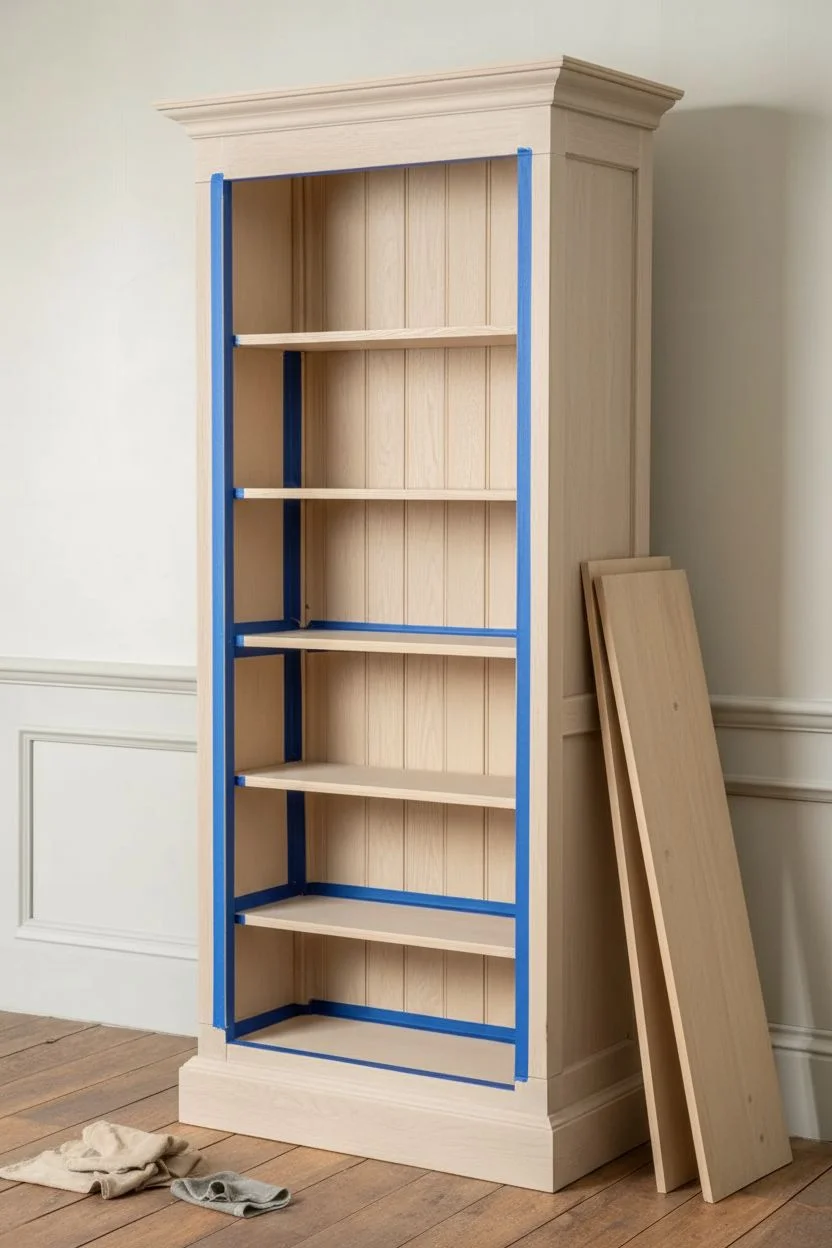
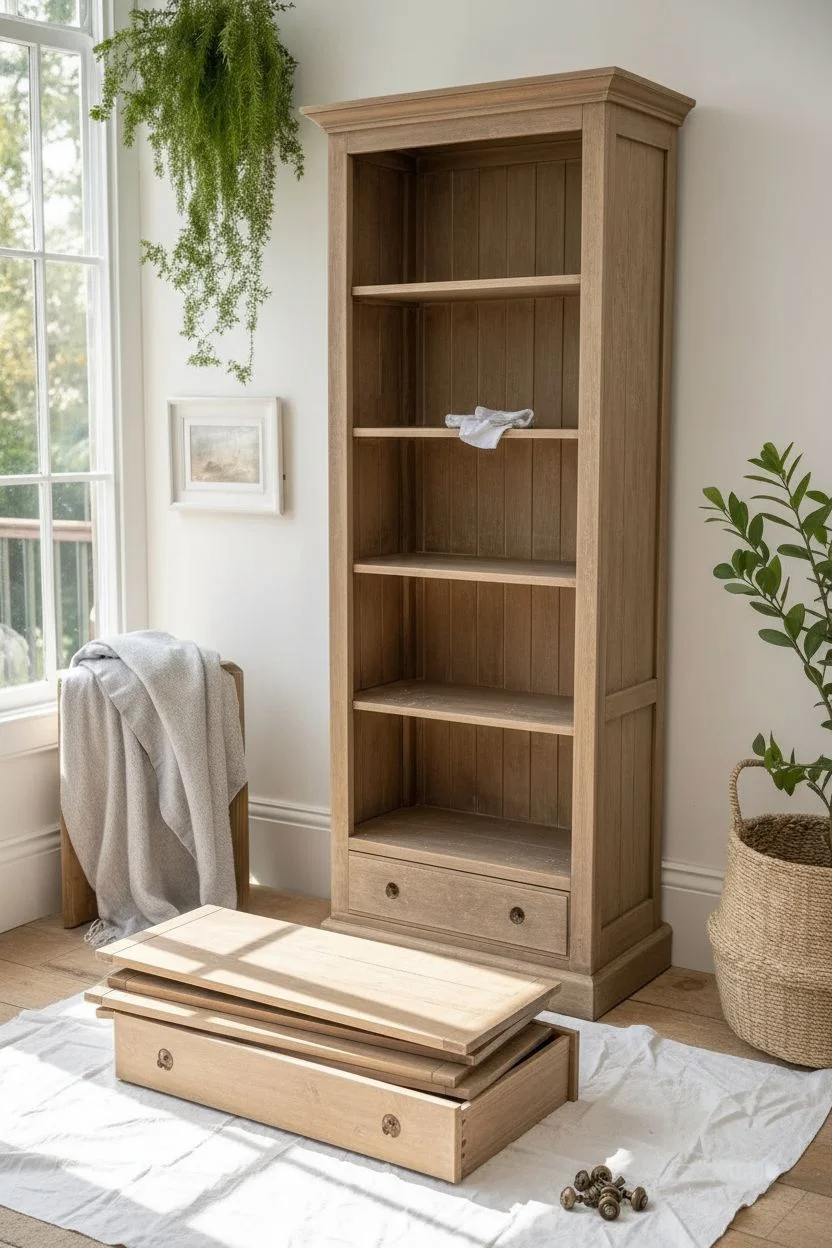
Transform a tired wooden bookcase into a stunning architectural focal point with a classic crisp white finish. This project creates a bright, airy look featuring subtle beadboard backing and elegant crown molding details that elevate any room.
Step-by-Step
Materials
- Solid wood bookcase (with or without drawers)
- Sandpaper (120 and 220 grit)
- Orbital sander (optional)
- High-quality white primer (oil-based recommended for stain blocking)
- Crisp white interior paint (eggshell or satin finish)
- Angled sash brush (2 inch)
- Small foam roller and tray
- Tack cloth
- Painter’s tape
- Screwdriver
- Wood filler
- Hardware (burnished brass or bronze knobs)
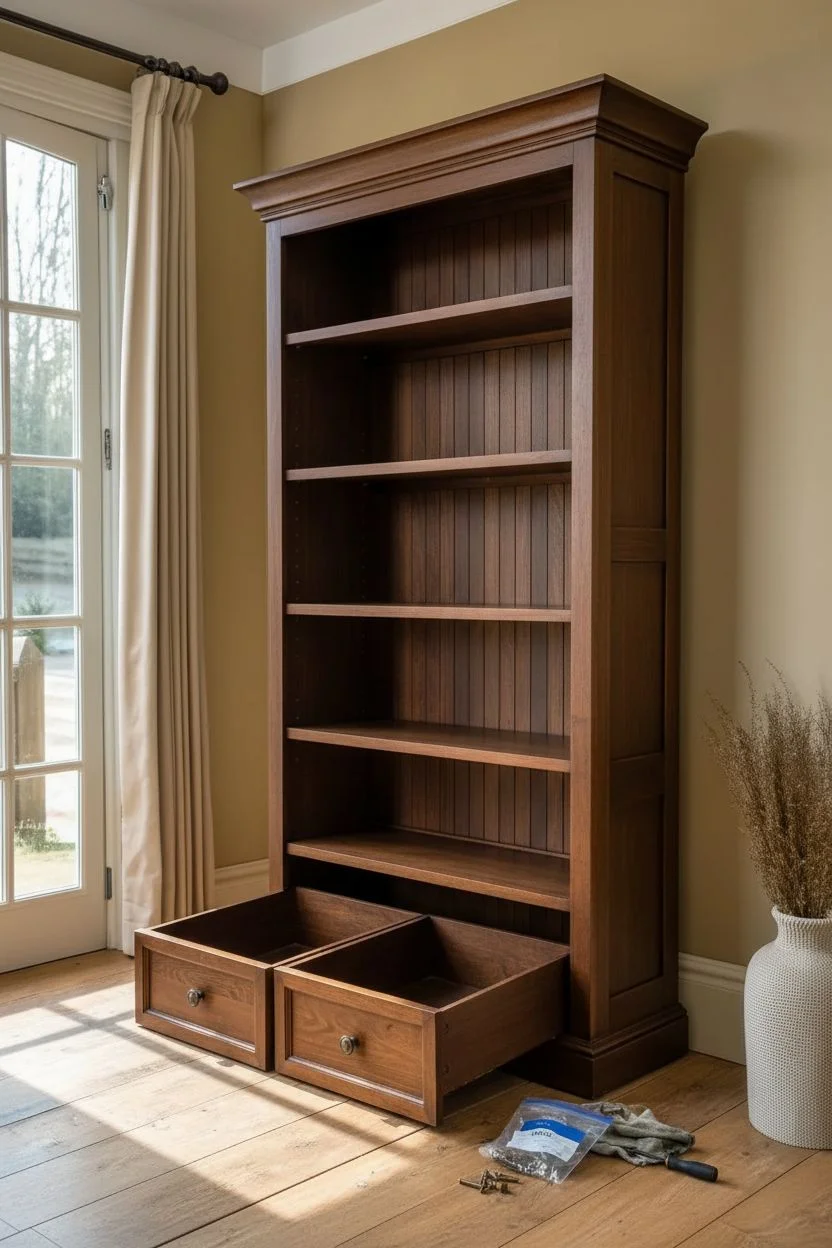
Step 1: Preparation & Disassembly
-
Clear and Clean:
Begin by removing all books, decor, and shelves from the bookcase. If the shelves are adjustable, take out the metal or plastic pegs and set them aside in a labeled bag. -
Remove Hardware:
Using your screwdriver, carefully unscrew any existing knobs or handles from the drawers. Keep the screws if you plan to reuse the old hardware, or discard them if you are upgrading. -
Take Out Drawers:
Pull the drawers completely out of their runners. This allows you to paint the drawer fronts and the surrounding frame without obstructions. -
Initial Cleaning:
Wipe down every surface with a damp cloth and a mild degreaser to remove dust, oils, and grime. This is crucial for paint adhesion.
Step 2: Sanding & Repairs
-
Rough Sanding:
Use 120-grit sandpaper to scuff all surfaces you intend to paint. You don’t need to strip it to bare wood, just remove the glossy sheen of the old finish. -
Detail Sanding:
Pay special attention to the beadboard grooves in the back panel. Fold a piece of sandpaper to get into those narrow crevices effectively. -
Fill Imperfections:
Inspect the wood for deep scratches or dents. Apply wood filler with a putty knife, let it dry completely, and then sand it flush with 220-grit paper. -
Dust Removal:
Vacuum up the sanding dust, then wipe everything down with a tack cloth. I like to do a second pass just to be sure, as any leftover dust will ruin your smooth white finish.
Paint Bleed Prevention
If painting straight over wood knots, start with a shellac-based primer. Standard water-based primers won’t stop tannins from eventually bleeding through.
Step 3: Priming for Durability
-
Tape Off Areas:
If there are areas you don’t want painted, like the drawer runners or the very back of the unit, apply painter’s tape now. -
Prime the Corners:
Using your angled brush, apply primer to the corners, the beadboard grooves, and any detailed molding around the top cornice. -
Roll the Flat Surfaces:
Switch to a small foam roller for the larger flat areas—the sides, shelf tops, and drawer fronts. This ensures a consistent texture without brush strokes. -
Dry and Light Sand:
Let the primer dry according to the can’s instructions. Once dry, lightly sand with 220-grit paper to knock down any raised grain, then wipe with a tack cloth.
Add Visual Depth
For a subtle designer touch, paint the back panel a very soft gray or cream instead of pure white. It adds depth without darkening the look.
Step 4: The Crisp White Finish
-
First Coat – Edges:
Dip your angled brush into the crisp white paint. Start by painting the beadboard grooves and the interior corners, working from top to bottom so you can catch any drips. -
First Coat – Surfaces:
Use the foam roller to apply paint to the flat surfaces. Apply thin, even coats rather than one thick one to avoid sagging. -
Drying Time:
Allow the first coat to dry fully—usually 4 to 6 hours for latex enamel, or longer for oil-based paints. Don’t rush this step. -
Second Coat:
Repeat the painting process. A second coat creates that solid, saturated white look that really pops. Check for any thin spots, especially on the edges of the shelves. -
Drawer Detail:
Don’t forget the drawer fronts. Paint them lying flat to prevent runs and ensure a perfectly smooth face.
Step 5: Reassembly & Styling
-
Cure Time:
ideally, let the piece cure for a few days before putting heavy heavy books back on. This prevents the books from sticking to the fresh paint. -
Install Hardware:
Attach your new knobs. Burnished bronze or brass knobs add a lovely vintage contrast to the bright white wood. -
Replace Shelves:
Insert the shelf supports and slide the painted shelves back into place. -
Style It Up:
Arrange your books creatively—try stacking some horizontally and leaning others vertically. Add decor items like vases or baskets to break up the lines.
Enjoy the fresh, sophisticated atmosphere your newly painted bookcase brings to your living space


Two-Tone Frame and Interior Contrast
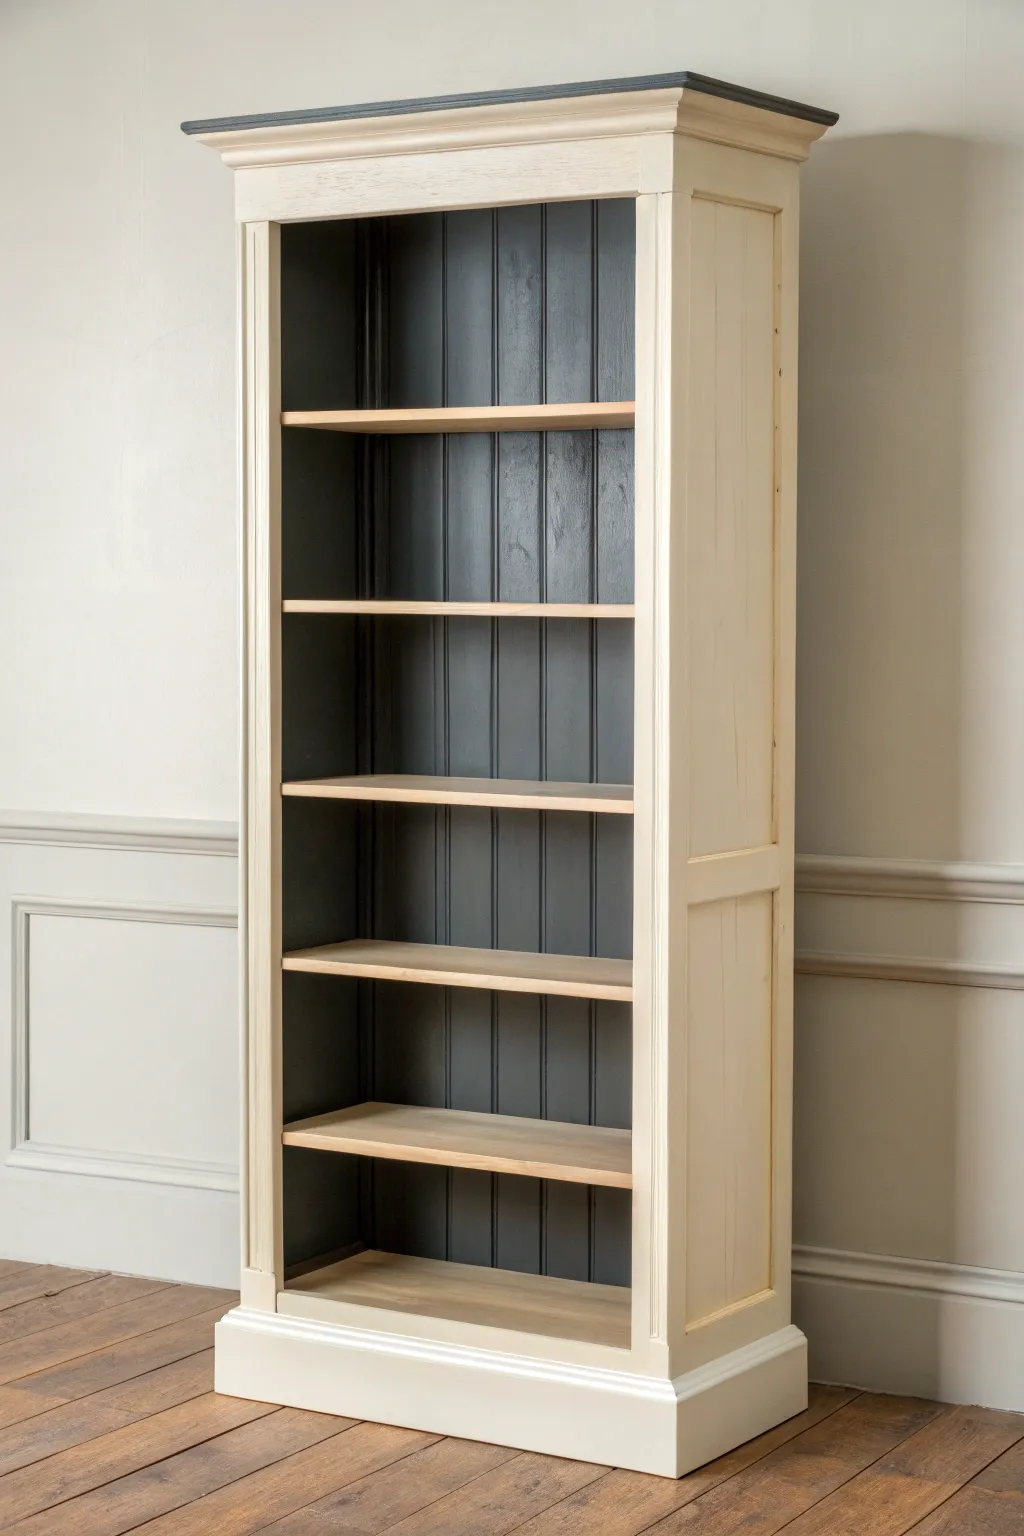
Achieve a sophisticated dual-personality look with this classic painting technique that pairs a bright, creamy exterior with a moody, dramatic interior. The contrast highlights your books and decor while maintaining a light, airy presence in the room.
Step-by-Step Guide
Materials
- Unfinished wooden bookcase
- Cream or off-white chalk paint (exterior)
- Charcoal grey or soft black matte paint (interior)
- Dark grey furniture wax or glaze (for top trim)
- Natural wood stain (optional for shelves)
- Clear matte polyurethane or furniture wax
- Painter’s tape
- Sandpaper (120 and 220 grit)
- Tack cloth
- 2-inch angled sash brush
- Small foam roller
- Drop cloths
Step 1: Preparation & Sanding
-
Disassemble the shelving:
Begin by removing all adjustable shelves from the bookcase. If the backing is removable and you haven’t assembled the piece yet, keep it separate to make painting the interior significantly easier. -
Initial light sanding:
Even if the wood is new, give the entire piece a quick scuff sand with 120-grit sandpaper. This opens up the wood grain and ensures the paint adheres properly, preventing future peeling. -
Clean the surfaces:
Wipe away every speck of sawdust using a tack cloth or a slightly damp rag. Any leftover dust will create a gritty texture in your final finish, so be thorough here. -
Masking off areas:
Apply painter’s tape to the front edges of the interior shelves if you plan to leave them natural or paint them a different color. If you are painting the frame first, tape off the interior backing edges where they meet the frame.
Step 2: Painting the Interior
-
Cutting in the corners:
Using your angled sash brush and the charcoal grey paint, carefully cut in along the corners and seams of the interior backing. This ensures full coverage in hard-to-reach crevices. -
Rolling the back panel:
Switch to a small foam roller to apply the charcoal paint to the large flat areas of the back panel. This creates a smooth, stroke-free finish that looks professionally sprayed. -
The second interior coat:
Allow the first coat to dry completely according to the can’s instructions—usually about 2-4 hours. Apply a second coat to ensure the dark color is rich and opaque.
Bleed-Through Blues
If dark knots from the wood are showing through your cream paint, spot-prime those knots with a shellac-based primer before applying another coat of paint to seal them in permanently.
Step 3: Finishing the Exterior
-
Applying the cream base:
Once the interior is dry and masking tape is removed or swapped, brush the cream chalk paint onto the exterior frame, sides, and bottom skirt. Long, smooth strokes with the grain yield the best results. -
Layering for opacity:
Lighter colors often need more coats. I find that three thin coats provide better durability and color richness than two thick, gloopy ones. Sand lightly with 220-grit paper between coats for an ultra-smooth feel. -
Accentuating the top trim:
For the crown molding at the top, paint the very top edge with the dark charcoal color to mirror the interior. You can feather this slightly or keep a hard line depending on your preference.
Add Beadboard Texture
If your bookcase has a plain flat back, use beadboard wallpaper or thin beadboard paneling for the interior back panel before painting it dark to add instant architectural interest.
Step 4: Shelves & Sealing
-
Treating the shelves:
If painting the shelves to match the interior, follow the charcoal steps now. However, for the look in the image, sand the shelves smooth and leave them natural, or apply a very light coat of clear matte sealer to protect the raw wood tone. -
Distressing the edges (Optional):
To enhance the farmhouse vibe, gently run 220-grit sandpaper over the sharp edges of the exterior frame, revealing a hint of the wood underneath. -
Sealing the paint:
Apply a clear clear wax or matte polyurethane over the painted surfaces. The dark interior needs this protection to prevent books from scuffing the paint, while the exterior needs it to resist fingerprints. -
Reassembly:
Once the sealer has cured—give it at least 24 hours to be safe—slide your shelves back into place and arrange your decor.
Now you have a stunning focal point that perfectly balances modern contrast with traditional warmth


Moody Dark Paint for a Library Feel
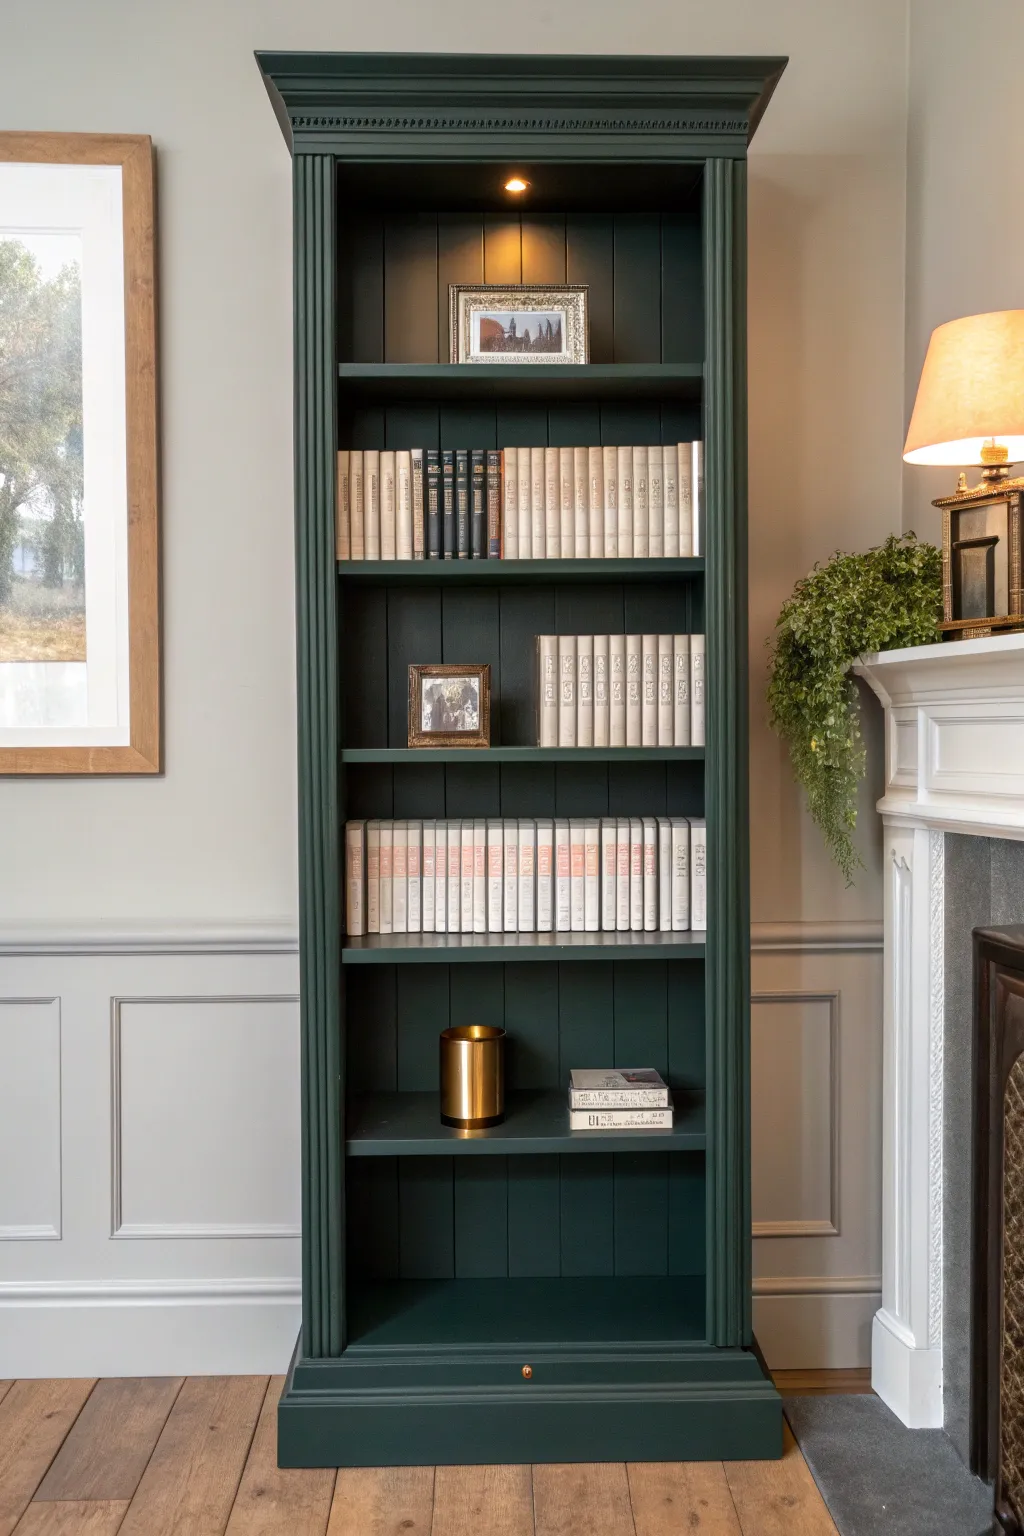
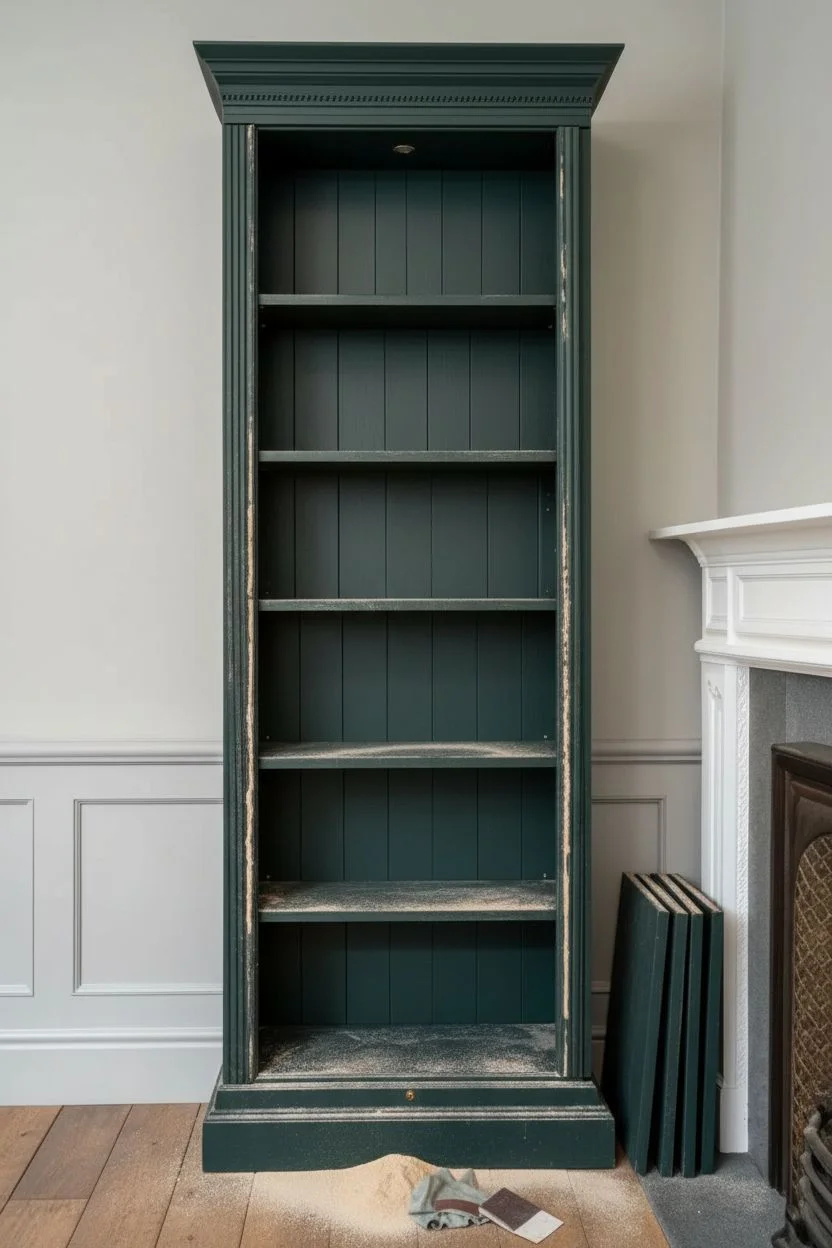
Transform a plain wooden bookshelf into a sophisticated, built-in style library piece with a deep, moody green finish. This project relies on meticulous prep work and the right paint sheen to achieve that rich, high-end look that anchors a room.
How-To Guide
Materials
- Tall wooden bookcase (with removable shelves)
- Sandpaper (120 and 220 grit)
- Tack cloth
- High-quality wood primer (grey tinted recommended)
- Interior satin or semi-gloss paint in deep forest green (e.g., Farrow & Ball generic equivalent)
- Synthetic angled sash brush (1.5 – 2 inch)
- Short-nap mini foam roller (4 inch) and tray
- Painter’s tape
- Screwdriver (for hardware removal)
- Wood filler and putty knife
- Under-cabinet lighting puck (optional, battery operated or wired)
Step 1: Preparation & Repairs
-
Clear and Disassemble:
Empty the bookcase completely and move it to a well-ventilated workspace. Remove all moveable shelves and set them aside. -
Remove Hardware:
Using your screwdriver, take off any shelf supports, pins, or decorative knobs. Bag these up so you don’t lose them. -
Fill Imperfections:
Inspect the frame and shelves for deep scratches or old nail holes. Apply wood filler with a putty knife, slightly overfilling as it shrinks when drying. -
Sanding the Surface:
Once the filler is dry, sand the entire unit—including the shelves—with 120-grit sandpaper. This scuffs the previous finish to help the new primer adhere. -
Clean Up Dust:
Vacuum away the bulk of the sanding dust, then wipe every surface down thoroughly with a tack cloth to ensure a completely smooth base.
Tint Your Primer
Ask the paint store to tint your primer grey. A white primer under dark green makes scratches excessively visible later.
Step 2: Priming for Depth
-
Tape Off Edges:
If there are parts you aren’t painting, or if you are painting in place against a wall, apply painter’s tape carefully to protect adjacent surfaces. -
Cut In Corners:
Dip your angled brush into the primer and tackle the inside corners, crevices, and detailed molding at the top first. -
Roll the Flat Surfaces:
Use the mini foam roller to apply primer to the back panel, sides, and shelves. A foam roller helps avoid brush strokes on these wide areas. -
Light Sanding:
After the primer is fully dry (check the can for times), give it a very light pass with 220-grit sandpaper to knock down any raised grain. -
Second Wipe Down:
Remove that fine white dust with your tack cloth again. I find this step crucial for that professional, factory-finish feel.
Step 3: Painting the Moody Green
-
First Coat – Cutting In:
Open your deep green paint and stir well. Just like with priming, start by brushing the paint into the corners, fluting details, and edges. -
First Coat – Rolling:
Roll the large flat surfaces with a thin, even layer of green. Don’t worry if the coverage isn’t perfectly opaque yet; thin coats are better than thick, drippy ones. -
Dry and Assess:
Let the first coat dry completely. Dark colors involve a lot of pigment and can stay tacky longer than lighter shades. -
Second Coat Application:
Apply the second coat looking for full saturation. Pay special attention to the fluted columns on the front, ensuring paint gets into the grooves without pooling. -
Shelf Painting:
Paint the tops and front edges of the shelves. Flip them only when fully dry to paint the undersides if desired, though often just the visible surfaces suffice. -
Painting Shelf Pins:
For a seamless look, stick your metal shelf pins into a piece of cardboard and spray or brush them with the same green paint or a metallic gold for contrast.
Sticky Shelves?
If shelves stick after painting, apply a thin layer of furniture wax to the edges where they contact the frame to reduce friction.
Step 4: Final Styling
-
Reassembly:
Wait at least 24-48 hours for the paint to cure before reinserting the shelves to prevent them from sticking to the frame. -
Install Lighting:
Mount a small puck light inside the top header to illuminate the display area, creating that cozy library atmosphere. -
Curate the Shelves:
Arrange your books (spines out or reversed for a uniform look) along with framed art and metallic accents to pop against the dark green background.
Enjoy the dramatic transformation your new bookcase brings to the quiet corner of your room


Soft Muted Color for a Calm, Cozy Look
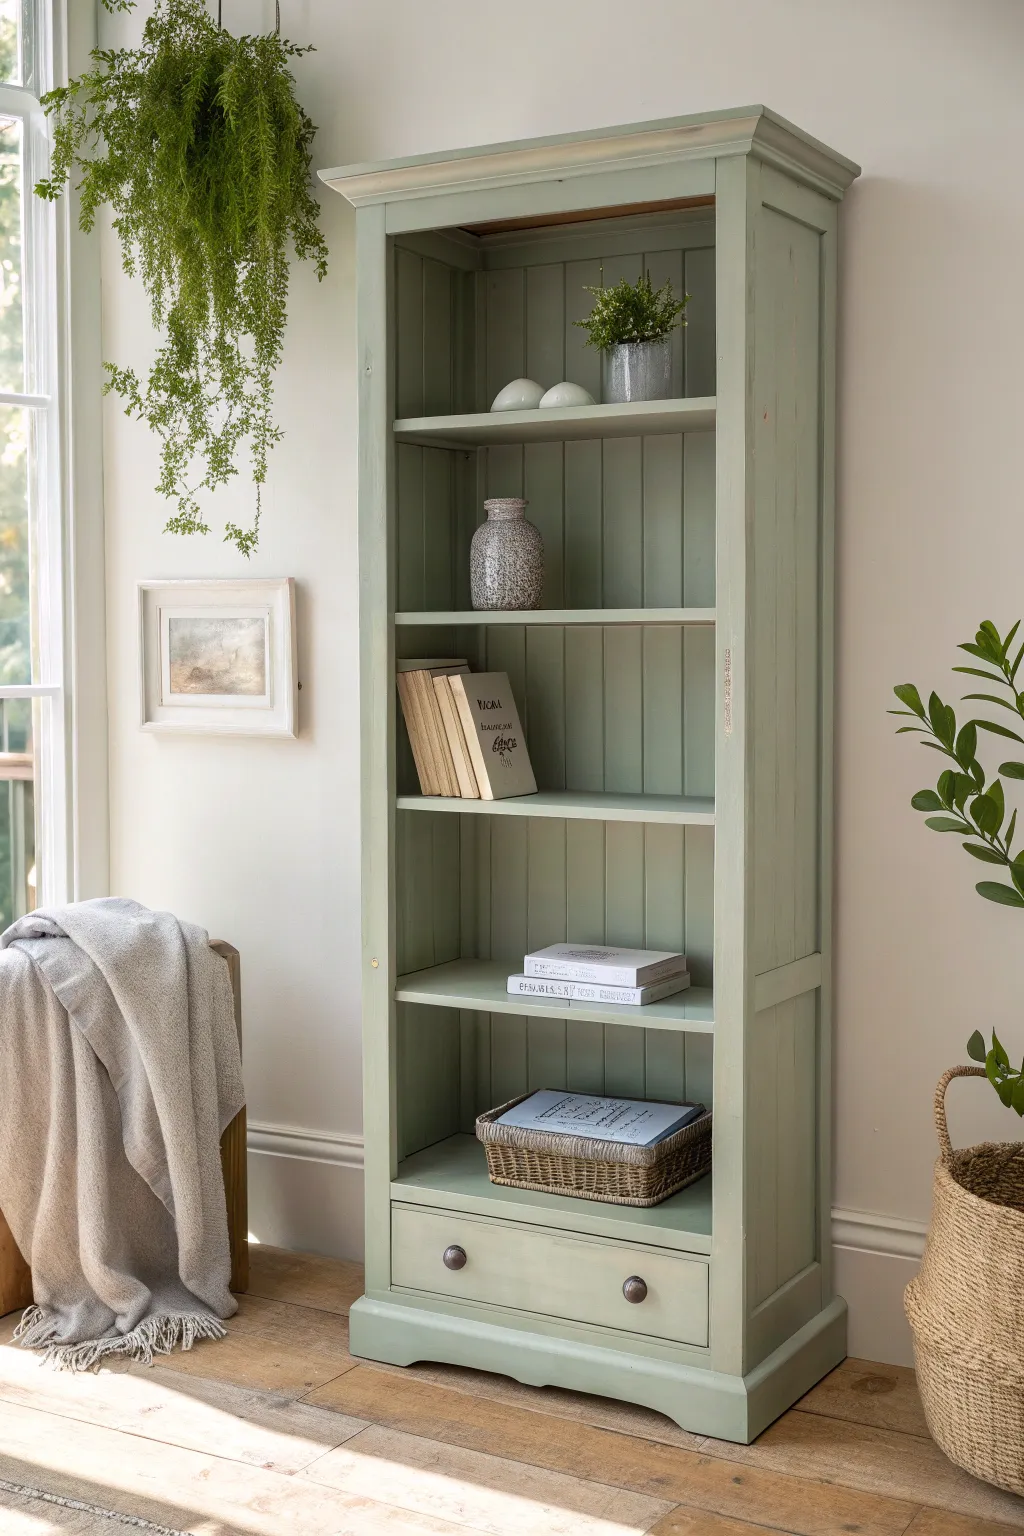
Transform a plain or dated wooden bookshelf into a calming sanctuary for your favorite reads with this soft sage green makeover. The muted finish and subtle distressing emphasize the cottage-core charm, creating a piece that feels both vintage and refreshingly modern.
Step-by-Step
Materials
- Wooden bookcase (unfinished or previously finished)
- High-quality chalk mineral paint (Sage Green or Muted Mint)
- Clear furniture wax
- Dark furniture wax (optional for antique effect)
- Medium-grit sandpaper (120-150 grit)
- Fine-grit sandpaper (220 grit)
- Tack cloth
- Sugar soap or TSP cleaner
- Oval chalk paint brush
- Lint-free waxing cloth or wax brush
- Painter’s tape
- Screwdriver (for hardware removal)
- New drawer knobs (antique bronze or dark pewter)
Step 1: Preparation
-
Clear and clean:
Begin by removing all shelves (if adjustable) and the bottom drawer. Remove the existing knobs from the drawer using your screwdriver. Lay down a drop cloth to protect your floor. -
Deep clean:
Scrub the entire piece with sugar soap or a TSP solution to remove dust, grease, and old furniture polish. A clean surface is crucial for paint adhesion. -
Scuff sanding:
Using medium-grit sandpaper, lightly scuff sand the entire bookcase. You don’t need to strip it to bare wood; just create a ‘tooth’ for the paint to grip. Pay attention to the grooves in the back paneling. -
Dust removal:
Wipe away all sanding dust thoroughly using a tack cloth or a damp rag. Let it dry completely before opening your paint can.
Bleed-Through Blues?
If stains or reddish wood tones seep through your wet paint, stop. Apply a coat of shellac-based primer (like BIN) to seal the tannins, let dry, then repaint.
Step 2: Painting
-
First coat application:
Stir your sage green chalk paint well. Dip your oval brush—just the tips—and apply a thin, even coat. Start with the interior back panel, working your way to the sides and finally the exterior. -
Managing the grooves:
For the tongue-and-groove backing, ensure you work the brush vertically into the crevices so no original wood color peeks through. Don’t let paint pool in the corners. -
Drying time:
Allow the first coat to dry for at least 2-4 hours, or until it feels dry to the touch. Chalk paint dries quickly, but patience prevents dragging. -
Second coat:
Apply a second coat for full opacity. I find that brushing in the direction of the wood grain gives the most professional finish. Check for drips around the shelf edges. -
Paint the drawer:
Don’t forget to paint the drawer front and the edges that will be visible. Propping the drawer up on scrap wood helps paint edges cleanly.
Pro Tip: Wet Your Brush
Keep a mister bottle of water handy. A quick spritz on your brush helps chalk paint glide smoother and eliminates heavy brush marks for a flawless flat finish.
Step 3: Finishing and Styling
-
Distressing (Optional):
Once fully dry, take fine-grit sandpaper and gently distress high-traffic areas like corners, edges of shelves, and around the drawer handle area. This reveals a bit of wood for that time-worn look. -
Smoothing:
Run the fine sandpaper very lightly over flat surfaces to knock down any heavy brush strokes, creating a buttery smooth texture. -
Clear wax application:
Using a wax brush or lint-free cloth, massage a layer of clear furniture wax into the paint. Work in small sections, wiping away excess as you go. -
Optional aging:
If you want more depth, apply a tiny amount of dark wax into the corners and grooves of the paneling, buffing it back immediately so it just sits in the shadows. -
Buffing:
Let the wax cure for about 24 hours, then buff deeply with a clean cloth to achieve a soft, protective sheen. -
Reassembly:
Insert the shelves back into place. Attach your new antique bronze knobs to the drawer front and slide it back into the bottom cavity.
Enjoy styling your new soothing sage bookcase with trailing plants and your favorite collections
BRUSH GUIDE
The Right Brush for Every Stroke
From clean lines to bold texture — master brush choice, stroke control, and essential techniques.
Explore the Full Guide
Monochrome Paint From Top to Bottom
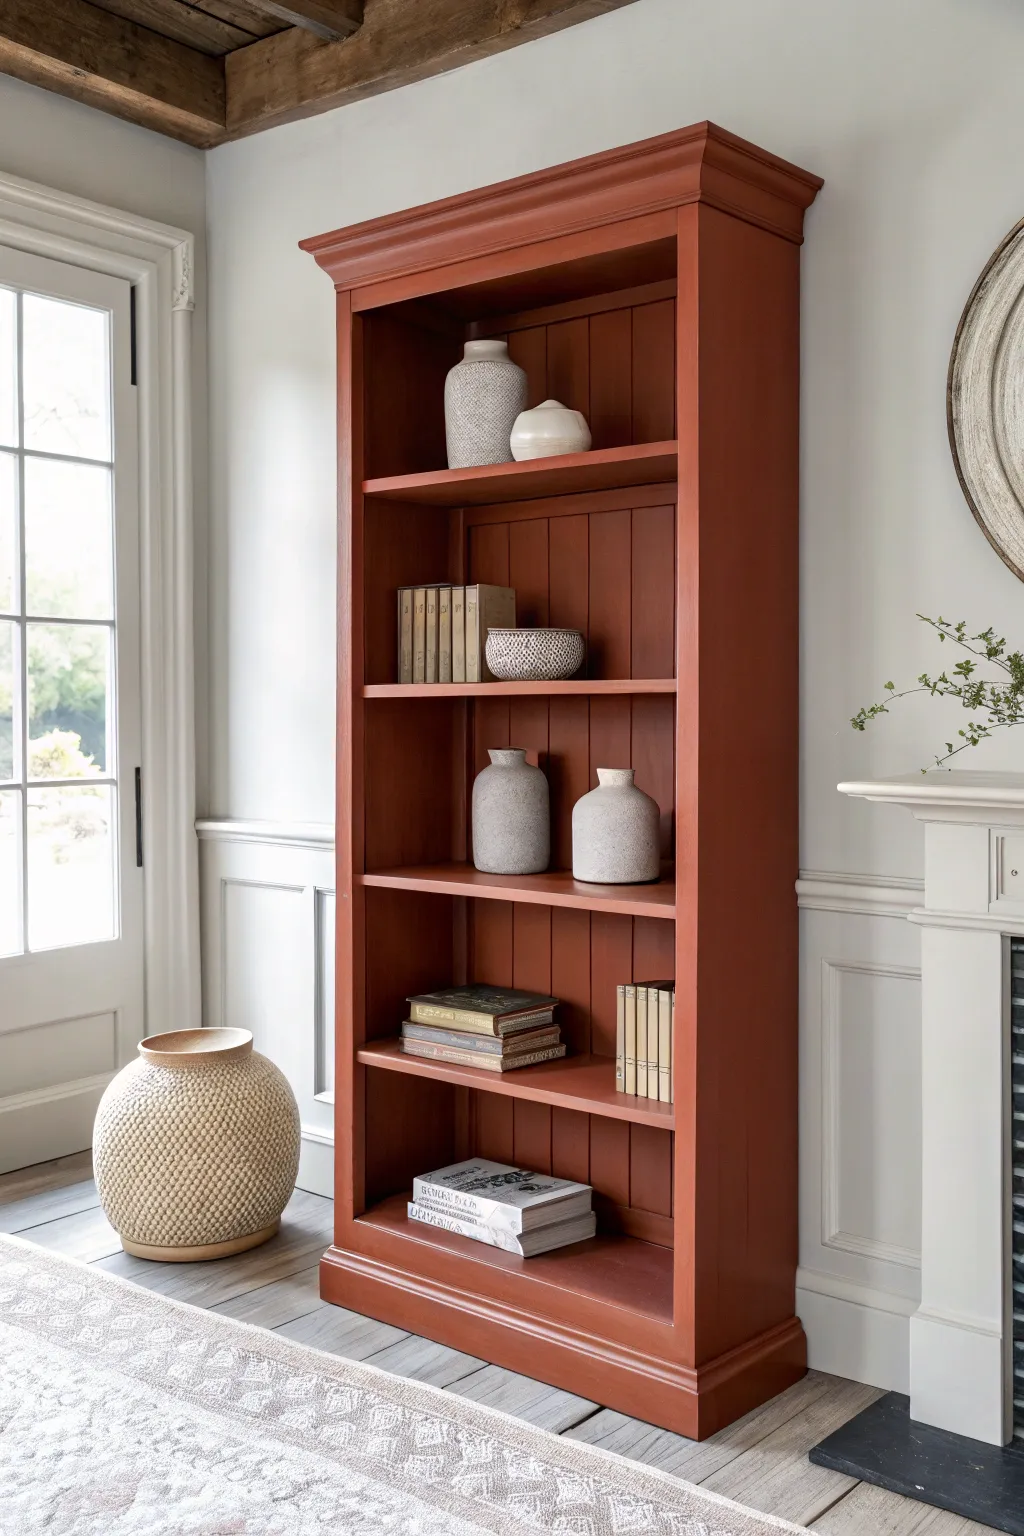

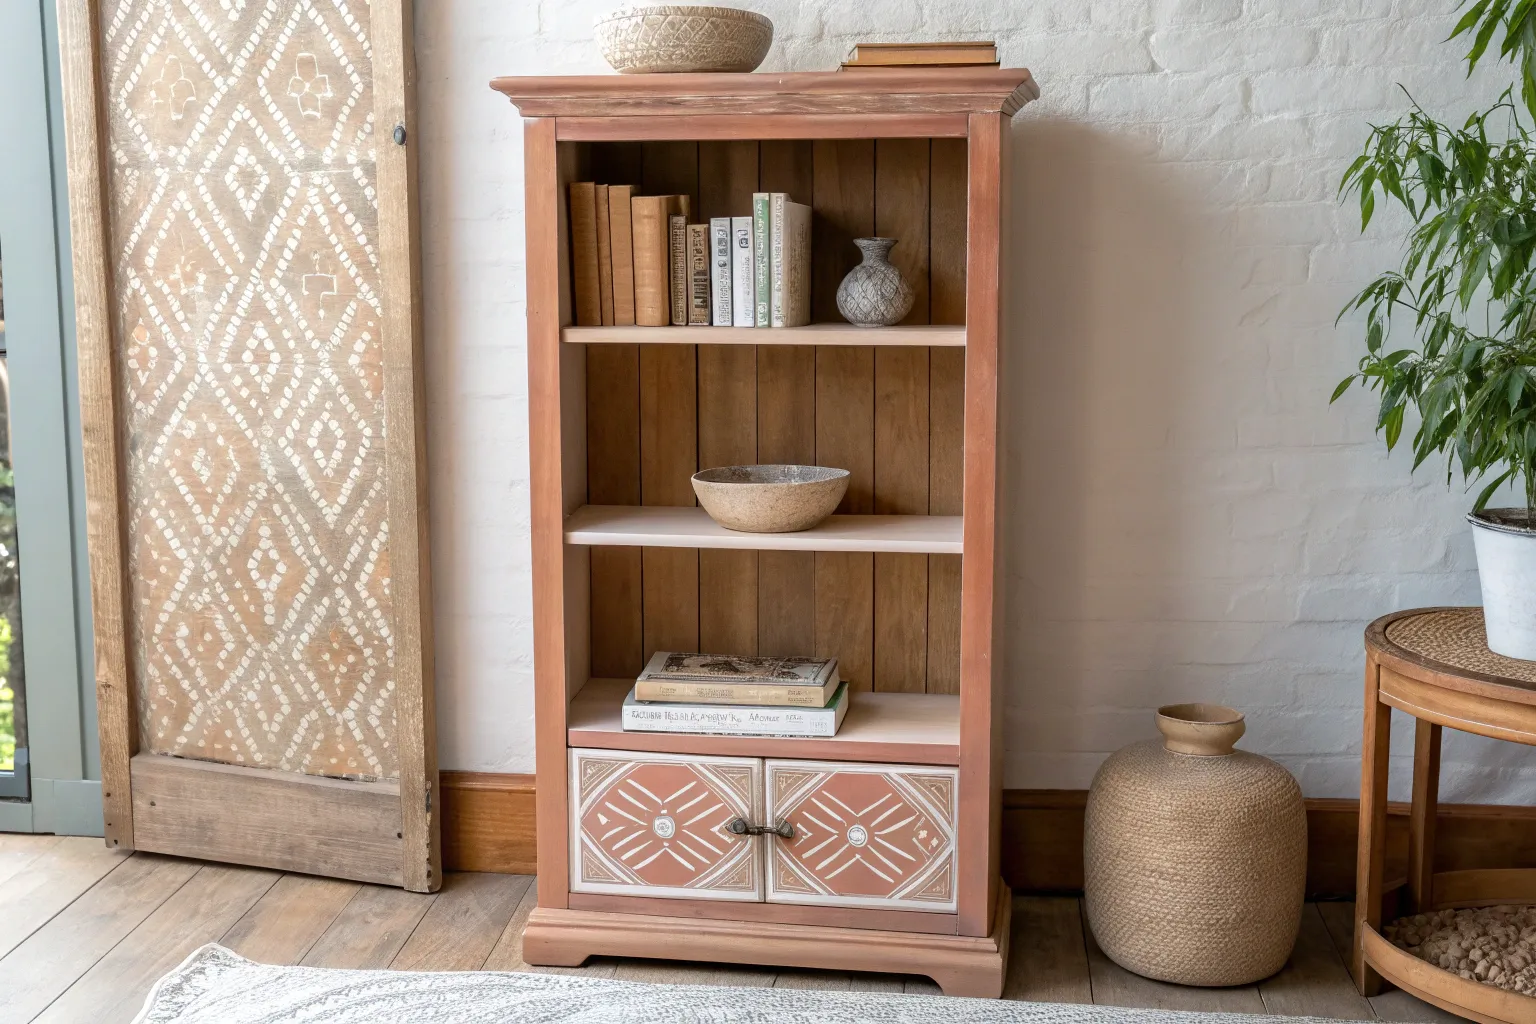
Embrace the warmth of nature with this monochrome bookcase makeover, where a rich, earthy terracotta hue takes center stage. This project takes a standard wooden shelving unit and elevates it into a sophisticated, unified statement piece by painting every inch—from the back panel to the molding—in the same striking color.
Step-by-Step Tutorial
Materials
- Solid wood bookcase (unfinished or previously finished)
- High-quality interior paint (Terracotta/Red Clay color, Eggshell or Satin finish)
- Stain-blocking primer
- Sanding block (medium grit)
- Sandpaper (fine grit)
- Tack cloths or microfiber rags
- Painter’s tape
- 2-inch angled sash brush
- 4-inch foam roller or short-nap microfiber roller
- Small paint tray
- Drop cloth
- Screwdriver (to remove hardware or shelves)
Step 1: Prep Work
-
Clear the space:
Empty the bookcase completely and move it to a well-ventilated area, placing it atop a drop cloth to protect your floors from dust and drips. -
Disassemble components:
If your bookcase has adjustable shelves, remove them now. I find it much easier to paint shelves when they are lying flat on a separate surface. Remove any hardware or metal shelf pins as well. -
Clean surfaces:
Wipe down the entire piece with a damp cloth to remove dust. If the piece is older or greasy, use a degreaser or mild soap solution, then dry thoroughly. -
Sand for adhesion:
Scuff sand the entire unit using a medium-grit sanding block. You aren’t trying to strip the finish completely, just creating a rough surface for the primer to grab onto. Don’t forget the back panel. -
Remove dust:
Vacuum up the sanding dust, then wipe everything down with a tack cloth to ensure a perfectly smooth surface before priming.
Paint Hack
Add a paint conditioner like Floetrol to your latex paint. It slows down drying time, reducing brush marks and helping the paint self-level for a factory-smooth finish.
Step 2: Priming
-
Choose your primer:
Since you are possibly painting over an existing dark wood finish or laminate, use a high-quality stain-blocking primer. This prevents tannins from bleeding through your beautiful terracotta color. -
Cut in corners:
Use your angled brush to apply primer into the deep corners where the shelves meet the sides, and along any detailed molding at the top or bottom. -
Roll the flat surfaces:
Switch to your foam roller for the side panels, back panel, and shelf tops. Apply a thin, even coat of primer. -
Check for drips:
Inspect the piece for drips, especially around the edges of the shelves, and smooth them out before the primer sets. Let this dry completely according to the can’s instructions.
Style It Up
For a truly custom look, swap standard white shelf pins for brass or matte black supports. It’s a tiny detail that makes the finished piece look much more expensive.
Step 3: Painting
-
Apply the first coat – Corners:
Stir your terracotta paint thoroughly. Begin with the angled brush again, painting the interior corners, the recesses of the wainscoting back panel, and the decorative trim. -
Apply the first coat – Flats:
Use the roller to cover the large flat areas. Roll in long, smooth strokes. Don’t worry if the coverage looks slightly patchy on the first coat; thin, even layers are key to a durable finish. -
Paint the shelves:
While the main unit dries, paint the removed shelves. Paint the undersides first, let them dry, flip them over, and then paint the tops and front edges. -
Light sanding:
Once the first coat is completely dry (usually 4-6 hours), very lightly run a fine-grit sandpaper over the flat surfaces to knock down any bumps. Wipe away the dust. -
Apply the second coat:
Repeat the painting process for a second coat. This layer will provide that rich, saturated opacity that makes the monochrome look so effective. -
Check for touch-ups:
Inspect the finish in good lighting. If you see any holidays (missed spots), touch them up lightly with your brush.
Step 4: Reassembly
-
Cure time:
Allow the paint to cure for at least 24 to 48 hours before putting any objects back on the shelves. Paint can feel dry to the touch but still be soft enough to stick to books or vases. -
Reinstall shelves:
Carefully replace the shelf pins and slide the adjustable shelves back into their designated spots. -
Style lightly:
Begin styling your new monochrome bookcase. Start with lighter items to prevent scuffing while the paint continues to harden fully over the next week.
Now that your bookcase is glowing with color, fill it with your favorite reads and enjoy the cozy atmosphere it brings to the room
Painted Back Panel in a Pop Color
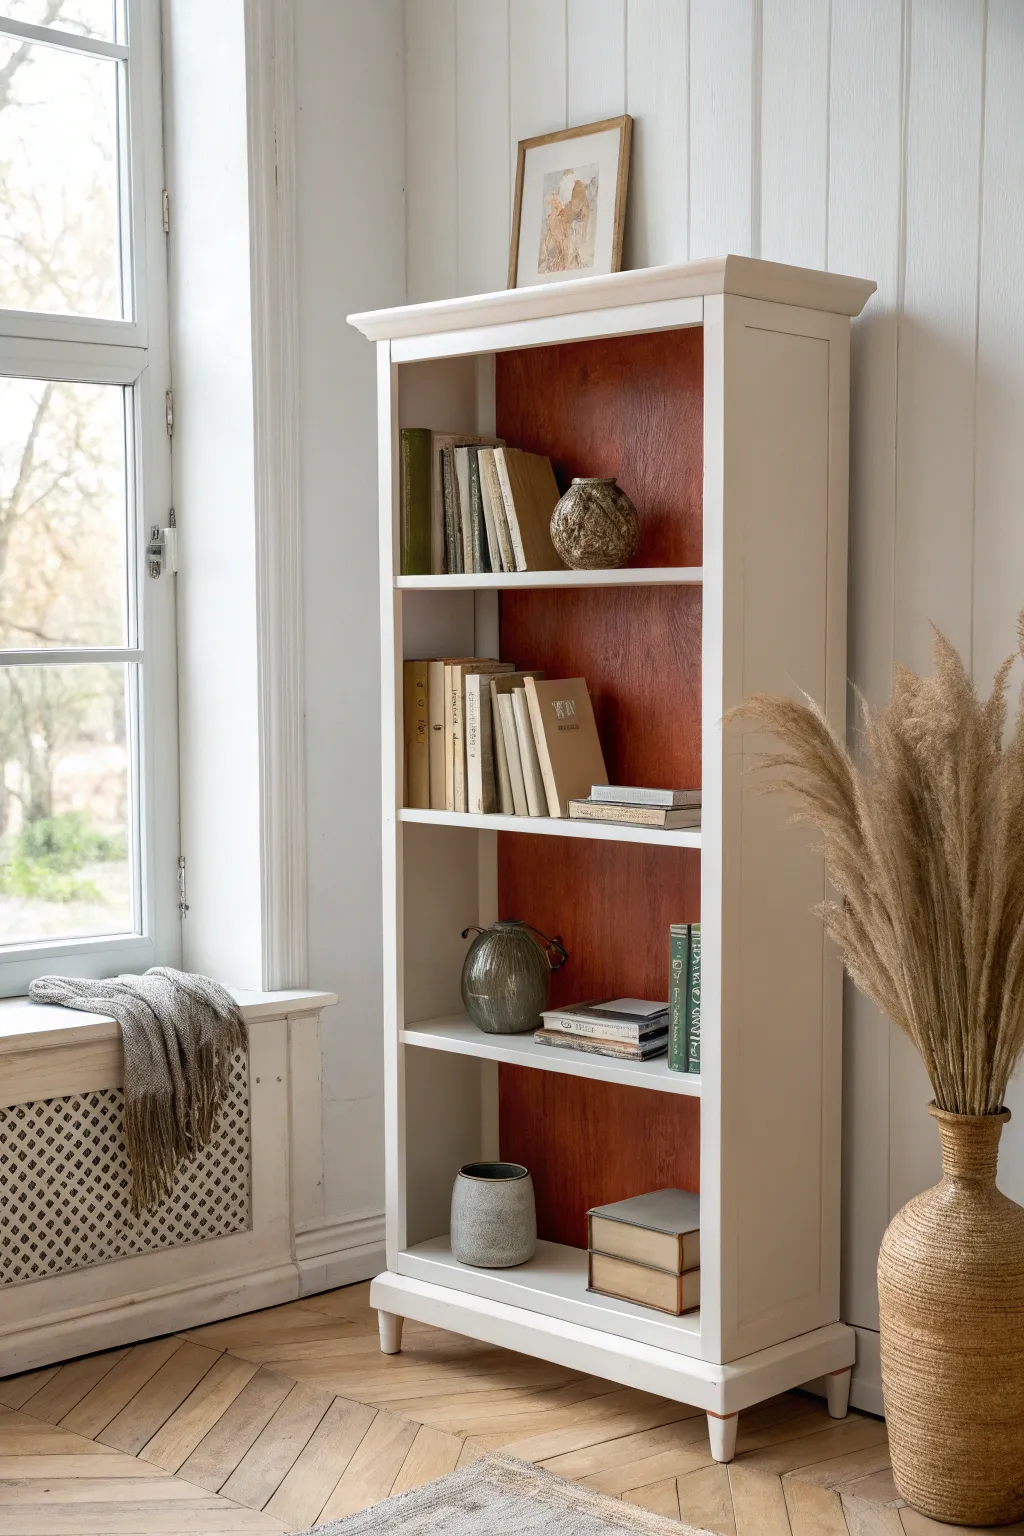
Transform a plain bookcase into a stylish focal point by giving the back panel a warm, contrasting pop of color. This project combines crisp white shelving with a rich, textured terracotta back that adds depth and character to your display.
Step-by-Step
Materials
- Wooden bookcase (with removable back panel preferred)
- Sandpaper (120 and 220 grit)
- Primer (bonding primer for laminate, or standard for wood)
- White semi-gloss enamel paint
- Terracotta or reddish-brown chalk or matte finish paint
- Dark antique wax or glazing medium (optional for texture)
- Small foam roller
- 2-inch angled paint brush
- Painter’s tape
- Screwdriver or hammer (to remove backing)
- Tack cloth
- Clear protective topcoat (matte or satin)
Step 1: Preparation
-
Disassemble the backing:
If your bookcase allows you to remove the back panel, do so carefully using a screwdriver or hammer to pull out small nails. This makes painting significantly easier. -
Clean surfaces:
Wipe down the entire bookcase with a damp cloth or mild degreaser to remove dust and grime. Let it dry completely. -
Sand the frame:
Lightly scuff sand the main body of the bookcase and the shelves with 120-grit sandpaper to help the paint adhere. -
Sand the back panel:
Give the back panel a thorough sanding. Since we want a bit of texture for the terracotta look, don’t worry about making it perfectly smooth. -
Remove dust:
Use a tack cloth to wipe away all sanding dust from every surface. -
Tape off edges:
If you couldn’t remove the back panel, apply painter’s tape precisely along the inner edges where the shelves meet the back to ensure crisp lines.
Step 2: Painting the Frame
-
Prime the frame:
Apply a coat of primer to the main body and shelves. I find a small foam roller works best here for a smooth, brush-free finish. -
Light sand:
Once the primer is dry, quickly run 220-grit sandpaper over it to knock down any bumps. -
First coat of white:
Apply your white semi-gloss enamel to the frame and shelves using the foam roller for flat areas and the angled brush for corners. -
Second coat:
After the first coat dries according to the can’s instructions, apply a second coat for full opacity and durability.
Uneven Color?
If the terracotta looks too flat, lightly sand random spots with 220-grit paper to reveal the primer or wood underneath, then seal for an instant aged look.
Step 3: Creating the Rustic Back
-
Base coat color:
Paint the back panel with your terracotta color. Use a brush rather than a roller here to create subtle vertical striations that mimic wood grain. -
Add depth (Optional):
To achieve the textured look in the photo, mix a small amount of dark antique wax or a darker brown glaze with your paint, or apply it thinly over the dry base coat. -
Dry brush technique:
While applying the second layer or glaze, use a dry brush to drag the color vertically, letting some of the lighter base show through for that weathered effect. -
Let it cure:
Allow the back panel to dry completely, preferably overnight, to ensure the finish is hard enough to handle. -
Seal the back:
Apply a clear matte topcoat to the colored back panel to protect it from scratches when sliding books in and out.
Try Wallpaper
Instead of painting, use peel-and-stick wallpaper with a woven or faux-wood texture on the back panel for an even faster, pattern-rich update.
Step 4: Reassembly
-
Reattach the panel:
Carefully align the back panel with the frame and secure it back in place with nails or screws. -
Touch ups:
Check for any nail heads that need a dab of paint or any seams that need a quick touch-up with a small artist’s brush. -
Final cure:
Let the fully assembled piece sit for at least 24 hours before loading it with books to prevent sticking.
Enjoy styling your refreshed bookcase with your favorite volumes and decorative ceramics

PENCIL GUIDE
Understanding Pencil Grades from H to B
From first sketch to finished drawing — learn pencil grades, line control, and shading techniques.
Explore the Full Guide
Hand-Painted Faux Shiplap Backing
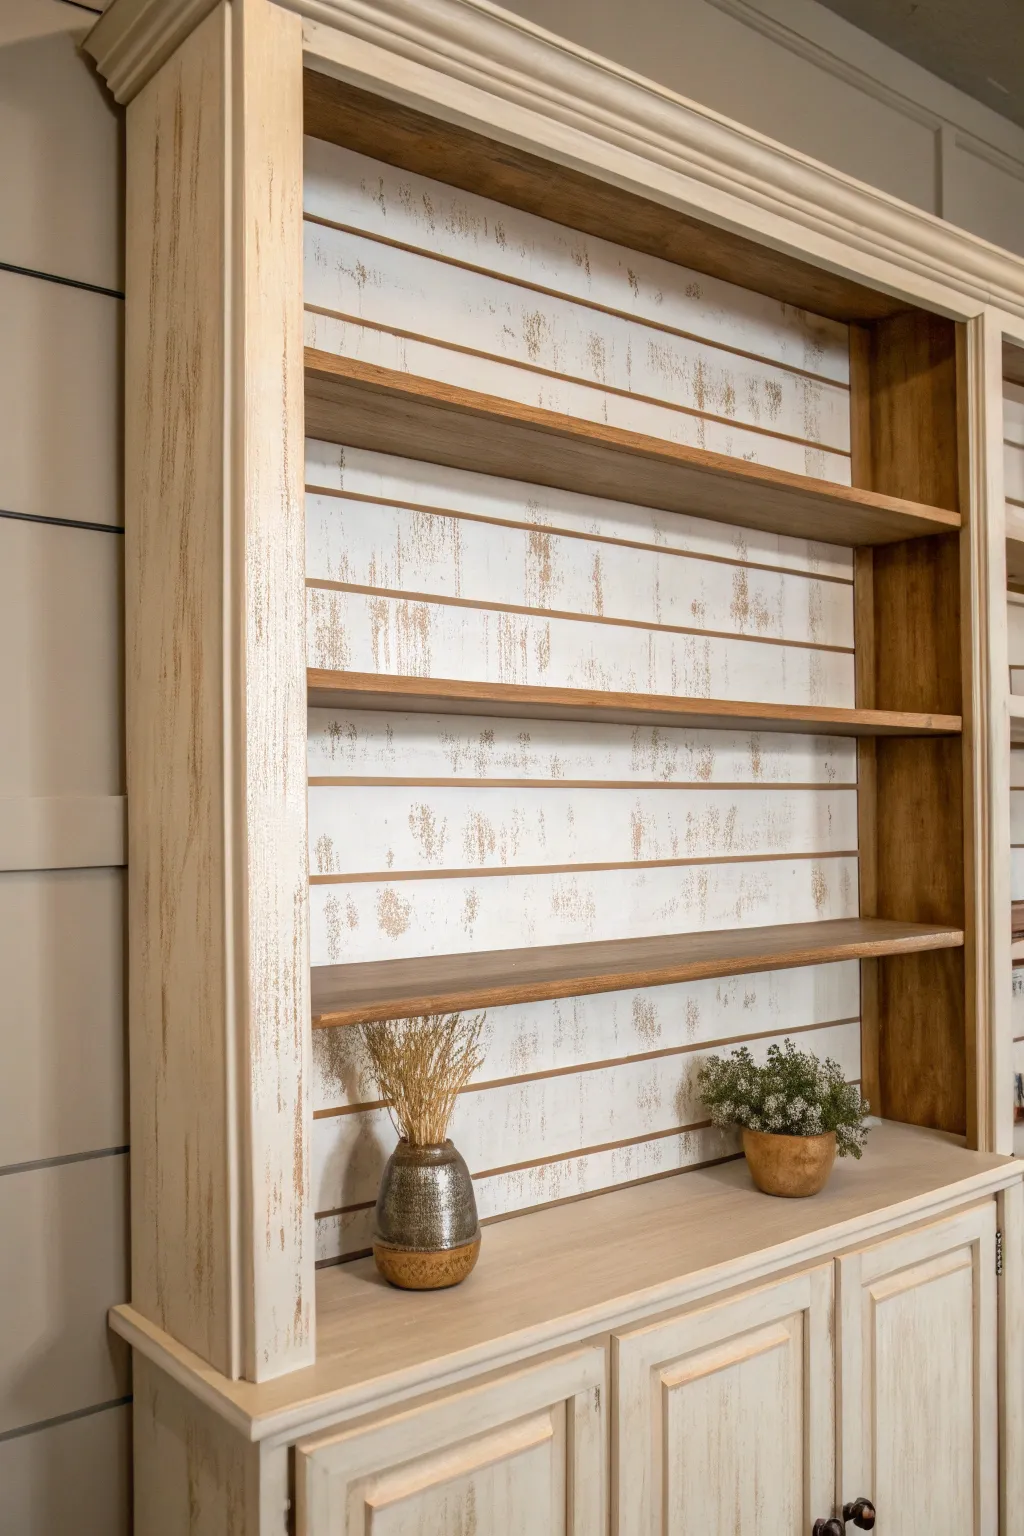
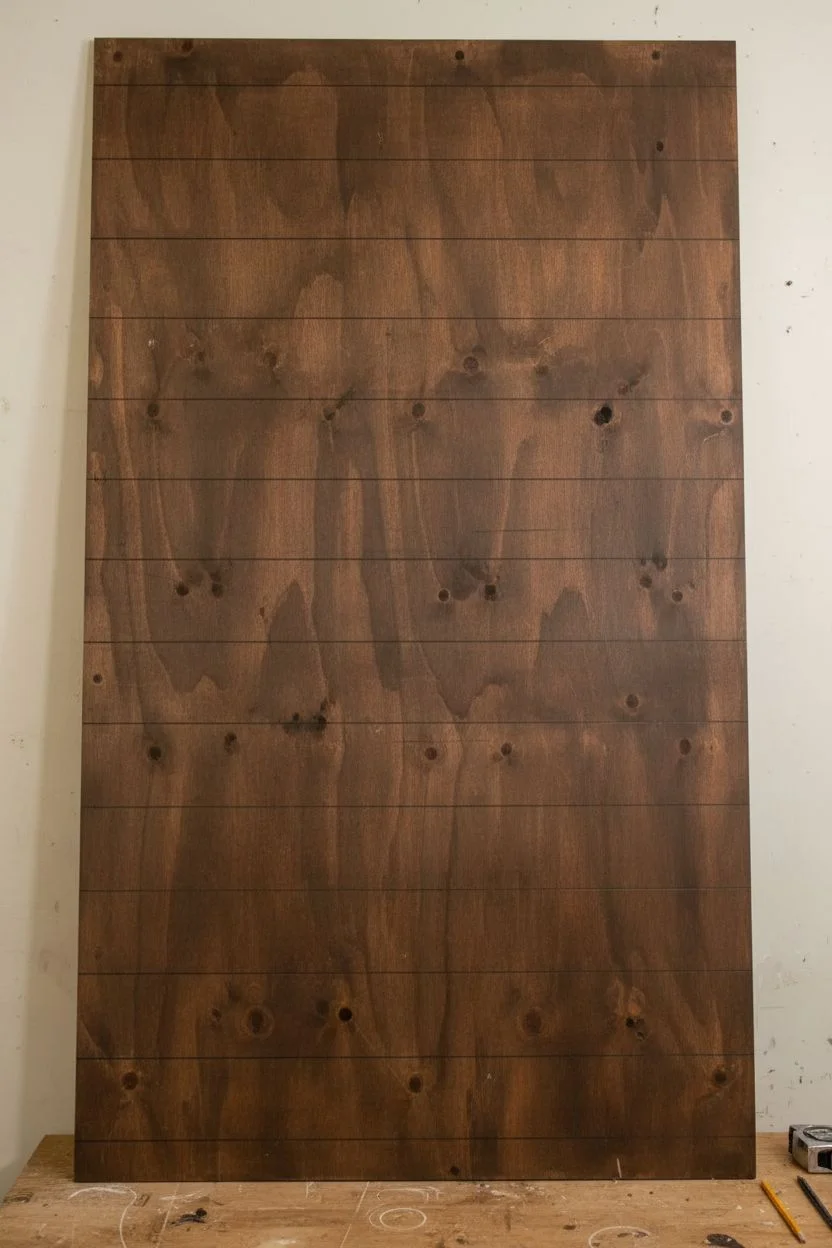
Transform a plain bookcase into a farmhouse masterpiece by adding a faux shiplap backing with a heavily distressed, hand-painted finish. This technique mimics the look of aged, peeling paint over rough-hewn wood, adding instant character and rustic charm to any room.
Detailed Instructions
Materials
- Plywood or MDF panel (cut to fit bookcase back)
- Table saw or circular saw
- Measuring tape
- Pencil
- Straight edge or chalk line
- White or cream latex paint (satin finish)
- Dark brown or grey stain (or glaze)
- Dry brush (stiff bristles)
- 2-inch angled sash brush
- Fine-grit sandpaper (220-grit)
- Medium-grit sandpaper (120-grit)
- Clean lint-free rags
- Painter’s tape
- Brown sharpie or dark pencil (for faux gaps)
- Level
Step 1: Preparation and Base Layer
-
Prepare the Back Panel:
If your bookcase has a removable back, take it off. If you are building from scratch, cut a piece of plywood or MDF to size. Sand the surface lightly with 220-grit sandpaper to remove any gloss and ensure the paint adheres well. -
Mark the Plank Lines:
Decide on the width of your faux shiplap planks (6-8 inches is standard). Measure and mark horizontal lines across the entire panel using a straight edge and pencil to guide your painting. -
Apply the Base Stain:
To achieve the look of wood showing through peeling paint, start by staining the entire panel. Apply a dark brown stain with a rag, wiping off excess. It doesn’t need to be perfect; unevenness adds to the aged effect. Let this dry completely.
Step 2: Creating the Distressed Finish
-
Dry Brush Technique:
Dip just the tip of your stiff dry brush into the white paint. Offload most of the paint onto a paper towel or cardboard until the brush is almost dry. -
Apply First Paint Layer:
Drag the dry brush horizontally across the panel, following the direction of your pencil lines. Keep the strokes light and feathery. You want the dark stain to peek through significantly in this first pass. -
Build Coverage:
Go back over areas where you want the white to be more opaque, adding slightly more paint. Leave the edges and random patches purposefully thin or bare to mimic natural weathering. -
Define the Lines:
Once the paint is dry to the touch, use a brown Sharpie or a dark pencil to heavily trace over your original horizontal pencil lines. This creates the illusion of shadow between individual boards. -
Enhance the Gaps:
For a more 3D effect, lightly smudge the Sharpie line while it’s fresh, or run a very thin line of dark glaze right along the marker line.
Too Much White?
If you painted too heavily and lost the ‘wood’ look, gently sand the white paint with rough grit sandpaper to reveal the dark base layer again.
Step 3: Painting the Structure
-
Prep the Frame:
Sand the main body of the bookcase (sides, face frame, and trim) with 120-grit sandpaper to rough up the surface for the distressed look. -
Base Coat for Frame:
Paint the bookcase frame with your white paint. I prefer to apply this coat totally solid, unlike the backing, because we will distress it manually later. -
Second Coat:
Once the first coat is dry, apply a second coat for full coverage. Let this cure for at least 24 hours so the paint hardens. -
Distress the Edges:
Take your medium-grit sandpaper and aggressively sand the edges, corners, and raised details of the molding. Sand until the raw wood beneath is clearly visible. -
Surface Distressing:
Lightly sand random spots on the flat surfaces of the frame to create scuff marks consistent with age. -
Glazing Tone:
Mix a small amount of dark brown paint with water or glazing medium. Brush this sheer mixture over the sanded areas and immediately wipe it back with a damp rag. -
Blending the Glaze:
This glazing step ‘dirties’ the bright white paint and stains the exposed raw wood, making the distressing look old rather than freshly sanded.
Get Real Texture
Instead of drawing lines, use a router or a table saw set to a shallow depth to cut actual grooves into the plywood before painting for 3D texture.
Step 4: Assembly and Finishing
-
Reattach the Backing:
Secure the faux shiplap panel back onto the bookcase frame using small nails or a staple gun. -
Install Shelves:
Slide your wooden shelves into place. If your shelves are adjustable, ensure the metal clips are hidden or paint them to match the wood tone. -
Protective Coat:
Apply a clear matte polychrylic sealer over the painted surfaces if the bookshelf sees heavy traffic, though leaving it unsealed allows it to age naturally.
Now you have a stunning focal point that brings timeless rustic warmth to your library or living space
Simple Painted Stripes Across the Back
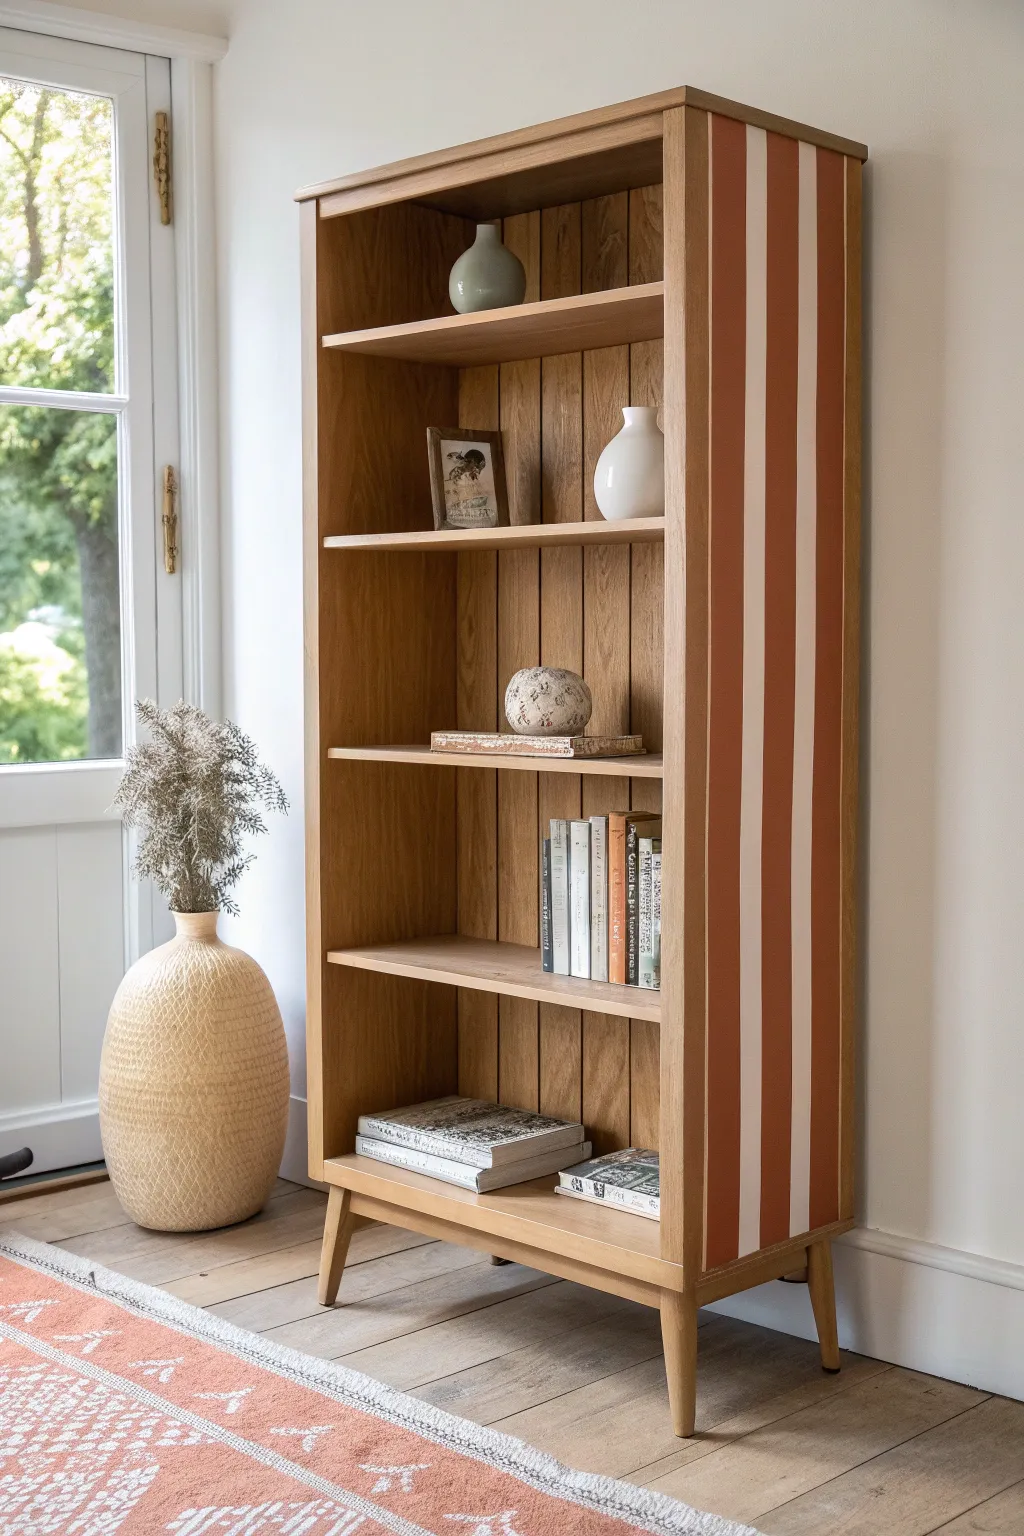
Transform a plain wooden bookcase into a striking mid-century modern inspired piece by adding bold vertical stripes to the exterior side panels. This project uses a warm terracotta and cream palette to complement natural wood tones, creating a high-end custom look with just a little paint.
Step-by-Step
Materials
- Wooden bookcase
- Sanding block (medium grit)
- Clean tack cloth
- Painter’s tape (high quality, 1-inch width)
- Measuring tape
- Pencil
- Primer (suitable for wood)
- Cream or off-white acrylic latex paint
- Terracotta or rust-orange acrylic latex paint
- Small foam roller
- Angle sash brush (1.5 inch)
- Matte clear topcoat (polycrylic)
Step 1: Prep and Prime
-
Clean surface:
Begin by removing any dust or oils from the side panel of the bookcase using a damp cloth and mild soap solution. Dry completely. -
Light sanding:
Scuff the side surface gently with a medium-grit sanding block. You don’t need to strip the wood entirely, just create enough ‘tooth’ for the primer to adhere. -
Wipe down:
Remove all sanding dust meticulously with a tack cloth to ensure a perfectly smooth finish. -
Apply primer:
Roll on a thin, even layer of wood primer over the entire side panel. Let this dry according to the manufacturer’s instructions.
Bleeding Paint?
If paint bleeds under the tape, wait for it to dry completely. Then, place a fresh piece of tape over the stripe and use the base color to crisp up the line.
Step 2: Base Coat Application
-
Paint the lighter color:
Paint the entire side panel with your cream or off-white color. Since this is the lighter of the two stripe colors, it’s much easier to use it as the background. -
Second coat:
Allow the first coat to dry fully, then apply a second coat to ensure solid, opaque coverage without any wood grain showing through. -
Full cure time:
Let the base coat cure for at least 24 hours. This is crucial; if the paint is soft, the tape used in the next step will peel it right off.
Step 3: Mapping the Stripes
-
Measure the width:
Measure the total width of the side panel. Decide on the number of stripes you want. In the example, the stripes look to be about 2-3 inches wide. -
Mark the lines:
Using a pencil and measuring tape, make small tick marks at the top and bottom of the panel to indicate where each stripe border will fall. -
Apply tape:
Run long vertical strips of painter’s tape connecting your top and bottom tick marks. Remember to place the tape on the *outside* of the area you intend to paint terracotta. -
Seal the tape edges:
I always press the tape edges down firmly with a credit card or fingernail. For crisp lines, lightly brush a tiny amount of the *base cream color* over the tape edge to seal it against bleeds.
Pro Tip: Consistency
Use a laser level to project a straight vertical line onto the furniture while taping. This guarantees your stripes are perfectly plumb, even if the floor isn’t.
Step 4: Adding the Color
-
Paint terracotta stripes:
Using a small foam roller or brush, fill in the exposed areas with the terracotta paint. Apply thin coats to avoid ridges. -
Second coat:
Apply a second coat of terracotta paint if needed for rich, deep color saturation. -
Remove tape:
Peel off the painter’s tape while the final coat is still slightly tacky set, pulling at a 45-degree angle away from the fresh paint.
Step 5: Finishing Touches
-
Touch ups:
Once fully dry, inspect your lines. Use a small artist’s brush to carefully fix any small bleeds or uneven spots. -
Seal the work:
Protect your new design by applying a clear matte polycrylic topcoat over the entire side panel.
Style your newly accented shelves with neutral ceramics and dried botanicals to echo the earthy tones of your painted design


Hand-Painted Geometric Blocks on Shelf Backs
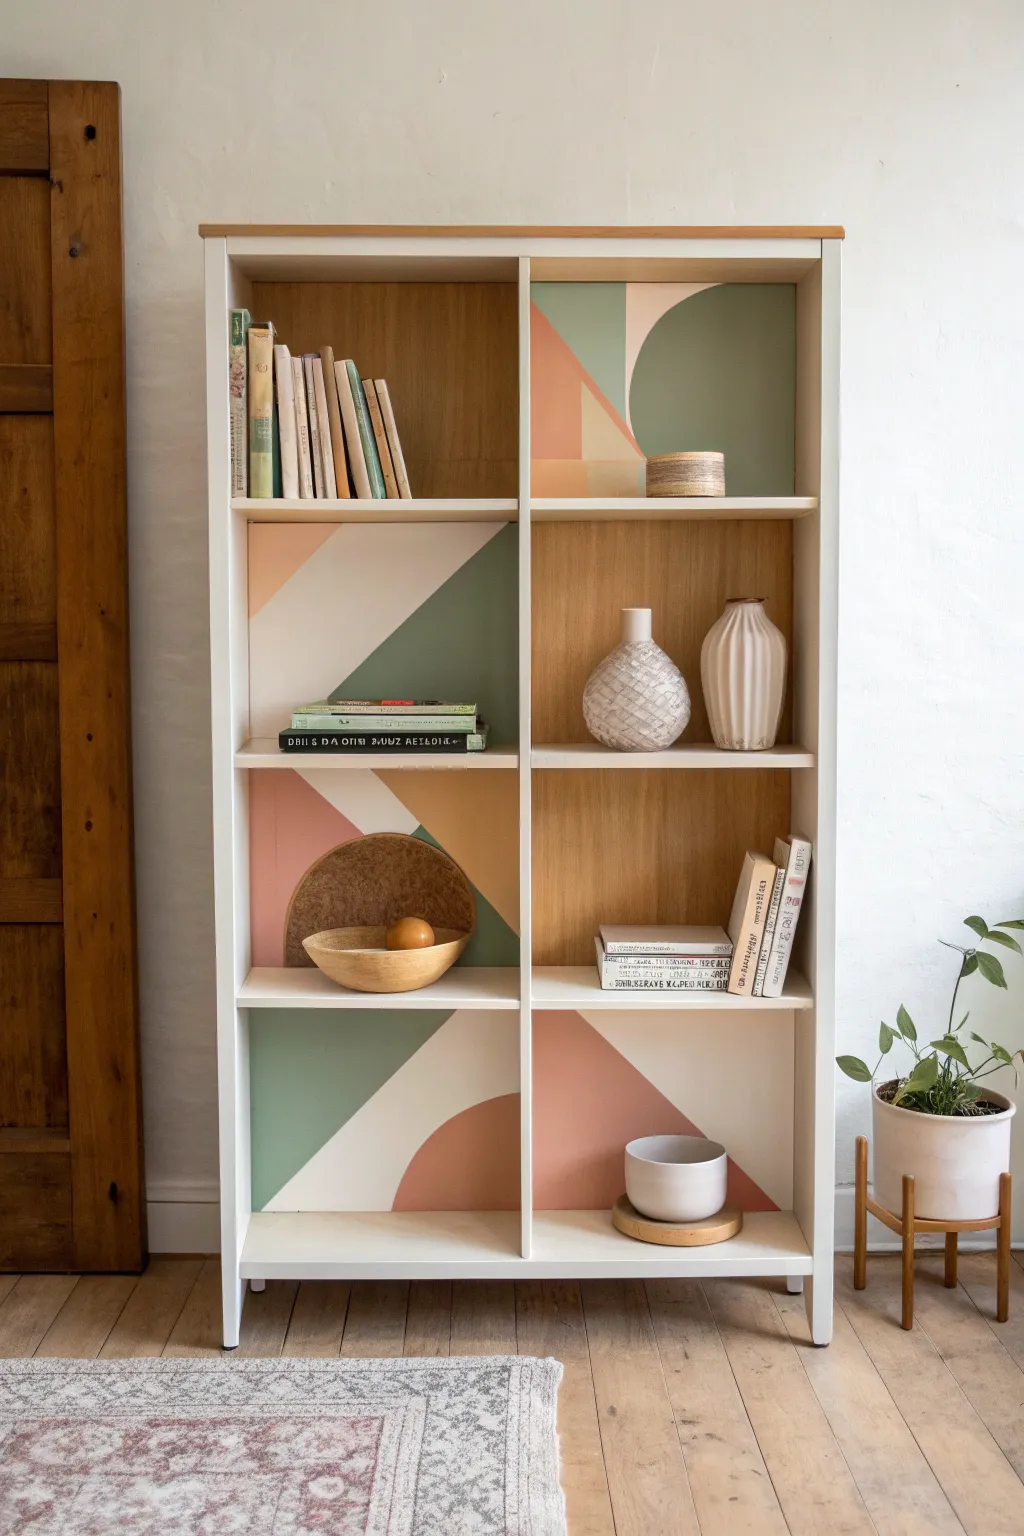
Transform a plain white bookcase into a modern art piece by treating the back panels as individual canvases. This project combines exposed wood grain with soft, geometric color blocks in sage, peach, and terracotta for a balanced, high-design look.
How-To Guide
Materials
- White bookcase (pre-assembled or flat-pack)
- Plywood sheeting or thin wood veneer (to replace original cardboard back)
- Sandpaper (220 grit)
- Painter’s tape (high quality)
- Acrylic paints (Sample pots in sage green, peach, terracotta, creamy beige)
- Foam rollers and small synthetic paint brushes
- Pencil and ruler
- Large circular objects (bowls or plates) for tracing curves
- Clear matte polyurethane sealer
- Wood glue or small nails
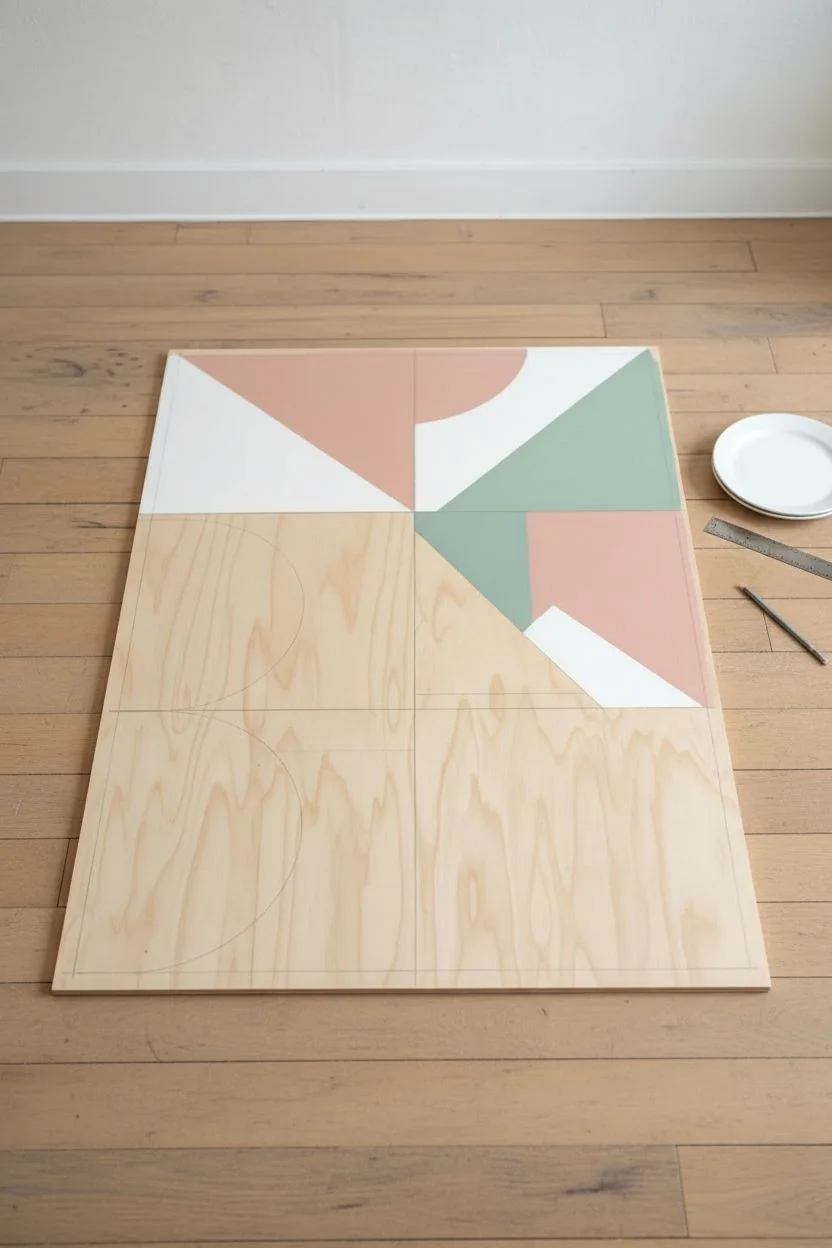
Step 1: Preparation and Planning
-
Prepare the back panel:
If your bookcase came with a flimsy cardboard back, discard it. Measure the back opening of your assembled bookcase and cut a piece of plywood or thin veneer to fit perfectly. This wood grain will serve as the beautiful natural background for your design. -
Sand the surface:
Give your wood panel a light sanding with 220-grit sandpaper. This smooths out any rough patches and ensures the paint adheres cleanly without raising the grain too much. -
Map out the grid:
Lay the back panel flat on the floor. Use a pencil to lightly mark where the fixed shelves and vertical divider will sit. This creates your ‘grid’ of eight separate rectangular sections to design within. -
Sketch the design:
Plan your layout lightly in pencil. Notice how the original artwork alternates: one panel is left plain wood, the next is painted. Create a checkerboard pattern where every other rectangle gets a geometric design, leaving the alternating ones natural or solid wood.
Tape Sealing Trick
Before painting your color, brush a tiny amount of clear matte medium along the tape edge. This seals the tape so not a single drop of color bleeds through.
Step 2: Painting the Base and Shapes
-
Tape straight lines:
For the angular designs like the triangles and diagonals, lay down painter’s tape firmly. Run your fingernail or a credit card along the edge of the tape to seal it tightly, which prevents paint bleed. -
Trace the curves:
For the circular elements and arches, simply grab a large mixing bowl or dinner plate, place it on your wood panel, and trace the curve with a pencil. I find this much easier than fussing with a compass. -
Paint the first color blocks:
Start with your lightest color, likely the creamy beige or soft peach. Apply the paint using a small foam roller for larger areas to get a smooth, brush-stroke-free finish. -
Cut in the edges:
Switch to a small, angled synthetic brush to carefully paint along your pencil lines for the curves. A steady hand is key here, but remember you can tidy up small wobbles later. -
Apply second coats:
Allow the first layer to dry completely—usually about 30 minutes for acrylics. Apply a second coat to ensure the colors are opaque and the wood grain doesn’t show through the painted sections unintentionally. -
Add contrasting shapes:
Once the base shapes are dry, mask off new areas for your darker colors like the sage green and terracotta. Position these shapes so they overlap or abut the lighter colors to create depth. -
Remove tape carefully:
Peel off the painter’s tape while the final coat is still slightly tacky, pulling at a 45-degree angle away from the paint edge. This helps keep the lines crisp.
Textured Dimension
Mix a small amount of baking soda or plaster into the terracotta paint to give the curved arch shapes a tactile, earthen plaster texture.
Step 3: Assembly and Finishing
-
Touch up lines:
Inspect your geometric shapes. If any paint bled under the tape or your freehand curves look shaky, use a tiny detail brush and a bit of the background wood color (or carefully scrape away excess paint) to fix it. -
Seal the artwork:
Protect your hard work by rolling a coat of clear matte polyurethane over the entire back panel. This unifies the sheen of the painted areas and the raw wood, making it look like a cohesive factory finish. -
Attach the back:
Once the sealer is fully cured (give it 24 hours to be safe), attach the painted plywood panel to the back of your bookcase frame using small nails or wood glue. -
Style the shelves:
Fill your shelves strategically. Place lighter objects in front of the darker painted sections and vice versa to let your new backdrop really shine through.
Enjoy styling your completely custom statement piece that looks high-end but was created with just a bit of paint and creativity
Botanical Vines Crawling Up the Side Panels
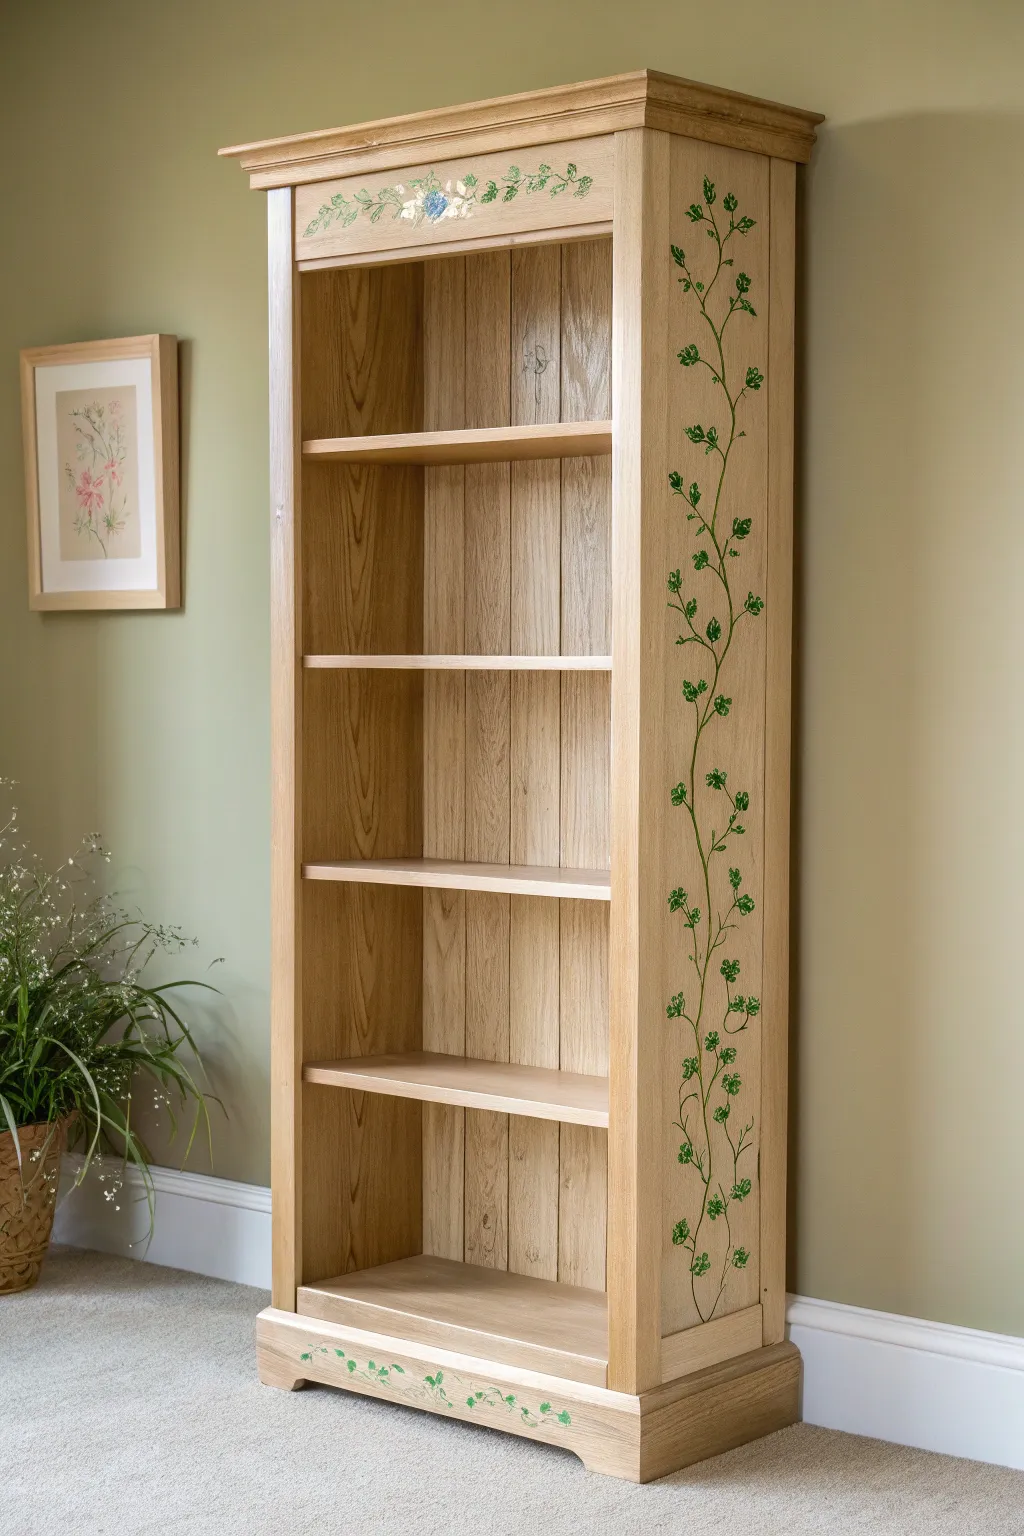
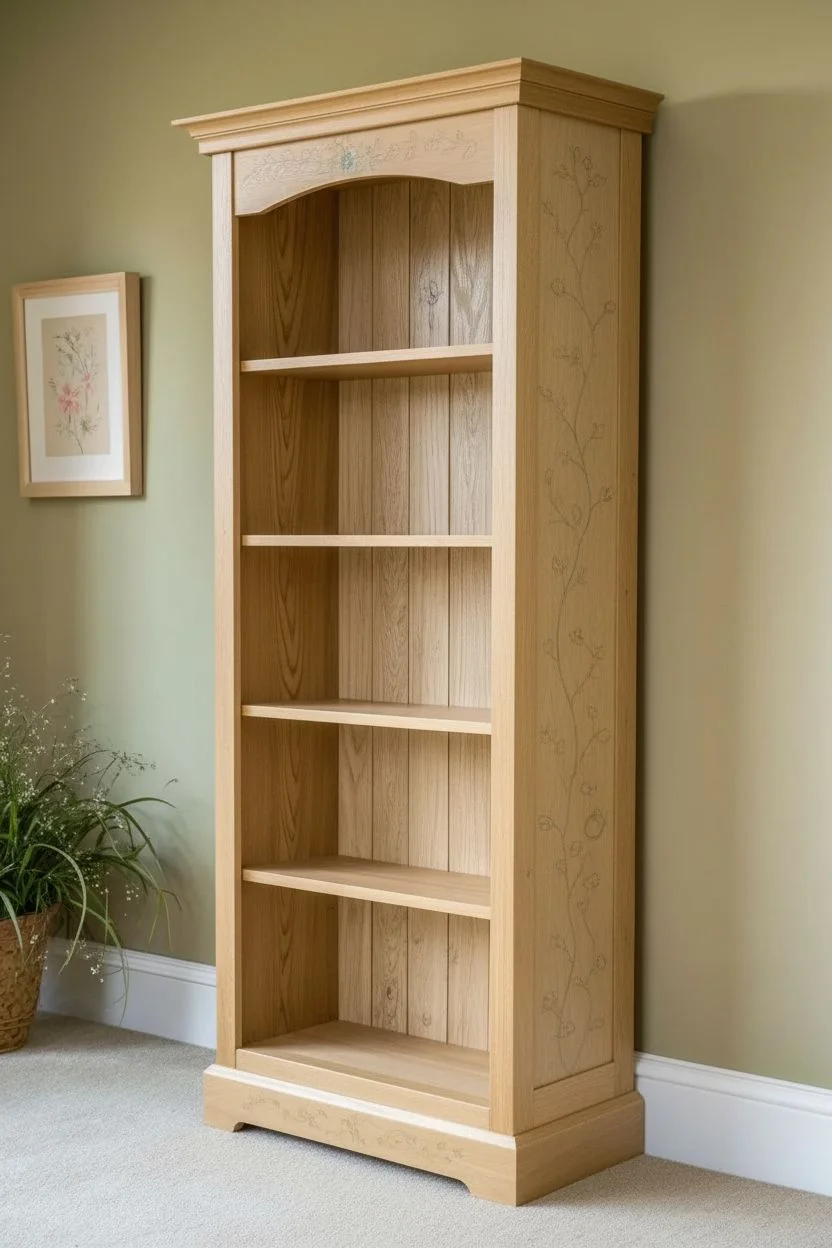
Transform a plain wooden bookcase into a storybook piece with delicate, hand-painted trailing vines and subtle floral accents. This project brings the outdoors inside, adding a gentle organic touch that climbs the side panels and frames your favorite reads beautifully.
Step-by-Step Tutorial
Materials
- Unfinished or sanded light wood bookcase (oak or pine)
- Fine-grit sandpaper (220 grit)
- Tack cloth
- Acrylic paints (Forest Green, Olive Green, White, and Cornflower Blue)
- Pencil
- Small round brushes (sizes 2 and 4)
- Fine liner brush (size 0 or 00)
- Clear matte or satin polyurethane topcoat
- Disposable plate or palette
- Paper towels
- Jar of water
Step 1: Preparation & Planning
-
Surface Prep:
Begin by ensuring the wood surface is clean and smooth. If your bookcase has a previous finish, lightly sand the side panels, top architrave, and bottom plinth with 220-grit sandpaper to create a ‘tooth’ for the paint. -
Dust Removal:
Wipe away all sanding dust thoroughly using a tack cloth. A clean surface is crucial for delicate line work to adhere properly. -
Sketching the Vine Path:
Take your pencil and very lightly sketch a long, winding S-curve starting from the bottom of the right side panel and reaching nearly to the top. Keep the line irregular and flowing rather than perfect. -
Top and Bottom Details:
Sketch a smaller, horizontal vine sequence across the top molding, centering it. Add a small creeping vine detail along the bottom kickplate or plinth to balance the design.
Uneven Lines?
If your vine lines look shaky, your paint is likely too thick. Add water drop by drop until it has an ink-like consistency that glides smoothly.
Step 2: Painting the Vines
-
Mixing the Vine Color:
On your palette, mix a small amount of Forest Green with a drop of Olive Green. I like to add a tiny touch of water to improve the flow of the paint for long lines. -
Painting the Main Stems:
Using the size 2 round brush, trace over your pencil lines for the main stems. Apply varying pressure—press down slightly for thicker sections and lift up for thinner, wispy ends. -
Adding Secondary Branches:
Switch to your liner brush (size 0) to paint tiny off-shoots coming from the main vine. These should be short, delicate stems where the leaves will eventually attach. -
Creating the Leaves:
Dip the size 4 brush into your green mix. To create a perfect leaf shape, touch the tip of the brush to the wood, press down firmly to flare the bristles, and then lift up quickly to a point. -
Varying Leaf Direction:
Paint clusters of three or four leaves along the vines on the side panel. Ensure they point in different outward directions to mimic natural growth, rather than having them all uniform. -
Top Panel Details:
Repeat the leaf technique on the top horizontal vine. In the center, leave a small gap for the floral focal point.
Step 3: Adding Floral Accents
-
Painting the Center Flower:
Mix a soft blue using Cornflower Blue and White. In the center of the top panel’s vine, paint a small, simple 5-petal flower using the round brush. -
Adding Highlights:
Once the green leaves are dry to the touch, mix a lighter green (Olive Green + White). Use your smallest brush to add tiny veins or highlights on just one side of each leaf for dimension. -
Bottom Plinth Work:
Don’t forget the bottom! Paint the small vine section on the kickplate using the same techniques, keeping the leaves slightly smaller here to maintain scale. -
Erasing Guides:
Allow the paint to dry completely (at least 2 hours). Gently erase any visible pencil marks that weren’t covered by paint.
Add Depth
Mix a tiny drop of brown into your green for the lower parts of the stem to make the vine look older and ‘woody’ near the roots.
Step 4: Sealing the Work
-
First Coat of Sealer:
Stir your clear matte polyurethane gently (don’t shake, or bubbles will form). Apply a thin, even coat over the painted areas using a clean wide brush. -
drying and Assessment:
Let the first coat dry according to the manufacturer’s instructions. Check for any raised wood grain; if it feels rough, lightly sand with a brown paper bag (it’s gentler than sandpaper). -
Final Seal:
Apply a second thin coat of polyurethane to ensure your artwork is durable enough to withstand dusting and daily use.
Step back and admire how a few simple brushstrokes have turned a standard piece of furniture into a charming, custom focal point for your room
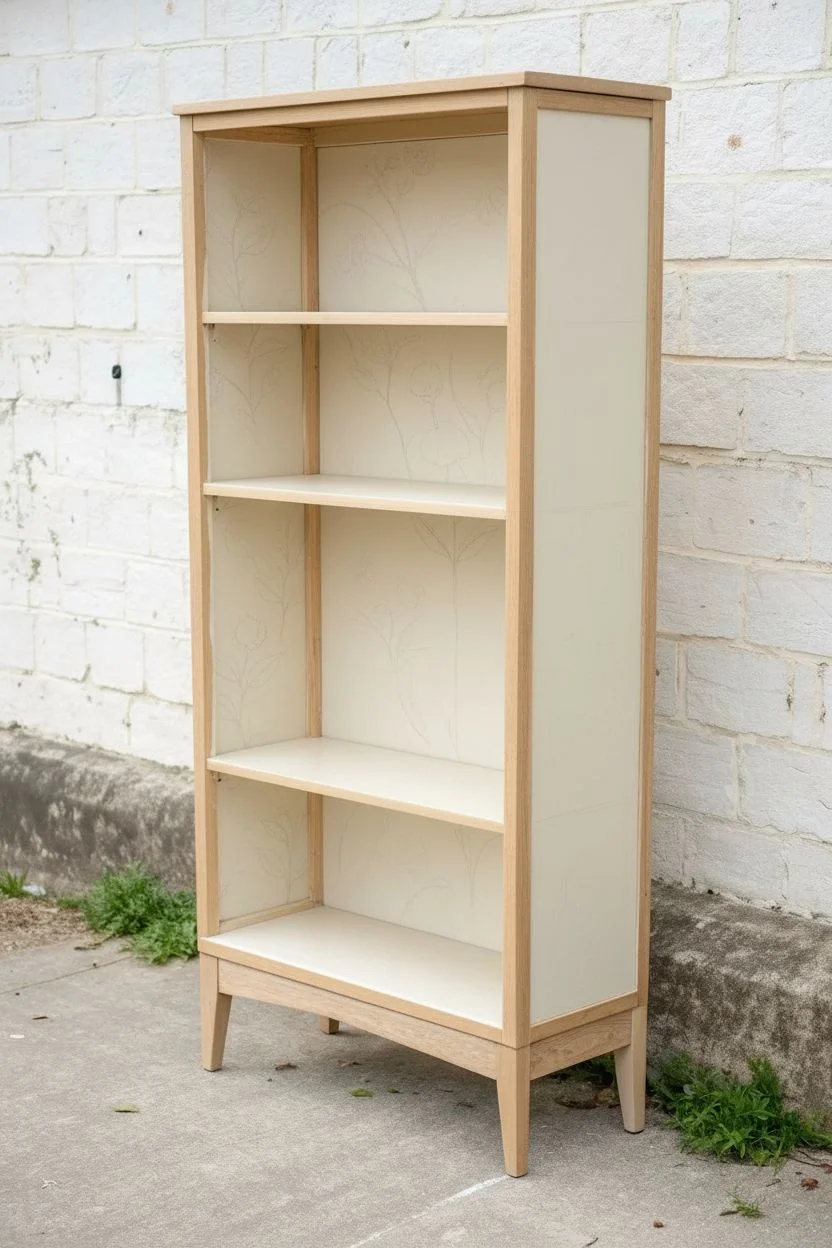
Hand-Painted Floral “Wallpaper” Effect on the Back
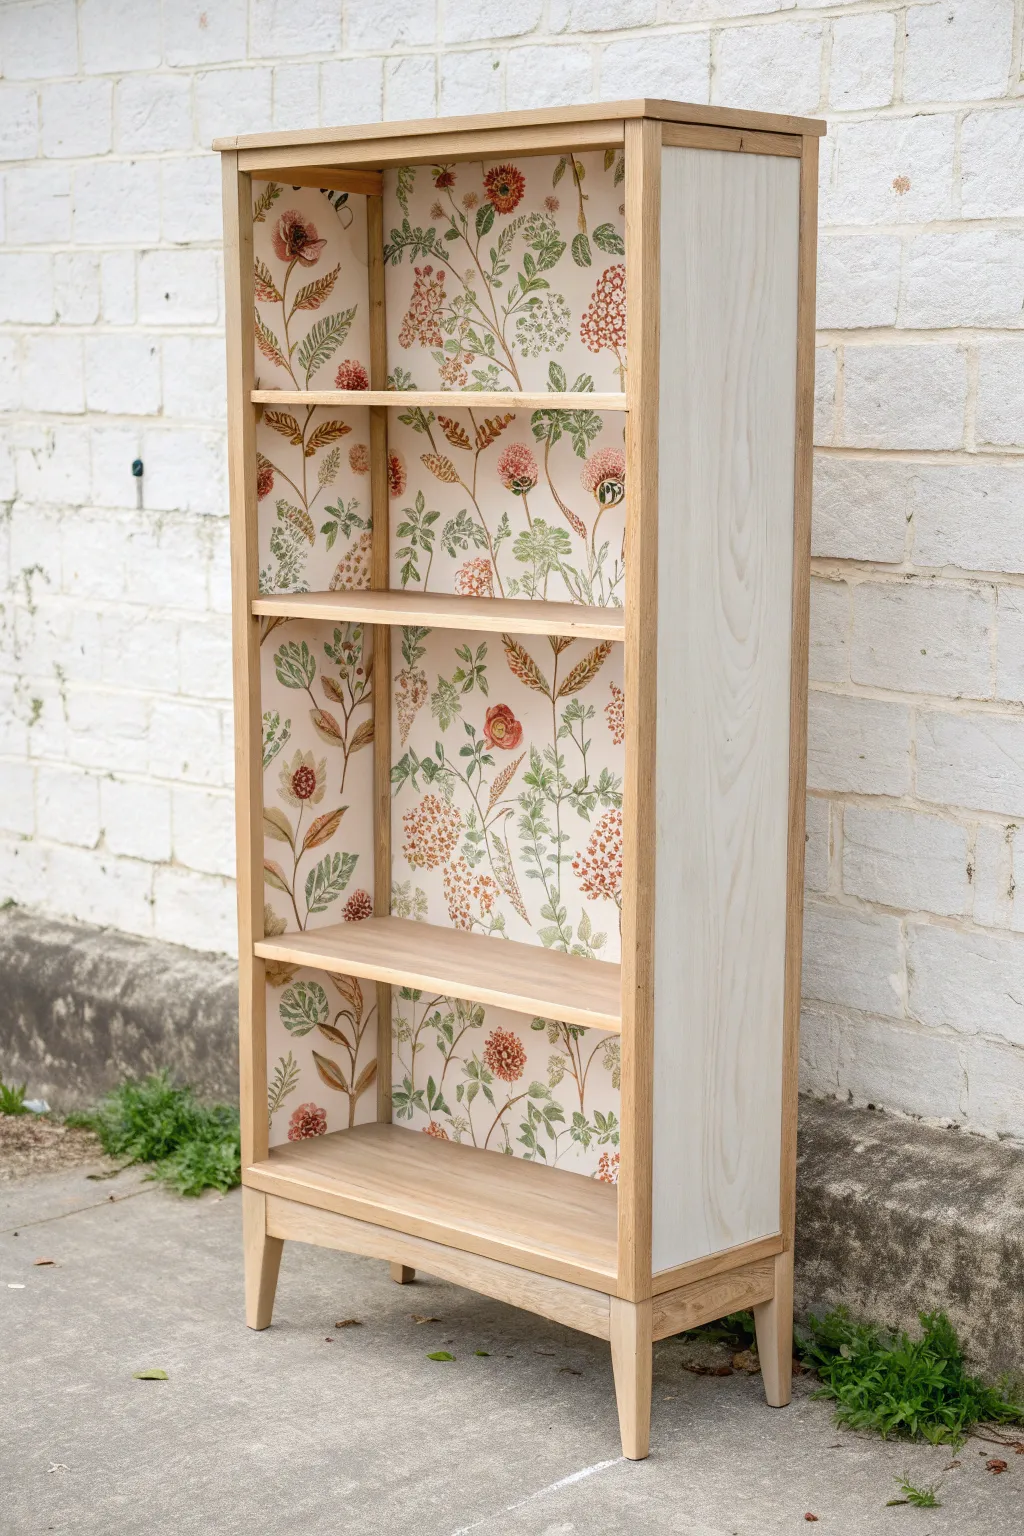
Transform a plain wooden bookshelf into a botanical masterpiece with this clever hand-painting technique. By creating a delicate floral pattern on the interior back panel, you achieve the charming look of vintage wallpaper without the hassle of paper or paste.
Detailed Instructions
Materials
- Wooden bookcase (unfinished or sanded down)
- Cream or off-white acrylic latex paint (base coat)
- Acrylic paints (olive green, sage green, terra cotta red, muted pink, burnt orange)
- Fine liner brushes (sizes 0 and 00)
- Small round brushes (sizes 2 and 4)
- Small filbert brush
- Pencil and eraser
- Tracing paper (optional)
- Matte polyurethane varnish
- Sandpaper (220 grit)
- Painter’s tape
Step 1: Preparation and Base Coat
-
Disassemble or tape:
If your bookcase has a removable back panel, take it off now—it makes painting infinitely easier. If not, use painter’s tape to meticulously mask off the interior sides and shelf edges to protect the natural wood finish. -
Sand the surface:
Lightly sand the back panel where you plan to paint. This gives the surface enough ‘tooth’ for the primer and paint to adhere properly. -
Apply the background:
Paint the entire back panel with a creamy, off-white acrylic latex paint. You want a matte finish that resembles paper. Apply two coats for full opacity, sanding lightly between them. -
Sketch the layout:
Once the base is fully dry, lightly sketch your floral design with a pencil. I like to start by drawing the main stems in a winding, vertical orientation to establish the flow before adding flowers.
Uneven Brushstrokes?
Don’t panic! Variation actually helps the illusion. If a leaf looks too thick, use a damp Q-tip to shape the edge while the paint is still wet.
Step 2: Painting the Greenery
-
Paint main stems:
Mix a muted olive green. Using your size 2 round brush, trace over your pencil lines for the main stems. Keep your hand loose to create natural, organic curves rather than rigid lines. -
Add leafy branches:
Switch to a lighter sage green. Paint thin branches extending from the main stems. Use a fine liner brush to flick the brush tip at the end of each stroke for a tapered, natural look. -
Create fern textures:
For the fern-like leaves seen in the design, use the liner brush with a very watered-down olive green. Paint tiny, parallel hash marks along a stem to mimic delicate fronds. -
Layer foliage:
Go back in with a slightly darker green to add depth. Paint small, solid leaves near the base of the flower clusters. Varying the green tones prevents the design from looking flat.
Step 3: Adding the Florals
-
Paint large blooms:
Using a terra cotta red and a small filbert brush, paint the round, prominent flowers. Dab the paint in a circular motion, leaving small gaps of the cream background showing through to create texture. -
Detail the center:
Once the red blooms are tacky-dry, use a tiny dot of yellow or dark brown in the center to give them a realistic anatomy. -
Add cone flowers:
For the taller, cone-shaped flowers, use a burnt orange. Paint a small oval shape, then use a liner brush to drag tiny spikes upward from the top, mimicking a thistle or dried bloom. -
Cluster the filler flowers:
Dip a size 0 brush into muted pink paint. Create clusters of tiny dots to represent hydrangeas or berry clusters. Group them tightly together for a dense, printed fabric look. -
Add shadowy details:
Mix a very watery grey-brown. Paint extremely faint shadows behind a few leaves or stems. This subtle step adds dimension and enhances the ‘trompe-l’œil’ effect.
Practice Makes Perfect
Before painting the furniture, practice your leaf flicks and flower dabs on a piece of cardboard primed with your base color to master the pressure.
Step 4: Assembly and Finishing
-
Let it cure:
Allow the painted panel to dry for at least 24 hours. Acrylic heavy body paints can feel dry to the touch but still be soft underneath. -
Seal the artwork:
Apply two thin coats of matte polyurethane varnish over the painting. A gloss finish will look like plastic, so stick to matte to maintain that wallpaper aesthetic. -
Reassemble:
Nail or screw the back panel onto the bookcase frame. If you taped off the shelves instead, carefully peel back the tape at a 45-degree angle to reveal crisp lines. -
Final touch-ups:
Inspect the edges where the wood meets the painted panel. If any paint bled, gently scrape it away with a craft knife or use a little sandpaper to clean up the wood grain.
Step back and enjoy the bespoke character your new botanical focal point brings to the room
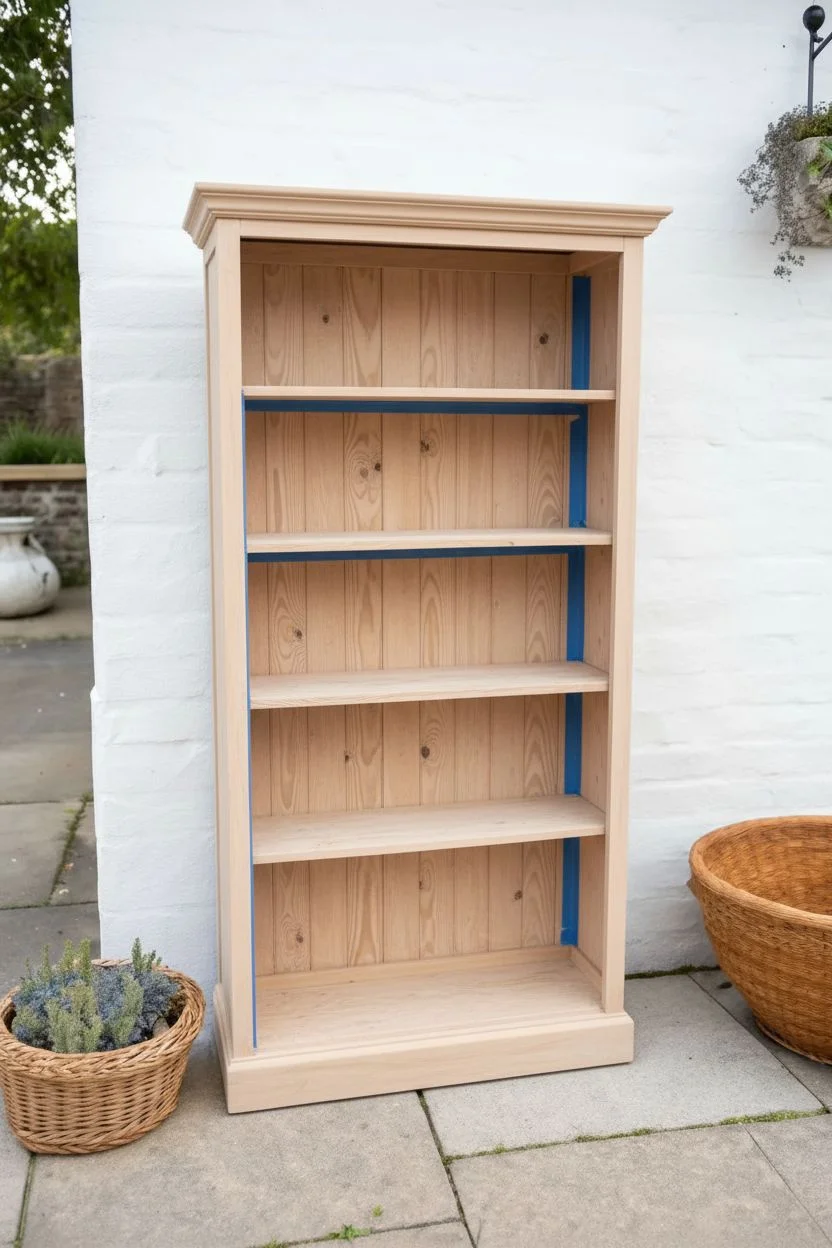
Ombre Shelves That Fade Light to Dark
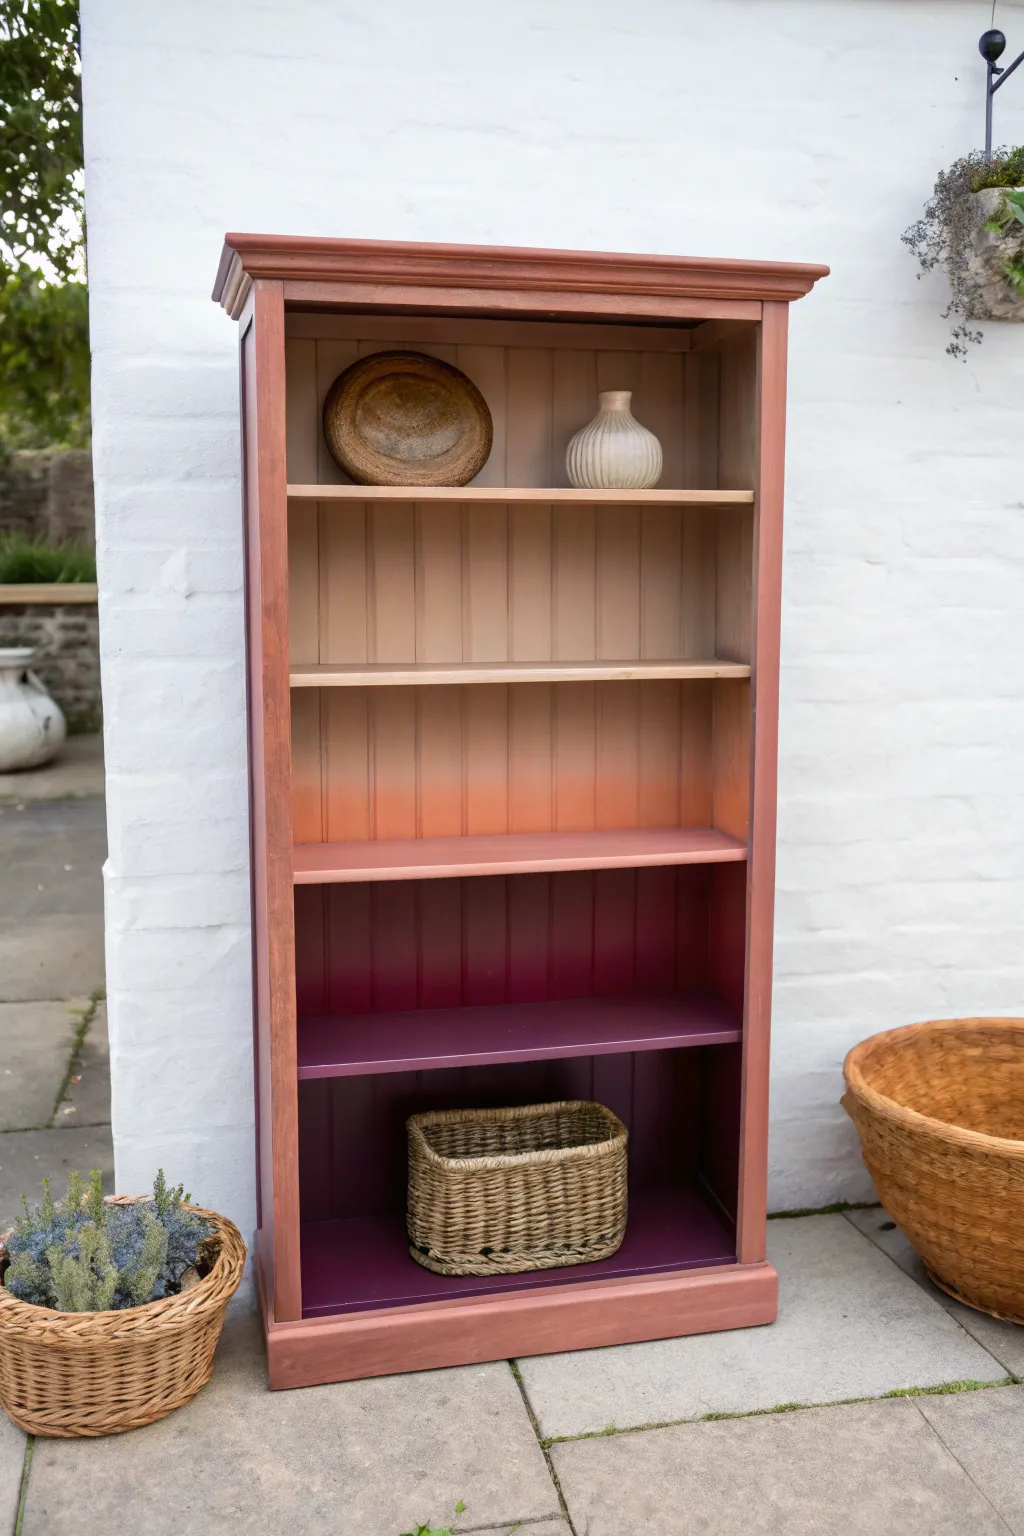
Transform a plain wooden bookcase into a stunning statement piece with this warm, sunset-inspired gradient. By blending hues from pale nude to deep plum directly on the back panel, you create a seamless fade that adds incredible depth and artistry to your storage.
How-To Guide
Materials
- Wooden bookcase (unfinished or sanded)
- Three chalk or mineral paints (Pale Nude, Terracotta, Deep Plum/Eggplant)
- Medium paintbrush (2 inch)
- Small blending brush or blending sponge
- Painter’s tape
- Sandpaper (120 and 220 grit)
- Clean lint-free cloths
- Water spray bottle (mister)
- Clear matte furniture wax or polycrylic sealer
Step 1: Preparation
-
Prep the surface:
Remove all adjustable shelves and set them aside. If your bookcase has a shiny finish, scuff sand the entire piece with 120-grit sandpaper to give the paint something to grip. Wipe away all dust with a damp cloth. -
Masking:
If you want to keep the frame color separate from the back panel during painting, apply painter’s tape to the inner edges of the side panels where they meet the backboard.
Mist for Magic
Keep a spray bottle of water handy. If your paint dries too fast while blending the transition lines, a fine mist will re-wet the paint and let you smear the colors together seamlessly.
Step 2: Painting the Exterior
-
Base coat the frame:
Using your medium brush, apply the Terracotta (mid-tone) paint to the entire exterior frame, the top cornice, and the front-facing edges of the shelves. Don’t worry about the back panel yet. -
Second coat:
Once the first coat is dry to the touch, apply a second coat for full opacity. I like to use long, vertical strokes here to minimize brush marks.
Add Vertical Detail
Before painting, apply thin vertical molding strips or use a router to create beading grooves on the back panel. The vertical lines add texture that makes the color fade look even more professional.
Step 3: Creating the Ombre Effect
-
Map out your zones:
Mentally divide the back panel of the bookcase into three horizontal sections. The top third will be your lightest color, the middle is the mid-tone, and the bottom is the darkest. -
Apply the top color:
Paint the top section of the back panel with the Pale Nude paint. Bring the color down slightly past where the first shelf would sit. -
Apply the middle color:
Paint the middle section with the Terracotta paint. Leave a gap of about 2-3 inches between this and the fresh Nude paint above. -
Apply the bottom color:
Paint the bottom third of the back panel with the Deep Plum paint, again leaving a small gap between it and the Terracotta section. -
First blend: Top transition:
While the paints are still wet, use a clean brush to bridge the gap between the Nude and Terracotta. Mix the two colors directly on the wood, blending up and down rapidly to erase the hard line. -
First blend: Bottom transition:
Repeat the process for the transition between the Terracotta and Deep Plum. If the paint feels tacky or sticky, lightly mist it with water to re-activate it for smoother blending. -
Painting the shelves:
Paint the removable shelves to match their corresponding ‘zone.’ Paint the top shelf Pale Nude, the middle shelf Terracotta, and the bottom shelf Deep Plum so they disappear into the background. -
Second coat and refine:
Let the first layer dry completely. Repeat the painting and blending process. The second coat is where the magic happens and the gradient becomes truly seamless.
Step 4: Finishing Touches
-
Smooth the finish:
Once fully dry, lightly run 220-grit sandpaper over the flat surfaces to knock down any raised grain or brush textures. -
Seal the piece:
Apply a clear matte wax or polycrylic topcoat to seal the paint. This is crucial for shelves that will have items sliding on and off them. -
Reassemble:
Remove any painter’s tape carefully. Re-insert the painted shelves into their proper height positions to match the gradient on the back. -
Style:
Arrange your decor items, placing lighter ceramics on darker shelves for contrast, or matching tones for a moody, monochromatic look.
Step back and admire how the colors melt into one another, turning your simple storage unit into a functional work of art
Painted Arch Shapes for a Trendy Backdrop
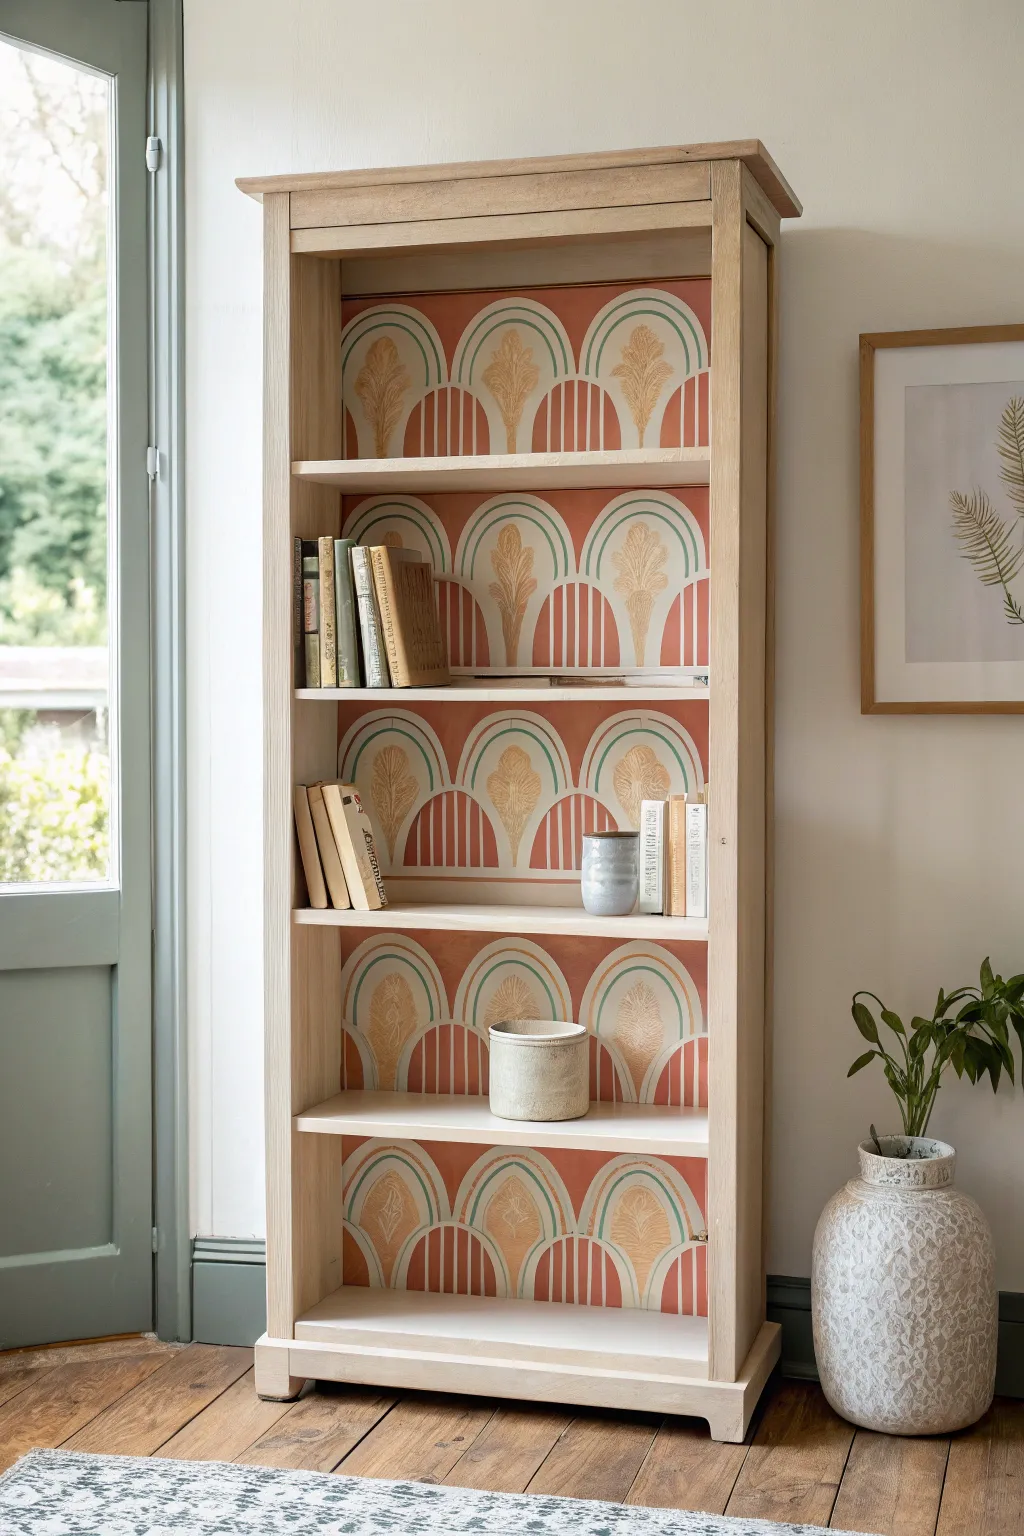

Give a simple wooden bookcase a complete personality overhaul with this trendy painted arch backdrop. The warm terracotta tones and repeating geometric pattern create a stunning, wallpaper-like effect that instantly warms up any room.
Step-by-Step
Materials
- Wooden bookcase with removable shelves (preferably unfinished pine or oak)
- Sandpaper (120 and 220 grit)
- White primer
- Terracotta or coral latex paint (base color)
- Cream or off-white acrylic paint
- Gold metallic paint
- Teal or sage green acrylic paint
- Cardboard or stencil plastic
- Pencil
- Scissors or craft knife
- Ruler and tape measure
- Angular detail paintbrush (small)
- Flat shader paintbrush (medium)
- Painter’s tape
- Clear matte polyurethane topcoat
Step 1: In the initial Preparation Phase
-
Prepare the workspace:
Remove all shelves from your bookcase and set them aside. If the shelves are adjustable, remove the metal pins as well to ensure a completely flat surface to work on. -
Clean and sand:
Wipe down the back panel of the bookcase to remove dust. If the wood is rough, give it a quick sanding with 120-grit sandpaper, followed by 220-grit for a smooth finish. Wipe away all dust with a damp cloth. -
Prime the surface:
Apply a coat of white primer to the back panel. This ensures your terracotta color pops and adheres properly. Let this dry completely according to the can’s instructions. -
Apply the base color:
Paint the entire back panel with your chosen terracotta or coral latex paint. You might need two coats for full, opaque coverage. Allow at least 2 hours of drying time between coats.
Step 2: Creating the Stencils
-
Measure your space:
Measure the width of the back panel. Decide how many arches you want per row—the example image uses three wide arches. Divide the total width by your desired number to get the width of each arch. -
Draft the arch shape:
On a piece of cardboard or stencil plastic, draw a rectangle using your calculated width. Round off the top to create a perfect semi-circle arch shape. -
Add internal details:
Within your main arch template, draw a smaller concentric arch about an inch inside the outer edge. This will help guide your painted borders later. -
Cut out the template:
Carefully cut out your main arch shape. Create a separate, smaller stencil for the central leaf motif if you aren’t confident freehanding it. The leaf shape resembles a stylized palmette or fountain.
Uneven Arches?
If your hand-painted arches look wobbly, use a Posca paint marker instead of a brush for the outlines. The firm felt tip offers much better control for long curves.
Step 3: Painting the Pattern
-
Trace the arches:
Starting at the bottom left corner, lightly trace your main arch template across the back panel using a pencil. Repeat this row by row, stacking them directly on top of each other until the panel is filled. -
Paint the teal borders:
Using a small angular brush and teal paint, carefully paint the curved line that defines the top of each arch. Keep your hand steady and use your pinky finger as a pivot point for smooth curves. -
Fill the arch interiors:
Mix a wash of cream paint (slightly diluted with water) to fill the background of the arch shape, but leave the bottom section (the ‘legs’ of the arch) in the original terracotta color. This creates a layered look. -
Paint the vertical stripes:
In the lower section of each arch where the terracotta shows through, paint vertical white stripes. Use a ruler to mark spacing first if you want precision, or freehand it for a more organic feel. -
Add the gold motifs:
In the center of the cream-painted area, use your metallic gold paint to create the stylized leaf motif. Paint a central stem first, then fan out feathery brushstrokes to each side to create the palm shape. -
Define the gold detail:
Once the gold base shape is dry, you can go back in with a very fine brush and a slightly darker gold or bronze to add tiny veins or definition lines to the leaves. -
Touch up lines:
Step back and look for any shaky lines. Use the base terracotta color to clean up the edges around the arches if your teal lines wandered, or use the cream paint to sharpen the vertical stripes.
Level Up: Texture
Mix a pinch of baking soda into your terracotta base paint before applying. It creates a plaster-like, unpolished texture that adds authentic old-world charm.
Step 4: Finishing and Assembly
-
Erase pencil marks:
Once the paint is absolutely bone dry (I usually wait overnight here just to be safe), gently erase any visible pencil guidelines. -
Seal the work:
Apply a clear matte polyurethane topcoat over the painted back panel. This protects your artwork from scratches when you slide books in and out. -
Reinstall shelves:
Put the shelf pins back into their holes and carefully slide the wooden shelves back into position. Style with your favorite books and objects.
Enjoy styling your new statement piece that looks like a custom wallpaper installation
Metallic Painted Details on Trim and Edges
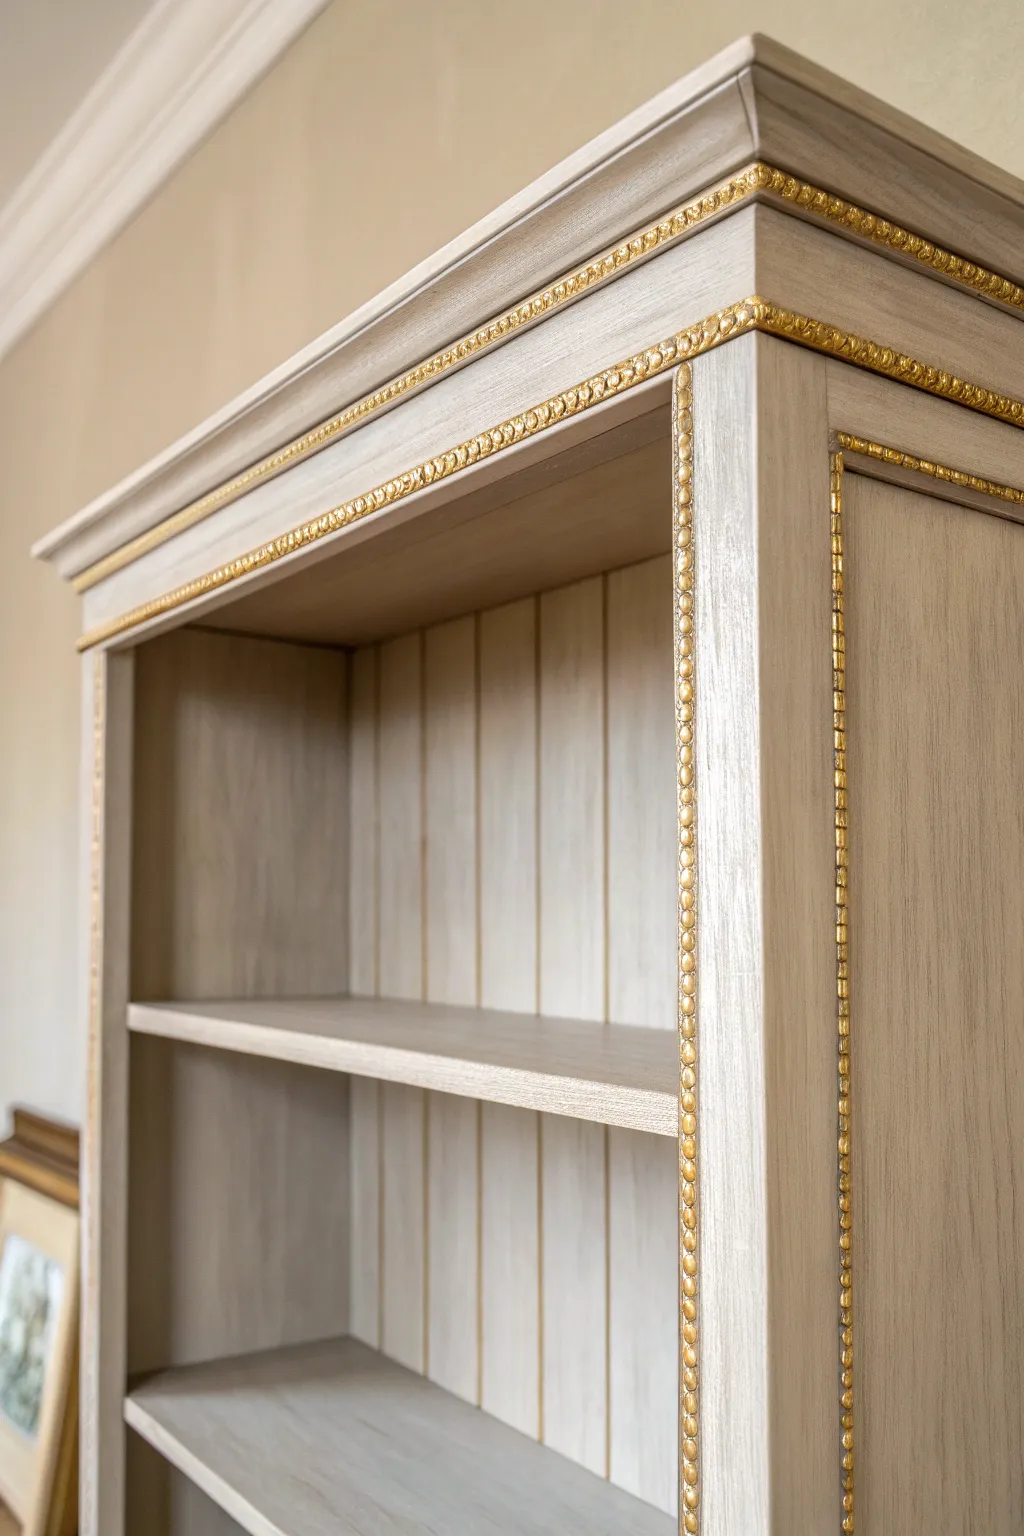
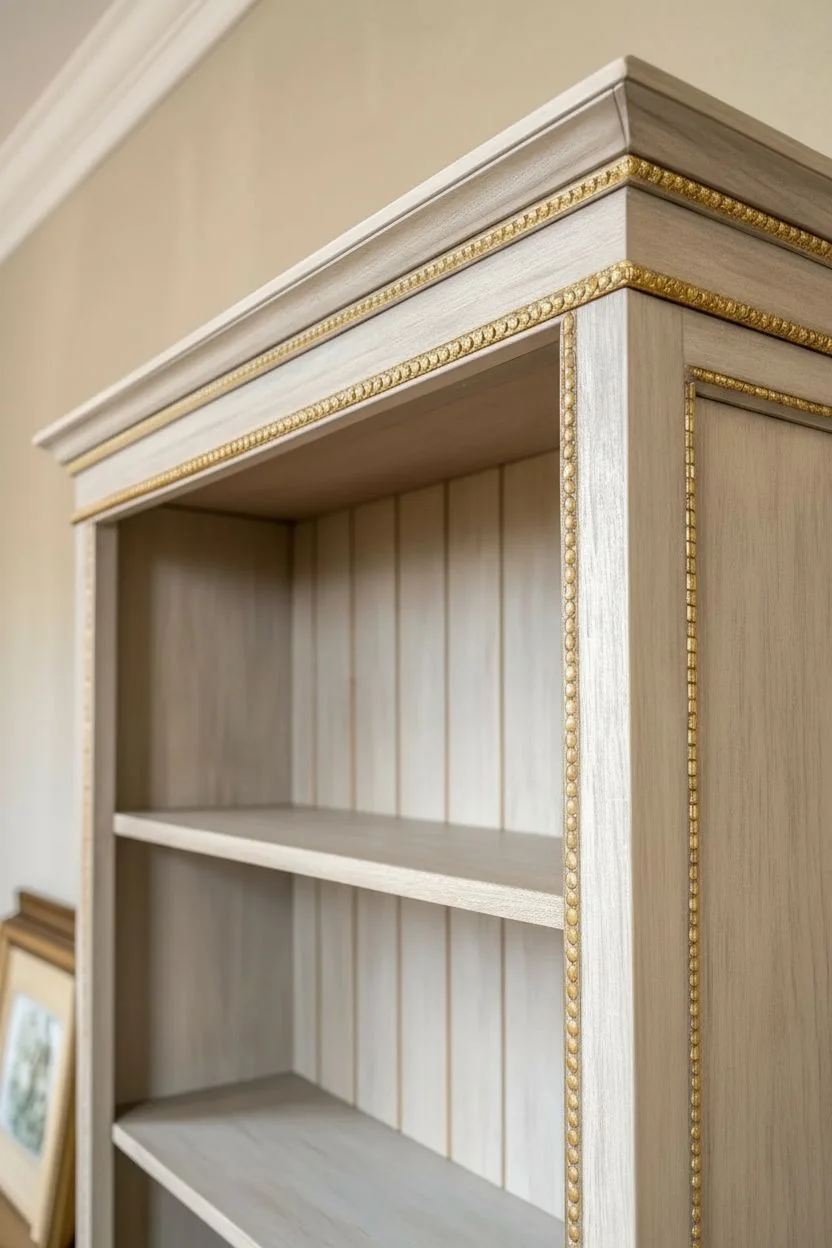
Transform a plain wooden bookcase into a sophisticated statement piece by combining a soft, whitewashed finish with striking gold accents. This project focuses on highlighting architectural details like beaded trim and edges to create a look that feels both antique and luxuriously modern.
Detailed Instructions
Materials
- Unfinished wooden bookcase with bead molding
- Sandpaper (120 and 220 grit)
- Tack cloth
- Gray-beige chalk paint or milk paint (e.g., ‘Greige’)
- White wax or whitewash glaze
- Metallic gold paint (high pigment)
- Small round artist brush (size 2 or 4)
- Fine liner brush (size 0 or 1)
- Lint-free rags
- Painter’s tape (optional)
- Clear matte polyurethane or wax topcoat
Step 1: Preparation and Base Coat
-
Assess and Sand:
Begin by inspecting your bookcase for any rough spots. Lightly sand the entire piece with 120-grit sandpaper to scuff the surface, especially if it was previously finished. This helps the new paint adhere properly. -
Smooth the Surface:
Follow up with a 220-grit sandpaper for a smoother finish. Pay close attention to the flat surfaces and the interior shelves where your hand might rest. Wipe away all dust thoroughly with a tack cloth. -
Apply the Base Color:
Stir your gray-beige chalk paint well. Apply the first coat evenly across the entire bookcase, including the trim and interior back panel. Don’t worry about complete opacity yet; a slightly thinner coat works well for a washed look. -
Refine the Base:
Once dry, apply a second coat if you desire deeper coverage. For this specific look, I prefer to keep the wood grain slightly visible, so a single thorough coat might suffice depending on your paint’s thickness. -
Create the Whitewash Effect:
To achieve that soft, airy wood tone seen in the photo, apply a layer of white wax or a whitewash glaze. Brush it on in small sections and immediately wipe it back with a lint-free rag. -
Blend the Glaze:
As you wipe off the excess wax or glaze, work in the direction of the wood grain (and vertical grooves on the back panel). The white pigment should settle into the crevices and grain, softening the greige base color.
Wobbly Hand woes?
If painting the straight pinstripe is difficult, apply two strips of painter’s tape to create a narrow channel. Burnish the edges well to prevent bleed, paint, and remove tape while wet.
Step 2: Painting the Gold Details
-
Prepare the Gold Paint:
Shake or stir your metallic gold paint vigorously. You want the metallic pigments fully suspended to ensure a bright, reflective shine rather than a dull yellow. -
Start the Top Molding:
Using a small round artist brush (size 2-4), begin painting the decorative bead molding along the top cornice. Apply the gold carefully to just the raised ‘beads’ and the recessed channel immediately surrounding them. -
Refine the Edges:
Keep a damp rag nearby. If you slip and get gold on the flat face frame, quickly wipe it away before it sets. The goal is to make the trim look like an applied metal accent. -
Vertical Beading detail:
Move down the vertical sides of the bookcase face. Paint the bead molding that runs vertically. Use short, controlled strokes to ensure you cover the sides of each tiny bead without flooding the surrounding wood. -
Painting the Pinstripe:
Switch to your fine liner brush (size 0 or 1). On the flat vertical edge just outside the bead molding, paint a thin, steady pinstripe of gold. Use your pinky finger as a stabilizer against the dry wood to keep your line straight. -
Check for Saturation:
Metallic paints can be semi-transparent. Step back and check your work in good light. If the gold looks streaky or dull, let it dry and apply a second coat to the trim for a truly solid, gilded appearance. -
The Back Panel Grooves:
For the interior back panel which features vertical planking, take a very small amount of gold on a dry brush. Very lightly run it down the very center of the vertical grooves to add a subtle depth, or skip this if you prefer a cleaner look.
Level Up: Antique It
Mix a tiny drop of dark brown or black paint into a glaze. Lightly brush this over the dried gold beading and wipe back instantly. It will stay in the recesses, making the gold look vintage.
Step 3: Finishing Touches
-
Cure the Gold:
Allow the metallic accents to dry completely, ideally overnight. Metallics can be soft and prone to smudging if handled too soon. -
Protect the Piece:
Apply a clear protective topcoat. If you used wax for the whitewash, stick with a clear wax over the gold. If you used glaze, a matte water-based polyurethane is a durable choice. -
Seal the Gold:
When sealing over the gold trim, use a gentle touch so you don’t drag metallic particles onto the surrounding pale wood. One or two light coats will prevent the gold from tarnishing over time.
Step back and admire how a few touches of gold have completely elevated the character of your furniture
Soft Distressed Finish for a Timeworn Look

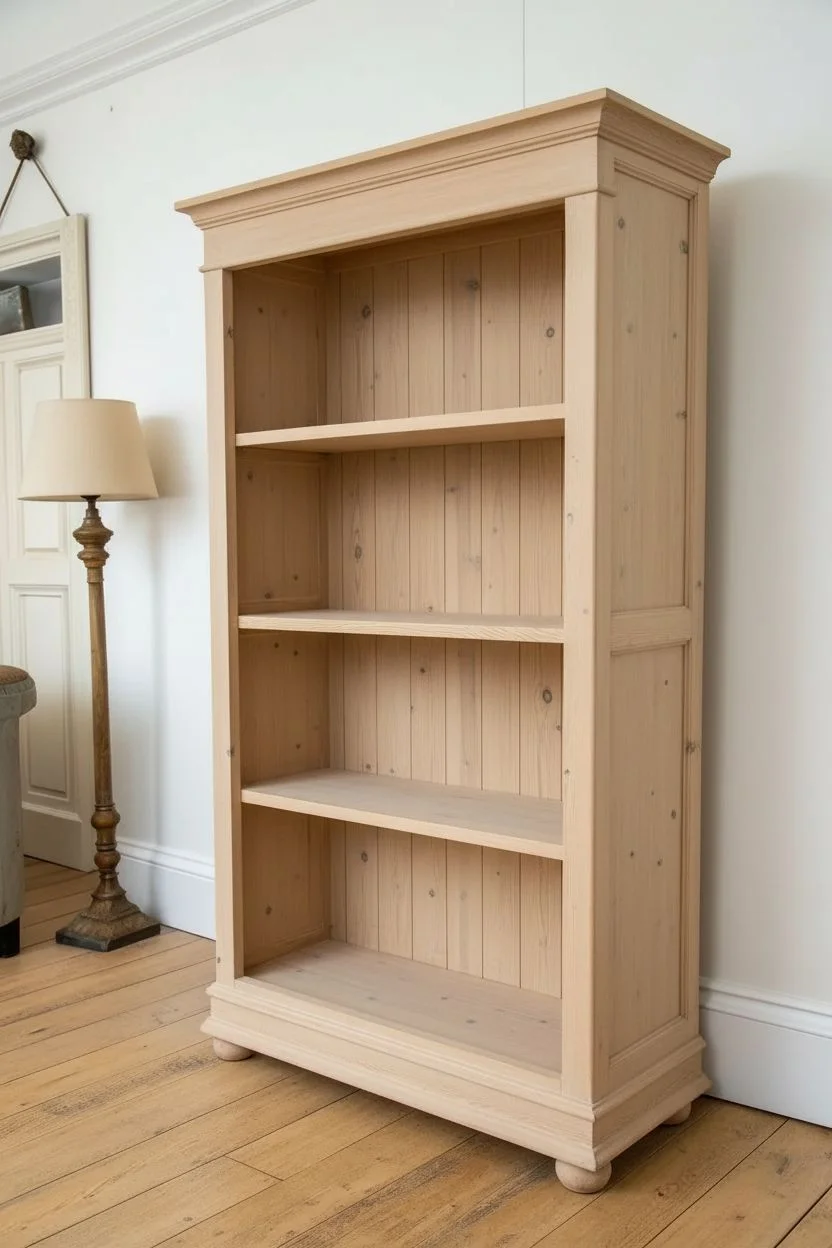
Achieve the airy elegance of a Swedish country home with this soft, distressed bookcase transformation. By using a specialized whitewash technique and subtle stenciling, you can turn a plain pine piece into a timeless heirloom with a gentle, time-worn patina.
Step-by-Step Tutorial
Materials
- Unfinished or stripped pine bookcase
- Medium and fine grit sandpaper (120 and 220 grit)
- White chalk paint or casein paint
- Clear matte mixing glaze or water (for dilution)
- Wide flat synthetic brush
- Natural bristle wax brush
- Dark grey or graphite acrylic paint (for detailing)
- Small stencil brush
- Floral or scrollwork stencil (frieze layout)
- Clear furniture wax
- Lint-free cotton rags
- Tack cloth
Step 1: Preparation and Stripping
-
Clean the surface:
Begin by thoroughly cleaning the bookcase to remove any old polish, dirt, or grease. A simple solution of warm water and dish soap works well, but ensure the wood dries completely before moving on. -
Sand to bare wood:
If your bookcase has an existing varnish, sand it down to the raw wood using 120-grit sandpaper. This look relies on the grain showing through, so getting back to the natural pine is essential. -
Smooth the grain:
Follow up with 220-grit sandpaper to smooth out any scratches. Lightly rounding off the sharp corners of the shelves and the crown molding helps simulate decades of use. -
Remove dust:
Wipe down the entire piece with a tack cloth. Any remaining sawdust will clump in your wash and ruin the smooth finish.
Uneven Wash?
If your whitewash looks blotchy, the wood may have soaked it up unevenly. Wet the wood slightly with a damp sponge before applying the paint to help it glide on smoother.
Step 2: Creating the Whitewash Wash
-
Mix the wash:
I prefer to dilute white chalk paint with water at a 1:1 ratio. You want a milky consistency that is translucent, not opaque like standard paint. -
Apply the wash inside:
Start painting the interior back panel and shelves first. Brush the wash on in the direction of the wood grain, working in manageable sections. -
Wipe back immediately:
Before the wash dries, use a lint-free cotton rag to firmly wipe off the excess paint. This pushes the white pigment into the wood grain while letting the natural pine color warmth glow through. -
Wash the exterior:
Repeat the brush-on, wipe-off technique on the exterior frame, sides, and crown molding. Pay attention to crevices where paint naturally accumulates, leaving it slightly heavier there for depth. -
Check for consistency:
Step back and check for uneven spots. If an area is too white, sand it lightly; if it’s too dark, apply a second thin wash layer.
Step 3: Adding Decorative Details
-
Position the stencil:
Secure your scrollwork stencil to the top frieze using painter’s tape. Ensure it is centered perfectly before you begin. -
Load the brush:
Dip your stencil brush into the dark grey paint, then offload almost all the paint onto a paper towel until the brush feels dry. Too much paint will bleed under the stencil. -
Apply the pattern:
Use a gentle dabbing or swirling motion to apply the paint over the stencil. Keep the application light and uneven to mimic an aged, hand-painted fresco look. -
Detail the side panels:
Apply the same stenciling technique to the vertical side panels or pilasters. If your stencil is repetitive, ensure the spacing is consistent down the length of the bookcase. -
Distress the artwork:
Once the stencil paint is fully dry, deeply sand over the design with 220-grit paper. You want to wear away parts of the pattern so it looks like it has faded over a century.
Level Up: Interior Contrast
Paint the back panel of the bookcase in a soft, muted grey-blue or sage green before whitewashing. This color peeking through adds incredible depth behind your books.
Step 4: Sealing and Finishing
-
Apply clear wax:
Using a round wax brush, massage a clear furniture wax into the entire piece. This seals the porous chalk paint and protects the raw wood. -
Buff to a sheen:
Wait about 20 minutes for the wax to haze over, then buff vigorously with a clean cotton cloth. This creates that soft, satin glow typical of antique Swedish furniture. -
Add faux aging (optional):
For extra character, you can mix a tiny amount of dark wax into your clear wax and apply it only into the deep corners and molding recesses to simulate accumulated dust.
Enjoy styling your new bookcase with textured ceramics and old hardbacks to complete the serene, historical aesthetic


Have a question or want to share your own experience? I'd love to hear from you in the comments below!