Memorial rock painting is one of my favorite ways to turn grief into something gentle you can hold in your hand. With a few simple shapes, meaningful symbols, and personalized lettering, you can make a tribute that feels quietly powerful.
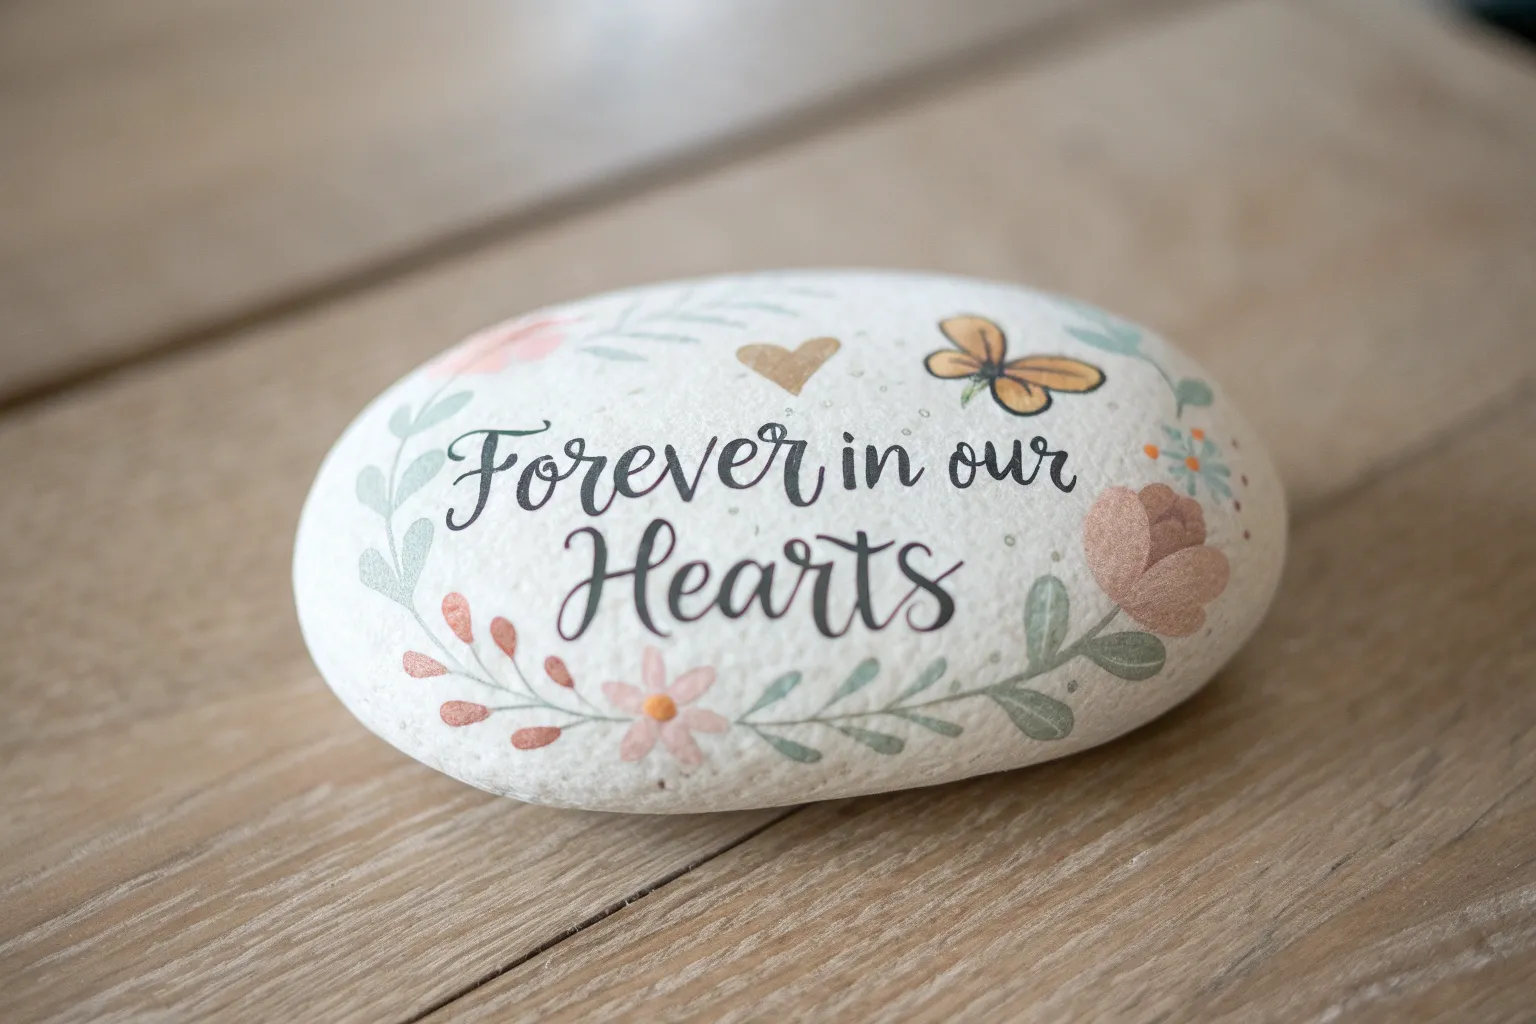
Simple Script Quote: Always in My Heart

This understated memorial rock uses clean typography and natural textures to create a lasting sentiment. The smooth beige stone serves as a gentle canvas for a stark, heartfelt message that feels both modern and deeply personal.
Detailed Instructions
Materials
- Smooth, flat river rock (light beige or cream)
- Mild soap and water
- Pencil (HB or lighter)
- Fine-point permanent marker or acrylic paint pen (black, 0.7mm tip)
- Extra-fine point marker (black, 0.5mm tip)
- Kneaded eraser
- Matte spray sealant
- Scrap paper
Step 1: Preparation & Planning
-
Clean the surface:
Begin by washing your selected stone thoroughly with mild soap and warm water. Scrub away any grit or dirt that could interfere with your pen tip later. -
Dry completely:
Allow the rock to dry fully for several hours or overnight. Even a hint of moisture trapped in the porous surface can cause ink to bleed. -
Draft your design:
On a piece of scrap paper, sketch out the phrase ‘ALWAYS IN MY HEART’ to get a feel for the spacing. Notice how the word ‘ALWAYS’ arches slightly at the top. -
Sketch guidelines:
Lightly draw a central vertical line down the middle of the rock with your pencil. This will help you center the alignment of your text stack.
Ink Bleeding?
If the ink feathers into the stone’s pores, switch to a finer tip pen or seal the raw stone with a clear matte medium before writing.
Step 2: Drafting the Typography
-
Pencil the first word:
Using your pencil, lightly letter the word ‘ALWAYS’ in an arch near the top third of the stone. Use tall, narrow capital letters. -
Add the middle line:
Below ‘ALWAYS’, sketch the small word ‘iN’. Make the ‘i’ lowercase but the same height as the capital ‘N’ for a whimsical touch. -
Add emphasis marks:
Draw three small hash marks on either side of the word ‘iN’ to frame it. -
Draft the third line:
Sketch the word ‘MY’ directly below the center line. Keep the letters slightly looser and more casual here. -
Complete the phrase:
Pencil in ‘HEART’ at the bottom. Try to match the width of this word to the width of the word ‘ALWAYS’ at the top to balance the composition. -
Draw the icon:
Sketch a simple, open line-art heart centered at the very bottom of the design.
Add Dimension
Use a white gel pen to add tiny highlight dots inside the thickest parts of the black letters for a ‘bubble’ effect.
Step 3: Inking & Finishing
-
Trace the main lines:
Take your fine-point (0.7mm) black marker and carefully trace over your pencil lines. I find it helpful to pull the pen toward me rather than pushing it away for smoother lines. -
Thicken the strokes:
Go back over the downstrokes of the letters (the vertical lines) a second time to add a subtle weight variation, mimicking calligraphy. -
Refine the details:
Switch to the extra-fine (0.5mm) marker to sharpen the corners of your letters and the pointed tip of the heart icon. -
Let the ink cure:
Wait at least 15 to 20 minutes for the ink to dry completely. If you erase too soon, you risk smudging the black pigment into the light stone. -
Erase guidelines:
Gently dab—don’t rub aggressively—with a kneaded eraser to lift the visible graphite lines without damaging the ink. -
Seal the artwork:
Take the rock to a well-ventilated area. Hold the matte spray sealant about 10 inches away. -
Apply first coat:
Spray a very light, misting coat over the surface. A heavy coat can re-liquefy the ink and cause it to run. -
Final coat:
Once the first mist is dry (about 30 minutes), apply a slightly heavier second coat for durability.
Now you have a durable, beautifully simple token of remembrance to keep close or place in a garden


Pet Memorial Paw Print With Soft Halo
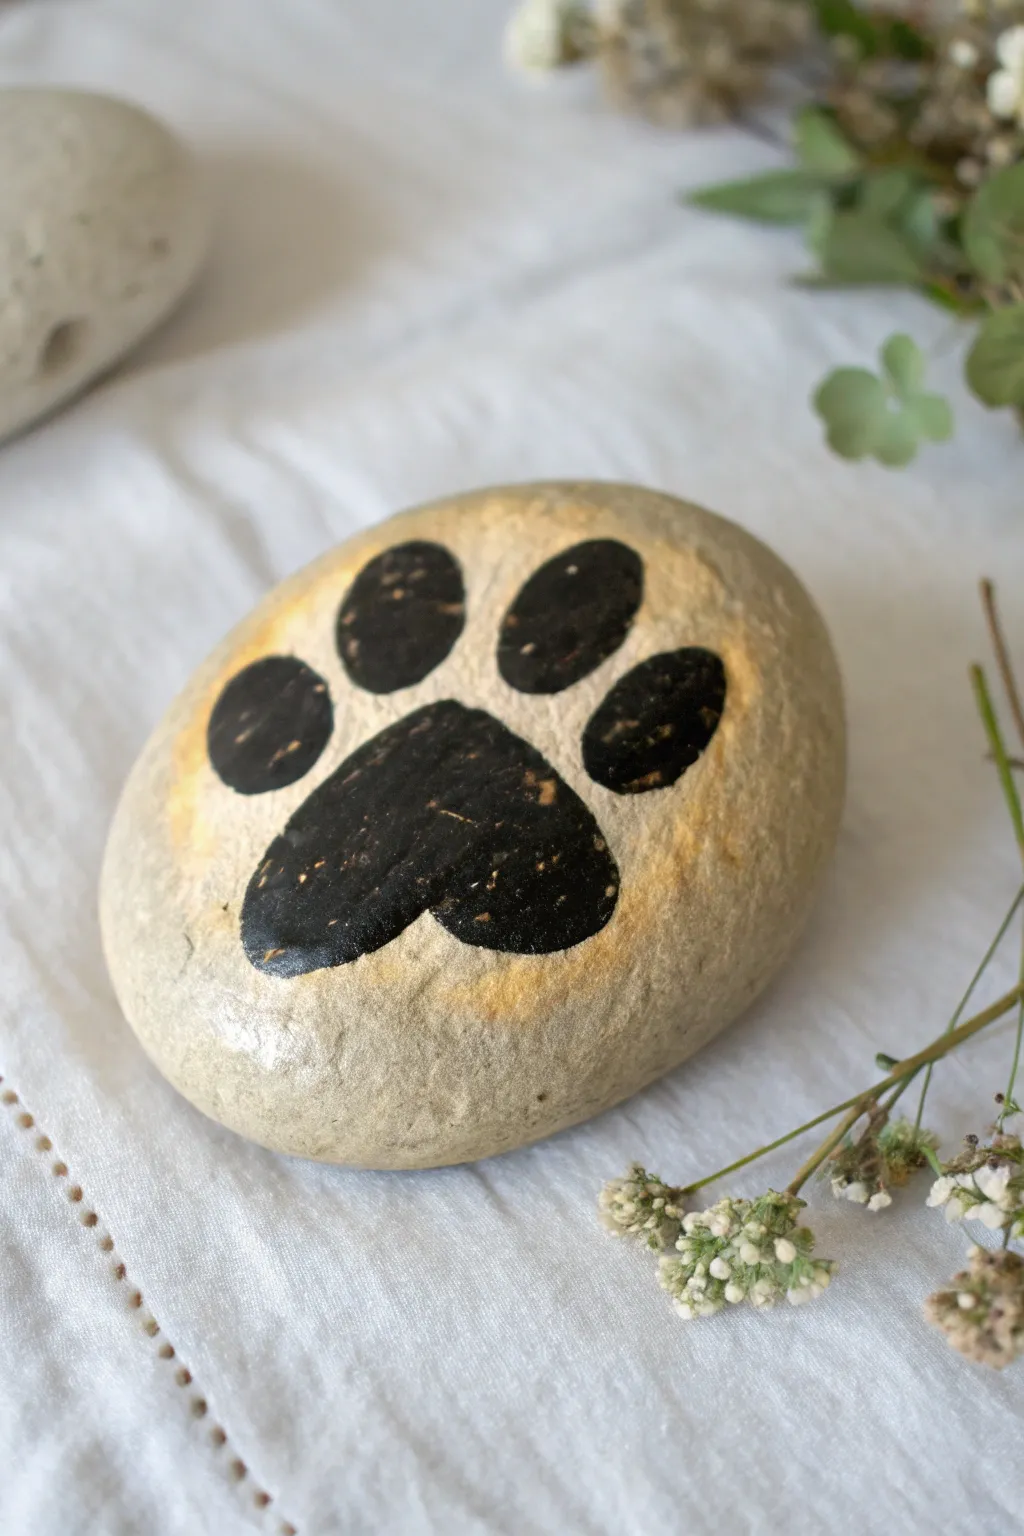
Capture the memory of a beloved companion with this understated and elegant memorial stone. A bold black paw print rests centrally on a smooth river rock, surrounded by a subtle, glowing wash of gold that symbolizes their lasting light.
Step-by-Step
Materials
- Smooth, flat river rock (light grey or beige)
- Black acrylic paint
- Metallic gold or yellow ochre acrylic paint
- Small flat brush (size 4 or 6)
- Detail round brush (size 0 or 1)
- Pencil (optional)
- Paper plate or palette
- Water cup and paper towels
- Spray sealer (matte or gloss)
- Sponge or older scruffy brush
Step 1: Stone Preparation & Layout
-
Select the perfect canvas:
Choose a rock that is relatively flat and smooth. A lighter color stone works best for this design as it provides contrast for the black paint and allows the subtle gold halo to show up clearly. -
Clean the surface:
Wash the rock thoroughly with warm soapy water to remove any dirt or oils. Let it dry completely in the sun or use a hair dryer to speed up the process. -
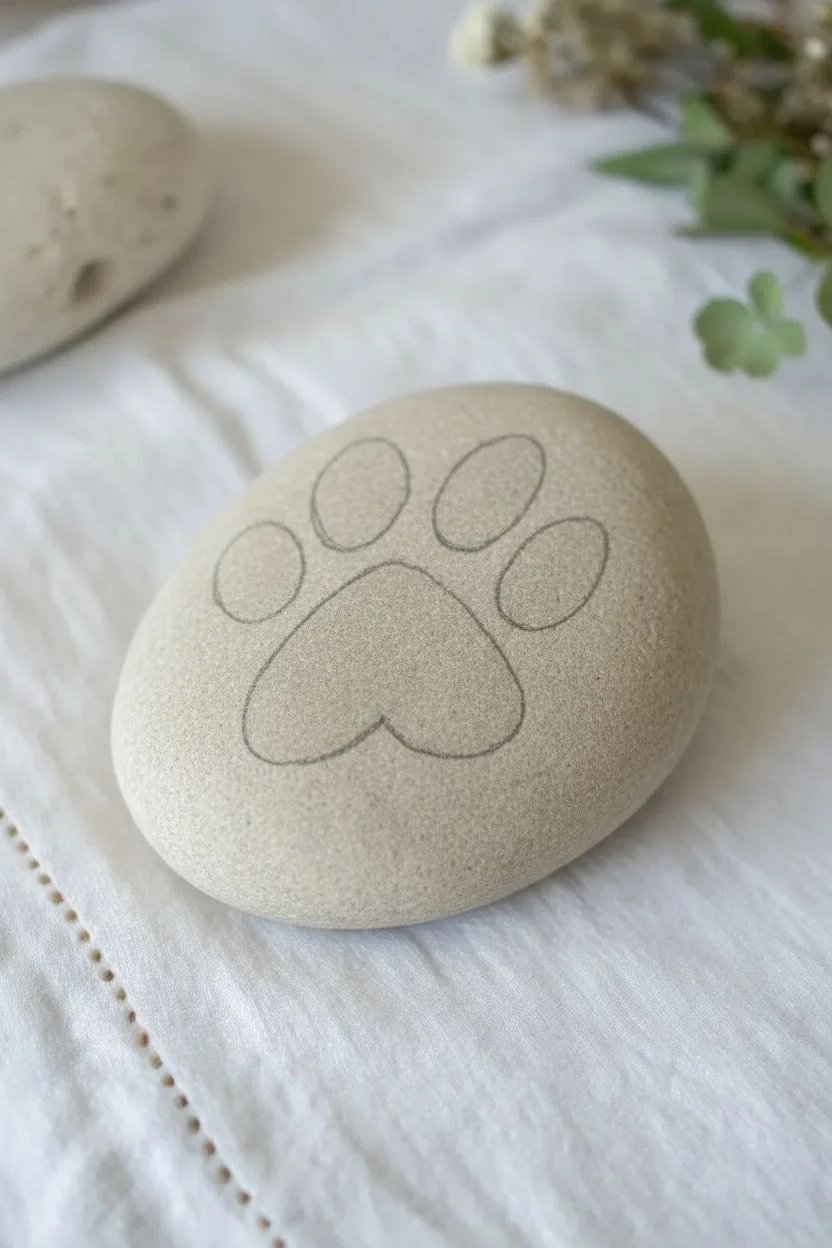
Sketch the placement:
Using a pencil very lightly, draw the outline of the main paw pad. It should be a large, inverted hear shape with rounded bottom edges, placed slightly below the center of the rock. -
Mark the toes:
Lightly sketch four oval shapes above the main pad. Arrange them in a gentle arc, ensuring they are evenly spaced and proportionate to the main pad.
Step 2: Creating the Golden Halo
-
Prepare the wash:
Mix a small amount of metallic gold or yellow ochre paint with a drop of water. You want a semi-transparent consistency, almost like a glaze, rather than a thick opaque layer. -
Apply the base glow:
Dip a sponge or an old scruffy brush into your gold mixture and dab off the excess on a paper towel. Gently pounce or dry-brush the color around the area where the paw print will go. -
Soften the edges:
Work the color outward so it fades into the natural rock color. Focus the pigment density near the center markings you made, letting it whisper out toward the edges. -
Add warmth:
If you want a deeper glow, add a tiny touch of orange or brown to your gold mix and dab just a little bit right near the pencil lines to create depth. -
Let it set:
Allow this background halo layer to dry completely. Since the paint is thin, this should only take about 10 minutes.
Dry Brushing Secret
For the halo, your brush should be almost totally dry. Wipe it on a paper towel until barely any color comes off before touching the rock for that soft, airy look.
Step 3: Painting the Paw Print
-
Fill the main pad:
Load your small flat brush with black acrylic paint. Carefully fill in the large main pad shape you sketched earlier. Use smooth strokes to keep the texture even. -
Paint the toes:
Switch to a smaller round brush if needed to paint the four toe pads. I find it easiest to start in the center of the oval and push the paint out toward the edges for a crisp line. -
Refine the edges:
Go back over the outlines of all five shapes with your detail brush to ensure they are smooth and rounded. Any jagged edges can be smoothed out while the paint is still wet. -
Add texture (optional):
The image shows a slightly rustic look. If you prefer this, you can lightly dab the wet black paint with a dry brush to lift a tiny bit of pigment, or let it dry solid for a modern look.
Personalize It
Use a tiny white paint pen to write your pet’s name or a significant date in small cursive script along the curve of the bottom edge of the stone.
Step 4: Finishing Touches
-
Check opacity:
Once the first coat of black is dry, evaluate if you need a second coat. A solid, opaque black contrasts beautifully against the soft halo. -
Highlight the texture:
Looking closely at the image, there are tiny flecks of the stone showing through or painted on top. You can splatter microscopic dots of gold over the black, or simply let the natural stone texture remain visible. -
Seal the memory:
Protect your artwork with a spray sealer. A matte finish looks natural and stone-like, while a gloss finish will make the black paint look wet and deep.
Now you have a durable, touching tribute that honors your furry friend with a gentle golden glow


Rainbow-Inspired Pet Tribute With Name
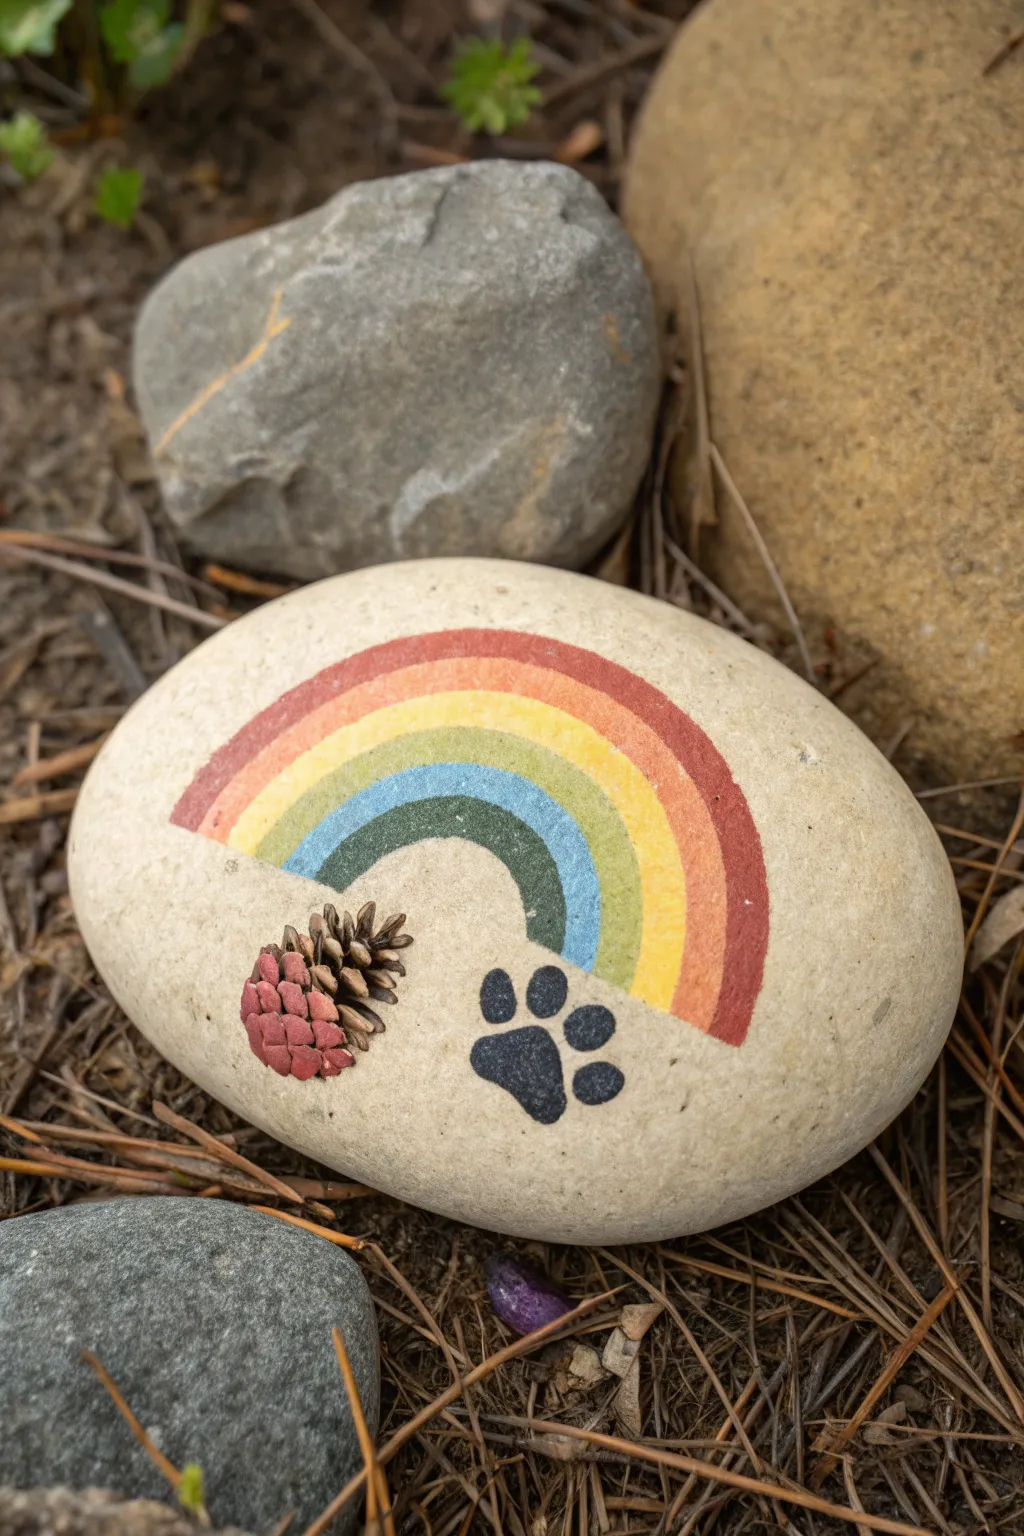
Create a touching tribute to a beloved pet with this simple yet poignant painted rock design. The gentle rainbow arch and singular paw print offer a quiet symbol of remembrance, perfect for placing in a garden or favorite outdoor spot.
Detailed Instructions
Materials
- Smooth, light-colored river rock (approximately 4-6 inches wide)
- Acrylic craft paints (terra cotta red, mustard yellow, pale yellow, sage blue-green, black)
- Small flat paintbrushes (size 4 or 6)
- Fine detail brush (size 0 or 1)
- Small pinecone or acorn cap
- Strong craft glue (E6000 or similar)
- Pencil for sketching
- Matte spray sealer
- Paper plate or palette
- Water cup and paper towels
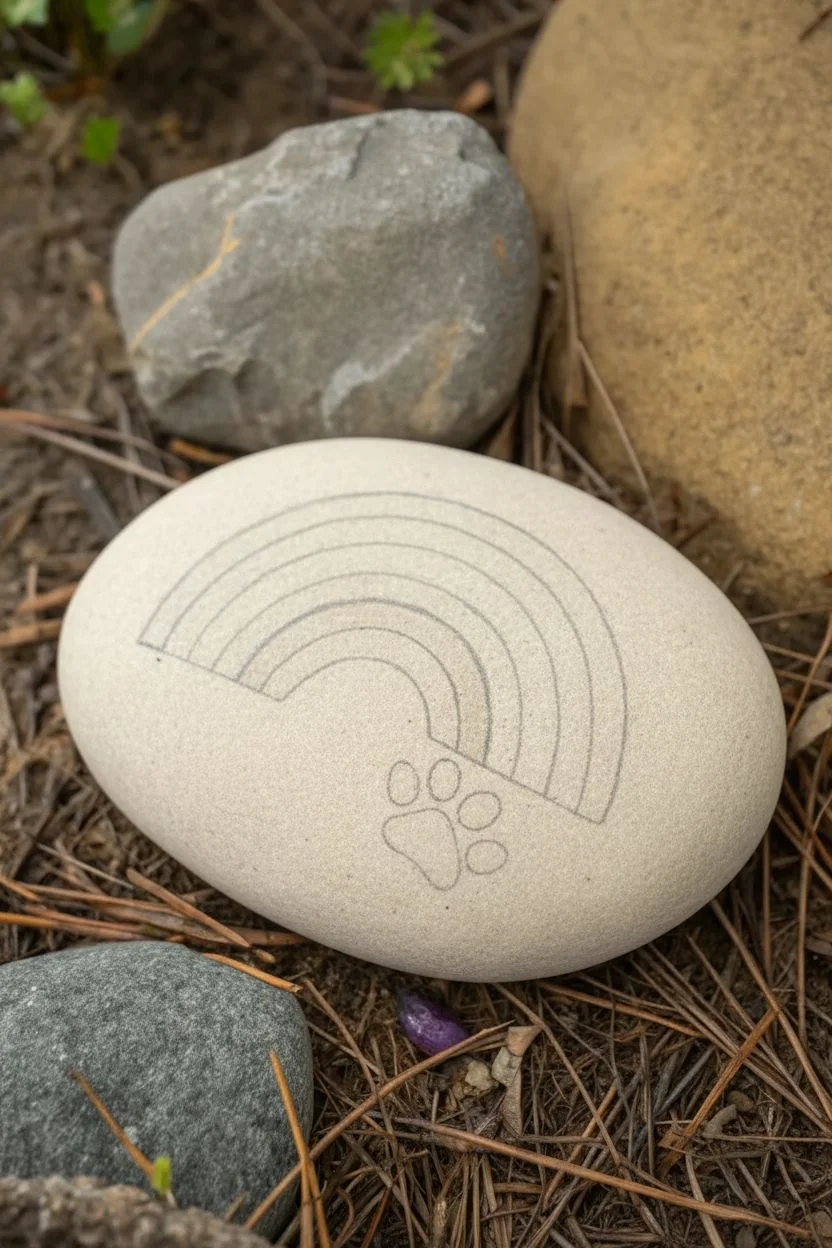
Step 1: Preparation and Sketching
-
Clean the stone:
Begin by washing your stone with warm soapy water to remove any dirt or oils. Let it dry completely, as any moisture trapped inside can affect paint adhesion. -
Plan the layout:
Look at the shape of your rock. The design works best on an oval, flattened surface. Imagine a horizontal line across the center where the rainbow will end. -
Sketch the rainbow:
Lightly use a pencil to draw four concentric arches. Don’t worry about making them mathematically perfect; a hand-drawn look adds warmth. Leave enough space at the bottom for the paw print and pinecone.
Step 2: Painting the Rainbow
-
Paint the top band:
Load your flat brush with the terra cotta red paint. Carefully fill in the top arch of your rainbow. I find that turning the rock as I curve the brush helps maintain a smooth line. -
Add the second band:
Clean your brush thoroughly and pick up the mustard yellow or orange-yellow shade. Paint the second band directly below the red one, letting the edges touch slightly for a cohesive look. -
Paint the yellow band:
Using the pale yellow paint, fill in the third band. If your paint is thin, apply a thin coat, let it dry for a few minutes, and add a second coat for better opacity. -
Complete the rainbow:
Finish the rainbow with the sage blue-green color on the smallest, innermost arch. Keep your hand steady and use the edge of the flat brush to get a crisp bottom curve. -
Dry thoroughly:
Allow the rainbow to dry completely before moving on to the other elements to prevent accidental smearing.
Uneven Arches?
If painting curves is tricky, use the bottom o a cup or a roll of tape to lightly trace your pencil arches before painting.
Step 3: Adding Details
-
Draft the paw print:
Lightly sketch the position of the paw print on the lower right side, under the rainbow’s end. -
Paint the paw pad:
Using black paint and a detail brush, fill in the main triangular pad of the paw. An inverted heart shape with rounded edges works well for this. -
Paint the toes:
Add four small oval toes above the main pad. Space them slightly apart in a gentle curve. -
Prepare the pinecone:
Choose a very small pinecone. If it has a stem, trim it off so it sits flush against the rock. -
Attach the pinecone:
Apply a dab of strong craft glue to the flat side of the pinecone. Press it firmly onto the rock on the lower left side, mirroring the paw print’s position.
Add a Name
Personalize the memorial by painting your pet’s name along the top curve of the rainbow using a fine liner brush or a paint pen.
Step 4: Finishing Touches
-
Clean up:
If any pencil marks are still visible around your paint, gently erase them once the paint is bone dry. -
Seal the artwork:
Take the rock to a well-ventilated area. Apply a light, even coat of matte spray sealer over the entire painted surface. This protects the tribute from weather if you plan to keep it outdoors. -
Final cure:
Let the sealer cure according to the can’s instructions—usually 24 hours—before placing it in your garden.
Place your finished stone in a quiet corner of your yard as a lasting reminder of your furry friend


Forget-Me-Not Flowers for Remembrance
This project transforms a simple smooth river rock into a lasting tribute featuring delicate blue forget-me-nots. The soft white background highlights the intricate botanical details, creating a peaceful and elegant piece perfect for remembrance.
Detailed Instructions
Materials
- Smooth, oval river rock (approx. 3-4 inches wide)
- White acrylic paint or gesso (matte finish)
- Acrylic paints: Sky Blue, Ultramarine Blue, Sap Green, Olive Green, Bright Yellow, and a touch of Grey
- Fine detail brushes (size 000 and 0 liners)
- Small flat brush (size 4 or 6)
- Palette or small dish for mixing
- Water cup and paper towels
- Clear matte varnish spray
Step 1: Preparing the Base
-
Clean the surface:
Begin by scrubbing your rock with warm soapy water to remove any dirt or oils. Let it dry completely before starting. -
Apply the base coat:
Using your flat brush, apply a smooth, even layer of white acrylic paint or gesso over the top surface. Feather the edges slightly so it blends naturally if you aren’t painting the entire underside. -
Double check coverage:
Once the first coat is dry, check for any thin spots where the rock’s natural color shows through. Add a second coat if necessary to get that lovely opaque, eggshell-like finish.
Step 2: Sketching and Stems
-
Light pencil guide:
Very lightly sketch the main curved stem line and the positions of the flower heads with a pencil. Keep the lines faint so they don’t show through the light blue paint later. -
Mix your greens:
Create a natural stem color by mixing Sap Green with a tiny drop of Olive Green. You want a fresh, lifelike shade rather than a synthetic bright green. -
Paint the main stems:
Using your liner brush, fluidly paint the thin, graceful stems following your pencil guide. Keep your hand loose to avoid shaky lines. -
Add the leaves:
Paint small, elongated leaves branching off the lower part of the stem. Vary the pressure on your brush to create tapered tips.
Preventing Wobbly Lines
If your hands shake with the fine stems, rest your painting wrist on the table or a sponge. Use your pinky finger as a pivot point on the table surface for stability.
Step 3: Painting the Blooms
-
Block in the flowers:
Mix Sky Blue with a touch of white. Paint the five-petal shapes for each flower. Don’t worry about details yet; just get the base silhouette down. -
Create depth:
While the base blue is still slightly tacky or just dry, take your Ultramarine Blue and dilute it slightly. Glaze over some of the petals, specifically towards the centers, to create a subtle gradient. -
Add a darker bloom:
Note that one flower on the right is a deeper blue. Paint this one using less white in your mix to add visual interest and variety to the bouquet. -
Paint the faded bloom:
For the greyish flower at the bottom, mix a very tiny dot of grey into your green-blue mix. This represents a flower that is slightly shadowed or older, adding realism. -
Define the petals:
Use a very fine liner brush and a slightly darker blue mix to outline the separation between individual petals on the lighter flowers. Keep these lines incredibly thin.
Pro Tip: Petal Transparency
Mix a tiny bit of glazing medium into your blue paint. This makes the petals look delicate and slightly translucent, just like real forget-me-nots.
Step 4: Detailing and Sealing
-
Add the centers:
Dip the very tip of your brush (or a dotting tool) into Bright Yellow. Place a small, textured dot in the center of each blue flower. -
Highlight the centers:
To make the yellow centers pop, add a microscopic dot of white or very pale yellow right in the middle of the yellow area once it’s dry. -
Refine the stems:
Connect the flower heads to the main stems with tiny green lines. I find it helpful to rotate the rock as I work to get the best angle for these tiny connections. -
Add subtle texture:
If you want a speckled egg effect on the background, flick a stiff toothbrush with diluted brown paint very lightly over the surface, shielding the flowers with a paper scrap. -
Final cure:
Allow the entire painting to dry for at least 24 hours to ensure all moisture has evaporated from the layers. -
Protect your work:
Finish by applying a clear matte varnish spray. Do light, misting coats rather than one heavy wet coat to prevent the ink or paint from bleeding.
Place this beautiful stone in a garden or keep it on a desk as a gentle, enduring reminder of loved ones.
BRUSH GUIDE
The Right Brush for Every Stroke
From clean lines to bold texture — master brush choice, stroke control, and essential techniques.
Explore the Full Guide
Dove and Olive Branch Peace Tribute
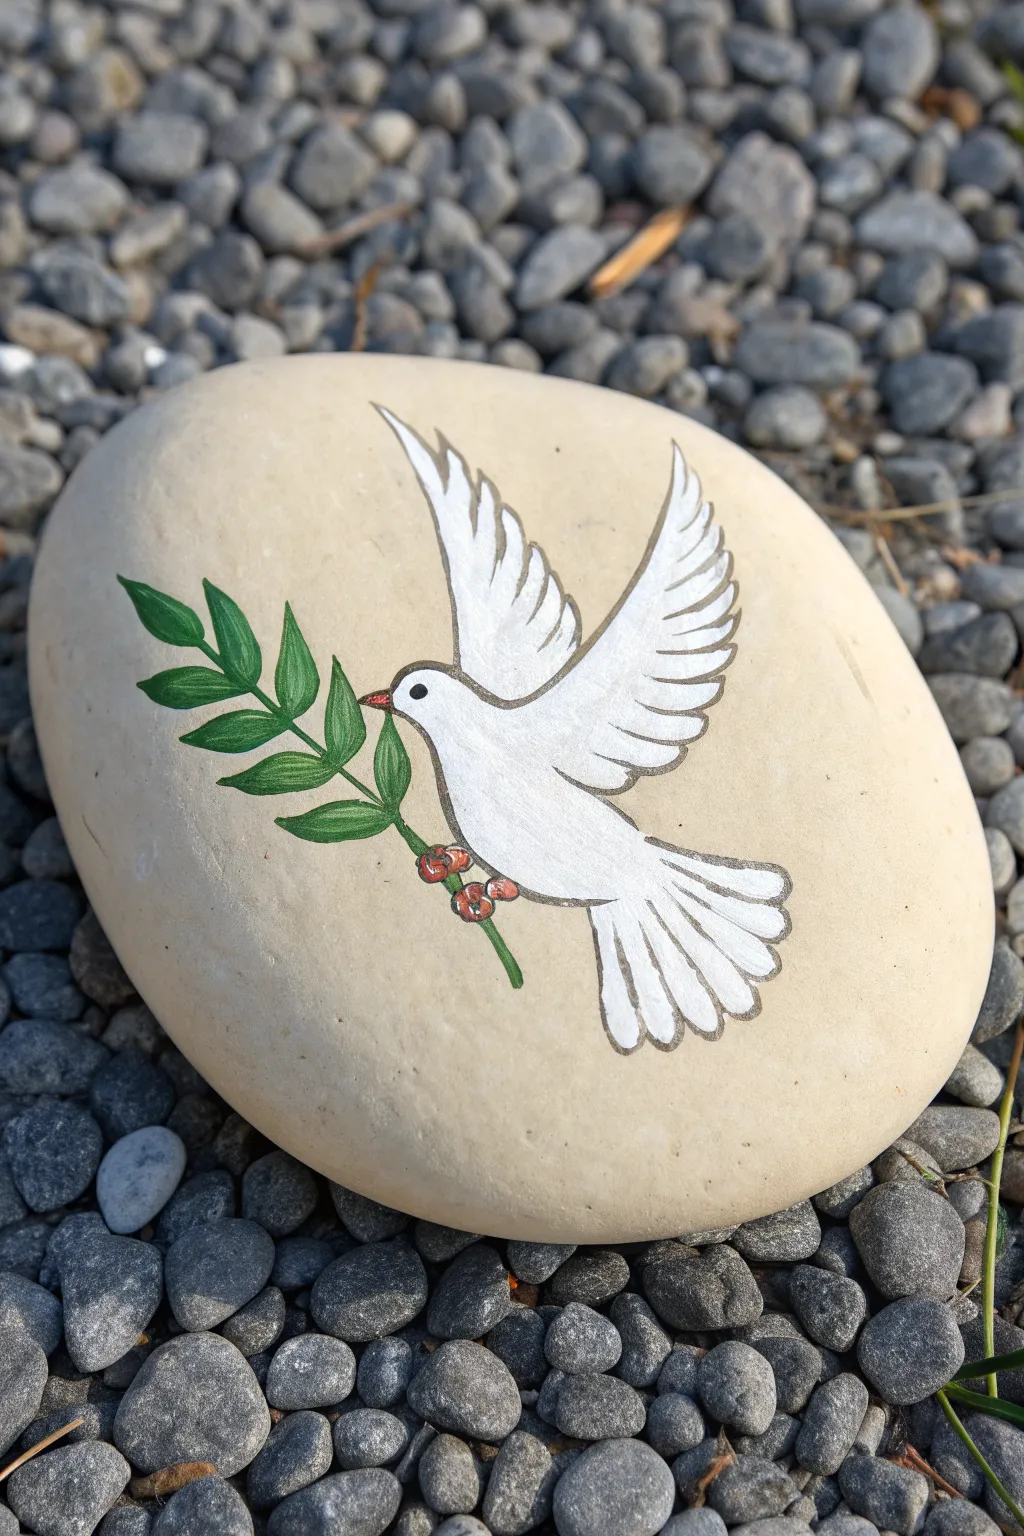
This serene rock painting features a classic symbol of peace: a white dove carrying an olive branch. The natural, light beige tone of the stone provides the perfect calm background for the crisp white feathers and vibrant green leaves.
Step-by-Step Guide
Materials
- Smooth, light-colored river rock (beige or off-white)
- Acrylic paint (Titanium White, multiple shades of Leaf Green, Dark Brown, Red, Black)
- Small round paintbrushes (sizes 0 and 1)
- Fine liner brush or extra-fine paint pen (Black)
- Pencil and eraser
- Matte spray varnish or brush-on sealer
- Palette or small plate for mixing
- Cup of water and paper towels
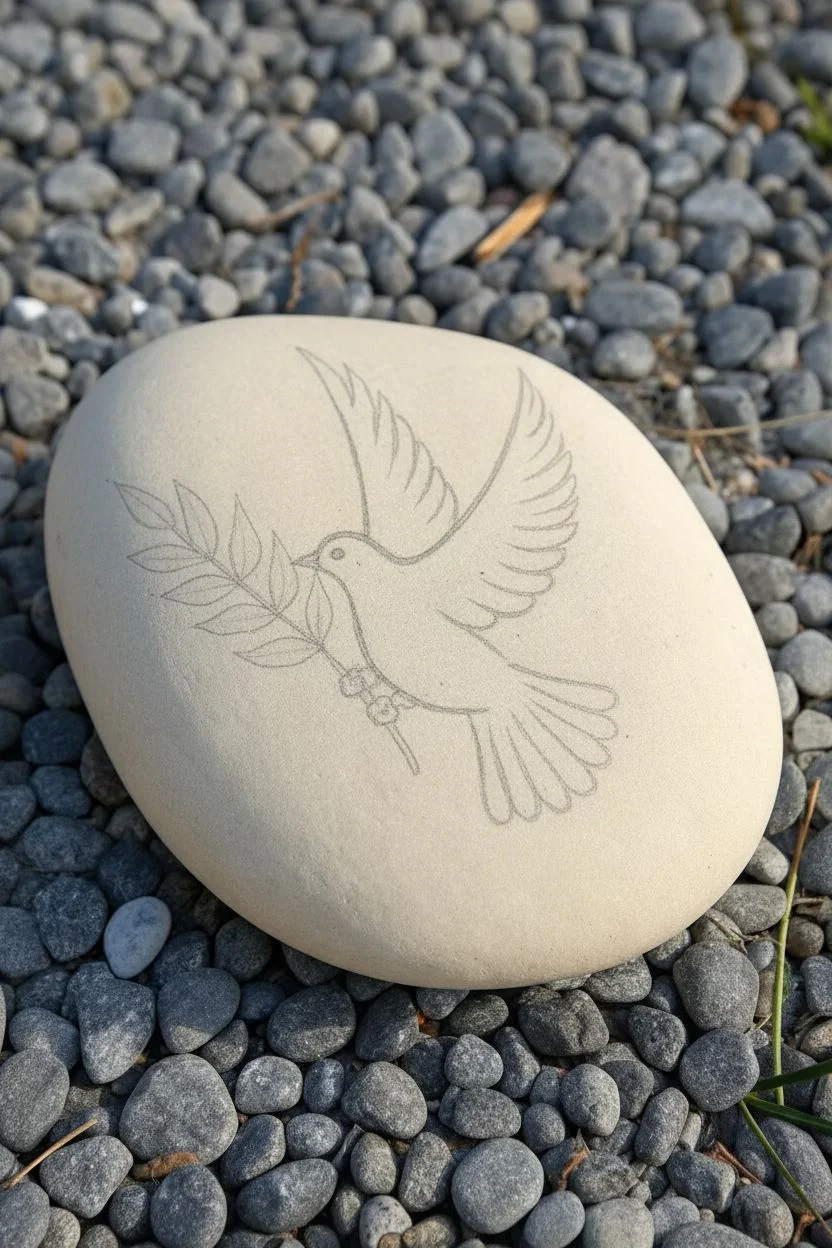
Step 1: Preparation & Sketching
-
Clean the surface:
Before starting, ensure your rock is completely clean and dry. Scrub it with mild soap and water to remove any dirt or oils, then let it dry fully in the sun or a warm spot. -
Position the dove:
Using a pencil, lightly sketch the outline of the dove’s body in the center of the rock. Angle the body slightly upward to the right to simulate flight, leaving room on the left for the branch. -
Outline the wings:
Sketch the two wings extending upwards. The wing closer to the viewer (the right wing) should be slightly larger and more prominently curved, while the rear wing (left) tucks behind it. Draw the scalloped edges for the flight feathers. -
Add the tail and branch:
Draw the fan-shaped tail extending downwards. Then, sketch the olive branch held in the dove’s beak, curving gently downwards to the left with paired leaves along the stem.
Step 2: Painting the Dove
-
Base coat the white:
Load a small round brush with Titanium White acrylic paint. Fill in the entire body, wings, and tail of the dove. Use smooth strokes to keep the texture flat. -
Apply a second coat:
White paint can be translucent on stone. Once the first layer is dry to the touch, apply a second coat to ensure a solid, opaque bright white finish. -
Paint the leaves:
Using a medium green shade, fill in the leaves on the olive branch. Use a pointed brush tip to get crisp points on the ends of the leaves. -
Add stem details:
Use a thin liner brush with thinned green or brown paint to connect the leaves to a central stem, extending it up towards the dove’s beak. -
Paint the berries:
Near the bottom of the stem, add small clusters of round berries using red paint. A small dotting tool or the back of a brush handle works perfectly for this. -
Detail the beak and eye:
Carefully paint a small triangle for the beak. I like to use a tiny dot of black for the eye first, let it dry, and then add a microscopic white highlight later if desired.
Steady Hand Trick
Rest your pinky finger on a dry part of the rock while outlining. This anchors your hand and gives you much better control for those fine black lines.
Step 3: Outlining & Defining
-
Outline the body:
Once all base colors are completely dry, switch to your finest liner brush or an extra-fine black paint pen. Outline the entire perimeter of the dove with a steady, thin line. -
Define the feathers:
Draw internal lines on the wings to separate the individual feathers. Follow the curve of the wing, making the lines swoop gently. -
Detail the tail feathers:
Add straight lines radiating from the base of the tail to the tips to create the individual tail feathers. -
Outline the branch:
Carefully outline the green leaves and the center line of the leaves to give them dimension. Outline the red berries as well. -
Highlight the berries:
Add tiny white dots or curved lines on the red berries to make them look shiny and round. -
Final clean up:
Check your lines. If any black lines became too thick, you can tidy them up by painting a little bit of the background stone color (or white, if on the bird) over the mistake once the ink is dry. -
Seal the artwork:
Let the paint cure for at least 24 hours. Finish by applying a matte spray varnish to protect the design without making the natural stone look too glossy.
Paint Pen Fixes
If your paint pen skips over the rough stone texture, try priming the area with a clear matte medium first to create a smoother surface for the nib.
Place this lovely tribute in a garden or memorial space to inspire peace and reflection
Cross or Spiritual Symbol With Gentle Florals
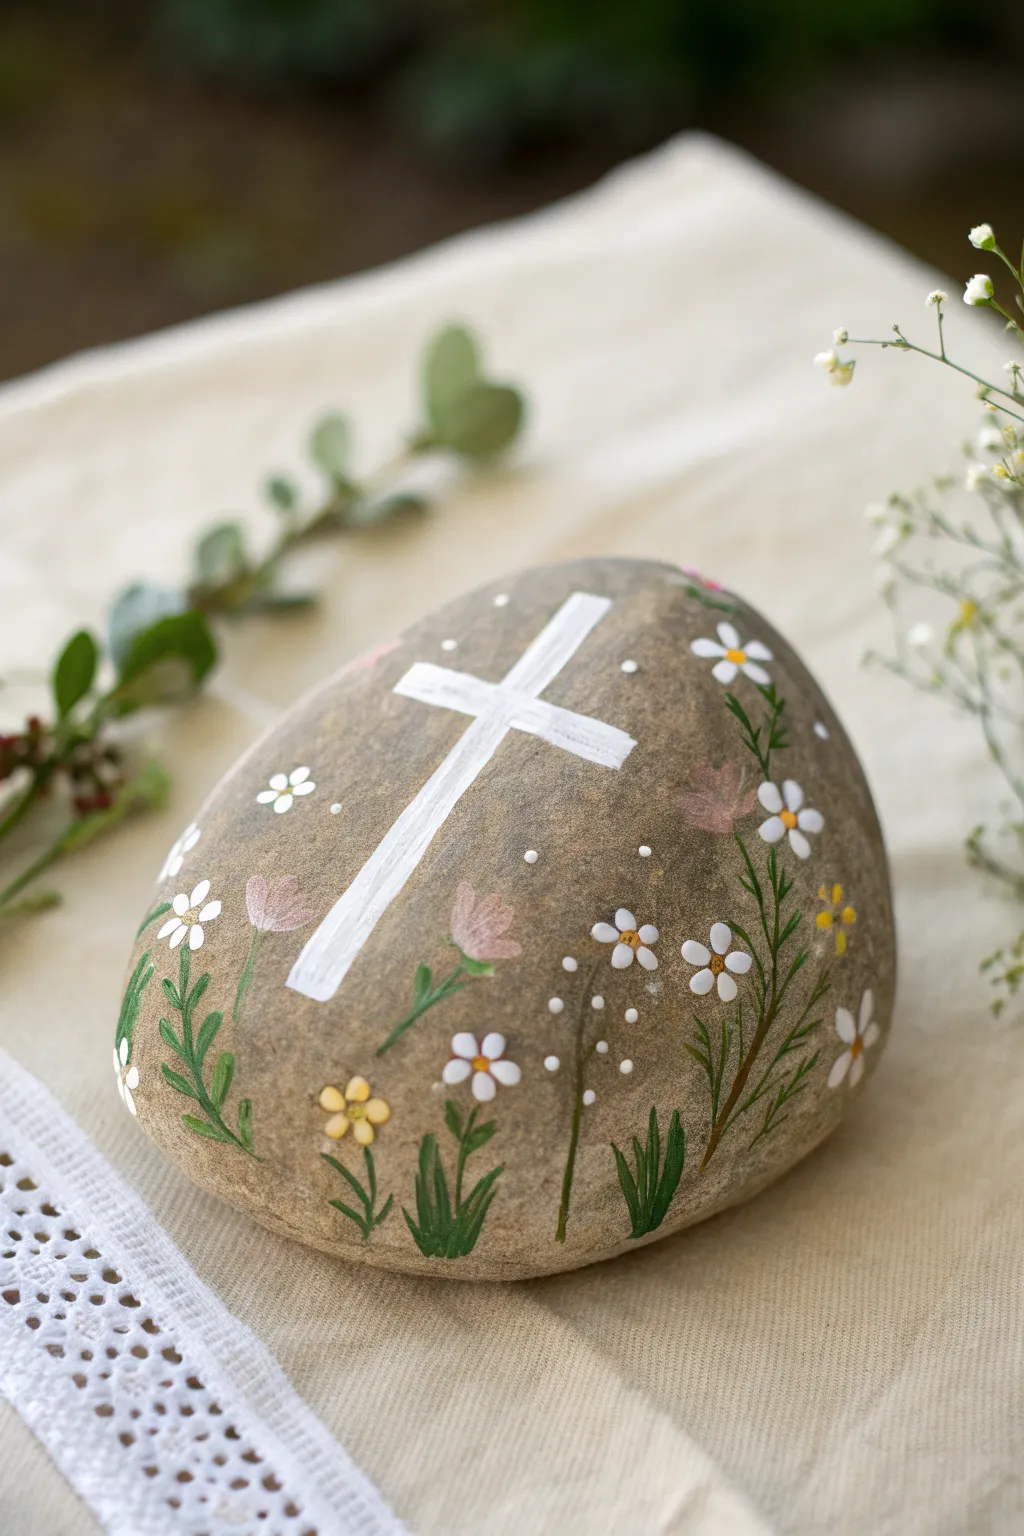
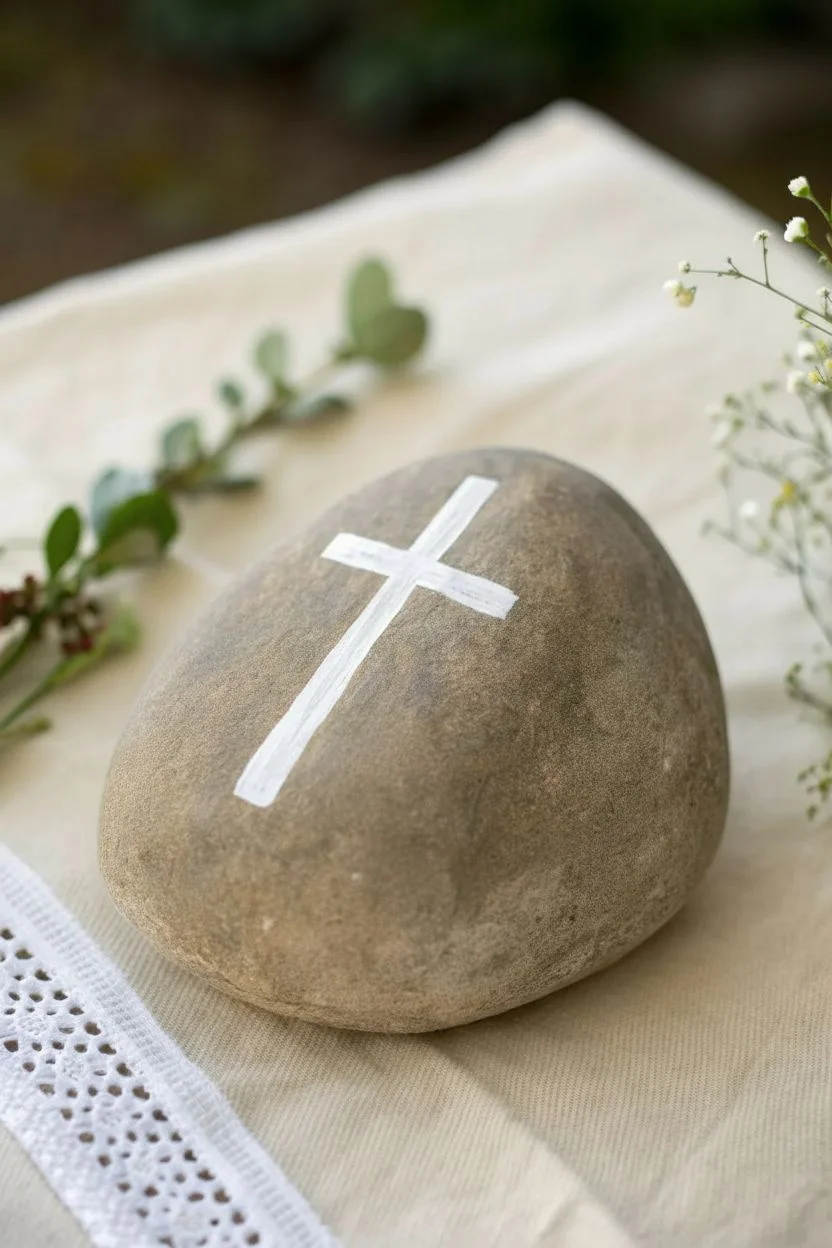
This serene memorial rock features a stark white cross resting gently amidst a field of delicate wildflowers. The design combines spiritual symbolism with the softness of nature, using muted greens, pale pinks, and bright whites to create a peaceful tribute.
How-To Guide
Materials
- Smooth, oval river rock (medium size)
- Acrylic paints: Titanium White, Sap Green, Olive Green, Pale Pink, Butter Yellow
- Flat brush (small, size 2 or 4)
- Round detail brush (size 0 or 00)
- Dotting tool or toothpick
- Pencil for sketching
- Matte or satin spray sealant
Step 1: Preparation & Base Symbol
-
Clean the canvas:
Start by scrubbing your river rock with warm, soapy water to remove any dirt or oils. Let it dry completely in the sun or use a hairdryer to speed up the process. -
Sketch the layout:
Using a pencil, lightly sketch the position of the cross in the upper-center of the stone. It should be slightly tilted to flow with the rock’s natural curve. -
Outline the cross:
Load your flat brush with Titanium White paint. Carefully paint the outline of the cross based on your sketch. I find it helpful to paint the vertical post first, then cross it with the horizontal bar. -
Fill in the white:
Fill in the cross with solid white paint. Depending on your paint’s opacity, you might need two or three thin coats to get a crisp, bright white against the dark stone. Let each layer dry fully.
Clean Lines Tip
Use a piece of low-tack painter’s tape or washi tape to mask off the edges of the cross if you struggle painting straight lines freehand.
Step 2: Painting the Foliage
-
Plan the greenery:
Visualise where the flower stems will grow. They should rise from the bottom edge of the rock, curving gently upwards to frame the cross rather than cover it. -
Base stems:
Mix a small amount of water with your Olive Green paint to make it flow smoothly. Using the thin round liner brush, paint long, slender stems starting from the bottom and reaching up the sides. -
Add leafy details:
Along these main stems, add small, alternating leaves. Use a ‘press and lift’ motion with your brush: touch the tip to the rock, press down slightly to widen the leaf belly, and lift up to create a point. -
Grass blades:
Switch to the Sap Green shade. Paint short, tufted blades of grass at the very bottom of the rock to ground your floral scene. Vary the heights to keep it looking natural.
Step 3: Blooming Details
-
Paint pink blossoms:
Using the small round brush and Pale Pink paint, create the tulip-shaped flowers. Paint a simple ‘U’ shape first, then fill it in and add two small peaks at the top. Place these sporadically among the taller stems. -
Create daisy petals:
For the white daisies, use the tip of a small round brush or a large dotting tool. create five small white dots or teardrop shapes arranged in a circle. Place these lower down amongst the grass and higher up on the side vines. -
Add flower centers:
Once the white petals are dry, dip a dotting tool or the back of a paintbrush into Butter Yellow. Place a single vibrant dot in the center of each daisy grouping. -
Yellow wildflowers:
Add variety by painting a few tiny, simple four-petal flowers using just the yellow paint. These should be small accents near the bottom grassy area. -
Whimsical dots:
Dip a toothpick into white paint. Add tiny, floating dots around the cross and near the flower tips to represent pollen, baby’s breath, or just a touch of magic. -
Clean up edges:
Inspect your cross. If any green stems accidentally overlapped the white, touch up the cross edges with fresh white paint to keep the symbol crisp and foregrounded. -
Seal the memory:
Allow the rock to cure for at least 24 hours. Finish by applying a coat of matte or satin spray sealant to protect the paint from weathering while maintaining a natural stone look.
Paint Too Transparent?
If your white paint looks streaky on the dark rock, don’t glob it on thick. Apply multiple thin layers, letting each dry completely in between.
Place this beautiful stone in a garden or special spot as a lasting reminder of peace and love

PENCIL GUIDE
Understanding Pencil Grades from H to B
From first sketch to finished drawing — learn pencil grades, line control, and shading techniques.
Explore the Full Guide
Matching Set of Memorial Rocks for Family Members
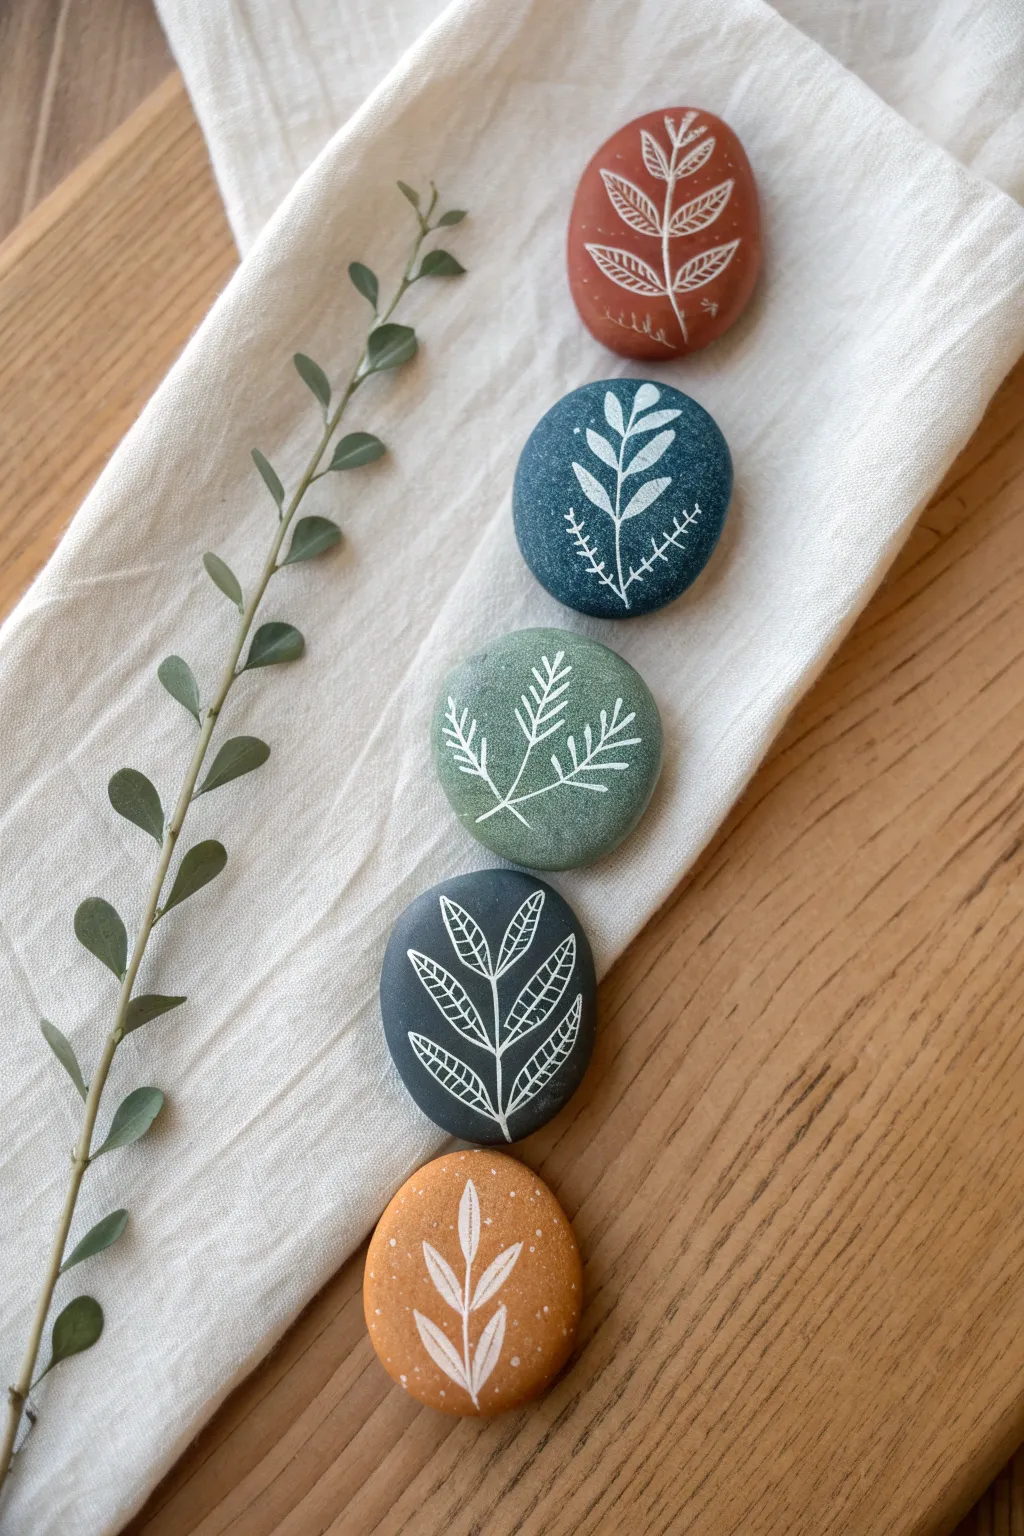
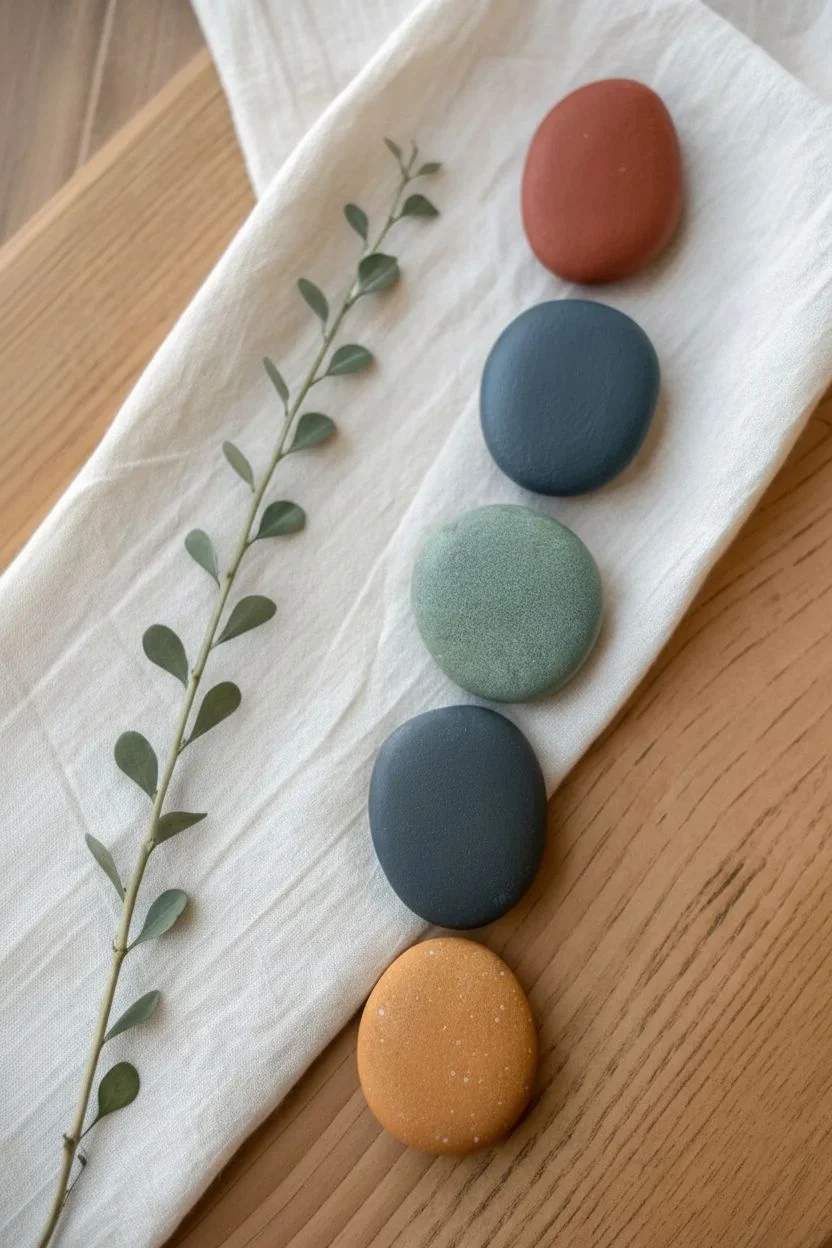
These beautifully understated memorial rocks feature soothing, earthy base tones adorned with delicate white botanical illustrations. The consistent style creates a harmonious set perfect for sharing among family members while allowing each stone to have its own unique personality.
Step-by-Step
Materials
- 5 smooth, round river rocks (approx. 2-3 inches wide)
- Acrylic craft paints (Terracotta, Slate Blue, Sage Green, Charcoal Grey, Mustard Yellow)
- White extra-fine tip paint pen (0.7mm or 0.5mm)
- Flat paintbrush (medium size)
- Mod Podge or clear matte acrylic sealer
- Paper plate or palette
- Water cup and towels
Step 1: Preparing the Canvas
-
Clean the stones:
Begin by washing your river rocks with warm soapy water to remove any dirt or oils that might prevent the paint from sticking. Dry them thoroughly with a clean towel. -
Mix your palette:
Squeeze a small amount of each acrylic paint color onto your palette. If the colors feel too bright, you can tone them down with a tiny drop of grey or brown to match the muted, earthy vibe of the example. -
Apply the base coat:
Using your flat brush, paint the entire top surface of the first rock. I usually start with the darkest colors, like the charcoal grey, to get a feel for the coverage. -
Smooth the edges:
Ensure the paint wraps slightly around the curve of the stone so raw rock isn’t visible from the top view. You don’t need to paint the very bottom. -
Paint the remaining stones:
Process the other four rocks, giving each one a distinct color: terracotta, slate blue, sage green, and mustard yellow. Rinse your brush thoroughly between shades. -
Dry and repeat:
Let the first coat dry completely (about 15-20 minutes). Apply a second coat to ensure a solid, opaque finish where no stone texture shows through.
Step 2: Designing the Botanicals
-
Prime the pen:
Shake your white extra-fine paint pen well and press the nib down on a scrap piece of paper until the ink flows smoothly. Do not test directly on the rock. -
Paint the central stems:
On each rock, draw a single, thin vertical line slightly curved to mimic a natural stem. Keep it centered but organic. -
Create the leafy fern (Terracotta stone):
For the red stone, draw pairs of oval leaves extending from the stem. Inside each leaf, add tiny diagonal hatch marks to create a vein texture. -
Draw the stylized sprig (Blue stone):
On the blue stone, draw solid, elongated teardrop leaves. At the base of the stem, add small dashed lines creating a ‘fern’ effect for contrast. -
Detail the wild branch (Green stone):
For the green stone, draw thin branches that split off the main stem. Instead of leaves, draw little ‘V’ shapes or pine needle clusters for a delicate texture. -
Sketch the veined leaves (Grey stone):
On the dark grey rock, draw larger, open leaf shapes. Draw a line down the center of each leaf and add small ribs or veins branching out. -
Add the simple sprout (Yellow stone):
Finish with the yellow stone by drawing a few simple, solid leaves. Add tiny white dots around the leaves to look like pollen or seeds. -
Refine lines:
Go back over the main stem lines very lightly if they need thickening, but keep the overall look delicate and airy.
Fixing Smudged Lines
If you make a mistake with the white pen, don’t wipe it! Let it dry completely, then paint over the error with the base color.
Step 3: Finishing Touches
-
Allow ink to cure:
Let the white ink dry for at least an hour. Paint pens can smear easily if sealed too wet. -
Seal the artwork:
Apply a thin layer of matte sealer or Mod Podge over the top. Use a light hand so you don’t drag the white ink. -
Final cure:
Let the sealer dry completely according to the bottle instructions before handling or wrapping the stones.
Adding Personalization
Flip the stones over and write the name, date, or a single meaningful work like ‘Hope’ or ‘Peace’ on the unpainted bottom.
Now you have a touching, handcrafted set of stones ready to be gifted or placed in special spots of remembrance.
Hobby or Lifestyle Memorial Silhouette
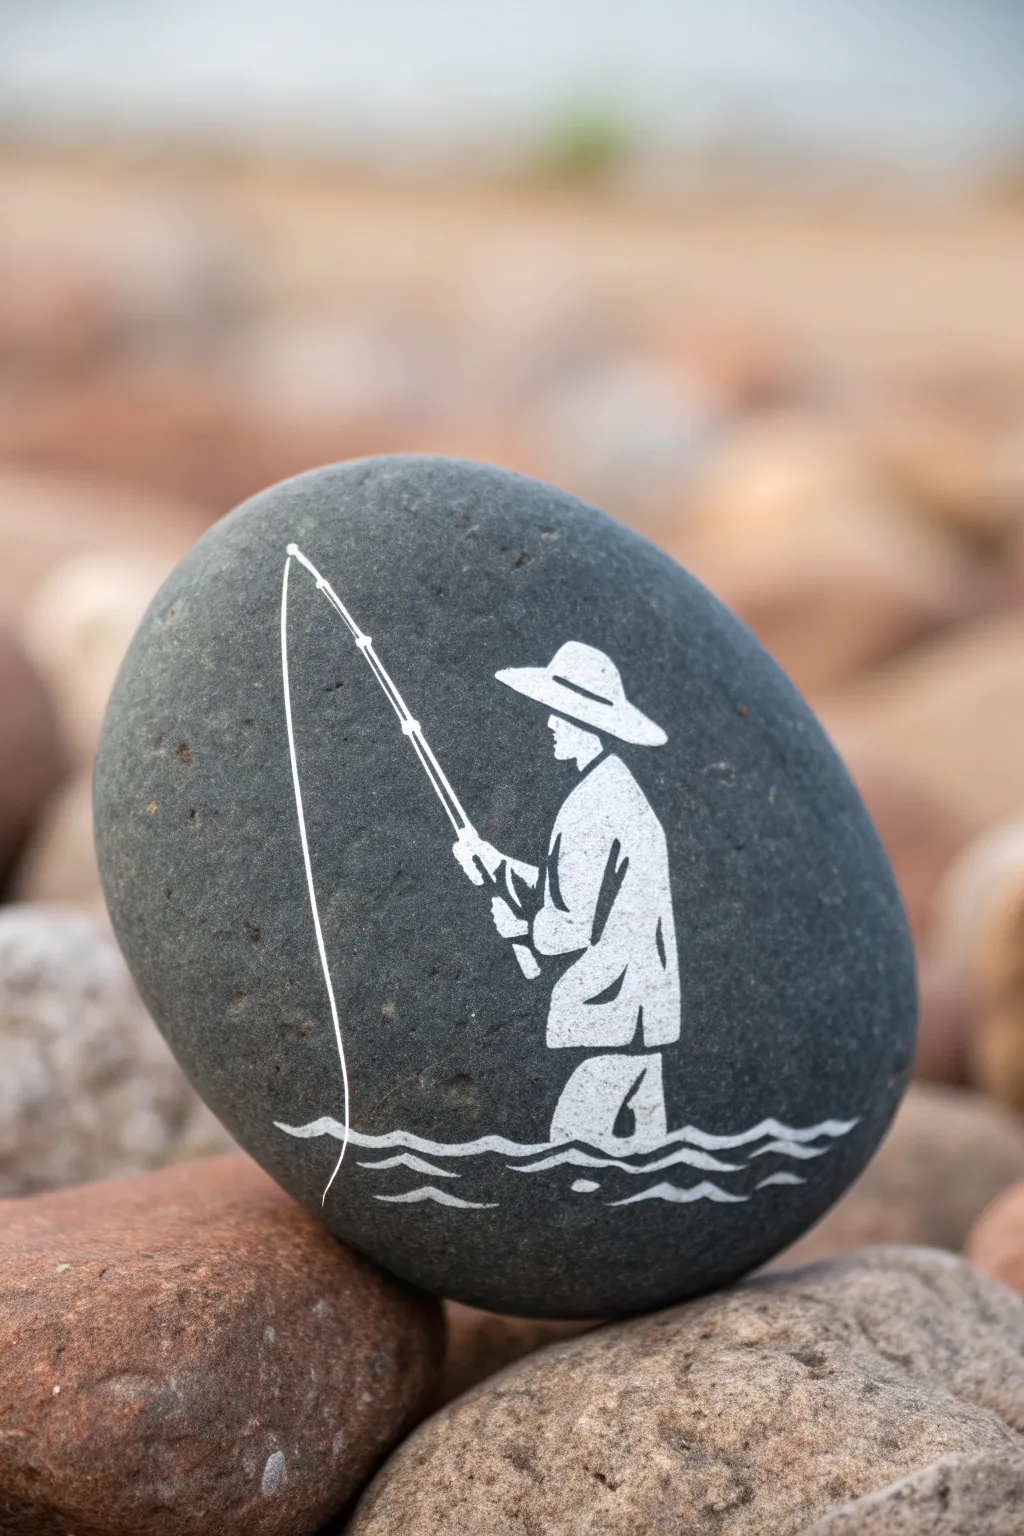

Capture the quiet serenity of a favorite pastime with this striking black and white memorial stone. Using a smooth, dark river rock as your canvas, you’ll paint a crisp white silhouette of a fisherman that stands out beautifully against the natural stone background.
Step-by-Step
Materials
- Smooth, dark grey or black river rock (palm-sized or larger)
- White acrylic paint (high opacity/heavy body works best)
- Fine detail paintbrushes (sizes 00 and 0 round)
- White paint pen (extra fine tip, 0.7mm)
- Graphite transfer paper or white chalk pencil (for sketching)
- Pencil
- Paper for stenciling (optional)
- Matte or satin spray sealer
Step 1: Preparation & Sketching
-
Clean the canvas:
Begin by scrubbing your chosen rock with warm soapy water and a stiff brush to remove any dirt or oils. Let it dry completely in the sun or with a hairdryer before starting. -
Assess the surface:
Examine your stone for the flattest, smoothest side. This project relies on clean lines, so avoiding major pits or bumps in the central area will make painting much easier. -
Draft the design:
On a piece of scrap paper, sketch out the fisherman’s profile. Focus on the simple shapes: the triangular hat, the curve of the back, and the angle of the fishing rod. Size it to fit comfortably on your rock face. -
Transfer the outline:
Place white transfer paper over the rock, tape your sketch on top, and trace firmly with a pencil. Alternatively, I find it helpful to just freehand the basic shapes lightly using a white chalk pencil, which wipes away easily if you make a mistake.
Paint Pen Struggles?
If your white paint pen stops flowing on the rough rock surface, press the tip on a separate piece of scrap paper to get the ink moving again before returning to your stone
Step 2: Painting the Silhouette
-
Outline the body:
Using your extra fine white paint pen, carefully trace the outline of the fisherman’s hat, face profile, and jacket. Don’t worry about filling it in yet; just establish crisp outer boundaries. -
Fill the main shapes:
Switch to your size 0 brush and white acrylic paint. Fill in the hat and the main body of the jacket. Apply the paint in thin, even layers. You will likely need two or three coats to get a solid, opaque white against the dark stone. -
Detailing the clothing folds:
Look closely at the reference image. Notice the small black negative spaces that define the arm and the folds of the jacket. Use the tip of your 00 brush (or a black fine-liner pen if you aren’t steady with a brush) to ‘cut’ these shapes out of the white silhouette, defining the sleeve and jacket hem. -
Paint the legs:
Paint the leg area below the jacket. Keep the edges slightly rougher here if you like, as they will soon merge with the water line.
Step 3: The Rod & Water
-
Draw the fishing rod:
This is the most delicate step. Use your paint pen for maximum control. Draw a straight line extending up and away from the hands. Add small distinct bumps for the reel and the rod guides. -
Add the fishing line:
Draw the fishing line curving down from the rod tip. Use a singular, confident stroke with the paint pen. A hesitant hand can make the line look shaky. -
Create the water surface:
Paint horizontal, wavy lines across the bottom of the figure using the paint pen or the 00 brush. Make sure one of these lines cuts right through the leg area to create the illusion that he is standing in the water. -
Underline and ripples:
Add a second tier of wavy lines below the main water line, slightly offset, to create depth and movement in the water. -
Clean up edges:
Once the white paint is fully dry, inspect your edges. If any lines look fuzzy, you can sharpen them by carefully painting over the mistake with a tiny bit of black paint or a black marker to match the stone.
Make it Personal
Add a tiny detail to personalize the silhouette, like a specific hat shape your loved one wore, or perhaps paint the fish on the end of the line if they had a favorite catch
Step 4: Finishing Touches
-
Final opacity check:
Check the main white areas of the silhouette. If the stone’s color is bleeding through, add one final thin layer of white paint to make the figure pop. -
Dry time:
Allow the stone to cure for at least 24 hours. The thick layers of white paint need to dry all the way through before sealing. -
Seal the memory:
Take the rock outside and apply a light coat of matte spray sealer. Several light mists are better than one heavy coat, which could cause the paint pen ink to run.
Now you have a durable, hand-painted tribute that captures the essence of quiet moments by the water


Have a question or want to share your own experience? I'd love to hear from you in the comments below!