Bricks are such an unexpectedly satisfying surface to paint—chunky, textured, and basically begging for bold color. If you’ve got a pile of old bricks or a plain brick spot that needs some love, these brick painting ideas will get your hands moving fast.
Painted Garden Paver Florals
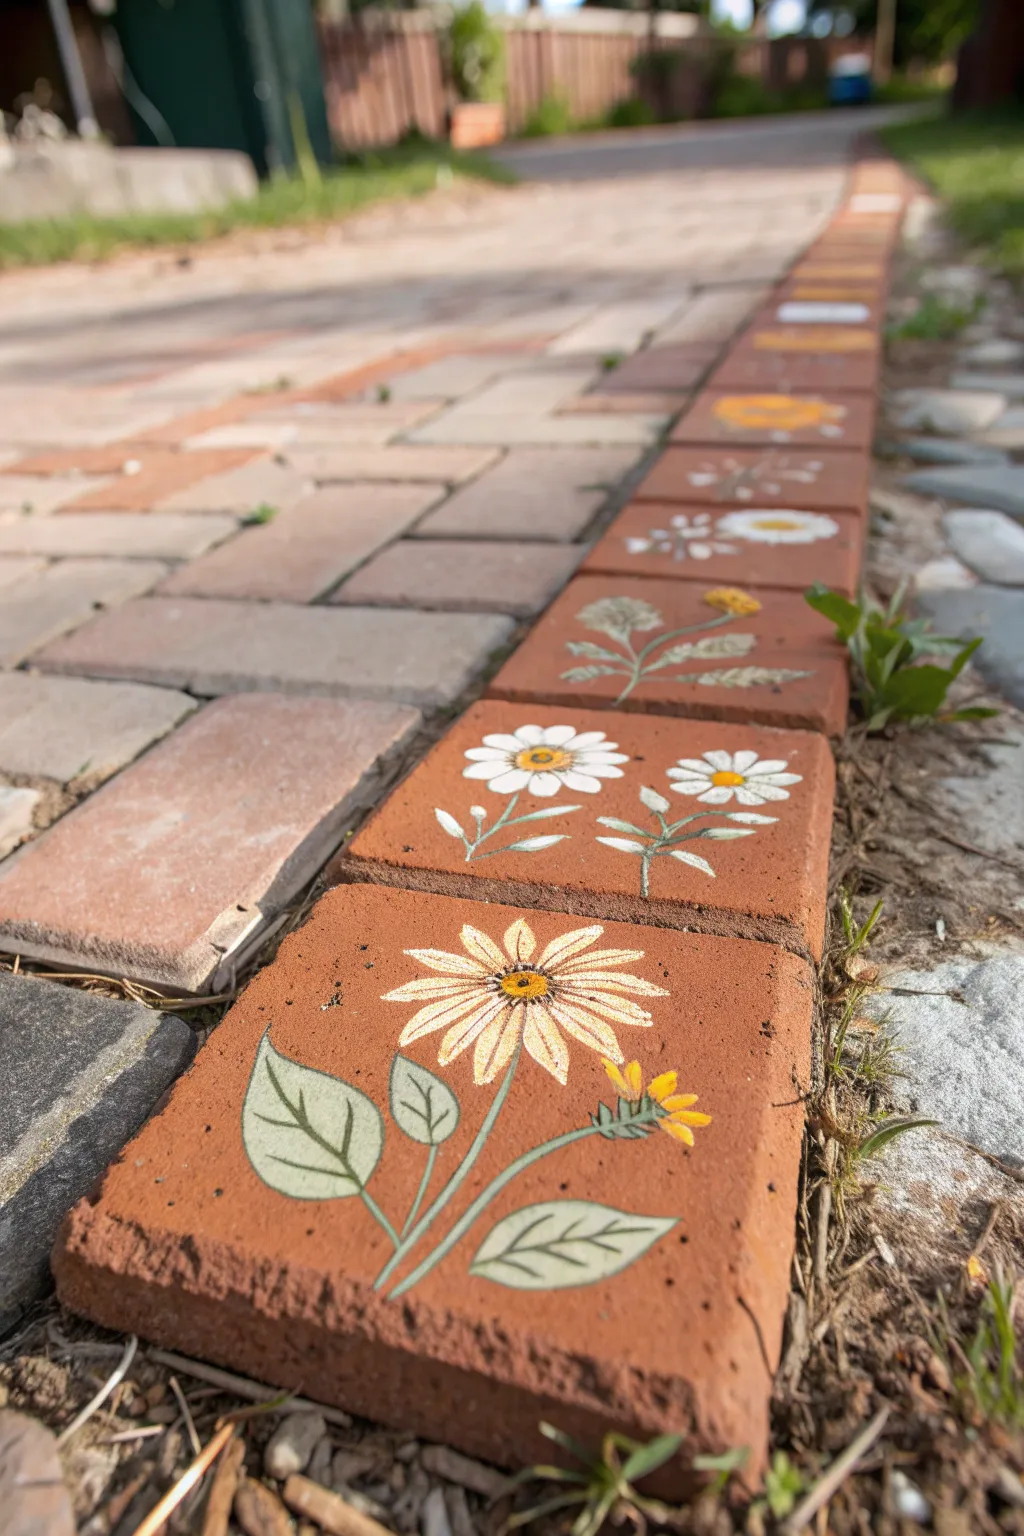
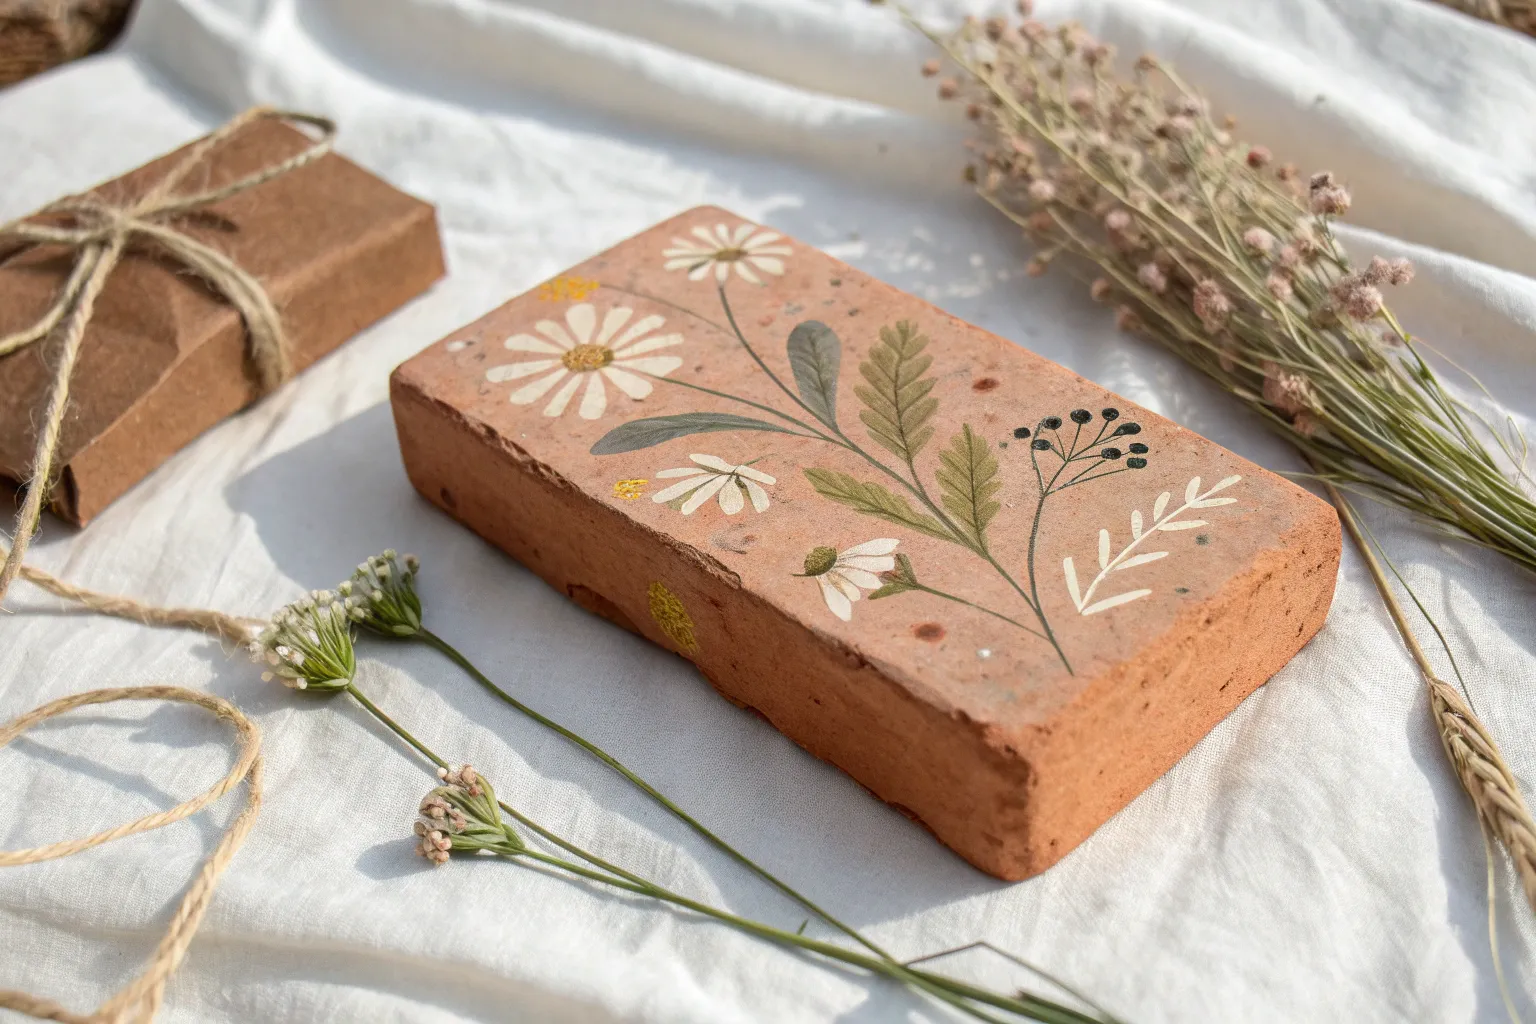
Transform a plain garden path into a whimsical walkway with these hand-painted floral pavers. Using simple terracotta bricks as your canvas, you can create a charming, weather-resistant border that adds a personalized touch to your outdoor space.
How-To Guide
Materials
- Clean, dry red clay paving bricks
- Outdoor acrylic patio paint (white, yellow, forest green, light olive)
- Small flat paintbrush (size 4 or 6)
- Fine liner brush (size 0 or 1)
- Pencil and eraser
- Clear outdoor sealant (spray or brush-on)
- Scrub brush and water (for prep)
- Palette or paper plate
Step 1: Preparation
-
Clean the surface:
Before thinking about paint, scrub your bricks thoroughly with water and a stiff brush to remove any dirt, moss, or loose grit. Let them dry completely, ideally in the sun for a few hours, as moisture trapped inside can cause the paint to peel later. -
Plan your layout:
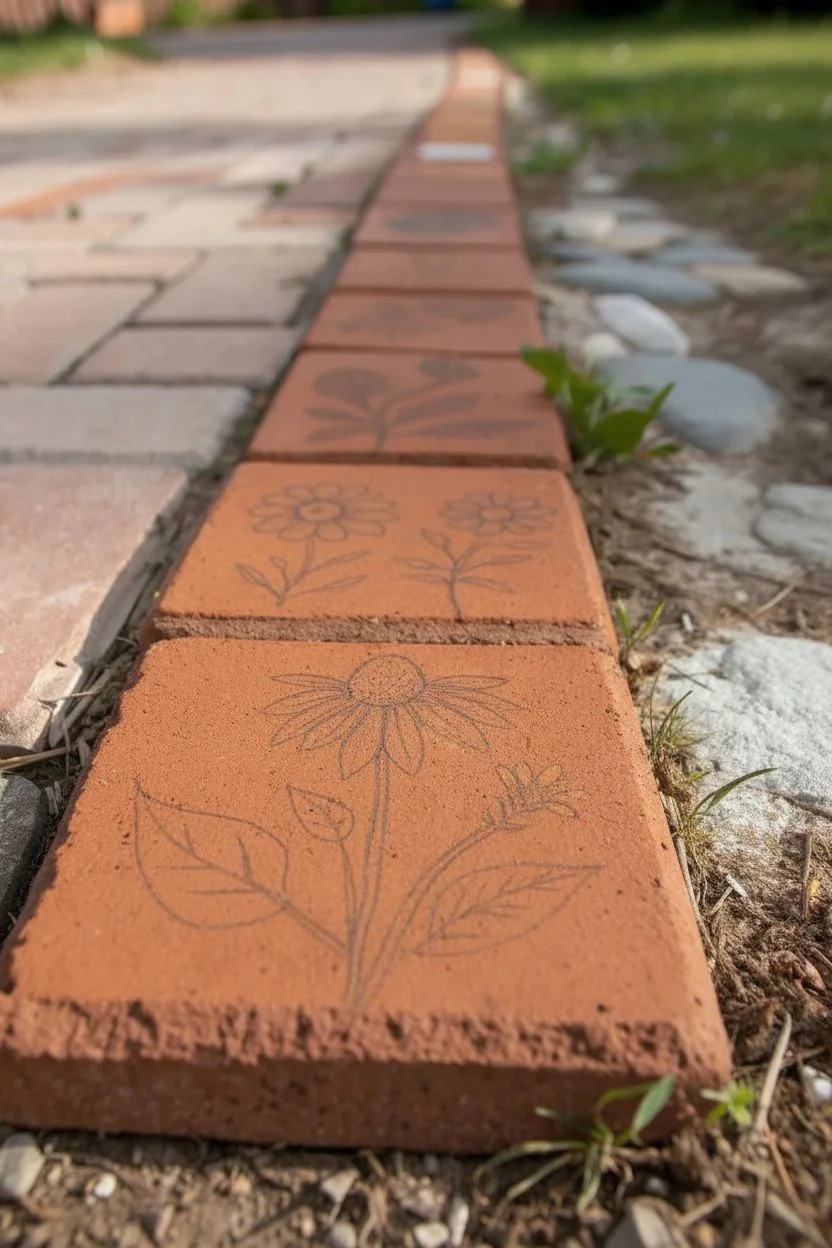
Decide on the orientation of your bricks. For this project, a square face works best. Lightly sketch your floral designs directly onto the dry brick surface using a pencil. Don’t press too hard; you just need faint guidelines for the stem, leaves, and flower center.
Pro Tip: Better Coverage
To make the white petals truly bright, paint the petal shape in white first as a primer. Let it dry, then paint the final white or color layer on top. This prevents the red clay from dulling your colors.
Step 2: Painting the Foliage
-
Mix green tones:
On your palette, squeeze out your forest green and mixing white. You want a soft, sage-like green for the leaves rather than a harsh primary color. I like to keep a little unmixed dark green on the side for shadow details. -
Paint the main stem:
Using the small flat brush turned on its edge (or a round brush if preferred), paint a thin, curving line for the main stem. Start from the bottom center and sweep upward. -
Outline leaf shapes:
Switch to your fine liner brush. Outline the leaf shapes extending from the stem. For the coneflower design, these are broad, pointed ovals near the base. -
Fill the leaves:
Fill in the leaf outlines with a lighter wash of your green mix. The brick’s texture will likely show through slightly, creating a nice rustic effect. -
Add leaf veins:
Once the base green is dry to the touch, use the liner brush and a darker shade of green to paint the central vein and small branching veins on each leaf.
Level Up: Seasonal Swap
Paint different botanical sets for different seasons—holly for winter, pumpkins for fall, and tulips for spring—and rotate the bricks in your path throughout the year.
Step 3: Painting the Blooms
-
Create the flower center:
For the daisy-like flowers, dip your brush in yellow paint and dab a round circle at the top of the stem. For the coneflower design, create a raised, cone-shaped center using a mix of yellow and a tiny dot of brown or orange. -
Paint the petals:
Using clean white outdoor acrylic, paint the petals. For the coneflower, start at the yellow center and pull your strokes downward to create drooping petals. For the standard daisies, stroke outward from the center. -
Second coat:
White paint over red clay often looks translucent at first. Let the first layer dry for about 20 minutes, then apply a second coat to the petals to make them pop against the terracotta background. -
Detail the center:
Add texture to the flower center by stippling (making tiny dots) with a darker yellow or light brown using the very tip of your stiffest brush. -
Highlight the leaves:
To give the leaves dimension, mix a tiny amount of white into your lightest green and add a thin highlight along one edge of the leaves. -
Add buds (Optional):
If you have empty space, paint a small closed bud using the green paint, topped with just a hint of yellow petals peeking out. -
Clean up edges:
If you went outside the lines, use a damp Q-tip to wipe away wet paint, or wait for it to dry and carefully scrape it off or touch it up with a brick-colored paint mix.
Step 4: Finishing
-
Let it cure:
Allow the painted bricks to dry for at least 24 hours in a dry, covered area. This ensures the paint bonds properly to the porous clay. -
Seal the artwork:
Apply two or three thin coats of clear outdoor sealer. A matte finish looks natural, while gloss will make the colors appear wetter and deeper. Ensure the sides are sealed as well to prevent moisture intrusion. -
Installation:
Place your bricks back into the garden border, spacing them out or lining them up continuously for a full floral path.
Enjoy watching your garden path stay in bloom all year round with these durable decorations


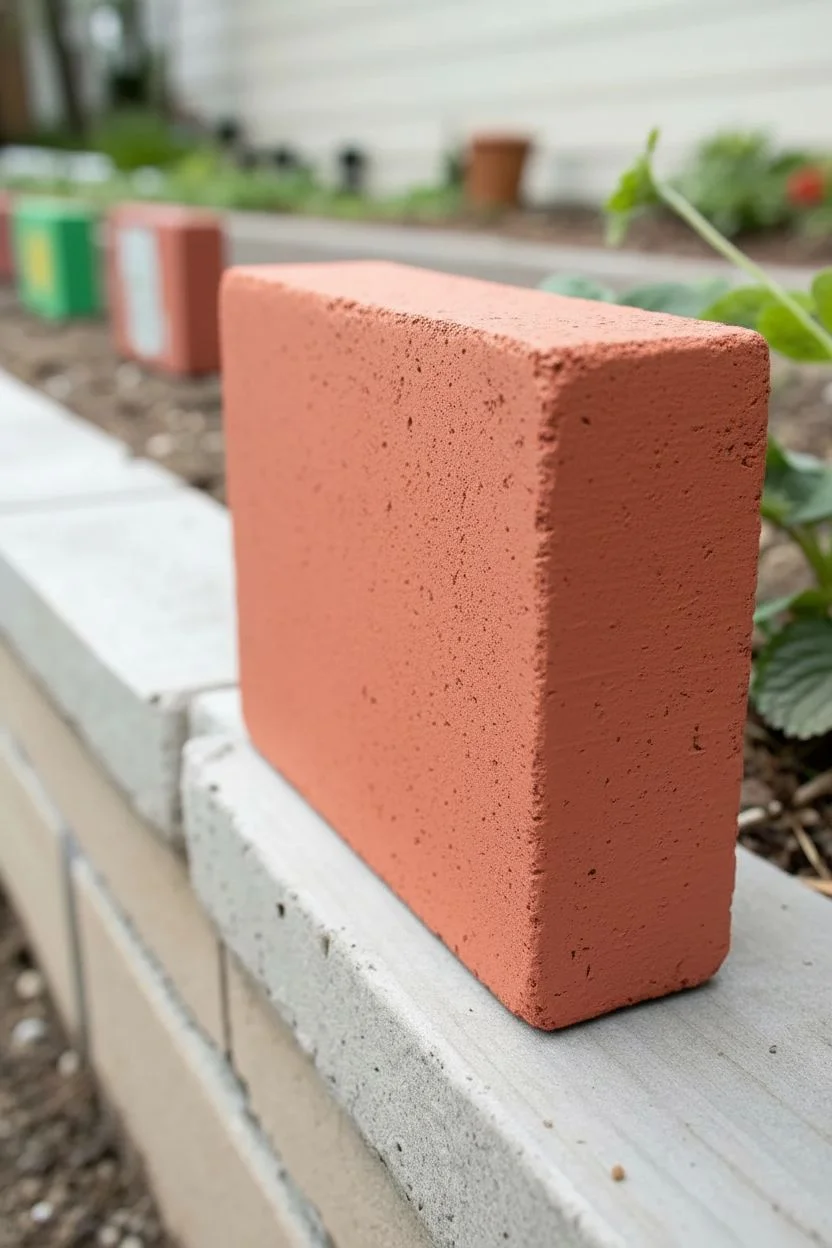
Bold Geometric Brick Patterns
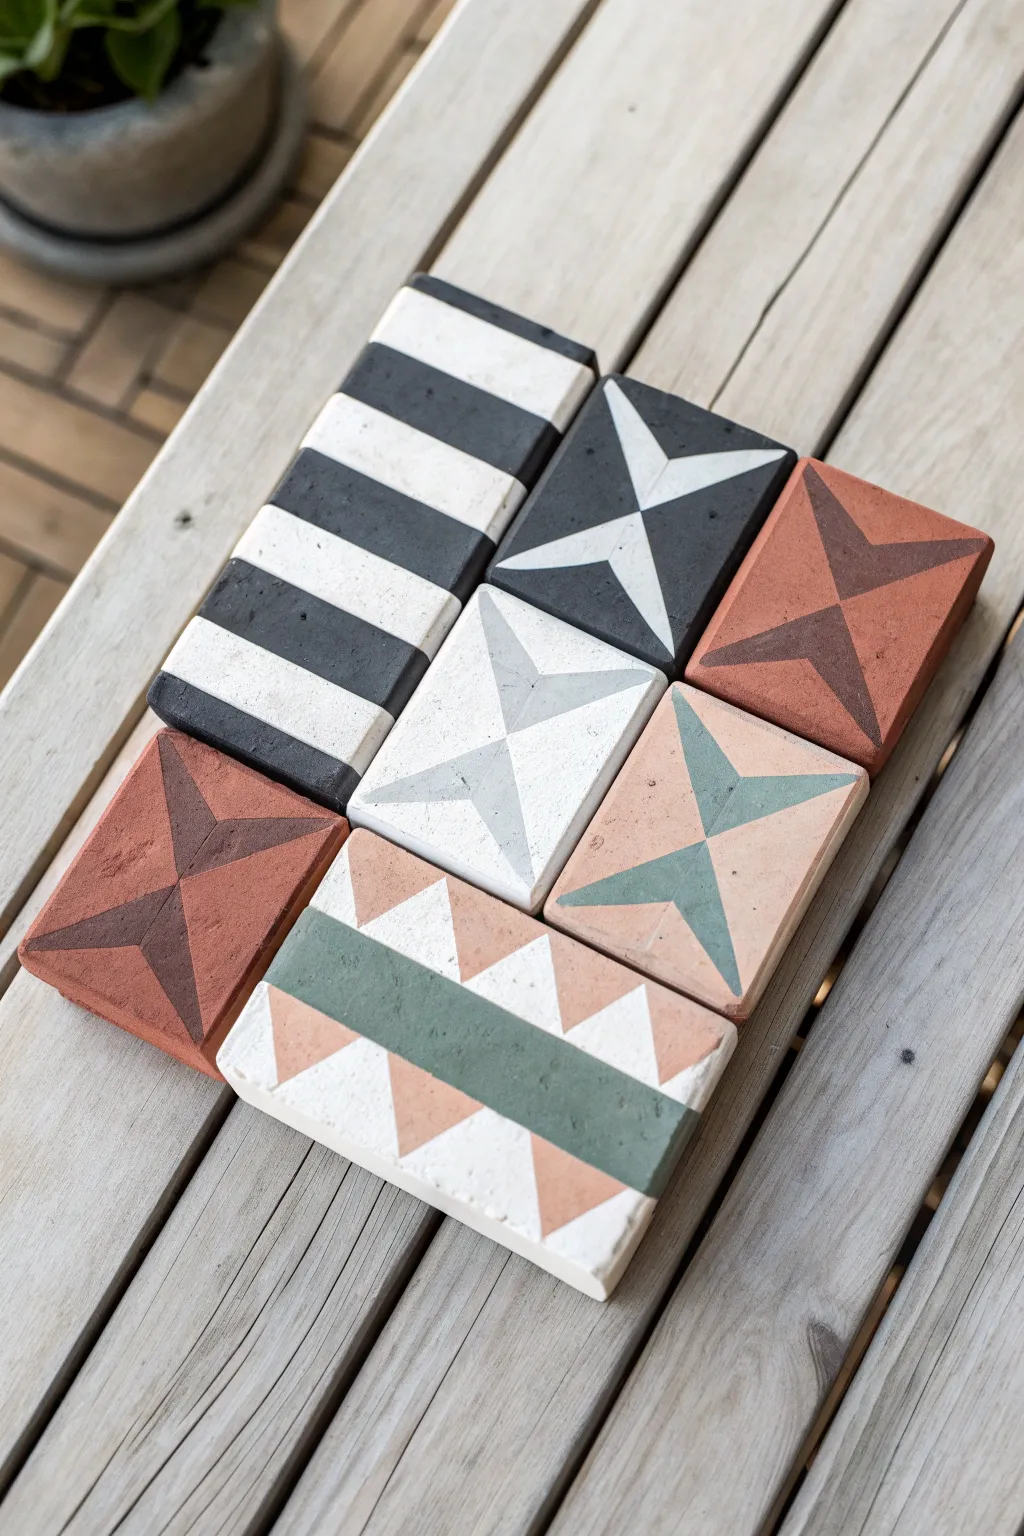
Transform standard pavers into stunning architectural decor with these bold, retro-inspired designs. Using a palette of terracotta, sage green, and high-contrast black and white, these painted bricks create a sophisticated puzzle of shapes perfect for styling a bookshelf or garden table.
Step-by-Step Tutorial
Materials
- Clean concrete bricks or pavers (standard rectangular size)
- Acrylic craft paints (black, white, terracotta/rust, sage green, beige)
- Stiff scrubbing brush and mild soap
- Painter’s tape (various widths)
- Flat shader brushes (medium and small)
- Ruler or straight edge
- Pencil
- Clear matte sealant spray
- Sandpaper (medium grit)
Step 1: Preparation
-
Clean and scrub:
Before painting, scrub your bricks thoroughly with soapy water and a stiff brush to remove any dust, moss, or loose grit. Let them dry completely in the sun for at least 24 hours to ensure no moisture is trapped inside. -
Smooth the surface:
If your bricks are particularly rough, give the top face a quick sanding with medium-grit sandpaper creates a nicer canvas for detailed lines. -
Base coat application:
Apply a solid base coat of white acrylic paint to the top surface of all the bricks. This acts as a primer and ensures your colors pop, especially the lighter sage and beige tones.
Crisp Line Hack
Paint over your tape edge with the BACKGROUND color first. This seals any gaps. Once dry, paint your accent color on top for perfectly sharp lines.
Step 2: Design 1: The Stripes
-
Tape the lines:
For the black and white striped brick, lay down strips of painter’s tape horizontally across the brick face, spacing them evenly to create bands. -
Seal edges:
Press the edges of the tape down firmly with your fingernail or a credit card to prevent paint bleed on the rough texture. -
Paint the black:
Fill in the exposed areas with matte black paint. Use a pouncing motion (dabbing up and down) rather than dragging the brush to get deep into the brick’s pores. -
Remove tape:
Peel off the tape while the paint is still slightly tacky to achieve the crispest lines.
Bookend Function
Glue a sheet of craft felt or cork to the bottom of your finished bricks. This prevents scratching furniture if you use them as stylish bookends.
Step 3: Design 2: The Hourglass Star
-
Mark the center:
For the starburst or hourglass patterns, use a ruler to lightly mark the exact center of the brick faces with a pencil. -
Draw the diagonal guides:
Draw X-shapes connecting the corners, then verify your straight lines across the horizontal and vertical centers to map out the triangles. -
Paint the background wedges:
Start by painting two opposing triangles in your chosen background color. For the terracotta brick, paint the left and right wedges; for the black brick, paint the top and bottom wedges. -
Paint the star points:
Once the first color is dry, paint the remaining two triangles in a contrasting shade to complete the hourglass look. I like to use a small flat brush here to keep the meeting points in the center sharp. -
Add detail lines:
For the more complex version (like the black and white one), paint a thinner, lighter stripe or triangle inside your main shapes to create a layered, 3D effect.
Step 4: Design 3: The Broken Chevron
-
Planning sections:
Divide the brick face horizontally into three main bands: a thick center band and two outer bands. -
Triangular taping:
Use small pieces of painter’s tape to block out a row of triangles along the top and bottom edges of the central band. -
Color blocking:
Paint the central band a solid sage green. Paint the exposed triangles in beige or terracotta, leaving the negative space white. -
Refining edges:
After removing the tape, use a fine detail brush to touch up any wiggly lines where the paint might have slipped under the tape.
Step 5: Finishing Touches
-
Side treatment:
Decide if you want the design to spill over the edges. If not, paint the sides a solid neutral color or leave them raw for an industrial look. -
Protect the work:
Take the bricks outside and apply two light coats of clear matte sealant spray. This is crucial if you plan to use these as doorstops or garden décor to prevent fading and chipping.
Now you have a set of unique, architectural art pieces ready to display


Simple Mandalas on Brick Faces
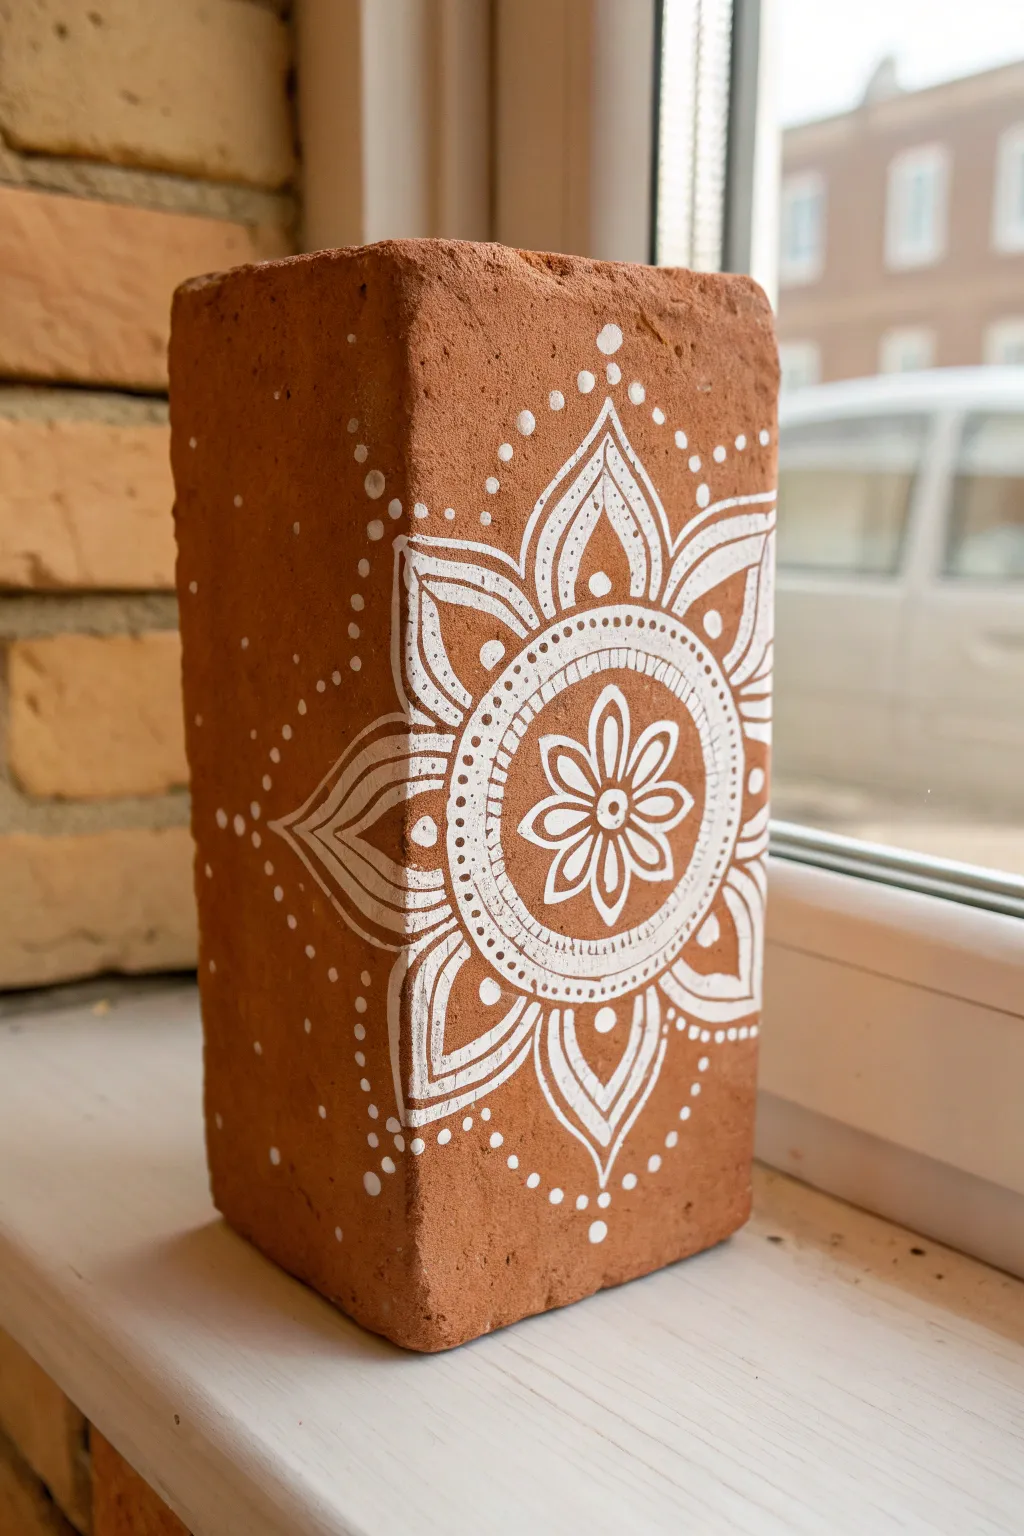
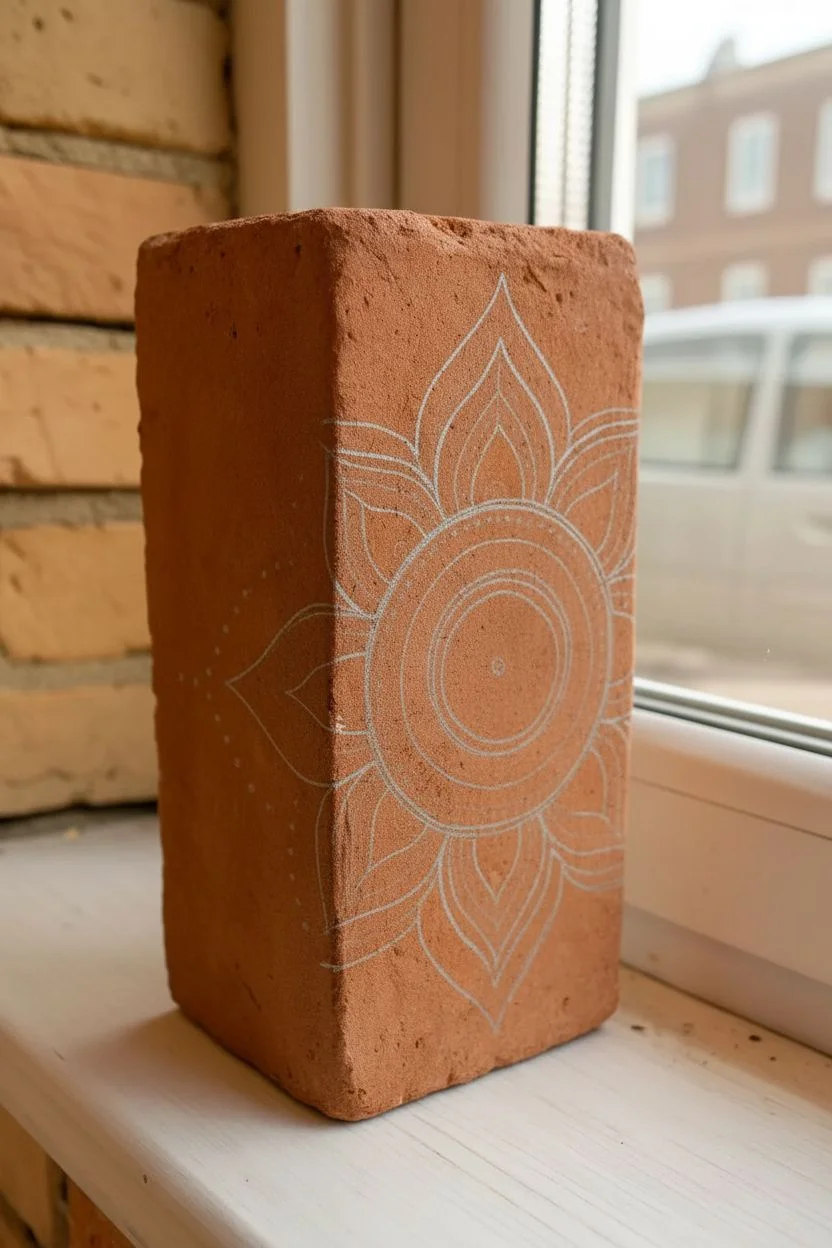
Transform a humble building block into a stunning piece of shelf decor with this delicate white mandala design. The contrast between the rough, earthy terracotta texture and the crisp white line work creates a surprisingly sophisticated aesthetic that fits perfectly in modern homes.
Detailed Instructions
Materials
- Clean, dry red clay brick (standard size)
- White acrylic paint or a white acrylic paint marker (fine and medium tips)
- Small round paintbrush (size 0 or 1, if not using markers)
- Pencil (HB or lighter)
- Ruler
- Compass (optional, for circles)
- Eraser
- Clear matte varnish spray (optional)
Step 1: Preparation & Mapping
-
Clean the surface:
Scrub your brick with a dry, stiff brush to remove any loose dust or debris. If the brick is very dirty, wash it with water and let it dry completely—this might take 24 hours, as porous brick holds moisture. -
Find the center:
Using your ruler, lightly mark the exact center of one face of the brick with a pencil. This will be the anchor point for your entire mandala. -
Pencil the guide circles:
Use a compass or trace around small circular objects (like coins or bottle caps) to draw three faint concentric circles expanding from the center point. These guides will help keep your symmetry in check. -
Sketch the primary petals:
Around the outermost circle guide, sketch the rough outlines of large, pointed petals extending toward the corners and edges of the brick. Don’t press too hard with the pencil.
Choosing Your Tool
A white acrylic paint pen (posca) is much easier than a brush for beginners on this rough surface. The nib handles the texture better than bristles.
Step 2: The Central Motif
-
Paint the center flower:
Start with your white paint pen or fine brush. Draw a small, six-petaled flower right at the center mark. I find it easier to paint the top and bottom petals first, then fill in the others to keep them even. -
Add the first ring:
Draw a solid white circle around your central flower, leaving a few millimeters of negative space between the petals and the line. -
Create the ladder ring:
Draw a slightly larger circle around the previous one. Fill the space between these two rings with tiny, evenly spaced hatch marks to create a ‘ladder’ effect. -
Dot the perimeter:
Add a ring of small, solid white dots immediately outside the ladder ring. Try to keep the spacing consistent between each dot.
Step 3: Expanding the Design
-
Outline the main petals:
Go back to your pencil sketches for the large petals. Paint over them with clean, sweeping strokes. These petal shapes should start from the dotted ring and extend outward. -
Inner petal details:
Inside each large petal, paint a smaller, identical shape. This ‘double outline’ adds depth to the design without needing shading. -
Add centerline accents:
Draw a simple line down the center of each large petal set. To make it more decorative, add a single larger dot at the base of this line, near the center mandala circle. -
Fill the gaps:
In the V-shaped spaces between the large petals, draw partial petal shapes peeking out from behind. This makes the design feel layered and full.
Paint Soaking In?
Bricks are very porous. If your first layer of white looks faded or transparent, let it dry and apply a second coat immediately over the lines to make them pop.
Step 4: Details & Finishing
-
Create the cascading dots:
Starting from the tip of each large petal, paint a line of dots trailing outwards toward the brick’s edges. Start with larger dots near the petal tip and make them progressively smaller as they move away. -
Add corner accents:
If there is empty space in the corners of the brick face, add a few floating dots to balance the composition. -
Clean up sketch lines:
Wait until the paint is absolutely bone dry. Gently erase any visible pencil marks, being careful not to smudge your white lines. -
Seal the work:
To protect the paint from chipping, spray the face of the brick with a clear matte varnish. One or two light coats are sufficient.
Now you have a sturdy piece of art that works beautifully as a bookend or a garden accent


Ladybugs, Bees, and Butterflies on Bricks
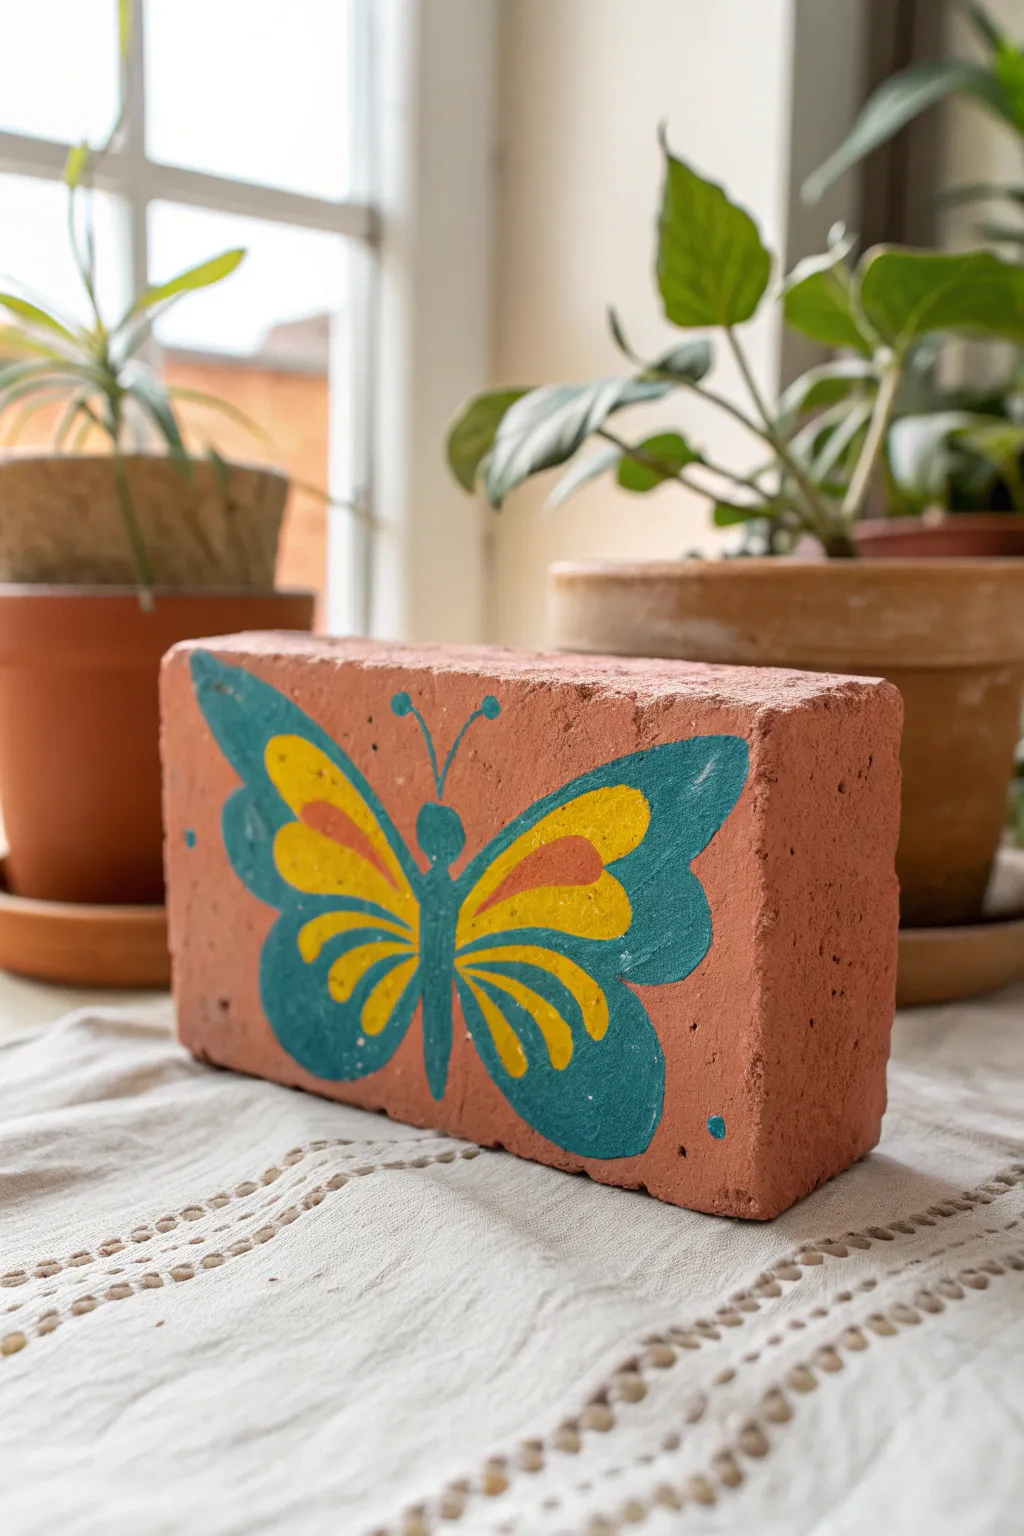
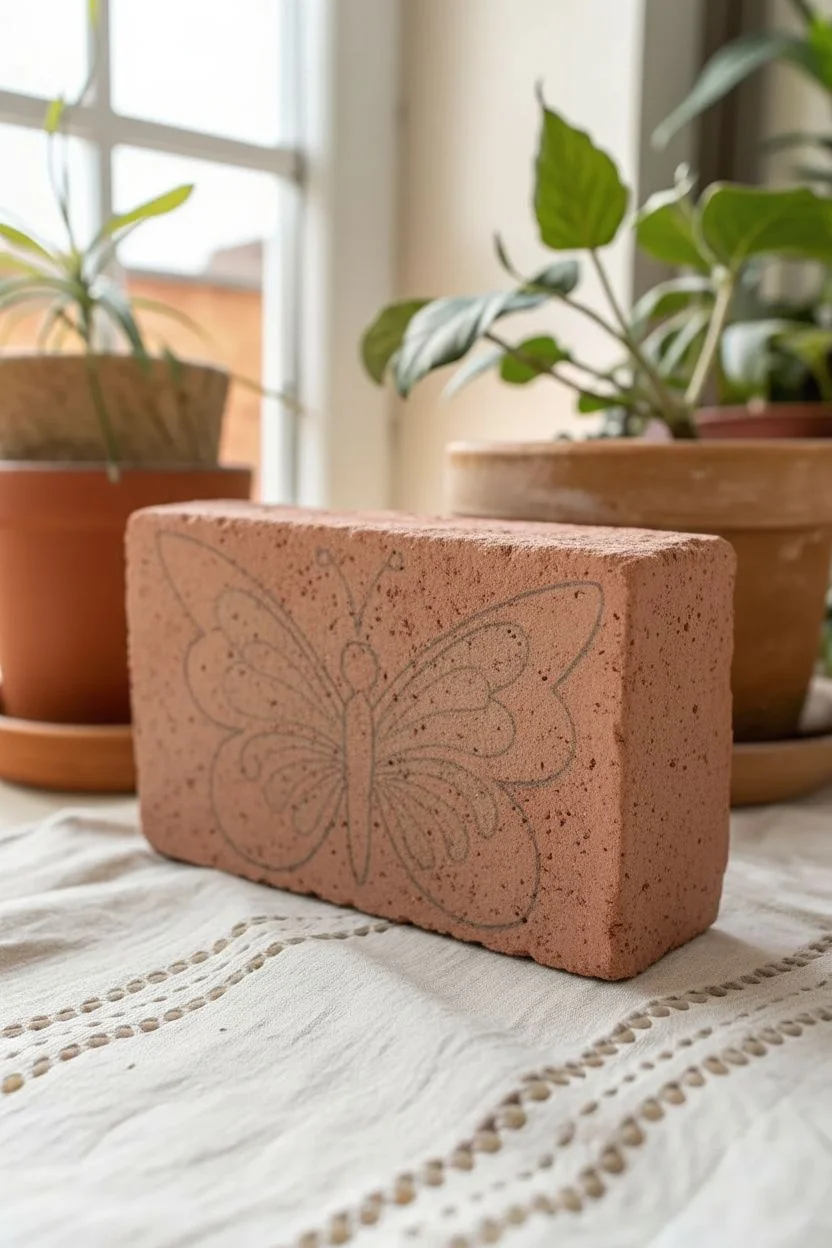
Transform a simple red clay brick into a piece of charming garden or shelf decor with this butterfly painting project. The design features bold teal wings with sunny yellow and soft orange accents, creating a delightful folk-art feel that brightens any corner.
Detailed Instructions
Materials
- Standard red clay brick (clean and dry)
- Acrylic paints (Teal/Turquoise, Bright Yellow, Soft Orange, Dark Blue/Black)
- Flat paintbrush (medium width)
- Round paintbrush (small for details)
- Fine liner brush
- Pencil
- Palette or paper plate
- Water cup and paper towels
- Matte or satin clear sealant spray (optional)
Step 1: Preparation & Base Sketch
-
Clean the surface:
Ensure your brick is free of loose dirt and completely dry. Use a stiff brush to scrub off any debris if it’s an old brick. -
Plan the placement:
Orient the brick horizontally. The butterfly will take up almost the entire front face, leaving just a small border of raw brick showing. -
Sketch the body:
Using a pencil, lightly draw a vertical, elongated oval in the exact center of the brick for the butterfly’s body. -
Draft the upper wings:
Sketch two large, rounded triangular shapes extending from the top of the body towards the upper corners of the brick. These should be your largest shapes. -
Draft the lower wings:
Draw two smaller, rounded lobes extending from the lower part of the body towards the bottom corners.
Rough Surface Tip
Bricks have deep pores. If your paint lines look jagged, use a slightly wetter brush or thin your acrylics with a drop of water to help the paint flow into the crevices.
Step 2: Painting the Wings
-
Fill the silhouette:
Load your medium flat brush with teal paint. Fill in the entire butterfly shape—wings and body—to create a solid base. Don’t worry about interior details yet. -
Apply a second coat:
Brick is porous and soaks up paint quickly. Once the first layer is dry to the touch, apply a second coat of teal to ensure the color is vibrant and opaque. -
Let it cure:
Allow the base color to dry completely before moving on to the yellow details to prevent muddying the colors. -
Paint the upper wing accents:
Switch to a small round brush and yellow paint. Inside each upper wing, paint a large, curved teardrop shape that follows the contour of the wing. -
Paint the lower wing accents:
Add three smaller, distinct teardrop strokes in yellow on each lower wing, fanning them out slightly like fingers.
Step 3: Adding Details & Finish
-
Layer the orange:
Once the yellow sections on the upper wings are dry, paint a smaller, thinner orange teardrop right in the center of the yellow shape. -
Refine the body:
Use your teal paint again to tidy up the central body shape if the yellow paint overlapped it. I like to make the head slightly distinct and rounded at the top. -
Add the antennae:
Mix a tiny amount of black into your teal to darken it, or use a dark blue. With a fine liner brush, paint two thin, curved lines extending from the head. -
Dot the antennae:
Place a small dot at the end of each antenna line using the tip of your round brush. -
Add decorative dots:
Using the teal paint, add a few playful dots floating in the empty brick space around the wings for extra character. -
Seal the artwork:
If you plan to keep this brick outside, spray the entire painted face with a clear matte or satin sealant to protect it from the elements
Go Metallic
Swap the yellow or orange paint for gold acrylic. The metallic sheen against the matte brick creates a stunning contrast that catches sunlight beautifully.
Place your finished brick painting near a potted plant or on a sunny windowsill to enjoy your handiwork
BRUSH GUIDE
The Right Brush for Every Stroke
From clean lines to bold texture — master brush choice, stroke control, and essential techniques.
Explore the Full Guide
Painted Brick Cactus and Succulent Designs
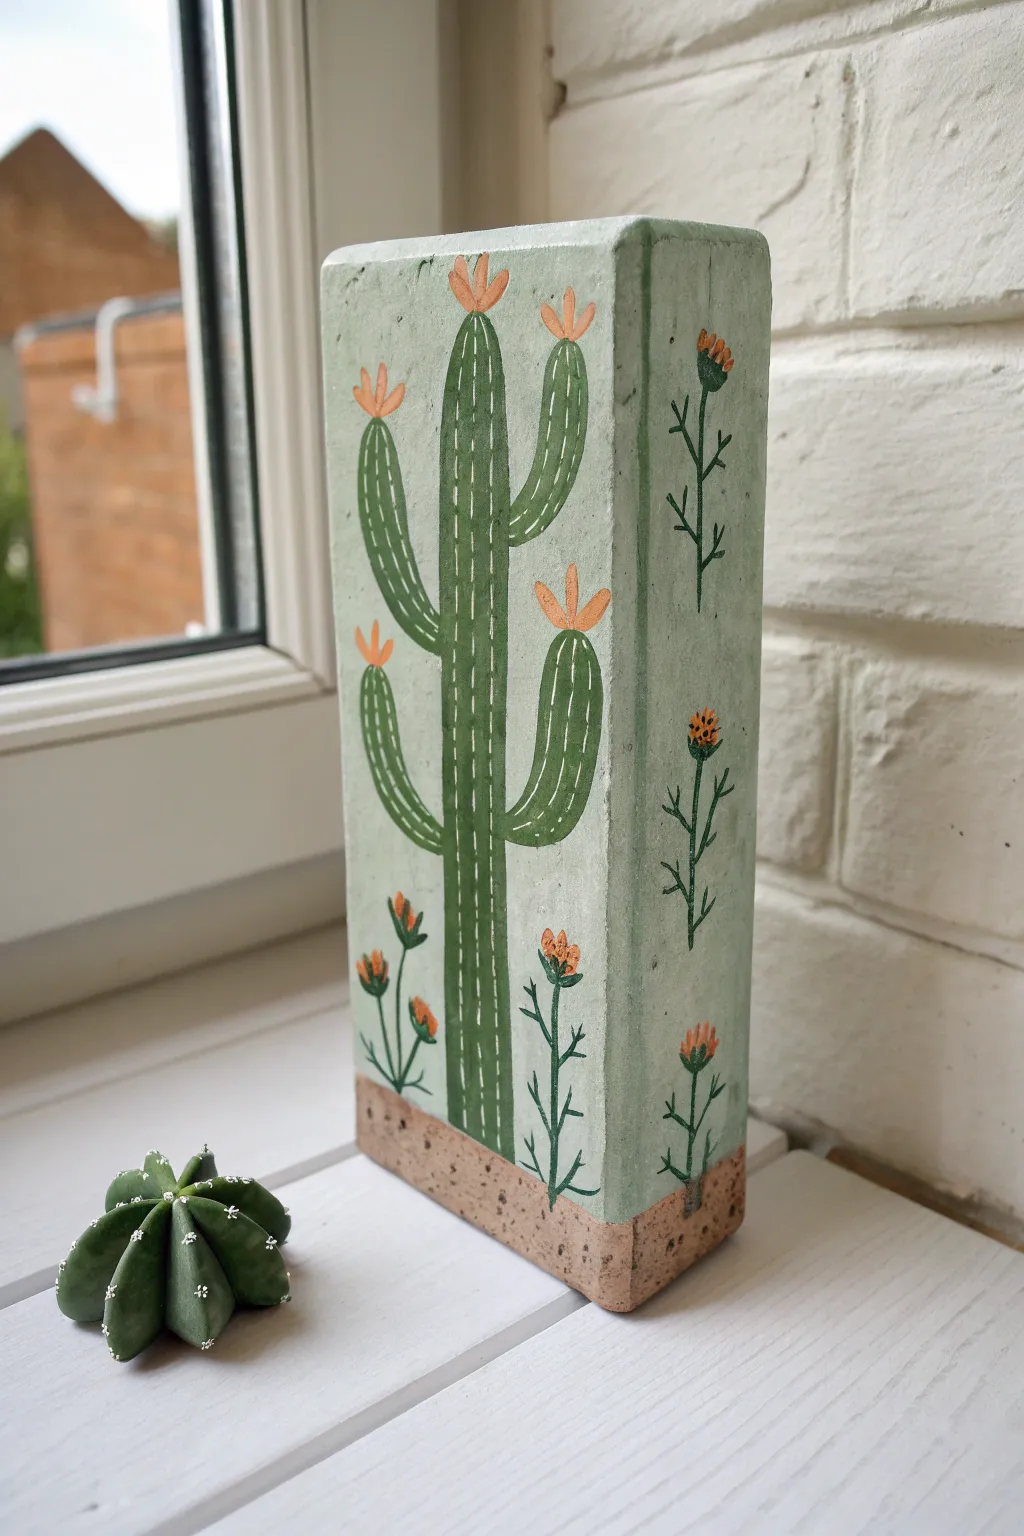
Transform a humble masonry block into a stylish piece of decor with this charming cactus design. The soft sage background and terracotta accents make for a soothing, modern aesthetic perfect for any windowsill or shelf.
Step-by-Step
Materials
- Clean, dry rectangular brick
- Acrylic craft paints: Sage Green (or Mint), Forest Green, Terracotta Orange, White, Dark Brown
- Painter’s tape
- Flat shader brush (medium width)
- Round detail brushes (small and fine liner)
- Pencil
- Matte spray varnish or sealer
Step 1: Preparing the Base
-
Surface Prep:
Begin by scrubbing your brick with a stiff brush to remove loose dust or debris. If the brick is very rough, you can lightly sand the faces you plan to paint, but keeping some texture adds character. -
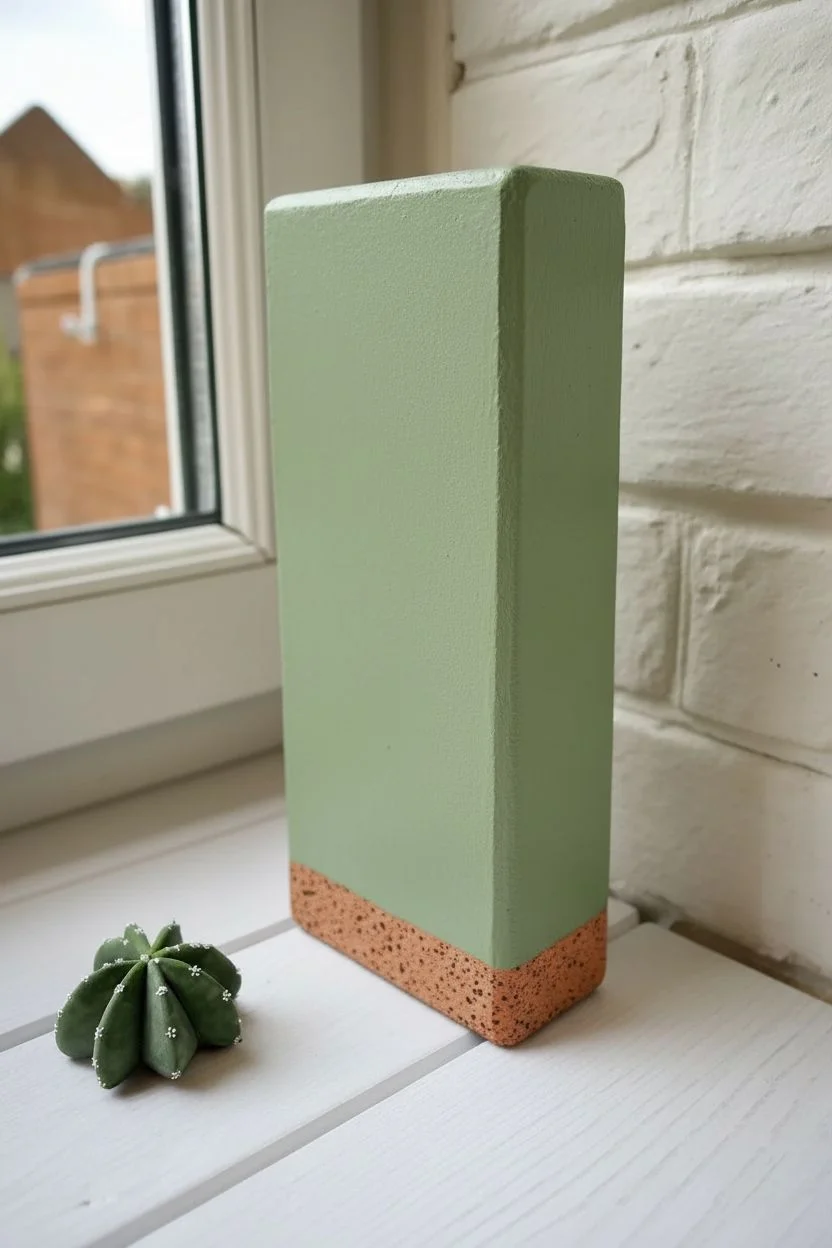
Tape the Base:
Measure about 1 to 1.5 inches from the bottom of the brick. Wrap a piece of painter’s tape horizontally around the entire brick at this height. This will create a clean line separating the painted area from the faux-soil base. -
Base Coat Application:
Using a flat shader brush, apply your Sage Green paint to the entire area above the tape line. Cover the front face and the visible sides. -
Building Opacity:
Brick is porous and will soak up the first layer. Let it dry completely, then apply a second or third coat of Sage Green until you have solid, opaque coverage without the red brick showing through. -
Painting the Soil:
Once the green is dry, remove the tape. Paint the bottom exposed section with a Terracotta or light brown shade. I like to stipple this paint slightly to mimic the texture of cork or pot clay. -
Adding Soil Texture:
To give the base a speckled look, dip a stiff brush or an old toothbrush into Dark Brown paint diluted slightly with water. Run your thumb over the bristles to flick tiny specks onto the terracotta section.
Step 2: Designing the Cactus
-
Sketching the Outline:
Lightly draw the central cactus shape on the front face using a pencil. Sketch a tall central column with two arms curving upward on either side. -
Painting the Cactus Body:
Fill in your pencil sketch using Forest Green paint and a small round brush. The paint should be dark enough to stand out clearly against the sage background. -
Side Detail:
Don’t forget the side of the brick. Paint a vertical stem with small branches coming off it on the narrow side face to continue the botanical theme. -
Adding Needles:
Switch to your finest liner brush and White paint. Paint vertical dashed lines running up the center of the main cactus column and its arms to represent the ridges and needles. -
Adding Blooms:
Using Terracotta Orange, paint small tulip-like flower shapes at the very tips of the cactus arms and the central column. Three distinct petals usually look best. -
Painting Lower Flowers:
Near the bottom of the green section, paint simple stems rising from the ‘soil’ line using Forest Green. Top these with small Terracotta Orange buds. -
Detailing the Side Flora:
Return to the side design. Add small orange flower heads to the tips of the branches you painted earlier. Add tiny black or dark brown dots to the centers of all your orange flowers for depth. -
Final White Accents:
Add tiny white highlights to the cactus arms or flower tips if desired to make them pop. Check for any patchy areas in the green background and touch them up. -
Sealing:
Allow the brick to dry overnight. Spray the entire piece with a matte clear varnish to protect the paint from chipping and to seal the porous brick surface.
Textured Tips
For sharper lines on rough brick, press your tape down firmly with a credit card before painting. This prevents the sage paint from bleeding underneath.
Go 3D
Glue a small pebble or faux succulent to the base for a mixed-media effect, or paint a second matching brick to create stylish bookends.
Now you have a piece of artwork that is both sturdy and stylish, ready to hold a door or brighten a corner
Brick House Portraits and Neighborhood Scenes
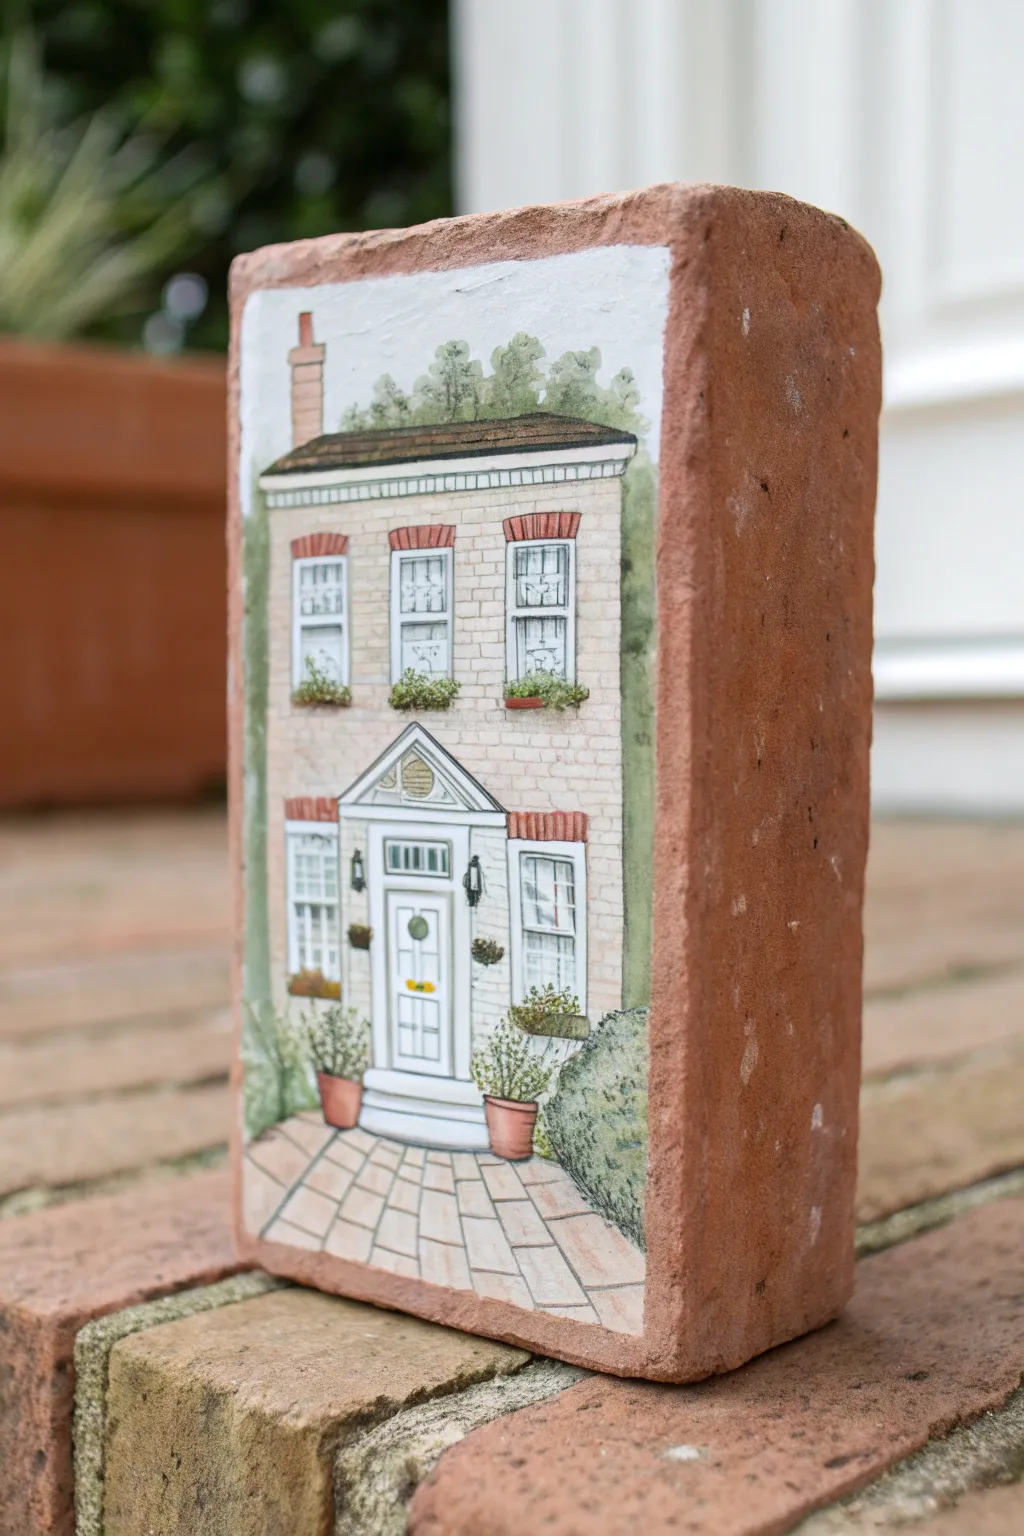
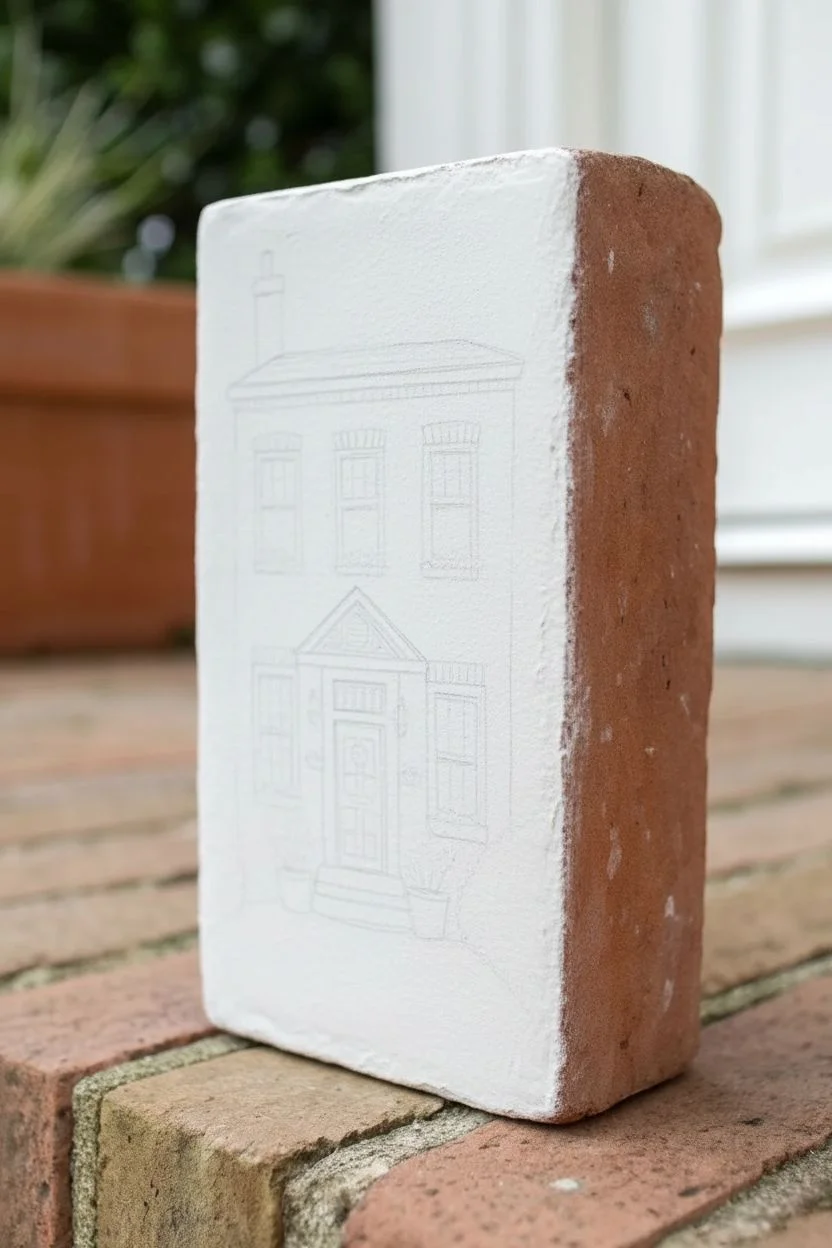
Transform a humble masonry brick into a charming architectural portrait that doubles as a unique doorstop or shelf accent. By painting a detailed house façade directly onto the rough surface, you create a delightful trompe-l’œil effect where the brick’s texture mimics real stonework.
Step-by-Step Tutorial
Materials
- Clean red clay brick (standard size)
- Gesso or white acrylic primer
- Acrylic paints (white, black, terracotta, greens, greys, browns)
- Fine grit sandpaper (optional)
- Small flat brushes and fine liner brushes (sizes 00, 0, 1)
- Pencil and eraser
- Ruler
- Matte spray varnish or sealant
- Palette for mixing
Step 1: Preparation and Base Layer
-
Clean and prep the brick:
Scrub your brick thoroughly with water and a stiff brush to remove loose dust and debris. Let it dry completely for 24 hours to ensure no moisture is trapped inside. -
Prime the surface:
Apply a coat of white gesso to the front face of the brick. You don’t need to cover the sides; leaving them raw adds rustic charm. Let this dry, then apply a second coat for an opaque, smooth canvas. -
Sketch the architecture:
Using a ruler and a light pencil touch, draw the main structural lines of the house. Mark the roofline, the vertical sides of the building, the placement of the windows, and the central doorway. -
Refine the details:
Sketch in the smaller details like the window panes, the triangular pediment above the door, the chimney, and the walkway stones at the bottom. Keep lines faint so they don’t show through later.
Tiny Texture Trick
Use an old, frayed brush for the greenery. The splayed bristles create perfect random leaf textures for bushes and window boxes without needing to paint individual leaves.
Step 2: Blocking in Color
-
Paint the sky:
Mix a very pale blue or keep it white, and carefully paint around the roof and chimney shape to establish the sky area at the top. -
Add the base brick color:
Mix a pale terracotta or beige tone to match the desired brick color of the painted house. Fill in the main walls, avoiding the windows and door frames. -
Paint the trim:
Using a small flat brush and pure white paint, fill in all the window frames, sills, and the grand door surround. You might need two coats here to cover the sketch lines. -
Create the roof and walkway:
Paint the roof area in a dark slate grey or brown. For the walkway at the bottom, use a lighter tan or stone color to differentiate it from the house walls.
Shaky Hands?
If you’re struggling with straight architectural lines, use a piece of masking tape or a ruler as a guide for your brush, especially for the roofline and long vertical trim.
Step 3: Adding Architectural Details
-
Define the brickwork:
This is where the magic happens. Mix a slightly darker shade of your wall color and use a very fine liner brush to paint small, horizontal dashes across the façade to suggest individual bricks. -
Detail the windows:
Paint the glass panes a soft grey-blue. Once dry, use your finest brush with white paint to re-establish the mullions (the grid within the window). Add sheer white curtains if desired. -
Add lintel details:
Above the windows, paint the decorative brick lintels using a reddish-brown tone. Vertical strokes work best here to mimic the standing bricks often found above classic windows. -
Define the door:
Outline the panels of the front door with a thin grey line to give it dimension. Add a tiny dot of gold or brass color for the doorknob and letterbox.
Step 4: Landscaping and Final Touches
-
Plant the greenery:
Use a stippling motion (rapid little dabs) with a mix of dark and light greens to create the bushes on either side of the house and the foliage behind the roof. -
Fill the window boxes:
Add tiny window boxes under the upper windows. Stipple green overflow and add tiny dots of color for flowers. -
Paint the pots:
Paint two small terracotta pots near the entryway steps. Once the pot color is dry, add stippled plants growing out of them. -
Outline and shadow:
I find that mixing a watery grey glaze helps here. Lightly paint shadows under the eaves, window sills, and door frame to give the house 3D depth. -
Detail the path:
Use a fine grey or brown liner to draw the grout lines between the paving stones on the front walkway. -
Seal the artwork:
Once the paint is fully cured (give it at least a few hours), spray the entire face of the brick with a matte varnish to protect your miniature masterpiece from dust.
Place your finished brick painting on a bookshelf or stoop to add a touch of whimsy to your home decor

PENCIL GUIDE
Understanding Pencil Grades from H to B
From first sketch to finished drawing — learn pencil grades, line control, and shading techniques.
Explore the Full Guide
Ocean Waves and Beachy Brick Mini Landscapes
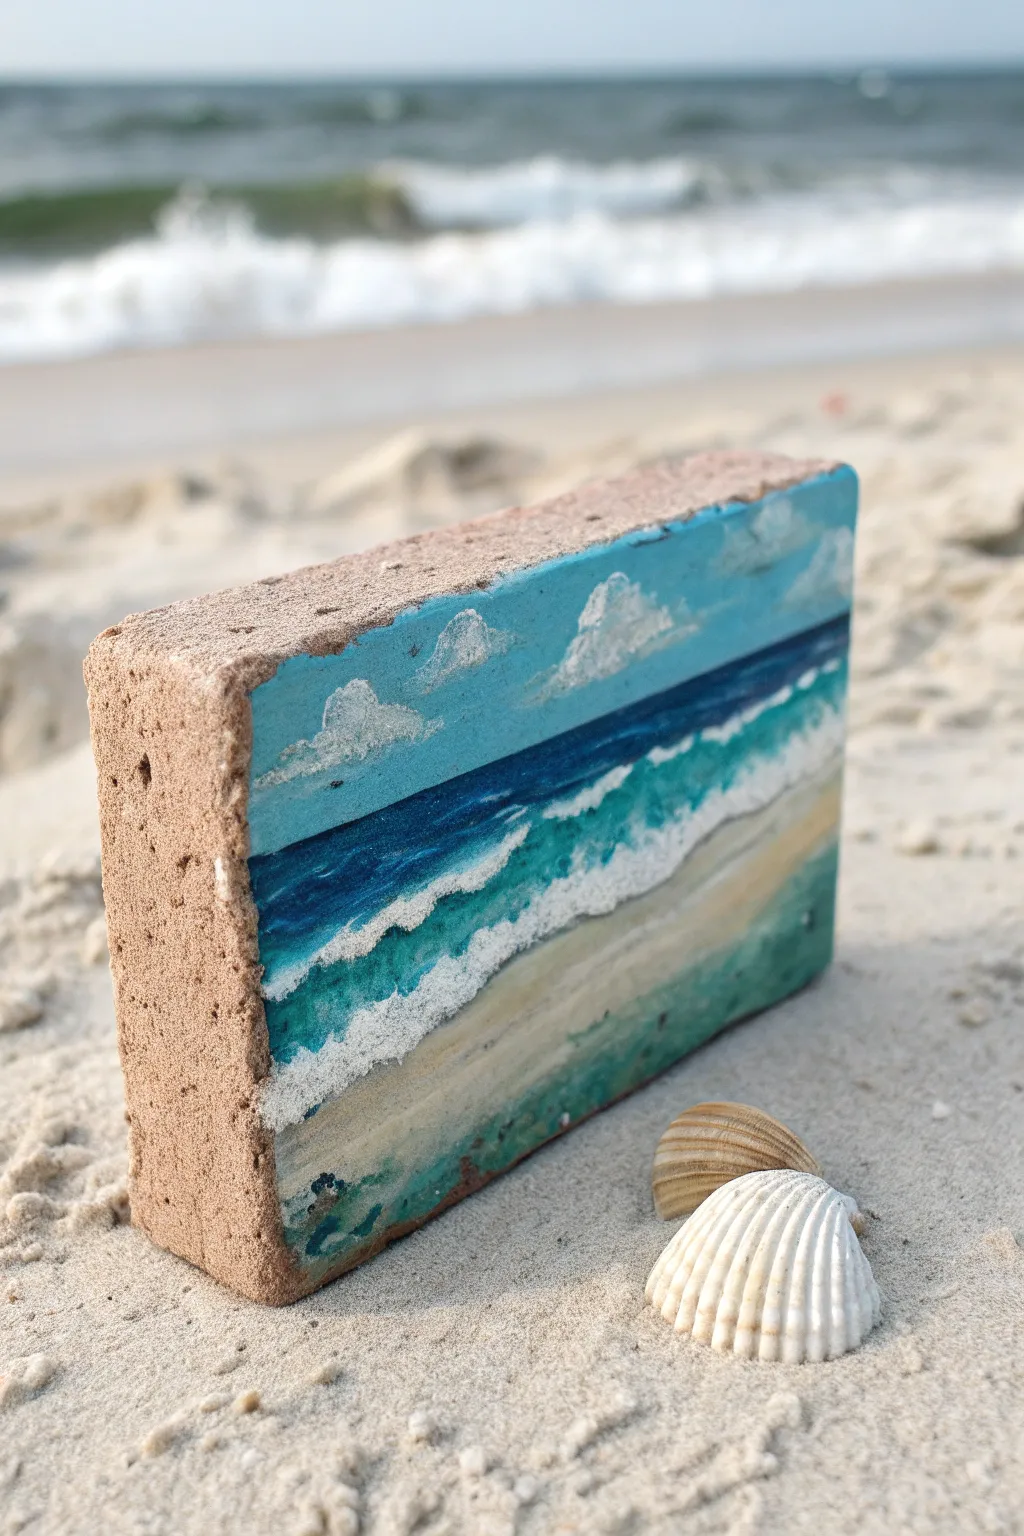
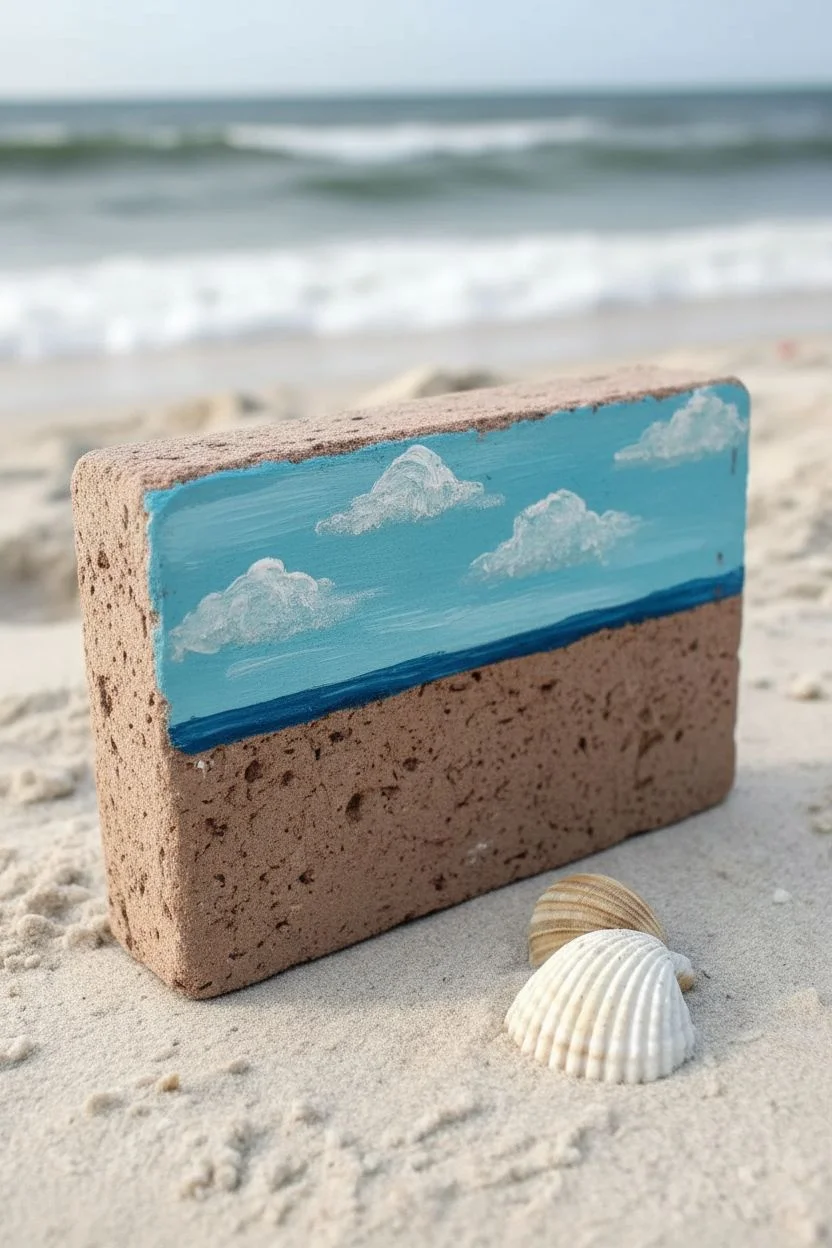
Transform a humble masonry brick into a window to the sea with this textured, layered painting project. The porous surface of the brick adds a natural, rugged feel that perfectly complements the aesthetic of crashing waves and sandy shores.
Step-by-Step Guide
Materials
- Standard rectangular concrete or clay brick (clean and dry)
- Acrylic paints (Phthalo Blue, Turquoise, Titanium White, Yellow Ochre, Burnt Sienna)
- Gesso primer (clear or white)
- Flat shader brushes (medium and small)
- Small round detail brush
- Old toothbrush or stiff bristle brush
- Palette or paper plate
- Cup of water and paper towels
- Spray sealant (matte or satin finish)
Step 1: Preparation and Sky
-
Prep the Surface:
Begin by scrubbing your brick with a dry stiff brush to remove any loose dust or debris. If the brick is very dirty, wash it and let it dry completely for 24 hours. -
Optional Priming:
For brighter colors, apply a thin coat of gesso to the face of the brick you intend to paint. If you prefer the natural stone texture to show through the sky, you can skip this step or use clear gesso. -
Mix the Sky Blue:
On your palette, mix Titanium White with a very small touch of Phthalo Blue to create a light, airy sky blue. -
Paint the Sky:
Apply this light blue to the top third of the brick face. Use horizontal strokes to mimic the atmosphere, allowing some of the brick’s natural texture to remain visible. -
Add Clouds:
While the sky is still slightly tacky, use a small round brush with pure Titanium White to dab in fluffy cloud shapes. Keep the bottoms of the clouds somewhat flat and the tops rounded. -
Define the Horizon:
Mix a darker ocean color using Phthalo Blue and a tiny touch of Burnt Sienna to de-saturate it slightly. Paint a straight, crisp horizontal line about one-third of the way down the brick to establish the horizon.
Paint Soaking In Too Fast?
If the brick drinks up your paint instantly, apply a coat of acrylic medium or PVA glue water mix first. This seals the pores without hiding texture.
Step 2: painting the Ocean
-
Deep Water:
Using your horizon color, paint a band of dark blue just below the horizon line. This represents the deep ocean far from shore. -
Transition to Turquoise:
Mix Turquoise with a little white. Blend this color into the bottom edge of your dark blue band, creating a gradient as the water moves closer to the ‘shore’. -
Mid-Water Texture:
Continue painting downwards with the turquoise mix, lightening it further with more white as you go. Use choppy, short horizontal strokes here to suggest movement in the water. -
The Sandy Base:
Mix Yellow Ochre, Titanium White, and a dot of Burnt Sienna to create a sand color. Paint the bottom third of the brick, angling the top edge diagonally to look like the shoreline. -
Wet Sand Effect:
Where the water meets the sand, darken your sand color slightly with a touch of the water color (turquoise) to create the look of wet, saturated sand.
Step 3: Waves and Foam Details
-
Create the Crash:
Load a small flat brush with thick Titanium White paint. Paint a jagged, irregular line where the turquoise water meets the deeper blue to suggest a breaking wave. -
Sea Foam Glaze:
Water down a little white paint until it is semi-transparent. Lightly drag this over the lighter turquoise area to create sea foam trails on the water’s surface. -
Shoreline Foam:
Use a round brush to stipple (dot) thick white paint along the edge where the water meets the sand. Make this line irregular and frothy. -
Spatter Texture:
Dip an old toothbrush into slightly watered-down white paint. Run your thumb over the bristles to flick tiny specks of ‘spray’ onto the crashing wave area for realism. -
Highlights and deeply shadows:
I like to add very thin lines of dark blue under the white crests of the waves to make them pop 3D-style. Add a few pure white highlights on the very top of the cloud edges. -
Allow to Cure:
Let the paint dry completely. Because brick is porous, this might take a bit longer than canvas, so give it a few hours. -
Seal the Artwork:
Finish by spraying the painted face with a matte or satin sealant to protect the colors from fading and moisture.
Pro Tip: Texture Play
Don’t try to fill every pit in the brick. Leaving small holes unpainted in the sand section mimics the look of little pebbles or crab holes on a beach.
Place your heavy little masterpiece on a shelf or use it as a decorative doorstop to keep summer vibes around all year long
Fruit and Veggie Bricks for Garden Beds
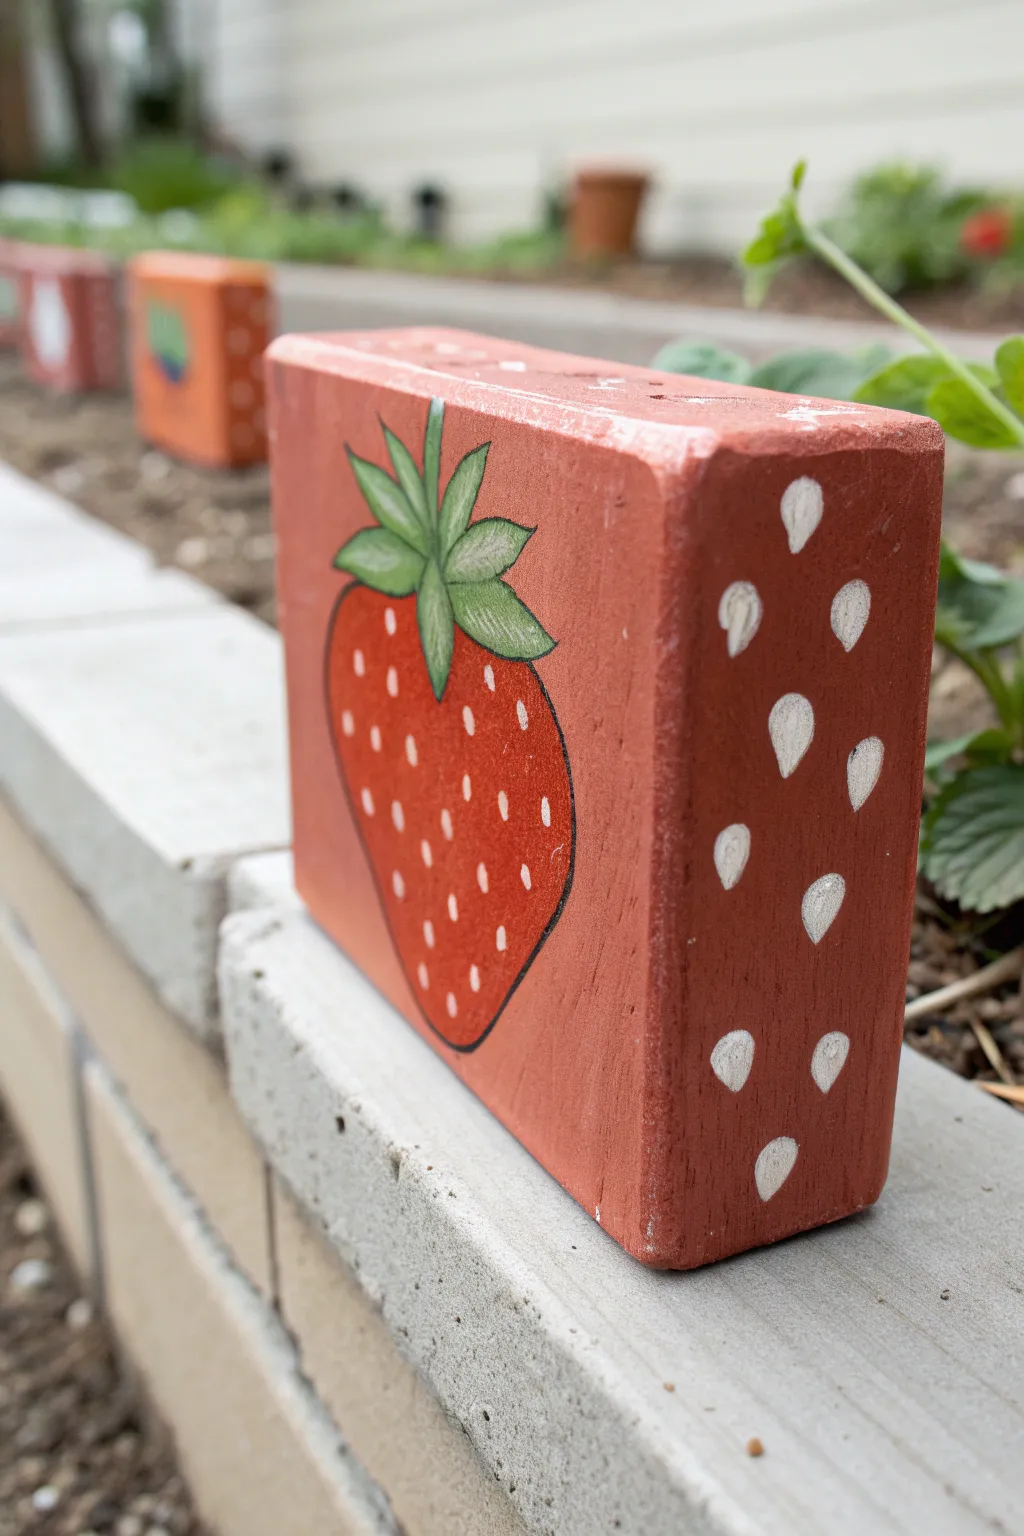
Add a pop of everlasting color to your garden bed with this adorable fruit-themed brick painting project. This cheerful strawberry design transforms a mundane building block into a functional and charming piece of garden art that won’t fade with the seasons.
How-To Guide
Materials
- Clean, dry brick (standard rectangular paver)
- Acrylic craft paints: terra-cotta/coral red, bright red, grass green, darker green, white, black
- Wide flat brush (for base coating)
- Medium round brush
- Fine detail liner brush
- Pencil
- Water cup and palette
- Clear outdoor acrylic sealer (spray or brush-on)
- Stiff scrub brush (for prep)
Step 1: Preparation & Base Coat
-
Clean the surface:
Before painting, scrub your brick thoroughly with water and a stiff brush to remove dirt, moss, or loose grit. Let it dry completely in the sun, possibly for a full day, to ensure moisture doesn’t get trapped under the paint. -
Mix the background color:
Create a custom base color that mimics a soft terra-cotta or coral hue. Mix some red with a touch of white and a tiny dot of yellow or orange until you get a warm, muted red-pink tone. -
Apply the first layer:
Using your wide flat brush, paint the entire front face and the visible sides of the brick with your mixed background color. I find pushing the paint into the rough crevices is easier with a dabbing motion rather than long strokes. -
Let it dry and repeat:
Allow the first coat to dry for about 20 minutes. Apply a second coat to ensure solid coverage so the original gray or red of the raw brick doesn’t peek through.
Paint Soaking In?
Bricks differ in porosity. If your brick drinks up the paint immediately, apply a coat of white primer or Gesso first to seal the pores before starting your base color.
Step 2: Designing the Strawberry
-
Sketch the outline:
Lightly sketch the shape of a large strawberry on the front face using a pencil. Draw a rounded heart-like shape that tapers toward the bottom, leaving border space around the edges. -
Sketch the leaves:
At the top of your berry shape, draw the leafy stem (the calyx). Sketch about five or six pointed leaf shapes radiating from the top center. -
Paint the berry body:
Fill in the strawberry shape with bright red acrylic paint. Use a medium round brush to carefully follow your pencil lines. You might need two coats here to make the red truly pop against the background. -
Paint the leaves:
Color in the leaf shapes with a grass green shade. Ensure the green overlaps slightly onto the top of the red berry area so there are no gaps. -
Add leaf details:
Once the green is dry, take your fine liner brush and a slightly darker green (or mix a little black into your green). Draw a thin line down the center of each leaf to create a vein.
Step 3: Details & Side Pattern
-
Outline the fruit:
Using the fine liner brush and black paint, carefully outline the entire strawberry body and the leaves. Keep your hand steady and the lines relatively thin for a crisp illustration style. -
Add seeds to the front:
With white paint and a small brush, dab small teardrop or oval shapes onto the red berry body. Scatter them randomly but keep the spacing somewhat even. -
Paint side seeds:
To make the brick look interesting from all angles, paint larger white teardrop shapes cascading down the side of the brick. Imagine these as abstract giant seeds decorating the background. -
Add dimension to side seeds:
This is a subtle touch: paint a tiny gray or light black shadow line on one side of the large white side-seeds to give them a little depth. -
Clean up edges:
Check your work for any accidental smudges. If you went outside the lines, use your background color mix to touch up the mistakes. -
Seal the artwork:
Since this brick will live outdoors, protection is crucial. Apply two thin coats of clear outdoor acrylic sealer. Spray sealers work best for getting into the brick’s texture without smearing the paint.
Make It a Set
Don’t stop at strawberries. Create a whole garden salad by painting companion bricks featuring carrots, radishes, or tomatoes to mark different rows in your veggie patch.
Place your new fruity marker at the edge of your garden bed and enjoy the handmade charm it brings to your outdoor space


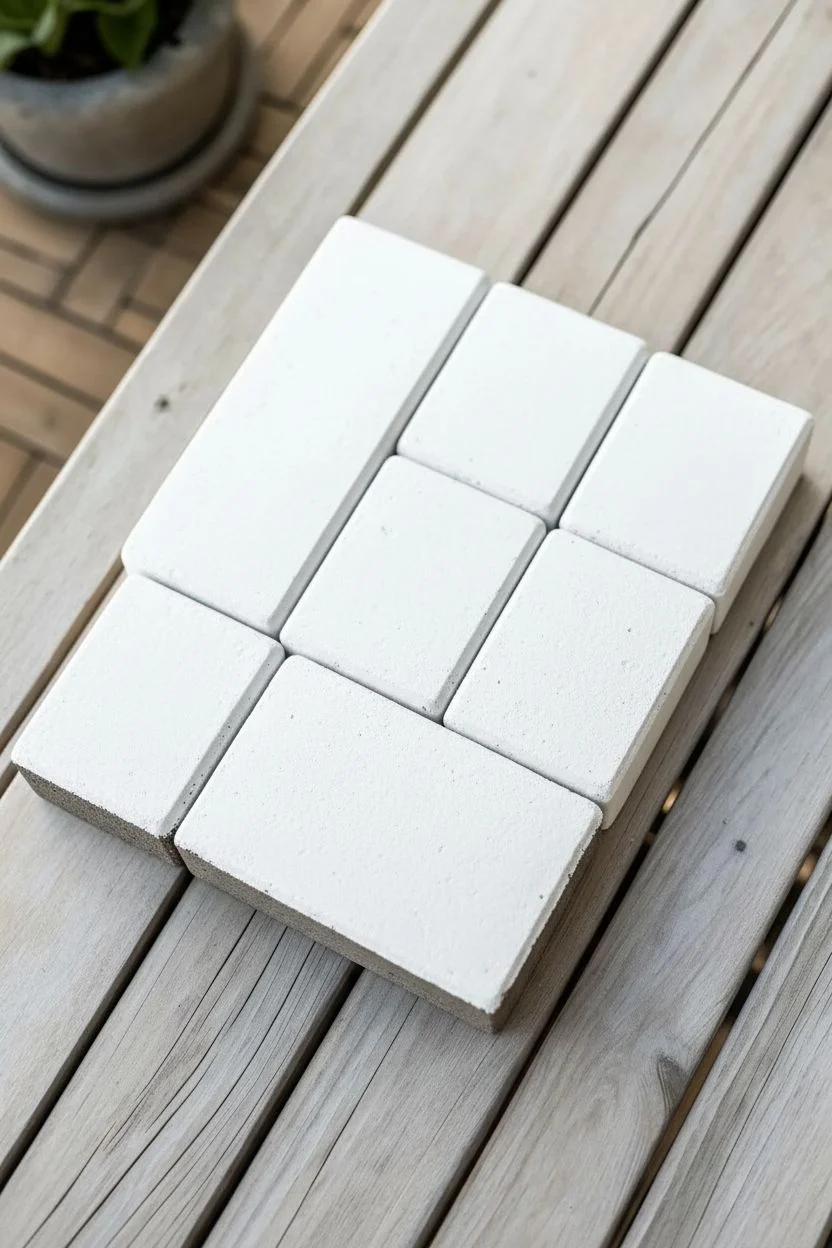
Brick Mosaics Made From Matching Sets

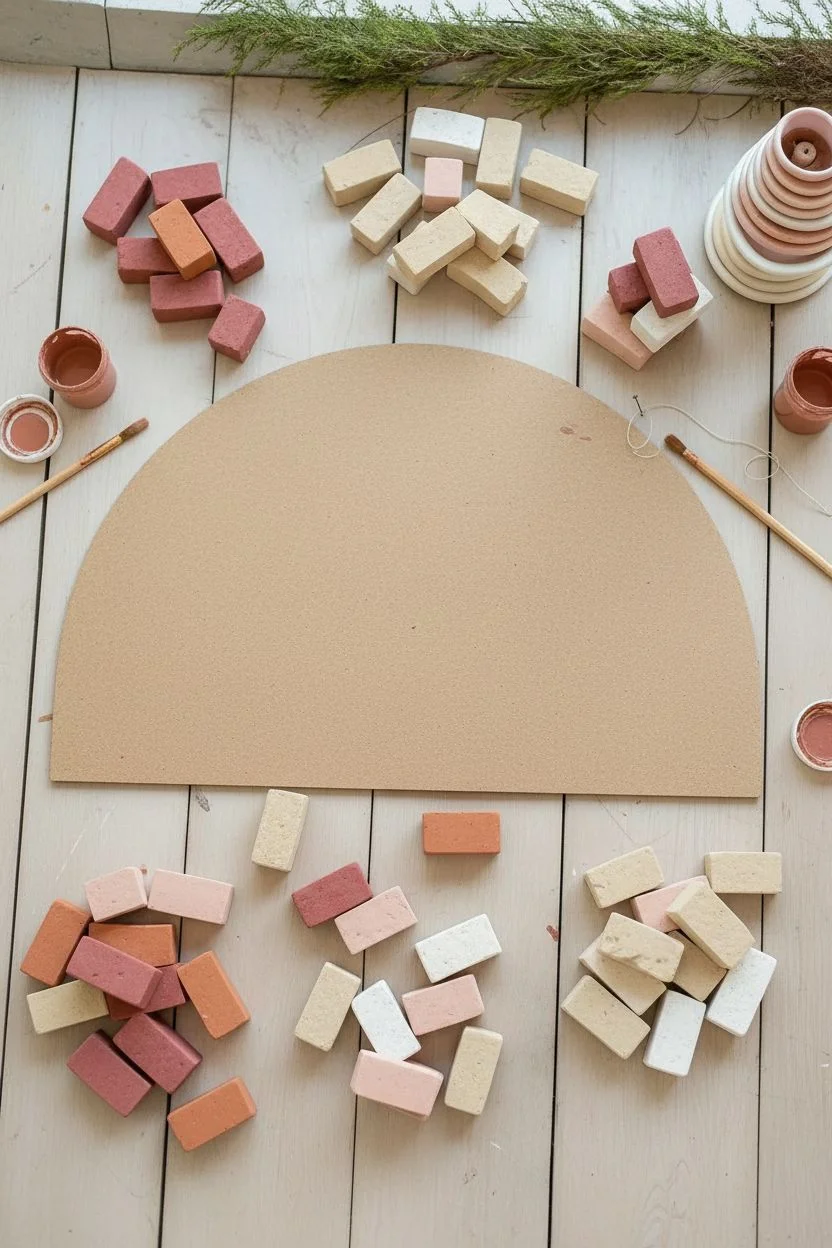
Bring earthy warmth into your space with this stunning rainbow mosaic, crafted from small, brick-shaped tiles in a spectrum of muted desert tones. This project combines the satisfying geometry of masonry with the gentle curve of a classic rainbow for a piece that feels both modern and timeless.
Step-by-Step Guide
Materials
- Small craft bricks or mosaic tiles (approx. 1″ x 0.5″)
- Paint primer (if using raw clay or porous stone)
- Acrylic paints (terracotta red, burnt orange, blush pink, cream, warm beige)
- Masonite board or plywood backing (cut to a semi-circle)
- Strong craft glue or construction adhesive (e.g., Liquid Nails)
- Clear matte sealant spray
- Paintbrushes (medium flat)
- Pencil
- Compass or string and tack
Step 1: Planning and Preparation
-
Prepare your palette:
Begin by sorting your colors if your bricks are pre-colored. If you are painting plain craft bricks, mix your acrylics to match the photo: a deep rust red, a soft terracotta orange, a pale blush, a creamy white, and a warm sand beige. -
Prime the bricks (optional):
If your miniature bricks are very porous or dark, give the top face of each a quick coat of primer. This ensures your final colors will pop and look consistent across the rainbow. -
Paint the bricks:
Paint the tops and sides of your bricks. You will need roughly 15-20 bricks for the outer arch, decreasing in number as the arches get smaller. I like to paint a few extras of each shade just in case. -
Let them dry:
Allow all the painted bricks to dry completely. A matte finish looks most authentic to the material, so avoid glossy sealants at this stage. -
Measure the backing:
Lay out a temporary ‘dry run’ of your mosaic on a table to determine the total width and height. Measure the final semi-circle shape. -
Cut the base:
Transfer these measurements to your Masonite or plywood board. Use a compass (or a string tied to a tack) to draw the perfect semi-circle arc, then cut it out carefully with a jigsaw.
Spacing Pro-Tip
Use flat toothpicks or small cardboard shims as spacers between the bricks while gluing. This keeps your ‘mortar lines’ consistent and prevents bricks from sliding down.
Step 2: Assembly
-
Start at the center:
The center of the rainbow is a solid half-circle piece rather than a standard brick. Locate the exact bottom center of your backing board and glue this core piece down first. -
Begin the first arch:
For the first row of bricks surrounding the core (the creamy white layer in the example), apply a dot of strong adhesive to the back of a brick. -
Place keystone first:
Place the top center brick (the keystone) of this arch first, directly above the core. This ensures your pattern stays symmetrical. -
Complete the inner arch:
Work outwards from that center brick down to the bottom edge on both sides. Keep the gaps between bricks tight and consistent, mimicking real mortar joints. -
Start the beige layer:
Move to the next color output (warm beige). Again, glue the top center brick first, aligning it directly above the center brick of the previous row. -
Stagger the joints:
As you place the rest of seed beige row, try to stagger the vertical lines slightly where possible, though the curvature makes perfect ‘running bond’ patterns tricky. The radial alignment is more important here. -
Add the white layer:
Proceed to the next creamy white layer. Apply glue and press firmly. Check your spacing frequently to ensure the arc remains smooth and doesn’t become lopsided. -
Isolate the blush layer:
glue the blush pink bricks for the next arch. By this layer, the gaps between the inner edges of the bricks will be noticeably smaller than the outer edges due to the radius; this is normal. -
continue with orange:
Add the terracotta orange layer. If you find the bricks are sliding while the glue sets, you can use small strips of masking tape to hold them in place temporarily. -
Finish with red:
Glue the final, outermost arch using the deep rust red bricks. Ensure the bottom edges of the lowest bricks line up perfectly with the flat bottom of your backing board.
Step 3: Finishing Touches
-
Clean up edges:
Once the glue is fully cured, check for any adhesive that may have squeezed out between the bricks and carefully scrape it away with a craft knife. -
Seal the piece:
Take the finished mosaic outside and spray it with a light coat of clear matte sealant. This protects the paint and unifies the finish. -
Add hanging hardware:
Attach a sawtooth hanger or a heavy-duty command strip to the back of the wood base so you can display your work.
Level Up: Grout It
For a true masonry look, fill the gaps between bricks with actual sanded grout in a light grey or cream color. Wipe clean with a damp sponge before it dries.
Now you have a structured piece of art that adds a sophisticated pop of color to any shelf or wall
Painted Brick Wall Borders and Vine Trails
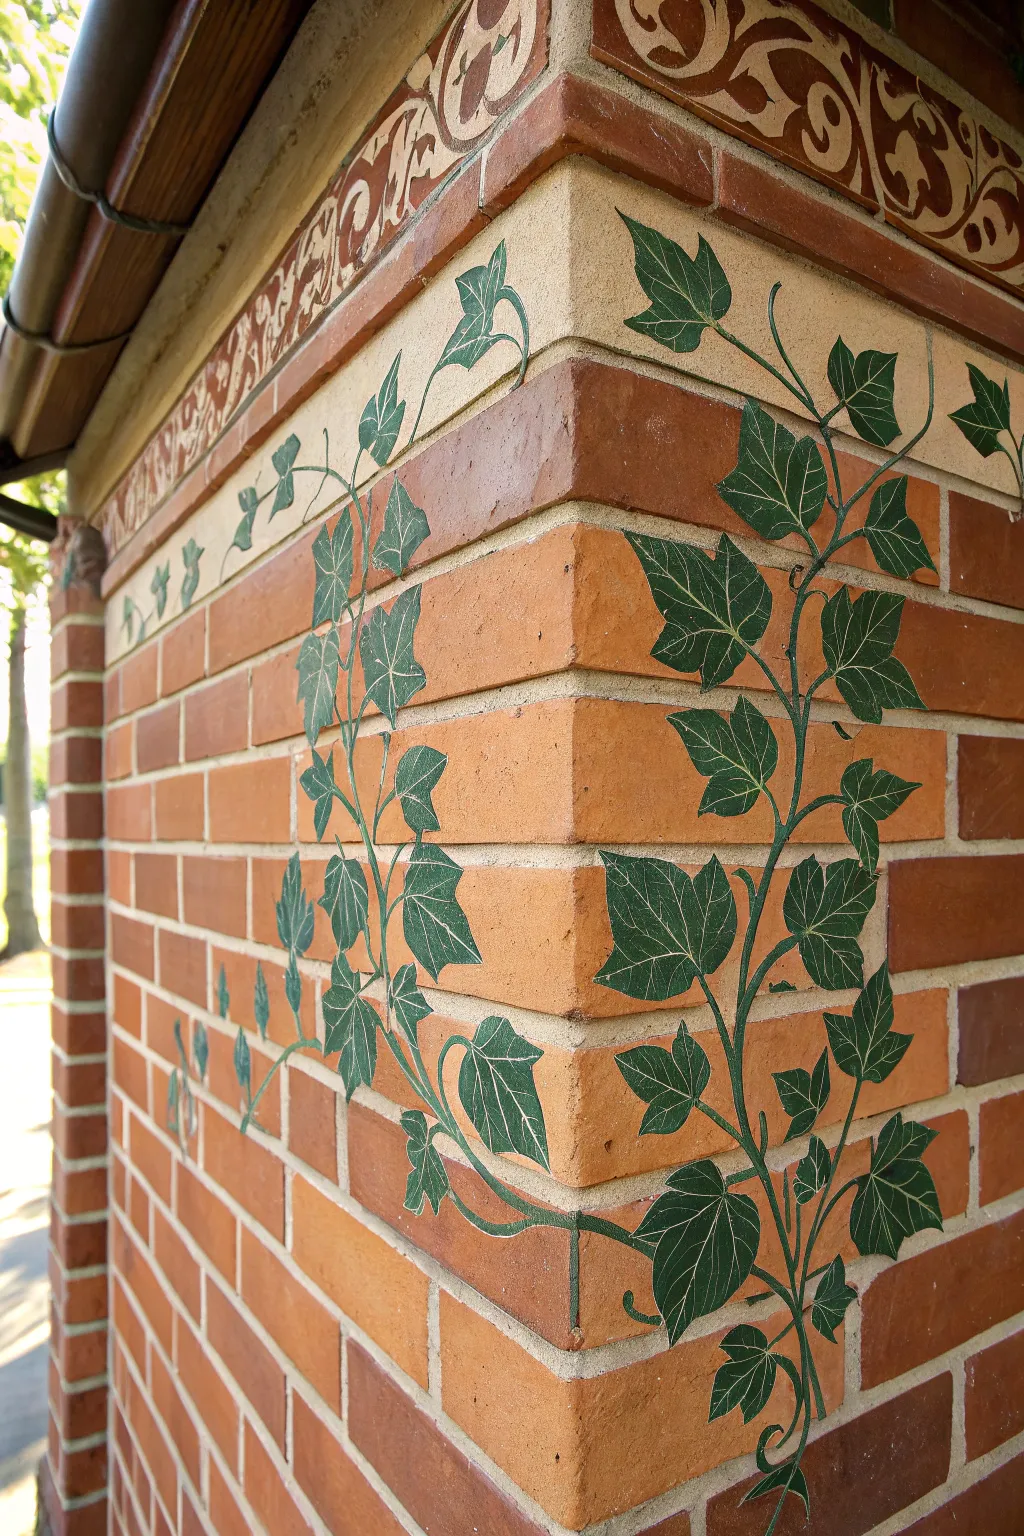
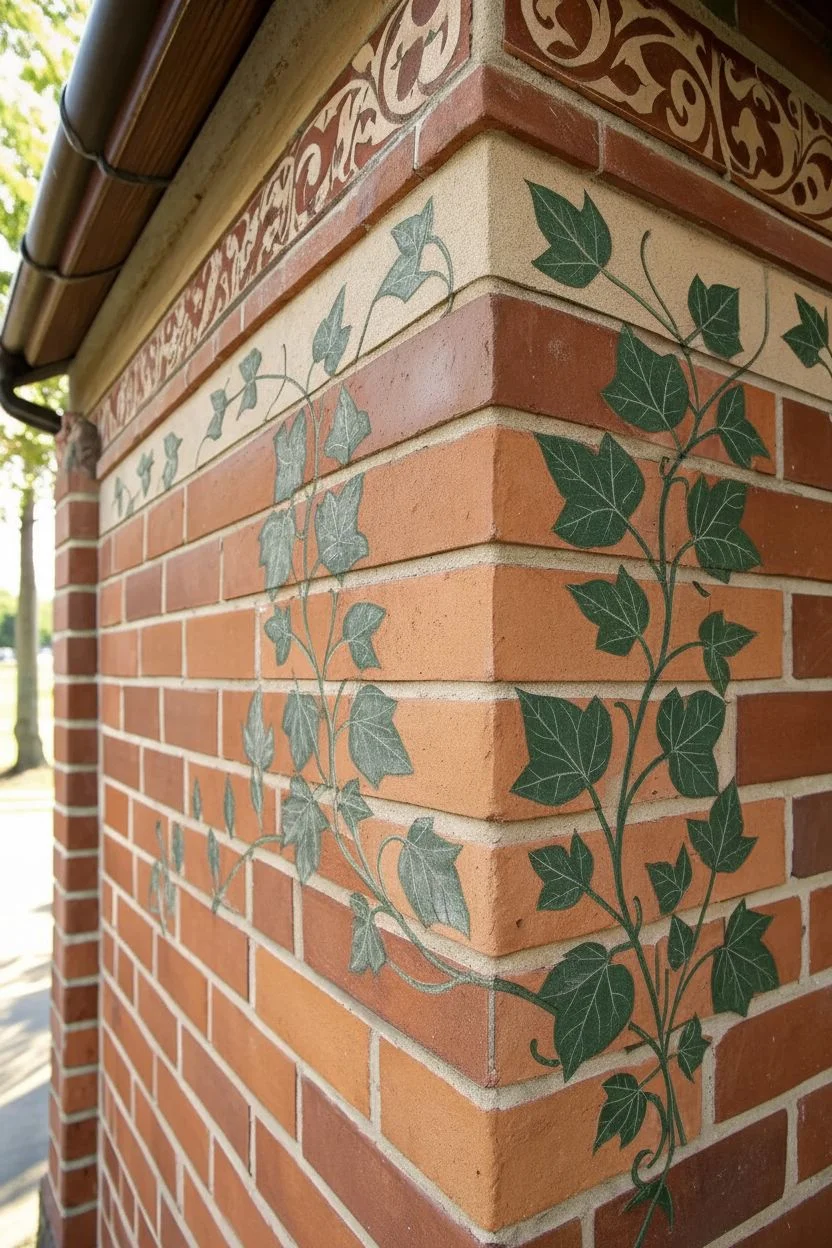
Transform a boring brick corner into an elegant garden feature with this stylized, hand-painted ivy trail. The deep green leaves pop beautifully against terracotta tones, creating a permanent climbing vine that never needs watering.
Step-by-Step
Materials
- Exterior acrylic latex paint (hunter green)
- Exterior acrylic latex paint (pale sage or mint green)
- Chalk or pencil for sketching
- Small angled shader brush (1/4 inch)
- Fine liner brush (size 1)
- Mild detergent and scrub brush
- Painters tape (optional)
- Clear matte exterior sealer (optional)
- Paper plate or palette
- Rags for cleanup
Step 1: Preparation & Layout
-
Clean the surface:
Before any paint touches the wall, scrub the brick thoroughly with mild detergent and water to remove dust, moss, and loose mortar. Rinse well and let the brick dry completely for at least 24 hours. -
Plan the main vein:
Using a piece of chalk, lightly sketch the main ‘S’ curve of your vine. Start near the bottom corner, winding up and around the brick edge. I like to let the vine follow the natural grout lines occasionally but mostly cross over them to create flow. -
Map leaf positions:
Mark rough triangular shapes where you want your leaves to sit. Aim for an alternating pattern—left, then right—as they climb the main stem. Keep the larger leaves near the bottom and smaller ones as the vine extends upward or outward. -
Refine the leaf shapes:
Go back over your rough triangles and sketch the distinctive three-point or five-point ivy shape. Use the brick texture as a guide; sometimes it helps to align a leaf point with the edge of a brick for stability.
Uneven Brick Surface?
For very rough or tumbled brick, don’t force a straight line. Let your brush skip slightly over deep pits for a weathered fresco look, rather than glopping paint into every single hole.
Step 2: Painting the Base Layer
-
Load the angled brush:
Pour a small amount of hunter green exterior paint onto your palette. Load your 1/4 inch angled brush, but don’t overload it—brick is porous and can cause drips if the paint is too heavy. -
Paint the main stem:
Carefully trace your chalk line for the central vine stem first. Use the sharp edge of the angled brush to keep the line relatively thin, but vary the pressure slightly to give it an organic, tapering look. -
Outline the leaves:
Using the same dark green, outline the perimeter of your first leaf. Press the paint into the nooks and crannies of the brick texture so the outline is solid and crisp. -
Fill the leaf bodies:
Fill in the rest of the leaf shape with the dark green. You may need to dab or stipple the brush to get full coverage on rough brick faces. Repeat this process for all leaves. -
Check for gaps:
Inspect your work from different angles. Brick has deep pores that can look like white specs from the side, so touch up any holidays (missed spots) to ensure solid coverage. -
Add connecting petioles:
Connect each leaf to the main stem with a thin, curved line (the petiole). Make sure these connections look natural and flow in the direction of growth. -
Allow to dry:
Let this base layer dry completely. Exterior acrylics usually skin over effectively in about an hour, but check your specific paint can for recoat times.
Step 3: Detailing & Veining
-
Prepare the highlight color:
Switch to your fine liner brush and the pale sage green paint. If the paint feels too thick to make long smooth lines, thin it with a barely-there drop of water. -
Paint the central vein:
Starting at the base of a leaf (where it connects to the stem), paint a sweeping curved line up toward the tip of the center leaf point. Taper the line so it gets thinner at the end. -
Add side veins:
From that central vein, branch out two to four smaller veins reaching toward the other points of the leaf. Keep your hand steady but allow for slight wiggles to mimic nature. -
Highlight the stem:
Add extremely thin, broken highlights along the top edge of the main vine stem. This separates the green stem from the dark leaf connection points and adds dimension. -
Add tendrils (optional):
If there are empty spaces that feel unbalanced, use the liner brush and dark green to add tiny, curly tendrils coming off the main stem. These add a whimsical touch. -
Clean up edges:
Inspect the edges of your leaves. If any green bled into the grout lines, you can carefully touch it up with a small brush and paint that matches your brick or grout (or just wipe it quickly if fresh). -
Seal the work:
Once fully cured (usually 24-48 hours), brush on a coat of clear matte exterior sealer. This isn’t strictly necessary with high-quality exterior paint, but it helps protect your art from UV fading and harsh weather.
Level Up: Shadow Play
Mix a tiny drop of black into your green and paint a thin shadow line on the brick just underneath each leaf. This creates a trompe l’oeil effect, making the leaves appear to float.
Step back and admire how your new architectural detail adds timeless character to your home’s exterior.
Night Sky Galaxy Bricks With Splatter Stars
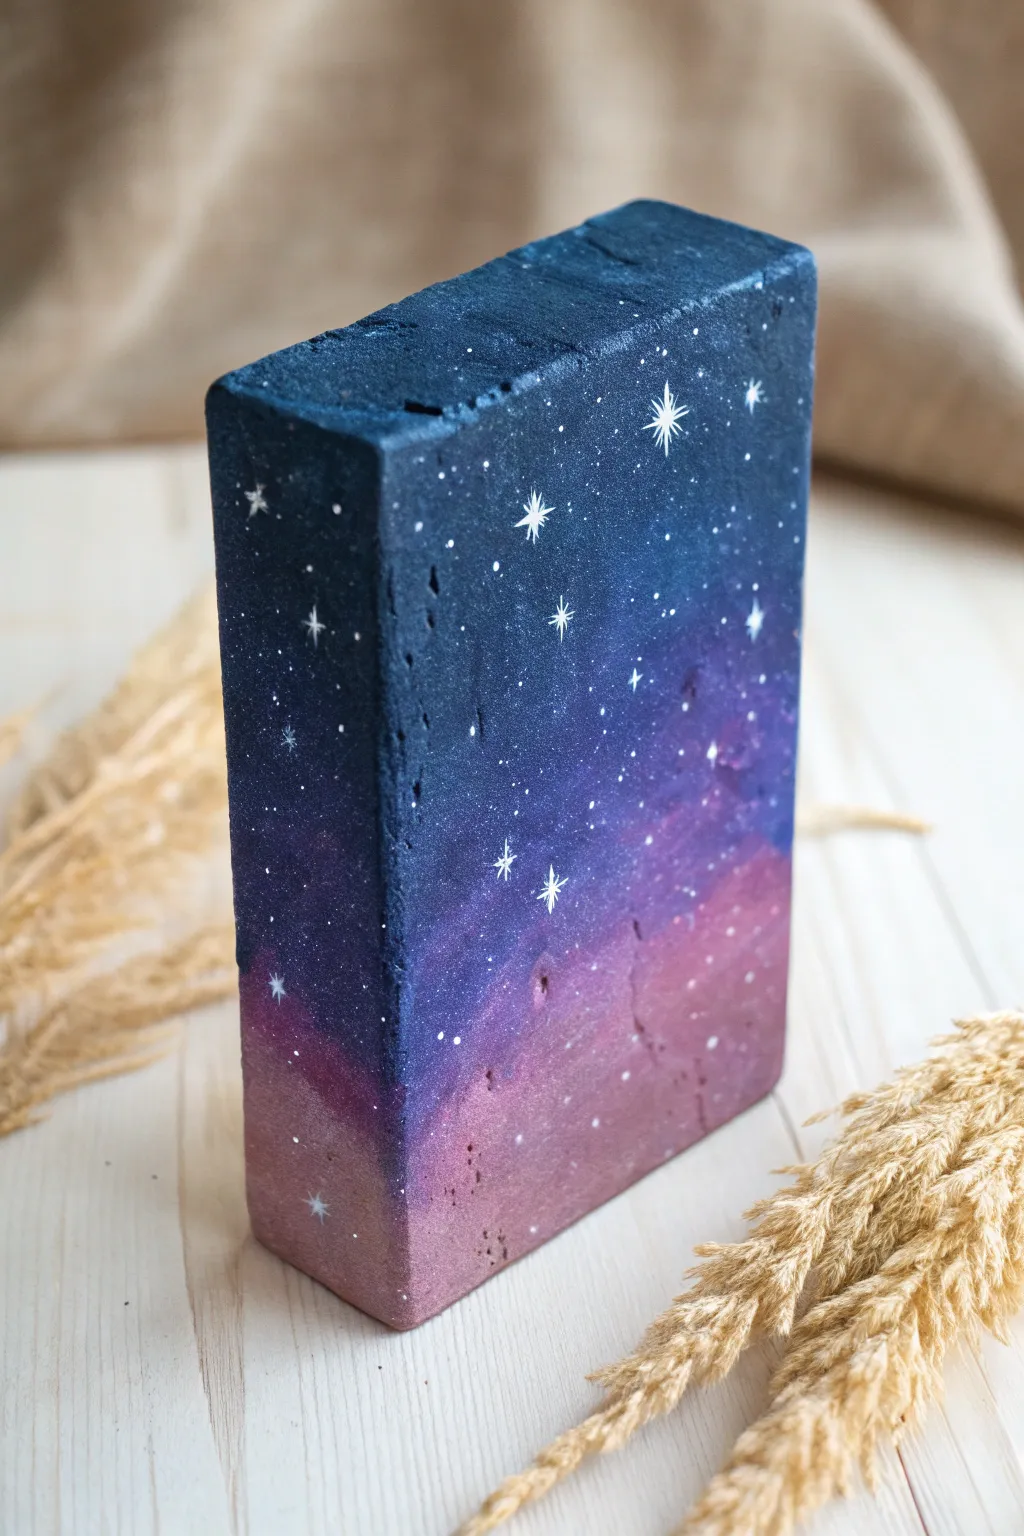
Transform a humble building material into a mesmerizing slice of the cosmos with this night sky project. Using simple blending techniques and splatter effects, you’ll create a stunning gradient that captures the magic of a starry evening.
How-To Guide
Materials
- Clean, dry brick (standard size)
- Acrylic paints: Navy Blue, Deep Purple, Magenta, Black, White
- Sponge applicators or cosmetic sponges
- Fine detail paintbrush (size 0 or 00)
- Old toothbrush or stiff bristle brush
- Water cup and paper towels
- Scrap paper or tarp
- Matte spray sealer (optional)
Step 1: Preparing the Canvas
-
Clean the surface:
Scrub your brick thoroughly with a stiff brush and water to remove any loose dust, grit, or moss. Let it dry completely for at least 24 hours before painting; trapped moisture can ruin the finish later. -
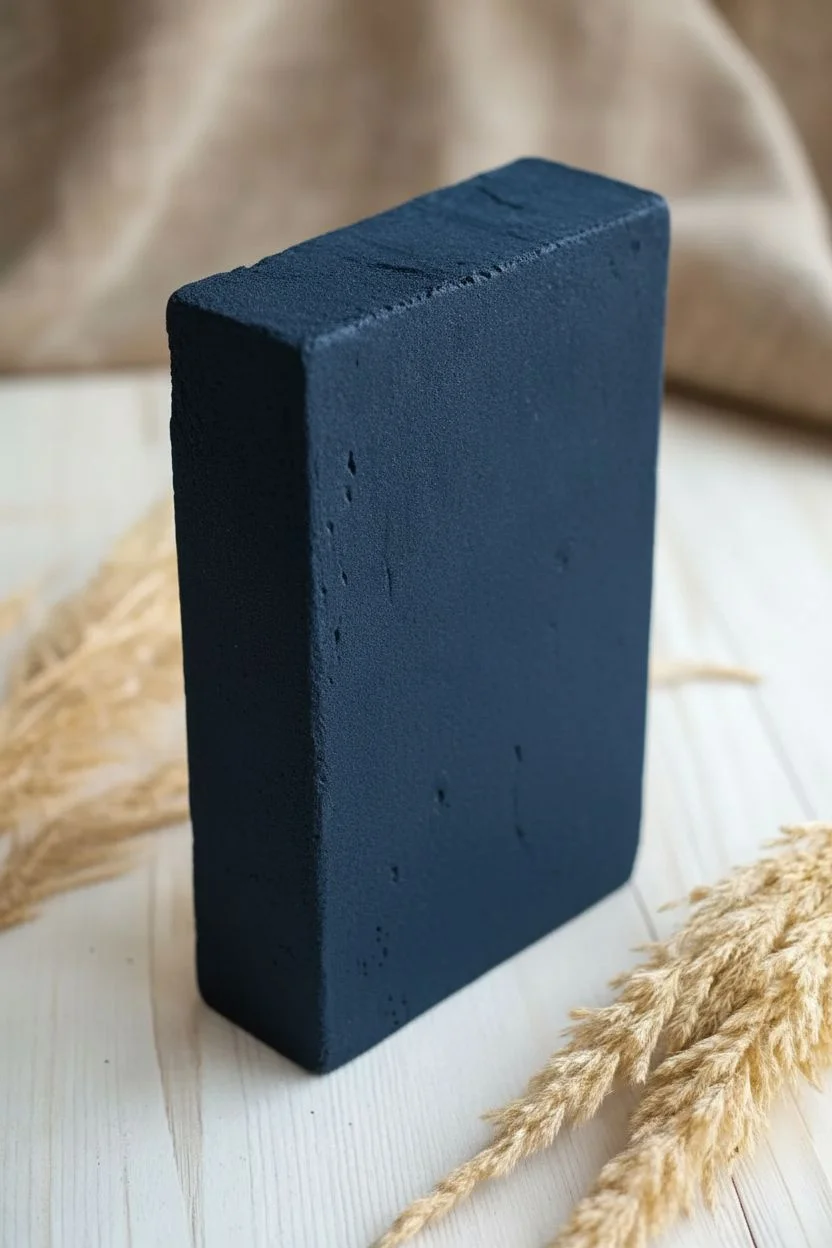
Base coat application:
Mix a small amount of black with your navy blue acrylic paint to create a very dark midnight blue. Apply this mixture over the entire surface of the brick—top, sides, and ends—to seal the pores and create a unified background color. -
Dry time:
Allow this base coat to dry fully. Bricks are porous and soak up paint, so you may notice you need a second coat of the dark blue to get solid, opaque coverage.
Sponge Savvy
Don’t drag the sponge! Use a rapid pouncing or tapping motion straight up and down. This mimics the cloudy, gaseous texture of a nebula much better than brushing.
Step 2: Creating the Galaxy Gradient
-
Start the gradient:
Pour small puddles of your Navy Blue, Deep Purple, and Magenta paint onto your palette. Dampen a sponge slightly and load it with the darkest Navy Blue. -
Apply the top layer:
Sponge the Navy Blue heavily onto the top third of the brick, dabbing up and down to create texture rather than brushing side-to-side. -
Blend in purple:
While the blue is still tacky, load your sponge with Deep Purple. Start dabbing in the middle section of the brick, slightly overlapping into the blue area to blur the line where they meet. -
Add the lighter tones:
Transition to Magenta for the bottom third of the brick. Dab this color near the bottom edge, working your way up into the purple section. -
Refine the blend:
Use a clean, slightly damp sponge to tap gently over the transition lines between colors. The goal is a soft, foggy look where you can’t tell exactly where one color ends and another begins. -
Adjusting saturation:
I usually step back here to check the color intensity. If the colors look dull as they dry, sponge on a second light layer of magenta or purple to make the galaxy really pop.
Splatter Control
If you accidentally create a giant white blob instead of a star, don’t wipe it! Let it dry, then sponge over it with your background color to cover the mistake.
Step 3: Painting the Stars
-
Prepare splatter paint:
Dilute a small amount of white acrylic paint with water until it reaches the consistency of heavy cream or ink. It needs to be fluid enough to fly off bristles, but opaque enough to show up against dark paint. -
Test your splatter:
Dip an old toothbrush or stiff brush into the thinned white paint. Test it on a piece of scrap paper first by running your thumb across the bristles to flick tiny droplets. -
Create distant stars:
Hold the brush about 6-8 inches away from the brick and flick the bristles to create a spray of tiny white dots across the gradient surface. Be sparing at first; you can always add more. -
Paint prominent stars:
Switch to your fine detail brush (size 0 or 00). Dip it into undiluted white paint and carefully touch the tip to the brick to create slightly larger, distinct round dots in random clusters. -
Add twinkling stars:
Choose a few of the larger round dots to turn into twinkling stars. Paint a thin vertical line through the center of a dot, extending it upward and downward. -
Finish the twinkle shape:
Paint a shorter horizontal line crossing through the same center point. It should look like an elongated cross or a four-pointed star. -
Highlighting:
Add a tiny, secondary dot of white in the very center of your four-pointed stars to make them appear to glow brighter.
Step 4: Sealing and Protection
-
Final dry:
Let the entire piece dry completely, preferably overnight. The thick layers of sponged paint can take longer to cure than regular brushstrokes. -
Seal the artwork:
If you plan to use this as a doorstop or garden decoration, spray the brick with a clear matte sealer. This protects the paint from chipping and keeps the colors vibrant without adding unnatural gloss.
Place your finished galaxy brick on a shelf or use it as a striking doorstop to add a little cosmic wonder to your room
Interactive Brick Art: Hidden Messages and Glow Layers
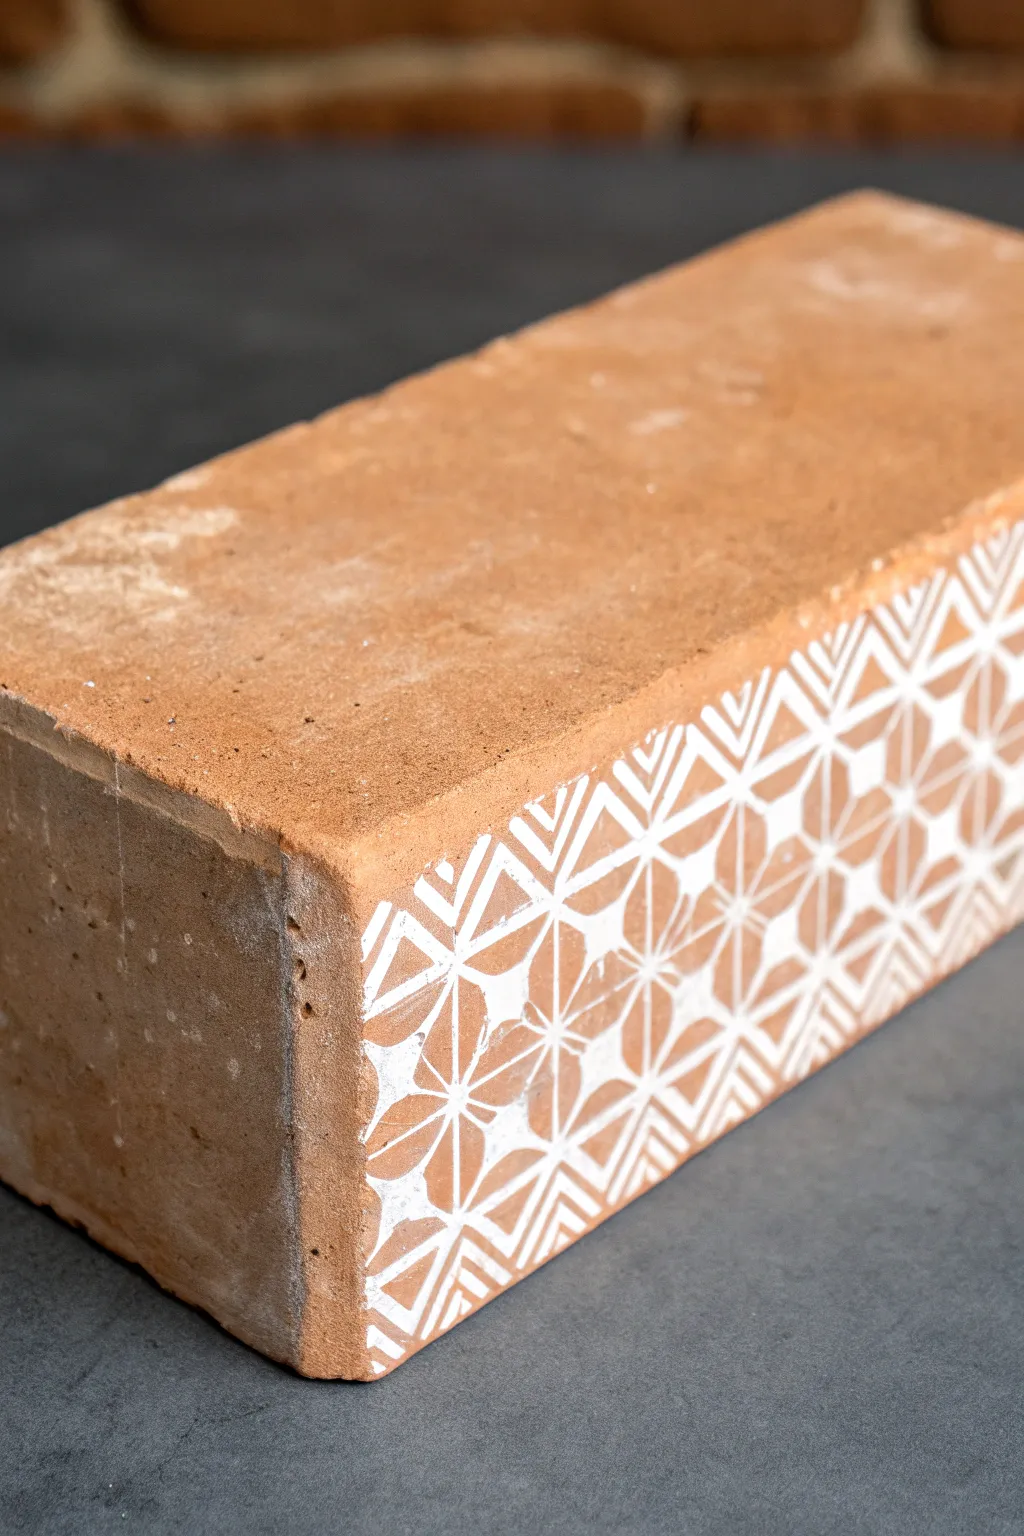
Transform a humble building material into a striking piece of decor by adding delicate, lace-like geometric patterns to raw terracotta. This project balances the rugged texture of an unglazed brick with the clean sharpness of white acrylic, creating a stunning contrast perfect for bookends or doorstops.
Detailed Instructions
Materials
- Clean terracotta brick
- White acrylic paint (high opacity)
- Small flat brush (size 2 or 4)
- Fine liner brush (size 00 or 0)
- Pencil
- Ruler
- Paper stencil (optional, graph paper works well)
- Painters tape
- Clear matte sealer spray
Step 1: Preparation & Planning
-
Clean the surface:
Before starting, scrub the brick with a stiff brush and water to remove loose dust, dirt, or crumbling clay particles. Let it dry completely for at least 24 hours, as moisture trapped inside can ruin the paint adhesion later. -
Select the display face:
Choose the smoothest long side of the brick to be your canvas. While the rustic look is desired, a surface with fewer deep craters will make painting straight lines much easier. -
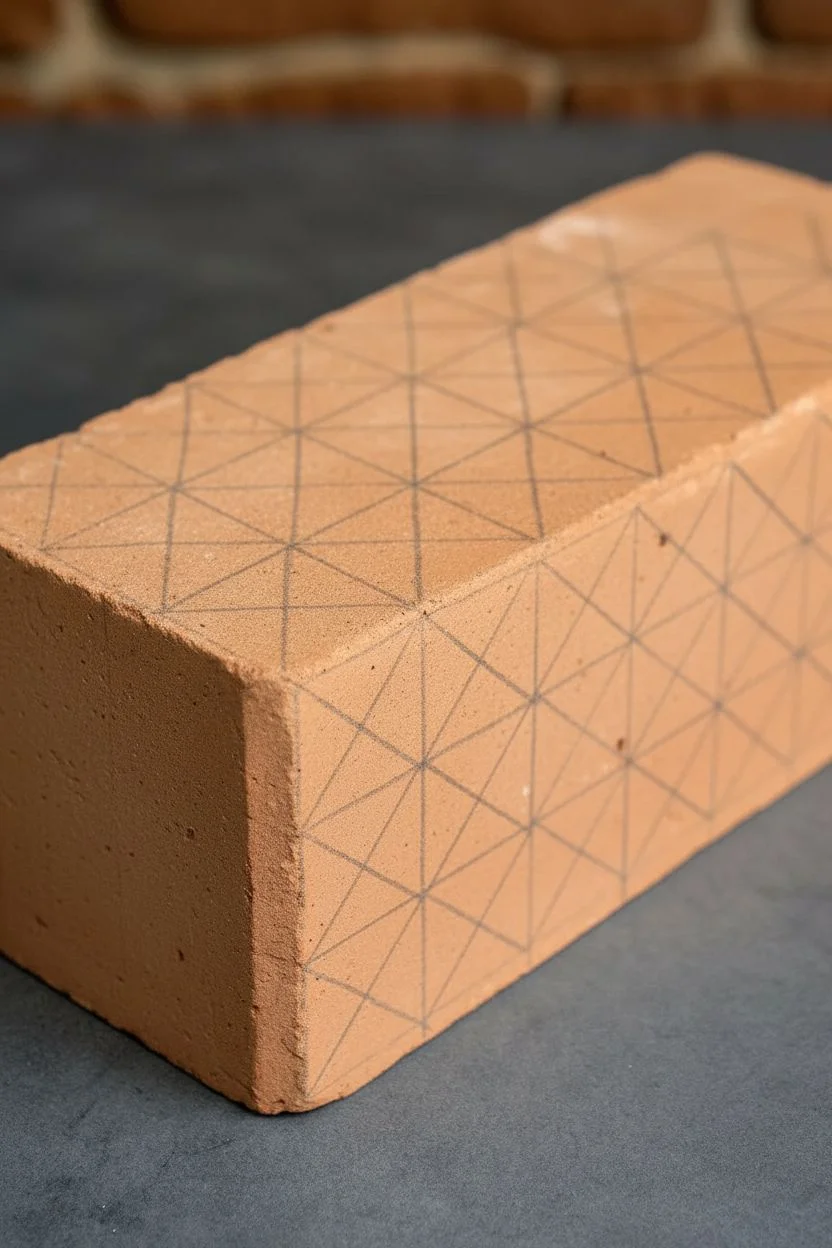
Map out the grid:
Using a ruler and a light pencil, lightly draw a grid on the chosen face. For the pattern shown, you’ll want square sections; I usually mark off 1.5-inch squares across the length of the brick. -
Draw the diagonals:
Within each square of your grid, lightly sketch an ‘X’ from corner to corner. This creates the triangular guidelines needed for the geometric starburst pattern.
Sticky Situation
Use masking tape to create the initial grid if drawing freehand feels too risky. Just peel carefully to avoid pulling up crumbly clay bits.
Step 2: Designing the Motif
-
Sketch the flower centers:
At the intersection where four grid squares meet, draw a small diamond shape. This becomes the negative space center of your floral geometric pattern. -
Outline the petals:
Sketch curved lines connecting the center points of the grid squares to the corners, creating almond-shaped petals that radiate outward. Don’t worry about perfection; the paint will refine this. -
Add the chevron details:
In the remaining triangular spaces between your ‘petals,’ sketch series of three to four nested V-shapes or chevron lines. These will be painted white to create the intricate lace effect. -
Review the pattern:
Step back and check that the pattern flows consistently across the brick face. Erase and adjust any sections that look uneven before you commit with paint.
Glow Up
Use glow-in-the-dark paint for the white sections. In daylight it looks classic, but at night the pattern reveals a hidden luminescence.
Step 3: Painting the Design
-
Load your brush:
Dip your fine liner brush into white acrylic paint. You want a creamy consistency—if it’s too thick, thin it with a distinct drop of water so it flows smoothly over the rough brick texture. -
Paint the main lines:
Start by painting over your pencil grid lines and the main diagonal ‘X’ lines. Use a steady hand and pull the brush towards you for the straightest lines. -
Fill the solid shapes:
Switch to a small flat brush to fill in the larger white triangular areas at the outer edges of the pattern. You may need two coats here to ensure the terracotta doesn’t bleed through the white. -
Detail the chevrons:
Switch back to your liner brush. Carefully paint the chevron ‘V’ stripes inside the triangular sections. Leave narrow gaps of raw brick showing between the white lines to define the pattern. -
Refine the edges:
Go over the edges of your design where the paint meets the unpainted brick face. Sharpen any fuzzy lines or drips with a slightly damp, clean brush or by carefully scraping away excess with a craft knife once dry. -
Wrap the corner (optional):
For a finished look like the example, extend the pattern slightly onto the adjacent short end of the brick. Just continue the grid lines about half an inch around the corner.
Step 4: Finishing Touches
-
Let it cure:
Allow the white acrylic paint to dry fully. Since brick is porous, it might dry to the touch quickly, but give it a good hour to be safe. -
Erase guidelines:
If visible pencil marks remain in the unpainted negative spaces of the design, gently use a kneaded eraser to lift them without smudging the surrounding dust. -
Seal the work:
Spray the painted face with a clear matte sealant. This protects the white paint from scuffs and dirt without changing the natural, dry look of the terracotta. -
Add felt pads:
If using this as a doorstop or bookend, stick felt pads to the bottom of the brick to prevent it from scratching your floors or shelves.
Enjoy your customized architectural accent piece that blends industrial texture with delicate design


Have a question or want to share your own experience? I'd love to hear from you in the comments below!