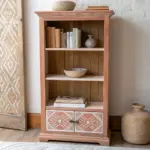
If your built-in bookshelves are feeling a little flat, a smart paint plan can instantly make them look custom and intentional. These are my go-to painting ideas—from classic, no-regrets upgrades to artsy details that make people stop and stare.
Contrasting Back Panel for Instant Depth
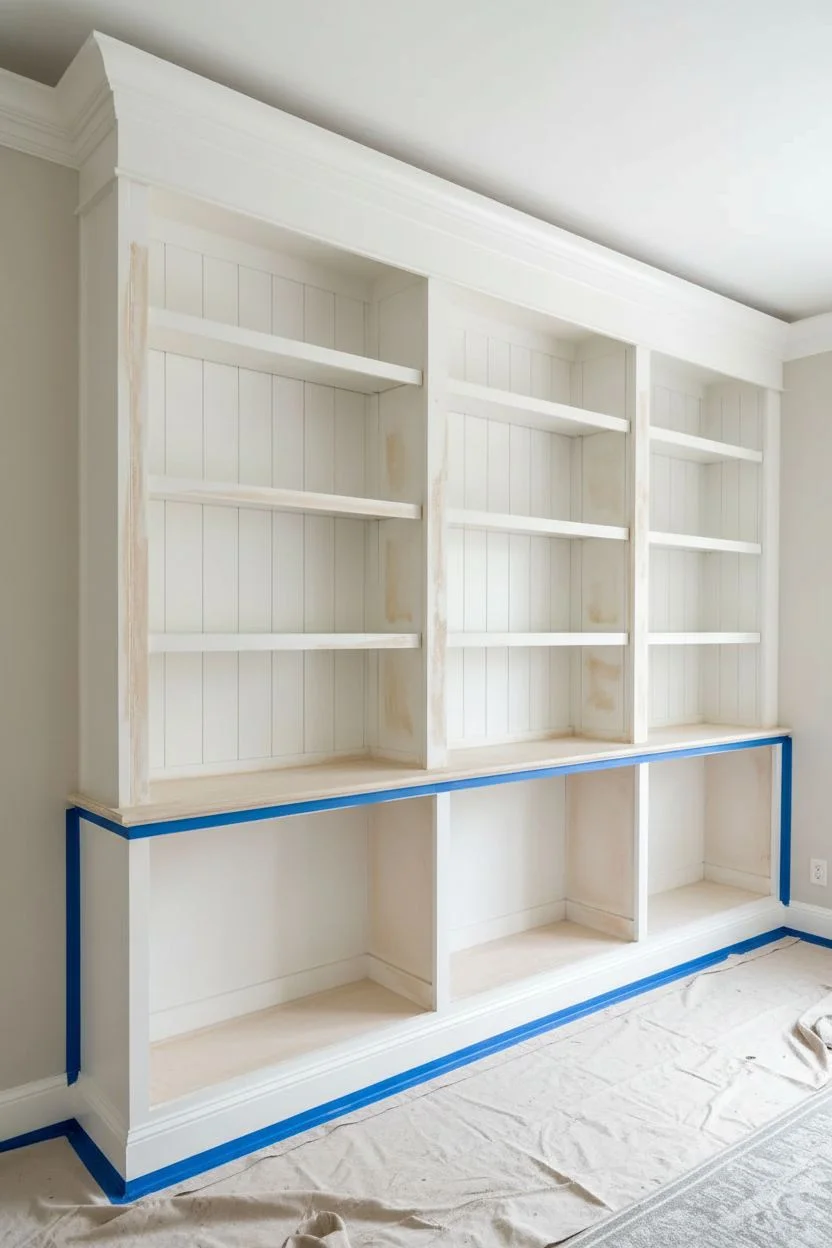
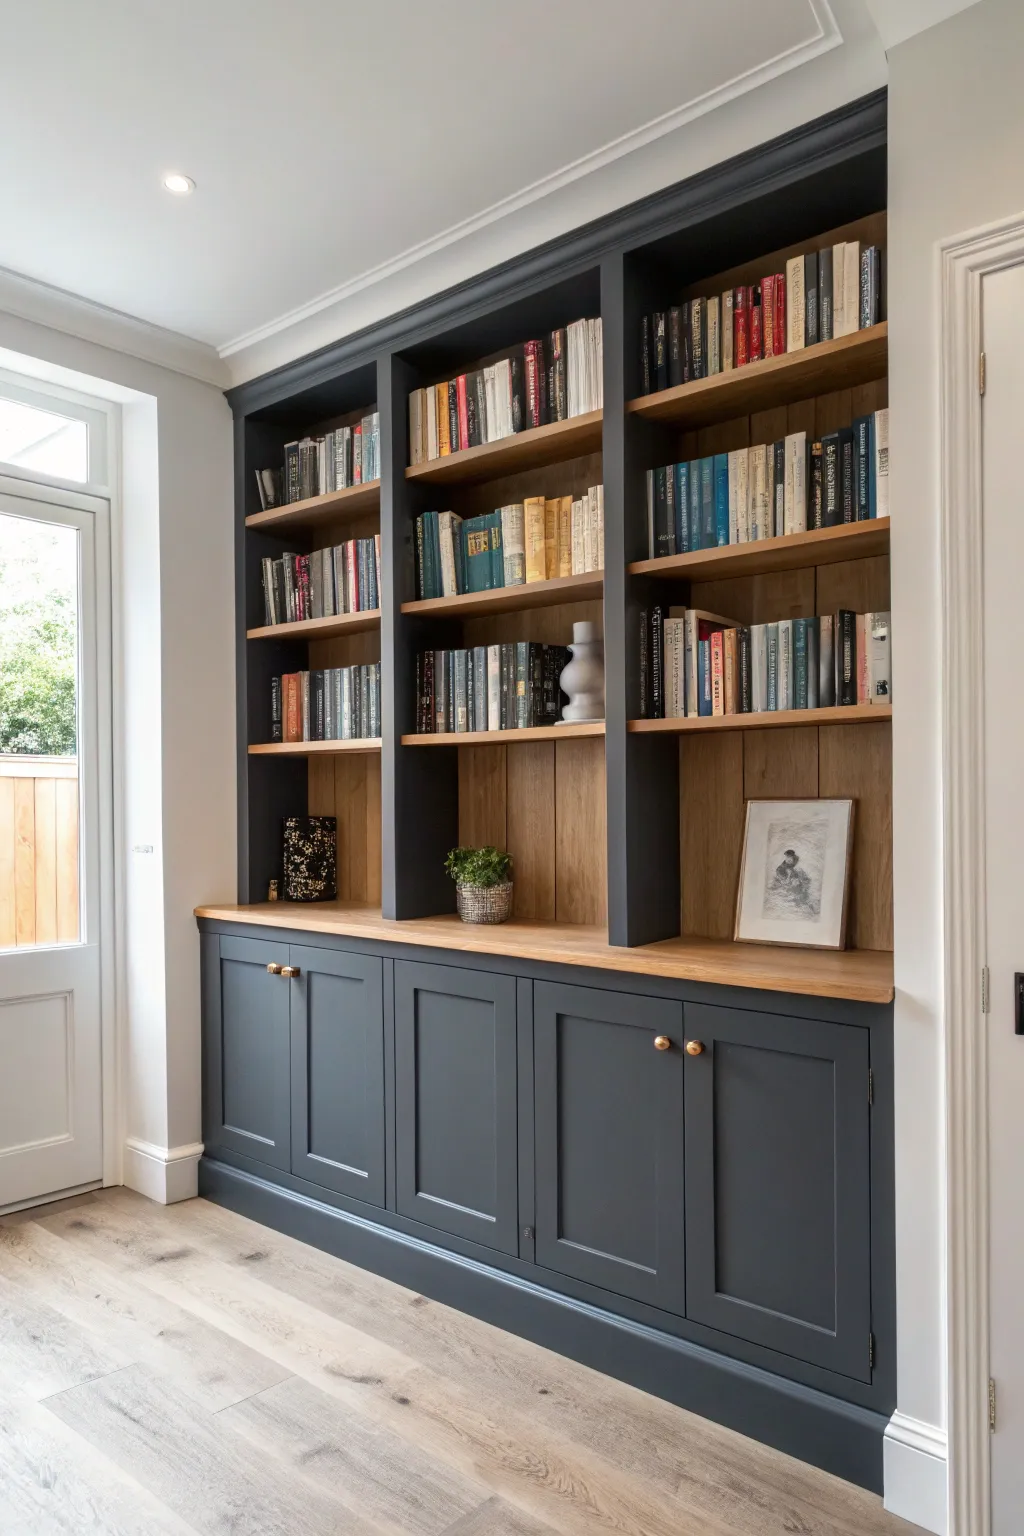
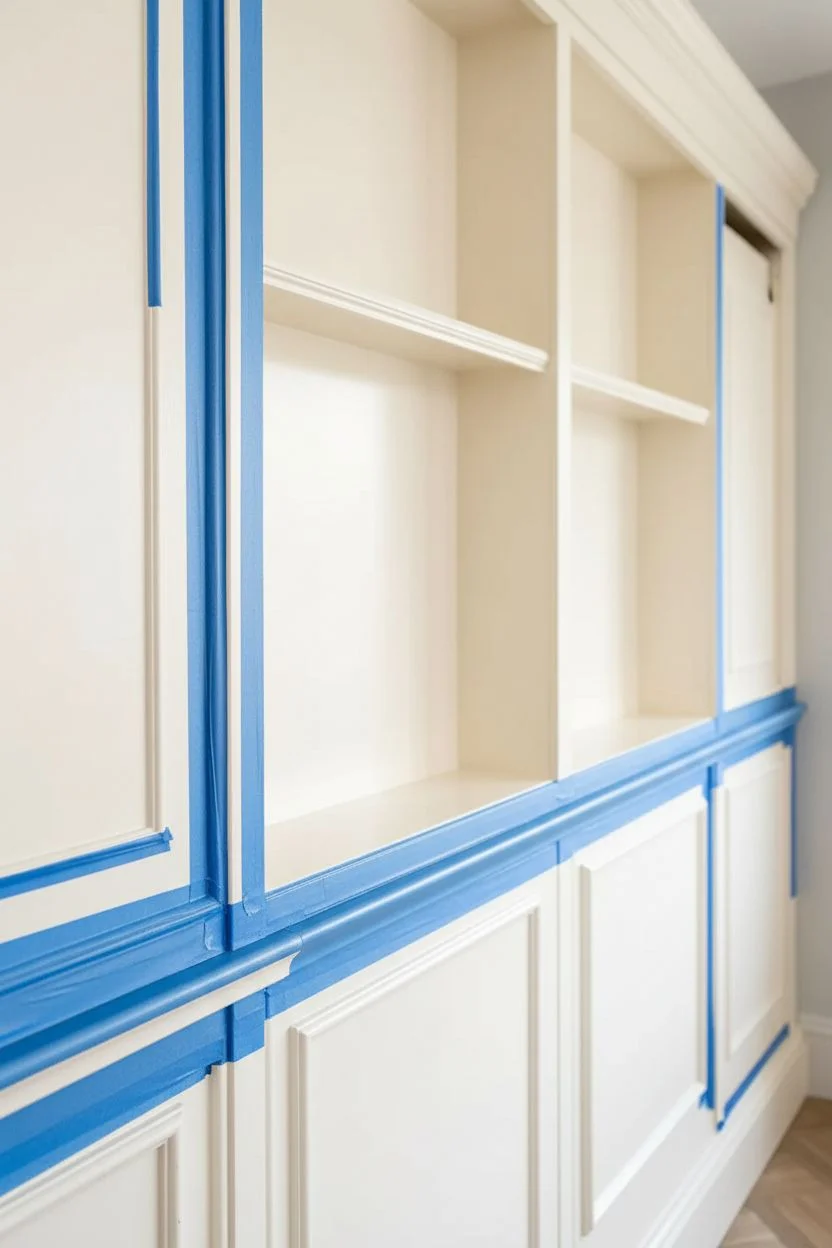
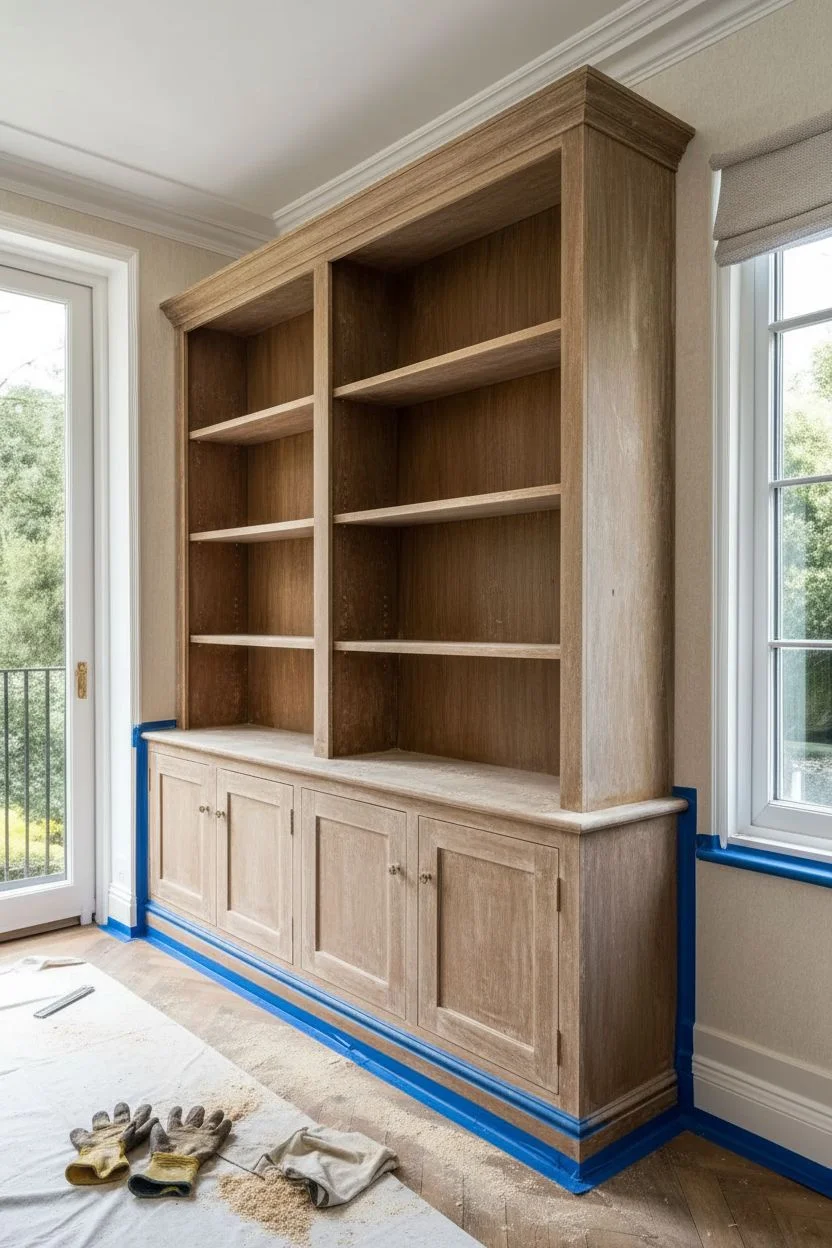
Transform a standard built-in or freestanding bookcase into a stunning focal point by adding a high-contrast back panel. This project uses deep navy paint against creamy white shelving to create sophistication and depth that makes your decor pop.
Step-by-Step Tutorial
Materials
- High-quality interior trim paint (Cream/Off-White)
- High-quality interior paint (Deep Navy Blue)
- Painter’s tape (high adhesion for clean lines)
- Sanding block (medium and fine grit)
- Tack cloth
- Small foam roller (4-inch) and handle
- Angled sash brush (1.5 or 2 inch)
- Drop cloths
- Screwdriver (if shelves are removable)
- Primer (bonding primer recommended)
Step 1: Preparation & Priming
-
Clear and Clean:
Remove all books, decor, and adjustable shelves from the unit. Wipe down every surface with a damp cloth and mild degreaser to remove dust and oils. -
Sand Surfaces:
Lightly scuff sand the entire unit, including the back panel and the frame, using medium-grit sandpaper. You aren’t trying to strip the finish, just creating ‘tooth’ for the new paint to grip. -
Dust Removal:
Vacuum out the corners and wipe everything down with a tack cloth to ensure absolutely no dust remains. -
Prime the Backing:
Apply a coat of bonding primer specifically to the back panel where the dark color will go. Use a brush to get into the grooves if your backing is beadboard like the inspiration image. -
Prime the Frame:
Prime the shelves and exterior frame as well. Let the primer cure fully according to the can’s instructions.
Clean Line Secret
If you have removable shelves, paint them separately on a drop cloth. It’s much faster than taping off every single shelf inside the unit.
Step 2: Painting the Framework
-
First Coat on Frame:
Start with your creamy off-white color. Paint the face frame, the sides, and the shelves. I find using a small foam roller gives the smoothest finish on these flat surfaces. -
Brush Work:
Use your angled sash brush to paint the corners and edges where the roller can’t reach, but be careful not to get too much white paint on the back panel you intend to paint blue. -
Second Coat:
Once dry, lightly sand with fine-grit paper, wipe clean, and apply a second coat of the cream paint for full coverage. -
Cure Time:
Allow the lighter paint to dry completely—ideally for 24 hours—before moving to the next step. This is crucial for tape adhesion.
Texture Play
No beadboard? No problem. Use vertical textured wallpaper on the back panel before painting to mimic the wood grooves perfectly.
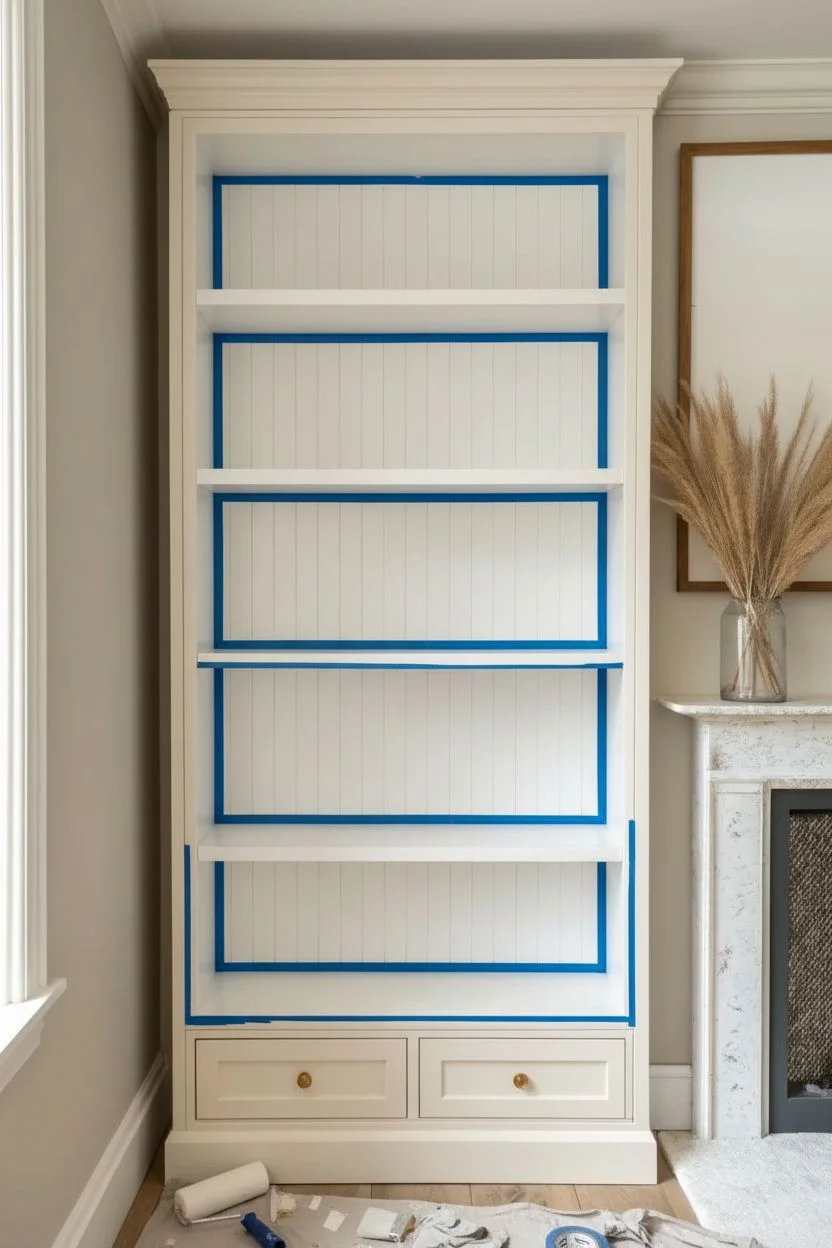
Step 3: Applying the Contrast
-
Tape the Edges:
Carefully apply painter’s tape along the interior corners where the side walls meet the back panel. Press the tape edge down firmly with a credit card to prevent bleed-through. -
Seal the Tape:
Brush a tiny amount of the *cream* paint over the edge of the tape. This seals the line so the dark blue won’t seep under. -
Cut In the Navy:
Using a clean angled brush, cut in the deep navy paint along the edges and into the grooves of the beadboard paneling. -
Roll the Back:
Use a fresh foam roller to apply the navy paint to the flat sections of the back panel. Work in vertical strokes for a uniform finish. -
Second Dark Coat:
Wait for the recommended drying time, then apply a second coat of navy to ensure a rich, opaque color. -
Remove Tape:
While the second coat is still slightly tacky (not fully dry), slowly peel off the painter’s tape at a 45-degree angle to reveal crisp lines.
Step 4: Styling & Finish
-
Cure Shelves:
Let the shelves cure for several days before putting heavy items back on them to prevent the paint from sticking or peeling. -
Reinsert Shelves:
Ideally, place your adjustable shelves back into the unit carefully to avoid scraping your fresh paint job. -
Curate the Look:
Arrange books with spines facing inward (as seen in the photo) or cover them in neutral paper to maintain the calm aesthetic. -
Add Ceramics:
Place textured white or cream ceramics on the shelves; the contrast against the navy background will make their shape pop.
Step back and admire how that simple pop of color completely completely redefines the character of your room


Full Monochrome Built-In Statement

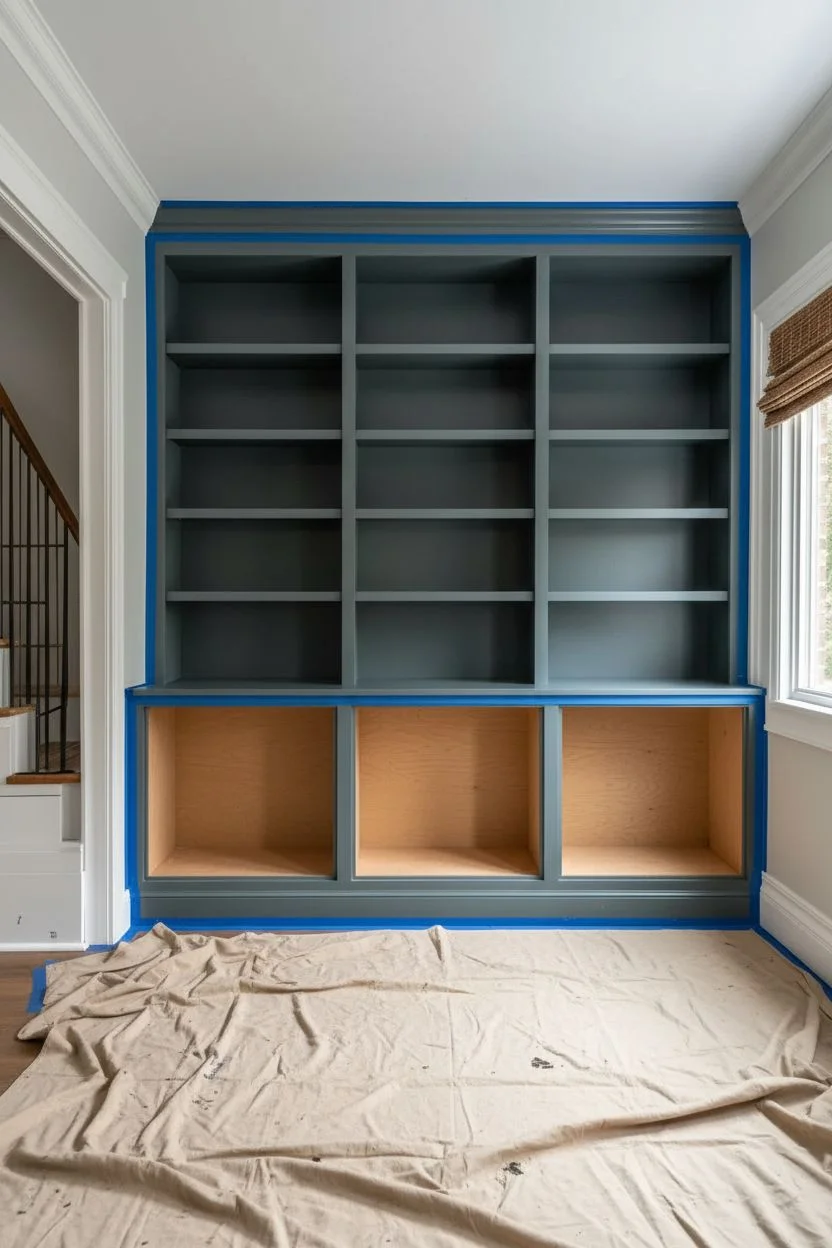
Transform ordinary built-ins into a sophisticated focal point by enveloping them in a rich, moody hue from crown molding to baseboards. This monochromatic approach creates depth and allows your styled collection of books and decor to truly pop against the dark background.
Detailed Instructions
Materials
- Interior latex paint (Satin or Semigloss finish)
- High-quality bonding primer
- Tri-sodium phosphate (TSP) substitute cleaner
- Sanding sponges (120 and 220 grit)
- Tack cloth
- Painter’s tape (multi-surface)
- Drop cloths or rosin paper
- Angled sash brush (2.5 inch)
- Small foam roller (4-inch) and handle
- Roller tray and liners
- Screwdriver or drill
- Wood filler (optional)
- Caulk and caulk gun (optional)
Step 1: Preparation & Cleaning
-
Clear and remove hardware:
Start by completely emptying the shelves. Remove all cabinet doors and drawers using your screwdriver or drill. Take off all knobs, pulls, and hinges, and store them in labeled bags so nothing gets lost. -
Protect the area:
Lay down drop cloths or rosin paper to protect your hardwood floors. Apply painter’s tape carefully along the walls where the built-in meets the drywall, and along the floor edges to ensure crisp lines later. -
Clean thoroughly:
Built-ins accumulate years of dust and oils. Scrub every surface—shelves, backing, and cabinet fronts—with a TSP substitute and a sponge. Let everything dry completely before moving on.
Sticky Shelves?
If books stick to the shelves even after drying, apply a coat of clear polycyclic wax or place small felt pads on the bottom corners of your books to protect the finish
Step 2: Sanding & Repairs
-
Fill imperfections:
Inspect the wood for any deep scratches or old hardware holes you want to hide. Fill them with wood filler and allow it to dry according to the package instructions. -
Sand for adhesion:
Lightly sand all surfaces using 120-grit sandpaper. You aren’t trying to strip the old finish, just ‘scuffing’ it to create a tooth for the new paint to grab onto. I find flexible sanding sponges work best for getting into corners. -
Remove dust:
Vacuum up the sanding dust, then wipe every inch with a tack cloth. Any leftover dust will create a gritty texture in your final finish.
Metallic Pop
For an extra layer of luxury, paint the back panel of the shelves in a metallic gold or copper before styling, or swap standard knobs for unlacquered brass hardware
Step 3: Priming
-
Apply bonding primer:
Using a high-quality bonding primer is non-negotiable for furniture. Brush it into corners, seams, and detailed molding first using your angled brush. -
Roll the flat surfaces:
Switch to a small foam roller for the shelves, cabinet sides, and doors. Apply a thin, even coat of primer. Don’t worry if it looks streakier than paint; coverage isn’t the goal here, adhesion is. -
Sand usually:
Once the primer is fully dry, do a very light pass with 220-grit sandpaper to smooth out any brush marks or raised grain. Wipe clean with a tack cloth again.
Step 4: Painting
-
Cut in the edges:
Open your moody teal-charcoal paint. Start by using the angled sash brush to ‘cut in’ the difficult spots: the inside corners of the shelf boxes, around the crown molding, and the recessed panels of the cabinet doors. -
Roll the first coat:
Use the foam roller to paint the larger flat surfaces, backing, and shelves. Work in small sections to keep a ‘wet edge’ and avoid roller marks. Let this coat dry for at least 4-6 hours, or as recommended on the can. -
Assess and recoat:
Apply a second coat using the same method—brushing corners first, then rolling flats. Dark colors often require deeper saturation, so don’t be surprised if you need a third light coat for total opacity. -
Paint the doors separately:
While the main unit dries, paint the cabinet doors and drawer fronts. Lay them flat on a work surface to prevent drips and ensure a smooth, factory-like finish.
Step 5: Finishing Touches
-
Cure time:
This is the hardest part: waiting. Let the paint cure for at least 3-5 days before putting heavy heavy books back on the shelves. This prevents the paint from sticking or peeling later. -
Reinstall hardware:
Once cured, reattach your hinges and handles. If you kept your old hardware, consider giving it a quick polish or spray paint update before reinstalling. -
Remove tape:
Carefully score the edge of the painter’s tape with a utility knife before peeling it away to ensure you don’t pull up any fresh paint.
Step back and admire how a single bold color can completely redefine the architecture of your room


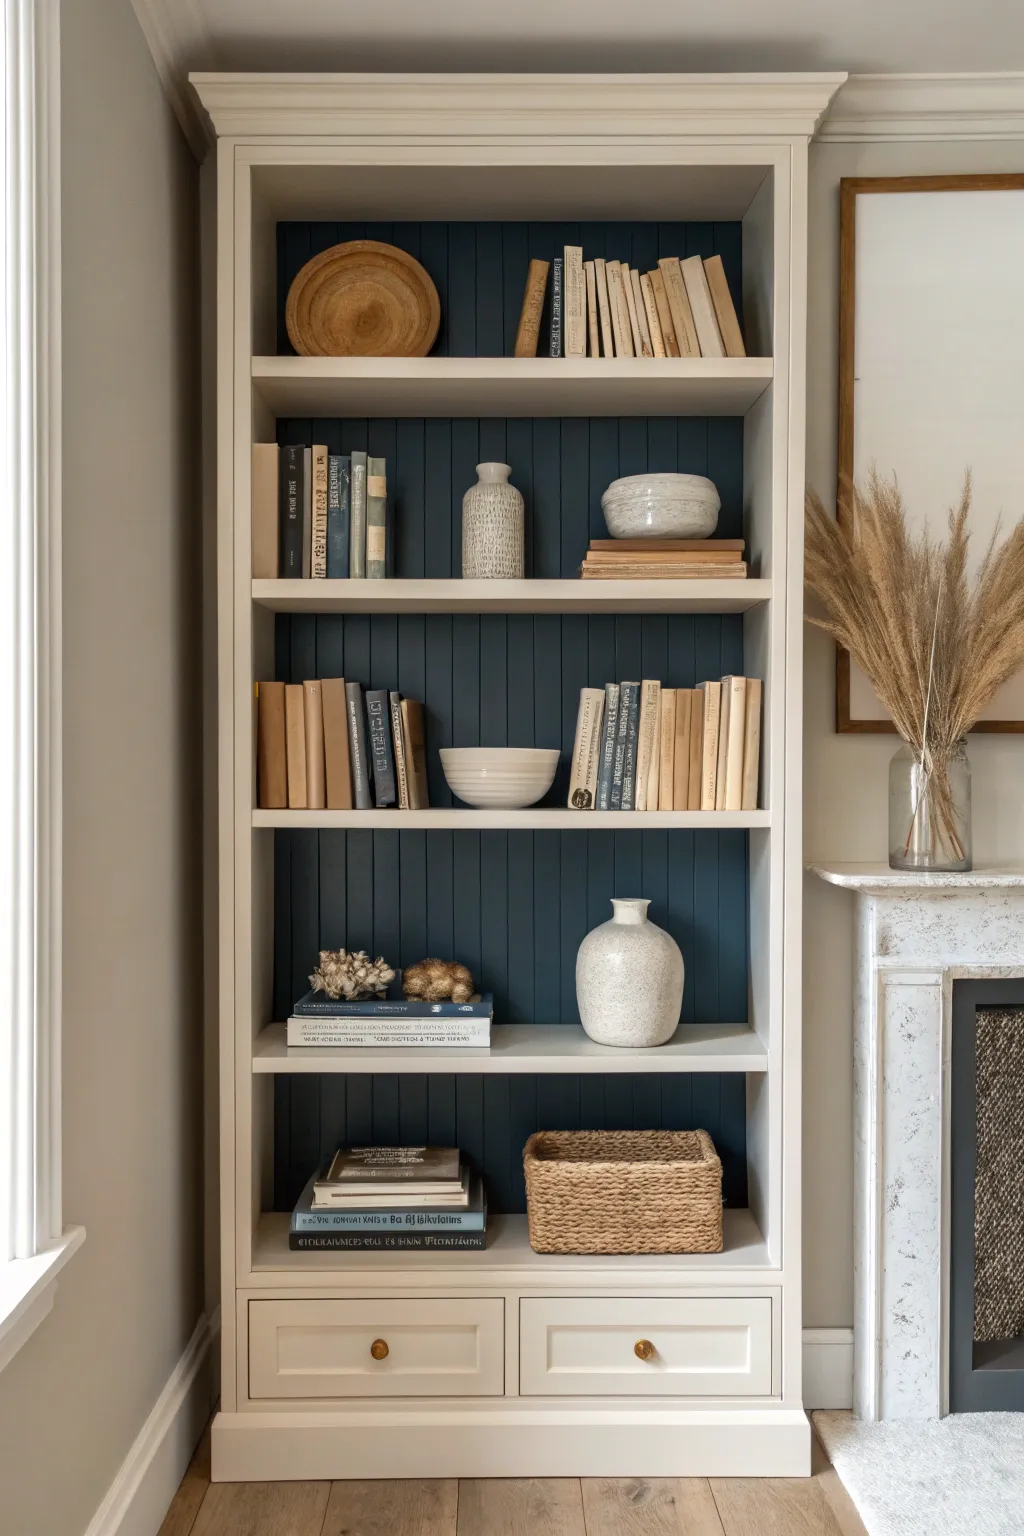
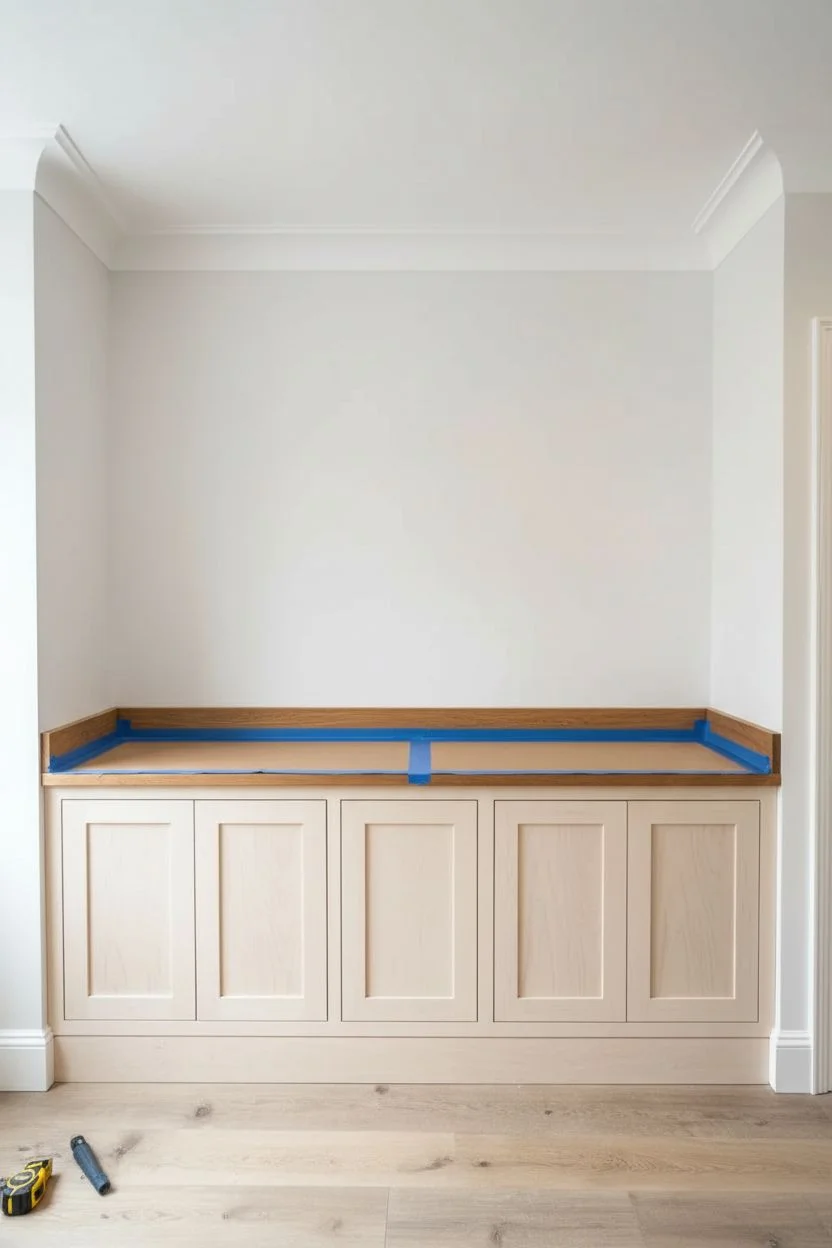
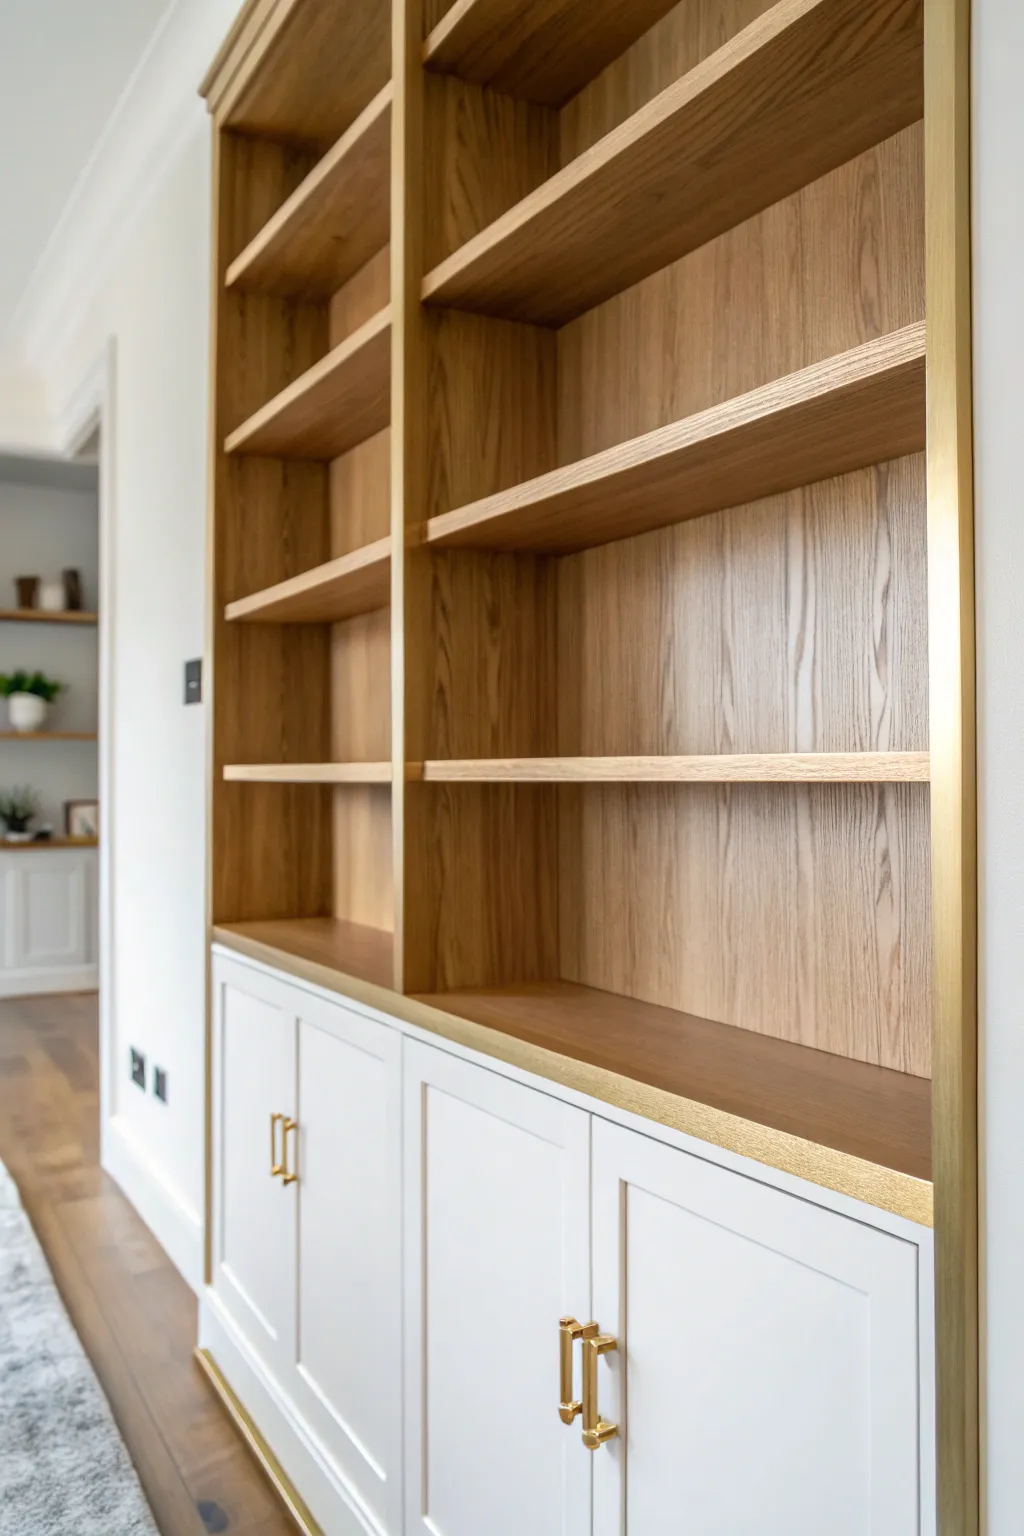
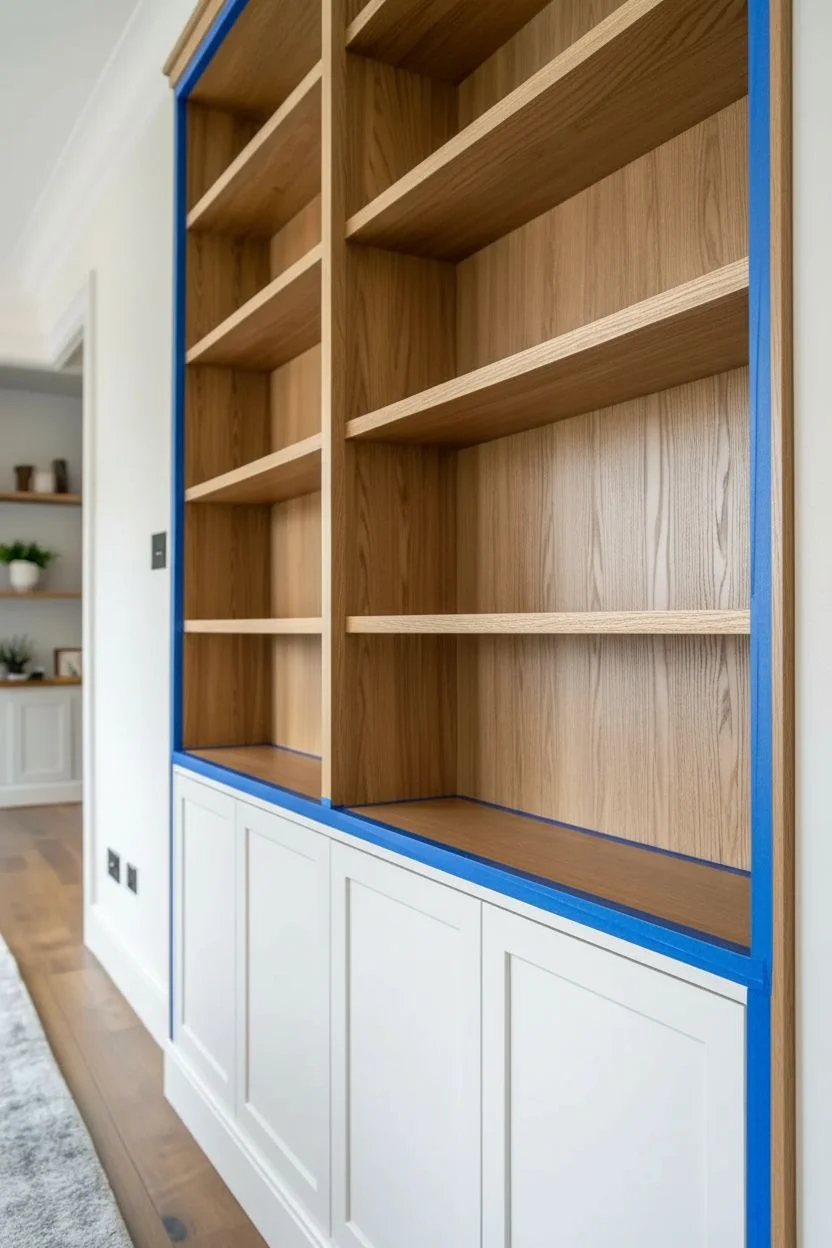
Two-Tone Frame and Interior Split

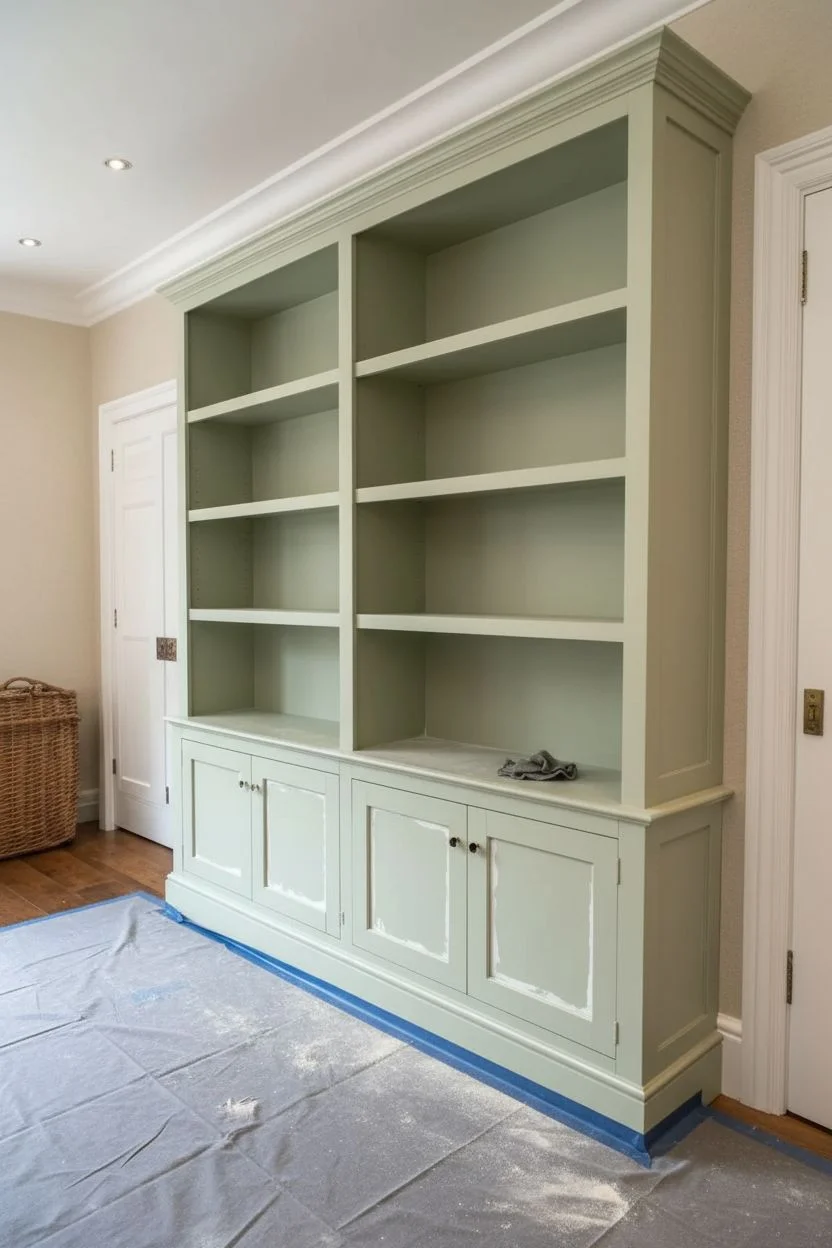
Elevate simple built-in cabinetry with this refined two-tone painting technique that adds depth without overwhelming the space. By pairing a soft sage exterior with a slightly darker interior hue, you create a sophisticated backdrop that makes books and decor pop.
Step-by-Step
Materials
- High-quality cabinetry paint (satin or semi-gloss finish)
- Interior paint color (1-2 shades darker than exterior)
- Exterior paint color (light sage green)
- Small foam roller
- 2-inch angled sash brush
- 1-inch artist brush (for tight corners)
- Painter’s tape (delicate surface)
- 120 and 220-grit sandpaper
- High-adhesion primer (oil-based or stain-blocking water-based)
- Tack cloth
- Drop cloths
- Screwdriver (for removing hardware)
- Wood filler (if repairing holes)
- Caulk and caulking gun
Step 1: Preparation & Repairs
-
Clear and Protect:
Begin by removing all books, shelves (if adjustable), and hardware from the unit. Lay down heavy drop cloths to protect your flooring, taping them right up to the base of the cabinetry. -
Remove Hardware:
Unscrew all cabinet knobs, hinges, and catches. Store them in labeled bags so you don’t lose any pieces. If you plan to update the hardware, fill the old screw holes with wood filler now. -
Clean Surfaces:
Wipe down every inch of the wood with a degreaser or a TSP substitute. Built-ins often collect unseen dust and oils that can ruin paint adhesion. -
Sanding:
Scuff sand all surfaces with 120-grit sandpaper. You aren’t trying to strip the paint, just de-glossing the surface to give the new primer something to grip. -
Caulking Gaps:
Inspect the seams, especially where the trim meets the wall or ceiling. Apply a thin bead of paintable caulk to any gaps for a seamless professional look, smoothing it with a wet finger. -
Final Clean:
Vacuum up all sanding dust, then wipe everything down thoroughly with a tack cloth to ensure a perfectly smooth surface.
Step 2: Priming
-
Prime the Interior:
Using your angled brush for corners and a foam roller for flat areas, apply a coat of high-adhesion primer to the back paneling and interior sides. Don’t worry about perfect coverage yet. -
Prime the Exterior:
Continue priming the face frames, doors, and exterior trim. Use long, smooth strokes with the roller to avoid texture buildup. -
Sand Primer:
Once the primer is fully dry (check the can for times), lightly sand everything with 220-grit sandpaper. This step is crucial for that factory-finish feel. Remove dust with a tack cloth.
Paint Bleeding?
If paint bleeds under tape on the beadboard, don’t panic. Wait for it to dry, then use a tiny artist’s brush and your background color to touch up the line precisely by hand.
Step 3: Painting the Two-Tone Effect
-
Paint the Interior Back:
Start with your darker interior color. Cut in the edges of the back panel (the beadboard area) with an angled brush. If the shelves are fixed, careful cutting-in is essential here. -
Roll the Back Panel:
Use a small foam roller to fill in the rest of the back panel. Work in small sections to keep a wet edge. I prefer to do two thin coats rather than one thick one to prevent drips. -
Dry and Tape:
Allow the darker back panel paint to cure for at least 24 hours. Then, apply delicate surface painter’s tape along the very edge where the back panel meets the side walls or shelves. -
Paint Interior Sides & Shelves:
Switch to your lighter sage color. Paint the side walls of the interior and the shelves. Brush into the corners first, then roll the flat surfaces. -
Paint the Face Frame:
Move to the exterior face frame. Use the angled brush for the molding and decorative edges, followed closely by the roller for the flat stiles and rails. -
Cabinet Doors:
Paint the cabinet doors separately, laid flat if possible to avoid runs. Paint the backs first, let them dry, flip them, and paint the fronts. -
The Second Coat:
Apply a second coat of the lighter color to all exterior surfaces and interior sides. This ensures true color depth and durability. -
Remove Tape:
Carefully peel away the painter’s tape while the final coat is still slightly tacky to ensure a crisp, clean line between the dark back and light sides. -
Reassembly:
Wait at least 48 hours for the paint to cure hard before reattaching hardware and sliding books back onto the shelves.
Level Up: Metallic Accent
Add a hidden touch of luxury by painting the very back edge (the part touching the wall) of adjustable wood shelves in gold or antique brass for a subtle metallic glint.
Enjoy styling your freshly painted shelves with your favorite collection of books and treasures


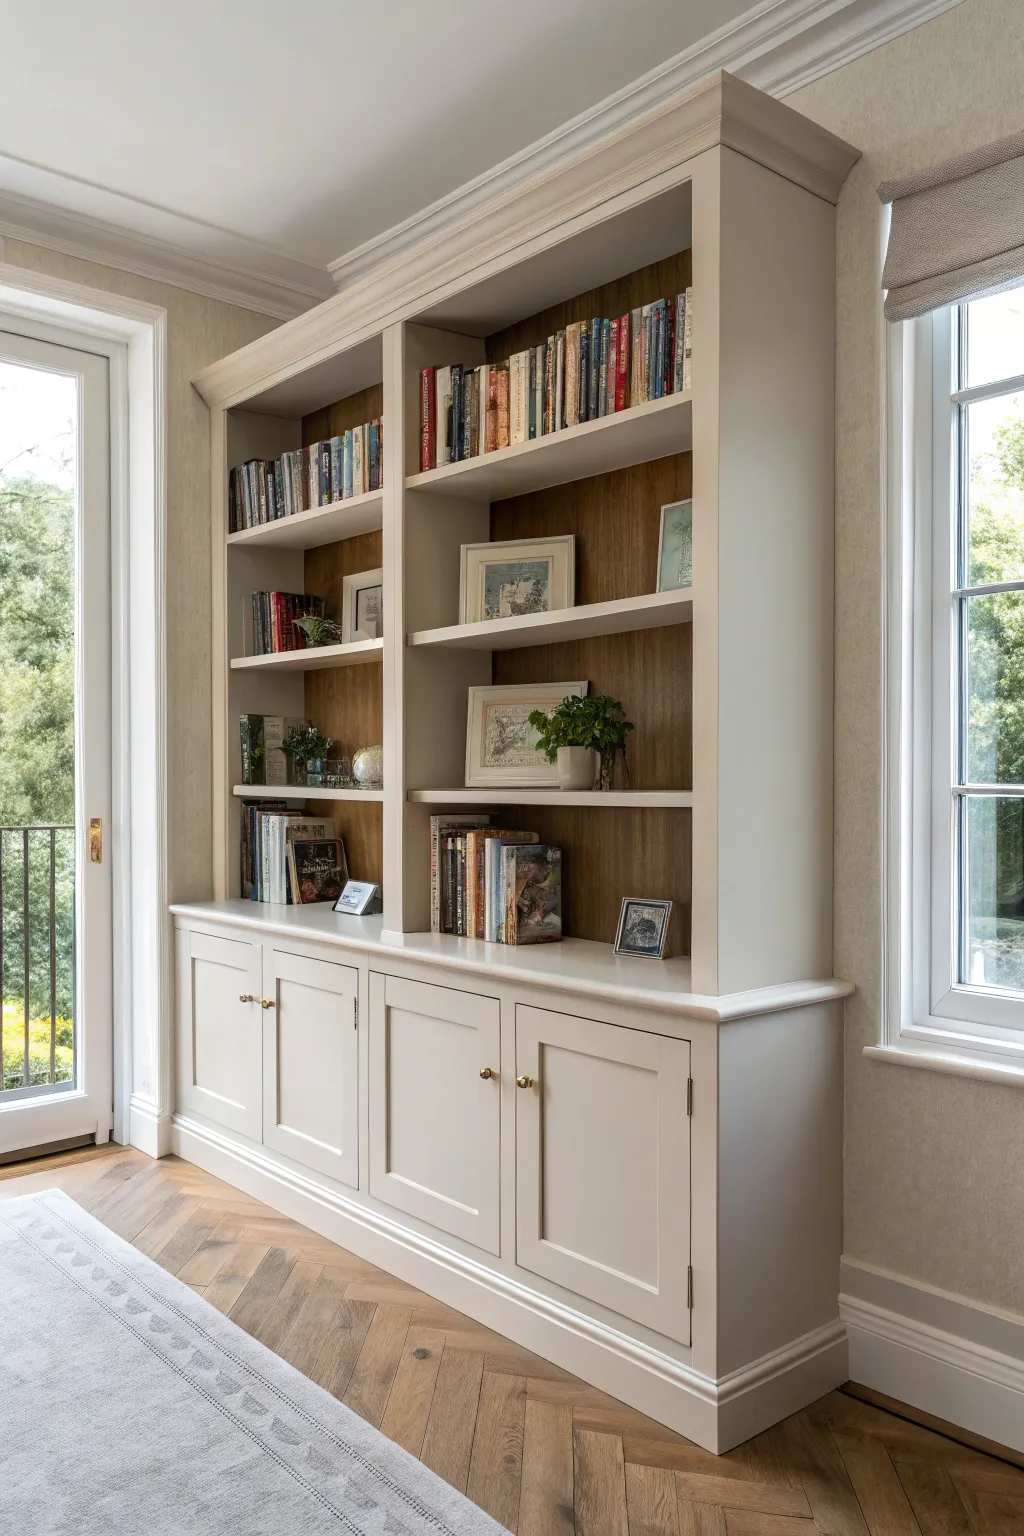
Match the Wall Color for a Seamless Look
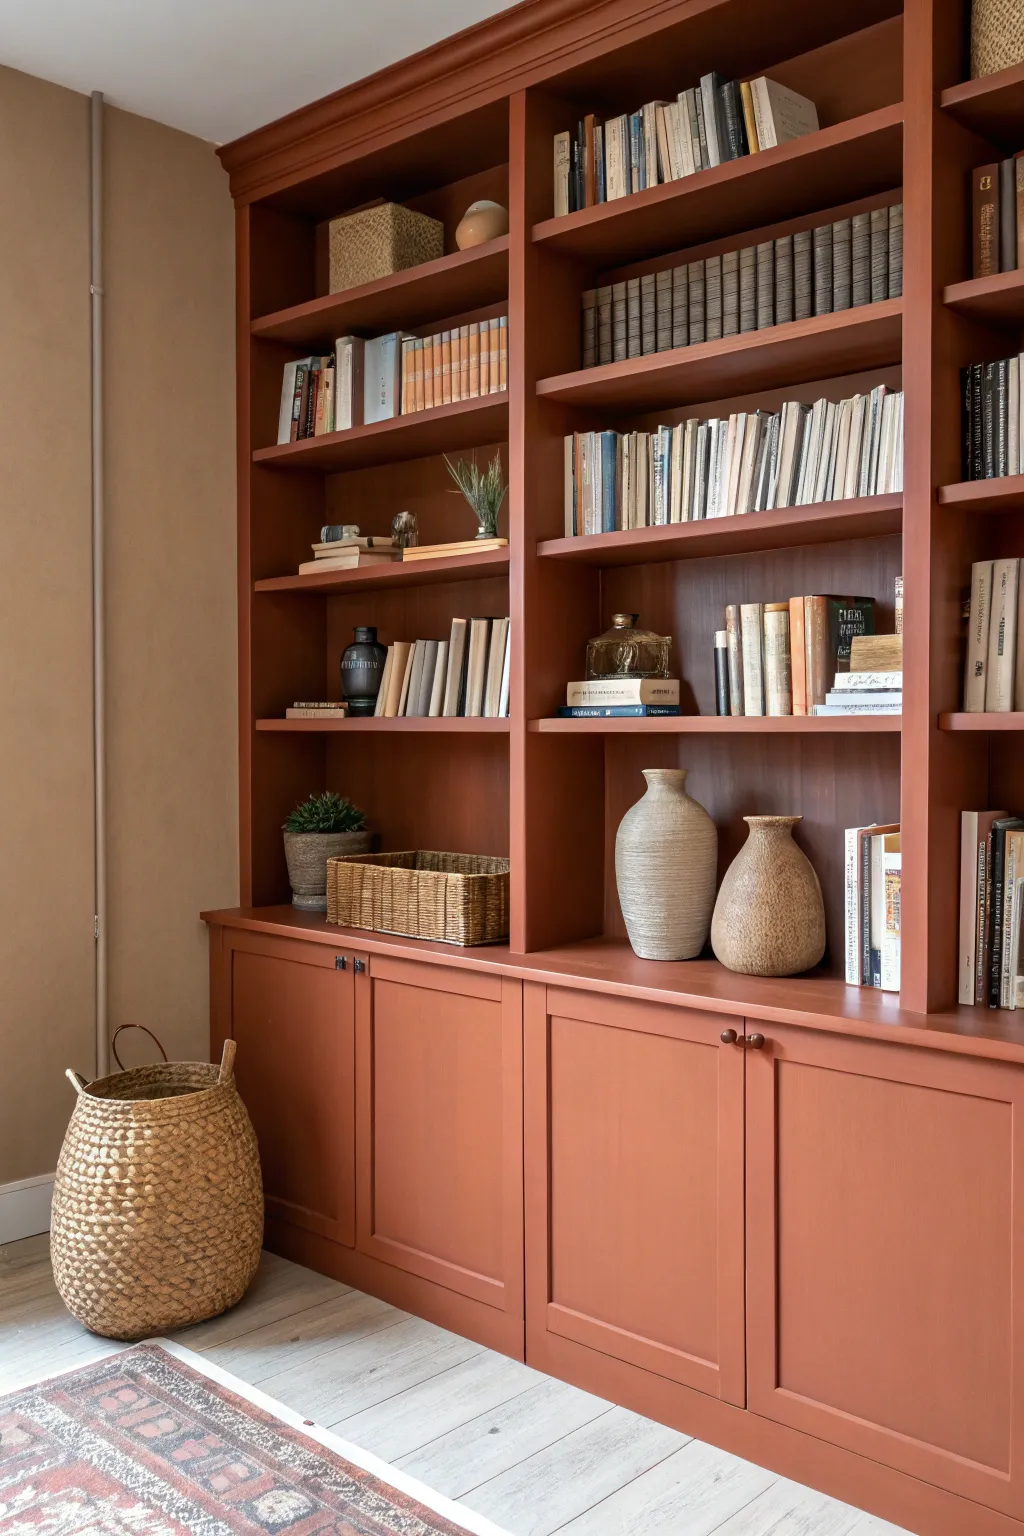
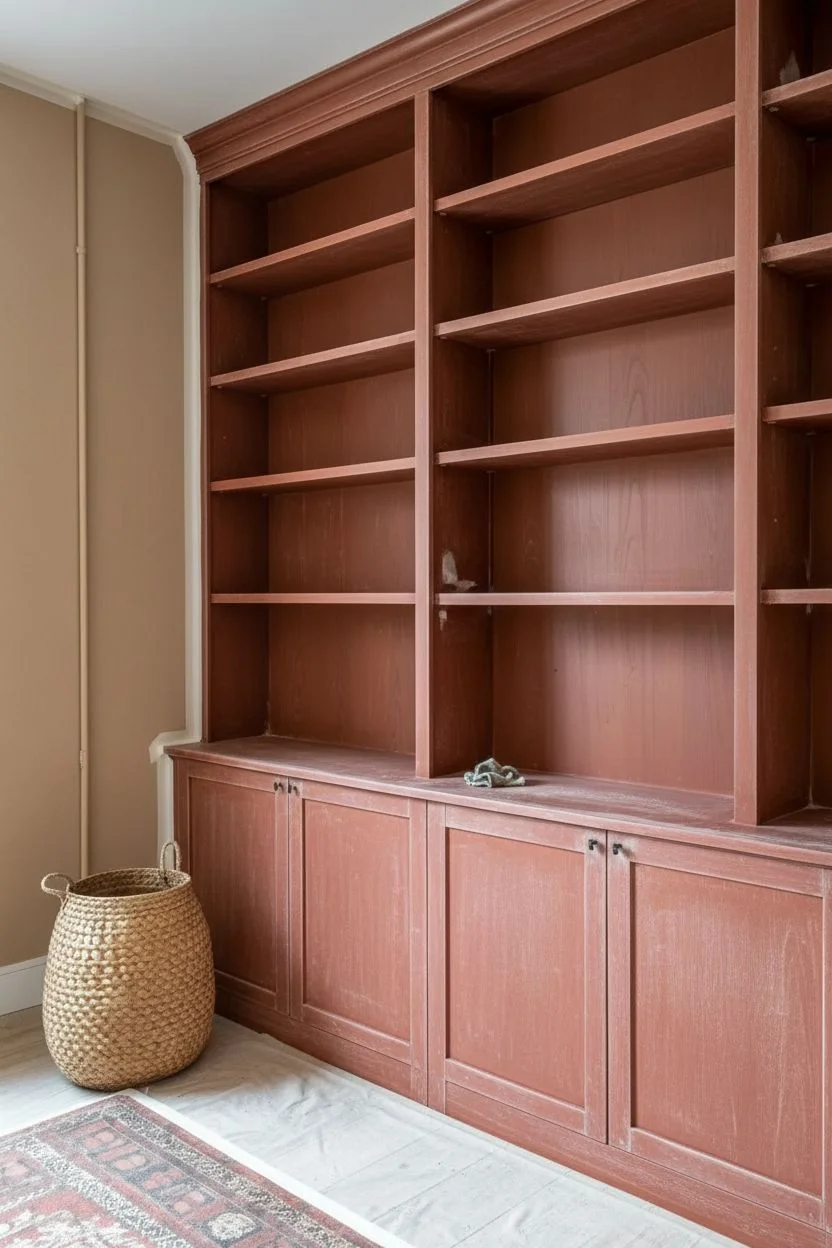
Transform ordinary built-ins into a sophisticated architectural feature by wrapping them in a warm, earthy hue that extends to the surrounding walls. This project creates a cozy, library-like atmosphere using a deep terracotta paint for a seamless, high-end finish.
Step-by-Step Tutorial
Materials
- High-quality interior paint (Satin or Semi-Gloss finish for shelves)
- Matching wall paint (Eggshell or Matte finish)
- High-adhesion primer (specifically for cabinetry)
- Wood filler or spackle
- Medium and fine-grit sandpaper (120 and 220 grit)
- Tack cloth
- Painter’s tape
- Drop cloths
- 2-inch angled sash brush
- 4-inch foam roller or mohair roller
- Paint tray and liners
- Screwdriver (for hardware removal)
- Caulk and caulk gun (paintable acrylic latex)
Step 1: Preparation & Repair
-
Clear the shelves:
Remove all books, decor, and adjustable shelves from the unit. This is the perfect time to declutter before putting things back later. -
Remove hardware:
Use a screwdriver to take off all cabinet door knobs, hinges, and shelf pins. Place them in a labeled bag so nothing gets lost during the process. -
Clean surfaces thoroughly:
Wipe down the entire built-in with a degreaser or TSP alternative to remove dust, oils, and grime, ensuring a clean base for the paint to adhere to. -
Fill imperfections:
Inspect the wood for nail holes, dents, or deep scratches. Apply wood filler to these areas, slightly overfilling them to account for shrinkage. -
Sand for smoothness:
Once the filler is dry, sand the filled areas and scuff-sand all surfaces with 120-grit sandpaper. This dulls the old finish and helps the new primer stick. -
Caulk the seams:
For that truly seamless built-in look, run a bead of paintable caulk along any gaps where the unit meets the wall or where shelves meet the frame. Smooth it with a wet finger.
Step 2: Priming & Painting
-
Protect the area:
Lay down drop cloths on the floor and apply painter’s tape to the ceiling, floor trim, and any adjacent walls you aren’t painting. -
Apply the primer:
Using your sash brush for corners and a roller for flat areas, apply a coat of high-adhesion primer. I like to let this dry overnight to ensure maximum bond. -
Lightly sand the primer:
Give the primed surface a very quick pass with 220-grit sandpaper to knock down any bumps, then wipe away the dust with a tack cloth. -
Cut in the color:
Begin applying your terracotta paint with an angled brush, hitting the corners, interior edges, and intricate trim details first. -
Roll the flat surfaces:
Use a 4-inch foam or mohair roller to paint the shelves, sides, and cabinet doors. These rollers leave a smooth, spray-like finish without brush marks. -
Paint the adjustable shelves:
Don’t forget the loose shelves you removed earlier. Set them on a flat surface and paint the edges and tops, flipping them only when fully dry. -
Apply a second coat:
After the recommended drying time, apply a second coat of paint. Deep earth tones often need two or even three coats for full, rich opacity.
Paint Finish Pro-Tip
Use a durable Satin or Semi-Gloss finish for the shelves themselves. It resists scuffs from sliding books much better than matte paint.
Step 3: Finishing Touches
-
Paint the adjacent wall:
While the shelves dry, paint the surrounding wall section in the matching color (using the matte/eggshell finish) to create the seamless visual effect. -
Let it cure:
This is the hardest part—waiting. Allow the paint to cure for at least 3-5 days before putting heavy heavy books back on the shelves to prevent sticking. -
Reinstall hardware:
Screw the hinges and knobs back onto the cabinet doors and replace the shelf pins. -
Style the shelves:
Arrange your books (some vertically, some horizontally) and mix in textured ceramics and baskets that complement the warm terracotta tone.
Level Up: Two-Tone Styling
For added depth, paint the back panel of the bookcase one shade darker than the frame. It adds subtle dimension without breaking the monochrome look.
Enjoy the cozy warmth your new seamless terracotta library brings to the room
BRUSH GUIDE
The Right Brush for Every Stroke
From clean lines to bold texture — master brush choice, stroke control, and essential techniques.
Explore the Full Guide
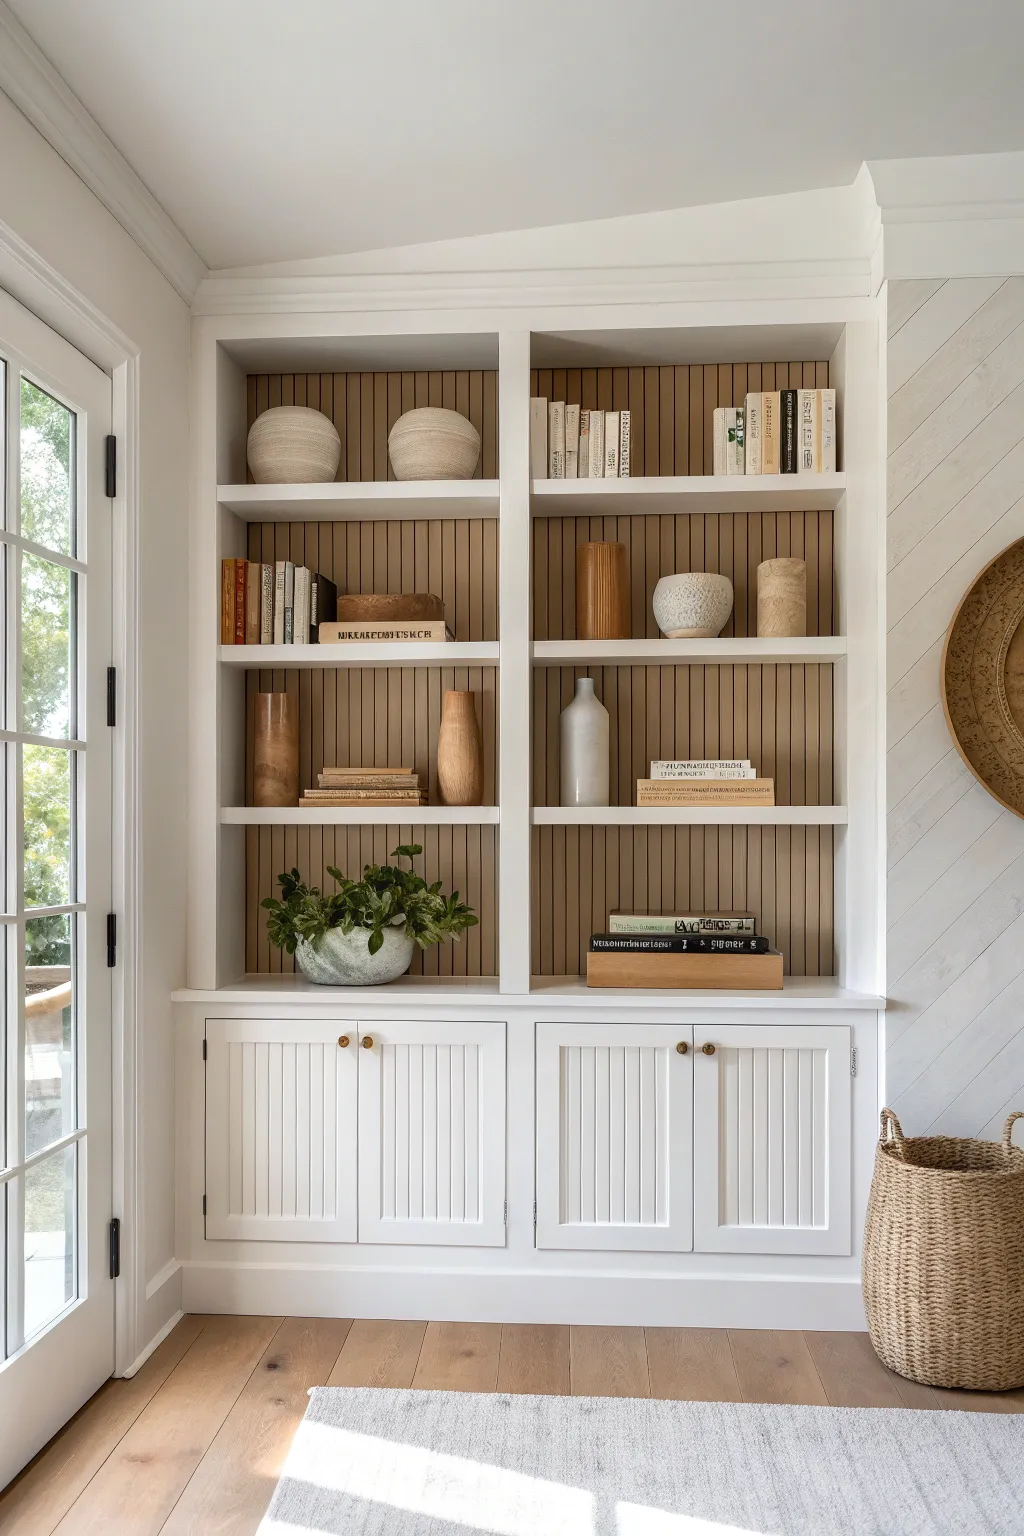
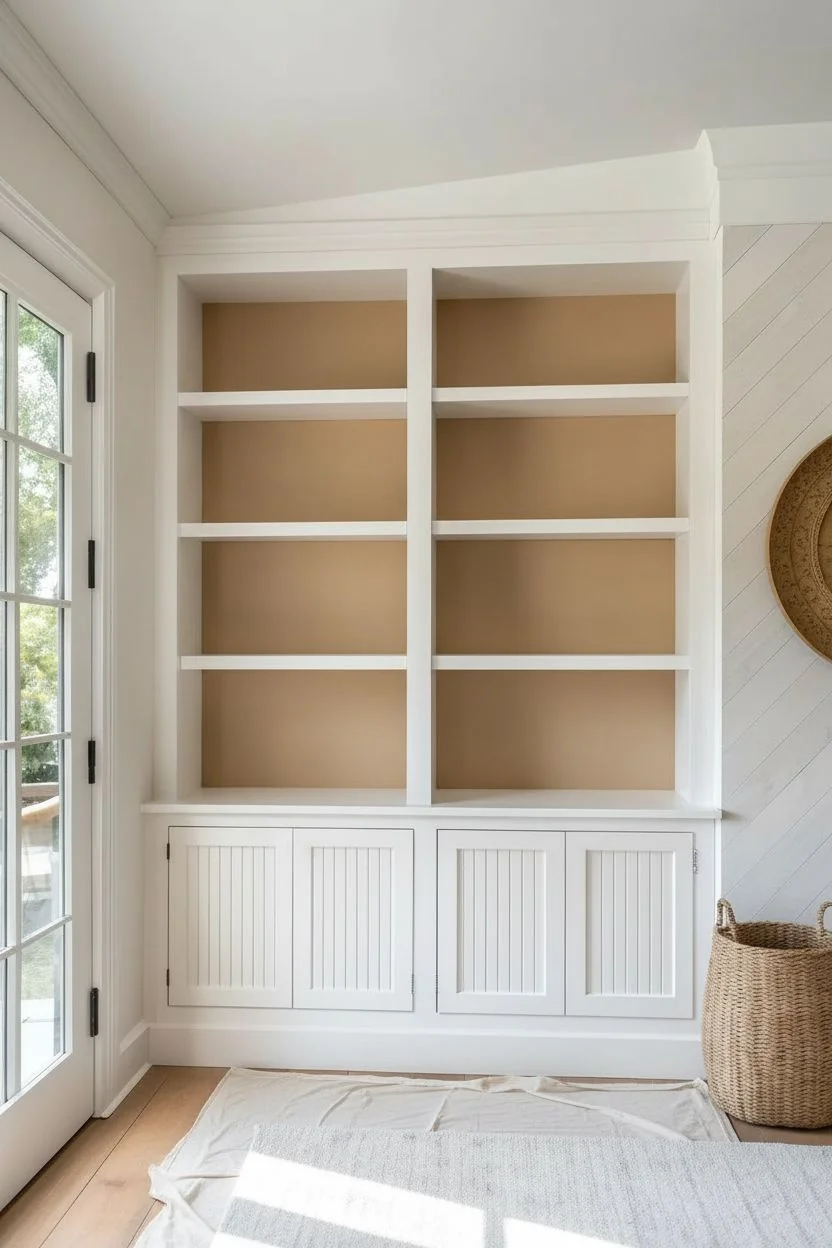
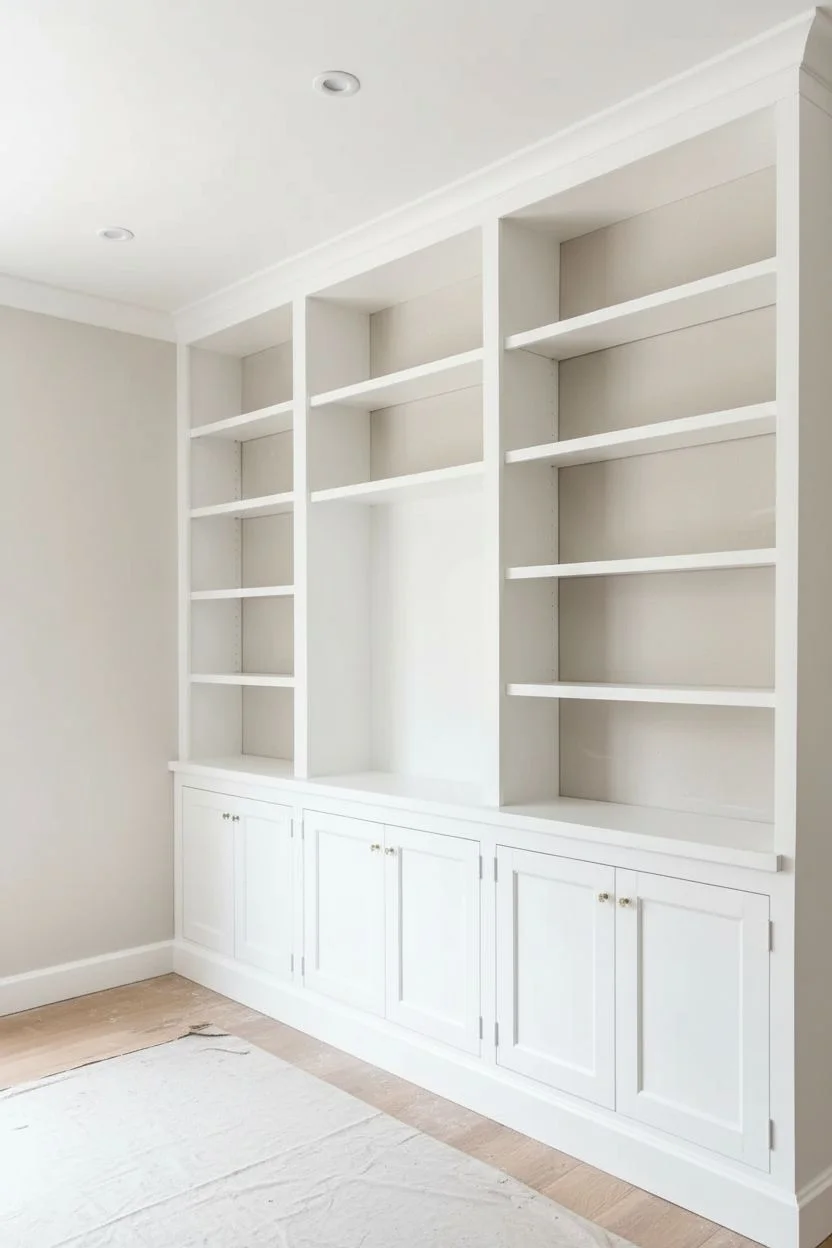
Classic Crisp White With Cleaned-Up Lines

Transform existing cabinetry or a new build into this stunning focal point using the power of crisp white paint and thoughtful prep work. This project achieves a seamless, high-end finish that brightens the room while showcasing clean architectural lines.
Step-by-Step
Materials
- High-quality bonding primer (oil-based or stain-blocking acrylic)
- Semi-gloss or satin enamel paint in bright white (e.g., Chantilly Lace or Simply White)
- 220-grit sandpaper blocks and loose sheets
- Tack cloth
- Painter’s caulk and caulk gun
- Wood filler or spackling paste
- Putty knife
- High-quality 2-inch angled sash brush
- 4-inch foam roller or mohair roller for smooth finishes
- Small paint tray and liner
- Drop cloths and painter’s tape
- Screwdriver (for removing hardware)
- Clean rags and degreaser (like TSP or a substitute)
Step 1: Preparation & Cleaning
-
Clear and unscrew:
Start by removing all books, decor, and adjustable shelves from the unit. Unscrew any cabinet doors and remove hinges and knobs, labeling them in bags so reassembly is headache-free later. -
Deep clean:
Wipe down every inch of the wood with a degreaser. Kitchen-adjacent built-ins often harbor invisible oils that can ruin a paint job, so be thorough. -
Fill imperfections:
Inspect the framing and shelves for dings or nail holes. Overfill slightly with wood filler, as it shrinks when drying, and let it cure completely. -
Sand for smoothness:
Using 220-grit sandpaper, lightly scuff all surfaces to help the primer adhere. Focus on smoothing out the dried wood filler until it’s flush with the surface. -
Remove dust:
Vacuum the shelves and crevices with a brush attachment. Wipe everything down with a tack cloth to ensure absolutely no dust remains. -
Caulk the seams:
Apply a thin bead of painter’s caulk along where the shelves meet the walls and where the shiplap backing meets the frame. This step is crucial for that seamless ‘custom’ look. -
Protect the room:
Tape off the walls, ceiling, and floor edges meticulously. Lay down drop cloths to catch splatter.
Sticky Shelves?
If books stick to the shelves even after drying, apply a coat of clear polycrylic over the shelf tops. It cures harder than standard paint and prevents ‘blocking’ (sticking).
Step 2: Priming the Surface
-
Prime the corners:
Use your angled brush to ‘cut in’ the primer into corners, grooves of the shiplap, and tight spots where a roller won’t fit. -
Roll the flat areas:
Follow immediately with the mini roller on the larger flat surfaces and shelf tops. Maintain a wet edge to avoid lap marks. -
Inspect and sand:
Once the primer is fully dry, run your hand over the surface. If it feels rough, do a very light sanding with 220-grit paper and wipe clean with a tack cloth.
Step 3: Painting & Finishing
-
First coat application:
Stir your white enamel paint thoroughly. I like to start at the top and work my way down to prevent drips from ruining lower sections. -
Brush the details:
Brush paint into the vertical shiplap grooves and corners first. Feather out the edges so the roller can blend them seamlessly. -
Roll for a glass-like finish:
Use the foam or mohair roller to apply paint to the shelves, sides, and cabinet faces. Use light pressure to avoid creating bubbles or texture. -
Paint the doors separately:
Lay the cabinet doors flat on a work surface to paint them. This prevents gravity from causing unsightly drips and runs. -
Dry and repeat:
Allow the first coat to dry according to the manufacturer’s instructions (usually 4-6 hours for enamels). Apply a second coat using the same method for full opacity. -
Reinstall hardware:
Once the paint has cured for at least 24-48 hours, reattach your cabinet doors and install the new or cleaned gold knobs. -
Style the shelves:
Wait a full week if possible before placing heavy books back on the shelves to prevent the paint from sticking or peeling. Then, arrange your decor with breathing room for a clean look.
Add Visual Depth
Paint the back wall of the shelves a soft gray or beige instead of white. This subtle contrast makes the white shelving pop and adds dimension to your display.
Now step back and admire how a simple coat of white paint has completely revitalized your space with brightness and elegance
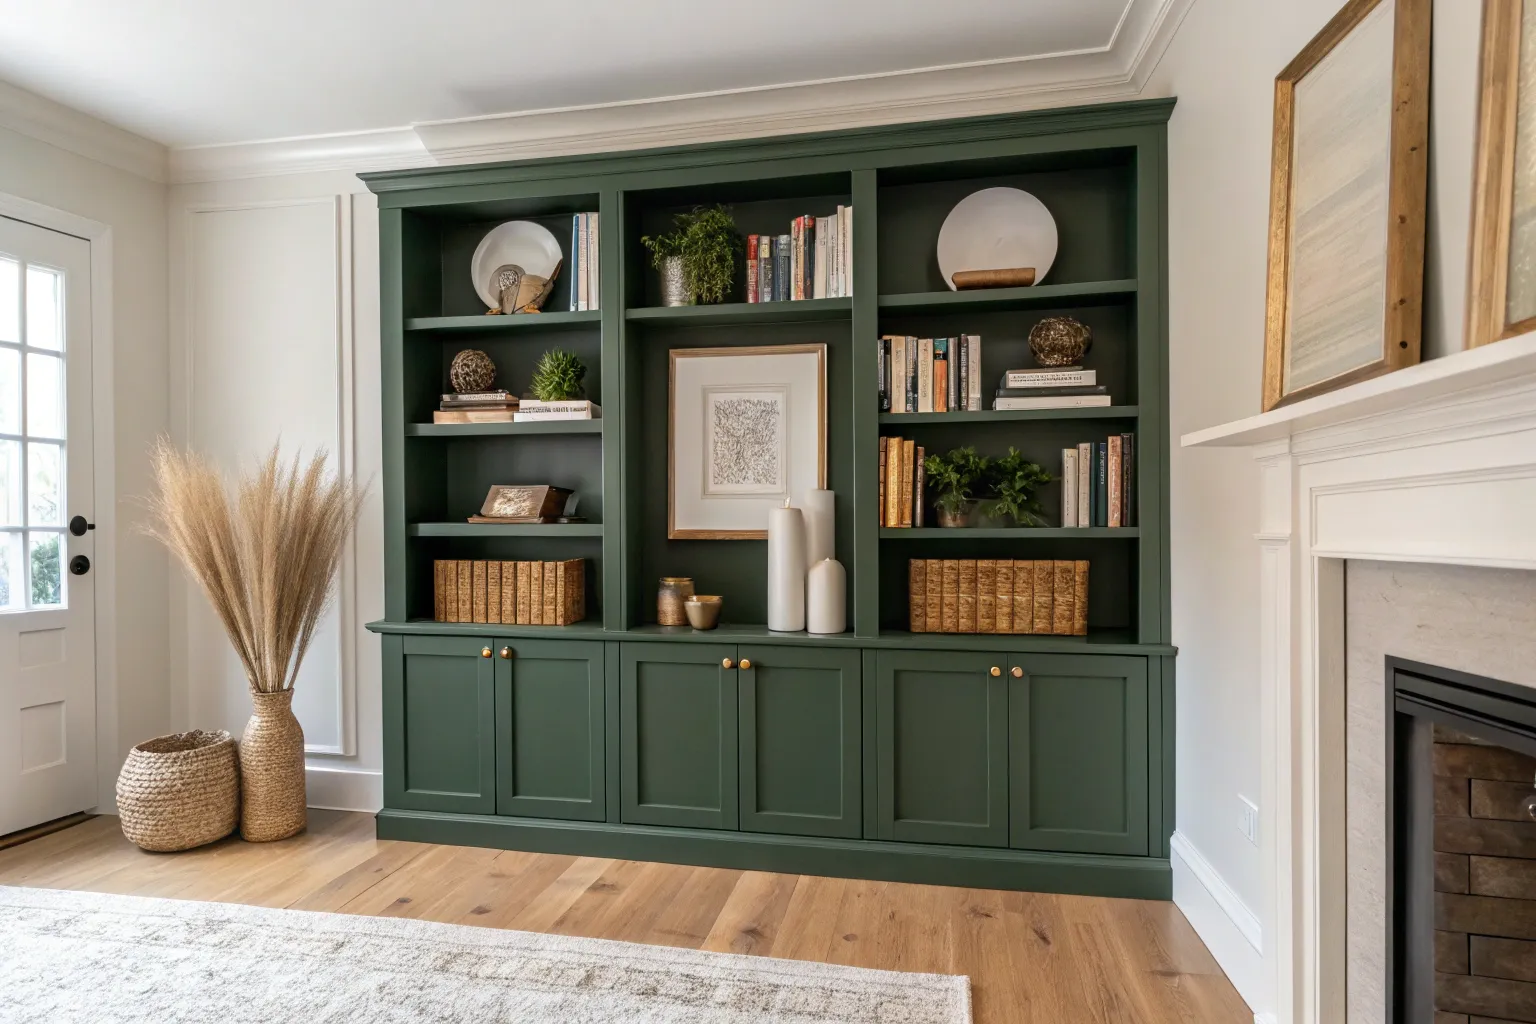
Paint the Ceiling and Built-Ins to Create a Cozy Cocoon

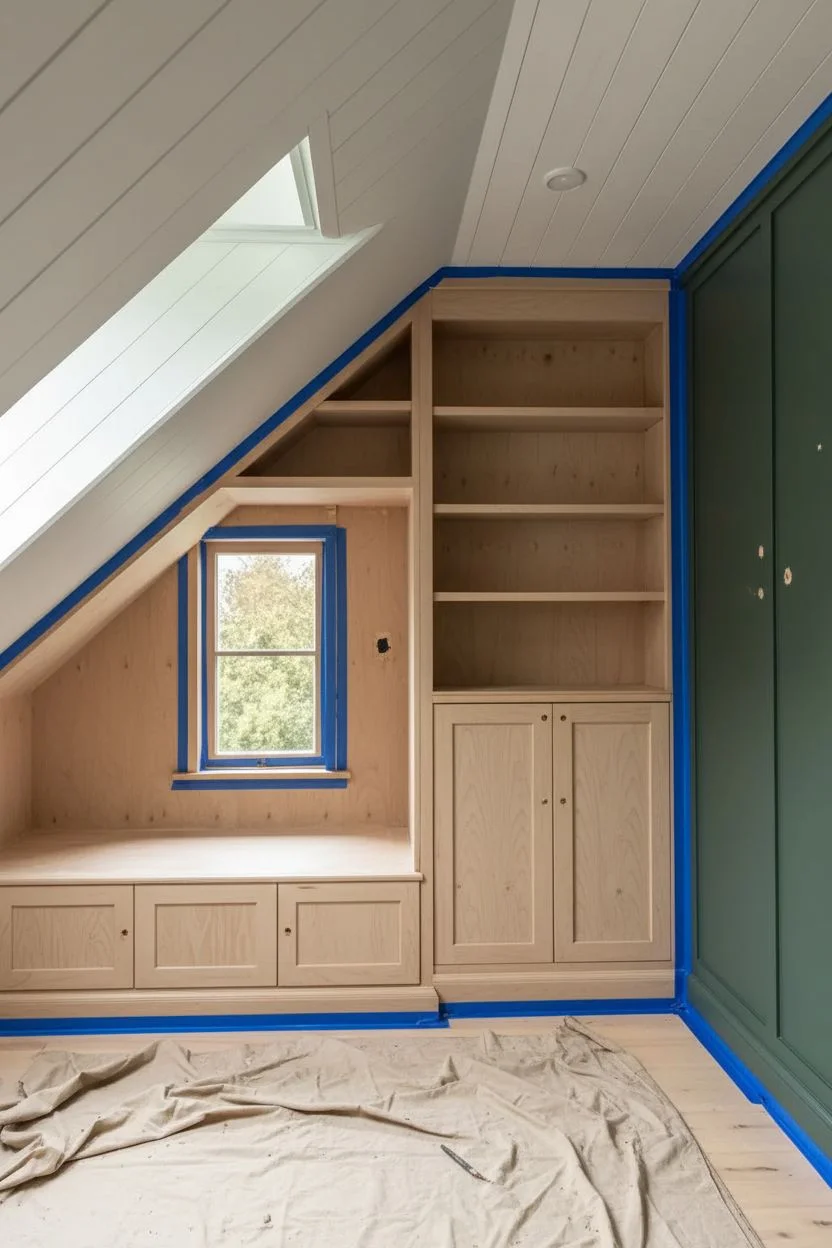
Transform an awkward attic corner into a sophisticated, cocoon-like retreat by enveloping built-in cabinetry and walls in a deep, moody green. This project balances the drama of dark paint with the brightness of a white shiplap ceiling to create the perfect cozy hideaway.
Step-by-Step Guide
Materials
- Deep forest green interior paint (e.g., Benjamin Moore Salamander or similar), satin or semi-gloss finish
- High-quality white ceiling paint, flat or eggshell finish
- Primer (tinted gray recommended for the dark topcoat)
- Painter’s tape (multiple widths)
- Drop cloths and plastic sheeting
- Sanding block (medium and fine grit)
- Tack cloth
- High-density foam roller (4-inch for cabinets)
- Angled sash brush (2-inch)
- Screwdriver (for removing hardware)
- Wood filler (if repairing holes)
- Caulk and caulk gun
Step 1: Preparation & Surface Care
-
Clear and Clean:
Begin by removing all books, cushions, and removable shelves from the built-in unit. Thoroughly clean all surfaces with a degreaser or TSP substitute to remove oils and dust, ensuring a pristine base for your paint. -
Hardware Removal:
Unscrew and remove all cabinet knobs, drawer pulls, and light fixture plates. Place them in labeled bags so nothing gets lost during the painting process. -
Patch and Repair:
Inspect the wood for any dings or nail holes. Fill these imperfections with wood filler, letting it dry completely. Once dry, sand the filled areas flush with the surface. -
Scuff Sanding:
Lightly sand all surfaces you intend to paint—including the window casing and shelves—with medium-grit sandpaper. This ‘de-glossing’ step is crucial for adhesion. Wipe away all dust with a tack cloth. -
Caulking Cracks:
Run a thin bead of finish caulk along any seams where the built-ins meet the wall or where the trim has gaps. Smooth it with a wet finger for a seamless look. -
Protecting the Space:
Apply painter’s tape precisely along the edges of the floor, the ceiling line, and the window glass. Cover the floor with heavy-duty drop cloths to catch any splatters.
Dark Paint Pro-Tip
For ultra-pigmented dark colors, use a ‘gray tint’ primer instead of white. It requires fewer topcoats to achieve full opacity and rich depth.
Step 2: Priming the Foundation
-
Apply Primer:
Brush primer into the corners and detailed grooves first, then roll the larger flat surfaces. Since we are going for a dark finish, I recommend using a gray-tinted primer to help cover the original surface faster layer. -
Inspect and Sand:
Once the primer is fully dry, lightly sand the surfaces with fine-grit sandpaper to knock down any brush marks or bumps. Wipe clean again with a tack cloth.
Level Up: Lighting
Install puck lights inside the top of the shelving units or wire in sconces on the side walls to highlight the deep color and warm up the nook at night.
Step 3: Applying the Color
-
Cutting In:
Start with your deep forest green paint. Use the angled sash brush to carefully cut in around the window frame, corners, and right up against the tape line at the ceiling. -
Painting Shelves and Interiors:
Paint the back walls of the bookshelves first, using a roller where possible and a brush for corners. Work your way out to the shelf supports and sides. -
Cabinet Facades:
Use the high-density foam roller to apply paint to the cabinet doors and drawer fronts. Use long, smooth strokes to avoid roller marks. Painting with the grain usually yields the best results. -
Drying Time:
Allow the first coat to cure according to the manufacturer’s instructions. Dark colors often take longer to dry and may look patchy after just one coat; be patient. -
Second Coat:
Apply a second coat using the same method: cut in with a brush, then roll the flat areas. This coat will deepen the color and provide that rich, velvety saturation seen in the image. -
The Ceiling Contrast:
If your ceiling needs a refresh to achieve that crisp contrast, carefully paint the shiplap or drywall a stark white. Ensure you have a sharp line where the green meets the white.
Step 4: Final Touches & Styling
-
Tape Removal:
Score the edge of the painter’s tape with a utility knife before pulling it off. This prevents the paint skin from peeling away with the tape. -
Reinstall Hardware:
Once the paint has cured for at least 24-48 hours, reinstall your cabinet hardware and light fixtures. The metallic accents will pop beautifully against the green. -
Style the Shelves:
Arrange your books and decorative objects. Try grouping books by color or size for visual interest, leaving some ‘breathing room’ so the dark back panel shows through. -
Soft Furnishings:
Add the seat cushion and throw pillows. Mix textures like velvet, leather, and woven fabrics to enhance the cozy, layered feel of the nook.
Now step back and enjoy your bespoke reading sanctuary, perfectly tailored for quiet afternoons.

PENCIL GUIDE
Understanding Pencil Grades from H to B
From first sketch to finished drawing — learn pencil grades, line control, and shading techniques.
Explore the Full Guide
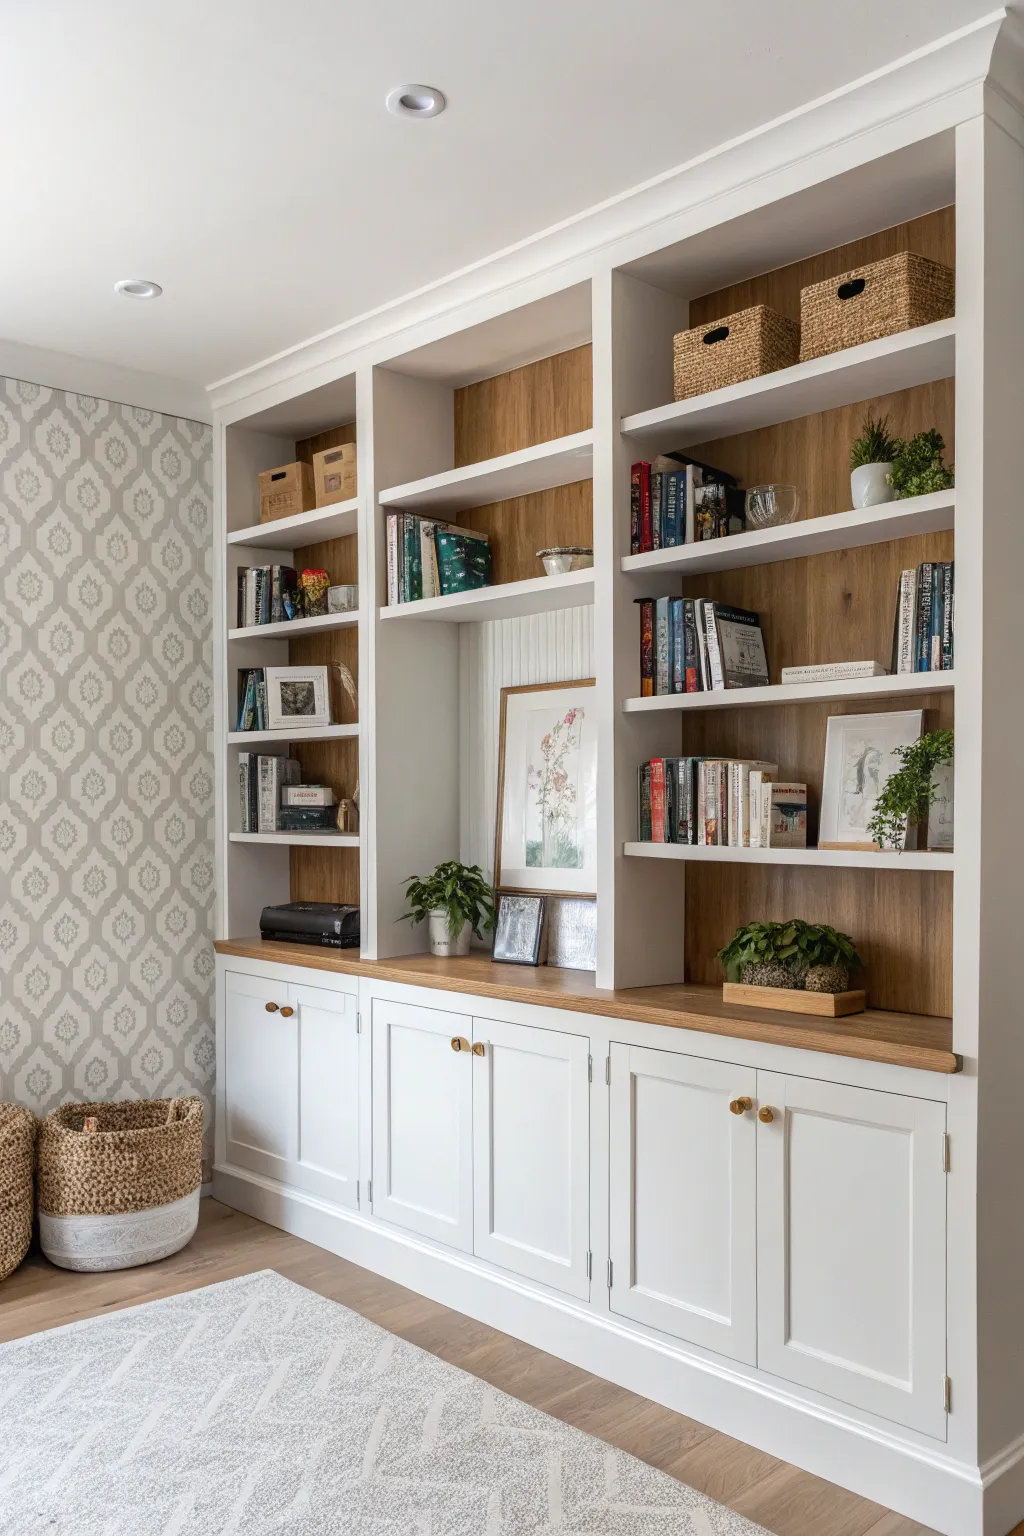
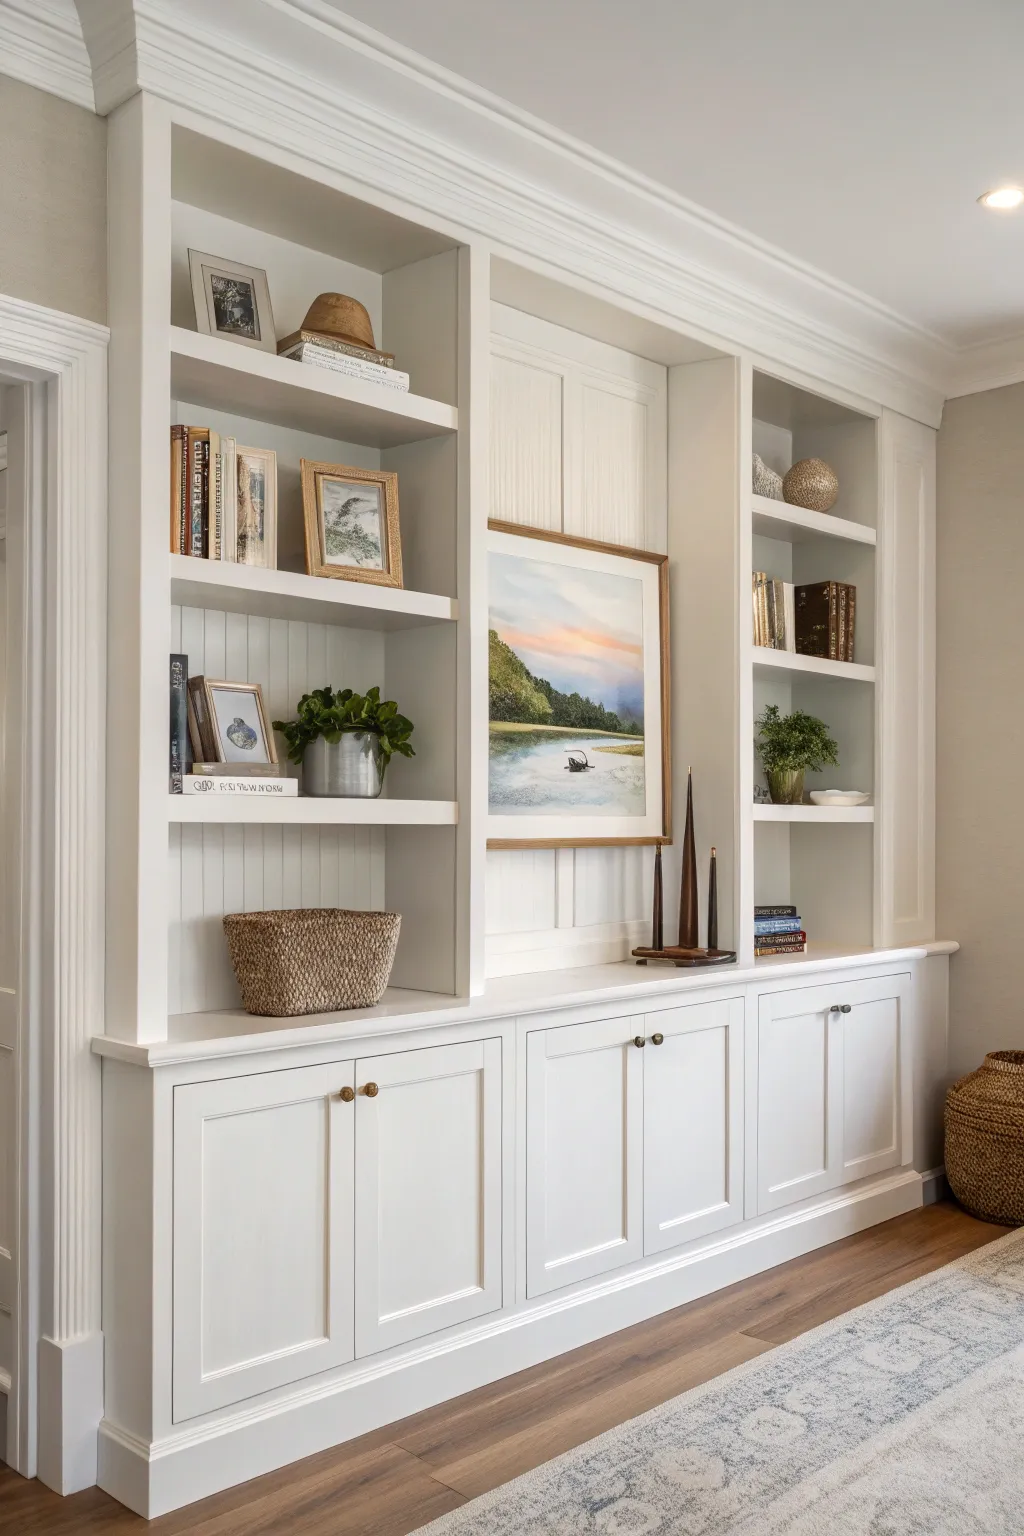
Make the Trim and Molding Subtly Stand Out
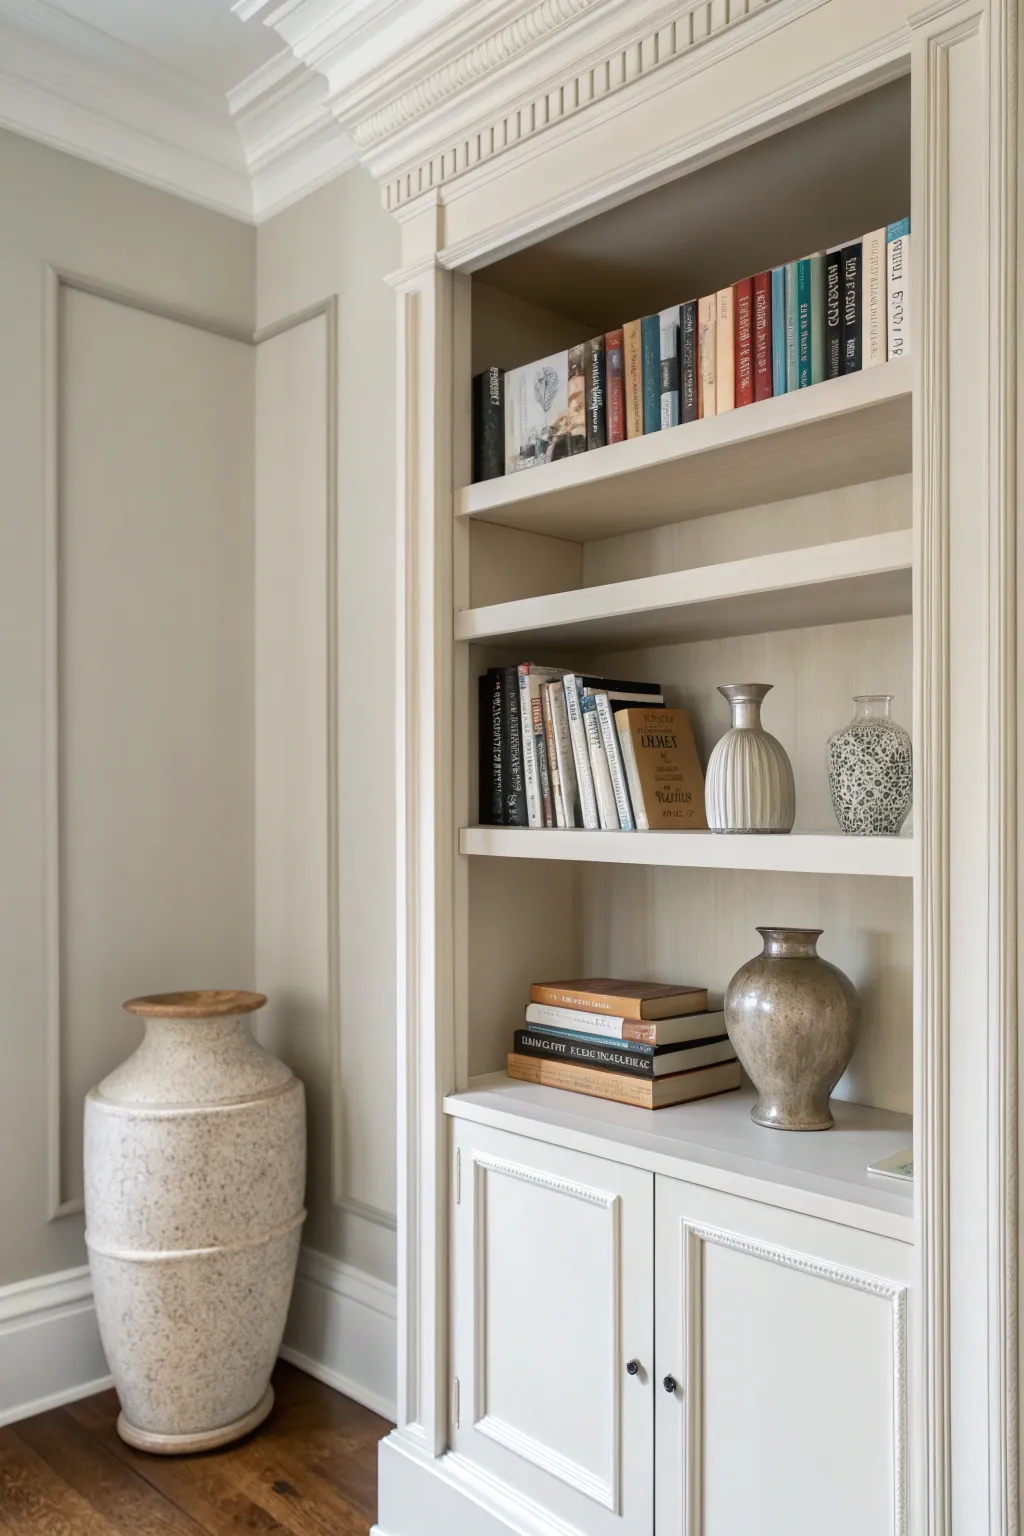
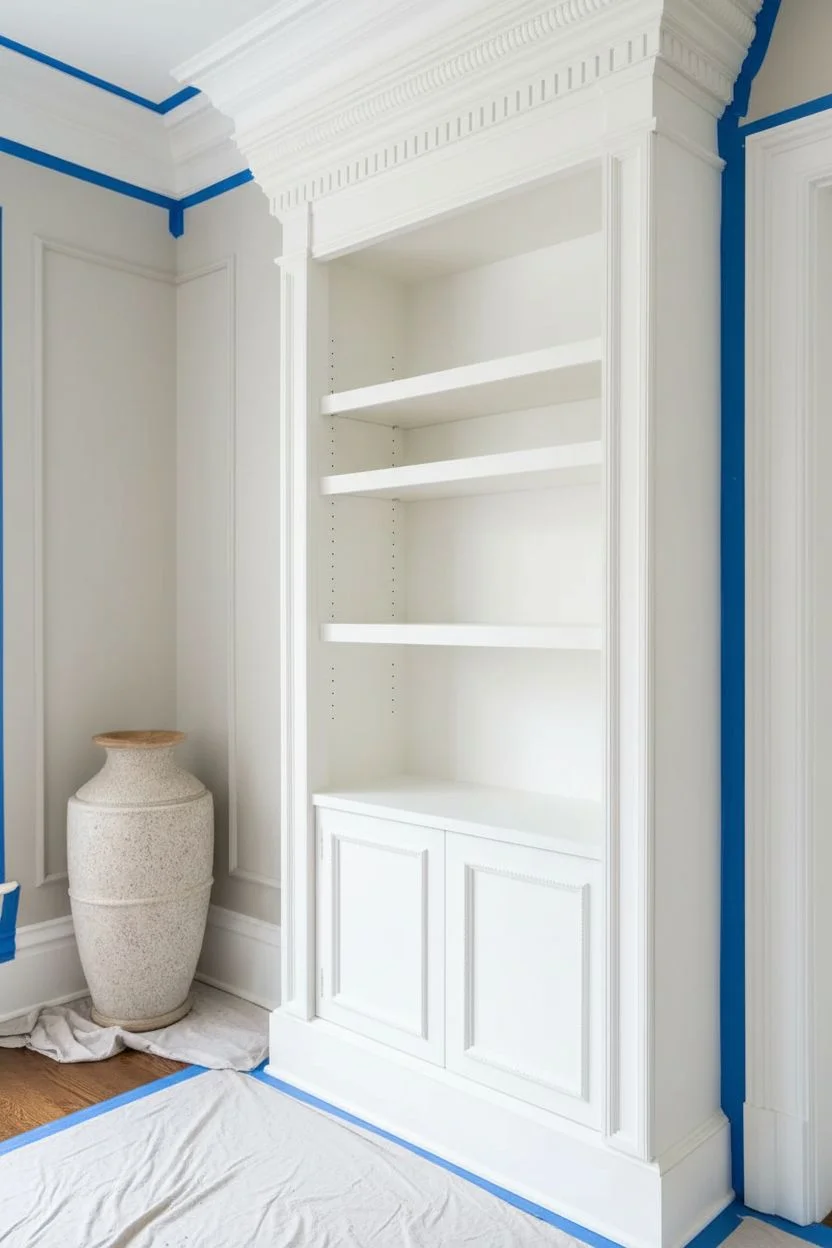
Elevate your built-ins by mastering the art of subtle contrast, using closely related shades of creamy beige and taupe to highlight architectural details. This technique creates a sophisticated, high-end look where the molding and trim gently pop against the surrounding walls without creating visual clutter.
How-To Guide
Materials
- High-quality interior latex paint (Satin or Semi-Gloss for trim)
- Interior latex paint (Eggshell or Matte for walls/backing)
- Painter’s tape (refined edge style)
- Fine-grit sandpaper (220-grit)
- Tack cloth
- Angled sash brush (2-inch)
- Small foam roller and tray
- Drop cloths
- Screwdriver (for removing hardware)
- Wood filler (if repairs are needed)
- Primer (bonding primer recommended for built-ins)
Step 1: Preparation & Priming
-
Clear the area:
Begin by removing all books, pottery, and decor from the shelves. If your shelves are adjustable, remove them and the metal supports to paint separately. -
Clean surfaces thoroughly:
Wipe down all cabinetry with a degreaser or mild soap solution to remove dust and oils, which ensures proper paint adhesion. -
Address imperfections:
Inspect the molding and shelves for dents or nail holes. Fill these with wood filler, let it dry completely, and sand flush. -
Sand for adhesion:
Lightly scuff-sand the entire unit—focusing on the trim and molding details—with 220-grit sandpaper to create a ‘tooth’ for the new paint. -
Remove dust:
Wipe away all sanding residue using a tack cloth. This step is crucial for achieving that smooth, professional cabinet finish. -
Prime the surface:
Apply a coat of bonding primer to all surfaces. I find this especially important if you are painting over a pre-existing glossy finish.
Brushwork Secret
Add a paint conditioner like Floetrol to your latex paint. It slows drying time, allowing brush marks to level out for a sprayed-on look.
Step 2: Painting the Detail Work
-
Tape off boundaries:
Apply painter’s tape to the floor and the ceiling where the crown molding meets, ensuring a crisp line. -
Paint the shelf backs:
Start by painting the back panel of the bookcase first. Use a slightly darker shade or a matte finish here to create depth behind your objects. -
Cut in the corners:
Using your angled sash brush, paint the difficult-to-reach corners and the intricate grooves of the crown molding and fluted trim. -
Roll the flat surfaces:
Use a small foam roller to apply paint to the larger flat sides of the cabinet box and the shelf surfaces for a smooth, brush-stroke-free finish. -
Apply the first trim coat:
Paint the face frames and decorative molding using the satin or semi-gloss paint. This higher sheen reflects light and highlights the architectural shape. -
Sand between coats:
Once the first coat is fully dry, very lightly sand with fine grit paper to knock down any raised grain or dust nibs. -
Apply the second coat:
Repeat the painting process for a second coat on both the backing and the trim to ensure full, rich coverage.
Depth Perception
Paint the back wall of the shelves just one shade darker than the face frames. It adds incredible depth without screaming ‘accent wall’.
Step 3: Finishing Touches
-
Paint the adjustable shelves:
If you removed shelves earlier, paint them now on a flat surface, allowing one side to cure before flipping to paint the other. -
Address the wall paneling:
If your room features wall molding shown to the left of the unit, paint the inner panel the same wall color, but use the trim paint on the molding itself to create a cohesive look with the bookcase. -
Remove tape:
Carefully peel away the painter’s tape while the final coat is still slightly tacky to prevent peeling the paint film. -
Reinstall hardware:
Once the paint has cured for at least 24-48 hours, reinstall your cabinet knobs and shelf supports. -
Style and stage:
Place your darker books and light ceramics back onto the shelves, arranging them to embrace the negative space.
Enjoy the refined elegance this subtle update brings to your living space
Dark Lower Cabinets With Lighter Upper Shelves
Transform a plain wall into a sophisticated focal point by building and finishing this charcoal-colored unit with warm oak accents. This project combines classic shaker-style cabinetry with open shelving for a look that feels both modern and timeless.
Step-by-Step
Materials
- Pre-made base cabinets (shaker style)
- 3/4-inch birch plywood (for carcasses)
- Solid oak countertop slab
- Oak veneer plywood (for backing)
- Poplar face frame boards (1×2 and 1×10)
- Crown molding
- Baseboard molding
- Dark charcoal wood paint (satin finish)
- Clear matte polyurethane varnish
- Wood filler and caulk
- Circular saw and track (or table saw)
- Pocket hole jig and screws
- Orbital sander with 120-220 grit discs
- Paint sprayer or high-quality foam rollers
- Brass cabinet knobs
Step 1: Setting the Foundation
-
Install the base cabinets:
Begin by positioning your pre-made shaker base cabinets against the wall. Remove any existing baseboards so the cabinets sit flush. Shim underneath them until they are perfectly level, then screw them together and secure them into the wall studs. -
Fit the oak countertop:
Measure and cut your solid oak slab to fit over the base cabinets. You want a consistent overhang on the front and exposed sides (typically 1 inch). Sand the surface up to 220 grit for a buttery smooth finish before installation. -
Finish the countertop early:
Since it’s messy to stain later, seal the oak top now. Apply three thin coats of clear matte polyurethane, sanding lightly with 320-grit paper between coats. Cover it with cardboard to protect it during the rest of the build.
Paint Bleeding?
If paint seeps under the tape onto the oak back, prevent it by sealing the tape edge with a thin layer of clear matte varnish before applying the dark paint. This creates a clear barrier.
Step 2: Constructing the Upper Shelving
-
Build the bookshelf carcasses:
Cut your 3/4-inch birch plywood into vertical panels for the bookshelf sides. Cut horizontal fixed shelves to connect them. Assemble three separate tower units using pocket holes placed on the exterior sides where they won’t be seen once installed. -
Install the oak backing:
Instead of standard white backing, cut the oak veneer plywood sheets to fit the back of each tower unit. I prefer to attach these with wood glue and brad nails for a sturdy structure. The visible wood grain is key to this specific look. -
Position the towers:
Lift the assembled towers onto the countertop. Secure them to the wall studs using L-brackets at the top and screw them down through the bottom rail into the countertop from below (so screws are hidden).
Light It Up
Route a channel into the underside of the face frames or shelves to hide LED strip lighting. Warm white LEDs (2700K) will make the oak backing glow and highlight your book collection.
Step 3: Trim and Face Frames
-
Apply vertical face frames:
Cut 1×2 poplar boards to cover the raw plywood edges on the bookshelf fronts. Glue and nail these in place. Use wider face frame boards where two units meet to create the illusion of thick, substantial pillars. -
Add the top header:
Install a wide flat board across the very top of the unit to bridge the gap between the shelves and the ceiling. This provides a nailing surface for the crown molding. -
Install moldings:
Cut and install crown molding along the top to meet the ceiling seamlessly. Then, add baseboard molding along the bottom of the lower cabinets to integrate the unit with the rest of the room. -
Prep for paint:
Fill all nail holes with wood filler and caulk every seam where wood meets wood (except on the oak parts). Once dry, sand the face frames and sides smooth.
Step 4: The Dark Finish
-
Tape and protect:
This step is critical. Meticulously tape off the oak backing and the oak countertop using high-quality painter’s tape and plastic sheeting. You want the dark paint only on the cabinetry frame and shelves. -
Prime the surface:
Apply a high-adhesion interior wood primer to all paintable surfaces. If your final color is very dark, have the paint store tint your primer gray to help with coverage. -
Apply the first coat:
Using a paint sprayer for the smoothest finish, or a high-density foam roller for a hand-painted look, apply your dark charcoal paint. Keep the coats thin to avoid drips in the corners. -
Sand and recoat:
Lightly hand-sand the first coat with fine sandpaper to knock down any raised grain. Wipe away dust with a tack cloth, then apply a second (and potentially third) coat for full, rich opacity. -
Reveal the oak:
Carefully peel away the painter’s tape while the final coat is still slightly tacky to ensure a crisp line. Install the adjustable shelves (if you made them removable) or touch up the fixed shelves. -
Install hardware:
Drill holes for your cabinet pulls. Install small round brass knobs to contrast beautifully against the deep charcoal paint.
Step back and admire the dramatic contrast created by your bold paint choice and the natural warmth of the oak.


Vertical Stripes Inside Each Shelf Bay
Transform plain white built-ins into a high-end designer feature by adding the illusion of vertical wood slats or beadboard. This technique uses paint and careful taping to mimic the texture and warmth of natural oak paneling without the need for expensive carpentry.
Step-by-Step Tutorial
Materials
- High-quality painter’s tape (1-inch width)
- Small paintbrush or foam roller
- Paint in a warm tan/beige shade (base color)
- Paint in a darker brown/umber shade (shadow color)
- Measuring tape
- Level or laser level
- Pencil
- Small artist brush
- Glaze medium (optional but recommended)
Step 1: Preparation & Base Coat
-
Clear and clean:
Remove all books, decor, and adjustable shelves from your built-in unit. Lay down a drop cloth to protect the floor and the cabinet ledge below. -
Light sanding:
If the back of your shelves has a glossy finish, give it a quick scuff sand with fine-grit sandpaper to help the new paint adhere properly. Wipe away all dust with a damp cloth. -
Apply the base color:
Paint the entire back panel of each shelf bay with your warm tan/beige base color. This will act as the ‘wood’ tone. -
Apply a second coat:
Once dry, apply a second coat for full opacity. Let this cure completely—I usually wait at least 24 hours to ensure the tape won’t peel it up later.
Use a Paint Comb
Instead of painting lines, apply a thick glaze layer over the base coat and drag a graining tool or stiff comb vertically to create actual physical texture.
Step 2: Creating the Vertical Lines
-
Mark your spacing:
Measure the width of the shelf back. Decide on your slat width; about 1.5 to 2 inches creates a realistic look. Mark these intervals lightly with a pencil along the top and bottom of each bay. -
Draw guide lines:
Use a level or a straight edge to connect your top and bottom marks with very faint pencil lines. Vertical accuracy is crucial here, as crooked lines will ruin the effect. -
Prepare the shadow paint:
Mix your darker brown paint. If you want a subtle, dimensional look, mix in a little clear glaze medium to make the paint translucent. -
Painting the grooves:
Using a thin artist’s brush and a steady hand (or a straight edge guide), paint thin lines over your pencil marks using the dark brown mixture. These simulate the gaps between wood slats. -
Varying the line weight:
Don’t make lines perfectly uniform. A slight wobble or variation in thickness can actually make the ‘wood’ look more organic and less like a printed wallpaper.
Real Wood Insert
For ultimate realism, cut thin plywood sheets to size, rout vertical V-grooves into them, stain them, and slide them over the existing back panel.
Step 3: Adding Texture & Finishing
-
Dry brushing (optional):
To enhance the wood grain effect, dip a stiff, dry brush lightly into a slightly darker shade than your base. Offload most paint onto a paper towel. -
Apply texture:
Drag the dry brush vertically down the painted ‘slats’ between your dark lines. This creates subtle streaks that mimic wood grain texture. -
Cleaning up edges:
If any paint smudged onto the white side walls or shelves, use a small angled brush with your original white trim paint to touch up the edges for a crisp border. -
Let it cure:
Allow the paint to fully harden for a few days before replacing heavy books or ceramic items to prevent sticking. -
Restyle the shelves:
Place your decor back onto the shelves. Group similar tones, like cream ceramics and old books, which pop beautifully against the new tan background.
Now step back and admire how much depth and warmth your new faux-wood backdrop adds to the room
Faux Linen Texture With a Dry-Brush Finish

Transform ordinary built-ins into a sophisticated feature wall with this subtle faux linen technique. By layering glaze over a base coat and manipulating it with a dry brush, you can achieve the high-end look of textile wallcoverings without the hassle of wallpaper.
How-To Guide
Materials
- High-quality latex primer
- Satin latex paint (Base Color: Cream or Off-White)
- Satin latex paint (Top Color: 1-2 shades darker than Base)
- Clear glazing liquid
- Painter’s tape based on your trim needs
- 2-inch angled sash brush (for cutting in)
- 4-inch foam roller and tray
- Large, soft-bristle blending brush or chip brush (clean and dry)
- Lint-free rags
- Gold leaf or metallic paint (optional for trim detail)
Step 1: Preparation & Base Coat
-
Clean and prep:
Begin by thoroughly cleaning the back panels of your bookshelves to remove any dust or grease. If the surface is glossy, give it a light scuff sand to help the paint adhere. -
Mask the edges:
Use painter’s tape to protect the surrounding shelves and trim if you plan to keep them a different color. Press the tape edges down firmly to prevent bleed-through. -
Apply the base coat:
Roll on your base color (the lighter cream shade) using a foam roller for a smooth finish. Ensure full coverage, even if it requires two coats. -
Let it cure:
Allow the base coat to dry completely, preferably overnight. The surface needs to be hard enough to withstand the friction of the glazing process without lifting.
Uneven Drag Marks?
If you stopped midway down a stroke, dab more wet glaze over that specific spot and drag the brush through again immediately to blend the line.
Step 2: Creating the Glaze Mixture
-
Mix the glaze:
In a separate container, mix one part of your darker paint color with four parts clear glazing liquid. The goal is a translucent mixture that stays wet longer than standard paint. -
Test the consistency:
Brush a small amount onto a scrap piece of cardboard. It should be semi-transparent; if it’s too opaque, add more clear glaze.
Step 3: The Linen Technique
-
Apply glaze sectionally:
Work on one shelf back at a time. Brush the glaze mixture onto the entire back panel surface. It doesn’t need to be perfectly even, but ensure the whole area is wet. -
Vertical dragging:
Immediately take your clean, dry bristle brush. Starting at the very top edge, drag the brush straight down to the bottom in one continuous motion. -
Wipe the brush:
After every downward pass, wipe the bristles off on a lint-free rag. This removes the excess glaze and prevents the brush from becoming saturated. -
Repeat across the panel:
Continue dragging vertically across the width of the panel. Overlap your strokes slightly to avoid distinct stripes and create a unified texture. -
Horizontal weaving (optional):
For a true woven linen look, once the vertical lines are dragged, lightly drag the brush horizontally across the wet glaze. Use a very light touch here to avoid muddying the texture. -
Check for pooling:
inspect the corners and edges where the glaze might pool. Dab these areas gently with a dry brush to smooth them out before they dry. -
Move to next section:
Repeat the glazing and dragging process on the remaining shelf backs, treating each panel as an individual canvas.
Keep It Clean
Keep multiple dry rags nearby. The key to crisp texture is wiping your brush bristles dry after every single pass to avoid simply pushing paint around.
Step 4: Finishing Touches
-
Dry time:
Allow the glaze layer to dry undisturbed for at least 24 hours. The glaze extends the drying time significantly compared to regular paint. -
Remove tape:
Carefully peel away the painter’s tape at a 45-degree angle. Proceed slowly to ensure you don’t pull up any of your fresh finish. -
Add metallic accents:
If your design includes the gold trim seen in the inspiration, use a small artist’s brush to apply metallic gold paint or gold leaf to the beveled edges of the molding. -
Touching up:
Inspect your work for any small imperfections. Use a tiny brush with your base color or glaze mix to correct any slips near the edges.
Step back and admire how this simple technique adds depth and softness to your shelving display
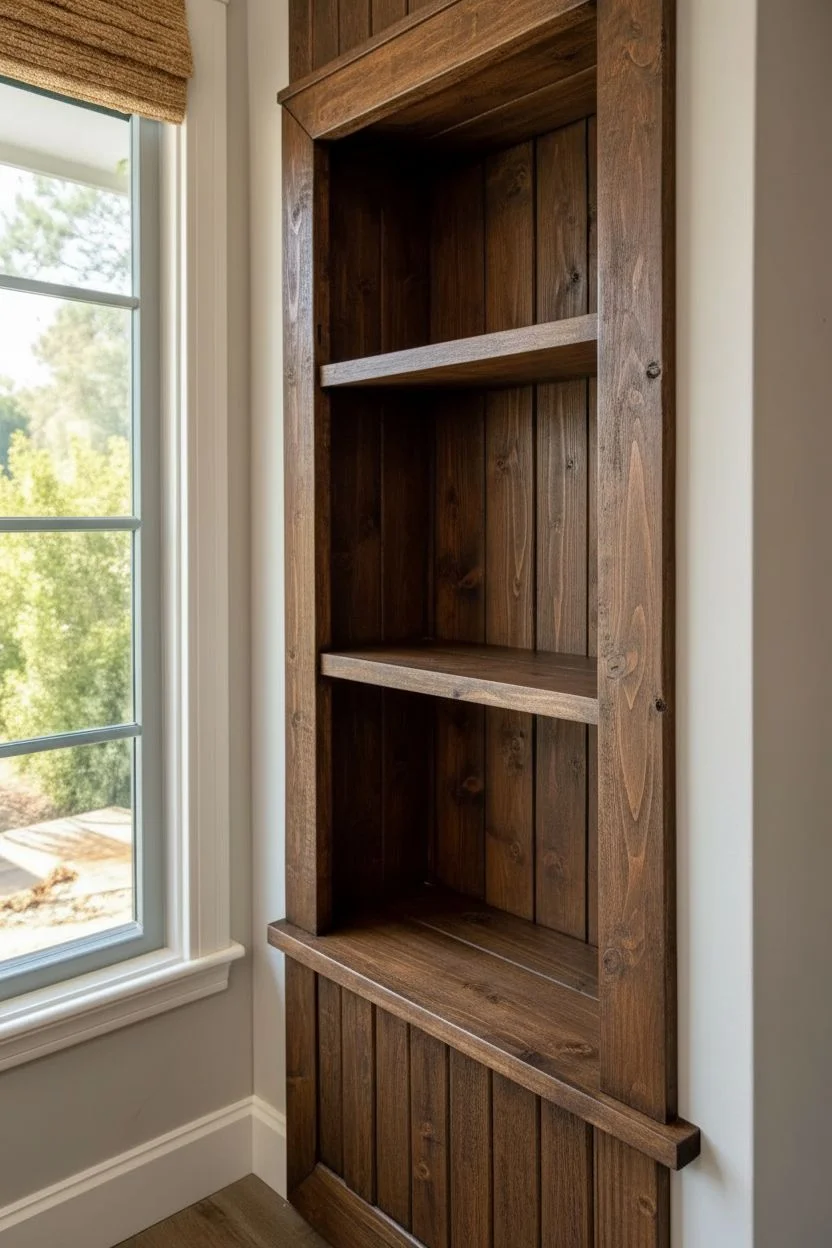
Faux Weathered Wood Look Using Layered Glazes
Transform ordinary wood shelving into a rustic masterpiece that looks like it’s been aging gracefully for decades. This technique uses strategic layering and heavy distressing to create that sought-after chipped, salvage-yard aesthetic perfect for farmhouse interiors.
Step-by-Step
Materials
- Unfinished wood shelving unit (rough-sawn texture preferred)
- Dark walnut or espresso wood stain
- Chalk-style paint (warm white or cream)
- Beeswax or paraffin wax puck (or candle stub)
- Putty knife or paint scraper
- Medium-grit sanding sponge (120-grit)
- Coarse-grit sandpaper (80-grit)
- Lint-free rags
- Synthetic bristle paint brush
- Clear matte sealer or wax
- Drop cloths
Step 1: Base Preparation
-
Assess the surface:
Begin by cleaning your bookshelf thoroughly. If the wood is slick or pre-finished, sand it down to raw wood; the texture needs to be somewhat rough for the most authentic look. -
Apply the dark base:
Using a lint-free rag, wipe on a generous coat of dark walnut or espresso wood stain. This layer represents the ‘aged wood’ that will peek through later. -
Ensure full coverage:
Make sure you get the stain into all the corners, grooves, and especially the beadboard backing if your unit has it. Don’t worry about it being perfectly even, as much of it will be covered. -
Let it cure:
Allow the stain to dry completely according to the manufacturer’s instructions, usually overnight. Applying paint over wet stain will cause bleeding and ruin the crisp white effect.
Paint sticking too well?
If the paint isn’t scraping off effectively over the wax, use a heat gun or hairdryer on a low setting to slightly soften the underlying wax, then scrape immediately.
Step 2: The Resist Technique
-
The wax resist method:
Take your wax puck or candle stub and vigorously rub it over areas where you want the paint to flake off naturally. Focus on high-traffic areas: edges of shelves, corners, and random spots on the vertical stiles. -
Heavy or light:
Where you apply wax, the paint won’t stick. For the heavy distressing seen in the example, be generous with the wax application, creating uneven patches rather than thin lines. -
Brush off crumbs:
Lightly brush away any large crumbs of wax that may have fallen loose, but leave the waxy coating on the wood intact.
Add vintage character
Before staining, beat the wood with a heavy chain or poke small groupings of holes with an awl to simulate old wormholes and physical damage for realism.
Step 3: Painting and Distressing
-
Apply the top coat:
Paint the entire unit with your warm white chalk-style paint. Use long, confident strokes. The paint may separate slightly over the waxed areas—this is good. -
Dry partially:
Let the paint dry until it is no longer tacky but hasn’t fully cured hard. This usually takes about 30 to 60 minutes depending on humidity. -
Scrape away paint:
Take your putty knife or scraper and firmly scrape the areas where you applied the wax. The paint should flake off easily in chips, revealing the dark stain underneath. -
Sand for softness:
After scraping, go over the entire piece with a coarse 80-grit sandpaper. This will smooth out the hard edges where the paint chipped and add extra wear to the flat surfaces. -
Refine the texture:
Switch to a medium-grit sanding sponge to blend the painted areas. I like to sand the beadboard grooves vertically to emphasize the linear pattern. -
Clean up dust:
Use a vacuum with a brush attachment or a tack cloth to remove all the sanding dust and paint chips from the crevices.
Step 4: Finishing Touches
-
Seal the finish:
To protect your work, apply a clear matte sealer or a clear furniture wax. Buff it gently with a clean cloth. -
Add depth (optional):
If the white looks too sterile, you can mix a tiny amount of dark glaze with your clear wax to settle into the grooves, adding an ‘antique’ dirty wax look.
Step back and admire how this timeless finish brings warmth and historic charm to your space
High-Gloss Interior With a Matte Outer Frame
Transform standard built-ins into a sophisticated focal point by playing with sheen levels rather than just color. This project combines a soft, matte exterior framework with a striking high-gloss interior backing to create depth and light reflection behind your books and decor.
Step-by-Step Tutorial
Materials
- Sandpaper (120 and 220 grit)
- Tack cloth
- Painter’s tape (high-quality)
- Bonding primer (oil-based preferred)
- Matte or eggshell finish paint (creamy off-white)
- High-gloss finish paint or lacquer (warm wood tone or deep bronze)
- Wood filler
- Caulk and caulk gun
- Angled sash brush (2 inch)
- Mini foam roller (for high gloss)
- Microfiber roller (for matte frame)
- Drop cloths
Step 1: Preparation & Repairs
-
Clear shelving:
Begin by removing all books, decor, and adjustable shelves from the unit. If you plan to paint the adjustable shelves, set them aside on a drop cloth. -
Clean surfaces:
Wipe down every inch of the bookcase with a degreaser to remove oils or wax buildup, ensuring a pristine surface for adhesion. -
Fill imperfections:
Inspect the wood for nail holes or dents. Apply wood filler, let it dry completely, and sand it flush with the surface. -
Sand for grip:
Lightly sand the entire unit with 120-grit sandpaper to scuff the existing finish. This step is crucial for primer adhesion on pre-finished furniture. -
Remove dust:
Vacuum up the sanding dust and follow up with a tack cloth to pick up fine particles.
Sticky Situation
If your high-gloss paint feels sticky or tacky after drying (called ‘blocking’), avoid putting books back immediately. Wait a full 7-14 days for the paint to fully harden and cure.
Step 2: Priming the Base
-
Tape edges:
Apply painter’s tape to the floor, walls, and ceiling adjacent to the built-ins to protect surrounding areas. -
Caulk gaps:
Run a thin bead of finish caulk along any seams where the cabinet meets the wall or where joinery has separated slightly. Smooth it with a damp finger. -
Apply primer:
Using a brush for corners and a roller for flat areas, cover the entire unit with a bonding primer. I find oil-based primer works best here to block tannins. -
Sand primer:
Once the primer is fully cured, lightly sand with 220-grit paper to knock down any brush strokes or texture.
Metallic Pop
For a glamorous twist, use a metallic bronze or gold paint for the glossy back panel. It reflects light beautifully and mimics the look of expensive brass sheeting.
Step 3: Painting the Interior (High Gloss)
-
Mask the frame:
Carefully tape off the inner edges of the face frame where it meets the back panel. You want a crisp line between the matte frame and glossy back. -
Cut in the gloss:
Using a high-quality angled brush, paint the corners and edges of the back panel with your high-gloss color (the wood-tone shade). -
Roll the sheen:
Immediately switch to a mini foam roller to apply the gloss paint to the flat back panel. Foam eliminates texture, which is vital for a true glossy reflection. -
Second coat:
Allow the first coat to dry according to the manufacturer’s instructions, then apply a second coat for maximum depth and opacity.
Step 4: Painting the Exterior (Matte/Eggshell)
-
Remove interior tape:
Carefully peel away the tape protecting the frame edges while the gloss paint is still slightly tacky to prevent peeling. -
Tape the gloss (optional):
If you don’t have a steady hand, wait for the gloss to fully cure (at least 24 hours), then tape over the gloss edges to protect them while you paint the frame. -
Paint the frame:
Apply your creamy matte or eggshell paint to the face frame, exterior sides, and cabinet doors. Use a microfiber roller for the smoothest finish on the flat shaker panels. -
Detail work:
Use your angled brush to get into the decorative molding at the top and the baseboards at the bottom. -
Final coat:
Apply a second coat of the matte paint to ensure full coverage and a rich, velvety appearance contrast against the glossy interior. -
Reassemble:
Once everything has cured for several days, reinstall your shelf pins and slide the adjustable shelves back into place.
Enjoy styling your newly transformed shelves with the beautiful play of light and texture
Metallic Accents on Edges, Trim, or Hardware
Elevate simple wooden built-ins into a luxurious statement piece by adding a metallic gold trim to the facing edges. This sophisticated upgrade contrasts beautifully against natural oak shelving and crisp white cabinetry, creating a high-end custom look without needing to replace the entire unit.
How-To Guide
Materials
- Unfinished oak built-in unit (base cabinets and upper shelving)
- White semi-gloss cabinet paint
- High-quality primer
- Metallic gold paint (specialty liquid leaf or high-grade metallic latex)
- Clear protective topcoat (polyurethane, satin finish)
- Painters tape (delicate surface)
- Sanding sponges (220-grit)
- Tack cloth
- Small angled sash brush (1.5 inch)
- Foam roller (4 inch) and tray
- Fine detail brush or artist brush
- Gold finish cabinet pulls (t-bar style)
Step 1: Base Cabinet Preparation & Painting
-
Prepare the surface:
Begin by removing any existing hardware from the lower cabinet doors. Lightly sand the doors and cabinet frames with a 220-grit sanding sponge to scuff the surface, ensuring better paint adhesion. -
Clean thoroughly:
Wipe down the entire lower unit with a tack cloth to remove every speck of dust. Any debris left behind will show through your smooth finish. -
Prime the base:
Apply a coat of high-quality primer to the cabinet doors and frame. I find using a small foam roller helps avoid brush marks on these flat center panels. -
Sand the primer:
Once the primer is fully dry, give it a very light sanding with a worn sanding sponge to knock down any raised grain or fuzz. -
Paint the first coat:
Apply your first coat of white semi-gloss paint. Use an angled brush for the recessed corners of the shaker doors first, then roll the flat surfaces with a foam roller. -
Finish the white base:
Allow the first coat to dry according to the manufacturer’s instructions, then apply a second coat for full, opaque coverage. Let this cure for at least 24 hours before moving on.
Bleeding Gold?
If gold paint bled under the tape onto the wood grain, gently scrape it off with an X-Acto knife blade held perpendicular to the wood before it fully hardens.
Step 2: Staining or Sealing the Shelves
-
Protect the white paint:
Carefully tape off the top edge of your freshly painted white base cabinet where it meets the upper shelving unit to protect it from drips. -
Seal the oak:
If your white oak shelves are raw wood, apply a clear satin polyurethane or a natural-toned stain to the flat shelving surfaces and back panels. Do not apply this to the front facing edges yet. -
Wipe away excess:
If using stain, wipe away excess immediately with a lint-free cloth to ensure an even, natural tone that highlights the wood grain.
Step 3: Applying the Metallic Trim
-
Masking the edges:
This is the most critical step. Apply delicate surface painter’s tape along the top and bottom of every single shelf board, leaving only the front-facing edge exposed. Press the tape down firmly to prevent bleed-under. -
Masking vertical stiles:
Apply tape along the inner and outer sides of the vertical stiles (the upright face frames), again leaving only the front face exposed. -
Base coat for metallics:
Metallic paints often cover poorly. Paint the exposed front edges with a color similar to your gold (like a mustard yellow or tan) first. It provides a solid foundation and warms up the final metallic tone. -
Mix the gold:
Stir your liquid gold leaf or metallic paint thoroughly. Metallic pigments settle quickly to the bottom, so keep stirring occasionally while you work. -
Paint the gold edges:
Using a high-quality artist brush or a very small foam roller, apply the gold paint to the masked-off edges. Use long, smooth strokes to minimize texture. -
Apply second coat:
Let the first coat dry completely, then apply a second coat of gold. This ensures the finish looks solid and reflective rather than semi-transparent. -
Remove tape:
Peel off the painter’s tape carefully while the final gold coat is still slightly tacky—not wet, but not fully cured. pull the tape away from the painted edge at a 45-degree angle to keep lines crisp. -
Touch ups:
Inspect your edges. If any gold seeped onto the wood shelf, use a tiny scraping tool or a damp cloth wrapped around a credit card to clean it up immediately.
Metallic Sheen Pro-Tip
For the most realistic metal look, buff the cured gold paint lightly with a soft cotton cloth or a brown paper bag. It burnishes the particles for a higher shine.
Step 4: Final Assembly
-
Hardware installation:
Mark the drill holes for your new hardware. To match the image, place the T-bar pulls vertically on the cabinet stiles, aligned perfectly with each other. -
Attach the pulls:
Screw in the gold cabinet hardware, ensuring the finish matches the tone of your painted gold edges for a cohesive look. -
Style the shelves:
Wait for all paint to fully cure (ideally 3-5 days for heavy objects) before loading your books and decor onto the shelves.
Step back and admire how a simple strip of gold completely transforms the scale and elegance of the room
Stenciled Pattern Only on the Back Panels
Give your built-ins a bespoke, high-end look by adding a textural backdrop rather than a plain paint color. This project uses vertical beadboard paneling as a base, but the real secret is the subtle stenciled wallpaper pattern effect on the adjacent wall to tie the room together visually.
Step-by-Step Guide
Materials
- Sanding sponges (medium and fine grit)
- Painter’s tape (delicate surface)
- Interior primer suitable for wood
- High-quality cabinet paint (White, semi-gloss or satin)
- Wood stain (medium oak or walnut tone)
- Clear polyurethane topcoat (satin finish)
- Beadboard paneling sheets
- Construction adhesive
- Brad nailer and pin nails
- Wall stencil (geometric lattice pattern)
- Stencil adhesive spray
- Stencil brush or foam roller
- Paint for stencil (light grey or beige)
- Drop cloths
- Small foam roller and tray
- Angled sash brush
Step 1: Preparing the Built-in Canvas
-
Clear and Clean:
Remove all items from the shelves and take off any existing hardware or doors if you are starting with a raw unit. Wipe down every surface to remove dust and oils. -
Sand Surfaces:
Lightly sand all the wood surfaces that will be painted white. You don’t need to strip it bare, just scuff it up enough so the primer adheres well. Wipe away the dust with a tack cloth. -
Prime the Frame:
Apply a coat of high-quality primer to the face frames, side panels, and shelf fronts. Let this dry completely according to the manufacturer’s instructions. -
Paint the Framework:
Paint the primed areas with your white cabinet paint. I prefer using a small foam roller for the flat sections to get a smooth, sprayer-like finish, and an angled brush for the corners. Apply 2-3 coats, sanding lightly between them.
Clean Lines Only
When painting the white frame against the wood backing, use ‘delicate surface’ painter’s tape on the stained wood. Press the edge down firmly with a credit card to stop any white paint from seeping through.
Step 2: Creating the Wood Tone Backing
-
Stain the Wood Backing:
Unlike typical painted backs, this look relies on a warm wood tone. If you are installing new plywood back panels, stain them first before installation. Apply the stain with a rag, wiping with the grain, and let it dry. -
Seal the Wood:
Once the stain is dry, apply two coats of clear satin polyurethane. This protects the wood and gives it a finished sheen that contrasts beautifully with the matte books. -
Install the Back Panels:
Measure and cut your stained panels to fit the back of each shelf section. Secure them using construction adhesive and a few brad nails in the corners.
Step 3: The Beadboard Feature
-
Cut Beadboard:
For the center recessed niche (where the artwork hangs in the photo), measure the space precisely. Cut a piece of beadboard paneling to fit this specific section. -
Paint Beadboard:
Paint the beadboard sheet white to match your main cabinetry shelving. It’s much easier to paint this flat on a workbench than trying to paint into the grooves once it’s vertical. -
Install the Accent:
Glue and nail the white beadboard panel into the center niche. This shift from wood backing to white texture creates a focal point for art.
Bleeding Stencil Paint?
If your stencil lines look fuzzy, your roller is too wet. It should feel almost dry to the touch before it hits the wall. You can also fix small errors later with a tiny artist’s brush and the base wall color.
Step 4: Stenciling the Adjacent Wall
-
Prep the Wall:
Moving to the wall immediately next to the built-in (as shown on the left), ensure the base wall color is a clean, neutral white or off-white. -
Position the Stencil:
Spray the back of your geometric lattice stencil with a light mist of stencil adhesive. Wait a moment for it to get tacky, then press it firmly onto the top corner of the wall. -
Load the Roller:
Pour a small amount of light grey paint onto a paper plate or tray. Load a dense foam roller, then offload almost all the paint onto a paper towel until the roller feels nearly dry. -
Apply the Pattern:
Roll over the stencil with light pressure. The ‘dry roller’ technique is crucial here to prevent paint from bleeding under the plastic edges. -
Repeat and Align:
Peel off the stencil and reposition it, using the registration marks on the stencil design to align the pattern perfectly with the section you just painted. Continue until the wall is covered.
Step 5: Final Styling
-
Reattach Hardware:
Install your cabinet door pulls. Gold or brass hardware adds a nice warmth that complements the wood backing. -
Layer the Shelves:
Style the shelves with a mix of books, plants, and baskets. The wood back panels will make white pottery and greenery pop.
Step back and admire how the combination of crisp white trim, warm wood backing, and the patterned wall creates a sophisticated, custom library feel.
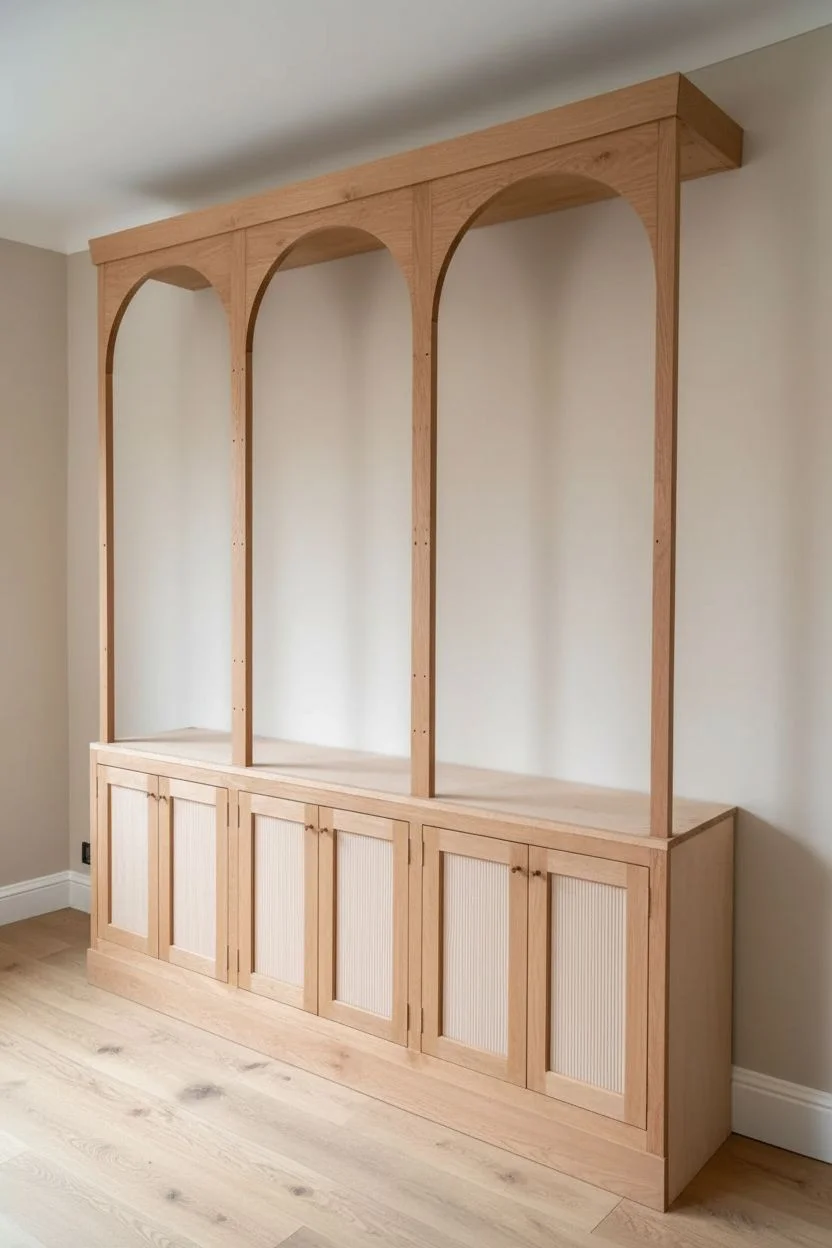
Painted Arched Niche Illusion in Each Section
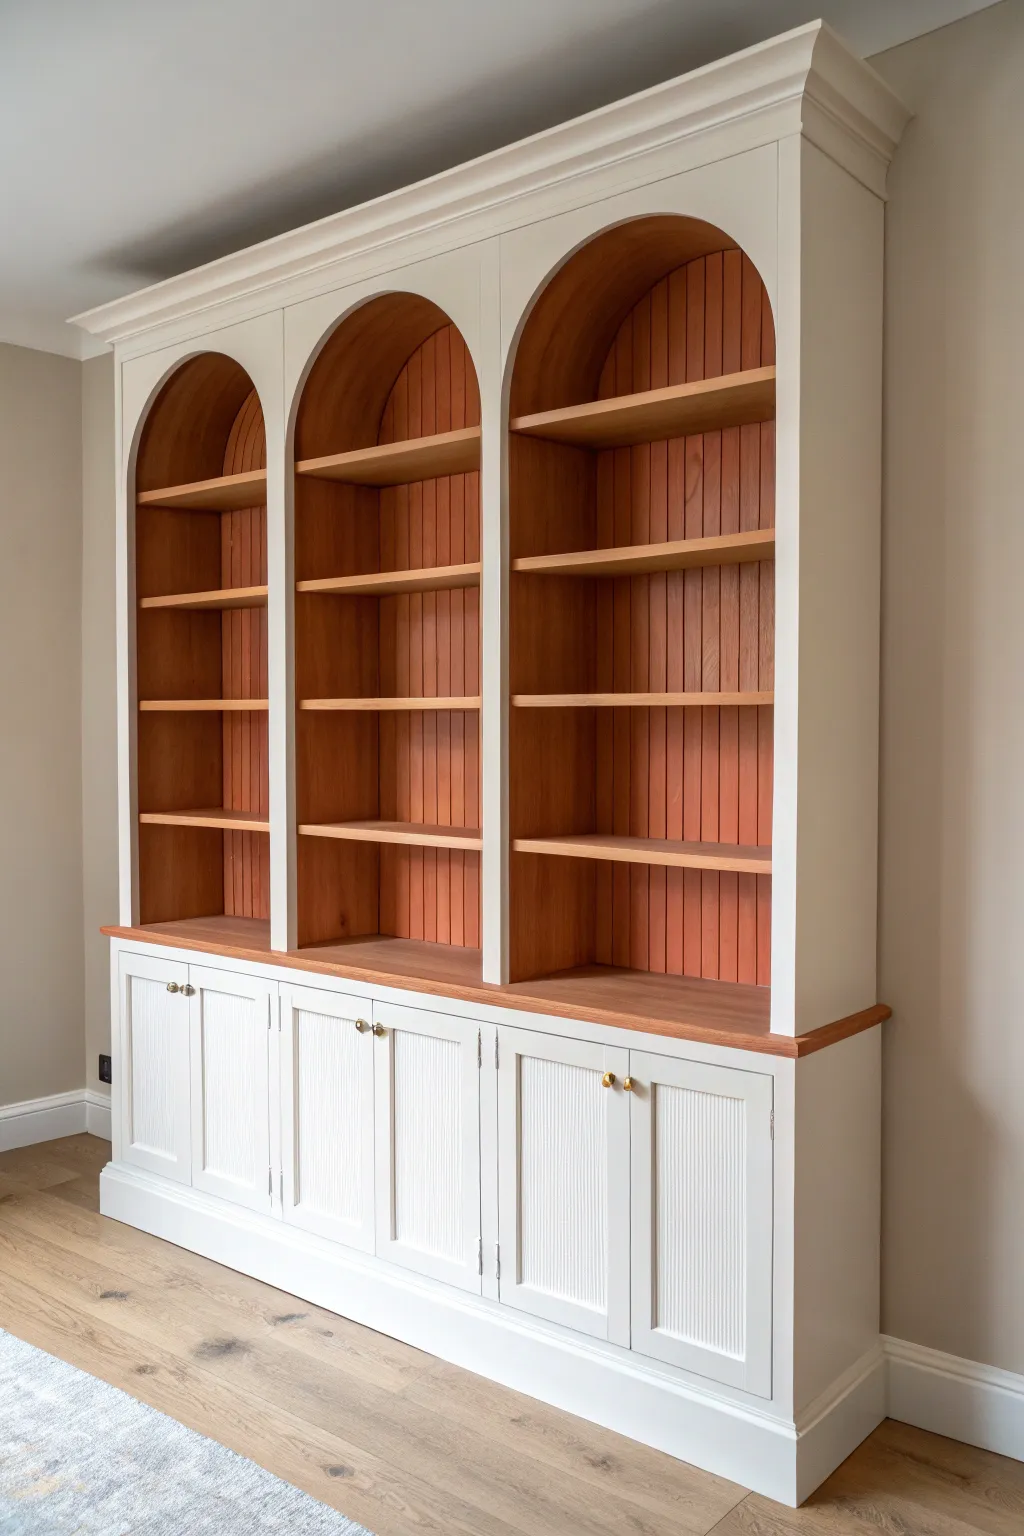
This project transforms a standard wall into a stunning architectural feature with custom arched shelving and classic beadboard detailing. The contrast between the crisp white face frame and the warm wood interior creates a sophisticated, high-end look that instantly elevates any room.
Detailed Instructions
Materials
- 3/4-inch plywood (for cabinet boxes and shelves)
- Hardwood face frame lumber (Poplar or Maple)
- Beadboard paneling (sheets)
- Solid wood countertop (Oak or similar)
- Cabinet grade hinges and knobs
- Primer and white cabinet paint (semi-gloss)
- Wood stain (warm oak tone)
- Clear polyurethane topcoat
- Jigsaw
- Router with flush trim bit
- Pocket hole jig
- Wood glue and wood filler
- Brad nailer and 18g nails
Step 1: Building the Base Cabinets
-
Construct the carcasses:
Begin by building three separate base cabinet boxes using your 3/4-inch plywood. Secure the sides to the bottom and top spreaders using pocket holes and glue for a seamless exterior. -
Install the dividers:
If you are building one long unit instead of separate boxes, install vertical plywood dividers to define the three cabinet sections. Ensure everything is perfectly square before the glue sets. -
Add the face frames:
Assemble a face frame for the base using your hardwood lumber. The stiles should cover the raw plywood edges, and the bottom rail should be wide enough to accommodate baseboard molding later. -
Create the shaker doors:
Build six door frames with simple rail-and-stile construction. Insert beadboard panels into the grooves instead of flat panels to match the upper section’s aesthetic. -
Mount doors and hardware:
Install the doors using concealed cabinet hinges. I prefer to drill the holes for the knobs at this stage but wait to install the actual hardware until after painting.
Step 2: Constructing the Arched Upper Section
-
Build the upper boxes:
Construct the upper shelving carcasses similar to the base, but leave the backs open for now. These boxes will sit on top of the counter later. -
Cut the arched face frame:
This is the signature step. Cut the top rail of your face frame from a wide board or plywood sheet. Use a trammel or a string tied to a pencil to draw three identical arches, then carefully cut them out with a jigsaw. -
Smooth the curves:
Sand the cut arches thoroughly until they are perfectly smooth. A drum sander attachment for a drill works wonders here to get a consistent curve. -
Attach upper face frames:
Glue and nail the face frame, including the arched top piece, onto the upper cabinet boxes. Ensure the vertical stiles align perfectly with the dividers between the shelf sections. -
Install the beadboard backing:
Cut beadboard sheets to size for the back of each section. Before attaching them, stain them with your chosen warm wood tone. It is much easier to stain these flat on a workbench than reaching inside a cabinet later.
Use a Router Templater
Make one perfect arch template from 1/4″ MDF. Use a flush-trim router bit to cut the actual face frame arches. This guarantees identical curves across all three sections.
Step 3: Assembly and Finishing
-
Install the countertop:
Secure the hardwood countertop to the base cabinets. Overhang the front edge slightly (about 1 inch) and stain it to match the beadboard backing. -
Stack the units:
Lift the upper shelving unit onto the countertop. Secure it by screwing up through the base cabinet ceiling into the upper unit and anchoring the back to the wall studs for safety. -
Attach the backing:
Nail the pre-stained beadboard panels onto the back of the upper unit. The vertical lines of the beadboard should run continuously from top to bottom. -
Fit the shelves:
Cut your wooden shelves to fit snugly inside the cabinet. Stain them to match the backing and countertop. You can use adjustable shelf pins or secure them permanently with cleats. -
Paint the exterior:
Mask off the stained wood areas carefully with painter’s tape. Prime the face frames, doors, and side panels. Follow up with two sprayed or rolled coats of high-quality white cabinet paint. -
Add architectural details:
Install crown molding along the very top edge and baseboard molding along the bottom to integrate the unit into the room’s existing trim. -
Final touches:
Remove the masking tape, touch up any paint bleed, and install your brass knobs. A final coat of clear polyurethane on the stained wood surfaces will protect them from scratches.
Integrated Lighting
Rout a small channel into the underside of the face frame arches or shelves to hide LED strip lighting. This adds a warm, library-style glow to your display.
Enjoy styling your new built-ins with books and decor, knowing you’ve created a permanent piece of functional art for your home
A Hidden Mini Painting Tucked Into One Shelf

Add a delightful element of surprise to your built-ins with this tiny, framed coastal vignette tucked discreetly onto a shelf. This project focuses on painting a serene, minimalist seascape in a small format, perfect for leaning against larger books or frames.
Step-by-Step
Materials
- Small square canvas board or heavy watercolor paper (approx. 4×4 inches)
- Small wooden picture frame (gold or wood tone)
- Acrylic paints: Titanium White, Ultramarine Blue, Cerulean Blue, Burnt Umber, Yellow Ochre
- Small flat brush (size 2 or 4)
- Detail round brush (size 0 or 00)
- Palette or paper plate
- Water cup and paper towels
- Pencil
Step 1: Preparing the Composition
-
Frame selection:
Begin by selecting a frame that has some character. A slightly ornate gold frame or a rustic wood frame adds a sense of importance to the tiny artwork. Ensure your painting surface fits snugly inside. -
Sketch the horizon:
Lightly draw a horizontal line across your canvas board about one-third of the way up from the bottom. This will separate your sky from your water. -
Outline landforms:
Sketch a soft, sloping hill or dune shape entering from the left or right side. Keep the lines simple; at this scale, clutter is the enemy.
Scale It Down
Work with the smallest brushes you can find. A size “000” brush is excellent for adding tiny birds or distant boats without blobbing paint.
Step 2: Painting the Sky and Water
-
Mix the sky blue:
On your palette, mix a large amount of Titanium White with a tiny dot of Cerulean Blue. You want a very pale, airy blue for the sky. -
Apply the sky:
Using the flat brush, paint the upper two-thirds of the canvas with horizontal strokes. I like to add a touch more white as I get closer to the horizon line to create atmospheric perspective. -
Mix the water color:
Combine Ultramarine Blue with a touch of Burnt Umber to create a deeper, moodier blue. Add white until it looks like a deep ocean hue. -
Paint the ocean:
Fill in the area below the horizon line with your ocean mix. Keep your brushstrokes steady and horizontal to mimic calm water. -
Blend the meeting point:
While the paint is still slightly tacky, use a clean, slightly damp brush to gently soften the line where the sky meets the water, ensuring it’s straight but not razor-sharp.
Texture Play
Mix a pinch of baking soda into your acrylic paint for the sandy dune areas. It adds gritty, realistic texture that pops even in miniature.
Step 3: Adding Detail and Depth
-
Create the land color:
Mix Yellow Ochre, Burnt Umber, and a little White to create a sandy, brownish-green tone for your land mass. -
Paint the dune:
Fill in the hill shape you sketched earlier. Don’t worry about texture yet; just get a solid base coat down that covers the white of the canvas. -
Add shadows:
Mix a slightly darker version of your land color by adding more Burnt Umber. Dab this onto the bottom edge of the hill and the side furthest from the light source. -
Highlighting the hill:
Mix Yellow Ochre with White. Use your small round brush to dab tiny dots or short strokes on the top curves of the hill to simulate sunlight hitting grass or sand. -
Ocean texture:
Take straight Titanium White on your detail brush. Paint very thin, broken horizontal lines on the water surface to suggest small waves catching the light.
Step 4: Finishing Touches
-
The focal point:
Paint a very small, dark speck near the center of the water or on the beach using dark brown paint. This abstract shape acts as a boat or a rock, giving the eye a place to rest. -
Assess and dry:
Step back three feet. If the image reads clearly from that distance, it is successful. Let the painting dry completely, usually about 20-30 minutes for acrylics. -
Framing:
Place dry artwork into your chosen frame. If using a frame with glass, ensure the paint is fully cured so it doesn’t stick. -
Styling the shelf:
Nestle the framed painting onto your bookshelf. Lean it against a larger, neutral book cover or tuck it slightly behind a vase so it feels like a discovered treasure.
Now you have a charming, subtle piece of art that rewards close inspection of your bookshelves


Have a question or want to share your own experience? I'd love to hear from you in the comments below!