A painted curio cabinet is one of my favorite makeovers because the transformation feels almost magical—like the whole room gets lighter with one project. Here are my go-to painted curio cabinet ideas I’d suggest if we were standing in my studio, picking colors and dreaming up your “after.”
Classic Bright White Curio Cabinet Makeover
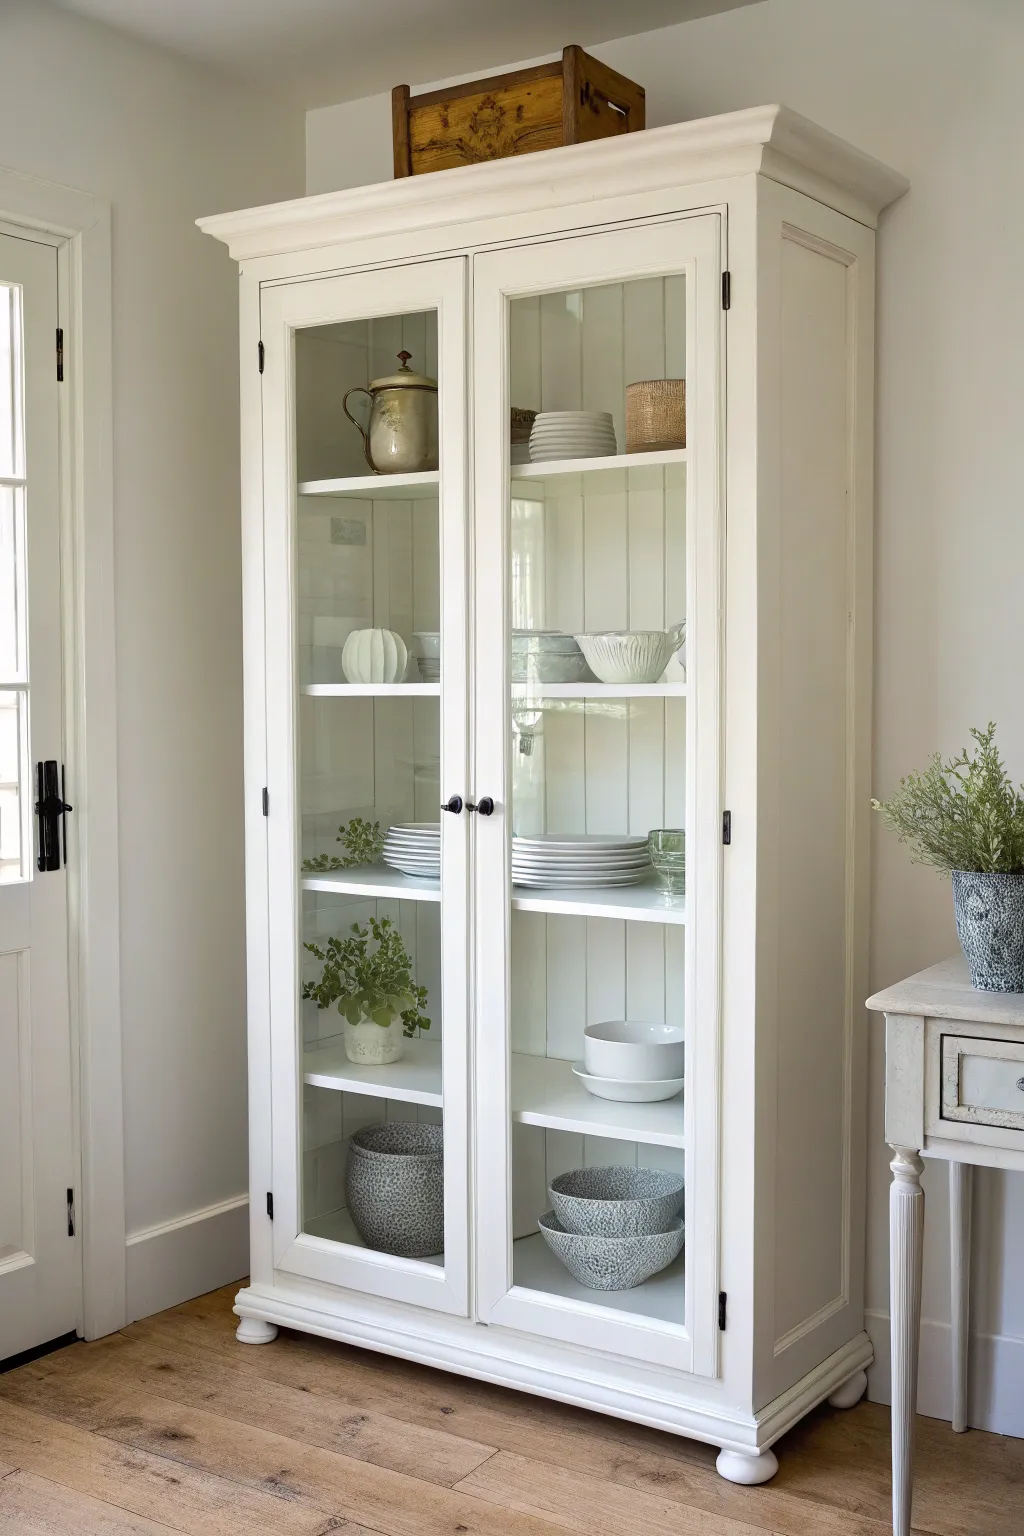
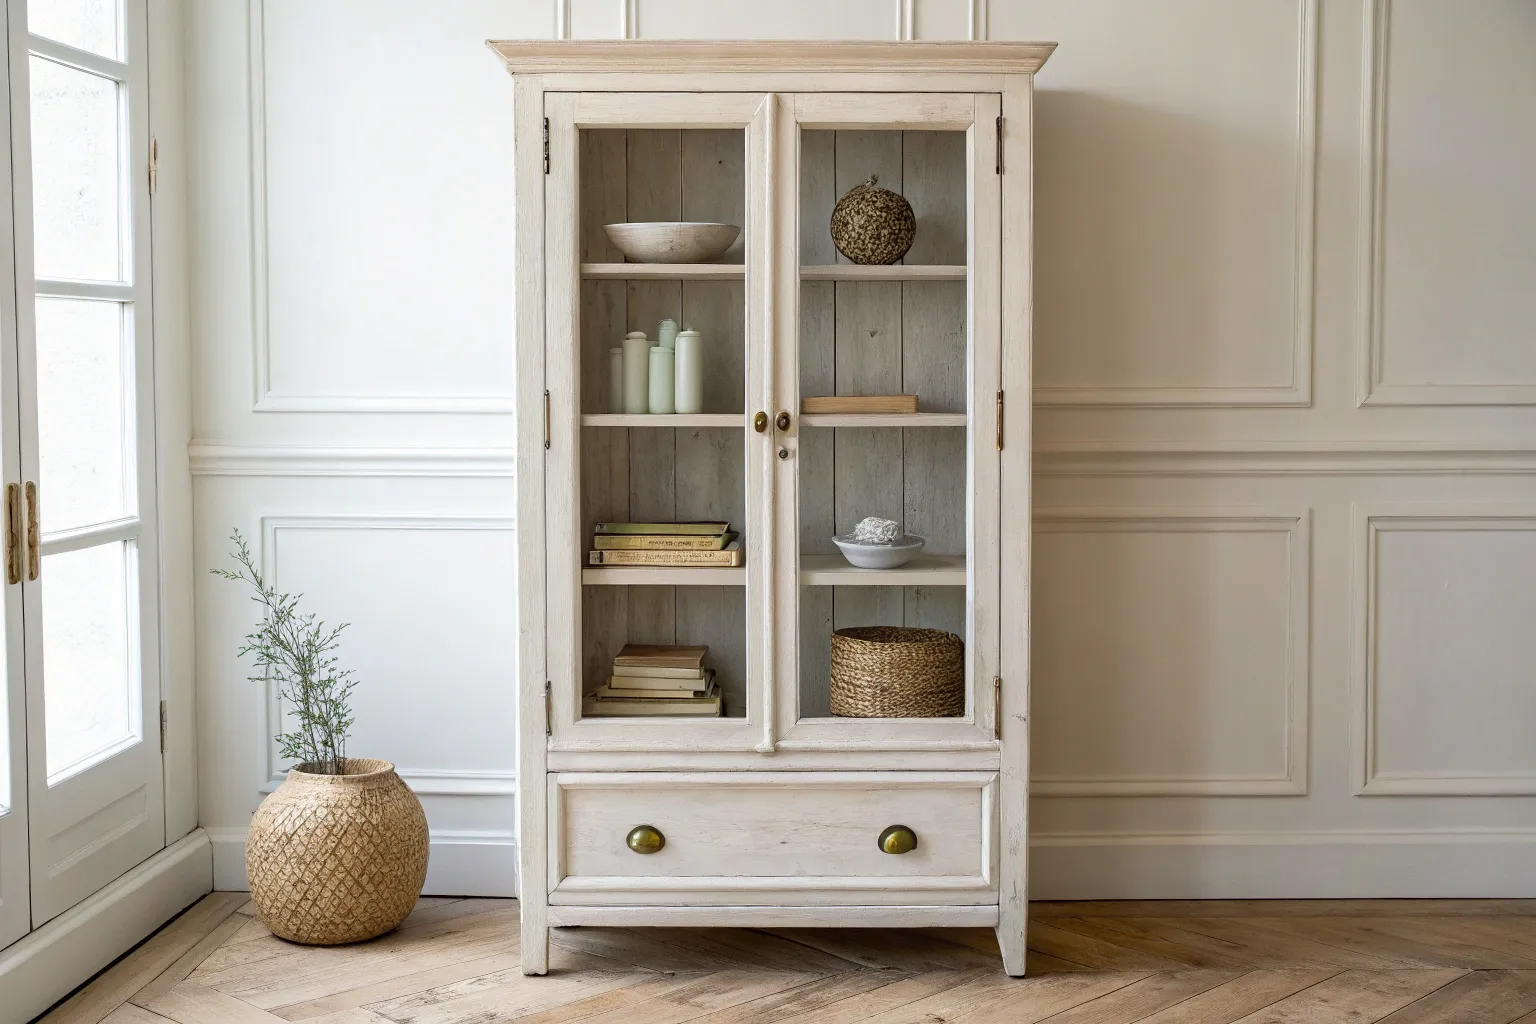
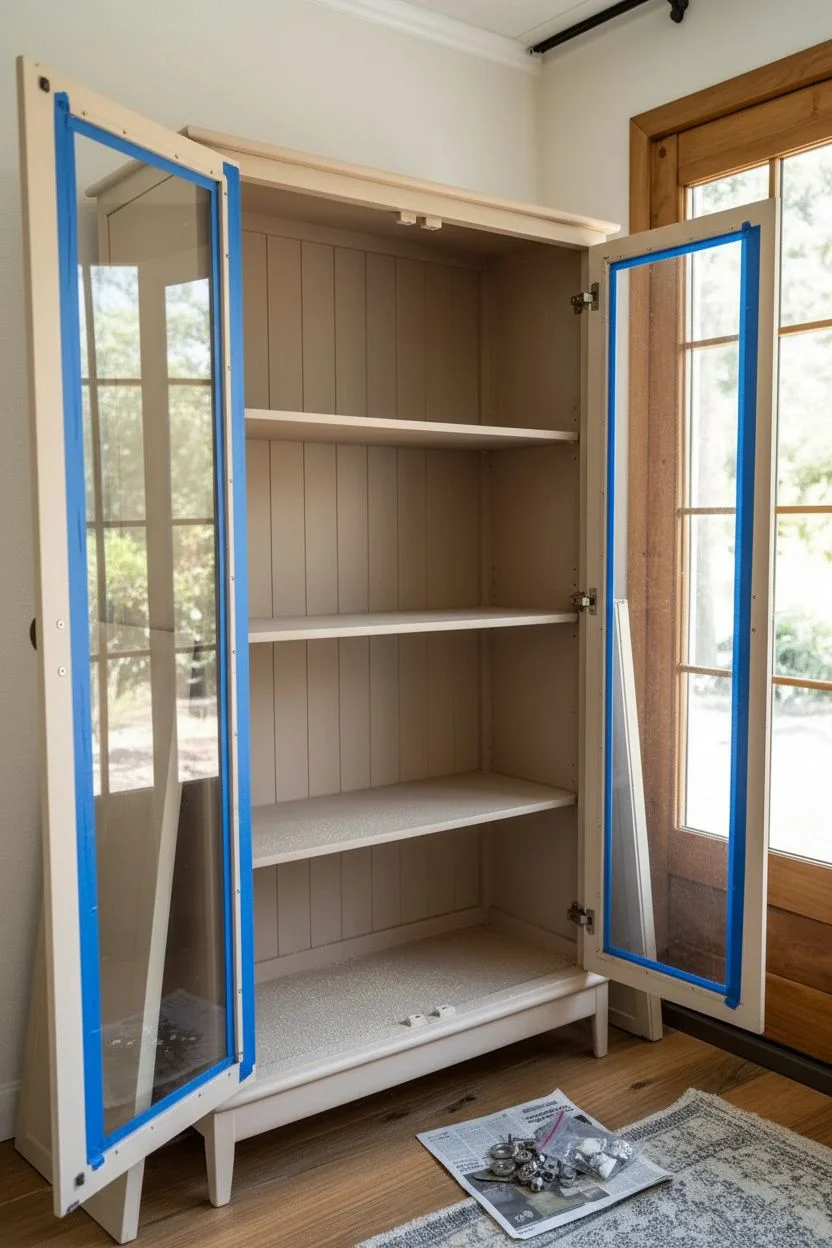
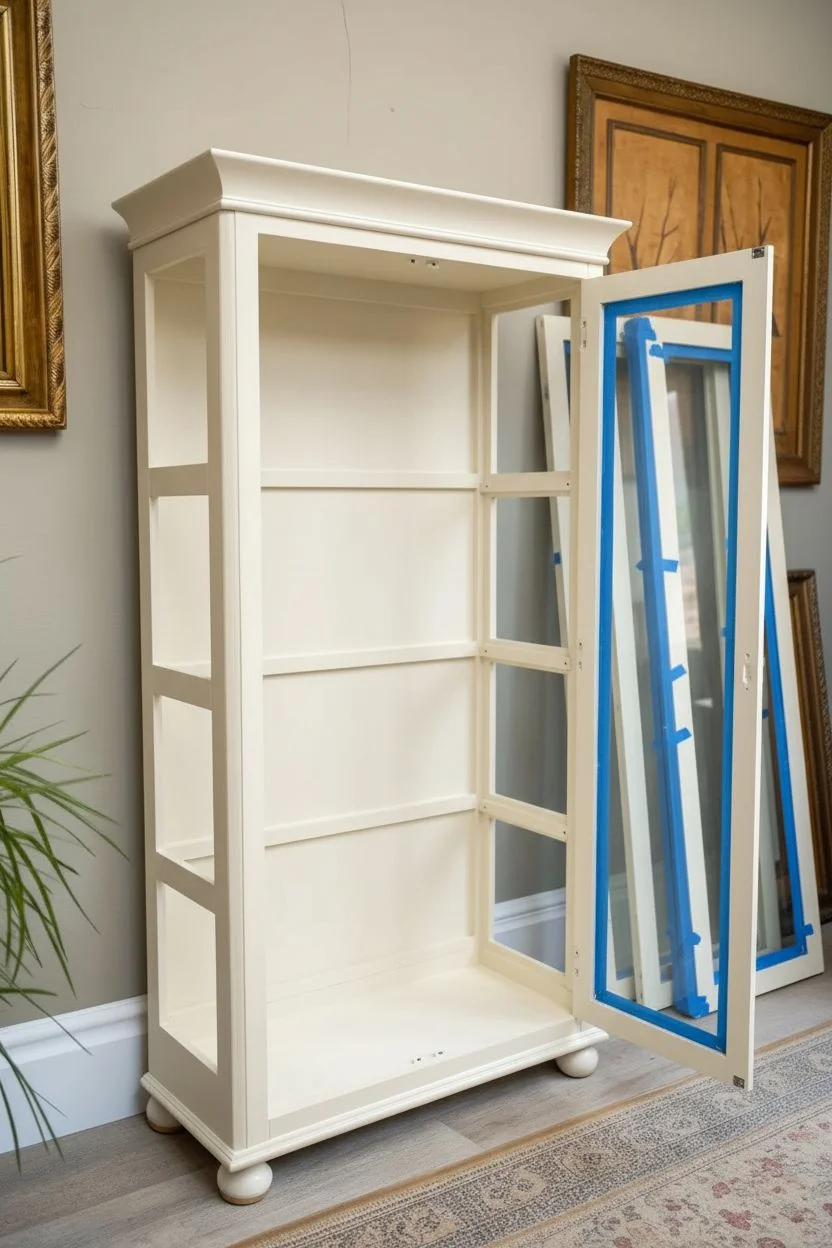
Transform a dark or dated curio into a stunning focal point with this bright white makeover. The crisp, clean finish highlights the beautiful items inside while the classic styling ensures it fits perfectly in any modern farmhouse or traditional home.
How-To Guide
Materials
- Used or thrifted wooden curio cabinet
- High-quality bonding primer (oil-based or stain-blocking)
- Bright white cabinet paint (enamel or alkyd hybrid)
- TSP substitute or degreasing cleaner
- Sanding sponges (120 and 220 grit)
- Painter’s tape
- 2-inch angled sash brush
- 4-inch foam or microfiber roller
- Drop cloths
- Screwdriver
- Wood filler (optional)
- Tack cloth
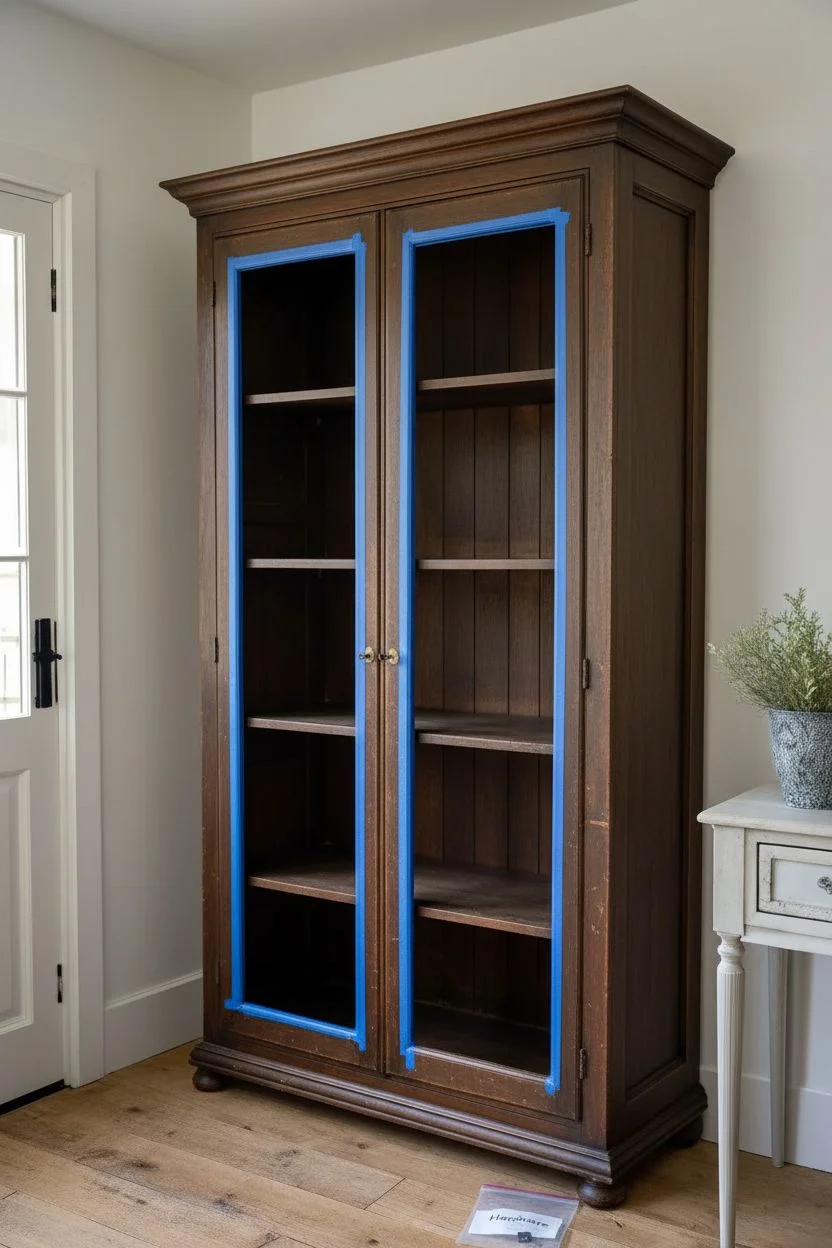
Step 1: Preparation & Cleaning
-
Clear and clean:
Remove all shelves and items from the cabinet. Using a TSP substitute or strong degreaser, scrub the entire piece down to remove years of dust, polish, and oils. This step is crucial for paint adhesion. -
Disassemble hardware:
Take off the doors by unscrewing the hinges. Remove knobs, pulls, and any shelf support pegs. Store all small hardware in a labeled bag so nothing gets lost during the process. -
Protect the glass:
Apply painter’s tape carefully around the edges of every glass pane on the doors and sides. Take your time here to ensure a sharp, professional line later. -
Scuff sanding:
Using a 120-grit sanding sponge, lightly scuff all wooden surfaces. You aren’t trying to strip the finish, just dulling the shine to give the primer something to grip. Wipe away all dust with a damp rag or tack cloth.
Sticky Doors?
If paint buildup makes doors stick, rub a little clear candle wax or paraffin along the inside edge where the door meets the frame to help it glide smoothly.
Step 2: Priming the Surface
-
Apply bonding primer:
Use a high-quality bonding primer, especially if the original wood is dark or shiny. An oil-based primer is best for preventing bleed-through. Brush into corners and roll flat areas. -
Check for bleed-through:
Once the first coat is dry, look for any yellow or pink spots seeping through. If you see discoloration, spot-prime those areas with a second coat of primer. -
Smooth it out:
After the primer has cured completely, lightly sand everything with 220-grit sandpaper. This knocks down any brush strokes or raised grain. Wipe clean with a tack cloth.
Step 3: Painting & Finishing
-
First coat application:
Start painting the interior back panel first. Use your angled brush for the vertical grooves and corners, then smooth out the flats with a small foam roller for a factory-like finish. -
Work outward:
Move to the exterior sides and face frame. Brush the intricate details and moldings, feathering out the paint to avoid drips. -
Painting the doors:
Lay the doors flat on a work surface if possible. Paint the muntins (the wood strips between glass) carefully with your angled brush. I find it easiest to work from the center outward. -
Dry and repeat:
Let the first coat dry according to the can’s instructions—usually 4 to 6 hours forcabinet paint. Apply a second coat to ensure full, opaque coverage. -
Shelf maintenance:
Don’t forget the shelves. If they are wood, sand, prime, and paint them to match. If they are glass, simply clean them thoroughly. -
Remove tape:
Carefully score the edge of the painter’s tape with a craft knife before the final coat is fully cured, then peel it away slowly at a 45-degree angle to reveal crisp lines. -
Reassembly:
Once the paint has cured for at least 24-48 hours, reattach the hinges and hang the doors. Install your hardware—either the original pieces or new contrasting black pulls for a modern touch. -
Final cleaning:
Use a glass cleaner to polish the panes inside and out, removing any smudges from reassembly. -
Styling:
Place your shelves back in and arrange your decor. Stick to a monochromatic palette like white ceramics and textured pottery to complete the ethereal look.
Add Interior Contrast
For a subtle pop, paint the back panel a soft grey or pale blue, or apply a textured beadboard wallpaper before painting for added depth.
Step back and enjoy the light and airy elegance your refreshed cabinet brings to the room


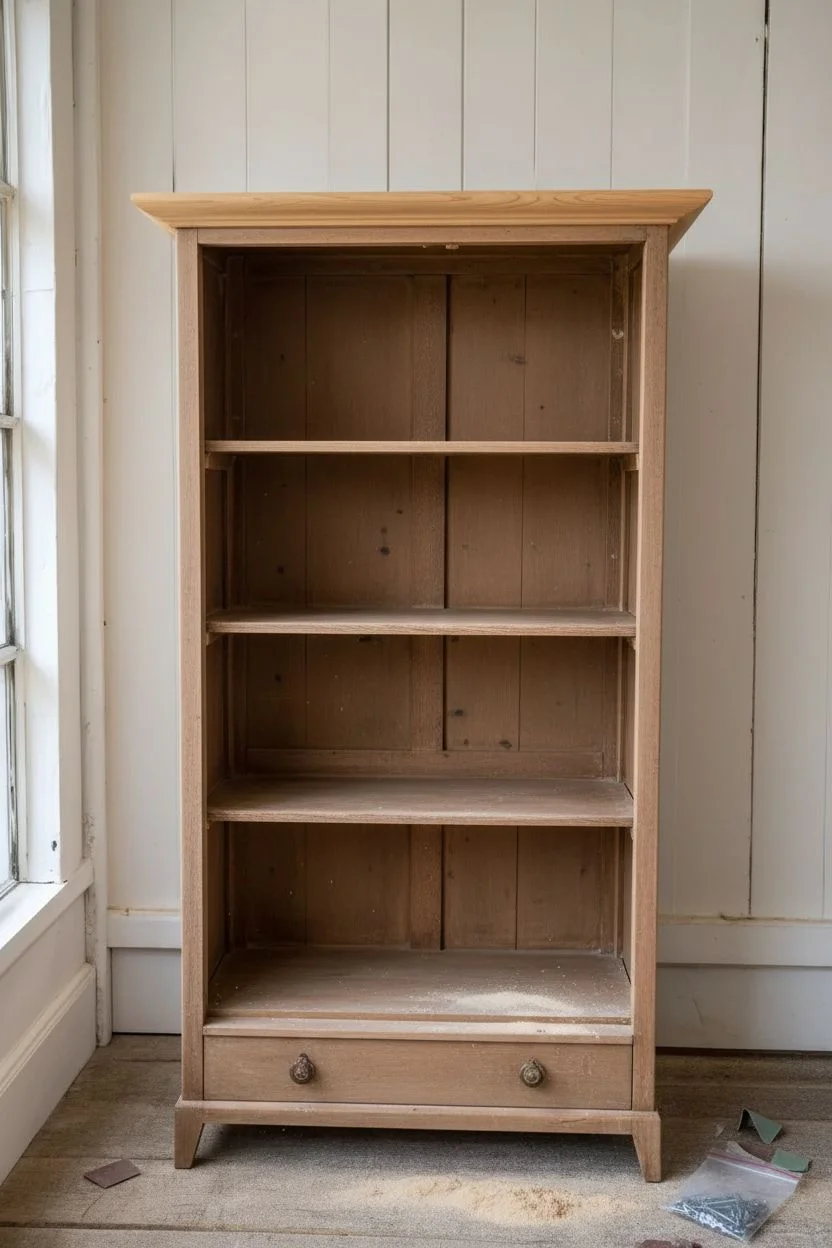
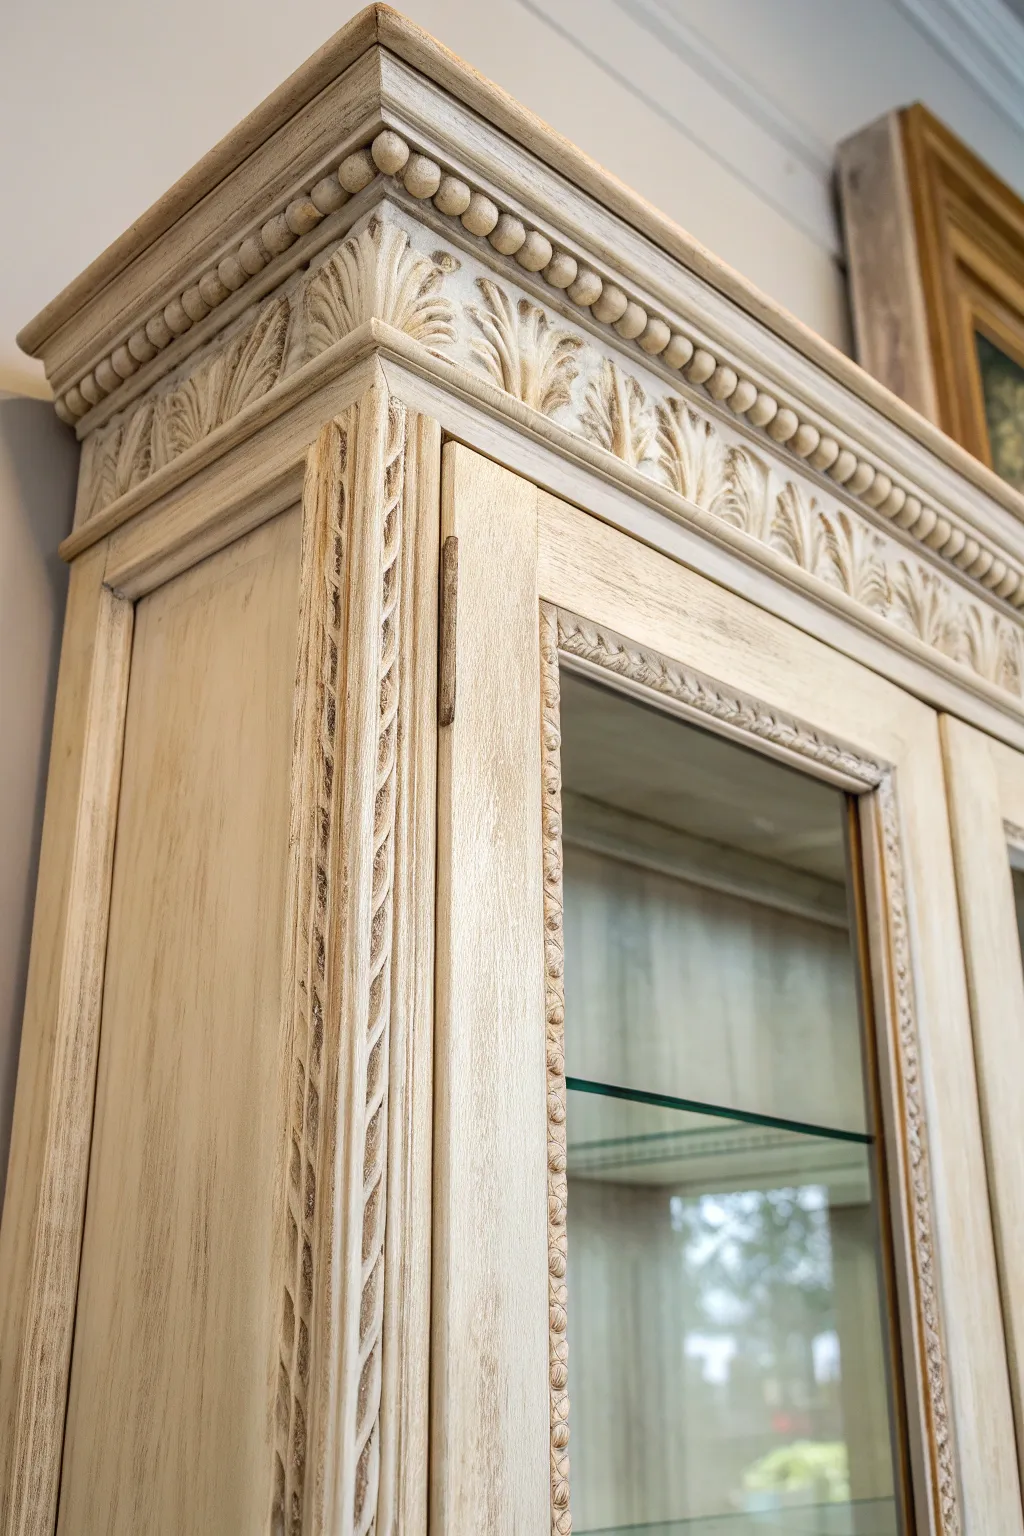
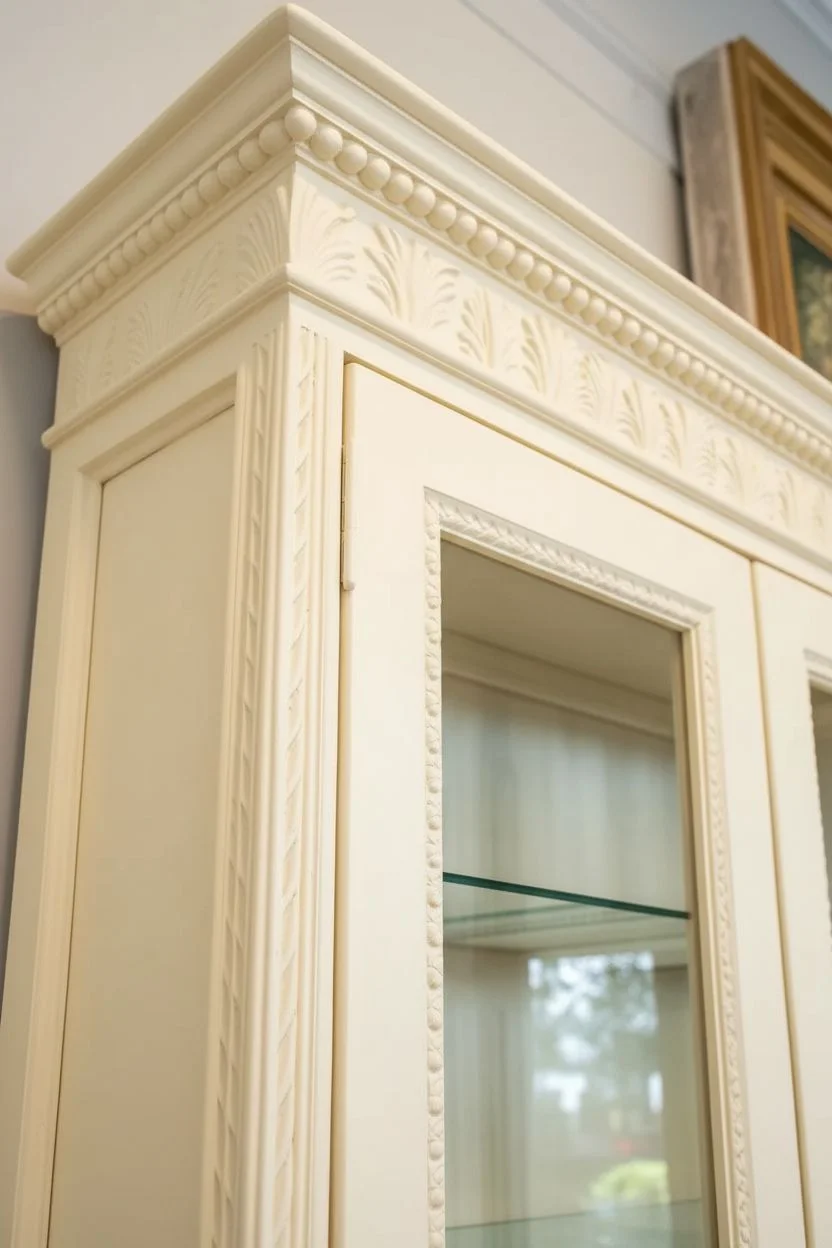
Soft Cream With Warm Antiquing Wax
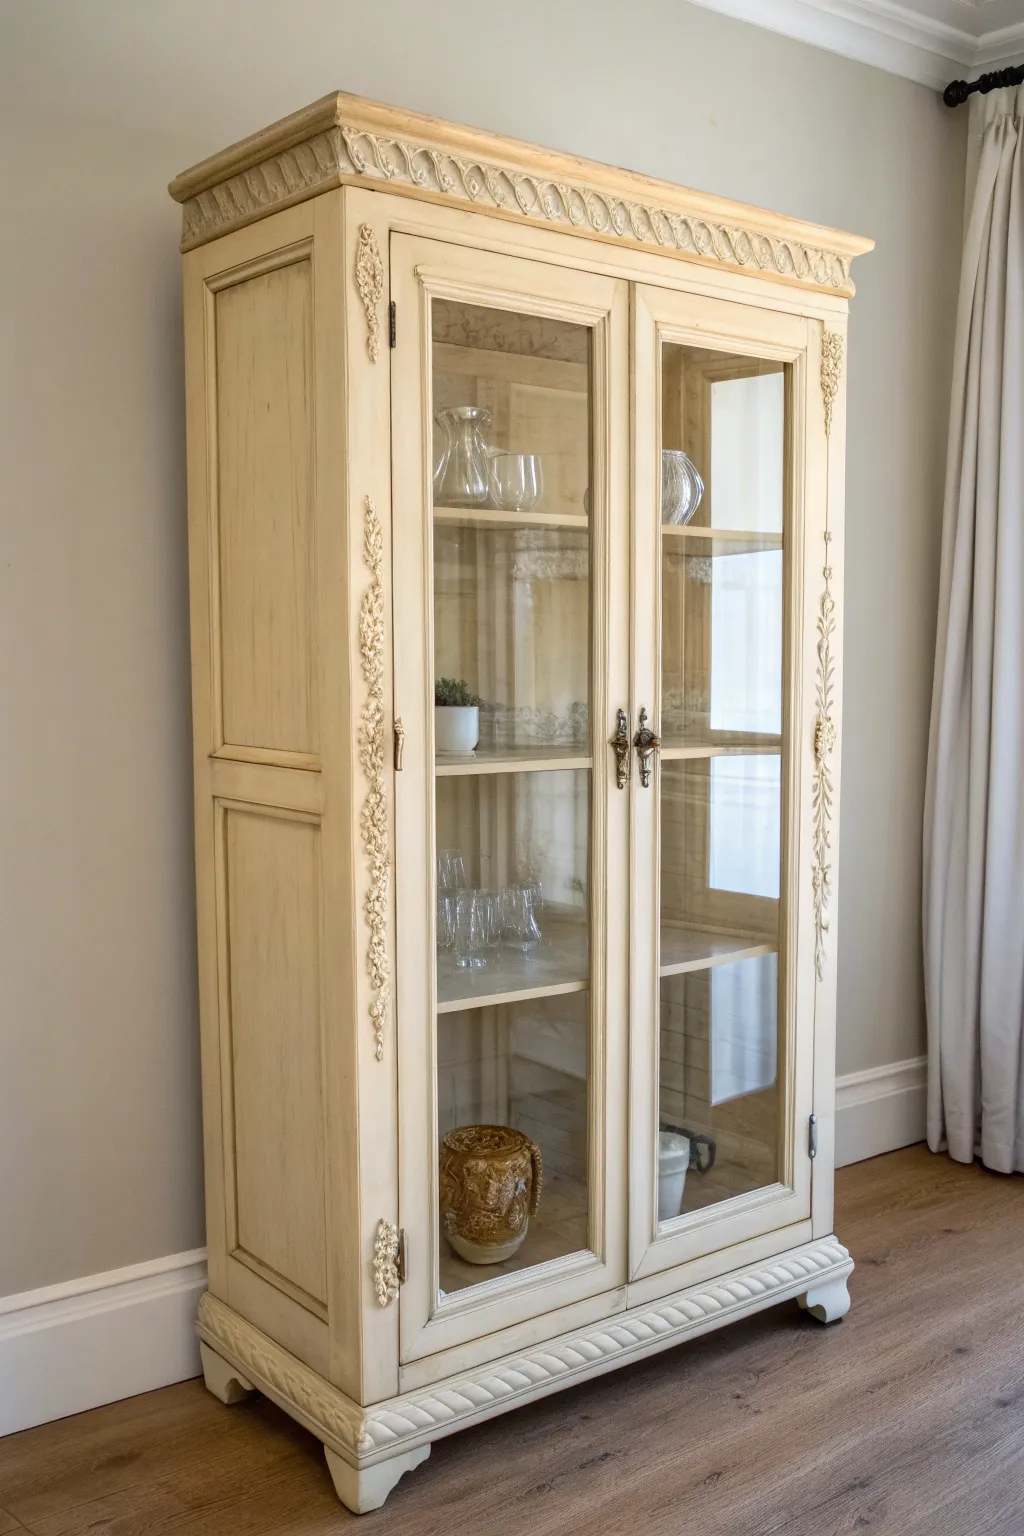
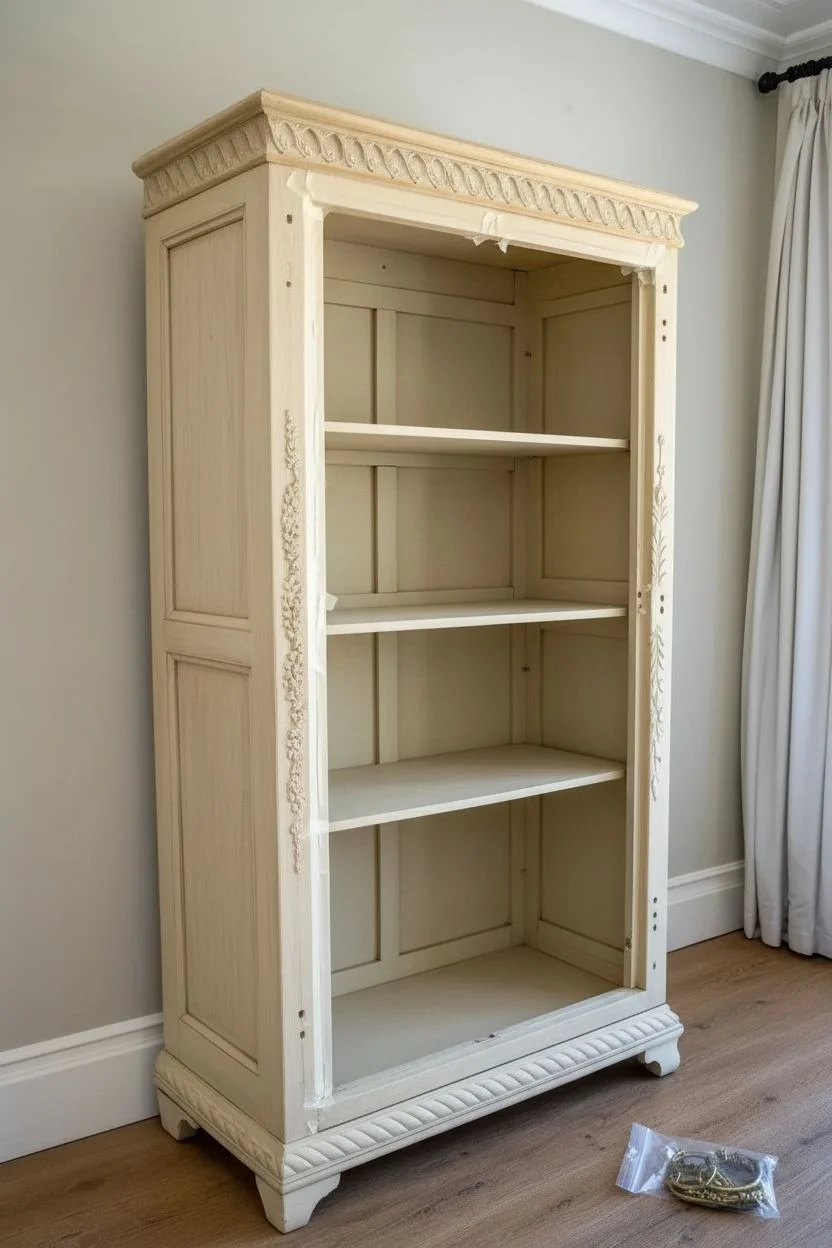
Transform a dated wooden cabinet into a timeless French-country masterpiece with this soft cream and warm wax finish. The combination of chalk-style paint and dark antiquing wax highlights intricate carvings and adds instant age and character to your furniture.
Step-by-Step Tutorial
Materials
- Wooden curio cabinet with glass doors
- Degreaser or TSP alternative
- Fine-grit sandpaper (220-grit)
- Painter’s tape
- Creamy off-white chalk-style paint (e.g., Annie Sloan Old White or similar)
- Round synthetic paint brush (medium size)
- Clear finishing wax
- Dark antiquing wax (brown)
- Wax brush or lint-free cotton rags
- Small artist brush (for corners)
- Clean, dry buffing cloths
Step 1: Preparation & Cleaning
-
Remove hardware and doors:
Begin by carefully unscrewing and removing all handles, hinges, and the glass doors. Label small hardware pieces in bags so you don’t lose them. While you can paint with doors on, removing them ensures a cleaner finish. -
Clean thoroughly:
Scrub the entire piece with a degreaser or TSP alternative to remove years of furniture polish, oil, and dust. This step is crucial for paint adhesion. -
Light scuff sanding:
Once dry, lightly scuff the surface with 220-grit sandpaper. You aren’t trying to strip the finish, just giving the paint something to grip. -
Protect the glass:
Apply painter’s tape to the glass panes on the inside and outside to protect them from stray brush strokes.
Step 2: Painting the Base
-
First coat application:
Apply your first coat of creamy chalk-style paint. Use a round brush to work the paint into the carvings and corners first, then smooth out the flat panels. Don’t worry if coverage is slightly uneven here. -
Dry time:
Allow the first coat to dry completely, usually about an hour depending on your humidity levels. -
Second coat application:
Apply a second coat for full, opaque coverage. Watch for drips in the detailed molding areas and smooth them out immediately. -
Sand for smoothness (optional):
For a super smooth finish, lightly sand the dried paint with fine-grit sandpaper, wiping away the dust afterwards with a tack cloth.
Don’t Skip the Clear Wax
Always apply clear wax BEFORE dark wax. Without it, the dark pigment absorbs instantly into the chalk paint and becomes impossible to blend or remove.
Step 3: Waxing & Antiquing
-
Apply clear wax:
Brush on a thin layer of clear finishing wax over a section of the cabinet. This seals the paint and acts as a barrier so the dark wax doesn’t stain too heavily. -
Wipe excess clear wax:
Use a lint-free cloth to wipe away excess clear wax. It should feel smooth, not sticky. -
Apply dark wax:
I prefer to work in small sections for this step. Dip your brush lightly into the dark antiquing wax and apply it over the clear wax, focusing heavily on carvings, corners, and moldings. -
Wipe back dark wax:
Immediately wipe away the dark wax with a clean cloth. The dark color will remain trapped in the textures and crevices, creating that aged shadow effect. -
Adjust the antique look:
If a spot is too dark, apply a little more clear wax on your rag and use it like an eraser to lift the dark wax. -
Buff to finish:
Once you have waxed the entire piece, let it cure for 24 hours. Then, buff the surface vigorously with a soft cloth to create a soft, satin sheen.
Highlight the Details
For extra dimension, try ‘wet distressing.’ Before waxing, use a damp sponge to gently rub paint off the highest points of the carvings to reveal the wood.
Step 4: Final Assembly
-
Clean the glass:
Remove the painter’s tape carefully. Use a glass cleaner or a razor blade to remove any paint seepage on the window panes. -
Reattach hardware:
Screw the hinges and handles back into place. If the original hardware looks too shiny, you might consider rubbing a little dark wax on them to match the cabinet’s new aged look. -
Style and enjoy:
Place your shelves back inside and style your newly finished cabinet with your favorite collectibles.
Enjoy the sophisticated charm this newly antiqued piece brings to your living space


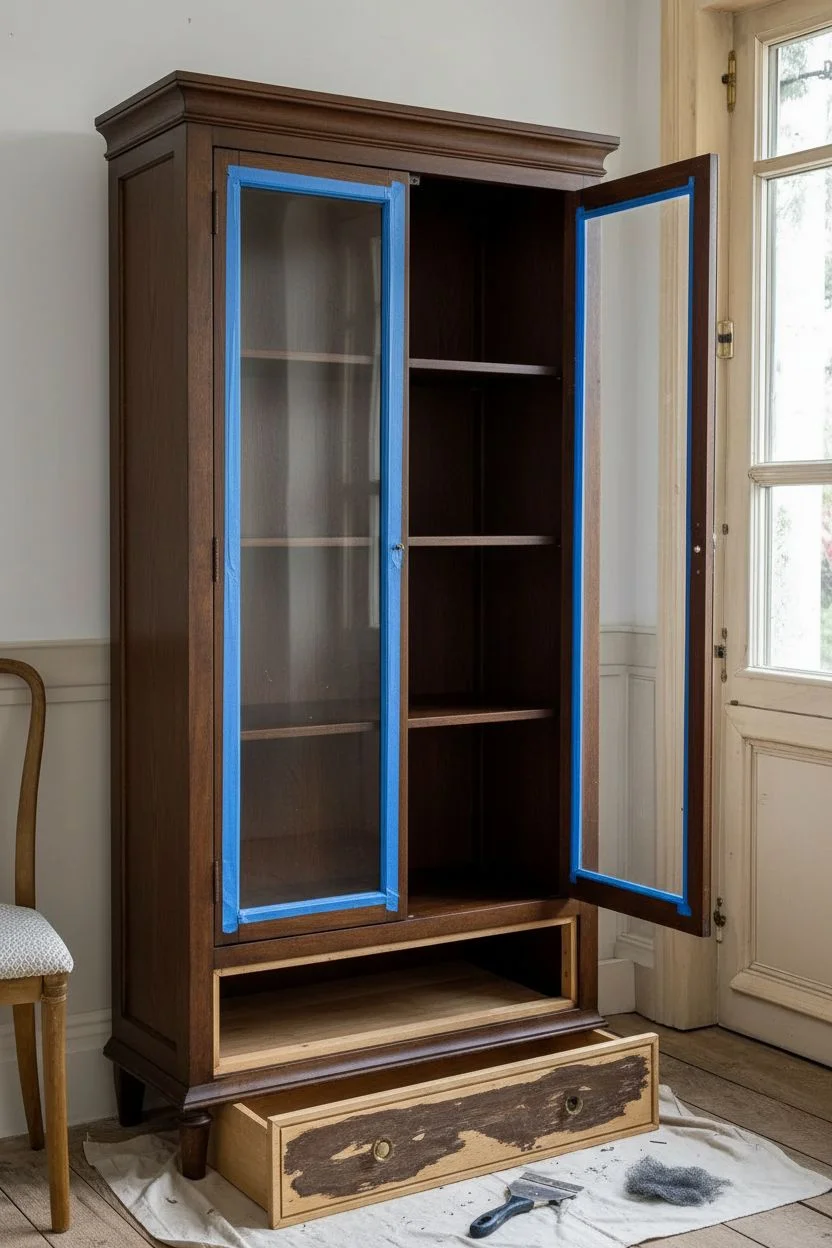
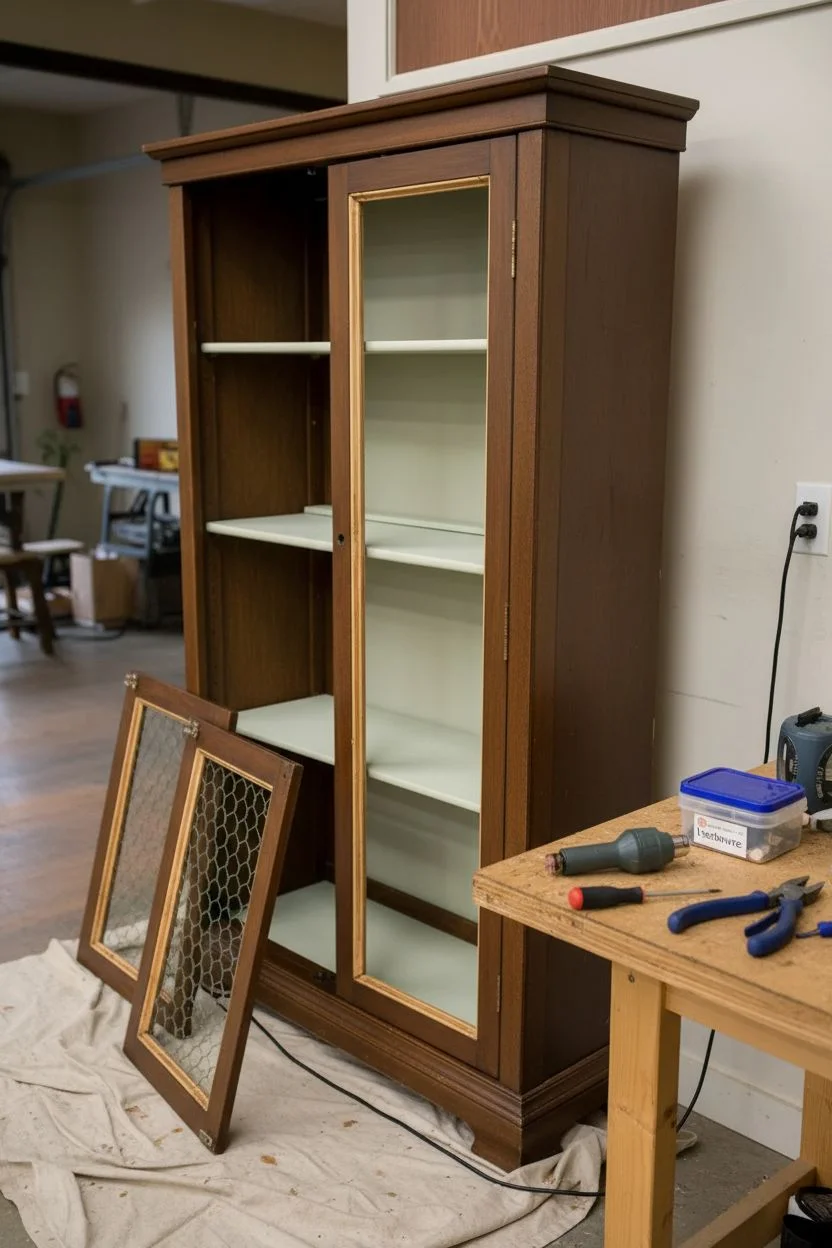
Crisp Black Exterior With Light Interior
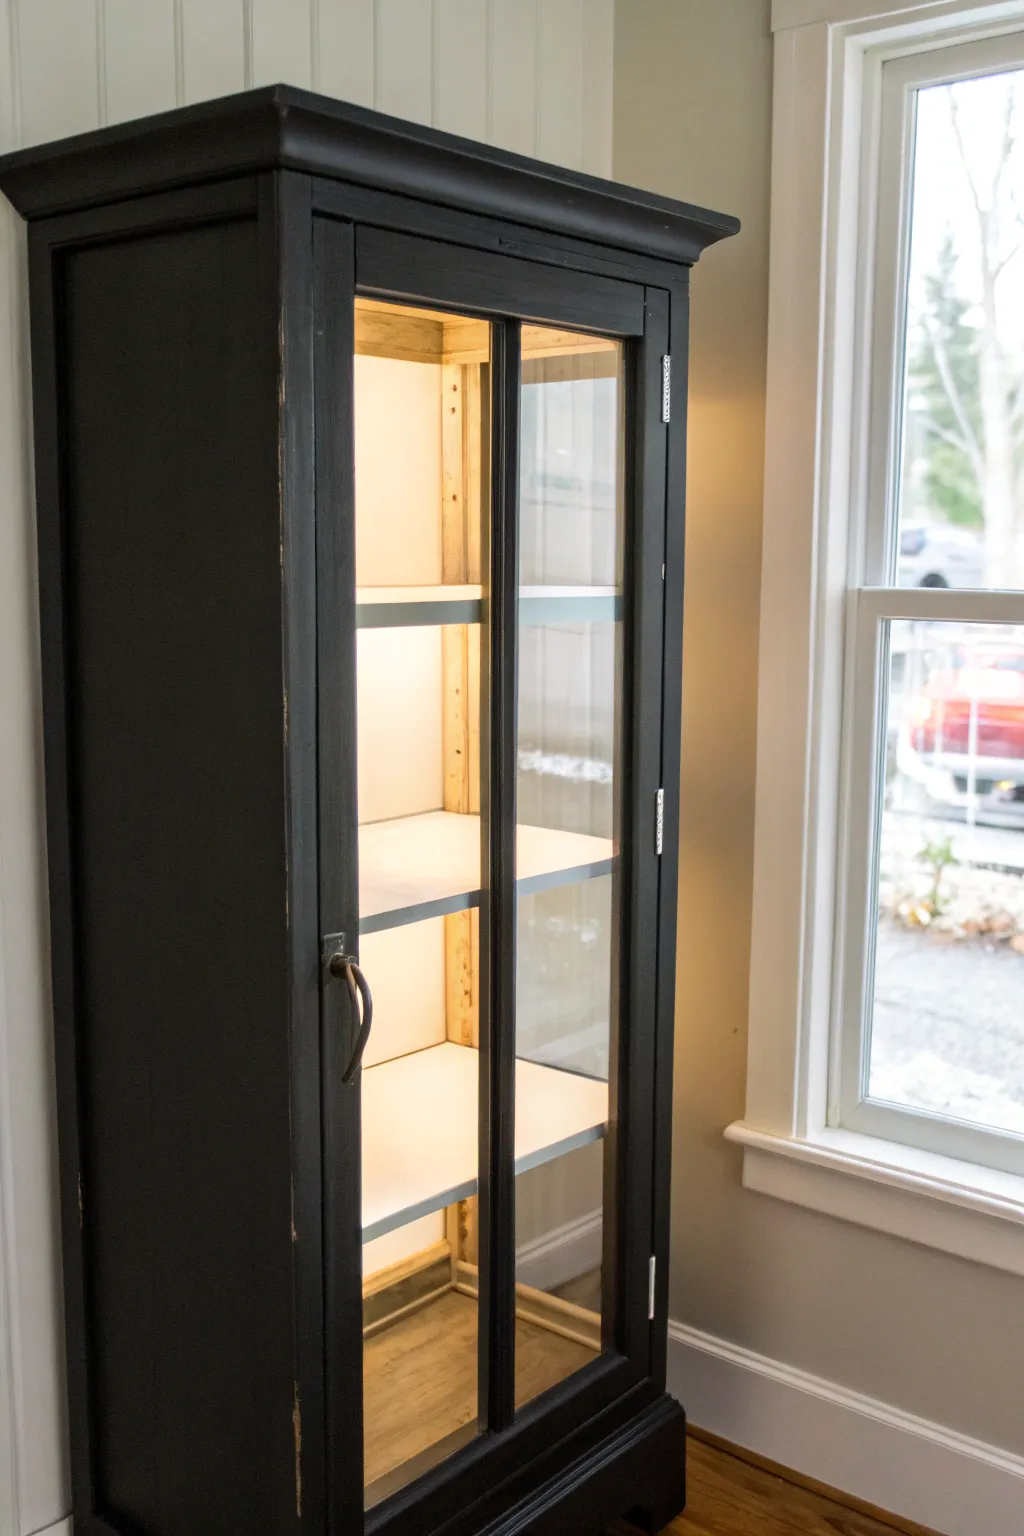
Transform a dated wooden cabinet into a striking statement piece by marrying a matte black exterior with a crisp, bright interior. This high-contrast look not only modernizes the furniture but also creates the perfect illuminated stage for displaying your treasured collectibles.
Step-by-Step Guide
Materials
- Wooden curio cabinet with glass doors
- Screwdriver (for hardware removal)
- Sandpaper (120-grit and 220-grit)
- Painter’s tape
- Clean rags or tack cloth
- Degreaser or TSP substitute
- Stain-blocking primer (grey tinted for the exterior is helpful)
- Matte black chalk-style or mineral paint
- Creamy white interior paint (satin or semi-gloss)
- Angled sash brush (2-inch)
- Small foam roller
- Clear protective topcoat (wax or poly)
- LED strip lighting kit
Step 1: Preparation and Cleaning
-
Remove hardware and doors:
Begin by carefully unscrewing and removing all metal hardware, including the handle and hinges. Take the glass doors off completely to make painting easier and label the screws in small bags so you don’t lose them. -
Clean thoroughly:
Wipe down the entire cabinet with a degreaser or TSP substitute. Years of furniture polish and dust need to be removed to ensure the new paint adheres properly. -
Scuff sand the surface:
Using 120-grit sandpaper, lightly scuff up the existing finish on both the inside and outside. You aren’t trying to strip it to bare wood, just de-glossing the surface to provide ‘tooth’ for the primer. -
Clean up dust:
Vacuum up the sanding dust and wipe everything down with a tack cloth or a damp rag. Any leftover dust will ruin your smooth finish. -
Protect the glass:
Apply painter’s tape meticulously around the edges of the glass panes. Run your fingernail or a credit card along the tape edge to seal it tight against the wood to prevent paint from seeping under.
Bleed-Through Blues?
If pink or yellow stains appear through your white interior paint, stop painting. Apply a coat of shellac-based primer specifically over those spots to seal the tannins before recoating.
Step 2: Priming and Painting the Interior
-
Prime the interior:
Apply a coat of stain-blocking primer to the interior walls and shelves. Since you are going light on the inside, this step is crucial to prevent wood tannins from bleeding through the white paint. -
Paint the interior base coat:
Once the primer is dry, apply your creamy white paint to the back panel, side walls, and shelves. I prefer using a small foam roller for the large flat back panel to get the smoothest finish, using a brush for the corners. -
Apply second interior coat:
Let the first coat dry completely according to the can’s instructions, then apply a second coat for full, opaque coverage. This bright backdrop is what will make your items pop later.
Level Up: Wallpaper Backing
Instead of painting the back panel white, apply a peel-and-stick wallpaper with a subtle geometric or botanical print. It adds incredible depth without permanence
Step 3: Painting the Exterior
-
Prime the exterior:
Apply primer to the outside of the cabinet. If possible, use a grey-tinted primer or mix a little black paint into your white primer; this helps the black topcoat cover faster and look richer. -
Apply the first black coat:
Stir your matte black mineral or chalk paint thoroughly. Using a high-quality synthetic brush, apply the first coat in long, smooth strokes following the grain of the wood. Don’t worry if it looks patchy; the second coat will fix it. -
Sand lightly between coats:
Once the first coat is fully dry, lightly run 220-grit sandpaper over the surface to knock down any brush strokes or nubs, then wipe clean. -
Apply the final black coat:
Paint the second coat of black, ensuring you get into any detailed grooves or molding at the top cornice. Check for drips around the edges where the tape meets the wood. -
Distress edges (optional):
If you want the slightly worn look seen in the photo, take a 220-grit sanding sponge and gently sand the sharp edges and corners until a peek of the wood underneath comes through.
Step 4: Finishing Touches
-
Seal the paint:
If you used chalk paint, apply a clear wax or a matte polychrylic topcoat to seal the finish. This protects the deep black color from fingerprints and dust. -
Remove tape and clean glass:
Peel off the painter’s tape while the topcoat is still slightly tacky to avoid pulling up paint. Use a razor blade to gently scrape any stray paint off the glass. -
Reattach hardware:
Screw the hinges and handle back into place. If the original hardware was brassy or dated, consider spray painting it an antique bronze or iron color before reattaching. -
Install lighting:
Run an LED light strip along the inner front edge of the cabinet (hidden behind the face frame). This hidden light source will illuminate the white interior without being directly visible.
Now step back and admire how this elegant contrast breathes new life into your room


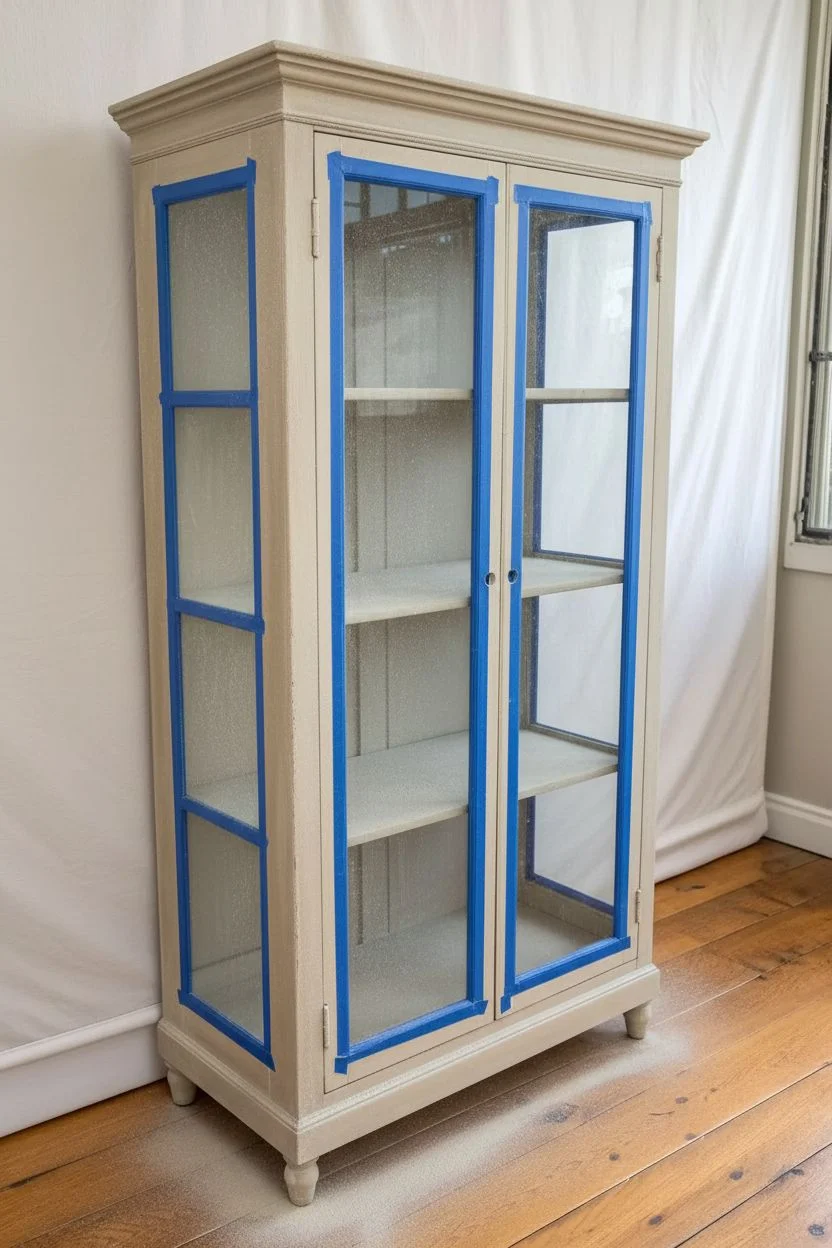
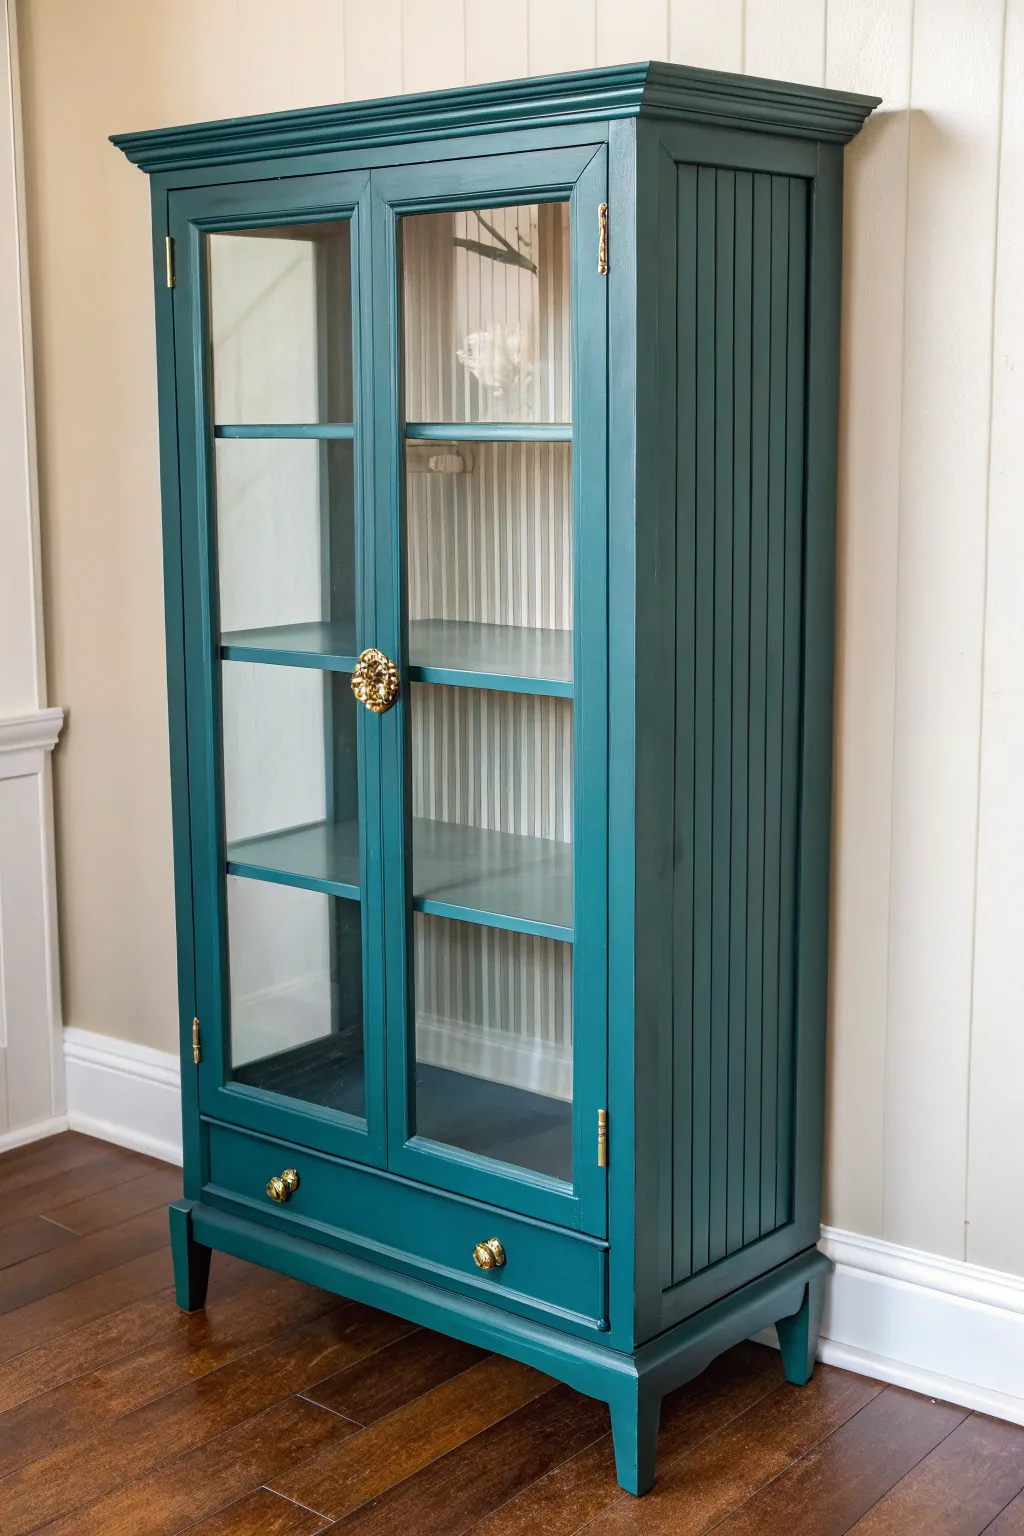
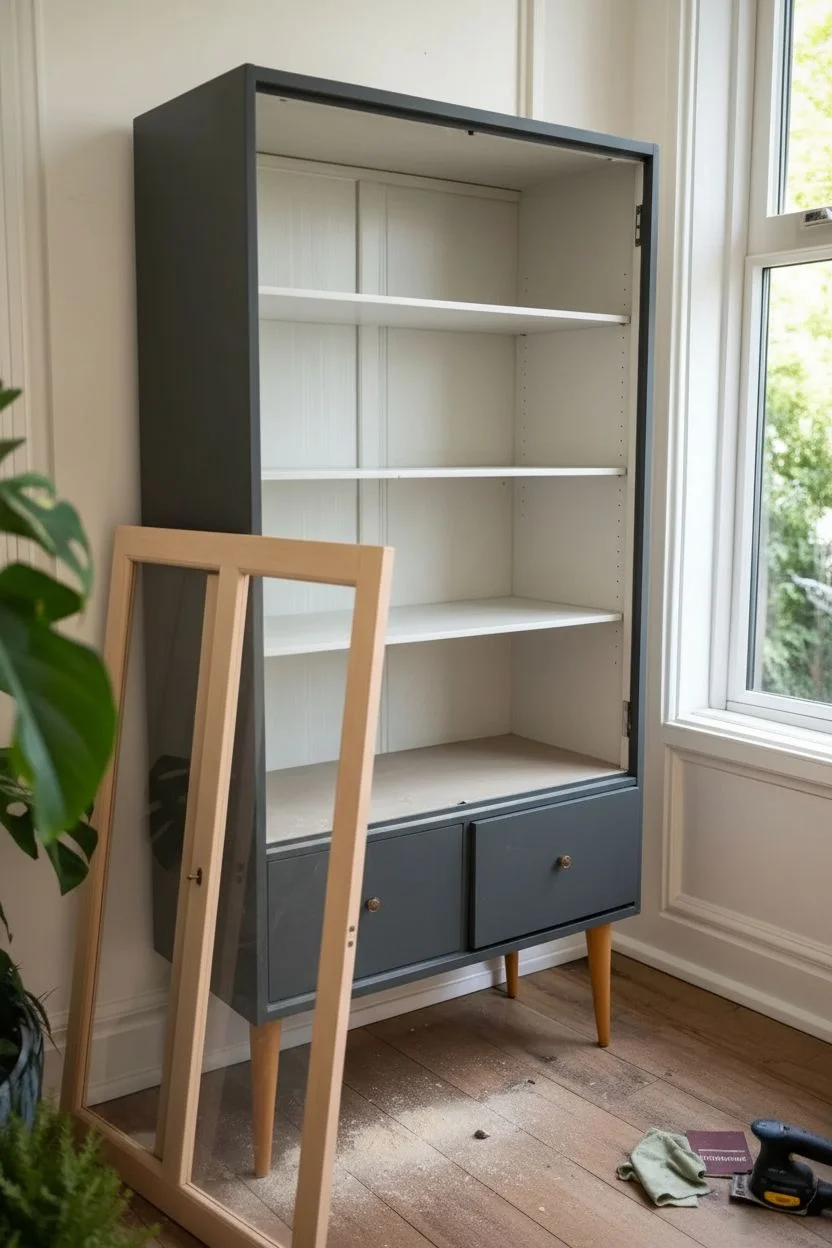
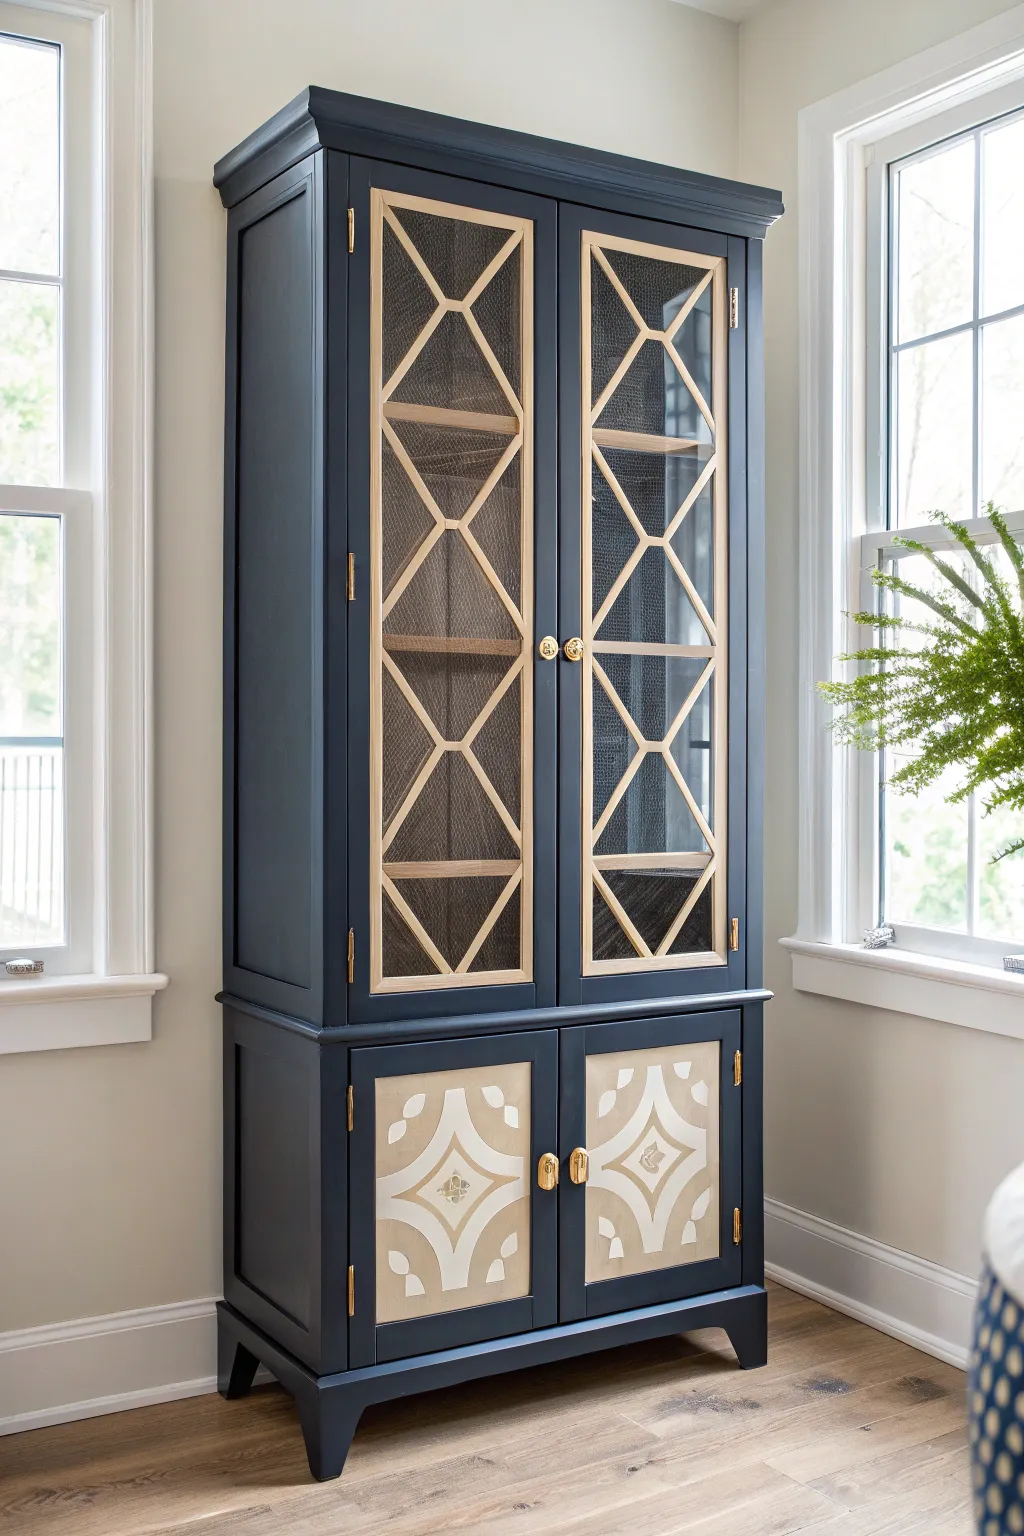
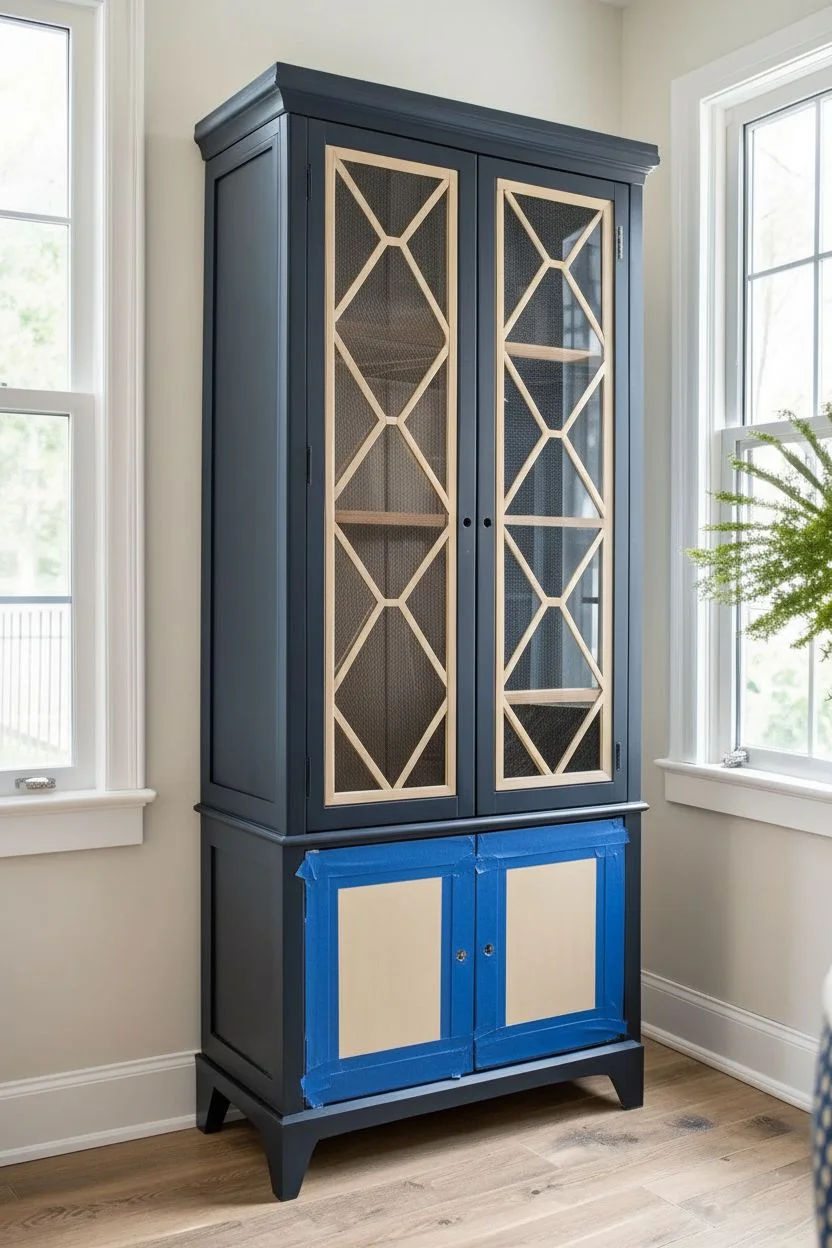
Moody Navy Curio Cabinet Statement Piece
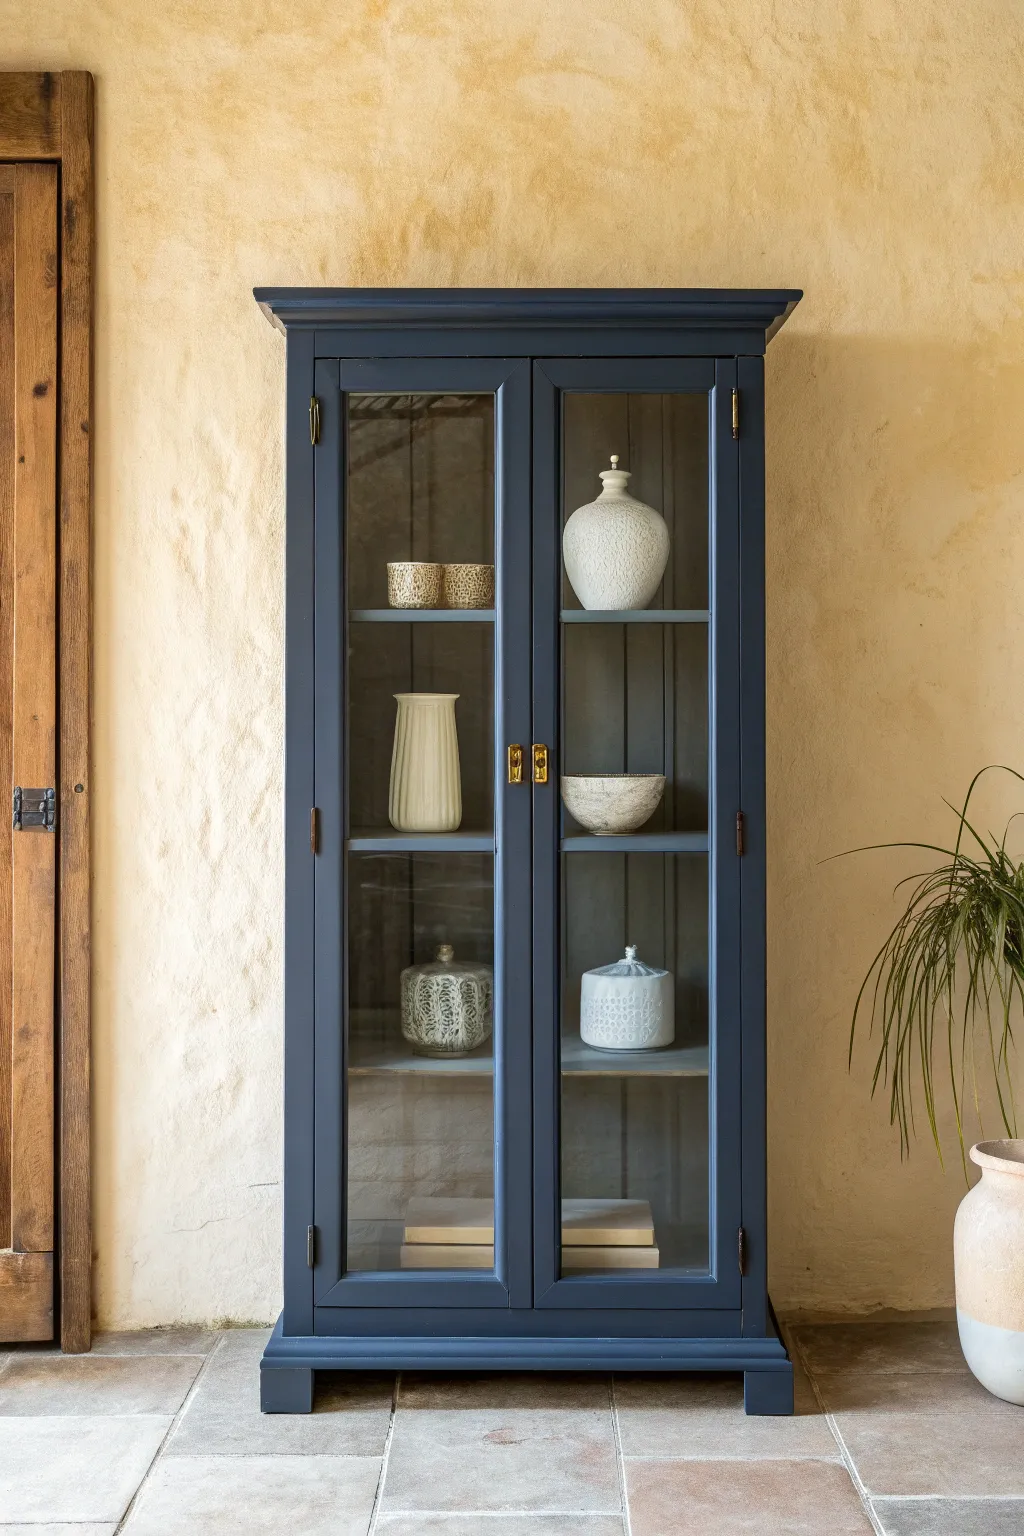
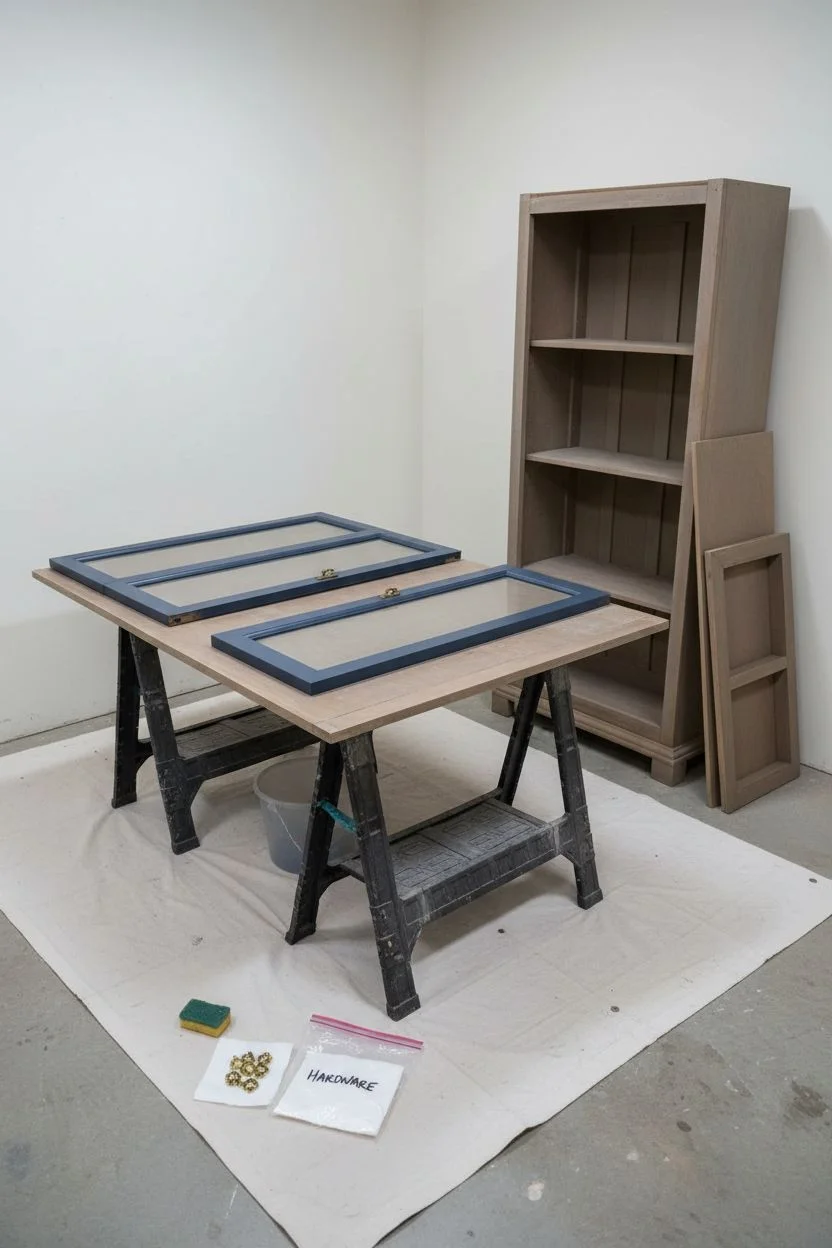
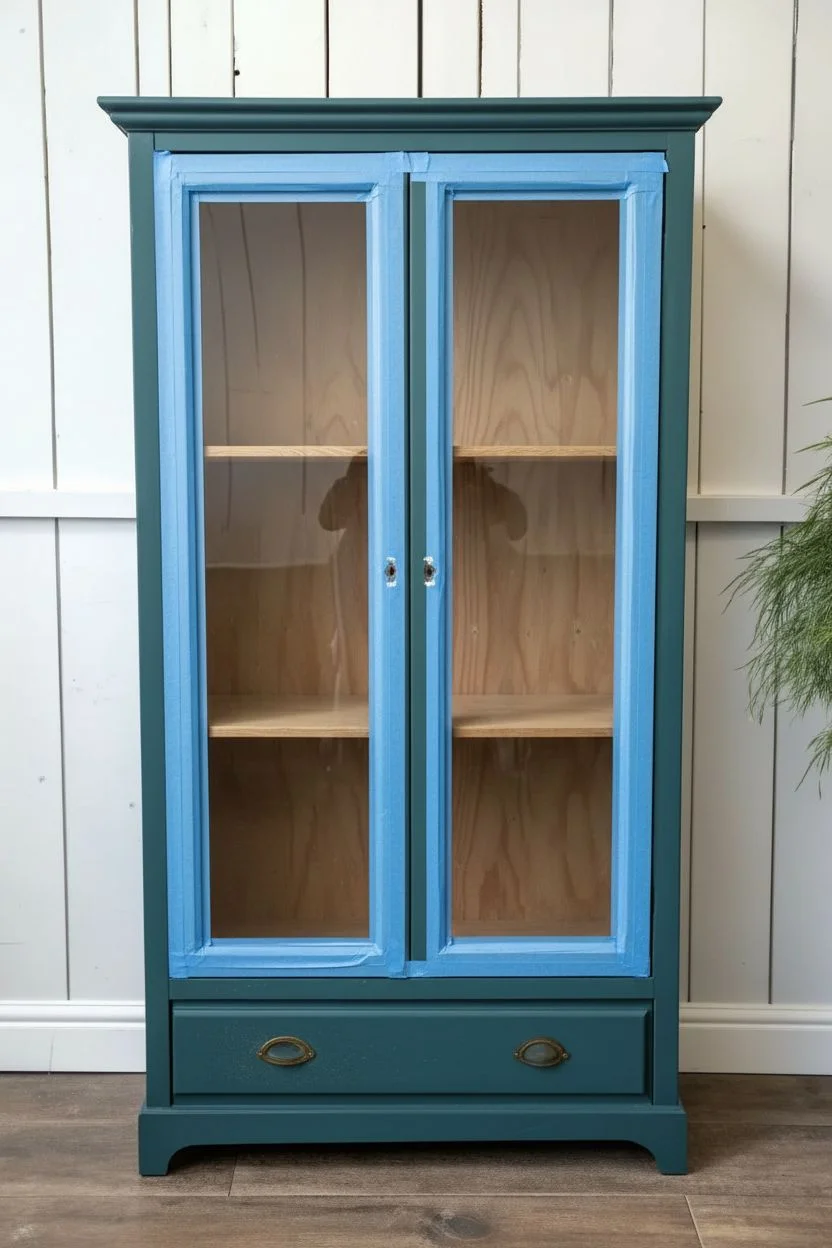
Transform a dated or plain wood cabinet into a sophisticated statement piece with this moody navy finish. The deep, rich blue creates a striking contrast against neutral decor and makes white ceramics pop beautifully behind the glass.
Step-by-Step Tutorial
Materials
- Wooden curio cabinet with glass doors
- High-quality furniture paint (Navy/Midnight Blue, satin or eggshell finish)
- Bonding primer (if painting over varnish)
- Sanding block (120 and 220 grit)
- Painter’s tape (blue or green)
- Small foam roller
- Synthetic bristle brush (2-inch sash brush)
- Small artist brush
- Degreaser or TSP alternative
- Tack cloth
- Screwdriver
- Gold Rub ‘n Buff or metallic gold spray paint (optional for hardware)
- Drop cloth
Step 1: Preparation & Disassembly
-
Setup:
Place your cabinet on a drop cloth in a well-ventilated area. If possible, move it away from walls to access all sides easily. -
Remove Hardware:
Using your screwdriver, carefully remove all knobs, handles, hinges, and magnetic catches. Place these small pieces in a labeled ziplock bag so nothing gets lost. -
Remove Doors and Shelves:
Take the doors off their hinges and set them on a flat, stable work surface. If the interior shelves are removable, take them out as well to make painting the interior easier. -
Clean Thoroughly:
Wipe down the entire piece with a degreaser or TSP alternative. Old furniture often has hidden oils or wax that repels paint, so don’t skip this scrubbing step.
Paint Bleed Fix
If paint bled under the tape onto the glass, don’t wipe it while wet! Wait for it to dry completely, then scrape it off cleanly with a fresh razor blade held at a low angle.
Step 2: Sanding & taping
-
Scuff Sanding:
Use a 120-grit sanding block to scuff all wood surfaces. You aren’t trying to remove the old finish completely, just creating a ‘tooth’ for the new paint to grip. I like to focus extra attention on areas near handles where wear is common. -
Dust Removal:
Vacuum up the sanding dust, then wipe everything down with a tack cloth to ensure a perfectly smooth surface. -
Tape the Glass:
Carefully apply painter’s tape to the glass panes on the inside and outside of the doors. Run a credit card or fingernail along the edge of the tape to seal it tightly against the wood and prevent seepage.
Step 3: Priming
-
Apply Primer:
Using a foam roller for flat areas and a brush for corners, apply a coat of bonding primer. Since we are going for a dark navy finish, you can have your primer tinted gray to help with coverage. -
Check for Drips:
Inspect corners and edges for primer buildup or drips while it’s still wet and smooth them out. -
Light Sand:
Once the primer is fully dry (consult the can’s instructions), lightly run a 220-grit sanding block over the surface to knock down any texture. Wipe away the dust.
Add Interior wallpaper
For a designer twist, apply a patterned peel-and-stick wallpaper or fabric to the back panel of the cabinet’s interior before putting the shelves back in.
Step 4: Painting
-
First Coat – Edges:
Begin with your synthetic brush. Paint the detailed molding, corners, and inside edges of the door frames first. Use smooth strokes to minimize brush marks. -
First Coat – Flat Surfaces:
Switch to the foam roller for the large side panels, top, and shelves. Roll in long, continuous strokes to achieve a factory-like finish. -
Dry and Assess:
Let the first coat dry completely. Don’t panic if it looks streaky or patchy; dark colors often look uneven until the second coat. -
Second Coat:
Apply the second coat using the same method—brush work first, then rolling. This layer brings the deep, saturated navy richness to life. -
Interior Detail:
If you are painting the interior back panel like the example, use a small roller to reach into the back corners more easily. -
Touch Ups:
Inspect the finish under bright light. Use a small artist brush to hit any tiny spots you might have missed near the glass trim.
Step 5: Finishing Touches
-
Hardware Refresh:
While the paint cures, clean your old hardware. If the gold has faded, gently rub a small amount of Gold Rub ‘n Buff onto the metal to restore its luster, or give it a quick spray with metallic gold paint. -
Remove Tape:
Carefully peel off the painter’s tape. Pull the tape away from the paint at a 45-degree angle while the paint is dry to the touch but not fully cured to avoid peeling. -
Glass Cleaning:
The tape might leave a tiny residue, or paint might have seeped through. Use a razor scraper gently on the glass to remove any rogue paint specks, then clean with glass cleaner. -
Reassembly:
Once the paint has cured for at least 24 hours (longer is better for durability), reattach the doors and hardware carefully.
Now you have a stunning, moody focal point ready to showcase your favorite collection
BRUSH GUIDE
The Right Brush for Every Stroke
From clean lines to bold texture — master brush choice, stroke control, and essential techniques.
Explore the Full Guide
Sage Green Cottage-Style Curio Refresh
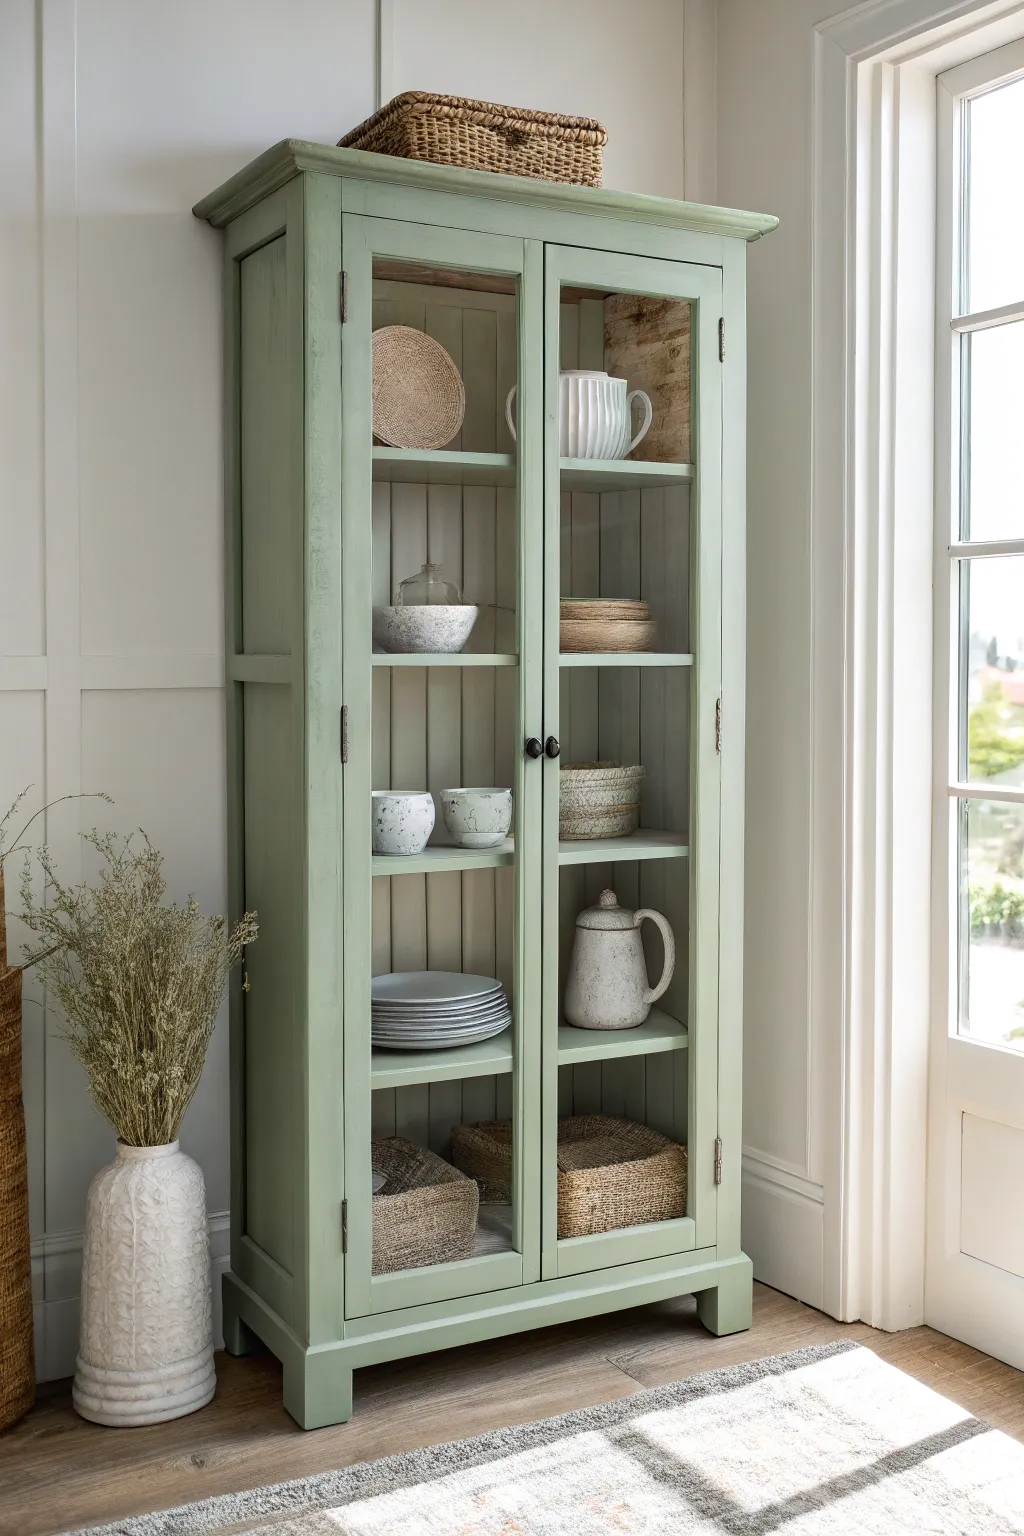
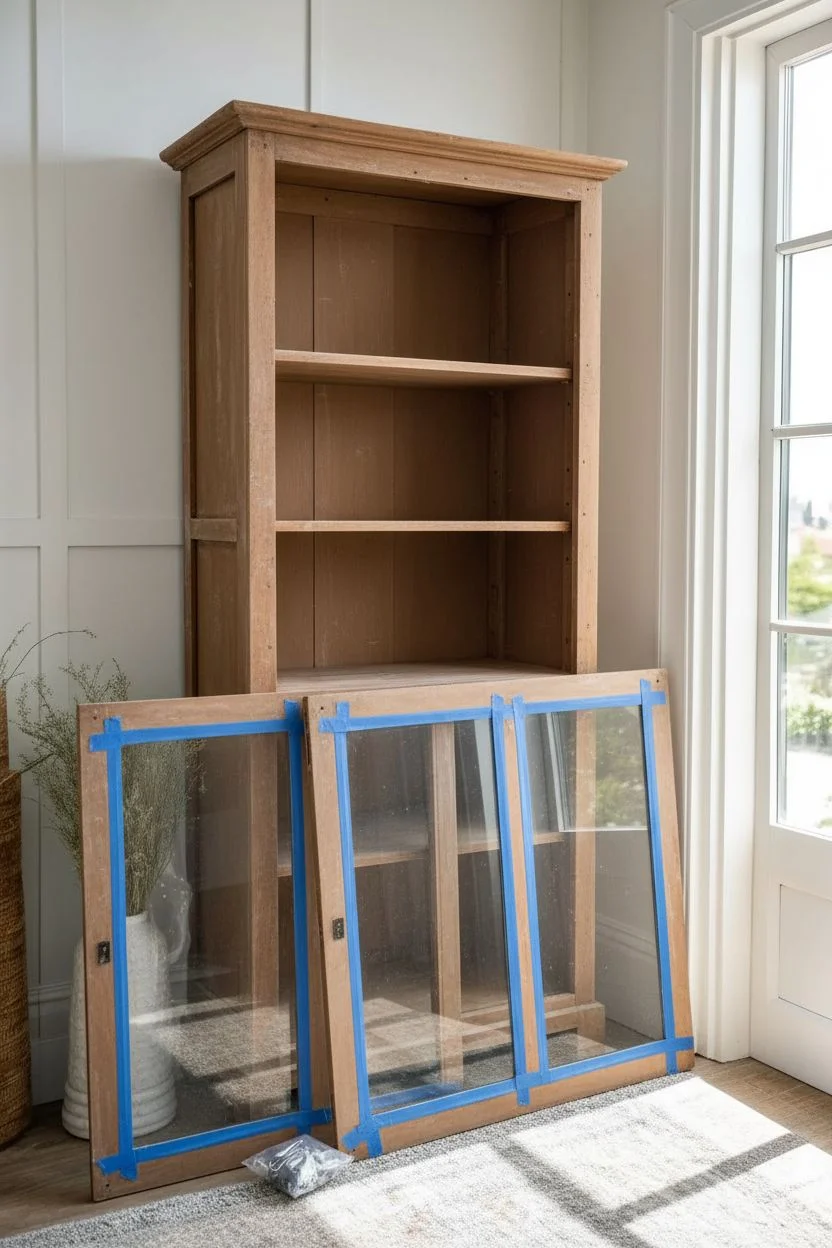
Transform a tired, dated wooden cabinet into this airy cottage-style focal point using a soft sage palette. This project focuses on achieving a smooth, matte finish that highlights the piece’s clean lines while adding subtle rustic charm through beadboard detailing.
How-To Guide
Materials
- Wooden display cabinet with glass doors
- Sanding block (120 and 220 grit)
- Painter’s tape
- High-quality primer (stain-blocking)
- Matte or eggshell paint in Sage Green
- Beadboard paneling (thin sheets)
- Construction adhesive or panel nails
- Paint sprayer or high-density foam rollers
- Angled sash brush (2 inch)
- Screwdriver
- Circular saw or jigsaw (to cut beadboard)
- Measuring tape
- Clean tack cloths
Step 1: Preparation & Disassembly
-
Remove hardware:
Begin by carefully unscrewing all knobs, handles, and hinges. Place the hardware in a labeled bag so nothing gets lost during the process. -
Detach the doors:
Take the glass doors off the cabinet frame. It is much easier to paint them lying flat on a workbench than while they are hanging vertically. -
Clean surfaces:
Wipe down the entire cabinet with a degreaser or a mixture of warm water and mild dish soap to remove years of dust and furniture polish. -
Light sanding:
Scuff sand all wood surfaces with 120-grit sandpaper. You aren’t trying to strip it bare, just creating a ‘tooth’ for the primer to grip. -
Dust removal:
Vacuum up the sanding dust and follow up with a tack cloth to ensure the surface is perfectly clean before any product touches it. -
Glass protection:
Apply painter’s tape meticulously around the glass panes on both sides of the doors. Take your time here; a clean tape line saves hours of scraping later.
Paint Like a Pro
Add a conditioner like Floetrol to your latex paint. It slows drying time, helping brush marks level out for that sprayed-on look.
Step 2: Installing the Beadboard Backing
-
Measure the interior:
Measure the back panel of your cabinet’s interior precisely. If your cabinet has a smooth back, adding beadboard texture is key to this look. -
Cut panels:
Using a circular saw or jigsaw, cut your beadboard sheet to fit the back panel dimensions. I usually dry fit it first to ensure it slides in snugly. -
Attach beadboard:
Apply construction adhesive to the existing back panel and press the beadboard into place. Secure it with small panel nails around the edges for extra hold. -
Caulk gaps:
Run a thin bead of paintable caulk along the edges where the beadboard meets the cabinet sides to create a seamless, built-in appearance.
Tape Tuck Trick
Is paint seeping under your tape? Press the tape edge down firmly with a credit card before painting to seal it tight against the glass.
Step 3: Painting & Finishing
-
Prime the wood:
Apply a coat of stain-blocking primer. This is crucial for preventing old wood tannins from bleeding through your lovely green paint later. -
Sand primer:
Once the primer is fully dry, give it a very light hand-sanding with 220-grit paper to smooth out any brush strokes or texture. -
First coat of sage:
Apply your first coat of sage green paint. Use a brush for corners and the beadboard grooves, and a foam roller for the flat surfaces to get a smooth finish. -
Dry and repeat:
Allow the first coat to dry according to the can’s instructions. Apply a second coat for full, rich coverage, watching for drips in the corners. -
Remove tape:
While the final coat is still slightly tacky (not fully cured), carefully peel away the painter’s tape at a 45-degree angle to keep the edges crisp. -
Reassemble:
Once the paint has cured for at least 24-48 hours, reattach the hinges and hang the doors back onto the cabinet frame. -
Add hardware:
Screw the knobs back into place. Dark bronze or black hardware contrasts beautifully with the soft green. -
Style shelves:
Finish by arranging white ceramics, woven baskets, and glass items on the shelves to complete the airy cottage aesthetic.
Now you have a stunning, custom piece of furniture ready to display your favorite treasures.
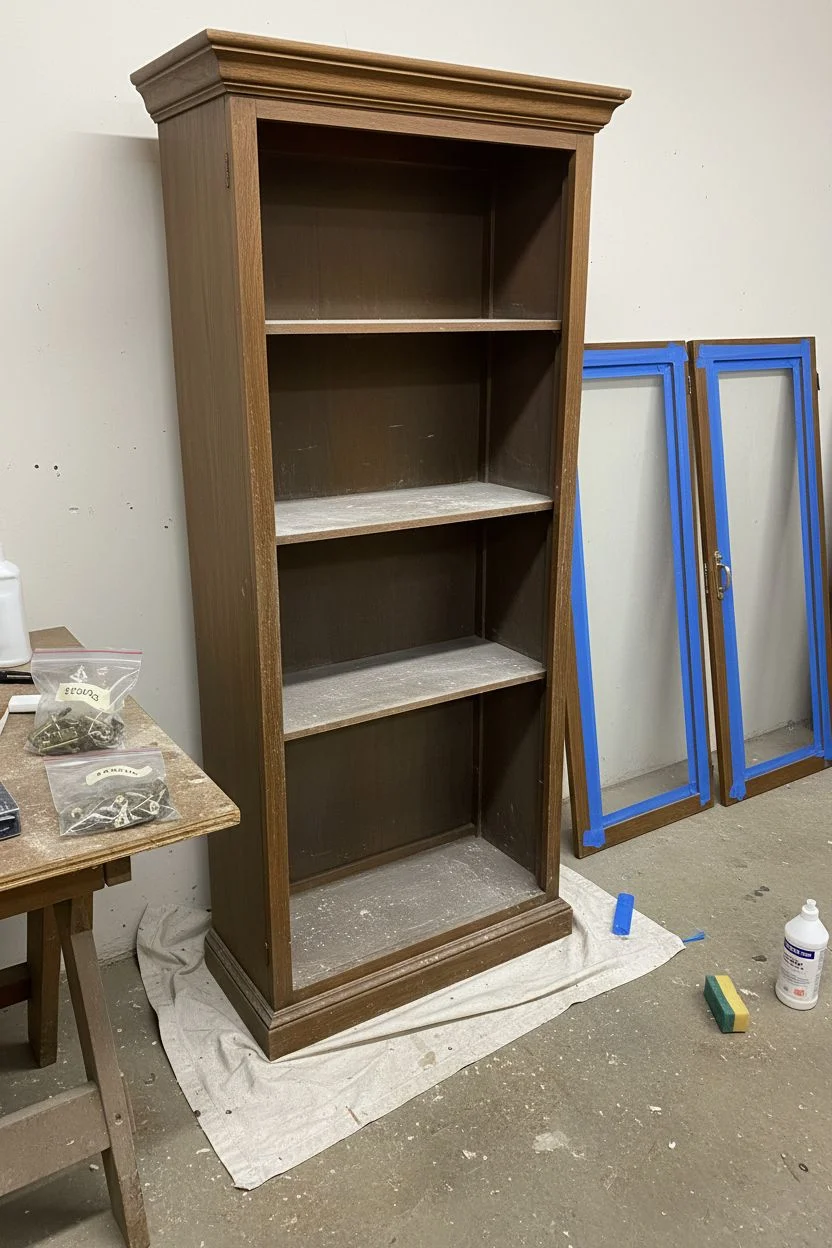
Paint the Inside Back Panel for Instant Glow
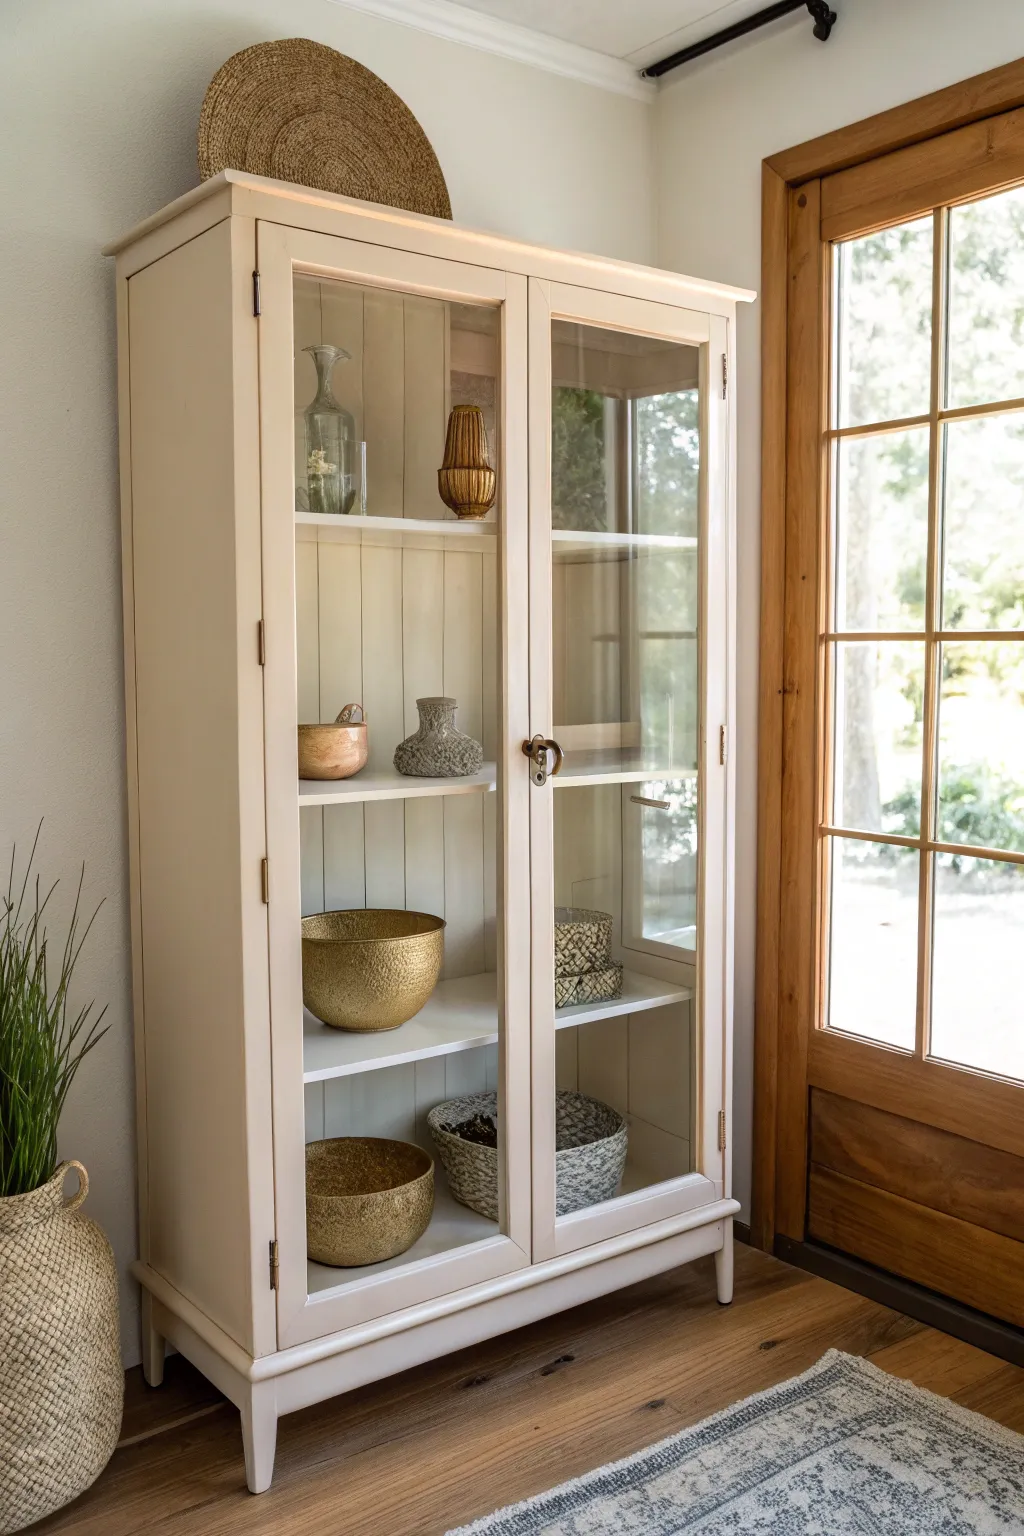
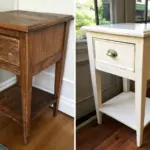
Transform a standard glass-door cabinet into a sophisticated display piece by painting the interior back panel to match the exterior. This tone-on-tone approach, using a warm creamy beige, creates a cohesive and custom-built look that instantly highlights your treasured decor items.
Step-by-Step Guide
Materials
- Wooden curio cabinet with glass doors
- Sandpaper (120 and 220 grit)
- Tack cloth
- Painter’s tape
- High-quality interior primer
- Satin or semi-gloss latex paint (warm cream/beige color)
- White semi-gloss paint (for shelves)
- 2-inch angled sash brush
- 4-inch foam roller
- Drop cloths
- Screwdriver (for hardware removal)
- Wood filler (optional)
Step 1: Preparation
-
Clear and Clean:
Begin by removing all items from inside the cabinet. Take out any adjustable shelves and set them aside. Wipe down the entire piece with a damp cloth to remove surface dust. -
Remove Hardware:
Using a screwdriver, carefully remove the door knobs, hinges, and any other metal hardware. Place these small pieces in a labeled bag so they don’t get lost. -
Protect the Glass:
This is a crucial step for a clean finish. Apply painter’s tape precisely along the edges of the glass panes on the inside and outside of the doors. Run a credit card or fingernail along the tape edge to ensure a tight seal against paint bleed. -
Scuff Sanding:
Lightly sand all surfaces you intend to paint—the exterior frame, doors, and that important back panel—using 120-grit sandpaper. You aren’t trying to strip it bare, just roughening the existing finish so the new paint adheres. -
Dust Removal:
Vacuum up the sanding dust, then wipe everything down thoroughly with a tack cloth. Any leftover dust will create a bumpy finish.
Sticky Situation?
If doors stick after painting, run a candle or bar of soap along the touching edges. This lubricates the surfaces and prevents paint from pulling off.
Step 2: Prime and Paint Back Panel
-
Prime the Interior:
Apply a coat of high-quality primer to the back panel. If your back panel is beadboard like the one shown, use a brush to get into the grooves first, then follow with a small foam roller for the flat surfaces. -
Prime the Exterior:
While the interior dries, prime the exterior frame and doors. I find it helpful to start with the intricate areas around the glass using an angled brush before rolling the larger flat sections. -
First Coat on Back Panel:
Once the primer is dry, stir your warm cream paint thoroughly. Start painting the back panel. Push paint into the beadboard grooves with your brush, then use long, smooth vertical strokes to finish. -
Painting the Frame:
Move to the exterior and door frames, applying the same cream color. Keep your coats thin to avoid drips, especially around the corners of the window panes. -
Second Coat Application:
Allow the first coat to dry completely according to the can’s instructions (usually 2-4 hours). Apply a second coat to the back panel and exterior for full, opaque coverage and a rich color depth.
Step 3: Shelves and Finishing
-
Prep the Shelves:
While the cabinet dries, turn your attention to the shelves. If they are wood, give them a light sanding and wipe clean. -
Paint Shelves White:
Paint the shelves with white semi-gloss paint. This creates a subtle contrast against the cream interior that helps reflect light and brighten the display. -
Remove Tape:
carefully score the edge of the painter’s tape with a utility knife before pulling it off. This prevents the tape from peeling up your fresh paint. -
Reassemble Hardware:
Once the paint has cured (ideally wait 24 hours for it to harden slightly), reattach your hinges and knobs. -
Clean the Glass:
Use glass cleaner to remove any smudges or stray paint specks that might have snuck past the tape. -
Insert Shelves:
Carefully slide your freshly painted white shelves back into the cabinet. -
Style and Decorate:
Arrange your decor items. Combine textures like woven baskets, metallic bowls, and glass vases to complement the neutral palette.
Add Some Contrast
For a bolder look, choose a wallpaper with a subtle geometric pattern for the back panel instead of paint to add texture behind your display.
Enjoy styling your refreshed cabinet with your favorite collectibles against that warm, glowing backdrop

PENCIL GUIDE
Understanding Pencil Grades from H to B
From first sketch to finished drawing — learn pencil grades, line control, and shading techniques.
Explore the Full Guide
Wallpapered Back Panel Like Framed Art
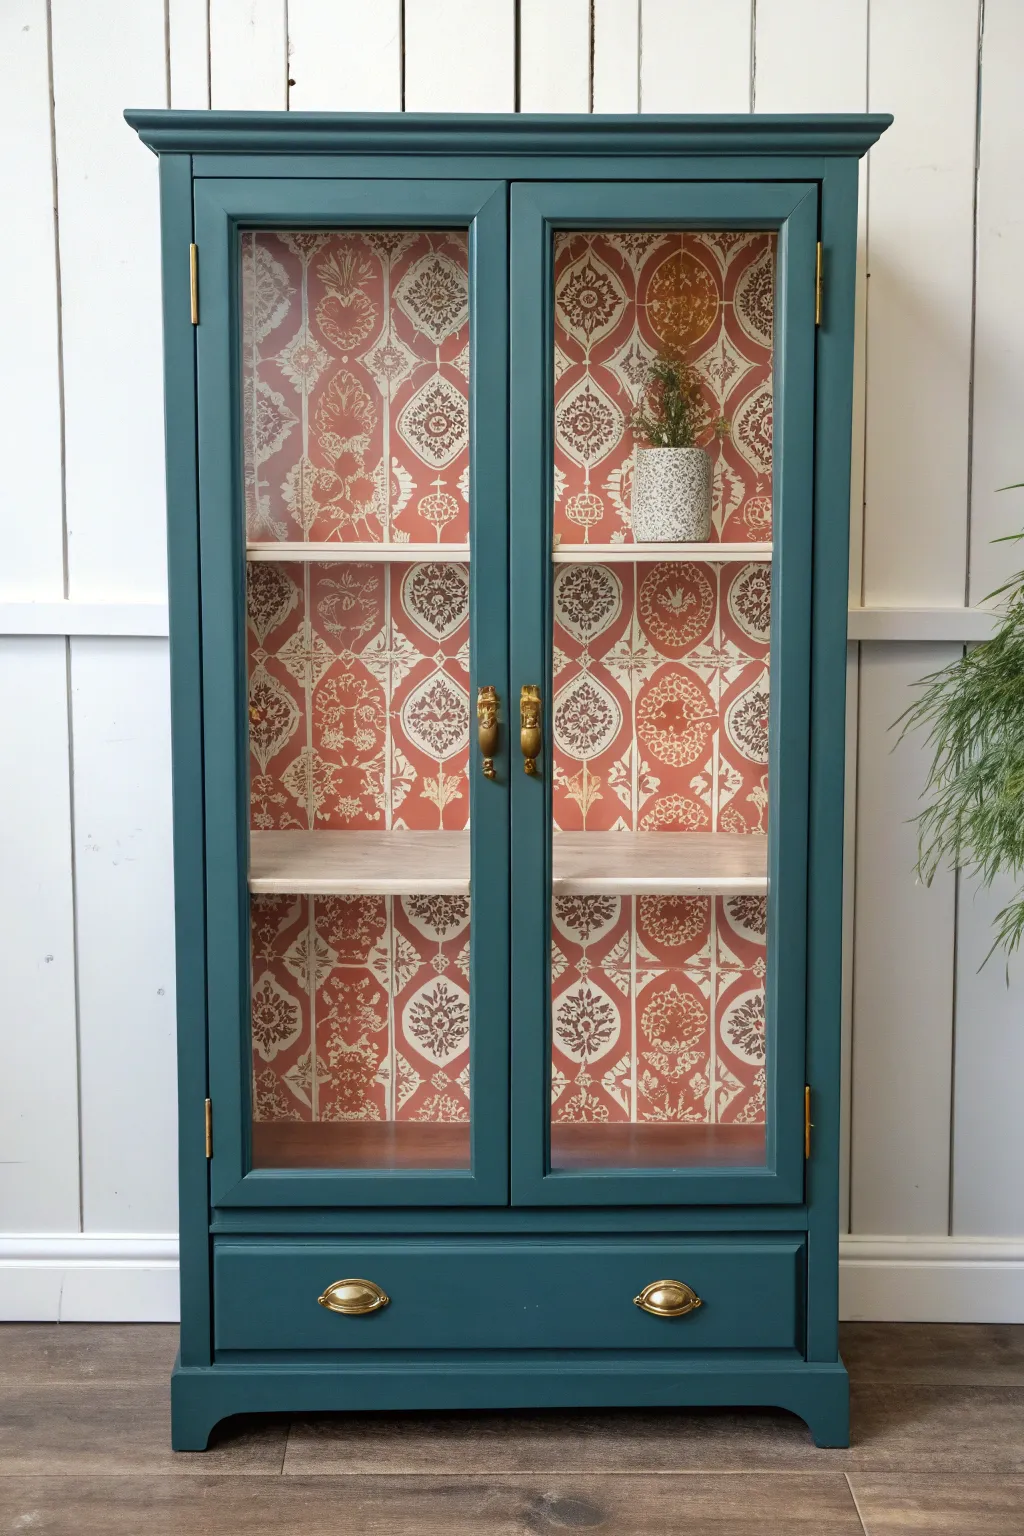
Transform a dated curio cabinet into multiple framed works of art by pairing a deep teal exterior with a striking contrasting interior wallpaper. This specific look relies on the tension between the rich, dark paint and the vibrant, patterned backdrop to make your display items pop.
Step-by-Step
Materials
- Wooden curio cabinet with glass doors
- Sander and sandpaper (120 and 220 grit)
- Painter’s tape
- Wood primer (stain-blocking)
- Deep teal chalk or mineral paint
- Synthetic angled sash brush (1.5-2 inch)
- Foam roller
- Wallpaper (bold orange/red damask or tile pattern)
- Wallpaper paste or spray adhesive
- Sharp utility knife or X-Acto blade
- Wallpaper smoothing tool
- Gold drawer pulls and cabinet hardware
- Clean rags and degreaser
Step 1: Preparation & Disassembly
-
Remove hardware:
Begin by removing all metal hardware, including knobs, handles, and hinges. Place them in a labeled bag so you don’t lose the screws. -
Clean deeply:
Scrub the entire piece with a degreaser or TSP alternative to remove years of furniture polish and grime, which can prevent paint adhesion. -
Scuff sand:
Lightly sand the exterior surfaces with 120-grit sandpaper. You don’t need to strip it to bare wood, just create a rough surface for the primer. -
Mask the glass:
Carefully apply painter’s tape to the glass panes on the inside and outside edges. Take your time here to ensure a crisp line later. -
Remove shelves:
Take out any adjustable shelves. If the back panel is removable (screwed on), take it off now—it makes wallpapering significantly easier.
Seamless Shelving
Consider painting your shelf edges creamy white. This creates a visual break that highlights the wallpaper pattern rather than blending into it.
Step 2: Painting the Exterior
-
Apply primer:
Roll or brush on a stain-blocking primer. Dark wood tannins can bleed through teal paint, so don’t skip this. Let it dry completely. -
Sand primer:
Once dry, very lightly run 220-grit sandpaper over the primer to knock down any brush strokes or texture. -
First coat of teal:
Using your angled brush for corners and the foam roller for flat areas, apply the first coat of deep teal paint. Don’t worry if it looks streaky; coverage will improve. -
Second coat:
Apply a second coat of paint. I prefer to paint in long, smooth strokes following the wood grain to minimize texture. -
Paint the drawer:
Don’t forget to paint the drawer front separately. If the sides of the drawer rub when closing, leave them unpainted or wax them later. -
Seal the paint:
If your paint requires a topcoat (like chalk paint), apply a clear matte protective wax or polycrylic varnish once the paint is fully cured.
Sticky Situations
If wallpaper bubbles appear after drying, prick them with a tiny pin and smooth them down with a squeegee toward the puncture hole.
Step 3: Wallpapering the Back
-
Measure the back:
Measure the height and width of the back panel. If the panel is still attached, measure the interior space carefully. -
Pre-cut strips:
Cut your wallpaper strips about two inches longer than your measurements to allow for adjustment and pattern matching. -
Apply adhesive:
Apply wallpaper paste to the back panel (or the paper back, depending on manufacturer instructions). A roller works best for even coverage. -
Position the first strip:
Place your first strip at the top edge. Use your smoothing tool to press from the center outward, eliminating air bubbles. -
Pattern matching:
Line up the second strip so the damask or tile pattern flows seamlessly from the first piece. This is crucial for the ‘framed art’ illusion. -
Trim excess:
Using a sharp new blade and a straight edge, trim the excess paper at the top, bottom, and sides for a perfect fit.
Step 4: Reassembly
-
Remove tape:
Peel off the painter’s tape at a 45-degree angle while the paint is still slightly tacky, or score the edge with a blade if fully dry. -
Clean glass:
Use a razor scraper to gently remove any paint that sneaked under the tape on the glass panes. -
Install hardware:
Reattach the hinges and hang the doors. Install new gold cup pulls and handles to complement the warm tones in the wallpaper.
Step back and admire how this elegant color combination essentially turns your storage space into a gallery display
Painted Shelves to Match or Contrast Displays
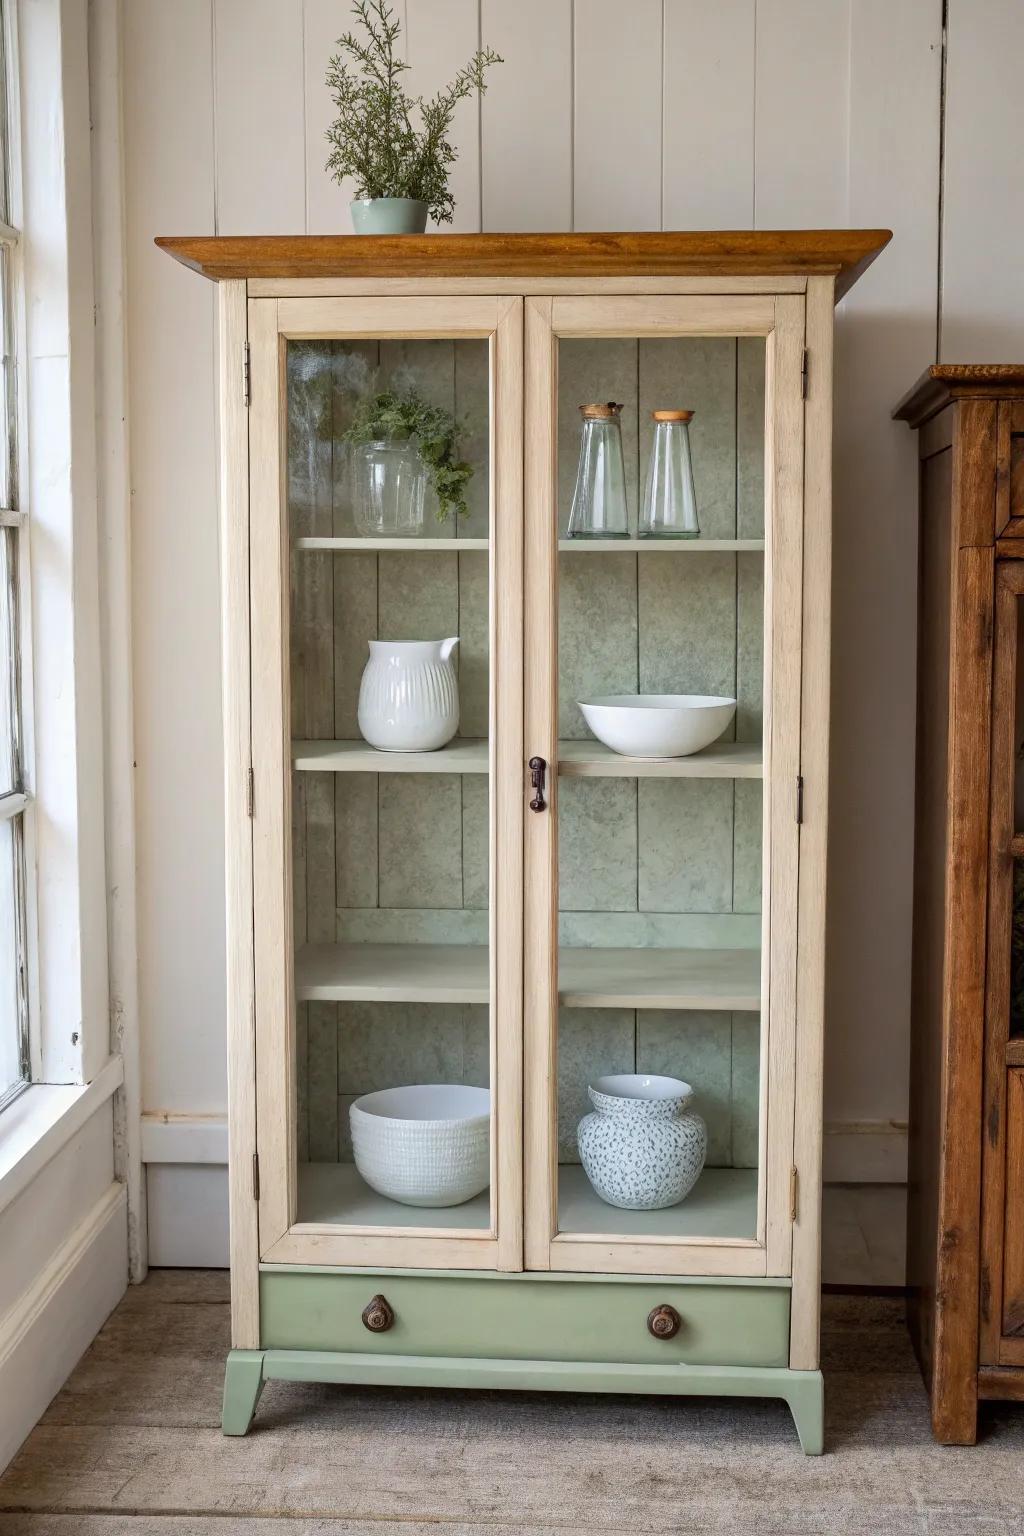
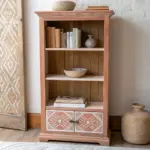
Transform a dated display cabinet into a bright, airy farmhouse focal point with this two-tone paint technique. By pairing a soft cream exterior with a subtle sage green interior, you create depth that beautifully highlights your favorite pottery and glassware.
How-To Guide
Materials
- Wooden curio cabinet with glass doors
- Sander (orbital or detailed) with 120 and 220 grit sandpaper
- Wood stain (medium oak or walnut)
- Chalk paint (Cream/Off-White)
- Chalk paint (Sage Green)
- Clear furniture wax
- Dark furniture wax (optional for aging)
- Painters tape
- Synthetic bristle brushes (medium and small)
- Lint-free rags
- Screwdriver (for hardware removal)
- Glass cleaner
Step 1: Preparation
-
Remove Hardware and Doors:
Start by unscrewing all knobs, handles, and hinges. Carefully remove the glass doors and set them aside on a flat, protected surface. Labeling the hardware in small bags helps immensely during reassembly. -
Clean Surfaces:
Since older furniture often has built-up polish or grime, scrub the entire piece down with a mixture of warm water and mild dish soap or a dedicated degreaser. Wipe dry immediately. -
Sand the Top:
For the top cornice piece to have that natural wood look, you need to strip it completely. Use an electric sander with 120-grit paper to remove old varnish or paint, then finish with 220-grit for a smooth surface. -
Scuff Sand the Body:
Lightly sand the rest of the cabinet (exterior and interior) with 220-grit sandpaper. You aren’t trying to strip it bare, just creating ‘tooth’ so the paint adheres properly. -
Tape the Glass:
Apply painter’s tape carefully around the edges of the glass panes on the doors. This takes time but ensures you get crisp, professional lines without scraping paint off the glass later.
Clean Lines
If you don’t trust your taping skills, run a utility knife along the tape edge after painting but BEFORE peeling. This severs the paint film and prevents peeling.
Step 2: Painting & Staining
-
Stain the Top:
Apply your chosen wood stain to the raw wood top using a lint-free rag. Wipe with the grain, let it penetrate for about 5-10 minutes, and wipe off the excess. Let this dry fully according to the can’s instructions. -
Paint the Interior:
Using a medium synthetic brush, apply the sage green chalk paint to the back panel and the interior shelves. I usually find two thin coats give better coverage than one thick one. Allow 2 hours of drying time between coats. -
Paint the Exterior:
Apply the cream or off-white chalk paint to the entire exterior frame, the door frames, and the legs. Don’t forget the side panels. Watch for drips around detailed moldings. -
Paint the Drawer Front:
For a unique contrast, paint the front of the bottom drawer in the same sage green used for the interior. This ties the inside and outside together visually. -
Apply Second Coats:
Once the first coats are dry, apply a second coat to both the cream exterior and green interior/drawer. Check for any missed spots or brush strokes. -
Distress the Edges:
When the paint is completely dry, use 220-grit sandpaper to gently distress the edges. Focus on high-traffic areas like corners, door frames, and the drawer edges to reveal a bit of wood underneath.
Step 3: Sealing & Assembly
-
Apply Clear Wax:
Brush on a layer of clear furniture wax over all painted surfaces. Work in small sections, brushing it on and then buffing it off with a lint-free cloth to seal the chalk paint. -
Seal the Top:
Protect the stained wooden top with either the same wax or a polycrylic topcoat if you plan to place heavy items up there. -
Clean the Glass:
Remove the painter’s tape and clean the glass thoroughly on both sides to remove any dust or stray paint specks (a razor blade helps scrape off stubborn spots). -
Reattach Hardware:
Screw the hinges back onto the doors and frame, and reattach the knobs. If you want a fresh look, you can spray paint the old hardware bronze before putting it back on.
Add Texture
For a shiplap look inside without buying wood, use a pencil to draw horizontal lines on the back panel before painting, or score lines into the wood.
Step back and admire how this fresh color palette completely revitalizes the piece.


Highlighted Trim With Subtle Dry Brushing
Transform a standard wooden cabinet into an heirlooom piece by layering creamy tones with subtle antiquing techniques. This finish highlights ornate details like carved molding and rope trim, giving them depth and a sophisticated, time-worn patina without looking heavy or distressed.
Detailed Instructions
Materials
- wooden curio cabinet (with ornate trim)
- degreaser or TSP substitute
- 120 and 220 grit sandpaper
- primer (stain-blocking)
- chalk-style or matte mineral paint (warm cream/off-white)
- translucent brown glaze or antiquing wax
- clean lint-free rags
- synthetic bristle brush (2-inch)
- small artist’s brush or detail brush
- chip brush (for dry brushing)
- matte or satin clear coat polycrylic
Step 1: Preparation & Base Coat
-
Clean deeply:
Begin by removing all doors, shelves, and hardware from the cabinet. Wipe down every surface thoroughly with a degreaser or TSP substitute to remove oils and furniture wax. -
Scuff sand:
Lightly sand the entire piece with 120-grit sandpaper to give the surface ‘tooth’ for the paint to adhere. Focus on flat areas, but gently scuff the intricate carvings as well. -
Remove dust:
Vacuum up the sanding dust and wipe the piece down with a tack cloth or damp rag to ensure a perfectly clean surface. -
Prime the surface:
Apply a coat of stain-blocking primer. This is crucial if you are painting over a dark wood to prevent bleed-through. Let it dry completely according to the can’s instructions. -
First coat application:
Using your synthetic bristle brush, apply the first coat of warm cream chalk-style paint. Brush in the direction of the wood grain. -
Work into crevices:
Pay special attention to the deep carvings, rope molding, and beadwork. Use a dabbing motion with the brush tip to ensure paint reaches the deepest recesses. -
Smooth and dry:
Once the first coat is applied, check for drips, especially around the ornate trim. Smooth them out immediately. Let this coat dry for at least 2-4 hours. -
Second coat:
Apply a second coat of the cream paint for full, opaque coverage. This creates a solid foundation for the glazing step found later in the process.
Glaze Control Tip
Keep a spray bottle of water handy. If your glaze dries too fast while wiping back, a light mist will reactivate it, making it easy to wipe away for a cleaner look.
Step 2: Defining the Details
-
Prepare the glaze:
Mix your translucent brown glaze. If it’s too thick, dilute it slightly with water or a glazing medium so it flows easily but remains workable. -
Apply glaze to sections:
Working in small sections (like just the top crown molding), brush the glaze liberally over the painted surface using an old brush. -
Wipe back immediately:
Before the glaze dries, take a damp, lint-free rag and wipe off the excess. The goal is to leave the dark glaze sitting in the deep crevices of the leaves and rope pattern while revealing the cream paint on the high points. -
Control the depth:
If I feel a spot is too dark, I like to use a clean part of the rag to remove more glaze. If it’s too light, simply dab a little more back into the cracks. -
Detail work:
Use a small artist’s brush to force glaze into tight corners or specific details like the tiny beads under the crown molding if the larger brush missed them. -
Dry brush highlights:
Once the glaze is fully dry, take a clean dry chip brush and dip just the tips into your original cream paint. Offload almost all the paint onto a paper towel until the brush is barely wet. -
Highlighting high points:
Lightly drag the dry brush over the very highest points of the carvings and molding. This ‘dry brushing’ technique brings back the brightness and creates a sharp contrast against the glazed shadows.
Step 3: Protection & Reassembly
-
Seal the finish:
Apply a coat of clear matte or satin polycrylic to protect your work. A matte finish will give it a more authentic, chalky antique look, while satin adds a slight sheen. -
Check for pooling:
Watch for the topcoat pooling in those deep carved areas we just highlighted. Use a dry brush to soak up any excess liquid before it dries milky. -
Final cure:
Allow the cabinet to cure for at least 24 hours before reattaching any hardware or placing items back inside. -
Reinstall glass:
Clean the glass panels thoroughly and reinstall them carefully into the doors.
Pearl Effects
Mix a tiny amount of metallic pearl paint into your final clear coat. This adds a barely-there shimmer that catches the light on the curves of the carving.
Enjoy the refined elegance this custom finish brings to your space
Distressed Edges for a Timeworn Finish
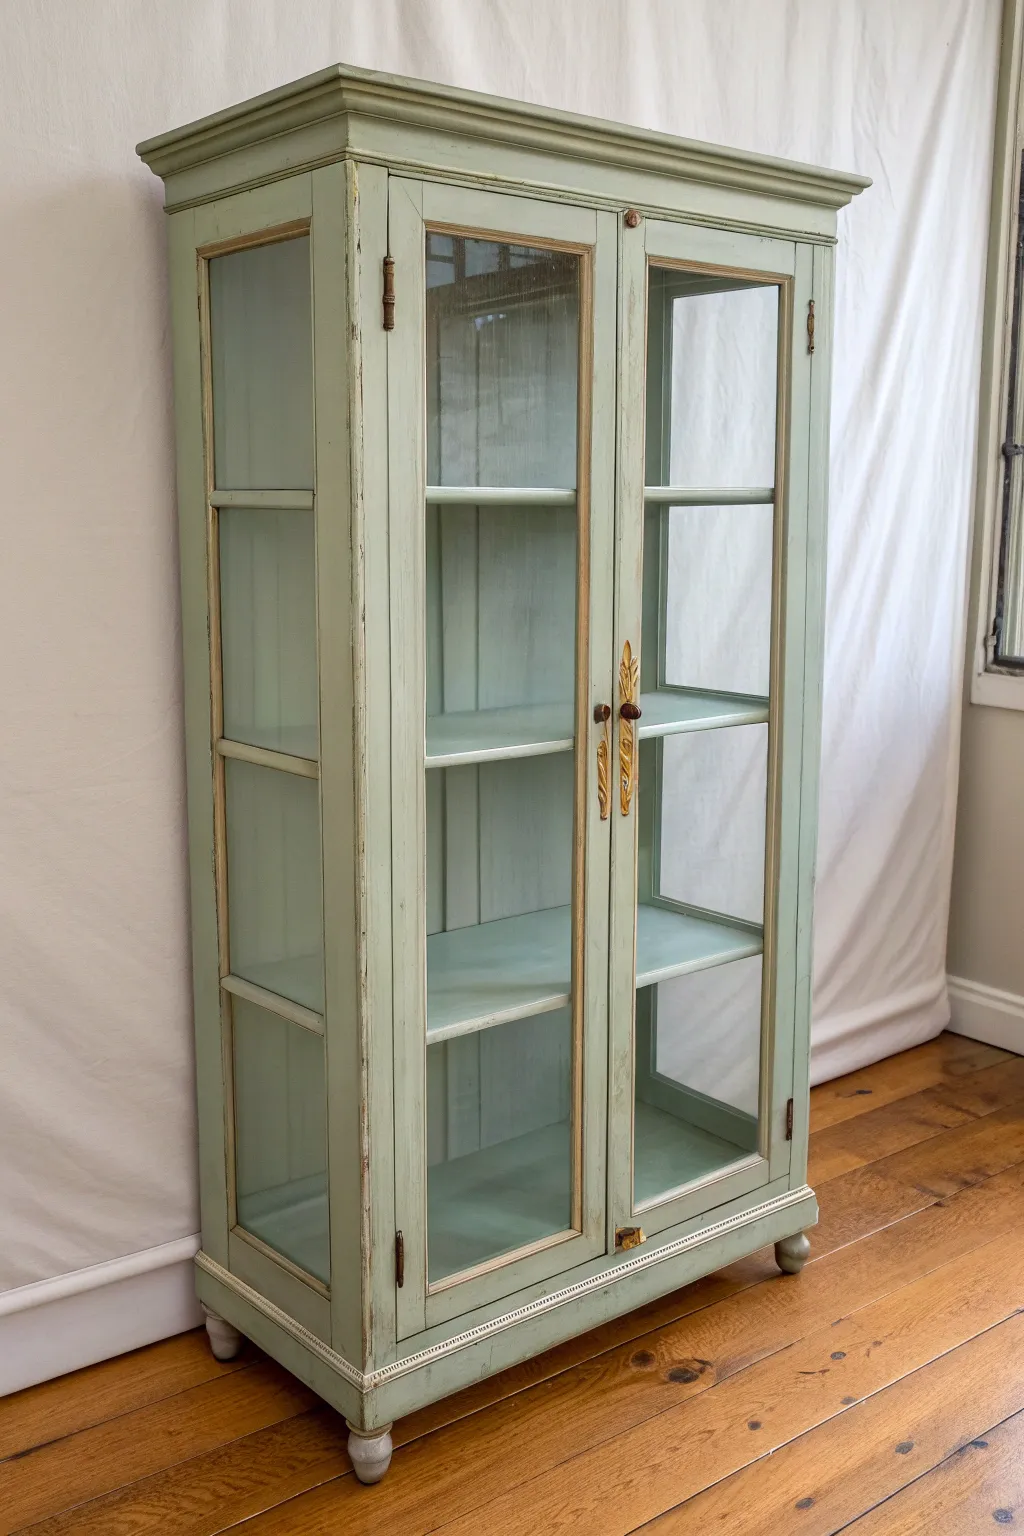
Transform a plain glass-front cabinet into a vintage-inspired treasure with a soothing sage green finish and gentle distressing. This technique highlights the architectural details of the piece, giving it the charm of an antique shop find without the high price tag.
How-To Guide
Materials
- Wooden curio cabinet
- Medium-grit sandpaper (120-150 grit)
- Fine-grit sandpaper (220 grit)
- Tack cloth
- Painter’s tape
- Primer (stain-blocking)
- Sage green chalk paint or acrylic latex paint
- Gold gliding wax or gold acrylic paint
- Clear protective wax or matte polyurethane
- Small artist brush
- 2-inch synthetic angled paintbrush
- Screwdriver
- Clean lint-free rags
- Cardboard or drop cloth
Step 1: Preparation and Cleaning
-
Clear and clean:
Begin by removing all items from the cabinet and relocating the piece to a well-ventilated workspace covered with a drop cloth. Wipe down the entire surface with a damp rag to remove dust and cobwebs. -
Remove hardware:
Using a screwdriver, carefully take off the handles, hinges, and any decorative metal bits. Store these in a labeled baggie so you don’t lose screws, or decide now if you plan to spray paint them gold later. -
Protect the glass:
This step is crucial for a clean finish. Apply painter’s tape precisely along the edges of every glass pane—front doors and side panels—pressing down firmly to prevent paint bleed. -
Light sanding:
Scuff sand the entire wooden surface with medium-grit sandpaper. You aren’t trying to strip the old finish completely, just creating a ‘tooth’ for the primer to grip. Wipe away the resulting dust thoroughly with a tack cloth.
Wax On, Wax Off
When applying clear wax, remember: a little goes a long way. If the surface feels tacky after buffing, you’ve used too much. Keep buffing with a clean cloth until it feels smooth and dry to the touch.
Step 2: Painting and Distressing
-
Prime the surface:
Apply a thin, even coat of stain-blocking primer. This is especially important if your original wood is dark, as it ensures your sage green color stays true. Let the primer dry completely according to the can’s instructions. -
First coat of color:
Using your angled paintbrush, apply the first coat of sage green paint. Work in long, smooth strokes following the wood grain. Don’t worry if it looks slightly streaky; the second coat will fix that. -
Dry and recoat:
Allow the first coat to dry fully. Then, apply a second coat for solid, opaque coverage. Pay special attention to the muntins (the wood strips between glass panes) and the feet of the cabinet. -
Distress the edges:
Once the paint is bone dry, take your medium-grit sandpaper again. Gently sand along the raised edges, corners, and moldings where natural wear would occur. Use a light hand—you want to reveal just a peek of the wood or primer underneath. -
Refine the distressing:
Step back to assess the look. If some areas look too uniform, scuff them a bit more. I prefer to focus heavily on the corners of the doors and the top cornice for an authentic aged look. Wipe away all sanding dust afterward.
Step 3: Accenting and Sealing
-
Add gold highlights:
Dip a small artist brush or your finger into gold gilding wax. Lightly run it along the inner bevels of the door frames or the very edges of the cornice molding. -
Detail the trim:
If your cabinet has decorative trim like the rope detail shown at the bottom, carefully brush the gold wax over the raised high points to make the texture pop against the green. -
Apply clear wax:
To seal chalk paint and create a velvety finish, use a lint-free rag to rub a thin layer of clear wax over the painted surfaces. Work in small sections, circular motions, then buff it out. -
Alternative sealing:
If you used standard latex paint instead of chalk paint, consider a coat of matte polyurethane for durability, especially on shelves where heavy items will sit. -
Remove tape and clean:
Carefully peel away the painter’s tape at a 45-degree angle. If paint seeped onto the glass, gently scrape it off with a razor blade for a crisp line. -
Reassemble:
Reattach your hardware once the sealer is cured. If you painted the handles, ensure they are dry before screwing them back into place.
Patterned Interior
For a surprise pop of pattern, line the back interior panel of the cabinet with a vintage floral wallpaper or fabric before reinstalling the shelves.
Enjoy styling your freshly updated cabinet with your favorite collectibles and books
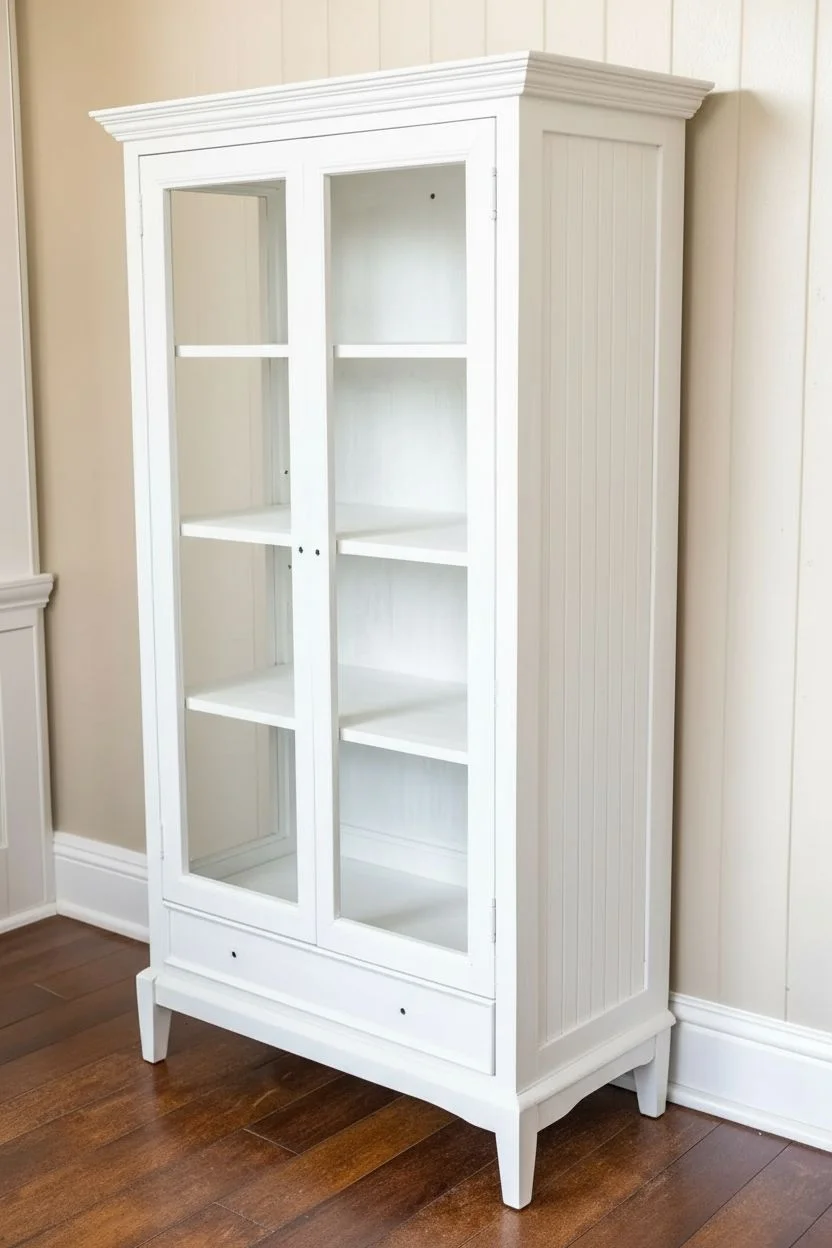
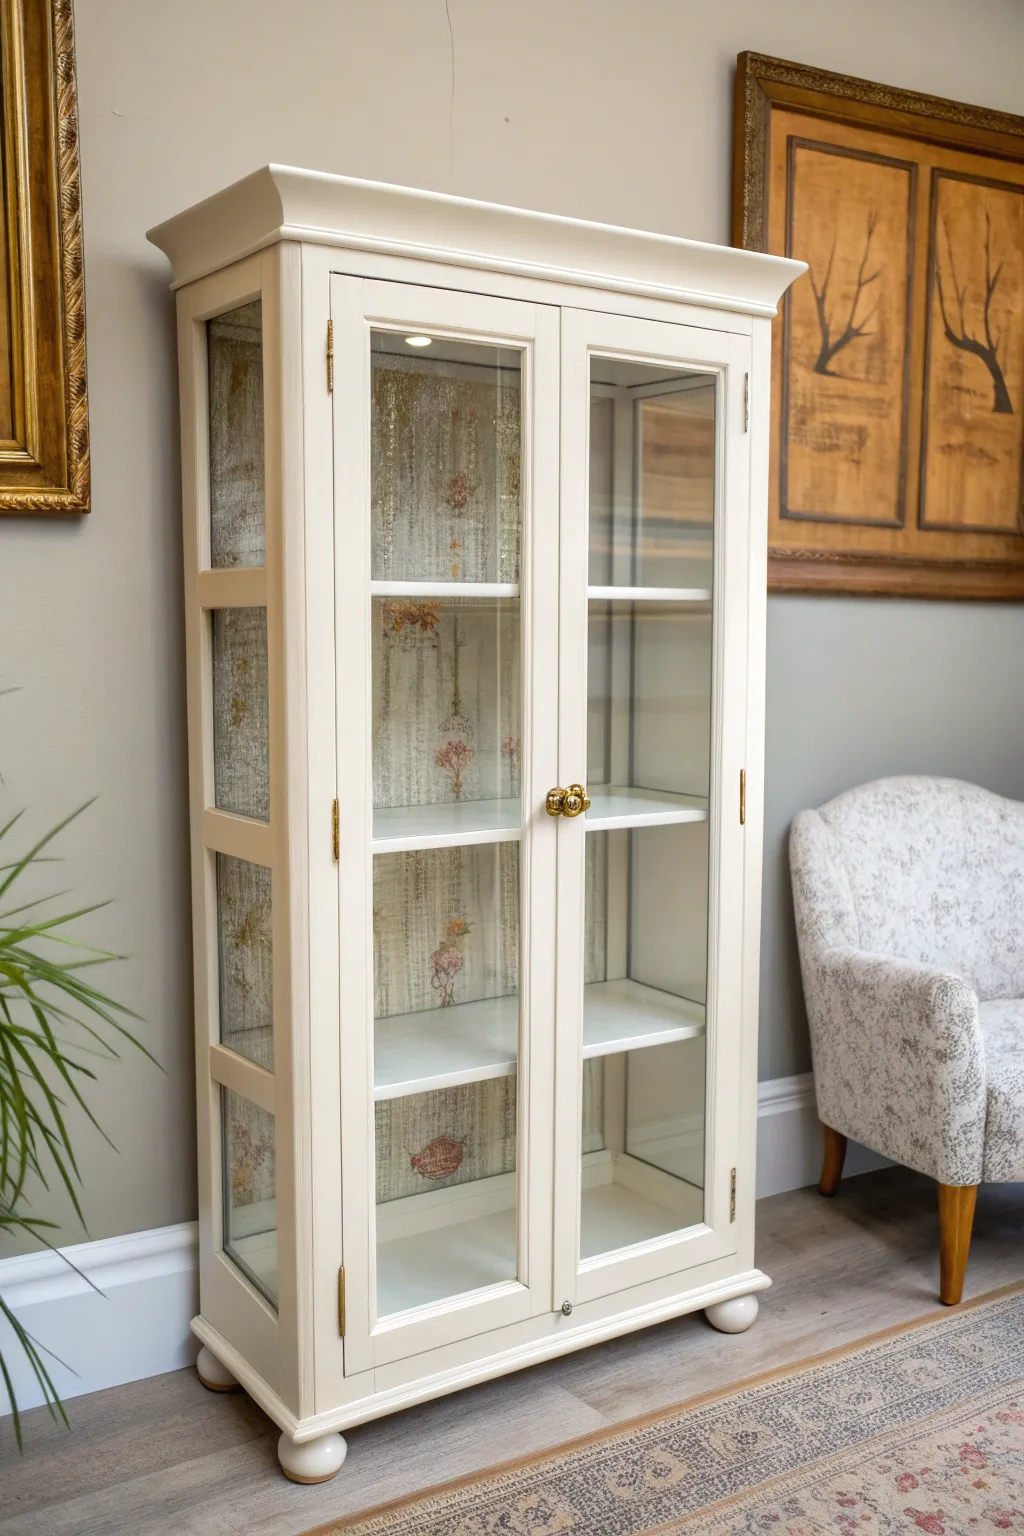
Frosted or Painted Glass for Soft Privacy
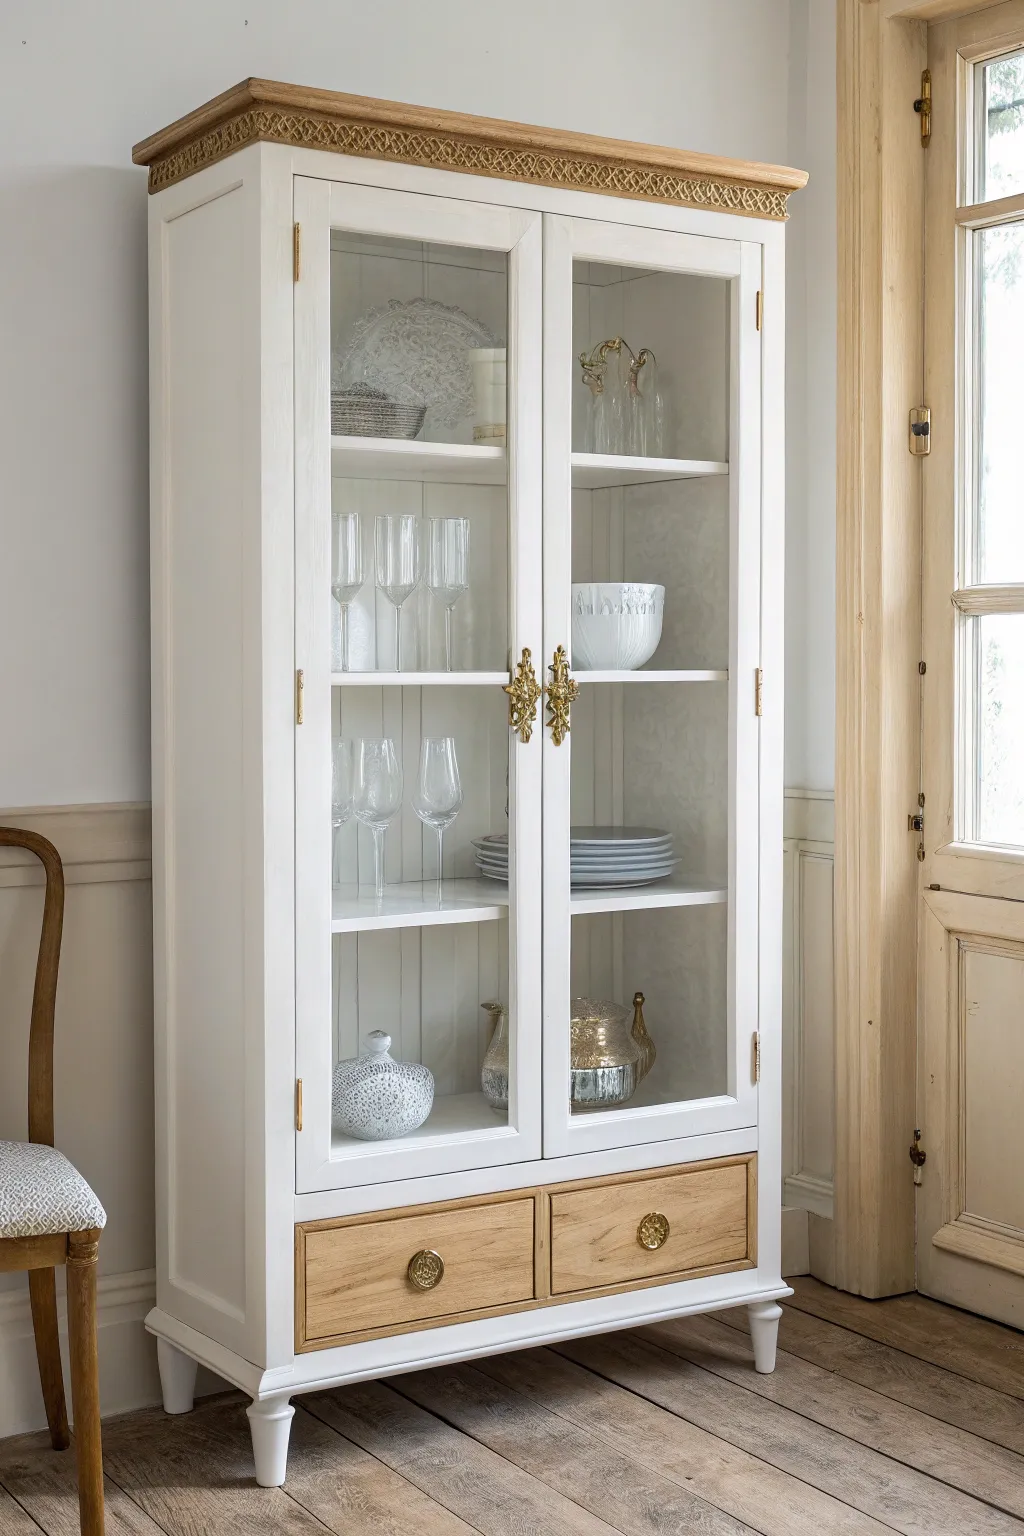
This project transforms a standard curio cabinet into a classic, two-tone masterpiece that balances crisp white paint with warm, natural wood accents. It’s an elegant way to display your cherished glassware while adding a light, airy feel to your dining room or hallway.
Step-by-Step
Materials
- Wooden curio cabinet with glass doors
- Sander or sandpaper (80, 120, and 220 grit)
- Painter’s tape
- Primer (stain-blocking)
- High-quality furniture paint (Pure White or similar)
- Chemical paint stripper (if removing old finish)
- Plastic scraper
- Clear wood oil or matte polyurethane
- Gold or antique brass ornamental pulls
- Gold drawer knobs
- Small foam rollers and high-quality synthetic brushes
- Screwdriver
Step 1: Preparation & Stripping
-
Remove hardware and doors:
Begin by carefully unscrewing all existing knobs, handles, and hinges. Remove the glass doors and the lower drawers to work on them separately. Place hardware in a labeled bag so nothing gets lost. -
Protect the glass:
Before doing any heavy sanding or painting, tape off the edges of the glass panes on both sides with high-quality painter’s tape to prevent scratches or paint bleed. -
Strip the accent areas:
Apply a chemical stripper to the top crown molding and the drawer fronts. We want to reveal the natural wood grain here, so follow the manufacturer’s instructions to soften the old finish. -
Scrape and clean:
Once the finish bubbles, use a plastic scraper to gently remove the goo from the wood and drawers. Clean the residue off with mineral spirits and steel wool.
Clean Edges Only
When painting the window mullions, run a razor blade carefully alongside the edge after the paint dries instead of taping. It’s often faster and cleaner.
Step 2: Sanding & Priming
-
Sand the body:
Scuff sand the main body of the cabinet, the door frames, and the interior shelves using 120-grit sandpaper. You don’t need to strip these parts to bare wood; just create a ‘tooth’ for the paint to grip. -
Sand the accent wood:
Sand the now-stripped top crown and drawer fronts. Start with 80-grit if the wood is rough, move to 120-grit, and finish with 220-grit for a buttery smooth surface. -
Clean thoroughly:
Vacuum up all the sawdust and wipe the entire piece down with a tack cloth or a damp rag to ensure a dust-free surface. -
Prime the paintable areas:
Apply a coat of stain-blocking primer to the body, doors, and interior. Do not prime the natural wood top or drawer fronts. Let the primer dry completely according to the can’s instructions.
Step 3: Painting & Sealing
-
Paint the interior:
Start by painting the inside of the cabinet. A small foam roller works wonders for the back panel, while an angled brush helps get into the corners. -
Paint the exterior body:
Apply your first coat of white furniture paint to the exterior frame and door frames. Use long, smooth strokes to minimize brush marks. -
Light sanding between coats:
Once the first coat is dry, lightly hand-sand with 220-grit paper to knock down any bumps. Wipe away the dust before proceeding. -
Apply the second coat:
Apply a second coat of white paint for full opacity. I like to let this dry for at least 24 hours to ensure the finish hardens properly. -
Treat the natural wood:
Apply a clear matte oil or polyurethane to the raw wood top and drawer fronts. This protects the wood while highlighting the natural grain and keeps the tone light and modern.
Add Texture
Line the back panel of the cabinet interior with beadboard wallpaper before painting. It adds subtle vertical texture that elevates the classic cottage look.
Step 4: Finishing Touches
-
Reattach hardware:
Install the ornate gold pulls on the doors and the round knobs on the drawers. The contrast of gold against the white and wood is essential for this look. -
Reassemble the cabinet:
Carefully screw the hinges back onto the cabinet frame and reattach the doors. Slide the drawers back into their slots. -
Clean the glass:
Peel away the painter’s tape and clean the glass thoroughly with vinegar and water to remove any adhesive residue or smudges.
Now you have a stunning focal point ready to showcase your favorite pieces with style and grace
Replace Door Glass With Wire Mesh for Airy Texture
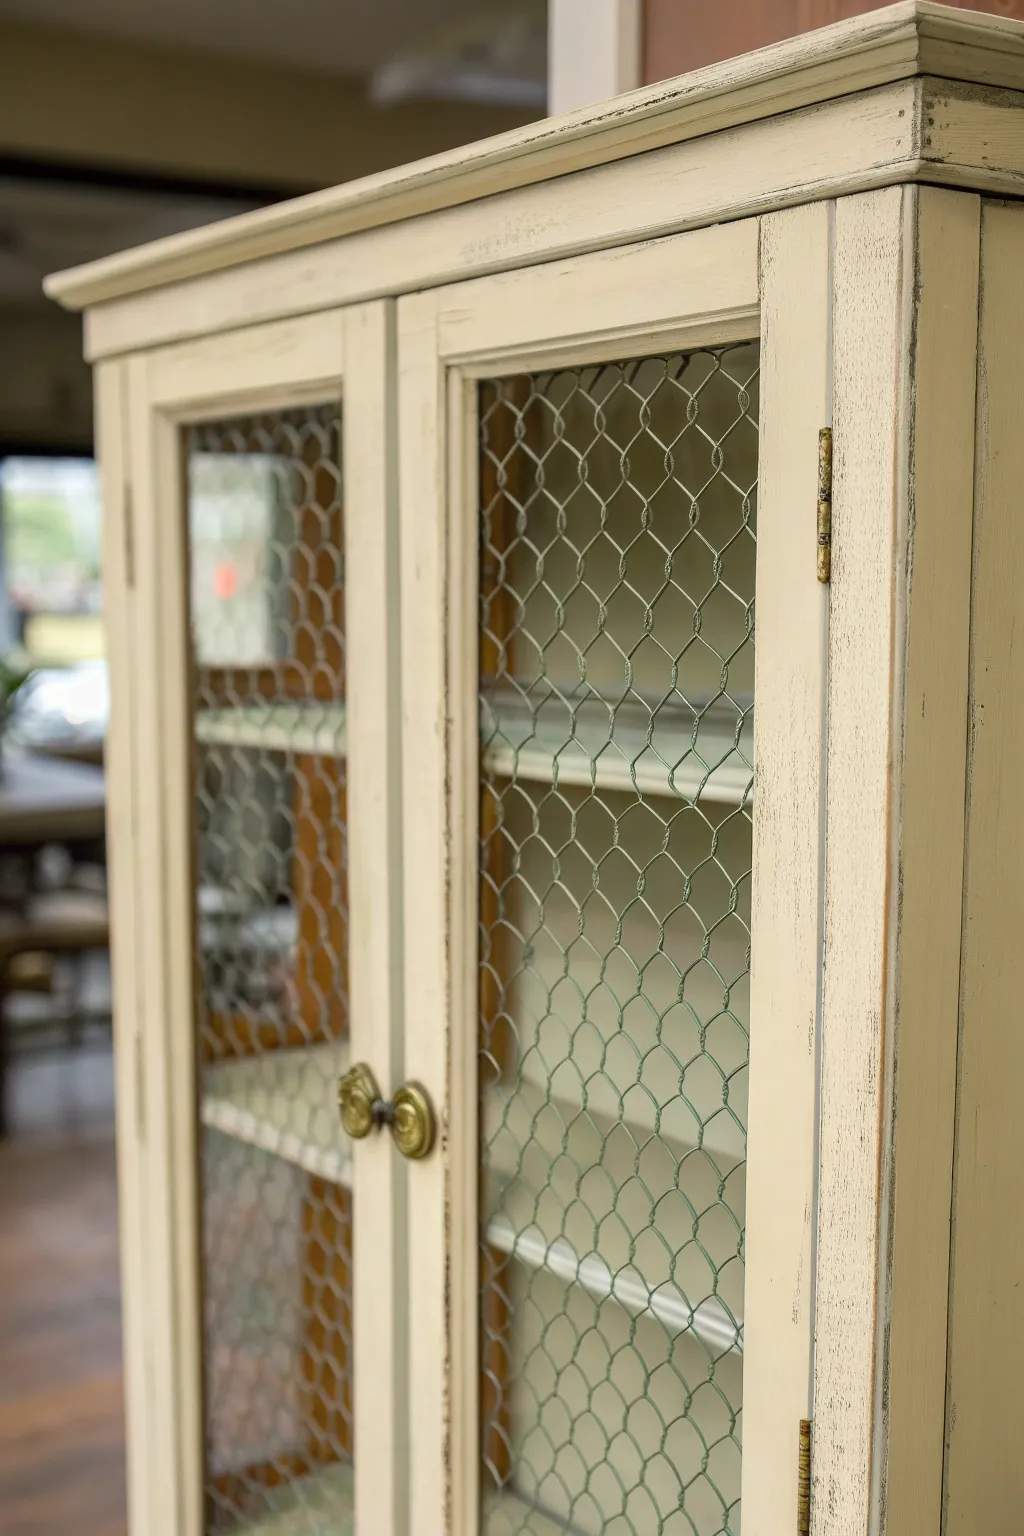
Transform a dated glass-front cabinet into a charming piece of farmhouse decor by swapping out traditional glass for rustic poultry netting. The combination of distressed cream paint and airy wire mesh creates a beautiful textural contrast that instantly lightens up any room.
Step-by-Step Tutorial
Materials
- Wooden curio cabinet with glass doors
- Chicken wire (1-inch hexagonal mesh)
- Chalk-style paint (cream or off-white)
- Dark wax or antique glaze
- Clear furniture wax
- Sandpaper (120 and 220 grit)
- Wire cutters
- Staple gun and 1/4 inch staples
- Needle-nose pliers
- Screwdriver
- Heavy-duty gloves
- Painter’s tape
- Paintbrushes (one for paint, one for wax)
- Clean lint-free rags
Step 1: Preparation and Removal
-
Clear and Clean:
Begin by removing all items from the cabinet and wiping down the entire surface with a mild degreaser to remove dust and oils. -
Remove Doors and Hardware:
Use your screwdriver to take the doors off their hinges. Remove all handles, knobs, and hinge hardware, placing them in a labeled bag so nothing gets lost. -
Glass Extraction:
Carefully remove the glass panels. Many cabinets have wood strips or clips holding the glass in place; loosen these gently. If the glass is glued, you may need a heat gun to soften the adhesive before prying it out. -
Clean Grooves:
Once the glass is out, inspect the grooves or rebates where the glass sat. Use pliers to pull out any old glazier points or stray staples.
Wire Woes?
If the wire is bulging or won’t lay flat, staple one entire side first. Then, use pliers to pull the mesh taut towards the opposite side before stapling again.
Step 2: Painting and Distressing
-
Base Coat Application:
Apply your first coat of cream chalk-style paint to the cabinet frame and doors. Don’t worry about perfect coverage here; we are aiming for a vintage look. -
Drying Time:
Allow the first coat to dry completely, typically about an hour depending on your brand of paint. -
Second Coat:
Apply a second coat for better opacity, brushing in the direction of the wood grain. Let this dry fully, preferably overnight. -
Distressing the Edges:
Using 120-grit sandpaper, gently sand the edges, corners, and raised details where natural wear would occur. I like to let the dark wood show through distinctly in these areas. -
Smooth the Surface:
Run a piece of 220-grit sandpaper lightly over the flat surfaces to smooth out brush strokes without removing the paint. -
Sealing and Aging:
Apply a coat of clear wax with a wax brush. While the clear wax is still wet, apply a small amount of dark wax into the corners and recessed areas to mimic age. -
Buffing:
After the wax has set for about 15-20 minutes, buff the entire piece with a clean, lint-free cloth to achieve a soft, protective sheen.
Pro Tip: Paint the Back
Before installing the wire, spray paint the mesh with an antique bronze or dull silver color. Bright galvanized silver can look too new against aged wood.
Step 3: Installing the Wire
-
Measure the Opening:
Turn your cabinet doors face down. Measure the recessed area where the glass used to sit, adding about an inch to both height and width for stapling allowance. -
Cut the Mesh:
Wearing heavy-duty gloves, unroll the chicken wire. Use wire cutters to snip the mesh to your measured dimensions. -
Flatten the Wire:
The wire will want to curl back up. Flatten it by bending it counter to the roll direction or pressing it under heavy books for a few minutes. -
Positioning:
Lay the mesh into the door frame recess. Ensure the hexagon pattern is straight vertically; crooked wire is very noticeable. -
Stapling:
Starting at the center of one side, pull the wire taut and staple it into the wood frame. Move to the opposite side, pull tight, and staple. Repeat for top and bottom. -
Secure Corners:
Work your way toward the corners, stapling every few inches. Keep the tension high so the wire doesn’t bulge. -
Trim Excess:
Use wire cutters to trim any sharp wire ends that extend beyond the wood frame recess. Tap down any sharp points with a hammer.
Step 4: Final Assembly
-
Reattach Doors:
Screw the hinges back onto the cabinet frame and re-hang your doors. -
Install Hardware:
Reattach your knobs or handles. If the old hardware looks too shiny, you might consider brushing it with a little dark wax to match the distressed vibe.
Step back and admire how this simple swap adds instant farmhouse charm to your space
Add Beadboard Panels to De-Glass a Curio Cabinet
Transform a dated glass-heavy cabinet into a stunning focal point with a beadboard upgrade and a rich, moody paint job. This project adds architectural character by swapping out plain glass side panels for textured wood grooves, creating hidden storage with a classic aesthetic.
Step-by-Step
Materials
- Curio cabinet with removable glass panels
- Beadboard paneling (sheets)
- Deep teal/petrol blue furniture paint (satin finish)
- High-quality primer (bonding primer geared for glossy surfaces)
- Gold ornate cabinet knobs
- Gold hinges (matching set)
- Circular saw or jigsaw
- Construction adhesive (e.g., Liquid Nails)
- Pin nailer or finishing nails
- Wood filler
- Sandpaper (120 and 220 grit)
- Painter’s tape
- Angled sash brush and foam roller
- Measuring tape and pencil
Step 1: Preparation & Demolition
-
Clear and clean:
Remove all shelves and clean the entire cabinet thoroughly with a degreaser to remove years of furniture polish or dust. -
Remove hardware:
Unscrew all existing hardware, including knobs and hinges. Label the hinges in ziplock bags if you plan to reuse them. -
Remove glass panels:
Carefully pry off the wood runner strips holding the glass side panels in place. Remove the glass carefully; wear gloves for safety. -
Light sanding:
Scuff sand the entire wooden surface of the cabinet with 120-grit sandpaper to give the primer something to grip onto.
Groove Control
When painting beadboard, use a fairly dry brush to push paint into the grooves first, then immediately roll over the surface to smooth out drips.
Step 2: Adding Beadboard Structure
-
Measure openings:
Measure the side openings where the glass used to be. Measure the interior back panel as well if you are covering a mirrored back. -
Cut panels:
Cut your beadboard sheets to size using a circular saw. Ensure the vertical grooves run straight up and down for the correct look. -
Dry fit:
Test fit the beadboard pieces into the side openings and the back to ensure a snug fit before applying any adhesive. -
Install side panels:
Apply construction adhesive to the edges of the frame where the glass sat. Press the beadboard into place, facing the textured side outward. -
Secure panels:
Use a pin nailer to shoot small nails into the edges of the beadboard from the inside to secure it while the glue dries. -
Fill gaps:
Run a bead of caulk along the seams where the beadboard meets the cabinet frame for a seamless, built-in look.
Step 3: Painting & Finishing
-
Prime the surface:
Apply a coat of bonding primer to the entire cabinet, including the new beadboard. I find a foam roller works best on the flat beadboard surfaces to avoid filling the grooves. -
Sand primer:
Once dry, lightly sand the primed surface with 220-grit sandpaper for a buttery smooth base. -
First coat of paint:
Apply your deep teal paint. Use a brush for corners and the beadboard grooves, and a roller for the flat exterior sides and doors. -
Second coat:
Allow the first coat to dry fully according to the can’s instructions, then apply a second coat for full opacity and richness. -
Paint the doors:
While the cabinet dries, paint the door frames carefully. Use painter’s tape on the door glass if you didn’t remove it earlier. -
Install hardware:
Attach the updated gold hinges and screw in the decorative gold floral knobs on the doors and drawers. -
Reassemble:
Rehang the doors carefully and slide the interior shelves back into place once the paint has cured for at least 24 hours.
Glass Won’t Budge?
If the retaining strips are stuck, score the painted edge with a utility knife first to break the seal without splintering the wood frame.
Enjoy styling your sophisticated new cabinet with your favorite books and heirlooms
Color-Blocked Sections for a Contemporary Twist
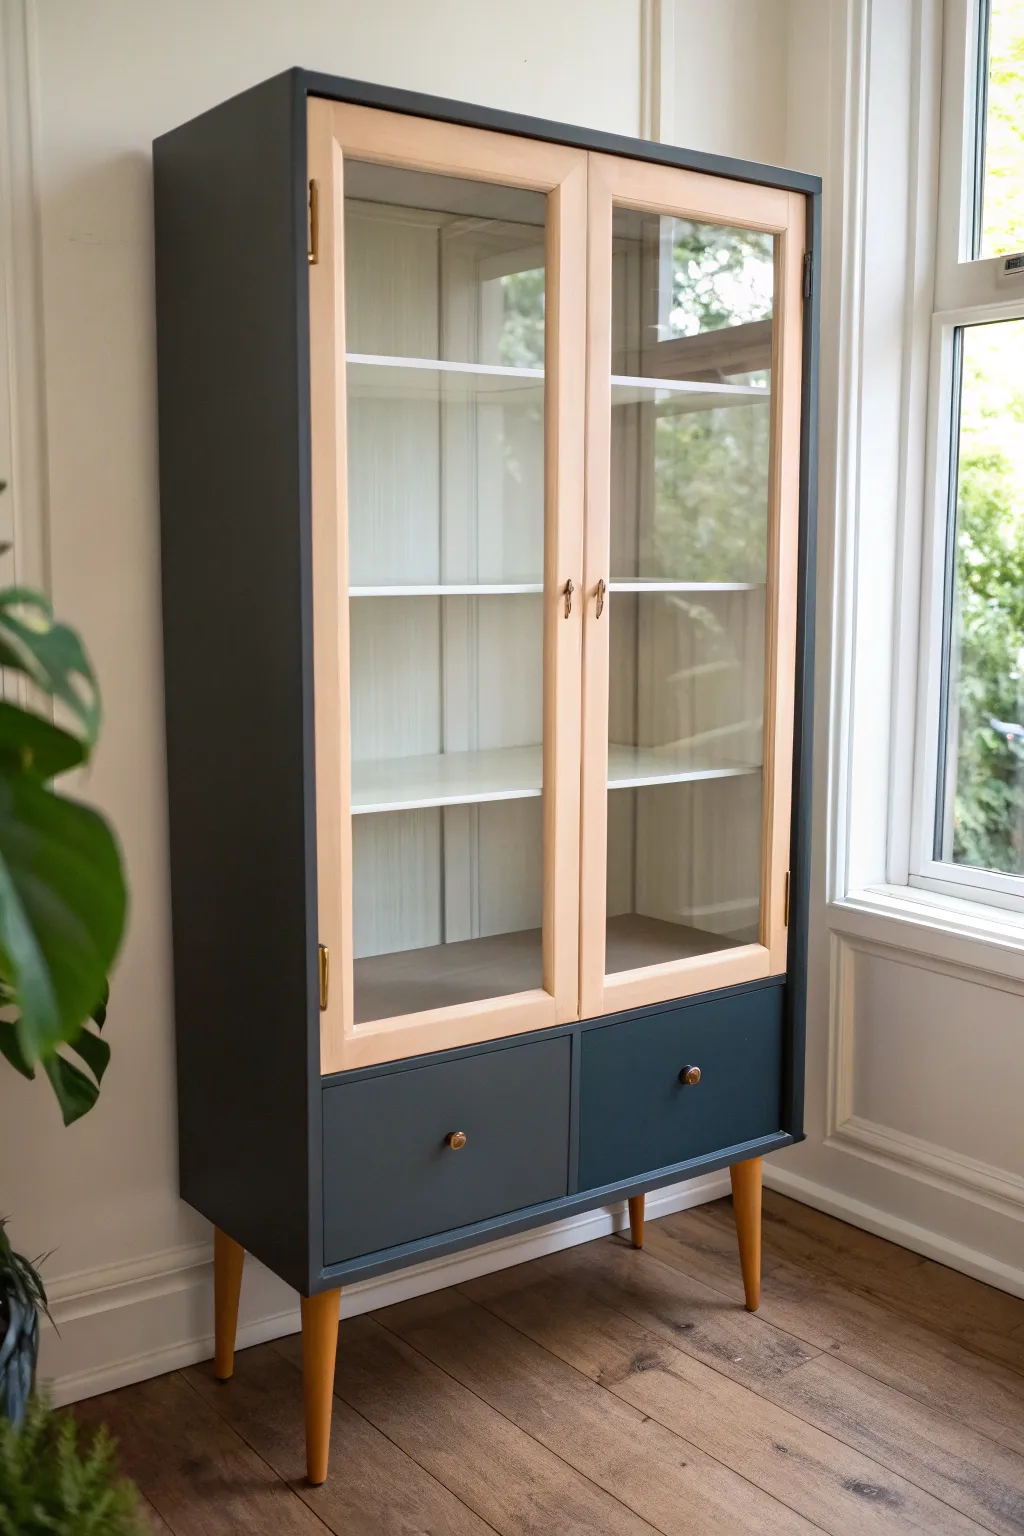
Transform a dated display cabinet into a striking contemporary piece by combining deep charcoal paint with natural wood accents. This project emphasizes clean lines and contrast, turning a simple storage unit into a sophisticated focal point for any room.
How-To Guide
Materials
- Wooden display cabinet with glass doors
- Screwdriver and hardware removal tools
- Sandpaper (120, 180, and 220 grit)
- Chemical paint stripper (optional, for stubborn finishes)
- Painter’s tape
- High-quality bonding primer
- Deep charcoal or navy mineral paint (matte finish)
- Clear matte polyurethane or wax topcoat
- Synthetic bristle paint brush (2 inch)
- Small foam roller
- Glass cleaner and lint-free cloths
- New brass knobs (optional)
Step 1: Preparation & Stripping
-
Hardware removal:
Begin by removing all doors, drawers, shelves, and hardware. Store screws and knobs in a labeled bag so nothing gets lost during the process. -
Assess the finish:
Examine the door frames. Since we want these to remain natural wood, check if the current finish is thick varnish or paint. If it’s heavy, apply a chemical stripper according to package directions to lift the old finish. -
Sand the frames:
Once stripped (or if the finish was thin), sand the door frames thoroughly using 120-grit paper to reveal the raw wood underneath. Follow up with 180-grit and finally 220-grit for a silky smooth feel. -
Scuff sand the body:
For the main cabinet body and drawer fronts that will be painted, you don’t need to strip to bare wood. simply scuff sand the entire surface with 180-grit sandpaper to create a ‘tooth’ for the primer to grip. -
Clean surfaces:
Vacuum up all sanding dust, then wipe every surface down with a tack cloth or a damp rag with a little degreaser. A clean surface is crucial for a smooth paint job.
Bleaching for Blonde Wood
If your sanded wood is still too red or dark, apply a household wood bleach or oxalic acid solution. This removes red undertones, achieving that Scandi-blonde look shown here.
Step 2: Painting the Body
-
Protect the glass:
If you couldn’t remove the glass panels, tape them off meticulously with painter’s tape. Run a credit card edge along the tape line to ensure a perfect seal against paint bleed. -
Prime the body:
Apply a coat of high-quality bonding primer to the cabinet exterior, interior back (if painting), and drawer fronts. Let it dry completely according to the manufacturer’s instructions. -
Check for imperfections:
Once the primer is dry, look for drips or rough spots. Lightly sand these areas with fine-grit paper to smooth them out before moving to color. -
First coat of color:
Stir your deep charcoal mineral paint well. Using a high-quality synthetic brush for corners and a foam roller for flat surfaces, apply the first coat. I generally prefer thin, even coats to avoid brush marks. -
Inter-coat drying:
Allow the first coat to dry for at least 4-6 hours, or overnight if possible. Mineral paints cure best when not rushed. -
Second coat:
Apply the second coat of paint. This deep color should now be opaque and rich. If you see any streakiness, a third thin coat may be necessary.
Sticky Drawers?
If painted drawers stick, rub a plain candle or dedicated furniture wax along the wooden runners and drawer sides. The wax acts as a lubricant for smooth gliding.
Step 3: Detaling & Assembly
-
Seal the wood accents:
Return to your sanded natural wood door frames. Apply a clear matte polyurethane or furniture wax to protect the raw wood without darkening it too much, maintaining that light contrast. -
Topcoat the paint:
While mineral and chalk paints are durable, a high-traffic piece benefits from protection. Apply a clear matte polycrylic over the painted sections for added durability. -
Clean the glass:
Peel off the painter’s tape carefully. Use glass cleaner and a lint-free cloth to remove any smudges or sticky residue from the glass panes. -
Refinish or replace legs:
If the original legs are dark or damaged, sand them down to match the door frames. Seal them with the same clear matte finish you used on the doors. -
Install hardware:
Attach your brass knobs to the drawers and doors. The gold tone of brass complements the charcoal and natural wood beautifully. -
Final assembly:
Reattach the doors to the hinges and slide the drawers back into place. Adjust the hinges if the doors aren’t hanging perfectly straight.
Step back and admire how the crisp contrast completely modernizes your furniture piece
Faux Bone Inlay Pattern on the Doors
Transform ordinary flat-panel doors into high-end statement pieces using a clever stenciling and painting technique. This project mimics the intricate look of traditional bone inlay without the hefty price tag, adding a sophisticated geometric flair to your curio cabinet.
Step-by-Step
Materials
- Cabinet with flat recessed panels on lower doors
- High-grit sandpaper (220-grit)
- Tack cloth
- Painter’s tape
- Chalk paint or furniture paint (Dark Navy/Charcoal)
- Chalk paint (Light Beige/Taupe for background)
- Chalk paint (Cream/Off-White for inlay pattern)
- Bone inlay geometric stencil
- Stencil brushes (flat and round)
- Small artist detail brush
- Spray adhesive (repositionable)
- Polycrylic topcoat or furniture wax
- Gold finish hardware (optional)
Step 1: Preparation & Base Coat
-
Remove hardware and doors:
Begin by unscrewing all knobs, handles, and hinges. Remove the doors entirely from the cabinet frame to work on a flat, stable surface. Label the hardware in small bags so you know exactly which screw goes where later. -
Clean and scuff:
Wipe down the entire piece with a degreasing cleaner to remove old oils or wax. Once dry, lightly scuff the surfaces with 220-grit sandpaper to give the paint something to grip. Wipe away the dust with a tack cloth. -
Paint the cabinet frame:
Apply your primary dark navy or charcoal color to the main body of the cabinet and the frames of the doors. Use a high-quality synthetic brush for smooth strokes. Let the first coat dry completely, then apply a second coat for full opacity. -
Tape off the inset panels:
On the bottom doors, carefully use painter’s tape to mask off the inner edge where the frame meets the recessed flat panel. Press the tape down firmly to prevent bleed-through. -
Paint the panel background:
Paint the Recessed panels with your light beige or taupe color. This lighter shade acts as the ‘wood’ or ‘resin’ background for your bone inlay pattern. Two thin coats are usually better than one thick one here.
Clean Lines Secret
To prevent stencil bleed, seal the edges of your stencil with a thin layer of the *background* color (beige) first. This fills any gaps, so your white top layer stays perfectly crisp.
Step 2: Creating the Inlay Pattern
-
Prepare the stencil:
Select a stencil with a geometric floral or diamond motif that fits the scale of your door panels. Lightly mist the back of the stencil with repositionable spray adhesive and let it get tacky for a moment. -
Position the stencil:
Center the stencil perfectly on the beige recessed panel. Use a tape measure to ensure equal distance from all sides. Press the stencil down firmly, paying extra attention to the small intricate bridges of the design. -
Load the brush minimally:
Dip your stencil brush into the cream/off-white paint, then offload almost all of it onto a paper towel. The brush should feel almost dry to the touch—this is critical for crisp lines. -
Stipple the pattern:
Apply the paint over the stencil using a straight up-and-down tapping motion (stippling). Avoid swirling or brushing side-to-side, as this pushes paint under the stencil edges. -
Build coverage slowly:
Do not try to get solid white coverage in one pass. It’s better to do two or three extremely light passes to build up the ‘bone’ intensity without smears. Let the paint dry slightly between passes. -
Fill the corners:
If your stencil doesn’t reach the very edges of the panel, carefully reposition it to continue the pattern, aligning it with the already painted design. -
Remove stencil and touch up:
Peel the stencil away immediately while the paint is still slightly damp. Once fully dry, use a tiny artist brush and the beige background paint to correct any small bleeds or fuzzy edges.
Step 3: Finishing Touches
-
Apply detail accents:
For an authentic look, I sometimes like to hand-paint small dots or connecting lines in the centers of the diamonds if the stencil left gap. This makes the design look more organic and hand-inlaid. -
Seal the artwork:
Once the stencil work has cured for at least 24 hours, apply a clear polycrylic topcoat or clear furniture wax over the entire door. This protects your intricate work from scratches. -
Reassemble:
Reattach the hinges and hang the doors back onto the cabinet frame. -
Install hardware:
Finish the look by installing sleek gold or brass knobs. The metallic sheen complements the faux bone aesthetic beautifully.
Pearl Effect Upgrade
Mix a small amount of pearlized medium or metallic white paint into your cream stencil paint. This gives the ‘bone’ shapes a subtle, realistic shimmer when the light hits.
Now you have a stunning focal point that brings worldly elegance to your room
Hand-Painted Mini Mural on the Back Panel
Transform a standard glass-door cabinet into an enchanted display case by focusing your artistic energy on the interior back panel. This project combines a soft, creamy exterior finish with a textural, hand-painted garden mural that peeks through the shelves for a subtle, vintage-inspired surprise.
Step-by-Step Tutorial
Materials
- Tall wooden curio cabinet with glass doors
- Sander or sandpaper (120 and 220 grit)
- Painter’s tape
- Creamy off-white chalk or mineral paint
- Primer (stain-blocking)
- Clear matte polyurethane topcoat
- Acrylic craft paints (olive green, terracotta, soft gold, grey, white)
- Glazing medium
- Various paintbrushes (2-inch flat, small round detail, stippling brush)
- Natural sea sponge
- Gold Rub ‘n Buff or metallic wax
- Screwdriver for hardware removal
Step 1: Preparation and Base Coat
-
Disassemble the cabinet:
Begin by removing all hardware, including handles and hinges. Carefully take out the glass shelves and set them aside in a safe location. -
Protect the glass:
Use high-quality painter’s tape to meticulously mask off all glass panels on the doors and sides. Run a credit card edge along the tape line to ensure a tight seal and prevent paint bleed. -
Sand the surfaces:
Lightly scuff sand the entire exterior and interior frame with 120-grit sandpaper to remove surface gloss. Wipe away all dust with a tack cloth or damp rag. -
Prime the wood:
Apply a coat of stain-blocking primer to the entire cabinet. This is crucial for preventing old wood tannins from bleeding through your light paint color. -
Apply the exterior color:
Paint the exterior and the interior shelving frames with your creamy off-white chalk paint. Use a high-quality synthetic brush for a smooth finish, applying two to three thin coats and letting them dry completely between layers.
Step 2: Creating the Interior Mural effects
-
Prep the back panel:
Paint the interior back panel with a solid base coat of your creamy white wall paint. This provides a neutral canvas for the mural effects. -
Create a textural glaze:
Mix a small amount of grey acrylic paint with clear glazing medium (about a 1:4 ratio). Don’t overmix; you want the pigment to remain somewhat translucent. -
Apply the vertical streaks:
Using a wide, dry brush, drag the grey glaze vertically down the back panel. Work in long, continuous strokes from top to bottom to create a weathered, linen-like texture background. -
Sponge for texture:
I like to dampen a natural sea sponge and dab it lightly into a mix of white and pale olive paint. Press this randomly over the dried glaze to create soft, cloudy patches that break up the linearity. -
Draft the stems:
With a thin round brush and watered-down olive green paint, sketch long, wandering vertical lines to represent flower stems. Vary the heights and let them weave slightly rather than standing perfectly straight. -
Add floral details:
Dip a small stippling brush or the tip of a round brush into terracotta and soft pink paints. Dab these colors near the tops of your stems to create loose, impressionistic flower heads. -
Layer in metallics:
Once the florals are dry, use a detail brush to add tiny accents of soft gold paint to the flower centers and scattered leaves. This catches the light through the glass doors.
Uneven Glaze Check
Glaze drying too fast and looking patchy? Keep a spray bottle of water handy. A light mist over the wet glaze keeps it workable longer, allowing you to blend out harsh stroke lines.
Step 3: Finishing Touches
-
Seal the paint:
Apply two coats of clear matte polyurethane over the entire cabinet, including the hand-painted back panel, to protect your artwork from scratches. -
Revive the hardware:
Clean the original brass hardware. If it looks dull, apply a tiny amount of Gold Rub ‘n Buff with your finger to restore its luster. -
Reassemble:
Peel away the painter’s tape carefully. Reattach the doors and insert the glass shelves back into position.
See-Through Stems
For the airy, watercolour look seen here, mix your acrylic craft paints with a drop of fabric medium or water. Heavy, opaque paint will look too cartoonish for this delicate style.
Step back and admire how your soft, painted garden brings a breath of fresh air to your room storage


Have a question or want to share your own experience? I'd love to hear from you in the comments below!