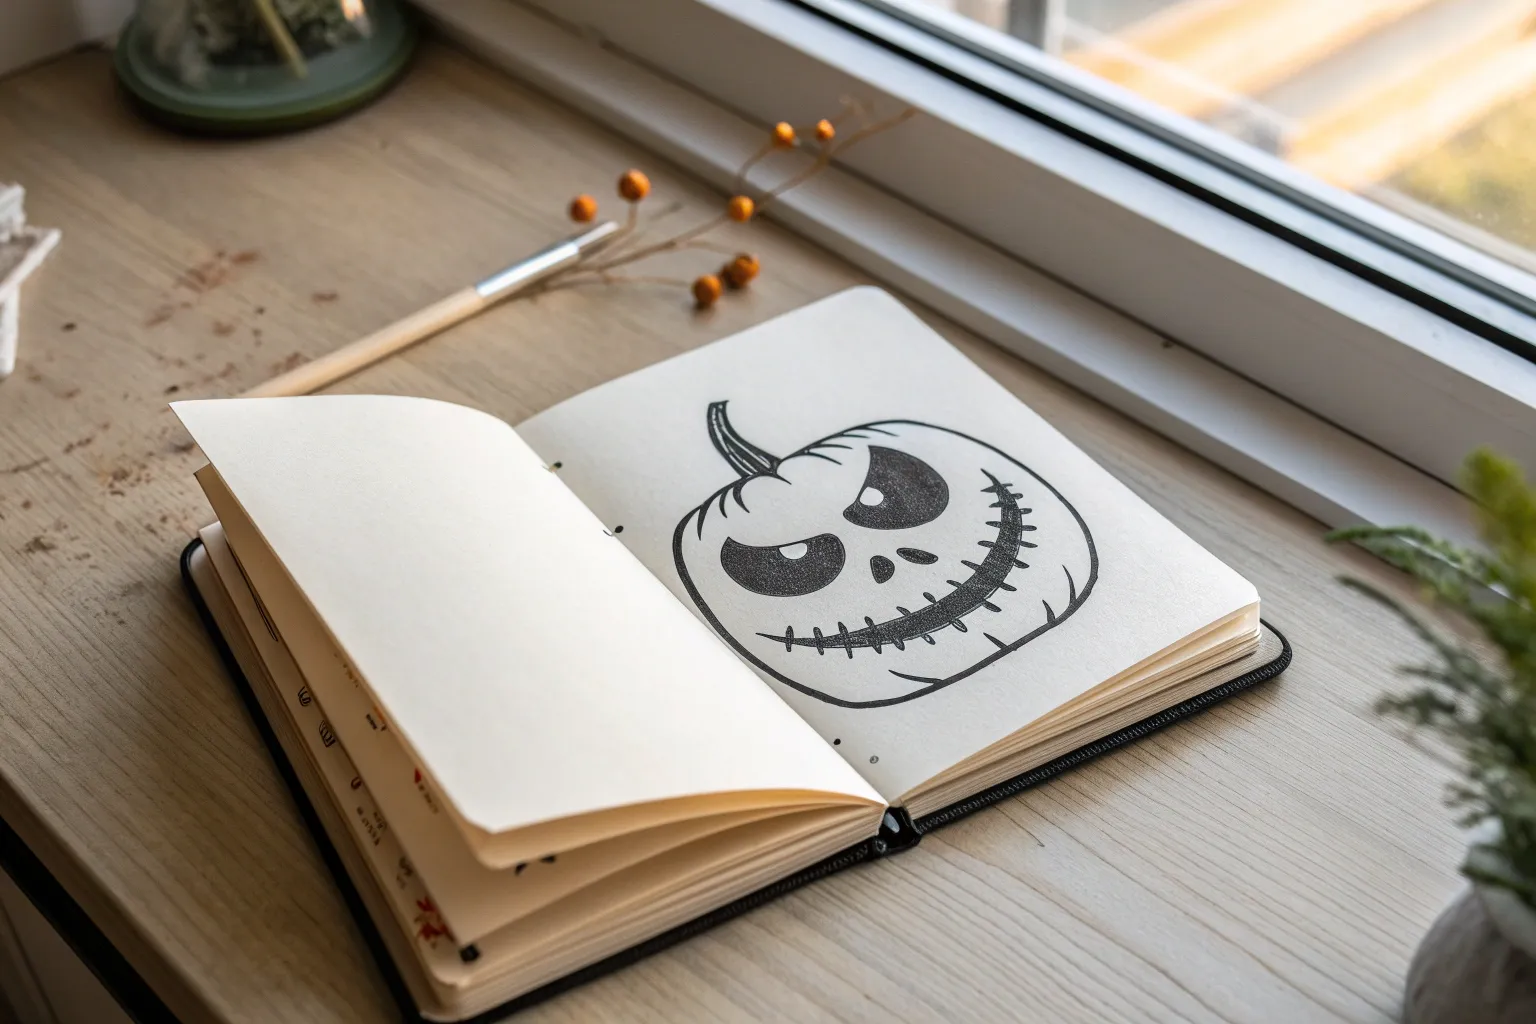
If you’re craving drawings that feel truly Halloween-scary (not just cute-spooky), you’re in the right headspace. These ideas are all about bold silhouettes, creepy textures, and that delicious moment when a simple sketch turns unsettling.
Haunted House on a Hill With Crooked Windows
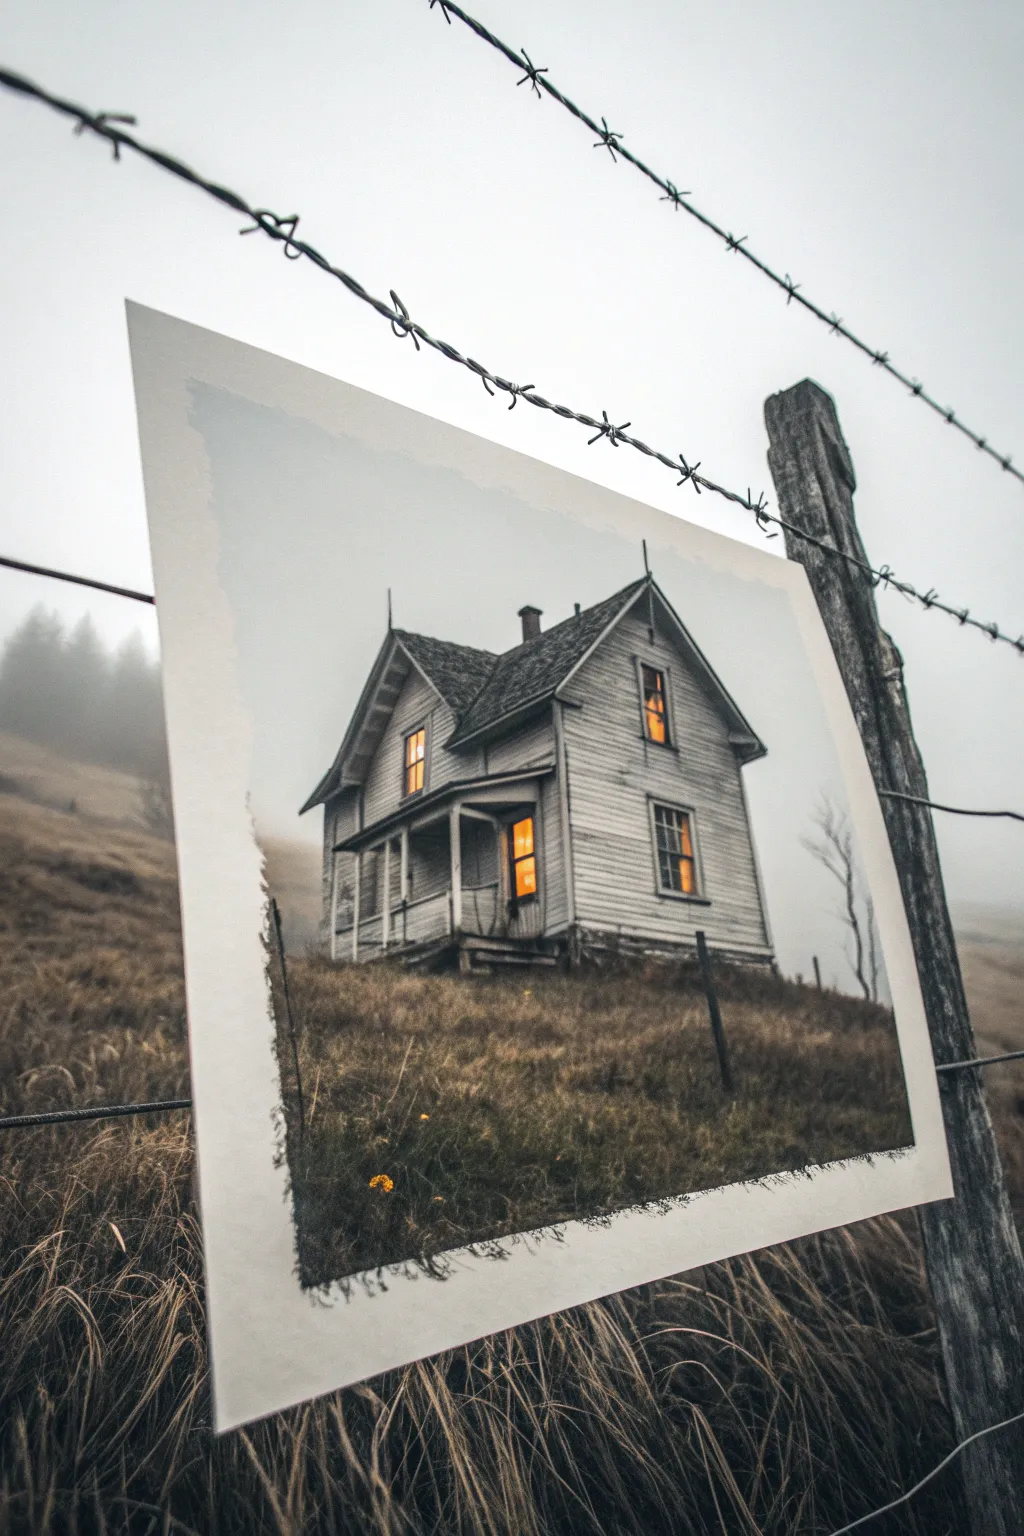
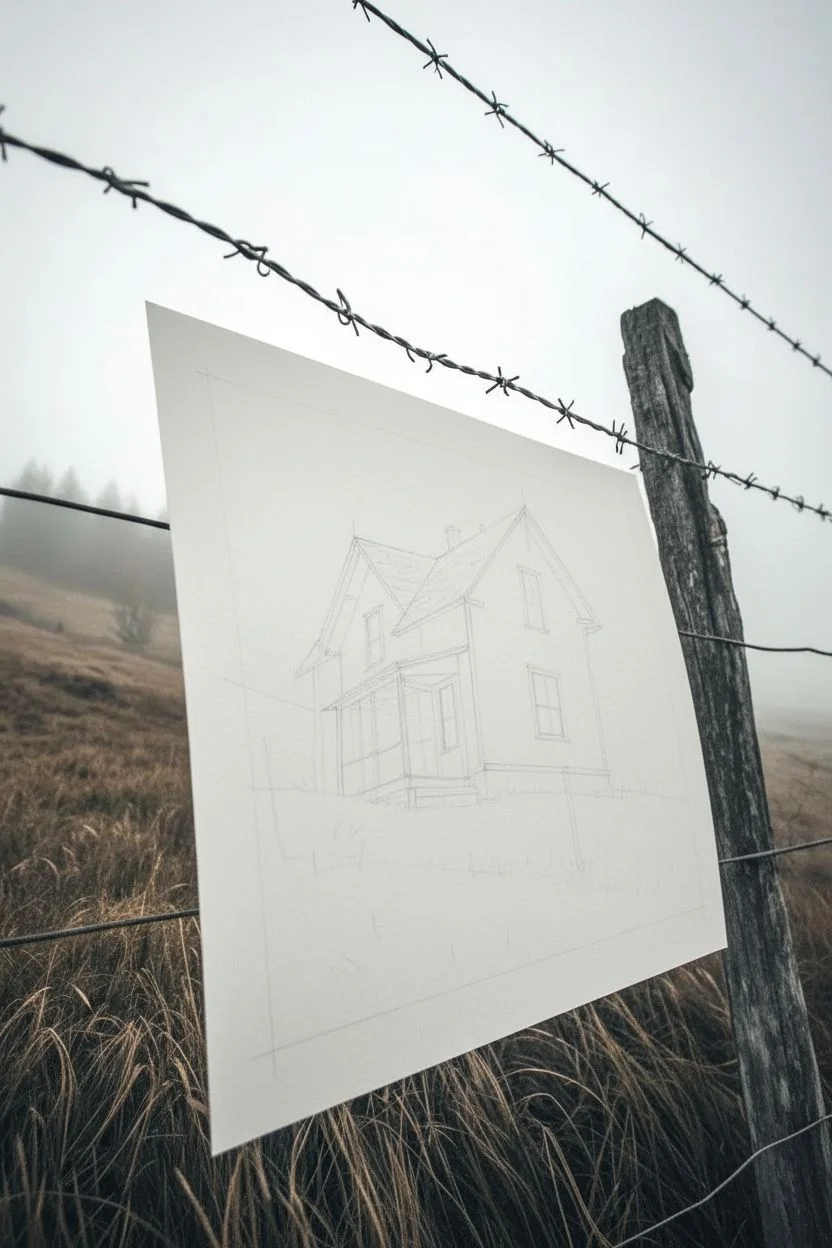
Looking for a haunting decoration that feels like a discovered artifact? This project involves drawing or digitally compositing a spooky farmhouse, printing it on textured cardstock, and adding hand-torn edges for that weathered, abandoned vibe.
Step-by-Step Guide
Materials
- Heavyweight matte photo paper or white cardstock
- Charcoal pencils (black, dark grey)
- Pastel pencils or markers (orange, yellow)
- Metal ruler
- Blending stumps (tortillons)
- Graphite pencils (4B, 6B)
- Spray fixative (matte)
- Optional: Scanner and printer (if creating digitally first)
Step 1: Drafting the Structure
-
Horizon line:
Begin by lightly sketching a sloping horizon line about one-third of the way up your paper. -
House perspective:
Sketch a two-point perspective box for the main body of the house, positioning it slightly off-center on the hill. -
Rooflines:
Add steeply pitched gables to the roof. Don’t worry about perfect straight lines; a little sag makes the house look older. -
Porch details:
Draw the front porch structure with thin pillars, ensuring they look slightly crooked or dilapidated.
Smudged Windows?
If charcoal dust accidentally dirties your yellow windows, use a kneaded eraser to lift the dark dust before reapplying the bright color.
Step 2: Adding moody details
-
Horizontal siding:
Using a graphite pencil, draw horizontal lines across the house for siding, breaking them occasionally to show wear. -
Window placement:
Sketch deep, dark window frames. Leave the glass panes completely blank for now. -
Roof texture:
Use your charcoal pencil to create dark, patchy textures on the roof shingles, pressing harder in shadow areas. -
Grass and terrain:
Fill the foreground hill with short, upward strokes using mixed graphite grades to simulate overgrown dead grass.
Step 3: Lighting the Windows
-
Base glow:
Fill the empty window panes with a bright yellow pastel or marker as a base layer. -
Orange warmth:
Layer orange pastel around the edges of the window panes, blending inward to create a glowing core effect. -
Cast light:
Lightly smudge a tiny bit of the orange pigment onto the porch pillars closest to the windows to show reflected light.
Age the Paper
Before drawing, lightly stain your paper with diluted tea and let it dry. This creates an authentic vintage backing for your house.
Step 4: Atmosphere and Finishing
-
Deepening shadows:
Go back with your darkest charcoal to reinforce the shadows under the eaves and the porch foundation. -
Blending the sky:
Lightly shade the sky area with dirty graphite powder or a dirty blending stump to create a foggy grey atmosphere. -
Setting the drawing:
Spray the artwork with a matte fixative to prevent the charcoal from smearing during the final step. -
Creating the rough edge:
Place a metal ruler along the edge of your paper. Instead of cutting, pull the paper upward against the ruler’s edge. -
Refining the tear:
Gently roughen the torn fibers with your fingernail; I find this gives it that specific ‘found photo’ aesthetic seen in the reference.
Display your eerie farmhouse print using rustic clips or twine to complete the abandoned look


Foggy Graveyard With Tilted Tombstones and Bare Trees
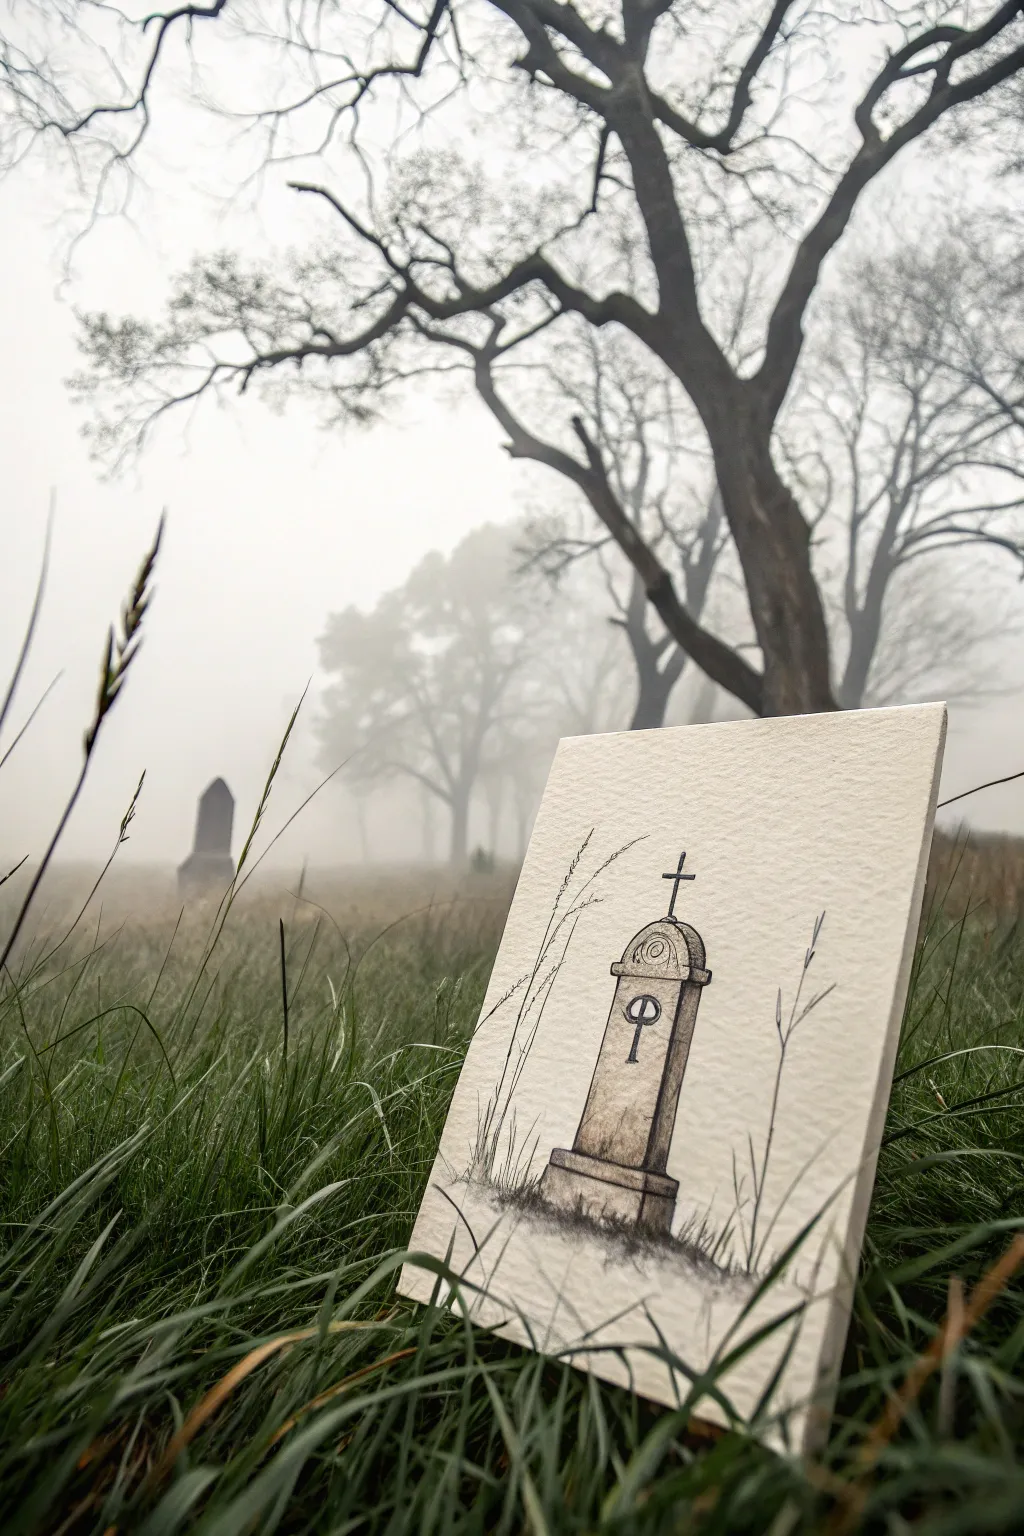
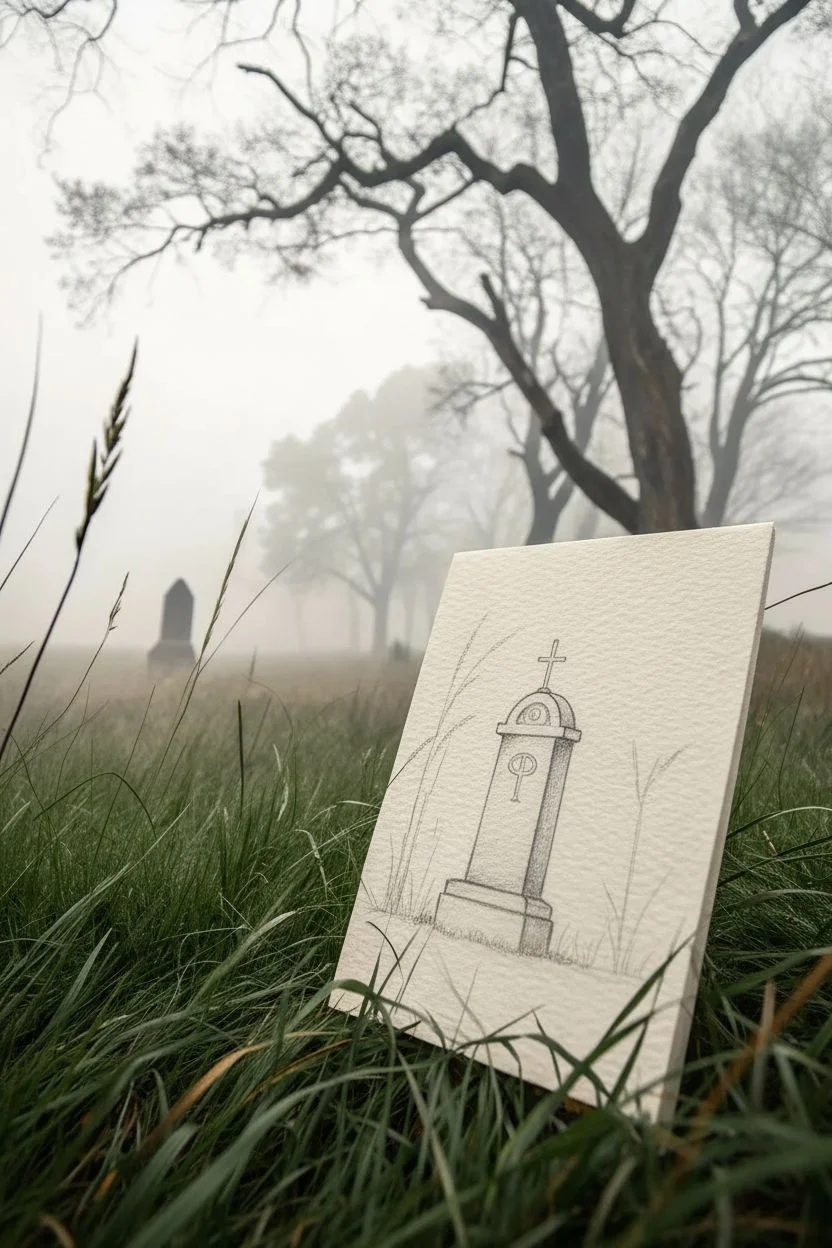
Capture the eerie silence of a foggy graveyard with this detailed ink and graphite illustration. This project combines precise architectural lines with organic textures to create a hauntingly realistic tombstone on textured paper.
Detailed Instructions
Materials
- Textured heavy-weight paper (Cold press watercolor or mixed media)
- HB and 2B graphite pencils
- Fine liner pens (0.1mm, 0.3mm, 0.5mm – black)
- Charcoal pencil or soft graphite stick
- Ruler
- Kneaded eraser
- Blending stump or cotton swab
Step 1: Drafting the Monument
-
Establish the Horizon:
Begin by lightly sketching a low horizon line about one-third of the way up from the bottom of your paper to ground the scene. -
Outline the Basic Shape:
Use your ruler and HB pencil to draw a tall, narrow rectangle in the center. Lightly add a wider, shorter rectangle at the base for the pedestal. -
Add Perspective:
To give the stone depth, draw diagonal lines receding slightly to the right from the top and bottom corners of your main rectangle, creating a narrow side panel. -
Shape the Headstone:
Round off the top of the main rectangle into an arch. Inside this arch, sketch a smaller concentric arch to define the decorative molding. -
Detail the Cross:
Center a vertical line extending up from the apex of the arch. Cross it horizontally to form a simple crucifix, thickening the lines slightly to give it physical form.
Step 2: Refining with Ink
-
Inking Structural Lines:
Switch to your 0.3mm fine liner. Trace your pencil pencil outlines, deliberately breaking the line occasionally to suggest chipped stone or age. -
Carving the Symbol:
In the upper third of the marker face, carefully draw a circle with a vertical line extending downward—resembling a stylized key or ankh. Use the 0.5mm pen here for boldness. -
Adding Cracks and Wear:
With the 0.1mm pen, draw tiny, jagged fissures originating from the edges of the stone. Concentrate these near the base and corners where weathering naturally occurs. -
Texturing the Stone surface:
Stipple tiny dots across the face of the stone using the 0.1mm pen. Cluster dots more densely on the shadowed side (the right side) to build form. -
Sketching the Grass:
Using quick, upward flicks with the 0.1mm pen, draw blades of grass overlapping the base of the tombstone to settle it into the ground. -
Adding Tall Weeds:
Draw a few taller, spindly stalks rising up the left and right sides of the composition. Keep lines thin and broken to convey fragility.
Uneven is Better
Don’t use a ruler for the final inking phase. A slightly wobbly hand mimics the natural decay of old stone better than perfect straight lines.
Step 3: Shading and Atmosphere
-
Establishing Shadows:
Take a 2B pencil and shade the right side panel of the tombstone firmly. This immediate contrast defines the light source coming from the left. -
Creating the Stone Patina:
Lightly shade the front face of the stone with the side of your pencil. I like to let the paper’s texture show through here to mimic rough granite. -
Deepening the Base:
Use a charcoal pencil or soft 4B graphite to darken the very bottom of the pedestal where it meets the earth, anchoring the weight of the object. -
Smudging for Fog:
Use a blending stump to gently smear the graphite at the base of the stone outward horizontally. This creates a localized misty effect around the bottom. -
Highlighting:
Use the kneaded eraser to lift graphite from the left edge of the arch and the symbol, creating crisp highlights that make the stone pop. -
Foreground Grass:
Add darker, bolder pencil strokes for grass in the immediate foreground. Smudge their bases slightly to integrate them with the misty ground. -
Final Contrast Check:
Review your drawing. If the stone feels flat, re-ink the darkest crevices under the pedestal lip and the right-side shadow with the 0.5mm pen.
Background Ghosting
Rub graphite powder on a tissue and swirl it very faintly behind the stone to suggest spooky, indistinct trees in the distance.
Now you have a somber, atmospheric study perfect for your Halloween art collection


Ghost Drifting Through Moonlight With Tattered Edges
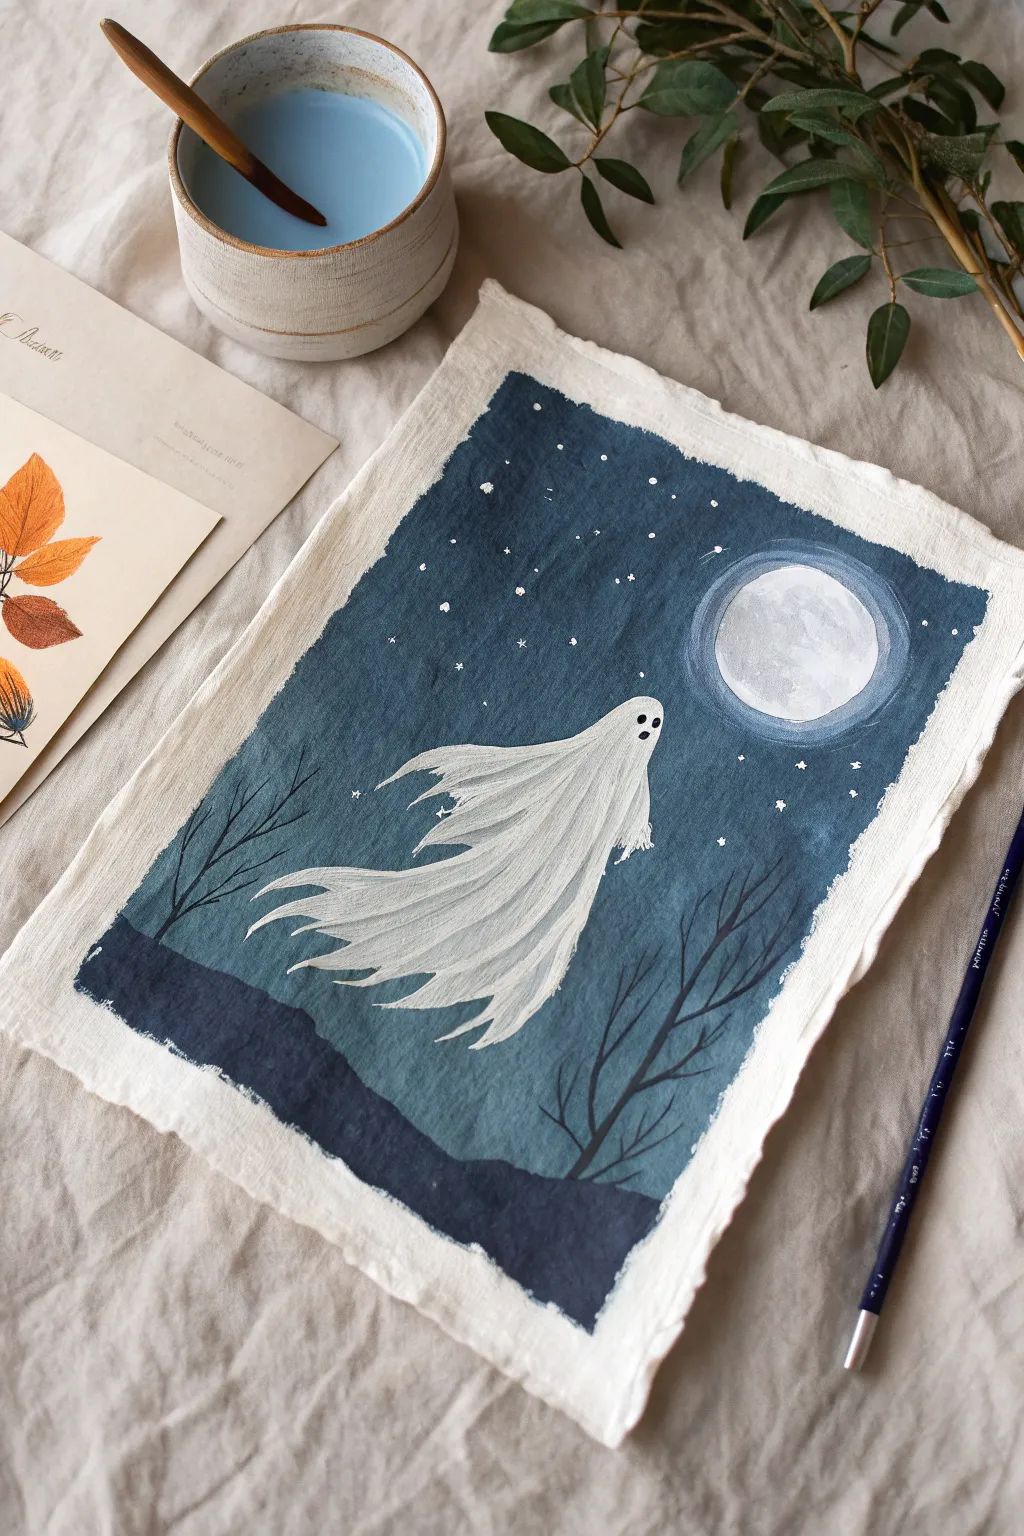
Capture the eerie silence of a moonlit night with this atmospheric gouache or acrylic painting. The floating ghost, rendered with flowing, semi-transparent strokes, contrasts beautifully against a deep blue, starry backdrop.
Step-by-Step
Materials
- Thick watercolor paper or mixed media paper with deckled edges
- Gouache or matte acrylic paints (deep indigo/navy blue, black, white)
- Flat shader brush (size 6 or 8)
- Round detail brushes (size 0 and 2)
- Cup of water
- Palette for mixing
- Paper towels
- Masking tape (optional)
Step 1: Setting the Scene
-
Prepare the paper:
Start with a piece of heavy watercolor paper. If yours doesn’t have the rough, torn look shown in the photo, you can carefully tear the edges yourself by hand or use a ruler edge to create a soft, deckled border. -
Establish the viewing area:
Leave a generous border of white space around your painting area. You can lightly mark the rectangular boundary with a pencil or freehand it for a more organic feel. -
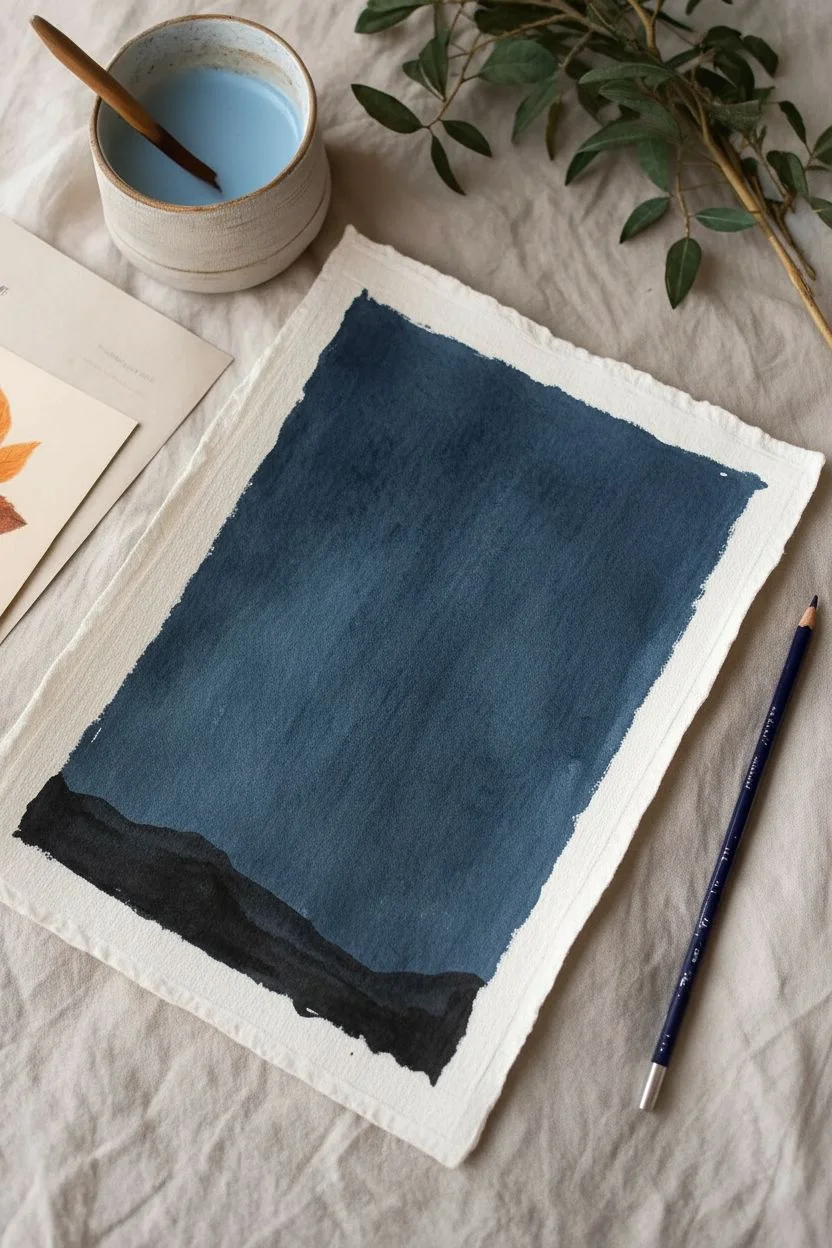
Mix the night sky color:
On your palette, mix a deep indigo blue with a tiny touch of black. You want a dark, moody twilight color, not a pure flat black. The gouache should be creamy but fluid enough to spread. -
Paint the background wash:
Using a flat brush, fill in the sky area. Apply the paint somewhat unevenly; slight variations in opacity add atmospheric depth, making the sky look like shifting night air rather than a solid wall. -
Create the horizon line:
While the sky is still damp, mix a darker shade using more black and indigo. Paint an uneven, rolling ground line at the bottom third of the rectangle to represent hills or terrain. -
Initial drying time:
Let this background layer dry completely. Gouache dries quickly, but if it feels cool to the touch, give it a few more minutes. Painting white over wet dark paint will turn muddy gray.
Step 2: Painting the Ghost
-
Outline the spirit:
Mix a diluted white paint—almost like skim milk. Using a round brush, lightly sketch the flowing shape of the ghost. Ensure the tail trails off to the left and the head tilts slightly upward. -
Fill the base shape:
Fill in the ghost shape with a slightly more opaque white. Don’t make it solid white yet; allow some of the blue background to influence the color, creating a translucent, spectral effect. -
Add flowing drapery:
Load your brush with thicker white paint. Create directional strokes that follow the ghost’s movement from right to left, mimicking fabric blowing in the wind. -
Create tattered edges:
At the trailing end of the ghost, flick your brush outward to create wispy, torn edges. These should look like smoke or shredded fabric dissolving into the night. -
Define the highlights:
Add pure, thick white highlights on the top curves of the ghost’s head and the ‘arms’ of the sheet to show where the moonlight hits strongly. -
Paint the spectral face:
Once the white paint is dry, use your smallest detail brush and pure black paint to add two small oval eyes and a tiny oval mouth. Place them high on the head to give it a curious expression.
Pro Tip: Dry Brushing
For the ghost’s tail, wipe most of the paint off your brush before applying. This ‘dry brush’ technique creates a scratchy texture that looks perfectly like fading mist.
Step 3: Atmosphere and Details
-
Paint the moon:
In the upper right corner, paint a circle using a pale grey-white mix. It doesn’t need to be a perfect geometric circle; a slightly organic shape fits the mood better. -
Add moon texture:
Dab a few subtle grey spots onto the moon while it’s wet to suggest craters. Once dry, outline the moon with a very faint, watery white ring to create a glowing halo effect. -
Detail the bare trees:
Mix a black-blue shade. Using a size 0 round brush (or a rigger brush if you have one), paint thin, jagged tree branches reaching up from the dark ground. Keep the lines shaky and organic. -
Sprinkle the stars:
Dip a small brush or toothbrush into watered-down white paint. Tap the handle against another brush over the paper to splatter tiny stars across the sky. Add a few larger cross-stars by hand for variety. -
Final touches:
Review your contrast. If the ghost feels too transparent, add one final layer of dry-brushed white to the brightest areas to make it pop against the dark blue.
Troubleshooting: Muddy White
If your white ghost turns blue, the background wasn’t dry enough. Let it dry fully, then apply another layer of pure white on top to fix it.
Now you have a hauntingly beautiful piece of art ready to display for the spooky season.


Creepy Spider Web Corner With Dew and a Hanging Spider
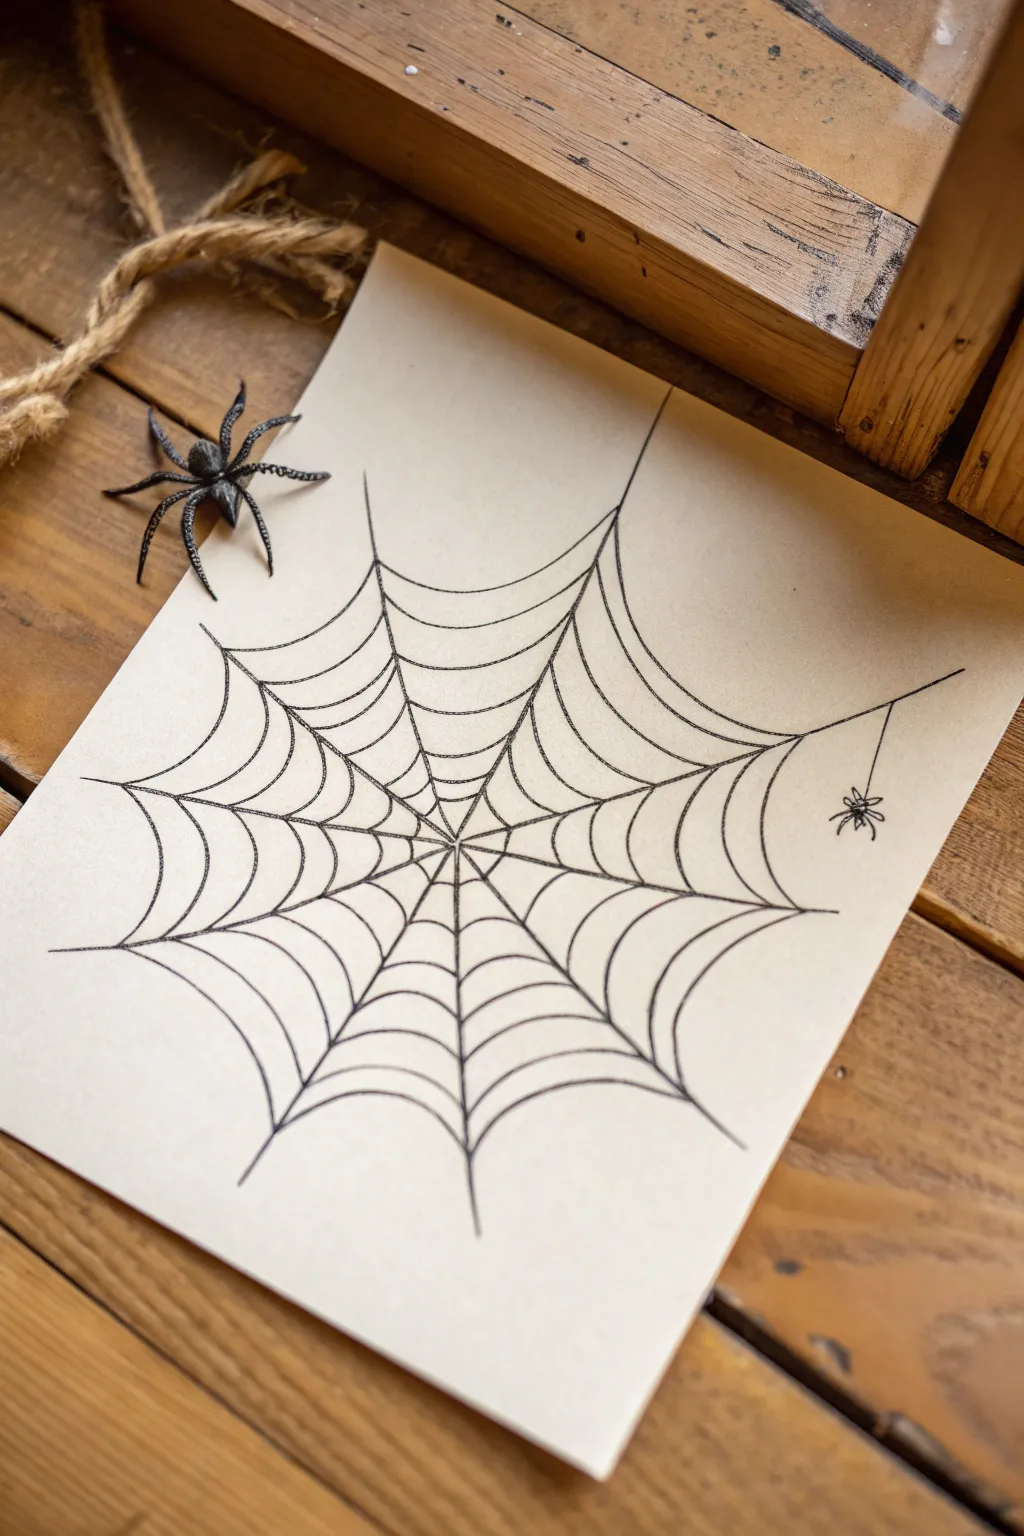
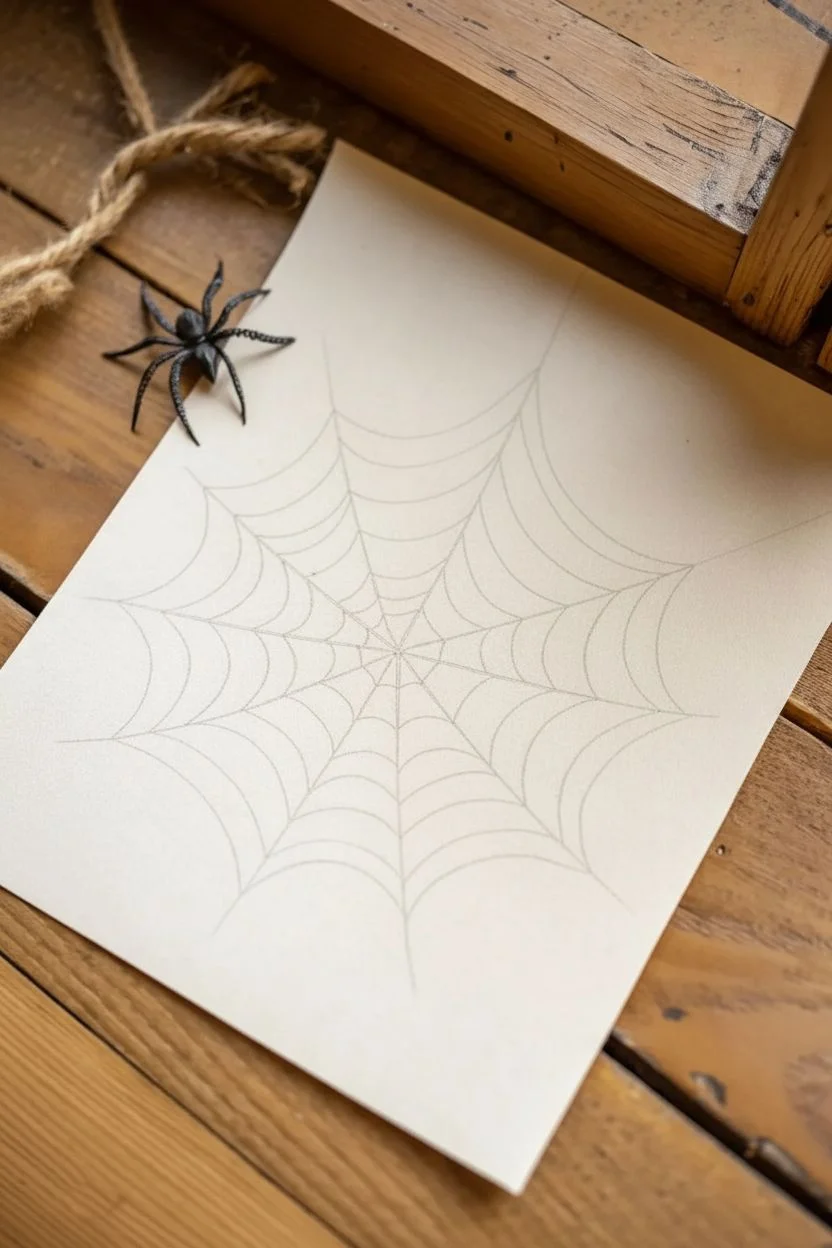
Capture the eerie simplicity of a spider’s home with this elegant corner web drawing. This design focuses on clean geometry and contrasting lines against a warm paper background to create a classic Halloween aesthetic.
Step-by-Step Tutorial
Materials
- Cream or off-white drawing paper (medium weight)
- Fine-tip black drawing pen (0.5mm)
- Ultra-fine tip black pen (0.1mm) for details
- Pencil (HB or 2H)
- Eraser (kneaded is best)
- Ruler or straight edge
- Small plastic spider (optional prop for final photo)
- Twine or rustic string (optional prop)
Step 1: Setting the Structure
-
Position the center point:
Visualize where the center of your web will be. For this corner layout, place a small dot with your pencil roughly one-third of the way up from the bottom and one-third in from the left edge. -
Establish the anchor lines:
Using your ruler and pencil, draw faint straight lines radiating outward from your center dot. Extend long lines toward the top right and bottom left corners first. -
Add radial spokes:
Fill in the remaining radial lines. You’ll want about 10-12 main spokes in total spreading out like a sunburst, but keep the spacing slightly irregular so it looks natural rather than perfectly mathematical. -
Ink the structural lines:
Switch to your 0.5mm black drawing pen. Carefully trace over your pencil spokes with a confident hand. I like to stop the lines abruptly at different lengths so the web feels unfinished and jagged.
Wobbly Lines?
Don’t panic if your hand shakes! Embrace the jitters—squiggly lines actually make the web look older and more dilapidated perfectly fitting the spooky theme.
Step 2: Weaving the Web
-
Start the spiral:
Beginning very close to the center point, draw small, concave curves connecting each spoke to its neighbor. -
Master the droop:
As you move outward, make the curves deeper. The lines should ‘droop’ slightly under gravity’s weight as they stretch between the radial lines. -
Work in rounds:
Continue adding rounds of webbing, moving outward. Don’t try to make a continuous spiral; instead, draw individual curved segments between the spokes one by one. -
Space it out:
Ideally, widen the gap between your web rows as you get further from the center. The center should look dense, while the outer threads look airy and stretched. -
Create variation:
Allow some lines to wobble slightly. A real spider web isn’t vector-perfect, and these little imperfections add organic character.
Step 3: Adding the Resident
-
Draw the drop line:
Choose a spot in the open space on the right side of the paper. From one of your outer web lines, draw a single vertical (or slightly angled) line dropping down to where the spider will hang. -
Sketch the spider body:
At the end of your drop line, draw a small oval for the abdomen and a smaller circle for the head section using your fine pen. -
Add the legs:
Using the 0.1mm ultra-fine pen, sketch eight legs. Since it’s hanging, the legs should be curled upward slightly, looking bunched together rather than spread out flat. -
Thicken slightly:
Go back over the spider’s body to darken it, making it stand out as a solid silhouette against the pale paper.
Make it Ancient
Before drawing, tea-stain your paper by brushing it with brewed black tea and letting it dry. This gives the background an aged, parchment-like appearance.
Step 4: Final Touches
-
Erase guidelines:
Once the ink is completely dry—give it a full five minutes to be safe—gently erase all visible pencil marks with your kneaded eraser. -
Check line weight:
Look at your web. If the main radial spokes look too thin compared to the connecting threads, re-trace them carefully to add a tiny bit of weight. -
Optional texturing:
For a rustic look, you can very lightly stipple small dots near the intersections of the web lines to suggest captured dust or dew, though keeping it clean is also striking. -
Stage your art:
Place your finished drawing on a wooden surface. Arrange a faux spider and some rough twine nearby to mimic the reference photo’s spooky atmosphere.
Now you have a delightfully spooky drawing perfect for framing or pinning up for the season
BRUSH GUIDE
The Right Brush for Every Stroke
From clean lines to bold texture — master brush choice, stroke control, and essential techniques.
Explore the Full Guide
Bat Swarm Silhouetted Against a Full Moon


Capture the spooky serenity of Halloween with this monochromatic watercolor and ink illustration. Featuring a luminous full moon, drifting clouds, and a colony of bats taking flight over a quiet cemetery, this piece balances eerie vibes with elegant execution.
Step-by-Step
Materials
- Cold press watercolor paper (approx. 300gsm)
- Watercolor paints (Payne’s Grey, Lamp Black, Olive Green)
- Black waterproof fine liner pens (sizes 005, 01, and 05)
- White gel pen or white gouache
- Round watercolor brushes (size 2, 4, and 8)
- Circle template or compass
- Pencil and kneadable eraser
- Paper towel
- Clean water
Step 1: Setting the Scene
-
Pencil Sketching:
Begin by lightly sketching your composition. Use a compass or trace a circular object in the center to define the moon. Sketch a rolling hill at the bottom for your horizon line and lightly mark the positions of the larger bats to ensure a balanced composition. -
Masking the Moon:
Before painting, visualize where your moon craters will be. The moon in this piece relies on negative space, so keep the paper white in the brightest areas. You can sketch faint outlines of the ‘seas’ (maria) on the moon now to guide your brush later.
Bleeding Lines?
If your fine liner ink bleeds into the paper, the watercolor wasn’t fully dry. Use a hair dryer on a low setting to ensure the paper is bone-dry before uncapping your pens.
Step 2: Painting the Atmosphere
-
Moon Texture Base:
Dilute a very small amount of Payne’s Grey with plenty of water. Using your size 4 brush, paint the darker patches of the moon’s surface, keeping the edges soft and irregular. Leave plenty of crisp white paper showing for high contrast. -
Deepening the Craters:
While the first layer is still slightly damp, drop a slightly more concentrated grey into the center of the dark patches. This wet-in-wet technique creates that bloom effect characteristic of watercolor. Let the moon dry completely. -
Cloud Foundation:
Mix a watery wash of Payne’s Grey. Start painting the cloud shapes around the bottom and right side of the moon. Use a scumbling motion (circular scrubbing) with your brush to create fluffy, billowy edges rather than straight lines. -
Building Cloud Volume:
While the cloud base is wet, drop darker grey paint into the bottom edges of the clouds. Gravity will pull the pigment down, naturally creating shadows and volume. The clouds should look heavier at the bottom and lighter near the top. -
Connecting the Sky:
Extend a few wisps of grey cloud towards the left side to balance the frame. Ensure some clouds slightly overlap the bottom edge of the moon to push it into the distance.
Step 3: Grounding the Composition
-
Grass Base Layer:
Mix Olive Green with a touch of Payne’s Grey to desaturate it—we want a moody, dead grass look, not vibrant spring green. Paint an uneven wash along the bottom hill area. -
Adding Vegetation Texture:
While the green wash is damp, flick your brush upward from the bottom edge to suggest tall grasses. Drop in concentrated black-green mix at the very bottom edge to weight the painting. -
Defining the Silhouette:
Once the grass is dry, use a smaller brush (size 2) and a dark grey-green mix to paint distinct clumps of jagged grass blades in the foreground. Vary the height and direction to keep it looking organic.
Glow Up
Make the moon pop by outlining the bottom half with a very faint wash of diluted white gouache. This creates a subtle ‘halo’ effect against the grey clouds.
Step 4: Inking the Details
-
The Main Bat:
Use a 05 black liner or very opaque black paint for the large bat on the left. Outline the wings carefully, emphasizing the sharp points and skeletal structure. Fill it in solid black, but leave tiny hairline gaps if you want to suggest texture. -
Distant Bats:
Switch to a 01 liner for the medium bats. Draw simple ‘M’ or ‘V’ shapes that are thickened in the center body. I find that varying the wing angles makes the swarm look more dynamic and less like a stamp. -
Tiny Fliers:
Use the 005 pen to add the smallest bats in the background as simple specks or tic-marks. Scatter small stars (dots and tiny crosses) around the upper sky area. -
Graveyard Elements:
Draw the silhouettes of two small crosses leaning slightly askew in the grass on the right. Thicken the lines to make them look like old wooden markers. -
Dead Flora:
With your finest pen, draw skeletal, leafless plants rising from the grass. Use shaky, jerky lines for the stems to make them look brittle and dried out. Add small seed pods at the tips. -
Final Highlights:
If you lost any brightness on the moon, use a white gel pen to stipple tiny craters back in. You can also add a tiny white rim light to the top edge of the black bats to separate them from the background.
Let your spooky masterpiece dry and frame it for a perfect seasonal decoration
Witch Silhouette With Streaming Hair and a Smoking Cauldron
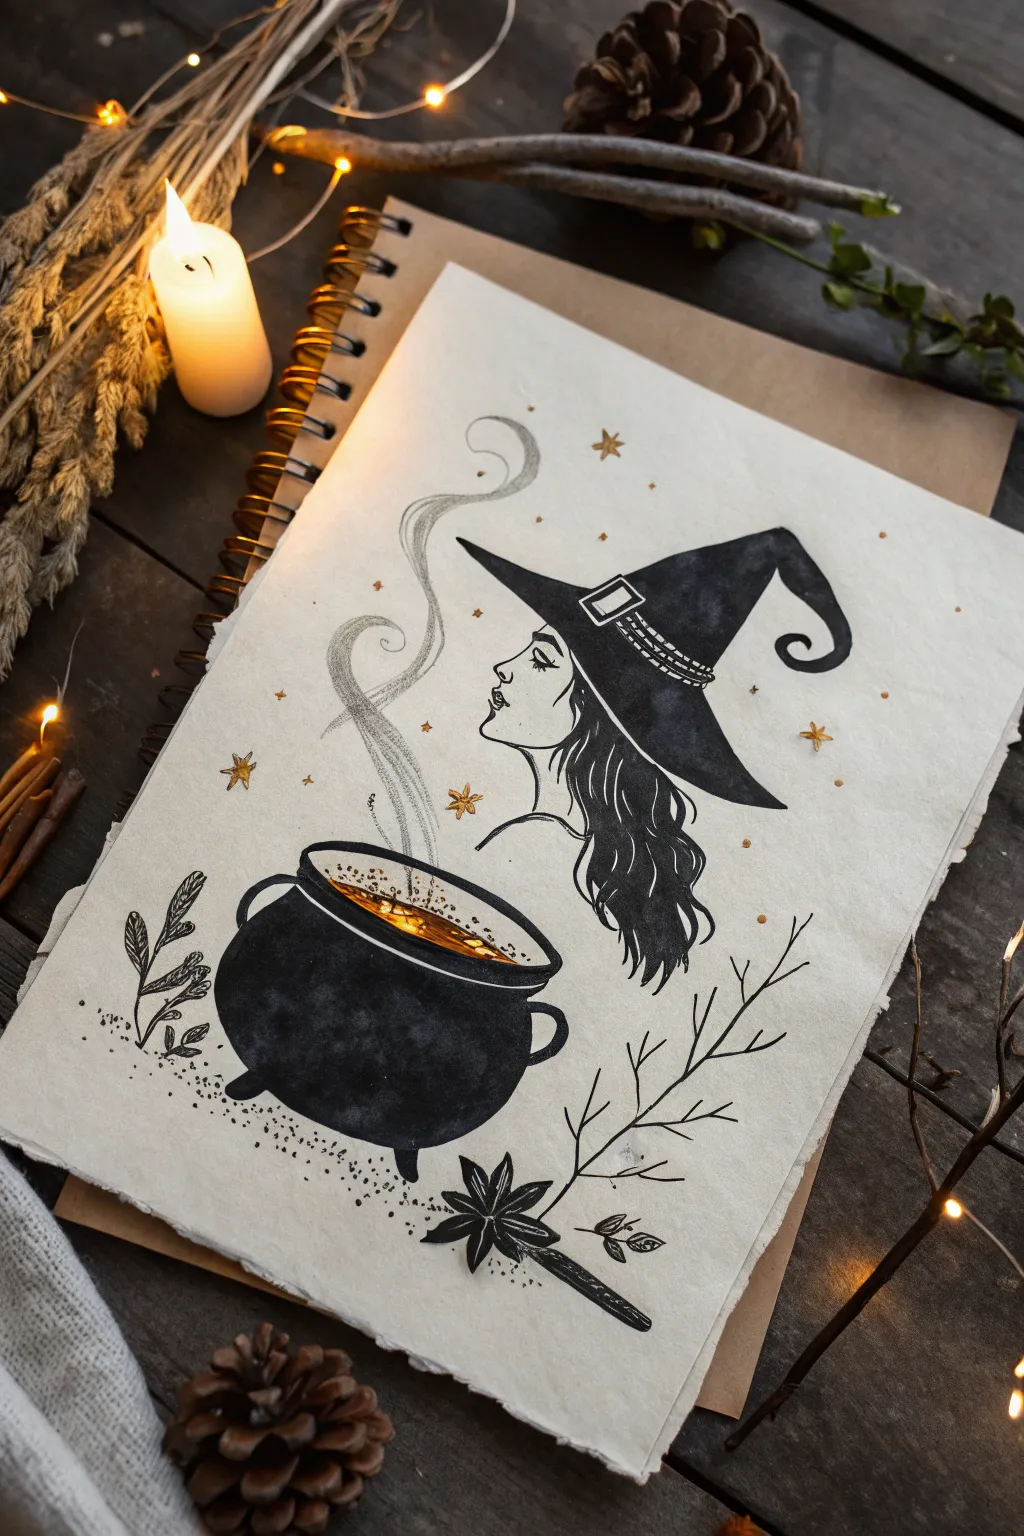
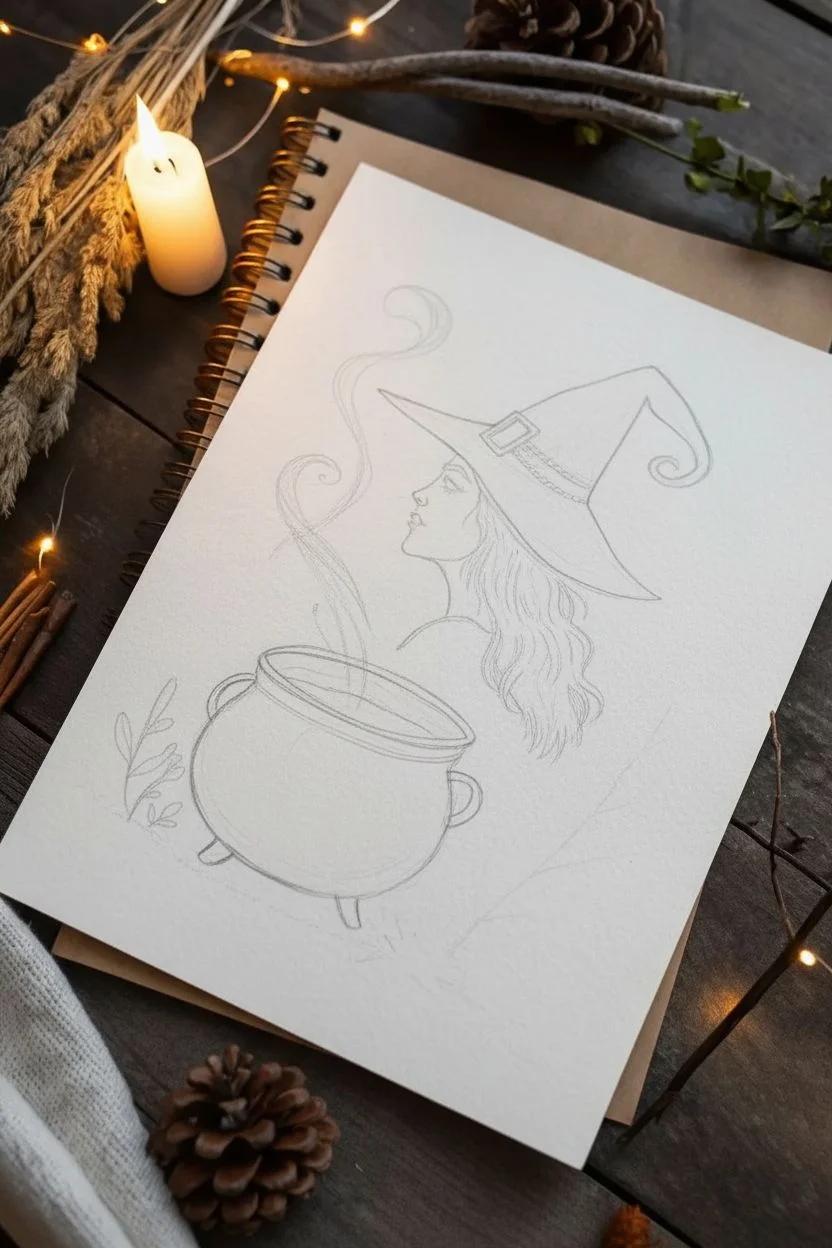
This evocative illustration captures the essence of a spooky spell in progress, featuring a classic witch profile and a bubbling cauldron rendered in stark black ink against textured paper. The smoke tendrils and golden accents add a magical, ethereal quality perfect for Halloween journaling.
Step-by-Step Guide
Materials
- Textured watercolor paper or handmade paper with deckled edges
- Pencil (HB or 2H)
- Kneaded eraser
- Fine liner pens (0.1, 0.3, and 0.5 sizes, waterproof)
- Black ink or watercolor paint
- Small round brushes (size 2 and 4)
- Metallic gold paint or gold gel pen
- White gel pen (optional for highlights)
Step 1: Sketching the Composition
-
Establish the layout:
Begin by lightly marking the position of the two main elements on your textured paper. Place the cauldron in the lower left quadrant and the witch’s head in the upper right quadrant to create a balanced diagonal flow. -
Draft the witch’s profile:
Sketch the witch’s face in profile, focusing on a slightly upturned nose and delicate chin. Don’t worry about perfect realism; a stylized look works beautifully here. -
Add the hat:
Draw the wide brim of the hat cutting across her forehead. Extend the cone of the hat upwards, giving it a slouchy, curved tip that points back downwards. -
Outline the flowing hair:
Sketch long, wavy locks of hair cascading down from beneath the hat. Let the hair flow loose and organic, ending roughly level with her shoulders. -
Sketch the cauldron:
Draw the cauldron as a sturdy, rounded pot with a wide rim and small feet. Add two curved handles on the sides. -
Add decorative elements:
Lightly pencil in the rising smoke trails twisting up from the cauldron. Sketch a few simple botanical shapes, like leaves or branches, near the base of the cauldron to frame the scene.
Uneven Coverage?
If your large black areas look patchy, apply a second layer of ink once the first is totally dry. Quality paper helps absorb ink evenly.
Step 2: Inking the Outlines
-
Define the main lines:
Using a 0.3 fine liner, carefully go over your pencil lines for the profile, the hat’s shape, and the cauldron’s outer rim. Keep your hand steady but allow for slight variations in line weight. -
Detail the hair:
Switch to a 0.1 pen for the hair strands. Draw long, sweeping lines that follow the waves you sketched earlier. Don’t fill it in black yet; just define the flow. -
Refine the cauldron:
Ink the cauldron’s body. You can make the bottom edge slightly thicker to give it a sense of weight. -
Erase pencil marks:
Wait until the ink is completely dry—I usually give it a full five minutes to be safe—then gently erase all visible pencil lines with a kneaded eraser.
Step 3: Adding Depth and Texture
-
Fill the cauldron:
Using black ink or watercolor and a size 4 brush, fill in the body of the cauldron. You can leave the very center slightly lighter or textured to suggest the roundness of the cast iron. -
Darken the hat & hair:
Fill in the witch’s hat with solid black. Then, fill in sections of the hair, leaving thin white gaps between some strands to show texture and volume. -
Paint the smoke:
Dilute your black ink significantly with water to create a very light grey wash. Paint the swirling smoke rising from the cauldron, keeping the edges soft and distinct from the solid black elements. -
Add foliage details:
Ink the botanical elements at the bottom in solid black. Use sharp, jagged strokes for leaves to create a crisp silhouette.
Add Cosmic Flair
Paint a faint watercolor wash of purple or midnight blue inside the smoke wisps to give the spell a galaxy-like effect.
Step 4: Magical Final Touches
-
Apply gold accents:
Using metallic gold paint or a gold gel pen, add bubbling liquid inside the rim of the cauldron. Add tiny gold stars or dots scattered around the smoke and the witch’s hat for a magical sparkle. -
Highlight the hat:
Add details to the hat’s band using a white gel pen or by carefully painting with white ink over the dry black area. A simple buckle or stitched line adds great character. -
Create ground texture:
Stipple tiny dots of black ink around the base of the cauldron and the plants to ground the drawing and add a bit of gritty texture.
Now you have a bewitching piece of art that perfectly captures the moody atmosphere of the season

PENCIL GUIDE
Understanding Pencil Grades from H to B
From first sketch to finished drawing — learn pencil grades, line control, and shading techniques.
Explore the Full Guide
Vampire Portrait With Sharp Fangs and High-Contrast Lighting

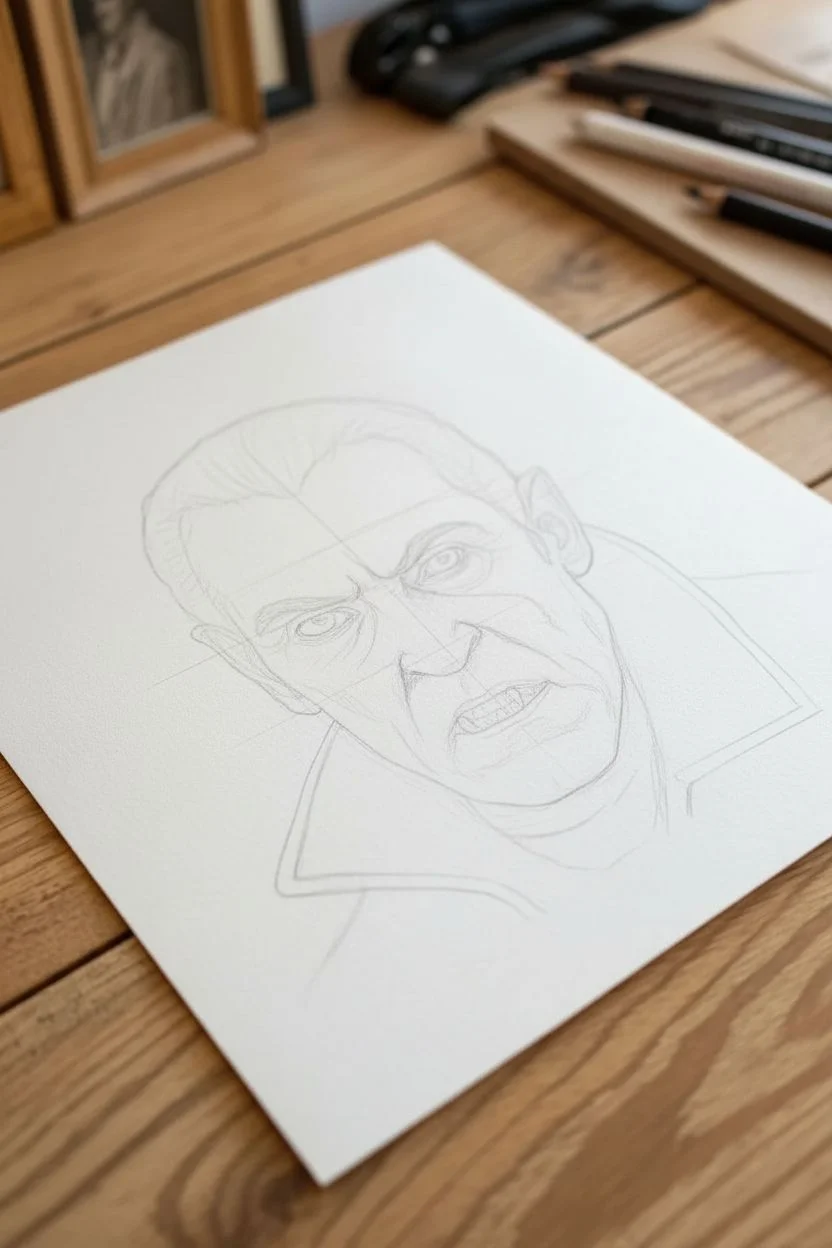
Summon the spirit of classic horror cinema with this striking graphite portrait of the ultimate vampire. By combining deep, velvety shadows with careful textural details, you’ll create a drawing that feels both timeless and terrifying.
Detailed Instructions
Materials
- High-quality drawing paper (smooth bristol or hot press watercolor paper)
- Graphite pencils (ranges: 2H, HB, 2B, 4B, 6B)
- Black charcoal pencil (for deepest blacks)
- Red colored pencil (Prismacolor or similar)
- Blending stumps (tortillons)
- Kneaded eraser
- Tombow Mono Zero eraser (for fine highlights)
- Ruler
Step 1: Constructing the Count
-
Establish the framework:
Begin with a 2H pencil to lay down a very faint outline of the head. Since this is a portrait, aim for an elongated oval shape, slightly tilted to the left. Mark a vertical center line and horizontal guidelines for the eyes, nose, and mouth to ensure proportion. -
Map the features:
Lightly sketch the distinct features: deep-set almond eyes, a sharp, prominent nose, and a mouth properly positioned to reveal teeth. Don’t worry about shading yet; just focus on getting the shapes accurate, particularly the iconic widow’s peak hairline. -
Define the collar:
Draw the sweeping lines of the high collar. This traps the face and adds that classic vampire silhouette. Keep these lines crisp and confident, as they will frame your detailed shading later. -
Refine the sketch:
Switch to an HB pencil to firm up your crucial lines. Pay special attention to the brow ridge and the tension in the mouth area. Erase your initial construction guidelines once you are happy with the placement.
Keep It Clean
Place a scrap piece of paper under your drawing hand. This prevents the oils from your skin from smudging the graphite you’ve already laid down and keeps the vampire’s pale skin pristine.
Step 2: Shading and Texture
-
Determine the light source:
Observe that the light is coming from the front-left, casting the right side of his face (viewer’s right) into shadow. Lightly map out where your deepest shadows will fall—under the brow, one side of the nose, and beneath the chin. -
Develop the skin tone:
Using a 2B pencil, begin shading the skin. Use small, circular motions to create a smooth, pale texture. Leave the forehead, bridge of the nose, and cheekbones almost white to represent the pallid vampire skin catching the harsh light. -
Carve the wrinkles:
This vampire has character lines. Use a sharp 4B pencil to deepen the wrinkles on the forehead and the nasolabial folds (lines from nose to mouth). Don’t just draw lines; shade the lower edge of each wrinkle to make it look like a fold in the skin. -
Detail the eyes:
This is a critical step. Use your 4B or 6B pencil to darken the pupils and the shadow under the heavy brow. Leave tiny specks of white paper in the eyes for that piercing reflection. -
Add the sanguine touch:
Take your red colored pencil and very gently glaze the irises of the eyes. We want a subtle bloodshot look, not glowing neon. You can also add a microscopic touch of red to the inner rim of the lower eyelid. -
Sculpt the mouth:
Use a 2B pencil for the teeth, keeping them mostly light but defining the gaps. The fangs should be prominent but integrated into the gum line. Shade the lips dark, particularly the upper lip.
Step 3: Clothing and Hair
-
Slick back the hair:
Start the hair at the widow’s peak. Use long, flowing strokes with a 4B pencil that follow the curve of the skull backward. Leave a band of lighter value near the crown to simulate the sheen of slicked-back styling. -
Darken the hair:
Layer over your initial hair strokes with a 6B pencil or black charcoal. I prefer to press harder here to get a true black, which contrasts beautifully with the pale forehead. -
Fill the collar:
The coat collar needs to look heavy and textured. Use a cross-hatching technique with a 4B pencil to build up a fabric-like texture. It should be dark, but slightly lighter than the pure black of the hair. -
Deepen the deepest blacks:
Use your charcoal pencil or the softest graphite (6B+) to fill in the shirt area beneath the chin and the darkest folds of the coat. This high contrast is what makes the drawing pop.
Gothic Frame-Up
Mount your drawing on dark grey cardstock before framing. Or, for a truly antique look, lightly stain the paper edges with a damp tea bag before you start drawing to age the ‘photo’.
Step 4: Final Atmosphere
-
Create background texture:
Instead of a plain white background, use the side of an HB pencil to create faint, diagonal hatching behind the head. This suggests an old photograph or atmospheric fog. -
Contrast check:
Step back and look at your drawing. Are the darks dark enough? If the graphite looks shiny or grey, go back over the deepest shadows (nostrils, pupils, shirt) with the charcoal pencil to kill the shine and deepen the value. -
Refine highlights:
Take your Tombow Mono Zero eraser (or a sharp edge of a generic eraser) and lift out thin highlights on the hair strands, the wetness of the lower lip, and the texture of the skin pores on the nose. -
Blend selectively:
Use a clean blending stump to soften the transition between the dark shadows and the pale skin on the cheeks. Be careful not to smudge your crisp lines around the eyes and mouth.
Once you’ve signed your name, you have a haunting masterpiece ready to watch over your Halloween festivities
Mummy With Unraveling Bandages and Hollow Stare
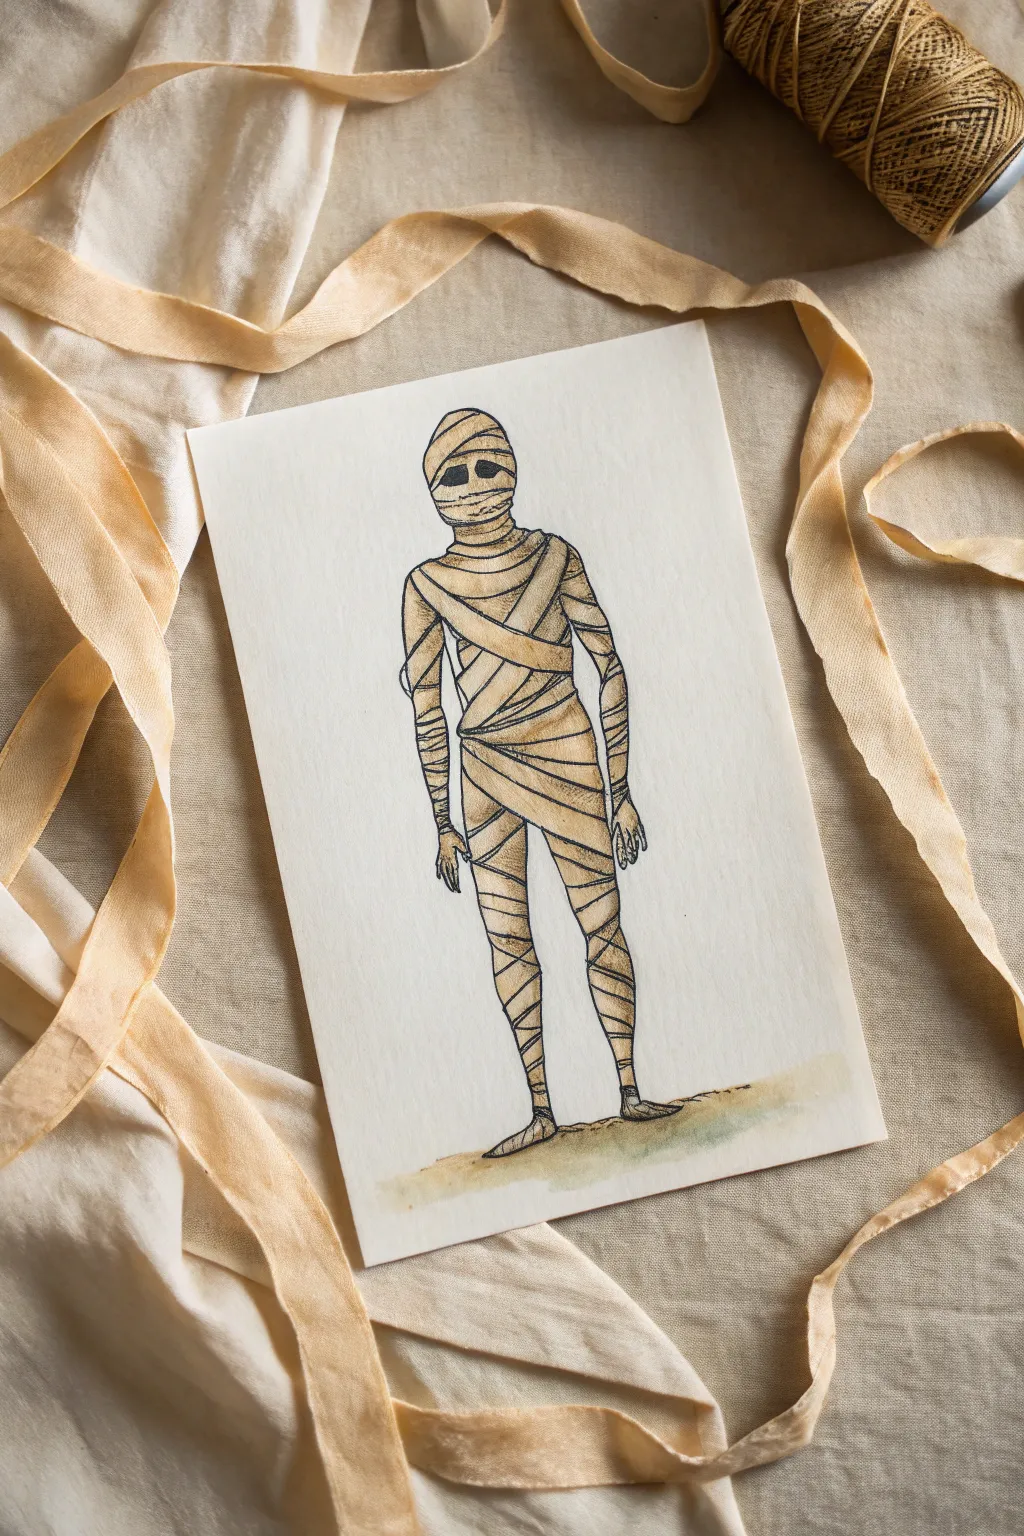
Capture the classic creepiness of a mummy with this detailed illustration, focusing on the texture of ancient linen and a hauntingly hollow expression. The warm, tea-stained palette gives the drawing an aged parchment feel that is perfect for spooky season décor.
Step-by-Step Tutorial
Materials
- Heavyweight watercolor paper or mixed media paper (off-white or cream preferred)
- Fine liner pens (black, sizes 01 and 03)
- Watercolor paints (Yellow Ochre, Burnt Umber, Raw Sienna)
- Round watercolor brush (size 4 or 6)
- Pencil (HB) and eraser
- Small cup of water and paper towel
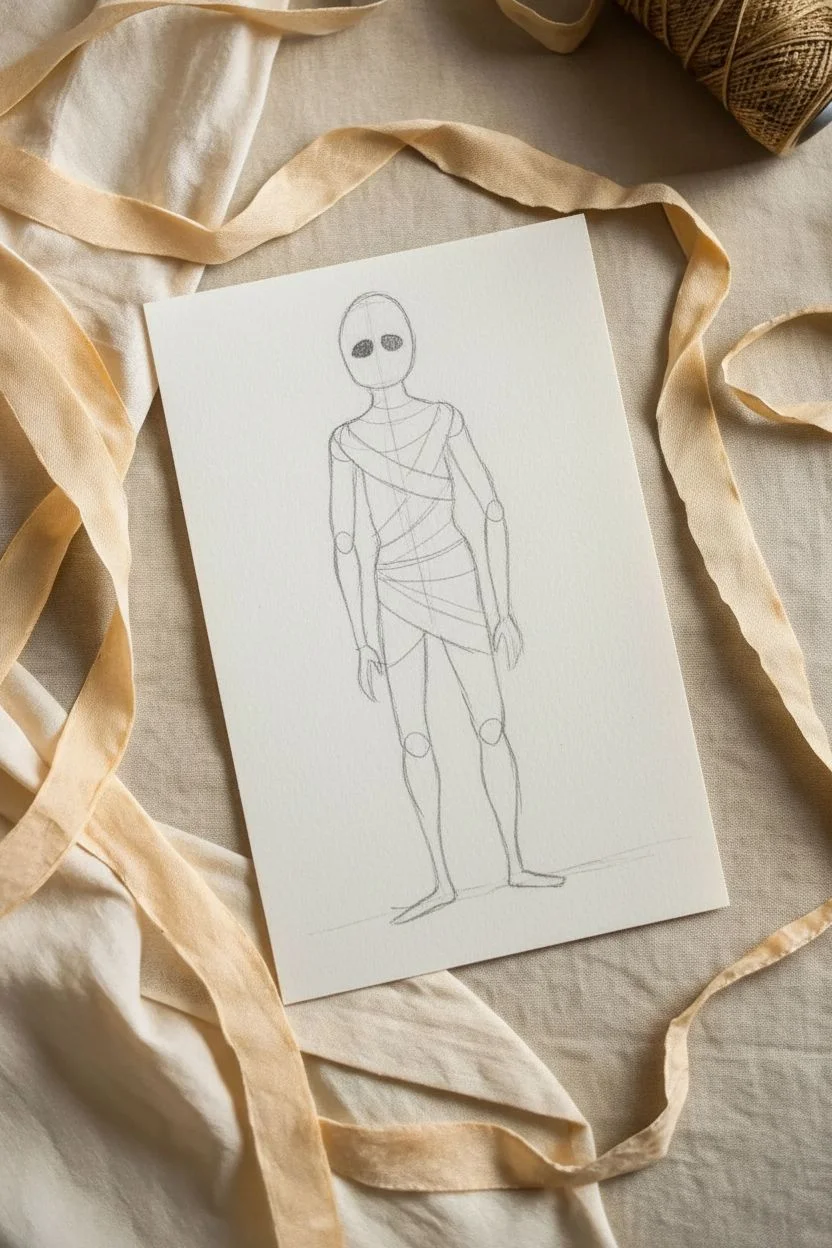
Step 1: Sketching the Skeleton
-
Establishing the Pose:
Begin by lightly sketching a simple stick figure to establish the mummy’s posture. Draw a vertical line for the spine, an oval for the head, and simple lines for the shoulders, arms, and legs. Keep the arms hanging loosely at the sides to create a stiff, undead stance. -
Fleshing Out the Form:
Around your stick figure guide, draw loose oval shapes to build the mass of the torso, arms, and legs. Don’t worry about anatomy being perfect; remember, the bandages will obscure most of the muscle definition. -
Defining the Head:
Refine the head shape. Sketch two darkened, uneven ovals for the eye sockets—place them slightly lower than center to give the forehead a looming feel. Leave the mouth area vague, as it will be covered.
Ink Smearing?
If your black ink bleeds when you add watercolor, your pen might not be waterproof. Switch to permanent pigment liners or apply the watercolor wash first, let it dry fully, then ink on top.
Step 2: Wrapping the Mummy
-
Head Bandages:
Starting at the top of the head, draw horizontal, slightly curved lines to represent the wrappings. Make these lines uneven and let them overlap. Leave a gap for the eye sockets we sketched earlier. -
Neck and Shoulders:
Wrap the neck with tighter, smaller bands. As you move to the shoulders, change the angle of your lines to drape diagonally across the chest, mimicking how fabric would actually be wound around a body. -
Torso Texture:
Draw the main body bandages. Vary the width of the strips. Some should be wide and flat, while others can be narrow and twisted. Draw a few diagonal strips crossing over the horizontal ones to create depth and complexity. -
Arms and Hands:
Wrap the arms in segments. At the elbows, bunch the lines closer together to suggest movement. Sketch the hands hanging down with slightly elongated fingers, leaving just enough detail to show they are wrapped individually. -
Legs and Feet:
Continue the wrapping pattern down the legs. Cross the bandages in an ‘X’ pattern occasionally. Finish with the feet, planting them firmly on the ground with simple outline shapes. -
Loose Ends:
To add age and decay, sketch a few small stray bits of fabric hanging loose from the arms or waist. These ‘unraveling’ details are crucial for the character of the piece.
Step 3: Inking the Details
-
Outlining the Form:
Switch to your 03 fine liner. Carefully go over the main outline of the mummy. I prefer to use a shaky or broken line here rather than a smooth one, as it enhances the tattered look of the cloth. -
Defining the Bandages:
Use the finer 01 pen to trace the internal bandage lines. Add small, quick hatch marks near the edges of the wrappings where they overlap to suggest shadows and thickness. -
The Hollow Stare:
Fill in the eye sockets completely with the black 03 pen. Make the edges of the black area slightly jagged, as if the bandages encroach on the holes. -
Erase Basics:
Once the ink is completely dry (give it a few minutes to avoid smearing), gently erase all your underlying pencil sketches.
Pro Tip: Tea Staining
For an authentic dusty beige color, use actual strong brewed black tea instead of paint. Paint it on loosely and let it pool in certain spots for organic, uneven staining.
Step 4: Adding the Ages
-
Mixing the Wash:
Prepare a very watery mix of Yellow Ochre with a tiny touch of Burnt Umber. You want a color that looks like tea or old parchment. -
Base Color Application:
Apply this pale wash over the entire mummy. Don’t worry about staying perfectly inside the lines; a little bleed adds to the messy, ancient aesthetic. -
Deepening Shadows:
While the paper is still slightly damp, drop a more concentrated mix of Burnt Umber into the crevices between the bandages, under the arms, and between the legs. This soft shading creates dimension. -
Grounding the Figure:
Mix a little Raw Sienna with a hint of green or grey. Paint a loose, horizontal patch just under the feet to ground the figure so it isn’t floating in space. -
Final Texture:
Once dry, use your finest pen to add tiny dots or stippling on the darker painted areas for that gritty, sandy texture associated with tombs. -
Assessing the Contrast:
Step back and look at your drawing. If the bandages look too flat, go back in with the 01 pen and strengthen the lines where the fabric overlaps.
Now your ancient traveler is ready to haunt your hallway or sketchbook with quiet, dusty mystery.


Grim Reaper in a Cloak With a Scythe and Hourglass
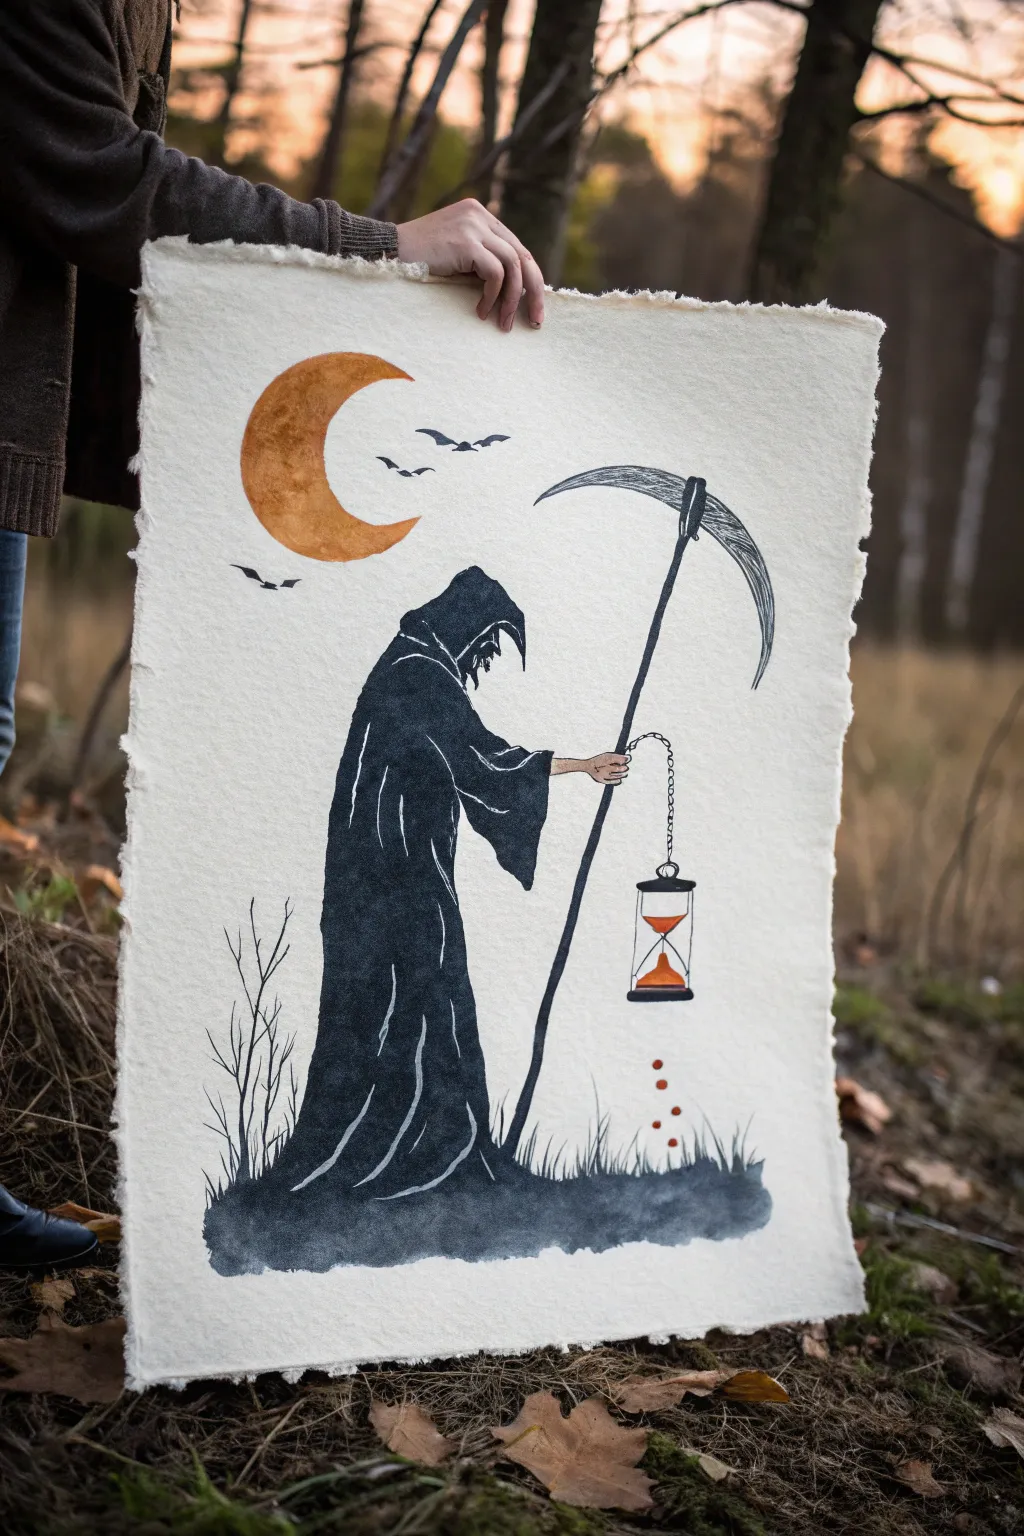
Capture the eerie essence of mortality with this striking Grim Reaper illustration, perfectly suited for handmade paper. The contrast between the deep black cloak, the rusty orange moon, and the delicate scythe creates a hauntingly beautiful piece that feels ancient and mysterious.
Detailed Instructions
Materials
- Large sheet of deckled-edge handmade paper (creamy or off-white)
- Black India ink or high-pigment black watercolor
- Rust orange/ochre watercolor paint
- Pencil (HB or 2B)
- Kneaded eraser
- Fine liner pens (0.1, 0.3, and 0.5 sizes, specifically black)
- Small round watercolor brush (size 2 or 4)
- Medium round watercolor brush (size 6 or 8)
- Ruler (optional)
- Compass or round object for tracing (optional)
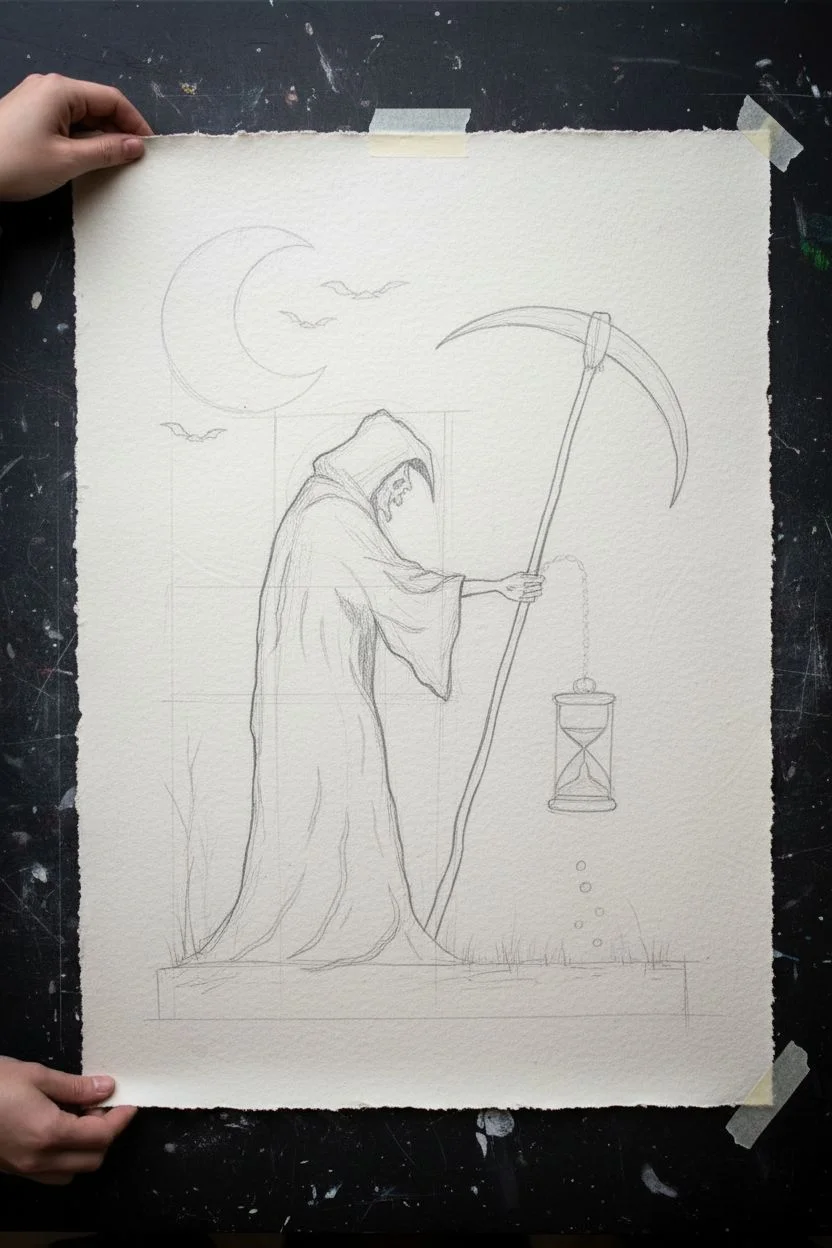
Step 1: Planning and Sketching
-
Prepare your paper:
Start by gently flattening your handmade paper if it has significant texture or warping. Tape the corners lightly to your work surface if needed, but be careful not to damage the delicate deckled edges. -
Sketch the Reaper’s posture:
Using a light hand and your pencil, sketch the curved spine of the Reaper first to establish the slumped, weary posture. Add a rough outline of the hood draping forward. -
Outline the cloak:
Draw the flowing lines of the robe, letting them pool at the bottom to form the ground. Pay attention to the jagged sleeve cuffs and the deep folds in the fabric. -
Position the tools:
Sketch a long diagonal line for the scythe handle, ensuring it crosses in front of the Reaper. Add the curved blade at the top and sketch the hand gripping the staff. -
Add the celestial elements:
In the upper left, lightly trace a crescent moon shape. Add three small, simple outlines for bats flying near the moon. -
Detail the hourglass:
Draw a chain hanging from the Reaper’s hand (or the scythe handle near the hand). At the end of the chain, sketch the hourglass frame and the sand mound inside.
Step 2: Inking the Grim Figure
-
Fill the silhouette:
Using your medium brush and black India ink (or concentrated watercolor), carefully fill in the Reaper’s cloak. Leave thin white lines where the folds occur to define the sleeve and the body’s shape—this negative space is crucial for dimension. -
Anchor the figure:
Extend the black ink at the hem of the cloak into a horizontal, uneven wash to create the ground. Use feathery upward strokes to simulate grass blades rising from the darkness. -
Define the face:
Switch to a finer brush or pen to detail the hood’s opening. Keep the face mostly in shadow, perhaps hinting at a skeletal jaw or nose with jagged lines. -
Draw the scythe handle:
With a steady hand, draw the long staff of the scythe. It doesn’t need to be perfectly straight; a slight wobble adds to the organic, wooden look. -
Texture the blade:
Outline the scythe blade with a fine liner pen. Use hatching or scratchy lines inside the blade to give it a worn, metallic texture. -
Detail the hand:
Carefully ink the hand gripping the staff. Since the figure is skeletal, focus on bony finger segments rather than fleshy curves.
Ink Bleeding?
Handmade paper is very absorbent. Use less water with your ink and test a small dot on the back corner first to see how much it spreads.
Step 3: A Splash of Color
-
Paint the moon:
Mix a rusty orange watercolor. Paint the crescent moon, allowing the pigment to be uneven—more saturated in some spots and watery in others—to create a cratered texture. -
Fill the hourglass:
Using the same orange mix, carefully paint the sand in the bottom and top bulbs of the hourglass. I like to drop a tiny bit of red into the wet orange here for extra depth. -
Add the falling sand:
Dip a fine brush tip into the orange paint and create small dots falling from the hourglass onto the dark ground below. Make them slightly irregular in size. -
Ink the chain:
Use your 0.1 fine liner to draw the delicate links of the chain holding the hourglass. Keep the lines crisp. -
Refine the background:
Ink the bats in solid black, giving them sharp, angular wings. Add a few spindly, leafless branches rising from the ground on the left side to balance the composition. -
Final touches:
Let the artwork dry completely. Once dry, gently erase any visible pencil lines, particularly around the moon and the white highlights of the cloak.
Level Up: Aged Effect
Lightly dab a wet tea bag around the edges of the paper before painting to create an antique, parchment-style border that complements the theme.
Hang this haunting masterpiece in a simple floating frame to show off the paper’s beautiful edges


Have a question or want to share your own experience? I'd love to hear from you in the comments below!