When I’m craving something cozy and low-pressure, easy Thanksgiving paintings are my go-to because the shapes are simple and the color palette does most of the work. Here are a bunch of warm, beginner-friendly ideas you can knock out in an afternoon and actually feel proud to hang up.
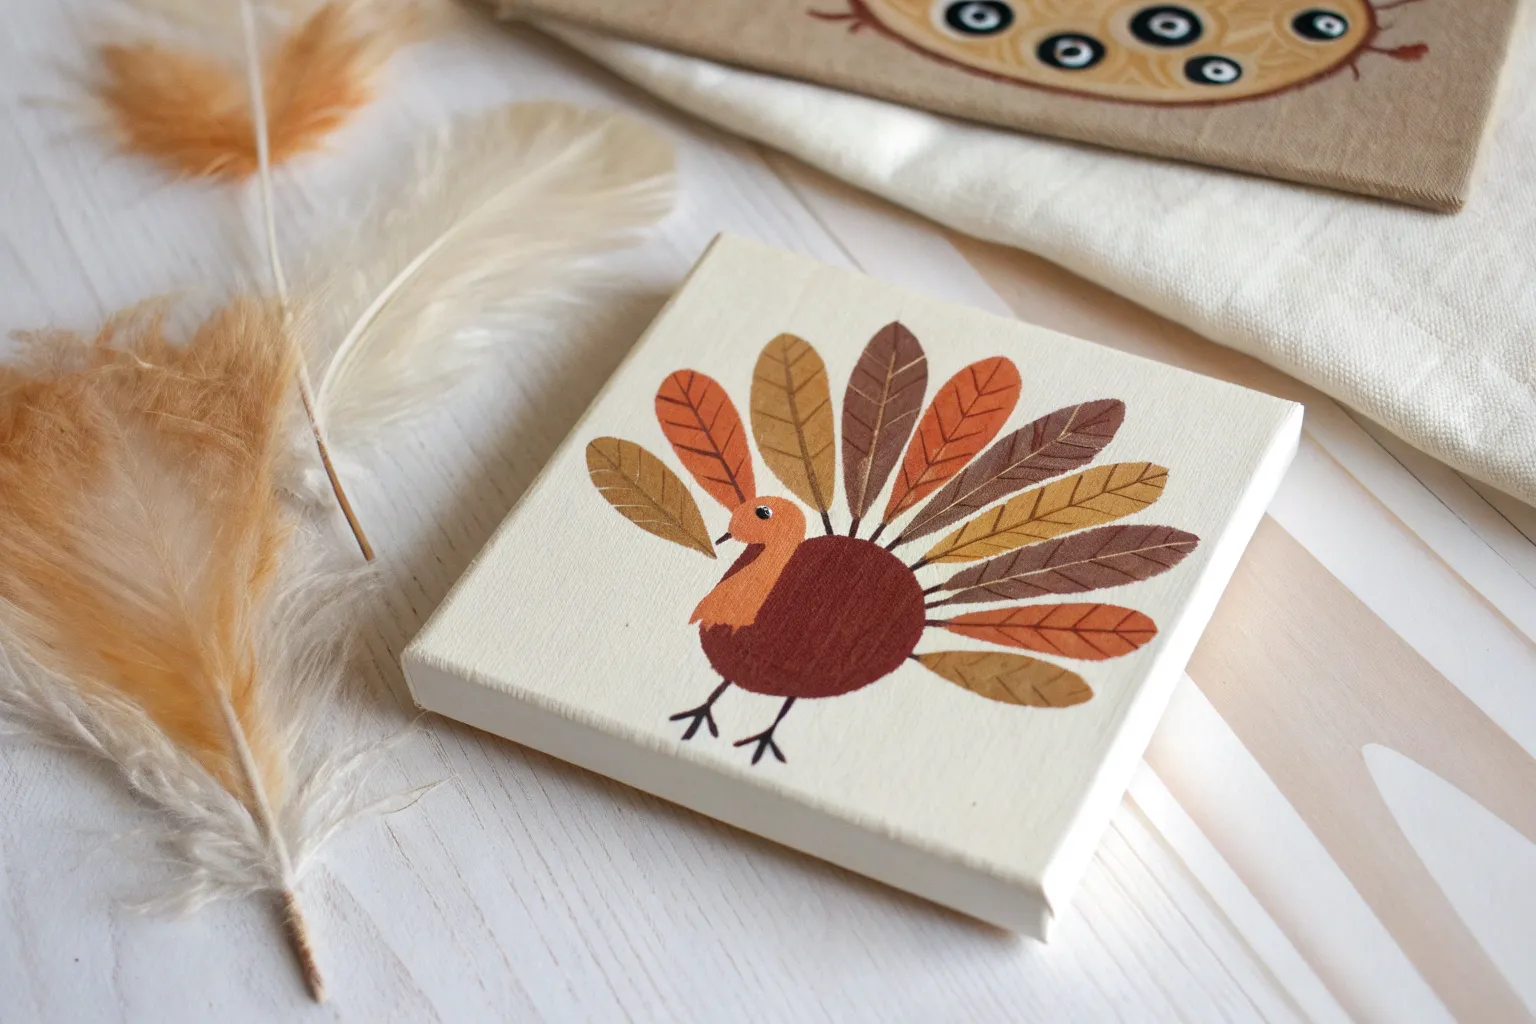
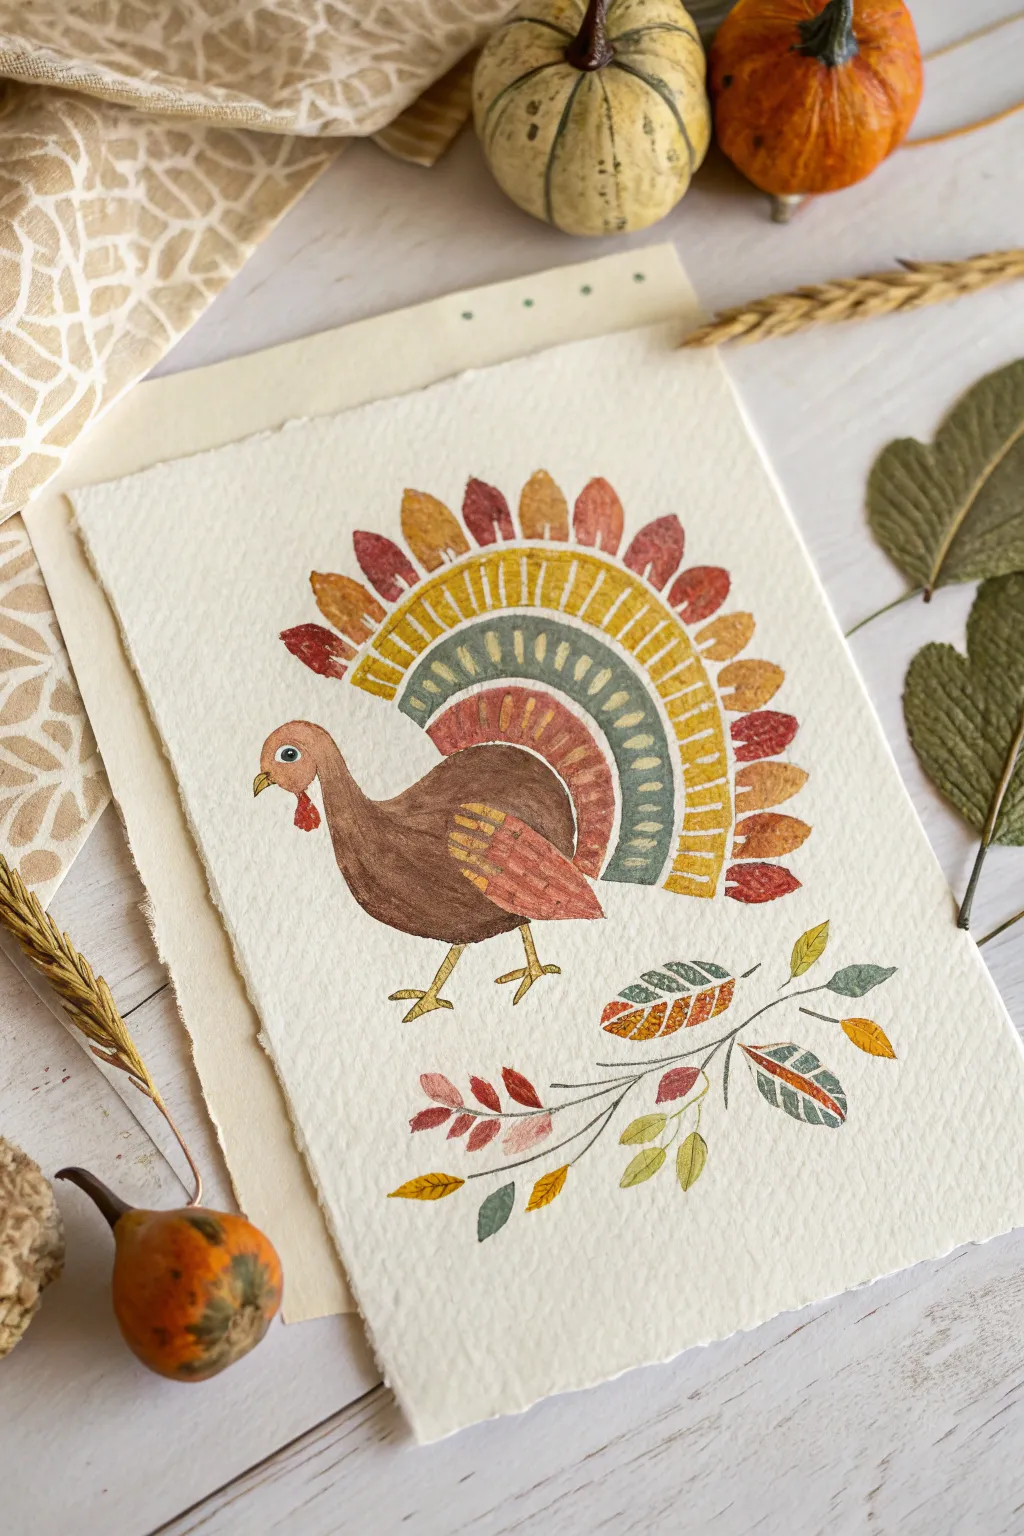
Front-Facing Thanksgiving Turkey With Simple Oval Shapes
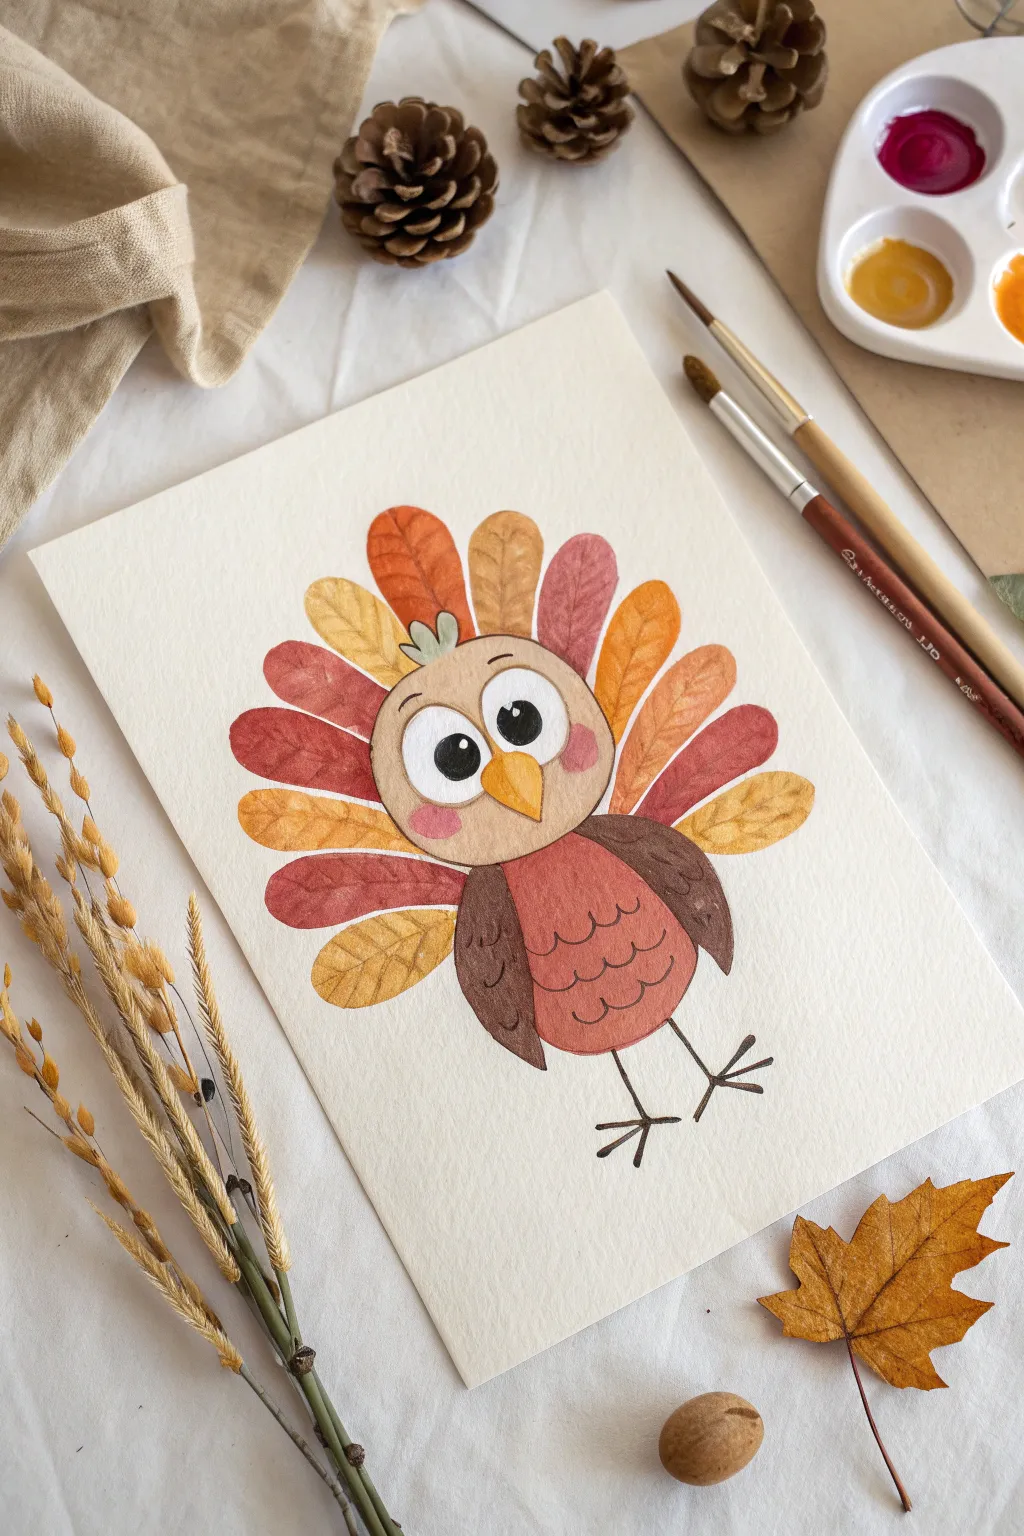
This charming project breaks a complex turkey down into friendly, manageable shapes that are perfect for beginners. Using warm autumn tones and simple watercolor techniques, you’ll create a delightful character full of festive personality.
Step-by-Step
Materials
- Cold-press watercolor paper (at least 140lb/300gsm)
- Watercolor paint set (Autumn palette: reds, oranges, yellows, browns)
- Round watercolor brushes (size 4 and 6)
- Fine liner brush or black waterproof ink pen
- Pencil (HB or H)
- Eraser
- Jar of clean water
- Paper towels for blotting
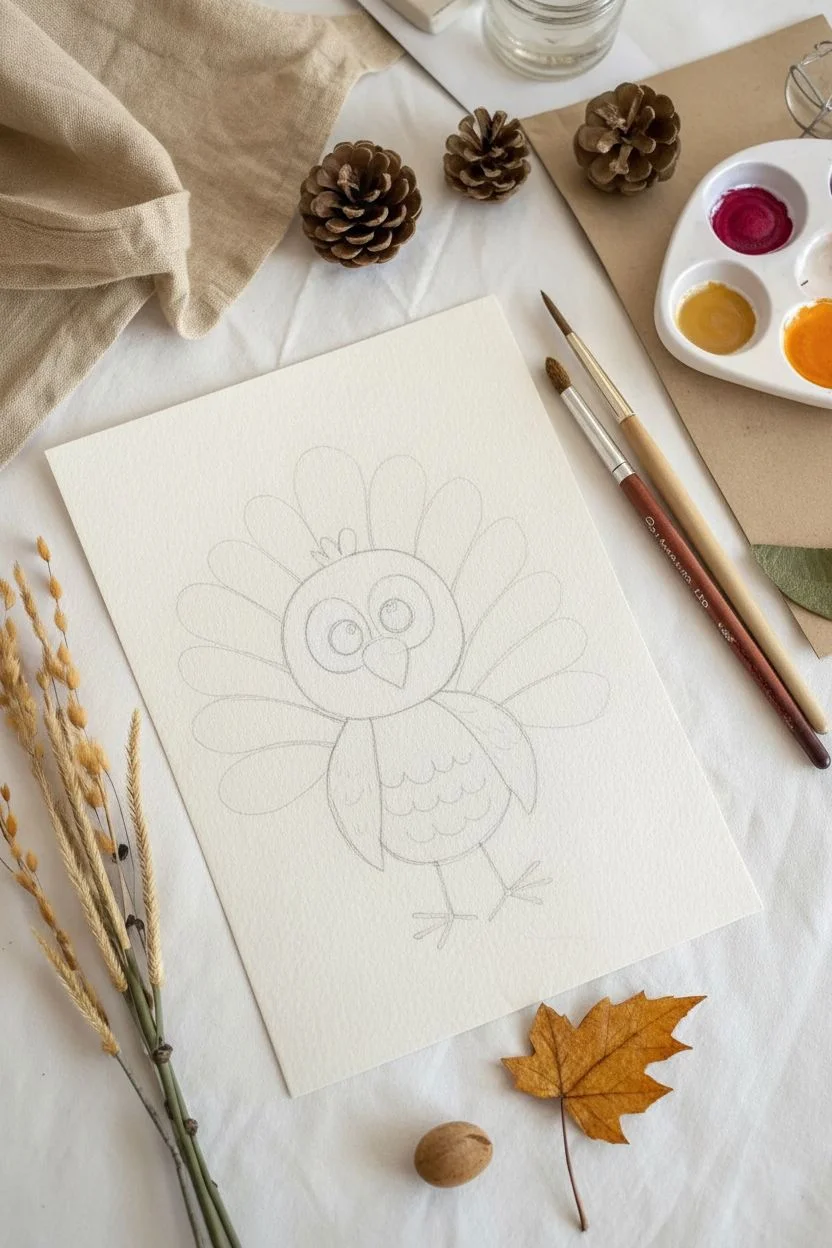
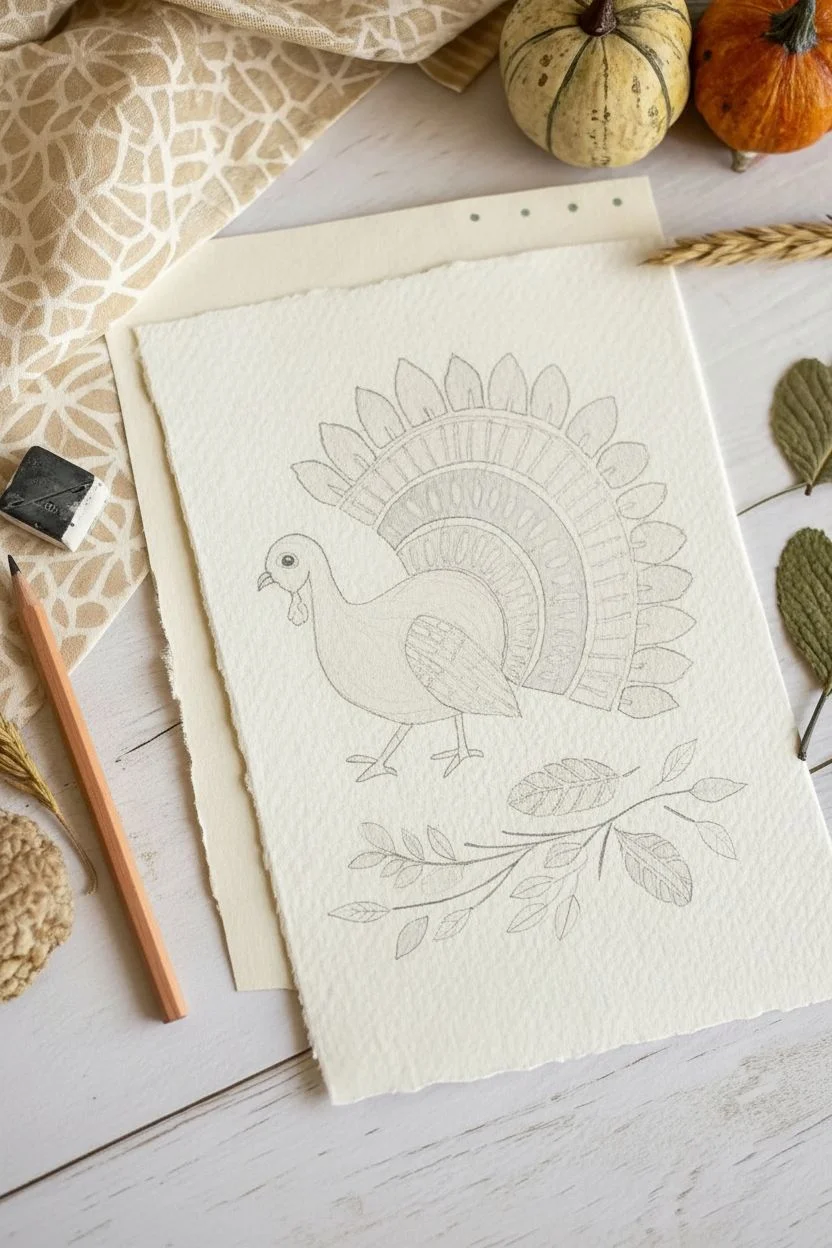
Step 1: Sketching the Base
-
Draw the head:
Start by lightly sketching a wide oval shape slightly above the center of your page. This will be the turkey’s head. -
Add the body:
Directly beneath the head oval, draw a slightly larger, rounded shape for the body. It should look a bit like a sturdy egg standing upright. -
Outline the wings:
On either side of the body, sketch two tear-drop shapes pointing downwards to form the wings. Tuck them slightly behind the body’s sides. -
Map out the tail feathers:
Lightly draw a large fan shape behind the body. Divide this fan into individual, petal-like oval sections radiating outward. Aim for about 10-12 feathers to keep it full but manageable. -
Detail the face:
Inside the head oval, draw two large circles for eyes that touch each other. Add a small triangular beak just below them, and sketch a tiny tuft of feathers on top of the head.
Bleeding Colors?
If your feather colors are running into each other, you’re painting too fast. Let every other feather dry completely before painting the ones in between.
Step 2: Painting the Features
-
Mix your skin tone:
Create a very diluted, pale beige or soft brown wash. Gently fill in the head shape, being careful to paint around the white eye circles and the beak. -
Paint the body:
Switch to a warm, reddish-brown or terracotta mix. Fill in the center body shape with an even wash of color. -
Fill the wings:
Using a darker shade of chocolate brown, carefully paint the two wing shapes. The contrast against the lighter body color adds lovely dimension. -
Color the beak and cheeks:
Use a bright yellow-ochre for the beak. Once the head is dry, dab two soft pink circles onto the cheeks for a rosy, cute effect. -
Alternate feather colors:
Mix three distinct autumn shades: burnt orange, mustard yellow, and a dusty red. Paint the tail feathers one by one, alternating these colors to create a vibrant pattern. -
Add texture while wet:
I like to drop a tiny bit of darker pigment into the bottom of each still-wet feather to create a soft, natural gradient.
Step 3: Adding Details & Definition
-
Define the eyes:
Using black paint or a waterproof pen, fill in the pupils, leaving a small white highlight sparkle in each to bring the character to life. -
Outline the main shapes:
With a fine liner brush and dark brown paint (or a fine-tip pen), carefully outline the head, body, and wings to separate the segments. -
Detail the feathers:
Draw a central vein line down the middle of each tail feather. Add tiny, diagonal V-shaped lines branching off the vein to mimic feather texture. -
Add chest feathers:
On the red body section, paint rows of small ‘U’ shapes or scallops to represent the layered chest plumage. -
Draw the legs:
Using your finest brush or pen, draw two straight lines coming down from the body, ending in three-pronged feet. -
Final touches:
Erase any visible pencil marks once the painting is completely bone-dry to keep your work looking crisp and clean.
Make It Sparkle
Once the paint is dry, use a metallic gold gel pen or gold watercolor paint to outline the tail feathers for a festive Thanksgiving shimmer.
Now you have a festive, colorful turkey illustration ready to display or turn into a holiday greeting card


Pilgrim Hat Turkey for Instant Thanksgiving Vibes
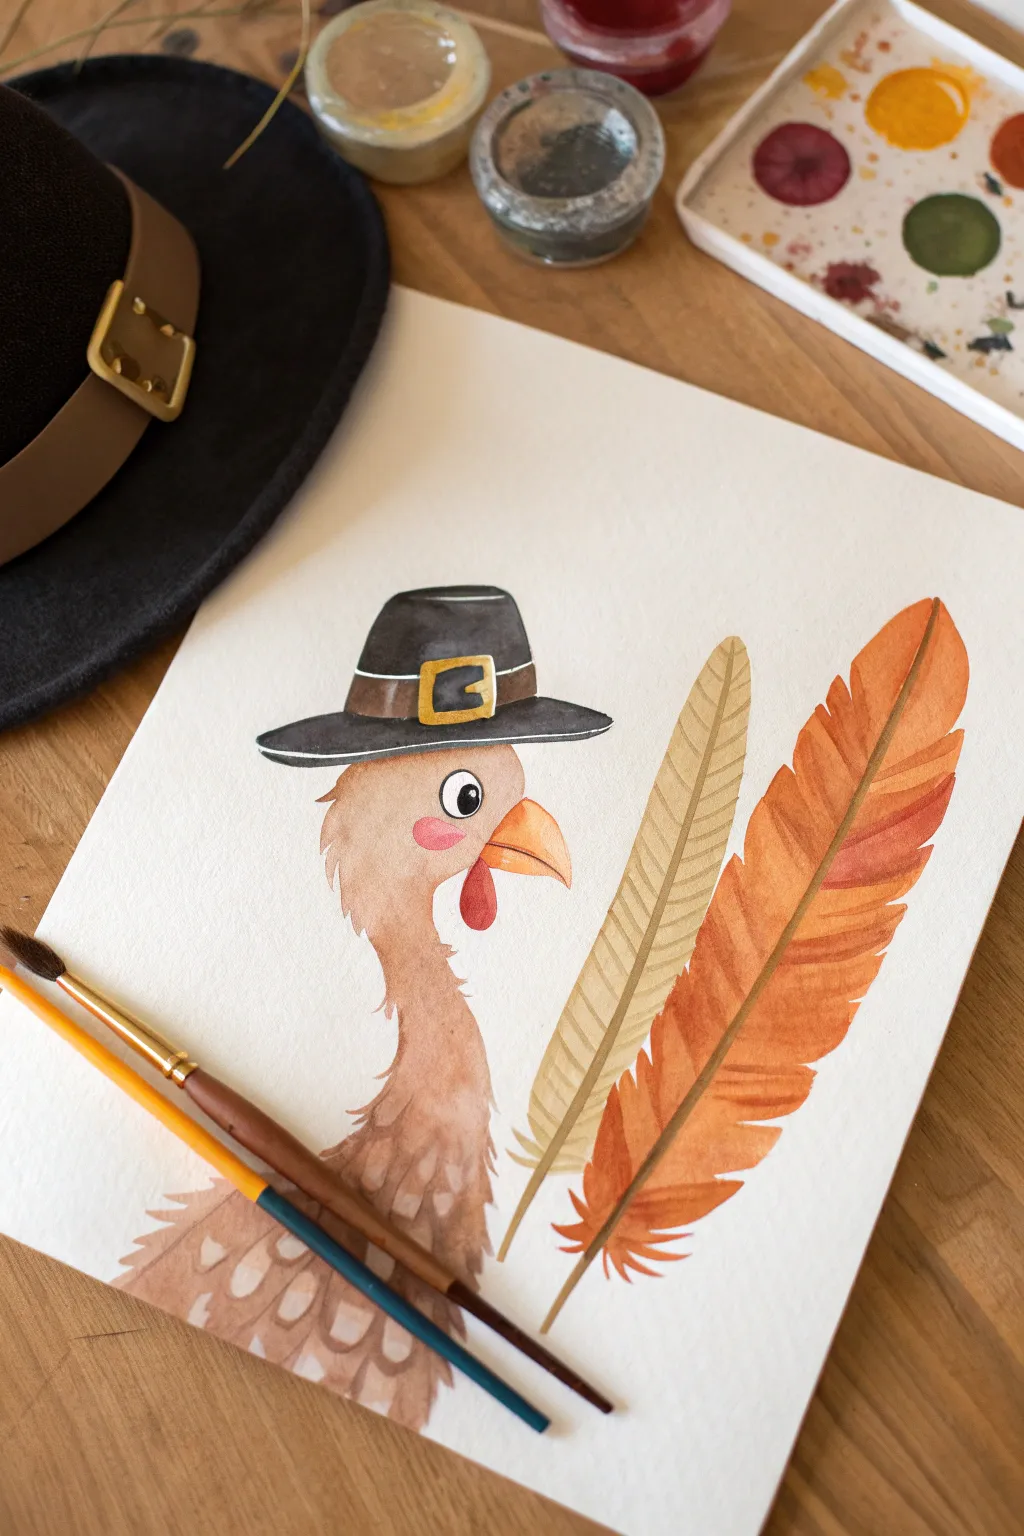
Capture the spirit of the holiday with this charming watercolor turkey sporting a traditional pilgrim hat. With its soft washes and crisp details, this painting strikes the perfect balance between festive and elegant for your Thanksgiving decor.
Step-by-Step Tutorial
Materials
- Cold press watercolor paper (minimum 140lb/300gsm)
- Watercolor paints (shades of brown, ochre, orange, black, red, and yellow)
- Round watercolor brushes (size 2 for details, size 6 or 8 for washes)
- Pencil (HB or H) and kneadable eraser
- Jar of clean water
- Paper towels
- Mixing palette
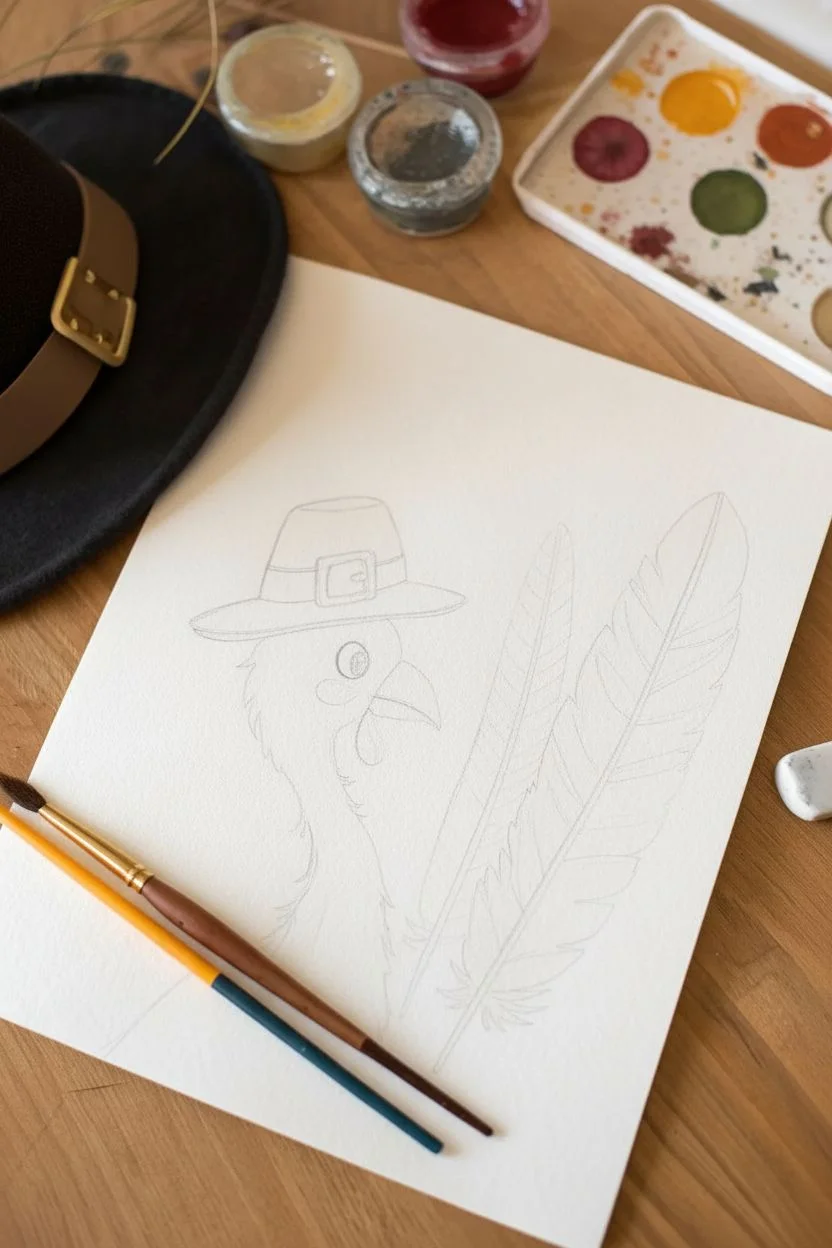
Step 1: Planning and Sketching
-
Lightly sketch the outline:
Start by drawing a gentle ‘S’ curve for the turkey’s neck and head. Keep your pencil pressure very light so the graphite won’t show through the transparent watercolor later. -
Add facial features:
Draw a small circle for the eye, a triangular beak pointing downward, and the signature wattle hanging underneath the beak. -
Draft the hat:
Position the pilgrim hat slightly tilted on the turkey’s head. Sketch a wide brim and a tapered crown, adding a small square buckle in the center of the hatband. -
Outline the feathers:
To the right of the turkey, sketch two large, elongated feathers. Make one slightly shorter and curved, and the other tall and straight, adding a center spine to each.
Clean Edges Trick
Wait for sections to dry! If the turkey’s head is wet when you paint the hat brim, the black will bleed into the brown. Patience is key for crisp lines.
Step 2: Painting the Turkey
-
Base wash for the head:
Mix a watery light brown or beige color. Apply this wash to the turkey’s head and neck area, avoiding the eye, beak, and wattle. Let this layer dry completely. -
Paint the eye:
Use a small brush and black paint to fill in the eye pupil, leaving a tiny circle of white paper unpainted for a highlight. -
Add the blush:
While the face is dry, dilute a tiny bit of red or pink paint. Gently dab a soft circle on the cheek area for a rosy effect. -
Detail the beak and wattle:
Paint the beak with a golden yellow. Once dry, create an orange gradient at the tip. Fill the wattle with a bright red, letting the color pool slightly for intensity. -
Texture the neck feathers:
Using a slightly darker brown than your base layer and a size 2 brush, add small, jagged brushstrokes at the base of the neck to suggest ruffled feathers.
Go Metallic
Swap the yellow ochre paint on the buckle for metallic gold watercolor or a gold paint pen to make the hat really shine.
Step 3: Painting the Hat
-
Fill the hat shape:
Mix a charcoal grey or black. Carefully paint the crown and brim of the hat, but stay clear of the hatband area. -
Paint the hatband:
Use a dark brown or lighter grey for the band itself to distinguish it from the black felt of the hat. -
Gild the buckle:
With a steady hand, paint the square buckle using a rich yellow ochre or gold paint. Ensure the black paint is fully dry first to avoid bleeding. -
Final hat outline:
I like to go back with a very fine brush and black paint to outline the brim and crown, giving it a crisp, illustrative finish.
Step 4: Feathers and Finishing Touches
-
First feather wash:
For the left feather, mix a pale yellow-ochre. Paint the entire shape, then immediately drop a slightly darker tan color along the edges while it’s still wet. -
Second feather gradient:
For the larger right feather, start with orange at the top mixed with rust. As you move down the feather, transition into a lighter orange. -
Add feather veins:
Once both feathers are bone dry, use a thin brush to paint the central spine (quill) and faint diagonal lines extending outward to mimic barbs. -
Body texture detail:
Return to the turkey’s lower body area. Paint overlapping ‘U’ shapes in varying shades of brown to create the look of dense body plumage. -
Clean up:
Once the entire painting is dry, gently erase any visible pencil lines that haven’t been covered by paint.
Frame this delightful piece in a simple wooden frame to add warmth to your Thanksgiving table setting


Easy Turkey Feathers as Colorful Fingerprint Loops
Embrace a warm, rustic aesthetic with this charming folk-art style turkey painting. Featuring segmented, colorful feathers and delicate botanical accents, this piece captures the cozy spirit of Thanksgiving on beautifully textured paper.
Step-by-Step
Materials
- Cold press watercolor paper (with deckle edge)
- Watercolor paints (Rust Orange, Mustard Yellow, Olive Green, Burnt Umber, Deep Red)
- Round watercolor brushes (Size 2 and Size 4)
- Fine liner brush (Size 0 or 00)
- White gel pen or white gouache
- Pencil and kneaded eraser
- Paper towel
- Cup of water
- Scrap paper for color testing
Step 1: Sketching the Outline
-
Position the turkey:
Begin by lightly sketching the body of the turkey in the lower center of your paper. Draw an oval shape for the main body and a smaller curved neck leading to a rounded head. -
Map out the tail feathers:
Sketch a large semi-circle arching over the turkey’s back. Divide this arch into three concentric bands: an inner arch, a middle arch, and an outer ring of individual feather shapes. -
Add details:
Draw the beak, the wattle (the red skin under the chin), and the legs. Sketch a simple wing shape on the body. Finally, lightly trace the curving branch and leaves at the bottom of the page.
Uneven Edges?
If your paint bleeds between feather bands, let the mistake dry completely. Then, use opaque white gouache to paint the crisp dividing lines over the bleed.
Step 2: Painting the Turkey Body
-
Base coat for the body:
Load your Size 4 brush with Burnt Umber. Paint the main body and neck, keeping the edges smooth. Leave the wing area unpainted for now or go slightly lighter with the wash there. -
Define the wing:
Once the body is semi-dry, mix a slightly reddish-brown tone. Paint the wing shape, adding small brushstrokes to suggest individual feathers. -
Face and legs:
Use a diluted tan or light brown for the head, getting darker near the neck. Paint the beak yellow and the wattle a vibrant red. Use a fine liner brush with yellow-ochre to carefully paint the thin legs and feet.
Step 3: Painting the Tail Feathers
-
Inner arch:
Paint the innermost arch (closest to the body) with a warm rust-red color. Let the watercolor pool slightly to create texture as it dries. -
Middle band:
Switch to Olive Green for the middle arch. Apply the paint evenly, following the curve of the fan. -
Outer band:
Paint the outermost band with Mustard Yellow. While that dries, paint the individual feather tips radiating from this yellow band, alternating between deep red, rust orange, and tan. -
Adding separation lines:
Once these base layers are completely dry, use white gouache or a gel pen to draw thin, vertical separation lines through the colored bands, defining the segments.
Rustic Texture Trick
To get that vintage, weathered look, gently dab a textured paper towel onto the paint while it’s still wet to lift pigment and create a mottled effect.
Step 4: Botanical Details
-
Skeletal stems:
Using your finest brush and diluted black or dark grey paint, draw thin, sweeping lines for the stems at the bottom right. -
Painting leaves:
Add leaves to the stems using your autumn palette. Create variety by painting some solid yellow, some green, and others with split colors (half rust, half green) for visual interest. -
Leaf details:
Once the leaves are dry, go back with your fine liner brush and add tiny veins or patterns in a contrasting color or white.
Step 5: Final Touches
-
The eye:
Paint a small white circle for the eye, and once dry, add a tiny black pupil. This brings the character to life. -
Decorative dots and dashes:
Look at the tail feathers again. Use the white gel pen or gouache to add small decorative dots along the green band and dash marks on the wing. -
Cleanup:
Gently erase any visible pencil sketch marks that haven’t been covered by paint, ensuring the paper is 100% dry before rubbing.
Now you have a charming piece of seasonal art ready to be framed or gifted


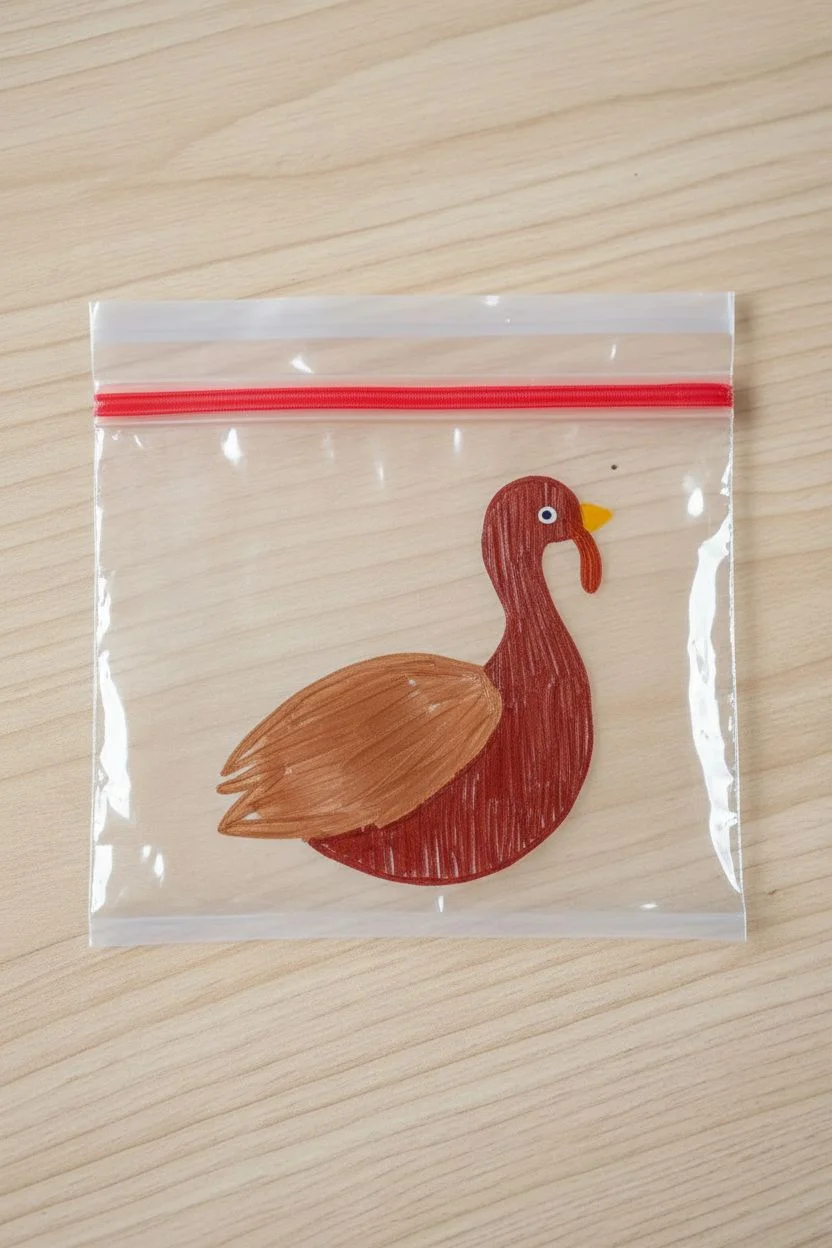
Family Handprint Turkey Painting for a Keepsake Look
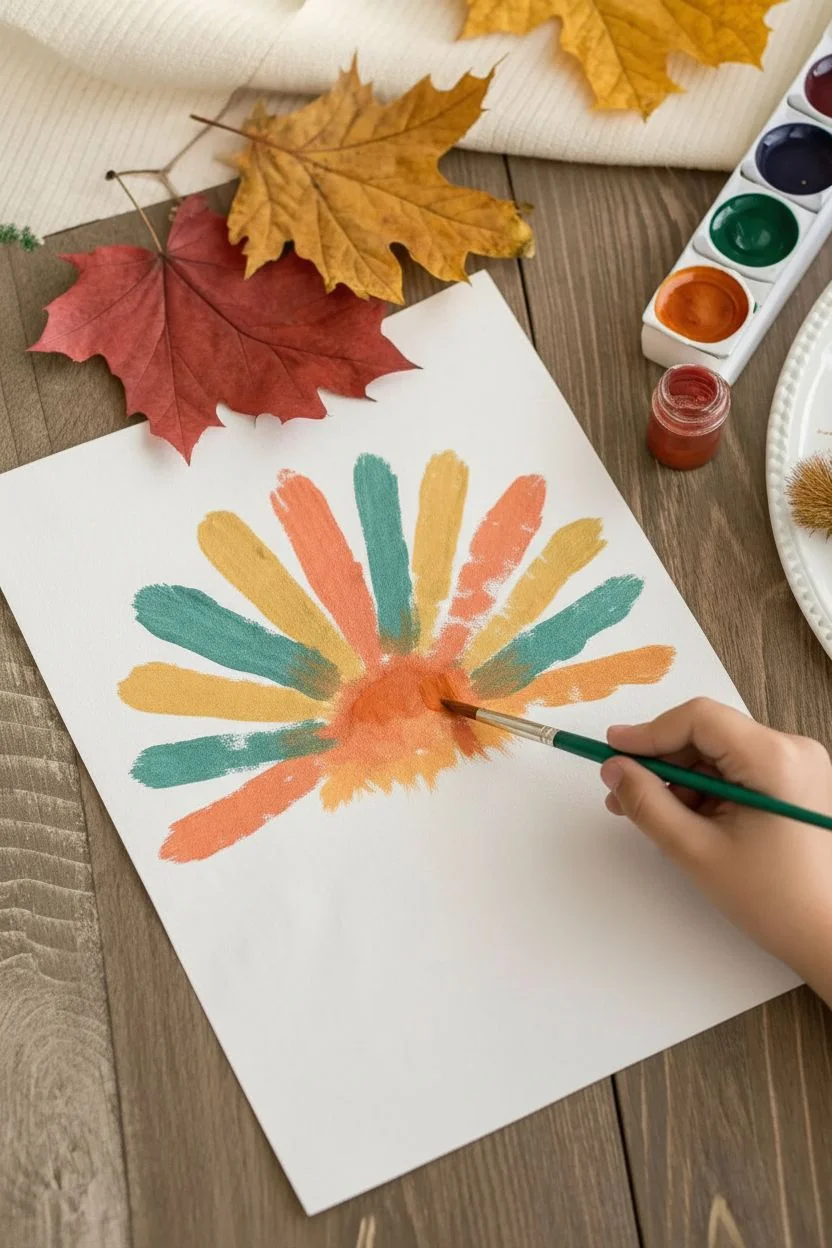
Capture the essence of fall with this charming turkey painting that utilizes simple brush strokes to mimic colorful feathers. It is a sweet, cleaner alternative to the traditional messy handprint craft that still results in a personalized keepsake.
Detailed Instructions
Materials
- Heavyweight white drawing paper or cardstock
- Brown, orange, teal/green, yellow, red, and black acrylic paints
- Medium round paintbrush
- Small detail paintbrush
- A small jar of water
- Paper towels for blotting
- Palette or paper plate
Step 1: The Fan of Feathers
-
Plan your arc:
Visualize a semi-circle near the center of your paper where the feathers will fan out. You want to leave enough room at the bottom for the turkey’s body. -
Paint the first feather:
Load your medium brush with orange paint. Starting from a central point (the turkey’s future lower back), press down and drag the brush outward and upward to create a thick, rounded stroke. -
Add color variety:
Without washing your brush perfectly, dip into a bit of yellow-ochre or gold. Paint the next stroke beside the orange one, allowing the colors to streak naturally for a textured look. -
Introduce cool tones:
Rinse your brush and pick up the teal or green paint. Add a stroke to your fan pattern. I like to alternate warm and cool colors to make the plumage really pop. -
Complete the fan:
Continue adding radiating strokes in an alternating pattern—orange, teal, yellow, green—until you have a full, colorful semi-circle. -
Blend the base:
While the paint is still slightly wet, dab a little orange or brown paint right at the convergence point where all the feathers meet to create a fuzzy transition area.
Pro Tip: Texture Trick
Don’t overmix your paints on the palette. Letting two colors sit side-by-side on the brush creates beautiful natural streaking in the feathers.
Step 2: The Turkey Body
-
Outline the body shape:
Using brown paint, paint a shape resembling a bowling pin or a peanut. The bottom round part should overlap the base of your feather fan, and the top round part will be the head. -
Fill in the body:
Fill the shape in with solid brown paint. Ensure the paint is opaque enough to cover the bottom tips of the feathers. -
Add a wing detail:
Mix a tiny amount of white into your brown paint to make a lighter shade. Use the small brush to paint a curved, simple wing shape on the lower body. -
Highlight the wing:
Add a sliver of unmixed white or very light beige along the top curve of the wing to give it a bit of dimension.
Step 3: Face and Feet Details
-
Paint the beak:
Switch to your smallest detail brush. Use yellow or light orange paint to create a small triangle pointing to the left on the turkey’s face. -
Add the snood:
Using bright red paint, dapp a small, teardrop shape hanging right below the beak for the turkey’s wattle or snood. -
Create the eye:
Dip the handle end of your paintbrush into black paint and dot it onto the face for a perfectly round eye. -
Add the eye sparkle:
Once the black dot is dry, use a toothpick or a clean brush handle tip to add a tiny speck of white paint inside the black eye for a livelier expression. -
Draw the legs:
Using the yellow-ochre or gold paint, draw two straight lines coming down from the body. -
Finish the feet:
At the bottom of each leg line, paint three small toes branching out to complete the feet.
Level Up: Real Leaves
Instead of painting feathers, glue actual pressed autumn leaves in a fan shape first, then paint the turkey body directly over the stem area.
Display your charming turkey art on the fridge or frame it as a festive Thanksgiving decoration
BRUSH GUIDE
The Right Brush for Every Stroke
From clean lines to bold texture — master brush choice, stroke control, and essential techniques.
Explore the Full Guide
Mess-Free Thanksgiving Turkey Painting in a Sealed Bag Style
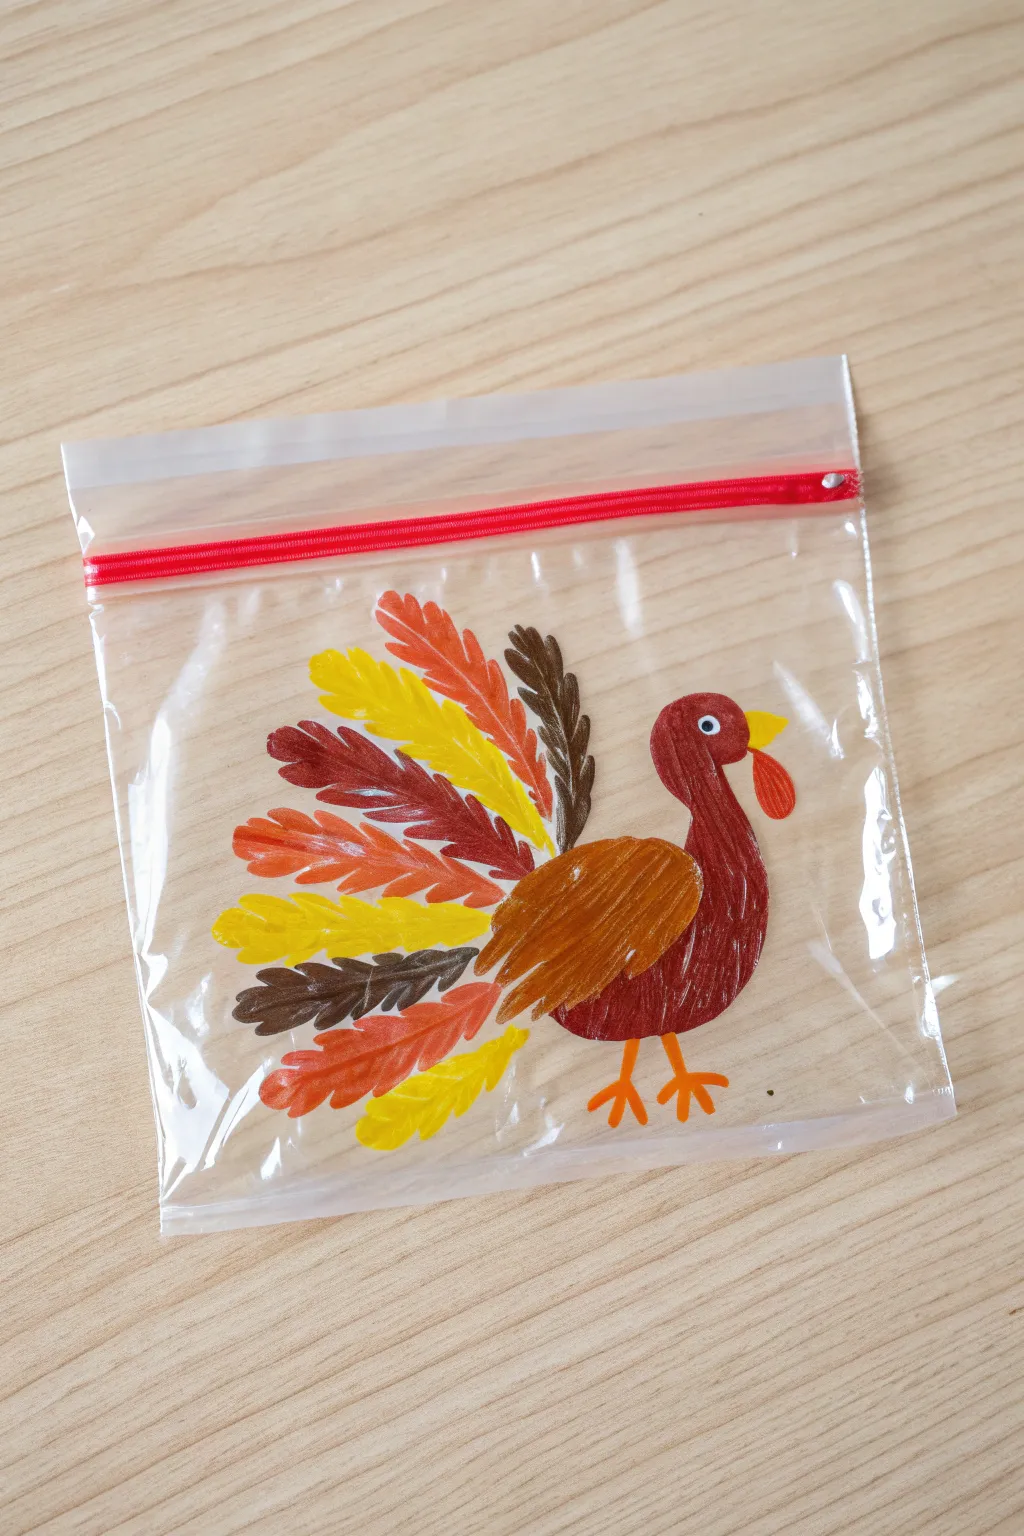
This clever craft creates a vibrant Thanksgiving turkey without a single drop of paint touching your table. By using paint or markers on the surface of a sandwich bag, you can capture the festive spirit in a self-contained, easy-to-display format.
Step-by-Step Guide
Materials
- Clear zippered sandwich or quart-sized bag
- Acrylic paint markers (brown, yellow, orange, red, dark brown)
- White paint marker or white acrylic paint
- Paper towel or baby wipes (for quick corrections)
- Small smooth surface/table
Step 1: Painting the Turkey’s Body
-
Outline the head and neck:
Begin with a maroon or reddish-brown paint marker. Draw a curved hook shape on the right side of the bag to form the turkey’s head and neck. -
Draw the body shape:
Continue the line downward to create a rounded, oval-like shape for the main breast of the turkey, connecting back to the neck. -
Fill in the base color:
Color in the entire head, neck, and lower body area you just outlined using vertical strokes to mimic the texture of feathers. -
Add the wing:
Switch to a lighter brown or bronze color. Draw an almond-shaped wing right in the center of the body, overlapping the darker base color. -
Texture the wing:
Fill the wing shape completely with diagonal strokes, ensuring good coverage against the transparent plastic.
Smudge Control
If the plastic surface is slippery and paint smears, let the outline dry for 60 seconds before filling it in. Isopropyl alcohol on a Q-tip erases mistakes instantly.
Step 2: Creating the Plumage
-
Start the first feather:
Choose a bright orange paint marker. Starting from behind the turkey’s body, draw a long, finger-like feather shape extending upwards. -
Detail the feather:
Add small, diagonal lines coming off a central spine on the feather to give it a realistic, fringed look. -
Add yellow feathers:
Using a yellow marker, draw another feather next to the orange one, fanning out towards the left. Repeat the internal line details. -
Incorporate dark accents:
Use a dark brown or burgundy marker to add depth. Draw feathers in between or behind the lighter ones to create a full, layered tail fan. -
Complete the fan:
Continue alternating orange, yellow, and dark brown feathers until you have a complete semi-circle fanned out behind the turkey’s back. -
Dry check:
I like to pause here for a minute to let the paint markers set so I don’t accidentally smudge the tail while working on the face.
Step 3: Adding Personality
-
Draw the eye:
Using a white paint marker, place a small dot on the head. Once dry, add a tiny black pupil in the center. -
Add the beak:
With a yellow or light orange marker, draw a small triangle pointing outwards from the face. -
Create the snood:
Draw a red, tear-drop shape hanging down from the top of the beak to represent the turkey’s snood. -
Give it legs:
Using an orange marker, draw two stick legs extending from the bottom of the body. -
Finish the feet:
Add three small toes to the bottom of each leg stick to complete the feet.
Sensory Surprise
Before sealing, squirt clear hair gel and glitter inside the bag. When you press the bag, the background sparkles behind your painted turkey design.
Enjoy displaying your transparent turkey on a window where the light can shine through the colors
Thanksgiving Pumpkin Patch With One-Brush “C” Strokes
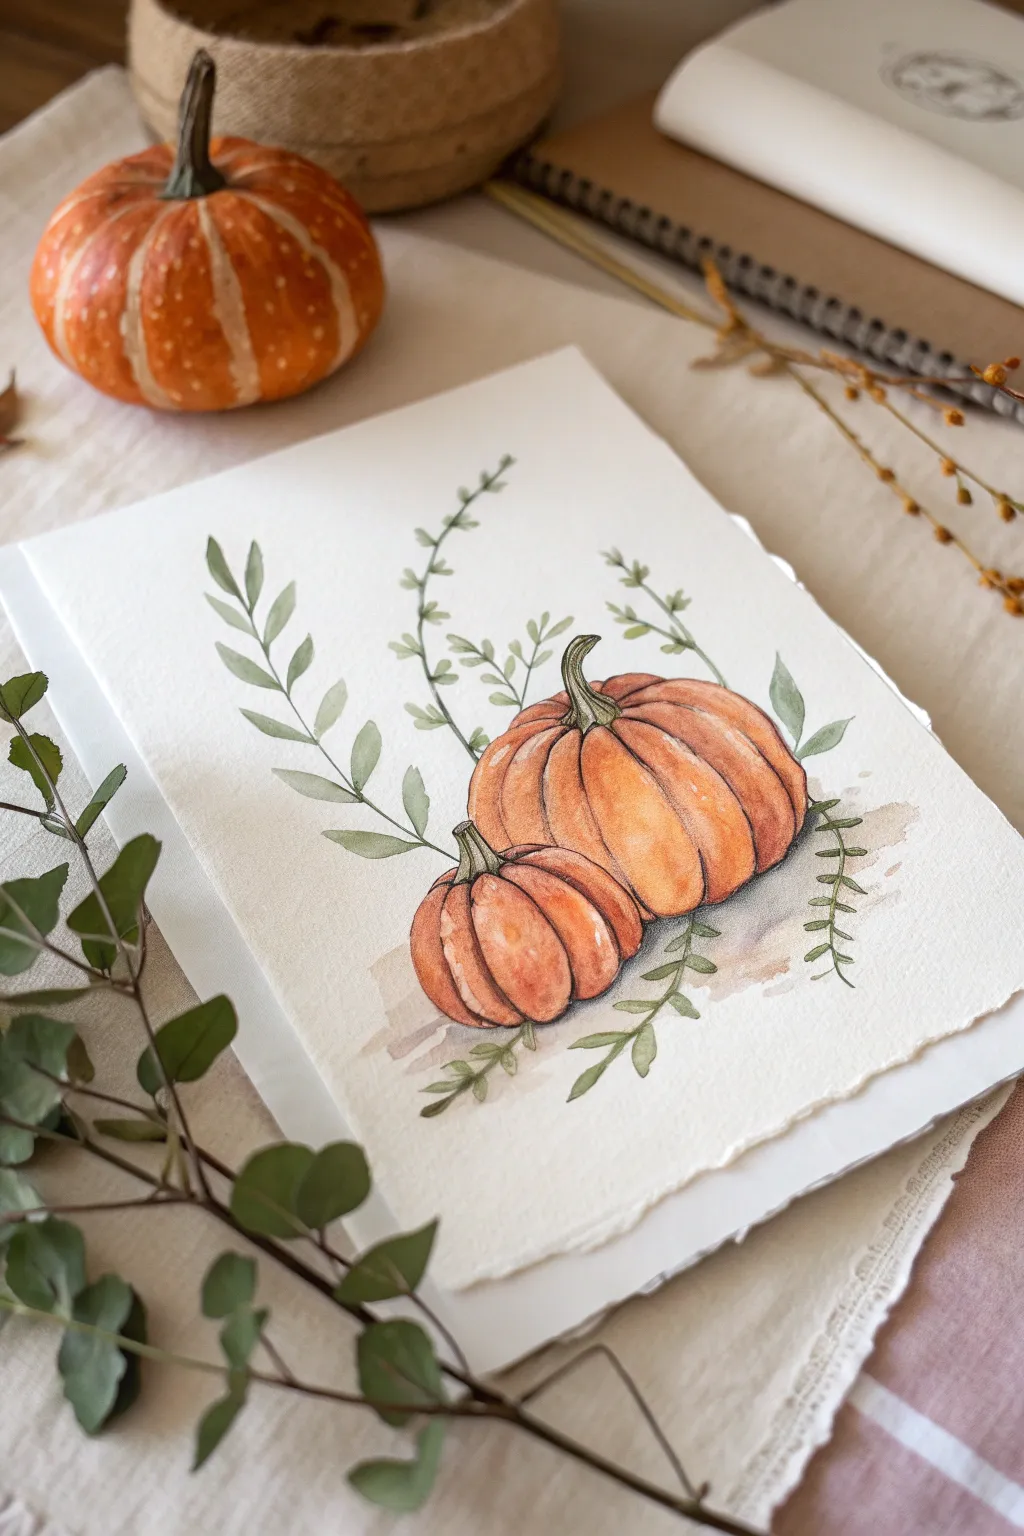
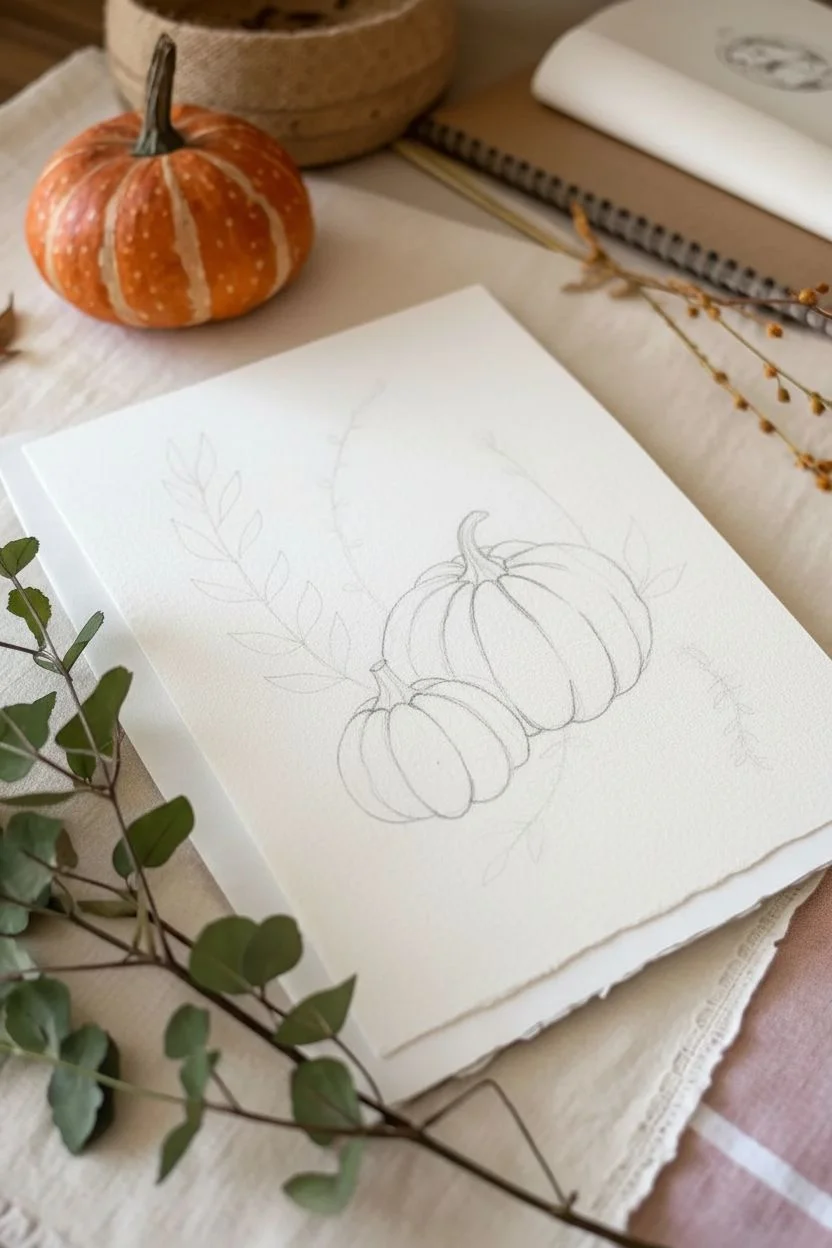
Capture the cozy essence of autumn with this warm watercolor illustration featuring two plump pumpkins nestled among delicate vines. The project combines soft, layered washes with fine line work to create a piece that feels both rustic and refined.
How-To Guide
Materials
- Cold press watercolor paper (deckle edge preferred)
- Watercolor paints (Orange, Burnt Sienna, Yellow Ochre, Sap Green, Olive Green, Burnt Umber)
- Round watercolor brushes (Size 6 for washes, Size 0 or 00 for details)
- Pencil (HB) and kneaded eraser
- Fine liner pen (brown or sepia, waterproof) – optional
- Cup of water and paper towels
- Masking tape (if not using a block)
Step 1: Sketching the Composition
-
Placement:
Begin by lightly sketching the larger, rear pumpkin slightly off-center to the right. Use gentle, curved C-strokes to define the segments of the pumpkin, ensuring it looks round and full. -
Adding the companion:
Sketch the smaller pumpkin in the foreground, positioning it so it partially overlaps the bottom left of the larger one. This creates depth and connection between the two subjects. -
Stems and segments:
Draw the stems emerging from the indentations at the top of each pumpkin. Give them a slight twist and a cut-off top for realism. Refine the segment lines, making sure they curve outward from the stem and tuck back in at the bottom. -
Planning the foliage:
Lightly trace the main stems for the greenery. Sweep one main branch upwards to the left, and drape a few smaller vines around the base and right side of the pumpkins, keeping the lines fluid and organic.
Step 2: Painting the Pumpkins
-
First wash:
Mix a watery vibrant orange. Paint the individual segments of the larger pumpkin, leaving a tiny sliver of white space between them to prevent colors from bleeding together immediately. -
Charging color:
While the paint is still wet, drop a touch of darker orange or burnt sienna into the bottom curves and the crevices near the stem to create instant volume and shadow. -
High lighting:
Lift out a bit of pigment from the center of each rounded segment using a clean, damp brush. This creates a soft highlight that makes the pumpkins look round and glossy. -
Foreground pumpkin:
Repeat this process for the smaller pumpkin. I find that making this one slightly more saturated or reddish-orange helps separate it visually from the one behind it. -
Stem work:
Paint the stems using a mix of Olive Green and Burnt Umber. Use vertical strokes to mimic the fibrous texture, keeping the base darker where it meets the pumpkin.
Muddy Colors?
If your shadows look muddy, wait for the orange layer to be bone dry before adding green stems or brown shading. Wet-on-wet mixing of opposites creates gray mud.
Step 3: Adding Foliage & Details
-
Main leaves:
Using a size 6 brush and Sap Green, paint the leaves on the left branch. Use a ‘press and lift’ motion: touch the tip for the stem, press down for the leaf belly, and lift for the point. -
Delicate vines:
Switch to a smaller brush for the finer, fern-like sprigs around the pumpkin base. These leaves should be smaller and more widely spaced than the main branch on the left. -
Grounding shadows:
Mix a diluted watery grey-brown. Gently glaze a loose, irregular shadow underneath the pumpkins to anchor them to the page, letting the edges fade softly into the white paper. -
Defining contours:
Once the orange paint is completely dry, use your smallest brush (or a fine liner pen) to strengthen the outlines of the pumpkin segments with thin, decisive brownish lines. -
Final texture:
Add tiny specks or scratches on the pumpkin skin using a relatively dry brush with Burnt Sienna to suggest imperfections and organic texture.
Level Up: Vintage Feel
Splatter the finished dried piece with a toothbrush dipped in diluted coffee or gold watercolor paint to give the background an aged, rustic speckle effect.
Now you have a charming autumnal centerpiece ready to be framed or gifted for the holiday season

PENCIL GUIDE
Understanding Pencil Grades from H to B
From first sketch to finished drawing — learn pencil grades, line control, and shading techniques.
Explore the Full Guide
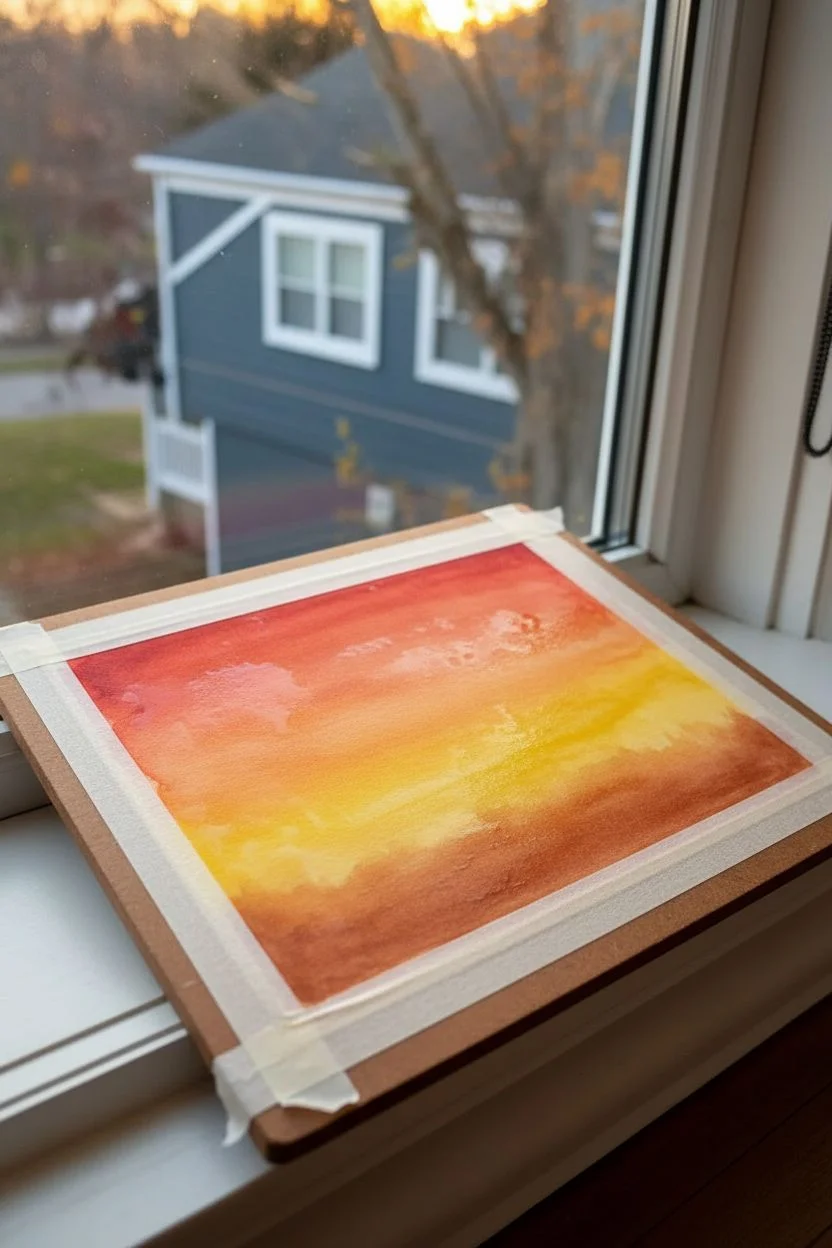
Minimal Turkey Silhouette With a Sunset Wash Background
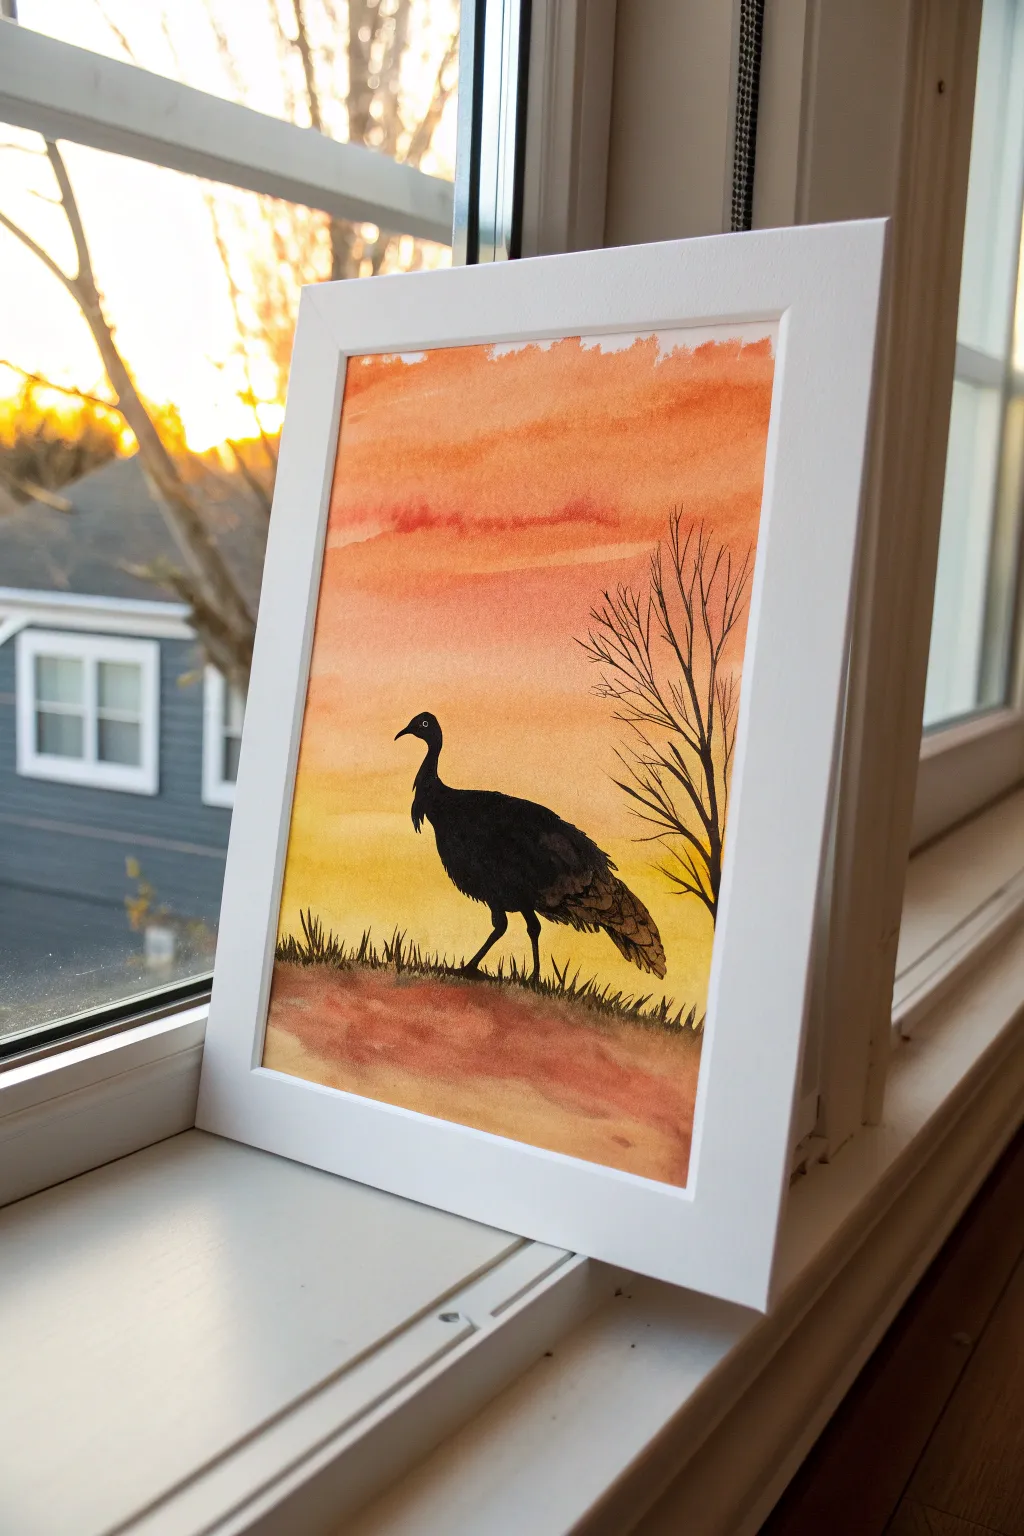
Capture the quiet beauty of an autumn evening with this striking silhouette painting that uses a warm gradient wash to create a glowing backdrop. The sharp contrast between the vibrant sunset and the dark turkey figure makes for a sophisticated yet simple piece of seasonal art.
Detailed Instructions
Materials
- Watercolor paper (cold press, 140lb recommended)
- Watercolor paints (orange, yellow, red, brown, black)
- Flat wash brush (1/2 inch or larger)
- Round brushes (size 4 and size 0 for details)
- Painter’s tape or masking tape
- Pencil and eraser
- Cup of water and paper towels
- White mat frame (optional, for display)
Step 1: Creating the Sunset Sky
-
Prepare your canvas:
Begin by taping down the edges of your watercolor paper to a flat surface or drawing board. This creates a crisp clean border and prevents the paper from buckling when it gets wet. -
Wet the sky area:
Dip your large flat brush in clean water and dampen the upper two-thirds of the paper where the sky will be. You want the paper shiny but not puddling with water. -
Apply the first wash:
Load your brush with a bright yellow. Start about one-third of the way up from the bottom and paint horizontal strokes across the paper, letting the color bleed slightly on the damp surface. -
Deepen the gradient:
While the yellow is still wet, mix a vibrant orange. Apply this directly above the yellow section, blending the two where they meet to create a soft transition. -
Add the top horizon:
Mix a darker reddish-orange to paint the very top of the sky. Paint horizontal strokes here as well, allowing gravity and the wet paper to pull the color downward slightly for a natural sunset look. -
Paint the ground base:
Rinse your brush and switch to a warm reddish-brown. Paint the bottom third of the paper for the ground, using horizontal, slightly uneven strokes to suggest terrain. It’s okay if this touches the yellow sky; a little bleeding mimics the horizon haze. -
Let it dry completely:
This is crucial—wait until the paper is bone dry and flat before moving on. If the paper is cool to the touch, it’s still damp.
Bleeding Lines?
If your black silhouette bleeds into the sky, the background was too wet. Let it dry fully, then sharpen the edges with a black pen or thick black paint later.
Step 2: Drawing and Painting the Silhouettes
-
Sketch the outlines:
Lightly sketch the outline of a turkey standing in the center. Focus on the distinct shape: a small head, thin neck, and a large, rounded body with a tail fanning downward. -
Add landscape details:
Sketch a simple bare tree on the right side with branches reaching up into the orange sky, and add jagged lines along the ground for grass. -
Fill the turkey body:
Using a size 4 round brush loaded with concentrated black paint (or very dark brown), fill in the main body of the turkey. Keep your edges sharp and clean. -
Detail the feathers:
For the tail feathers, dilute your black paint slightly with water to make a dark grey. Paint the tail shape, and while wet, drop in tiny dots of pure black to create a textured, feathery appearance. -
Paint the tree trunk:
Switch to your smaller round brush (size 0 or fine liner). Paint the main trunk of the tree on the right, starting thicker at the base and tapering as it goes up. -
Add fine branches:
Using the very tip of your fine brush, extend delicate branches outward from the trunk. Use a shaky hand slightly to give them a natural, organic look rather than straight lines. -
Ground the scene:
Mix a dark brown-black. Paint short, quick upward flicking strokes along the horizon line where the turkey stands to create shadowy grass blades. -
Add ground texture:
Wash a sheer layer of that dark brown over the foreground area to deepen the shadows near the bottom edge of the paper. -
Define the eye:
If you painted over the eye area, use a tiny dot of white gouache or a white gel pen to place the eye. If you avoided it, ensure the white paper shows through clearly. -
Final reveal:
I love this part—once the painting is fully dry, carefully peel away the painter’s tape at a 45-degree angle to reveal your crisp white borders.
Make it Metallic
Once the matte paint is dry, add subtle shimmer by painting gold watercolor glazes over the lightest yellow parts of the sunset or the turkey’s tail feathers.
Place your finished piece in a simple white mat to make those sunset colors truly pop on your mantel


Have a question or want to share your own experience? I'd love to hear from you in the comments below!