Nothing changes a room faster than a wall drawing—it’s like giving your space a personality upgrade with your own two hands. I pulled together my favorite wall drawing ideas that range from clean and classic to delightfully unexpected, so you can find a vibe that feels like you.
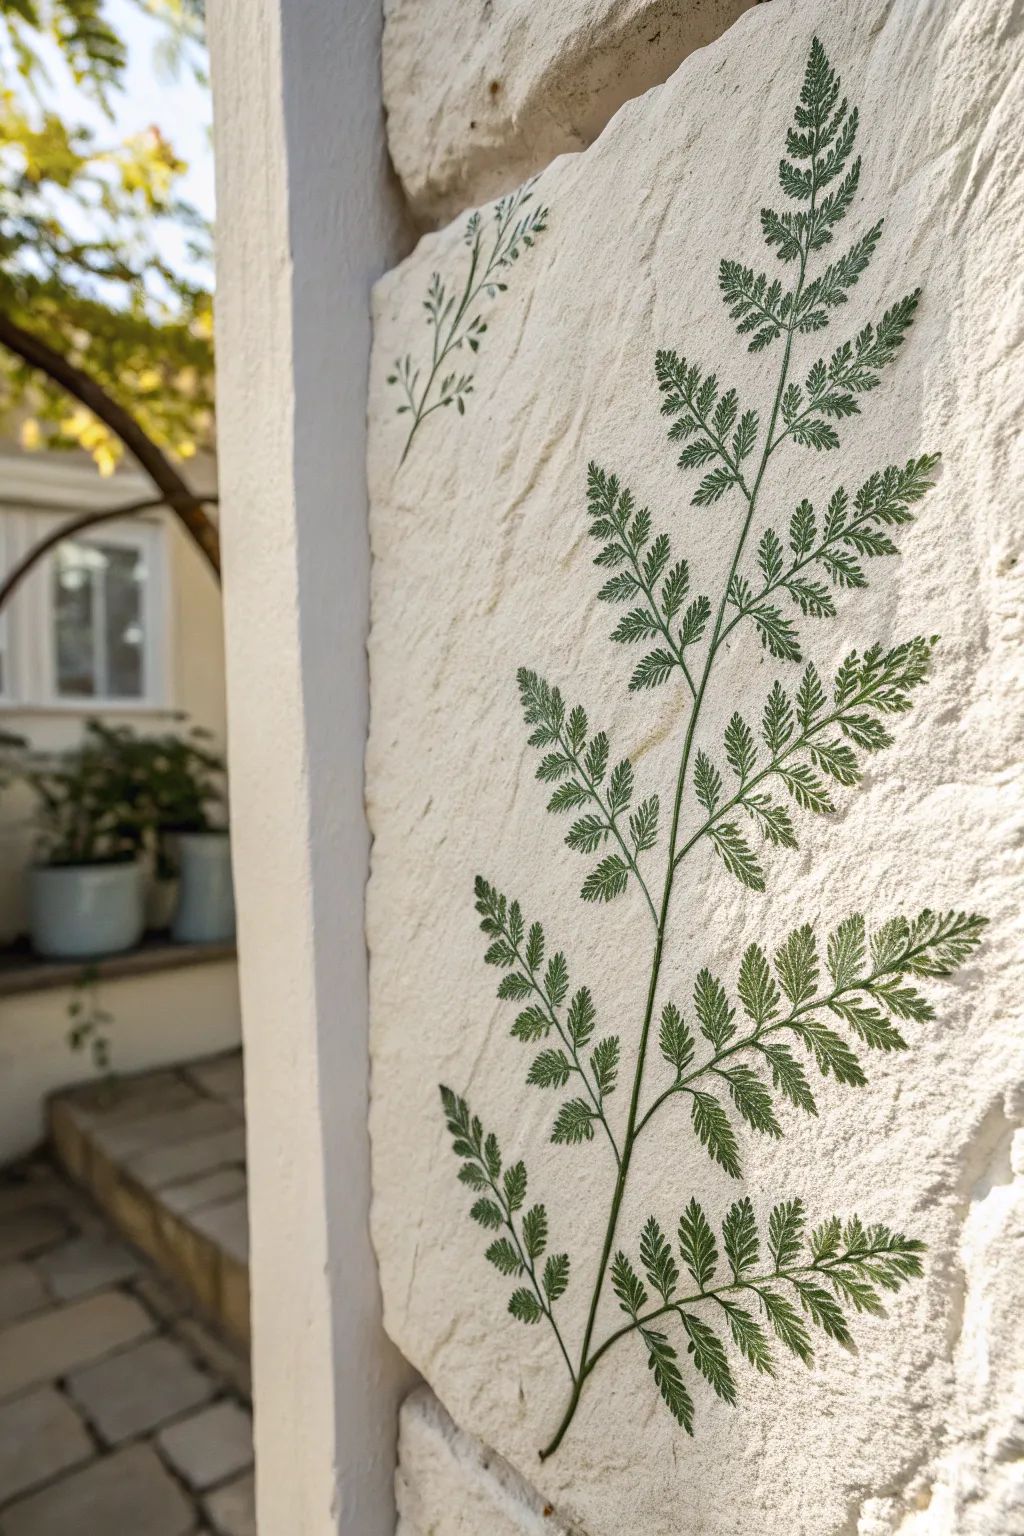
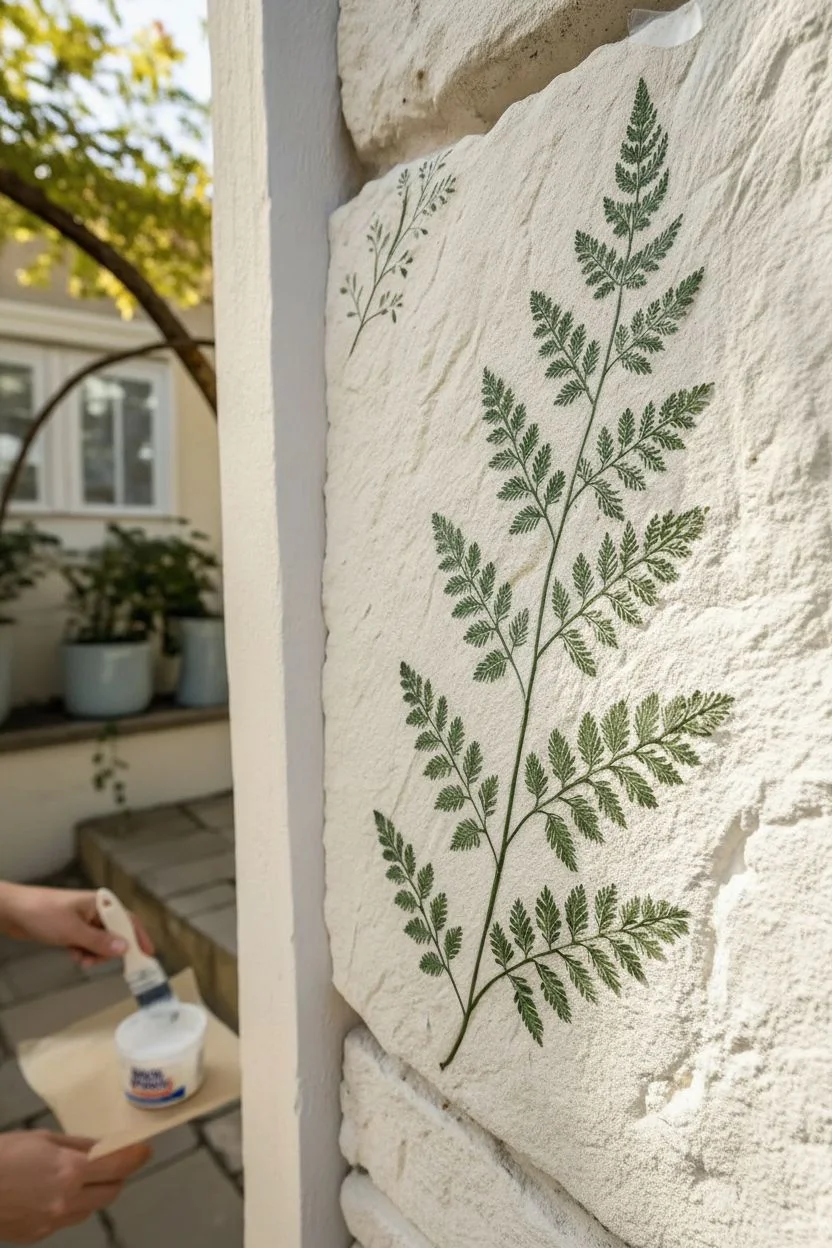
Botanical Vine That Climbs the Corner
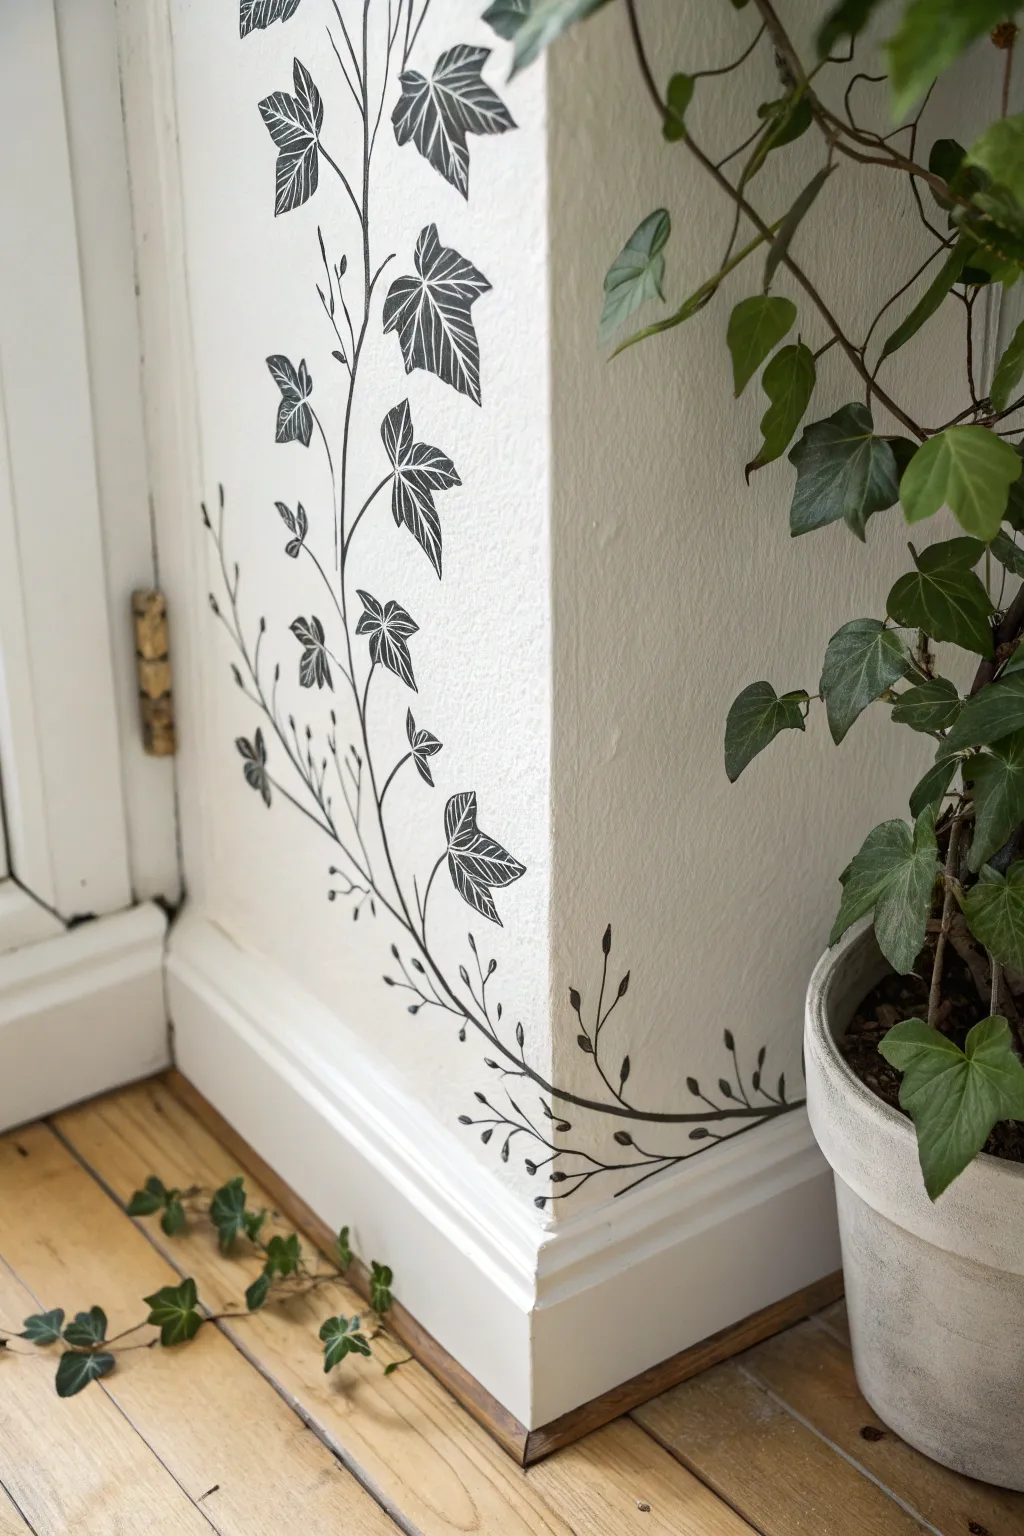
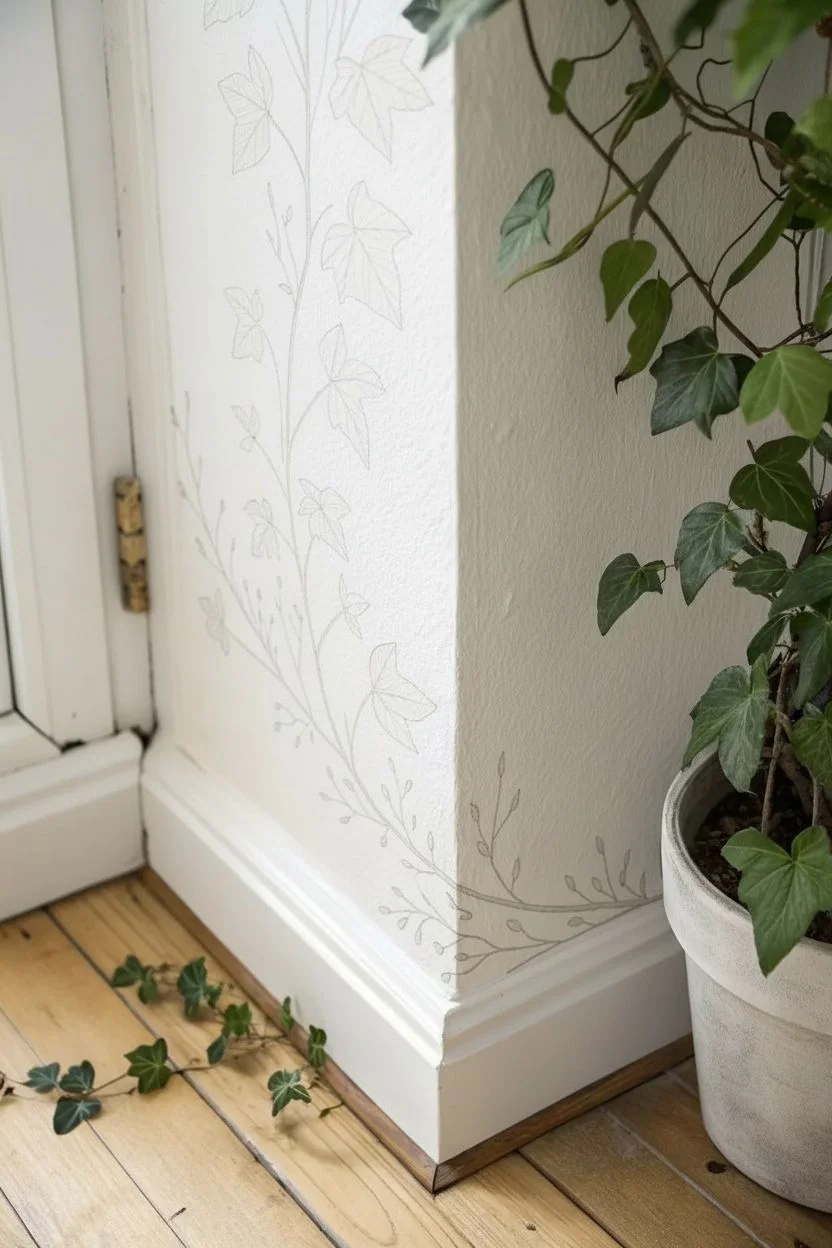
Transform an awkward corner into a botanical feature with this elegant ink-style vine drawing. The high-contrast black leaves pop beautifully against white walls, creating a seamless connection between your floor and ceiling.
How-To Guide
Materials
- Black acrylic paint or black interior latex paint
- Fine liner brush (size 0 or 1)
- Round brush (size 2 or 4)
- Pencil (HB or lighter)
- Clean eraser
- Painter’s tape (optional, for baseboards)
- Reference photo of ivy leaves
- Small container for paint
- Damp cloth for mistakes
Step 1: Planning the Growth
-
Clean surface:
Begin by wiping down the corner of the wall with a damp cloth to remove any dust or cobwebs that might interfere with the paint adhesion. -
Protect baseboards:
If you are worried about drips, apply a strip of painter’s tape along the top edge of your baseboard where the vine will originate. -
Sketch the main stem:
Using your pencil, lightly draw a single, winding line starting from the very bottom corner, just above the skirting board. -
Extend the height:
Continue sketching the line upwards, letting it undulate gently away from and back toward the corner crease. Keep the curves organic rather than perfectly symmetrical. -
Add secondary branches:
Sketch smaller offshoot lines branching from the main stem. Vary their length and direction just like real ivy does. -
Outline leaf shapes:
Lightly pencil in the iconic five-point ivy leaf shapes attached to the ends of your stems. Vary the sizes, placing larger leaves lower down and smaller ones near the tips. -
Detail the buds:
Add small clusters of tiny circles or teardrop shapes near the base of the drawing to represent berries or new growth buds.
Pro Tip: Steady Hands
Rest your pinky finger against the wall to stabilize your hand while painting detailed veins. It acts as a pivot point for smoother lines.
Step 2: Inking the Vines
-
Prepare the paint:
Pour a small amount of black acrylic paint into your container. You want a creamy consistency that flows easily off the brush but isn’t watery. -
Paint the main stem:
Using the round brush, carefully trace over your main pencil stem line. Apply slightly more pressure on the downstrokes to thicken the vine naturally. -
Taper the ends:
As you reach the top of the stem or the end of a branch, lift your brush gradually to create a fine, tapered point. -
Connect the branches:
Paint the secondary branches, ensuring they flow smoothly out of the main stem rather than looking stuck on at a sharp angle. -
Outline the leaves:
Switch to your fine liner brush. Carefully outline the perimeter of each ivy leaf with a steady hand. -
Fill the leaves:
You can now fill in the leaves solid black if you prefer a silhouette look, or keep them outlined for a lighter illustrative style. -
Add leaf veins:
For the specific look in the photo, paint the leaf solid black first, but leave very thin negative space lines for the veins if you have steady hands, or paint solid and come back with white paint later. -
Alternative vein method:
I actually find it easier to paint the leaf outline, then paint the sections between the veins black, leaving the white wall showing through as the vein lines.
Level Up: Reality Bend
Paint the vine starting ‘behind’ a piece of furniture or the baseboard to make it seem like it’s truly growing out from the architecture.
Step 3: Refining Details
-
Paint the berries:
Using the very tip of your round brush, dab on the small berry shapes near the baseboard stem. -
Check density:
Step back and look at the composition. If a section looks too sparse, pencil in a small extra leaf or tendril and paint it. -
Clean up stray marks:
Once the paint is fully dry to the touch, gently erase any visible pencil lines. -
Crisp up edges:
Inspect your leaf points. Use the fine liner to sharpen any tips that look too rounded or blunt.
Enjoy the feeling of bringing the outdoors in with this permanent, zero-maintenance garden feature


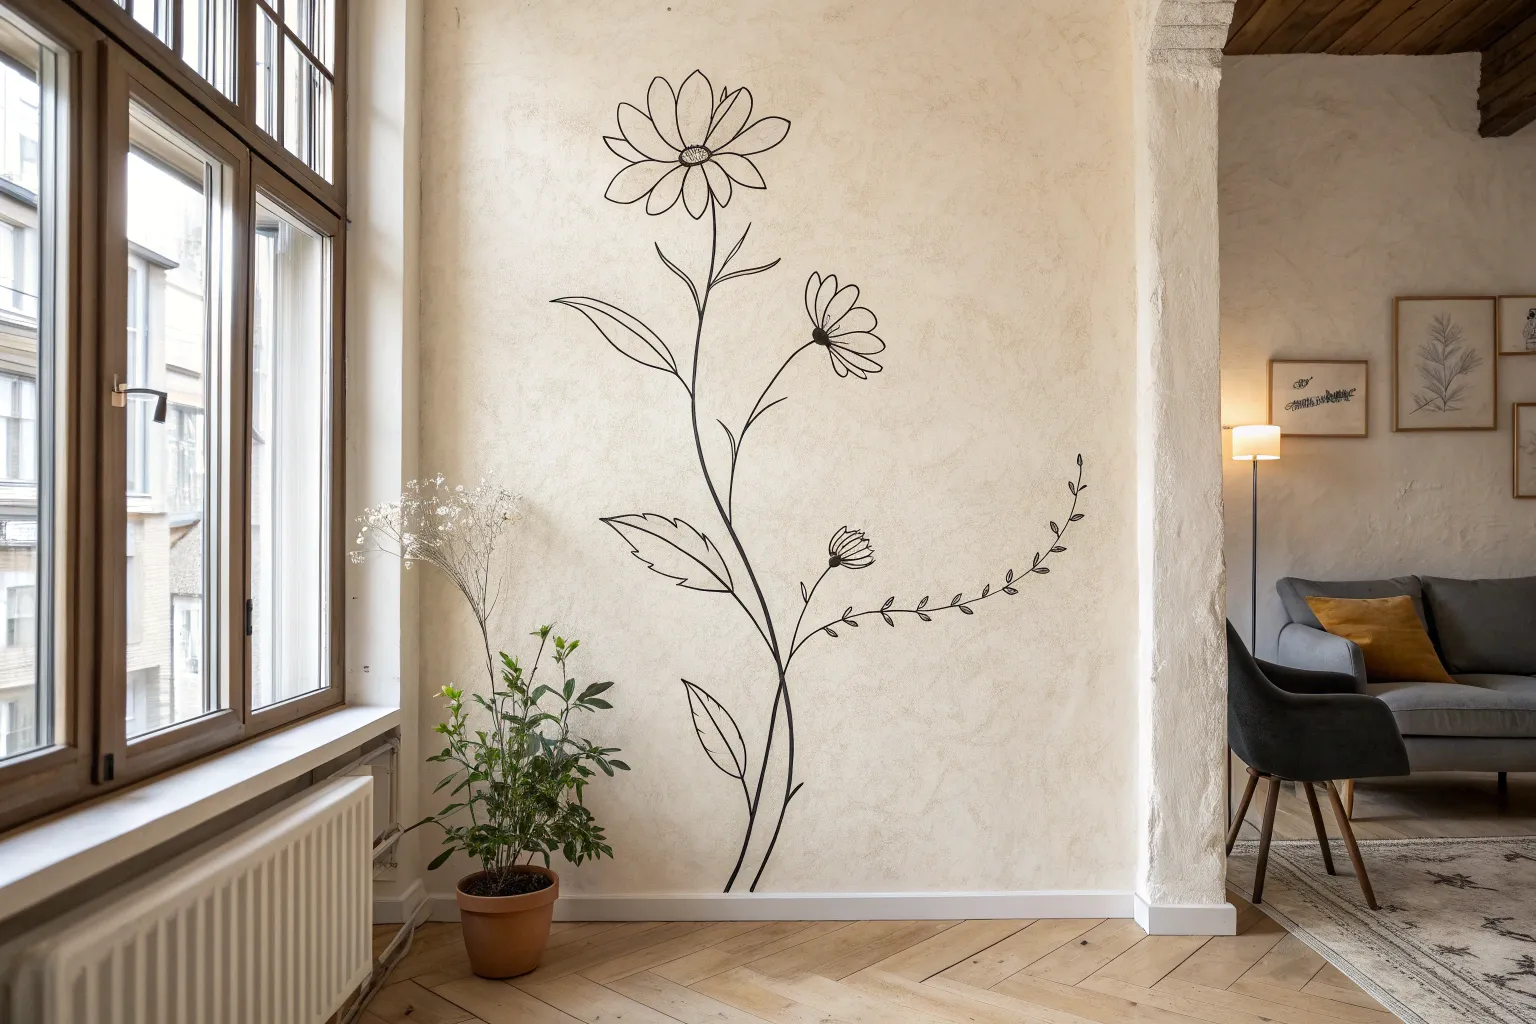
Simple Wildflower Border Above a Headboard

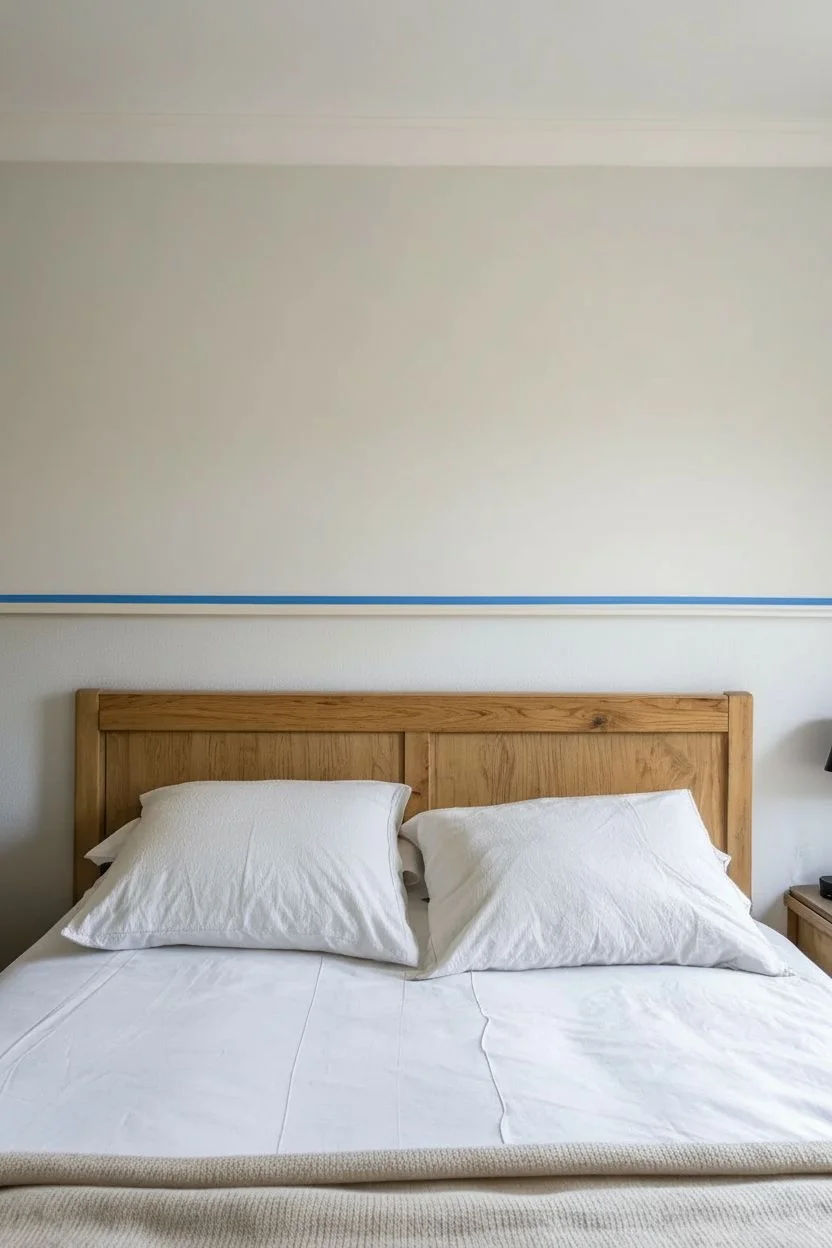
Transform the blank space above your bed into a serene botanical garden with this delicate hand-drawn mural. Using simple black line work, this project creates an airy, sophisticated border of wildflowers that feels both modern and timeless.
Step-by-Step Tutorial
Materials
- Digital or printed botanical reference photos
- HB pencil
- High-quality gum eraser
- Black acrylic paint marker (fine point, 0.7mm – 1mm)
- Black acrylic paint marker (medium point, 2mm-3mm)
- Painter’s tape or long ruler (optional)
- Step ladder
- Damp cloth
Step 1: Preparation & Planning
-
Prepare the wall surface:
Ensure the wall area above your headboard is clean, dry, and free of dust. If the wall has a glossy finish, you might want to lightly sand it for better paint adhesion, though standard matte or eggshell wall paint is usually ready to go. -
Define the drawing area:
Decide on the height of your wildflower border. A good rule of thumb is to have the tallest flowers reach about 2-3 feet above the headboard. You can lightly mark a ‘ceiling’ line with painter’s tape if you want to keep the heights relatively uniform, though a natural, uneven look is often more organic. -
Gather botanical inspiration:
Collect 5-7 distinct flower and leaf shapes to repeat. The example features daisies, echinacea (coneflowers), fern-like leaves, grassy stalks, and dandelions. Having these references printed out or on a tablet nearby is crucial for maintaining variety.
Variation Technique
Don’t draw every flower facing forward. Draw some in profile (side view) and some as closed buds to make the garden look realistic and dynamic.
Step 2: Sketching the Composition
-
Rough out the stems:
Using your HB pencil, lightly sketch vertical lines to represent the main stems. Space them mostly evenly but allow for some natural gaps. Vary the heights significantly, ensuring you have short, medium, and tall stalks intermingled. -
Sketch the primary blooms:
At the top of your tallest stems, lightly draw circles or ovals to mark where the main flower heads will go. Don’t worry about petals yet; just place the general shapes to balance the composition. -
Add leaf foundations:
Mark the position of leaves along the stems. For some plants, draw lines branching out symmetrically; for others, alternate the branching pattern to create visual interest. -
Refine the pencil sketch:
Go back over your rough layout and sketch the actual petals and leaf shapes. Keep the pencil pressure very light so it’s easy to erase later. Focus on the silhouette of each plant—some should droop, while others stand rigid. -
Step back and review:
This is the most critical step. Step back to the foot of the bed or further. Look for empty awkward spots or areas that feel too cluttered. Add small filler stems or grassy blades to balance the density.
Step 3: Inking the Mural
-
Test your markers:
On a hidden patch of wall or a piece of similar cardboard, test your black paint markers to ensure the flow is smooth and the ink is opaque. -
Outline the main stems:
Starting from the bottom (just behind where the headboard or border sits), trace your pencil stems with the medium-point marker. Use a confident, steady hand. If a line wavers, just go with it—nature isn’t perfectly straight. -
Draw the detailed flowers:
Switch to your fine-point (0.7mm – 1mm) marker for the delicate flower heads. For daisy-like flowers, draw the center first, then pull the petals outward. For the dandelion puffs, use tiny dashed lines. -
Detail the foliage:
Ink the leaves. I like to use the fine tip for the veins inside the leaves and the medium tip for the outer leaf outline to create subtle depth. -
Add texture and shading:
Using the finest marker, add stippling (tiny dots) or hatching (fine parallel lines) to the centers of flowers and the undersides of leaves. This adds the ‘engraving’ style look seen in the reference. -
Include filler elements:
Look for gaps near the bottom. Draw simple blades of grass or tiny stems with buds using quick, upward strokes to ground the composition. -
Let the ink cure:
Allow the paint marker ink to dry completely. Wait at least 1-2 hours to be absolutely safe, as smearing black ink on a white wall is difficult to fix.
Level Up: watercolor wash
After the black ink fully cures (wait 24h), dilute acrylic paint with water and lightly paint inside the petals for a soft, stained-glass faux watercolor effect.
Step 4: Finishing Touches
-
Erase pencil lines:
Gently erase the visible pencil sketch marks using a high-quality white gum eraser. Rub gently to avoid burnishing the paint or leaving gray smudges on the wall. -
Final inspection:
Check for any faint lines or spots where the black ink looks thin. A second coat on just the thickest stem lines can make the drawing pop significantly more. -
Clean up edges:
If you made any mistakes, use a small brush with a bit of your original wall paint to ‘white out’ the error. It works just like correction fluid.
Now you have a custom, permanent art piece that brings the calming beauty of nature right into your bedroom


Geometric Pattern Wall Drawing Using Tape Guides
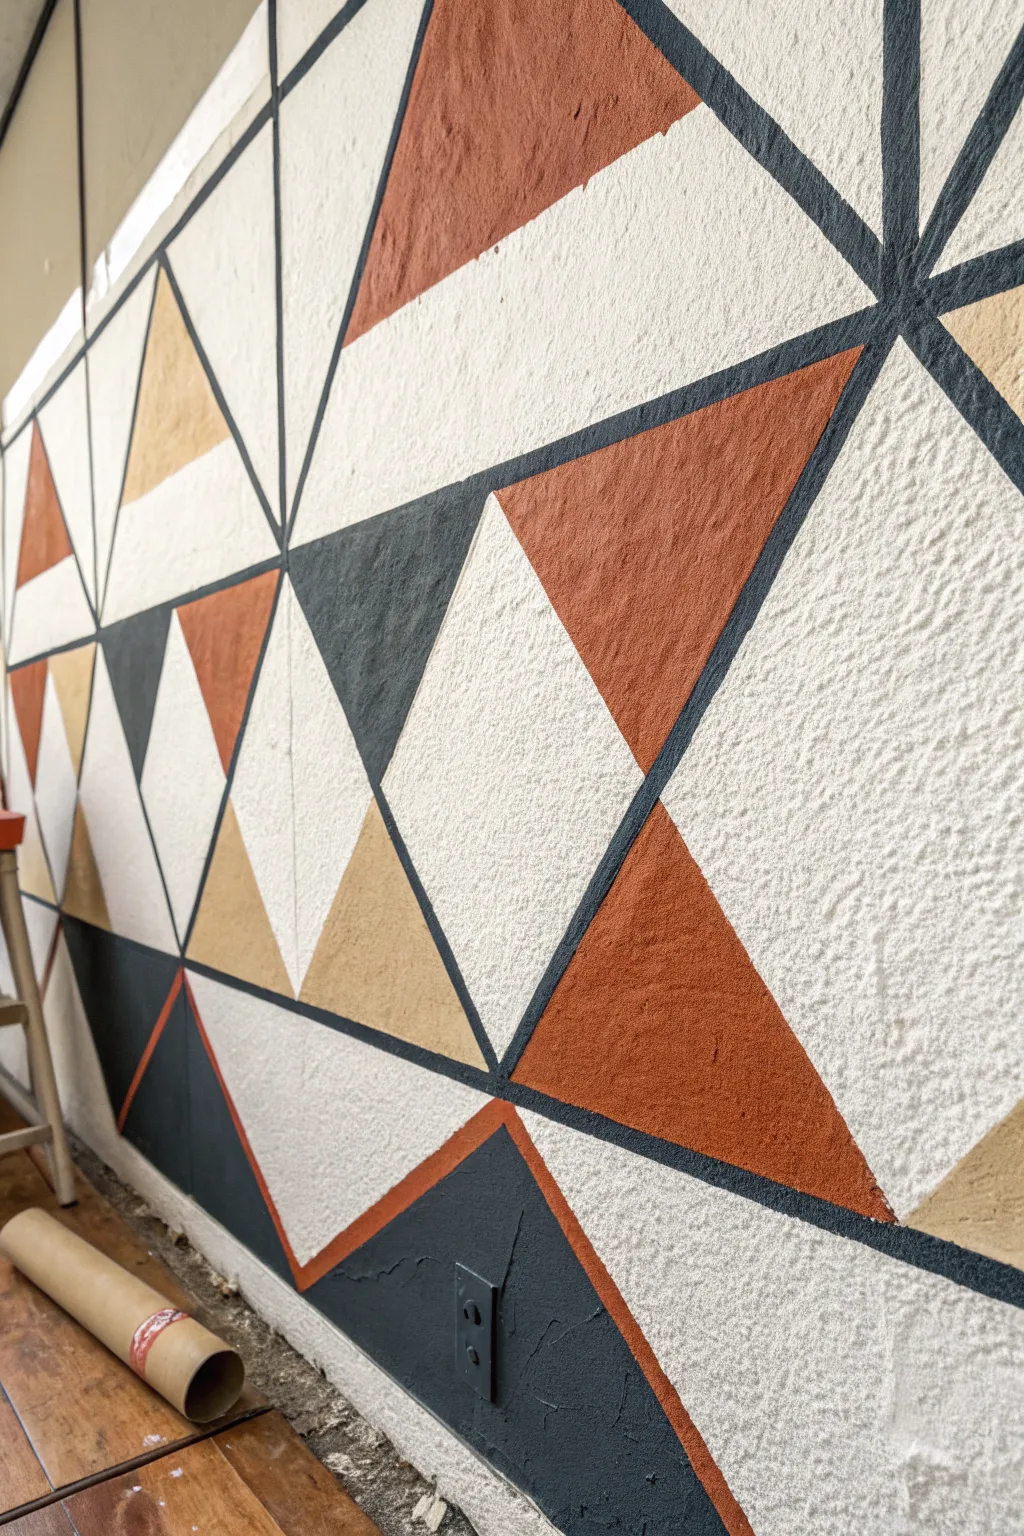
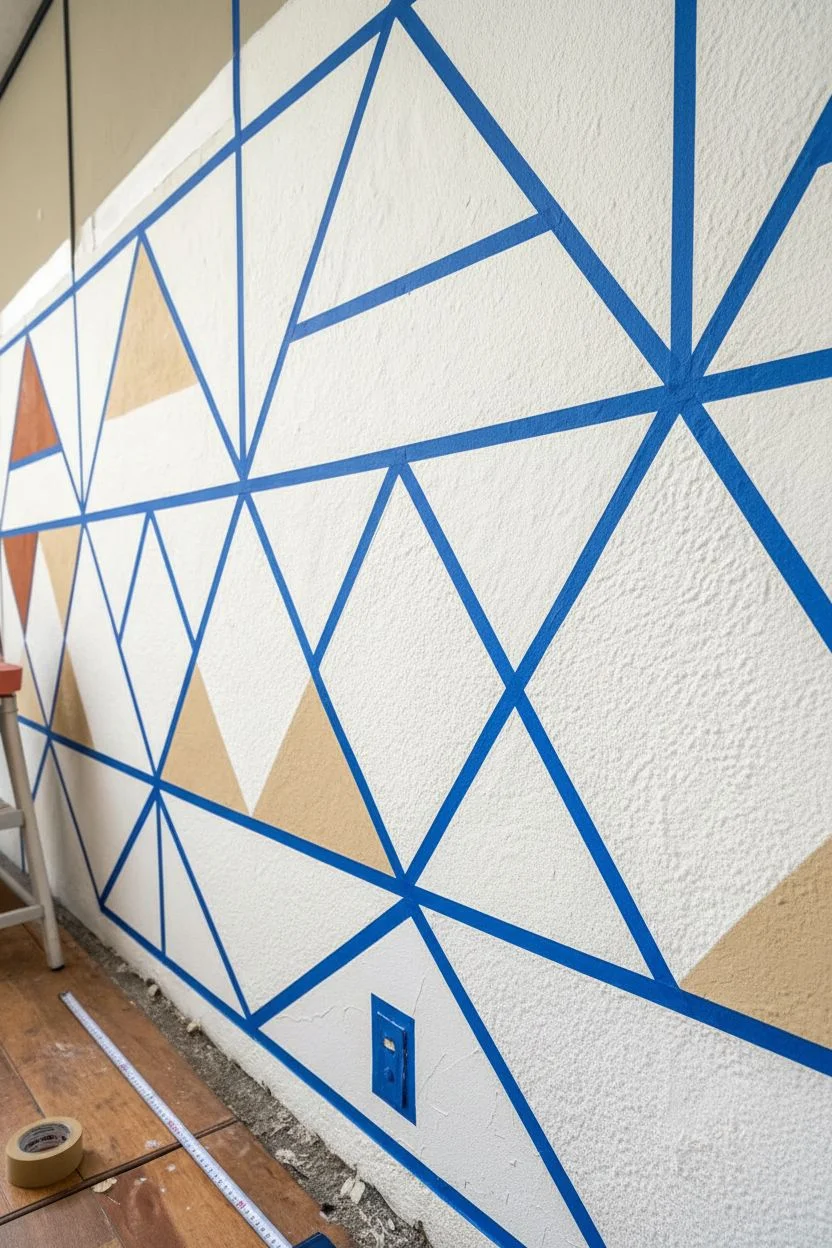
Transform a plain textured wall into a modern art piece with this bold geometric mural. Using a warm palette of rust, mustard, and charcoal against a crisp white background, this design brings energy and structure to any room.
Step-by-Step
Materials
- Painter’s tape (various widths, 1-inch recommended)
- Interior latex paint (White/Base color)
- Interior latex paint (Rust/Terracotta)
- Interior latex paint (Mustard Yellow)
- Interior latex paint (Charcoal/Black)
- Angled sash brush (2-inch)
- Small foam rollers and tray
- Drop cloth
- Measuring tape
- Pencil
- Level (optional but helpful)
Step 1: Preparation and Mapping
-
Clean and prep the surface:
Begin by wiping down the wall to remove any dust or cobwebs, ensuring the tape will stick properly. If your wall has a heavy texture like the one shown, press the cleaning cloth firmly into the crevices to get everything out. -
Plan your grid:
Visualize the large triangles. You don’t need a perfect grid, but marking a few key center points with a pencil helps keep the scale consistent. I usually aim for triangles that are about 2-3 feet wide at the base for a mural of this size. -
Apply the main diagonal lines:
Stretch long strips of painter’s tape diagonally across the wall. Create a series of large X shapes or zig-zags first. These will dictate the primary flow of the pattern. -
Form the triangles:
Intersect your diagonal lines with vertical or opposing diagonal tape lines to close off the shapes. The goal is to create a network of varied triangles—some large, some medium. -
Secure the tape edges:
Run your finger or a plastic putty knife firmly along all the tape edges. This ‘burnishing’ step is crucial, especially on textured walls, to prevent paint from bleeding under the tape.
Sealing Textured Walls
On heavy texture, clear matte medium works better than base paint for sealing tape edges. It fills the gaps invisible, creating an impenetrable barrier for the colored paint.
Step 2: Sealing and Painting
-
Seal the tape lines:
Paint a thin layer of your *base wall color* (white) over the edges of the tape. This trick ensures that if any paint bleeds under, it matches the wall, creating a perfectly crisp line later. -
Allow the seal to dry:
Wait for this sealing layer to dry completely to the touch. This usually takes about 30 to 60 minutes depending on humidity. -
Assign your colors:
Mark each triangle with a small dot of the color you intend to paint it (rust, mustard, charcoal, or leaving it white). This helps you balance the composition before you commit with a full brush. -
Paint the charcoal sections:
Start with your darkest color. Use an angled sash brush to cut in the corners near the tape, then fill the center with a small foam roller for an even finish. -
Apply the terracotta triangles:
Moving to the rust/terracotta shade, fill in the designated triangles. Be generous with the paint to get into the wall’s texture, dabbing vertically with the brush if needed to fill deep pores. -
Add the mustard accents:
Paint the yellow/mustard sections. Since this is a lighter color, you might need two coats to ensure the original wall color doesn’t show through. -
Check for coverage:
Inspect the wall from different angles. Textured walls often have ‘holidays’ (missed spots) that are only visible from the side. Touch these up while the paint is still wet.
Step 3: The Reveal
-
Let the paint set:
Allow the final coat of paint to dry until it feels tacky but not fully cured—usually about an hour. -
Remove the tape slowly:
Peel the tape off at a sharp 45-degree angle. Pull slowly and steadily. If the paint feels like it’s sticking to the tape, score the edge lightly with a craft knife. -
Touch up lines:
Even with perfect prep, textured walls can be tricky. Use a tiny artist’s brush and a bit of the base white paint to fix any small bleeds or rough spots.
Metallic Accent Lines
Once the tape is removed and paint covers are dry, re-tape 1/4 inch outside a few triangle lines and paint the gap gold for a glamorous, inlaid metal look.
Step back and admire how a simple roll of tape and three paint colors have completely redefined your space


Soft Mountain Range Along the Lower Wall
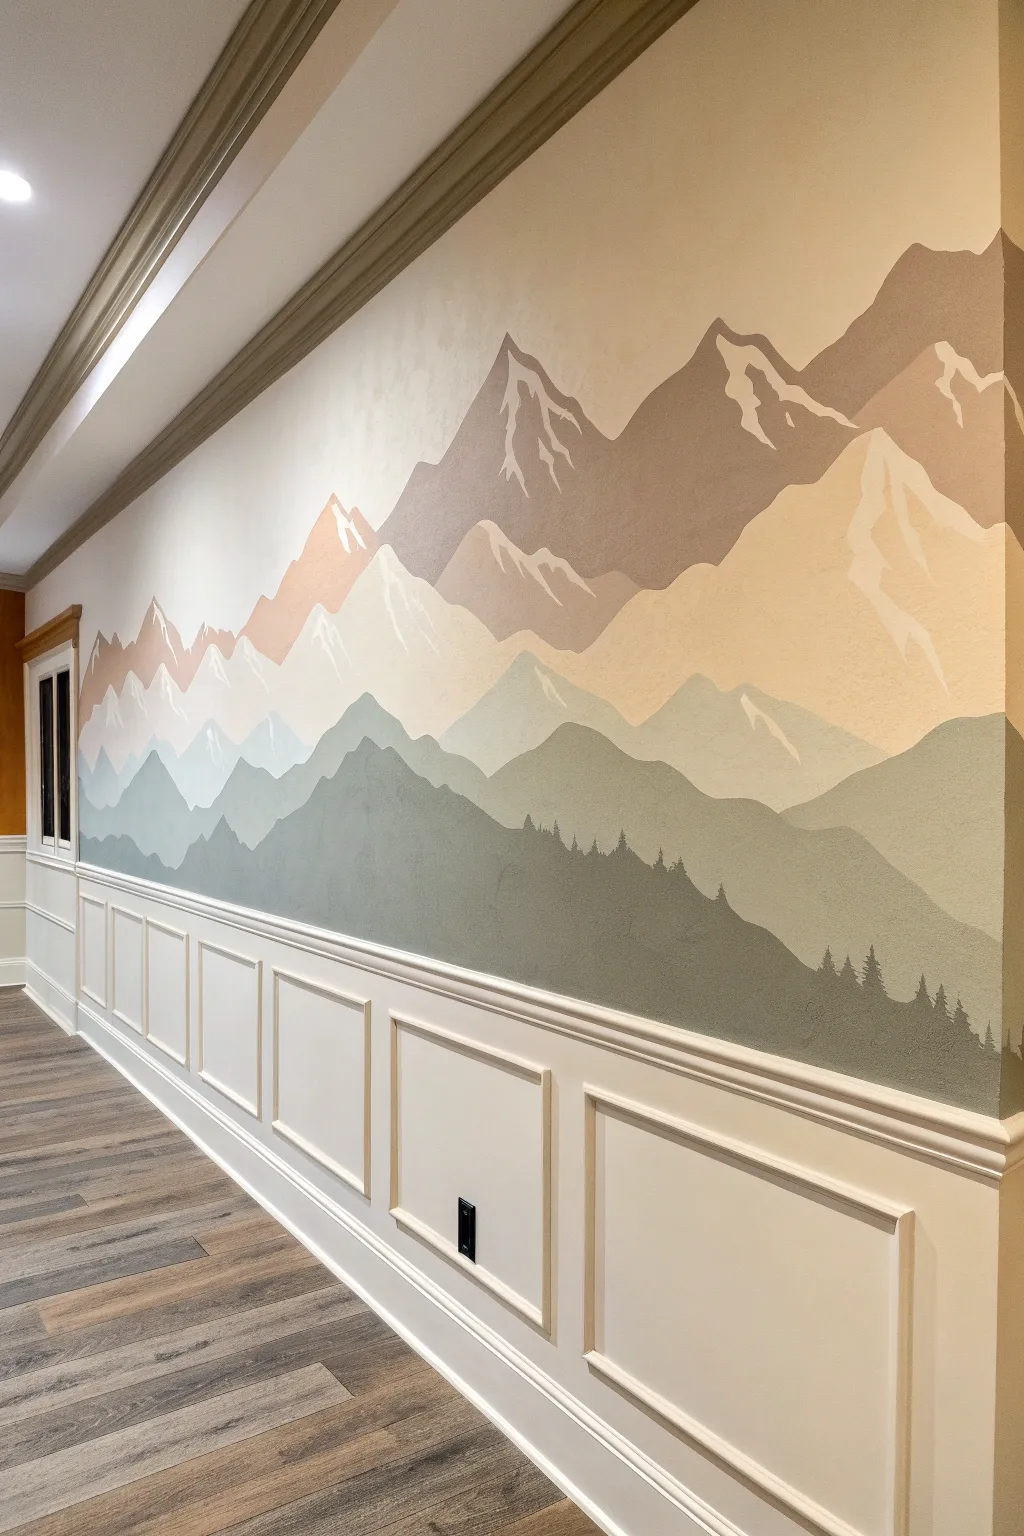
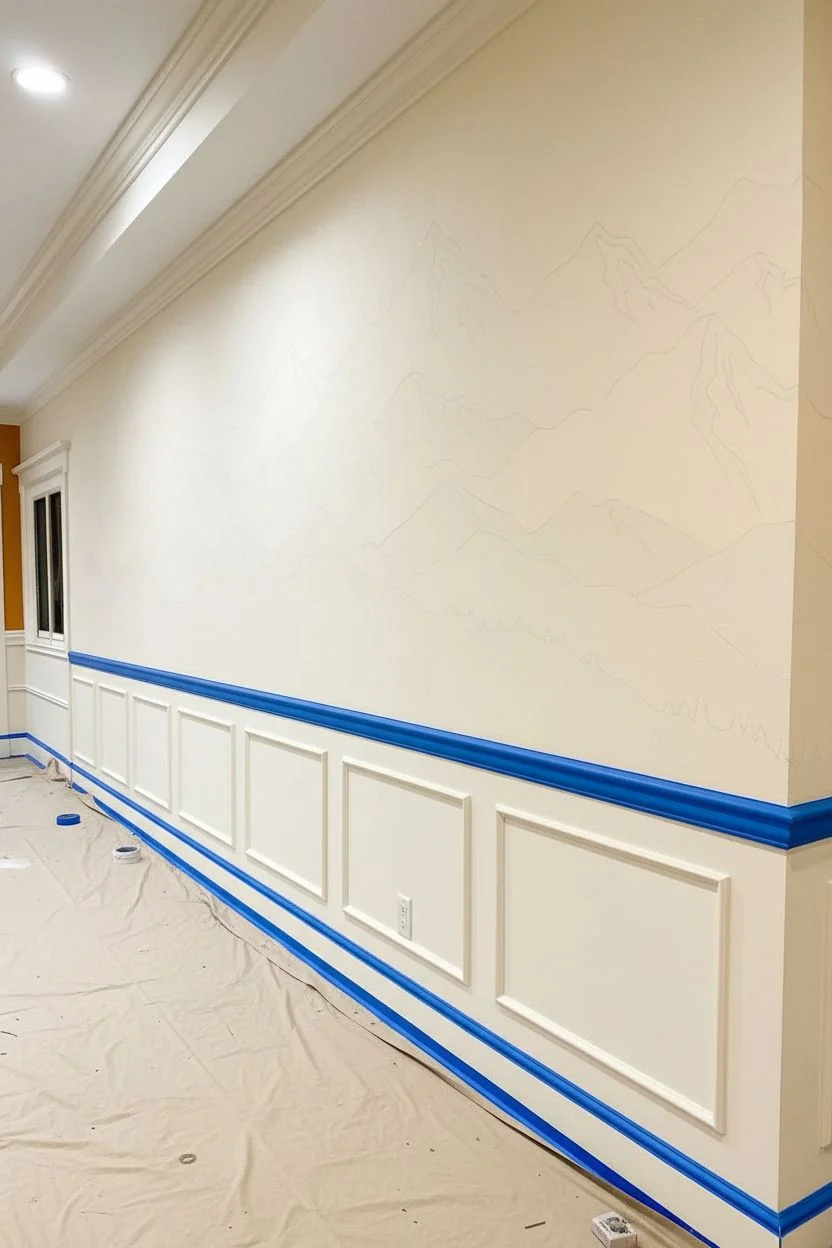
Bring the serenity of the great outdoors inside with this layered mountainscape mural that sits elegantly above wainscoting. The soft, earth-toned palette creates a calming depth that makes any hallway or bedroom feel expansive and grounded.
Step-by-Step Tutorial
Materials
- Latex interior wall paint (5-6 shades: dark sage, olive green, light grey-blue, cream, tan, chocolate brown)
- Painter’s tape (high quality)
- Pencil and eraser
- 2-inch angled sash brush
- Small artist brushes (round and flat tips)
- Mini paint roller and tray
- Drop cloth
- Damp rag for clean-up
Step 1: Preparation and Sketching
-
Prepare the workspace:
Clear the area and lay down a drop cloth to protect your flooring. If you have existing wainscoting like the example, tape off the top edge precisely to ensure a crisp line where the mural meets the trim. -
Base coat application:
Apply a fresh coat of your lightest background color—likely a soft cream or off-white—to the entire upper wall section. Let this dry completely before starting your pencil sketch. -
Sketch the ranges:
Using a pencil, lightly draw jagged, uneven lines to map out your mountain layers. Start with the highest, most distant peaks near the ceiling, then draw overlapping ranges moving downward. Aim for 4-5 distinct layers to create depth.
Gradient Magic
To get perfect transitional shades, buy just two main colors (a dark green and a brown) and increasingly mix them with white paint for each receding layer.
Step 2: Painting the Layers
-
Mix your palette:
Organize your paint colors from lightest to darkest. The general rule for atmospheric perspective is that objects become lighter and less saturated the further away they are, so your top peaks will be the palest. -
Paint the top layer:
Start with the highest mountain range using your tan or light brown shade. Use the angled sash brush to carefully cut in the jagged ridgeline, then fill in the body of the mountain down to where the next layer begins. -
Work downward:
Move to the second layer using a slightly darker or cooler tone, like the grey-blue seen in the image. slightly overlap the bottom of the first layer to cover your pencil lines. -
Continue layering:
Proceed to the middle layers, introducing greenish-grey tones. If the paint feels too opaque, I sometimes mix in a tiny bit of water or glaze to help the brush glide over the texture of the wall. -
Paint the foreground:
For the lowest, closest mountain range, use your darkest sage or olive green. This layer should be the most substantial and anchor the bottom of the mural against the wainscoting.
Metallic Touch
For a modern twist, use a metallic gold or copper paint for the very tips of the snow caps to make them catch the light.
Step 3: Adding Details and Highlights
-
Add snow caps:
Using a small flat artist brush and your lightest cream paint, add jagged patches to the right side of the peaks. Imagine a light source coming from the right to keep the highlights consistent. -
Create shadows:
On the opposite side of the peaks (the left side), you can mix a slightly darker version of each mountain’s base color to paint subtle shadows, enhancing the 3D effect. -
Paint the treeline:
For the bottom-most layer, switch to a small round brush. along the ridgeline of the dark green mountains, dab tiny vertical strokes to simulate the silhouette of pine trees, varying their heights for a natural look. -
Refine the edges:
Step back and look for any unsteady lines. Use a small brush to sharpen the peaks or smooth out transitions between the layers. -
Remove tape:
While the paint is dry to the touch but not fully cured, carefully peel away the painter’s tape from the wainscoting at a 45-degree angle to reveal a clean edge.
Enjoy the peaceful view of your new mountain range every time you walk down the hall
BRUSH GUIDE
The Right Brush for Every Stroke
From clean lines to bold texture — master brush choice, stroke control, and essential techniques.
Explore the Full Guide
Rainbow Arch Niche Behind a Chair or Bed
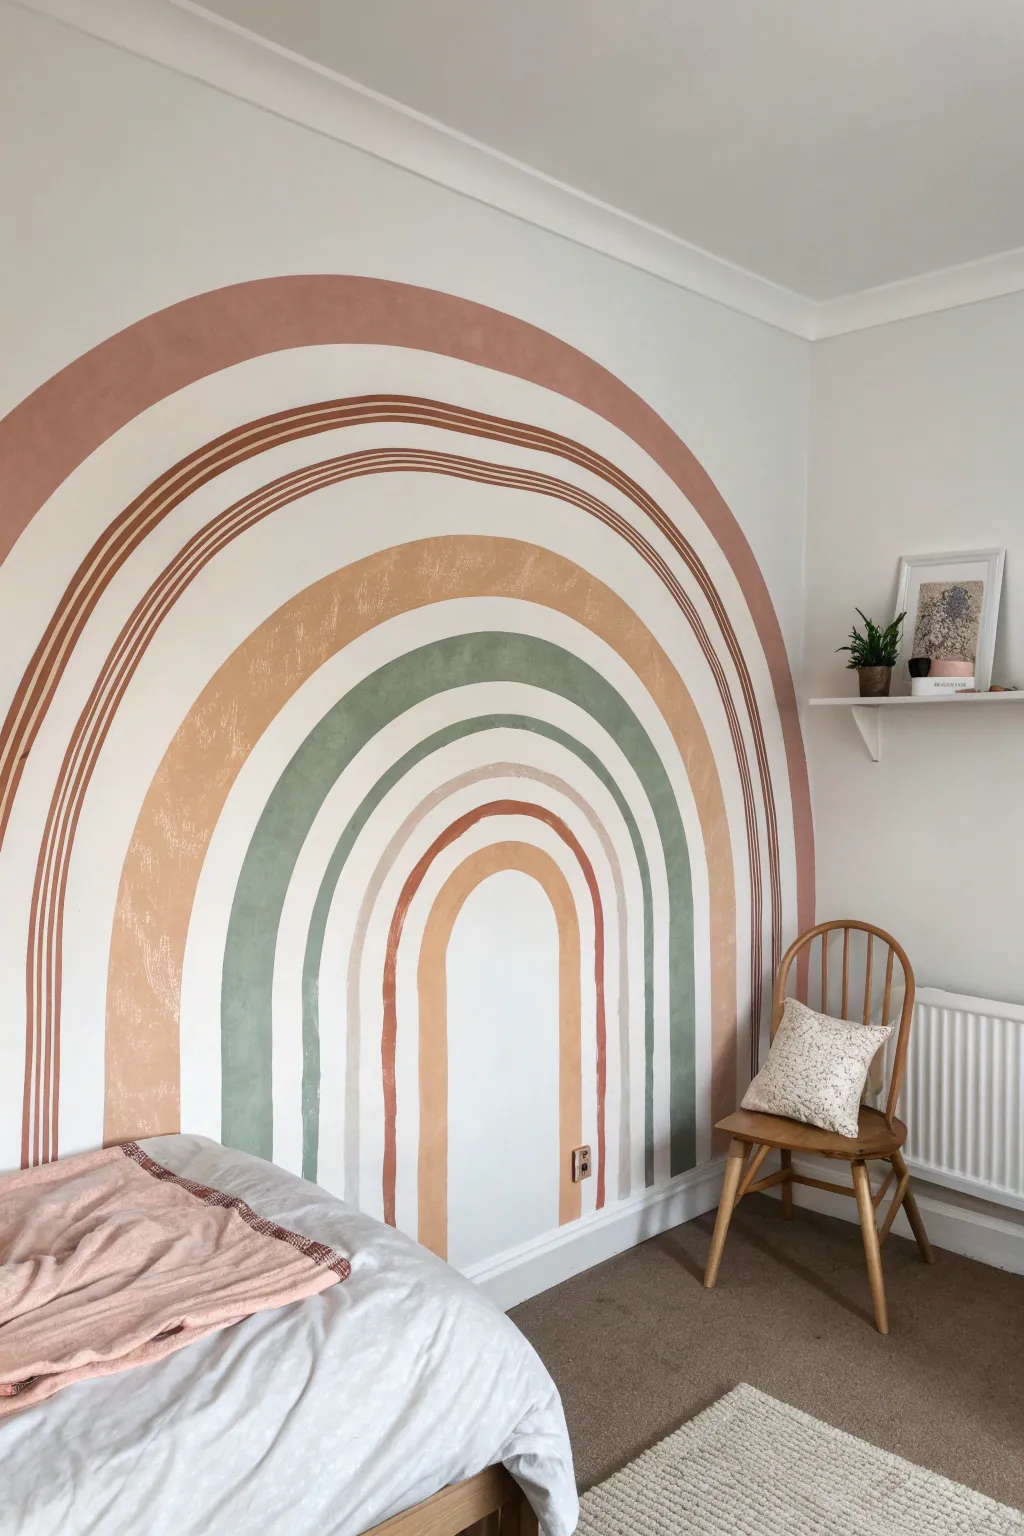
Transform a plain white wall into a stunning focal point with this large-scale, earth-toned rainbow arch. Its hand-painted, slightly imperfect edges give it a warm, organic feel that perfectly frames a bed or cozy reading nook.
Detailed Instructions
Materials
- Interior latex paint (white base)
- Sample pots of paint (terracotta, burnt orange, sage green, mustard yellow, beige)
- Pencil
- String or twine
- Painter’s tape
- Thumb tack or small nail
- 1-inch angled sash brush
- 2-inch flat synthetic brush
- Small round artist brush (size 6 or 8)
- Drop cloth
- Ladder or step stool
- Eraser
- Measuring tape
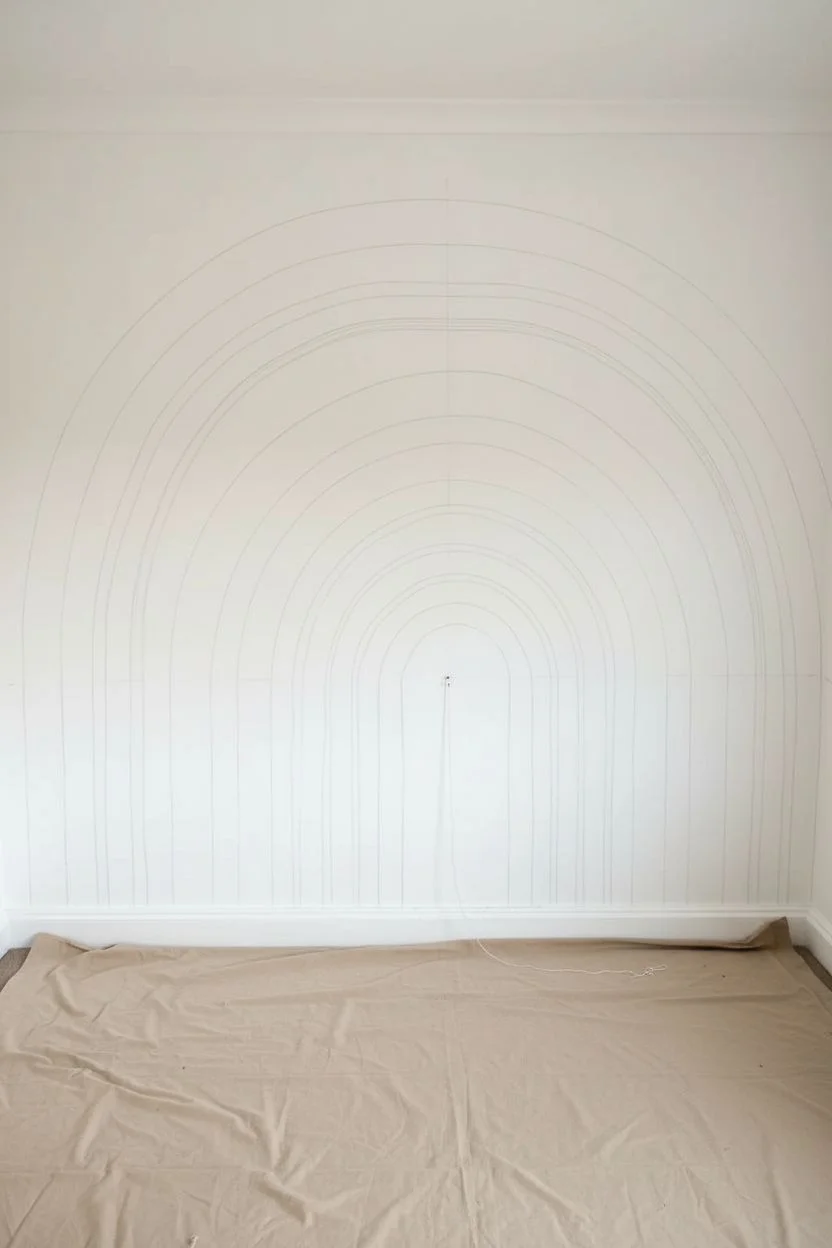
Step 1: Planning and Sketching
-
Prepare the workspace:
Clear the area of furniture, including the bed and chair shown in the photo. Lay down a drop cloth to protect your carpet or flooring from any accidental drips. -
Find your center point:
Measure the width of the wall or the specific area you want the rainbow to span. Mark a center point very low on the wall, just above the baseboard. This will be the anchor for your compass. -
Create a string compass:
Tie one end of a piece of non-stretchy string to a pencil. Tie the other end to a thumb tack or hold it firmly at your center mark. This simple tool is crucial for getting those nice, wide arcs. -
Sketch the outermost arch:
Extend the string to the desired height of your largest arch. Keeping the string taut, lightly draw a mesmerizing semi-circle from the baseboard on the left, up to the ceiling area, and down to the right. -
Mark the inner arches:
Adjust your string length to draw the remaining concentric arches. Based on the reference image, leave varied gaps between some arches. You will need roughly 6-7 distinct guide lines representing the tops of each color band. -
Review the composition:
Step back and look at your pencil faint lines. If an arch looks too wonky or the spacing feels off, now is the time to erase and adjust the string length.
Step 2: Painting the Bands
-
Start with the outermost band:
Begin with your widest brush and the terracotta/dusty rose color. Paint the outermost thick band, following your top pencil line. Don’t worry about being perfectly straight; the charm of this mural lies in the hand-painted look. -
Add the thin detail lines:
Switch to a smaller round brush or the edge of your 1-inch brush. Dip it into a darker burnt orange or brown shade to create the thin double stripes just inside the main arch. -
Paint the mustard wide band:
Using the mustard yellow or ochre paint, fill in the next wide section. I like to keep a defined gap of white wall space between this and the previous stripes to let the design breathe. -
Apply the sage green arch:
Using a clean 2-inch flat brush, paint the sage green curve. Focus on keeping the brush strokes vertical or following the curve to maintain a smooth texture. -
Create the inner pinstripes:
Using the small round artist brush and the sage green paint mix, add a very thin, delicate line mirroring the green arch, leaving about an inch of white space in betwen. -
Paint the inner terracotta arch:
Mix a lighter version of your first terracotta color or use a beige-orange tone. Paint a medium-thickness arch inside the green pinstripe. -
Finish the center arch:
Complete the rainbow with the smallest, central arch in a muted peach or clay tone. Ensure the bottom legs of all arches go straight down once the curve ends, hitting the baseboard cleanly.
Dry Brush for Texture
Don’t overload your brush with paint. A slightly ‘dry’ brush creates those lovely textured edges seen in the photo, making the wall look like plaster or canvas rather than a sticker.
Step 3: Refining and Styling
-
Touch up edges:
Once the paint is dry to the touch, inspect the edges. If any line looks too messy (beyond the desired boho style), use a small brush with your original white wall color to “erase” and neaten the edges. -
Erase visible pencil marks:
Check for any pencil guide lines that are still visible through the paint or in the white gaps. Gently erase them, being careful not to scuff the fresh paint. -
Thicken lower legs if needed:
Sometimes the vertical parts of the arch near the floor can look thin. You can go back and slightly widen the base of each color band to ground the mural visually. -
Let it cure:
Allow the entire mural to dry for at least 24 hours before pushing furniture back against the wall to prevent scuffing or sticking. -
Style the space:
Position your bed or chair back in place. The mural acts as a visual headboard, so centering your furniture with the middle of the rainbow creates a satisfying symmetry.
Color Harmony Trick
To ensure your colors coordinate perfectly, mix a tablespoon of your darkest color into your white base paint to create custom, lighter tints for the inner arches.
Step back and enjoy the warmth and personality your new hand-painted feature wall adds to the room
Ombre Gradient With Hand-Drawn Details

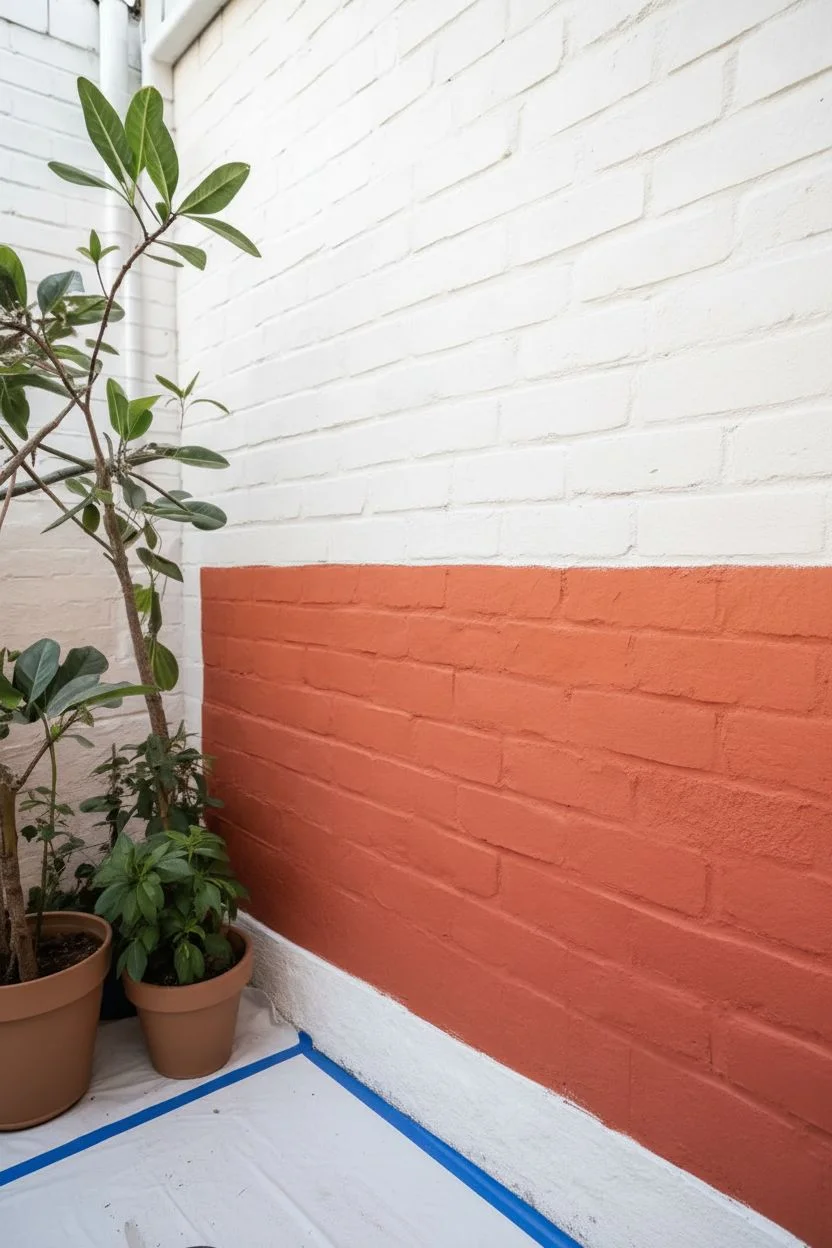
Transform a plain brick wall into a dreamy evening sky with this warm ombre gradient technique. The design features a smooth transition from creamy white to deep terracotta, accented by playful hand-painted stars that reverse colors as the background changes.
How-To Guide
Materials
- White exterior masonry paint
- Terracotta/burnt orange exterior masonry paint
- Paint roller and tray
- Large blending brush (soft bristle)
- Small round detail brush (size 2-4)
- Medium flat brush (for large stars)
- Painter’s tape
- Drop cloth
- Pencil or chalk
- Bucket of water and rags
Step 1: Preparation and Base Coat
-
Clean the surface:
Before starting, ensure the brick wall is thoroughly cleaned. Remove any dust, cobwebs, or loose debris with a stiff brush or broom so the paint adheres properly. -
Protect the area:
Lay down a drop cloth to catch drips and apply painter’s tape to any adjacent pipes, trim, or floor edges you want to keep paint-free. -
Establish the white zone:
Pour your white masonry paint into a tray. Paint the upper section of the wall (about the top 1/3) completely solid white using a roller to get into the brick texture. -
Define the dark zone:
Clean your roller or grab a fresh one. Pour the terracotta paint and cover the bottom 1/3 of the wall, ensuring full saturation in the mortar lines.
Brick Blending Secret
Use a nearly dry brush for the gradient blending on brick. Too much paint will pool in the mortar lines and ruin the soft fade effect.
Step 2: Creating the Ombre Gradient
-
Mix the mid-tone:
In a separate container, mix roughly equal parts of the white and terracotta paint to create a soft peach or salmon mid-tone. -
Apply the middle band:
Roll this mixed mid-tone color onto the middle section of the wall, leaving a gap of a few inches between it and the solid top/bottom colors. -
Wet blending – Top transition:
While the paint is still wet, dip a large soft brush slightly into white paint. Work the transition line between the top white section and the middle peach section using crisscross strokes. -
Refine the fade:
Continue blending until the line disappears. I find that keeping the brush slightly damp helps drag the pigment smoothly over rough brick. -
Wet blending – Bottom transition:
Repeat the process for the lower transition. Dip your blending brush into the terracotta color and work it into the bottom edge of the peach section blending upwards. -
Let it dry completely:
Allow the entire gradient wall to dry for several hours or overnight before starting the detail work.
Constellation Magic
Instead of random stars, map out real constellations like Cassiopeia or the Big Dipper on the upper section for a hidden personal touch.
Step 3: Adding the Celestial Details
-
Sketch the upper stars:
Using a pencil or chalk, lightly sketch outlines of five-pointed stars on the upper white section. scatter them randomly, varying their sizes for a natural look. -
Paint the upper stars:
Using the terracotta paint and a medium flat brush, fill in these star shapes. The contrast of the dark orange against the white brick looks striking. -
Create the lower star field:
Switch to your white paint and a small round detail brush. On the darkest bottom section, begin painting tiny four or five-pointed stars. -
Stipple star dust:
Fill the space between the defined white stars with simple dots. Vary the pressure to create different sized points of light. -
Build density:
Concentrate the white stars and dots heavily at the very bottom, making them sparse as you move up into the middle gradient section. -
Clean up edges:
Remove the painter’s tape carefully. Use a small brush to touch up any white paint that might have bled onto the floor or skirting.
Step back and admire your personal slice of sunset sky right in your own patio or room

PENCIL GUIDE
Understanding Pencil Grades from H to B
From first sketch to finished drawing — learn pencil grades, line control, and shading techniques.
Explore the Full Guide
Doorframe Florals That Act Like a Garland
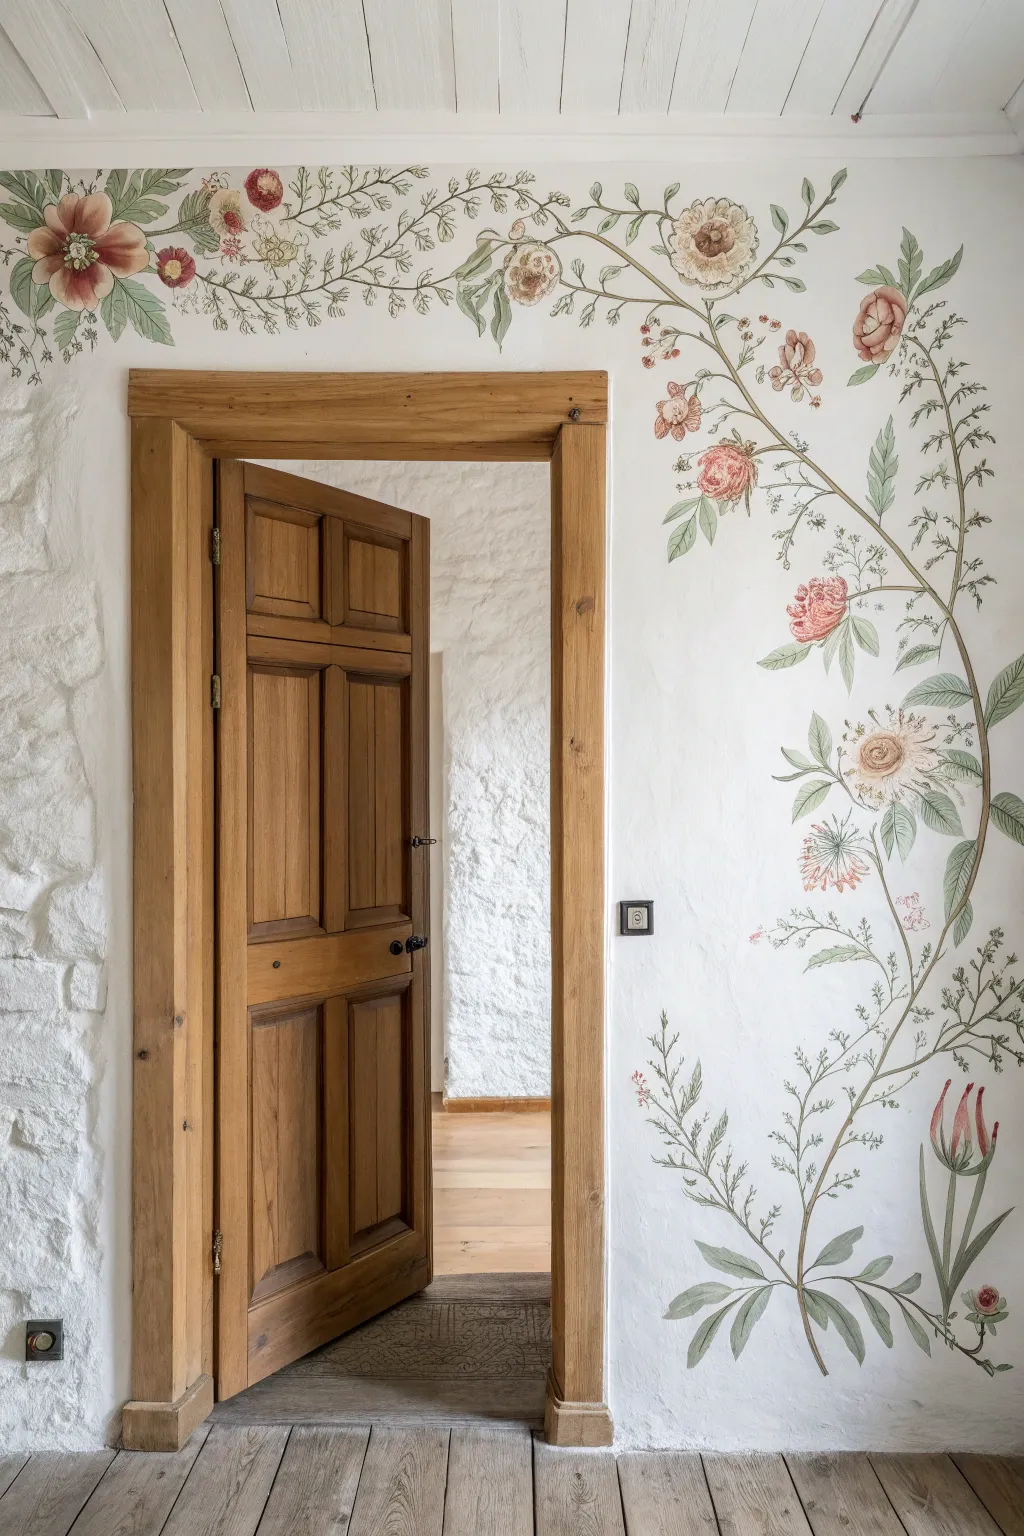
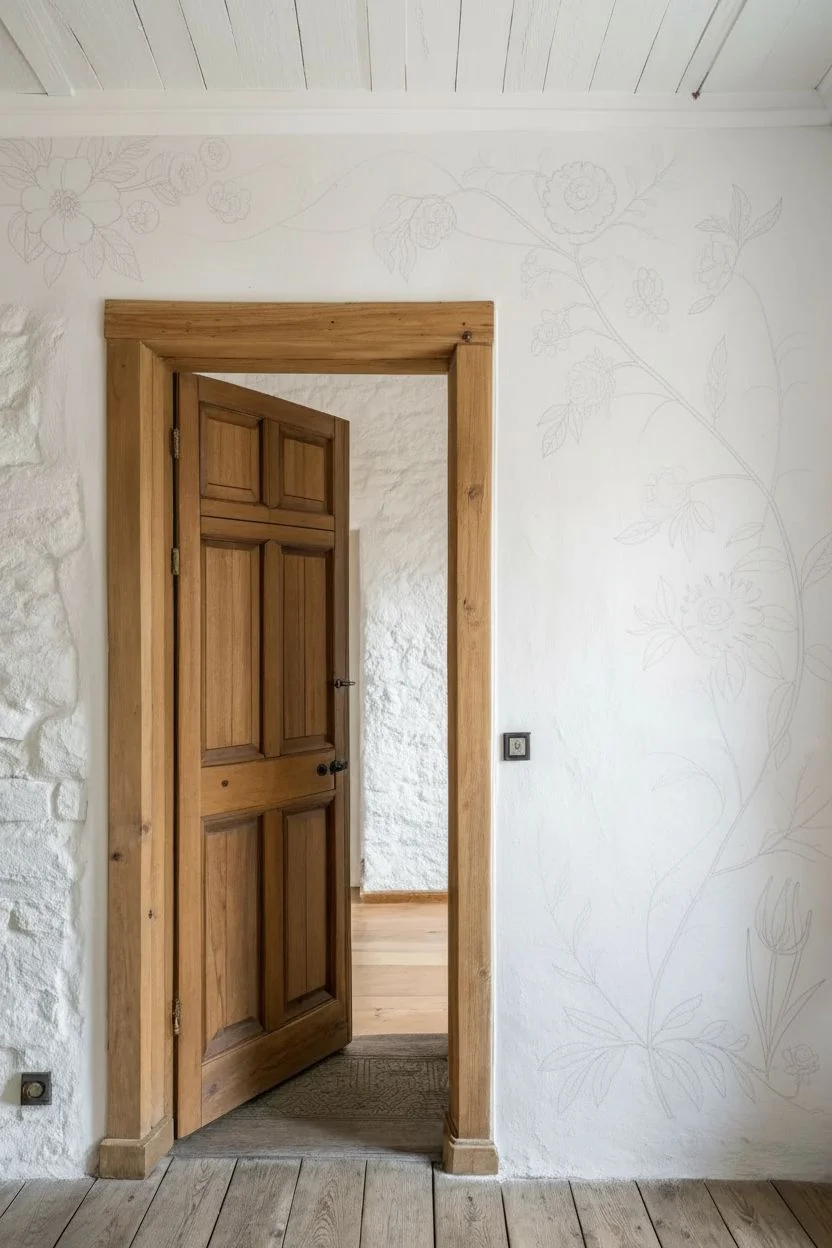
Transform a simple doorway into a storybook entrance with this delicate, vintage-inspired botanical mural. By painting a climbing vine that wraps around the corner and spills down the casing, you create an organic frame that feels timeless and whimsical.
Step-by-Step
Materials
- Matte latex wall paint (white or cream for base)
- Acrylic paints (olive green, muted sage, dusty rose, terracotta, cream, pale pink)
- Pencil
- Kneadable eraser
- Round synthetic brushes (sizes 2, 4, and 6)
- Small liner brush (size 0 or 00 for details)
- Paper plate or mixing palette
- Clean rag
- Water cup
- Stepladder
Step 1: Planning and Sketching
-
Prepare the Surface:
Ensure your wall is clean and dry. If the wall has a rough texture like the one in the photo, give it a quick dusting with a dry cloth to remove debris from the crevices. -
Map the Main Vine:
Using a light pencil grip, sketch the primary vine stem. Start from the top left corner above the door, letting it undulate gently across the top and curve gracefully down the right side of the doorframe. -
Position the Blooms:
Sketch circles or ovals to mark where the large flowers will sit. Place a large focal bloom near the upper corner curve and stagger smaller flowers down the vertical vine to create visual balance. -
Add Leaf Structure:
Draw the stems for the leaves branching off the main vine. Don’t worry about perfect leaf shapes yet; just establish the direction and flow of the foliage.
Step 2: Painting the Foliage
-
Mix Your Greens:
On your palette, mix an olive green with a touch of brown for the stems. Create a separate, lighter sage green for the leaves by adding white and a tiny dot of yellow. -
Paint the Stems:
Use a size 4 round brush to paint the main vine stems. Keep the pressure varied—press down for thicker sections and lift up for thinner, vine-like ends. -
Lay Down Leaf Base:
With the sage green mixture and a size 6 brush, fill in the leaf shapes. I find it helpful to start at the stem end of the leaf and pull the brush outward to create a natural point. -
Add Leaf Veins:
Once the base green is dry to the touch, use your liner brush and a slightly darker green mix to add delicate central veins to the larger leaves. -
Create Fern-Like Accents:
Intersperse small, fern-like sprigs using the liner brush. These should look like tiny, feathery branches extending from the main vine to fill empty spaces.
Uneven Texture?
If painting on rough stone or plaster, thin your acrylics slightly with water. This helps the paint flow into the deep crevices rather than skipping over the surface texture.
Step 3: Blooming Details
-
Base Coat the Flowers:
Mix a dusty rose and a pale pink. Paint the base shapes of the flowers using the size 6 brush. Keep the edges soft and slightly irregular to mimic natural petals. -
Layering Petals:
While the base is still slightly damp, add strokes of darker terracotta or deep red near the center of the flowers to create depth and shadow between petals. -
Highlighting:
Mix a creamy white with a touch of pink. Add highlights to the outer edges of the petals where the light would naturally hit, giving the blooms a three-dimensional look. -
Detailing Centers:
For the open-faced flowers, use the liner brush to stipple tiny dots of yellow and brown in the center to represent pollen and stamens. -
Buds and Berries:
Add small closed buds at the ends of thin stems using the darkest pink shade. You can also add tiny red berries in clusters for extra color variation.
Antique Finish
Mix a translucent glaze with a tiny drop of raw umber paint. Lightly wash over dried leaves to mute the bright colors and give the mural an aged, botanical illustration look.
Step 4: Refining and Final Touches
-
Clean Up Edges:
Step back and look for any pencil marks still visible. Gently dab them with the kneadable eraser once the paint is fully dry. -
Add Whispy Tendrils:
Using your thinnest liner brush and watered-down green paint, add very fine, curling tendrils coming off the main vine. This adds movement and whimsy to the design. -
Check Balance:
If any area looks too sparse, paint a few floating petals or a small extra leaf to fill the gap without making it look cluttered.
Step back and admire how your new floral archway softens the room and brings a touch of the garden indoors
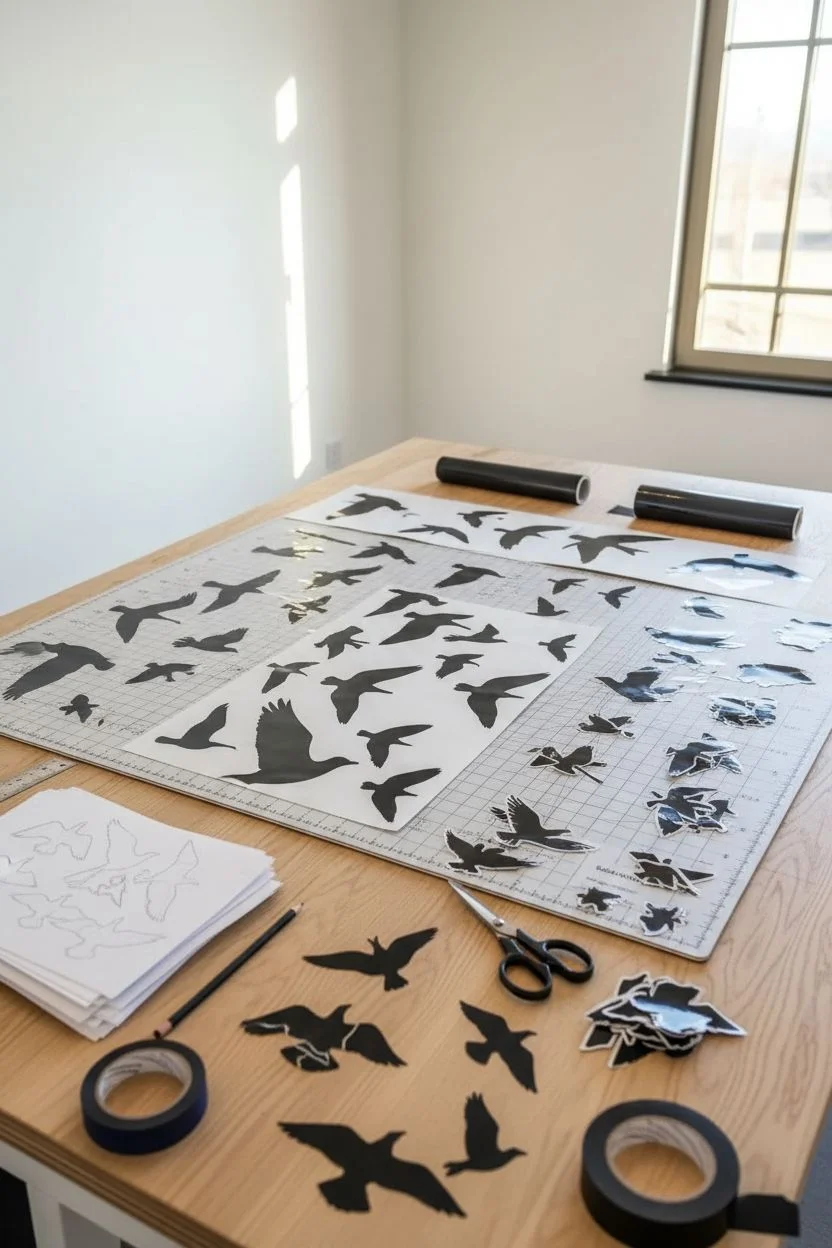
Bold Black Silhouette Mural for Instant Drama
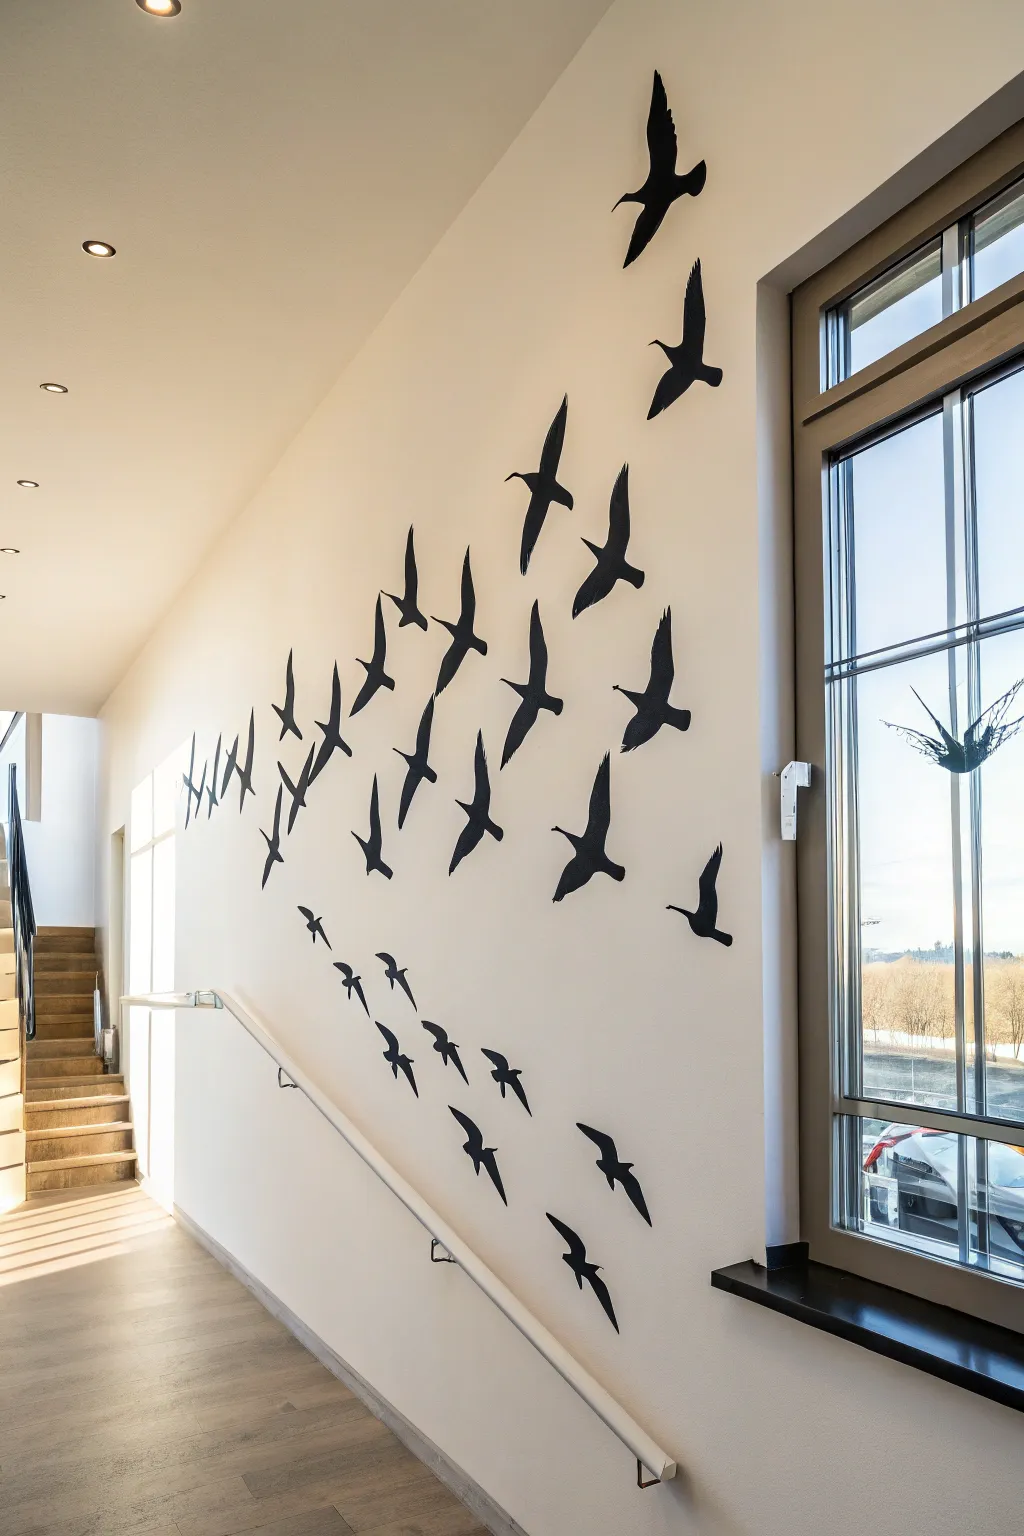
Transform a plain white stairwell into a dynamic art installation with this striking flock of birds. The high-contrast black silhouettes create instant drama and movement, creating the illusion of flight ascending with the stairs.
How-To Guide
Materials
- Black matte vinyl adhesive sheets OR black cardstock
- Removable mounting putty (if using cardstock)
- Pencil
- Bird silhouette templates (flight variations)
- Scissors or precision craft knife
- Cutting mat
- Painter’s tape
- Laser level (optional for alignment)
- Squeegee or credit card (if using vinyl)
Step 1: Planning and Design
-
Assess the space:
Stand at the bottom of the stairs and visualize the flow. Your flock should mimic the upward diagonal line of the handrail, starting sparse near the bottom and becoming denser towards the top. -
Source templates:
Find or draw simple bird silhouettes in various stages of flight—some gliding with wings flat, others flapping with wings banked. You’ll need at least 4-5 different poses to keep the flock looking natural. -
Create size variations:
Scale your templates. Print them in three sizes: large (for the foreground/focal points), medium (for the bulk of the flock), and small (to create depth and distance).
Step 2: Cutting the Birds
-
Prepare the material:
If using black vinyl sheets, lay them flat on your cutting mat. If choosing cardstock for a 3D effect, ensure it’s a heavy weight so the wings don’t sag. -
Trace the shapes:
Trace your templates onto the backing of the vinyl or the cardstock. Fit as many as possible on a sheet to minimize waste, but leave enough space between them for easy cutting. -
First rough cut:
Cut rough shapes around each bird first to separate them from the main sheet. This makes the detailed cutting much easier to manage. -
Detailed cutting:
Use precision scissors or a sharp craft knife to cut exactly along the lines. Focus on sharp tips for the wings and beaks to maintain a crisp silhouette. -
Organize your flock:
Group your cutouts by size and pose. This organization will be crucial when you’re standing on the stairs trying to make quick placement decisions.
Sticky Situation?
If vinyl is peeling at the wing tips, apply a tiny dot of repositionable glue stick. For cardstock falling off, clean the wall spot with rubbing alcohol to remove dust before re-sticking.
Step 3: Installation
-
Mark the trajectory:
Use painter’s tape to lightly mark a general diagonal ‘flow line’ on the wall parallel to the stairs. This helps prevent the flock from drifting too high or too low. -
Place the anchor birds:
Start with your largest birds. Position them loosely along the center of your flow line using small loops of painter’s tape for temporary placement. -
Fill in the gaps:
Add the medium-sized birds around the large ones. Avoid placing them in straight lines; stagger heights and angles to mimic natural flight patterns. -
Add detail with small birds:
Place the smallest silhouettes at the edges of the flock or trailing behind at the bottom. This creates a sense of perspective. -
Step back and review:
Walk down the stairs and view the composition from a distance. Adjust any birds that look clustered or out of sync with the overall movement. -
Secure the artwork:
Once happy with the layout, commit to the placement. For vinyl, peel the backing and smooth onto the wall with a squeegee to remove bubbles. -
Securing cardstock option:
If using cardstock, apply small amounts of mounting putty to the body of the bird only. I like to gently fold the wings outward slightly to create a shadow behind them. -
Final clean up:
Remove your guide tape and check for any adhesive residue or smudges on the wall, wiping gently with a clean cloth.
Add Dimension
Use black foam tape instead of flat adhesive for the cardstock birds. This lifts the shapes slightly off the wall, casting real shadows that change throughout the day as the light moves.
Now enjoy the upward momentum your new aerial art brings to the space


Leaf Print Wall Drawing Cluster for an Organic Look
Bring the serene elegance of a forest floor directly onto your textured walls with this surprisingly simple technique. By combining decoupage methods with natural elements, you can create a seamless, fossil-like botanical imprint that appears to have grown right out of the stone.
Detailed Instructions
Materials
- Fresh fern fronds (or high-quality realistic silk ferns)
- Matte Mod Podge or heavy gel medium
- Foam brush
- Small bristle brush (for details)
- Brayer or rolling pin
- Paper towels
- Wax paper
- Matte clear sealant spray
Step 1: Preparation & Selection
-
Clean the surface:
Begin by gently dusting your textured wall with a dry cloth or soft brush. You need to remove any loose grit or dust to ensure the medium adheres properly to the stone or plaster. -
Select your specimens:
Choose fern fronds that are relatively flat. If you are using fresh ferns, pick ones that aren’t too thick or woody at the stem. I like to press them between heavy books for just an hour to flatten them slightly without drying them out completely. -
Dry fit the arrangement:
Hold your ferns up to the wall to determine the best placement. Look for natural flow; imagine how plants would naturally climb or drape across the surface.
Natural Fade
Fresh leaves will eventually brown. For permanent green, use high-quality printed paper cutouts or realistic silk leaves instead.
Step 2: Application Process
-
Apply base medium:
Using your foam brush, apply a generous layer of matte Mod Podge or gel medium directly onto the wall where your first fern will go. Work it into the texture of the stone. -
Coat the botanical:
Lay your fern on a sheet of wax paper. Apply a thin, even coat of the medium to the back side of the frond. Be careful not to tear delicate leaflets. -
Position the fern:
Gently press the adhesive side of the fern against the prepared spot on the wall. Start pressing from the stem and work your way up to the tip. -
Secure the bond:
Place a clean piece of wax paper over the fern on the wall. Use a brayer or your fingers to firmly press the leaf into the wall’s crevices. The goal is to make the leaf follow the contours of the rough texture. -
Peel and check:
Slowly peel back the wax paper. If any edges are lifting, dab a tiny bit more medium under them and press down again.
Ancient Stone Look
After drying, lightly dry-brush white or cream paint over the raised parts of the fern to make it look like a fossilized carving.
Step 3: Sealing & Finishing
-
Top coat application:
Once the fern is secured, switch to your foam brush again. Apply a layer of medium over the top of the entire fern. This seals it and helps blend the edges into the wall. -
Texture integration:
While the top coat is wet, use a bristled brush to stipple (tap vertically) over the fern. This pushes the plant material further into the stone’s texture, enhancing that ‘fossilized’ look. -
Cleanup edges:
Use a damp paper towel to wipe away any excess glue that spread too far from the leaf edges. Doing this now prevents a shiny halo effect later. -
Repeat the process:
Continue this method for any additional fern fronds, creating a cluster or a trailing vine effect as seen in the inspiration image. -
Let it cure:
Allow the entire arrangement to dry completely. This usually takes closer to 24 hours depending on humidity and the thickness of your gel medium. -
Final matte seal:
To remove any residual tackiness and unify the sheen, spray the area lightly with a matte clear sealant. This protects the color and keeps the finish natural.
Step back and admire how seamlessly nature has merged with your architecture
Constellation Wall Drawing With Subtle Connecting Lines
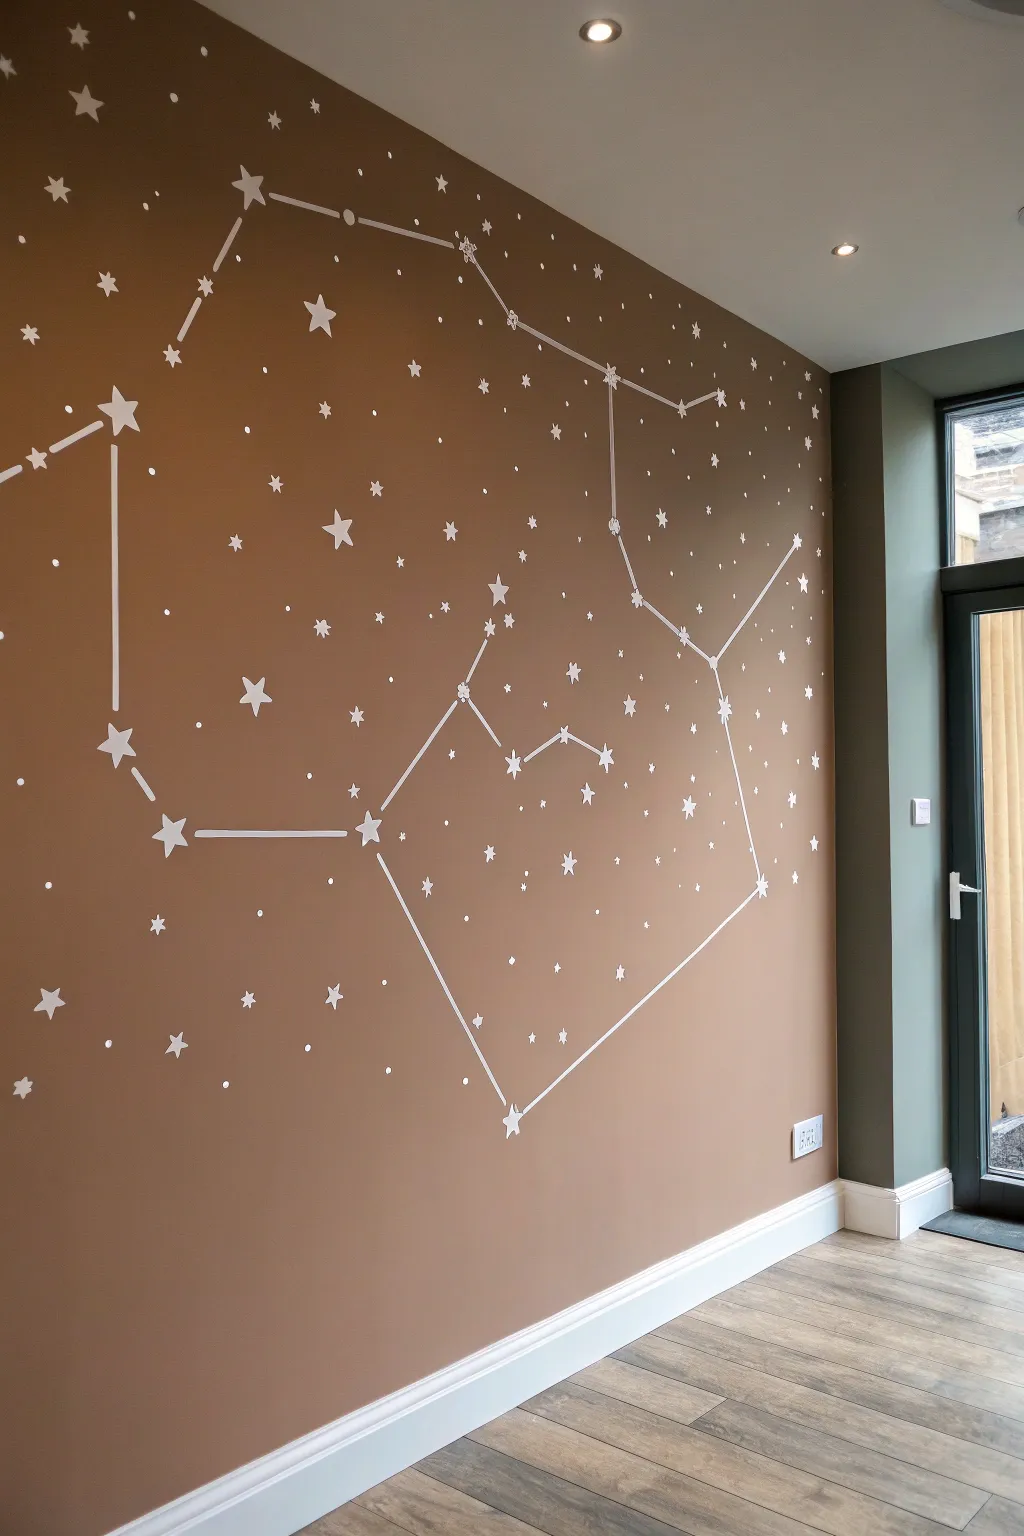
Bring the night sky indoors with this sophisticated constellation mural that turns a plain wall into a celestial feature. The combination of clean white lines and scattered stars against a warm earth-tone creates a dreamy yet modern focal point for any room.
Step-by-Step Tutorial
Materials
- Interior wall paint (warm mocha or tan color)
- White acrylic paint or specialized wall art paint
- Pencil
- White paint pen (medium tip)
- White paint pen (fine tip) or fine liner brush
- Ruler or straight edge
- Painter’s tape
- Star stencils (various sizes) or cardstock to make your own
- Small stencil brush or sponge applicator
- Laser level (optional), spirit level
Step 1: Preparation and Base Coat
-
Prepare the surface:
Begin by ensuring your wall is clean, dry, and free of dust. Fill any holes or cracks with spackling paste and sand smooth once dry to create the perfect canvas. -
Apply base color:
Paint the entire wall with your chosen background color. The example uses a warm, earthy mocha tone, which provides excellent contrast for the white stars. Apply two coats if necessary and allow it to dry completely—ideally overnight—so your tape and stencils won’t lift the fresh paint later.
Step 2: Mapping the Constellations
-
Plan your layout:
Look at star charts or choose specific constellations like Ursa Major or Orion. Sketch a rough plan on paper first to visualize how they will fit across your wall’s dimensions. -
Mark star positions:
Using a pencil, lightly mark the positions of the main ‘anchor’ stars that form the constellation shapes. Step back frequently to check the scale and placement. -
Draft connecting lines:
Use a long ruler or straight edge to lightly draw pencil lines connecting your anchor stars. A laser level can be incredibly helpful here to check general alignment, though constellations don’t need to be perfectly geometric.
Clean Lines Trick
Before painting white between your tape strips, paint a thin layer of your base wall color (mocha) first. This seals the tape edge so any bleed is invisible.
Step 3: Painting the Stars
-
Create star stencils:
If you don’t have pre-made stencils, cut out several five-pointed star shapes from cardstock in three different sizes: large for anchors, medium for secondary stars, and small for background filler. -
Paint anchor stars:
Start with the largest stars at your marked ‘anchor’ points. Secure your stencil with painter’s tape and use a stencil brush with a very small amount of white paint. Tap the paint on (stippling motion) rather than brushing to prevent bleed-under. -
Add medium stars:
Once the main constellation points are dry, scatter medium-sized stars around the composition, following your initial plan or placing them randomly where the wall feels empty. -
Freehand tiny stars:
For the smallest background stars, use a fine-tip white paint pen or a small round brush. Simply dot the wall or draw tiny crosses to represent distant glimmering stars. I find varying the density makes the sky look more realistic. -
Refine edges:
If any stenciled stars look fuzzy, use a small angled brush and a tiny bit of the base wall color to clean up the edges once the white paint is dry.
Glow in the Dark
Mix a clear glow-in-the-dark medium into your white paint for the stars. By day it looks crisp white, but at night the constellation mapping will softly glow.
Step 4: Connecting the Lines
-
Tape the lines:
To get crisp, straight lines connecting your constellations, apply painter’s tape along the pencil lines you drew earlier. Place two strips of tape parallel to each other, leaving a thin gap (about 1/8 to 1/4 inch) between them. -
Seal the edges:
Press the tape edges down firmly with a credit card or your thumbnail to ensure paint doesn’t seep underneath. -
Paint the connections:
Fill in the gap between the tape strips with white paint. A small foam roller or a flat brush works well here. Apply thin coats to avoid ridges. -
Remove tape:
Peel off the tape carefully while the paint is still slightly tacky—this helps create a cleaner edge than waiting for it to be fully cured. Pull the tape away at a 45-degree angle. -
Touch up gaps:
Where the lines meet the stars, there might be a small gap. Use your white paint pen to manually bridge the connection so the line appears to go straight into the center of the star.
Step back and admire your personal galaxy, creating a peaceful atmosphere perfect for dreaming.
One-Point Perspective City Sketch That Expands the Room
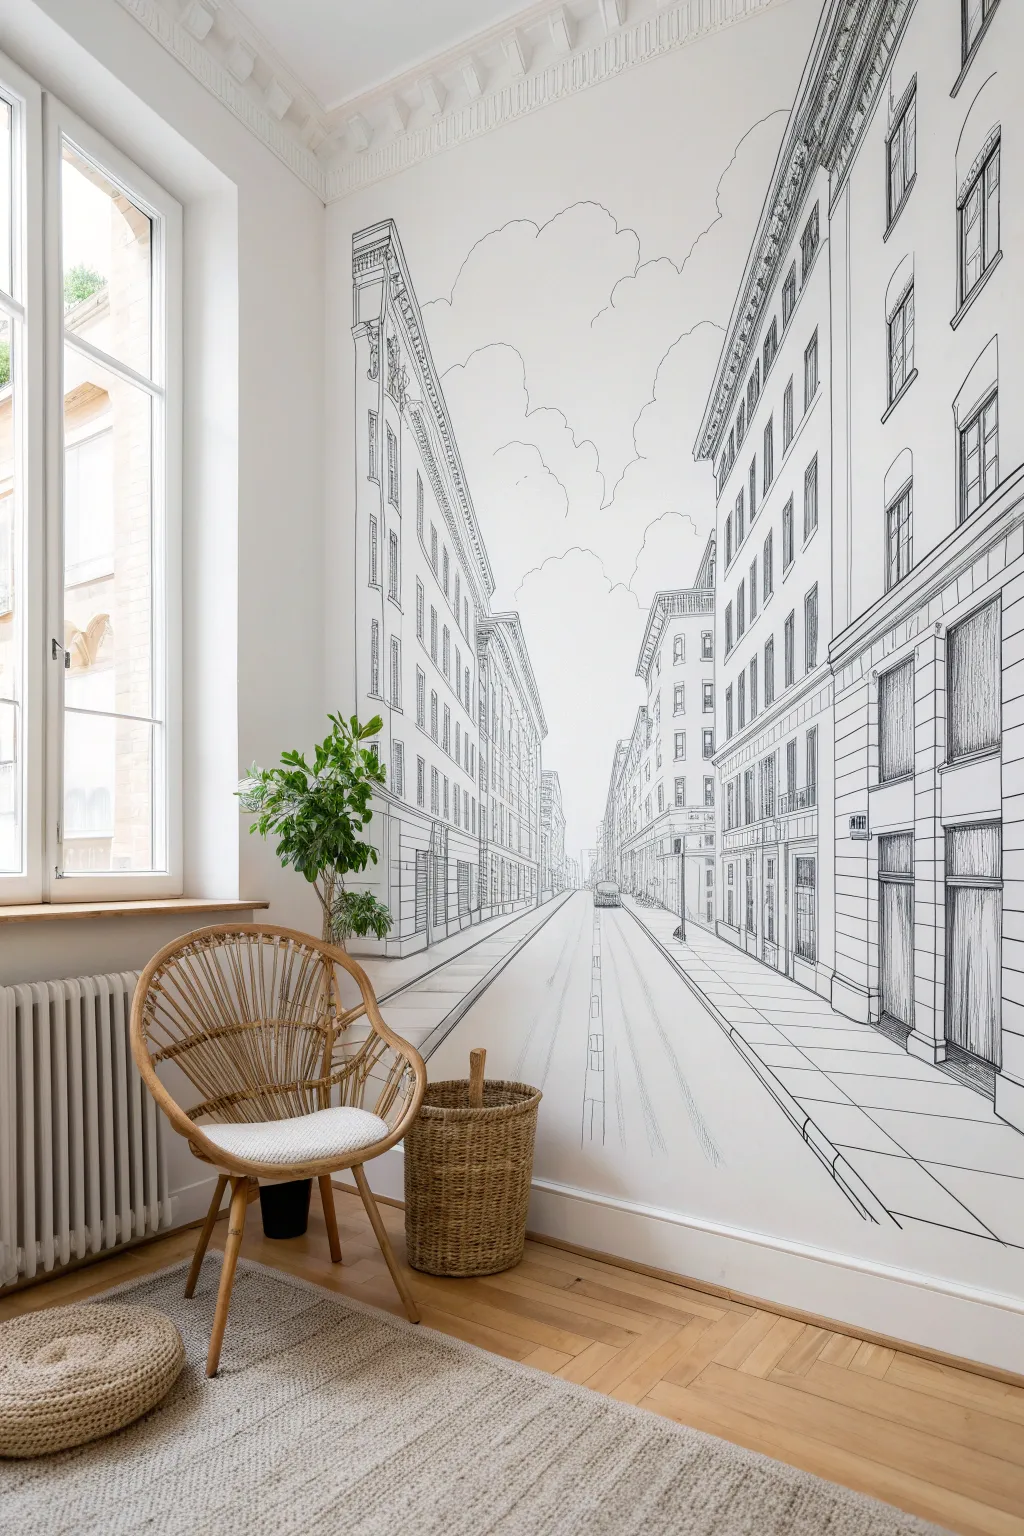
Transform a blank wall into a bustling cityscape with this immersive one-point perspective drawing. Using simpl bold lines and architectural details, this mural creates an incredible sense of depth that visually expands the size of your room.
Step-by-Step Guide
Materials
- High-quality interior wall paint (white or off-white base)
- Black acrylic paint or latex paint
- Paint markers (black, various tip sizes: fine, medium, broad)
- Pencil (HB or 2H for light sketching)
- Large gum eraser
- Long straight edge or level (4-foot minimum)
- Measuring tape
- Painter’s tape
- Ladder or step stool
- Reference image of a street scene
- Small angled brush (for cutting in visuals)
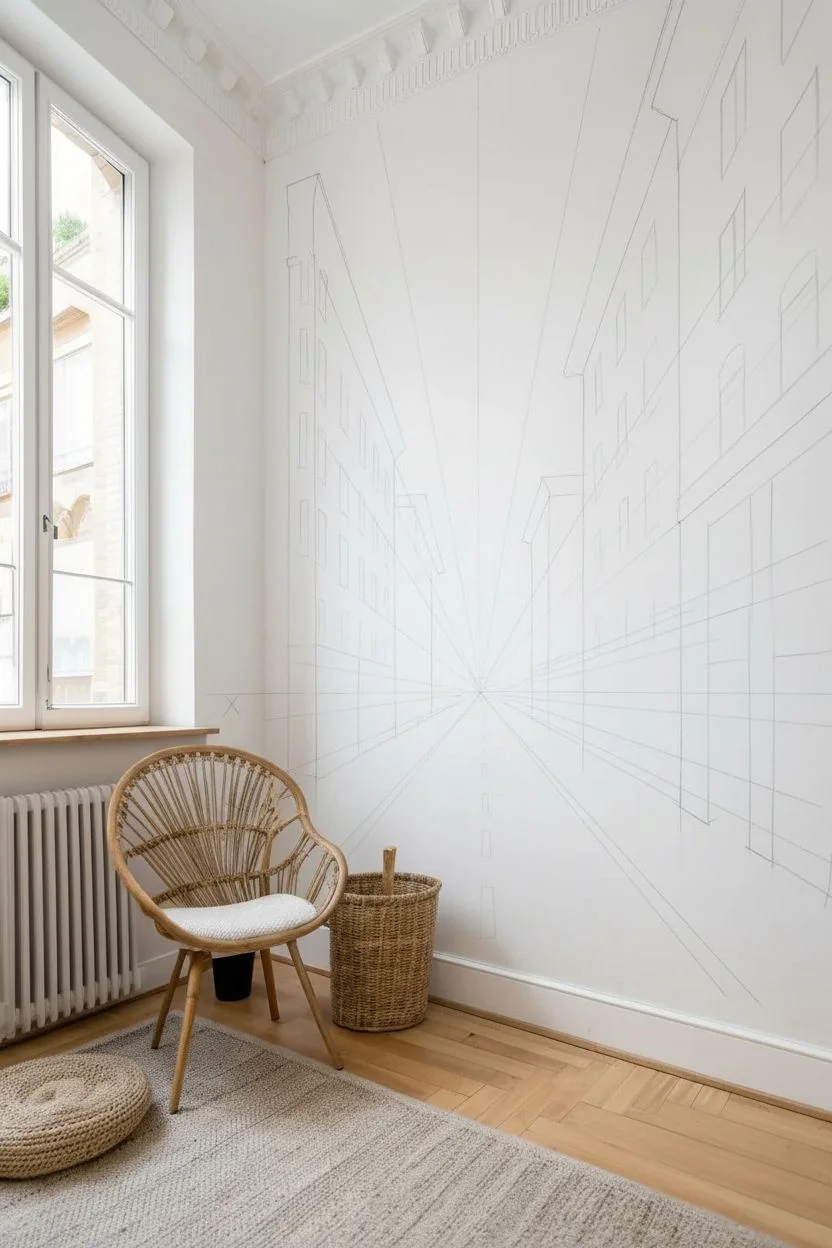
Step 1: Preparation & Mapping
-
Prepare the canvas:
Ensure your wall is clean, dry, and painted with your base color. A matte or eggshell finish works best to reduce glare on the final line work. If you’ve just painted the base, let it cure for at least 24 hours. -
Establish the horizon line:
Decide on your eye level. For this mural, the horizon line is relatively low (about waist height) to emphasize the towering buildings. Use your level and pencil to draw a faint horizontal line across the wall. -
Mark the vanishing point:
Place a small ‘X’ on your horizon line. This is your single vanishing point. All diagonal lines for the buildings, sidewalks, and road will converge exactly at this spot. -
Sketch the main perspective lines:
Using your long straight edge, draw light pencil lines radiating from the vanishing point. These will serve as the top and bottom edges of your buildings and the curbs of the street. -
Block in vertical structures:
Draw vertical lines perfectly perpendicular to the floor to define the corners of your buildings. Don’t worry about windows yet; just focus on the main boxes of the architecture.
Straight Edge Secret
Tape a string to your vanishing point. Pull it taut to any point on the wall to instantly check if your perspective angles are correct before drawing.
Step 2: Architectural Sketching
-
Define the building facades:
Flesh out the shapes of the buildings. Since objects get smaller as they recede, make the buildings in the foreground wider and limit the detail on the distant ones. -
Add window grids:
Lightly sketch the horizontal and vertical lines for windows. Remember, the horizontal tops and bottoms of the windows on the side walls must angle back toward your vanishing point. -
Sketch the cornice details:
Add decorative elements like roof cornices or ledges. These small overhangs add realism. I like to keep these loose and sketch-like rather than rigid technical drawings. -
Draw sidewalk and street details:
Pencil in the curb lines and pavement squares. Add the center lane markings on the road, ensuring they get thinner and closer together as they approach the vanishing point. -
Add cloudy sky elements:
Sketch billowing, cloud-like shapes at the top of the mural. These soft, organic curves will provide a nice contrast to the sharp, geometric lines of the architecture.
Step 3: Inking & Defining
-
Outline main structures:
Switch to your medium or broad-tipped black paint marker (or a small brush with black paint). Trace over your main structural pencil lines first to establish the ‘bones’ of the city. -
Vary line weights:
Use thicker lines for objects in the foreground (closest to the viewer) and thinner lines for the distant buildings near the vanishing point. This naturally enhances the feeling of depth. -
Fill in windows:
Using a finer marker, draw the interior frames of the windows. For visual interest, darken some window panes completely with black paint to suggest shadows or reflection. -
Detail the stonework:
Add horizontal rustication lines (the grooves between stones) on the lower levels of the foreground buildings. Keep these lines slightly imperfect to mimic the hand-drawn style. -
Ink the organic elements:
Trace your cloud shapes with a thin, slightly wavy line. You don’t want these to look heavy, so use a light touch. -
Add texture and hatching:
Use fine hatching (closely spaced parallel lines) to add shading under ledges, inside window frames, or on the shady side of the street. This ‘sketchy’ texture is key to the aesthetic. -
Final clean up:
Once the paint and marker ink are completely dry, gently erase any visible pencil guidelines. I find using a large gum eraser prevents smudging the wall paint.
Wobbly Lines?
Don’t panic if lines aren’t laser-straight. The charm of this mural is its hand-sketched look. Minor wobbles actually make the drawing feel more authentic.
Step back and admire how your new cityscape instantly opens up the room with metropolitan charm
Glow-In-The-Dark Night Garden for a Secret Surprise
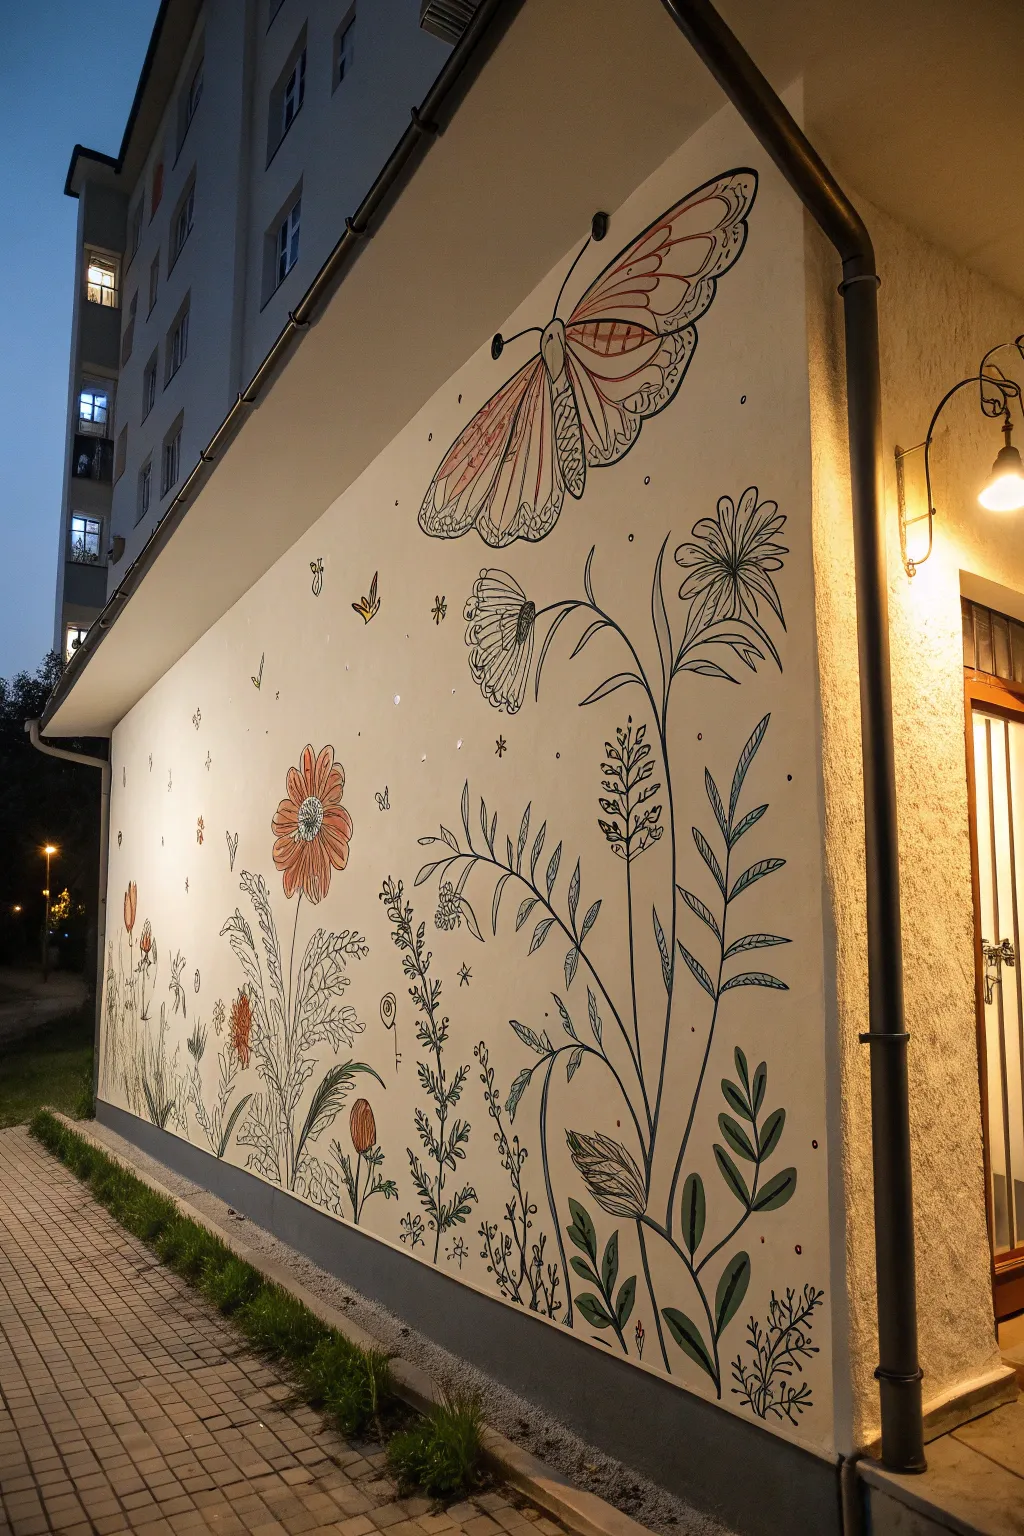
Transform a plain exterior wall into a magical garden with this large-scale mural featuring delicate line art and soft, vintage-inspired colors. The design combines oversized butterflies and wildflowers in a sketch-like style that looks stunning by day and enchanting under warm evening lights.
Step-by-Step Tutorial
Materials
- Exterior primer (white or off-white)
- Exterior acrylic latex paints (various muted colors: coral, sage green, cream, pale yellow)
- Black exterior paint or paint markers (for outlines)
- Small and medium artist brushes
- Painters tape
- Chalk or a light pencil for sketching
- Ladder or sturdy step stool
- Drop cloths
- Projector (optional but recommended for scale)
- Clear exterior sealant (matte finish)
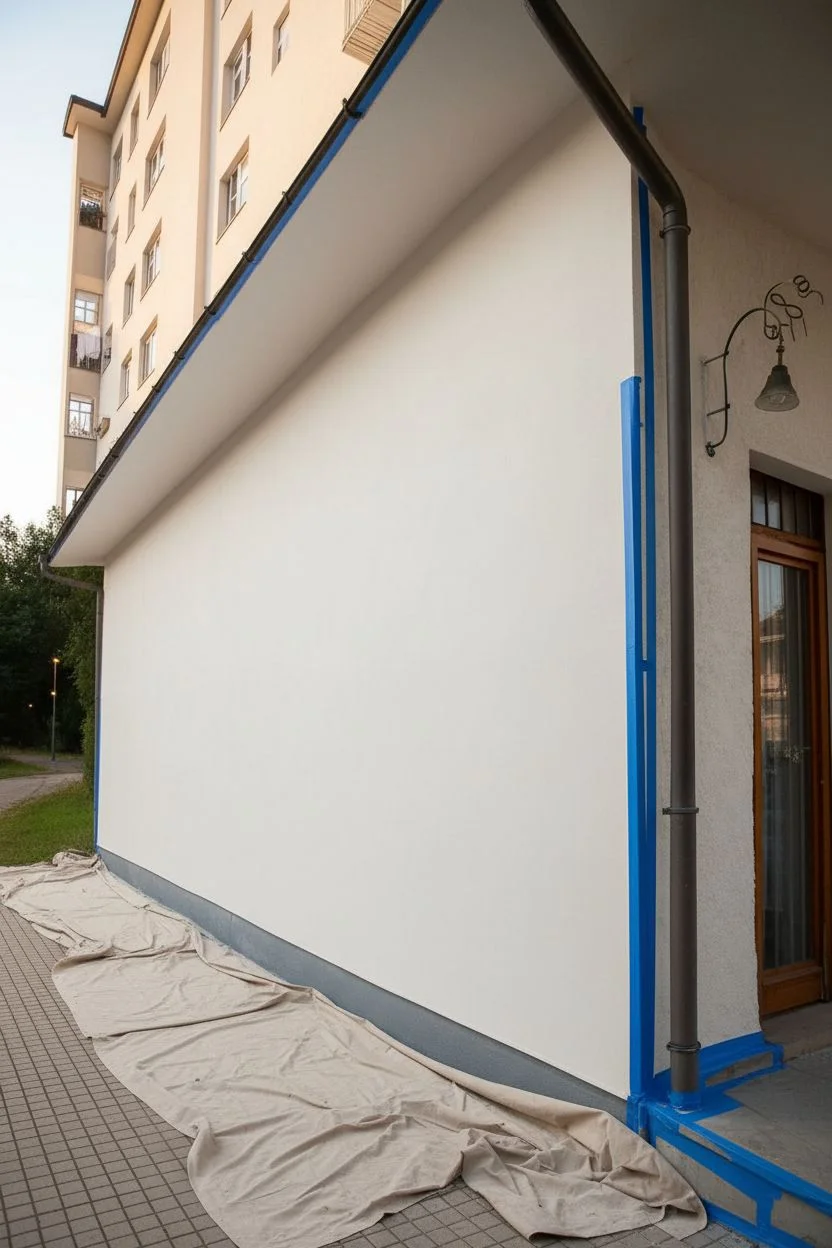
Step 1: Preparation and Base
-
Prepare the surface:
Clean the exterior wall thoroughly to remove dust, dirt, and cobwebs. If the stucco texture is very rough, use a stiff brush to ensure loose debris is gone. -
Protect the area:
Lay down drop cloths along the base of the wall to protect the pavement or garden bed from drips. Tape off any adjacent trim, pipes, or light fixtures. -
Apply the background:
Roll on a coat of off-white or cream exterior primer/paint to create a clean, blank canvas. Let this dry completely according to the manufacturer’s instructions.
Rough Texture Help
If painting on rough stucco, dab the brush rather than dragging it to get clean lines. Acrylic paint markers with thick nibs can also provide better control than brushes on bumpy walls.
Step 2: Sketching the Design
-
Plan the composition:
Decide where your largest elements will go. The giant butterfly should be high up near the top right, while the tall wildflowers should anchor the bottom, growing upward. -
Draft the outlines:
Using a projector at night is the easiest way to get the scale right. Project your line art onto the wall and trace the main shapes lightly with chalk. If drawing freehand, start with general sweeping curves for the flower stems to establish flow. -
Detail the butterfly:
Sketch the large butterfly wings near the roofline. Focus on the vein structures within the wings, as these will be important for coloring later. -
Add floral variety:
Draw a mix of flower types—daisies, wheat-like stalks, bell flowers, and leafy ferns. Vary the heights so the garden feels organic and wild.
Use UV Paint
For a true ‘night garden’ surprise, trace over key elements like wing veins or flower centers with clear UV-reactive paint that will invisibly charge by day and glow softly at night.
Step 3: Line Work and Coloring
-
Paint the black outlines:
Using a thin round brush and black, durable exterior paint, carefully go over your chalk sketches. Keep the lines relatively thin to maintain that delicate, illustration-style look. -
Vary line weight:
For a more dynamic look, slightly thicken the lines on the underside of leaves or stems to suggest shadow and weight. -
Add color washes:
Once the black lines are dry, start adding color. The goal isn’t to fill every shape solidly. Instead, use a ‘dry brush’ technique or watered-down paint to add swatches of color to specific petals or leaves. -
Color the butterfly:
Fill sections of the butterfly wings with muted coral and cream tones. I prefer leaving some segments unpainted or just partially filled to keep the artwork feeling airy and light. -
Paint the flowers:
Add touches of dull orange to center flowers and sage green to selected leaves. Leave roughly 50% of the design as just black and white line art. -
Layer details:
Go back in with your black paint to add tiny details like stamen dots, leaf veins, or small flying insects around the main flowers.
Step 4: Finishing Touches
-
Create background ambiance:
Dip a toothbrush in slightly watered-down white or glow-in-the-dark paint and flick it to create tiny specks or ‘pollen’ floating in the empty spaces. -
Clean up lines:
Step back and look for any shaky lines or drips. Touch these up with the background cream color. -
Seal the mural:
Apply a clear, matte exterior sealant over the entire mural. This protects the pigments from UV fading and weather damage. -
Install lighting:
Allow the wall to dry fully. Position a warm exterior wall sconce or uplighting to illuminate the artwork, making the colors glow warmly against the night sky.
Enjoy the view of your enchanted night garden every time you come home in the evening


Have a question or want to share your own experience? I'd love to hear from you in the comments below!