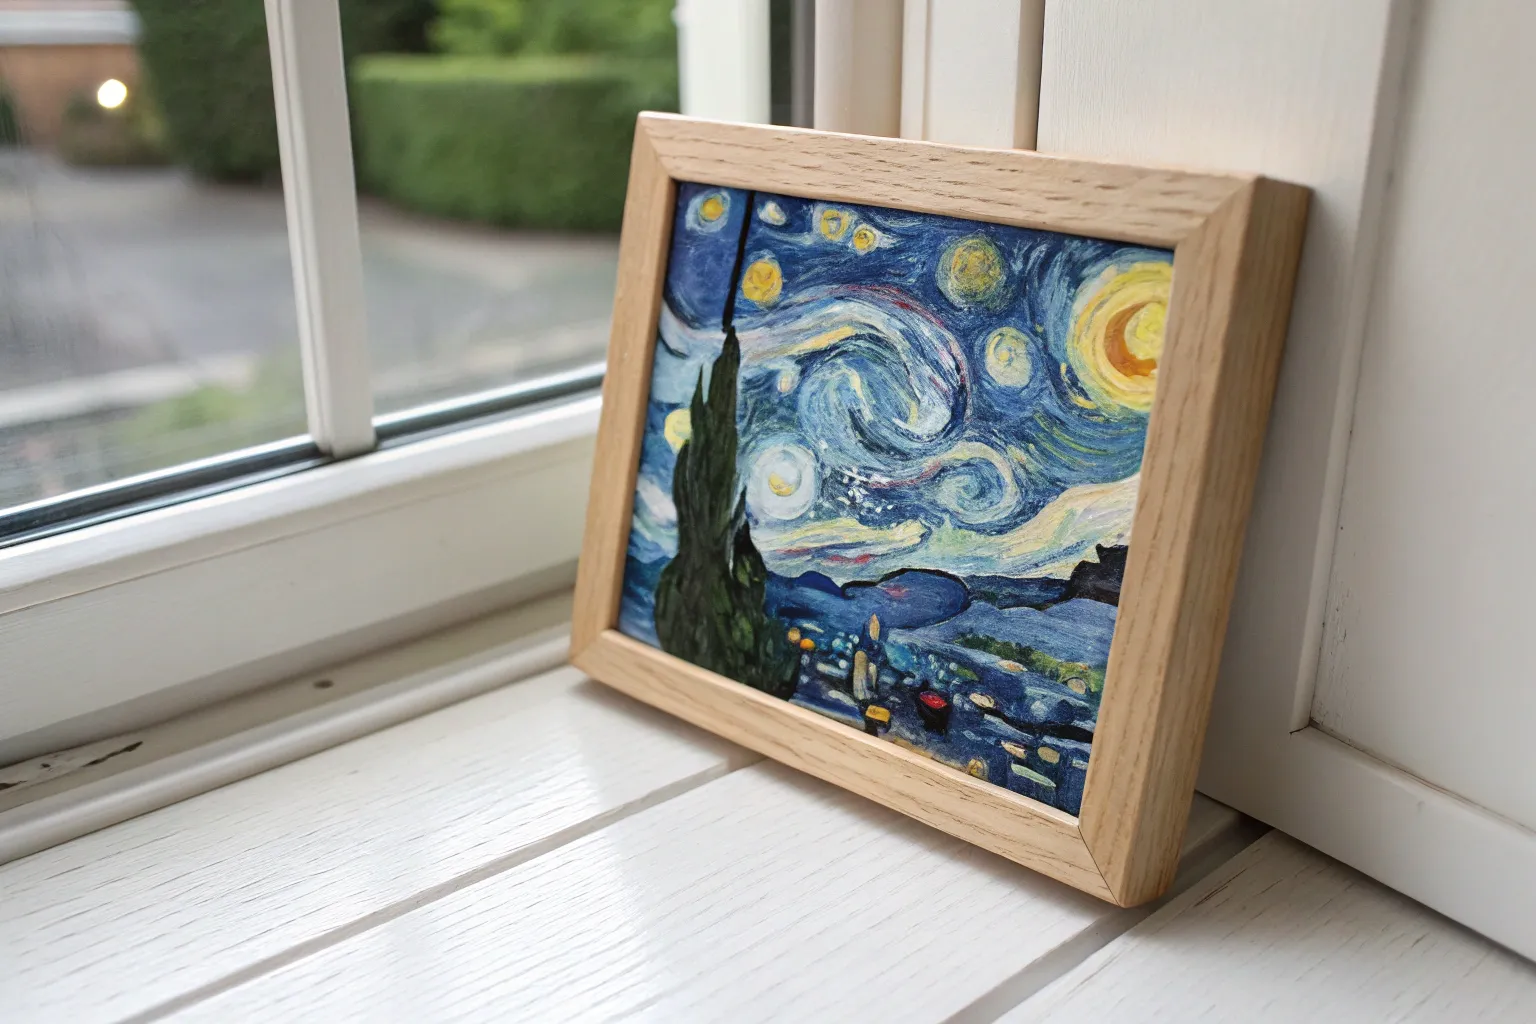
If you love that iconic swirling sky look, a starry night painting is one of the most satisfying projects you can tackle—no matter your skill level. I pulled together my favorite starry night painting ideas that keep the vibe recognizable while giving you plenty of room to make it totally yours.
Easy Starry Night With a Bold Cypress Silhouette
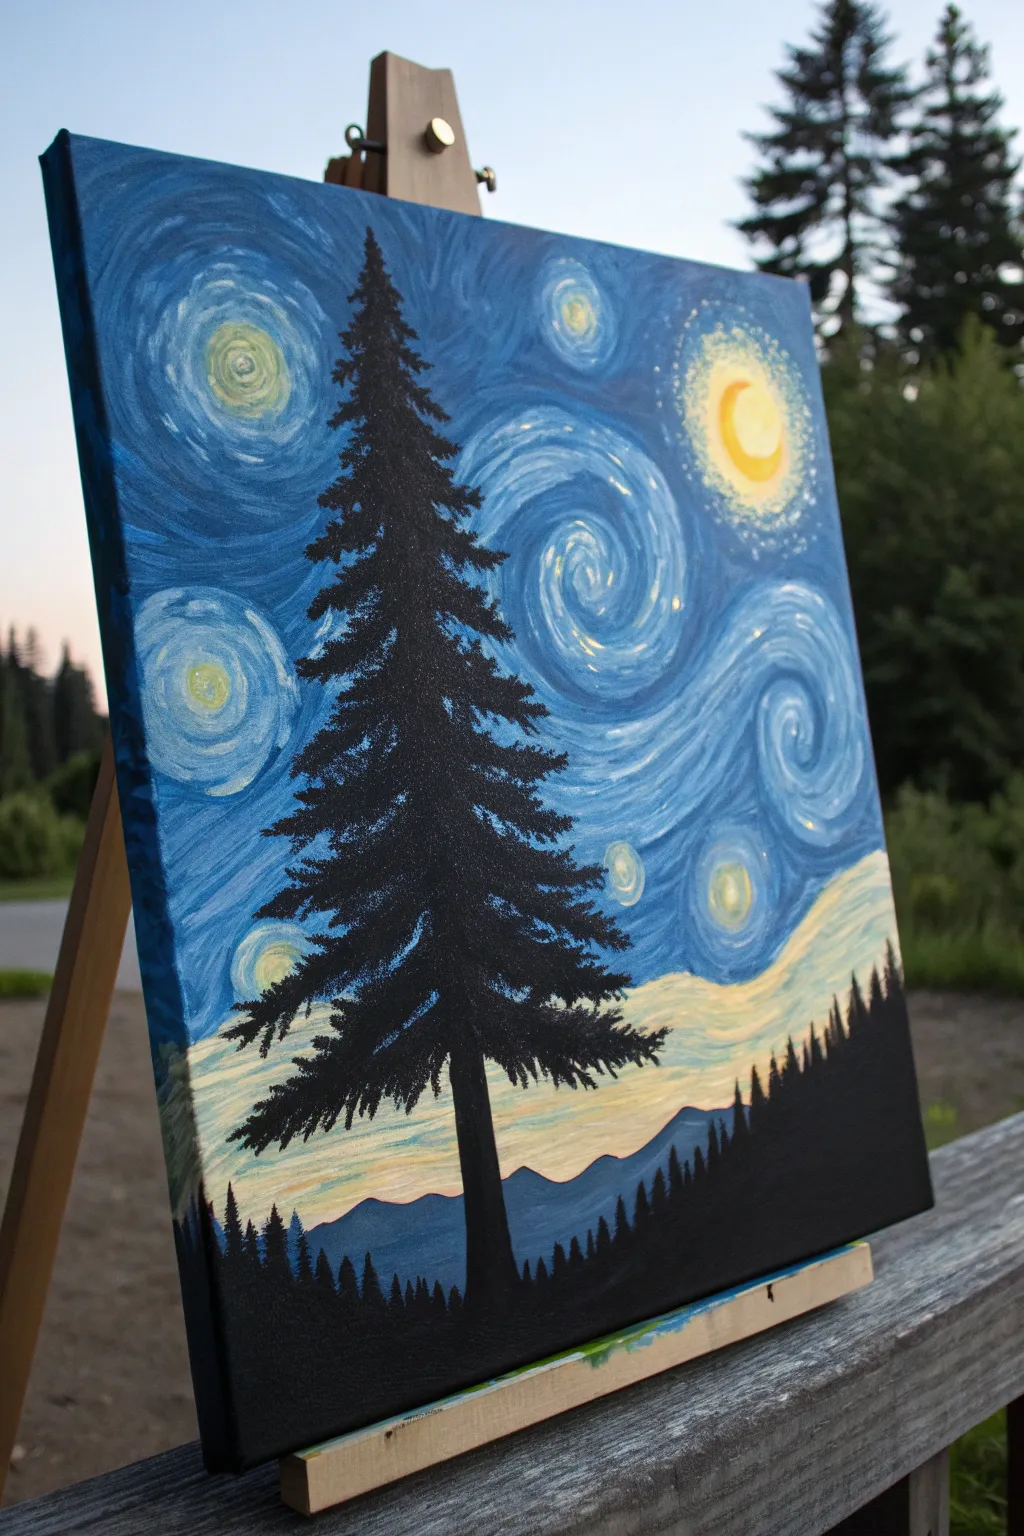
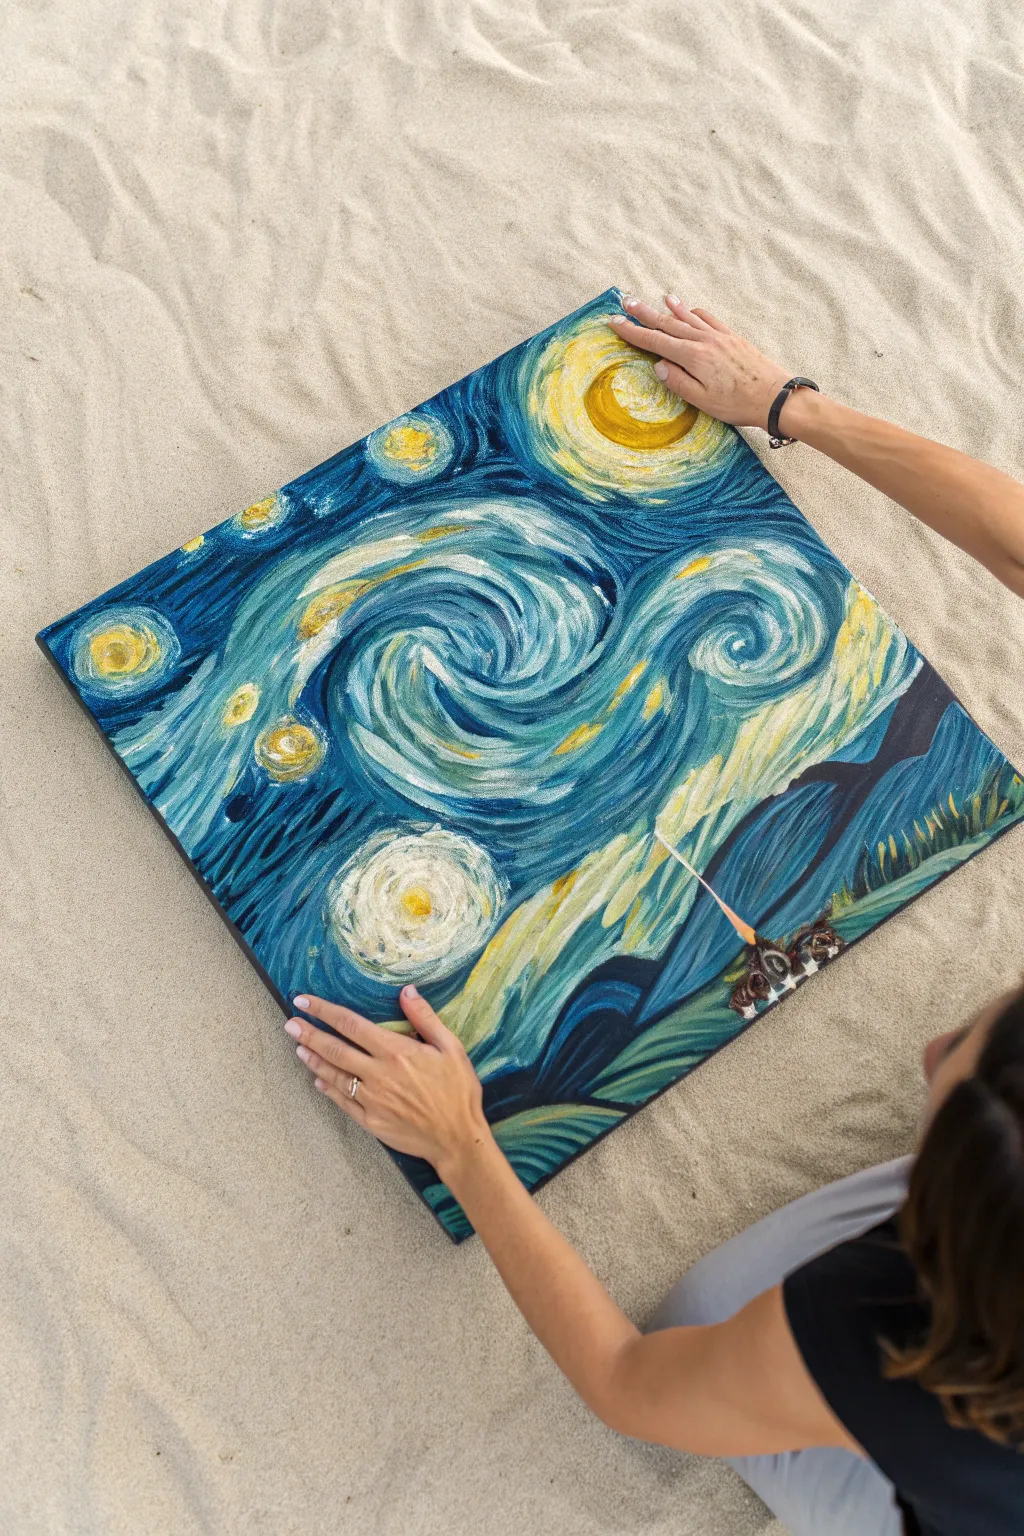
This striking acrylic painting merges the iconic swirling energy of a Starry Night sky with a serene, Pacific Northwest-inspired landscape. The bold, black silhouette of a towering pine tree anchors the composition, creating a beautiful contrast against the dreamy blues and yellows.
Step-by-Step Tutorial
Materials
- Stretched canvas (e.g., 11×14 or 16×20 inches)
- Acrylic paints: Phthalo Blue, Ultramarine Blue, Titanium White, Cadmium Yellow, Mars Black
- Paintbrushes: Large flat brush, medium filbert brush, small round brush, liner brush
- Palette or paper plate
- Cup of water and paper towels
- Pencil (optional for sketching)
- Easel
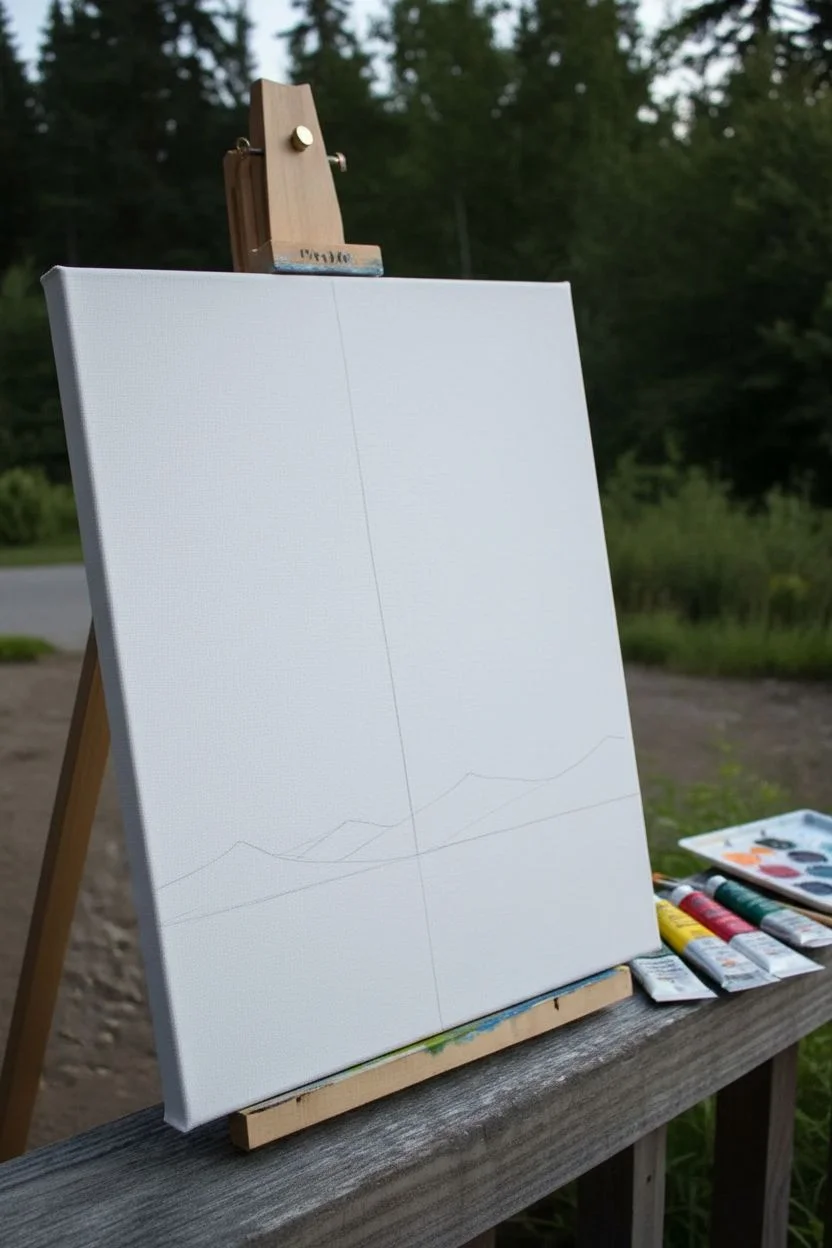
Step 1: Planning the Composition
-
Sketch the horizon:
Start by lightly sketching a low horizon line about one-quarter up from the bottom of the canvas. Add a few gentle peaks to indicate distant mountains. -
Position the main tree:
Draw a vertical line roughly in the center (or slightly off-center for interest) to mark the trunk of your large foreground tree. Don’t worry about the branches yet; this is just a guide and will be painted over.
Step 2: Creating the Starry Sky
-
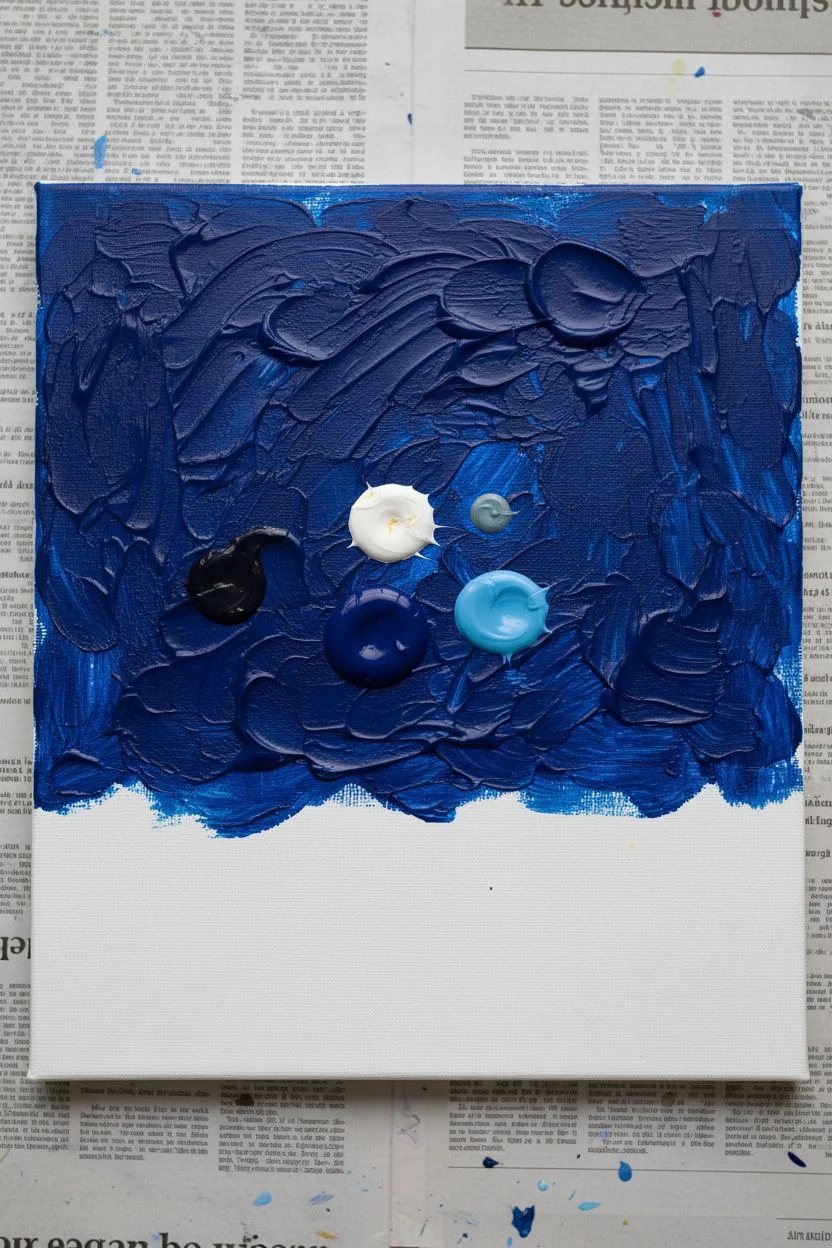
Base coat the sky:
Using your large flat brush, mix Phthalo Blue with a touch of Titanium White. Cover the entire sky area above your mountain line with a smooth, medium-blue base coat. Let this layer dry completely. -
Map out the moon and stars:
Dip your medium filbert brush into Cadmium Yellow mixed with a lot of White. Paint a crescent moon shape in the upper right corner and several circles scattered around the sky for stars. -
Start the swirls:
Switch to a smaller round brush. Mix a lighter blue using White and Phthalo Blue. Paint dashed, curved lines swirling around your yellow stars and moon, echoing the famous Van Gogh movement. -
Deepen the contrast:
Now, use pure Ultramarine Blue or a dark navy mixture. Paint short, dashed strokes in the empty spaces between the light swirls, following the same curved direction to enhance the flow. -
add the glow:
Using a very pale yellow (mostly white), dab small broken lines immediately surrounding the yellow star centers and the moon to create a radiant ‘glow’ effect. -
Blend the wind:
Create a distinct ‘wind’ current across the middle of the sky by painting a series of long, connected S-shaped swirls using your lightest blue mixture. Keep the strokes visible and textured; we don’t want a smooth gradient here.
Keep it Moving
For the sky, don’t over-blend your colors. The charm of this style comes from seeing the individual brushstrokes
Step 3: Painting the Landscape
-
Paint the background sky:
Just above the mountain line, blend a strip of very pale yellow and white horizontally. This mimics the light pollution or sunset glow often seen in starry night variations. -
Block in the mountains:
Mix a dark blue-grey color (Ultramarine Blue plus a tiny dot of Black and White). Paint the mountain range silhouette, letting the bottom edge remain wet. -
Add the distant forest:
While the mountain paint is fresh or just after it dries, mix a darker shade of blue-black. Paint a jagged, sawtooth line along the bottom of the canvas to represent a distant forest of trees on the horizon.
Make it Yours
Swap the pine tree for a recognizable silhouette from your own region, like a cactus for a desert night or a palm tree for a tropical vibe
Step 4: The Silhouette Foreground
-
Paint the main trunk:
Load your brush with pure Mars Black. Paint the trunk of your large tree over your initial pencil guide, making it wider at the base and tapering to a point near the top of the canvas. -
Start the top branches:
Using a small round brush or liner brush, dab small, irregular strokes at the very tip of the tree. These should be short and point slightly upward. -
Build the tree volume:
Work your way down the trunk, making the branches wider and heavier as you go. Use a stippling or dabbing motion to simulate pine needles. I find it helpful to leave small ‘windows’ of sky showing through the branches to keep the tree from looking like a solid triangle. -
Extend the branches:
For the lower half of the tree, allow the branches to droop slightly under their own weight before curving up at the tips. Extend them out aggressively to overlap your starry sky work. -
Ground the tree:
Fill in the bottom foreground with solid black, merging the base of the tree into the distant tree line you painted earlier. Add shorter vertical strokes along this black strip to suggest grass or smaller saplings. -
Final touches:
Step back and look at your composition. If the sky needs more pop, add a few tiny dots of pure white in the center of the stars or along the wind swirls for extra sparkle.
Allow your masterpiece to dry completely before displaying it on a shelf or hanging it on your wall


Simple Village Strip Under a Starry Night Sky
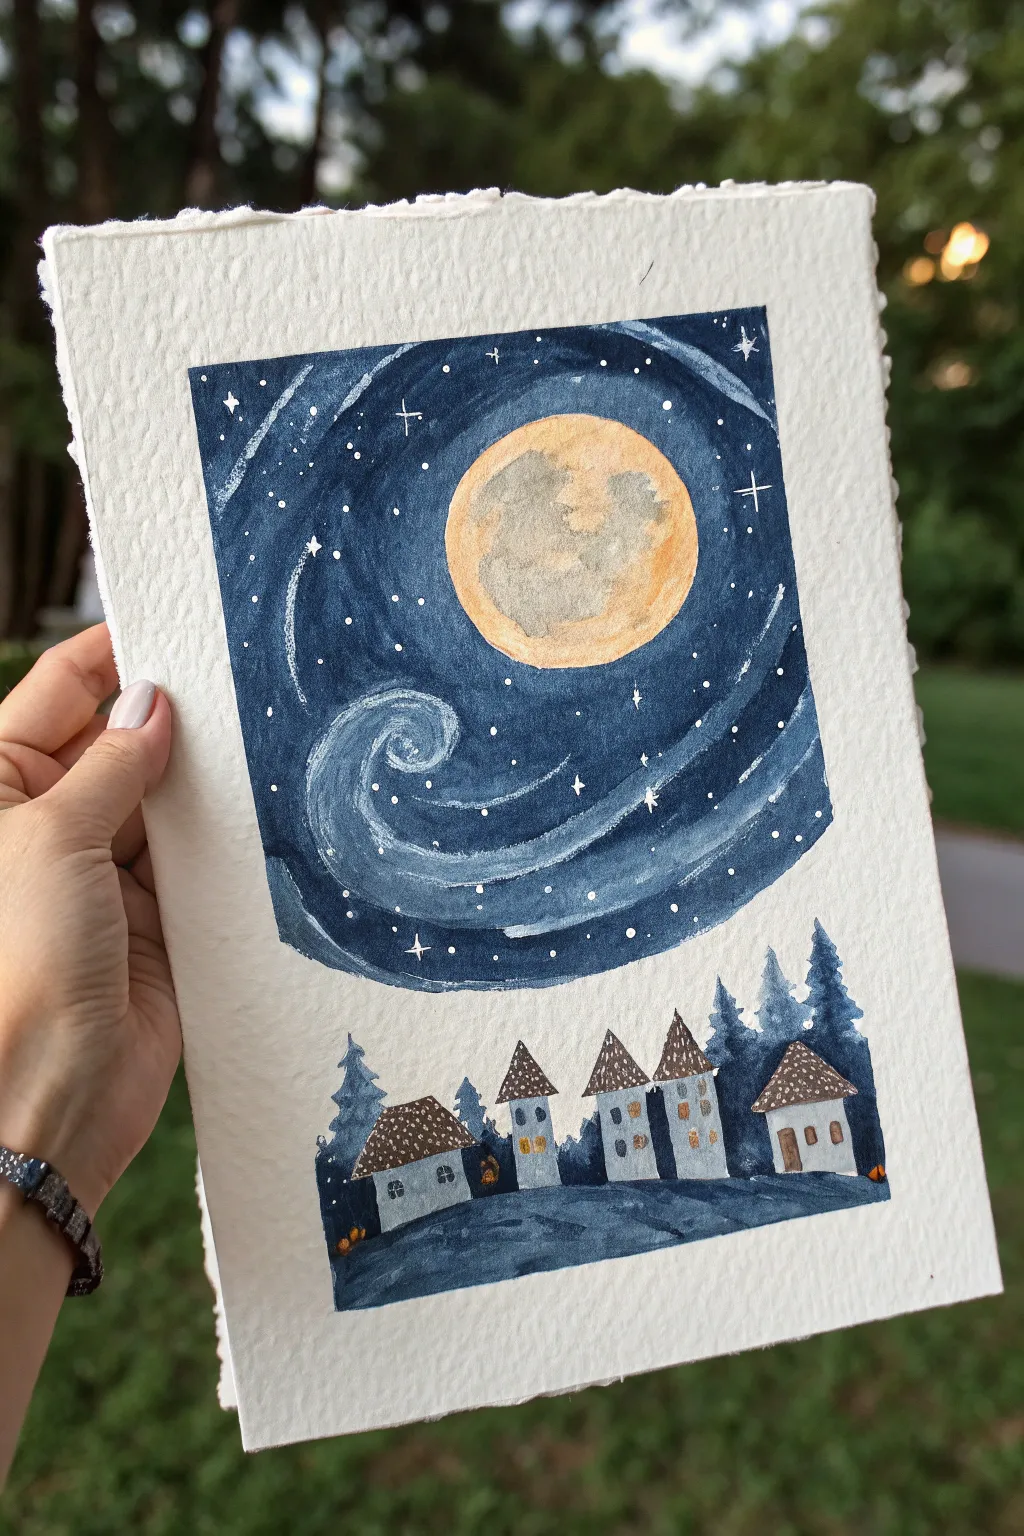

Capture the magic of a Van Gogh-inspired night sky swirling above a cozy, stylized village. This watercolor project uses deep indigo blues and bright, textured moons to create a dreamy, storybook atmosphere perfect for framing.
Step-by-Step Guide
Materials
- Cold press watercolor paper (deckle edge optional)
- Watercolor paints: Indigo, Prussian Blue, Yellow Ochre, Burnt Sienna, Payne’s Grey
- White opacity medium: White Gouache or White Gel Pen
- Round brushes: Size 6 for washes, Size 0 or 1 for details
- Pencil and eraser
- Masking tape or fluid (optional for moon)
- Palette for mixing
- Two jars of water
Step 1: Planning and Sketching
-
Define the Composition:
Visualize your paper divided into two main sections: a larger, square-ish area at the top for the sky, and a smaller rectangular strip at the bottom for the village. -
Sketch the Moon:
Lightly draw a large circle in the upper third of the sky section. Don’t worry about perfect symmetry; a slightly organic shape adds character. -
Outline the Village:
Sketch a row of quirky, uneven houses along the bottom strip. Very lightly draw cone-shaped roofs and simple rectangular bodies. Add some tiny windows and pine tree shapes tucked between the buildings.
Moon Texture Trick
While the moon paint represents wet, sprinkle a tiny pinch of salt on it. Let it dry completely before brushing off for instant, easy crater textures.
Step 2: Painting the Village
-
Paint the House Bodies:
Mix a very watery, pale blue-grey using a touch of Indigo and plenty of water. Fill in the bodies of the houses, keeping the color transparent and light. -
Add the Roofs:
Using Burnt Sienna or a warm brown, paint the triangular roofs. Let the varied water concentration create natural texture within the shape. -
Create the Ground:
Mix a medium-strength Indigo. Paint the ground in rolling, uneven hills beneath the houses, ensuring you anchor the buildings to the earth. -
Paint the Trees:
Use a concentrated Indigo or Payne’s Grey to paint the silhouette pine trees behind the houses. Use the tip of your brush to create jagged, leafy edges. -
Add House Details:
Once the house bodies are dry, use a fine detail brush with dark grey to outline the windows and doors. Dot a little yellow ochre inside the windows for a warm glow. -
Texture the Roofs:
Stipple small white dots (using gouache or a gel pen) onto the brown roofs to mimic shingles or a dusting of frost.
Make It Golden
Swap the yellow ochre window lights for gold metallic watercolor paint. The windows will actually shimmer when light hits the painting.
Step 3: Creating the Starry Sky
-
Paint the Moon Base:
Wet the moon circle with clean water first. Drop in Yellow Ochre, letting it bloom. While still damp, dab in small amounts of diluted grey or brown to create crater-like textures. -
Establish the Sky Shape:
Mix a large puddle of deep Indigo or Prussian Blue. Carefully outline a distinct, uneven box shape around the moon, leaving the sky area separate from the village below. -
Swirling Winds:
Begin filling the sky area with your dark blue. As you paint, lift out pigment with a thirsty brush or leave negative space to create a large swirl pattern near the bottom left of the sky box. -
Darkening the Night:
Apply a second layer of dark blue to the outer edges and corners of the sky box to create depth, making the moon appear brighter by contrast. -
Add Wind Highlights:
Once the blue wash is dry, use thinned white gouache to paint sweeping motion lines following your swirl. I like to use quick, confident strokes here to suggest movement. -
Paint the Stars:
Using opaque white, valid dot stars of varying sizes throughout the blue sky. Create a few larger stars with cross shapes for extra sparkle. -
Connect the Swirl:
Enhance the main wind swirl with more concentrated white strokes, layering them to look like a gust of wind moving across the night. -
Final Touches:
Check the separation between the sky block and the village. If needed, darken the shadows in the trees to ensure the village feels grounded below the celestial scene.
Enjoy the peaceful feeling of your handcrafted village resting under the swirling stars


Step-by-Step Sky: Gradient First, Swirls Second, Stars Last
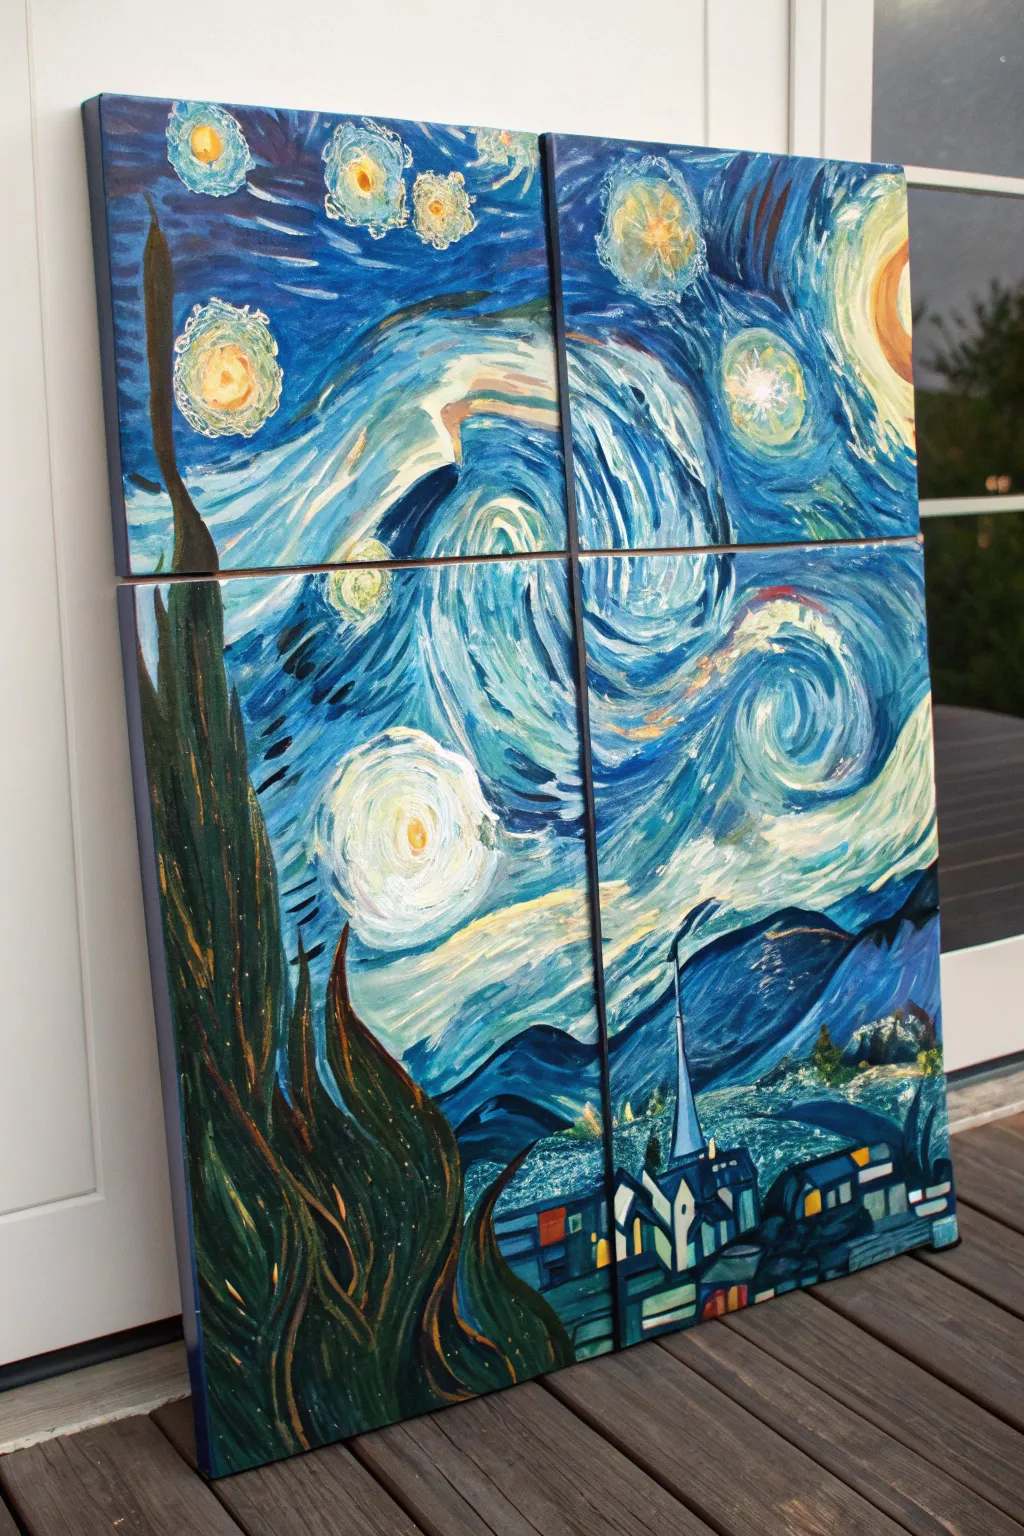
Transform a classic masterpiece into a modern statement piece by painting Van Gogh’s *The Starry Night* across four separate canvas panels. This segmented approach makes the complex composition more manageable while adding a contemporary gallery feel to your finished display.
Detailed Instructions
Materials
- 4 stretched canvases (equal size, e.g., 12×16 or 16×20 inches each)
- Acrylic paints (Phthalo Blue, Ultramarine Blue, Titanium White, Cadmium Yellow, Yellow Ochre, Burnt Sienna, Black)
- Set of bristle brushes (large flat, medium filbert, small round)
- Assorted palette knives (optional for texture)
- Large palette or mixing plate
- Pencil and ruler
- Water cup and paper towels
- Easle or large flat workspace
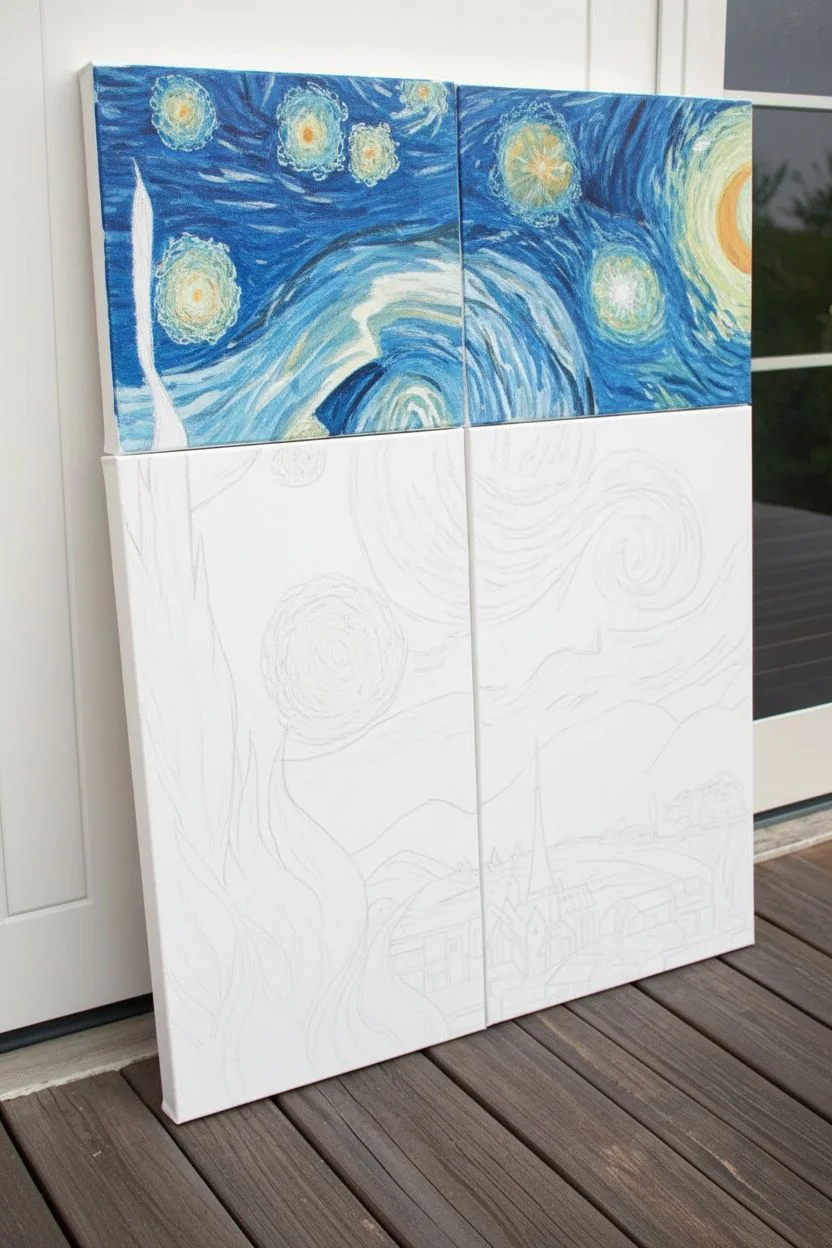
Step 1: Preparation and Sketching
-
Arrange the grid:
Lay your four canvases out on a flat surface in a 2×2 grid. Press them tightly together so they touch. This is crucial for ensuring the image flows seamlessly across the gaps. -
Establish the horizon:
Using a pencil, lightly sketch the rolling hills and the village horizon line across the bottom two canvases. The mountains should dip and rise, crossing the vertical gap between the panels. -
Place key elements:
Sketch the large, flame-like cypress tree on the left side, spanning both the top-left and bottom-left panels. Then, draw circles for the moon in the top right and the major stars scattered across the top two panels. -
Map the wind:
Lightly draw the directional flow of the wind swirl in the center. It should start in the top-left panel, swoop down into the bottom-left, cross into the bottom-right, and curl up into the top-right.
Tip: Managing Breaks
Paint the edges of the canvas where the image ‘breaks’ to match the front painting. This ensures the image looks continuous even when hung with gaps on the wall.
Step 2: Blocking in the Base Layers
-
Darkest blues first:
Mix Ultramarine Blue with a touch of Black. Paint the dark silhouette of the cypress tree and the deepest shadows of the hills. Don’t worry about details yet; just get the dark values down. -
Sky gradient base:
For the background sky, mix various shades of blue ranging from deep Phthalo to lighter mixes with white. Apply these in long, horizontal strokes, getting lighter as you move from top to bottom, avoiding the swirl area. -
Village foundation:
Block in the shapes of the houses and church in the bottom section using cool greys and muted blues. Keep the shapes geometric and simple for now. -
Separate the panels:
Once your basic sketch and dark blocking are done, separate the canvases slightly (about an inch) to paint the edges. I find painting the sides black or a dark blue gives the finished piece a very polished look.
Trouble: Muddy Colors?
If your yellow stars look green against the blue sky, let the blue background dry completely before applying the yellow. Acrylics dry fast, so be patient between layers.
Step 3: The Sky and Swirls
-
Layering the wind:
Mix a mid-tone blue and use a medium filbert brush to create the main wind current. Use short, dashed strokes that follow the curved path you sketched earlier. -
Adding movement:
Load your brush with lighter blue (Ultramarine + White) and add another layer of dashed strokes right next to the mid-tone ones. The contrast creates the sense of motion. -
Defining the swirl:
In the center of the swirl, use almost pure white mixed with a tiny drop of yellow. Paint concentric, broken circles to create the bright center of the wind gust. -
Painting the moon and stars:
Paint the moon crescent and the star centers with Cadmium Yellow. Surround them with dashes of Yellow Ochre and pale yellow-white to create the glowing halos or ‘auras’ typical of Van Gogh’s style.
Step 4: Detailing and Texture
-
Cypress tree texture:
Return to the large dark tree. Use a small round brush with dark green (mix blue and yellow) and burnt sienna to add flame-like, upward-flicking strokes over the black base. -
Village lights:
Add tiny squares of bright yellow and orange to the windows of the village houses to make them look illuminated against the dark blue night. -
Impasto strokes:
To mimic the thick texture of the original, mix your paint with a little heavy body gel or just use generous amounts of paint on your brush. Go over the sky swirls with fresh, thick dashes of light blue and white. -
Outline the hills:
Use a dark blue-black mix to outline the tops of the rolling hills, giving them clear definition against the swirling sky. -
Final continuity check:
Push the canvases back together one last time. Check that the lines of the wind, the hills, and the tree connect visually across the gaps. Make any small adjustments needed to ensure the flow is consistent.
Hang your four panels with about an inch of space between them to complete this impressive wall display


High-Saturation Starry Night With Electric Yellows and Teals
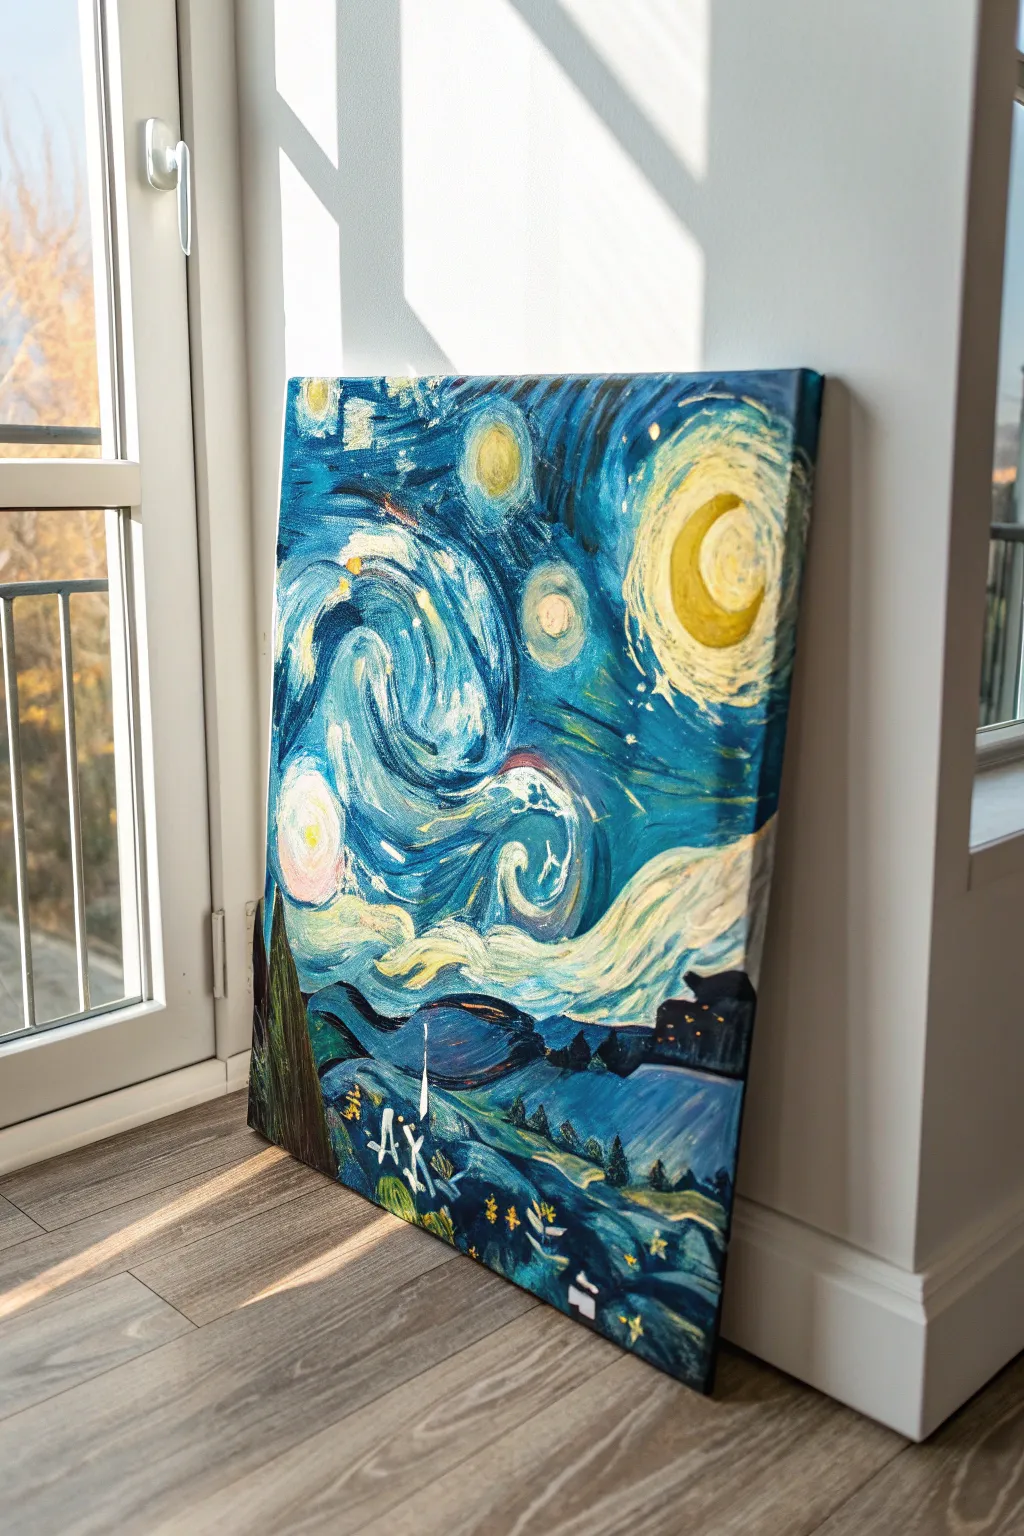

Recreate Van Gogh’s masterpiece with a modern twist by amping up the saturation and focusing on vibrant teals and electric yellows. This project uses bold, sweeping brushstrokes to capture that famous swirling sky in a way that feels fresh and energetic.
Step-by-Step
Materials
- Rectangular stretched canvas (e.g., 16×20 inches)
- Acrylic paints (Phthalo Blue, Ultramarine Blue, Teal/Turquoise, Titanium White, Cadmium Yellow Medium, Lemon Yellow, Burnt Umber, Black)
- Set of bristle brushes (large flat, medium filbert, lush small round)
- Palette knife (optional for texture)
- Water cup and paper towels
- Palette or paper plate
- Hairdryer (optional for speeding up drying)
Step 1: Blocking the Composition
-
Prime the background:
Start by covering the entire canvas with a wash of watered-down Phthalo Blue. This kills the white canvas and establishes a cool, dark undertone for your night sky. -
Map the horizon:
Using a small round brush and dark blue paint, loosely sketch the rolling hill line about one-third up from the bottom. Mark the position of the large cypress tree on the left side as a tall, flame-like shape. -
Place the celestial bodies:
Sketch circles for the stars and a crescent shape for the moon in the upper right. Don’t worry about perfect circles; Van Gogh’s style is organic and fluid. -
Outline the swirl:
Draw the central S-curve wave in the middle of the sky. This guides the movement of the entire painting, so take a moment to get the flow right.
Muddy Colors?
If your yellow stars turn green against the blue sky, let the blue layer dry completely first. Apply a coat of white over the dry blue, let that dry, and then paint yellow on top.
Step 2: Building the Vibrant Sky
-
Layering darks:
Mix Ultramarine Blue with a touch of Black. Apply short, directional dashes around the stars and the main swirl. These strokes should follow the shape of your sketch lines. -
Introducing teal:
Load your medium filbert brush with pure Teal or Turquoise. Paint distinct strokes woven between the dark blue areas, creating that electric, high-saturation look specific to this variation. -
Creating the glow:
Mix Titanium White with Lemon Yellow. Paint concentric dashed rings around each star and the moon. Leave a small gap between the yellow rings and the star center. -
Intensifying the moon:
Fill the moon crescent with Cadmium Yellow. While wet, streak in some orange or darker yellow for texture. -
Painting the wind:
Using a lighter blue (Teal mixed with White), paint long, sweeping curves through the central swirl. Let these strokes sit on top of the darker background layers. -
Adding the white mist:
Near the horizon line, create the rolling ‘mist’ effect using long, horizontal strokes of white mixed with a tiny drop of yellow. It should look like a glowing cloud resting on the hills.
Make It 3D
Mix varying amounts of modeling paste into your acrylics before painting. This creates physical ridges in every brushstroke, mimicking the heavy impasto texture of an oil painting.
Step 3: Ground and Details
-
Base coating the village:
Paint the hills and village area with cool blues and teals. Use flatter, more horizontal strokes here to distinguish the ground from the swirling sky. -
The cypress tree foundation:
Fill the large tree shape on the left with a mix of Black, Burnt Umber, and Phthalo Green. It should be the darkest object on the canvas. -
Village details:
Use a small brush to outline simple geometric shapes for the houses and church spire. I like to use a dark blue-black for outlines rather than pure black for color harmony. -
Adding windows:
Dot tiny squares of yellow into the dark village shapes to represent lit windows. This warmth connects the ground to the sky. -
Refining the cypress:
Take a dry brush with a little brown and dark green and flick upward strokes on the cypress tree to simulate its flame-like texture.
Step 4: Final Flourishes
-
Highlighting the swirl:
Go back to the main sky swirl. Add fresh, clean strokes of white and pale yellow to the crests of the waves to make them pop forward. -
Small star centers:
Place a solid dot of bright yellow or white in the dead center of your star circles. -
Texture check:
Step back and look at the canvas. If any areas look too flat, add more thick paint strokes (impasto). You want the texture to be visible.
Now you have a vibrant, expressive piece of art ready to bring energy to your room
BRUSH GUIDE
The Right Brush for Every Stroke
From clean lines to bold texture — master brush choice, stroke control, and essential techniques.
Explore the Full Guide
Finger-Painted Starry Night for Playful Texture
Capture the iconic movement of Van Gogh’s masterpiece with a playful, hands-on approach that builds incredible texture. By using your fingers instead of brushes for the sky, you’ll create thick, swirling ridges of paint that bring the turbulent energy of ‘The Starry Night’ to life on a square canvas.
Step-by-Step Tutorial
Materials
- Square stretched canvas (approx. 16×16 inches or 20×20 inches)
- Heavy body acrylic paints (Prussian Blue, Ultramarine Blue, Phthalo Blue, Titanium White, Cadmium Yellow, Yellow Ochre, Black)
- Palette or paper plate for mixing
- Paper towels or rags for wiping fingers
- Small round brush (for fine details only)
- Easel or flat surface protected with newsprint
Step 1: Setting the Night Sky
-
Prime the background:
Start by squeezing a generous amount of Prussian Blue directly onto the canvas. Use your fingers to spread a thin, uneven base layer across the upper three-quarters of the canvas. It doesn’t need to be perfect; this just eliminates the white harshness. -
Map the swirl centers:
Dip your index finger into Titanium White mixed with a tiny drop of Yellow Ochre. Place a dot roughly in the center of the canvas for the main swirl, and a smaller dot to the right for the second spiral. -
Establish the color gradient:
On your palette, mix three shades of blue: a dark midnight (Prussian/Black), a mid-tone (Ultramarine), and a light sky blue (Ultramarine/White). Place blobs of these colors near your spiral centers.
Tip: Texture Is Key
Don’t smooth the paint out! The beauty of this finger-painting technique lies in the physical ridges of paint. Leave the clumps and streaks visible for an authentic impasto look.
Step 2: Creating the Swirls
-
Begin the central spiral:
Using your index and middle fingers together, drag the light sky blue paint in a circular motion outward from your center dot. Press firmly to leave ridges in the paint. -
Add darker depth:
Without wiping your fingers clean, dip into the mid-tone Ultramarine. Trace the outside of your previous light blue swirl, blending the edges slightly where they meet but keeping distinct bands of color. -
Expand the movement:
Dip into the darkest Prussian mixture. Continue the spiral outward, making larger, sweeping C-shapes that extend toward the edges of the canvas. The thick paint should pile up on the sides of your finger trails. -
Create the secondary flow:
Repeat this process for the smaller swirl on the right side, ensuring its movement flows into the larger central spiral seamlessly. I find connecting them with long, wavy horizontal strokes helps unify the composition. -
Fill the wind currents:
Use clean fingers to add streaks of white and pale yellow throughout the blue sky areas. Use short, curved dashes rather than long lines to mimic Van Gogh’s signature brushwork style.
Step 3: Stars and Moon
-
Form the crescent moon:
In the top right corner, use your thumb to press a solid circle of Cadmium Yellow. Then, use a clean finger to carve out a crescent shape by overlapping it with the surrounding blue paint. -
Adding the halo effect:
Mix a pale yellow (mostly White with a touch of Cadmium). Tap this color in concentric circles around the moon and the star locations you’ve chosen on the left side. -
Intensify the starlight:
Place a small dab of pure Cadmium Yellow in the center of each halo. Gently swirl it once to blend it slightly into the pale background without losing its vibrancy.
Troubleshooting: Muddy Colors
If your blue and yellow swirls start turning into an ugly green, stop and wipe your fingers. Let the blue layer dry for 10 minutes before adding yellow highlights on top.
Step 4: The Sleeping Village
-
Lay the hills:
For the rolling hills at the bottom, mix Ultramarine Blue with a touch of Green or Yellow to create a teal-like shade. Use broad, horizontal finger sweeps to define the landscape below the sky. -
Add the cypress shape:
Mix Black with a little Prussian Blue for the large cypress tree structure in the foreground. Using two fingers, pull the paint upward in wavy, flame-like strokes from the bottom edge. -
Highlight the grass:
Dip a pinky finger into Yellow Ochre and add tiny vertical dashes along the hilltops to suggest distant houses or grassy highlights catching the moonlight. -
Refine the cypress:
To give the dark tree dimension, lightly streak a bit of the dark green or brown through the black paint while it is still wet. This prevents it from looking like a flat silhouette. -
Add final highlights:
Step back and look at the overall flow. If any swirls look disconnected, use a clean finger with a tiny amount of white to bridge the gap with a few connecting strokes. -
Optional brush work:
If your fingers feel too clumsy for the tiny stars or window lights in the village, use your small round brush to add those final pinpoints of light.
Enjoy the messy, magical process of swirling your own night sky into existence


Have a question or want to share your own experience? I'd love to hear from you in the comments below!