
Whenever I need a quick hit of art magic, I reach for salt painting—those crunchy crystals and raised glue lines make color do the most beautiful, blurry things. Here are my favorite salt painting ideas to try, starting with the classics and sliding into some seriously fun twists.
Sea Turtle Shell Pattern Salt Painting

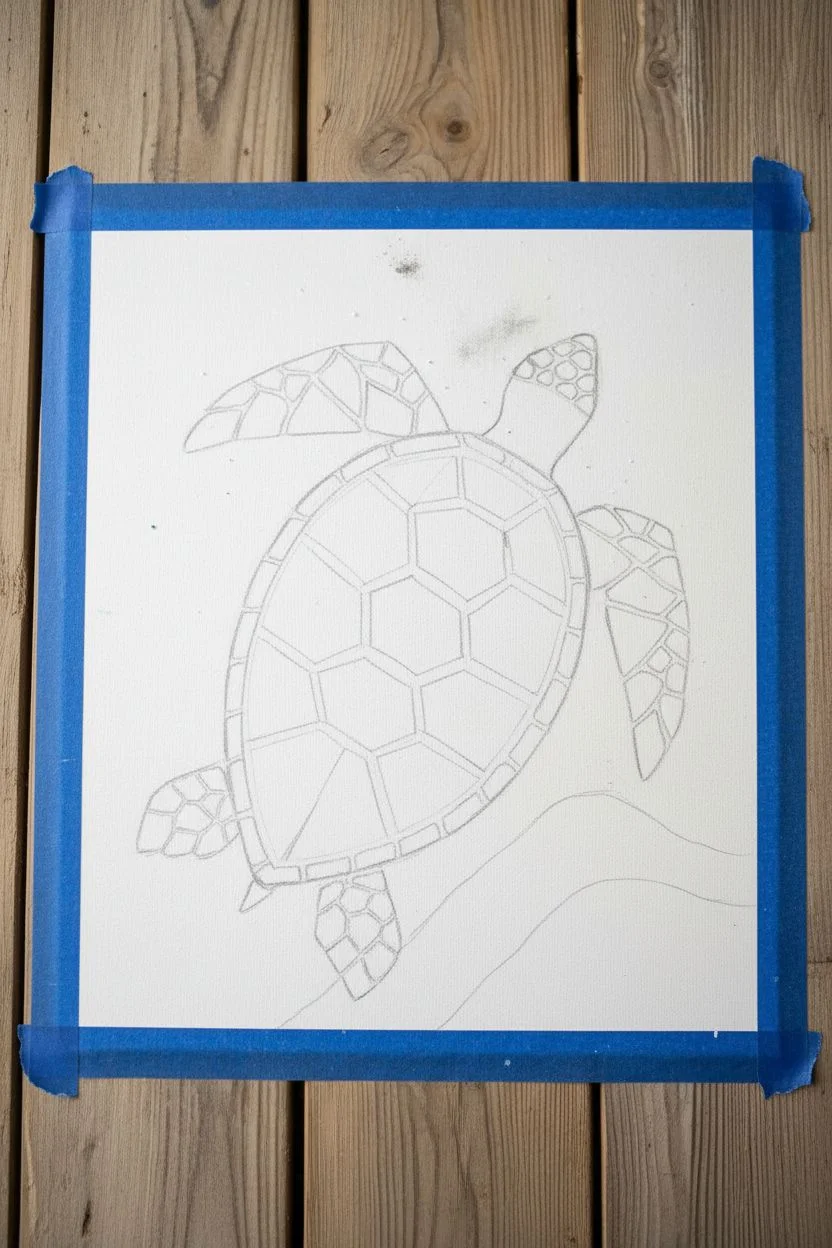
Bring the calming vibes of the ocean into your home with this stunning textural artwork that uses coarse salt to create a glimmering, mosaic-like turtle. The finished piece features beautiful gradients of teal and aquamarine captured within defined shell segments.
Step-by-Step Tutorial
Materials
- Canvas board or heavy watercolor paper (A3 or similar size)
- White or light wood frame (to fit your substrate)
- White PVA craft glue or clear tacky glue (with a precision tip)
- Coarse sea salt or kosher salt (larger granules work best)
- Fine table salt (for detailed areas)
- Watercolor paints or liquid food coloring mixed with water
- Small round paintbrushes (size 2 and 4)
- Pencil and eraser
- Reference image of a sea turtle
- Sealant spray (clear acrylic, matte or gloss)
- Paper towels
- Small cups for mixing colors
Step 1: Sketching the Outline
-
Prepare your canvas:
Begin by lightly cleaning your canvas board or heavy paper to ensure no dust interferes with the glue adhesion. If you are using paper, tape down the edges to prevent warping. -
Draft the turtle shape:
Using a pencil, lightly sketch the outline of the sea turtle in the center of your board. Focus on getting the overall oval shape of the body and the four flippers symmetrical first. -
Detail the shell pattern:
Draw the geometric ‘scutes’ (the hexagonal plates) on the turtle’s shell. These should look like a honeycomb pattern. Leave a small gap between each shape—this negative space will form the white lines later. -
Add flipper details:
Sketch smaller, irregular shapes inside the flippers and the head to mimic scales, keeping those same small gaps between them for definition. -
Sketch the wave:
In the bottom right corner, draw a gentle curved line to represent a washing wave where the turtle is swimming.
Melting Salt Crisis?
If your painting looks ‘weepy’ or wet after a humid day, you didn’t seal it enough. Apply another 2-3 light coats of clear acrylic spray to lock out moisture.
Step 2: Applying Glue and Salt
-
Outline with glue:
Working in sections to prevent the glue from drying too fast, apply a thick, steady bead of white PVA glue. Trace exactly over your pencil lines, filling in the shapes but avoiding the gaps between them. -
The first salt layer:
While the glue is wet, sprinkle a generous amount of coarse sea salt over the glue. I like to press down very gently with the back of a spoon to ensure the crystals embed into the adhesive. -
Shake off excess:
Wait about 2-3 minutes for the glue to grab the salt, then tilt your board over a tray to shake off the loose granules. -
Refine the gaps:
Use a toothpick or a dry brush to sweep away any stray salt grains that landed in the ‘gaps’ between the shell segments. These lines need to stay clean and white. -
Fill the background (optional):
If you want the textured white background shown in the photo, apply a thin layer of watered-down glue to the empty white space around the turtle and sprinkle fine table salt over it for a subtle contrast. -
Let it cure:
Allow the glue and salt structure to dry completely. This usually takes at least 4-6 hours, or overnight for best results.
Step 3: Painting the Gradient
-
Prepare your palette:
Mix several shades of blue and green watercolors. You’ll need a deep navy, a bright teal, a seafoam green, and a pale aqua. The paint should be very watery. -
The ‘drop’ technique:
Load your brush with watery paint. Gently touch the tip of the brush to the salt-covered shapes. Do not drag the brush; just let the salt absorb the liquid. The color will spread on its own. -
Create gradients in the shell:
For the shell scutes, drop dark blue on one edge and teal on the other. Watch as they bleed together in the middle. Vary the colors so some plates are darker (navy) and some are lighter (mint). -
Paint the flippers:
Use a darker teal or blue for the flippers to frame the shell. Keep the application blotchy and organic to mimic natural shell patterns. -
Paint the wave:
For the corner wave section, use a wash of bright turquoise. Leave some spots of salt white or very pale blue to look like sea foam or bubbles.
Pro Tip: Depth of Field
Use coarse Kosher salt for the turtle shell to create high texture, but use fine table salt for the flippers and background. This variation makes the shell pop out visually.
Step 4: Finishing Touches
-
Add highlights:
If you want extra sparkle or ‘bubbles,’ drop tiny dots of clean water onto areas of concentrated color to push the pigment away, creating light spots. -
Dry completely:
Let the paint dry fully. The salt may look darker while wet but will lighten as it dries. -
Seal the artwork:
Take the artwork to a well-ventilated area and spray it with a clear acrylic sealant. This prevents the salt from absorbing humidity and melting over time. -
Frame it:
Once the sealant is dry, remove the glass from your frame (as the salt texture is too thick for glass) and mount your masterpiece inside.
Hang your textured sea turtle in a bright spot where the light can catch the crystalline edges of the salt


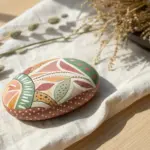
Pumpkin and Vine Salt Painting
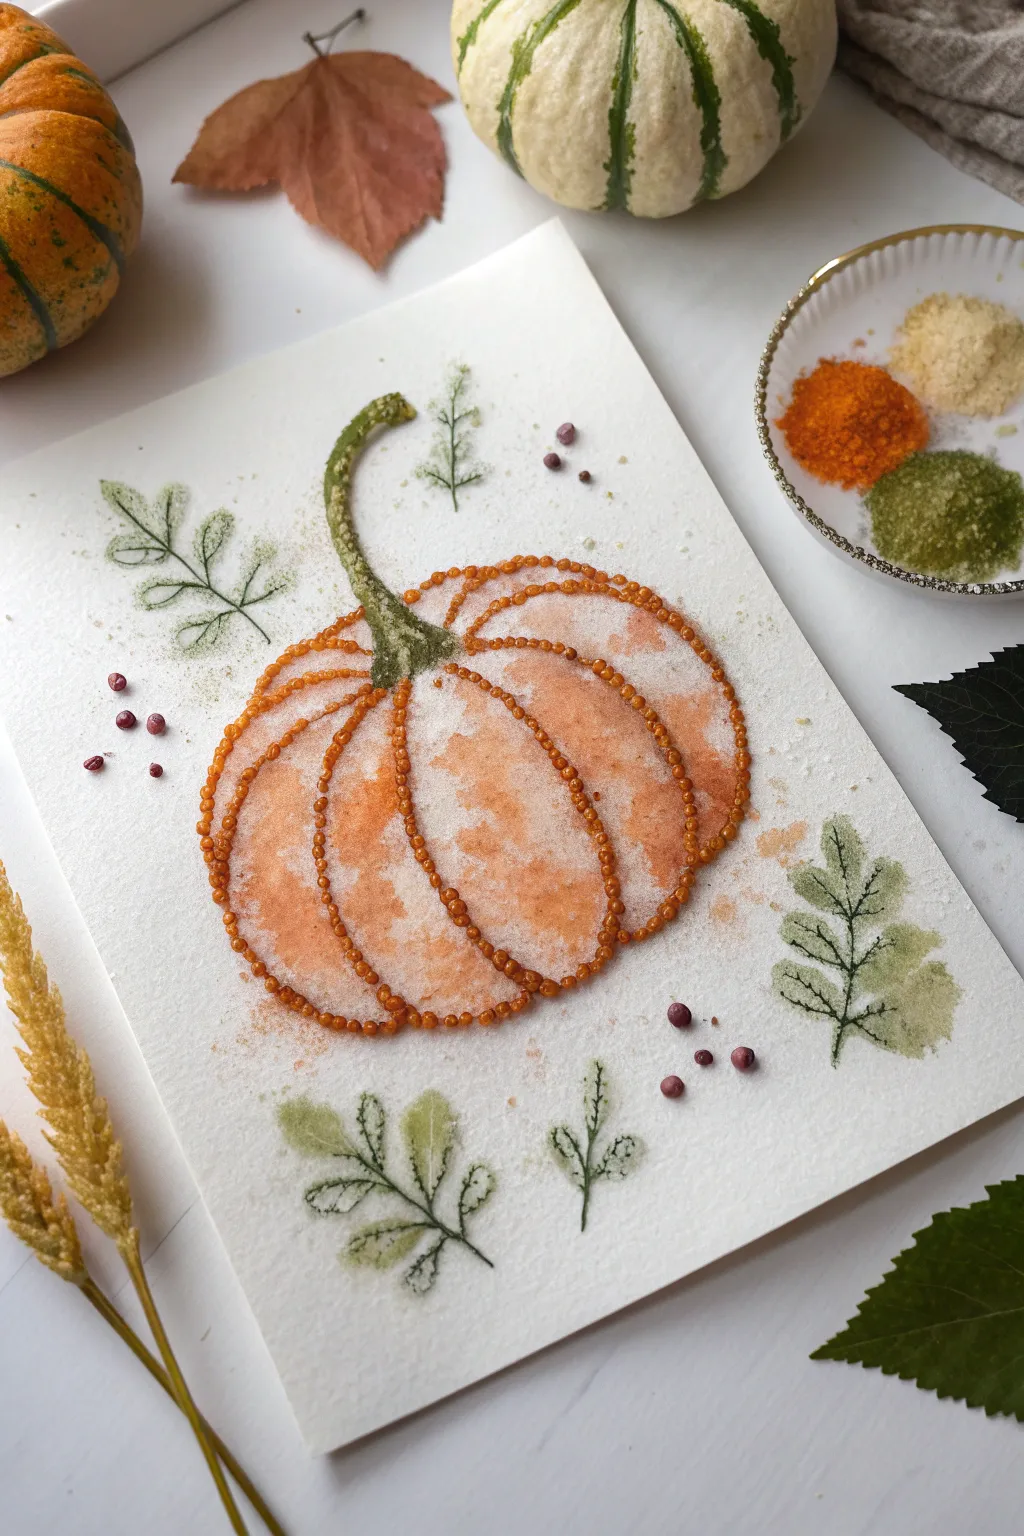
This project combines the texture of salt painting with the warm, earthy hues of autumn spices for a stunningly dimensional effect. The result is a pumpkin illustration that captures the cozy essence of fall through both sight and subtle scent.
How-To Guide
Materials
- Heavy watercolor paper like Fabriano or Arches (cold press)
- White craft glue (PVA) with a fine-tip applicator
- Table salt (fine grain)
- Watercolor paints (burnt orange, sap green, raw sienna)
- Soft round brushes (sizes 4 and 8)
- Small seeds or peppercorns (like pink peppercorns)
- Ground spices (turmeric, paprika) – optional for texture mixing
- A tray or baking sheet to catch excess salt
- Black fine-liner pen (0.1 or 0.3mm)
Step 1: Sketching the Base
-
Outline the pumpkin shape:
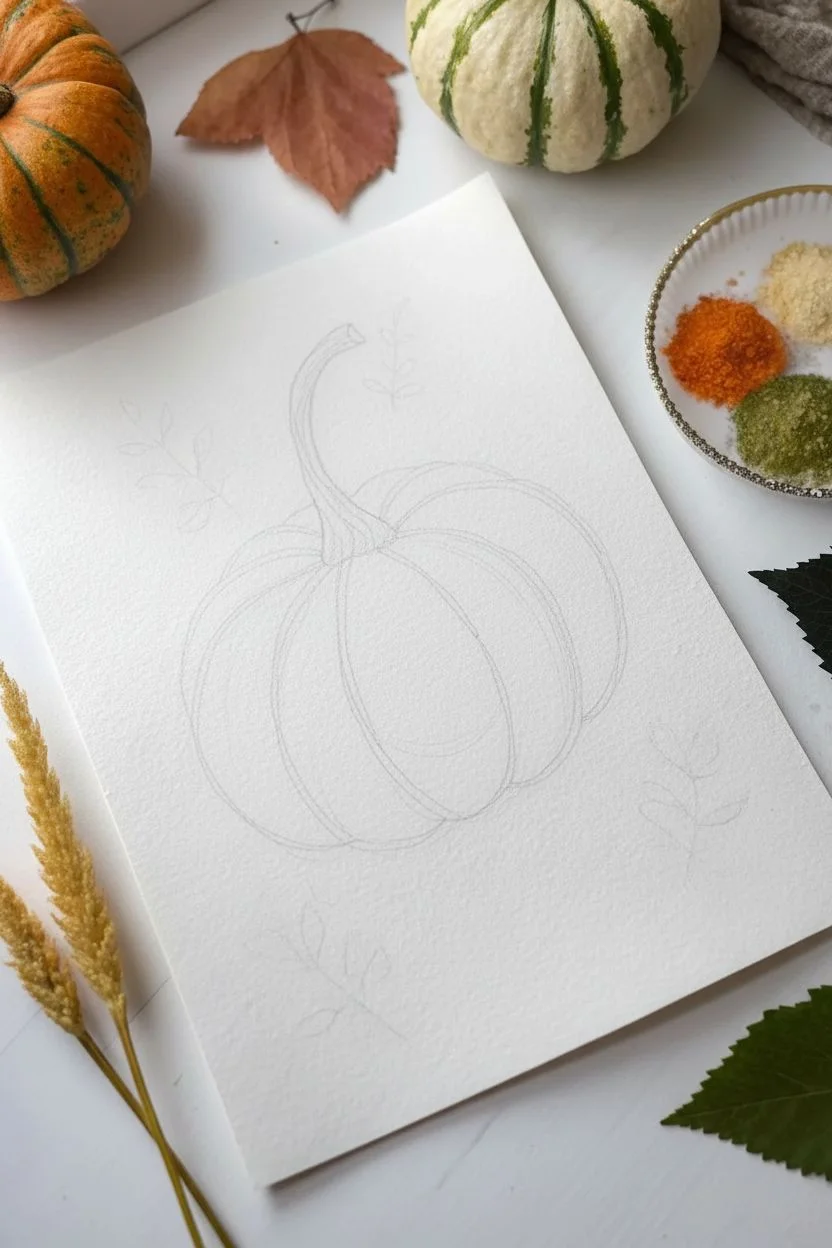
Start by lightly sketching a wide, slightly flattened oval shape in the center of your paper using a pencil. Keep the lines very faint since the salt will cover them later. -
Add the ribs:
Draw curved vertical lines fanning out from the top center to the bottom, creating the distinct ribbed sections of the pumpkin. Aim for about 5-7 visible sections. -
Draft the stem:
Sketch a curled, twisting stem emerging from the top center, leaning slightly to the left for a natural look. -
Plan the greenery:
Lightly mark placements for floating leaves around the central pumpkin. Don’t draw the details yet, just the general spacing.
Step 2: Applying the Salt Lines
-
Trace with glue:
Using your fine-tip glue bottle, carefully trace over your pencil lines for the pumpkin’s ribs. Keep your hand steady to ensure a consistent bead of glue. -
Coat with salt:
Immediately sprinkle a generous amount of table salt over the wet glue lines. Ensure every bit of glue is completely covered. -
Shake off excess:
Gently lift the paper and tap the excess salt onto your tray. You should be left with crisp, raised salt lines defining your pumpkin’s shape. -
Let it dry:
Allow the glue lines to dry completely. This prevents the colors from bleeding uncontrollably later—usually about 15-20 minutes is safe.
Uneven Salt Lines?
If your salt lines look patchy, your glue layer was likely too thin. Re-apply a thicker bead of glue over the gap and re-salt immediately.
Step 3: Adding Color to the Pumpkin
-
Mix your orange wash:
Create a watery wash of burnt orange watercolor. I like to mix in a tiny pinch of paprika here for extra grit and warmth. -
Paint the pumpkin body:
Gently touch your loaded brush to the paper inside the salt outlines. Use a wet-on-dry technique, allowing the paint to pool slightly for that mottled, watercolor texture. -
Tint the salt lines:
Very carefully touch the tip of your brush, loaded with concentrated orange paint, to the dry salt lines. Watch the color wick through the salt crystals like magic. -
Paint the stem:
Using a mix of sap green and a touch of brown, paint the stem area. Dab some of this green paint onto the salt line at the base of the stem to transition the colors.
Scented Art Upgrade
Mix pumpkin pie spice directly into your salt before sprinkling. Your artwork will smell like fresh autumn baking whenever you get close.
Step 4: Details and Leaves
-
Draw delicate vines:
While the main pumpkin dries, use your fine-liner pen to draw sketched, airy leaves around the border. Use loose, sketchy strokes to mimic veins. -
Salt the leaves (optional):
If you want extra texture, add tiny dots of glue to parts of the leaves and sprinkle with a little salt, or leave them as ink drawings for contrast. -
Add watercolor to leaves:
Wash over your ink drawings with a very pale, diluted green watercolor. Let the color extend slightly outside the lines for an artistic feel. -
Place the peppercorns:
Dab small dots of glue randomly around the pumpkin and press pink peppercorns or small seeds into them as decorative accents. -
Sprinkle spice dust:
While the paint inside the pumpkin sections is still slightly damp, sprinkle a tiny pinch of coarse salt or turmeric powder for a textured, speckled finish.
Display your textured masterpiece flat until fully cured to keep those crisp salt ridges intact


Mountain Sunset Salt Painting Silhouette
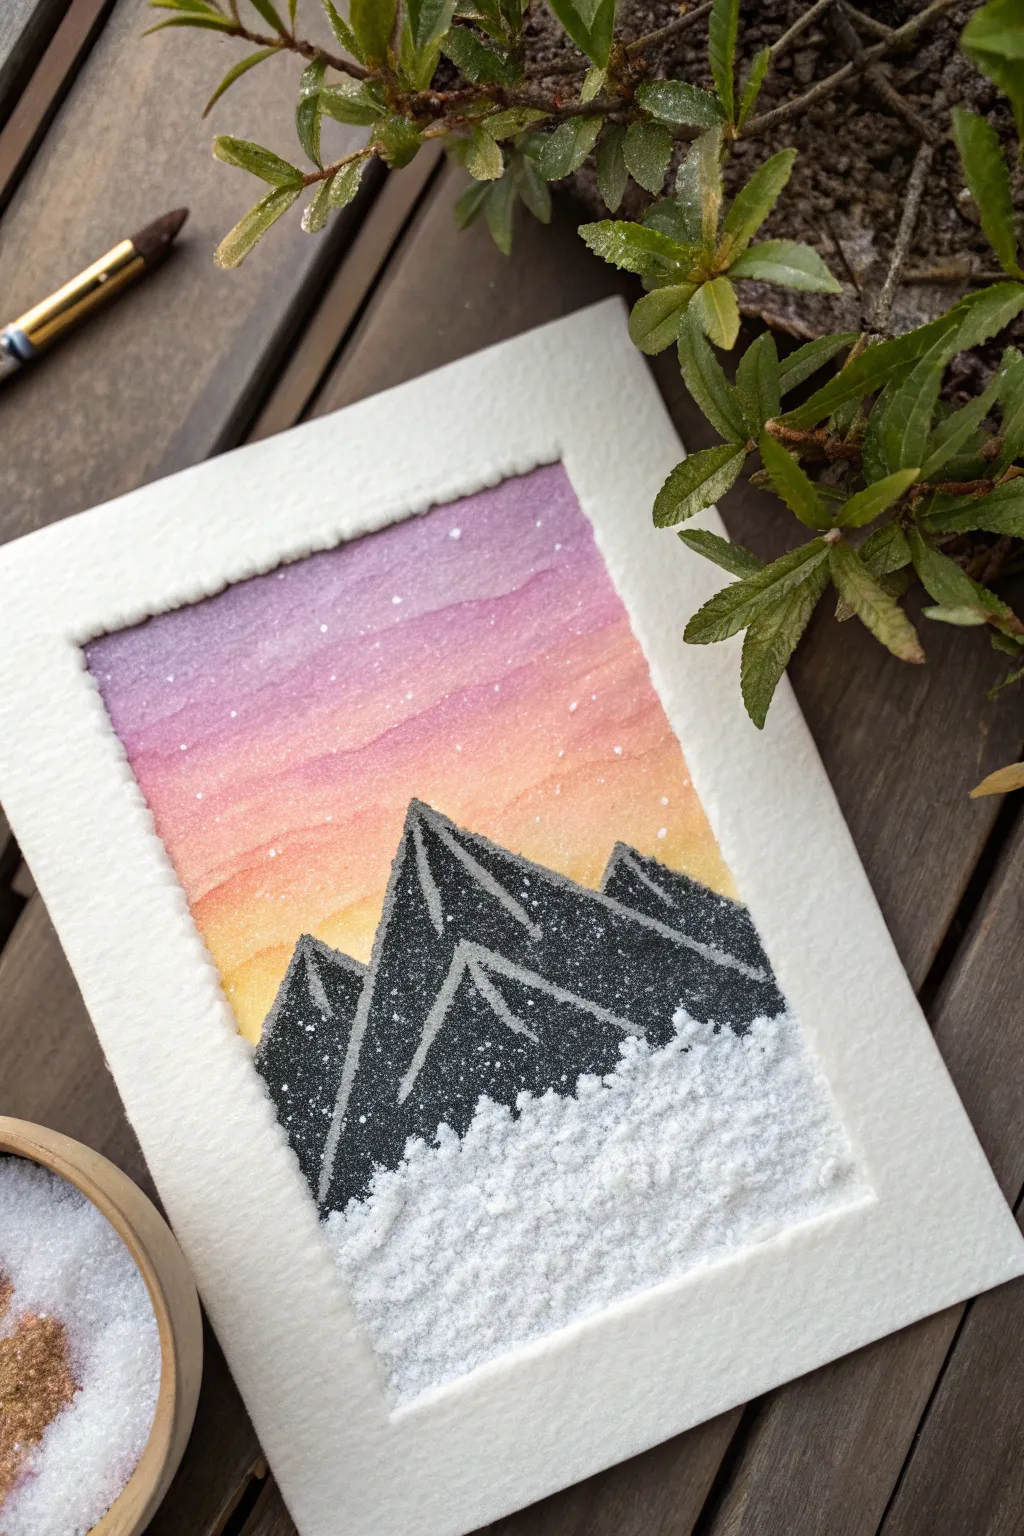
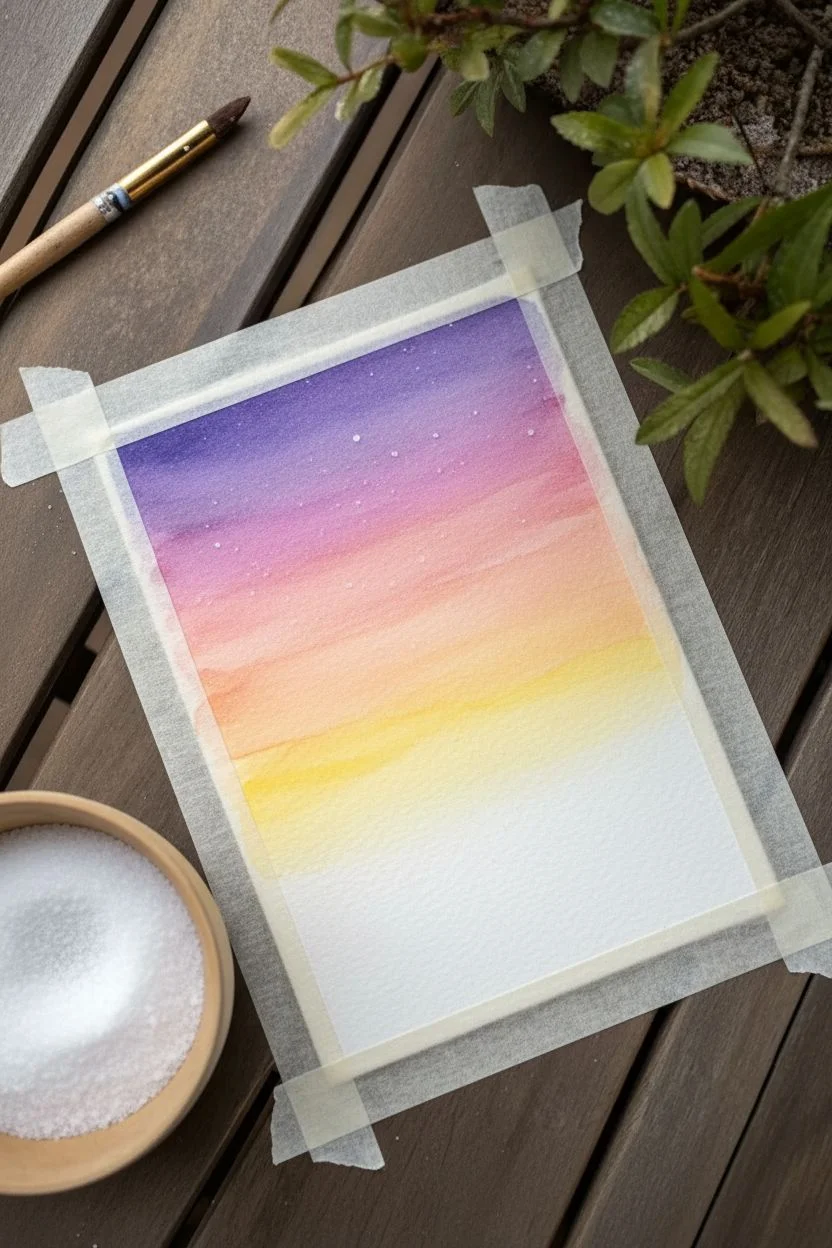
Capture the serene beauty of twilight peaks with this textured salt painting technique. By combining warm sunset gradients with a crisp, crystalline snow effect, you’ll create a dimensional landscape that shimmers just like the real thing.
Step-by-Step Tutorial
Materials
- Thick watercolor paper (cold press recommended)
- Watercolor paints (purple, pink, orange, yellow)
- Black acrylic paint or black drawing ink
- Table salt or fine kosher salt
- White PVA glue (school glue)
- White gel pen or fine white paint marker
- Paintbrushes (flat wash brush and fine detail brush)
- Masking tape or painter’s tape
Step 1: Preparing the Sky
-
Tape boundaries:
Begin by taping down all four edges of your watercolor paper to a board or table. This creates a clean white border and prevents the paper from buckling when wet. -
Apply clean water:
Using a wide flat brush, coat the entire sky area (roughly the top two-thirds of the paper) with clean water until it glistens but isn’t dripping. -
Paint the purple:
Load your brush with purple watercolor and apply it horizontally across the very top of the wet paper. -
Blend downwards:
Without cleaning your brush, pick up a pink hue and paint just below the purple. Let the colors bleed slightly into each other. -
Add warmth:
Continue the gradient by blending orange into the pink, followed by a bright yellow near the horizon line. -
Create texture:
While the paint is still wet, sprinkle a very small pinch of salt over the sky area to create tiny ‘star-like’ blooms. Let this dry completely before brushing off the excess salt.
Step 2: Adding the Peaks
-
Outline mountains:
Once the sky is bone dry, use a pencil to lightly sketch three distinct triangular mountain peaks, overlapping them slightly. -
Fill the silhouette:
Using black acrylic paint or ink, fill in the mountain shapes completely. Acrylic works well here because it is opaque and sits nicely on top of the watercolor. -
Define ridges:
After the black paint dries, take a white gel pen or paint marker and draw lines down the center of each peak to create ridges, as well as diagonal lines to suggest rocky faces. -
Add distant stars:
Dot the purple section of the sky with your white gel pen to create a scattering of stars.
Uneven Salt Texture?
If the salt looks patchy after drying, you likely applied the glue too thinly. Dab fresh glue into the gaps and sprinkle more salt immediately.
Step 3: The Snowy Foreground
-
Apply glue base:
Cover the remaining bottom white section of your paper with a generous, even layer of white PVA glue. -
Overlap the mountains:
Carefully dab a little glue along the very bottom edge of the black mountains so the snow appears to be resting against the base. -
Add snow caps:
Use a small brush or toothpick to apply tiny streaks of glue on the black mountain peaks where you want snow to settle. -
The salt pour:
Pour a liberal amount of salt over all the wet glue areas. Ensure every bit of glue is covered. -
Press and wait:
Gently press down on the salt with a clean piece of paper or your hand to ensure good adhesion, then let it sit undisturbed. -
Shake off excess:
Once the glue is completely clear and hard (this may take a few hours), lift the paper vertically and tap it to remove loose salt. -
Final reveal:
Slowly peel away the masking tape at a 45-degree angle to reveal your crisp white borders.
Make it Shimmer
Mix a small amount of silver cosmetic glitter or iridescent white glitter into your salt before pouring it for a magical, frost-like sparkle.
Display your textured masterpiece in a shadow box frame to protect the delicate salt crystals


Night City Skyline Salt Painting
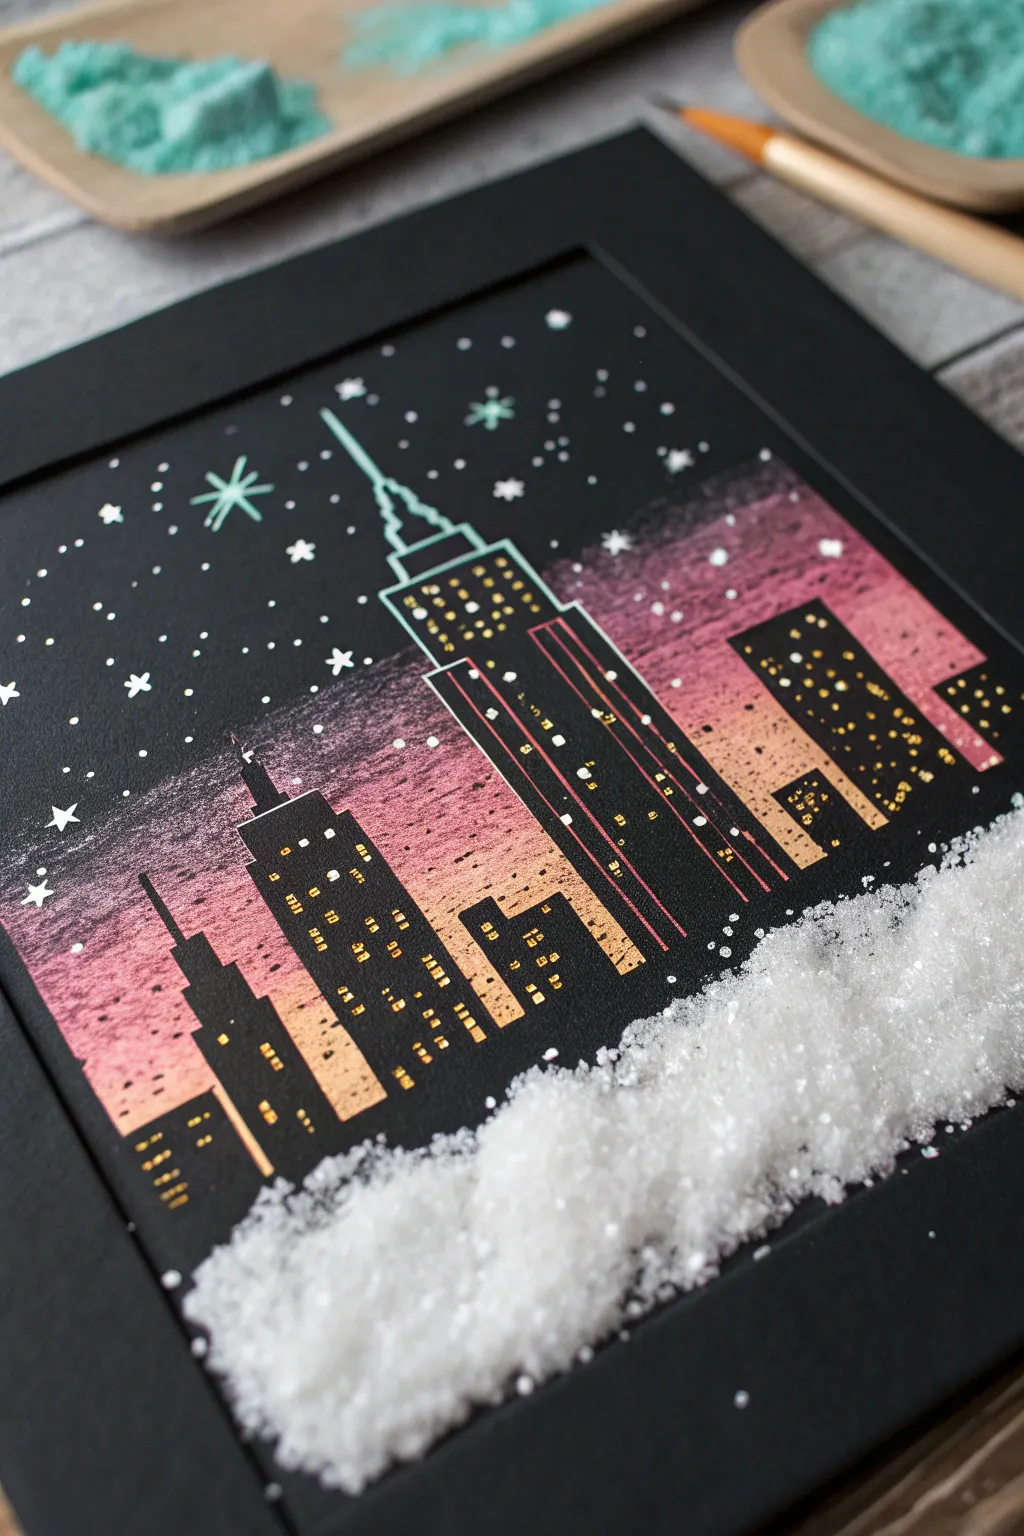
Capture the magic of a snowy evening in the city with this striking contrast of black paper and vibrant sunset hues. This project combines simple drawing techniques with textured salt elements to create a dazzling 3D winter scene.
Step-by-Step Guide
Materials
- Heavyweight black cardstock or mixed media dark paper
- Soft pastels or chalk pastels (pinks, oranges, purples)
- Ruler
- Gold gel pen or metallic marker
- Teal or light blue gel pen
- White gel pen (fine tip)
- PVA glue or white school glue
- Table salt or coarse kosher salt
- Drafting tape or masking tape (optional)
- Cotton swabs or blending stump
- Fixative spray (optional)
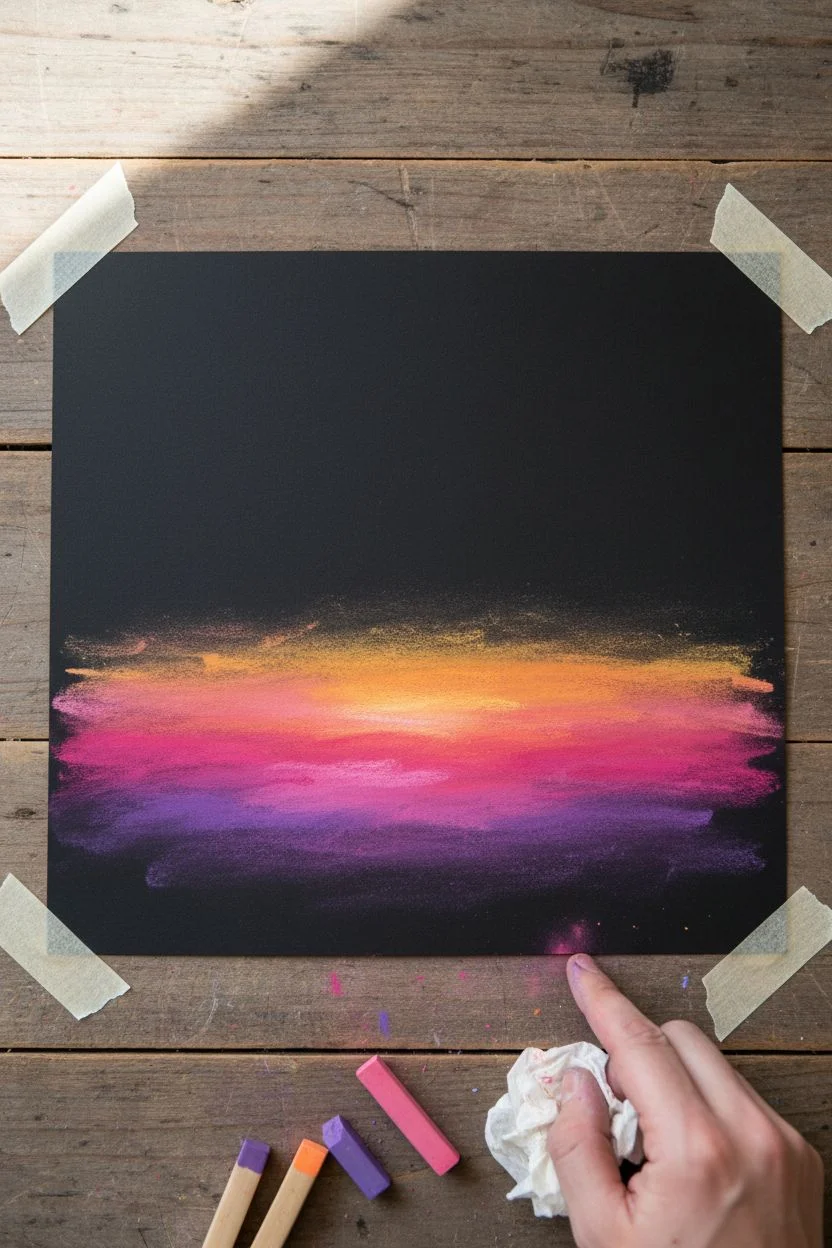
Step 1: Setting the Scene
-
Prepare your canvas:
Start with a piece of heavy black cardstock cut to your desired size, perhaps a square format like 8×8 inches. -
Create the horizon line:
About one-third of the way up from the bottom, lightly mark where your buildings will stand. You don’t need a pencil line, just a mental guide. -
Apply the sunset colors:
Using the side of your chalk pastels, rub strokes of purple, pink, and orange horizontally across the middle of the paper where the sky meets the buildings. -
Blend the sky:
Use your finger or a tissue to gently smudge the pastels together, creating a soft, glowing gradient that fades into the black paper at the top.
Clean Lines Pro-Tip
For super sharp building edges, place pieces of masking tape vertically on the paper before applying the pastel, then peel them away to reveal perfectly straight black gaps.
Step 2: constructing the Skyline
-
Outline the skyscrapers:
With a ruler and a black marker or pencil, sketch the rectangular outlines of various buildings over the blended pastel background. -
Fill the silhouettes:
Color in the building shapes completely with black ink or heavy marker so they stand out starkly against the colorful sky. -
Add architectural details:
Using a teal gel pen, outline the central skyscraper, adding a spire and stepped tiers at the top for an art deco look. -
Illuminate the windows:
Take your gold gel pen and draw rows of tiny squares or dashes on the black buildings to represent lit windows. -
Create variation:
Make some window patterns distinct—vertical lines on the tall central tower and scattered random lights on the smaller side buildings.
Step 3: The Starry Night
-
Draw primary stars:
Using the teal gel pen, draw a few large, eight-pointed stars in the upper black section of the sky. -
Scatter the stardust:
Switch to your white gel pen to add tiny dots and smaller four-pointed stars throughout the sky, concentrating some near the horizon. -
Clean up:
If any pastel dust has clouded your black building silhouettes, carefully wipe it away with a clean, dry cotton swab.
Level Up & Customize
Mix a tiny pinch of silver eco-glitter into your salt before pouring it. This gives the snowdrift extra iridescent sparkle that catches the light beautifully.
Step 4: The Salt Snowdrift
-
Apply the glue base:
Squeeze a generous amount of PVA glue along the bottom edge of the paper, covering the entire area below the buildings. -
Create texture:
Use the nozzle of the glue bottle or a craft stick to swirl the glue slightly, making it look like piled-up snowdrifts rather than a flat line. -
Make it snow:
Pour a heavy layer of salt over the wet glue until no white glue is visible. I find coarser salt adds better dimension here. -
Let it sparkle:
Allow the project to dry completely flat for several hours or overnight. Do not shake off the excess salt until the glue is fully hardened. -
Reveal the drift:
Once dry, tilt the paper over a bin to shake off the loose salt, leaving behind a crusty, shimmering snowbank.
Display your shimmering cityscape in a deep shadow box frame to protect the delicate salt texture
BRUSH GUIDE
The Right Brush for Every Stroke
From clean lines to bold texture — master brush choice, stroke control, and essential techniques.
Explore the Full Guide
Faux Stained-Glass Salt Painting Panels
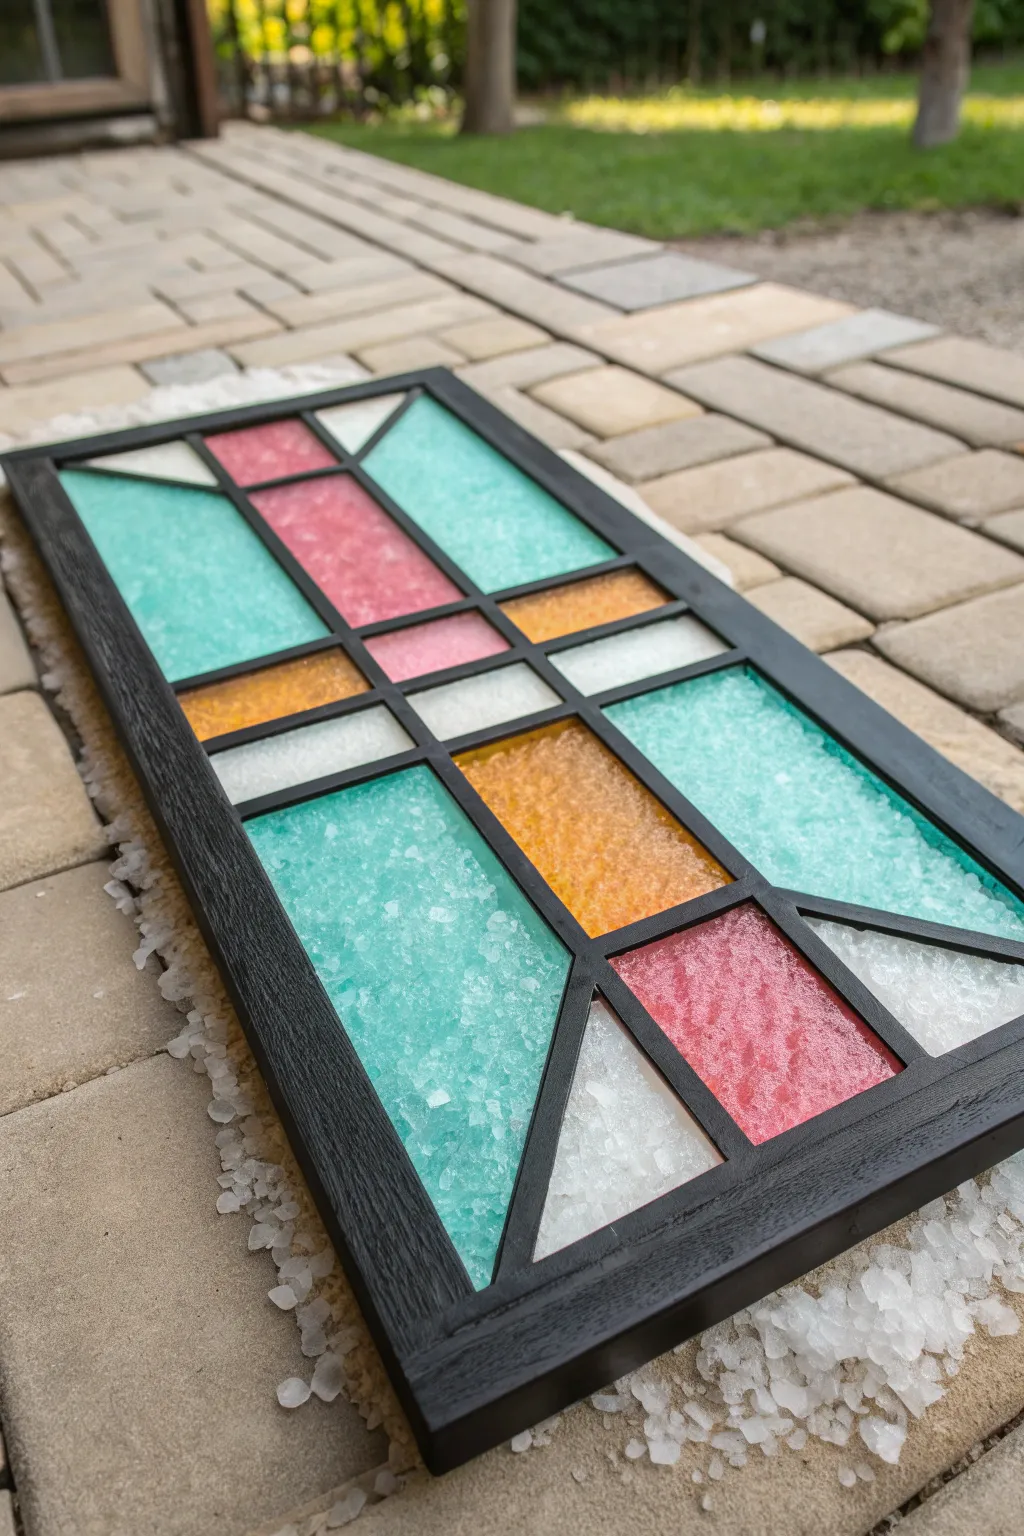
Achieve the timeless elegance of stained glass using nothing more than salt, glue, and a simple wooden frame. This project mimics the crystalline texture of expensive art glass with a stunning geometric pattern that catches the light beautifully.
Step-by-Step Guide
Materials
- Rectangular wooden frame (approx. 10×20 inches) with backing removed or glass insert
- Clear acrylic sheet (if frame doesn’t have glass) or clear sturdy plastic
- Coarse sea salt or Epsom salts
- Black liquid lead leading or black puff paint
- Liquid watercolor paints or food coloring
- White craft glue (PVA) or clear drying craft glue
- Mod Podge or clear sealant spray
- Ruler and pencil
- Small paintbrushes
- Disposable cups for mixing
- Paper towels
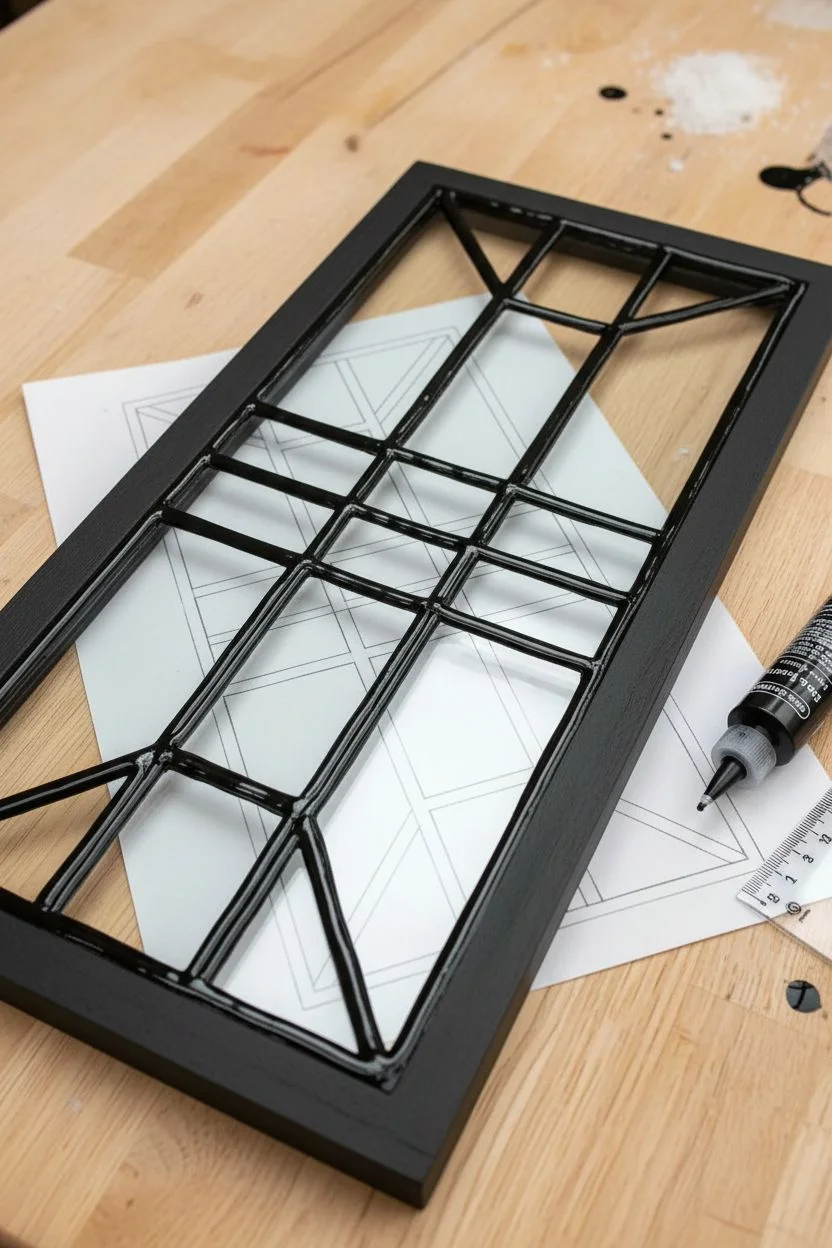
Step 1: Planning and Leading
-
Prepare the surface:
Begin by removing the backing from your picture frame. If your frame has glass, clean it thoroughly with alcohol to remove any grease. If you are using an acrylic sheet, ensure it fits snugly inside the frame and is clean. -
Design the pattern:
Sketch your geometric design on a piece of paper that fits the size of your frame. For this Art Deco style, use a ruler to draw a symmetrical layout featuring long vertical rectangles flanked by angled triangles and squares. -
Trace the lines:
Place your paper sketch underneath the glass or acrylic sheet. Using black liquid lead or puff paint, carefully trace over your lines directly onto the clear surface. Keep the nozzle close to the surface for smooth, consistent lines that mimic soldering. -
Let the outlines dry:
Allow the black leading to dry completely. This acts as a barrier to keep your colored salts separated. I find it usually takes about 4 to 6 hours, but leaving it overnight is the safest bet to avoid smears. -
Prepare the frame:
While the leading dries, paint your wooden frame black to match the faux leading lines. This creates a cohesive, heavy-metal look typical of real stained glass windows. Let this dry fully.
Step 2: Creating the Salt Glass
-
Mix colors with salt:
Divide your coarse salt into separate disposable cups. Add a few drops of liquid watercolor or food coloring to each cup—you’ll need teal, amber, reddish-pink, and leave one cup plain white. Stir until the color is evenly distributed. -
Apply the adhesive:
Working with one color section at a time, apply a generous layer of white craft glue or clear drying glue onto the glass within the specific bordered area. Ensure the glue reaches all the way to the black leading edges. -
Add texture:
Immediately sprinkle the corresponding colored salt onto the wet glue. For the teal sections, pile it slightly higher than you think you need; as the glue dries, the salt will settle into a crystalline layer. -
Press gently:
Using a dry finger or the back of a spoon, verify that the salt is pressed into the glue. Don’t crush the crystals, but make sure they have made contact with the adhesive base. -
Continue filling sections:
Repeat the gluing and sprinkling process for the amber and pink sections. Use a clean brush or spoon for each color to prevent muddying the hues. -
Fill the white areas:
Finally, apply glue to the remaining sections and fill them with the uncolored white salt. This provides a frosty contrast to the vibrant colors.
Crystal Clarity Tip
Use Epsom salts for a chunkier, more jewel-like texture, or table salt for a finer, frosted glass appearance. Mixing grain sizes adds depth.
Step 3: Sealing and Assembly
-
Initial drying phase:
Let the entire piece sit undisturbed for at least 24 hours. The glue needs to cure completely beneath the salt layer. -
Remove excess salt:
Once dry, gently tilt the glass vertically over a tray or trash bin to let any loose, unadhered salt fall away. Tap the back of the glass lightly to dislodge stragglers. -
Seal the artwork:
To prevent the salt from shedding over time or reacting to humidity, gently coat the salt surface with a layer of spray sealant or carefully dab on a watered-down layer of Mod Podge. -
Back the project (Optional):
For a brighter effect, you can place a piece of white vellum paper behind the glass before putting it back in the frame. This diffuses the light nicely. -
Final assembly:
Insert your finished glass piece back into the painted black wooden frame. Secure it in place using the frame’s tabs or a line of hot glue along the interior edge.
Light Box Upgrade
Mount LED strip lights inside the back of the frame rim before hanging. When lit, the salt crystals will glow vividly like real stained glass.
Hang your masterpiece in a sunny window to see the colors glow and transform throughout the day
Geode Crystal Slice Salt Painting
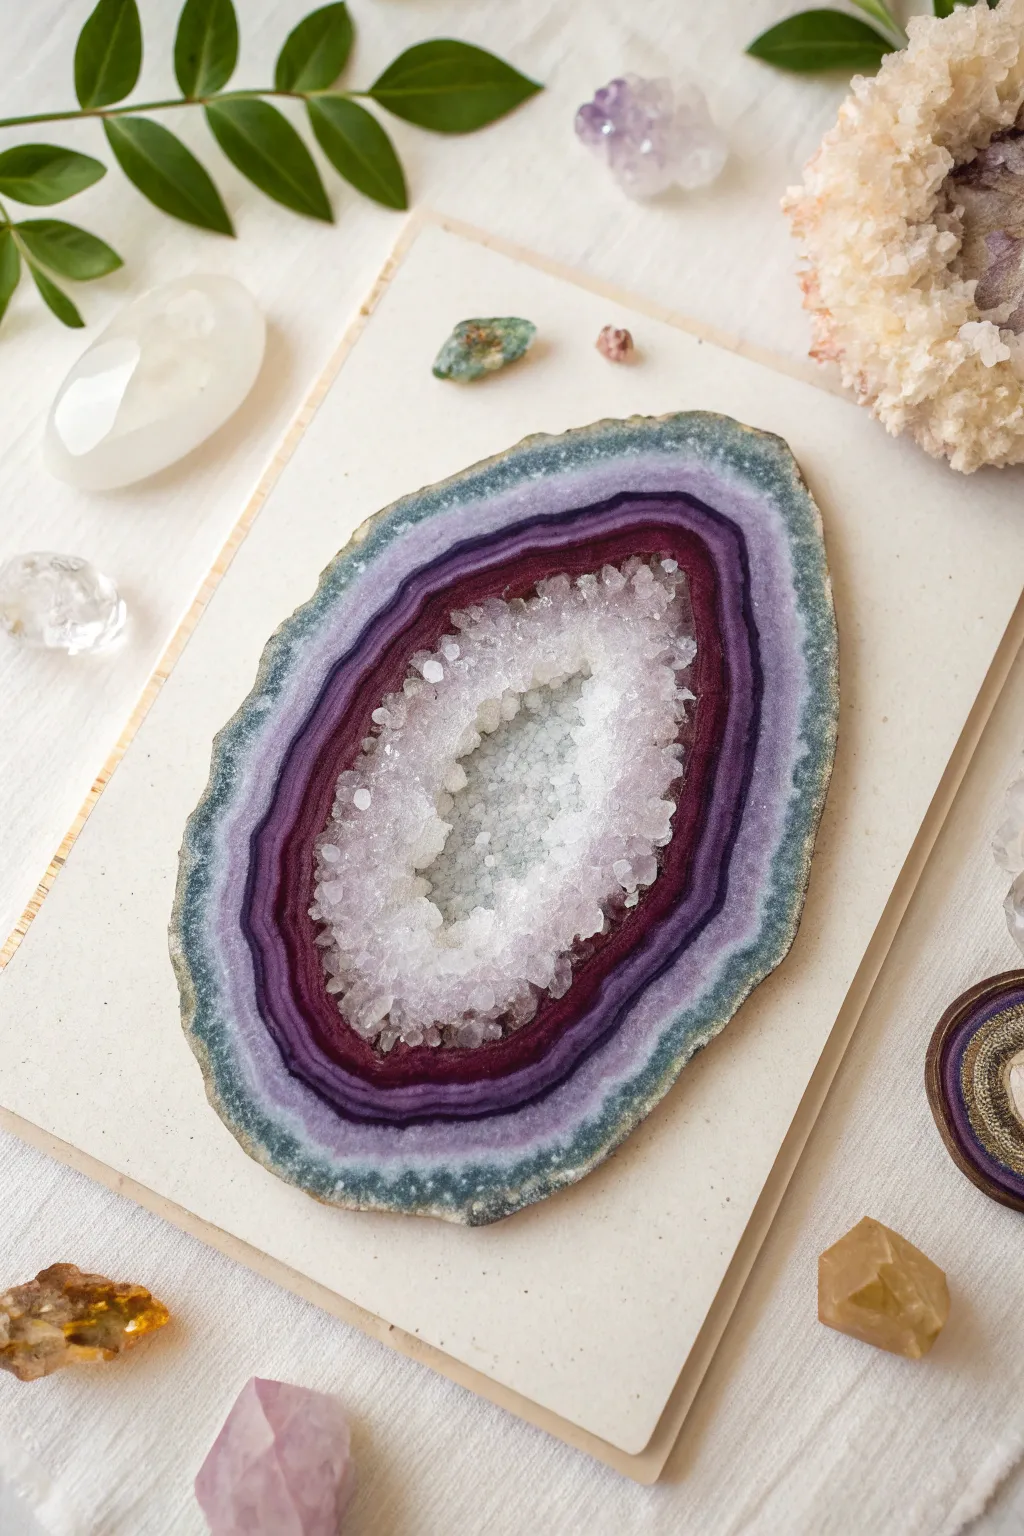
Capture the natural beauty of crystalline rock structures with this stunning geode slice project. Using watercolor and coarse salt, you’ll create organic banding and a mesmerizing, glittering center that mimics real quartz.
Step-by-Step Tutorial
Materials
- Heavyweight watercolor paper (300gsm recommended)
- Pencil
- Liquid watercolor paints or high-pigment tube watercolors (Teal, Purple, Deep Magenta/Burgundy)
- White or clear school glue (with a fine nozzle)
- Coarse sea salt or kosher salt
- Table salt (fine grain)
- Round watercolor brushes (sizes 4 and 8)
- Cup of water
- Paper towels
- Palette or mixing tray
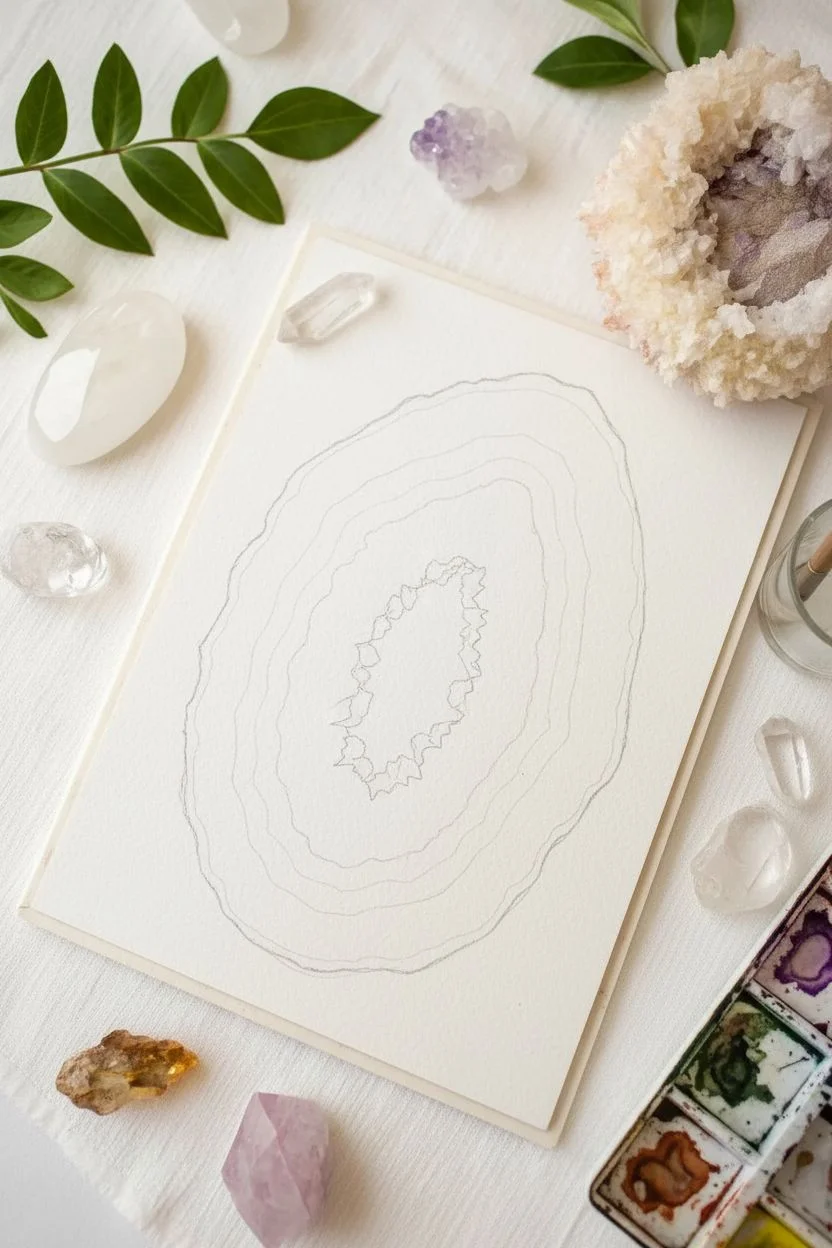
Step 1: Drafting the Shape
-
Sketch the outline:
Begin by lightly sketching an organic, jagged oval shape on your watercolor paper to define the outer edge of the geode. -
Define the center:
Draw a smaller, irregular hollow shape in the middle. This will be the crystalline cavern, so keep the edges jagged and uneven to look natural. -
Map the bands:
Sketch 2-3 concentric faint lines between the outer edge and the inner center. These guides will help you place your color rings later.
Color Bleeding Control
If paints engage in a muddy mess rather than blending, wait 2-3 minutes between rings. The paper should be damp, not swimming in a puddle.
Step 2: Creating the Crystalline Core
-
Apply glue to the center:
Squeeze a generous layer of white glue specifically inside the central hollow area you sketched. -
Add texture:
While the glue is wet, sprinkle a heavy amount of coarse sea salt onto the glue. This large-grain salt mimics the actual quartz crystals found inside geodes. -
Fill the gaps:
Sprinkle a little fine table salt in between the large grains to ensure the center looks dense and fully encrusted. -
Initial drying:
Let this glue and salt mixture dry completely before painting near it, usually about an hour or two, to prevent the paint from bleeding uncontrollably into the center immediately.
Make It Sparkle
Mix a small pinch of actual cosmetic glitter into your coarse salt for the center. It catches the light just like real mineral formations.
Step 3: Painting the Layers
-
Prepare your colors:
Dilute your teal, purple, and deep magenta paints on your palette. You want them fluid but still vibrant. -
Paint the outer crust:
Using the teal or blue-grey color, paint the outermost rim of the geode. Use a jagged brushstroke to make the rock edge look rough. -
Transition to purple:
While the teal edge is still slightly damp, paint the next ring inward using a light lavender or purple. Let the edges touch slightly so the colors bleed together softly. -
Deepen the intensity:
Move inward to the next band with a darker, more saturated purple. I like to dab the paint on here rather than brushing, which adds to the grainy rock texture. -
The innermost ring:
Using your deepest magenta or burgundy, paint the ring that directly touches the salted center. Make this layer very dark to create contrast with the white crystals.
Step 4: Adding Salt Texture
-
Salt the paint:
While your colored paint rings are still very wet, sprinkle fine table salt lightly over the painted areas. The salt will absorb the pigment and create a unique, speckled geological texture as it dries. -
Enhance the center:
If you want the center crystals to have a slight tint, lightly touch the tip of a brush loaded with very watery purple paint to the edge of the dried glue-salt center. The color will wick into the crystals subtly. -
Wait for the magic:
Allow the entire painting to dry completely. This is crucial—if you move it too soon, the salt patterns might smudge. -
Reveal the texture:
Once fully dry (giving it overnight is best), gently brush off the loose salt from the painted rings. Do NOT brush the salt off the glued center; that stays permanently. -
Final touches:
If the outer edge looks too clean, add a few dry-brush strokes of dark grey or brown to the very perimeter to simulate the rough exterior rock skin.
Display your finished geode art on a shelf or cut it out to use as a unique wall hanging

PENCIL GUIDE
Understanding Pencil Grades from H to B
From first sketch to finished drawing — learn pencil grades, line control, and shading techniques.
Explore the Full Guide
Topographic Map Line Salt Painting
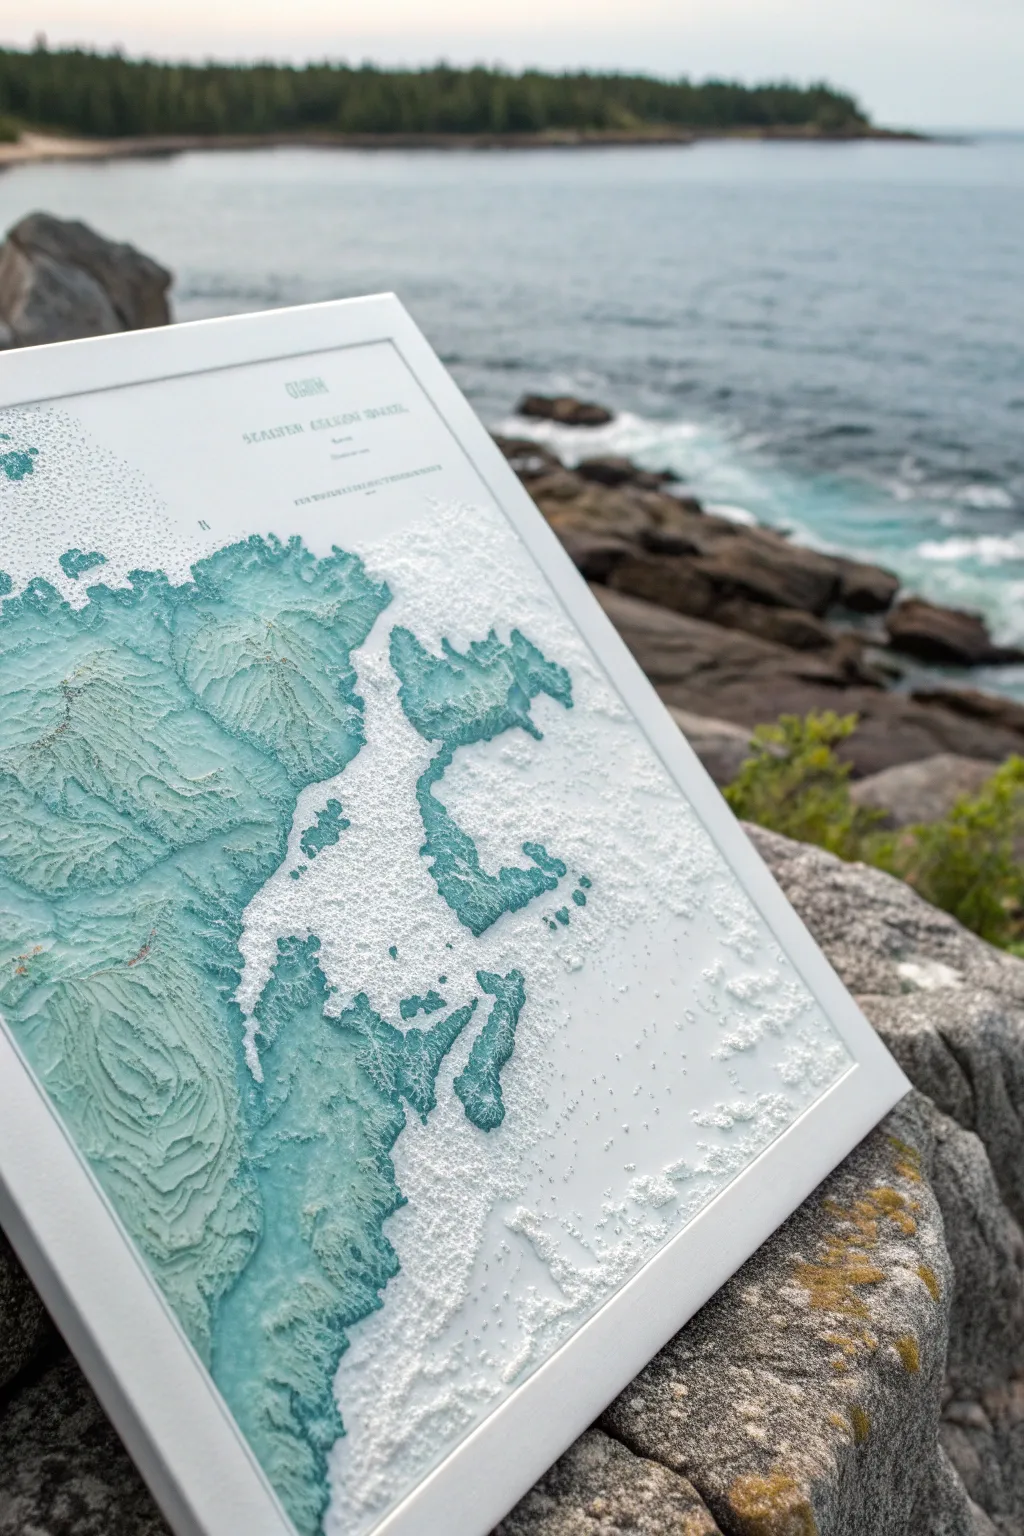
Capture the rugged beauty of a coastline with this textured topographic map project that mimics the look of a vintage relief chart. By combining raised salt textures with watercolor washes, you’ll create a stunning, dimensional piece that celebrates the meeting of land and sea.
Step-by-Step Guide
Materials
- High-quality watercolor paper (heavyweight, cold press)
- White PVA glue or craft glue with a precision tip
- Table salt (fine grain)
- Watercolor paints (teal, turquoise, deep blue)
- Soft round paintbrushes (sizes 4 and 8)
- Pencil
- Printed map reference (of your favorite coastline)
- White or light wood frame
- Painter’s tape
- Tray or large sheet of paper (to catch excess salt)
- Fine-tip waterproof pen (optional for text)
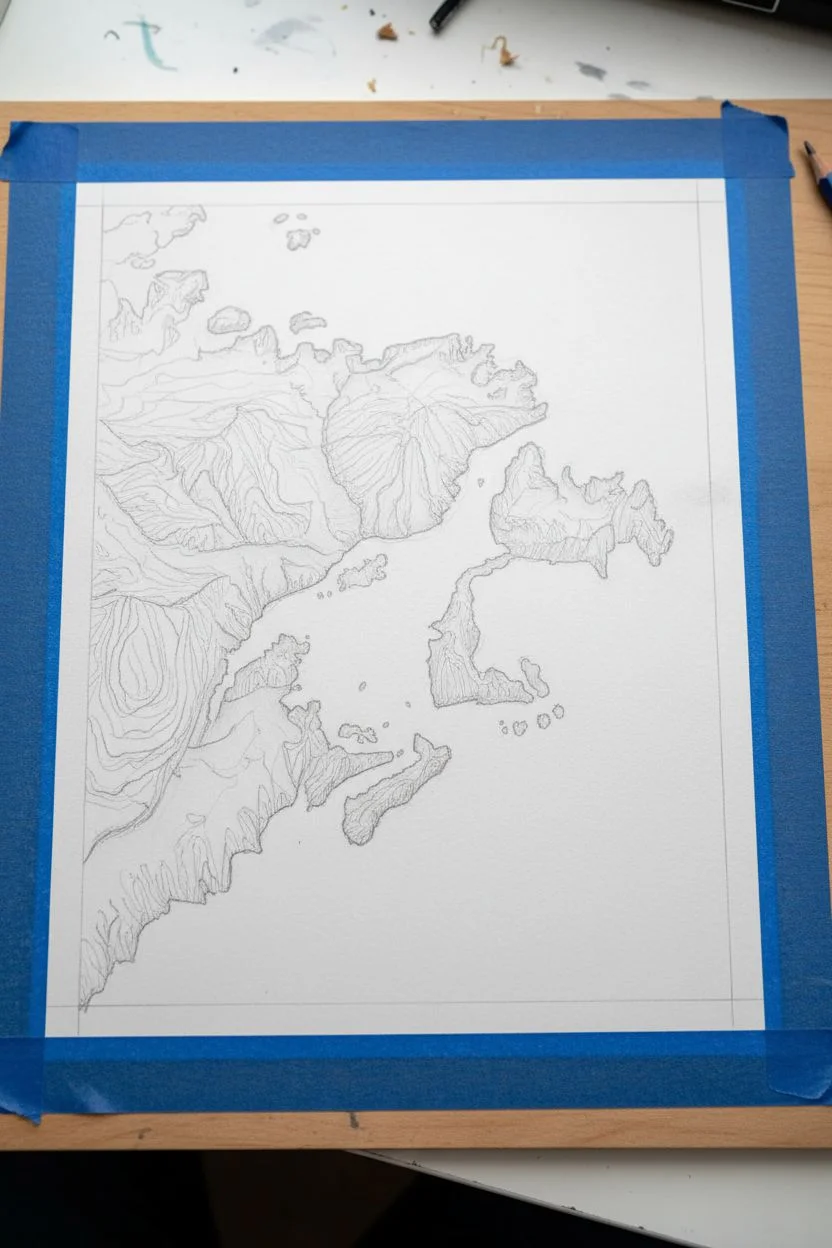
Step 1: Mapping the Terrain
-
Prepare your canvas:
Begin by taping down your watercolor paper to a flat, sturdy surface using painter’s tape. This prevents the paper from warping when it gets wet later and creates a clean border. -
Sketch the coastline:
Using your reference map, lightly sketch the outline of the landmass with a pencil. Don’t worry about being perfectly precise; capture the general organic shape of the inlets and peninsulas. -
Draw topographic lines:
Inside the land area, draw concentric lines that mimic elevation changes. These ‘iso-lines’ should wiggle and curve naturally, getting closer together where the terrain would be steeper. -
Add detail to islands:
Sketch in smaller islands or detached landmasses near the main coast. The variety in size adds visual interest and creates a realistic archipelago effect.
Step 2: Creating the Salt Structure
-
Apply the glue lines:
Carefully trace over your pencil lines with PVA glue. Maintain a steady hand to keep the bead of glue consistent in thickness. I find it easier to work in small sections to prevent smudging. -
Fill land areas:
For areas that need solid texture rather than just lines (like the peaks of hills), fill the space between lines with a thin layer of glue. -
Add sea spray texture:
Dot tiny amounts of glue in the ‘ocean’ areas surrounding the land to represent shoals, waves, or shallow waters. This stippling effect creates the speckled look seen in the reference. -
The salt pour:
While the glue is still very wet, generously pour fine table salt over the entire paper. Ensure every bit of glue is completely covered in a mound of salt. -
Let it set:
Allow the project to sit undisturbed for at least 15-20 minutes. This gives the glue time to bond with the salt crystals. -
Shake off excess:
Tilt the paper over a tray or trash bin to shake off the loose salt. You should be left with a crisp, crystalline raised white drawing.
Salty Spills
If salt clumps or crumbles off after drying, your glue layer was likely too thin. Dab a tiny dot of fresh glue on the bald spot and sprinkle new salt.
Step 3: Painting the Relief
-
Mix your palette:
Prepare a watery wash of teal and turquoise watercolor paint. You want the pigment to be quite fluid so it travels easily along the salt. -
Touch the salt:
Gently touch your loaded brush to the salt lines. You don’t need to ‘paint’ in strokes; simply let the salt absorb the liquid. Watch the color wick and spread along the raised lines magically. -
Add depth variations:
Drop simpler, more concentrated blue pigment into the ‘deeper’ valley areas of your topography, and use clearer water near the peaks to create a gradient effect mimicking height. -
Keep the ocean white:
Leave the majority of the surrounding ocean area white or very faintly tinted. This negative space makes the colored landmass pop. -
Final drying time:
Let the painting dry completely overnight. The salt needs to be fully dry and hard before framing. -
Add text labels:
If desired, use a waterproof fine-tip pen to write the name of the location or coordinates in the open white space, giving it an authentic map aesthetic. -
Frame your work:
Carefully place your artwork into a deep-set frame. Remove the glass if the texture is too high, or use a shadow box frame to protect the delicate salt structure.
Golden Hour Glow
Mix a tiny amount of metallic gold watercolor into your teal wash. It will settle in the crevices of the salt, making the map shimmer like sunlight on water.
Hang your textured map where it can catch the light and remind you of your favorite seaside wanderings


Have a question or want to share your own experience? I'd love to hear from you in the comments below!