A fresh coat of paint can change the whole energy of your home faster than almost any other DIY. Here are my favorite home painting ideas—from classic, confidence-boosting upgrades to artsy, unexpected statements you’ll be excited to live with.
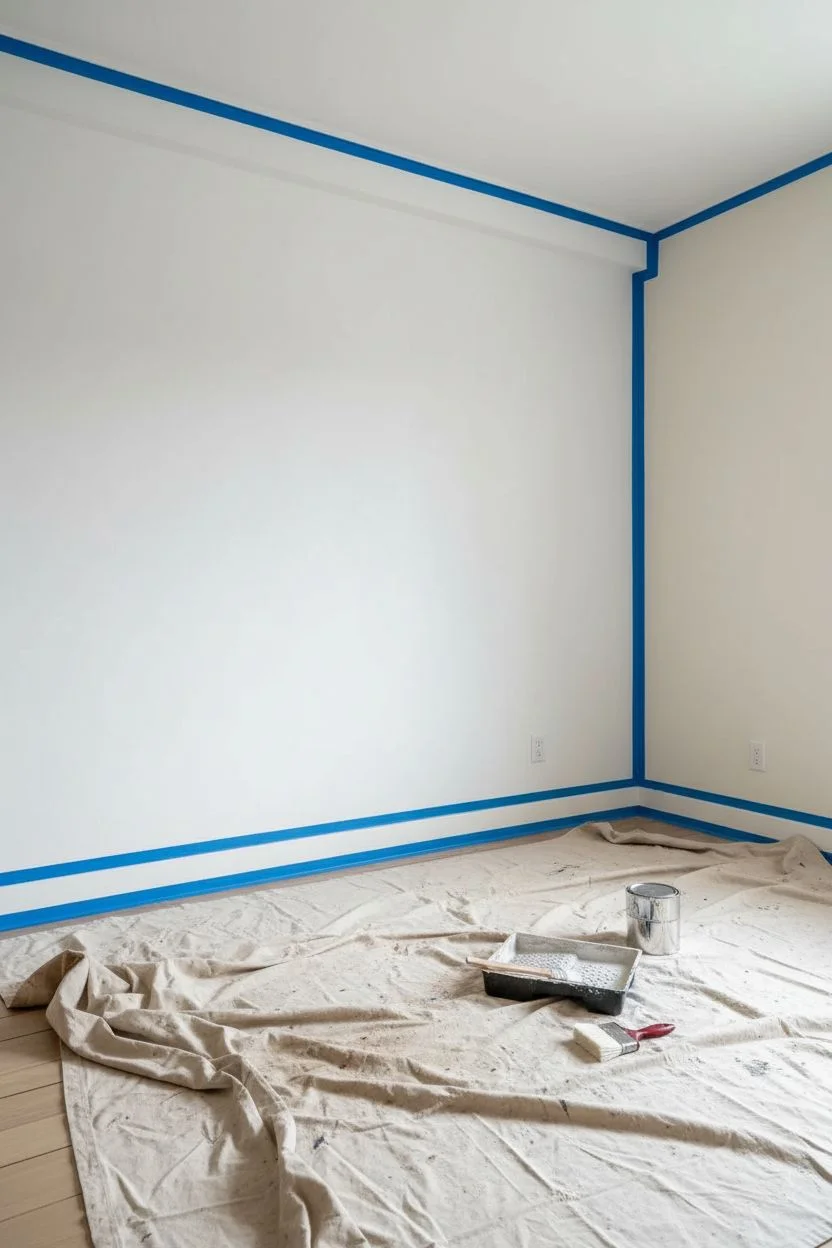
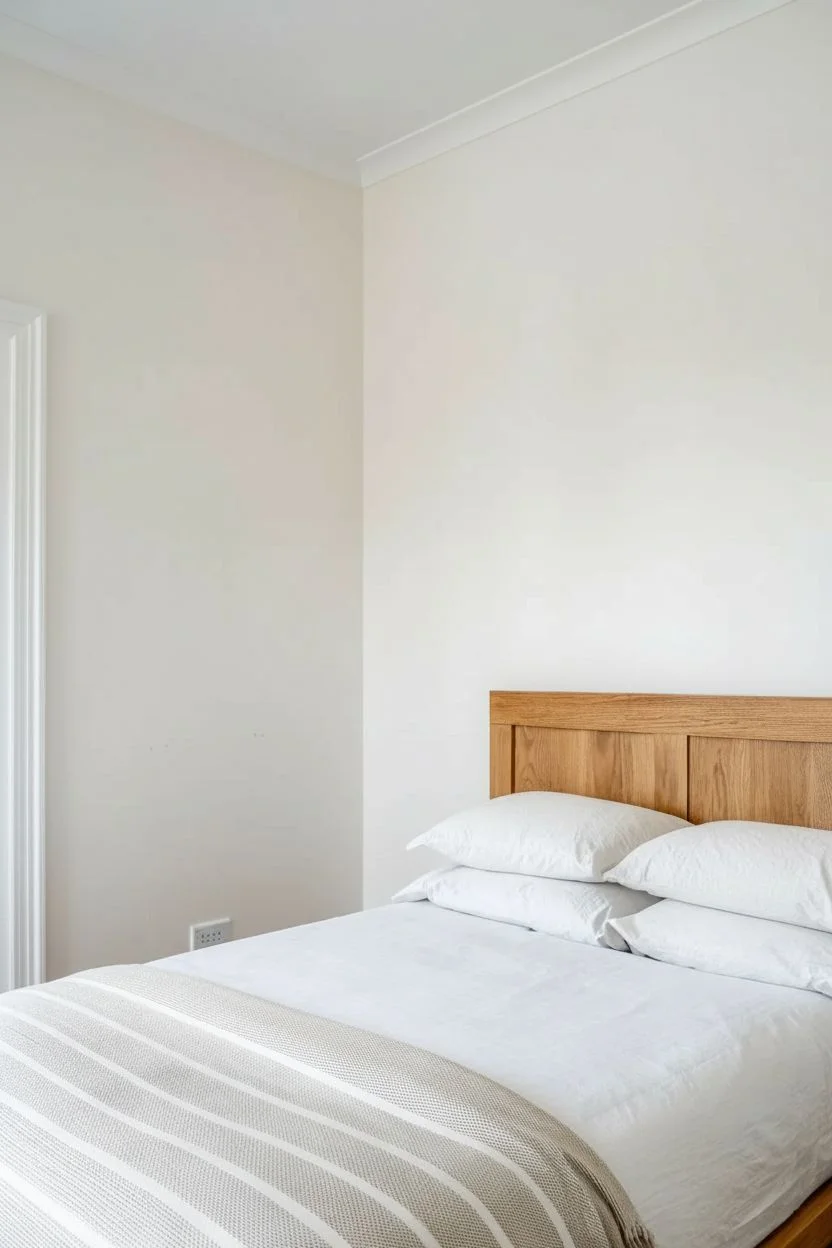
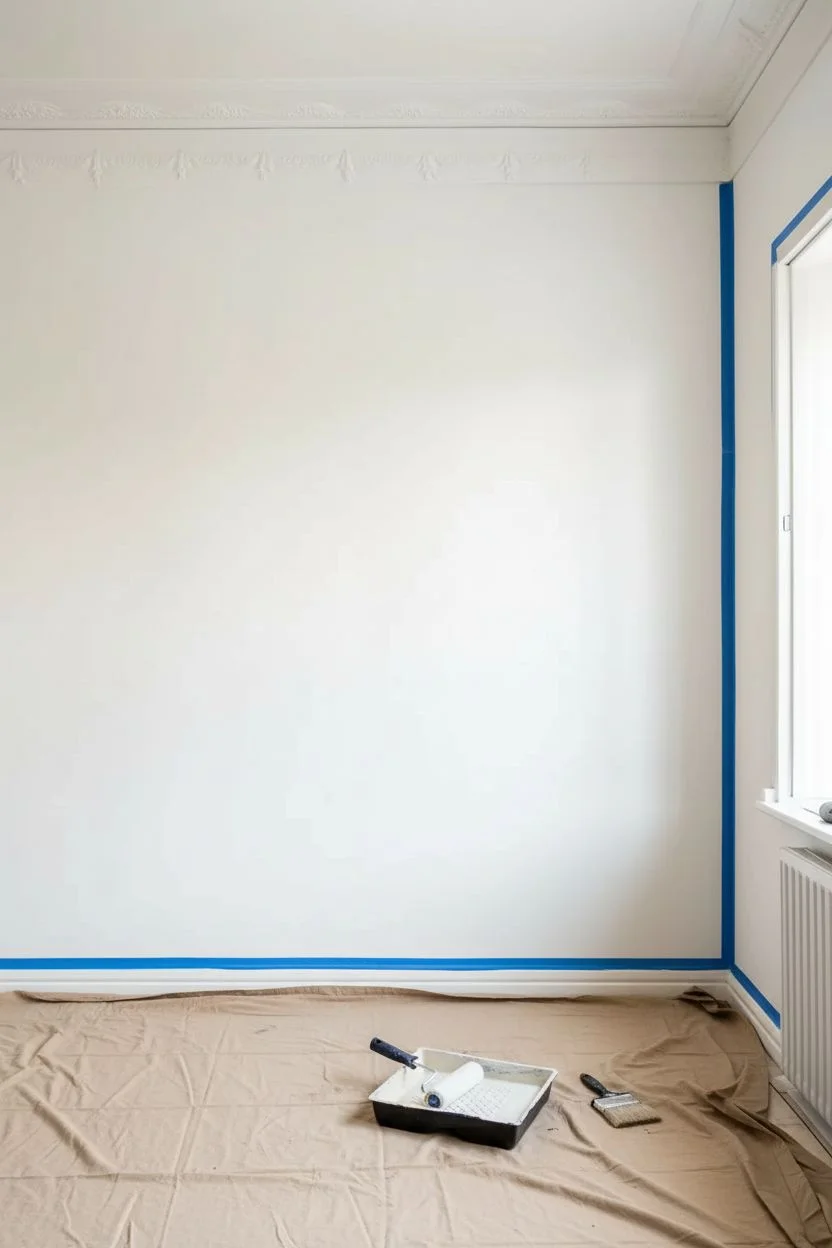
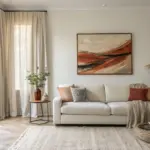
Timeless Neutral Walls With Crisp White Trim
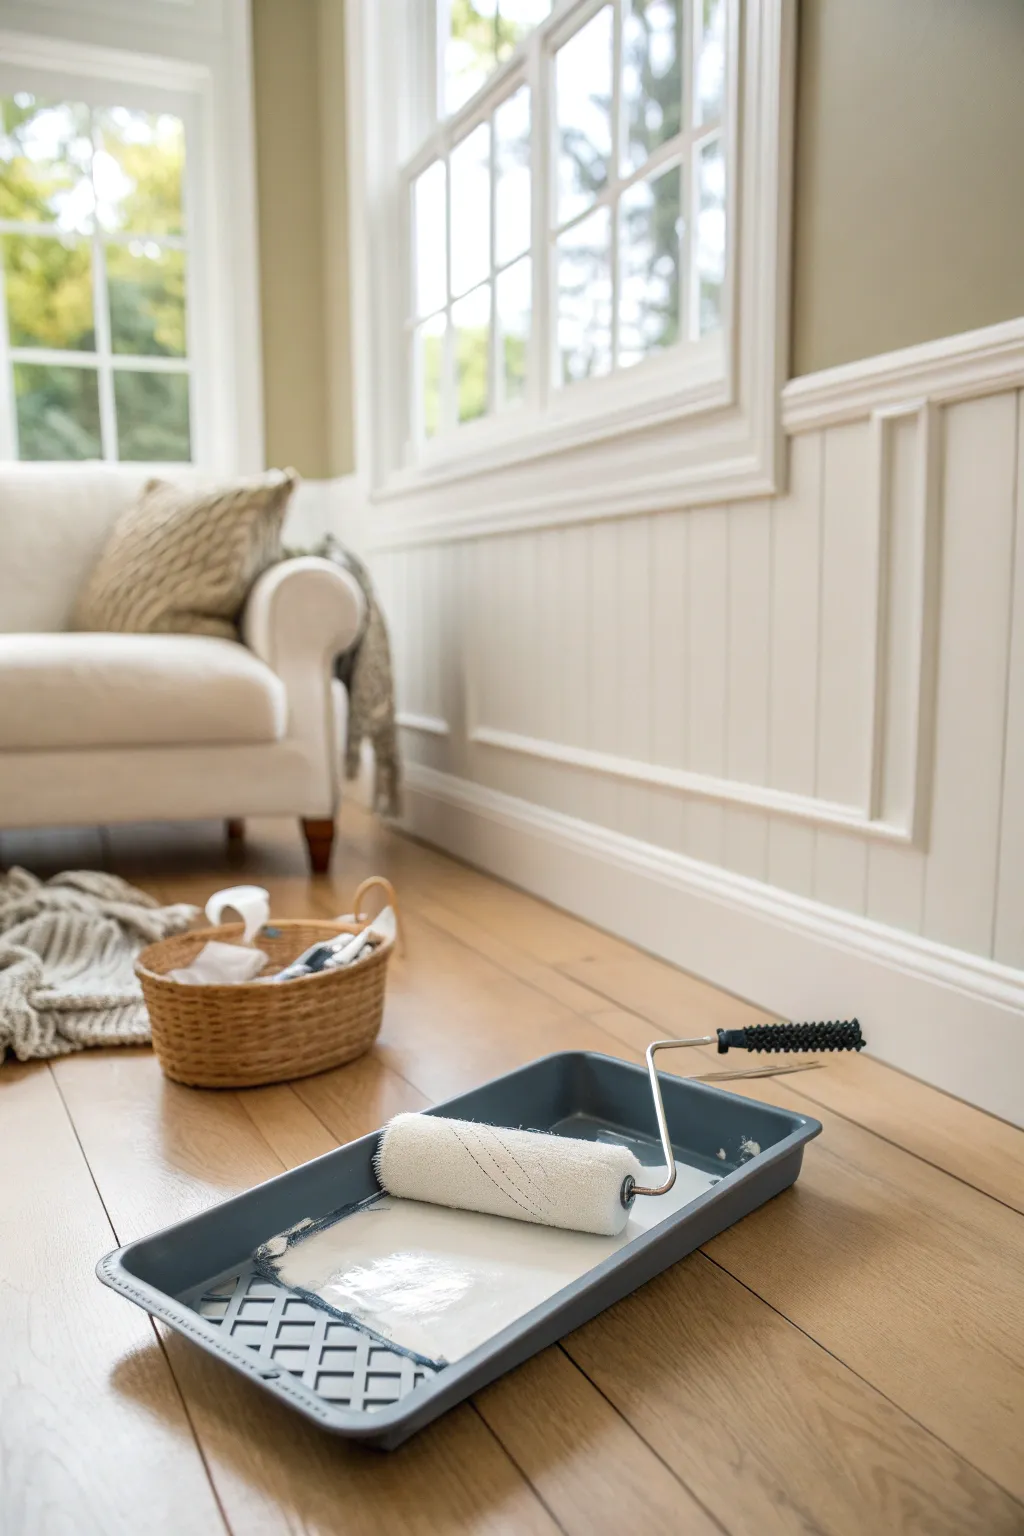
Transform any room with this classic combination of soft neutral uppers and bright white wainscoting. This tutorial guides you through achieving that high-contrast, architectural look using paneling and careful paint application.
Step-by-Step
Materials
- Interior latex paint (Satin or Eggshell finish for walls, Semi-gloss for trim)
- White primer
- Paint roller frame and roller covers (3/8 inch nap)
- Angled sash brush (2.5 inch)
- Paint tray and liners
- Painter’s tape
- Drop cloths
- Pre-cut wainscoting panels or trim molding
- Construction adhesive
- Caulk and caulking gun
- Spackle and putty knife
- Fine-grit sandpaper (120 and 220 grit)
- Level and measuring tape
Step 1: Preparation and Wall Painting
-
Clear and Clean:
Begin by removing all furniture from the area or pushing it to the center of the room, covering it with drop cloths. Clean the walls thoroughly with a damp cloth or a mild TSP substitute to remove dust and oils, ensuring the new paint adheres properly. -
Tape and Protect:
Apply painter’s tape along the ceiling line, baseboards (if staying), and window trim. Lay down drop cloths to protect your hardwood floors from splatters. -
Patch Imperfections:
Inspect the upper walls for nail holes or dents. Fill them with spackle, let dry, and sand smooth with fine-grit sandpaper. Wipe away any dust with a tack cloth. -
Cut In the Upper Wall Color:
Using your angled sash brush and the neutral beige latex paint, ‘cut in’ a 2-3 inch border around the ceiling, corners, and windows on the upper portion of the wall. -
Roll the Walls:
Pour your neutral paint into the tray. Load the roller evenly and apply the paint to the upper walls using a ‘W’ pattern to distribute it, then fill in the gaps with vertical strokes. I find rolling while the cut-in edges are still wet helps blend everything seamlessly. -
Apply Second Coat:
Allow the first coat to dry according to the manufacturer’s instructions (usually 2-4 hours). Apply a second coat for full, rich coverage and let it cure completely.
Uneven Paint Coverage?
If the white trim paint looks streaky, you may be overworking it. Apply the paint generously, lay it off with one final smooth stroke, and walk away to let it self-level.
Step 2: Wainscoting Installation
-
Measure and Mark:
Determine the height of your wainscoting (typically 32-36 inches from the floor). Use a level to draw a straight horizontal line around the room at this height to guide your installation. -
Install Base Panels:
If you are using board-and-batten style or beadboard sheets, measure and cut your panels to fit between the baseboard and your marked line. Apply construction adhesive to the back and press firmly onto the wall. Secure with finish nails if necessary. -
Add Chair Rail:
Install the chair rail molding along the top edge of your panels, aligning it perfectly with your level line. This cap piece hides raw edges and creates that polished, finished visual break. -
Install Vertical Battens (Optional):
If creating a paneled look like in the photo, measure and cut vertical trim pieces. Space them evenly along the wall and adhere them vertically between the baseboard and chair rail. -
Caulk the Gaps:
Run a thin bead of paintable caulk along every seam where wood meets wall, wood meets wood, and around the chair rail. Smooth it with a wet finger for a seamless look.
Step 3: Painting the Trim
-
Prime the Woodwork:
Once the caulk is dry, apply a coat of white primer to all the wainscoting, chair rail, and baseboards. This is crucial for raw wood or MDF to ensure the topcoat looks uniform. -
Sand Lightly:
After priming, lightly sand the surface with 220-grit sandpaper to knock down any raised grain or brush marks. Wipe clean thoroughly. -
Paint the Reveal:
Using the angled sash brush, carefully paint the recessed areas of the molding and edges first with your semi-gloss white paint. -
Roll the Flat Surfaces:
Use a small foam roller or a short-nap mini roller to paint the flat panels and the face of the chair rail. This provides a smoother, spray-like finish compared to brushing large areas. -
Final White Coat:
Apply a second coat of semi-gloss white to the wainscoting. Watch for drips in the corners of the molding and brush them out immediately. -
Remove Tape:
While the final coat is still slightly tacky (not fully dry), gently peel away the painter’s tape at a 45-degree angle to ensure a crisp, clean line.
Pro Tip: Cutting In
When cutting in the dark wall color against the white chair rail, hold your breath slightly on the downstroke to steady your hand for a razor-sharp line without needing tape.
Step back and admire how the crisp white woodwork instantly elevates the soft neutral walls for a sophisticated finish


One Bold Accent Wall Behind the Sofa or Bed
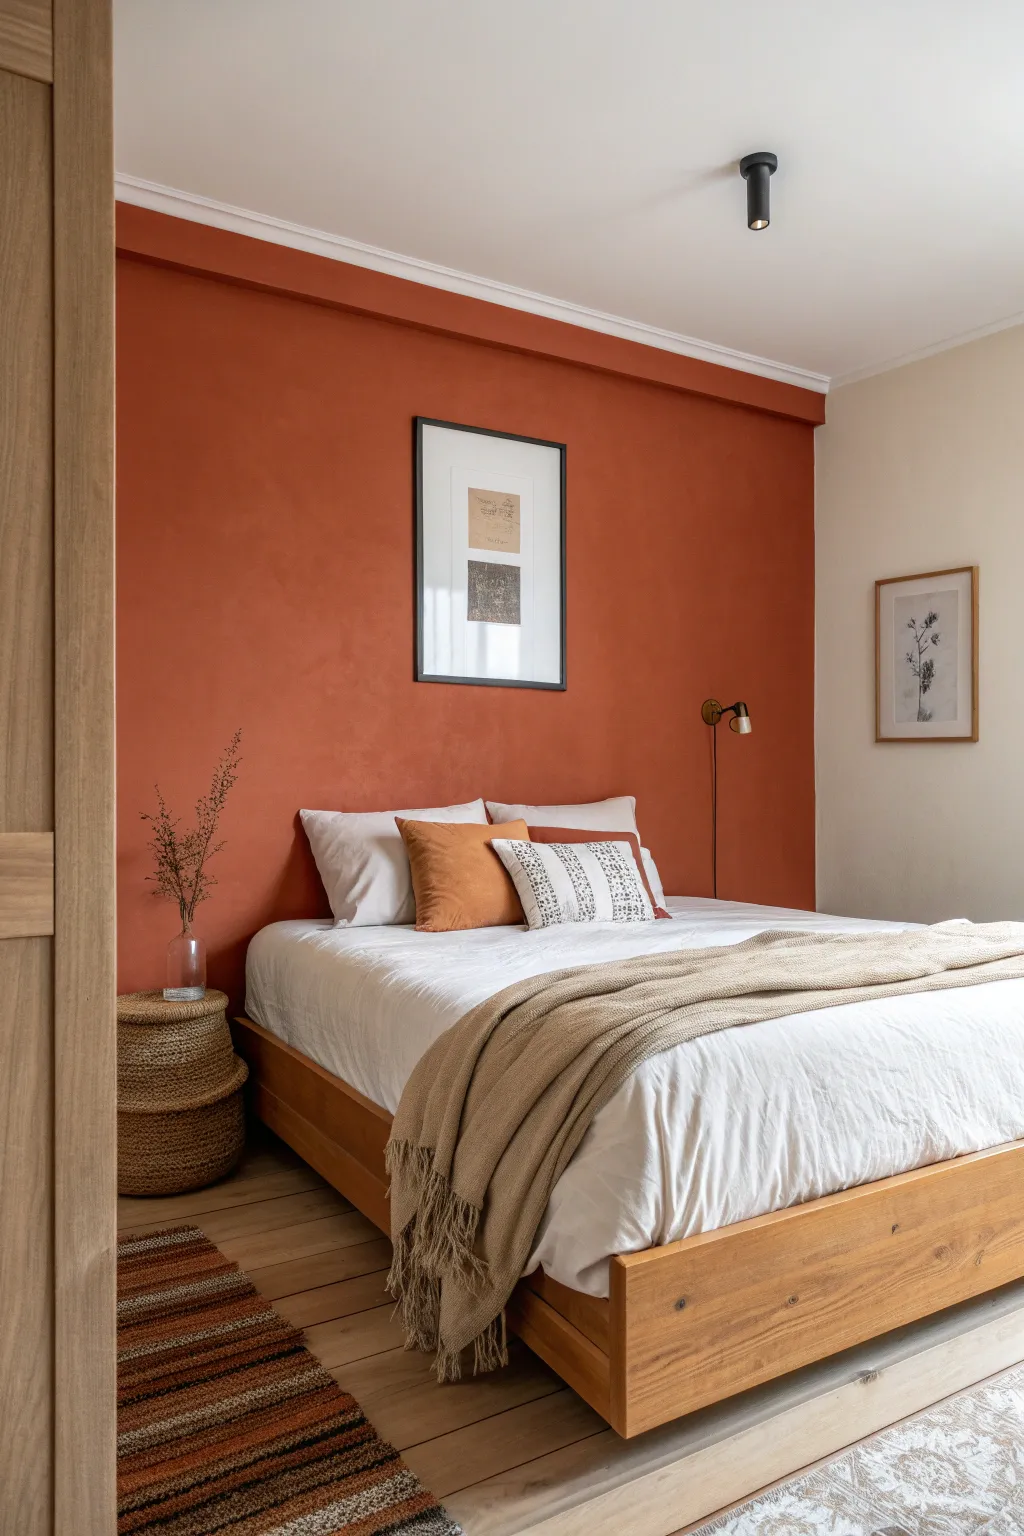
Transform your bedroom into a warm, earthen sanctuary with this textured accent wall project. By using a limewash or chalk-based paint technique in a rich rusty-orange hue, you can achieve a depth and softness that flat latex paint simply cannot replicate.
Detailed Instructions
Materials
- Terracotta or rust-colored limewash paint (or chalk mineral paint)
- Block brush (large, thick bristles for masonry/limewash)
- Painter’s tape
- Drop cloths
- Primer suitable for limewash (usually a specific mineral primer)
- Paint tray and liner
- Edging brush (medium sash brush)
- Stir stick
- Ladder
Step 1: Preparation
-
Clear and clean:
Begin by removing all furniture from the wall area, including the bed frame and nightstands. Wipe the wall down with a damp cloth to remove dust and oils, ensuring a clean bonding surface. -
Protect boundaries:
Apply painter’s tape carefully along the ceiling line, the adjacent white walls, and the baseboards. Press the edges of the tape down firmly to prevent any bleed-through. -
Floor coverage:
Lay down your drop cloths to protect wooden floors or carpet. Limewash is thin and can splatter easily, so ensure you have generous coverage on the ground. -
Prime the surface:
Apply a coat of the specific mineral primer designed for your limewash paint. This is crucial because standard drywall primer is too slick; the mineral primer adds ‘tooth’ for the texture to grab onto. -
Let it cure:
Allow the primer to dry completely according to the manufacturer’s instructions. Do not rush this step, as a wet base can compromise the final texture.
Master the brushwork
Don’t overwork the paint. Lay it down in crossing strokes and leave it alone. Going back over drying paint pulls it off the wall and ruins the texture.
Step 2: First Coat & Technique
-
Mix the paint:
Stir your limewash paint thoroughly. Ideally, use a drill attachment if the pigment has settled heavily at the bottom, as consistency is key for this look. -
Cut in the edges:
Using your smaller edging brush, paint a border around the taped edges. Keep this edge wet and work in sections so it blends seamlessly when you start the main brushing. -
Start the cloud technique:
Dip your large block brush into the paint. Instead of straight up-and-down strokes, apply the paint in random, crisscross ‘X’ patterns or cloud-like swirls. This creates the movement you see in the photo. -
Work in patches:
Focus on a 3×3 foot section at a time. I like to keep a ‘wet edge’ by never letting a section dry completely before overlapping it with the next patch of strokes. -
Finish the first layer:
Continue the crisscross motion across the entire wall. Don’t worry if it looks patchy or translucent right now; limewash changes opacity significantly as it dries. -
First drying phase:
Let this first coat dry for several hours. The color will likely lighten as the moisture evaporates, revealing the initial blooming effect.
Correcting heavy spots
If one area looks too dark or heavy with pigment, lightly mist it with water while it’s still damp and brush outwards to disperse the color.
Step 3: Building Depth
-
Assess the coverage:
Look at the wall from a distance. Identify areas that look too thin or where the brush strokes seem too uniform. -
Apply the second coat:
Repeat the cloud-like, crisscross brushing technique for the second coat. This layer is where the magic happens, building up that velvety, sueded texture characteristic of the style. -
Feather the strokes:
Use a slightly lighter touch on this pass to feather the paint edges, creating soft transitions between the darker and lighter areas of the wash. -
Final dry time:
Allow the final coat to dry for at least 24 hours. The true depth of the terracotta color won’t be fully visible until the minerals have completely calcified on the wall. -
Remove tape:
carefully peel away the painter’s tape while the wall is fully dry. Pull the tape at a 45-degree angle away from the fresh paint to ensure a crisp line. -
Touch ups:
If any paint bled under the tape or you missed a spot near the trim, use a tiny artist’s brush to correct it with either the wall color or trim color.
Now step back and admire how the natural light plays across the rich, velvety texture of your new feature wall


Soft, Airy Pastels for a Calm Home Vibe
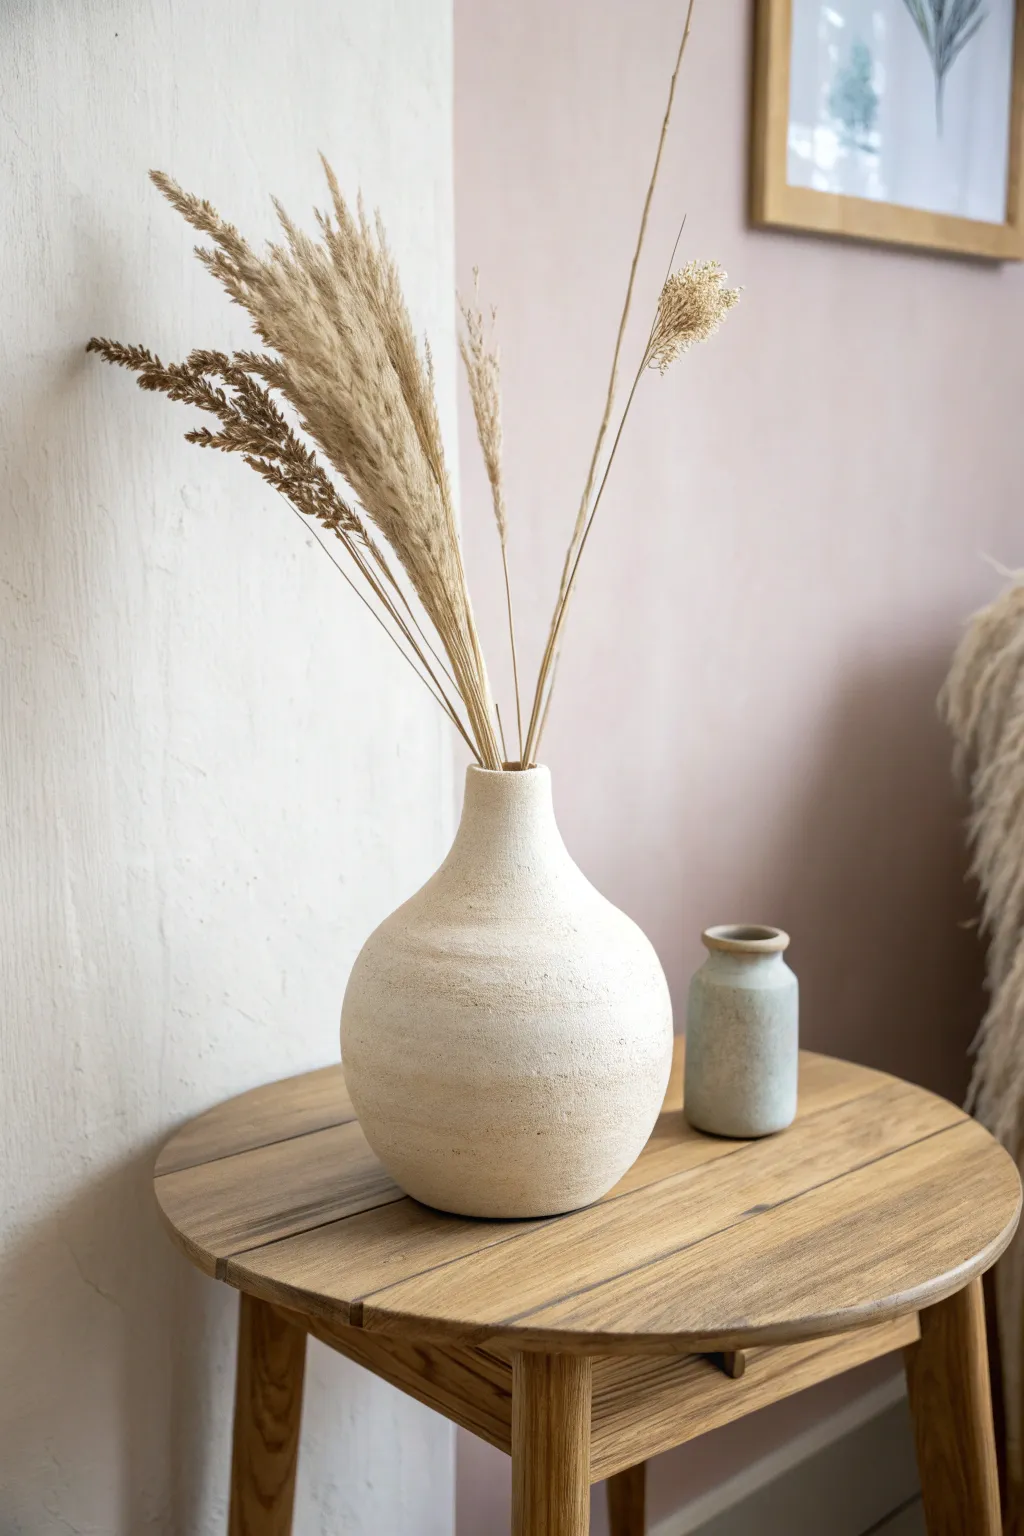

Transform a plain glass or ceramic vessel into a piece of high-end decor with this simple texturing technique. By mixing paint with baking soda, you’ll achieve that coveted organic, matte stoneware finish that brings an earthy calm to any pastel-inspired space.
How-To Guide
Materials
- A glass or smooth ceramic vase (thrifted is perfect)
- White or cream acrylic paint
- Baking soda (fresh works best)
- Small mixing bowl or disposable cup
- Medium-sized flat paintbrush
- Plastic spoon or stirring stick
- Fine-grit sandpaper (optional)
- Clear matte sealer spray
Step 1: Preparation
-
Clean the Surface:
Before you begin, ensure your chosen vase is completely clean and dry. Wash it thoroughly with warm soapy water to remove any grease, dust, or sticker residue, as these can prevent the textured paint from adhering properly. -
Set Up Your Workspace:
Lay down some newspaper or a drop cloth to protect your table. While acrylic paint is easy to clean up, the added texture can be a bit crumbly during the process.
Step 2: Mixing the Texture
-
Pour the Paint:
Pour a generous amount of your white or cream acrylic paint into your mixing bowl. You’ll likely need about half a cup depending on the size of your vase, but start with less—you can always mix more. -
Add Baking Soda:
Gradually sprinkle baking soda into the paint. A good starting ratio is roughly 1 part baking soda to 2 parts paint, but this isn’t an exact science. -
Stir Thoroughly:
Mix the combination with your plastic spoon. Aim for a consistency that resembles fluffy frosting or mousse. If it’s too runny, add more baking soda; if it’s too thick and clumpy, add a touch more paint. -
Check the Feel:
I like to test a small dab on a piece of paper first. The mixture should hold its shape slightly but still spread smoothly without dragging excessively.
Color Depth Secret
Mix two separate batches of texture paint—one slightly darker beige and one lighter cream. Dab them on simultaneously for realistic stone variation.
Step 3: Applying the Finish
-
First Coat Application:
Using your flat paintbrush, apply a generous layer of the mixture onto the vase. Don’t worry about being neat or unidirectional; horizontal strokes actually help mimic the look of wheel-thrown pottery. -
Create Texture:
As you paint, dab the brush slightly in areas where you want more rough, stone-like texture. Let the bristles leave small ridges and bumps. -
Let It Dry:
Allow this first coat to dry completely. This usually takes about 30 to 60 minutes. The baking soda will give it a matte, chalky appearance as it dries. -
Second Coat Coverage:
Apply a second coat over the first. This layer ensures full opacity and builds up that rich, tactile dimension. Any glass showing through will be covered now. -
Smoothing the Rim:
Pay special attention to the rim of the vase. Paint slightly inside the opening so the original material doesn’t show when you display it empty. -
Adding Organic Details:
While the second coat is still wet, you can gently stipple the surface with a dry sponge or balled-up paper towel if you want an even rougher, aged limestone effect.
Fixing Cracks
If the paint cracks as it dries, your layer was too thick. Don’t panic; just brush a thin layer of plain paint (no baking soda) over the cracks to fill them in.
Step 4: Finishing and Styling
-
Full Dry Time:
Let the vase sit undisturbed for several hours, or ideally overnight. The baking soda mixture needs to cure fully so it doesn’t flake off when handled. -
Optional Sanding:
If any peaks are too sharp or aggressive, very gently graze over them with fine-grit sandpaper to knock them back, just like weathering on natural stone. -
Sealing the Work:
To protect your new textured finish, take the vase outside and give it a light coat of clear matte sealer spray. This prevents the baking soda from shedding over time. -
Arranging Foliage:
Once the sealer is dry, style your vase with dried pampas grass, wheat stalks, or bunny tails. The soft beige tones of dried botanicals perfectly complement the faux-stone aesthetic.
Enjoy the quiet elegance this custom textured vase adds to your home decor


Color Drenching: Walls, Trim, and Ceiling All One Shade
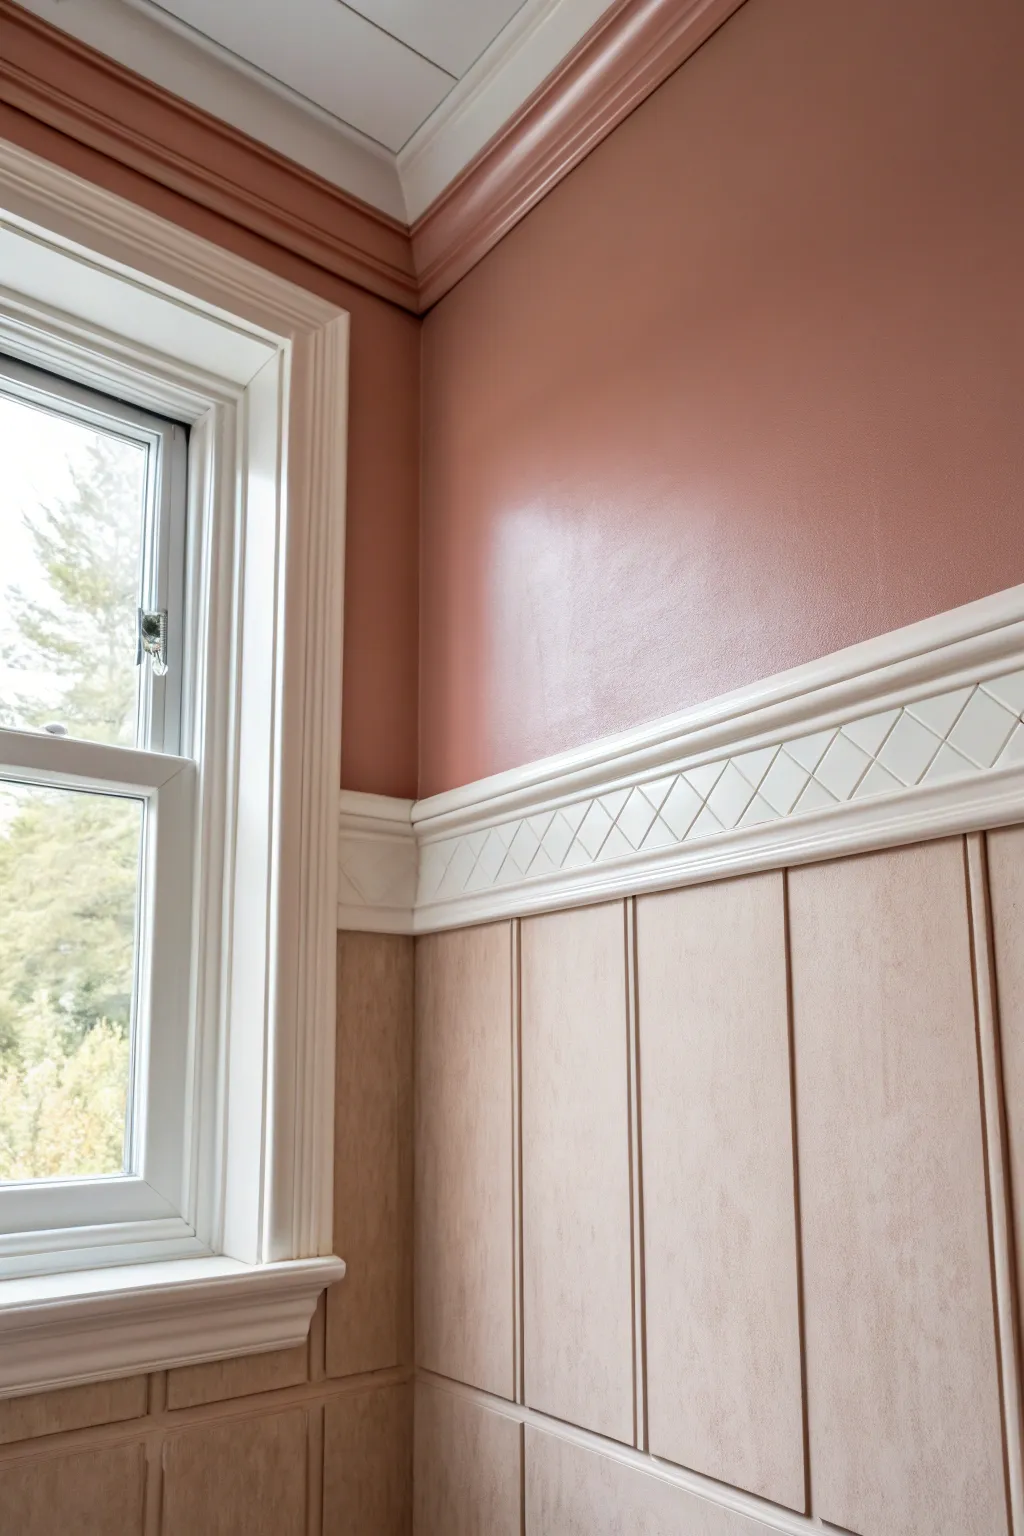
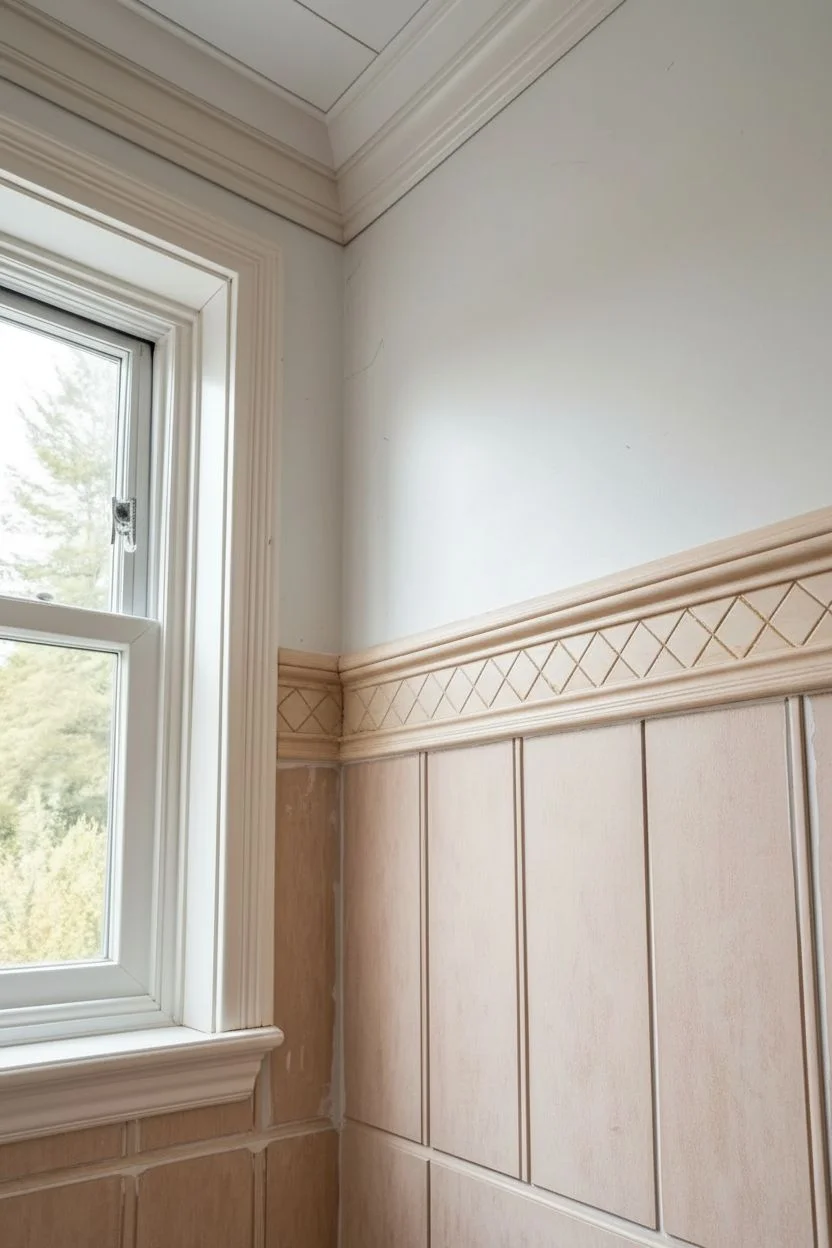
Transform a plain wall corner into a rich, textured focal point by combining classic board-and-batten wainscoting with a warm, color-drenched paint scheme. This project balances crisp white architectural details against deep terracotta walls and textured beige paneling for a sophisticated, layered look.
Step-by-Step
Materials
- MDF or plywood panels (4×8 sheets)
- Dovetail or beadboard molding strips
- Chair rail molding with diamond details
- Crown molding
- Window casing trim
- Construction adhesive (Liquid Nails)
- Brad nailer and 1 1/4 inch nails
- Wood filler and putty knife
- Caulk and caulking gun
- Painter’s tape
- Primer (oil-based if covering stains)
- Terracotta rose interior latex paint (satin finish)
- Crisp white interior trim paint (semi-gloss)
- Textured beige wallpaper or faux-finish glaze
- Assorted paintbrushes (angled sash)
- Paint rollers and trays
- Sandpaper (120 and 220 grit)
Step 1: Preparation and Carpentry
-
Measure and Plan:
Begin by measuring your wall height and determining where the chair rail will sit—typically about one-third up the wall (32-36 inches). Mark this line level across the room. -
Install Window Trim:
If your window lacks casing, install a classic picture-frame trim around the window using mitered corners. Ensure the reveal is even on all sides before nailing it into place. -
Install the Wainscoting Base:
Cut your plywood or MDF panels to fit the lower section of the wall below your marked chair rail line. Apply construction adhesive to the back and nail them securely to the studs. -
Add Vertical Battens:
Cut vertical molding trips to create the board-and-batten look. Space them evenly—I usually aim for 12-16 inches apart—and nail them over the paneling. -
Attach the Chair Rail:
Install the decorative chair rail molding directly on top of the wainscoting panels. For this specific look, choose a molding with an integrated lattice or diamond pattern. -
Install Crown Molding:
Cut and install crown molding along the ceiling line. Since we are color drenching, this molding will eventually match the upper wall color, blurring the line where the wall meets the ceiling. -
Fill and Caulk:
Fill all nail holes with wood filler. Once dry, sand smooth. Run a bead of caulk along every seam where wood meets wood or wood meets wall to ensure a seamless finish.
Step 2: Painting and Finishing
-
Prime Everything:
Apply a coat of high-quality primer to the new wood, the walls, and the wainscoting. This is crucial for ensuring the paint adheres uniformly and the true colors shine through. -
Paint the Upper Walls:
Using a roller, apply the deep terracotta rose paint to the upper walls. Cut in carefully around the window trim and the top of the chair rail. -
Paint the Ceiling and Crown:
Extend that same terracotta color up onto the crown molding. This is the key to the ‘color drenching’ effect shown here, making the room feel cozy and enveloped. -
Paint the Trim White:
Carefully paint the window casing and the decorative chair rail with crisp white semi-gloss paint. Use an angled sash brush for the diamond details to avoid drips. -
Create the Textured Lower Wall:
For the wainscoting panels, apply a base coat of beige paint. Let it dry completely. -
Apply Glaze or Texture:
To mimic the textured look in the photo, mix a slightly darker tan glaze. Apply it over the beige base with a rag or sponge, dabbing gently to create a subtle, mottled parchment effect. -
Clean Up Edges:
Once everything is dry, remove any painter’s tape carefully. If any terracotta bled onto the white trim or vice versa, use a small artist’s brush to touch up the lines for a razor-sharp finish.
Clean Lines
When painting the diamond relief on the chair rail, use a ‘dry brush’ technique to keep paint from pooling in the small corners of the design.
Texture Twist
Instead of glazing, use a heavy-weight textured wallpaper directly inside the wainscoting panels before painting for an authentic tactile feel.
Now you have a stunning architectural feature wall that proves bold color and classic trim make a perfect pair
BRUSH GUIDE
The Right Brush for Every Stroke
From clean lines to bold texture — master brush choice, stroke control, and essential techniques.
Explore the Full Guide
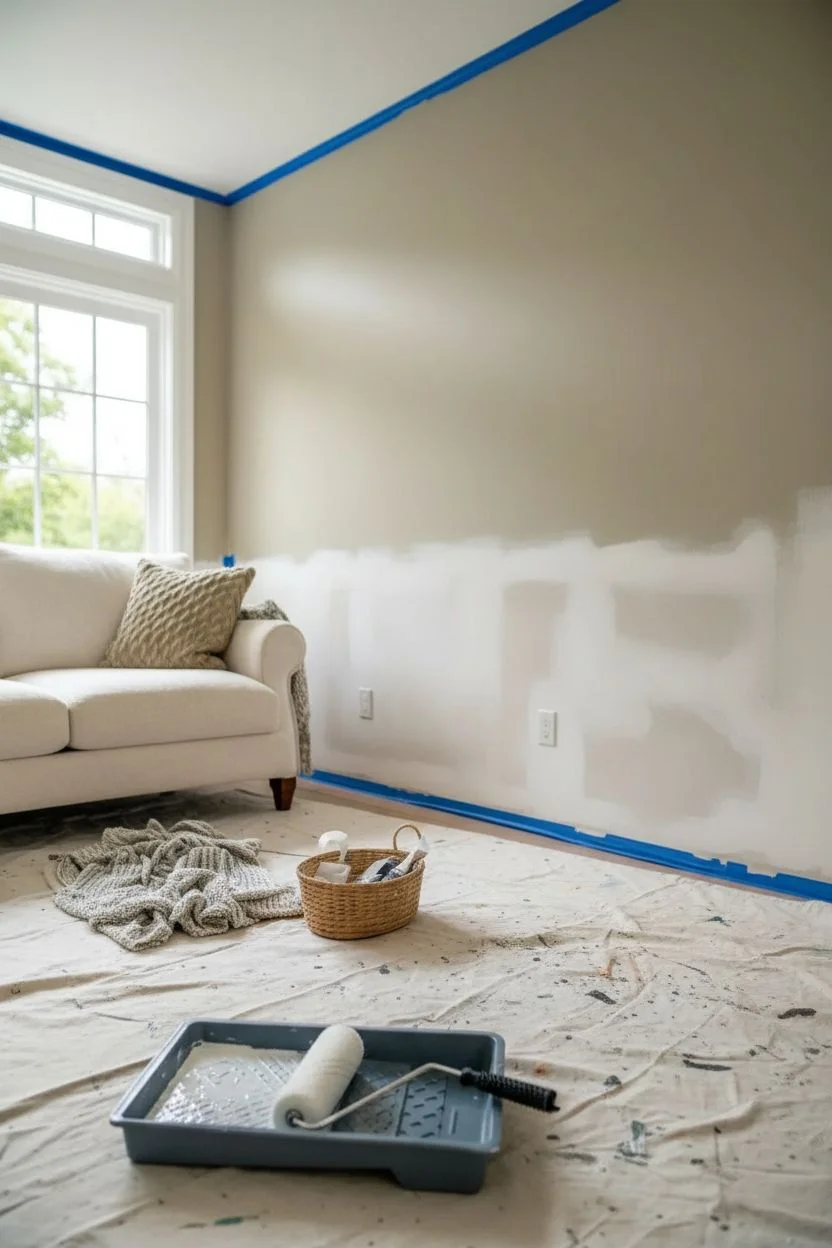
Two-Tone Walls With a Clean Chair-Rail Break
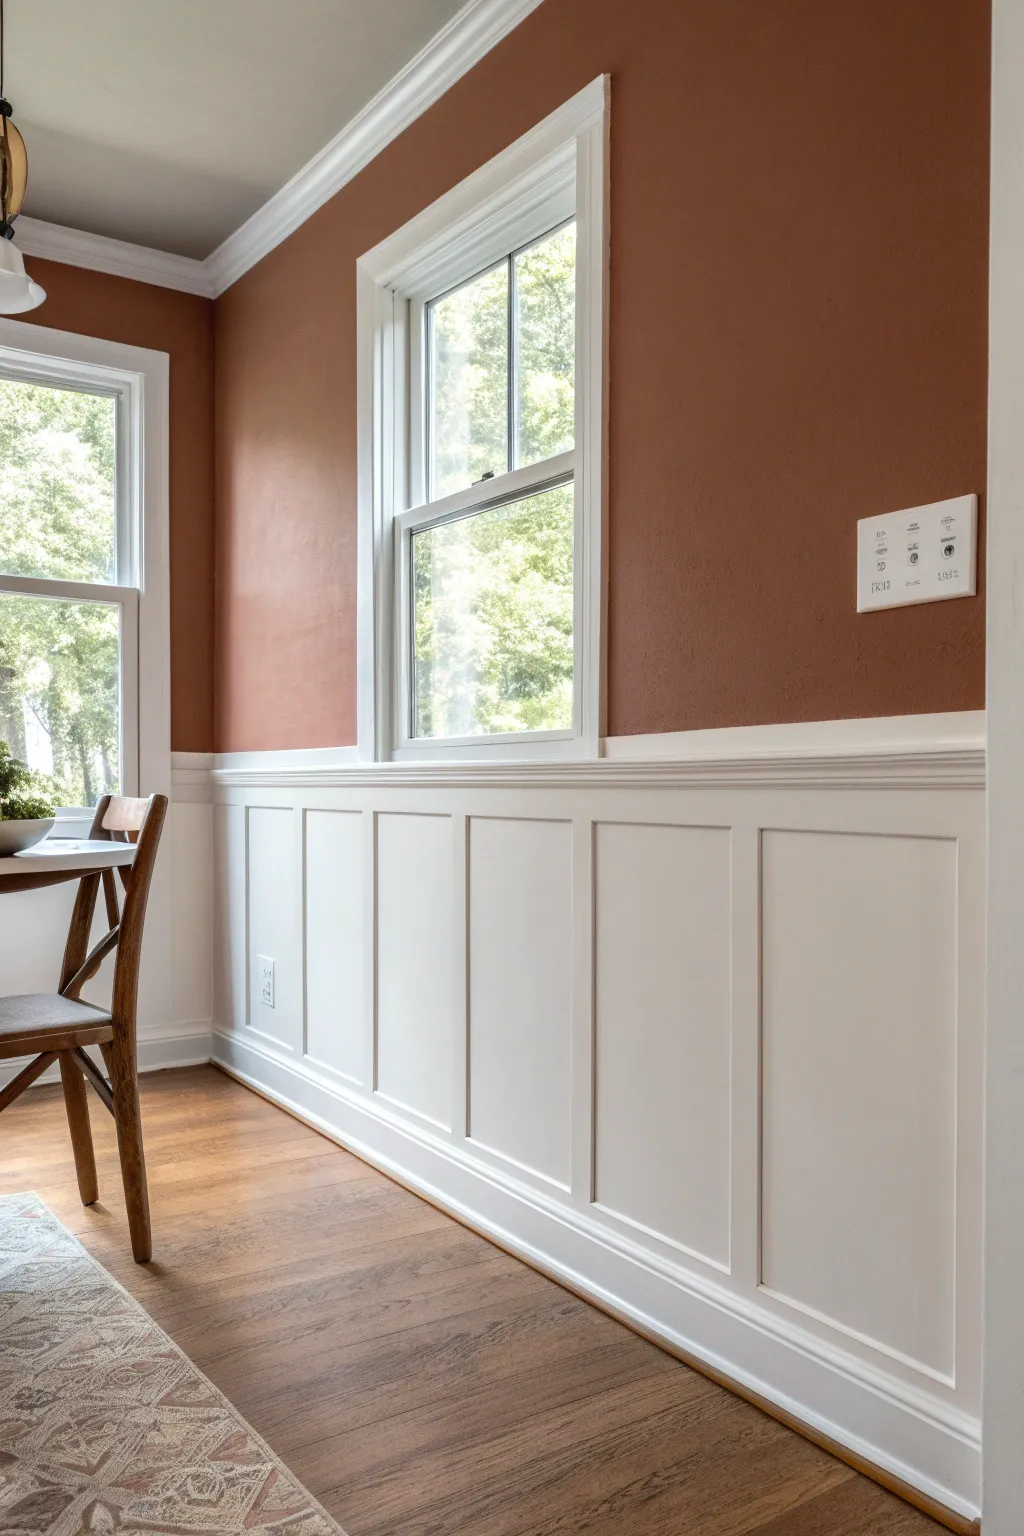
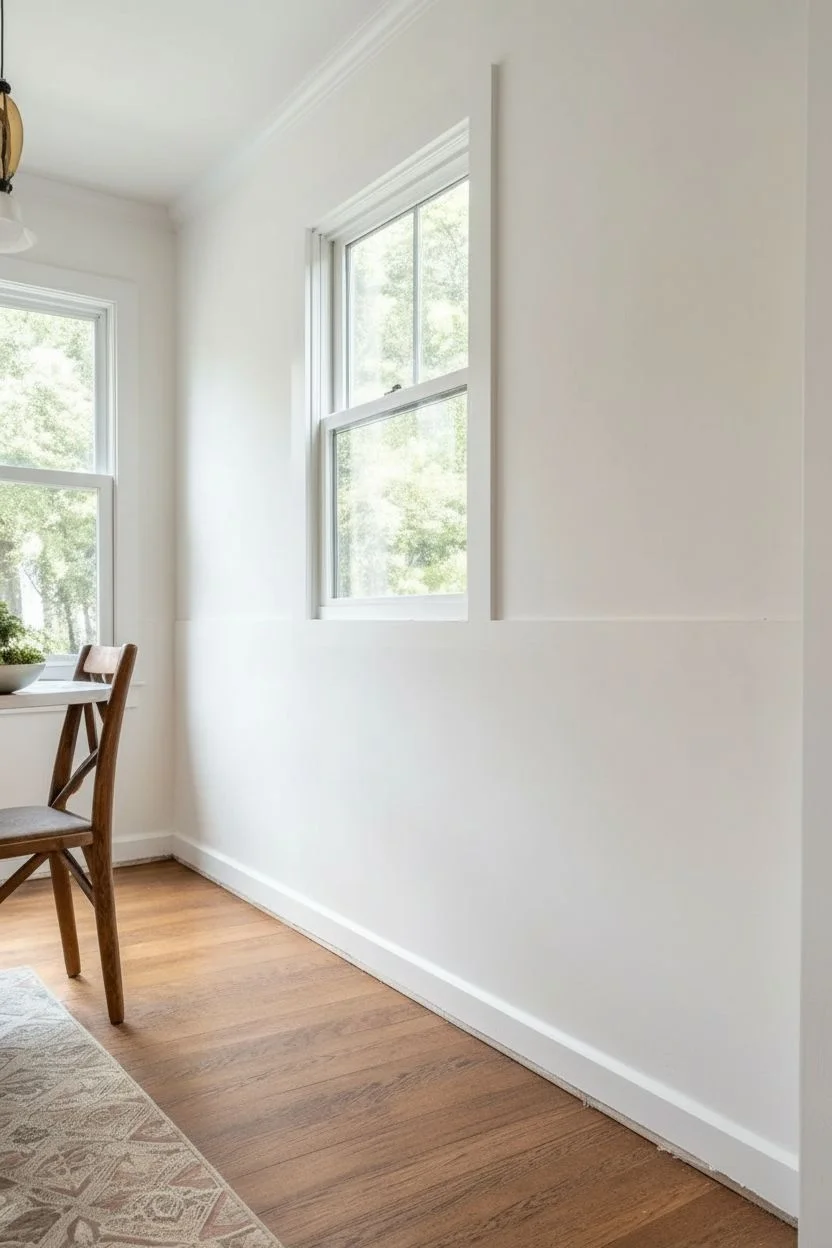
Bring warmth and architectural interest to your dining space by combining a rich, earthy upper wall color with crisp, classic board and batten wainscoting. This project creates a sophisticated two-tone effect that instantly elevates the character of any room.
Detailed Instructions
Materials
- Interior paint (terra cotta/burnt orange, satin or eggshell finish)
- Interior paint (bright white, semi-gloss finish)
- Primer (high-quality bonding)
- Chair rail molding
- Baseboard molding
- 1×4 MDF or primed pine boards (for battens and top rail)
- Construction adhesive
- Finishing nails (1.5 inch and 2 inch)
- Wood filler or spackle
- Paintable caulk
- Painter’s tape
- Sandpaper (120 and 220 grit)
- Paint rollers (microfiber covers)
- Angled sash brush (2.5 inch)
- Level (4-foot)
- Stud finder
- Miter saw
- Nail gun or hammer
Step 1: Setting the Scene
-
Prep the canvas:
Begin by removing existing baseboards carefully if you plan to reuse them, though replacing them often yields a cleaner look for this style. Patch any holes or imperfections in the drywall with spackle and sand smooth once dry. -
Determine height:
Decide on the height of your wainscoting. A classic rule of thumb is about one-third of the wall height, or roughly 32 to 36 inches from the floor. Mark this height level around the entire room using your 4-foot level and a pencil. -
Prime the walls:
Appy a coat of primer to the entire wall if you are making a drastic color change, or just the lower section if your walls are already in good shape. This ensures your bright white wainscoting will have true coverage.
Step 2: Upper Wall Painting
-
Cut in the color:
Start with your terra cotta paint. Using the angled sash brush, cut in along the ceiling line, corners, and around window trim. Don’t worry about the bottom edge where the wainscoting will go; just paint slightly below your marked level line. -
Roll the color:
Using a microfiber roller cover, apply the paint to the upper wall section. Work in ‘W’ patterns to distribute the paint evenly. I find that two coats are almost always necessary for deep, earthy tones to achieve full saturation. -
Let it cure:
Allow the upper wall paint to dry completely according to the manufacturer’s instructions before moving on to any installation steps to avoid marring the fresh surface.
Seamless Spacing Secret
Cut a ‘spacer block’ from scrap wood to the exact width of your desired gap. Use this block to position each batten instantly without measuring every single time.
Step 3: Carpentry & Assembly
-
Install the baseboard:
Install your baseboard molding first. Apply construction adhesive to the back, press it into place, and secure it into the wall studs with 2-inch finishing nails. -
Install the top rail:
Install the horizontal top rail (a 1×4 board) so that its top edge aligns with your level line. Secure this into studs just like the baseboard. This defines the upper boundary of your paneling. -
Measure batten spacing:
Measure the horizontal distance between corners. calculate spacing for your vertical battens (the 1×4 boards) to ensure even gaps. A gap of 12 to 16 inches usually looks balanced. -
Cut and place vertical battens:
Cut your 1×4 vertical boards to fit snugly between the baseboard and the top rail. Dry fit them first to ensure your measurements are precise. -
Secure the battens:
Apply adhesive to the back of each vertical batten and nail them into place. If a batten doesn’t land on a stud, use construction adhesive liberally and cross-nail (nailing at opposing angles) into the drywall to hold it tight. -
Add the chair rail cap:
To finish the structure, install a chair rail molding or a projecting ledge piece on top of the flat top rail. This adds depth and creates that traditional finished carpentry look.
Level Up: Picture Ledge
Use a slightly deeper board for the top chair rail cap (like a 1×3) to create a functional picture ledge for displaying small art frames or decorative plates.
Step 4: Finishing Touches
-
Fill nail holes:
Go over every nail hole with wood filler. Overfill slightly to account for shrinkage, and once dry, sand it completely flush with the wood surface using 220-grit sandpaper. -
Caulk the seams:
Apply a thin bead of paintable caulk to every seam where wood meets wall or wood meets wood. Smooth it immediately with a damp finger for a seamless look. This step is crucial for making the board and batten look like one integrated unit. -
Protect the color:
Apply a strip of delicate-surface painter’s tape along the bottom edge of your terra cotta wall, right where it meets the top of the new chair rail molding. -
Paint the wainscoting:
Paint the entire lower section—boards, drywall, and trim—with your semi-gloss white paint. The sheen difference between the wall and the semi-gloss woodwork is part of the magic. -
Second coat application:
Lightly sand any rough spots once the first coat is dry, wipe away dust, and apply a final coat of white paint for a durable, washable finish. -
The reveal:
Remove the painter’s tape slowly at a 45-degree angle while the paint is still slightly tacky to ensure a razor-sharp transition line.
Enjoy the sophisticated contrast and architectural depth your new two-tone walls bring to the room
Half-Painted Walls to Fake Wainscoting on a Budget
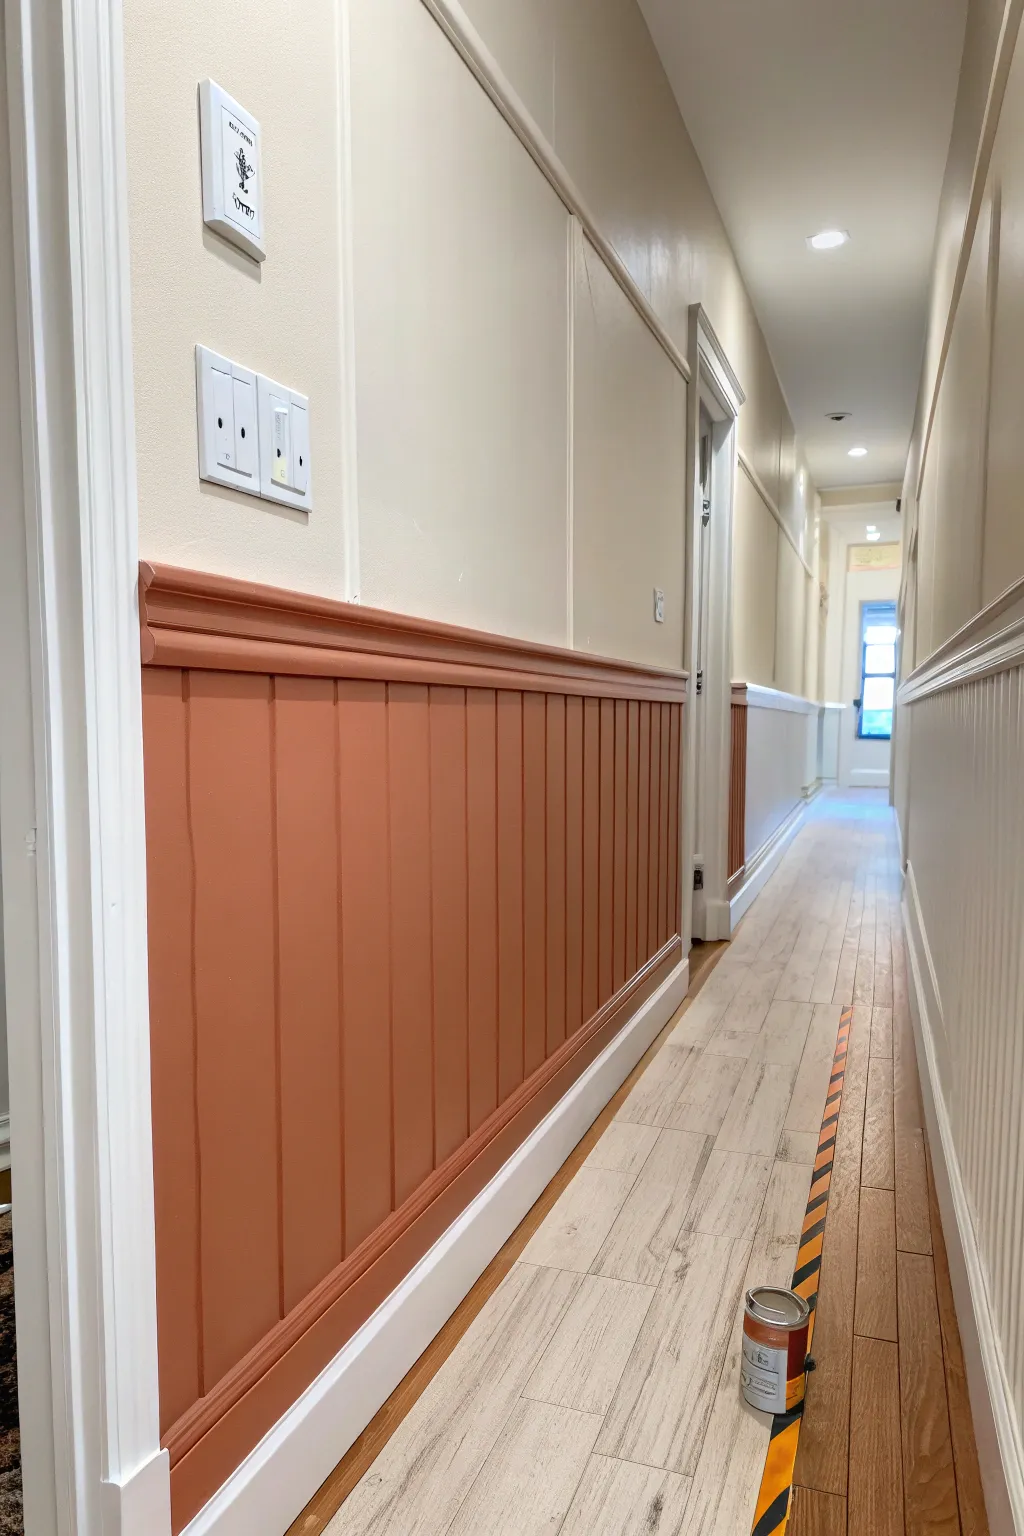
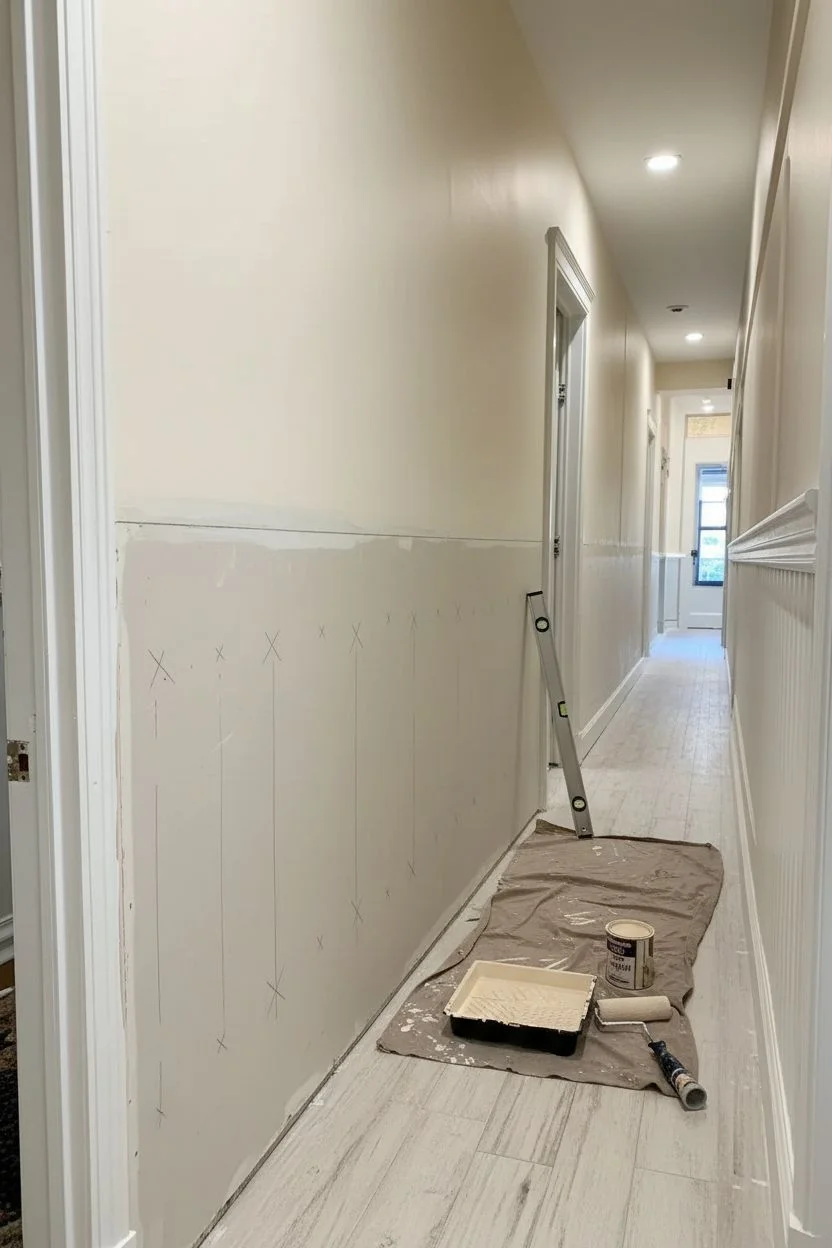
Transform a plain hallway into a classic architectural feature using real wood paneling and a bold splash of color. This project combines traditional beadboard wainscoting with a warm, terra-cotta hue to create distinct visual interest and durable wall protection.
How-To Guide
Materials
- Beadboard paneling sheets (MDF or wood)
- Chair rail molding
- Baseboard molding
- Terra-cotta or salmon colored interior paint (semi-gloss finish)
- Cream or off-white interior paint (eggshell finish)
- Construction adhesive
- Brad nailer and brad nails
- Circular saw or jigsaw
- Miter saw
- Level
- Stud finder
- Caulk and caulk gun
- Wood filler
- Paint roller and tray
- Angled sash brush
- Fine-grit sandpaper
- Painter’s tape
- Measuring tape
Step 1: Preparation and Wall Layout
-
Determine Height:
Decide on the height of your wainscoting. A general rule is to cover the bottom third of the wall, so for an 8-foot ceiling, aim for about 32 to 36 inches high. -
Mark a Level Line:
Measure up from the floor to your desired height and make a mark. Use a long level or a laser level to draw a continuous horizontal reference line around the entire hallway. -
Remove Old Trim:
Carefully pry off existing baseboards using a trim puller or pry bar. Score the top edge with a utility knife first to prevent peeling the drywall paper. -
Locate Studs:
Use a stud finder to locate and mark the wall studs along your layout line. Marking these now ensures you nail into solid wood later. -
Prep the Upper Wall:
Before installing any wood, paint the upper portion of the wall with your cream or off-white paint. It is much easier to cut in a straight line now than trying to paint around the new chair rail later.
Step 2: Installing the Beadboard
-
Measure and Cut Panels:
Measure the horizontal distance of your first wall section. Cut your beadboard sheets to the correct height (subtracting a small gap for floor expansion) and width using a circular saw. -
Cut Outlets:
Measure exact locations for electrical outlets. Transfer these measurements to your panel and carefully cut out the openings with a jigsaw before installation. -
Apply Adhesive:
Apply a zigzag pattern of construction adhesive to the back of the beadboard panel for extra holding power. -
Secure First Panel:
Press the panel onto the wall, ensuring the grooves are vertical. Nail it into place using a brad nailer, hitting the studs you marked earlier. -
Continue Installation:
Install subsequent panels, butting them tightly against the previous one. Most beadboard has a lap joint edge; ensure these overlap correctly for a seamless look.
Miter Saw Mastery
When cutting chair rail corners, cut the pieces slightly long first. Interior walls are rarely perfectly square, so you can shave off slivers for a tight fit.
Step 3: Adding Trim and Finishing
-
Install Baseboards:
Measure and cut your baseboard molding to fit the length of the wall. Nail it securely through the bottom of the beadboard and into the wall plate. -
Install Chair Rail:
Cut the chair rail molding to length. Place it on top of the beadboard edge so it caps the paneling. Use a level to ensure it is perfectly straight before nailing it into the studs. -
Fill and Sand:
Fill all nail holes and any gaps between panels with wood filler. Once dry, sand these spots smooth with fine-grit sandpaper. -
Caulk Seams:
Run a bead of paintable caulk along the top of the chair rail (where it meets the wall) and all internal corners to create a professional, gap-free seal. -
Tape Off Upper Wall:
Once the cream paint on the upper wall is fully cured, apply painter’s tape just above the chair rail to protect your previous work. -
Paint the Wainscoting:
Apply the terra-cotta paint to the beadboard, baseboard, and chair rail. Use a brush for the grooves and trim profiles, followed by a roller for the flat surfaces to smooth out brush marks. -
Second Coat:
Allow the first coat to dry, then apply a second coat for full, rich color coverage. I find semi-gloss works best here for durability and easy cleaning. -
Clean Up:
Remove the painter’s tape while the final coat is still slightly tacky to ensure a crisp, clean line.
Two-Tone Twist
For a subtle, modern look, paint the beadboard and the trim the same color, but use a high-gloss finish on the trim and a satin finish on the panels.
Step back and admire how this architectural detail instantly lengthens and warms your hallway.

PENCIL GUIDE
Understanding Pencil Grades from H to B
From first sketch to finished drawing — learn pencil grades, line control, and shading techniques.
Explore the Full Guide
Geometric Tape Pattern Feature Wall
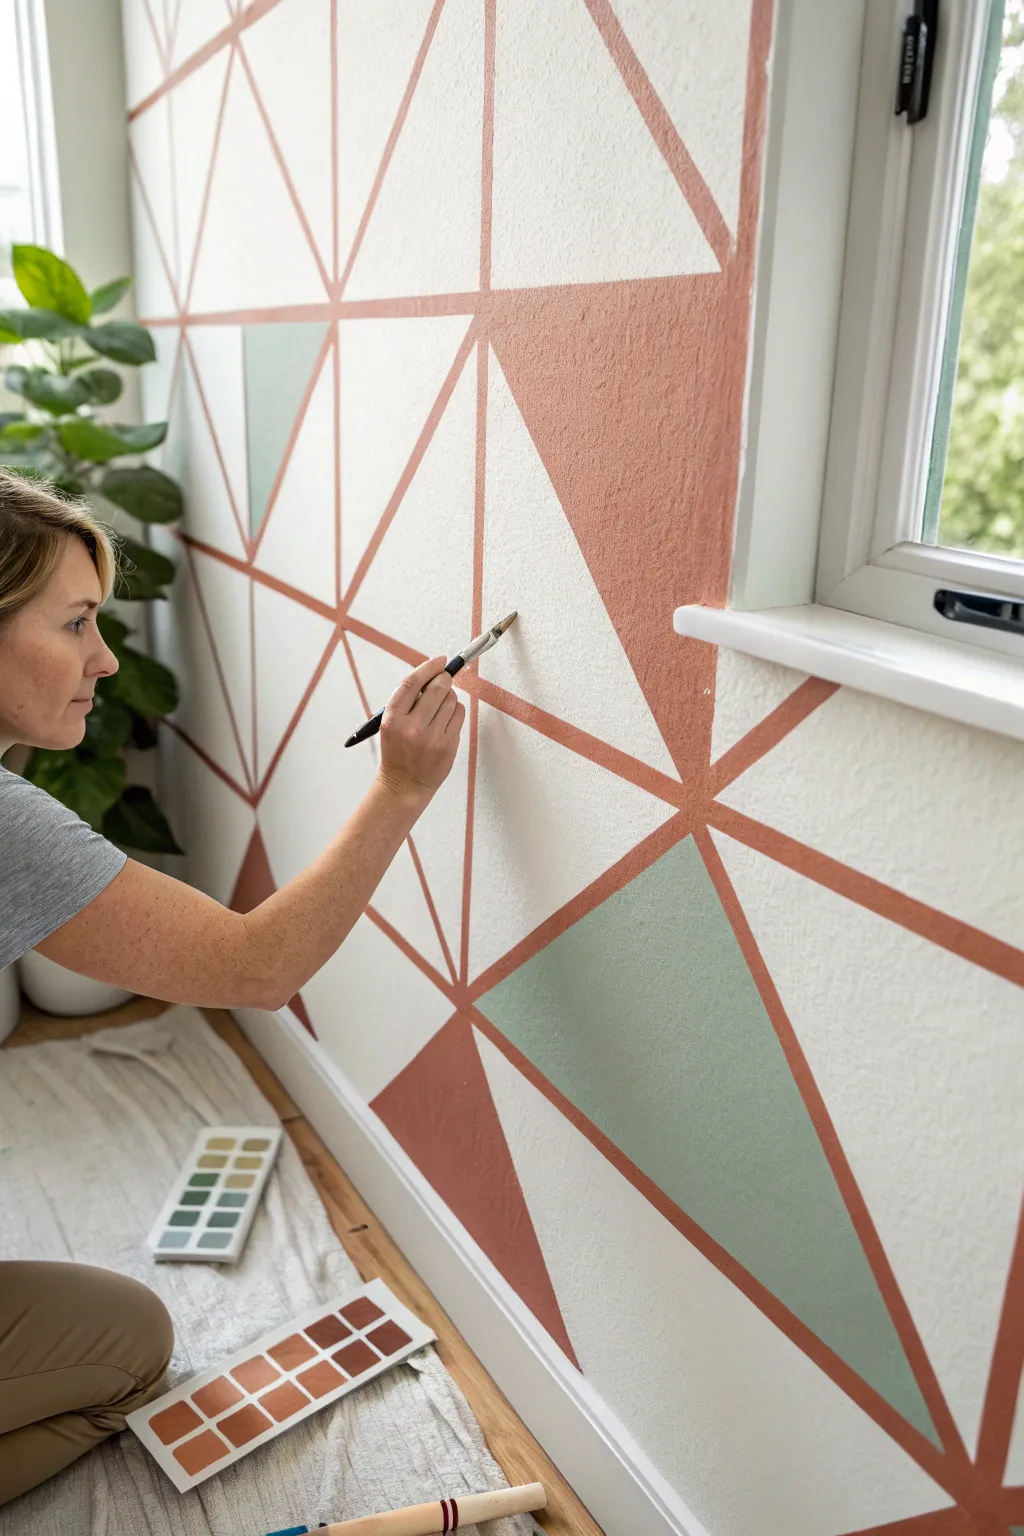
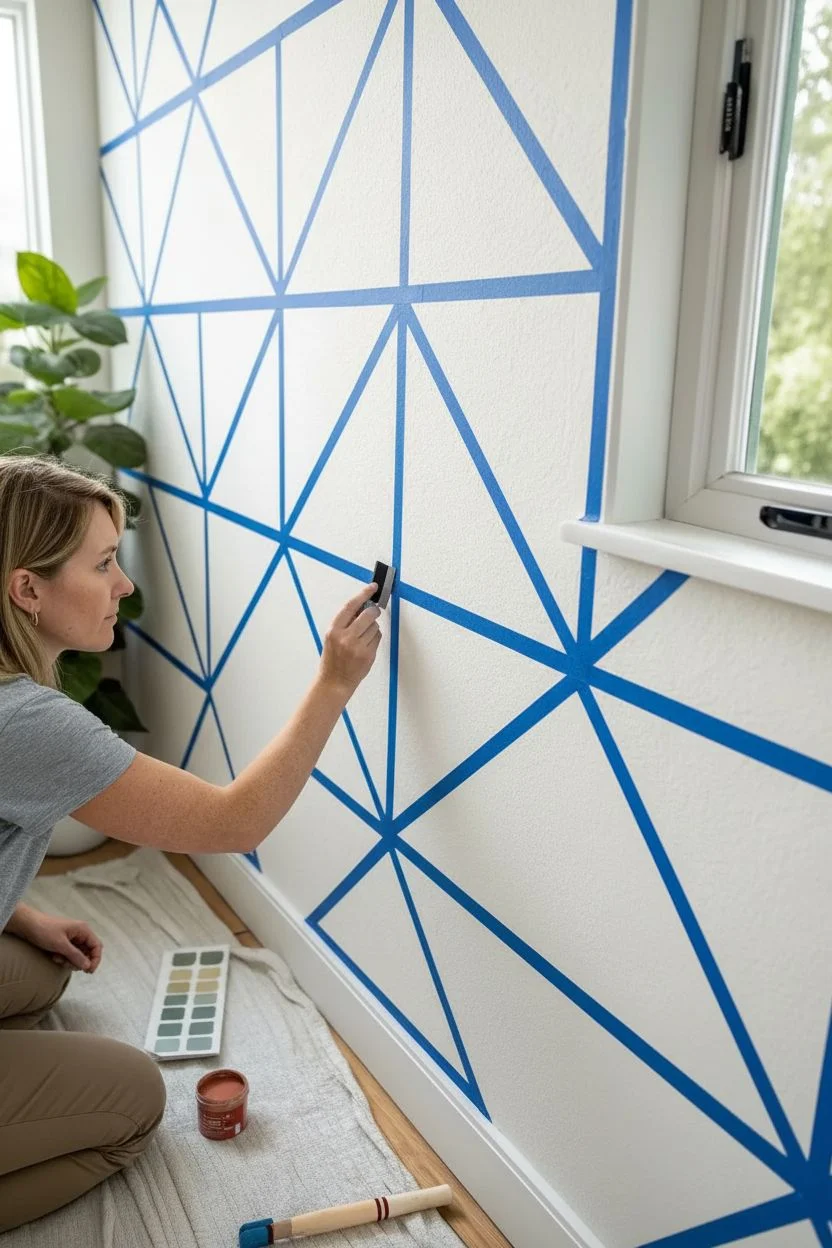
Transform a plain white wall into a modern art piece with this geometric design featuring warm terra cotta and cool sage tones. This project uses painter’s tape to create crisp, clean lines and a striking repeating triangle pattern.
Step-by-Step Guide
Materials
- Interior latex paint (White base)
- Interior latex paint (Terra Cotta/Rust)
- Interior latex paint (Sage Green)
- Painter’s tape (1-inch width)
- Angle sash brush (2-inch)
- Small artist brush or liner brush (for touch-ups)
- Drop cloth
- Paint tray and liners
- Ladder or step stool
- Level and measuring tape
- Pencil
Step 1: Setting the Grid
-
Prep the surface:
Begin by cleaning the wall thoroughly with a damp cloth to remove dust and grease. Lay down your drop cloth to protect the flooring. -
Base coat application:
If your wall isn’t already white, apply a coat of your white base paint. Let this dry completely—I recommend waiting at least 24 hours before applying tape to ensure it doesn’t peel up the fresh paint. -
Plan your triangles:
Decide on the scale of your triangles. Use a pencil, level, and measuring tape to lightly mark a grid of squares on the wall. -
Tape the diagonals:
Connect the corners of your squares with painter’s tape to create X shapes. This effectively turns each square into four distinct triangles meeting at a central point. -
Seal the tape edges:
Press down firmly on all tape edges with a putty knife or credit card. For extra crisp lines, paint a light layer of your base wall color (white) over the tape edges to seal them preventing bleed.
Bleeding Lines?
If paint bleeds under the tape, wait for it to dry fully. Then, create a sharp edge using a small stiff brush and the background color to ‘erase’ the bleed.
Step 2: Applying Color
-
Select your color layout:
Plan which triangles will be green, which will be terra cotta, and which will stay white. A random scatter looks organic, but balancing the heavy colors keeps the room feeling open. -
Paint the Terra Cotta sections:
Pour a small amount of the rust-colored paint into your tray. Using the angle sash brush, fill in the designated triangles, brushing away from the tape edge initially to minimize seepage. -
Paint the Sage Green sections:
Switch to a clean brush and fill in the sage green triangles. Apply two coats if necessary for full opacity, allowing dry time between coats. -
Remove the tape:
This is the crucial moment: peel off the painter’s tape while the final coat of paint is still slightly tacky. Pull at a 45-degree angle slowly and steadily.
Add Metallic Flair
Instead of painting the grid lines in terra cotta, use gold or copper metallic paint for the dividing lines to add a touch of glamour.
Step 3: Refining the Lines
-
Assess the gaps:
Once the tape is removed, you will have thick white lines separating your colored triangles. The original image shows a unique twist: the dividing lines are actually painted rust-color. -
Hand-painting the grid:
To achieve the look in the photo, you need to fill in those white tape lines. Load a small angle brush or a steady artist brush with the terra cotta paint. -
Trace the lines:
Carefully paint over the white grid lines where the tape used to be. This connects the terra cotta triangles and frames the white and green ones. -
Cutting in edges:
Use your small brush to ensure the painted lines meet the corners of the triangles perfectly, creating sharp vertices. -
Clean up imperfections:
If any color bled or a hand-painted line went wobbly, use the adjacent color and a tiny detailing brush to correct the mistake once the area is dry. -
Final cure:
Allow the entire mural to cure for roughly 24-48 hours before placing furniture back against the wall.
Step back and admire how this bold geometric pattern adds depth and character to your space
Striped Walls for Subtle Movement and Height
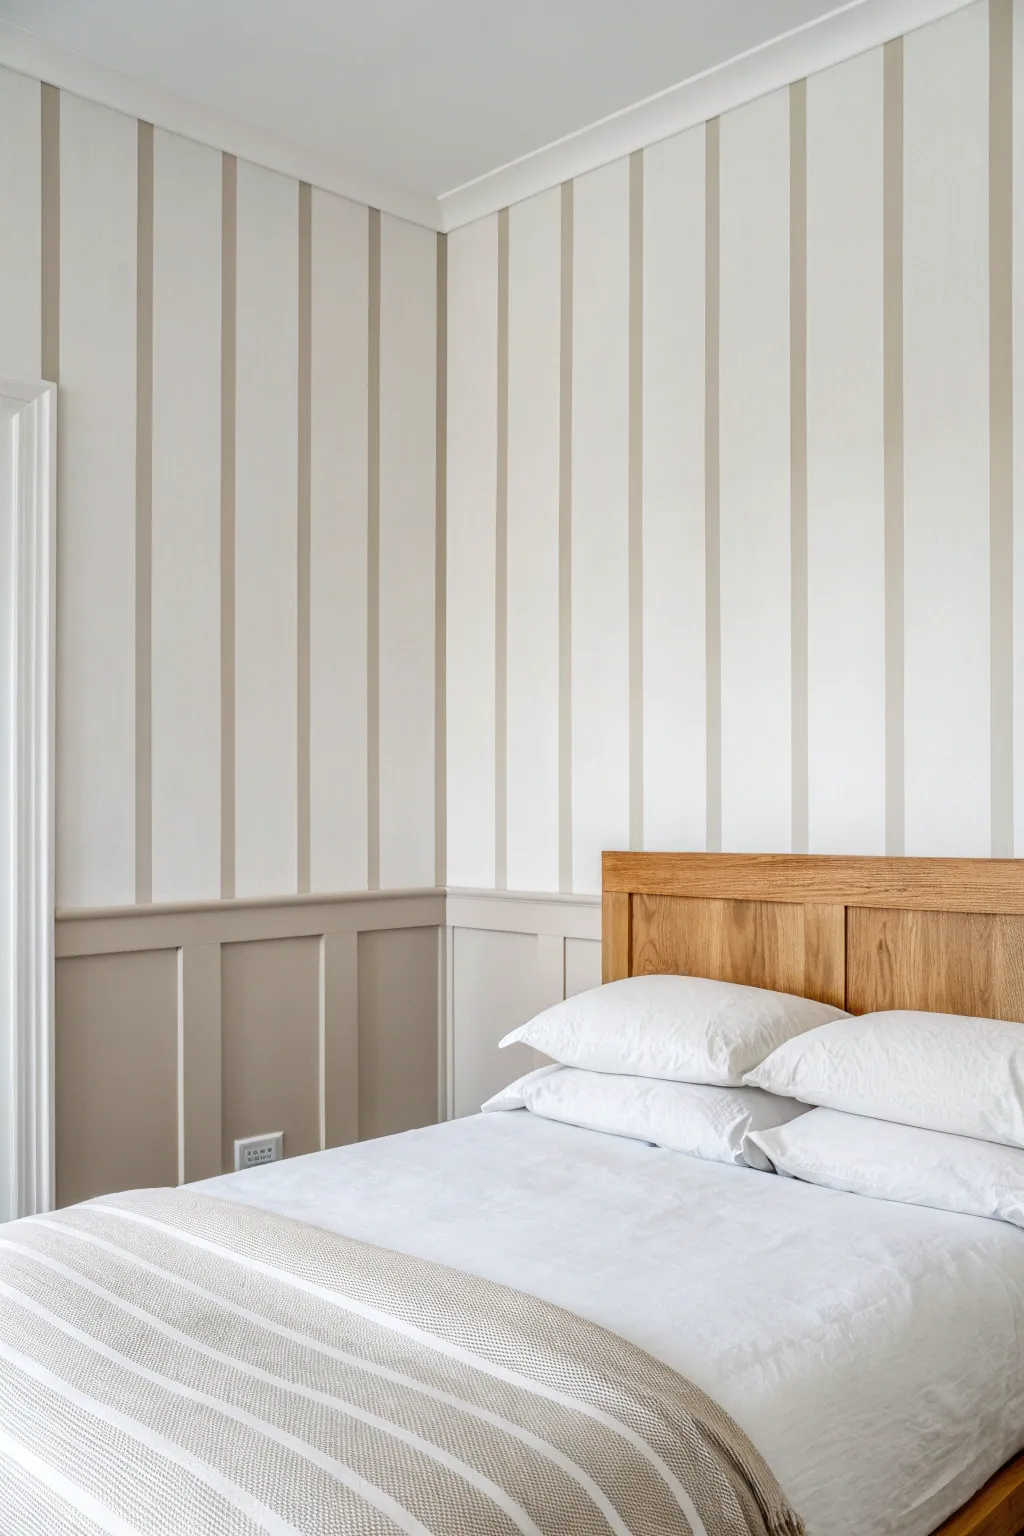
Elevate a simple bedroom into a tailored retreat by combining classic board-and-batten wainscoting with elongating, hand-painted vertical stripes. This project merges architectural dimension with visual height, using a soothing palette of cream and taupe for a sophisticated finish.
Step-by-Step Tutorial
Materials
- Interior latex wall paint (Cream/Off-white for base)
- Interior latex wall paint (Taupe/Beige for stripes and paneling)
- 1×3 or 1×4 MDF or primed wood boards (for battens/stiles)
- 1×4 or 1×6 MDF or wood board (for top rail)
- Construction adhesive
- Brad nailer and 1.5-inch brad nails
- Wood filler
- Sandpaper (120 and 220 grit)
- Caulk and caulk gun
- Painter’s tape (high quality)
- Laser level (highly recommended)
- Tape measure
- Pencil
- Paint rollers (microfiber) and tray
- Angled sash brush (2-inch)
- Drop cloths
Step 1: Preparation & Base Coat
-
Clear and Prep:
Remove all furniture from the room and lay down drop cloths to protect your flooring. Remove any existing baseboards if you plan to replace them, or prep the existing ones by cleaning and lightly sanding them. -
Patch and Clean:
Fill any holes from old artwork or nails with spackle. Once dry, sand smooth and wipe the walls down with a damp cloth to remove dust and grease, ensuring a clean surface for adhesion. -
Apply the Base Colour:
Paint the entire wall (from floor to ceiling) with your chosen cream or off-white base color. I prefer an eggshell finish for walls as it offers a subtle sheen that is easy to clean. Apply two coats for full coverage, allowing proper drying time between each.
Laser Precision Tip
Skip the pencil lines! If you have a steady hand, align your tape directly against the laser level beam. It saves erasing marks later and guarantees perfectly plumb lines.
Step 2: Installing the Wainscoting
-
Mark the Height:
Determine the height of your wainscoting. A standard height is often around 36 to 42 inches, or sometimes higher for visual impact like the photo. Use a level and pencil to draw a continuous horizontal line around the room at your chosen height. -
Install the Top Rail:
Cut your top rail boards to length. Apply construction adhesive to the back, place them along your marked line, and secure them into the studs using a brad nailer. Check for level frequently as you work your way around the room. -
Plan Batten Spacing:
Measure the wall length and decide on the spacing for your vertical battens. A gap of 12 to 16 inches is typical. Calculating this beforehand ensures you don’t end up with an awkward sliver of space in a corner. -
Cut and Attach Battens:
Measure the distance from the floor (or baseboard) to the bottom of the top rail for each batten location. Floors can be uneven, so measure individually. Cut the battens, apply adhesive, and nail them into place vertically. -
Fill and Caulk:
Fill all nail holes with wood filler. Once dry, sand them flush. Run a bead of paintable caulk along every seam where the wood meets the wall to create a seamless, built-in look. Smooth the bead with a wet finger. -
Paint the Paneling:
Using your darker taupe or beige color, paint the wainscoting section. Use a brush for corners and edges, and a small foam or microfiber roller for the flat surfaces to minimize brush strokes. Apply two coats.
Level Up: Texture Play
Mix a glazing medium into your stripe paint for a translucent, watercolor effect, or choose a satin finish for the stripes against a matte wall to add subtle light reflection.
Step 3: Creating the Striped Upper Wall
-
Measure Stripe Width:
Decide on the width of your vertical stripes. The image shows stripes slightly narrower than the white spaces, perhaps 4-5 inches wide. Calculate the layout so you start and end with the same color in the corners if possible. -
Mark Vertical Lines:
Using a laser level is a game-changer here. Project a vertical line and mark your stripe intervals lightly with a pencil along the top rail of the wainscoting and near the ceiling. -
Tape Section One:
Apply painter’s tape along the pencil marks. Remember to tape on the *outside* of the area you intend to paint, so the painted stripe retains its full intended width. Press the tape edges down firmly. -
Seal the Tape:
To prevent paint bleed and get crisp lines, lightly brush a small amount of the *base wall color* (cream) over the edge of the tape. This seals the edge so any bleeding is just the base color, invisible to the eye. -
Paint the Stripes:
Using a small roller or brush, paint between your tape lines with the taupe color (matching the wainscoting). Use a ‘dryer’ roller technique to avoid pushing too much paint under the tape. -
Alternate and Repeat:
If your pattern requires painting stripes that touch, you must let one set dry completely, remove tape, and re-tape. However, for this alternating pattern (stripe-space-stripe), you can likely tape and paint all stripes in one session. -
The Reveal:
Remove the painter’s tape while the paint is still slightly tacky—pulling it off at a 45-degree angle helps ensure a sharp, clean edge. -
Touch Up:
Inspect your work closely. Use a small artist’s brush to correct any tiny bleeds or imperfections on the stripes or the wainscoting trim.
Step back and admire how the vertical lines draw the eye upward, making the room feel taller and wonderfully tailored.


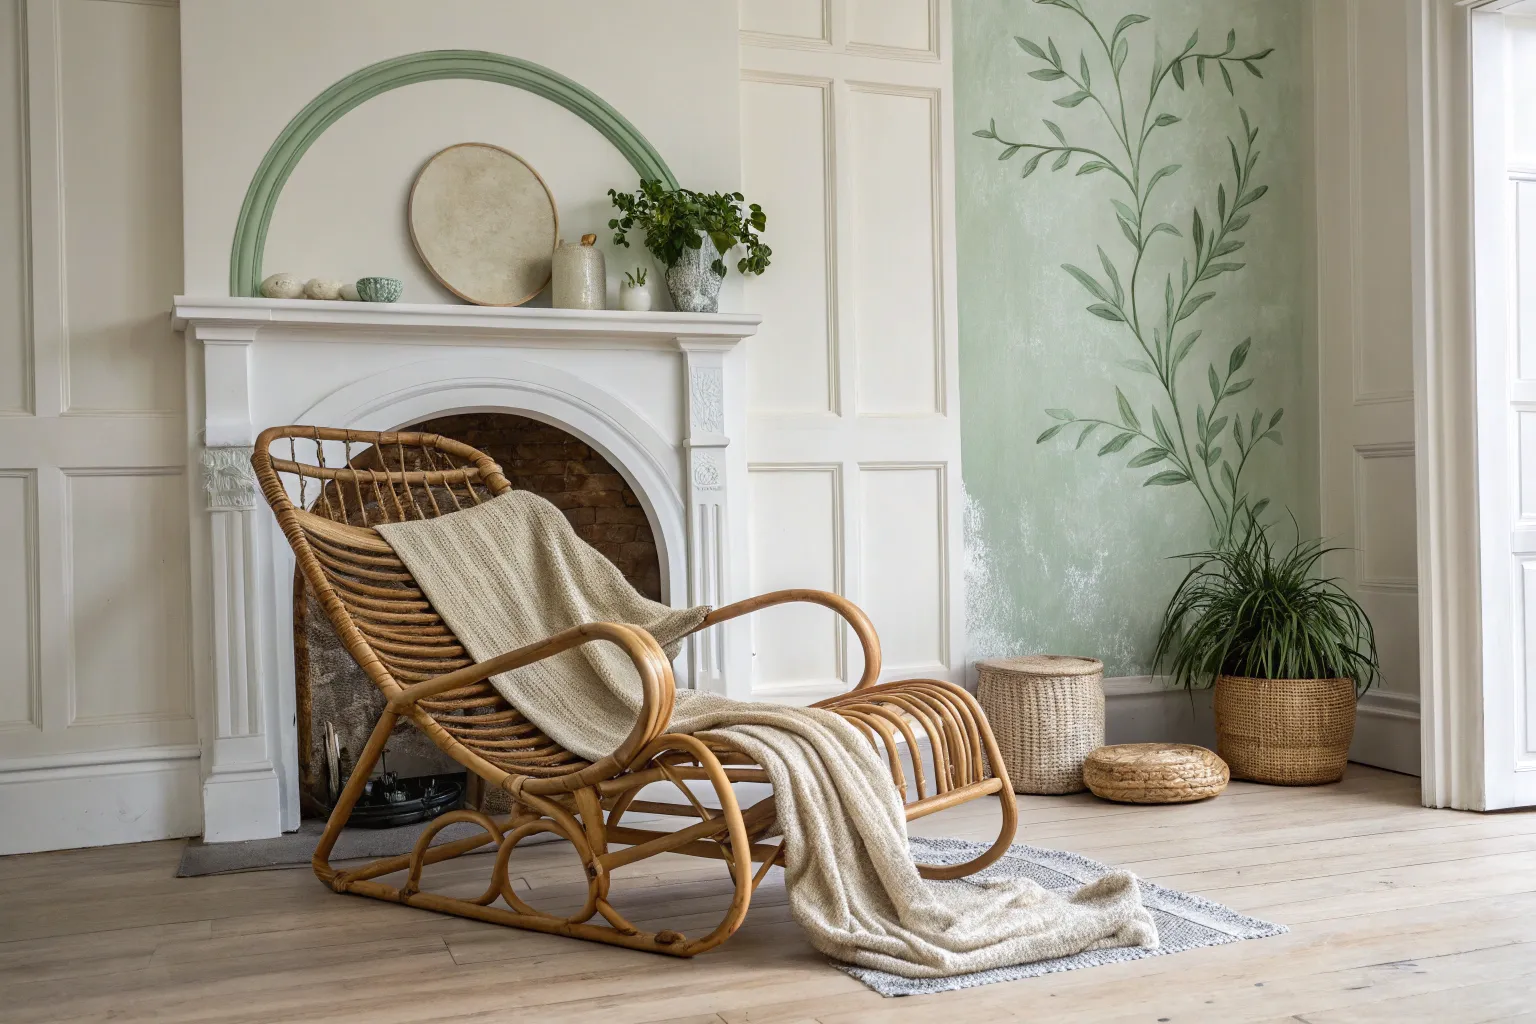
Painted Arches to Frame a Reading Nook or Headboard
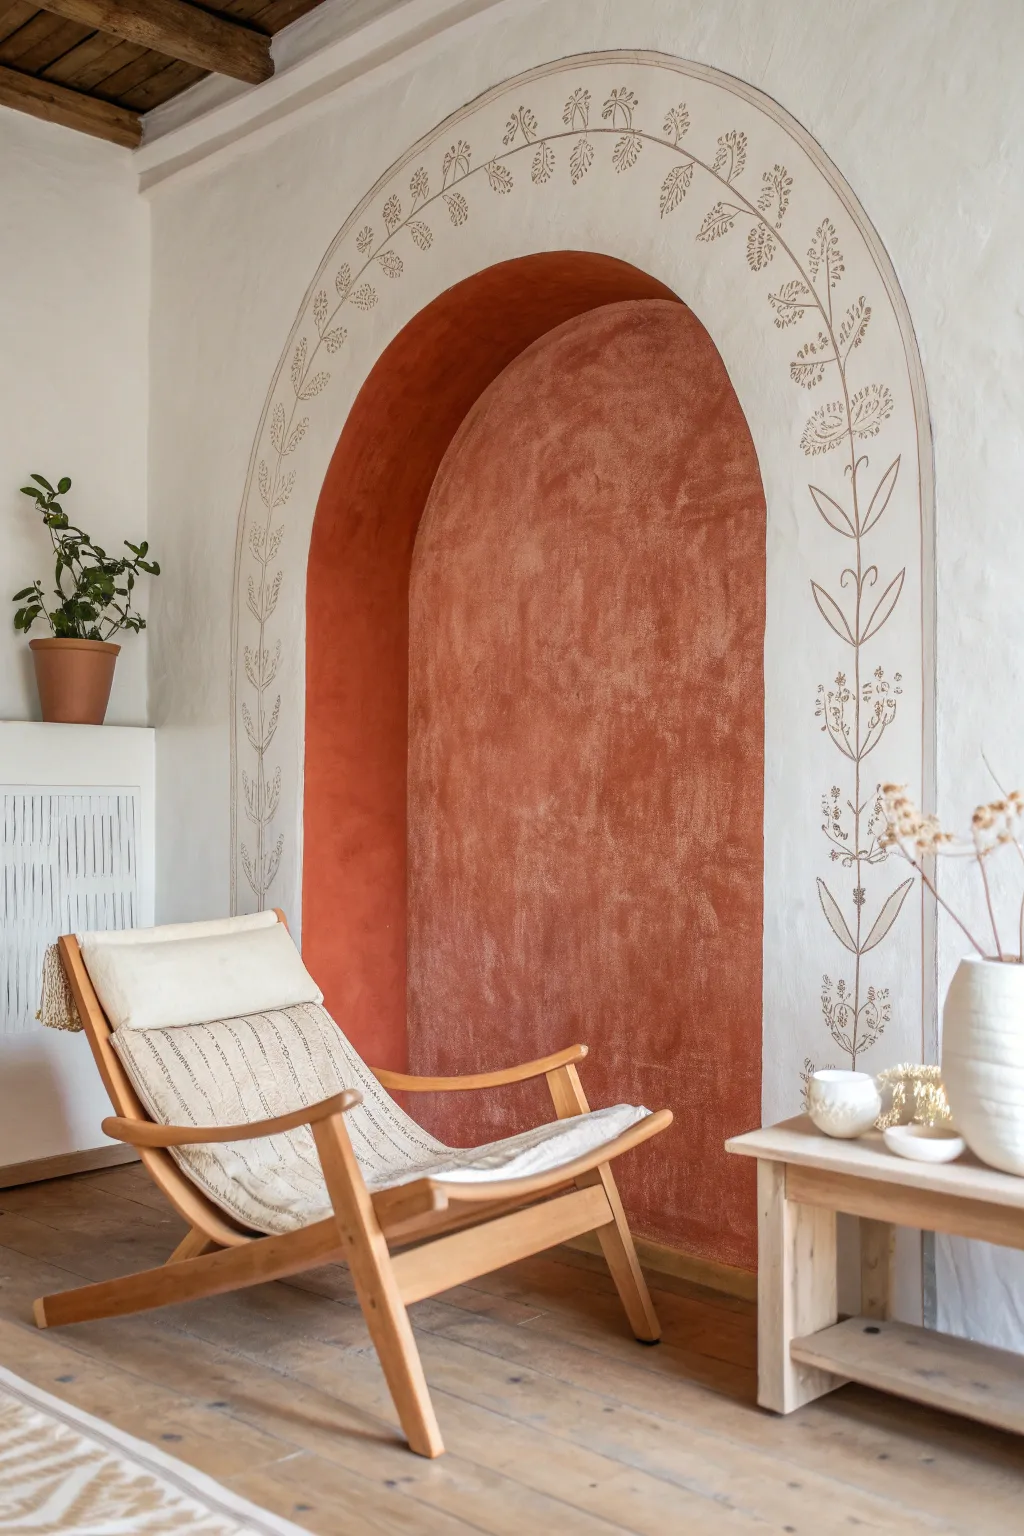
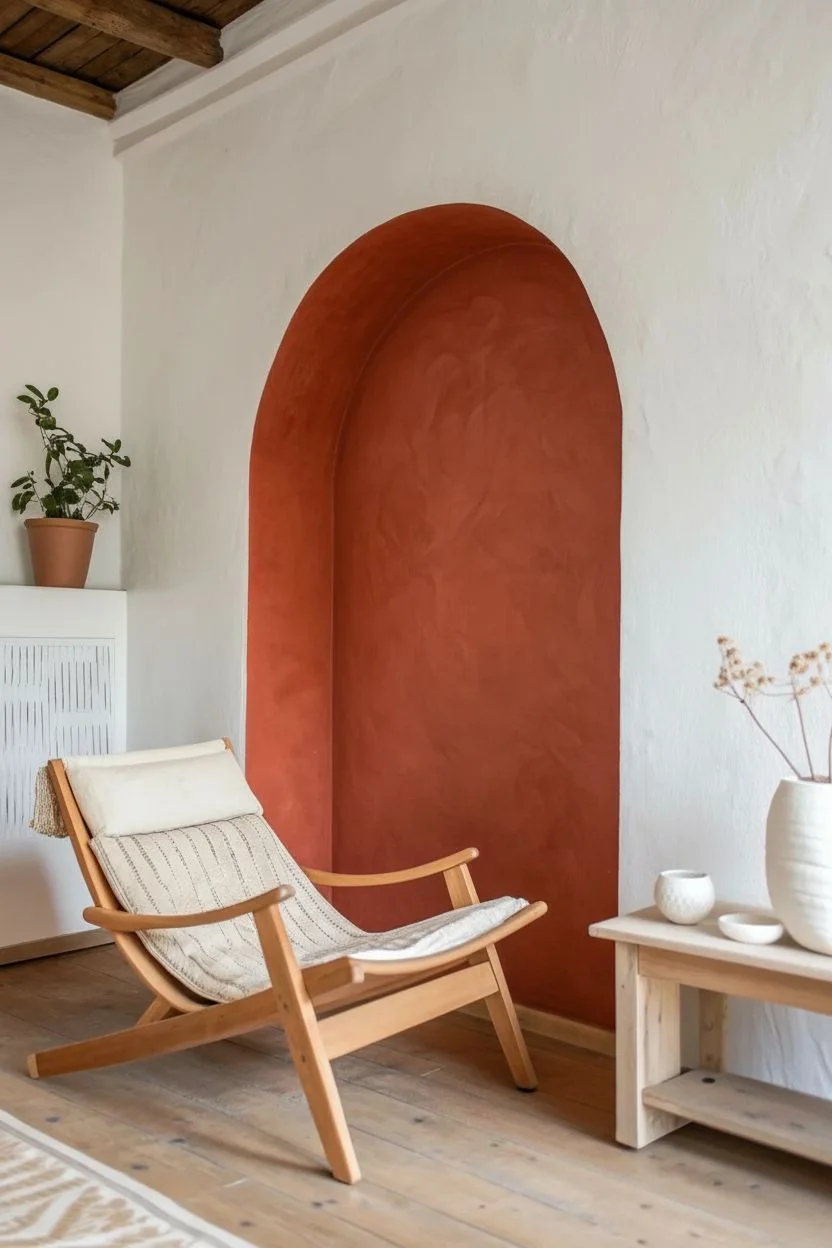
Transform a plain alcove or a flat wall into a stunning architectural feature with this dual-layered painting project. By combining a rich, limewash-style interior with darker botanical line work on the perimeter, you create depth and an inviting focal point perfect for a cozy reading chair.
Detailed Instructions
Materials
- Painter’s tape
- Drop cloth
- Pencil
- String and thumb tack (if creating an arch on a flat wall)
- Deep terracotta or rust-colored interior paint (matte finish)
- Limewash glaze or water for texturing
- Large, wide bristle brush or block brush
- Fine liner brush (size 1 or 2)
- Round watercolor brush (size 4 or 6)
- Taupe or muted olive acrylic paint (for vines)
- A steady hand and patience
- Eraser
Step 1: Painting the Recess
-
Prep the space:
Begin by clearing the area and laying down your drop cloth. Tape off the floor edge inside the nook or along the baseboard to ensure a crisp line where the paint meets the wood floor. -
Define the boundary:
If you have an existing physical recess like the photo, tape off the front face of the wall so you can paint the inside edge cleanly. If painting a faux arch on a flat wall, use a string tied to a pencil and tacked to the center point to trace your perfect arch shape first. -
Base coat application:
Apply your primary terracotta color to the entire inner recess. Don’t worry about perfect smoothness here; a little texture is actually desirable for the final look. -
Create the limewash effect:
Once the base is dry to the touch, mix your paint with a little water or a clear glaze medium. Using a wide block brush, apply this thinned mixture in crisscross, ‘X’ shaped strokes. -
Build texture:
Continue the crisscross motion, allowing some of the bottom layer to peek through. This creates that cloudy, old-world plaster aesthetic that gives the nook its warmth. -
Dry thoroughly:
Let this interior section cure completely—ideally overnight—before removing any tape or starting the detailed border work.
Step 2: Hand-Painting the Botanical Border
-
Sketch the perimeter line:
Using a pencil, lightly trace a guideline about 4-5 inches outside the edge of your colored arch. This outer line defines the width of your vine border. -
Mark the center spine:
Lightly sketch a central vine line running exactly in the middle of your white border space, following the curve of the arch all the way up and over. -
Map out leaf placement:
Mark small tick marks along the vine where you want your leaves and stems to branch off ensuring they are evenly spaced but organic. -
Mix the vine color:
Prepare your taupe or muted olive paint. I like to dilute the acrylic slightly with water so it flows smoothly off the fine liner brush without dragging. -
Paint the main stem:
Start from the bottom and paint the long, continuous central stem line using your fine liner brush. Move slowly and lift your brush occasionally to reload paint. -
Add secondary stems:
Switch to your medium round brush if you want thicker lines, or stick with the liner. Paint small curved stems branching off your main vine at the marked points. -
Paint the leaves:
Using the round brush, press down and lift up to create teardrop-shaped leaves at the end of each stem. Vary the pressure to make some leaves larger than others. -
Detail the clusters:
For the floral clusters seen in the design, use the very tip of your fine brush to dab small dots or tiny dashes at the ends of specific stems to mimic seeds or buds. -
Add distinct outline borders:
Paint a thin, solid line following the inner edge (closest to the terracotta) and the outer edge (your first pencil mark) to encapsulate the vines. -
Check and refine:
Step back to look at the overall symmetry. Fill in any sparse areas with extra tiny leaves or buds to balance the visual weight. -
Erase guidelines:
Wait at least 24 hours for the paint to fully harden before gently erasing any visible pencil marks with a clean white eraser.
Pro Tip: Steady Hand
Rest your pinky finger against the wall to stabilize your hand while painting the long, curved lines. It acts as a pivot point for smoother strokes.
Level Up: Gilded Edge
Use gold leaf paint for the thin outer border lines instead of taupe. This adds a subtle, luxurious shimmer that catches the light beautifully.
Now step back and admire your custom, hand-painted sanctuary capable of making any corner feel like a villa retreat
Ombre Wall Fade for a Dreamy Gradient Effect
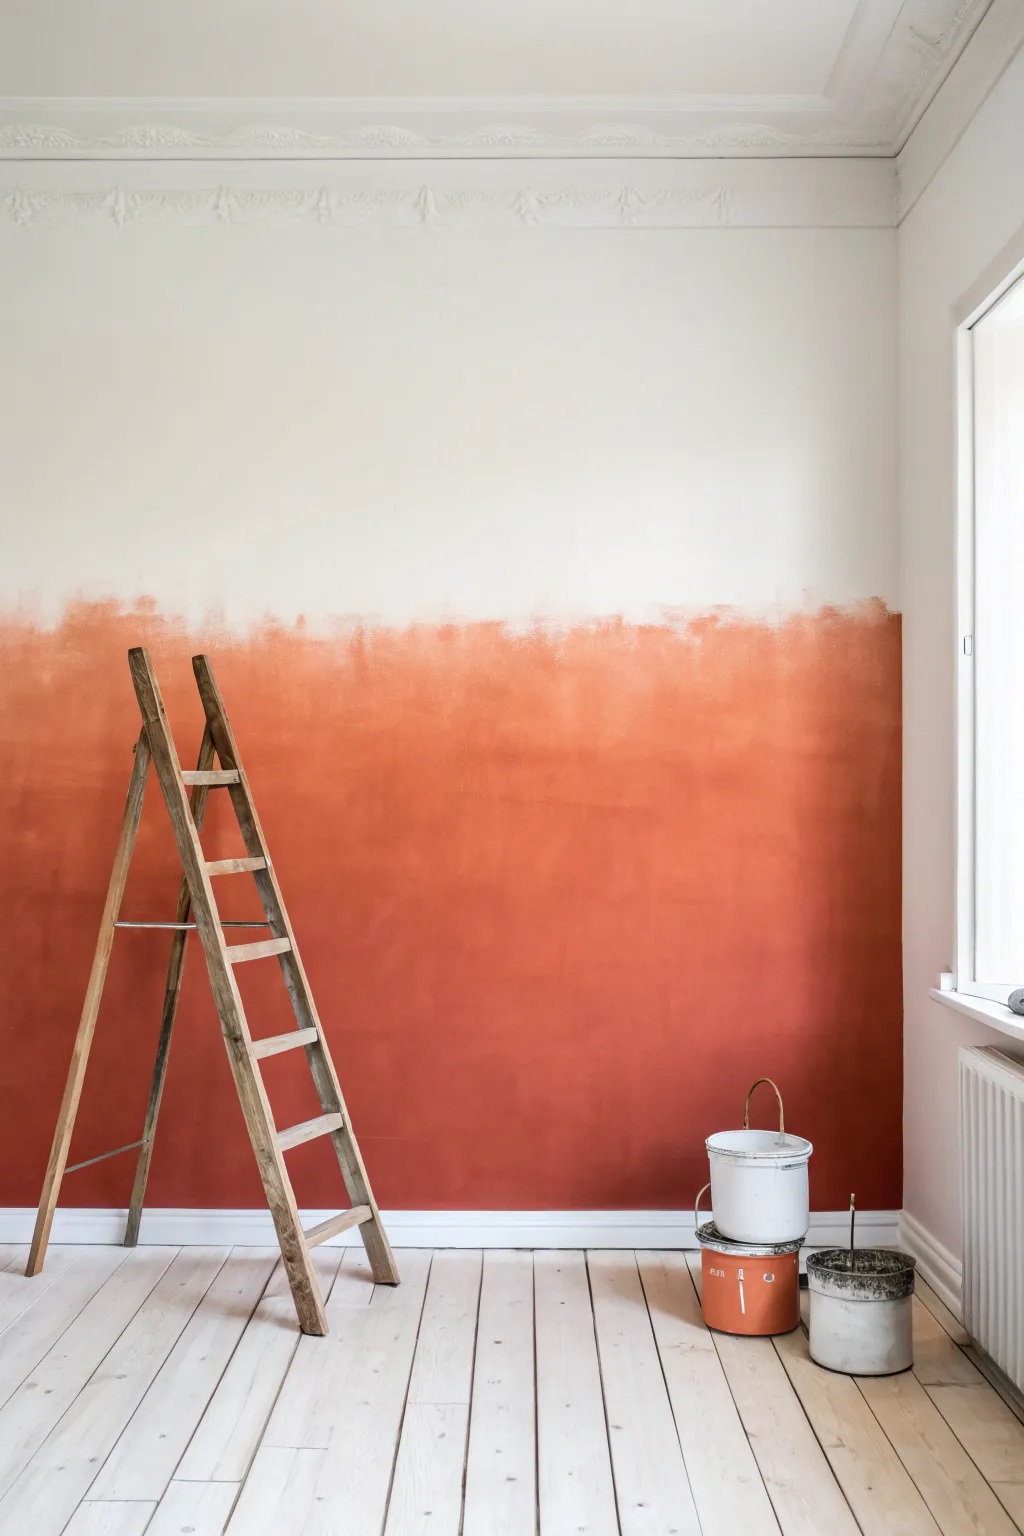
Transform a plain white room into a warm, inviting space with this stunning gradient wall technique. By blending a rich burnt orange hue into a crisp white ceiling, you achieve a dreamy, soft-focus horizon line right in your own home.
Step-by-Step Tutorial
Materials
- White latex interior wall paint (base coat)
- Terracotta or burnt orange latex paint
- Painter’s tape
- Drop cloths
- Paint roller and tray
- Wide paintbrush (4-inch)
- Clean spray bottle with water
- Dry blending brush or large sponge
- Small bucket for mixing
Step 1: Preparation and Base Coat
-
Protect the space:
Begin by clearing the area near the wall. Lay down drop cloths to protect your beautiful floorboards from any accidental splatters, and run a line of painter’s tape along the baseboards and adjoining walls. -
Clean the surface:
Wipe down the wall with a damp cloth to remove any dust or cobwebs. A clean surface ensures the gradient blends smoothly without catching on debris. -
Apply the base color:
Roll on two coats of your white base paint over the entire wall. Even though the bottom will be covered, having a fresh white canvas underneath helps the orange pop and ensures the top section looks pristine. -
Dry completely:
Allow the white base coat to dry fully, preferably overnight. Attempting to blend on wet base paint can muddy the colors and ruin the effect.
Keep it Wet!
Acrylic blending requires speed. If the paint dries, it won’t mix. Work in small sections or use an acrylic retarder medium to slow down the drying time.
Step 2: Creating the Ombre Effect
-
Mix a middle tone:
In a separate small bucket, mix equal parts of your white paint and your terracotta paint. This 50/50 blend will serve as the crucial transition bridge between the two solid colors. -
Paint the bottom section:
Using a roller, apply the solid terracotta paint to the bottom third of the wall. Don’t worry about a perfect top edge yet; just get good solid coverage near the floor. -
Apply the transition color:
Immediately above the wet terracotta section, roll on a thick band of your mixed middle tone. Leave a small gap of a few inches between this strip and the solid orange below. -
Wet the boundary:
Lightly mist the gap between the solid orange and the middle tone with your water spray bottle. You want it damp, not dripping. -
Blend upward:
Using a dry 4-inch brush, work the dark orange paint upward into the lighter mix using continuous criss-cross ‘X’ strokes. This rapid movement blurs the line where the two colors meet. -
Add the upper fade:
Roll a strip of pure white paint just above your mixed middle tone section. I like to keep this strip wet while working on the blending below to maintain a uniform texture. -
Blend the upper transition:
With a clean, dry brush (or large sponge), blend the top edge of the middle tone into the wet white paint above it. Use vivid, feathery upward strokes to disperse the pigment so it disappears into the white. -
Soften harsh lines:
Step back and look for any hard lines. If you see one, lightly mist it with water and gently dab it with a dry brush to diffuse the pigment further. -
Repeat for depth:
Ombre often looks best with layers. Once the first pass is dry, you might need to repeat the blending process, especially in the dark orange section, to get a truly opaque, rich color.
Fixing “Stripes”
If your wall looks like three distinct stripes instead of a fade, your brush was too wet with paint. Use a clean, dry brush to aggressively feather the boundaries.
Step 3: Finishing Touches
-
Inspect the fade:
Check the gradient from a distance. The transition should look like a soft cloud, not stripes. If a section looks too blocky, apply a tiny amount of diluted paint and dry-brush it out. -
Clean the edges:
Carefully peel off the painter’s tape while the paint is still slightly tacky to prevent peeling. Use a small artist’s brush to touch up any white spots near the baseboard. -
Style the scene:
To recreate the specific look of the photo, lean a rustic wooden ladder against the colored section of the wall. The wood tones complement the terracotta perfectly. -
Add the props:
Place your white paint bucket and the mixing bucket (perhaps the old rusted one for character) on the floor nearby. This adds to that ‘work in progress’ studio aesthetic.
Enjoy the warmth of your permanent sunset every time you walk into the room
Paint Interior Doors a Statement Color
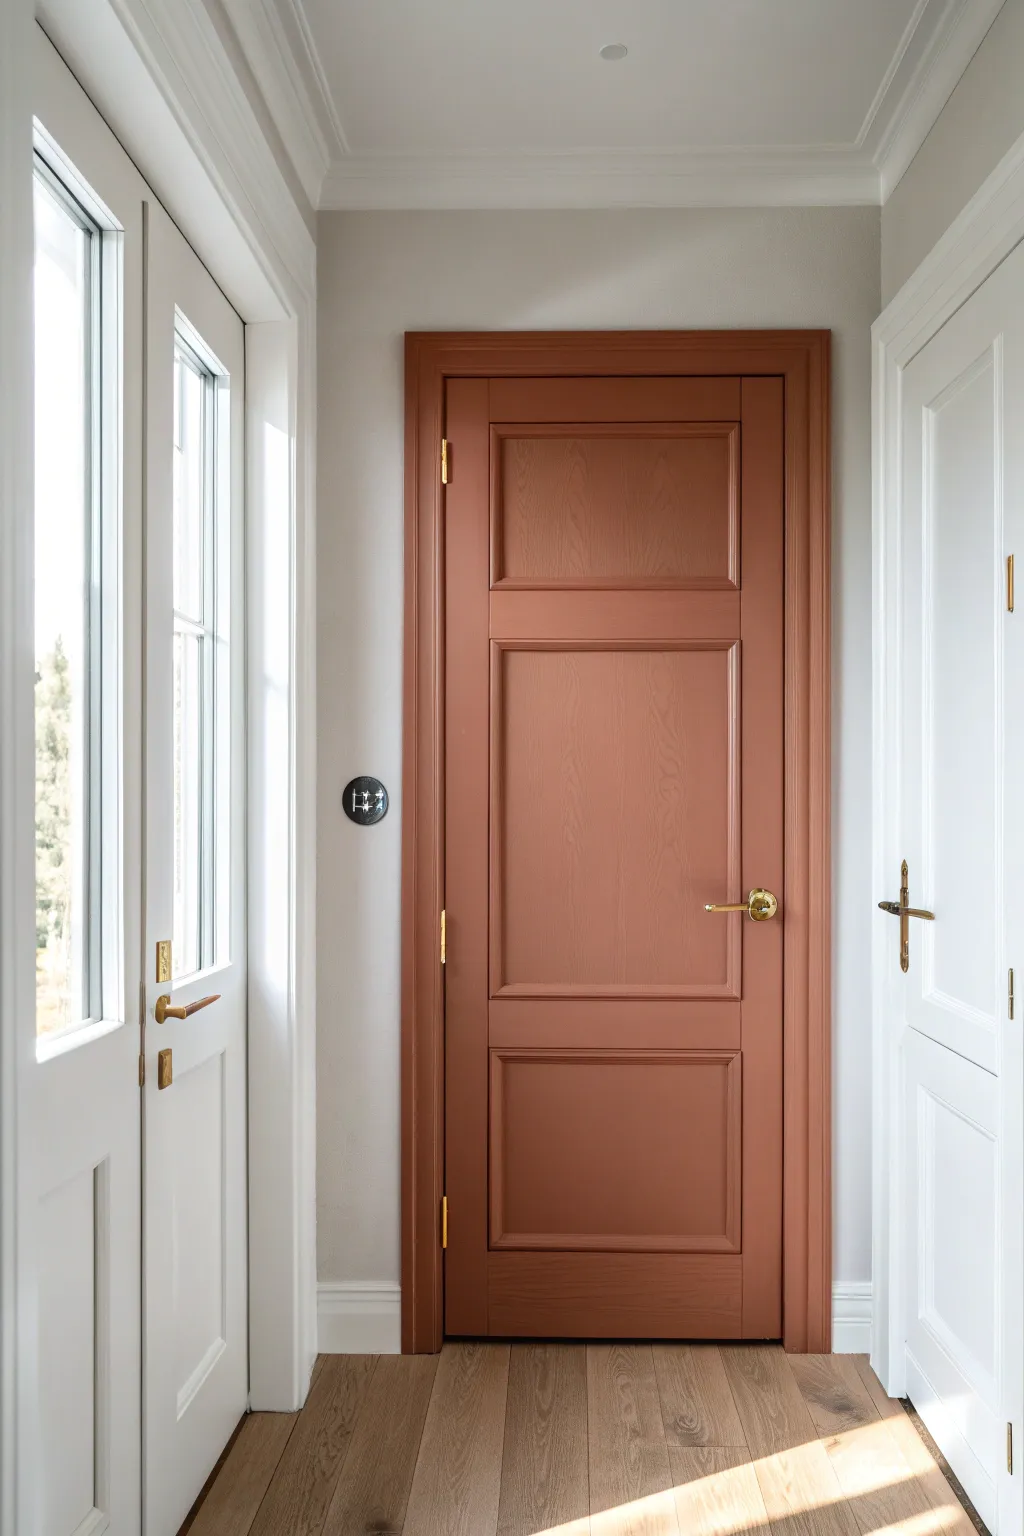
Elevate a simple hallway by painting a standard paneled door in a warm, earthy terracotta hue that instantly draws the eye. This unexpected pop of color adds depth and character to a neutral space, proving that bold choices can feel grounded and timeless.
How-To Guide
Materials
- Interior wood door (pre-primed or existing)
- Medium-grit sandpaper (120-grit)
- Fine-grit sandpaper (220-grit)
- Tack cloth
- Painter’s tape
- High-quality primer (if painting bare wood or dark colors)
- Satin or semi-gloss interior paint in terracotta/burnt sienna
- 2-inch angled sash brush
- 4-inch foam roller or mini microfiber roller
- Paint tray and liners
- Screwdriver (for hardware removal)
- Canvas drop cloth
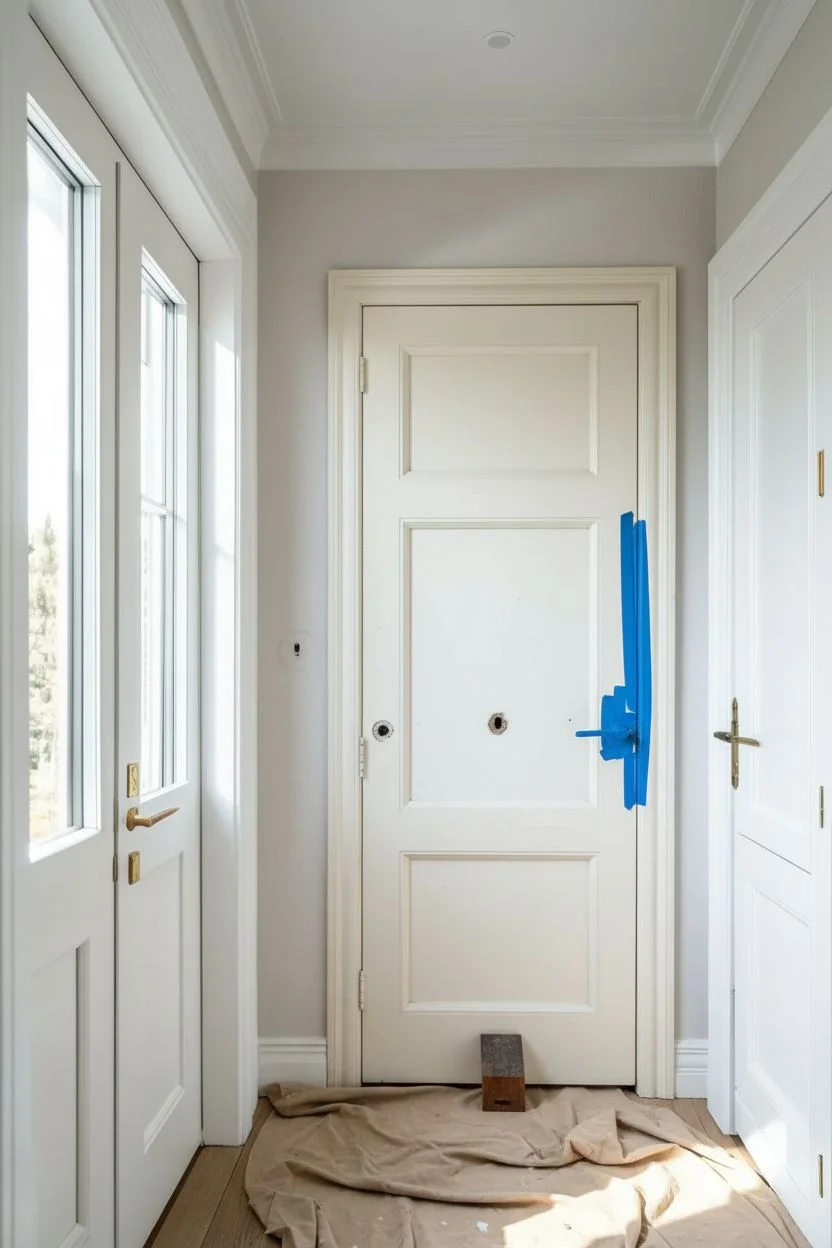
Step 1: Preparation & Hardware Removal
-
Clear the area:
Before starting, open the door fully and lay down a canvas drop cloth to protect your flooring. Secure the door with a wedge so it doesn’t swing while you work. -
Remove hardware:
Using a screwdriver, carefully remove the door handle, lock mechanism, and strike plates. It is much cleaner to paint a door without the hardware than to tape around it. -
Store pieces safely:
Place all screws and hardware pieces into a labeled ziplock bag immediately so nothing gets lost during the process. -
Tape hinges:
If you aren’t taking the door off the hinges (which is often easier for a quick refresh), cover the hinges completely with painter’s tape.
Sticky Situation
Does the door stick to the frame? Rub a candle on the door edges after the paint cures. The wax acts as a lubricant and prevents peeling if the paint gets tacky.
Step 2: Sanding & Cleaning
-
Initial sand:
Lightly scuff the entire surface of the door with 120-grit sandpaper. You aren’t trying to remove old paint completely, just giving the surface ‘tooth’ for the new paint to grip. -
Dust removal:
Wipe away the sanding dust with a dry cloth first, then go over the entire door with a tack cloth to pick up fine particles. -
Clean the surface:
Wash the door with a mild degreasing cleaner or a water-vinegar mix to remove any oils from hands, which can prevent paint adhesion. -
Dry completely:
Let the door air dry fully before opening any paint cans.
Color Harmony
To make the door truly pop, paint the surrounding trim a crisp, high-gloss white. The contrast emphasizes the warm terracotta tones.
Step 3: Painting the Panels
-
Start with panels:
Dip your angled sash brush into the terracotta paint. Begin by painting the recessed moldings inside the square panels first. -
Paint panel centers:
While the molding paint is still wet, use your mini roller or brush to paint the flat center of the panel. Smooth out any pooling paint in the corners immediately. -
Feather edges:
Feather out any paint giving you a hard line on the styles (verticals) or rails (horizontals) surrounding the panel to avoid ridge buildup.
Step 4: Painting Rails & Stiles
-
Vertical center stile:
Paint the vertical strip running down the center of the door, between the panels, using long, smooth vertical strokes. -
Horizontal rails:
Next, paint the horizontal rails (the top, middle, and bottom sections). I prefer to overlap slightly with the wet edge of the vertical stile to blend them seamlessly. -
Outer vertical stiles:
Finish the face of the door by painting the two long vertical stiles on the far left and right. Keep your brush strokes continuous from top to bottom. -
Don’t forget edges:
Paint the inner edge of the door frame (the part that touches the jamb when closed). If the door opens inward, paint the hinge edge; if outward, paint the latch edge.
Step 5: Finishing Touches
-
Allow to dry:
Let the first coat dry for at least 4-6 hours, or according to your paint can’s instructions. Do not close the door yet. -
Light sanding:
Once dry, run a piece of 220-grit sandpaper very lightly over the surface to knock down any bumps or raised grain, then wipe with the tack cloth. -
Second coat:
Apply a second coat following the exact same order: recessed molding, panels, center stile, rails, outer stiles. This richness of color usually requires two coats for full opacity. -
Reinstall hardware:
Wait at least 24 hours for the paint to cure sufficiently before screwing the handle and plates back into place.
Step back and admire how a single weekend project completely redefined the warmth of your hallway
Refresh Exterior Siding With a Modern, Cohesive Color

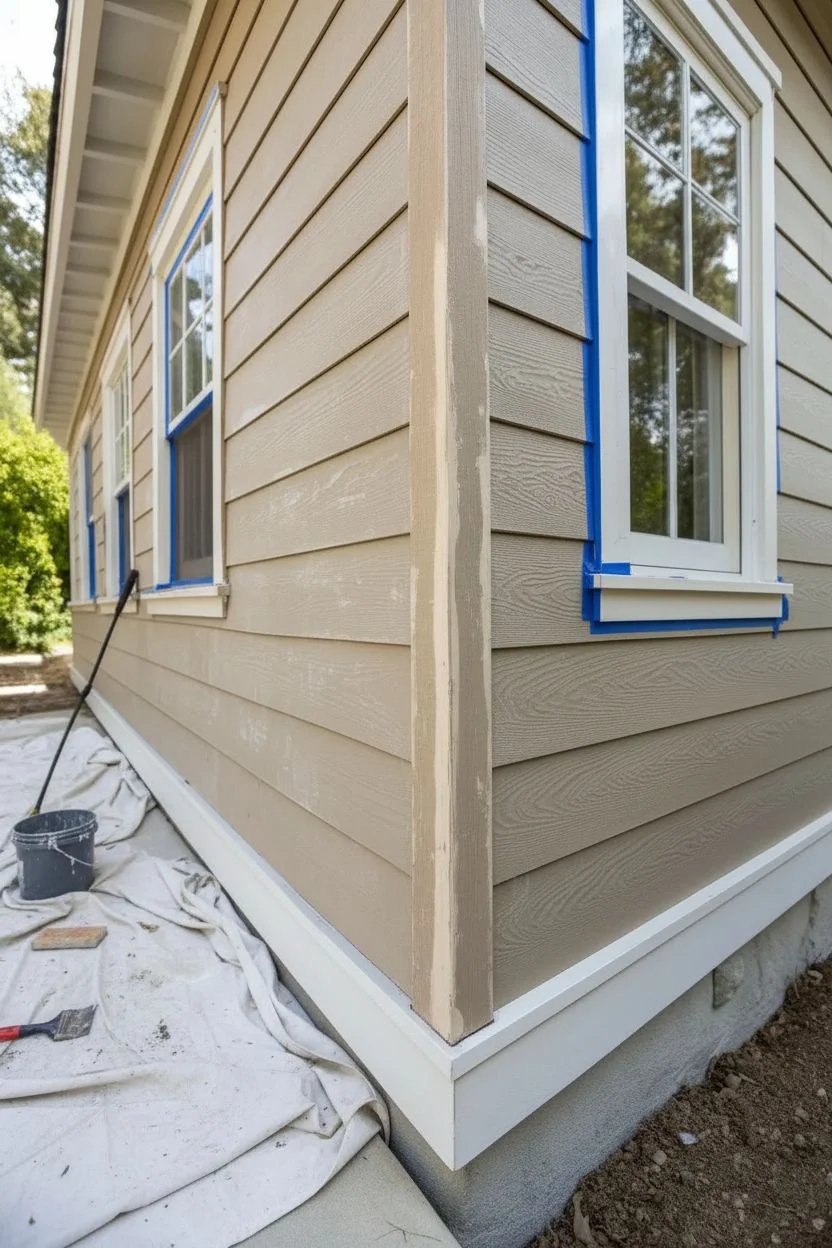
Transform tired exterior siding into a modern showstopper with this clean, two-tone color scheme. By pairing warm beige lap siding with stark white trim, you’ll achieve a timeless look that feels both fresh and grounded.
Step-by-Step Guide
Materials
- External acrylic latex paint (Beige/Tan for siding)
- External semi-gloss enamel (Bright White for trim)
- High-quality angled sash brush (2.5 inch)
- Mini roller with 3/8 inch nap
- Pressure washer or scrub brush with hose
- Exterior painter’s tape
- Paint scraper and sanding block
- Drop cloths
- Caulk gun and exterior caulk
- Bucket and paint tray
- Clean rags
Step 1: Preparation
-
Clean the Surface:
Begin by thoroughly cleaning the siding and trim. Use a pressure washer on a low setting or a stiff brush with soapy water to remove dirt, mildew, and chalky residue. A clean surface is critical for adhesion. -
Scrape and Sand:
Once dry, inspect for any peeling or flaking paint. Use a scraper to remove loose chips, then sand the edges of these areas with a sanding block to create a smooth transition. -
Repair Imperfections:
Check for gaps around windows, corner boards, or between siding planks. Fill these gaps with a high-quality exterior caulk to ensure a weather-tight seal and a seamless finish. -
Protect Surroundings:
Lay down drop cloths over any concrete walkways, landscaping, or decking below your work area. Tape off window glass and any fixtures you can’t remove to protect them from splatters.
Step 2: Painting the Trim
-
Cut In Edges:
Start with your bright white trim paint. Using your angled sash brush, carefully cut in along the edges where the trim meets the siding. I like to keep a wet rag handy here to quickly wipe any accidental smudges on the siding. -
Fill the Flat Surfaces:
Paint the flat faces of the corner boards and window casings. Apply the paint in long, smooth strokes to minimize brush marks. For wider trim boards, a mini roller can speed up this process. -
Check for Drips:
Inspect the corners and bottom edges of the trim for any paint drips or runs. Smooth these out immediately with your brush before the paint begins to tack up. -
Apply Second Coat:
Allow the first coat of trim paint to dry according to the manufacturer’s instructions. Apply a second coat to ensure full coverage and a durable, semi-gloss finish.
Sticky Situation?
If paint peels up with your tape, score the edge where the tape meets the paint with a sharp utility knife before pulling. This separates the dried film cleanly.
Step 3: Painting the Siding
-
Cut In Siding:
Once the trim is completely dry, you can tape off the edges of the trim if you don’t trust your steady hand. Cut in the beige siding paint around the window frames and corner boards using your angled brush. -
Paint Under the Laps:
Before rolling or brushing the main face, run your brush along the bottom edge (the ‘drip edge’) of each siding plank. This ensures the underside is coated and protected from moisture. -
Paint the Faces:
Working in sections of 3-4 boards at a time, paint the face of the siding. You can use a roller to apply paint quickly, but immediately follow up with a brush (back-brushing) to work the paint into the wood grain texture. -
Maintain a Wet Edge:
Move horizontally along the wall to maintain a wet edge. Stopping in the middle of a board can cause visible lap marks, so try to reach a natural break point like a corner or window. -
Feather the Edges:
As you move to a new section, feather your brush strokes back into the previously painted area to blend the sections seamlessly. -
Second Coat Siding:
After the first coat has dried, assess the coverage. A second coat is usually necessary for true color depth and weather protection, especially on textured surfaces.
Add Dimension
For a custom look, paint the window sashes (the moving parts) a dark charcoal or black. It adds a modern, graphic pop against the white trim.
Step 4: Finishing Touches
-
Remove Tape:
Carefully remove any painter’s tape while the final coat is still slightly tacky. Pull the tape at a 45-degree angle away from the painted surface to create a crisp line. -
Touch Up:
Walk around the exterior with a small artist’s brush to touch up any tiny spots where the colors might have bled or coverage is thin. -
Clean Up Tools:
Wash your brushes and rollers thoroughly with warm soapy water (for latex paint). Reshaping your brushes before letting them dry will help them last for your next project.
Enjoy the satisfaction of stepping back to admire your home’s crisp new curb appeal


Have a question or want to share your own experience? I'd love to hear from you in the comments below!