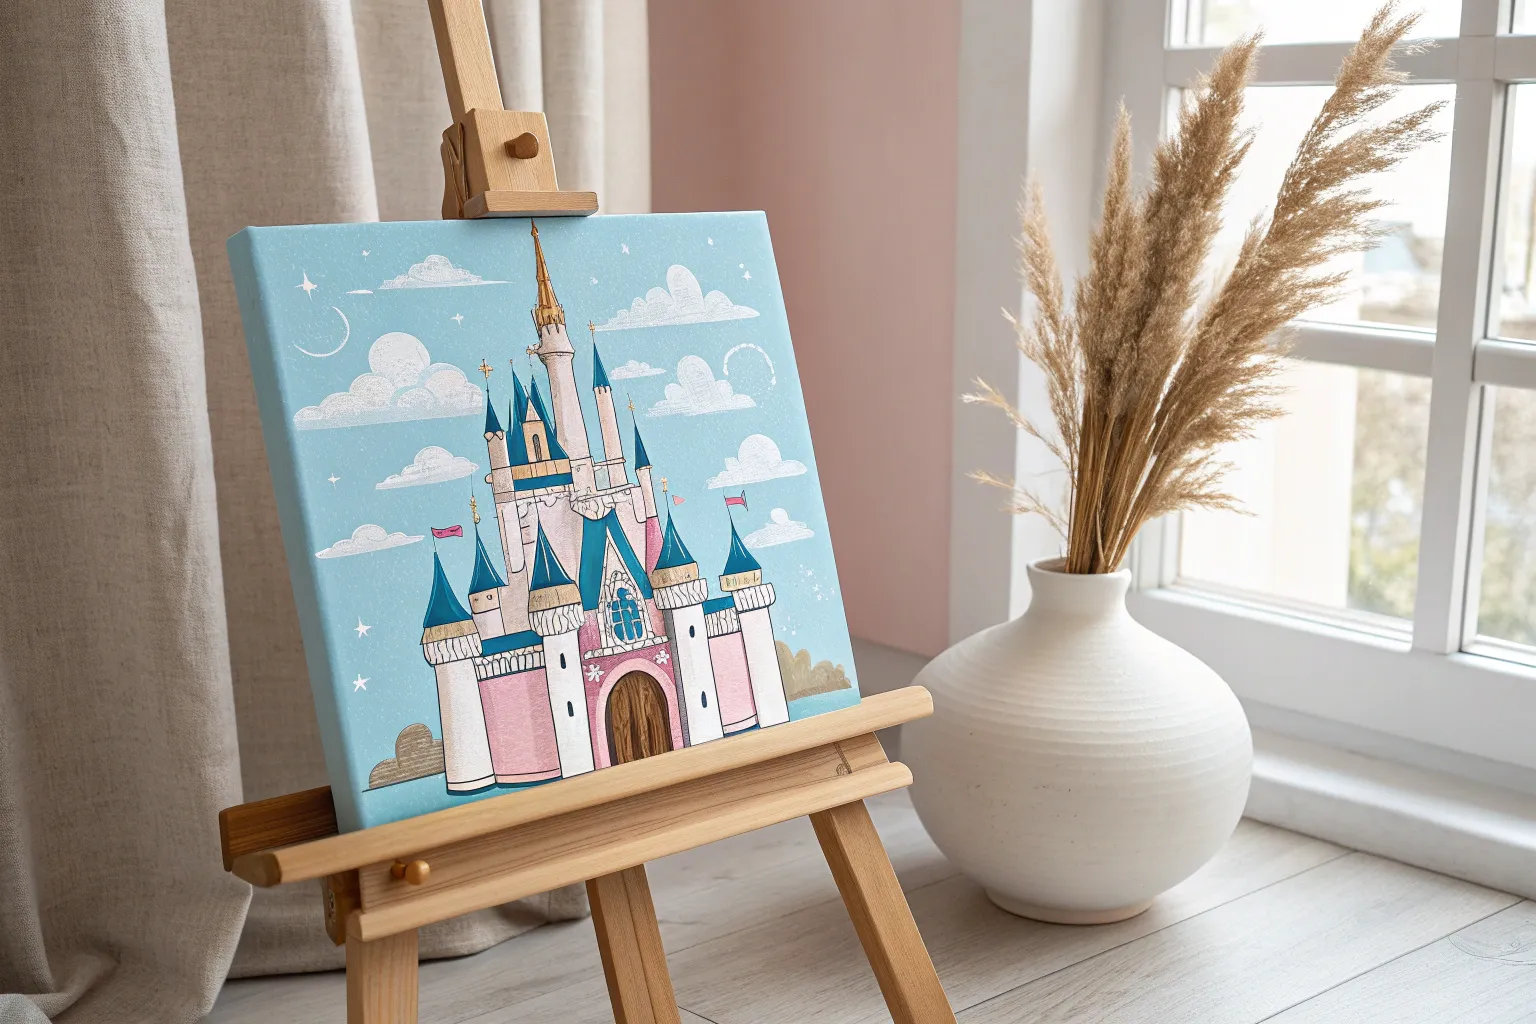
If you’re craving that classic, storybook-magic vibe in your next piece, these disney painting ideas are the perfect place to play. I’m keeping things super paint-friendly—think bold shapes, glowing skies, and iconic symbols you can make your own.
Paint a Storybook Castle at Sunset
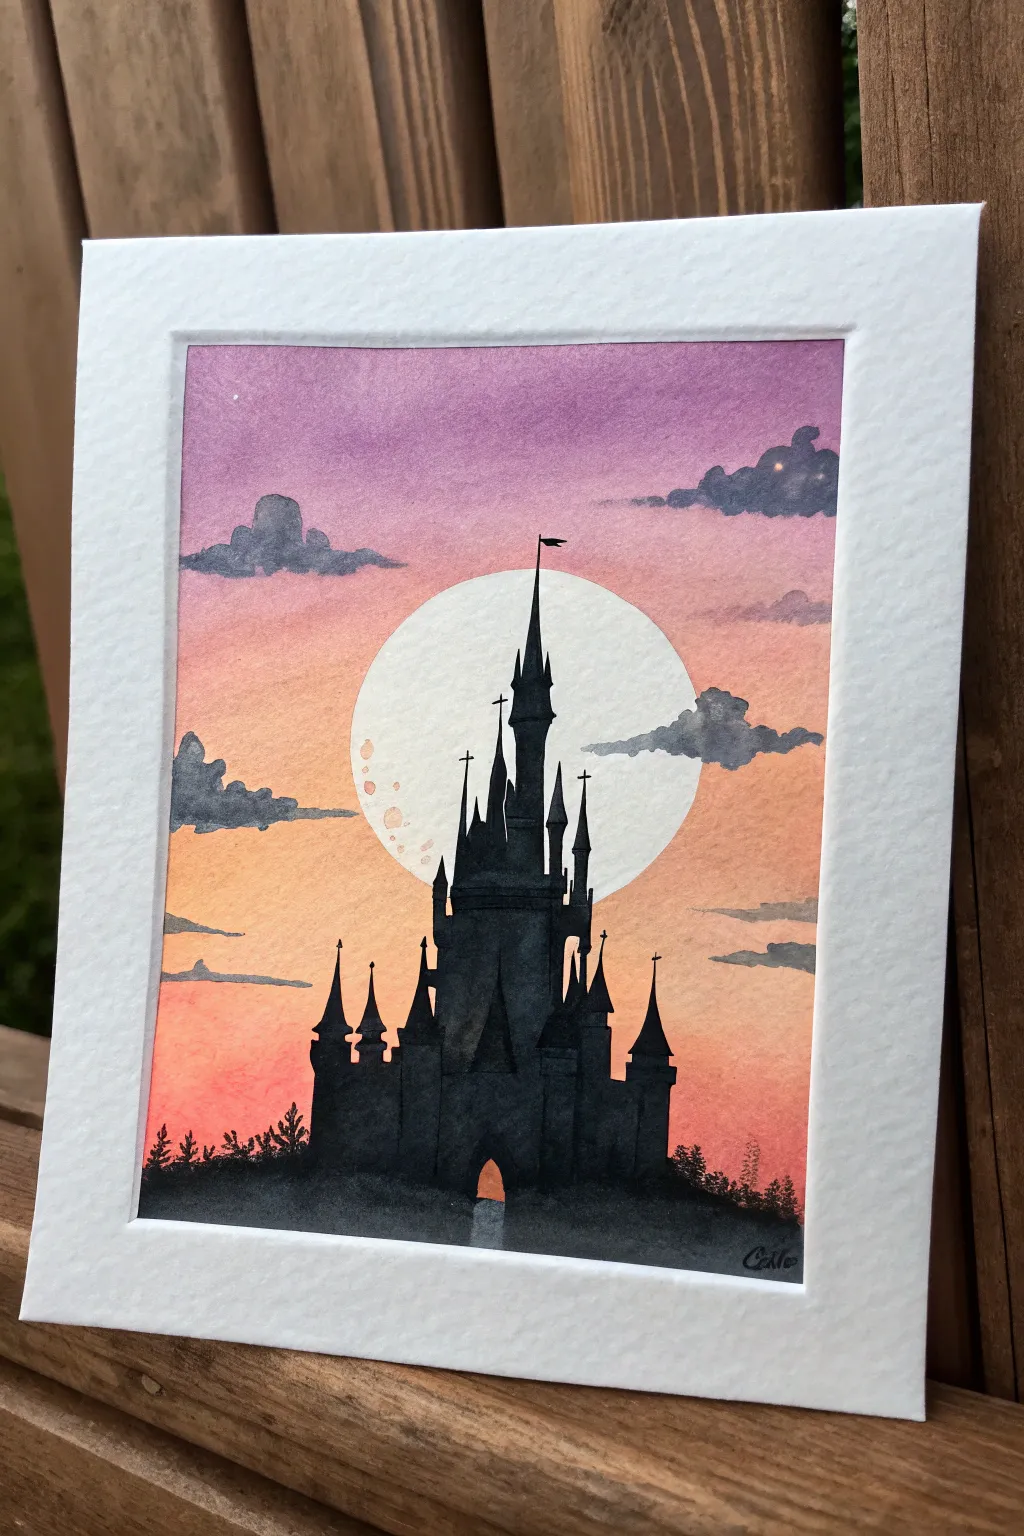
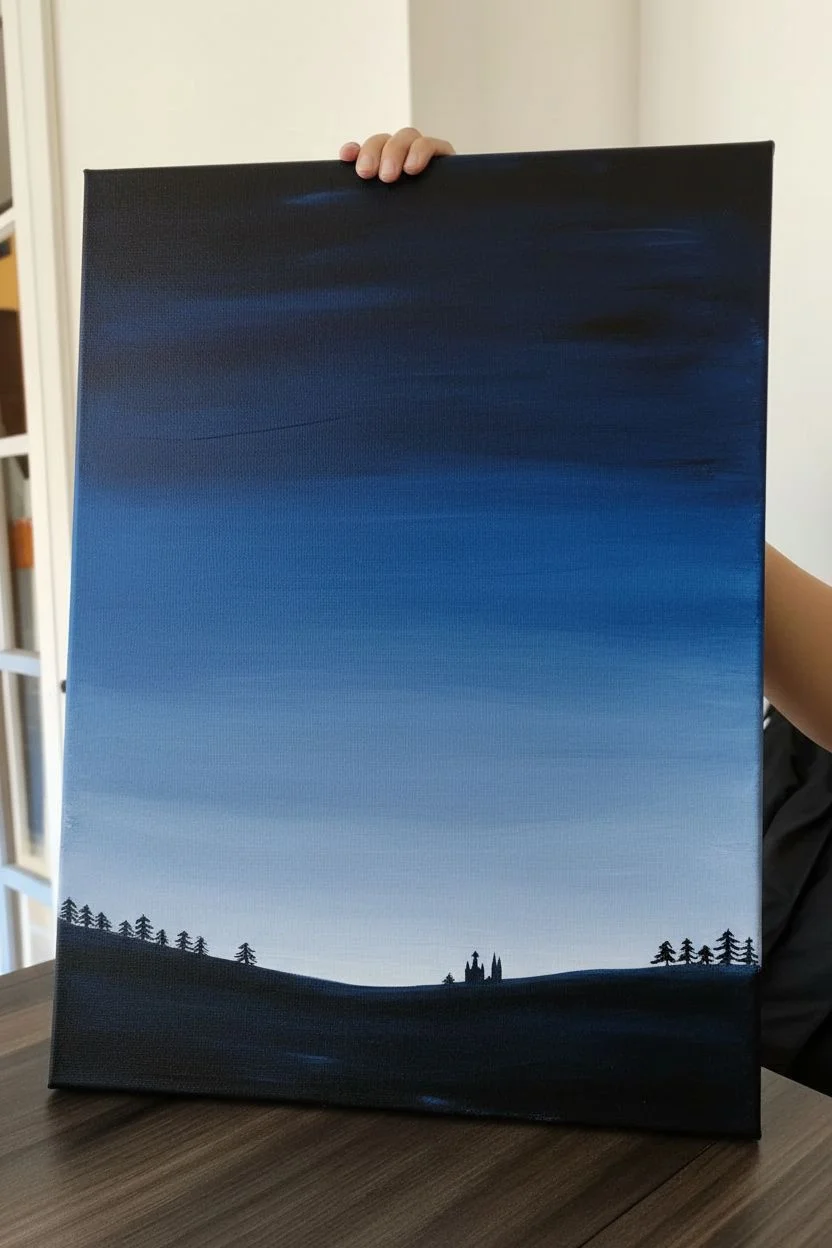
Capture the magic of a fairytale evening with this enchanting watercolor project featuring a towering castle silhouette against a vibrant gradient sky. The contrast between the soft, blended sunset and the crisp, dark architecture creates a dramatic and dreamy focal piece.
How-To Guide
Materials
- Watercolor paper (cold press, 140lb/300gsm recommended)
- Watercolor paints (purple, magenta, orange, yellow, black or Payne’s gray)
- White gouache or white gel pen
- Masking fluid (optional but helpful) or masking tape
- Round brushes (large size 10-12 for washes, small size 0-2 for details)
- Pencil and eraser
- Palette for mixing
- Jars of clean water
- Paper towels
- Compass or circle template
Step 1: Planning and Sky
-
Outline the basics:
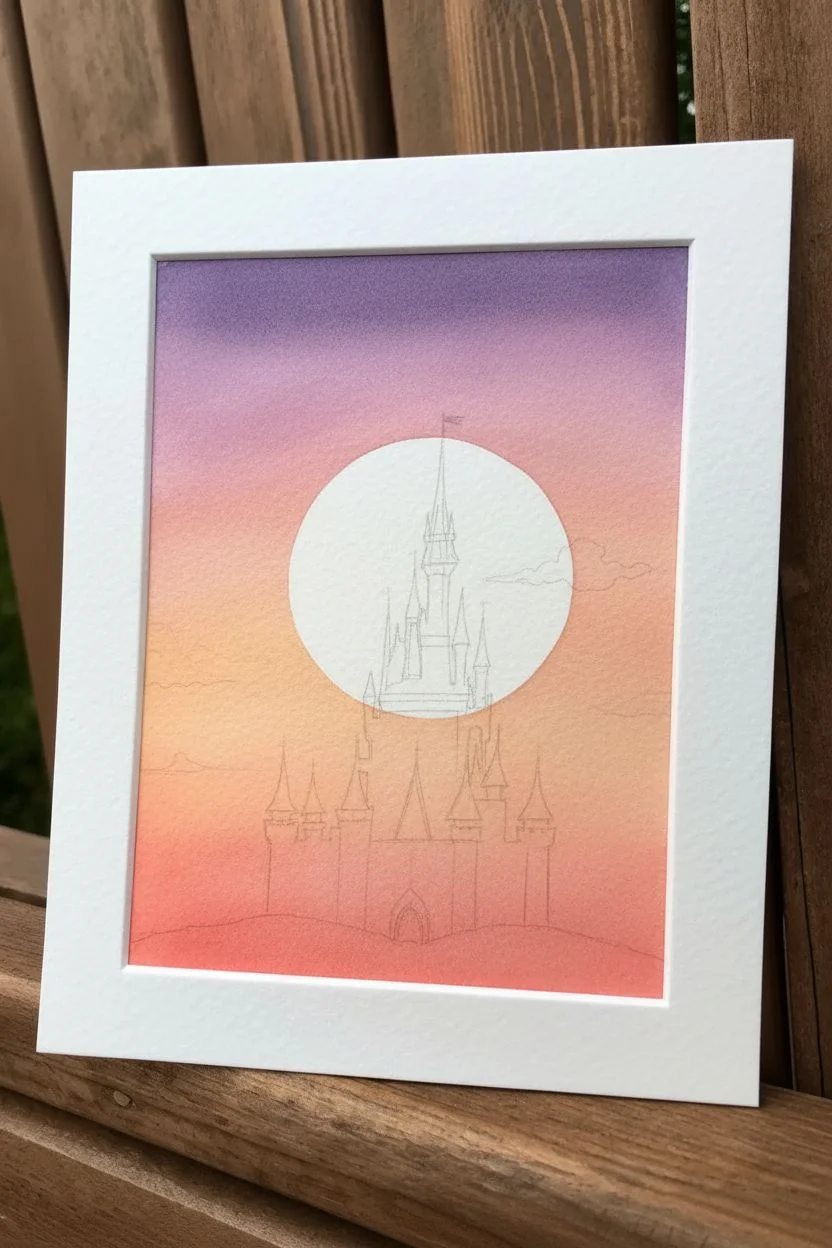
Begin by lightly sketching the horizon line near the bottom third of your paper. Use a compass or a round household object to trace a large circle in the center where the moon will sit. -
Sketch the silhouette:
Lightly draw the outline of the castle spires and towers. You don’t need perfect detail yet, just the main shapes to know where the black paint will eventually go. Keep your pencil lines faint so they don’t show through later. -
Mask the moon:
To keep the moon perfectly bright, carefully apply masking fluid to the circle area. If you don’t have masking fluid, you can carefully paint around it, cut a circle from masking tape, or simply avoid that area with your brush. -
Prepare the wash:
Mix your sky colors on your palette: a deep violet, a rosy pink, and a warm peach or orange. Make sure you have enough of each mixture ready so the wash doesn’t dry while you’re mixing more. -
Paint the gradient:
Start at the very top of the paper with the violet paint using a large, wet brush. Work your way down, rinsing your brush slightly and picking up the pink as you move toward the middle. -
Blend the sunset:
Continue painting downward, transitioning from pink into the warm orange near the horizon line. I like to tilt the paper slightly to help the colors flow and blend seamlessly together. -
Let it dry completely:
This is crucial—allow the sky to dry 100% before moving on. The paper should feel flat and room temperature to the touch. If you used masking fluid, carefully rub it off once the paper is bone dry.
Clean Lines
For the straightest spire tips, hold your breath for a second while painting the very top line, or use a ruler to lightly guide your hand (but don’t use the ruler with the paint directly).
Step 2: Moon and Details
-
Paint the moon:
If you masked the moon, reveal the white paper now. Paint a very pale, watery wash of light grey or cream over the moon circle, leaving some areas white for texture. Add tiny dabs of darker grey for craters while it’s still damp. -
Start the castle base:
Switch to your black or Payne’s gray watercolor. You want a very concentrated, creamy consistency for opacity. Begin filling in the castle shape starting from the bottom, creating a solid foundation. -
Build the towers:
Work your way up the castle, painting the main central structure first. Keep your edges sharp. If your black paint looks transparent, let it dry and add a second layer for true darkness. -
Add the spires:
Switch to your smallest detail brush (size 0 or 2). Carefully paint the thin, pointy roofs of the towers. Use just the very tip of the brush to get those fine, needle-like points and flagpoles. -
Define the architecture:
Add small architectural details like the crosses on the spires, the little side turrets, and the arched gateway at the bottom. The gateway can be left the color of the background or painted a lighter shade to suggest light coming from within. -
create the foreground:
At the base of the castle, stipple pure black paint to create rough, uneven ground and foliage. Dab your brush to suggest treetops and bushes silhouetted against the light.
Bleeding Colors?
If your black silhouette bleeds into the sky, the background wasn’t dry enough. Stop immediately, let it dry fully, then gently touch up the edge with opaque darker paint.
Step 3: Atmosphere and Finishing Touches
-
Add floating clouds:
Mix a watery grey-purple color. Paint loose, fluffy cloud shapes overlapping the moon and floating in the sky. Soften the bottom edges of the clouds with a clean, damp brush for a wispy look. -
Highlight the clouds:
To give the clouds dimension, paint the tops slightly darker or lighter depending on your preference, or lift a little color with a thirsty brush to show the moonlight hitting them. -
Paint the stars:
Using white gouache or a white gel pen, add a few tiny stars in the darker purple area of the sky. Keep them sparse to maintain focus on the castle. -
Final assessment:
Step back and look at your painting. Deepen any blacks that dried too light, particularly on the main castle body, to ensure a strong silhouette effect.
Frame your masterpiece in a simple white mat to let the colors truly pop


Try a Princess Gown Silhouette With a Gradient Sky
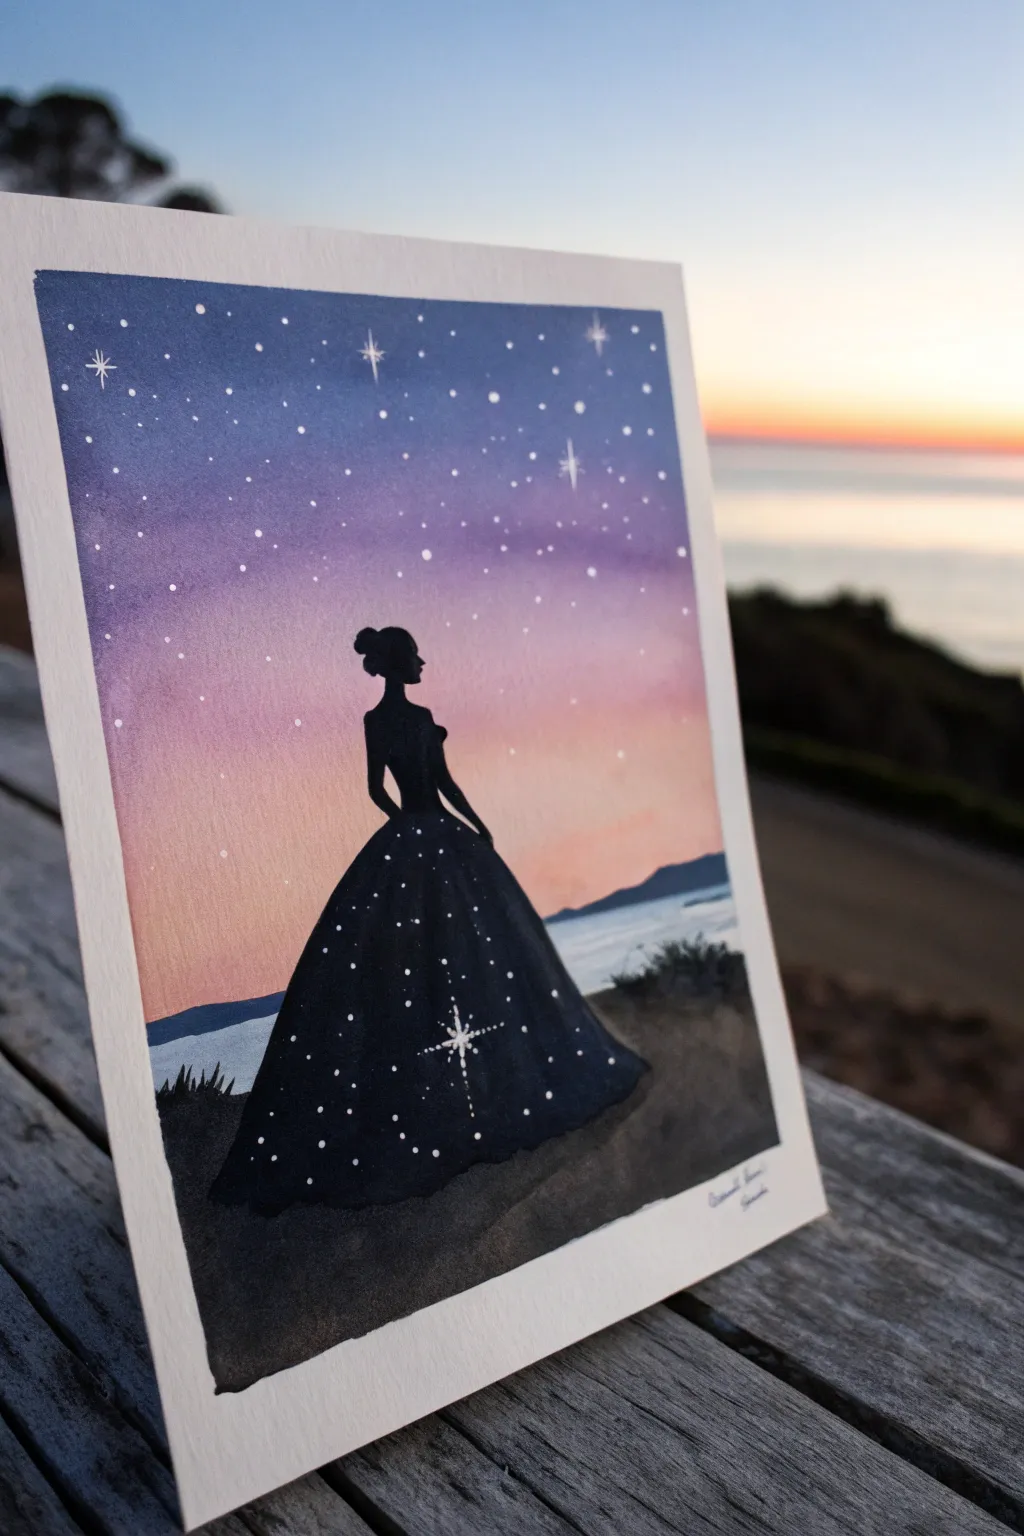
Capture the magic of a fairytale evening with this enchanting watercolor silhouette. By blending a twilight sky into a starry gown, you blur the line between the character and the cosmos.
Step-by-Step Guide
Materials
- Watercolor paper (cold press, 140lb/300gsm recommended)
- Watercolor paints (Indigo, Purple/Violet, Rose/Pink, Peach/Orange)
- Black gouache or waterproof black ink
- White gel pen or white gouache
- Masking tape
- Pencil and eraser
- Flat wash brush (large)
- Round detail brushes (sizes 0 and 2)
- Cup of water
- Paper towels
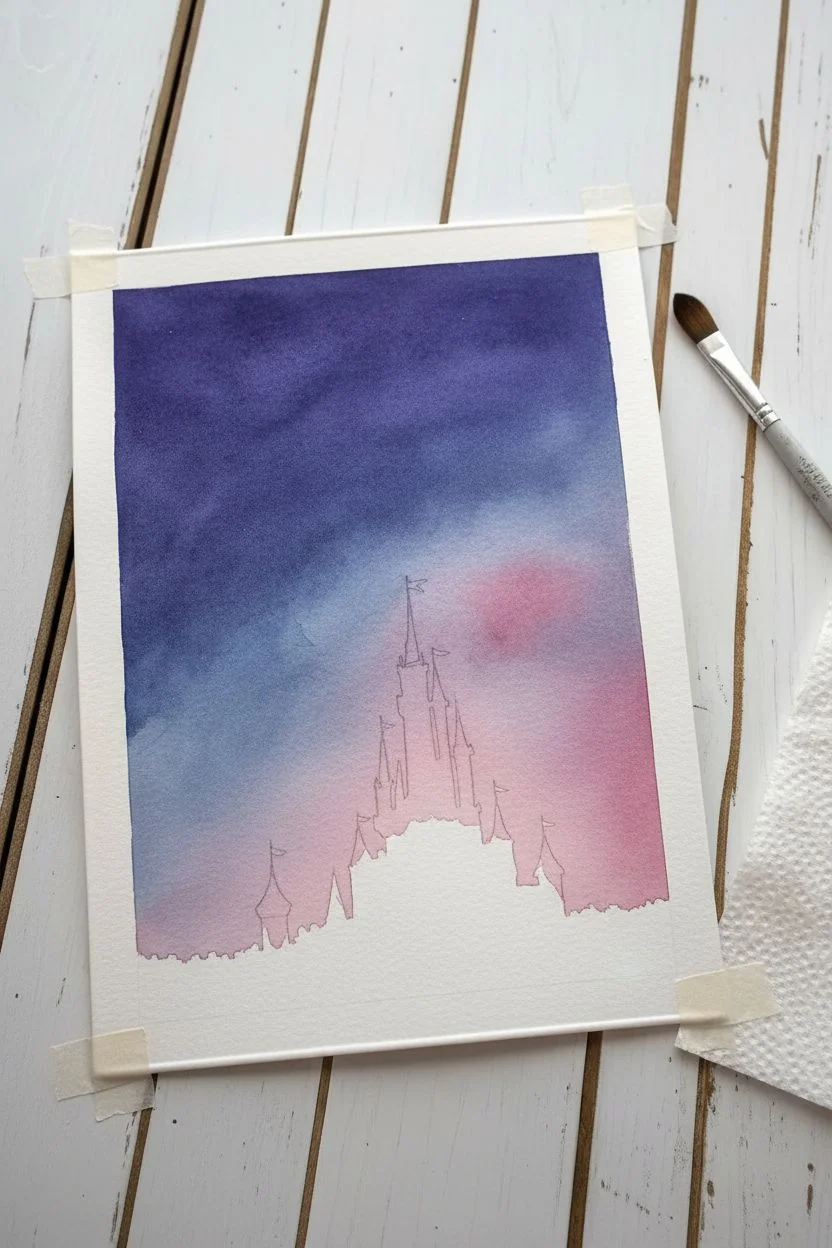
Step 1: Setting the Scene
-
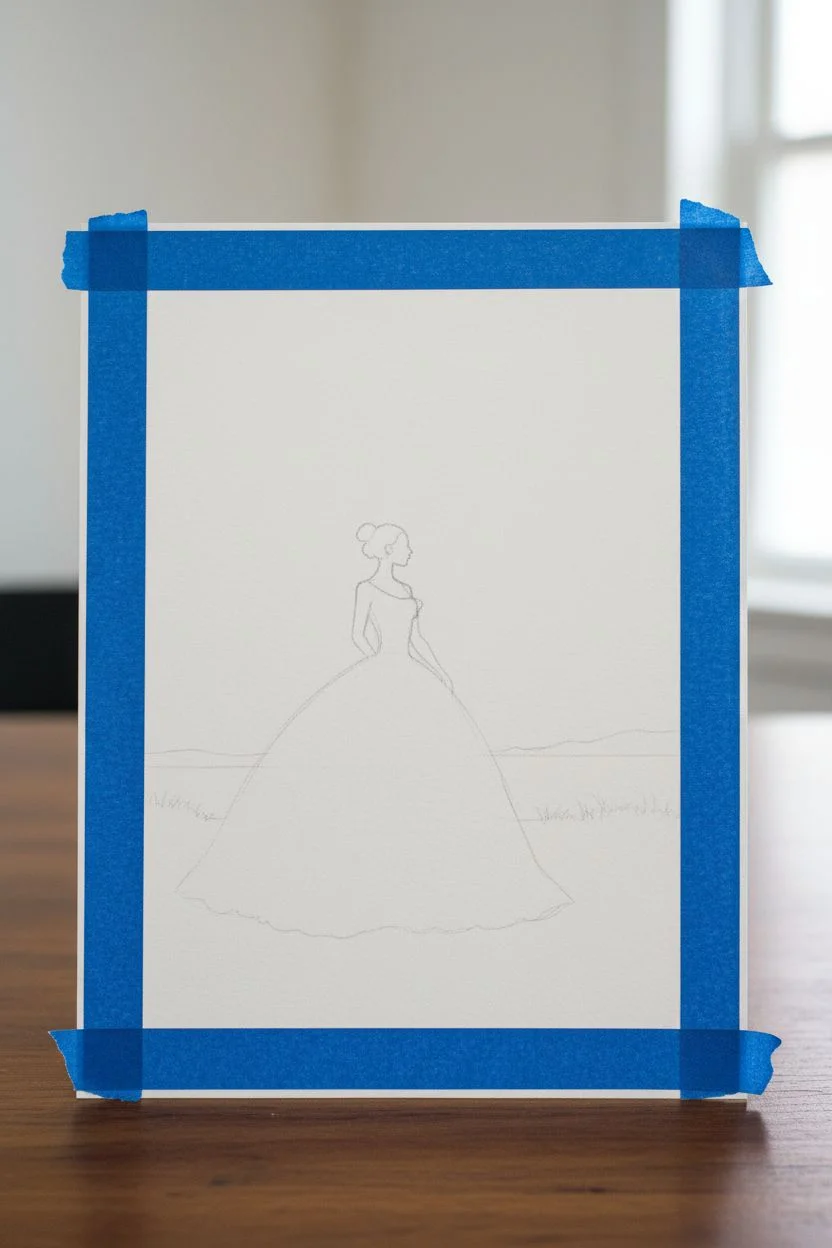
Tape the edges:
Secure your watercolor paper to a board or table using masking tape on all four sides. This creates that crisp, professional white border and prevents the paper from buckling when wet. -
Sketch the silhouette:
Lightly sketch the outline of the princess in the center of the page. Focus on the shape of the head, bun, bodice, and the wide, bell-shaped skirt. Keep your pencil lines faint so they don’t show through the lighter sky colors later. -
Mark the horizon:
Draw a faint horizontal line about one-third up from the bottom of the page to represent the horizon where the sky meets the water. Below this, lightly sketch the uneven line of the grassy hill she is standing on.
Keep it Clean
If you accidentally paint inside the silhouette with the sky color, don’t panic. The black gouache is opaque enough to cover the mistake later.
Step 2: Painting the Gradient Sky
-
Prepare your colors:
Mix your sky colors on your palette before starting. You’ll need a deep indigo/violet for the top, a medium purple for the middle, and a soft pink/peach for the horizon line. -
Start the wash:
Using your flat brush, wet the sky area with clean water (wet-on-wet technique). Be careful to paint *around* the silhouette of the princess; try not to get water inside her outline. -
Apply the dark top:
Load your brush with the indigo/violet mix and apply it to the very top of the sky. Let the paint flow naturally into the damp paper. -
Blend downwards:
Rinse your brush slightly and pick up the medium purple. Blend this into the bottom edge of the indigo, pulling the color down to the middle of the sky. -
Finish with warmth:
Switch to your pink/peach tone. Blend this from the purple section down to the horizon line. If the colors feel too separated, use a clean, damp brush to gently smooth the transition area. -
Paint the water:
For the water below the horizon, use a very diluted wash of blue-grey. Keep it light to contrast with the dark foreground later. Let the entire background dry completely before moving on.
Step 3: Creating the Silhouette
-
Outline the figure:
Using a fine round brush (size 0 or 2) and black gouache (or ink), carefully trace the outline of the princess’s head, arms, and dress. Gouache is opaque and matte, which gives a solid, velvety finish. -
Fill in the dress:
Fill in the entire shape of the princess and her gown with the solid black. Ensure the coverage is even and opaque. -
Paint the ground:
Use the same black paint to fill in the grassy hill she is standing on. Add small, flicking strokes along the top edge of the hill to simulate blades of grass silhouetted against the sky. -
Paint distant land:
If you sketched mountains or land in the distance on the horizon line, paint these in with a lighter grey or a very watered-down black, so they look further away than the princess.
Add Extra Magic
Mix a tiny amount of glitter or iridescent medium into your white paint for the stars on the dress to make it actually sparkle in the light.
Step 4: Adding the Stars
-
Check dryness:
Wait until the black silhouette is 100% dry. If it’s even slightly wet, the white stars will bleed and turn grey. -
Dot the sky:
using a white gel pen or a fine brush with white gouache, add tiny dots for stars in the purple section of the sky. Vary the sizes slightly for a natural look. -
Add larger stars:
Draw a few larger ‘cross’ shaped stars or four-pointed sparkles in the upper sky to add visual interest. -
Decorate the gown:
This is the magical part: continue the star pattern onto the black dress. Add many white dots across the skirt, making it look like the gown is made of the night sky itself. -
Create a focal shine:
Place one large, prominent four-pointed starburst on the skirt to act as a sparkling highlight. -
The final reveal:
Once everything is fully dry, slowly and carefully peel off the masking tape at a 45-degree angle to reveal your clean white border.
Frame your whimsical artwork or gift it to someone who still believes in fairytales


Paint a Floating Lantern Night Sky Scene
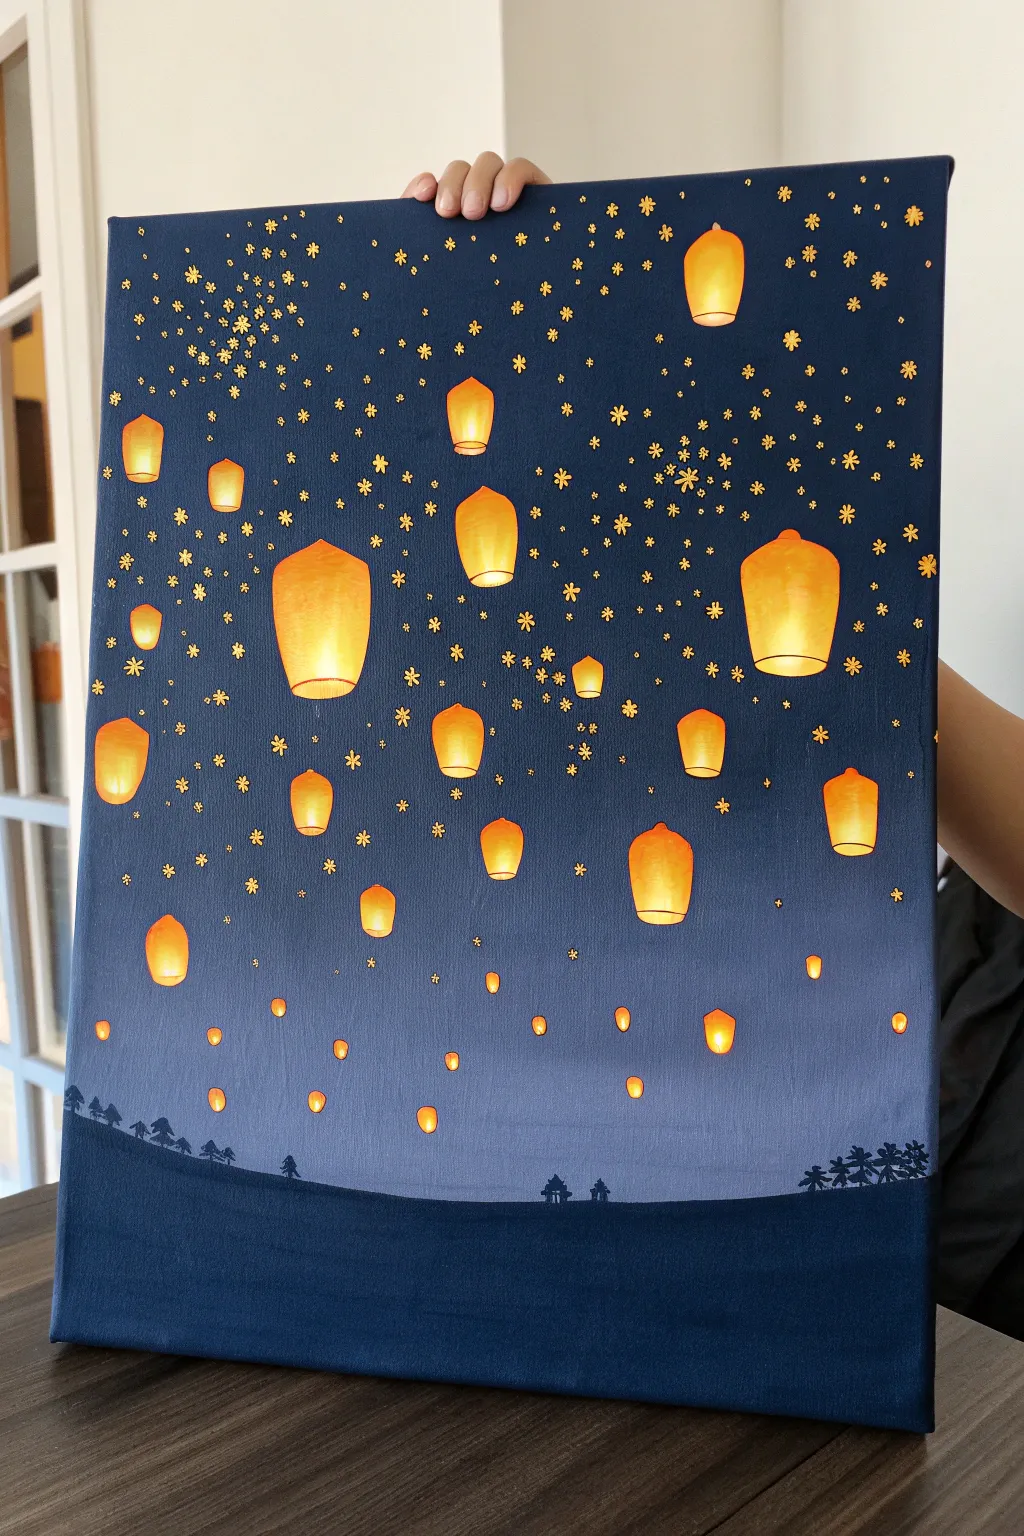
Capture the magic of the kingdom of Corona with this stunning illuminated canvas art. By combining painting techniques with actual LED lights, you can create a centerpiece that truly glows just like the scene from the movie.
How-To Guide
Materials
- Rectangular stretched canvas (e.g., 16×20 inches)
- Acrylic paints: Navy Blue, Royal Blue, Black, White, Yellow, Orange
- Flat wash brush (1-inch)
- Small detail brushes (round sizes 0 and 2)
- Battery-operated warm white fairy lights (strand with small bulbs)
- Craft knife or Awl tool
- Pencil
- Masking tape or painter’s tape
- Reference image of lanterns (optional)
- Mixing palette
- Cup of water and paper towels
Step 1: Creating the Sky Gradient
-
Prime the background:
Start by mixing a deep Navy Blue with a touch of Black. Apply this darkest shade to the top one-third of your canvas using your large flat wash brush, ensuring smooth, horizontal strokes. -
Transition to mid-tones:
Clean your brush slightly, then load it with pure Royal Blue. Blend this color into the bottom edge of your dark navy section while the paint is still wet to create a seamless gradient. -
Lighten the horizon:
Mix Royal Blue with a generous amount of White to create a soft, hazy blue-grey. Paint the bottom third of the canvas with this lighter shade, blending it upwards into the mid-tone blue. -
Create the ground silhouette:
Once the background is dry to the touch, mix Black with a tiny drop of Navy Blue. Paint a rolling hill shape along the very bottom edge of the canvas to ground your scene. -
Add tiny trees and structures:
Using your smallest detail brush and the black mixture, carefully paint tiny silhouettes of pine trees and small castle-like structures along the horizon line of the hill. Keep these very small to emphasize the vastness of the sky.
Blending Blues
If your gradient looks choppy, use a clean, slightly damp brush to gently sweep back and forth over the meeting line of two colors while they are still wet.
Step 2: Painting the Lanterns
-
Sketch the placement:
Lightly sketch the outlines of your lanterns using a pencil. Place larger ones near the center and middle ground, and draw tiny specs for distant lanterns near the top. Vary the shapes slightly; some should be taller rectangles, others more rounded. -
Base coat the lanterns:
Paint the interior of each sketched lantern shape with a mix of Titanium White and Yellow. This bright base coat is crucial for making the final colors pop against the dark blue background. -
Add the golden glow:
Once the white base is dry, glaze over the lanterns with a Golden Yellow paint. For the larger lanterns, leave the very center slightly lighter to simulate a heat source. -
Define the edges:
Mix a bright Orange. Using a fine liner brush, outline the top and sides of each lantern. Blend the orange slightly inward at the top and bottom corners to give the lanterns a three-dimensional, curved appearance. -
Paint the bottom rim:
Use a slightly darker Red-Orange to paint the structural ring at the bottom of the larger lanterns where the flame would sit.
Golden Glaze
Mix a tiny bit of iridescent gold medium into your yellow paint for the lanterns. It catches the light even when the LEDs are turned off.
Step 3: The Starry Details
-
Add small stars:
Dip a small round brush or a toothpick into pale yellow paint. Dot tiny stars throughout the upper dark section of the sky. -
Create flower bursts:
To mimic the ‘magic’ effect often seen in this style, paint tiny five-petal flower shapes or starbursts scattered among the lanterns in gold or pale yellow. I like to cluster these near the top left corner to create a sense of movement.
Step 4: Lighting It Up
-
Plan your light points:
Decide which lanterns you want to actually light up. Usually, the larger, closer lanterns work best for this. -
Pierce the canvas:
Place the canvas face down on a soft surface (like a towel). Carefully use a craft knife or an awl to poke small holes through the center of the chosen lanterns from the back side. -
Insert the fairy lights:
Push the LED bulbs of your fairy light strand through the holes from the back. If the fit is loose, secure each bulb base to the back of the canvas with a piece of masking tape. -
Secure the battery pack:
Tape the remaining wire flat against the back of the wooden frame so it doesn’t hang loose. Tape or velcro the battery pack to the bottom of the frame where it is easily accessible but hidden.
Flip the switch on your battery pack and watch your painted kingdom come to life with a warm, magical glow


Make an Underwater Coral Window With Shimmery Bubbles
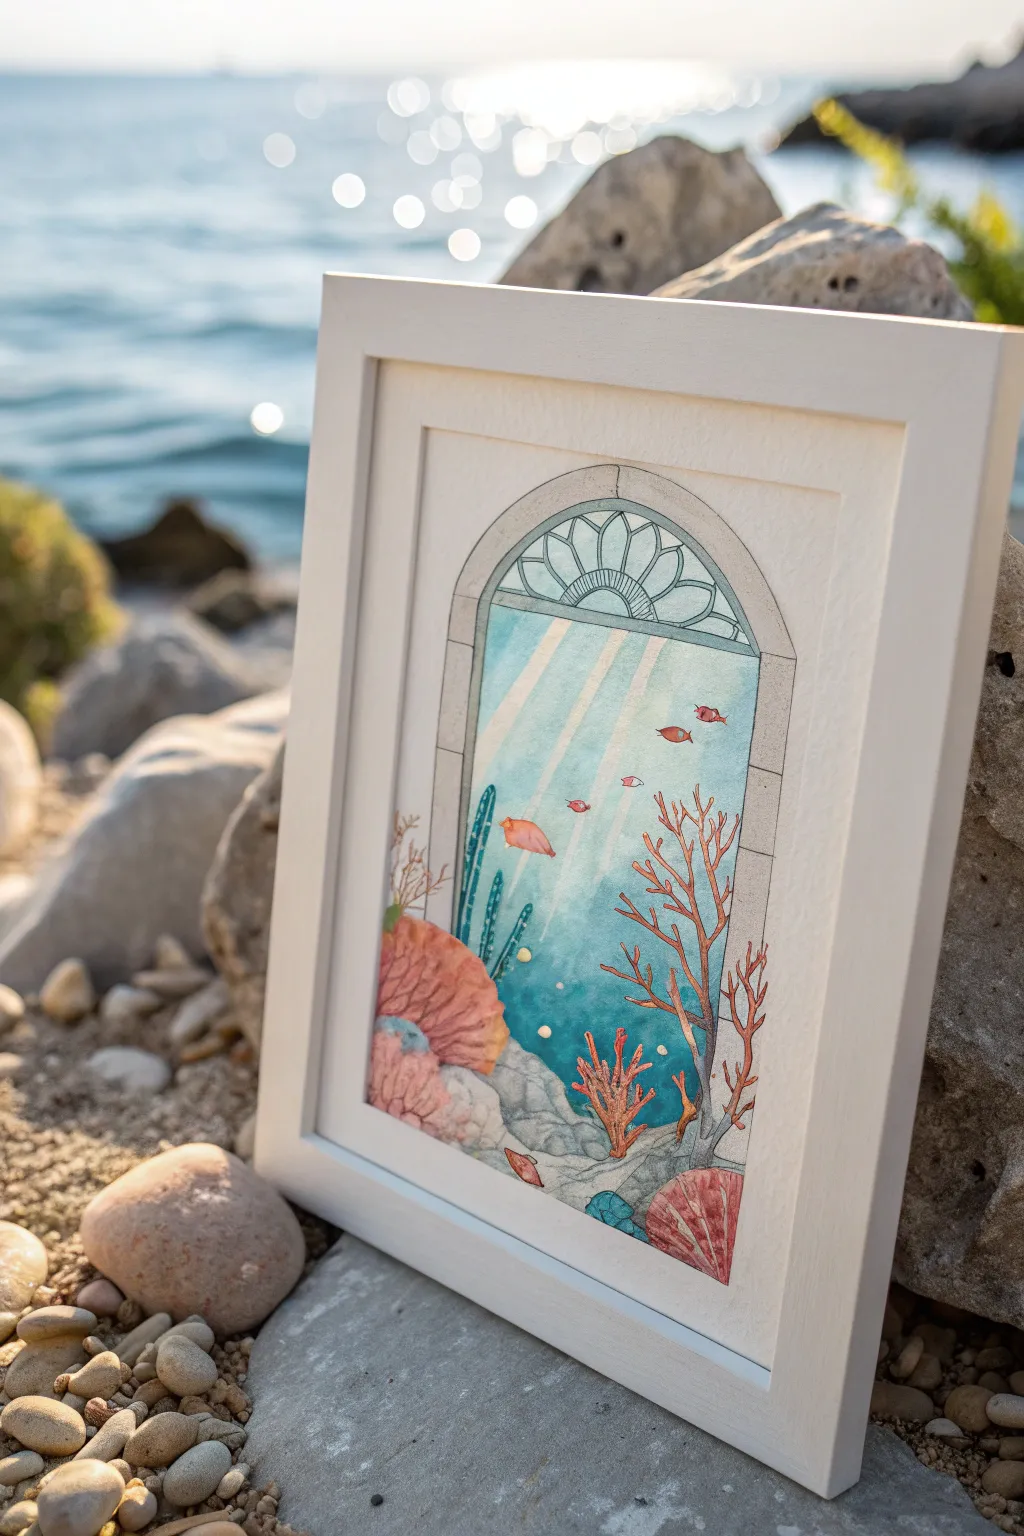
Transport your room to a whimsical underwater kingdom with this layered watercolor painting framed within an intricate stone arch. The cool aquatic blues contrast beautifully with warm coral tones, creating a serene slice of ocean life that feels like looking out a castle window.
Detailed Instructions
Materials
- Cold Press Watercolor Paper (heavyweight, 300gsm)
- Watercolor Paints (Phthalo Blue, Turquoise, Sap Green, Coral Red, Burnt Sienna, Payne’s Gray)
- White Gouache or White Gel Pen
- Fine Liner Pen (Black, waterproof, size 01 or 03)
- Gold or Pearlescent Watercolor Paint (optional for shimmer)
- Round Watercolor Brushes (Sizes 2, 6, and 10)
- Pencil and Eraser
- Ruler and Compass (for the arch)
- Masking Tape
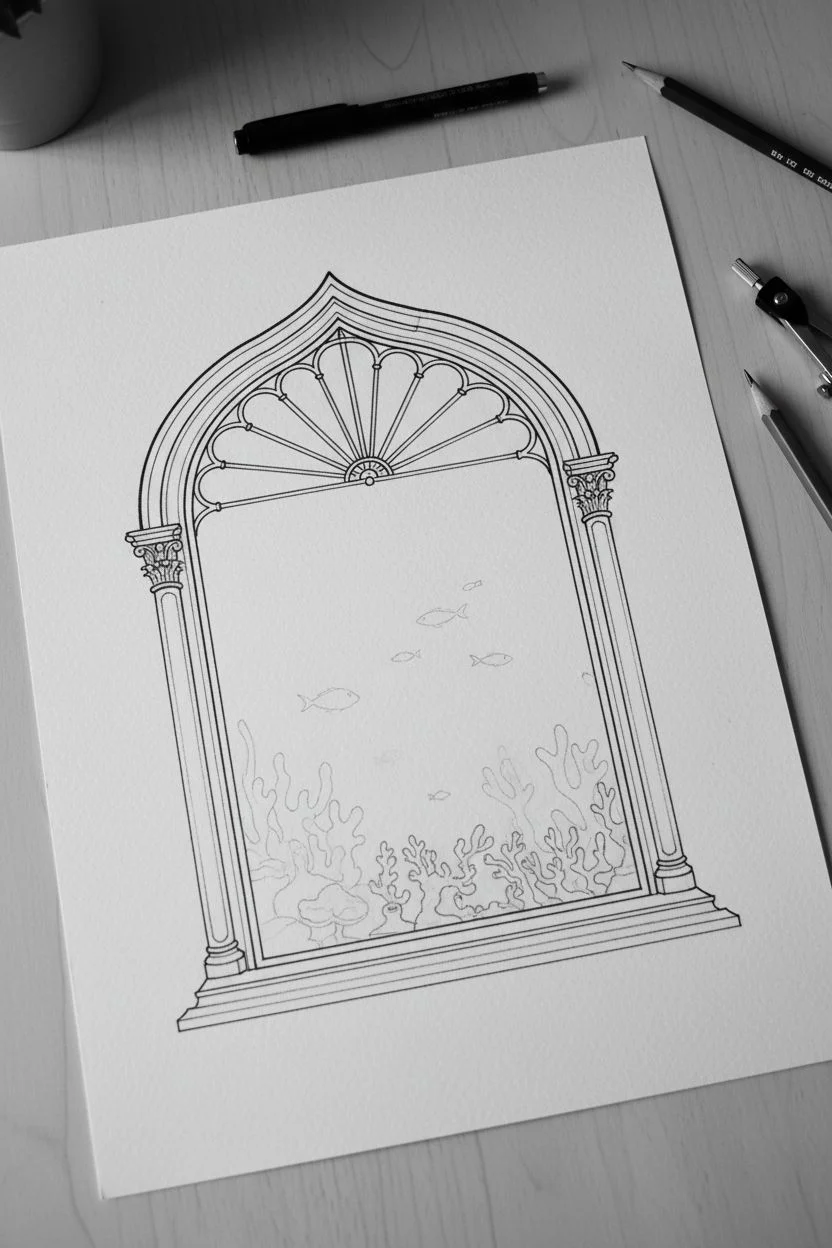
Step 1: Drafting the Window Frame
-
Outline the Arch:
Begin by lightly sketching a large rectangle in the center of your paper, leaving a generous border. Use your compass to draw a perfect semi-circle on top of the rectangle to form the main arch shape. -
Add Architectural Detail:
Draw a second, slightly smaller arch inside the first to create the thickness of the stone window frame. Inside the top semi-circle, sketch a decorative fan or floral motif using curved lines radiating from a central point. -
Sketch the Seascape:
Inside the window opening, lightly lightly sketch organic shapes for coral reefs at the bottom. Draw a few small, simple fish silhouettes swimming upwards near the center. -
Ink the Stone:
Go over your window frame lines with a waterproof fine liner pen. Use a ruler for straight edges, but keep your hand loose to give the stone a slightly weathered, ancient look. Do not ink the underwater elements yet.
Bleeding Lines?
If your black ink lines bleed when you paint over them, your pen likely isn’t waterproof. Let it dry for at least 24 hours, or do the inking as the very last step instead.
Step 2: Painting the Ocean Depths
-
Wet-on-Wet Background:
Clean your large size 10 brush and wet the entire area inside the window frame with clean water. The paper should be glistening but not forming puddles. -
Apply the Gradient:
While wet, drop in Phthalo Blue and Turquoise at the bottom of the window. Gradually dilute the paint as you move upward, transitioning to very pale blue or near-white at the top to mimic sunlight filtering down. -
Create Light Rays:
Lift out pigment while the paint is still damp using a clean, thirsty brush. Swipe diagonal lines from the top left corner down towards the center to create soft, ethereal sunbeams. -
Let it Dry Completely:
Allow the background wash to dry fully. If you rush this, your coral details will bleed into the blue water.
Add Dimension
Use a craft knife to carefully cut out the white spaces between the window grilles, then layer a piece of blue metallic paper behind it for a 3D stained-glass effect.
Step 3: Adding Coral and Life
-
Base Layer of Corals:
Mix a soft Coral Red and Burnt Sienna. Paint the large, fan-like coral shapes in the bottom corners. Keep the wash relatively flat for now. -
Painting Seaweed:
Use a size 6 brush and Sap Green mixed with a touch of blue to paint vertical, wavy seaweed strands rising from the rocks. -
Detailing the Reef:
Once the base coral layers are dry, use a smaller brush to add texture. Use darker red dots for pores on the coral fans and thin, branching lines for the intricate twig-like corals. -
Painting the Fish:
Fill in your sketched fish with bright orange or pink. I find that careful, tiny strokes work best here to keep their shapes distinct against the blue background. -
Painting the Stones:
Paint the bottom rocky area with a very diluted gray wash. Add shadows in the crevices with a stronger Payne’s Gray.
Step 4: Finishing Touches
-
Coloring the Window Frame:
Paint the stone archway with a very pale, warm gray. While wet, dab in tiny spots of brown or darker gray to simulate stone texture. -
Adding Bubbles:
Using white gouache or a gel pen, dot small clusters of bubbles rising from the coral. Add a few larger, transparent circles higher up. -
Shimmer Highlights:
If you have pearlescent paint, glaze over the bubbles and the edges of the fish scales to catch the light. -
Final Inking:
Bring the foreground into focus by outlining the seaweed, fish, and main coral structures with your fine liner pen, giving the artwork a crisp, illustrative style.
Now frame your masterpiece in white or light wood to complete the airy, coastal aesthetic of your new window view
BRUSH GUIDE
The Right Brush for Every Stroke
From clean lines to bold texture — master brush choice, stroke control, and essential techniques.
Explore the Full Guide
Paint a Balloon-Lifted House With Mixed-Media Details
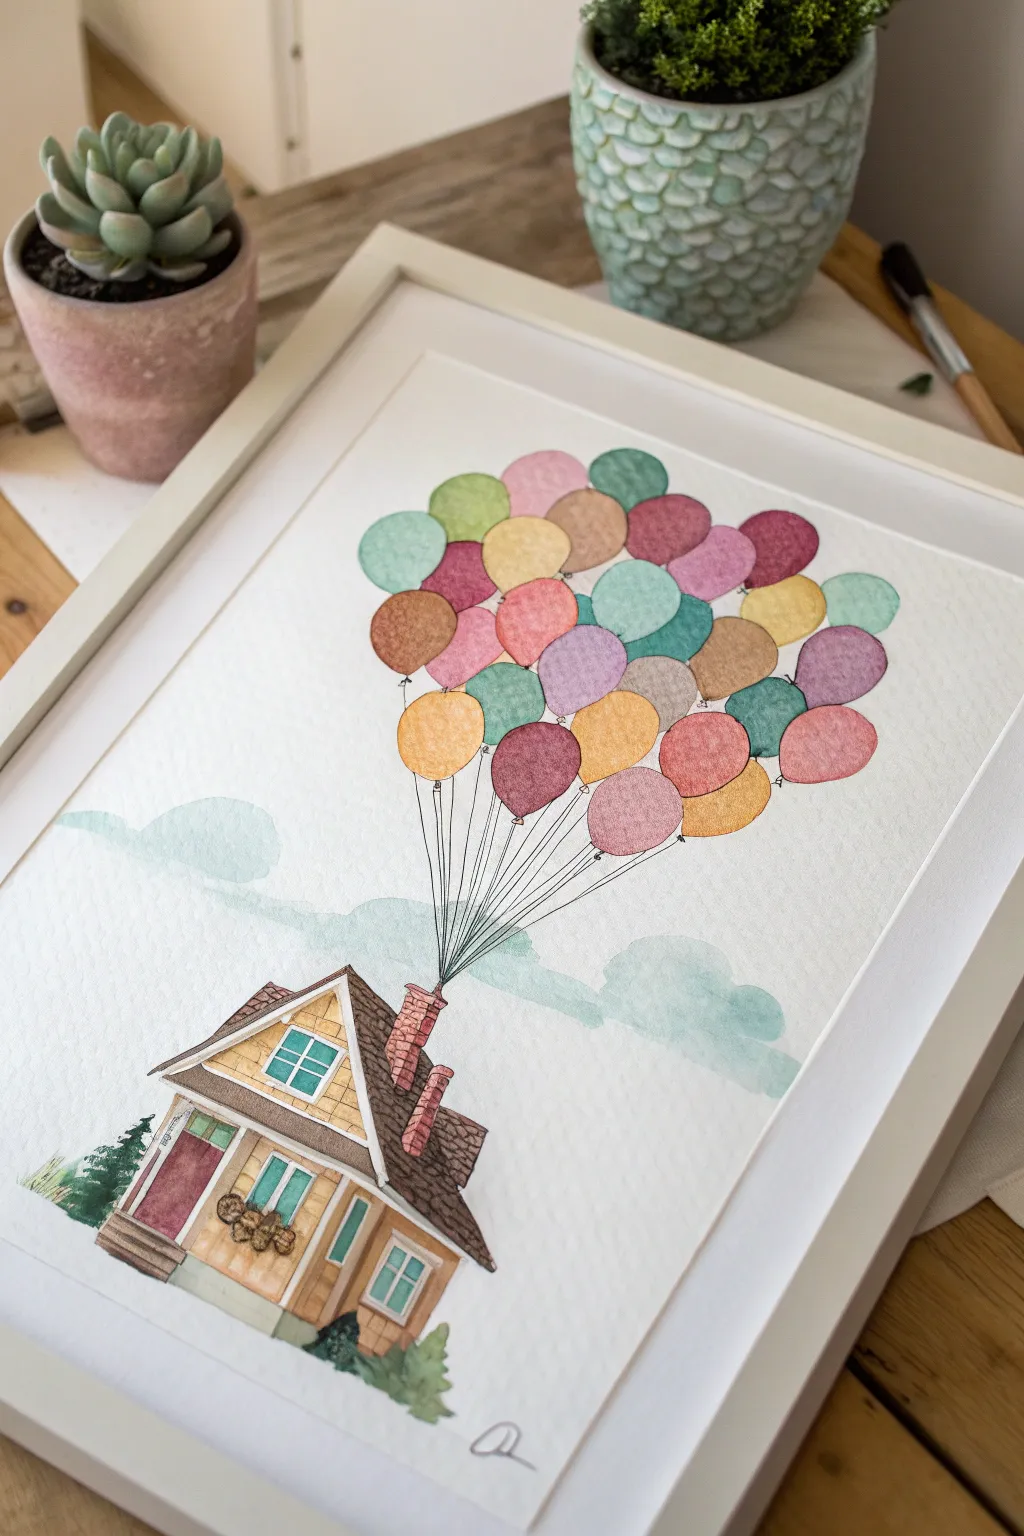
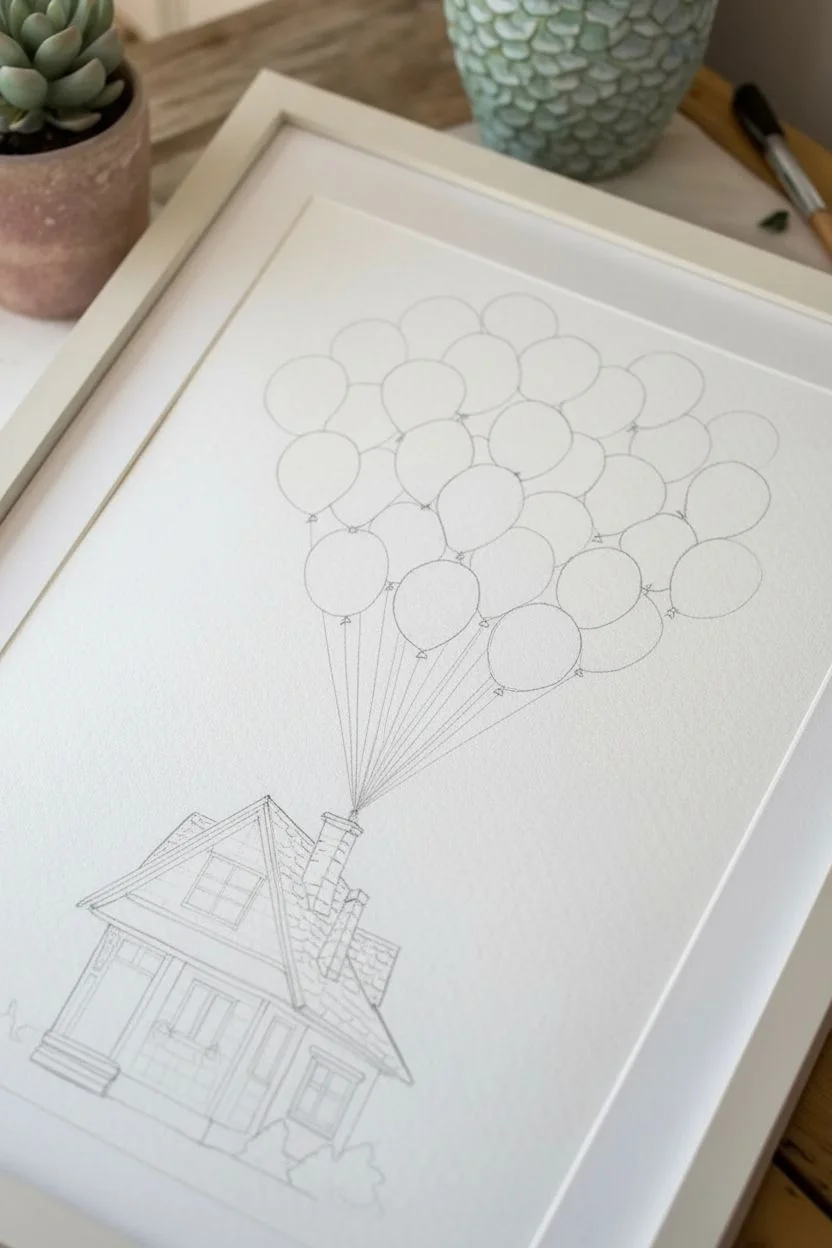
Capture the spirit of adventure with this whimsical watercolor painting inspired by a beloved animated classic. This project combines precise architectural lines with soft, dreamy washes of color to create a house taking flight.
Step-by-Step Tutorial
Materials
- Cold press watercolor paper (300 gsm)
- Watercolor paint set (pan or tube)
- Fine liner waterproof pens (micron 01 and 03)
- Small round brushes (size 2 and 4)
- Pencil (HB) and kneaded eraser
- Ruler
- Circle stencil (optional but helpful)
- White gel pen (optional)
Step 1: Sketching the Foundation
-
Outline the house structure:
Begin by lightly sketching the outline of the Victorian-style house near the bottom left corner of your paper. Use your ruler to keep the roof lines and walls straight. The house features a prominent front gable, a smaller side section, and a distinct chimney stack. -
Add architectural details:
Sketch in the windows, the front porch with its small railing, and the front door. Don’t forget the tiny details like the roof shingles and window panes, but keep your pencil lines light so they don’t show through the paint later. -
Draft the balloon cluster:
Above the chimney, lightly sketch a large, contained shape where the balloons will go. If you have a circle stencil, use it to draw overlapping circles within this shape. If freehanding, vary the sizes slightly to make it look natural, ensuring they all cluster tightly together. -
Draw the strings:
Use a straightedge to draw faint lines connecting the bottom of the balloon cluster directly to the chimney. These lines should converge as they reach the chimney like a funnel.
Keep it Clean
Wait for each balloon to dry completely before painting the one touching it. This prevents unplanned color bleeding and keeps the shapes crisp.
Step 2: Inking the Lines
-
Ink the house frame:
Using a waterproof 0.3 fine liner, trace over your pencil lines for the house. Be deliberate with your strokes. For the roof shingles, simple scalloped or wavy lines work perfectly. -
Ink the balloons and strings:
Carefully ink the balloon outlines. For the strings, I switch to a thinner 0.1 pen to keep them delicate. Make sure the ink is completely waterproof and dry before moving to paint to avoid smudging. -
Erase pencil marks:
Once the ink is thoroughly dry, gently erase all visible graphite marks with your kneaded eraser to leave a clean black-and-white framework.
Step 3: Painting the Balloons
-
Prepare your palette:
Mix a variety of soft, muted pastel colors. You’ll need dusty pinks, sage greens, light yellows, soft violets, and muted oranges. The key to this look is avoiding neon-bright saturated colors. -
Paint individual balloons:
Start painting the balloons one at a time. To prevent colors from bleeding into each other, paint non-adjacent balloons first and let them dry before painting their neighbors. -
Add dimension:
While the paint is still wet on a balloon, drop a tiny bit of slightly darker pigment on one side to create a shadow, giving the sphere some volume. -
Layering the cluster:
Continue filling in the cluster until every circle is painted. The variety of colors is what makes this piece sing, so try not to put two of the same color right next to each other.
Muddy Colors?
If your balloon colors look dull, clean your water cup. Dirty water tints yellow paint specifically very quickly, turning it greenish or brown.
Step 4: Painting the House and Sky
-
Color the siding:
Use a warm yellow ochre for the main siding of the house. Apply the wash lightly so the texture of the paper shows through. -
Paint the roof and chimney:
Mix a dark brown mixed with a touch of grey for the roof shingles. For the chimney bricks, use a terracotta or brick red shade. Detailed areas like this require your smallest brush. -
Add windows and door:
Paint the window glass with a very pale teal. Use a deep maroon or burgundy for the front door to give it contrast against the yellow siding. -
Create the clouds:
Mix a very watery, pale blue-green wash. Roughly paint organic cloud shapes in the background, keeping the edges soft and uneven. Don’t paint the whole sky; just hint at floating clouds behind the house. -
Ground the house:
If you sketched trees or bushes at the base, dab in some deep greens. This grounds the artwork even though the house is technically floating.
Once the watercolor is fully dry, you can frame your piece to showcase your colorful journey upward
Do a Minimal Character Face Grid on Mini Canvases
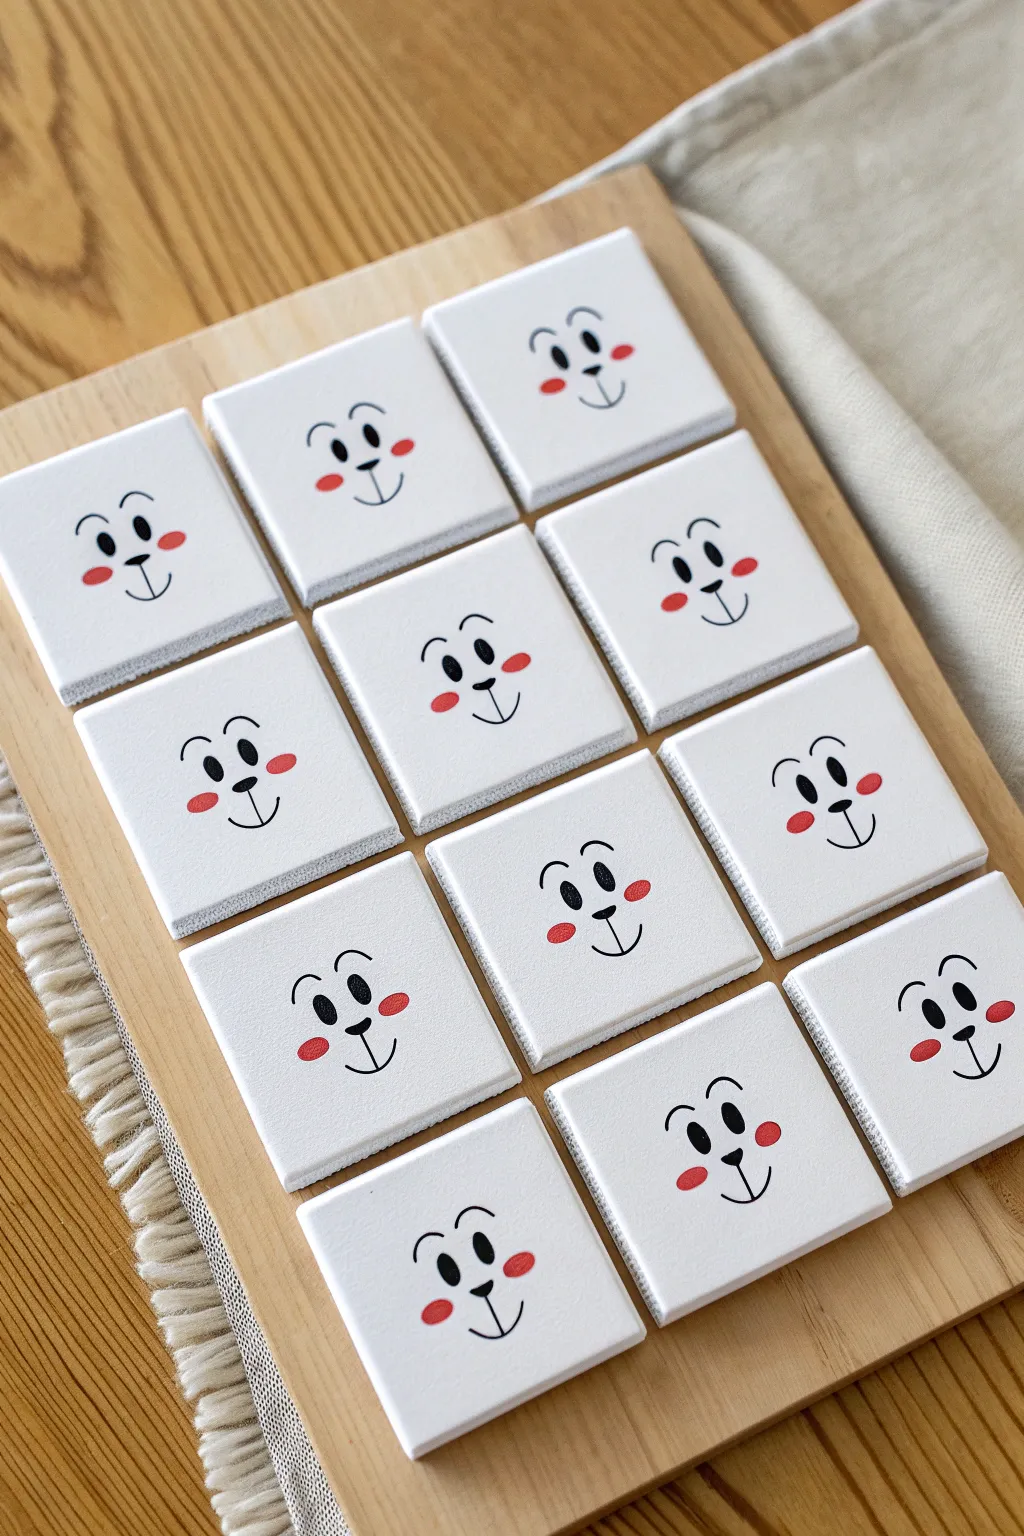

Create a charming, minimalist art piece by arranging a series of mini canvases into a cohesive grid. This project focuses on subtle variations in expression using simple black linework and pops of red on a clean white background.
Step-by-Step Guide
Materials
- 12 mini square canvases (approx. 2×2 or 3×3 inches)
- White acrylic gesso or white acrylic paint
- Carbon black acrylic paint or a black paint pen (fine tip)
- Bright red acrylic paint or a red paint pen
- Wooden board or tray for mounting (sized to fit grid)
- Sandpaper (fine grit)
- Ruler
- Pencil
- Small round brush (size 0 or 1)
- Matte varnish (optional)
- Strong craft glue or wood glue
Step 1: Canvas Prep
-
Smooth the Surface:
Begin by lightly sanding the surface of your mini canvases. Since the design is very minimal, any bumps in the canvas texture will be noticeable, so you want a surface that feels almost like smooth paper. -
Base Coat:
Apply a solid coat of white gesso or white acrylic paint to each canvas. Even though they come pre-primed, a fresh coat ensures a uniform, bright white background. -
Edges Matter:
Don’t forget to paint the sides of the mini canvases white as well. Since they will sit raised off the wooden board, the edges will be visible from different angles. -
Let it Dry:
Allow the white base coat to dry completely. If the texture still feels rough, do a very light sanding and apply a second thin coat.
Uneven lines?
If your hand shakes while painting lines, rest your pinky finger on the dry part of the canvas for stability, or switch to a fine-tip permanent marker.
Step 2: Drafting the Faces
-
Plan Your Grid:
Lay out your 12 dry canvases on a table in a 3×4 grid pattern. This helps you visualize the variety of expressions before you commit to painting. -
Marking Center:
Using a ruler, lightly mark the vertical center on each canvas with a pencil. This guide will help you keep the noses and mouths perfectly aligned. -
Sketching Features:
Lightly sketch the character faces. Start with the nose—an oval shape placed just below the vertical center—then add the curved mouth line connecting to the bottom of the nose. -
Adding Eyes:
Draw the tall, oval-shaped eyes. Vary the position of the pupils (looking left, right, up, or cross-eyed) to give each face a unique personality. -
Eyebrows and Cheeks:
Add small arches for eyebrows above the eyes. Finally, softly sketch circles for the rosy cheeks on either side of the mouth.
Step 3: Painting the Details
-
Black Linework:
Using a fine-tip black paint pen or a size 0 brush with thinned black acrylic, carefully trace your pencil lines for the eyes, nose, eyebrows, and mouth. -
Fill the Pupils:
Fill in the pupils solid black. I find that using a paint pen gives much crisper edges for these small shapes than a brush typically does. -
The Nose:
Fill in the oval nose shape with black paint. Ensure the edges are smooth and rounded. -
Red Accents:
Dip a small round brush into bright red paint. Carefully paint the cheek circles. You want this color to be opaque, so you might need two thin coats. -
Clean Up:
Once the paint is fully dry, gently erase any visible pencil marks. Be careful not to scrub too hard over the painted areas. -
Seal (Optional):
Apply a coat of spray matte varnish to protect the artwork and eliminate any sheen difference between the black loops and white background.
Level Up: 3D Element
Instead of painting the noses flat, glue on small, black wooden beads or buttons for a tactile, three-dimensional pop on each face.
Step 4: Assembly
-
Prepare the Base:
Take your wooden board and ensure it is clean and dust-free. The natural wood tone contrasts beautifully with the stark white canvases. -
Dry Fit:
Arrange the finished canvases on the board again to determine your final spacing. Aim for equal gaps between each square. -
Glue Down:
Apply a dot of strong craft glue to the back of each canvas frame and press them firmly onto the wood board. -
Final Press:
Place a heavy book over the grid (with a clean sheet of paper in between to protect the paint) for an hour to ensure everything adheres flat.
Now you have a playful, gallery-style piece that adds a touch of whimsy to any room

PENCIL GUIDE
Understanding Pencil Grades from H to B
From first sketch to finished drawing — learn pencil grades, line control, and shading techniques.
Explore the Full Guide
Practice Big-Eyed Cartoon Portraits With Simple Shading
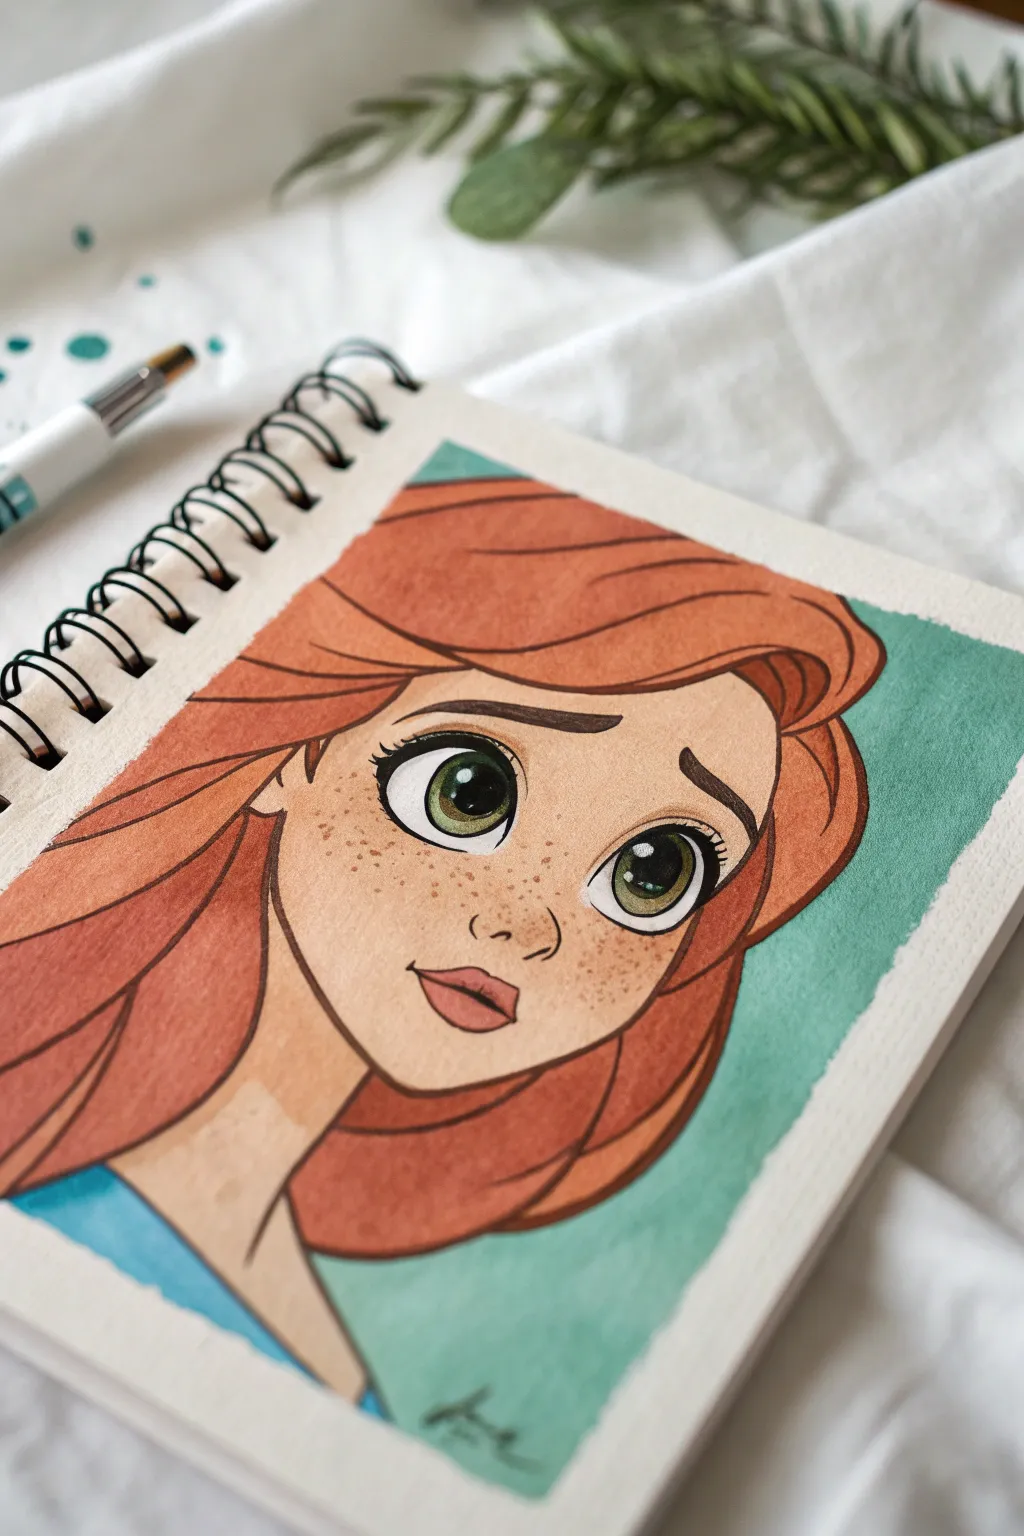
Capture the charm of classic animation with this vibrant portrait featuring sweeping red hair and expressive green eyes. This project combines clean linework with soft marker shading to create a character that pops right off the sketchbook page.
Step-by-Step Tutorial
Materials
- Heavyweight sketchbook paper (mixed media or watercolor)
- Pencil (HB or H)
- Kneaded eraser
- Fine liner pens (Black, 0.1mm and 0.3mm)
- Alcohol markers (Skin tones: fair, blush; Hair: rust red, burnt orange, dark brown)
- Teal or seafoam green marker/paint for background
- White gel pen (for highlights)
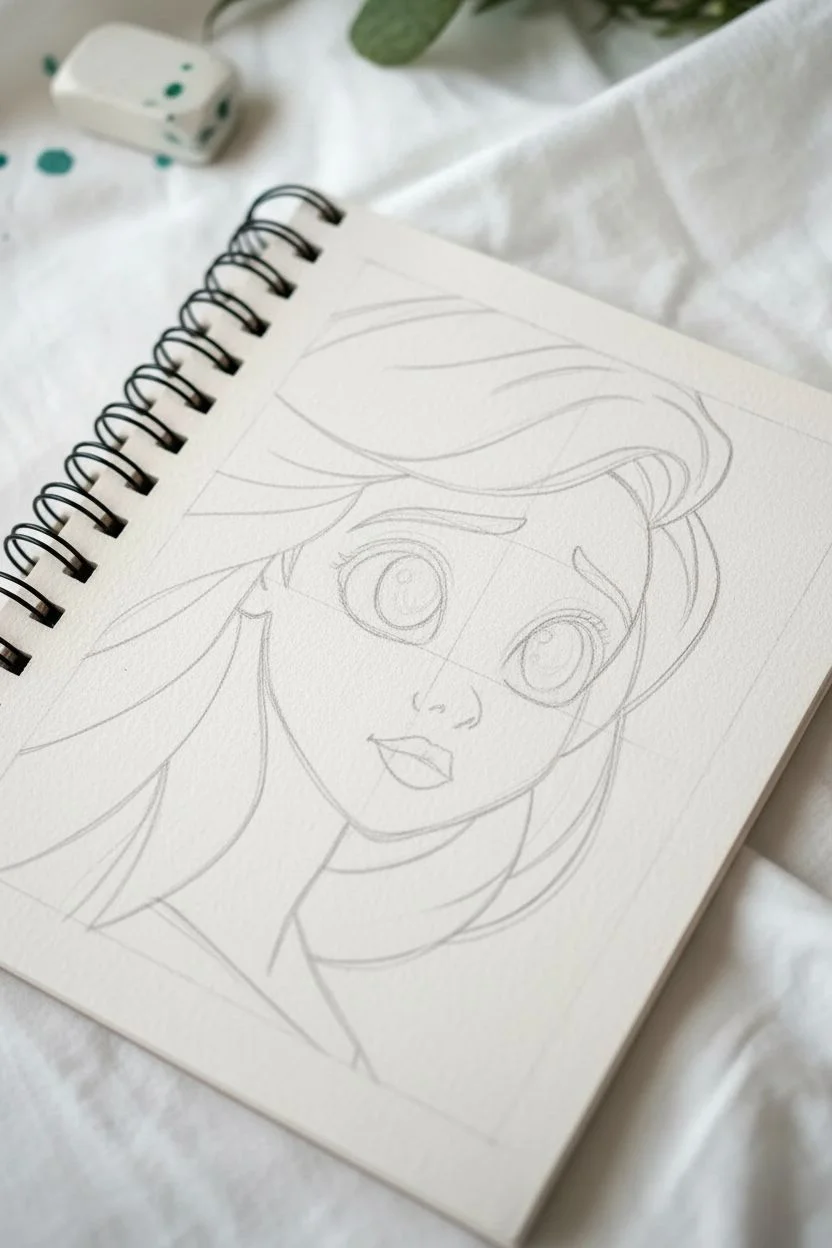
Step 1: Sketching the Foundations
-
Basic Head Shape:
Start by lightly sketching a circle for the cranial mass and a gently curving jawline underneath. This character has a somewhat heart-shaped face, so taper the jaw down to a small, rounded chin. -
Placement Guidelines:
Draw light horizontal and vertical guidelines. The eyes should be placed slightly lower than the halfway point of the face to emphasize the ‘big-eyed’ cartoon aesthetic. -
Defining Features:
Sketch two large oval shapes for the eyes, leaving plenty of space between them. Add a small, button-like nose just above the mouth line, and sketch full lips with a subtle downward curve at the corners. -
Hair Flow:
Outline the hair in large, sweeping sections. Create a side part and let hefty locks drape around the face. Don’t draw individual strands yet; focus on the main masses of hair volume.
Hair Flow Pro-Tip
When coloring hair, always start your marker stroke at the root or tip and flick outward. Lifting the marker at the end of the stroke naturally creates a tapered, shiny look mid-strand.
Step 2: Inking and Outline
-
Clean Linework:
Using your 0.3mm fine liner, go over your pencil sketch with confident strokes. Vary your line weight slightly—thicker on the outer jawline and hair curves, thinner for facial features. -
Eye Details:
Switch to a 0.1mm pen for delicate areas like the eyelashes and the iris details. Leave the pupils empty for now if you plan to color them black later, or fill them in now. -
Erase Sketches:
Once the ink is completely dry, gently remove all underlying pencil marks with a kneaded eraser to keep the paper surface pristine.
Fixing Bleeding Ink
If your marker bleeds outside the lines, use a white gel pen to cover the mistake. Once the white ink dries, you can carefully re-draw the black outline over it to hide the error.
Step 3: Vibrant Coloring
-
Base Skin Tone:
Apply a light, fair skin tone marker evenly across the face and neck. Work quickly to blend the strokes while the ink is wet to avoid streaking. -
Facial Shading:
Use a slightly darker skin tone or blush color to add shadows under the hairline, beneath the chin, and on the nose. -
Rosy Cheeks:
Layer a subtle pink or coral tone on the cheeks and the tip of the nose to give the character life. -
Base Hair Color:
Fill in the hair using your lightest rust-red or pumpkin orange marker. Ensure full saturation blocks out the white of the paper. -
Hair Dimension:
Before the base layer dries fully, come in with a darker burnt-orange marker. Add strokes starting from the roots and tips, flicking toward the center of the hair strands to create a shine effect. -
Deep Shadows:
Use a dark brown marker sparingly in the deepest crevices of the hair (behind the neck and under the ear) to add volume.
Step 4: Eyes and Background
-
Iris Coloring:
Color the irises with a gradient of green markers—darker at the top near the lash line, lighter toward the bottom. -
Pupil and Reflection:
Fill in the pupils with solid black if you haven’t already. I like to leave a tiny sliver of white paper uncolored in the eye for a catchlight, but we will enhance this later. -
Teal Frame:
Carefully color the negative space around the head with a teal or seafoam green marker. Create a rough, rectangular border that doesn’t reach the page edge for an artistic, framed look.
Step 5: Final Touches
-
Freckles:
Take a fine brown pen or marker and gently tap random dots across the bridge of the nose and cheeks. Vary the pressure so some freckles are darker than others. -
Sparkle Highlights:
Using a white gel pen, add crisp white highlights to the eyes (the catchlights), the tip of the nose, and the peak of the lips. -
Hair Shine:
Add a few thin white lines following the curve of the hair strands to amplify the glossy texture.
Now you have a charming, expressive character portrait ready to brighten up your sketchbook
Spotlight a Cute Sidekick With Bold Outlines
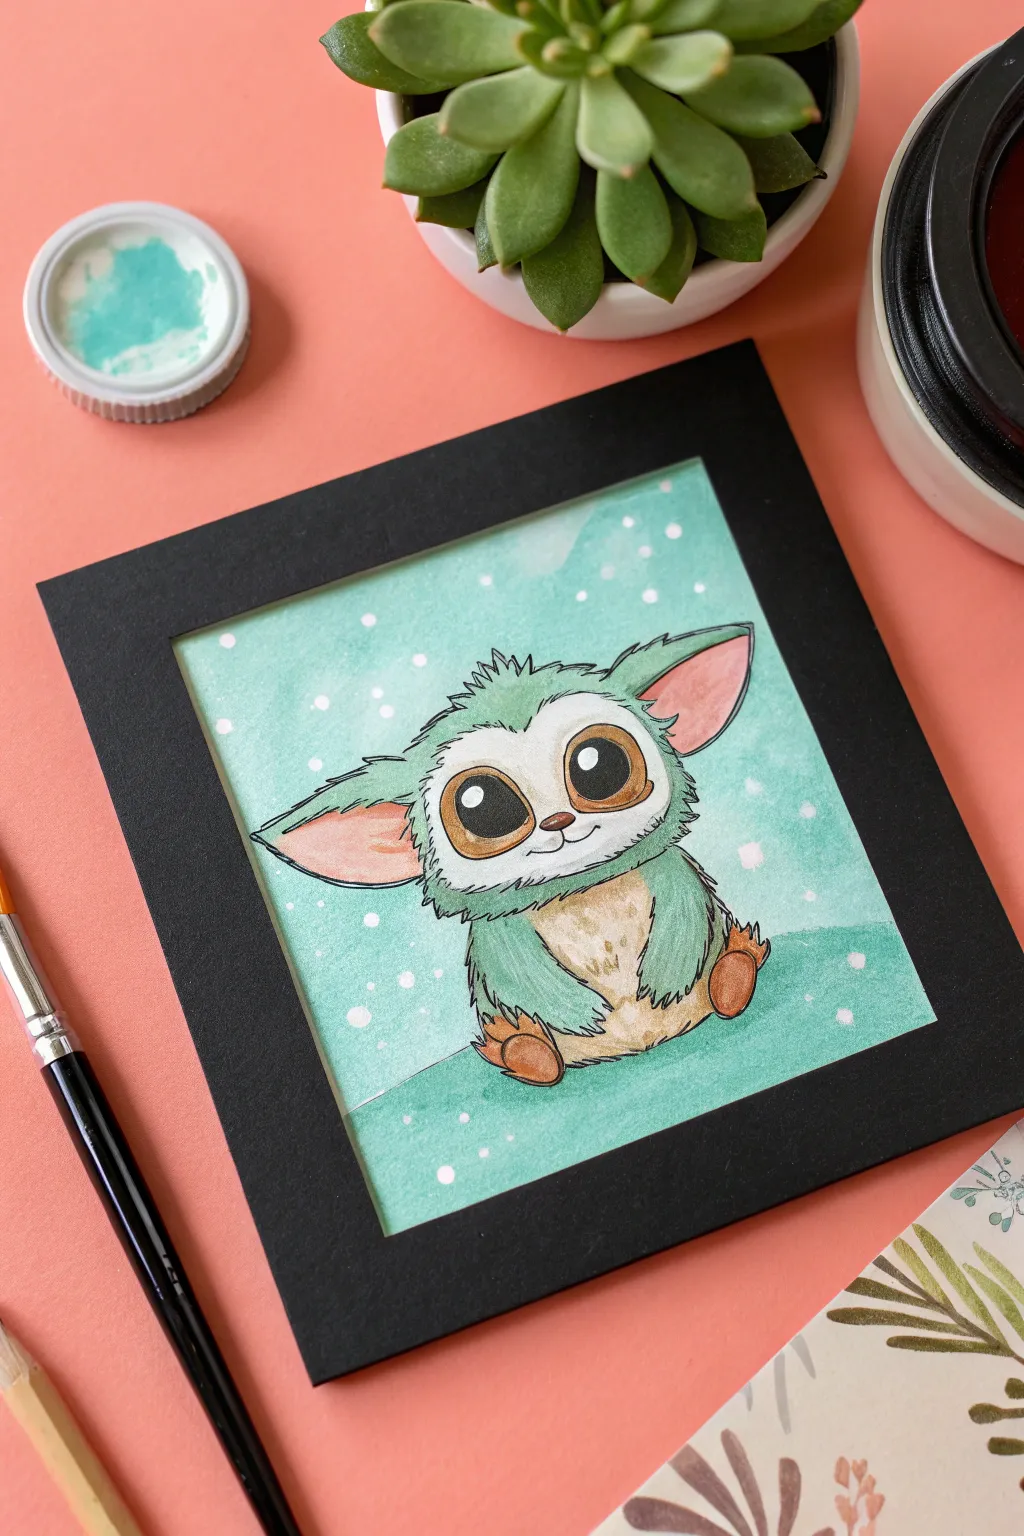
Capture the charm of an adorable creature with oversized eyes and fuzzy green fur in this delightful watercolor project. The combination of black ink outlines and soft, layered watercolor washes creates a crisp, illustrative style that pops off the page.
Detailed Instructions
Materials
- Watercolor paper (cold press recommended)
- Pencil and eraser
- Waterproof black fine liner pen (0.3mm or 0.5mm)
- Watercolor paints (teal/mint green, beige/warm brown, pink, burnt sienna)
- Round watercolor brushes (size 4 and size 0 or 1)
- White gouache or white gel pen
- Jar of water
- Paper towels
- Black cardstock for framing (optional)
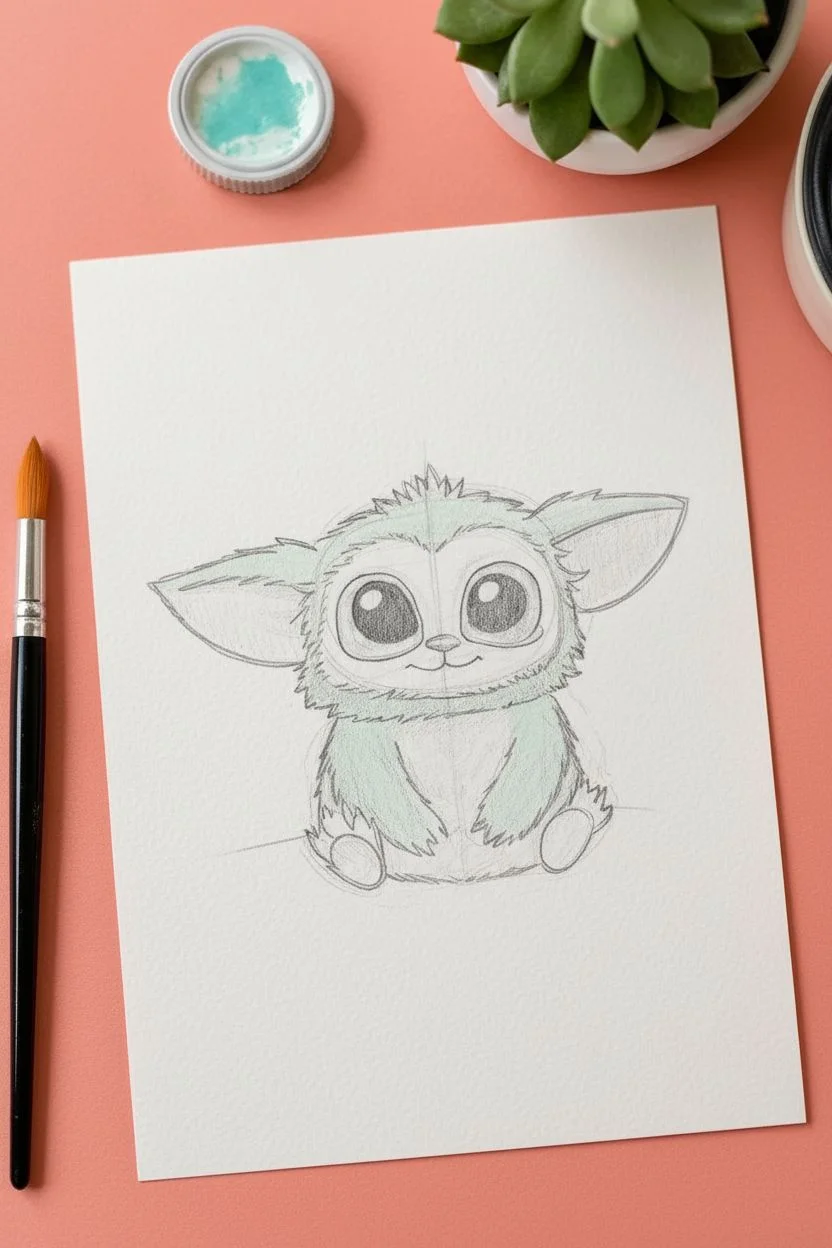
Step 1: Sketching the Character
-
Map out the head shape:
Start lightly with your pencil in the center of the paper. Draw a wide, flattened oval shape for the head, keeping the bottom curve slightly flatter than the top. -
Add the body:
Sketch a pear-like shape beneath the head for the body. It should be slightly smaller than the head to emphasize the cute, ‘chibi’ proportions. -
Position the features:
Draw two very large circles for the eyes in the middle of the face. Leave a small gap between them for the nose. Add large, triangular ears extending from the sides of the head. -
Refine the details:
Sketch the facial markings—this character has a heart-shaped mask area around the eyes. Add the small paws resting near the belly and the feet pointing outward at the bottom. -
Add fur textures:
Go over your smooth outlines and make them jagged to suggest fur, especially on the cheeks, top of the head, and sides of the body.
Step 2: Inking the Outlines
-
Trace over the pencil:
Using your waterproof fine liner, carefully trace your final pencil lines. I find confident, quick strokes work best for the fur texture to keep it looking sharp. -
Solidify the eyes:
Outline the large pupils and irises. You can choose to fill the pupils in with black ink now or paint them later, but ensure you outline the highlight circles so they remain white. -
Clean up:
Wait for the ink to dry completely to avoid smudging. Gently erase all visible pencil marks from the paper so you have a clean slate for painting.
Fixing Smudges
If your ink runs when painting, stop! The pen isn’t waterproof. Let it dry 24 hours or switch to painting outlines last.
Step 3: Painting the Character
-
Paint the fur base:
Mix a watery mint green or teal color. Apply this wash to the main fur areas—the head, ears, and outer body—avoiding the face mask and belly. -
Fill the warm tones:
While the green dries, use a pale beige or diluted warm brown for the face mask and the belly patch. -
Add color to the ears:
Take a soft pink color and paint the inner sections of the large ears. If the pink touches the wet green, it might bleed, so ensure the green is dry or leave a tiny white gap. -
Deepen the eyes:
Paint the irises a warm brown or amber color. Once dry, fill the pupils with black (if you didn’t ink them earlier) or a very dark brown, being careful to preserve the white highlights. -
Shade the feet:
Use a burnt sienna or reddish-brown for the paws and feet pads. You can add a second layer to the bottom edges for shadow once the first layer dries. -
Layering fur texture:
Using a smaller brush and a slightly darker, less watered-down version of your mint green paint, add small flicking strokes on top of the dry base coat to simulate fur depth.
Add a Prop
Give your sidekick a tiny accessory, like a holding a warm cup of cocoa or wearing a scarf, to match the cozy vibe.
Step 4: Background and Final Touches
-
Wash the background:
Mix a large amount of a very pale teal or aqua. Carefully paint around your character to fill the background. Keep the edges ragged or uneven for a dreamy look. -
Create a ground shadow:
While the background wash is still slightly damp, add a concentrated line of darker teal or green directly under the character to ground them. -
Splatter snow or stars:
Load a brush with white gouache (or white acrylic). Tap the brush handle against a finger to splatter white dots over the background and character for a magical, snowy effect. -
Add highlights:
Use a white gel pen or a fine brush with white gouache to add tiny highlights to the nose, tops of the ears, and toes to make them look shiny. -
Frame the piece:
Once fully dry, cut a piece of black cardstock to create a simple window frame. Tape your artwork behind it to make the bright colors really stand out.
Now you have a charming little companion ready to brighten up any wall or greeting card


Combine Hand-Lettered Quotes With a Simple Icon
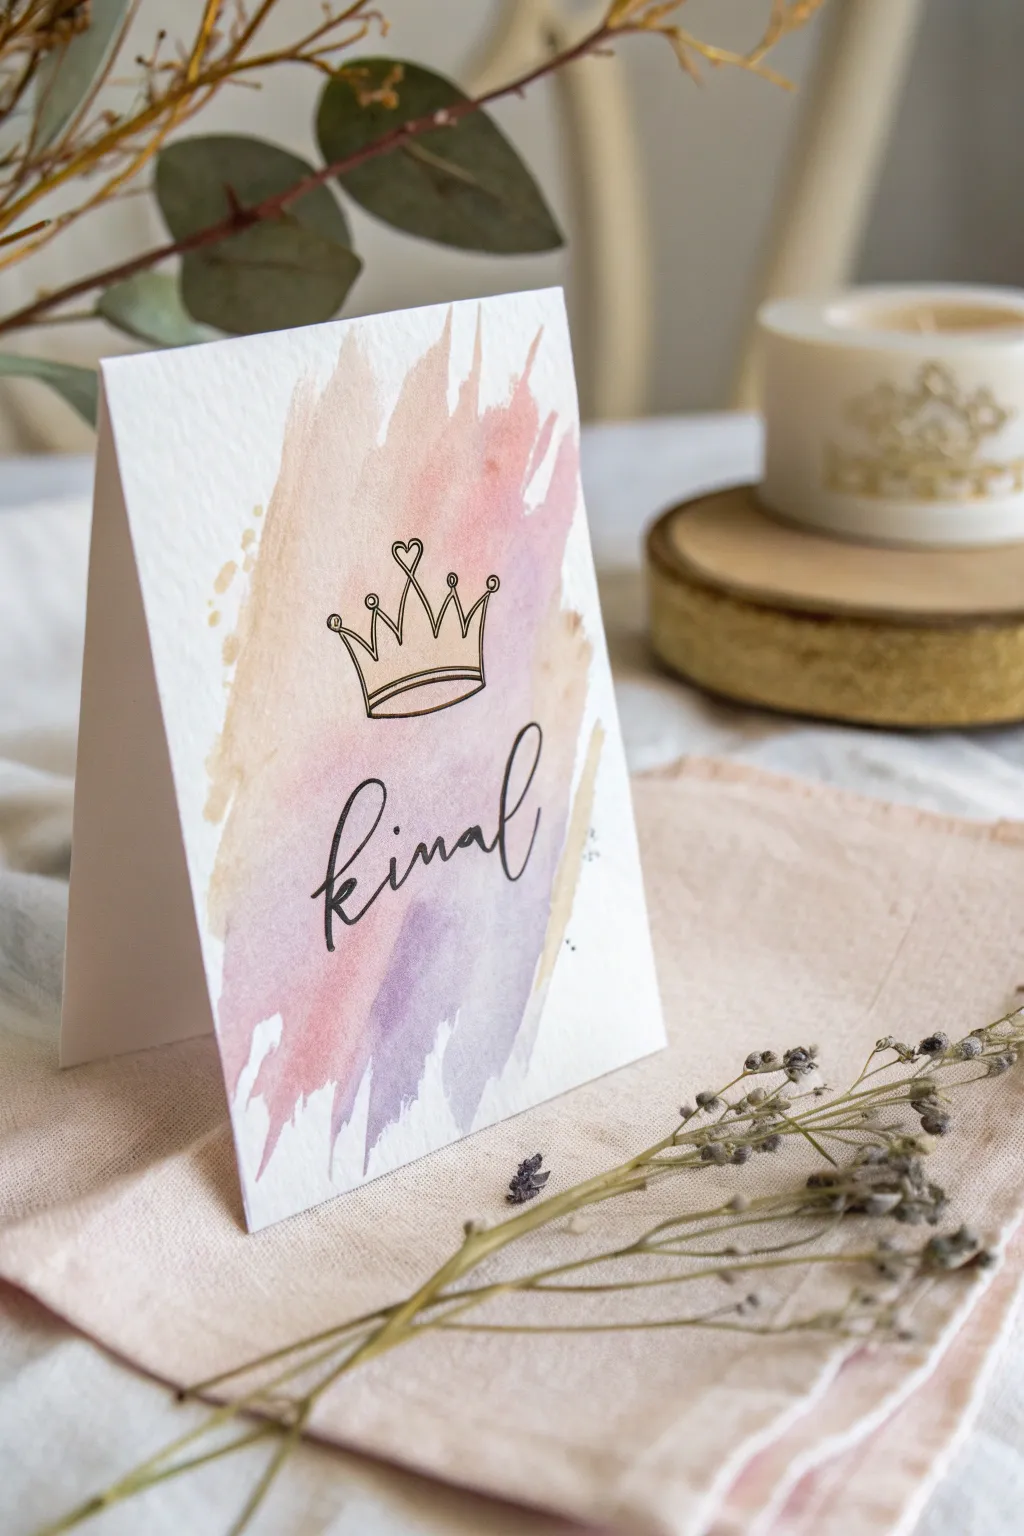
This elegant project combines a dreamy, soft watercolor background with crisp line art to create a sophisticated greeting card. The result is a piece that feels both handcrafted and polished, perfect for special occasions or as a personalized keepsake.
Step-by-Step Guide
Materials
- High-quality watercolor paper (cold press, heavy weight)
- Watercolor paints (Peach, Dusty Rose, Lavender/Purple, Beige/Sand)
- Wide flat wash brush
- Medium round watercolor brush
- Fine liner pen (Black, waterproof/archival)
- Pencil and eraser
- Ruler
- Bone folder (optional)
- Paper towels
- Water container
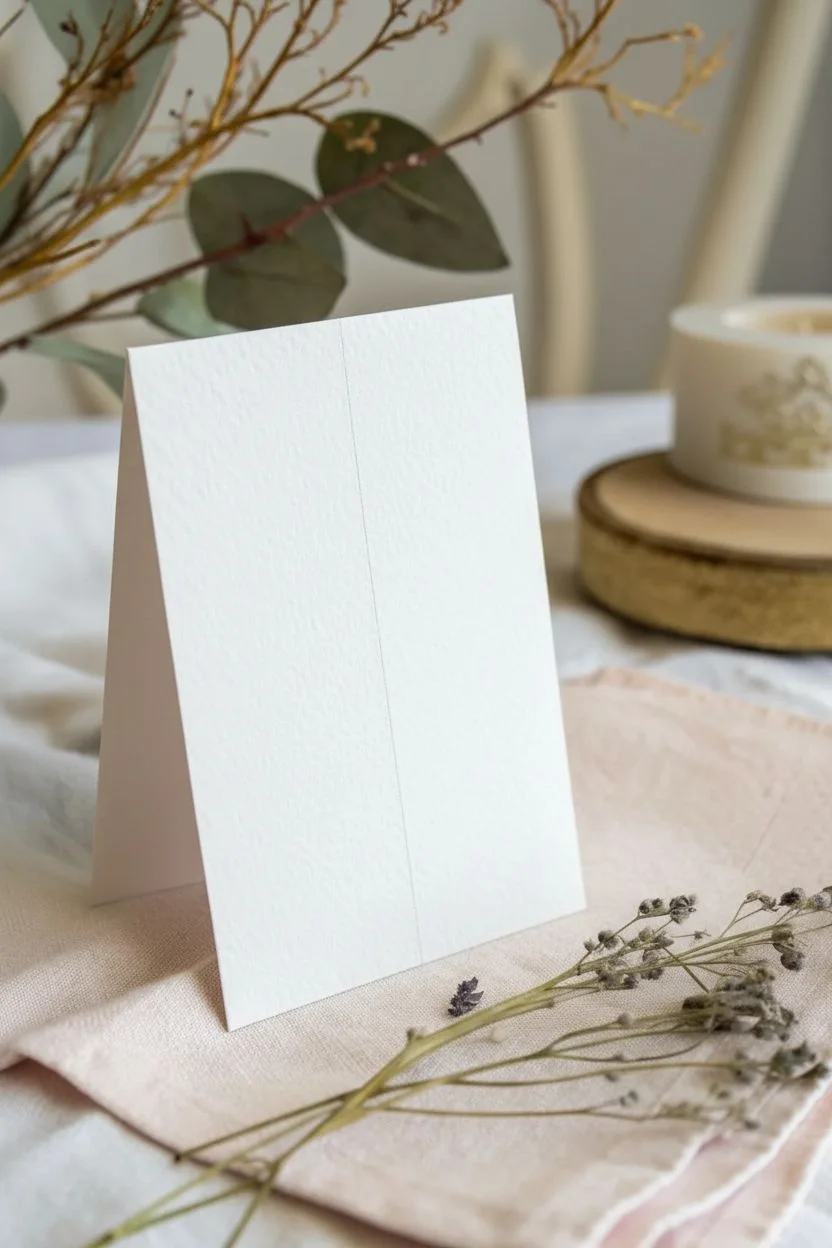
Step 1: Preparing the Card Base
-
Cut the Paper:
Begin by measuring and cutting your watercolor paper to your desired size. A standard 5×7 inch folded card works well, so cut a 10×7 inch rectangle. -
Score and Fold:
Measure the midpoint of the long edge. Using a ruler and a dull edge (like a bone folder), score a straight line down the center. Fold the card crisply along this line.
Step 2: Painting the Watercolor Background
-
Prepare Your Colors:
On your palette, mix watered-down puddles of peach, dusty rose, lavender, and a warm beige. Keep the consistency milky to ensure transparency. -
First Stroke – Peach:
Using a flat wash brush, load it with the peach mixture. Apply a broad, loose vertical stroke starting near the top center and dragging downwards. -
Adding Warmth:
While the first stroke is still damp, pick up the beige or sand color. Apply this to the left edge of the peach stroke, allowing the colors to bleed together slightly. -
Introducing Pink:
Clean your brush and switch to the dusty rose. Add another vertical stroke to the right of the center, staggering the height so it looks organic. -
Placing the Purple:
At the bottom overlap of your strokes, brush in the lavender purple. Let it blend upward into the pinks and peach to create a soft gradient effect. -
Feathering the Edges:
I like to use a slightly drier brush to pull the paint outward at the very top and bottom edges, creating that jagged, ‘dry brush’ texture seen in the reference. -
Add Splatters:
Load a round brush with the beige paint. Tap the handle against another brush to flick tiny droplets onto the left side of the colored area for texture. -
Dry Completely:
This is crucial: Let the card dry completely. The paper must be bone dry before you use any ink, otherwise the lines will feather and bleed.
Don’t Overwork It
Resist the urge to brush over the same spot repeatedly. The beauty of this wash lies in the visible brush strokes and overlaps. One or two passes is plenty.
Step 3: Adding the Line Art
-
Draft the Crown:
Lightly sketch a crown shape in the upper center of the painted area with a pencil. Make the center point the tallest, tipped with a heart shape. -
Draft the Text:
Below the crown, lightly pencil in the name or word. Use a loose, modern calligraphy style with large loops. -
Inking the Crown Base:
Using your waterproof black fine liner, improved trace over your pencil lines. Start with the curved base of the crown, drawing two parallel curved lines. -
Drawing the Crown Points:
Draw the vertical points of the crown. Add small circles to the tips of the side points and trace the heart at the very top center. -
Adding Detail Lines:
Draw five thin, vertical lines inside the crown band to mimic the structure shown in the original design. -
Inking the Lettering:
Carefully trace your penciled word. Focus on smooth, continuous motions for the loops of the ‘k’ and ‘l’ to keep the lettering fluid. -
Erase Guide Lines:
Wait at least 10 minutes to ensure the ink is fully set. Gently erase any visible pencil marks to clean up the design.
Metallic Accent
Once the black ink is dry, use a gold gel pen or gold watercolor paint to fill in the band of the crown or trace one side of your letters for a royal shimmer.
Prop your beautiful card up on a table setting or slip it into an envelope to brighten someone’s day
Create a Fireworks Over Castle Night Scene With Splatter
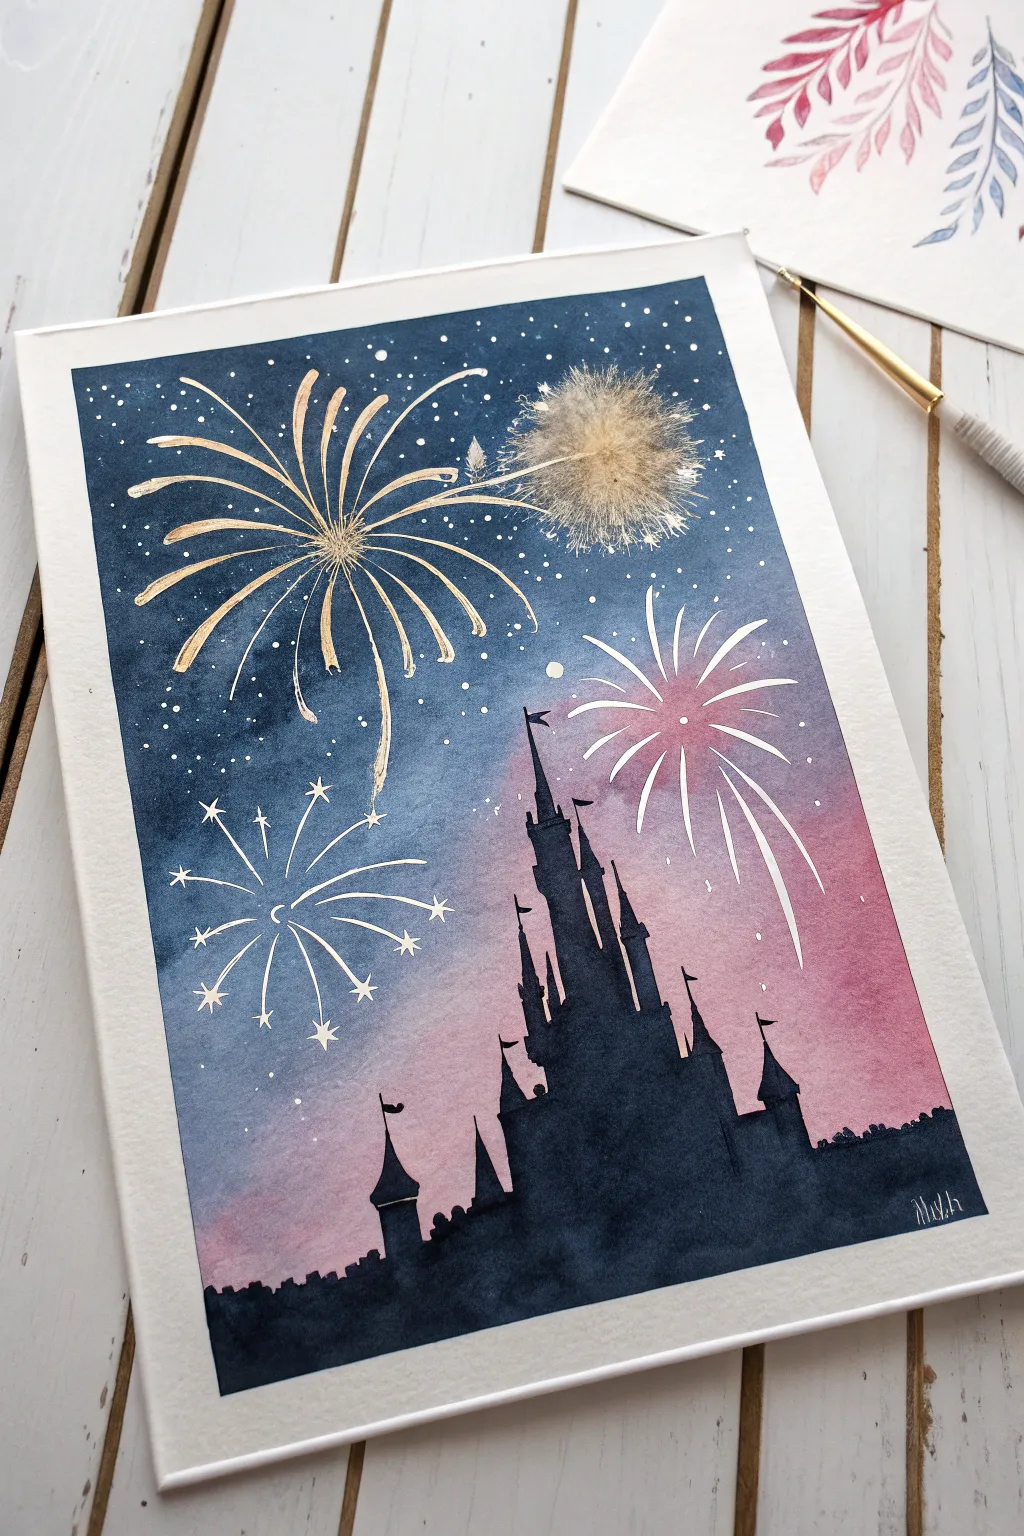
Capture the magic of a fairytale evening with this mixed-media watercolor piece featuring a bold castle silhouette against a twilight sky. The standout element is a real dandelion puff integrated into the fireworks for a whimsical, 3D texture.
How-To Guide
Materials
- Watercolor paper (cold press, at least 300gsm)
- Watercolor paints (Indigo, Prussian Blue, Payne’s Grey, Alizarin Crimson, Rose)
- Gold metallic watercolor paint or ink
- White gouache or white gel pen
- Black waterproof ink or gouache
- Synthetic round brushes (sizes 2, 6, and 10)
- Clean water jars and paper towel
- Masking tape
- Pencil and eraser
- Real pressed dandelion seed head (puffball)
- Clear craft glue or matte medium
Step 1: Painting the Sunset Sky
-
Prepare the paper:
Begin by taping down all four edges of your watercolor paper to a board or table to prevent buckling and create a crisp white border. -
Sketch the silhouette:
Lightly pencil in the bottom horizon line and the basic shapes of the castle turrets. Keep the pencil lines faint so they don’t show through later. -
Wet the sky area:
Using a clean, large brush, wet the entire sky area with clean water, stopping just above your pencil sketch of the castle. -
Apply the twilight colors:
Starting at the bottom near the castle outline, drop in your pinks (Rose mixed with a touch of Alizarin Crimson). Let this bleed upwards. -
Add the night sky:
While the paper is still wet, start painting from the top with your darkest blue (Indigo or Payne’s Grey). Blend downwards into Prussian Blue. -
Create the gradient:
Gently tilting your board can help the dark blue merge seamlessly into the pink area, creating a soft purple transition in the middle. Let this layer dry completely.
Preserving the Seeds
Spray the dandelion puff with a light coat of cheap aerosol hairspray before gluing. This helps lock the seeds in place so they don’t drift off your artwork over time.
Step 2: The Castle Silhouette
-
Paint the base:
Using black ink or gouache and a medium brush, fill in the solid ground at the bottom of the page. -
Outline the castle:
Switch to a smaller round brush (size 2 is good for details) to carefully paint the castle structure. Ensure your edges are sharp against the colorful sky. -
Add architectural details:
Paint the spires, turrets, and small flags. Variations in height make the silhouette more interesting. -
Dry thoroughly:
Allow the black silhouette to dry completely before touching the sky area again to avoid smudging.
Step 3: Fireworks & Final Details
-
Paint the gold firework:
Load a liner brush with gold metallic paint. Create a large starburst pattern in the upper left, painting curved lines radiating from a central point. -
Add the white firework:
On the right side, use white gouache (consistency of heavy cream) to paint a second starburst shape. -
Create smaller bursts:
Add smaller starry fireworks near the bottom left using fine lines and cross shapes in white or silver. -
Splatter stars:
Dilute a bit of white gouache on your brush and tap the handle against another brush to splatter tiny ‘stars’ across the dark blue section of the sky. -
Prepare the botanical element:
Take your dried dandelion seed head. Apply a small dot of clear craft glue to the center of your large gold firework. -
Attach the dandelion:
Gently press the seed head onto the glue dot. Careful handling is key here as they are fragile. -
Highlight the dandelion:
I like to lightly brush the very tips of the dandelion seeds with a tiny amount of gold paint to integrate it into the painted explosion. -
Remove tape:
Once everything is 100% dry, peel away the masking tape slowly at a 45-degree angle to reveal your crisp border.
Add Hidden Magic
Use a UV-reactive clear ink to add hidden details in the castle windows or extra stars in the sky that only appear under blacklight.
Hang your finished piece in a shadow box frame to protect the delicate dandelion texture
Paint a Galaxy Background Behind Classic Icons
Transport a classic fairytale silhouette into deep space with this stunning galaxy painting. By blending vibrant purples, pinks, and blues, you will create a celestial backdrop that makes the black castle pop with magical contrast.
Step-by-Step Guide
Materials
- Square canvas (stretched)
- Acrylic paints (black, white, phthalo blue, navy blue, purple, magenta/pink)
- Wide flat brush for blending
- Small round detail brush (size 0 or 00)
- Old toothbrush (for stars)
- Palette (or paper plate)
- Water cup and paper towels
- Pencil (optional for sketching)
Step 1: Painting the Galaxy Sky
-
Prime the dark corners:
Start by loading your wide flat brush with navy blue mixed with a touch of black. Paint the upper left corner and the top edge of the canvas heavily, sweeping downwards in a diagonal motion. -
Introduce the blue nebula:
Before the dark paint dries, mix a brighter phthalo blue on your palette. Blend this into the lower edge of your dark corner, continuing that diagonal sweeping motion towards the center. -
Shift to purple:
Clean your brush thoroughly. Pick up your purple paint and start a new band of color next to the blue, allowing the wet edges to overlap slightly so they mix on the canvas itself. -
Add the vibrant glow:
While the purple is still wet, transition immediately into a bright pink or magenta for the lower right section of the sky. This area represents the brightest part of the aurora, so keep the color saturated. -
Whiten the horizon:
At the very bottom right where the sky meets the horizon, blend a tiny amount of titanium white into the pink. This creates a soft, glowing haze effect behind where the castle will sit. -
Smooth the transitions:
Take a clean, slightly damp dry brush and very lightly sweep over the lines where your colors meet. Use long, gentle strokes to blur any harsh lines until the gradient looks seamless. -
Create the milky way streaks:
Mix a very watery white paint. Using a thin brush, paint faint, jagged lines through the blue and purple sections, then immediately smudge them out with your finger or a dry brush to create wispy cosmic clouds. -
Splatter the stars:
This is the fun part: dip an old toothbrush into watered-down white paint. Hold it over the canvas and flick the bristles with your thumb to spray a fine mist of stars over the entire sky. -
Highlight major stars:
Use your smallest detail brush to paint a few larger, manual stars. Create ‘cross’ shapes with a long vertical line and a shorter horizontal line to make them twinkle.
Starry Splatter Tip
Test your toothbrush splatter on a piece of scrap paper first. If the paint is too thick, you get blobs; too thin, and it drips. Aim for the consistency of thin cream.
Step 2: Adding the Silhouette
-
Plan the horizon:
Make sure your sky is completely dry before proceeding. Use black paint to block in a slightly uneven, low horizon line across the bottom of the canvas. -
Outline the castle structure:
Using a pencil or very thin diluted black paint, sketch the basic shapes of the castle towers. It helps to start with the central highest tower and work outwards. -
Fill in the main blocking:
Use a medium round brush to fill in the main body of the castle with solid black paint. Apply two coats if necessary to ensure no background color shows through. -
Detail the turrets:
Switch to your smallest detail brush. Carefully paint the pointed roofs of the towers. I find it helpful to pull the brush upward to get a razor-sharp point. -
Add architectural features:
Paint small rectangular notches along the tops of the walls to create battlements. Add tiny horizontal lines on the spires for texture. -
Flags and finials:
With the very tip of your detail brush, add tiny flags blowing to the left on the tallest towers, and small crosses or spikes on the lower roofs. -
Create windows:
Wait for the black paint to dry fully. If you want lit windows, use a tiny dot of white or pale yellow paint. Alternatively, leave small gaps of the background showing through when painting the black silhouette. -
Paint the forest line:
Along the horizon line to the left and right of the castle, use the tip of a small brush to dab irregular vertical shapes. -
Refine the trees:
Tap the brush in a zig-zag motion starting narrow at the top and getting wider at the bottom to create pine tree silhouettes that blend into the dark ground.
Fixing Muddy Blends
If your sky colors start turning brown or muddy where they meet, let the layer dry completely. Then, glaze over the area with a fresh, semi-transparent layer of the desired color.
Now step back and admire how your magical kingdom shines against the vastness of the cosmos
Go Abstract With Color Swatches That Hide Tiny Easter-Egg Icons
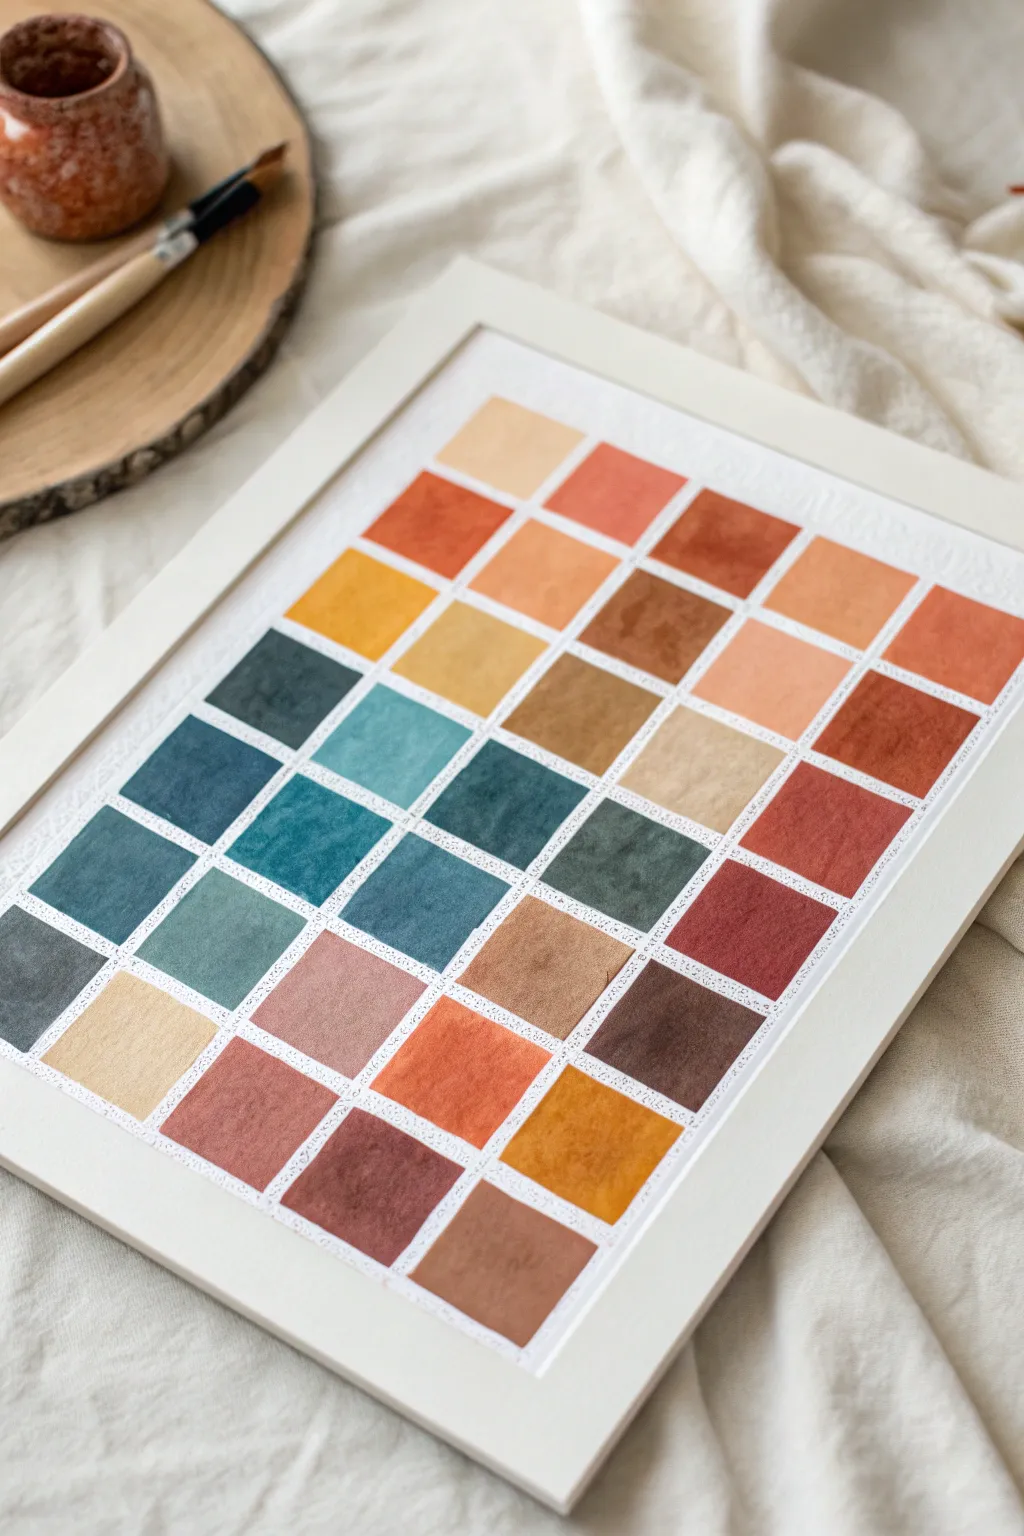
Transform specialized color swatches into a sophisticated piece of modern art that subtly nods to Disney magic. This grid of earthy, textured watercolor squares creates a calming aesthetic from afar, but invites viewers to hunt for tiny, hidden Easter eggs upon closer inspection.
Step-by-Step
Materials
- Cold-pressed watercolor paper (140lb/300gsm)
- White picture frame with mat
- Watercolor paints (pan set or tubes)
- Flat shader brush (size 6 or 8)
- Removable painter’s tape or washi tape
- Pencil and ruler
- White gel pen (0.8mm or 1.0mm)
- Palette for mixing custom shades
- Paper towels
- Two water jars
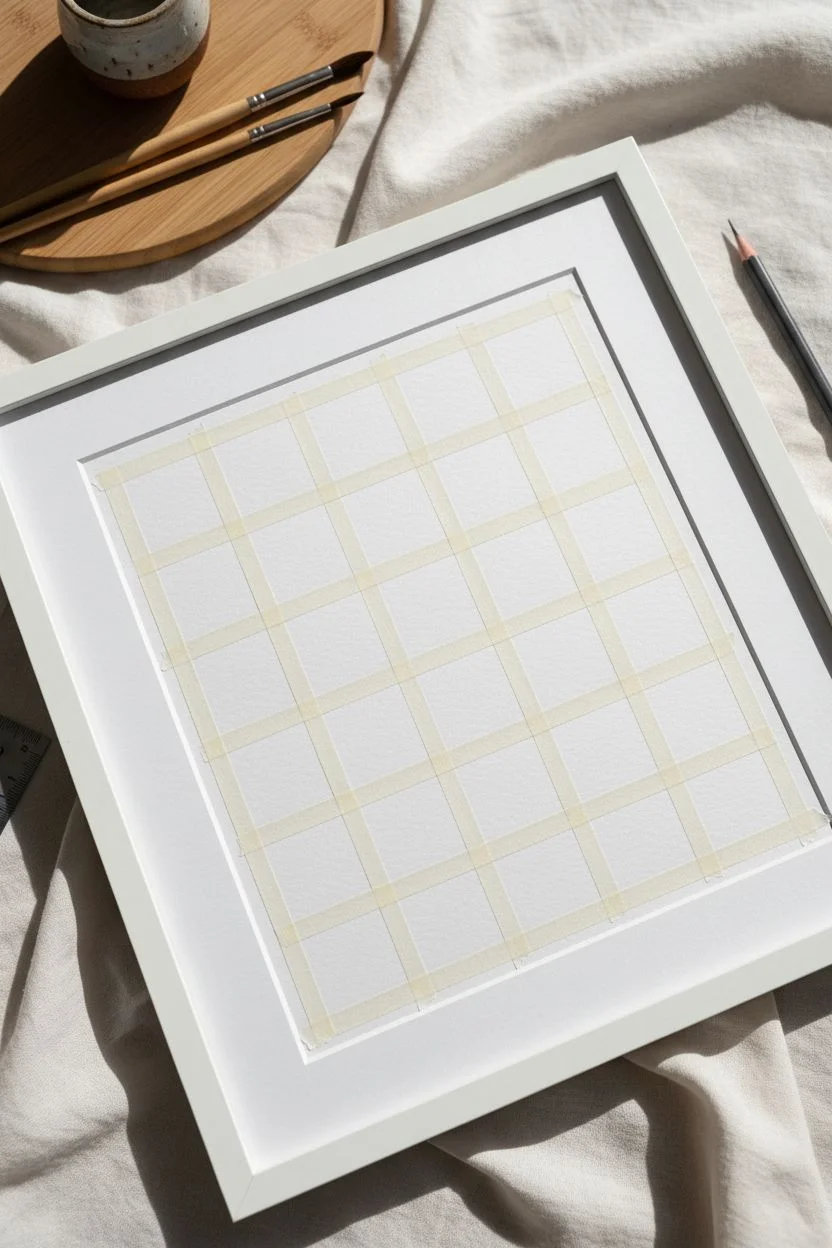
Step 1: Grid Preparation
-
Measure your space:
Begin by measuring the visible area inside your picture mat to determine the working dimensions of your paper. -
Calculate square sizes:
Divide the width and height by the number of desired columns and rows (the example uses a 6×8 grid). Aim for squares about 1.5 inches wide, leaving small gaps for borders. -
Mark the layout:
Using a light pencil hand and your ruler, mark out the grid lightly on your watercolor paper. Don’t press too hard, as you’ll want these lines to disappear later. -
Apply the tape:
Mask off the grid lines using thin removable painter’s tape or specific drafting tape. Press the edges down firmly with a fingernail to prevent paint from bleeding underneath.
Step 2: Mixing and Painting
-
Create a palette:
Mix a variety of earthy, muted tones. Think terracotta, ochre, sage green, dusty blue, and slate gray. You want a cohesive but varied spectrum. -
Paint the first square:
Load your flat shader brush with a terracotta shade and fill in a random square. Use enough water to let the pigment pool slightly, creating that lovely watercolor texture. -
Vary uniformity:
As you move to other squares, vary the water-to-pigment ratio. Some squares should be opaque and solid, while others can be more translucent. -
Scatter the colors:
Don’t paint all the blue squares next to each other. Hop around the grid as you work to ensure the colors are balanced throughout the composition. -
Add texture:
While a square is still damp, I sometimes like to drop in a tiny bit of darker pigment or plain water to create ‘blooms’ and visual interest within the swatch. -
Let it dry completely:
Allow the entire grid to dry thoroughly. This is crucial—if the paper is damp when you remove the tape, it will tear.
Bleed Prevention
Before painting color, brush a thin layer of clear water or matte medium over the tape edges to seal them perfectly.
Step 3: Finishing Touches
-
The reveal:
Carefully peel back the tape at a 45-degree angle. Move slowly to reveal crisp white lines between your colorful squares. -
Add the magic:
Take your white gel pen and draw tiny, minimalist icons in a few select squares. A simple three-circle Mickey silhouette or a tiny castle turret works best. -
Keep it subtle:
Don’t fill every square. Choose 3-5 random spots for your icons so they remain true ‘hidden’ details that reward close viewing. -
Clean up edges:
If any paint bled under the tape, use a tiny amount of opaque white gouache or acrylic to establish a clean edge. -
Erase guidelines:
Gently erase any visible pencil marks remaining in the white grid lines. -
Frame the work:
Center your artwork in the frame, secure the backing, and hang it where the light can catch those watercolor textures.
Character Themes
Use specific color palettes for different characters—lavender and sun-yellow for Rapunzel, or teal and purple for Ariel.
Now you have a stylish piece of decor that keeps your Disney fandom elegant and understated


Have a question or want to share your own experience? I'd love to hear from you in the comments below!