If you’ve ever looked at a plain stone and thought, “You could totally become something adorable,” you’re in the right headspace. These school rock painting ideas are my favorite mix of cute, simple, and meaningful—perfect for classroom vibes, back-to-school surprises, and teacher gifts.
Yellow School Bus Rock in Side View
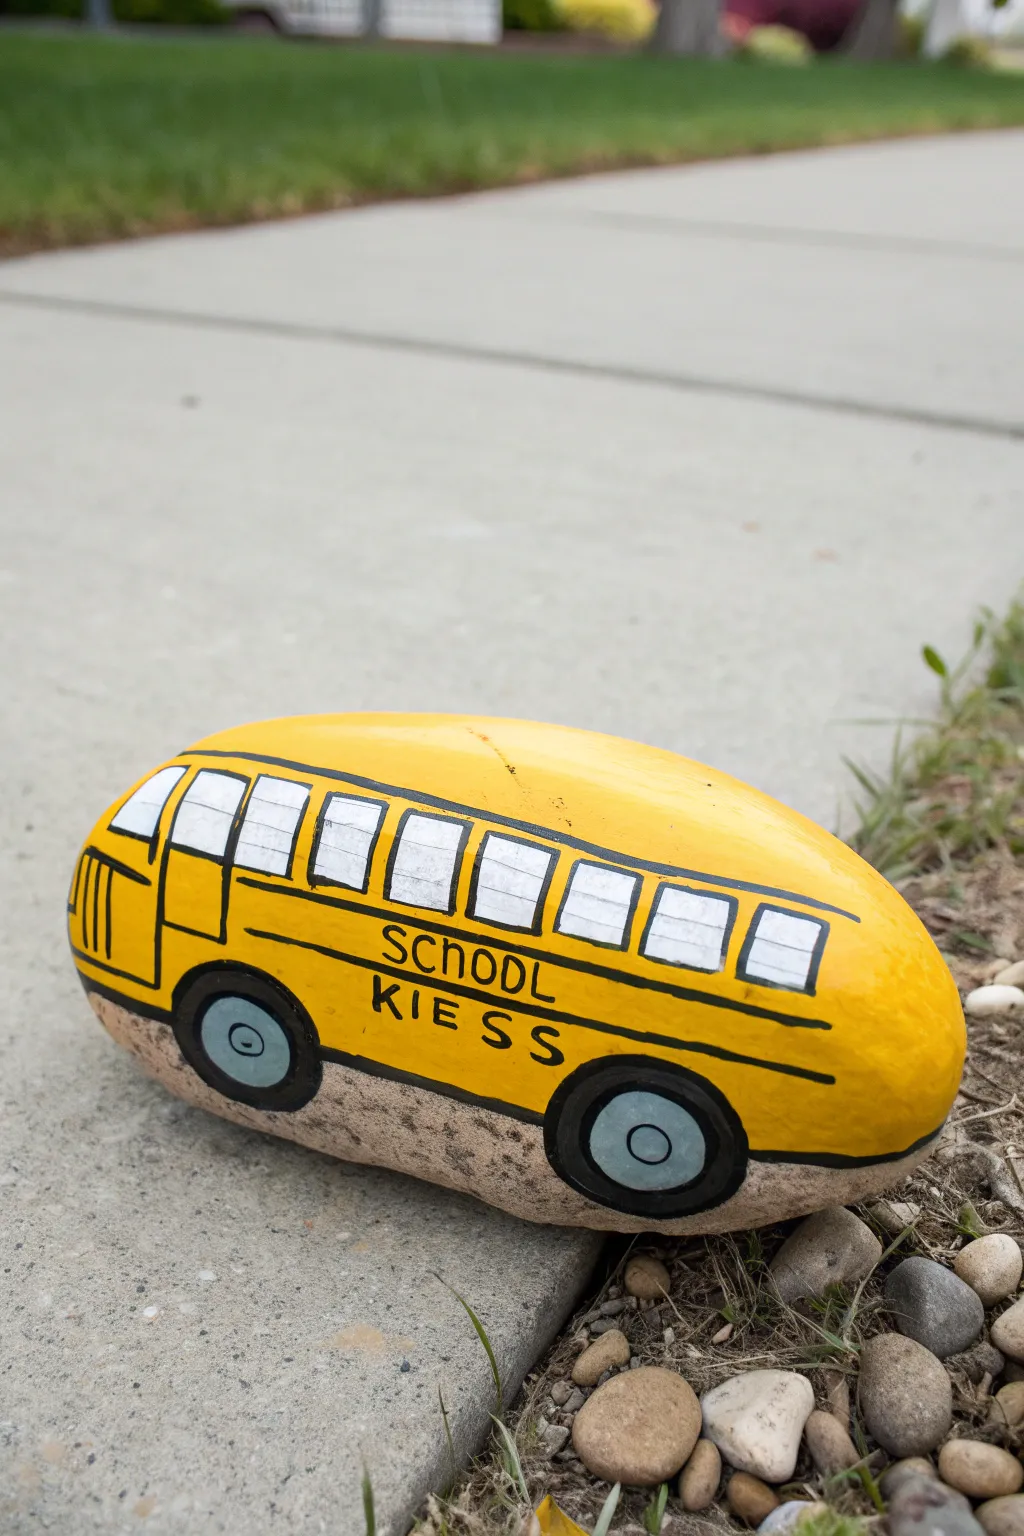
Transform a smooth, oval stone into a cheerful symbol of education with this yellow school bus design. This project captures the classic side profile of a bus, complete with passenger windows and bold lettering, making it a perfect back-to-school gift or garden decoration.
Step-by-Step
Materials
- Smooth, elongated oval rock (approx. 4-6 inches)
- Acrylic paint: Bright Yellow, Black, White, Grey/Light Blue
- Posca paint pens (Extra Fine and Fine): Black, White
- Paintbrushes: Flat shader (medium), round detail brush (small)
- Pencil and eraser
- Spray sealant (gloss or matte)
Step 1: Base Coat & Shape
-
Stone Selection:
Find a rock that is naturally long and slightly rounded at the ends, mimicking the shape of a bus chassis. A flatter bottom helps it sit upright. -
Clean and Dry:
Scrub your rock with soapy water and let it dry completely to ensure the paint adheres properly. -
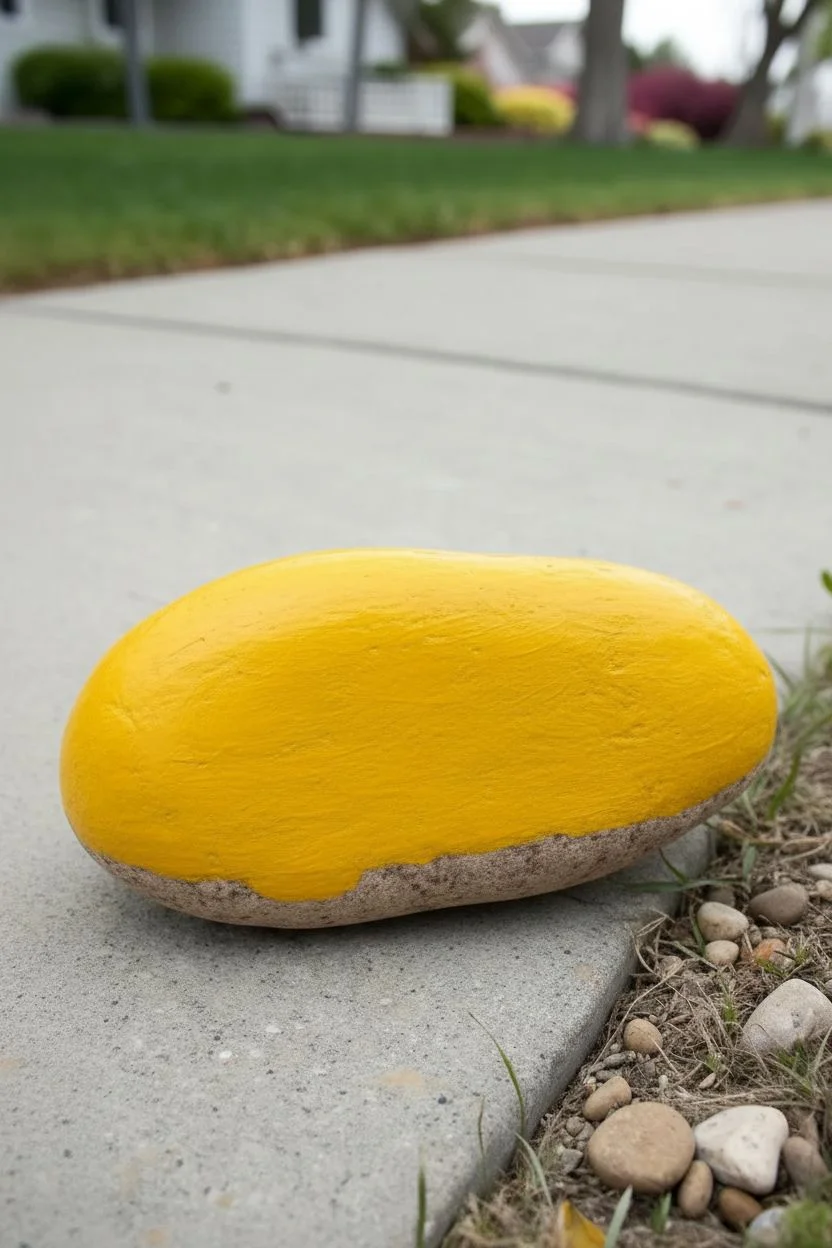
Yellow Base:
Using a medium flat brush, paint the upper 3/4 of the rock with bright yellow acrylic paint. Leave the bottom sliver unpainted to look like the road or undercarriage shadow. -
Second Coat:
Applying yellow over a dark rock can be tricky, so let the first coat dry and apply a second or third layer until the color is solid and opaque.
Step 2: Sketching & Outlining
-
Pencil Draft:
Lightly sketch the bus details with a pencil. Draw a horizontal line for the roof, a parallel line for the bottom of the bus body, and mark out the wheel wells. -
Window Placement:
Sketch a row of rectangles for the windows along the top half. Add a distinct, slanted window at the front for the windshield. -
Lettering Guide:
Pencil in two horizontal guide lines below the windows. In this space, draft the words ‘SCHOOL’ on the top line and your custom text (like ‘KIESS’ or a teacher’s name) below it. -
Initial Outlining:
Use a fine black paint pen to trace over your main structural lines—the roof, the separation between windows and body, and the wheel arches.
Wobbly Wheels?
If painting perfect circles for tires is hard, trace a bottle cap or use a round foam pouncer dipped in black paint for an instant, perfect wheel shape.
Step 3: Windows & Wheels
-
Painting Windows:
Fill the window rectangles with white acrylic paint. You might need two coats for brightness. -
Wheel Construction:
Using black paint, fill in the two circular distinct tires at the bottom. Make sure they extend slightly below the yellow body line. -
Hubcaps:
Once the black tires are dry, paint a smaller grey or light blue circle in the center of each tire. -
Hubcap Details:
Add a tiny black dot in the very center of the grey hubcap and sketch a thin circle around it with your extra-fine pen. -
Window Outlines:
Now that the white window paint is dry, carefully outline each rectangle with the black paint pen. Add a curved vertical line on the front windshield to show dimension.
Make It Personal
Swap the ‘KIESS’ text for your child’s grade (e.g., ‘1st Grade’), the year, or their teacher’s name to make it a custom appreciation gift.
Step 4: Details & Lettering
-
Bus Stripes:
Draw three distinct horizontal black lines running the length of the bus: one just under the roof, one under the windows, and one near the bottom of the yellow section. -
Front Grill:
On the far left (the nose of the bus), draw vertical lines to create the front grill and a small curved shape for the headlight. -
Lettering:
Using your black paint pen or a very fine brush, carefully fill in your penciled text. Keep the font simple and blocky for readability. -
Clean Up:
I like to take this moment to check for any smudges. Use yellow paint to cover any accidental black marks outside the lines. -
Sealing:
Once the paint is fully cured (give it at least an hour), spray the entire rock with a clear sealant to protect it from weather and scratches.
Now you have a durable little vehicle ready to park in your garden or on a teacher’s desk


Crayon Trio Rocks in Bright Classroom Colors
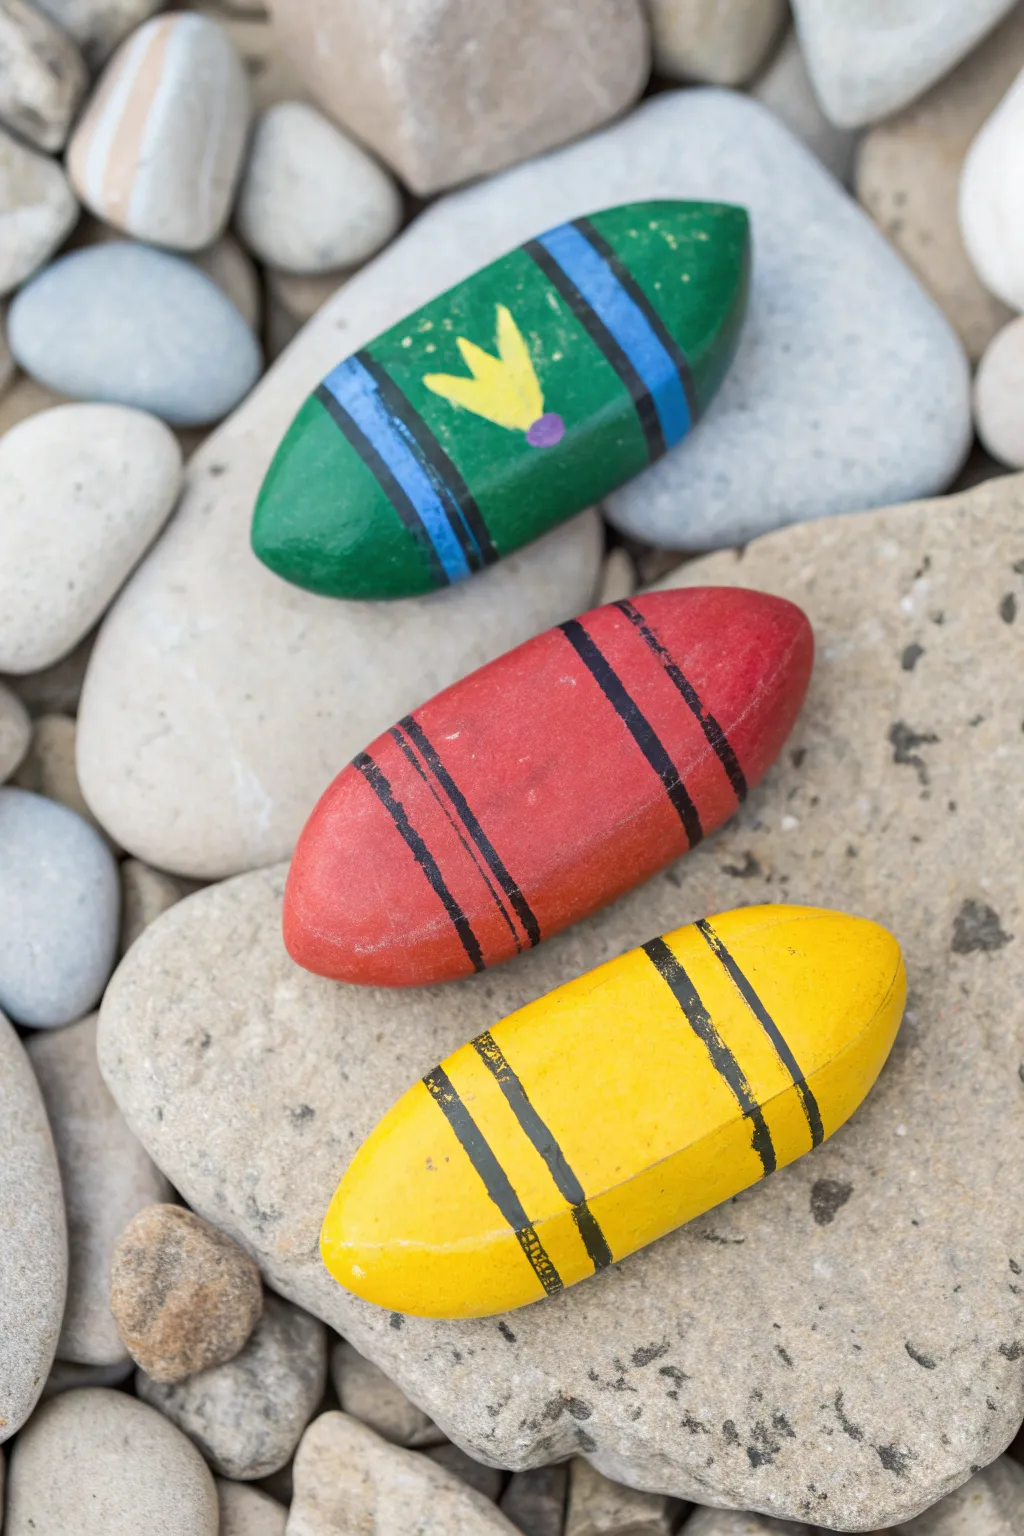
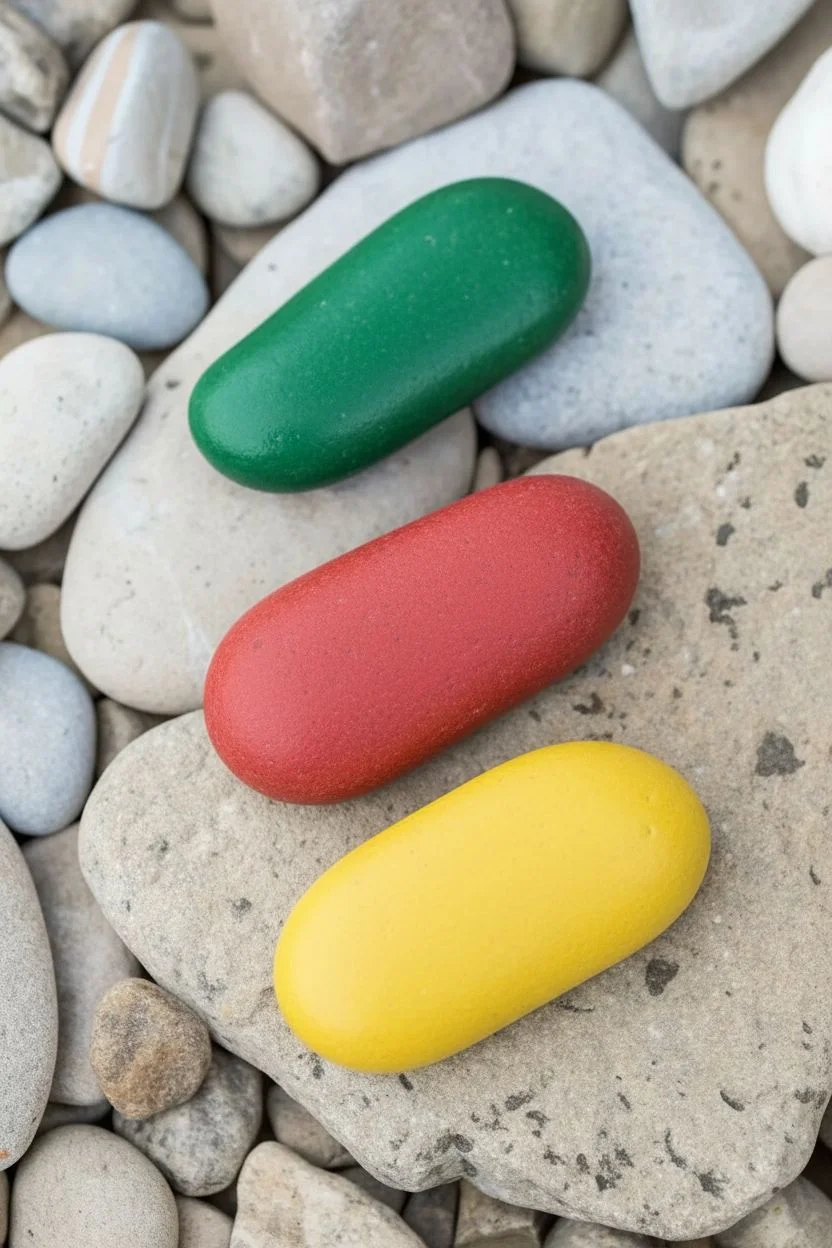
These charming painted rocks transform simple elongated stones into bright classroom crayons. With deep primary colors and perfectly imperfect lines, they make for beautiful school-themed decor or teacher appreciation gifts.
How-To Guide
Materials
- 3 elongated, smooth river rocks (flat or oval shaped)
- Acrylic paints (Red, Bright Yellow, Forest Green)
- Black acrylic paint or black fine-tip paint pen
- Blue acrylic paint
- Light yellow acrylic paint
- Purple acrylic paint
- Paintbrushes (medium flat brush and fine detail brush)
- Pencil for sketching
- Clear sealant spray (matte or gloss)
- Palette or small plate
- Water cup and paper towels
Step 1: Base Coating
-
Select your stones:
Choose three stones that are roughly the same size and have an elongated shape, similar to a crayon. Smooth surfaces work best for clean lines. -
Clean the surface:
Wash your rocks with warm soapy water and scrub away any dirt or grit. Let them dry completely before applying any paint. -
Paint the red base:
Take the first stone and cover the entire top surface with red acrylic paint. You may need two coats to get a solid, opaque color. -
Paint the yellow base:
Repeat the process for the second stone using bright yellow paint. Painting yellow over dark rocks can be tricky, so I usually apply thin layers and let each dry fully. -
Paint the green base:
Coat the third stone with forest green paint. Ensure the paint extends down the sides of the rock so the natural stone doesn’t show from the top view. -
Dry completely:
Allow all three base coats to dry thoroughly. If the paint feels cool to the touch, it needs more time.
Uneven Lines?
If painting straight lines on a curved rock is difficult, wrap a rubber band around the stone as a guide. Paint along the edge of the band for a straighter stripe.
Step 2: Adding Crayon Details
-
Sketch the bands:
Lightly sketch two curved bands near the top (the ‘pointy’ end) and two curved bands near the bottom of each rock using a pencil. -
Stripe the red crayon:
Using black paint and a fine detail brush (or a paint pen), carefully paint the two sets of double stripes over your pencil lines on the red rock. -
Stripe the yellow crayon:
Recreate the same double-stripe pattern on the yellow rock using black paint. Try to follow the curve of the stone to make it look 3D. -
Detail the green crayon:
For the green crayon, the stripes are different. Paint the stripes using blue acrylic paint instead of black. -
Outline the blue stripes:
Once the blue stripes are dry, use your thinnest brush or a black liner pen to outline the edges of the blue bands for a sharper look. -
Add the faint texture:
If you look closely at the red and green rocks, there’s a very subtle weathered look. You can simulate this by dry-brushing a tiny amount of lighter paint over the surface, though this is optional.
Make it a Set
Don’t stop at three! Paint a whole box worth of colors and write the color name (like ‘Dandelion’ or ‘Sky Blue’) in the center oval for a fun literacy tool.
Step 3: The Special Touches
-
Create the emblem:
On the green crayon specifically, paint a small light yellow abstract shape in the center, between the bands. It resembles a stylized crown or flower. -
Add the center dot:
Place a small dot of purple paint at the base of your yellow emblem on the green rock. -
Check for gaps:
Inspect all three rocks. if any base color looks streaky, touch it up carefully around your new black lines. -
Seal the artwork:
Take the rocks to a well-ventilated area and spray them with a clear acrylic sealer. This protects the paint from chipping and makes the colors pop.
Once sealed, these colorful crayon rocks are ready to brighten up a desk or garden path


Library Book Stack Rock for Reading Motivation
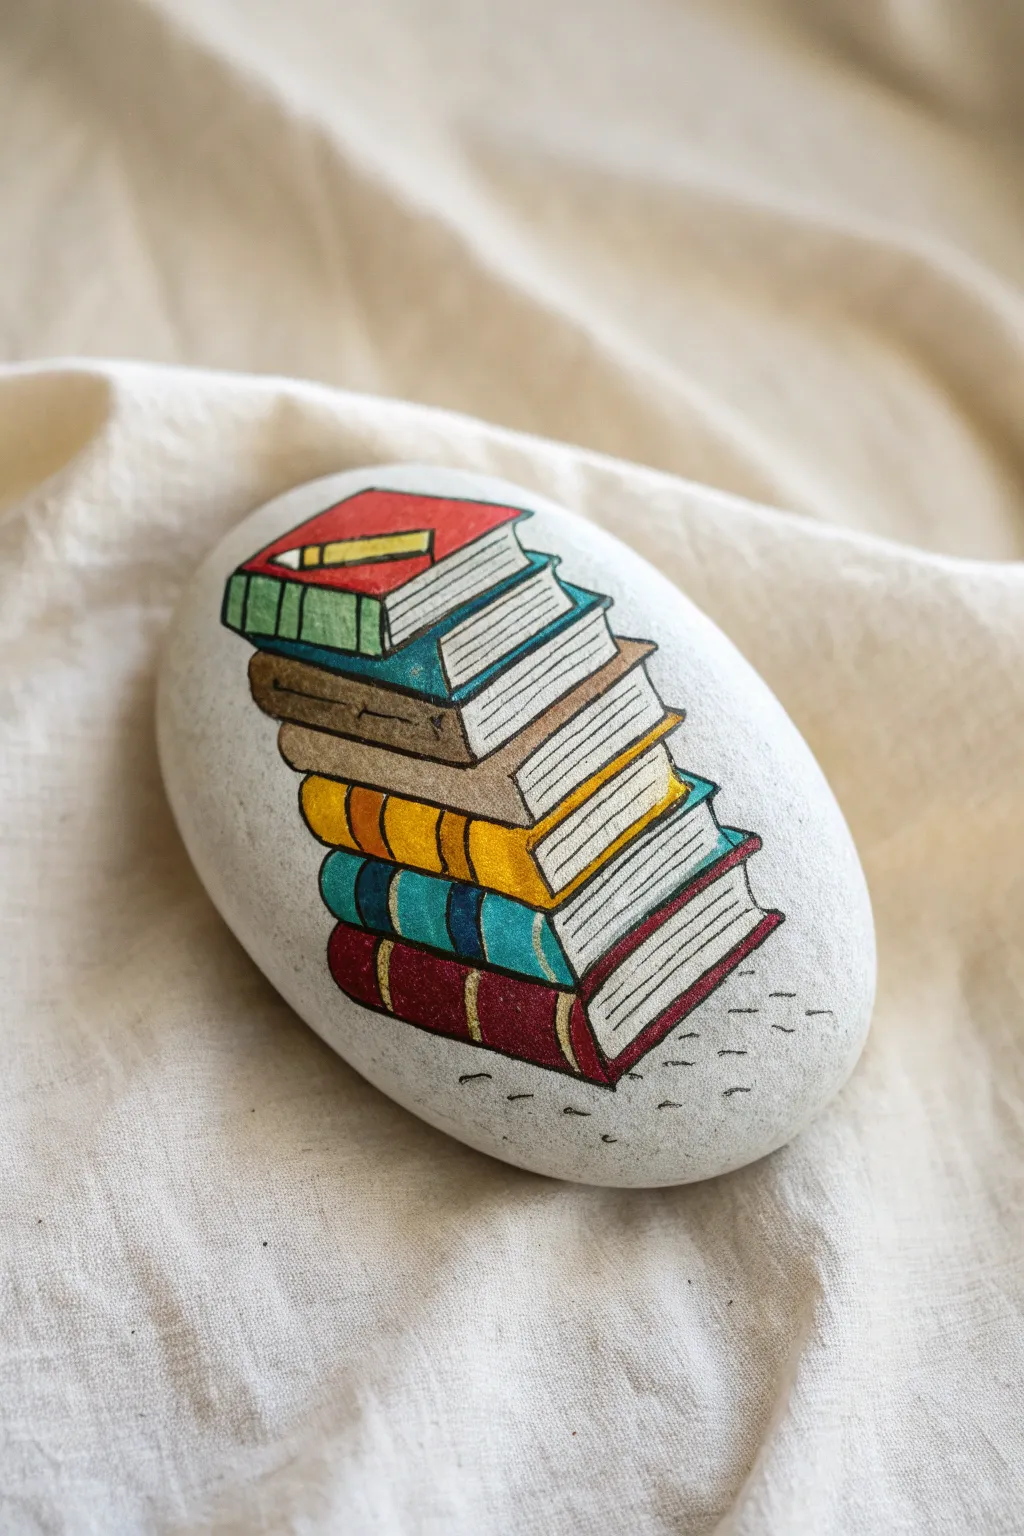
Encourage a love for reading with this charming painted stone featuring a teetering stack of colorful library books. The clean white background helps the vibrant book spines pop, making it a perfect paperweight for a teacher’s desk or a hidden treasure for a bookworm.
How-To Guide
Materials
- Smooth, oval-shaped river rock (cleaned and dried)
- White acrylic paint or gesso (for the base coat)
- Pencil (for sketching)
- Black fine-liner paint pen or permanent marker (0.5mm or .03mm)
- Acrylic paints or paint pens in various colors (red, green, blue, brown, yellow/gold, teal, maroon)
- Small detail paintbrush (if using bottle acrylics)
- Spray sealer or varnish (matte or glossy)
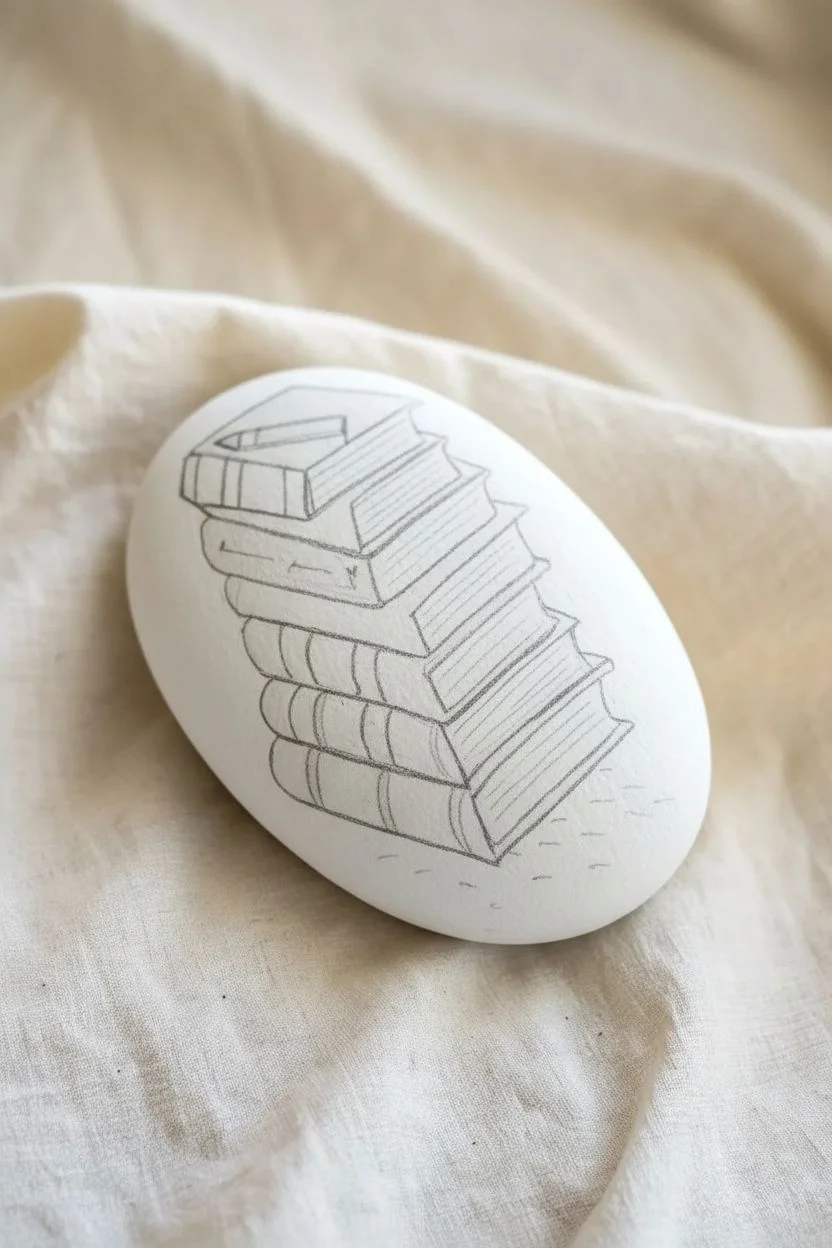
Step 1: Preparation & Sketching
-
Base Coating:
Begin by painting your clean rock with a layer of white acrylic paint. You want a smooth, opaque surface, so apply a second coat if the rock’s natural color shows through. Let this dry completely before moving on. -
Sketch the Top Book:
Using a pencil, lightly draw the topmost book first. It should be slightly angled. Draw a parallelogram for the cover and vertical lines down for the spine to give it a 3D effect. -
Add the Pencil:
Sketch a small cylinder shape resting on top of that first book to represent the pencil. -
Build the Stack:
Work your way down, sketching the remaining books one by one under the first. Vary the angles slightly—some sticking out to the left, some to the right—to give the stack a charming, imperfect look. -
Add Spine Details:
For the bottom few books, sketch curved lines on the spines to represent rounded binding. Don’t worry about perfect straight lines; the hand-drawn look adds character.
Step 2: Color Blocking
-
Paint the Top Cover:
Start with the top book cover. Fill it in with a bright red paint pen or acrylics. Avoid painting over the pencil sketch. -
Color the Top Binding:
Paint the spine of the top book green. I find that contrasting the cover color with the spine color makes the book look more realistic. -
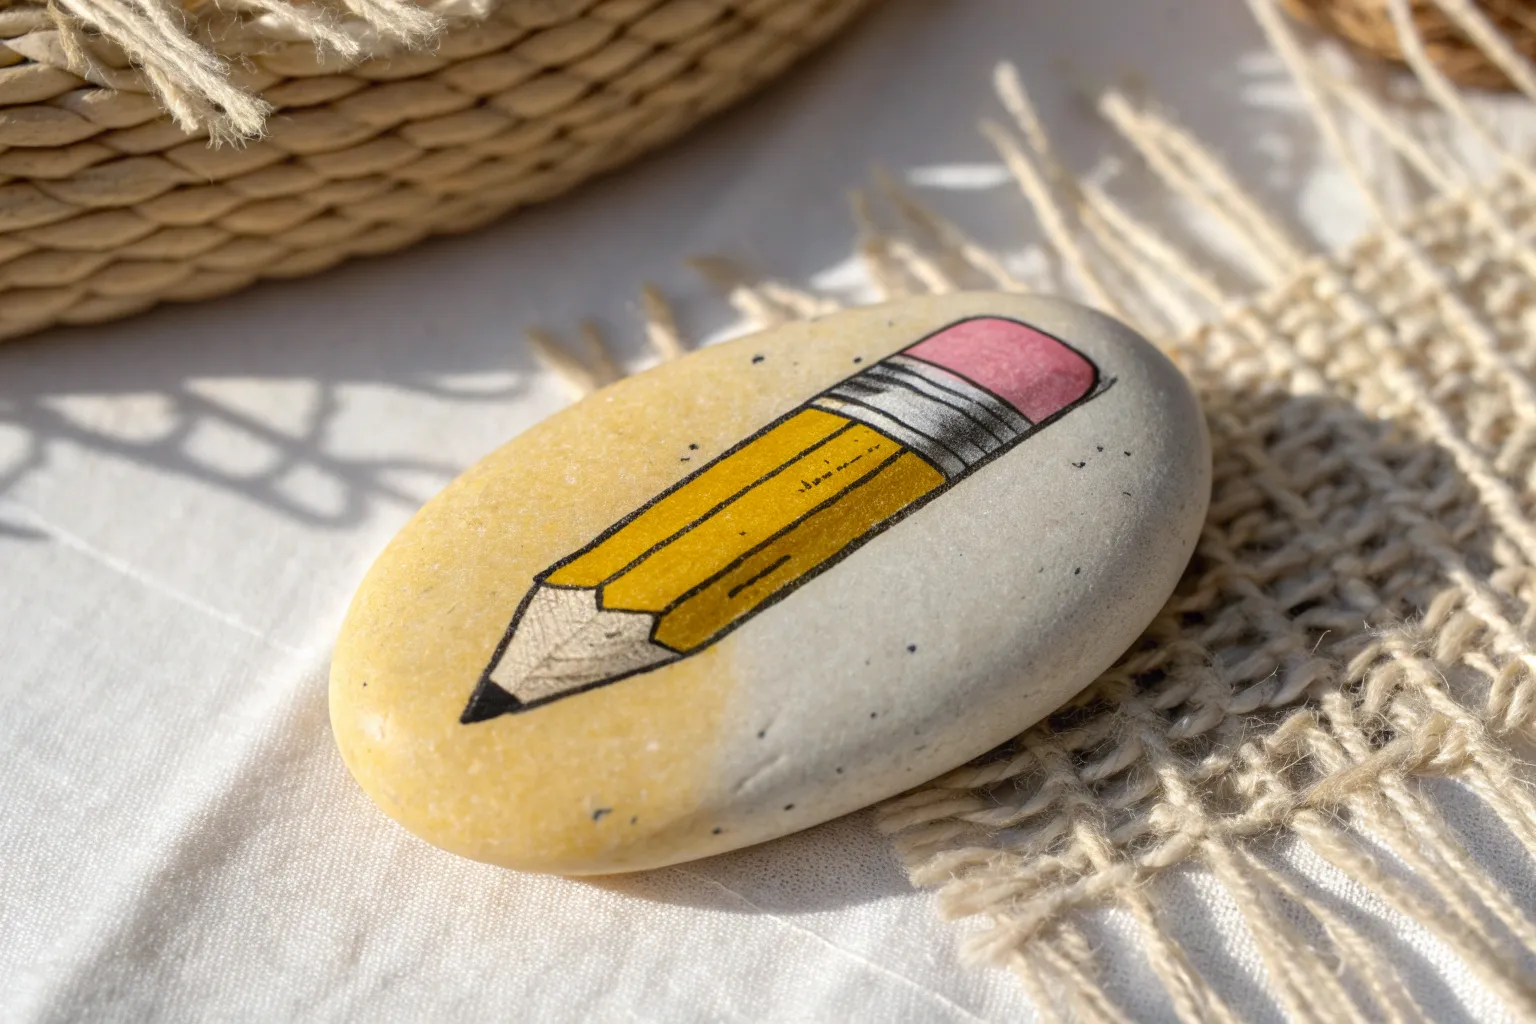
Paint the Pencil:
Fill in the pencil body with yellow. Add a tiny pink spot for the eraser and a black triangle for the lead tip. -
Second Book:
Paint the cover of the second book a teal or light blue. Paint the visible spine edge a darker blue to show shadow. -
Third Book (The Thick One):
For the third book down, use a light brown or tan for the cover and a darker brown for the spine area to create depth. -
Fourth Book:
Paint the fourth book’s spine a soft beige or taupe color. -
Fifth Book:
Make the fifth book stand out with a bright yellow spine. Add an orange strip near the binding for extra detail. -
Sixth Book:
Paint the second-to-last book with a rich teal or turquoise color for the spine. -
Bottom Book:
Anchor the stack with a deep maroon or burgundy color for the largest bottom book. -
The Pages:
Carefully fill in the triangular wedges on the side of the stack (where the pages would be) with white paint. If your base coat is clean enough, you can leave these unpainted, but a fresh coat of white makes them pop.
Uneven Lines?
If your outlines get shaky due to the rock’s texture, thicken the black line slightly to hide the wobble, or use a wider marker tip.
Step 3: Outlining & Finishing
-
Initial Outline:
Once all colored paint is bone dry, take your black fine-liner paint pen. Trace over all your pencil lines to define the books. -
Page Details:
Draw thin, parallel lines inside the white page sections. These lines represent the individual pages of the books. -
Spine Decorations:
Add small decorative details to the spines using the black pen or gold paint—like horizontal bands on the blue and maroon books to look like leather binding. -
Grounding Shadow:
Add a few tiny dashes and dots around the base of the bottom book. This creates a subtle shadow effect so the books don’t look like they are floating. -
Seal:
Finish the project by spraying or brushing on a clear sealer to protect your artwork from chipping.
Add Book Titles
Use your finest pen to write actual titles of favorite books on the spines for a personalized gift for a teacher or librarian.
Now you have a literary masterpiece that will inspire reading wherever it’s placed


Science Lab Rock With Beaker Bubbles
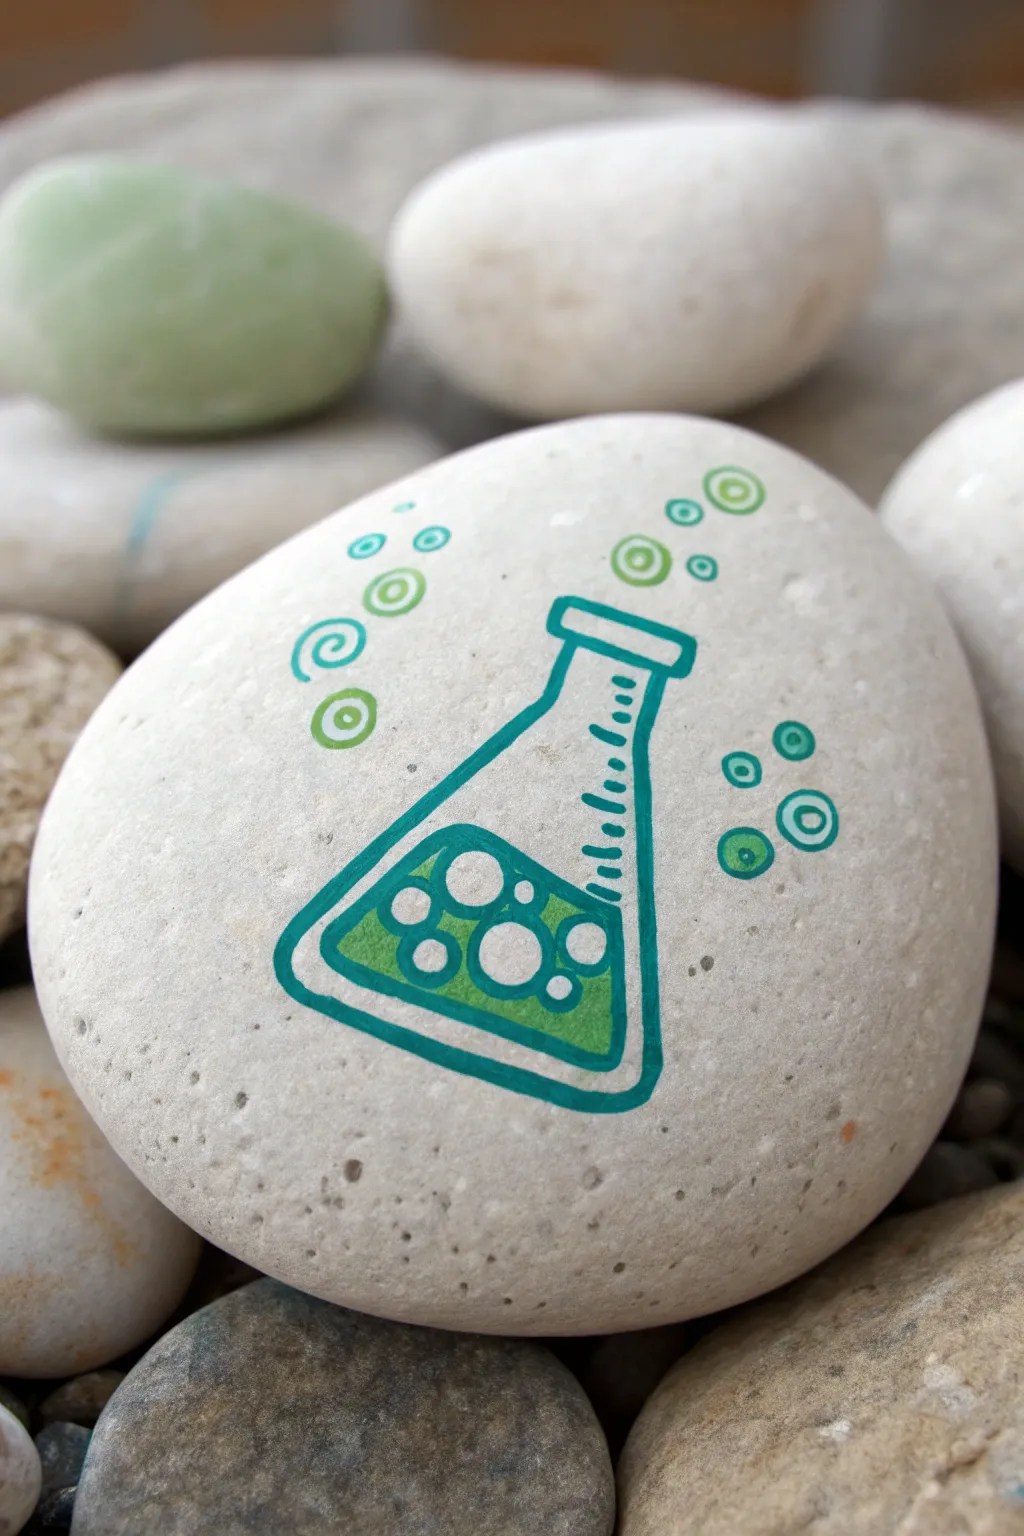
Celebrate the scientific method with this charming painted stone that looks like it belongs right on the chemistry lab table. Featuring a classic Erlenmeyer flask with effervescent bubbles, the bright teal and lime green color palette pops beautifully against a smooth white background.
Detailed Instructions
Materials
- Smooth, oval-shaped river rock (approx. 3-4 inches wide)
- White acrylic paint or gesso
- Teal acrylic paint (or paint pen)
- Lime green acrylic paint (or paint pen)
- White paint pen (fine tip)
- Fine liner brush (if using jar paints)
- Pencil and eraser
- Water cup and paper towels
- Clear acrylic sealant (spray or brush-on)
Step 1: Preparing the Base
-
Clean and dry:
Start by scrubbing your rock with warm, soapy water to remove any dirt or oils. Let it dry completely in the sun or use a hairdryer to speed things up. -
Apply the base coat:
Paint the top surface of the rock with white acrylic paint. You may need 2-3 coats to get a solid, opaque coverage that hides the natural stone color. -
Dry thoroughly:
Allow the white base to dry fully between layers. If the paint is still tacky, your pencil sketch might dig into it later.
Pro Tip: Pen vs. Brush
For this style of line art, acrylic paint pens are far easier to control than brushes. They give you steady, even lines perfect for the flask outline.
Step 2: Drafting the Design
-
Light sketch:
Using a pencil, lightly sketch the outline of an Erlenmeyer flask. Start with a rectangle for the neck and angle out two lines for the triangular body. -
Internal details:
Draw a wavy line inside the flask to represent the liquid level. Sketch circles of various sizes inside the liquid area for the bubbles. -
External bubbles:
Around the flask, lightly draw several small circles floating upward to represent fizzing bubbles escaping into the air.
Troubleshooting: See-through Paint
If your lime green looks streaky or translucent over the white base, let the first layer dry completely and simply add a second thin coat for opacity.
Step 3: Painting the Flask Outline
-
Outline the shape:
Using your teal paint pen or a fine liner brush with teal paint, trace over your pencil lines for the flask’s outer shape. -
Thicken the lines:
Go over the main outline a second time to make the lines bold and prominent, similar to a cartoon style. -
Add measurement marks:
On the right side of the flask’s neck, paint small horizontal hash marks to mimic volume measurements.
Step 4: Adding the Liquid and Bubbles
-
Fill the liquid:
Using lime green paint, fill in the bottom portion of the flask up to your wavy liquid line. Paint carefully around the internal bubble circles you sketched. -
Paint internal bubbles:
For the bubbles inside the liquid, outline them in the teal color first, then leave the centers white (showing the base coat) or paint them fresh white for contrast. -
Floating bubbles:
Move to the bubbles outside the flask. Use a mix of teal spirals and lime green circles. I find that varying the style—some solid rings, some spirals—adds a nice sense of motion. -
Layering details:
Once the lime green liquid is dry, you can use your white paint pen to add tiny highlight dots or refine the edges of the submerged bubbles.
Step 5: Finishing Touches
-
Clean up lines:
Check your teal outlines. If the green paint wobbled over the line, touch up the teal border to make it crisp again. -
Dry completely:
Let the rock sit undisturbed for at least an hour to ensure all thick layers of paint are cured. -
Seal the rock:
Apply a coat of clear acrylic sealant. This protects your science art from chipping and gives it a finished, glossy look.
Now you have a bubbling experiment frozen in time, ready to inspire curiosity in any classroom or garden
BRUSH GUIDE
The Right Brush for Every Stroke
From clean lines to bold texture — master brush choice, stroke control, and essential techniques.
Explore the Full Guide
Music Class Rock With Notes and a Staff

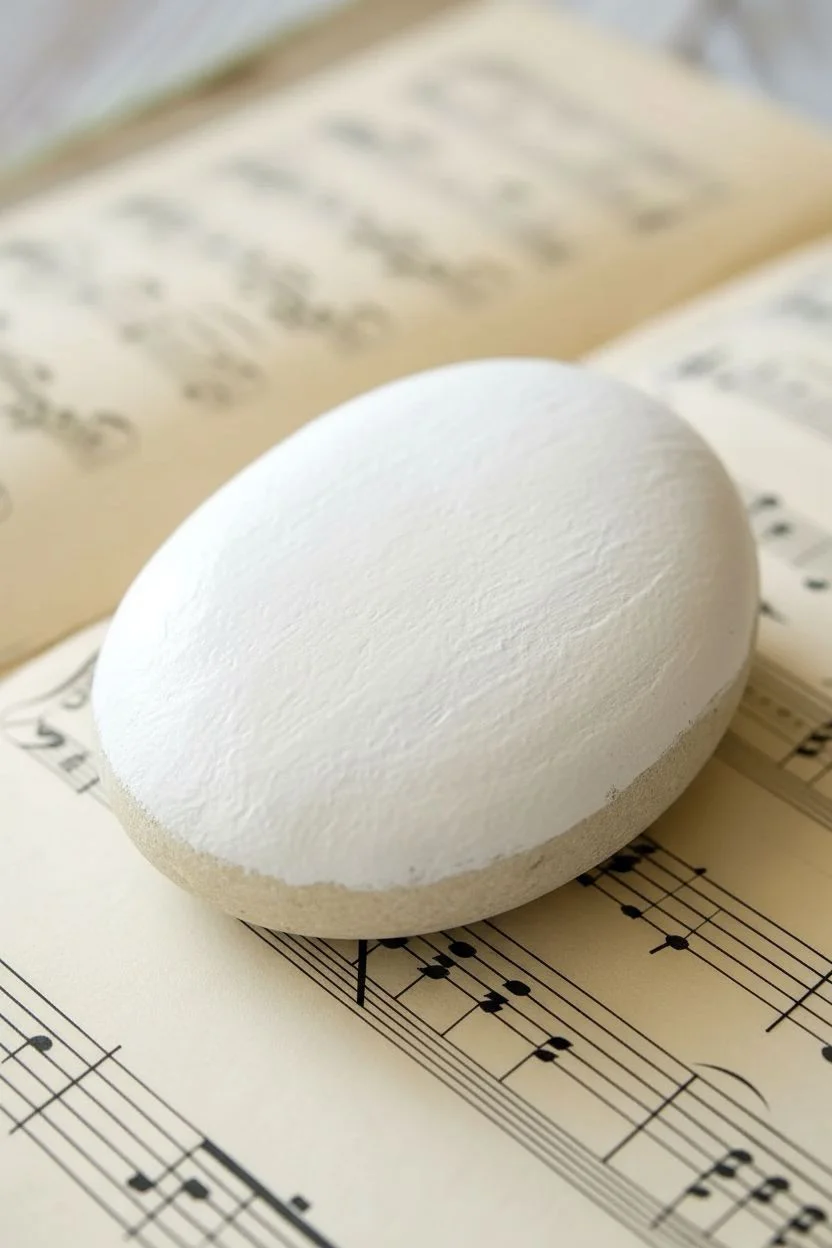
This elegant project transforms a simple river rock into a musical keepsake featuring a flowing staff and graceful notes. The black-on-white design mimics the classic look of sheet music, making it a perfect gift for music teachers or band students.
Step-by-Step
Materials
- Smooth, light-colored river rock (oval shape preferred)
- White or cream acrylic paint
- Fine-point black paint pen (extra fine tip is best)
- Medium-point black paint pen
- Graphite pencil (HB or lighter)
- Eraser
- Wide flat paintbrush
- Matte spray sealer
Step 1: Preparing the Canvas
-
Clean the stone:
Begin by washing your rock with warm soapy water to remove any dirt or oils. Let it dry completely before starting, as moisture can trap under the paint. -
Base coat application:
Using a wide flat brush, apply a layer of white or cream acrylic paint to the top surface of the stone. I like to keep the brush strokes horizontal to simulate the texture of paper. -
Second layer:
Allow the first coat to dry for about 15-20 minutes. If the stone’s original color is still showing through, apply a second coat for a solid, opaque background. -
Final drying:
Let the base coat cure fully. It should be dry to the touch and not tacky before you attempt to draw on it.
Steady Hands
Rest your wrist on a table or a small book while drawing the staff lines. This anchors your hand and helps keep those parallel lines straight and even.
Step 2: Drafting the Design
-
Sketching the staff lines:
Using a pencil with a very light touch, lightly sketch five curved, parallel lines on the right side of the rock. They should swoop upwards slightly to follow the rock’s natural contour. -
Positioning the clef:
Sketch the outline of a treble clef over your staff lines. Place the spiral ‘belly’ of the clef on the second line from the bottom. -
Adding scattered notes:
To the left of the treble clef, lightly pencil in a variety of musical symbols. Include a mix of beamed eighth notes, quarter notes, and perhaps a sharp symbol for variety.
Step 3: Inking the Music
-
Tracing the staff:
With an extra-fine black paint pen, carefull trace over your pencil lines for the staff. Use smooth, confident strokes to keep the lines parallel. -
Drawing the clef spine:
Switch to the medium-point pen for the thicker parts of the treble clef. Start with the vertical line down the center, thickening it slightly as you go. -
Detailing the spiral:
Carefully draw the spiral of the treble clef. Observe how the line thickens on the curves and thins as it curls inward; mimic this calligraphy style by varying your pressure or going over lines twice. -
Adding the tail:
Finish the bottom of the treble clef with a small, filled-in dot or loop. -
Inking the notes:
Using the fine-point pen, outline the note heads you sketched on the left. Fill them in solid black. -
Adding stems and beams:
Draw the stems extending upwards or downwards from the note heads. Add flags or beams to connect the eighth notes, keeping the lines crisp. -
Drawing the sharp symbol:
If you sketched a sharp symbol (#), ink it now using very fine, intersecting lines.
Vintage Vibe
Mix a tiny drop of brown paint into your white base coat for an ‘antique paper’ look, or dab tea-stained water on the dried white paint before sealing.
Step 4: Finishing Touches
-
Cleanup:
Once the black ink is completely dry (give it at least 30 minutes to be safe), gently erase any visible pencil marks. Be gentle to avoid scratching the base paint. -
Create texture (Optional):
To make the rock look like aged sheet music, you can very lightly sponge a tiny bit of watered-down tan paint around the edges, blending it inward. -
Sealing:
Take the rock to a well-ventilated area. Hold the spray sealer about 10-12 inches away and apply a light, even coat to protect your artwork from chipping.
Now you have a harmonious piece of decor that hits all the right notes
Art Room Palette Rock With Paint Dabs
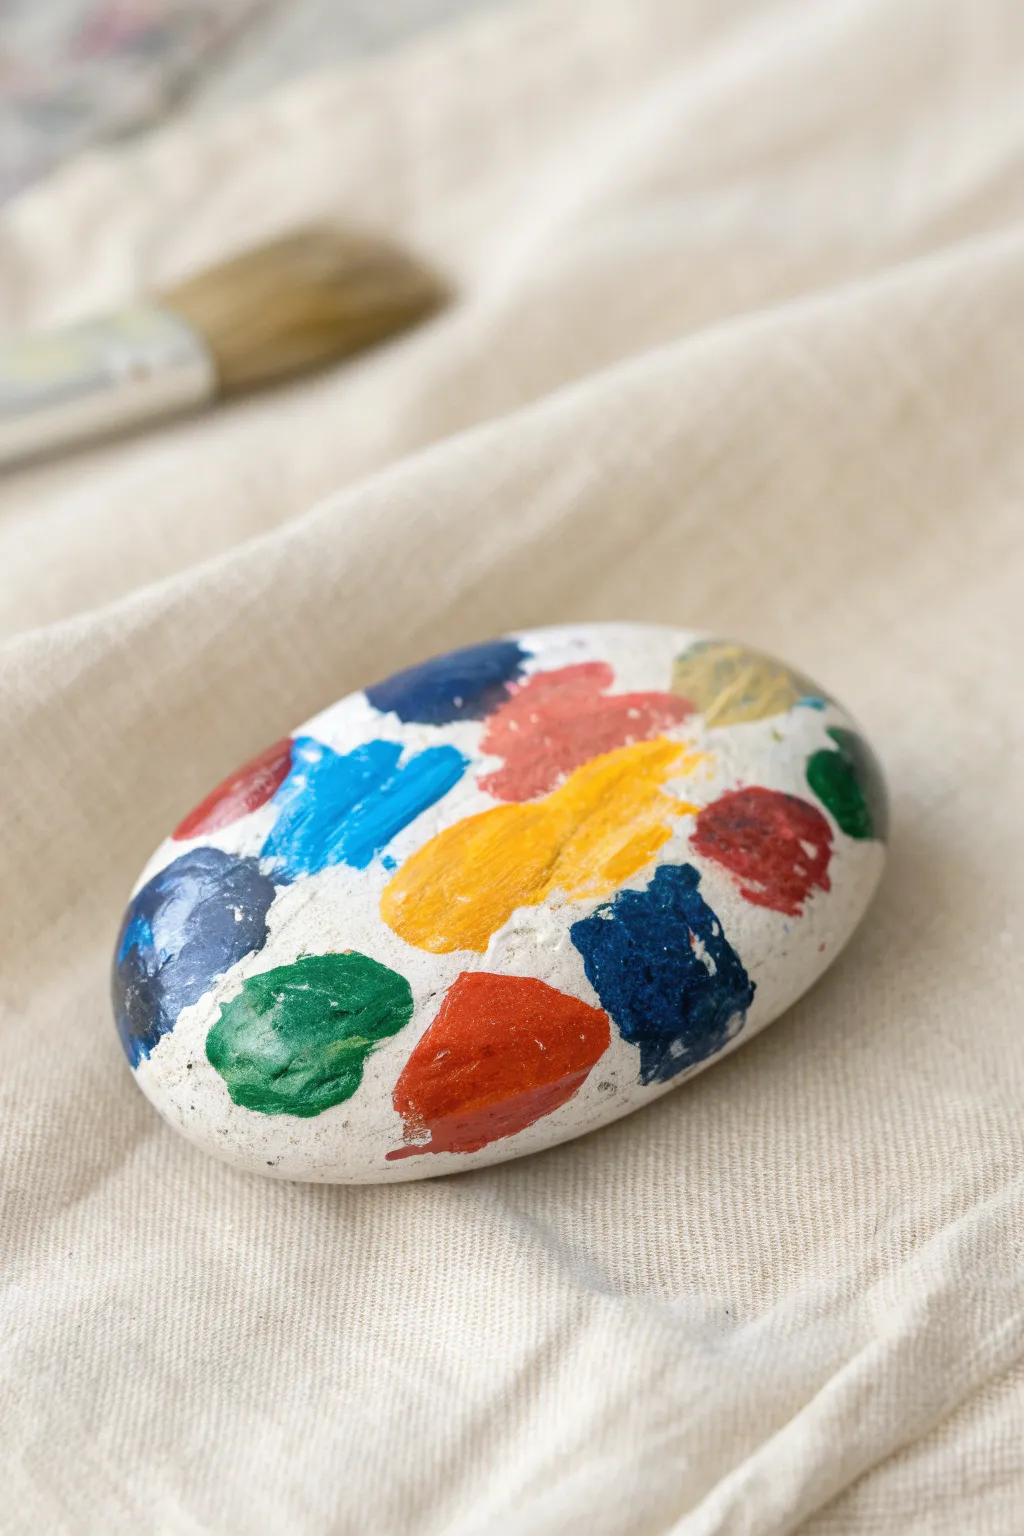
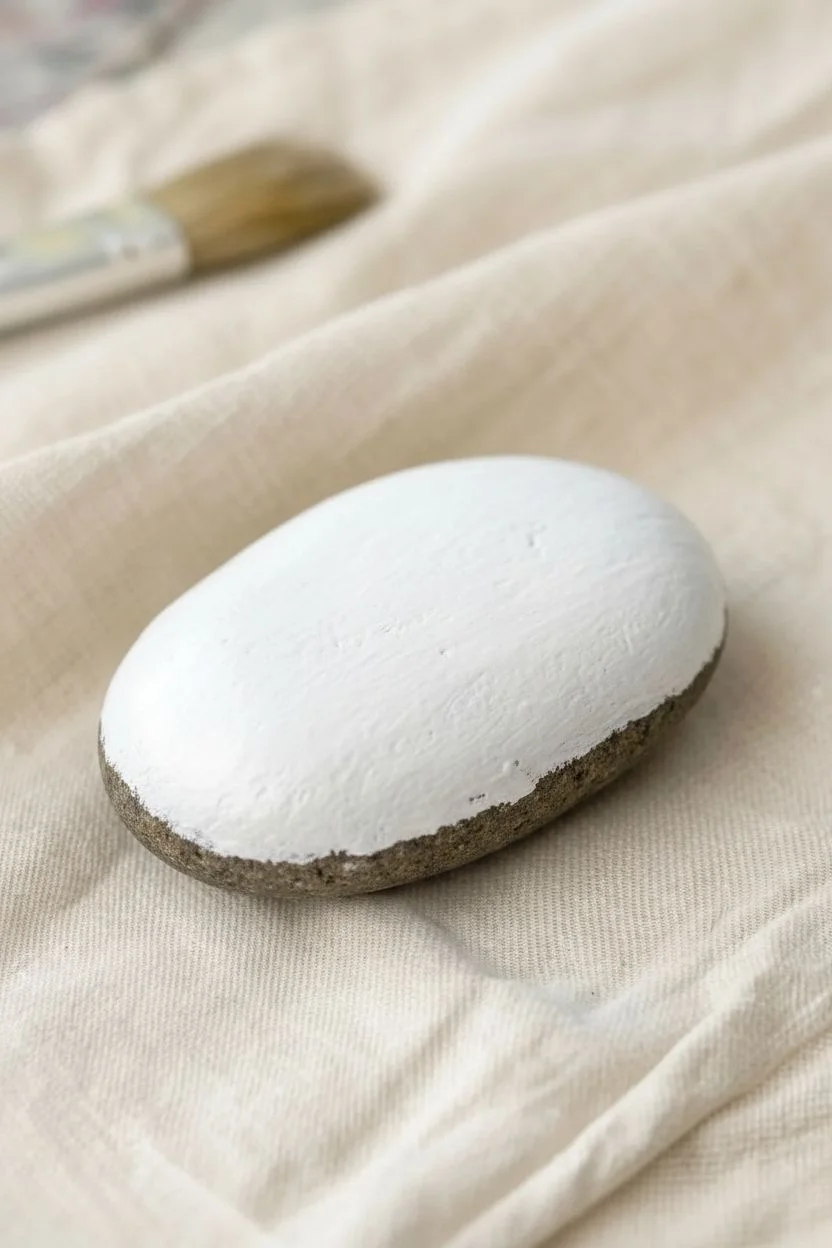
Transform a simple stone into a charming artist’s tool with this clever rock painting idea. By mimicking a messy, well-loved painter’s palette, you’ll create a colorful tribute to the art room that looks almost real enough to dip a brush into.
How-To Guide
Materials
- Smooth, oval-shaped river rock
- White acrylic paint (matte finish)
- Assorted acrylic craft paints (primary red, blue, yellow, green, burnt sienna)
- Medium flat paintbrush
- Small round detail brush
- Clear spray sealant (matte or satin)
Step 1: Preparing the Canvas
-
Clean the surface:
Begin by thoroughly washing your rock with warm soapy water to remove any dirt or oils. Let it dry completely before starting, as any moisture trapped inside can cause the paint to bubble later. -
Base coat application:
Using a medium flat brush, apply a generous coat of white matte acrylic paint over the entire top surface of the rock. -
Build opacity:
Since rocks are often dark, a single coat of white might look streaky. Allow the first layer to dry for about 15 minutes, then apply a second coat to ensure a solid, opaque white background. -
Smooth the texture:
If your brushstrokes are visible, you can dampen your brush slightly for the final white coat to help the paint self-level. Let this base dry fully—usually about 30 minutes—before adding colors.
Pro Tip: Texture is Key
For realistic raised paint blobs, mix your acrylics with a small amount of modeling paste or heavy gel medium. This holds the ‘peaks’ of the brushstrokes perfectly.
Step 2: Adding the Paint Dabs
-
Plan your palette:
Visualize where your color blobs will go. A real palette is random, so aim for an irregular arrangement around the perimeter and center, rather than a perfect circle. -
Start with the center blob:
Using a small round brush, pick up a generous amount of yellow paint. Create a large, elongated dab in the center of the rock. Don’t smooth it out too much; the texture of the paint adds realism. -
Add primary red:
Rinse your brush and switch to bright red. Place a medium-sized blob near the bottom edge. I like to press the brush down and wiggle it slightly to create that natural ‘squished paint’ shape. -
Introduce deep blue:
On the opposite side, lay down a patch of dark blue paint. Make this one slightly square or irregular to vary the shapes across your ‘palette’. -
Create a green accent:
Add a distinct blob of green paint near the bottom left area. Keep the paint thick so it maintains a raised 3D texture as it dries. -
Mix a lighter blue:
Mix a tiny bit of white into your blue paint to create a lighter, sky-blue shade. Add a streak of this near the top left, perhaps slightly overlapping a darker color or standing alone. -
Add earthy tones:
Use a burnt sienna or ochre color to add a dab near the top right. This subtle earth tone breaks up the bright primaries and makes the palette look more authentic. -
Layer for dimension:
To make the paint look wet and freshly squeezed, go back over the center of your larger blobs (like the yellow or red) with a second, thick dollop of paint once the bottom layer is tacky. -
Include accidental smudges:
Use a nearly dry brush with a tiny amount of grey or diluted color to create faint ‘dirty’ smudges on the white background between the main colors, implying a used surface.
Level Up: Realism
Paint a small, black thumb hole near one edge of the oval using black paint to simulate the grip hole found on traditional wooden art palettes.
Step 3: Finishing Touches
-
Dry thoroughly:
Because you applied the colored blobs thickly for texture, this project needs extra drying time. Leave it undisturbed for at least an hour or two. -
Seal the artwork:
Once fully dry, spray the rock with a clear matte or satin sealant. A glossy finish works too if you want the ‘paint’ to look permanently wet, but matte looks more like a dried palette.
Now you have a delightful piece of faux art supply decor that captures the creative spirit of the classroom

PENCIL GUIDE
Understanding Pencil Grades from H to B
From first sketch to finished drawing — learn pencil grades, line control, and shading techniques.
Explore the Full Guide
School Garden Marker Rocks for Classroom Plots

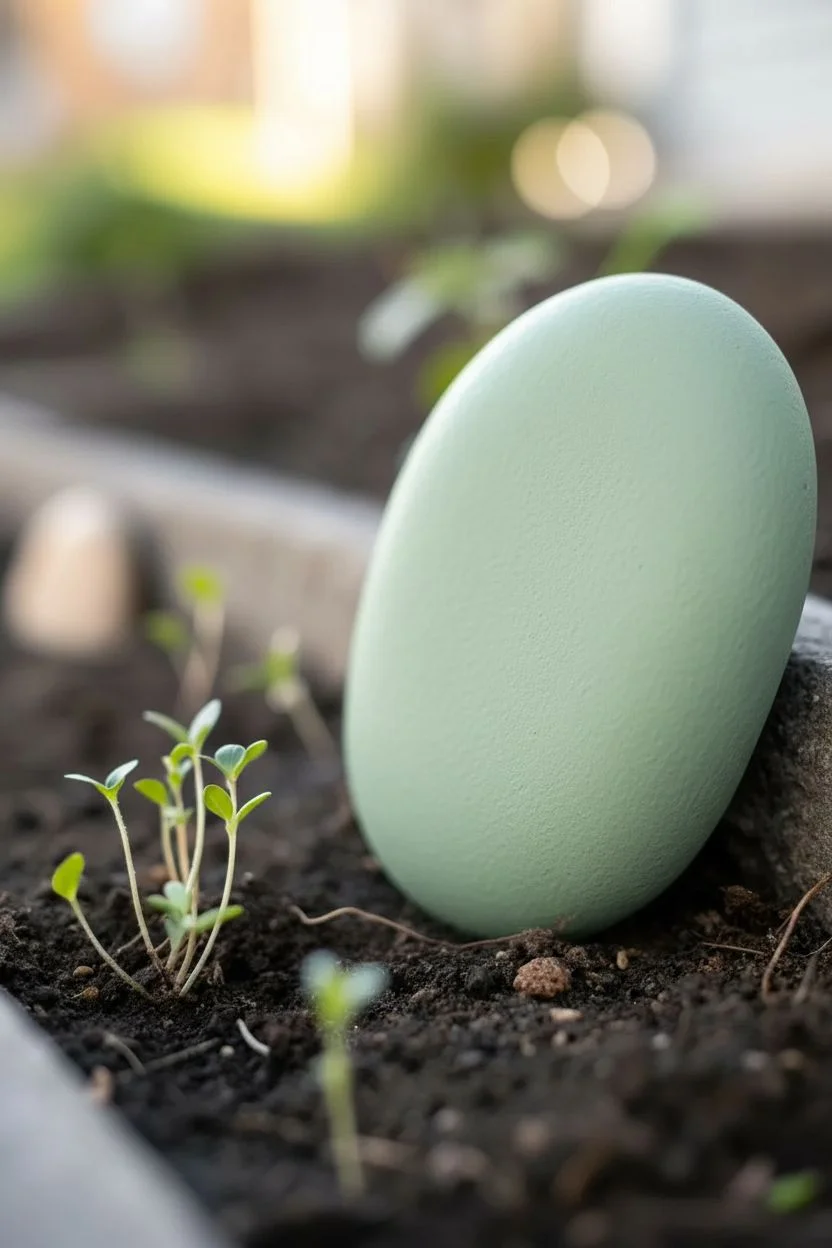
This elegant garden marker features stylized foliage in warm metallic copper and burnt orange tones against a soft sage green background. The smooth, matte finish gives it a sophisticated look that pairs beautifully with sprouting seedlings in a classroom garden plot.
Step-by-Step Tutorial
Materials
- Smooth, oval river rock (approx. 4-5 inches tall)
- Acrylic paint (sage green, dark copper/bronze metallic, light peach/gold)
- Fine grit sandpaper
- Flat paintbrush (medium size)
- Fine liner brush (size 0 or 00)
- Pencil
- Matte spray sealant or outdoor varnish
- Water cup and paper towels
Step 1: Base Preparation
-
Clean the Stone:
Begin by scrubbing your rock with warm soapy water to remove any dirt or oils that might prevent paint adhesion. Let it dry completely. -
Smooth the Surface:
If your rock has any rough patches, lightly sand them down with fine-grit sandpaper to create a better canvas for the detailed line work. -
Apply Base Coat:
Using a flat brush, paint the entire rock with a creamy sage green acrylic paint. Use long, even strokes to avoid texture. -
Second Coat:
Allow the first layer to dry for about 15-20 minutes. Apply a second coat of sage green to ensure full opacity, covering any speckles of the original stone color.
Brush Control Pro-Tip
For the crispest lines on the negative-space leaves, stabilise your painting hand against the table and hold the brush near the ferrule (the metal part), not the handle end.
Step 2: Sketching and Stems
-
Light Sketching:
Once the base is bone dry, use a pencil to very lightly sketch the main curved stem line rising from the bottom center toward the top right. -
Mark Leaf Positions:
Add small tick marks along the stem where your leaf clusters will go. I find it helpful to balance them by alternating sides as you move up the stem. -
Paint the Main Stem:
Load your fine liner brush with dark copper or bronze metallic paint. Carefully trace your stem line, keeping the pressure steady for a consistent thickness. -
Stem Clean Up:
If the line is shaky, wait for it to dry and gently touch up the edges with your sage green base color.
Step 3: Painting the Foliage
-
Outline Dark Leaves:
Using the dark copper paint, draw the outlines of the pointed, oval-shaped leaves on the upper right side of the stem. -
Create Negative Space:
Instead of filling these dark leaves in solidly, leave small, vein-like shapes unpainted in the center, letting the sage green background show through. -
Fill Dark Leaves:
Fill in the rest of the dark leaf shape around your negative space veins. The metallic paint should shimmer slightly. -
Draft Light Leaves:
Switch to a light peach or soft gold color. Sketch the outlines of the lobed, oak-like leaves on the lower left side of the stem. -
Fill Light Leaves:
Fill these lighter leaves in completely with the peach/gold paint. You may need two thin coats here, as lighter colors tend to be more transparent. -
Add Small Details:
At the very bottom, add a small, solitary dark leaf using the copper paint to anchor the design visually.
Troubleshooting Color
If your light peach leaves look streaky or dull against the green, paint a layer of white over the leaf shape first. Let it dry, then apply the peach color on top for vibrancy.
Step 4: Detailing and Sealing
-
Vein Work:
Once the peach leaves are dry, use your finest liner brush and the dark copper paint to draw delicate central veins and side branches on top of them. -
Speckling Effect:
For a natural stone look, dip an old toothbrush or stiff brush into watered-down black or dark brown paint. Run your thumb over the bristles to flick tiny speckles across the rock. -
Speckle Check:
Be sparing with the speckles; you want a subtle texture, not to cover your design. Wipe off any large drops immediately. -
Final Drying:
Let the entire rock dry overnight to ensure all paint layers are cured. -
Weatherproofing:
Since this belongs in a garden, apply two coats of clear, matte outdoor sealer or varnish to protect the artwork from rain and sun.
Place your finished marker in the soil to help students identify their growing plants


Have a question or want to share your own experience? I'd love to hear from you in the comments below!