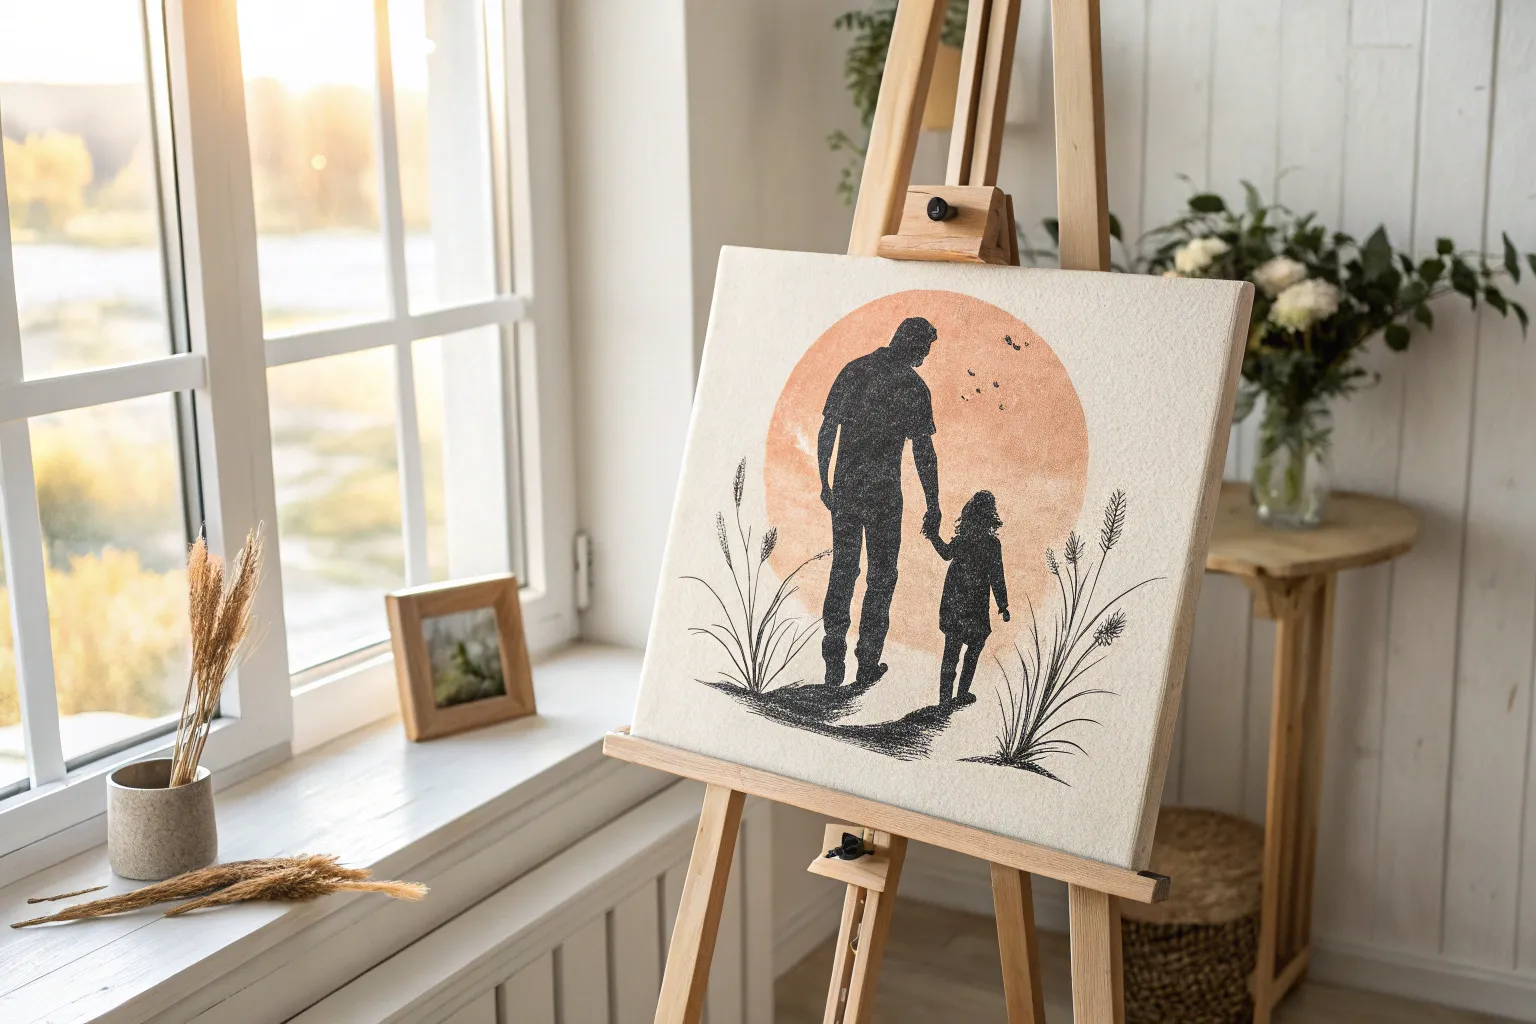
If you want a gift that feels personal (and actually looks great on the wall), Father’s Day canvas painting is such a sweet way to say “I see you, Dad.” Here are my favorite ideas—starting with the classics everyone loves, then drifting into some creative, artsy twists you can totally make your own.
“Dad, My Hero” Simple Badge Design
Celebrate your personal hero with this clean, graphic canvas art that mimics a classic prize ribbon. The design features a bold denim-blue centerpiece with elegant typography, framed by a soft patterned scalloped edge, making it a sophisticated yet heartfelt gift for Father’s Day.
Detailed Instructions
Materials
- Square white canvas (12×12 or similar)
- Acrylic paint (Deep Navy Blue, Metallic Gold, Off-White/Cream, Light Gray-Blue)
- Assorted brushes (1-inch flat, fine liner, small angled)
- Pencil and eraser
- Compass or round object for tracing
- Ruler
- Painter’s tape
- Scalloped edge scissors or a scalloped stencil (optional)
- Cardstock (for making stencils)
- Carbon transfer paper (optional)
Step 1: Planning and Base Layers
-
Prepare the canvas:
Start with a clean white canvas. If you want a smoother surface for lettering, apply a coat of gesso and sand it lightly once dry. -
Draft the center circle:
Use a compass or trace a medium-sized bowl to draw a perfect circle in the upper center of the canvas. This will be the main body of the badge. -
Create the scallop guide:
Draw a larger circle around the first one, leaving about a 1-inch border. Inside this border, sketch a scalloped edge pattern. Creating a small cardboard template for a single scallop hump helps keep them uniform all the way around. -
Sketch the ribbons:
Using a ruler, draw two wide ribbon tails extending downwards from the bottom of the circle. Angle them slightly outward and add a V-shape cut at the bottom of each ribbon end.
Step 2: Painting the Badge
-
Paint the scallop border:
Mix a light gray-blue color. Carefully paint the scalloped border area. To mimic the fabric-like texture seen in the photo, you can dab the paint with a dry sponge or stiff brush rather than stroking it on smoothly. -
Add the border pattern:
Once the gray-blue base is dry, use a very fine brush or a white paint pen to add small, repetitive dot patterns or hatching over the scalloped area to give it a textured, printed look. -
Paint the center circle:
Fill in the inner circle with your deep navy blue acrylic. Apply two coats to ensure a solid, opaque finish that contrasts well with the lettering later. -
Outline the gold rim:
Use metallic gold paint and a steady hand or a fine liner brush to paint a thin ring separating the navy circle from the scalloped border. -
Paint the ribbons:
Fill in the ribbon shapes with the same deep navy blue used for the center circle. Let this dry completely before moving to details.
Wobbly Lines?
If painting the gold circles or text feels shaky, switch to a metallic gold extra-fine tip paint marker. It offers much more control than a brush.
Step 3: Lettering and Details
-
Draft the text:
Lightly sketch ‘DAD, MY HERO’ onto the navy circle. Use a serif font style for ‘DAD’ and ‘HERO’ and a script style for ‘MY’ to match the design. This is where carbon paper is helpful if you aren’t confident freehanding. -
Paint the lettering:
Using an off-white or cream paint and your smallest liner brush, carefully fill in the letters. You may need a second coat on the white paint to make it pop against the dark blue. -
Add script flourishes:
For the word ‘MY’ and the decorative swirls, mix a little gold into your cream paint or use pure gold for a subtle shine. Carefully paint the thin, curving lines extending from the text. -
Detail the ribbons:
Paint a thin line of metallic gold down both vertical edges of the ribbon tails. This mimics the gold stitching often found on prize ribbons. -
Add ribbon texture:
Mix a slightly lighter shade of navy (by adding a drop of white to your base blue) and dry-brush faint vertical streaks onto the ribbons. This simulates the vertical grain of grosgrain ribbon. -
Clean up edges:
Use white paint to touch up the background canvas around the badge if any blue strayed outside your lines. -
Final varnish:
Once absolutely everything is dry, apply a matte or satin varnish to protect the painting and unify the sheen of the different paint types.
Add Real Texture
Instead of painting the scalloped background, cut a piece of actual patterned scrapbooking paper or fabric and decoupage it onto the canvas before painting the center.
Now you have a timeless tribute art piece ready to hang in Dad’s office or garage


Backyard Grill Dad Still Life
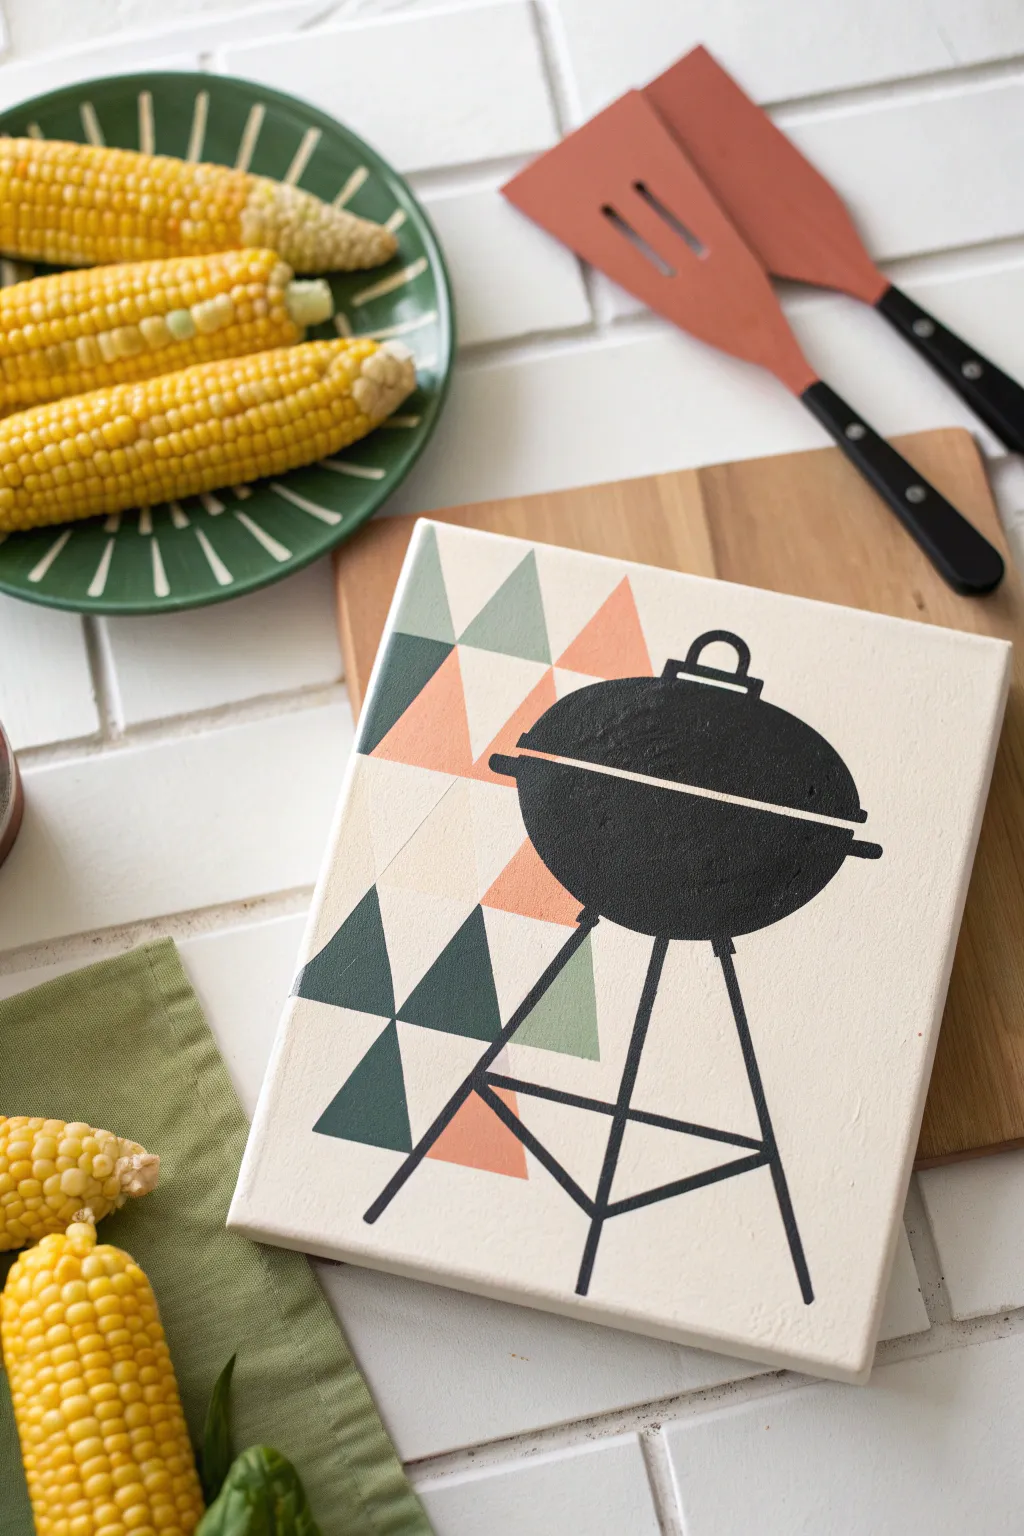
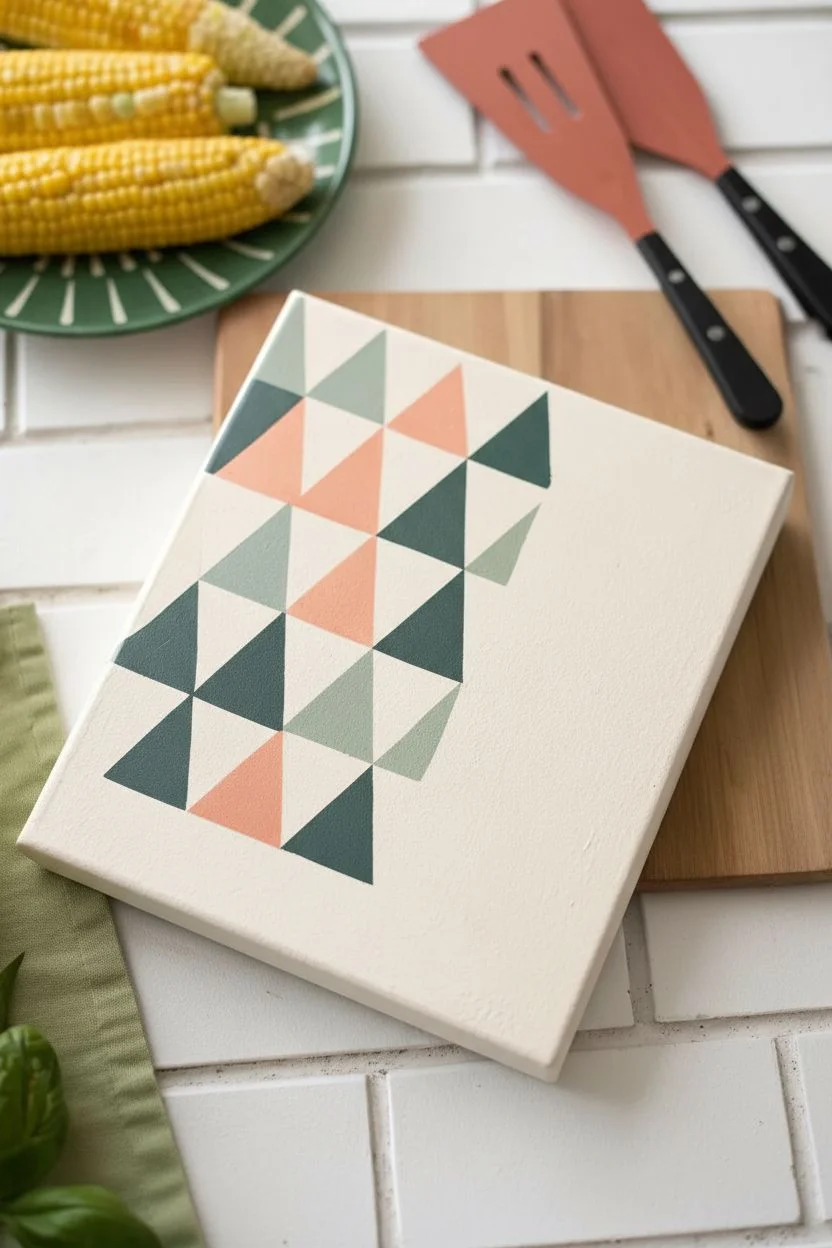
Celebrate the king of the barbecue with this modern, graphic canvas art. Combining a trendy geometric background with a bold grill silhouette, this project strikes the perfect balance between artistic flair and masculine design.
Step-by-Step Tutorial
Materials
- Small rectangular canvas (e.g., 8×10 or 9×12)
- Acrylic paints: Black, Cream/Off-White, Peach/Coral, Sage Green, Dark Green
- Painter’s tape or masking tape (approx. 1 inch width)
- Flat paintbrushes (medium and small sizes)
- Fine liner brush
- Pencil
- Ruler
- Carbon paper (optional)
- Printed grill silhouette template (optional)
Step 1: Preparing the Background
-
Base coat:
Begin by painting the entire surface of your canvas with a coat of cream or off-white acrylic paint. This ensures a uniform background color and helps the other colors pop. Extend the paint around the edges for a finished look. -
Triangle layout:
Once the base coat is completely dry, use a ruler and pencil to lightly draw a grid of triangles on the left side of the canvas. You don’t need to cover the whole canvas; focus on the area where the pattern will sit behind the grill. -
Masking tape application:
To get crisp lines, apply painter’s tape along the pencil lines of your first set of triangles. You won’t be able to tape every triangle at once because the tape strips will overlap the wet paint of neighbors. -
First color pass:
Select a few triangles to paint with your peach/coral shade and others with your sage green. Apply the paint firmly, brushing away from the tape edge to prevent bleeding. -
Second color pass:
Carefully peel off the tape while the paint is still slightly tacky. Let these triangles dry fully before taping off the adjacent shapes. Repeat the process with the dark green and remaining colors until your geometric pattern is complete.
Step 2: The Grill Silhouette
-
Drafting the design:
Using a pencil, lightly sketch the grill silhouette over your dried background. The main body is a flattened oval shape with a lid. If you aren’t confident in freehand sketching, print a silhouette image and transfer it using carbon paper. -
Outlining the body:
Load a small flat brush with black acrylic paint. carefully outline the main bowl and lid of the grill. I like to steady my hand on a dry part of the canvas to keep the curve smooth. -
Filling the form:
Fill in the large oval shape of the grill body with solid black paint. You may need two coats to achieve total opacity, especially where the black overlaps the geometric triangles. -
Creating the gap:
Leave a thin horizontal line of negative space (the cream background color) between the lid and the bowl to define the opening. If you accidentally paint over it, just paint a thin cream line back in later. -
Adding the handle:
Paint a small, arched rectangle on top of the lid for the handle. Keep the lines straight and boxy for that classic grill look. -
Side handles:
Add small rectangular tabs on the left and right sides of the main bowl to represent the side handles or hinges.
Bleeding Lines?
If paint seeps under your tape, wait for it to run completely dry. Then, take a small brush with your base cream color and carefully paint over the bleed to straighten the edge.
Step 3: Legs and Details
-
Drafting the legs:
Use a ruler to lightly pencil in the tripod leg structure. The front two legs should angle outward, while the back leg sits slightly between them. -
Lining the legs:
Switch to your fine liner brush or a very thin flat brush. With black paint, trace over your pencil lines to create the legs. Aim for a consistent width for all three supports. -
Cross-bracing:
Paint the horizontal triangular brace that connects the legs near the bottom. This adds realism and structural integrity to the design. -
Final touches:
Check your edges. If the black paint looks sketchy or uneven, go back with the liner brush to crisp up the silhouette. Use a touch of the cream base paint to clean up any smudges on the background. -
Protecting the art:
Allow the black paint to cure for at least 24 hours. Once fully dry, consider adding a clear matte varnish to protect the surface from dust and fading.
Sharper Geometric Shapes
Before painting the color, seal the tape edge by painting a thin layer of the *base* color over it. This blocks gaps so the colored paint can’t sneak underneath.
This stylish tribute to dad’s grilling skills is ready to be wrapped or displayed on the kitchen shelf


Minimalist “Things I Love About Dad” Icon Row
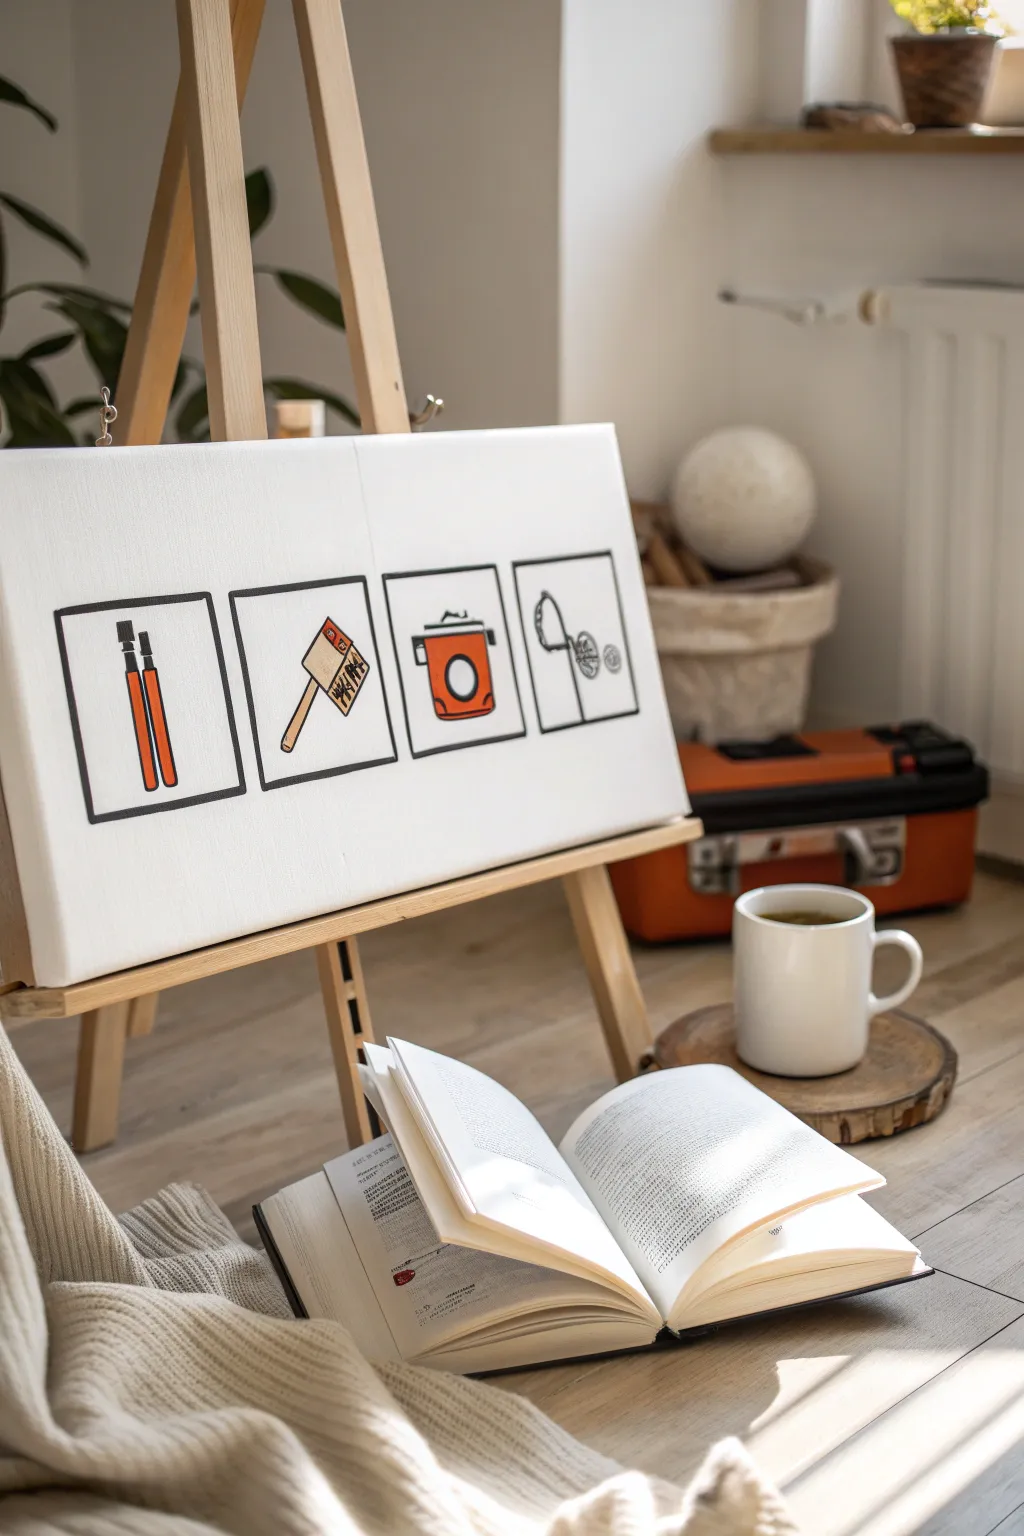
Celebrate Dad’s favorite hobbies with this clean, modern canvas featuring a row of custom icons. The bold black outlines and punchy orange accents create a striking graphic look that feels personal yet professional.
Step-by-Step Guide
Materials
- Rectangular stretched canvas (e.g., 12×24 inches)
- Pencil and eraser
- Ruler or T-square
- Black acrylic paint or Posca paint markers (medium and fine tip)
- Orange acrylic paint
- Light beige or wood-tone acrylic paint
- Flat shader brush (size 6 or 8)
- Round detail brush (size 0 or 1)
- Painter’s tape (optional)
- Black permanent marker (ultra-fine for touch-ups)
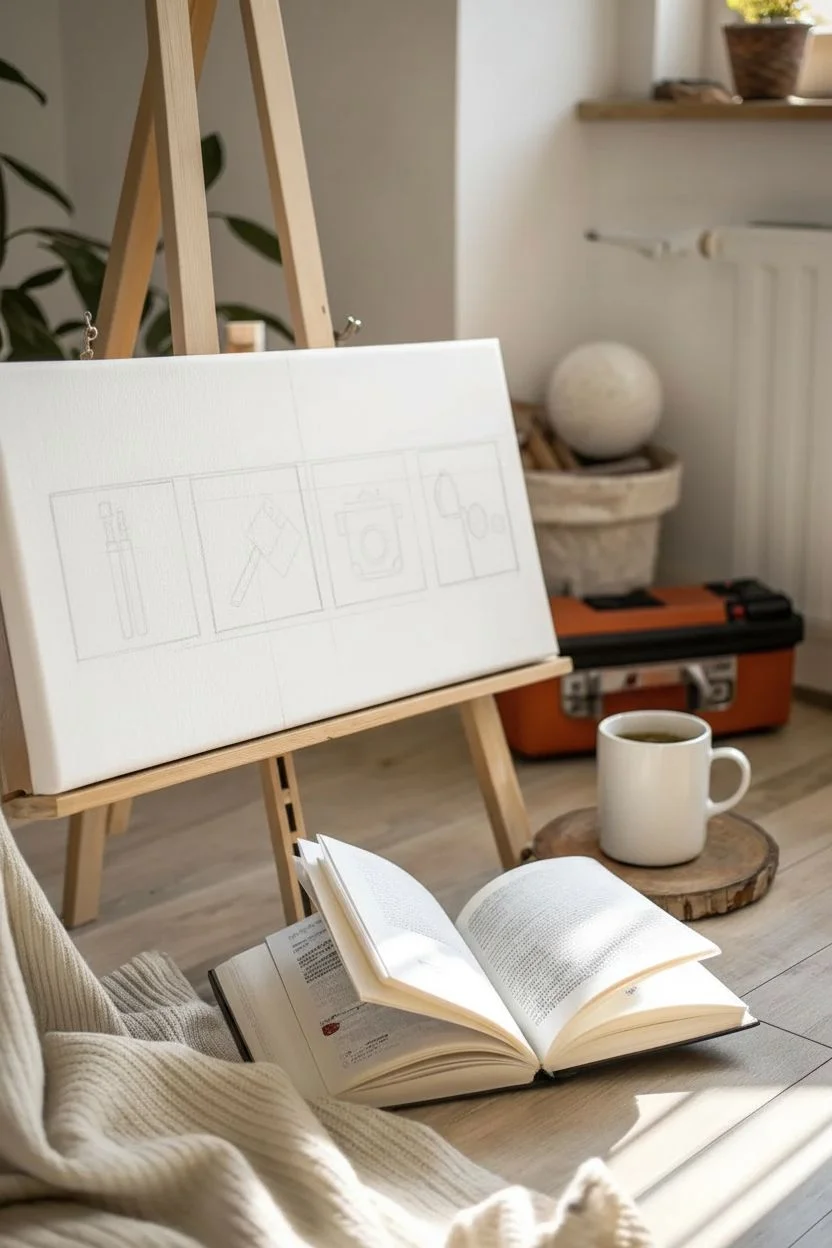
Step 1: Planning the Layout
-
Measure and mark:
Begin by finding the horizontal center line of your canvas using a ruler. Lightly mark this line with a pencil to serve as your guide. -
Map the squares:
Measure four equal squares across the canvas. Leave equal spacing between them—about 1 to 1.5 inches usually looks balanced. Ensure the outer margins on the left and right are symmetrical. -
Outline the boxes:
Using your T-square for perfectly straight lines, draw the four squares lightly in pencil. These boxes will frame your icons. -
Sketch the icons:
Inside each box, lightly sketch a simplified symbol representing one of Dad’s interests. For this project, sketch vertical pliers, a hammer/mallet, a camera or toolbox, and a fishing loop or reel. Keep shapes basic and geometric.
Straight Talk
Use painter’s tape to mask off the four outer squares before painting the black borders. It guarantees sharp, professional corners without needing a supersteady hand.
Step 2: Adding the Color
-
Paint the orange tools:
Start with the orange acrylic paint. Use your size 6 flat brush to fill in the handles of the pliers in the first box. Apply two coats if the orange is semi-transparent. -
Fill the camera body:
Move to the third box and paint the main body of the camera or toolbox icon solid orange. Be careful to stay within your pencil guidelines. -
Add wood tones:
Switch to the beige paint. Use the flat brush to fill in the handle of the hammer in the second box. This subtle neutral tone helps break up the strong orange color. -
Paint detail accents:
If your fishing icon in the fourth box has a float or handle, apply a small dab of the beige or orange paint as needed. Let all colored sections dry completely before moving to the outlines.
Step 3: Outlining and Defining
-
Outline the main frames:
Using a medium-tip black paint marker or a steady hand with black paint and a flat brush, trace over the four main square borders. Make these lines thick and confident—they ground the entire design. -
Outline the tools:
Switch to a finer brush or fine-tip paint marker to outline the orange pliers. Add the black metallic heads to the top of the handles. -
Define the hammer:
Outline the hammer handle and head. Use the marker to draw rough ‘bristle’ lines or wood grain texture on the hammer head to give it a schematic look. -
Detail the camera:
Outline the orange camera box. Draw a bold white circle in the center first (if you haven’t painted around it), then outline it in black for the lens. Add small black rectangles for buttons. -
Sketch the fishing gear:
For the fourth box, use a very fine liner brush or pen to draw the thin, looping line of the fishing wire and the reel mechanism. This line should be more delicate than the heavy box borders.
Make It Interactive
Instead of painted icons, leave the squares blank and glue on actual small physical mementos, like a spare key, a guitar pick, or a scrabble tile.
Step 4: Cleaning Up
-
Erase guidelines:
Once you are absolutely certain the black paint is 100% dry, gently run a clean eraser over the canvas to remove any visible pencil marks. -
Crisp up edges:
If any orange paint bled outside the lines, use a small amount of white paint (or gesso) to carefully cover the mistake and sharpen the edges.
Hang this personalized tribute on the wall and enjoy the modern, schematic art you’ve created for Dad


Custom Dad Portrait With a Soft Background Wash

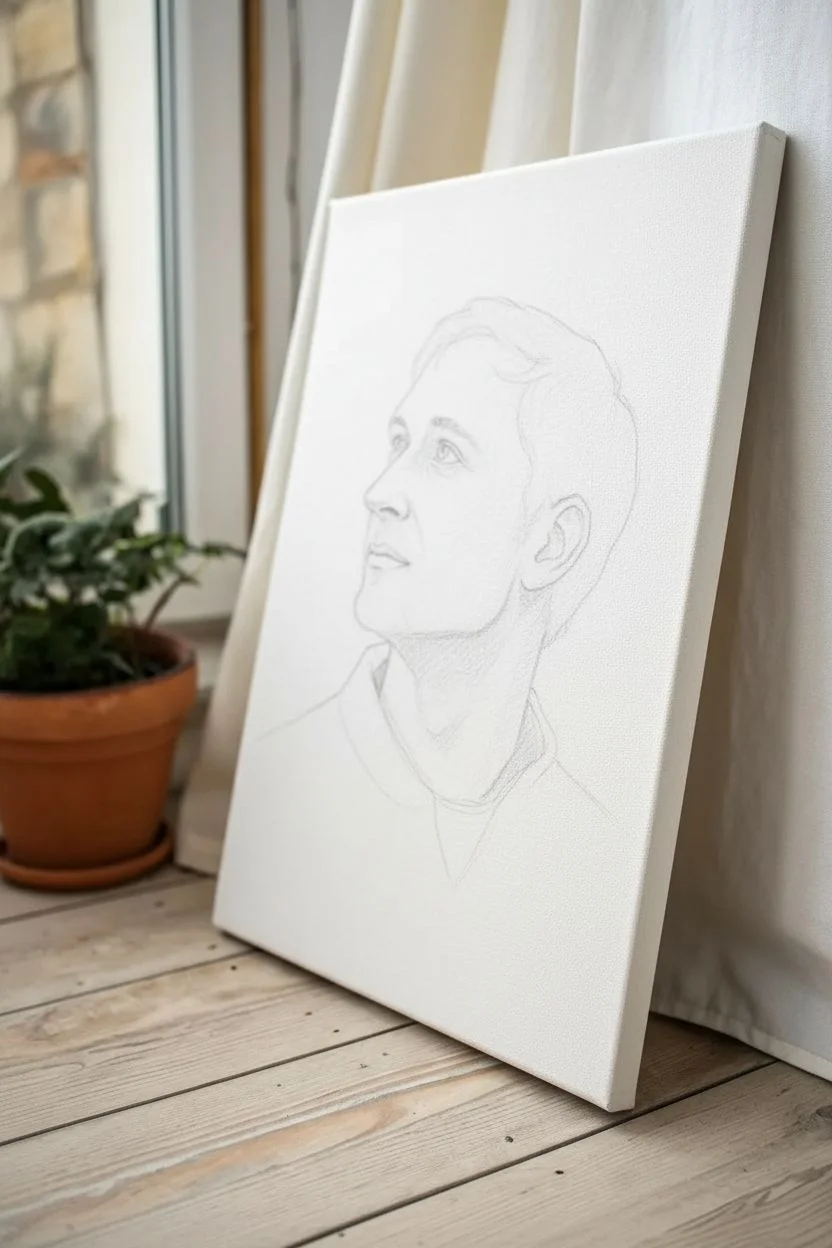
Capture Dad’s thoughtful side with this gentle, semi-realistic portrait painted on a stretched canvas. The combination of precise facial details with a loose, washed-out background creates a timeless, heirloom-quality piece perfect for Father’s Day.
Step-by-Step Tutorial
Materials
- Stretched canvas (primed for watercolor or absorbent ground applied)
- Watercolor paints or fluid acrylics
- Watercolor ground (if using standard canvas)
- Set of soft synthetic brushes (Sizes 0, 2, 6, and a flat wash brush)
- HB pencil for sketching
- Kneaded eraser
- Reference photo of Dad in profile
- Palette for mixing
- Two jars of water
- Paper towels
Step 1: Preparation & Sketching
-
Prime the Surface:
Since standard canvases repel water, apply three thin coats of watercolor ground (absorbent ground) to your canvas. Let each layer dry completely and lightly sand between coats for a smooth, paper-like finish. -
Establish the Head Shape:
Using your H pencil, lightly sketch a simple oval for the head and a cylinder for the neck. Place the head slightly off-center to leave ‘looking room’ in the direction of his gaze. -
Map Facial Features:
Draw the profile line carefully. Mark the position of the ear, which aligns roughly with the nose and eyebrow line. This anchor point is crucial for getting the proportions right. -
Detail the Portrait:
Refine the sketch, adding the eye, nose bridge, lips, and hair flow. Keep your pencil lines light; watercolor is transparent, and heavy graphite will show through later. -
Lighten the Sketch:
Roll your kneaded eraser gently over the entire sketch. You want the lines to be barely visible—just ghost guides for your brush.
Step 2: Painting Skin Tones
-
Mix Your Base Tone:
Create a pale skin wash using Yellow Ochre, a touch of Alizarin Crimson, and plenty of water. Test the color on a scrap paper first. -
First Wash:
Apply this pale wash over the face and neck, carefully avoiding the white of the eye and the highlight on the nose bridge. -
Build Shadows:
While the first layer is still slightly damp, drop in a slightly darker mix (add a tiny bit of Burnt Sienna or faint blue) under the chin, inside the ear, and in the eye socket. -
Adding Warmth:
Introduce a little more red into your mix for areas with more blood flow, specifically the cheek, the ear lobe, and the nose tip. -
Facial Hair Texture:
If Dad has stubble or a beard, use a stippling motion with a semi-dry brush and a cool grey-brown mix to suggest texture without painting every single hair.
Pro Tip: Lifting Out
Make a mistake? Since canvas grounds lift easier than paper, you can use a clean, damp stiff brush to ‘scrub’ away pigment and reclaim highlights.
Step 3: Defining Features & Hair
-
The Eye:
Use your smallest brush (size 0) to paint the iris. Leave a tiny speck of white paper for the catchlight to bring the eye to life. -
Deepening Shadows:
Mix a darker brown for the deepest creases—the nostril, the line of the mouth, and the area behind the ear. Apply sparingly. -
Hair Base Layer:
Start the hair with a light wash of the lightest hair color (e.g., Raw Sienna or Yellow Ochre). Follow the direction of hair growth with your strokes. -
Hair Strands:
Once the base is dry, use a size 2 brush with a darker brown to flick in individual strands. Focus on the shadow areas and the ends of the hair clumps.
Level Up: Metallic Glaze
Once fully dry, add a touch of gold leaf or metallic watercolor to the background wash for a subtle shimmer that catches the sunlight.
Step 4: Clothing & Background
-
Clothing Wash:
Paint the shirt loosely. Use a very pale grey or blue wash, keeping the edges soft. I like to leave plenty of white canvas showing here to keep the focus on the face. -
Background Prep:
Wet the background area around the head with clean water, being careful not to touch the dry portrait. -
Apply Background Color:
Drop in soft greens, teals, or warm yellows into the wet area. Let the colors bleed and bloom naturally creates that dreamy, atmospheric look. -
Final Adjustments:
Step back and assess contrast. If the face looks too pale against the background, glaze a very thin layer of warmth over the shadowed side of the face.
Allow the painting to cure for at least 24 hours before spraying with a UV-resistant fixative to protect your beautiful work
BRUSH GUIDE
The Right Brush for Every Stroke
From clean lines to bold texture — master brush choice, stroke control, and essential techniques.
Explore the Full Guide
Kids’ Scribble Background With Clean “Dad” Overlay
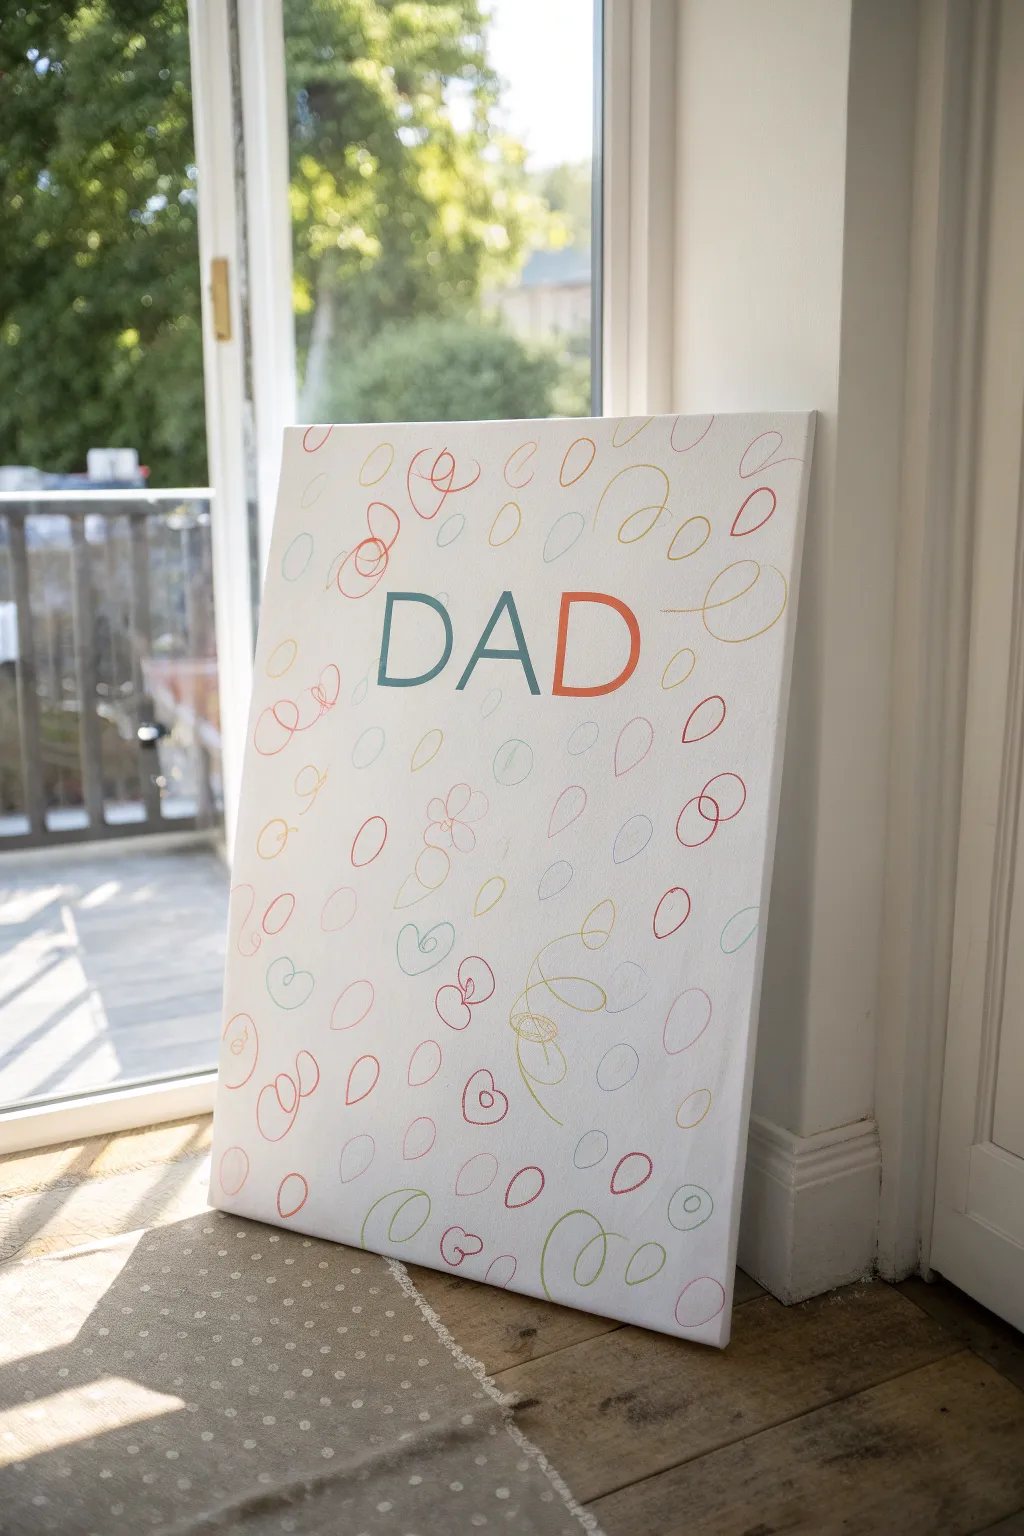
This project transforms childlike scribbles into a sophisticated piece of modern art that any father would be proud to display. By using a vinyl resist technique or careful layering, you create a crisp, clean “DAD” focal point against a playful, abstract background of loops and swirls.
Detailed Instructions
Materials
- Rectangular stretched canvas (e.g., 16×20 inches)
- Adhesive vinyl sheets or painter’s tape
- Cutting mat and craft knife (or a digital cutting machine)
- Acrylic paints (white, teal, orange, muted blue)
- Fine-tip paint markers or colored pencils (pastels, oranges, soft blues, greens)
- Clear matte acrylic sealer spray
- Large flat paintbrush
- Sponge brush
- Ruler
Step 1: Preparation & Lettering
-
Prepare the canvas:
Start with a clean, white canvas. If your canvas isn’t bright white, give it a quick base coat of white acrylic paint to ensure a smooth, even surface for the later steps. -
Design the text stencil:
Create your “DAD” stencil. You can do this by printing the letters in a large, clean sans-serif font onto copy paper to use as a template, or design it in software if using a digital cutter. -
Cut the letters:
Cut the letters out of adhesive vinyl. We want the positive space (the letters themselves) to stick to the canvas, acting as a mask. If you don’t have vinyl, wide painter’s tape works perfectly for simpler block letters. -
Position the text:
Measure the center of your canvas to ensure perfect alignment. Place your vinyl letters firmly onto the white canvas. Rub the edges down securely so no paint can bleed underneath later. -
Seal the edges:
Lightly brush a tiny amount of white paint over the edges of the vinyl letters. This clever trick seals the stencil; if any paint bleeds under, it will be white and invisible.
Step 2: Creating the Background
-
Color selection:
Choose a palette of 5-6 colors for the scribbles. The example uses soft oranges, pale yellows, muted teals, and light pinks. Avoid dark, muddy colors to keep the look fresh. -
The scribble phase:
This is the fun part where kids can help. Using fine-tip paint pens or acrylic markers, start drawing loops, circles, squiggles, and teardrop shapes all over the canvas. -
Overlap the text:
Ensure you scribble directly *over* the vinyl letters. This is crucial—you want the pattern to hug the shape of the word so that when you peel the sticker away, the negative space is clearly defined. -
Keep it light:
Maintain a sense of airiness by leaving plenty of white space between the loops. We want a delicate texture, not a solid wall of color. -
Dry check:
If using paint pens, let the scribbles dry for about 10-15 minutes. They need to be fully set before we move to the background wash. -
Alternative background (optional):
If you prefer the clean look in the photo where the letters are colored and the background is just white with scribbles, you can skip a background wash. However, for the specific style shown where the letters are colored, we actually reverse the process in the next phase.
Bleeding Edges?
If paint bled under your stencil, wait for it to dry fully. Then, scrape the excess gently with an X-Acto knife or touch it up with a tiny brush and the background color.
Step 3: The “Reverse” Method (Specific to Image)
-
Correcting the approach:
Looking closely at the specific image, the letters are solid colors (teal and orange) and the background is white. To achieve exactly this, we need to paint the letters *first*. -
Paint the letter zones:
Remove the vinyl stickers you thought about using earlier—we are changing tactics to match the photo exactly! Instead, paint a large teal block in the center-left and a large orange block in the center-right where the letters will go. -
Apply the reverse stencil:
Once those color blocks are 100% dry, apply vinyl letters outlining “DAD” on top of the painted areas. This covers the colorful letters and protects them. -
Whiteout layer:
Paint the entire canvas white, covering your colored blocks and the vinyl stickers. You may need two coats to fully hide the teal and orange paint underneath. -
Scribble time:
Once the white top coat is dry, draw your colorful scribbles, loops, and circles over the white surface using your paint pens or colored pencils. -
Reveal the text:
Carefully find the edges of your vinyl letters buried under the white paint. Gently peel them away to reveal the clean, solid teal and orange letters underneath the white layer. -
Touch ups:
If any white paint has jagged edges around the letters, use a very fine brush and a tiny bit of water to smooth it out, or tough up the colored letter with leftover paint.
Pro Tip: Sheerness
For the scribbles, use high-quality colored pencils instead of paint markers. This adds a lovely texture and feels more like an authentic ‘sketch’ on the canvas.
Step 4: Finishing Touches
-
Sealing the art:
Take the canvas to a well-ventilated area. Spray a light, even coat of clear matte acrylic sealer over the entire piece. -
Final dry:
Let the artwork dry completely overnight before gifting it to ensure the sealer is non-tacky and durable.
This playful yet polished masterpiece is now ready to brighten up Dad’s office or the hallway wall.


Have a question or want to share your own experience? I'd love to hear from you in the comments below!