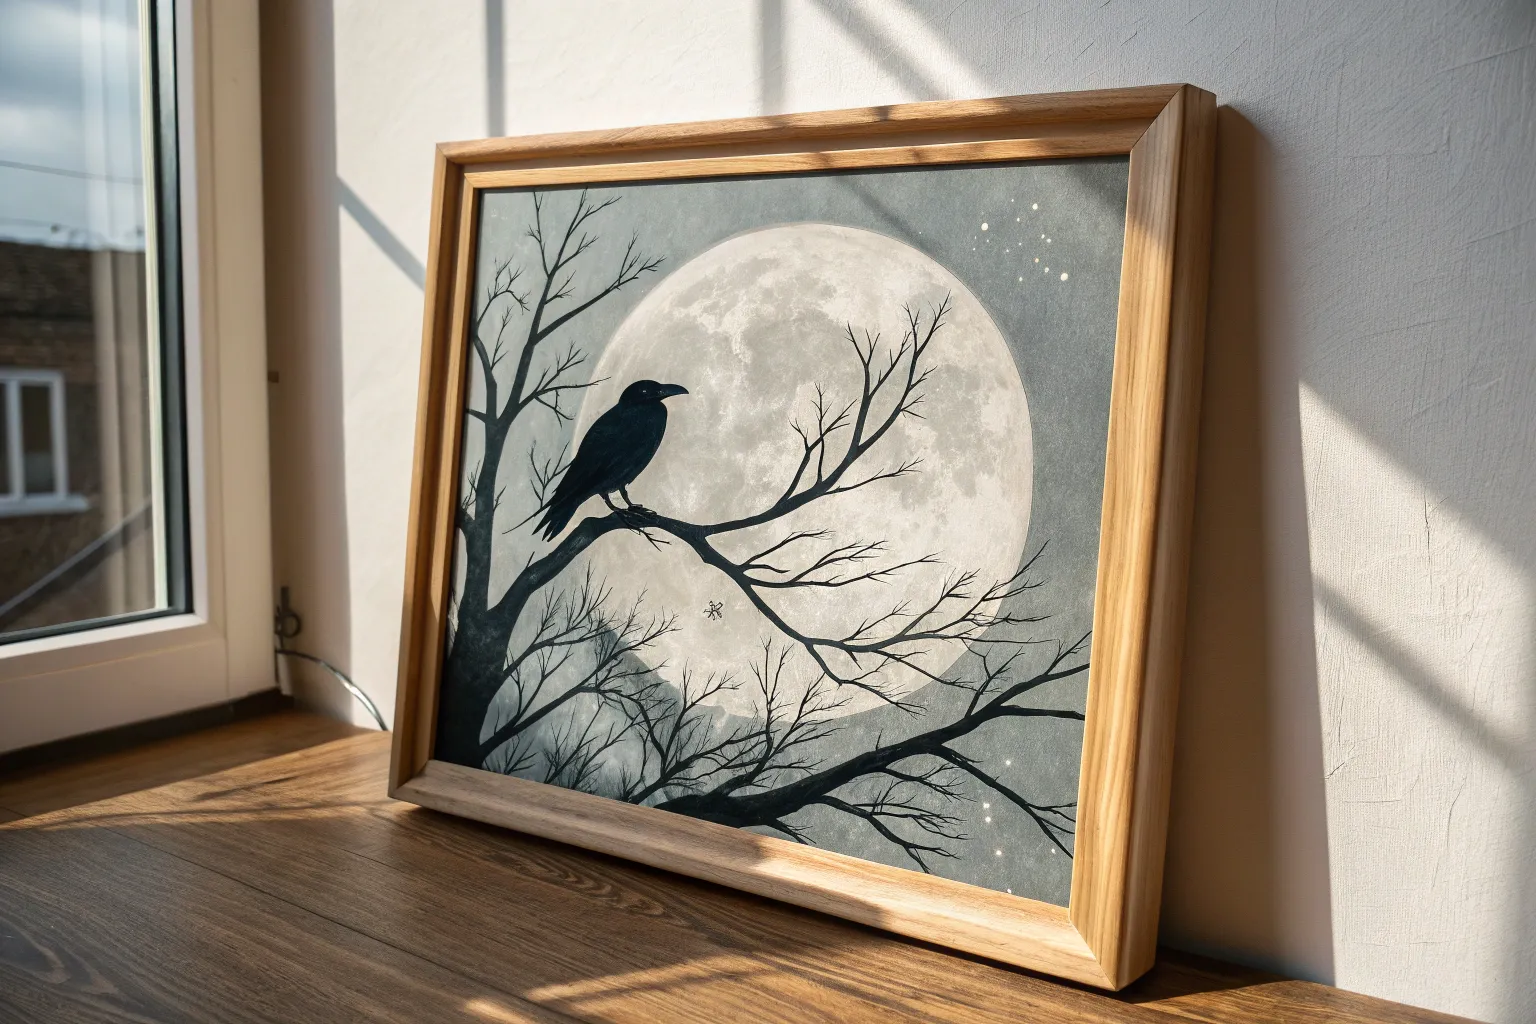
Whenever I’m in the mood to paint something dark and moody, I reach for gothic imagery because it instantly gives you drama, mystery, and that romantic little shiver. These ideas are all about atmosphere, bold silhouettes, and spooky-beautiful details you can make totally your own.
Moonlit Gothic Castle Silhouette
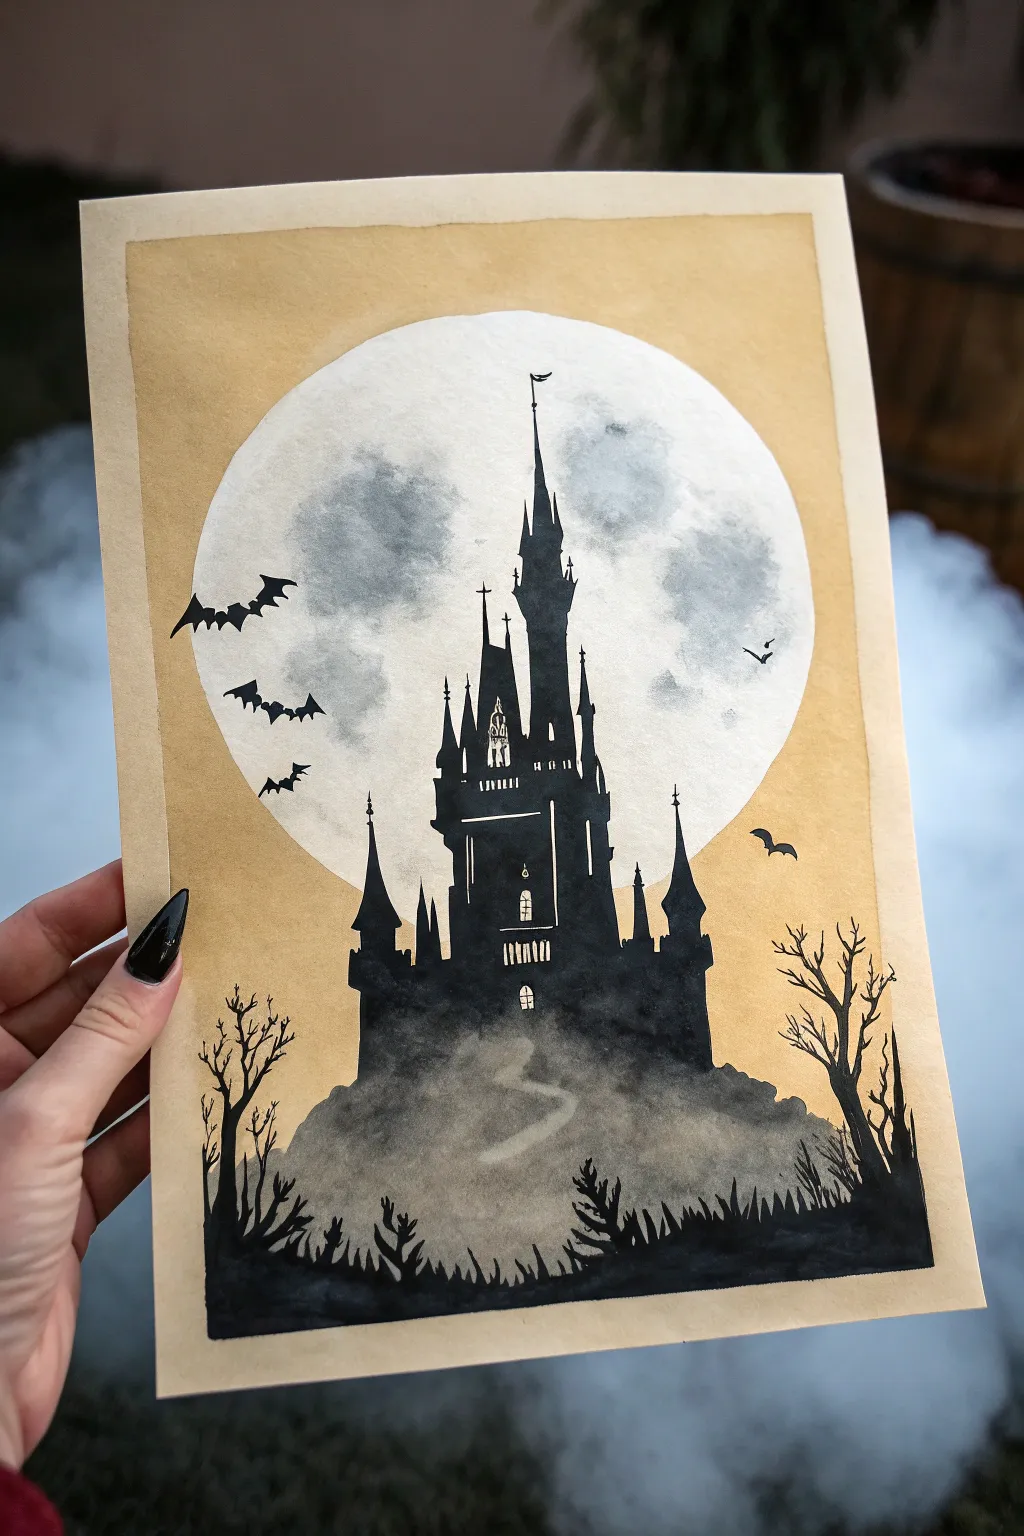
Capture the spooky allure of a dark fantasy tale with this high-contrast silhouette painting. Using a limited palette on toned paper allows the stark black castle and glowing moon to pop with minimal effort but maximum drama.
How-To Guide
Materials
- Tan or beige toned watercolor paper (or mixed media paper)
- Black waterproof ink or heavy body acrylic paint
- White gouache or white ink
- Graphite pencil (HB) and eraser
- Compass or circular object (for tracing)
- Fine liner brushes (sizes 0 and 00)
- Small flat brush (size 4 or 6)
- Round watercolor brush (size 6 or 8)
- Masking tape (optional for borders)
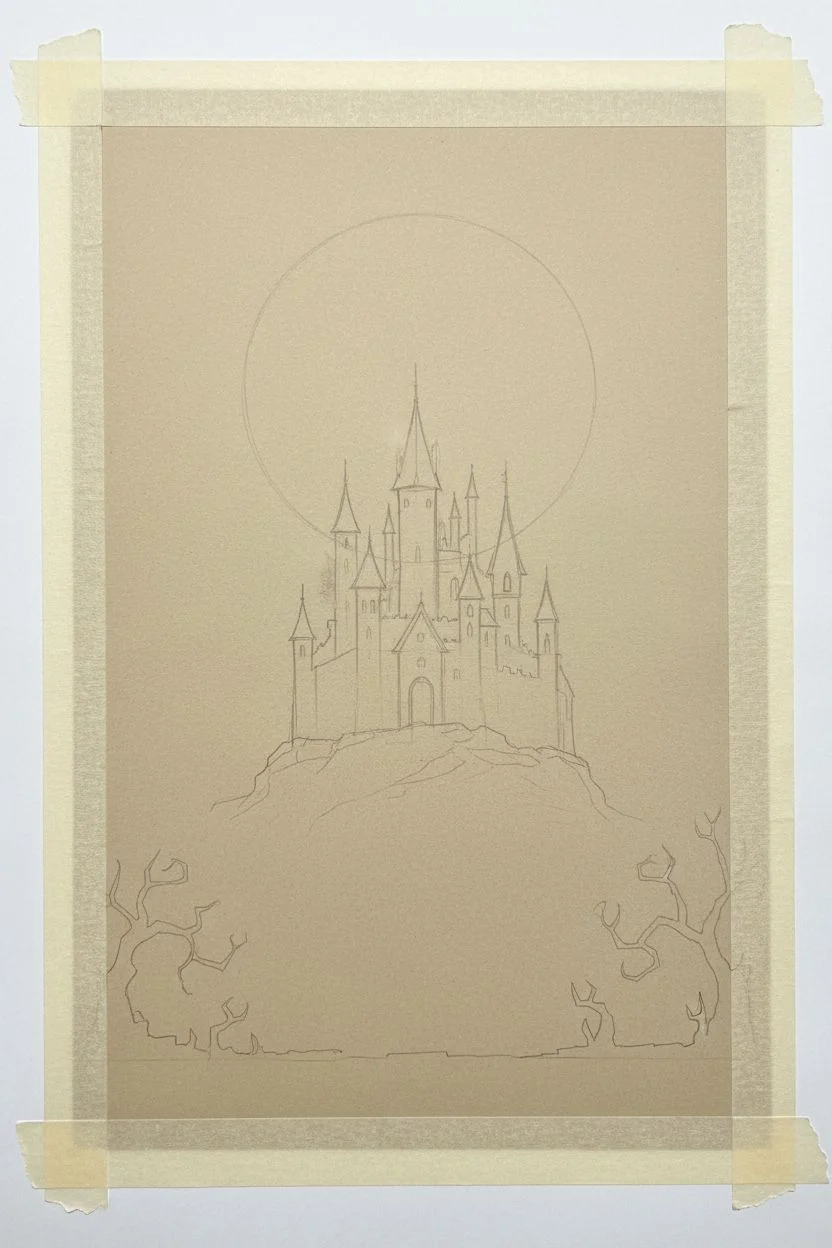
Step 1: Setting the Scene
-
Tape the borders:
If you want the crisp, framed look shown in the reference, begin by taping down a rectangle in the center of your paper. Leave about an inch of border space all around to create that inner frame effect later. -
Draft the moon:
Position your compass or circular object in the upper center of the composition. Lightly trace a large circle with your graphite pencil. This will be the focal point and light source. -
Sketch the silhouette:
Using very faint lines, sketch the outline of the castle within the lower half of the moon circle. Focus on varying heights for the towers and spires. The castle should feel tall and narrow. -
Add landscape elements:
Extend the sketch downwards to create a rocky hill base. Sketch in some jagged ground at the very bottom and place bare, twisting trees on the left and right flanks.
Step 2: The Lunar Glow
-
Fill the moon base:
Load your round brush with white gouache diluted slightly with water. Fill in the entire moon circle, carefully painting around your pencil sketch of the castle towers. It doesn’t need to be perfectly opaque yet. -
Create texture:
While the white is still damp, mix a tiny drop of black ink into a separate puddle of white to make a very pale grey. Dab this randomly onto the moon to create craters and surface texture. -
Refine the surface:
Add a few more dabs of pure white over the grey areas to soften the contrast. Let the moon layer dry completely before moving on—this is crucial so the black ink doesn’t bleed later.
Sharper Silhouettes
If your hand shakes while painting lines, try using a waterproof fine-tip drawing pen (0.5mm or 0.8mm) for the castle spires and tree branches instead of a brush.
Step 3: Inking the Darkness
-
Outline the towers:
Switch to your finest liner brush and black ink. Carefully trace the outline of your castle spires against the white moon. Keep your hand steady to get sharp, pointed roofs. -
Fill the castle body:
Using a slightly larger brush, fill in the main body of the castle with solid black. Ensure the coverage is opaque; you may need a second coat if using watercolor. -
Detail the windows:
Leave tiny rectangular or arched spaces unpainted to represent lit windows. If you accidentally paint over them, don’t worry—you can add them back later with white gouache. -
Paint the hill:
Below the castle, paint the rocky hill. Instead of solid black, use a watered-down wash of black ink here to create a foggy, translucent effect that fades into the foreground. -
Establish the foreground:
At the very bottom of the paper, use solid, undiluted black to paint the jagged grass and ground. This creates depth by separating the foreground from the foggy hill.
Spooky Fog Effect
Once the main black ink is dry, dilute a tiny drop of white gouache with lots of water. Glaze this over the bottom of the castle to make it look like it’s rising from mist.
Step 4: Atmospheric Details
-
Adding the trees:
Use your fine liner brush to paint the silhouettes of dead trees on the left and right sides. Make the branches crooked and spindly, reaching up towards the moon. -
The bat colony:
Paint small ‘m’ shapes or angular V-shapes in the sky on the left side to represent a flock of bats flying away from the castle. -
Window touch-ups:
I like to take a touch of white gouache on the tip of a detail brush and refine the windows, adding small crossbars or arch details to make them look architectural. -
The misty path:
With a very dilute white glaze, paint a winding, S-shaped path leading up the foggy hill to the castle gate. It should be subtle and barely visible. -
Final border:
Remove your tape carefully. To get the painted border look, use diluted brown or tea-stain watercolor and paint a thick frame around your image area, letting the edges be slightly uneven.
Peel back the tape to reveal a haunting scene perfect for the Halloween season


Haunted Forest With Twisted Trees
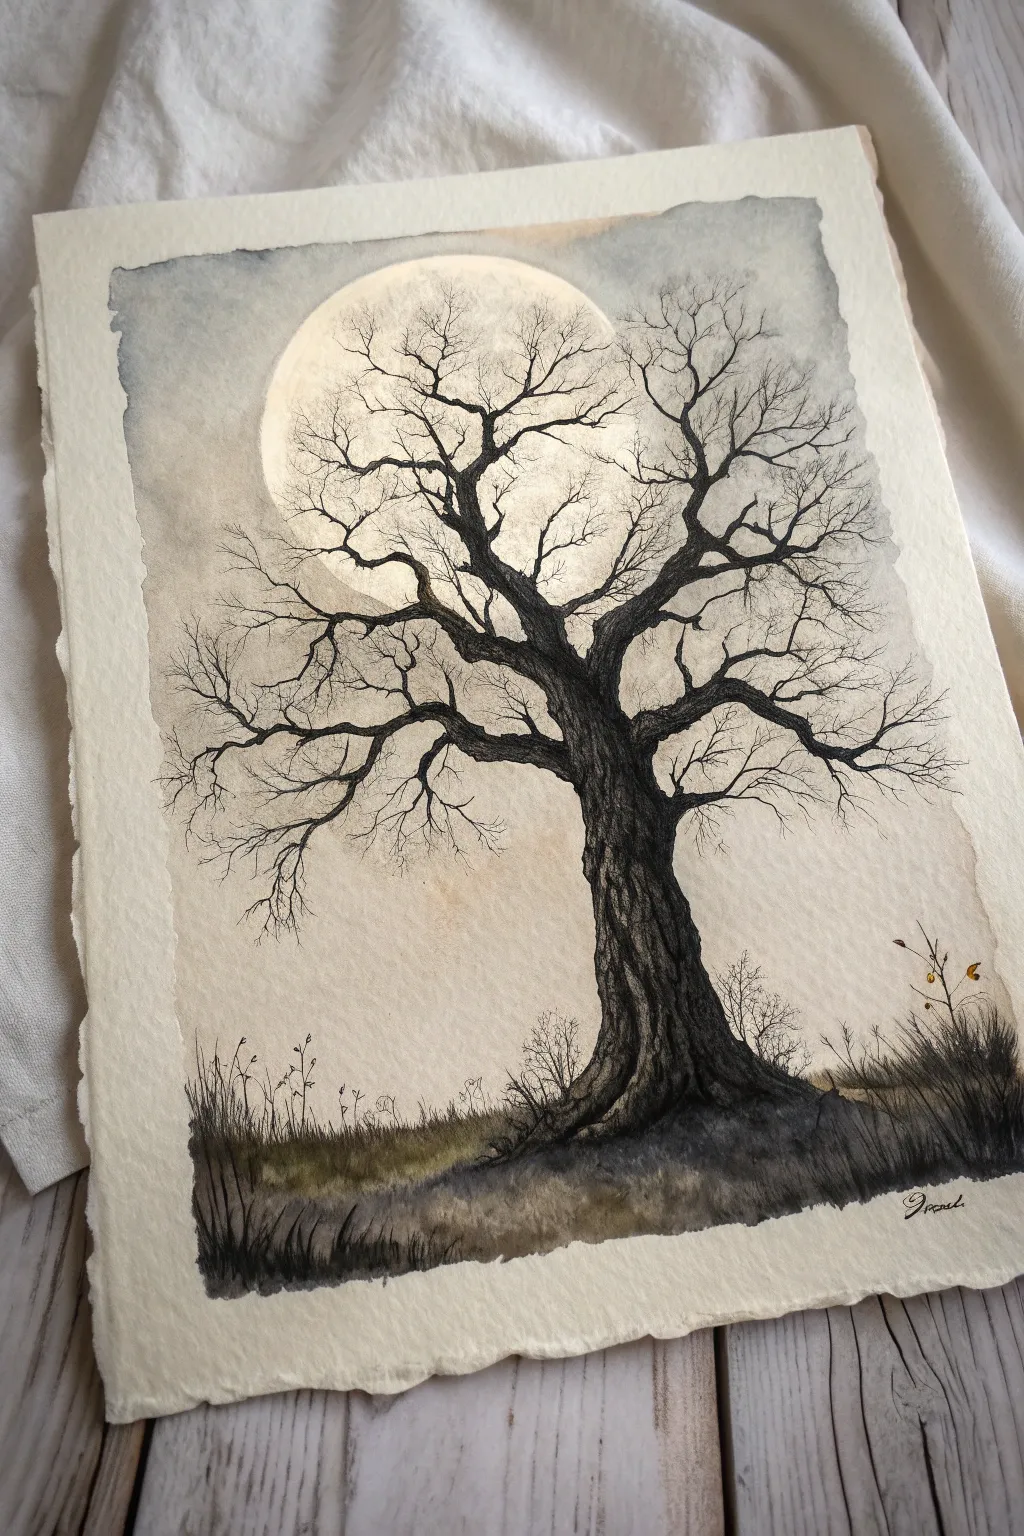
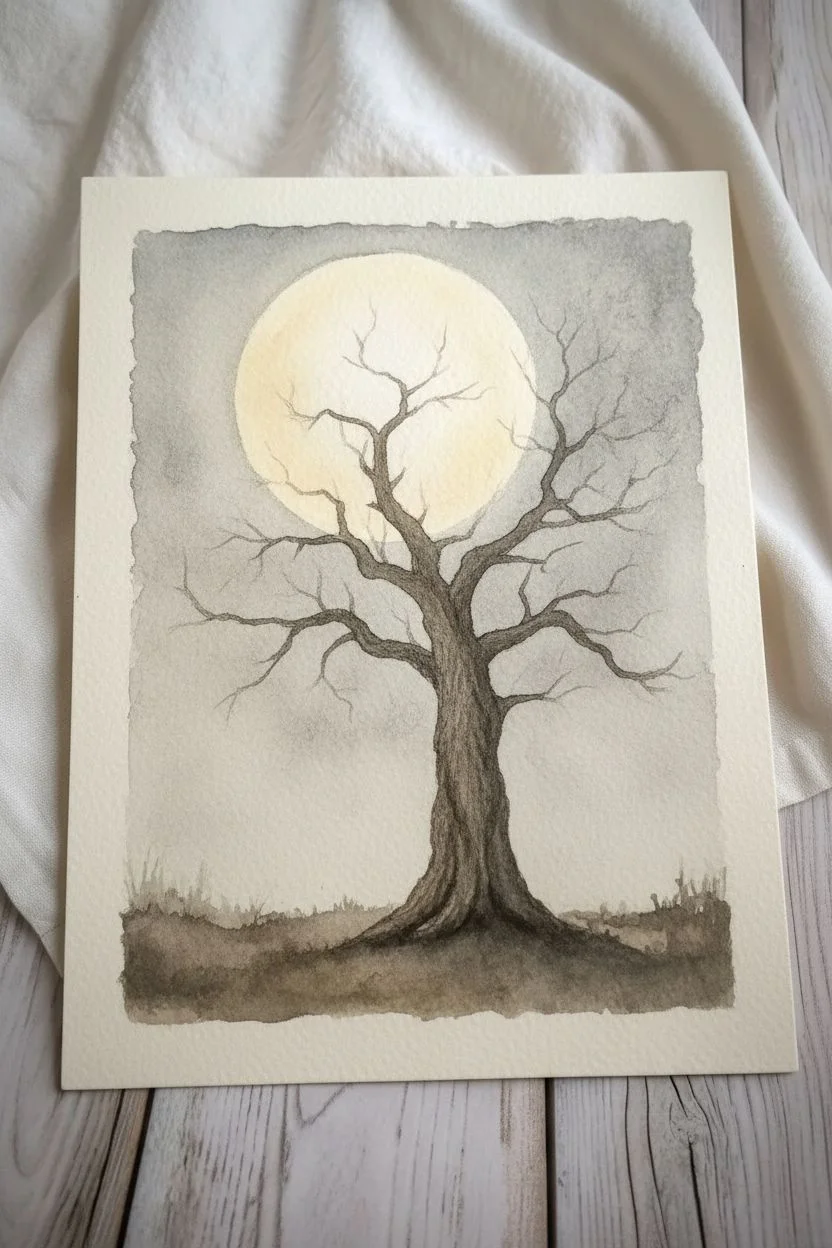
Capture the eerie beauty of a gothic landscape with this atmospheric mixed-media painting. By combining soft watercolor washes with crisp ink details, you will create a hauntingly beautiful twisted tree silhouetted against a luminous full moon.
Step-by-Step Guide
Materials
- Heavyweight watercolor paper (300gsm, cold press with deckled edge)
- Watercolor paints (Payne’s Grey, Sepia, Yellow Ochre, Burnt Umber)
- Black waterproof fine liner pens (sizes 0.1, 0.3, and 0.5)
- Round watercolor brushes (size 4, 8, and a large wash brush)
- Masking fluid or white gouache (optional)
- Pencil (HB) and kneaded eraser
- Paper towels and two jars of water
- Circular object (like a bowl or compass) for the moon
- Masking tape (if not stretching paper)
Step 1: Setting the Scene
-
Sketch the composition:
Begin by lightly tracing a large circle near the top center of your paper to represent the moon. Below it, sketch the basic S-curve shape of the tree trunk and the main sprawling branches, keeping your lines very faint. -
Mask the moon:
Carefully paint clear water inside your moon circle, then drop in a very dilute wash of Yellow Ochre mixed with a tiny touch of Sepia. Keep it extremely pale to make it glow later. -
Create the sky wash:
While the moon area is drying (or if you used masking fluid, apply it now), wet the entire sky area around the moon. Prepare a watery mix of Payne’s Grey and a hint of Sepia. -
Add atmospheric texture:
Allow the grey wash to bleed slightly into the paper’s texture. You want a cloudy, uneven look rather than a flat color. Let the pigment pool naturally at the edges of the paper for a vintage vignette effect. -
Ground the painting:
While the sky is still damp near the horizon line, paint a soft, indistinct ground layer using a mix of Sepia and Payne’s Grey. Let the horizon blur into the sky to create a foggy distance.
Step 2: Structuring the Tree
-
Base layer for the trunk:
Once the background is bone dry, mix a stronger solution of Burnt Umber and Sepia. Paint the silhouette of the trunk and the thickest branches, leaving some small gaps for texture. -
Developing the bark:
While the trunk wash is damp (but not soaking), drop in concentrated Payne’s Grey or black watercolor on the shadowed side of the tree—usually the side facing away from the moon—to create cylindrical volume. -
Branching out:
Switch to a smaller round brush (size 4). Extend the branches outward, making them gnarled and angular think ‘elbows and knees’ as you change direction with your strokes. -
Fine twig details:
Using your finest brush or a 0.5 pen, draw the delicate outer twigs that overlap the moon. I find that shaking my hand slightly while drawing helps create that organic, shivering look natural to old trees. -
Adding the ink texture:
Once the paint is completely dry, use a 0.3 waterproof pen to outline the deep crevices in the bark. Use vertical, wiggly lines that follow the contour of the wood grain. -
Deepening shadows:
Use the 0.5 pen to blackout the deepest shadows at the base of the roots and under the main branch forks. This high contrast anchors the heavy tree against the light background.
Moon Glow Trick
To make the moon pop, thoroughly erase the pencil line around it after painting. Then, use a clean, damp brush to gently lift a tiny bit of pigment from the sky right at the moon’s edge.
Step 3: Final Atmospheric Touches
-
Ground cover details:
Mix a dark, muddy grey-brown. Use upward, flicking strokes at the base of the tree to suggest dead grass and unruly weeds growing up around the roots. -
Ink the foreground:
Use your 0.1 pen to add extremely fine details to the grass, adding a few taller, skeletal weeds or dried flower stalks poking up on the sides. -
Refining the silhouette:
Step back and look at your branch balance. If the tree looks too sparse, add tiny, hairline fissures and twigs with your finest pen, especially where they cross the bright moon. -
Optional sparse leaves:
If you want a hint of lingering autumn, add three or four tiny dots of Yellow Ochre or Burnt Sienna on the tips of the lower branches to represent dead leaves clinging on. -
Deckled edge effect:
If your paper doesn’t have a natural deckled edge, you can tear the edges carefully against a metal ruler to achieve that antique, torn-manuscript look.
Muddy Colors?
If your grey sky looks too brown or muddy, you may be mixing warm and cool tones too aggressively. Let layers dry completely between washes to keep the colors distinct and crisp.
Now you have a brooding, gothic masterpiece perfect for framing in a dark wood frame.


Misty Graveyard With Tilted Headstones
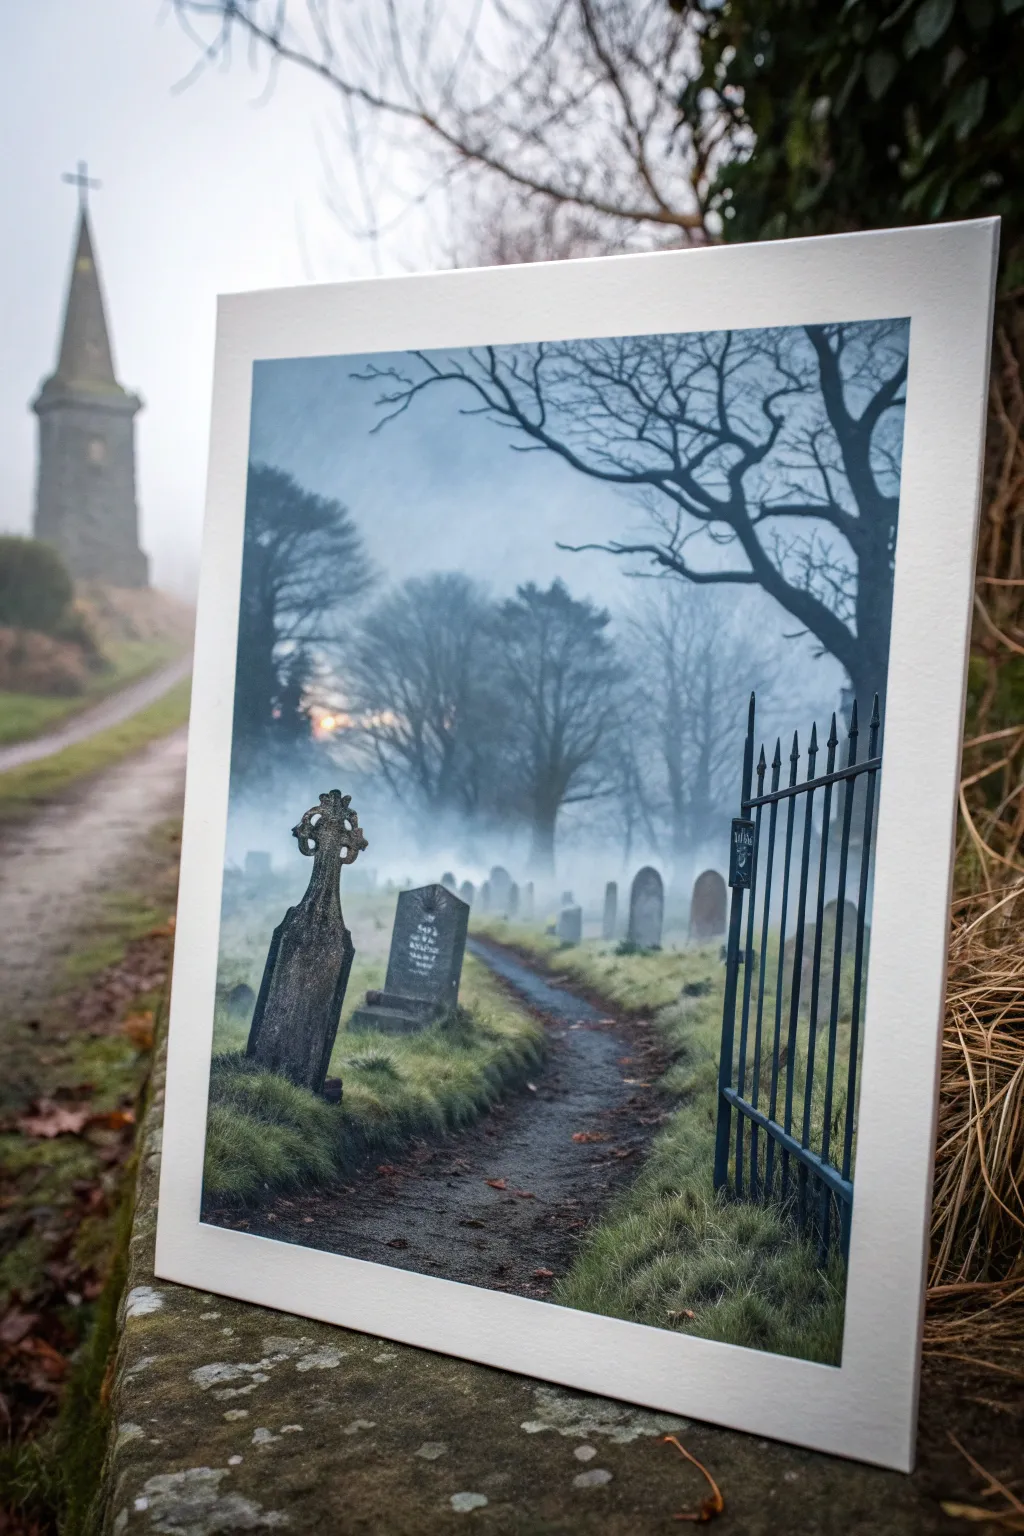
Capture the haunting beauty of dawn breaking over an ancient cemetery with this atmospheric painting. You’ll master the art of creating misty depth and silhouetted forms to produce a piece that feels both peaceful and slightly eerie.
Step-by-Step Tutorial
Materials
- Heavyweight watercolor paper or mixed media board (approx. A3 size)
- Acrylic paints (Titanium White, Mars Black, Payne’s Grey, burnt umber, sap green, cerulean blue)
- Flat shader brushes (sizes 8 and 12)
- Round detail brushes (size 0 and 2)
- Soft blending brush or sea sponge
- Painter’s tape
- Palette knife (optional for texture)
- Water cups and paper towels
Step 1: Setting the Atmosphere
-
Prepare the canvas:
Tape down all four edges of your paper to a rigid board to prevent warping. This also creates the clean white border seen in the finished piece. -
Mix the base sky tone:
Create a cool, pale blue-grey by mixing a large amount of Titanium White with a tiny touch of Payne’s Grey and Cerulean Blue. It should be very light. -
Paint the background wash:
Apply this pale mix across the upper two-thirds of the paper. Keep the strokes fluid and horizontal. -
Create the horizon mist:
While the sky is still slightly damp, mix pure Titanium White into your specific grey mix. Blend this into the lower middle section where the trees will stand, creating a soft, foggy transition. -
Add the dawn light:
Mix a tiny hint of yellow ochre or warm white and gently scumble it near the left-center horizon line to suggest a weak sun trying to break through.
Foggy Glazing Trick
To make the fog look extra realistic, use a dry brush with a tiny amount of white paint and circular motions to smudge the bases of distant trees.
Step 2: Mid-Ground and Trees
-
Paint distant tree shapes:
Mix a diluted grey-blue shade (slightly darker than the sky). Use a round brush to paint faint, ghostly tree shapes in the distance. They should lack detail to look pushed back by the fog. -
Draft the main path:
Using a mix of Burnt Umber and Payne’s Grey, sketch the winding path starting wide at the bottom and narrowing as it disappears into the mist. -
Block in the grass areas:
Mix Sap Green with a lot of grey and white. Stipple this dull green along the sides of the path, keeping it darker in the foreground and fading to white-grey as it recedes. -
Paint the main tree silhouette:
Using nearly pure Black mixed with a touch of blue, use your size 2 brush to paint the prominent bare tree on the right. Focus on the gnarly, twisting branches reaching over the path. -
Add the smaller background trees:
Add the mid-ground trees on the left using a medium grey shade. I find that keeping these edges slightly soft helps maintain the misty illusion.
Make it Ancient
Splatter watered-down green paint lightly on the bottom of the headstones to mimic centuries of moss growth.
Step 3: The Stone Details
-
Outline the headstones:
Using a dark grey mix, outline the shapes of the tombstones. Place the prominent Celtic cross on the left and a few tilting slabs further back. -
Fill and texture the stones:
Fill in the stones with varying shades of slate grey. Dab a paper towel or sponge on the wet paint to give them a weathered, mossy stone texture. -
Add headstone highlights:
Mix a light grey to highlight the top edges and inscriptions on the stones, suggesting moonlight or diffuse dawn light catching the damp surfaces. -
Paint the iron gate:
With your finest detail brush (size 0) and inky black paint usually thinned with a drop of water, carefully draw the vertical bars of the gate on the right foreground. -
Detail the gate spikes:
Add the pointed finials to the top of the fence bars. Keep the lines crisp to show they are closest to the viewer.
Step 4: Final Touches
-
Enhance the fog:
Create a glazing medium or very watery white paint. Gently glaze over the area where the path meets the background trees to intensify the ‘ground fog’ effect. -
Add fallen leaves and debris:
Dot tiny specks of burnt sienna and dark brown along the path and near the fence to represent decaying leaves. -
Deepen the shadows:
Glaze a thin layer of dark blue-black at the very bottom corners and under the bushes to anchor the composition. -
Reveal the border:
Once the painting is 100% dry, slowly peel away the painter’s tape at a 45-degree angle to reveal the crisp white edge.
Place your finished piece in a simple frame or lean it against a wall to enjoy the eerie calm of your creation


Gothic Portrait With Dramatic Chiaroscuro
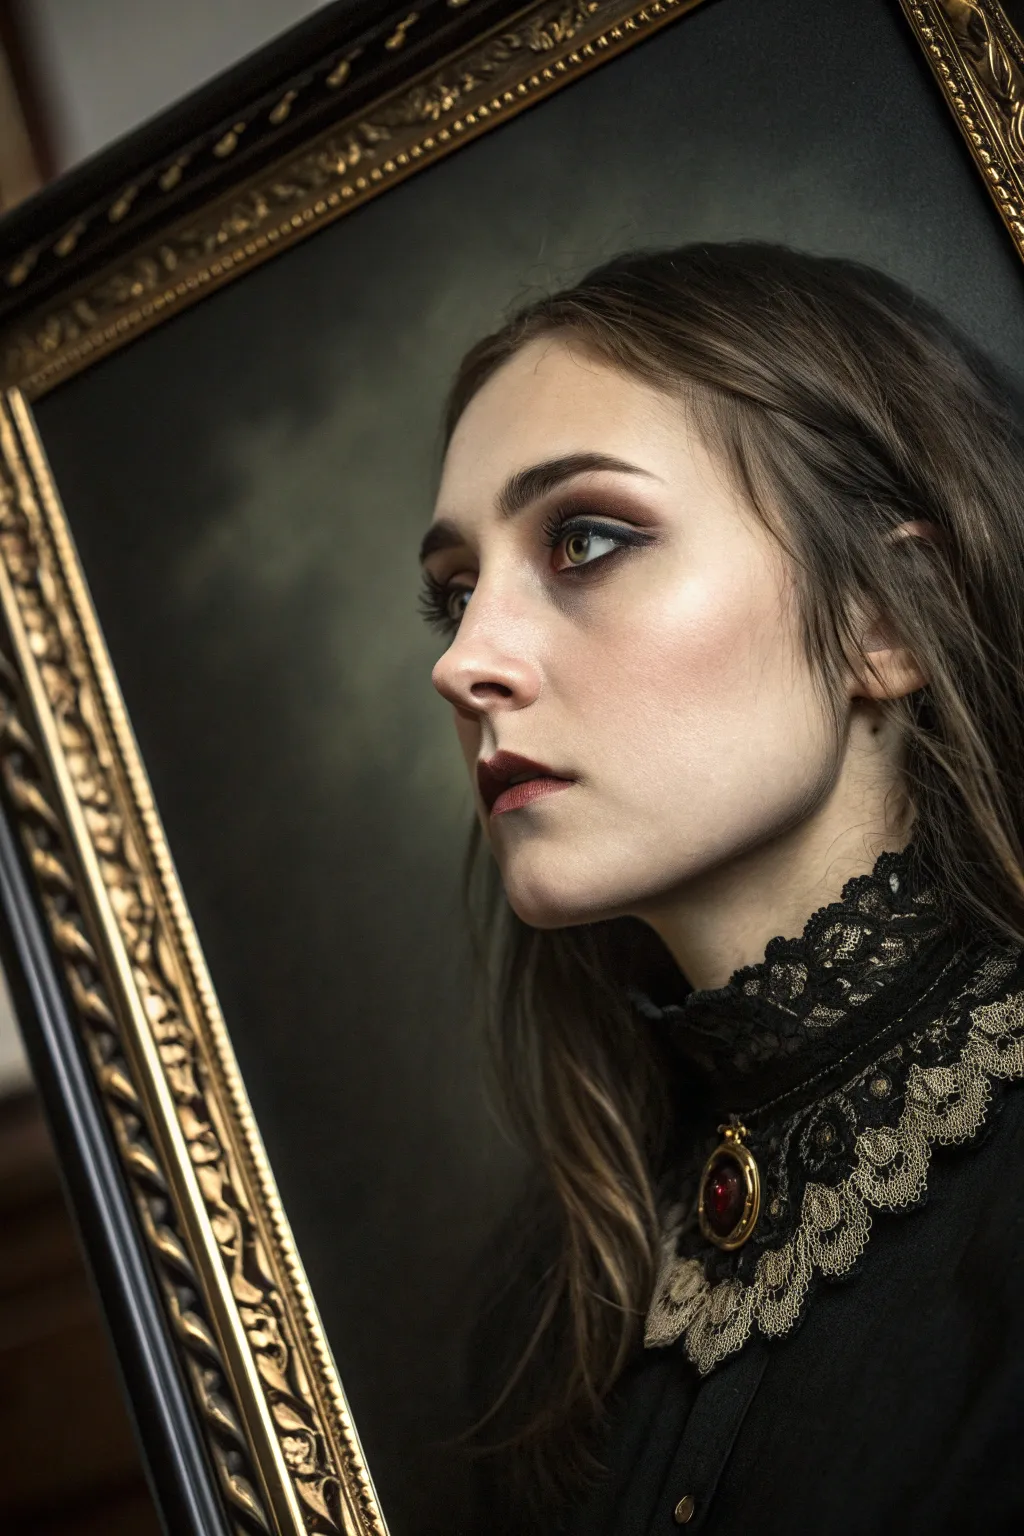
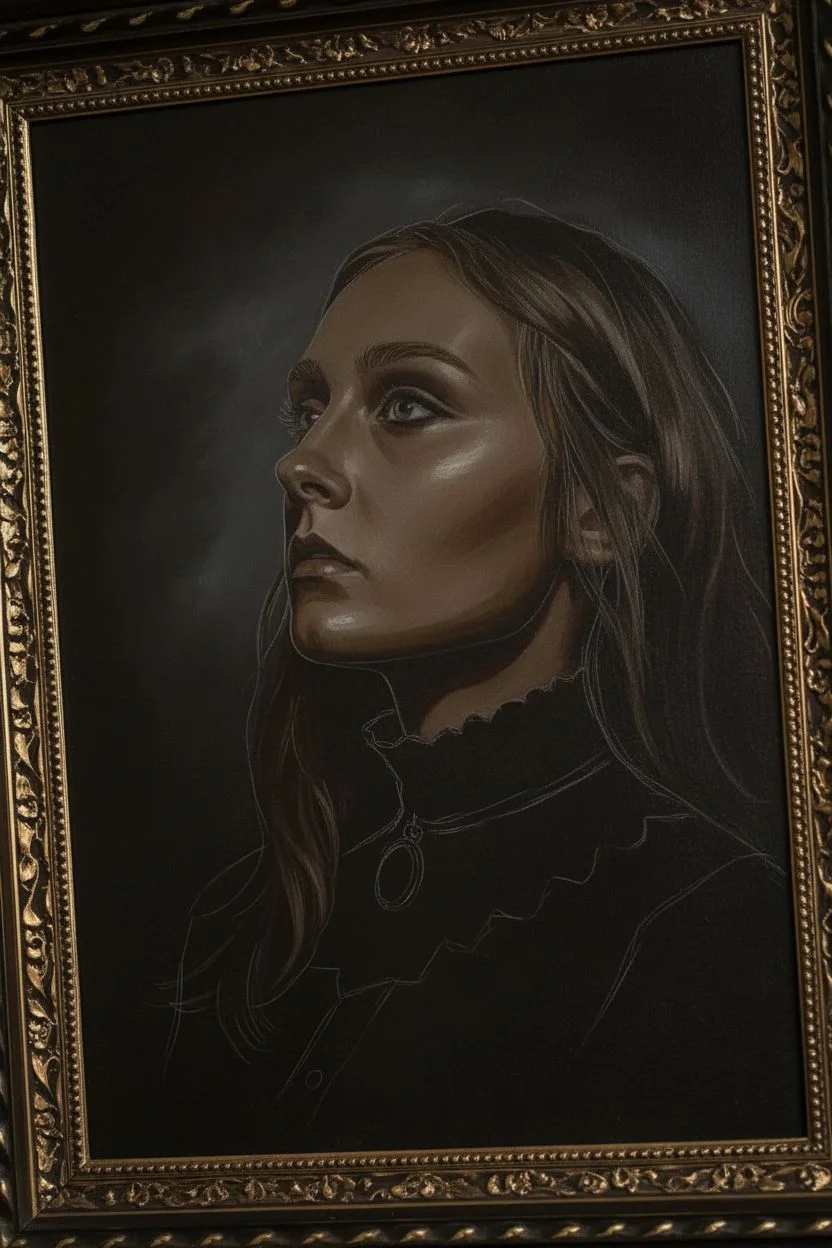
Capture the haunting elegance of Victorian gothic aesthetics with this dramatic portrait painting. This project focuses on high-contrast chiaroscuro techniques to sculpt the face, paired with intricate detailing on lace and jewelry, all set within a moody, dark atmosphere.
Step-by-Step Guide
Materials
- Canvas or canvas board (16×20 recommended)
- Oil or acrylic paints (Titanium White, Ivory Black, Burnt Umber, Yellow Ochre, Alizarin Crimson, Raw Sienna, Ultramarine Blue)
- Variety of brushes: filbert (medium/large), rigger or liner (small), soft blending brush
- Ornate gold frame (vintage or faux-finished)
- Palette and palette knife
- Slow-drying medium (if using acrylics) or linseed oil (if using oils)
- Graphite pencil for sketching
Step 1: Setting the Scene
-
Blocking the background:
Begin by painting the entire canvas with a dark, murky mix of Ivory Black and a touch of Burnt Umber. While it’s still wet, blend in subtle clouds of slate grey (Black mixed with White) to create a smoky, undefined atmosphere behind where the head will be. -
Light sketch:
Once the background is dry, use a light graphite pencil or a thin wash of diluted white paint to sketch the profile of the woman. Focus on placement—ensure the gaze looks outward and the neck elongates elegantly. -
Underpainting shadows:
Using a thin wash of Burnt Umber, map out the darkest areas of the face: the hollow of the eye socket, the shadow under the nose, under the lip, and the heavy shadow beneath the jawline.
Skin Tone Trouble?
If the skin looks too ‘chalky’ or dead, glaze a very thin layer of diluted Alizarin Crimson over the cheek and nose tip to bring back a flush of blood and warmth.
Step 2: Sculpting the Face
-
Base skin tones:
Mix a pale flesh tone using Titanium White, a tiny dot of Yellow Ochre, and a whisper of Alizarin Crimson. Apply this to the highlighted areas of the face—the cheekbone, forehead, bridge of the nose, and chin. -
Mid-tone transitions:
Create a transition color by adding Raw Sienna to your flesh tone. Paint the areas between the bright highlights and the deep shadow lines you established earlier. -
Blending the contours:
Using a clean, soft blending brush, gently feather the edges where the highlights meet the shadows. The goal is a smooth, porcelain-like finish, so keep your brushstrokes light and undetectable. -
Darkening the eyes:
For the dramatic eye makeup, use a mix of Burnt Umber and Alizarin Crimson. Apply this around the eye socket, deepening the crease and fading it outward for a bruised, romantic look. -
Painting the eye:
Paint the iris with a mix of Yellow Ochre and Green. Add a sharp black pupil and a tiny, crisp white reflection dot to bring the subject to life. -
Defining the lips:
Mix Alizarin Crimson with a touch of Black for a deep wine color. Paint the lips, keeping the edges slightly soft rather than harsh, and add a small highlight on the lower lip.
Step 3: Costume and Details
-
Blocking the clothing:
Fill in the dress area with pure Ivory Black. It should be solid and opaque to contrast with the skin. -
Lace collar foundation:
Mix a dark grey color and paint the general shape of the high-neck collar. This acts as the shadow layer for the lace. -
Detailing the lace:
Switch to your smallest rigger brush. Using a mix of Yellow Ochre and White (to mimic gold thread) or pale grey, paint tiny loops, scallops, and netting over the dark collar area. I like to keep these strokes a bit irregular to simulate fabric texture. -
Adding the pendant:
Paint an oval shape with gold paint or yellow ochre at the base of the throat. Fill the center with deep red for the gem, adding a gleam of white on the side to make it look convex and glassy.
Lace Master Trick
Don’t paint every single thread of the lace. Focus on the edges and the highest points of the pattern; let the viewer’s eye fill in the rest of the detail.
Step 4: Atmosphere and Framing
-
Hair texture:
Paint the hair using sweeping strokes of Burnt Umber. While wet, streak in thin lines of lighter brown and ochre to suggest individual strands catching the dim light. -
Final glazing:
If using oils (or acrylic glazing liquid), apply a very thin, transparent glaze of Burnt Umber over the background and the shadow side of the face to unify the tone and deepen the mood. -
Framing:
Place your finished, dry canvas into the ornate frame. If the frame is too bright, rub a little black shoe polish or dark wax into the crevices to age it and match the painting’s goth vibe.
Step back and admire the mysterious allure of your gothic masterpiece
BRUSH GUIDE
The Right Brush for Every Stroke
From clean lines to bold texture — master brush choice, stroke control, and essential techniques.
Explore the Full Guide
Black Roses and Thorny Vines
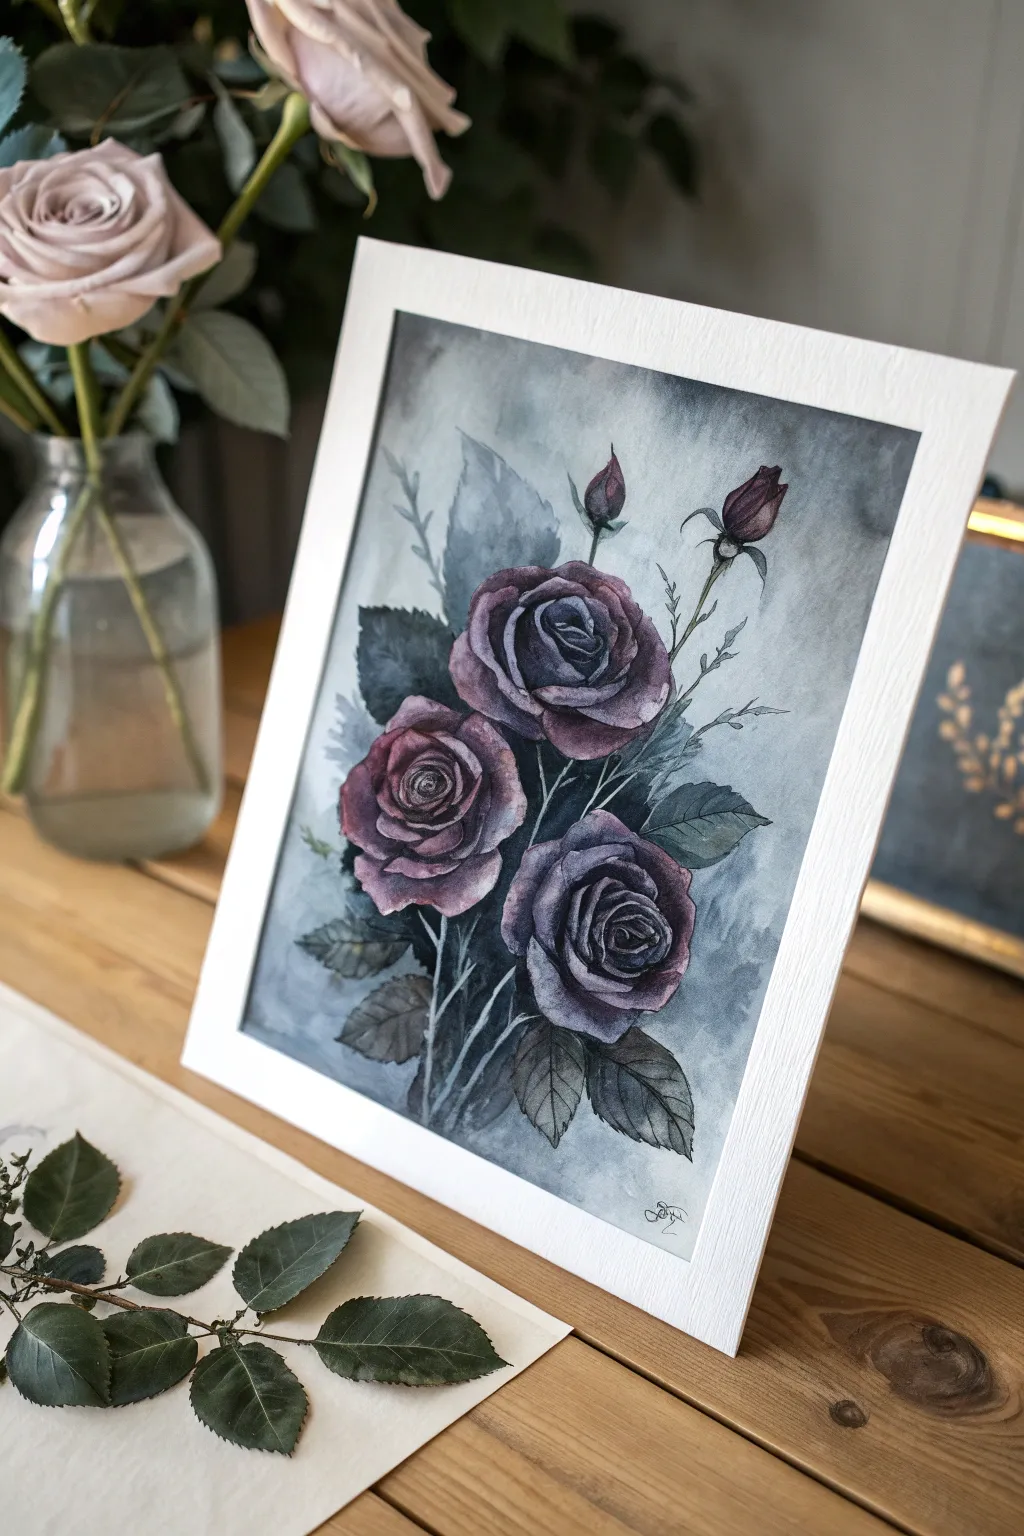
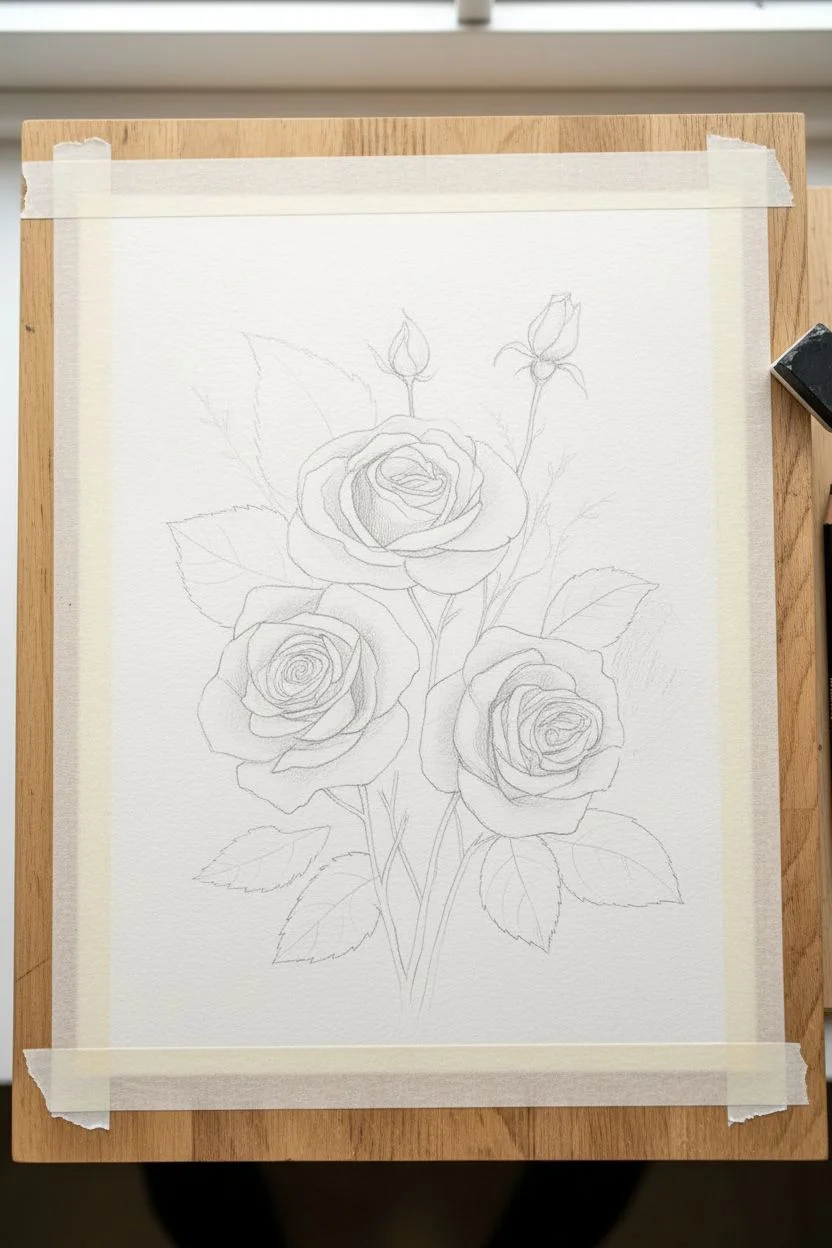
Capture the moody elegance of gothic aesthetics with this ethereal watercolor piece featuring three prominent dark roses. The soft, smoky background contrasts beautifully with the sharp details of the thorny vines, creating a striking balance between darkness and light.
Detailed Instructions
Materials
- Cold press watercolor paper (300 gsm)
- Watercolor paints (Alizarin Crimson, Payne’s Grey, Indigo, Sap Green, Burnt Umber)
- Round watercolor brushes (Size 2, 6, and 10)
- Fine liner brush (Size 0 or 00)
- Masking tape
- Pencil (HB or H) and kneadable eraser
- Two jars of water
- Paper towels
- White or light wood frame (optional)
Step 1: Sketching and Preparation
-
Secure the paper:
Tape your watercolor paper down to a board using masking tape. This prevents warping when the paper gets wet and creates a crisp white border if you paint all the way to the edge. -
Map out the composition:
Using an HB pencil, lightly sketch the placement of the three main roses. Arrange them in a loose triangle shape—one top center, one bottom left, and one bottom right. -
Define the rose centers:
Sketch the tight spirals at the center of each rose. Don’t worry about perfect symmetry independent petals look more organic. -
Add stems and buds:
Draw slender stems extending downwards and add two smaller, closed rosebuds interacting with the top bloom. Keep your pencil lines faint so they don’t show through the lighter washes later. -
Include leaf details:
Sketch serrated leaves framing the roses. Add a few faint, ghostly leaves in the background area to create depth.
Muddy Colors?
If your purple shadows look brown or muddy, ensure your first layer is 100% dry before adding the second. Also, clean your water jar frequently; dirty water dulls vibrant hues.
Step 2: The First Wash
-
Create a misty background:
Mix a very dilute wash of Payne’s Grey and a touch of Indigo. Wet the background area framing the roses with clean water first, then drop in your grey mix, letting it bloom softly to create a smoky atmosphere. -
Soften edges:
While the background is still damp, lift out pigment in random areas with a paper towel to create cloudy, light patches. I find this unevenness adds to the ghostly gothic vibe. -
Base layer for roses:
Mix Alizarin Crimson with a tiny bit of Payne’s Grey to get a dusty purple-pink. Paint the entire shape of each rose with a light, watery layer of this color, avoiding the very edges of the petals to leave white highlights. -
Base layer for leaves:
Mix Sap Green with Payne’s Grey for a desaturated, shadowy green. Apply a light wash to the leaves and stems, keeping it loose. -
Let it dry completely:
Wait for the paper to be bone dry before moving to the next phase to avoid muddying your crisp details.
Level Up: Salt Texture
While the background wash is still wet, sprinkle a few grains of table salt into the paint. When it dries and you brush the salt off, it creates stunning, frost-like starburst textures.
Step 3: Building Depth and Detail
-
Darken the rose centers:
Mix a stronger concentration of Alizarin Crimson and Indigo. Using a size 6 brush, paint the shadows between the petals, focusing on the tight center spirals where the shadows are deepest. -
Define individual petals:
Work your way outward from the center, painting the shadow shapes underneath each petal overlap. Soften the outer edge of these shadows with a clean, damp brush to blend them into the petal body. -
Deepen the buds:
Apply the same dark purple-red mix to the rosebuds, leaving a sliver of lighter color on one side to indicate volume and light direction. -
Layering the leaves:
Using a darker green-grey mix (more Indigo this time), paint the veins and shadows on the leaves. Leave the center of leaf sections lighter to suggest convexity. -
Adding background foliage:
paint ‘ghost leaves’ in the background using a very watery grey-blue mix. These should appear to sit behind the main roses and lack detailed veining.
Step 4: Final Contrast and Outline
-
Intensify the darkest darks:
Mix a near-black using Indigo and Burnt Umber. With your smallest brush, add tiny touches of this color into the very deepest crevices of the rose centers to make them pop. -
Refine the stems:
Use a liner brush to sharpen the edges of the stems and add small, sharp thorns. The stems should look woody and delicate. -
Add texture to leaves:
Use the liner brush to add fine serrations to the leaf edges and crisp up the vein lines. -
Final assessment:
Step back and look at the overall contrast. If the background feels too light, add another glaze of cool grey around the flowers to push them forward. -
Sign and frame:
Once completely dry, remove the tape carefully. Sign your work in the corner with a fine pen or brush, and frame it in a simple white frame to let the dark tones stand out.
This hauntingly beautiful floral study proves that roses don’t need to be red to capture the imagination
Ghostly Figure in a Long Hallway
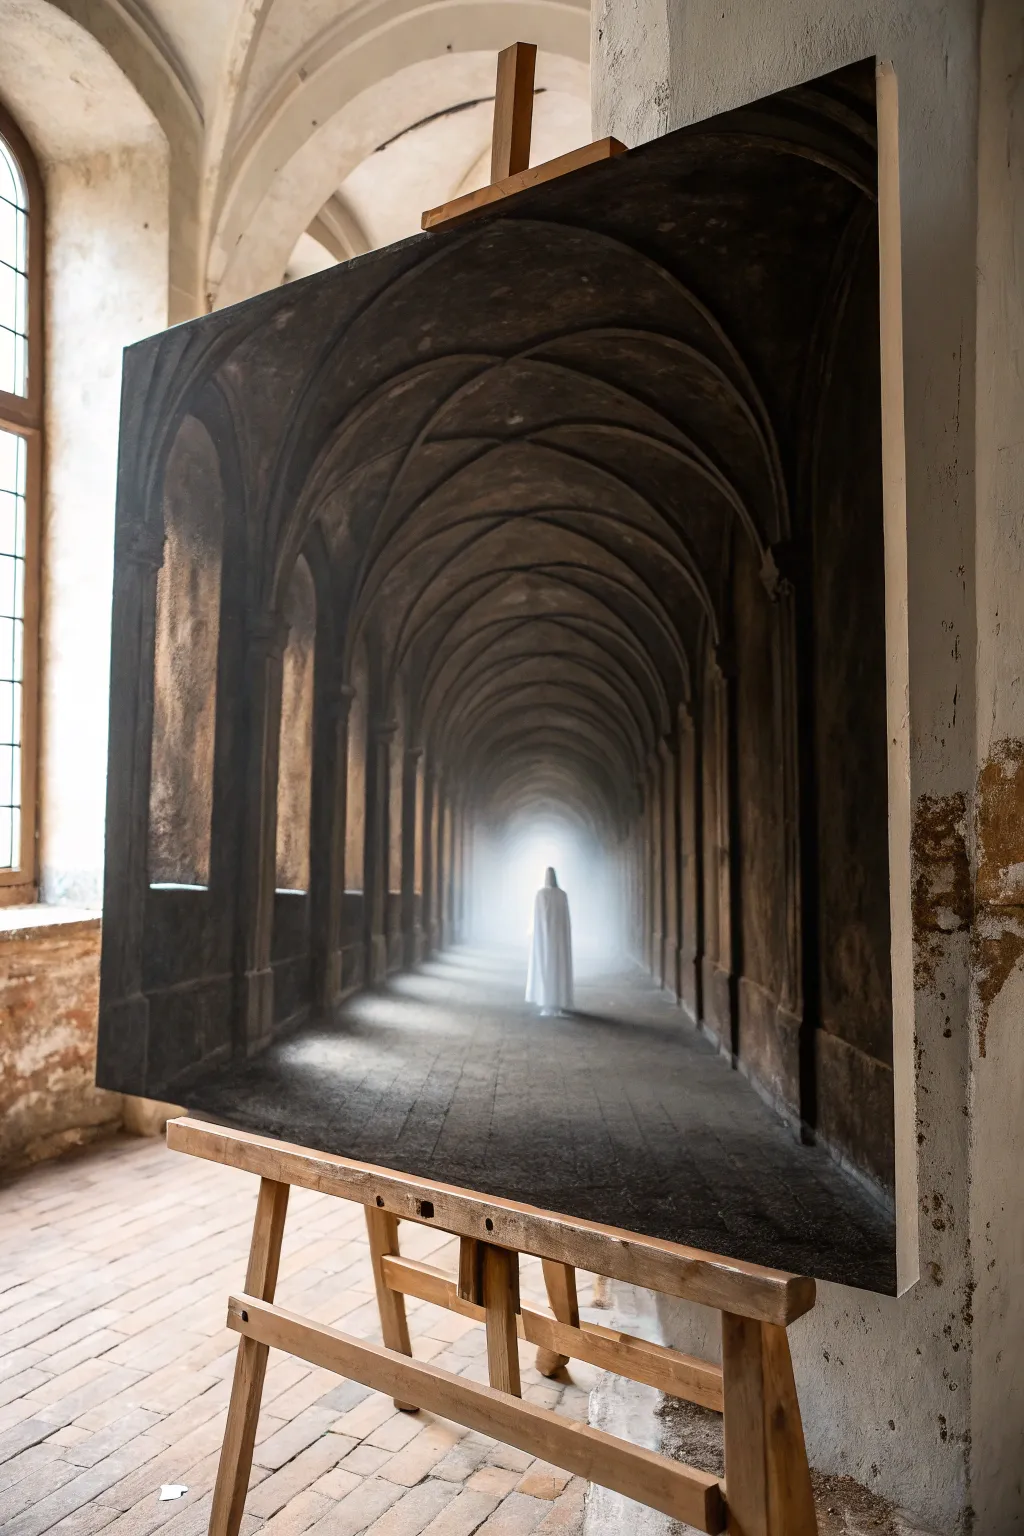
Capture the eerie silence of a gothic corridor in this striking canvas project, where light and shadow play a central role. You will learn to create immense depth using one-point perspective and master the subtle art of atmospheric mist to frame a ghostly silhouette.
Step-by-Step
Materials
- Large stretched canvas (at least 24×30 inches)
- Acrylic paints: Mars Black, Burnt Umber, Raw Sienna, Titanium White, and darker grey tones
- Gesso (optional for priming)
- Ruler or T-square
- Pencil and eraser
- Large flat brushes (1-2 inch)
- Medium filbert brushes
- Small round detail brushes
- Spray bottle with water
- Dry blending brush (soft bristle)
- Palette knife (optional for texture)
- Easel
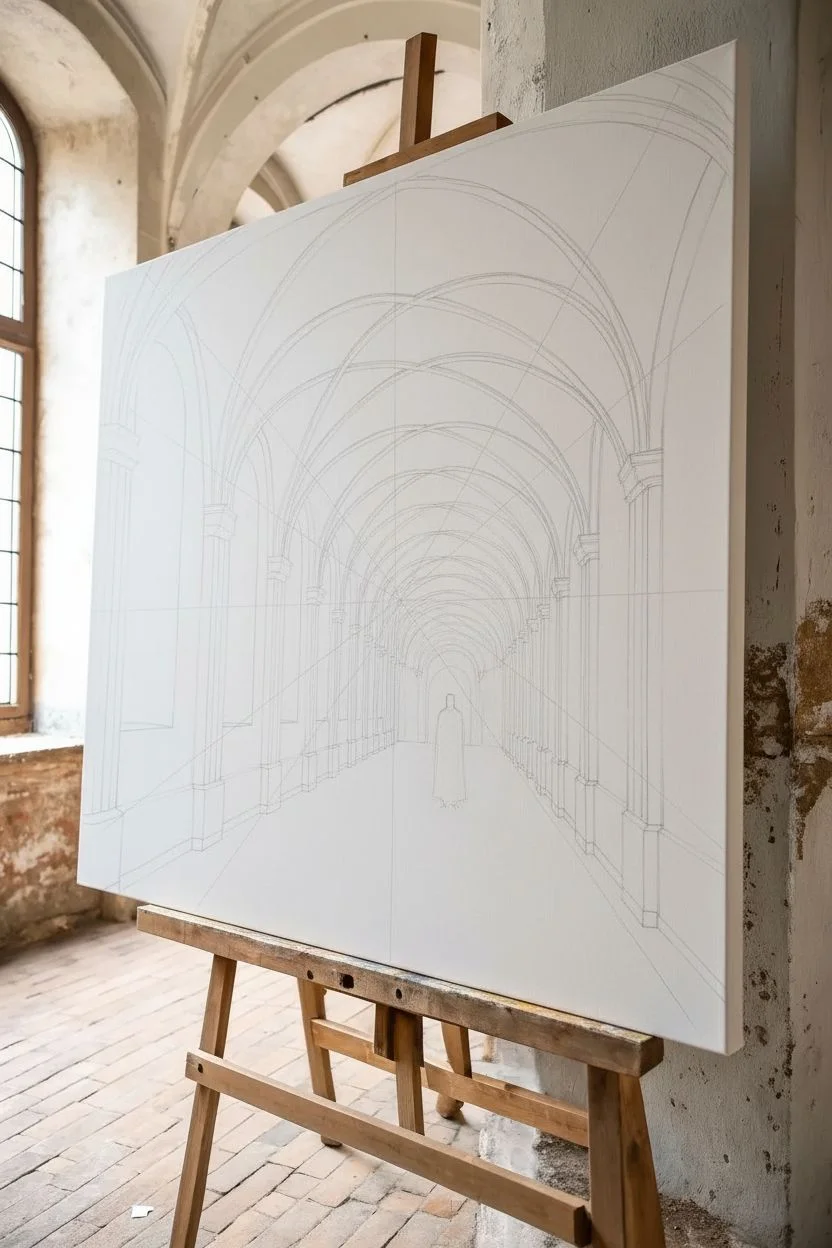
Step 1: Setting the Perspective
-
Prime and prep:
Begin by ensuring your large canvas is clean. If desired, apply a fresh coat of gesso for a smoother surface. Once dry, place it securely on your easel. -
Establish the vanishing point:
Using a pencil and ruler, lightly mark a single point exactly in the center of the canvas. This will be the source of your light and the destination for all perspective lines. -
Sketch the corridor guidelines:
Draw diagonal lines radiating from your vanishing point to the corners and sides. These lines dictate the ceiling height and floor width of the hallway. -
Draft the arches:
Sketch a series of repeating arches getting smaller as they approach the center. Space them wider at the front (foreground) and closer together near the vanishing point to simulate depth. -
Outline the pillars:
Draw vertical lines down from the arches to the floor line. Make the closest pillars thick and detailed, while the distant ones should be mere slivers.
Fixing Flatness
If the hallway looks flat, darken the foreground pillars significantly and brighten the far end mist. Extreme contrast creates the illusion of distance.
Step 2: Blocking in Values
-
Mix your base darks:
Create a rich, dark mixture using Mars Black and Burnt Umber. It should look nearly black but have a warm, earthy undertone. -
Paint the shadows first:
Using a large flat brush, fill in the darkest areas—specifically the spaces between the pillars and the shadowy corners of the vaulted ceiling. -
Establish the floor:
Mix a dark grey and paint the floor area with horizontal strokes. I like to keep this loose at this stage, focusing only on covering the white canvas. -
Create the light source:
Mix Titanium White with a tiny touch of grey. Paint a circle around your vanishing point, blending outwards into the dark surroundings while the paint is still wet to create a soft glow.
Pro Tip: Mist Control
Use a gentle misting spray bottle on your acrylics while blending the central light. This keeps the paint workable longer for a perfect, seamless fog effect.
Step 3: Detailed Architecture
-
Refine the arches:
Switch to a medium filbert brush. Using a lighter brown-grey mix, paint the curved edges of the ribs in the vaults. Highlights should be on the inner edges facing the center light. -
Texture the stone:
Dry brush some Raw Sienna and lighter grey over the brown pillars. Use a rough, scrubbing motion to mimic the texture of aged sandstone. -
Deepen the contrast:
Go back in with pure black to sharpen the edges where the pillars meet the background walls. High contrast is key to the gothic look. -
Pavers and perspective:
On the floor, paint lines radiating from the vanishing point to create stone slabs. Add horizontal lines for the rows, making them denser as they recede. -
Add floor reflections:
Glaze a thin, watery layer of white over the center of the floor path. This simulates the light bouncing off worn, smooth stones.
Step 4: The Ghost and Atmosphere
-
Build the mist:
Load a clean, dry brush with a small amount of white paint. Gently scumble (rub lightly) over the distant end of the hallway to create a foggy, ethereal haze. -
Paint the silhouette base:
In the center of the light, block in a small, vertical shape for the figure using a light grey. Do not use black here; the figure is back-lit by the fog. -
Define the cloak:
Using pure Titanium White, paint the edges of the figure’s robe. Keep the center of the figure slightly darker to show volume. -
Soften the edges:
Blur the bottom of the figure into the floor mist so they appear to be floating or walking through thick fog. -
Final atmospheric glaze:
Once everything is dry, apply a very watery wash of black/brown over the outer edges of the canvas (vignette) to force the viewer’s eye toward the bright center.
Step back and admire how the deep perspective draws you straight into the mystery of your gothic scene

PENCIL GUIDE
Understanding Pencil Grades from H to B
From first sketch to finished drawing — learn pencil grades, line control, and shading techniques.
Explore the Full Guide
Blood-Red Moon Over Rooftops
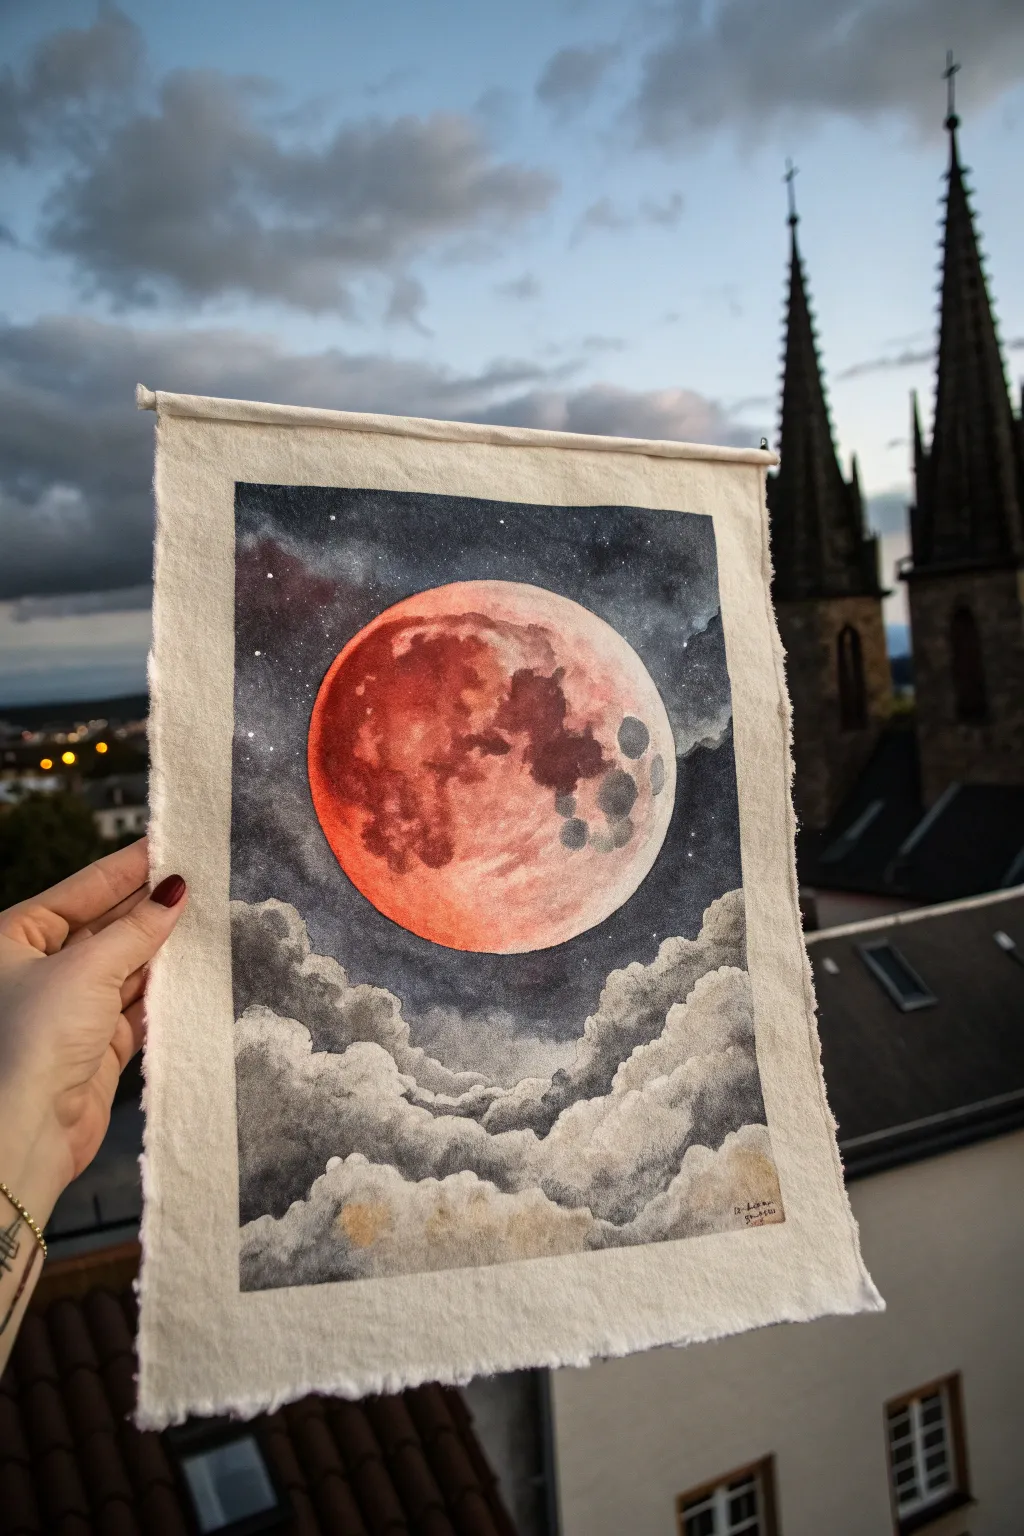
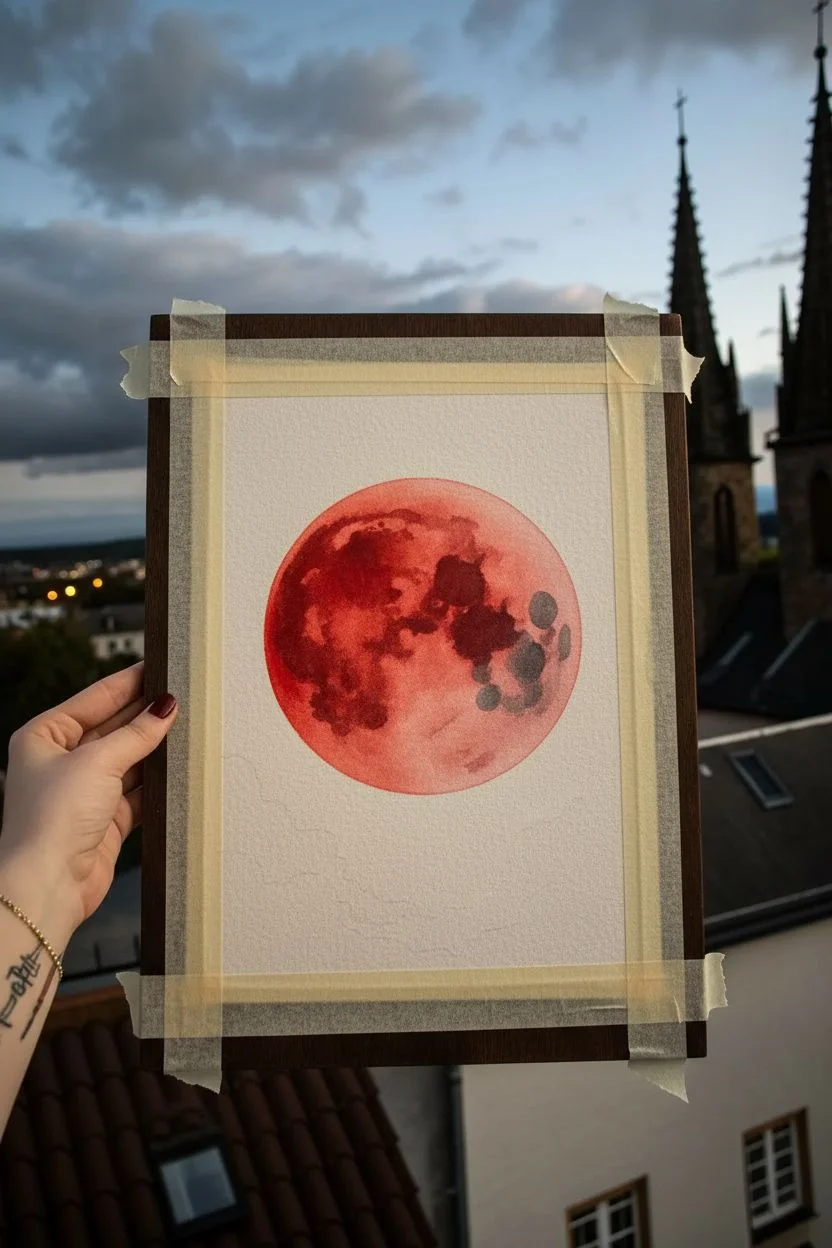
Capture the eerie beauty of a blood-red moon with this gothic-inspired watercolor scroll. This project combines atmospheric cosmic textures with the rustic charm of unhemmed canvas for a truly haunting wall hanging.
Step-by-Step Guide
Materials
- Heavyweight watercolor paper or primed loose canvas sheet (approx. 8×10 inches)
- Wooden dowel (thin, cut to 9 inches)
- Watercolor paints (Alizarin Crimson, Cadmium Red, Payne’s Grey, Indigo, Lamp Black, Burnt Umber)
- White gouache or white ink
- Large round brush (size 10 or 12)
- Small detail brush (size 0 or 2)
- Masking tape or painter’s tape
- Compass or circular object for tracing
- Pencil
- String or twine for hanging
- Strong craft glue or needle and thread
Step 1: Preparing the Moon
-
Prepare your surface:
Cut your canvas or paper to size, leaving a slightly frayed edge if using canvas for that rustic look. Tape the edges down securely to a board to prevent warping. -
Sketch the layout:
Using a compass or a round bowl, lightly trace a large circle in the upper center of the page. Below the circle, sketch loose, billowy shapes to map out where the cloud layers will sit. -
Base wash for the moon:
Wet the inside of the moon circle with clean water. Drop in a light wash of Cadmium Red mixed with a touch of water, leaving some areas very pale or nearly white for highlighting. -
Deepening the crater shadows:
While the red is still damp but not dripping, mix Alizarin Crimson with a tiny bit of Burnt Umber. Dab this darker mix onto the left side and center of the moon to create the ‘maria’ or lunar seas. Let these bloom naturally. -
Adding texture details:
Once the moon is semi-dry, use a smaller brush to add specific crater details on the right side using a greyish-purple mix. Paint small circles and blot parts of them with a paper towel to give them depth. -
Final lunar glaze:
When completely dry, add a very thin glaze of bright orange-red over the entire moon to unify the colors. Let this dry completely before moving to the sky.
Step 2: The Night Sky & Clouds
-
Painting the dark expanse:
Mix a rich, dark color using Indigo and Lamp Black. Carefully paint around the moon’s edge—I find holding my breath for a second helps keep the line steady. Fill the upper sky area, fading it out slightly as you approach the cloud line. -
Creating the stars:
To make the stars, load a stiff brush or toothbrush with white gouache. Flick the bristles to spatter tiny white dots across the dark sky area. Add a few larger stars manually with a detail brush. -
First cloud layer:
Mix a watery Payne’s Grey. Paint the top edges of the highest clouds, softening the bottom edge of each brushstroke with clean water so it fades into nothingness. -
Building cloud volume:
As the first layer dries, move lower down. Use a slightly darker grey mix for the middle clouds. Paint the scalloped top edges distinctively, then drag the color down into the wet area below. -
Deepening the shadows:
For the bottom-most clouds and the deepest crevices between layers, use a concentrated Payne’s Grey or Black mix. Paint strictly in the ‘valleys’ between the cloud tops to make them pop forward. -
Adding warmth:
While the lower clouds are still damp, drop in tiny hints of watered-down brown or yellow oxide near the bottom right corner to reflect distant city lights or atmospheric glow.
Muddy Clouds?
If your grey clouds look flat or muddy, you likely overworked them while wet. Let layers dry completely between passes. Use clean water to soften edges, not more paint.
Step 3: Assembly
-
Remove the tape:
Once the painting is bone dry, carefully peel away the masking tape. If you used canvas, you can gently pull a few loose threads from the sides to enhance the frayed aesthetic. -
Create the top channel:
Fold the top half-inch of the canvas/paper backward. Glue it down firmly to create a channel, or use a simple running stitch if working with fabric canvas. -
Insert the dowel:
Slide your wooden dowel through the channel you just created. Ensure the dowel extends slightly beyond the artwork on both sides. -
Attach the hanger:
Tie a piece of twine or ribbon securely to both exposed ends of the dowel. Adjust the length to suit where you plan to hang your masterpiece.
Golden Glow
For a magical touch, use metallic gold watercolor paint for the larger stars or carefully outline the rim of the moon to catch the light.
Hang your lunar creation in a spot where it can oversee your room with its quiet, gothic mystery
Moth and Skull Botanical Illustration
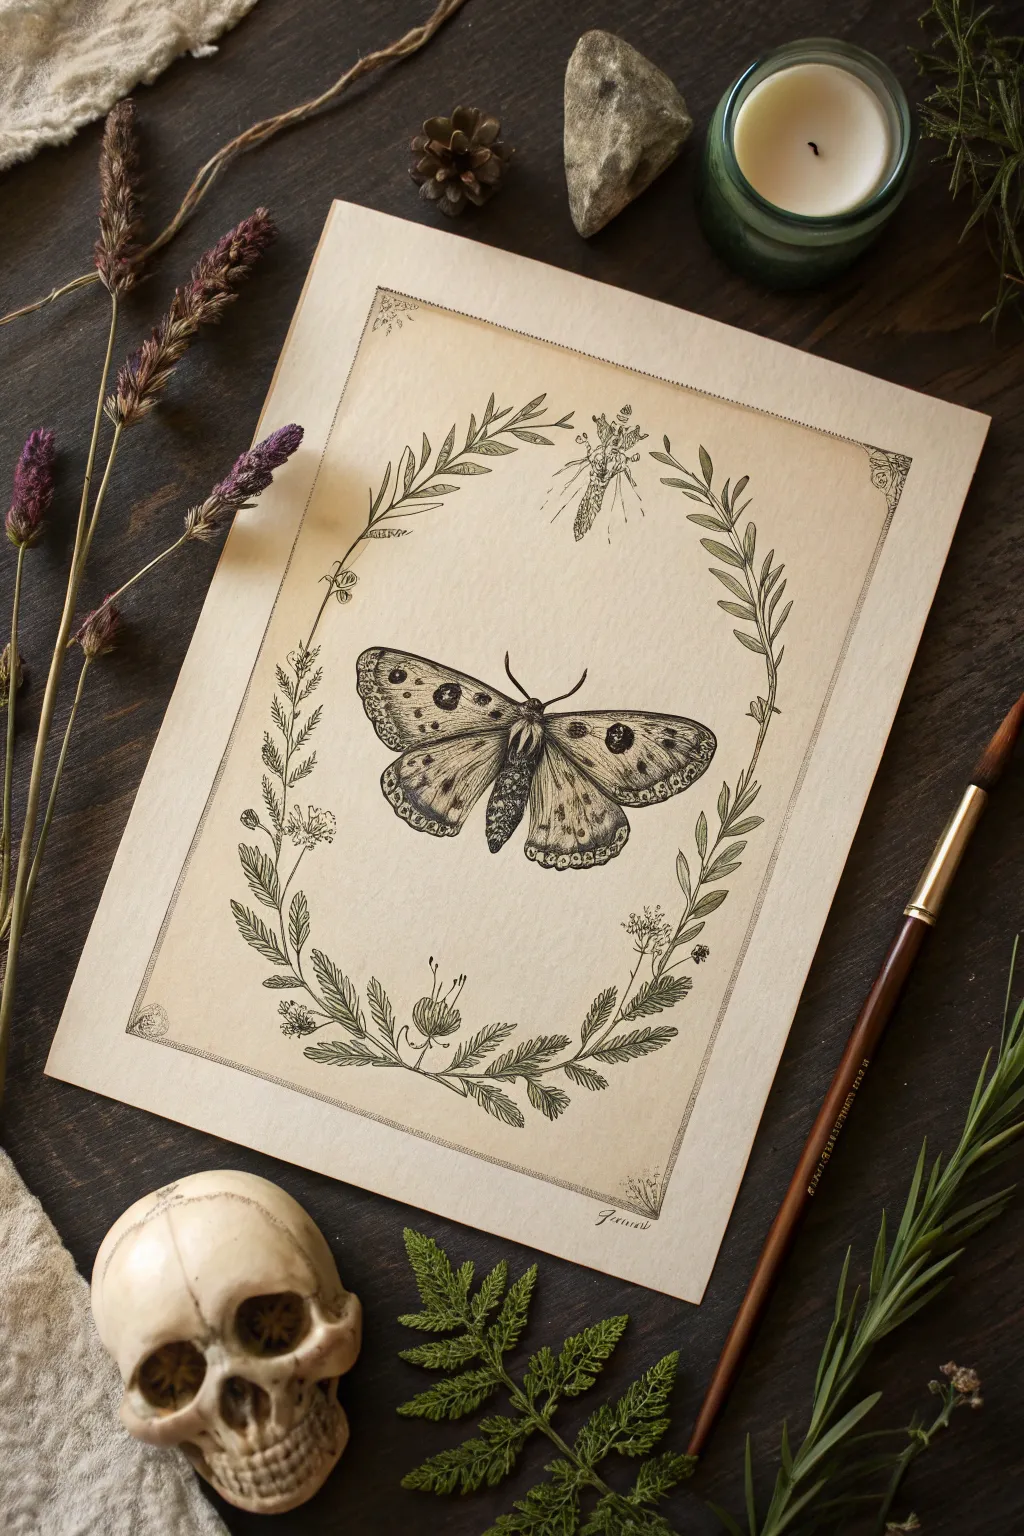
Capture the moody elegance of a bygone era with this intricate moth and botanical illustration. By combining fine stippling techniques with a delicate wreath composition, you’ll create a piece that feels like a forgotten page from a Victorian naturalist’s sketchbook.
Step-by-Step
Materials
- High-quality hot press watercolor paper or smooth Bristol board (A4 size)
- Pencil (HB or 2H)
- Kneaded eraser
- Fine liner pens (sizes 005, 01, 03, and 05) in black archival ink
- Ruler
- Compass or oval template (optional)
- Tea bag or coffee (for staining paper)
- Paper towels
- Artist tape
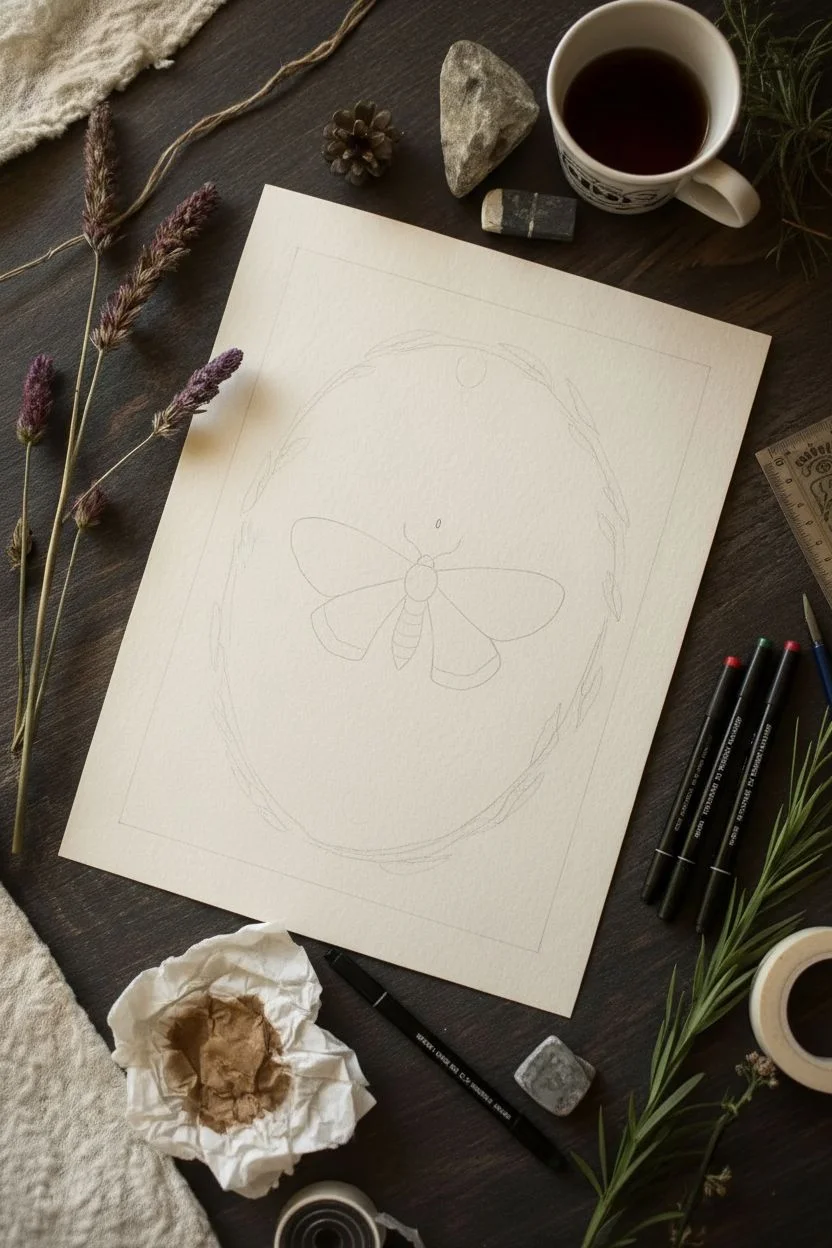
Step 1: Preparation & Layout
-
Age your paper:
Before drawing, give your paper that antique look. Brew a strong cup of tea or coffee and let it cool. Lightly brush the liquid over your paper with a wide brush or sponge. Let it pool slightly in areas for a natural, uneven stain. Allow it to dry completely flat. -
Establish the frame:
Using a ruler and a light pencil touch, draw a rectangular border about 1 inch from the edge of the paper. Inside this border, lightly sketch a large oval that will serve as the guide for your botanical wreath. Keep these lines faint as they will be erased later. -
Locate the center:
Find the center point of your oval. This is where the moth’s thorax will sit. Mark it lightly. Sketch the basic geometric shapes of the moth: a small oval for the body and two triangular shapes extending outward for the wings.
Step 2: Drawing the Moth
-
Refine the moth outline:
Flesh out your geometric sketch. detailed the forewings and hindwings, adding the gentle curves of the wing edges. Sketch the antennae curving gracefully outward. Add the small circle spots on the wings—two distinctive eyespots on the upper wings and smaller markings below. -
Outline in ink:
Switch to your 01 fine liner. carefully trace the outline of the moth’s wings and body. Do not trace the inner patterns yet. Use broken lines for the furry texture of the moth’s body to suggest softness. -
Add wing details:
Using the 005 pen, draw the veins of the wings. They should radiate from the body toward the wing edges. Be precise but delicate; these lines guide your shading. -
Stipple the patterns:
Now for the fun part. Using the 03 or 05 pen, fill in the dark eyespots. For the gradient areas around the spots and wing edges, use the stippling technique—creating shading with hundreds of tiny dots. Denser dots create shadows; sparse dots create highlights. -
Texture the body:
With your 01 pen, use short, directional strokes to create the fuzzy texture of the thorax and abdomen. Leave a small strip down the center slightly lighter to indicate volume and roundness.
Smudge Prevention
Place a scrap piece of paper under your drawing hand while you work. This prevents oils from your skin transferring to the paper and protects your fresh ink lines from accidental smears.
Step 3: Creating the Botanical Wreath
-
Sketch the foliage:
Along your penciled oval guide, lightly sketch curving stems. Alternate the types of leaves: some fern-like fronds at the bottom, simpler elliptical leaves on the sides, and perhaps a small insect or bud at the very top center for balance. -
Ink the stems:
Using the 03 pen, trace the main stems of your wreath. Vary the line weight slightly—thicker at the bottom of the stem, tapering thinner toward the tips. -
Detail the leaves:
Switch back to the 01 pen for the leaves. For the fern-like sections, use quick, short strokes to mimic fine needles. For broad leaves, add a central vein and light hatching on one side to suggest depth. -
Add the top detail:
If you included the small insect or hanging chrysalis at the top, ink it now with the 005 pen. Keep it subtle so it doesn’t compete with the central moth.
Antique Gold Accent
Use a tiny brush and metallic gold watercolor to accent the eyespots on the moth or the corner flourishes. It adds a luxurious, illuminated manuscript feel to the piece.
Step 4: Finishing Touches
-
Ink the border:
Go over your rectangular border with a 01 or 03 pen. For a gothic touch, add small ornamental flourishes or scrollwork in the four corners. -
Erase pencil lines:
Wait until the ink is completely dry—I usually give it at least 15 minutes to be safe. Then, gently erase all underlying pencil sketches with your kneaded eraser to reveal the crisp ink work. -
Final contrast check:
Step back and look at your drawing. If the moth needs to pop more, add a few more stippled dots to the darkest areas of the wings to increase the contrast against the paper. -
Sign and date:
Add your signature or initials in a small, cursive script near the bottom corner, staying within the vintage aesthetic.
Frame your illustration in dark wood or float it in a glass frame to complete the cabinet-of-curiosities aesthetic


Memento Mori Animal Hybrid
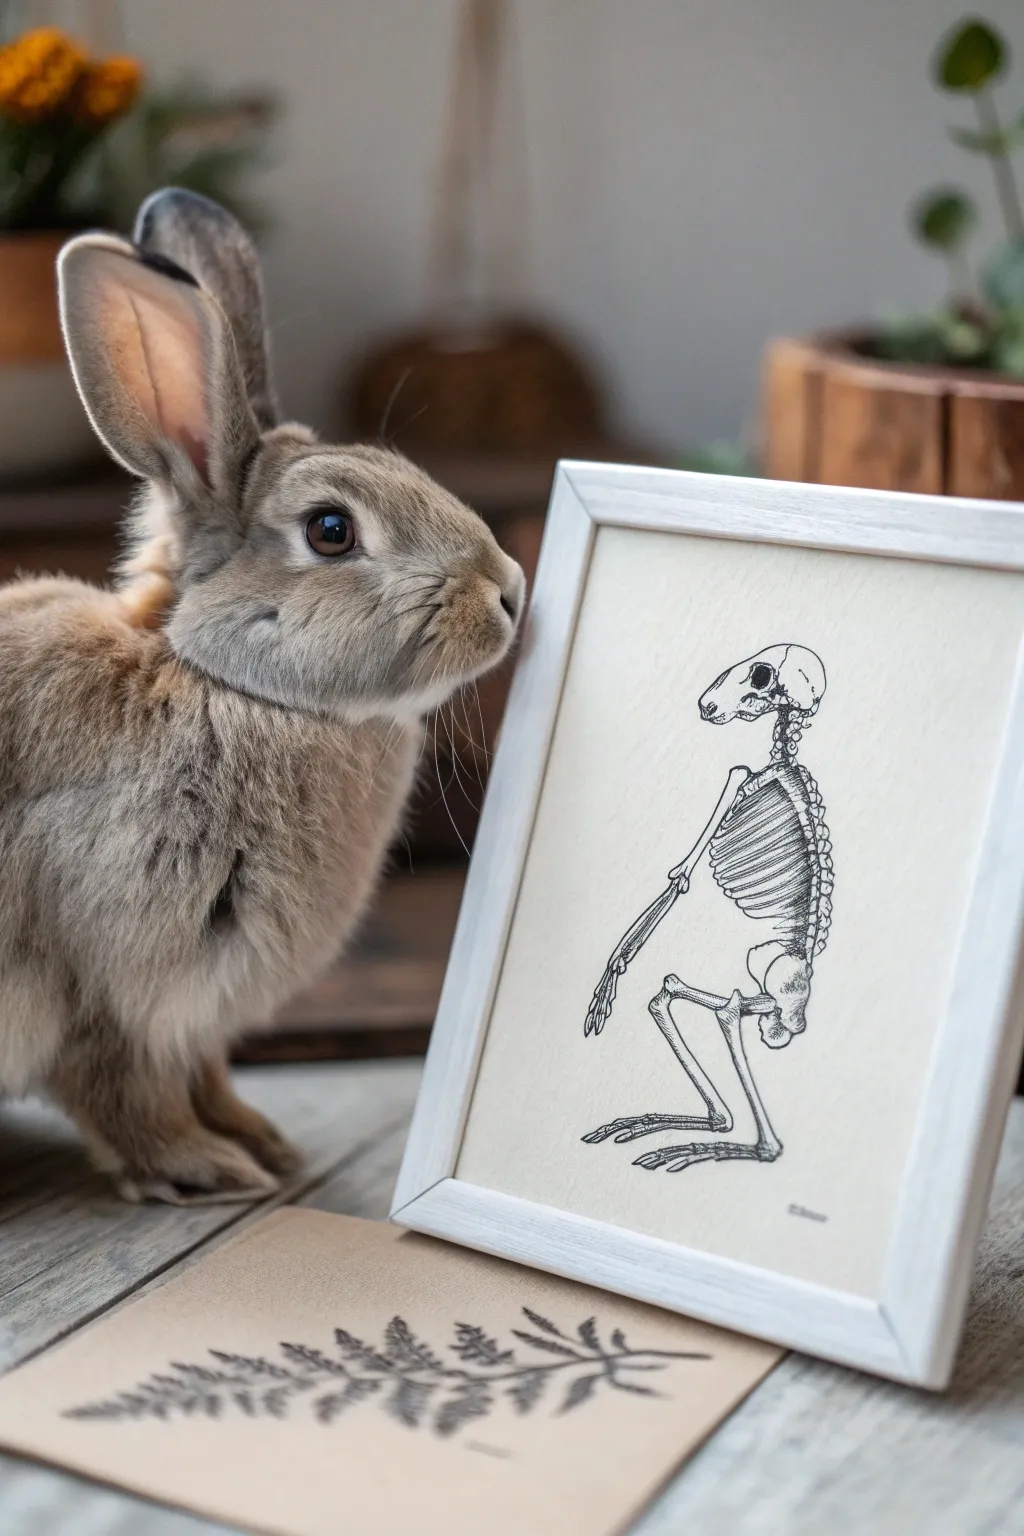
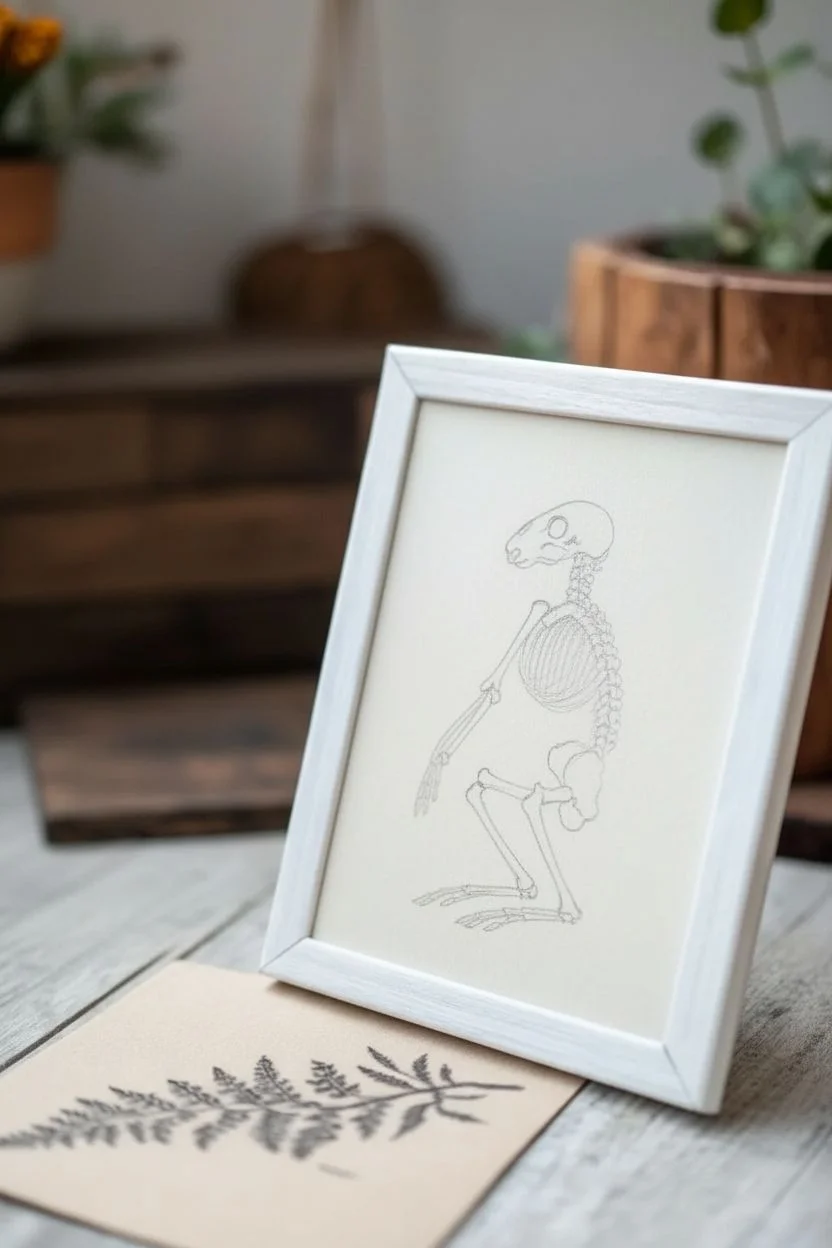
Capture the delicate balance between life and mortality with this fine-line pen illustration of a rabbit skeleton. This piece merges scientific illustration with gothic undertones, perfect for a subtle, macabre addition to your gallery wall.
Detailed Instructions
Materials
- Heavyweight cream or off-white cardstock (hot press)
- Pencil (HB or 2H for sketching)
- Kneaded eraser
- Fine liner pens (sizes 005, 01, 03, and 05)
- White or light wood frame (approx. 5×7 or 8×10)
- Ruler
- Reference image of rabbit anatomy
Step 1: Planning the Anatomy
-
Prepare your surface:
Cut your cream cardstock to fit your frame size. Lightly mark the center of the paper to help position your skeleton, ensuring there is equal negative space around the figure. -
Basic shapes:
Using your pencil, sketch the main masses of the rabbit skeleton. Draw an oval for the skull, a curved line for the spine, a rounded cage for the ribs, and stick-figure lines to determine the angle of the legs sitting in a crouch. -
Refine the skull:
Flesh out the skull shape. Focus on the elongated snout, the large eye socket, and the curve of the jaw. Keep your pencil pressure very light so these lines can be erased later. -
Spine and ribcage:
Sketch the vertebrae along the spinal curve. Add the ribs, curving them downward from the spine to create volume. Remember that a rabbit’s ribcage is quite compact compared to its powerful hind legs. -
Limbs and posture:
Detail the bones of the legs. The hind leg should be folded tightly (femur, tibia/fibula, and long foot bones). The front arm extends straight down. Pay attention to the joints; they look like small knobs where bones connect.
Wobbly Lines?
Don’t panic if your lines aren’t surgical. Organic bone isn’t perfectly straight. A slightly shaky hand can actually add realistic texture to old skeletal structures.
Step 2: Inking the Details
-
Outline the skull:
Switch to your 01 fine liner. Carefully trace the outline of the skull. Use broken lines slightly near the sutures (cracks) in the bone to suggest texture rather than a solid cartoon outline. -
Darken the eye socket:
Use the 03 pen to fill in the deep shadow of the eye socket, but leave small specs of white or use cross-hatching to keep it from looking like a flat black hole. -
Vertebrae details:
With the 005 pen, draw the individual vertebrae. These are small, complex shapes that interlock. Don’t just draw a ladder; draw small, bumpy segments. -
Ribcage texture:
Ink the ribs with the 01 pen. I like to thicken the line slightly on the underside of each rib bone to imply shadow and weight without adding confused shading. -
Complex joints:
Move to the hip and shoulder blades. Use the 005 pen to add stippling (small dots) on the pelvis bone to give it a porous, bone-like texture. -
Leg bones:
Outline the long bones of the legs with the 03 pen for stability. Ensure the ends of the bones look rounded where they meet at the knee and ankle. -
Phalanges and claws:
Switch back to the 005 for the delicate foot bones and toes. These are tiny, so precise, sharp lines are crucial here to separate the individual digits.
Aged Look
Soak your paper in strong tea before drawing and let it dry completely. This creates a stained, parchment effect that makes the anatomy study look antique.
Step 3: Shading and Finishing
-
Erase pencil lines:
Wait at least 15 minutes for the ink to fully cure. Gently roll a kneaded eraser over the entire drawing to lift the graphing, leaving only the crisp ink. -
Hatching shadows:
Use the 005 pen to add hatching (parallel lines) in shadow areas: under the ribcage, inside the pelvic cavity, and under the jaw. Keep the lines consistent in direction. -
Deepen contrast:
Take the 05 pen and darken just the very bottom edges of the main bones (femur and spine) to ground the figure and give it visual weight. -
Final texture check:
Look for any large white spaces on the bones that look too flat. Add a few tiny cracks or dots with your finest pen to simulate old, dry bone. -
Signature:
Sign your name or initials discreetly near the bottom right corner in a small, neat serif font to match the vintage aesthetic. -
Mounting:
Place the artwork into your light wood frame. If you used standard paper, you might want to back it with a piece of cardboard to keep it rigid.
Now you have a striking, scientific memento mori to display.
Gothic Lace Pattern Backgrounds and Borders

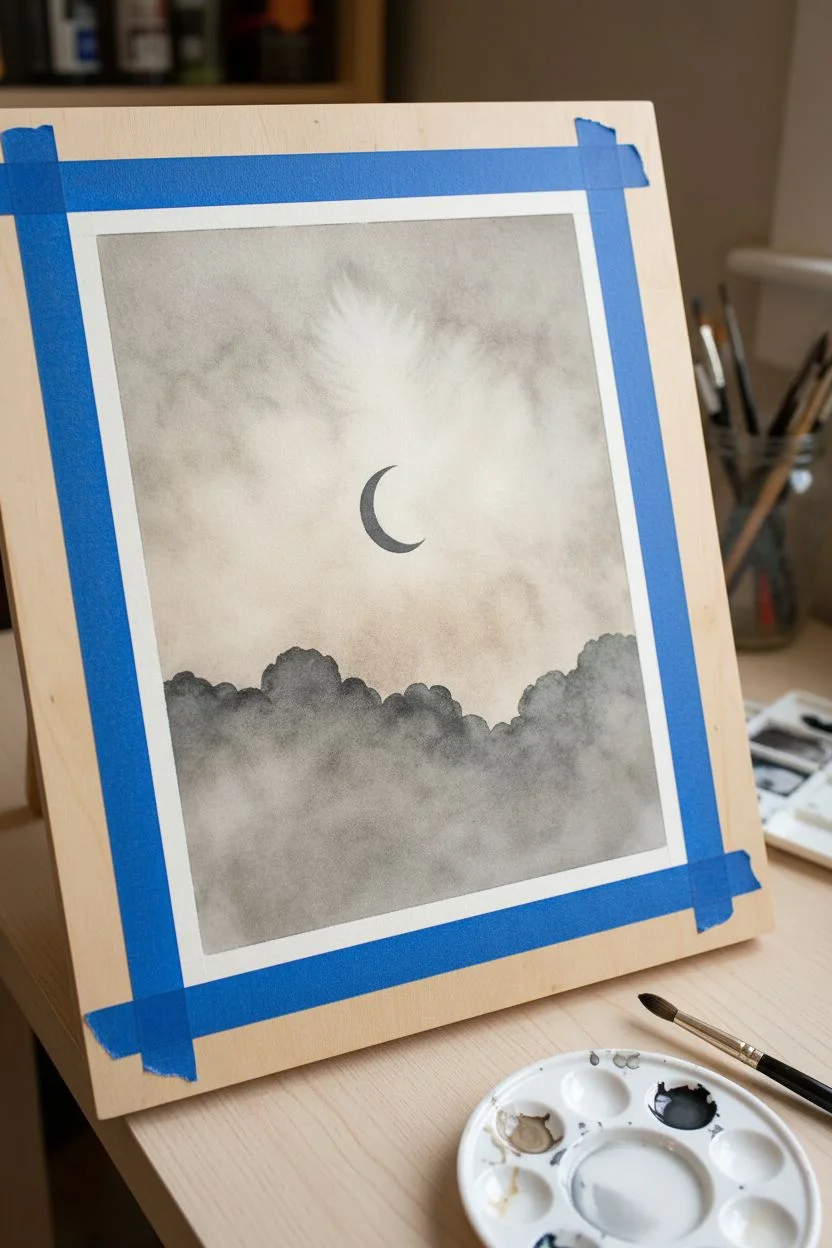
This hauntingly beautiful project combines subtle watercolor blending with intricate papercraft to create a moody, gothic atmosphere. The centerpiece is a misty moonscape nestled within a striking, lace-cut border that transforms a simple frame into a dark work of art.
Step-by-Step Guide
Materials
- Watercolor paper (cold press, heavy weight)
- Watercolor paints (Payne’s Grey, Black, Sepia)
- Round watercolor brushes (sizes 4 and 8)
- Clean water and mixing palette
- Pencil and eraser
- Black cardstock or heavy construction paper
- Craft knife (X-Acto) with fresh blades
- Self-healing cutting mat
- Ornate black photo frame (8×10 or similar)
- Cream or off-white mat board
- Spray adhesive or craft glue stick
- Paper towels
Step 1: Painting the Ethereal Sky
-
Prepare the paper:
Cut your watercolor paper to fit the opening of your mat board. Use painter’s tape to secure the edges to a hard board, which prevents buckling when wet. -
Sketch the moon:
Lightly draw a small, sharp crescent moon in the center of the paper. Keep the lines very faint so they disappear once painted. -
Establish the background wash:
Wet the entire paper surface with clean water, avoiding the crescent moon shape. Mix a very dilute wash of sepia and grey to create a warm, vintage-toned sky. -
Add misty texture:
While the background is still damp, drop in slightly darker grey pigment in random patches. Soften the edges with a clean, damp brush to create a cloudy, atmospheric effect. -
Define the moon:
Once the sky is dry, carefully paint the crescent moon. I like to use a dark grey blend, almost black, ensuring the inner curve is sharp and the outer edge is crisp against the lighter sky. -
Create the cloud bank:
Mix a saturated dark grey or Payne’s Grey. Paint the bottom third of the paper with rolling, scalloped shapes to mimic heavy storm clouds gathering at the horizon. -
Soften the clouds:
While the cloud paint is wet, use a clean, thirsty brush to lift out some pigment from the tops of the cloud shapes, giving them volume and a misty appearance. -
Final touches:
Let the painting dry completely. If the sky looks too light, apply a second very thin glaze of sepia to deepen the antique mood.
Step 2: Creating the Lace Border
-
Measure the frame glass:
Measure the visible glass area of your chosen frame. You will be creating a paper overlay that sits on top of the mat but under the frame edge. -
Draft the lace pattern:
On black cardstock, lightly sketch a repeating scalloped lace pattern. You can find printable gothic lace stencils online or draw freehand loops and floral motifs. -
Cut the main border structure:
Cut strips of cardstock to the width of your frame’s borders. These will serve as the base for your lace cutouts. -
Detail cutting:
Using a sharp craft knife, carefully cut out the negative space in your lace design. This takes patience—rotate the paper often to make smooth curves. -
Refine the edges:
Clean up any fuzzy paper bits with small scissors or the craft knife. The cleaner the cut, the more convincing the ‘lace’ effect will be. -
Layering the lace:
If your pattern is complex, consider layering a second, slightly offset cutout behind the first to add depth, or use a semi-transparent vellum backing.
Sharp Cuts Secret
Change your X-Acto blade frequently! A dull blade drags and tears cardstock rather than slicing it cleanly, ruining the delicate lace effect immediately.
Step 3: Assembly and Framing
-
Adhere the lace:
Apply a light mist of spray adhesive to the back of your black lace cutouts. Carefully press them onto the glass itself (create a border on the glass) or onto the mat board edge, depending on your visual preference. -
Mount the painting:
Center your dry watercolor painting behind the mat board opening and secure it with tape on the back. -
Clean the glass:
ensure the inside of the frame glass is perfectly clean and free of fingerprints before closing everything up. -
Final assembly:
Place the glass (now adorned with your paper lace), the mat, and the artwork into the frame and secure the backing clips.
Add Velvet Texture
Instead of cardstock, use self-adhesive black velvet paper for the lace border. It absorbs light and adds a lush, tactile gothic dimension.
Hang your moody creation in a dimly lit corner to fully embrace its mysterious charm
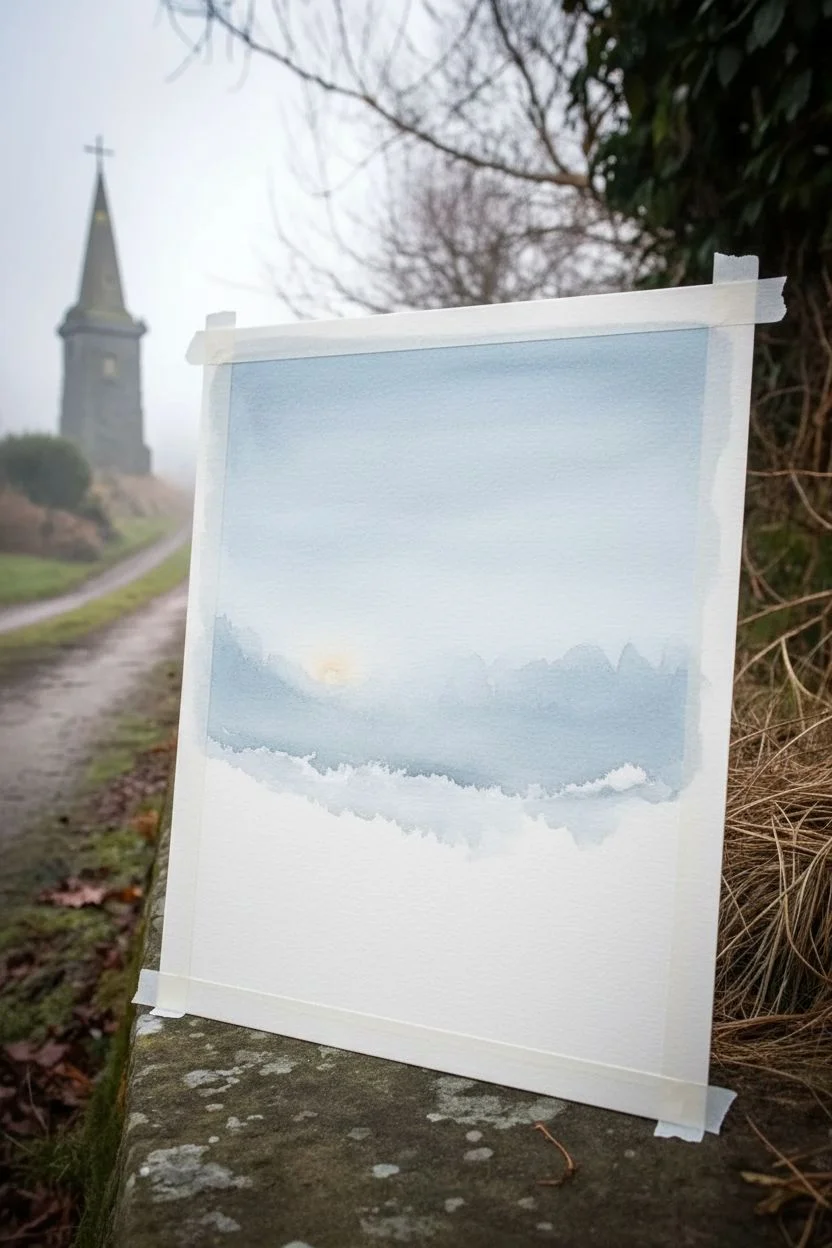
Monochrome Ink Wash With Splattered Fog

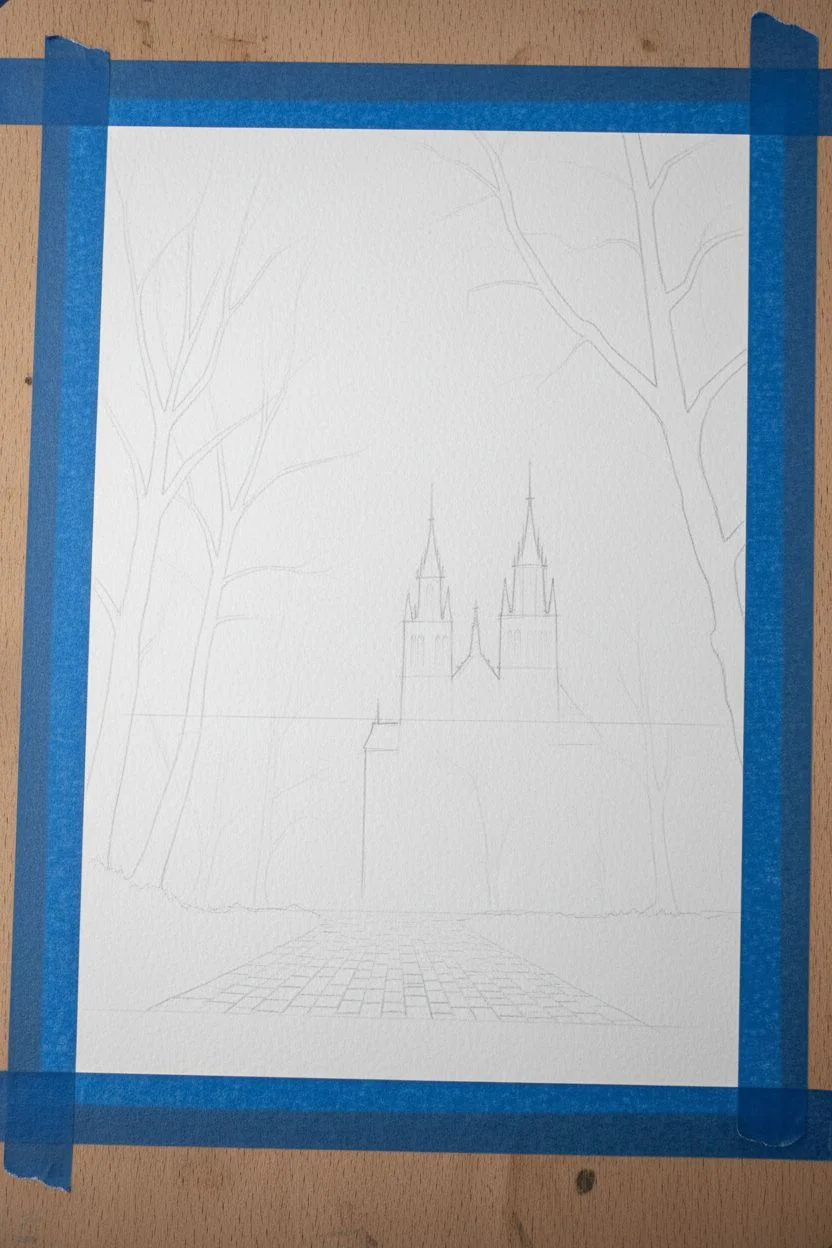
Capture the eerie beauty of a towering cathedral lost in fog with this monochrome ink wash painting. By balancing sharp silhouettes against soft, atmospheric washes, you will create a haunting scene full of Gothic mystery.
Step-by-Step Tutorial
Materials
- High-quality watercolor paper (rough or cold press, 300gsm)
- Black India ink or concentrated liquid watercolor
- White gouache or acrylic ink (for mist effects)
- Set of round brushes (sizes 2, 6, and 10)
- Rigger or liner brush for fine branches
- Old toothbrush (for spatter)
- Clean water jars
- Paper towels
- Masking tape
- Pencil (HB) for sketching
Step 1: Setting the Scene
-
Tape and Prep:
Secure your watercolor paper to a board using masking tape. This prevents buckling when we apply heavy water washes later. Ensure the paper is taut. -
Light Sketching:
Using an HB pencil, very faintly sketch the horizon line about one-third up from the bottom. Outline the basic geometric shapes of the cathedral towers in the distance and suggest the path of the cobblestone road leading toward it. -
Tree Placement:
Mark the positions of the main tree trunks on the left and right sides. Since these will be silhouetted later, focus only on their placement and curve, not the texture just yet.
Step 2: Building the Atmospheric Background
-
First Grey Wash:
Dilute a small amount of black ink with plenty of water to create a very pale, ghostly grey. Wash this over the sky area, leaving the bottom section (where the fog will be thickest) nearly white. -
Defining the Cathedral:
While the sky is semi-dry, mix a slightly darker grey. Paint the cathedral shape. Because it is shrouded in fog, keep the edges soft, especially at the base. You don’t want hard lines here; let the bottom of the building fade into the white of the paper. -
Deepening the Spires:
Once the base layer of the building is dry, use a size 6 brush with a darker grey mix to add vertical details and windows to the towers. Keep the tops sharper and the bottoms blurry to enhance the sense of height and distance. -
Splattered Fog:
Dip an old toothbrush into diluted white gouache or clean water. Flick the bristles to spray fine mist over the base of the cathedral and the middle ground. This creates a speckled, airy texture that mimics rising fog.
Pro Tip: Deckled Edges
For that authentic old-world look shown in the photo, tear the edges of your finished paper against a ruler instead of cutting them with scissors.
Step 3: The Silhouetted Foreground
-
Painting the Path:
Mix a medium-dark grey wash. Paint the path leading into the fog. Use horizontal strokes that get narrower as they recede to create perspective. -
Cobblestone Details:
When the path is damp but not soaking, use a smaller brush with concentrated ink to suggest cobblestones. Don’t draw every stone; just create broken, horizontal lines that fade out as the path goes deeper into the mist. -
Main Trunk Structure:
Now for the high contrast. Load a size 10 brush with pure, undiluted black ink. Paint the thick trunks of the foreground trees on the left. Press down for the base and lift as you move upward to taper the trunk. -
Secondary Branches:
Switch to a size 2 brush. extend branches from the main trunk. Remember that trees grow organically, so add slight zig-zags and varying angles rather than straight lines. -
Fine Twigs:
Using a rigger or liner brush, add the tiniest twigs at the ends of the branches. I prefer to hold the brush loosely at the end of the handle to create more erratic, natural-looking strokes. -
Right Side Framing:
Repeat the tree painting process on the right side, perhaps making these trees slightly smaller or further back to create depth variety.
Troubleshooting: Ink Bleeding
If your crisp tree branches are bleeding into the sky, the background wash wasn’t fully dry. Wait until the paper is barely cool to the touch before adding silhouettes.
Step 4: Atmosphere and Final Touches
-
Ground Vegetation:
Use a scruffy or dry brush with black ink to stipple textured grasses and bushes at the base of the trees. This grounds your trees so they don’t look like they are floating. -
Adding the Birds:
With the very tip of your smallest brush, dot tiny ‘v’ or ‘m’ shapes in the sky around the towers. Make them very small to emphasize the massive scale of the cathedral. -
Flying Speckles:
Load a brush with watery black ink and tap it against another brush handle over the top area of the painting. These distinct black splatters add a gritty, Gothic texture and suggest falling debris or distant birds. -
Final Fog Glaze:
If the cathedral looks too dark, apply an extremely watered-down glaze of white gouache over the bottom half of the building to push it back further into the mist.
Peel off the tape carefully to reveal your moody masterpiece, ready for a vintage frame


Have a question or want to share your own experience? I'd love to hear from you in the comments below!