
When I’m stuck on alien design ideas, I start by changing anatomy first, then I let color, texture, and culture follow. Here are some of my favorite ways to push a creature beyond “person in a suit” and into something truly otherworldly.
The Classic Big-Eyed Humanoid With a Twist
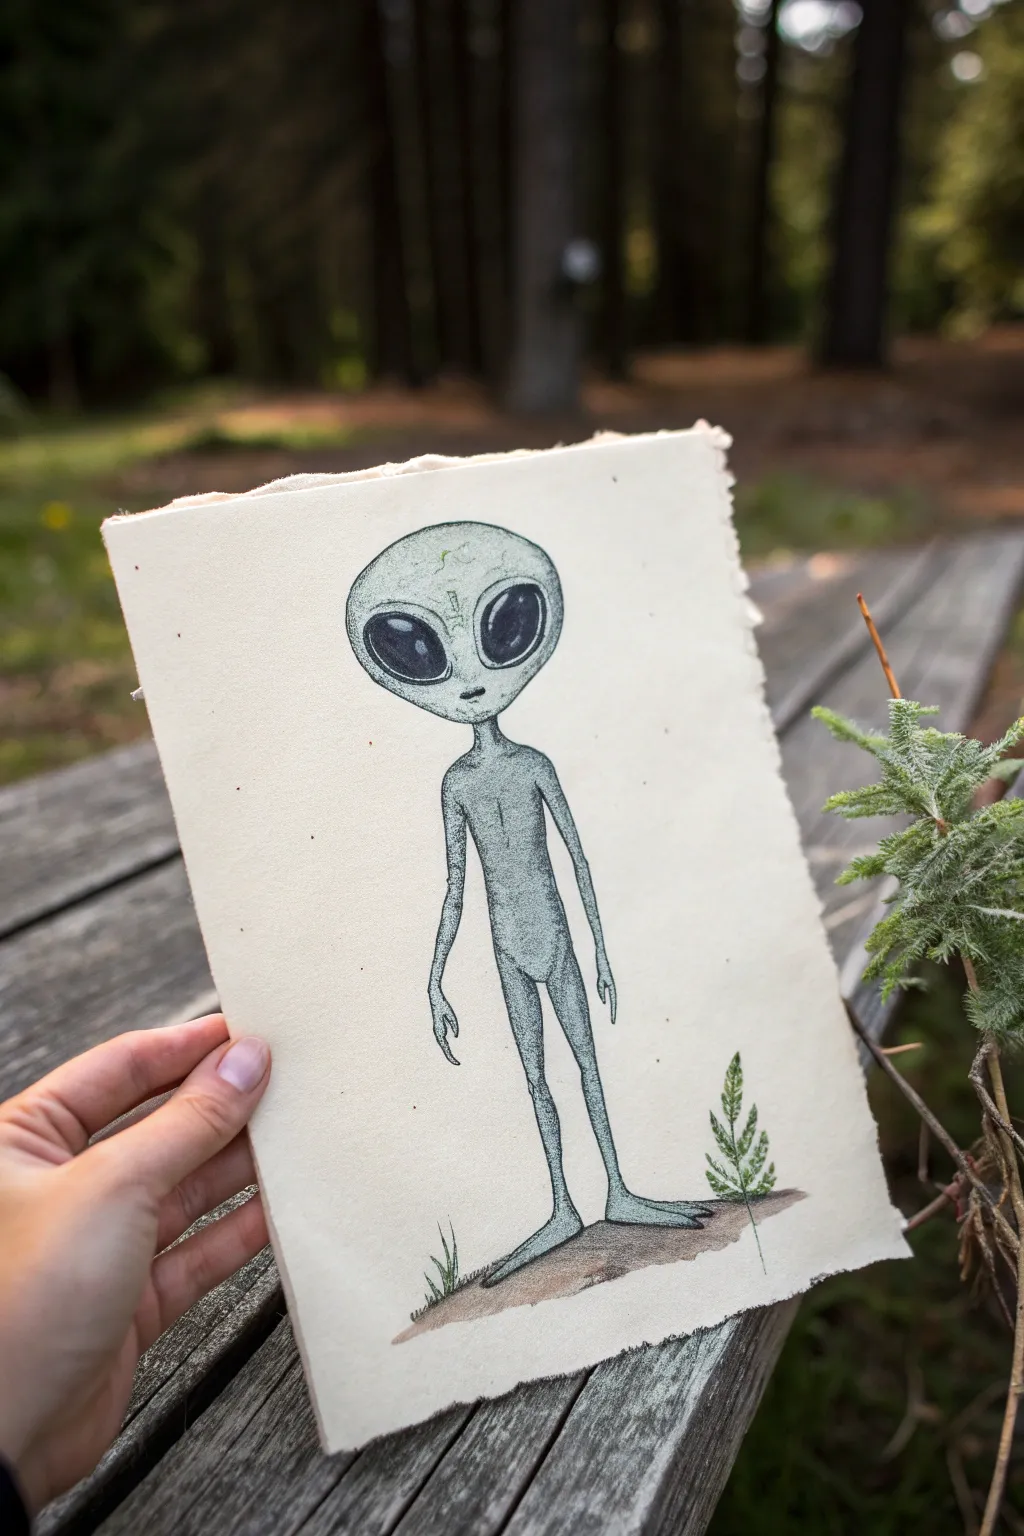

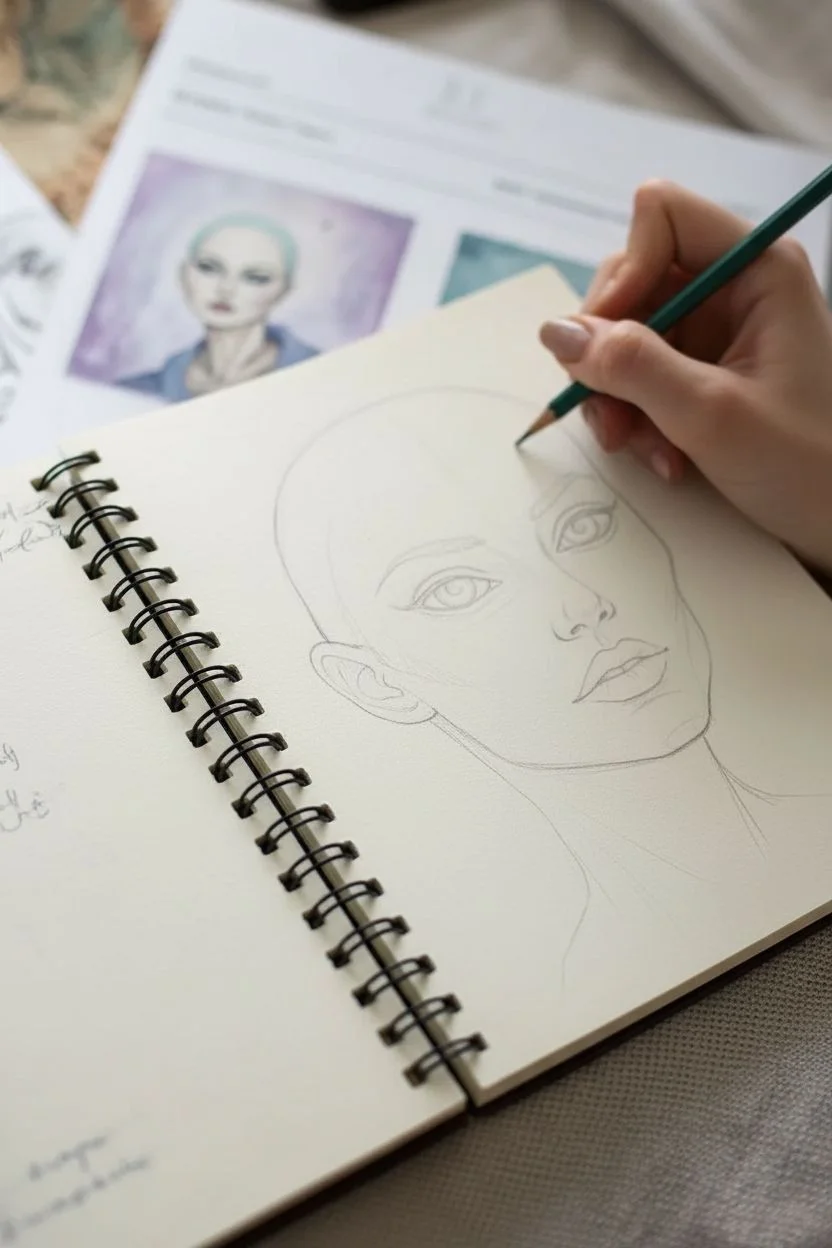
Capture the eerie charm of classic extraterrestrial lore with this scientific illustration-style drawing. Using fine liners and stippling on textured deckle-edge paper, you’ll create a piece that looks like it was torn from a secretive X-Files dossier.
Step-by-Step Tutorial
Materials
- heavyweight deckle-edge paper (watercolor or handmade paper)
- HB graphite pencil
- kneaded eraser
- fine liner pens (sizes 0.05, 0.1, and 0.5)
- cool grey alcohol markers or diluted grey watercolor
- white gel pen or gouache
- sepia or earth-tone colored pencil
Step 1: Conceptual Sketching
-
Establish the Head Shape:
Begin lightly with your HB pencil. Draw an inverted teardrop or bulb shape for the head, making sure the top is significantly wider than the chin area. -
Map Facial Features:
Center two large, almond-shaped ovals for the eyes. These should dominate the face and tilt slightly upward at the outer edges. Mark tiny slits for the nose and a small, straight line for the mouth. -
Draft the Body:
Sketch a very slender neck connecting to narrow shoulders. Extend the torso down, keeping it thin and elongated, slightly widening at the hips. -
Elongate the Limbs:
Draw the arms extending down past the hips, ending in long, slender fingers. Sketch thin legs that end in flat, somewhat large feet. -
Refine the Silhouette:
Go back over your sketch to smooth out the lines, adding subtle anatomical details like the collarbone and the slight protrusion of the belly.
Uneven is Better
Don’t aim for perfect symmetry. Making one shoulder slightly lower or the head a bit lumpy adds to the biological realism of the specimen.
Step 2: Inking and Outline
-
Initial Outline:
Using a 0.1 fine liner, carefully trace over your pencil lines. Use broken or slightly jittery lines in some areas to enhance the organic, vintage feel. -
Deepen the Eyes:
Switch to a 0.5 pen or a brush pen to fill in the large almond eyes. Leave them solid black for now; we will add highlights later. -
Erase Pencil Guidelines:
Once the ink is completely dry—give it a few minutes to avoid smudging—gently lift the graphite sketch with your kneaded eraser.
Ink Bleeding?
Handmade paper is absorbent. If lines are feathering, switch to a harder nib pen or outline faster. Avoid lingering in one spot.
Step 3: Shading and Texture
-
Apply Stippling:
Using the 0.05 pen, start stippling (creating tiny dots) around the edges of the head and under the chin. This creates a gradient shadow without harsh lines. -
Define Musculature:
Continue stippling along the sides of the torso, under the arms, and along the inner thighs to give the flat drawing distinct three-dimensional form. -
Base Color Wash:
I like to use a very light cool grey marker here to fill the skin. Apply it evenly, but don’t worry about perfection; slight streakiness adds to the ‘sketch’ aesthetic. -
Deepen Shadows:
Once the base grey is dry, go back with a slightly darker grey marker or more dense stippling in the deepest shadow areas, like the neck and hip creases. -
Add Skin Texture:
Draw tiny, faint veins or wrinkles on the forehead and joints using your thinnest pen to make the creature look biological rather than robotic.
Step 4: Final Details
-
Highlight the Eyes:
With a white gel pen, add a curved reflection line and a dot or two to the upper part of the black eyes. This brings the creature to life instantly. -
Ground the Figure:
Sketch a small patch of uneven ground under the feet. Use the sepia pencil to add a dirt tone, blending it out softly so it fades into the paper. -
Add Vegetation:
Draw a few small blades of grass or a fern-like plant near the feet using green ink or pencil. This gives a sense of scale and places the alien in a natural settings. -
Distress the Edges (Optional):
If your paper isn’t naturally aged, you can lightly brush the deckle edges with the sepia pencil or a tea bag to make the document look old.
Now you have a mysterious artifact that looks like it was discovered in a classified archive


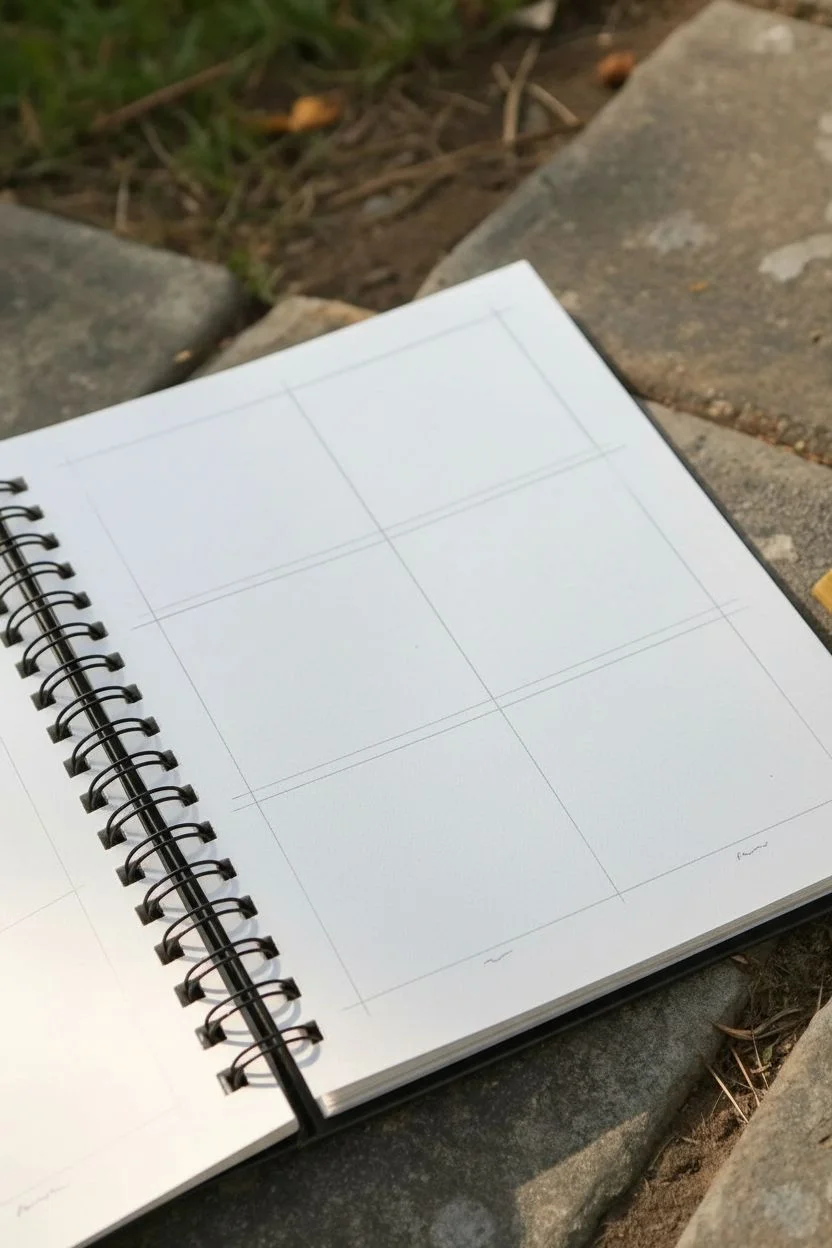
Elongated Skull Silhouettes for Instant Otherworldliness
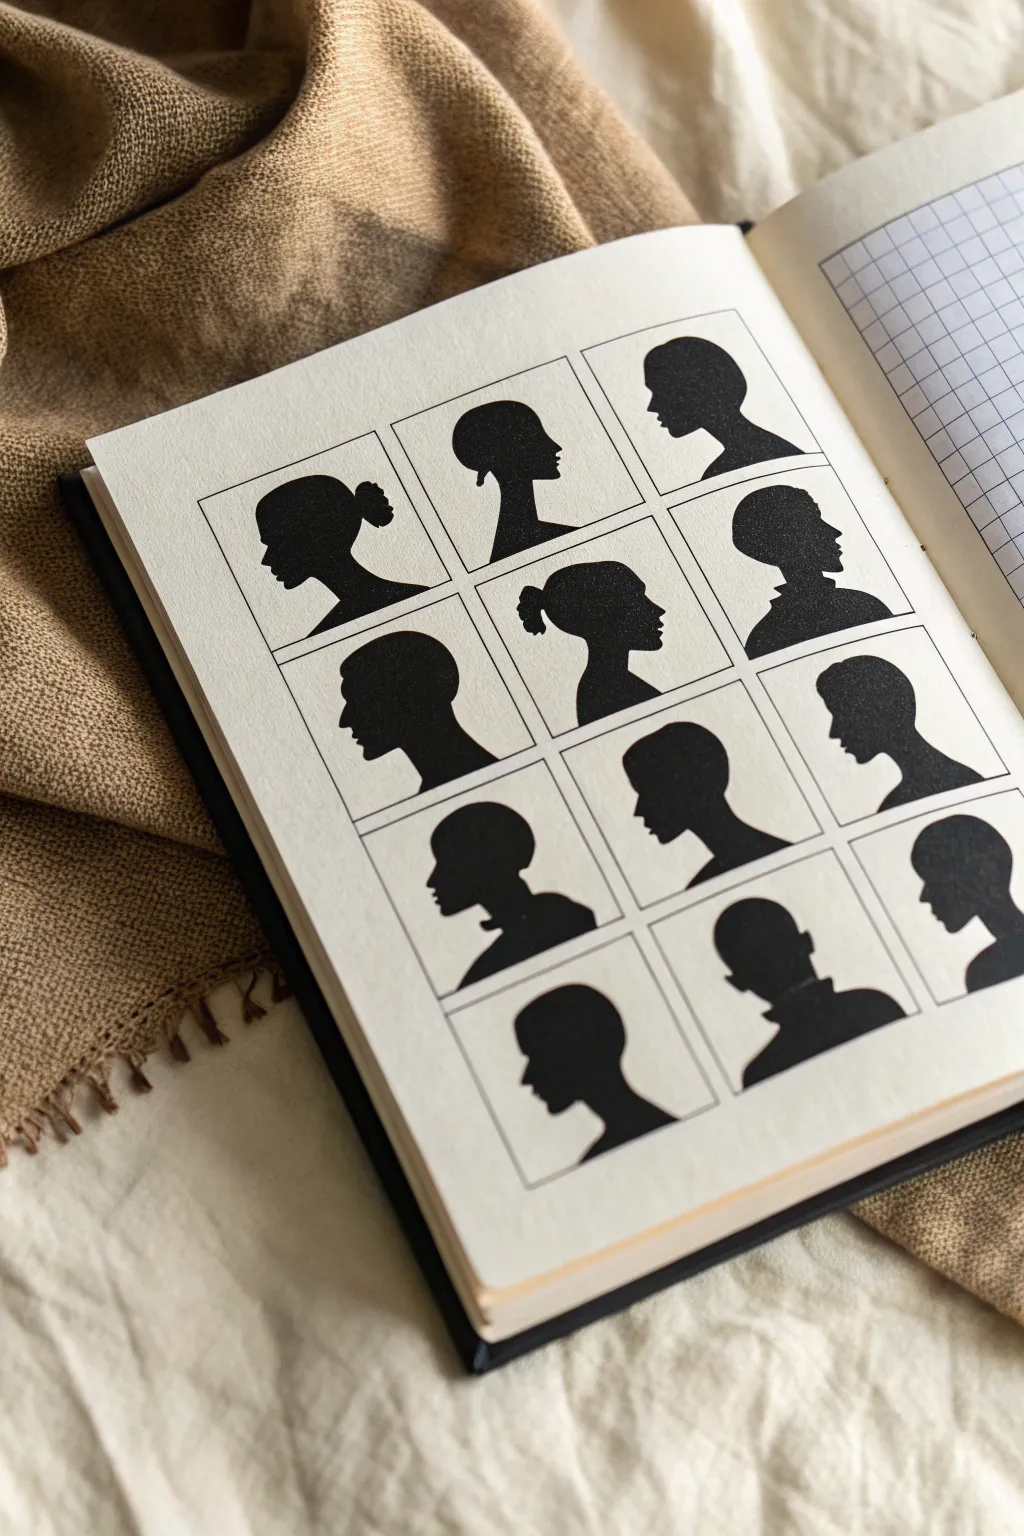
This striking sketchbook exercise explores character design through the simplicity of high-contrast silhouettes, perfect for brainstorming alien species with subtle anatomical value. The grid format creates a clean, scientific specimen look while allowing you to iterate on cranial shapes and facial features quickly.
How-To Guide
Materials
- Hardcover sketchbook (plain or mixed media paper preferred)
- Pencil (HB or 2B)
- Eraser
- Ruler
- Fine liner pen (0.1mm or 0.3mm)
- Black brush pen or India ink with a small brush
- Reference photos of profile views (optional)
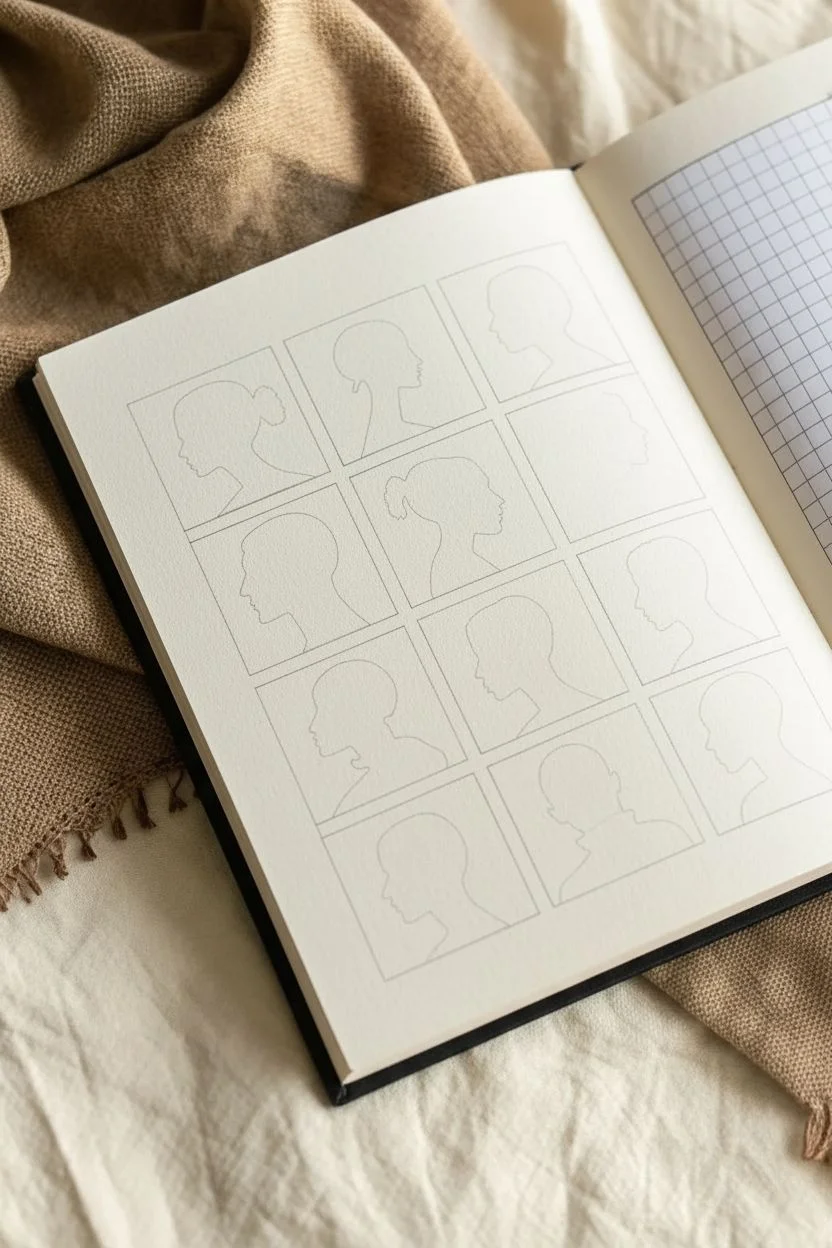
Step 1: Setting the Grid
-
Measure the margins:
Begin by determining the printable area of your sketchbook page. Leave a generous margin of about 1-1.5 inches at the top and bottom, and about 0.5 inches on the sides to frame your artwork. -
Calculate grid size:
You need a layout of 3 columns and 4 rows. Measure the width of your working area and divide it by three to find the width of each individual box. -
Draw the frame:
Using your ruler and a light pencil touch, draw the outer boundary box first to ensure everything is centered. -
Create the inner divisions:
Mark your vertical third points and your horizontal quarter points. Draw straight lines across to create twelve distinct, equal rectangles. -
Clean up:
Double-check your box sizes. If they look uneven, adjust now before committing to ink.
Step 2: Drafting the Shapes
-
Establish the neck anchor:
In the bottom third of the first box, lightly sketch a curve for the neck and shoulders. This grounds the silhouette and ensures the head won’t float. -
Sketch the cranium:
Draw the basic head shape. Since we are aiming for ‘otherworldly,’ feel free to elongate the back of the skull, heighten the forehead, or flatten the top. -
Refine the profile:
Add the facial features. Experiment with recessed noses, protruding brows, or sharp chins. Keep the details focused solely on the outer edge. -
Repeat the process:
Move through the remaining eleven boxes. Try to make each silhouette distinct—give one a bun, another a flat top, and another a pronounced jaw. -
Add subtle variations:
I like to vary the neck thickness and shoulder slope here to imply different body types or species classes.
Edge Control
If your brush pen feels too shaky for the detailed nose and lip areas, simply outline those tiny details with a 0.5mm micron pen before filling the rest.
Step 3: Inking and Filling
-
Outline the boxes:
Switch to your fine liner pen. Carefully trace over your ruler grid lines to create crisp, permanent frames. -
Trace the loose profiles:
Go over your pencil sketches with the fine liner. You don’t need to fill them yet; just establish a clean, continuous boundary line for each head. -
Erase pencil marks:
Once the fine liner is completely dry (give it a minute or two), gently erase the underlying graphite grid and sketch lines. -
Fill the positive space:
Using a brush pen or a brush dipped in India ink, carefully fill in the interior of each silhouette. Start near the center and work your way out to the edges. -
Refine the edges:
Use the very tip of your brush pen or switch back to the fine liner to sharpen any corners, specifically around the nose, lips, and eyelashes. -
Check for gaps:
Hold the page up to the light to see if your black fill is patchy. Apply a second coat of ink if necessary for a true opaque void.
Bio-Luminescence
Once the black ink is fully dry, use a white gel pen to add glowing ‘tattoos,’ cybernetic implants, or eyes within the black silhouette void.
Now you have a catalogue of mysterious visitors ready for your next sci-fi story


Alien Color Palette Built From Unnatural Skin Tones
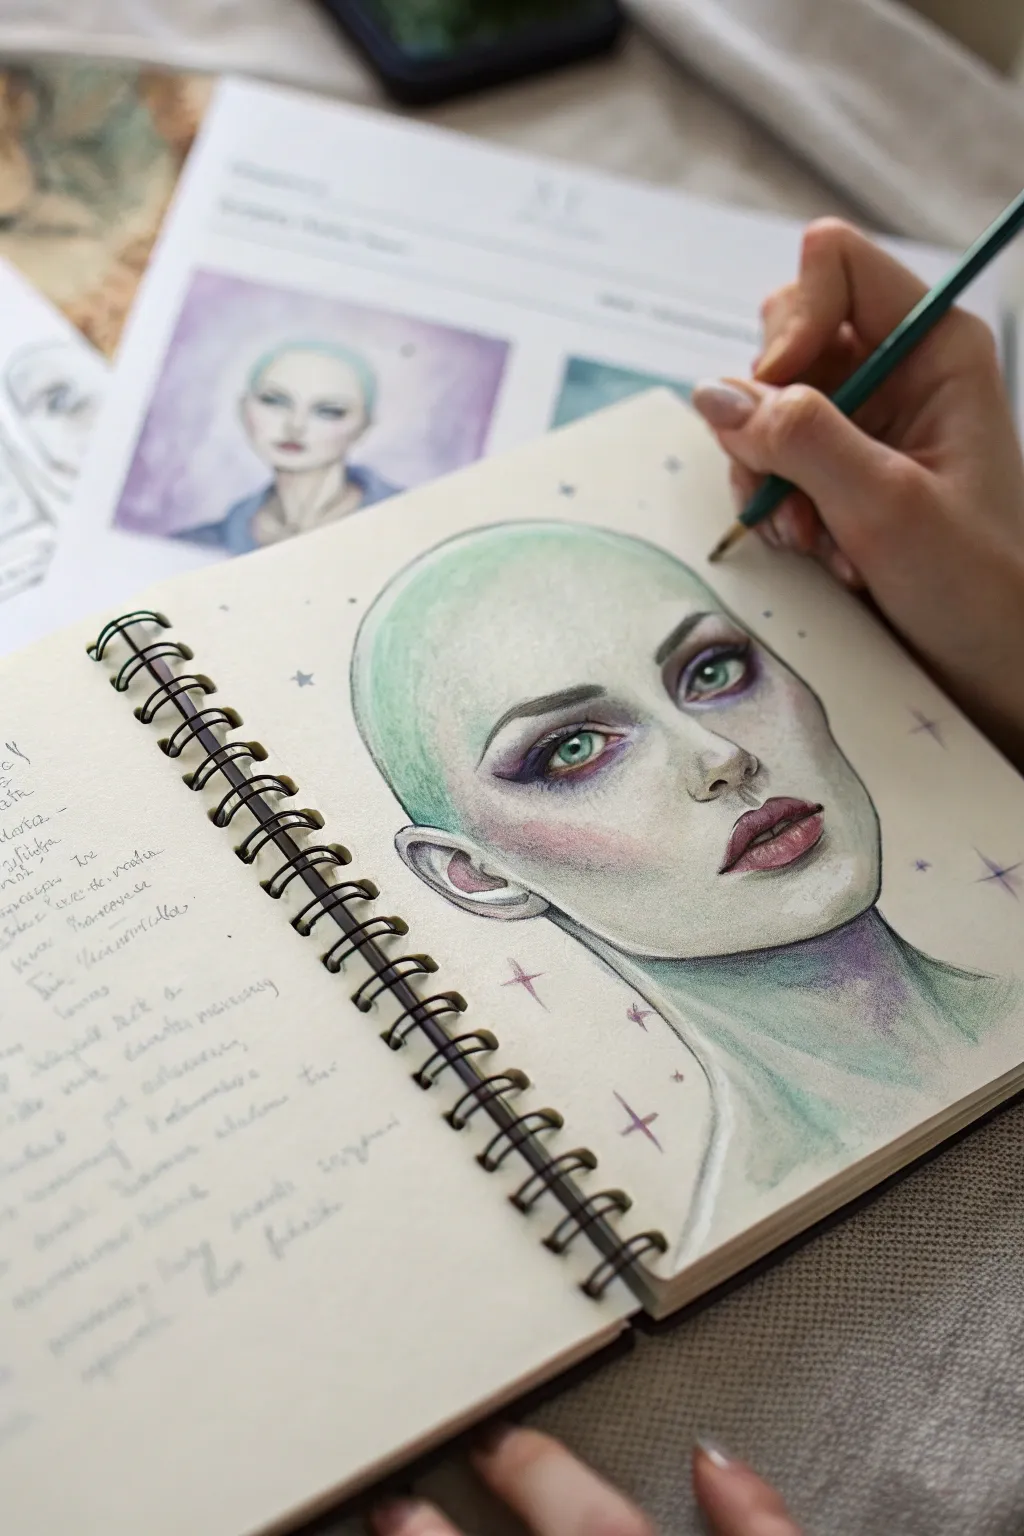
This tutorial guides you through creating a striking alien portrait that moves beyond traditional sci-fi tropes, focusing on soft, ethereal beauty using unnatural skin tones. You’ll layer pencils to achieve a smooth, luminescent green complexion accented with violet shadows and starry details.
Step-by-Step Tutorial
Materials
- Spiral-bound sketchbook (mixed media or heavy drawing paper)
- Graphite pencil (HB or 2B) for sketching
- Soft eraser (kneaded preferred)
- Colored pencils (wax or oil-based based on preference)
- Key colors: Mint green, pale sage, deep violet, plum, indigo, soft pink, slate grey
- Fine-liner pen (optional, for stars)
- White gel pen or gouache (for highlights)
- Pencil sharpener
Step 1: Laying the Foundation
-
Initial Outline:
Begin with a light graphite sketch of the head. Aim for a slightly elongated, bald skull shape rather than a standard human head. Use very light pressure so lines -
Facial Features Placement:
Draw large, almond-shaped eyes slightly wider apart than a human’s. Let the nose act as a small anchor point, keeping it delicate, while the lips should be full and well-defined. -
Refining the Clean Linev:
Once satisfied with the proportions, clean up your sketch with a kneaded eraser. You want faint guide lines that won’t dirty your colored pencil layers later.
Step 2: Skin Tone Base Layer
-
First Green Wash:
Take your lightest mint green pencil. Apply a soft, even layer over the entire face and head, using small circular motions to avoid directional streaks. -
Building Saturation:
Go over the sides of the skull and the cheek areas again with a slightly darker sage green to begin establishing volume. Leave the center of the forehead and nose bridge lighter. -
Neck Shadows:
Extend the green down the neck, but start introducing a hint of slate grey mixed with the green under the jawline to create depth immediately.
Fixing Muddy Colors
If green and purple blend into brown, stop layering. Erase lightly to lift pigment, then re-apply distinct layers. Keep pencils sharp for clean transitions.
Step 3: Shadows and Contouring
-
Introducing Violet:
This is where the magic happens. Instead of using black for shading, pick up a deep violet or plum pencil. Lightly shade the eye sockets, the hollows of the cheeks, and the side of the nose. -
Deepening the Eyes:
Intensify the pressure around the eyes using indigo or a dark purple. Create a heavy, smoky effect on the upper and lower lids to make the eyes pop. -
Ear Details:
Sketch the inner folds of the ear using a mix of your grey and violet pencils. I find that keeping the ear slightly lower on the head adds to the subtle ‘otherworldly’ feeling. -
Blending the Contours:
Take your original mint green pencil and color over the edges where the violet meets the green. This burnishing technique blends the colors seamlessly.
Go Cosmic
Add faint constellations on the bald scalp using a white gel pen or silver pencil. Connect the dots lightly for a literal star-map skin texture.
Step 4: Features and Details
-
Iris Coloration:
Color the irises with a piercing teal or emerald green. Add a dark pupil in the center and leave a tiny spot white (or lift pigment) for the catchlight. -
Luscious Lips:
Fill the lips with a mauve or muted pink. Add darker violet lines in the corners and the center line of the mouth for dimension. -
Blushing the Cheeks:
Lightly dust a soft pink pencil over the cheekbones, right above the violet contour. This brings a surprising warmth and life to the alien skin. -
Eyebrows and Lashes:
Draw the eyebrows using short, sharp strokes with a dark grey or brown pencil. Keep them arched and defined. Add delicate lashes to the upper lid.
Step 5: Final Atmosphere
-
Refining the Head Shape:
Go around the outer edge of the head with a sharp grey or violet pencil to crisply define the separation between the subject and the background. -
Neck Gradient:
Fade the bottom of the neck drawing out into the paper using loose strokes of violet and teal, creating an unfinished, artistic vignette effect. -
Adding Stars:
Using a purple pencil or fine-liner, draw small four-point stars and dots randomly around the head to emphasize the cosmic theme. -
Final Highlights:
Use a white gel pen or white charcoal pencil to add bright highlights to the tip of the nose, the center of the lower lip, and the wet line of the eye.
Step back and admire how the unnatural palette creates a character that feels both strange and oddly familiar.


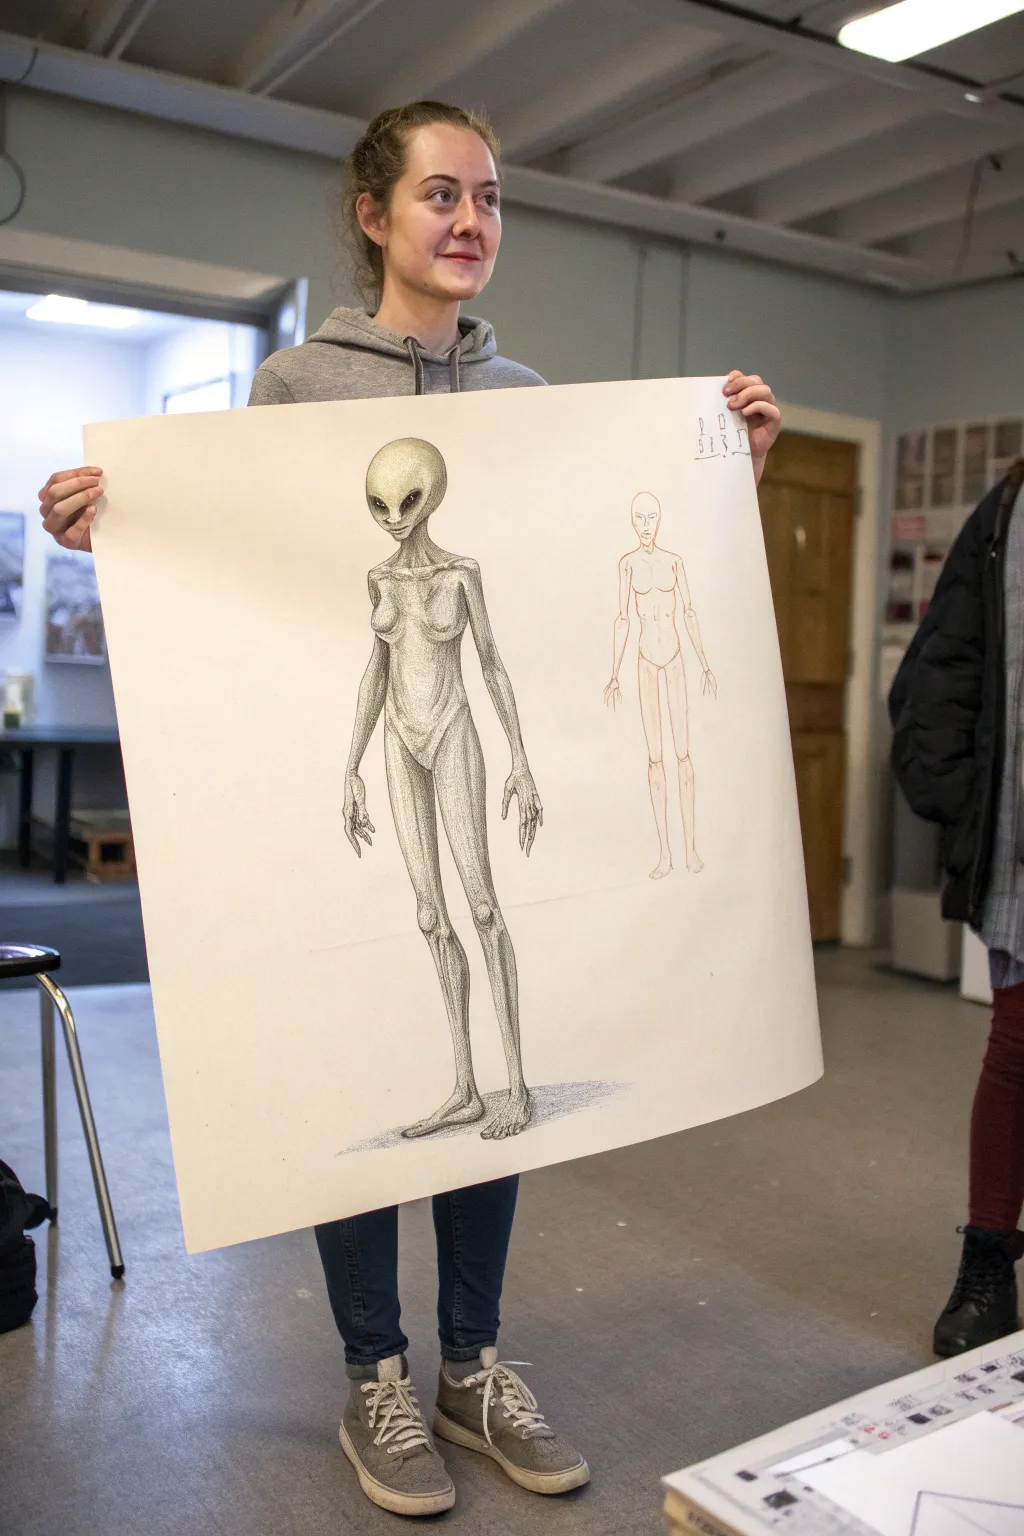
Character Turnaround Sheet for a Solid Design
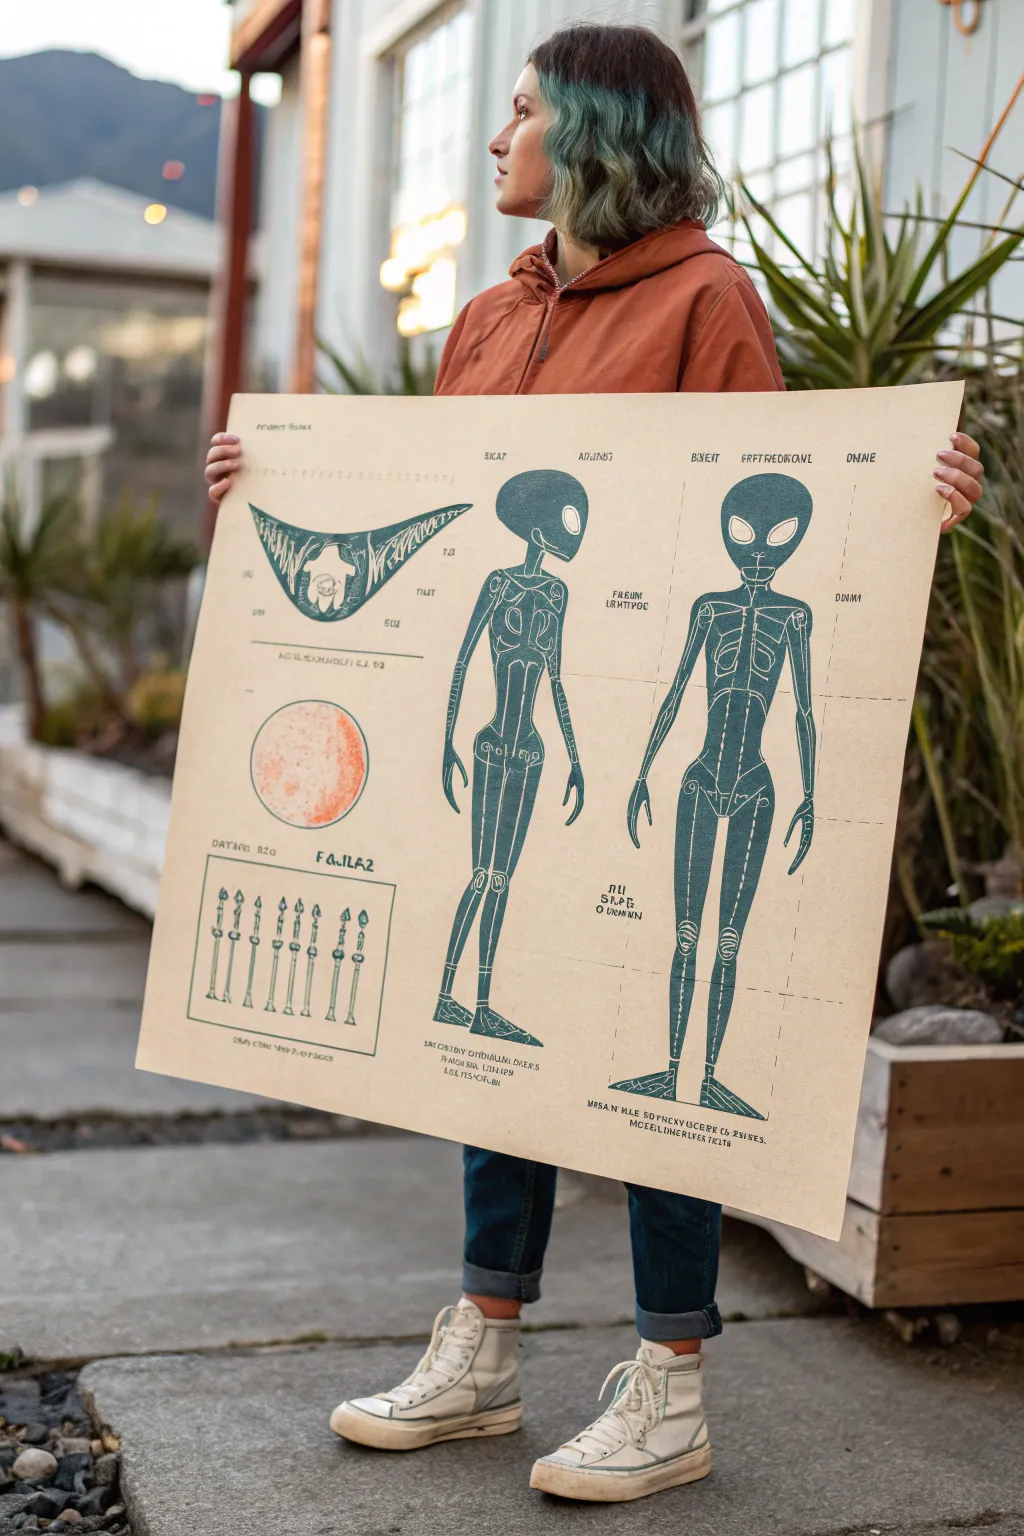
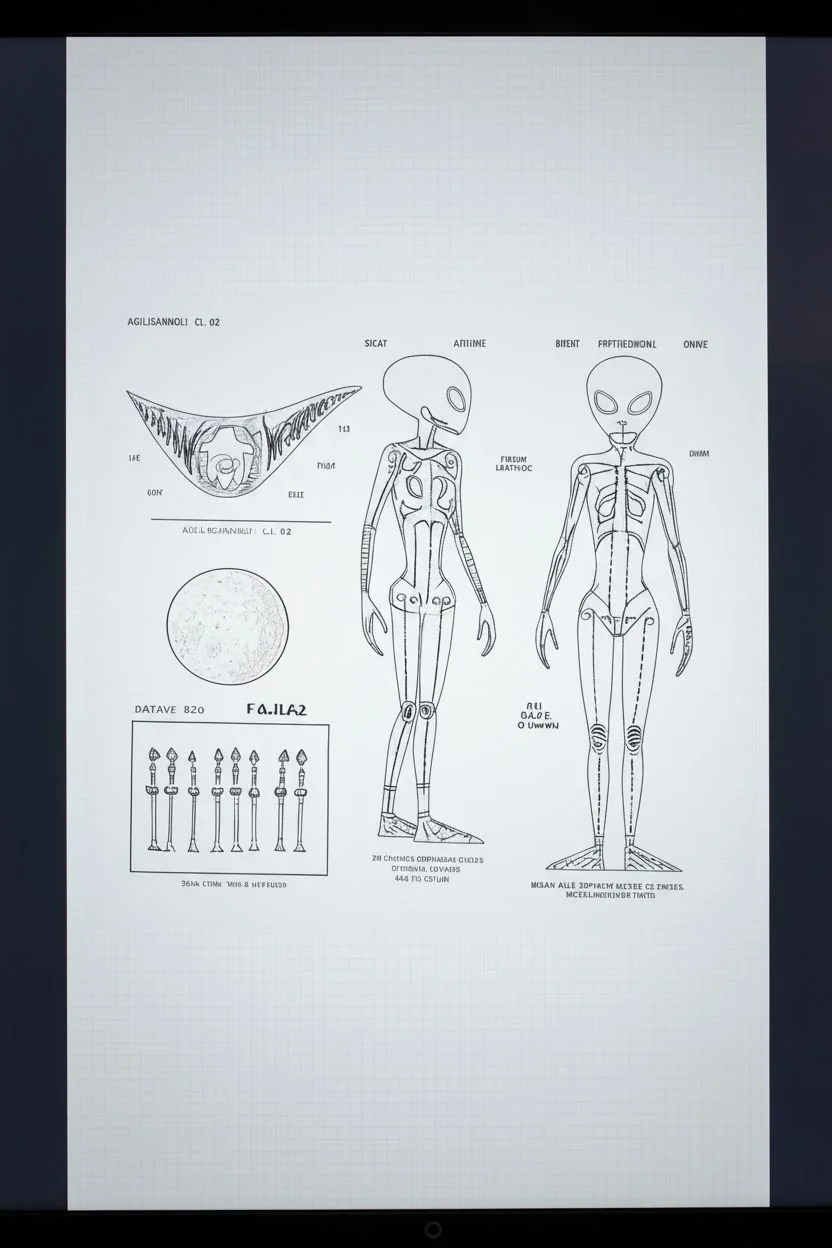
Bring your extraterrestrial concepts to life with this oversized, diagrammatic character sheet that looks like it was salvaged from a retro sci-fi archive. This project combines digital drafting with physical aging techniques to create a convincing, large-scale prop perfect for your studio wall.
How-To Guide
Materials
- Large format heavy watercolor paper or ‘kraft’ paper (A1 or A2 size)
- Tea bags or instant coffee (for aging)
- Wide sponge brush or spray bottle
- Digital drawing tablet and software (Photoshop/Procreate)
- Large format printer (or access to a print shop)
- Teal or cyan ink cartridges (if printing at home)
- Fine-grit sandpaper
- Matte finish spray sealant
- Ruler and T-square
Step 1: Digital Character Drafting
-
Define the silhouette:
Begin your digital canvas with high resolution (300 DPI) at your intended print size. Sketch the side profile of your alien first, focusing on elongated limbs and a prominent cranium to match the ‘classic grey’ aesthetic shown. -
Create the wireframe:
Using the side view as a guide, draw horizontal guidelines across the canvas to align the top of the head, shoulders, hips, and knees. Use these guides to draw the corresponding front-facing view, ensuring the proportions match perfectly. -
Detail the anatomy:
Refine your sketch into clean line art. Instead of solid shading, use cross-hatching and contour lines to suggest muscle groups and skeletal structures, mimicking the style of old medical illustrations. -
Add technical callouts:
In the blank spaces, draw isolated details like a magnified eye socket or a planetary map. I like to add dashed lines connecting these details to the main figure to enhance the ‘blueprint’ feel. -
Inscribe alien typography:
Create blocks of text using a geometric, rune-like font or hand-drawn symbols. Place these near joint articulations or key features as if labeling biological functions.
Pro Tip: False Folds
To make it look like a folded map, lightly score a grid pattern on the back with a bone folder, then gently fold and unfold before staining. The ink will settle in the creases.
Step 2: Printing & Preparation
-
Color grading:
Before printing, change your black line art to a deep, muted teal or slate blue color. This mimics the look of vintage cyanotypes or mimeographs better than stark black ink. -
Paper selection:
Source a heavy, slightly textured paper. If you can’t print directly on vintage-colored paper, choose a cream or off-white stock to serve as your base. -
The printing process:
Send your file to a large-format printer. Ask for a matte finish—glossy paper will ruin the antique illusion instantly. If printing at a shop, request ‘architectural bond’ paper for an authentic blueprint texture.
Step 3: Aging & Finishing
-
Brewing the stain:
Brew a very strong pot of black tea or instant coffee. Let it cool completely. The goal is a subtle, uneven beige wash, not a dark brown stain. -
Applying the patina:
Lay your print on a flat, waterproof surface. Using a wide sponge brush or a spray bottle, lightly dampen the paper with your tea mixture. Avoid soaking it too much to prevent the ink from bleeding. -
Create organic imperfections:
While damp, sprinkle a few grains of instant coffee directly onto the paper in random corners to create darker, age-spot speckles. Dab any pools of liquid with a paper towel. -
Drying and flattening:
Allow the paper to air dry completely. Once dry, place it under heavy books for 24 hours to flatten any buckling caused by the moisture. -
Edge distressing:
Take your fine-grit sandpaper and very gently buff the edges and corners of the poster. This white abrasion mimics years of handling and storage wear. -
Seal the artifact:
Take the poster outside and apply a light coat of matte spray sealant. This protects the tea stain from fading and locks in the texture.
Level Up: UV Secrets
Use invisible UV-reactive ink to add hidden messages or ‘classified’ biological data over the drawing that only appears under a blacklight.
Hang your mysterious schematic on the wall and wait for your guests to ask which government archive you stole it from
BRUSH GUIDE
The Right Brush for Every Stroke
From clean lines to bold texture — master brush choice, stroke control, and essential techniques.
Explore the Full Guide
Alien Expression Sheet With Non-Human Features
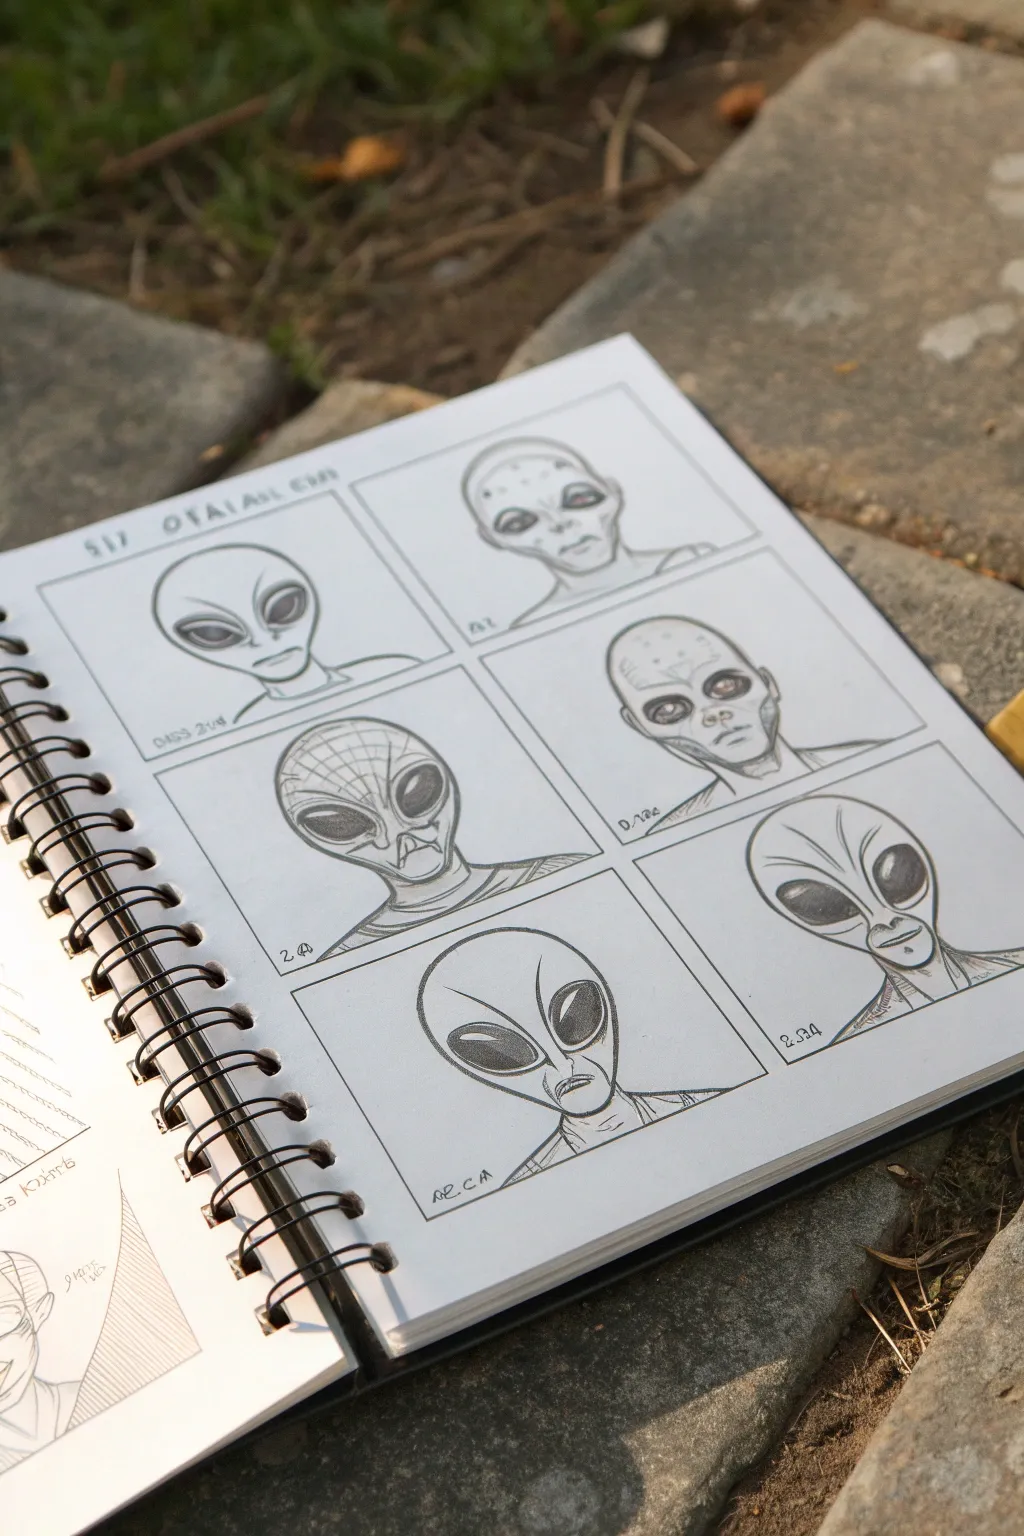
Explore the subtle nuances of alien anatomy with this grid-based character design exercise, perfect for developing unique non-human features. Using simple graphite and ink, you’ll create a structured sheet of six distinct alien portraits that balance classic tropes with imaginative textures.
Detailed Instructions
Materials
- Sketchbook (spiral bound, medium weight paper)
- Ruler
- HB or 2B Graphite Pencil
- Fine-point technical pen (0.1mm or 0.3mm)
- Eraser (kneaded preferred)
- Blending stump (optional)
Step 1: Setting the Grid
-
Measure the layout:
Begin by opening your sketchbook to a fresh page. Using your ruler, lightly measure out a large rectangular area that fills most of the page, leaving a modest margin around the edges. -
Divide into cells:
Divide this large rectangle into six equal smaller rectangles—two columns wide and three rows high. Use light pencil strokes for these guidelines so they can be inked or adjusted later. -
Ink the frames:
Once you are happy with the spacing, use your ruler and a fine-point pen to draw clean, solid lines over your grid. Leave a tiny bit of space at the bottom of each box for notes or names.
Eye Depth Trick
When filling in the dark alien eyes, create a gradient. Make the top of the eye pitch black and fade slightly to dark grey at the bottom to suggest curvature.
Step 2: Basic Head Structures
-
Draft the ‘Grey’ silhouette:
In the first box (top left), sketch a classic ‘Grey’ alien head shape—an inverted teardrop with a large cranial area and a narrow, pointed chin. Keep the pencil pressure extremely light. -
Vary the anatomy:
Move through the remaining five boxes, drawing similar head shapes but introducing variations. Make one skull wider at the top, another jawline more square, or elongate the neck on another. The goal is family resemblance, not identical clones. -
Place the features:
Lightly mark guidelines for eyes, nose slits, and mouths. Position the eyes lower on the face than a human’s, and make them significantly larger and tilted upwards at the outer edges.
Smudged Pencil?
Graphite smudges easily on smooth paper. Place a clean sheet of scrap paper under your drawing hand to protect finished panels while you work on new ones.
Step 3: Detailed Character Design
-
Refine the classic alien (Box 1):
For the first portrait, stick to the basics. Draw large, almond-shaped eyes that are completely black. Add two tiny slits for a nose and a grim, thin line for a mouth. -
Add textual cranial details (Box 2):
In the top right box, give the alien distinct facial markings. Sketch small dots or nodes on the forehead and emphasize the cheekbones with shading to suggest a more skeletal structure. -
Create a patterned variant (Box 3):
For the middle left portrait, draw a spiderweb-like grid pattern across the forehead and scalp. Darken the eyes significantly, adding a highlight to make them look wet and reflective. -
Design a hybrid look (Box 4):
In the middle right box, try more human-like eyes with pupils, but keep the alien skull shape. Add lines under the eyes and around the mouth to suggest aging or wrinkled skin texture. -
Experiment with smooth features (Box 5):
On the bottom left, create a sleeker look. Use smooth, curving lines for the jaw and neck. Shade the large eyes heavily, leaving a sharp, white crescent reflection to give them depth. -
Develop structural ridges (Box 6):
For the final portrait in the bottom right, draw ridges running from the forehead down to the nose bridge. This gives the alien a brow-heavy, intense expression.
Step 4: Inking and Shading
-
Outline the portraits:
Take your fine-point pen and carefully embrace the pencil lines you want to keep. Outline the heads, necks, and main facial features. Do not ink the shading yet. -
Fill the eyes:
This is crucial for the alien look. Fill in the large eye shapes with your pencil or pen. If using pencil, press firmly for a dark charcoal grey. Leave small white ovals or lines for specular highlights. -
Apply shading:
Use your pencil to shade under the chins, the sides of the necks, and the temples. This makes the heads look 3D rather than flat stickers. I like to use a hatching technique for the darker areas. -
Add scribbled notes:
To enhance the ‘scientific field study’ aesthetic, scribble small, illegible or alien-language notes in the bottom corners of each frame using your pen. -
Clean up:
Wait for the ink to be completely dry to avoid smudging, then gently erase all the underlying pencil guidelines to leave a crisp, professional finish.
Now you have a structured study of extraterrestrial biology ready to inspire your next sci-fi story
Digitigrade Legs to Break Human Anatomy
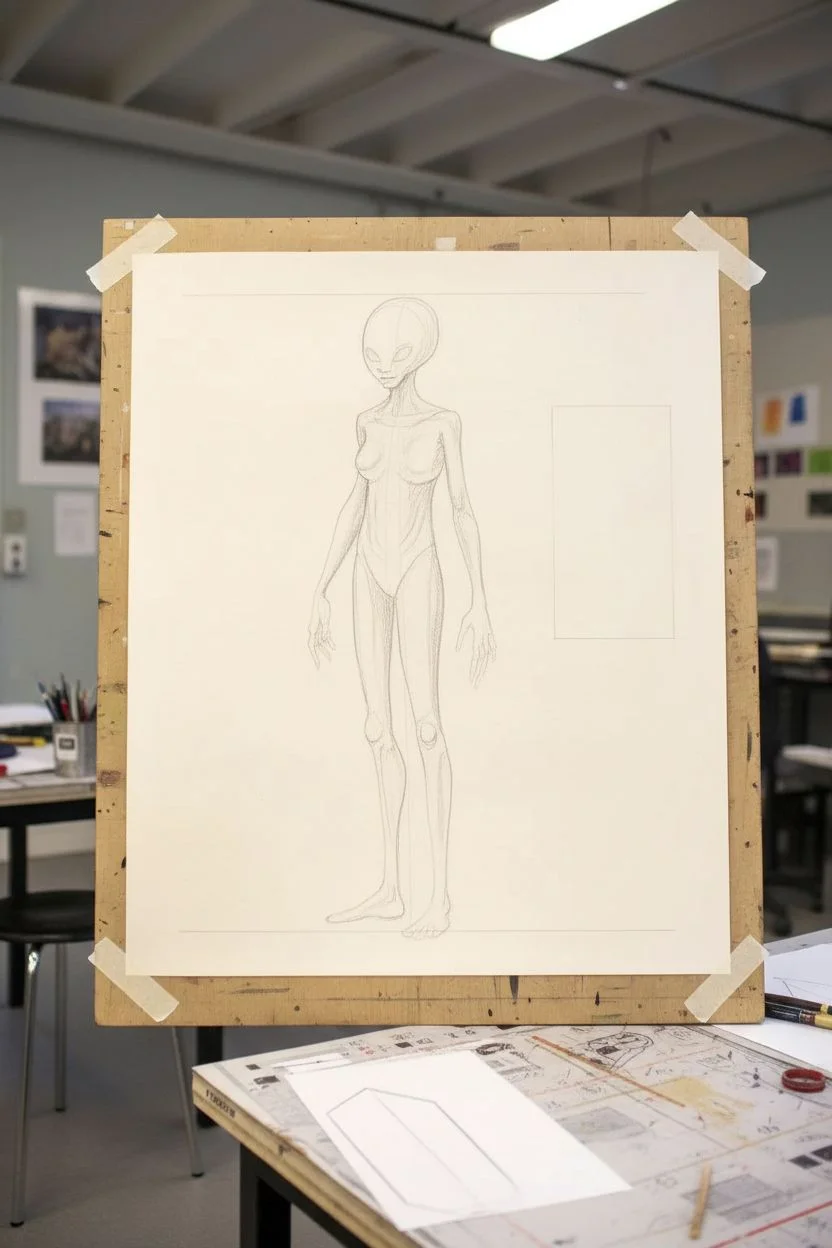
This large-scale concept sketch reimagines the classic Grey alien with elongated, digitigrade anatomy for a striking, uncanny effect. Using graphite and pencil on oversized paper, the drawing captures subtle musculature and smooth skin textures.
Step-by-Step Guide
Materials
- Large format drawing paper (A1 or approx. 24×36 inches)
- Graphite pencils (HB, 2B, 4B, 6B)
- Mechanical pencil with fine lead (0.5mm)
- Colored pencil (sanguine or light brown for the secondary sketch)
- Kneadable eraser
- Vinyl eraser
- Blending stump or tortillon
- Drafting tape
- Large drawing board or easel
Step 1: Conceptual Layout
-
Prepare the workspace:
Secure your large drawing paper to a sturdy board or wall using drafting tape. Ensure you have ample lighting to see subtle shading details. -
Determine scale and placement:
Visualize where the main figure sits—slightly off-center to the left to leave room for the secondary anatomical study on the right. Mark the top of the head and the feet lightly. -
Block in the main figure:
Using an HB pencil with a very light hand, sketch the gesture line for the alien’s spine. Block in the large oval head, the thin torso, and the elongated limbs.
Smudge Control
Graphite smears easily on large paper. Place a clean sheet of scrap paper under your drawing hand to protect finished areas while you work.
Step 2: Main Alien Line Art
-
Refine the head shape:
Carve out the classic inverted tear-drop head shape. Draw large, almond-shaped guidelines for the eyes, placing them lower on the face than human eyes. -
Detail the torso anatomy:
Sketch the prominent collarbones and a slender ribcage. Add the suggestion of breasts or pectoral muscles, keeping them subtle and organic. -
Draft the arms:
Draw the arms extending down past the hips. Elongate the forearms specifically. Sketch the hands with long, slender fingers, tapering to pointed tips. -
Construct the digitigrade legs:
This is the key design element. Instead of straight human legs, draw a ‘dog-leg’ structure: a short thigh, a long shin, and an elevated ankle joint (hock) that creates the backward bend, leading down to long toes that act as the foot. -
Clean up the outline:
Once satisfied with the proportions, use a mechanical pencil to define the final contour lines. Erase the loose gesture lines carefully.
Enhance the Alien Feel
Instead of normal shading, use stippling (tiny dots) for the skin texture near the joints. It gives a reptilian or amphibious quality to the creature.
Step 3: Shading and Texture
-
Establish the light source:
Decide on a light source coming from the upper left. This will dictate where your deepest shadows fall. -
Shade the eyes:
Switch to a 4B or 6B pencil. Fill in the large eyes completely dark, but leave a tiny, sharp highlight for a wet, glossy look. -
Model the skin volume:
Using a 2B pencil, lightly hatch shadows along the sides of the head, under the chin, and along the ribs. I prefer to keep pencil strokes directional to follow the form of the muscles. -
Enhance the musculature:
Darken the shadows under the collarbones, the sternum, and the hip bones. Use a blending stump to soften the graphite for that smooth, hairless alien skin texture. -
Define the limbs:
Add core shadows to the cylindrical shapes of the arms and digitigrade legs. Pay attention to the bony landmarks like the knees and the hock joint. -
Ground the figure:
Sketch a cast shadow on the ground beneath the feet using horizontal hatching strokes. This gives the figure weight and prevents it from looking like it’s floating.
Step 4: Secondary Study & Final Touches
-
Sketch the secondary figure:
To the right of the main drawing, use a sanguine or light brown colored pencil. Draw a smaller, frontal view of the alien focusing on the torso and shoulder width. -
Keep it loose:
Keep this secondary sketch less detailed, more architectural. It acts as a supporting ‘blueprint’ for your design. -
Add notations (optional):
If you like the look of a design document, add small, cryptic glyphs or notes in the top right corner. -
Final contrast check:
Step back from the board. Use your darkest pencil (6B) to deepen the darkest crevices—armpits, groin, and under the chin—to make the drawing pop off the white paper.
Hang your finished anatomical study and enjoy the eerie presence of your extraterrestrial creation

PENCIL GUIDE
Understanding Pencil Grades from H to B
From first sketch to finished drawing — learn pencil grades, line control, and shading techniques.
Explore the Full Guide
Extra Limbs That Actually Look Functional
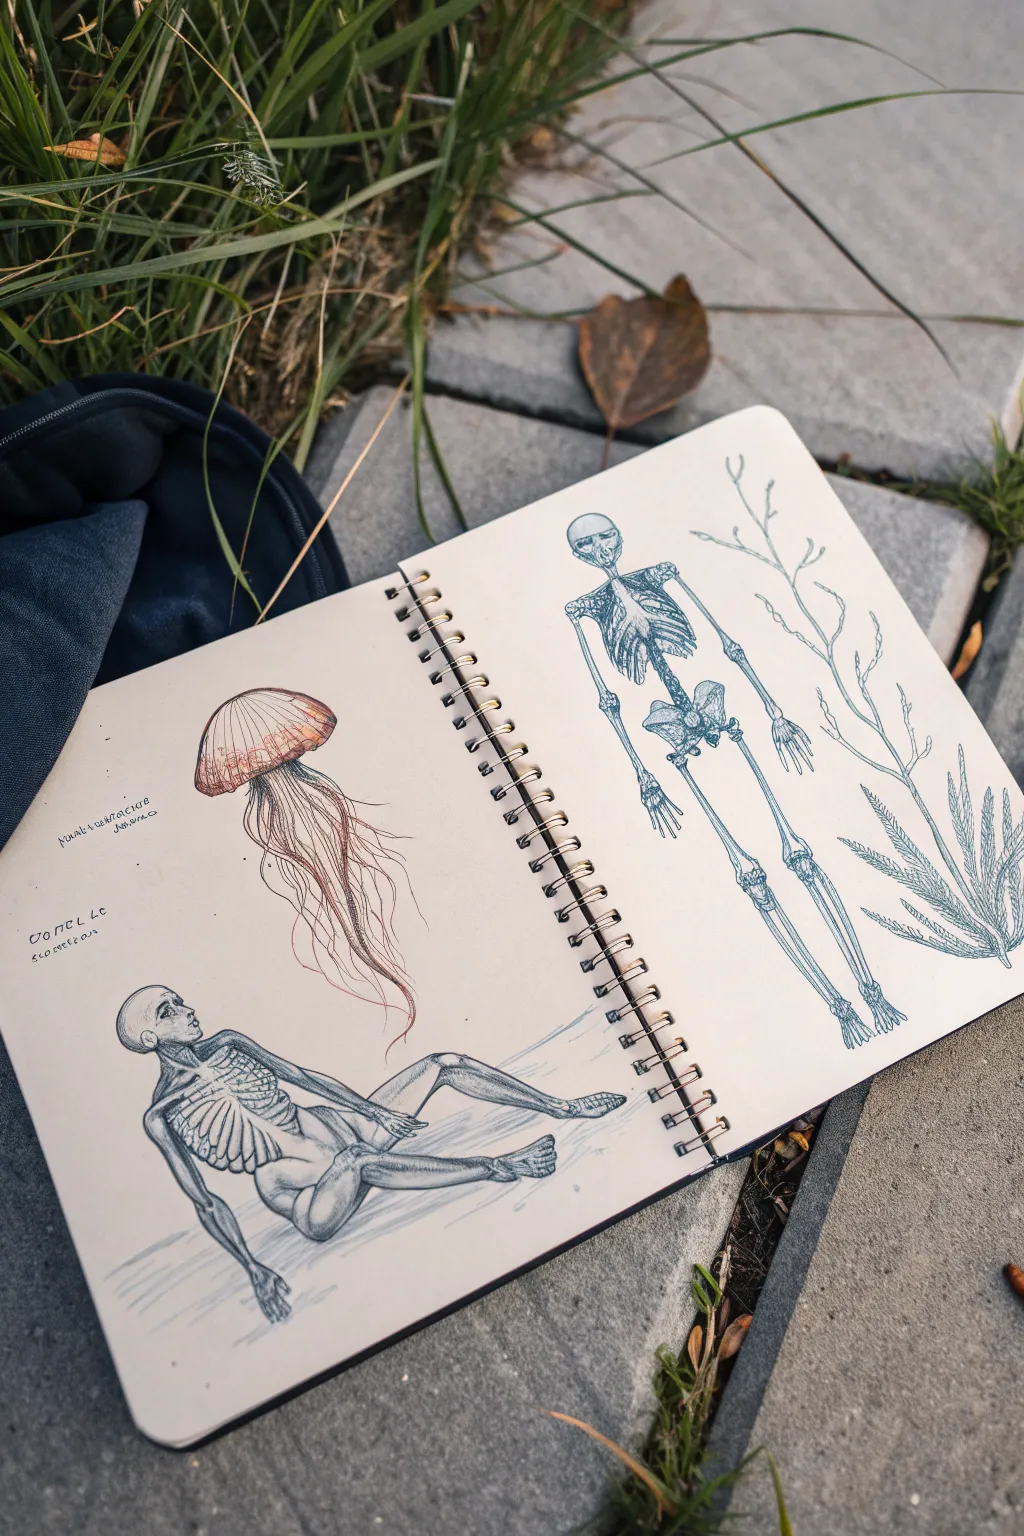
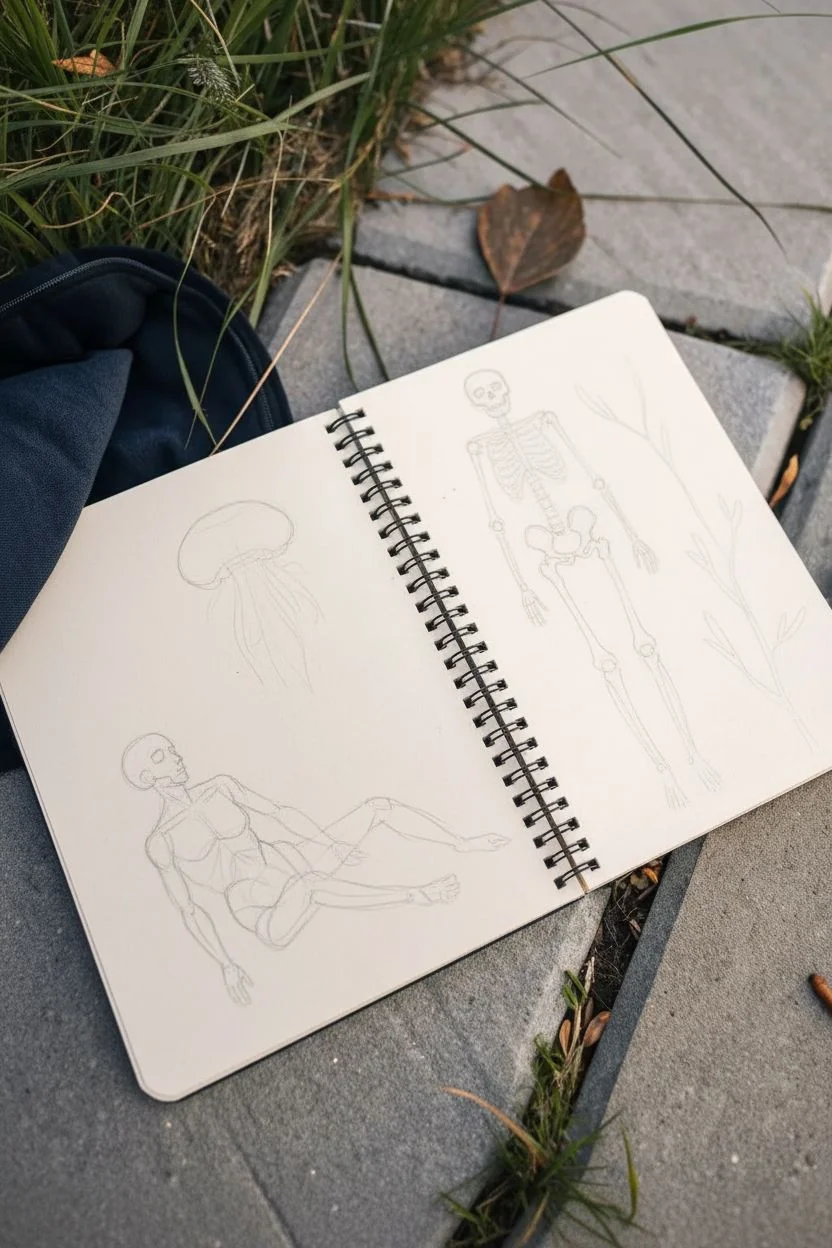
Capture the eerie beauty of speculative biology with this sketchbook spread, featuring detailed studies of skeletal forms and aquatic textures. The finished piece combines the precision of scientific illustration with the imaginative twist of alien anatomy.
How-To Guide
Materials
- Spiral-bound sketchbook (cream or off-white paper)
- Fine liner pens (sizes 0.05, 0.1, and 0.3, black ink)
- Graphite pencils (HB and 2B)
- Colored pencils (muted red, peach, pale blue, teal)
- Blending stump or cotton swab
- Kneaded eraser
Step 1: Conceptual Layout
-
Assess the composition:
Visualize the spread as two pages. The left page will feature two smaller studies—a jellyfish-like organism and a seated humanoid figure. The right page will be dominated by a standing skeletal figure and organic branch-like structures. -
Light blocking:
Using an HB pencil with very light pressure, block in the basic stick figures for the skeletons to establish pose and scale. Sketch a simple dome shape for the jellyfish on the upper left page. -
Refine the shapes:
Flesh out the stick figures into basic geometric volumes. For the seated figure on the left, focus on the recline of the torso. For the standing figure on the right, elongate the limbs slightly beyond human proportions to give that unsettled ‘alien’ feel.
Pro Tip: Line Weight
Vary your pen pressure. Use heavier lines for bone outlines and feather-light touches for internal textures like marrow or cracks.
Step 2: Left Page: Jellyfish & Seated Figure
-
Drawing the jellyfish cap:
Outline the dome of the jellyfish using a 0.1 fine liner. Draw vertical contour lines following the curve of the dome to suggest volume. -
Adding color to the jellyfish:
Lightly shade the dome with peach and muted red colored pencils. Keep the color heaviest at the bottom rim and fading toward the top to create a translucent effect. -
Inking the tendrils:
Switch to a 0.05 fine liner for the tendrils. Draw them as wavy, flowing lines that tangle slightly. Overlay red pencil strokes over the black ink specifically in the middle section of the tentacles to add depth. -
Detailing the seated skeleton:
Move to the figure below. Use the 0.1 pen to outline the skull and ribcage. Draw the ribs clearly, exposing the structure beneath the ‘skin’ layer. It looks like a classic anatomical écorché study. -
Shading the seated figure:
Use a pale blue or cool grey pencil to shade the shadowed areas of the seated figure—under the thigh, the side of the ribcage, and the eye socket. This mimics the look of a silverpoint drawing or blue under-sketch. -
Adding annotations:
Scribble some illegible text or ‘alien script’ near the jellyfish using your smallest pen tip. This adds to the scientific field journal aesthetic.
Step 3: Right Page: The Standing Sentinel
-
Constructing the spine:
On the right page, draw the spine of the standing figure using the 0.3 pen for the main vertebrae to ensure they stand out. -
Drawing the ribcage:
Create the ribcage with curved hatching strokes. Leave gaps between the ribs to show emptiness. The prompt mentions ‘extra limbs,’ so consider drawing the shoulder blades with slight protrusions or hints of a second set of joint sockets. -
Elongated limbs:
Draw the arm and leg bones using straight, precise lines. Emphasize the joints (knees and elbows) by drawing them slightly knob logic than a human skeleton. -
Blue outline technique:
Take a teal or blue colored pencil and trace tightly along one side of the black ink lines of the standing skeleton. This creates a subtle chromatic aberration effect, making the drawing pop off the page. -
Botanical elements:
To the right of the skeleton, sketch a branching organic structure. Use shaky, organic lines for the central stalk and thin, whispy strokes for the leaves or ‘feathers’ growing from it. -
Botanical shading:
Use the teal pencil to fill in the botanical structure with light, feathery strokes. I prefer to leave some white paper showing through to keep it feeling airy and delicate. -
Final touches:
Erase any remaining graphite construction lines. Add a few random ink splatters or stray marks to make the sketchbook feel used and authentic.
Level Up: Aged Paper
Lightly brush the paper with weak tea or coffee and let it dry before drawing to simulate an ancient discovered manuscript.
Now you have a mysterious page of biological studies ready to spark curiosity
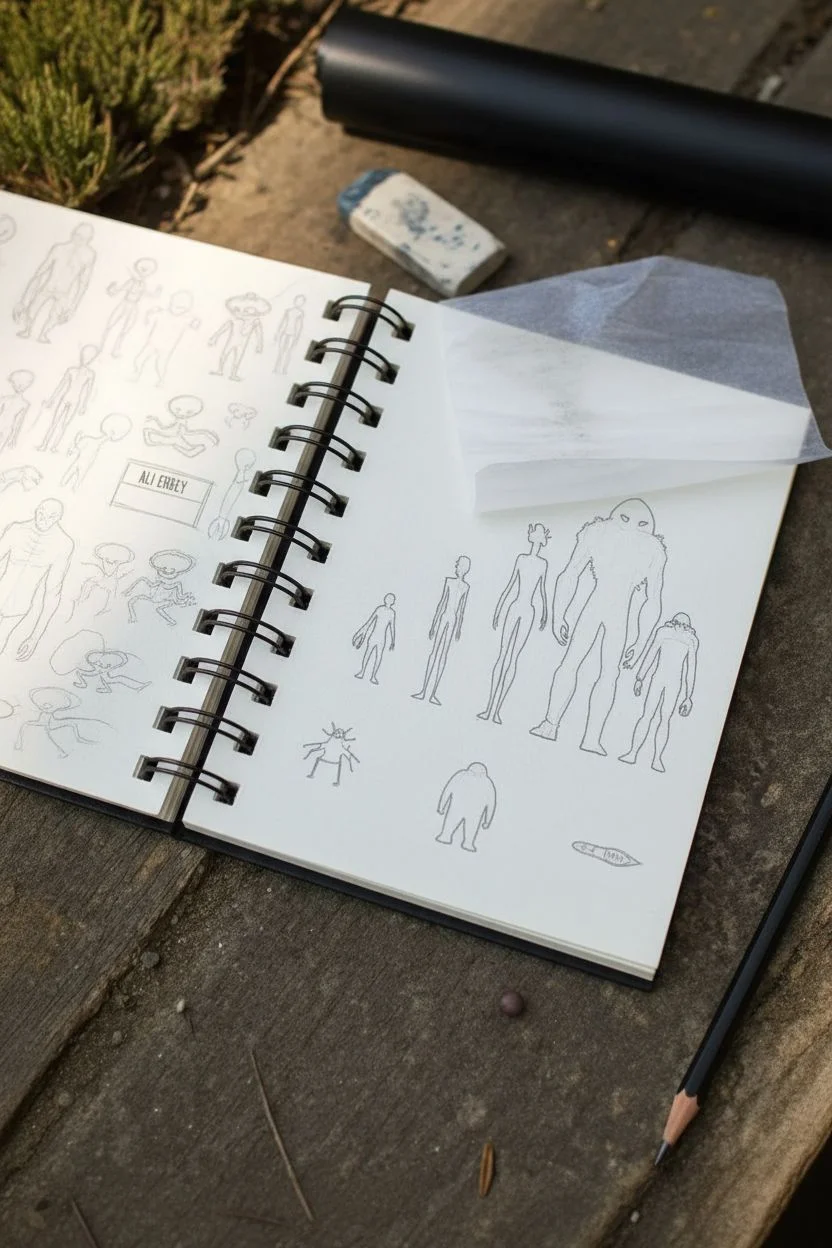
Alien Species Scale Lineup to Show Ecosystem and Hierarchy
This minimalist project creates a striking visual hierarchy of alien species using bold block printing techniques in a simple sketchbook. The high-contrast black ink against cream paper gives it the feel of a field researcher’s classified journal.
Step-by-Step
Materials
- Spiral-bound sketchbook (cream or off-white paper)
- Black block printing ink or heavy body acrylic
- Linoleum carving block (soft cut variety recommended)
- Linoleum carving tools (V-gouge and U-gouge)
- Brayer (rubber roller)
- Glass or acrylic pane (for rolling ink)
- Pencil and eraser
- Tracing paper
- Baren or clean wooden spoon
- Alphabet stamp set (typewriter font style)
Step 1: Designing the Creatures
-
Sketch concepts:
Begin by sketching your alien silhouettes on scratch paper. Aim for distinct anatomical differences—vary the leg lengths, head shapes, and shoulder widths to distinguish the species. -
Scale the lineup:
Arrange your chosen designs in a row from smallest to largest, or intermixed to show scale. Ensure the tallest figure (the hulking brute) towers over the others significantly. -
Refine the silhouettes:
Darken your sketches to solid black to test readability. If a figure looks like an undefined blob, refine the negative space between arms and bodies to make the posture clear. -
Transfer to linoleum:
Trace your final lineup onto tracing paper. Flip the tracing paper over and rub the back with graphite, then place it face-down on your linoleum block and trace again to transfer the image in reverse.
Step 2: Carving the Block
-
Outline the figures:
Using your finest V-gouge tool, carefully carve along the precise outline of each alien figure. Keep the blade cutting away from the figure to protect the edge. -
Clear small gaps:
Switch to a slightly wider gouge to remove the material between the legs and arms. These tiny areas of negative space are crucial for defining the anatomy. -
Remove background material:
Use a wide U-gouge to clear away the rest of the linoleum around the figures. You don’t need to cut too deep, just enough so the background doesn’t pick up ink. -
Carve the stragglers:
Don’t forget to carve the separate smaller elements—the crab-like creature, the small blobby figure, and the seed pod—on the open areas of your block. -
Cleanup cut:
Do a final pass to smooth out ridges in the negative space. Any high points left in the background might accidentally print as ‘chatter’ marks.
Patchy Black Ink?
If your print looks speckled or gray rather than solid black, your paper might have too much texture. Mist the paper extremely lightly with water before printing to help it grab the ink better.
Step 3: Printing the Page
-
Prepare the ink:
Squeeze a small line of black block printing ink onto your glass pane. I always find that less is more here—you want a tacky consistency, not a slippery puddle. -
Roll out the ink:
Use the brayer to roll the ink out until it makes a distinct hissing sound, indicating an even, thin coating on the roller. -
Ink the block:
Roll the inked brayer over your carved linoleum block. Apply ink in multiple directions to ensure every part of the raised silhouettes is fully black and glossy. -
Position the block:
Carefully align the block over your open sketchbook page. Hover briefly to ensure it’s centered before committing to the placement. -
Press and burnish:
Lower the block onto the paper. Using a baren or the back of a wooden spoon, rub firmly in circular motions over the entire back of the block to transfer the ink. -
The reveal:
Peel one corner of the block up slowly to check the transfer quality. If it looks solid, lift the entire block away to reveal your silhouette lineup.
Variant Species
Carve interchangeable heads or limbs on separate small blocks. This lets you mix and match body parts during printing to ‘evolve’ new hybrid species on the fly.
Step 4: Finishing Touches
-
Allow to dry:
Block printing ink—especially oil-based varieties—can take time to cure. Leave the book open in a safe place for at least 24 hours. -
Stamp the title:
Once dry, use your alphabet stamp set with the same black ink to add a name or classification code (like ‘ALI ERBEY’) near the top edge. -
Add detail notes (optional):
If desired, use a fine-tip pen to add tiny measurement markings or scale references on the adjacent page to enhance the scientific journal aesthetic.
Now you have a permanent record of xenobiological life ready for field study


Have a question or want to share your own experience? I'd love to hear from you in the comments below!