When you paint a big rock, it stops being a random stone and starts acting like a tiny piece of outdoor art you can actually live with. I love big rocks for how their curves, edges, and texture practically hand you the design if you let them.
Classic Ladybug Garden Boulder
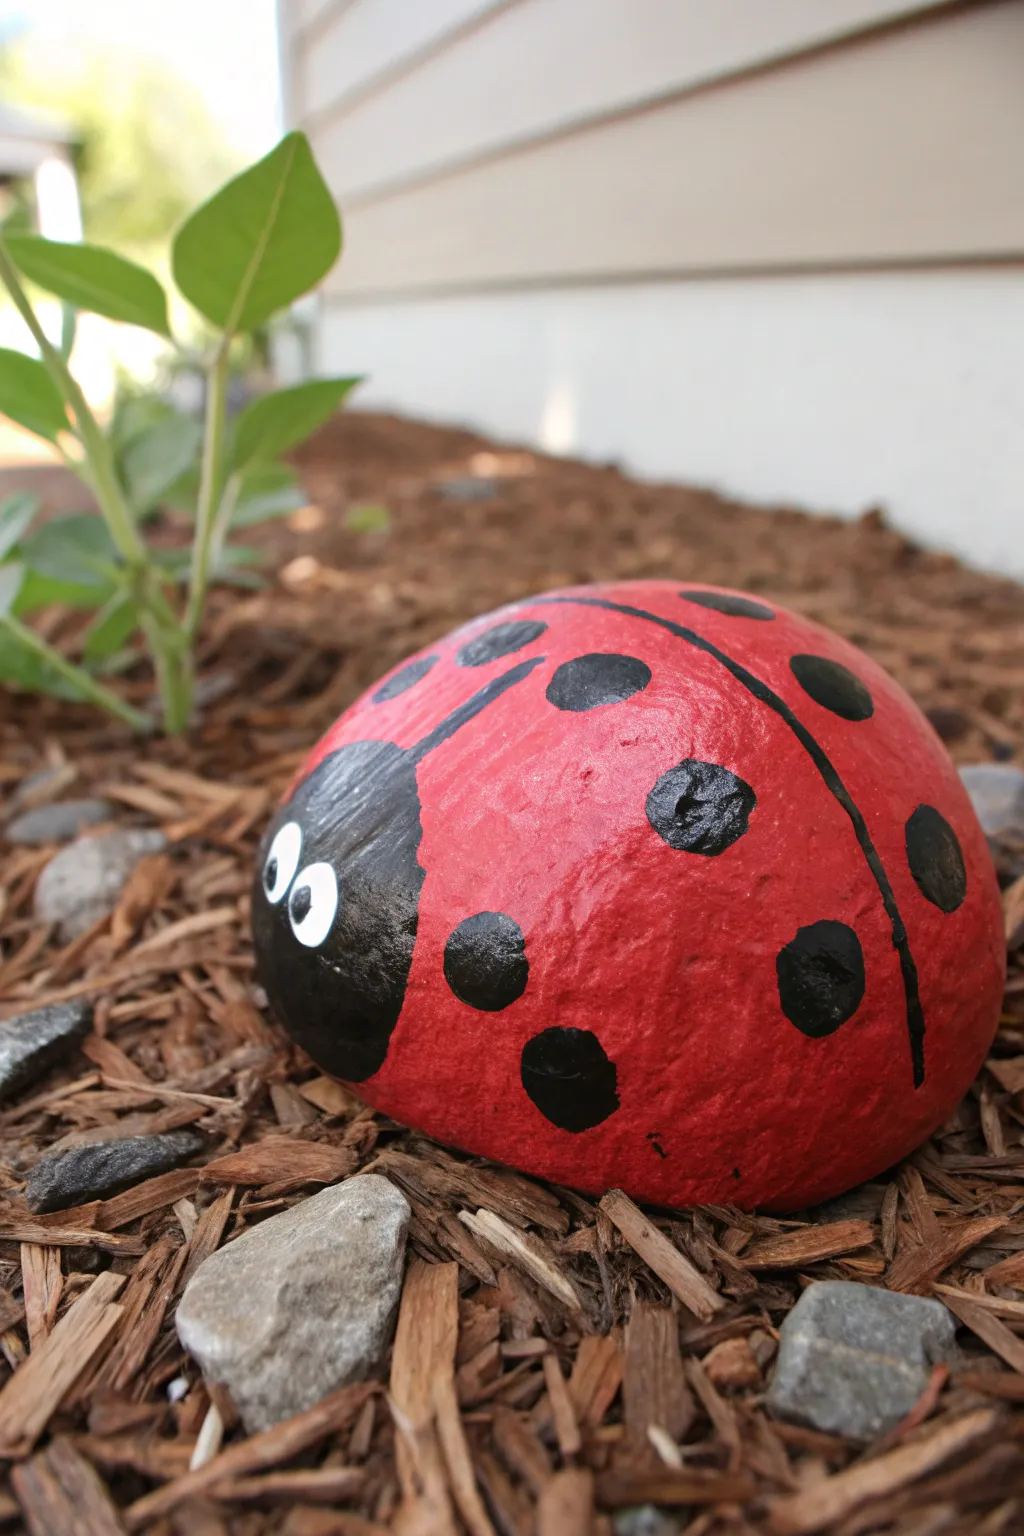
Transform a simple, rounded stone into a cheerful ladybug that will watch over your flowerbeds rain or shine. This classic design uses bold colors and simple shapes to create a charming, glossy accent piece that pops against natural mulch.
Detailed Instructions
Materials
- Large, smooth, rounded river rock or boulder
- Outdoor acrylic craft paint (Bright Red, Black, White)
- Wide flat paintbrush (1-2 inch)
- Medium round paintbrush
- Small liner or detail brush
- Round foam sponge pouncer (optional)
- Pencil or white chalk
- Outdoor sealant spray (gloss finish)
- Water cup and paper towels
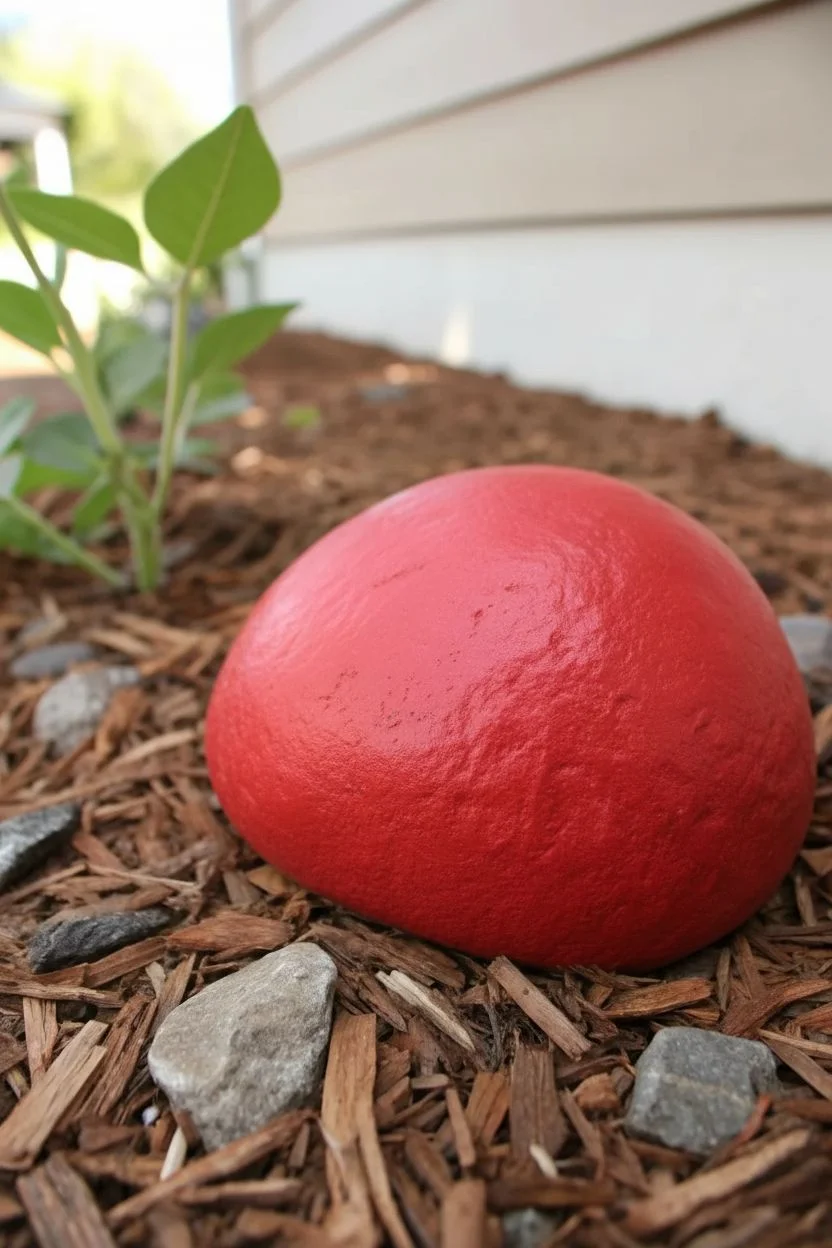
Step 1: Preparation and Base Coat
-
Clean the canvas:
Begin by scrubbing your rock thoroughly with soap and water to remove any dirt or moss. Allow it to dry completely in the sun, as moisture trapped inside can ruin the paint later. -
Prime the surface:
If your rock is very dark, you might want to apply a layer of white paint first to help the red pop. Otherwise, you can skip straight to the color. -
Apply the first red layer:
Using your wide flat brush, coat the entire top surface of the rock with bright red acrylic paint. Don’t worry about the bottom where it sits on the ground. -
Let it cure:
Allow the first coat to dry until it’s no longer tacky to the touch. This usually takes about 20-30 minutes depending on humidity. -
Add a second coat:
Apply a second layer of red paint to ensure a solid, opaque color. The texture of the rock might still show through, which adds character, but you want deep, rich color.
Stone Selection Tip
Look for a rock that is slightly flatter on the bottom. This prevents your ladybug from rolling away and makes painting the top surface much easier.
Step 2: Defining the Features
-
Sketch the outlines:
Once the red paint is fully dry, use a pencil or a piece of white chalk to lightly sketch the curve for the head section at the front of the rock. -
Draw the wing division:
From the center of your head line, sketch a straight line running all the way down the back of the rock to create the two wings. -
Paint the face:
Using the medium round brush and black paint, fill in the semi-circle area you marked off for the head. Extend the black slightly down the sides for a wrapped look. -
Paint the centerline:
Switch to a smaller brush or the edge of your flat brush to paint a thick black line down the center of the distinct wing division mark. -
Create the spots:
You can hand-paint black circles using your round brush, or for perfect circles, dip a round foam pouncer into black paint and press it onto the rock. -
Vary spot placement:
I like to place a few spots partially on the sides of the rock, not just the top, so the design looks complete from all angles. -
Refine the edges:
Use your smallest detail brush to touch up the edges of the spots or the center line if they look a little rough or uneven.
Step 3: Eyes and Finishing Touches
-
Base for the eyes:
Dip a clean medium round brush (or the handle end of a large brush) into white paint. Dot two large ovals onto the black head section. -
Adding pupils:
Once the white is dry, use your small detail brush or a toothpick to add small black dots inside the white ovals. Placing them slightly cross-eyed or looking up adds a cute personality. -
Highlight the eyes:
For extra life, add a tiny speck of white inside the black pupils to create a reflection highlight. -
Final drying time:
Let the entire rock dry for at least 24 hours to ensure all layers are hardened. -
Weatherproofing:
Spray the rock with a clear outdoor gloss sealant. Apply 2-3 thin coats rather than one thick one to prevent dripping and cloudiness.
Make it a Family
Use different sized rocks to create a whole family. Paint smaller pebbles as ‘baby’ ladybugs and arrange them trailing behind this large mother bug in your mulch.
Nestle your new bright red friend among the green leaves and enjoy the pop of color it brings to your garden space


Wise Owl Face on a Round Rock
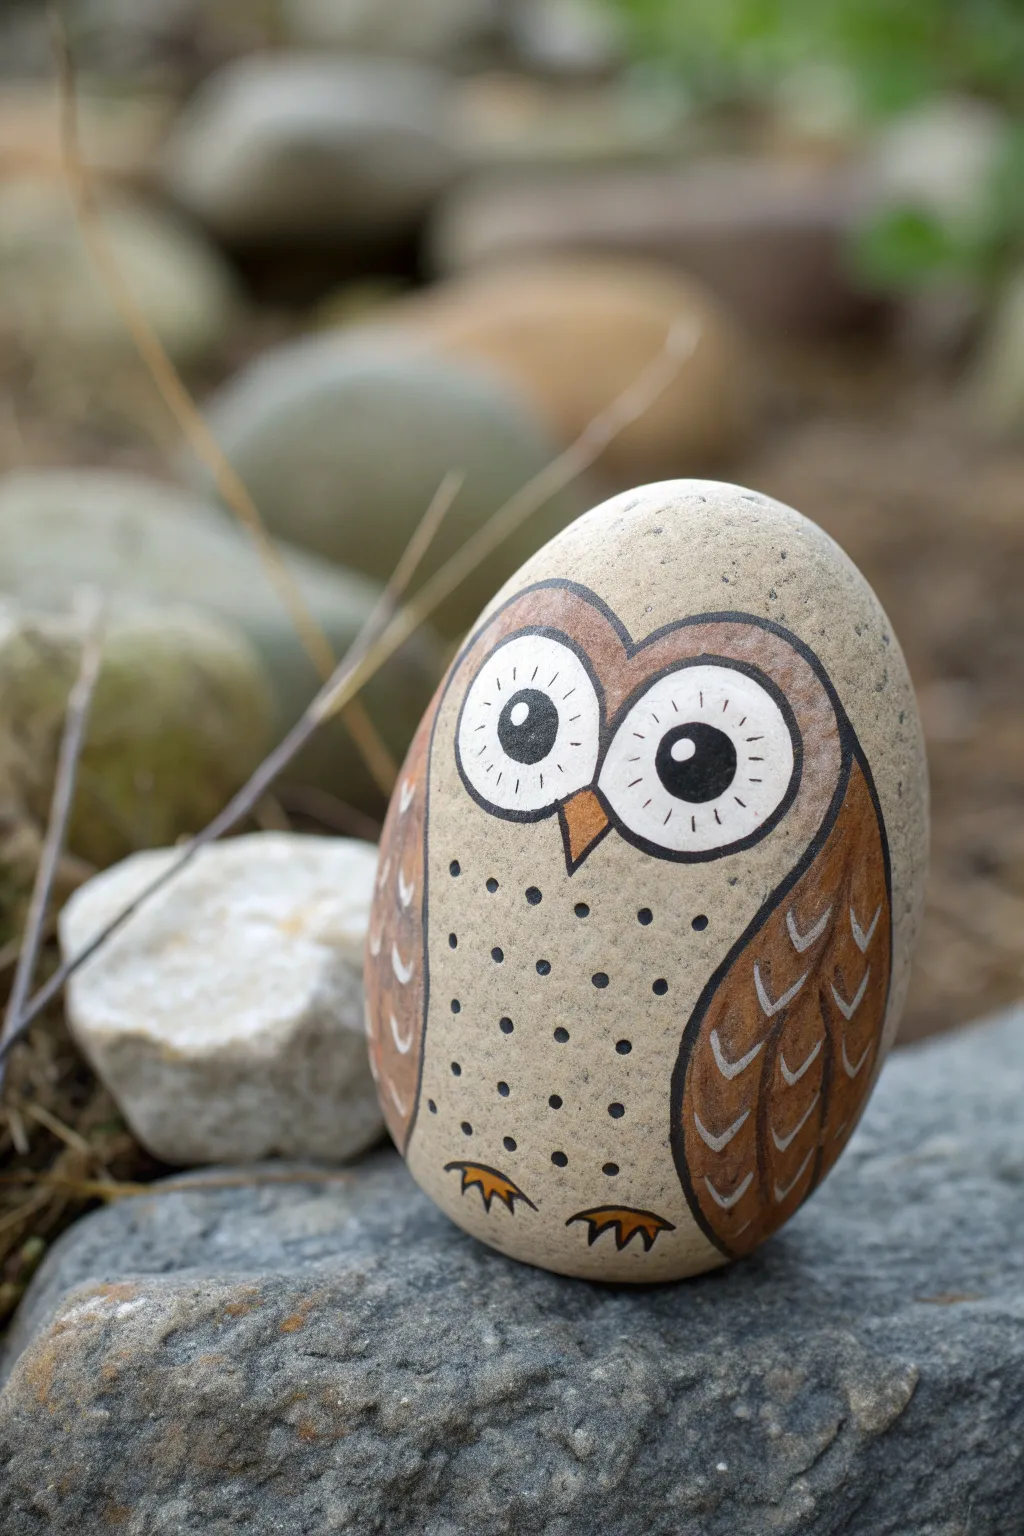
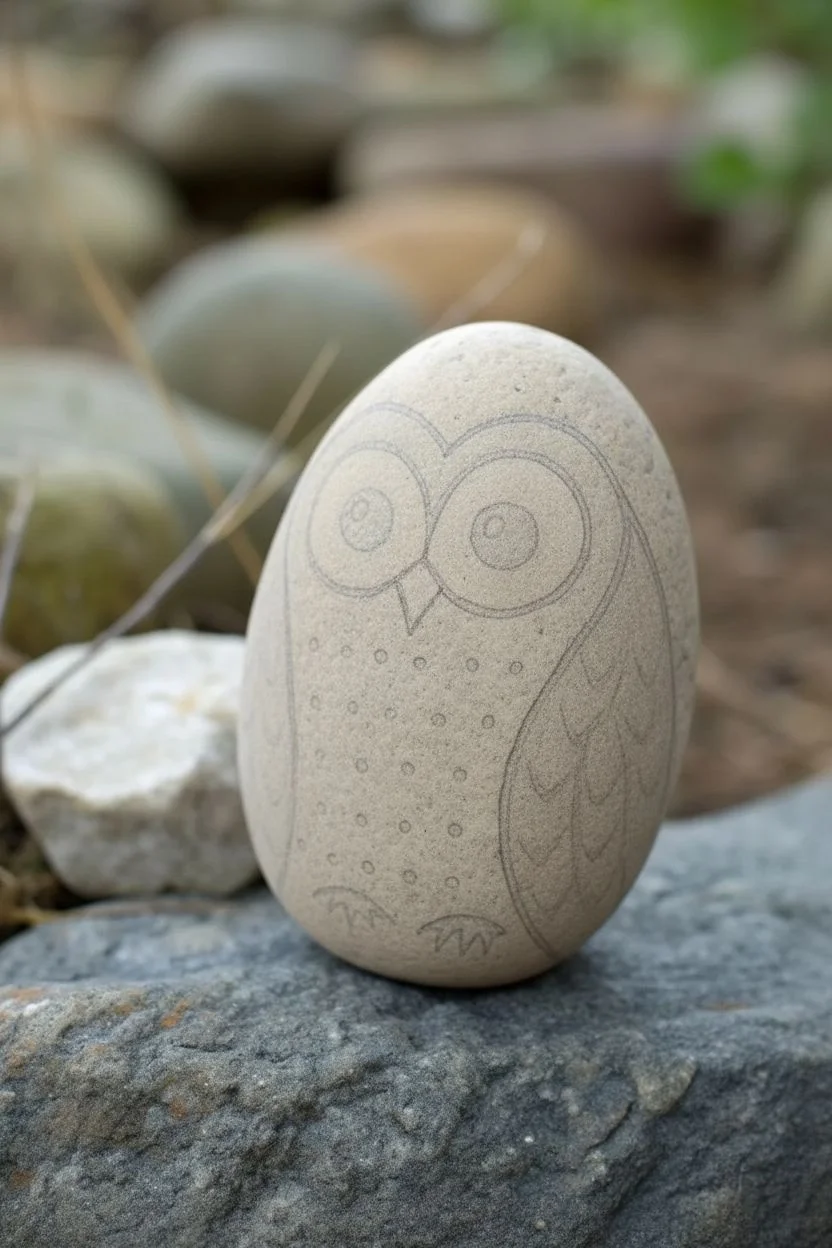
Transform a smooth, rounded stone into a charming woodland creature with this delightful owl painting project. Using simple shapes and earthy tones, you’ll create a textured feather effect that brings this little bird to life right in the palm of your hand.
Step-by-Step Guide
Materials
- Smooth, egg-shaped river rock (approximately 3-4 inches tall)
- Acrylic paints: white, black, light brown/tan, dark chocolate brown, orange
- Pencil and eraser
- Fine liner brush (size 0 or 00)
- Small flat brush (size 2 or 4)
- Dotting tool or toothpick
- Matte or satin clear sealant spray
- Palette or small dish for mixing
- Water cup and paper towels
Step 1: Preparing the Base
-
Clean the surface:
Begin by washing your rock thoroughly with soap and water to remove any dirt or oils. Let it dry completely before starting, as moisture trapped in the rock can ruin the paint later. -
Sketch the outline:
Using a pencil, lightly sketch a large heart shape near the top of the rock for the face area. Draw two large circles inside the heart for eyes, and two curved wing shapes down the sides. -
Evaluate the symmetry:
Take a step back and look at your sketch. Adjust the wings so they mirror each other, ensuring the owl doesn’t look lopsided before committing to paint.
Paint Slipping?
If your acrylic paint is slipping off the smooth rock surface, dab a little white glue or gesso onto the area first to create a ‘tooth’ for the colored paint to grab onto.
Step 2: Blocking in Color
-
Paint the face outline:
Mix a medium brown shade using your tan and chocolate brown paints. Use the flat brush to paint the thick ‘heart’ outline around the eyes, leaving the center circles unpainted for now. -
Fill the eyes:
Using pure white acrylic, fill in the two large eye circles. You may need two coats to ensure the white is opaque and bright against the stone’s natural color. -
Define the wings:
Paint the wing shapes on either side using the dark chocolate brown. Make sure the curves flow naturally with the shape of the rock. -
Add the beak:
Paint a small, sharp triangular beak right where the two eye circles meet at the bottom. Use a bright orange or ochre color for contrast.
Step 3: Adding Details
-
Outline the features:
Switch to your fine liner brush and black paint. Carefully outline the white eye circles, the beak, and the outer edge of the brown face mask. -
Create the pupils:
Paint two large, solid black circles inside the white areas for the pupils. Place them slightly cross-eyed or looking sideways to give the owl a goofy or wise variety of character. -
Add eye highlights:
Once the black pupils are dry, dip the very tip of your brush (or a toothpick) in white paint and add a tiny white dot to each black pupil. This ‘catchlight’ is crucial for bringing the eyes to life. -
Detail the iris:
Using the fine liner with black paint, draw short, radiating tick marks inside the white part of the eye, going all the way around the pupil like the numbers on a clock. -
Outline the wings and body:
Use the black liner to create a crisp border around the dark brown wings. I find resting my hand on a table helps steady the line.
Night Owl Glow
Swap the standard white paint in the eyes for glow-in-the-dark acrylic paint. Your garden owl will charge up in the sun and keep watch nicely all night long.
Step 4: Texturing and Finishing
-
Feather the wings:
Mix a light tan or cream color. Paint small ‘V’ or ‘U’ shapes in rows down the dark brown wings to simulate feathers. -
Dot the belly:
Dip the handle end of a paintbrush or a dotting tool into black paint. Stamp small polka dots randomly across the exposed rock surface (the belly area) to create texture. -
Paint the talons:
Near the bottom of the rock, paint two small sets of talons using the orange paint, then outline them in black once dry. -
Final dry:
Allow the entire rock to dry for at least 24 hours to ensure all layers are fully set. -
Seal the artwork:
Spray the rock with a clear matte or satin sealant. This protects the paint from chipping and makes the colors pop without adding too much unnatural glare.
Place your stoic little guardian in a potted plant or on a garden wall to enjoy his company


Bumblebee Stripes on a Long Stone
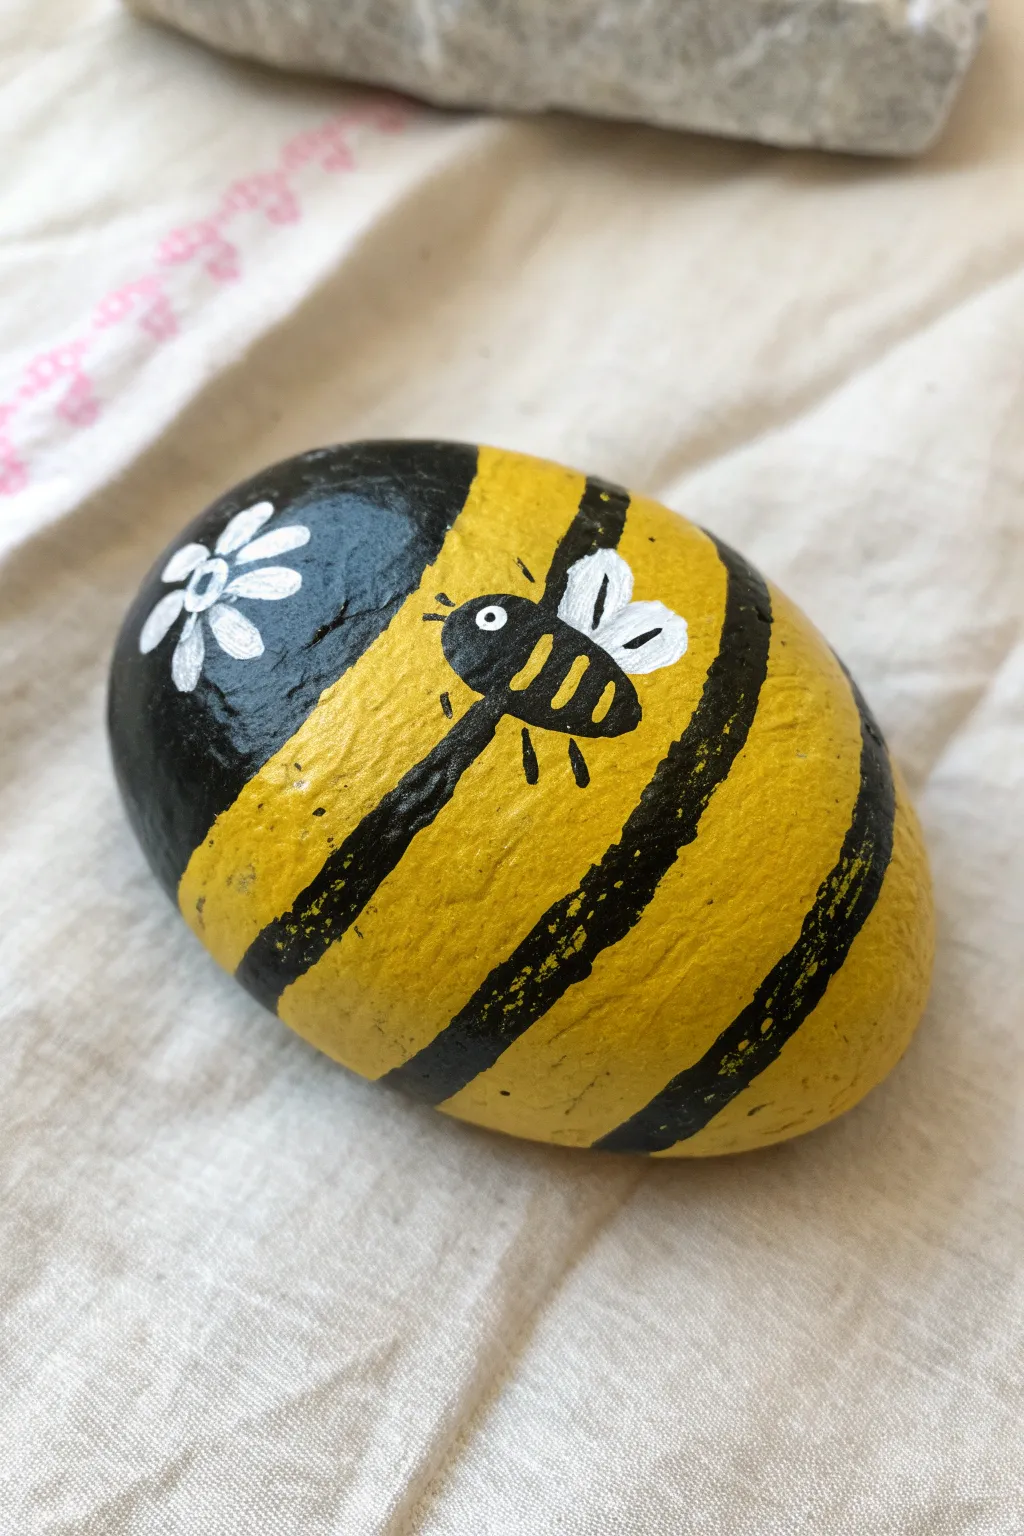
Transform a simple garden stone into a cheerful, buzzing character with bold stripes and delicate details. This eye-catching design combines a graphical pattern with cute miniature illustrations, making it a perfect addition to flower pots or garden paths.
Detailed Instructions
Materials
- Smooth, oblong river rock
- Yellow acrylic paint (bright sunflower shade)
- Black acrylic paint
- White acrylic paint
- Medium flat paintbrush
- Small round paintbrush
- Fine liner or detail brush
- Clear acrylic sealer (spray or brush-on)
- Water cup and paper towels
Step 1: Base Stripes
-
Clean surface:
Begin by thoroughly washing your rock with soap and water to remove any dirt or grit. Let it dry completely before starting, as moisture can trap bubbles under the paint. -
Map the stripes:
Visualize where your stripes will go. You want a large black section at the front for the ‘head,’ followed by alternating yellow and black bands. You can lightly sketch these with a pencil if you’re worried about spacing. -
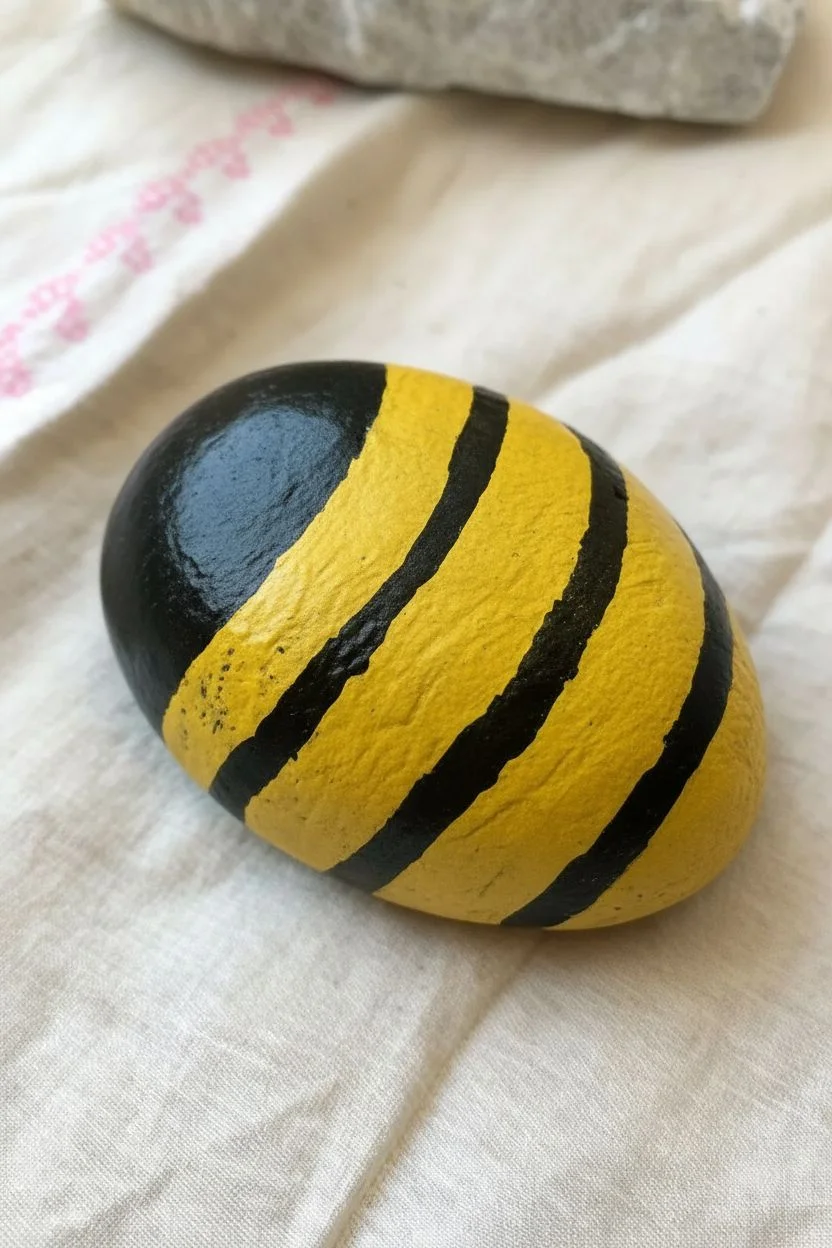
Paint the yellow bands:
Using your medium flat brush and bright yellow paint, fill in the yellow sections first. Paint wide, curving bands that follow the rounded shape of the rock. Don’t worry about perfect edges yet, as the black will cover them. -
Apply second yellow coat:
Yellow can sometimes be transparent. Once the first layer is dry to the touch, apply a second coat to ensure a solid, opaque color. -
Paint the black head:
Load your brush with black paint and fill in the front rounded section of the rock to create the bee’s face area. Create a clean, curved edge where it meets the first yellow stripe. -
Add black stripes:
Paint the remaining black stripes between your yellow bands. I like to keep the edges slightly organic rather than using tape, as it gives the rock a more natural, painted look. -
Dry completely:
Let the entire base coat dry thoroughly. This is crucial because you will be painting tiny details on top, and you don’t want the colors to muddy.
Paint Choice Matters
Use multi-surface acrylics for the best adhesion on stone. If your yellow looks streaky, mix in a tiny drop of white paint to increase its opacity before painting your layers.
Step 2: Adding Details
-
Start the mini bee body:
Switch to your small round brush. In the center of the widest yellow stripe, paint a small black oval. This will be the body of the miniature bee. -
Paint the flower center:
On the large black ‘head’ section of the rock, locate a spot for your flower. Dip the handle end of a paintbrush into white paint and dot it onto the rock to create the flower’s center. -
Add flower petals:
Using your fine liner brush and white paint, draw simple teardrop shapes radiating out from the center dot to create the flower petals. -
Detail the mini bee stripes:
Once the small black oval is dry, use your finest brush and yellow paint to add two tiny, curved stripes across the miniature bee’s back. -
Add mini wings:
With white paint and a small brush, dab two teardrop shapes on the upper side of the mini bee for wings. A second coat might be needed here to make them stand out against the yellow background. -
Create the eye:
Dip the very tip of a brush handle or toothpick into white paint and place a tiny dot on the front of the mini bee’s head for an eye. Let dry, then add a microscopic black pupil dot in the center. -
Draw legs and antennae:
Using your finest liner brush or a black paint pen, carefully draw tiny lines for the six legs and two antennae on the miniature bee. -
Seal the artwork:
Once all paint is completely bone dry (wait at least an hour), apply a layer of clear acrylic sealer. This protects your hard work from weathering if you place the rock outside.
Glittery Wings
For a magical touch, apply a thin layer of glitter glue or iridescent medium over the white wings of the mini bee and the flower petals after the paint dries.
Place your buzzing creation in a sunny garden spot to greet visitors


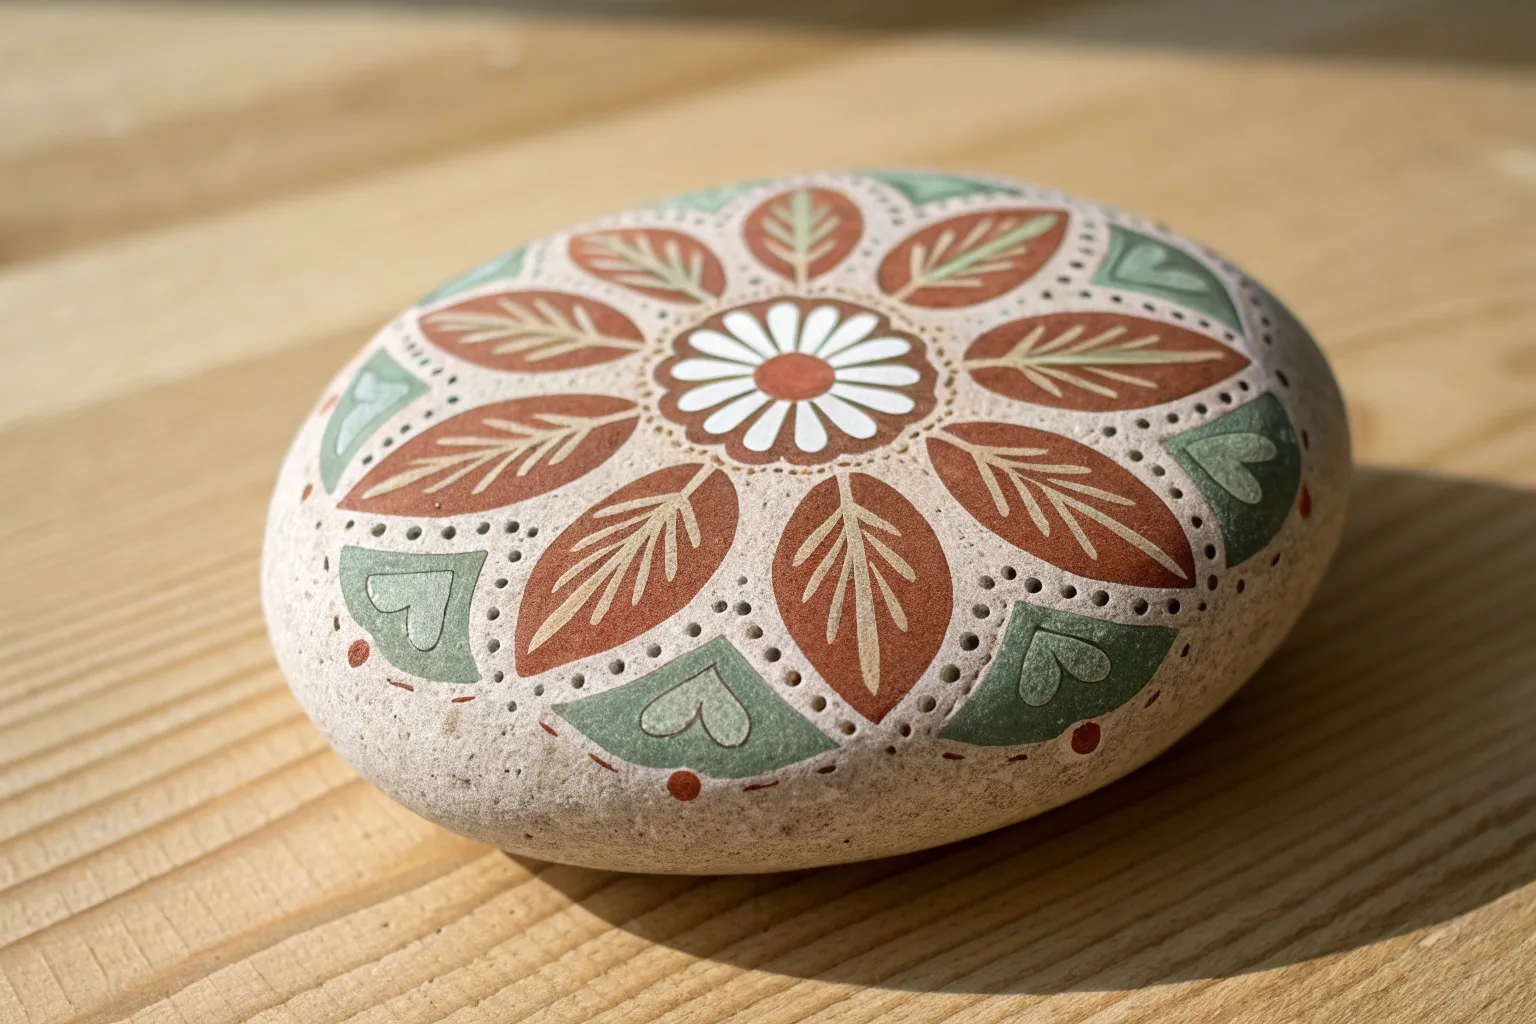
Sunflower Medallion on a Flat Big Rock
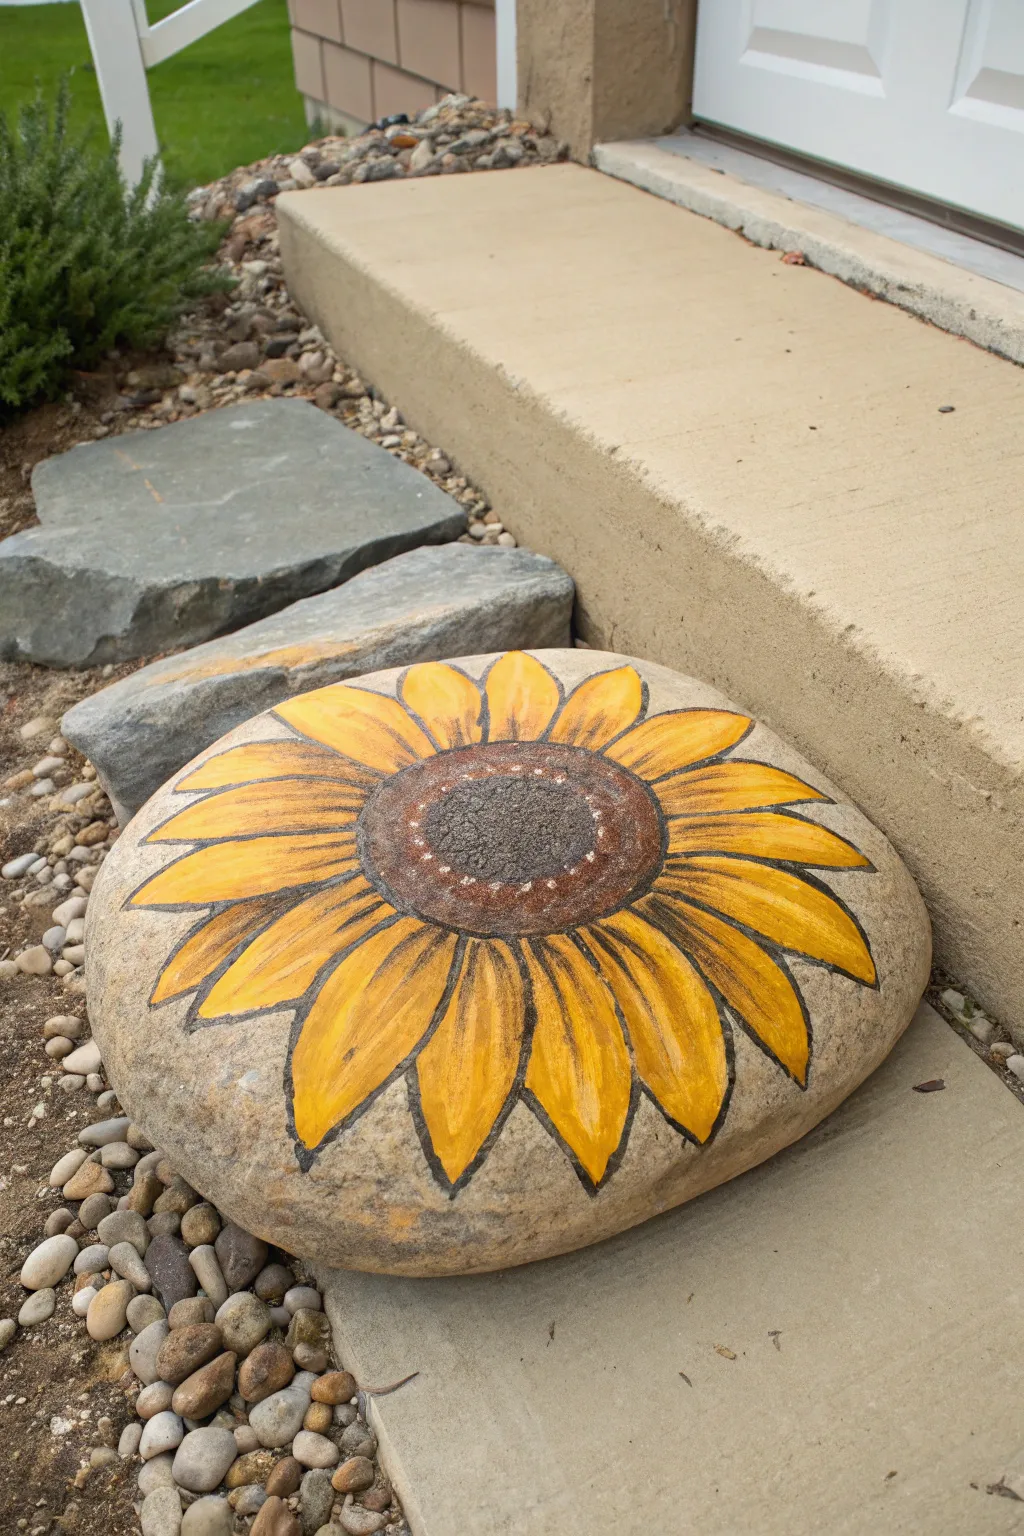
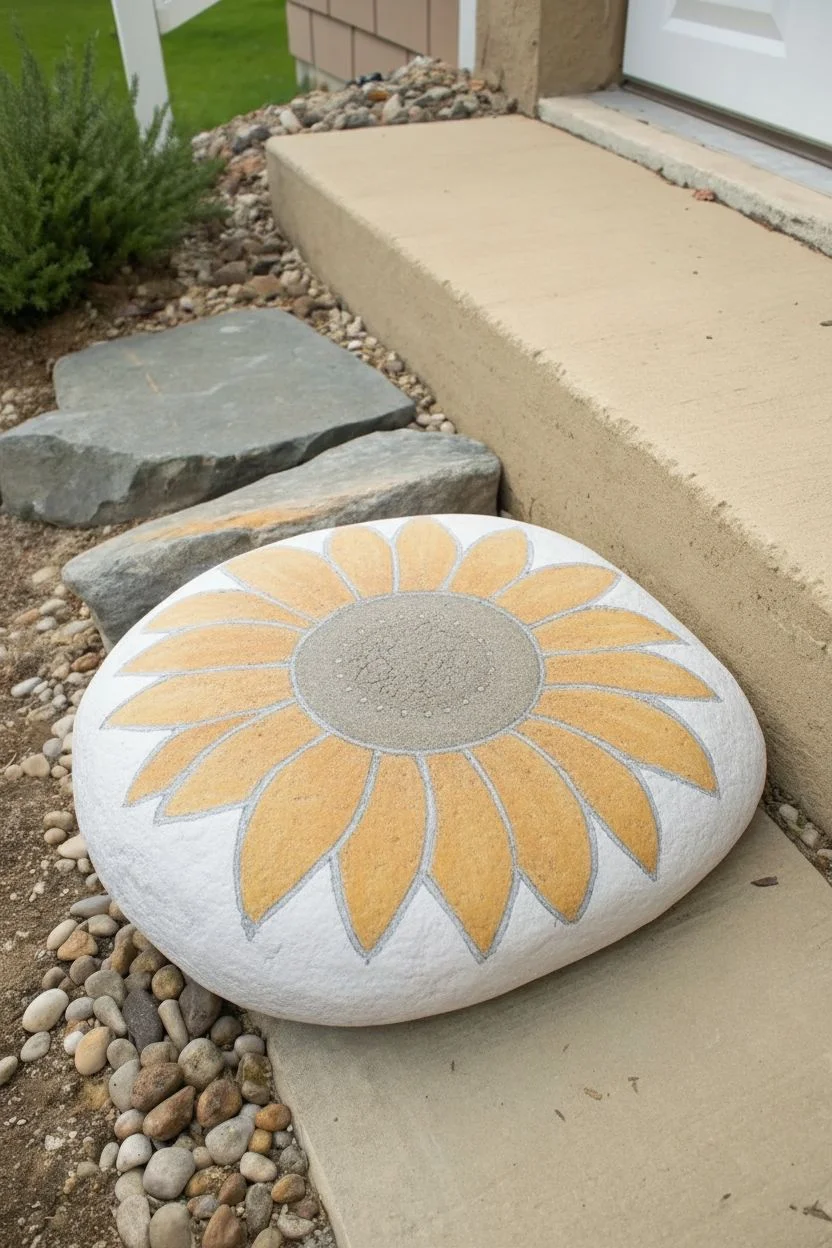
Transform a simple garden stone into a welcoming burst of sunshine with this cheerful sunflower design. The large, sweeping petals and textured center create a bold medallion effect that looks lovely nestled among greenery or resting on a porch step.
Step-by-Step Tutorial
Materials
- Large, flat, rounded river rock (approx. 10-12 inches diameter)
- Scrub brush, soap, and water
- gesso or white acrylic primer (optional)
- Acrylic paints: Bright Yellow, Golden Yellow, Burnt Sienna (dark brown), Raw Sienna (light brown), White, Black
- Paintbrushes: 1-inch flat brush, Medium round brush, Fine liner brush
- Pencil or white chalk
- Outdoor matte varnish or clear sealant spray
Step 1: Preparation & Base shapes
-
Clean the canvas:
Begin by scrubbing your rock thoroughly with soap and water to remove any dirt or moss. Rinse it well and let it dry completely in the sun until it is warm to the touch. -
Prime the surface:
If your rock is very dark, apply a thin coat of white gesso or primer to the top surface. This helps the yellow paint pop later, though you can skip this if you prefer a more rustic, stony background. -
Sketch the center:
Using a pencil or a piece of white chalk, lightly draw a medium-sized circle right in the middle of the rock. This will be the seed head. -
Outline the petals:
Sketch the petals radiating outward from the center circle. Start with the four main directional petals (up, down, left, right) to establish symmetry, then fill in the gaps with overlapping petal shapes until the circle is full.
Step 2: Painting the Sunflower
-
Base coat the petals:
Load your medium round brush with Bright Yellow. Fill in all the petal shapes. You will likely need two coats here to get solid coverage, letting the first coat dry for about 15 minutes before applying the second. -
Paint the center:
While the petals dry, use Burnt Sienna (dark brown) to fill in the center circle. Apply it solidly, covering the rock surface completely. -
Add petal depth:
Mix a little Golden Yellow or light orange. Paint the base of each petal (nearest the center) and streak it upward about halfway into the petal. This creates a natural shadow effect. -
Highlight the tips:
Mix a touch of White with your Bright Yellow. Apply this lighter shade to the very tips and outer edges of the petals to simulate sunlight hitting the flower. -
Center shading:
Add a ring of darker brown or a tiny touch of black mixed with brown around the outer edge of the center circle to give it a recessed, 3D look. -
Texture the seeds:
Dip the handle end of a paintbrush or a toothpick into paint. Use Raw Sienna (light brown) to dot a ring inside the dark center. Add a second, inner ring of dots using a mix of White and light brown for contrast.
Use Nature’s Geometry
Don’t make petals perfect! vary their width and give some slightly waved or pointed tips. Real flowers have imperfections that make them beautiful.
Step 3: Details & Finishing
-
Outline work:
Switch to your fine liner brush and thinned black paint (or a black paint pen). Carefully outline each petal. Keep your hand steady but allow for varying line thickness to make it look organic. -
Define individual petals:
Ensure you outline where petals overlap; the petals in the ‘front’ should have complete outlines, cutting off the lines of the petals tucked behind them. -
Center texture lines:
Add very short, fine, radiating lines coming from the dark center into the base of the yellow petals. This mimics the creases found on real sunflowers. -
Final dry:
Allow the entire painting to cure for at least 24 hours. The thick layers of acrylic need to be completely moisture-free before sealing. -
Seal for protection:
Take the rock outside and spray it with several light coats of outdoor clear sealant. I prefer a matte finish to keep the rock look natural, but gloss works if you want a ‘wet’ look.
Fixing Wobbly Lines
If your black outline gets too thick or messy, wait for it to dry completely. Then, come back with your yellow paint and ‘cut in’ to cover the mistake.
Place your warm and welcoming creation near your front door to greet guests with a permanent splash of summer color
BRUSH GUIDE
The Right Brush for Every Stroke
From clean lines to bold texture — master brush choice, stroke control, and essential techniques.
Explore the Full Guide
Blooming Wildflower Boulder Cluster
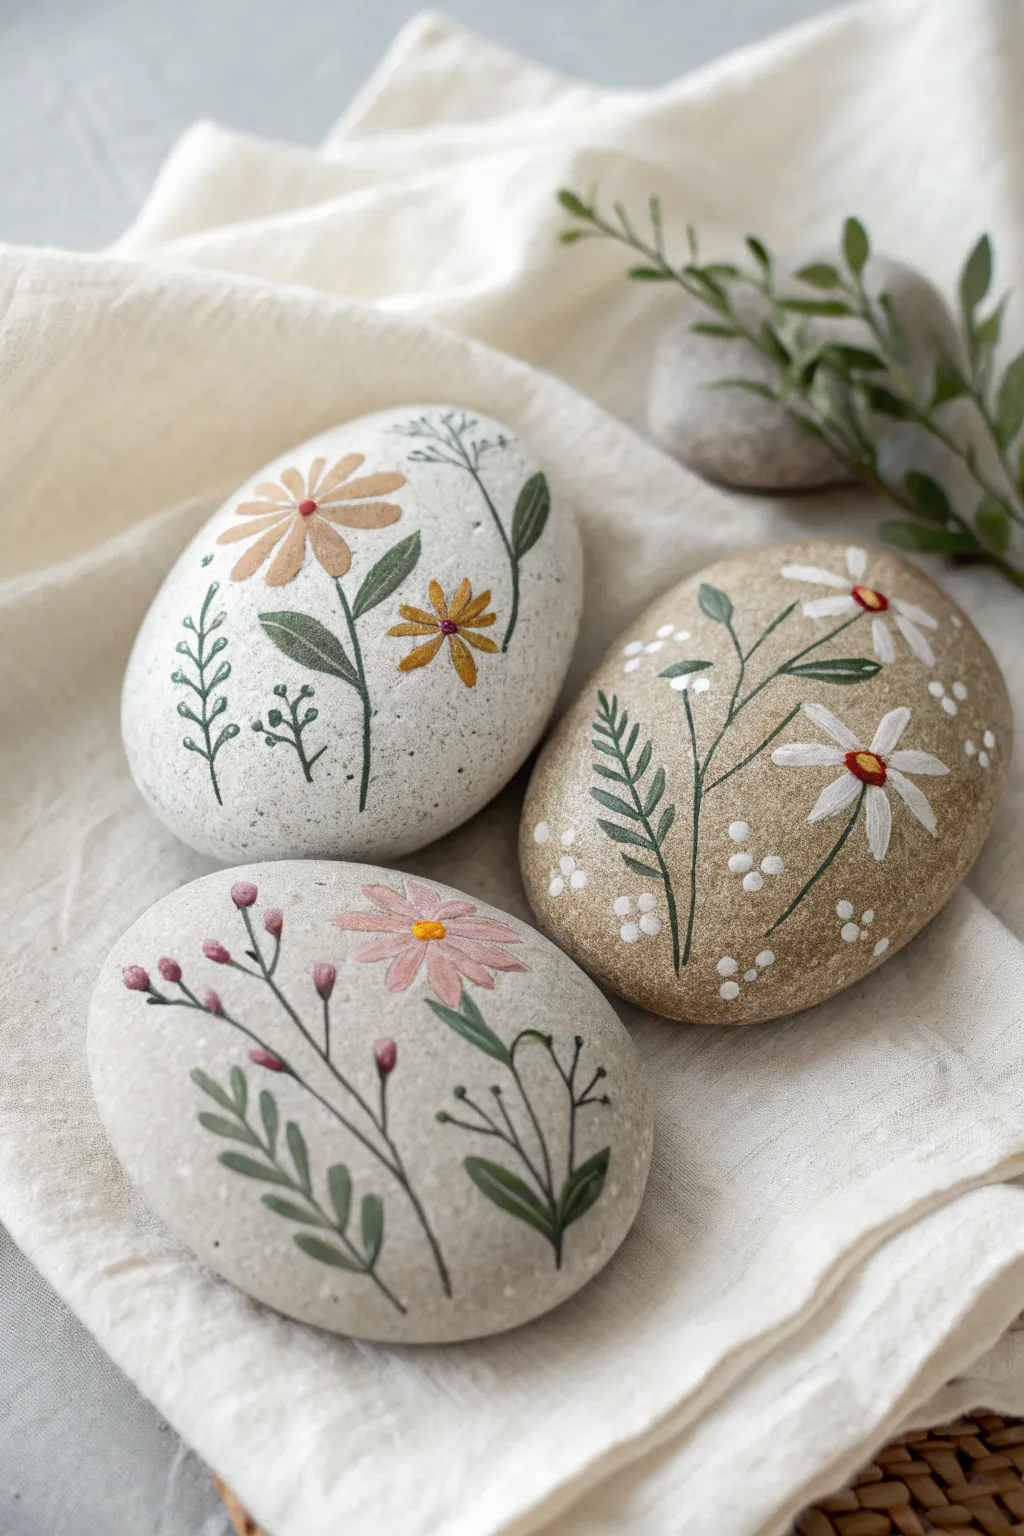
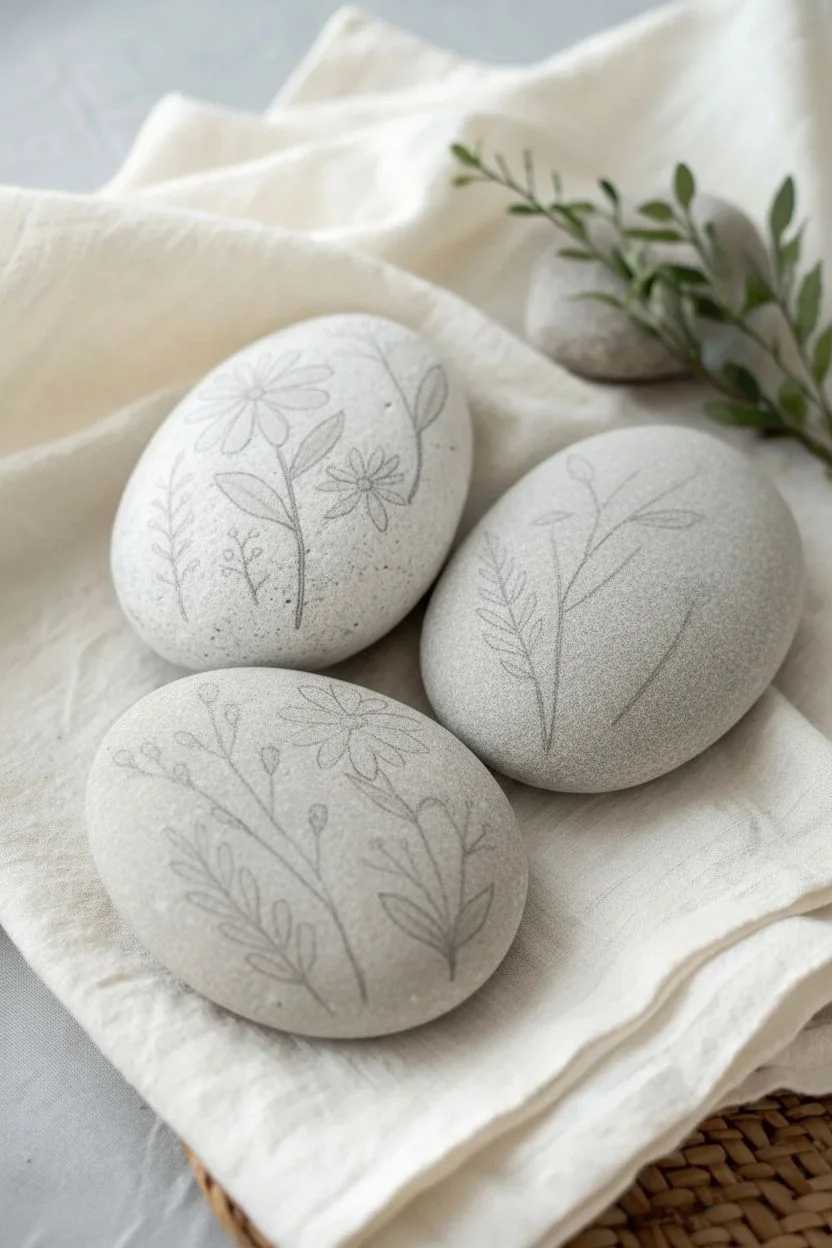
Transform smooth river stones into everlasting botanical displays with this delicate floral painting project. By layering opaque acrylics over natural stone textures, these pieces capture the quiet beauty of a meadow in bloom.
Detailed Instructions
Materials
- Three smooth, palm-sized river rocks (light grey, white, and tan)
- Acrylic paints (White, Sage Green, Forest Green, Pastel Pink, Mustard Yellow, Soft Brown, Deep Red)
- Fine detail brushes (size 0 and 00)
- Small flat brush (size 2)
- Pencil for sketching
- Matte spray varnish or sealant
- Palette or paper plate
- Cup of water and paper towels
Step 1: Cleaning and Base Work
-
Stone Selection:
Choose three stones with relatively flat, smooth surfaces. A mix of natural base colors—like the white, light grey, and tan stones shown here—adds lovely variety to the finished cluster. -
Wash and Dry:
Scrub your rocks thoroughly with soap and warm water to remove any dirt or oils. Let them dry completely, or the paint won’t adhere properly. -
Light Sketching:
Using a pencil, very lightly sketch the main stems of your flowers. Keep the lines faint so they don’t show through later, just giving yourself a guide for placement.
Uneven Texture?
If the rock surface is too bumpy for fine lines, base coat the painting area with a layer of matte clear gesso first to create a smoother working surface.
Step 2: Stone 1: The Tan Daisy Stone
-
Painting Stems:
Mix a deep forest green. Using your thinnest liner brush, trace the main curved stem and the side branches for the fern-like leaves on the tan stone. -
Adding Daisy Petals:
Load a size 0 brush with opaque white paint. Paint thin, elongated teardrop shapes radiating from a center point to create three daisy heads. -
Fern Leaves:
Return to the forest green. Add small, quick individual strokes along the side branches to create the fern fronds. -
Centers and Accents:
Once the white petals are dry, add a small dot of yellow to the center, followed by a tiny speck of red on top. Add scattered clusters of three white dots around the flowers for filler.
Gilded Garden
After the matte sealer dries, use a metallic gold paint pen to trace just the very edges of the flower petals for a luxurious, light-catching outline.
Step 3: Stone 2: The White Sunflower Stone
-
Main Petals:
On the whitest stone, use a soft brown color to paint large, rounded petals for the main flower. These should look like a simple daisy or sunflower shape. -
Mustard Blooms:
Mix a mustard yellow and paint a smaller, second flower nearby with sharper, pointier petals. -
Greenery:
Use a sage green color to paint the stems connecting your flowers. Add broad, leaf-shaped strokes attached to the main stem. -
Sprigs:
On the left side, paint a simple vertical twig with small pairs of leaves using a darker green for contrast. -
Detailing:
Add a tiny red dot to the center of the brown flower and the yellow flower to tie the color palette together.
Step 4: Stone 3: The Grey Pink Flower Stone
-
Pink Blossom:
On the grey stone, paint a large, open flower with dusty pink petals. Make the petals slightly transparent or textured to look delicate. -
Berry Buds:
Paint long, thin stems stretching across the rock. At the tips of the smaller branches, add small oval buds in a deep rose or muted red color. -
Leafy Base:
At the bottom of the design, paint thicker, fern-like leaves in a muted olive green to anchor the composition. -
Final Centers:
Add a bright yellow center to the main pink flower.
Step 5: Finishing Touches
-
Clean Up:
Look over your rocks for any mistakes. You can gently scrape off dried acrylic with a toothpick or paint over it with a color matching the stone. -
Sealing:
To protect your work, especially if these go outside, apply a coat of matte spray varnish. I prefer matte over glossy to keep that natural, organic look.
Arranged together on a shelf or scattered in the garden, these painted stones bring a permanent bloom to any space
Cactus Scene for a Big Rock in a Planter
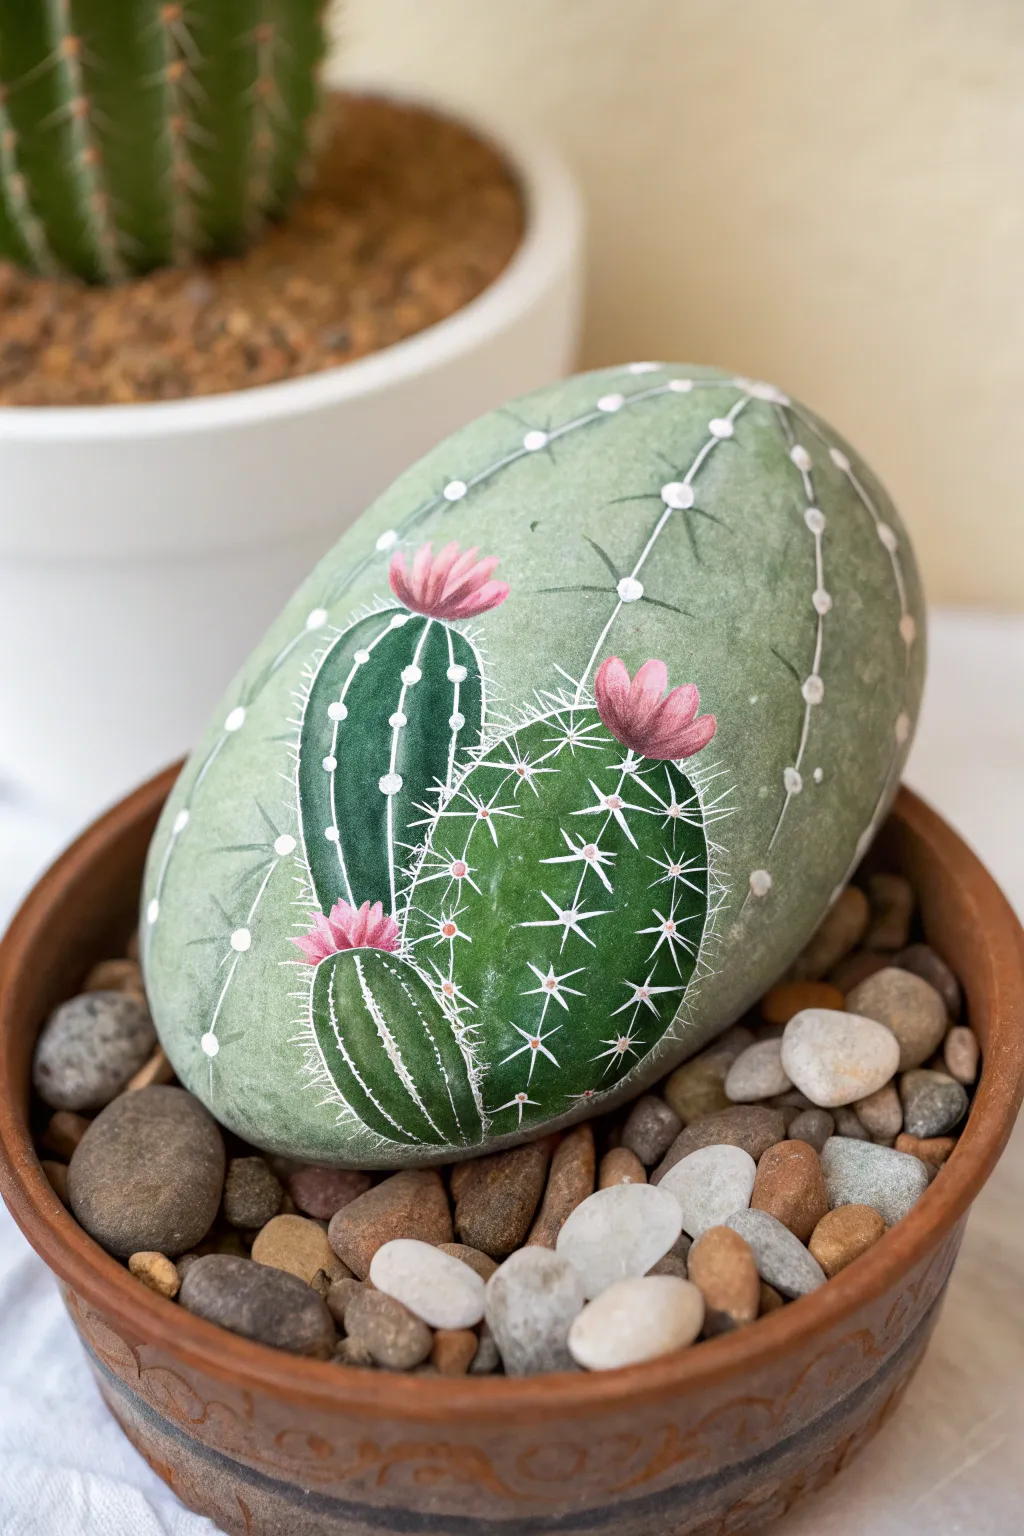

Transform a smooth garden stone into a zero-maintenance botanical beauty with this clever cactus-on-cactus design. This project involves painting a large stone to look like a cactus itself, then layering detailed miniature cacti illustrations on top for a whimsical, dimensional effect.
Step-by-Step Tutorial
Materials
- Large, smooth, oval-shaped river rock (cleaned and dried)
- Acrylic paints: Sage green, dark forest green, titanium white, pale pink, magenta
- Medium flat brush
- Small round brush (size 2 or 4)
- Fine liner brush (size 0 or 00)
- Pencil for sketching
- Matte or satin acrylic sealer/varnish
- Palette or paper plate
- Water cup and paper towels
Step 1: Base Coating & Background
-
Prepare the canvas:
Begin by scrubbing your rock thoroughly with soap and water to remove any dirt or oils. Let it dry completely before starting, as moisture trapped inside can ruin the paint later. -
Mix the base color:
Create a soft, sage green hue by mixing sage green paint with a significant amount of white. Keep adding white until you achieve a pale, muted green that looks like the skin of a prickly pear. -
Apply the base coat:
Using the medium flat brush, cover the entire visible surface of the rock with your pale green mix. You may need two coats for full opacity, allowing the first layer to dry for about 15 minutes before applying the next. -
Add background texture:
Once the base is dry, use a slightly darker version of your sage green mix to sponge or lightly dab subtle texture across the surface. This gives the ‘rock cactus’ a more organic, less plastic look. -
Paint the background spines:
Using your fine liner brush and pure white paint, create thin, curved lines traveling vertically down the rock to simulate the ribs of the main cactus shape. Add small white dots along these lines to represent areoles.
Step 2: Painting the Foreground Cacti
-
Sketch the cluster:
Lightly sketch a cluster of three oval cactus shapes in the lower left quadrant of the rock using a pencil. Arrange them so they overlap slightly: a tall one in back, a rounder one in front, and a small pup at the bottom. -
Block in the shapes:
Fill in your sketched shapes with the dark forest green paint using the small round brush. Paint smoothly to create a solid silhouette for each cactus pad. -
Add highlights:
While the forest green is still slightly tacky, I find it helpful to blend a tiny bit of lighter green along the upper left edges of the pads to suggest a light source. -
Define the ribs:
Once the dark green is dry, use the liner brush and a very pale green (almost white) to paint vertical, curved dashed lines down each dark cactus pad. These lines define the 3D shape. -
Dot the areoles:
Place distinct white dots along the dashed lines you just painted. Space them evenly, as these will be the anchor points for your spikes. -
Paint the spines:
Switch to your finest liner brush and thin your white paint slightly with water for better flow. Paint tiny ‘starburst’ patterns coming out of each white dot to create the sharp spines.
Steady Your Hand
For the ultra-fine spine details, rest your pinky finger on a dry part of the rock to stabilize your hand. Thinning your white paint to an ink-like consistency helps lines flow smoothly.
Step 3: Flowering Details & Finish
-
Base the flowers:
At the top of each dark green cactus pad, paint a small, fan-shaped bloomed using pale pink paint. -
Add flower depth:
While the pink is wet, dab a little magenta or dark pink at the very base of the flower where it connects to the cactus. Pull the color upward slightly for a gradient effect. -
Define petals:
Use the liner brush with the dark pink to paint thin separation lines between the petals, giving the flowers individual definition. -
Final highlights:
Add tiny touches of pure white to the very tips of the flower petals and the absolute brightest points of the dark green cactus bodies to make them pop. -
Seal the artwork:
Allow the rock to dry overnight to ensure all thick layers are set. Apply a coat of matte or satin sealer to protect your work from the elements without making it look unnaturally glossy like plastic.
Rock Garden Surprise
Paint different rock shapes as different cactus varieties—tall skinny rocks as San Pedro cactus, and perfectly round stones as Golden Barrels—to create a diverse ‘garden’ requiring zero water.
Place your finished masterpiece in a terracotta pot filled with small pebbles for a convincing illusion that will fool your guests

PENCIL GUIDE
Understanding Pencil Grades from H to B
From first sketch to finished drawing — learn pencil grades, line control, and shading techniques.
Explore the Full Guide
Dot Mandala Burst Across a Large Flat Stone
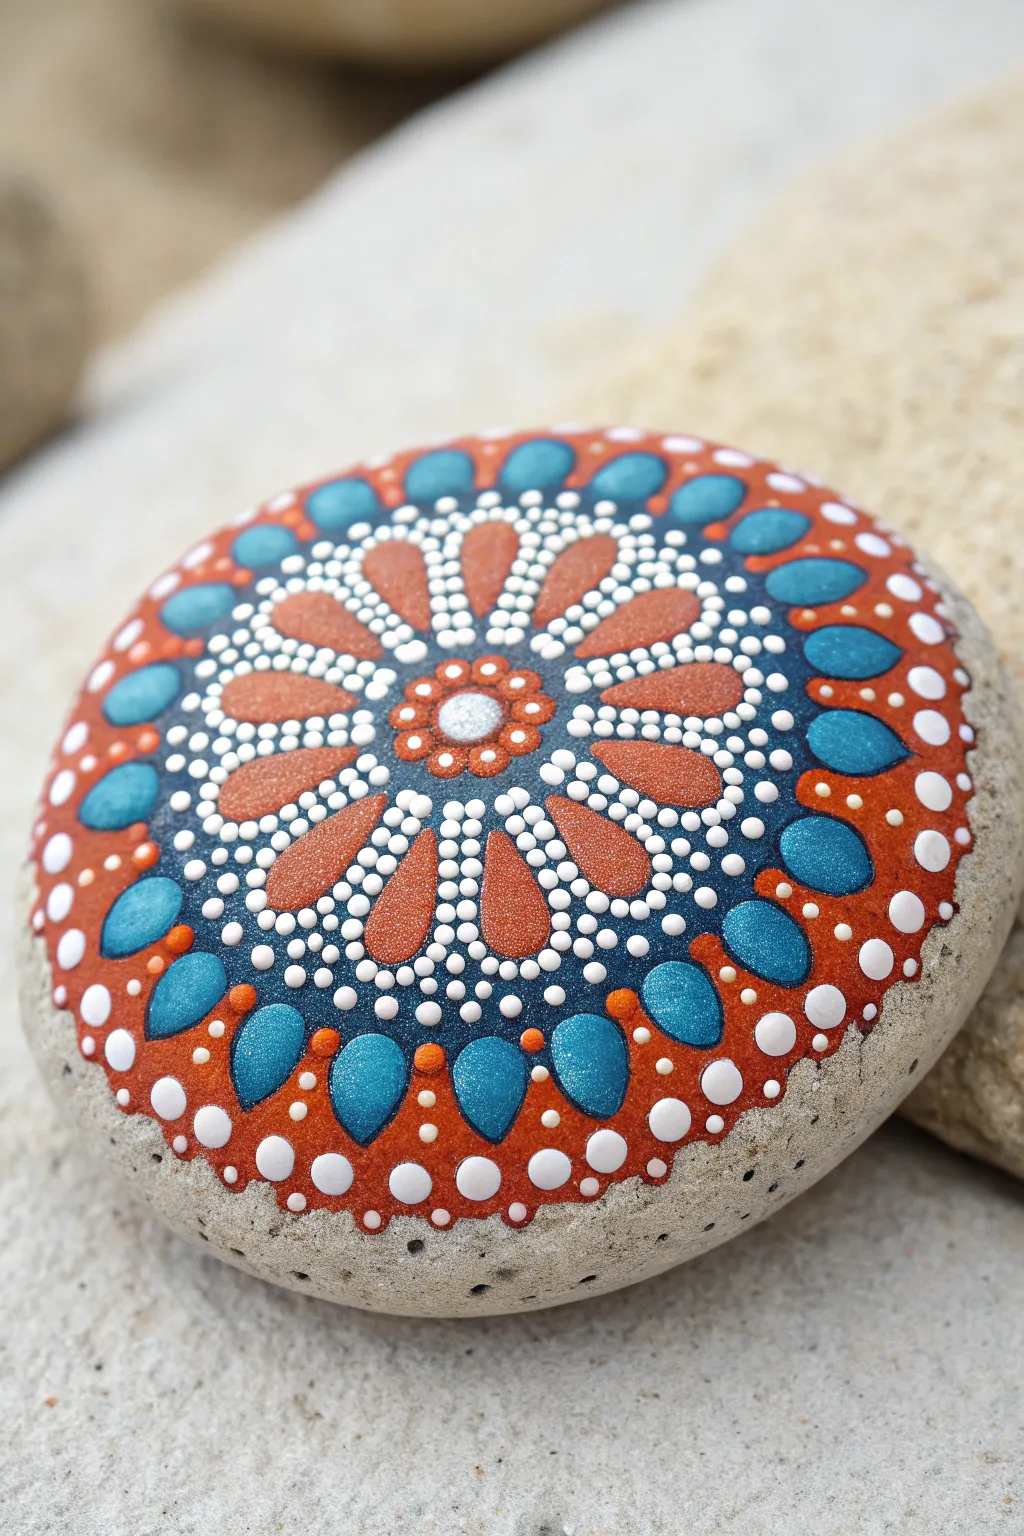

Transform a smooth river rock into a mesmerizing piece of art with this intricate dot mandala pattern. Featuring a rich palette of copper, teal, and white, the design radiates outwards in expanding rings to create a soothing, hypnotic effect.
Step-by-Step
Materials
- Large, smooth, round river stone (light grey base)
- Acrylic paints: Metallic Copper/Bronze, Teal/Turquoise, White, Deep Navy Blue
- Dotting tools (various sizes from fine needle to 6mm)
- Small flat brush
- Compass or white charcoal pencil (optional for guidelines)
- Gloss varnish or clear acrylic sealer
Step 1: Base Preparation
-
Clean the canvas:
Scrub your stone thoroughly with warm soapy water to remove any dirt or oils, then let it dry completely in the sun. -
Establish the center:
Find the approximate center of your stone. If you want perfect symmetry, lightly draw a cross and concentric circles with a white charcoal pencil to act as guides for your mandala rings.
Step 2: The Central Core
-
Paint the first dot:
Using a medium-sized dotting tool, place a single, perfect white dot in the direct center of the stone. -
Initial ring:
Surround the central dot with a ring of small copper dots. Keep them tightly packed but not touching. -
Second ring:
Create a second ring using slightly larger copper dots around the first ring. This builds the warm core before we introduce cooler tones. -
The petal base:
Paint a dark navy blue background circle around your center motif, extending outwards about 1-1.5 inches. This dark base will make the white dots pop.
Paint Consistency
For perfect round dots that don’t peak, your paint should be the consistency of heavy cream. Use a medium pouring medium to thin heavy body acrylics.
Step 3: Expanding the Pattern
-
Create the first petals:
Using your metallic copper paint, create a ring of 12-14 teardrop shapes (petals) pointing outwards. The tips should face the center. -
Outline delicate dots:
Switch to your finest dotting tool and white paint. Carefully walk small dots around the edge of each copper petal, starting small at the tip and getting slightly larger towards the rounded end. -
Second petal layer:
In the spaces between the copper petals (the V-shapes), paint a second set of slightly larger teardrop petals using the teal paint. Ensure the rounded ends point outward. -
Walking the dots again:
Repeat the white walking-dot technique around these teal petals. I find taking a slow breath before starting each arc helps keep my hand steady. -
Fill the gaps:
Place a medium-sized white dot at the outer tip of every teal petal to anchor the design.
Glitter Glam
Mix a tiny amount of iridescent medium into your teal paint before applying. It will make the stone shimmer beautifully in sunlight.
Step 4: The Outer Rim
-
The copper band:
Create a wide band of copper paint around the entire mandala. You don’t need to paint the whole rock, just a wide ring that frames your current work. -
Large outer petals:
On top of this copper band, paint large, bold teal teardrops. Orient them so they align with the gaps of the previous layer. -
Defining the border:
Use a large dotting tool to place prominent white dots around the very outer edge of the design, spacing them between the large teal petals. -
Intermediate accents:
Add smaller orange or copper dots between the large white border dots to create a jeweled necklace effect around the rim. -
Tiny details:
Go back and add tiny ‘top dots’—small pinpoints of lighter color on top of larger dried dots—to add dimension. For example, put a tiny light blue dot inside the large teal teardrops. -
Clean up:
Use a damp cotton swab or a fine brush with water to gently erase any stray chalk guidelines that are still visible. -
Sealing:
Once the paint is fully cured (usually 24 hours), apply a coat of gloss varnish to protect the stone and give the dots a glass-like shine.
Now you have a stunning centerpiece for your garden or a meditative object for your desk
Ocean Wave Wraparound on an Oval Big Rock
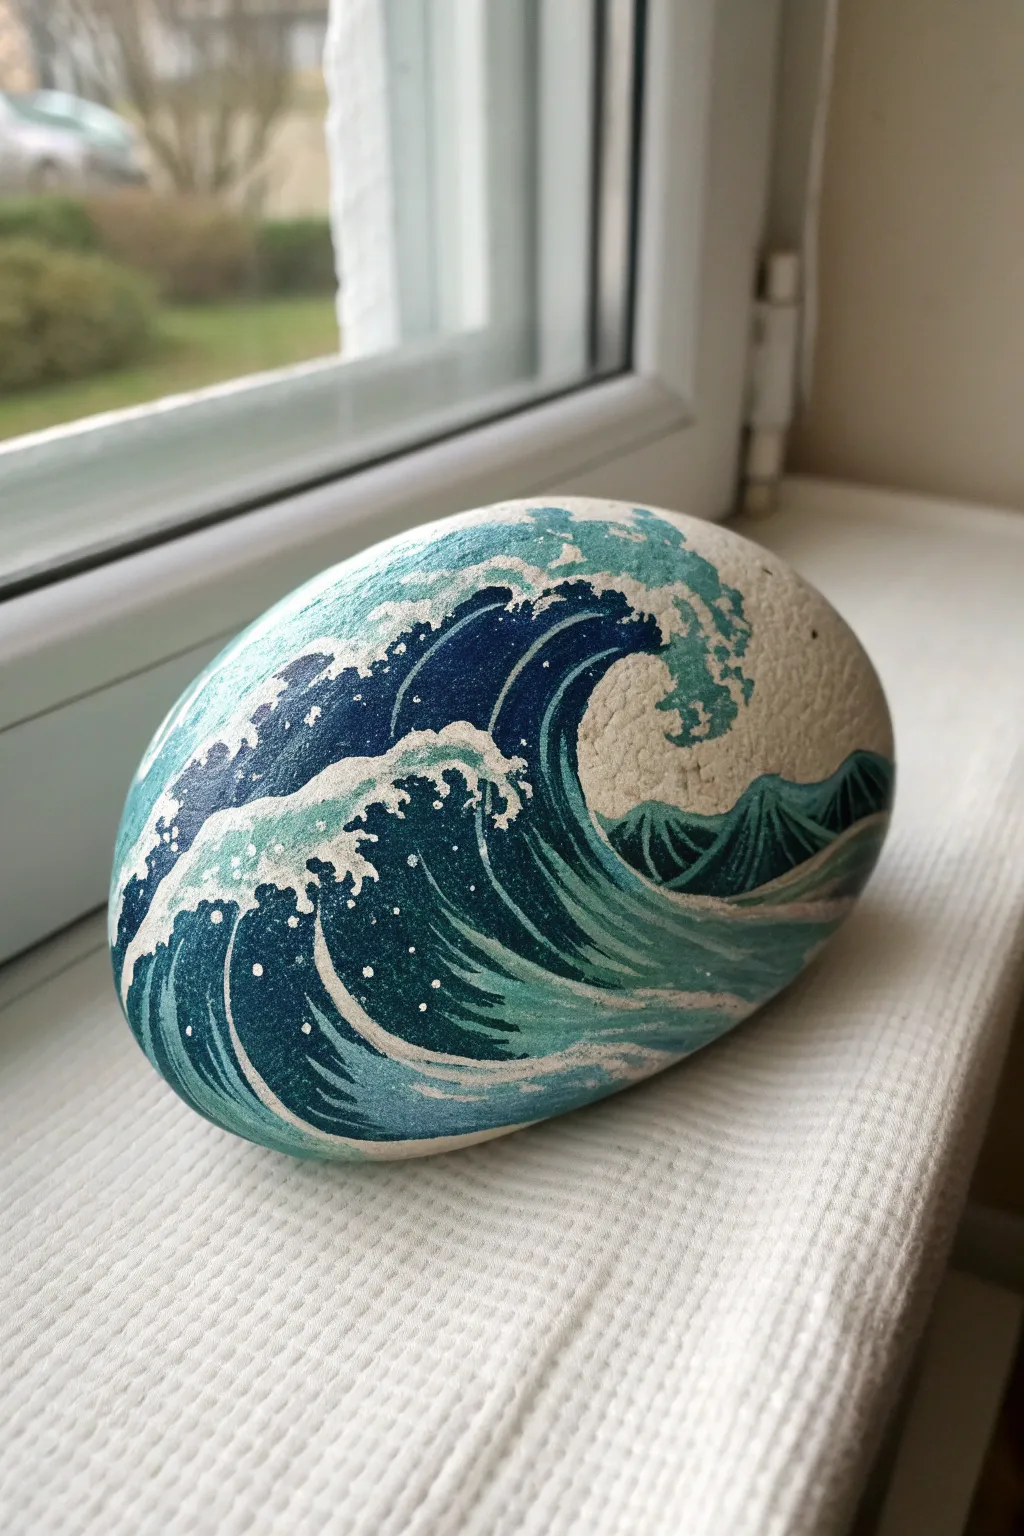
Capture the iconic power of the ocean on a smooth, oval stone with this Hokusai-inspired wave design. The wraparound technique gives the artwork kinetic energy, making the water feel like it’s crashing around the three-dimensional surface.
Step-by-Step Tutorial
Materials
- Large, smooth oval river rock
- Gesso or white acrylic primer
- Acrylic paints (Navy Blue, Teal/Turquoise, Cerulean Blue, White)
- Pencil for sketching
- Medium flat brush
- Small round brush (size 1 or 2)
- Fine liner brush (size 0 or 00)
- Spray gloss varnish
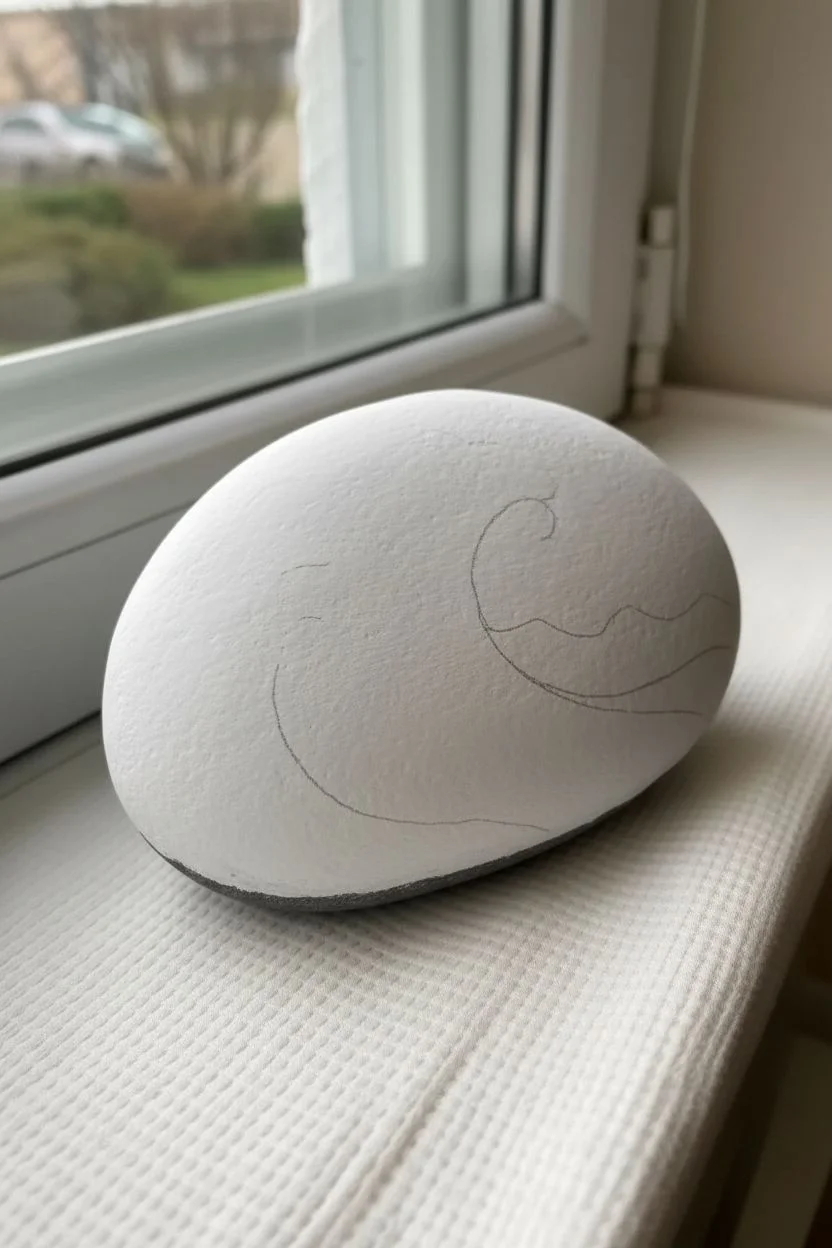
Step 1: Preparation and Base
-
Clean the canvas:
Scrub your rock thoroughly with soap and water to remove any dirt or oils that might repel paint. Let it dry completely. -
Prime the surface:
Apply a base coat of white acrylic paint or gesso to the entire top and sides of the stone. This ensures your blue tones will pop rather than sinking into the grey rock color. Let this dry fully. -
Sketch the flow:
Using a light pencil, sketch the main curve of the wave. Start low on the right side and swoop upwards towards the left, creating that signature curling crest shape. Don’t worry about tiny details yet; just get the big swooping motion.
Step 2: Blocking in Color
-
Deep ocean depths:
Mix a dark navy blue. Using your medium brush, paint the main body of the wave, specifically the area underneath the cresting curl. Leave the very top edge unpainted for the foam later. -
Mid-tone transition:
While the navy is still slightly tacky, blend in a turquoise or teal color towards the bottom of the wave and the tail on the right side to create a gradient effect. -
Distant mountains:
On the far right side of the rock (trailing behind the main wave), paint small, jagged triangular shapes in a deep teal or muted blue to represent distant waves or mountains. Keep these lower on the rock’s horizon line. -
Inner wave stripes:
I like to use a liner brush here to add thin, curved strokes of lighter cerulean blue inside the dark navy section. Follow the curve of the wave to exaggerate the movement.
Flow & Motion
When painting the internal stripes of the wave, rotate the rock in your hand as you pull the brush. This physical turning helps create smoother, naturally curved lines.
Step 3: Detailing the Foam
-
Outline the crest:
Load a small round brush with pure white paint. Outline the top jagged edge of the crashing wave. -
Fill the foam claws:
Pant the ‘claws’ of the wave—the little fingers of water reaching out. Make the white opaque and solid in these areas. -
Create separation:
Add thin white lines separating the different layers of water currents within the main blue body. These lines should sweep upward, mirroring the main curve. -
Sea spray dots:
Using the very tip of your finest brush or a toothpick, dot tiny specks of white paint flinging off the main crest and floating in the air above the wave. -
Texturing the white:
For the large white area inside the wave’s curve, don’t paint it solid white. Stipple or dab the paint slightly to give it a frothy, aerated texture.
Try a Sunset
Instead of leaving the background plain stone or white, paint a soft gradient of pale yellow and pink behind the wave before starting the blue sections for a dramatic sunset effect.
Step 4: Finishing Touches
-
Refine the edges:
Go back with your dark navy paint and a liner brush to sharpen the contrast right next to the white foam. This high contrast is what makes the design striking. -
Clean up the bottom:
If your paint dripped or the bottom edge looks messy, paint a clean line along the base or leave it natural depending on your preference. -
Seal the work:
Allow the paint to cure for at least 24 hours. Once fully dry, take the rock outside and apply a clear spray sealer to protect the artwork and give the water a wet, glossy look.
Place your finished stone near a sunny window and enjoy the eternal movement of your captured wave


Koi-Style Fish Painted to Swim Around the Stone
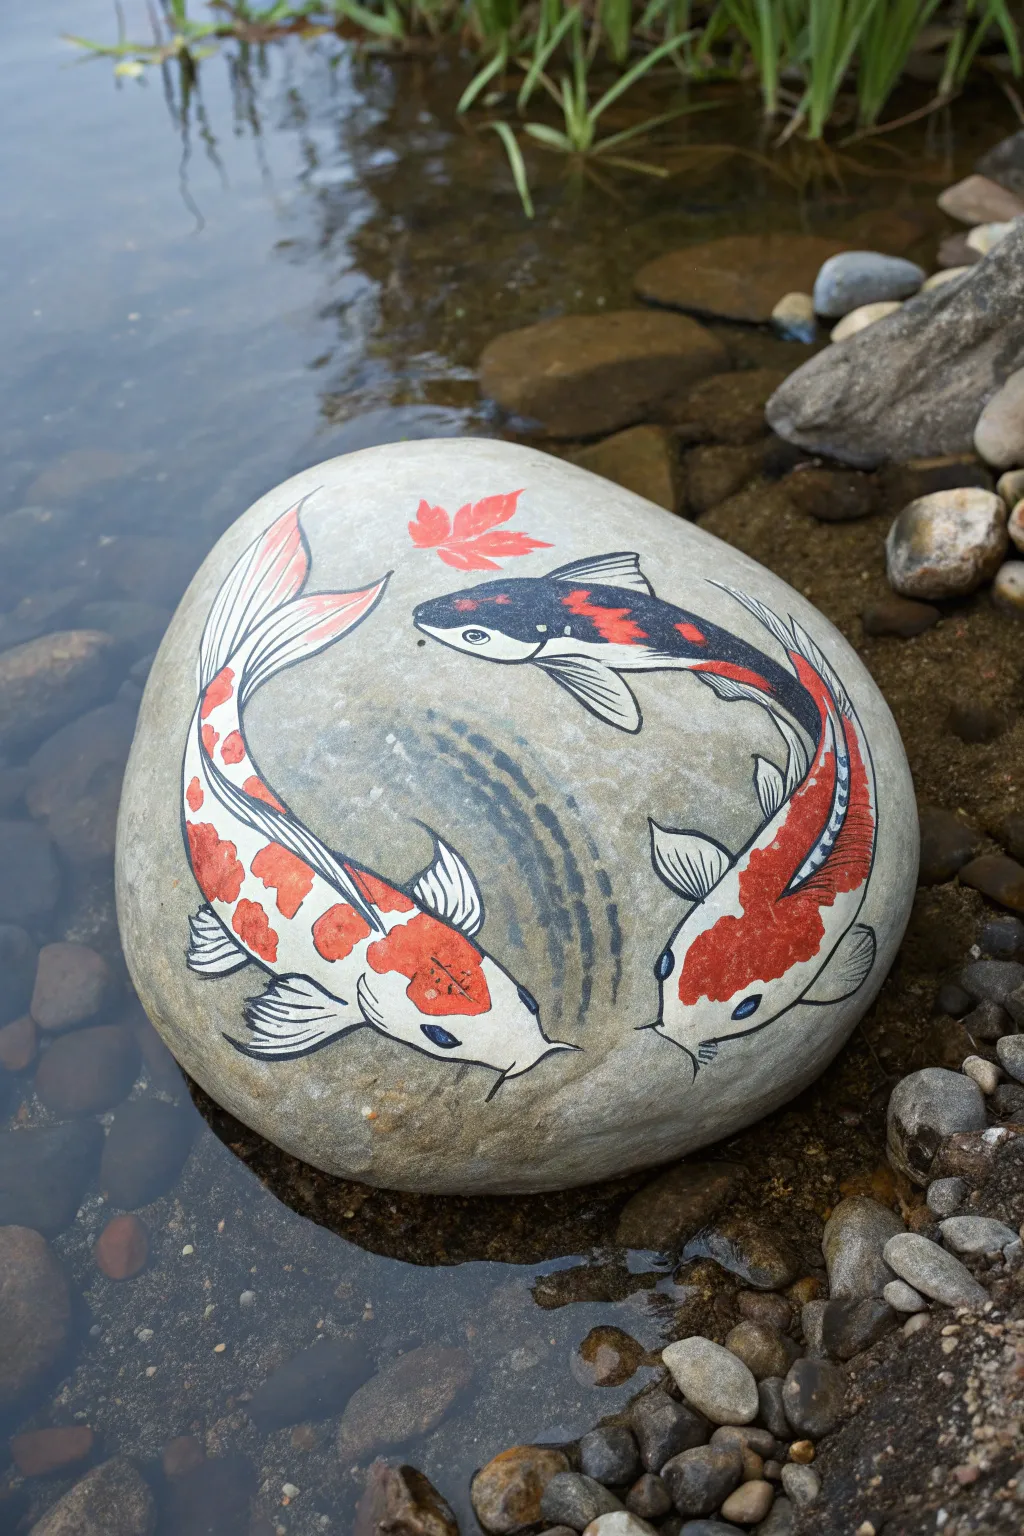
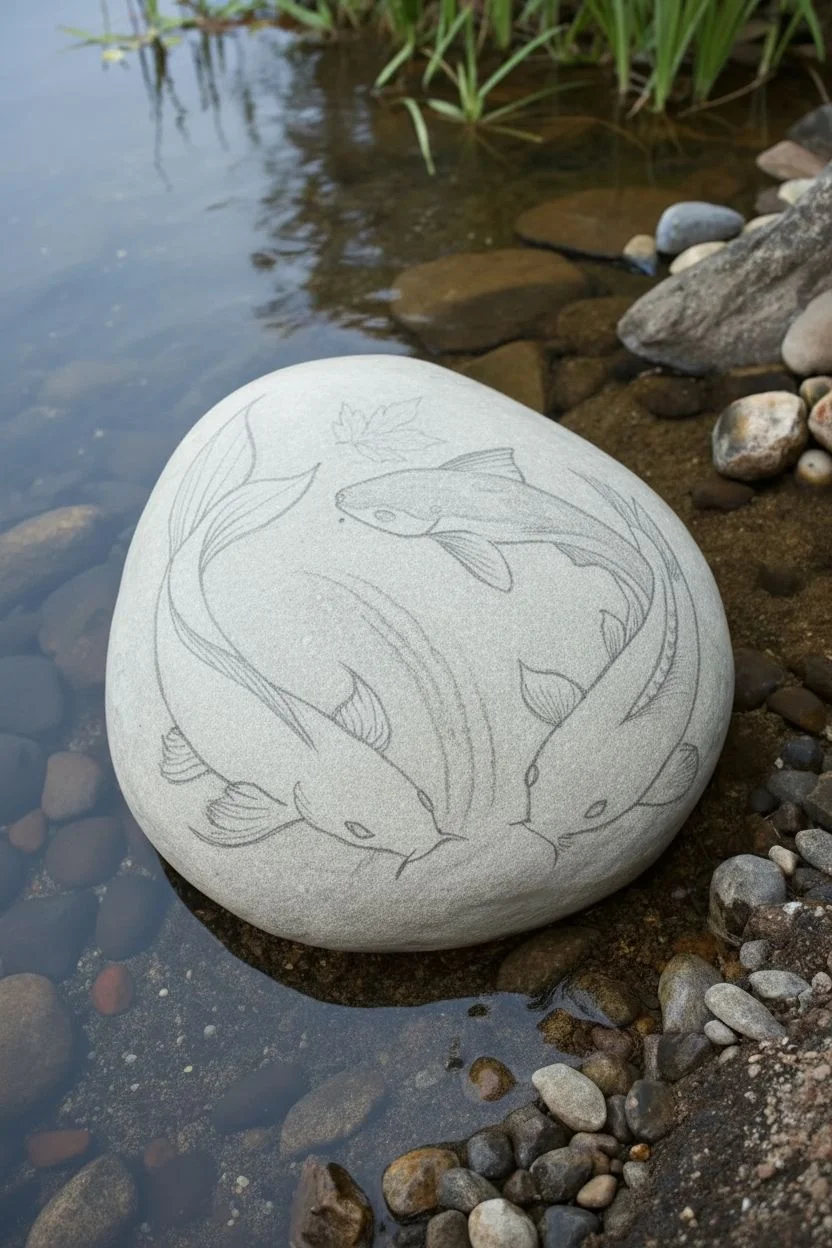
Transform a smooth river rock into a tranquil pond scene with this beautiful koi fish painting. The circular composition of three swimming fish creates a harmonious flow that looks stunning placed near a garden water feature or nestled among plants.
Step-by-Step Guide
Materials
- Large, smooth, rounded river stone (approx. 8-10 inches diameter)
- Acrylic paints (Titanium White, Carbon Black, bright Orange/Vermilion, Dark Blue/Grey)
- Fine liner brushes (size 0 and 00)
- Small flat shader brush (size 4 or 6)
- Pencil and eraser
- Spray sealant (matte or gloss outdoor varnish)
- Water cup and palette
Step 1: Preparation and Sketching
-
Clean the surface:
Before starting, scrub your rock thoroughly with soap and water to remove any dirt or oily residue. Let it dry completely in the sun; moisture trapped inside can ruin the paint later. -
Plan the composition:
Visualize a circle on top of the rock. Use a pencil to lightly sketch three curved lines following this circle—these will be the spines of your fish. -
Draft the fish bodies:
Flesh out the shapes around your spine lines. Draw teardrop-shaped bodies that taper into tails. Position them nose-to-tail to create that swimming motion. -
Add fin details:
Sketch the pectoral fins (on the sides) and dorsal fins (on top). Make them flow backwards to suggest movement through water. Don’t forget the long, flowing tail fins. -
Adding the accent leaf:
Draw a small maple leaf floating in the center or slightly off-center between the fish for a pop of seasonal color.
Step 2: Base Coating
-
White underpainting:
Use your flat shader brush to fill in the fish bodies with Titanium White. This is crucial even if you plan to use other colors, as rock surfaces tend to absorb paint and dull colors. -
Second white layer:
Let the first coat dry fully. Apply a second coat of white to ensure a solid, opaque base. This will make the orange and black markings we add later really pop. -
Leaf base coat:
Paint the maple leaf white as well to prepare it for the bright red-orange topcoat later.
Uneven surface?
If your rock has pits making fine lines hard, thin your black paint slightly with water. It flows into the texture better than thick paint.
Step 3: Adding Color and Pattern
-
Painting the classic patterns:
For the two Kohaku-style koi (white and orange), paint large, organic blotches of bright Orange along their backs. Leave plenty of white space showing on the head and tail areas. -
Painting the Showa-style koi:
For the third fish, use a mix of Dark Blue/Grey and Black for the main body color, but add patches of Orange and leave distinct White areas. This variety adds visual interest. -
Coloring the leaf:
Paint the maple leaf with a vibrant Red or Vermilion orange. I like to let this dry briefly and add a tiny touch of lighter orange in the center for depth. -
Creating water ripples:
Dilute some blue-grey paint with water to make a glaze. Using a curved stroke, paint faint, sweeping ripple lines between the fish in the center of the rock to imply water direction.
Go 3D
Add a drop of clear UV resin or glossy dimensional medium over the eyes and the water droplets. It creates a realistic, wet shine.
Step 4: Outlining and Finishing
-
Main outlines:
Switch to your finest liner brush (size 00) and black paint. Carefully outline the entire shape of each fish. Keep your hand steady and use your pinky finger on the rock for balance. -
Scale details:
You don’t need to draw every individual scale. Suggest them with small ‘U’ shapes along the colored patches, or by outlining the edges of the color spots. -
Fin texture:
Draw long, thin lines inside the tail and pectoral fins to mimic the delicate rays of the fin structure. -
Facial features:
Paint small circles for the eyes. Add a tiny white dot reflecting light inside the black pupil to bring the fish to life. Draw the barbels (whiskers) near the mouth. -
Sealing the work:
Once the paint is cured (wait at least 24 hours), take the rock outside and apply 2-3 coats of spray varnish. This protects your hard work from rain and river water.
Place your finished stone near water or in a garden bed to add a permanent splash of color
Painted Stone Mosaic Illusion on a Big Rock
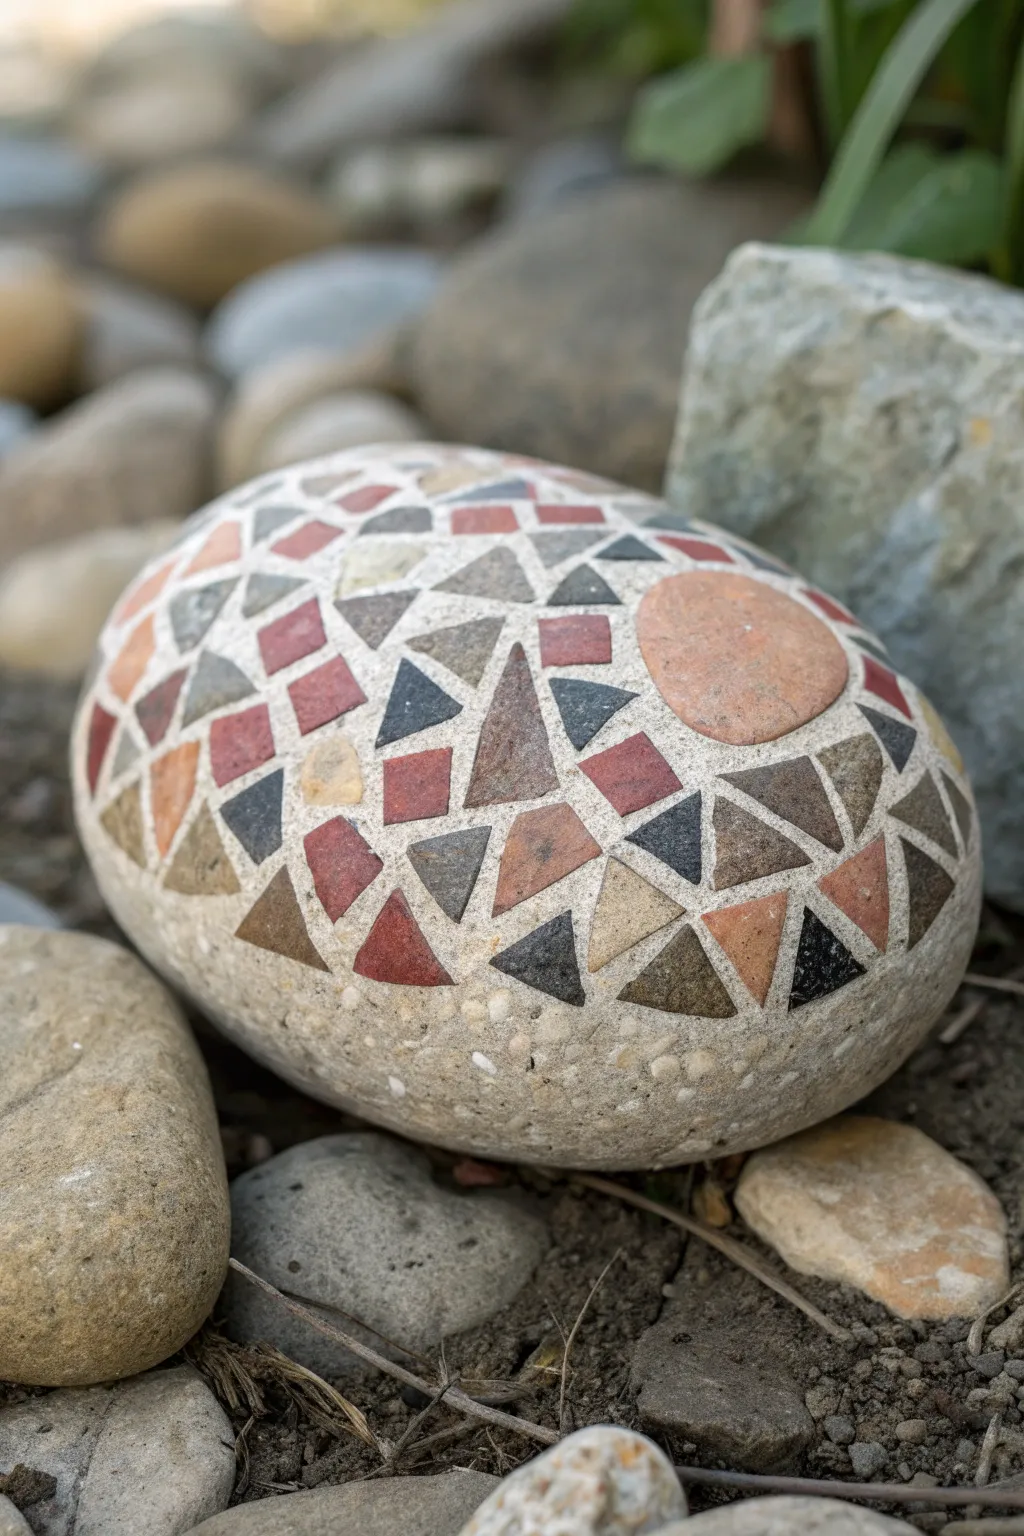
Transform a smooth garden stone into a stunning piece of faux-mosaic art using nothing but paint. This project creates the realistic illusion of inlaid ceramic tiles without the need for grout, tile nippers, or sharp edges.
Detailed Instructions
Materials
- Large, smooth river rock (approx. 6-10 inches)
- Acrylic paints (terracotta, brick red, charcoal grey, slate blue, warm beige, cream)
- Small flat brush (size 2 or 4)
- Fine liner brush (for outlines)
- Outdoor varnish or sealant (matte or satin finish)
- Pencil
- Palette or paper plate
- Water cup and paper towels
Step 1: Preparation and Grout Base
-
Clean the Stone:
Begin by scrubbing your rock thoroughly with soap and water to remove any dirt or moss. Allow it to dry completely in the sun, as moisture trapped inside can ruin the paint later. -
Apply the Grout Layer:
For the most realistic mosaic look, don’t paint white lines on top of colors. Instead, paint the entire top surface of the rock with a creamy off-white or light beige acrylic. This will serve as your ‘grout’ color. -
Double Coat:
Apply a second coat of the cream base to ensure full opacity. You want a solid, neutral background so the stone’s natural color doesn’t peek through the gaps.
Uneven Grout Lines?
Don’t stress over perfect spacing. Real hand-laid artisan mosaics naturally have uneven grout. These imperfections actually make the illusion more convincing.
Step 2: Drafting the Pattern
-
Sketch the Focal Point:
Once the base coat is bone dry, use a pencil to lightly sketch a focal shape. In the example, a large, imperfect circle is placed slightly off-center to anchor the design. -
Outline Geometric Shapes:
Draw grid-like lines radiating out from or surrounding your focal circle. These don’t need to be perfect; the charm is in the slightly organic feel. -
Create Tiles:
Inside your grid sections, sketch individual ’tiles.’ Focus on triangles and slightly skewed quadrilaterals. Leave a uniform gap of about 1/8th of an inch between every shape to let the ‘grout’ show through. -
Refine the Edges:
Extend the pattern down the sides of the rock, allowing the tile shapes to taper off naturally so the design doesn’t look like a sticker placed on top.
Adding Dimension
Mix a tiny drop of white into your tile colors and paint a very thin highlight line on the top edge of each shape. This tricks the eye into seeing 3D raised tiles.
Step 3: Painting the Tiles
-
Mix Earth Tones:
Prepare a palette of natural stone colors. You’ll want a brick red, a dark charcoal, a slate blue-grey, and a warm brown. I like to keep them slightly muted rather than neons to maintain the stone aesthetic. -
Paint the Focal Circle:
Start by filling in your large focal circle with a warm terracotta or peach tone. Use your flat brush to get clean, crisp edges. -
Randomize Colors:
Begin filling in the smaller geometric shapes. Work one color at a time—paint five or six triangles in brick red scattered randomly across the rock. -
Add Contrast:
Switch to your dark charcoal paint and fill in several more shapes. Place dark tiles next to lighter ones to create visual depth and pop. -
Fill Remaining Spaces:
Continue rotating through your color palette (slate blue, warm beige, brown) until every pencil-drawn shape is filled. Leave the cream gaps untouched. -
Second Coats:
The ’tile’ colors need to look solid and opaque like ceramic. Go back over any patchy areas with a second layer of paint once the first is dry.
Step 4: Texturing and Sealing
-
Stipple for Texture:
For a hyper-realistic stone look, use an old, stiff brush or a sponge to lightly dab a tiny bit of darker or lighter variation onto a few individual tiles. This mimics the natural texture of stone or terracotta. -
Clean Up Lines:
If any paint went into the grout lines, use your fine liner brush and the original cream base color to carefully touch up the gaps, keeping them crisp. -
Dry Time:
Let the rock sit for at least 24 hours to ensure the acrylic paint has fully cured and hardened. -
Seal for Outdoors:
Apply two coats of a clear, non-yellowing outdoor varnish. A matte finish looks increasingly realistic, while a gloss finish makes it look like polished ceramic.
Place your finished faux-mosaic masterpiece in a garden bed or walkway and enjoy the pop of color year-round
Night-Sky Constellations on a Glow-Style Boulder
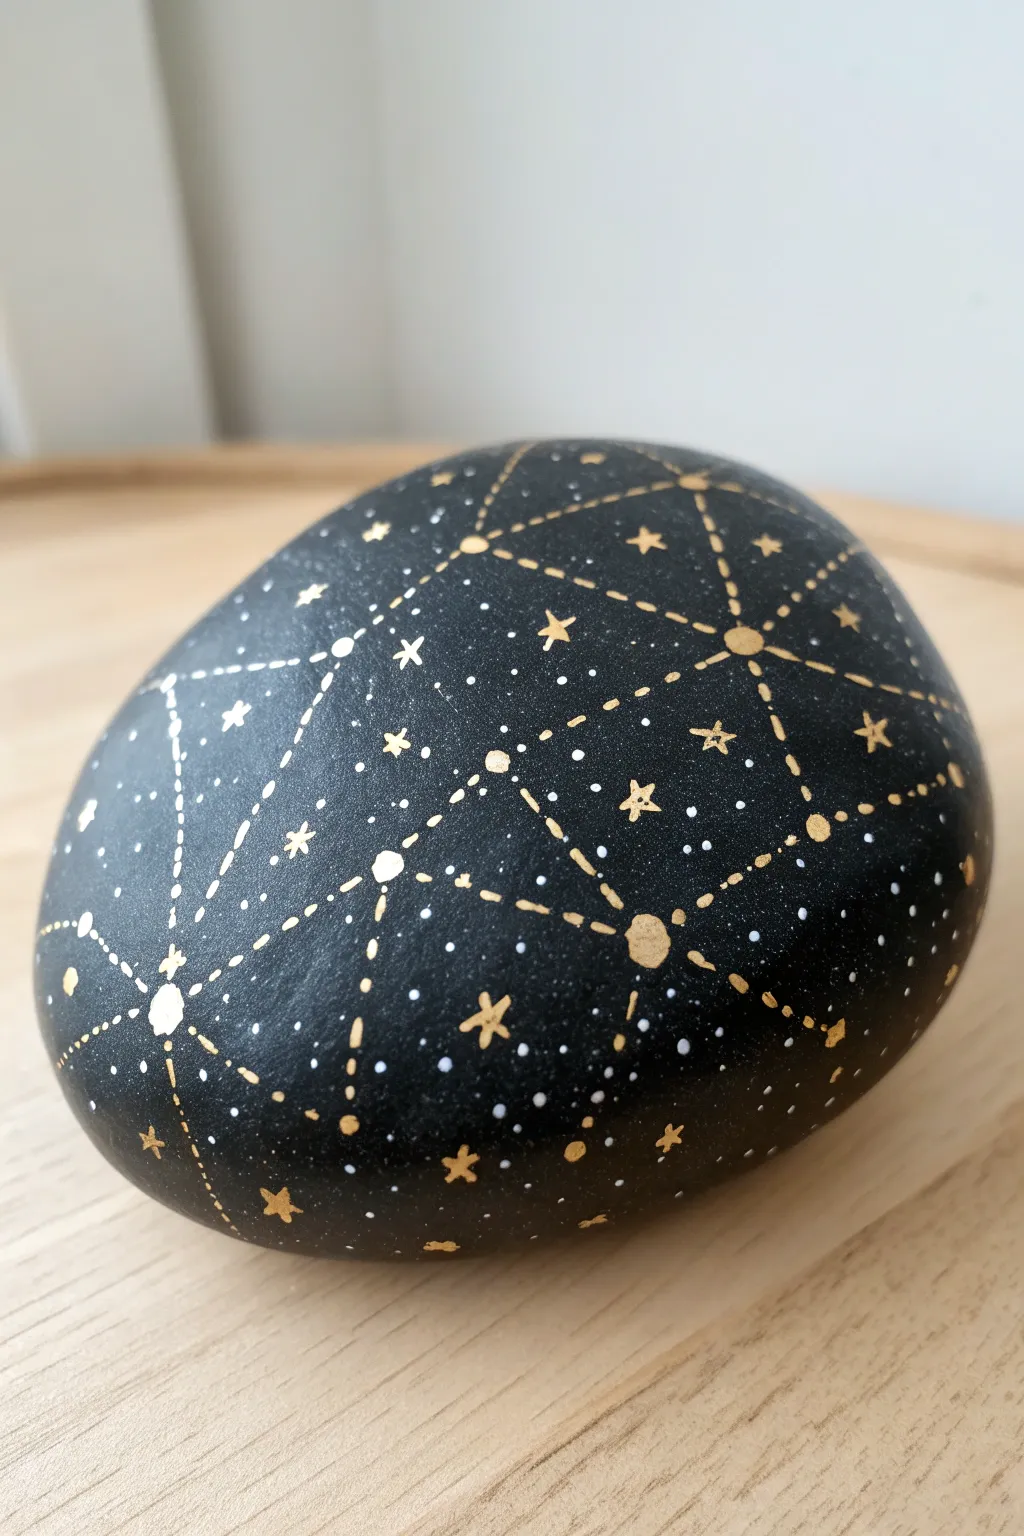
Transform a smooth river rock into a handheld galaxy by combining the mystique of the night sky with crisp geometric lines. This project uses a striking black base to make gold and white details pop, creating a sophisticated piece of decor.
Step-by-Step Guide
Materials
- Smooth, rounded river rock (approx. 4-6 inches wide)
- Black acrylic paint (matte or satin finish)
- Medium flat paintbrush
- Metallic gold paint pen (fine tip)
- White paint pen (extra fine tip)
- White acrylic paint (for splattering/dotting)
- Pencil (optional)
- Gloss or satin spray varnish
Step 1: Preparing the Canvas
-
Clean and Dry:
Begin by thoroughly washing your rock with warm, soapy water to remove any dirt or oils. Scrub well with an old toothbrush if needed and let it dry completely in the sun or with a cloth. -
Base Coat Application:
Using your medium flat brush, apply a layer of black acrylic paint over the entire top surface of the rock. Don’t worry about the bottom just yet; focus on getting a smooth, opaque finish. -
Second Layer:
Once the first coat is dry to the touch, apply a second coat of black. This ensures a deep, void-like background that will make the metallic colors truly shine. -
Full Cure:
Allow the black base coat to cure fully for at least an hour. If the paint is tacky, the paint pens might drag and ruin the surface texture.
Step 2: Mapping the Constellations
-
Planning Points:
Visualize a geometric web across the rock’s surface. You can lightly dot the main connection points with a pencil first if you want to ensure balanced spacing before committing with paint. -
Gold Nodes:
Take your gold paint pen and draw solid circles at your chosen connection points. These range from small dots to slightly larger ‘planet’ sizes, roughly 3-5mm in diameter. -
Connecting the Dots:
Connect your gold nodes with dashed lines using the gold pen. I create short, rhythmic dashes rather than solid lines to mimic the look of star charts or navigational maps. -
Triangulation:
Continue connecting the nodes until you have a series of triangles and geometric shapes spanning the curved surface of the rock. -
Adding Stars:
inside some of the larger triangles or open spaces, draw small five-point stars with the gold pen. vary their orientation so they don’t look too uniform. -
Tiny Gold Details:
Fill a few empty voids with very small gold dots to suggest distant stars. Keep these sparse to avoid cluttering the design.
Steady Hands Pro-Tip
Anchor your pinky finger against the dry part of the rock while drawing. This acts as a stabilizer, allowing you to make precise dashes and tiny stars without shaking.
Step 3: Layering the Galaxy
-
White Highlights:
Switch to your extra fine white paint pen. Add tiny white dots interspersed among the gold pattern, focusing on the spaces inside the triangles. -
Accent Lines:
If you want extra depth, re-trace a few of the gold dashed lines with very thin white dashes right next to them, or add a white dot in the center of the largest gold nodes. -
The Milky Way Effect:
Create clusters of tiny white dots (stippling) in specific areas to mimic the density of the Milky Way. Keep your pen vertical and tap gently. -
Drying Time:
Let all the paint pen work dry for at least 30 minutes. Paint pens can smear easily if sealed too casually.
Level Up: Glow Effect
Trace over the white constellation lines with glow-in-the-dark paint. In daylight, it looks normal, but at night, your rock will reveal hidden star maps.
Step 4: Sealing and Protection
-
Spray Sealing:
Take the rock outside or to a well-ventilated area. Apply a light mist coat of spray varnish. Do not spray heavily or the ink might run. -
Final Coat:
Once the mist coat is dry, apply a fuller, wet coat of varnish to seal the rock completely and give it a finished, durable sheen.
Place your finished celestial stone on a desk or shelf to add a touch of cosmic wonder to your room


Have a question or want to share your own experience? I'd love to hear from you in the comments below!