If you’re craving that coquette aesthetic on your canvas, think soft pastels, romantic little details, and a touch of playful vintage charm. Here are my favorite coquette painting ideas to help you build a sweet, blush-toned collection that feels like it belongs in a cozy, sunlit studio.
Pink Roses on a Cloudy, Creamy Background
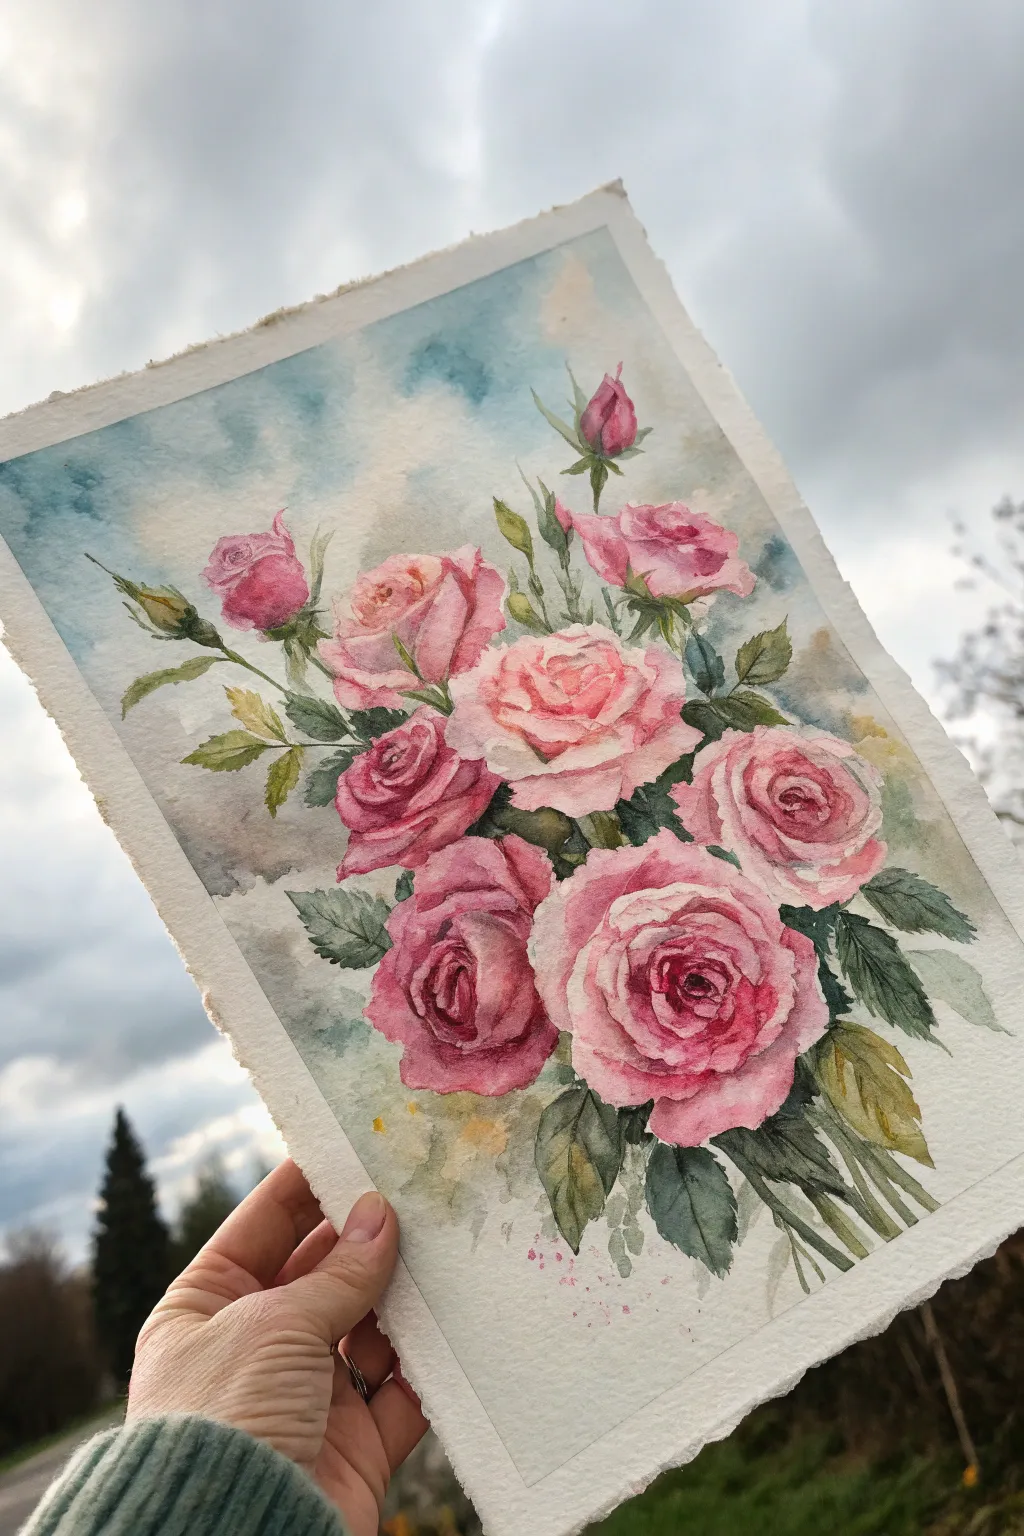
Capture the romantic essence of classic horticulture with this loose yet detailed watercolor study of pink roses. The soft, diffuse background contrasts beautifully with the crisp petals, creating an airy, dreamy effect that is perfect for the coquette aesthetic.
Step-by-Step
Materials
- Cold press watercolor paper (300 gsm or heavier, rough texture preferred)
- Watercolor paints: Alizarin Crimson, Rose Madder, Sap Green, Perylene Green, Indigo, Yellow Ochre, Burnt Sienna
- Round watercolor brushes: Size 2 (for details), Size 6 (for petals), Size 10 (for washes)
- Masking tape
- Pencil (HB or H)
- Paper towels
- Two jars of water
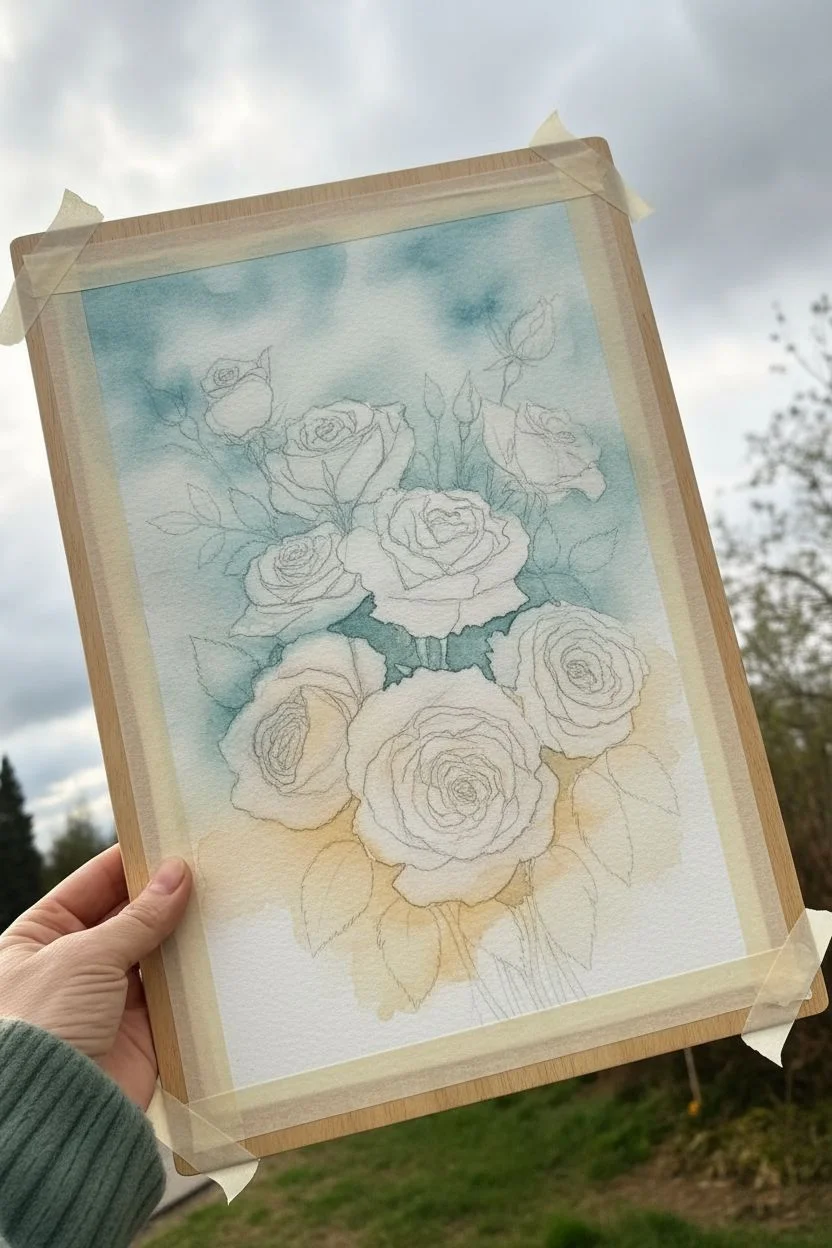
Step 1: Sketch and Background
-
Tape and Prep:
Secure your paper to a board using masking tape, leaving a clean border around the edges. This prevents buckling when we apply wet washes later. -
Light Skeleton Sketch:
Using an H or HB pencil, very lightly sketch the composition. Mark circles for the main rose heads—grouping three larger ones near the bottom right and scattering looser buds towards the top left. Don’t press hard; we want the graphite to disappear under the paint. -
Refining the Shapes:
Add suggestions of petals within your circles and draw the stems radiating downward. Sketch in the serrated leaves, paying attention to the empty spaces between the flowers. -
Wet-on-Wet Sky:
Wet the background area around the flowers with clean water, being careful not to soak the rose sketches. Mix a very dilute wash of Indigo and a touch of Perylene Green to create a moody, cloudy teal-blue sky. -
Creamy Atmospherics:
While the blue wash is still damp, drop in hints of Yellow Ochre mixed with a tiny bit of Burnt Sienna in the lower portions and around the edges of the bouquet. Let these colors bleed softly into the blue to create that ‘cloudy, creamy’ transition.
Pro Tip: Soft Edges
To keep the roses looking romantic and not stiff, avoid outlining every petal. Let some edges blur into the background or into adjacent petals using clean water.
Step 2: Painting the Roses
-
First Petal Layers:
Start with the lightest pink, mixing Rose Madder with plenty of water. Paint the outer petals of the large roses using the side of your size 6 brush, leaving white paper showing for the highlights on the petal edges. -
Building the Centers:
While the outer petals dry slightly, move to the center of the roses. Use a stronger mix of Alizarin Crimson. Paint tight, C-shaped strokes that hug each other to form the dense bud center. -
Mid-Tone Definition:
Return to the outer petals. Using a mix of Rose Madder and a touch of Crimson, paint the shadows underneath the unfurling petals to give them volume. Soften the hard edges with a clean, damp brush. -
Buds and smaller blooms:
For the higher, unopened buds, use a more saturated pink. Paint a teardrop shape, keeping the color strongest at the base and lighter at the tip. -
Deepening the Contrast:
Once the first layers are dry, go back into the darkest recesses of the rose centers with highly concentrated Alizarin Crimson. This deep contrast makes the flowers pop against the soft background.
Troubleshooting: Muddy Colors
If your pinks and greens are mixing creating brown mess, let the flower heads dry completely before painting the adjacent leaves. Patience prevents the bleed.
Step 3: Leaves and Details
-
Base Leaf Color:
Mix Sap Green with a little Yellow Ochre for a warm, natural green. Paint the basic shapes of the leaves, letting your brush stroke follow the direction of the leaf vein. -
Adding Shadowy Greens:
While the base green is still damp in places, drop in a darker mix of Perylene Green and Indigo near the base of the leaves and where leaves overlap. This creates depth without rigid lines. -
Stems and Thorns:
Using your size 2 brush and the dark green mix, paint the thin stems connecting the buds. Add tiny triangular thorns. Notice how the stems on the right fade out at the bottom—mimic this by lifting pressure on your brush as you trail off. -
Sepals:
Don’t forget the green sepals (the leafy parts cupping the flower base). Paint these with quick, flicking strokes at the base of the rosebuds to show them curling away. -
Splatter Effect:
Cover your main blooms with a scrap of paper. Load a brush with watery pink and green paint and gently tap it to create subtle splatters near the bottom stems for an artistic, loose finish. -
Final Assessment:
Remove the tape carefully. If any petals look too flat, I usually add one final glaze of very watery Alizarin Crimson to the shadowed side to round them out.
Once the paint is fully dry, you will have a timeless floral piece ready to be framed or gifted.


Cameo Silhouette Portrait With Ribbon Accents
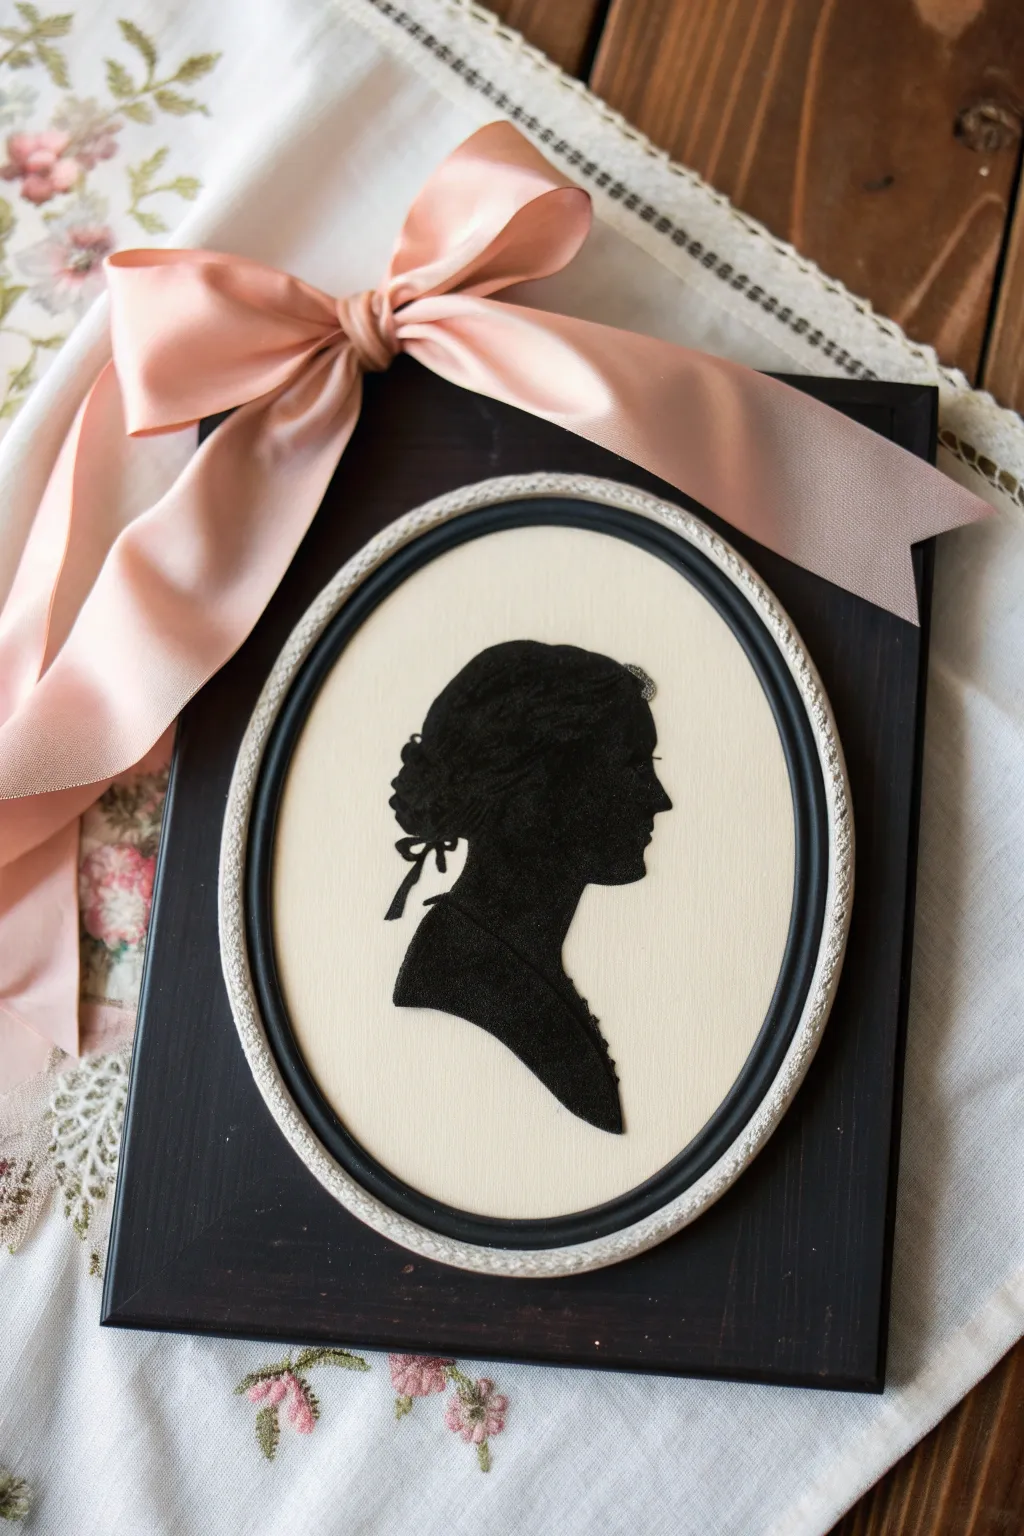
Capture the elegance of the Regency era with this sophisticated silhouette portrait project. By combining stark black paper cutting with soft ribbon accents, you’ll create a striking piece of wall decor that feels both vintage and playfully coquette.
Detailed Instructions
Materials
- High-quality black silhouette paper or matte black cardstock
- Cream or ivory textured cardstock (for background)
- Oval wooden frame with glass removed
- Matte black spray paint or acrylic paint
- Wide blush pink satin ribbon (approx. 2 inches wide)
- Pencil and eraser
- Detail craft knife (e.g., X-Acto) with fresh blades
- Silhouette template or a profile photo to trace
- Spray adhesive or craft glue stick
- Small pearls or lace scraps (optional detail)
- Hot glue gun and glue sticks
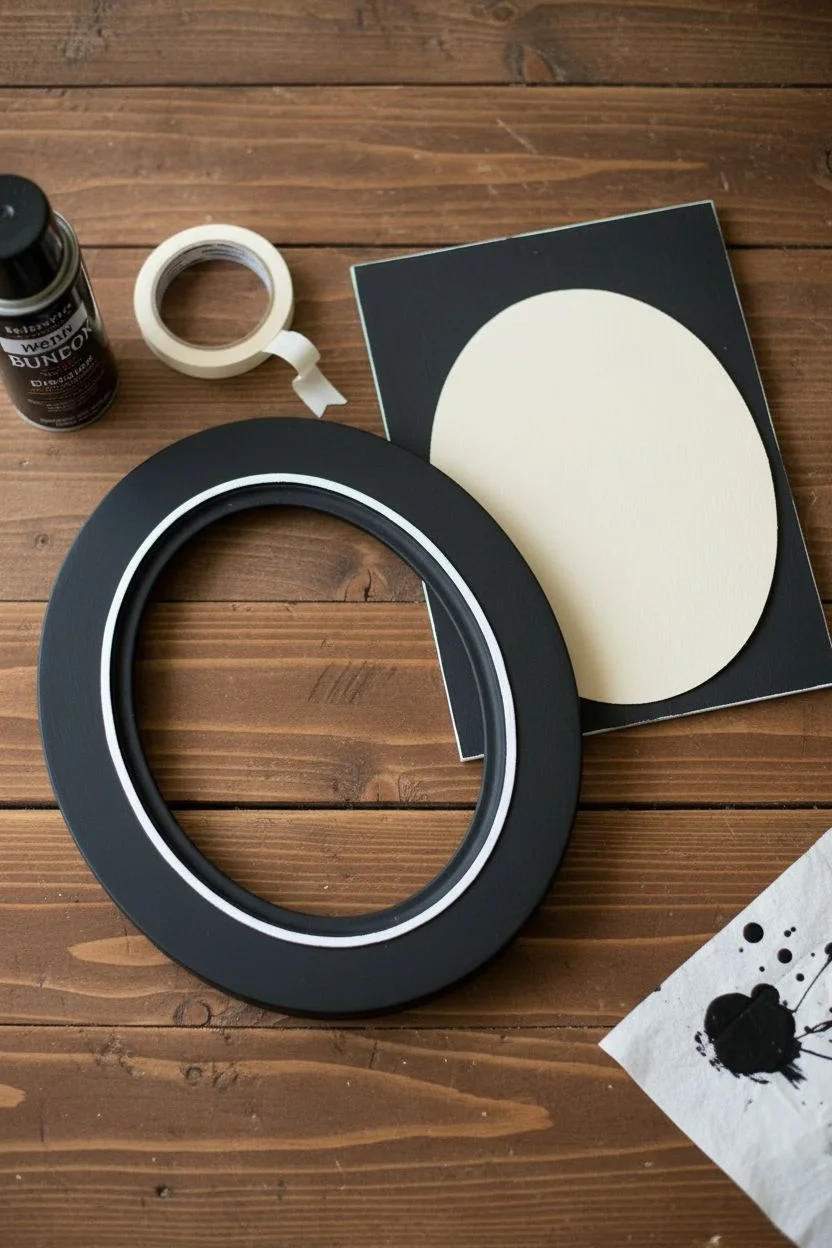
Step 1: Preparing the Frame
-
Disassemble frame:
Begin by removing the backing board and glass from your oval frame. Clean the frame surface to remove any dust or oils. -
Paint the frame:
Apply an even coat of matte black paint to the wooden frame. I prefer using spray paint for a smooth, brush-free finish, but acrylic paint works too. Let it dry completely. -
Create the inner border:
If your frame doesn’t have a decorative inner rim like the photo, you can paint a thin white border along the inner edge of the oval opening to create contrast.
Pro Tip: Sharpness Matters
Change your craft knife blade frequently—even every 5-10 minutes. A dull blade drags on the paper fibers and creates fuzzy edges that ruin the silhouette effect.
Step 2: Creating the Silhouette
-
Select your subject:
Choose a side-profile photograph to use as your base. Print it out to the exact size that fits within your frame. -
Trace the outline:
Place your printed photo on top of the black cardstock. Use a pencil to firmly trace the outline, pressing hard enough to leave a slight indentation on the black paper below, or use transfer paper. -
Refine the details:
Go over the indented lines on the black paper with a pencil to make them visible. Pay close attention to the details of the hair bun, the eyelashes, and the slope of the nose. -
Begin cutting:
Using a craft knife with a brand-new blade, carefully cut out the silhouette. Start with the most intricate areas first, like the hair ribbons or facial features, before cutting the larger smooth curves. -
Add embellishments:
For extra dimension, you can cut tiny details like a bow for the hair separately, or leave negative space cuts to imply curls and texture.
Troubleshooting: Uneven Edges
If your cut edges look ragged, use a black marker to gently color the white paper core along the cut line. This hides imperfections and makes the silhouette look crisp.
Step 3: Assembly & Finishing Touches
-
Prep the background:
Cut your cream textured cardstock to fit the frame’s backing board. Ensure it’s slightly larger than the oval opening so no gaps show. -
Mount the silhouette:
Apply a light, even layer of spray adhesive to the back of your black paper cutout. Carefully center it on the cream background. -
Press and smooth:
Place a clean sheet of scrap paper over the artwork and gently rub to adhere the silhouette flat without transferring oils from your fingers. -
Frame the art:
Place the mounted artwork into the painted frame and secure the backing board. Since there is no glass, the texture of the paper will be beautifully visible. -
Adding texture:
To mimic the inspiration image, glue a piece of braided trim or thick white cord around the inner oval edge of the frame if your paint line wasn’t crisp enough. -
Form the bow:
Cut a generous length of blush satin ribbon. Tie it into a large, floppy bow, ensuring the tails are long and drapey. -
Attach the ribbon:
Using a dab of hot glue, attach the bow to the top left corner of the frame, letting the ribbon cascade down the side naturally.
Hang this charming portrait in a reading nook or bedroom to add a touch of romance to your daily view


Coquette Bunny Portrait With a Bow Collar
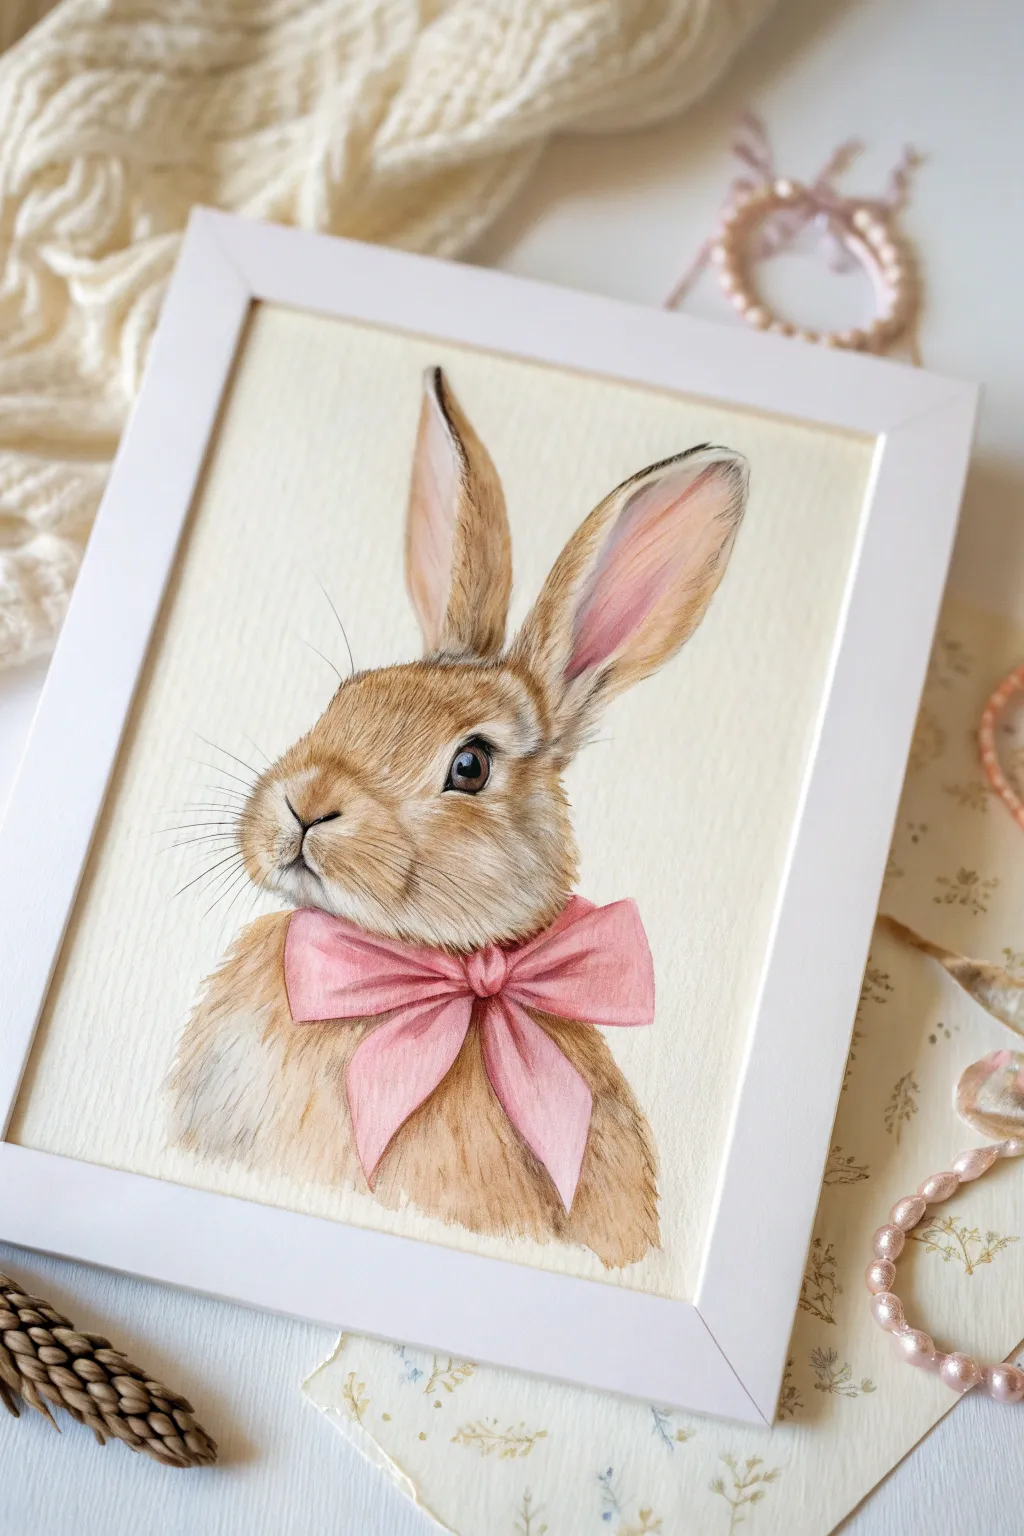
Capture the essence of coquette charm with this delicate watercolor portrait featuring a soft brown bunny adorned with a statement pink bow. The gentle brushwork and warm tones make this piece perfect for adding a touch of sweetness to a nursery or vanity space.
Step-by-Step Guide
Materials
- Hot press watercolor paper (A4 or 8×10)
- Watercolor paints (Burnt Sienna, Yellow Ochre, Burnt Umber, Alizarin Crimson, Lamp Black, Titanium White)
- Round watercolor brushes (sizes 2, 4, and 00 for details)
- Pencil (H or HB)
- Kneaded eraser
- Ceramic palette
- Two jars of water
- White or light wood frame
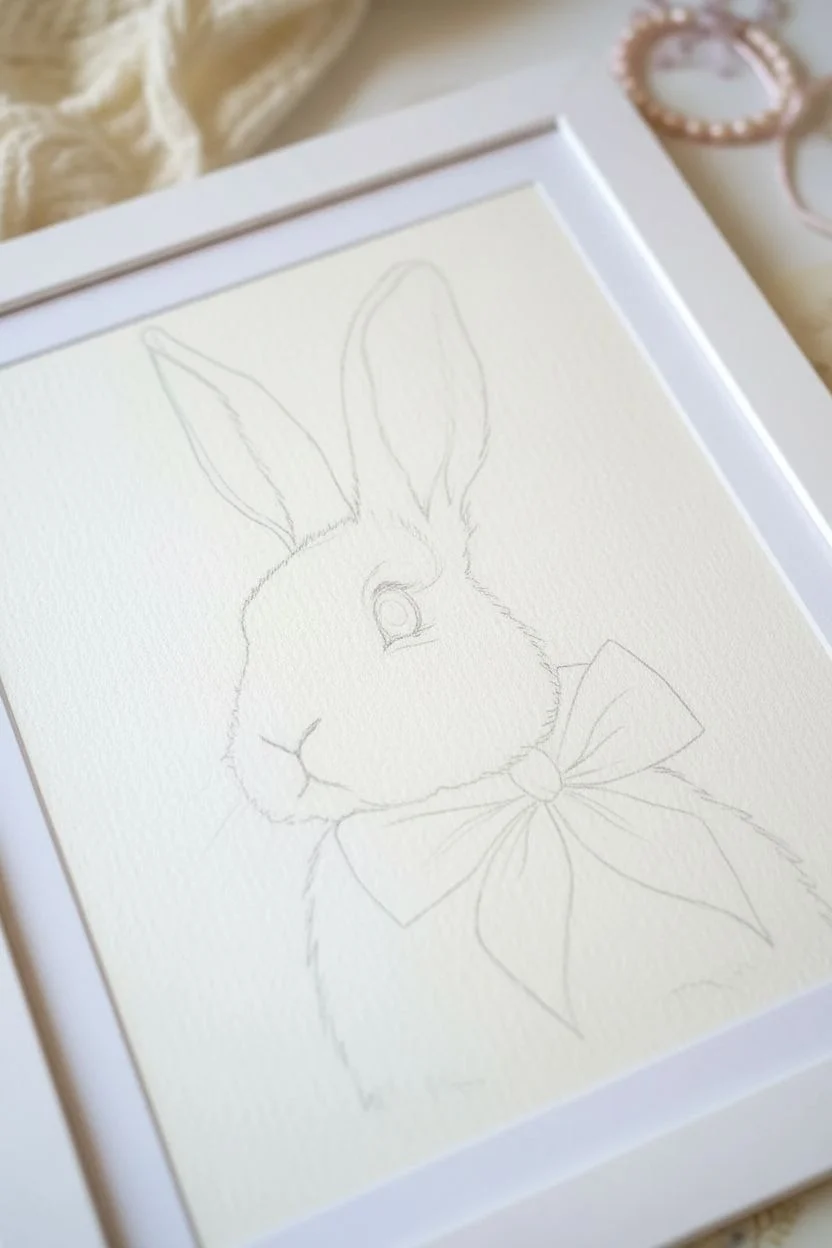
Step 1: Sketching the Subject
-
Basic Shapes:
Start by lightly sketching a large oval for the bunny’s head and a rounded triangular shape below it for the chest area. Add two long, almond-shaped ears extending upwards, tilting the right one slightly back for a natural look. -
Facial Features:
Mark a horizontal line across the lower third of the face oval to place the eyes and nose. Draw a small ‘Y’ shape for the nose and mouth, and sketch a large, dark circle for the eye on the side facing the viewer. -
The Bow Outline:
Draw a large, floppy bow at the neck area. Make the loops full and slightly droopy to mimic heavy satin ribbon, ensuring the knot is centered right beneath the chin. -
Refining the Lines:
Go over your sketch to refine the contours, adding jagged, short strokes along the edges to suggest fur texture rather than a solid line. Gently lift excess graphite with a kneaded eraser until only a faint guide remains.
Soft Fur Tip
For fluffier looking fur, lightly dampen the paper before your first layer of texture strokes. The pigment will bleed slightly, creating a soft undercoat.
Step 2: Painting the Fur
-
Base Wash:
Mix a very watery wash of Yellow Ochre and a touch of Burnt Sienna. Apply this pale beige tone over the entire bunny, avoiding the eye and the bow area, creating a warm underpainting. -
Building Form:
create a slightly darker mix using Burnt Sienna. While the paper is nearly dry, apply soft shadows around the muzzle, under the chin, and inside the ears to establish dimension. -
Fur Texture – Layer 1:
Using a size 2 brush and a mix of Burnt Umber and Sienna, start painting short, directional strokes that follow the growth pattern of the fur. Focus on the forehead and cheeks, keeping the pressure light. -
Deepening the Fur:
Switch to a smaller brush. Darken your brown mix with a tiny bit of Lamp Black. Add finer, darker fur strokes in the shadowed areas behind the ears and at the base of the neck to create depth. -
Ear Details:
Mix a diluted Alizarin Crimson with Titanium White (or white gouache) to get a soft dusty pink. Paint the inner part of the ears, blending it gently into the brown fur at the edges.
Step 3: The Features and Bow
-
The Eye:
Paint the eye using a strong mix of Burnt Umber and Black. Leave a tiny speck of white paper unpainted for the highlight, or add it later with white gouache for that sparkling life-like look. -
Defined Whiskers:
Using your 00 detail brush and a dark grey mix (diluted Black), pull quick, confident lines outward from the muzzle for the whiskers. I like to practice these strokes on scrap paper first to ensure my hand is steady. -
Bow Base Color:
Mix a lovely rose pink using Alizarin Crimson and a lot of water. Fill in the bow shape with this solid wash. -
Bow Shadows:
While the pink is still slightly damp, drop in a more concentrated crimson mix into the folds of the knot and the underside of the loops to create soft, fabric-like shadows. -
Highlights:
Use a thicker white gouache or opaque watercolor to add subtle highlights on the top curves of the bow loops and the tip of the nose to simulate light hitting the texture. -
Final Fur Details:
Add the final, tiniest fur hairs with your smallest brush and dark brown paint, specifically around the eye and nose to crisp up the focal points.
Muddy Colors?
If fur colors look muddy, let the layer dry completely before adding more. Wet-on-wet with dark browns can quickly turn into an undefined blob.
Once dry, frame your charming bunny portrait to bring a gentle woodland aesthetic to your room


Kitten With a Ribbon and Heart Tag
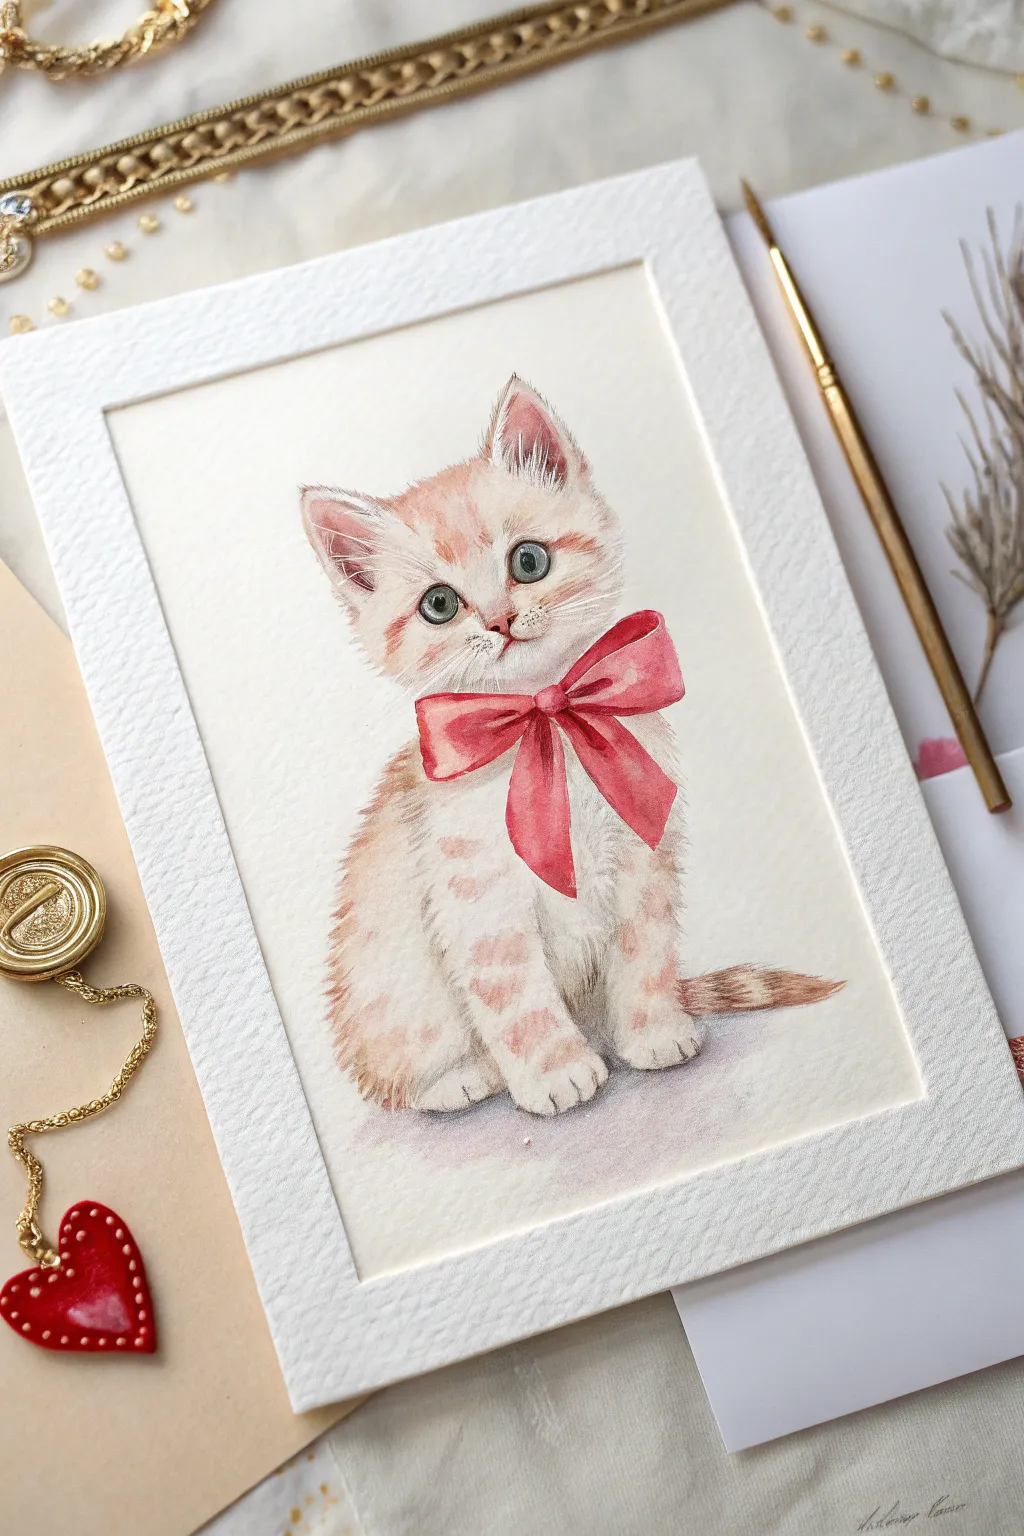
Capture the essence of coquette charm with this delicate watercolor painting of a fluffy kitten adorning a grand pink ribbon. The soft textures and sweet expression make this piece a timeless addition to any gallery wall or greeting card collection.
Step-by-Step
Materials
- Cold press watercolor paper (300 gsm)
- Watercolor paints (Peach, Burnt Sienna, Alizarin Crimson, Indigo, Sepia)
- Round watercolor brushes (Size 2, 4, and 00 for details)
- Pencil (HB or 2H)
- Kneaded eraser
- Water cups and paper towels
- White gouache or gel pen
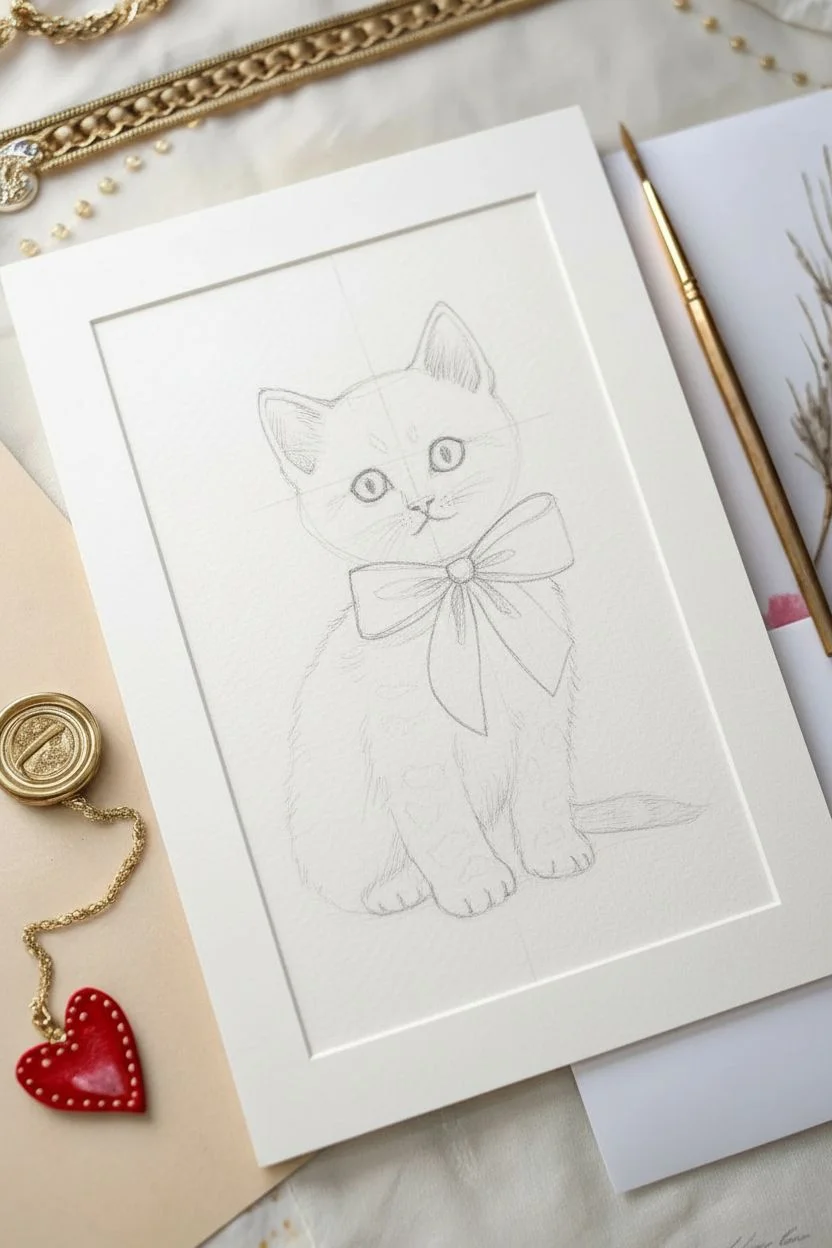
Step 1: Sketching the Base
-
Outline the head and body:
Start with a light circle for the head and a rounded pear shape for the body sitting below it. Keep your pencil pressure very light so the graphite won’t show through the transparent watercolor layers later. -
Add facial features:
Draw a horizontal guideline slightly below the center of the face circle. Place two almond shapes for eyes here. Add a small triangle nose and the mouth lines. Sketch the large triangular ears on top of the head. -
Sketch the ribbon:
Draw the knot of the bow right at the neck area. extend two large, loops outward for the bow wings, and let the tails drape down over the kitten’s chest. The ribbon should feel oversized and billowy.
Fur Texture Tip
Don’t outline the whole cat. Use broken, flicking brushstrokes on the edges to simulate fluff, letting the paper white show through for lightness.
Step 2: Painting the Fur
-
Initial wash:
Mix a very watery wash of Peach with a touch of Burnt Sienna. Apply this pale color to the face and body, avoiding the eyes, nose, and ribbon area. This creates a warm base tone. -
Adding fur texture:
While the base is still slightly damp (but not soaking), use a size 4 brush to drop in slightly more saturated orange-brown pigment to suggest stripes on the forehead, cheeks, and legs. Use short, flicking strokes to mimic fur direction. -
Defining the ears:
Paint the inner ears with a soft pink wash. Use a darker brown mix on the outer edges of the ears to make them pop against the background. -
Building depth:
Once the first layer is dry, switch to a smaller size 2 brush. Mix a Sepia tone and carefully paint fine hair strokes on the paws, the chest fluff, and the tail to build up the fluffy volume.
Step 3: The Big Red Bow
-
Base ribbon color:
Load your brush with Alizarin Crimson or a bright red. Paint the entire ribbon shape, but leave tiny Slivers of white paper where the light would hit the curves of the loops and the knot. -
Shadows and folds:
Mix a tiny bit of Indigo into your red to create a deep maroon. Apply this shadow color to the center of the knot, under the loops, and in the folds of the tails to give the fabric a satin-like dimension. -
Softening edges:
Clean your brush and use just damp bristles to soften any hard edges within the ribbon, blending the shadows into the mid-tones for a smooth finish.
Level Up: Paper Border
Mount your finished painting on a textured cardstock matte or deckle-edge paper to frame it elegantly before hanging.
Step 4: Details & Features
-
Painting the eyes:
Fill the irises with a diluted Indigo or teal color. While wet, drop a darker concentration of blue at the top of the iris. Leave a distinct white circle for the highlight, or add it later with gouache. -
Pupils and definition:
Once the iris is dry, paint the black pupil in the center. Outline the eyes with a very fine dark line using your size 00 brush. -
Nose and mouth:
Paint the nose with a soft pink. Use a mix of Sepia and Sienna to draw the mouth line and the little dots where the whiskers will originate. -
Whiskers:
With a steady hand and your finest brush (or white gel pen), draw long, sweeping whiskers extending from the muzzle. I find quick, confident strokes work best here to keep them looking natural. -
Final highlights:
Use white gouache to add tiny sparkles to the eyes and a few stray white hairs on the ears and chest to enhance the realism.
Now you have an adorable piece of art that perfectly captures the gentle coquette aesthetic


Have a question or want to share your own experience? I'd love to hear from you in the comments below!