
Easter is basically an invitation to paint with soft color, simple shapes, and a little bit of whimsy. If you’re craving projects that feel cheerful and doable (even if you’re brand-new), these easy Easter painting ideas are made for you.
Classic Patterned Easter Eggs in Pastels
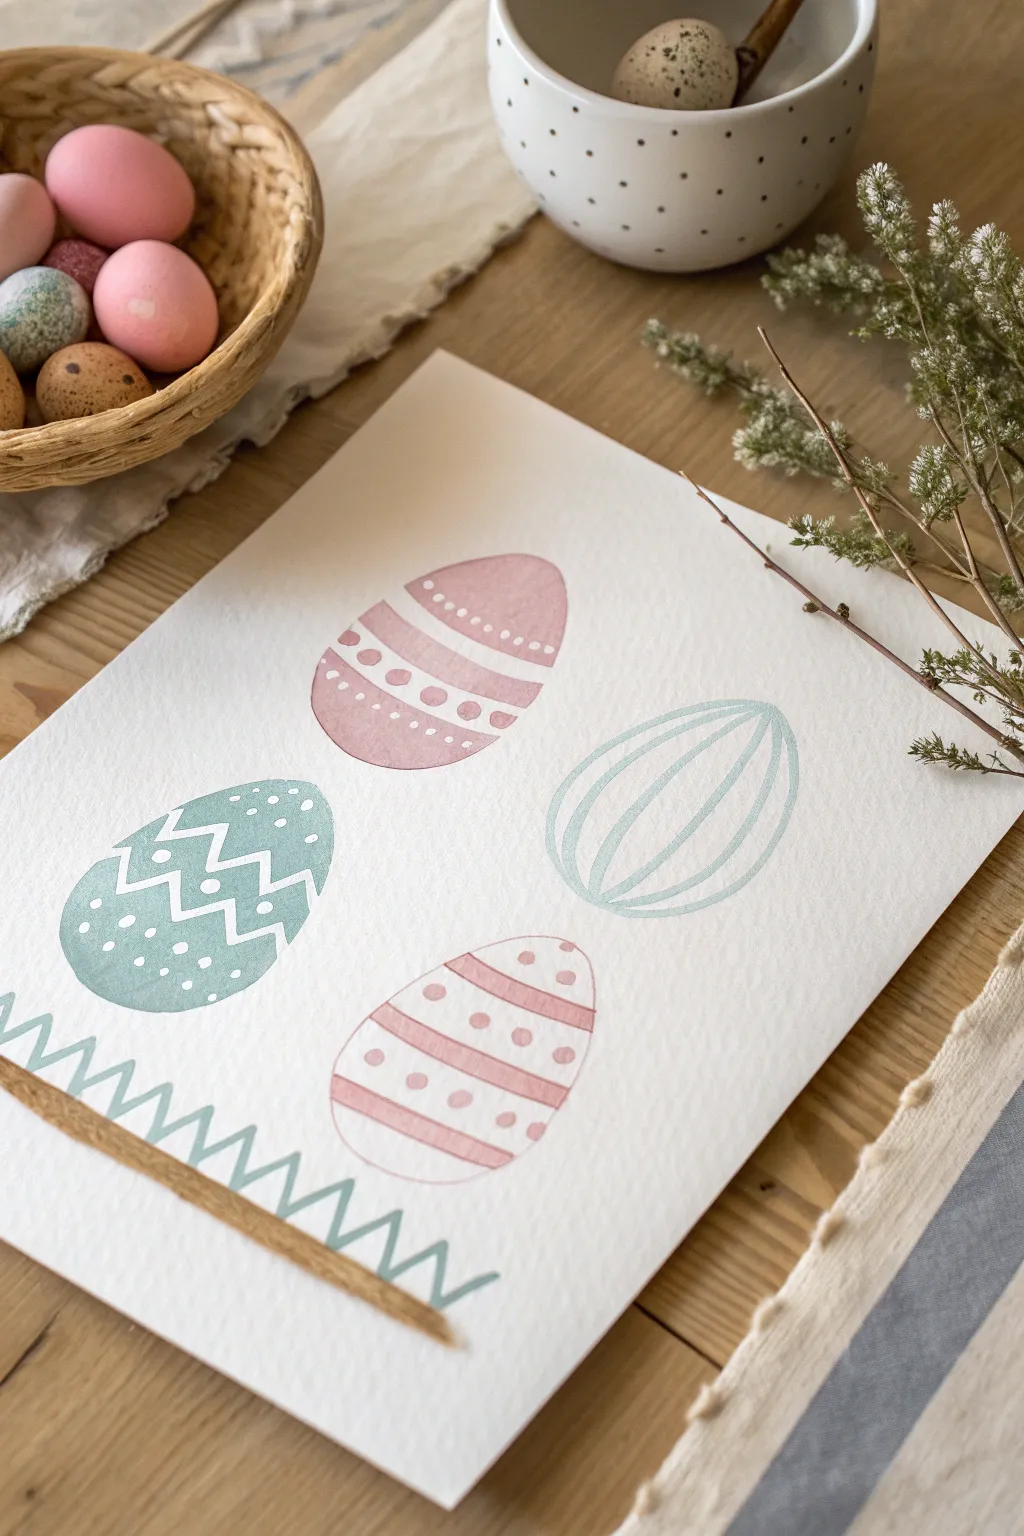
Capture the soft elegance of spring with this minimalist watercolor study featuring four distinctively patterned eggs. The combination of muted rose and seafoam teal creates a calming, modern aesthetic perfect for framing or handmade cards.
How-To Guide
Materials
- Cold press watercolor paper (A4 or 9×12 inch)
- Watercolor paints (muted rose pink, teal/mint green)
- Round watercolor brushes (size 4 and 6)
- Pencil (HB or lighter)
- Kneaded eraser
- Pencil sharpener
- White gel pen (optional, for crisp details)
- Ruler
- Paper towel
- Two jars of water
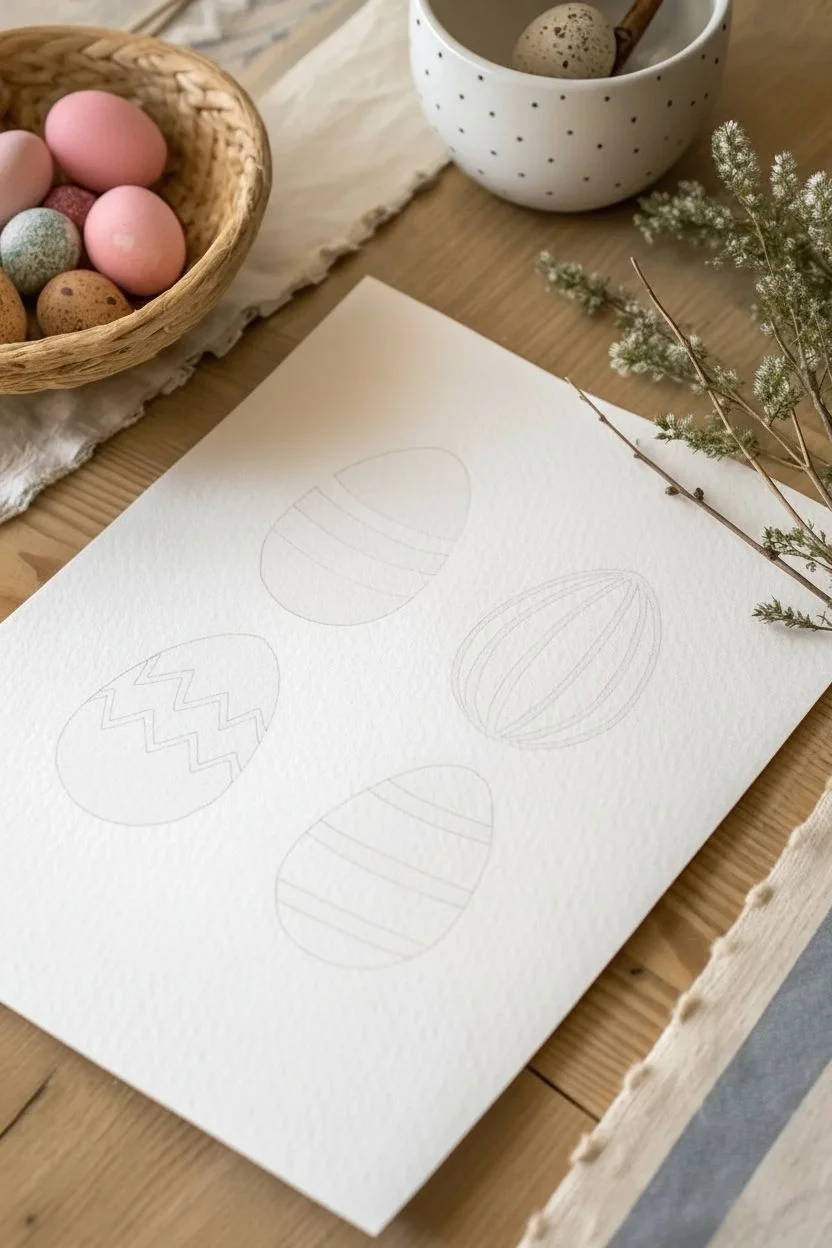
Step 1: Sketching the Layout
-
Mark placement dots:
Visualize your paper divided into four quadrants. Lightly mark a small dot where the center of each egg will reside to ensure balanced spacing. -
Draft the egg shapes:
Around your center dots, sketch four oval egg shapes using a very light hand. They should be roughly the same size but don’t need to be mathematically perfect; slight organic variation adds charm. -
Lighten the lines:
Once you are happy with the positioning, roll your kneaded eraser gently over the ovals. You want the graphite lines to be barely visible ‘ghost’ lines so they don’t show through the translucent paint.
Use White Space Wisely
For the cleanest look, use masking fluid to block out the white patterns before painting. Rub it away once the paint is bone dry to reveal crisp white paper.
Step 2: Pink Patterned Eggs
-
Mix your pink wash:
Prepare a muted rose color on your palette. Add enough water so the pigment flows easily but isn’t dripping wet. -
Paint the top pink egg:
For the top-center egg, paint horizontal bands across the oval shape. Leave narrow strips of white paper showing between the pink bands to create the white stripe effect naturally. -
Add dot details:
While the pink bands are still wet, carefully lift out small dots of pigment with a thirsty (dry) brush, or wait for it to dry and use a white gel pen later to add the row of dots across the bands. -
Paint the bottom pink egg:
For the bottom-center egg, switch tactics. Outline the egg shape lightly with your brush, then fill it with horizontal stripes. This one features thinner, more delicate lines. -
Incorporate spots:
Between the pink stripes on this bottom egg, dab small round dots of the same pink mixture. Keep the spacing loose and airy.
Step 3: Teal Patterned Eggs
-
Mix the teal shade:
Create a soft teal or mint green wash. I find mixing a touch of grey into standard turquoise helps achieve that vintage pastel look. -
Paint the left teal egg:
For the egg on the left, fill the entire oval shape with a solid wash of your teal mix. Work quickly to ensure an even coat without harsh drying lines. -
Lift the zigzag pattern:
While the left egg is semi-damp (not soaking, not dry), use a clean, slightly damp brush to ‘lift’ away pigment in a zigzag pattern across the center. Alternatively, let it dry completely and paint the white zigzags and dots with opaque white gouache or a gel pen. -
Paint the right teal egg:
For the egg on the right, draw vertical curved lines that follow the contour of the egg shape. Start from the top tip and curve outward, meeting back at the bottom tip to create a segmented look. -
Refine the segments:
Go over your curved vertical lines again to thicken them slightly, leaving the spaces between them pure white.
Add Metallic Glamour
Once the watercolor is dry, trace over some of the decorative dots or zigzag lines with metallic gold paint for a luxurious, shimmering finish.
Step 4: Adding the Grass Border
-
Prepare the borders:
Load your brush with the teal paint mixture used earlier, perhaps slightly more diluted for transparency. -
Paint the first zigzag:
Near the bottom left corner, paint a continuous zigzag line that mimics grass blades. Keep the strokes angled and somewhat loose. -
Add the second layer:
Using a slightly darker or more saturated teal (less water), paint a second zigzag line directly beneath stripes of the first one to add depth. -
Final touches:
Once everything is fully dry, gently erase any remaining visible pencil marks. If the white patterns didn’t stay crisp enough, touch them up with white acrylic artist ink or a gel pen.
Allow your painting to dry flat completely before framing it to brighten up your home for the holiday


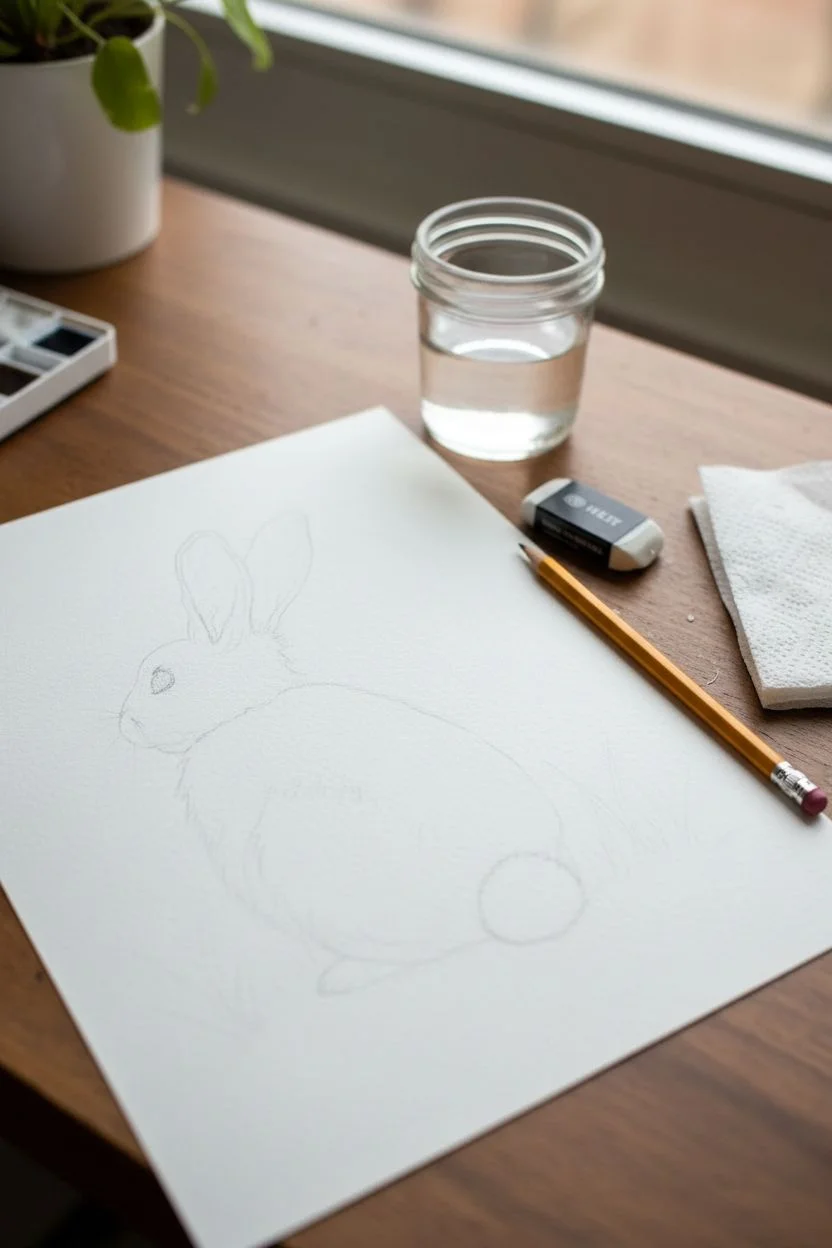
Simple Bunny Face With Oval Shapes
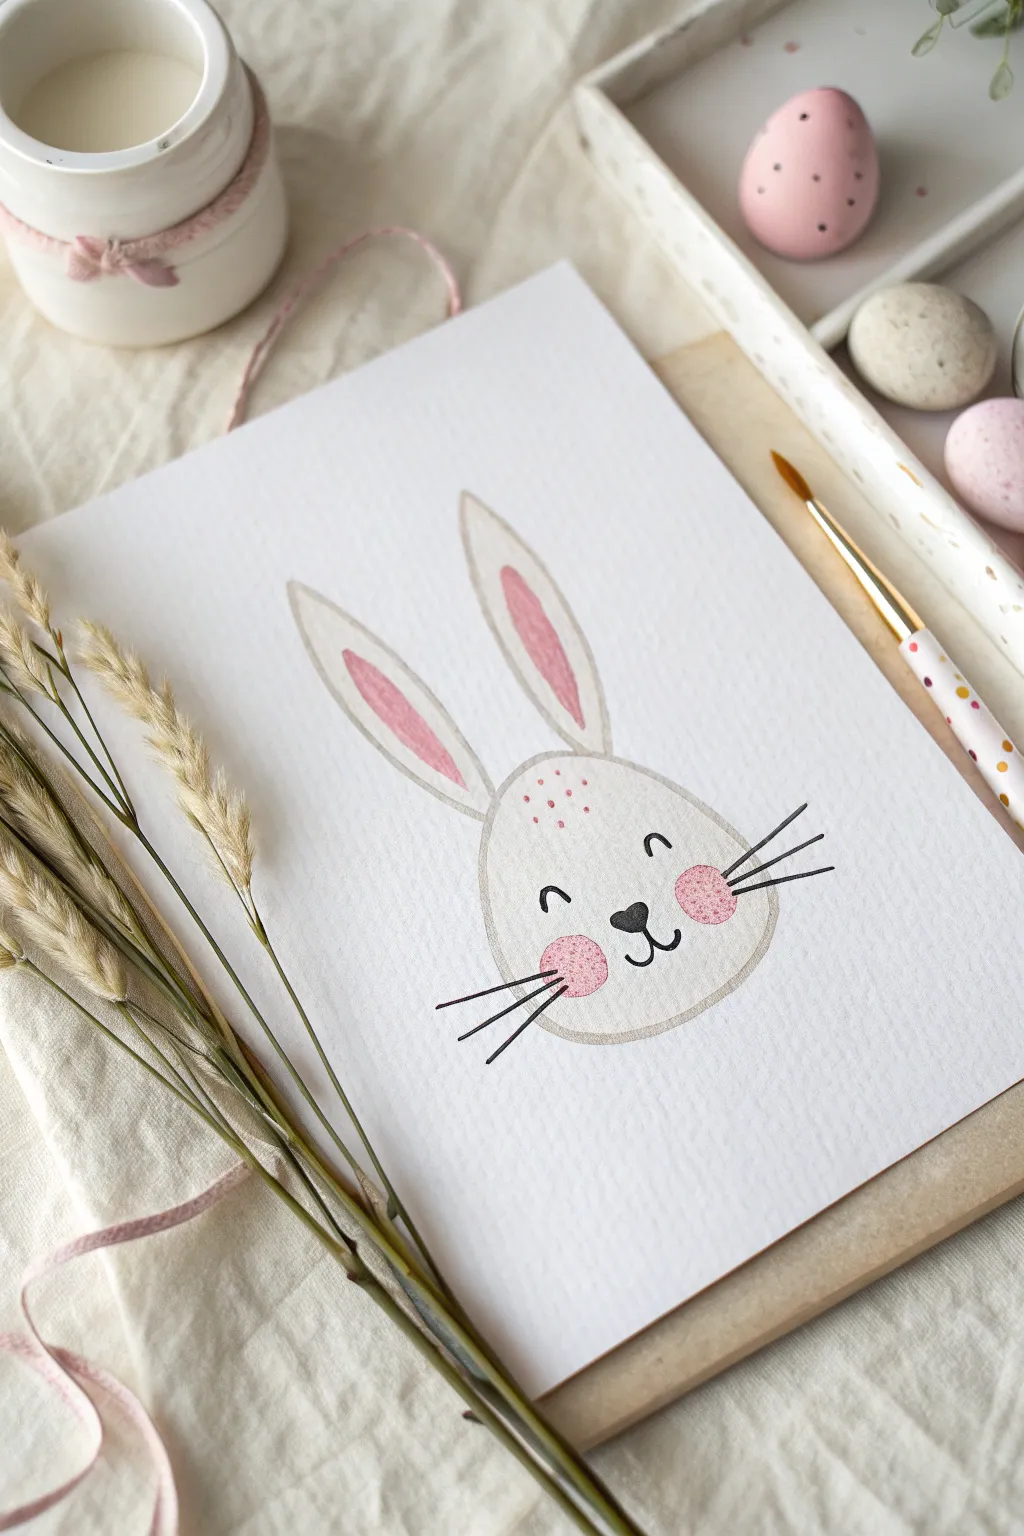
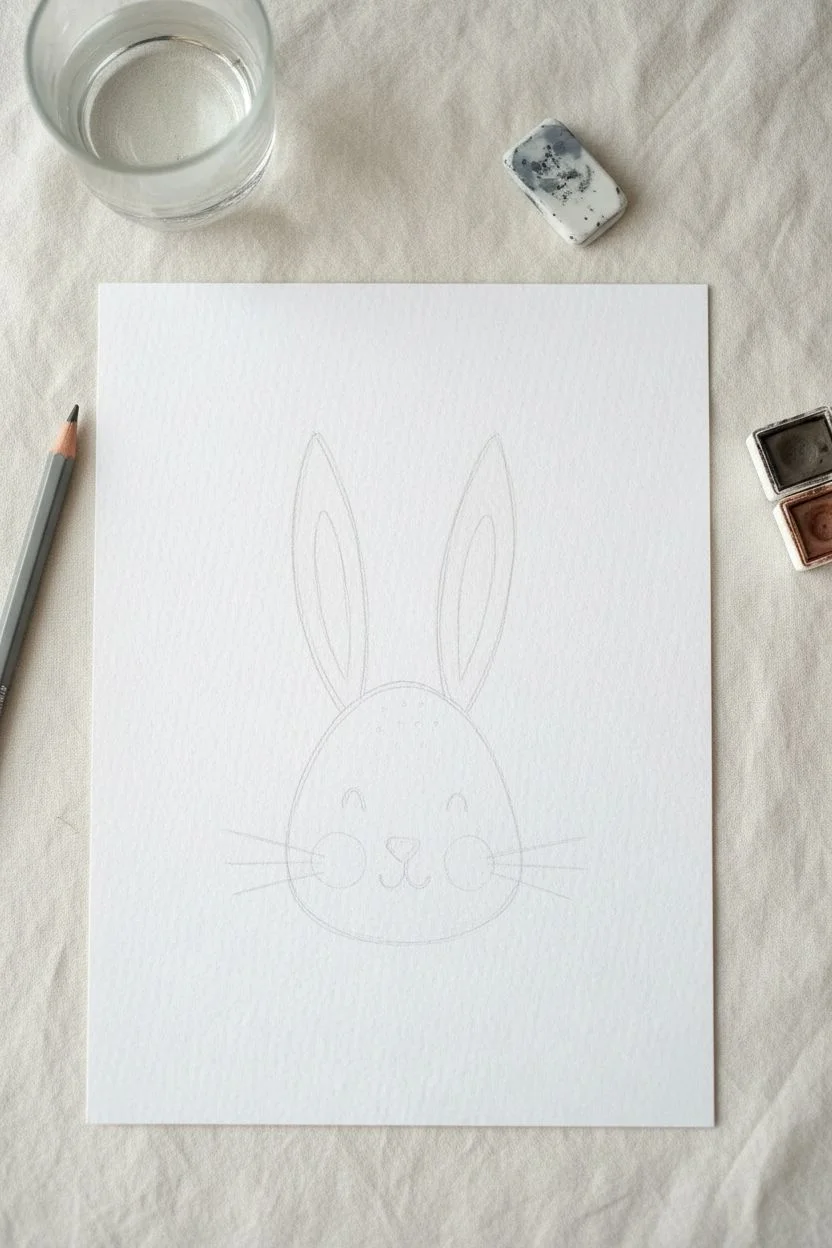
Capture the sweetness of spring with this minimalist bunny portrait that relies on simple geometric forms. Using gentle watercolor washes and precise ink details, this project creates a clean, modern illustration perfect for Easter cards or nursery decor.
Step-by-Step Guide
Materials
- Cold press watercolor paper (A4 or 5×7 inch)
- Watercolor paints (grey/beige, soft pink)
- Round watercolor brush (size 4 or 6)
- Fine liner pen (black, waterproof)
- Pencil (HB or H)
- Kneaded eraser
- Jar of clean water
- Paper towel
Step 1: Planning the Shape
-
Center the head:
Start by lightly sketching a wide, soft oval in the lower center of your paper. This will be the bunny’s head, so make sure it’s slightly flattened at the bottom for a cute, chubby look. -
Add the ears:
Sketch two elongated, leaf-shaped ovals extending upwards from the top of the head. Angle them slightly outward for a perky expression, making the left one just a tiny bit lower or tilted differently to add character. -
Mark inner ears:
Inside each ear shape, draw a smaller, similar oval shape. Leave a consistent border between this inner shape and the outer ear line. -
Refine the sketch:
Use your kneaded eraser to roll over the graphite lines until they are barely visible. This ‘ghost’ image will guide your painting without showing through the translucent watercolor.
Keeping Lines Steady
Rest the side of your palm on a clean sheet of scrap paper while painting. This stabilizes your hand and prevents oils from your skin transferring to the art paper.
Step 2: Applying Watercolour
-
Mix your outline colour:
Create a very watery, pale wash of warm grey or beige on your palette. You want this color to be subtle—just enough to give form without a heavy outline. -
Outline the head:
Using just the tip of your round brush, carefully paint over your pencil line for the main head oval. Keep your hand steady but allow for slight natural variations in line thickness. -
Outline the ears:
Continue with the same pale grey mix to outline the outer shape of both ears, connecting them smoothly to the top of the head. -
Paint the inner ears:
Rinse your brush and pick up a soft, pastel pink. Fill in the inner oval shapes of the ears. For a nice effect, I like to drop a tiny bit of water into the center of the pink while it’s wet to create a soft bloom. -
Create the cheeks:
While you have the pink on your brush, paint two circular rosy cheeks on the face area. If you want a textured look like the example, dab the paint on gently rather than sweeping it. -
Add forehead freckles:
Using the very tip of your brush and a slightly more saturated pink, add a small cluster of dots between the ears on the forehead for a decorative touch. -
Full drying time:
This is crucial: Let the painting dry completely. If you touch the damp paper with an ink pen in the next step, the ink will bleed and feather ruinously.
Oops, Too Much Water!
If a puddle forms or paint runs outside the lines, touch the corner of a clean, dry paper towel to the wet spot. It will wick up the excess liquid instantly like a straw.
Step 3: Inking the Details
-
Draw the nose:
Using your black waterproof fine liner, draw a small, upside-down heart shape in the center of the face, slightly below the eye line. Fill it in solid black. -
Create the mouth:
From the bottom point of the nose, draw a small vertical line down, then curve outward to the left and right to create a ‘w’ shape mouth. -
Add the eyes:
Draw two small, upside-down ‘u’ shapes for the eyes. verify they are spaced widely apart to enhance the cute factor. -
Draw the whiskers:
Place three straight lines on each cheek, radiating outward. Keep them crisp and swift, extending right through the pink cheek spots. -
Optional texture:
If your pink cheeks look too flat, you can use a colored pencil to add tiny stipple dots over the dried watercolor for extra fuzziness.
Once the ink is fully set, you have a charming piece of art ready to frame or gifted to a loved one


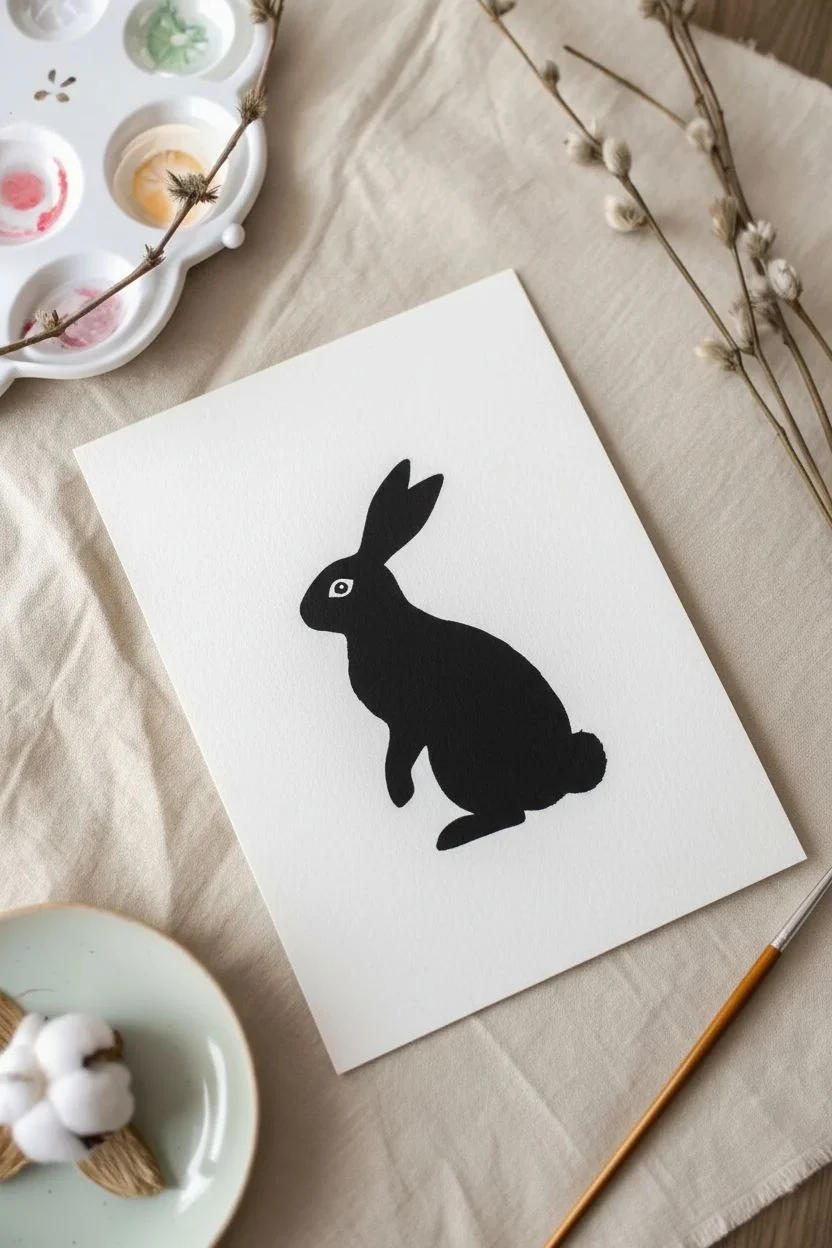
Bunny Silhouette Against a Soft Sunset Wash

Capture the magic of twilight with this serene watercolor piece, featuring a stark black bunny silhouette against a dreamy, blended sky. The contrast between the soft, warm wash of colors and the crisp, dark figure creates a striking yet peaceful composition perfect for Easter cards.
Detailed Instructions
Materials
- Cold press watercolor paper (heavyweight, textured)
- Masking tape or painter’s tape
- Watercolor paints (Yellow ochre, soft pink, coral/orange)
- Black ink, gouache, or a black fine-liner pen
- Medium round watercolor brush (size 6 or 8)
- Small detail brush (size 0 or 1)
- Pencil and eraser
- Jar of clean water
- Paper towel
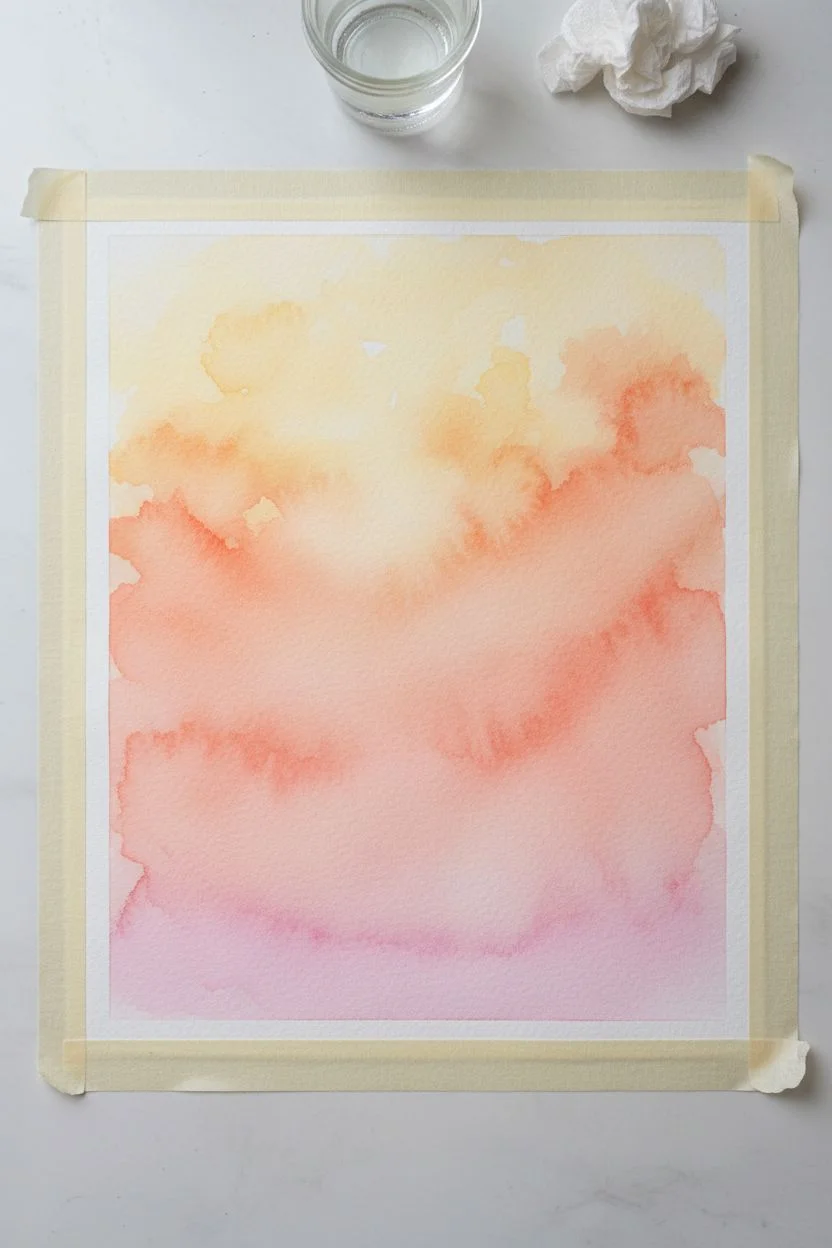
Step 1: Preparing the Sky
-
Paper Prep:
Begin by taping down all four edges of your watercolor paper to a hard surface. This creates that crisp white border seen in the example. -
Wet on Wet:
Brush a layer of clean water over the entire inner rectangle of the paper. You want the surface to be glistening but not forming puddles. -
Yellow Glow:
Load your medium brush with a watered-down yellow ochre. Dab this color randomly across the top third of the paper, letting it bloom softly into the wet surface. -
Adding Warmth:
While the yellow is still wet, introduce a touch of coral or orange just below and slightly into the yellow sections to start building the sunset transition. -
The Pink Horizon:
Clean your brush and pick up a soft pink shade. Apply this to the bottom half of the paper, working upwards so it meets the yellow and orange tones. -
Blending:
Tilt your board slightly or use a damp brush to help the pink and yellow merge naturally in the middle. Aim for a soft, cloudy look rather than straight stripes. -
Grounding Color:
Add a slightly stronger concentration of pink or light purple at the very bottom edge to suggest weight for the ground. -
Texture Check:
If you want the mottled texture shown in the photo, let the paint settle into the paper’s grain without over-brushing it. -
Complete Drying:
This is crucial: allow the background wash to dry completely. The paper must be bone-dry and flat before you add the silhouette.
Keep it fluid
Don’t overwork the background wash. Drop the colors in and let the water move the pigment for you to get that natural, cloud-like texture.
Step 2: The Silhouette
-
Sketching:
Lightly sketch the outline of the bunny sitting on its haunches directly over the dry wash. Keep the lines very faint so they don’t show through later. -
Outline the Form:
Using black ink or opaque gouache with your smallest brush, carefully trace the outline of your pencil sketch. -
Filling In:
Fill the interior of the bunny shape with soli black. If using watercolor, you may need two layers to get it this opaque; gouache or ink works best for that deep matte black. -
Refining the Ears:
Pay special attention to the ears. Leave a tiny sliver of the background color showing inside the ear if possible, or paint it solid first and add a tiny highlight later. -
The Eye:
While painting the head, carefully leave a tiny white (paint-free) dot for the eye. If you accidentally paint over it, use a dot of white gel pen later. -
Grass Details:
With the very tip of your detail brush, flick small, curved lines upward from the ground level to create wispy blades of grass around the bunny’s feet. -
Final Touches:
Check the edges of your silhouette. If they look jagged, smooth them out with the detail brush for a crisp finish. -
The Reveal:
Once the black ink is fully dry, slowly peel away the masking tape at a 45-degree angle to reveal the clean white frame.
Bleeding edges?
If black paint bleeds into the sky, your background wasn’t dry enough. Let it dry fully, then sharpen the edge with opaque black gouache.
Display strictly on a shelf or adhere to a card base for a handmade holiday greeting


Fluffy-Tail Bunny From Behind
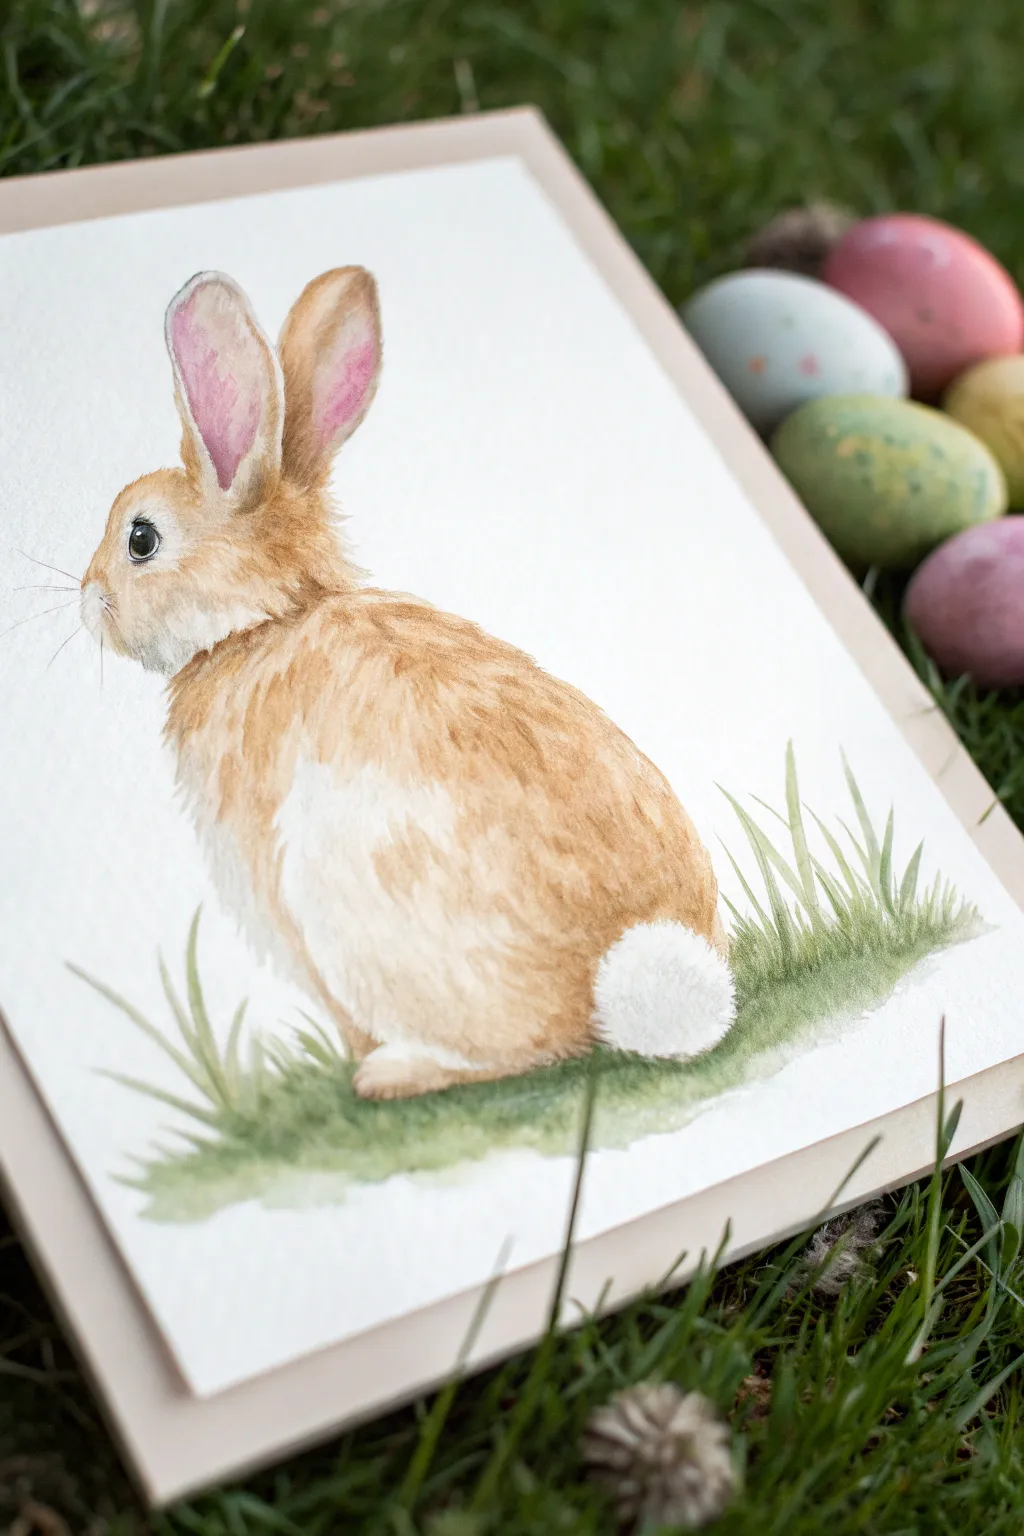
Capture the softness of spring with this gentle watercolor study of a bunny in profile. Using layered washes and delicate dry-brushing creates realistic fur texture and a fluffy white tail that looks touchably soft.
Step-by-Step Guide
Materials
- Cold press watercolor paper (300 gsm)
- Watercolor paints (burnt sienna, yellow ochre, raw umber, sap green, quinacridone rose, lamp black)
- White gouache paint
- Round watercolor brushes (sizes 2, 6, and a finer detail brush)
- Pencil (HB or H) and kneaded eraser
- Two jars of water
- Paper towels
- Masking fluid (optional)
Step 1: Sketching the Form
-
Outline the body shapes:
Begin with a light pencil sketch. Draw a larger oval for the body and a smaller, slightly overlapping circle for the head to establish the basic proportions. -
Add feature details:
Refine the contour of the face, adding the curve of the nose and the position of the large eye. Sketch two tall, upright ears, keeping the inner ear shape distinct. -
Define the tail and grass:
Mark a small, round area at the rear for the cotton-tail. Lightly sketch jagged lines at the base to indicate where the grass will eventually cover the paws. -
Lighten the sketch:
Gently roll a kneaded eraser over your drawing. You want the graphite lines to be barely visible so they don’t show through the transparent watercolor layers later.
Muddy Fur?
If fur texture looks muddy, let the paper dry completely between layers. Wet-on-wet blends colors; wet-on-dry creates distinct hair lines.
Step 2: Painting the Base Layers
-
First wash of color:
Mix a watery wash of yellow ochre and burnt sienna. Apply this to the main body and head, leaving the belly area, the tail, and the area around the eye white. -
Adding ear warmth:
While the head is still slightly damp, drop a very diluted mix of quinacridone rose into the inner ear sections to create a soft, fleshy pink glow. -
Building form:
Once the first layer is dry, mix a slightly stronger brown using burnt sienna and raw umber. Apply this to the back and the shadow areas under the chin to start creating a sense of volume. -
The eye:
Using a small detail brush and lamp black (or very concentrated dark brown), paint the eye. Be careful to leave a tiny speck of white paper unpainted for the highlight, which gives the bunny life.
Make It 3D
Glue a real mini cotton pom-pom onto the tail area after the painting is dry for an adorable mixed-media 3D effect suitable for greeting cards.
Step 3: Creating Texture
-
Layering fur strokes:
Switch to a size 2 brush with a mix of raw umber and burnt sienna. Use short, flicking strokes in the direction of hair growth to mimic fur texture on the back and head. -
Softening edges:
I like to use a clean, slightly damp brush to soften the edges of some fur strokes, ensuring the bunny looks fluffy rather than spiky. -
Deepening shadows:
Mix a darker brown for the deepest shadows—specifically where the ears meet the head and beneath the front neck ruff. Apply sparingly to add contrast. -
Painting the whiskers:
Using your finest brush or a specialized rigger brush, paint extremely thin, delicate whiskers extending from the muzzle. Keep your hand loose for a natural curve.
Step 4: Finishing Touches
-
The fluffy tail:
The tail needs to look distinct from the body. Use white gouache (or very thick white watercolor) and a dry brush to stipple texture onto the tail area, letting it overlap the brown fur slightly. -
Adding the grass base:
Mix sap green with a touch of brown for an earthy tone. Paint upward, flicking strokes at the base of the bunny to create grass blades that partially obscure the feet. -
Grounding the subject:
Add a wash of watery green underneath the grass blades to ground the image, letting the color fade out casually at the edges for a vignette effect. -
Highlights and refined details:
Finally, use the white gouache to add tiny hairs inside the ears and a few bright highlights on the rounded part of the back to suggest glossy fur.
Once dry, this charming bunny portrait is ready to be framed or turned into a festive holiday card
BRUSH GUIDE
The Right Brush for Every Stroke
From clean lines to bold texture — master brush choice, stroke control, and essential techniques.
Explore the Full Guide
Cotton Ball Stamped Bunny Tail Painting
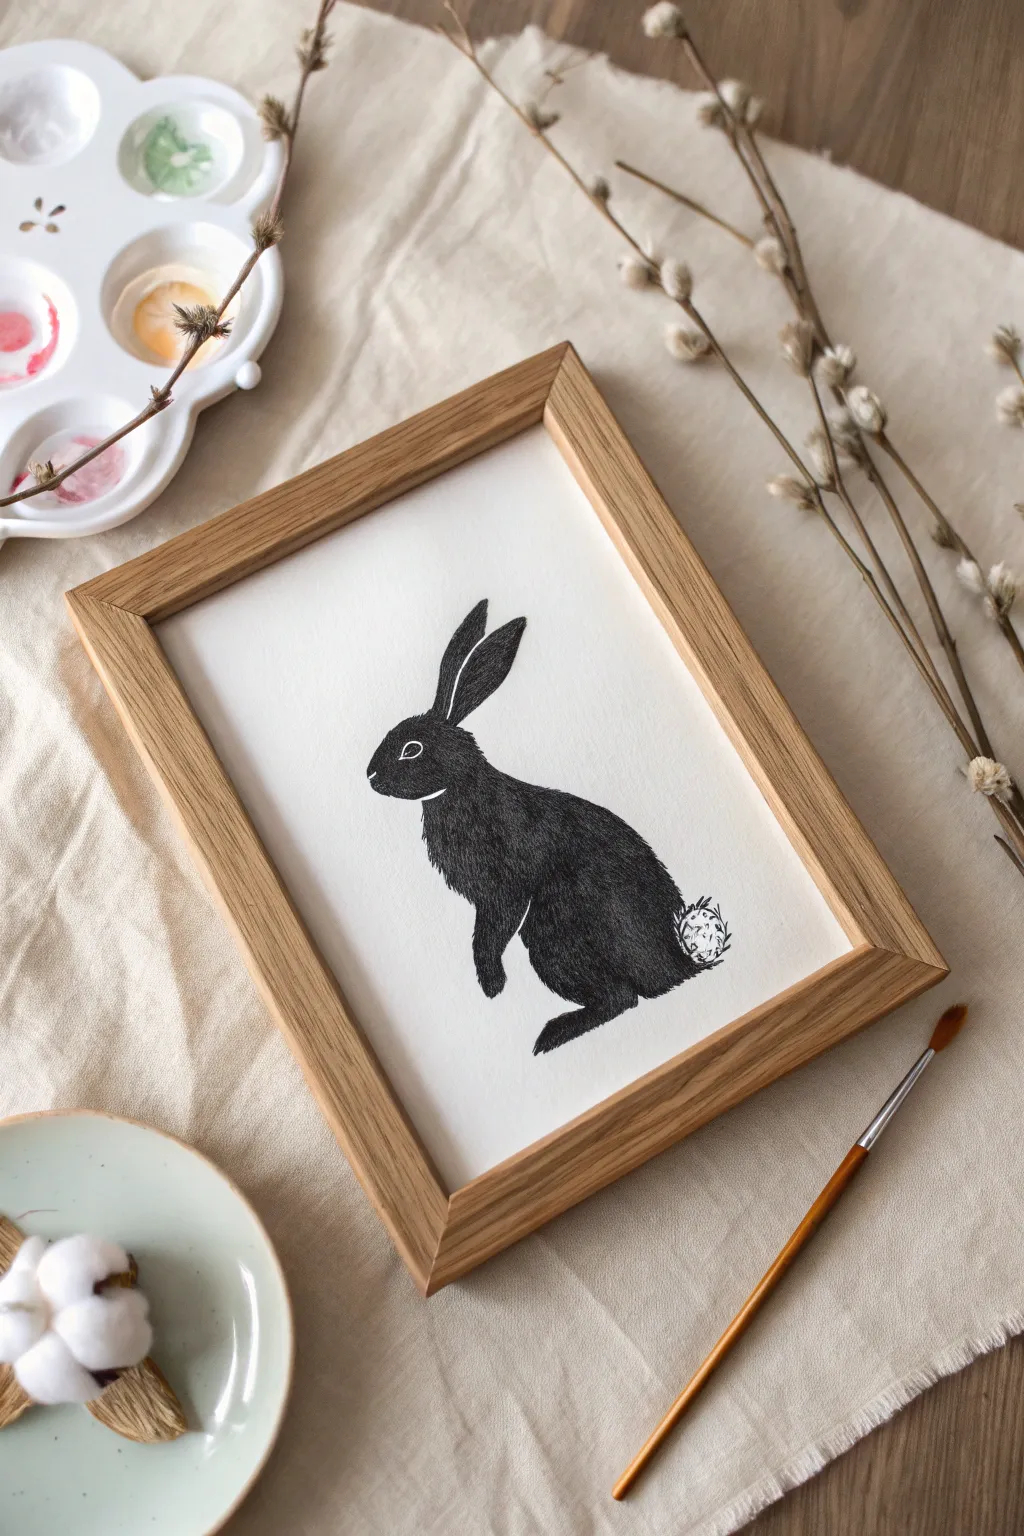
This elegant bunny painting combines detailed ink work with a playful stamped texture to create sophisticated Easter art. The stark contrast of the black silhouette against the fluffy white cotton-ball tail makes for a striking modern piece that looks far more complex than it actually is.
How-To Guide
Materials
- Heavyweight watercolor paper or mixed media paper (A4 or similar)
- Black ink or fluid acrylic paint
- Fine liner pens (0.3mm and 0.5mm, black)
- Small round paintbrush (size 2 or 4)
- White acrylic paint or white gouache
- Cotton balls
- Pencil and eraser
- A small mixing palette or plate
- Wooden picture frame (optional, for display)
Step 1: Sketching and Silhouetting
-
Outline the form:
Begin by lightly sketching the rabbit’s outline with a pencil. Focus on the distinct tall ears, the rounded back, and the tucked-in paws. Don’t worry about fur texture yet; just get the smooth outer shape right. -
Mask the eye:
Before painting, carefully draw a small almond shape for the eye. You want to keep this area pure white, so mark it clearly to avoid painting over it accidentally. -
Block in the base:
Using your black ink or fluid acrylic and a round brush, fill in the main body of the rabbit. Start from the center and work your way out to the edges. -
Refine the edges:
As you reach your pencil lines, switch to a finer brush or pen if needed to keep the silhouette crisp. Leave the tail area completely unpainted for now—we want the white paper to show through there. -
Create the eye detail:
Once the black paint around the eye is dry, use a fine liner pen to outline the white eye shape and add a tiny pupil, leaving a speck of white for a highlight.
Dry Brush Detail
If the black paint looks too flat, lightly dry-brush a tiny bit of dark grey acrylic over the shoulder area to suggest muscle definition before inking.
Step 2: Adding Fur Texture
-
Start the fur strokes:
When your base coat is fully dry, take a fine liner pen (0.3mm works well here). Begin adding quick, short strokes over the black paint. -
Directional flow:
Pay close attention to the direction real fur would grow. On the ears, strokes go upward; on the back, they curve down towards the tail. -
Layering for depth:
Build up density in shadowed areas like the neck and under the belly. The ink over paint creates a subtle sheen and texture rather than a stark color change. -
Feathering the edges:
Go back over the outer perimeter of your silhouette. Add tiny flicking motions extending just slightly outward to make the bunny look soft rather than like a rigid cutout.
Uneven Tail Texture?
If the cotton ball leaves flat blobs instead of fluff, your paint is too wet. Let the paint sit on the palette for 5 minutes to thicken before stamping again.
Step 3: The Cotton Tail Technique
-
Prepare the stamp:
Take a clean cotton ball and gently tease the fibers apart just a little to loosen it. You want a fluffy texture, not a dense hard ball. -
Load the paint:
Pour a small amount of thick white acrylic paint onto your palette. Dip the cotton ball lightly into the paint—you don’t want it saturated, just coated on the surface fibers. -
Test the print:
I always blot the cotton ball on a scrap piece of paper first. This removes excess globby paint and ensures you get that delicate, airy texture. -
Stamp the tail:
Press the cotton ball firmly onto the unpainted tail area of your rabbit. Use a precise up-and-down motion; don’t drag it, or you’ll smear the texture. -
Add dimension:
Let the first stamp dry for a minute, then dab a little more white paint in the very center of the tail to create a highlight and 3D effect. -
Define the tail base:
Once the white paint is completely dry, use your fine liner pen to draw tiny, sparse black hairs barely overlapping the base of the white tail to integrate it with the body.
Place your finished piece in a simple wood frame to let the high-contrast design really shine on your wall
Easter Gnome With a Bunny or Egg Accent
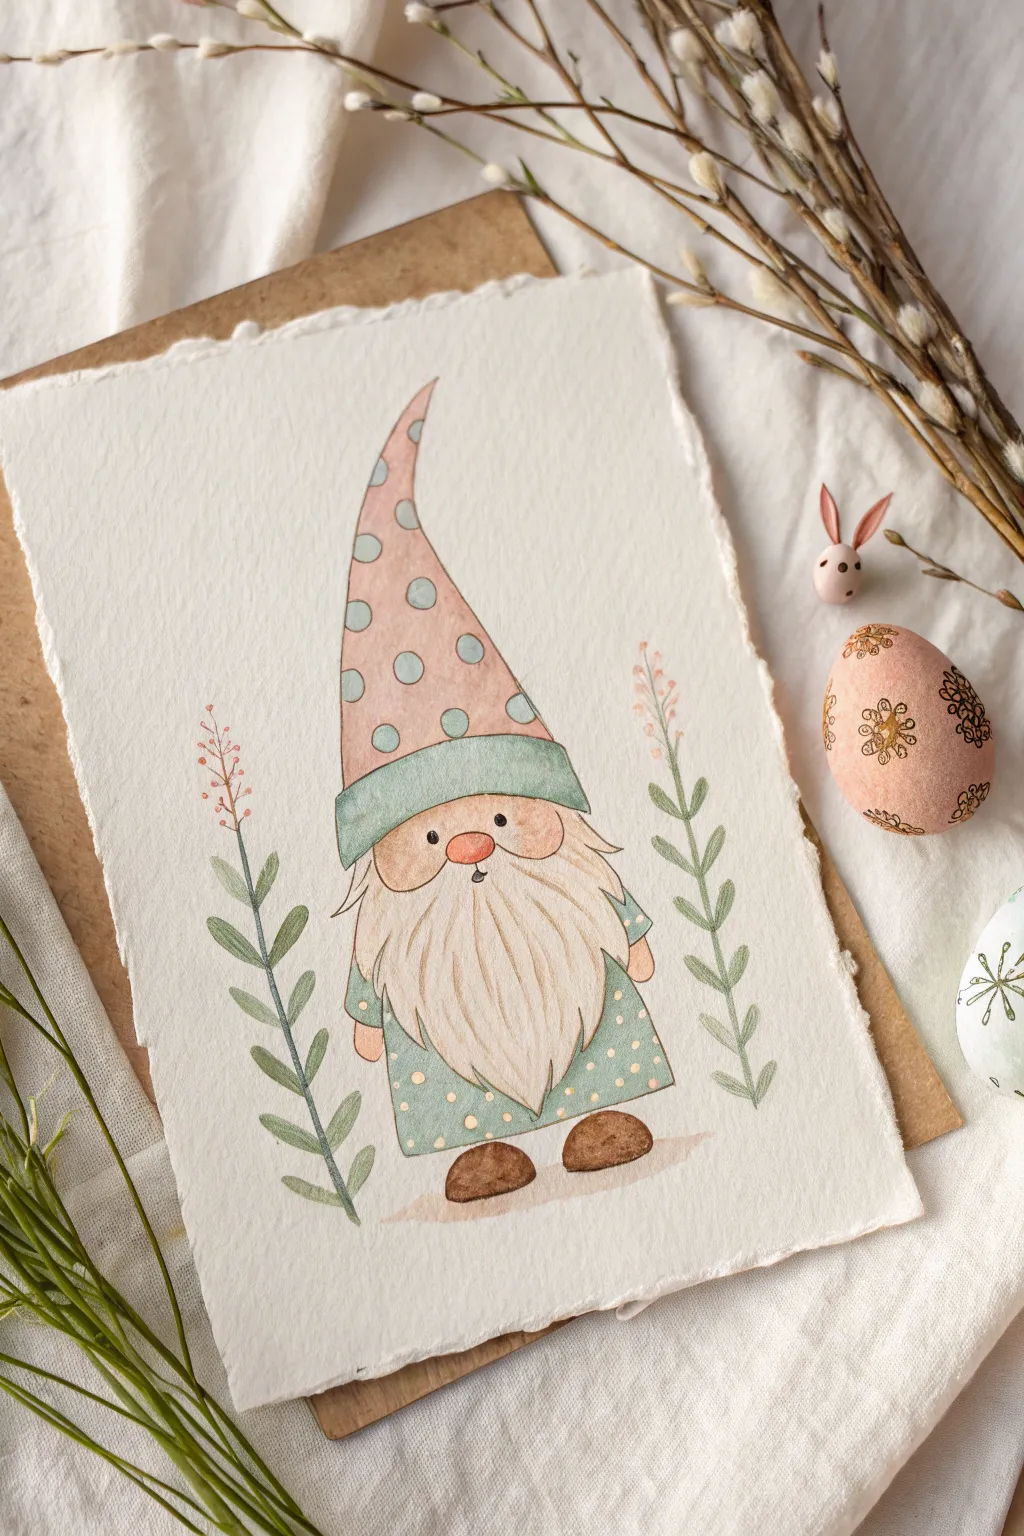
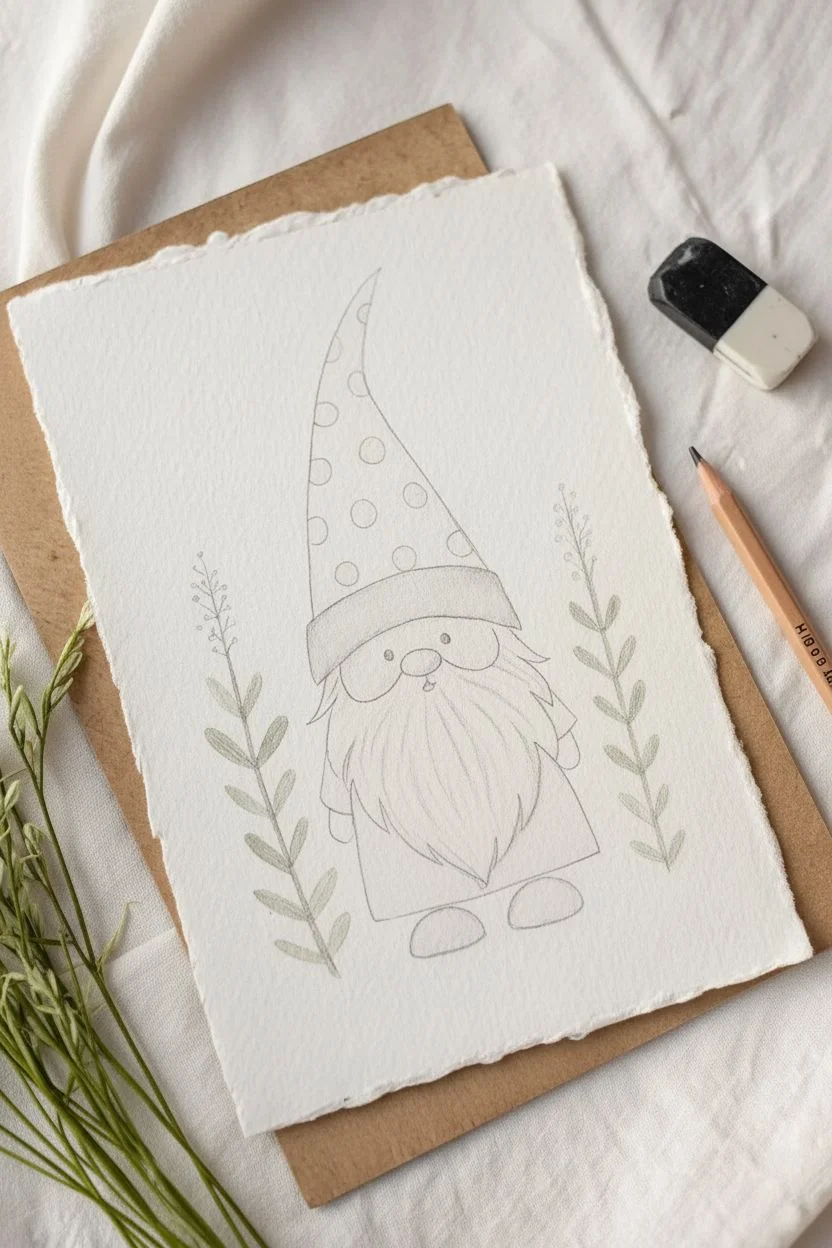
Capture the sweetness of spring with this charming watercolor gnome, featuring a soft pastel palette and whimsical polka dots. This project is perfect for beginners, focusing on simple washes and delicate details on textured paper.
Step-by-Step Tutorial
Materials
- Cold press watercolor paper (deckle edge optional)
- Watercolor paints (pastel pink, teal/mint, earthy brown, skin tone, green)
- Round watercolor brushes (size 2 and size 6)
- Pencil (HB or H)
- Kneaded eraser
- Two jars of water
- Paper towels
Step 1: Sketching the Character
-
Outline the head and hat:
Start near the center of your paper. Draw a large, slightly curved triangle for the hat that leans to the left at the tip. At the base of the triangle, sketch a wide brim that curves gently over where the face will be. -
Add facial features:
Directly under the hat brim, draw a small oval for the nose. On either side of the nose, sketch simple ear shapes peeking out. Then, outline a large, fluffy beard shape that flows down from the nose and cheeks to a central point. -
Draw the body and feet:
Below the beard, draw the visible bottom edge of a robe or tunic. It should look like a simple rectangle partially hidden by the beard. Add two small, oval feet at the very bottom, pointing slightly outward. -
Sketch the greenery:
On the left and right sides of the gnome, draw a simple vertical stem. Add small, leaf-like shapes branching off symmetrically as you go up, topping the stems with tiny dots for flower buds.
Step 2: Basic Watercolor Washes
-
Paint the hat base:
Mix a watery, pale dusty pink. Using your size 6 brush, fill in the main cone of the hat. Keep the wash wet enough so it doesn’t streak, but avoid puddling. -
Fill the hat brim:
While the top dries, mix a soft mint or teal green. Carefully paint the brim of the hat. I like to let the pink layer dry completely first so the colors don’t bleed into each other. -
Paint the tunic:
Using the same mint green mixture (perhaps with a touch more water for variation), paint the visible parts of the gnome’s tunic and sleeves peeking out from the beard. -
Color the face and hands:
Mix a light peach or skin tone. Paint the nose, ears, and the small rounded hands at the ends of the sleeves. Add a tiny bit more pigment to the nose while it’s wet for a cute blush effect. -
Beard base layer:
Dilute a light brown or beige until it’s very faint. Paint the entire beard shape with this wash to negate the stark white of the paper, giving it a creamy undertone.
Clean Edges
For the crispest polka dots on the hat, ensure the base pink layer is totally dry. If the paper feels cool to the touch, it’s still wet inside.
Step 3: Details & Definition
-
Add hat polka dots:
Once the pink hat is bone-dry, mix a slightly more opaque teal (less water). Using the tip of your size 2 brush, paint evenly spaced circle outlines or filled dots on the pink area. -
Detail the tunic:
Switch to a creamy yellow or white gouache if you have it (or lift color carefully) to add tiny dots to the bottom hem of the green tunic for texture. -
Paint the foliage:
Mix a muted sage green. Using the size 2 brush, paint the stems and leaves you sketched earlier. For the tiny buds at the top, switch to a diluted pink or coral. -
Define the beard:
Using a fine liner brush and a light brown paint, draw delicate, sweeping lines through the beard to mimic hair texture. Follow the curve of the beard shape downward. -
Finalize the face:
Use a dark brown or black to add two tiny dots for eyes just under the brim. Add a tiny mouth line under the nose if desired. Paint the shoes a solid earth brown. -
Grounding shadow:
Mix a very watery purple-grey. Paint a quick, horizontal wash underneath the shoes to ground the figure so he isn’t floating in space.
Muddy Colors?
If your mint green brim bleeds into the pink hat, stop. Blot gently with a tissue. Let it dry 100%, then re-apply paint with a less watery brush load.
Display your whimsical gnome in a simple frame or use it as a cheerful greeting card for spring

PENCIL GUIDE
Understanding Pencil Grades from H to B
From first sketch to finished drawing — learn pencil grades, line control, and shading techniques.
Explore the Full Guide
Minimal Faith-Inspired Cross With Easter Sunrise Colors
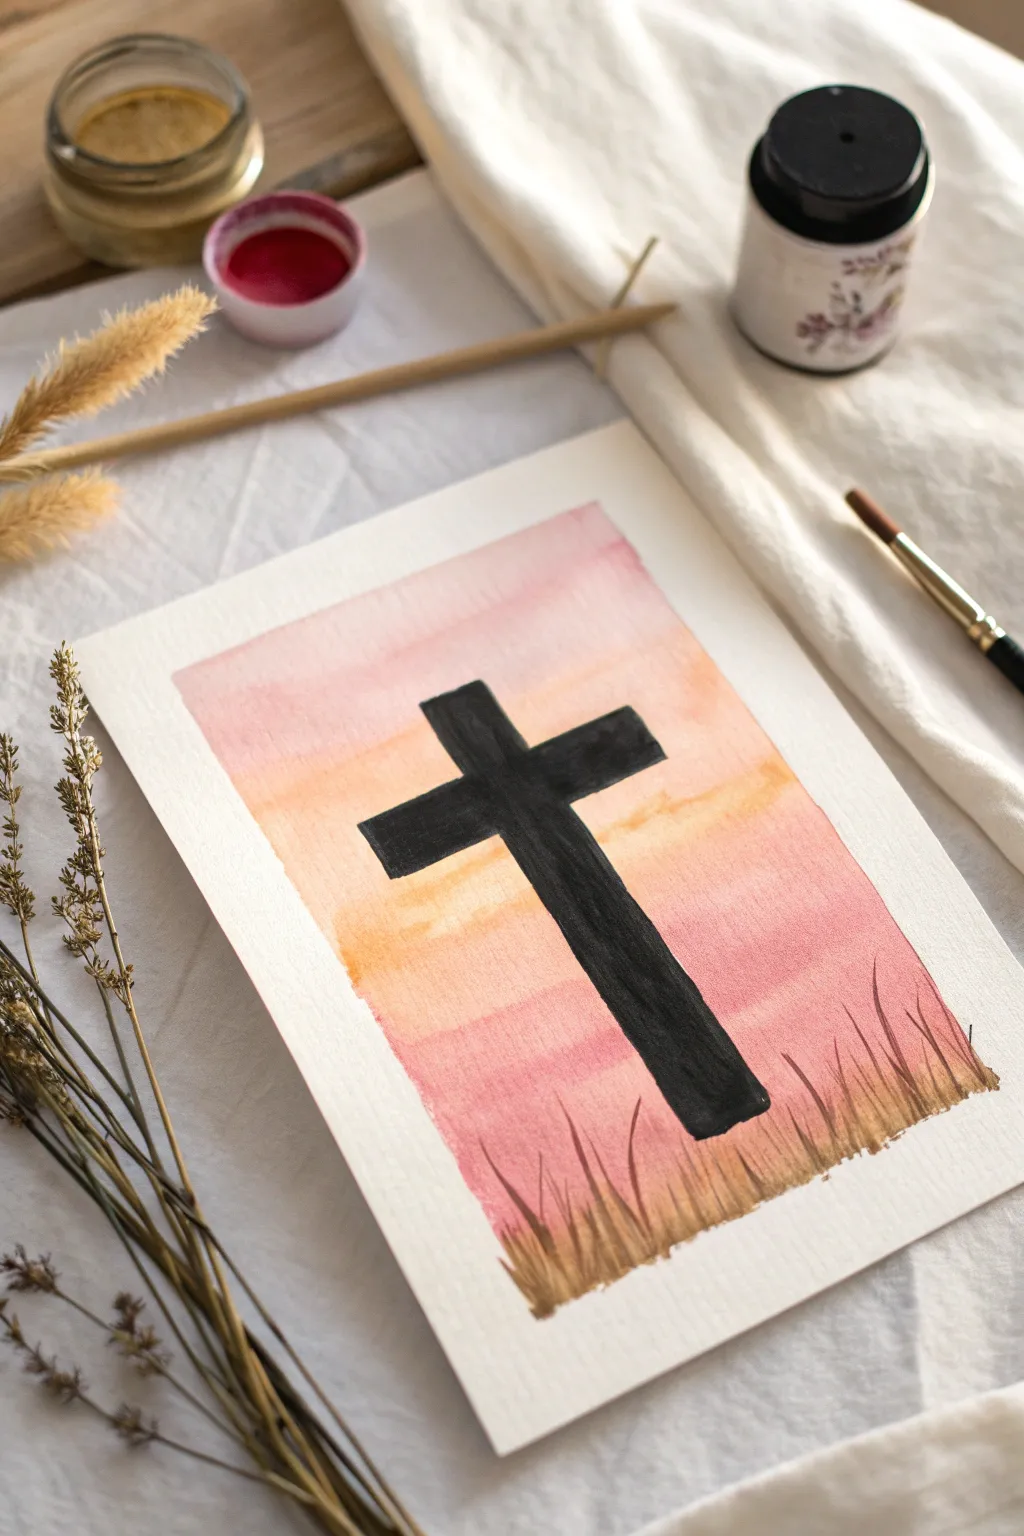

Capture the essence of Easter morning with this serene watercolor project featuring a bold silhouette against a soft, glowing sky. The blend of gentle pinks and oranges creates a warm sunrise effect that beautifully contrasts with the stark black cross.
How-To Guide
Materials
- Cold press watercolor paper (A5 or 5×7 inches)
- Watercolor paints (Pink, Orange, Yellow Ochre, Burnt Sienna)
- Black acrylic paint or black India ink
- Painter’s tape or masking tape
- Flat brush (3/4 inch)
- Round brush (size 4 or 6)
- Small detail brush (size 0 or 1)
- Cup of water
- Paper towels
- Pencil and eraser
- Ruler
Step 1: Preparing the Canvas
-
Tape the edges:
Secure your watercolor paper to a flat surface using painter’s tape on all four sides. This creates a clean white border and prevents buckling while you paint. -
Lightly sketch the cross:
Using a ruler, very lightly draw the outline of the cross in the center of your paper. Keep the lines faint so they won’t show through the sky later, just enough to guide where you won’t paint the background.
Step 2: Painting the Sky Gradient
-
Mix your colors:
Prepare watered-down puddles of a soft pink, a warm orange, and a pale yellow. You want these to be quite transparent for that airy morning feel. -
Start at the top:
Load your flat brush with the soft pink. Apply a horizontal stroke across the top third of the paper, using plenty of water to keep the edge wet. -
Blend in the orange:
While the pink layer is still damp, pick up the orange paint. Apply it just below the pink, letting the two strip slightly overlap so they bleed together softly. -
Add the horizon glow:
Clean your brush and pick up the yellow ochre mixed with a touch of orange. Paint this through the middle section, surrounding the area where the cross crossbar will be. -
Deepen the bottom sky:
Transition back into a deeper pink or reddish-orange for the lower third of the sky, creating a sandwich of warmth. Don’t worry about painting over your pencil lines for the cross; we will cover them with opaque black later. -
Let it dry completely:
Allow the background wash to dry fully. The paper should feel uniform in temperature and not cool to the touch.
Bleeding Lines?
If your black paint bleeds into the sky, the paper wasn’t dry enough. Wait longer between layers or use a hair dryer on a low, cool setting to speed it up.
Step 3: Adding the Grass Texture
-
Mix a grassy brown:
Combine Burnt Sienna with a tiny touch of yellow ochre to create a warm, dried-grass color. -
Paint the ground base:
Using your round brush, paint a jagged, uneven strip along the very bottom edge of the paper to establish the ground. -
Flick the grass blades:
Switch to your small detail brush. Using quick, upward flicking motions, pull thin lines up from the ground base. Vary the height and angle of the blades to make them look natural. -
Layer the grass:
Add a second layer of grass flicks using a slightly more concentrated brown paint to add depth and dimension to the field.
Add Gold Leaf
Once the painting is dry, apply a tiny strip of gold leaf along one edge of the cross to simulate a catching sun glint for extra elegance.
Step 4: Painting the Silhouette
-
Prepare the black medium:
Squeeze out some black acrylic paint or pour a small amount of India ink. I prefer acrylic here because it’s opaque and covers the watercolor background thoroughly. -
Outline the cross:
Using your small round brush or detail brush, carefully paint the straight edges of your cross shape first to get crisp lines. -
Fill in the shape:
Once the outline is secure, switch to a slightly larger brush to fill in the body of the cross with solid black. -
Check for opacity:
If the background color shows through the black, wait for the first coat to dry and apply a second coat for a truly solid silhouette. -
Connect to the ground:
Ensure the bottom of the cross merges seamlessly into the brown grass area. You can add a few tiny grass flicks overlapping the very bottom of the black post to settle it into the scene.
Step 5: Final Touches
-
Final drying time:
Let the entire piece dry completely, ensuring the thick black paint is no longer tacky. -
Reveal the border:
Slowly peel away the painter’s tape at a 45-degree angle to reveal your crisp white edges.
Frame this peaceful piece in a simple wood frame to highlight the warmth of the colors


Have a question or want to share your own experience? I'd love to hear from you in the comments below!