If your holiday decor style leans more giggles than glitter, funny Christmas window painting is the sweetest way to make your whole street smile. I love how a few bold shapes, silly faces, and a cheeky punchline can turn plain glass into a tiny Christmas comedy show.
Santa Stuck in the Chimney (Feet Kicking Out)
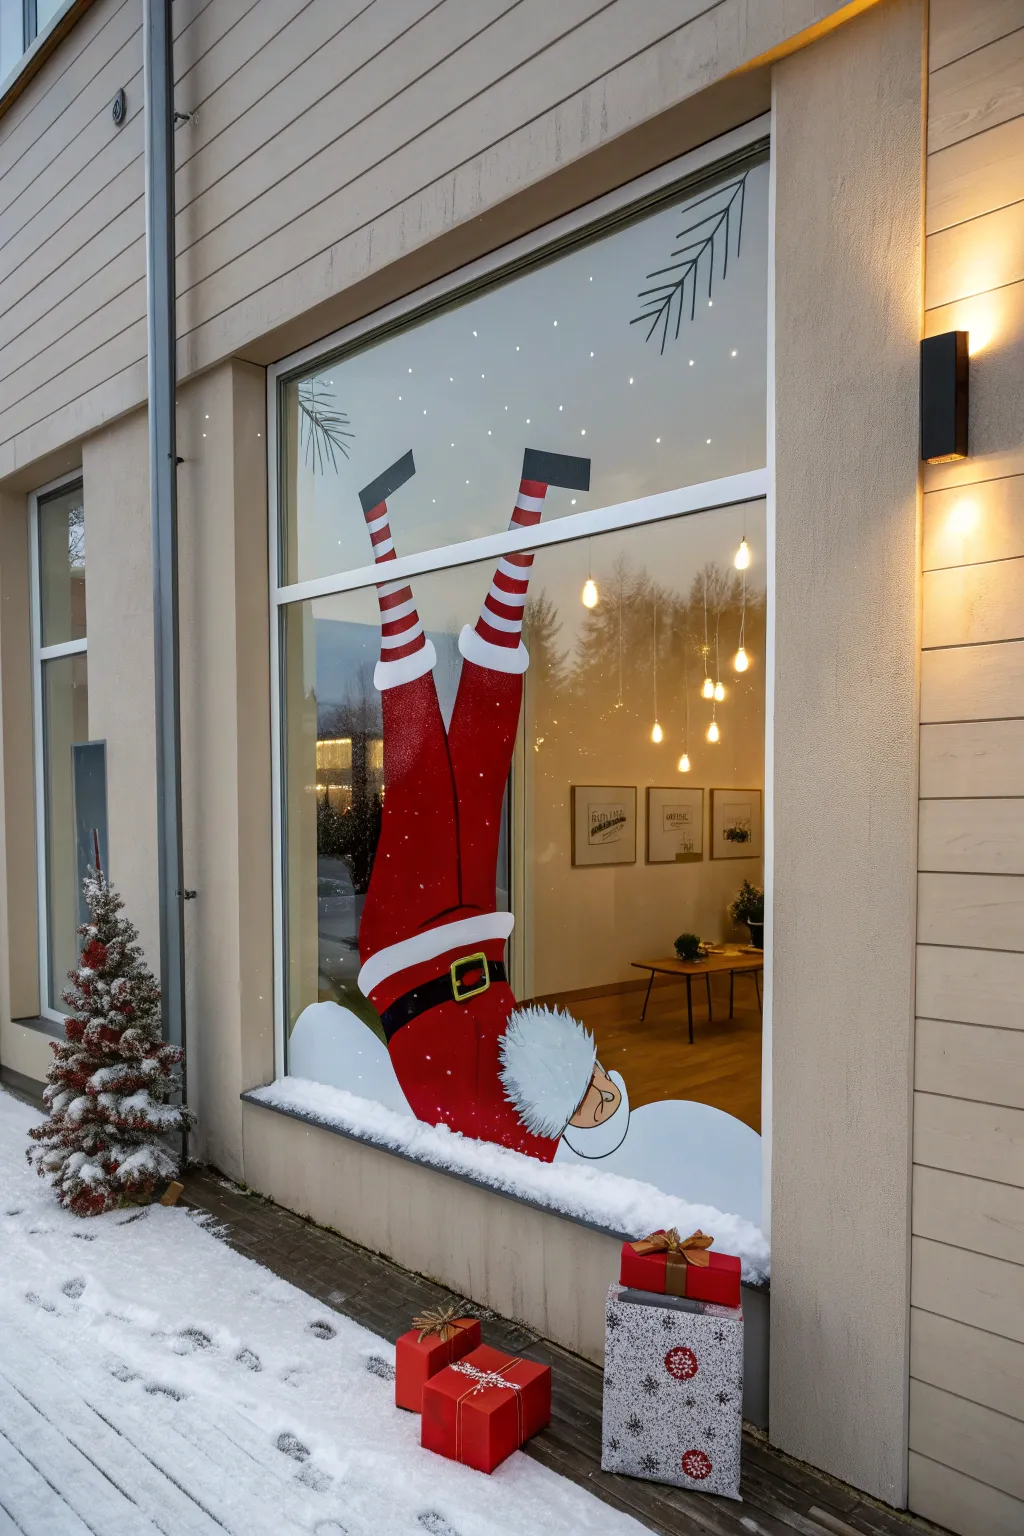
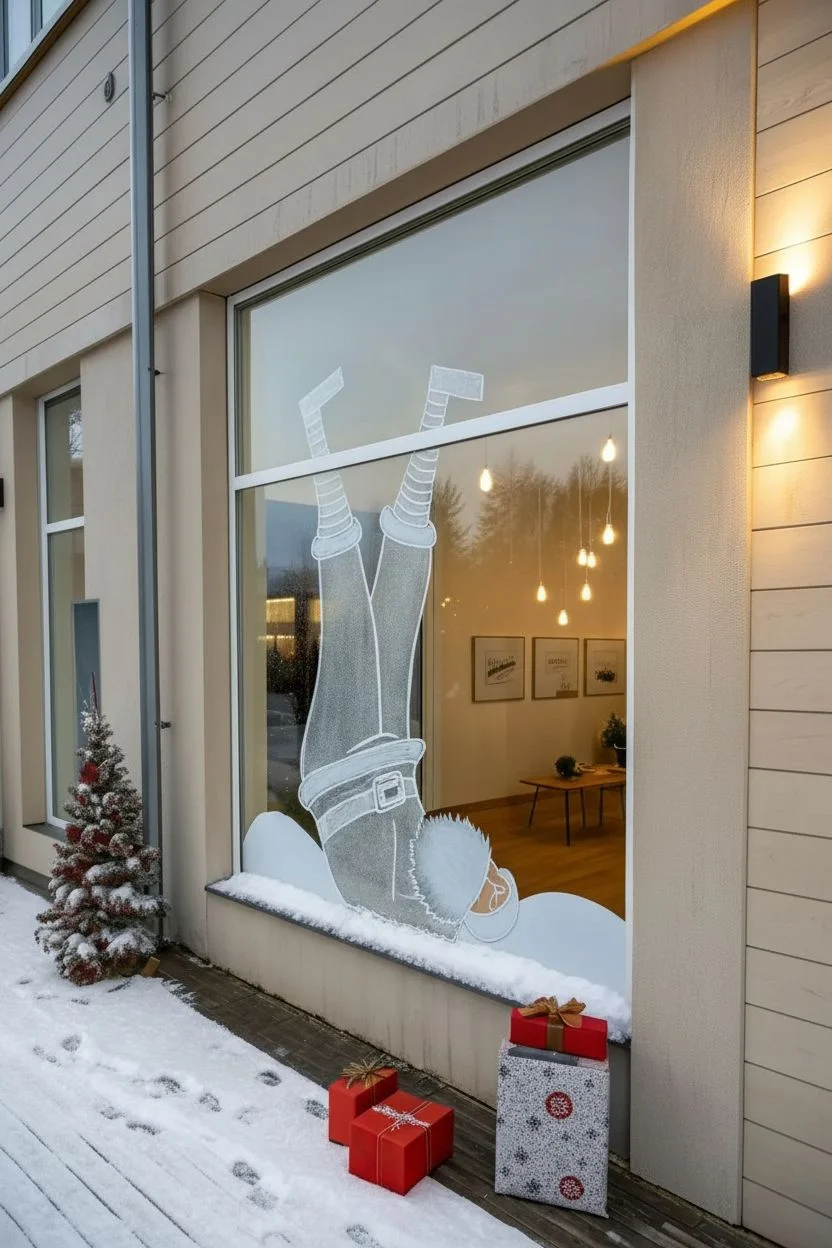
Transform your storefront or home window into a hilarious scene featuring Santa stuck upside down in a snowdrift. Using bold acrylics and simple shapes, this playful display creates an eye-catching focal point that visitors will love from both inside and out.
How-To Guide
Materials
- White liquid chalk marker or glass pen
- Acrylic craft paints (Red, White, Black, Gold/Yellow, Flesh tone)
- Wide flat paintbrush (1-2 inch)
- Medium round paintbrush
- Small liner brush
- Painter’s tape or low-tack masking tape
- Window cleaner and microfiber cloth
- Reference photo or rough sketch on paper
- Measuring tape (optional)
Step 1: Preparation and Outline
-
Clean surface:
Start with a crystal-clear canvas by thoroughly cleaning both the inside and outside of the window with glass cleaner and a microfiber cloth to remove any grease or dust. -
Determine placement:
Decide on the scale of your Santa. Since this design spans almost the full height of the window pane, you’ll want the head near the bottom sill and the feet reaching towards the top third. -
Draft the outline:
Using a white chalk marker, lightly sketch the basic shapes on the *inside* of the glass if possible (for weather protection), or outside if you prefer. Start with a large inverted ‘V’ shape for the legs. -
Refine the sketch:
Flesh out the legs, adding the boots at the top, knees, and the torso coming down to a head shape at the bottom. Don’t forget the belt area. -
Verify perspective:
Step back outside to check your proportions. The feet should be slightly angled outward to suggest kicking or falling.
Step 2: Painting the Base Colors
-
Paint the trousers:
Using your wide flat brush and red acrylic paint, fill in the leg shapes. Apply the paint thick enough to be opaque, but smooth enough to let some light filter through if desired. I like to do two thin coats rather than one thick gloopy one. -
Add the torso:
Continue with the red paint for the main body/torso area below the belt line, curving it downwards toward the window sill. -
Paint the boots:
Switch to black paint for the boots at the very top. Create a solid block shape for the foot and a rectangle for the calf. -
Create the striped socks:
Between the red pant leg and the black boot, paint horizontal bands of white. Once dry, add the red stripes between them to create the classic candy-cane sock look. -
Fill the belt:
Paint a thick black band across the widest part of the torso for Santa’s belt. -
Paint the face:
Near the bottom sill, paint the upside-down face using a flesh-tone acrylic. Keep the shape simple and round.
Opacity Secret
Mix a tiny drop of dish soap into your acrylic paint. It helps the paint stick to the slick glass better and makes removal much easier later on.
Step 3: Details and Snow Effects
-
Add fur trim:
Use white paint to create the fluffy cuffs on the pants (where the red meets the socks) and the trim on the jacket hem. Use a dabbing or stippling motion with your brush to simulate a furry texture. -
Paint the beard and hat:
Paint a large, fluffy white beard flowing ‘upward’ (since he’s upside down) and the white trim of his hat resting on the sill. Stipple the paint here too for volume. -
Detail the belt buckle:
With a smaller brush and gold or yellow paint, carefully draw a square buckle over the center of the black belt. -
Add facial features:
Using your fine liner brush and black paint, outline the nose, closed eyes, and perhaps a mouth to give him a surprised or grumpy expression. -
Create the snowdrifts:
Paint large, swooping mounds of white snow along the bottom of the window pane, overlapping Santa’s shoulders slightly to make him look buried. -
Add falling snow:
Using a small round brush or the back end of a paintbrush handle, dot small spots of white paint across the upper empty space of the window to create snowflakes. -
Paint pine branches:
In the top corners, use green or black paint to add simple, stylized pine branches hanging down, framing the scene. -
Final outlines:
Once all base colors are completely dry, go back with the black paint and a liner brush to outline the main shapes (legs, boots, belt) to make the image pop against the glass.
Streaky Paint?
If the sun makes your paint look uneven from the outside, wait for the first coat to dry completely, then sponge on a second layer for a textured, solid finish.
Now your window is ready to bring a smile to every passerby with this whimsical winter mishap


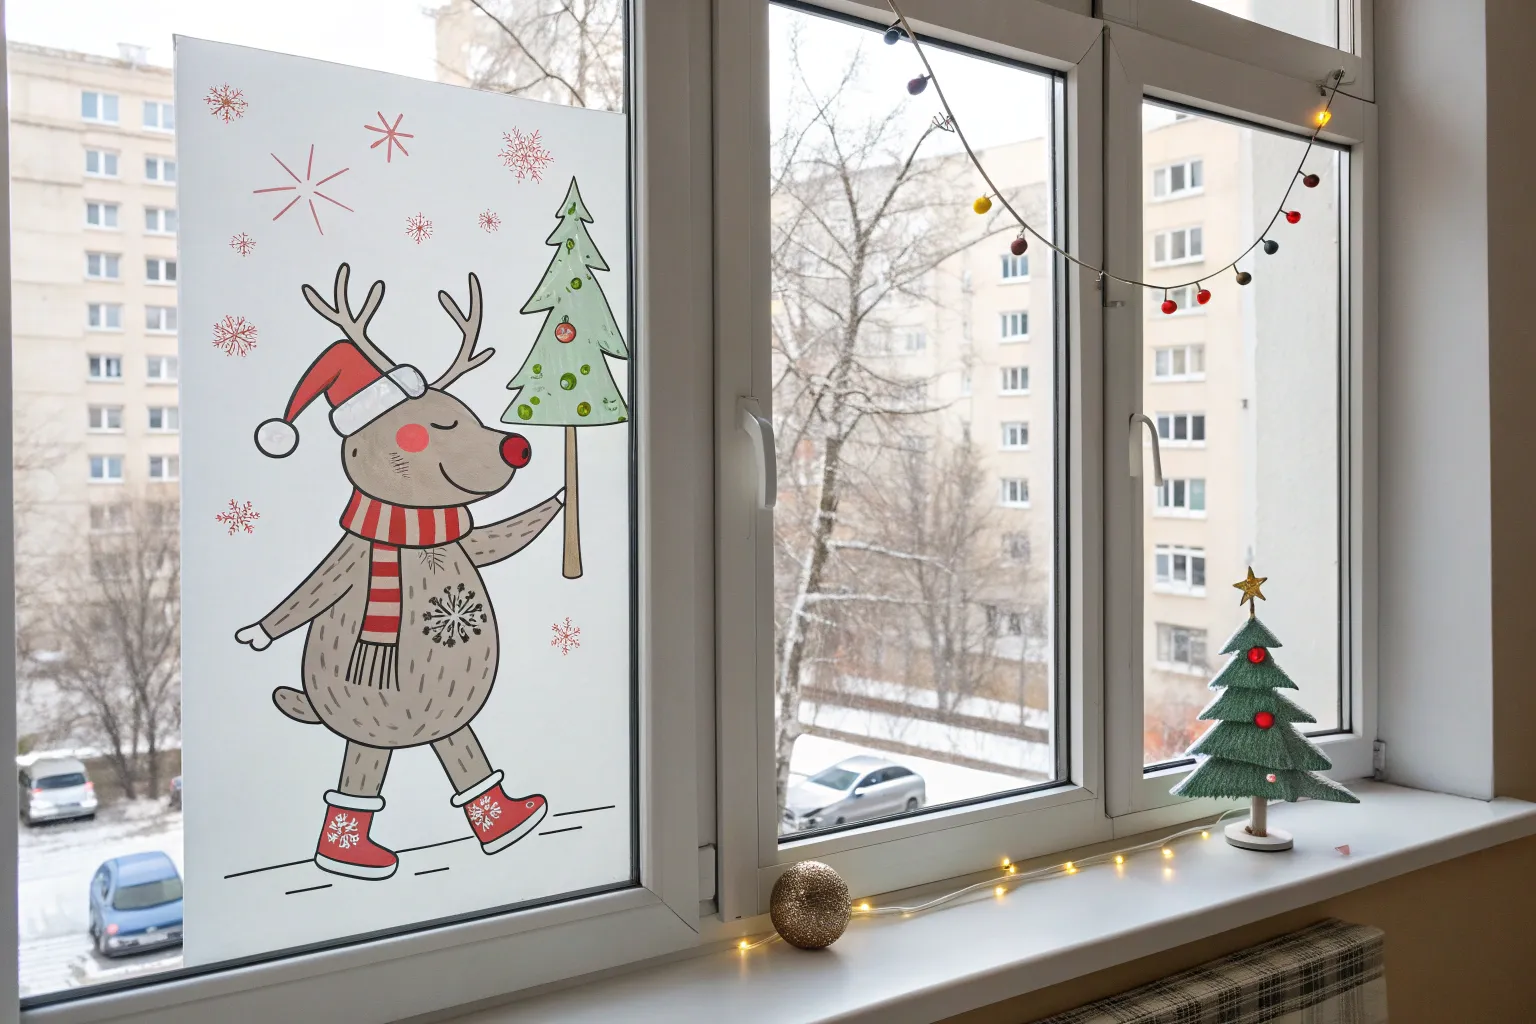
Cross-Eyed Reindeer With Wonky Antlers
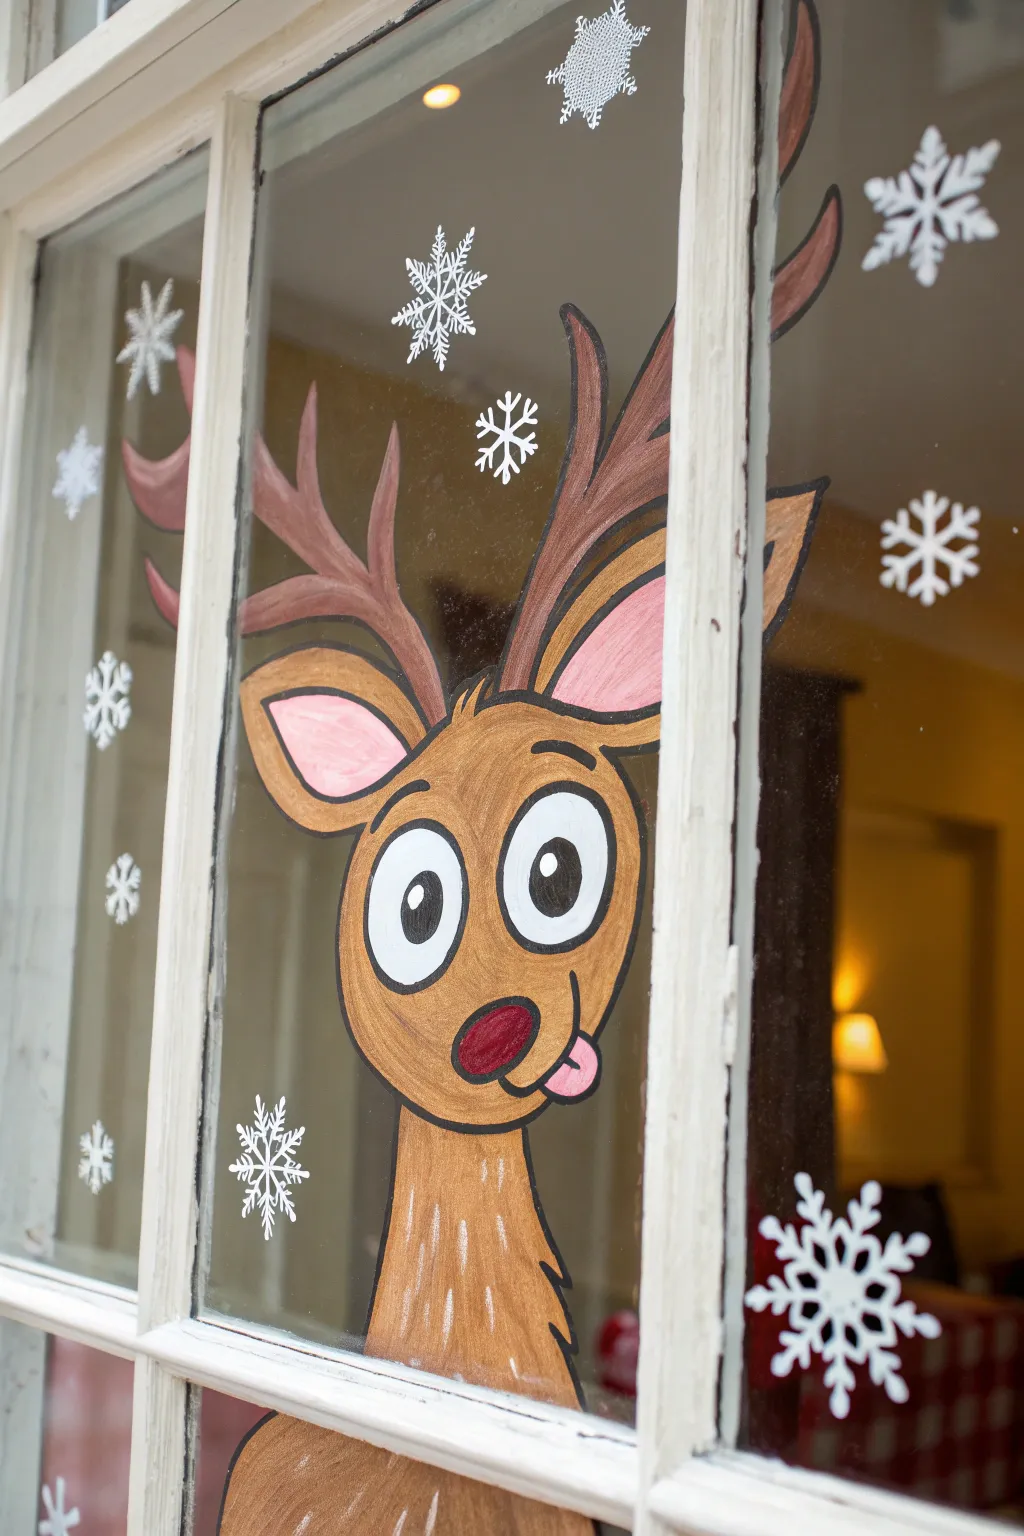
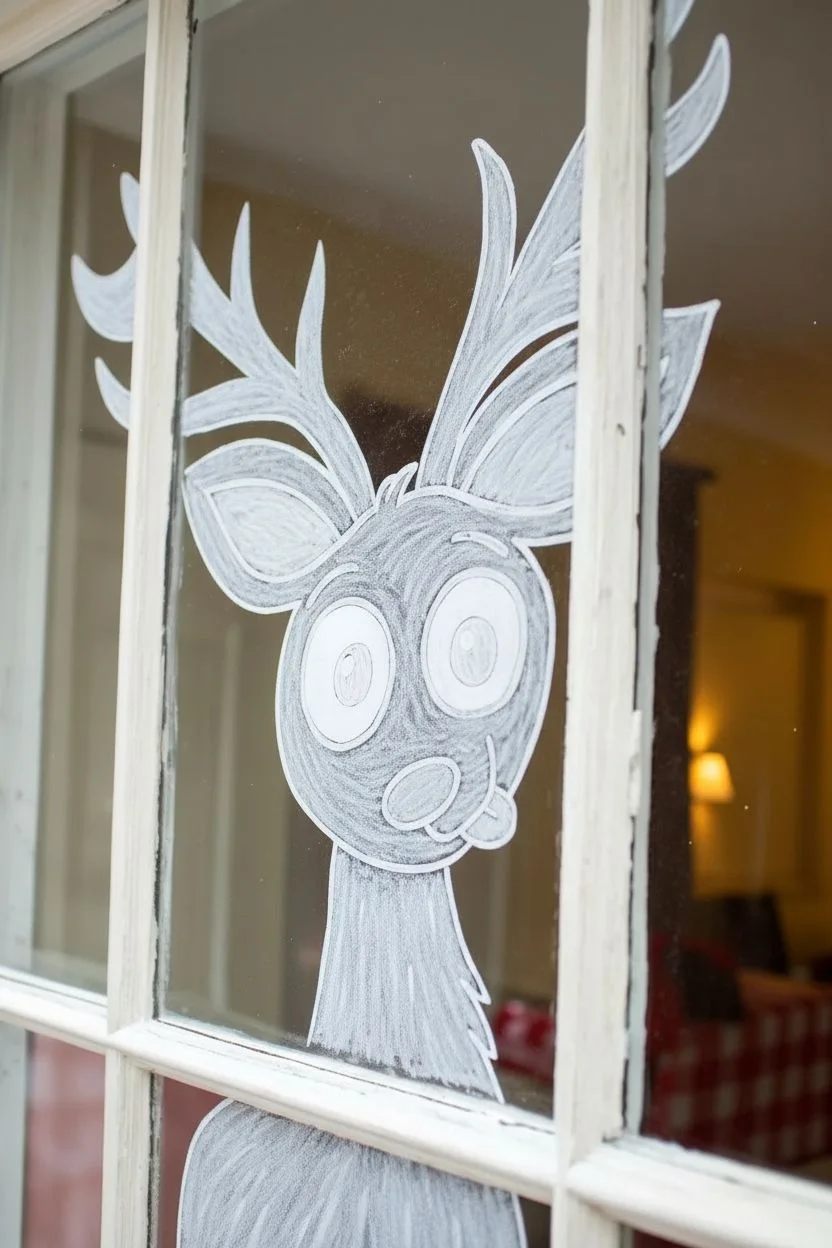
Spread some playful holiday cheer to your neighbors with this lovable, cross-eyed reindeer painted directly on your window pane. The distinct cartoon outline and bright acrylics make this character pop against the glass, creating a whimsical display that looks great from both inside and out.
Step-by-Step Tutorial
Materials
- Acrylic paints (brown, white, black, red/pink)
- Window cleaner (or vinegar solution)
- Lint-free cloth
- Chalk markers (white) or dry-erase marker
- Round paintbrushes (small and medium)
- Fine detail brush (for outlining)
- Paper cup or palette
- Paper towels
Step 1: Preparation & Sketching
-
Clean the Surface:
Begin by thoroughly cleaning the window pane where you plan to paint. Start with window cleaner and a lint-free cloth to remove any dust, grease, or fingerprints, ensuring the paint adheres properly. -
Map the Head Shape:
Using a white chalk marker or a dry-erase marker, lightly sketch a large, vertical oval shape in the lower center of the pane for the reindeer’s head. Add a thick neck extending downwards from the base of the oval. -
Add Facial Features:
Draw two large circles near the center of the face for eyes; making them slightly different sizes adds to the goofy charm. Below them, sketch a smaller oval for the nose and add a curved line for the mouth with a small ‘U’ shape for the tongue sticking out. -
Draft the Antlers and Ears:
Sketch two large, pointy ears extending from the sides of the head. Just above the ears, draw the antlers branching upwards and outwards. In my experience, keeping the antlers asymmetrical makes him look even funnier.
Streaky Paint?
Glass is slick, so the first coat often looks thin. Don’t overwork wet paint. Let the first layer dry completely (about 15 mins), then dab a second layer on top for solid coverage.
Step 2: Applying Color
-
Mix Your Brown:
Squeeze out brown acrylic paint onto your palette. If it feels too dark, mix in a tiny drop of white or yellow to warm it up. This will be your main fur color. -
Fill the Fur Areas:
Using a medium round brush, paint the entire face, neck, and the outer parts of the ears with your brown mix. Be careful to paint around the eyes and nose area. -
Paint the Antlers:
For the antlers, you can use the same brown or darken it slightly with a touch of black for contrast. Fill in the antler shapes completely, using smooth strokes to avoid streakiness on the glass. -
Add Pink Accents:
Mix a soft pink using red and white paint. Use a smaller clean brush to fill in the inner shapes of the ears and the little tongue sticking out of the mouth. -
Paint the Eyes:
Fill the large eye circles with bright white paint. You may need two coats here to ensure they are opaque enough to stand out against the background. -
Color the Nose:
Use a deep red or burgundy color to fill in the nose oval. Let all of these base colors dry completely before moving on to the next step.
Step 3: Outlining & Details
-
Create the Black Outline:
Once the base layers are dry to the touch, load a fine detail brush with black acrylic paint. Carefully trace the outer edges of the entire reindeer, including the antlers and neck. -
Define the Face:
Outline the inner details with black: trace the eyes, the nose, the inner ears, and the mouth. This step really brings the cartoon style to life. -
Add Pupils:
Paint two black circles (pupils) inside the white eyes. paint them close together and slightly crossed to achieve that hilarious expression. -
Highlight the Eyes:
Once the black pupils are dry, add a tiny dot of white paint to each pupil as a reflection catchlight. This small detail makes the character look alive. -
Texture the Fur:
Using a very fine brush or a toothpick, add small white scratch marks or lines on the chest and neck area to simulate fur texture.
Make it Glow
Mix a tiny amount of glow-in-the-dark medium into your white paint for the eyes and snowflakes. At night, the goofy eyes will eerily glow for passersby.
Step 4: Snowy Environment
-
Draw Snowflakes:
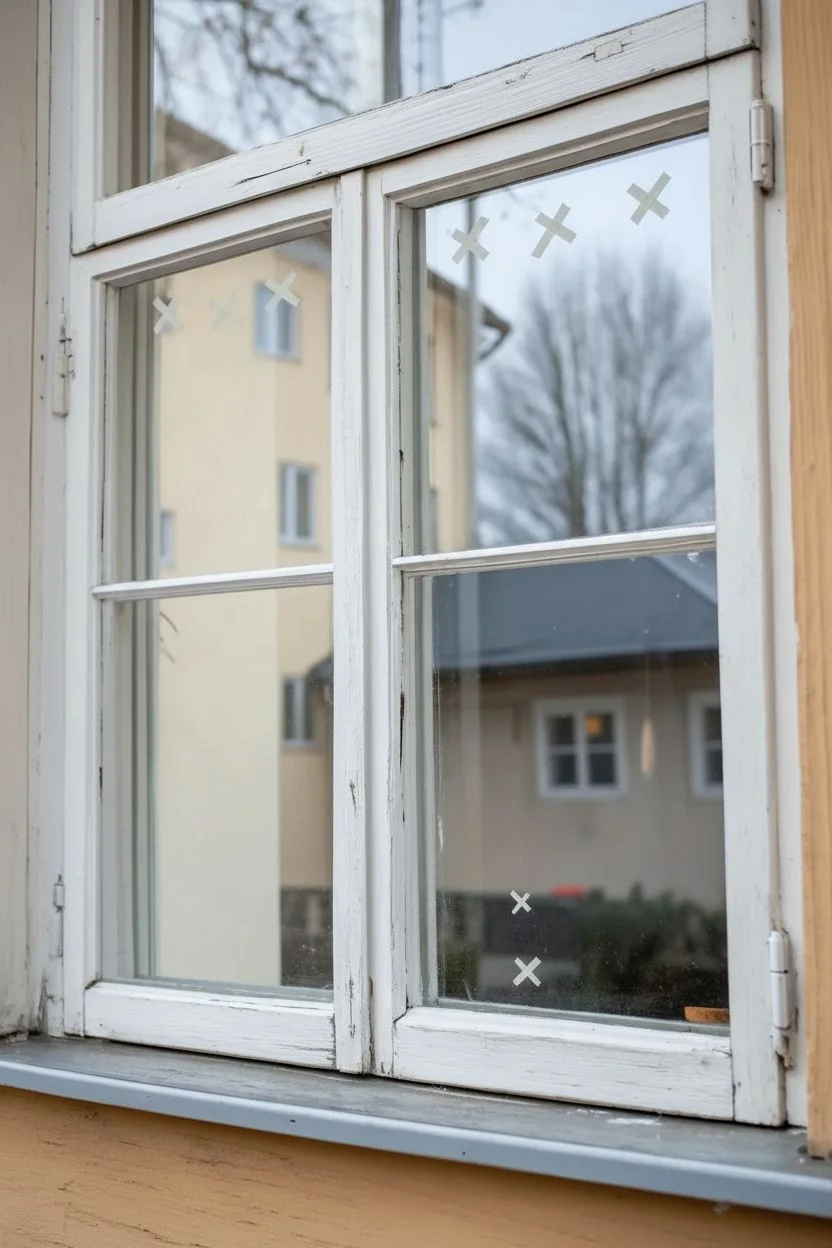
Using your smallest brush and white paint, create snowflakes scattered around the reindeer. Start with a simple ‘X’ shape and add a cross through the middle to make an asterisk. -
Detail the Flakes:
Add small ‘V’ shapes to the ends of the snowflake lines for a crystalline look. Vary the size of the flakes to create depth. -
Clean Up Edges:
Inspect your work for any stray paint drops. A damp cotton bud or the edge of a credit card (as a scraper) works perfectly to remove unwanted specks.
Now step outside and enjoy seeing your neighbors smile at this goofy holiday greeter


Elf Chaos: Tangled in Christmas Lights
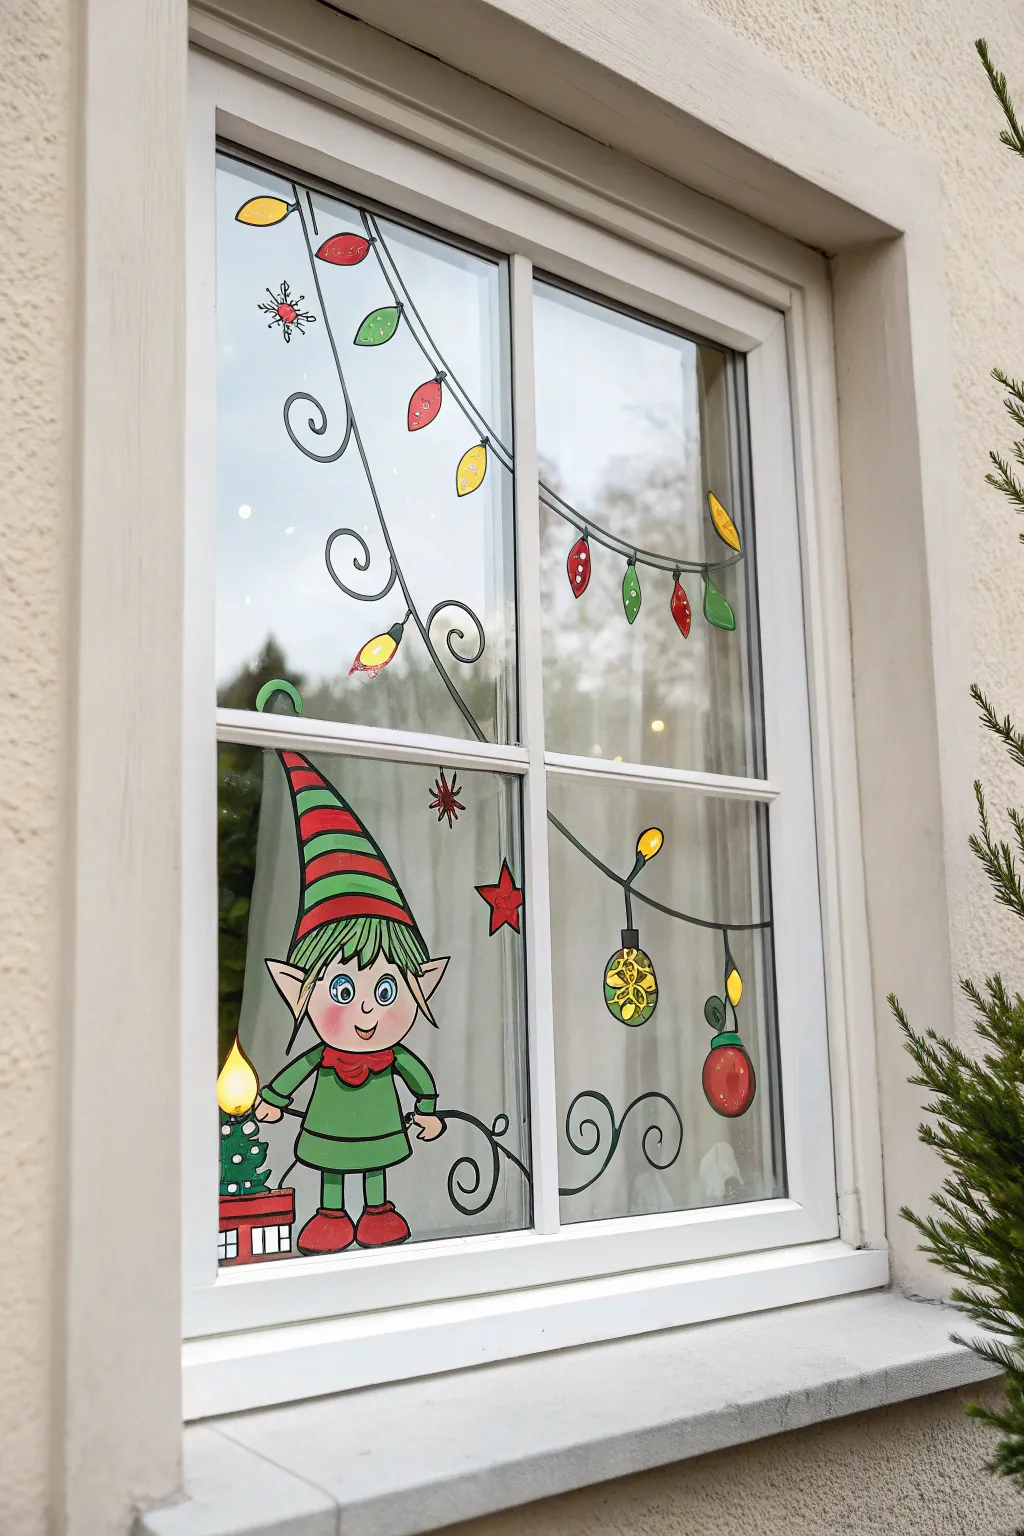
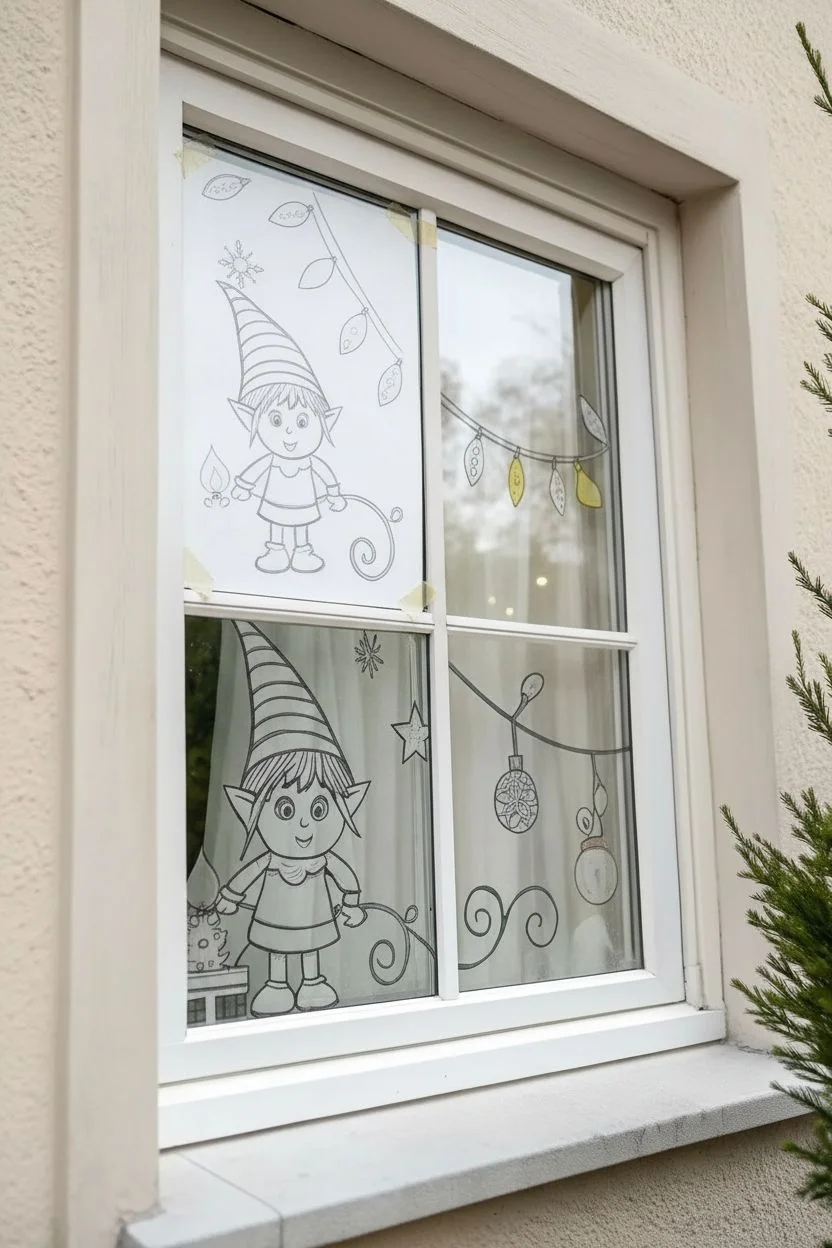
Transform your winter view with this charming window painting featuring a cheerful elf surrounded by festive string lights. Using bright colors and bold outlines directly on the glass, you’ll create a lively scene that delights neighbors and passersby.
How-To Guide
Materials
- Glass-appropriate paint markers (black for outlines)
- Acrylic paints or window paints (red, green, yellow, peach/skin tone, white, blue)
- Fine detail paintbrushes
- Medium flat paintbrush
- Paper towels and water cup
- Glass cleaner and microfiber cloth
- Sketch paper and pencil (for planning)
- Masking tape (optional for template)
Step 1: Planning and Surface Prep
-
Clean the Canvas:
Start by thoroughly cleaning your window pane with glass cleaner and a microfiber cloth. Any dust or grease will prevent the paint from sticking properly, so ensure the surface is spotless and completely dry. -
Sketch the Design:
On a large sheet of paper, sketch your elf and light string layout to scale. If you aren’t confident drawing freehand directly on glass, tape this sketch to the *outside* of the window to use as a tracing guide.
Fixing Mistakes
Paint drips? Wait for acrylics to dry completely, then gently scrape the error off the glass with a sharp razor blade or craft knife edge.
Step 2: Outlining the Elf
-
Draw the Contour:
Using a black glass paint marker or a fine brush with black acrylic, carefuly draw the elf’s outline. Start with the pointed hat, curving it slightly to one side. -
Add Facial Features:
Draw the face shape, including the prominent pointed ears. Add large circles for the eyes, a small nose, and a curved smile. Don’t fill anything in yet; just focus on clean, solid lines. -
Body and Clothing:
Extend the lines down to create the tunic with a collar, the arms holding a light string, and the legs with curled elf shoes. Include details like the tunic belt and cuffs. -
Sketch the Accessories:
Draw the small candle lantern and present box near the elf’s feet to complete the character’s immediate surroundings.
Step 3: Stringing the Lights
-
String Guidelines:
Draw the long, swooping black lines for the electrical cord. Let them loop and curve naturally across the upper window panes, ensuring the line connects logically visually, even if broken by window frames. -
Bulb Outlines:
Along the cord, draw teardrop shapes for the classic C9-style bulbs. Mix up their angles so they look like they are hanging freely. -
Decorative Swirls:
Add decorative curling swirls extending from the main wire to fill empty negative space and add a whimsical touch.
Make It Glow
Tape actual battery-operated fairy lights to the inside of the window frame behind your painted bulbs to make the artwork illuminate at night.
Step 4: Adding Color Blocking
-
Paint the Hat Stripes:
Using a small brush, fill in the stripes on the hat, alternating between bright red and forest green. Apply the paint thick enough to be opaque but smooth enough to let light filter through slightly. -
Fill the Tunic:
Paint the elf’s tunic and shoes with the same forest green. Use a smaller brush to get into the corners near the black outline without painting over it. -
Skin Tones:
Mix a gentle peach or skin tone and fill in the face, ears, and hands. Allow this layer to dry completely before adding any facial details on top. -
Brighten the Bulbs:
Paint the light bulbs in a variety of colors—red, yellow, green, and blue. I like to leave a tiny spot unpainted in each bulb to mimick the filament or highlight, but you can also paint it solid.
Step 5: Details and Highlights
-
Eye Details:
Once the skin tone is dry, paint the whites of the eyes. carefully add blue irises and huge black pupils. Add a tiny white dot in the pupil for a ‘sparkle’ effect. -
Hair Texture:
Paint the hair peeking out from under the hat using jagged green strokes to look like bangs. -
Rosy Cheeks:
Dilute a tiny bit of red paint with water or white paint to make a translucent pink, and create soft circles on the elf’s cheeks. -
Patterned Bulbs:
Select one or two special bulbs (like the yellow one) and add a pattern inside, such as a starburst or grid, using a contrasting color line marker once the base paint is dry. -
Stars and Snowflakes:
In the open glass areas, paint small red stars and delicate white or black snowflakes to balance the composition. -
Final Outline Check:
Stand back and inspect your work. If any color has overlapped your black lines, go back over those specific spots with your black marker to crisp up the edges.
Now you have a festive friend greeting everyone who walks by your home this holiday season


Santa’s Sleigh With Presents Flying Everywhere

Transform your plain glass pane into a festive holiday story with this charming window painting project. Featuring a classic red silhouette of Santa’s sleigh taking flight over snowy white gifts and trees, this design creates a beautiful layered look visible from both inside and out.
Step-by-Step Tutorial
Materials
- Red and white window paint or acrylic paint mixed with dish soap
- Various sizes of flat artist brushes (1-inch, 1/2-inch, and detail brushes)
- Painter’s tape or masking tape
- Glass cleaner and lint-free cloth
- Printed templates or stencils (optional)
- White chalk marker or dry erase marker
- Measuring tape
- Paper towels for cleanup
Step 1: Preparation and Layout
-
Clean the Surface:
Begin by thoroughly cleaning the entire window surface with glass cleaner and a lint-free cloth. Any dust or grease will prevent the paint from adhering properly, so ensure it is completely dry and streak-free before starting. -
Mark Horizons:
Using painter’s tape, mark a low horizon line across the bottom of the window frame. This will be the base for your snowdrifts and the resting place for the large presents at the bottom. -
Establish the Grid:
If you are working on a multi-pane window like the one shown, plan which elements go where. Treat the vertical mullions as natural breaks in the scene—for instance, placing Santa in one pane and the reindeer leading into the next.
Step 2: Painting the Upper Elements
-
Sketch the Garland:
Using a white chalk marker or dry erase marker, lightly sketch the draping evergreen boughs across the very top of the window. Draw loose, sweeping curves to act as the spine of the branches. -
Paint Pine Needles:
Load a medium flat brush with dark green paint (or mix blue and yellow window paint). Use quick, flicking strokes outward from your sketched spine to create the texture of pine needles. Vary the angle of your strokes for a natural look. -
Add Berry Details:
Once the green is dry to the touch, use a small detail brush dipped in red paint to dot clusters of holly berries among the greenery. Group them in threes or fives for the most pleasing arrangement. -
Outline the Flight Path:
Sketch the silhouette of Santa’s sleigh and the reindeer team. Position the sleigh on the left and the reindeer ascending toward the right. If drawing freehand is daunting, tape a printed silhouette to the outside of the glass and trace it from the inside. -
Fill in the Silhouettes:
Using a solid, opaque red paint, carefully fill in the sleigh, Santa, and the reindeer. Use a small flat brush for the bodies and a liner brush for delicate details like antlers and hooves. Apply two coats if the first looks streaky against the outside light. -
Add Reins:
Connect the reindeer to the sleigh with very fine lines using your thinnest brush or a red paint pen to represent the reins.
Paint Persistence
If your acrylic paint is too transparent on the glass, mix a small amount of white paint into your red or green. This increases opacity without drastically changing the hue.
Step 3: Creating the Snowy Scene Below
-
Draft the Tree:
On the left side of the window, sketch a large, stylized pine tree. Instead of realistic needles, draw sweeping, curved tiers that stack on top of one another to create a solid white shape. -
Paint the Tree White:
Fill in your tree shape with opaque white paint. Work from the top down to avoid smudging your work. Ensure the edges are crisp and clean to define the heavy, snow-laden branches. -
Block in Present Shapes:
Along the bottom taped line, draw various rectangular and square boxes. Vary their heights and widths to create visual interest, ensuring they span across the entire bottom width of the window. -
Decorate the Gifts:
Fill some boxes with solid white and others with solid red. Once the base coats are dry, add contrasting patterns: stripes, polka dots, or starbursts. I find that keeping the patterns simple makes them readable from a distance. -
Paint Ribbons and Bows:
Top each present with a painted bow. Use a contrasting color (red on white, white on red) to make them pop. Add vertical and horizontal lines across the boxes to represent the ribbon wrapping. -
Add Text (Optional):
If you have a large white present, like the one on the far right, you can use a fine red brush to add whimsical text or ‘gift tag’ details.
Sparkle Upgrade
While the white ‘snow’ paint is still wet, gently blow loose iridescent glitter onto the damp areas. It will stick as it dries, making your snowy window shimmer in the sunlight.
Step 4: Finishing Touches
-
Create Snowdrifts:
Remove the bottom painter’s tape. Paint a wavy, undulating line of white snow along the very bottom edge, overlapping the bottom of the presents slightly to ground them in the scene. -
Add Falling Snow:
Dip the end of a brush handle into white paint and dot random snowflakes across the entire window. Vary the size of the dots—some large, some tiny—to create depth and movement. -
Highlight and Refine:
Step back to view the window from a distance. Use a clean, damp cotton swab to clean up any messy edges or paint drips. Add small white highlights to the red sleigh or berries to give them a glossy appearance.
Step back outside and enjoy how your festive painted scene brings holiday cheer to the whole neighborhood
BRUSH GUIDE
The Right Brush for Every Stroke
From clean lines to bold texture — master brush choice, stroke control, and essential techniques.
Explore the Full Guide
Grumpy Christmas Tree That Needs Coffee
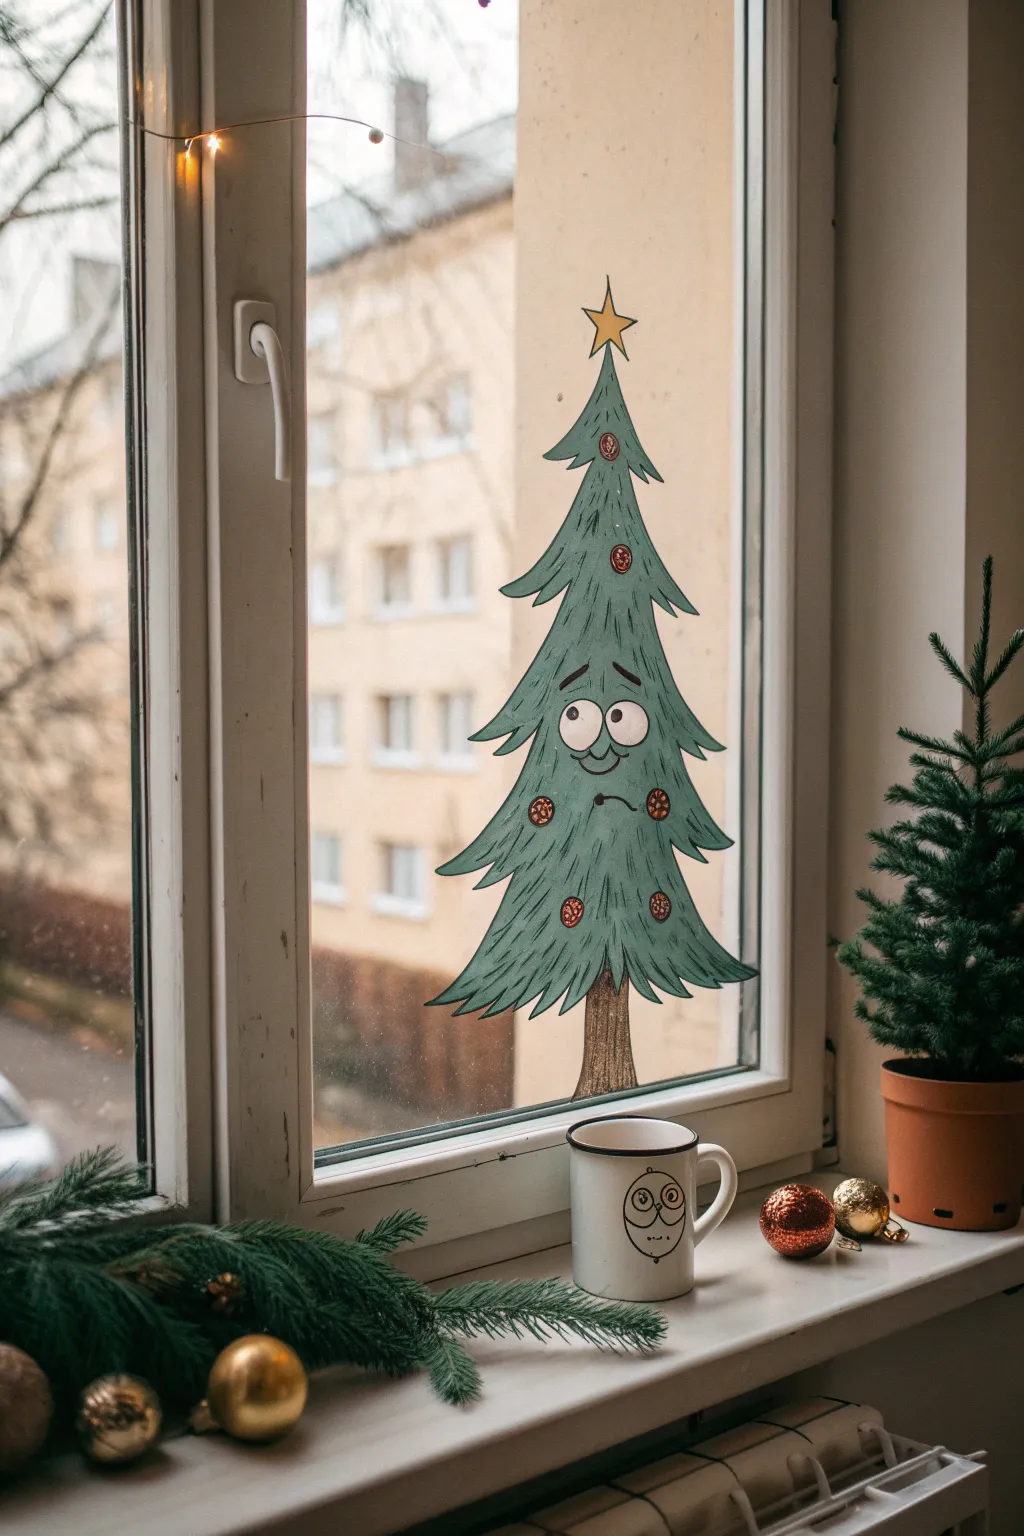
Bring some humorous realism to your holiday decor with this delightfully grumpy Christmas tree window painting. Featuring tired eyes and a reluctant frown, this character perfectly captures that early morning holiday mood before the first cup of coffee.
How-To Guide
Materials
- White liquid chalk marker or acrylic paint marker (broad tip)
- Green acrylic paint or window paint
- Brown acrylic paint
- Yellow acrylic paint
- Red acrylic paint
- Fine liner brush (size 0 or 1)
- Medium flat brush (size 6 or 8)
- Black liquid chalk marker or permanent marker (for outline)
- Paper plate or palette
- Cup of water and paper towels
- Glass cleaner and microfiber cloth
Step 1: Setting the Scene
-
Prep the Surface:
Start by thoroughly cleaning your window pane with glass cleaner and a microfiber cloth. Any dust or fingerprints will prevent the paint from sticking properly, and we want a crisp finish. -
Rough Outline:
Using your white liquid chalk marker, sketch the basic triangular shape of the tree directly onto the glass. Start at the top point and work your way down, creating four tiers of jagged, sweeping branches on each side. Don’t worry about perfection; the jagged edges add to his disheveled look. -
Add the Trunk and Star:
Draw a simple rectangular stump at the bottom center of the tree. Then, crown the top tip with a classic five-pointed star shape. Keep your lines light so they don’t show through the final paint layers.
Opacity Pro Tip
Mix a drop of dish soap into your acrylic paint. It helps the paint adhere smoothly to slick glass surfaces and makes it easier to scrape off later.
Step 2: Bringing in Color
-
Mix Your Green:
On your palette, squeeze out a generous amount of green acrylic paint. I like to add a tiny touch of white to make the green slightly opaque and pastel-like, which helps it stand out against the daylight. -
Base Coat the Tree:
Using your medium flat brush, fill in the entire tree body with the green mixture. Use vertical strokes that follow the direction of the drooping branches. Applying two thin coats is better than one thick one to avoid streaks on the glass. -
Paint the Trunk:
Switch to brown paint and fill in the tree stump. Use vertical strokes to mimic wood grain texture. Let this dry completely before adding details later. -
Illuminate the Star:
Carefully fill in the star at the top with bright yellow paint. You might need a second coat here to ensure it pops against the potentially gray winter sky outside.
Step 3: Adding the Grumpy Details
-
Create the Eyes:
Once the green paint is dry to the touch, paint two large, connecting white ovals in the upper-middle section of the tree. These should be slightly uneven to enhance the groggy expression. -
Outline the Tree:
Take your black liquid chalk marker or a fine liner brush with black paint. Carefully outline the entire green shape of the tree, emphasizing the pointed tips of the branches. -
Define the Trunk:
Outline the brown stump in black, adding a few vertical squiggly lines inside the brown area to suggest bark texture. -
Detail the Star:
Outline the yellow star with a crisp black line. Connect the star to the top of the tree with a tiny black stem.
Level Up: 3D Coffee
Paint a small, steaming mug of coffee on the windowsill area just below the tree’s branch, as if he’s reaching for it.
Step 4: Character and Expression
-
The Tired Stare:
Inside the white eyes, paint two small black pupils. Place them slightly off-center or looking in different directions for a dazed look. Add small black curved lines under the eyes to create ‘bags’—essential for the sleepy vibe. -
The Brows:
Draw two floating eyebrows above the eyes using black. Angle them upwards in the center to create a look of distress or exhaustion. -
The Frown:
Between the lower branches, draw a squiggly, uneven line for the mouth. Add a small downward curve at one end to emphasize the frown. -
Adding Ornaments:
Dip a small round brush or the back end of a paintbrush into red paint. Dot five or six small red circles randomly onto the tree branches. -
Ornament Detail:
Once the red dots are dry, outline them with a thin black line and add tiny scribbles inside to give them a textured, glittery appearance without actually using glitter. -
Inner Texture:
Finally, use your fine black marker to add small, vertical dashed lines throughout the green body of the tree. These little hatch marks simulate pine needles and give the flat painting some visual depth.
Your window now features a hilarious holiday character that everyone can relate to during the busy season
Christmas Penguin Slip-and-Slide Disaster
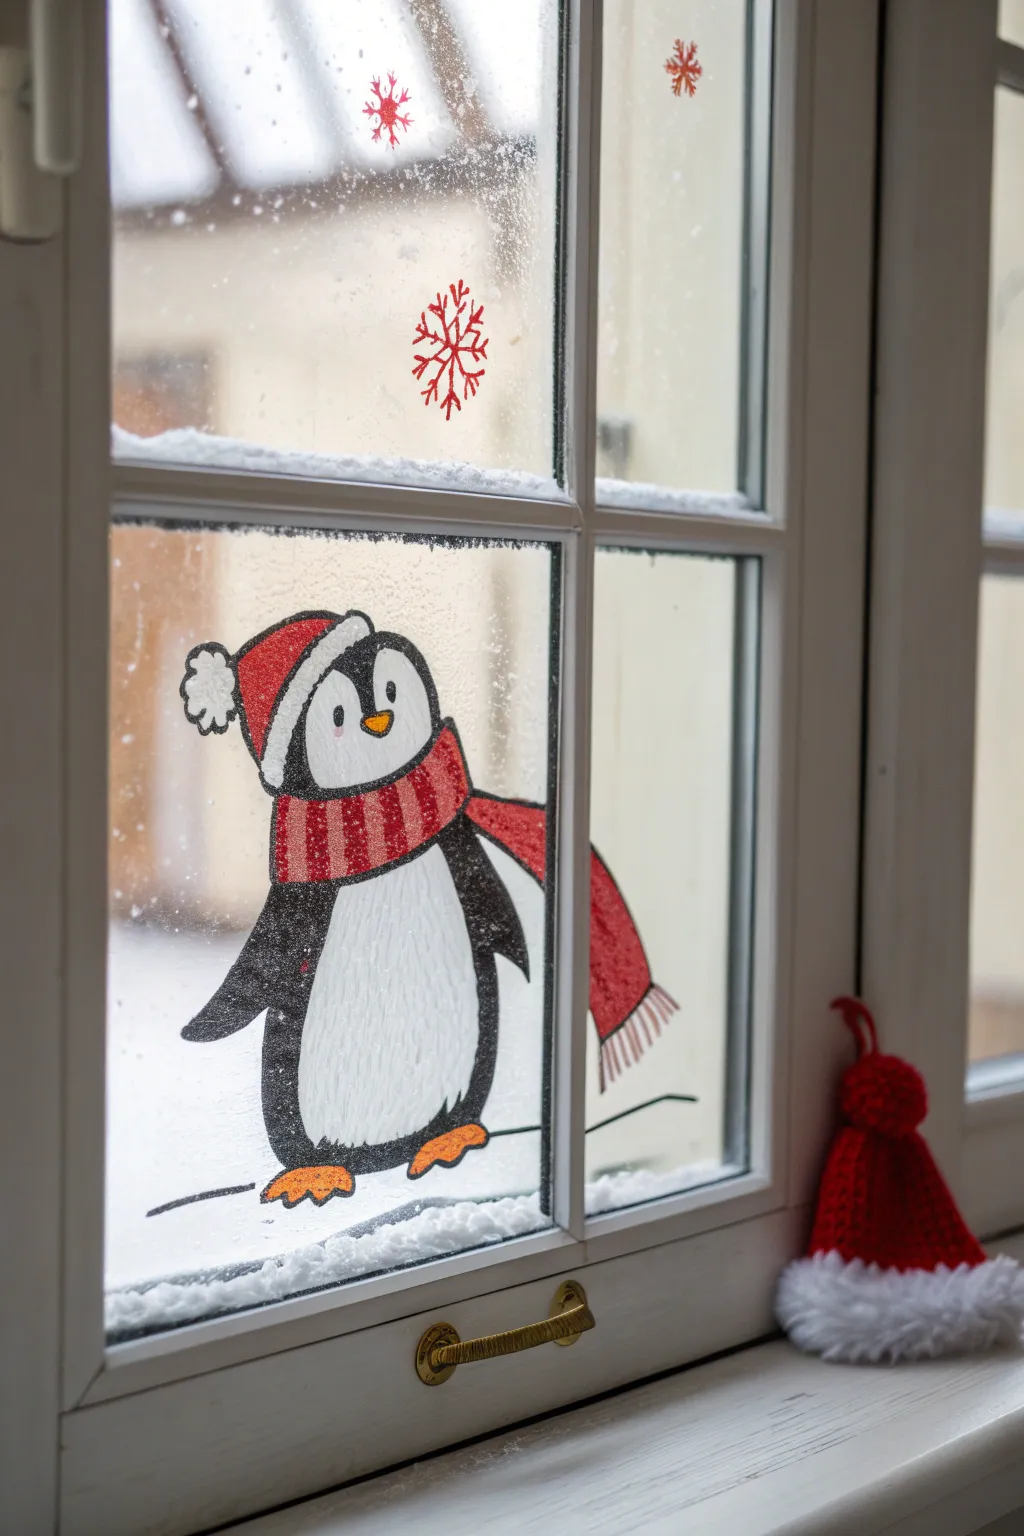

Transform your winter view with this adorable painted penguin that greets passersby with festive cheer. Using window-safe markers or paints, this charming character adds a pop of color and personality directly onto the glass panes.
How-To Guide
Materials
- White liquid chalk marker (medium tip)
- Black liquid chalk marker or acrylic paint pen
- Red liquid chalk marker or acrylic paint paint
- Orange liquid chalk marker
- Glass cleaner and microfiber cloth
- Paper towels
- Reference photo or printed sketch (optional)
Step 1: Preparation and Outline
-
Clean surface:
Begin by thoroughly cleaning the window pane with glass cleaner and a microfiber cloth. Any dust or grease will prevent the markers from adhering smoothly. -
Plan position:
Decide where your penguin will stand. Aim for the bottom left corner of a pane, leaving room for the scarf to flow off to the right. -
Outline the body:
Using the black marker, draw a large oval shape for the penguin’s body. Don’t close the top yet; leave it open for the hat. -
Add flippers:
Draw two curved triangles on the sides of the body for wings. The left one points down slightly, while the right one can angle out. -
Draw the face shape:
Inside the main oval, near the top, sketch a heart-shaped outline (without the point at the bottom) to define the white face area. -
Sketch the hat:
Draw a floppy triangle shape on top of the head for the Santa hat. Add a fluffy, cloud-like pom-pom at the tip of the triangle. -
Add the scarf:
Draw a thick band around the penguin’s neck area. Extend a long tail of the scarf flowing out to the right side, even crossing over the window muntin if you like the 3D effect.
Step 2: Coloring and Details
-
Fill the black areas:
Color in the outer body and wings with your black marker. Use long, consistent strokes to avoid streakiness. -
White belly and face:
Fill the large belly oval and the face area with the white chalk marker. You may need two coats here to make it opaque against the outdoor light. -
Hat brim and pom-pom:
Color the hat’s brim and the pom-pom white. Using a stippling motion (dotting the marker) creates a nice fluffy texture. -
Red hat and scarf:
Fill the main part of the hat and the scarf with bright red. Be careful near the wet black lines to avoid smudging colors together. -
Beak and feet:
Draw a small orange triangle for the beak. At the bottom, add two orange webbed feet pointing outward. -
Scarf stripes:
Once the red paint is fully dry, carefully draw vertical lines on the scarf using a lighter red or white marker to create a striped pattern. -
Eyes and cheeks:
Add two black vertical ovals for eyes inside the white face area. I like to add tiny pink or light red circles for cheeks if I have the color handy. -
Definition lines:
Go back over your initial black outlines to crisp up the edges, especially around the scarf and hat. -
Snowflakes:
In the pane above or around the penguin, draw simple red or white snowflakes. Start with a cross, add an ‘X’ over it, and add small V-shapes to the tips. -
Ground line:
Draw a simple, slightly wavy black line underneath the feet to show the snowy ground he is standing on.
Opacity Pro Tip
Window markers can look translucent. Let the first layer dry completely (about 5-10 mins) before adding a second coat for solid, vibrant color.
Fixing Mistakes
Did a line go rogue? Wait for the paint to dry completely, then use a dry Q-tip to scratch or rub the mistake away without smearing wet paint.
Enjoy your festive creation and the smiles it brings to creative window watchers

PENCIL GUIDE
Understanding Pencil Grades from H to B
From first sketch to finished drawing — learn pencil grades, line control, and shading techniques.
Explore the Full Guide
Caroler With a Squeaky Off-Key Expression
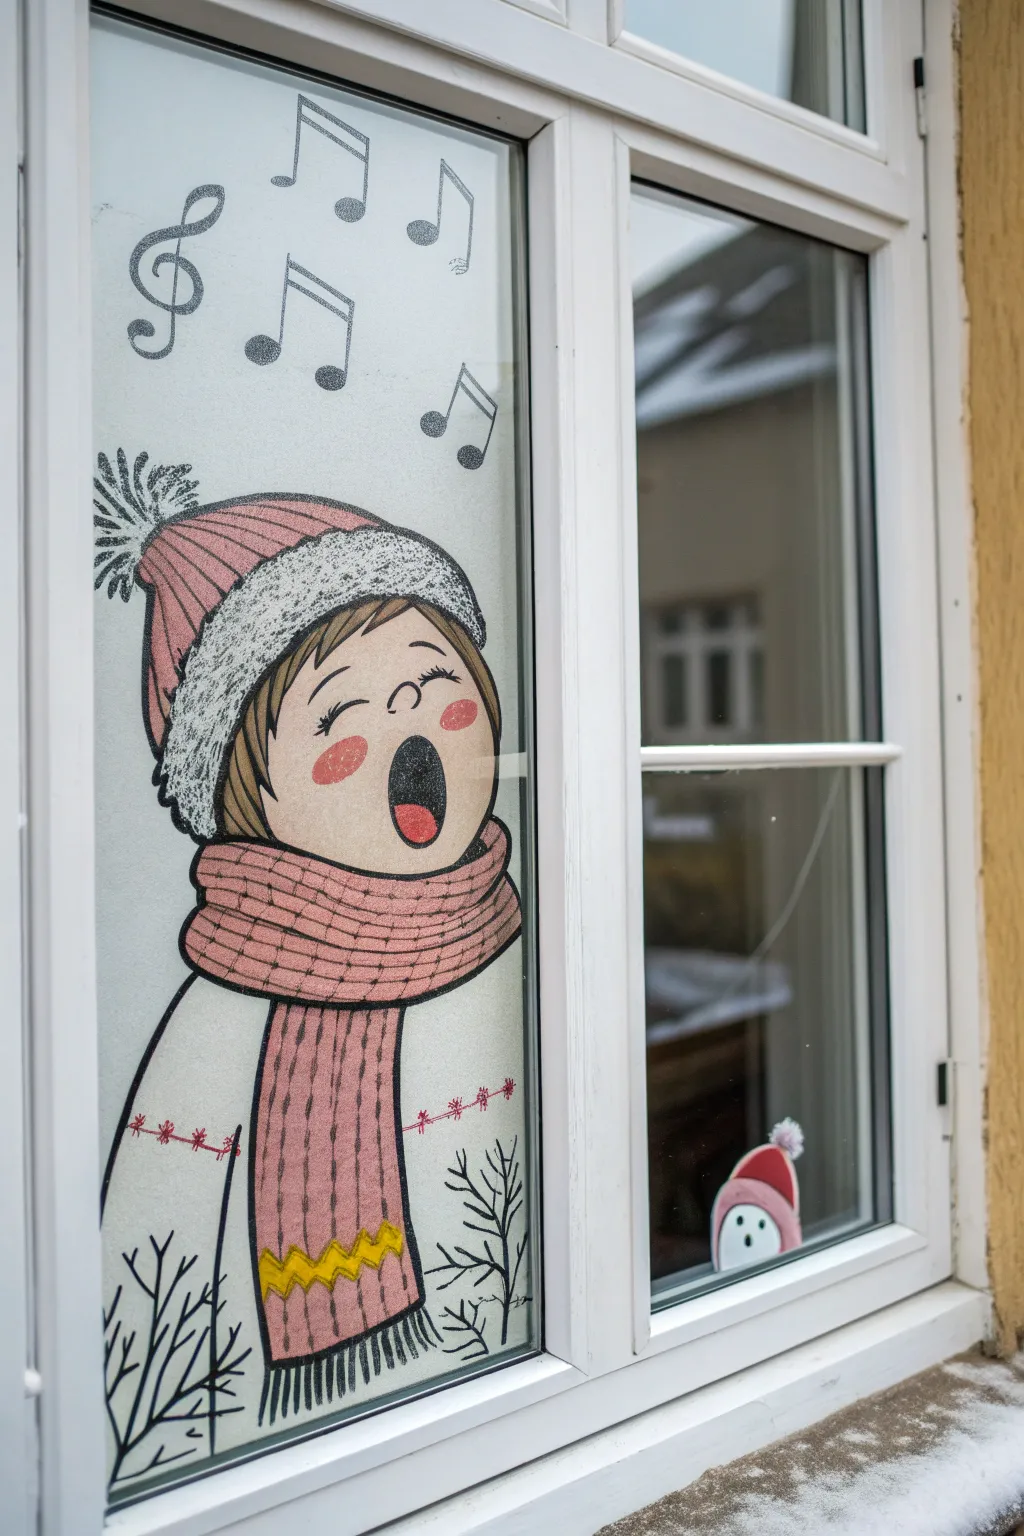
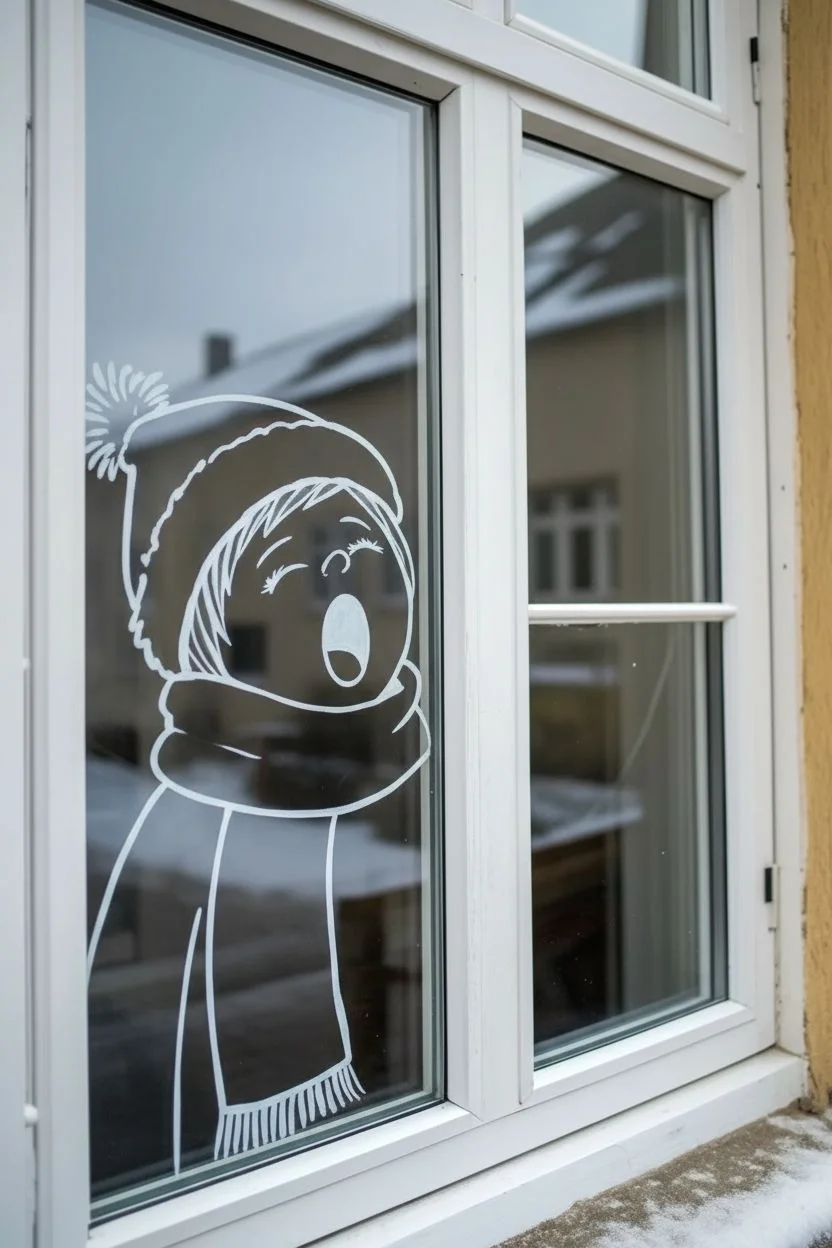
Bring the joy of holiday music to life with this charming window painting featuring an enthusiastic young singer bundled up in pink winter gear. The frosted glass effect provides a perfect snowy canvas for this cheerful, cartoon-style character and her floating musical notes.
Step-by-Step
Materials
- White liquid chalk marker (broad tip)
- Black liquid chalk marker (fine and broad tips)
- Acrylic craft paint (pink, beige/flesh tone, yellow, red)
- Small flat paintbrush
- Fine liner paintbrush
- Sponge dabber or small piece of kitchen sponge
- Glass cleaner and paper towels
- Masking tape (optional)
Step 1: Preparation and Outline
-
Clean surface:
Start by thoroughly cleaning the window pane with glass cleaner to remove any dust or grease, ensuring the paint adheres properly. -
Block out the head:
Using the white chalk marker, lightly sketch a large circle for the head in the lower center of the pane, leaving enough room above for musical notes. -
Add the hat shape:
Draw a beanie shape on top of the head circle, making sure to include a wide, folded brim across the forehead. -
Sketch the body:
Extend a curved line down from the left side of the scarf area to create the shoulder and back, forming a simple coat shape.
Sponge Savvy
For the hat brim texture, use a natural sea sponge instead of a dense kitchen sponge. The irregular holes create a much more realistic fluffy wool effect.
Step 2: Adding Color Layers
-
Paint the face:
Mix a small amount of flesh-tone acrylic paint and fill in the face area below the hat brimming, avoiding the mouth area. -
Fill the hat:
Using pink acrylic paint and a flat brush, fill in the main part of the beanie cap with smooth, even strokes. -
Create the scarf base:
Paint a thick pink band around the neck area for the scarf, then extend two vertical sections hanging down the front of the coat. -
Detail the brim:
Use white acrylic paint or the broad white marker to fill in the hat’s brim, dabbling it with a sponge to give it a fuzzy, wool-like texture. -
Add hair details:
Paint brown swoops emerging from under the hat brim to frame the face.
Dripping Paint?
If vertical drips ruin your lines, your paint is too watery. Mix in a tiny bit of cornstarch to thicken acrylics without altering the color significantly.
Step 3: The Singing Expression
-
Paint the mouth:
Paint a tall, black oval shape for the open singing mouth; once dry, add a red tongue shape at the bottom. -
Add rosy cheeks:
Apply two soft pink circles on the cheeks using a sponge dabber or your fingertip for a natural flush. -
Draw facial features:
With a fine black marker or liner brush, draw two arched lines for closed, happy eyes, small eyelashes, and a tiny nose bump.
Step 4: Texture and Definition
-
Outline everything:
Go over the entire illustration with a black marker or black paint and a fine brush to create bold, cartoon-style outlines. -
Add hat texture:
Draw vertical curved lines on the pink part of the hat to mimic knitting ribs. -
Detail the scarf:
Draw a grid pattern on the scarf using thin black lines to create a woven look, and add a zig-zag yellow pattern near the bottom with yellow paint. -
Scarf fringe:
Use the black marker to draw vertical tassel lines at the very bottom edge of the scarf. -
Pom-pom texture:
Draw a messy, spiky ball on top of the hat using black ink to represent the yarn pom-pom.
Step 5: Atmospheric Details
-
Musical notes:
Above the singer’s head, draw large eighth and sixteenth notes floating upward using black outline and grey fill or shading. -
Frosty background:
I like to use a nearly-dry sponge with white paint to lightly dab around the outside of the figure, creating a ‘frosted glass’ look that makes the character pop. -
Winter foliage:
Sketch simple, black, leafless branch shapes at the bottom corners to ground the image. -
Bonus character:
If you have a second pane, paint a tiny snowman head peeking up from the bottom frame to create a fun interaction.
Enjoy the smiles from neighbors as they walk past your spirited holiday display
Christmas Cat Knocking Ornaments Off the Tree
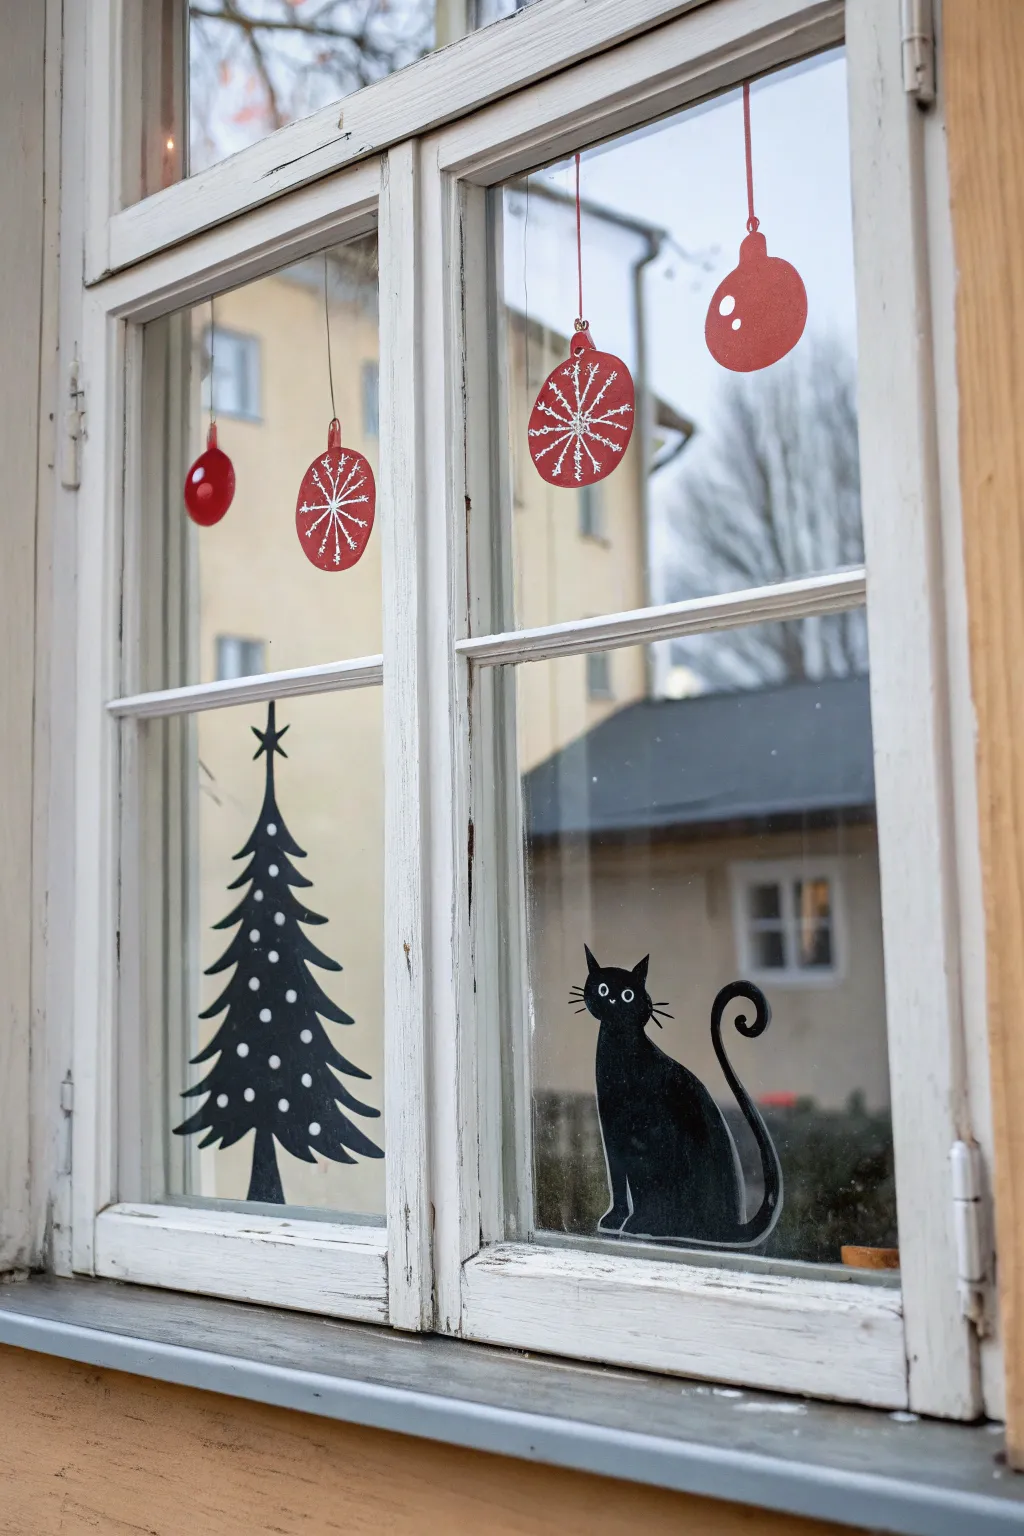
Transform your winter view with this playful combination of hanging red ornaments and a mischievous black cat eyeing the Christmas tree. Using window-safe paints or markers, you can create a festive scene that looks charming from both inside and outside.
Step-by-Step Guide
Materials
- Black liquid chalk marker (medium tip)
- White liquid chalk marker (fine tip)
- Red liquid chalk marker or acrylic paint
- Fine paintbrush (if using paint)
- Masking tape or painter’s tape
- Glass cleaner and paper towels
- Printable cat and tree stencils (optional)
- Scissors
Step 1: Preparation & Planning
-
Clean the Canvases:
Begin by thoroughly cleaning the window panes where you intend to paint. Any dust or grease will prevent the markers from adhering smoothly, so give it a good shine with glass cleaner and dry completely. -
Plan the Layout:
Visualize where your elements will go. The four ornaments hang from the top pane, while the tree and cat sit on the bottom pane. You can use small pieces of masking tape to mark the center points for each element.
Use a Stencil Trick
Not confident drawing freehand? Print the shapes on paper, tape them to the OUTSIDE of the glass, and trace them from the inside.
Step 2: The Hanging Ornaments
-
Draw the Strings:
Using the red chalk marker, draw four vertical lines descending from the very top of the window frame. Vary the lengths slightly to create a staggered, interesting look, just like real decorations. -
Outline the Shapes:
At the end of each red string, draw the outline of your ornaments. Create two simple circles for the patterned baubles and two teardrop shapes for the solid bulbs. -
Fill in the Red:
Color inside your outlines completely with the red marker or paint. You want a solid, opaque look, so if the red looks streaky, let the first layer dry for five minutes and apply a second coat. -
Add the Caps:
Where the string meets the ornament, add a tiny rectangle or square in red to represent the metal cap that holds the hook. -
Detail the Snowflakes:
Once the red paint is fully dry to the touch, switch to your white fine-tip marker. On the two round baubles, draw a simple eight-point star or snowflake pattern in the center. -
Add Reflections:
On the two teardrop-shaped bulbs and the round ones, add small white curved dashes or dots near the edges to mimic the shine of light glancing off glossy ornaments.
Step 3: The Silhouette Tree
-
Start the Tree Top:
On the lower left pane, use the black marker to draw a small star first. This ensures you leave enough room at the top without running into the window divider. -
Draw the Tree Outline:
Starting just below the star, sketch the curved, swooping branches of a stylized evergreen tree. Keep the edges wavy and slightly curled upwards at the tips. -
Fill the Tree:
Color in the entire tree shape with your black marker. Work in smooth strokes to avoid seeing tool marks when the sun shines through. -
Decorate with Dots:
Wait for the black ink to dry completely. Then, using the white marker, dab small dots all over the tree to represent lights or ornaments contrast against the dark background.
Fixing Smudges
If you make a mistake, don’t smear it while wet. Let the chalk marker dry completely, then gently scratch it off with a fingernail or a dry Q-tip.
Step 4: The Curious Cat
-
Outline the Cat Body:
On the lower right pane, outline a seated cat shape using the black marker. Focus on a pear-shaped body and a round head with pointed ears. -
Create the Tail:
Draw a long, curvy tail rising from the base of the cat. Make it swirl elegantly to fill the empty space to the right of the body. -
Fill the Silhouette:
Color in the cat and tail completely with black. I find it helpful to outline the perimeter first and then fill inward to keep the edges sharp. -
Outline the Legs:
Once dry, use the white marker to draw a very thin line defining the front leg. This negative space trick makes the silhouette look like it has dimension. -
Add the Face:
With the white marker, draw two wide, round eyes with tiny black dots for pupils. Add a small nose and thin whiskers radiating from the cheeks. -
Final White Outline:
Trace a very thin white border around the entire cat silhouette. This helps separate the black figure from dark outdoor backgrounds, ensuring your kitty is visible at night.
Enjoy your cozy holiday window display that adds cheer to both your home’s interior and the neighborhood view


Dog Stealing the Snowman’s Nose
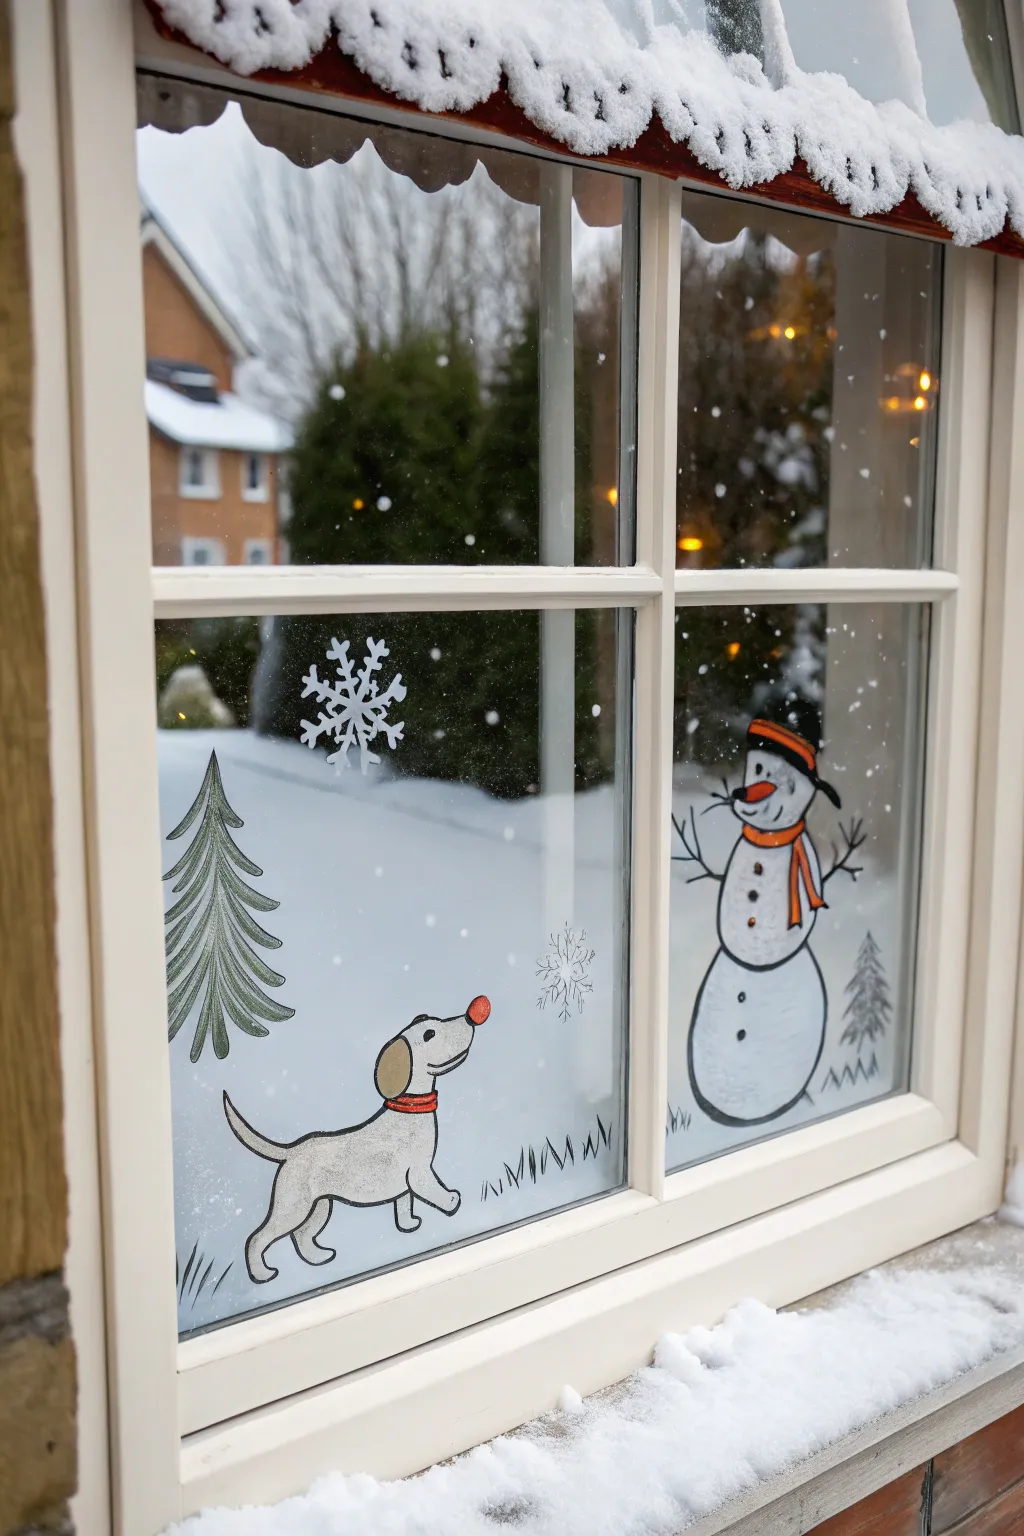

Usually, the Snowman is the star of the show, but in this playful scene, a mischievous pup has snatched the carrot nose for himself. This charming window painting uses simple chalk markers or acrylic paint pens to create a lighthearted story that passerby will love deciphering.
Detailed Instructions
Materials
- White liquid chalk marker (medium tip)
- White liquid chalk marker (fine tip)
- Acrylic paint pens (orange, black, grey)
- Glass cleaner and lint-free cloth
- Paper towels
- Scrap paper for sketching
- Cotton swabs (for cleanup)
Step 1: Setting the Scene
-
Clean the surface:
Begin with a perfectly clean canvas. Spray your window pane with glass cleaner and wipe it down with a lint-free cloth to remove any dust or fingerprints that might interfere with the paint adhesion. -
Plan your layout:
Before touching the glass, sketch a quick rough draft on paper. You want the dog on the bottom left pane and the snowman on the bottom right pane so they appear to be interacting across the window frame mullion. -
Draw the ground line:
Using your medium white chalk marker, draw some simple, jagged grass tufts along the bottom edge of both window panes to ground your characters.
Oops! Runny Paint?
If your chalk marker is too runny, press the tip onto a paper towel for a few seconds to blot excess ink before returning to the vertical glass surface.
Step 2: Creating the Snowman
-
Outline the body:
On the right pane, draw two large circles stacked on top of each other using the black acrylic paint pen. Make the bottom circle slightly larger and flatter at the base. -
Add the face details:
Draw two small dots for eyes and a classic ‘coal’ smile with the black pen. Leave the nose area intentionally empty to sell the joke. -
Accessorize:
Draw a simple hat on the head. Then, add a scarf around the neck area. I like to outline these in black first before filling them with color. -
Color accents:
Use your orange paint pen to add stripes to the hat and scarf. This pop of color draws the eye immediately to the snowman. -
Add arms and buttons:
Sketch stick arms branching out from the sides using thin, jagged black lines. Add three vertical buttons down the chest. -
Shade the snowman:
To give the snowman volume, use a silver or very light grey marker to gently shade the left side of the snowballs, blending slightly with your finger if the paint is still wet.
Level Up: Frosted Look
Dab a sponge dipped in watered-down white acrylic paint along the very bottom corners of the window panes to create a realistic frosted ice effect.
Step 3: Drawing the Mischievous Dog
-
Outline the dog:
On the left pane, use the black pen to draw a simple dog profile. Start with an oval for the head, a floppy ear, and a rectangular body with a tail sticking straight out. -
The stolen nose:
Right at the tip of the dog’s snout, draw a bright orange circle or triangle. This is the crucial detail—the stolen carrot nose! -
Add the collar:
Draw a small collar around the dog’s neck and color it orange to match the snowman’s accessories, tying the color scheme together. -
Expression and shading:
Give the dog a single dot eye and a happy curved mouth line. Lightly color the dog’s body with grey, or use white chalk paint mixed with a tiny bit of black on a palette before applying.
Step 4: Atmospheric Details
-
Draw the tree:
Behind the dog on the left pane, draw a stylized pine tree. Use downward swooping strokes in black or dark green to create the branches. -
Add a small tree:
On the right pane, next to the snowman, draw a much smaller, subtle pine tree in grey or black to create depth. -
Create a giant snowflake:
Above the dog, draw a large, intricate six-pointed snowflake using the medium white chalk marker. -
Add falling snow:
Dot the remaining empty space on both panes with random white spots of varying sizes to mimic a gentle snowfall. -
Final clean up:
Check your lines. If any edges look messy, use a damp cotton swab to wipe away the excess paint and sharpen the outlines once everything is dry.
Enjoy the smiles from neighbors as they spot the missing nose on your playful winter window display
Jack Frost With a Mischievous Mustache and Icicle Tricks
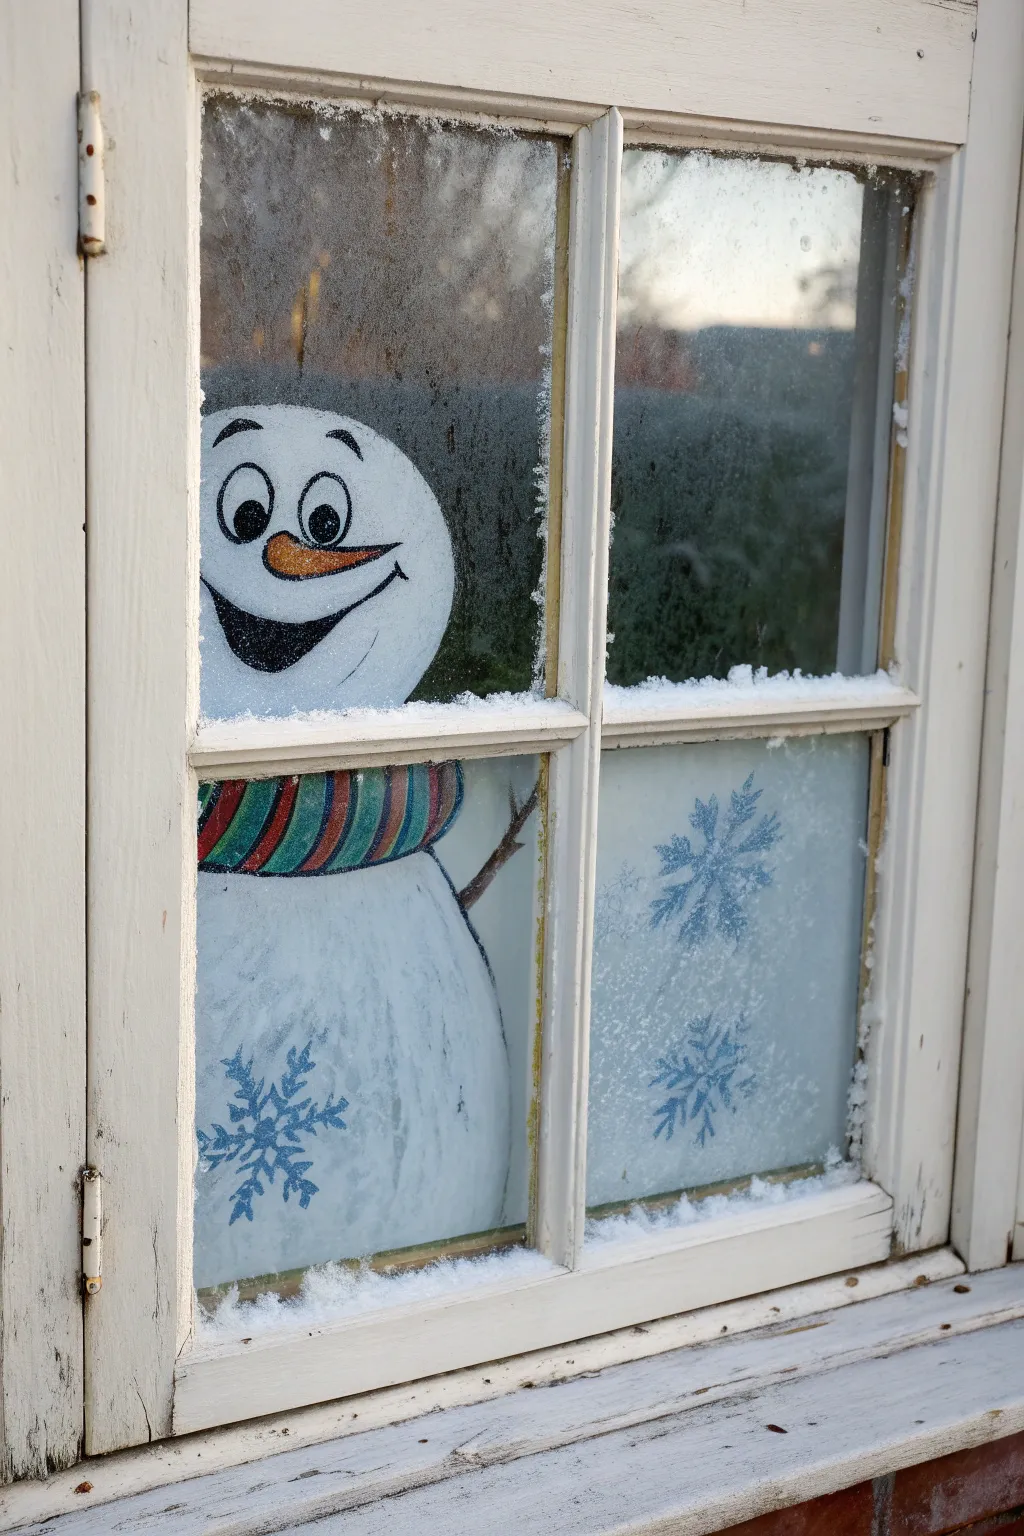
Transform your view into a winter wonderland with this cheerful snowman peeking through the glass. Using simple acrylics and frost spray, you’ll create a friendly character that looks like he’s greeting you from the cold outside.
How-To Guide
Materials
- White, black, orange, blue, red, and green acrylic craft paint
- Assorted paintbrushes (medium flat, small round, fine liner)
- Painter’s tape or masking tape
- Glass cleaner and paper towels
- Spray snow or artificial frost spray
- Water cup and palette/paper plate
- Pencil and scrap paper (for sketching)
- Dry sponge (optional)
Step 1: Preparation & Frosting
-
Clean the glass:
Start with a perfectly clean surface. Thoroughly wipe down the window panes inside and out with glass cleaner to remove any dust or oils that might prevent the paint from sticking. -
Plan your placement:
Decide which panes will hold your design. For this split look, the snowman’s head goes in an upper pane and the body directly below it. The adjacent lower pane will hold snowflakes. -
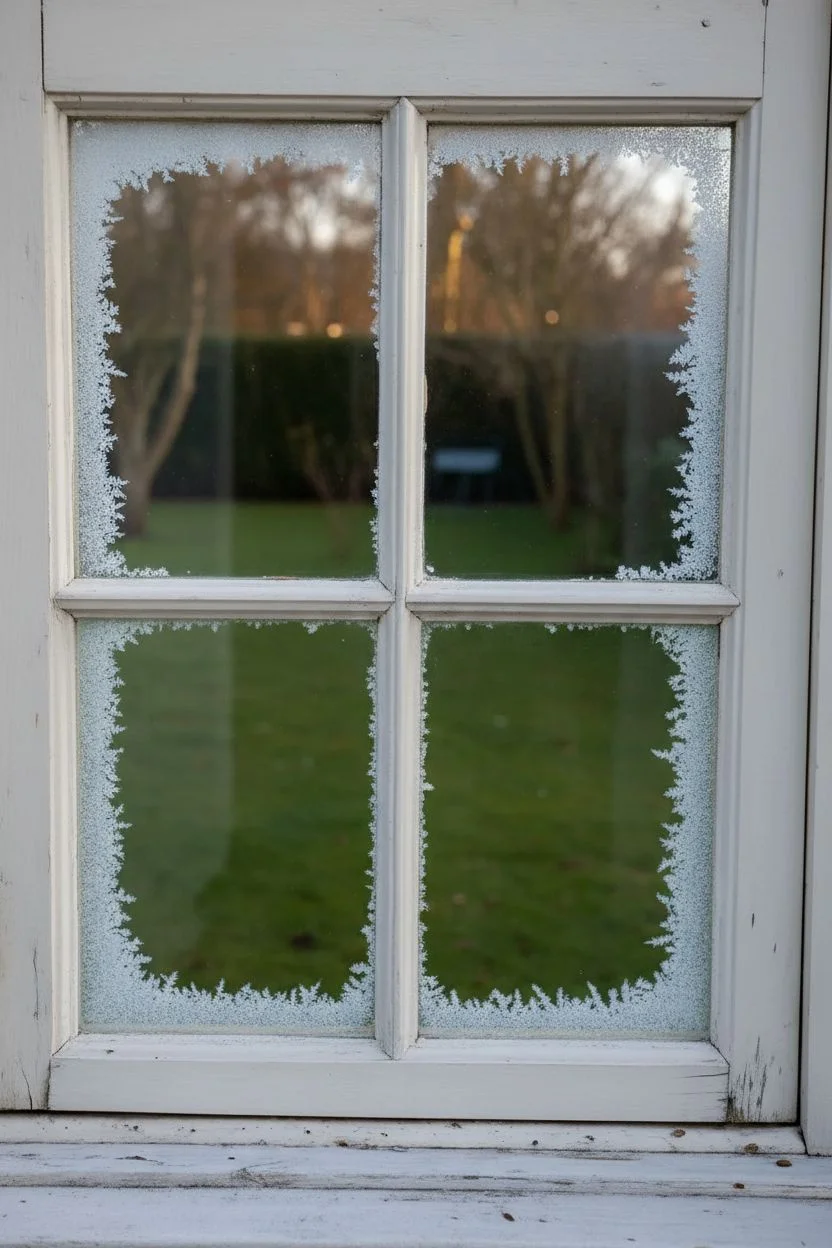
Apply the frost base:
Lightly spray the edges and corners of the window panes with artificial frost spray. You want a realistic, chilly look, so focus more heavily on the perimeter and fade it inward, leaving the center clear for painting.
Clearer Colors
If your white paint looks streaky on the glass, resist overworking it while wet. Let it dry fully, then sponge on a second layer for a solid, opaque finish.
Step 2: Painting the Head (Top Pane)
-
Outline the head shape:
Using a small round brush and white paint, outline a large, rounded shape for the head in the bottom left corner of the top pane. It should look like it’s resting on the window mutton. -
Fill in the face base:
Fill the entire head outline with white acrylic paint. You may need two coats for solid opacity; let the first coat dry completely before adding the second. -
Sketch the features:
Once the white base is dry, lightly use a liner brush with very diluted grey paint to map out where the eyes, nose, and mouth will go. This acts as a guide before committing to bold colors. -
Paint the eyes:
Paint two large white ovals, then outline them with a fine liner brush and black paint. Add large black pupils near the bottom of the ovals and tiny white highlight dots to bring them to life. -
Add the carrot nose:
Paint a curved, triangular carrot nose using orange paint. I like to add a tiny line of brown or darker orange on the underside for a bit of dimension. -
Create the smile:
Paint a wide, enthusiastic grin using black paint. Ensure the corners of the mouth turn up high towards the eyes for that joyful expression. -
Add eyebrows:
Paint two arched eyebrows floating high above the eyes using black paint to enhance the surprised, happy expression.
Step 3: Painting the Body (Bottom Pane)
-
Paint the scarf:
Directly below the head (separated by the window frame), paint a thick, curved band for the scarf. Use colored stripes—red, green, blue, and yellow—following the curve of the ‘neck’ area. -
Outline the body:
Paint a large, rounded shape extending downward from the scarf for the snowman’s body. Fill this area with white paint, applying a second coat if needed for full coverage. -
Add texture strokes:
Once the white body is dry, use a dry brush with a tiny amount of light blue or grey paint to add wispy curved strokes. This suggests the texture of packed snow and gives the body volume. -
Paint the stick arm:
On the right side of the body, paint a brown branch-like arm reaching upward. Make the lines slightly jagged and uneven to resemble real wood. -
Add a snowflake detail:
Paint a blue snowflake directly onto the white body of the snowman using a fine liner brush. This looks like a pattern or a falling flake landing on him.
Sparkle & Shine
While the white paint on the snowman’s body is still slightly wet, sprinkle a pinch of iridescent white glitter over it to mimic the shimmer of fresh snow.
Step 4: Finishing Touches
-
Paint floating snowflakes:
In the adjacent window pane (bottom right), paint two or three large, intricate snowflakes using light blue paint. Use a fine brush to create the six radiating arms and small V-shapes on each arm. -
Add textural snow to the frame:
Apply a thicker layer of spray snow or dab white paint with a sponge along the horizontal window muttons to verify the look of gathered snow. -
Cleanup lines:
Once everything is fully dry, use a razor blade or a damp cotton swab to gently scrape away any paint that went outside your intended lines or onto the window frame.
Now you have a frosty friend to keep you company all winter long
Interactive Speech Bubbles for a Holiday One-Liner
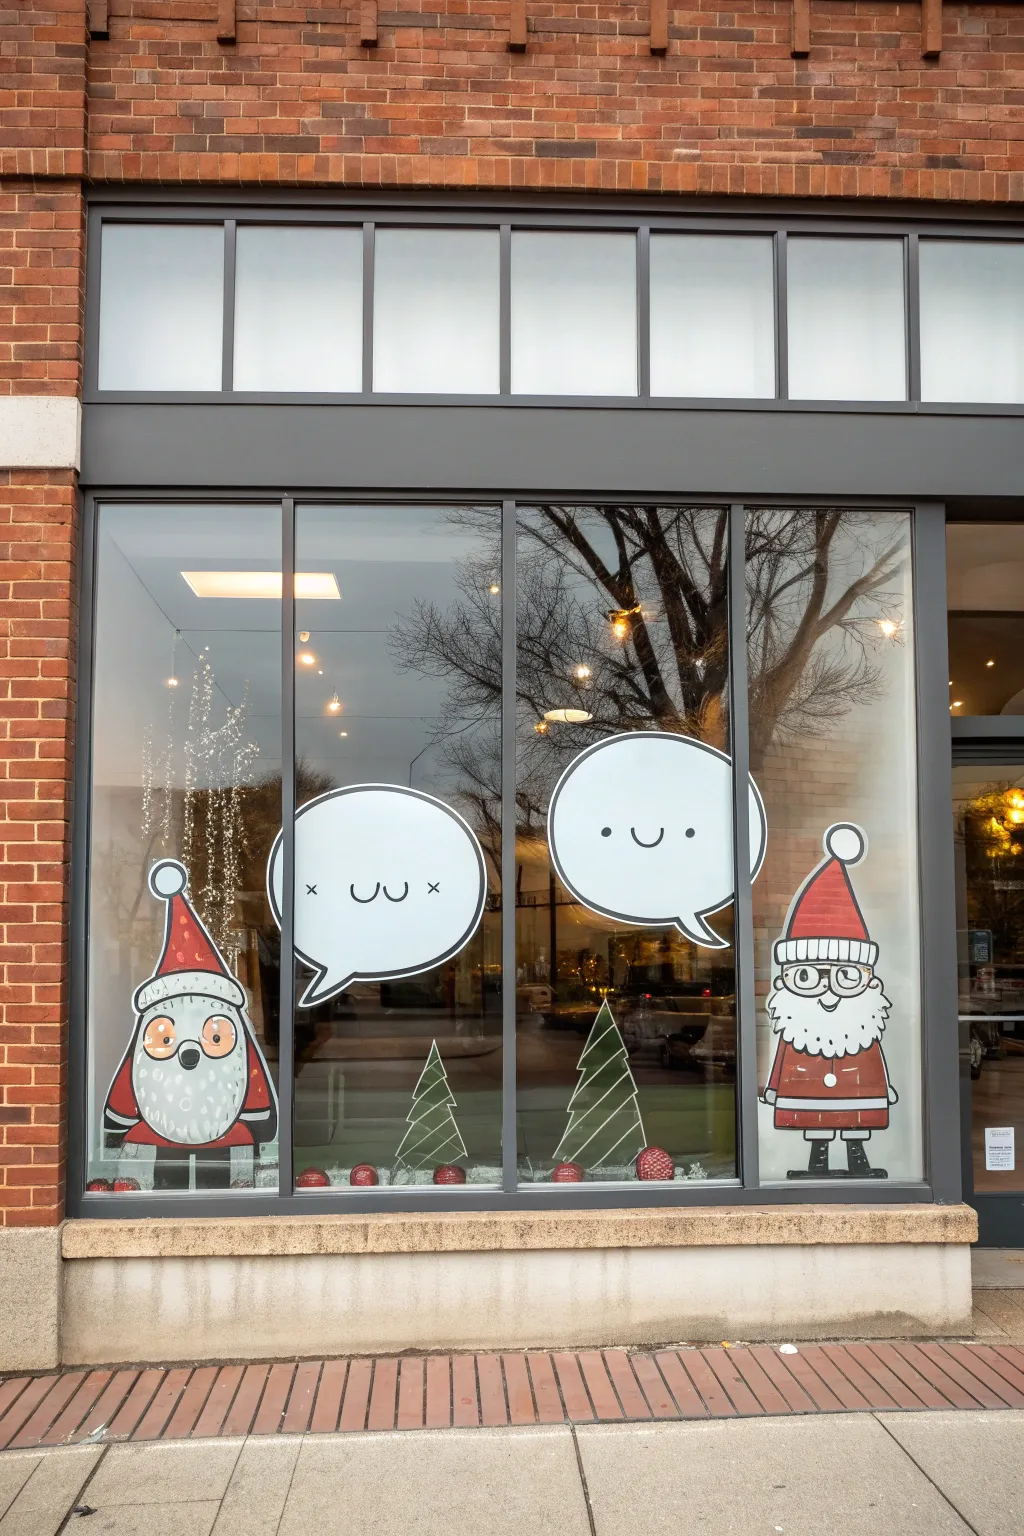
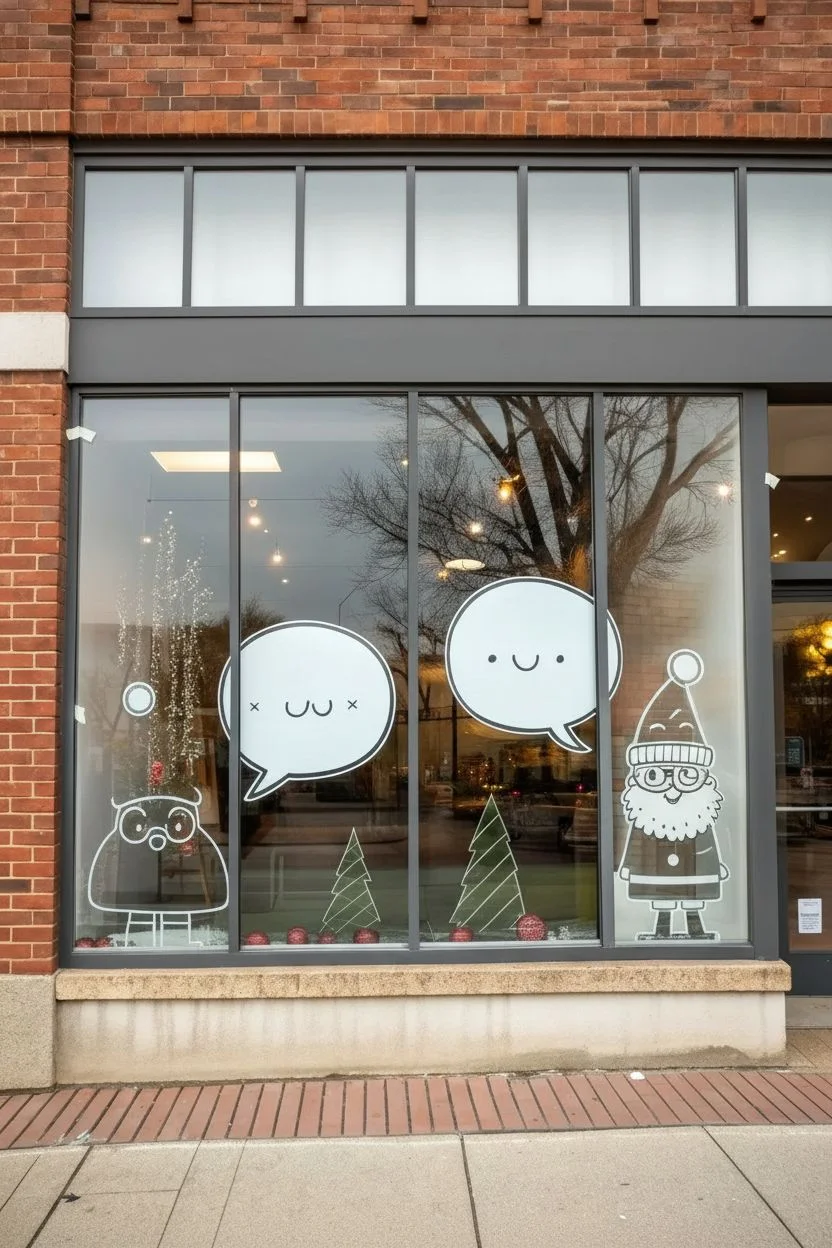
Transform your storefront or home window into a playful holiday scene featuring two whimsical Santa characters having a chat. This project uses bold, opaque window paints to create oversized speech bubbles that invite passersby to imagine the dialogue.
Detailed Instructions
Materials
- Glass cleaner and microfiber cloth
- White liquid chalk marker (broad tip)
- Red acrylic window paint
- White acrylic window paint
- Black acrylic window paint
- Assorted paintbrushes (flat 1-inch, medium round, fine liner)
- Painter’s tape or masking tape
- Paper towels and water cup
- Sketch paper and pencil (for drafting)
- Reference photo
Step 1: Planning and Outlining
-
Clean surface:
Begin by thoroughly cleaning the window glass inside and out. Any dust or grease will prevent the paint from adhering smoothly, so give it a good shine with glass cleaner and a microfiber cloth. -
Draft layout:
Before touching the glass, sketch your design on paper to get the proportions right. Notice how the two characters anchor the bottom corners, while the speech bubbles float in the center panes. -
Tape boundaries:
If your window has multiple panes like the one shown, use the frames as natural guides. You can place small pieces of tape on the outside of the glass to mark the top of Santa’s hat or the width of the speech bubbles as reference points. -
Outline speech bubbles:
Using a broad-tip white liquid chalk marker, draw the large, rounded speech bubbles first. Keep the lines clean and continuous. Draw the tails of the bubbles pointing toward where the characters’ heads will be. -
Outline characters:
Draw the outline of the Santa on the left (a wider, rounded shape) and the Santa on the right (a taller, rectangular shape). Don’t worry about filling in details yet; just focus on the main silhouette shapes. -
Sketch the trees:
Add two simple triangular Christmas trees in the center area near the bottom. Draw a zig-zag line inside the triangle to suggest branches.
Step 2: Painting the Base Layers
-
Fill the white bubbles:
Using your flat 1-inch brush and white window paint, fill in the entire area of the speech bubbles. Apply the paint in smooth, horizontal strokes. You may need two coats to make it fully opaque. -
Paint Santa reds:
Switch to red paint for the hats and coats. For the left Santa, paint the main hat triangle and the coat sides. For the right Santa, fill in the hat and the main coat rectangle. Leave space for white fur trim. -
Add white elements:
Paint the beards, hat brims, and pom-poms with white. Paint the left Santa’s beard as a large, fluffy circular area. For the right Santa, paint a scalloped edge for the beard. -
Paint the trees:
Using a smaller round brush, trace over your tree lines with green or white paint (the example uses simple white outlines for a minimalist look), or fill them in if you prefer a solid appearance. -
Drying time:
Let all the base colors dry completely. This is crucial—if the paint is wet, your black outlines will bleed into the colors.
Paint on the Inside?
Painting inside protects art from weather, but remember to reverse text! Since this design has no words, you can paint inside freely without mirroring.
Step 3: Adding Details and Defining Lines
-
Outline in black:
Once the base paint is bone dry, use a fine liner brush with black paint (or a black window marker) to outline everything. Go over the exterior of the speech bubbles, the characters, and the trees to make them pop. -
Draw speech bubble faces:
Inside the dry white speech bubbles, paint simple ‘uwu’ style happy faces. Use two small U-shapes for eyes and a central curve for the mouth on the left bubble, and simple dots and a smile on the right. -
Detail the left Santa:
Paint large circular glasses and tiny dot eyes on the left character. Outline his nose and add texture lines to his beard to make it look hairier. -
Detail the right Santa:
Add rectangular glasses, a round nose, and a smile to the taller Santa. Don’t forget to paint his belt buckle and little black boots at the bottom. -
Add floating elements:
Paint small red ornaments along the bottom window ledge to ground the scene. You can simply paint red circles and outline them in black to look like baubles resting on the sill. -
Final touch-ups:
Step back to the sidewalk to view your work. Fill in any patches where the light shines through unevenly, and sharpen any black outlines that look wobbly.
Dripping Paint Fix
If paint drips, wait for it to dry completely. It scrapes off cleanly with a razor blade or credit card, unlike smearing wet paint which makes a mess.
Enjoy the smiles your whimsical window art brings to everyone walking by this season
Inside-Out Illusion: Santa Pressed Up Against the Glass
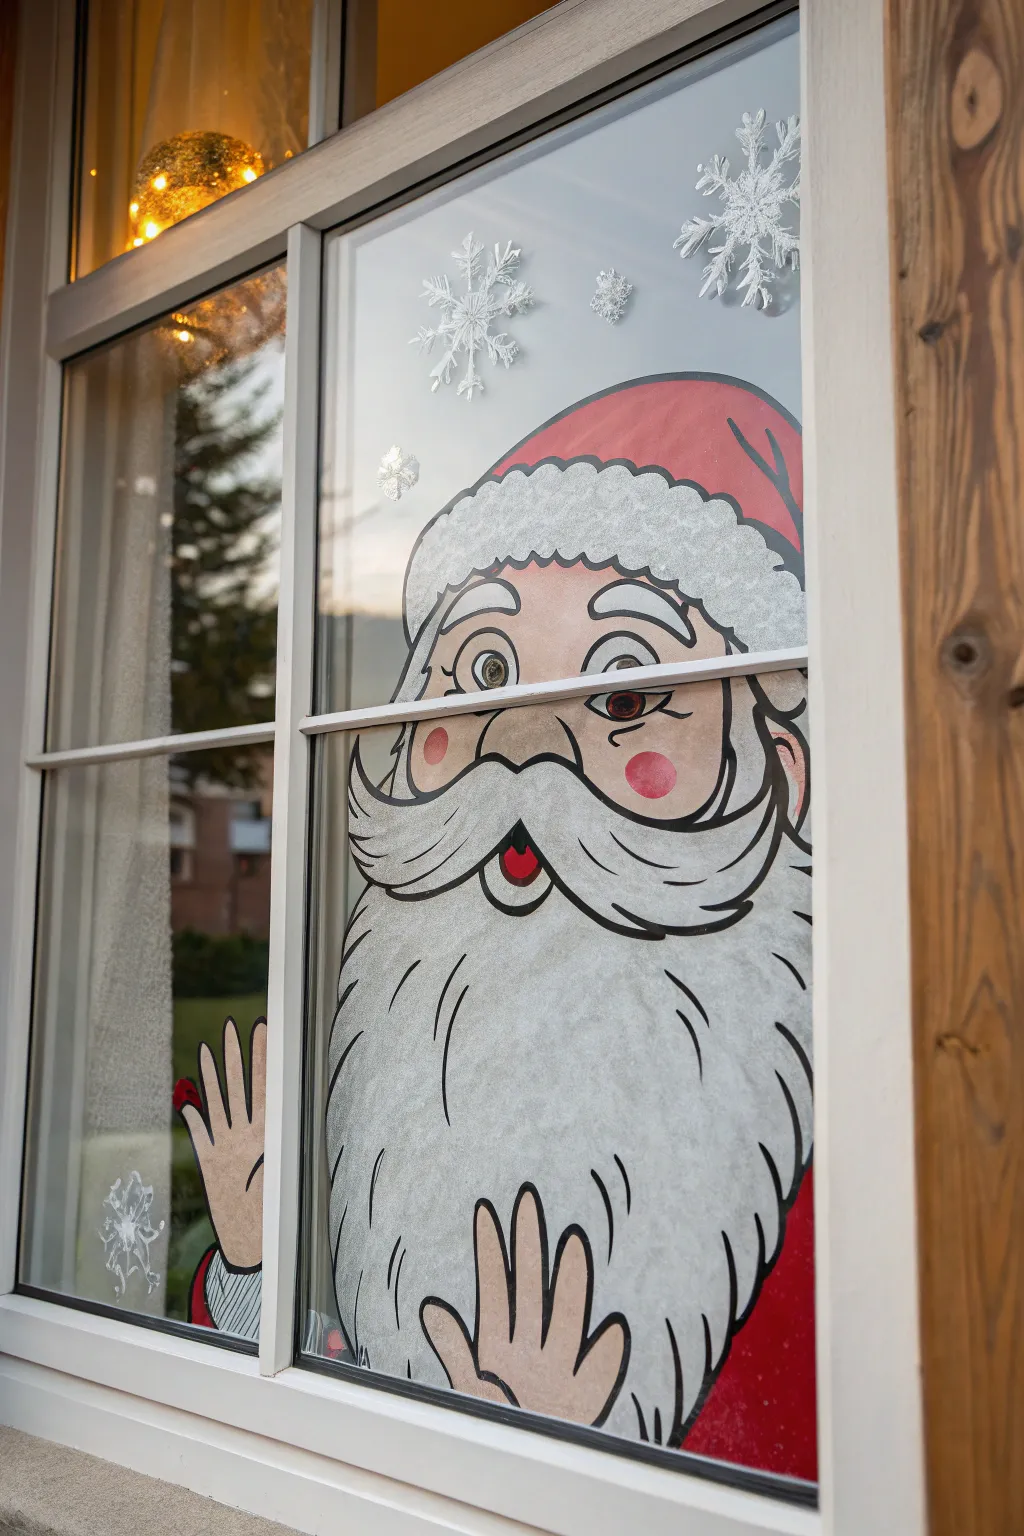

Transform your plain window into a comical holiday scene with this clever illusion painting. By illustrating Santa peering directly through the glass with wide eyes and waving hands, you create a delightful ‘inside-out’ effect that amuses passersby and guests alike.
How-To Guide
Materials
- White liquid chalk marker (broad tip)
- Red liquid chalk marker or acrylic window paint
- flesh-tone acrylic craft paint (or mix white/orange/pink)
- Black liquid chalk marker or fine liner brush with black acrylic
- Synthetic paint brushes (flat and round tip)
- Small sponge dabber (optional)
- Glass cleaner and lint-free cloth
- Printed Santa template (optional)
- Painter’s tape
Step 1: Preparation & Outline
-
Clean the canvas:
Begin by thoroughly cleaning the inside of your window pane. Any dust or grease will prevent the paint from adhering smoothly, so give it a good wipe with glass cleaner and a lint-free cloth. -
Position your guide:
If you aren’t confident drawing freehand, print out a large reference image or template of Santa’s face. Tape this to the *outside* of the window facing in so you can trace it. -
Trace the main shapes:
Using a black liquid chalk marker or a thin brush with black acrylic paint, trace the major outlines. Focus on the big shapes first: the dome of the hat, the wide oval of the face, and the cascading beard. -
Define the features:
Carefully draw the facial features. For this surprised look, draw large, arched eyebrows and wide oval eyes. Don’t forget the mustache that curls up at the ends. -
Add the hands:
Sketch Santa’s hands at the bottom of the window pane. One hand should be waving (fingers spread) and the other cut off by the frame to suggest he’s leaning in.
Streaky Paint?
If your acrylic paint looks translucent or streaky on glass, let the first layer dry completely (about 20 mins) before sponging on a second layer. Dab, don’t drag, for solid coverage.
Step 2: Filling with Color
-
Paint the face:
Mix a light flesh tone using acrylic paint. Apply this evenly to the face area and the hands, avoiding the eyes and mouth. You may need two coats for opacity. -
Santa’s signature red:
Use a bright red acrylic paint or a thick red chalk marker to fill in the hat. Make sure to stay within your black contour lines for a crisp look. -
Rosy cheeks:
While the face paint is dry, take a small amount of diluted red paint or use a sponge dabber to create soft, pink circles on the cheeks and the tip of the nose. -
The white beard base:
Using a broad white chalk marker or white acrylic paint, fill in the large beard area and the hat’s trim. Don’t worry about texture yet; just get a solid white base down.
Level Up: Night Mode
Place a string of warm white fairy lights around the inside window frame. The backlight will make the painted colors verify vibrant and create a cozy glow around Santa’s silhouette.
Step 3: Detailing & Texture
-
Fluff the fur:
Once the white base is dry, use a scruffy brush or a sponge to dab extra white texture onto the hat’s brim and pom-pom to mimic fluffy fur. -
Beard strands:
Take your black liner brush again and draw sweeping, curved lines inside the white beard area to define individual locks of hair. This gives the beard volume and flow. -
Eye details:
Fill the whites of the eyes, then add the irises. I like to add a tiny white dot in the pupil to simulate a reflection, bringing life to Santa’s expression. -
The surprised mouth:
Paint the inside of the open mouth black or dark red, and add a small pink tongue at the bottom. -
Refine outlines:
Go over any black outlines that got covered by paint. Ensure the mustache stands out clearly against the beard.
Step 4: Atmospheric Effects
-
Snowflake sketches:
above Santa’s head, use your white chalk marker to draw several snowflakes. Start with a simple cross and add ‘V’ shapes to the arms for a classic crystal look. -
Vary the sizes:
Draw some snowflakes large and detailed, and others as simple dots or small stars to create depth and fill empty space on the glass. -
Final clean up:
Check for any smudges or drips. A damp cotton swab is perfect for erasing tiny mistakes or sharpening the edges of your lines.
Step back outside to admire your new jovial visitor who is permanently greeting your neighbors


Have a question or want to share your own experience? I'd love to hear from you in the comments below!