
Charcoal is my go-to when I want drama fast—deep blacks, velvety midtones, and highlights I can literally pull back out with an eraser. Here are some charcoal art ideas I love teaching because they look impressive, but they’re totally doable once you lean into value and texture.
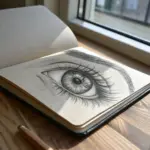
Realistic Eye Value Study
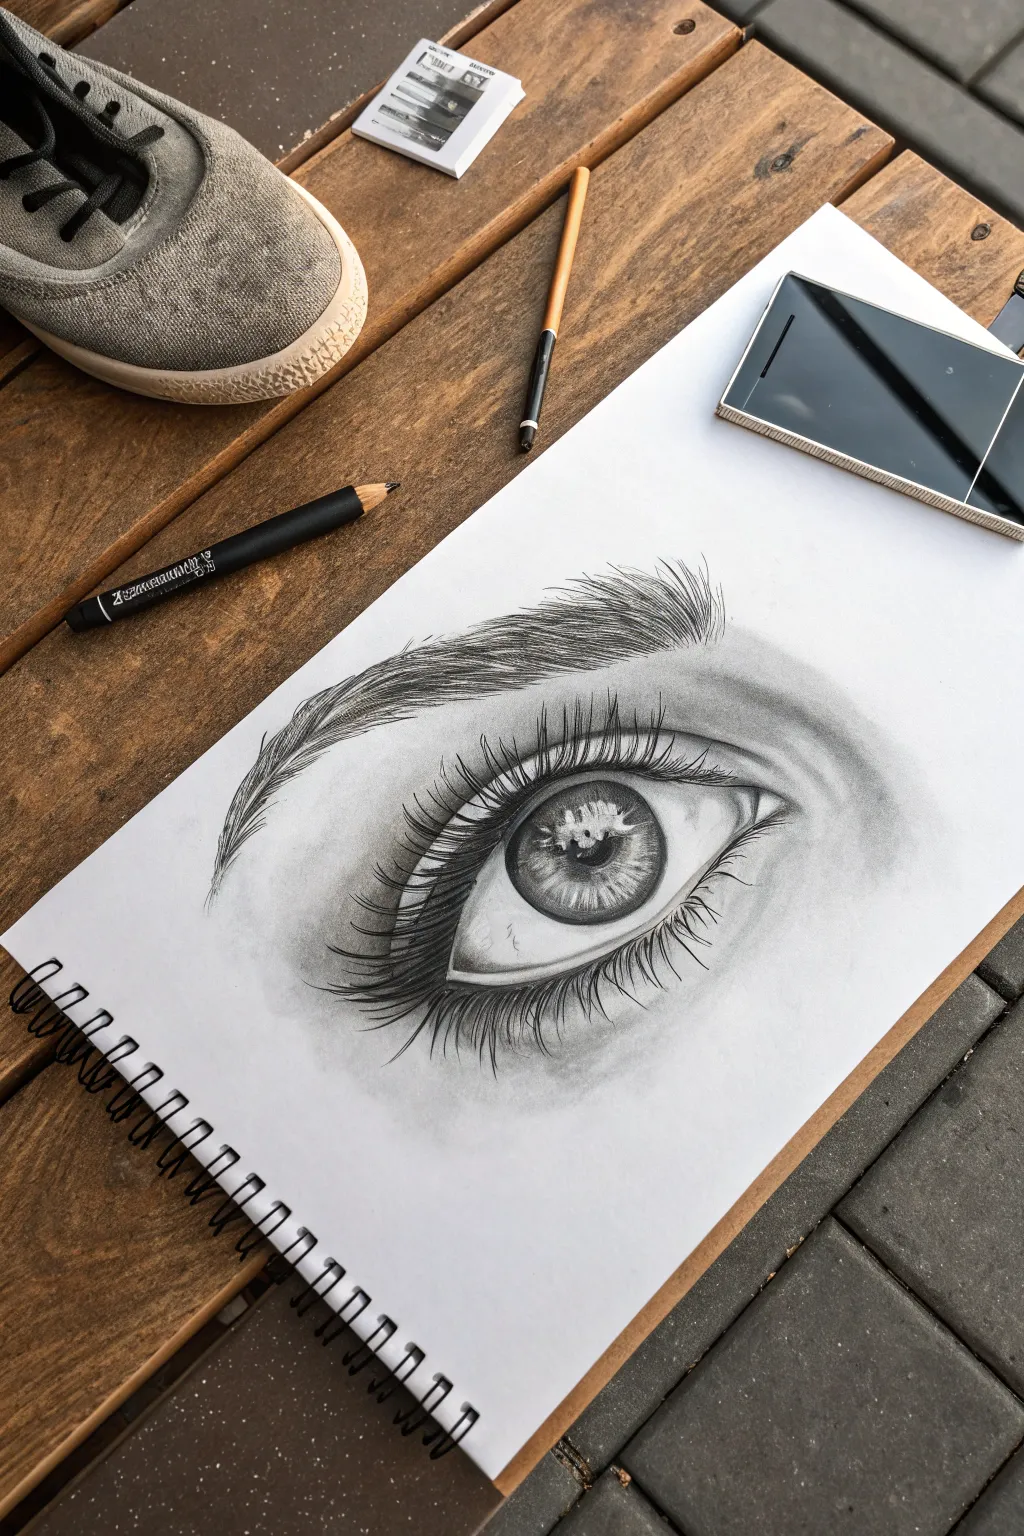
Master the art of observation with this focused study of a human eye, capturing the depth of the iris and the sweep of the lashes. This project uses strong contrasts and careful shading to create a striking, three-dimensional realism that pops off the page.
How-To Guide
Materials
- High-quality sketchbook paper (smooth texture preferred)
- Charcoal pencils (Soft, Medium, Hard)
- Graphite pencil (HB for initial sketching)
- Kneaded eraser
- Paper blending stump (tortillon)
- Pencil sharpener
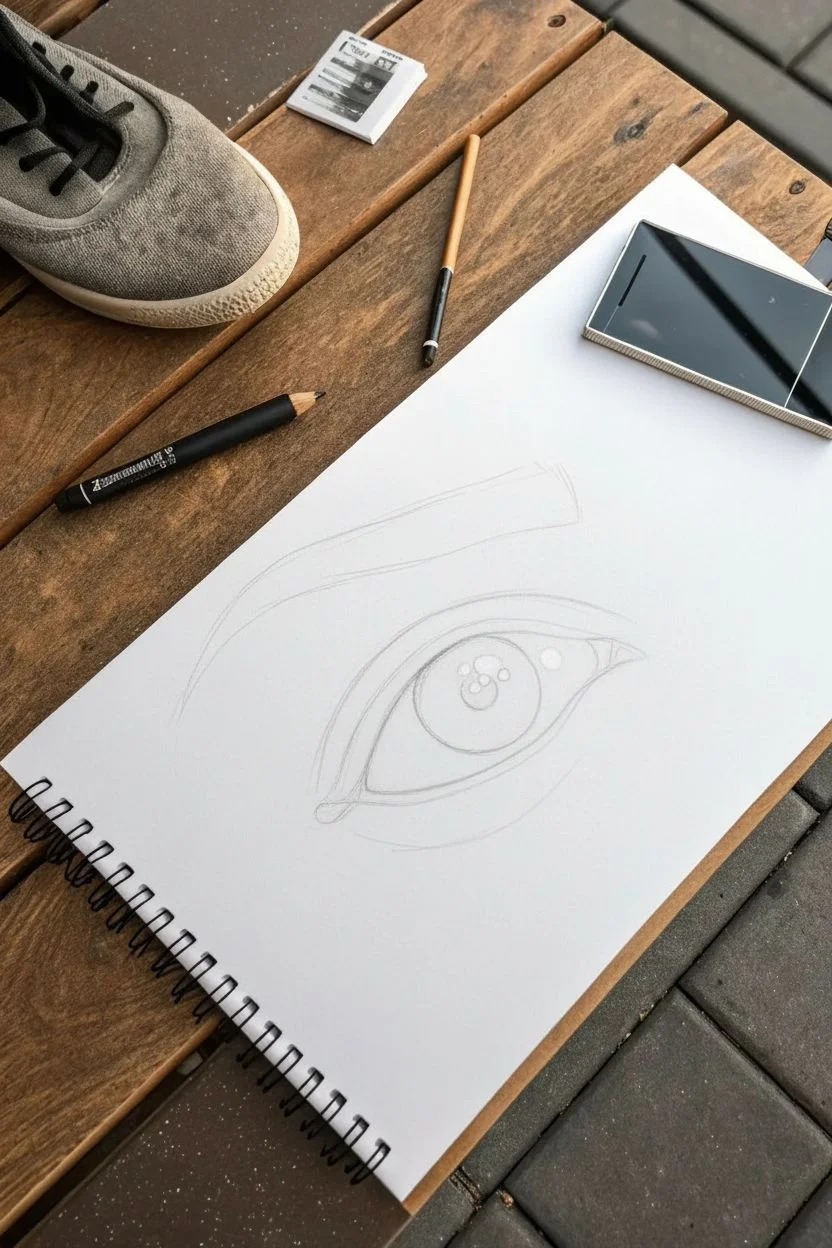
Step 1: The Framework
-
Outline the shape:
Begin with an HB pencil, using a very light touch to draw the basic almond shape of the eye. Sketch the circular iris within it, ensuring the top is slightly covered by the upper lid, and mark out the pupil in the very center. -
Establish the tear duct:
Add the small, fleshy area of the tear duct on the inner corner (left side). This shouldn’t be a sharp point but a soft, slightly rounded curve connecting the upper and lower lids. -
Mark the highlights:
Before adding any darkness, lightly outline where the bright reflections in the pupil and iris will be. Preserving these pure white paper areas now is crucial for that glassy, wet look later. -
Map the eyebrow:
Sketch a faint guideline for the eyebrow arch well above the eye. Don’t draw individual hairs yet; just establish the direction and thickness of the brow shape.
Step 2: Deepening Values
-
Darken the pupil:
Switch to a soft charcoal pencil to fill in the pupil. Press firmly to get a rich, deep black, but be extremely careful to work around your mapped highlights, keeping them pristine. -
Structure the iris:
Using a medium charcoal pencil, draw the outer ring of the iris. Then, create the radial texture by drawing lines flicking outward from the pupil and inward from the outer ring, leaving a lighter halo area in the middle of the iris muscle. -
Shade the eyeball:
The ‘white’ of the eye isn’t actually white. Use a hard charcoal pencil or just a smudged blending stump to add soft grey shading to the corners of the eyeball, giving it a spherical form. -
Define the crease:
Draw the deep crease of the upper eyelid with a confident, dark line. I find that thickening this line slightly in the center helps emphasize the curve of the socket.
Pro Tip: Direction Matters
Always rotate your paper when drawing lashes. Pulling the stroke ‘towards’ your body allows for a more natural, tapered curve than pushing the pencil away.
Step 3: Lashes and Brows
-
Blend the skin:
Apply soft charcoal shading to the skin around the eye—above the crease and under the lower lid. Use your blending stump to smooth this out completely so it looks like skin texture, not lines. -
Draw upper lashes:
Using a freshly sharpened soft charcoal pencil, create the upper eyelashes. Start at the root on the eyelid rim and flick your wrist upward and outward in a swift, curved motion. Clump a few together for realism. -
Add lower lashes:
Repeat the process for the lower lashes, but make these shorter, thinner, and slightly more spaced out. Remember that they curve downward away from the eye. -
Reflect lashes:
Add a few subtle reflections of the upper lashes into the highlight area of the eye itself. This tiny detail adds immense realism. -
Build the eyebrow:
Fill in the eyebrow using short, quick strokes that follow your initial guide. Start with lighter strokes in the center and get darker and denser toward the arch and tail. -
Add stray hairs:
Draw tiny, faint stray hairs around the main brow shape and near the tear duct to break up outlines that look too perfect.
Level Up: Reflection Detail
Instead of a generic white box highlight, try sketching a tiny ‘window’ reflection in the pupil that mirrors a specific imaginary light source.
Step 4: Final Polish
-
Highlight recovery:
Take your kneaded eraser and pinch it into a fine point. Lift out tiny pigment spots in the iris and on the lower waterline to create a wet, glistening texture. -
Deepen contrasts:
Do a final pass with your darkest charcoal. Re-blacken the pupil, the lash line roots, and the darkest part of the crease to maximize the contrast against the white paper.
Step back and admire the intensity of the gaze you have created on the page


Hands Holding Something Simple
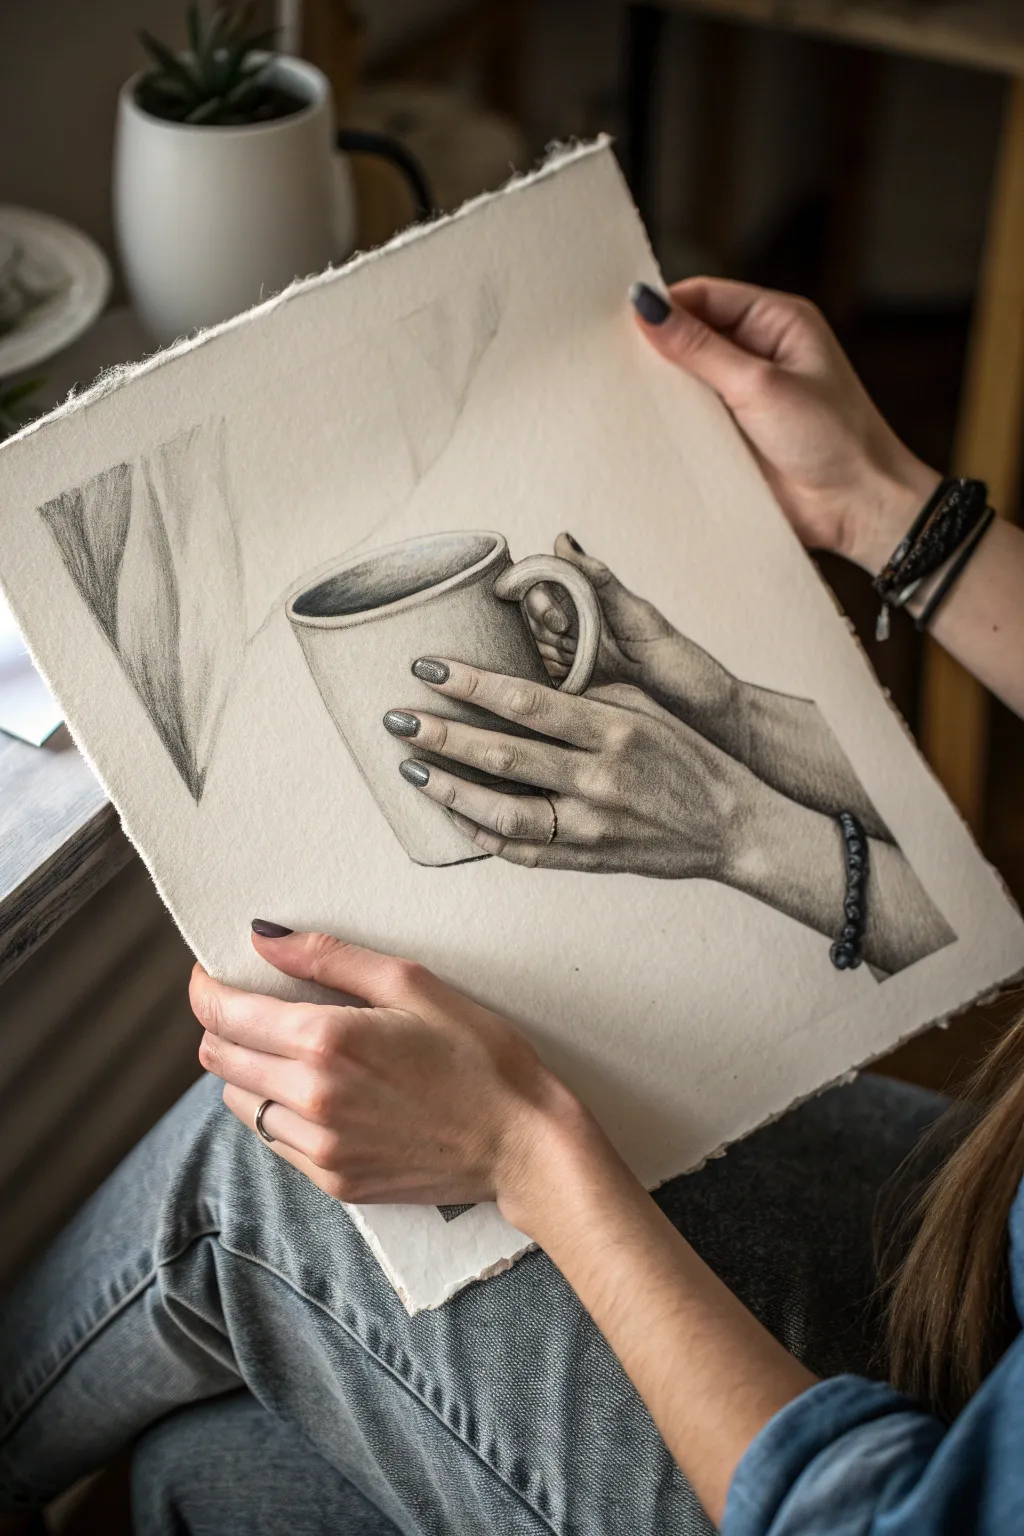
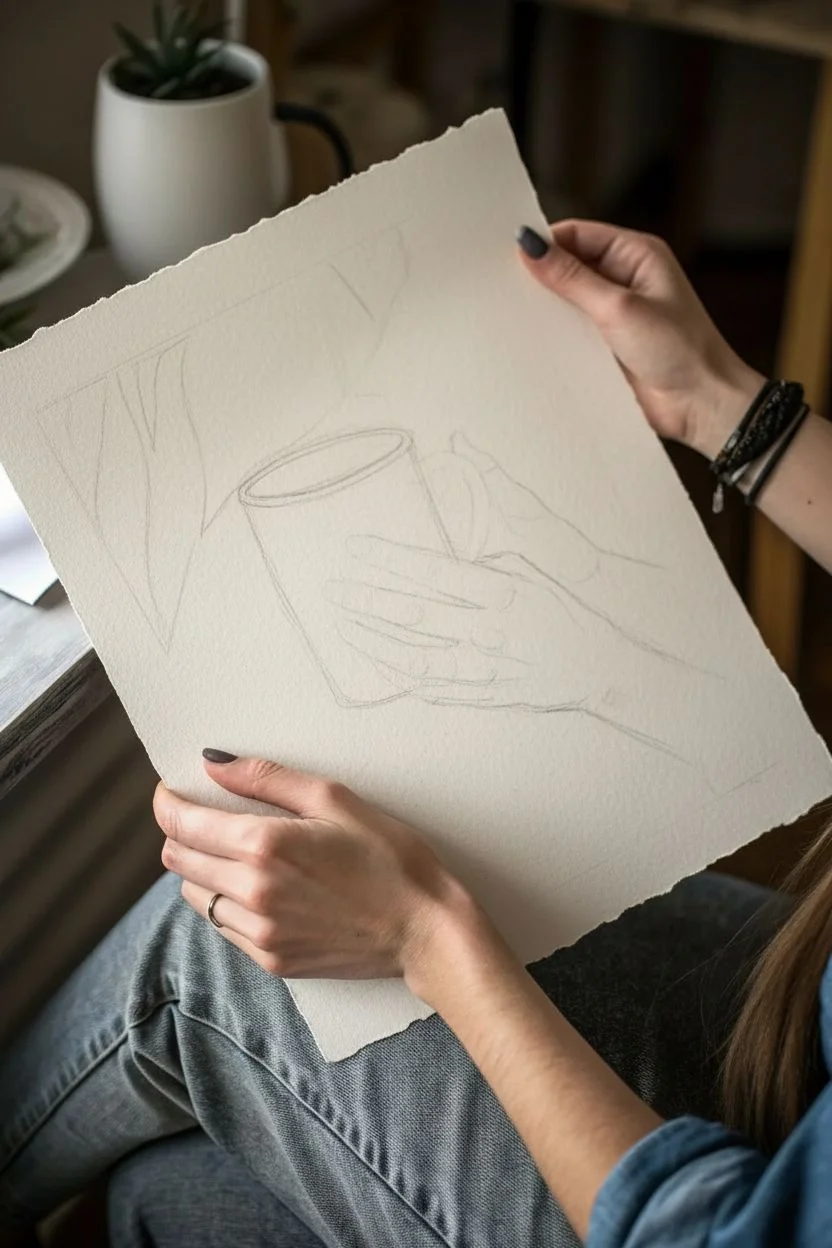
Capture the comforting simplicity of hands cradling a warm mug with this detailed charcoal study. The textured paper and deep shadows create a wonderful sense of depth and tactile realism that brings the drawing to life.
Detailed Instructions
Materials
- Heavyweight textured drawing paper (deckle-edge optional)
- Vine charcoal (soft and medium)
- Compressed charcoal pencils (HB, 2B, 4B)
- White charcoal pencil or white pastel
- Kneaded eraser
- Blending stump (tortillon)
- Paper towels or chamois cloth
- Fixative spray
Step 1: Planning and Composition
-
Prepare your surface:
If you are using a large sheet with deckled edges like in the photo, tape it down gently at the corners to a drawing board to keep it flat. Ensure your lighting is positioned to avoid casting your own hand’s shadow on the paper. -
Establish the mug shape:
Using a very light touch with a hard vine charcoal stick, sketch the basic cylinder of the mug in the center of the page. It doesn’t need to be perfect yet; focus on the angle of the rim and the handle placement. -
Map the hands:
Block in the shapes of the hands wrapping around the mug. Instead of drawing individual fingers immediately, draw the ‘mitt’ shape of the palm and the general direction the fingers are pointing. -
Refine the forms:
Go back in and define the individual fingers, paying close attention to the negative space between them and the mug handle. Lightly indicate the fingernails and the bracelet on the wrist. -
Background atmosphere:
Sketch the faint outlines of the ‘steam’ or abstract shapes in the upper left background. These should remain very subtle throughout the process.
Step 2: Shading and definition
-
Lay down the base tone:
Using soft vine charcoal, apply a light, even layer of grey tone over the hands and the shadowed side of the mug. Use a chamois cloth or paper towel to rub this tone into the paper’s tooth for a smooth base. -
Deepen the shadows on the mug:
Switch to a 2B compressed charcoal pencil to darken the interior of the mug (the coffee/tea) and the cast shadow under the rim. This high contrast anchors the drawing. -
Model the fingers:
Observe where the light hits the knuckles. Add shading to the sides of the fingers and the palm area away from the light source. I find it helpful to squint at my reference to see the main shapes of light and dark better. -
Texture the skin:
Use a blending stump to smooth out transitions on the skin, but leave some of the paper’s texture visible to mimic skin pores. Use the tip of the kneaded eraser to lift out small highlights on the knuckles and tendons. -
Detailing the nails:
Use a sharp HB charcoal pencil to outline the fingernails. Shade them slightly darker than the skin if you want a painted nail look, adding a tiny white highlight on the curve of each nail. -
Render the jewelry:
Draw the individual beads of the bracelet. Use deep blacks for the shadows between beads and sharp highlights on top to make them look round and solid.
Keep it Clean
Place a scrap piece of paper under your drawing hand while you work. This prevents oils from your skin transferring to the paper and stops you from accidentally smudging completed areas.
Step 3: Contrast and Final Touches
-
Enhance the mug’s form:
Add a crisp, dark line where the fingers meet the mug to show contact. Shade the mug’s body, keeping the side opposite the light source darker, and blend it out for a ceramic feel. -
Background shading:
Gently shade the abstract shapes in the background using the side of a vine charcoal stick. Smudge these lines heavily so they look like soft shadows or rising steam. -
Push the darks:
Take a 4B compressed charcoal pencil and re-assert the darkest areas: the deep crevices between fingers, the coffee liquid, and the bracelet shadows. -
Final highlights:
Use a white charcoal pencil to add the brightest highlights on the mug’s rim and the wettest-looking points of the fingernails. This makes the image pop. -
Clean up edges:
Check the silhouette of the arm and mug. Use your kneaded eraser to clean up any smudges on the surrounding white paper to maintain a crisp, professional look. -
Preservation:
Once you are happy with the contrast, spray the drawing with a workable fixative in a well-ventilated area to prevent smudging.
Adding Cozy Texture
For a knit sweater effect on the sleeve, use a cross-hatching technique with a dull charcoal pencil, then gentle dabs with a kneaded eraser to create the soft, fuzzy look of wool.
Now you have a timeless piece of art that captures a simple, comforting moment


Single Fruit Still Life
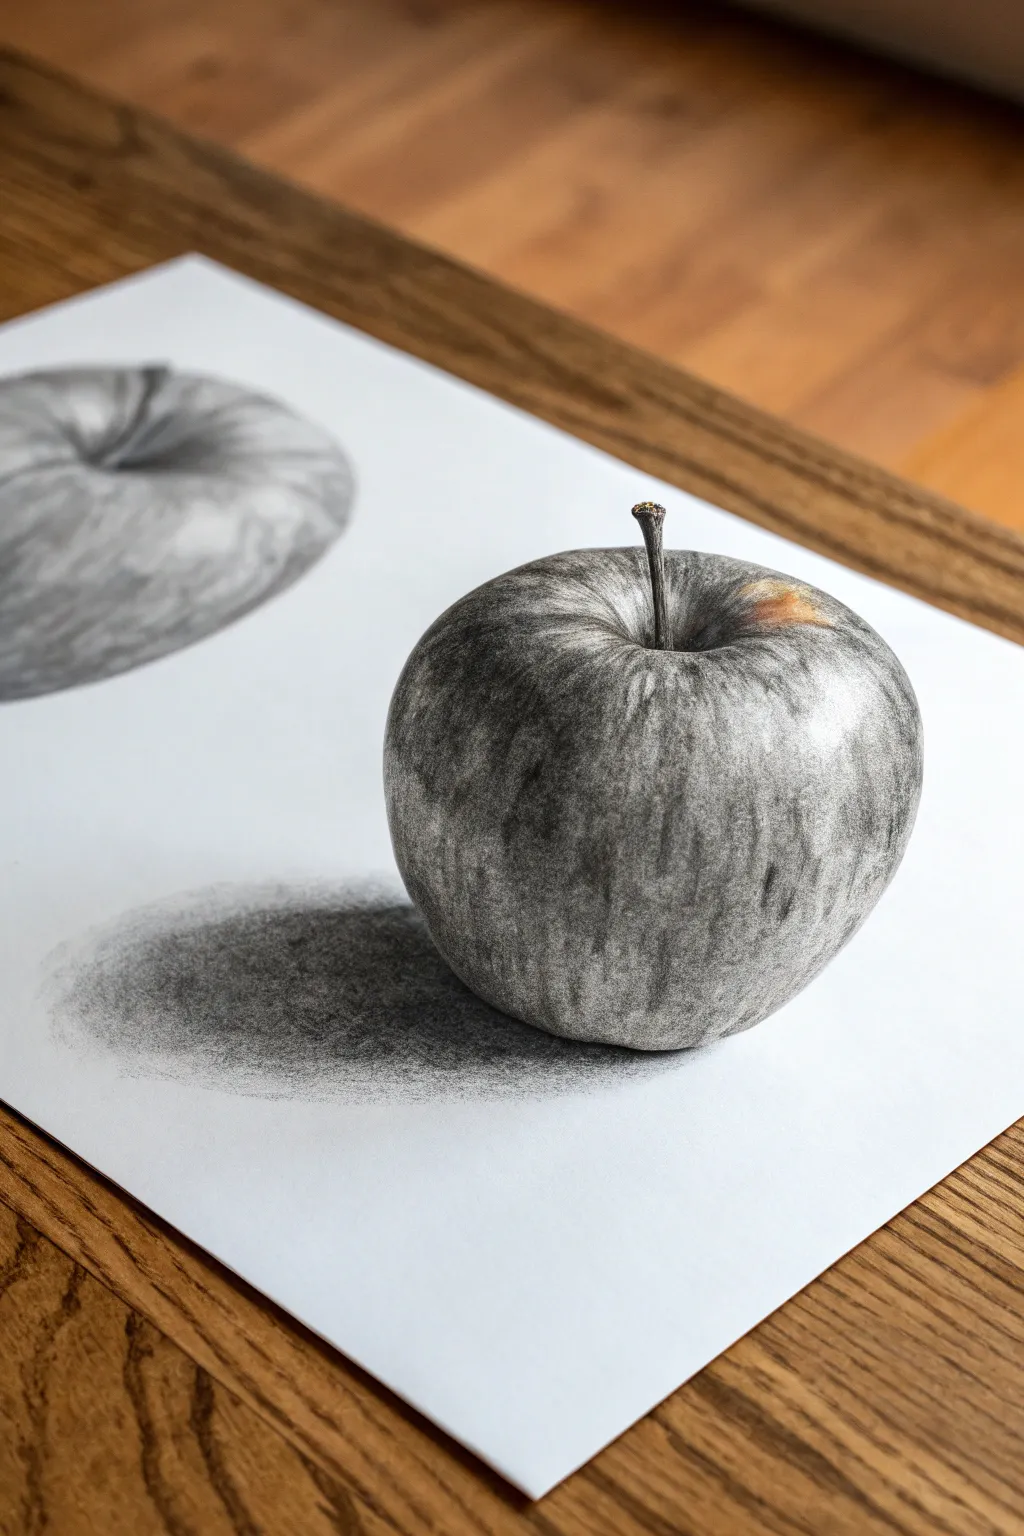
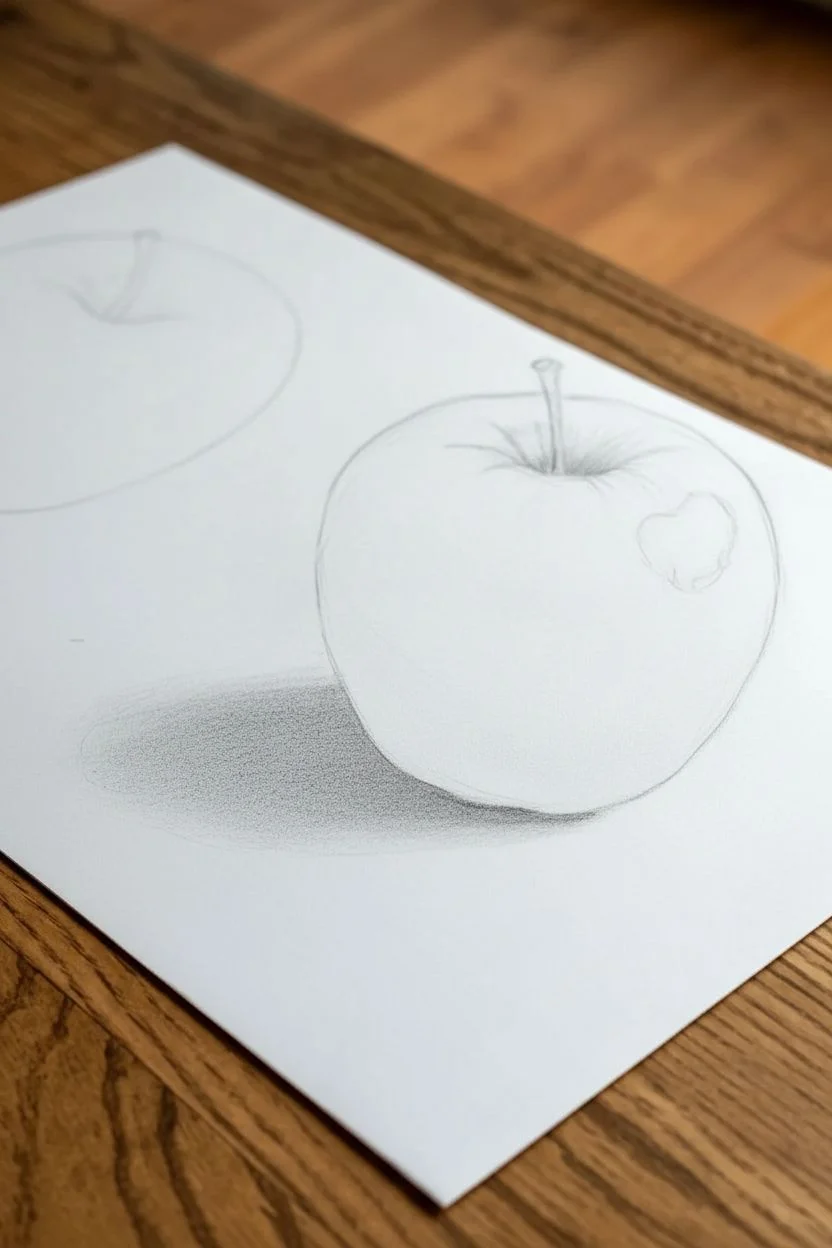
Master the art of illusion with this stunning still life project that transforms simple charcoal strokes into a three-dimensional apple. This tutorial focuses on building form through deep shadows and preserving pristine highlights to make the fruit pop right off the page.
Step-by-Step
Materials
- High-quality drawing paper (smooth or vellum finish)
- Vine charcoal (soft/medium)
- Compressed charcoal (for darkest darks)
- Charcoal pencils (soft, medium, hard)
- Kneaded eraser
- Precision eraser (e.g., Mono Zero)
- Blending stumps (tortillons) in various sizes
- Soft brush (for sweeping away dust)
Step 1: Laying the Foundation
-
Sketch the outline:
Begin with a gentle touch using a hard charcoal pencil or a vine charcoal stick. Draw the basic circular shape of the apple, noting the dip at the top for the stem. Keep these lines incredibly faint so they disappear later. -
Map shadow shapes:
Lightly outline the major areas of shadow on the apple’s surface and the cast shadow on the table. Don’t shade yet; just create a roadmap for where your values will change. -
Initial toning:
Take a piece of vine charcoal and lay it on its side. Gently rub it across the entire apple shape, excluding the brightest highlight area on the upper right shoulder. This creates a mid-tone base. -
Smooth the base:
Use a large blending stump or a soft tissue to rub the vine charcoal into the paper tooth. The goal here is a smooth, uniform grey tone, leaving that one highlight completely white.
Step 2: Developing Form and Texture
-
Establish the core shadow:
Using a soft charcoal pencil, darken the side of the apple opposite the light source. Follow the curvature of the fruit with your strokes to emphasize its roundness. -
Create vertical streaks:
Apples often have vertical variation in their skin. Use a sharp medium charcoal pencil to draw subtle, broken vertical lines curving from the stem down to the base. -
Deepen the stem cavity:
The area where the stem enters the apple needs deep contrast. Use compressed charcoal here for a rich black, fading out as it rises to the rim of the cavity. -
Draw the stem:
Sketch the stem with a fine point. Make it uneven and knobby. Add a strong highlight on one side of the stem to show its cylindrical shape. -
Lifting highlights:
Take your kneaded eraser and mold it into a wedge. Dab and lift charcoal away in speckles across the skin to create the texture of the apple’s pores and lighter variations. -
Refining the main highlight:
Ensure the brightest spot on the shoulder has soft edges. Use a clean blending stump to blur the boundary between the white paper and the grey charcoal, creating a glossy skin effect.
Keep it Clean
Place a scrap piece of paper under your drawing hand. This prevents your palm from dragging across the paper, which causes unwanted smudging and transfers oils to the surface.
Step 3: Contrast and Grounding
-
Darkest accents:
I like to go back in with my darkest compressed charcoal now to push the contrast. Darken the very bottom edge of the apple where it meets the table. -
The cast shadow foundation:
Apply soft charcoal generously to the paper surface right underneath the apple. Press firmly to get a dense, dark tone immediately touching the fruit. -
Gradient diffusion:
Blend the cast shadow outward using a large stump. It should be pitch black near the apple and fade to a soft, misty grey as it stretches away. -
Background element (optional):
To recreate the background apple shown in the example, lightly sketch a similar shape behind the first. Keep it entirely in soft vine charcoal and blur it heavily with a tissue for a depth-of-field effect. -
Final clean up:
Use your precision eraser to clean up the outer edges of the main apple. A crisp, sharp edge is crucial for the 3D ‘pop’ effect.
Too Dark Too Fast?
If you’ve applied too much black and hidden the texture, press your kneaded eraser flat onto the area and lift straight up—don’t rub. This removes layers without ruining the paper.
Step back and admire how simple dust and varying pressure have created a convincing form on the flat page

Pet Portrait With Fur Texture
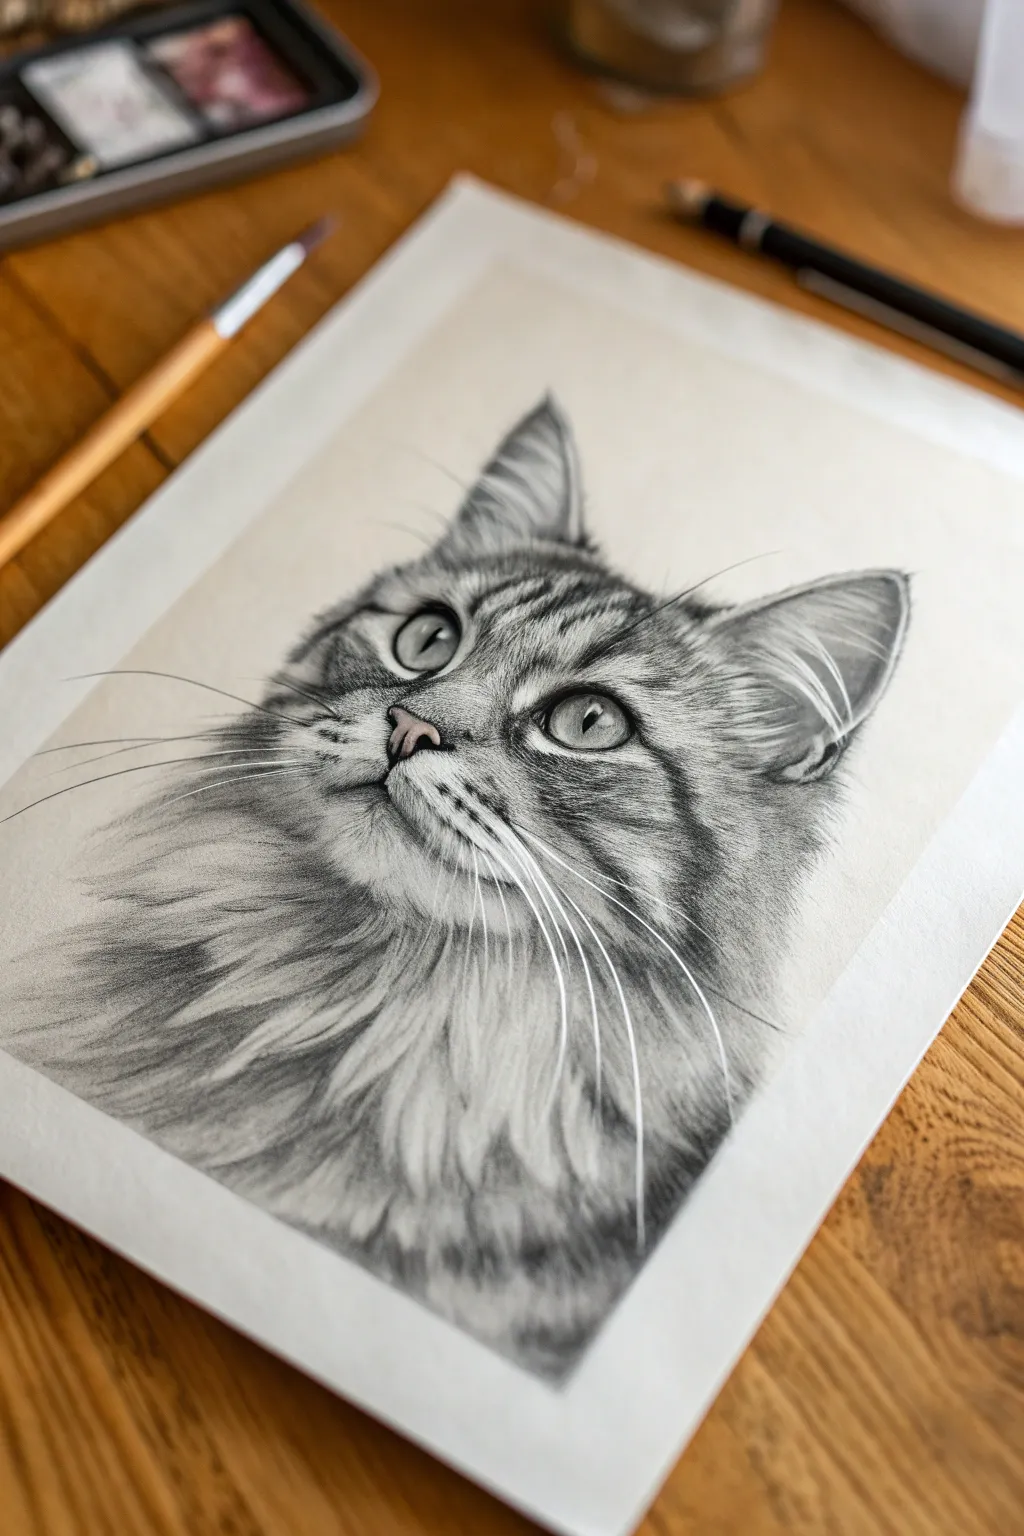

Capture the soulful gaze and fluffy elegance of a tabby cat with this detailed charcoal study. You’ll master the art of layering delicate fur textures and contrasting deep shadows to bring this feline subject to life on toned paper.
Detailed Instructions
Materials
- Smooth bristol or mixed media paper
- Willow charcoal sticks (thin)
- Charcoal pencils (HB, 2B, 4B, 6B)
- White pastel pencil or white charcoal pencil
- Kneaded eraser
- Precision eraser (mono zero or similar)
- Blending stumps (tortillons)
- Soft synthetic brush for blending
- Workable fixative
Step 1: Laying the Foundation
-
Outline lightly:
Begin with a very faint sketch using an HB charcoal pencil. Focus on the triangular shape of the head, the placement of the ears, and the almond shape of the eyes. Keep lines minimal so they don’t show through later. -
Map the darks:
Identify the darkest tabby markings on the forehead and cheeks. Using a freshly sharpened 4B charcoal pencil, lightly block in these striped patterns, following the direction the fur grows. -
Establish the eyes:
The eyes are the focal point. Outline the iris and pupil clearly. Darken the pupil with 6B charcoal, leaving a small, crisp circle of white paper for the highlight catchlight.
Smudge Control
Charcoal gets messy fast. Place a sheet of glassine or scrap paper under your drawing hand to protect finished areas from smearing while you work.
Step 2: Building the Face Texture
-
Shade the iris:
Lightly shade the iris with an HB pencil, blending it slightly towards the outer rim to create depth. Leave the area near the catchlight lighter. -
Create the nose:
For the nose leather, shade softly with a 2B pencil. Use a blending stump to smooth it out, then add tiny dots or ‘stippling’ for texture. Use your eraser to lift a tiny highlight on the top edge. -
Forehead fur direction:
Start applying short, flicking strokes on the forehead with a 2B pencil. Always flick the pencil outward, lifting at the end of the stroke to taper the ‘hair’. -
Muzzle volume:
The muzzle needs to look rounded. Shade the whisker pads lightly with willow charcoal, then blend with a soft brush to create a smooth, underlying shadow before adding details. -
Defining the markings:
Go back into the forehead stripes with your 6B pencil. Press harder to deepen the center of the dark bands, feathering the edges so the transition to light fur isn’t too harsh.
Eye Depth Trick
Add a tiny touch of white pastel pencil to the lower rim of the eyelid (the waterline). This makes the eyes look wet and three-dimensional immediately.
Step 3: Creating Fluffy Fur
-
Layering the chest:
The neck ruff (mane) has longer fur. Use the side of a willow charcoal stick to lay down a broad, mid-tone grey wash over the chest area. Blend this completely smooth. -
Carving out locks:
Using a precision eraser or the sharp edge of a kneaded eraser, ‘draw’ by erasing into the grey wash. Lift out thick, curved clumps of chest fur to reveal the light paper underneath. -
Shadows between clumps:
With a 4B pencil, darken the negative spaces *between* the clumps of fur you just erased. This creates immediate depth and makes the light fur pop forward. -
Cheek fluff:
On the sides of the face, use medium-length strokes. I like to mix 2B and 4B grades here to vary the visual weight of the hairs. -
Ear details:
Shade the inner ear darkly, but use a clean eraser to swipe quick, curved strokes coming out of the ear to mimic those long, wispy ear furnishings.
Step 4: Refining and Highlighting
-
Deepen contrast:
Evaluate the drawing. The darkest areas (pupils, stripes, deep fur folds) should be nearly black. Re-apply 6B charcoal where needed to punch up the contrast. -
White fur accents:
Switch to your white pastel or charcoal pencil. Apply sharp, decisive strokes over the chest fur and ear tips to add piercing highlights that sit on top of the grey tones. -
Whisker placement:
This step requires confidence. Sharpen your white pencil to a needle point. Draw the long whiskers in single, fluid sweeping motions. Don’t hesitate or the line will look shaky. -
Secondary whiskers:
Don’t forget the eyebrow whiskers above the eyes. These are thinner and slightly curved. Add a few erratic, shorter hairs around the chin for realism. -
Final cleanup:
Use your kneaded eraser to clean up any charcoal dust that has smudged onto the pristine background paper, ensuring a sharp silhouette.
Step back and admire the soft texture and lifelike personality in your finished charcoal portrait

PENCIL GUIDE
Understanding Pencil Grades from H to B
From first sketch to finished drawing — learn pencil grades, line control, and shading techniques.
Explore the Full Guide
Feather Study With Layered Blacks
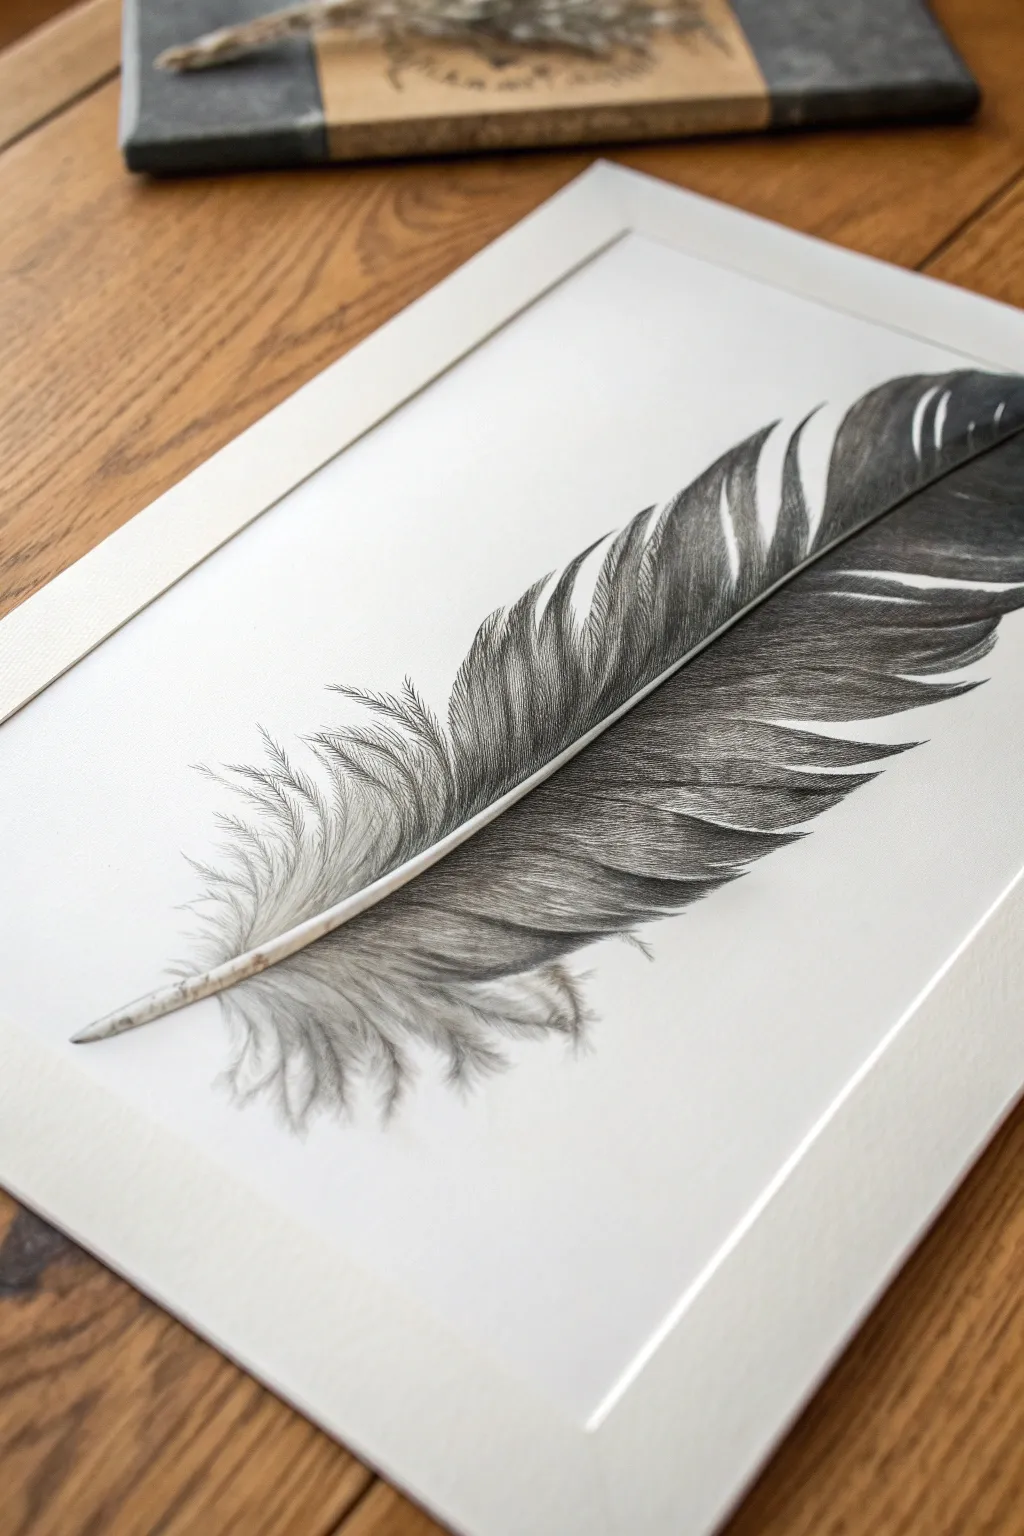
This stunning feather study captures the delicate weightlessness of nature using deep, velvety blacks and soft gradients. By layering charcoal and utilizing the white of the paper for structure, you will create a piece that feels dimensional enough to lift off the page.
Step-by-Step Tutorial
Materials
- Heavyweight textured drawing paper (white)
- Willow charcoal sticks (various thicknesses)
- Compressed charcoal (medium and soft)
- White charcoal pencil or pastel pencil
- Kneaded eraser
- Precision eraser stick (like a Tombow Mono Zero)
- Blending stump (tortillon)
- Soft synthetic brush (for sweeping dust)
- Workable fixative spray
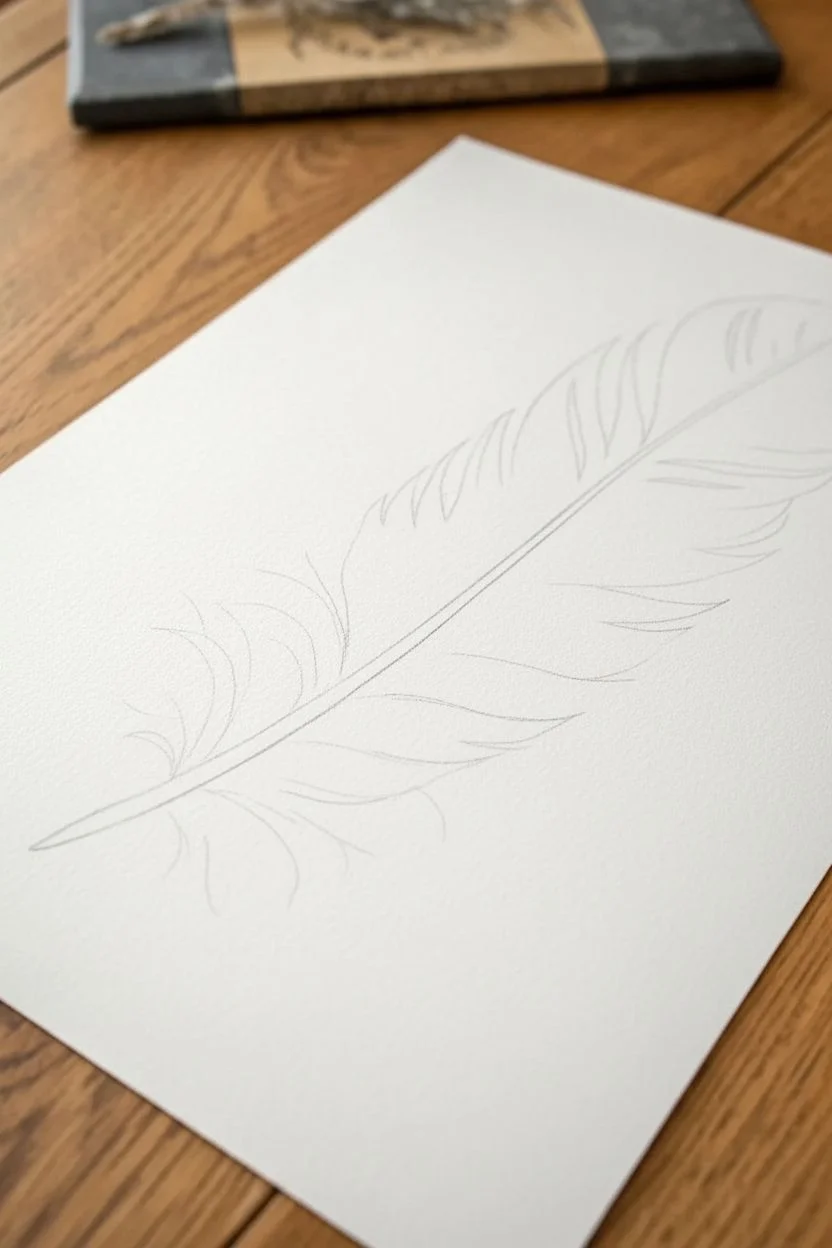
Step 1: Drafting the Structure
-
Placement and curve:
Begin by lightly sketching the central shaft (rachis) of the feather with a thin willow charcoal stick. Create a gentle, sweeping diagonal curve from the bottom left to the top right to establish the flow of the piece. -
Define the boundaries:
Lightly outline the overall shape of the feather vanes. Don’t make a solid line; instead, use broken, whisper-light strokes to map out where the barbs will extend, ensuring the feather tapers naturally at the tip. -
Protect your whites:
Before adding any heavy darks, carefully mask or simply consciously avoid the central shaft itself. The bright white paper must show through here to create the three-dimensional spine of the feather.
Smudge Prevention
Charcoal is messy! Place a sheet of smooth glassine paper under your drawing hand. This prevents skin oils from locking the charcoal into the paper and stops your palm from ruining the finished sections.
Step 2: Building the Vanes
-
Base layer shading:
Using the side of a willow charcoal stick, lay down a soft, mid-tone grey across the main sections of the feather vanes. Follow the direction of the growth—angling outward and upward from the center shaft. -
Initial blending:
Take a clean blending stump or a soft tissue and gently rub the willow charcoal into the paper’s tooth. This creates a hazy underpainting that mimics the softness of down. -
Establishing the splits:
Feathers are rarely perfect. Use your kneaded eraser to lift out distinctive ‘V’ shapes along the edges. These negative spaces represent the natural splits where the barbs have separated. -
Darkening the core:
Switch to compressed charcoal for deeper values. Begin darkening the areas immediately adjacent to the white central shaft. This high contrast is what makes the shaft appear raised and rounded.
Step 3: Detailing the Texture
-
Drawing individual barbs:
Sharpen a hard charcoal pencil to a fine point. Draw the individual parallel lines (barbs) extending from the shaft. vary your pressure: press harder near the center and lift off as you move toward the edge for a wispy look. -
Layering blacks:
Return to the darker sections, particularly on the right side of the feather, with soft compressed charcoal. Layering this over the previous steps creates those rich, velvety blacks that give the drawing depth. -
The downy base:
Focus on the bottom left of the feather where the quill is exposed. Use quick, erratic, and curved strokes to simulate the fluffy, disorganized down feathers found at the base. -
Softening the down:
Gently tap—don’t rub—a blending stump over these erratic base strokes. This blurs them slightly, reinforcing the difference in texture between the structured top barbs and the fluffy bottom down. -
Refining the edges:
Use your precision eraser to clean up the outer edges of the feather. I like to cut back into the black charcoal to create sharp, crisp ends on the barbs.
Level Up: Color Tint
Make the feather iridescent! lightly glaze over the darkest black sections with a Prussian Blue or Deep Purple pastel pencil. The subtle color shift adds a glossy, realistic sheen to the darks.
Step 4: Highlights and Final Touches
-
Sculpting the shaft:
The central shaft is currently stark white. To make it look round, run a very thin line of shadow along its bottom edge using a hard pencil, and lightly glaze the very ends with dirty willow charcoal so it doesn’t look cut out. -
Adding subtle highlights:
If you lost some definition in the dark areas, use a white charcoal pencil or pastel to add thin, striking highlights along the curvature of the barbs, suggesting how light hits the glossy surface. -
Shadow play:
To ground the feather, lightly smudge a very faint shadow beneath the quill and the fluffiest parts of the down. This separation shadow lifts the object off the paper surface. -
Final clean up:
Scan the white background for any accidental smudges or fingerprints. Use the kneaded eraser to lift these completely so the contrast remains stark. -
Fixing the drawing:
Hold a can of workable fixative about 12 inches away and spray a light, even coat to prevent the heavy charcoal dust from smearing or dropping off the page.
Frame this piece behind glass with a mat to keep the charcoal pristine and enjoy the elegant simplicity of your study
Moonlit Forest Silhouette
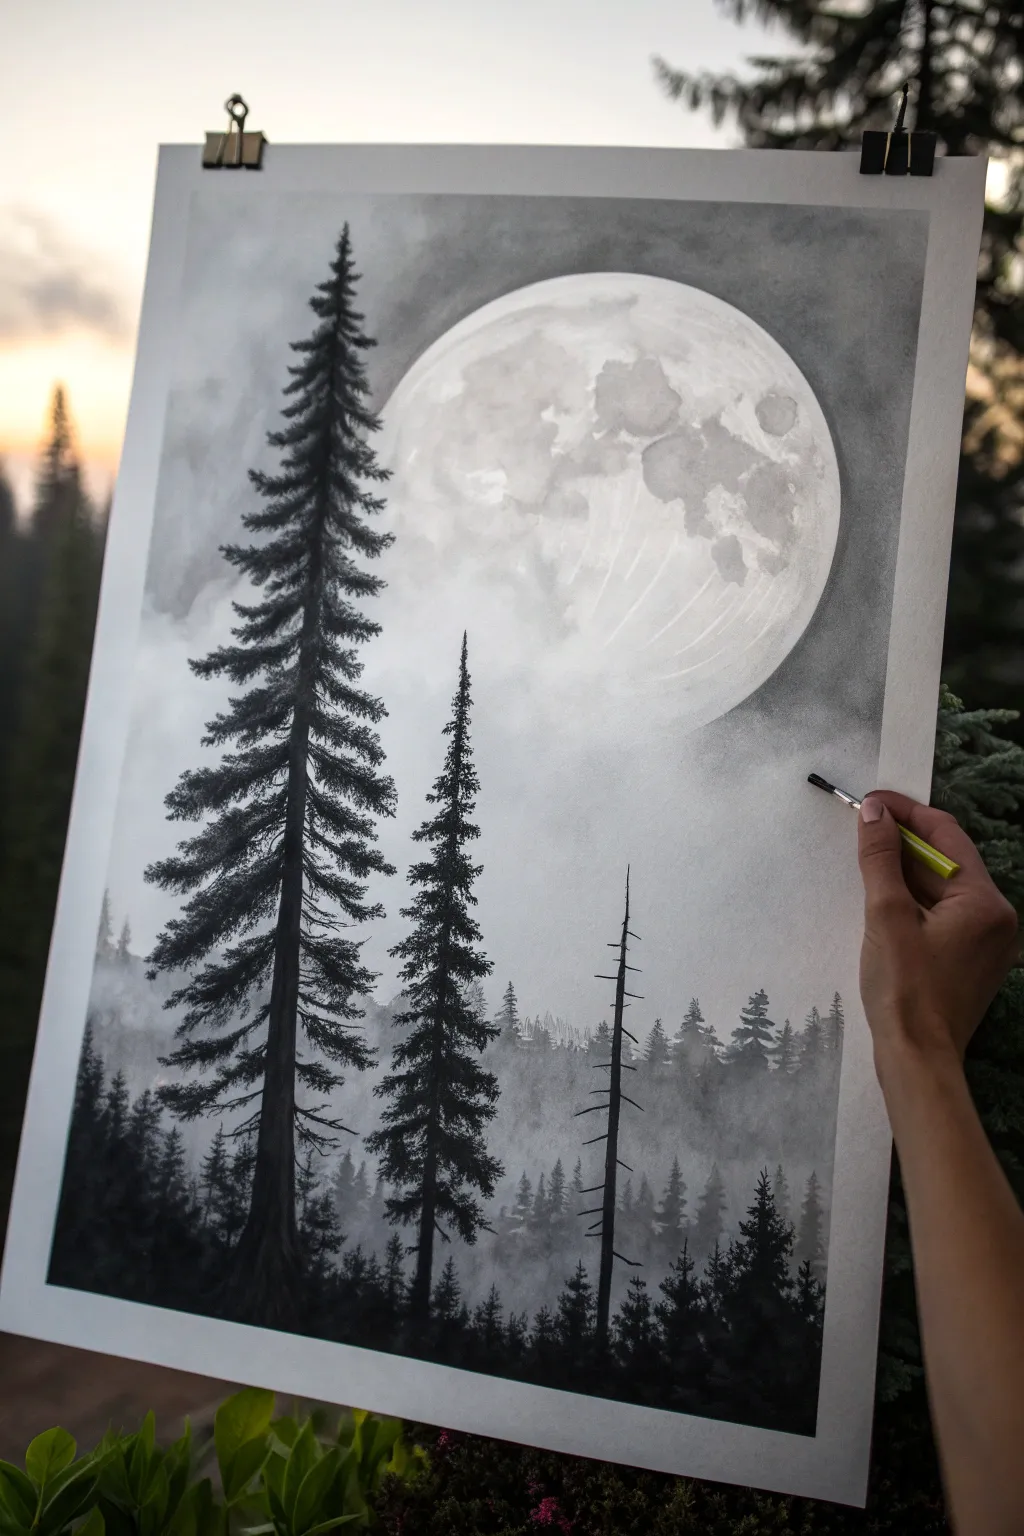
Capture the solemn beauty of a misty night with this dramatic charcoal landscape, featuring towering pines against a luminous oversized moon. By combining deep charcoal darks with soft blending techniques, you’ll create an atmospheric depth that feels both peaceful and mysterious.
Step-by-Step Guide
Materials
- Heavyweight drawing paper or mixed media paper (A3 size recommended)
- Willow charcoal sticks (soft and medium)
- Compressed charcoal pencils (hard, medium, soft)
- White pastel pencil or white charcoal pencil
- Soft blending brushes (makeup brushes work well)
- Kneaded eraser
- Paper blending stump (tortillon)
- White gel pen or gouache (optional for stars)
- Workable fixative spray
- Drawing board and clips
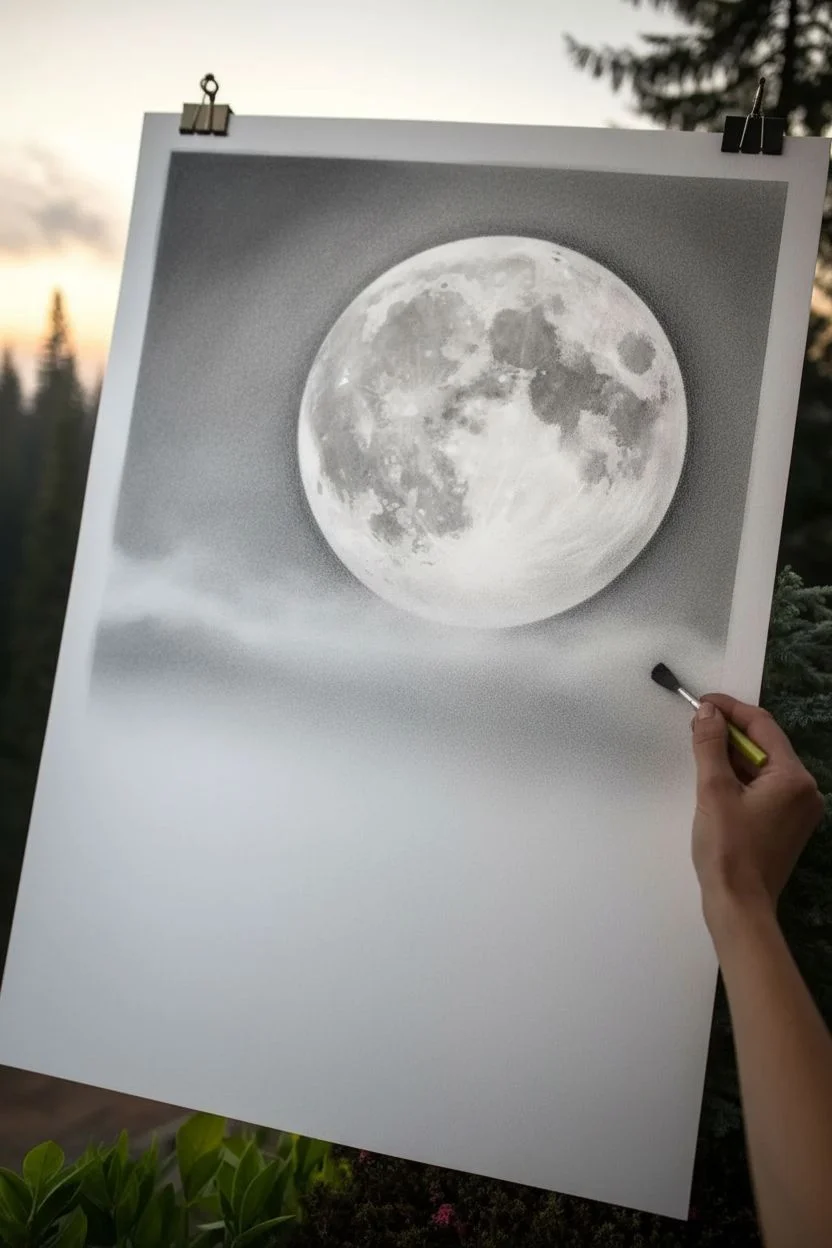
Step 1: Setting the Atmosphere and Moon
-
Outline the composition:
Begin by lightly sketching the placement of your main elements using a hard charcoal pencil. Draw a large circle for the moon in the upper right quadrant—you can trace a bowl or plate to get a perfect shape. Mark a faint horizon line about a third of the way up the page. -
Shade the sky:
Load a soft blending brush or a piece of chamois with powdered willow charcoal. Gently swirl this over the sky area around the moon, keeping the charcoal darker at the corners and fading out as you approach the moon’s edge to create a glow. -
Define the moon’s surface:
Inside the moon circle, use a very light touch with willow charcoal to create the crater shapes. Avoid hard lines; instead, dab the charcoal to create cloud-like textures, leaving plenty of white paper showing for high brilliance. -
Add lunar details:
With a paper blending stump, soften the grey patches on the moon. If you lose too much brightness, lift pigment away with a kneaded eraser to reclaim the pure white highlights. -
Create the mist:
Below the moon, apply a slightly heavier layer of charcoal dust. Use a large, clean brush to sweep this horizontally across the paper. This creates the illusion of fog rolling through the valley. I find that blurring the edges of the moon slightly into this mist helps integrate it into the scene.
Keep it Clean
Place a piece of scrap paper under your hand while drawing the foreground trees. This prevents your palm from smudging the delicate mist and moon details you’ve already perfected.
Step 2: Building the Distant Forest
-
Sketch the distant treeline:
Using a medium charcoal pencil, sketch a jagged line of small tree shapes along the horizon. These should be small and indistinct to suggest distance. -
Shade the background trees:
Fill in these distant trees with a medium grey tone. Don’t make them pitch black yet; atmospheric perspective means objects further away appear lighter and less contrasted. -
Soften the distance:
Take your soft blending brush and gently tap over the distant treeline. This forces the trees ‘back’ into the mist, making them look hazy and far away. -
Establish the middle ground:
Draw a second layer of slightly larger trees in front of the misty ones. Press harder with your charcoal stick here to create a darker grey, establishing a sense of layers.
Step 3: The Foreground Giants
-
Draw the main tree trunk:
Select a soft compressed charcoal pencil for the deepest blacks. Draw the tall, straight trunk of the main pine tree on the left side, extending almost to the top of the paper. Taper it slightly as it goes up. -
Detail the branches:
Starting from the top of the tree, use quick, downward-flicking strokes to create the pine boughs. The branches should be wider at the bottom and narrower at the top. Group the needles in clusters rather than drawing individual lines. -
Add the secondary tree:
Create a slightly shorter, thinner pine tree to the right of the main one. Ensure the branches overlap the glowing moon—this high contrast between the black charcoal and the white moon creates dramatic silhouette effects. -
Create the dead snag:
Draw the bare, skeletal tree trunk further to the right using a sharp hard charcoal pencil. Keep the lines jagged and broken to mimic old, dry wood, with just a few snapped branches protruding. -
Anchoring the foreground:
Fill the bottom of the page with dense black charcoal to represent the forest floor and low-lying bushes. Use vertical strokes to suggest grass and small saplings growing in the dark. -
Refining contrasts:
Check your values. The foreground trees should be absolute black. If they look grey, layer more compressed charcoal over them. Use a white pastel pencil to add subtle rim lighting on the right side of the main trunks, suggesting the moon’s light hitting the bark.
Starry Night
For extra magic, dip an old toothbrush in watered-down white gouache. Flick the bristles to splatter tiny stars across the dark upper corners of the sky, avoiding the trees.
Step back and admire how the stark silhouettes pop against that glowing moon, creating a silent night you can almost hear.
BRUSH GUIDE
The Right Brush for Every Stroke
From clean lines to bold texture — master brush choice, stroke control, and essential techniques.
Explore the Full Guide
Mountain Range With Lifted Snow
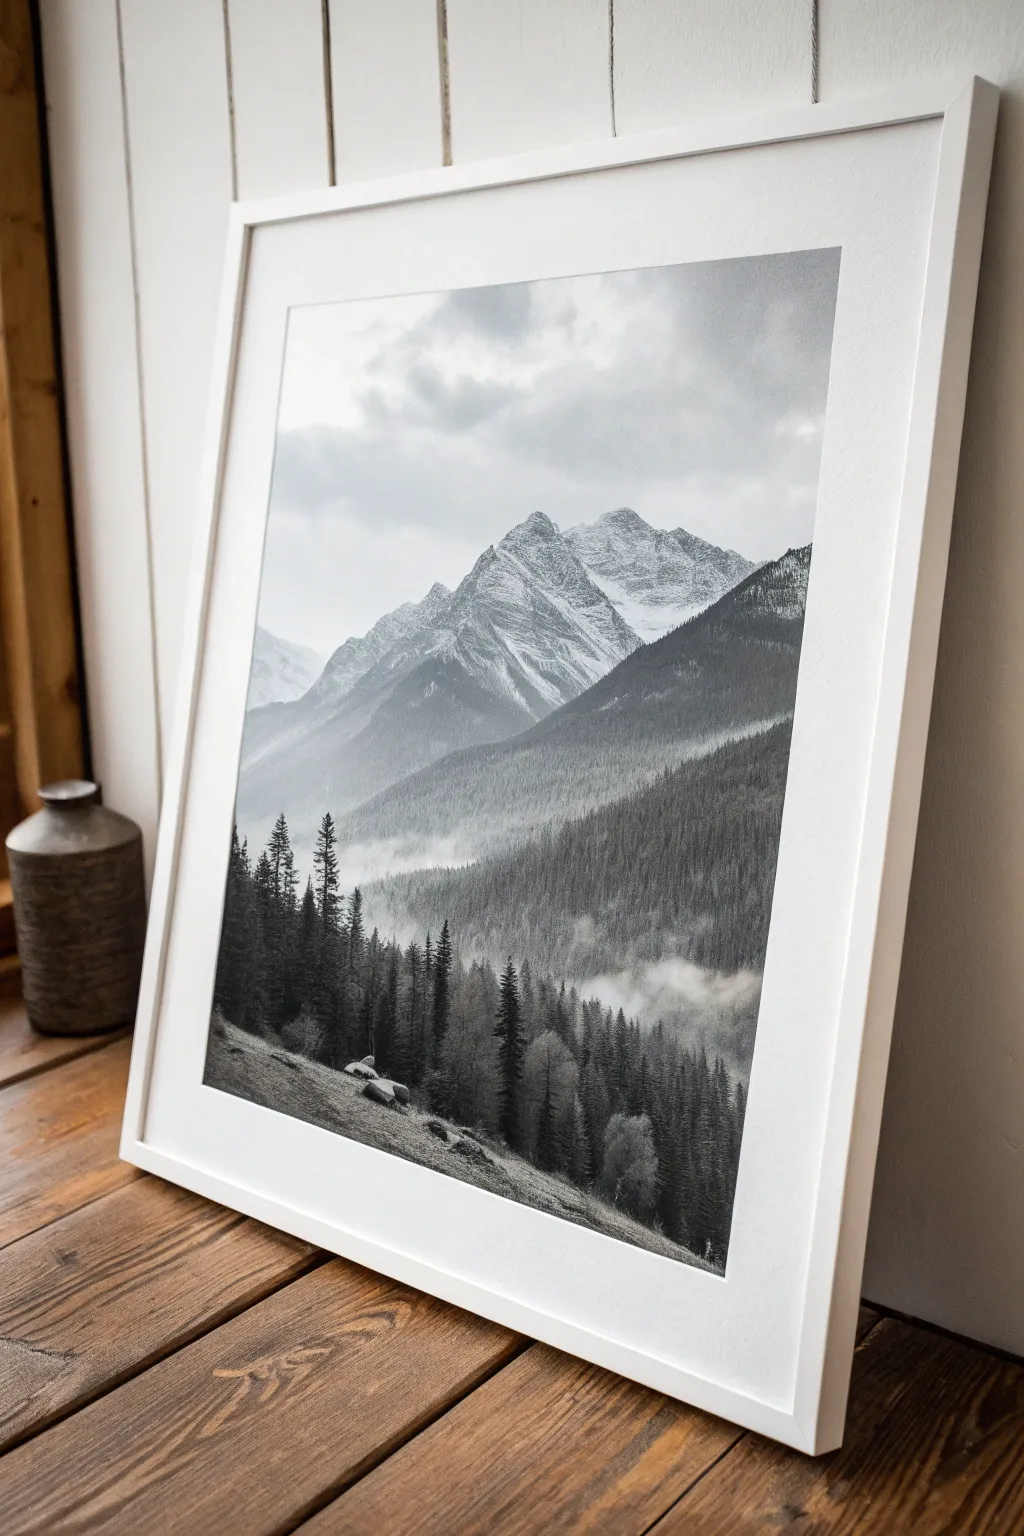
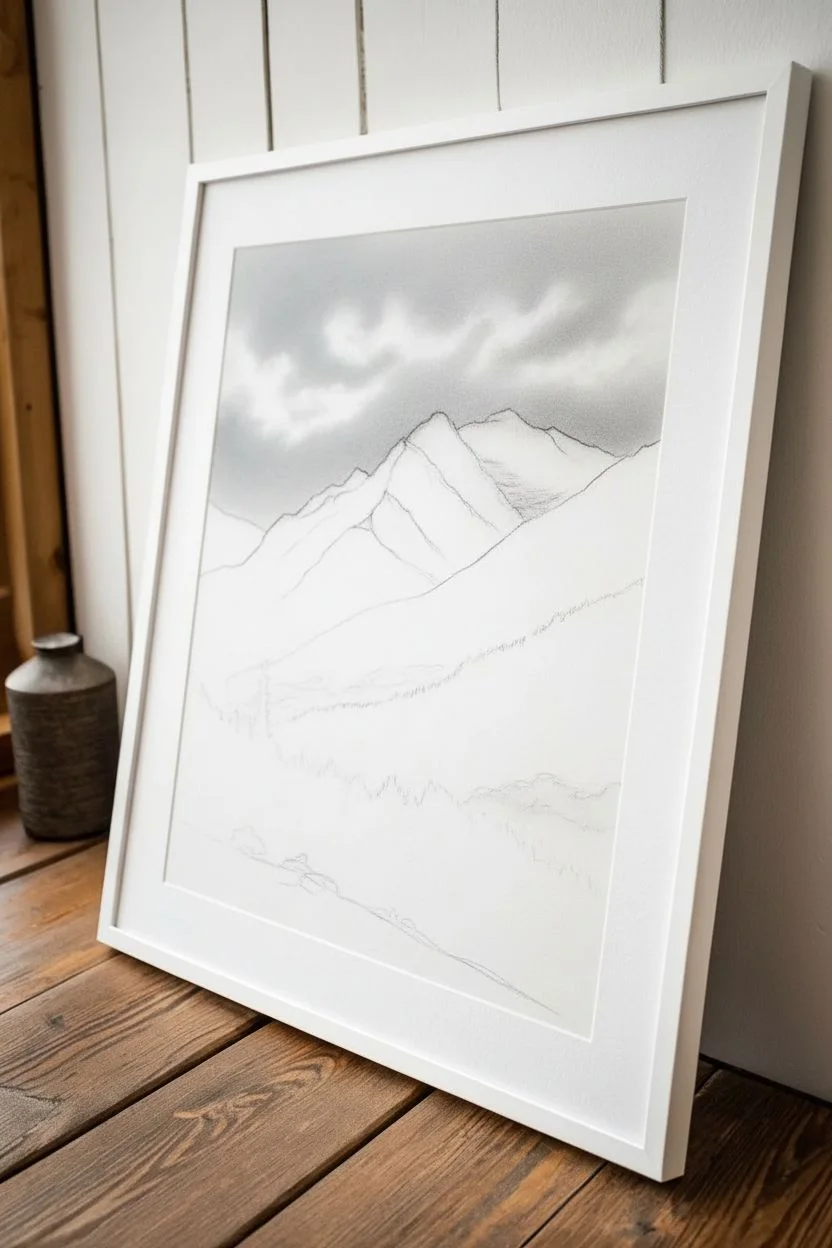
Capture the serene grandeur of a snow-capped mountain range using charcoal’s dramatic range of values. This project focuses on atmospheric perspective, using blending tools and erasers to create a soft, misty valley nestled between jagged peaks and a sharp, detailed foreground forest.
How-To Guide
Materials
- Textured charcoal paper (white or off-white, at least 11×14 inches)
- Vine charcoal (soft and medium)
- Compressed charcoal sticks
- Charcoal pencils (soft, medium, hard)
- Kneaded eraser
- Precision eraser (mono zero or electric)
- Blending stumps (tortillons) of various sizes
- Soft blending brush or chamois cloth
- Workable fixative spray
Step 1: Setting the Scene
-
Outline the composition:
Begin by lightly sketching the main mountain shapes using a hard charcoal pencil or a stick of vine charcoal. Keep your lines very faint. Place the highest peak slightly off-center and define the sloping valley lines that will guide the viewer’s eye. -
Establish the sky:
Use a piece of vine charcoal on its side to gently block in the sky area. We don’t want this pitch black; aim for a soft, cloudy grey. Use a chamois cloth or tissue to smudge this layer until it is smooth and ethereal. -
Lift out the clouds:
Take your kneaded eraser and mold it into a soft, rounded shape. Gently dab and lift pigment from the sky area to create natural, fluffy cloud formations against the grey background.
Step 2: Sculpting the Components
-
Block in the mountain shadows:
Using a medium vine charcoal, identify the shadowed side of your mountain peaks. Lay down the charcoal in the darker crevices and rock faces, leaving paper white for the sunlit, snowy ridges. -
Refine the rock texture:
Switch to a medium charcoal pencil to add jagged details to the mountain faces. Use short, angular strokes to mimic the roughness of rock, ensuring you maintain a sharp contrast against the white paper to represent snow. -
Create the misty valley:
For the distant hills below the main peaks, apply a very light layer of vine charcoal. Blend this aggressively with a large stump or brush. The goal is to make these hills look out of focus and distant compared to the sharp peaks above. -
Layering the middle ground:
As you move down the paper, darken your values slightly. Sketch in the suggestions of a dense forest on the sloping hillsides using vertical strokes, but keep them fairly indistinct to suggest distance. -
Adding the fog effect:
To create the ‘lifted snow’ or rising mist effect, take a clean blending brush or a soft tissue. Drag it horizontally across the base of the mountains and the middle ground forest, blurring the bottom edges into a white mist.
Muddy Shadows?
If your darks look grey or muddy, you may be over-blending. Apply fresh compressed charcoal directly on top and leave it unblended for a truly deep black.
Step 3: Foreground Detail
-
Establish the foreground slope:
The bottom section requires the darkest values. Use compressed charcoal to lay down a solid, dark foundation for the nearest hill. This high contrast helps push the misty mountains backward in space. -
Draw individual trees:
Using a sharp soft charcoal pencil, draw specific pine trees in the foreground. Start with a vertical trunk line, then use quick, zig-zag scribbles to create the pine boughs, making them wider at the bottom. -
Vary tree heights:
Ensure your forest looks natural by varying the heights and density of the trees. Some should overlap others, creating a sense of depth within the forest itself. -
Add foreground texture:
I like to use the side of a charcoal pencil to scumble texture onto the grassy slope in the immediate foreground. Use short, directional strokes that follow the curve of the land. -
Highlighting with erasure:
This is crucial for the ‘lifted snow’ look. Use your precision eraser to cut sharp, white highlights into the snowy peaks and the tips of the foreground trees, simulating snow resting on branches. -
Add rocks and debris:
Draw a few small rocks or fallen logs in the bottom foreground to give the scene scale. Create a dark shadow underneath them and lift a highlight on top. -
Final atmosphere check:
Step back and squint at your drawing. If the misty middle section feels too dark, gently tap it with the kneaded eraser to lighten the value and enhance the foggy effect. -
Seal the artwork:
Once fully satisfied, take the drawing to a well-ventilated area and spray it with a workable fixative to prevent the thick charcoal layers from smudging excessively.
Sharpen Your Edges
For ultra-crisp mountain ridges against the sky, place a piece of scrap paper over the sky area as a mask and draw your mountain edge right against it.
Frame your misty mountain landscape with a wide white mat to emphasize the dramatic contrast of the charcoal work
Reflective Lake in a Circular Frame
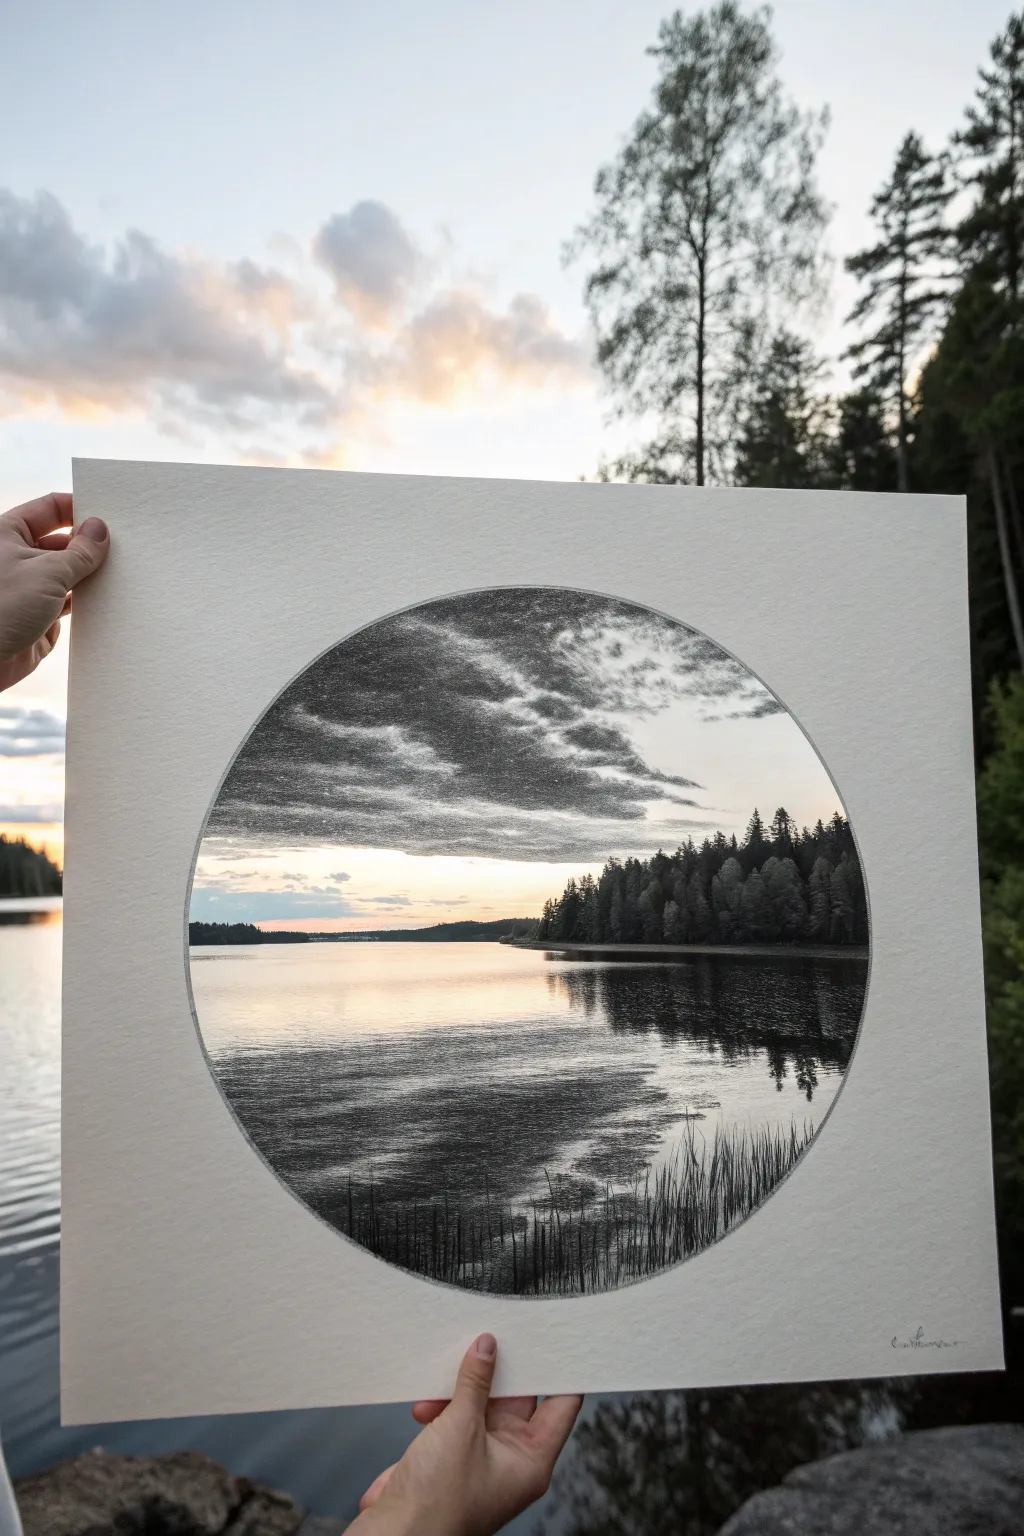
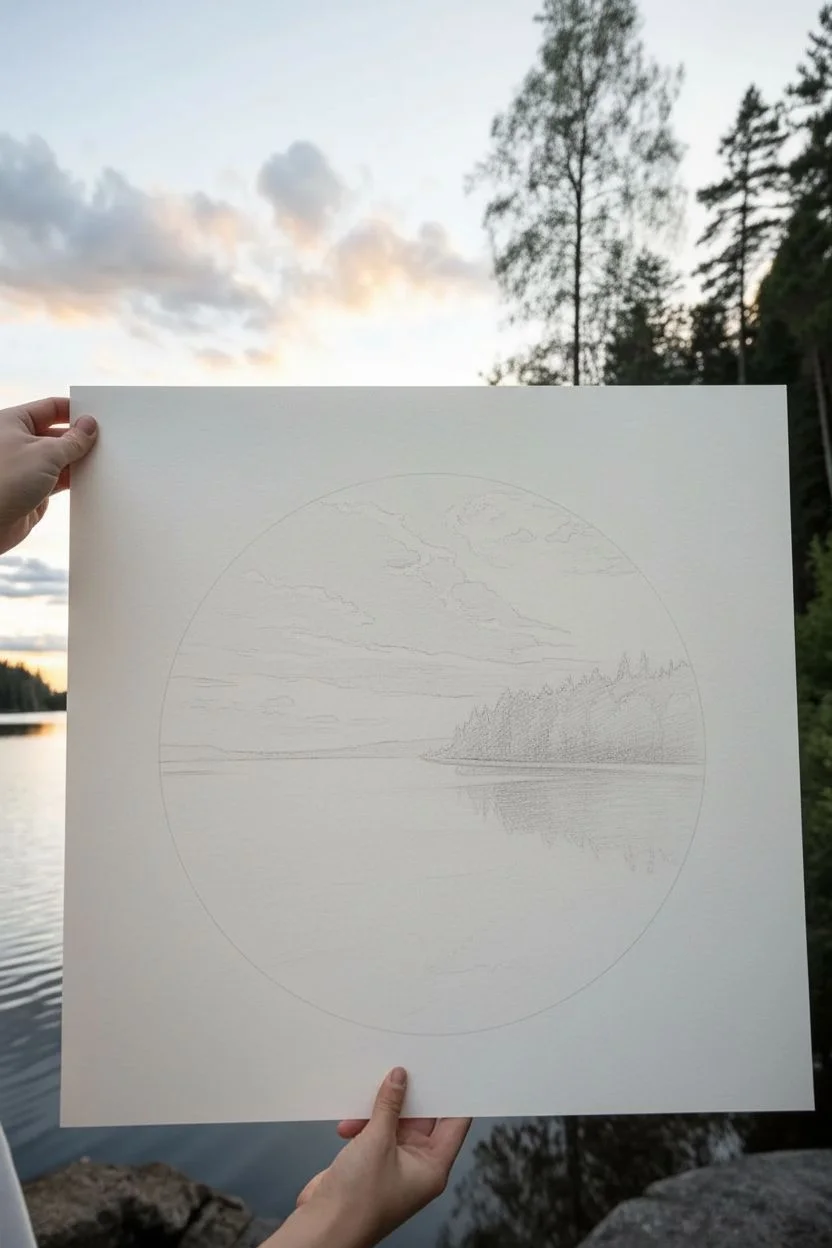
Capture the tranquil stillness of a lakeside evening with this sophisticated circular composition. Using a limited tonal range, you will learn to balance heavy, atmospheric skies with the crisp, glassy reflections of water in a unique tondo format.
Detailed Instructions
Materials
- High-quality bright white drawing paper (heavyweight, at least 90lb)
- Vine charcoal (soft and medium)
- Compressed charcoal sticks or charcoal pencils (2B, 4B, 6B)
- Circular stencil, compass, or a large plate (approx. 8-10 inches)
- Kneaded eraser
- Precision eraser (pencil style or stick)
- Blending stumps (tortillons) and a soft chamois cloth
- Fixative spray
Step 1: Preparation and Initial Layout
-
Prepare the boundary:
Begin by securing your paper to a smooth, hard surface. Place your circular object or use a compass to lightly trace a perfect circle in the center of the page. This frame is crucial, so keep your pencil line extremely faint—you want the charcoal to define the edge later, not a graphite outline. -
Establish the horizon:
Lightly sketch the horizon line about one-third of the way up from the bottom of the circle. This low horizon emphasizes the sky, which is a major feature of this piece. Sketch the uneven silhouette of the tree line on the right side, extending naturally towards the center. -
Ghost in the values:
Use a stick of soft vine charcoal to very loosely block in the major shapes. Don’t press hard; simply create a grey map of where the dark trees and the heavy cloud banks will sit. This creates a base layer that captures the paper’s tooth.
Clean Edge Secret
Cut a hole in a piece of scrap paper or sticky frisket film the exact size of your circle. Place this overlay on your drawing paper to act as a shield, keeping the outside border perfectly white.
Step 2: Drawing the Sky and Atmosphere
-
Cloud formation:
Start at the top of the circle with a medium vine charcoal. Apply broad, horizontal strokes to suggest the cloud layers. The sky should be darker at the very top edge to create depth, gradually lightening as you approach the horizon. -
Adding texture:
Switch to a darker charcoal pencil for the undersides of the clouds. Use small, scrubbing motions to build up density, but keep the edges soft. Clouds are vapor, not solid objects, so avoid hard outlines here. -
Blending the atmosphere:
Gently gently use a chamois cloth or a large blending stump to smooth out the vine charcoal in the sky. This unifies the tone. I like to lift out highlights afterwards using a kneaded eraser to create the ‘silver lining’ effect where light breaks through. -
The glowing horizon:
Ensure the area immediately above the treeline remains the brightest part of the paper. This negative space represents the sunset glow and provides necessary contrast for the dark trees you are about to draw.
Try a Colored Tint
Instead of white paper, try this on toned grey or tan paper. Use the charcoal for shadows as usual, but add white charcoal or white pastel for the brightest highlights in the sky and water.
Step 3: The Treeline and Reflections
-
Blocking the trees:
Use a 4B or 6B compressed charcoal or pencil to fill in the treeline. These trees should be the darkest value in the drawing (your ‘blackest black’). Use vertical strokes to mimic pine trunks and stippling motions for the foliage. -
Creating the reflection base:
Mirror the shape of the trees into the water below. However, do not make this a solid black mass. Apply vertical strokes that pull downwards from the shoreline, pressing firmly at the bank and lifting pressure as you go down. -
Disturbing the water:
To make the reflection look like water, cut across your vertical reflection strokes with horizontal swipes of a clean eraser or a horizontal stroke of charcoal. This mimics the surface tension and ripples on the lake.
Step 4: Foreground and Final Details
-
Water texture:
In the open water area on the left and center, use the side of a charcoal stick to graze the paper surface lightly. This ‘scumble’ technique catches the paper texture, looking like ripples catching light. -
Foreground reeds:
At the very bottom right of the circle, use a sharp charcoal pencil to draw fine, vertical grasses and reeds emerging from the water. Vary their heights and angles slightly for realism. -
Refining the reeds:
Add subtle reflections for these reeds directly beneath them. They should be darker and slightly more blurred than the reeds themselves. -
Defining the edge:
Carefully clean up the perimeter of your circle. Use your precision eraser to remove any charcoal dust that strayed outside the boundary. A crisp edge is essential for the window-like effect. -
Final contrast check:
Step back and squint at your drawing. Deepen the darks in the treeline if they look washed out, and use the eraser to reclaim the bright white of the reflected sky in the water if it got muddy. -
Fixing the image:
Spray a workable fixative over the drawing in a well-ventilated area to prevent smudging, especially if you plan to frame it without a mount.
Enjoy the peaceful view you’ve created, and perhaps hold it up against a real landscape to see how your interpretation compares to reality


Rainy Street Scene With Reflections
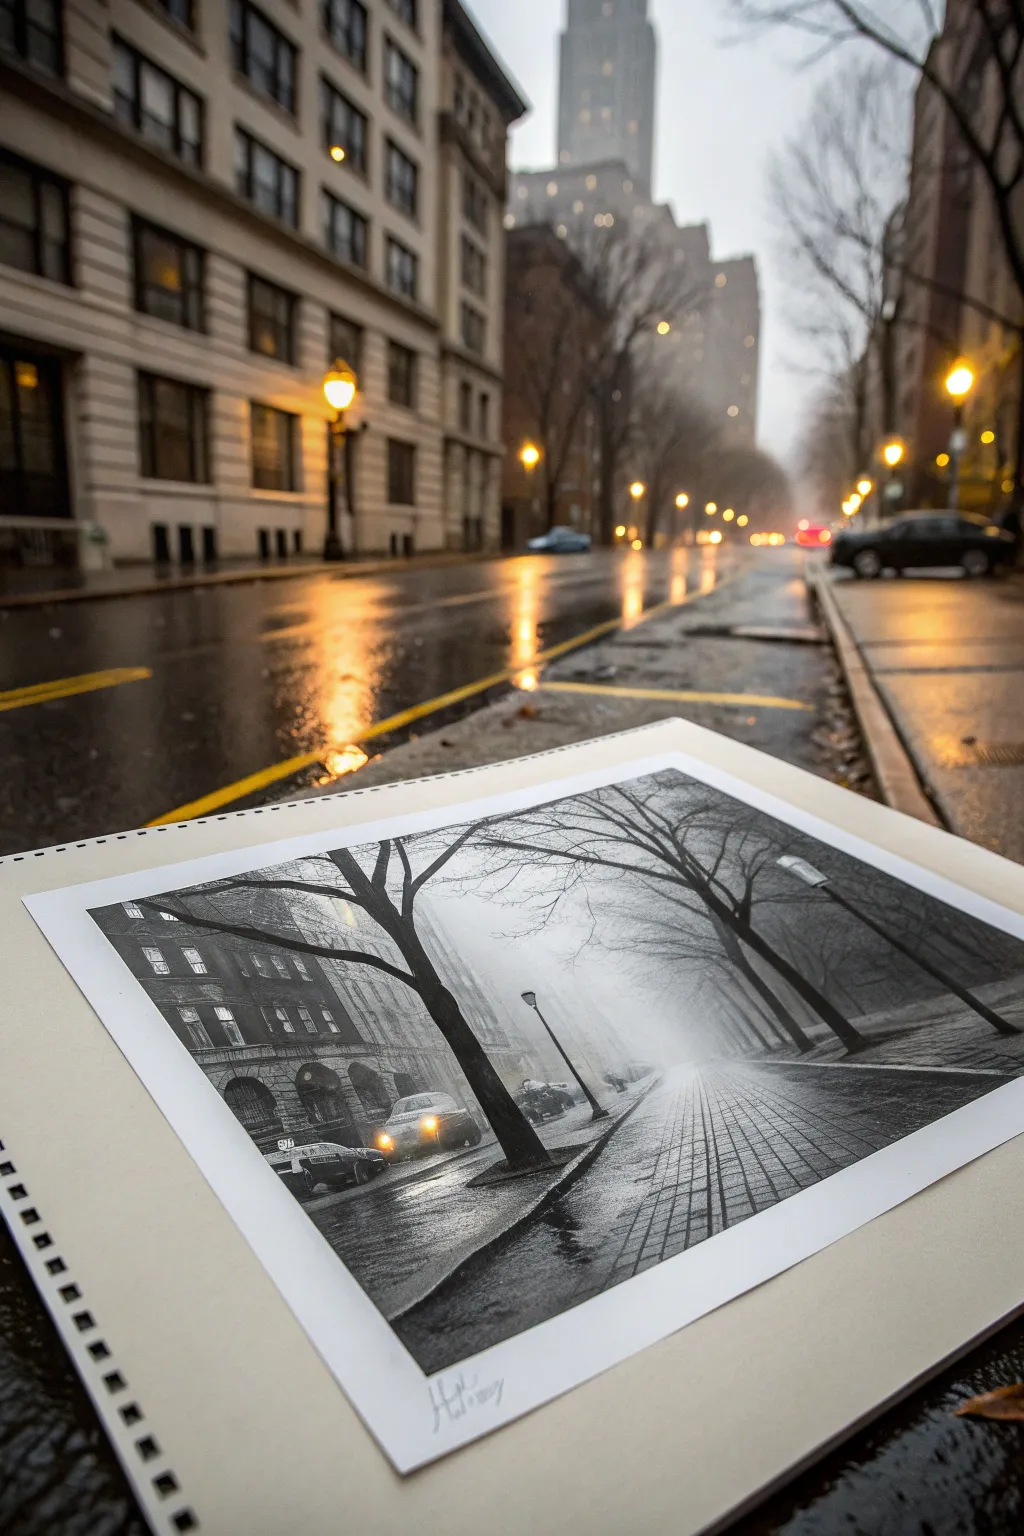
Capture the moody elegance of a rain-slicked city street with this atmospheric charcoal drawing. By focusing on soft gradients and sharp reflections, you’ll create a scene that feels both quiet and alive with contrasting textures.
Step-by-Step Tutorial
Materials
- Heavyweight drawing paper or mixed media paper (smooth to medium grain)
- Vine charcoal (soft/medium)
- Compressed charcoal sticks (medium/hard)
- Charcoal pencils (soft, medium, hard)
- Kneaded eraser
- Paper blending stumps (tortillons)
- Soft brush (for sweeping away dust)
- White pastel pencil or white charcoal pencil
- Fixative spray
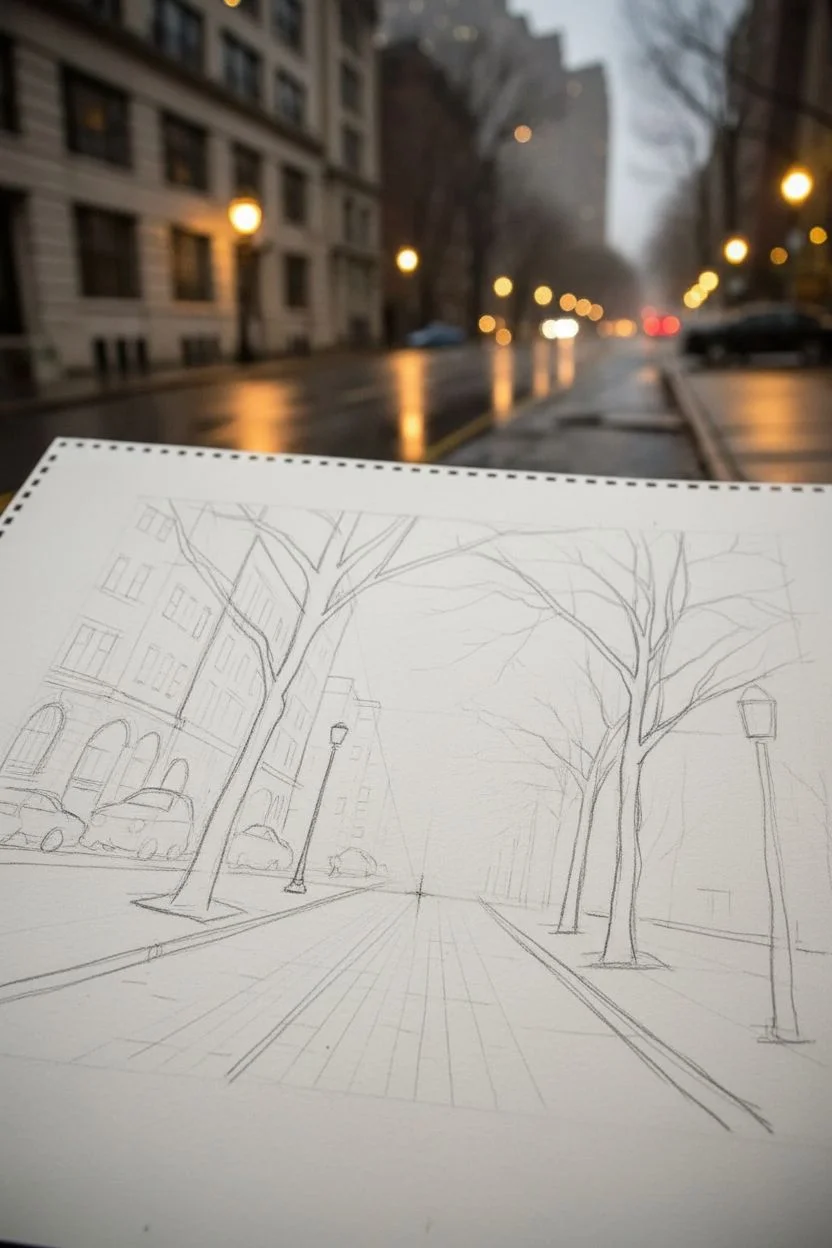
Step 1: Establishing the Horizon and Perspective
-
Draw the horizon line:
Lightly sketch a horizontal line across the lower third of your paper using a harder charcoal pencil. This will determine your eye level. -
Map the vanishing point:
Place a vanishing point slightly to the right of the center on your horizon line. All your converging lines—the sidewalk edges, tree lines, and building cornices—will radiate from this single point. -
Sketch the major shapes:
Using a vine charcoal stick, loosely block in the large shapes of the buildings on the left and the tree line on the right. Keep these lines faint and easy to erase. -
Refine the composition:
Draw the specific angles of the sidewalk pavement leading into the distance. Ensure the sidewalk on the right takes up a significant portion of the foreground to lead the viewer’s eye into the mist.
Master the Mist
Don’t overwork the background. The misty effect relies on leaving the white of the paper or very light gray tones visible near the vanishing point.
Step 2: Creating the Atmoshere
-
Tone the background:
Use the side of a soft vine charcoal stick to lay down a gentle, even layer of gray in the sky and distant background area. -
Blend for mist:
Take a large paper stump or a soft clean cloth and rub the background tone in circular motions. You want a smooth, hazy gradient that gets lighter as it approaches the vanishing point, simulating distant fog. -
Build the distant buildings:
Lightly sketch the silhouettes of the furthest buildings. Keep edges soft here; distinct details should fade into the fog.
Step 3: Adding Structure and Shadows
-
Develop the buildings:
Moving to the left foreground buildings, use compressed charcoal to darken the façades. Add architectural details like arched windows and cornices, pressing harder for deep alcoves. -
Draw the skeletal trees:
Use a sharpened charcoal pencil for the trees. Start with the trunk in the foreground, making it thick and dark, tapering the branches into fine lines as they reach upward and outward. -
Create canopy depth:
Add smaller, interlacing branches higher up. I find it helps to let lines fade out slightly at the tips to mimic thin branches disappearing into the mist. -
Add streetlights:
Draw the vertical posts of the street lamps along the sidewalk. Keep the lamps themselves unshaded for now to represent the light source.
Make It Glow
Add a touch of yellow pastel to the street lamps and car headlights for a realistic warm glow against the cool grey charcoal tones.
Step 4: Reflections and Wet Pavement
-
Draw pavement texture:
Using a ruler or steady hand, draw the perspective lines of the sidewalk tiles or cobblestones. Use a medium charcoal pencil, keeping lines darker in the foreground and lighter as they recede. -
Create wet reflections:
Shade the ground directly beneath the trees and streetlights with vertical, downward strokes. Smudge these slightly with a tortillon to create the blurred look of reflections on wet stone. -
Lift out highlights:
Take your kneaded eraser and shape it into a wedge. ‘Draw’ with the eraser by lifting pigment off the pavement to create bright, reflective streaks where the wet ground catches the light. -
Enhance the glow:
Use a white pastel or charcoal pencil to add bright spots inside the street lamps and the headlights of the cars on the left. Add a tiny halo around these lights to show them glowing through the mist. -
Add car silhouettes:
Darken the car shapes on the left side of the street. Use deep blacks for the undercarriages and tires to anchor them to the road.
Step 5: Final Touches
-
Deepen contrast:
Look for your darkest darks—typically the base of the nearest tree and the deepest building shadows. Re-apply compressed charcoal here to make the image pop. -
Clean up edges:
Use the eraser to clean up the borders of your drawing for a crisp presentation, or sketch a deliberate frame around it. -
Seal the artwork:
Once satisfied, spray a fixative over the drawing in a well-ventilated area to prevent the charcoal from smudging.
Now you have a stunning, moody cityscape that perfectly captures the feeling of a rainy walk home.
Botanical Close-Up With Soft Background
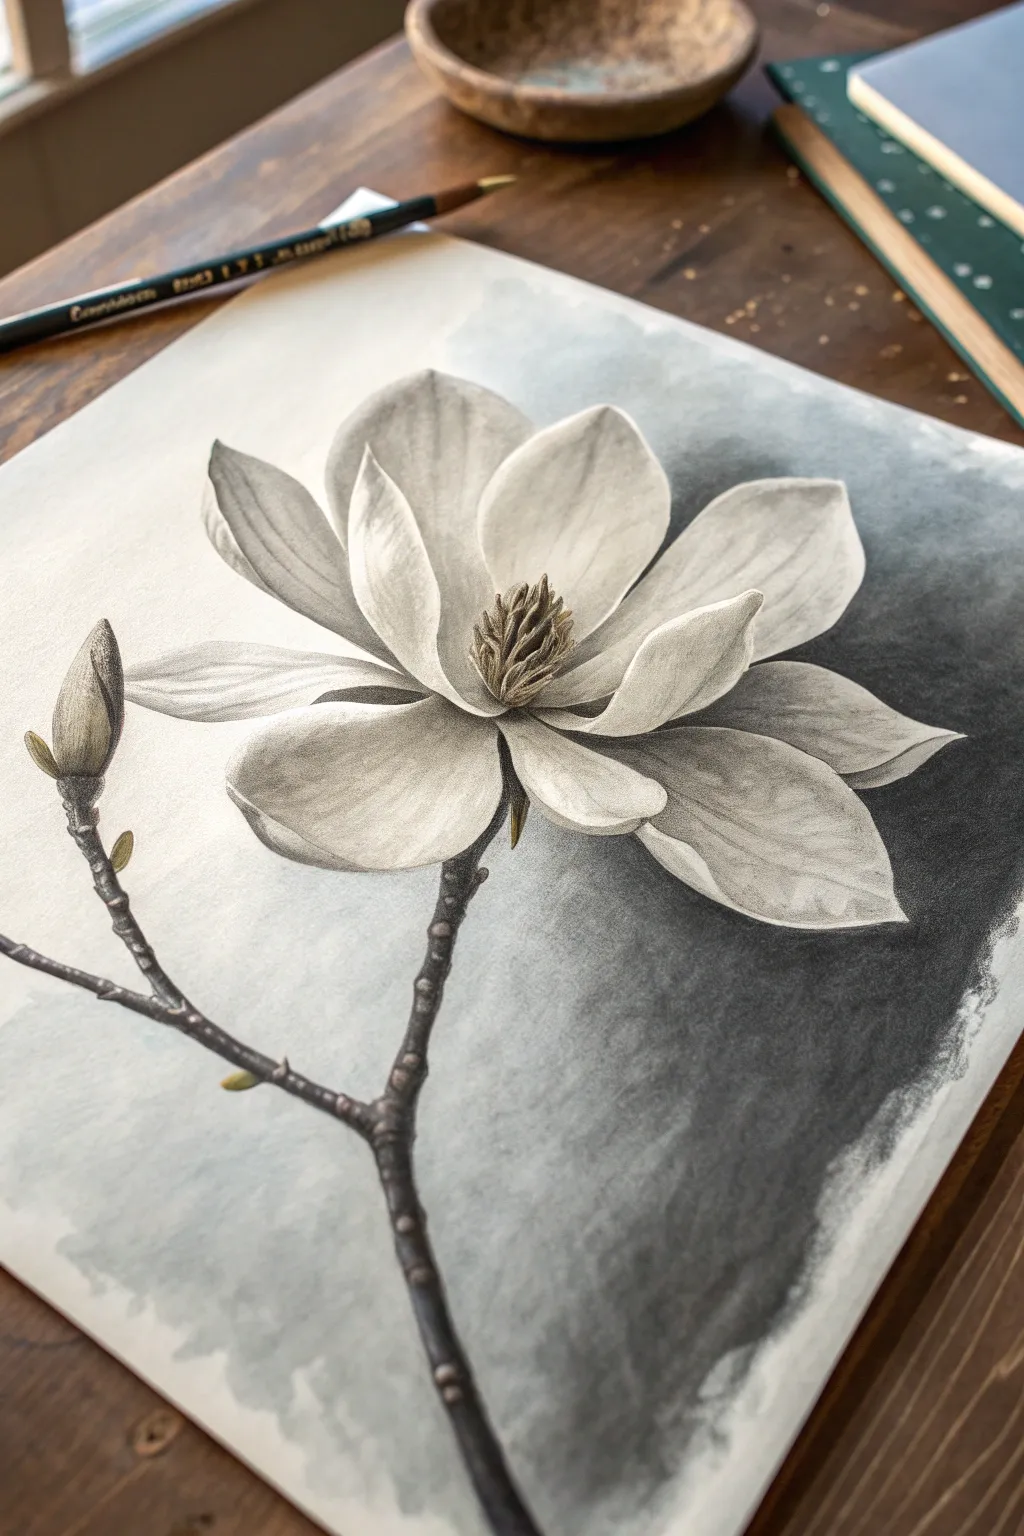
Capture the delicate elegance of a blooming magnolia with this dramatic charcoal study. You will learn to balance high-contrast shading with soft, ethereal transitions to create a flower that seems to glow against a smoky background.
Detailed Instructions
Materials
- Heavyweight drawing paper (smooth or vellum finish, approx 9×12 inches)
- Vine charcoal sticks (soft)
- Compressed charcoal (medium and soft)
- Charcoal pencils (HB, 2B, 4B)
- White charcoal pencil or white pastel pencil
- Kneaded eraser
- Blending stumps (tortillons) in various sizes
- Soft blending brush or chamois cloth
- Workable fixative spray
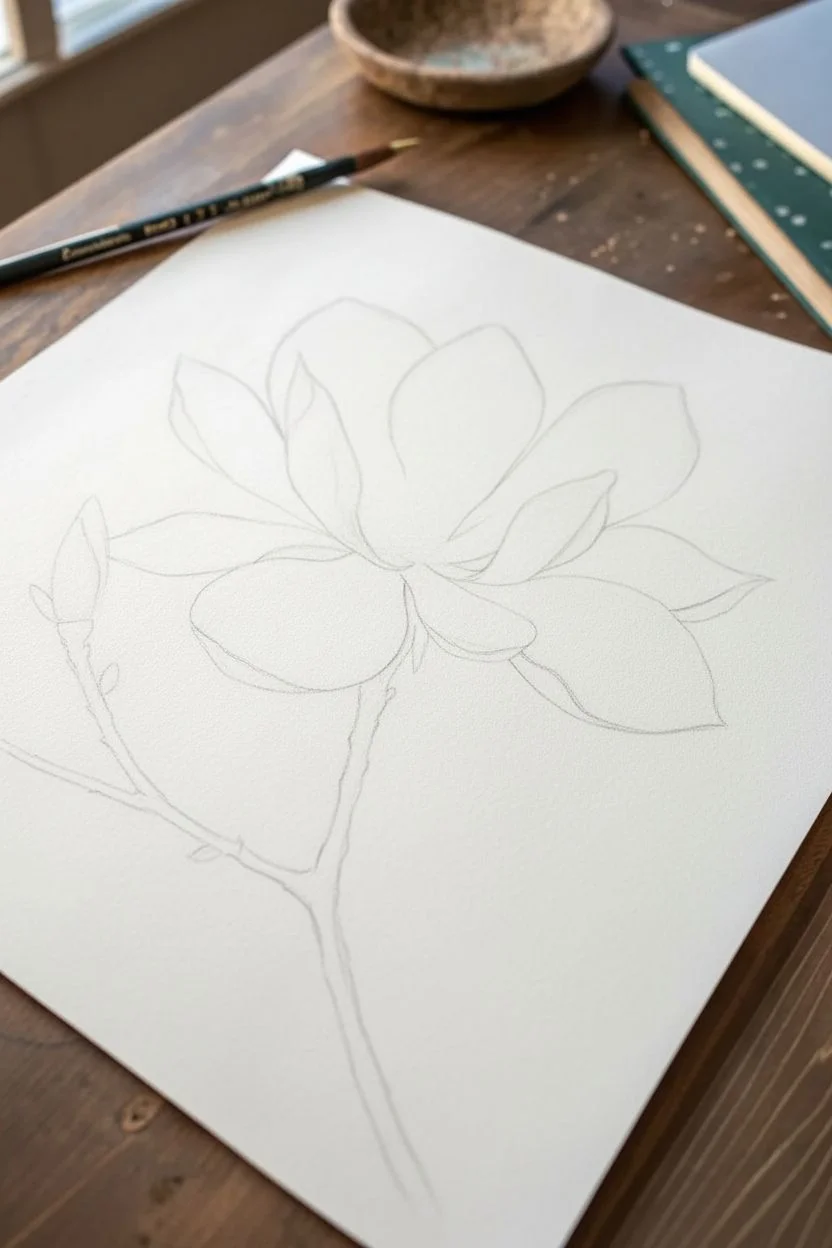
Step 1: Sketching the Structure
-
Establish the curve:
Begin by lightly drawing the main branch line using a hard charcoal pencil. Start from the bottom center and curve it gently upward toward the left, creating a natural anchor for your flower. -
Map the blossom:
At the top of your branch, sketch a large, rough oval to define the overall size of the main flower. Don’t worry about petals yet; just establish the boundaries so your composition is balanced. -
Outline the petals:
Inside your oval, lightly draw the individual petals. Magnolia petals are large and cup-shaped. Draw the central petals standing upright and the outer petals unfurling sideways. Keep your lines faint so they can be easily adjusted. -
Add the bud:
On the smaller branch extending to the left, sketch the teardrop shape of the unbloomed bud. Add small leaf nodes along the branch for realism.
Smudge-Free Zone
Charcoal loves to smear. Place a clean sheet of scrap paper under your drawing hand at all times to protect the white petals from oils and stray charcoal dust.
Step 2: Building the Atmospheric Background
-
Lay down base tone:
Using the side of a vine charcoal stick, gently rub a layer of grey across the background area, focusing heavily on the right side of the paper. -
Create the gradient:
Switch to a compressed charcoal stick for the darkest areas on the far right. Apply heavy pressure to get a deep black, then fade your pressure as you move toward the flower. -
Blend for softness:
Take a chamois cloth or a soft blending brush and smooth out the charcoal. Blend from the dark right side inward, stopping before you hit the flower petals to keep the paper white there. This creates that ‘glow’ effect. -
Refine the edges:
Use a clean kneaded eraser to lift off any smudges that strayed into the flower area. The contrast between the dark background and the white paper is crucial here.
Step 3: Detailed Shading of the Flower
-
Define the center:
Using a sharpened charcoal pencil (2B), draw the cone-like center of the flower. Use small, upward ticking strokes to mimic the texture of the stamens and carpels. -
Start the petals:
Choose a back petal to start. Lightly shade the base where it meets the center, pulling the tone upward with a dirty tortillon. This suggests the curve of the petal without outlining it too harshly. -
Deepen petal shadows:
Where petals overlap, use a 4B charcoal pencil to add deeper shadows. This separation is what gives the flower its 3D volume. -
Add petal texture:
Magnolia petals have subtle veins. Use a very sharp HB charcoal pencil to draw faint, curving lines that follow the shape of the petal from base to tip. Soften these immediately with a clean stump. -
Highlighting edges:
I like to use a white charcoal pencil here to accentuate the curled edges of the petals. Apply it strictly to the rims where the light hits most directly.
Vintage Patina
Tint the finished paper slightly with a wash of weak tea or coffee avoiding the white flower petals to give the piece an antique botanical illustration look.
Step 4: Texturing the Branch and Bud
-
Darken the wood:
Fill in the branch using a 4B pencil. Unlike the smooth petals, the branch should look rough. Use short, disjointed strokes to create a bark-like texture. -
Detail the nodes:
The branch has distinct knobby joints. Emphasize these by pressing harder with your charcoal to create small pockets of shadow under each node. -
Shade the bud:
The bud has a fuzzy texture. Use a dull charcoal pencil to shade it, using a stippling motion (tiny dots) rather than smooth strokes. Leave the very tip slightly lighter.
Step 5: Final Adjustments
-
Boost the contrast:
Step back and look at the background. If the grey has faded, re-apply compressed charcoal to the darkest corner to ensure the white flower pops. -
Clean up highlights:
Use your kneaded eraser to tap (not rub) on the brightest parts of the petals to lift any gray haze back to pure white paper. -
Protect your work:
Once satisfied, spray the drawing with a light coat of fixative in a well-ventilated area to prevent the heavy charcoal background from smearing.
Now step back and admire the dramatic contrast you’ve created between light and shadow
Smoke, Mist, and Fog Gradients

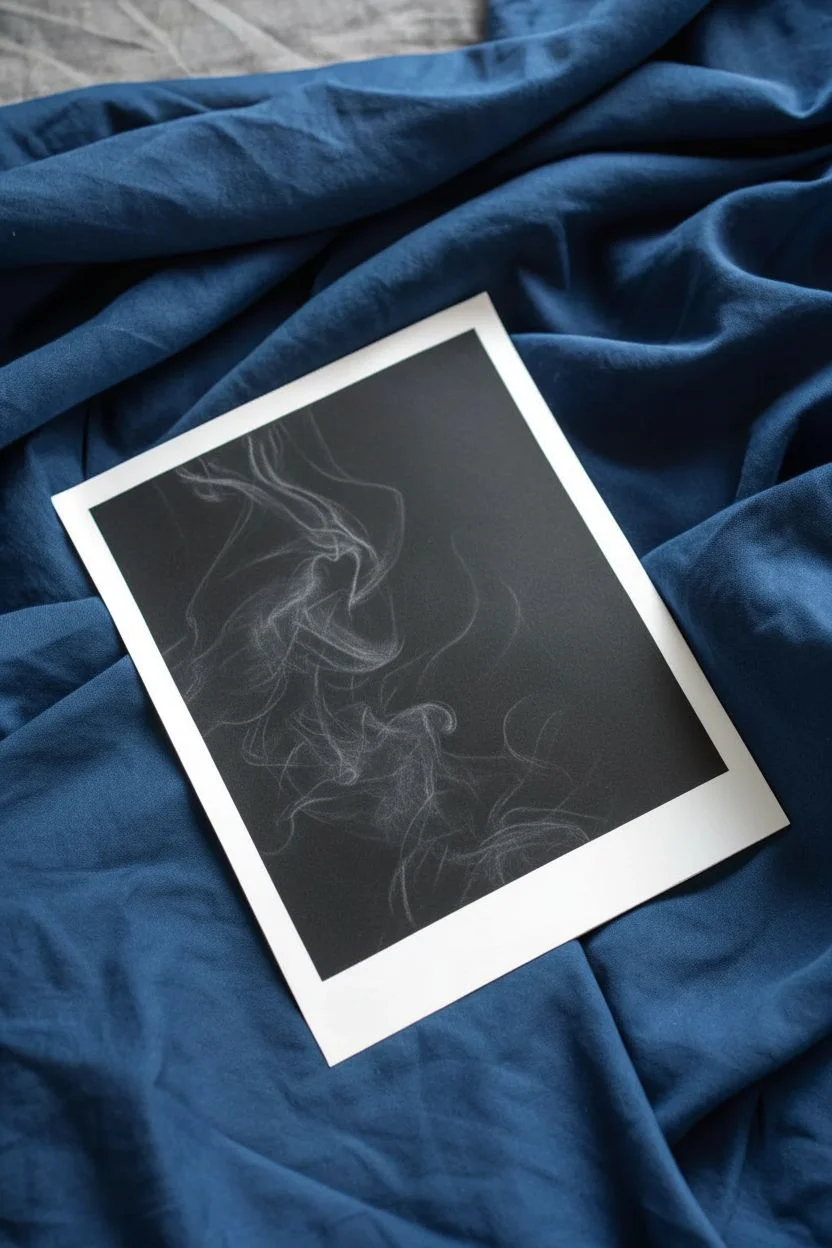
Learn to draw the ephemeral nature of smoke using the striking contrast of white charcoal on black paper. This project focuses on soft gradients and flowing lines to create a moody, illusionistic effect that looks like it’s floating off the page.
Step-by-Step Guide
Materials
- Black drawing paper or black cardstock (smooth or vellum finish)
- White charcoal pencil (soft/medium)
- White compressed charcoal stick
- Kneaded eraser
- Blending stump (tortillon)
- Soft makeup brush or drafting brush
- Fixative spray (workable)
Step 1: Laying the Groundwork
-
Observe the Flow:
Before making a mark, lightly trace the primary path of the smoke plume with your finger in the air. Notice how smoke isn’t a single object but a collection of folding ribbons. -
Map the Main Artery:
Using a very light touch with your white charcoal pencil, sketch a faint, wandering line that represents the spine of the smoke column. Keep this line barely visible. -
Block in Shapes:
Lightly outline the major ‘clouds’ or wider sections of the smoke. Don’t worry about details yet; just capture the general mass and direction where the smoke is thickest.
Don’t Blow It!
Never blow eraser crumbs or charcoal dust off your black paper with your breath. The moisture can cause spots. Use a soft drafting brush or lighter gravity instead.
Step 2: Building Opacity
-
Establish the Core:
identify the absolute brightest white areas in your reference. Use the compressed white charcoal stick here to lay down dense, opaque pigment. These are the hearts of the smoke density. -
Soften the Edges:
Immediately use your blending stump to pull the pigment from that bright core outward. The goal is to lose the hard edge of your initial mark entirely. -
Create the Mid-Tones:
Switch to the white charcoal pencil. Apply light, feathery strokes adjacent to your bright cores. These strokes should follow the curve and twist of the smoke ribbon. -
Initial Blend:
Use a clean blending stump or your finger (if it’s not oily) to gently smudge the pencil strokes into the black paper. This creates the ‘translucent’ grey mist effect.
Step 3: Refining the Form
-
Carve with Darkness:
This is crucial for realism: Take your kneaded eraser and shape it into a fine point. Lift away charcoal in areas where the black background needs to peek through the smoke. -
Define the Folds:
Smoke folds over itself like fabric. Use the eraser to cut sharp lines into soft blurred areas, creating the illusion of one distinct layer of smoke passing in front of another. -
Add Wispy Tendrils:
I like to sharpen the white pencil to a needle point for this part. Draw very fine, stray lines breaking away from the main mass at the top and edges. -
Fade the Bottom:
The bottom of the smoke column should likely fade into darkness or become less distinct. Use a soft dry brush to sweep over the lower section, diffusing the charcoal significantly. -
Layering Up:
Go back to the brightest highlights. Apply a second layer of compressed white charcoal on top of the blended base. Keep this application small and precise.
Tinted Haze
For a supernatural effect, lightly grate a tiny amount of blue or violet pastel chalk over the finished smoke and gently buff it in for a ghostly colored glow.
Step 4: Final Polish
-
Check Contrast:
Step back from the artwork. The illusion relies on high contrast. If the brightest whites look grey, add more pressure with the charcoal pencil. -
Clean the Negative Space:
Charcoal dust migrates easily. Use a clean kneaded eraser to dab (do not rub) the surrounding black background to remove any stray white speckles. -
Soften Harsh Lines:
If any of your ‘wispy’ lines look too much like drawn wires, tap them gently with the blending stump to push them back into the atmosphere. -
Seal the Work:
Lightly spray the drawing with a workable fixative in a well-ventilated area to prevent smudging. Use short bursts from a distance.
Frame your smoke study with a wide white mat to emphasize the deep blacks and delicate whites you’ve achieved
Expressive Animal Gesture Sketch
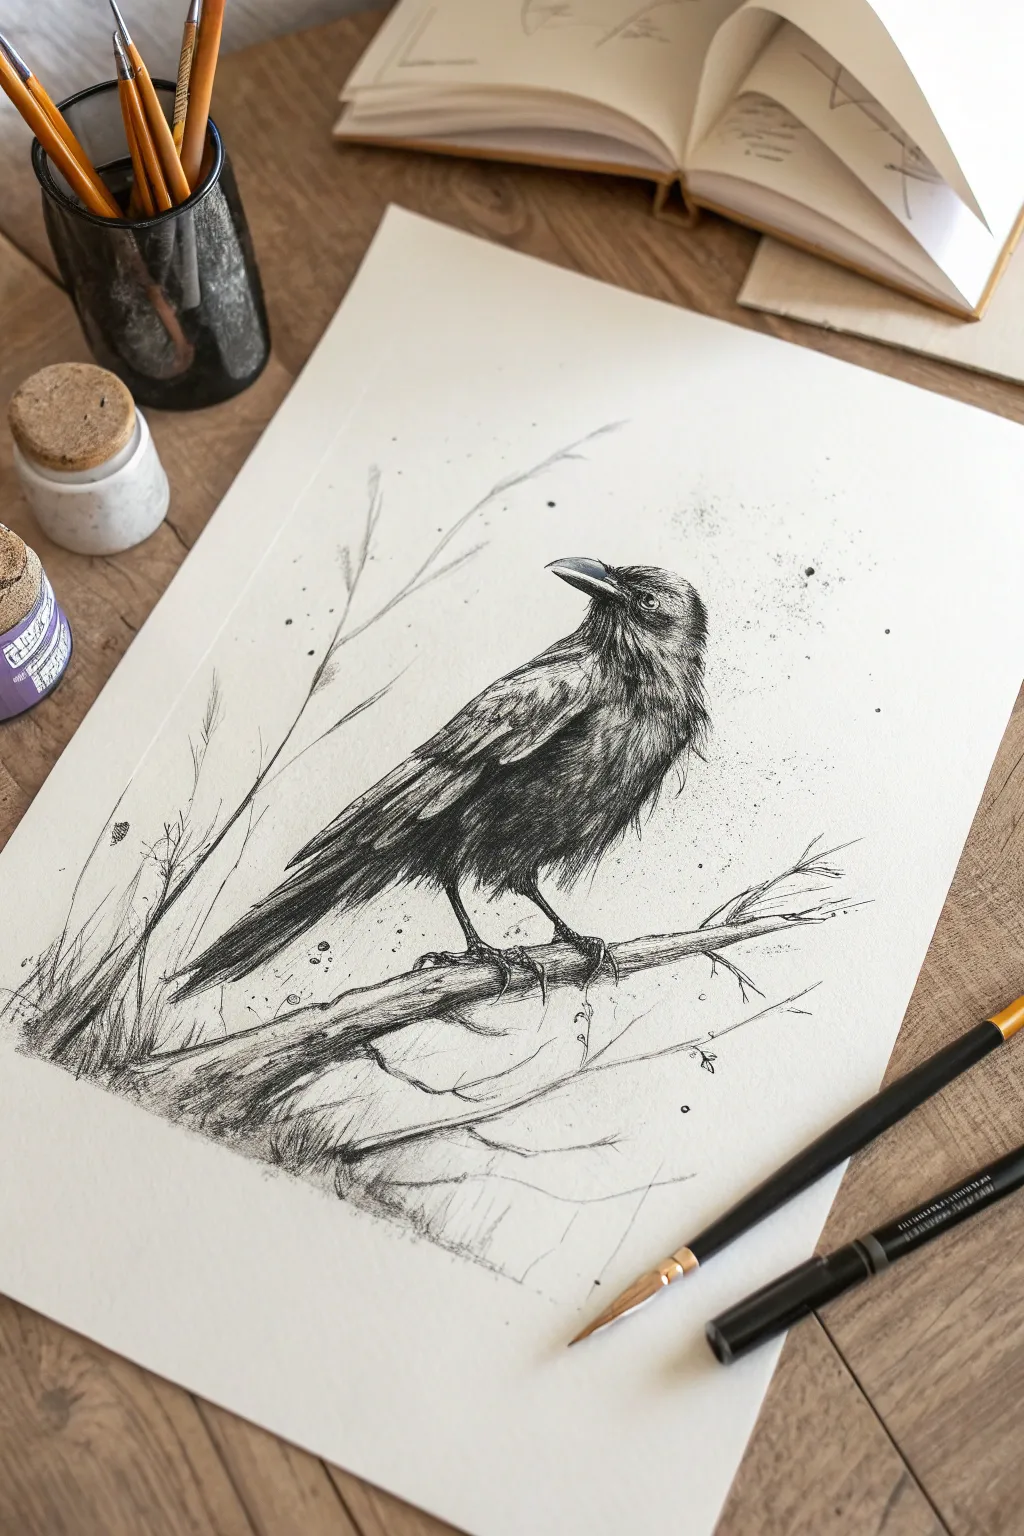
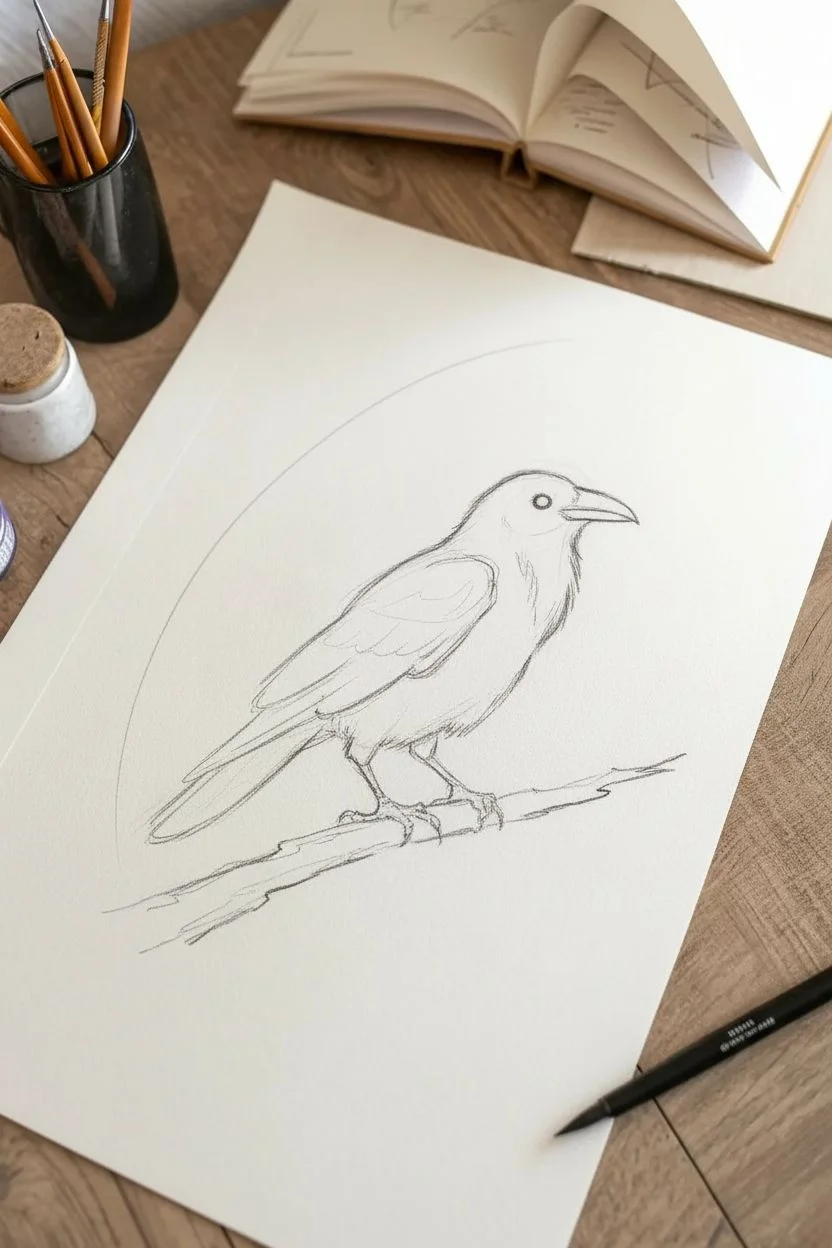
Capture the intelligent gaze and brooding texture of a raven using the moody medium of charcoal and ink. This project balances fine, scratchy details with bold, gestural strokes to create a striking bird portrait on textured paper.
How-To Guide
Materials
- Heavyweight textured drawing paper (approx. 300gsm)
- Charcoal pencils (Hard/HB and Soft/4B)
- Willow charcoal stick
- Fine-liner ink pen (0.3mm or 0.5mm)
- White gel pen (optional for highlights)
- Kneaded eraser
- Blending stump (tortillon) or cotton swab
Step 1: Laying the Foundations
-
Establish the Gesture Line:
Begin with your hard charcoal pencil. Lightly sketch a sweeping curve that starts at the head, flows down the back, and angles where the tail will be. This single line dictates the bird’s posture. -
Block in Basic Shapes:
Add an oval for the body along your gesture line and a smaller circle for the head. Connect them with a thick, short neck shape. Don’t worry about feathers yet; just focus on proportions. -
Draft the Perch:
Sketch the rough diagonal line of the branch beneath the bird. Keep this line jagged and uneven to suggest old wood, and add a few smaller twigs branching off into the background. -
Define the Beak and Eye:
Refine the head shape. Draw the beak with a slight curve, thick at the base and pointed at the tip. Place the eye high on the head, leaving a tiny white circle empty for the highlight. -
Outline the Legs:
Sketch the legs extending from the lower body. They should look sturdy and scaled. Draw the claws gripping the branch, wrapping around the rough wood texture.
Step 2: Building Texture and Depth
-
Initial Charcoal Layering:
Using the willow charcoal or soft pencil, lay down a base tone for the bird’s darkest areas—the belly, the wing tips, and the shadow under the neck. Keep your strokes loose. -
Feather Direction Mapping:
Switch to your hard charcoal pencil. Draw short, directional lines over the body. On the head, lines should be tiny and bristle-like; on the wings, use longer sweeping strokes following the curve of the wing. -
Deepen the Darks:
Press harder with your soft (4B) charcoal pencil to define the deepest shadows. Focus on the underside of the tail, the separation between wing feathers, and the pupil of the eye. -
Smudging for Softness:
Take a blending stump and gently smudge the charcoal on the raven’s chest and belly. I often find this helps create the illusion of soft, downy under-feathers contrasting with the flight feathers. -
Adding Ink Accents:
Introduce the fine-liner pen. Go over the eye outline (leaving the sparkle white), the beak’s sharp edge, and the claws. Add tiny, scratchy ink lines in the darkest feather areas for extra definition. -
Defining the Wing Feathers:
Use the hard charcoal pencil to draw the specific shapes of the primary flight feathers. Leave small gaps of white paper between some strokes to simulate light catching the glossy plumage.
Smudge Fixer
If you accidentally smear charcoal across the stark white background, don’t rub it! Dab repeatedly with a clean kneaded eraser to lift the dust without grinding it into the paper grain.
Step 3: Atmospheric Details & Finish
-
Rendering the Branch:
Add texture to the branch using rough, horizontal strokes. Use the side of your pencil to create bark patterns, pressing harder on the underside of the branch for shadow. -
Drawing Background Elements:
Lightly sketch faint, vertical grasses or thin twigs rising up from the left side. Keep these strokes extremely delicate and faint so they look distant and don’t compete with the bird. -
Creating ‘Noise’:
Take a piece of willow charcoal, rub it on a scrap paper to create dust, and touch your finger to it. Gently tap faint smudges around the bird. You can also flick your pen to add tiny ink splatters for an energetic look. -
Highlight Refinements:
Use your kneaded eraser to lift out pigment on the top of the head and the shoulder of the wing. This creates the ‘shine’ of black feathers. -
Final Eye Polish:
If your white paper reserve for the eye highlight got muddy, use a tiny dot of white gel pen to make the eye sparkle. This brings the bird to life. -
Grounding Shadows:
Add a few dark, scribbly lines immediately under the claws and tail where they touch the branch to firmly plant the bird in the scene.
Level Up: Color Accent
Add a hint of iridescence to the black feathers. Lightly glaze over the highlighted wing areas with a deep blue or purple pastel pencil to mimic the sheen of real raven plumage.
Now step back and admire the stark contrast and personality of your charcoal raven
Abstract Charcoal Texture Landscape
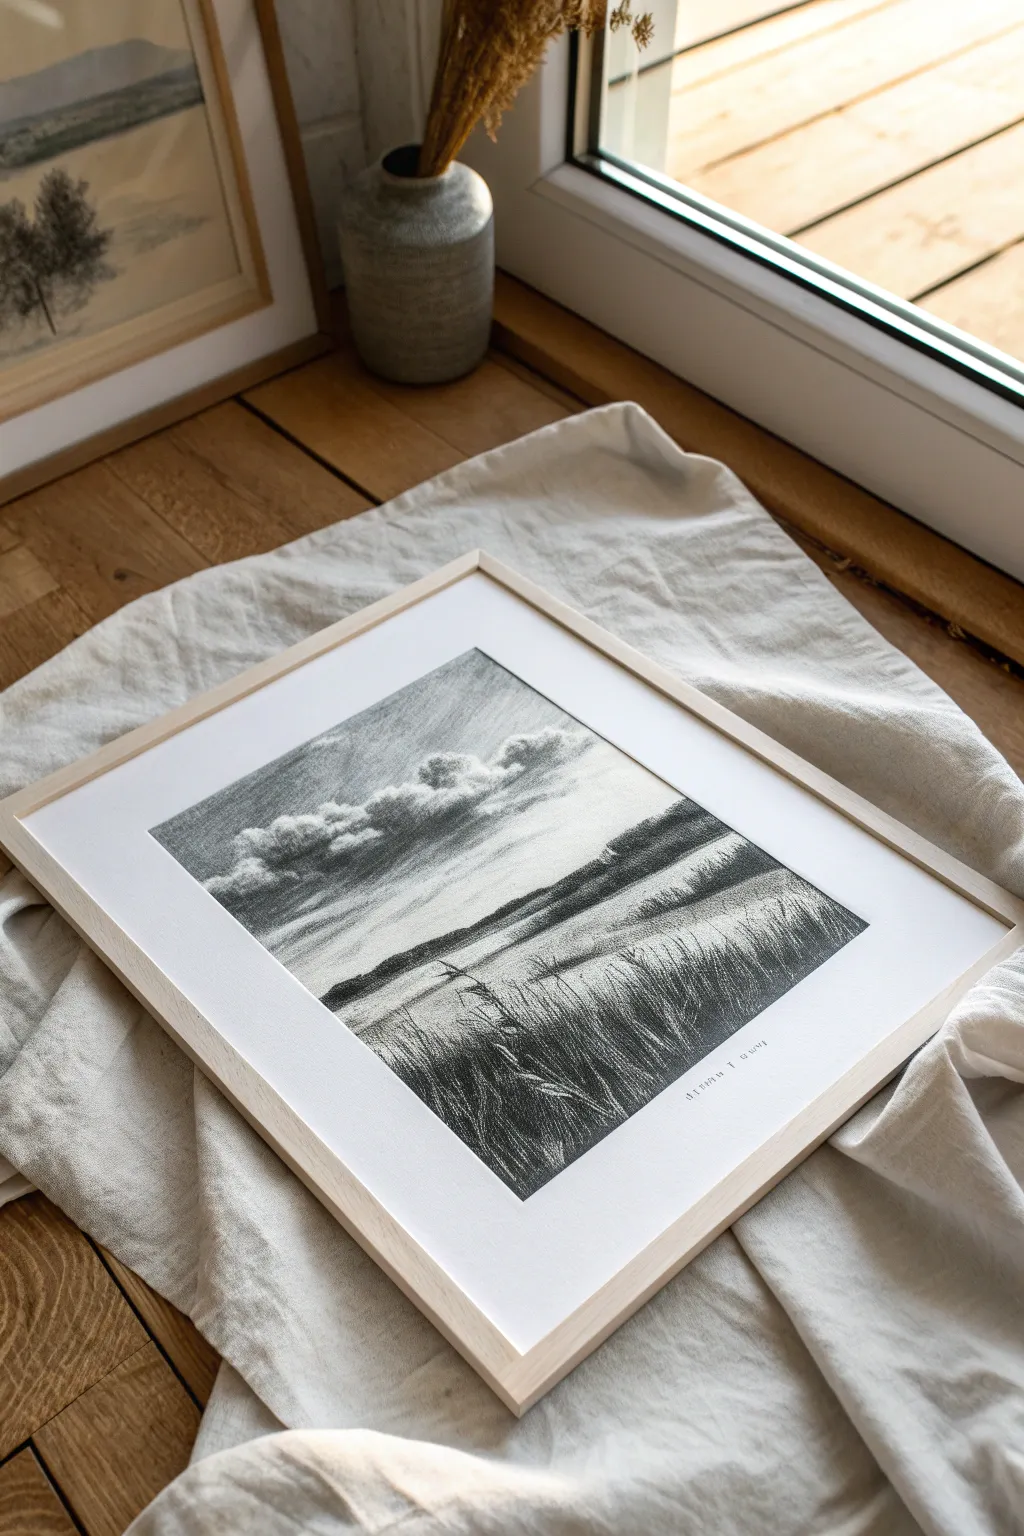
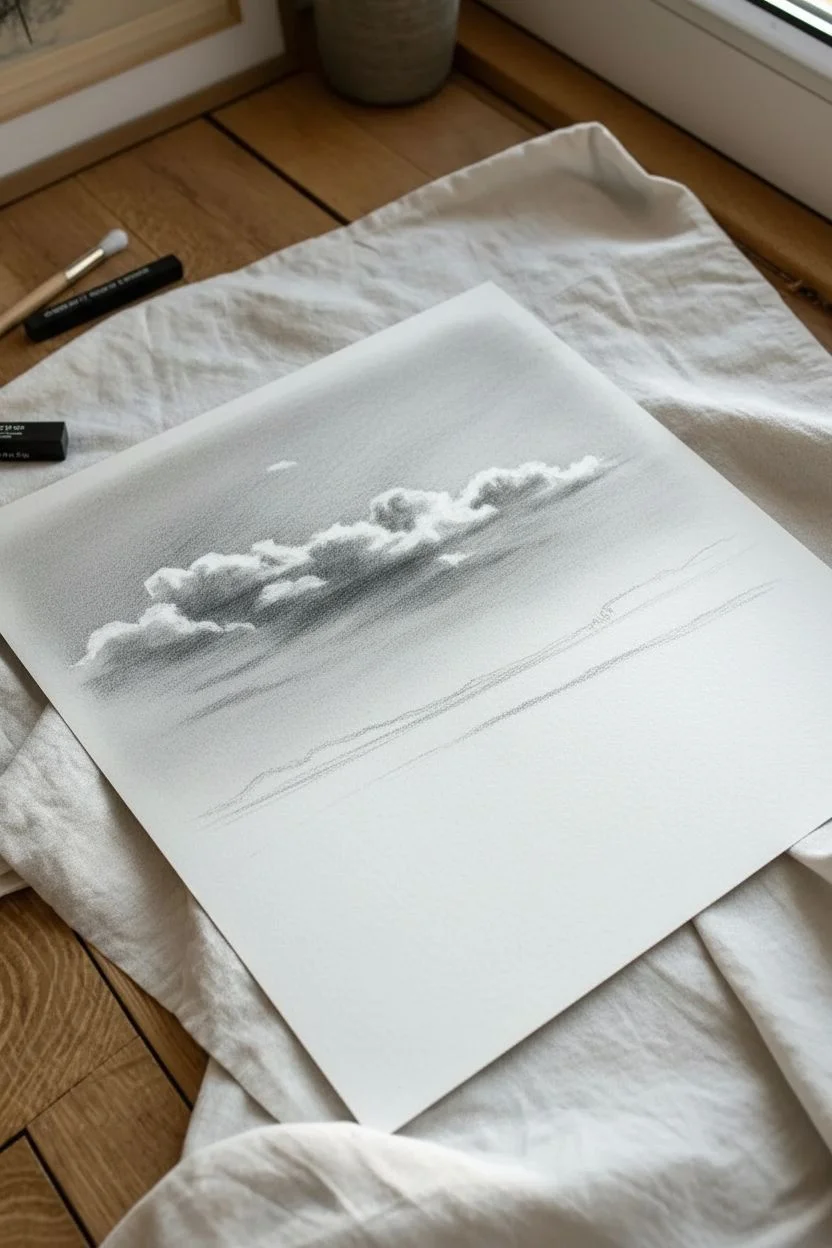
This tutorial guides you through creating a serene, black and white landscape that balances detailed grassy textures with sweeping, atmospheric skies. The finished piece captures the quiet beauty of a grassy shoreline using rich charcoal values and subtle blending techniques.
Detailed Instructions
Materials
- Heavyweight drawing paper or mixed media paper (smooth to medium grain)
- Vine or willow charcoal sticks (soft)
- Compressed charcoal sticks (medium and hard)
- Kneadable eraser
- Paper blending stump (tortillon) or chamois cloth
- Workable fixative spray
- Light wood frame with white matting (for display)
Step 1: Planning and Sky
-
Establish the Horizon:
Begin by lightly marking your horizon line slightly below the vertical center of the paper using a piece of vine charcoal. This line determines the separation between the expansive sky and the water below. -
Lay Down the Sky Tone:
Turn a piece of vine charcoal on its side and gently sweep it across the top third of the paper. You don’t need perfect coverage; aim for a light, hazy grey base tone. -
Blend the Atmosphere:
Use a chamois cloth or a soft tissue to gently rub the vine charcoal into the paper grain. This creates a smooth, atmospheric backdrop for your clouds. -
Draft the Clouds:
Sketch the rough shapes of the cumulus clouds floating above the horizon. Focus on the bottoms of the clouds first, where shadows naturally gather, using slightly more pressure with the vine charcoal. -
Add Cloud Volume:
Deepen the shadows on the underside of the clouds using a compressed charcoal stick for richer blacks. Keep the tops of the clouds untouched or very light to suggest sunlight hitting them. -
Refine Edges:
Use your kneadable eraser to lift pigment from the top edges of the clouds. This ‘negative drawing’ technique creates the fluffy, bright white highlights that make the clouds pop against the grey sky.
Clean Lines Pro Tip
Keep a piece of scrap paper under your drawing hand at all times. This prevents oils from your skin transferring to the paper and stops you from accidentally smudging completed areas.
Step 2: Land and Water
-
Create the Distant Shore:
Draw the dark landmass sitting on the horizon line. I prefer using compressed charcoal here to get a solid, deep black that contrasts sharply with the lighter water. -
Soften the Reflection:
Below the dark landmass, add a softer, mirrored dark shape into the water area. Use a blending stump to drag this pigment vertically downward slightly, mimicking a reflection on the water’s surface. -
Render the Water:
Fill the middle section (the water) with horizontal strokes of vine charcoal. Blend this horizontally to create a calm, flat surface appearance, leaving some paper white to represent glinting light.
Step 3: Foreground Textures
-
Block in the Grass Base:
At the very bottom of the page, apply a layer of medium darkness using the side of a charcoal stick. This serves as the soil and shadow layer for the grass. -
Start the Tall Grass:
Using a sharpened stick of hard compressed charcoal, begin flicking lines upward from the bottom edge. Vary the pressure: press hard at the base and lift off quickly at the tip to create tapered grass blades. -
Layering Direction:
Add more grass strokes, crossing them over each other slightly. While most should point generally upward, tilting some to the left and right creates a natural, wind-blown look. -
Add Mid-Ground Details:
In the area where the grass meets the water, draw smaller, fainter reed-like shapes. These should be less detailed to suggest distance. -
Create Seed Heads:
On a few of the tallest grass stalks, add small, textured clusters at the tips to represent seed heads or wheat. Use a tapping motion with the charcoal tip. -
Highlighting with Eraser:
Mold your kneadable eraser into a thin wedge. Press it into the dark grass area and lift out thin, light lines. These act as blades of grass catching the light. -
Final Contrast Check:
Step back and assess your values. Darken the base of the grass clumps with heavy charcoal to anchor the image, ensuring you have a full range from bright white to deep black. -
Preserve the Work:
Once satisfied, take the drawing outside and spray it with a workable fixative to prevent the charcoal dust from smudging before framing.
Level Up: Matting
Use a generous white mat when framing charcoal. The profound white space increases the perceived contrast of the artwork, making the deep blacks look even richer and more professional.
Hang your newly framed landscape in a well-lit spot to enjoy the dramatic interplay of light and shadow.

Have a question or want to share your own experience? I'd love to hear from you in the comments below!