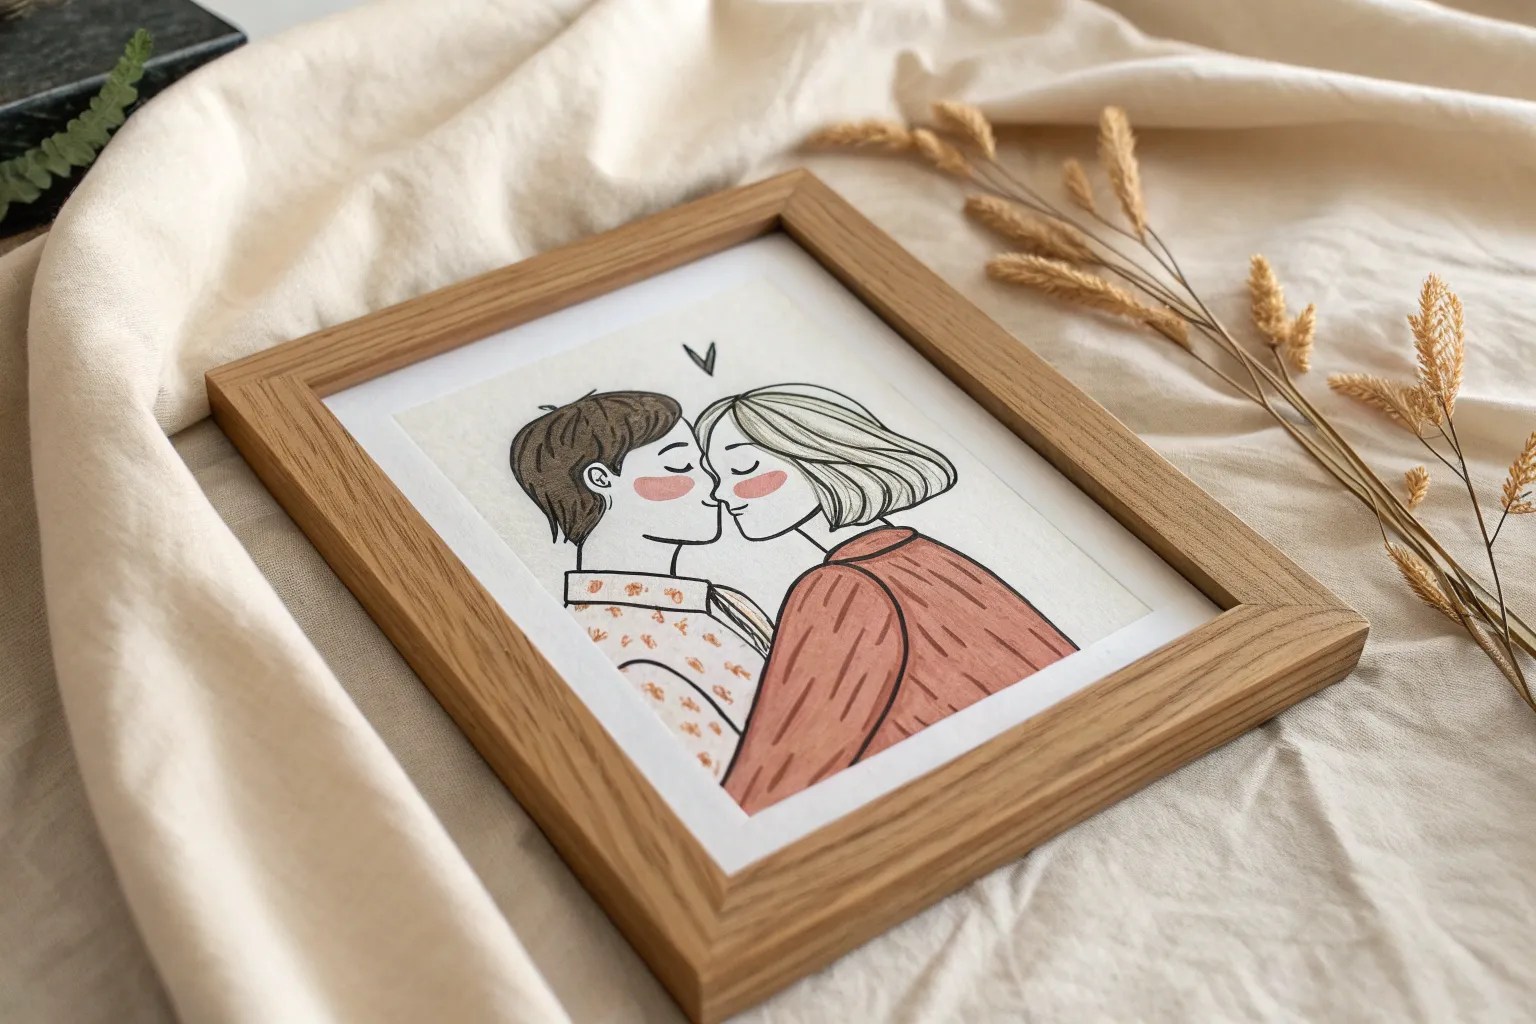
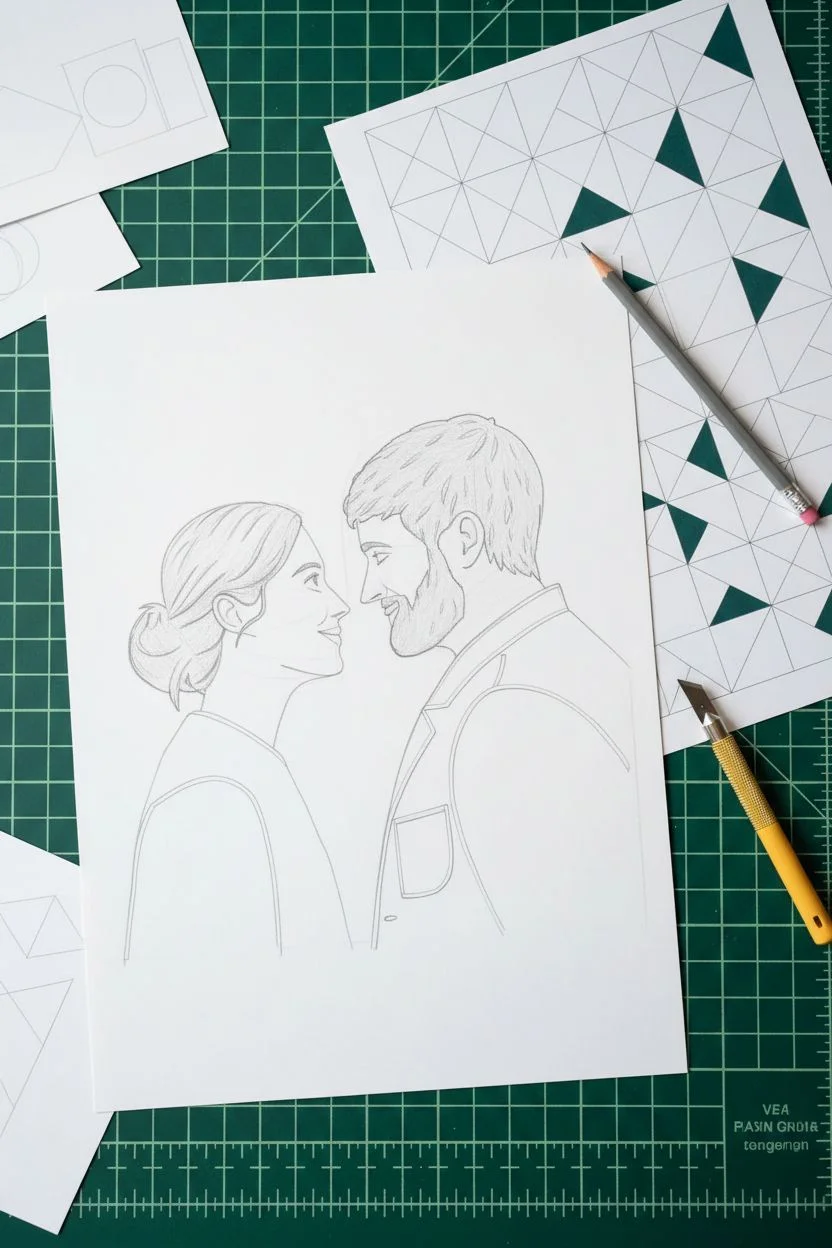
If you want something romantic but low-pressure, cartoon couple painting is the sweetest way to make art together without stressing over realism. I love these ideas because you can keep them super simple, customize them to your story, and still end up with something you’ll actually want to hang up.
Cartoon Sunset Silhouettes Holding Hands
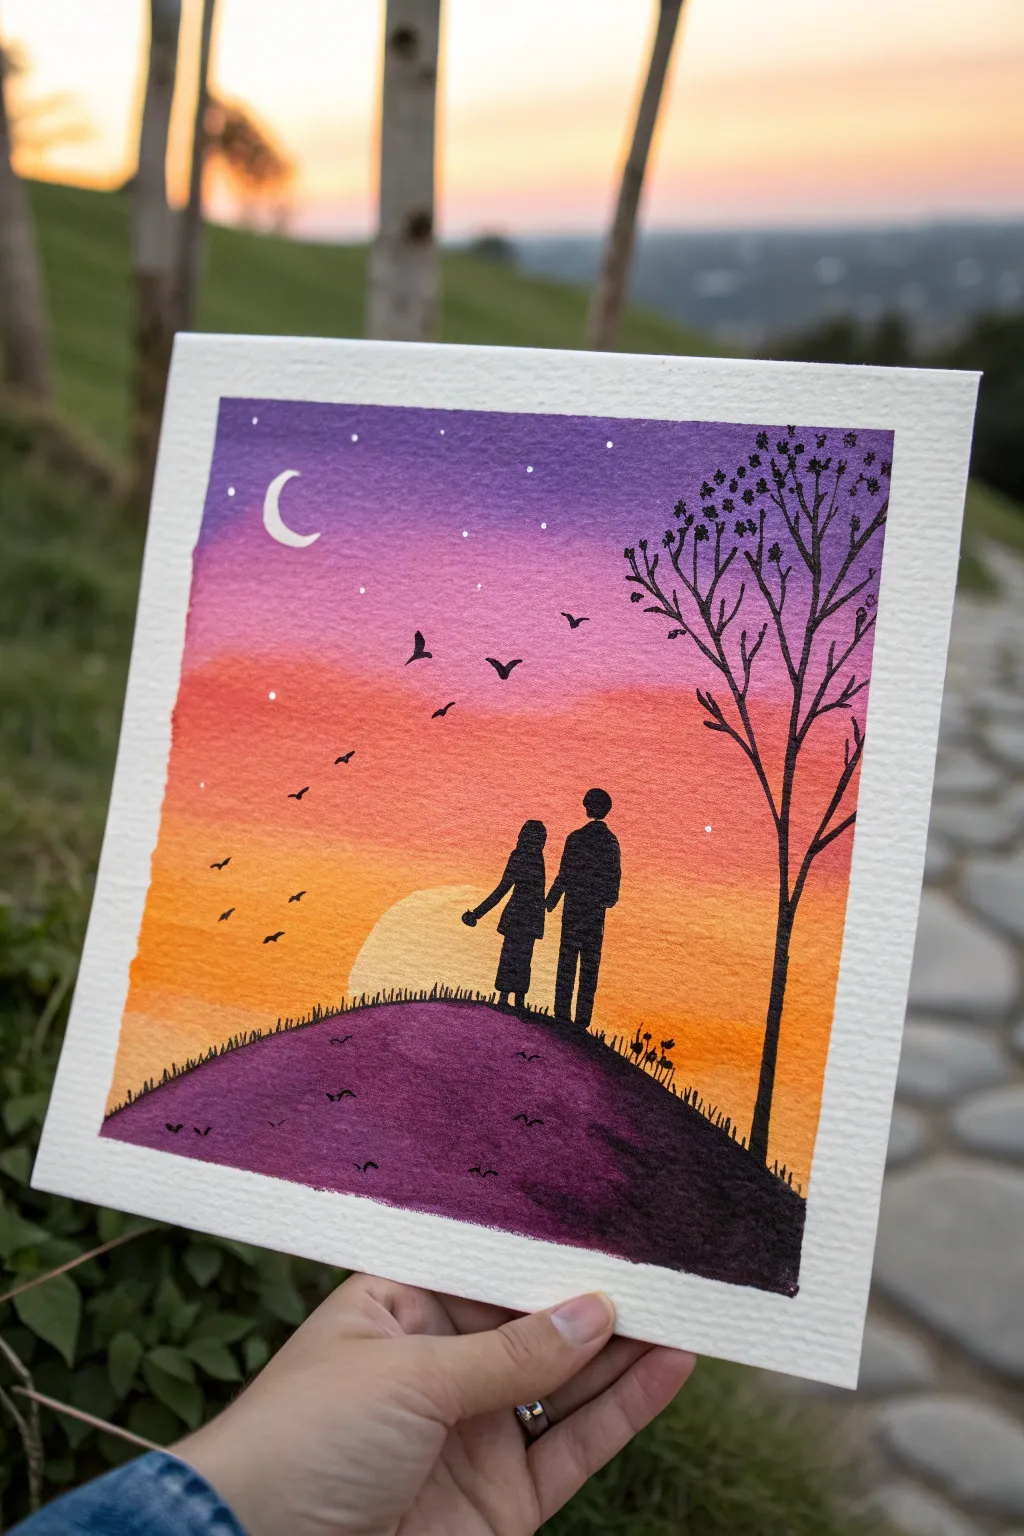
Capture a tender moment against a vibrant sky with this beautiful silhouette painting. Using a stunning gradient of purple, pink, and orange, you’ll create a romantic scene featuring a silhouetted couple holding hands beneath a crescent moon.
Step-by-Step Guide
Materials
- Cold-pressed watercolor paper (300 gsm)
- Watercolor paints (Purple, Magenta/Pink, Orange, Yellow)
- Black gouache or acrylic paint (for opacity)
- White gel pen or white gouache
- Flat wash brush (large)
- Round detail brushes (sizes 2 and 0)
- Masking tape
- Paper towel
- Jar of clean water
- Pencil
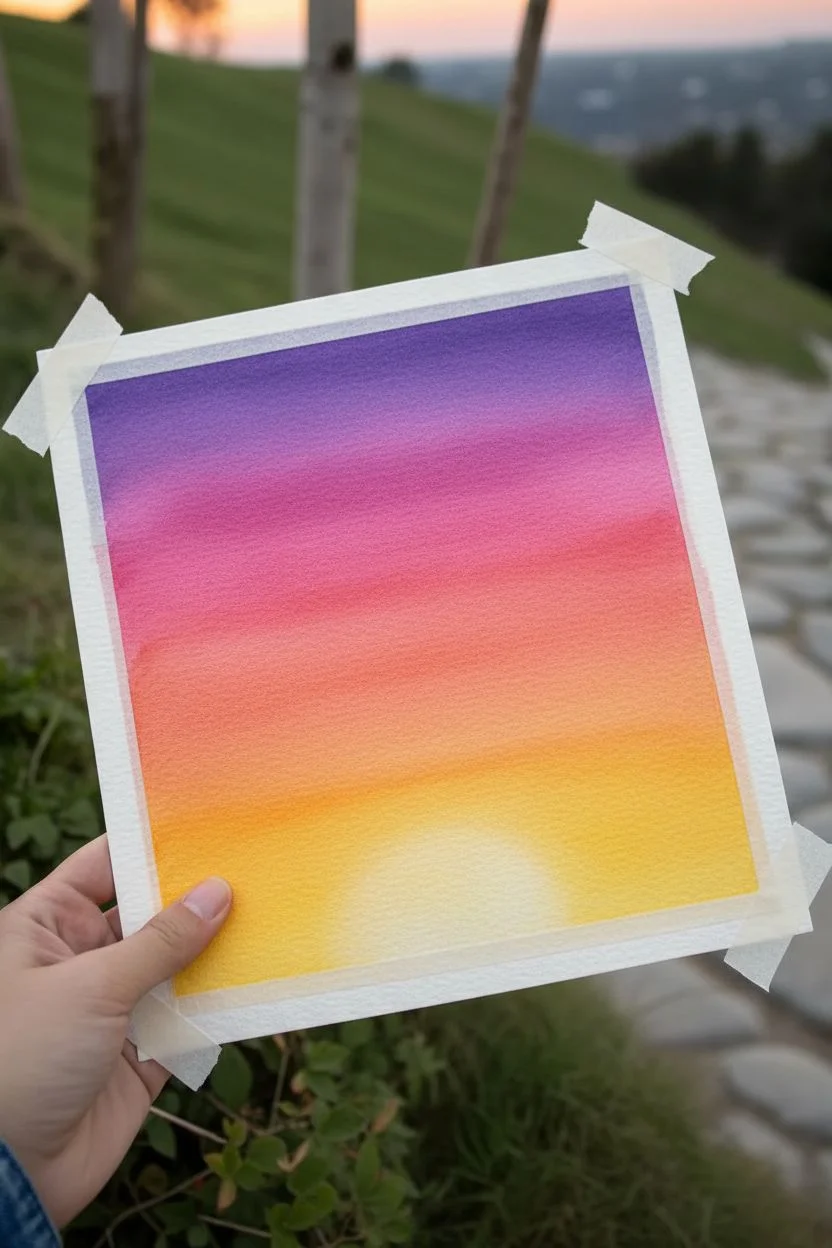
Step 1: Preparing the Sky Gradient
-
Tape the borders:
Begin by securing your watercolor paper to a flat surface using masking tape on all four sides. This creates that crisp, clean white border you see in the final piece and prevents the paper from buckling when wet. -
Wet the paper:
Using a clean flat brush, lightly wet the upper three-quarters of your paper with clear water. You want it damp and glistening, but not soaking wet with puddles. -
Apply the purple:
Load your brush with a deep violet or purple watercolor. Start painting horizontally at the very top of the paper, letting the pigment flow into the damp surface. -
Transition to pink:
Clean your brush slightly and pick up a vibrant magenta or pink. Apply this directly below the purple, brushing back and forth where they meet to create a soft, seamless blend. -
Add the orange glow:
Moving downward, introduce a bright orange hue. Blend it gently into the bottom of the pink section, keeping your horizontal strokes smooth. -
Finish with yellow:
For the lowest part of the sky (before the hill), blend a warm yellow into the orange. This creates the glowing horizon line where the sun has just set. -
Paint the distant sun:
While the yellow area is still slightly damp but not wet, use a clean brush to lift out a semi-circle shape at the horizon, or paint a very pale, diluted yellow semi-circle to represent the setting sun. -
Let it dry completely:
It is crucial to let the sky background dry completely before moving on. I like to use a hairdryer on a low setting to speed this up, or just interpret it as a forced coffee break.
Uneven Gradients?
If your sky stripes look too distinct, re-wet the area with a clean, damp brush and gently work the colors back and forth. Work quickly before the paint sets fully.
Step 2: Painting the Foreground
-
Sketch the hill:
Once dry, lightly pencil in the curve of the hill at the bottom. It should obstruct the bottom of your sun slightly. -
Paint the hill base:
Mix a deep purple with a touch of black. Paint the hill area solidly. While still wet, you can drop in slightly darker pigment at the bottom edge to give the hill some volume and dimension. -
Add grassy texture:
Using your smallest round brush or a rigger brush and black gouache (which is more opaque than watercolor), flick tiny vertical lines along the top ridge of the hill to create the look of grass.
Sharper Silhouettes
Use black gouache or acrylic paint for the figures and tree instead of black watercolor. Its opacity ensures no background color shows through your subject.
Step 3: Adding Details and Silhouettes
-
Draft the couple:
Very lightly sketch the outline of the couple holding hands. Position them slightly off-center on the hill. Keep the shapes simple—focus on their pose rather than details like clothes. -
Fill the silhouettes:
Using black gouache and a size 2 round brush, carefully fill in the couple. Ensure the edges are sharp and the black is solid and opaque against the colorful background. -
Paint the tree:
On the right side, paint a tall, slender tree trunk using the black gouache. Extend branches upward and outward, keeping them thin and delicate as they reach into the purple sky. -
Add leaves:
Instead of painting individual leaves, use the tip of your brush to dab small clusters of dots along the branches to suggest sparse foliage.
Step 4: Final Touches
-
Add birds:
Paint a few small ‘V’ shapes in the middle sky area using black paint to represent birds flying in the distance. -
Paint the moon:
Using a white gel pen or opaque white gouache, carefully paint a crisp crescent moon in the upper left purple section of the sky. -
Create stars:
Dot tiny points of white in the purple and pink sections of the sky for stars. Vary the pressure to make some stars appear brighter than others. -
Remove tape:
Once everything is 100% dry, slowly peel away the masking tape at a 45-degree angle to reveal your clean edges.
Frame your masterpiece or gift it to someone special to celebrate a shared moment


Chibi-Style Couple Hug Portrait
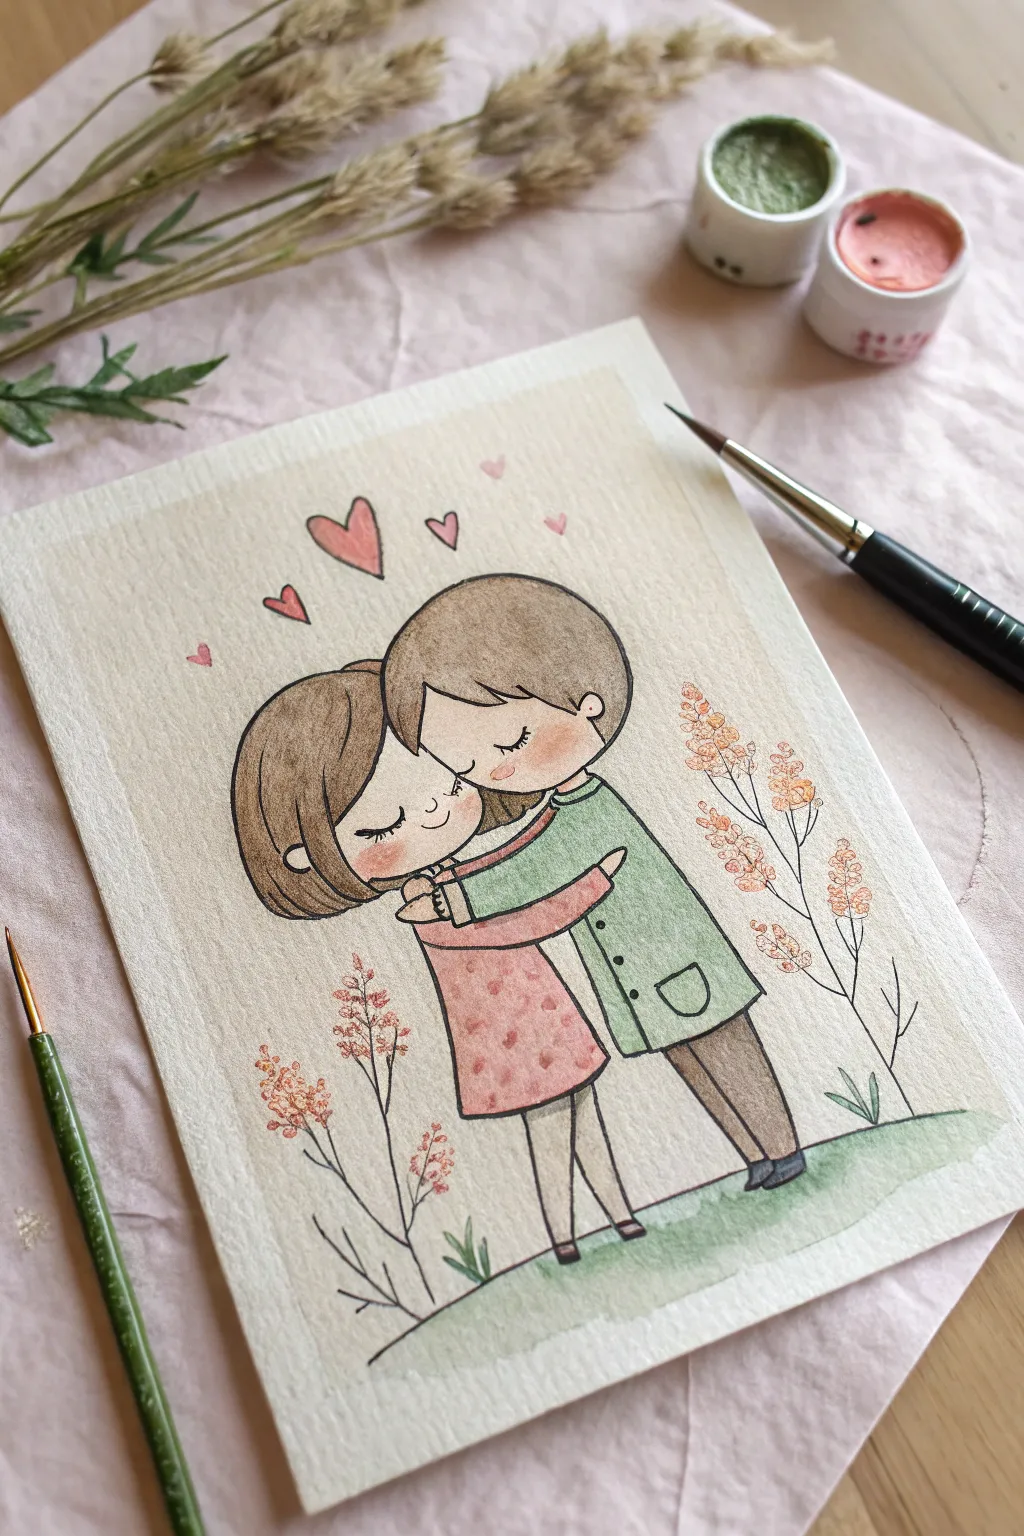
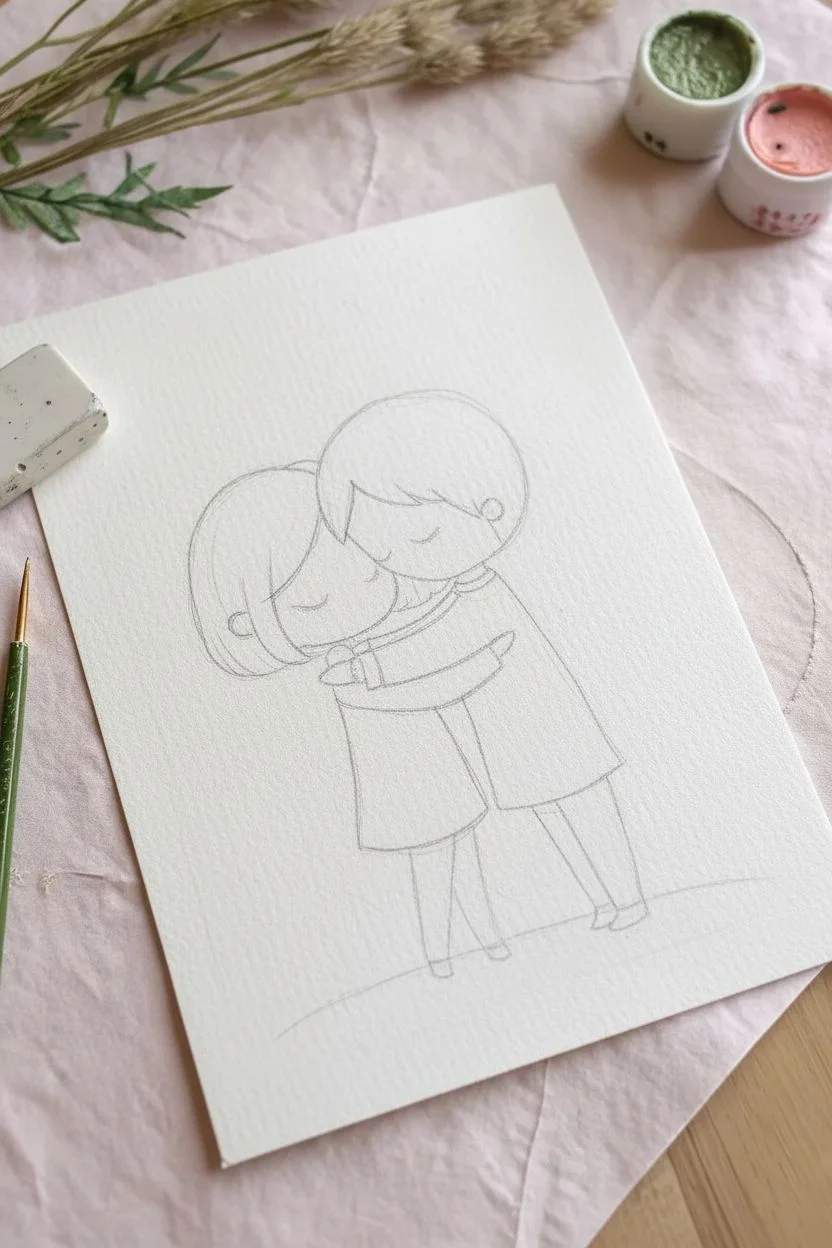
Capture the warmth of a loving hug with this adorable chibi-style watercolor illustration. Featuring soft pastel tones and simple, expressive lines, this project is perfect for beginners looking to create a heartfelt keepsake or greeting card.
Step-by-Step Tutorial
Materials
- Cold press watercolor paper (300 gsm)
- Pencil (HB or H for light sketching)
- Fine liner pen (black or dark brown, waterproof, 0.1mm – 0.3mm)
- Watercolor paints (pans or tubes)
- Round watercolor brushes (size 2 and 4)
- Mixing palette
- Jar of clean water
- Paper towels
- Kneaded eraser
Step 1: Sketching the Figures
-
Outline the heads:
Begin by lightly sketching two overlapping circles for the heads. The girl’s head (on the left) should tilt slightly downward, while the boy’s head rests gently against hers. -
Add hair basic shapes:
Sketch the hair outlines. For the girl, draw a simple bob shape framing her face. For the boy, sketch a soft, bowl-cut style with bangs that sweep across his forehead. -
Draft the bodies:
Draw the bodies below the heads. Use simple rectangular shapes that taper slightly. Position the arms so they wrap around each other in a hug—the girl’s arm reaching up towards his shoulder, and his arm wrapping around her back. -
Complete the limbs:
Add simple legs and feet. The girl’s legs can be thin lines widening into feet, while the boy needs slightly wider trousers. Sketch a simple horizon line at their feet for the grassy ground.
Step 2: Inking the Lines
-
Trace with precision:
Using your waterproof fine liner, carefully go over your pencil lines. Keep your hand steady and try to make smooth, continuous strokes rather than sketchy dashes. -
Refine the details:
Add the facial features now—simple curved lines for closed, happy eyes, a small smile for the girl, and cute round ears. Add the pocket detail on the boy’s coat and buttons. -
Add floating hearts:
Draw three small hearts floating above their heads to emphasize the romantic theme. -
Ink the floral elements:
On either side of the couple, draw tall, slender stems with clusters of small circles or dots to represent stylized wildflowers. -
Erase guidelines:
Once the ink is completely dry (wait at least 5-10 minutes to avoid smudging), gently erase all the underlying pencil sketches.
Water Control Tip
For the blushing cheeks, use the ‘wet-on-wet’ technique. Apply clear water to the cheek area first, then touch it with pink paint so it blooms softly outward naturally.
Step 3: Painting the Base Colors
-
Paint the skin:
Mix a very dilute wash of pale beige or peach. Apply this to the faces, leaving the hair areas untouched. While wet, drop a tiny bit of rose pink onto the cheeks for a blush effect. -
Color the hair:
Use a light brown wash for both characters. I like to keep the color slightly uneven to suggest texture and light reflection. -
Paint the clothing:
Paint the girl’s dress with a soft, dusty pink. For the boy’s coat, mix a muted sage green. Ensure the skin tone is dry before painting the clothes so the colors don’t bleed into each other. -
Fill the hearts:
Use a diluted red or pink to fill in the floating hearts above them.
Level Up: Texture
Use a white gel pen after the paint is fully dry to add tiny highlights to the hair, the tops of the shoes, or the center of the hearts for extra sparkle.
Step 4: Adding Depth and Background
-
Add clothing patterns:
Once the pink dress is dry, take a slightly darker pink or red and dab small, irregular spots to create a patterned texture on the fabric. -
Shade the hair:
Mix a darker brown and apply it to the roots and tips of the hair, or where the hair tucks behind the ears, to create volume. -
Paint the pants and shoes:
Color the boy’s trousers in a neutral beige or grey, and paint the shoes dark grey or black. -
Paint the wildflowers:
Using the tip of your smallest brush, dab orange and pink tones onto the flower heads. Keep the strokes loose and playful. -
Ground the image:
Wash a pale green strip at the bottom for the grass. Let the color fade out at the edges for a vignette look. -
Final background tint:
Optional: Apply a very watery, barely-there wash of warm beige or cream across the entire background area (avoiding the figures) to give the paper an aged, warm feel.
Allow your painting to dry flat completely before framing this charming moment of connection

Paint Each Other as Cartoon Characters (Style Swap)
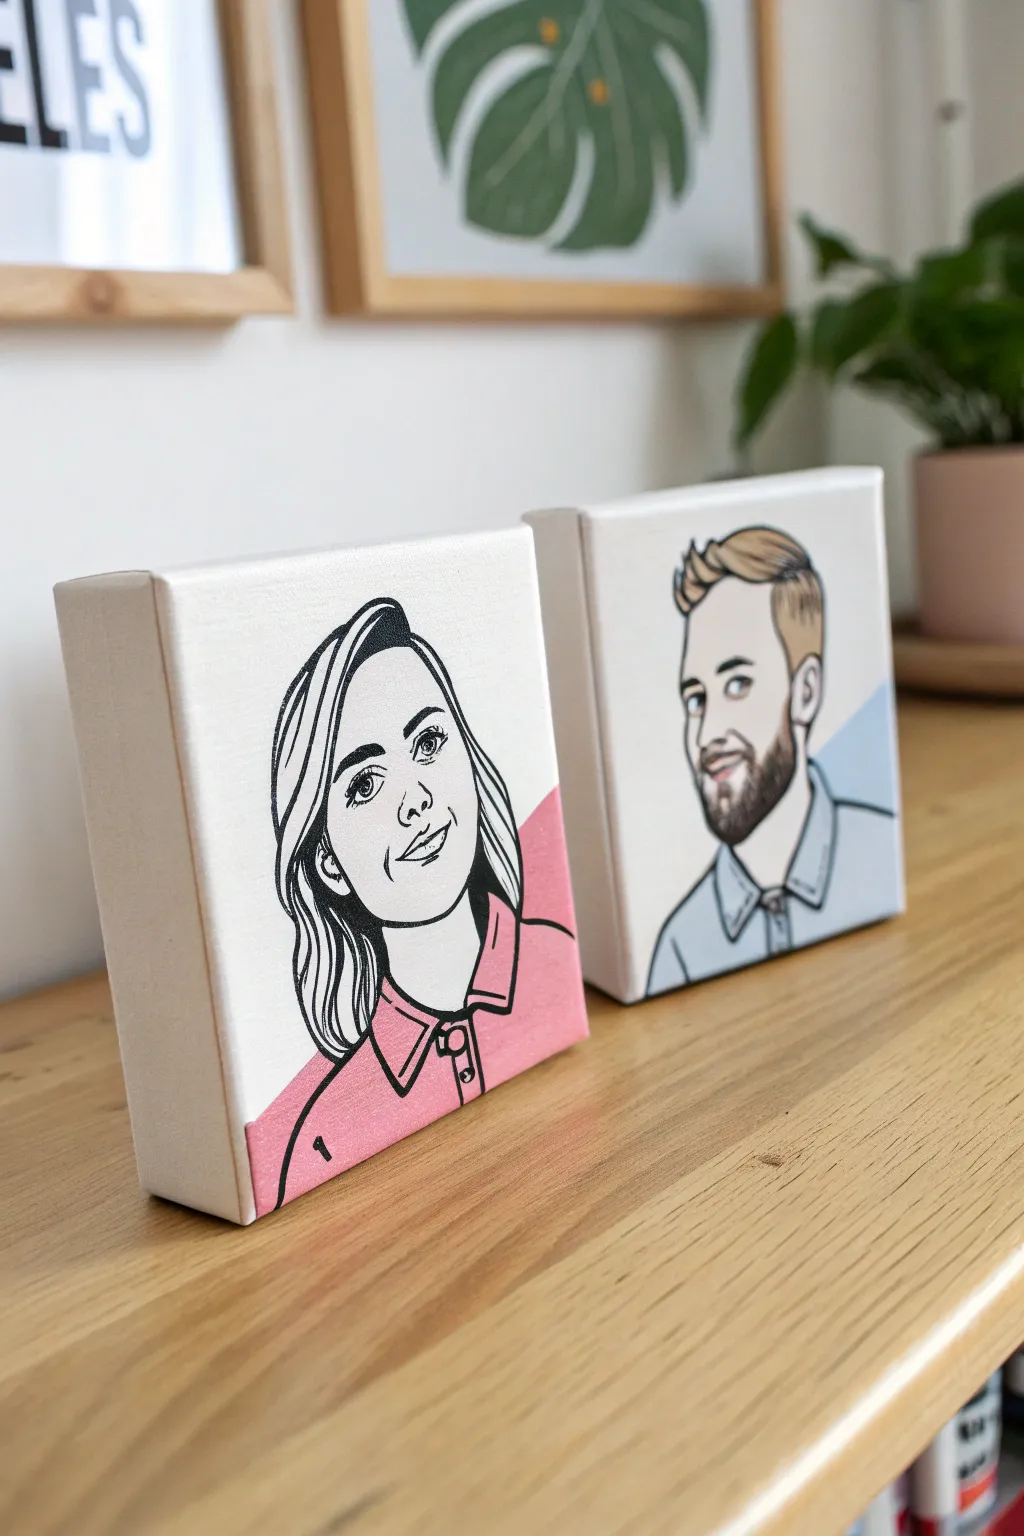
These charming mini canvases feature clean, comic-book style portraits that turn a couple into stylized art. The project relies on crisp black linework and bold, solid blocks of color to create a modern graphic look.
Step-by-Step
Materials
- Two small square canvases (e.g., 6×6 or 8×8 inch, deep edge)
- Acrylic paints (black, white, skin tones, contrasting colors like pink and blue)
- Digital tablet or tracing paper (for drafting)
- Carbon transfer paper
- Pencil and eraser
- Fine liner brush (0 or 00 size for linework)
- Flat shader brush (for color blocking)
- Black paint marker (optional, for steadier lines)
- Varnish (matte or satin)
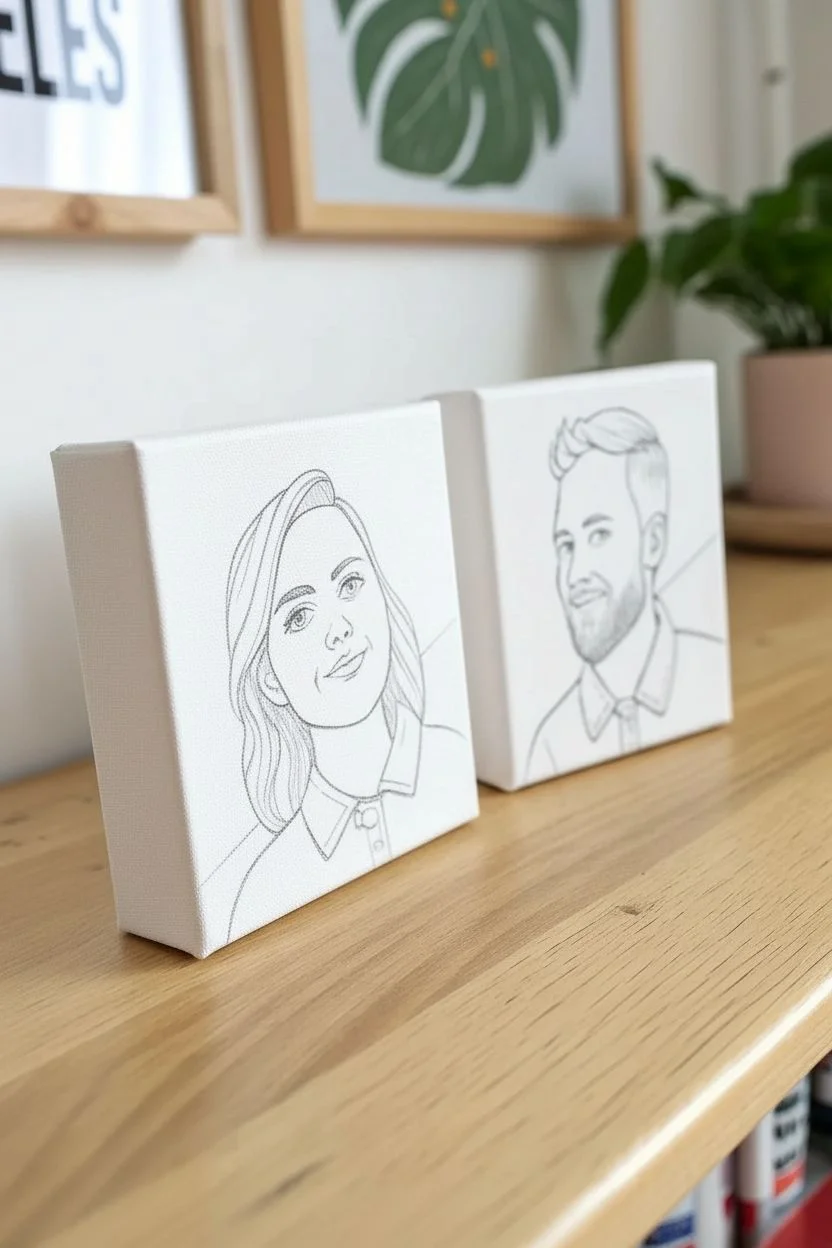
Step 1: Preparation and Drafting
-
Photo selection:
Choose a clear reference photo of each person. The best photos for this style have good lighting and distinct features rather than blurry shadows. -
Create the line art:
Using a tablet or tracing paper over your photo, trace the key facial features. Ignore small wrinkles or complex shading; focus on the jawline, eyes, nose shape, and hair, simplifying everything into clean, continuous lines. -
Size the design:
Scale your drawings so the heads fill most of the square canvas space, creating a nice focal point. -
Transfer the sketch:
Place carbon paper on your canvas, layer your sketch on top, and use a pencil to press firmly over your lines to transfer the design onto the fabric surface.
Clean Lines Hack
If your hand shakes while painting lines, rest your wrist on a mahl stick or a clean, dry ruler bridged across the canvas to stabilize your stroke without touching wet paint.
Step 2: Color Blocking
-
Mix skin tones:
Mix a base skin tone using white, yellow ochre, and a touch of red. You want a flat, even color without gradients for this graphic style. -
Paint the faces:
Carefully fill in the face and neck areas with your flat brush, going right up to—but not over—your pencil lines. You may need two coats for full opacity. -
Hair coloring:
Mix the hair colors. For the blonde/light hair, use yellow ochre and white; for the beard and darker hair, mix burnt umber. Paint these areas neatly. -
Add accent colors:
Choose two distinct colors for the shirts—like the pink and blue used here. Paint the shirt area solidly. -
Background accents:
To make the portraits pop, paint a geometric shape or diagonal slash of color behind the shoulders that matches the shirt color. This connects the figure to the background. -
Dry thoroughly:
Let all the colored layers dry completely before moving to the black lines to prevent smudging.
Simplify Your Shapes
Don’t outline every tooth or eyelash. For this comic style, simpler is better—suggest teeth with a single white shape and lashes with a bold upper eyelid line.
Step 3: Linework and Details
-
Outline the face:
Using thin black acrylic paint on a fine liner brush, trace over your original pencil lines. Keep the pressure steady to create a uniform line width. -
Define the hair:
Add the defining strokes for the hair. Remember, you aren’t painting individual strands, but rather the suggestion of flow and volume. -
Facial features:
Paint the eyes and eyebrows. I find it easiest to do the pupils last to ensure the gaze is directed correctly. -
Clothing details:
Outline the collar, shoulders, and buttons. These bold black lines are what give the painting its signature cartoon aesthetic. -
Optional marker finish:
If you struggle with brush control, you can use a high-quality acrylic paint marker for the outlines instead of a brush. -
Clean up:
If any white canvas is showing where it shouldn’t, touch it up with the appropriate background or skin color. -
Seal the work:
Once fully cured (wait at least 24 hours), apply a coat of matte or satin varnish to protect the paint and unsify the sheen.
Display these side-by-side or gift them for a genuinely personalized decor touch


Cartoon Couple With Your Pet as a Sidekick
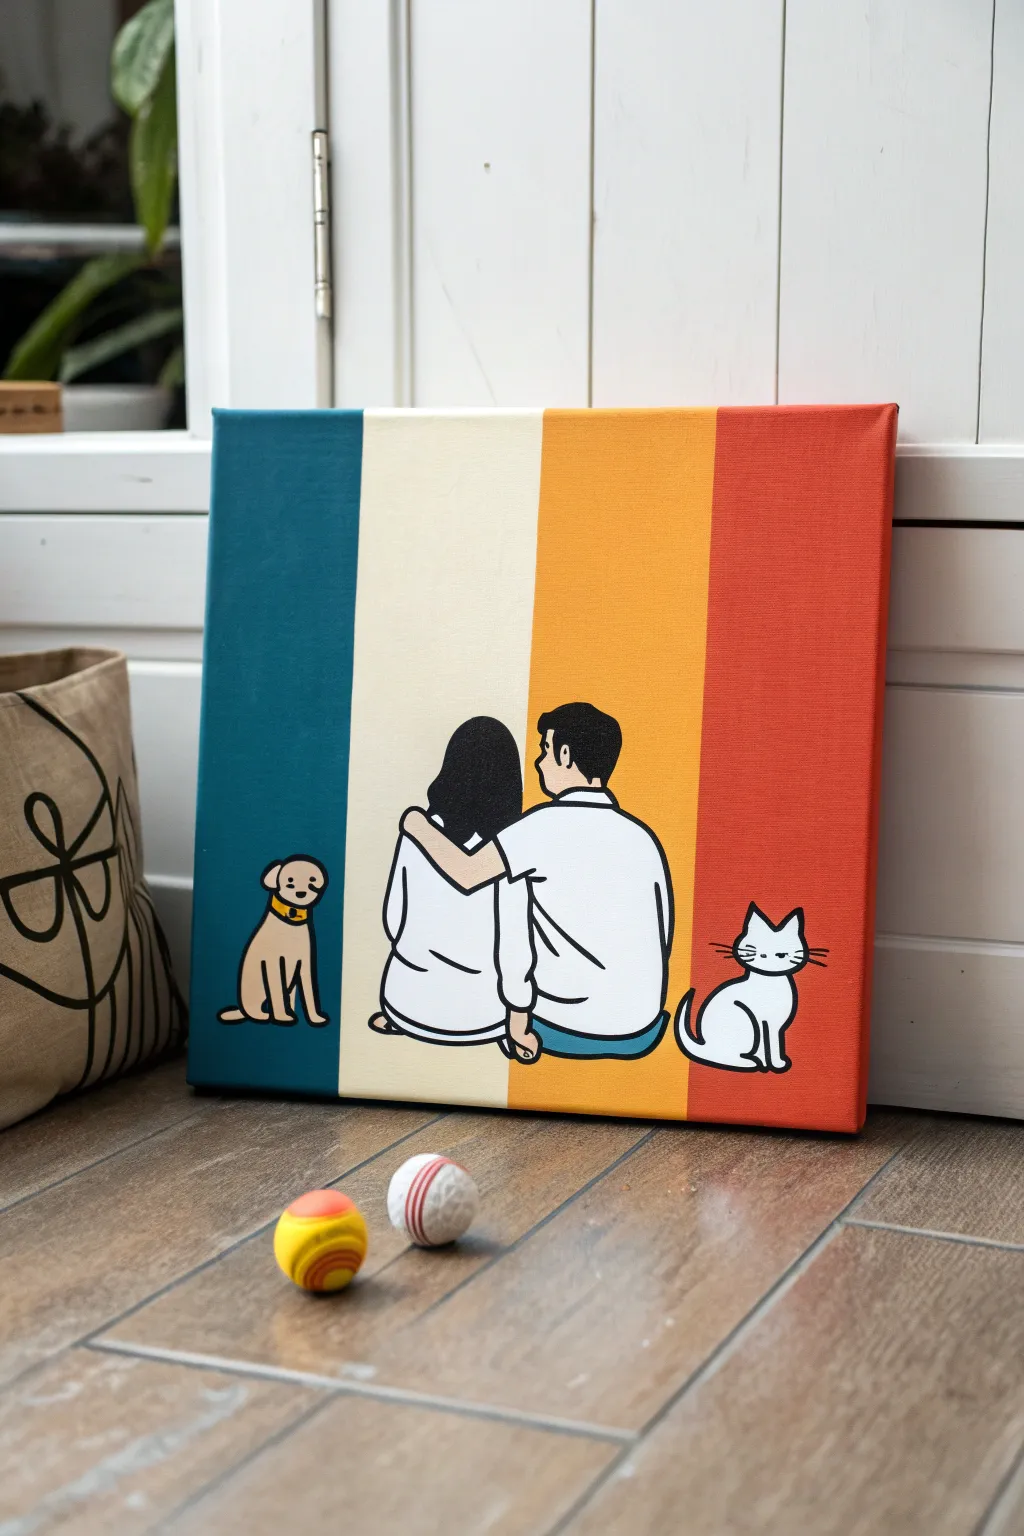
Create a modern, personalized family portrait without needing advanced realism skills by combining bold color blocking with a simple, clean illustrative style. This project relies on graphic shapes and confident line work to capture the essence of a couple and their pets against a retro-inspired vibrant background.
Detailed Instructions
Materials
- Square stretched canvas (approx. 12×12 or 16×16 inches)
- Acrylic paints (teal, cream/off-white, yellow-orange, rust-red, white, black)
- Painter’s tape or masking tape (1 inch wide)
- Pencil and eraser
- Ruler
- Flat synthetic paintbrushes (large for background, medium for filling)
- Fine liner brush or black acrylic paint marker (0.7mm or finer)
- Carbon paper (optional, for tracing)
- Varnish (matte or satin finish)
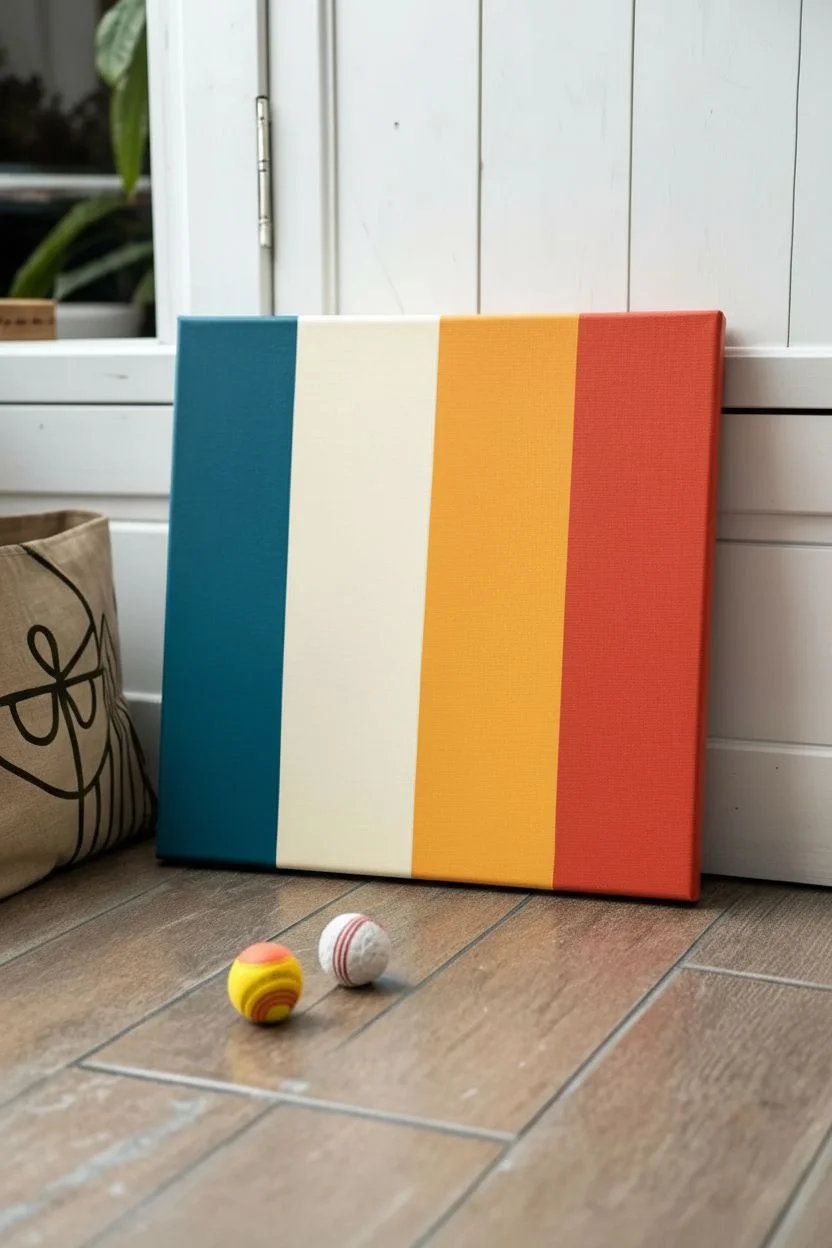
Step 1: Creating the Striped Background
-
Measure the segments:
Place your canvas on a flat surface. Using a ruler, measure the total width of the canvas and divide it by four. Lightly mark these vertical dividing lines with a pencil from top to bottom. -
Tape the first borders:
Apply painter’s tape along the pencil lines. To get crisp edges, you’ll need to paint in stages. Tape off the area for the first stripe (the teal on the far left) and the third stripe (the yellow-orange), ensuring the tape covers the sections you aren’t painting yet. -
Seal the tape edges:
Press the tape down firmly. A little trick I use is to paint a very thin layer of white (or clear matte medium) along the tape edge first; this prevents the colored paint from bleeding underneath. -
Paint the first colors:
Paint the first section with a deep teal acrylic and the third section with a warm yellow-orange. Apply two coats for solid, opaque coverage, letting the first coat dry to the touch before adding the second. -
Remove and re-tape:
Once the paint is completely dry, carefully peel off the tape. Now, tape over the edges of the dry teal and yellow stripes to protect them while you paint the remaining sections. -
Paint the remaining stripes:
Fill the second section with a soft cream or off-white color, and the final section on the right with a rusty red-orange. Again, use two coats for an even finish. -
Dry completely:
Remove the final tape strips and let the entire canvas cure for at least an hour. The surface must be hard and dry before you start drawing the figures.
Clean Lines Pro-Tip
If you struggle with shaky brush hands, always use a black acrylic paint pen for the final outlines. It offers the control of a marker but possesses the permanence and opacity of paint.
Step 2: Sketching the Figures
-
Draft your design:
On a separate piece of paper the same size as your canvas, sketch your couple and pets. Keep the details minimal—focus on back profiles, simple hairstyles, and sitting postures. The style relies on clean outlines rather than shading. -
Transfer the image:
Place a sheet of carbon paper over the dry canvas, then tape your sketch on top. Trace over your lines firmly with a pencil to transfer the design onto the painted stripes. -
Refine the lines:
Lift the paper and check your transfer. If any lines are faint, go over them lightly with a pencil directly on the canvas so you can see them clearly.
Level Up: Texture
Instead of solid stripes, mix a tiny bit of white into your colors unevenly as you paint the background. This creates a subtle, streaky texture that makes the flat cartoon characters pop more.
Step 3: Painting the Subjects
-
Block in white shapes:
Using a medium flat brush and white acrylic paint, fill in the shapes of the shirts and the cat’s body. You may need 2-3 layers of white to cover the bold background colors completely. -
Paint skin and hair:
Mix a skin tone for the couple and paint their arms and necks. Then, block in the hair color solidly with black or dark brown. Don’t worry about individual strands; think of the hair as a single solid shape. -
Color the pets:
Paint the dog’s body with a tan or beige color. Leave the eyes and collar details for later. Ensure the cat is fully opaque white. -
Add incidental color:
Paint the small details like the dog’s yellow collar or the blue of the man’s jeans. Let all paint layers dry completely before moving to the outlining phase.
Step 4: Outlining and Details
-
Prepare the liner:
Shake your black acrylic paint marker well, or thin down some black fluid acrylic paint to an ink-like consistency for a fine liner brush. -
Outline main figures:
Carefully trace the outer edges of the couple, their clothing folds, and the animals. Keep your hand steady and maintain a consistent line thickness. -
Add facial profiles:
Draw the profile of the man’s face and ear. For this cartoon style, a simple line for the jaw and brow is sufficient. -
Detail the pets:
Add the dog’s collar details, eye, and nose. For the cat, draw the whiskers, squinty eyes, and tail outline. The simplistic ‘closed eye’ look adds a cute, relaxed character. -
Clean up:
Check for any smudges or uneven lines. You can touch up the background colors carefully if you went outside the lines. -
Varnish:
Once the black ink is cured (wait 24 hours to be safe with markers), apply a coat of matte or satin varnish to protect the artwork and unify the sheen.
Hang your new personalized masterpiece on a shelf or wall to celebrate your little family unit
BRUSH GUIDE
The Right Brush for Every Stroke
From clean lines to bold texture — master brush choice, stroke control, and essential techniques.
Explore the Full Guide
Cartoon Couple in a Tiny Boat on a Dreamy Lake

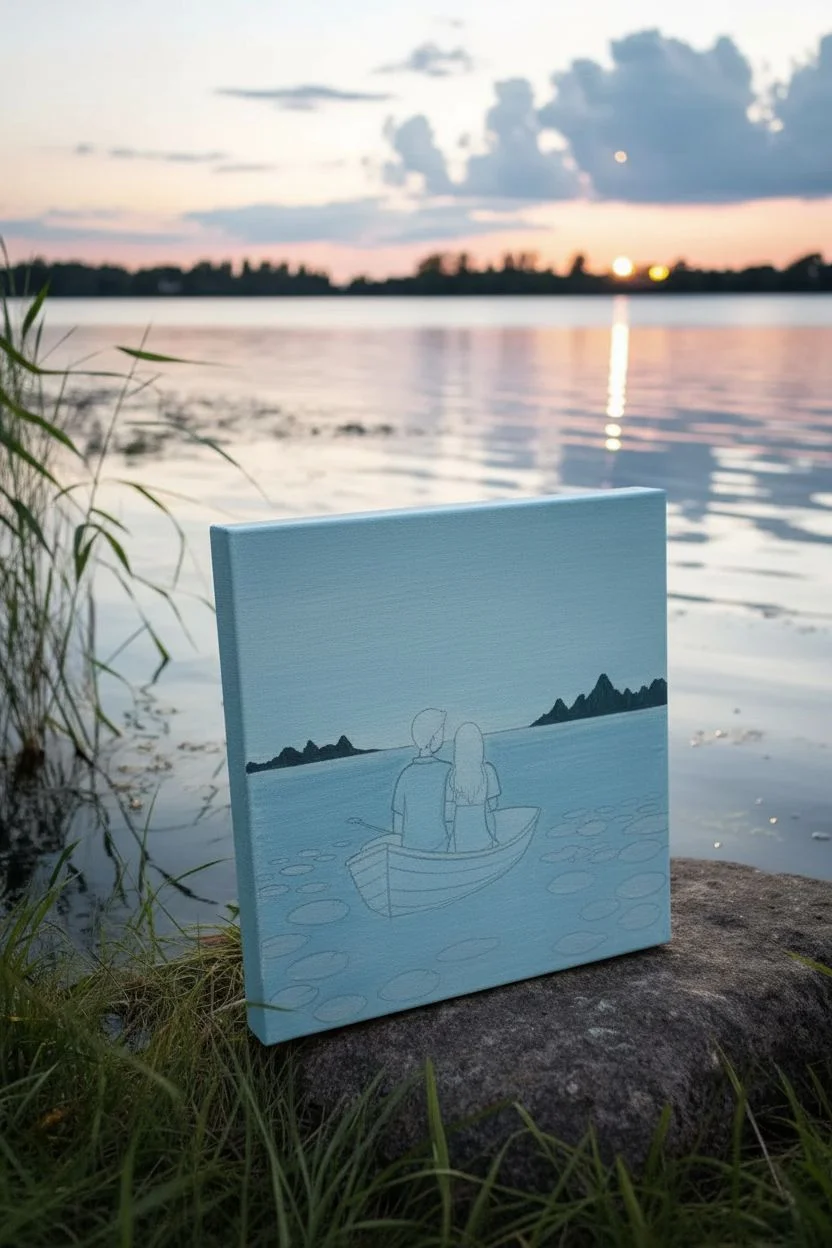
Capture a romantic moment of tranquility with this charming acrylic painting of a couple drifting on a moonlit lake. The soft blues and glowing stars create a dreamy atmosphere perfect for a personalized keepsake or gift.
Step-by-Step Tutorial
Materials
- Square stretched canvas (e.g., 8×8 or 10×10 inches)
- Acrylic paints (Titanium White, Phthalo Blue, Mars Black, Burnt Umber, Burnt Sienna, Olive Green, Yellow Ochre)
- Set of brushes (1-inch flat, medium filbert, lush small round, fine liner)
- Palette or paper plate
- Cup of water and paper towels
- Pencil and eraser
- Gold or silver metallic paint (optional for stars)
Step 1: Setting the Scene
-
Sketch the composition:
Begin by lightly sketching the horizon line just below the halfway point of the canvas. Draw the outline of the rowboat in the lower center, angling it slightly to the right. -
Add the figures:
Sketch the two figures sitting in the boat from behind. Focus on simple shapes: ovals for heads and rounded rectangles for torsos, ensuring they are leaning slightly towards each other. -
Detail the surroundings:
Lightly draw ovals scattered in the foreground water to represent lily pads. Add a distant, jagged treeline along the horizon and a small circle for the moon in the upper right quadrant. -
Paint the background sky:
Mix Titanium White with a tiny drop of Phthalo Blue to create a very pale, icy blue. Paint the entire sky area, using horizontal strokes to keep it smooth. -
Create the water base:
Use a slightly darker shade of that same blue mix for the water. Paint horizontal strokes, leaving the boat and lily pads unpainted for now. -
Add the distant mountains:
Mix a dark Slate Blue using Phthalo Blue, a touch of Black, and White. Paint the silhouette of the distant hills or trees along the horizon line, keeping the bottom edge straight.
Starry Night Tip
For tiny stars, don’t use a brush. The tip of a toothpick creates perfectly round, controlled dots that look much sharper.
Step 2: Painting the Subjects
-
Paint the boat hull:
Mix White with a tiny amount of Burnt Umber for a creamy beige. Fill in the boat shape. Once dry, use a thin brush with diluted brown paint to add curved lines defining the wooden planks. -
Color the figures:
Paint the man’s shirt a muted teal and the woman’s dress a soft pink or white. For hair, use Burnt Umber or Black, adding lighter streaks for highlights afterwards. -
Define the interior:
Fill the visible inside portion of the boat with a dark brown to create depth, showing that the figures are sitting inside the vessel. -
Paint the lily pads:
Mix Olive Green with a little Yellow Ochre. Paint the oval lily pads in the foreground, making the ones closer to the bottom edge slightly larger than those further away. -
Add lily pad details:
Once the green is dry, use a lighter green mix to add a small crescent highlight on one side of each pad, and a darker green for a shadow on the opposite side.
Make It Grow
Add 3D texture by using modeling paste on the moon before painting it, or glue tiny plastic gems over the painted stars for real sparkle.
Step 3: Lighting and Atmosphere
-
Paint the moon:
Use pure Titanium White to fill in the moon circle. To make it glow, dry brush a very faint, translucent ring of white around the sharp edge. -
Create water reflections:
Mix a glaze of White and water. Paint zigzagging horizontal lines directly under the moon on the water’s surface to create a shimmering reflection path. -
Add boat shadows:
Mix the water color with a little black. Paint a soft, dark shadow directly underneath the boat and the lily pads to anchor them to the surface. -
Outline for definition:
Using your finest liner brush and thinned black paint, carefully outline the figures, the boat, and the lily pads. This gives it that crisp, illustrative look seen in the photo. -
Add the stars:
Dip the tip of a toothpick or the handle end of a small brush into yellow or metallic gold paint. Dot twinkling stars across the sky, varying their spacing.
Now you have a serene lakeside scene that captures the quiet magic of a moonlit evening.
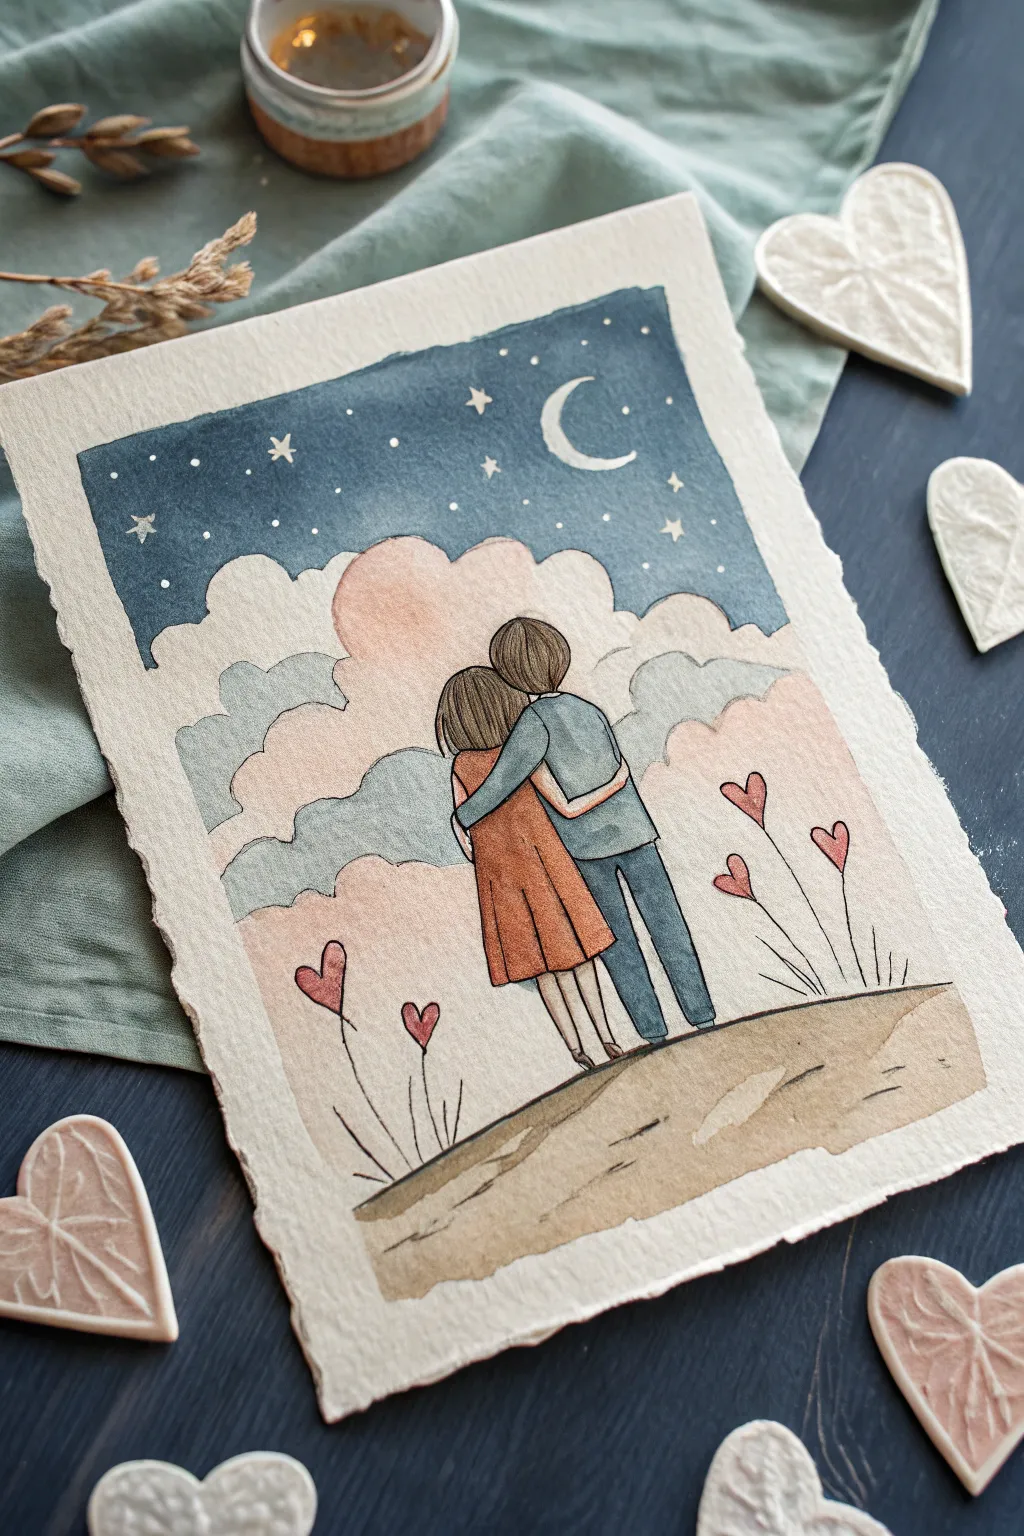
Night-Sky Cartoon Couple With Constellation Initials
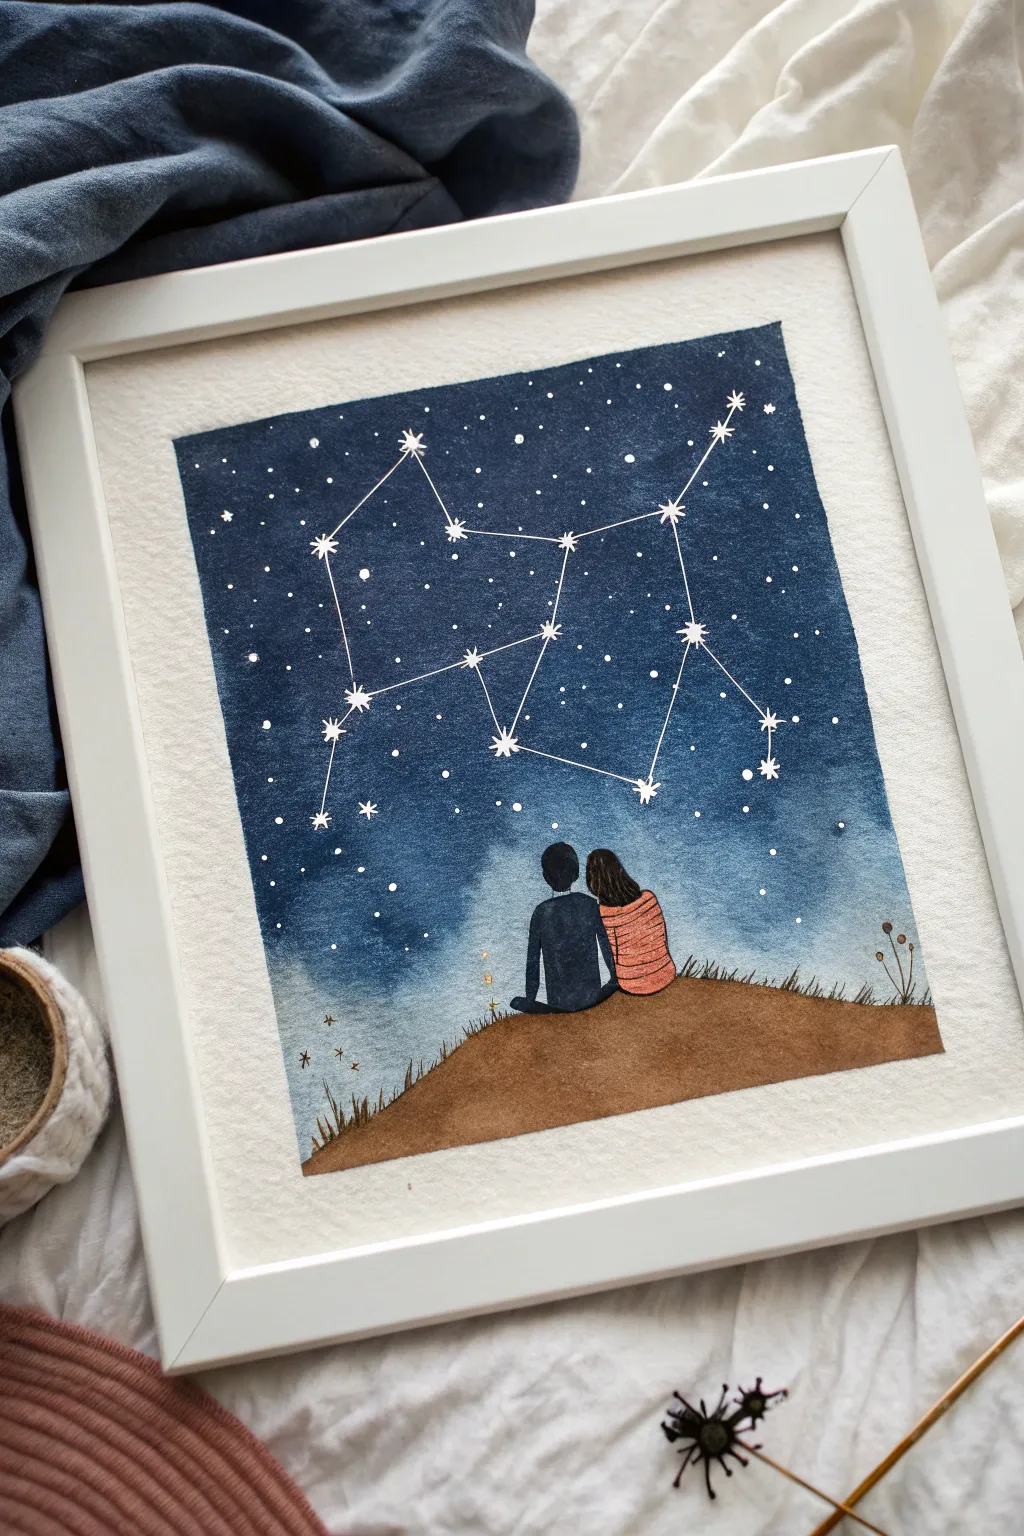
Capture a romantic moment under the cosmos with this charming watercolor piece featuring a couple gazing at their own personalized constellation. The rich indigo washes create a stunning backdrop for the delicate white stars and cozy figures.
Detailed Instructions
Materials
- Cold press watercolor paper (140lb/300gsm)
- Watercolor paints (Indigo, Payne’s Grey, Burnt Sienna, Burnt Umber, Flesh Tint)
- White gouache or white gel pen
- Masking fluid (optional)
- Pencil (HB or H)
- Painter’s tape or washi tape
- Flat wash brush (3/4 inch)
- Round detail brushes (size 0 and 2)
- Ruler
- Palette for mixing
- Two jars of water
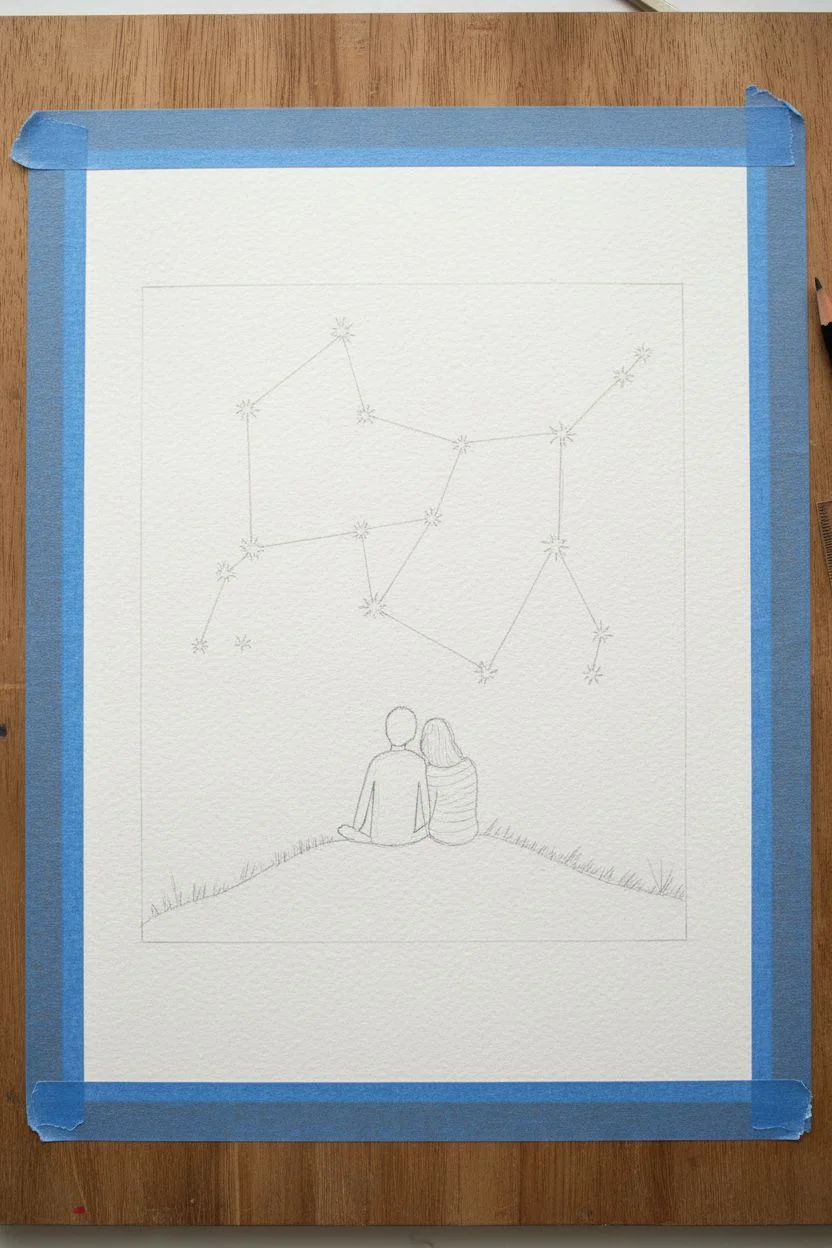
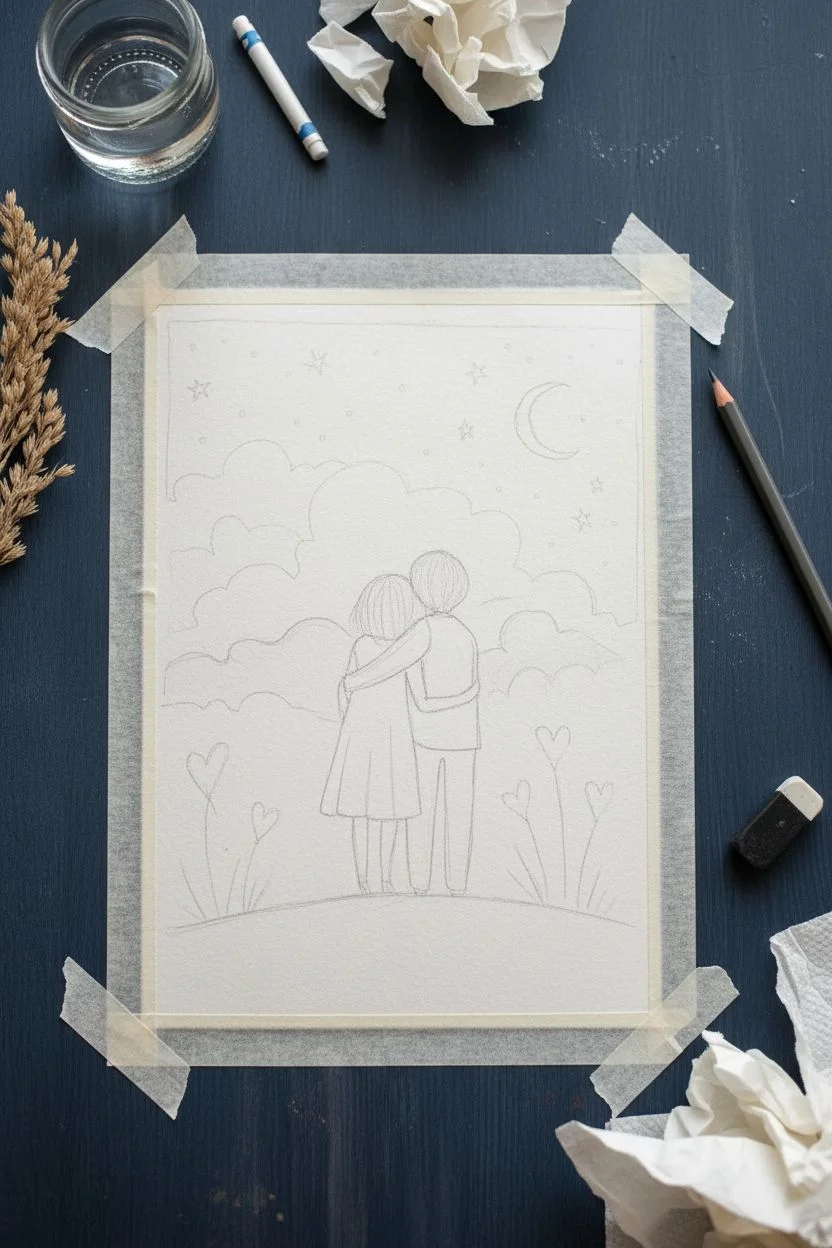
Step 1: Preparation & Sketching
-
Prepare the paper:
Begin by taping down all four edges of your watercolor paper to a hard board using painter’s tape. This creates that crisp, clean white border seen in the final piece and prevents the paper from buckling under heavy water washes. -
Map the horizon:
Lightly sketch a gentle curve near the bottom third of the paper to represent the grassy hill. Don’t make it perfectly straight; a slight unevenness looks more natural. -
Sketch the couple:
Draw the simple silhouettes of two figures sitting side-by-side in the center of the hill. Focus on simple shapes: ovals for heads and rounded triangles for the torsos. Keep their posture relaxed, leaning slightly towards each other. -
Plan the constellation:
Using a ruler and pencil, very faintly mark out the geometric points of your constellation. You can copy the abstract shape from the example or plan out lines that connect to form initials or a significant date.
Starry Precision
Draw your constellation lines with a white gel pen first for control, then go over them with a fine liner brush and gouache if you want a more painterly, textured look.
Step 2: Painting the Sky
-
Mix the night sky color:
Create a deep, dark blue by mixing Indigo with a touch of Payne’s Grey. You want a high pigment-to-water ratio for that intense midnight look. -
Wet-on-wet technique:
Using clean water and your flat brush, wet the entire sky area, stopping carefully at the edge of the hill and around the couple. The paper should be glistening but not forming puddles. -
Apply the wash:
Start dropping your dark blue mix into the wet paper at the very top. Let gravity help pull the pigment down. As you get closer to the horizon line, dilute your paint slightly with water to create a misty, lighter gradient near the ground. -
Let it dry completely:
This is crucial. The paper must be bone dry before you add the sharp details, otherwise, your stars will blur. I usually give this at least 20-30 minutes.
Step 3: Painting the Ground & Figures
-
Paint the hill:
Mix Burnt Sienna with a little Burnt Umber for a warm earth tone. Paint the hill area using a medium round brush. While the paint is still wet, you can tap in a slightly darker brown near the bottom edge for depth. -
Paint the male figure:
Using a very dark blue (almost black), fill in the silhouette of the figure on the left. Ensure the edges are neat against the background sky. -
Paint the female figure:
Paint the hair dark brown and the sweater a warm muted orange or rust color. Add horizontal lines with a darker shade of orange once the base layer dries to mimic the texture of a knitted sweater. -
Add grass texture:
Once the hill wash is dry, use your smallest detail brush (size 0) with dark brown paint to flick tiny, quick vertical strokes along the horizon line and sporadically on the hill to represent grass blades.
Hidden Message
Instead of a random shape, arrange the major stars to form the astrological constellations of you and your partner, or connect the dots to spell out a hidden ‘I Love You’.
Step 4: The Celestial Details
-
Connect the constellation:
Using white gouache (thinned to a creamy consistency) or a white gel pen, draw the straight lines connecting your constellation points. Use a ruler if your hand isn’t steady. -
Add major stars:
At every intersection point of your lines, paint a small 8-point star or a simple bright dot to anchor the constellation. -
Fill the galaxy:
Dip an old toothbrush or a stiff bristled brush into white gouache. Flick the bristles to splatter tiny stars across the dark blue sky area. Cover the couple and hill with a paper towel first to protect them. -
Enhance specific stars:
Go back in with your fine brush and add a few larger, distinct stars manually to balance the random splatter. -
Remove tape:
Once the entire painting is perfectly dry, slowly peel off the painter’s tape at a 45-degree angle away from the artwork to reveal your crisp borders.
Frame your cosmic masterpiece in a simple white frame to let the deep blues pop.

PENCIL GUIDE
Understanding Pencil Grades from H to B
From first sketch to finished drawing — learn pencil grades, line control, and shading techniques.
Explore the Full Guide
Three-Panel Mini Comic of Your Love Story
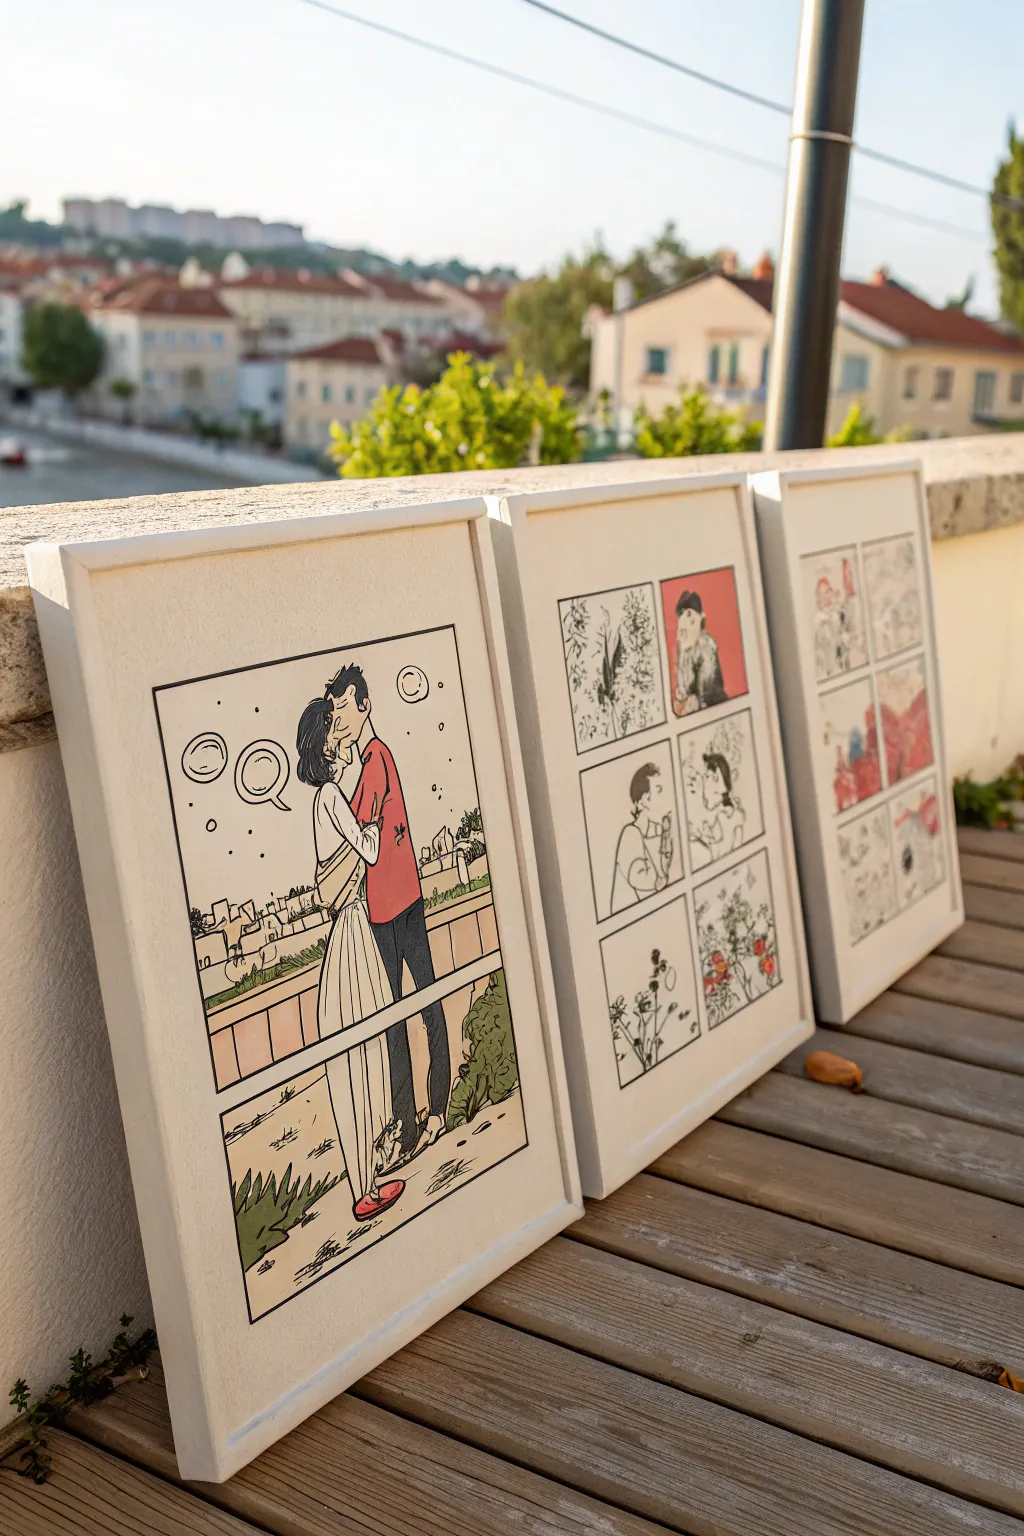
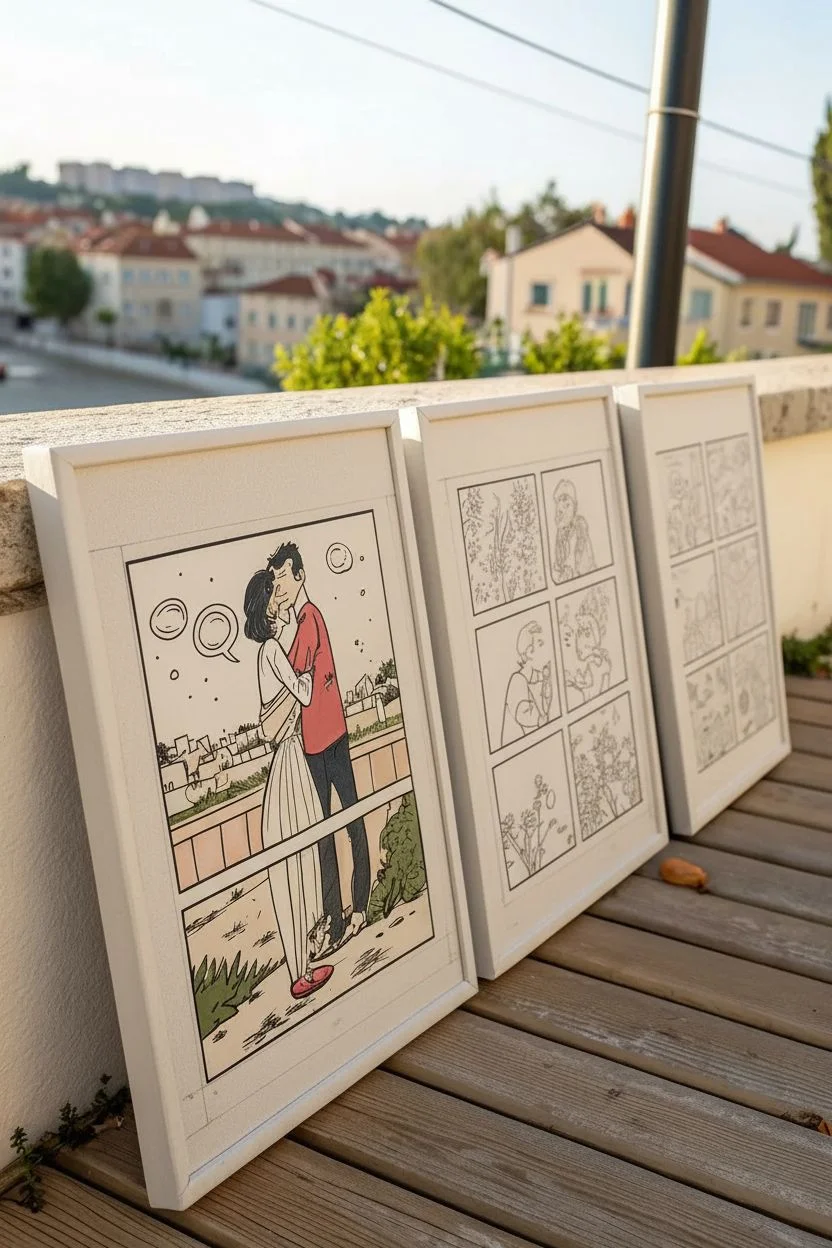
Transform your favorite relationship memories into a charming three-part comic series displayed in matching frames. This project combines clean line art with soft, muted coloring to create a professional-looking narrative of your love story.
How-To Guide
Materials
- Three identical white wooden frames (approx. A3 or 11×14 inches)
- High-quality matte art paper or Bristol board
- Pencil and eraser
- Fine liner pens (0.1mm, 0.3mm, and 0.5mm)
- Alcohol markers or watercolor paints (muted red, peach, sage green, grey)
- Ruler or T-square
- Light box (optional)
- Digital drawing tablet (optional, if printing the design)
Step 1: Planning the Narrative
-
Storyboard your concept:
Before drawing, decide on the flow. The left frame acts as the ‘cover’ or climax moment (the kiss). The middle and right frames should tell the backstory or small anecdotes through multi-panel grids. Sketch these roughly on scrap paper first. -
Prepare the paper:
Cut your art paper to fit the frames exactly. Use a ruler and pencil to lightly mark out the borders. For the panel pages, measure a grid. In the example, the middle frame uses a 2×3 grid (two columns, three rows). -
Draft the layouts:
Lightly sketch your scenes onto the final paper using a hard pencil like a 2H. Keep the lines faint so they don’t groove the paper. Focus on framing the characters from the waist up to keep facial expressions clear.
Ink Smearing?
If your fine liner smears when you color over it, it isn’t waterproof. Switch to pigment-based liners (like Microns) or sketch/ink digitally and print on cardstock before coloring manually.
Step 2: Inking the Lines
-
Ink the panel borders:
Using a ruler and a thicker pen (0.5mm or 0.8mm), ink the boxes for your comic panels first. This establishes the structure of the page. -
Outline the characters:
Use a 0.3mm fineliner for the main character outlines. Keep the style loose and illustrative rather than perfectly realistic. Capture the sloping posture of a hug or the tilt of a head. -
Add detail work:
Switch to your finest 0.05mm or 0.1mm pen to add facial features, hair textures, and background elements like the cityscape or plants. Don’t over-hatch; keep the drawing open for color. -
Erase pencil marks:
Wait at least 15 minutes for the ink to fully cure, then gently erase all visible pencil guidelines with a kneaded eraser to avoid smudging.
Make it Pop
Add speech bubbles! Cut clean white ovals from stick-on label paper, write your dialogue or dates inside, and stick them onto the finished art for a crisp, professional comic look.
Step 3: Adding Color
-
Select a limited palette:
Choose 3-4 main colors to unify the triptych. The example uses a specific terracotta red for shirts and backgrounds, a soft sage for foliage, and greys for shadows. This constraint makes the set look cohesive. -
Apply base colors:
If using alcohol markers, lay down the lightest colors first (skin tones, light clothing). Use broad strokes to fill large areas. If using watercolor, keep the washes very transparent. -
Create focus with contrast:
Use your ‘spot color’ (like the red in the shirt) sparingly but strategically. In the middle frame, notice how the red background in the top-right panel draws the eye immediately. -
Add simple shading:
I usually add a light grey marker or wash on one side of the figures to suggest dimension. Don’t over-render; a simple shadow under the chin or along the back is enough for this cartoon style.
Step 4: Assembly
-
Check for errors:
Scan the artwork for any stray pencil marks or uneven coloring. You can use a white gel pen to cover small mistakes or add highlights to the eyes. -
Clean the glass:
Remove the backing from your white frames and clean the glass thoroughly on both sides to ensure no dust is trapped against your art. -
Mount the artwork:
Place the artwork inside. If your paper is thinner than the frame allowance, insert a piece of cardstock behind it to keep it pressed flat against the glass. -
Secure the backing:
Close the tabs on the back of the frame. Ensure the artwork hasn’t shifted and is perfectly centered before hanging or displaying.
Now you have a personalized gallery that tells your unique story in a whimsical way
Opposite-Day Split Background: Sun and Moon Couple
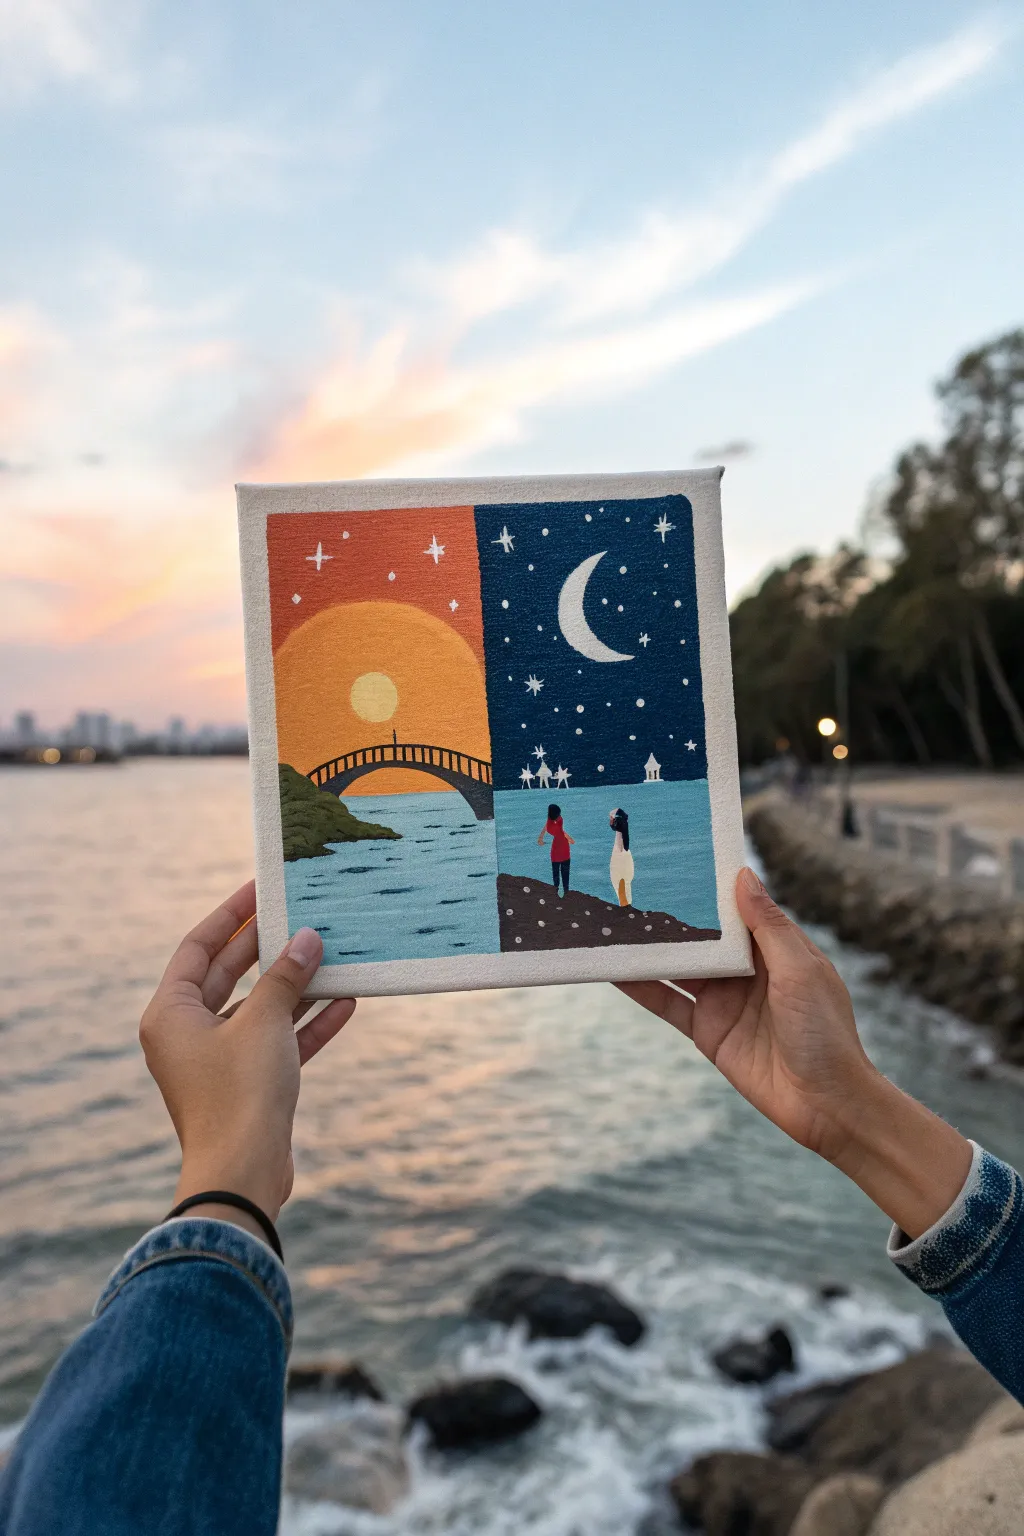
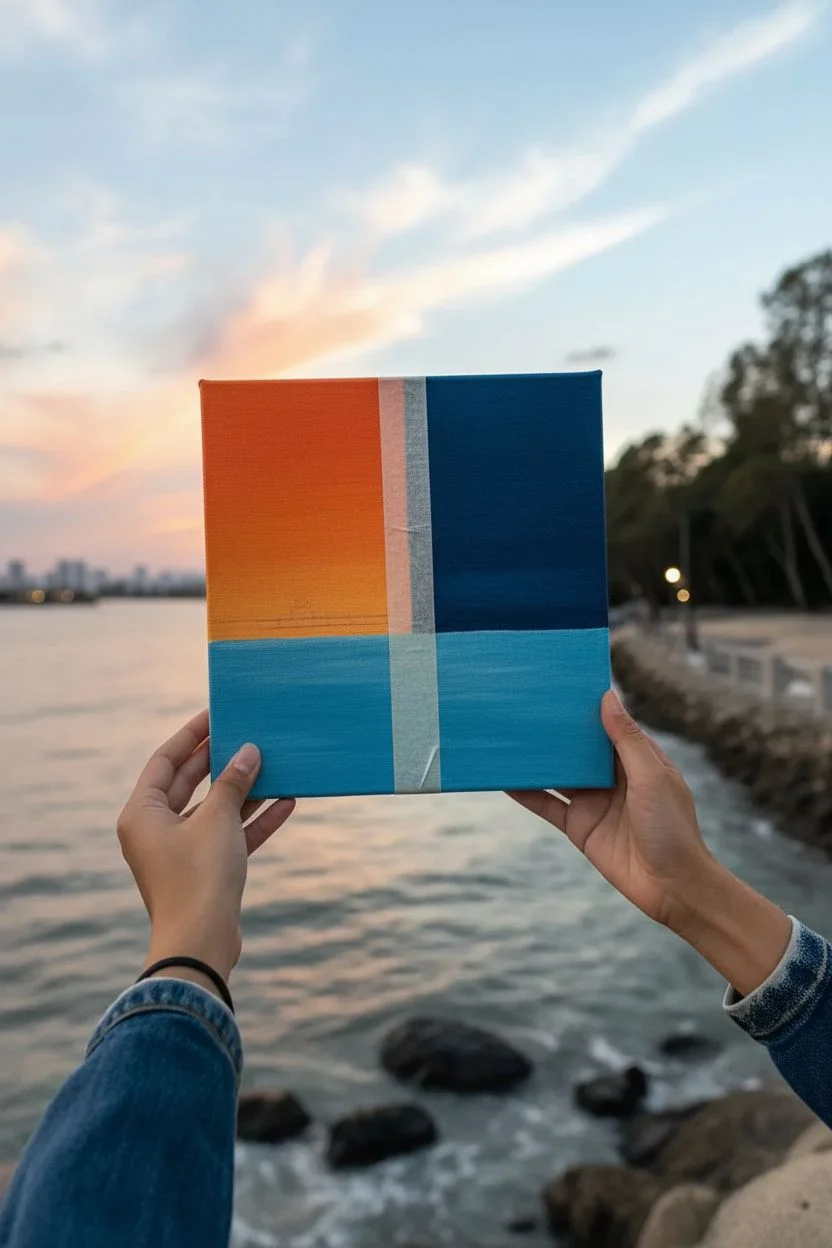
Capture the magic of two worlds meeting in the middle with this charming day-and-night split canvas. This project uses bold color blocking and simple silhouettes to create a romantic scene of a couple gazing at contrasting skies.
Step-by-Step Guide
Materials
- Small square canvas (approx. 8×8 or 10×10 inches)
- Acrylic paints: Orange, deep blue, white, black, green, yellow, red
- Painter’s tape or masking tape
- Flat brush (medium)
- Round detail brush (small)
- Pencil for sketching
- Cup of water and paper towels
- Palette or paper plate
Step 1: Setting the Scene
-
Divide the canvas:
Place a strip of painter’s tape vertically down the exact center of your canvas. Press the edges down firmly to prevent paint bleeding underneath later. -
Sketch the horizon:
Lightly draw a horizontal line across the canvas, about one-third of the way up from the bottom. This will separate your sky from the sea and ground. -
Paint the day sky:
On the left side, paint the upper section with a vibrant orange. While the paint is still wet, mix in a tiny bit of yellow near the horizon line to create a subtle sunrise gradient. -
Paint the night sky:
On the right side of the tape, fill the upper section with a deep, dark blue. You can mix a dot of black into your blue near the top corners for extra depth. -
Add the water:
Paint the bottom section of both sides with a lighter blue for the water. Don’t worry about the landmasses yet; just get a solid base color down for the sea.
Uneven Horizon Line?
If your horizon line isn’t perfectly straight across the tape gap, paint a thicker layer of ‘distant mountains’ or a silhouette treeline across the entire horizon to hide the mismatch.
Step 2: Celestial Details
-
Create the sun:
Once the orange sky is dry, use your medium brush to paint a solid yellow circle in the middle of the left sky. If the orange shows through, apply a second coat after the first dries. -
Shape the moon:
On the dark blue side, paint a white crescent moon. I find it helpful to paint a ‘C’ shape first and then thicken the middle to get the proportions right. -
Add larger stars:
Using a small detail brush and white paint, create four-pointed stars on both sides. Place a few in the orange sky and scatter several across the blue night sky. -
Sprinkle stardust:
Dip the tip of a toothpick or the very end of a small brush handle into white paint to dot tiny, distant stars around the crescent moon.
Step 3: Land and Architecture
-
Remove the tape:
Carefully peel off the center tape. Paint the thin exposed strip to match the adjacent sections—orange/blue for the sky and light blue for the water—blending the edges slightly. -
Paint the grassy bank:
On the bottom left, paint a curved, mossy green shape emerging from the left edge. Use a dabbing motion with your brush to give it a grassy texture. -
Form the rocky shore:
On the bottom right, paint a dark brown irregular shape for the ground where the couple will stand. Add lighter brown dots for pebbles. -
Bridge the gap:
With black paint and a steady hand, draw an arching bridge silhouette connecting the grassy bank on the left toward the center line. Add vertical lines for the railing.
Pro Tip: Glowing Sun
To make the sun pop, paint a circle of white first and let it dry completely. Then, paint your yellow over the white. This prevents the orange background from dulling the yellow.
Step 4: Figures and Final Touches
-
Outline the couple:
On the right-hand shore, sketch two small figures appearing to look out over the water. Keep them simple and fairly abstract. -
Color the figures:
Paint one figure in a red shirt and dark pants, and the other in a light cream dress or outfit. Add black hair to both figures. -
Detail the waves:
Using your smallest brush and dark blue or black paint, add thin, wavy horizontal lines across the water to represent gentle ripples. -
Highlight the water:
Add a few white horizontal dashes in the water near the shorelines to suggest foam or reflection. -
Add bridge details:
Paint a tiny silhouette of a person or object on top of the bridge if desired, creating a sense of distance and scale. -
Seal the canvas:
Allow the entire painting to cure for 24 hours. A light coat of matte varnish will protect your work without creating too much glare.
Find a beautiful spot by the water to display your new dual-world masterpiece


Paper-Cutout Style Cartoon Couple Collage Painting
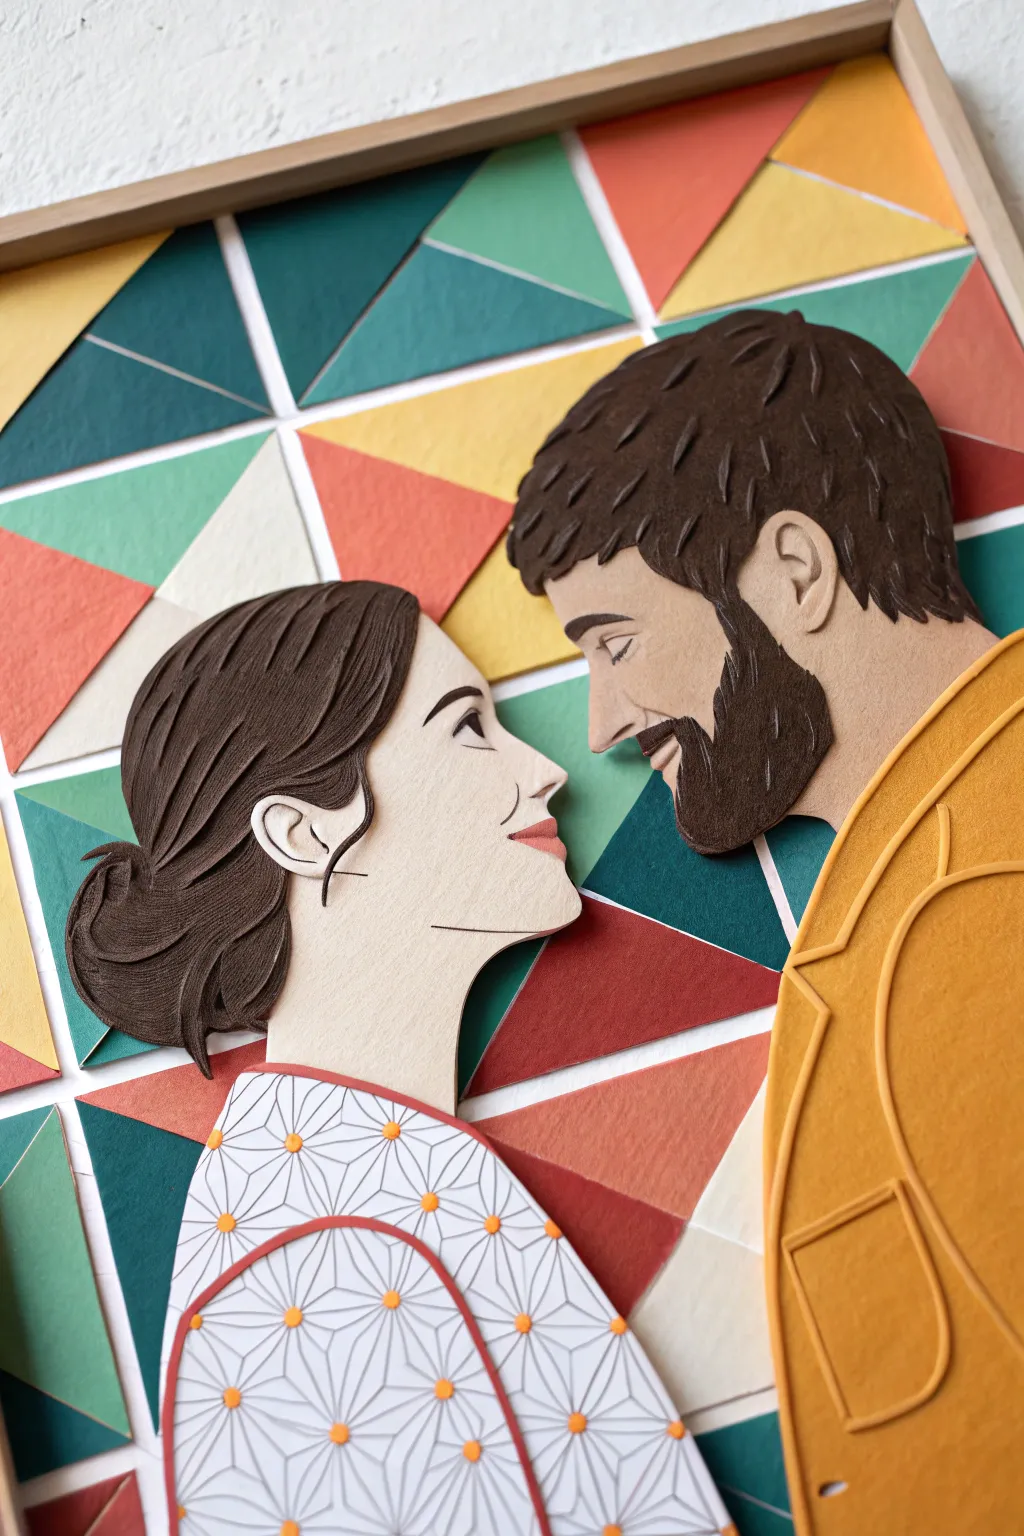
This stunning artwork combines the crisp, tactile feel of paper crafting with illustrative portraiture. By layering textured paper shapes over a bold geometric background, you’ll create a dimensional couple’s portrait that feels both modern and deeply personal.
Step-by-Step Tutorial
Materials
- Heavyweight cardstock (various colors: skin tones, hair colors, yellow, white)
- Textured scrapbook paper (greens, teals, oranges, yellows)
- Precision craft knife (e.g., X-Acto)
- Self-healing cutting mat
- Pencil and eraser
- Fine-tip scissors (for curved cuts)
- Foam adhesive squares (for dimension)
- Acid-free glue stick or craft glue
- Fine-point markers or colored pencils (for facial details)
- Wooden shadow box frame (approx. 11×14 inches)
- Fine-tip embossing stylus (optional)
Step 1: Designing the Composition
-
Drafting the sketch:
Begin by sketching your couple on a plain piece of paper the same size as your frame backing. Focus on the profile view, ensuring their gazes meet. Keep the shapes relatively simple, thinking about how they will be cut from paper. -
Mapping the hair and clothes:
Define the hair shapes as separate ‘masses’ that will sit on top of the head. Plan the clothing—like the patterned kimono and the structured jacket—as large, solid shapes that will be layered. -
Planning the background grid:
On a separate sheet (or layer if sketching digitally first), draw a grid of triangles. These triangles should vary in size slightly but maintain a cohesive geometric pattern that radiates outward.
Sticky Situation?
If small paper pieces won’t stick or your glue oozes, use tweezers for placement and switch to a dry adhesive runner or very sparing dots of tacky glue applied with a toothpick.
Step 2: Creating the Background
-
Selecting the palette:
Choose 4-5 complementary colors of textured cardstock for the background triangles. In the example, we use teal, mint green, coral, rust orange, and mustard yellow. -
Cutting the triangles:
Using your craft knife and a ruler, cut out numerous triangles of varying sizes. Precision is key here, so ensure your blade is sharp for clean edges. -
Assembling the mosaic:
Arranging the triangles on your backing board is like a puzzle. Glue them down one by one, leaving a very thin (approx. 1-2mm) white gap between them to create that ’tiled’ look. Ensure the entire background is covered.
Personalize It
Swap the geometric background for a simplified paper-cut landscape of a place special to the couple, like a mountain range or city skyline, using the same layered technique.
Step 3: Fabricating the Figures
-
Cutting the base profiles:
Trace the outline of each face onto the chosen skin-tone cardstock. Cut these shapes out carefully with fine-tip scissors or your craft knife to handle the delicate curves of the nose and chin. -
Adding facial features:
For the eyes, eyebrows, and mouth, you can either cut tiny slivers of darker paper or, for more control, use colored pencils to gently draw them on. I find drawing adds a softness that works well for expressions. -
Creating the woman’s hair:
Cut the main hair shape from dark brown textured paper. To simulate the flow of hair strands, use an embossing stylus or the back of your knife to gently score curved lines into the paper without cutting all the way through. -
Crafting the man’s hair and beard:
Cut the beard and hair shapes from dark brown stock. Similar to the woman’s hair, add texture by making tiny V-shaped shallow cuts or using the stylus to create depth and directional flow.
Step 4: Clothing and Details
-
Constructing the yellow jacket:
Cut the main jacket shape from mustard-yellow felt or textured thick paper. Add details like the lapel and pocket by cutting thin strips of the same material and gluing them on top to create raised contour lines. -
Making the patterned kimono:
Cut the kimono shape from white cardstock. Draw the geometric star pattern using a fine gray pen. Add small dots of orange paint or tiny paper circles at the intersections of the lines for a pop of color. -
Adding the red trim:
Cut extremely thin strips of red paper to serve as the collar and edge of the kimono. Glue these carefully along the neckline boundaries.
Step 5: Final Assembly
-
Layering the figures:
Assemble each person separately first—hair on head, clothes on body. Once the individual figures are complete, position them on the background. -
Adding dimension:
Instead of gluing the figures flat against the background, use foam adhesive squares. Place them behind the heads and bodies to lift the couple off the geometric backdrop, creating beautiful shadows. -
Final touches:
Check for any loose edges or stray glue. Once everything is secure and dry, place the artwork into your shadow box frame to protect the delicate paper layers.
Now you have a deeply textured, meaningful keepsake that beautifully captures a moment in time
Secret Message Cartoon Couple With Wax-Resist Details
Capture a tender moment under the stars with this charming watercolor illustration involving a hidden message technique. Using a simple wax-resist method, you will create glowing stars and a crescent moon that magically appear as you paint the night sky.
How-To Guide
Materials
- Cold-pressed watercolor paper (300 gsm)
- Watercolor paint set (indigo, payne’s grey, burnt sienna, crimson, ochre)
- Round watercolor brushes (sizes 2, 4, and 8)
- White wax crayon or clear wax candle
- Fine-liner pen (black, 0.3mm or 0.5mm)
- Pencil (HB)
- Eraser
- Masking tape
- Jar of water
- Paper towels
Step 1: Sketching and Wax Resist
-
Prepare the paper:
Begin by taping down the edges of your watercolor paper to a flat surface. Since this project has a lovely deckled edge look in the photo, you can tear the edges of your paper first if you want that rustic aesthetic, then tape loosely. -
Sketch the couple:
Lightly sketch the outline of the couple in the center foreground with your HB pencil. Draw the girl on the left in a dress and the boy on the right with his arm around her. Keep the lines faint so they don’t show through the paint later. -
Add landscape elements:
Draw a curved horizon line beneath their feet to create a small hill. Add three simple heart shapes on thin stems growing from the ground on either side of the couple. -
Outline the clouds:
Sketch a series of fluffy, scalloped cloud shapes behind the couple. Make sure these clouds take up the middle third of the page, separating the ground from the sky area. -
Apply the wax resist:
This is the secret magic step. Take your white wax crayon or the edge of a candle and firmly draw a crescent moon in the upper right sky. Press hard to ensure a good layer of wax. -
Add wax stars:
Using the same crayon, press small dots and tiny star shapes (‘*’) scattered throughout the upper sky area. These invisible marks will repel the watercolor paint in the next phase.
Wax Resist Success
To ensure your stars really pop, sharpen your white crayon to a fine point before drawing. The sharper the wax tip, the crispier your stars will look against the dark paint.
Step 2: Painting the Scene
-
Paint the night sky:
Load your size 8 brush with a deep indigo or navy blue. Paint the entire sky area above the clouds. Watch as the paint beads up over your wax drawings, instantly revealing the bright white moon and stars. -
Soften the cloud edges:
While the blue sky paint is still slightly wet, rinse your brush and run clean water along the bottom edge of the blue where it meets the clouds to create a soft transition. -
Color the clouds:
Mix a very diluted dusty pink and a light grey. Paint the fluffy cloud shapes, alternating between the pink and grey tones. I like to let the colors bleed into each other slightly for a dreamy, sunset effect. -
Base coat for the ground:
Paint the hill using a wash of burnt sienna or light brown. Keep the color relatively flat but allow some variation in tone to suggest texture. -
Paint the clothing:
Use a burnt orange or rust color for the girl’s dress. For the boy’s shirt, use a soft blue-grey, and paint his pants in a darker denim blue shade. Use a smaller brush (size 4) here to stay inside the lines. -
Detail the hair:
Using a mix of brown and ochre, paint the hair for both figures. Paint in the direction of hair growth to add suggestion of volume. -
Pop of red:
Fill in the heart shapes on the stems with a diluted crimson or reddish-pink.
Step 3: Inking and Finishing
-
Dry thoroughly:
Wait until the painting is completely bone-dry. If the paper is cool to the touch, it is still wet. Use a hair dryer on a low setting if you are impatient. -
Outline the figures:
Using your black fine-liner pen, carefully trace over your original pencil lines for the couple. Use broken or sketchy lines in some areas, like the folds of the clothes, for a more artistic look. -
Define the hair:
Add fine ink strokes to the hair to define the strands and style. Outline the boy’s head and the girl’s bob cut. -
Ink the landscape:
Draw the stems for the heart flowers and outline the hearts themselves. Add a few scratchy lines on the ground to suggest grass or uneven terrain. -
Final touches:
You can lightly outline the clouds if you wish, or leave them soft. If your wax stars need more definition, you can carefully outline a few with the pen, but often the resist look is perfect on its own.
Add a Hidden Note
Use the white crayon to write a secret message or a date in the clouds or on the hill before painting. The text will magically appear when you brush the watercolor over it.
Once the ink is dry, frame your artwork or gift it to someone special to share the magic of this starry night scene


Have a question or want to share your own experience? I'd love to hear from you in the comments below!