Resin pendants are like tiny, wearable canvases—clear, glossy, and packed with personality. If you love the idea of trapping color, texture, and little treasures in a gem-like piece, these resin pendant ideas will keep your hands happily busy.
Pressed Flower Resin Pendants
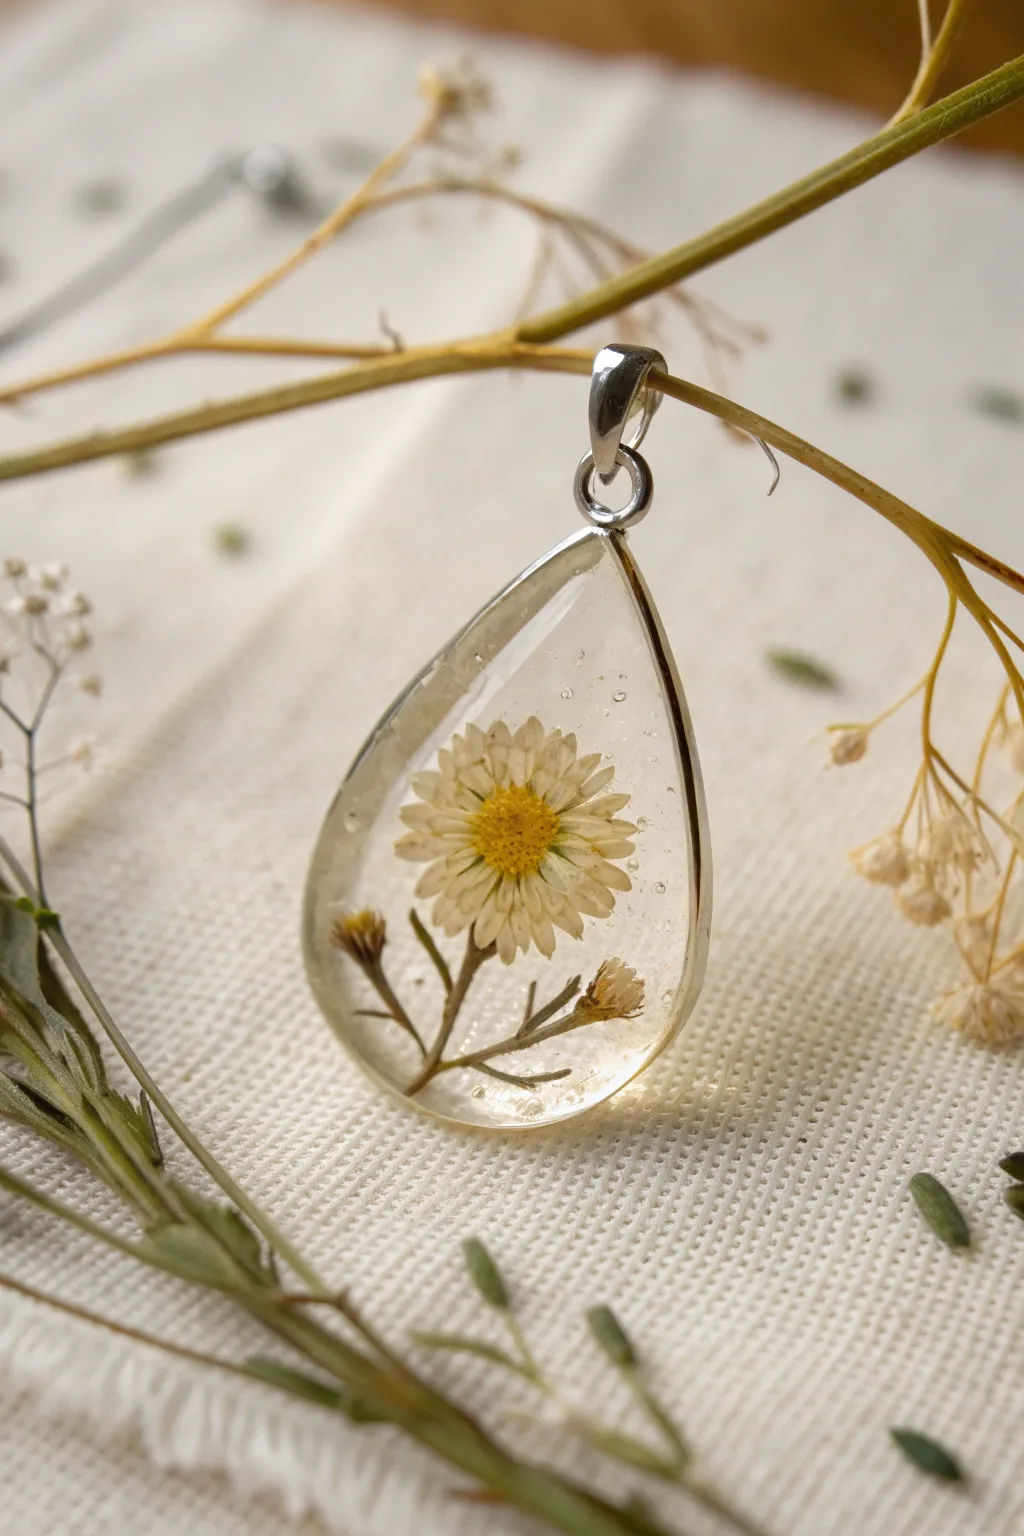
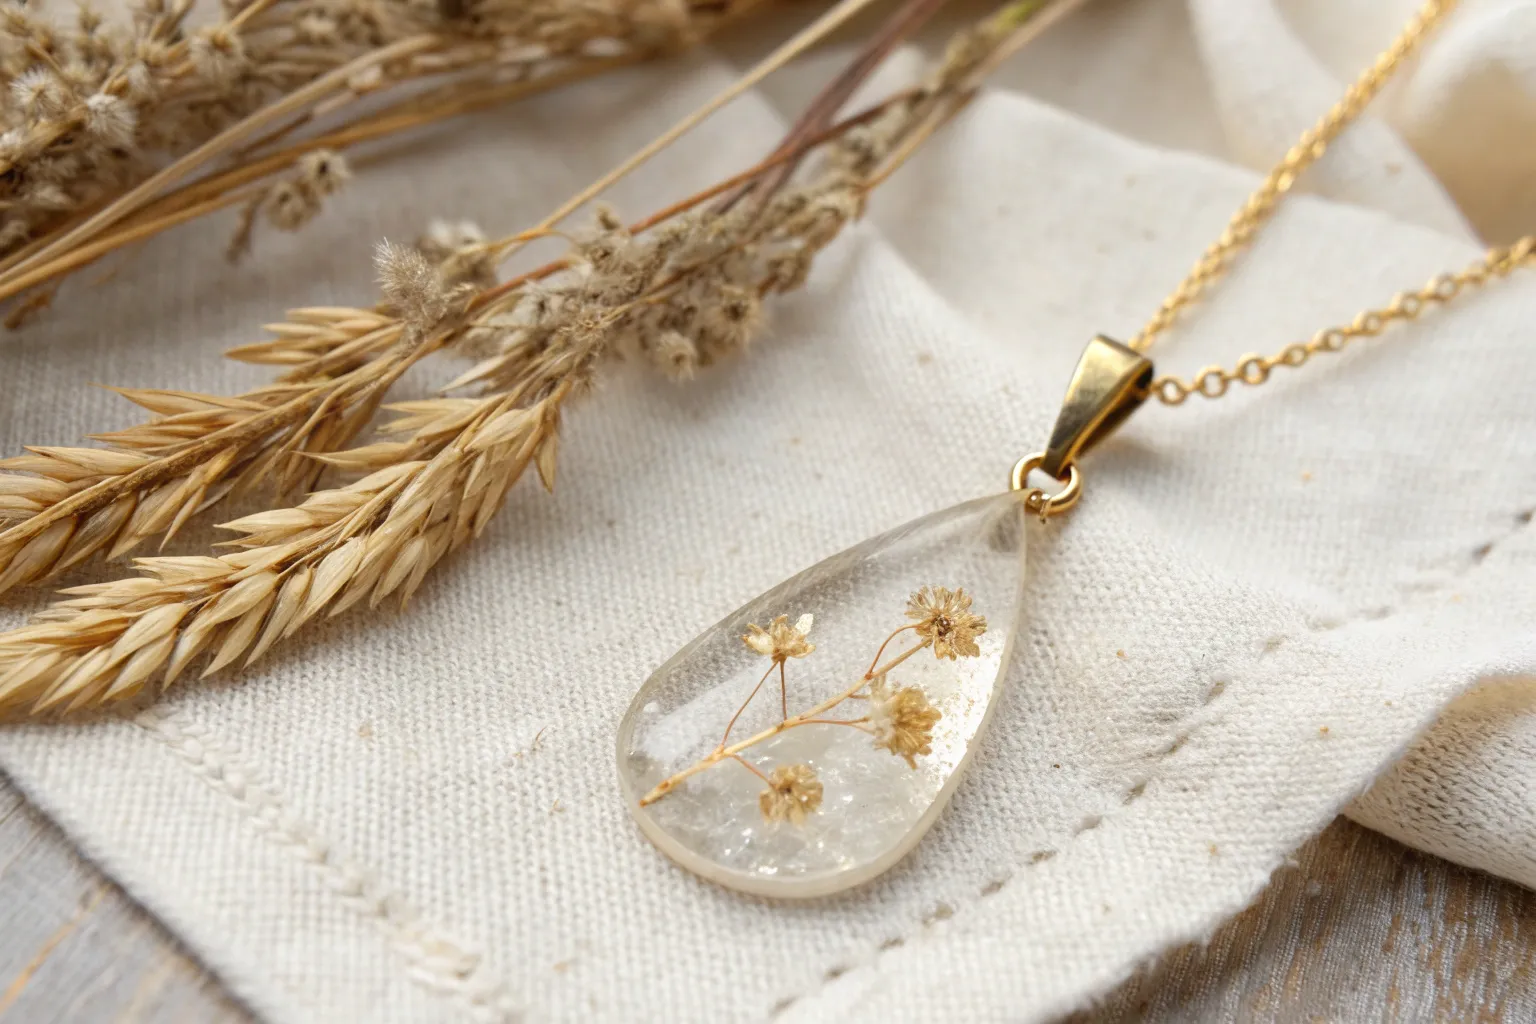
This classic teardrop pendant captures the delicate beauty of a dried white daisy floating in crystal clear resin. The silver bezel frame adds a professional, polished finish that makes this piece perfect for everyday wear or gifting.
Step-by-Step Guide
Materials
- Teardrop-shaped open back bezel (silver)
- UV resin (clear hard type)
- UV lamp
- Dried pressed white daisy (small enough to fit the bezel)
- Dried greenery or tiny buds (optional accents)
- Resin tape or a silicone mat
- Tweezers
- Toothpick or silicone tool
- Lighter or heat gun
- Sandpaper or nail file (very fine grit)
Step 1: Preparation
-
Prepare the workspace:
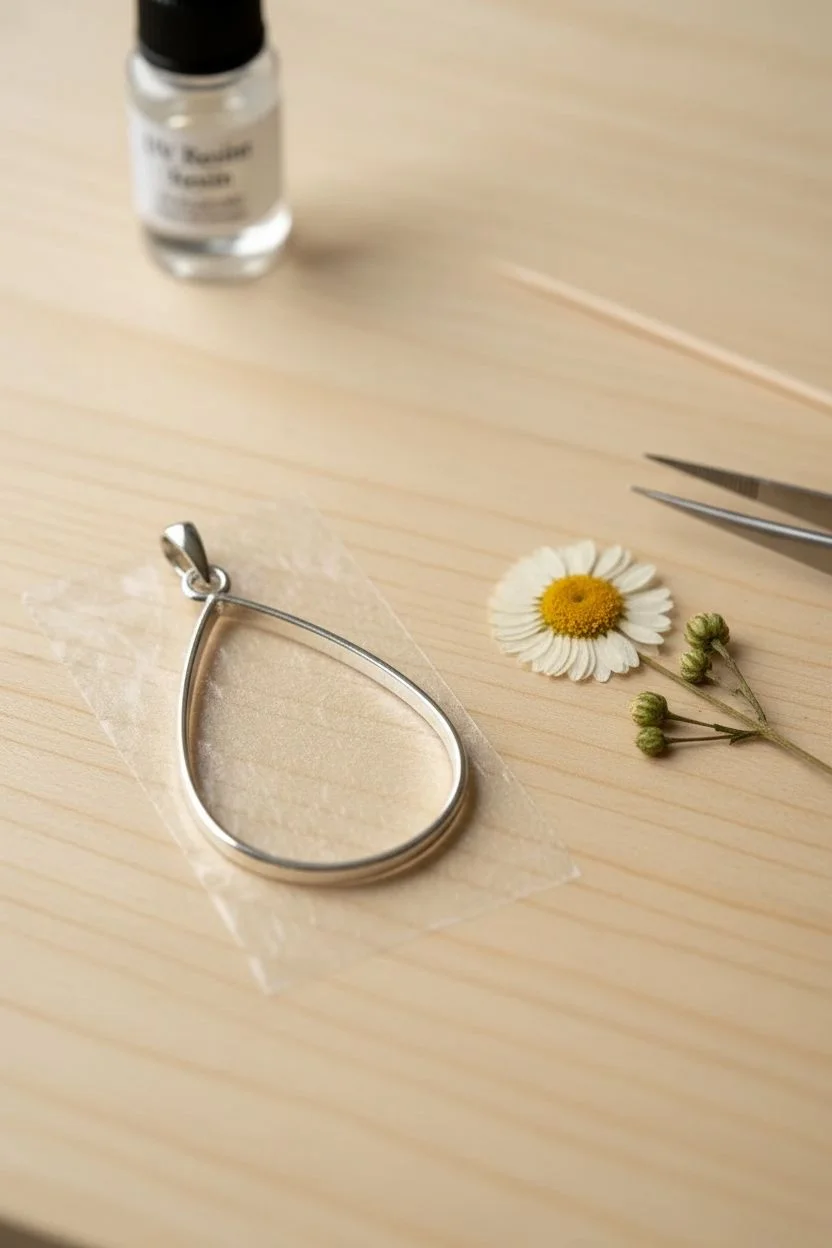
Ensure your work surface is level and clean. Lay down a piece of resin tape, sticky side up, and firmly press your silver teardrop bezel onto it. Make sure the seal is tight to prevent leaks. -
Select your blooms:
Choose a dried daisy that fits comfortably inside the teardrop shape without touching the edges. Dry fit it first to ensure the layout looks balanced.
Cloudy Resin Correction
If your resin looks cloudy after curing, it might be due to moisture in the flower. Ensure flowers are 100% dry. If the surface is dull, a thin top coat of fresh resin fixes it instantly.
Step 2: Base Layer
-
Pour the first layer:
Pour a very thin layer of UV resin into the bezel, just enough to coat the bottom (which is currently the tape). Spread it to the edges with a toothpick. -
Remove bubbles:
Check for any air bubbles. If you see them, quickly pass a lighter flame over the surface or pop them with your toothpick. -
Initial cure:
Place the bezel under your UV lamp and cure for about 60 seconds. This creates a solid base for your flower to sit on.
Step 3: Arrangement
-
Apply adhesive layer:
Add a tiny drop of fresh resin to the center of your cured base layer. This acts as glue for the flower. -
Place the main flower:
Using tweezers, gently pick up your daisy and place it into the bezel. Press it down lightly so it makes contact with the wet resin drop. -
Add accents:
If you are using tiny buds or extra greenery stems like in the example, tuck them carefully underneath or beside the main bloom using your tweezers. -
Lock in place:
I like to flash cure this for just 10-15 seconds to freeze the flower in position so it doesn’t float away during the next pour.
Add a Little Sparkle
Mix a tiny pinch of gold foil flakes or iridescent glitter into the back layer of resin. It creates a shimmering background that makes the white petals pop without hiding them.
Step 4: Encapsulation
-
Fill the bezel:
Slowly pour more UV resin over the flower until the bezel is filled. Be careful not to overflow; stop just before the rim. -
Check for trapped air:
Flowers love to trap air bubbles under their petals. Use a toothpick to gently prod the flower or coax bubbles out from underneath. -
Full cure:
Cure under the UV lamp for 2-3 minutes. Ensure the resin is hard and no longer tacky. -
Domed finish:
To get that beautiful magnifying effect, slowly add a final drop of resin to the center. Let it spread to the edges naturally, creating a surface tension dome. -
Final cure:
Cure one last time for 3-5 minutes to ensure the dome is perfectly hard and durable.
Step 5: Finishing Touches
-
Remove the tape:
Peel the finished pendant off the resin tape. The back might be slightly sticky or textured from the tape adhesive. -
Seal the back:
Flip the pendant over. Apply a thin layer of resin to the back to seal it and make it crystal clear, then cure for 2 minutes. -
Clean up:
If there are any sharp resin burrs on the edges, gently smooth them away with a fine-grit nail file. -
Attach hardware:
Add a jump ring or bail to the loop at the top of the bezel, and thread it onto your favorite chain.
Enjoy wearing your permanent piece of captured nature


Beach Sand and Shell Resin Pendants
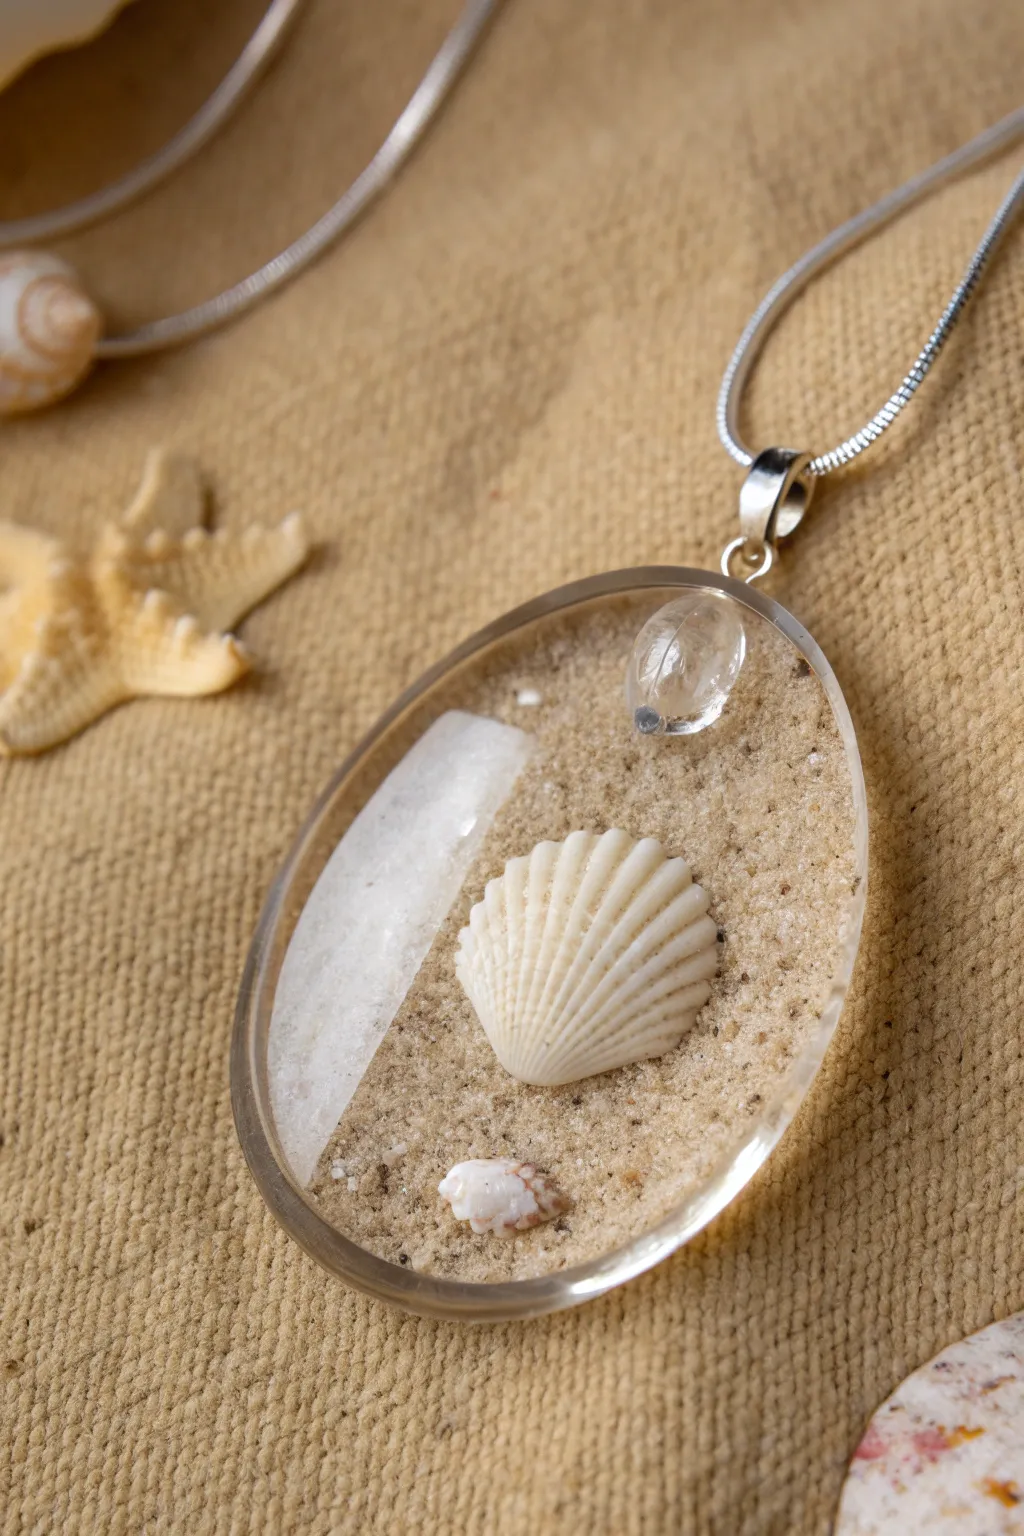
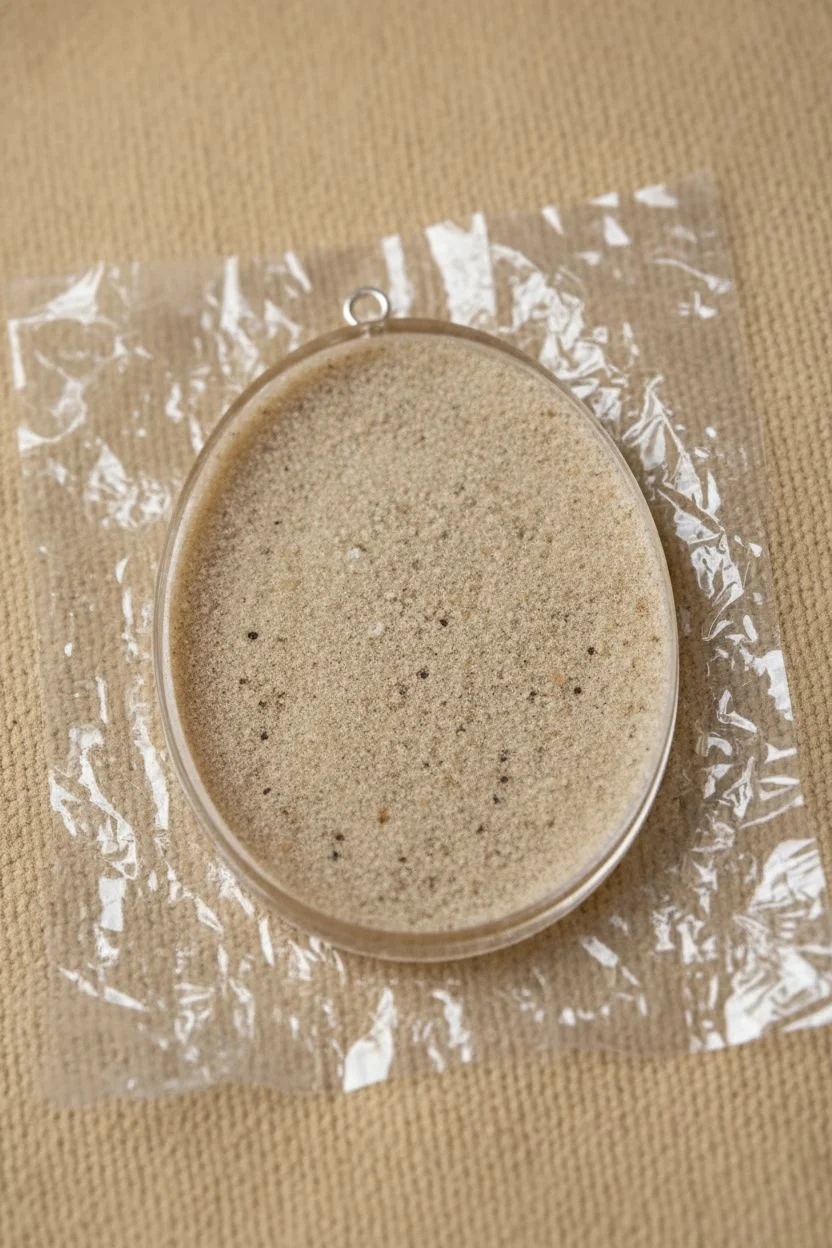
Capture the serene beauty of the shoreline with this elegant oval pendant, featuring real sand, delicate seashells, and sea glass suspended in crystal-clear resin. This project perfectly preserves tiny beach finds, creating a wearable piece of the ocean that looks like a miniature tide pool frozen in time.
How-To Guide
Materials
- Open-backed oval bezel (silver or rhodium plated)
- UV resin (clear hard type)
- UV lamp
- Fine beach sand
- Small white scallop shell (fit to bezel size)
- White or clear sea glass shard
- Small clear quartz point or teardrop crystal
- Tiny shell fragment or micro-shell
- Resin tape or packing tape
- Wooden toothpick or silicone tool
- Tweezers
- Silicone mat
- Silver snake chain
Step 1: Preparation
-
Prepare the Bezel:
Cut a piece of resin tape slightly larger than your oval bezel. Press the bezel firmly onto the sticky side of the tape, ensuring a tight seal around the entire bottom edge to prevent leaks. -
Clean Your Finds:
Make sure your shells, sand, and glass pieces are completely clean and absolutely dry. Any moisture trapped inside will cause the resin to cloud or the organic material to rot. -
Base Layer:
Pour a very thin layer of clear UV resin into the bottom of the bezel. You just want enough to coat the tape surface. -
Adding Sand:
Sprinkle fine beach sand into the wet resin. Use a toothpick to spread it unevenly, creating a natural ‘dune’ effect rather than a flat floor. Ensure the sand is fully saturated with resin. -
First Cure:
Place the bezel under your UV lamp for about 60 seconds to set the sandy base layer. This provides a stable foundation for the larger objects.
Step 2: Arrangement & Embedding
-
Placement Glue:
Apply a small drop of fresh UV resin to the center of the cured sand layer and along the left edge where the sea glass will sit. -
Adding the Sea Glass:
Using tweezers, carefully place the long shard of white sea glass along the left curve of the oval. Press it gently so it adheres to the resin drop. -
Positioning the Shell:
Place the main white scallop shell in the center, slightly to the right of the sea glass. Angle it so the fan shape points upward naturally. -
Adding Accents:
Dip the tiny shell fragment and the clear quartz crystal into a bit of resin, then place the fragment at the bottom and the crystal near the top bail loop. -
Structure Cure:
Flash cure under the UV lamp for 30-60 seconds. This locks your arrangement in place so items don’t float away during the final pour.
Bubble Trouble
Shells often trap stubborn air pockets. Before placing the shell in the bezel, dip it entirely in a small cup of resin to pre-fill the crevices and release trapped air.
Step 3: Encapsulation
-
First Fill:
Slowly pour clear UV resin over the arrangement, starting from the edges and letting it flow toward the center. Fill until you cover about half the height of the shell. -
Check for Bubbles:
I like to pause here and look closely for trapped air, especially under the curve of the scallop shell. Use a toothpick to gently coax any bubbles to the surface. -
Intermediate Cure:
Cure for 60-90 seconds. Doing this in layers prevents the resin from heating up too much and shrinking. -
Final Dome:
Pour the final layer of resin until it reaches the rim of the bezel. Add just a tiny bit more to create a slight surface tension dome, which magnifies the objects inside. -
Final Cure:
Cure under the UV lamp for a full 2-3 minutes. Rotate the piece or flip it over (once rigid) to ensure light reaches underneath the embellishments.
Ocean Foam Effect
Mix a tiny amount of white pigment into a drop of resin and swirl it delicately around the edges of the sand to mimic sea foam crashing on the shore.
Step 4: Finishing Touches
-
Cool Down:
Let the pendant sit for a few minutes to cool down completely relative to room temperature before handling. -
Remove Tape:
Peel the resin tape off the back of the bezel. If there is any sticky residue, wipe it clean with a little rubbing alcohol or Goo Gone. -
Sealing the Back:
If the back looks cloudy from the tape texture, apply a thin layer of UV resin to the back surface and cure for 60 seconds to make it crystal clear. -
Assembly:
Thread your finished pendant onto the silver snake chain.
Now you have a stunning piece of wearable art that keeps summer memories close to your heart all year round


Ocean Wave Resin Pendant Layers
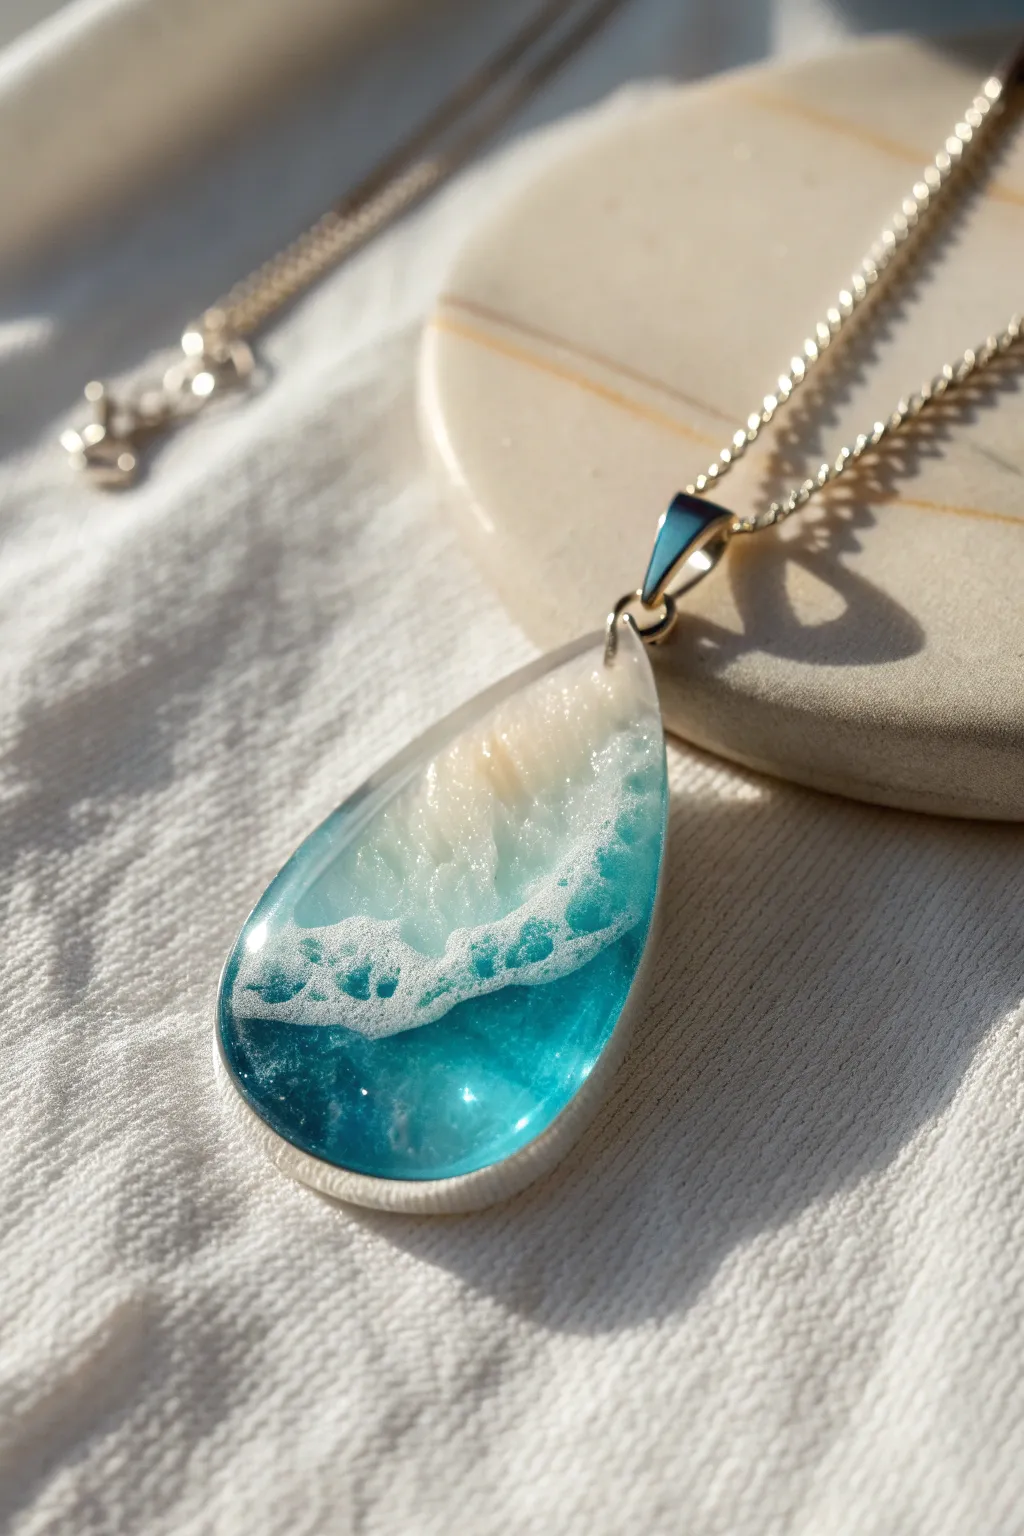
Capture the serene beauty of the shoreline in a wearable piece of art with this stunning teardrop pendant. Using layered resin techniques, you will create a realistic depth featuring sandy shores, deep turquoise waters, and crashing white foam.
Step-by-Step Tutorial
Materials
- Teardrop-shaped open bezel pendant (silver or gold finish)
- UV resin (clear)
- UV lamp
- Resin dyes/pigments: Deep Ocean Blue, Turquoise, White (opaque)
- Fine white sand or beige mica powder
- Painter’s tape or dedicated resin tape
- Toothpicks or fine dotting tools
- Heat gun or lighter
- Silicone mixing cups
- Fine sandpaper (optional)
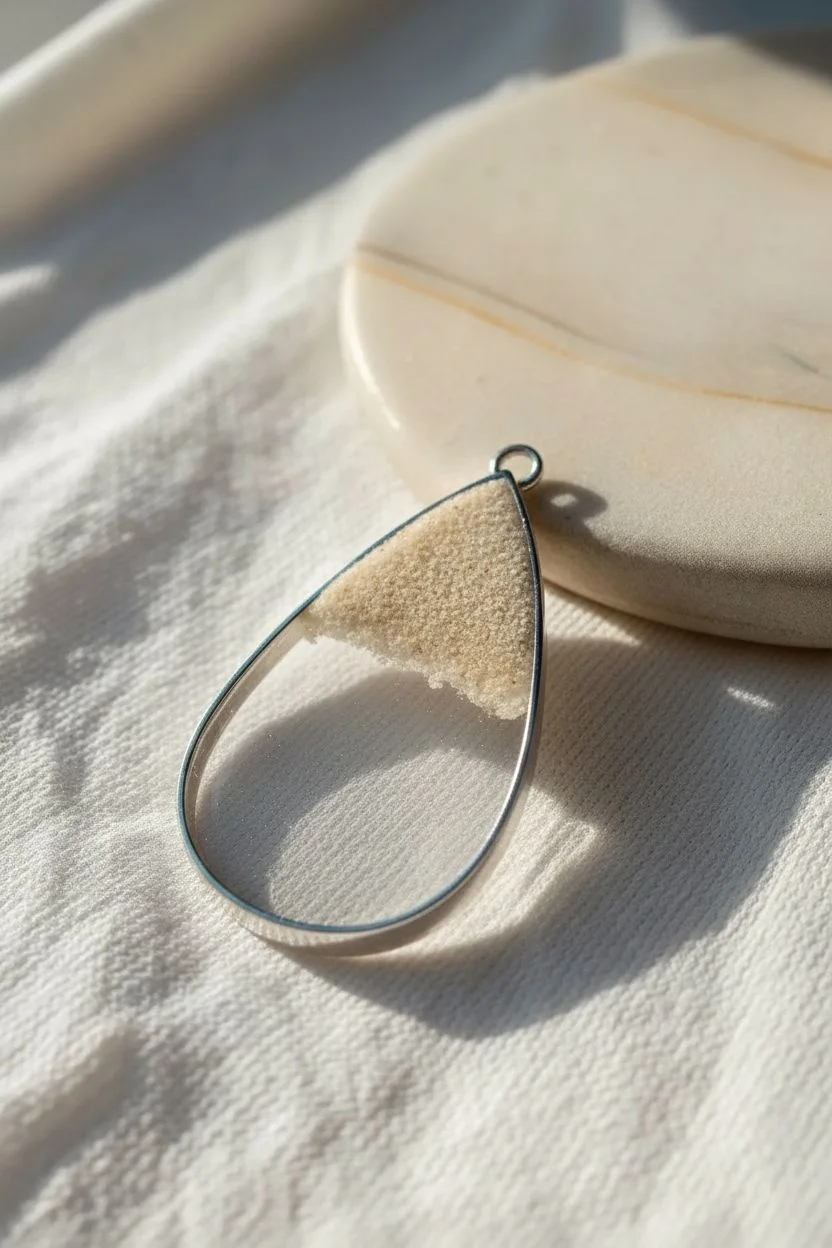
Step 1: Setting the Scene
-
Pendant Prep:
Cut a piece of resin tape slightly larger than your teardrop bezel. Press the bezel firmly onto the sticky side of the tape, ensuring a tight seal around the entire metal rim to prevent leaks. -
Mixing the Sand Layer:
In a small silicone cup, mix a pea-sized amount of clear UV resin with a pinch of fine white sand. You want a slushy consistency—enough resin to bind it, but enough sand to look textured. -
Applying the Beach:
Using a toothpick, carefully nudge the sand mixture into the pointed top of the teardrop bezel. This will act as your shoreline. Fill about 1/4 of the bezel area with this mixture. -
Initial Cure:
Place the bezel under your UV lamp for 60 seconds to lock the sand layer in place.
Pro Tip: Better Cells
For better sea foam ‘cells,’ mix a tiny drop of silicone oil or white alcohol ink into your white resin. The chemical reaction naturally pushes the pigment apart.
Step 2: Layering the Ocean
-
Mixing Ocean Hues:
Dispense a small amount of clear resin into a cup and tint it with a tiny drop of turquoise pigment. Aim for a translucent, gem-like blue rather than an opaque one to maintain depth. -
Pouring the Shallows:
Pour the turquoise resin into the middle section of the bezel, letting it touch the edge of the cured sand. Don’t fill the bezel completely; we need room for depth. -
Deepening the Waters:
Mix a second batch of resin with a darker ‘Deep Ocean Blue’ tint. Pour this into the rounded bottom of the teardrop, blending it slightly where it meets the turquoise to create a natural gradient. -
Bubble Removal:
Pass a heat gun or lighter quickly over the surface to pop any micro-bubbles, then cure under the UV lamp for 60-90 seconds.
Step 3: The Sea Foam Effect
-
Creating the White Wave:
Mix a small amount of resin with opaque white pigment. You want this mixture to be highly saturated so it stands out against the blue. -
Laying the Foam Line:
Using a fine toothpick, draw a thin, wiggly line of white resin right where the sand meets the blue water. Add a second, fainter line mid-way through the turquoise section for extra movement. -
Blurring the Foam:
Gently drag the toothpick from the white line backward into the clear/blue water to create wispy ‘cells.’ I like to use a heat gun for just a second here—the heat helps the white resin spread and form those characteristic lacy cells. -
Locking the Wave:
Once you preserve the cell pattern you like, immediately freeze it by curing under the UV lamp for 60 seconds.
Level Up: Starfish Detail
Before the final clear coat, use tweezers to place a tiny microscopic gold star or seashell charm on the ‘sand’ area for a hidden treasure effect.
Step 4: Finishing Touches
-
Doming the Top:
Pour a final layer of crystal-clear UV resin over the entire piece. Start in the center and gently guide it to the metal edges with a clean toothpick to create a nice surface tension dome. -
Final Cure:
Cure for a full 2-3 minutes to ensure a hard, scratch-resistant finish. If the surface feels tacky, let it sit in direct sunlight for an additional 10 minutes. -
Tape Removal:
Peel off the back tape. If there is any sticky residue on the back of the pendant, wipe it away with a little rubbing alcohol or apply a thin layer of clear resin to the back and cure again to seal it. -
Assembly:
Attach a jump ring to the pendant bail and thread your chain through to complete the necklace.
You now have a miniature seascape featuring crashing waves that you can carry with you everywhere


Glitter Galaxy Resin Pendants
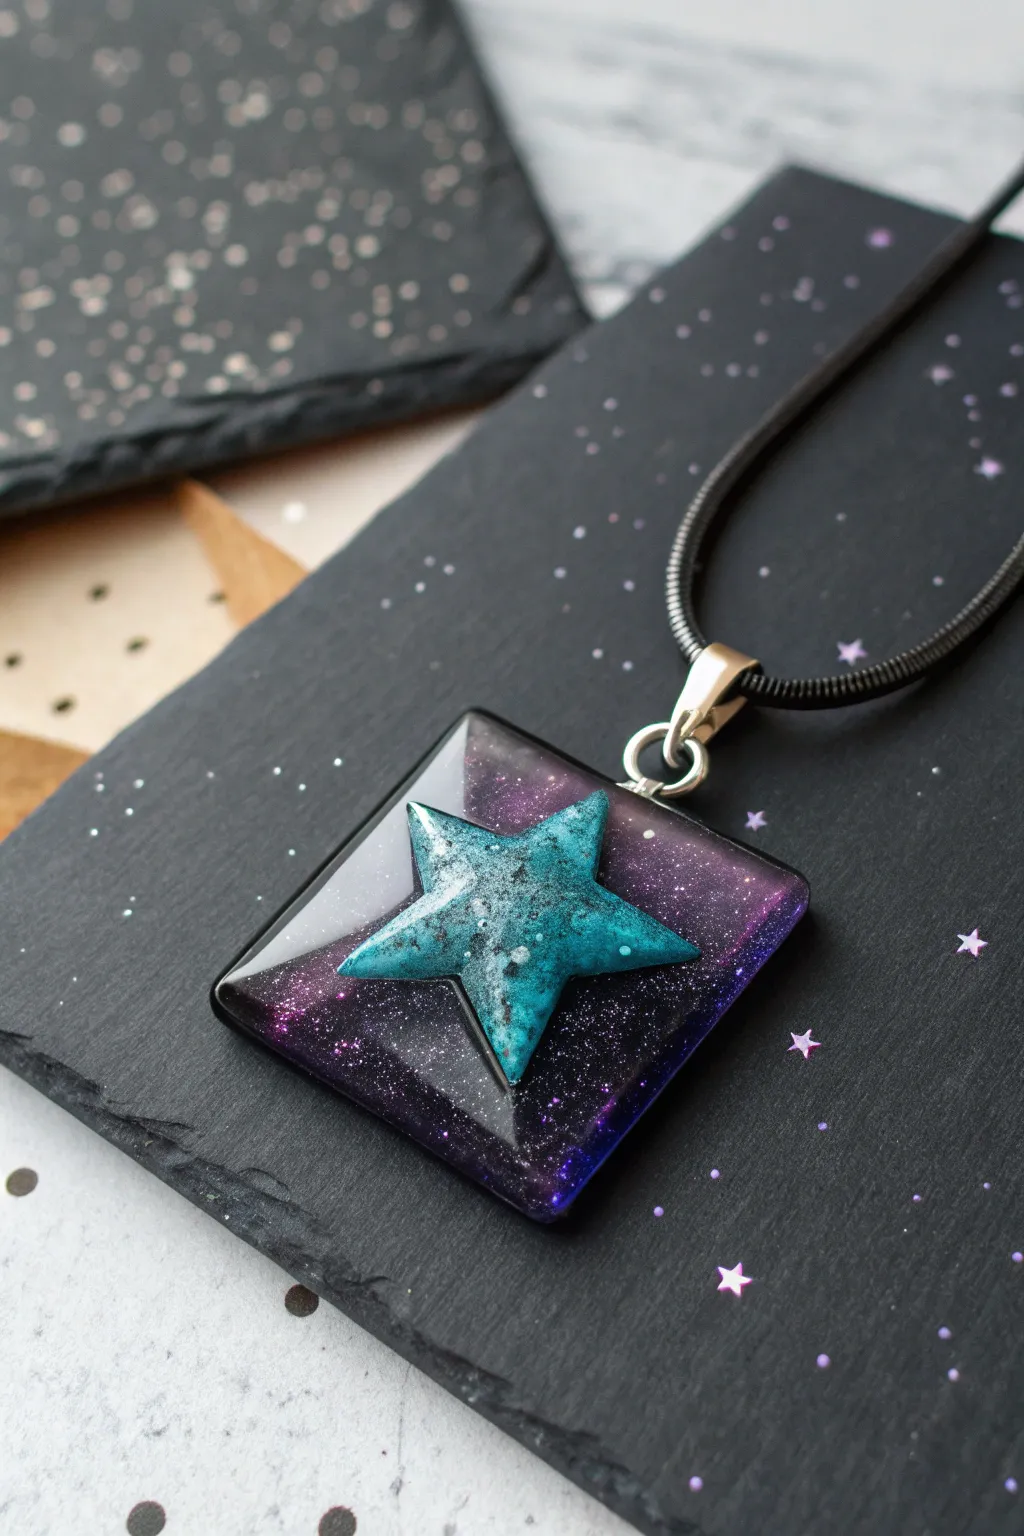
Capture the mysteries of the cosmos in a single piece of jewelry with this deep space-inspired pendant. Featuring a swirling purple galaxy background and a striking dimensional turquoise star, this resin project offers a stunning depth that looks like a window into the universe.
How-To Guide
Materials
- Square bezel pendant tray (silver or black metal)
- Two-part epoxy resin (jewelry grade)
- UV resin (optional, for quick adhesion)
- Small silicone star mold (dimensional)
- Mica powders: Deep Purple, Black, Turquoise/Teal, faint Silver
- Fine holographic glitter
- Mixing cups and stir sticks
- Toothpicks
- Heat gun or lighter
- UV lamp (if using UV resin)
- Pendant cord (black)
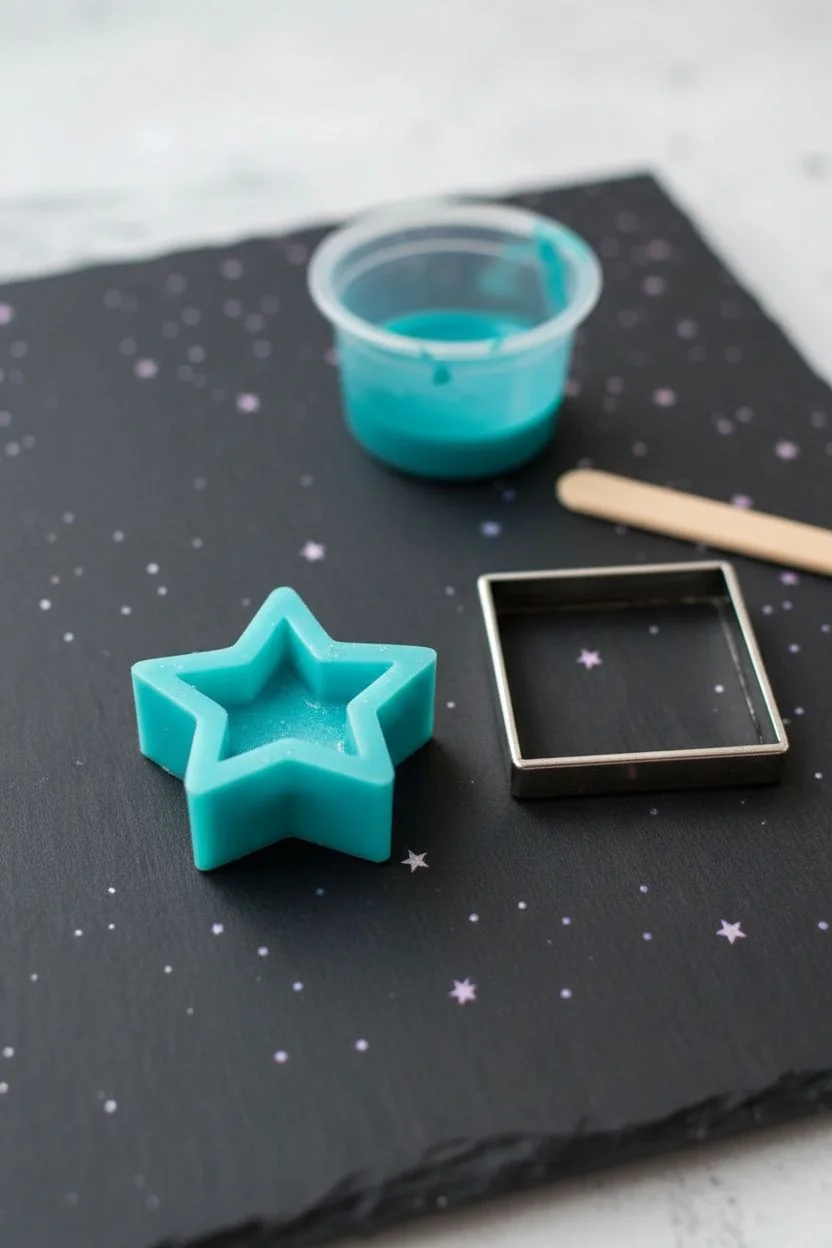
Step 1: Creating the Star
-
Mix the Star Color:
Begin by mixing a small amount of epoxy resin. Stir in a vibrant turquoise or teal mica powder until fully opaque. I like to add a tiny pinch of silver mica here to give the star a subtle metallic shimmer. -
Fill the Mold:
Carefully pour the turquoise resin into your small silicone star mold. Fill it just to the top without overfilling. -
Remove Bubbles:
Pass a lighter or heat gun quickly over the mold to pop any surface bubbles. Let this cure completely (usually 24 hours for epoxy) before demolding.
Step 2: Pouring the Galaxy Base
-
Prepare the Base Resin:
Mix a fresh batch of epoxy resin. Divide it into two small cups. -
Tint the Background:
In the first cup, mix a deep purple mica powder. In the second cup, add a tiny amount of black mica or pigment to create a translucent shadow color. -
Base Layer Pour:
Pour the purple resin into the square bezel tray, filling it about halfway. Tilt the bezel slightly to ensure the resin reaches all four corners. -
Add Depth:
Dip a toothpick into the black resin mixture and swirl it gently through the purple, concentrating on the edges to create a vignette effect. -
Add Stardust:
Sprinkle a very fine dusting of holographic glitter over the wet resin. Don’t overdo it; you want it to look like distant stars, not a solid glitter block. -
First Cure:
Cover the bezel to protect it from dust and let this base layer cure until it is tacky but stable, or fully hard.
Star won’t stick?
If the star slides around while curing, the base layer might be too slick. Scuff the spot where the star sits with fine sandpaper before gluing it down.
Step 3: Assembly and Dome
-
Position the Star:
Once the base is cured and your star is demolded, place a tiny drop of clear resin (UV resin works best here for speed) in the center of the bezel. -
Secure the Centerpiece:
Press the turquoise star firmly onto the drop of resin. Cure under a UV lamp for 60 seconds or let the epoxy set to lock the star in place. -
Mix Clear Resin:
Mix a final batch of clear epoxy resin. Let it sit for a few minutes to degas naturally so bubbles are minimal. -
Domed Finish:
Carefully pour clear resin over the background area, surrounding the star. You can carefully dome it up to the edges of the star, but try to keep the top surface of the star exposed for a textural contrast, or submerge it slightly if you prefer a smooth finish. -
Detail Check:
Use a clean toothpick to guide the clear resin exactly to the rim of the bezel, relying on surface tension to stop it from spilling over. -
Final Cure:
Cover the piece again and allow the final topcoat to cure undisturbed for at least 24 hours.
Glow Up
Mix glow-in-the-dark powder into the turquoise star resin. The pendant will look elegant by day and emit a ghostly cosmic light in the dark.
Step 4: Finishing Touches
-
Inspecting:
Check the cured surface for any sharp edges or sticky spots. If the back of the bezel has any resin drips, sand them away carefully. -
Add the Cord:
Thread your black cord through the pendant bail. Your piece is now ready to wear.
Now you have a unique piece of wearable galaxy art that captures the depth of space
BRUSH GUIDE
The Right Brush for Every Stroke
From clean lines to bold texture — master brush choice, stroke control, and essential techniques.
Explore the Full Guide
Alcohol Ink Swirl Resin Pendants
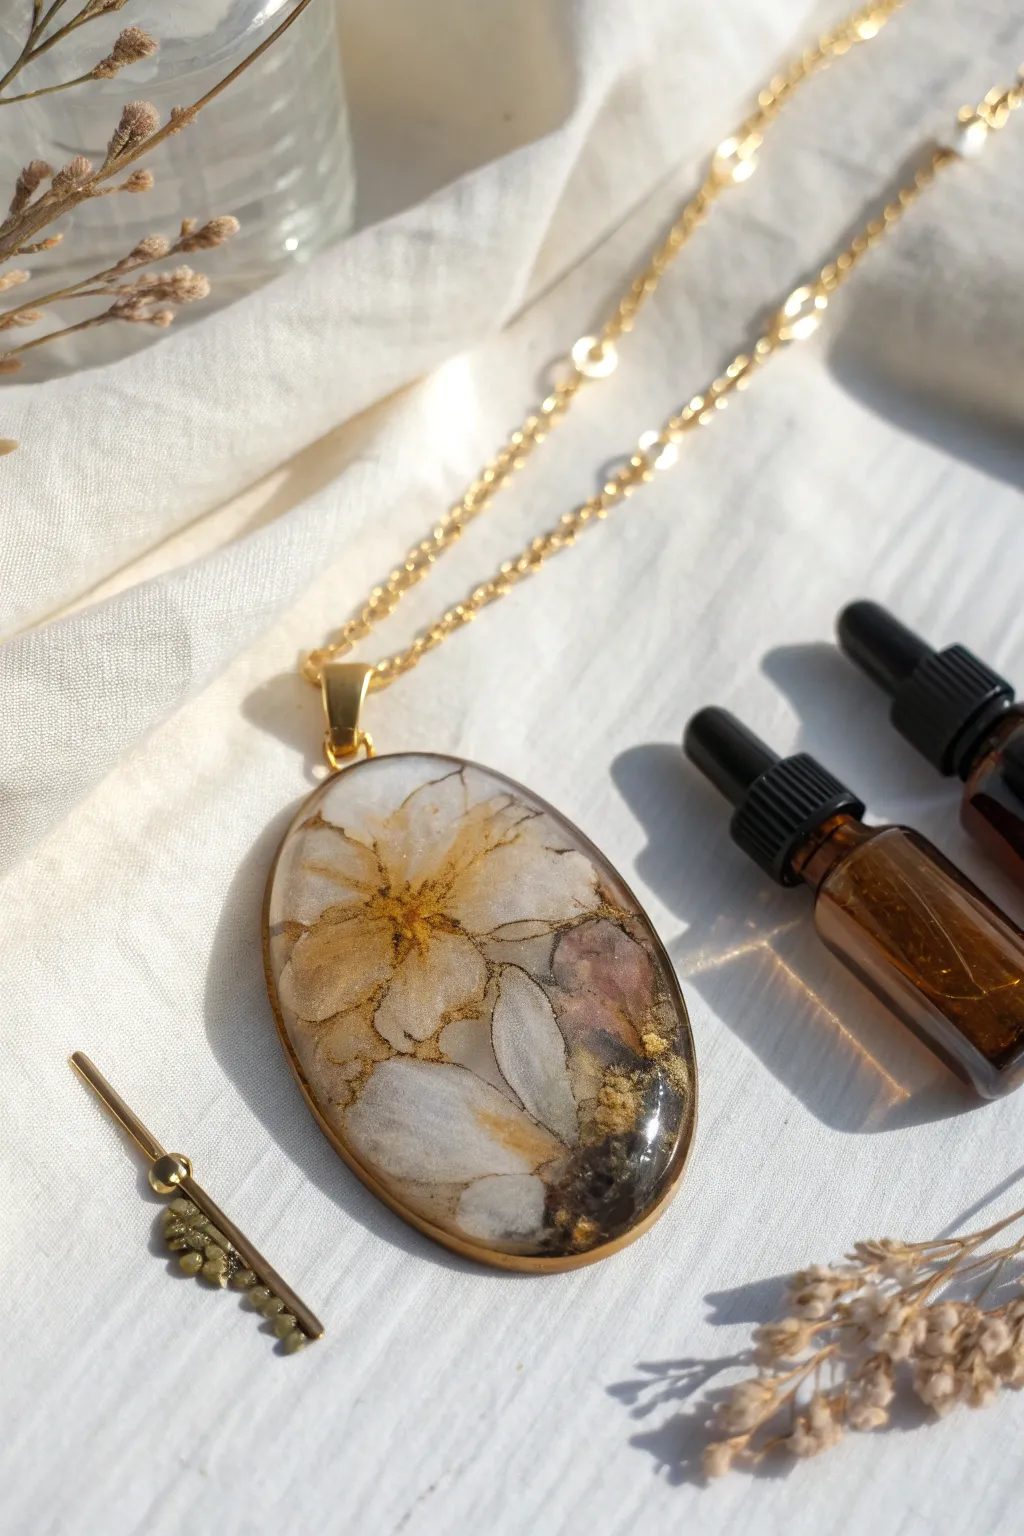
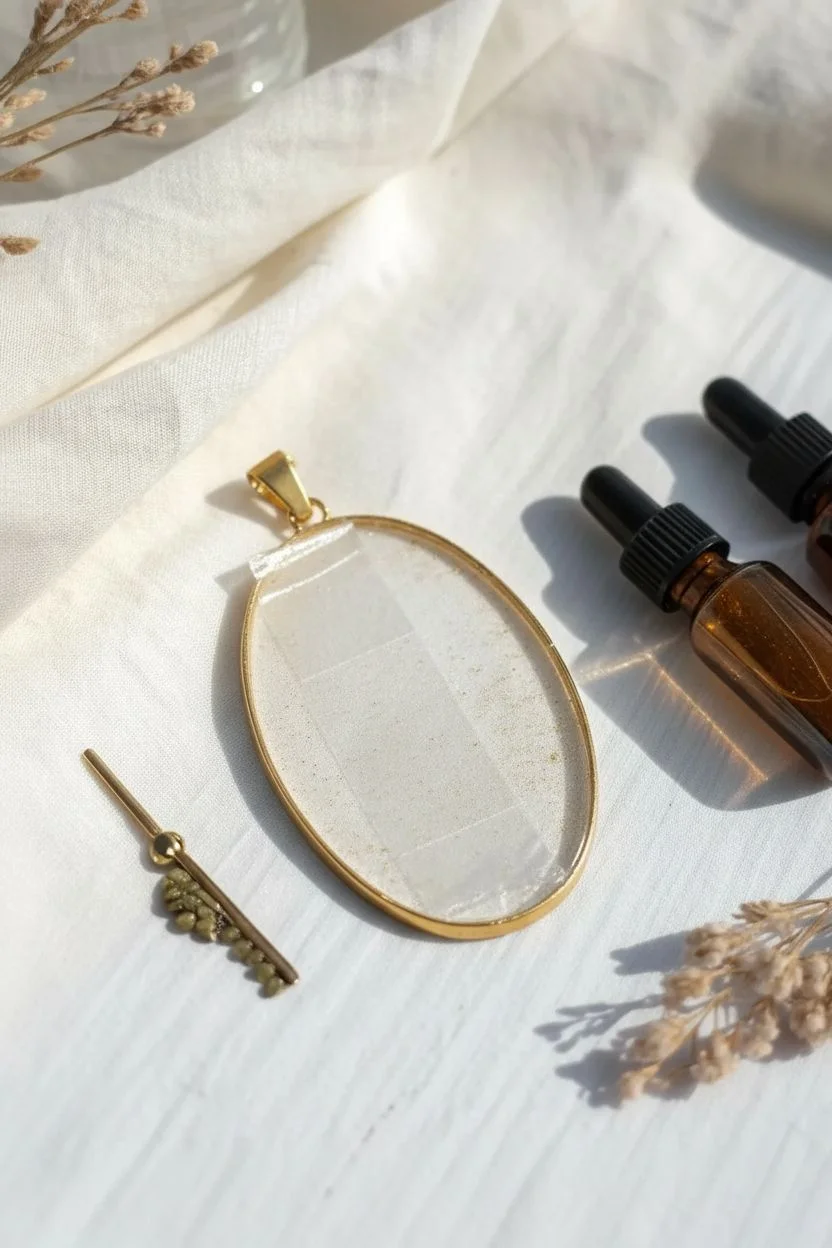
This elegant pendant captures the delicate beauty of pressed flowers suspended in a crystal-clear resin, enhanced with subtle gold accents that add a vintage touch. The combination of natural textures and warm metallic shimmers creates a timeless piece perfect for everyday wear.
Detailed Instructions
Materials
- Oval open-back bezel pendant (gold)
- UV resin or 2-part epoxy resin
- Pressed white flowers (e.g., small cherry blossoms or jasmine)
- Gold mica powder or gold alcohol ink
- Gold leaf flakes
- UV lamp (if using UV resin)
- Resin tape
- Tweezers
- Toothpick or silicone dotting tool
- Gold necklace chain
- Small jump ring
Step 1: Preparation & Base Layer
-
Tape the bezel:
Cut a strip of resin tape and press the open-back bezel firmly onto the sticky side. Ruby seal the edges to prevent any resin from leaking out during the pouring process. -
Mix a shimmer touch:
If you want a subtle background shimmer, mix a tiny amount of gold mica powder into a small drop of clear resin. Alternatively, you can use pure clear resin for a fully transparent look. -
Pour the first layer:
Pour a thin layer of resin into the bezel, filling it just enough to coat the bottom (the tape surface). Use a toothpick to guide the resin to the edges, popping any bubbles. -
Cure briefly:
Cure this base layer under a UV lamp for about 60 seconds (or let epoxy set until tacky) to create a solid foundation for your flowers.
Bubble Buster
Warm your resin bottle in a bowl of warm water before using it. Warmer resin is thinner, allowing bubbles to rise and pop much easier.
Step 2: Arranging the Botanicals
-
Prepare the flowers:
Select your pressed white flowers. If they are too large for the bezel, carefully trim the petals or separate them into smaller clusters. -
Place the main blooms:
Dip the back of your main flower into a tiny bit of wet resin (to act as glue) and place it centrally or slightly off-center in the bezel using tweezers. -
Add secondary elements:
Tuck smaller petals or dried buds around the main flower to fill empty spaces. Layering them slightly creates a beautiful sense of depth. -
Seal the organic material:
Gently dab a little resin over the flowers to seal them. This prevents air bubbles from getting trapped under the petals later. -
Cure again:
Place the pendant under the UV lamp for another 60-90 seconds to lock the floral arrangement in place.
Step 3: Adding Gold Accents & Sealing
-
Apply gold leaf:
Using a toothpick, pick up small flakes of gold leaf and tuck them into the gaps between petals or along the edges of the bezel for an antique effect. -
Create the alcohol ink swirl:
Dip a toothpick into gold alcohol ink or a metallic mix. Gently swirl it through the clear spaces or lightly drag it over petal edges to mimic organic veins. -
Pour the dome layer:
Slowly pour clear resin over the entire arrangement until it reaches the rim of the bezel. Add resin drop by drop until you achieve a nice, rounded dome effect caused by surface tension. -
Final cure:
Cure for 2-3 minutes under the UV lamp (or follow full cure times for epoxy) to ensure the top layer is hard and scratch-resistant. -
Remove the tape:
Peel the resin tape off the back of the bezel. If there is any sticky residue, wipe it clean with a little rubbing alcohol. -
Back sealing (optional):
If the back feels slightly tacky or matte from the tape, brush on a very thin layer of resin and cure one last time for a crystal-clear finish. -
Assemble the necklace:
Open a jump ring with two pairs of pliers, slide it through the pendant’s loop, attach your gold chain, and close the ring securely.
Antique Finish
Mix a tiny drop of sepia or brown alcohol ink into the resin near the edges to give the piece an aged, vintage amber look.
Now you have a stunning, botanical heirloom piece ready to catch the light
Gold Leaf Flake Resin Pendants
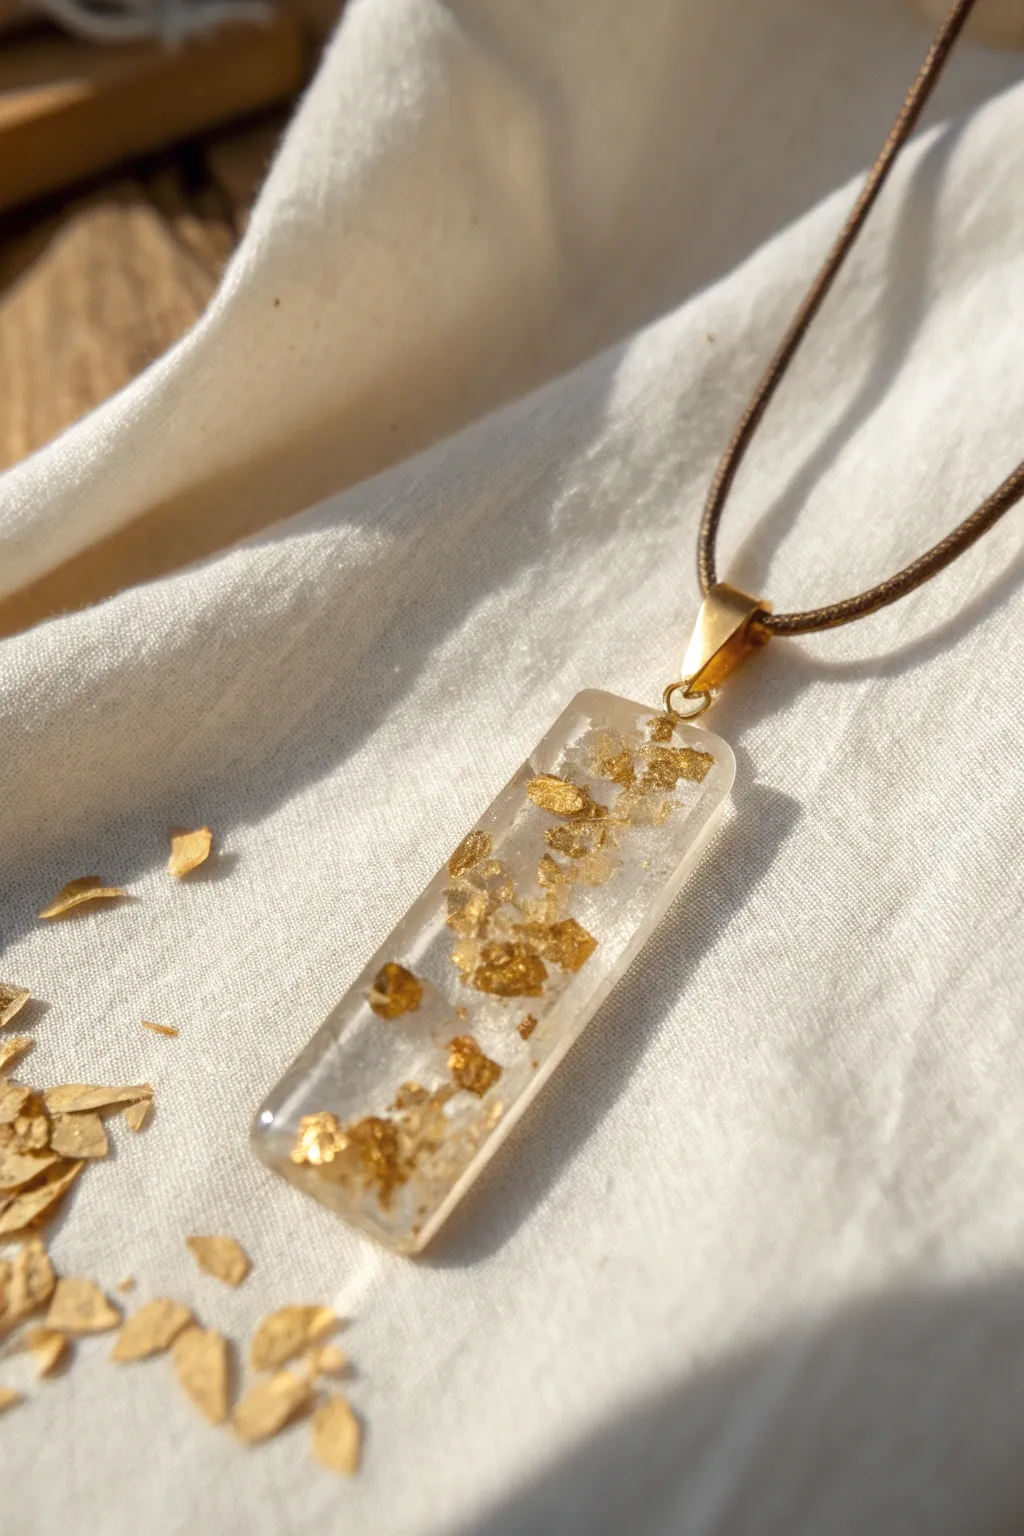
This elegant pendant captures suspended gold flakes within crystal-clear resin, creating a luxurious and timeless accessory. The minimalist rectangular shape allows the scattered gold leaf to take center stage, shimmering beautifully against the light.
Step-by-Step
Materials
- Clear epoxy resin (Part A and Part B)
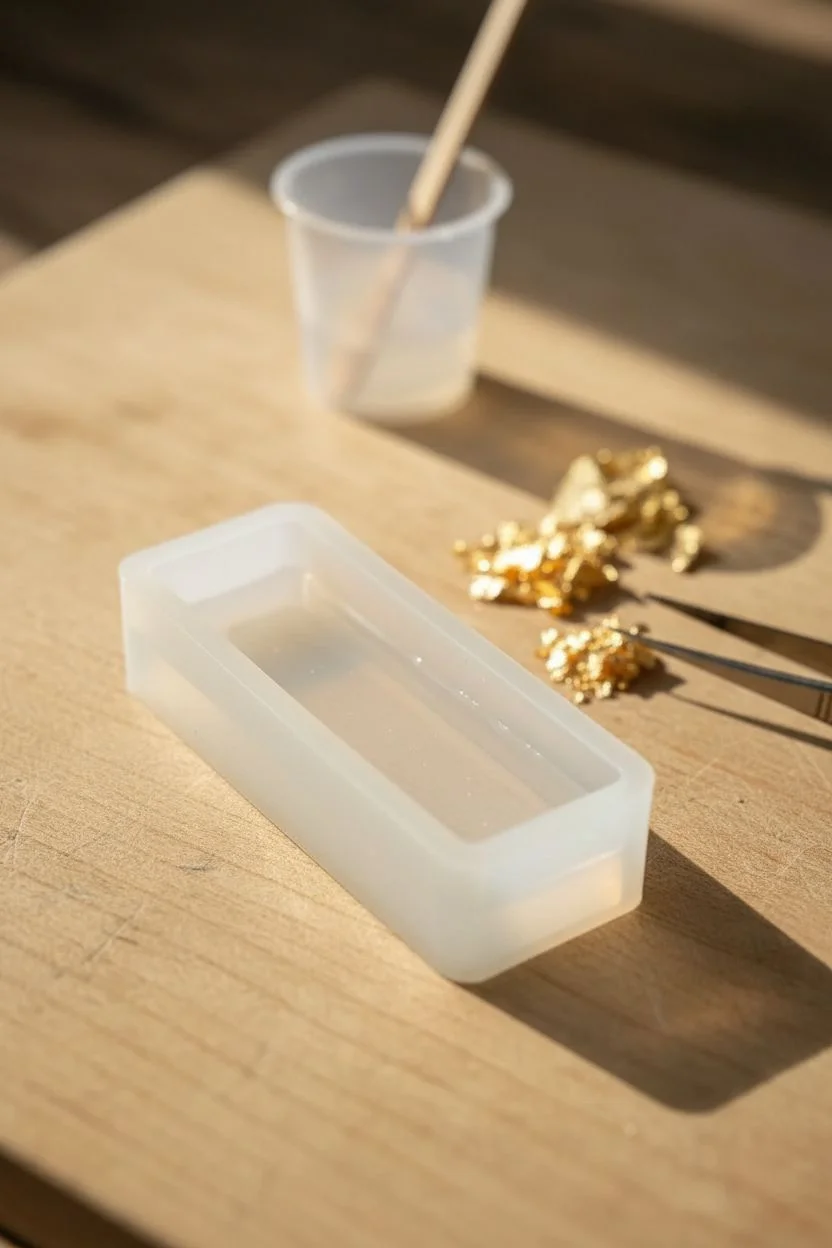
- Rectangular silicone jewelry mold
- Gold leaf flakes
- Mixing cups and stir sticks
- Tweezers or a toothpick
- Lighter or heat gun
- Gold tone pendant bail
- Gold jump ring
- Jewelry pliers
- Brown cord necklace
- Protective gloves and mask
Step 1: Preparation and Mixing
-
Safety check:
Before you begin, ensure you are working in a well-ventilated area and put on your protective gloves and mask. -
Clean your mold:
Check your rectangular silicone mold for any dust or lint. Use a piece of tape to lift away any tiny particles so your final piece is perfectly clear. -
Measure the resin:
Pour equal parts of resin (Part A) and hardener (Part B) into a small mixing cup, following the specific ratio instructions on your resin brand’s packaging. -
Mix slowly:
Stir the mixture slowly and steadily for at least 3 to 5 minutes. Scraping the sides and bottom of the cup ensures a complete chemical blend. -
Let it rest:
Let the mixed resin sit for about 3-5 minutes. This allows air bubbles created during stirring to rise to the surface and pop naturally.
Layering for Depth
To prevent all flakes from sinking to the bottom, wait 15-20 minutes after the first pour until the resin gets ‘tacky’ before adding the gold.
Step 2: Poring and Styling
-
Pour the first layer:
Pour a small amount of resin into the mold, filling it only about halfway. This base layer will hold the gold flakes in suspension. -
Prepare the gold leaf:
Using tweezers, tear small, irregular pieces of gold leaf from your sheet or pick them from a container of pre-flaked gold. -
Place the gold:
Gently drop the gold flakes into the wet resin. Aim for a random, organic distribution rather than a uniform pattern. -
Adjust the position:
Use a toothpick to push some flakes deeper into the resin and leave others near the surface. I like to cluster a few pieces slightly denser at one end for visual interest. -
Fill the mold:
Slowly pour the remaining resin over the gold flakes until the mold is filled to the brim. Pouring slowly helps prevent trapping new air bubbles. -
Remove bubbles:
Pass a lighter or heat gun quickly over the surface of the resin to pop any remaining surface bubbles. Don’t hold the heat in one spot too long to avoid damaging the mold. -
Check alignment:
Take a final look to ensure no gold flakes have drifted to an unwanted edge. Nudge them back into place with your toothpick if needed.
Add a Tint
Mix a tiny drop of translucent amber or champagne alcohol ink into the resin for a vintage, warm-toned glass effect.
Step 3: Curing and Assembly
-
Cure the resin:
Cover the mold with a dust cover (like a clean box) and let it cure undisturbed for 24 to 48 hours, depending on your resin’s cure time. -
Demold carefully:
Once fully hardened, gently peel the silicone mold away from the resin pendant. It should pop out with a glossy, smooth finish. -
Sand edges if needed:
If there are any sharp edges or a lip from overfilling, gently sand them down with fine-grit sandpaper or wet-sand for a polished look. -
Attach the bail:
Open a gold jump ring using two pairs of pliers. Thread it through the hole in the pendant (or glue on a bail if your mold didn’t have a hole post). -
Secure the hardware:
Attach the pendant bail to the jump ring and close the ring securely, ensuring the ends meet flush so the pendant doesn’t slip off. -
Final touch:
Thread the brown cord necklace through the bail to complete your piece.
Enjoy wearing your sophisticated new accessory that catches the sunlight with every movement

PENCIL GUIDE
Understanding Pencil Grades from H to B
From first sketch to finished drawing — learn pencil grades, line control, and shading techniques.
Explore the Full Guide
Color Gradient Ombre Resin Pendants
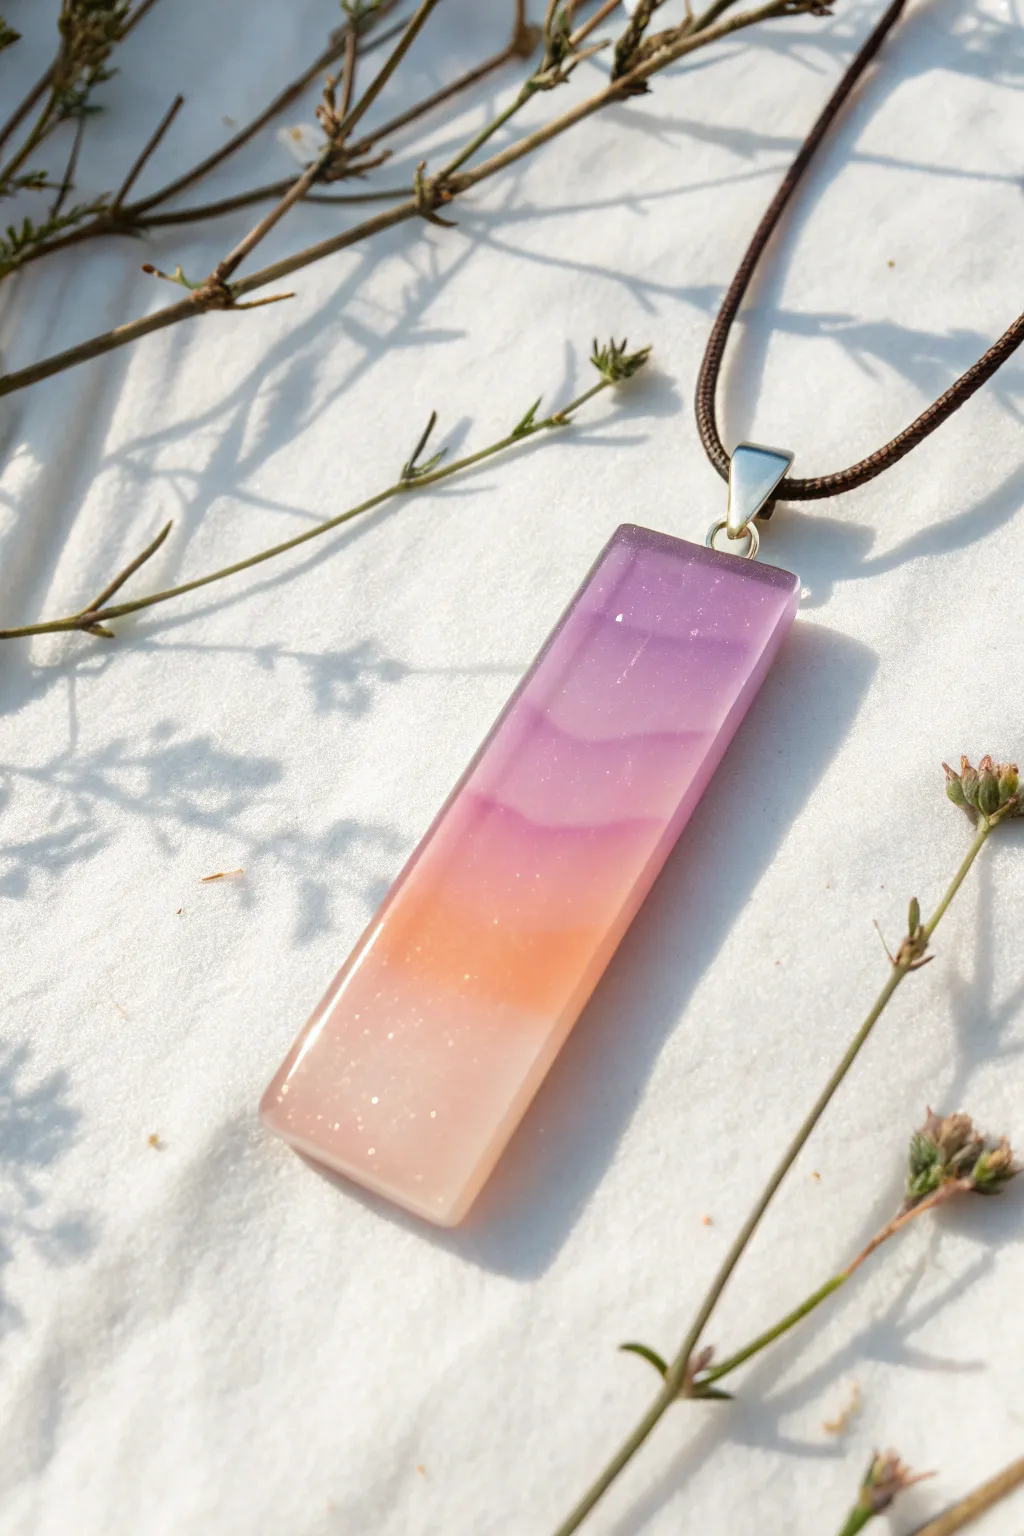

Capture the serene beauty of a setting sun with this stunning gradient pendant. By carefully layering tinted resin, you’ll create a seamless ombre transition from violet to cream that glows with a subtle shimmer.
Step-by-Step Tutorial
Materials
- Two-part epoxy resin (jewelry grade)
- Rectangular silicone jewelry mold
- Purple translucent resin dye
- Peach or orange translucent resin dye
- White alcohol ink or opaque pigment paste
- Fine iridescent glitter or mica powder
- Mixing cups and stir sticks
- Toothpicks or needle tool
- Bail finding (silver)
- Small drill or bail glue
- Heat gun or lighter
- Cord for necklace
Step 1: Preparation & Mixing
-
Mix the Base Resin:
Begin by measuring equal parts of your resin and hardener according to the manufacturer’s instructions. Stir slowly and thoroughly for at least 3-5 minutes to ensure a complete chemical bond, scraping the sides often. -
Eliminate Bubbles:
Let the mixed resin sit for about 5 minutes to allow large air bubbles to rise to the surface. Sometimes I gently exhale over the cup or use a lighter to pop the stubborn ones. -
Divide the Mixture:
Pour equal amounts of your clear mixed resin into three separate small cups. These will become your purple, peach, and cream layers. -
Add Shimmer:
Sprinkle a tiny pinch of fine iridescent glitter into all three cups. You want a subtle sparkle, not a heavy glitter effect, so keep it light and mix well.
Step 2: Creating the Colors
-
Tint the Purple Top:
In the first cup, add a drop of purple translucent dye. Mix it in, checking opacity; you want it rich but see-through. Add more dye very slowly if needed. -
Create the Peach Middle:
In the second cup, add a small amount of peach or orange translucent dye. This layer should be slightly lighter than the purple to help the transition. -
Mix the Milky Bottom:
In the third cup, add a drop of white alcohol ink or pigment paste. Unlike the others, this should be semi-opaque or milky to anchor the design visually at the bottom.
Wet-on-Wet Pouring
To get a seamless gradient without distinct lines, pour the second color while the first is still liquid. Waiting for layers to dry creates stripes, not an ombre effect.
Step 3: Pouring the Gradient
-
Pour the Purple:
Tilt your mold slightly if possible, or just carefully pour the purple resin into the top third of the rectangular cavity. -
Pour the Peach:
Immediately pour the peach resin into the middle section. Allow it to naturally touch the purple resin. The goal is to pour while both are wet for a soft blend. -
Pour the White:
Finish by pouring the milky white resin into the bottom third of the mold, filling it to the top rim. -
Blend the Seams:
Take a toothpick and very gently drag it back and forth ONLY at the lines where the colors meet. Don’t overmix; just swirl the boundary slightly to blur the hard line. -
Final Bubble Check:
Pass a heat gun quickly over the surface to pop any bubbles introduced during the pouring and blending process.
Add Cloud Effects
Before curing, use a toothpick to drag tiny wisps of the white layer up into the peach and purple sections to mimic faint clouds in a sunset sky.
Step 4: Finishing Touches
-
Curing:
Cover the mold with a box to prevent dust from settling on it and let it cure undisturbed for 24-48 hours. -
Demolding:
check that the resin is rock hard, then gently pop the pendant out of the silicone mold. Check for any sharp edges. -
Sanding Edges:
If the back edges are sharp, lightly wet-sand them with fine-grit sandpaper (like 600 or 1000 grit) to smooth them out. -
Attach the Bail:
If your mold didn’t have a pre-made hole, use a small hand drill to create a hole at the top. Attach a silver pinch bail through the hole. -
Stringing:
Thread a simple brown or black cord through the bail to complete the minimalist look shown in the photo.
Now you have a piece of wearable art that captures the magic of twilight
Faux Opal Resin Pendants With Iridescent Chips

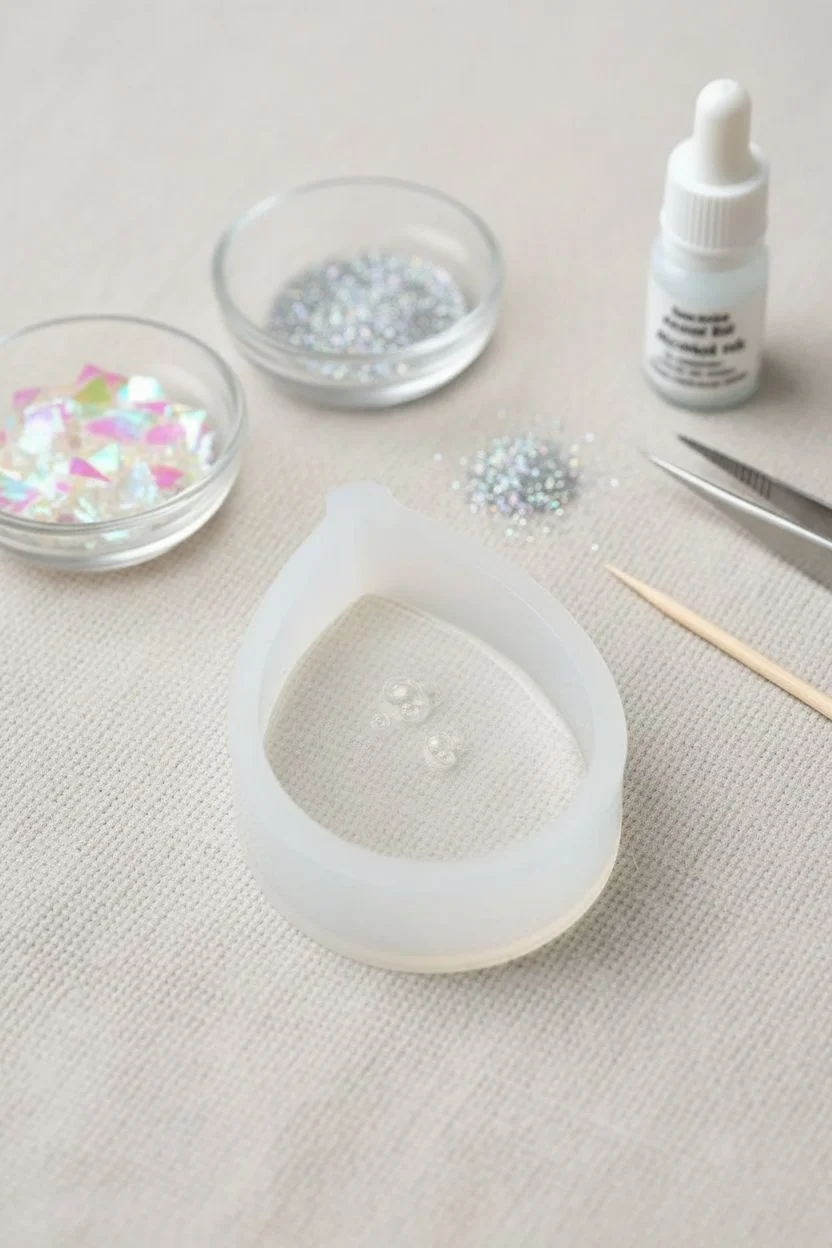
Capture the ethereal beauty of a naturally formed opal without the steep price tag using this simple resin technique. By layering iridescent cellophane flakes within clear resin, you can create a milky, light-catching pendant that glows with every movement.
Step-by-Step
Materials
- Two-part epoxy resin (jewelry grade)
- Teardrop-shaped silicone mold
- Iridescent cellophane flakes or ‘mylar flakes’ (clear/white base)
- Fine iridescent glitter (white/silver)
- White alcohol ink (piñata white)
- Mixing cups and stir sticks
- Toothpicks or needle tool
- Hand drill or pin vise (if mold has no hole)
- Silver pinch bail
- Silver jump ring
- Jewelry pliers
- Black cord necklace
Step 1: Preparation & First Layer
-
Prepare the workspace:
Ensure your silicone mold is completely clean and lint-free by dabbing it gently with a piece of tape. Set up your mixing cups and have your iridescent inclusions ready to grab. -
Mix the resin:
Measure equal parts of resin and hardener (or according to your package instructions) into a small cup. Stir slowly but thoroughly for at least 3 minutes, scraping the sides and bottom to ensure a perfect chemical bond. -
Let the bubbles rise:
After mixing, let the cup sit for about 2-3 minutes. This allows large air bubbles created during stirring to rise to the surface and pop naturally. -
Pour the base layer:
Carefully pour a small amount of clear resin into the teardrop mold, filling it just about 1/4 of the way. This creates a clear window for the chips to float in.
Don’t Over-Stir
When swirling the white ink, do not over-mix. The goal is cloudy streaks, not a solid milky color. Less is more to keep that translucent, gem-like quality.
Step 2: Creating the Opal Effect
-
Add iridescent chips:
Using a toothpick or tweezers, pick up the iridescent cellophane flakes and gentle push them into the wet resin layer. -
Layer the flakes:
Don’t just lay them flat; angle some of the larger chips so they catch the light differently. I find that overlapping them slightly creates the most convincing depth. -
Add subtle sparkle:
Sprinkle a tiny pinch of fine iridescent white glitter into the mix. You don’t want to overwhelm the large flakes, just add a bit of background shimmer. -
Fill the mold:
Pour more clear resin over the inclusions until the mold is nearly full, leaving just a millimeter of space at the top. -
The milky illusion:
Dip a toothpick into your white alcohol ink. Swirl this toothpick gently through the resin in the mold. You aren’t trying to dye it solid white, but rather create cloudy wisps that mimic natural opal stone. -
Final chip placement:
Add a few more flakes right at the top surface (which will be the back of the pendant) to ensure the opal look is consistent throughout the depth. -
Remove surface bubbles:
Pass a lighter or heat gun quickly over the surface of the resin to pop any remaining bubbles. Be careful not to overheat the silicone mold itself. -
Cure completely:
Cover the mold with a box to prevent dust from settling on it and let it cure undisturbed for 24 hours, or until fully hard.
Step 3: Finishing Touches
-
Demold the piece:
Gently flex the silicone mold to release the vacuum seal and pop the hardened resin teardrop out. -
Sand edges if needed:
If there is a sharp lip or rough edge where the resin met the mold wall, gently sand it smooth with fine-grit wet sandpaper (around 400-600 grit). -
Drill the hole:
If your mold didn’t have a built-in post for a hole, mark the center top of the teardrop. Using a hand drill or pin vise, carefully drill a small hole through the resin from front to back. -
Attach the hardware:
Open a silver jump ring using two pairs of jewelry pliers. Thread it through the drilled hole and then hook your silver pinch bail onto the jump ring (or attach the pinch bail directly if the prongs fit). -
Close and secure:
Squeeze the bail or close the jump ring securely so there constitutes no gap for the pendant to slip through. -
Final assembly:
Slide your finished faux opal pendant onto the black cord necklace.
Add Fire
For a ‘fire opal’ look, mix in a tiny drop of orange or pink transparent dye alongside the flakes to give the stone a warm, glowing undertone.
Now you have a stunning piece of jewelry that mimics nature’s artistry with a durable, handcrafted twist


Micro Bead and Crystal Resin Pendants
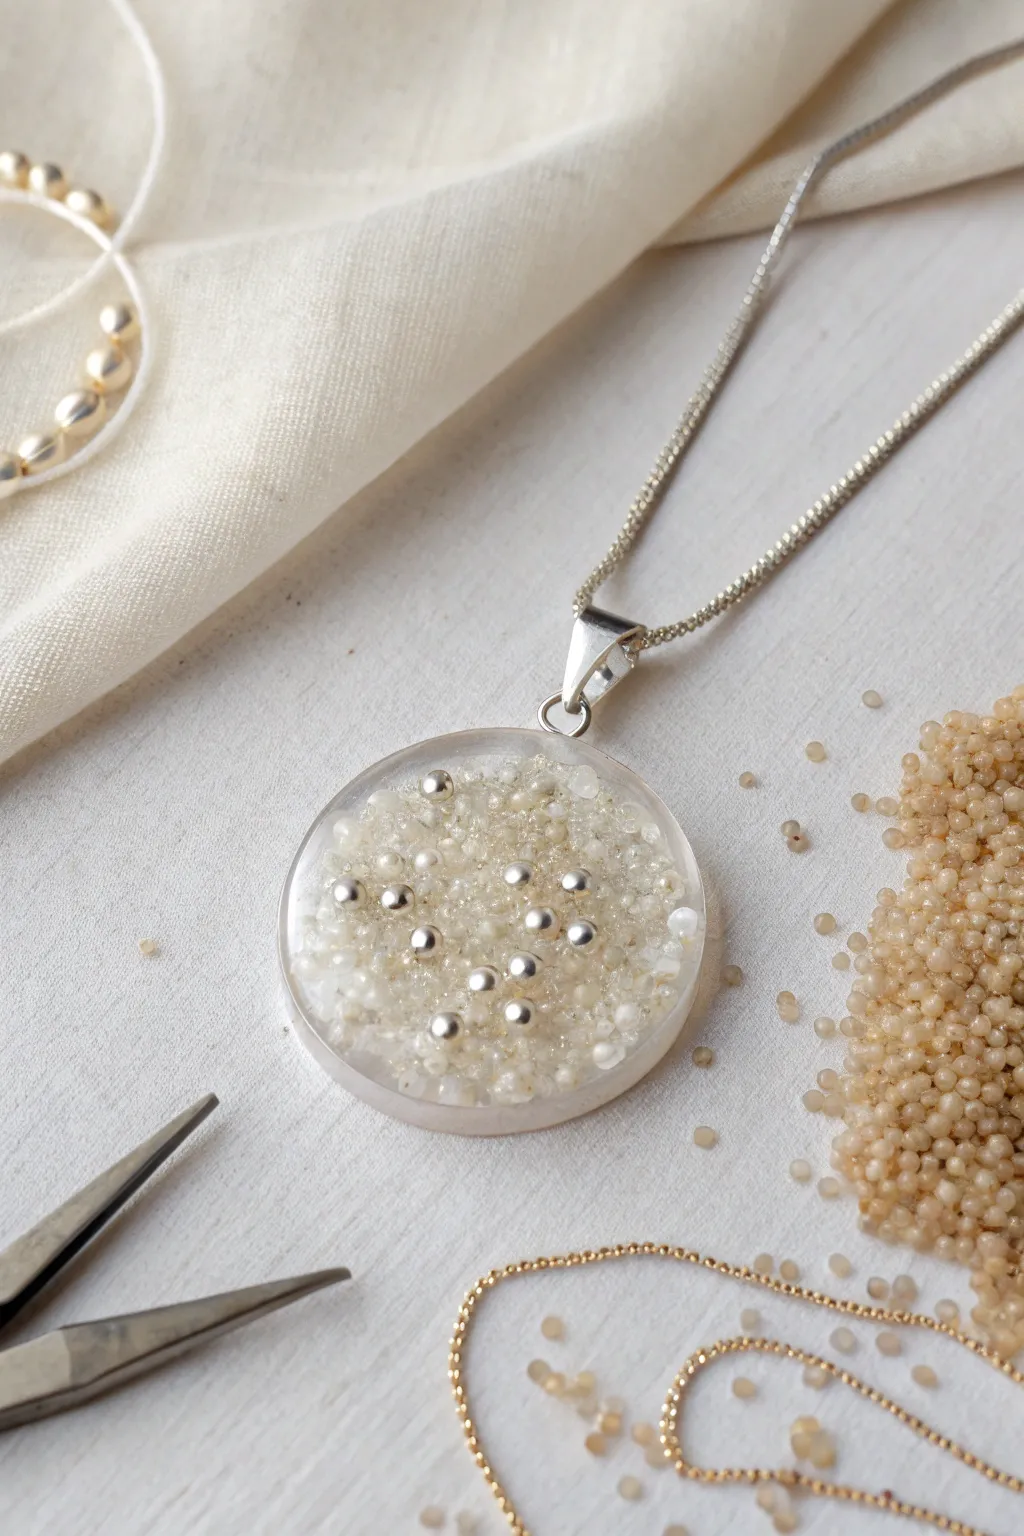
This elegant pendant captures the serene beauty of a winter landscape with its mix of translucent textures and striking metallic accents. By suspending silver spheres within a bed of crystalline micro beads, you create a piece that feels both organic and modern.
How-To Guide
Materials
- Clear UV resin or 2-part epoxy resin
- Round silicone pendant mold (approx. 3-4 cm diameter)
- Clear or frosted white micro beads (no-hole)
- Silver metallic spacer beads or ball bearings (3mm – 4mm)
- UV lamp (if using UV resin)
- Silicone mixing cup and stir stick
- Tweezers
- Silver pinch bail
- Silver chain
- Sandpaper or polishing block (optional)
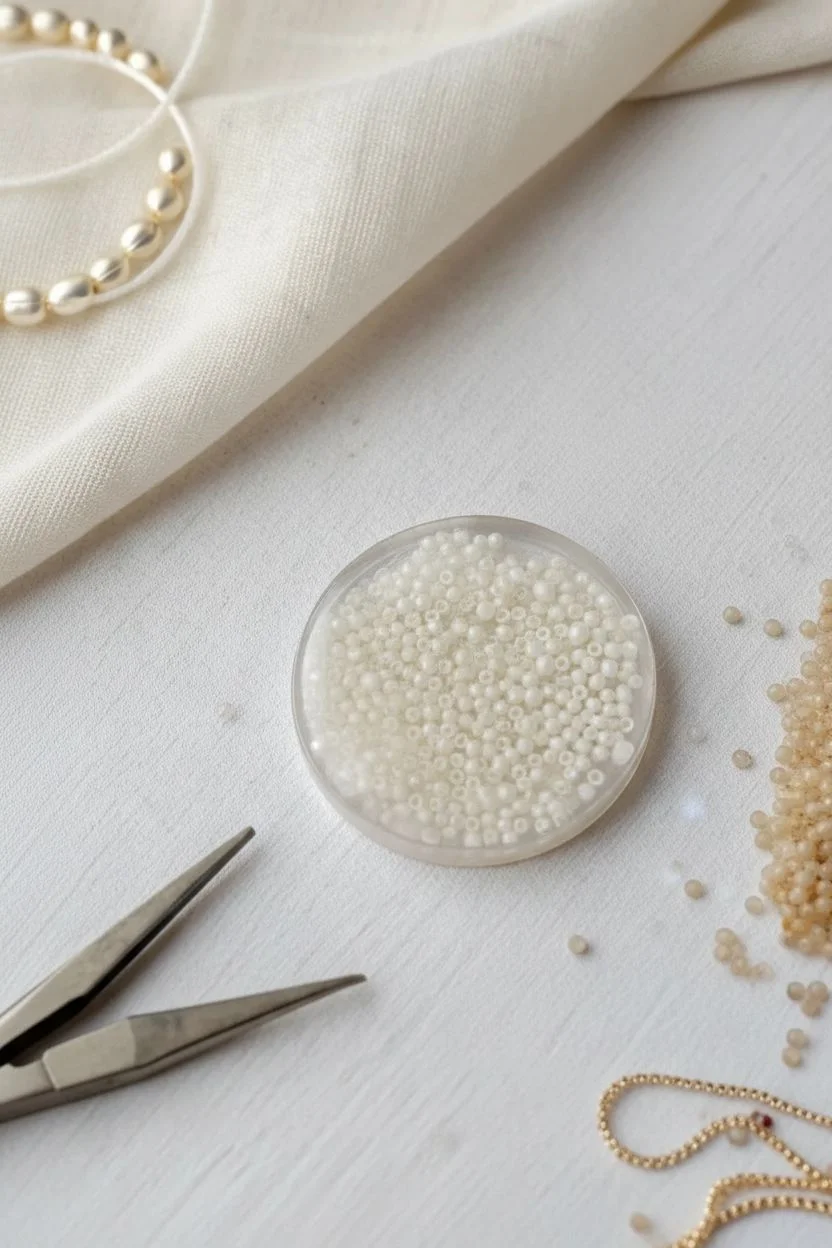
Step 1: Preparation & Base Layer
-
Clean your workstation:
Ensure your mold is completely free of dust and lint. Use a piece of tape to lift away any stray particles from the silicone surface before you begin. -
Mix the base resin:
Pour a small amount of clear resin into your mixing cup. If using 2-part epoxy, ensure you mix strictly according to the manufacturer’s ratio and let it sit for a few minutes to degas bubbles. -
Pour the initial layer:
Pour a thin layer of clear resin into the bottom of the mold, filling it about 1/3 of the way up. This acts as the foundation for your inclusions. -
Add texture:
Sprinkle a generous amount of clear or frosted white micro beads into the wet resin. You want a dense, snowy look, so ensure they cover the area evenly without clumping too much in one spot. -
Adjust the beads:
Use your stir stick or a toothpick to gently push the micro beads around, ensuring they involve fully with the resin and there are no dry pockets. -
Initial cure:
If using UV resin, cure under the lamp for 60 seconds to set this base layer. For epoxy, wait until it reaches a tacky ‘gel’ stage to prevent heavier items from sinking straight to the bottom.
Cloudy Resin?
If your finished piece looks foggy, it might be humidity. Work in a low-humidity room or use a doming layer of clear resin on top to restore glassy shine.
Step 2: Adding Metallic Accents
-
Prepare the second layer:
Pour another layer of clear resin over the cured textured base, filling the mold just shy of the top rim. -
Place the silver spheres:
Using tweezers, carefully pick up your silver metallic balls one by one. I like to drop them in randomly to keep the look organic rather than arranged in a grid. -
Check placement:
Look at the mold from the side to ensure the silver balls are suspended in the resin and not just sitting on top. Gently push them down if needed. -
Fill the gaps:
add a pinch more of the white micro beads around the silver spheres. This adds depth and makes it look like the silver is emerging from the snowy texture. -
Remove bubbles:
Let the piece sit for a minute. Pass a lighter or heat gun quickly over the surface to pop any bubbles that have risen to the top. -
Final cure:
Cure completely under your UV lamp for 2-3 minutes or let your epoxy cure for a full 24-48 hours until hard.
Step 3: Finishing Touches
-
Demold the pendant:
Gently flex the silicone mold to release the hardened resin piece. It should pop out with a smooth, glassy surface. -
Inspect edges:
Check the edges for any sharpness or over-pour. If there are rough spots, gently sand them down with fine-grit wet sandpaper. -
Drill a hole (if needed):
If your mold didn’t have a built-in post for a hole, use a small hand drill or rotary tool to bore a hole near the top edge for the hardware. -
Attach the bail:
Take your silver pinch bail and insert the prongs into the hole of the pendant. Squeeze it firmly shut with pliers to secure it. -
Add the chain:
Thread your silver chain through the loop of the bail to complete the necklace.
Color Pop
Mix a tiny drop of translucent blue ink into the resin before pouring. It creates an ‘icy’ effect that pairs beautifully with the silver spheres.
Wear your new frosty creation with pride or wrap it as a stunning handmade gift
Handwritten Word Resin Pendant Inserts
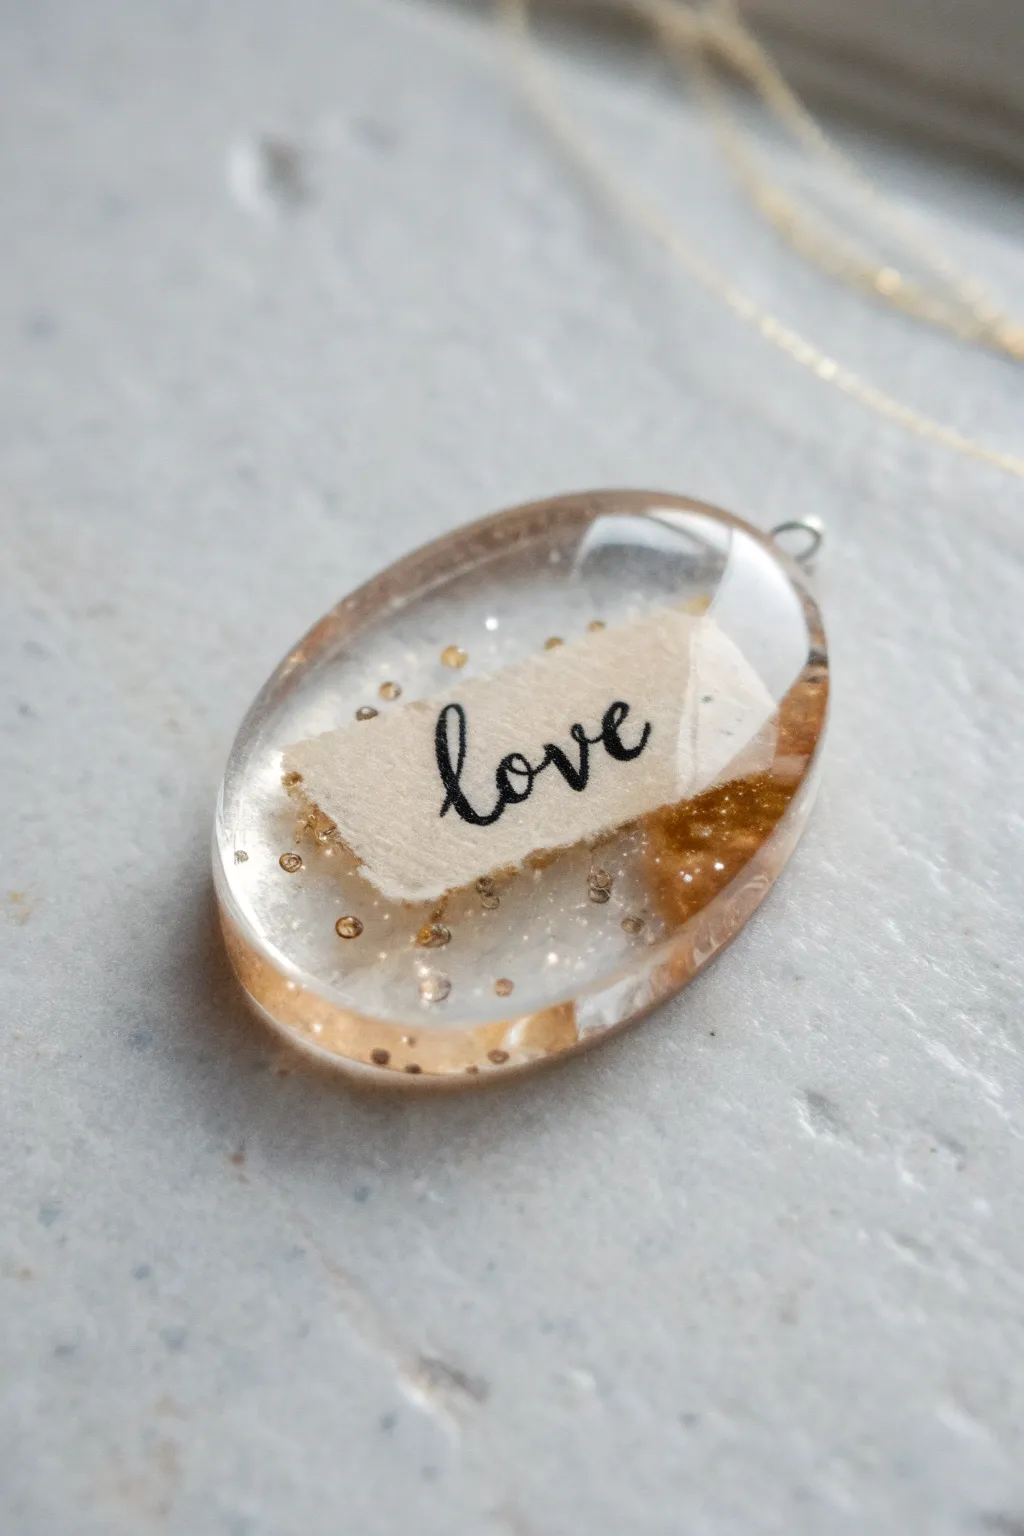
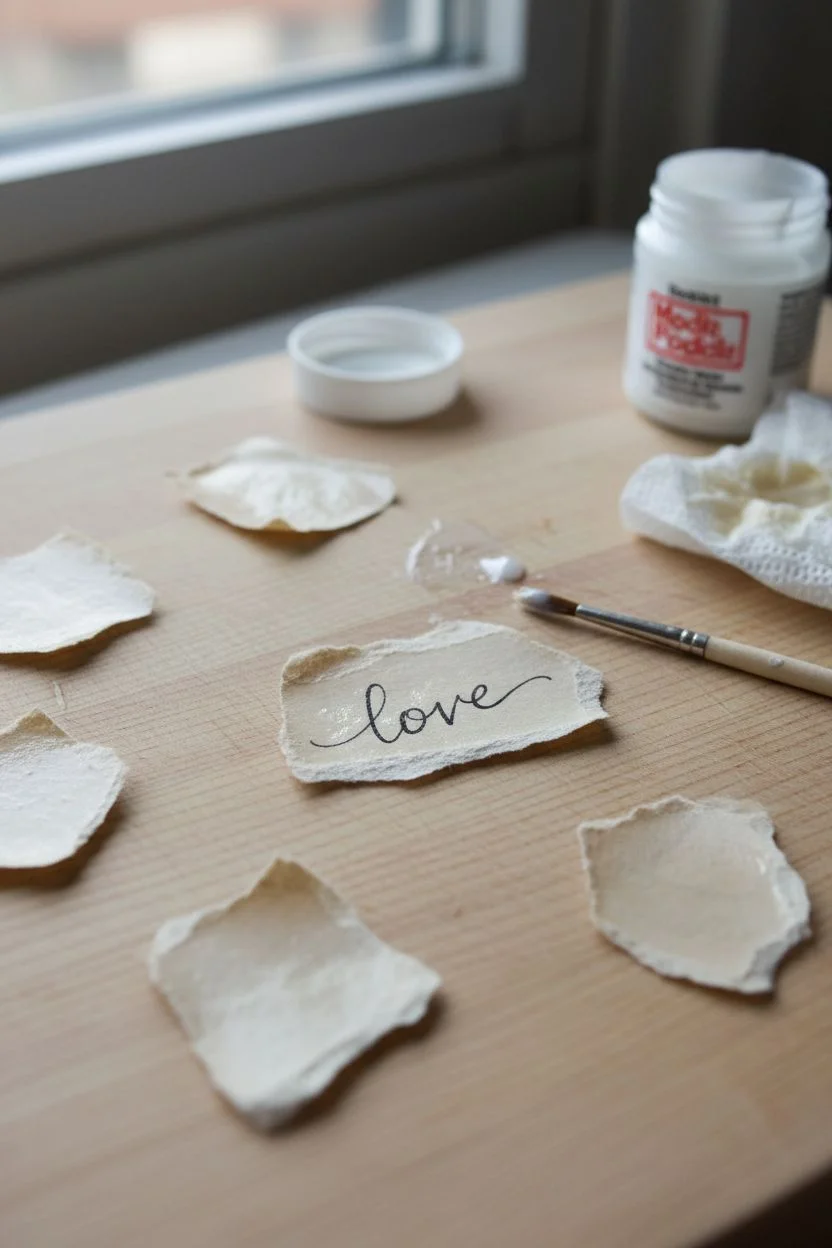
Capture a special sentiment forever with this elegant resin pendant, featuring a torn-paper handwritten note suspended in crystal clear epoxy. This delicate piece combines the rustic charm of aged paper with the modern sparkle of gold glitter for a truly personalized accessory.
How-To Guide
Materials
- Two-part epoxy resin (jewelry grade)
- Oval silicone mold (pendant size)
- Heavyweight beige or cream paper (cardstock or watercolor paper works well)
- Black archival ink pen or fine-tip permanent marker
- Gold glitter or gold microbeads
- Small mixing cups and stir sticks
- Tweezers
- Lighter or heat gun
- Mod Podge or white craft glue (clear drying)
- Small paintbrush
- Jewelry jump ring (if mold doesn’t include a hole)
Step 1: Preparing the Sentiment
-
Write the message:
On your piece of beige paper, carefully write the word ‘love’ in cursive using the black archival ink pen. Ensure the writing is small enough to fit comfortably within your mold’s shape. -
Create the torn edge:
Tear the paper around the word into a small rectangle. Don’t use scissors; the rough, torn edges are essential for the vintage aesthetic shown in the project. Aim for a slightly irregular shape. -
Seal the paper:
This is a crucial step often missed. Coat both sides and the torn edges of your paper slips with a thin layer of Mod Podge or white glue using a small brush. -
Let it dry completely:
Allow the sealant to dry until fully clear and non-tacky. If you skip this, the resin will soak into the paper, turning it dark and translucent, ruining the look.
Step 2: Resin Mixing and First Layer
-
Measure the resin:
Pour equal parts of resin and hardener (Part A and Part B) into a small mixing cup, following your specific brand’s volume instructions. -
Mix thoroughly:
Stir the mixture slowly but steadily for at least 3-5 minutes, scraping the sides and bottom of the cup to ensure a complete chemical blend. -
Let it rest:
Allow the mixed resin to sit for about 2-3 minutes so that large air bubbles created during stirring can rise to the surface and pop. -
Pour the base layer:
Pour a very thin layer of clear resin into the bottom of your oval silicone mold. You only need enough to cover the bottom surface. -
Add first sparkle:
Spinkle a pinch of gold glitter or microbeads into this wet base layer. I like to concentrate them slightly near the edges rather than the center.
Paper Turning Dark?
If your paper looks wet or darker after curing, you didn’t seal it enough. Apply 2-3 thin coats of glue, letting each dry fully, to create a plastic-like barrier before resin immersion.
Step 3: Embedding and Finishing
-
Place the paper:
Using tweezers, gently lower your sealed paper note into the mold, placing it directly on top of the wet base layer. Center it carefully. -
Press perfectly flat:
Use a clean toothpick or stir stick to gently press the paper down, ensuring no air bubbles are trapped underneath it. -
Initial cure:
Let this layer set for about 4-6 hours until it reaches a ‘soft gel’ phase. This prevents the paper from floating up when you pour the final layer. -
Mix final batch:
Mix a second small batch of clear resin following the same careful stirring process as before. -
Add floating glitter:
Mix a tiny amount of gold glitter into this fresh resin batch for a suspended stardust effect. -
Top it off:
Pour the final layer of resin over the paper until the mold is filled to the brim, creating a nice domed effect on the back. -
Pop bubbles:
Pass a lighter or heat gun quickly over the surface to pop any surface tension bubbles. -
Final cure:
Cover the mold with a dust cover (like a box) and let it cure undisturbed for 24-48 hours. -
Demold and finish:
Pop the cured pendant out of the mold. If your mold didn’t have a built-in post, use a small hand drill to make a hole at the top and attach a jump ring.
Golden Touch
Before sealing, carefully burn the torn edges of the paper with a lighter for a split second. This adds a charred, antique border that pairs beautifully with the gold glitter.
Now you have a beautifully preserved memory ready to wear on a chain or gift to someone special
Tiny Terrarium Resin Pendant Scenes
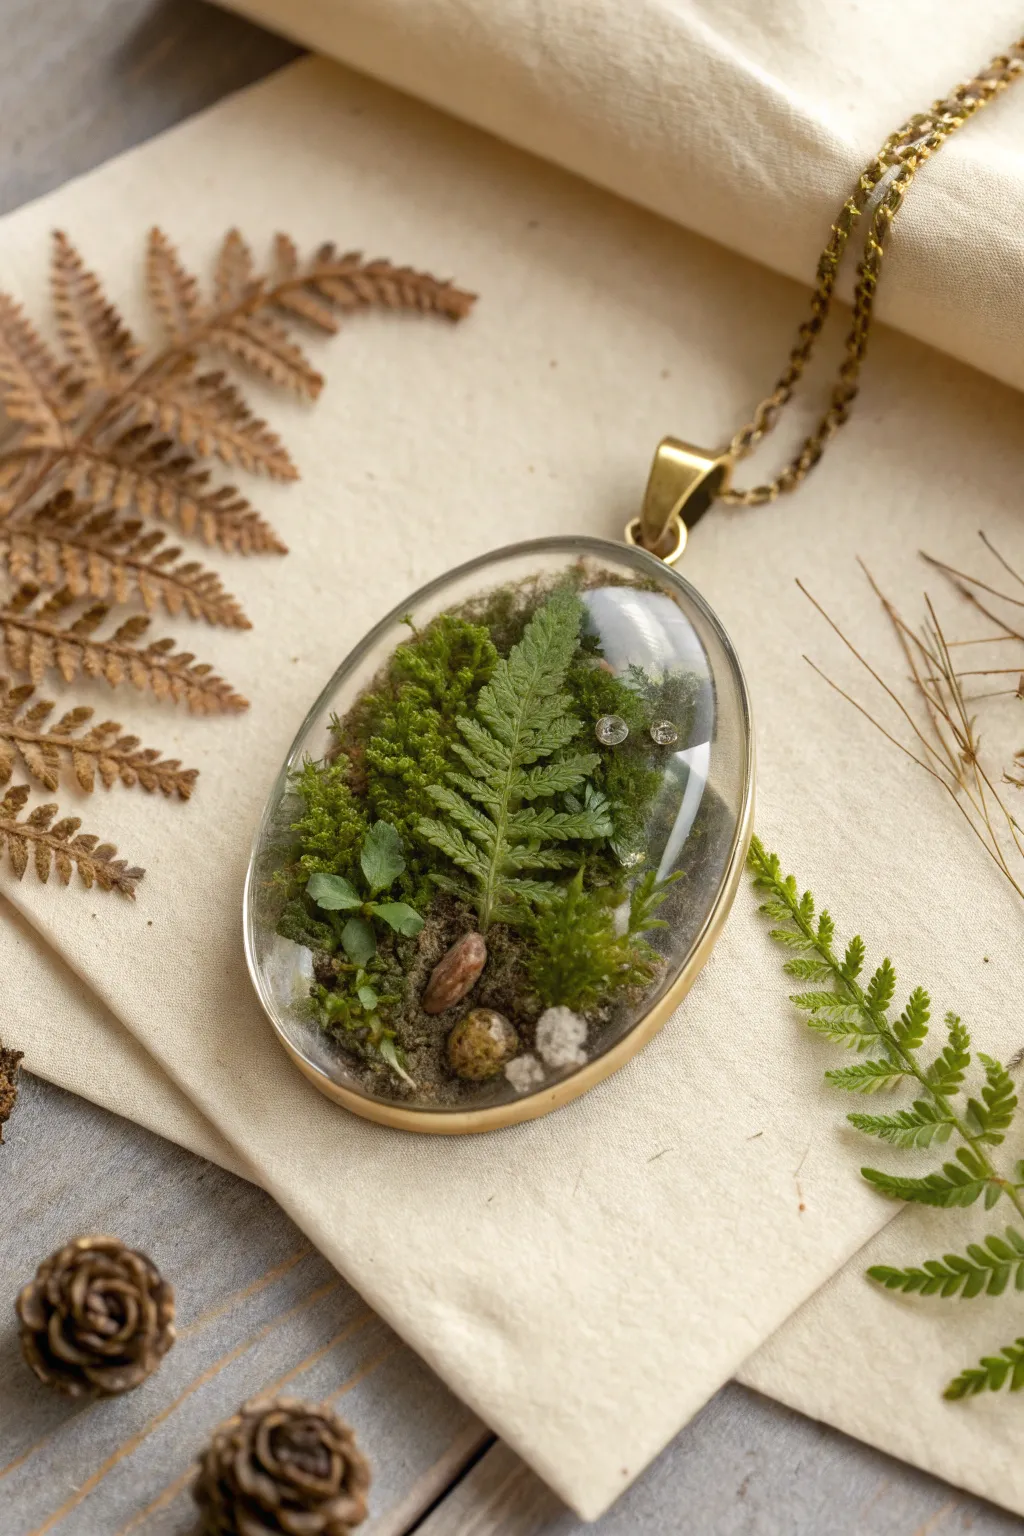
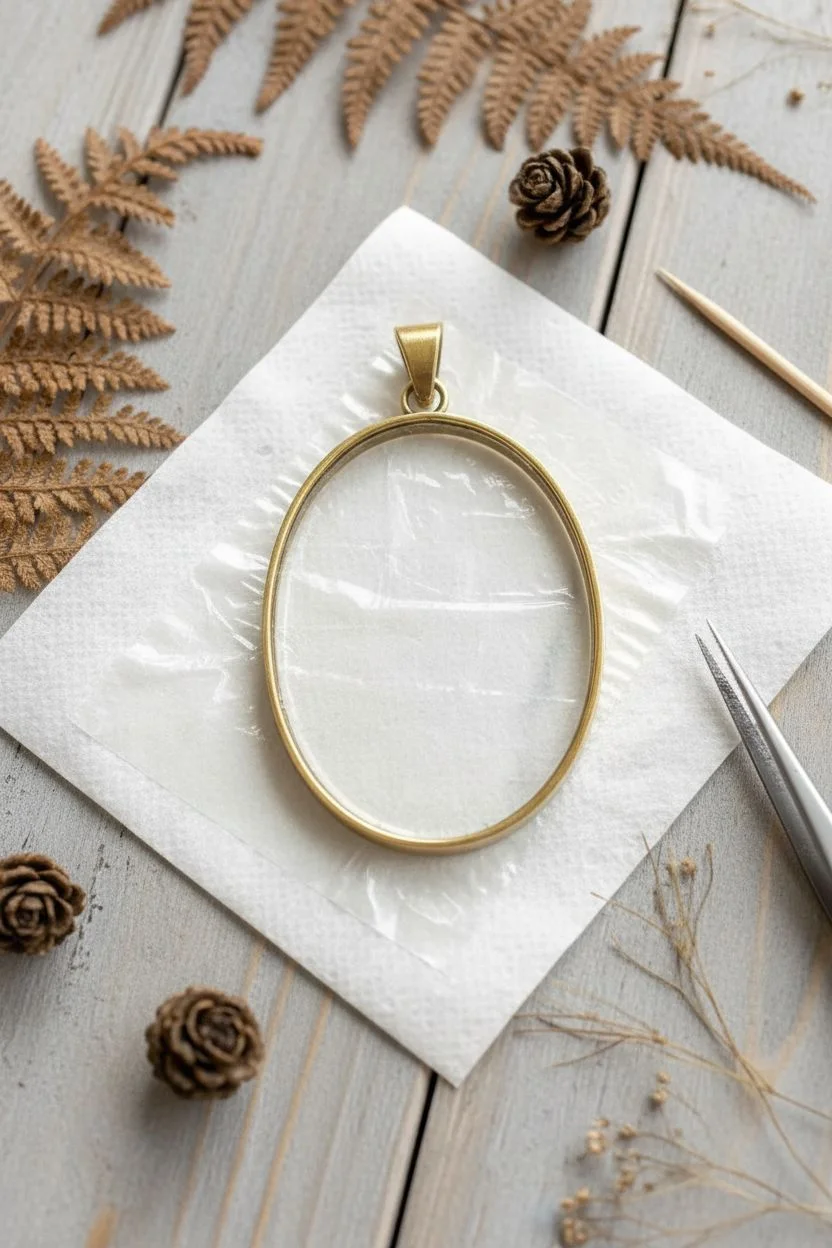
Capture the serene beauty of a forest floor in a wearable keepsake with this tiny terrarium resin pendant. By layering preserved botanicals and miniature stones within an open-back bezel, you create a dimensional, realistic nature scene that looks like a captured moment in time.
Detailed Instructions
Materials
- Large oval open-back bezel (bronze or antique gold finish)
- UV resin (clear hard type)
- UV lamp
- Packing tape (clear)
- Preserved sheet moss (various shades of green)
- Tiny fern tips or preserved plumosus fern
- Miniature pebbles or coarse sand (natural colors)
- Tweezers (fine-point)
- Toothpicks or silicone blending tool
- Mixing stick
- Paper towel or wet wipes
Step 1: Preparing the Base
-
Seal the back:
Cut a piece of clear packing tape slightly larger than your bezel. Press the bezel firmly onto the sticky side of the tape, ensuring a tight seal all around the rim to prevent resin leakage. -
Check the seal:
Rub the back of the tape with your fingernail or a burnishing tool to ensure there are no air gaps where the metal meets the adhesive. -
Pour base layer:
Pour a very thin layer of UV resin into the bezel, just enough to coat the bottom (the sticky side of the tape). Tilt the bezel to spread it evenly to the edges. -
Cure the base:
Place the bezel under your UV lamp and cure for about 60 seconds. This creates a solid foundation for your arrangement.
Cloudy Resin?
If your resin looks cloudy after curing, it might be moisture from the plants. Ensure all moss and ferns are 100% dried or preserved before encapsulating.
Step 2: Building the Landscape
-
Create the ground:
Mix a tiny amount of UV resin with coarse sand or clean dirt dust on a piece of scrap paper until it forms a thick paste. Carefully apply this to the bottom third of the bezel to simulate forest soil. -
Add texture:
Using tweezers, place somewhat larger tiny pebbles (2-3mm) into the ‘soil’ mixture while it is still wet. I find placing them off-center looks more natural. -
Lock the ground:
Flash cure the soil and pebble layer under the UV lamp for 30-60 seconds to freeze them in place. -
Prepare the greenery:
Select small tufts of preserved moss in varying shades of green. Tear them into tiny pieces that will fit within the frame without overcrowding. -
Layer the moss:
Dip the back of each moss tuft into a drop of clear UV resin and place them into the bezel, building up from the soil layer. Don’t fill the entire space; leave room for the focal fern.
Make It Magical
Add a tiny pinch of white glitter or crushed opal specifically near the ‘ground’ layer to simulate morning dew or magical forest dust.
Step 3: Positioning the Focal Point
-
Select the fern:
Choose a perfect, tiny tip of a fern frond. It should be small enough to have clear resin space around the edges, framing it nicely. -
Place the fern:
Apply a thin layer of clear UV resin over the soil and moss background. Gently lay the fern frond on top, pressing it slightly with a toothpick so it embeds into the texture below without floating away. -
Check for bubbles:
Look closely for trapped air bubbles, especially under the fern leaves. Use a toothpick or a heat gun (quickly) to pop them. -
Mid-project cure:
Cure under the UV lamp for 90 seconds to secure the entire composition.
Step 4: Encapsulating and Finishing
-
The doming pour:
Slowly pour clear UV resin over the entire scene until it reaches the rim of the bezel. Do this slowly to avoid new bubbles. -
Create surface tension:
Continue adding resin drop by drop until it forms a slight convex dome (curved top) due to surface tension. Don’t let it overflow. -
Final cure:
Cure under the UV lamp for at least 2-3 minutes. Ensure the light hits from different angles if possible to cure the resin tucked behind the moss. -
Remove tape:
Once fully cool, peel off the packing tape from the back. If the back feels tacky, flip the pendant over and cure the back side under the lamp for another minute. -
Clean up:
If there’s any sticky residue from the tape, wipe the back with a little rubbing alcohol or Goo Gone and a soft cloth.
Attach your pendant to a vintage bronze chain and enjoy wearing your personal slice of the forest
Wood and Resin Landscape Pendants
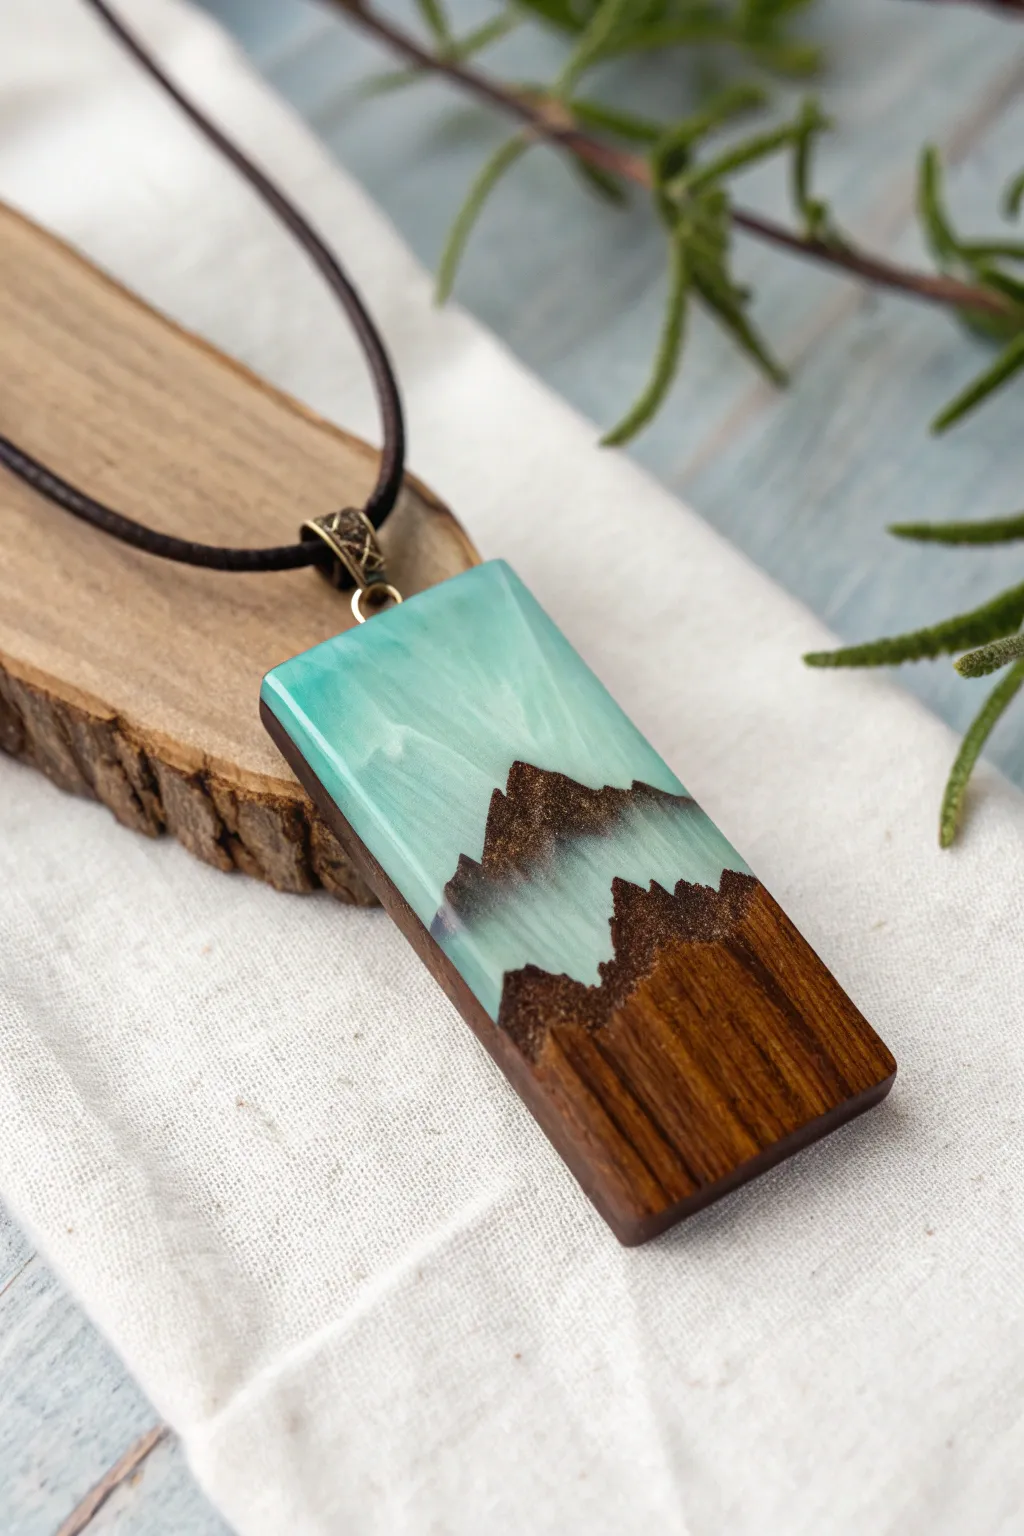
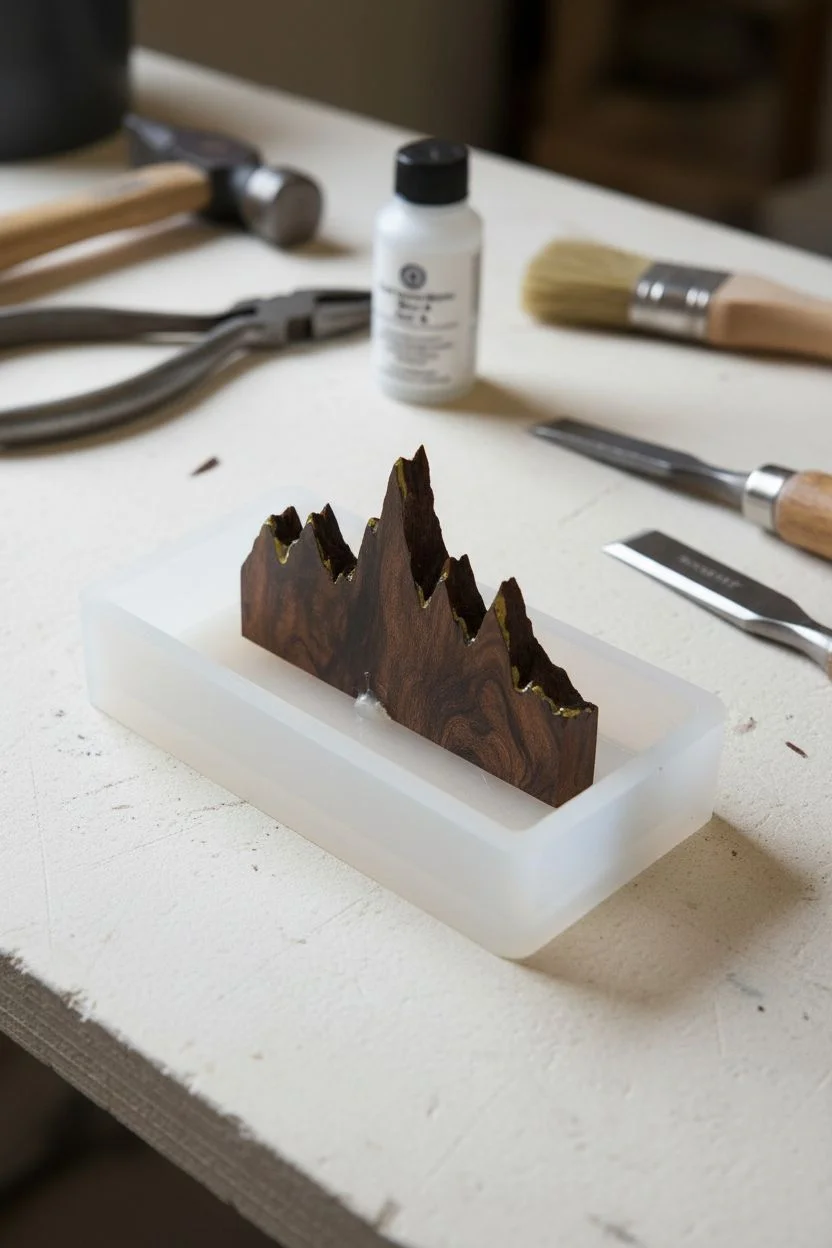
Capture the serenity of a misty mountain range with this stunning landscape pendant. By combining splintered exotic wood with swirled teal resin, you’ll create a wearable piece of art that looks like a miniature world frozen in time.
Step-by-Step
Materials
- Hardwood block (burl wood or walnut preferred)
- Epoxy resin (two-part casting resin)
- Teal/mint mica powder or alcohol ink
- White pearl mica powder
- Rectangular silicone mold (approx 1×2 inches)
- Hot glue gun or silicone caulk
- Sandpaper (grits: 120, 240, 400, 600, 1000, 2000)
- Polishing compound and microfiber cloth
- Drill with small bit (1-2mm)
- Jewelry hardware (jump ring and bail)
- Leather cord
Step 1: Preparing the Landscape
-
Select the wood:
Choose a small block of hardwood with interesting grain. Burl wood works best for mimicking rocky textures, but walnut is a great accessible alternative. -
Create the peaks:
Instead of cutting widely, use pliers or a hammer and chisel to fracture the wood piece intentionally. You want a jagged, uneven edge that resembles a mountain range silhouette. -
Clean the debris:
Use a stiff brush or compressed air to remove any loose splinters or dust from the fractured edge. This prevents loose particles from floating in your resin ‘sky’ later. -
Seal the wood:
Paint a thin layer of clear resin or Mod Podge onto the fractured wood edge and let it cure. This is crucial to prevent bubbles from escaping the wood during the casting process. -
Secure the wood:
Place the wood piece into the bottom of your rectangular silicone mold. Use a tiny dab of hot glue on the bottom face to keep it from floating when you pour.
Bubble-Free Tip
Warm your resin bottles in a bath of warm water before mixing. Thinner resin releases trapped air much faster!
Step 2: Casting the Sky
-
Mix the resin:
Combine your two-part epoxy resin according to the manufacturer’s ratio instructions. Stir slowly for several minutes to minimize bubbles. -
Tint the sky:
Separate a small amount of resin into a second cup. In the main cup, mix in a very small amount of teal or mint mica powder until you achieve a semi-opaque look. -
Create the clouds:
In the smaller cup, mix a tiny pinch of white pearl mica powder. I like to keep this mixture slightly more transparent than the teal base. -
Pour the base:
Pour the teal resin into the mold, filling the negative space above your wooden mountains. Stop just before the mold is totally full. -
Add the swirls:
Dip a toothpick into the white pearl resin and drag it through the wet teal resin. swirl gently near the ‘peaks’ to simulate mist or clouds clinging to the mountains. -
Pop bubbles:
Pass a heat gun or torch quickly over the surface to pop any rising air bubbles. Cover the mold to protect from dust and let it cure fully (usually 24-48 hours).
Step 3: Shaping and Finishing
-
Demold the piece:
Once hardened, pop the rough block out of the silicone mold. Don’t worry if the edges aren’t perfect yet. -
Sand the shape:
Using 120 grit sandpaper (or a belt sander if you have one), sand the entire block into a clean, sharp rectangle. Ensure the resin surface is flush with the wood surface. -
Refine the surface:
Progress through your sandpaper grits: 240, 400, and 600. Wet sand from 400 onwards to keep dust down and prevent the resin from overheating. -
Polish to shine:
Continue wet sanding with 1000 and 2000 grit paper. The resin should start looking clear and glossy, and the wood grain will pop. -
Buffing:
Apply a plastic polishing compound to a microfiber cloth or buffing wheel and buff the piece vigorously until it shines like glass. -
Oil the wood:
Rub a distinct drop of wood oil or wax onto the wooden section to nourish it and match the gloss of the resin. -
Drill the hole:
Mark the center top of the pendant. Carefully drill a pilot hole for your hardware using a small bit. -
Assemble:
insert a screw-eye bail or jump ring into the hole. Thread your leather cord through the bail to complete the necklace.
Glow Up
Mix a tiny amount of glow-in-the-dark powder into the white ‘cloud’ resin for a magical Northern Lights effect at night.
Wear your miniature mountain landscape with pride or gift it to a nature lover.
Mini Mountain Range Resin Pendants
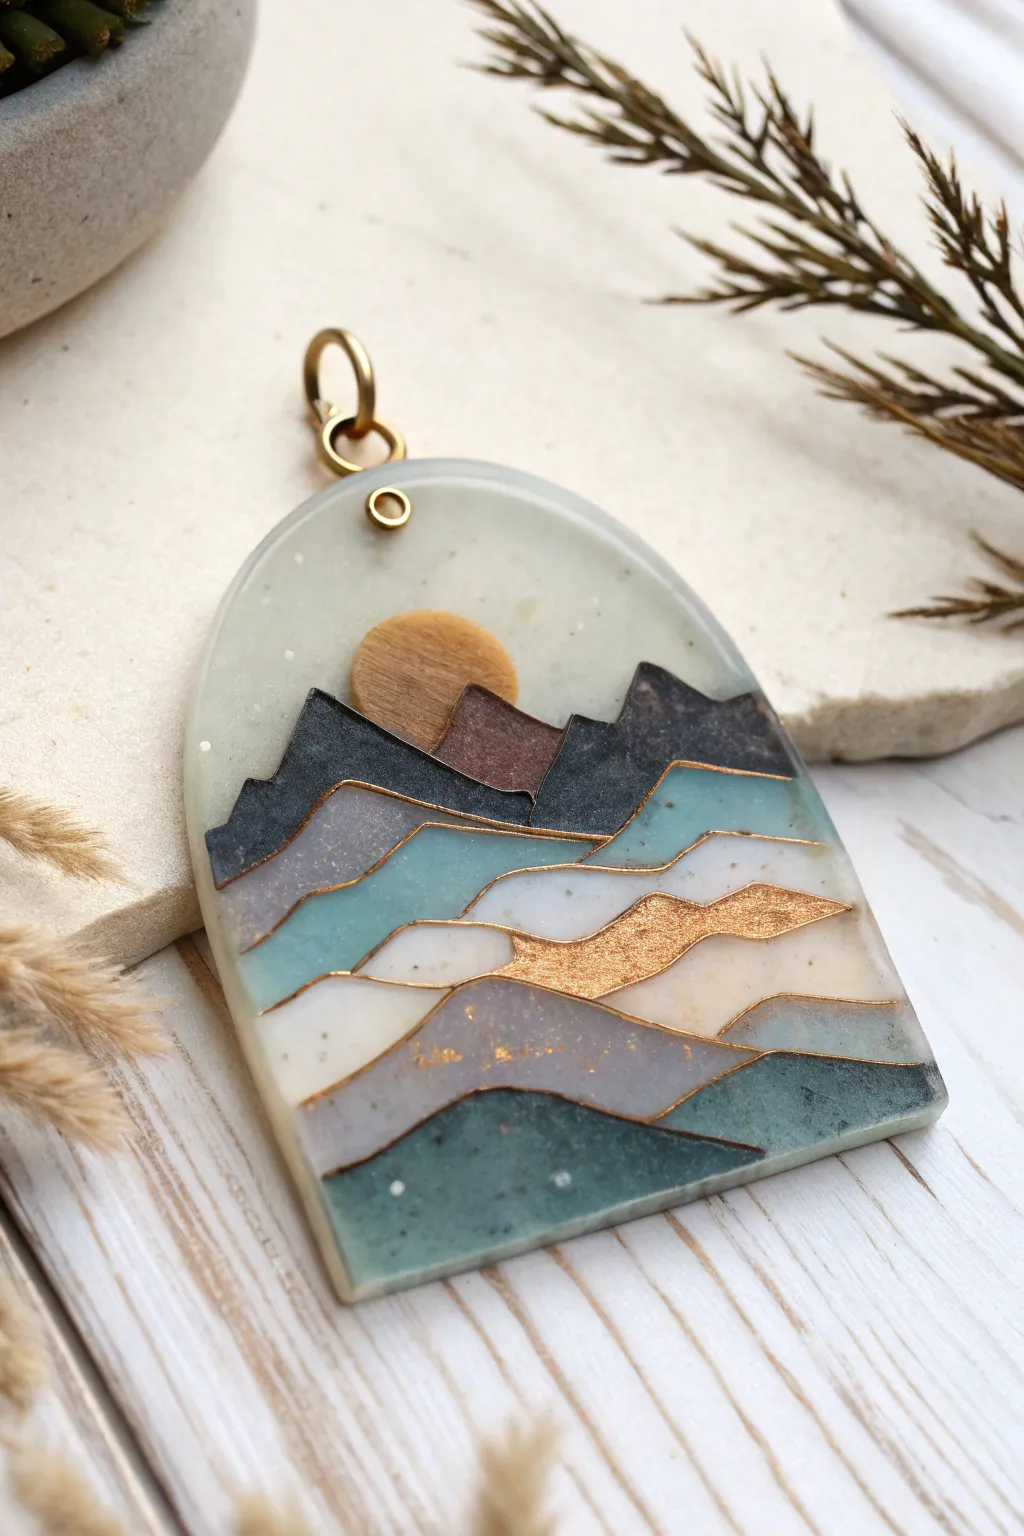
Capture the serene beauty of a textured mountain range in this elegant arch pendant. This project combines translucent resin layers with rich gold detailing and mica powders to create a miniature landscape with depth and dimension.
Detailed Instructions
Materials
- UV resin or 2-part epoxy resin (2-part is better for clarity)
- Arch-shaped silicone mold (approx. 2 inches tall)
- Polymer clay (terracotta or mustard yellow for the sun)
- Gold armature wire or flat gold beading wire (20-24 gauge)
- Mica powders (charcoal grey, teal/blue, white/pearl, copper)
- Fine glitter (iridescent or gold)
- Mixing cups and stir sticks
- Toothpicks or fine dotting tool
- Tweezers
- UV lamp (if using UV resin)
- Jump rings (gold finish)
- Jewelry pliers
- Sandpaper (fine grit, optional)
Step 1: Preparation & The Sun
-
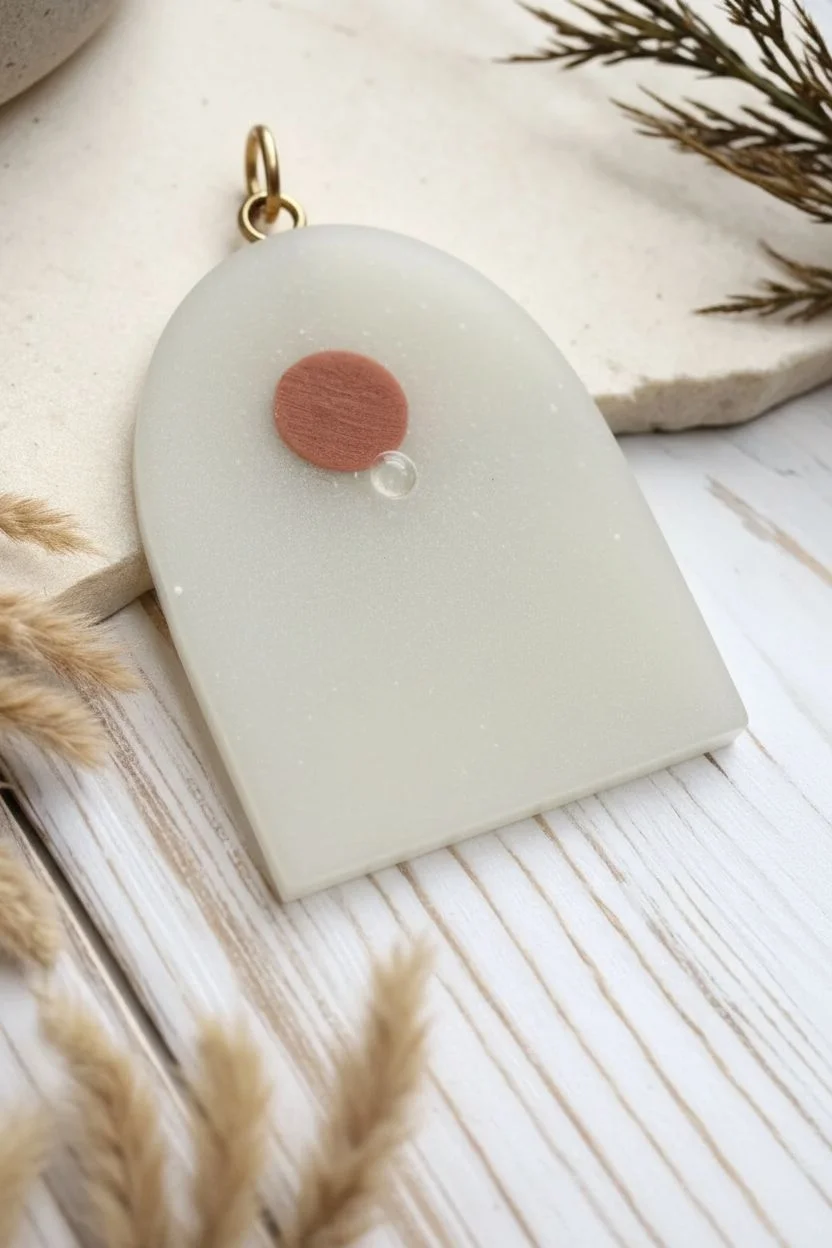
Prep the ‘Sky’ Base:
Begin by mixing a small amount of resin with a very tiny touch of white mica powder or white alcohol ink. You want a milky, semi-translucent look, not opaque white. Pour a thin layer into the arch mold to cover the entire background area and cure fully. -
Craft the Sun:
Take a tiny pinch of terracotta or mustard-yellow polymer clay. Flatten it into a small disc about 5-6mm in diameter. Bake according to package instructions (usually 275°F for 15 minutes) and let cool. -
Position the Sun:
Place the cooled clay sun onto your cured base layer, slightly off-center near the top. Secure it with a tiny drop of clear resin and cure to lock it in place.
Step 2: Creating the Gold Framework
-
Shape the Wires:
Cut 5-6 pieces of gold wire, slightly wider than the width of your mold. Using jewelry pliers or your fingers, bend them into organic, wavy shapes to mimic rolling mountain ridgelines. -
Placement Strategy:
Arrange the wires on top of the cured base layer to plan your composition. The top wire should frame the highest peaks, cutting below the sun. The bottom wires should be flatter. -
Secure the Lines:
Once satisfied with the layout, dip the bottom edge of each wire into a tiny bit of clear resin and place them onto the base. Cure deeply to ensure the wires act as barriers for your colored resin.
Wire dam pro-tip
If your wire doesn’t lie perfectly flat, use a faster-curing UV resin to ‘tack’ down the ends and corners first, holding them down with a toothpick while curing.
Step 3: Filling the Landscape
-
Mix Your Palette:
Prepare four distinct resin mixtures in small cups: a dark charcoal/granite with glitter specks, a soft teal blue, a pearlescent white, and a translucent grey-lilac. -
The Dark Peaks:
Using a toothpick, carefully drip the dark charcoal mixture into the top mountain section (closest to the sun) and the very bottom section. The toothpick helps push the resin right up against the wire boundary without spilling over. -
Mid-Range Tones:
Fill the section below the dark peaks with the teal blue mixture. I find it helps to let each section sit for a minute to self-level before curing, but be careful not to overfill the wire dams. -
The Golden Accent:
For the striking middle layer, instead of colored resin, mix clear resin with a high concentration of copper or gold mica powder until it looks like liquid metal. Fill one of the central narrow sections with this mix. -
Remaining Layers:
Fill the remaining sections with your pearlescent white and translucent grey mixtures. Alternate them to create contrast between the light and dark zones. -
Cure the Puzzle:
Once all ‘cells’ between the wires are filled, place under UV light or let cure for the full recommended time. Ensuring this layer is hard is crucial before the final coat.
Level Up: Texture
Mix real sand or crushed stone into the bottom-most dark layer for an authentic gritty texture that contrasts beautifully with the smooth sky.
Step 4: Finishing
-
Doming:
Mix a final batch of clear resin. Pour a generous amount over the entire piece to create a smooth, domed surface that encapsulates the wires and levels everything out. Pop any bubbles with a lighter or heat gun. -
Drilling:
Once fully cured and demolded, use a hand drill or pin vise to drill a small hole at the top center of the arch for your hardware. -
Hardware Assembly:
Open a gold jump ring with pliers and thread it through the drilled hole. Add a larger jump ring or bail to the first one to allow the pendant to hang correctly on a chain.
Wear your miniature mountain range with pride and enjoy the way the gold catches the light
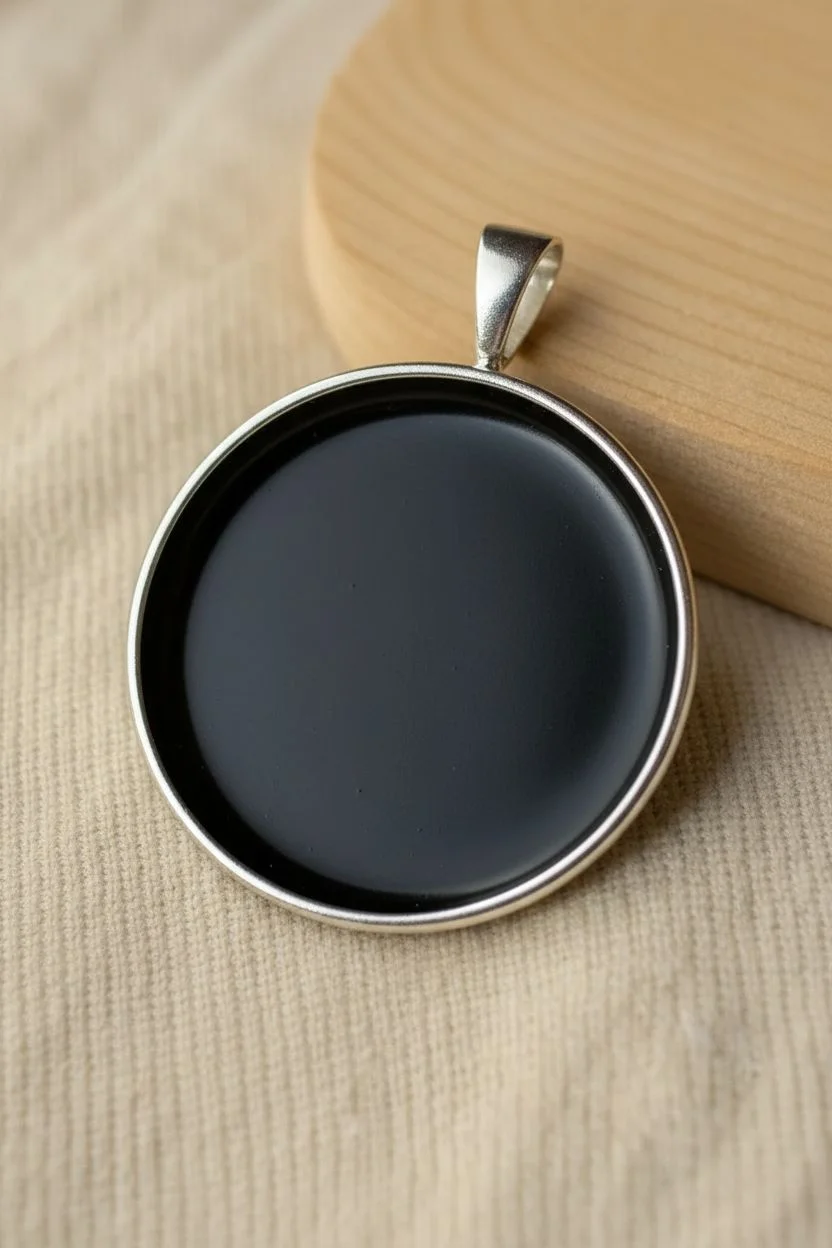
Aurora Sky Resin Pendants

Capture the ethereal beauty of the aurora borealis in this stunning pendant project. By swirling iridescent pigments into black resin, you create a miniature galaxy that dances with light and mesmerizing color.
Step-by-Step Tutorial
Materials
- Epoxy resin (2-part jewelry grade)
- Round open-back bezel or silicone mold with bail attachment
- Silver pendant bail (if using a mold)
- Black opaque resin pigment
- Aurora aurora color-shifting pigment powders (green to teal, purple to magenta)
- Fine holographic or silver glitter
- Mixing cups and stir sticks
- Toothpicks or needle tool
- UV resin (optional, for quick doming)
- UV lamp (if using UV resin)
- Resin heating mat or torch (for bubbles)
- Silicone work mat
Step 1: Base and Background
-
Prepare the workspace:
Ensure your room is well-ventilated and your silicone mat is clean. If you are using an open bezel, press it firmly onto a piece of jewelry tape to seal the back. If using a mold, clean it with tape to remove dust. -
Mix the resin:
Measure and mix your 2-part epoxy resin according to the manufacturer’s directions. Stir slowly but thoroughly for at least 3 minutes to minimize air bubbles. -
Create the midnight sky:
Pour a small amount of the mixed resin into a separate cup. Add a few drops of black opaque pigment. You want a deep, solid black color to make the aurora colors pop. -
Pour the base layer:
Carefully pour the black resin into your mold or bezel. Fill it about halfway to two-thirds full. You need to leave room for the clear cap and the swirling effects. -
Pop bubbles:
Use a torch or heat gun lightly over the surface to pop any rising air bubbles. Let this black layer sit for about 30-45 minutes so it thickens slightly; this prevents the colors from sinking straight to the bottom.
Depth Trick
For a 3D effect, paint slight wisps of interference powder on the dried black layer before adding the colored resin on top.
Step 2: Creating the Aurora
-
Mix the aurora colors:
While the black layer thickens, divide a portion of your remaining clear resin into two or three small cups. Mix a tiny amount of green-teal pigment powder into one and purple-magenta into another. Keep a third cup clear. -
Add some stardust:
In the clear resin cup, mix in a pinch of fine holographic glitter. Don’t overdo it; you want scattered stars, not a disco ball. -
Apply the color ribbons:
Using a toothpick, drizzle thin, wavy lines of the colored resin across the black base. Think about the flow of an aurora curtain—make natural, curved S-shapes. -
Swirl the galaxy:
Take a clean toothpick and gently drag it through the colored lines you just poured. Do not over-mix or you will get grey mud. Gentle swirls create that feathery light effect. -
Add starry accents:
Dip a toothpick into the glitter resin mixture and dab it into the empty black spaces or lightly over the colored ribbons to add depth. -
Cure the design layer:
Once you are happy with the swirl pattern, cover the piece to protect it from dust and let it cure fully (usually 24 hours).
Step 3: Doming and Finishing
-
Prepare the doming resin:
Mix a fresh, small batch of clear epoxy resin. Alternatively, for this final top coat, I often prefer using UV resin for speed and high surface tension. -
Apply the dome:
Pour the clear resin into the center of the cured piece. Using a fresh toothpick, guide the resin to the very edges of the bezel or casting. Surface tension should keep it from spilling over if you go slowly. -
Check reflection:
Look at the reflection of a light source on the wet resin. If the reflection is distorted, add a tiny drop more resin to create a perfect, smooth dome. -
Final cure:
Cure the top dome. If using UV resin, place under the lamp for 2-3 minutes. If using epoxy, cover and wait another 24 hours. -
Attach hardware:
If you used a silicone mold, drill a small hole at the top and attach your pinch bail. If you used a bezel with an integrated loop, simply thread your chain through. -
Polish:
Wipe the finished pendant with a soft cloth to remove any fingerprints and check the back for any sharp edges, sanding slightly if needed.
Colors Sinking?
Your black base was too fluid. Wait longer (until it’s like tacky honey) before adding the colored swirls so they stay suspended.
Now you have a piece of the night sky ready to wear
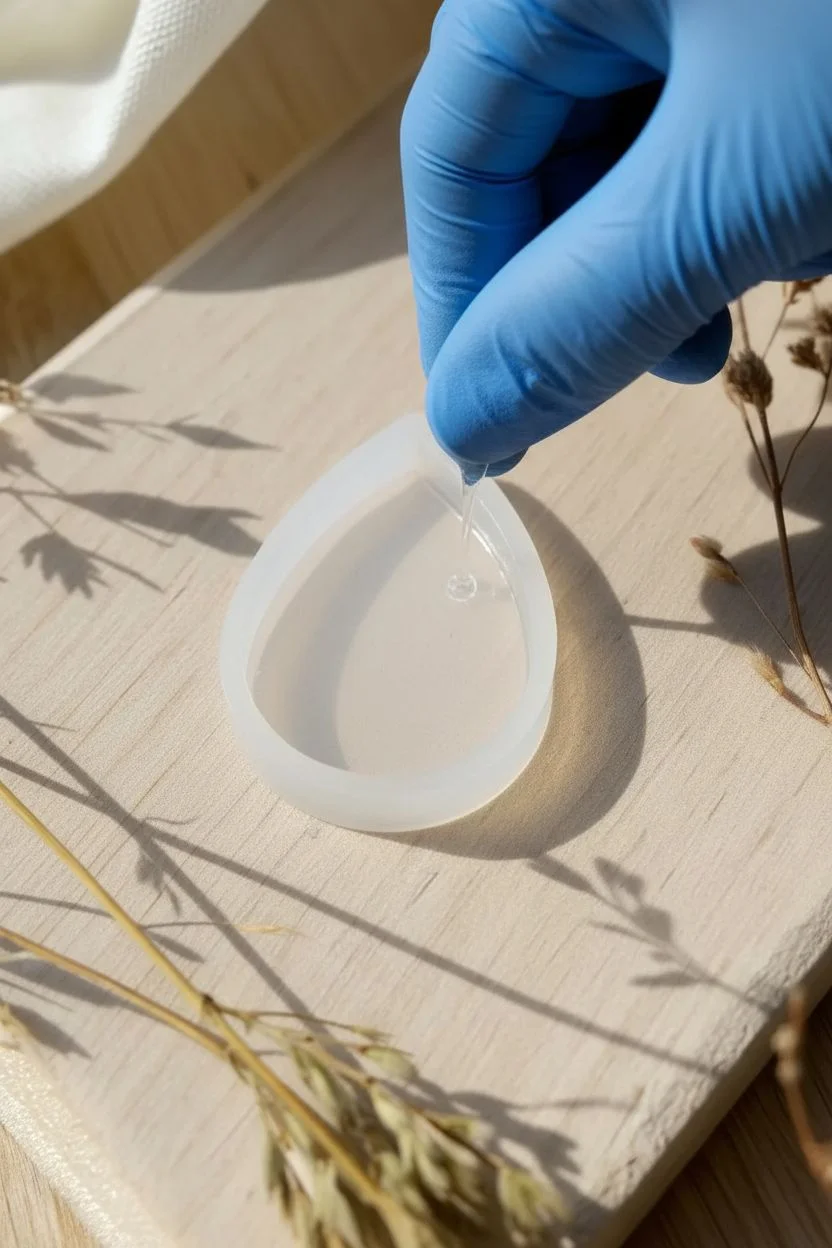
Fingerprint Texture Resin Pendants
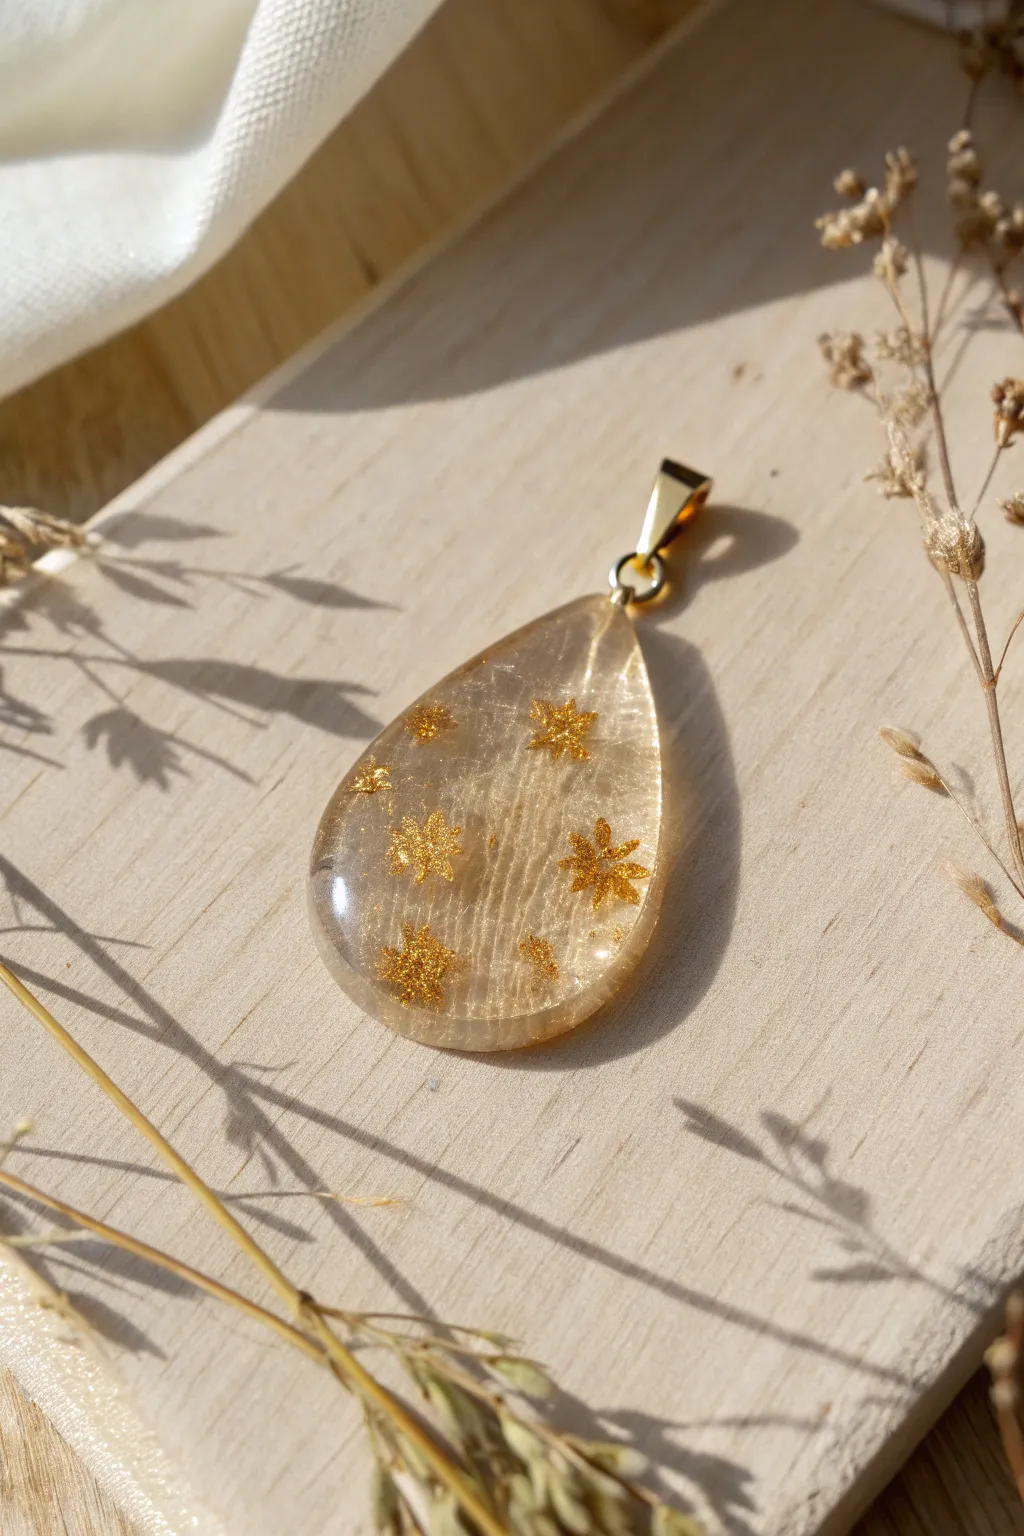
Immortalize a unique touch with this elegant teardrop pendant that features a subtle, personal texture. Suspended within crystal-clear resin, delicate gold starbursts float over a fingerprint impression, creating a deeply personal keepsake catching the light.
Step-by-Step Guide
Materials
- Two-part casting resin (epoxy)
- Small teardrop silicone jewelry mold
- Gold starburst or snowflake glitter inclusions
- Gold metallic pigment powder (mica powder) or gold flakes
- Mixing cups and stir sticks
- Latex or nitrile gloves
- Lighter or heat gun
- Gold pendant bail
- Jewelry pliers
- Tweezers
- Fine-grit sandpaper (optional)
Step 1: Preparation and First Layer
-
Safety check:
Before starting, ensure your workspace is well-ventilated and you are wearing your protective gloves. Resin can be sticky and tricky to clean off skin. -
Mix the resin base:
Measure equal parts of your resin and hardener (or according to your specific brand’s ratio) into a mixing cup. Stir slowly and steadily for several minutes to avoid whipping comfortably excessive bubbles into the mixture. -
Initial pour:
Pour a very thin layer of clear resin into the bottom of your teardrop mold. You only want to fill about a quarter of the depth right now. -
Pop bubbles:
Use a lighter or heat gun to quickly pass over the surface of the resin. This pops any rising air bubbles for a crystal-clear finish. -
Let it sit:
Allow this initial thin layer to cure until it reaches a ‘tacky’ or soft-gel stage. This usually takes about 1-2 hours depending on your resin brand, but check the instructions.
Sticky Situation?
If the fingerprint impression disappears, you poured the next layer too soon. Wait for the base layer to be fully hard, then dust it, then pour.
Step 2: Adding the Fingerprint Texture
-
Testing the tackiness:
Touch the edge of the resin with a gloved finger. It should be firm enough not to stick to you like honey, but soft enough to hold an impression—similar to firm dough. -
Create the impression:
Press your clean, dry thumb (or the finger you wish to capture) firmly onto the surface of the semi-cured resin layer. Rock it slightly to ensure the ridges are captured. -
Dusting the print:
To make the fingerprint visible, dip a soft brush into a tiny amount of gold mica powder. Very gently brush this over the impression you just made. The gold will stick to the ridges, highlighting the unique pattern. -
Cleaning up excess:
If you used too much powder, gently blow away the excess or use a clean part of the brush to wipe the non-printed areas clean so the surrounding resin stays transparent.
Go Cosmic
Add a tiny drop of translucent blue or purple ink to the final layer of resin to give the piece a ‘night sky’ effect behind the gold stars.
Step 3: Layering the Gold Stars
-
Mix the second batch:
Prepare a fresh, small batch of clear resin following the same mixing procedures as before. -
Pour the second layer:
Pour a small amount of resin over your dusted fingerprint layer. Fill the mold about halfway to three-quarters full. -
Placement of stars:
Using tweezers, carefully pick up your gold starburst or snowflake glitter pieces. Place them into the wet resin. I like to arrange them at slightly different depths to create a sense of dimension. -
Adjusting position:
Use a toothpick to gently nudge the stars into your desired arrangement. Ensure they aren’t clumped together and are evenly distributed across the teardrop shape.
Step 4: Final Pour and Finishing
-
Top it off:
Pour the remaining clear resin into the mold until it forms a slight dome on the top (meniscus), which adds a beautiful magnifying effect. -
Final bubble check:
Do one last pass with your lighter to remove surface bubbles. Be quick so you don’t scorch the mold. -
Full cure:
Cover the mold to protect it from dust and let it cure fully for 24 to 48 hours. Patience is key here to avoid sticky prints. -
Demolding:
Gently flex the silicone mold to release the hardened pendant. It should pop out clean and clear. -
Drilling the hole:
If your mold didn’t have a built-in post for a hole, use a small hand drill or rotary tool to carefully drill a hole at the top narrow point of the teardrop. -
Attaching hardware:
Open the jump ring on your gold bail using two pairs of pliers. Thread it through the hole in the pendant and close it securely.
You now have a shimmering, personalized piece of jewelry that captures a moment in time


Have a question or want to share your own experience? I'd love to hear from you in the comments below!