If you love turning plain dark clothes into wearable art, bleach painting is such a satisfying little magic trick—one brushstroke and you’re pulling light out of darkness. Here are my favorite bleach painting ideas (from classic crowd-pleasers to the weird, artsy experiments) you can try on tees, hoodies, denim, and more.
Classic Bleach Splatter Galaxy Tee
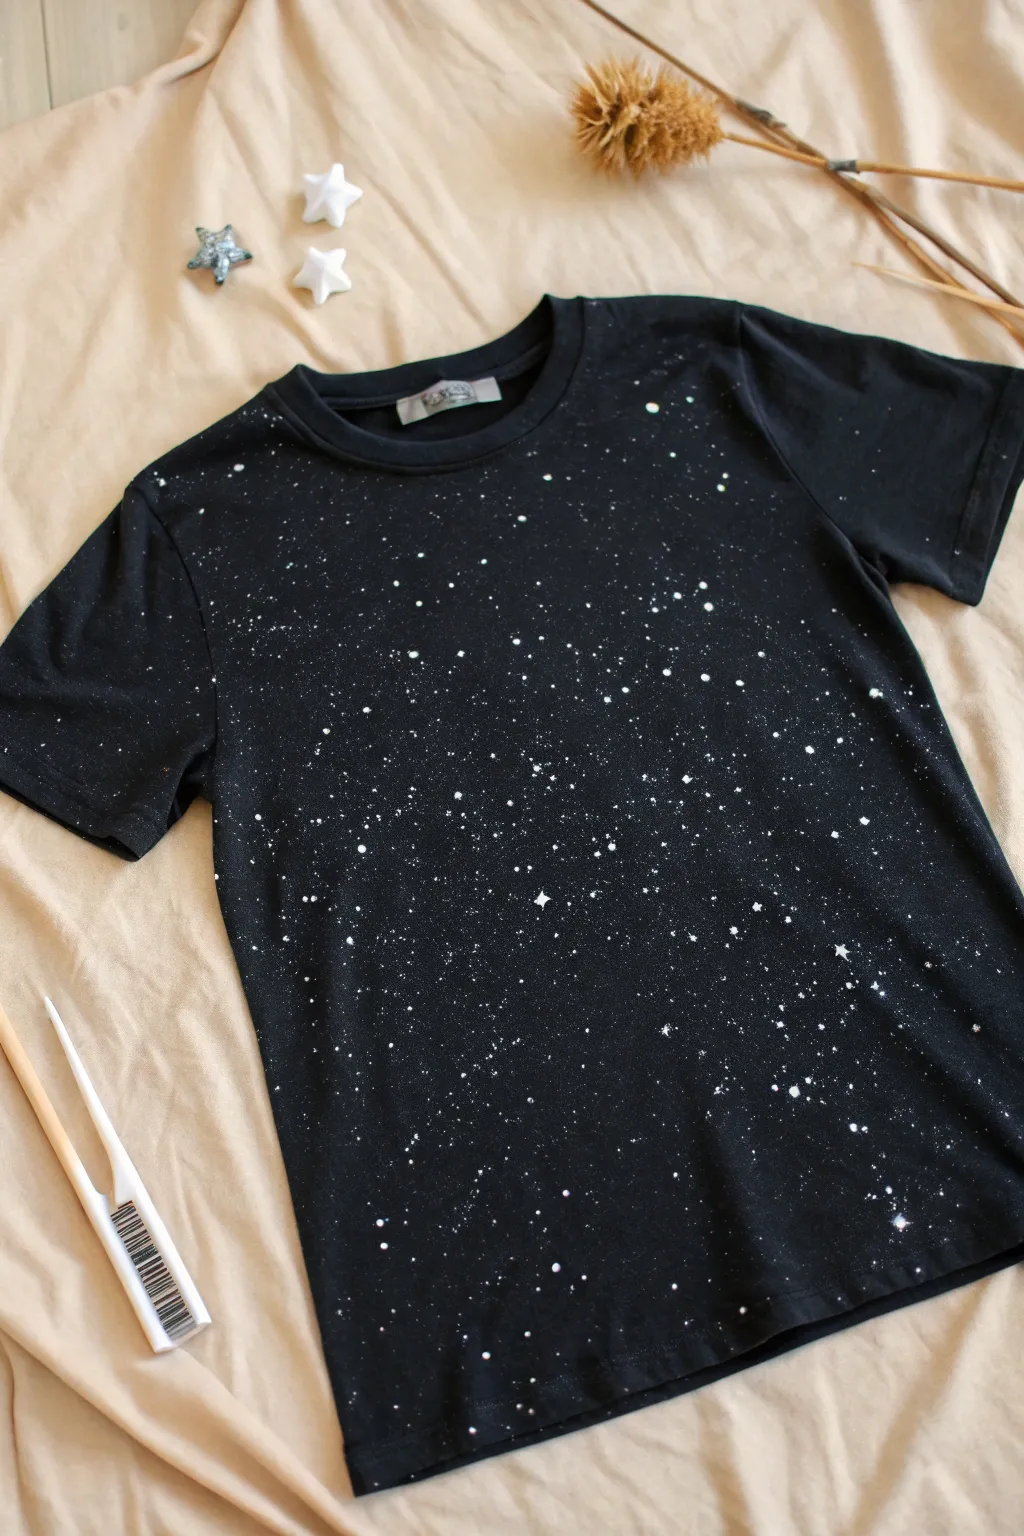
Transform a plain black shirt into a wearable piece of the night sky using simple household bleach. This project creates a stunning, chaotic array of stars and nebulae that looks far more complex than the easy splatter technique actually is.
Step-by-Step
Materials
- Black cotton t-shirt (100% cotton works best)
- Household liquid bleach
- Water
- Plastic spray bottle (optional)
- Old toothbrush
- Stiff bristle brush or paintbrush
- Protective gloves
- Cardboard insert for shirt
- Plastic drop cloth or garbage bags
- Small bowl or cup
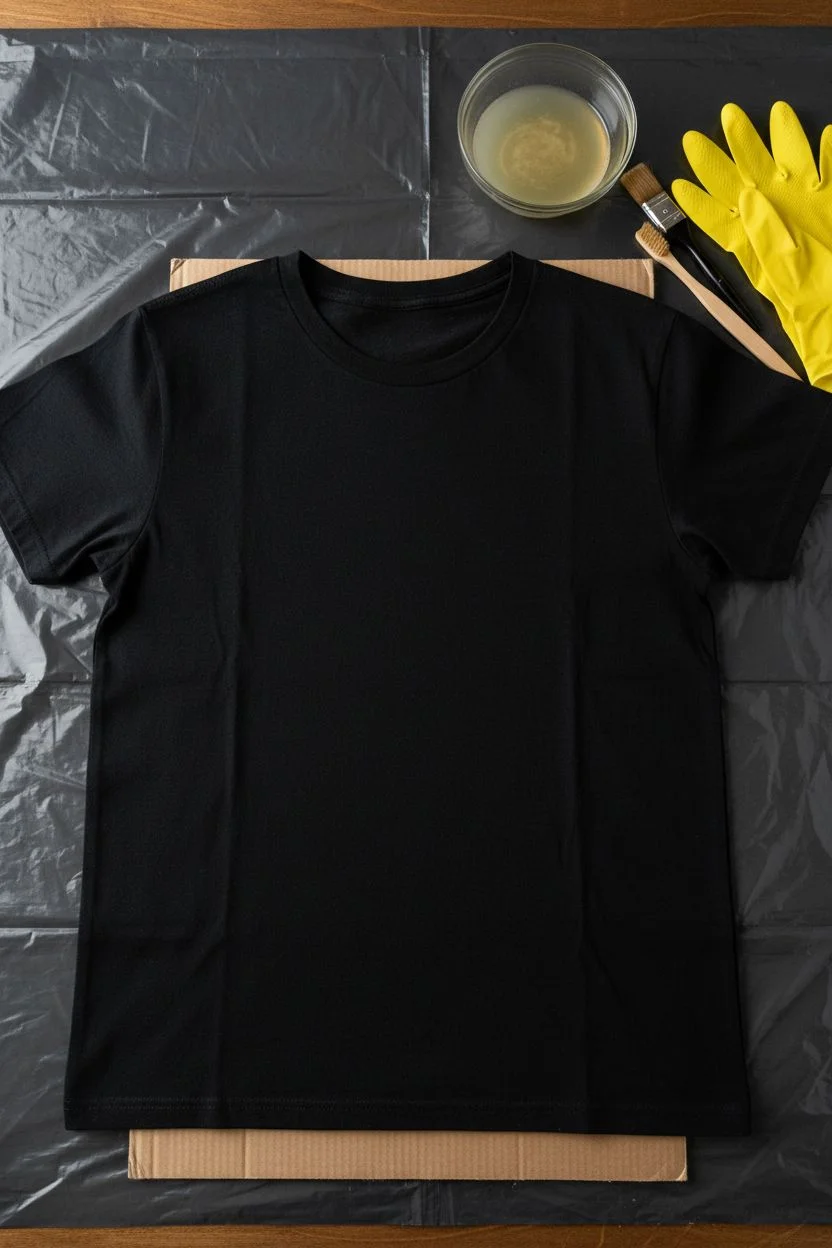
Step 1: Preparation
-
Wash and dry:
Begin with a pre-washed and dried black t-shirt. Removing the sizing chemicals from a new shirt helps the bleach penetrate the fibers more evenly. -
Protect your workspace:
Lay down a plastic drop cloth or garbage bags on a flat surface. Bleach is permanent and can ruin floors or tables, so thorough coverage is essential. -
Insert barrier:
Slide a thick piece of cardboard inside the t-shirt. This prevents the bleach from soaking through the front and staining the back of the shirt unnecessarily. -
Smooth it out:
Flatten the shirt on your work surface, smoothing out any major wrinkles that could cause the design to warp. -
Mix your solution:
In your small bowl or spray bottle, mix a solution of roughly equal parts bleach and water. I find a 50/50 mix offers good control without degrading the fabric too quickly.
Orange Spots?
Don’t panic if spots look rusty red at first. Bleach lifts dye in stages; it just needs a few more minutes to lighten to white.
Step 2: Creating the Stars
-
Test patch:
If you have a scrap piece of similar black fabric, test your splatter technique there first to get a feel for how the liquid flies. -
Fine mist technique:
Dip an old toothbrush into your bleach solution. Hold it over the shirt and run your thumb briskly across the bristles to flick a fine mist of tiny droplets. -
Create density variation:
Concentrate this fine mist in a diagonal band across the shirt to mimic the Milky Way, or scatter it randomly for a general starry night feel. -
Medium stars:
Switch to a stiffer paintbrush. Dip it in the solution and tap the handle against your other hand or finger over the shirt to release slightly larger droplets. -
Large feature stars:
For the brightest stars, dip the end of a brush handle directly into the bleach and gently touch it to the fabric in a few select spots. Let the liquid soak in to create larger, distinct orbs. -
Watch the change:
Pause and watch. The bleach won’t turn white instantly; it will transition from rusty red to orange and finally to a lighter cream or white color over several minutes.
Step 3: Finishing Up
-
Monitor the color:
Keep an eye on the lightening process. Once the spots reach a rusty orange or light tan color that you like, you are ready to stop the reaction. -
Rinse immediately:
Once the desired lightness is achieved, immediately rinse the shirt thoroughly in cold water. This stops the bleach from eating holes in the fabric. -
Wash cycle:
Run the shirt through a full wash cycle alone or with old towels to ensure all bleach residue is removed before wearing. -
Dry and wear:
Dry your new galaxy tee as normal. The design is permanent and won’t fade further.
Bleach Safety
Always work in a well-ventilated area or outdoors. Fumes can build up quickly. Wear old clothes you don’t mind ruining.
Enjoy styling your unique cosmic creation which is now ready for any casual outing


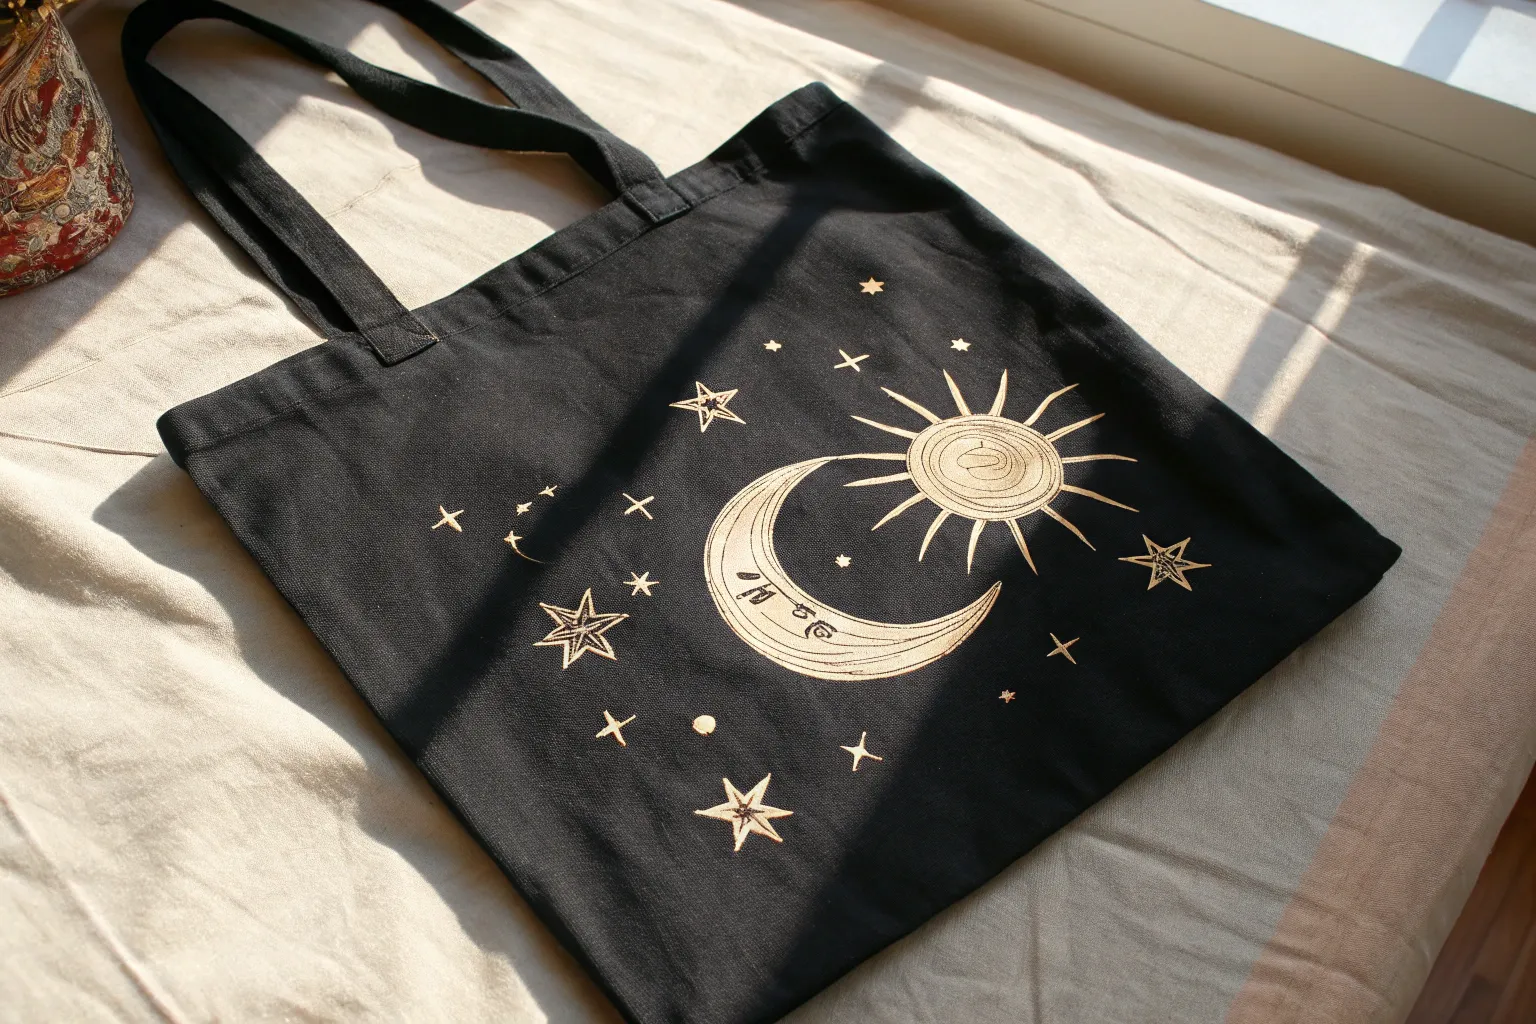
Stenciled Moon and Stars Bleach Print
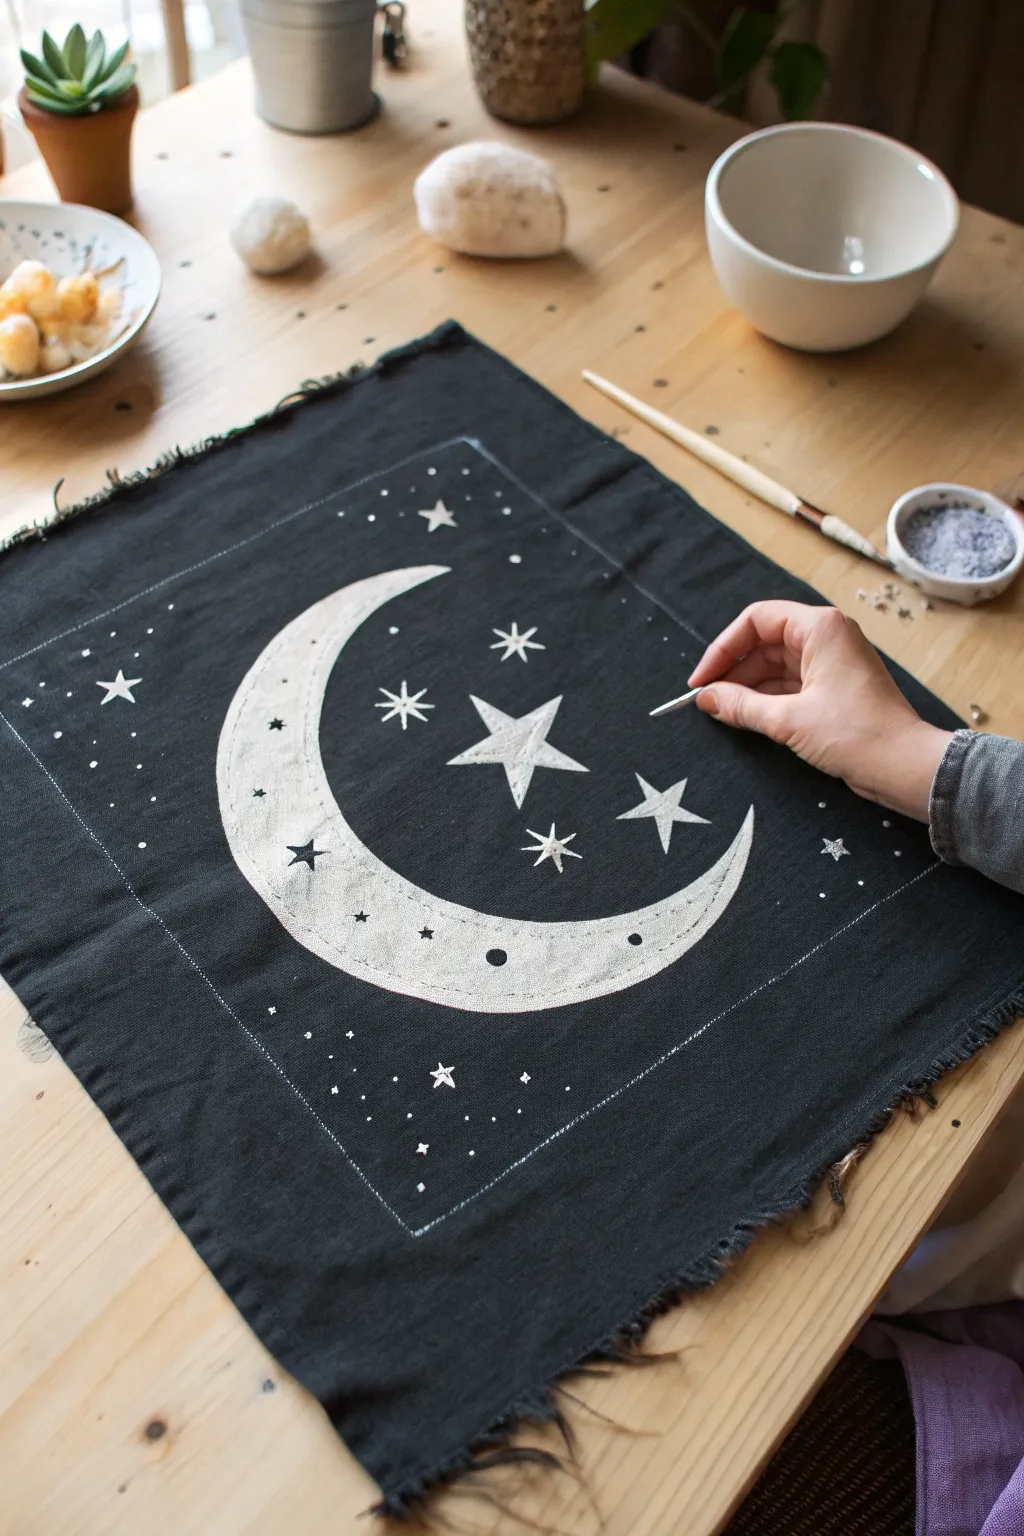
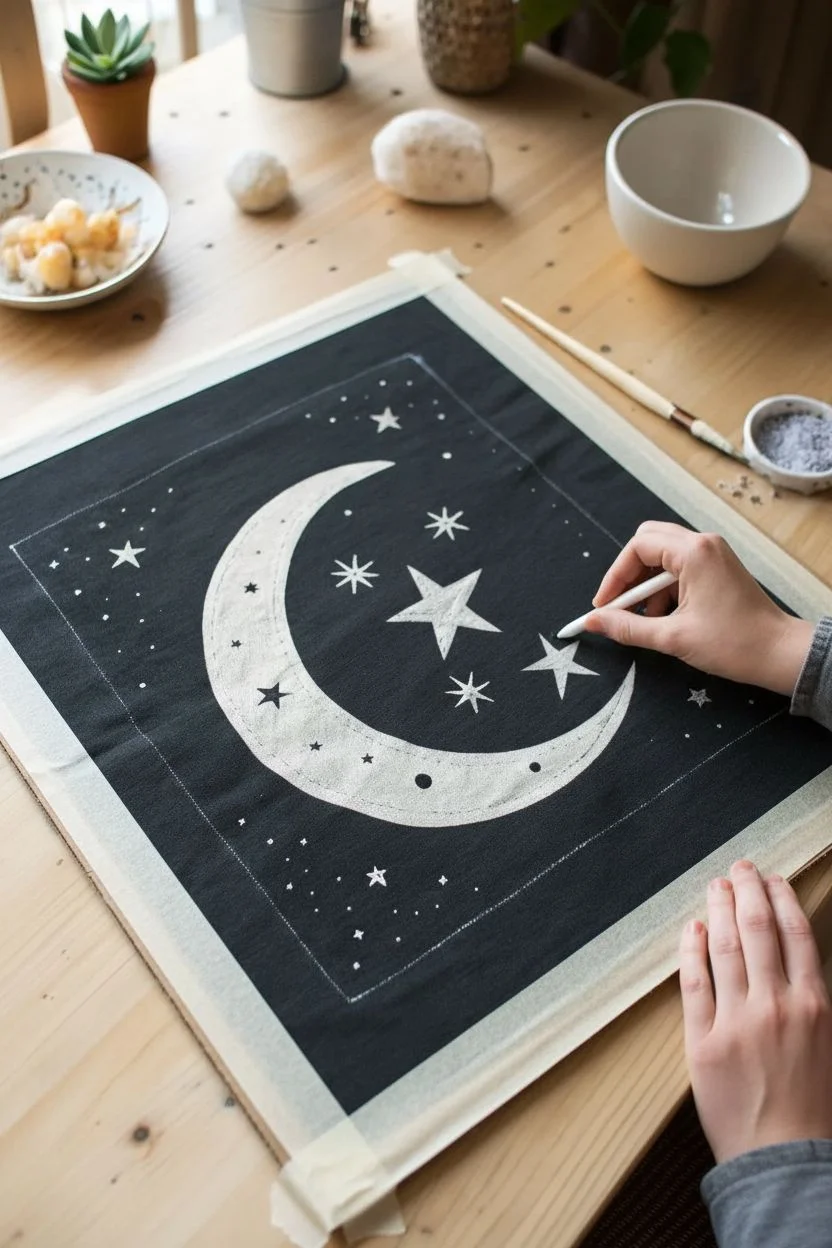
Transform a simple square of black fabric into a mystical night sky using the magic of bleach. This high-contrast design features a large crescent moon surrounded by twinkling stars, creating a stunning piece suitable for wall art or a unique altar cloth.
Step-by-Step Guide
Materials
- Black cotton or linen fabric square (pre-washed)
- Household bleach
- Small glass or ceramic bowl
- Fine-point synthetic paintbrush
- White gel pen or chalk pencil
- Cardboard or plastic thick sheet (for backing)
- Painter’s tape or masking tape
- Paper towels
- Ventilated workspace
Step 1: Preparation & Sketching
-
Prepare the fabric:
Begin by ironing your black fabric square to remove any creases. Lay it flat on top of a piece of cardboard or a thick plastic sheet to protect your work surface from bleed-through. -
Secure the workspace:
Tape down the corners or edges of the fabric to the backing board. This prevents the fabric from shifting while you sketch and paint. -
Draw the border:
Using a ruler and a white gel pen or chalk pencil, lightly draw a rectangular frame about two inches inside the frayed edge of the fabric. This defines your active painting area. -
Sketch the moon:
Inside the frame, freehand a large crescent moon shape. If you aren’t confident in your freehand circles, trace a dinner plate for the outer curve and a smaller salad plate for the inner curve. -
Add celestial details:
Sketch a variety of stars within the moon’s curve. Draw a large central five-pointed star, flanking it with two smaller stars. Add tiny dots and diamond shapes scattered around to represent distant starlight.
Bleed Patrol
If bleach bleeds outside your lines, don’t panic. Quickly dab the spot with a water-soaked Q-tip to dilute it, or turn the mistake into a new star
Step 2: Applying the Bleach
-
Prepare the bleach solution:
Pour a small amount of household bleach into your ceramic or glass bowl. I find using it straight from the bottle gives the brightest white, but you can dilute it 50/50 with water for a more subtle rust tone. -
Test your tool:
Dip your fine-point brush into the bleach and test it on a scrap piece of the same black fabric. This helps you gauge how quickly the fabric wicks the liquid and changes color. -
Outline the moon:
Carefully trace the outline of your crescent moon with the bleach-dipped brush. Use a steady hand and don’t overload the brush, as bleach can bleed beyond your lines. -
Fill the moon:
Fill in the body of the moon. This doesn’t need to be perfectly solid; a slightly uneven texture adds to the cratered, lunar look. -
Paint the major stars:
Paint the five-pointed stars you sketched earlier. Start from the center of the star and pull the brush outward to the tips for sharp points. -
Add decorative elements:
Paint small black stars or dots *inside* the white body of the moon using a tiny brush dipped in black fabric paint, or simply paint around these negative spaces if you have excellent brush control.
Cosmic Color
After neutralization and drying, go back in with diluted watercolor or fabric dye to tint the bleached white moon with subtle purples or blues
Step 3: Refining & Finishing
-
Create the galaxy background:
Dip the very tip of your brush (or a toothpick) into the bleach and dot tiny stars into the black space around the moon inside your border. -
Define the frame:
Go over your initial chalk border line with a very thin line of bleach. You can make this a solid line or a series of small dashes for a stitched effect. -
Watch firmly:
Allow the bleach to process. You will see the color shift from black to rust, and finally to a creamy white. This usually takes about 10-20 minutes. -
Stop the action:
Once you are happy with the lightness, immediately rinse the fabric thoroughly in cold water to stop the chemical reaction. This prevents the bleach from eating holes in the cloth over time. -
Wash and dry:
Hand wash the piece with a mild detergent and let it air dry. Iron the finished piece to crisp up the fabric before displaying.
Hang your celestial creation on a wall or use it as a centerpiece for a magical table setting


Reverse Tie-Dye Spiral With Bleach
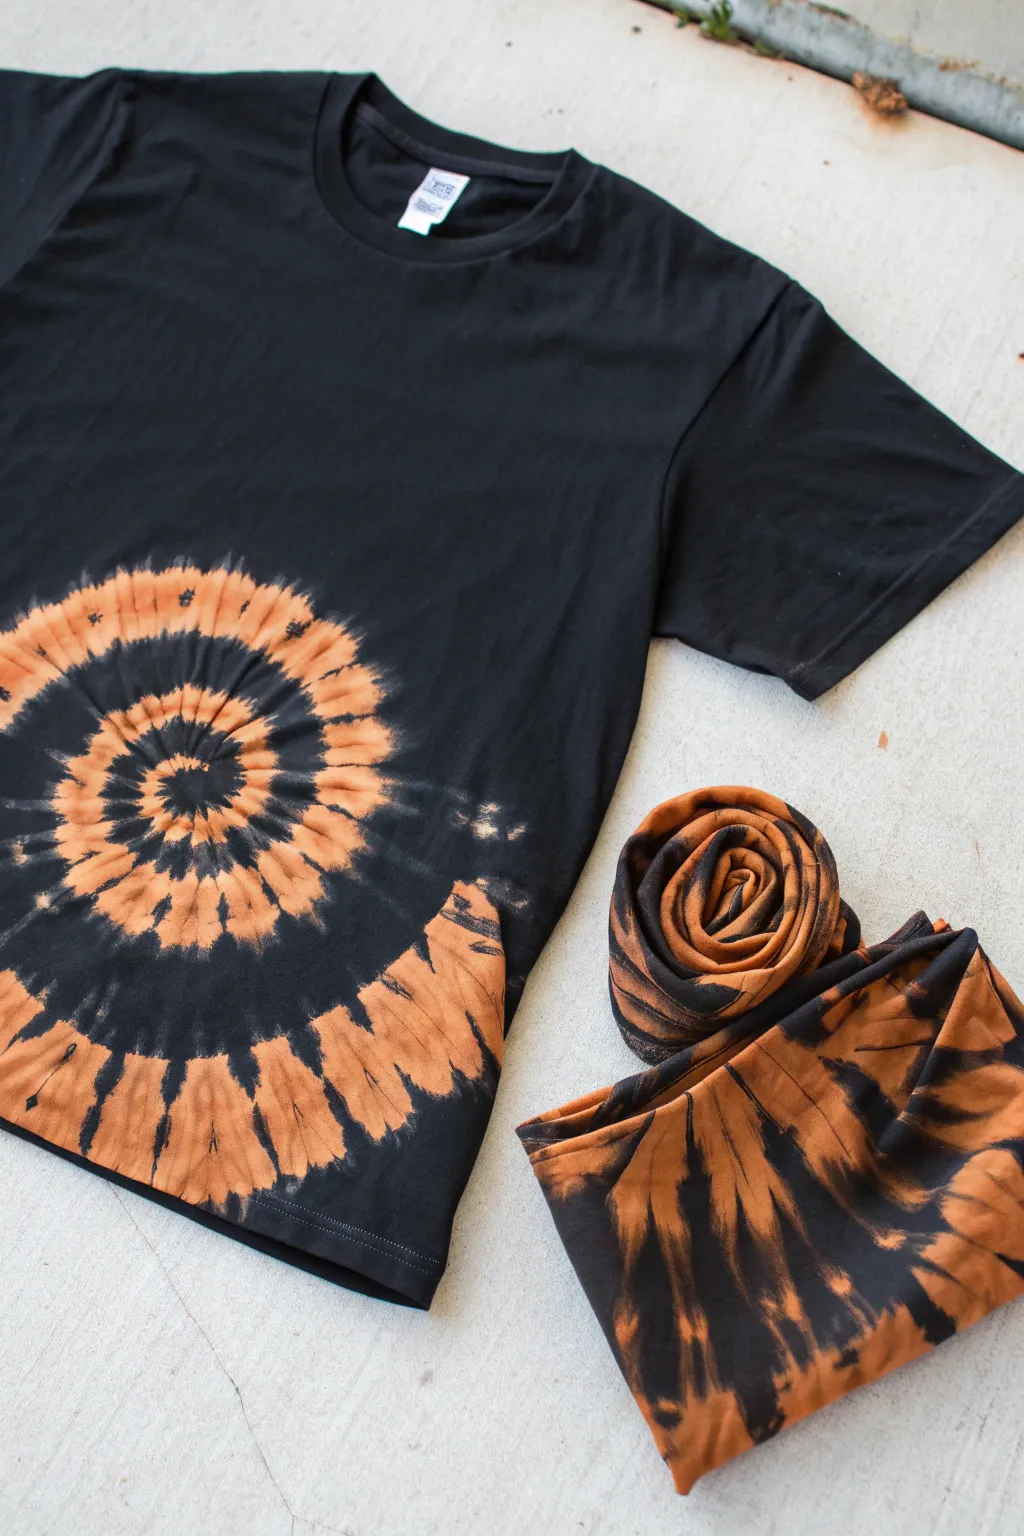
Transform a plain black tee into a striking statement piece using the power of reverse tie-dye. This project uses bleach to strip away pigment, revealing a warm, rusty orange spiral design that contrasts beautifully against the dark fabric.
Step-by-Step Tutorial
Materials
- Black cotton t-shirt (100% cotton works best)
- Liquid household bleach
- Water
- Spray bottle or squeeze bottle
- Rubber bands
- Rubber gloves
- Protective sheet or tarp
- Bucket or sink for rinsing
- Hydrogen peroxide (optional, to stop bleaching)
Step 1: Preparation and Binding
-
Prepare your workspace:
Set up in a well-ventilated area, ideally outdoors. Lay down a plastic tarp or drop cloth to protect your surface from bleach splatters. -
Dampen the shirt:
Soak your black t-shirt in water until it is fully saturated, then wring it out so it is damp but not dripping wet. Damp fabric helps the bleach penetrate more evenly. -
Lay it flat:
Spread the shirt out completely flat on your work surface, smoothing out any major wrinkles. -
Locate the spiral center:
Decide where you want the center of your spiral. For the look in the photo, choose a spot on the lower side of the shirt, rather than the dead center. -
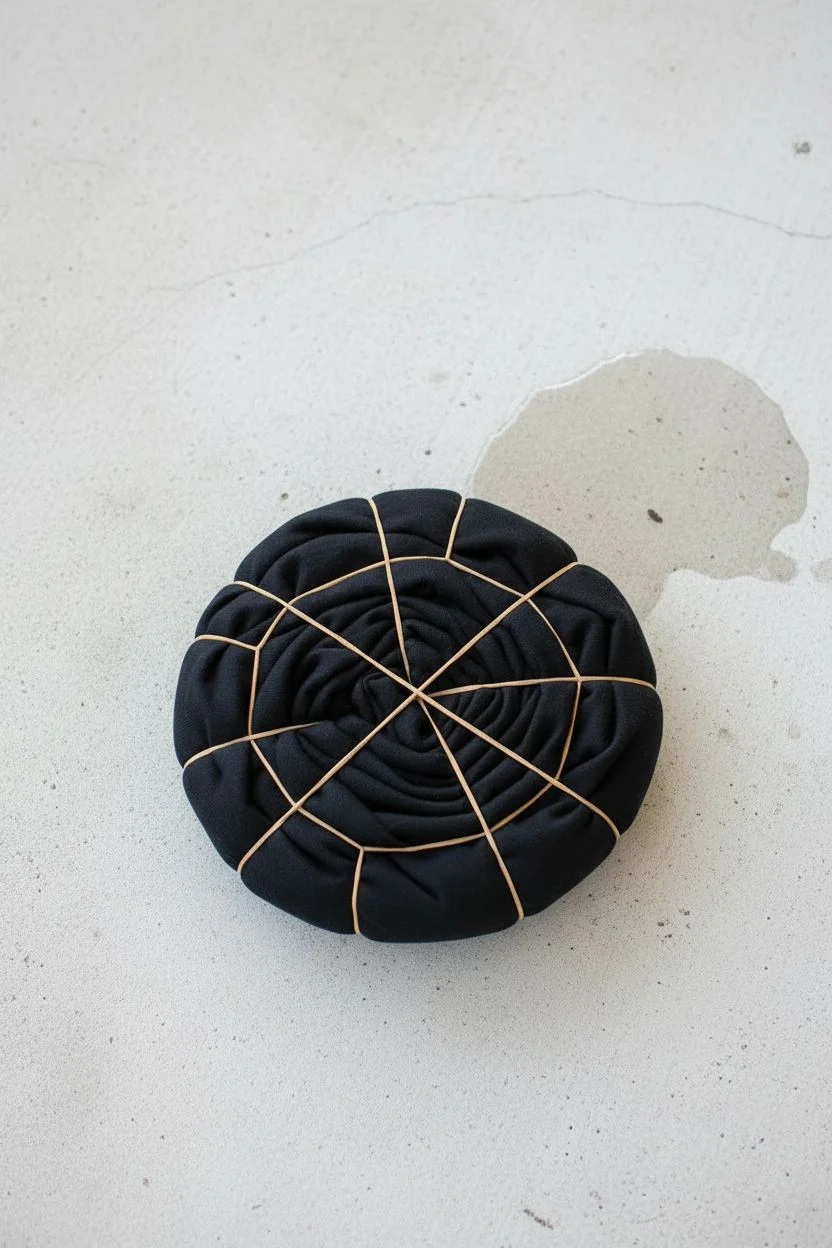
Pinch and twist:
Pinch the fabric at your chosen center point with your thumb and forefinger. begin twisting the fabric clockwise or counter-clockwise. -
Form the disc:
Keep twisting, using your other hand to guide the deeper pleats into a flat, round disc shape. Try to keep the pleats relatively even in height. -
Secure with bands:
Once the entire shirt is coiled into a tight disc, carefully slide rubber bands across the center. Create a pie-slice shape with the bands, essentially dividing the disc into wedges. Use at least 3-4 rubber bands to hold it tight.
Step 2: Bleaching Process
-
Mix the solution:
In your squeeze bottle, mix a solution of equal parts bleach and water (50/50 ratio). Wear your gloves for this part to protect your skin. -
Apply the bleach:
Apply the bleach mixture directly into the wedges created by the rubber bands. Saturate the fabric, but don’t flood it so much that it puddles underneath. -
Flip and repeat:
Carefully turn the bound disc over and apply the bleach solution to the backside, ensuring the liquid penetrates deep into the folds. -
Watch the color change:
Let the shirt sit. This is the crucial observation phase. You will see the fabric turn from black to brown, and finally to the rusty orange color shown in the image. This usually takes 10 to 20 minutes. -
Check carefully:
I prefer to peek inside one of the folds slightly to make sure the color is changing towards the center, not just on the surface.
Bleach Safety Pro-Tip
Only use fresh bleach for this project. Old bleach loses potency and might only turn the fabric a muddy gray instead of the vibrant orange you want.
Step 3: Rinsing and Finishing
-
Stop the bleaching:
Once the color has lifted to that vibrant orange tone, immediately rinse the bound shirt under cold running water. You can also dip it in a solution of 1 part hydrogen peroxide to 10 parts water to instantly neutralize the bleach. -
Unbind the shirt:
Carefully cut or remove the rubber bands while continuing to rinse the shirt. -
Thoroughly rinse:
Keep rinsing the unfolded shirt until the water runs completely clear and the smell of bleach has dissipated significantly. -
Wash and dry:
Run the shirt through a normal washing machine cycle with mild detergent, then dry it. It is now ready to wear.
Level Up: Galaxy Effect
After the bleach spiral is done, spray a light mist of diluted purple fabric paint over the orange sections to create a deep, cosmic nebula look.
Enjoy styling your new, custom-designed graphic tee


Painter’s Tape Stripes in Bleach
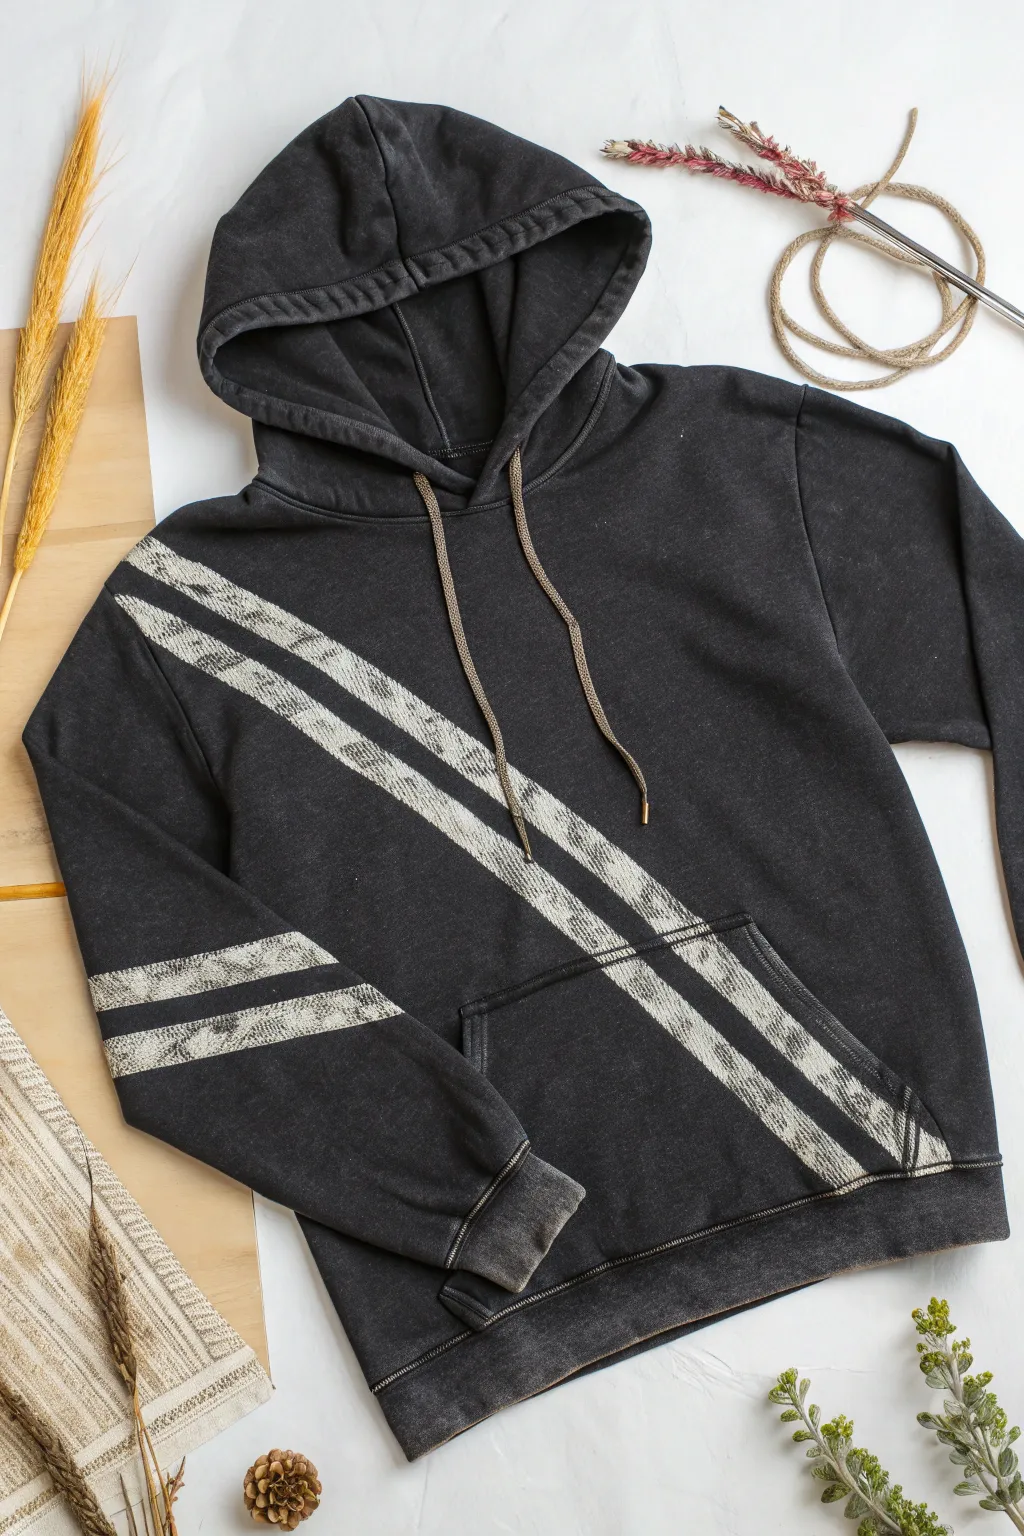
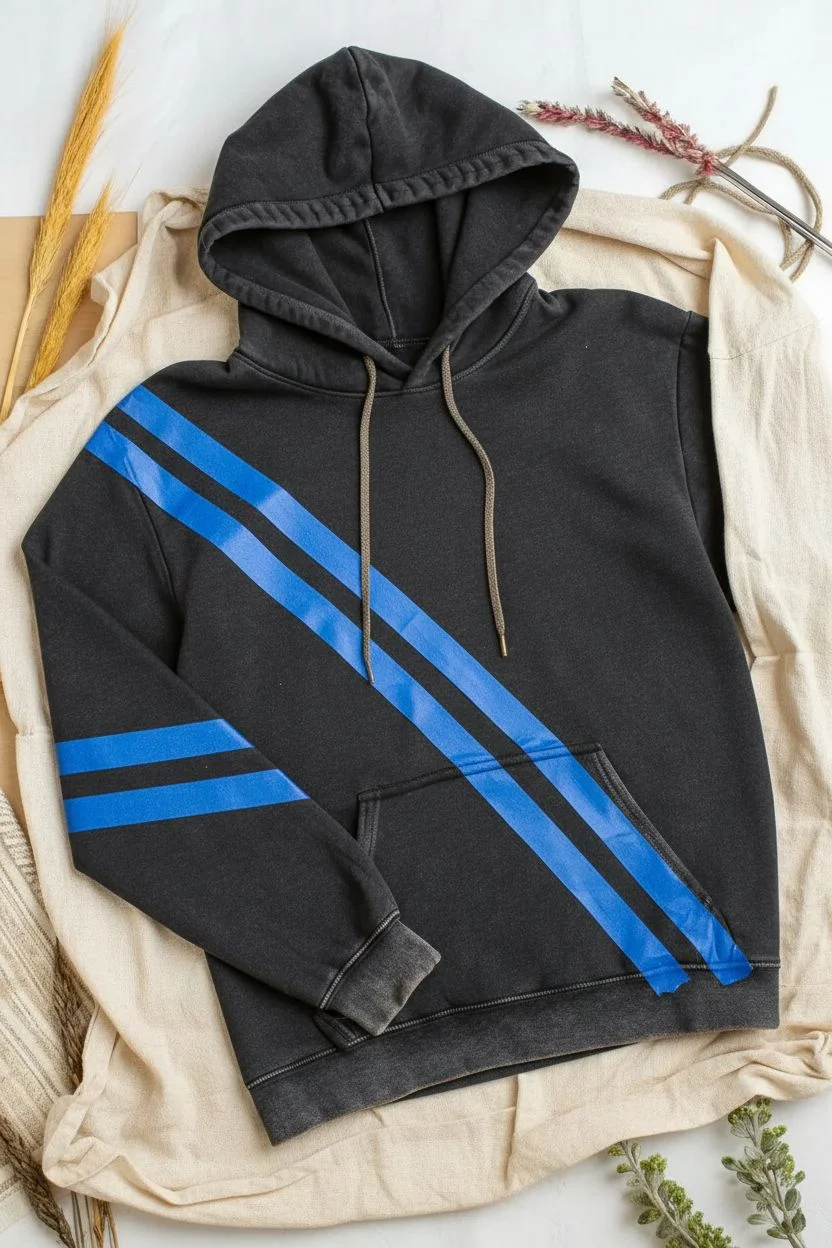
Transform a plain black hoodie into a streetwear-inspired statement piece using a simple bleach technique. The result is a cool, distressed look with dynamic diagonal stripes that appear to wrap around the body.
How-To Guide
Materials
- Dark grey or black cotton hoodie
- Painter’s tape (1.5-inch or 2-inch width)
- Liquid household bleach
- Plastic spray bottle (mist setting)
- Cardboard insert
- Paper towels or old rags
- Rubber gloves
- Well-ventilated workspace or drop cloth
Step 1: Preparation and Masking
-
Prep the workspace:
Lay down a drop cloth or work outside. Insert a large piece of cardboard inside the hoodie to prevent the bleach from bleeding through to the back panel. -
Flatten the garment:
Lay the hoodie out completely flat on your work surface. Smooth out the sleeves, particularly the left sleeve (or whichever side you plan to stripe), so it lies naturally alongside the body. -
Plan the first stripe:
Apply a strip of painter’s tape diagonally across the chest. Start high near the opposite shoulder and angle it down toward the pocket area. Extend this tape line across the sleeve to create a continuous visual line. -
Create the stripe gap:
Place a second piece of tape parallel to the first one, leaving about a 2-inch gap. This gap is where you will apply the bleach. -
Plan the second stripe:
Measure about 1-2 inches down from your second piece of tape and apply a third strip of tape parallel to the others. This creates the negative space between your two bleached stripes. -
Define the final edge:
Place the fourth and final strip of tape parallel to the others, creating the second 2-inch gap for bleaching. Press down all tape edges firmly to ensure a crisp line. -
Protect the surroundings:
Use paper towels or extra rags to cover the rest of the hoodie outside your tape lines. You only want bleach mist landing in the designated stripe gaps.
Tape Trick
Use your fingernail or a credit card to burnish (rub hard) the edges of the tape. This seals the adhesive and prevents fuzzy, bleeding lines.
Step 2: Bleaching Process
-
Prepare the solution:
Fill your spray bottle with undiluted bleach. If you prefer a slower, more controllable reaction, you can dilute it 50/50 with water. -
Test spray:
Spray a test spurt onto a paper towel to ensure the nozzle is set to a fine mist, not a solid stream. -
Apply the first layer:
Lightly mist the bleach into the gaps between the tape. Don’t soak the fabric; you want a speckled, heathered texture rather than a solid white block. -
Blot excess:
Immediately blot the wet bleached areas gently with a paper towel. This lifts pooling liquid and prevents it from seeping under the tape edges. -
Wait and watch:
Let the hoodie sit for about 5 to 10 minutes. You will see the color shift from black to rusty orange, and eventually to the lighter tan color shown in the photo. -
Assess intensity:
If the color isn’t lifting enough, apply a second light misting. I usually find that two light coats work better than one heavy one. -
Detail the pocket:
Pay careful attention where the tape crosses the kangaroo pocket. Press the tape into the pocket seams so the bleach line doesn’t look broken or messy over the bulky fabric.
Level Up: Pattern Play
Before spraying, lay a piece of crumpled plastic wrap or a mesh net over the exposed fabric gaps. Spray over it to create a marbled stone effect.
Step 3: Finishing Up
-
Neutralize the reaction:
Once the stripes have reached a light beige or off-white color, remove the masking tape immediately. -
Rinse thoroughly:
Immediately rinse the hoodie in a sink or tub with cold water to stop the bleaching process completely. -
Wash and dry:
Run the hoodie through a washing machine cycle on its own with mild detergent, then tumble dry.
Enjoy wearing your custom-designed hoodie that looks like high-end streetwear
BRUSH GUIDE
The Right Brush for Every Stroke
From clean lines to bold texture — master brush choice, stroke control, and essential techniques.
Explore the Full Guide
Soft Ombre Dip-Dye With Bleach
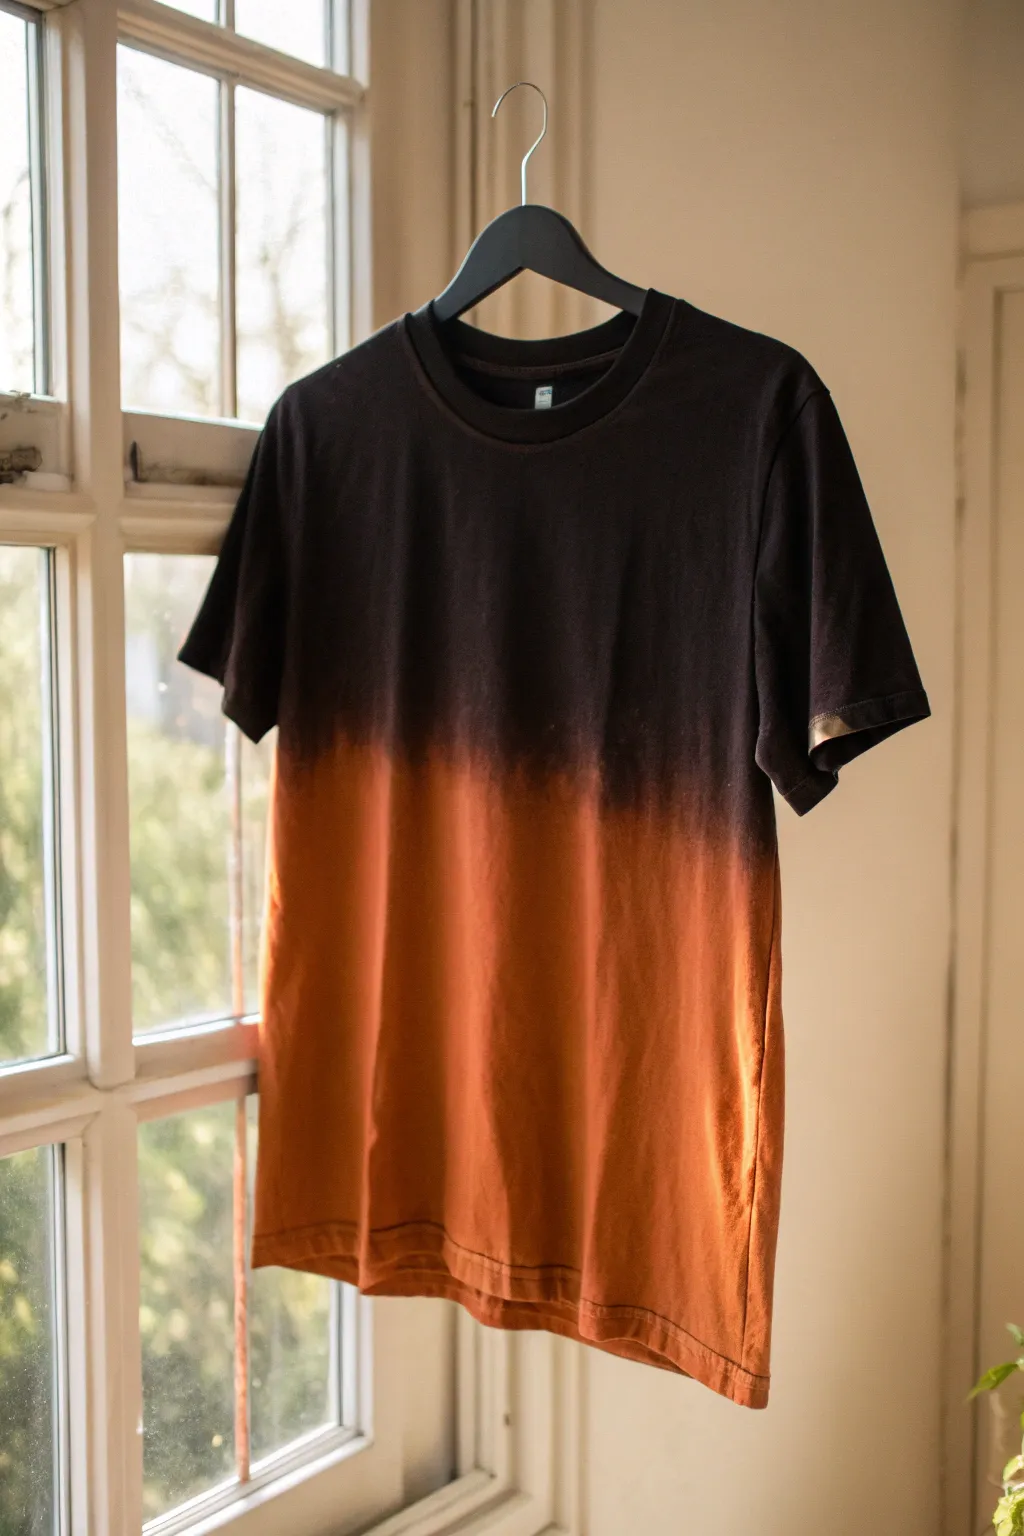
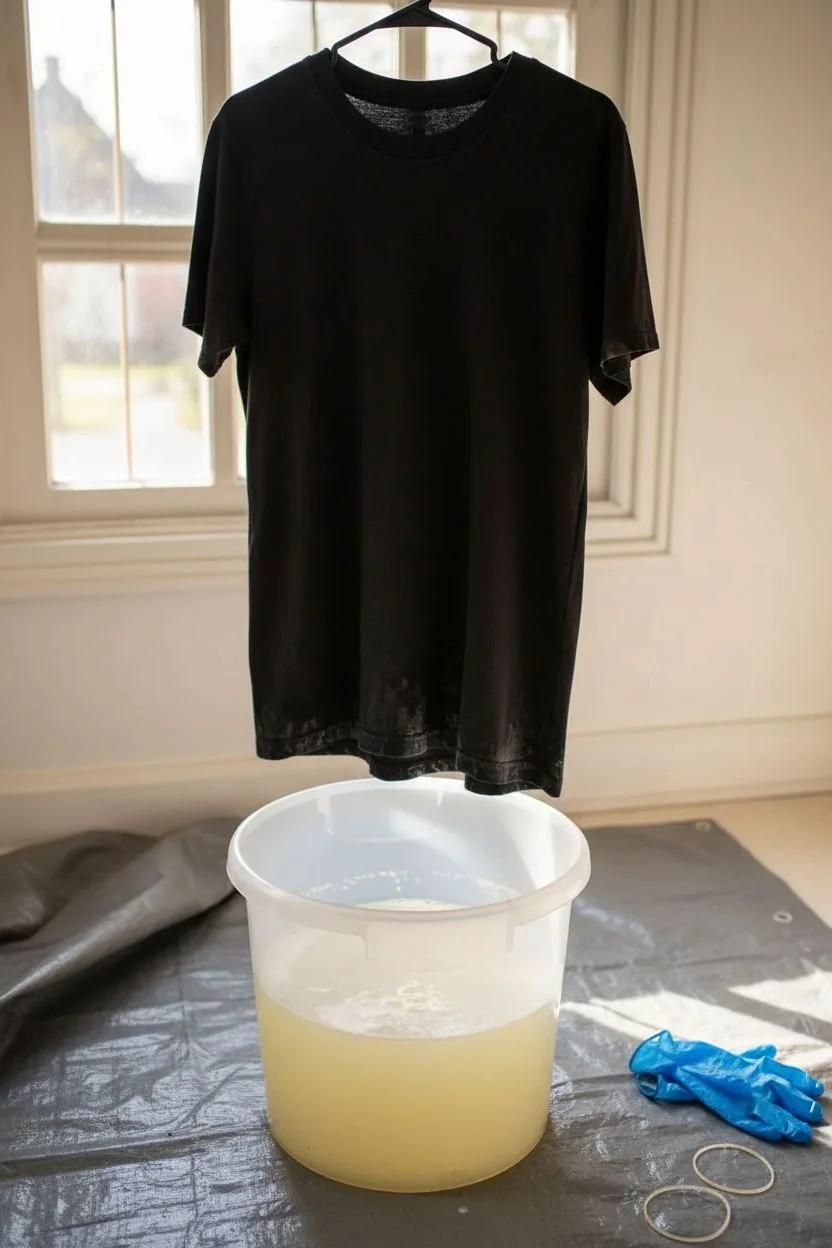
Transform a plain black tee into a striking two-tone garment with this simple reverse-dyeing method. By soaking just the bottom half in bleach, you’ll reveal warm, rusty orange tones hidden within the dark fabric, creating a seamless ombre fade.
Step-by-Step Guide
Materials
- Black cotton t-shirt (100% cotton works best)
- Liquid household bleach
- Water
- Large plastic bucket or tub
- Disposable gloves
- Clothes hanger (plastic or rust-proof)
- Rubber bands or clips (optional)
- Neutralizing agent (hydrogen peroxide mixed with water, or a bleach stop solution)
- Tarp or drop cloth
Step 1: Preparation
-
Set up your workspace:
Work in a well-ventilated area, preferably outdoors or near an open window. Lay down a tarp or drop cloth to protect your floor or table from accidental bleach splashes. -
Prepare the bleach solution:
In your plastic bucket, mix a solution of one part bleach to two parts water. The water dilutes the bleach slightly to give you more control over the color change speed. -
Prepare the shirt:
Put on your disposable gloves. Dampen the entire t-shirt with plain water and wring it out so it is damp but not dripping. Wet fabric helps the bleach wick upwards more smoothly.
Bleach Acting Too Slow?
Synthetics resist bleach. If the color isn’t lifting after 10 mins, your shirt likely has high polyester content. Stick to 100% cotton for best results.
Step 2: Creating the Dip Dye
-
Hang the shirt:
Place the shirt on a hanger. You want to be able to lower it into the bucket without your hands getting in the way of the process. -
The initial dip:
Hold the hanger and slowly lower the bottom half of the shirt into the bleach solution. Submerge it up to the line where you want the dark section to begin. -
Hold steady:
Keep the shirt submerged at this level for about 2-3 minutes. Watch as the color begins to strip away from the black dye. -
Create the gradient:
To soften the line between black and orange, lift the shirt out of the liquid slightly (about an inch) every few minutes. This ‘stair-step’ removal creates the soft fade. -
Monitor the color:
Keep the very bottom hem submerged the longest. You are looking for a vibrant rust or copper color. Remember that wet fabric looks darker than dry fabric, so aim for a slightly lighter shade than your final goal. -
Manual blending (optional):
If the line looks too harsh, I sometimes use a gloved finger to gently rub the transition line, pulling a tiny bit of bleach solution upward into the black area.
Step 3: Rinsing and Neutralizing
-
Remove from bleach:
Once the bottom is a bright rusty orange, immediately pull the entire shirt out of the bucket. -
Initial rinse:
Rinse the bleached section thoroughly under cold running water. Try to keep the unbleached black upper part dry during this step so the bleach water doesn’t run down and streak it. -
Neutralize the bleach:
Submerge the bleached area in a mixture of 1 part hydrogen peroxide to 10 parts water. This stops the chemical reaction instantly so the fibers don’t degrade. -
Wash completely:
Now you can wash the entire shirt. Hand wash it alone first with mild detergent to ensure no residual bleach affects your other laundry. -
Dry the shirt:
Wring out the excess water and hang the shirt to dry. Avoid direct sunlight if possible, as it can fade the remaining black dye unevenly. -
Final inspection:
Once dry, check your gradient. The rusty tone should transition smoothly into the original black, giving you that modern, dipped aesthetic.
Add a Space Dye Effect
Before dipping, lightly scrunch the bottom fabric and secure loosely with rubber bands. The bleach will penetrate unevenly for a cloudy, textured look.
Enjoy styling your new grunge-inspired custom tee knowing no two dips are ever exactly alike
Constellation Map Bleach Back Panel
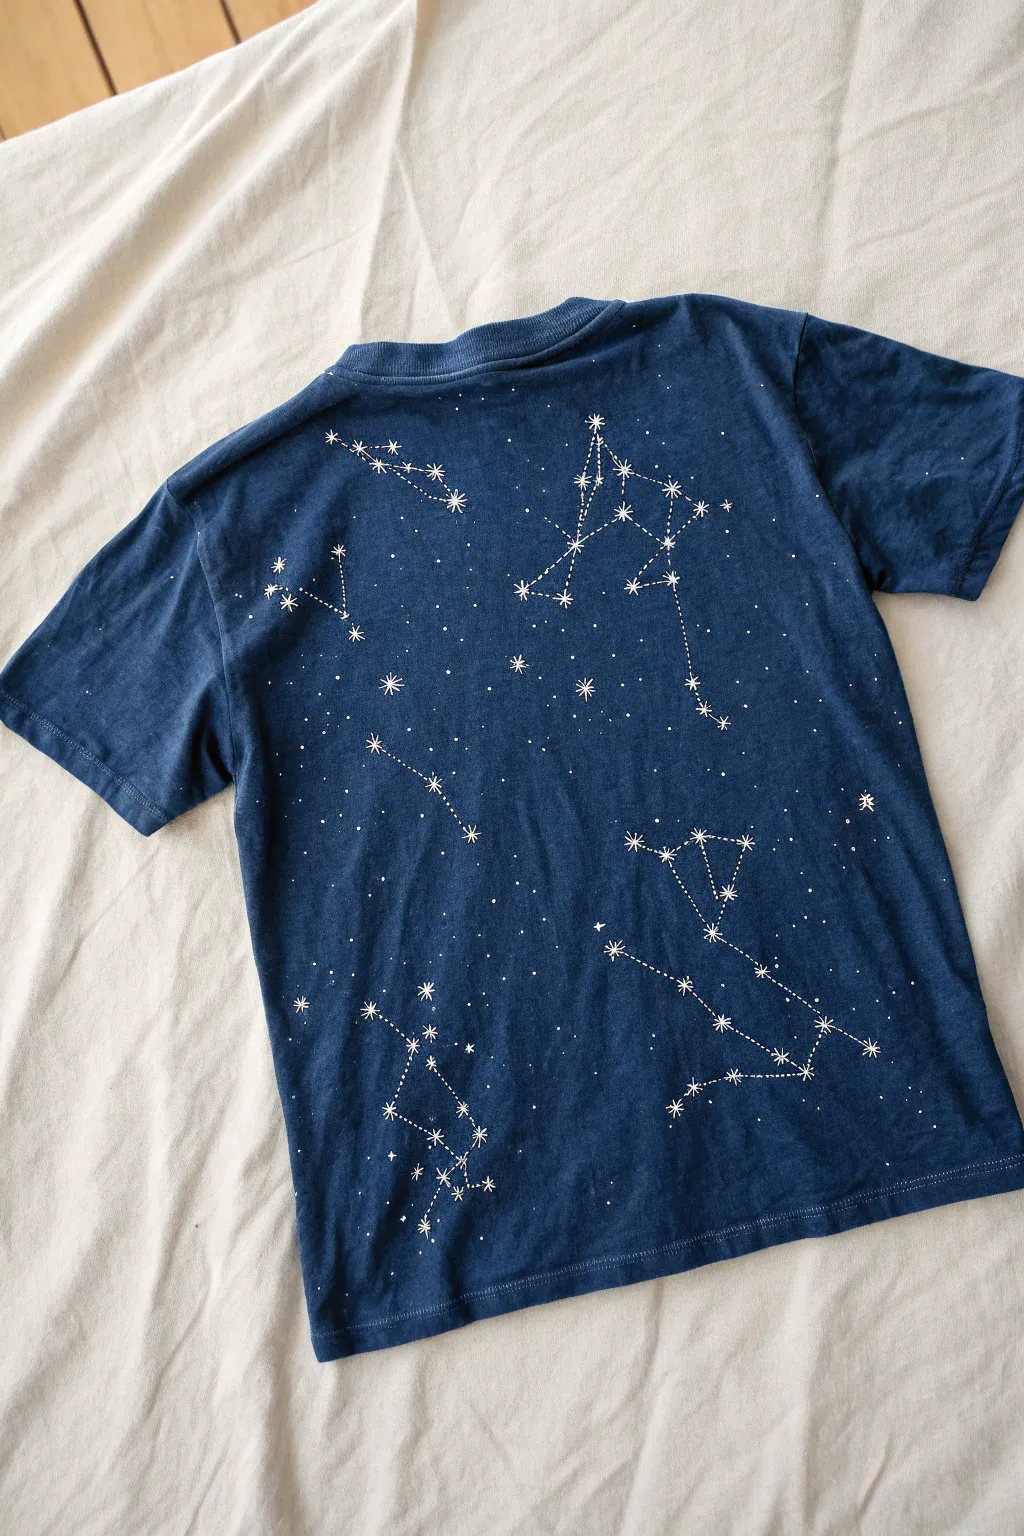
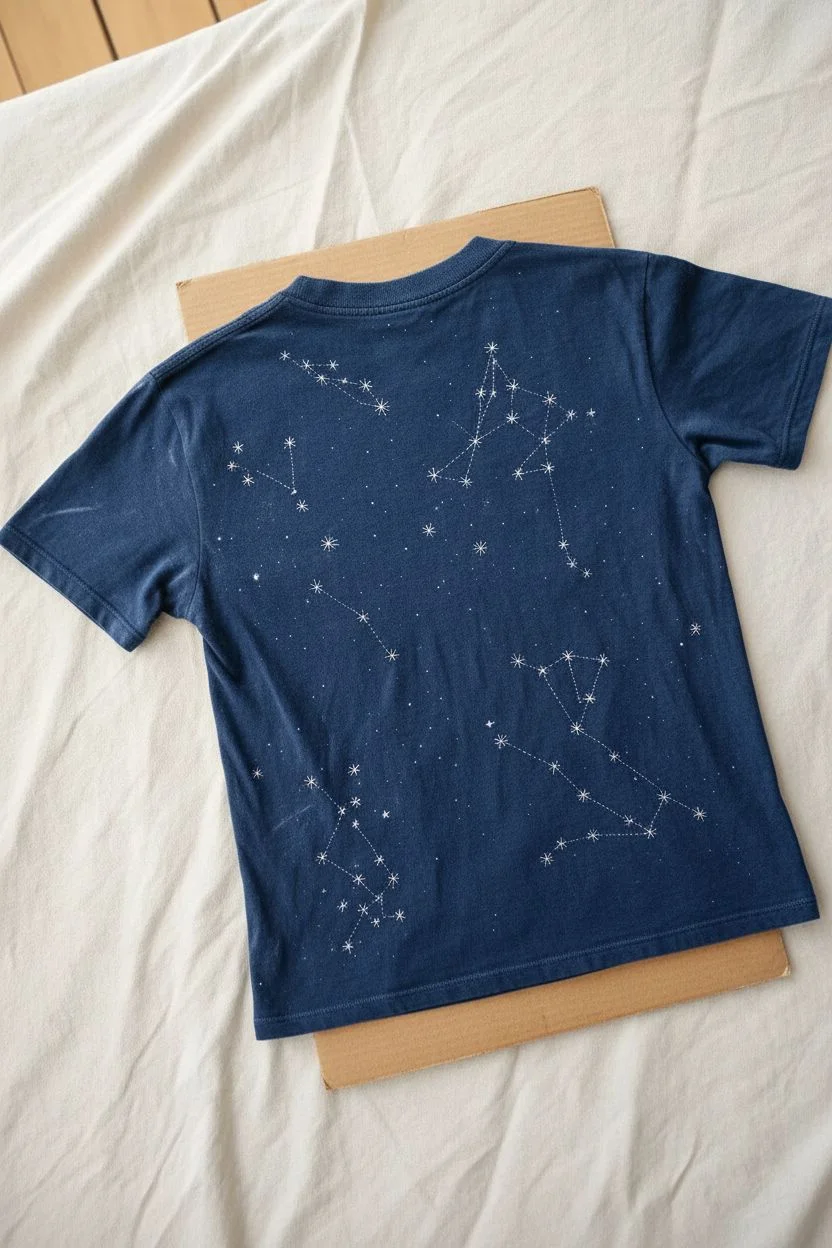
Transform a plain dark t-shirt into a wearable night sky using the magic of bleach. This project creates a stunning, intricate constellation map on the back panel that looks professionally printed but is entirely handmade.
Step-by-Step Guide
Materials
- Dark navy or black cotton t-shirt (100% cotton works best)
- Bleach pen or gel bleach
- Household liquid bleach
- Small synthetic paintbrush (fine tip)
- White tailor’s chalk or a white charcoal pencil
- Piece of cardboard (to fit inside the shirt)
- Ruler
- Printed constellation map or reference photo
- Small cup or bowl
- Protective gloves
- Paper towels
Step 1: Preparation & Mapping
-
Prepare your workspace:
Lay your dark t-shirt flat on a protected surface. Insert a piece of cardboard inside the shirt, specifically under the back panel where you’ll be working, to prevent bleach from soaking through to the front. -
Smooth the canvas:
Use your hands to smooth out any wrinkles on the back of the shirt, ensuring the fabric is taught against the cardboard insert. -
Choosing constellations:
Look at your reference photo or star map. Identify the major constellations you want to feature, such as Cassiopeia, Ursa Major, or Cygnus. -
Sketch the stars:
Using your white tailor’s chalk, lightly mark the positions of the main stars for your chosen constellations directly onto the fabric. Don’t worry about drawing the connecting lines yet; just focus on the anchor points. -
Connect the dots:
Once your star points are placed, use a ruler and the chalk to lightly sketch the connecting lines, creating the geometric shapes of the constellations. -
Review the layout:
Step back and look at the composition. If a constellation looks crooked or too crowded, simply brush the chalk away and re-mark it before moving on to the bleach.
Clean Lines Hack
Use a bleach pen or bleach gel for the main stars and lines instead of liquid bleach. The thicker consistency prevents it from bleeding into the fabric grain.
Step 2: Bleaching the Stars
-
Prepare the bleach:
Pour a small amount of liquid bleach into a cup. Put on your protective gloves to keep your skin safe. -
Create major stars:
Dip a fine-tipped paintbrush into the bleach. Touch the tip to the center of your largest chalk star marks. Hold it there for a second to let the bleach wick into a small circle. -
Add starburst details:
For the brightest stars, use the very tip of the brush to pull tiny lines outward from the center dot, creating a classic four or eight-point starburst shape. -
Draw the constellation lines:
Reload your brush sparingly. Carefully paint dotted or dashed lines over your chalk guides to connect the stars. I find dashed lines look more like vintage star maps than solid ones. -
Wait for the color change:
Pause for a moment and watch the fabric. The bleach takes a minute or two to lift the dye, turning from wet dark spots to rusty orange, and finally to white or cream.
Bleach Not Lightening?
If the design stays orange and won’t turn white, your bleach might be old. Fresh bleach is crucial for high contrast on dark fabrics. Buy a new bottle and re-apply.
Step 3: Adding Atmosphere
-
Fill the empty space:
Dip the brush again and add random, smaller dots in the negative spaces between your constellations to represent distant stars. -
Create variation:
Make some stars tiny pinpricks and others slightly larger dots. Varying the size adds depth and realism to your galaxy. -
Optional splatter technique:
If you want a dense Milky Way look, load the brush with bleach and gently tap the handle against your finger over the shirt to create a fine mist of tiny spots. -
Let it process:
Allow the bleach to sit on the fabric until it has lightened to your desired shade. This usually takes about 10 to 20 minutes, but check frequently. -
Rinse immediately:
Once the design is bright enough, immediately remove the cardboard and rinse the shirt thoroughly in cold water to stop the chemical reaction. -
Wash and dry:
Throw the shirt in the washing machine on a gentle cycle, then dry as normal. This ensures all bleach residue is gone and the fabric is safe to wear.
Now you have a custom piece of wearable art that looks beautiful from every angle.

PENCIL GUIDE
Understanding Pencil Grades from H to B
From first sketch to finished drawing — learn pencil grades, line control, and shading techniques.
Explore the Full Guide
Detailed Moth Illustration in Bleach
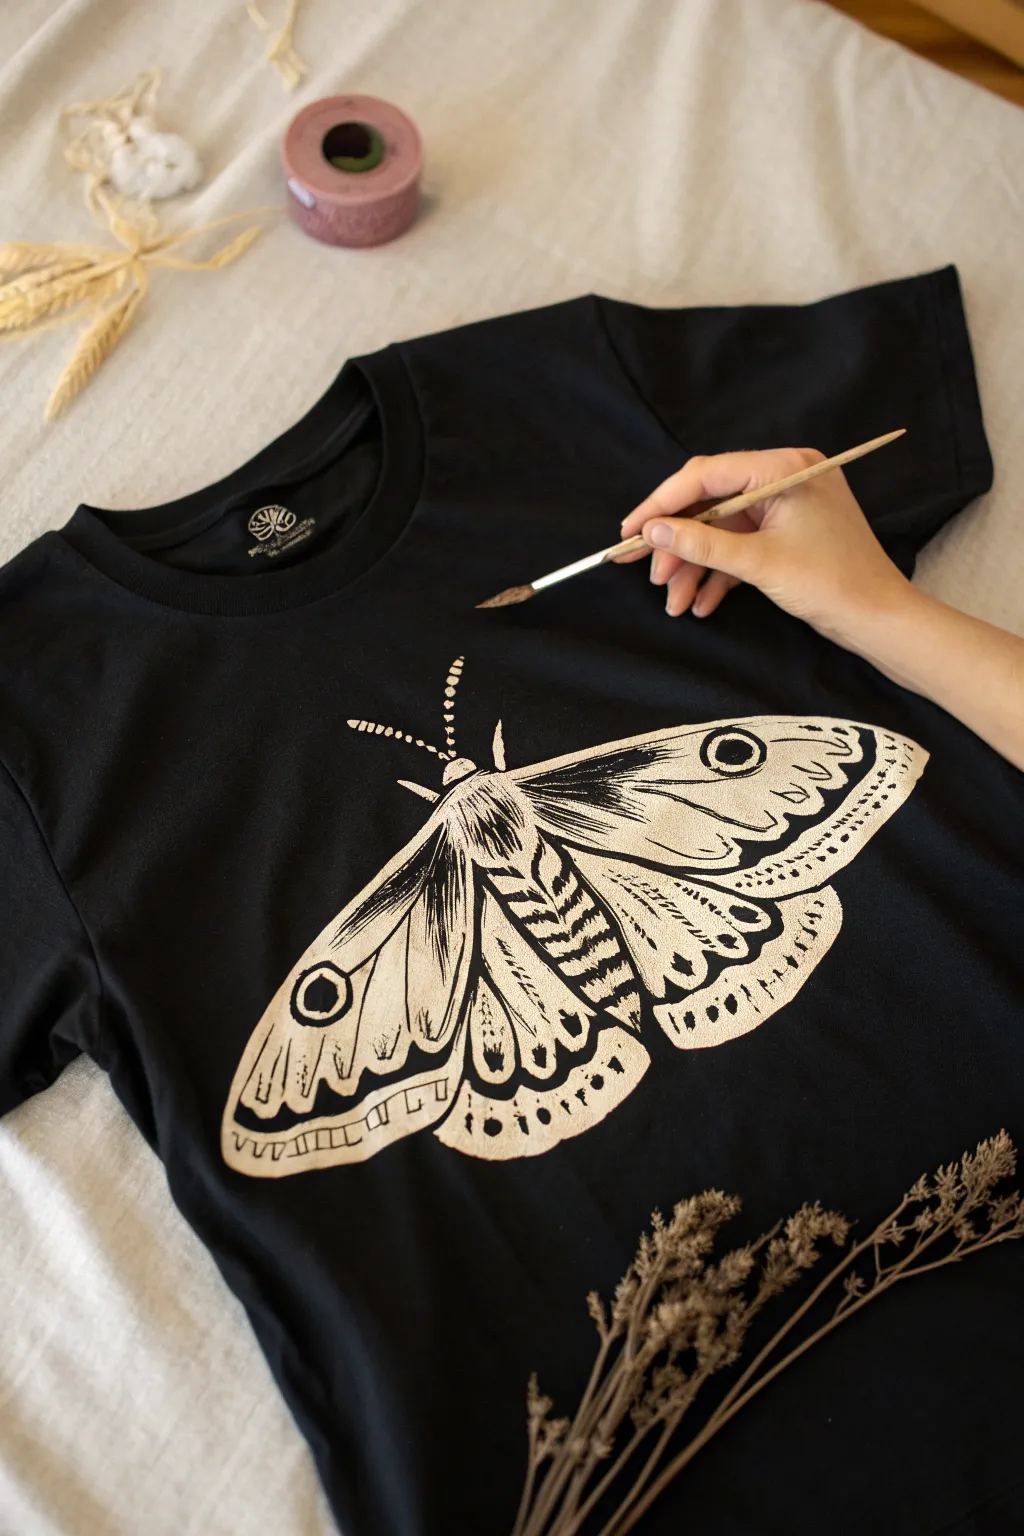
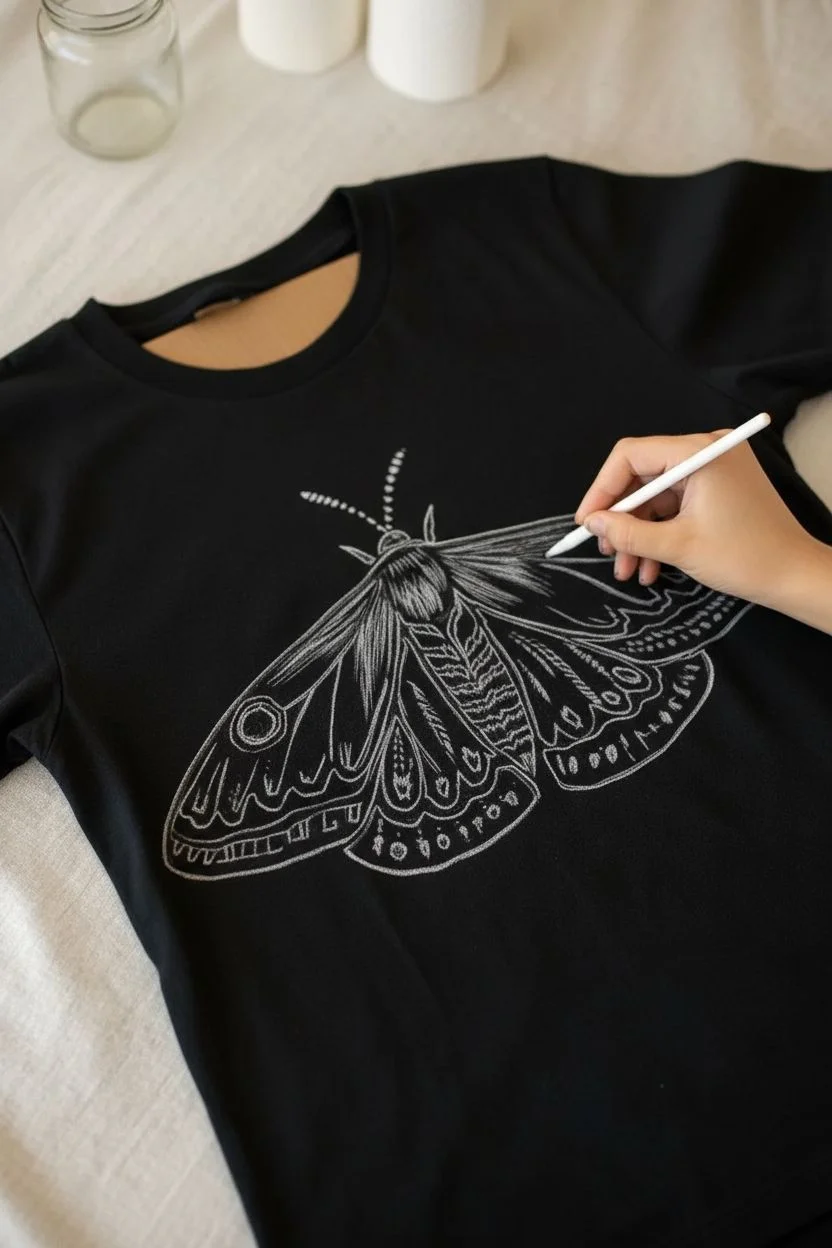
Transform a plain black tee into wearable art with this striking moth design created entirely by removing color rather than adding it. The bleach painting technique allows for incredible detail, resulting in a permanent, high-contrast illustration that won’t crack or fade over time.
Step-by-Step Tutorial
Materials
- Black cotton t-shirt (100% cotton works best)
- Household bleach
- Small glass jar or ceramic dish
- Synthetic paintbrushes (fine liner for details, small round for filling)
- White gel pen or chalk pencil
- Cardboard or plastic insert
- Paper towels
- Protective gloves
- Reference image of an Emperor Moth or similar species
Step 1: Preparation & Sketching
-
Prepare your workspace:
Work in a well-ventilated area. Place a piece of cardboard or plastic inside the shirt directly under where you plan to paint. This prevents the bleach from soaking through to the back of the shirt. -
Smooth the fabric:
Pull the fabric taut against the cardboard insert and secure it with clips or masking tape if necessary to prevent shifting while you work. -
Draft the outline:
Using a white gel pen or a chalk pencil, lightly sketch the symmetrical shape of the moth onto the black fabric. Start with the central body, then extend the upper forewings and the rounded hindwings. -
Add guide lines:
Sketch in the major internal patterns, such as the eye-spots on the wings and the segmented sections of the abdomen. Don’t worry about tiny details yet; just get the main proportions right.
Step 2: Bleach Application
-
Mix your solution:
Pour a small amount of liquid bleach into your glass or ceramic dish. For beginners, I recommend a 50/50 mix of bleach and water to slow down the reaction, but for the bright white seen in the photo, use full-strength bleach. -
Test on a hidden spot:
Dab a tiny dot of bleach on the inside hem of the shirt to see how fast it reacts. Cotton usually turns orange-rust quickly, then lightens to cream. -
Outline the wings:
Dip a fine liner brush into the bleach, wipe off the excess on a paper towel, and carefully trace your chalk outline. The bleach will bleed slightly, so paint just inside your sketch lines. -
Paint the upper wings:
Switch to a slightly larger round brush to fill in the larger cream areas of the forewings. Leave thin black lines of negative space to represent the veins in the wings. -
Create the eye-spots:
On the wing tips, paint a circle of bleach but leave a solid black dot in the center. This contrast creates the classic moth ‘eye’ pattern. -
Detail the abdomen:
Paint the body segment by segment. Use short, curved strokes to create the fuzzy texture of the moth’s thorax and abdomen, leaving thin black gaps between the segments. -
Fill the lower wings:
Move to the hindwings. Fill in the broad sections with bleach, again being careful to leave black structural lines (veins) untouched. The bleach needs to be saturated enough to turn the fabric nearly white. -
Add texture marks:
Use your finest brush to add stippling (tiny dots) or hatch marks inside the lighter areas. This shading mimics the dusty texture of moth wings. -
Paint the antennae:
Very carefully paint the two feathery antennae extending from the head. Use a ‘dry brush’ technique with very little liquid to keep these lines crisp and prevent spreading.
Bleach Bleeding?
If bleach spreads too fast, your brush is too wet. Blot it on a paper towel before touching the fabric. Use a black fabric marker to correct mistakes after washing.
Step 3: Finishing Touches
-
Wait and watch:
Allow the bleach to sit and react. You will see the color lift from rust-orange to a pale yellow or cream over the next 10-20 minutes. -
Re-apply for brightness:
If certain areas aren’t light enough, apply a second layer of bleach carefully over the dry first layer to achieve that high-contrast bone-white color. -
Neutralize the bleach:
Once you are happy with the lightness, rinse the shirt immediately in cold water. You can also spray it with a mixture of hydrogen peroxide and water (1:10) to instantly stop the chemical reaction. -
Wash and dry:
Hand wash the shirt with mild detergent and hang it to dry. This removes any residual chemicals and chalk marks. -
Iron the design:
Once dry, iron the shirt inside out to smooth the fibers back down, leaving you with a soft, permanent design.
Add Celestial Magic
Surround the moth with tiny bleach-dotted stars and a crescent moon phases above the antennae to give the illustration a mystical, nighttime vibe.
Enjoy wearing your unique, hand-painted creation that captures the beauty of nature in negative space
Ocean Wave Linework With Bleach Foam
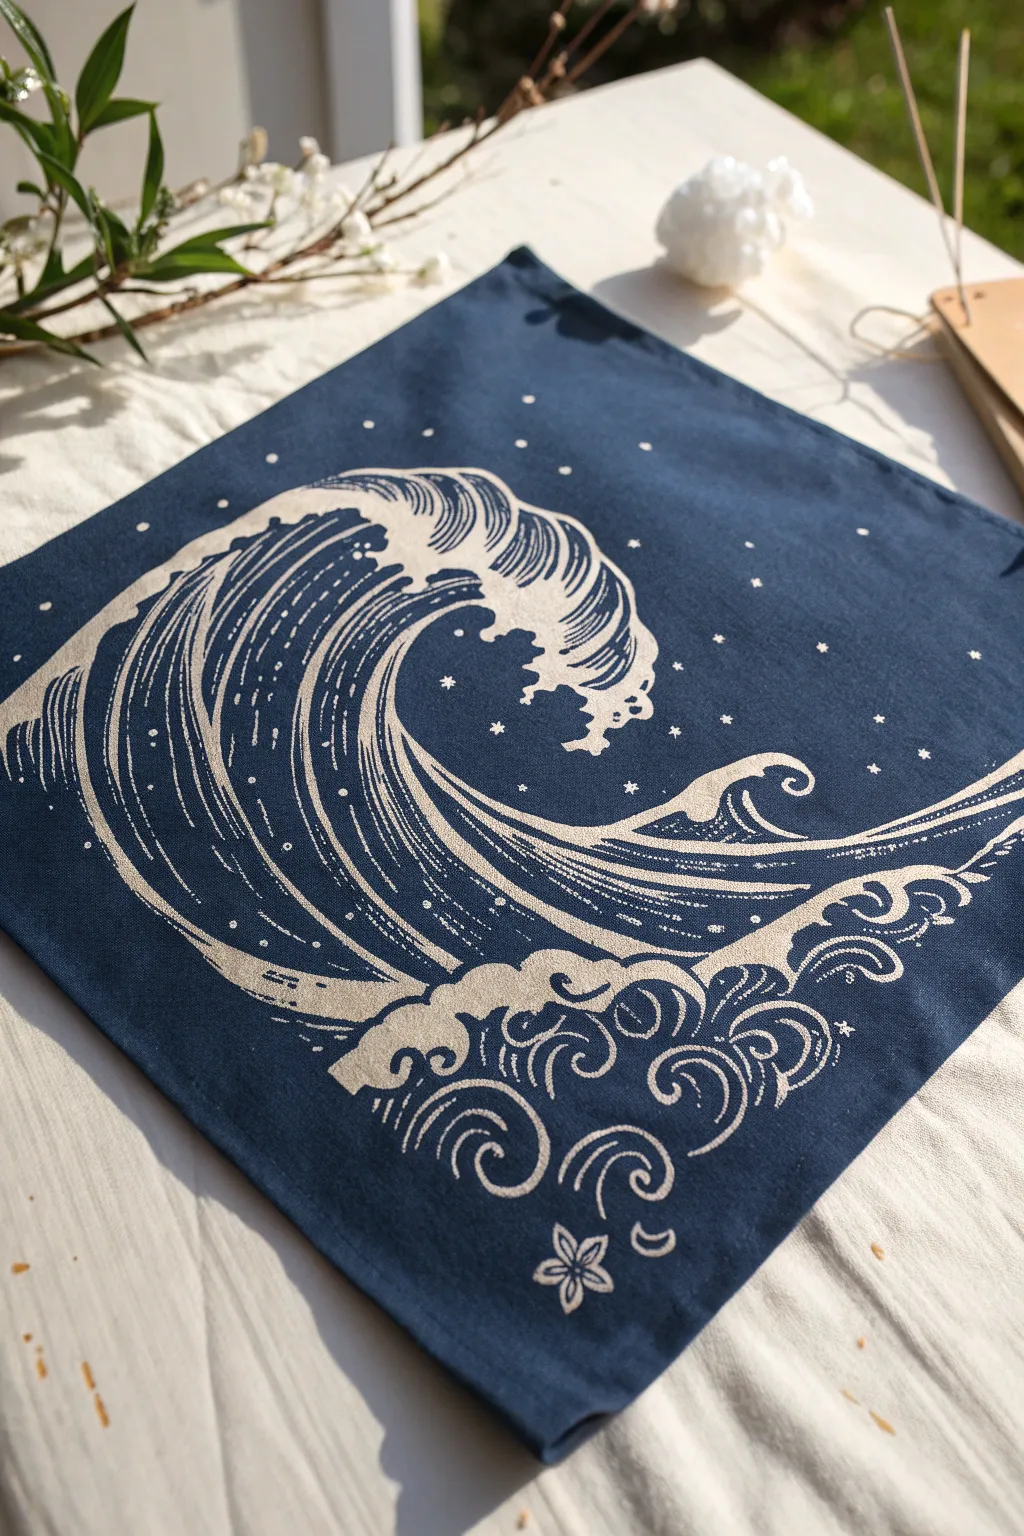
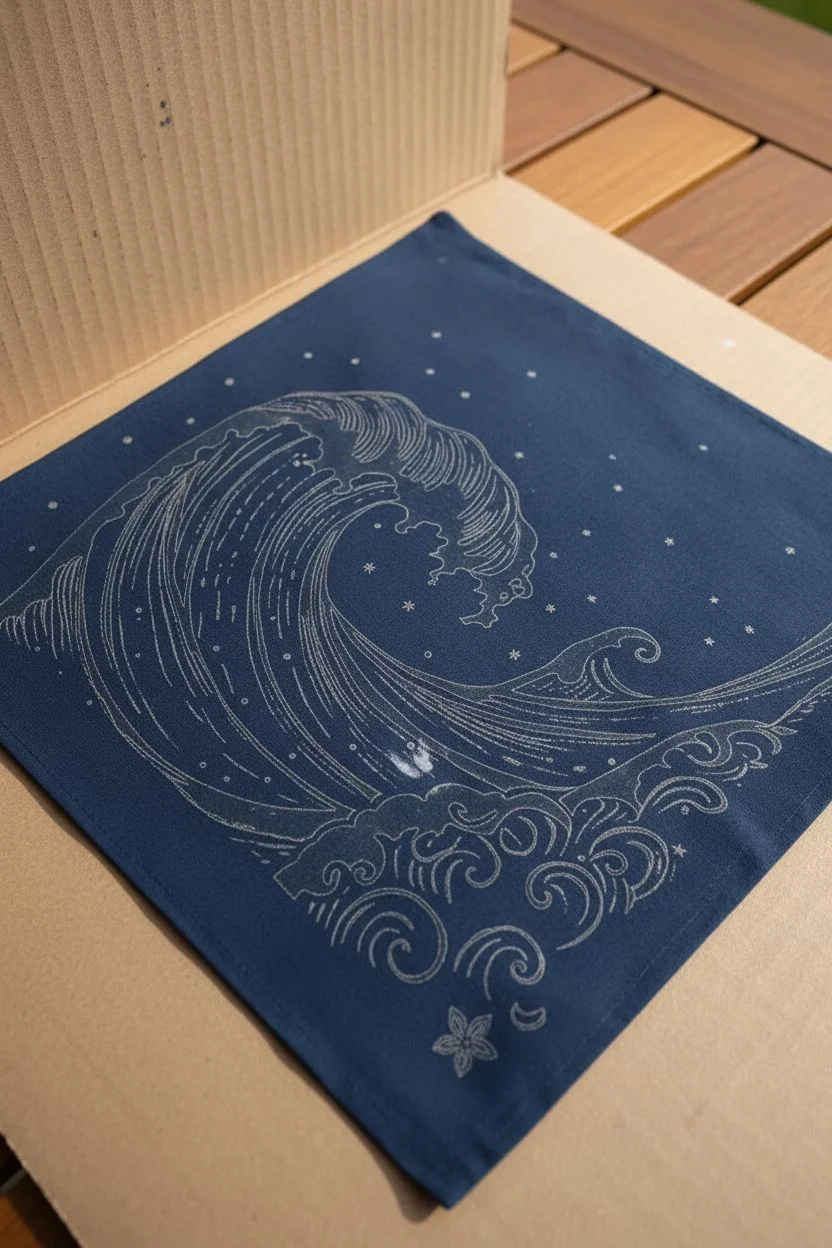
Transform a plain dark fabric into a dynamic seascape using nothing but bleach and a fine brush. This project captures the energy of Japanese woodblock prints with intricate linework and bubbly foam details that emerge as the bleach lifts the indigo dye.
Step-by-Step Tutorial
Materials
- Dark blue cotton napkin or bandana (100% cotton works best)
- Household liquid bleach
- Bleach pen (gel formula)
- Small glass or ceramic dish for liquid bleach
- Fine liner brush (size 0 or 00)
- White gel pen (optional, for sketching)
- Cardboard or plastic barrier
- Iron and ironing board
- Paper towels
- Protective gloves
Step 1: Preparation and Sketching
-
Prepare your workspace:
Lay down your protective barrier (cardboard or plastic) on a flat surface. Bleach bleeds through fabric instantly, so do not skip this step or you risk ruining the surface underneath. -
Secure the fabric:
Place your dark blue cotton fabric flat on the barrier. Smooth out any wrinkles with your hand or give it a quick press with an iron if it’s deeply creased. -
Plan the composition:
Sketch the wave design lightly directly onto the dry fabric using a white gel pen. Focus on the big sweeping curve first, then mark the general areas for the foam and the lower currents.
Brush Control Pro Tip
Synthetic brushes work best with bleach. Natural hairs can dissolve or become brittle. If your lines are bleeding, your brush is too wet—blot it on a paper towel before touching the fabric.
Step 2: Painting the Wave Body
-
Set up your bleach palette:
Pour a very small amount of liquid bleach into your glass dish. Do not dilute it for this project, as we want high contrast against the dark blue. -
Begin the main curve:
Dip your fine liner brush into the bleach. Wipe the excess on the rim so the brush isn’t dripping. With a steady hand, trace the large spine of the wave, starting from the left and arching upwards. -
Create the striated texture:
Fill the body of the wave with long, thin parallel lines that follow the curve of the spine. Leave thin gaps of the original blue fabric between your bleach strokes to define the water’s movement. -
Add separation lines:
For the inner sections of the wave, paint thicker solid lines to separate the different currents. This helps create depth and dimension within the water wall. -
Monitor the color change:
Pause briefly. The bleach takes a minute to fully activate. You should see the lines turning a rusty orange before settling into a creamy white.
Level Up: Color Tinting
After neutralizing and washing, use fabric markers or diluted watered-down acrylic paint to add subtle tints of teal or seafoam green over the bleached white areas for a colorful twist.
Step 3: Detailing the Foam and Spray
-
Outline the crest:
Paint the jagged, claw-like shapes of the crashing foam at the very top of the wave. Keep these lines crisp. -
Fill the foam areas:
Switch to the bleach pen (or use more liquid on a slightly larger brush) to fill in the solid white areas of the foam crest. The gel bleach pen is great here because it sits on top of the fabric and creates a very bright white. -
Detail the lower currents:
At the base of the wave, paint swirling circular patterns to represent churning water. Use simple C-curves and S-curves. -
Add distant spray:
Create the illusion of water spray by adding tiny dots of bleach around the main wave and crest. Vary the size of the dots slightly for a natural look. -
Include celestial elements:
Scatter small star-shaped dots or tiny crosses in the negative space around the wave to suggest a night sky or sparkling atmosphere.
Step 4: Finishing Touches
-
Paint the bottom flourish:
Add a small flower or star icon at the very bottom center of the design as a signature mark. -
Review and refine:
Look over the entire piece. If any lines look too faint, carefully go over them a second time with fresh bleach to brighten them. -
Neutralize the bleach:
Once dry to the touch, submerge the fabric in a water bath mixed with hydrogen peroxide (1 part peroxide to 10 parts water) to stop the chemical reaction. This prevents the fabric from deteriorating over time. -
Wash and dry:
Rinse the fabric thoroughly with plain water, then wash with mild detergent. Hang to dry or tumble dry low.
Your finished wave will have a timeless, handcrafted look that is perfect for a wall hanging or unique table setting


Animal Silhouette With Bleach Star Fill
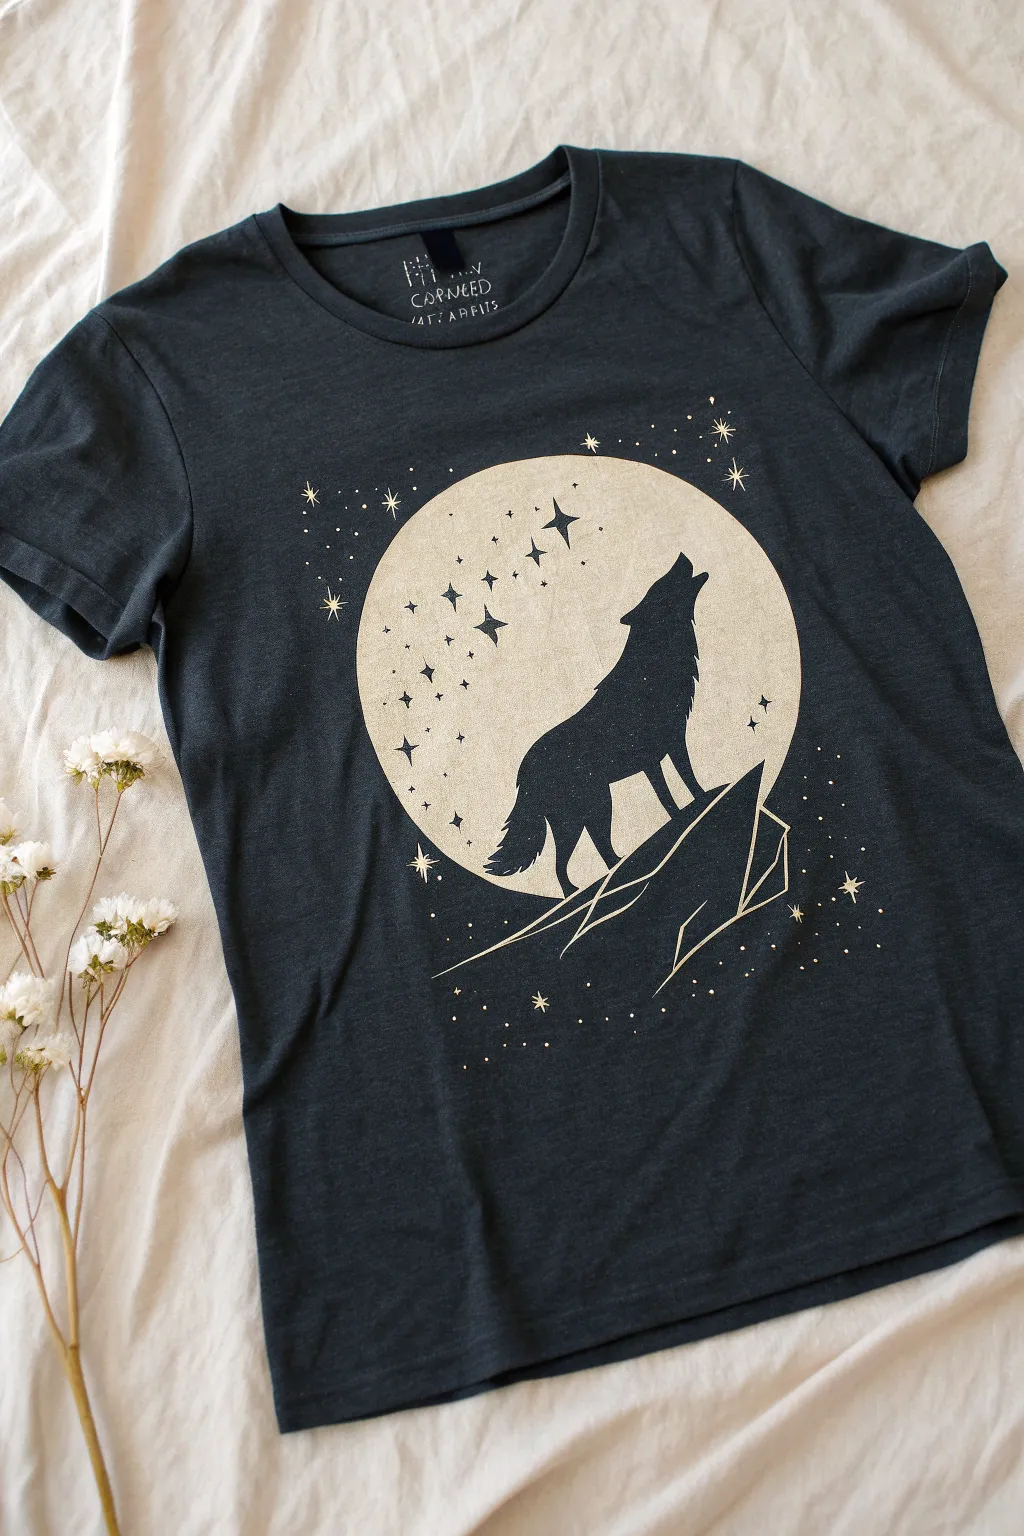
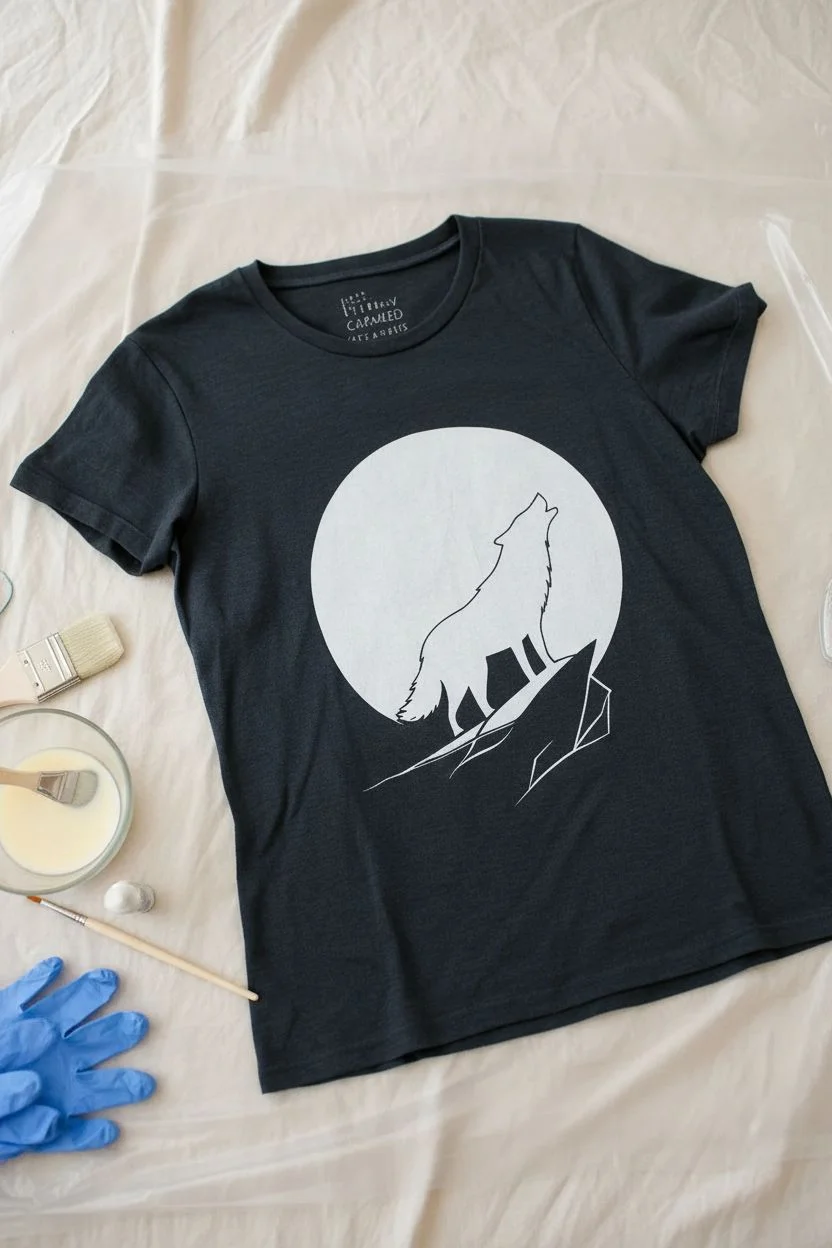
Create a mystical night scene on a dark tee using the power of bleach to lift color away. This project uses negative space techniques to reveal a howling wolf silhouette against a glowing moon, framed by a scattering of starlight.
Step-by-Step Guide
Materials
- Dark grey or navy cotton t-shirt
- Bleach (liquid, regular strength)
- Plastic or glass bowl
- Synthentic paintbrushes (various sizes)
- Freezer paper or stencil vinyl
- Iron (if using freezer paper)
- Craft knife or cutting machine (like Cricut)
- Cardboard piece (to fit inside shirt)
- Spray bottle with water (optional)
- Hydrogen peroxide (to stop bleach)
- Protective gloves and mask
Step 1: Preparation & Stencil Creation
-
Prepare your workspace:
Lay down plastic or a drop cloth to protect your table from accidental bleach spills. Ensure the room is well-ventilated, as bleach fumes can be strong. -
Insert barriers:
Slide a thick piece of cardboard inside the t-shirt to prevent bleach from soaking through to the back layer. -
Design the stencil:
Draw or print a silhouette of a howling wolf standing on a jagged rock. You also need a large circle for the moon. -
Cut the stencil:
Using freezer paper (shiny side down) or vinyl, carefully cut out the wolf and rock shape. Keep the *positive* shape (the wolf itself), not the outline. -
Secure the stencil:
Place the wolf silhouette onto the center of the shirt. If using freezer paper, iron it on with high heat (no steam) until the shiny side adheres completely to the fabric. -
Create the moon barrier:
Cut a large circle out of a separate piece of freezer paper or cardstock. This will be a reverse guide—you want to bleach the *inside* of this circle while protecting the wolf in the middle.
Crisp Edges Tip
Iron your freezer paper stencil really well, especially at the tiny points of the wolf’s fur. This prevents bleach from bleeding under the paper.
Step 2: Bleaching Process
-
Mix your solution:
Pour a small amount of liquid bleach into your bowl. I prefer to start with a 50/50 mix of bleach and water for a softer lift, but you can use full strength for brighter, faster results. -
Outline the silhouette:
Dip a medium brush into the bleach and carefully trace around the edges of your adhered wolf stencil. This ensures a crisp line where the animal meets the moon. -
Fill the moon:
Continue painting outward from the wolf to fill in the large circular moon shape. You don’t need a hard edge for the moon yet; just get the bulk of the color lifting. -
Add internal stars:
While the moon area is wet, use a fine-tip brush dipped in straight bleach to draw small four-point stars or dots inside the moon circle for extra brightness. -
Define the moon’s edge:
Use your circular guide or freehand a clean edge for the moon. Make sure the bleach coverage inside the circle is relatively even, though some patchiness adds texture. -
Create external stars:
Dip a fine detail brush or a toothpick into pure bleach. Dot small points around the outside of the moon to create a starry sky effect. -
Add starbursts:
Select a few of the outer dots and draw small cross shapes or long thin lines through them to create twinkling starbursts.
Step 3: Finishing Touches
-
Watch the color lift:
Let the bleach sit and process. You will see the fabric turn from dark to orange, then eventually to a pale cream or off-white. This usually takes 10-20 minutes. -
Neutralize the bleach:
Once you are happy with the lightness, spray the bleached areas with a mix of water and hydrogen peroxide, or dunk the shirt in a water bath to stop the chemical reaction. -
Remove stencil:
Peel off the freezer paper or vinyl wolf silhouette to reveal the original dark fabric underneath, creating a sharp contrast against the bleached moon. -
Wash and dry:
Rinse the shirt thoroughly in cold water, then wash it alone in the washing machine with mild detergent to remove all bleach residue before wearing.
Galaxy Glow
After bleaching, use diluted fabric paint to add faint washes of purple or blue around the moon for a subtle, colorful galaxy aura.
Enjoy wearing your new celestial design and the magic of negative space art
Mandala Medallion Bleach Design
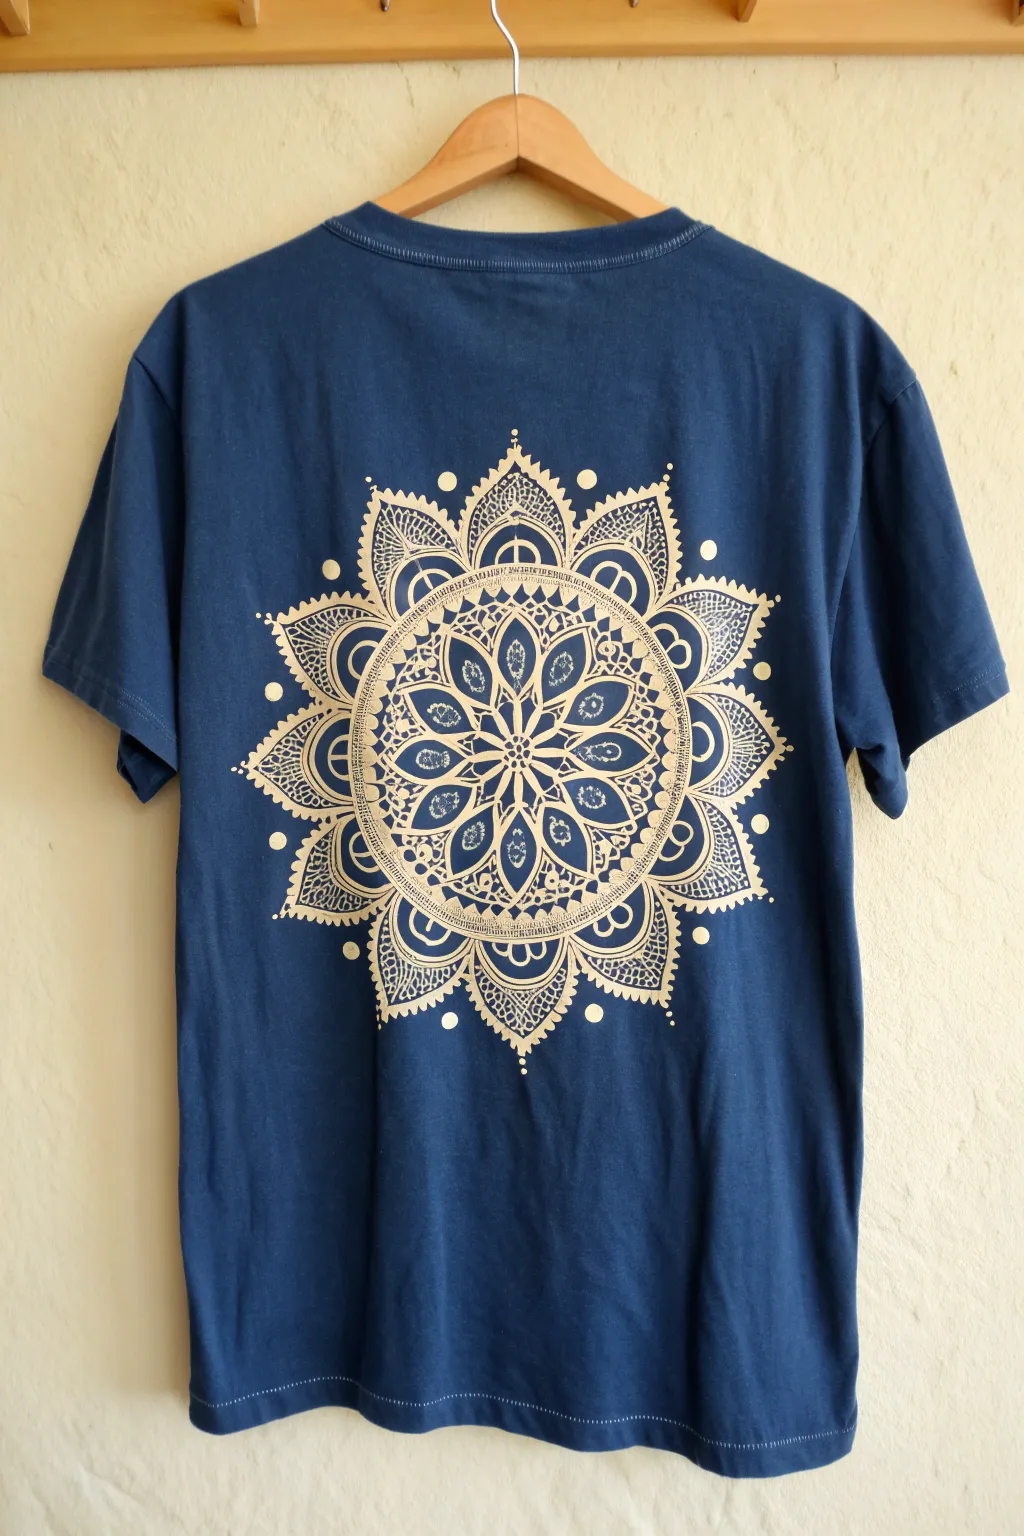

Transform a plain navy tee into a wearable piece of spiritual art with this intricate mandala design. The bleach lifts the dark pigment to reveal a warm, golden-tan hue, creating a striking contrast that looks professionally printed.
Detailed Instructions
Materials
- Navy blue cotton t-shirt (pre-washed)
- Bleach (liquid household bleach)
- Bleach pen (gel formula)
- Small plastic cups or palette
- Fine detail synthetic brushes (sizes 0, 00, and 1)
- White chalk or a white charcoal pencil
- Ruler and compass (or round objects for tracing)
- Cardboard or plastic barrier (to put inside the shirt)
- Protective gloves
- Paper towels
Step 1: Preparation & Mapping
-
Prepare the workspace:
Lay your pre-washed t-shirt flat on a hard, protected surface. Insert a piece of cardboard or a plastic cutting mat inside the shirt to prevent bleach from bleeding through to the front. -
Find the center:
Using a ruler, measure the width of the shirt to find the exact center point on the back. Mark this lightly with white chalk. -
Draw guide circles:
Use a compass with a chalk pencil attached, or trace various sizes of round household objects (bowls, plates, lids) to lightly draw concentric circles radiating from your center point. These will serve as guidelines for the mandala layers. -
Sketch the primary segments:
Divide your circles into even pie-slice segments using a ruler. For this specific design, an 8-point or 16-point division works best to keep the petals symmetrical. -
Draft the petals:
Sketch the large outer lotus petals and the inner floral shapes within your grid using the chalk. Don’t worry about perfection; the bleach handling is freehand, so the chalk is just a rough map.
Bleach Pen Control
Use a gel bleach pen for the solid dots. The thick gel sits on top of the fabric without spreading, creating perfectly crisp circles.
Step 2: Painting the Core
-
Pour the bleach:
Pour a small amount of liquid bleach into a plastic cup. It’s potent, so work in a well-ventilated area. -
Paint the center star:
Dip a size 1 brush into the bleach, wiping off excess on the rim. Paint the small central 8-pointed star flower. You will see the color change happen almost immediately. -
Create the inner petals:
Moving outward to the next layer, paint the rounded petals with teardrop shapes inside them. Use a stippling motion for the textured ‘dotted’ look inside the leaves. -
Add fine lines:
Switch to your smallest brush (size 00) for the delicate webbing and cross-hatching inside the middle ring of petals. Light pressure is key here to prevent the bleach from spreading too much.
Bleeding Lines?
If lines are spreading too much, blot your brush on a paper towel before painting. Too much liquid causes wicking in the cotton fibers.
Step 3: Detailed Outer Layers
-
Outline the large petals:
Trace the outlines of the largest, outermost lotus petals. Keep your hand steady and reload your brush frequently, as cotton absorbs liquid quickly. -
Fill with texture:
Instead of coloring the petals solid, use patterns. Fill alternating petals with a ‘fish scale’ or scalloped pattern using fine lines. -
Add decorative flourishes:
Inside the remaining large petals, add intricate swirls or tiny grid lines. I like to vary the density of lines to create visual depth and shading. -
The dot work border:
Using the handle end of your paintbrush or a bleach pen, place distinct dots around the very outer tips of the pointed petals to create a floating halo effect. -
Finalize dots and accents:
Add larger solid dots between the main petal points for balance. These solid circles anchor the airy design.
Step 4: Finishing Touches
-
Review and refine:
Step back and look at the whole design. If any lines look too faint, carefully go over them a second time to brighten the gold tone. -
Neutralize the bleach:
Once you are happy with the brightness (usually after 10-20 minutes of sitting), submerge the shirt in a sink/bucket of water mixed with hydrogen peroxide (1 part peroxide to 10 parts water) to stop the bleaching action. -
Wash and dry:
Rinse the shirt thoroughly, then wash it alone in the machine with mild detergent. Dry as normal to remove any chalk lines and fluff the fabric.
Enjoy wearing your custom mandala creation, knowing no one else has a shirt exactly like yours
Three-Tone Shading With Diluted Bleach Layers
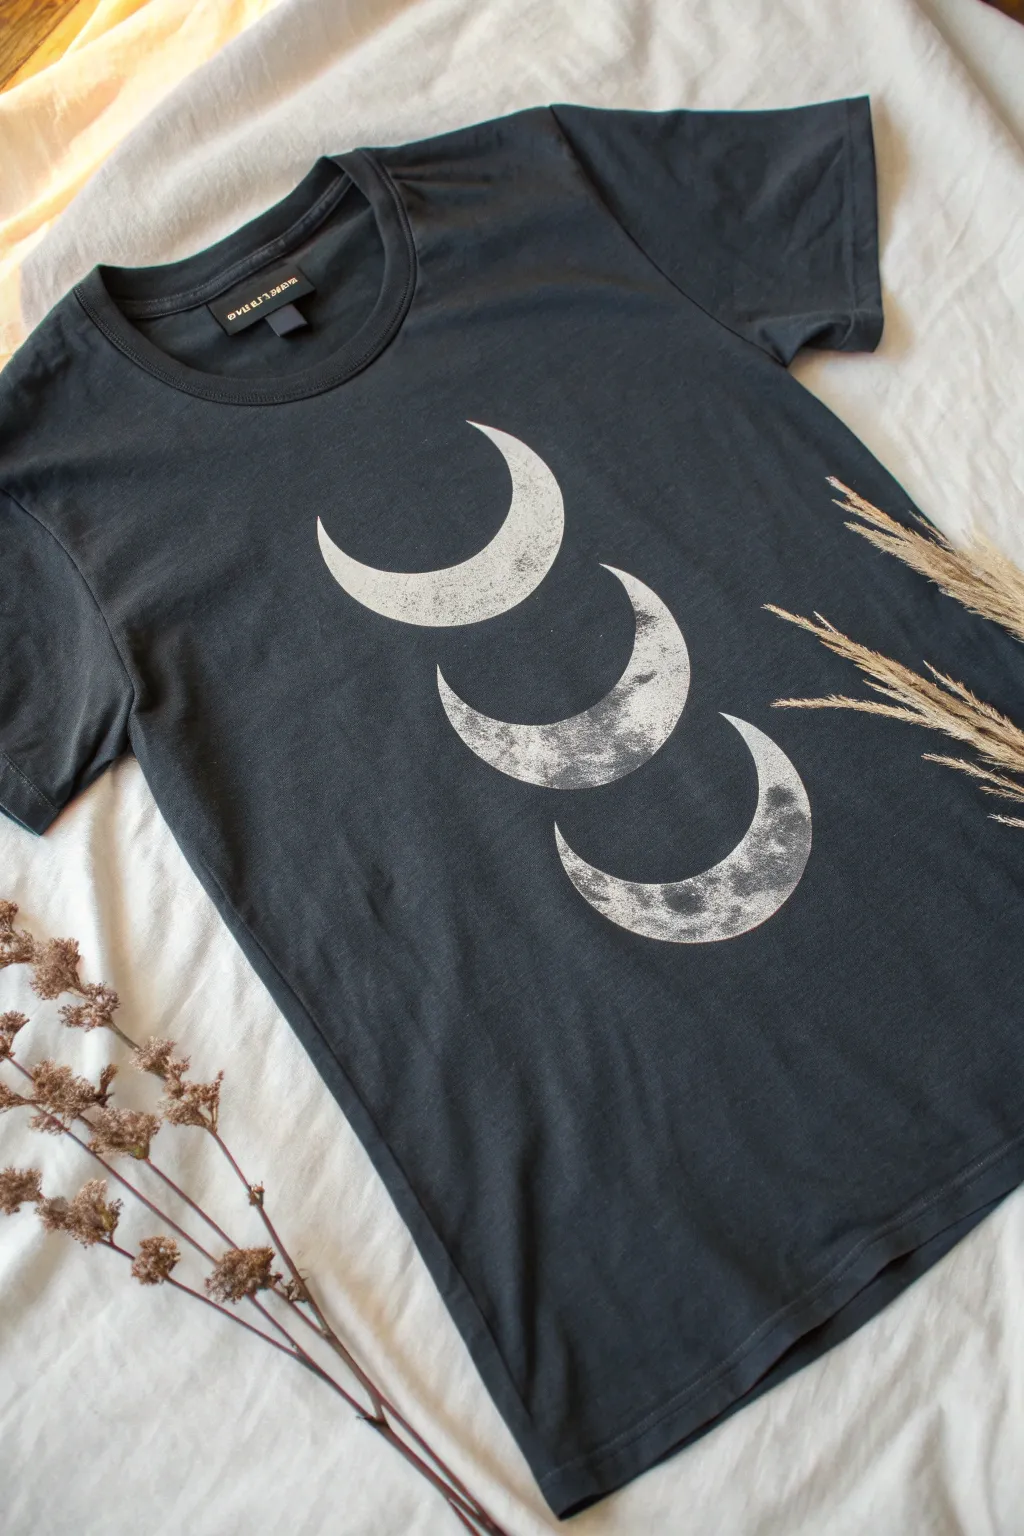
Transform a plain dark t-shirt into a celestial statement piece using simple bleach techniques. By blending different dilution strengths, you can achieve a realistic, textured moon surface with depth and dimension.
Step-by-Step Tutorial
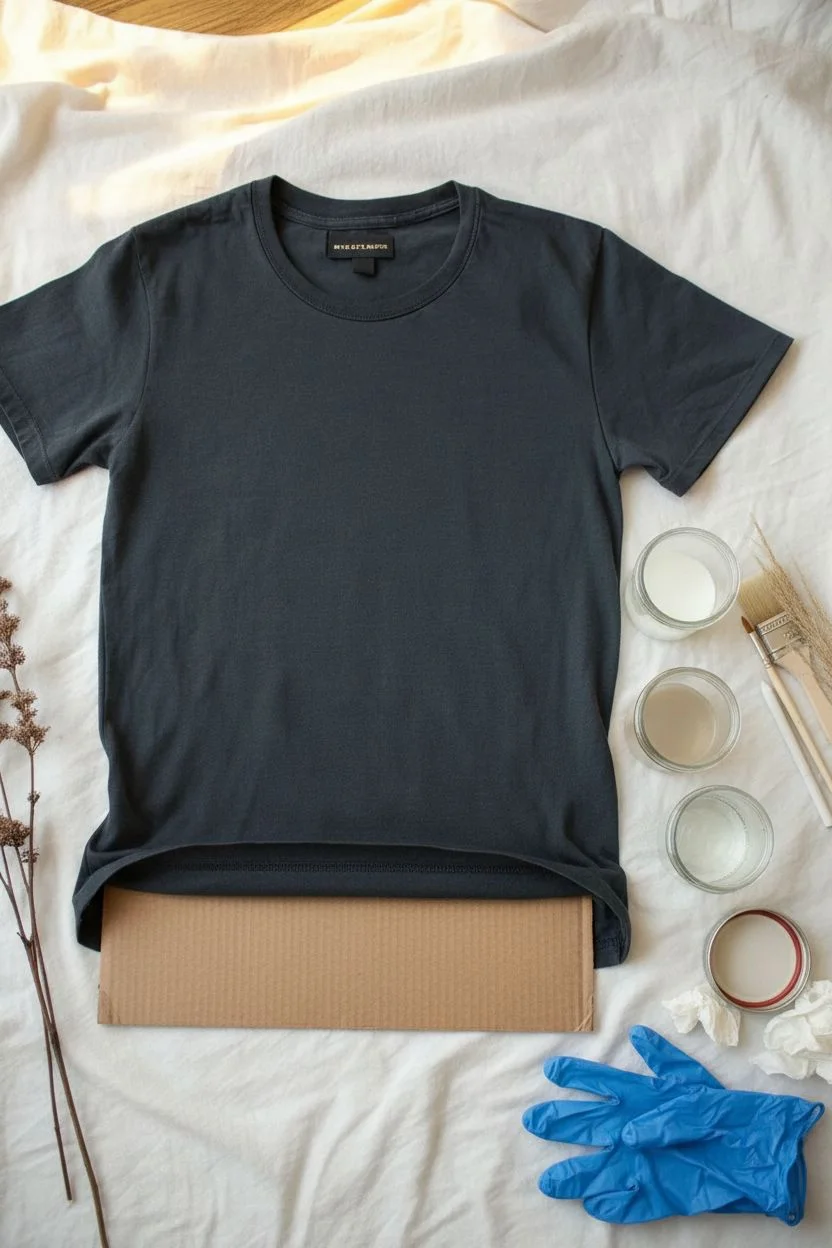
Materials
- Dark charcoal or black cotton t-shirt
- Liquid household bleach
- Water
- 3 small mixing cups or jars
- Paintbrushes (various sizes, synthetic bristles required)
- Cardboard insert for the shirt
- White chalk or fabric pencil
- Circular stencil or household object (bowl/lid)
- Paper towels
- Protective gloves
Step 1: Preparation & Setup
-
Prepare the workspace:
Lay your shirt flat on a protected surface in a well-ventilated area. Bleach fumes can be strong, so opening a window or working outside is ideal. -
Insert the barrier:
Slide a piece of cardboard inside the shirt. This is crucial to prevent the bleach from soaking through to the back of the garment. -
Mix bleach solutions:
Create three different bleach strengths in your small cups. Cup 1: 100% bleach. Cup 2: 50/50 bleach and water. Cup 3: 20% bleach and 80% water. This variety creates the tonal shading.
Synthetic Brushes Only
Always use synthetic brushes (like nylon). Natural hair brushes will be eaten away by the bleach chemicals within minutes, ruining your tools.
Step 2: Drafting the Design
-
Trace the circles:
Using a bowl lid or circular stencil, trace three circles vertically down the center of the shirt with white chalk. Space them evenly apart. -
Define the crescents:
Shift your circular object slightly to the right inside your traced circles and sketch a new inner curve. This creates the crescent moon shape you will be filling in. -
Refine the sketch:
Use the chalk to lightly sketch interior details, marking where you want the “craters” or dark spots to remain unpainted.
Step 3: Applying the Bleach
-
Start with the weakest solution:
Dip your brush into the 20% bleach solution (Cup 3). Paint the entire crescent shape, avoiding only the darkest crater spots. -
Wait for color change:
Allow the first layer to sit for a few minutes. You should see a faint rust or grey tone emerging. Don’t rush this; bleach takes time to develop. -
Add mid-tones:
Switch to the 50/50 solution (Cup 2). Dab this mixture onto the lighter areas of the moon, blending wet-on-wet with the previous layer to create soft transitions. -
Texture technique:
Use a stippling motion (rapid dotting) with an older, frayed brush to mimic the rough texture of the moon’s surface rather than painting smooth strokes. -
Apply highlights:
Use the 100% bleach solution (Cup 1) sparingly. Target the brightest edges of the crescent and the rims of the craters for maximum contrast. -
Blotting excess:
If a pool of bleach forms, gently blot it with a paper towel. Too much liquid can cause the design to bleed outside your chalk lines.
Bleeding Lines?
If the bleach starts spreading past your chalk outline, you’re using too much liquid on the brush. Blot your brush on paper towels before touching the fabric.
Step 4: Finishing Touches
-
Check the contrast:
Step back and look at the design. If the craters look too dark, add a tiny wash of the weakest solution to specific areas to soften them. -
Neutralize the bleach:
Once the design has reached the desired lightness (usually light grey or white), immediately rinse the shirt in cold water or dunk it in a hydrogen peroxide and water bath to stop the chemical reaction. -
Wash and dry:
Machine wash the shirt separately on a gentle cycle, then hang to dry. This removes any residual chalk and bleach smell.
Now you have a custom celestial tee perfect for layering or wearing on its own
Mixed-Media Finish: Bleach Plus Stitching Accents
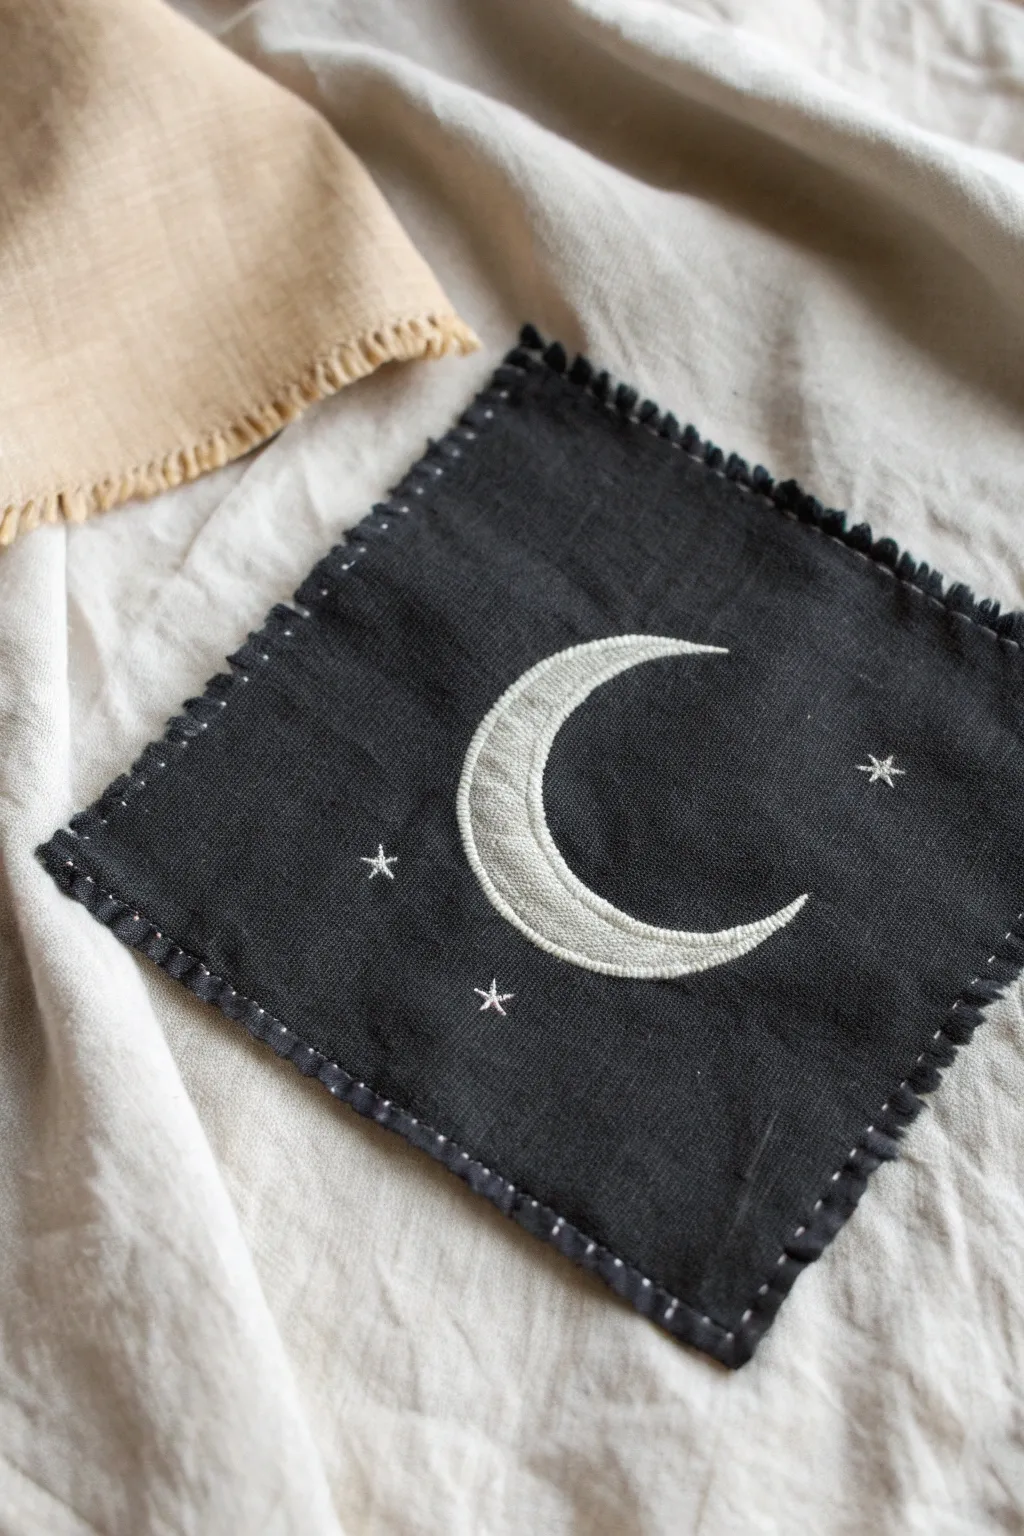
This stunning mixed-media project combines the ghostly, organic fade of bleach with the crisp definition of hand embroidery. The result is an ethereal crescent moon patch on dark linen that feels like a treasured, magical artifact.
Step-by-Step Guide
Materials
- Black linen fabric (pre-washed)
- Small square of scrap dark fabric (for testing)
- Household bleach
- Small glass or ceramic dish
- Synthetic round paintbrush (size 2 or 4)
- White gel pen or chalk pencil
- Embroidery hoop (4-6 inch)
- Embroidery floss (ecru or pale grey)
- Embroidery needle
- Scissors
- Paper towels
- Pinking shears (optional)
Step 1: Preparation & Mapping
-
Pre-wash your linen:
Ensure your black linen is washed and dried to remove any sizing chemicals that might repel the bleach. Iron it flat so you have a perfect canvas. -
Cut the rough square:
Cut your fabric into a square, leaving at least an inch of margin around your intended final patch size. I usually aim for a 5×5 inch square for a coaster-sized patch. -
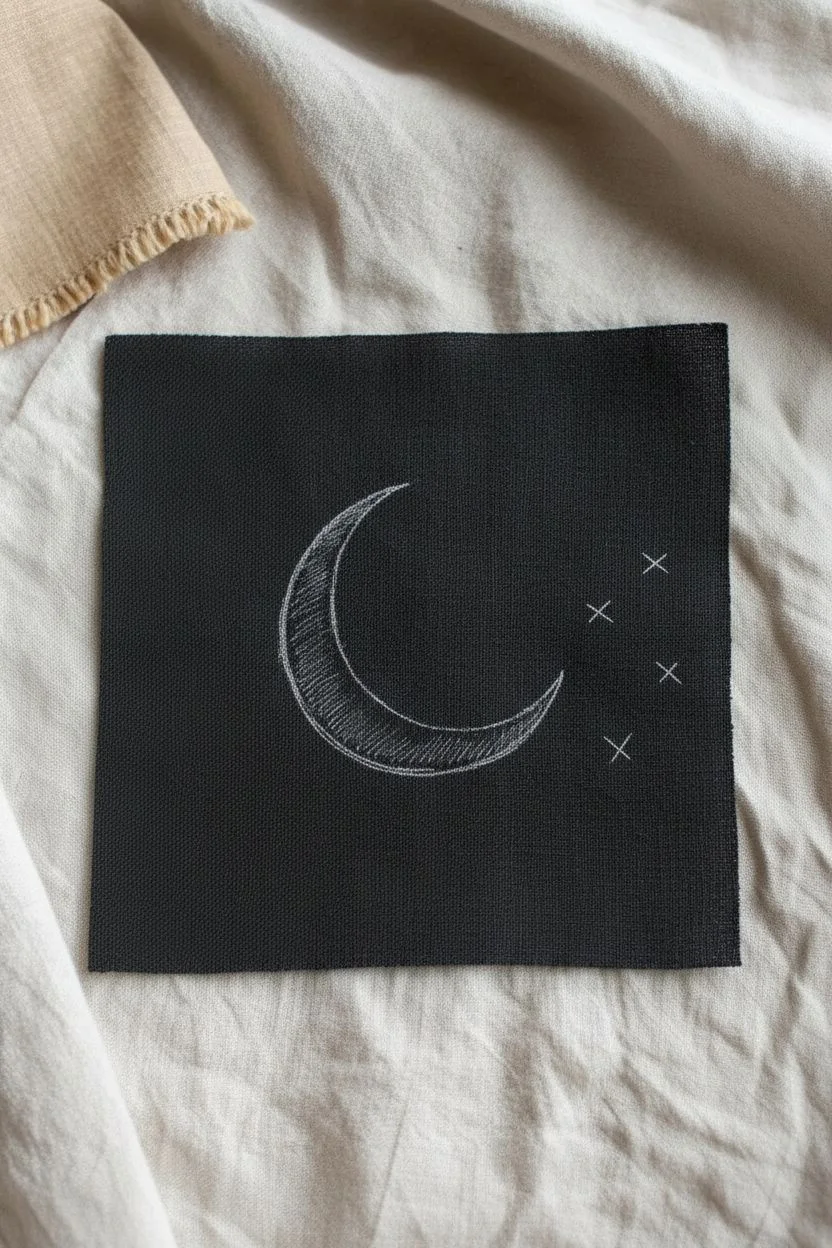
Draft the moon:
Using a white gel pen or a chalk pencil, lightly sketch a classic crescent moon shape in the center. Add three small dots or ‘x’ marks where you want your stars to sit.
Bleach Control Tip
If you are worried about bleach bleeding, lightly dampen the fabric with water first. It dilutes the bleach slightly but helps define the edges for a soft, watercolor look.
Step 2: Painting with Light
-
Test your bleach:
Pour a tiny amount of bleach into your glass dish. Before touching your main project, dip your brush and test it on that scrap fabric to see how fast it lifts the color. -
Paint the first layer:
Carefully paint the bleach inside your sketched moon outline. Use a confident stroke, but don’t overload the brush—you don’t want the bleach to bleed outside your lines. -
Wait and observe:
Let the bleach sit for a few minutes. You’ll see the black turn to rust, then eventually to a pale cream or grey. Linen can take bleach differently, so patience is key here. -
Apply a second coat (optional):
If the moon isn’t light enough after it dries, apply a precise second layer of bleach to brighten the center, leaving the edges slightly darker for a glow effect. -
Stop the reaction:
Once you are happy with the color, rinse the fabric thoroughly in cold water to stop the chemical reaction. Let it dry completely before stitching.
Step 3: Stitching the Accents
-
Hoop the fabric:
Place your dried fabric into the embroidery hoop, ensuring it is taut like a drum skin. -
Outline the crescent:
Using two strands of ecru floss, stitch a neat satin stitch or a split stitch along the very edge of the bleached area. This defines the moon’s shape sharply. -
Fill the texture:
For the interior of the moon, use long and short stitches or a running stitch following the curve of the crescent to add texture over the bleached background. -
Stitch the stars:
For the stars, create a simple small cross stitch, then add a smaller vertical cross over it to create an eight-point twinkle effect.
Level Up: Galaxy Dust
Dilute white acrylic paint with water and flick it off a toothbrush onto the dark areas of the linen to create a subtle galaxy of distant stars around your moon.
Step 4: Finishing Touches
-
Trim the patch:
Remove the hoop and cut the square to your final desired size. You can use pinking shears for a jagged edge or straight scissors for a clean look. -
Fray the edges:
Using a needle or your fingernails, gently pull away the horizontal and vertical threads at the very edge of the square to create a deliberate fringe. -
Secure the fringe:
To prevent the fringe from unraveling further, stitch a running stitch barrier about 1/4 inch inward from the raw edge. -
Final whip stitch detail:
For that charming rustic detail seen in the photo, use white thread to whip stitch around the border, just inside your fringed edge. Keep the spacing consistent.
This mystic little patch is now ready to be sewn onto a jacket or used as a unique coaster


Have a question or want to share your own experience? I'd love to hear from you in the comments below!