Glass art has this magical way of turning plain light into color, sparkle, and mood—almost like painting with sunshine. Here are some of my favorite glass art ideas that range from classic, can’t-go-wrong projects to a few surprising experiments for when you feel extra brave.
Classic Stained Glass Suncatchers
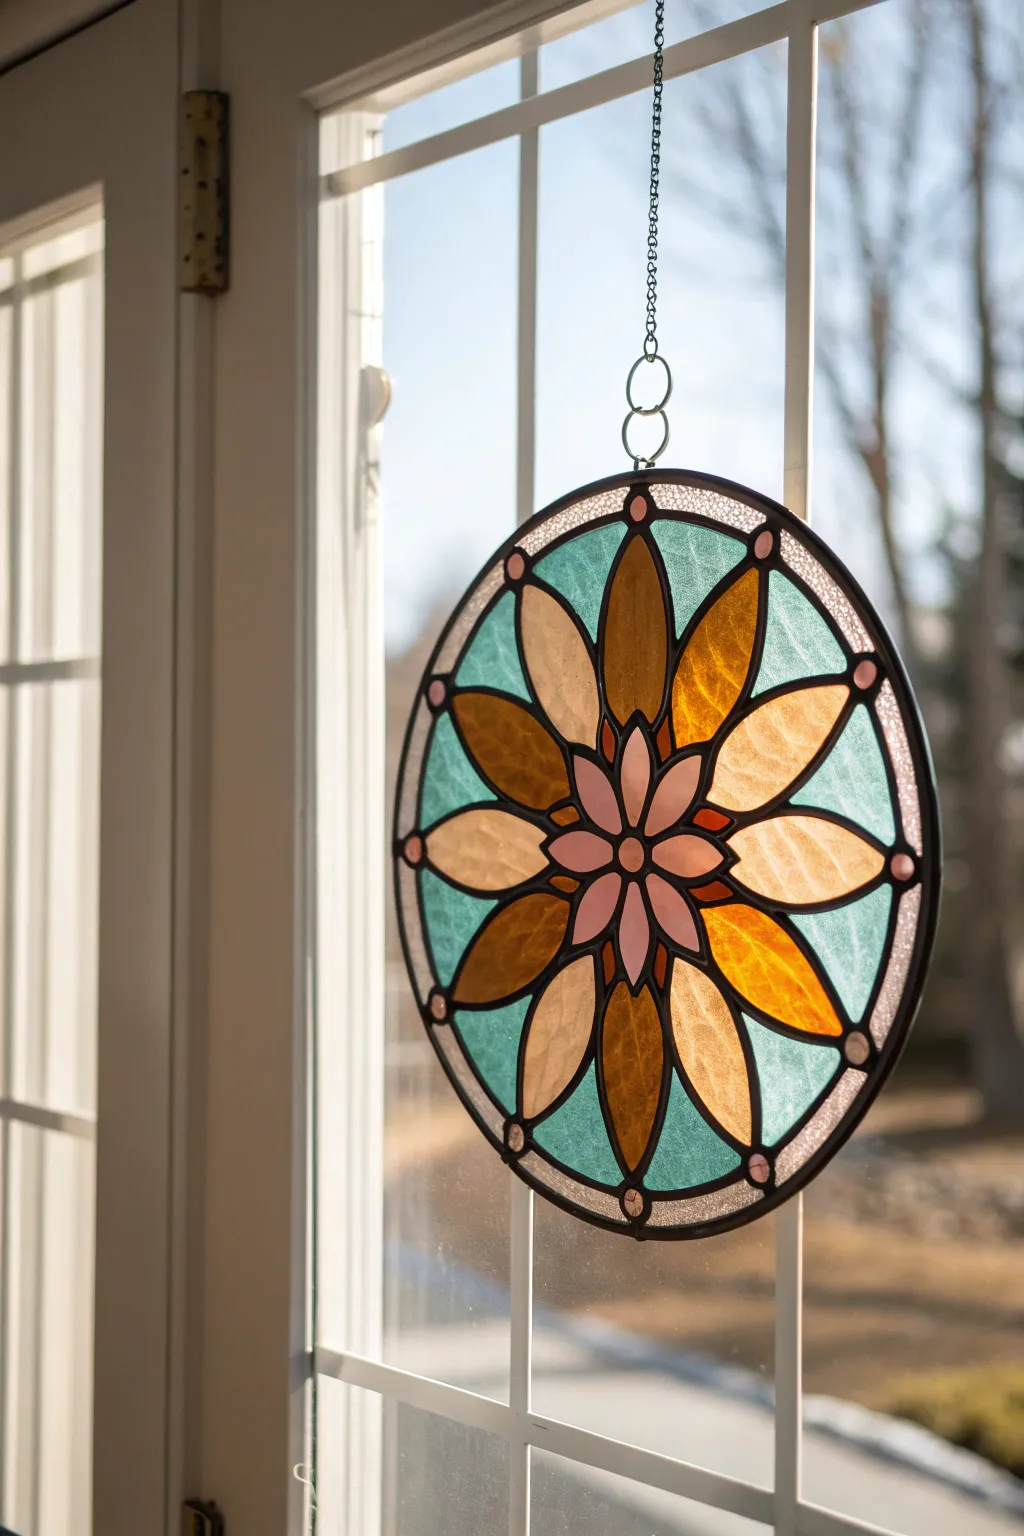
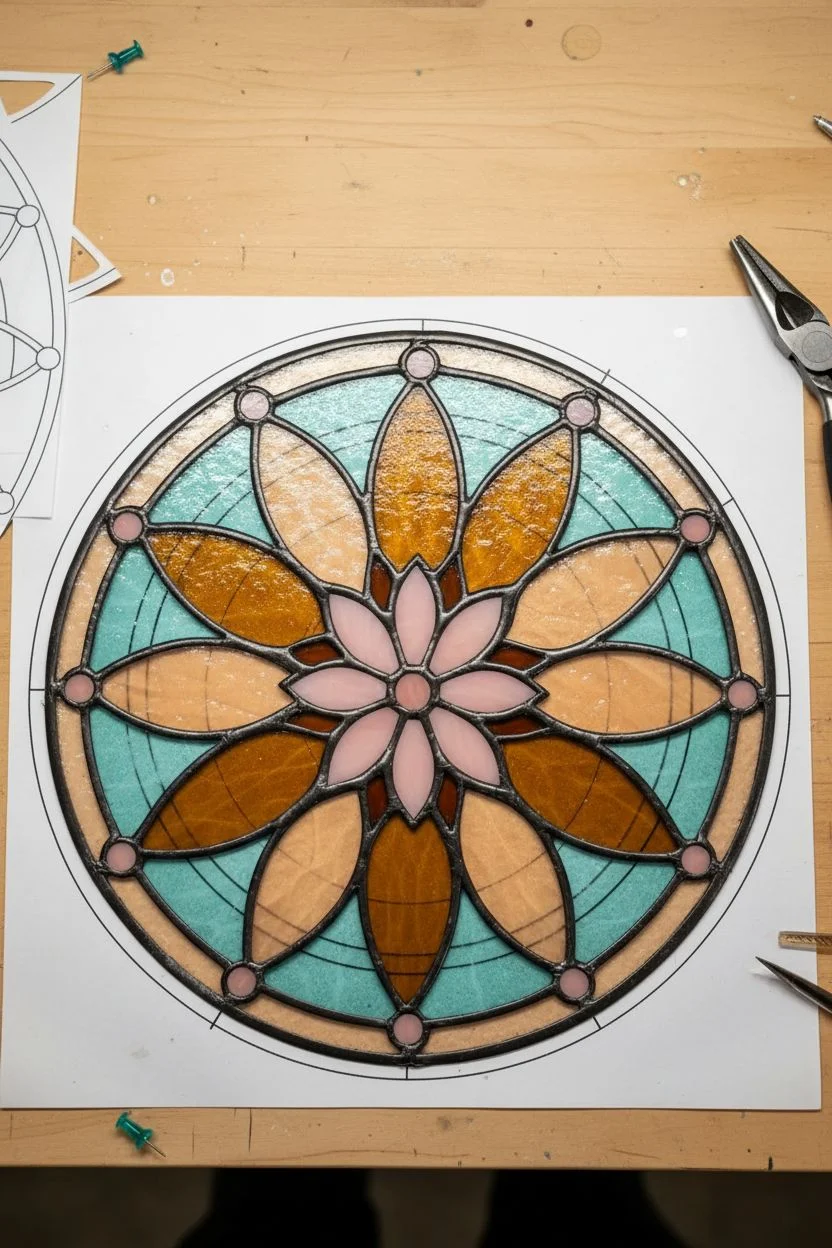
This radiant circular suncatcher brings a classic elegance to any window with its symmetrical floral design. The interplay of amber, teal, and soft pink glass creates a warm, inviting glow reminiscent of vintage cathedral windows.
Step-by-Step Guide
Materials
- Stained glass sheets: Teal (textured/cathedral), Amber/Gold (wispy), Soft Pink (opaque or semi-opaque)
- Glass cutter (pistol grip or pencil style)
- Running pliers
- Grozing pliers
- Copper foil tape (7/32 inch, black backed)
- Soldering iron (100-watt)
- 60/40 Solder
- Flux and flux brush
- Pattern paper and cardstock
- zinc came outlining strip (U-channel for the perimeter)
- Chain for hanging
- Jump rings
- Patina (black)
- Glass grinder
- Safety glasses and gloves
Step 1: Designing and Cutting
-
Prepare the Pattern:
Begin by drawing two concentric circles to define your outer rim and inner area. Draft a central eight-pointed flower (pink), surrounded by eight larger petal shapes (amber and gold alternating), and fill the background sections with teal. Number each piece on your paper pattern. -
Create Templates:
Make two copies of your pattern. Keep one as your layout guide and cut the other apart with pattern shears (which remove a small strip of paper to account for the copper foil) to use as individual templates. -
Trace onto Glass:
Trace your templates onto the corresponding glass sheets. Use the teal glass for the outer background segments, the amber/gold mix for the large petals, and the soft pink for the central small flower and the outer rim accents. -
Score the Glass:
Wearing safety goggles, hold your glass cutter perpendicular to the glass surface. Apply consistent pressure to score along your traced lines. Listen for that distinct ‘zipping’ sound which indicates a good score. -
Break the Scores:
Use running pliers to snap the glass along the score lines. For difficult curves, use grozing pliers to gently nibble away excess glass until you reach your line. -
Grind Formatting:
Run the edges of every glass piece through a glass grinder. This ensures they fit perfectly together on your layout pattern and creates a rough surface for the copper foil to adhere to.
Foil Lifting?
If foil lifts while soldering, your iron may be too hot or you stayed in one spot too long. Let the glass cool completely, trim the loose foil, re-apply a patch, and solder quickly.
Step 2: Foiling and Assembly
-
Clean the Glass:
Wash all your ground pieces thoroughly to remove glass dust and grinder fluid. Dry them completely, as moisture will prevent the foil from sticking. -
Apply Copper Foil:
Wrap the perimeter of each piece with 7/32 inch copper foil. Center the glass on the tape so there is an even overlap on both the front and back sides. -
Burnish the Foil:
Use a fid or a plastic burnishing tool to rub the foil down tight against the glass. I find it helpful to start on the edges and then fold over to the faces to ensure crisp corners. -
Assemble the Pattern:
Place your foiled pieces onto the layout pattern. Use push pins or a jig system to hold the perimeter pieces in a perfect circle so the design doesn’t shift. -
Flux the Joints:
Brush liquid flux onto every copper seam. This chemical agent cleans the copper and allows the solder to flow smoothly.
Step 3: Soldering and Finishing
-
Tack Solder:
Apply small dots of solder at key intersections where pieces meet. This ‘tacking’ process locks the design in place so you can solder the full lines without movement. -
Complete the Solider Lines:
Run a continuous bead of solder along all seams. Aim for a smooth, rounded profile (the ‘bead’) rather than a flat tape look. -
Install the Zinc Border:
Measure and cut a length of U-channel zinc came to wrap around the circumference. Fit the glass circle inside the channel and solder the joints where the came meets the foil lines. -
Solder the Second Side:
Carefully flip the piece over. Flux and solder all the seams on the back side, ensuring you have sturdy connections. -
Attach Hardware:
Solder two jump rings securely to the top of the zinc rim. Make sure they are positioned symmetrically so the mandala hangs straight. -
Clean and Patina:
Wash the piece with soapy water to neutralize the flux. Once dry, apply black patina to the solder lines with a rag to achieve that dark, contrasting finish seen in the photo. -
Hanging:
Attach a decorative silver chain to the jump rings. Polish the glass one final time with a finishing compound to make the colors pop.
Add Dimension
Use glass globs (decorative glass nuggets) for the rounded accents on the outer rim instead of cutting precise circles. They catch light beautifully and save cutting time.
Hang your finished mandala in a sunny spot and enjoy the colorful patterns it casts across your room


Beginner-Friendly Fused Glass Coasters
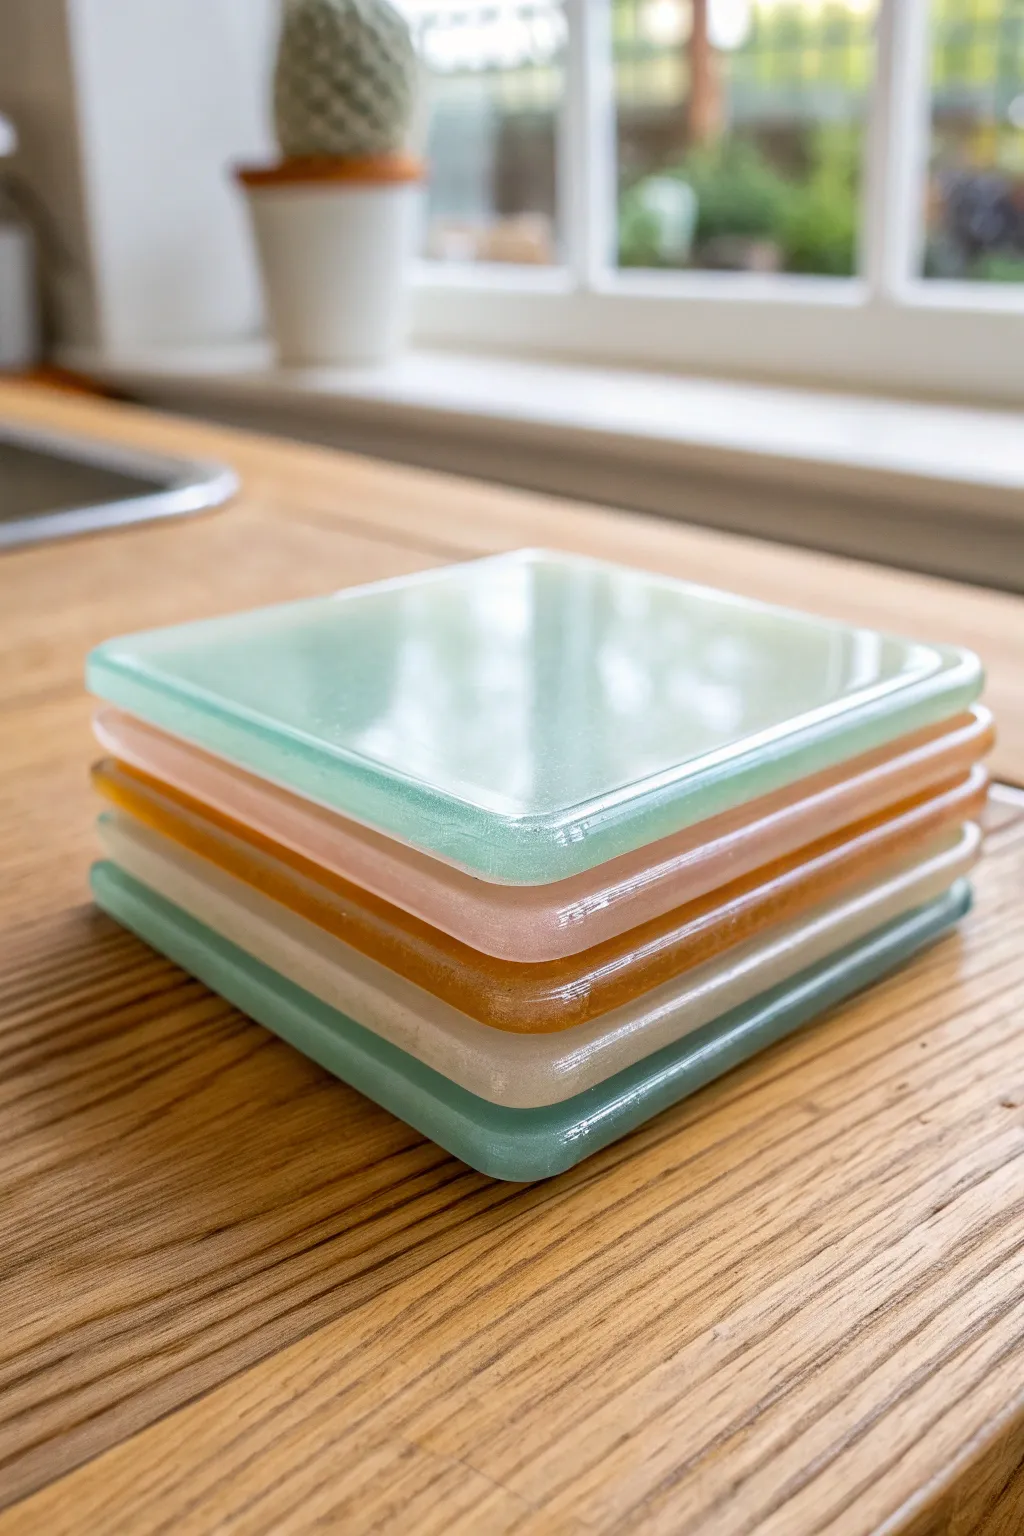
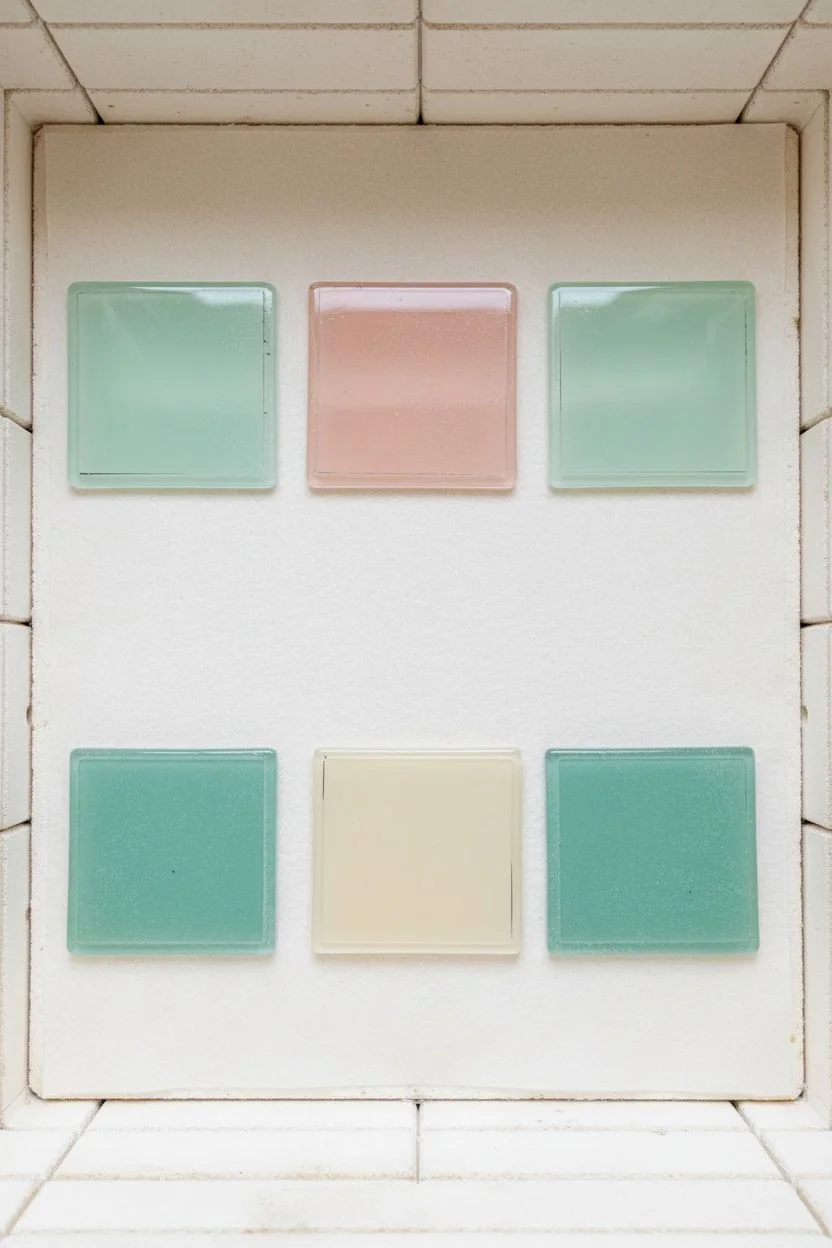
These elegant, semi-opaque coasters feature a soft, milky finish and perfectly rounded edges typical of a full fuse firing schedule. The stacking set showcases a beautiful gradient of muted pastels, from mint green to warm amber, making them a functional yet sophisticated addition to any tabletop.
Detailed Instructions
Materials
- COE 90 or COE 96 fusible glass sheet (Opal/Opaque styles)
- Colors: Pale mint, soft pink, amber, cream, and teal
- Clear fusible glass sheet (optional capping)
- Glass cutter (toy or pencil grip)
- Running pliers
- Breaking/grozer pliers
- Glass grinder with fine grit bit
- Kiln wash or thick shelf paper
- Kiln suitable for glass fusing
- Isopropyl alcohol and lint-free cloth
- Fine permanent marker or Sharpie
- Ruler or layout block system
Step 1: Preparation & Cutting
-
Clean your workstation:
Begin by ensuring your cutting surface is completely free of glass shards or dust. A clean slate prevents scratches on your pristine sheet glass before you even begin. -
Measure the squares:
Decide on your finished size. For coasters, 3.5 to 4 inches is standard. Mark your opal glass sheets (mint, pink, amber, cream, teal) using a fine permanent marker. I find marking on the smooth side rather than the textured side yields better accuracy. -
Score the glass:
Using your glass cutter, make a firm, continuous score line along your markings. Listen for that consistent ‘zipping’ sound which indicates a good score. -
Break the glass:
Use your running pliers to apply pressure to the score line, snapping the glass cleanly. Repeat this process until you have five individual squares of different colors. -
Cut the second layer:
To achieve the 6mm thickness required for a sturdy coaster that naturally rounds out, you need two layers. You can either cut a second identical square of the same colored glass, or cut a square of clear fusible glass to use as a cap. -
Clean the edges:
Check your squares for any sharp flares or uneven edges. Use your grozer pliers to gently nibble away imperfections.
Air Bubble Prevention
To avoid large trapped bubbles between layers, use ‘bubble squeeze’ scheduling: hold at 1225°F for 30-45 mins before the final ramp up.
Step 2: Refining & Assembling
-
Grind the corners:
Take your squares to the glass grinder. While the kiln will round the corners significantly, slightly rounding them now ensures a uniform final shape. -
Wash the glass:
Thoroughly clean every piece of glass with soap and water, followed by a wipe down with isopropyl alcohol. Fingerprints or oil can leave permanent hazy marks after firing. -
Prepare the kiln shelf:
Apply a fresh coat of kiln wash to your shelf or cut a piece of thick fiber paper. Ensure the surface is perfectly flat so your coasters don’t warp. -
Stack the layers:
Place your base color square on the shelf. Carefully place the second layer (color or clear) directly on top. Align the edges perfectly so they don’t slide during the initial heat up. -
Repeat for all colors:
Arrange all five stacks (mint, pink, amber, cream, teal) on the kiln shelf, leaving at least 1 inch of space between them to allow for slight expansion.
Step 3: Firing & Finishing
-
Program the Full Fuse:
Set your kiln for a ‘Full Fuse’ schedule. A typical schedule ramps up slowly (300°F/hr) to 1225°F, holds for a bubble squeeze, and then ramps fast to a top temperature around 1480°F. -
Soak at top temperature:
Hold at your top temperature (approx. 1480°F) for 10-15 minutes. This soak time allows the two layers to merge completely and the edges to pull in, creating that smooth, rounded ‘lozenge’ look seen in the photo. -
Rapid cool to anneal:
Flash cool the kiln by opening the vent slightly (if your controller dictates) to drop rapidly to the annealing temperature, usually around 900°F. -
Annealing phase:
This is crucial. Hold the temperature at 900°F for at least one hour. This relieves internal stress in the 6mm thick glass. -
Cool down to room temp:
Allow the kiln to cool naturally to room temperature before opening. Opening too early can cause thermal shock and crack your work. -
Add protective feet:
Once fully cooled, remove the coasters. Wipe them down and attach small bumper feet to the bottom corners to protect your wooden table surfaces.
Matte Finish Option
For a sea-glass texture instead of glossy, sift a thin layer of glass powder over the top before firing, or explore sandblasting after firing.
Now you have a stunning set of durable, custom-colored coasters ready to serve drinks in style


Sea Glass Mosaic Hearts in a Shadow Box
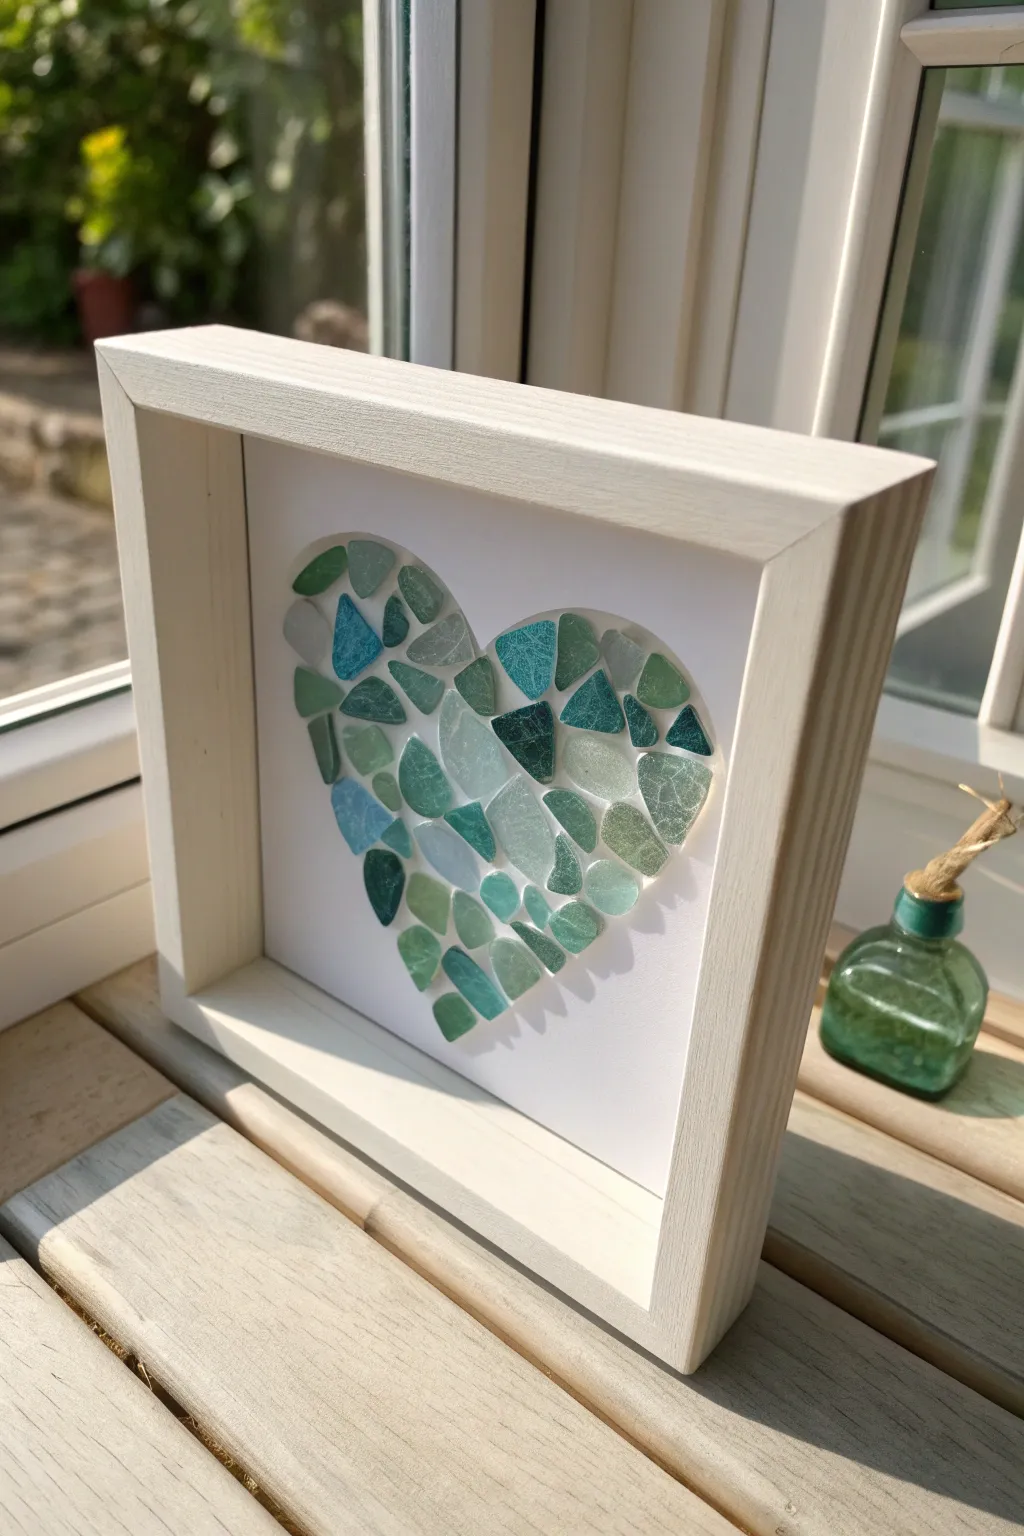
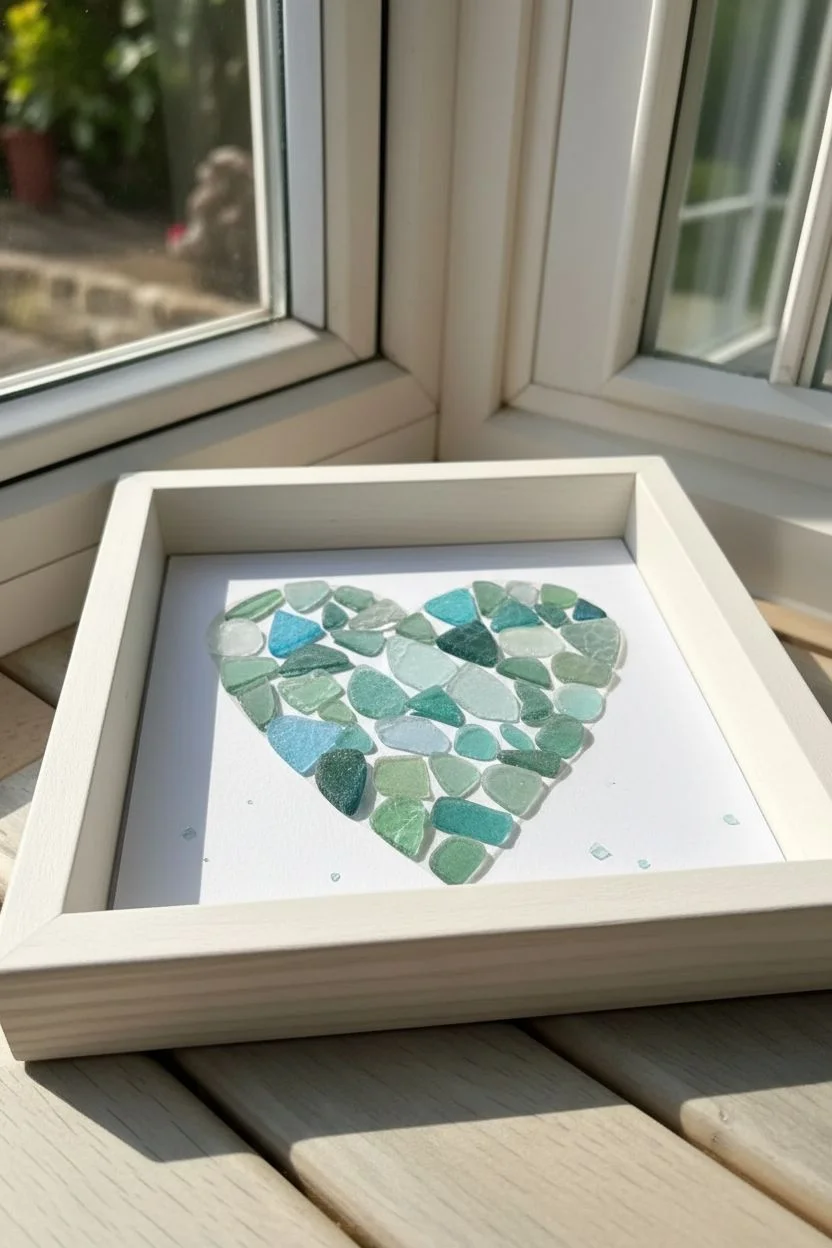
Capture the serene beauty of the ocean with this elegant sea glass mosaic. By arranging tumbled glass fragments in a soothing gradient within a deep shadow box, you create a piece of modern coastal decor that catches the light beautifully.
Step-by-Step Guide
Materials
- Deep white shadow box frame (approximately 8×8 or 9×9 inches)
- White backing cardstock (heavyweight, acid-free)
- Sea glass pieces (mix of turquoise, seafoam, emerald, and white/frosted clear)
- Clear craft glue (weldbond or clear silicone adhesive)
- Pencil
- Heart-shaped template (paper or card)
- Tweezers
- Toothpick (for glue application)
- Clean cloth or eraser
Step 1: Preparation and Layout
-
Open the frame:
Disassemble your shadow box frame carefully. Remove the glass and the backing board, setting the glass aside in a safe spot to avoid fingerprints or breakage. -
Prepare the substrate:
Cut your heavyweight white cardstock to fit exactly inside the frame. It needs to be sturdy enough to hold the weight of the glass without buckling. -
Trace the shape:
Place your heart template in the absolute center of the cardstock. Lightly trace the outline with a pencil. Keep this line very faint solely as a guide, as you won’t want to see it later. -
Sort your glass:
Organize your sea glass by color and size. Separate the deep emerald greens, the bright turquoise blues, and the lighter seafoam or frosted white pieces into distinct piles. -
Dry fit the edges:
Before gluing anything, arrange pieces along the pencil line to define the heart’s border. Look for pieces with at least one straight or smoothly curved edge to create a clean perimeter. -
Fill the interior:
Continuing the ‘dry fit’ process, fill in the center of the heart. Puzzle the pieces together, leaving small, even gaps between them to resemble a traditional grout line. -
Adjust the gradient:
Step back and look at your arrangement. Aim for a balanced scatter of colors—notice how the example mixes dark greens and light blues throughout rather than banding them.
Glue Ghosting?
If clear glue dries with a visible sheen on the white paper between stones, use a matte varnish on a tiny brush to dull the shiny spots after the glue cures fully.
Step 2: Adhering and Assembly
-
Prepare the adhesive:
Squeeze a small amount of clear craft glue onto a scrap piece of paper or a plastic lid to use as a palette. -
Glue the perimeter first:
Pick up a perimeter piece using tweezers. Apply a small dab of glue to the back of the glass—I prefer using a toothpick for this to control the amount—and press it gently into place. -
Work inward:
Systematically lift, glue, and replace the interior pieces one by one. Try not to disturb the neighboring unsecured pieces as you work. -
Manage glue overflow:
If any glue squeezes out from the sides, clean it immediately with the tip of a toothpick or a cotton swab before it hardens. -
Check for gaps:
Once the main pieces are down, look for awkward empty spaces. Use tiny shards or ‘micro’ sea glass to fill these voids for a dense, professional mosaic look. -
Allow to cure:
Let the artwork dry completely flat for at least 24 hours. This ensures the heavy glass won’t slide when the frame is stood upright. -
Clean the pencil lines:
If any pencil marks are visible around the edges of your glass heart, gently erase them now using a white eraser. -
Clean the frame glass:
Wipe down the inside of the shadow box glass with glass cleaner and a microfiber cloth to remove dust and smudges. -
Final assembly:
Place your mounted artwork back into the shadow box frame. Secure the back panel. -
Display:
Set the finished piece on a windowsill where natural sunlight can illuminate the varying opacities of the sea glass.
Add Dimension
For a 3D effect, mount the cardstock on a piece of foam board before putting it in said frame. This lifts the heart off the back, creating deeper shadows.
Enjoy the calming play of light through your personal beach-inspired window art


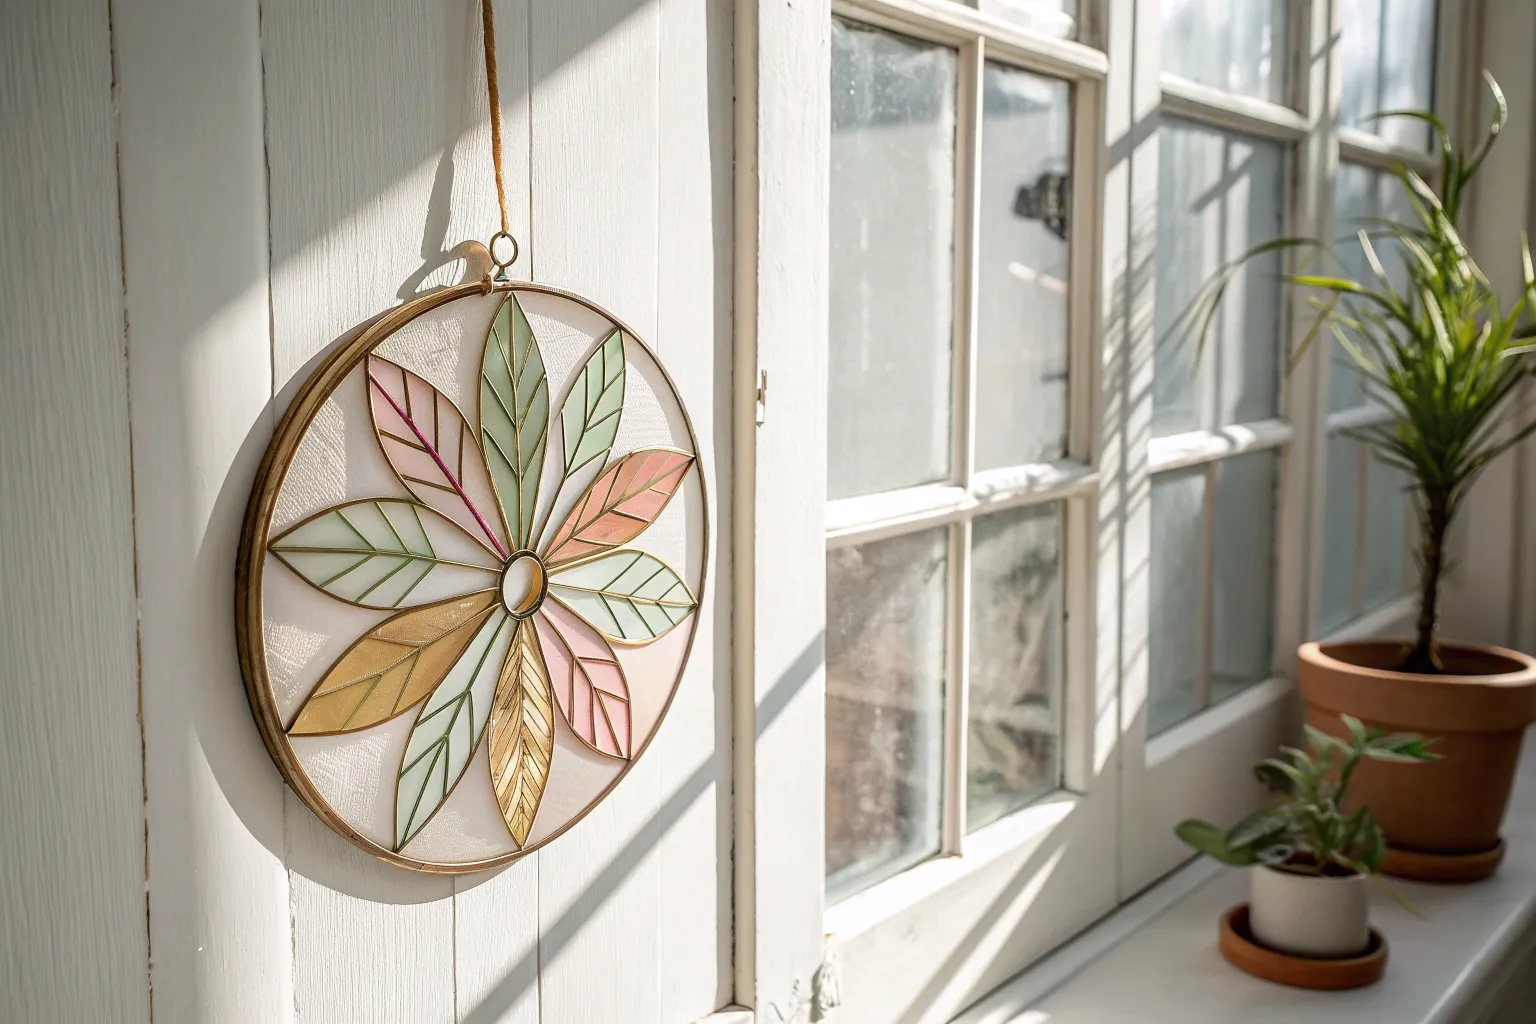
Pressed Botanicals Between Glass Panes
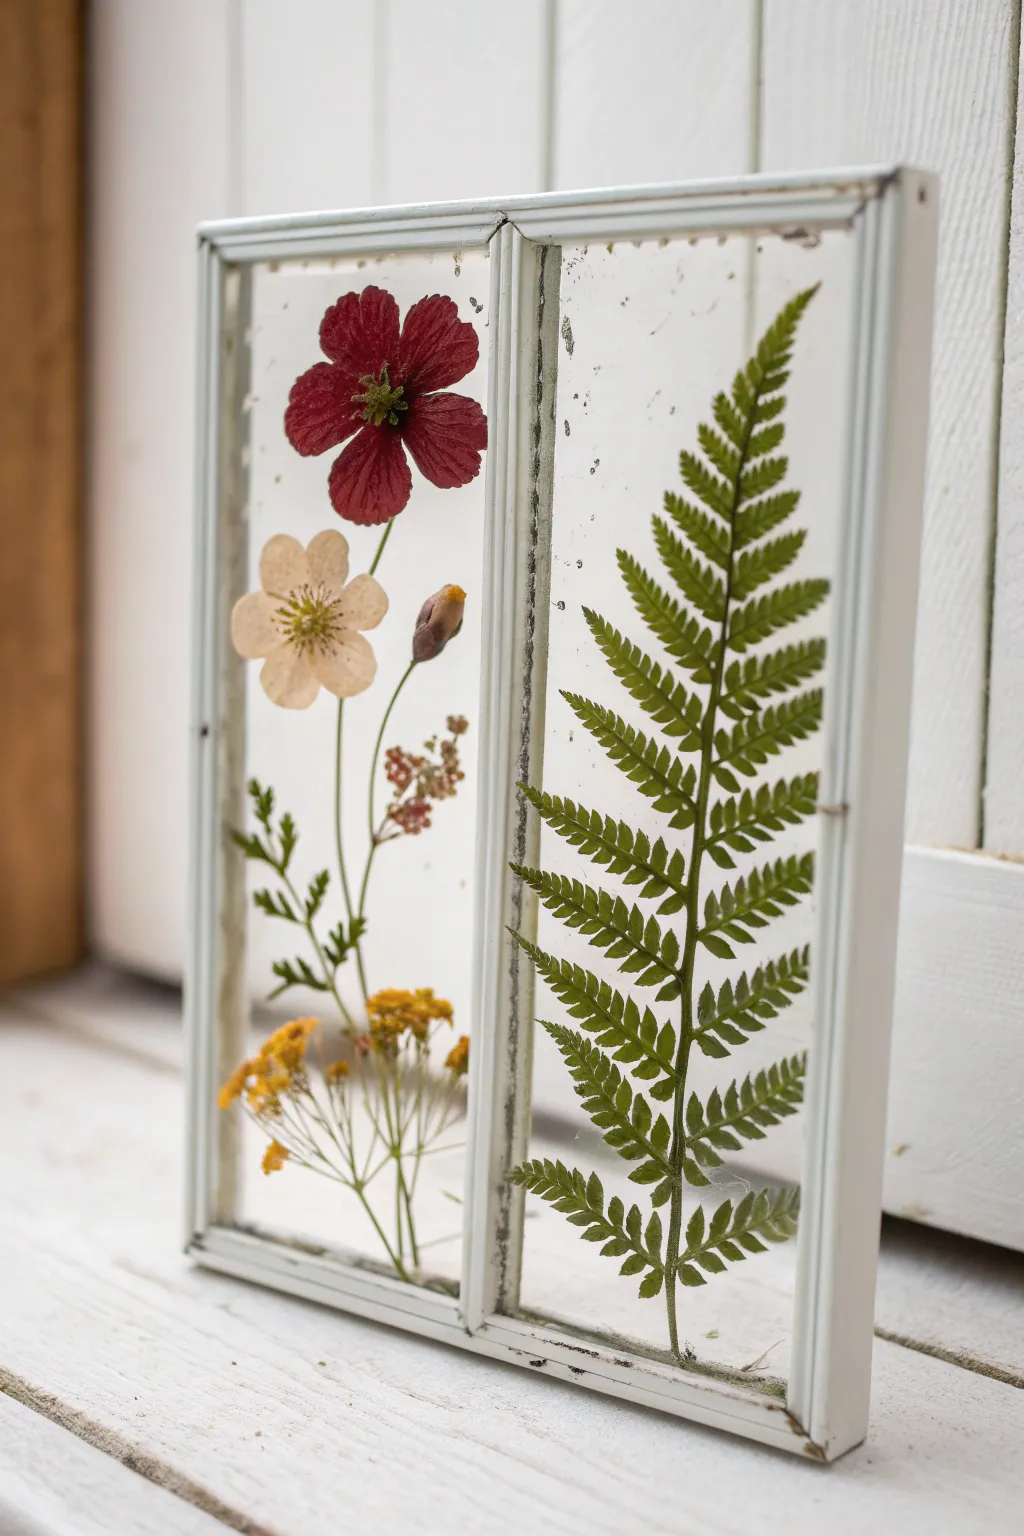

Transform a rustic, divided window frame into a stunning botanical display that captures the delicate beauty of nature. This transparent artwork allows light to filter through preserved flowers and ferns, creating a floating garden effect perfect for a cottage-style shelf or mantel.
How-To Guide
Materials
- Small vintage window frame (with two panes)
- Two pieces of clean, thin glass cut to fit the frame openings
- Pressed botanical specimens (Red cosmos/geranium, pale buttercup, yellow tansy/yarrow, fern frond)
- Clear silicone adhesive or E6000 glue
- Glazier points or small push points (optional)
- Glass cleaner and microfiber cloth
- tweezers
- White or cream chalk paint (if distressing needed)
- Sandpaper (medium grit)
- Small paintbrush
Step 1: Preparing the Frame
-
Source the frame:
Find a small, divided wooden window frame. Thrift stores or architectural salvage yards are goldmines for these. If you can’t find a true vintage one, a new unfinished wood frame works perfectly. -
Clean and sand:
If using an old frame, clean it thoroughly to remove loose dirt. Lightly sand any rough patches, but keep the peeling paint if you love the rustic look. -
Distress the finish:
For a new frame, apply a coat of white chalk paint. Once dry, sand the edges and corners aggressively to reveal the wood underneath, mimicking the weathered look in the photo. -
Clean the glass:
Thoroughly clean both sides of the original glass panes (if present) and your new backing glass pieces. Any fingerprint left now will be sealed inside forever.
Flatness is Key
Ensure your botanicals are perfectly flat before starting. If they are bulky, the glass panes won’t sit flush, risking breakage when you secure the points.
Step 2: Arranging the Botanicals
-
Planning the layout:
Lay your cut backing glass on a flat white surface. This lets you mock up your design before committing. Test the arrangement seen here: flowers on the left, foliage on the right. -
Positioning the fern:
On the right pane’s glass, place a large pressed fern frond diagonally. Envision it reaching from the bottom left corner toward the top right. -
Placing the focal flowers:
For the left pane, start with the largest red flower (like a cosmos) near the top. Position a pale yellow bloom slightly below and to the left of it. -
Adding supporting stems:
Tuck a small flower bud on a long stem between the two main blooms. I find tweezers essential here to avoid crushing delicate petals. -
Anchoring with yellow:
Arrange a cluster of small yellow dried flowers (like tansy or yarrow) at the very bottom of the left pane to create weight and balance. -
Adding filler greenery:
Intersperse small sprigs of green leaves or stems among the flowers on the left side to connect the disparate elements visually.
Step 3: Sealing the Artwork
-
Transfer to frame:
Carefully place the glass sheets with the arranged botanicals into the window frame rebates (the recessed grooves). If the frame has existing glass, you are simply sandwiching the flowers against it. -
The sandwich method:
If your frame was empty, place a clear pane down first, arrange the flowers on it, and then place the second pane on top to sandwich the plants. -
Securing the edges:
Apply a very thin bead of clear silicone adhesive or E6000 along the very edge of the glass where it meets the wood frame. -
Installing points:
For extra security, especially with heavier glass, push glazier points into the wooden frame tight against the back of the glass every few inches. -
Final clean up:
Wipe away any excess glue immediately before it cures. Check the front of the glass for smudges one last time. -
Touch up paint:
If the glazier points or glue are visible, dab a little white paint over them to blend them into the distressed frame.
Slipping Flowers?
If plants slide when you add the top glass, use a tiny dot of pH-neutral craft glue on the back of the stem to tack it to the bottom glass pane.
Place your finished herbarium on a sunny sill where adjacent light can illuminate the delicate veins of your preserved garden
BRUSH GUIDE
The Right Brush for Every Stroke
From clean lines to bold texture — master brush choice, stroke control, and essential techniques.
Explore the Full Guide
Painted Glass Votive Holders
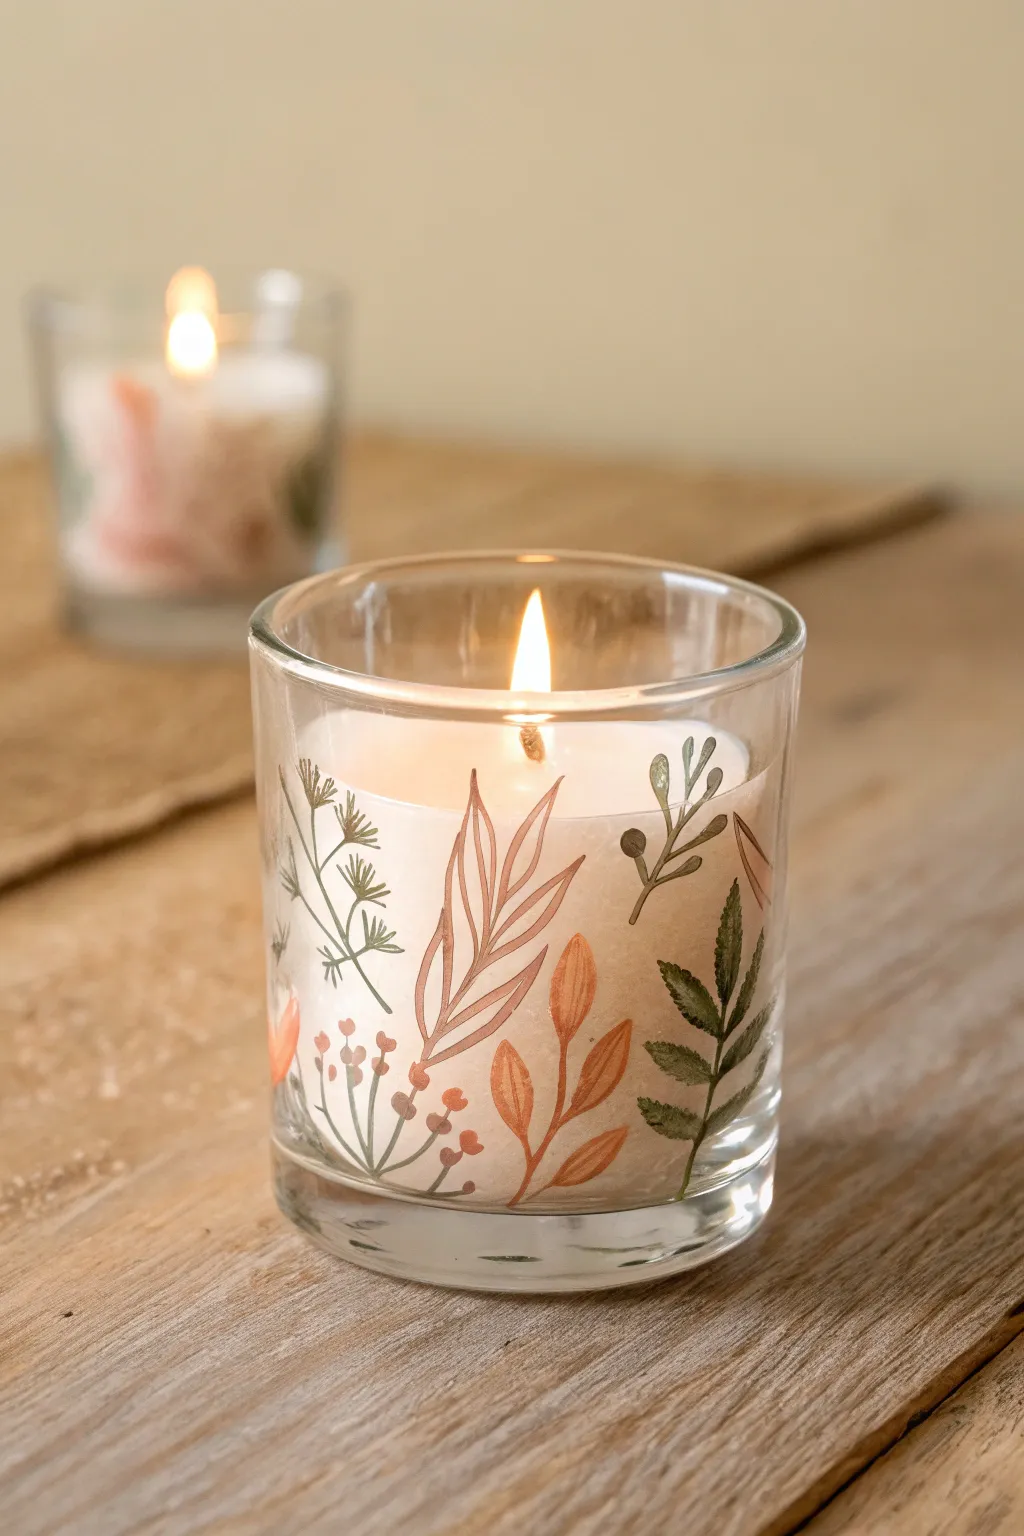
Transform a simple glass vessel into a cozy autumn accent with delicate botanical illustrations. This project mimics the translucent, almost watercolor-like effect of pressed leaves and sprigs painted directly onto the glass surface for a warm, organic glow.
Step-by-Step Guide
Materials
- Clear glass votive holder (cylindrical)
- Rubbing alcohol
- Cotton pads or paper towels
- Glass enamel paints (transparent or semi-transparent finish)
- Colors: Burnt orange, olive green, sage green, brown, cream
- Fine liner brush (size 0 or 00)
- Small round brush (size 1 or 2)
- Palette or small dish
- Oven (for curing, if paint requires)
- Reference sketch or printed botanical pattern
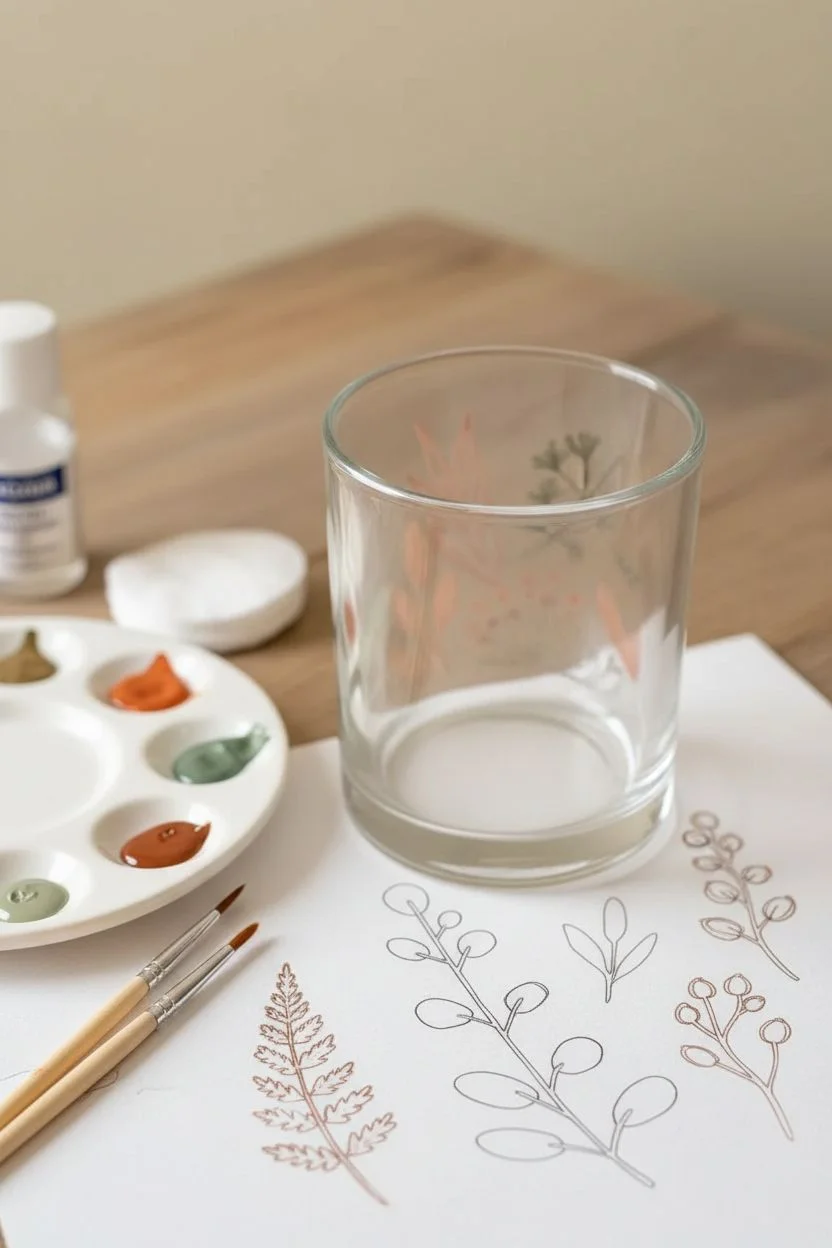
Step 1: Preparation
-
Clean the Glass:
Before making a single stroke, thoroughly clean the outside of your glass votive with rubbing alcohol and a cotton pad. This removes oils and fingerprints that prevent paint adhesion. -
Plan Your Composition:
Visualize where your stems will go. It helps to sketch a few simple leaf shapes on paper first to practice the flow—aim for a mix of fern-like fronds, rounded leaves, and berry sprigs. -
Load the Palette:
Squeeze small amounts of your glass enamel paints onto your palette. If the paints are too opaque, you can mix in a tiny drop of glass paint medium or clear extender to achieve that watercolor translucency.
Layering Trick
Paint the stems first and let them dry for 10 minutes before adding leaves. This prevents colors from muddying where they overlap.
Step 2: Painting the Foliage
-
Start with Main Stems:
Using your fine liner brush dipped in a diluted brown or sage green, paint thin, curving lines rising from the bottom edge of the glass. Vary the heights to create natural movement. -
Paint the Fern Fronds:
For the darker green fern element, switch to the small round brush. Press the tip down gently and lift as you pull outward from the stem to create tapered leaves. -
Add Variation:
Try to keep your strokes loose. The beauty of this design lies in the slight imperfections that mimic hand-drawn illustrations. -
Create the Orange Sprig:
Clean your brush and pick up the burnt orange paint. Paint a central stem, then add elongated, teardrop-shaped leaves coming off the sides. -
Detail the Orange Leaves:
Once the orange base shape is tacky but not fully dry, use the very tip of your liner brush with a slightly darker shade to draw a thin vein down the center of each leaf for definition. -
Painting Rounded Leaves:
Mix a soft olive color. I find that dabbing the brush rather than sweeping it helps create the rounder, eucalyptus-style leaves shown on the right side of the glass. -
Adding Berries:
For the berry sprigs, draw a thin brownish wire-like stem first. Then, using the handle end of a brush or a detail tool, dip into muted red or brown paint and dot tiny berries onto the stem tips.
Step 3: Refining and Curing
-
Fill the Gaps:
Step back and rotate the glass. Look for empty spaces that need a small sprig of greenery or a tiny bud to balance the composition, but remember to leave plenty of negative space so the candlelight shines through. -
Clean Up Edges:
If you made any mistakes or smeared paint, use a damp cotton swab or a toothpick to gently scrape away the unwanted wet paint before it sets. -
Let it Dry:
Allow the votive to dry completely according to the paint manufacturer’s instructions. This usually takes at least 24 hours for air drying. -
Cure the Paint:
For durability, especially if you plan to reuse these often, place the glass in a cool oven. Turn the heat to 350°F (or your paint’s specified temp) and bake for 30 minutes, then let it cool down inside the oven. -
Insert Candle:
Once fully cooled, place a simple white votive candle or tea light inside your new holder.
Frosted Effect
Before painting your botanical designs, sponge a thin layer of frost medium over the glass for a misty, matte background.
Light your candle and enjoy the serene, nature-inspired shadows cast by your beautiful artwork
Etched Glass Quote or Pattern Panels
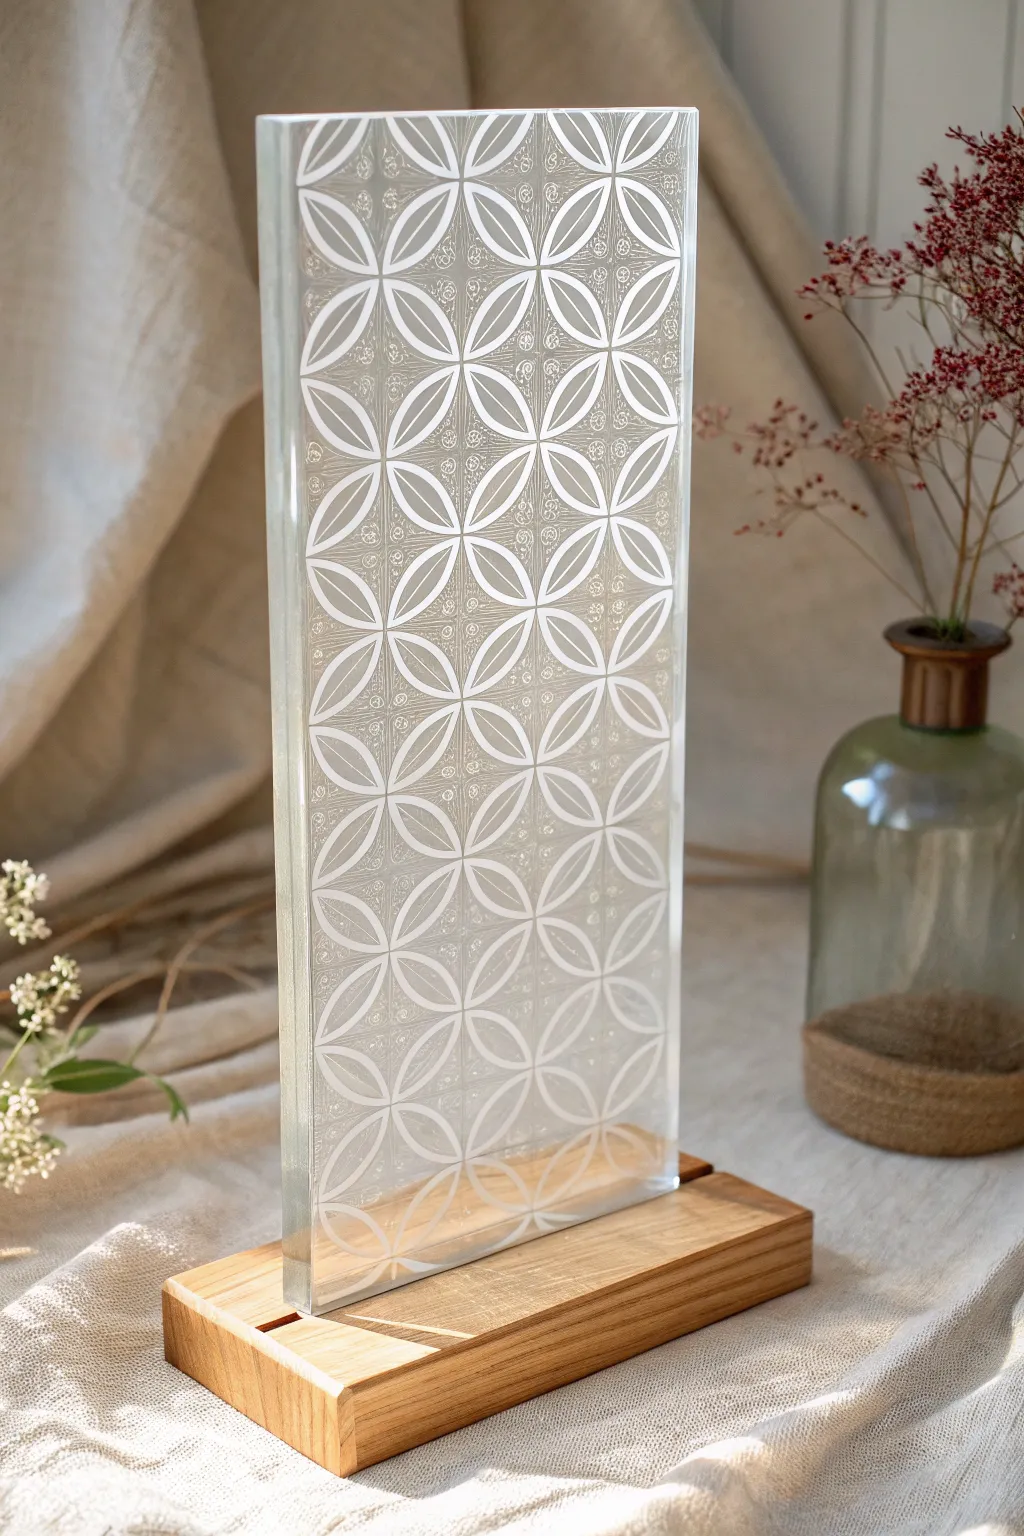
This elegant standalone glass panel brings a modern, airy feel to any shelf or mantelpiece. By combining simple geometric stenciling with a wooden base, you can create a piece that looks like high-end architectural glass art.
How-To Guide
Materials
- Rectangular clear glass pane (approx. 6mm thick, edges polished)
- Glass etching cream (e.g., Armour Etch)
- Adhesive vinyl or contact paper
- Cricut or Silhouette cutting machine (optional but recommended)
- X-Acto knife and cutting mat (if cutting by hand)
- Transfer tape
- Burnishing tool or old credit card
- Rubber gloves and protective eyewear
- Foam brush
- Glass cleaner and microfiber cloth
- Sponge and bucket of water
- Solid wood block (oak or pine)
- Table saw or router
- Sandpaper (120 and 220 grit)
- Wood stain or clear matte varnish
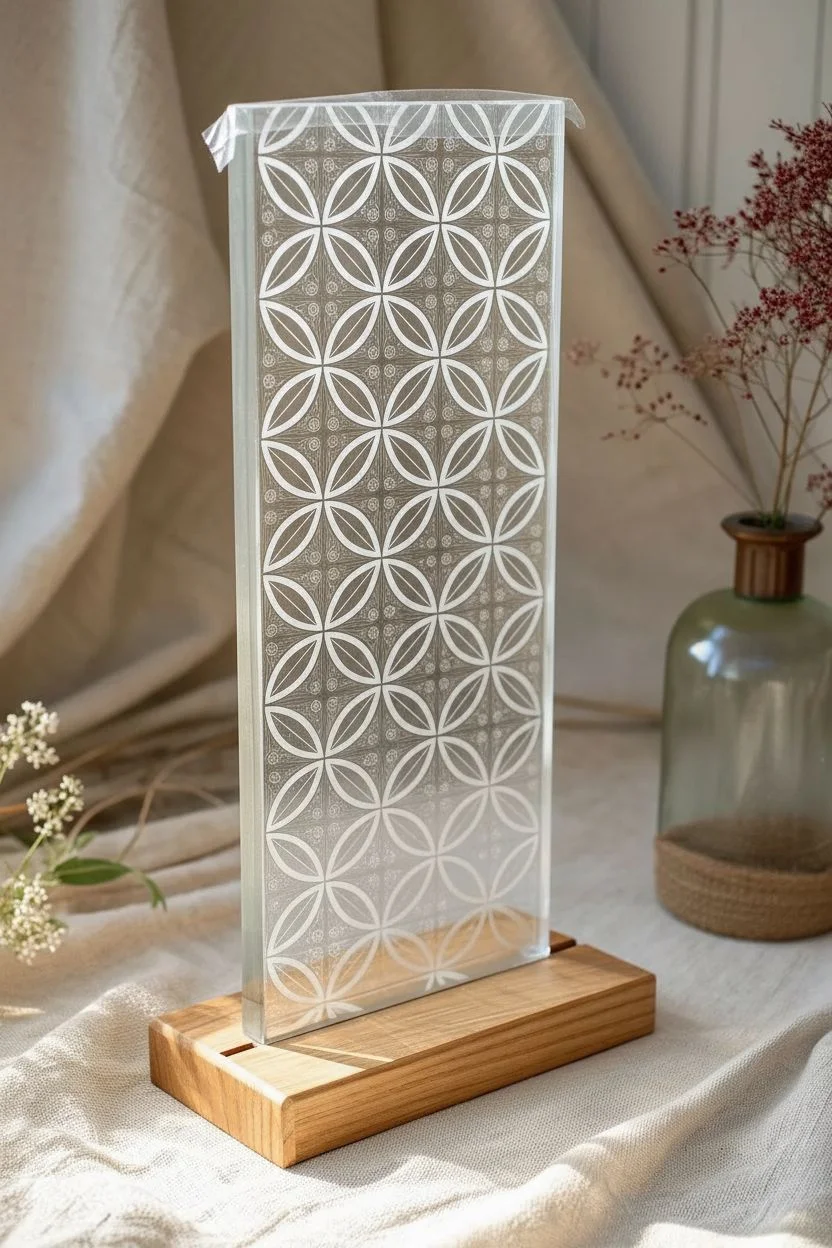
Step 1: Creating the Stencil
-
Design the Pattern:
Choose a repeating geometric ‘flower of life’ or overlapping petal pattern. If using design software for a cutting machine, ensure the lines connecting the petals are thick enough to remain as the mask, while the negative spaces (the petals themselves) will be weeded out to be etched. -
Cut the Vinyl:
Load your adhesive vinyl into your cutting machine and run the cut. If cutting by hand, print your pattern on paper, tape it over the vinyl, and carefully cut out the petal shapes with a sharp X-Acto knife. -
Weed the Design:
Remove the pieces of vinyl where you want the frosting to appear. For this specific look, you are removing the internal shapes of the petals and the small background shapes, leaving a thin grid of vinyl lines that will separate the etched sections. -
Apply Transfer Tape:
Cut a piece of transfer tape slightly larger than your design. Press it firmly over the weeded vinyl stencil using a burnishing tool to ensure it lifts freely from the backing paper.
Uneven Frosting?
Patchy spots usually mean oil was on the glass. Ensure the glass is super clean, and keep the etching cream thick and moving during the wait time.
Step 2: Etching the Glass
-
Clean the Surface:
Thoroughly clean your glass pane with glass cleaner and a lint-free cloth. Any oil or fingerprints left on the surface can cause patchy etching results. -
Position the Stencil:
Align your stencil carefully on the glass. I find it helpful to tape the top edge first to create a hinge, then slowly lower the rest. -
Transfer and Burnish:
Peel away the backing paper and smooth the vinyl onto the glass. Spend extra time burnishing the edges of the design; these must be tight against the glass to prevent the cream from bleeding underneath. -
Remove Transfer and Protect:
Peel off the transfer tape at a sharp angle. Use painter’s tape to cover any exposed glass edges around the stencil so accidental drips don’t ruin the clear borders. -
Apply Etching Cream:
Put on your gloves and eyewear. Using a foam brush, pat—don’t brush—a thick layer of etching cream onto the stenciled area. You want a heavy deposit that completely obscures the design. -
Wait and Redistribute:
Let the cream sit for about 5 minutes. Halfway through, lightly tap the cream with your brush to move it around; this breaks up air bubbles that can cause uneven frosting. -
Rinse Off:
Rinse the cream off in a stainless steel sink or a bucket using a sponge and warm water. Avoid porcelain sinks as the acid can dull the finish over time. -
Reveal the Design:
Peel off the vinyl stencil and wash the glass one final time to remove any adhesive residue, revealing your crisp, frosted pattern.
Level Up: LED Base
Route a channel in the bottom of the wood base for an LED strip. When lit from below, the frosted etched areas will glow beautifully.
Step 3: Building the Base
-
Measure and Cut Wood:
Cut your wood block to be about 2 inches wider than your glass pane. A thickness of about 1.5 inches provides good stability. -
Create the Slot:
Set your table saw blade height to about half the thickness of the wood. Carefully cut a groove (kerf) down the center lengthwise. You may need to make multiple passes to get the width just right so the glass fits snugly without forcing it. -
Sand the Wood:
Sand the entire block, starting with 120 grit to soften the sharp edges and finishing with 220 grit for a smooth touch. -
Finish the Base:
Apply a clear matte varnish or a light wood stain to protect the timber while keeping a natural look. Let it dry completely. -
Assembly:
Gently insert the etched glass pane into the wooden slot. If it’s too loose, you can add a small dot of clear silicone in the groove for a permanent hold.
Place your newly created glass panel near a window where the light can catch the texture and admire your handiwork

PENCIL GUIDE
Understanding Pencil Grades from H to B
From first sketch to finished drawing — learn pencil grades, line control, and shading techniques.
Explore the Full Guide
Stained Glass-Inspired Acrylic Outline Art on Frames
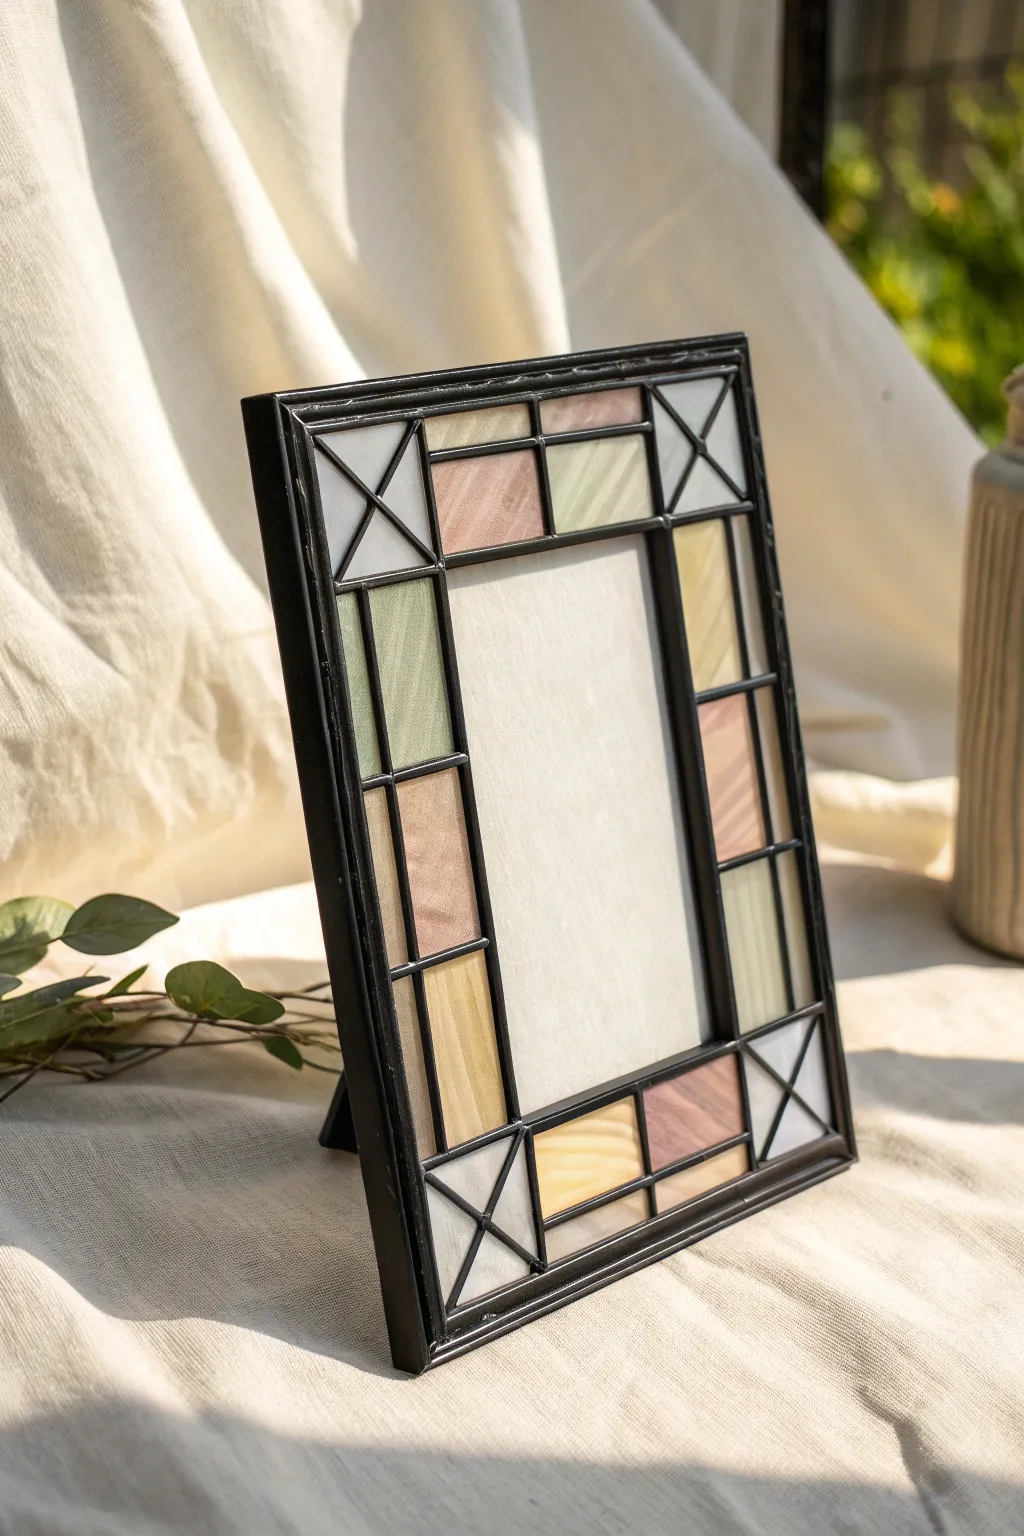

Transform a plain picture frame into a stunning piece of faux stained glass art using simple acrylic paints and dimensional outline paste. The geometric pattern and soft, muted colors create a sophisticated vintage look that catches the light beautifully.
Step-by-Step Tutorial
Materials
- Wide, flat picture frame (glass or acrylic front needed)
- Black Gallery Glass simulated liquid leading (or black dimensional fabric paint)
- Gallery Glass window color paints (or transparent glass paints) in dusty pink, sage green, amber, and clear/frosted
- Toothpicks or a scribe tool
- Paper towels
- Reference pattern (optional, sketched on paper)
- Ruler
- Rubbing alcohol
Step 1: Preparation and Design
-
Clean surface:
Remove the backing and any existing artwork from your frame. Use rubbing alcohol and a paper towel to thoroughly clean the glass or acrylic pane. This removes oils and fingerprints that could prevent the paint from adhering properly. -
Draft the pattern:
On a piece of paper cut to the size of your frame’s glass, sketch out your geometric design. For this project, draw a border of rectangular blocks around the perimeter, with square blocks in each corner containing an ‘X’ shape. -
Secure the guide:
Place your sketched pattern underneath the glass pane. Tape it securely in place so it doesn’t shift while you are working. If you feel confident, simple geometric lines like this can also be marked directly on the glass with a washable marker.
Step 2: Creating the Lead Lines
-
Test the flow:
Before touching the glass, squeeze a small amount of your black liquid leading onto a scrap paper towel to ensure the bottle isn’t clogged and to get a feel for the flow rate. -
Outline main borders:
Starting from the top left corner, hold the bottle tip slightly above the surface and let the line of paint fall onto the glass as you move your hand. Trace the long vertical and horizontal lines first to establish the main grid. -
Add detail lines:
Fill in the shorter horizontal dividers to create the rectangular sections. Then, carefully draw the ‘X’ lines inside the corner squares. Don’t worry if intersections are messy; we can fix them later. -
Clean up intersections:
Wait about 15-20 minutes for the leading to skin over slightly. Then, use a toothpick to gently push or nudge any uneven lines into straightness and clean up the corners where lines meet. -
Let it cure:
Allow the leading lines to dry completely. This usually takes 8 to 24 hours depending on humidity. They should be firm to the touch before you add color.
Fixing Wobbly Lines
If a lead line dries crooked, don’t panic! Use a craft knife to slice the bad section out, peel it off the glass, and re-pipe just that small area.
Step 3: Adding Color
-
Prepare the paint:
If your glass paints have bubbles, tap the bottoms of the bottles gently on the table. We want a smooth, glass-like finish without trapped air. -
Fill the amber sections:
Select a few random rectangular sections for the amber color. Apply the paint generously, filling the space right up to the black leading lines. I like to ‘puddle’ the paint rather than brush it to avoid streaks. -
Add pastel tones:
Repeat the filling process with your sage green and dusty pink paints. Choose alternating sections to create a balanced, varied look. Use a toothpick to pop any tiny air bubbles that appear immediately. -
Create the white glass effect:
For the ‘X’ corners and some rectangle sections, use a ‘crystal clear’ or ‘glistening frost’ paint. When dry, this will mimic the look of textured white glass or clear glass, contrasting nicely with the colors. -
Create texture:
While the paint is still wet, you can use a small brush or toothpick to gently swirl the paint surface. This mimics the ripples found in real stained glass. Do this sparingly for the best effect. -
Dry flat:
Leave the glass pane absolutely flat to dry. If you tilt it too soon, the colors might run into each other or pool unevenly at one side.
Level Up: Texture Trick
Tap the bottom of the wet paint with a stiff brush to create a ‘hammered glass’ texture that hides brush strokes and diffuses light beautifully.
Step 4: Assembly
-
Check for transparency:
Hold the glass up to a light source once dry. If any sections look too thin or streaky, you can carefully apply a second coat of the same color. -
Reassemble frame:
Once fully cured (usually 24 hours), remove the paper pattern from the back. Place the glass back into the frame carefully. Insert a clean white backing paper or your chosen photo behind the glass to make the colors pop.
Place your new art piece near a window where natural light can illuminate those beautiful colors
Fused Glass Mini Magnets With Texture
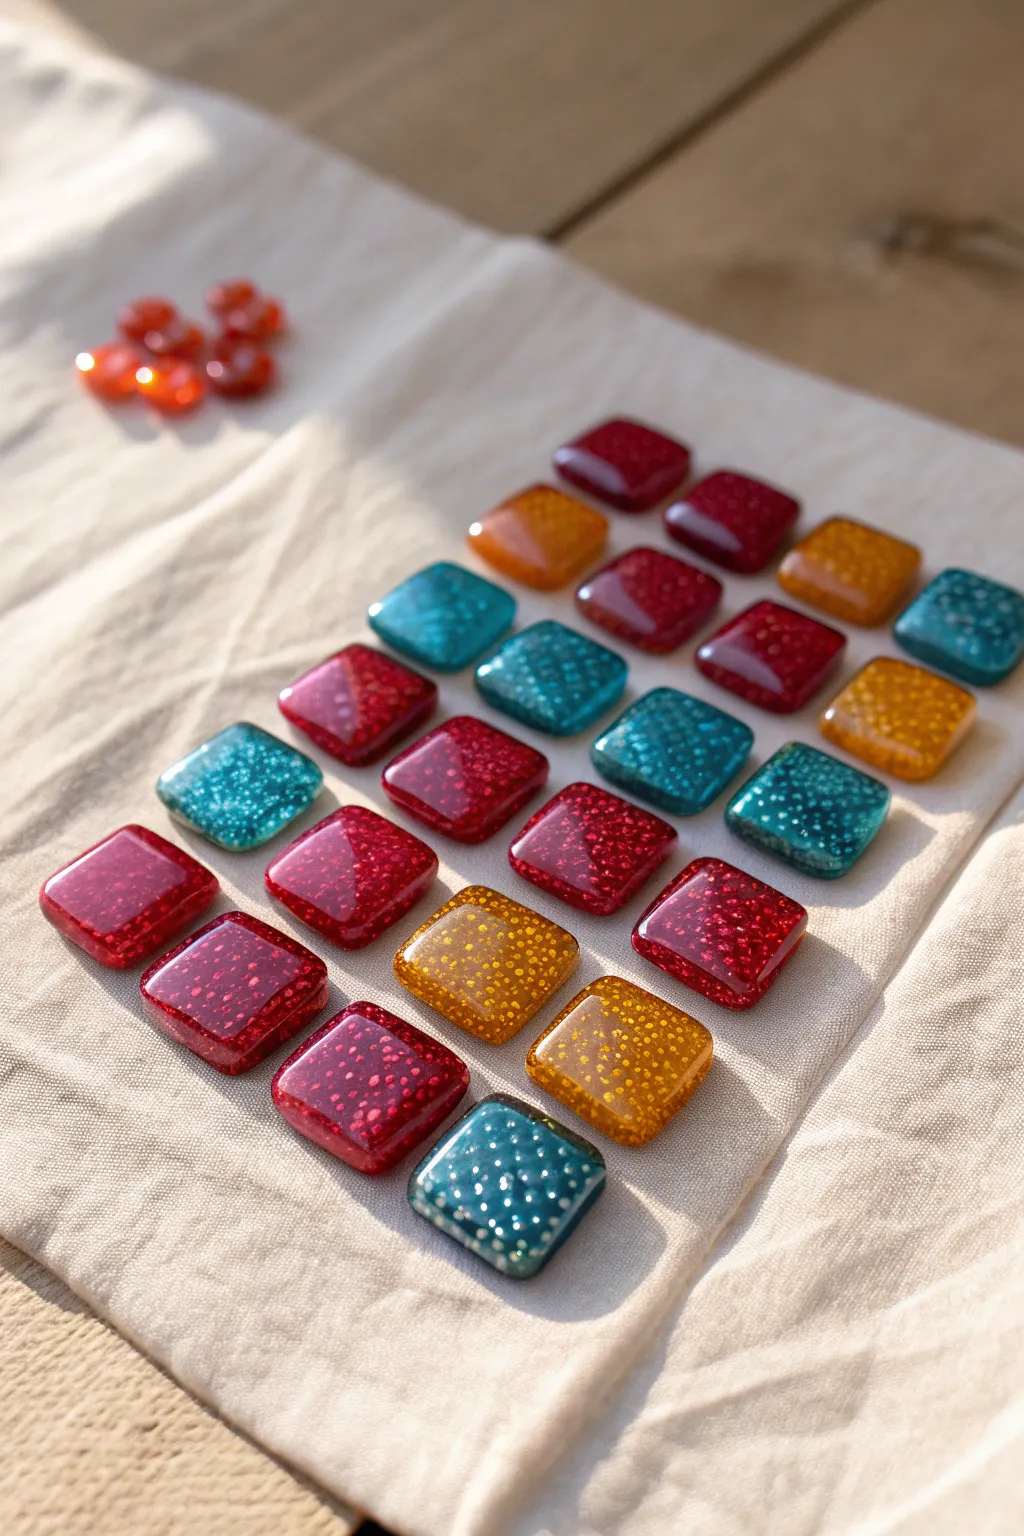

These vibrant, gem-like glass nuggets are perfect for adding a touch of fused glass magic to your fridge or magnetic board. Using small scraps and frit, you can create luminous, bubbly textures trapped within smooth, rounded squares.
Step-by-Step
Materials
- COE 90 or COE 96 fusible glass sheet scraps (must serve as compatible clear cap and colored base)
- Glass cutter and running pliers
- Medium or coarse glass frit (transparent colors like teal, amber, ruby)
- Dichroic glass scraps (optional, for extra sparkle)
- Kiln wash or shelf paper
- Glass kiln
- Strong craft glue (E6000 or similar)
- Small neodymium magnets
- Safety glasses
- Marker for glass
Step 1: Preparation and Cutting
-
Clean your glass:
Before making any cuts, thoroughly clean your glass sheets with alcohol or glass cleaner to remove fingerprints and oils. Clean glass fuses much more reliably. -
Measure the base squares:
Decide on the size of your magnets. The examples shown are approximately 1-inch squares. Mark your colored base glass at 1-inch intervals using a ruler and a glass marker. -
Score the base glass:
Using your glass cutter, make firm, continuous scores along your marked lines. Ensure you maintain even pressure from edge to edge. -
Break the strips:
Use your running pliers to gently break the glass along the score lines to create long 1-inch strips. -
Cut individual squares:
Cross-cut the strips into 1-inch squares. You will need one colored base square for each magnet you plan to make. -
Prepare the clear caps:
Repeat the measuring and cutting process with your clear fusible glass. I find it helpful to cut these *slightly* larger than the base to ensure full coverage during the fuse, though equal size works too.
Step 2: Assembly and Design
-
Prepare the kiln shelf:
Ensure your kiln shelf is perfectly primed with kiln wash or lined with fresh shelf paper to prevent sticking. -
Lay out the base pieces:
Place your colored glass squares onto the kiln shelf, leaving at least half an inch of space between each one to allow for expansion as they melt. -
Add the sparkle layer:
Sprinkle a small pinch of medium or coarse frit onto the center of each colored base square. Alternatively, place a small chip of dichroic glass here for that distinct metallic shimmer. -
Clean edges:
Use a small brush to sweep away any stray frit granules that fell onto the kiln shelf, as these can create rough spikes on the back of your finished pieces. -
Cap the design:
Carefully place the clear glass squares directly on top of the frit-covered bases. It’s okay if they wobble slightly; the heat will level them out.
Bubble Control
To trap perfectly round decorative bubbles, sprinkle a tiny pinch of baking soda between glass layers before fusing.
Step 3: Firing and Finishing
-
Load the kiln:
Make sure the shelf is level inside your kiln so the glass rounds out evenly rather than sliding to one side. -
Full fuse schedule:
Run a standard full fuse schedule. This typically involves ramping up to about 1480°F (804°C) and holding for 10-15 minutes. This high heat will cause the two layers to merge completely and the corners to pull in, creating that soft, pillow-like shape. -
Cool down annealing:
Allow the kiln to cool gradually through the annealing phase (around 900°F/482°C) to remove internal stress. Do not open the kiln until it is completely cool (room temperature). -
Clean the fired pieces:
Wash the finished glass cabochons with soapy water to remove any residual shelf primer or kiln wash dust. -
Flip and glue:
Place the glass pieces face down on a protected surface. Apply a pea-sized dot of strong adhesive like E6000 to the center of the back. -
Attach the magnets:
Press a neodymium magnet firmly into the glue on each piece. Let them cure undisturbed for at least 24 hours before sticking them to your fridge.
Shape Shifting
Cut your base glass into circles instead of squares before fusing for perfectly rounded, pebbly magnets.
Now you have a colorful scattering of custom glass gems ready to organize your life


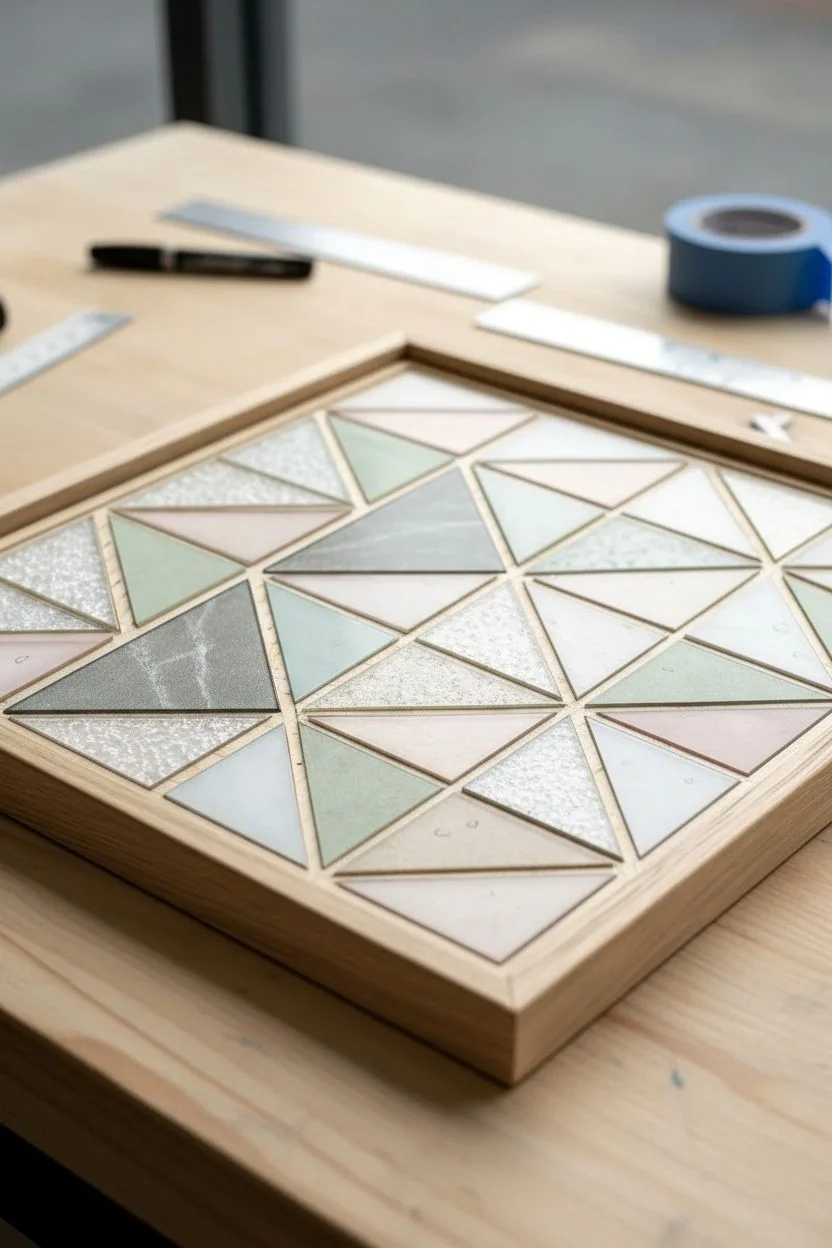
Geometric Glass Mosaic Wall Plaque
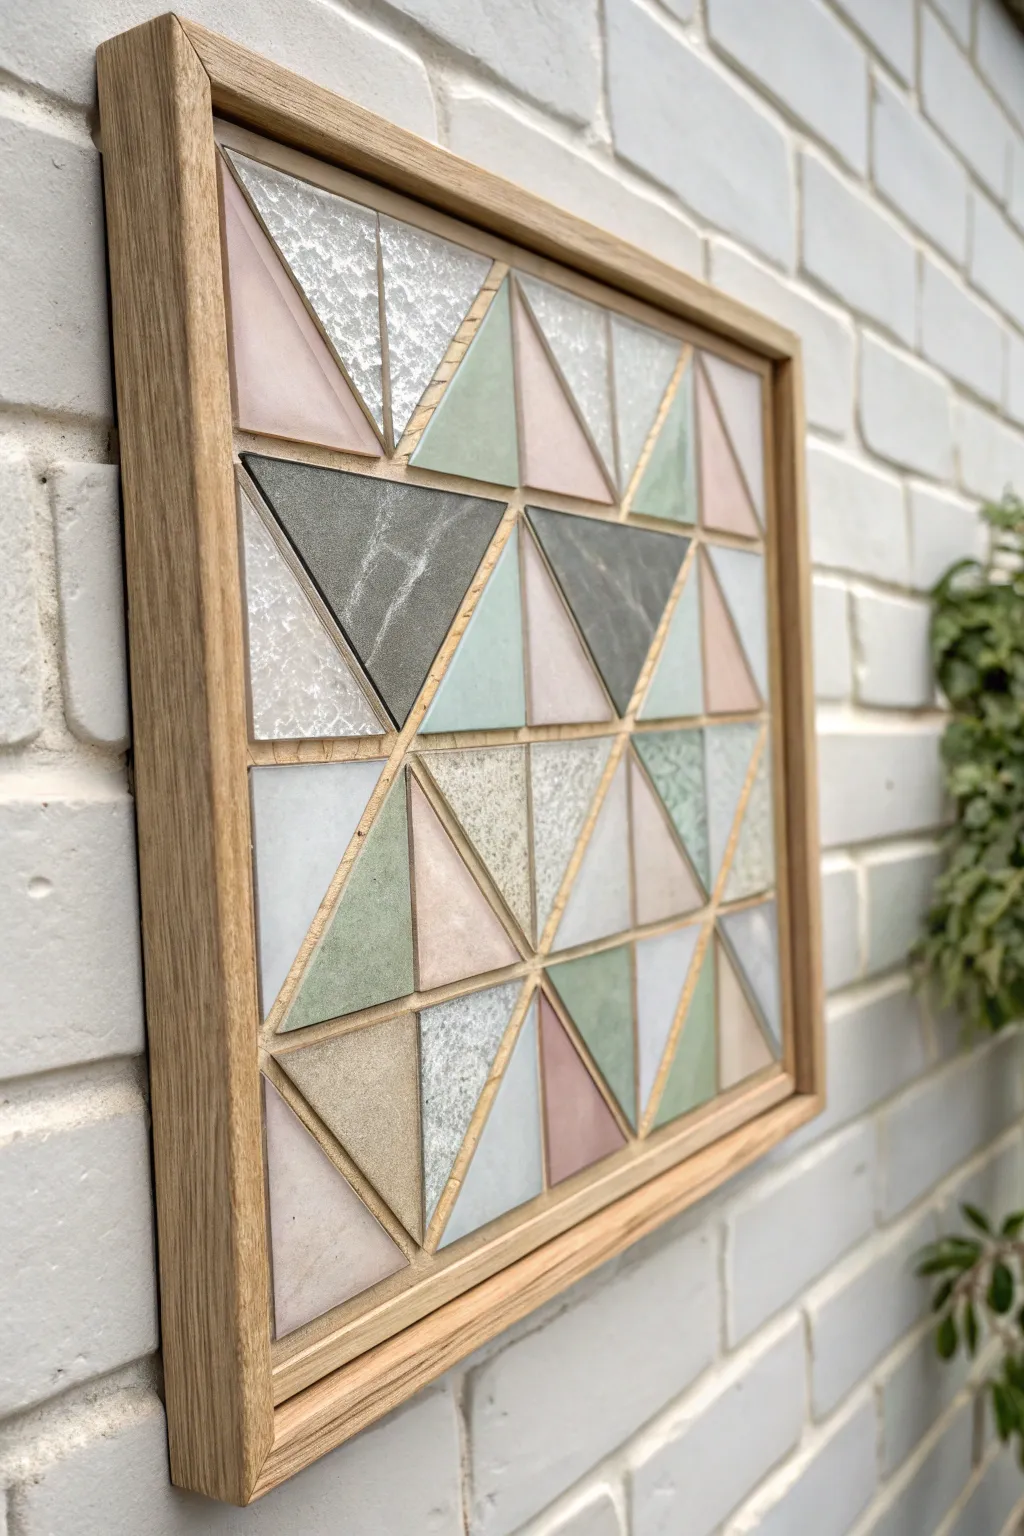
This elegant wall plaque merges the timeless appeal of stained glass with modern geometric design. By arranging soft pastel triangles within a sturdy wooden frame, you’ll create a sophisticated piece that adds texture and subtle color to any space.
How-To Guide
Materials
- Light oak or pine shadow box frame (approx. 12×12 inches)
- Stained glass sheets (pastel pink, mint green, grey, textured clear, iridescent)
- Glass cutter (pistol grip or pencil style)
- Running pliers
- Grozing pliers
- Ruler or straight edge
- Permanent marker (fine tip)
- Mosaic adhesive (clear drying, e.g., Weldbond or silicone)
- Plywood backing board (cut to fit inside frame)
- Grout (sanded, light beige or warm grey)
- Grout sealer
- Mixing bowl and spatula
- Sponge and soft rags
- Safety glasses and gloves
Step 1: Design and Preparation
-
Prepare the Backing:
Remove the glass and backing from your shadow box frame. You will be building directly onto a sturdy plywood insert that fits snugly inside this frame. Ensure the wood surface is clean and dry. -
Sketch the Grid:
Using a ruler, draw a grid of squares on your plywood backing. Then, draw diagonal lines through each square to create a uniform pattern of triangles. This will serve as your direct template. -
Plan the Pattern:
Visualize your color distribution. The reference piece uses clusters of pinks and mints balanced by darker grey triangles and textured clear glass. You can lightly label the triangles on your wood with ‘P’ for pink, ‘G’ for green, etc., to keep track.
Consistent Gaps
Use tile spacers or toothpicks between your glass triangles while gluing. This keeps your grout lines perfectly straight and uniform, which is crucial for this geometric look.
Step 2: Cutting the Glass
-
Set Up Your Work Station:
Lay out a cutting mat or a flat surface covered with newspaper to catch glass shards. Put on your safety glasses before making a single score. -
Score Strips:
Measure the height of the triangles required for your grid. Using your glass cutter and ruler, score long, straight strips of glass in each of your chosen colors. -
Break the Strips:
Use your running pliers to gently snap the glass along the score lines. You should now have several long rectangles of glass in various colors. -
Cut Triangles:
Mark the triangle angles on your glass strips. Score and snap the glass to create individual triangle tiles. I find it helpful to cut a few extra triangles of each color in case of breakage. -
Refine Edges:
Inspect your cut pieces. If any triangles have sharp flares or uneven edges, use grozing pliers to carefully nibble away the excess glass until they are uniform.
Add Depth
Mix glass opacities! Combine opaque stained glass with semi-transparent or textured cathedral glass. It allows light to catch the piece differently throughout the day.
Step 3: Assembly and Grouting
-
Dry Fit the Mosaic:
Place your cut glass triangles onto the plywood template without glue. Arrange them to ensure the gaps between pieces are consistent; you want about 1/16th to 1/8th of an inch for the grout lines. -
Glue the Pieces:
Lift one piece at a time, apply a dab of mosaic adhesive to the back, and press it firmly onto the wood. Continue until the entire board is covered. Let the adhesive cure for at least 24 hours. -
Mix the Grout:
Mix your sanded grout with water until it reaches the consistency of peanut butter. A warm beige tone works best to complement the light wood frame shown here. -
Apply Grout:
Spread the grout over the entire surface, pressing it firmly into the crevices between the glass triangles. Ensure every gap is filled to the level of the glass surface. -
Clean Excess Grout:
Wait about 10-15 minutes for the grout to set slightly. Using a damp (not soaking) sponge, gently wipe away the excess grout from the face of the glass. Rinse your sponge frequently. -
Buff and Shine:
Once the grout has dried completely (usually another 24 hours), a haze will remain on the glass. Use a soft, dry rag to buff the glass until it sparkles. -
Final Assembly:
Place your finished mosaic board back into the wooden frame. Secure it from the back using glazier points or small nails, ensuring it sits flush against the front edge.
Now you have a stunning, architecturally inspired art piece ready to hang or lean on a shelf
Rainbow Gradient Glass Strip Suncatcher
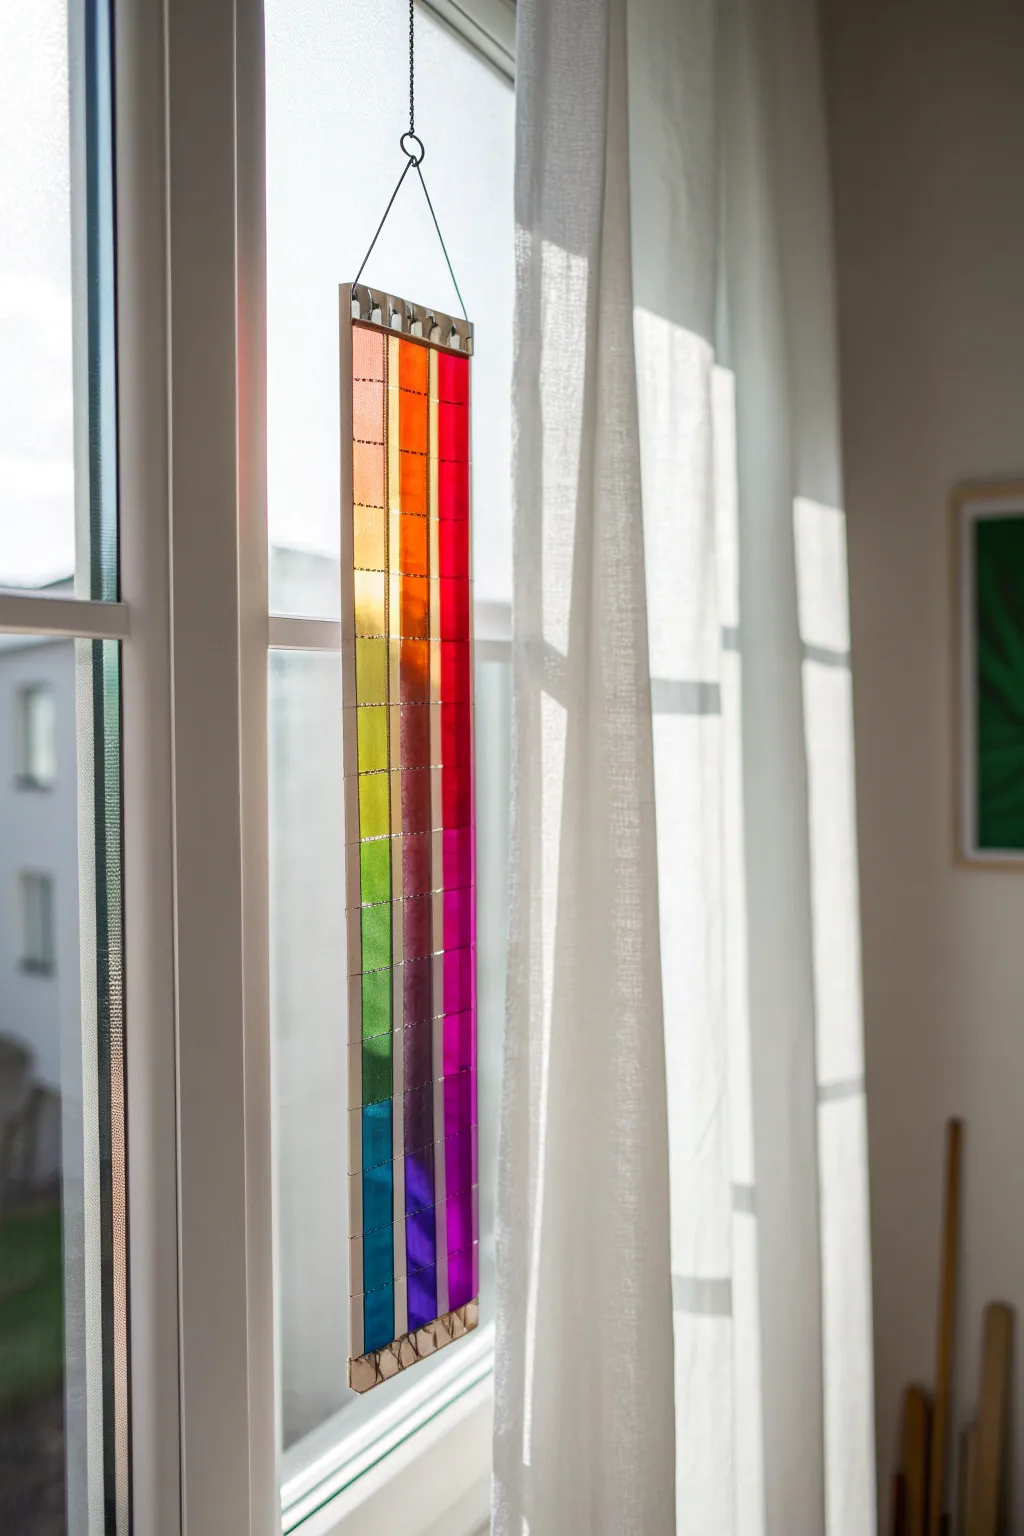
Capture the full spectrum of light with this sleek, modern stained glass suncatcher that features vertical columns of carefully curated color gradients. The architectural design uses long, slender strips of glass divided into a grid, creating a stunning luminous effect when hung against a bright window.
Step-by-Step Guide
Materials
- Stained glass sheets (reds, oranges, yellows, greens, blues, purples, pinks)
- Glass cutter (pistol grip or pencil style)
- Running pliers
- Grozing pliers
- Copper foil tape (7/32 inch, black back recommended)
- Flux (liquid or gel)
- Soldering iron (100-watt)
- 60/40 Solder
- Metal framing strip or U-channel zinc came (for top and bottom)
- Two small jump rings
- Chain for hanging
- Fid or burnishing tool
- Glass grinder (optional but recommended)
- Safety glasses
- Graph paper and ruler
Step 1: Design and Preparation
-
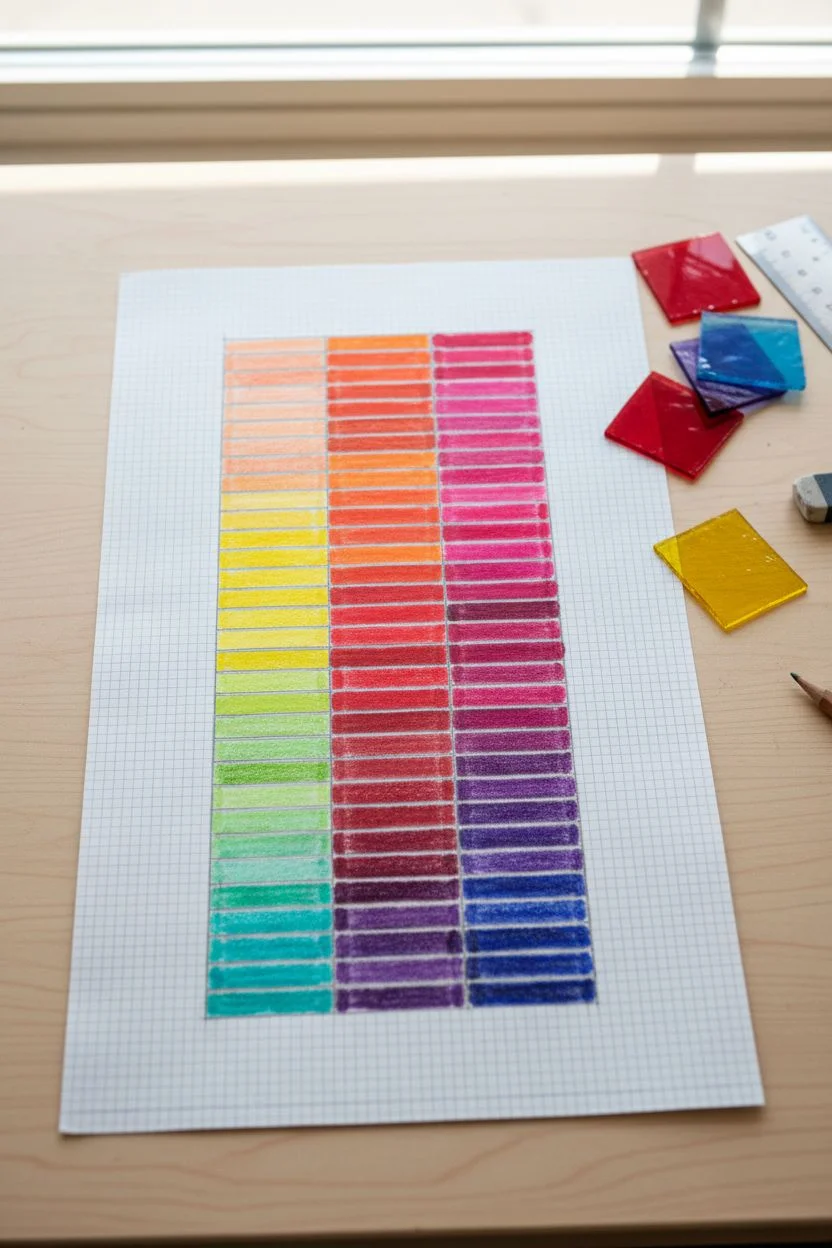
Draft the pattern:
Begin by drawing a long rectangle on graph paper, approximately 3 inches wide by 12-14 inches long. Divide this main rectangle into three equal vertical columns. -
Create the grid:
Divide the vertical columns horizontally into small squares or slight rectangles. In the example, there are roughly 15-18 rows. Ensure the lines align perfectly across all three columns. -
Plan the color gradient:
Map out your colors or lay your glass sheets next to the pattern. The left column transitions from peach to yellow, green, and finally teal. The middle column runs from orange to deep red and purple to indigo. The right column moves from red to magenta and deep violent. Aim for a smooth transition where colors bleed visually into the next.
Uneven Solder Lines?
If your lines look lumpy, your iron may be too cool. Turn up the heat or move slower. If solder falls through, the gap is too wide—fill it with a snippet of copper wire before soldering.
Step 2: Cutting the Glass
-
Score the strips:
It is most efficient to cut long vertical strips of glass first. Measure the width of one column and score a long strip from your chosen glass sheet. -
Break the strips:
Use running pliers to snap the long strip cleanly. Repeat this for all the color variations you need. -
Cut individual segments:
Using your pattern as a guide, mark the horizontal cuts on your glass strips. Score and break them into the individual small rectangular pieces. -
Organize pieces:
As you cut, place each piece directly onto your paper pattern to ensure you don’t mix up the subtle color shifts. -
Grind edges:
Briefly run the edges of each glass piece against a grinder to remove sharp burrs and ensure a perfect fit. If you don’t have a grinder, a carborundum stone works well for smoothing.
Step 3: Foiling and soldering
-
Clean the glass:
Wash all glass pieces with mild soapy water and dry them thoroughly. Foil won’t stick well to dusty or oily glass. -
Apply copper foil:
Wrap the edges of every individual glass rectangle with copper foil tape. Center the glass in the tape so there is an even overlap on both the front and back. -
Burnish the foil:
Use a fid or the casing of a sharpie to rub the foil down flat and smooth against the glass. This is crucial for a strong solder line. -
Reassemble the design:
Place all foiled pieces back onto the pattern, ensuring they fit snugly together with no large gaps. -
Tack solder:
Brush flux onto the intersections of the grid. Apply a small drop of solder to key corners to lock the pieces in place so they don’t shift while you work. -
Complete the soldering:
Flux all the foil lines. Run a smooth, continuous bead of solder down the long vertical seams first, then do the short horizontal lines. Flip the piece carefully and solder the back side. -
Add reinforcement:
I like to attach a U-channel zinc came or a rigid metal strip to the very top and bottom edges. This adds structural stability to the long, narrow shape and provides a clean visual cap. -
Attach hardware:
Solder two jump rings to the top reinforcement bar or the corners of the top glass pieces. Ensure the connection is robust as it will hold the weight. -
Final cleaning:
Wash the finished piece thoroughly to neutralize the flux. Polish it with a soft cloth and a stained glass finishing compound to make the solder lines shine.
Pro Tip: Light Play
Mix textures! Use a combination of cathedral (transparent) and wispy or opalescent (semi-opaque) glass. This creates varying depths of light diffusion even within the same color family.
Hang your new creation in a sunny window and watch how the shifting light transforms your room throughout the day
Beachy Sea Glass Wave Scene
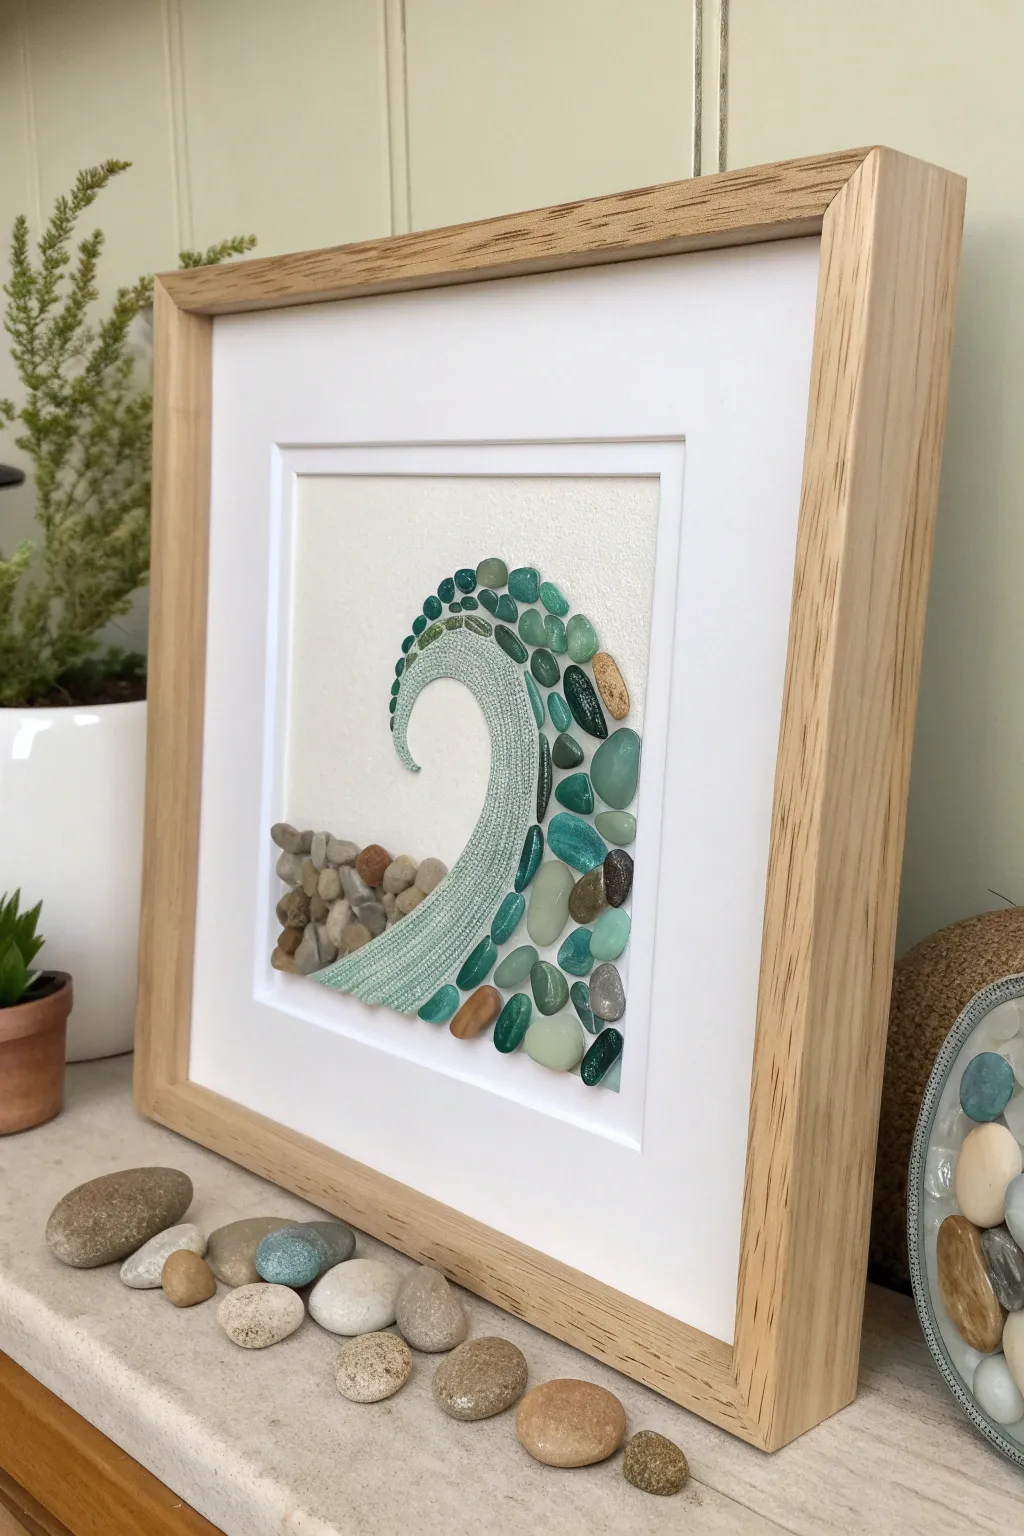
Capture the rhythm of the ocean with this elegant mixed-media wave design. Combining the smooth textures of sea glass and river stones with a unique fabric element, this shadow box brings a permanent splash of coastal calm to your walls.
Step-by-Step Tutorial
Materials
- Deep shadow box frame (square, light wood finish)
- Heavyweight textured cardstock or watercolor paper (white/cream)
- Sea glass assortment (teals, greens, light blues, varied sizes)
- Small river pebbles or beach stones (browns, greys, tans)
- Teal or aqua burlap, woven placemat material, or coarse fabric
- Pencil and eraser
- Strong craft adhesive (E6000 or clear silicone glue)
- Scissors (fabric shears recommended)
- Tweezers
- Tracing paper (optional)
Step 1: Planning and Preparation
-
Prepare the backing:
Open your shadow box frame and remove the glass and backing board. Cut your textured cardstock to fit perfectly inside the frame’s mat opening. This will serve as your canvas. -
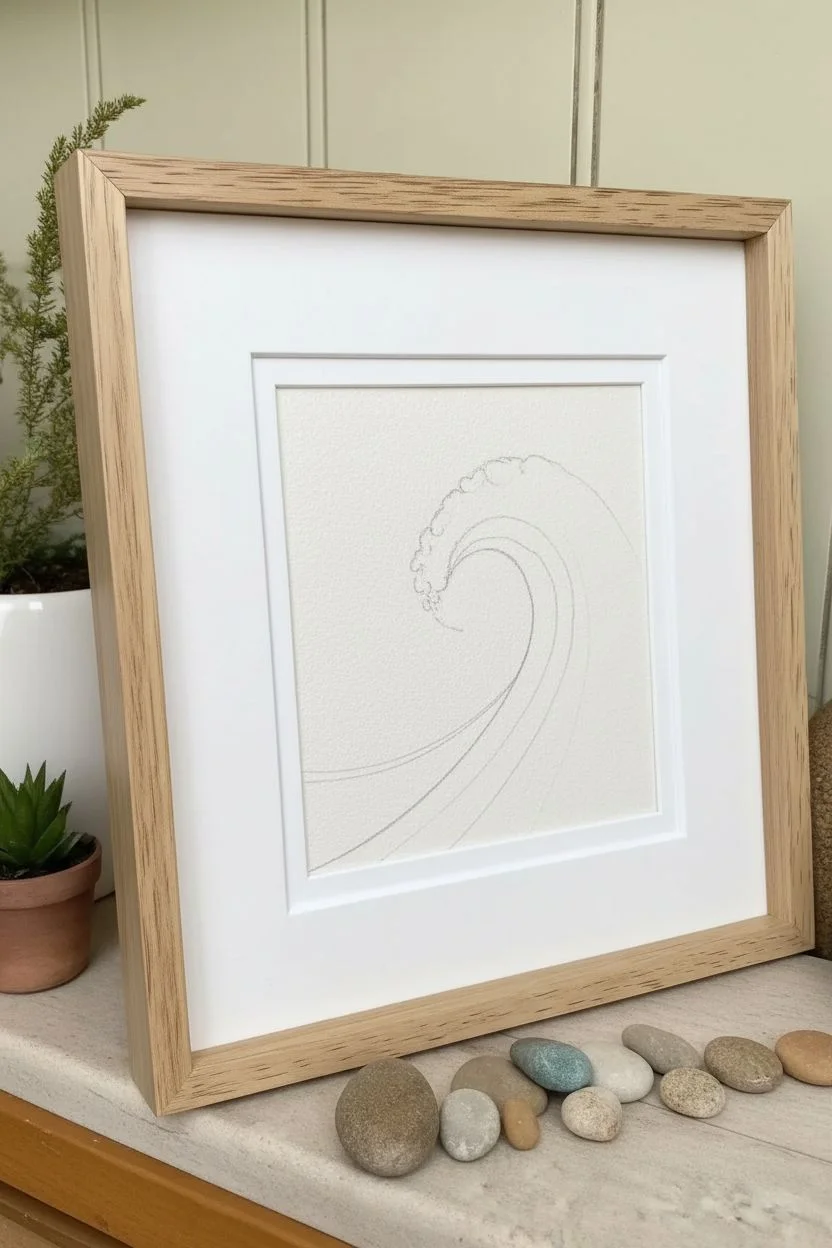
Sketch the wave shape:
Lightly sketch a large, crashing wave outline on the cardstock using a pencil. Start with a wide base on the left and curve it upwards into a crest that curls over to the left. Keep the lines faint so they can be erased later. -
Outline the inner curl:
Draw an inner curve parallel to your main wave line. This space, which tapers as it goes up into the curl, will be filled with your fabric material to represent the rushing water’s texture.
Sticky Situation?
If your heavy stones keep sliding down while the glue dries, prop the frame up at a slight angle or use a tiny bit of masking tape to hold them in place temporarily.
Step 2: Creating the Fabric Wave
-
Trace the shape:
Use tracing paper to copy the exact shape of that inner wave section you just drew. Cut this paper template out to ensure it fits the space on your cardstock perfectly. -
Cut the material:
Place your template onto your teal burlap or woven material. Pay attention to the weave direction—having the lines follow the curve of the wave adds incredible movement. Cut the shape out carefully with sharp scissors. -
Secure the fabric:
Apply a thin, even layer of adhesive to the back of the fabric cutout. Press it firmly onto the cardstock within your sketched lines. I find holding this down for a minute helps heavier fabrics adhere flat.
Make it Sparkle
Add crushed clear glass or iridescent glitter very sparingly at the very tip of the wave crest to mimic sunlight hitting the sea spray.
Step 3: Adding the Sea Glass Spray
-
Select your glass:
Sort your sea glass pieces by size and color gradient. You’ll want smaller, lighter pieces for the top spray and larger, darker teal pieces for the body of the wave. -
Dry fit the crest:
Before gluing, arrange the sea glass pieces along the outer curve of the fabric wave. Place them so they look like water droplets spraying off the top. Use tiny pieces at the very tip of the curl. -
Build the wave body:
Continue arranging larger glass pieces down the right side of the wave, following the curve. Mix in a few flat pebbles among the glass to add contrast and earthy tones. -
Glue the glass:
Once you are happy with the arrangement, lift one piece at a time with tweezers, apply a dot of strong clear glue, and press it back into place.
Step 4: The Pebbled Base
-
Create the shoreline:
At the bottom left, where the wave begins to rise, start arranging your small river stones. These represent the heavy, churning water and the ocean floor. -
Layer the stones:
Stack the stones slightly; putting smaller stones on top of larger ones creates a nice 3D relief effect that matches the height of the sea glass. -
Blend the transition:
Where the stones meet the fabric wave base, mix in a few semi-transparent or brownish glass pieces to create a smooth visual transition from earth to water. -
Final adhesive application:
Glue down all the stones. Check for any visible pencil marks and gently erase them if they haven’t been covered by your materials.
Step 5: Finishing Touches
-
Clean and dry:
Allow the artwork to dry flat for at least 24 hours. Check for any glue strings (spiderwebs) and remove them with tweezers or a toothpick. -
Reassemble:
Clean the inside of the shadow box glass thoroughly. Place your finished art piece back into the frame and secure the backing. -
Display:
Hang your piece near a window where natural light can catch the edges of the sea glass for a luminous effect.
Now you have a serene piece of coastline scenery preserved forever in your home
Glass-On-Glass Mosaic Picture Frame
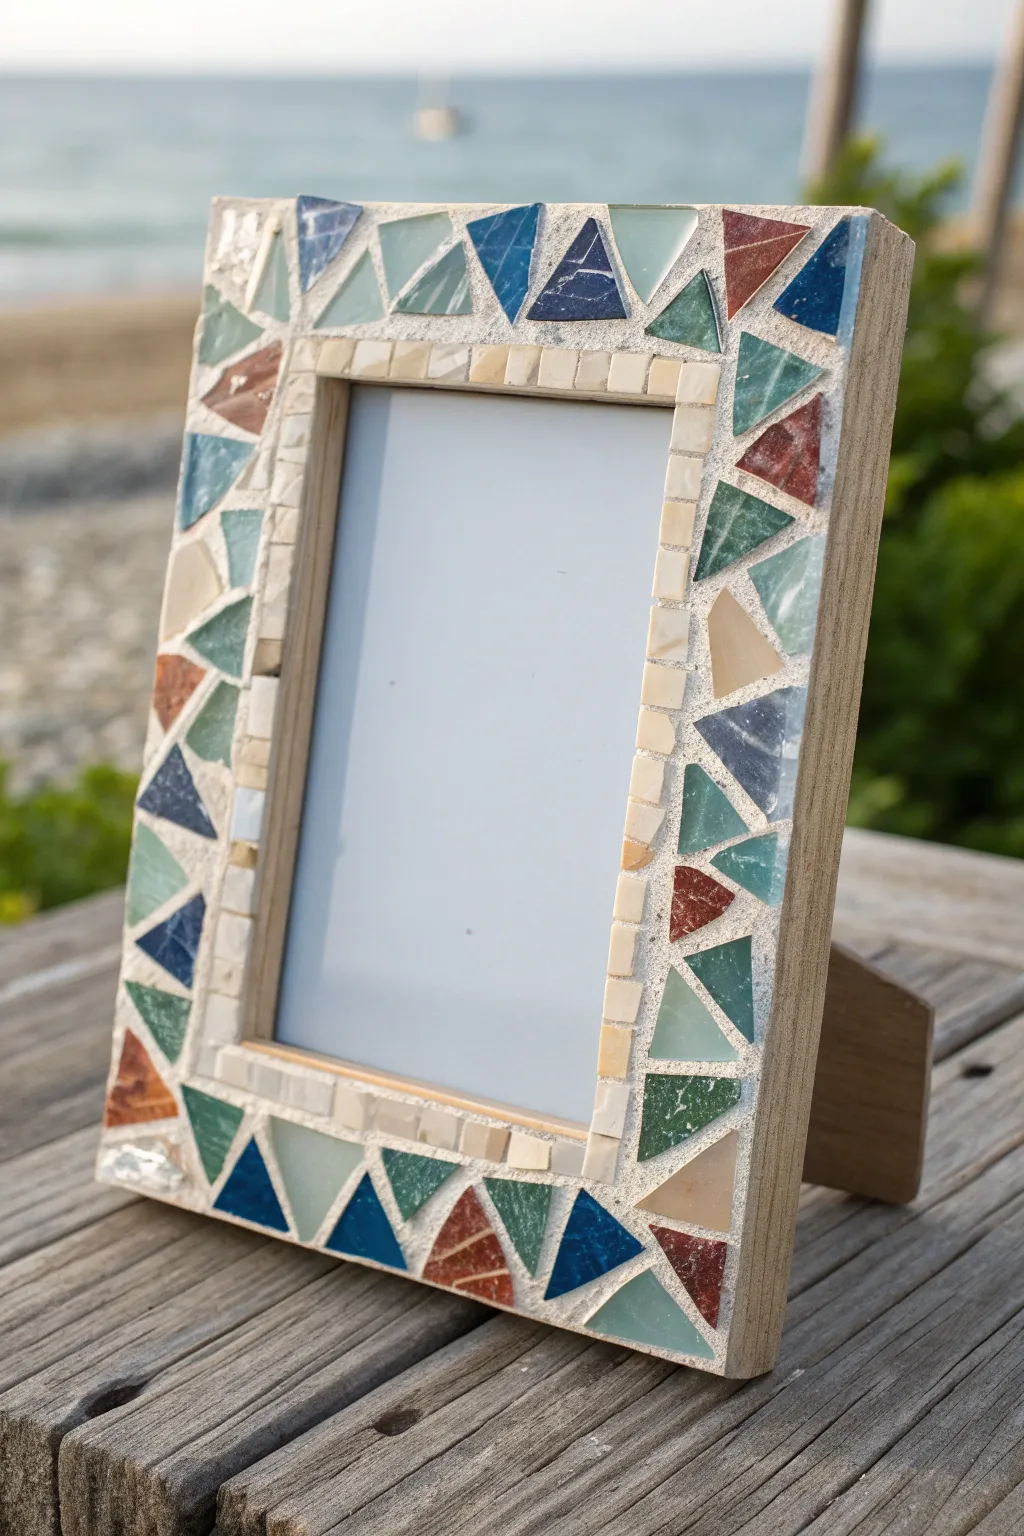
Capture the breezy elegance of a coastal retreat with this geometric mosaic picture frame. Using a mix of muted blues, teals, and earthy terracotta glass tiles, this project transforms a simple wooden base into a sophisticated piece of decor.
Step-by-Step Guide
Materials
- Wide-rimmed wooden picture frame (unfinished)
- Stained glass sheets or pre-cut glass tiles (teal, navy blue, dusty red, seafoam green, beige)
- White or cream vitreous glass mini-tiles (square)
- Wheeled glass nippers
- Mosaic adhesive (Weldbond or similar PVA glue)
- Light-colored grout (sand or off-white)
- Grout sponge & soft rags
- Safety glasses
- Mixing bowl and spatula
- Palette knife
- Small paintbrush (for glue application)
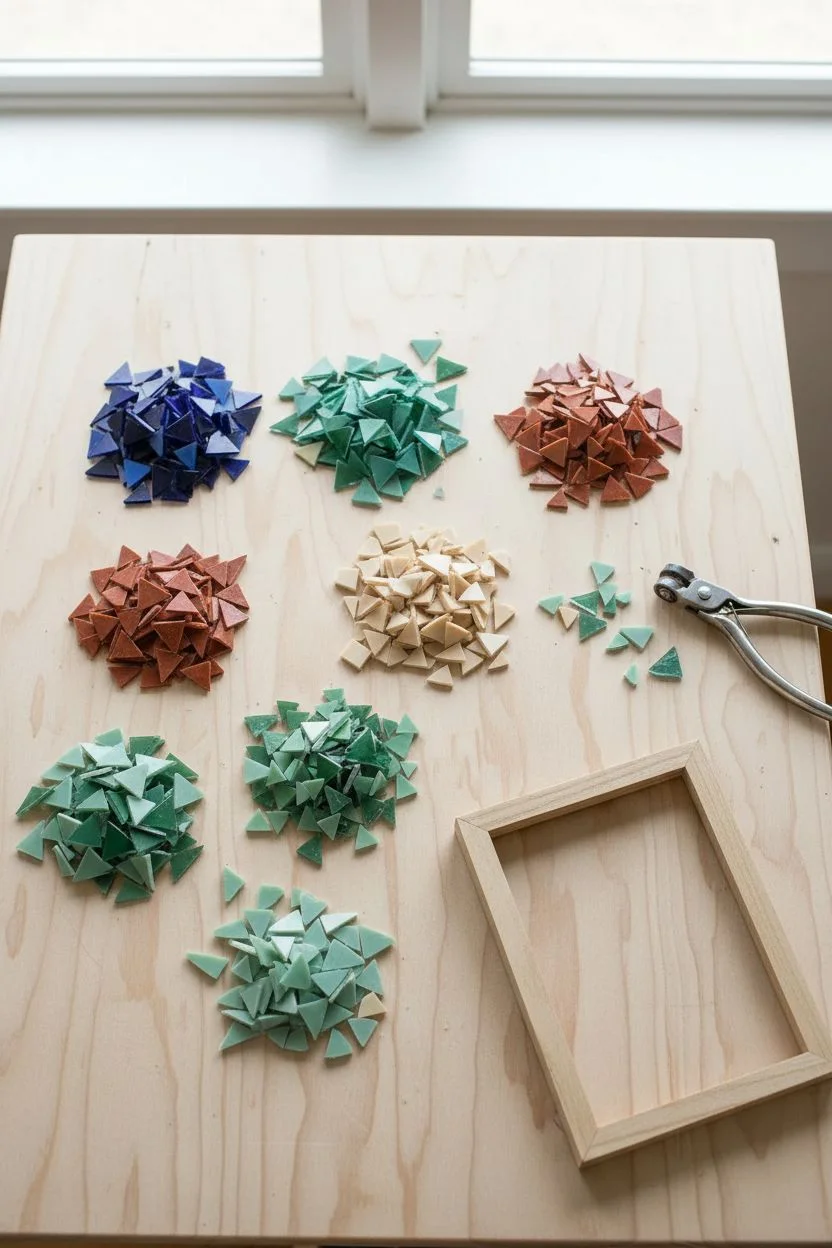
Step 1: Glass Preparation
-
Safety First:
Before you begin cutting any glass, ensure you are wearing safety glasses to protect your eyes from flying shards. -
Cut Triangle Shapes:
Using your wheeled glass nippers, cut the larger stained glass pieces into varied triangles. Aim for inconsistent sizes—some equilateral, some elongated—to create that organic, shattered look seen in the reference. -
Sort by Color:
Group your freshly cut triangles into color piles: deep blues, sea glass greens, earthy reds, and neutrals. This makes the randomization process much smoother later on. -
Prepare the Mini-squares:
If your cream-colored vitreous tiles are too large, nip them down into small, uniform rectangles or squares that will fit along the inner rim of the frame.
Step 2: Designing the Layout
-
Dry Fitting the Border:
Before gluing, lay out the small cream tiles along the very inner edge of the frame. This creates a neat, defined border next to your photo and acts as a guide for the rest of the pattern. -
Arranging the Triangles:
Start placing your colored triangles on the wider part of the frame. I like to let the triangles point in differeng directions so they interlock loosely like a puzzle. -
Check Spacing:
Leave a small, consistent gap (about 1/16 to 1/8 inch) between all pieces. This channel is crucial for the grout to adhere properly. -
Balance the Colors:
Step back and look at your dry arrangement. Ensure you don’t have a cluster of just red or just blue in one corner; distribute the colors evenly for a balanced aesthetic.
Sticky Situation?
If glue squeezes up between tiles, let it dry until tacky, then scrape it out with a toothpick. Dried glue blocks grout and ruins the finish.
Step 3: Adhering the Mosaic
-
Glue the Inner Border:
Lift one cream tile at a time, apply a small dab of adhesive to the back, and press it firmly into place along the inner rim. -
Glue the Geometrics:
Proceed to glue the triangular pieces. Use enough glue to hold them firm but not so much that it oozes up between the tiles where the grout needs to go. -
Clean Edges:
If any glass overhangs the outer wooden edge of the frame, carefully nip it flush or slide it inward before the glue sets. -
Drying Time:
Allow the adhesive to cure fully according to the manufacturer’s instructions, typically at least 24 hours, to ensure no tiles shift during grouting.
Coastal Chic Upgrade
Mix a tiny pinch of fine glitter or crushed seashells into your grout mix to give the finished frame a subtle, sandy shimmer in the sunlight.
Step 4: Grouting and Finishing
-
Mix the Grout:
Mix your sanded grout with water until it reaches a consistency similar to peanut butter or thick cake batter. -
Apply Grout:
Scoop the grout onto the frame and use a spatula or your gloved hand to push it deep into the crevices between the glass pieces. -
Clear Excess:
Wipe away the bulk of the excess grout from the surface of the glass using your hand or the spatula. -
First Sponge Wipe:
Dampen your sponge slightly (ensure it’s not dripping wet) and wipe across the tiles to clean them. Rinse the sponge frequently. -
Final Buff:
Once the grout has formed a hazy film (after about 10-20 minutes), use a soft, dry cloth to buff the glass tiles until they shine brightly against the sandy grout. -
Paint the Edges:
If the outer wooden edge of the frame looks messy, touch it up with a neutral acrylic paint or leave it natural if it complements the grout tone.
Now create a gallery wall by making several frames with different geometric patterns to display your favorite memories
Layered Translucent Paper Collage Under Glass
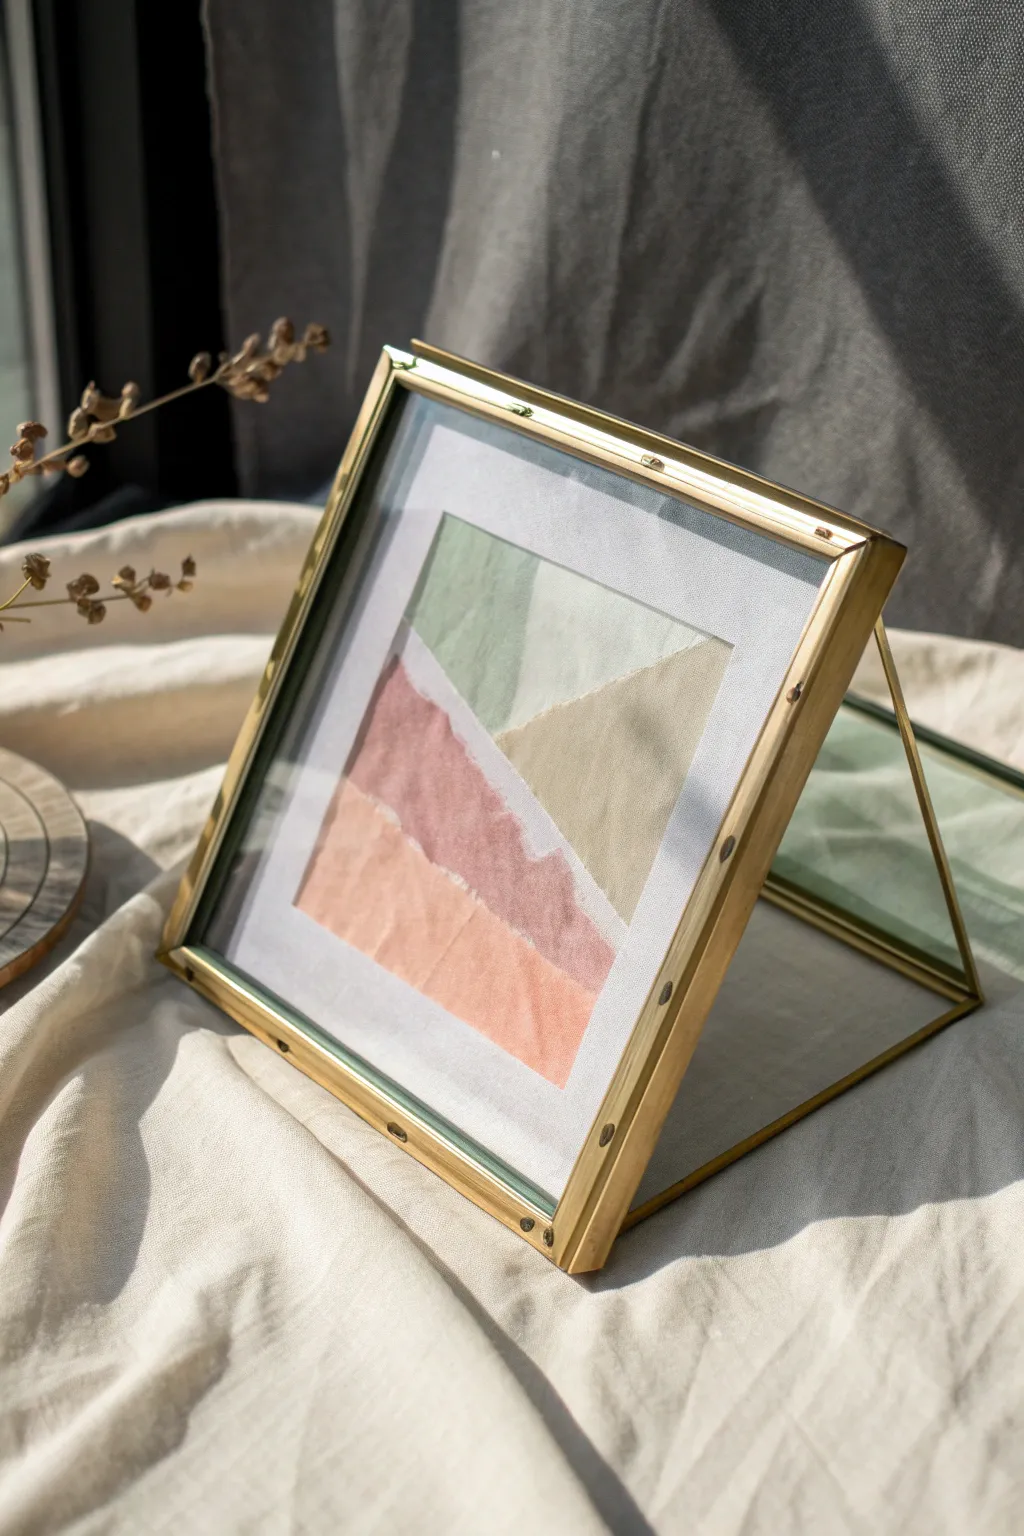
Capture the serene beauty of a rolling landscape using nothing more than torn paper scraps and a hinged geometric frame. By layering translucent mulberry or tissue papers, you create dreamy, overlapping color fields that seem to float effortlessly between panes of glass.
Step-by-Step Tutorial
Materials
- Hinged floating glass frame with brass trim (square)
- White cardstock or heavy watercolor paper (for backing)
- Translucent mulberry paper or tissue paper (sage green, dusty rose, peach, sand)
- Acid-free glue stick or matte medium
- Small paintbrush (if using liquid adhesive)
- Ruler
- Pencil
- Scissors
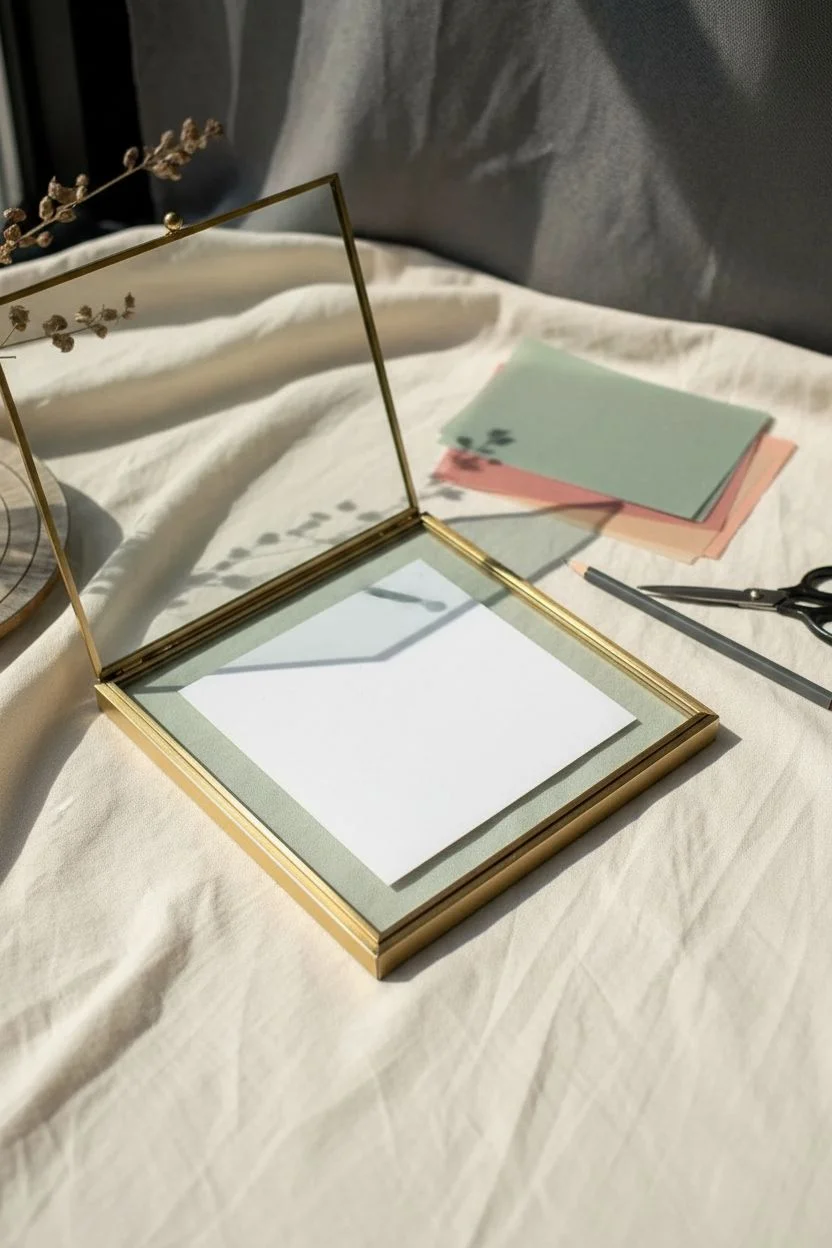
Step 1: Preparing the Foundation
-
Open the frame:
Carefully slide the latch on your brass frame and open the hinged glass door. Remove any sample inserts or protective foam sheets that came inside. -
Measure the opening:
Using a ruler, measure the interior dimensions of the glass area. You want your background paper to be slightly smaller than the full glass pane to create that distinctive ‘floating’ invisible border effect. -
Cut the background:
Cut your square of white cardstock or heavy paper to size. A good rule of thumb is to leave about half an inch of clear glass visible on all sides. -
Plan the palette:
Lay out your colored papers on a table. For this soft, earthy look, select a muted sage green, a sandy beige, a dusty rose, and a soft peach tone.
Step 2: Layering the Landscape
-
Tear the first layer:
Starting with the peach color for the bottom foreground, tear a strip of paper horizontally. Aim for an uneven, organic edge rather than a straight line to mimic rolling hills. -
Dry fit the piece:
Place the torn peach strip at the very bottom of your white square to check the size. Let the torn edge face upward. -
Glue the base:
Apply a thin layer of adhesive to the back of the peach paper and press it firmly onto the bottom of the white cardstock backing. Smooth out any air bubbles gently with your finger. -
Create the middle ground:
Tear a piece of the dusty rose paper. This piece should be taller on one side (the left) and slope down toward the right, creating a dynamic diagonal line. -
Layering the rose tone:
Glue this rose piece so it overlaps the top edge of the peach layer slightly. The translucency of the paper will create a beautiful third color where they overlap. -
Tear the beige hill:
Take the sandy or beige paper and tear a triangular shape that will sit on the right side of the composition. I like to make this tear steeper to balance the gentler slopes below. -
Adhere the beige layer:
Glue the beige piece so it tucks behind or sits adjacent to the rose layer, filling the middle-right section of your landscape. -
Form the sky or distant mountain:
Finally, tear a large piece of the sage green paper for the top section. The bottom edge of this tear should interact with the peaks of your pink and beige layers. -
Complete the collage:
Glue the green piece at the top, ensuring it covers the remaining white space above your other layers while slightly overlapping their torn edges.
Glue Wrinkles?
If the paper buckles, you used too much glue. Apply glue very thinly, or switch to a ‘dry’ glue stick rather than liquid glue for thin tissues.
Step 3: Finishing Touches
-
Trim the excess:
Once the glue is dry, flip your white backing card over. Use scissors to trim away any colored paper bits hanging off the straight edges of the square. -
Clean the glass:
Before assembly, wipe the inside of both glass panes with a microfiber cloth to remove any fingerprints or dust specks. -
Center the artwork:
Place a tiny dot of double-sided tape or adhesive on the very back center of your collage card. Position it perfectly in the center of the rear glass pane. -
Close the frame:
Gently lower the front glass pane/door and slide the latch shut to secure your artwork inside.
Tearing Tip
For a softer, fuzzier edge (more like a cloud), dampen the paper slightly along the line you want to tear using a wet paintbrush before pulling.
Now enjoy how sunlight catches those overlapping paper layers in your new translucent art piece
Painted Glass Bottle Silhouettes
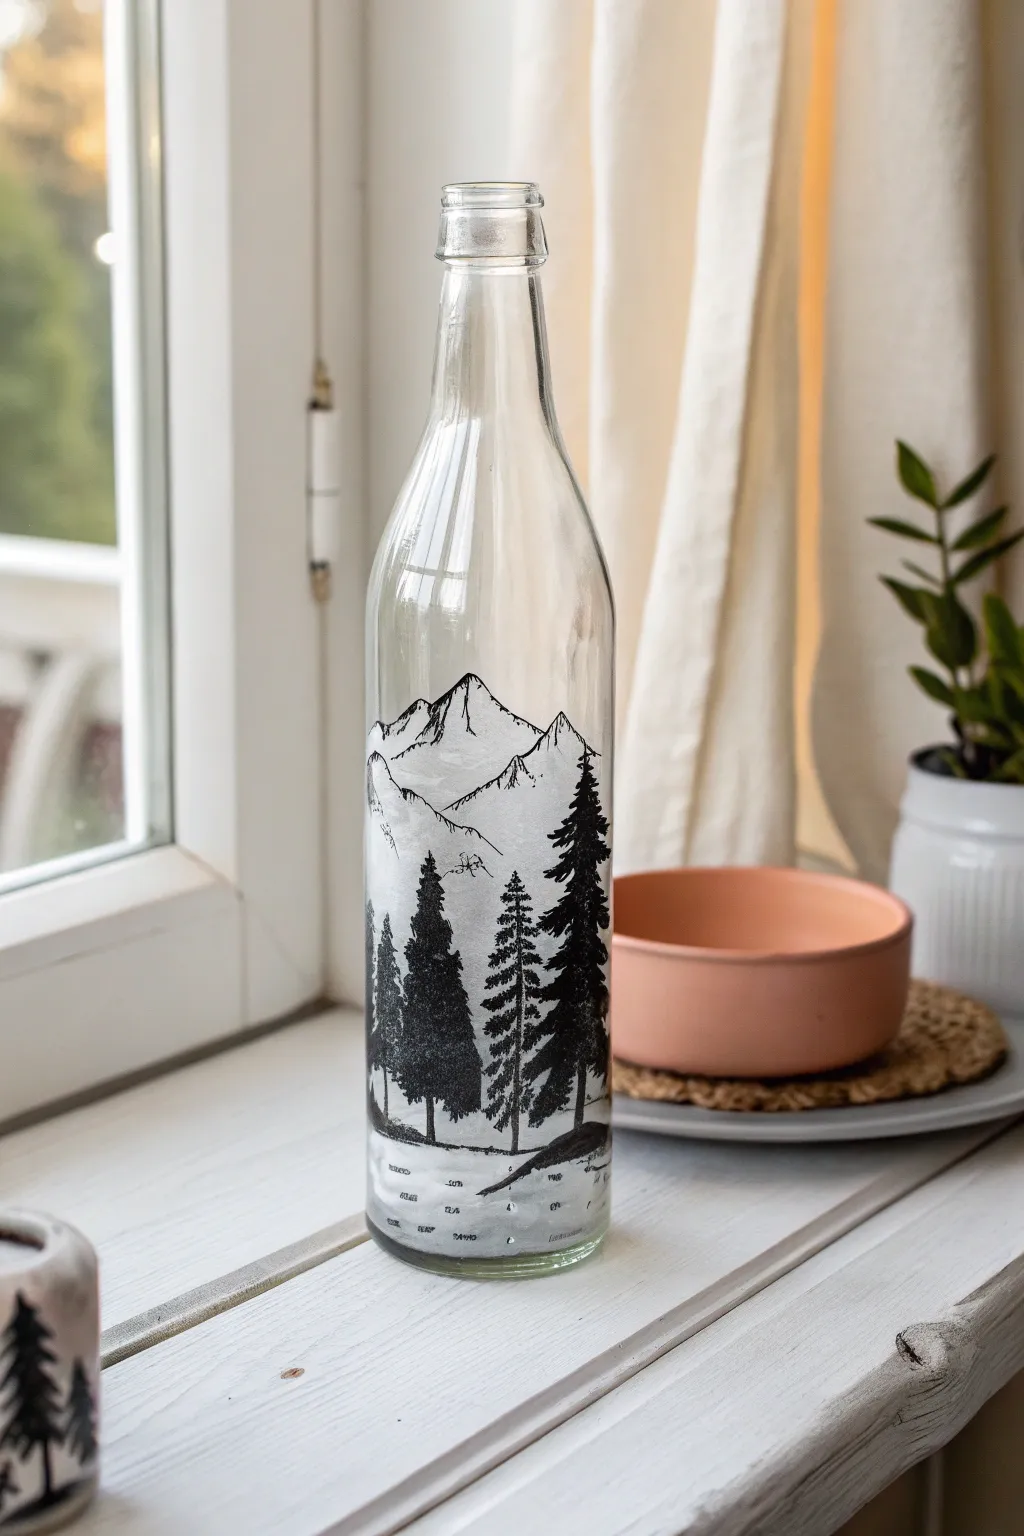
Transform a simple clear glass bottle into a serene alpine landscape using basic painting techniques. This project captures the crisp beauty of snowy peaks and dark evergreen silhouettes, perfect for winter decor or a unique vase.
Step-by-Step
Materials
- Clear glass bottle (wine or sparkling water style), label removed and cleaned
- Rubbing alcohol and cotton pads
- White acrylic paint (or glass-specific enamel paint)
- Black acrylic paint (or glass-specific enamel paint)
- Small sea sponge or cosmetic wedge sponge
- Fine detail paintbrush (size 0 or 00)
- Small flat paintbrush (size 2 or 4)
- Water cup and palette
- Clear spray sealant (matte or satin finish)
Step 1: Preparation and Background
-
Clean the surface:
Before starting any paint work, wipe down the entire exterior of the bottle with rubbing alcohol and a cotton pad to remove oils and fingerprints. -
Sponge the base layer:
Dip your sponge lightly into white paint and dab off the excess on your palette until almost dry. Gently tap this onto the bottom third of the bottle to create a textured, snowy ground effect. -
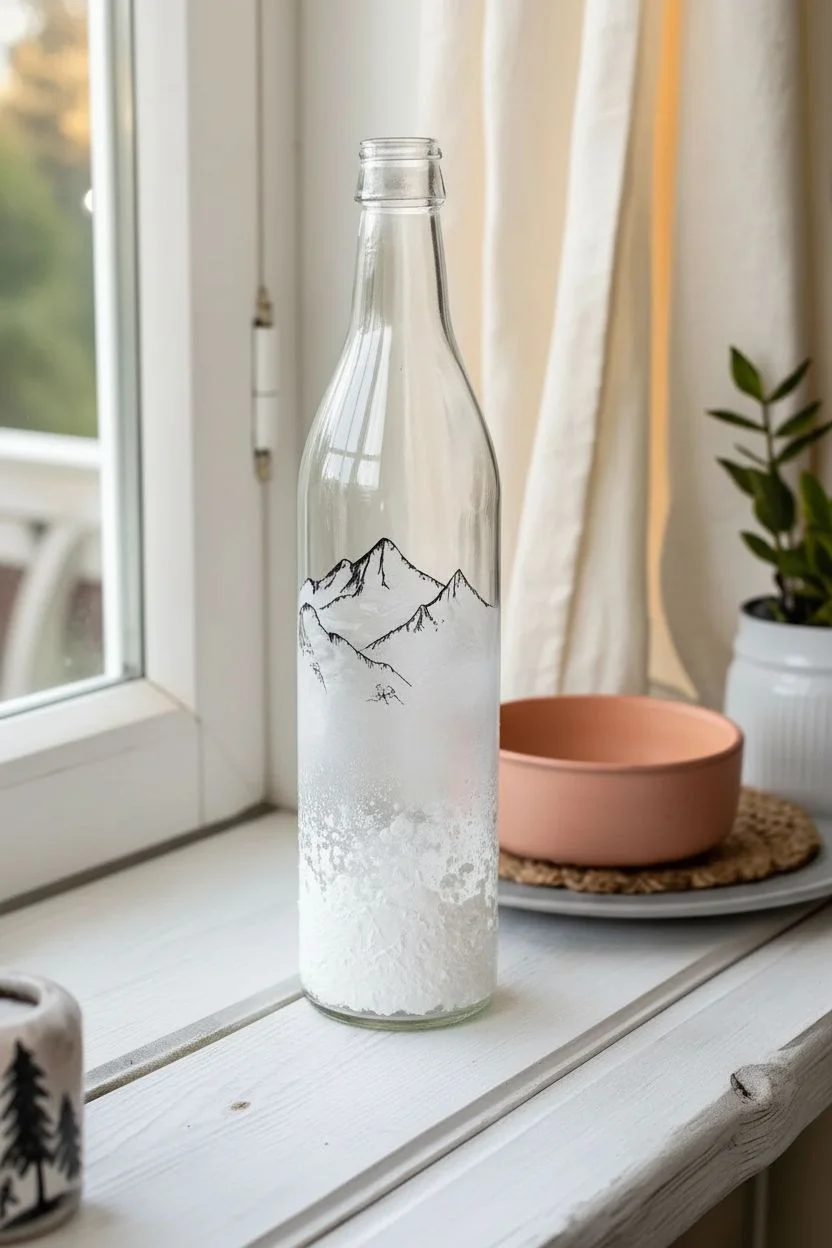
Create the misty sky:
Using the same sponge technique but with even less paint, work your way up the bottle’s neck. Fade the white out as you go higher so the glass remains mostly clear towards the top. -
Define the mountain range:
Mix a tiny amount of black into your white paint to create a very pale grey. Use a small flat brush to paint loose, jagged triangular shapes for the distant mountain peaks about halfway up the bottle. -
Add mountain texture:
While the grey is still tacky, use a clean corner of your sponge to dab white highlights onto the peaks, giving them a snow-capped appearance. -
Outline the peaks:
Switch to your fine detail brush and black paint. Carefully outline the very tops of your mountains with a thin, shaky line to mimic rugged rock faces. -
Dry the background:
Let this background layer dry completely for at least 30 minutes before starting the foreground.
Sponge Success
Don’t drag the sponge! Use a straight up-and-down tapping motion. This creates the ‘frosted’ glass look rather than streaks.
Step 2: Silhouettes and Details
-
Anchor the trees:
Visualize where your trees will stand. Paint vertical black lines of varying heights down in the foreground area to serve as the trunks. -
Paint the foliage:
Using the fine brush, use short, horizontal dabbing motions starting from the top of the trunk and working downward. Widen your strokes as you descend to create the classic triangular pine shape. -
Vary the density:
Make some trees dense and dark, while leaving others slightly sparse to show the white ‘snow’ background through the branches. -
Ground the scene:
At the base of your trees, use the black paint to create a slight uneven horizon line, connecting the trees to the snowy bottom. -
Add foreground details:
Paint a few tiny, scattered vertical lines or dots near the bottom edge to represent small shrubs or rocks poking through the snow. -
Create texture on the glass:
If you want the snowy ground to look aged or styled like a sketch, create tiny tick marks or small printed text-like scribbles in the white area at the very bottom. -
Final drying time:
Allow the black paint to cure fully. This usually takes closer to an hour depending on how thickly the paint was applied. -
Seal the artwork:
Take the bottle to a well-ventilated area and apply a light coat of clear matte spray sealant to protect the paint from scratching.
Light feature
Insert a string of battery-operated fairy lights (cork style work best) inside the bottle to illuminate the mountains from behind.
Place your bottle on a sunny windowsill where the natural light can filter through the misty mountains
Wire-Wrapped Glass Charm Mobile
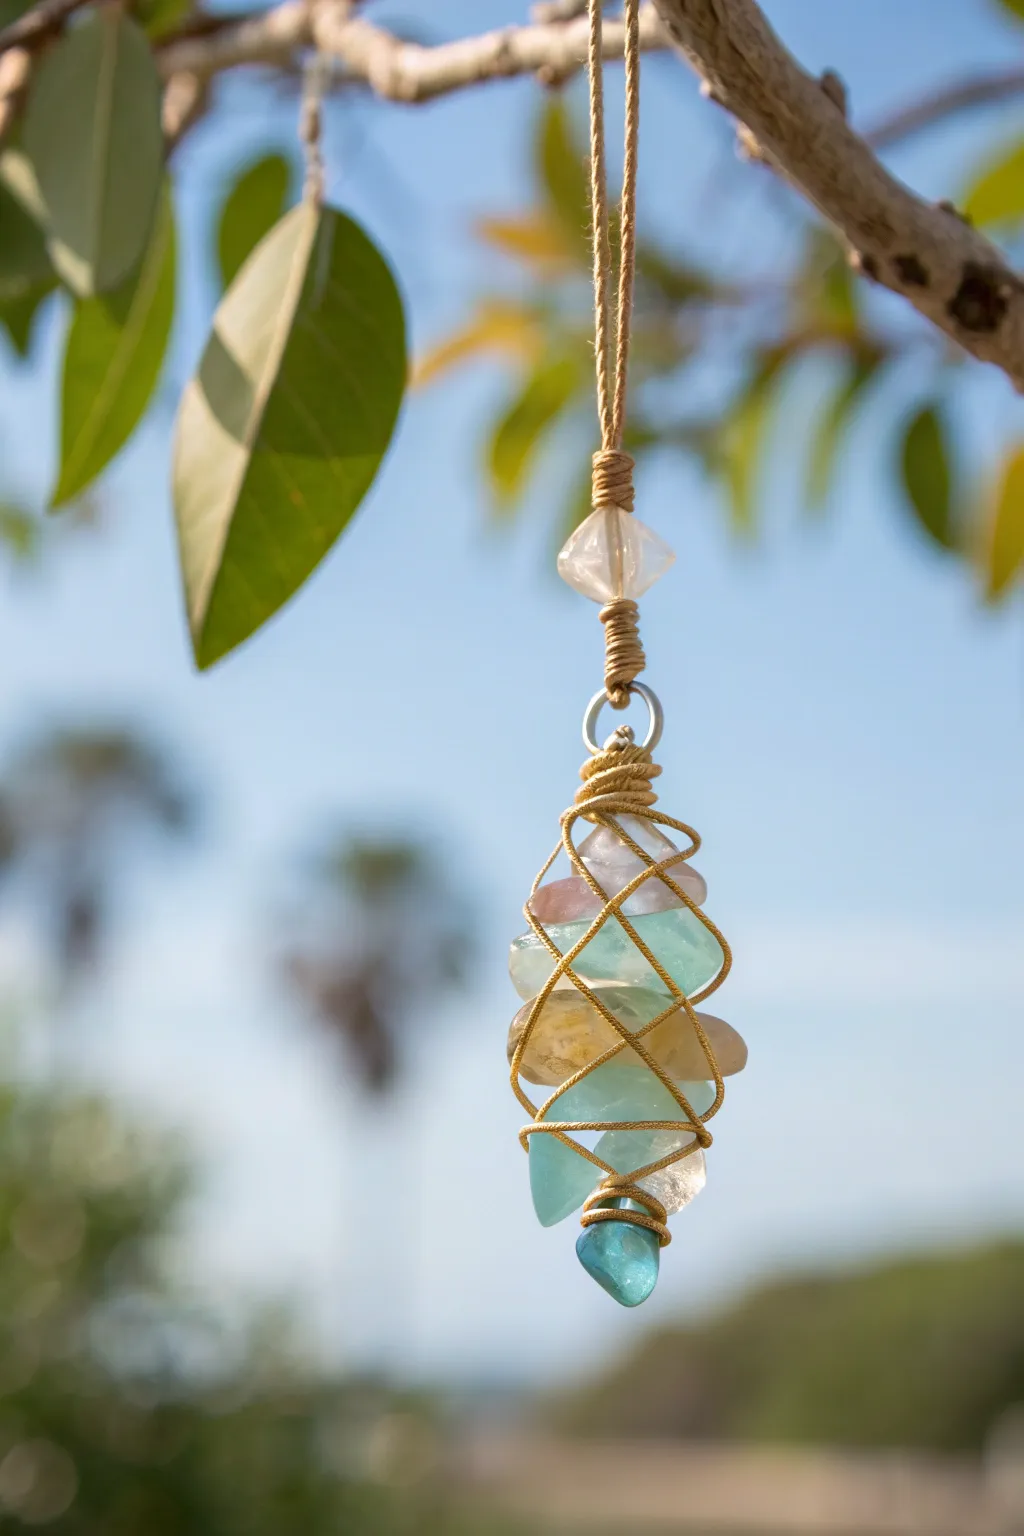
Capture the light and colors of the coast with this delicate hanging mobile. By encasing tumbled glass pieces in a simple knotted net, you create a glowing, elongated charm that sways beautifully in the breeze.
Step-by-Step Guide
Materials
- Assorted tumbled sea glass or faux glass crystals (clear, teal, amber, pink)
- One faceted clear crystal bead (approx. 10-12mm)
- Small metal jump ring or closed metal ring (silver tone)
- High-tensile gold nylon cord or thin macrame thread (0.8mm – 1mm)
- Scissors
- Clear jewelry adhesive or super glue
- Tweezers (optional)
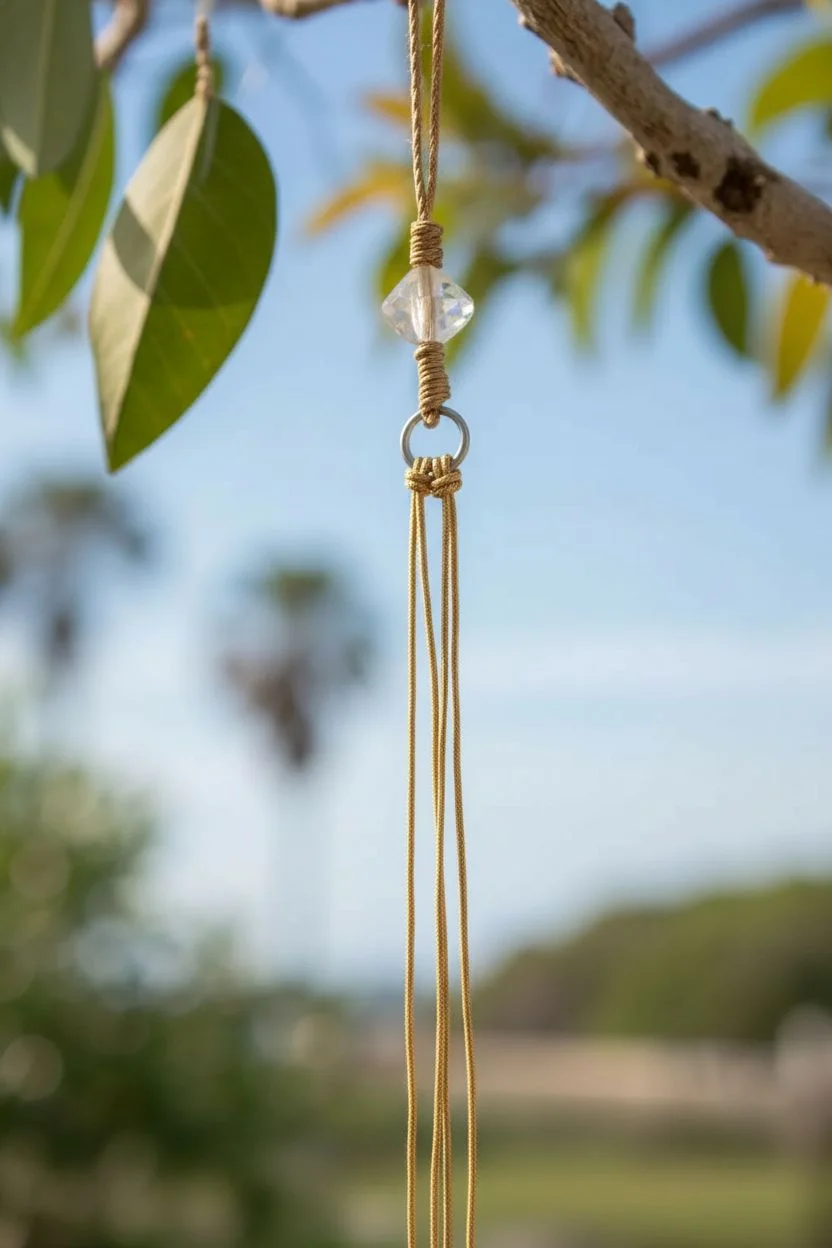
Step 1: Creating the Top Suspension
-
Cut the Cord:
Begin by cutting a generous length of your gold nylon cord, approximately 4 feet long. You will need the extra length for the wrapping process. -
String the Loop:
Fold the cord in half to find the center. Pass the folded loop end through your faceted clear crystal bead. -
Secure the Bead:
Tie an overhand knot right above the crystal bead to create a loop for hanging, and another knot immediately below the bead to lock it in place. -
Wrap the Neck:
Take the two long trailing ends of the cord and pass them through your metal ring. Fold them back up and wrap one strand tightly around the bundle of cords just below the crystal bead, creating a ‘whipping’ knot effect for about half an inch. -
Attach the Metal Ring:
Secure the metal ring firmly below this wrapped section. This ring acts as the transition point between the hanging loop and the glass cage.
Sticky Situation
Use a tiny dab of E6000 or jewelry glue between the stones as you stack them. This keeps the glass column stable while you struggle with the cord wrapping.
Step 2: Building the Net
-
Anchor the Cords:
Attach two new pieces of cord (about 3 feet each) to the metal ring using lark’s head knots. This gives you four working strands hanging down from the ring. -
Initial Wraps:
Gather the four strands and perform a wrapping knot (or ‘gathering knot’) directly below the metal ring for about 1/2 inch to create a solid neck. -
Start the Spiral:
Separate the four strands. Take a small piece of tumbled glass (preferably a pointy one for the top) and place it centrally below the wrapped neck. -
First Crossover:
Guide the strands diagonally across the glass piece. This isn’t traditional wire wrapping; you are creating a spiral cage. Cross the front left strand over to the right, and the back strands to the front. -
Secure the First Stone:
Once the cords cross over the first stone, cinch them slightly so the glass is held by tension. I find it helpful to use a tiny dab of clear glue here if the glass is very slippery. -
Stacking Stones:
Place your next stone—perhaps a teal or amber piece—directly underneath the first one. Let the cords naturally spiral down from the first stone to embrace the second. -
The Criss-Cross Pattern:
Continue crossing opposite cords over the face of each new glass piece. The goal is to create diamond shapes or Xs with the gold cord that hold the glass stack together. -
Adjusting Tension:
Every time you add a stone, pull the cords gently but firmly. The stack relies on the compression of the stones against each other.
Step 3: Finishing the Tassel
-
Placement of Final Stone:
Select a teardrop-shaped piece of glass for the bottom, pointing downwards. This provides a visual finish to the mobile. -
Gathering the Ends:
Bring all four cords together at the very bottom tip of the final glass piece. -
Final Whipping Knot:
Using one of the longest remaining strands (or a separate piece of scrap cord), wrap tightly around all cords at the bottom tip of the glass to seal the cage. -
Trim and Seal:
Trim the excess cord ends as close to the final knot as possible. Carefully apply a drop of clear jewelry adhesive to the cut ends to prevent fraying and ensure the knot holds permanently.
Slippery Cords?
If the gold cord slides off the smooth glass, try roughing up the glass edges slightly with sandpaper or choosing a cord with more texture, like waxed cotton.
Hang your finished glass charm in a sunny window or from a branch to enjoy the play of light through the colors
Crushed Glass “Painterly” Floral Panel

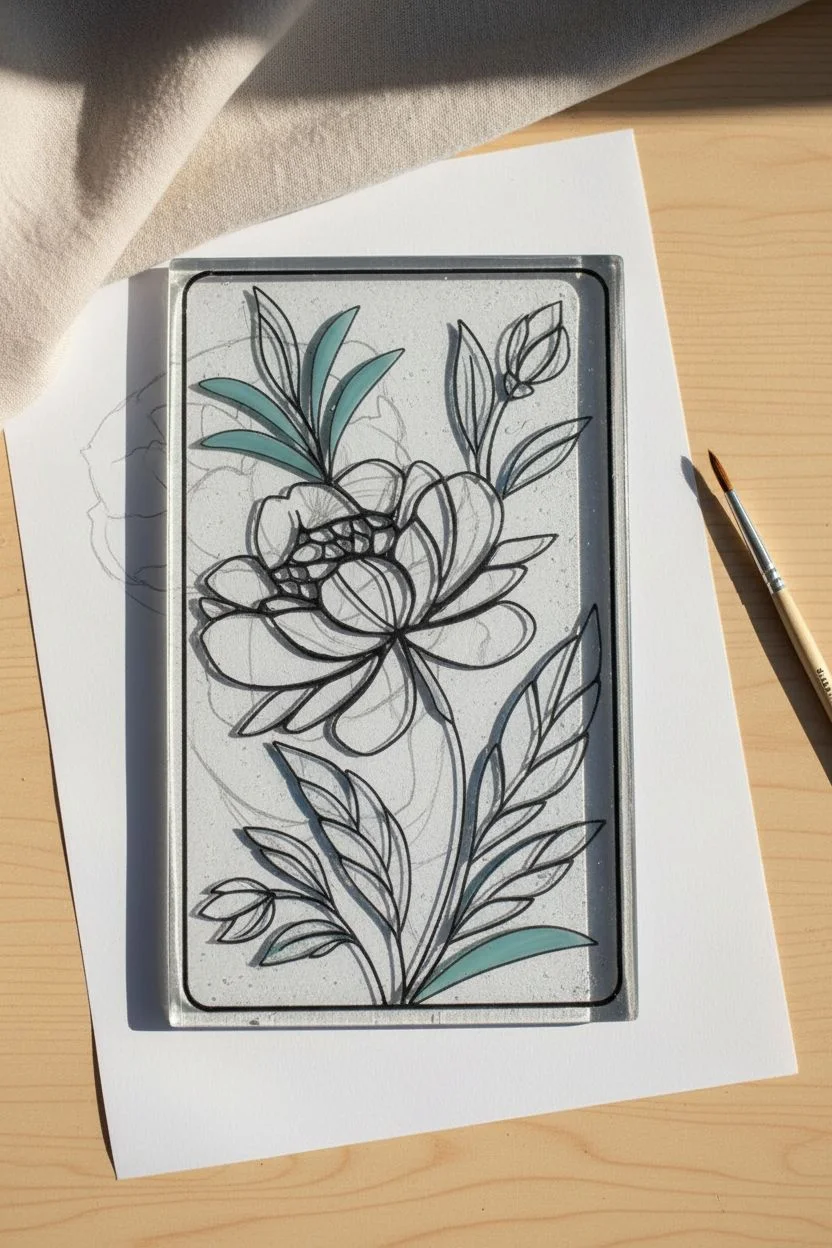
Capture the delicate beauty of a blooming garden in a surprisingly sturdy medium with this glass art project. This panel combines the texture of clear crushed glass with vibrant, hand-painted floral motifs, resulting in a piece that glows beautifully in natural light.
Step-by-Step Tutorial
Materials
- Clear float glass base (rectangular, e.g., 6×10 inches)
- Clear medium-grain glass frit (crushed glass)
- Glass contour lead paste or relief outliner (black or dark grey)
- Glass enamels or solvent-based glass paints (Red/Orange, Teal/Dark Green, Light Green)
- Clear glass adhesive (UV glue or E6000 style)
- Small round paintbrush (sz 0 and sz 2)
- Heat gun (optional, for popping bubbles)
- Protective gloves and eyewear
Step 1: Preparation & Outlining
-
Clean the substrate:
Begin by thoroughly cleaning your rectangular glass base with alcohol or glass cleaner to remove any fingerprints or oils. This ensures the adhesive and paints will bond permanently. -
Draft the design:
Sketch your floral design on a piece of white paper cut to the same size as your glass. Draw a large central peony-style flower with distinct petals, surrounded by sweeping stems and variegated leaves. -
Trace the contours:
Place the clear glass directly over your paper sketch. Using the glass contour paste or relief outliner, carefully trace all the lines of your design directly onto the glass surface. -
Let the lines cure:
Ensure your lines are solid and slightly raised to create ‘dams’ for the paint. Allow this outline to dry completely according to the manufacturer’s instructions—usually at least 1-2 hours.
Uneven Frit?
If your background looks patchy, apply a second spot-layer of adhesive and sprinkle more frit into the gaps before the first layer fully cures.
Step 2: Creating the Icy Background
-
Apply adhesive:
Working in sections outside of the flower outline, brush a thin, even layer of clear glass adhesive onto the background areas of the panel. -
Sprinkle the frit:
Gently pour the clear medium-grain frit over the wet adhesive areas. You want a dense coverage that mimics ice or heavy frost. -
Tap and set:
Lightly tap the edge of the glass to settle the frit pieces flat. If using UV glue, cure it now with a UV lamp; otherwise, let the adhesive set until the frit is immovable. -
Remove excess:
Once dry, carefully tilt the panel to shake off any loose frit that didn’t adhere to the background.
Paint Flow Tip
If your glass paint is too thick to flow smoothly into the corners of the petals, add a single drop of thinner or medium to improve leveling.
Step 3: Painting the Flora
-
Mix the petal color:
Prepare your red/orange enamel. I like to keep the paint slightly translucent so light can pass through, rather than opaque. -
Fill the petals:
Using a size 2 brush, drop the red paint into the petal sections. Use the tip of the brush to push the paint right up to the contour lines. -
Add dimension:
While the red paint is wet, you can dab just a tiny bit of shimmer or finer frit into the center of the petals to catch the light. -
Paint the dark leaves:
Switch to a clean brush and apply the dark teal or forest green paint to the larger, lower leaves and the stem sections. -
Paint the accent leaves:
Use a lighter mint or sage green for the upper, slender leaves to create visual interest and contrast against the darker foliage.
Step 4: Finishing Touches
-
Inspect for gaps:
Hold the panel up to a light source to check for any pinholes in the paint or bare spots in the frit background. -
Seal edges (Optional):
If you want a smoother finish, you can pipe a thin line of clear contour paste along the very edge of the glass to seal the frit line. -
Final cure:
Set the piece in a dust-free area to cure completely. Some glass paints require baking in a home oven to become permanent; check your specific paint brand’s instructions.
Place your finished panel on a stand near a window to watch the sunlight dance through the textured glass and vibrant colors
Glass Pebble and Clear Resin Window Hang
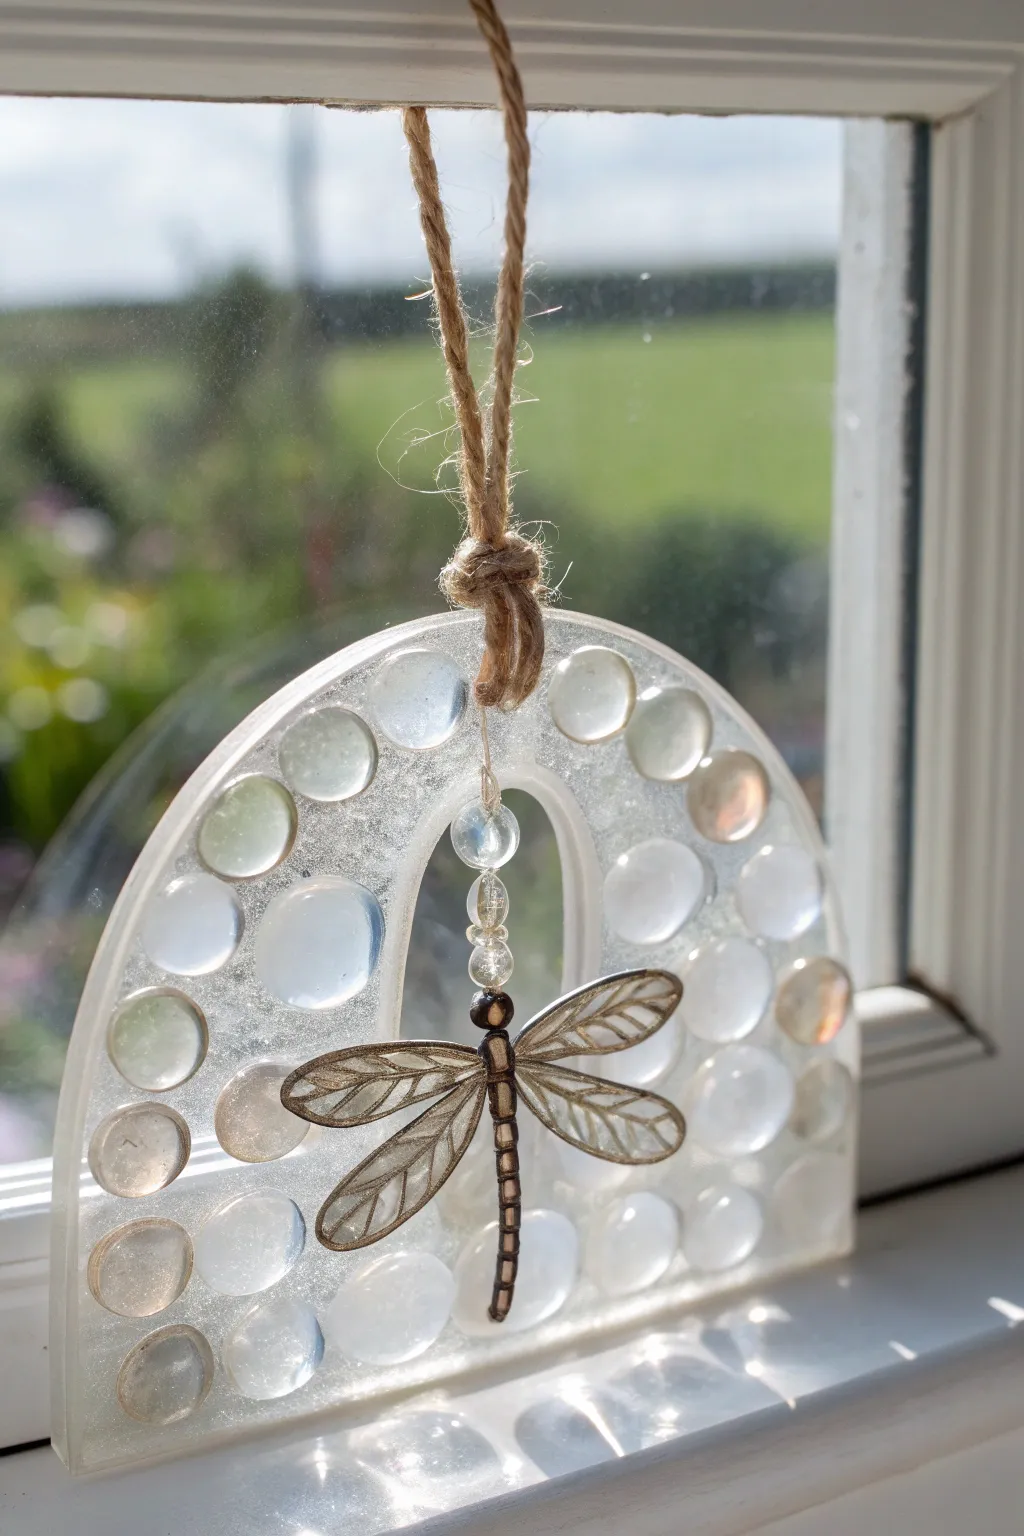
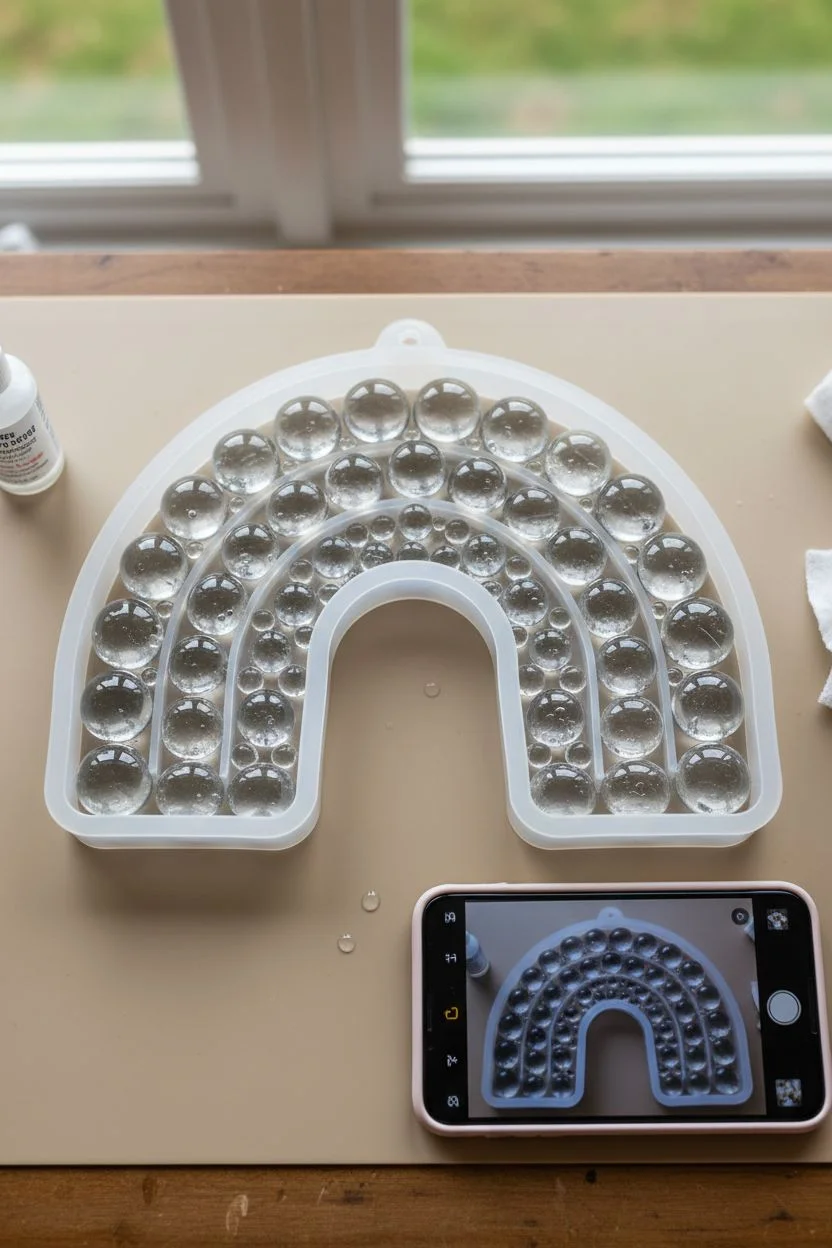
Capture the sunlight with this elegant resin and glass pebble suncatcher. The combination of translucent gems, sparkling resin, and a delicate dragonfly charm creates a beautiful window feature that plays with light throughout the day.
Detailed Instructions
Materials
- Rainbow-shaped silicone mold (approximately 5-6 inches wide)
- Clear epoxy resin (Part A and Part B)
- Clear glass pebbles/gems (various sizes, round)
- White or iridescent fine glitter
- Metal dragonfly charm (bronze or antique gold tone)
- Small clear beads (crystal/glass)
- Headpin or thin wire
- Jute twine or hemp cord
- Mixing cups and stir sticks
- Needle-nose pliers
- Hand drill with tiny bit (optional, if mold lacks a hole)
Step 1: Preparation and Arrangement
-
Prepare your workspace:
Set up in a well-ventilated area. Cover your surface with a silicone mat or wax paper to catch any drips. Ensure your mold is clean and completely dry. -
Clean the glass pebbles:
Wipe down your glass pebbles with a little rubbing alcohol to remove any oils or fingerprints. This ensures the resin adheres perfectly to the glass. -
Dry fit the design:
Place the glass pebbles into the rainbow mold to plan your layout. Focus on following the curve of the arch. -
Create variation:
Mix different sizes of pebbles. Use larger ones for the main curve and fill gaps with smaller ones, but keep them away from the very center where the dragonfly will hang later. -
Remove for pouring:
Once satisfied with the arrangement, take a photo for reference, then remove the pebbles and set them aside.
Cloudy Resin?
If your resin looks milky after mixing, you likely haven’t stirred enough or the room is too cold. Warm your unmixed resin bottles in warm water before starting for crystal clarity.
Step 2: Resin Mixing and Pouring
-
Mix the resin:
Combine your resin and hardener according to the manufacturer’s ratio (usually 1:1) in a mixing cup. Stir slowly for at least 3 minutes to minimize bubbles. -
Add sparkles:
Mix in a generous pinch of fine iridescent or white glitter. You want a subtle shimmer, not an opaque glitter bomb, so add it gradually. -
First pour:
Pour a thin base layer of resin into the mold, filling it about halfway. Let this sit for 5-10 minutes to allow bubbles to rise. -
Pop bubbles:
Use a lighter or heat gun briefly over the surface to pop any stubborn air bubbles. -
Embed the pebbles:
re-place your glass pebbles into the wet resin, following your planned design. Press them down gently so resin flows around sides, but don’t submerge them completely if you want texture. -
Top up:
If needed, carefully pour a little more resin around the pebbles to secure them, ensuring the surface is level. -
Cure completely:
Allow the piece to cure fully, usually 24-48 hours, before demolding.
Step 3: Assembly and Finishing
-
Drill the holes:
If your mold didn’t have built-in posts for holes, use a small hand drill to make a hole at the top center of the arch (for hanging) and a smaller hole in the bottom center of the inner arch (for the dragonfly). -
Prepare the dragonfly charm:
Thread a headpin with a few small crystal beads, then attach your dragonfly charm to the bottom loop of the pin. -
Attach the charm:
Feed the top of the headpin or wire through the bottom center hole of your resin arch. Use pliers to create a secure loop or knot to hold it in place so the dragonfly dangles freely. -
Prepare the hanging cord:
Cut a length of jute twine, approximately 12 inches long. Fold it in half. -
Thread the hanger:
Push the looped end of the twine through the top hole of the arch from front to back. -
Secure the knot:
Pull the loose tails of the twine through the loop you just pushed through (a lark’s head knot) and tighten it securely against the resin. -
Final tie:
Tie the loose ends of the twine together in a knot at your desired hanging length.
Add Color Depth
Add a single drop of translucent blue or teal alcohol ink to your resin mix. This gives a faint, watery tint that makes the clear glass pebbles pop against the background.
Hung in a bright window, your new creation will scatter light beautifully into your room
Slumped Glass Dish With Embedded Color Swirls
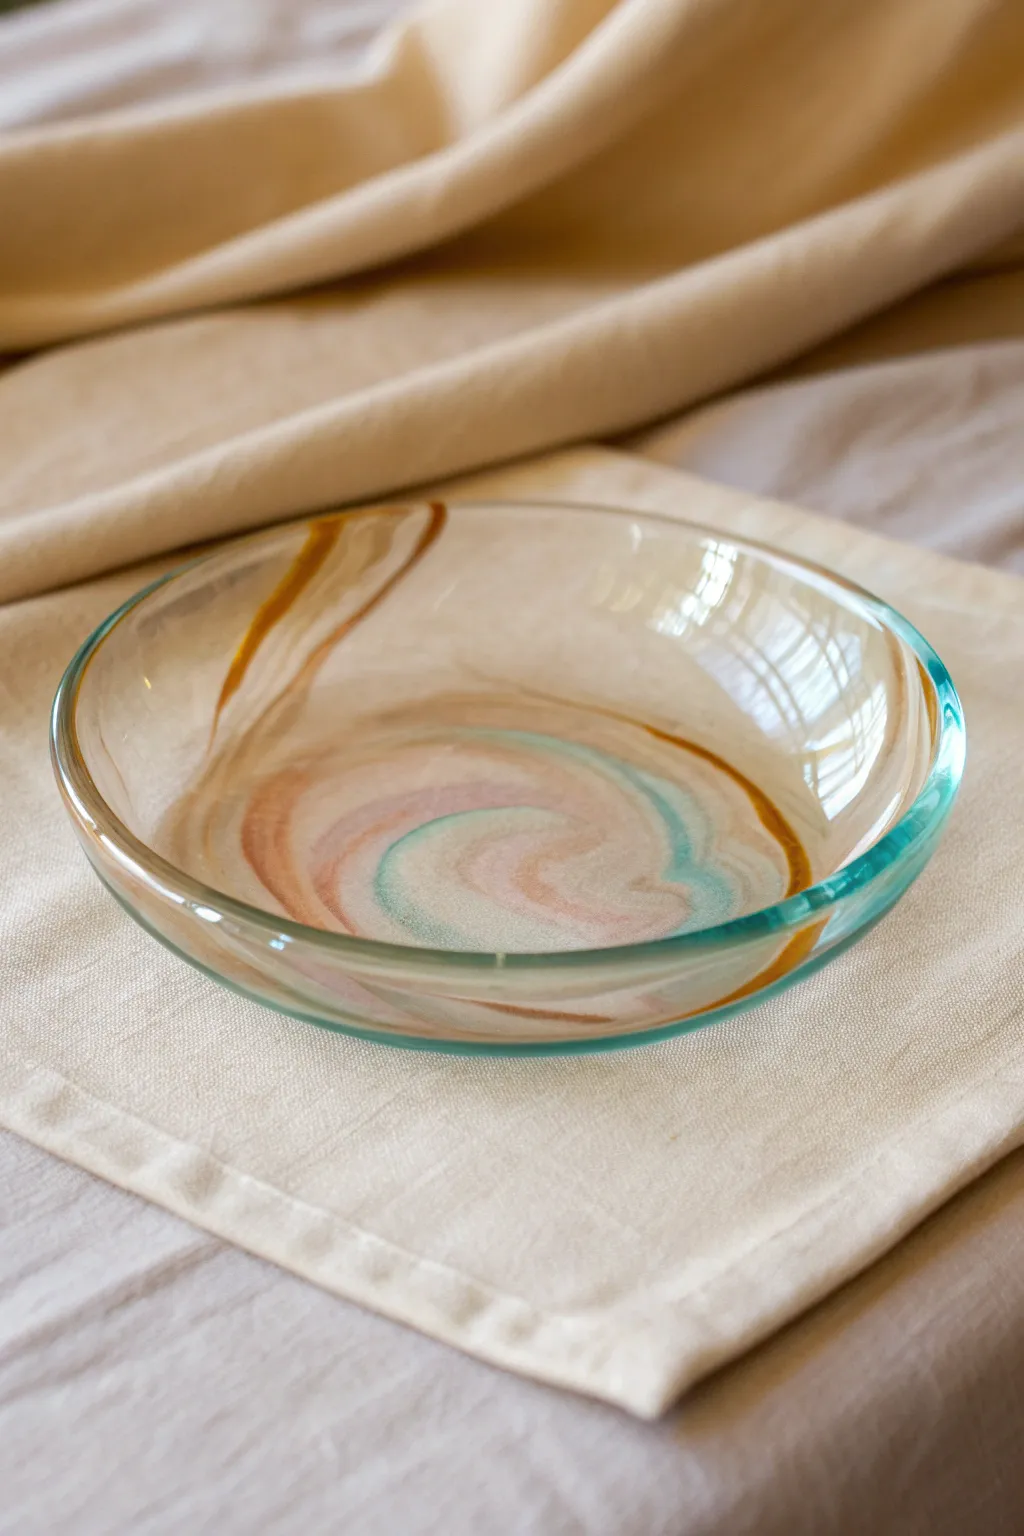
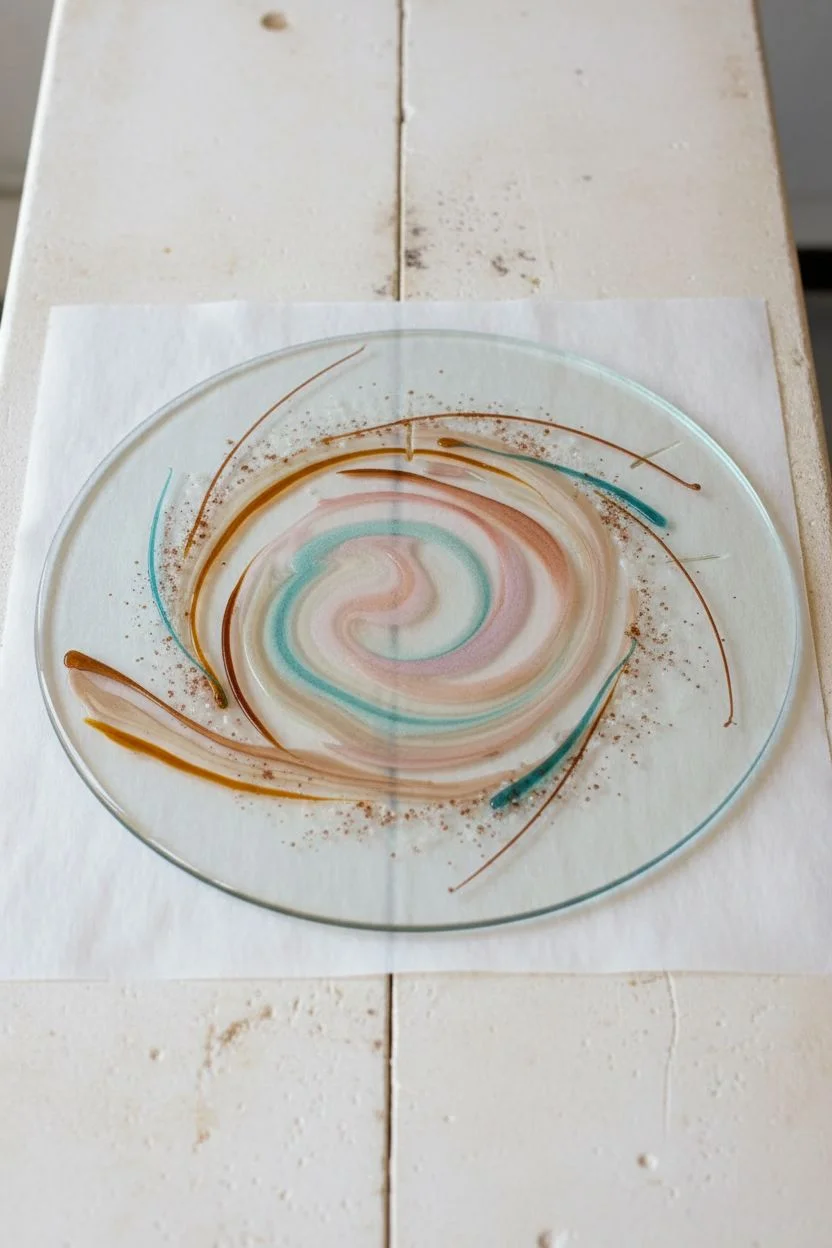
Create a captivating centerpiece with this slumped glass dish, featuring elegant swirls of brown, teal, and pink suspended within clear glass. The gentle, organic movement of the colors gives this piece a sophisticated, painterly feel that looks beautiful on any table.
How-To Guide
Materials
- Clear fusing glass circle (6-8 inches, COE 90 or 96 depending on compatibility)
- Stringers or noodles (amber, teal, light pink, white)
- Glass frit (fine or powder in matching colors, optional)
- Clear capping glass circle (same size and COE)
- Glass cutter and running pliers
- Shelf primer or kiln paper
- Slumping mold (shallow bowl shape)
- Glass fusing kiln
- Mosaic nippers (optional)
- Liquid hairspray or glass tack (adhesive)
Step 1: Design & Preparation
-
Clean Your Glass:
Start by thoroughly cleaning your base clear glass circle with alcohol or glass cleaner to remove any oils or fingerprints. A clean surface is crucial for preventing devitrification (cloudiness) during firing. -
Prepare the Stringers:
Using a candle flame or a small torch, you can gently bend your glass stringers (thin glass rods) to create pre-formed curves. Alternatively, simply break straight stringers into varying lengths for a more abstract look. -
Lay Out the Pattern:
Arrange your colored stringers and noodles on the base glass. Mimic the photo by creating a central swirl motion, alternating between the amber, teal, and soft pink tones. Leave plenty of negative space (clear glass) to keep the airy, light look. -
Add Depth:
I like to sprinkle a tiny amount of fine copper or white frit in the gaps between stringers. This adds a subtle texture that catches the light differently than the solid lines. -
Secure the Design:
Apply a very light mist of hairspray or a few tiny dots of fusing glue to keep your loose glass pieces from rolling away before they get to the kiln. Let this dry completely.
Uneven Edges?
If your fused blank isn’t perfectly round after the first firing, use a glass grinder to true up the circle before the slumping phase. This ensures a symmetrical final bowl.
Step 2: The Full Fuse
-
Cap the Piece:
Carefully place the second circle of clear glass directly on top of your arranged design. This ‘capping’ technique traps the colors inside and ensures a smooth, bubble-free surface. -
Prepare the Kiln Shelf:
Coat your kiln shelf with fresh primer or cut a piece of thinfire kiln paper to size. Place your glass sandwich carefully on the prepared surface. -
Load the Kiln:
Ensure the glass is centered and not touching any kiln posts. If you are firing multiple pieces, keep them at least an inch apart. -
Full Fuse Schedule:
Program your kiln for a full fuse. Typically, this means ramping up to around 1480°F (804°C). Hold at the top temperature for about 10-15 minutes to allow the glass layers to fully merge into a single flat disk. -
Annealing:
Allow the kiln to cool to the annealing phase (around 900°F/482°C) and hold there for at least an hour to relieve stress in the glass. Let the kiln cool naturally to room temperature before opening.
Air Bubble Prevention
To avoid large trapped bubbles, construct your design so air has a path to escape. Don’t completely encircle an area with stringers; leave small gaps for air flow.
Step 3: The Slump
-
Inspect the Blank:
Once cool, remove your fused flat disk (now called a ‘blank’) and inspect it for sharp edges. If needed, do a quick grind on the edges, though a full fuse usually rounds them nicely. -
Prepare the Mold:
Coat your shallow bowl slumping mold with several coats of kiln primer. Ensure it is completely dry; moisture in the mold can crack it during firing. -
Position the Glass:
Center your fused glass blank on top of the mold. Centering is critical—if it’s off-balance, the bowl will slump unevenly. -
Slump Firing:
Program the kiln for a slump firing. This is a lower temperature, usually peaking around 1225°F (663°C). You want the glass to soften just enough to sink into the mold’s shape without melting further. -
Watch the Process:
If your kiln has a viewing window, peek in once the temperature hits 1200°F. Stop the heat as soon as the glass touches the bottom of the mold to prevent it from warping or snagging. -
Final Cool Down:
Just like the first firing, anneal the glass properly and let it cool completely to room temperature before removing your finished bowl.
Place your finished dish in a spot where sunlight can filter through the translucent colors for the best effect
Faux Leaded Glass Window Cling Design

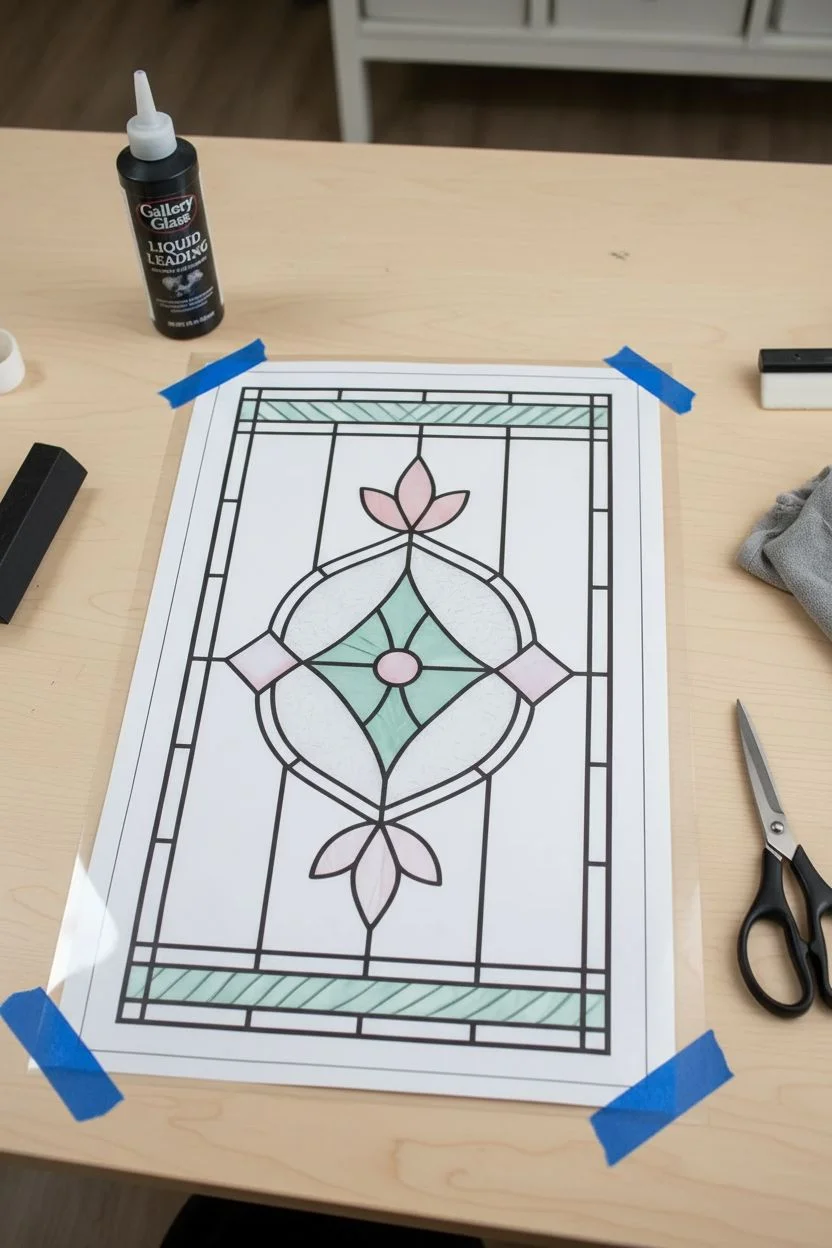
Transform an ordinary window into a stunning focal point with this faux leaded glass cling project. Featuring a classic geometric floral motif in soft pinks and aqua greens, this design mimics the texture and light-catching beauty of real stained glass without the heavy lifting.
Step-by-Step
Materials
- clear window film (static cling)
- gallery glass liquid leading (black or charcoal)
- gallery glass window color paints (crystal clear, rosy pink, aqua green)
- sharp craft knife or scissors
- pattern template (printed to size)
- painter’s tape
- glass cleaner and lint-free cloth
- work surface (glass/plastic sheet or a protected table)
- toothpicks or pin tool (for popping bubbles)
- squeegee
Step 1: Preparation and Templating
-
Measure the window:
Begin by accurately measuring the dimensions of the window pane you intend to cover. You want the film to fit snugly inside the frame, so precision is key. -
Create the template:
Sketch or print out the geometric floral design based on your measurements. The design features a central diamond, a surrounding oval, and top/bottom petal clusters, all framed by straight borders. -
Prepare the film:
Cut your clear static cling film to the exact size of your window pane. Clean the film surface thoroughly to ensure paint adhesion. -
Secure the workspace:
Tape your paper pattern onto a flat work surface. Place the cut window film directly over the pattern, securing the corners with low-tack tape so it doesn’t shift while you work.
Step 2: Creating the Leaded Lines
-
Outline the straight borders:
Using the liquid leading bottle, carefully trace the straight vertical and horizontal lines first. Keep a steady, even pressure on the bottle to create a consistent ‘lead’ line width. -
Draw the geometric center:
Move to the central motif, tracing the large oval and the interior diamond shapes. I like to rest my elbow on a stable surface to keep my hand steady for these curves. -
Add floral details:
Trace the three-petal designs at the very top and bottom of the central oval. Ensure the lines connect fully to the existing borders to prevent paint leakage later. -
Add striped accents:
Pipe the diagonal hatching lines in the top and bottom horizontal bars. These decorative stripes add a nice texture to the border. -
Dry the leading:
Allow the liquid leading to dry completely. This usually takes 8 to 24 hours depending on the brand; the lines will become firm and matte when ready.
Lead Line Precision
Store your liquid leading bottle upside down for 15 minutes before starting. This prevents air pockets from causing the line to ‘splutter’ and break.
Step 3: Painting the Glass
-
Fill the pink petals:
Start with the rosy pink gallery glass paint. Fill in the top and bottom petal clusters, as well as the two small diamond shapes on the left and right sides of the oval. -
Apply the aqua tones:
Use the aqua green paint to fill the four sections of the central diamond and the diagonal striped borders at the top and bottom. Apply the paint generously up to the leading. -
Texture the clear areas:
Fill the large background sections (the oval interior and the outer rectangular spaces) with the crystal clear paint. To mimic the ‘pebbled’ texture seen in the photo, dab the wet paint surface gently with a stiff brush or toothpick. -
Pop air bubbles:
Inspect your wet paint closely. Use a toothpick or pin tool to pop any tiny air bubbles immediately, as these will be permanent once the paint dries. -
Let the paint cure:
Allow the entire piece to dry flat and undisturbed. Wait at least 24 to 48 hours for the paint to cure fully and become translucent.
Texture Variation
For the clear sections, swirl your application tip while squeezing the bottle. This creates ridges that refract light more intensely when dry.
Step 4: Installation
-
Clean the target window:
While the project cures, clean your actual window pane thoroughly with glass cleaner. It must be dust and grease-free for the cling to stick. -
Apply the cling:
Peel the painted film off your work surface. Lightly mist the window with a tiny bit of water, position the film, and smooth it from the center outward. -
Final smoothing:
Use a squeegee or a soft cloth to gently push out any trapped air or water bubbles, being careful not to scratch your fresh paint work.
Enjoy the beautiful play of light through your new custom window art
Kiln-Carved Relief Glass Tiles
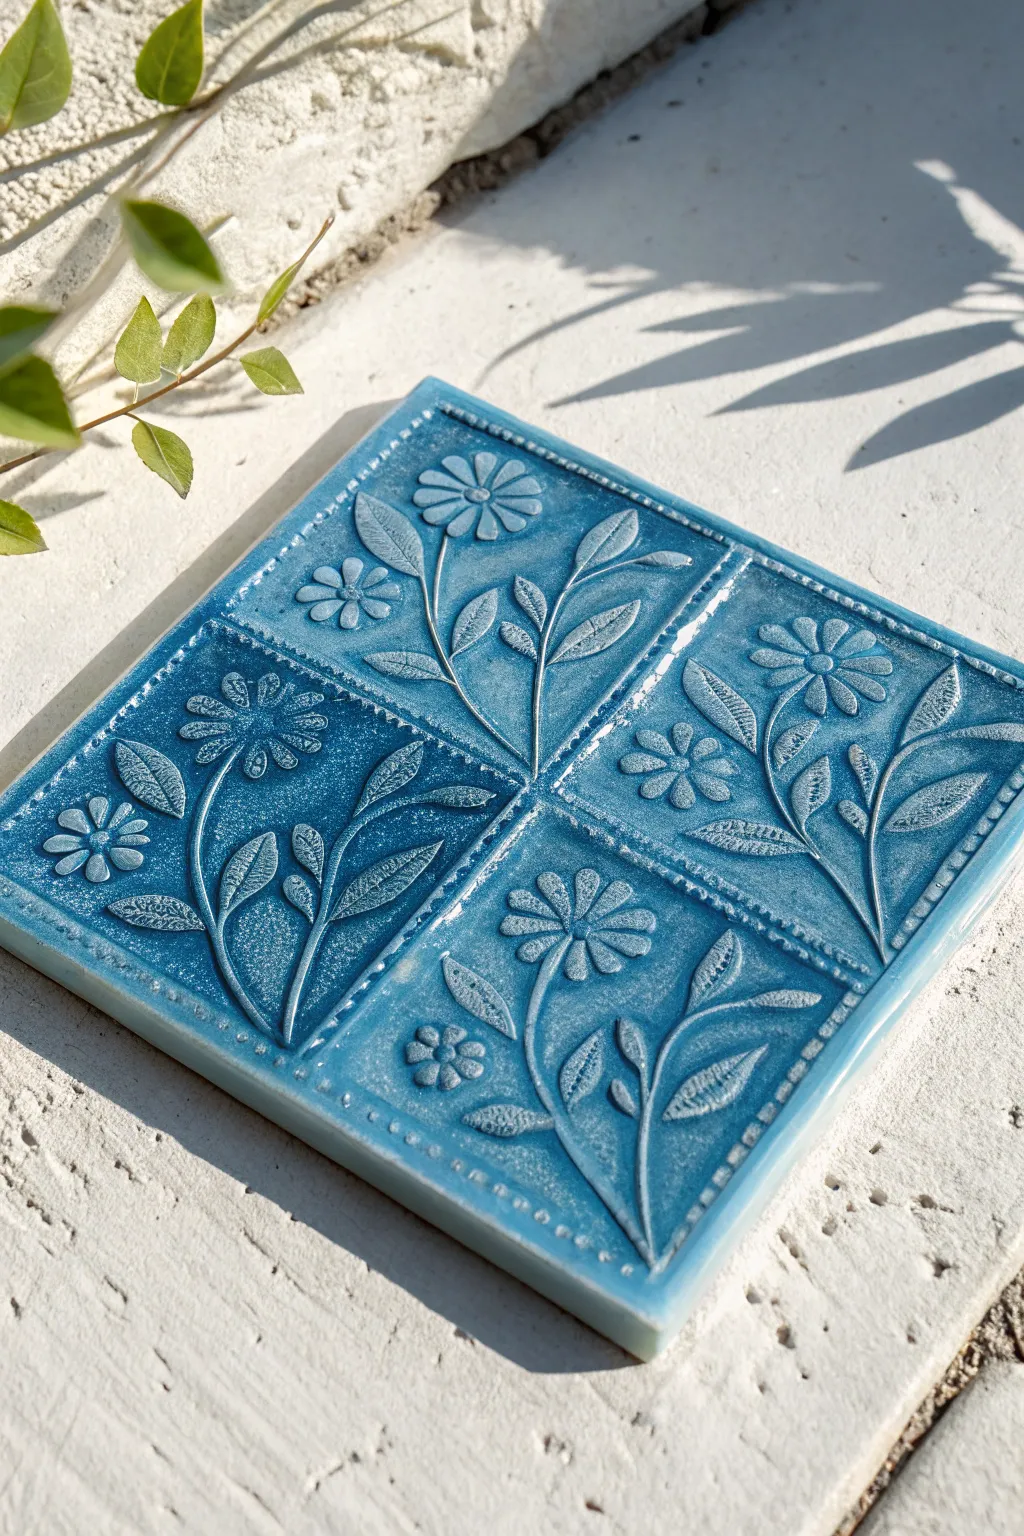
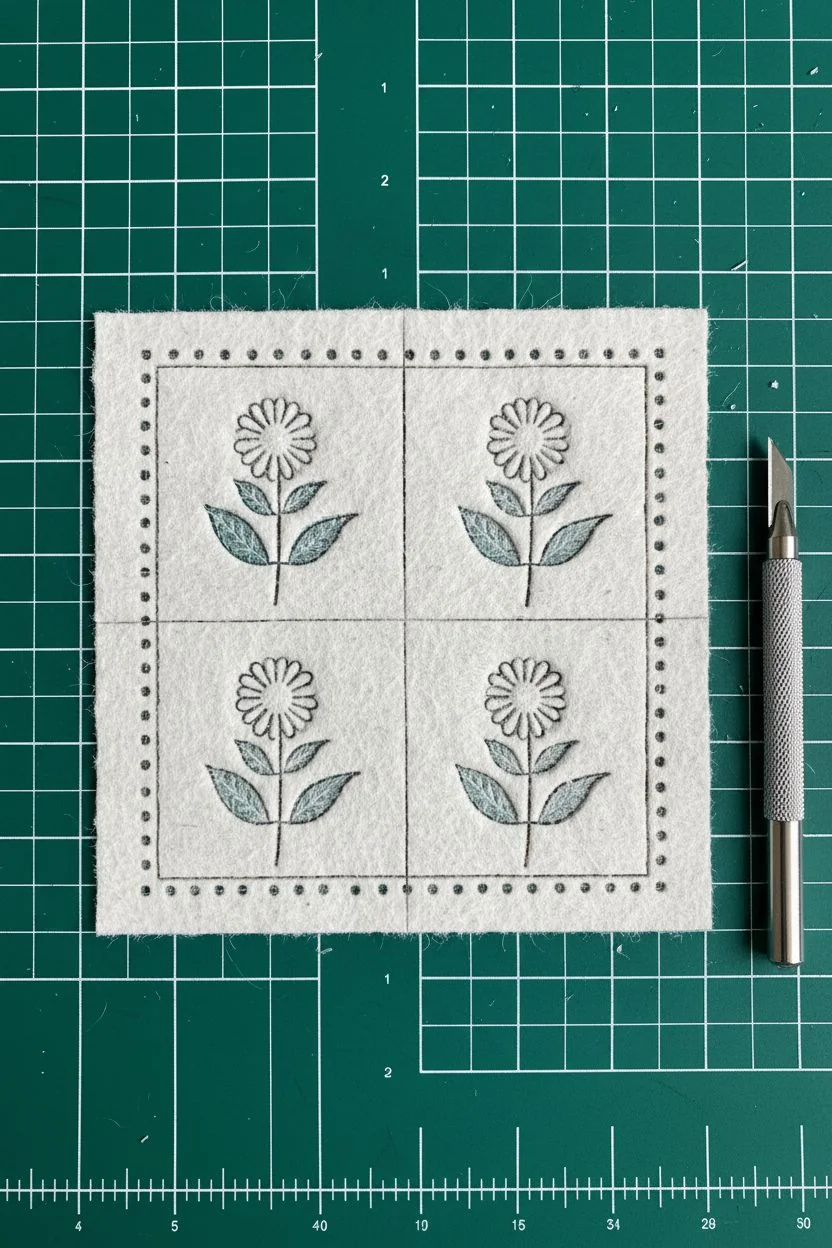
Achieve the look of antique relief tiles using modern warm glass techniques. This project uses kiln carving to create deep, detailed floral impressions in fused glass, resulting in a stunning translucent blue coaster or architectural accent.
Step-by-Step Guide
Materials
- Fiber paper (1/8 inch thickness)
- Bullseye or System 96 fusible glass (transparent light blue)
- Clear fusible glass (same COE as blue)
- X-Acto knife with fresh blades
- Self-healing cutting mat
- Pencil and ruler
- Spray adhesive (light tack)
- Glass cutter and running pliers
- Kiln wash or shelf paper
- Kiln suitable for fusing
Step 1: Designing the Fiber Template
-
Prepare the substrate:
Cut a piece of 1/8 inch thick fiber paper to exactly 4×4 inches. This material is soft and fluffy, similar to felt, and will create the negative space for your design. -
Draft the grid:
Since this design features four distinct quadrants, lightly draw a cross in the center of your fiber paper to divide it into four equal 2-inch squares. -
Sketch the florals:
Draw your botanical design directly onto the fiber paper using a soft pencil. Create a simple stem, two leaves, and a daisy-like flower head in each quadrant. Keep lines simple; avoid extremely tiny details that might burn out. -
Add borders:
Draw a double border around each quadrant box and add small dots within the border lines to mimic the beaded effect seen in the reference image. -
Carve the design:
Using a very sharp X-Acto knife, cut out the shapes you just drew. You are removing the parts where you want the glass to stick *out* (relief). For the stems and leaves, cut completely through the fiber paper. -
Refine the texture:
For the petals and leaves, you can create bevels by cutting at an angle, though straight cuts work perfectly well for a clean graphic look. Remove all the cut-out paper debris.
Cloudy Glass Fix
If the back of your relief looks hazy or rough after scrubbing, it’s called ‘devitrification’. Brush on a devit spray next time, or sandblast the back for a matte finish.
Step 2: Glass Preparation and Assembly
-
Cut the base glass:
Cut your transparent blue fusible glass into a 4×4 inch square to match your fiber paper template. -
Cut the cap glass:
Cut a second square of 4×4 inch clear fusible glass. I like to use clear on top to add depth and thickness without making the blue too dark, but you could use two layers of blue if it is a very pale tint. -
Clean everything:
Thoroughly clean both pieces of glass with alcohol to remove any cutting oil or fingerprints. -
Prepare the kiln shelf:
Place a fresh sheet of thin kiln shelf paper on your kiln shelf. This protects the shelf from the fiber paper residue. -
Set the fiber design:
Place your cut fiber paper stencil on the kiln shelf. Ensure it is flat and positioned where you want the final tile to bake. -
Stack the glass:
Carefully place the blue glass square directly on top of your fiber paper design. Align the edges perfectly. -
Add the clear cap:
Place the clear glass square on top of the blue square. This double thickness (6mm total) allows the glass to become heavy enough to sink down into the cut-out areas of the fiber paper.
Adding Color Depth
Before firing, sift a tiny amount of darker blue glass powder into the cut-out areas of the fiber paper. The molten glass will pick it up for a shadowed effect.
Step 3: Firing and Finishing
-
Program the kiln:
Set your kiln to a full fuse schedule. You want a top temperature around 1480°F (804°C) with a hold time of roughly 10-15 minutes to allow the glass to fully conform to the texture underneath. -
Annealing:
Ensure your firing schedule includes a proper annealing phase for the thickness of your glass (6mm). Cool carefully to room temperature. -
Remove the fiber:
Once cool, remove the tile from the kiln. The fiber paper will have turned to a dusty powder. Wear a mask for this step. -
Scrub the residue:
Under running water, use a stiff brush to scrub away all the white powdery residue from the indented areas. It might take some elbow grease to get the corners clean. -
Optional cold working:
If the edges of your tile have slight needle points (this can happen where glass flows over the edge of the fiber), smooth them gently with a diamond hand pad or a wet grinder.
Display your botanical relief tile in a stand where light can pass through to reveal the intricate depths of the carving


Have a question or want to share your own experience? I'd love to hear from you in the comments below!