If you’re craving a painting subject that instantly brings story, mood, and drama, you can’t go wrong with a witch. I’m sharing a mix of classic and unexpected witch painting ideas—from beginner-friendly silhouettes to atmospheric scenes you can really sink your brush into.
Moonlit Witch Silhouette
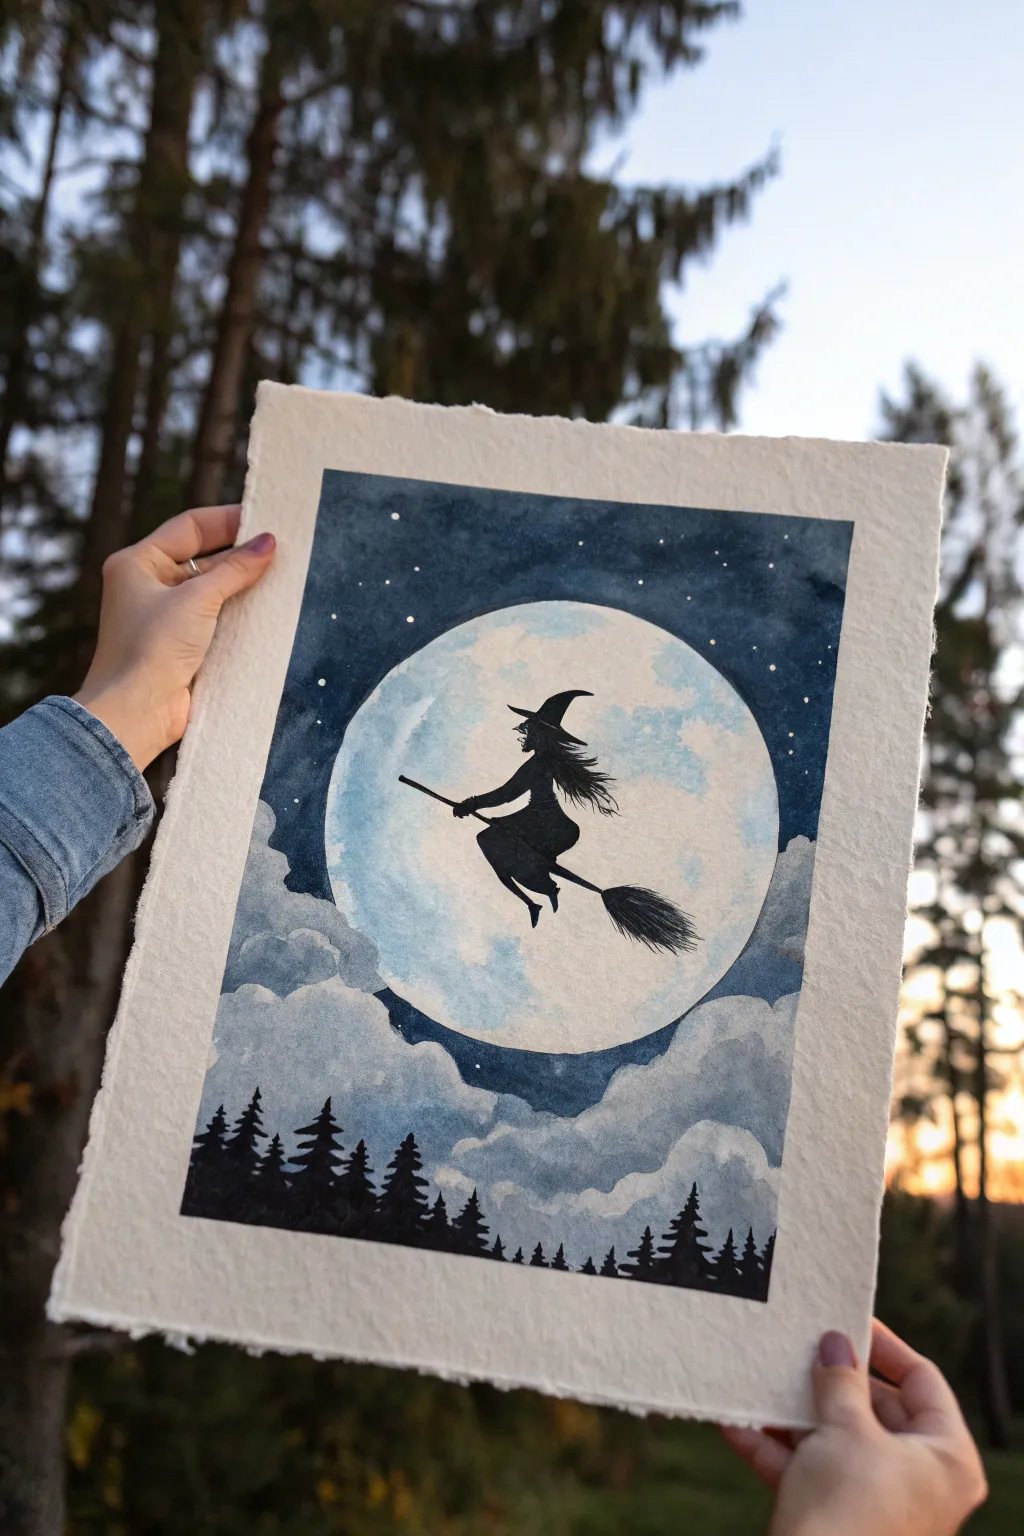
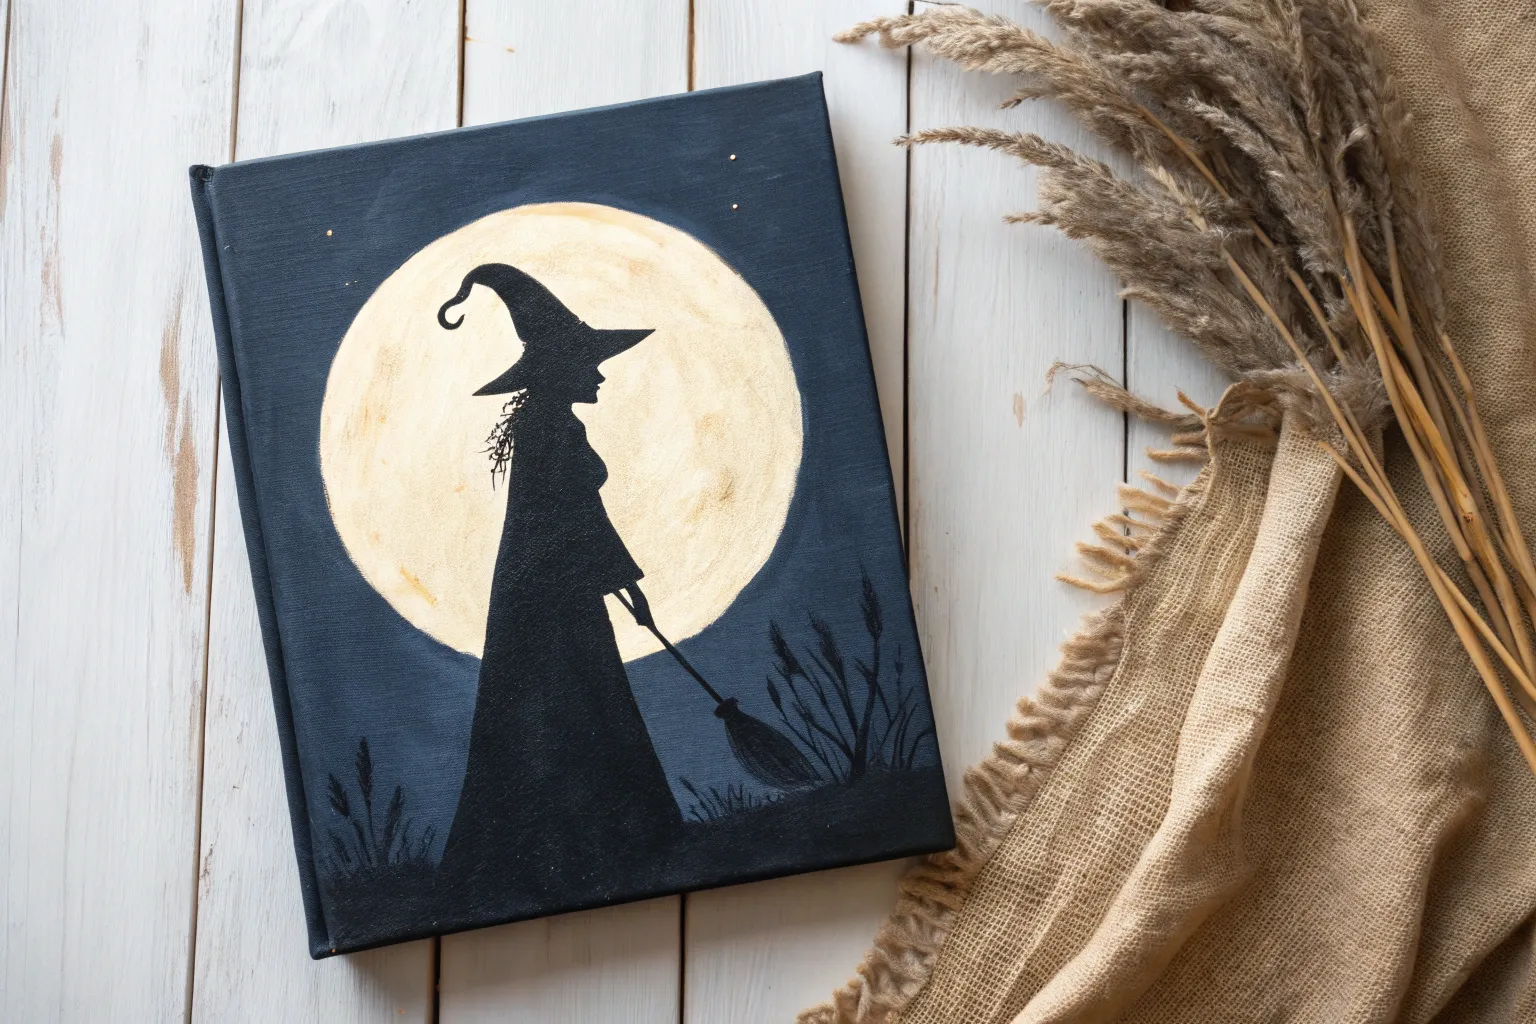
Capture the magic of a crisp Halloween night with this ethereal watercolor painting featuring a classic witch silhouette soaring past a luminous full moon. The contrast between the bright moon, soft clouds, and deep indigo sky creates a dramatic atmosphere that looks professional but is surprisingly achievable.
Detailed Instructions
Materials
- Cold press watercolor paper (deckled edge preferred for that rustic look)
- Watercolor paints: Indigo, Payne’s Grey, Cerulean Blue, Lamp Black, White gouache
- Round brushes: Sizes 2 (detail), 6, and 10 (washing)
- Masking fluid
- Pencil and eraser
- Circular object (like a bowl or masking tape roll) for tracing
- Clean water and paper towels
- Hairdryer (optional, for speeding up drying time)
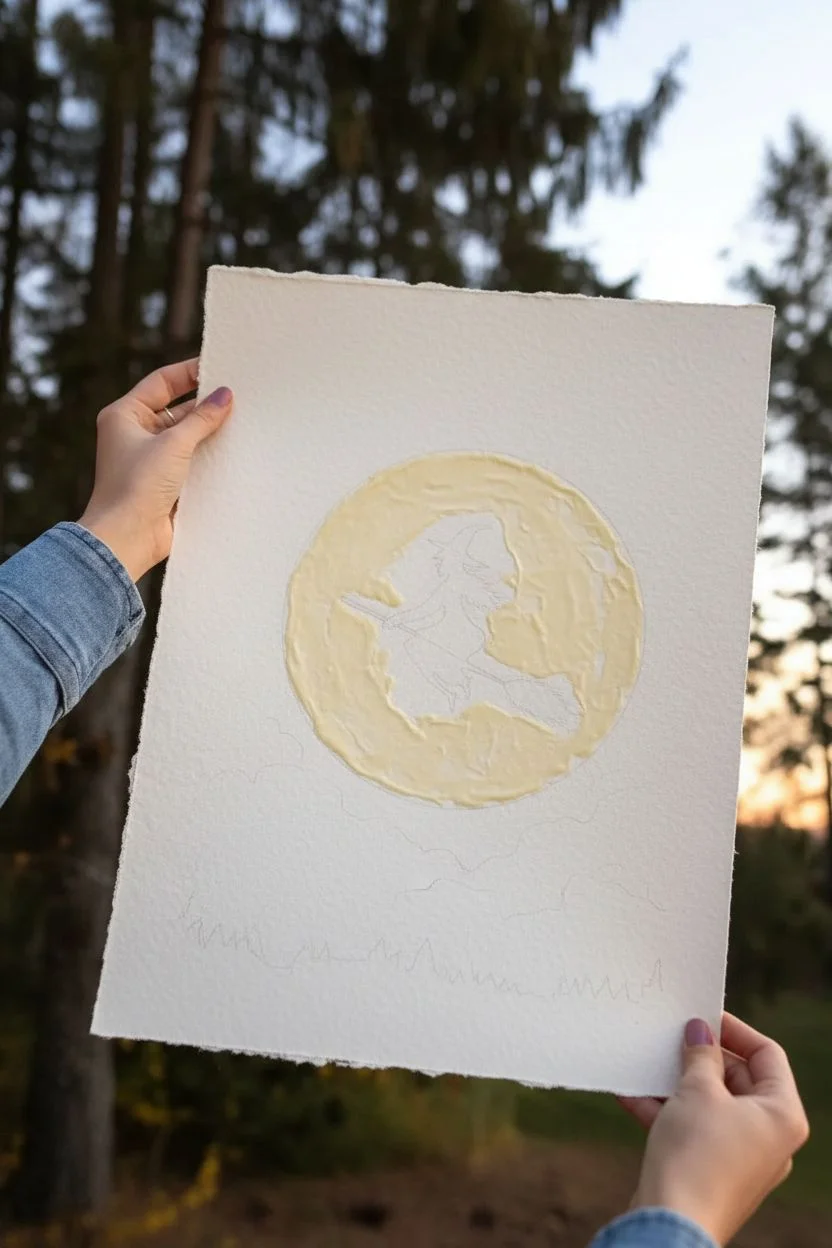
Step 1: Setting the Scene
-
Prepare the paper:
Tape down your watercolor paper to a board. If you are using paper with deckled edges, just tape the very corners or use a floating mount technique to keep the beautiful edges exposed. Or, simply tape a border and tear the edges later. -
Sketch the moon:
Place your circular object in the center of the paper and trace it lightly with a pencil. This will be the main light source for your composition. -
Outline the witch:
Inside the moon circle, lightly sketch the silhouette of the witch on her broomstick. Focus on the sharp angles of the hat, her flowing hair, and the bristles of the broom trailing behind her. -
Establish the treeline:
Draw faint, jagged lines across the very bottom of the paper to indicate where your pine tree silhouettes will go later. -
Protect the moon:
Apply masking fluid carefully over the witch silhouette and the entire moon circle. This is crucial for keeping that area pristine while we paint the dark sky. Let it dry completely.
Step 2: Painting the Night Sky
-
Wet the sky area:
Using your largest brush, apply clean water to the paper everywhere *outside* the masked moon area, stopping just above your pencil line for the trees. -
Apply the first wash:
Drop in a wash of Indigo and Payne’s Grey. Let the colors bleed and flow on the wet paper. Concentrate the darkest pigments at the top corners of the painting to create a vignette effect. -
Add depth:
While the paper is still damp, dab in more concentrated Indigo near the edges of the moon mask to create high contrast. This makes the moon pop later. -
The starry splatter:
Once the sky is semi-dry (damp, not soaking), load a brush with white gouache or slightly watered-down white acrylic. Tap the brush handle against another brush to splatter tiny stars across the dark sky. -
Create the cloud base:
Near the bottom of the sky area, lift out some pigment with a thirsty (clean, damp) brush or blot wit a tissue to create soft, white cloud shapes. -
Define the clouds:
Mix a very watery grey-blue. Paint fluffy, rolling shapes just below the moon and above the treeline, softening the bottom edges with clean water to make them look misty.
Masking Fluid Magic
Don’t shake your masking fluid bottle, as bubbles will create holes in your seal. Instead, roll the bottle gently between your palms to mix it before applying.
Step 3: The Moon and Witch
-
Reveal the moon:
Ensure the sky is 100% dry. Gently rub away the masking fluid to reveal the stark white paper underneath. -
Texture the moon:
Mix a very pale, watery wash of Cerulean Blue and a touch of Grey. Dab it randomly onto the moon surface, leaving plenty of white space to represent craters and lunar texture. I like to keep the center slightly brighter. -
Paint the silhouette:
Using your size 2 detail brush and opaque Lamp Black paint, carefully fill in the witch sketch. Start with the hat point to ensure it’s sharp. -
Refine the details:
Add wispy strokes for her hair blowing backward and use a dry-brush technique for the broom tail to simulate individual twigs.
Glow Up
For an eerie glow, add a very faint, watery ring of yellow ochre or pale green around the outside edge of the moon before you paint the dark sky wash.
Step 4: Finishing Touches
-
Paint the forest:
Load your brush with thick Lamp Black. Paint the treeline at the bottom, using vertical strokes that taper to a point for the pine tree tops. -
Layer the trees:
Make the trees in the immediate foreground absolute black, and if you want depth, mix a dark grey for a second row of trees slightly behind them. -
Connect sky and earth:
Ensure the black trees overlap slightly with the bottom of the clouds you painted earlier, grounding the scene. -
Final stars:
If your stars faded during drying, add a few fresh, bright white dots with a gel pen or white gouache, placing a few specifically ‘inside’ the dark silhouette of the trees for magic. -
Dry and admire:
Let the entire piece dry completely flat before removing from your board to prevent buckling.
Once dry, frame or display your bewitching masterpiece for everyone to enjoy


Witch and Black Cat Familiar
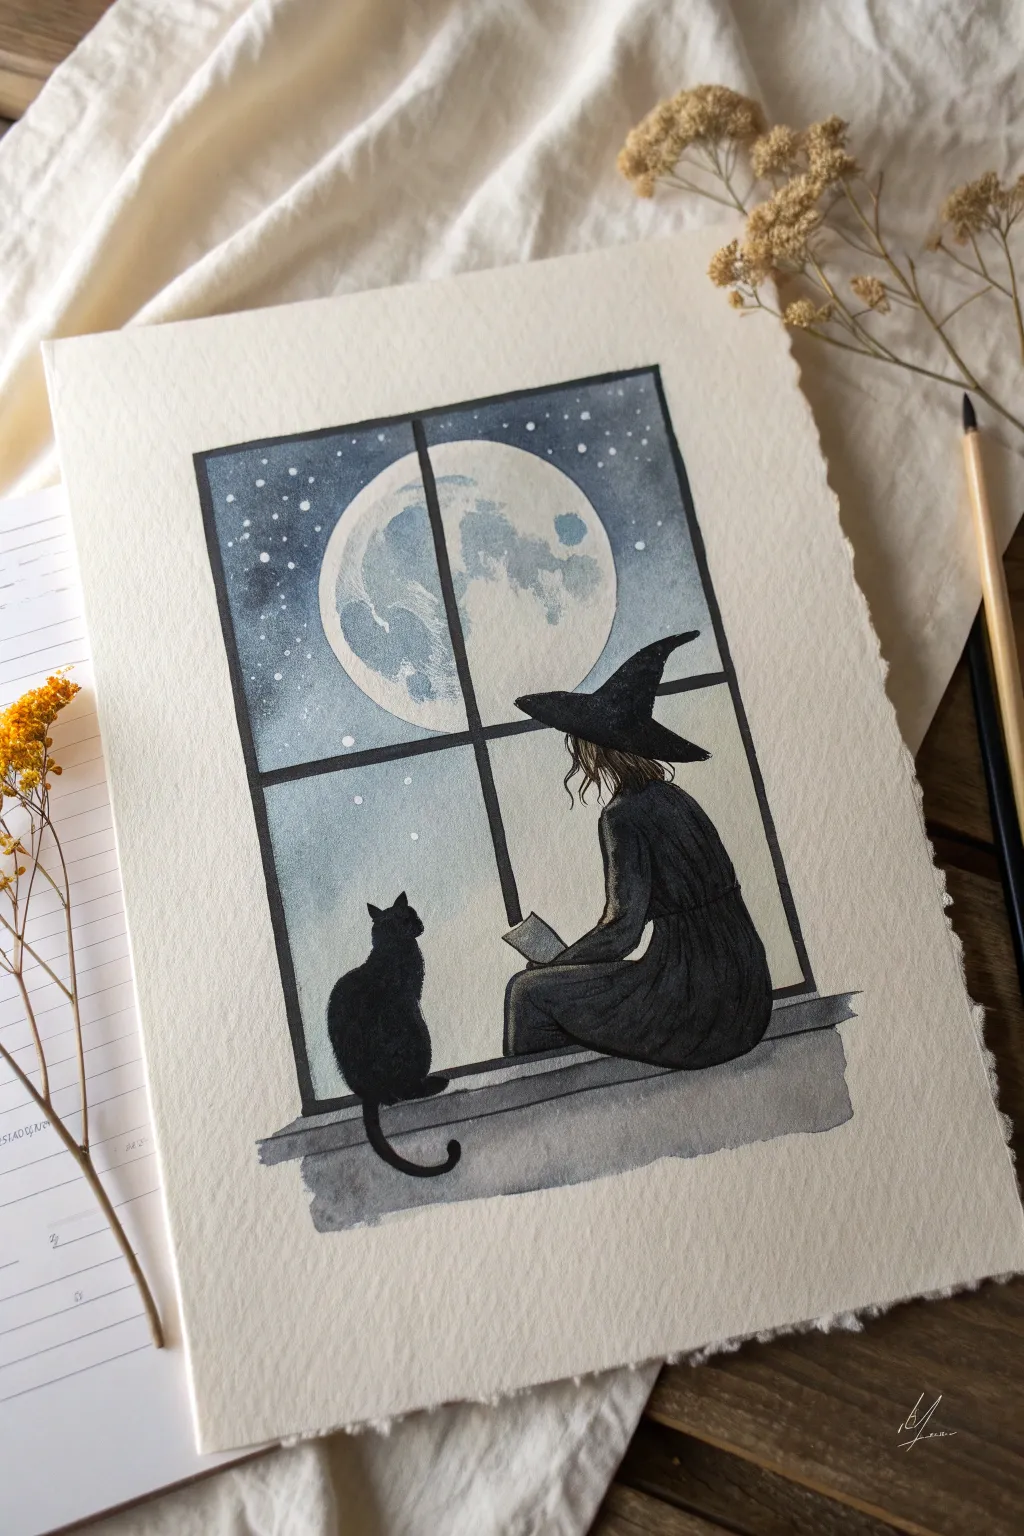
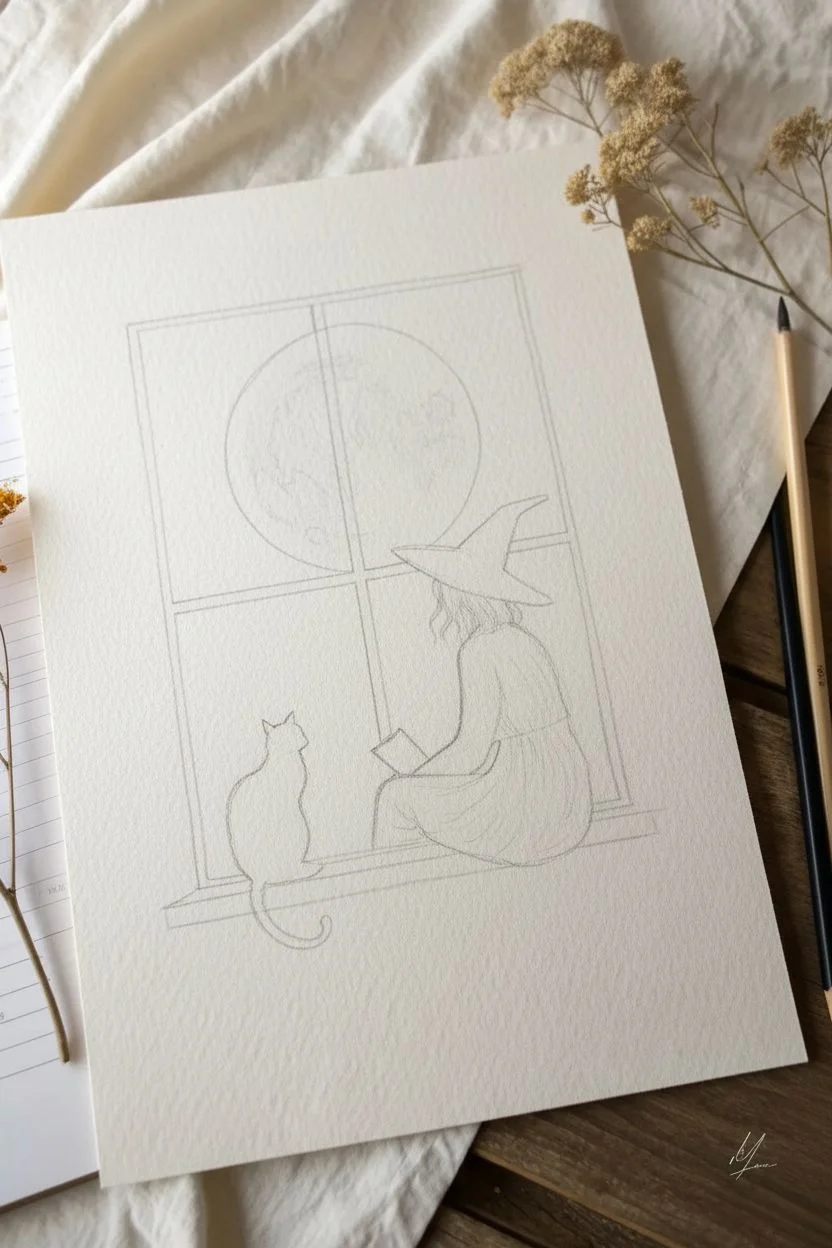
Capture a quiet moment of magic with this serene watercolor illustration featuring a witch and her familiar gazing at a full moon. Using a limited palette of cool blues and deep blacks, you’ll learn to balance negative space and silhouettes to create a cozy, atmospheric window scene.
Step-by-Step
Materials
- Cold press watercolor paper (300 gsm)
- Pencil (HB or 2B) and eraser
- Watercolor paints: Indigo, Paynes Gray, Ultramarine Blue, Lamp Black
- White gel pen or gouache
- Masking tape or painter’s tape
- Round brushes (sizes 2, 6, and 8)
- Ruler
- Palette for mixing
Step 1: Sketching the Framework
-
Define the window:
Begin by lightly drawing a large rectangle in the center of your page using a ruler. Inside this, sketch the crossbars of the windowpane—one vertical line slightly off-center and one horizontal line about a third of the way up. -
Outline the moon:
In the upper quadrants, lightly draw a large circle for the full moon. It should take up a significant portion of the top window panes, sitting behind the crossbars. -
Sketch the silhouettes:
On the bottom window ledge, outline the figure of a sitting witch on the right side. Give her a pointed hat and a simple dress shape. On the left, draw a seated cat with its tail curling down below the ledge. -
Finalize the sketch:
Add a small book in the witch’s hands. Keep all pencil lines very faint, as watercolor is transparent and heavy graphite can smudge or show through.
Bleeding Lines?
If your black silhouette bleeds into the blue sky, your sky layer wasn’t fully dry. Let it dry completely, then carefully paint over the bleed with opaque black gouache to fix the crisp edge.
Step 2: Painting the Night Sky
-
Masking the moon:
Carefully paint clear water onto the moon circle first, or use masking fluid if you have it. If using just water, be very careful not to let the surrounding dark sky paint bleed into this area. -
Sky base layer:
Mix a wash of Indigo and Ultramarine Blue. Apply this to the sky area outside the moon, keeping it wet. Ensure the sky looks darkest at the top corners and gradually gets lighter near the horizon line. -
Adding stars:
While the sky wash is still completely wet, sprinkle coarse salt or splatter tiny drops of clean water to create texture. Alternatively, wait for it to dry and use a white gel pen later. -
Moon texture:
Once the sky is dry, wet the moon area. Drop in very diluted washes of blue-grey for the craters, keeping the edges soft. Leave plenty of white paper showing to make the moon glow. -
Lower sky gradient:
For the sky sections beneath the horizontal window bar, use a much lighter wash of the same blue mix. This suggests atmospheric perspective and faint light near the ground.
Pro Tip: Glowing Moon
To make the moon really pop, gently lift a little color from the center of the craters with a clean, damp paper towel while the paint is still wet. This creates soft, glowing highlights.
Step 3: Creating the Silhouettes
-
Painting the witch:
Mix a dense Lamp Black or very concentrated Paynes Gray. Carefully fill in the witch’s hat and dress. I try to load my brush well so I can complete the shape in one go to avoid streaks. -
Handling the hair:
Switch to your smallest brush (size 2) to paint the witch’s hair. Use delicate, sweeping strokes to create loose strands falling from under the hat for a natural look. -
The cat familiar:
Using the same dark black mixture, fill in the cat shape. Pay attention to the ears and the curve of the tail hanging off the ledge. -
Add the book:
Paint the book cover with a mid-tone grey, leaving the pages lighter to distinguish it from her dress. -
Refining edges:
Go back over the edges of your silhouettes with the small brush to smooth out any bumps and sharpen the points of the hat and cat ears.
Step 4: Window Frame and Details
-
Window bars:
Paint the vertical and horizontal window bars in thick black. Use a ruler to guide your hand if you feel unsteady, but freehand lines add a nice organic charm. -
The ledge:
Paint the stone ledge below them using a wash of Paynes Gray. Keep it somewhat uneven and textured to look like stone. -
Ledge shadow:
Add a darker strip of grey just under the main ledge to create a 3D effect of thickness. -
Final stars:
If you didn’t seek salt texture earlier, take your white gel pen or gouache and dot tiny stars into the dark blue sky area. -
Highlighting:
Add tiny white highlights to the top of the witch’s hat, her shoulders, and the cat’s ears to show the moonlight hitting them.
Peel off your tape to reveal the clean edges and enjoy the peaceful magic of your new painting


Witch Flying Over Rooftops
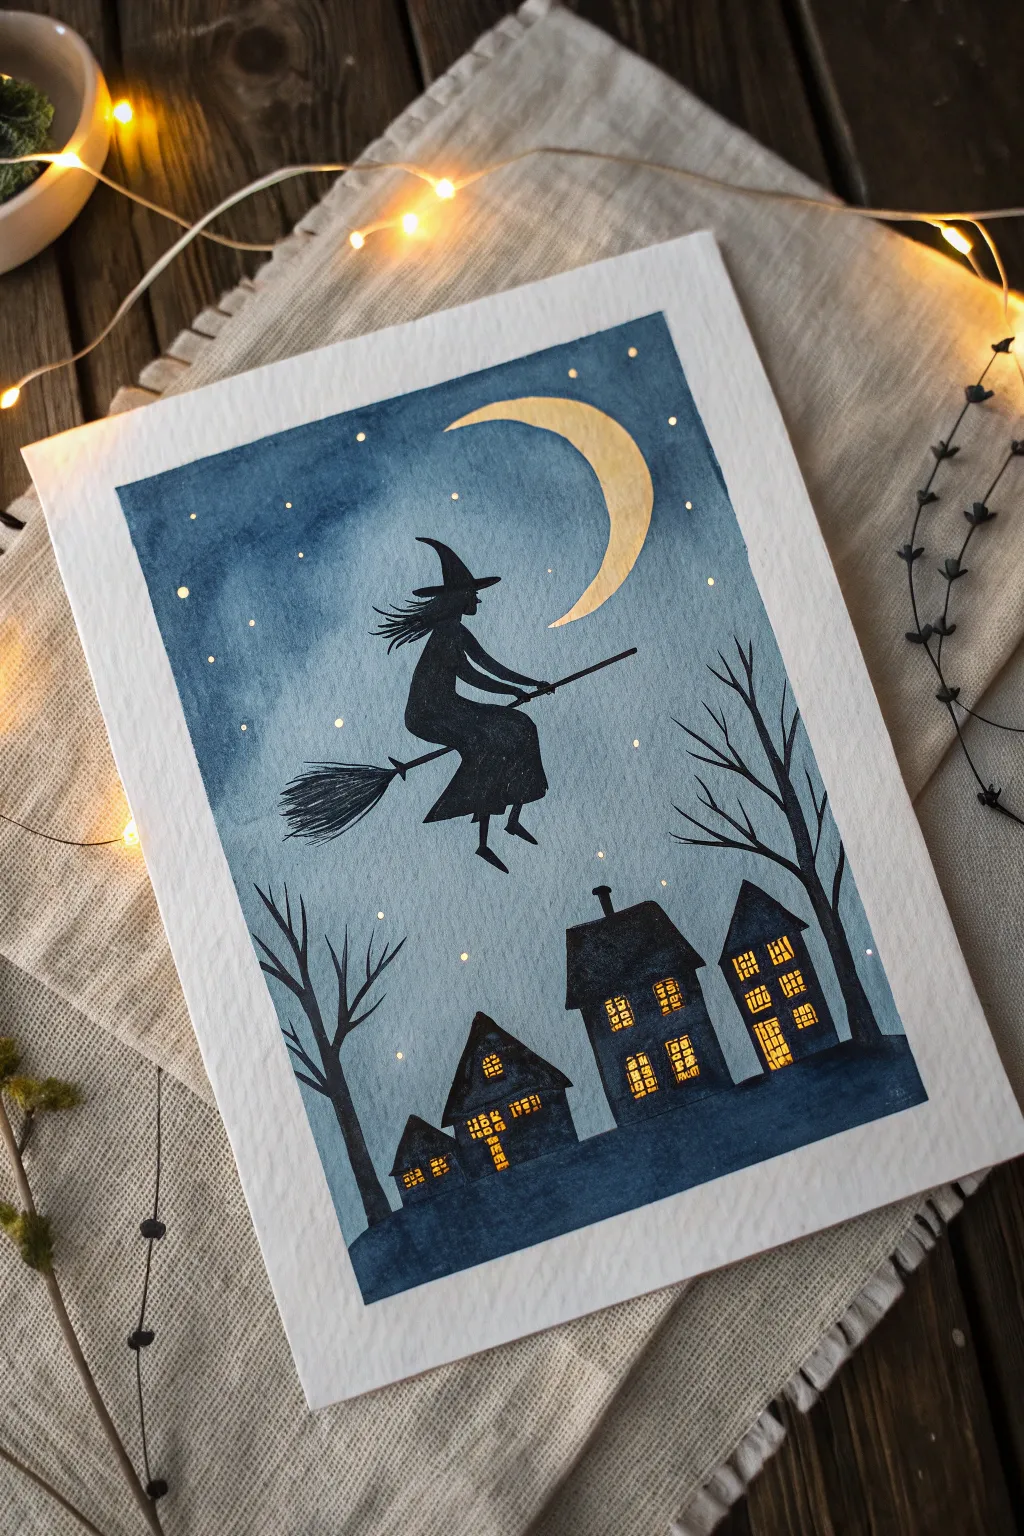
Capture the magic of a Halloween night with this enchanting watercolor scene featuring a classic witch silhouette against a moody moonlit sky. The contrast between the deep blues of the night and the warm glow of the windows creates a cozy yet spooky atmosphere perfect for the season.
Step-by-Step Tutorial
Materials
- Cold-pressed watercolor paper (A4 or 5×7 inch)
- Watercolor paints (Indigo, Payne’s Gray, Yellow Ochre or Gold)
- Black ink or gouache for silhouettes
- White gel pen or gouache
- Masking fluid (optional but recommended for the moon)
- Round watercolor brushes (Size 8 for washes, Size 0 or 2 for details)
- Pencil and eraser
- Painter’s tape
- Jar of clean water
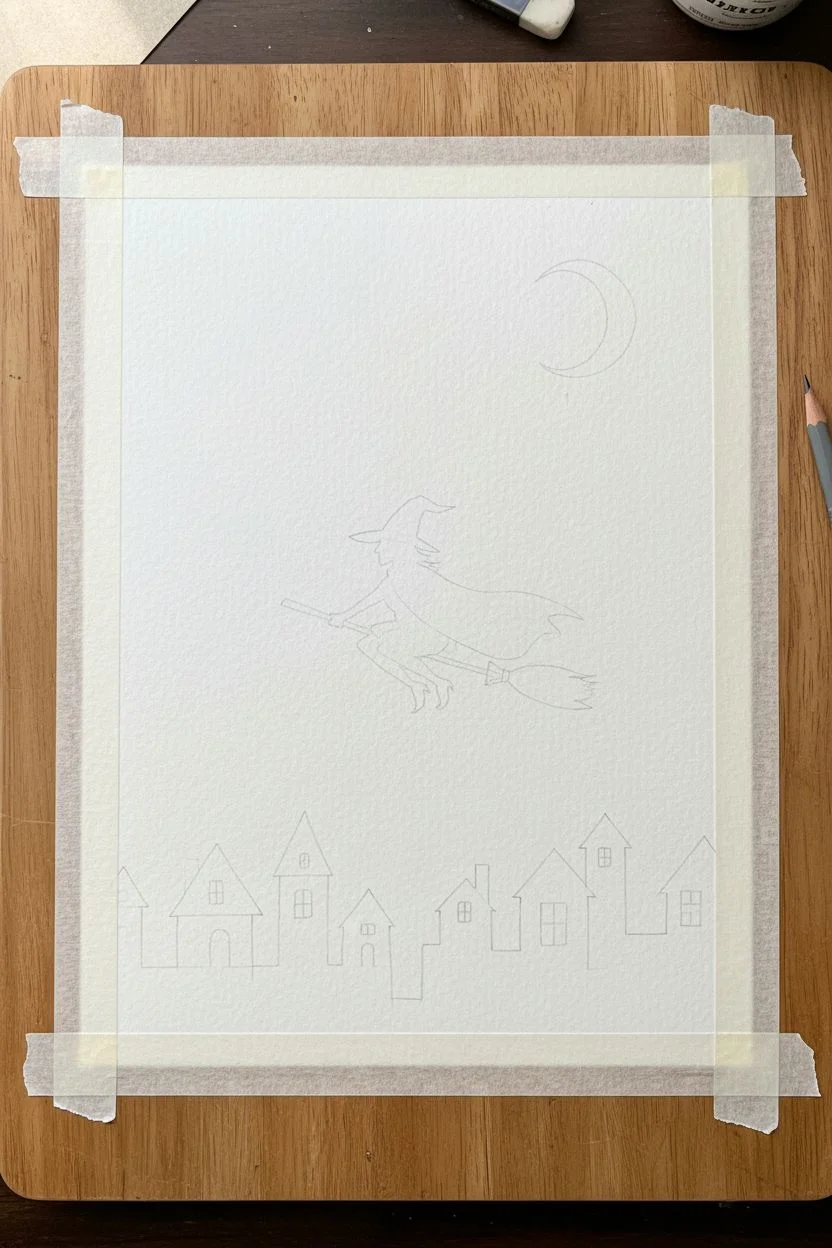
Step 1: Preparation and Sketching
-
Secure Your Paper:
Begin by taping down all four edges of your watercolor paper to a hard board or table. This creates that crisp, clean white border seen in the final piece and prevents the paper from buckling when wet. -
Draft the Composition:
Lightly sketch the horizon line for the rooftops near the bottom third of the paper. Keep these simple—just basic house shapes with pointed roofs. -
Outline the Moon:
In the upper right quadrant, lightly draw a crescent moon shape. Don’t worry about it being perfectly circular; a slight stylization adds charm. -
Sketch the Witch:
Draw the silhouette of the witch in the center. Focus on the main shapes: the pointed hat, the flowing cape, the broomstick, and her legs trailing behind. Keep the pencil lines barely visible.
Pro Tip: Glowing Moon
Before painting the dark sky, try painting a faint circle of clean water around the moon protection. When you touch blue paint to the wet sky, it will stop softly before hitting the moon, creating a hazy halo.
Step 2: Painting the Sky
-
Protect the Moon:
Apply masking fluid to the crescent moon shape and let it dry completely. If you don’t have masking fluid, you’ll need to carefully paint around this area. -
First Sky Wash:
Wet the entire sky area (down to the rooftops) with clean water. Load your large brush with a diluted Indigo or deep blue watercolor and apply a light wash across the sky. -
Deepening the Night:
While the paper is still damp, drop in concentrated Payne’s Gray or a darker Indigo mixture around the edges and corners to create a vignette effect. This draws the eye toward the center. -
Adding Texture:
I like to lift a little color out near the moon using a thirsty (damp but clean) brush to create a subtle glow. Let the sky layer dry completely.
Step 3: Creating the Village
-
Painting the Rooftops:
Mix a very dark, near-black blue using Indigo and a touch of black. Paint the silhouette of the houses, filling them in completely solid. -
Adding Trees:
Using your smallest detail brush, paint the skeletal trees on either side of the village. Use shaky, uneven strokes to make the branches look gnarled and natural. -
Paint the Windows:
Once the dark house shapes are bone dry, use opaque yellow gouache or a yellow gel pen to draw tiny grid windows on the houses. The contrast will make them look illuminated.
Level Up: Metallic Magic
Swap the yellow ochre for actual gold watercolor paint for the moon and windows. When the light hits your painting, the celestial elements and village lights will literally shimmer.
Step 4: The Witch and Details
-
Filling the Silhouette:
Using black ink or highly concentrated black gouache, carefully fill in the witch sketch. Ensure the edges of the hat and broom bristles are sharp and defined. -
Painting the Moon:
Remove the masking fluid (if used). Paint the moon with Yellow Ochre or a metallic gold paint. Keep the inner edge slightly paler than the outer curve for dimension. -
Adding Stars:
Take a white gel pen or white gouache on a fine brush and dot tiny stars throughout the sky. Vary the sizes slightly for a realistic night effect. -
Final Touches:
Review your painting for any gaps. Add a few extra twigs to the broom tail to imply motion. -
The Reveal:
Wait until the painting is absolutely dry to the touch, then slowly peel away the painter’s tape at a 45-degree angle to reveal your crisp borders.
Now you have a whimsical piece of seasonal art ready to frame or gift to a friend


Witch Cottage on a Twisting Path
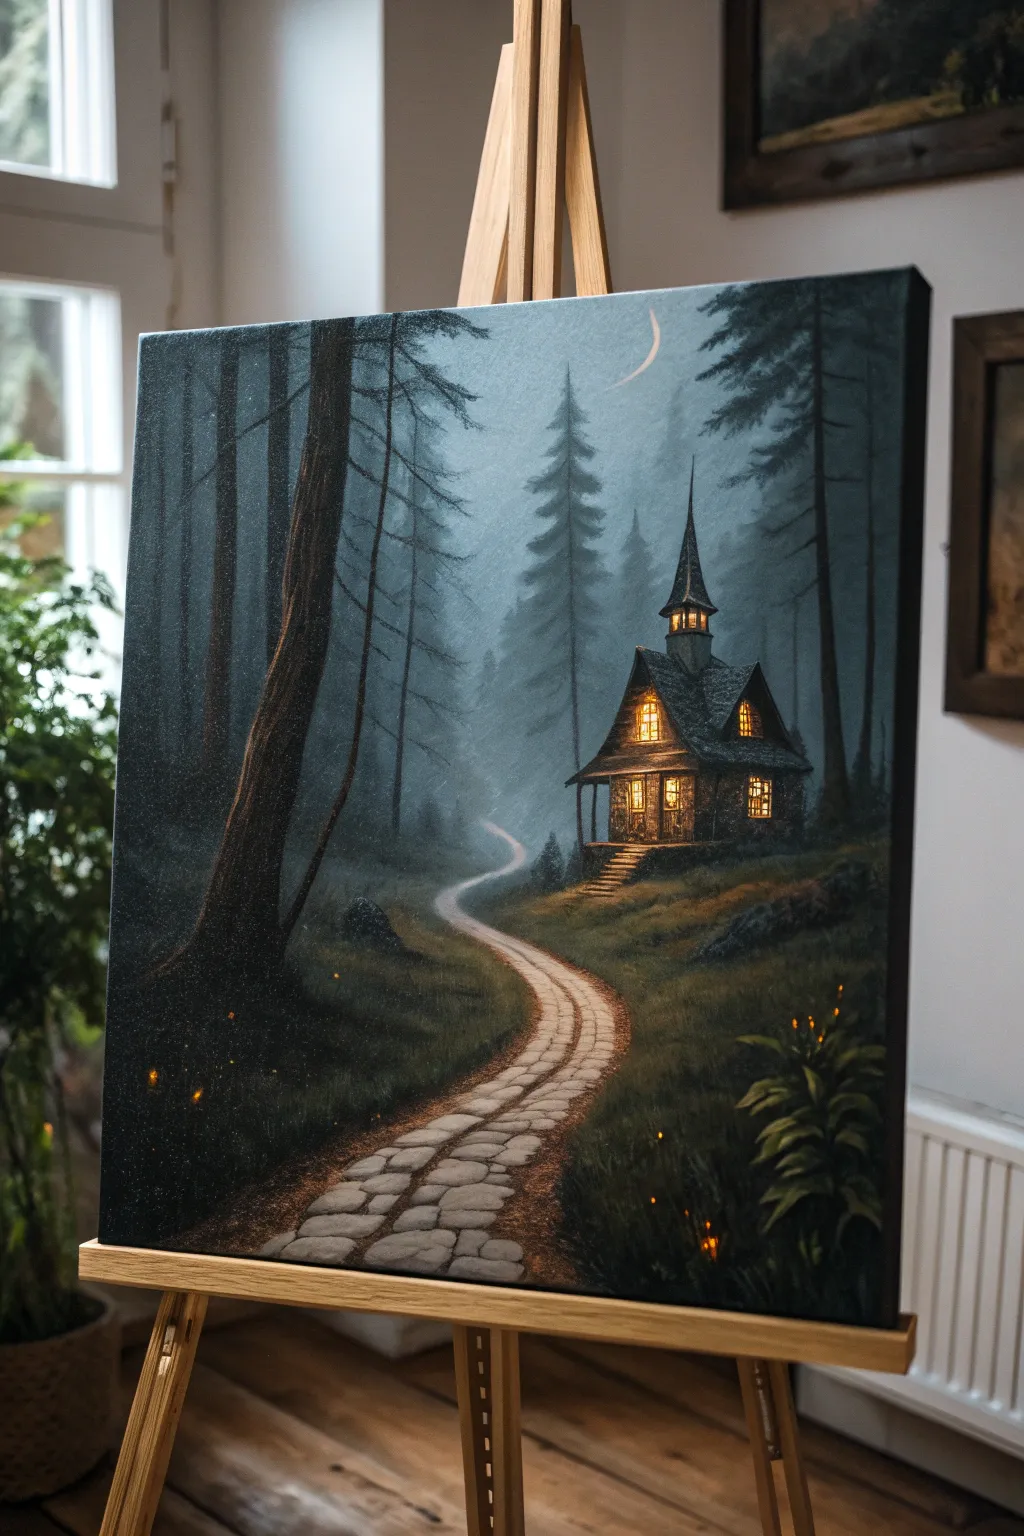
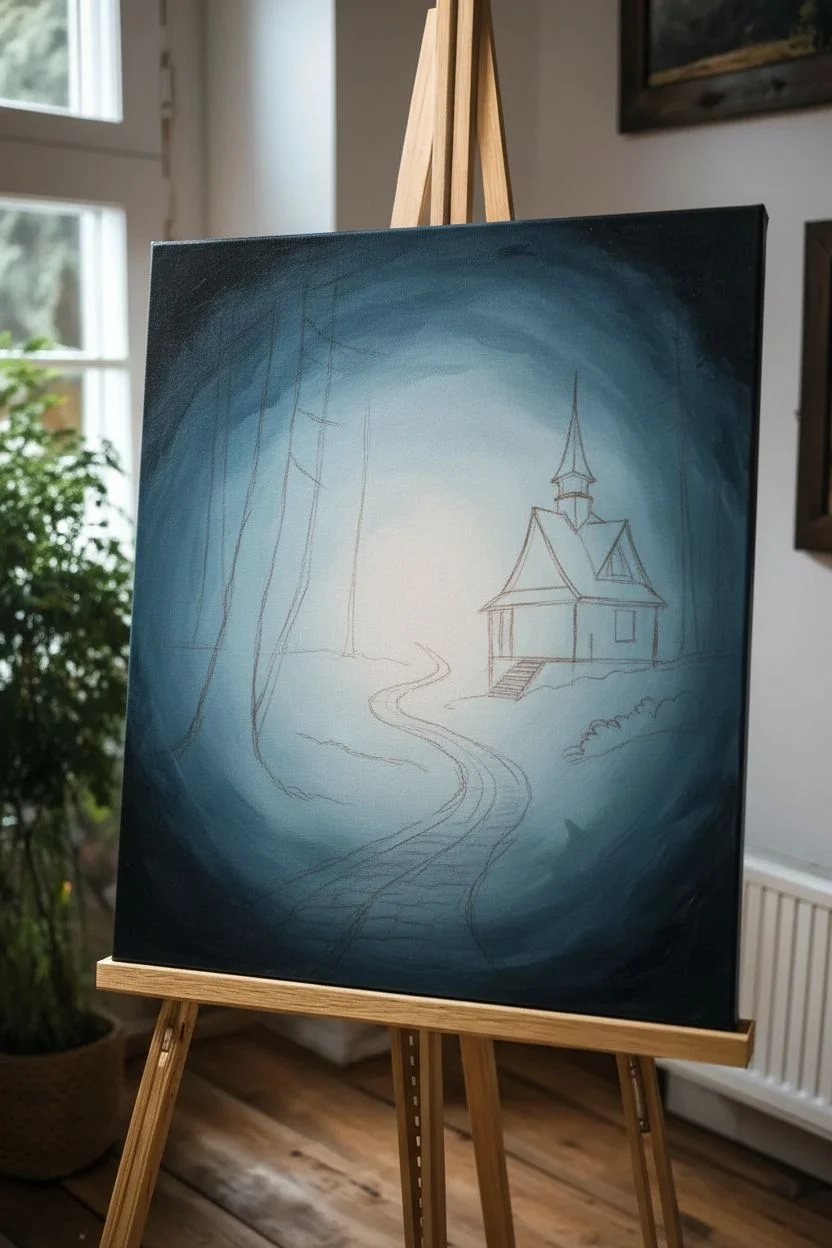
Capture the mysterious allure of a secluded dwelling deep within an enchanted forest with this atmospheric acrylic painting project. You will learn to build up misty layers to create depth and use warm light to make the cottage glow against the cool twilight.
How-To Guide
Materials
- Canvas (16×20 inches recommended)
- Acrylic paints (Phthalo Blue, Mars Black, Titanium White, Burnt Umber, Yellow Ochre, Cadmium Yellow, Raw Sienna)
- Set of brushes: 1-inch flat, medium filbert, lush round, and a fine liner
- Palette knife
- Water cup and paper towels
- Slow-drying blending medium
Step 1: Setting the Mood
-
Establish the background gradient:
Begin by covering the entire canvas. Mix Phthalo Blue with a touch of Mars Black and plenty of blending medium. Start at the top corners with the darkest mix, quickly transitioning to a mixture of mostly Titanium White and a tiny dot of blue in the center. -
Blend the atmosphere:
While the paint is still wet, use a clean, dry 1-inch brush to soften the transition between the dark corners and the bright center. Use crisscross strokes to create a seamless, foggy effect. -
Sketch the composition:
Once the background is dry to the touch, use a watered-down Burnt Umber and a round brush to lightly sketch the horizon line, the twisting path, the vertical lines for the foreground trees, and the basic geometric shape of the cottage.
Fixing Muddy Fog
If your background blending gets muddy, let it dry completely. Then, apply a thin wash of white mixed with water over the center area to reset the brightness.
Step 2: Building the Forest
-
Paint distant trees:
Mix a gray-blue shade using your background colors but just a shade darker than the fog. Using a flat brush turned vertically, tap in faint, ghost-like pine trees in the distance. They should barely be visible. -
Add mid-ground trees:
Create a darker mix by adding more black to your blue. Paint the pine trees that sit behind the cottage. Use the corner of a flat brush to create the downward-sloping pine branches. -
Construct the main foreground tree:
On the left side, paint the large tree trunk using Mars Black mixed with Burnt Umber. Make the trunk curve slightly valid the center. Add texture by striping in slightly lighter brown on the right edge where the ‘moonlight’ hits it. -
Texture the bark:
I like to use a palette knife here to scrape a little Raw Sienna vertically down the lighted side of the trunk to suggest rough bark texture.
Step 3: The Cottage and Path
-
Block in the cottage structure:
Fill in the cottage shape with a dark mix of Burnt Umber and Black. Don’t worry about details yet; just get the silhouette solid against the misty background. -
Paint the roof details:
Use a mix of white and blue-gray to highlight the roof edges and shingles. Keep the strokes small and choppy to mimic slate tiles. -
Create the cobblestone path:
Paint the path area with a base of light gray (White + tiny Black). While wet, blend in some Burnt Umber on the edges for a dirt effect. -
Define the stones:
Using a liner brush and thin gray-brown paint, outline irregular stone shapes on the path. The stones should get smaller and less distinct as the path recedes toward the cottage. -
Highlight the path:
Add pure white highlights to the top edges of the foreground stones to make them look three-dimensional.
Magical Mist Effect
Glazing is key! Mix a tiny drop of white paint with lots of water. Lightly brush this transparent haze over the base of the distant trees to push them further back.
Step 4: Bringing It to Life
-
Paint the glowing windows:
Fill the window shapes with pure Cadmium Yellow. Let it dry, then add a smaller square of White in the center of each pane to simulating intense light source. -
Add the window frames:
Carefully draw the crossbars over the yellow light using a liner brush and thick black paint. -
Cast the warm glow:
Dry brush a little Yellow Ochre onto the ground immediately in front of the cottage door and on the path steps to show the light spilling out. -
Plant the foreground foliage:
Use a fan brush or filbert brush to tap in uneven grasses along the sides of the path using Black and dark Green. Add a distinct leafy plant in the bottom right corner. -
Final magic touches:
Paint a thin crescent moon in the sky with Titanium White. Add tiny specks of yellow/orange in the dark grass to represent fireflies or magical embers.
Step back and admire how the warm cottage light contrasts beautifully with the cool, mysterious forest you have created
BRUSH GUIDE
The Right Brush for Every Stroke
From clean lines to bold texture — master brush choice, stroke control, and essential techniques.
Explore the Full Guide
Close-Up Witch Portrait With Glowing Eyes
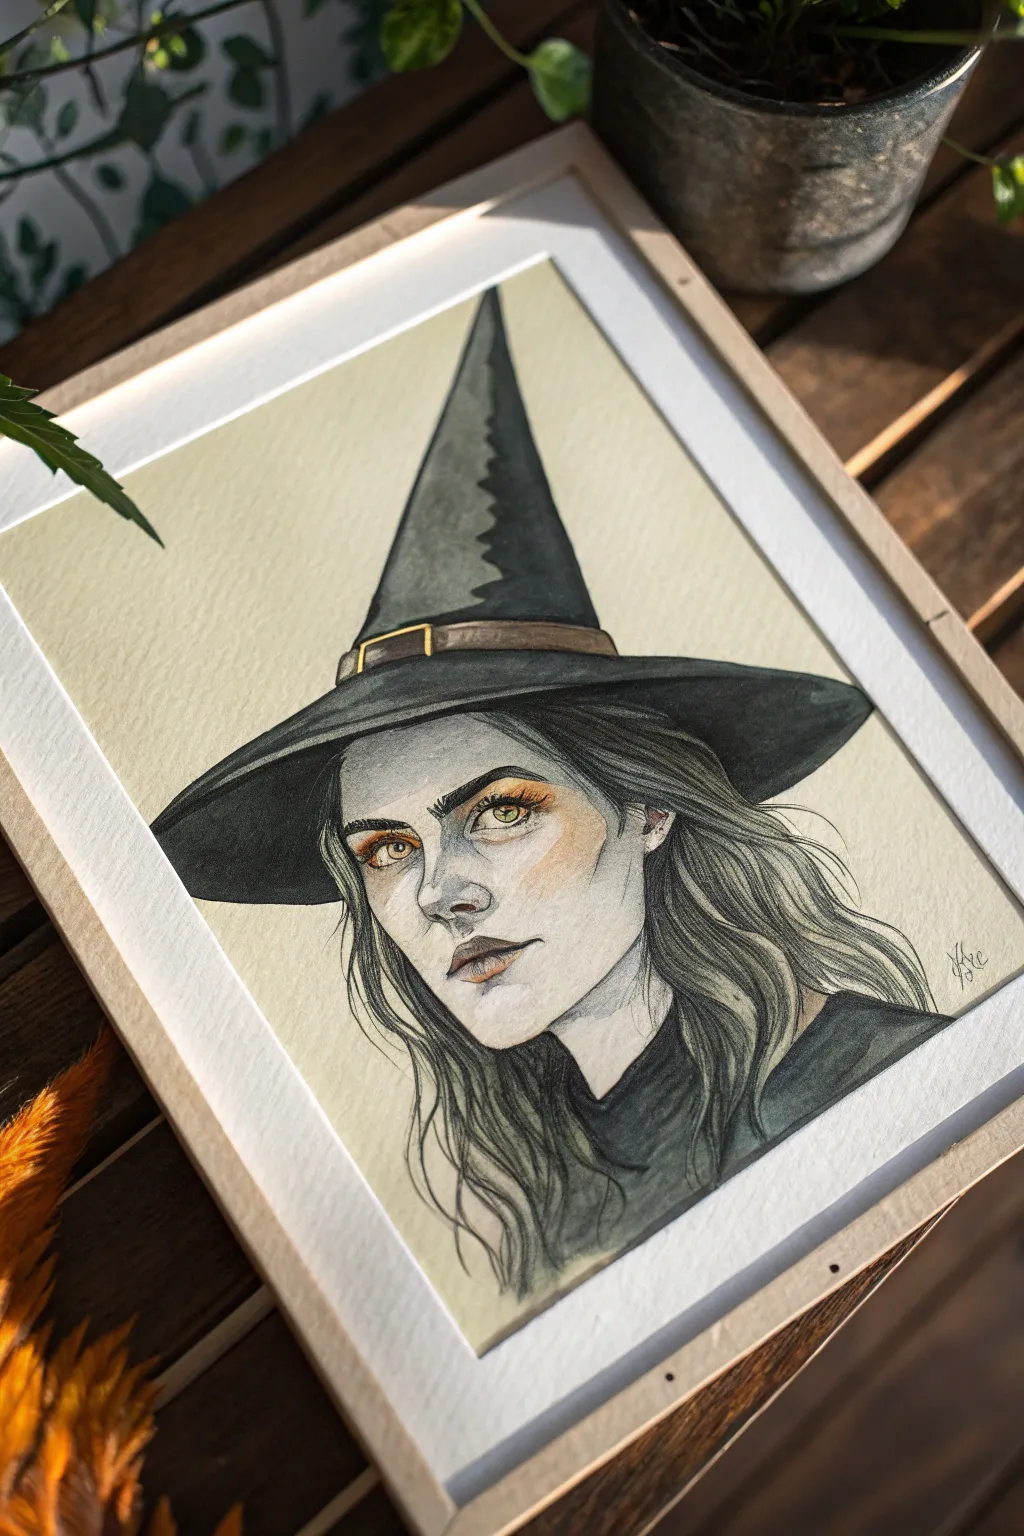
This striking portrait captures a young witch with piercing golden eyes and a classic pointed hat, rendered in gentle earth tones and deep charcoal hues. The piece balances delicate facial features with bold, dark washes for the hat and clothing, creating a captivating contrast.
Detailed Instructions
Materials
- Hot press watercolor paper (smooth texture is key for facial details)
- Watercolor paints (neutral tint/Payne’s gray, yellow ochre, burnt sienna, sepia, faint pink)
- Pencil (HB or H) for sketching
- Kneaded eraser
- Round brushes (size 2 for details, size 6 or 8 for washes)
- White gouache or white gel pen
- Masking tape
- Drawing board or hard surface
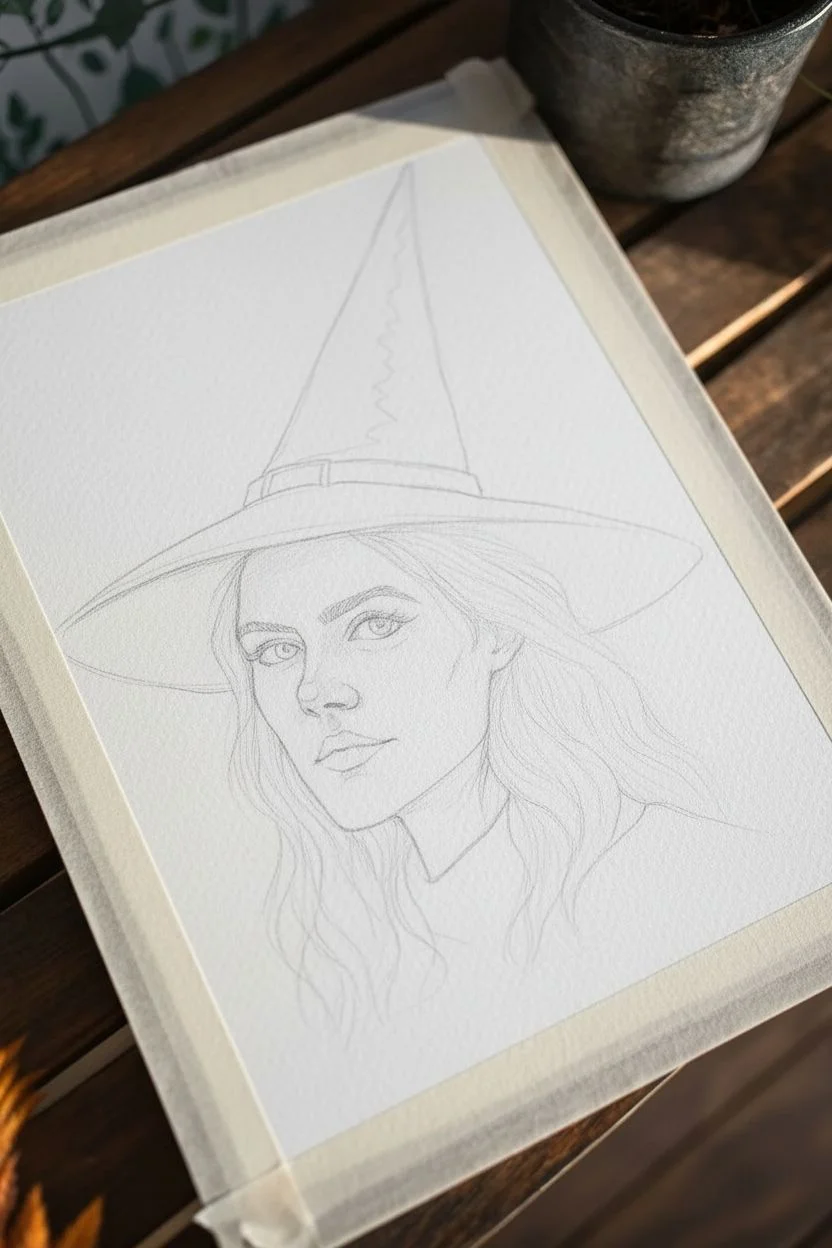
Step 1: Sketching the Foundation
-
Establish the pose:
Begin by lightly sketching the angle of the head and the general placement of facial features. The witch is looking slightly to her right (viewer’s left), in a three-quarter view. -
Outline the hat:
Draw the wide brim of the hat cutting across the forehead. Extend the pointed cone upward, keeping the lines slightly wavy to suggest fabric texture rather than rigid geometry. -
Define the features:
Carefully draw the eyes, nose, and mouth. The eyes are the focal point, so ensure they are almond-shaped and level. Mark out the hairline flowing from under the hat brim. -
Refine the lines:
Tighten up your sketch, adding the buckle detail on the hat band and the waves of her hair. Use your kneaded eraser to lift any heavy graphite so the pencil lines remain faint.
Smooth Skin Secrets
To keep the pale skin looking smooth and not reworked, use the largest brush possible for the initial wash and avoid going back over drying areas, which causes ‘blooms’.
Step 2: Painting the Face and Eyes
-
Base skin tone:
Mix a very watery, pale wash using a touch of yellow ochre and a tiny bit of raw sienna or pink. Apply this over the face and neck, keeping it extremely light to represent pale skin. -
Add warmth and shadow:
While the face is slightly damp or just dry, glaze a soft pinkish-orange tone on the cheeks and nose. Use a diluted cool grey or purple-grey to add shadows under the hat brim, under the nose, and along the jawline. -
The glowing eyes:
Paint the irises with a bright yellow ochre or raw sienna. Leave the whites of the eyes clean. Once dry, outline the eyes with a fine brush and dark grey paint, adding the pupils. -
Enhancing the gaze:
Add a reddish-brown wash around the eyes to create a tired or intense look. This brings immediate focus to her golden stare.
Step 3: The Hat and Hair
-
Base wash for the hat:
Mix a deep, dark grey using Payne’s Gray or Neutral Tint. Apply a wash to the hat, but don’t make it solid black yet. Let the watercolor clarify the texture. Leave the hat band unpainted for now. -
Layering the darkness:
Once the first layer is dry, go back in with a more concentrated dark grey to deepen the shadows on the left side of the hat cone and the underside of the brim. -
Painting the hat band:
Fill in the belt around the hat with a burnt sienna or sepia tone. Use a touch of yellow ochre or gold paint for the small buckle light. -
Hair base layer:
For the hair, use a diluted mix of your dark grey and perhaps a touch of brown. Paint flexible, wavy strokes following the direction of the hair strands. -
Building hair volume:
I like to wait for the previous layer to dry completely before adding darker, thinner strokes to define individual locks of hair. Focus darks near the neck and under the hat.
Magical Metallic Touch
Swap the yellow ochre in the eyes or the hat buckle for metallic gold watercolor paint. It catches the light beautifully and adds a subtle magical shimmer.
Step 4: Background and Final Details
-
The background wash:
Mix a large amount of a very pale, muted yellow-green or beige wash. Carefully paint around the witch’s silhouette to fill the background. This flat color makes the portrait pop. -
Deepen the blacks:
Evaluate your darks. If the hat or clothing looks too washed out, add another layer of dense black or dark grey watercolor to solidify the forms. -
Highlights:
Using white gouache or a gel pen, add tiny highlights to the tear ducts, the tip of the nose, and the reflection in the eyes to bring life to the face. -
Final touches:
Add any stray hairs with a very fine script liner brush and sharpen the edges of the hat brim if needed.
Once completely dry, remove your tape carefully to reveal the crisp border around your haunting new portrait
Stained Glass Witch Design

Capture the magic of traditional glasswork on paper with this striking watercolor illustration. By combining bold black outlines with vibrant, jewel-toned washes, you’ll create a witch portrait that looks like it belongs in an enchanted cathedral window.
Detailed Instructions
Materials
- Cold press watercolor paper (300 gsm)
- Watercolor paint set (pan or tube)
- Black waterproof fine liner pens (0.3mm and 0.8mm)
- Round watercolor brushes (sizes 2, 4, and 6)
- Graphite pencil (HB) and eraser
- Ruler
- Clean water jar and paper towels
Step 1: Planning the Composition
-
Establish the frame:
Begin by lightly sketching a rectangular border in the center of your paper. Leave plenty of white space around the edges to give the finished piece a professional, matted look. -
Sketch the halo:
Use a compass or trace a circular object to draw a large circle behind the central figure. This will act as the glowing stained-glass ‘halo’ behind the witch. -
Geometric divisions:
Using your ruler, segment the background into geometric shards. Draw lines radiating from the circle’s center and intersecting lines within the rectangular border to mimic leaded glass panes. -
Draft the figure:
Lightly sketch the witch’s profile in the foreground. Focus on the sharp angles of the hat brim and the flowing drape of her cape, ensuring the hat breaks the top boundary of the circle for depth.
Bleeding Lines?
If your black ink bleeds when you paint over it, stop immediately. Your pen isn’t waterproof. Let it dry 24 hours or switch to pigment liners.
Step 2: Inking the Framework
-
Outline the main figure:
Switch to your 0.3mm waterproof pen. carefully trace your pencil lines for the witch’s face, hair, and clothing details. Keep these lines relatively delicate for now. -
Create the ‘lead’ lines:
For the stained-glass background and the outer border, use the thicker 0.8mm pen. Go over your ruler lines to create that heavy, structural look characteristic of lead framing. -
Thicken intersections:
Where the background glass lines meet the figure or the border, slightly thicken the ink line. This small detail mimics the soldering points in real stained glass. -
Clean up:
Once the ink is completely dry—give it a few minutes to be safe—gently erase all underlying pencil marks to keep your watercolor washes pure.
Pro Tip: Glass Textures
While the background paint is still wet, drop in a pinch of salt or a drop of clean water. This creates blooms that mimic vintage textured glass.
Step 3: Applying Color
-
Paint the skin tone:
Mix a very pale wash of ochre and a touch of red for the skin. Apply it smoothly to the face and neck, leaving the paper white for the eyes. -
Create the jewel tones:
For the background circle, alternate between warm yellows and oranges. Paint wet-on-dry to keep the edges crisp against the black lines. -
Add cool contrasts:
Fill the geometric shards outside the circle with cool greens and blues. Vary the intensity of the pigment in each ‘pane’ to simulate different thicknesses of glass. -
Deepen the witch’s attire:
Use a concentrated black watercolor for the hat and cloak. I like to leave tiny slivers of white paper showing through in the black areas to suggest fabric texture rather than a solid flat block. -
Accentuate with red:
Paint the underside of the hat brim and the cape’s collar with a deep crimson red. This pop of color draws the eye directly to the witch’s face.
Step 4: Final Details
-
Define the hair:
Using a mix of brown and burnt umber, paint the hair with stroke-like motions that follow the hair’s wave pattern, rather than filling it in strictly solid. -
Enhance the eyes and lips:
Carefully add color to the lips with red and define the iris color. Use your finest pen to re-emphasize the eyelashes if they were faded by the skin wash. -
Paint the brooch:
Add a vivid green dot to the clasp on her cloak, leaving a tiny white highlight unpainted to make it look like a reflective gem. -
Final outline check:
Review your black lines. If the paint has dulled any of the ‘lead’ lines in the background, go over them one last time with the thick pen to restore the high contrast.
Step back and admire how the bold lines make those colors radiate light

PENCIL GUIDE
Understanding Pencil Grades from H to B
From first sketch to finished drawing — learn pencil grades, line control, and shading techniques.
Explore the Full Guide
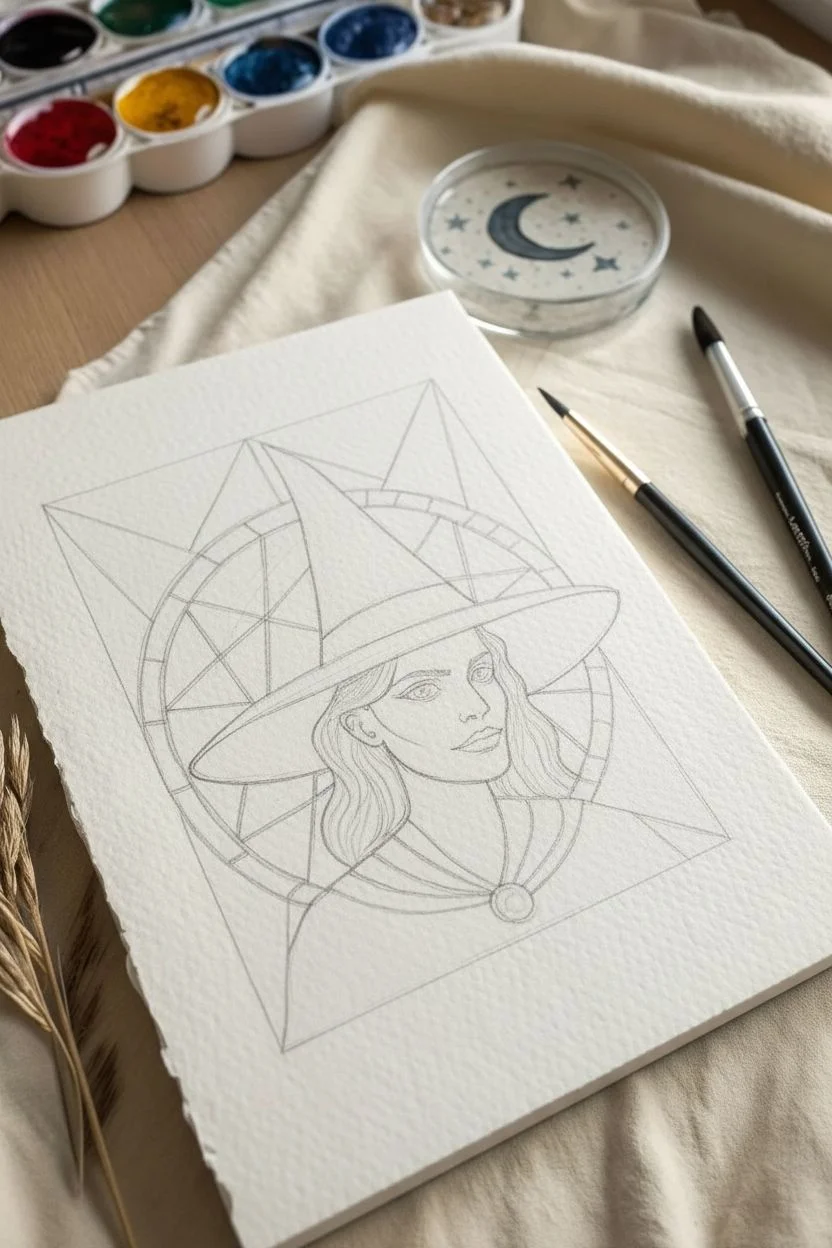
Abstract Witch Aura and Symbols
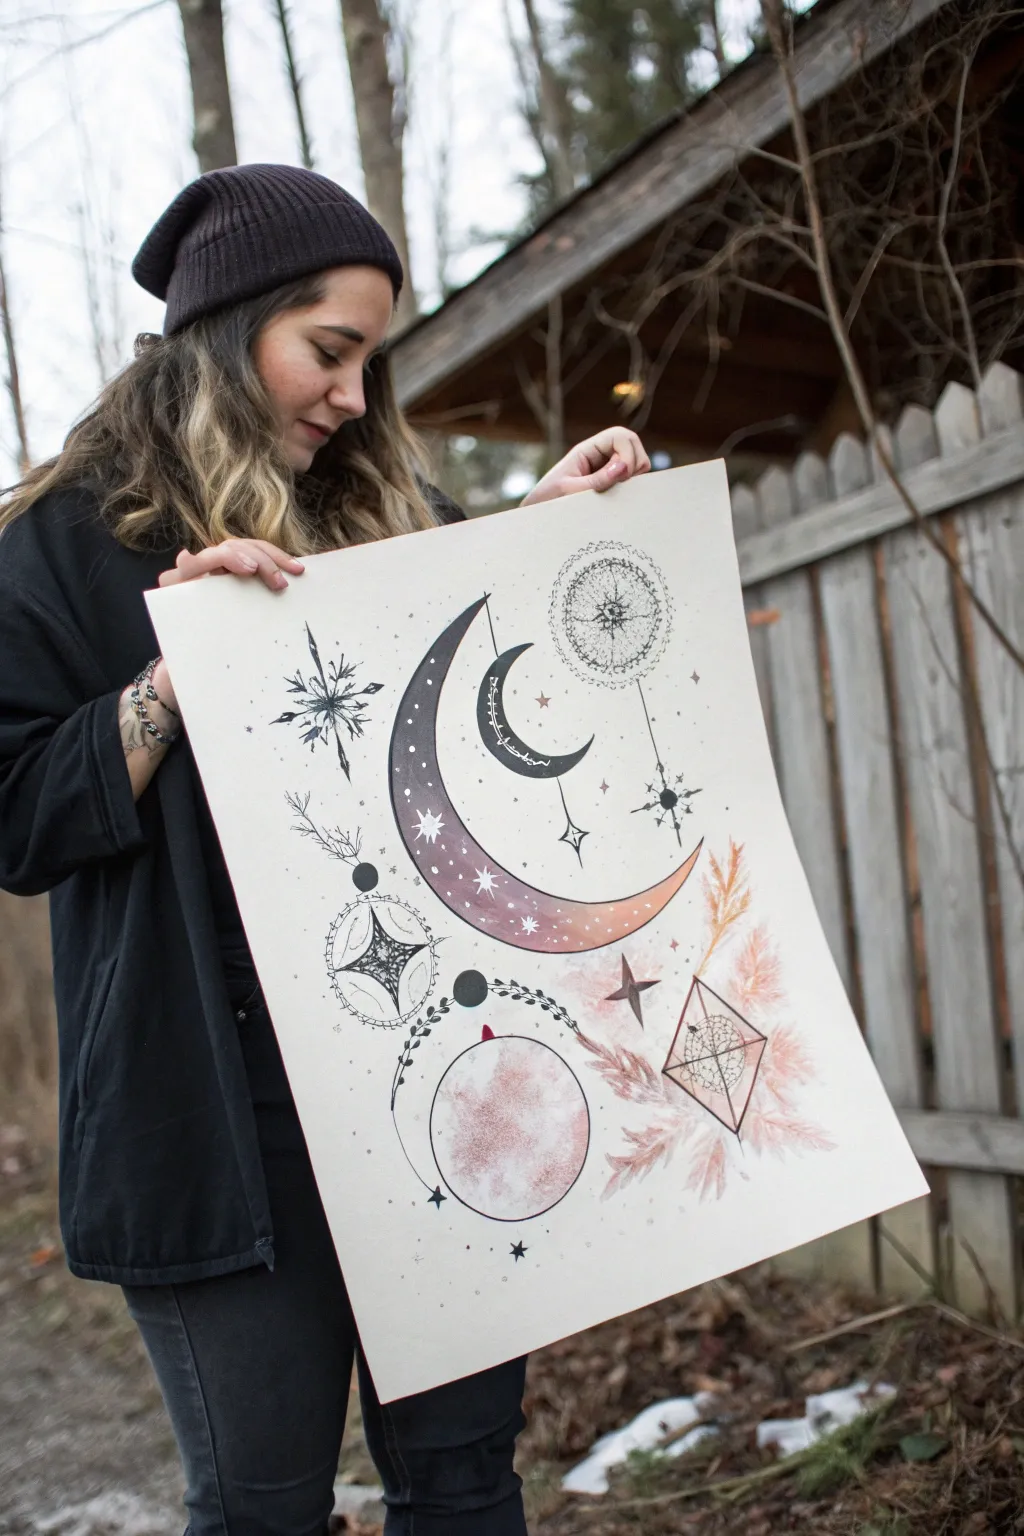
This striking mixed-media piece combines precise geometric linedrawing with soft, ethereal watercolor washes to create a modern witchy aesthetic. Featuring celestial bodies, crystals, and dreamcatcher motifs, the artwork balances sharp black ink with warming hues of rust, mauve, and dusty rose.
Step-by-Step Guide
Materials
- Large heavy-weight watercolor paper (hot press for smoother lines)
- Watercolors (Rust, Indigo/Payne’s Grey, Dusty Rose, Yellow Ochre)
- Fine liner pens (sizes 005, 01, 03, and 05 – waterproof/archival black ink)
- Pencil (HB or 2H)
- Large eraser (kneaded or soft vinyl)
- Compass for drawing circles
- Ruler
- Round watercolor brushes (Size 4, 8, and a large wash brush)
- Masking fluid (optional)
- White gel pen or gouache
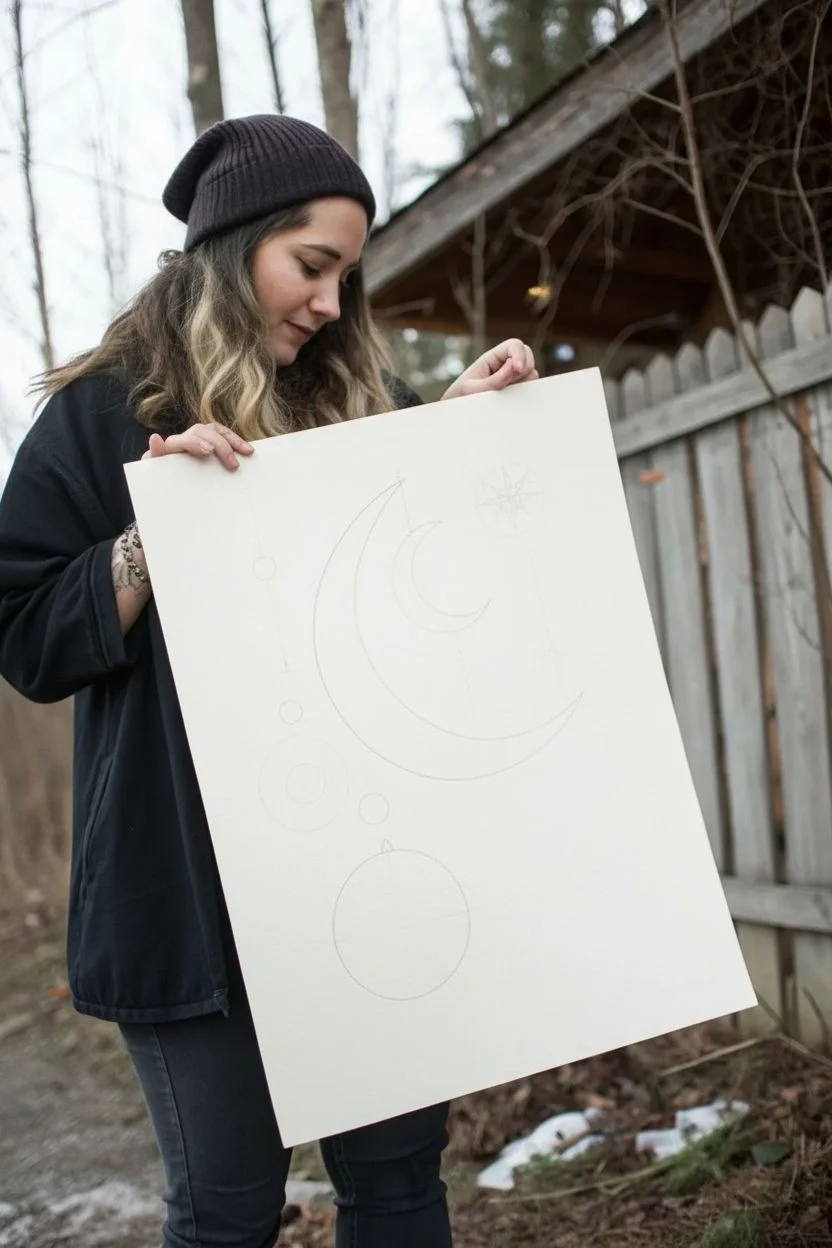
Step 1: Planning the Celestial Layout
-
Find the center:
Begin by lightly marking the center of your large paper. This composition relies on balance, so having a center vertical axis helps, even if the elements aren’t perfectly symmetrical. -
Draft the primary circles:
Using a compass, lightly sketch the largest circle in the center for the main crescent moon. Directly below it, draw a second large circle for the planet sphere. Off to the right and slightly higher, draw a smaller circle for the intricate mandala/compass shapes. -
Sketch the crescents:
Within your main central circle, use the compass again to create the inner curve of the large crescent moon. Then, sketch a smaller, darker crescent nested inside the curve of the larger one. -
Add floating elements:
Lightly sketch the surrounding symbols: a crystal geometric shape on the lower right, a snowflake-like star on the upper left, and various hanging lines or ‘charms’ dropping from the main elements.
Ink Confidence
Don’t stress about perfect circles! If your hand wobbles while tracing the compass lines, thicken the line slightly in that area to hide the unevenness.
Step 2: Applying Watercolor Washes
-
Paint the large crescent:
Mix a blend of Indigo and deep Purple. Start painting the large crescent moon from the top, allowing the color to be darkest at the upper tip. While wet, drop in hints of Dusty Rose near the bottom to create a gradient fade. -
Create the planet texture:
For the large sphere at the bottom, use a wet-on-wet technique. Wet the circle with clean water first, then touch your brush loaded with diluted Rust and Pink to the paper. Let the pigment bloom naturally to create a textured, planetary surface. -
Add floral warmth:
On the bottom right, paint loose, feathery fronds using Yellow Ochre and Rust. Keep these strokes organic and soft to contrast with the rigid geometric lines coming later. -
Dry completely:
This is crucial: allow the paint to dry 100% before touching it with a pen. I usually wait at least an hour or use a hair dryer on a low setting to speed things up.
Metallic Magic
Use gold leaf or metallic gold watercolor paint for the stars and the geometric prism lines to make the piece shimmer in candlelight.
Step 3: Inking the Details
-
Outline the moons:
Using a size 05 pen, trace the outline of the large painted crescent. Leave a small gap between the paint and ink if you want an airy feel, or trace directly on the edge. -
Fill the dark crescent:
Take the smaller, inner crescent sketch and fill it in solid black or very dark grey paint. Leave tiny white specks or use a white gel pen later to add ‘stars’ inside the darkness. -
Draw the mandala compass:
Move to the top right circle. Use your 01 pen to draw intricate mandala patterns. Start with a central dot and radiate outward with petals, dots, and stippling (tiny dots) for texture. -
Construct the geometric prism:
Over the dried feathery wash on the bottom right, use a ruler to draw a diamond or prism shape with the 03 pen. The sharp black lines over the soft watercolor create a beautiful depth. -
Add the botanical line work:
On the left side, draw a stylized branch using the 01 pen. Keep the leaves simple and linear. Add a small black circle at the base of this branch as an anchor point.
Step 4: Final Celestial Embellishments
-
Connect with hanging lines:
Draw vertical lines extending downward from the top mandala and the main crescent tips, terminating them in small stars or diamond shapes. -
Detail the large sphere:
Draw a delicate ink circle around your painted planet. Add a stylized laurel or vine wrapping over the top edge of the sphere in black ink. -
Stipple shading:
Use your smallest 005 pen to add stippling (shading with dots) to the tips of the crescent moon and around the edges of the planet sphere giving them volume. -
Sprinkle stars:
Scatter small four-pointed stars, dots, and tiny open circles throughout the empty spaces of the composition to connect the main elements. -
Highlight:
Use a white gel pen to add bright white stars on top of the darkest painted section of the crescent moon for high contrast. -
Erase guidelines:
Once the ink is fully dry, gently erase any visible pencil marks to leave the artwork crisp and clean.
Hang your finished celestial chart in a simple wooden frame to let the magic shine


Have a question or want to share your own experience? I'd love to hear from you in the comments below!