When I want unique creative drawing ideas, I stop trying to draw “the thing” and start asking, “What could it become?” These prompts are all about unexpected juxtapositions—turning everyday objects into little visual stories that feel dreamy, clever, and totally you.
Open Book That Spills a Landscape

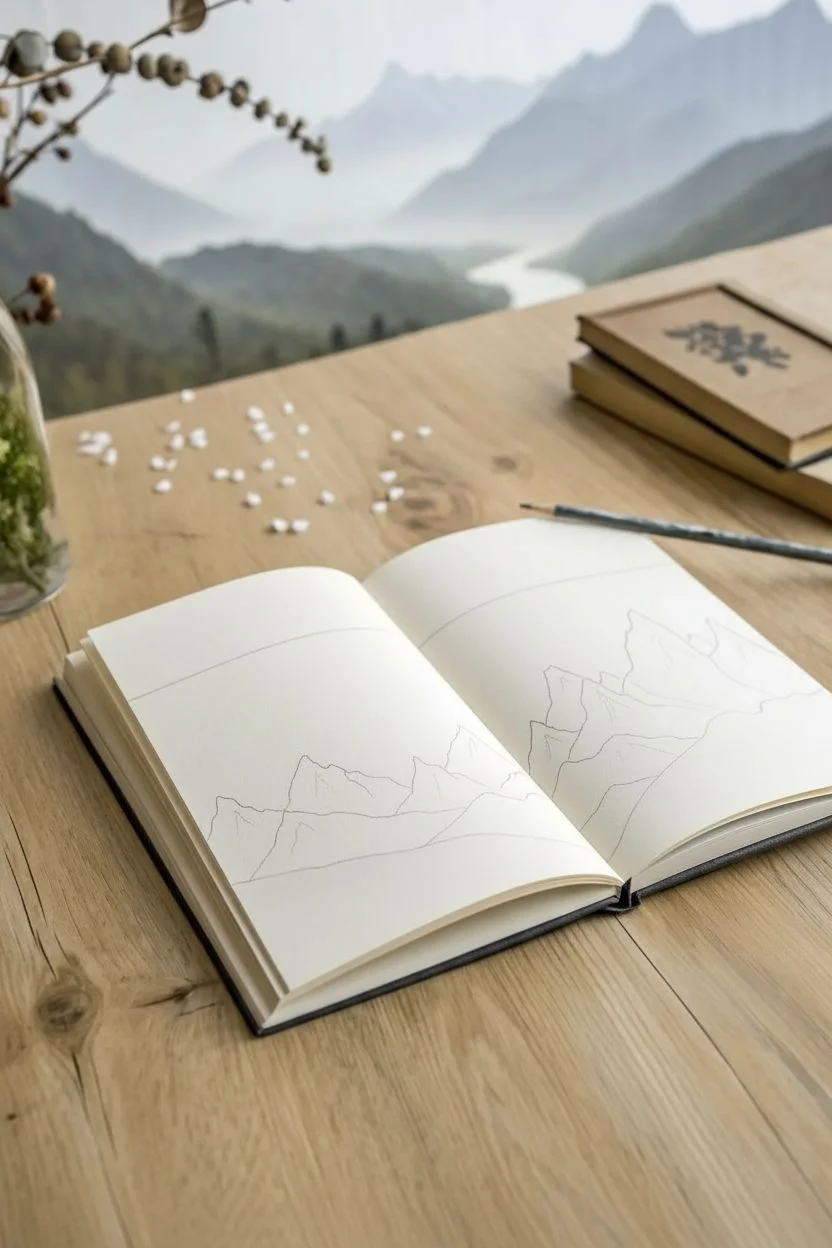
This serene project transforms a simple sketchbook spread into a window overlooking a foggy mountain range, blurring the lines between art and reality. By extending the drawing style to the table with tiny cut-paper birds, you create a whimsical illusion that your landscape is coming to life.
Step-by-Step
Materials
- Hardbound sketchbook with cream or off-white paper
- Graphite pencils (HB, 2B, 4B)
- Fine liner pen (black, 0.1mm or 0.3mm)
- Blending stump or tortillon
- Black construction paper or cardstock
- Small craft scissors or X-ACTO knife
- White gel pen (optional)
- Kneaded eraser
- Ruler
Step 1: Setting the Scene
-
Horizon placement:
Open your sketchbook to a fresh spread. Lightly sketch a horizontal line across the right page, about one-third of the way up from the bottom, to establish where your mountains will sit. -
Mountain outlines:
Using an HB pencil, draw the jagged peaks of the mountains on the right page. Make the foreground mountains taller and darker, while the distant peaks should be smaller and fainter to simulate atmospheric perspective. -
Foreground slopes:
Extend a gentle slope from the right page onto the bottom of the left page. This connects the two sides visually, creating a continuous landscape across the gutter of the book.
Step 2: Rendering the Landscape
-
Shading the peaks:
Switch to a 2B pencil to shade the mountains on the right page. Use the side of the lead for soft, broad strokes. Focus the darkest values on the right side of each peak, imitating a light source coming from the left. -
Creating the mist:
Use your blending stump to smudge the graphite downwards from the peaks, letting the bottom of the mountains fade into the white of the paper. This creates that ethereal, misty valley look seen in the reference. -
Adding texture:
With a 4B pencil, add tiny vertical dashes along the ridges of the closest mountain to suggest a distant forest line. Keep these loose and irregular.
Smudgy Pages?
If graphite transfers to the opposite page when you close the book, place a sheet of wax paper or drawing fixative between the pages to protect your misty fade.
Step 3: The Lonely Tree
-
Sketching the trunk:
On the left page, starting from the slope you drew earlier, sketch a thin, vertical line for the main trunk of the tree. Let it curve slightly for a natural feel. -
Branching out:
Draw primary branches extending upward and outward. I like to keep my wrist loose here to ensure the lines don’t look too stiff or mechanical. -
Fine details:
Switch to your 0.1mm fine liner pen. Carefully trace over your tree sketch, adding tiny twigs at the ends of the branches. Vary your line weight—thicker at the base, hair-thin at the tips. -
Buds and leaves:
Add tiny dots or minuscule tear shapes along the thinnest twigs to represent small buds or sparse leaves, keeping the aesthetic minimal and wintery.
Level Up: depth
Use a light grey marker to tint the distant mountains before shading with pencil. This adds a cool undertone that enhances the feeling of cold, morning fog.
Step 4: The Spillover Effect
-
Drawing birds:
On a separate sheet of black construction paper, draw several tiny V-shaped silhouettes of birds in flight. Vary their sizes; some should be widely open wings, others sharper angles. -
Cutting them out:
Carefully cut out these tiny bird shapes using sharp craft scissors or an X-ACTO knife. This requires patience, as they are essentially confetti-sized. -
Placement strategy:
Arrange the paper birds on the wooden surface below the bottom right corner of your sketchbook. Create a ‘flight path’ that looks like they are flying out of the drawn landscape and onto the table. -
Securing the flock:
Once you are happy with the arrangement, you can leave them loose for a temporary photo styling, or use tiny dabs of glue to adhere them to the table if this is a permanent display installation. -
Final touches:
Erase any stray graphite marks on the pages with your kneaded eraser to keep the negative space crisp and clean. Place a pencil nearby to complete the staged aesthetic.
Step back and enjoy the tranquil atmosphere you have created on your page and desk


Geometric Slice Through a Soft Botanical Scene
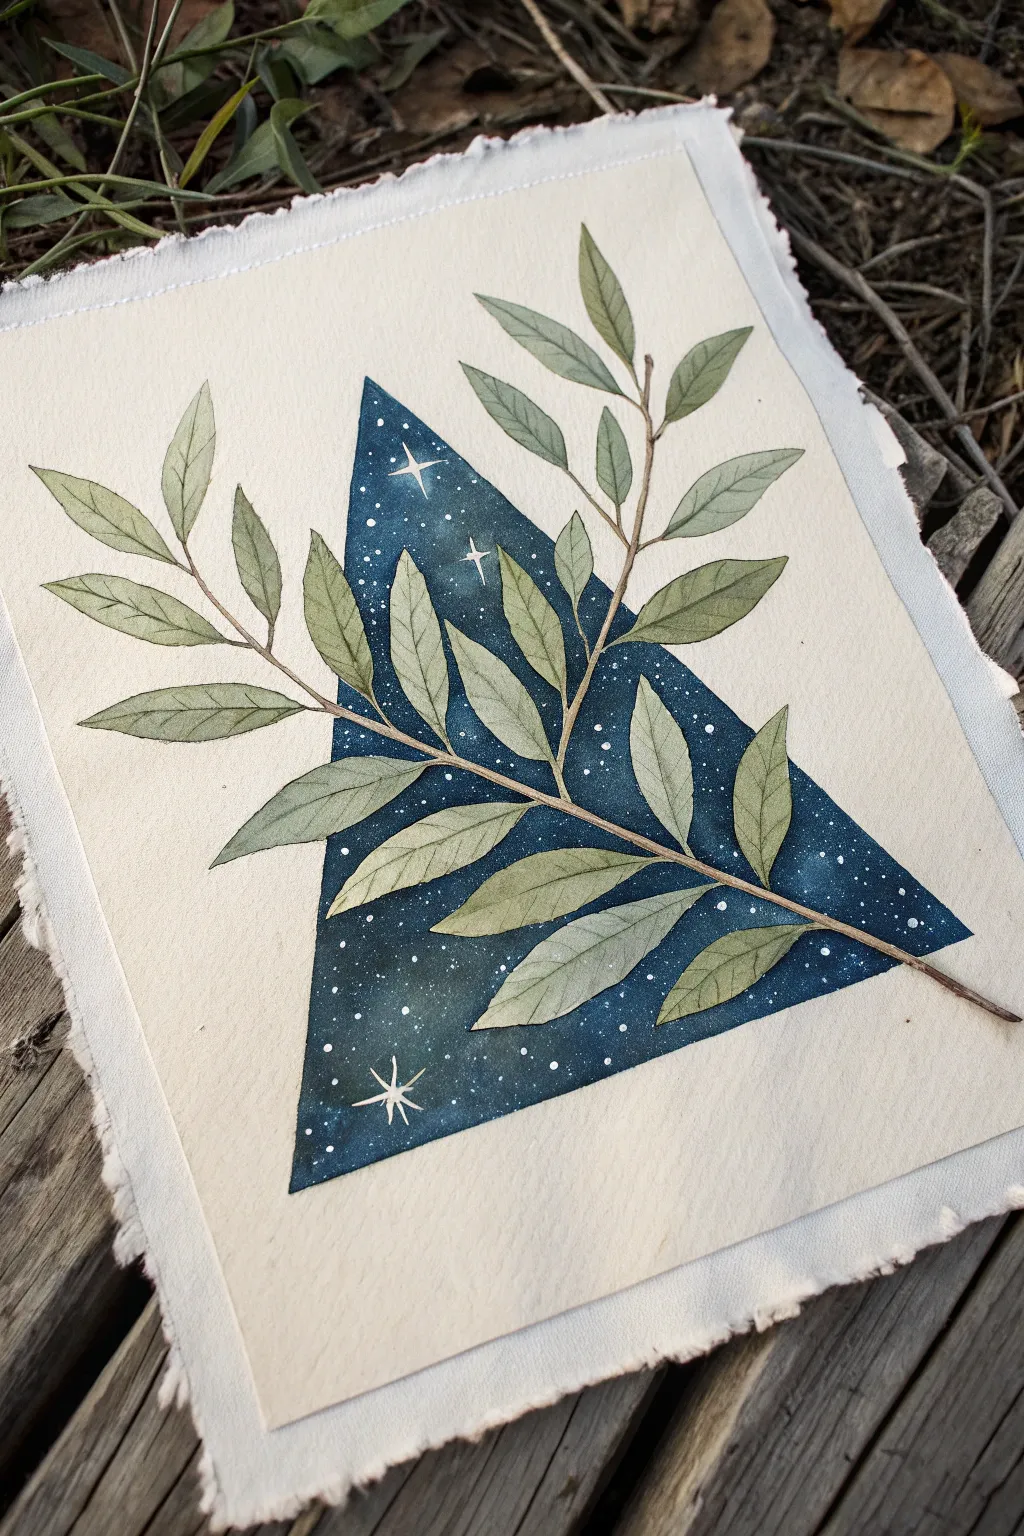
This striking watercolor piece combines the organic flow of nature with sharp geometric precision. By contrasting a deep, starry galaxy within a triangle against soft, sage-green leaves, you create a surreal window into another world.
How-To Guide
Materials
- Heavyweight watercolor paper (300gsm, cold press)
- Ruler
- Pencil (HB or H)
- Painter’s tape or washi tape (low tack)
- Watercolor paints (Indigo, Phthalo Blue, Black, Sap Green, Burnt Umber, Yellow Ochre)
- White gouache or white gel pen
- Round brushes (sizes 2, 4, and 6)
- Palette for mixing
- Jar of water
- Paper towels
Step 1: Preparation and Sketching
-
Prepare the Paper:
Start by tearing the edges of your watercolor paper against a ruler if you want that rough, deckle-edge look shown in the reference. If you prefer clean edges, just cut it to size. -
Draft the Triangle:
Use your ruler and a light pencil to draw an equilateral triangle in the center of your page. Press lightly so the graphite doesn’t show through the paint later. -
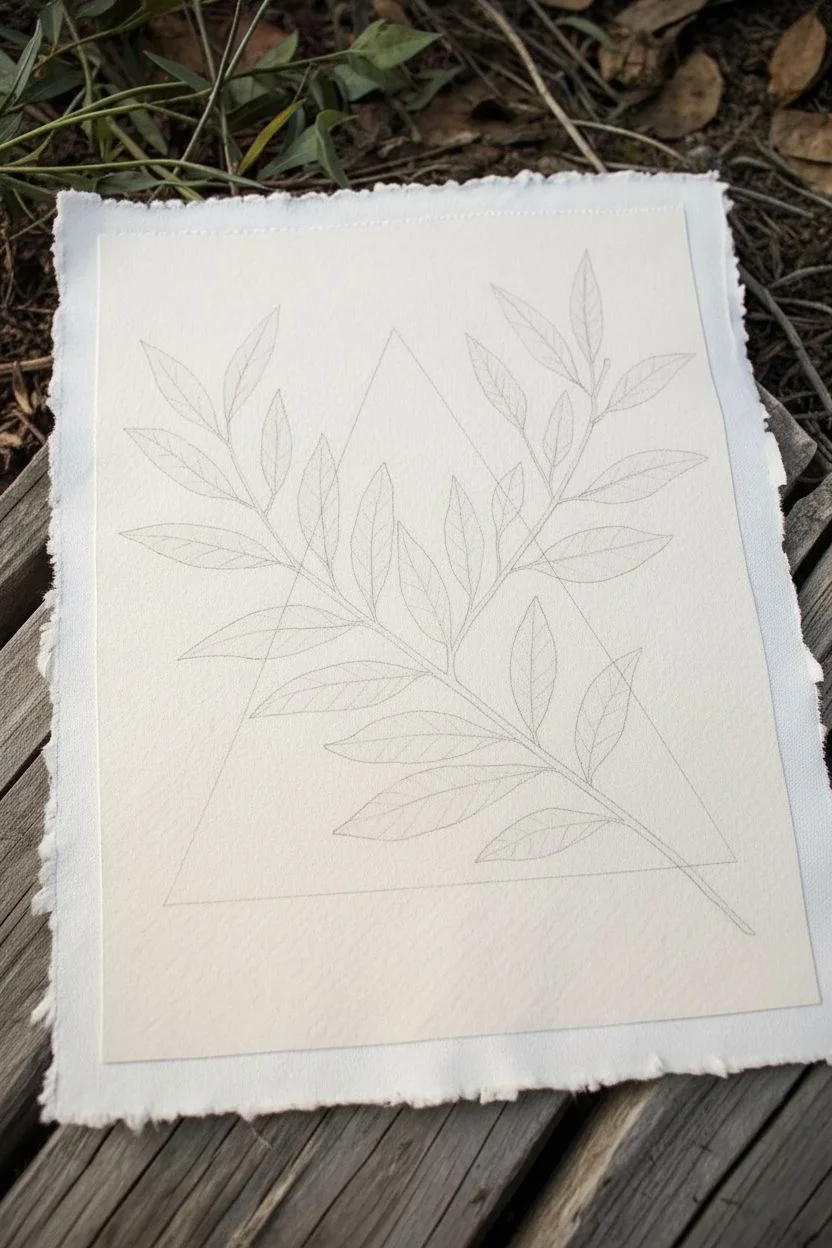
Sketch the Botanical:
Lightly sketch a leafy branch that starts from the bottom right and extends diagonally upward across the triangle. The key is to draw the leaves overlapping the triangle’s borders. Draw the main stem first, then add alternating leaves. -
Refine the Overlap:
This is crucial: erase the pencil lines of the triangle *only* where they pass underneath a leaf or stem. The leaves must appear to be sitting on top of the geometric shape.
Step 2: Painting the Cosmic Void
-
Masking (Optional):
You can use masking fluid on the leaves inside the triangle if you have a shaky hand. Otherwise, creating this sharp edge relies on careful brush control. -
Base Layer:
Mix a watery wash of Phthalo Blue and apply it inside the triangle shape, carefully painting around the sketched leaves. Keep the paper damp but not soaking. -
Deepening the Darkness:
While the first layer is still slightly damp, drop in concentrated Indigo and a touch of Black, especially near the corners and edges of the triangle. This creates that deep space depth. -
Blending:
Use a clean, damp brush to soften any harsh transitions within the blue zone, aiming for a cloudy, nebula-like texture. Let this layer dry completely.
Clean Edges Trick
Use low-tack artist tape to outline the triangle’s straight edges. Just be sure to cut the tape away where the leaves overlap so you don’t block the botanical drawing.
Step 3: Painting the Botanical
-
Mix the Leaf Color:
Create a sage green by mixing Sap Green with a little burnt umber and a touch of blue to desaturate it. You want a natural, muted tone to contrast with the vibrant sky. -
First Leaf Wash:
Paint the leaves with a light wash of your green mix. Paint right over the boundary of the triangle—the color should be consistent whether the leaf is ‘inside’ or ‘outside’ the geometric shape. -
Adding Veins and Shadow:
While the leaves are drying, mix a slightly darker, more concentrated version of your green. Use your smallest brush (size 2) to paint a central vein down each leaf. -
Leaf details:
Add subtle shading to the base of the leaves where they meet the stem using the darker green mix. This gives them volume. -
Painting the Stem:
Mix Burnt Umber with a tiny bit of black. Carefully paint the main stem and the smaller petioles connecting the leaves. For a realistic look, vary the pressure to make the stem slightly uneven.
Level Up: Metallic Pop
Instead of white gouache for the stars, swap it for metallic gold or silver watercolor. The shimmer will make the ‘cosmic’ section look magical when the light hits it.
Step 4: Stars and Details
-
Splatter Stars:
Cover your leaves with a scrap piece of paper to protect them. Load a brush with white gouache (diluted slightly) and tap it against another brush handle over the triangle to create a spray of tiny stars. -
Manual Stars:
Use a white gel pen or a fine detail brush with gouache to add a few larger, distinct stars. I like to add a classic four-point starburst shape in one or two spots for a focal point. -
Clean Up:
Once everything is bone dry, gently erase any remaining visible pencil marks around the triangle’s exterior.
Frame your piece with plenty of white space to let the contrast between the galaxy and the garden really shine
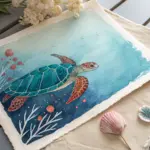


Cloud Fish Swimming Through a Night Sky
Dive into a dreamy cosmos with this whimsical watercolor piece featuring a serene whale navigating a starry indigo sky. The contrast between deep blue washes and crisp white details creates a magical, storybook atmosphere perfect for framing.
Detailed Instructions
Materials
- Cold press watercolor paper (300 gsm)
- Painter’s tape or masking tape
- Watercolor paints (Indigo, Payne’s Grey, Prussian Blue, Black)
- White classic gouache or bleed-proof white ink
- Gold metallic paint or gold gel pen
- Round watercolor brushes (Size 2, 6, and 10)
- Fine detail liner brush (Size 0 or 00)
- Pencil (HB) and kneaded eraser
- Ruler
- Two jars of water (one clean, one for rinsing)
- Paper towels
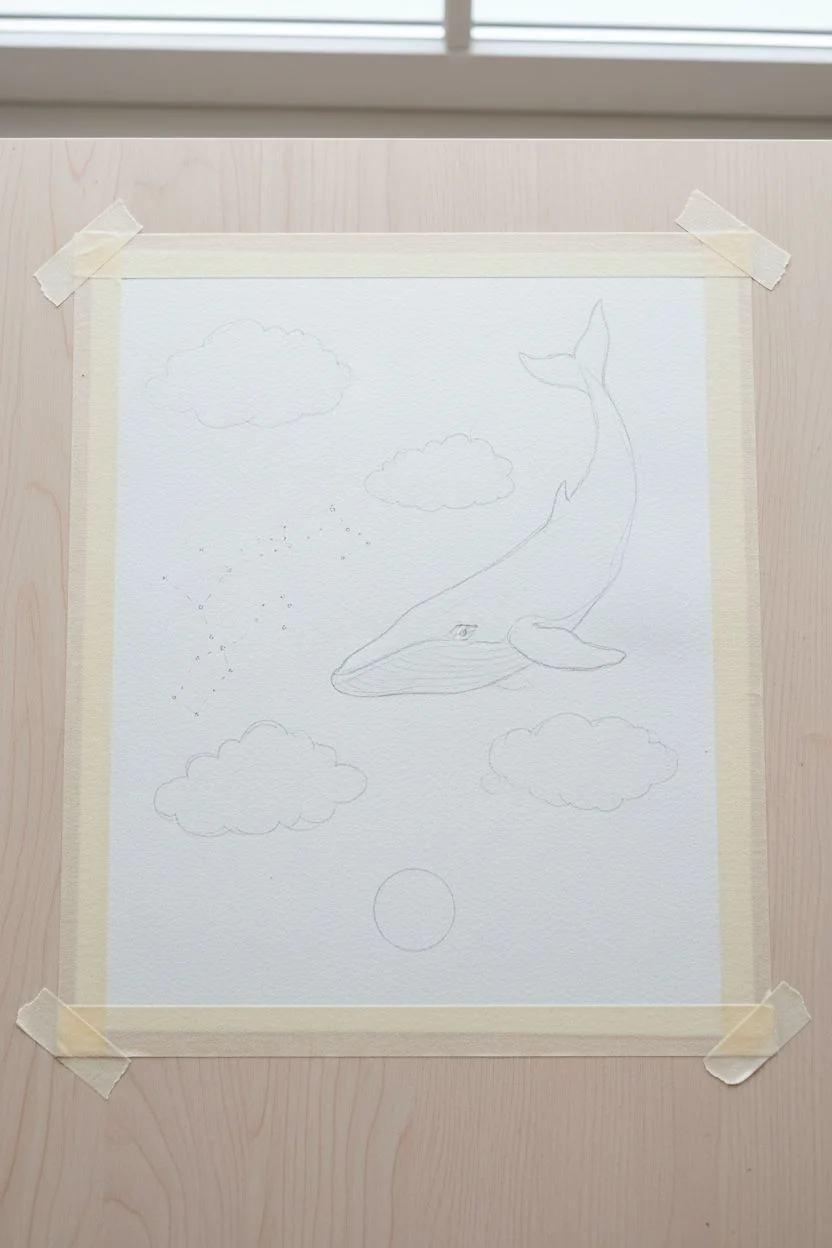
Step 1: Preparation & Sketching
-
Secure the paper:
Begin by taping down all four edges of your watercolor paper to a hard board or table. Press the tape down firmly to ensure crisp, clean borders later. -
Outline the composition:
Lightly sketch the position of the whale in the center right, curving its body upward. -
Add celestial elements:
Sketch a circle for the moon at the bottom center and softly outline three main cloud clusters: top left, middle right, and bottom left. -
Map the constellations:
Using your ruler, lightly mark dots for the constellation stars to the left of the whale, connecting them with faint lines so you know where to avoid painting later. -
Lighten the guides:
Take your kneaded eraser and gently dab (don’t rub) the whole page to lift up graphite, leaving only the faintest ghost lines visible.
Uneven Wash?
If your sky looks streaky, re-wet the entire sky area gently with a large brush and drop in more pigment while wet. This technique, called glazing, smooths out transitions.
Step 2: The Deep Blue Sky
-
Prepare the wash:
Mix a large puddle of deep indigo and Prussian blue. I like to keep this mixture quite saturated but fluid. -
Paint around subjects:
Carefully paint the night sky using the size 6 or 10 brush. Work around the whale shape completely, leaving the paper white. -
Create cloud boundaries:
As you approach the cloud sketches, paint loosely around their edges. Don’t make a hard line; simply stop painting and let the blue wander slightly. -
Soften cloud edges:
Before the blue paint dries near the clouds, take a clean, damp brush and gently drag the blue pigment into the white cloud areas to create a soft, diffused fade. -
Deepen the background:
While the first layer is still damp, drop in concentrated Payne’s Grey or Black into the corners and the areas furthest from the luminous clouds to create depth. -
Initial drying:
Allow this background layer to dry completely. The paper must be bone-dry before moving to the next phase.
Step 3: Clouds & Whale
-
Cloud shadows:
Mix a diluted, watery wash of Payne’s Grey. Dab this loosely inside the white cloud areas to give them volume, keeping the tops of the clouds white for highlights. -
Base layer for the whale:
Using a very diluted grey-blue wash, paint the body of the whale. Keep it extremely pale, almost white. -
Whale shading:
While the whale is damp, add a slightly darker grey to the underside of the belly and under the fins to create a 3D effect. -
The Moon:
Paint the moon using a pale grey wash, dappling in darker spots while wet to mimic craters.
Level Up: Cosmic Glow
Mix a tiny amount of iridescent medium into your white gouache for the stars. When the light hits your painting from different angles, the night sky will shimmer.
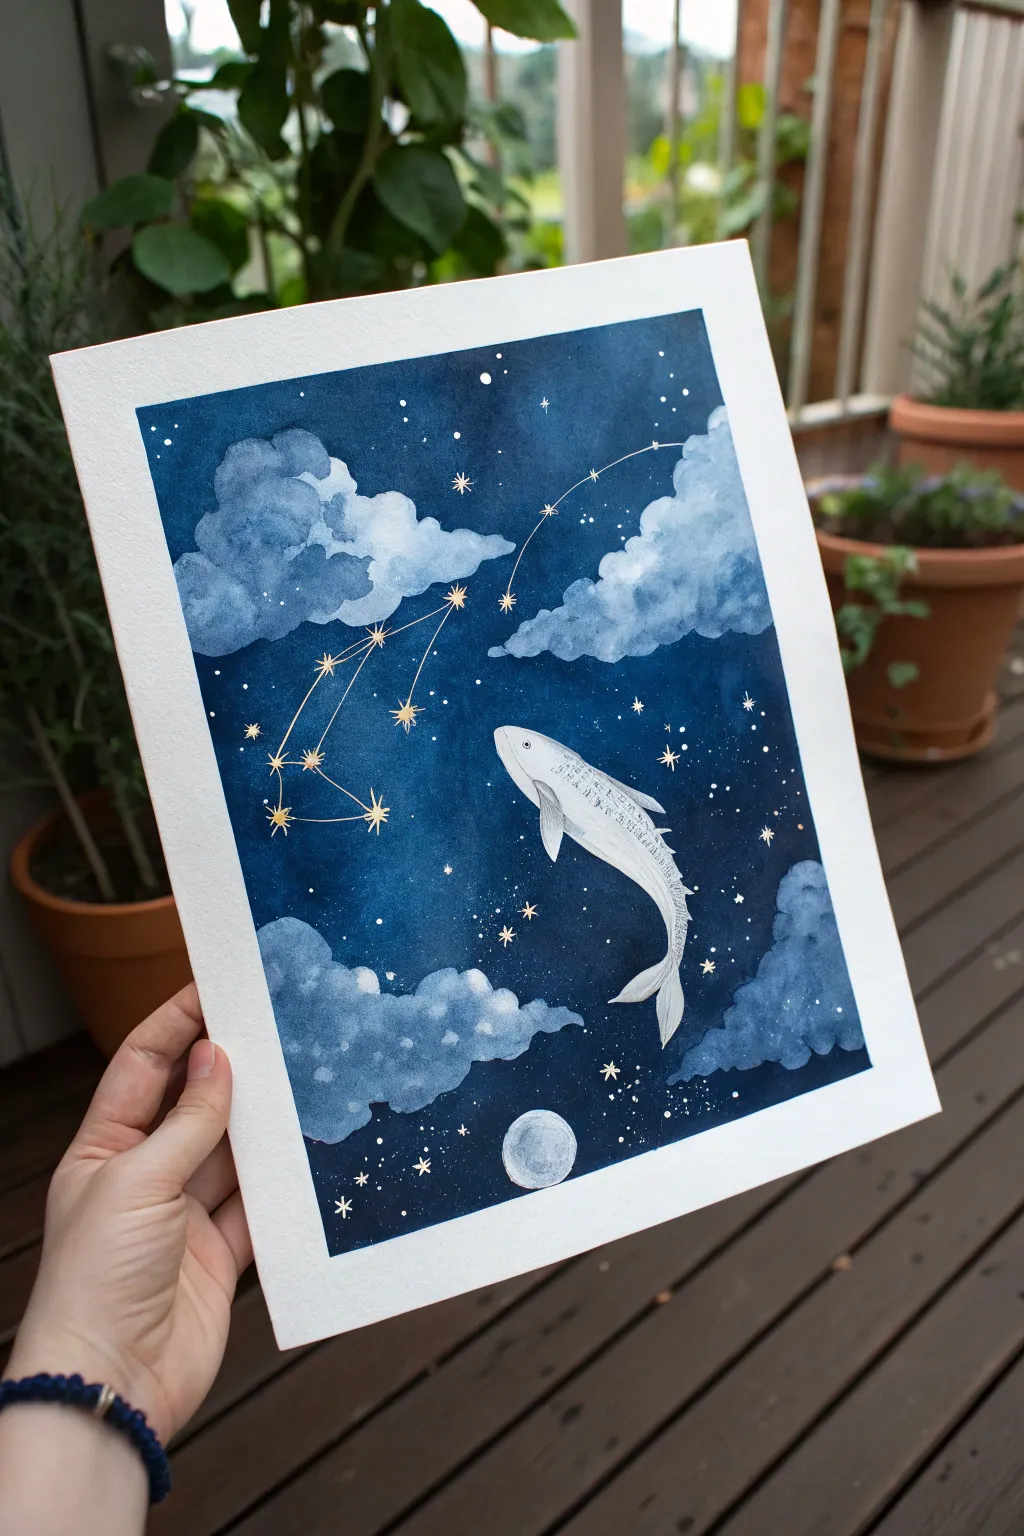
Step 4: Magical Details
-
Painting the constellations:
Using your gold paint or gel pen, draw the star connection lines and add small starburst shapes over your initial pencil marks. -
Adding the stars:
Switch to white gouache or ink. Dip a stiff brush (or toothbrush) into the white and flick it over the dry painting to create a spray of distant stars. -
Highlighting celestial bodies:
Use your fine liner brush and white gouache to add larger, specific stars and tiny dots to the dark sky areas for emphasis. -
Whale details:
With the fine liner and white gouache (or a white gel pen), draw the eye, the mouth line, and the texture stripes along the whale’s belly. -
Final touches:
Add tiny gold accents to a few random stars for extra sparkle, then carefully peel away the tape to reveal your clean edges.
Hang your celestial creation in a spot where it can catch the light and inspire daydreams.


Impossible Staircase Garden Loop
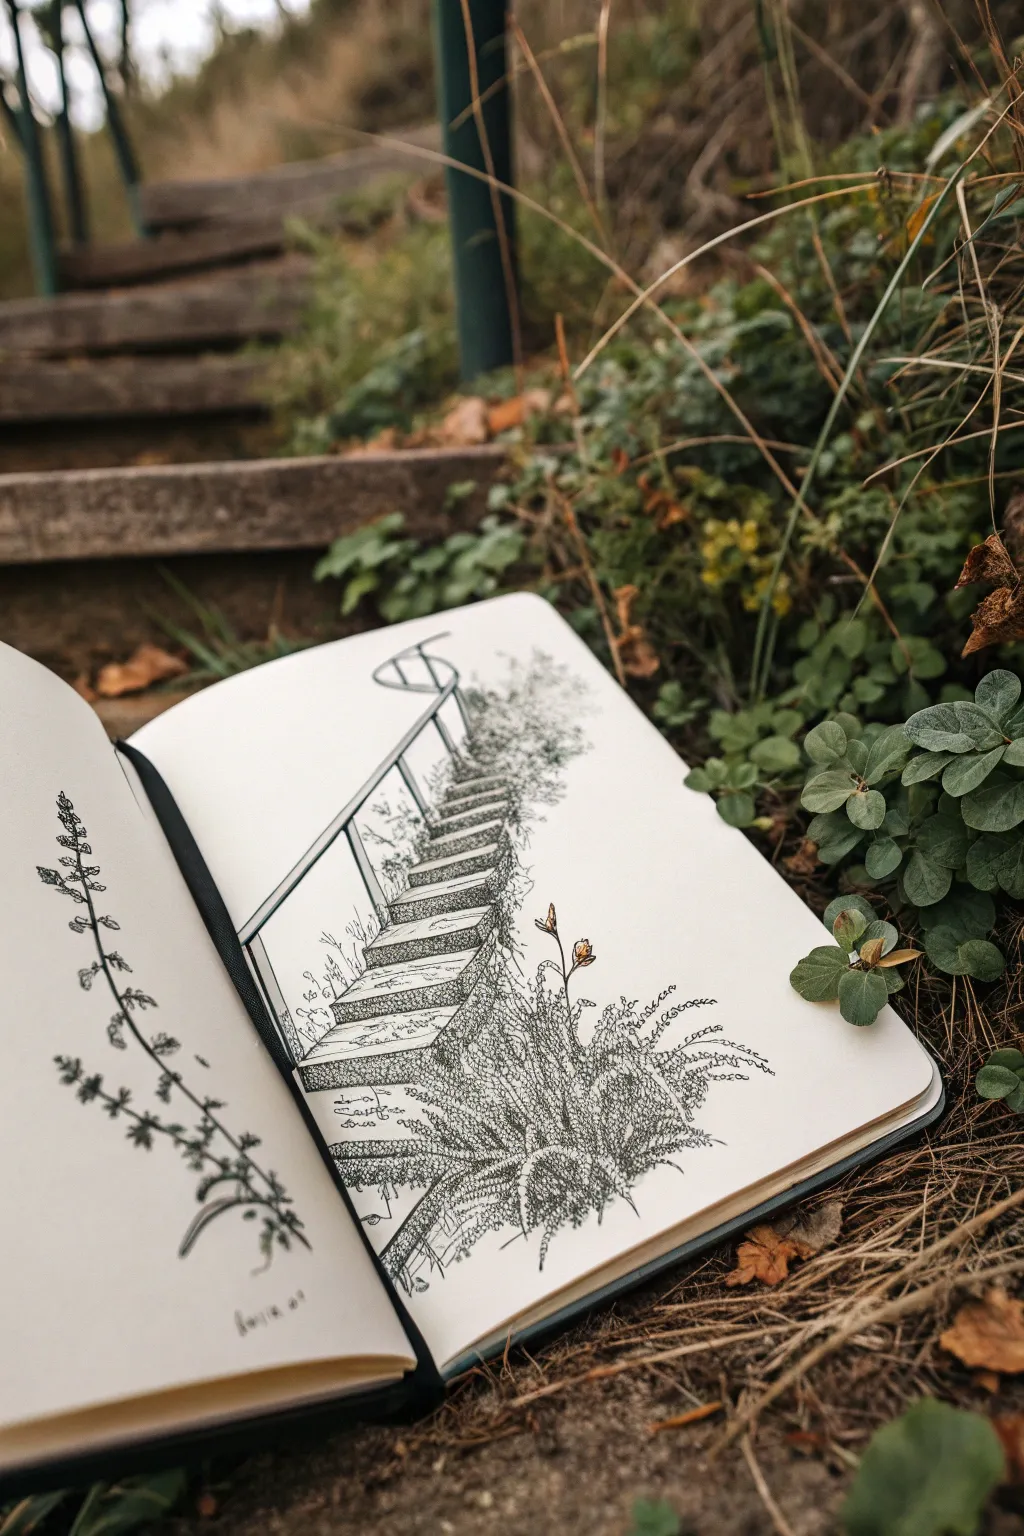
Capture the magic of an outdoor setting by blending observation with imagination in this pen-and-ink sketchbook study. You will create a whimsical staircase that ascends into a tangle of foliage, distorting perspective for a dreamlike effect.
How-To Guide
Materials
- Hardbound sketchbook (A5 or similar size, smooth cartridge paper)
- Fine liner pens (sizes 0.05, 0.1, 0.3, and 0.5)
- Graphite pencil (HB or 2B)
- Kneadable eraser
- Ruler (optional, for the railing)
- Outdoor setting with steps/railing for reference
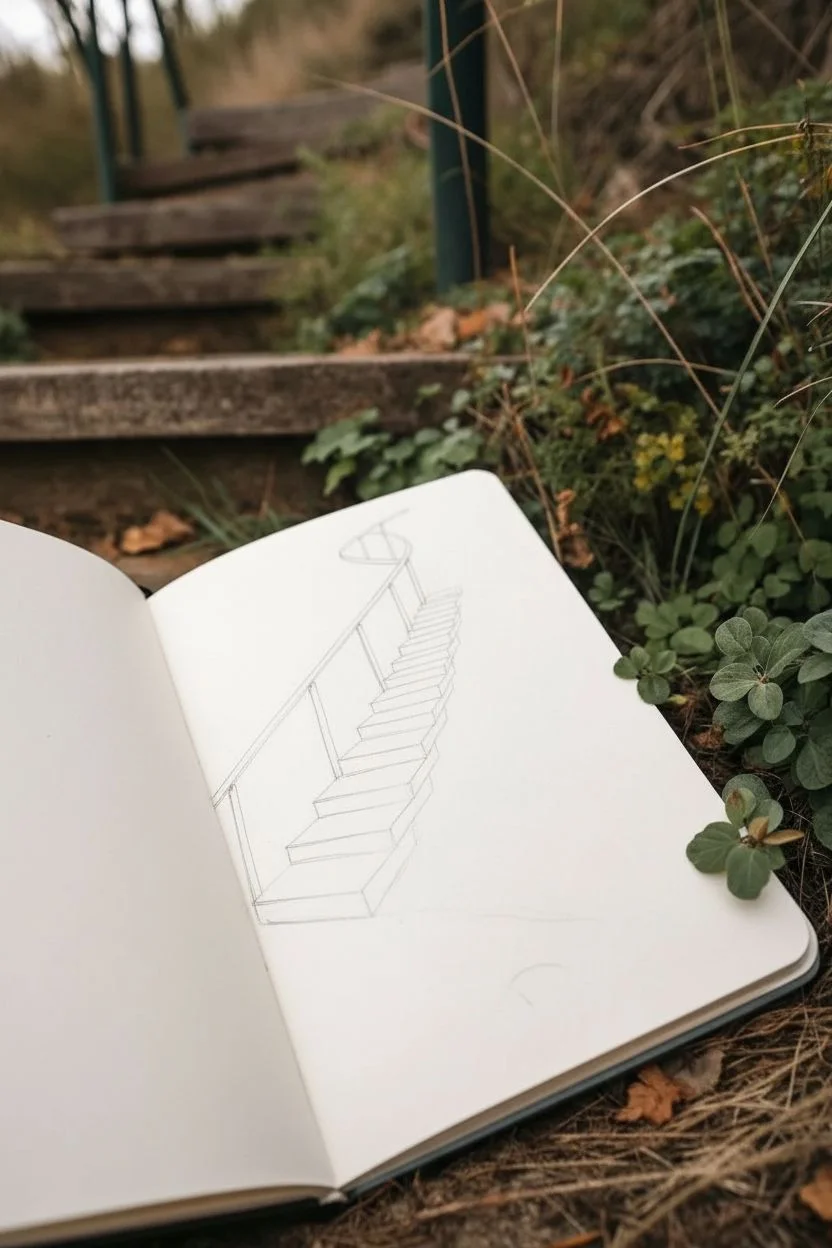
Step 1: Pencil Structure
-
Establish the curve:
Begin by sketching a gentle ‘S’ curve lightly in pencil, starting from the bottom right of the right-hand page and curving upward toward the top center. This will be the spine of your staircase. -
Draft the railing:
On the left side of your curve, lightly draw the vertical posts of the railing first. Space them increasingly closer together as they move upward to create a sense of recession and distance. -
Connect the handrail:
Sketch a continuous double line connecting the tops of your posts. Let the railing loop or twist slightly at the very top, abandoning realism to hint at an ‘impossible’ structure. -
Block in the steps:
Draw the horizontal treads of the stairs. Keep the lines parallel to the bottom of the page for the lower steps, but angle them slightly as the stairs curve away. Don’t worry about perfect perspective; a little wonkiness adds character.
Step 2: Inking the Structure
-
Outline the railing:
Switch to a 0.3 pen to ink the handrail and posts. Use confident, single strokes rather than feathery lines to make the metalwork look solid. -
Define the treads:
Ink the visible tops of the stair treads using the 0.1 pen. For the vertical ‘risers’ of the stairs, use broken or stippled lines to suggest worn concrete or wood texture rather than solid edges. -
Add structural shadows:
Use your 0.05 pen to add very light hatching on the side of the stairs facing away from the light source. This grounds the floating structure.
Wobbly Lines?
If your railing lines aren’t straight, embrace it. Turn accidental wobbles into vines wrapping around the metal or cracks in the wood. Organic imperfections fit this style perfectly.
Step 3: Botanical Details
-
Start the foreground foliage:
At the base of the stairs on the right page, use the 0.3 pen to draw spiky, grass-like clumps. Start your strokes at the base and flick upward for a natural taper. -
Plant the left page:
On the facing left page, draw a tall, slender plant specimen. I like to focus on a single stalk with spaced-out leaves, drawing the stem with a 0.3 and the delicate leaf veins with a 0.05 pen. -
Integrate the stairs:
Return to the right page and draw vines or small leafy clusters wrapping around the railing posts and spilling over the stair treads. This makes the structure feel overgrown and ancient. -
Create depth with texture:
Behind the main staircase, use a stippling technique (lots of small dots) or tiny scribbles with the 0.05 pen to suggest distant bushes. Keep this area lighter and less defined than the foreground. -
Highlight floral elements:
If you have colored pens or pencils, add a tiny touch of muted orange or yellow to just one or two flower heads in the foreground to draw the eye.
Reference Hack
Take a photo of the real stairs from a low angle on your phone. Zoom in on specific textures like rust or moss and copy those micro-details to add realism to your surreal shape.
Step 4: Finishing Touches
-
Erase guidelines:
Once the ink is completely dry—give it a few minutes to be safe—gently erase all underlying pencil sketches with your kneadable eraser. -
Refine the shadows:
Go back in with your 0.1 pen and darken the areas where the plants meet the ground and underneath the stair overhangs. High contrast here will make the drawing pop. -
Add script notes:
scribble a few illegible notes or ‘asemtic writing’ (fake abstract text) near the base of the plant on the left page or under the stairs to mimic the look of a field researcher’s journal. -
Final assessment:
Check the balance of the composition. If the top of the stairs looks too empty, add a few drifting leaves or floating seeds to guide the eye upward.
Close your book knowing you’ve captured a mundane object and turned it into a mysterious pathway


Have a question or want to share your own experience? I'd love to hear from you in the comments below!