I love how a painted pumpkin can feel less like a holiday craft and more like a little piece of aesthetic home decor. Here are my go-to designs when you want pumpkins that look modern, artsy, and totally display-worthy.
Matte Neutral Pumpkin Set
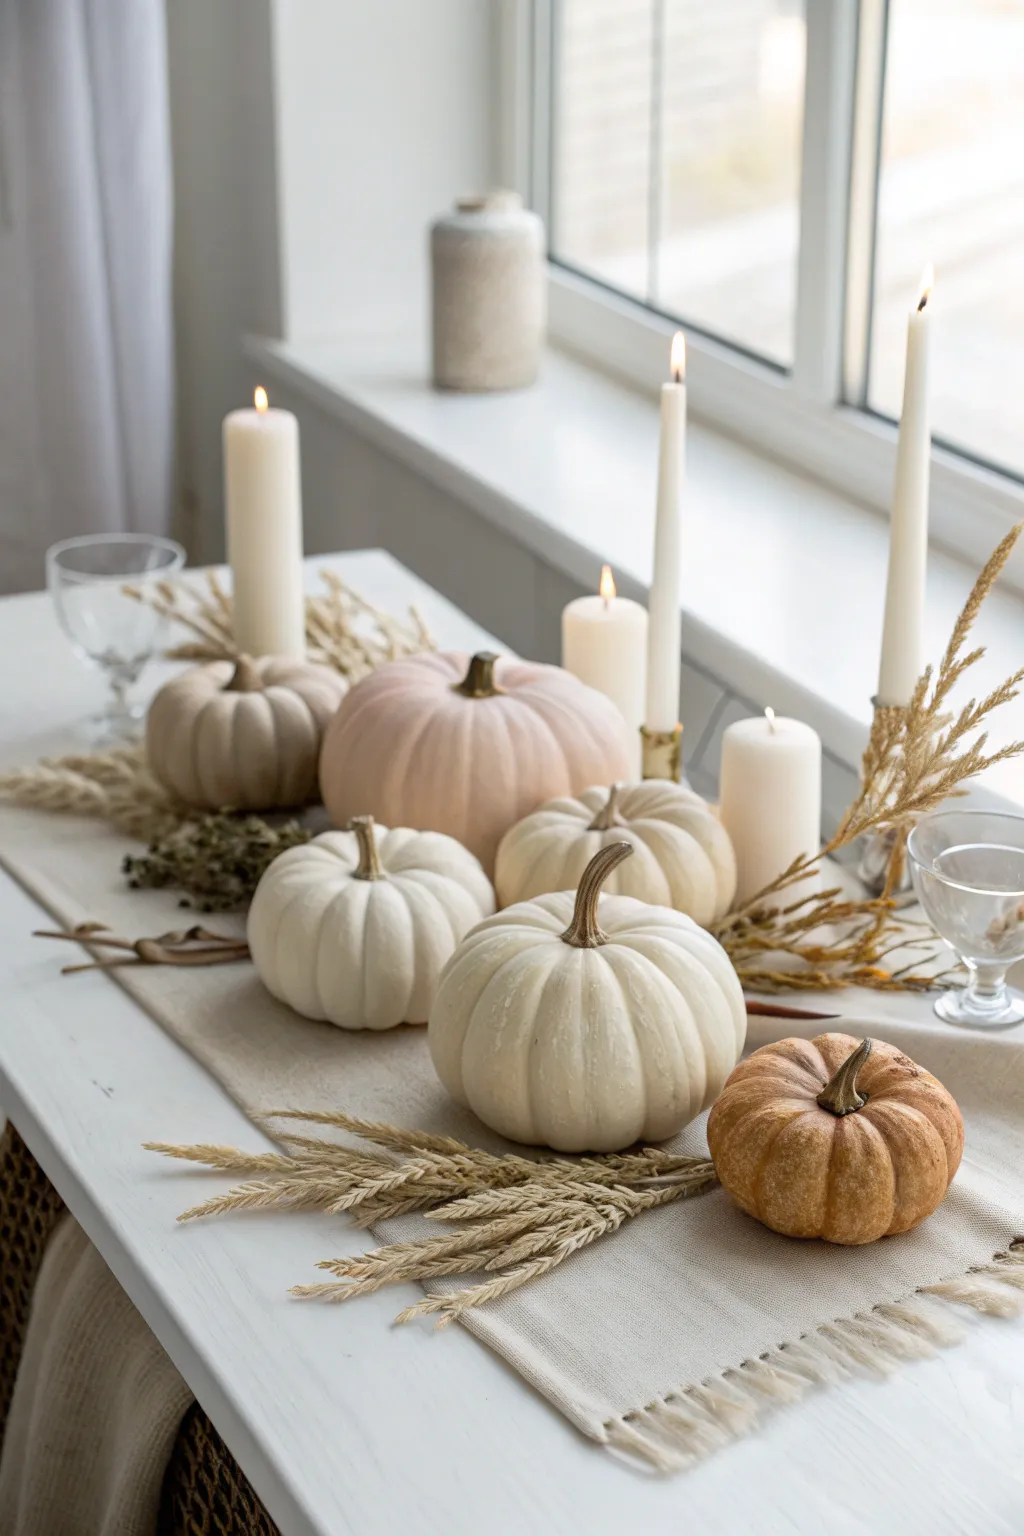
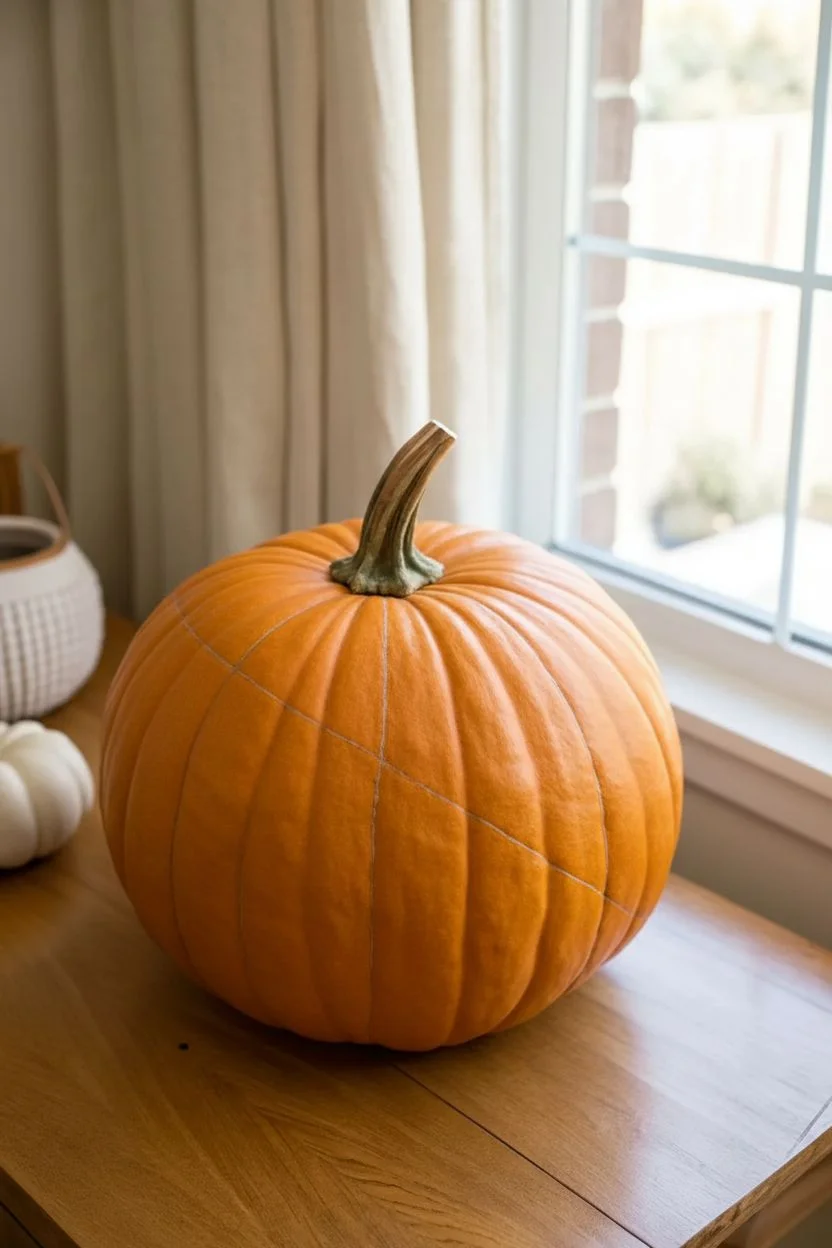
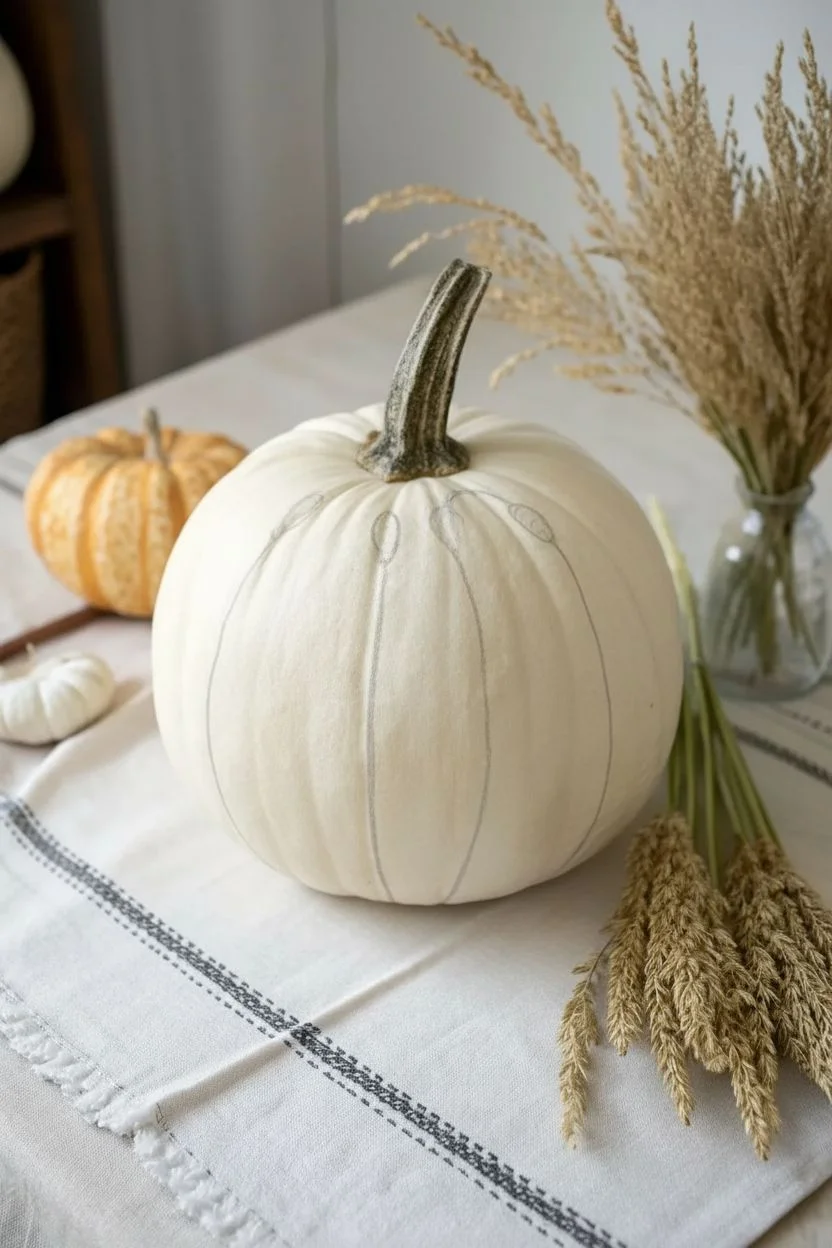
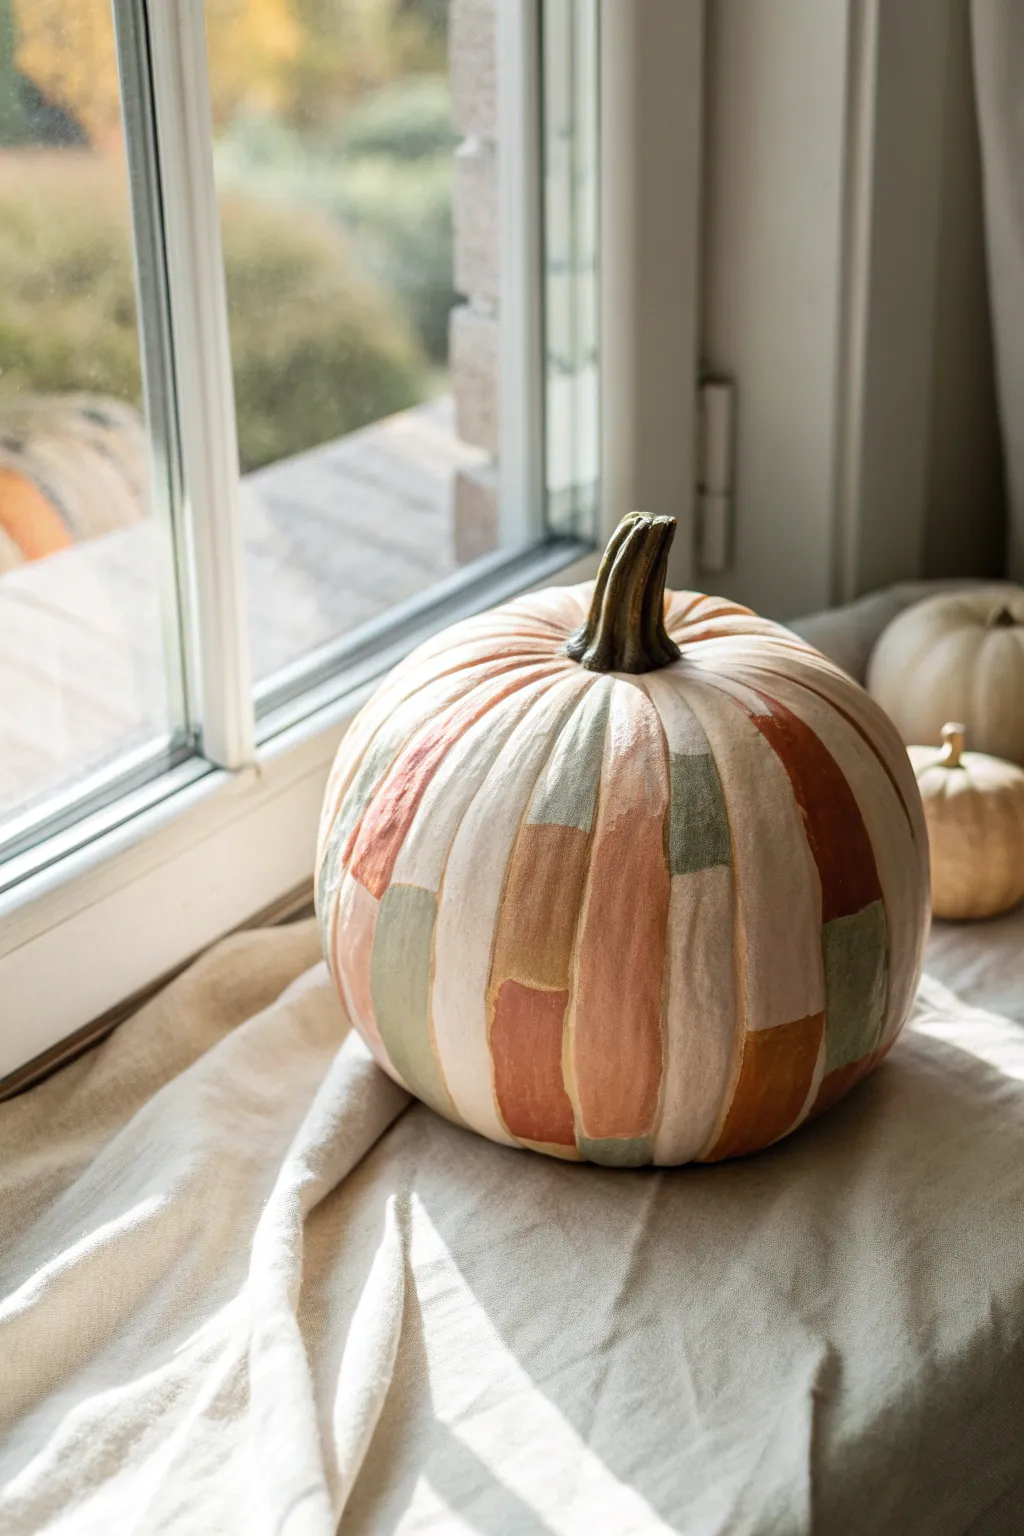
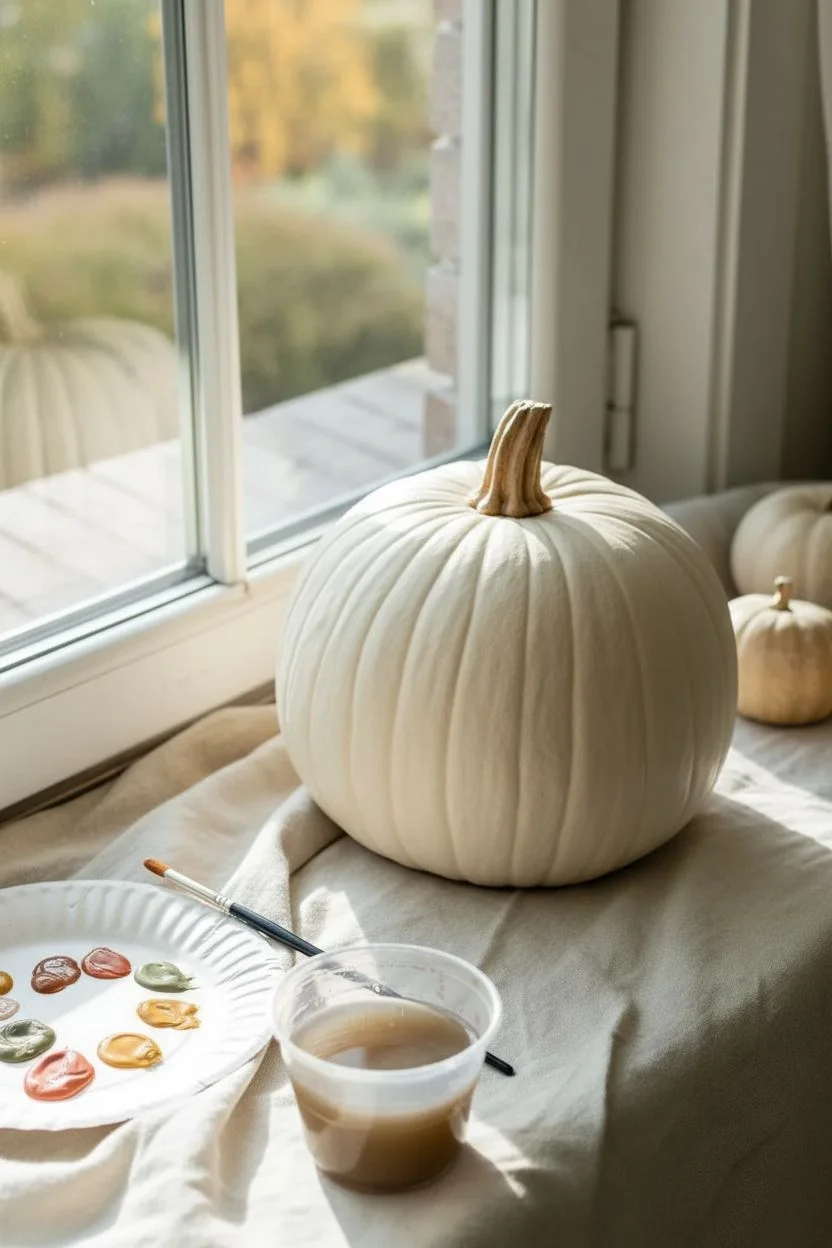
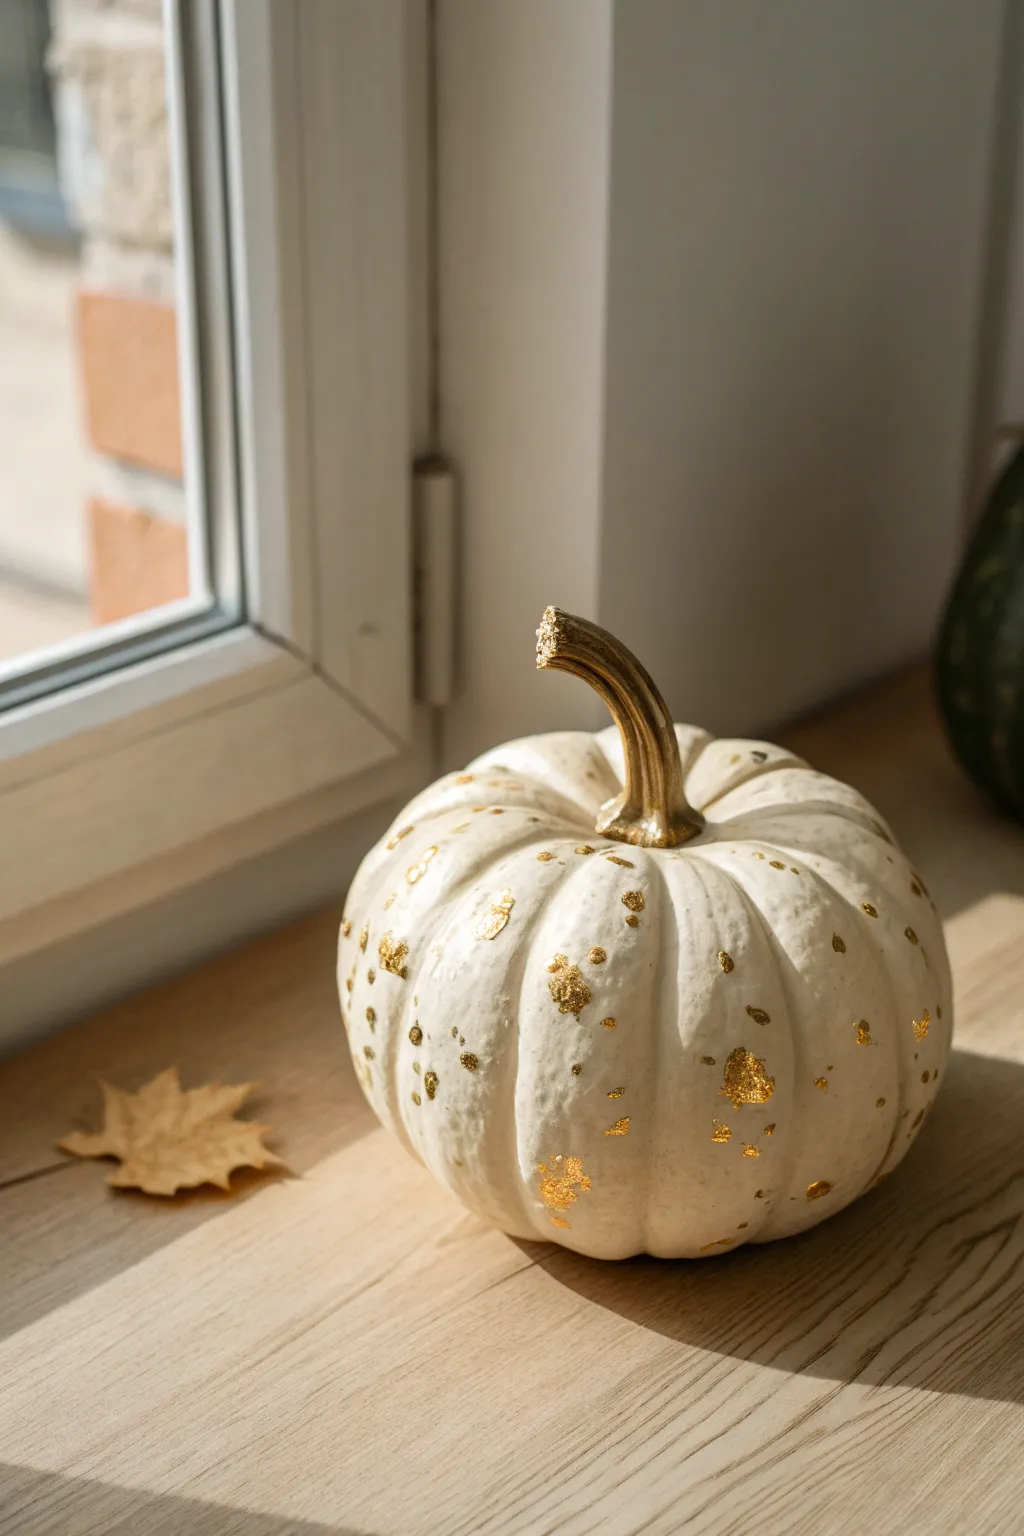
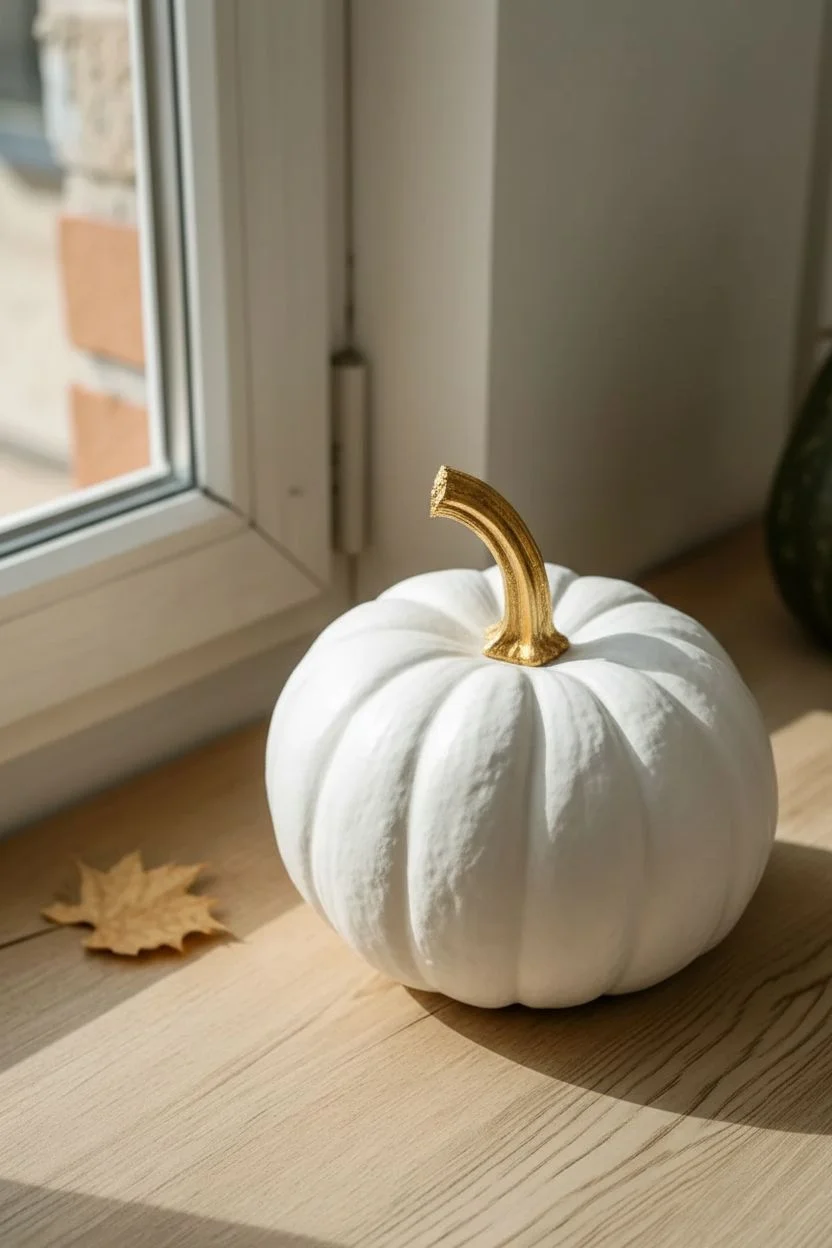
Transform ordinary craft store pumpkins into a sophisticated autumn centerpiece with this matte neutral painting project. By layering soft creams, beiges, and muted earthy tones with a chalky finish, you can achieve a high-end designer look that feels cozy and modern.
Step-by-Step Guide
Materials
- Assorted faux pumpkins (various sizes and shapes)
- Chalk paint or matte acrylic paint (White, Cream, Beige, Taupe, Muted Terracotta)
- Baking soda (if using acrylic paint)
- Foam brushes
- Medium soft-bristle paintbrushes
- Small detail brush
- Dark brown or metallic antique gold acrylic paint (for stems)
- Matte clear sealant spray
- Painter’s tape (optional)
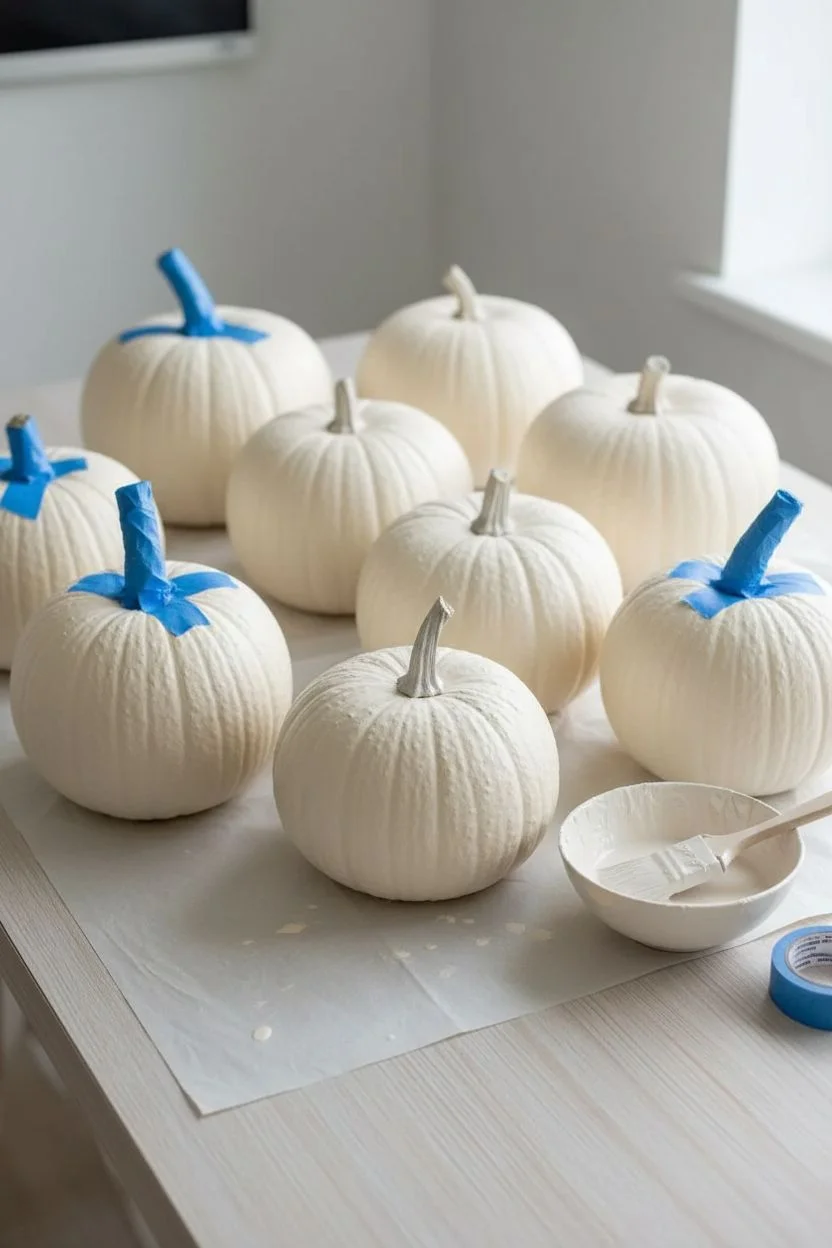
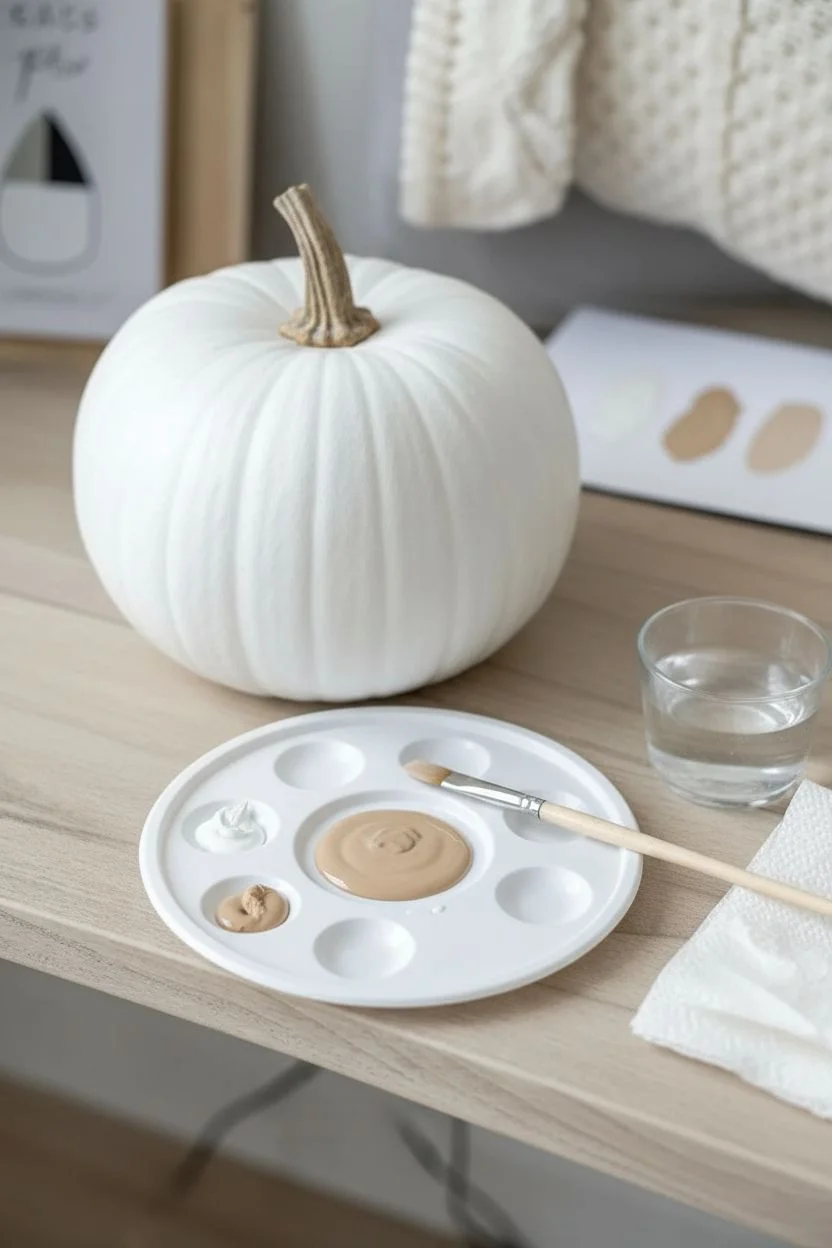
Step 1: Preparation & Base Coat
-
Clean the Pumpkins:
Wipe down all your faux pumpkins with a damp cloth to remove any dust or manufacturing residue. If they are glossy plastic, give them a light scuffing with fine-grit sandpaper to help the paint adhere better. -
Remove or Tape Stems:
If the stems are removable, pop them out to make painting easier. If they are fixed, carefully wrap them with painter’s tape to keep them clean while you work on the body of the pumpkin. -
Mix the Texture:
To get that ultra-matte, ceramic-like finish seen in the photo, mix your acrylic paints with baking soda. I usually aim for a 1:1 ratio of paint to baking soda for a thick, textured look, or less baking soda for a smoother but still matte finish. If you are using chalk paint, you can skip this step as it is naturally matte. -
Apply the First Layer:
Using a foam brush, apply a base coat of your lightest color (clean white or cream) to all pumpkins. This acts as a primer, especially if your original pumpkins were bright orange. -
Dry Completely:
Let this base layer dry fully. The baking soda mixture can be thicker than normal paint, so give it at least an hour or use a hair dryer on a cool setting to speed things up.
Step 2: Creating the Color Palette
-
Select Your Shades:
Decide which pumpkin gets which shade. In the reference, there is a mix of bright white, creamy off-white, soft taupe, beige, and a muted, dusty pink/terracotta. -
Paint the White Pumpkins:
Paint your designated white pumpkins with a fresh coat of matte white paint. Use vertical brush strokes that follow the natural curve of the pumpkin ribs to enhance their shape. -
Paint the Cream Pumpkins:
For the slightly warmer pumpkins, mix a tiny drop of yellow ochre or brown into your white paint. Apply this creamy shade to the medium-sized pumpkins, ensuring full coverage. -
Paint the Beige & Taupe Pumpkins:
For the darker neutral pumpkins, use a beige or ‘greige’ paint. If the color looks too flat, stipple the paint slightly with your brush to add organic texture rather than smooth strokes. -
Create the Dusty Terracotta:
For the standout colored pumpkin, mix a dusty pink or muted terracotta shade. You want it to be subtle, not vibrant. Paint this onto one of the larger, flatter pumpkins to serve as an anchor for your arrangement.
Natural Stem Hack
Swap out plastic stems for real preserved pumpkin stems or dried driftwood pieces. Glue them on top for an instantly more realistic and high-end organic look.
Step 3: Detailing & Finishing
-
Add Dimension:
Once the main colors are dry, use a dry brush technique with a slightly lighter shade on the raised ribs of the colored pumpkins. This subtle highlighting mimics the way light catches natural textures. -
Paint the Stems:
If you didn’t remove the stems, unwrap the tape now. Paint them a realistic dark brown or a very muted antique gold. I like to dry-brush a little bit of the pumpkin’s body color onto the base of the stem to make it look like it grew there naturally. -
Create a ‘Speckled’ Look (Optional):
For the darker tan pumpkin, you can dilute some dark brown paint with water and flick it off a toothbrush onto the pumpkin for a natural, speckled gourd effect. -
Seal the Finish:
To protect your work without adding shine, spray all the pumpkins with a high-quality matte clear sealant. This prevents the baking soda paint from flaking off over time.
Paint Cracking?
If your baking soda paint cracks while drying, don’t panic. It actually adds to the rustic ceramic look. Just apply a thin layer of regular paint over the cracks to seal them.
Arrange your beautiful new collection on a runner with candles to complete the serene autumn display


Soft Pastel Color-Block Pumpkins
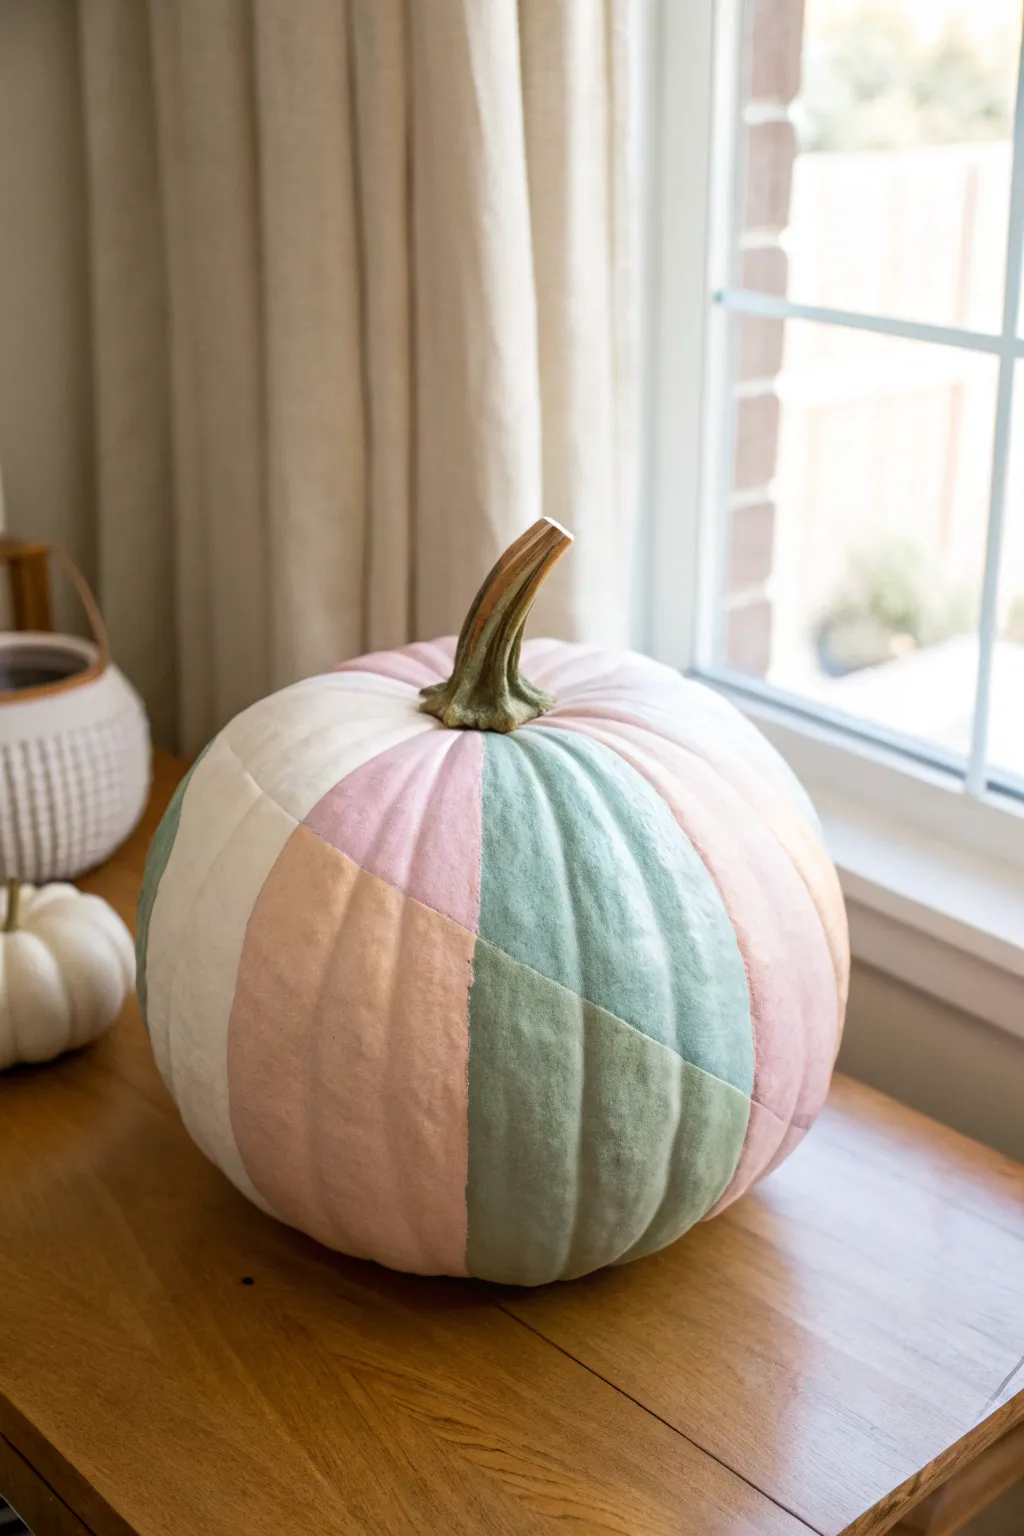
Transform a classic autumn gourd into a piece of modern art with this gentle, color-blocked design. Using a palette of muted sage, millennial pink, apricot, and cream, you’ll create a sophisticated decoration that feels fresh and airy.
How-To Guide
Materials
- Large pumpkin (real or faux)
- Acrylic craft paints (sage green, pale pink, peach/apricot, cream/white)
- Painters tape (delicate surface variety)
- Medium flat synthetic brush
- Small angled brush (for edges)
- Pencil
- Palette or paper plate
- Damp cloth or paper towel
Step 1: Preparation & Planning
-
Clean surface:
Begin by wiping down your pumpkin with a damp cloth to remove any dirt or oils. If using a real pumpkin, ensure it is completely dry before starting; if it’s faux, just a quick dust-off will do. -
Visualize the blocks:
Study the natural ribs of your pumpkin. This design works best by playing with those vertical lines while disrupting them with horizontal or diagonal cuts. -
Sketch the zones:
Using a pencil very lightly, sketch out your color block zones directly onto the pumpkin skin. Aim for large, sweeping sections rather than tiny squares. -
Map the diagonals:
Draw diagonal lines that cut across two or three ribs to create dynamic movement, exactly like the triangles seen in the reference image.
Chalky Finish Trick
Mix a teaspoon of baking soda into your acrylic paint. This creates a gorgeous, velvety matte texture that mimics expensive chalk paint perfectly.
Step 2: Creating the Base Layer
-
Mix the cream:
Squeeze out your white paint and add a tiny drop of yellow or brown to warm it up into a creamy off-white. This prevents the white sections from looking too stark against the pastels. -
Paint the lightest sections:
Use your flat brush to fill in the sections you’ve designated for the cream color. Painting the lightest color first helps if you accidentally overlap into a dark zone, as darker colors cover easily. -
Feather the edges:
When painting up to your pencil lines, use the edge of the brush carefully. Don’t worry about perfection yet, as adjacent colors will sharpen these lines later. -
Allow to dry:
Let the white sections dry completely. Acrylics dry fast, but thick layers might take 15-20 minutes.
Gold Leaf Accents
For a glam twist, paint thin lines of gold liquid gilding over the seams where your color blocks meet. It adds a subtle, elegant shimmer.
Step 3: Adding Pastel Blocks
-
Mix the pinks:
Prepare your pale pink and peach tones. If they look too neon, I like to mix in a tiny bit of the sage green or grey to desaturate them for that dusty, matte look. -
Apply the peach tone:
Select a few large, vertical rib sections for the peach/apricot color. Apply the paint in long vertical strokes from top to bottom to minimize brush marks. -
Add sage green:
Load a clean brush with the sage green paint. Fill in the diagonal block sections creating sharp angles against the peach and pink zones. -
Refine the lines:
Use your small angled brush to clean up the meeting points between colors. This ‘cutting in’ technique is crucial for that crisp, geometric look without using tape for every single line. -
Second coat:
Pastel colors often have less coverage. Apply a second coat to the colored sections once the first is dry to ensure the orange pumpkin skin doesn’t show through.
Step 4: Finishing Touches
-
Check the crevices:
Inspect the deep grooves between the ribs. Use the small brush to ensure paint gets all the way into these crevices so there are no gaps in the design. -
Clean the stem:
If you got any paint on the stem, wipe it off with a damp cloth immediately, or paint the stem a solid dark green or metallic gold for a uniform finish. -
Final inspection:
Look over the pumpkin from a few feet away. If any lines look wobbly, use the adjacent color to straighten them out. -
Seal (Optional):
If this pumpkin will live on a porch, apply a clear matte spray sealer to protect your paint job from moisture.
Now you have a stunning, geometrically inspired pumpkin that perfectly bridges the gap between fall whimsy and modern decor


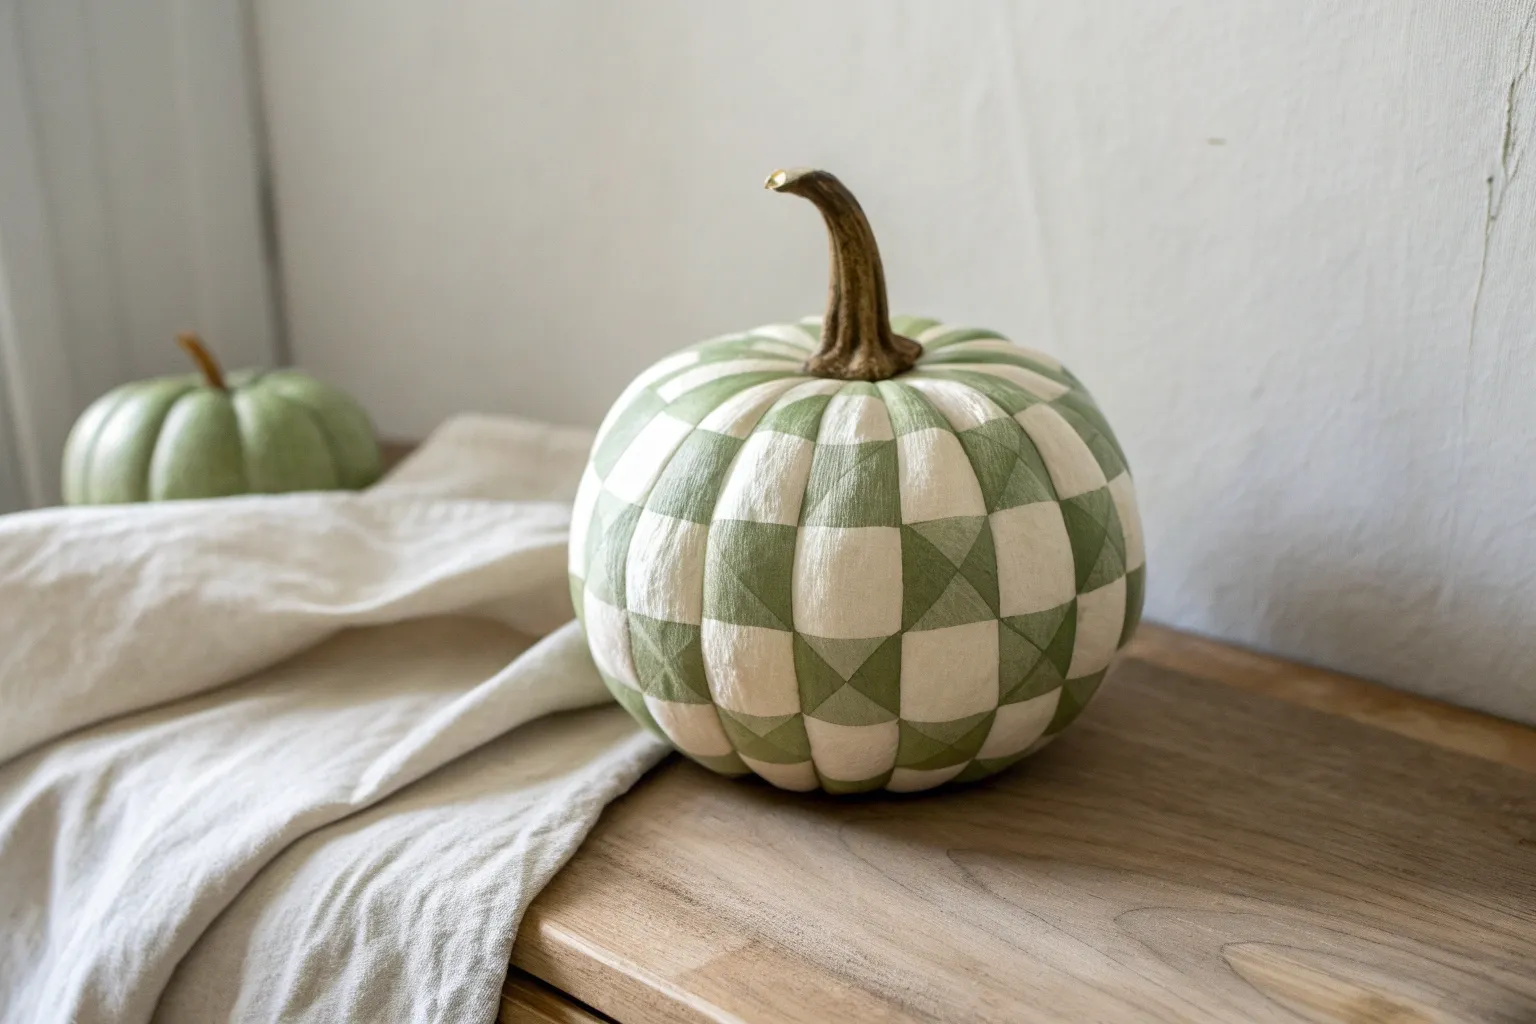
Classic Checkerboard Pumpkin
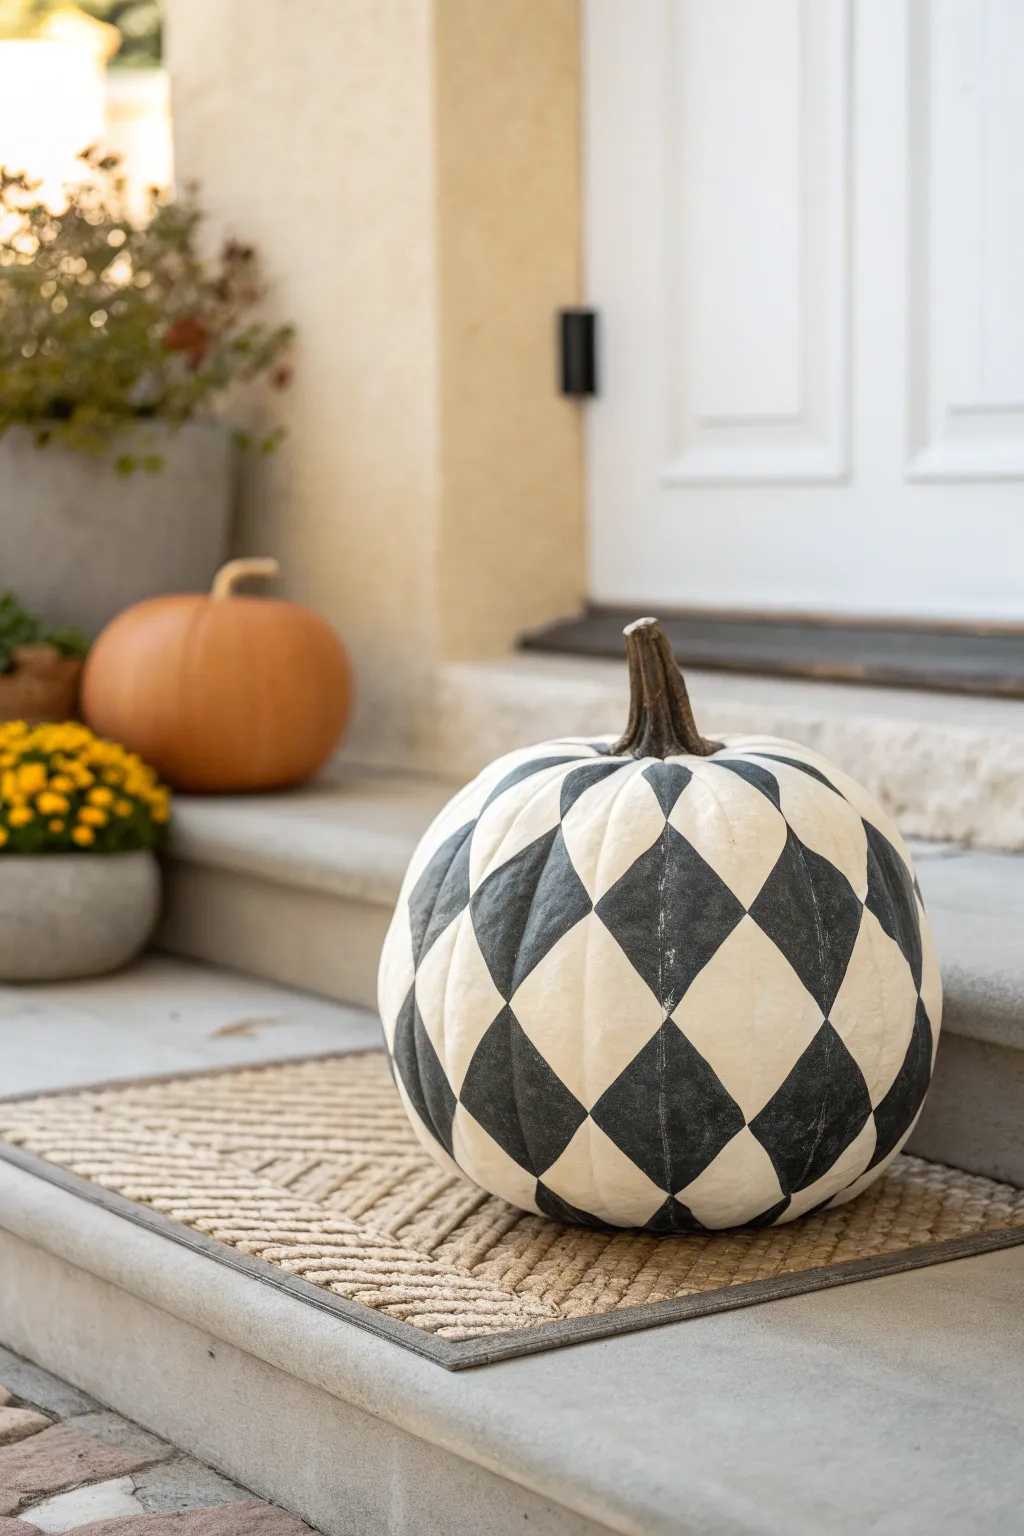
Elevate your front porch this season with this sophisticated take on classic patterns. The distinct black and cream diamond design brings a timeless, slightly whimsical Alice in Wonderland vibe to your autumn decor.
Detailed Instructions
Materials
- Large, smooth artificial or real pumpkin
- Cream or off-white chalk paint
- Black chalk paint
- Pencil
- Flexible measuring tape
- Flat shader brush (medium width)
- Small round detail brush
- Painter’s tape (optional but helpful)
- Damp cloth or eraser
- Matte clear sealant spray
Step 1: Base Prep & Planning
-
Clean the Surface:
Begin by thoroughly wiping down your pumpkin with a damp cloth to remove any dirt or oils. If using a real pumpkin, ensure it is completely dry before proceeding. -
Apply the Base Coat:
Paint the entire pumpkin with your cream or off-white chalk paint. I prefer chalk paint here because it offers that lovely matte, velvety texture seen in the photo. -
Add a Second Layer:
Allow the first coat to dry completely, usually about 30 minutes. Apply a second coat to ensure full, opaque coverage where no orange shows through. -
Mark Vertical Ribs:
Identify the natural ribs of the pumpkin. If your pumpkin is smooth, use a flexible measuring tape to lightly mark vertical lines from stem to base, spacing them evenly around the circumference. -
Mark Horizontal Bands:
Measure the height of your pumpkin. Lightly mark horizontal rings around the pumpkin at even intervals (about 3-4 inches apart), creating a grid system over the cream base.
Pro Tip: Grid Logic
Make your diamonds elongate slightly near the stem and base. This tricks the eye and accommodates the pumpkin’s curve better than perfect squares.
Step 2: Sketching the Pattern
-
Connect the Diagonals:
To create the diamonds, use your pencil to connect the grid intersections diagonally. Draw a line from one vertical/horizontal intersection to the next intersection on the row above and over one vertical line. -
Complete the Diamond Shape:
Mirror that diagonal line downward to form the top half of the diamond, then repeat the process for the bottom half. It helps to ‘x’ out the diamonds that will remain cream so you don’t accidentally paint them. -
Refine Lines:
Step back and look at your sketched pattern. Adjust any wonky lines now while they are just pencil marks; the diamonds should taper naturally toward the top and bottom of the pumpkin.
Step 3: Painting the Diamonds
-
Outline the Black Zones:
Using your small round detail brush and black chalk paint, carefully trace the outline of the diamonds you intend to fill. A steady hand is key here. -
Fill the Centers:
Switch to your flat shader brush. Dip it in black paint and fill in the center of the outlined diamonds. -
Smooth the Edges:
While filling, gently push the paint toward your outlined edges to create sharp, crisp points on the diamonds without going over the line. -
Let it Dry:
Allow the black paint to dry responsibly. Be careful not to smudge wet diamonds while rotating the pumpkin to reach new sections. -
Second Black Coat:
If the black looks streaky or translucent, apply a second coat to the diamonds. Deep, rich black coverage contrasts best against the cream. -
Touchups:
Once fully dry, inspect it for mistakes. Use a tiny bit of cream paint to clean up any black smudges that strayed outside the lines.
Level Up: Distress It
Once dry, lightly sand the painted surface with high-grit sandpaper to scuff the diamonds. This creates a vintage, aged farmhouse look.
Step 4: Finishing Touches
-
Erase Guide Lines:
Gently use a clean eraser or a very slightly damp cloth to dab away any visible pencil marks remaining in the cream sections. -
Paint the Stem:
Give the stem a realistic look by dry-brushing it with a mix of brown or dark green paint, or keep it natural if it’s in good condition. -
Seal the Work:
Take the pumpkin to a well-ventilated area and apply a light coat of matte clear sealant spray. This protects the paint from chipping and moisture.
Place your striking harlequin pumpkin by the door to welcome guests with high-contrast style


Cozy Gingham Pumpkin
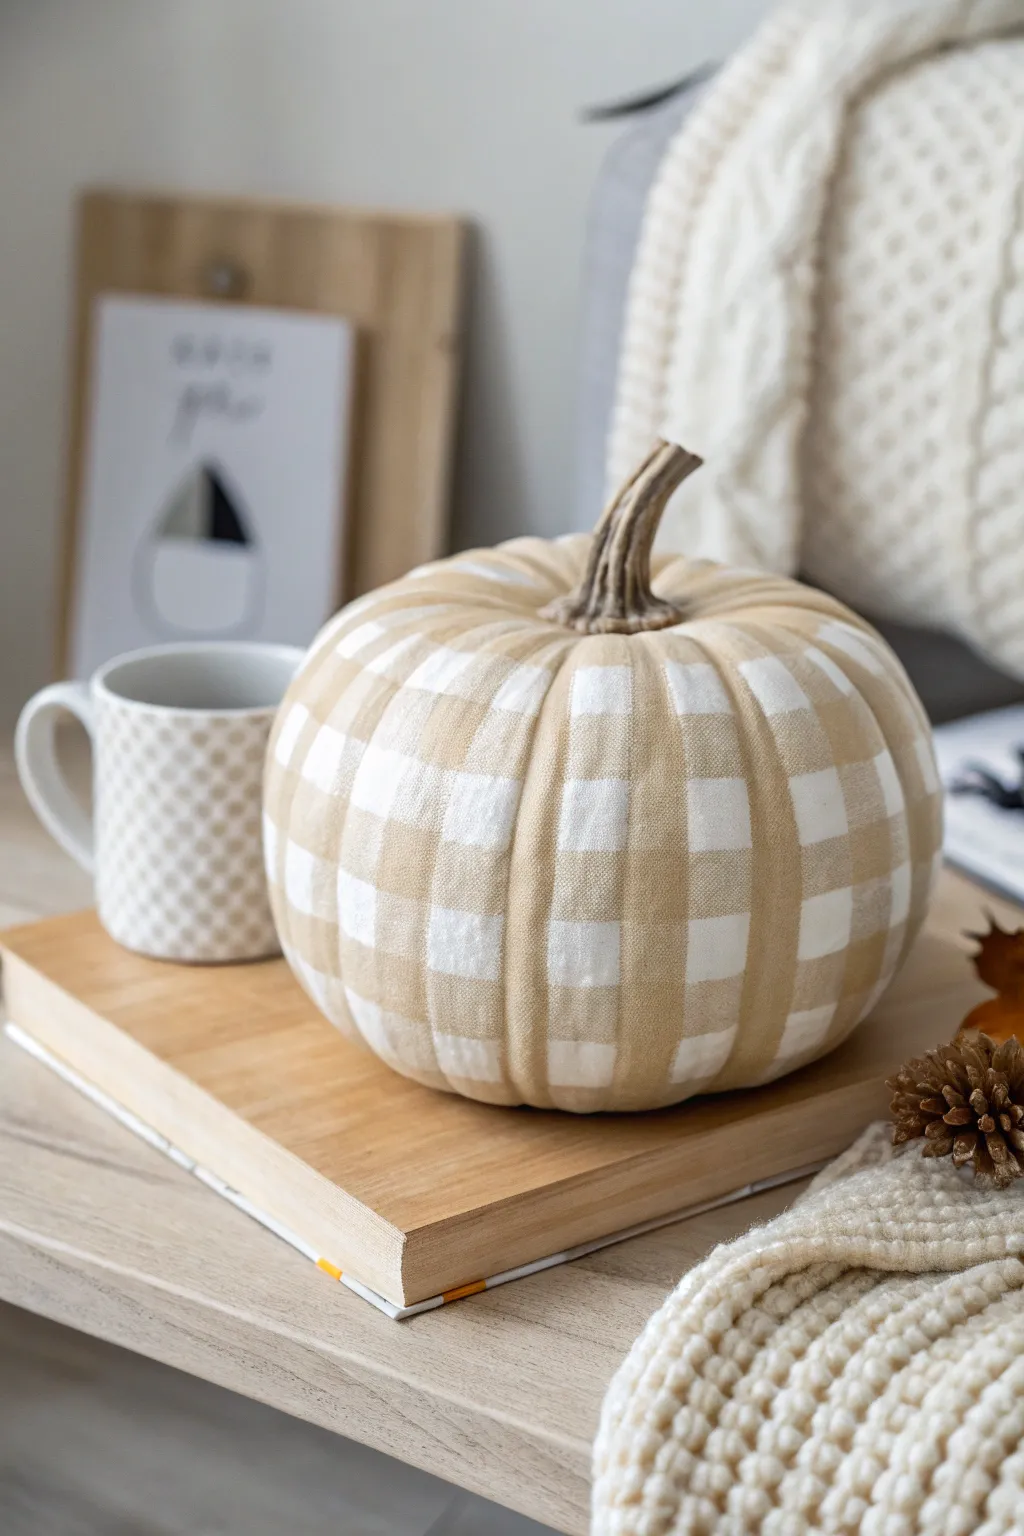
Bring warmth to your autumn decor with this sophisticated take on a classic pattern. This project transforms a simple white pumpkin into a cozy masterpiece using layers of beige and white to mimic the woven texture of gingham fabric.
Step-by-Step
Materials
- Medium-sized faux white pumpkin
- Beige acrylic paint (matte finish)
- White acrylic paint (matte finish)
- Flat shader brush (1-inch width)
- Small flat brush (for touch-ups)
- Measuring tape (flexible sewing tape)
- Pencil
- Mixing palette
- Water cup
- Paper towels
Step 1: Color Mixing and Prep
-
Clean surface:
Begin by wiping down your faux pumpkin with a slightly damp cloth to remove any dust or manufacturing residue. Ensure it is completely dry before painting. -
Create your shades:
You will need three distinct colors: pure white (or the pumpkin’s base color), pure beige, and a mid-tone mix. On your palette, squeeze out a generous amount of beige and white. -
Mix the mid-tone:
Combine equal parts beige and white in the center of your palette to create a ‘50% opacity’ look. This lighter tan shade is crucial for the overlapping areas of the gingham pattern. -
Test the swatch:
Paint a small swatch of each color (white, mid-tone, pure beige) on a piece of scrap paper. Let them dry to ensure the mid-tone looks exactly halfway between the other two.
Wobbly Lines?
Don’t stress about perfect geometry. Pumpkin surfaces are bumpy. If a line is too messy, let it dry, paint over it with the base white, and try again. The texture hides many sins.
Step 2: Drafting the Grid
-
Vertical guidelines:
Using a flexible measuring tape, lightly mark vertical lines along the pumpkin’s ridges. Since pumpkins are naturally segmented, follow the natural grooves as your primary guides. -
Mark horizontal rings:
Starting from the stem and working down, measure even intervals (about 1 to 1.5 inches depending on pumpkin size) for your horizontal stripes. Mark these with tiny pencil dots around the circumference. -
Connect horizontal marks:
Lightly sketch the horizontal rings connecting your dots. Don’t worry if the lines aren’t perfectly straight; the curvature of the pumpkin makes straight lines impossible, so aim for level rings.
Level Up: Texture
Mix a small amount of baking soda into your acrylic paint before applying. This creates a gritty, chalky texture that makes the pattern look more like heavy linen or wool fabric.
Step 3: Painting the Vertical Stripes
-
Paint the verticals:
Dip your 1-inch flat brush into the mid-tone (light tan) mixture. Paint vertical stripes down the pumpkin, skipping every other section. Follow the natural ribs of the pumpkin for the most organic look. -
Clean edges:
Use the edge of your brush to keep the stripe borders relatively crisp, but don’t stress over perfection as the next layers will hide minor wobbles. -
Dry time:
Allow these vertical stripes to dry completely to the touch before proceeding. If the paint is tacky, the next step will smear it.
Step 4: Painting the Horizontal Stripes
-
Paint horizontal rings:
Reload your brush with the same mid-tone mix. Paint horizontal bands around the pumpkin, tracing the grid you drew earlier. Skip every other band just like you did with the verticals. -
Check opacity:
Apply the paint thinly enough that it feels like a transparent wash, or stick to solid color if you prefer a sharper graphic look. The image uses a solid, matte application. -
Let dry again:
This is the most important drying phase. Step away for at least 20 minutes to ensure the grid is set.
Step 5: Adding the Darkest Tone
-
Identify intersections:
Look at where your vertical mid-tone stripes cross over your horizontal mid-tone stripes. These intersection squares are where the ‘fabric’ would be doubly thick. -
Paint the squares:
Using the pure, unmixed beige paint, carefully fill in just those intersection squares. This creates the optical illusion of transparent fabric weaving together. -
Refine the shape:
Use the smaller flat brush for these squares to keep the corners neat and square, which helps sell the gingham effect.
Step 6: Finishing Touches
-
Clean up the white:
Finally, inspect the ‘white’ squares (the empty spaces). If you got any beige smudges where it should be white, use your pure white paint and a small brush to touch up those areas. -
Detail the ribs:
To enhance realism, I sometimes take a very dry brush with a tiny bit of white paint and lightly dry-brush the raised ribs of the pumpkin to simulate fabric texture. -
Stem maintenance:
If you accidentally got paint on the stem, wipe it off with a damp Q-tip or paint over it with a dark brown to restore a natural look.
Place your finished pumpkin on a stack of books or a wooden tray to instantly warm up your room for the season
BRUSH GUIDE
The Right Brush for Every Stroke
From clean lines to bold texture — master brush choice, stroke control, and essential techniques.
Explore the Full Guide
Tone-on-Tone Spiderweb Lines
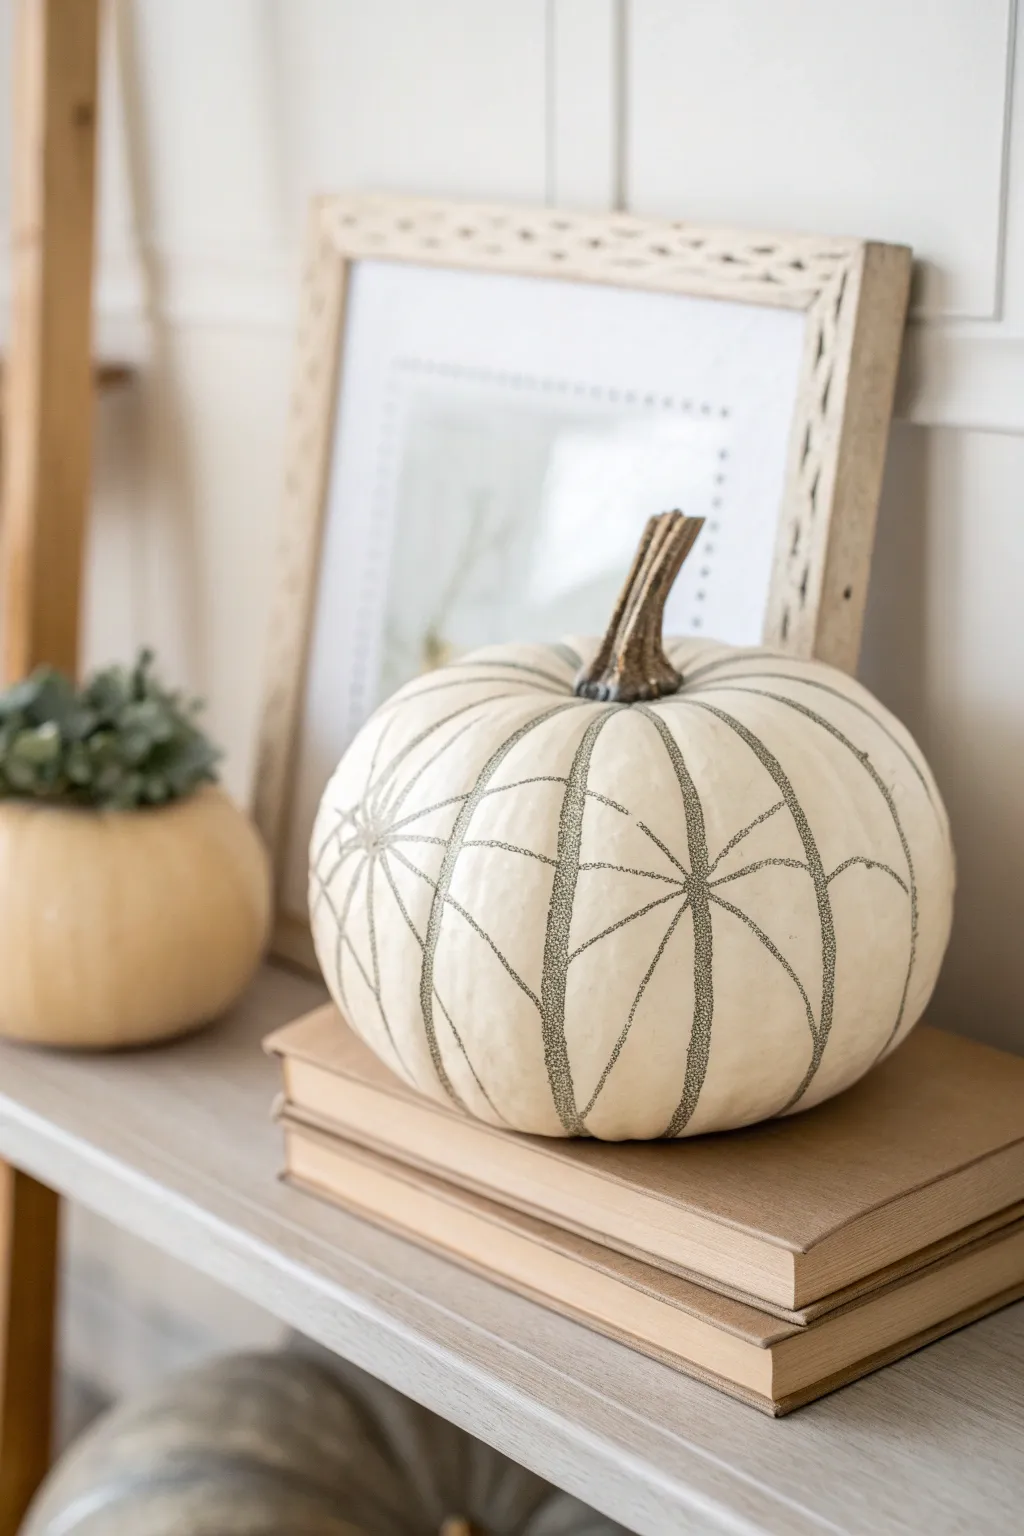
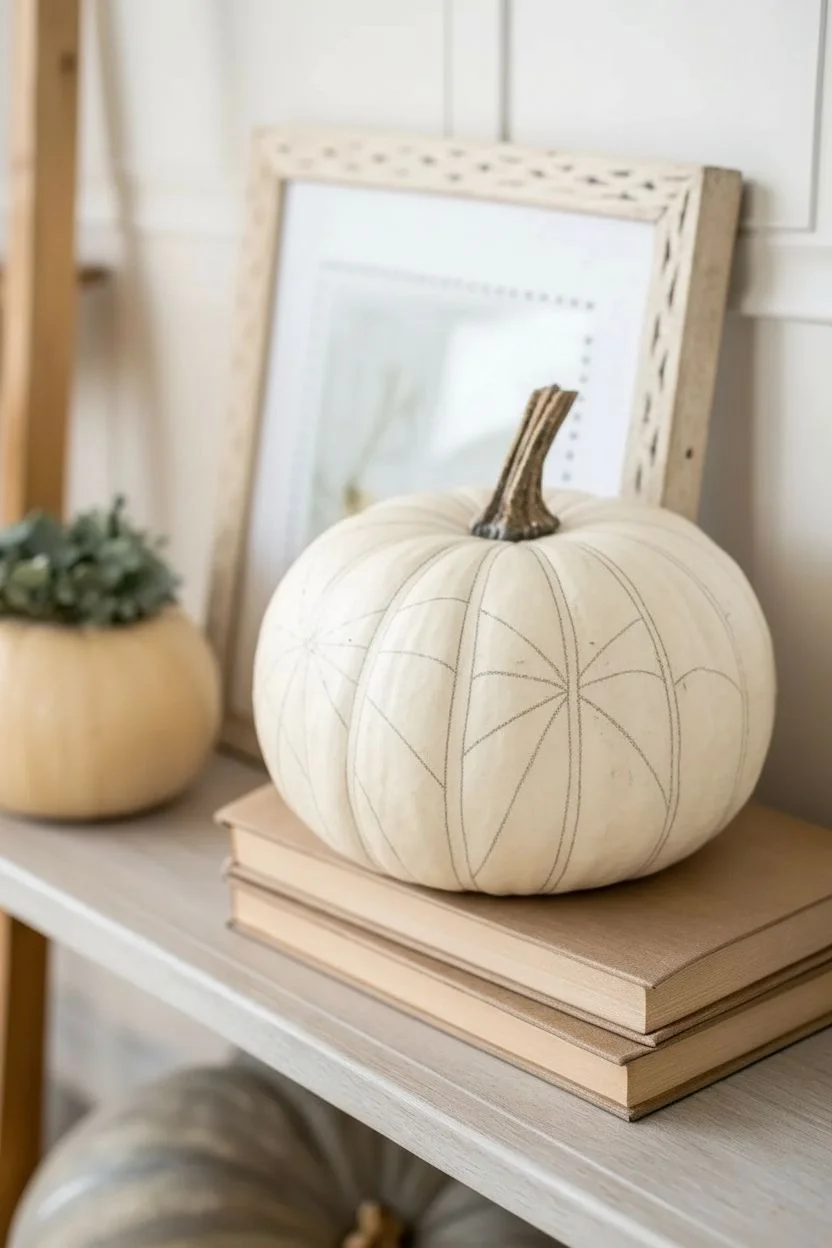
For a subtle yet spooky touch, this design trades bold black paint for delicate stippling to create a gossamer spiderweb effect. The tone-on-tone approach keeps the look sophisticated enough for a mantle or centerpiece while celebrating the season.
How-To Guide
Materials
- Medium-sized white faux pumpkin (or a real white pumpkin)
- Fine-point permanent marker or paint pen (sage green or charcoal gray)
- Pencil
- Eraser
- Paper towel or soft cloth
Step 1: Planning the Web
-
Clean the surface:
Before beginning, wipe down your pumpkin with a slightly damp cloth to remove any dust or oils. If using a real pumpkin, ensure it is completely dry; for a faux pumpkin, a quick wipe ensures the ink adheres properly. -
Mark the center point:
Locate the stem of the pumpkin. This natural feature will act as the center anchor for your spiderweb design. -
Sketch the vertical ribs:
Using a pencil very lightly, trace the natural vertical grooves of the pumpkin from the stem down to the base. Real pumpkins aren’t perfectly symmetrical, so follow the organic shape rather than trying to force straight lines. -
Add the horizontal swoops:
Sketch the horizontal webbing lines connecting the vertical ribs. Instead of straight lines, draw concave curves (u-shapes) that dip slightly between each rib to mimic the natural drape of a spiderweb. -
Vary the spacing:
Allow the gaps between your horizontal web lines to vary slightly. I find that keeping lines closer together near the stem and wider apart near the middle creates a more realistic perspective.
Ink Smearing?
If your marker smears on the slick faux pumpkin surface, switch to an oil-based paint pen (like Sharpie Oil-Based) and let it dry longer between sections.
Step 2: Inking the Design
-
Test your marker:
On a scrap piece of paper or the bottom of the pumpkin, test your pen to ensure the ink flows smoothly. You want a color that contrasts gently with the white skin—sage green or slate gray works beautifully here. -
Start with vertical lines:
Begin tracing over your vertical pencil lines with the marker. The key to the texture shown in the image is to use a stippling motion—tapping tiny dots closely together—rather than drawing a solid, heavy line. -
Build line density:
Make the vertical lines slightly thicker than the horizontal ones you will draw later. You can achieve this by adding a second row of stippled dots right next to the first pass. -
Trace the webbing:
Move on to the horizontal swooping lines. Use a single pass of lighter stippling here. The dots can be slightly more spaced out to make these lines feel more delicate and thread-like. -
Create intersection points:
Where a horizontal line meets a vertical rib, darker the intersection slightly with a few extra dots. This emphasizes the ‘knot’ in the web. -
Extend to the bottom:
Continue the pattern all the way down the sides of the pumpkin. As the pumpkin surface curves underneath, you can let the web design fade out or widen significantly. -
Check for consistency:
Step back and look at the pumpkin from a distance. If any lines look too faint or disappear into the texture of the pumpkin skin, go back and add more stippling to strengthen them.
Step 3: Finishing Touches
-
Let the ink cure:
Allow the design to dry completely for at least 15 to 20 minutes to prevent smearing. -
Erase guidelines:
Once the ink is fully dry, gently erase any visible pencil marks. Be careful not to scrub too hard over the inked areas, especially if using a paint pen. -
Add optional shading:
For extra depth, you can add a barely-there shadow along one side of the vertical ribs using a very light gray marker or pencil crayon, though the stippling alone provides excellent texture.
Dotting Patience
The stippling effect takes time! Put on a podcast and rhythmically tap-tap-tap. Don’t rush or the dots will turn into dashed lines.
Place your elegant new creation on a stack of vintage books to complete the understated autumn vibe
Elegant Calligraphy Word Pumpkin
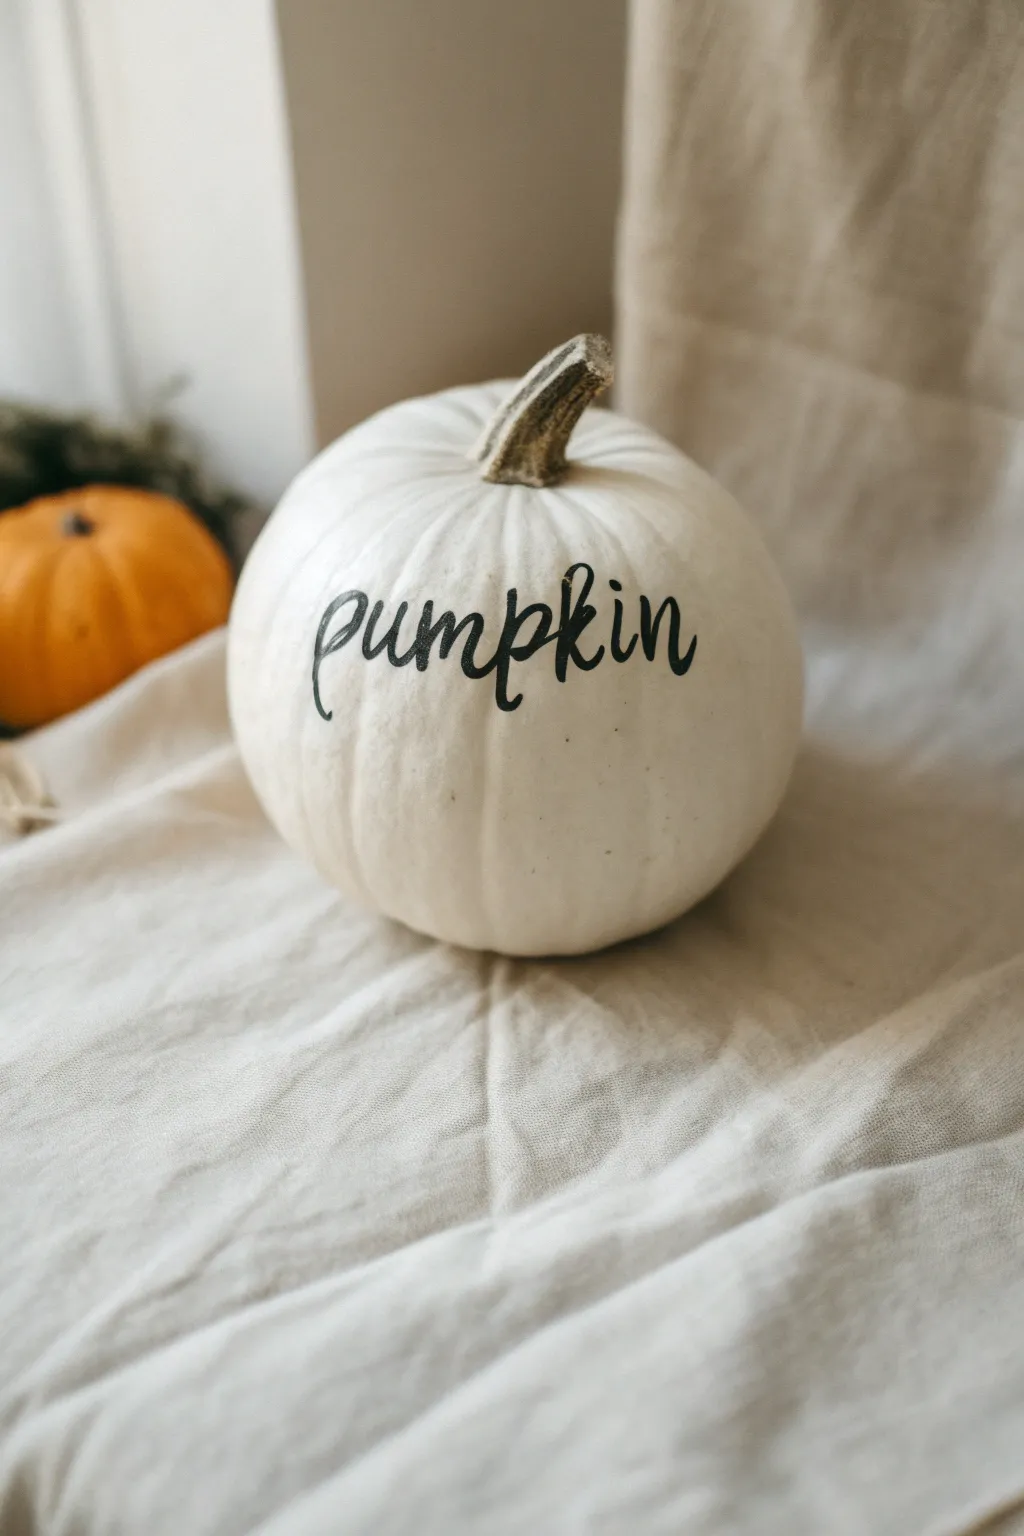
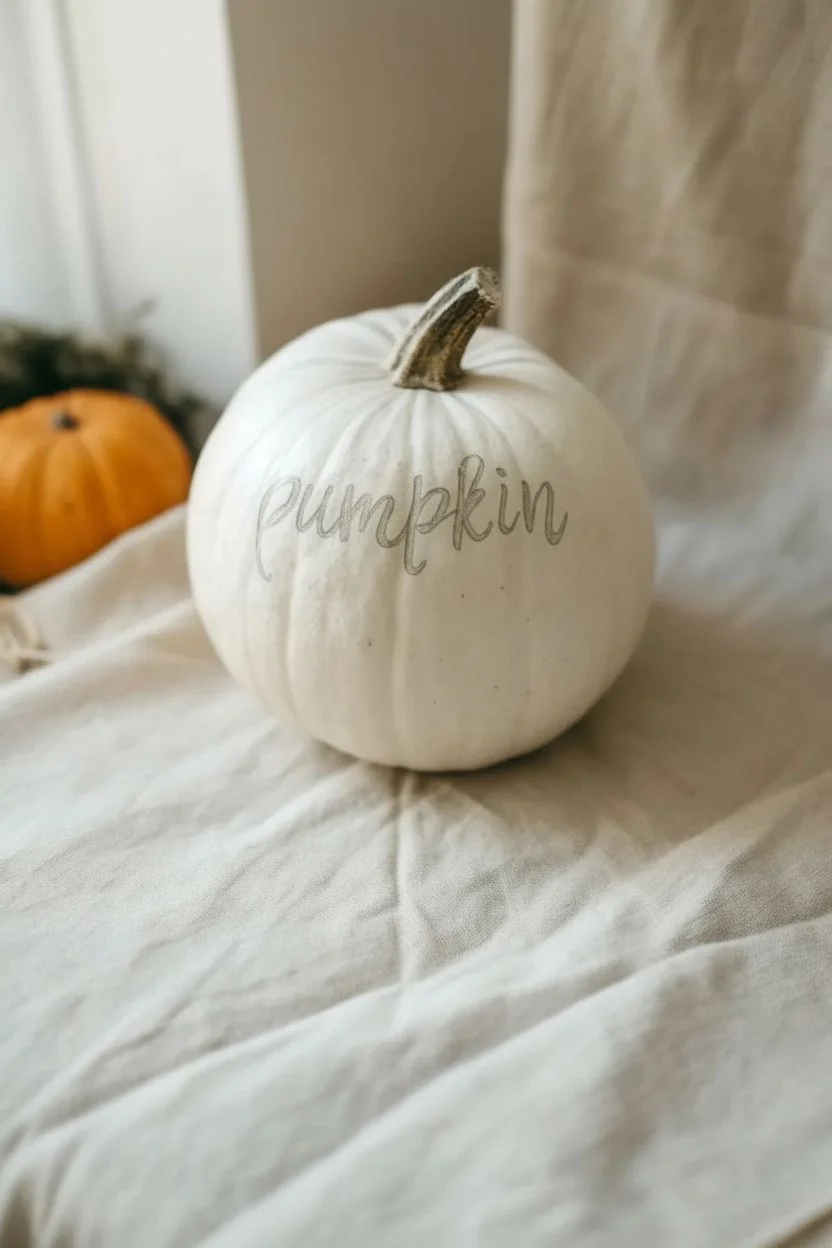
Embrace the beauty of minimalism with this stunningly simple calligraphy pumpkin that brings an air of sophistication to your fall display. The stark contrast of black script against a creamy white gourd creates a modern, understated aesthetic perfect for any neutral home decor.
Step-by-Step Guide
Materials
- Medium-sized faux or real white pumpkin
- Rubbing alcohol and cotton pad (if using real pumpkin)
- Pencil (soft lead like 2B is best)
- Kneaded eraser
- Black oil-based paint marker (medium tip)
- Black oil-based paint marker (fine tip)
- Optional: Clear matte sealant spray
Step 1: Preparation and Planning
-
Clean the Surface:
Before you begin, ensure your pumpkin is perfectly clean. If using a real pumpkin, wipe the surface down with rubbing alcohol on a cotton pad to remove any oils or dirt that might prevent the paint from sticking. -
Dry Completely:
Allow the pumpkin to dry completely. Moisture is the enemy of crisp paint lines, so give it a few minutes to air dry. -
Position the Pumpkin:
Sit the pumpkin on a flat surface. Rotate it to find the ‘face’—the smoothest, most symmetrical side where the ridges aren’t too deep, which will make lettering much easier. -
Draft the Text:
Using your pencil, very lightly sketch out the word ‘pumpkin’ in cursive. Don’t press hard; you just want a faint guide. Start in the center to ensure the word is balanced nicely across the curve.
Smooth Moves
Work with your arm, not just your wrist. Resting your pinky finger on the pumpkin surface helps stabilize your hand against the curved, uneven ridges.
Step 2: Lettering
-
Prime the Marker:
Shake your medium-tip paint marker well and press the tip onto a scrap piece of paper until the ink flows smoothly and consistently. -
Trace the Skeleton:
Carefully trace over your pencil lines with the medium-tip marker. Don’t worry about varying the thickness yet; just create a single, clean monoline for the entire word. -
Identify Downstrokes:
Look at your cursive script. Every time your pen moved *downward* while writing (like the vertical line of the ‘p’ or the legs of the ‘m’), that section needs to be thickened. -
Thicken the Lines:
Go back and add a second line parallel to your original stroke on those downward sections. Fill in the space between the two lines to create that classic faux-calligraphy look. -
Refine the Look:
I like to use the fine-tip marker here to crisp up the edges of your thickened lines or to fix any tiny jitters in the loops of the ‘k’ or ‘p’. -
Connect the Flow:
Ensure the transitions between thin (upstrokes) and thick (downstrokes) appear smooth, gradually tapering rather than starting abruptly. -
Let it Set:
Allow the paint to dry for at least 15 to 20 minutes. Oil-based markers are durable but can smudge easily while wet.
Step 3: Finishing Touches
-
Erase Guidelines:
Once you are absolutely certain the ink is dry, gently dab—don’t rub aggressively—with a kneaded eraser to lift any visible pencil marks remaining around the letters. -
Check for Gaps:
Inspect the lettering for any spots where the bumpy texture of the pumpkin skin might have caused the marker to skip. Fill these pinholes in with the fine tip. -
Seal the Design:
If you plan to keep this outdoors or want it to last for years (on a faux pumpkin), apply a light coat of clear matte sealant spray. -
Style the Stem:
If the stem looks a bit dull, you can dry-brush a tiny bit of brown or gold paint on the ridges to emphasize the texture, though leaving it natural often looks best. -
Display:
Place your finished pumpkin on a soft linen cloth or near other neutral autumn elements to complete the cozy vignette.
Gilded Glamour
For a luxe variation, trace the outer edge of your black letters with a super-fine gold paint pen to create a subtle shadow effect that catches the light.
Step back and admire how a simple word can transform a plain pumpkin into a charming seasonal statement piece

PENCIL GUIDE
Understanding Pencil Grades from H to B
From first sketch to finished drawing — learn pencil grades, line control, and shading techniques.
Explore the Full Guide
Monochrome Curved Stripe Pumpkin
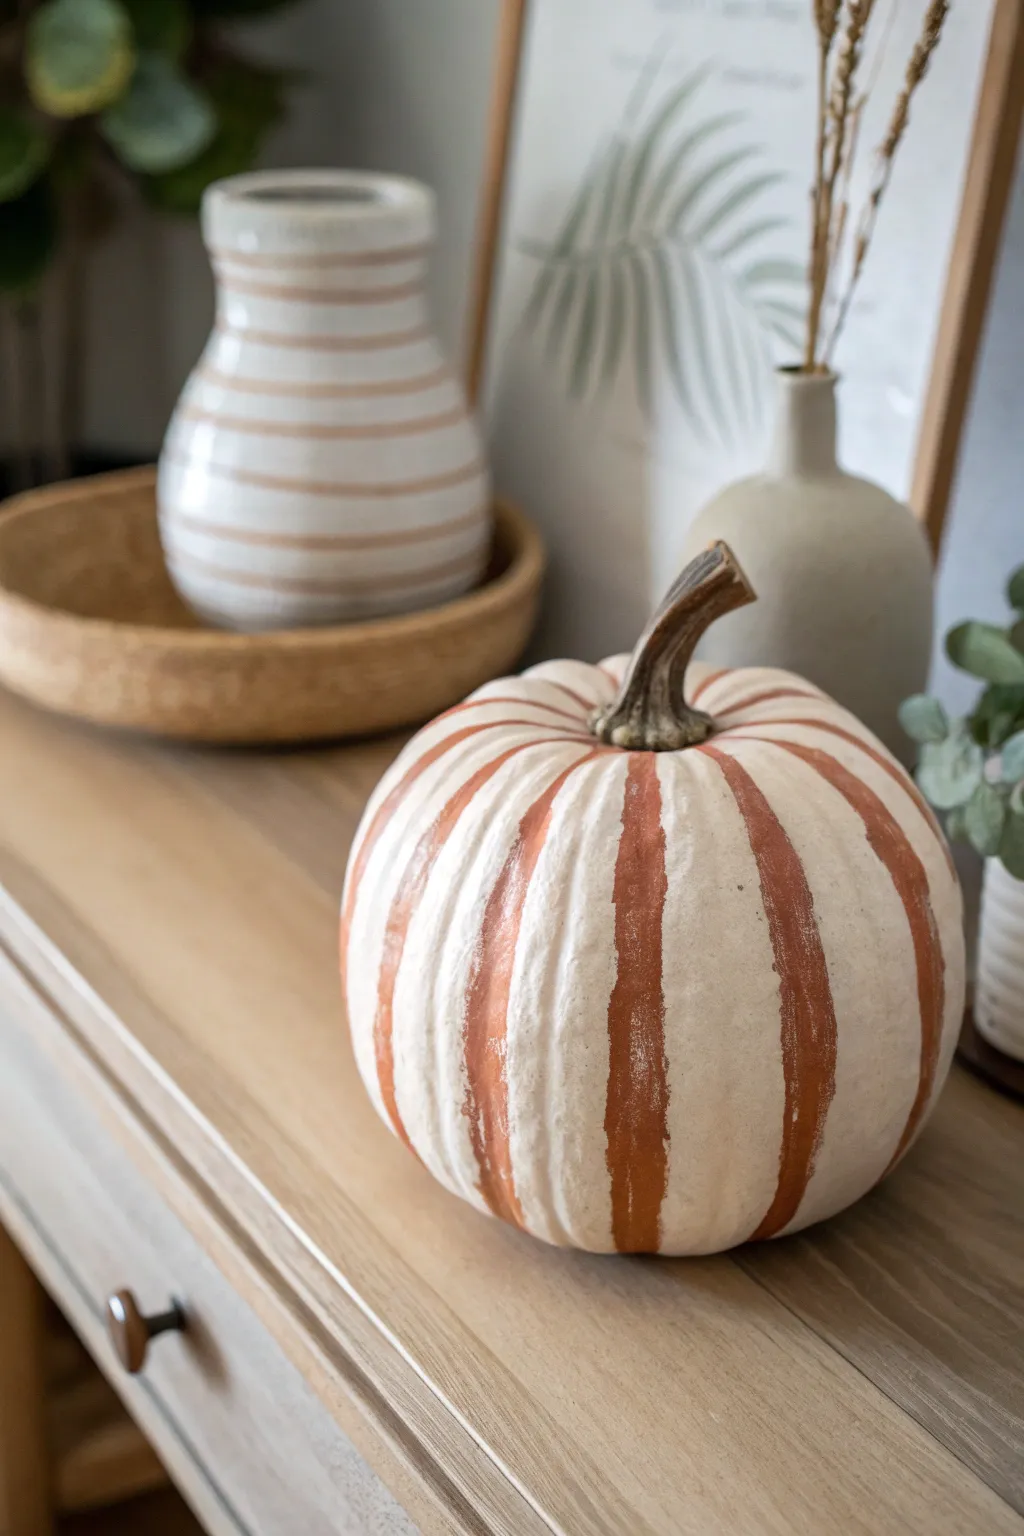
For a minimalist yet rustic autumn look, this painted pumpkin blends modern simplicity with earthy tones. By highlighting the natural ribs of a white pumpkin with warm terracotta stripes, you can create a piece that feels both handcrafted and high-end.
Step-by-Step Tutorial
Materials
- Medium-sized white pumpkin (real or faux)
- Acrylic paint in warm terracotta, burnt sienna, or rust orange
- Medium flat paintbrush (approx. 1/2 inch)
- Small detail brush
- Paper palette or plate
- Damp paper towels or rag
- Matte clear sealer spray (optional)
Step 1: Preparation
-
Clean surface:
Begin by wiping down your pumpkin thoroughly. If you are using a real pumpkin, make sure all dirt is removed from the grooves so the paint adheres properly. For a faux pumpkin, a quick wipe with a damp cloth removes any manufacturing dust. -
Dry completely:
Ensure the surface is absolutely dry before grabbing your brush. Any trapped moisture can cause acrylic paint to lift or streak. -
Prepare the palette:
Squeeze a generous amount of your terracotta-colored acrylic paint onto your palette. If the paint feels too thick or paste-like, I prefer to mix in a tiny drop of water to improve the flow, but don’t make it too runny.
Step 2: Painting the Stripes
-
Identify the ribs:
Examine the natural vertical indentations (ribs) of your pumpkin. These will serve as your guides. You will be painting the raised sections between the deepest grooves, or alternating sections depending on your preference. -
Start at the top:
Load your medium flat brush with paint. Place the brush near the base of the stem, but don’t touch the stem itself. Leave a tiny sliver of white space for a clean look. -
The first stroke:
Using steady, downward pressure, pull the brush down following the natural curve of the pumpkin. Don’t worry about making the edges perfectly straight; a slightly organic, wavy edge adds to the hand-painted charm. -
Complete the stripe:
Continue the stroke all the way to the bottom of the pumpkin. Again, stop just before the very center underneath so the pumpkin sits flat without sticking to your table. -
Spacing:
Skip the deep groove next to your painted stripe and move to the next raised section. The goal is to leave the recessed crevices white to create visual depth and contrast. -
Alternate sections:
Continue painting alternating stripes around the circumference. By skipping every other section (or painting the raised parts and leaving the grooves), you create that classic striped effect.
Wobbly Lines?
Don’t stress over perfection. If a line goes crooked, wipe it immediately with a damp paper towel. Or, let it dry and paint over the mistake with white acrylic paint to ‘erase’ it.
Step 3: Refining the Look
-
Check for coverage:
Once the first coat is touch-dry (usually about 10-15 minutes), inspect your stripes. If the orange looks streaky or too translucent, apply a second coat directly over the first. -
Distress texture:
Looking at the reference image, the application isn’t solid plastic-looking; it has texture. You can achieve this by ‘dry brushing’ the second coat lightly, allowing tiny specs of the texture to show through, or simply not smoothing out your brushstrokes too much. -
Clean edges:
Use your small detail brush dipped in a tiny bit of white paint (or water if the paint is fresh) to tidy up any slips where the orange paint ventured too far into the white grooves. -
Stem maintenance:
Double-check the area around the stem. Ensure no orange paint accidentally got on the stem itself, as keeping the stem natural (brown/green) provides a necessary contrast.
Level Up: Texture
Mix a teaspoon of baking soda into your acrylic paint before applying. This creates a gritty, ceramic-like texture that makes the pumpkin look like expensive stoneware pottery.
Step 4: Finishing Up
-
Full dry time:
Let the pumpkin sit undisturbed for at least an hour. Acrylics dry fast, but thicker layers need time to cure. -
Optional sealing:
If you plan to place this pumpkin on a porch or in a humid area, create a protective barrier by misting it lightly with a matte clear sealer spray. -
Final check:
Take a step back and look at your work. The stripes should emphasize the pumpkin’s roundness. Place it on a tray or shelf to enjoy your handiwork.
This simple striped design brings a beautiful warmth to your seasonal decor without overwhelming the space
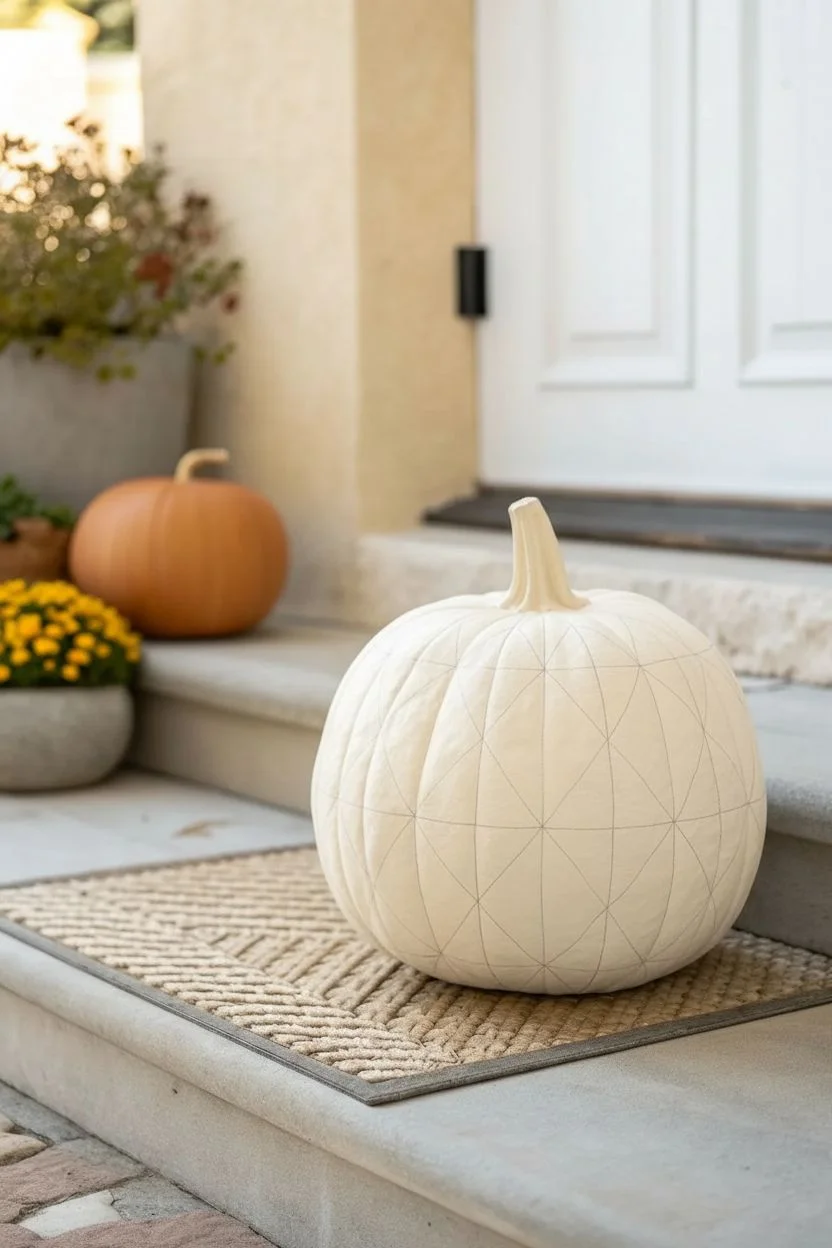
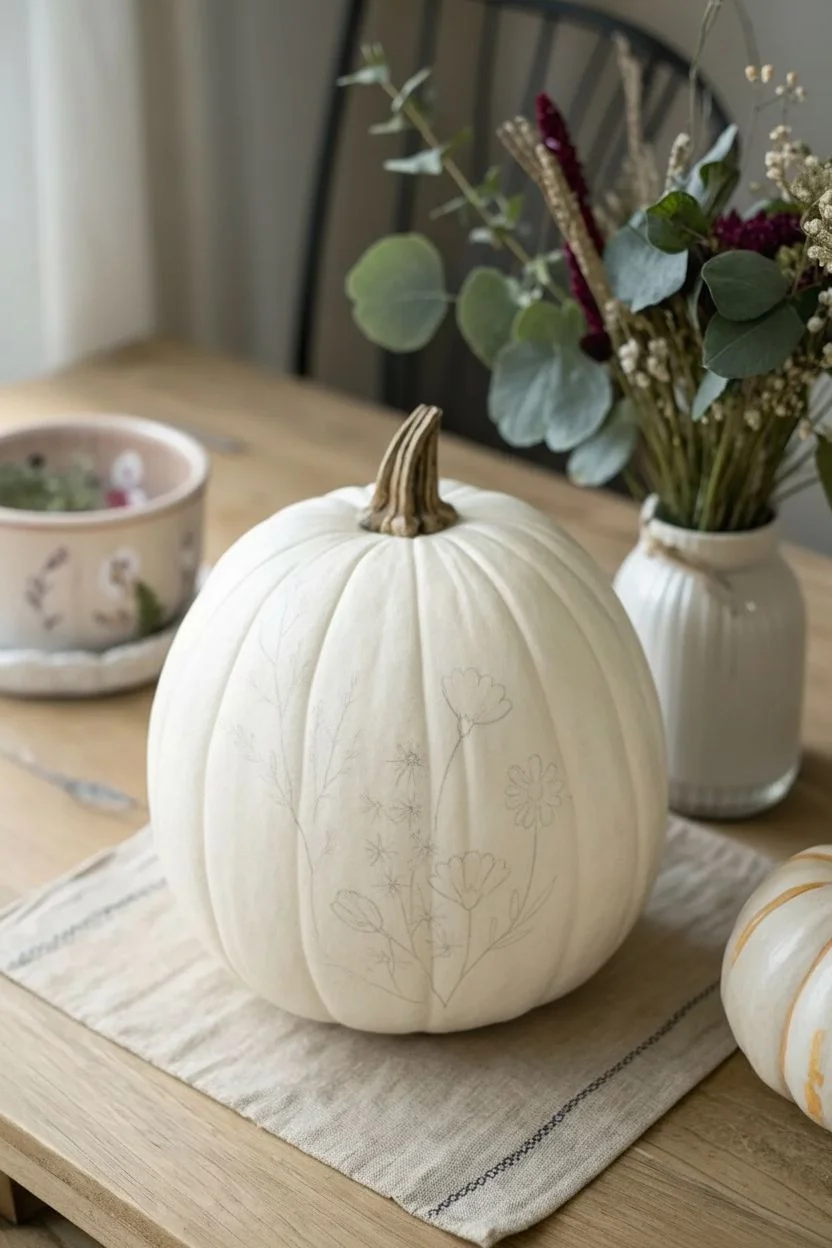
Minimal Botanical Line Art Pumpkin
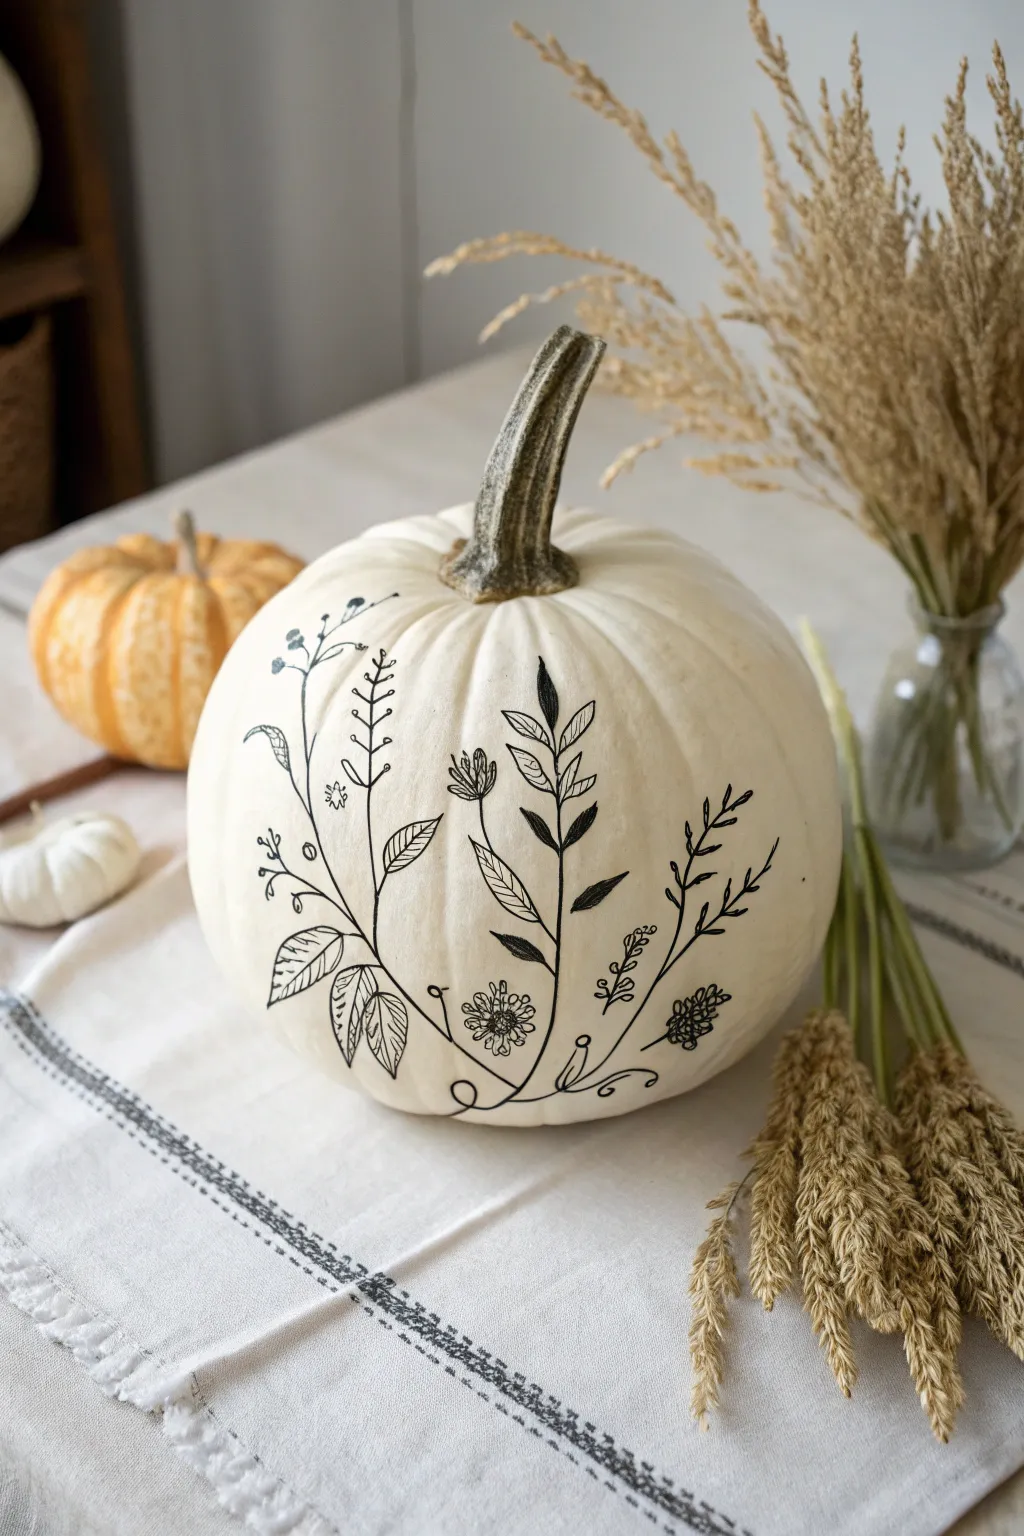
Embrace the understated elegance of nature with this minimal line art pumpkin design. By combining fine lines and bold black ink against a creamy white background, you create a sophisticated autumn centerpiece that feels modern yet classic.
Step-by-Step Guide
Materials
- White or cream-colored craft pumpkin (faux or real)
- Black permanent marker (fine tip)
- Black permanent marker (ultra-fine tip)
- Pencil (HB or lighter)
- Eraser (kneaded or white vinyl)
- Reference images of wildflowers or herbs
- Paper towels
- Rubbing alcohol (for prep)
Step 1: Preparation & Planning
-
Surface Cleaning:
Before you begin, wipe down your pumpkin thoroughly. If using a real pumpkin, a damp cloth works well; for a faux pumpkin, give it a quick wipe with rubbing alcohol to remove any manufacturing oils that might resist the ink. -
Dry Time:
Ensure the surface is completely dry. Any moisture will cause your markers to bleed or skip. -
Sketch the Base:
Using your pencil, lightly sketch the main curved stems. Start from the bottom center and draw three to five main lines that arch upwards and outwards, following the natural curve of the pumpkin.
Smudge Prevention
Work from the top down or left to right (if right-handed) so your hand doesn’t rest on fresh ink. Place a scrap of paper under your palm as a guard while drawing.
Step 2: Drafting the Design
-
Add Leaf Structure:
On your pencil guide lines, sketch small, simplified leaf shapes. I like to alternate the placement of leaves on either side of the stem to keep the design balanced but organic. -
Incorporate Blooms:
At the tips of your stems or branching off the sides, lightly draw simple floral shapes—think tiny circles for berries, teardrops for buds, or small daisy-like shapes. -
Review Composition:
Step back and look at your pencil sketch. Does it flow nicely? Ensure the design isn’t too cluttered; negative white space is crucial for this aesthetic.
Gold & Glam
Trace just the outer edges of the main leaves with a metallic gold paint pen after the black ink dries. It adds a subtle shimmer that catches candlelight beautifully.
Step 3: Inking the Artwork
-
Main Stems:
Take your standard fine-tip permanent marker. Carefully trace over the main stem lines first. Use a steady hand and pull the pen towards you for smoother curves. -
Solid Leaves:
Identify which leaves you want to be solid black (as seen in the center of the reference image). Outline these leaves and then fill them in completely with the fine-tip marker. -
Switching Tools:
Switch to your ultra-fine tip marker. This is essential for the delicate details that give the piece its engraved look. -
Detailed Leaves:
With the ultra-fine pen, outline the remaining leaves. Instead of filling them in, draw a center vein and delicate diagonal lines for texture. -
Floral Details:
Trace your floral elements with the ultra-fine tip. Add tiny stippling dots or dashed lines inside the flower heads to create depth without heaviness. -
Adding Whimsy:
Near the base of the stems, draw small, loose curlicues or spirals with the ultra-fine pen. This grounds the design and mimics curling vines.
Step 4: Finishing Touches
-
Let Ink Set:
Allow the ink to dry completely for at least 15 minutes. This patience prevents smudging during cleanup. -
Erase Guidelines:
Gently erase any visible pencil marks. Use a kneaded eraser if possible, dabbing rather than rubbing to protect the ink. -
Final Check:
Inspect the lines. If the black looks patchy on the solid filled leaves, go over them a second time for a rich, opaque finish. -
Optional Protection:
If this pumpkin will be outside, you may want to spray a light coat of matte clear sealer over the design to prevent fading.
Place your botanical pumpkin on a linen runner or near dried grasses to complete this serene autumn scene


Wildflower Bouquet Pumpkin

Transform a simple white pumpkin into an autumnal masterpiece featuring delicate wildflowers and grasses. This project mimics the look of vintage botanical illustrations or embroidery using just a few earthy paint colors.
Step-by-Step Tutorial
Materials
- Faux or real white pumpkin (medium size)
- Acrylic paints (rust orange, burnt sienna, olive green, mustard yellow, dark brown, white)
- Fine liner brushes (size 00 or 000)
- Small round brush (size 1)
- Palette or paper plate
- Pencil (optional)
- Matte finish sealer spray (optional)
Step 1: Preparation & Planning
-
Clean the canvas:
If using a real pumpkin, wash and dry it thoroughly to remove dirt and oils. For a faux pumpkin, give it a quick wipe with a damp cloth to ensure the paint adheres properly. -
Sketch the layout:
Lightly sketch your main stems using a pencil. You don’t need to draw every detail, but mark the general direction and height of 3-5 main floral stems that radiate slightly outward from the base, similar to a bouquet.
Brush Control Tip
For the thinnest stem lines, slightly water down your acrylic paint to an ink-like consistency. This helps the paint flow smoothly off the liner brush without breaking.
Step 2: Painting the Stems & Grasses
-
Mix your base green:
Combine olive green with a tiny drop of dark brown to create a muted, earthy stem color. If it’s too bright, add a touch of burnt sienna to desaturate it. -
Paint main stems:
Using your finest liner brush, paint thin, fluid lines following your pencil marks. Vary the pressure slightly; lift the brush at the top of the stems to create a tapered, natural end. -
Add grassy shoots:
Switch to a mustard yellow tone mixed with a little brown. Paint long, sweeping grass-like strokes on the left side of your bouquet. Keep these lines very wispy and delicate. -
Create leafy details:
Along the green stems, add tiny, elongated leaves. Press the belly of the brush down and pull up quickly to create a pointed leaf shape. Keep leaves sparse to maintain a minimalist aesthetic.
Level Up: Texture
Mix a small amount of baking soda into your acrylic paint for the flower petals. This creates a gritty, 3D texture that makes the painted flowers look like raised embroidery.
Step 3: Adding Floral Elements
-
Base petals for rust flowers:
Select a rust orange color. Using the small round brush, paint fan-shaped petals for the two main flowers on the right. Imagine a half-circle or a cone shape for the blooms. -
Add the daisy-like bloom:
Mix burnt sienna with a touch of gold or yellow. Paint longer, separated petals radiating from a central point for the flower near the middle-right. -
Detail the ‘dried’ flowers:
For the seed-head or dried flower look in the center, use a very pale brown or beige. Use a stippling motion (tiny dots) to create a fuzzy, textured cluster at the top of a thin stem. -
Layering color:
Once the base rust flowers are dry, add thin lines of a darker burnt orange or brown over the petals to mimic veins and texture. This gives them an ’embroidered’ look. -
Highlight the grasses:
Go back to your yellow-brown grass stalks. Add a few highlights using a lighter tan or gold color on the tips to give them dimension. -
Paint the flower centers:
For the daisy flower, add a dark brown or deep yellow center. Use small dots rather than a solid circle to add texture.
Step 4: Final Details
-
Connect the elements:
Check for any floating flowers. Use your liner brush with green paint to ensure every bloom is connected to a stem leading down towards the base of the design. -
Add tiny buds:
Scattered along the upper stems, paint tiny dots or small oval shapes in rust or mustard to represent unopened buds. -
Refine lines:
If any lines look too thick, you can carefully ‘erase’ or thin them by painting over the edge with white paint (matching your pumpkin) once the color is dry. -
Seal the work:
Allow the paint to dry completely (at least an hour). If you plan to put this pumpkin outside, spray a light coat of matte sealer over the painted area to protect it from moisture.
Enjoy displaying your elegant, hand-painted autumnal centerpiece
Trailing Vine Wrap Pumpkin
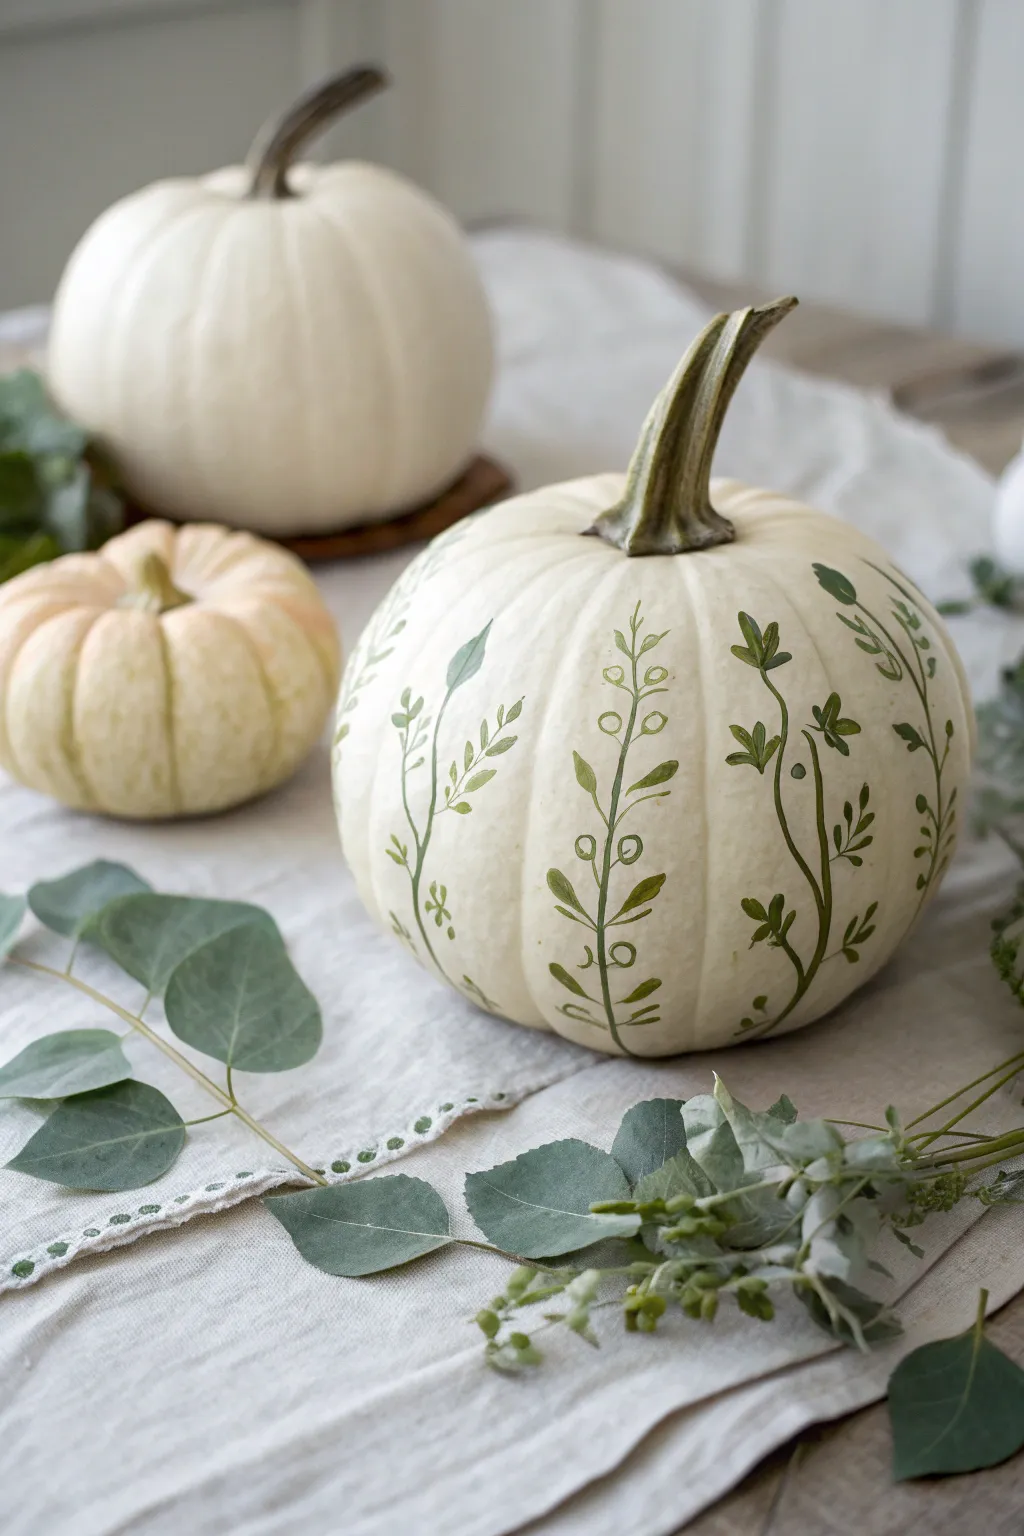
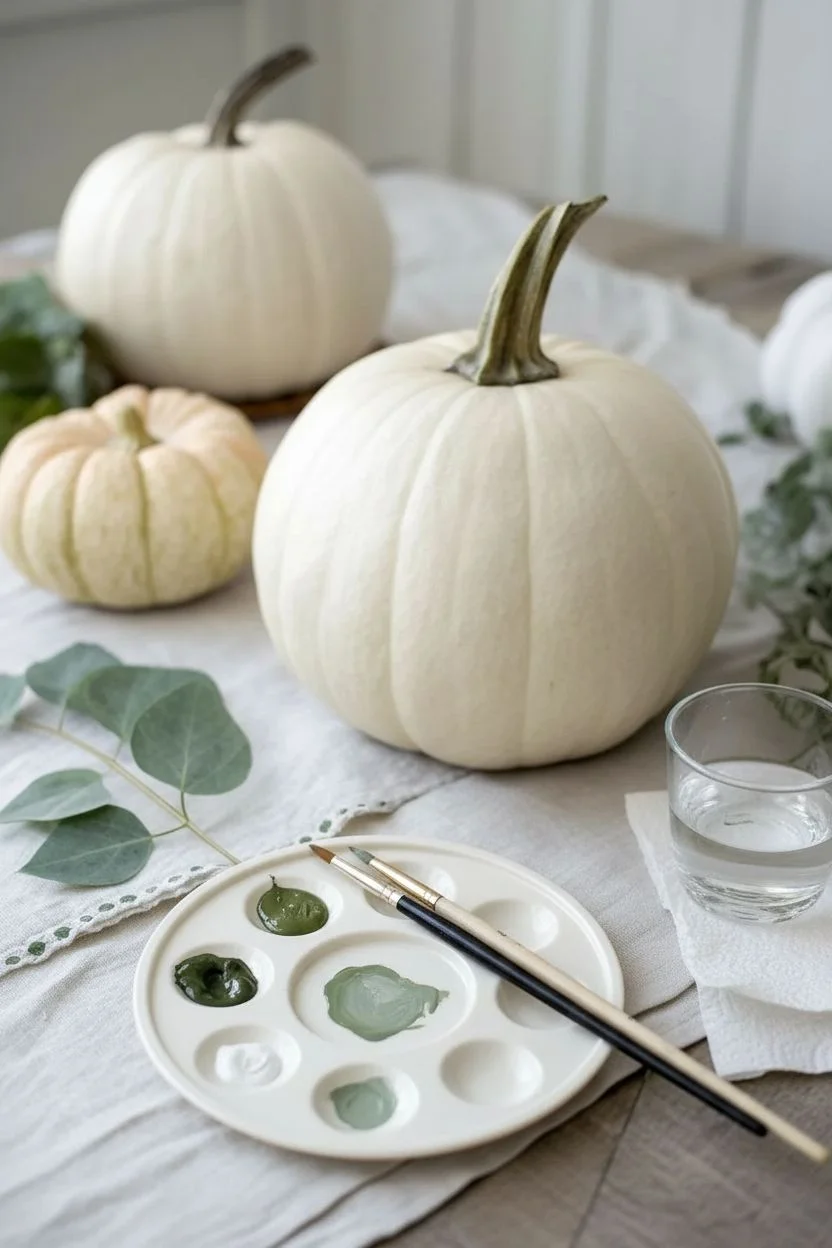
Embrace a soft, organic aesthetic with this delicate trailing vine design painted on a pristine white pumpkin. The sage green foliage climbs naturally up the pumpkin’s ribs, creating a sophisticated and airy botanical look perfect for a neutral autumn display.
How-To Guide
Materials
- Medium-sized white pumpkin (real or faux)
- Acrylic craft paint (Sage Green, Olive Green, White)
- Fine liner paintbrush (size 0 or 00)
- Small round paintbrush (size 2)
- Palette or paper plate
- Paper towels
- Water cup
- Matte clear sealant spray (optional)
Step 1: Preparation and Planning
-
Clean surface:
Begin by thoroughly wiping down your pumpkin with a damp cloth to remove any dust or dirt. If you are using a real pumpkin, ensure it is completely dry before painting. For faux pumpkins, a quick wipe with rubbing alcohol can help the paint adhere better. -
Plan placement:
Identify the natural vertical ridges or ‘ribs’ of your pumpkin. The design works best when the vines follow these natural indentations, traveling from the bottom up toward the stem. -
Mix colors:
Squeeze out your olive green and sage green paints onto your palette. I like to mix a tiny drop of white into the sage green to create a softer, more muted tone for the lighter leaves.
Step 2: Painting the Vines
-
Start the main stems:
Load your fine liner brush with the darker olive green paint. Starting near the bottom of the pumpkin, paint a thin, wavering line carrying upward along a ridge. -
Create natural movement:
Don’t make the line perfectly straight. Let it curve slightly left and right as it travels up, mimicking the organic growth of a real vine. Stop the line about an inch or two from the stem. -
Vary the heights:
Repeat this process on alternating ridges around the pumpkin. vary the heights slightly so some vines reach higher while others stay lower for a more dynamic, unforced look. -
Thicken the base:
Go back over the bottom inch of each stem and slightly thicken the line to give the plant visual weight at its base.
Uneven Lines?
If your vine lines are shaky, try resting your pinky finger against the pumpkin surface for stability while you guide the brush upward.
Step 3: Adding Foliage and Details
-
Paint foundational leaves:
Using the small round brush and your sage green mix, press gently against the stem to create small almond-shaped leaves. Place these in alternating pairs or singles along the vine stems. -
Add dark accents:
Switch back to the darker olive green. Add smaller, darker leaves interspersed among the sage ones to create depth and dimension. -
Create distinct leaf shapes:
Try painting different leaf types on different vines. For one vine, use simple oval shapes; for another, try painting three-lobed leaves that look like tiny ivy or parsley. -
Paint berry stems:
On one or two of the vines, paint very short, thin branches extending outward from the main stem using the fine liner brush. -
Add berry details:
Dip the very tip of a small brush handle or use your fine brush to place small, open circles or solid dots at the ends of these short branches. These act as abstract buds or berries. -
Connect the elements:
Ensure all leaves and berries connect back to the main vine with a tiny, thin stem line using the liner brush. -
Refine the edges:
Look over your work for any jagged edges. You can smooth out leaf shapes with a damp, clean brush if the paint is still slightly wet. -
Final touches:
Add a few tiny stray leaves falling near the bottom of the pumpkin or a small curl of a vine tendon for extra whimsy. -
Let it dry:
Allow the paint to dry completely for at least an hour. Be careful not to smudge wet vines as you rotate the pumpkin to work on other sides. -
Seal:
Once fully dry, you may spray a light coat of matte clear sealant over the pumpkin to protect your artwork, especially if it will be displayed outdoors.
Leaf Variation
Mix a tiny bit of brown into your green occasionally for ‘fading’ leaves, adding a realistic, autumnal touch to the greenery.
Place your beautifully painted pumpkin on a linen runner with some dried eucalyptus to complete the serene autumn vignette
Terrazzo Speckle Pumpkin
Embrace a minimalist aesthetic this fall with this stunning earthy terrazzo pumpkin. This technique transforms a plain faux pumpkin into a modern piece of decor featuring organic speckles in warm amber, cinnamon, and espresso tones.
Step-by-Step
Materials
- White or cream faux pumpkin
- Acrylic craft paint (amber, rust/cinnamon, dark brown, black)
- Small flat brush
- Small round detail brush
- Old toothbrush or stiff bristle brush
- Cardboard or palette
- Paper towels
- Water cup
- Matte finish spray sealant (optional)
Step 1: Preparation
-
Clean surface:
Begin by wiping down your faux pumpkin with a slightly damp cloth to remove any manufacturing dust or oils that might prevent the paint from adhering properly. -
Dry completely:
Let the pumpkin air dry for a few minutes or wipe it down with a dry paper towel to ensure a clean slate. -
Set up palette:
Squeeze a dime-sized amount of your amber, rust/cinnamon, and dark brown acrylic paints onto your palette or cardboard piece.
Step 2: Creating the Terrazzo Shapes
-
Start with amber:
Load your small round detail brush with the amber paint. Paint small, irregular organic shapes scattered randomly across the pumpkin’s surface. -
Vary the shapes:
Avoid perfect circles. Create blobs, ovals, and slight kidney bean shapes to mimic real terrazzo stone chips. -
Add rust accents:
Rinse your brush thoroughly. Pick up the rust or cinnamon color and paint slightly larger irregular shapes in the empty spaces between your amber spots. -
Overlap gently:
It’s visually interesting if two shapes nearly touch, but try not to overlap the wet paint unless you want the colors to muddy together. -
Introduce dark brown:
Using the dark brown paint, add a few medium-sized shapes. Be sparser with this darker color to keep the overall look light and airy. -
Check balance:
Step back and rotate the pumpkin. Look for any large empty voids and fill them in with an appropriately sized shape of whichever color seems missing.
Natural Variety
Real terrazzo isn’t uniform. Make some shapes tiny and others twice as big to create authentic visual rhythm.
Step 3: Adding the Speckle Texture
-
Prepare the splatter paint:
Mix a small amount of black or very dark grey paint with a few drops of water on your palette. You want an inky consistency, like heavy cream. -
Test the splatter:
Dip an old toothbrush into this thinned paint. Hold it over a scrap piece of paper and run your thumb across the bristles to test the spray pattern. -
Apply fine speckles:
Once confident, hold the toothbrush about 6 inches from the pumpkin. Flick the bristles to send a fine mist of black speckles over the painted shapes. -
Rotate and repeat:
Turn the pumpkin carefully and repeat the splatter process, ensuring coverage on the top near the stem and down towards the base. -
Add larger flecks:
For variety, I like to dip the very tip of the detail brush into the watery black paint and manually dot on a few larger, distinct black specks here and there. -
Paint the bottom:
Wait until the sides are tacky to the touch, then carefully tilt the pumpkin to add shapes and speckles near the very bottom edge so no blank white shows when displayed.
Splatter Control
If a paint splatter lands too large or runny, quickly dab it gently with the corner of a paper towel to lift the excess liquid without smearing.
Step 4: Finishing Touches
-
Dry fully:
Allow the pumpkin to sit undisturbed for at least an hour. The thicker blobs of paint will take longer to dry than the fine mist. -
Stem detail:
If your pumpkin’s stem looks too plastic, dry brush a little bit of the dark brown paint over the ridges to give it a weathered, realistic look. -
Seal (optional):
To protect your work for future seasons, take the pumpkin to a well-ventilated area and apply a light coat of matte clear spray.
Place your warm-toned terrazzo pumpkin on a tray or shelf to add a sophisticated touch to your seasonal decor
Soft Ombre Fade Pumpkin
This elegant project transforms a simple white pumpkin into a piece of modern decor with a delicate wash of color. The soft gradient creates a dreamy, watercolor-like effect that mimics the gentle blush of a ripening fruit.
Step-by-Step Tutorial
Materials
- White pumpkin (real or faux)
- Acrylic paint (Soft Rose or Blush Pink)
- Acrylic paint (Warm Peach or Golden Yellow)
- White acrylic paint (optional, for base)
- Medium flat synthetic brush
- Soft cosmetic sponge or wedge sponge
- Palette or paper plate
- Water cup
- Paper towels
- Matte spray sealant (optional)
Step 1: Preparation
-
Clean the Surface:
Begin by thoroughly wiping down your pumpkin with a damp cloth to remove any dirt or oils. If you are using a real pumpkin, ensure it is completely dry before proceeding. -
Prime (Optional):
If your pumpkin isn’t a bright, clean white, apply a thin coat of white acrylic paint all over. Let this base coat dry completely so your pink tones will show up true to color. -
Set Up Your Palette:
Squeeze a dime-sized amount of your blush pink and a smaller dot of the peach or golden yellow onto your palette. Leave plenty of space between them for mixing.
Harsh Lines?
If your gradient looks blocky, dip your sponge in a tiny drop of water and white paint. Dab over the transition line to blur the hard edge back into the background.
Step 2: Applying the Transition Color
-
Load the Sponge:
Dampen your cosmetic sponge slightly and squeeze out excess water. Dip just the tip into the peach or golden yellow paint, blotting most of it off onto a paper towel until almost dry. -
Create the First Fade:
Gently dab this peach color onto one side of the pumpkin, starting about halfway down. Keep the application very light and sheer. -
Feather the Edges:
While the paint is still wet, use the clean side of your sponge to feather the top edge upward, making it disappear seamlessly into the white skin of the pumpkin.
Step 3: Building the Pink Ombre
-
Start the Pink Layer:
Pick up a small amount of the blush pink paint on a fresh section of your sponge. Blot it carefully; you want to build color slowly rather than applying a thick glob. -
Apply the Base Pink:
Start dabbing the pink near the very bottom of the pumpkin where you want the color to be most intense. Press firmly to deposit the most pigment here. -
Work Upwards:
Gradually move your sponge upward, overlapping the peach area you painted earlier. Use a lighter touch as you move up to create that natural fade. -
Blend the Transition:
I like to dampen the sponge just a tiny bit more here to help blend the pink into the peach and white sections. The moisture acts like a glaze, smoothing out any harsh sponge distinct marks. -
Check the Gradient:
Step back and look at the pumpkin. You want the bottom to be a solid, rich pink that slowly dissolves into the creamy white top. -
Intensify the Bottom:
If the bottom looks too washed out, add a second layer of pink specifically concentrated on the lower 2 inches of the pumpkin.
Use A Makeup Sponge
Cheap triangular makeup wedges are superior to craft brushes for this. Their density creates a much smoother, airbrushed texture than bristles can achieve.
Step 4: Finishing Touches
-
Refine the Fade:
Take a nearly clean, dry brush and very gently dry-brush over the transition line where the color meets the white. This softens the look even further. -
Clean Up the Stem:
If any stray paint got onto the stem, wipe it away immediately with a damp q-tip or cloth to keep the natural wood look pristine throughout. -
Inspect from Angles:
Rotate your pumpkin to ensure the gradient looks consistent from the main viewing angle, though an asymmetrical patch of color (as shown in the image) looks very organic and artistic. -
Let it Cure:
Allow the paint to dry completely. Acrylics dry fast, so 20 minutes should be sufficient. -
Seal (Optional):
To protect your work, especially if this will be outside, mist the painted area lightly with a matte sealant spray.
Place your finished pumpkin near a window where the light can catch the soft gradient and enjoy the cozy atmosphere it brings to the room
Night-Sky Constellation Pumpkin
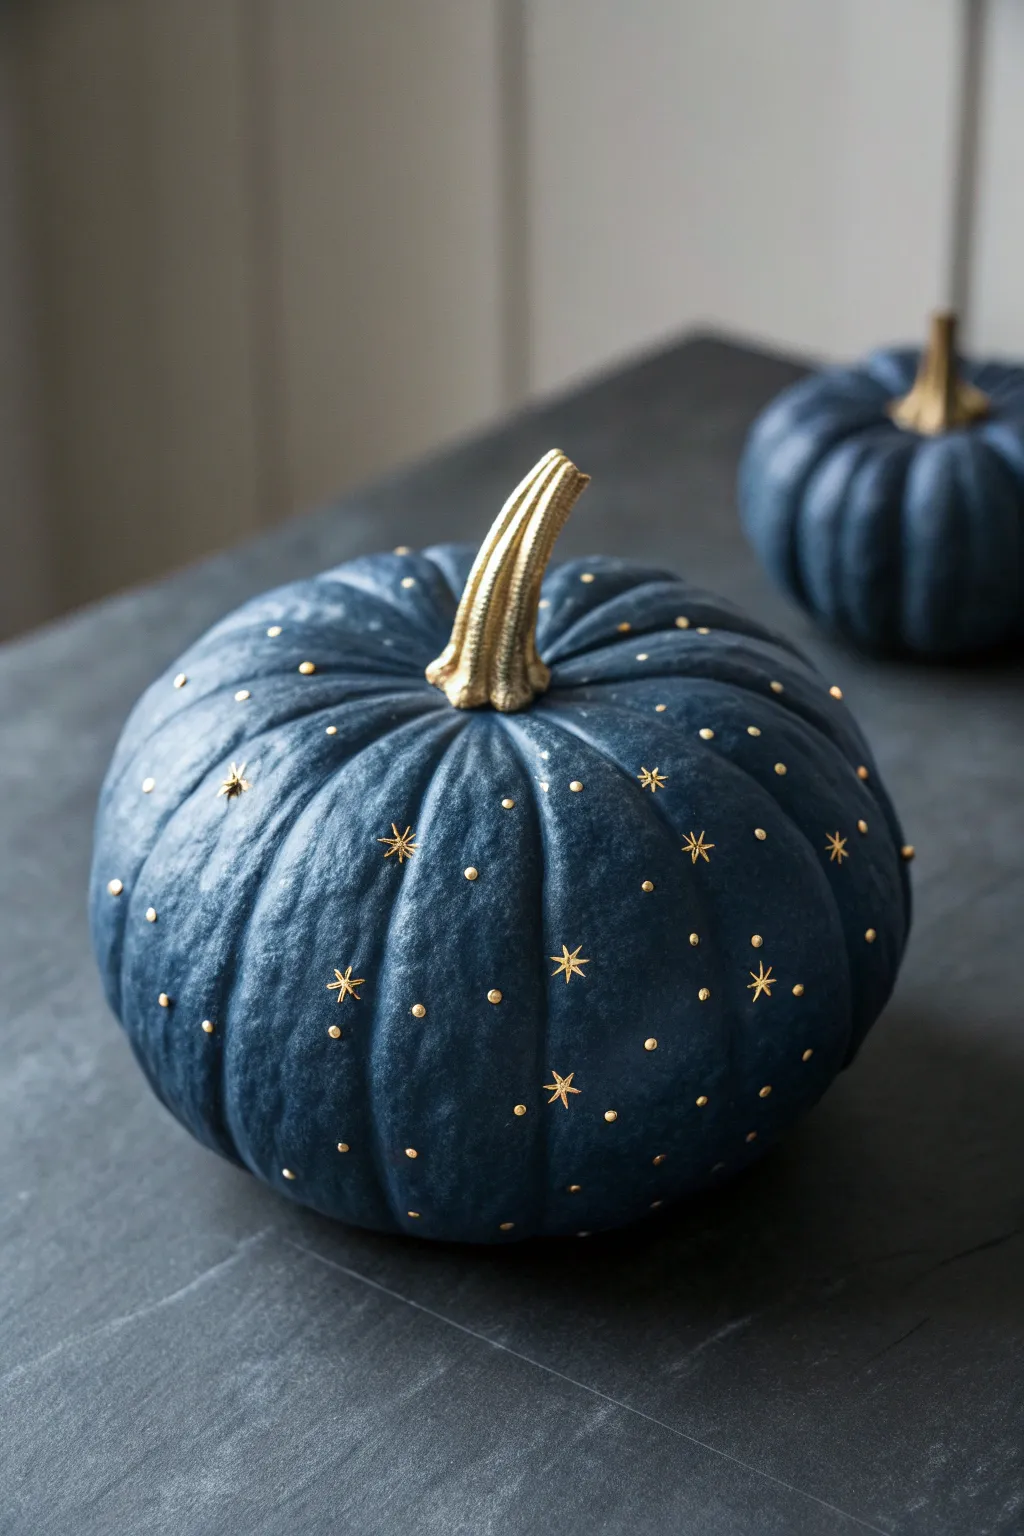
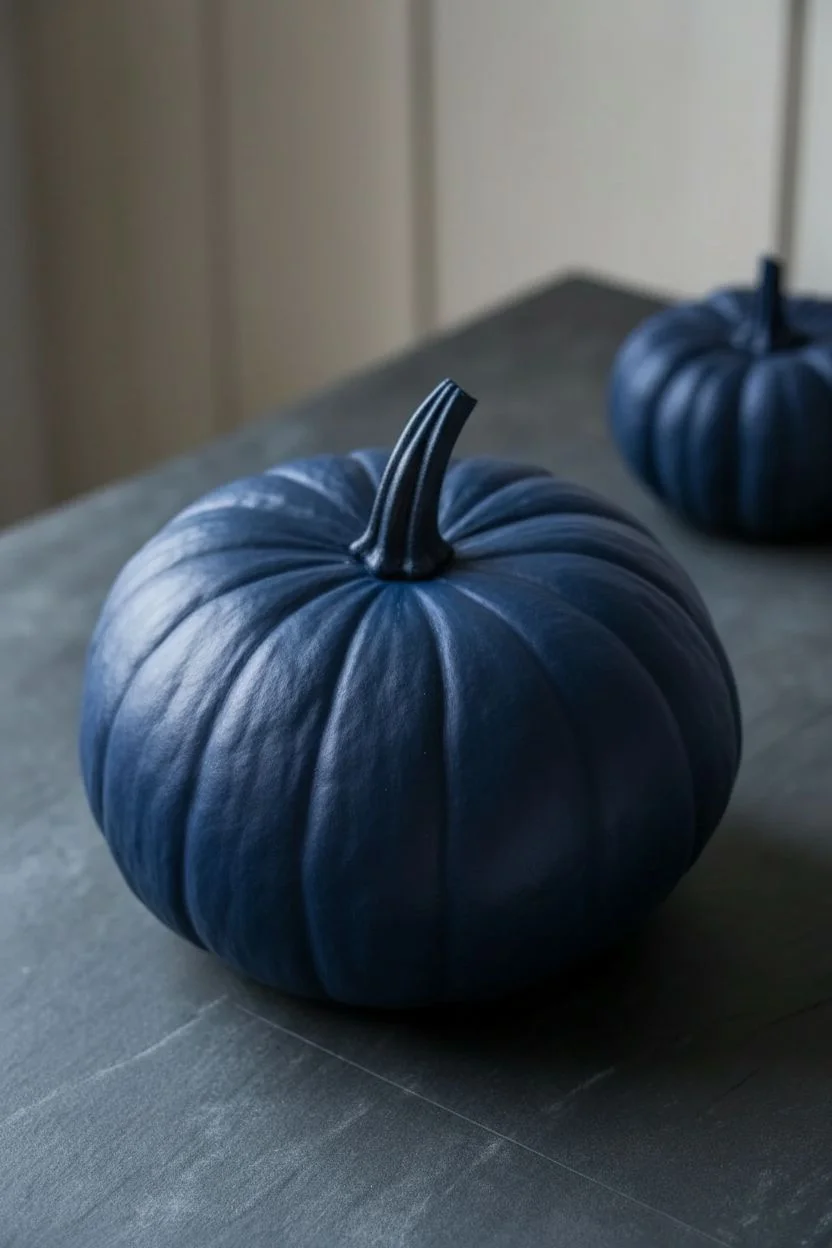
Transform a classic autumn gourd into a dreamy piece of decor inspired by the cosmos. This sophisticated project combines a deep midnight blue base with delicate gold stars and a gilded stem to create a mystical night sky effect that feels magical.
Step-by-Step
Materials
- Medium-sized pumpkin (real or faux)
- White primer spray paint
- Deep midnight blue acrylic paint (matte or satin finish)
- Wide flat paintbrush
- Gold metallic paint (liquid, not spray)
- Fine detail paintbrush (size 0 or 00)
- Small round paintbrush (size 2)
- Wax paper or paint palette
- Gold wax paste or gold leaf paint (for maximal shine on stem)
- Clear matte sealant spray
Step 1: Preparation & Base Coat
-
Clean the surface:
Begin by thoroughly wiping down your pumpkin with a damp cloth to remove any dirt or oils. If you are using a real pumpkin, make sure it is completely dry before moving on. -
Prime the pumpkin:
Apply a coat of white primer spray paint. This crucial step ensures that the rich dark blue we’ll use later pops and adheres properly without streaking. -
First coat of blue:
Using your wide flat brush, apply the first layer of midnight blue acrylic paint. Work in vertical strokes following the natural ribs of the pumpkin. -
Deepen the color:
Allow the first layer to dry completely, then apply a second coat. I find that two or three thin layers create a much smoother, velvety finish than one thick globs of paint. -
Check for gaps:
inspect the pumpkin from all angles, especially near the bottom and around the stem base, to ensure no primer is showing through. -
Dry time:
Let the blue base coat cure fully. It needs to be dry to the touch so your hand doesn’t smudge it while adding details.
Pro Detail Tip
For perfectly round star dots, use the head of a sewing pin or a toothpick instead of a brush. Dip and press lightly for uniform circles.
Step 2: Gilding the Stem & Stars
-
Paint the stem base:
Using a small round brush and your gold metallic paint, carefully paint the entire stem. Start at the top and work your way down to where it meets the pumpkin skin. -
Clean up edges:
Create a clean line where the gold stem meets the blue pumpkin. You don’t need tape; just use a steady hand to make the transition crisp. -
Add dimension to the stem:
Once the base gold is dry, I like to rub a tiny bit of gold wax paste over the ridges of the stem to give it that high-end, solid metal look shown in the photo. -
Plan your constellations:
Before painting, visualize where your main stars will go. You want a random but balanced distribution, avoiding clumps of stars. -
Paint the large stars:
Dip your fine detail brush into the gold paint. Paint small 5-point or 6-point starbursts scattered around the upper half of the pumpkin. -
Refine the star shape:
To get the sharp look from the photo, paint a simple cross first, then add smaller diagonal lines in the center. Keep the lines extremely thin. -
Add the dots:
Using the tip of your brush handle or a dotting tool, dip it in gold paint and gently press dots onto the pumpkin surface to create ‘distant stars’. -
Vary dot sizes:
Create visual depth by making some dots slightly larger and others tiny pinpricks. The variety makes the ‘sky’ feel vast. -
Fill the lower section:
As you move toward the bottom of the pumpkin, reduce the number of large starbursts and rely mostly on the gold dots to fade the design out. -
Gold specs:
Look for empty voids in your dark blue canvas and add a final few tiny gold specks to balance the composition.
Fixing Smudges
If you smudge a gold star, don’t wipe it! Let it dry completely, then paint over the mistake with your blue base color before trying again.
Step 3: Finishing Touches
-
Final dry:
Allow the metallic paint to set for at least an hour. Metallics can sometimes take longer to dry than matte acrylics. -
Protect your work:
Take the pumpkin outside or to a ventilated area and apply a light coat of clear matte sealant spray. This protects the paint from scratching without ruining the velvety dark finish.
Place your celestial pumpkin on a mantel or entryway table to bring a touch of starlight into your home this season
Retro Wavy Squiggle Pumpkin
Bring the groovy vibes of the 1970s to your autumn decor with this wavy, retro-inspired design. The combination of simple vertical stripes and playful squiggles creates a sophisticated yet whimsical look that stands out from traditional jack-o’-lanterns.
Step-by-Step Tutorial
Materials
- medium-sized pumpkin (real or faux)
- matte cream or off-white acrylic paint
- burnt orange acrylic paint
- sage green acrylic paint
- large flat paintbrush
- medium round paintbrush
- fine detail liner brush
- pencil or light-colored chalk
- palette or paper plate
- cup of water
- paper towels
Step 1: Base Coat Preparation
-
Clean surface:
Begin by wiping down your pumpkin with a damp cloth to remove any dirt or oils, ensuring the paint adheres properly. -
Apply base color:
Using your large flat brush, apply an even coat of the matte cream or off-white paint over the entire pumpkin. -
Second coat:
Let the first layer dry completely. I like to let this dry briefly in a sunny spot to speed things up. Apply a second coat to ensure fully opaque coverage so no orange rind shows through. -
Identify ribs:
Take a moment to look at the natural vertical ribs of your pumpkin. These indentations and raised areas will serve as the natural guide for your pattern.
Use Flow Aid
Mix a drop of acrylic flow improver into your green paint. It helps the liner brush glide smoothly for long, uninterrupted squiggles.
Step 2: Creating the Orange Stripes
-
Plan the pattern:
Decide which sections will be solid stripes. For this design, you want to leave a wide gap between each colored stripe, essentially painting every other raised rib. -
Sketch guides:
Lightly sketch the vertical bands with a pencil or chalk, following the natural curves of the pumpkin from the stem down to the base. -
Paint first stripe:
Load your medium round brush with burnt orange paint. Start at the top near the stem and pull the brush down in a confident stroke. -
Refine edges:
Widen the stripe slightly to match the width of the pumpkin rib. Don’t worry about razor-sharp straight lines; a slightly organic edge adds to the handmade charm. -
Continue spacing:
Skip a significant section of the cream background, then paint your next orange stripe. Repeat this around the entire circumference. -
Touch-ups:
Go back over the orange stripes with a second layer if the cream background is peeking through, then allow them to dry fully.
Make it Matte
Mix baking soda into your base coat paint for a textured, ceramic-like finish that looks incredibly high-end and modern.
Step 3: Adding the Wavy Details
-
Prepare the green:
Mix your sage green paint on the palette. You want a fluid consistency, so add a tiny drop of water if the paint feels too thick. -
Switch brushes:
Pick up your fine detail liner brush. This tool is essential for getting those delicate curves. -
Practice stroke:
Before hitting the pumpkin, practice a long ‘S’ curve motion on a piece of paper to get the feel of the wavy line. -
Paint center waves:
In the open cream spaces between the orange stripes, paint a vertical wavy line starting from the stem. Aim for the center of the gap. -
Add flanking waves:
Paint two more wavy green lines on either side of the orange stripes. These should hug the contour of the orange bands closely but not touch them. -
Outline stripes:
Carefully use the liner brush to outline the edges of the orange stripes with the same sage green. This defines the shape and makes the color pop. -
Stem detail:
Finish by dry-brushing a tiny bit of the sage green onto the base of the stem to integrate it with the rest of the design.
Place your warm-toned masterpiece on a linen cloth or wooden tray to complete the cozy autumn aesthetic
Abstract Brushstroke Patchwork Pumpkin
Embrace a modern, artistic autumn vibe with this patchwork-style pumpkin that uses earthy tones and deliberate brushstrokes. The design relies on simple geometric blocks of color that follow the pumpkin’s natural ribs, creating a sophisticated and textured look.
Step-by-Step
Materials
- Faux craft pumpkin (cream or white) or a real white pumpkin
- Acrylic paints (muted terracotta, olive green, mustard yellow, beige, copper/bronze)
- Medium flat shader brush (approx. 1/2 inch to 3/4 inch)
- Small flat brush for touch-ups
- Palette or paper plate
- Cup of water
- Paper towels
- Clear matte sealer spray (optional)
Step 1: Preparation and Planning
-
Clean surface:
Begin by wiping down your pumpkin with a damp cloth to remove any dust or oils. If you are using a real pumpkin, ensure it is completely dry before starting; for faux pumpkins, a quick wipe ensures better paint adhesion. -
Palette setup:
Squeeze out a dime-sized amount of each paint color onto your palette. I find that keeping the colors separate at first helps visualize the balance, but you can mix a little white into the terracotta or green to create softer, muted variations. -
Mental mapping:
Observe the vertical ribs of the pumpkin. These natural indentations act as perfect guides for your columns of color. Plan visualize your patchwork grid—you’ll be painting rectangular blocks within these vertical sections.
Uneven Edges?
If your rectangles look messy, use a flat brush slightly damp with water (not paint) to “erase” and tidy the wet edges before they dry.
Step 2: Painting the Patchwork
-
First color block:
Load your medium flat brush with the terracotta paint. Choose a rib section and paint a rectangle about 2-3 inches long. Use the width of the brush to create clean, straight edges, letting the brushstroke texture remain visible. -
Spacing the first color:
Continue adding terracotta blocks randomly around the pumpkin. Skip a few ribs between each block and vary their vertical placement—some near the top, some near the bottom. -
Adding olive tones:
Rinse your brush thoroughly and switch to the olive green paint. Fill in open spaces next to or above your terracotta blocks. Try to keep the blocks roughly the same width (filling the rib section) but vary the heights slightly for an organic feel. -
Incorporating mustard:
Apply the mustard yellow blocks in the remaining large gaps. This color adds a warm brightness that bridges the gap between the darker green and the reddish terracotta. -
Leaving negative space:
Crucially, leave distinct gaps of the original pumpkin color between your painted blocks. These unpainted ‘gutters’ create the patchwork effect and keep the design from looking like solid stripes. -
Brushstroke texture:
Don’t overwork the paint. One or two confident swipes per block is ideal to maintain that painterly, streak-filled aesthetic shown in the photo.
Add Metallic Glam
Outline just one side of each colored block with a thin line of gold leaf or metallic paint pen for a chic, high-contrast finish.
Step 3: Refining and Layering
-
Beige blending:
Using a clean brush, mix a very small amount of beige or cream paint with the terracotta on some blocks. Lightly drag this lighter color over the drying paint to create depth and a weathered look. -
Metallic accents:
If desired, take a tiny amount of copper or bronze paint. I like to dry-brush this very sparingly on the edges of a few blocks to catch the light, though the original look is primarily matte. -
Stem detail:
The stem in the image is a dark, natural green-brown. If your pumpkin’s stem is plastic-looking, paint it with a mix of dark brown and olive green to ground the design. -
Checking the balance:
Step back and rotate the pumpkin. Look for any areas that feel too heavy with one color. If needed, paint a new block over an empty space to balance the composition. -
Touch ups:
Use your small flat brush to sharpen any wobbly edges on your rectangles strictly where the paint bled, but keep the ends of the brushstrokes natural and feathered. -
Drying:
Let the pumpkin sit undisturbed for at least an hour. Thick acrylic applications can feel dry to the touch but still be soft underneath. -
Sealing:
For longevity, especially if placing outdoors, spray a light coat of clear matte sealer over the entire pumpkin to protect your artwork from moisture.
Place your warm-toned masterpiece on a linen cloth by a window to highlight those beautiful brush textures with natural light
Soft Marble-Swirl Pumpkin
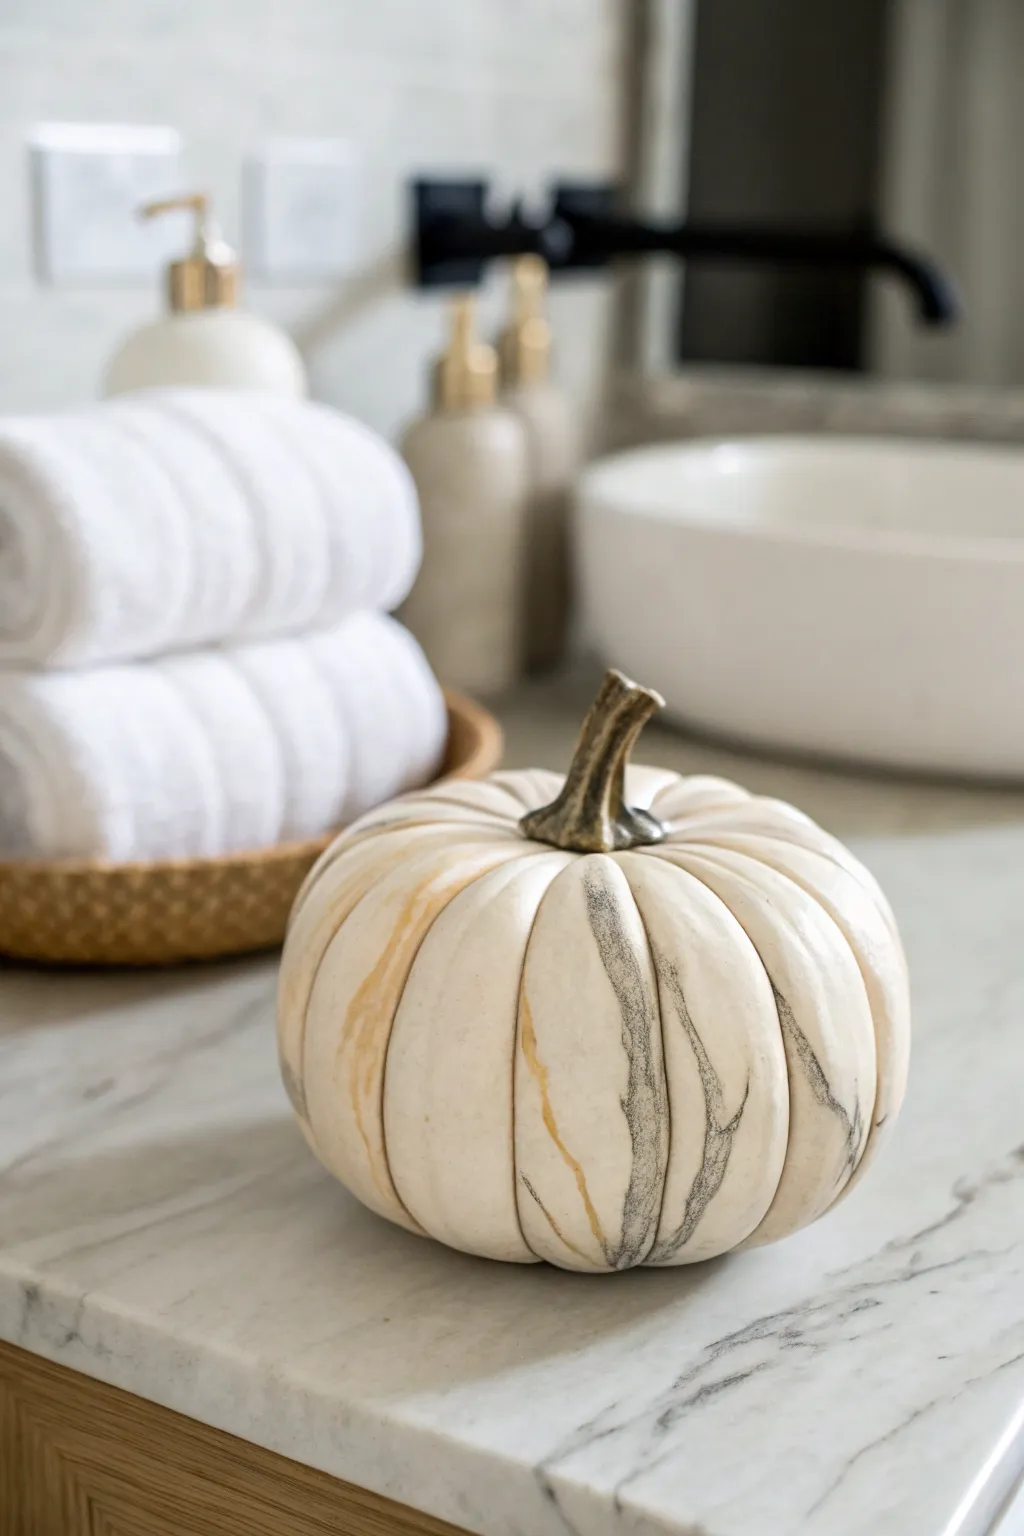
Transform a plain craft pumpkin into a high-end decor piece with this surprisingly achievable faux marble technique. By layering soft grey veins with flashes of gold, you can mimic the organic beauty of real stone.
Detailed Instructions
Materials
- Artificial white pumpkin (smooth surface works best)
- White acrylic paint (matte or satin finish)
- Grey acrylic paint (cool tone)
- Metallic gold paint or liquid gold leaf
- Glazing medium or water (for thinning)
- Small round detail brush (size 2 or 4)
- Fine liner brush (size 0 or 00)
- Feather or sea sponge (optional for softening)
- Paper towels
- Matte clear spray sealer
Step 1: Base Preparation
-
Clean surface:
Begin by wiping down your artificial pumpkin with a damp cloth to remove any dust or manufacturing oils. If the pumpkin is glossy plastic, you might want to give it a quick scuff with fine-grit sandpaper for better paint adhesion. -
Apply base coat:
Paint the entire pumpkin with a solid coat of white acrylic paint. Even if the pumpkin is already white, a fresh coat of paint provides a better ‘tooth’ for the marble details than bare plastic. -
Dry completely:
Let this base layer dry fully. Depending on your paint coverage, you may need a second coat to ensure it is opaque and smooth.
Step 2: Creating the Marble Veins
-
Prepare the grey wash:
Mix a small amount of cool grey paint with water or glazing medium. You want a very thin, watery consistency—almost like watercolor—so the veins look translucent rather than solid. -
Map out primary veins:
Using your small round brush, lightly drag irregular lines down the vertical ridges of the pumpkin. Don’t make them straight; let your hand wobble slightly to mimic natural stone fissures. -
Soften the edges:
Immediately after painting a section of vein, use a clean, slightly damp brush (or a feather) to blur the edges of the line. The paint should fade into the white background, creating a smoky effect. -
Add darker accents:
While the grey is still slightly tacky, mix a slightly less diluted version of the grey. Go back into the wettest parts of your veins and add thin, darker streaks with the liner brush to create depth. -
Blotting technique:
If a line looks too harsh or uniform, lightly dab it with a crumpled piece of paper towel or a sea sponge to lift some pigment and create texture. -
Branching out:
Create Y-shaped splits where the veins branch off. Real marble rarely features isolated straight lines; the veins should connect and diverge naturally.
Natural Line Work
Hold your brush loosely by the end of the handle when painting veins. This reduces control and creates the shaky, organic lines found in real natural stone.
Step 3: Adding the Gold Highlights
-
Mix gold paint:
Prepare your metallic gold paint. I find that liquid gold leaf offers the brightest shine, but a high-pigment metallic acrylic works perfectly well too. -
Trace nearby veins:
Using your finest liner brush, paint thin gold lines that run parallel to or intertwine with the grey marble veins. Don’t outline every grey mark; just pick a few key areas to highlight. -
Keep lines crisp:
Unlike the grey wash, keep the gold lines relatively crisp and opaque. This contrast between the blurry grey and sharp gold adds the sophisticated finish shown in the image. -
Add independent gold:
Place a few stray gold wisps on their own in the white spaces, following the vertical curve of the pumpkin. This keeps the design from looking too clustered. -
Stem treatment:
Paint the stem. In the reference image, the stem has an antiqued bronze or dark metallic look. You can achieve this by painting it dark grey first, then dry-brushing gold over the raised textures.
Stone Texture
Before sealing, flick a toothbrush loaded with diluted grey paint at the pumpkin to create tiny speckles, simulating granite or porphyry details.
Step 4: Final Touches
-
Review and refine:
Step back and look at the pumpkin from a distance. If any areas look too empty, add very faint grey washes (extremely diluted) to bridge the gaps. -
Dry thoroughly:
Allow the painted details to dry completely. Metallic paints often take a little longer to cure than standard acrylics. -
Seal the work:
To protect your faux stone masterpiece, spray the entire pumpkin with a matte or satin clear sealer. Avoid high gloss, as it can make the ‘stone’ look plastic.
Place your elegant pumpkin on a vanity or coffee table to add a touch of stone-cold style to your autumn decor
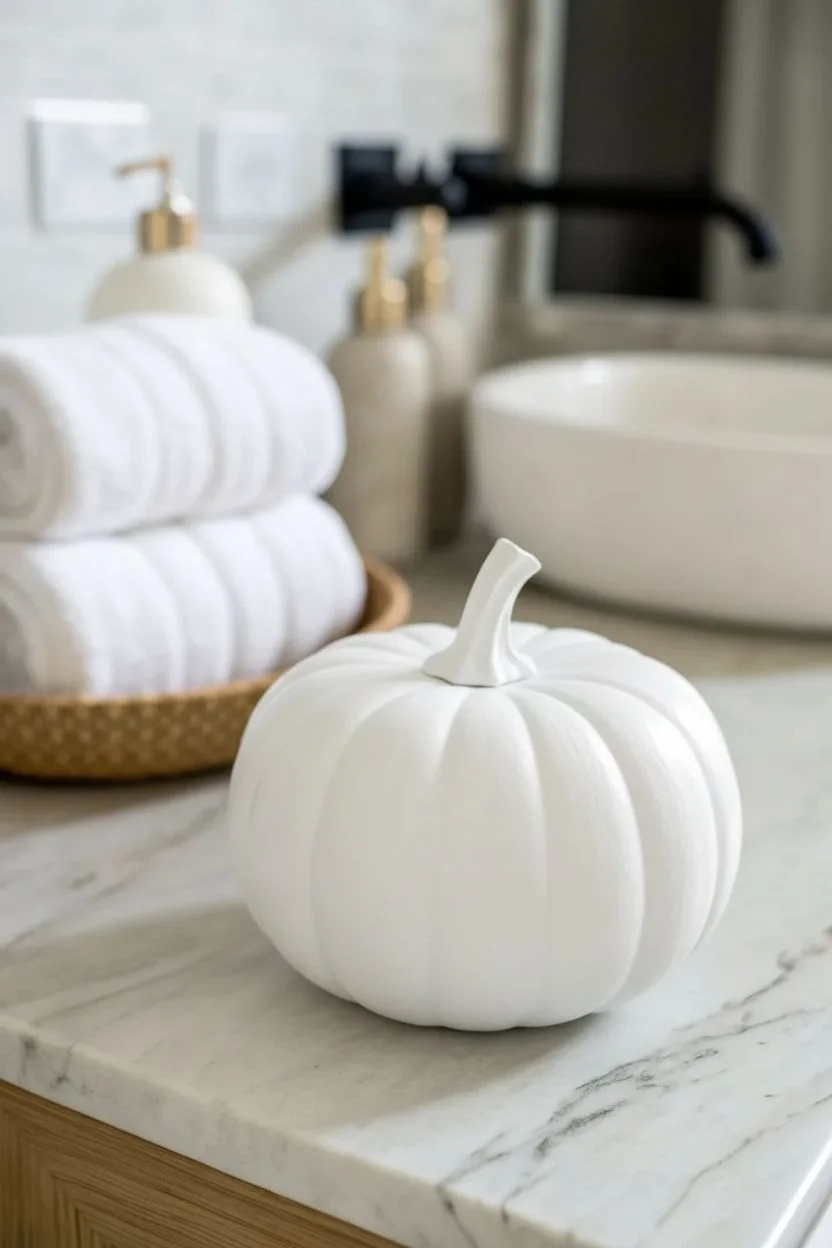
Metallic Leaf Accent Pumpkin
Elevate your autumn home styling with this chic, minimalist pumpkin design that combines clean white tones with luxurious metallic accents. The scattered gold leaf effect mimics organic flecks, creating a sophisticated piece that catches the light beautifully on a sunny windowsill.
Step-by-Step Guide
Materials
- Small to medium foam or real pumpkin (white)
- White acrylic paint (matte finish)
- Gold leaf flakes
- Metal leaf adhesive (sizing)
- Liquid gold gilding paint or gold metallic acrylic paint
- Two soft paintbrushes (one small detail brush, one medium)
- Dry, fluffy brush (for removing excess leaf)
- Sealer spray (clear matte or satin, optional)
- Disposable gloves
Step 1: Preparation and Base Coat
-
Clean surface:
Begin by wiping down your pumpkin with a damp cloth to remove any dirt or oils. If you are using a real pumpkin, ensure it is completely dry before proceeding. -
Apply base color:
Even if your pumpkin is already white, painting it with white matte acrylic paint creates a uniform canvas. Apply a thin, even coat over the entire surface, avoiding the stem. -
Dry completely:
Let the first coat dry for about 20-30 minutes. If the original color is still showing through, apply a second coat for full opacity. -
Paint the stem:
While the body dries, carefully paint the stem with your liquid gold gilding paint. Use a small detail brush to get into the crevices where the stem meets the pumpkin without getting gold on the white skin. -
Stem second coat:
Liquid gilding is usually opaque, but if you used metallic acrylic, you might need a second layer on the stem for that rich, solid gold look shown in the photo.
Sticky Situation
If the gold leaf tears or doesn’t stick, you likely applied it too soon while the glue was wet. Wait until the adhesive is completely clear and tacky next time.
Step 2: Applying the Gold Accents
-
Plan placement:
Visualize a scattered pattern. The charm of this design is its randomness, so plan for asymmetrical clusters of spots rather than perfect rows. -
Apply adhesive dots:
Using a small brush, dab small, irregular spots of metal leaf adhesive onto the pumpkin. Keep the spots various sizes—some tiny specks, some larger blotches. -
Wait for tackiness:
This is crucial: wait for the adhesive to turn from milky to clear. It should feel sticky or ‘tacky’ to the touch but not wet. This usually takes 10-15 minutes depending on the brand. -
Press on gold leaf:
Pick up small pieces of gold leaf (using tweezers helps avoid sticking to your fingers) and press them gently over the tacky adhesive spots. -
Cover completely:
Don’t worry about shape yet; just ensure every bit of sticky adhesive is covered by a piece of foil. -
Burnish gently:
With a clean, dry finger or a soft cloth, very gently press the gold leaf down to ensure it has adhered well to the pumpkin surface. -
Brush away excess:
Take a dry, stiff brush and briskly sweep over the gold areas. The excess leaf that isn’t stuck to glue will flake away, leaving behind those crisp, organic gold shapes. -
Refine the edges:
If a spot looks too blocky, you can use the stiff brush to scratch at the edges slightly to create a more distressed, splashed look. -
Touch ups:
Inspect the pumpkin from different angles. If you feel a side is too bare, simply repeat the adhesive and foiling process in that specific area.
Step 3: Finishing
-
Clear any dust:
Use a soft, fluffy brush to dust off any tiny stray particles of gold leaf that might be clinging to the white paint due to static. -
Seal (optional):
If this pumpkin will be handled frequently or placed outside, spray a light coat of clear matte sealer over the entire project to prevent the metal leaf from tarnishing. -
Style and display:
Place your finished pumpkin near natural light to really make those gold accents sparkle.
Mixed Metals
Create depth by mixing gold and copper leaf flakes. Apply them simultaneously for a rich, multi-tonal metallic effect that mimics rusting leaves.
Enjoy the elegant shimmer of your handmade centerpiece as the autumn light changes throughout the day
Coordinated Pumpkin Topiary Stack
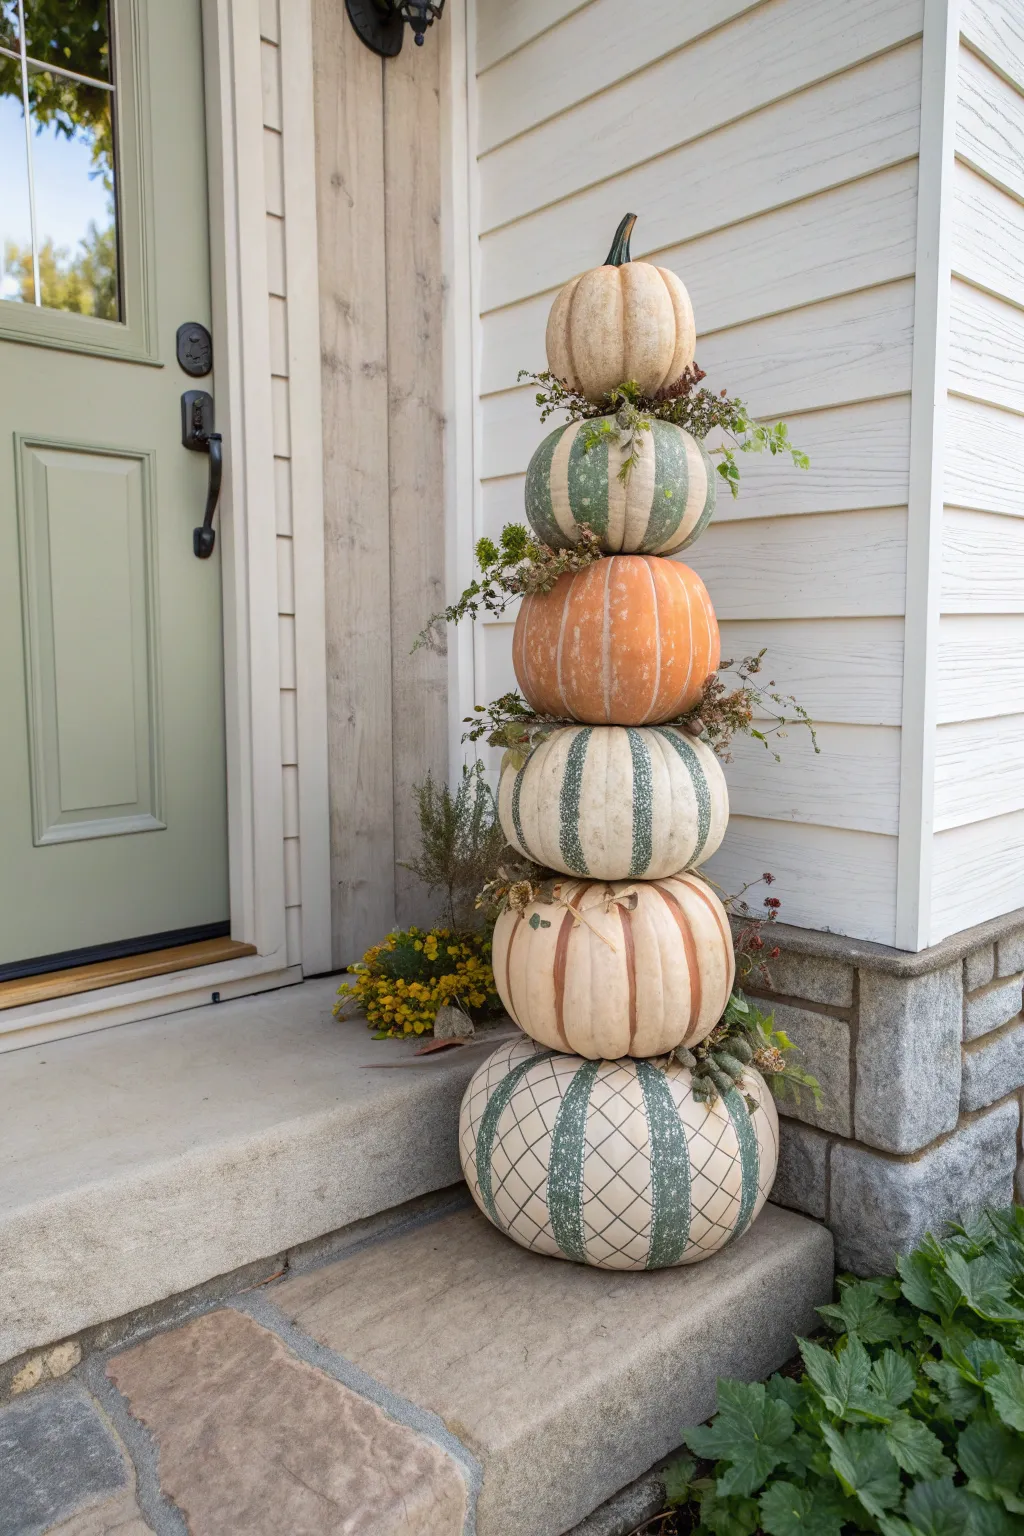
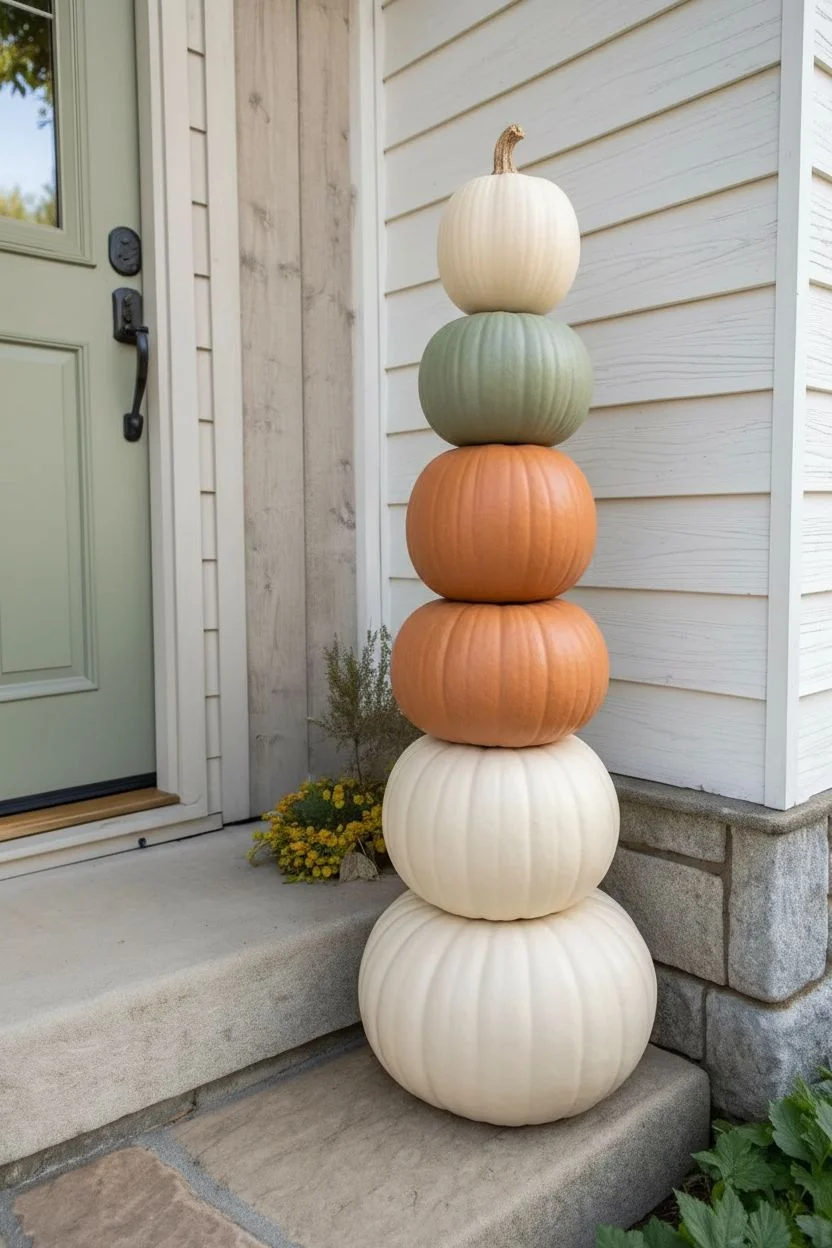
Bring an elegant, vertical focal point to your porch with this soothingly coordinated pumpkin stack. Featuring a mix of painted plaids, wide stripes, and natural orange tones, this six-tier topiary mimics the look of high-end ceramic décor.
Step-by-Step
Materials
- 6 faux pumpkins in graduated sizes (largest to smallest)
- Acrylic craft paints (creamy white, sage green, warm terra cotta)
- Matte finish spray sealer
- Painter’s tape (various widths)
- Pencil
- Flat shader brushes (medium and large)
- Fine liner brush
- Plaid stencil (optional)
- Hot glue gun and glue sticks
- Faux greenery sprigs (dried moss, leaves, delicate vines)
- Wooden dowel or metal rod (at least 3-4 feet long)
- Drill with a large bit (matching rod diameter)
Step 1: Preparation & Base Coats
-
Select and sort:
Arrange your six faux pumpkins in a tower to ensure they graduate smoothly in size from a wide base to a small topper. -
Remove stems:
Carefully remove the stems from all pumpkins except the very smallest one that will sit on top. You can usually twist them off or cut them flush with a craft knife. -
Drill the path:
Drill a hole through the top and bottom center of the bottom five pumpkins. For the top pumpkin, drill a hole only into the bottom. This channel will hold the stability rod later. -
Prime the surface:
If your faux pumpkins are bright neon orange, I recommend giving them all a quick coat of primer or white spray paint to neutralize the base color. -
Base painting: Cream:
Paint the bottom (largest), fourth (middle-large), and top (smallest) pumpkins entirely in a creamy white acrylic paint. You may need two coats for full opacity. -
Base painting: Orange:
Paint the second pumpkin (from the bottom) and the fifth pumpkin (second from top) in a warm, muted terra cotta or soft orange. If they are already a nice orange color, you can leave them natural. -
Base painting: Sage:
Paint the third pumpkin (middle) entirely in a soft sage green.
Step 2: Painting the Patterns
-
Bottom pumpkin: Sage stripes:
On your large white pumpkin, use medium-width painter’s tape to mark off vertical segments following the pumpkin’s natural ribs. Paint the exposed areas with sage green to create thick vertical stripes. -
Bottom pumpkin: The grid:
Once dry, remove the tape. Using a fine liner brush and black or dark grey paint, carefully paint thin diagonal lines across the whole surface to create a diamond grid pattern overlaid on top of the stripes. -
Second pumpkin: Stripes:
Take the orange pumpkin (second from bottom) and paint thin, vertical creamy white stripes in the crevices between the ribs using a steady hand and a flat brush. -
Third pumpkin: White detailing:
On the sage green pumpkin, use a dry-brush technique with cream paint to highlight the raised ridges, giving it a textured, weathered look. Then add thick vertical white stripes spaced evenly around the circumference. -
Top tiers: Repeating motifs:
For the upper three smaller pumpkins, repeat elements from the bottom. Paint the second-from-top pumpkin with sage green stripes on a white background, and leave the orange pumpkin largely solid with just subtle shading.
Wobbly Stack?
If the pumpkins don’t sit flush against each other due to curved tops, cut a small circle of felt or craft foam and glue it between the layers as a buffering washer.
Step 3: Assembly & Styling
-
Seal the artwork:
Once all paint is completely dry, spray each pumpkin individually with a matte sealer. This protects the paint from porch humidity and chipping. -
Insert the rod:
Thread your wooden dowel or metal rod into the largest base pumpkin. Apply hot glue around the hole opening for extra stability. -
Stack and glue:
Slide the next pumpkin onto the rod. Apply a ring of hot glue where the pumpkins touch to prevent spinning. Continue stacking until you reach the top. -
Cap it off:
Place the final, smallest pumpkin (with its stem intact) on the tip of the rod and glue it firmly in place. -
Add nature:
Tuck sprigs of faux moss, dried hydrangea bits, or small leaves into the gaps between the stacked pumpkins. Use a dab of hot glue to secure them, softening the transition between tiers.
Weatherproof Pro Tip
Add sand or gravel inside the very bottom pumpkin before sealing it up. This weighted base prevents your tall masterpiece from toppling over on windy autumn days.
Place your finished topiary by the front door for a sophisticated autumn welcome that lasts all season long


Have a question or want to share your own experience? I'd love to hear from you in the comments below!