When kids paint Christmas, it’s like bottling up that whole cozy, sparkly feeling and putting it on paper. Here are my go-to Christmas painting ideas for kids that are simple to pull off, super festive, and genuinely fun to make together.
Classic Triangle Christmas Tree
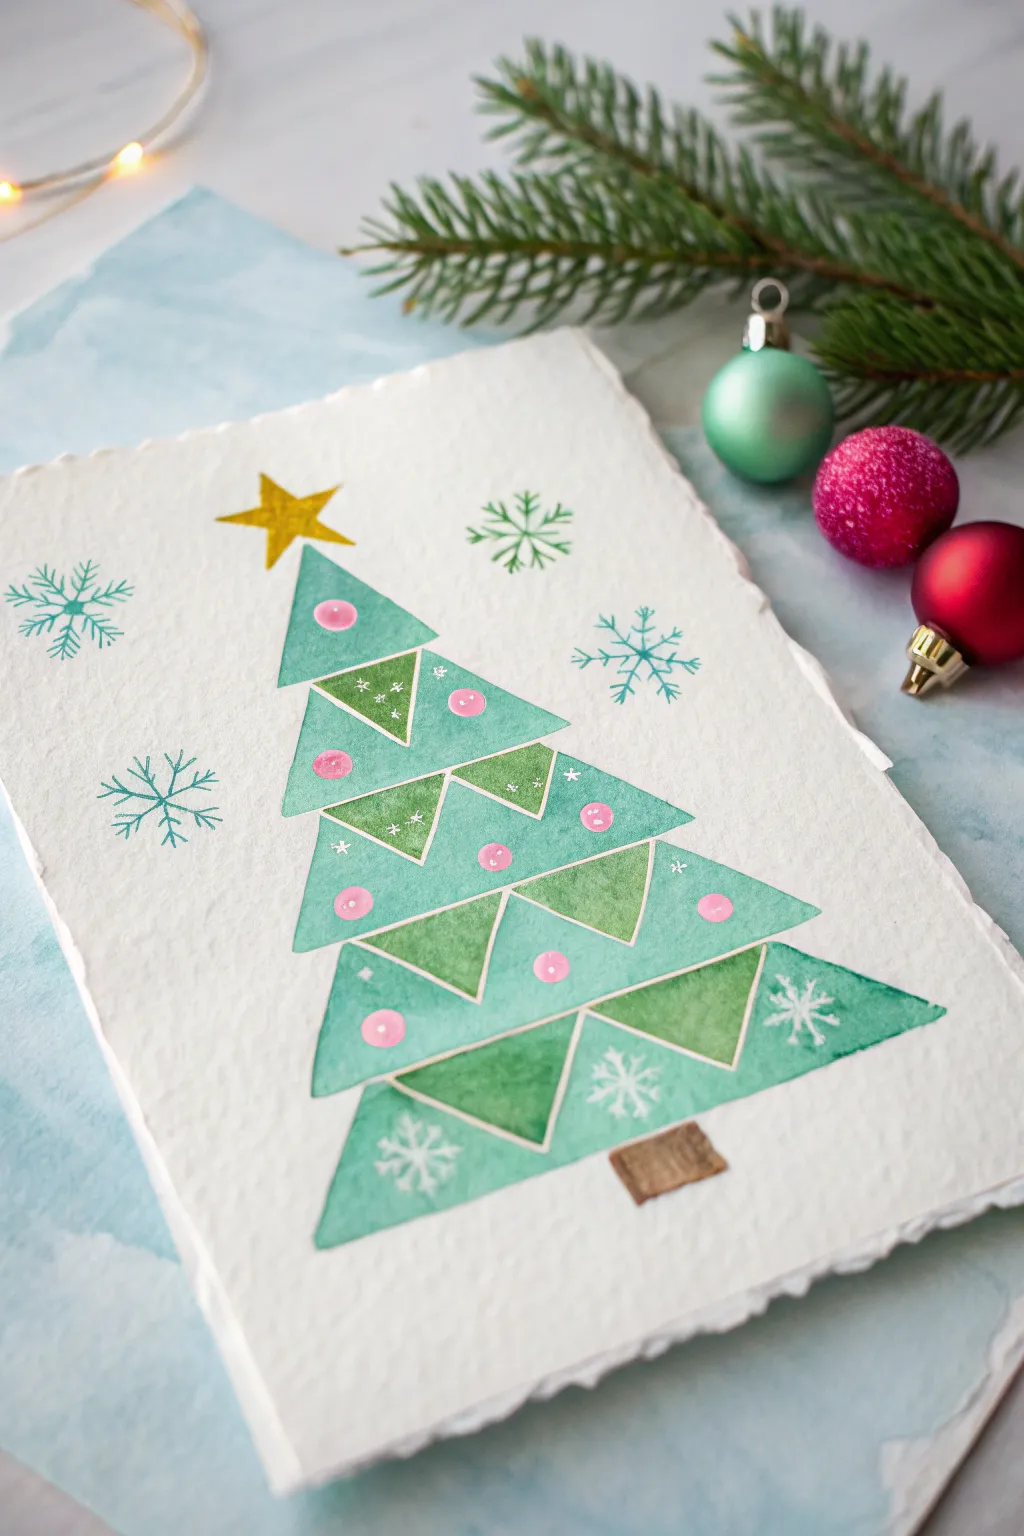
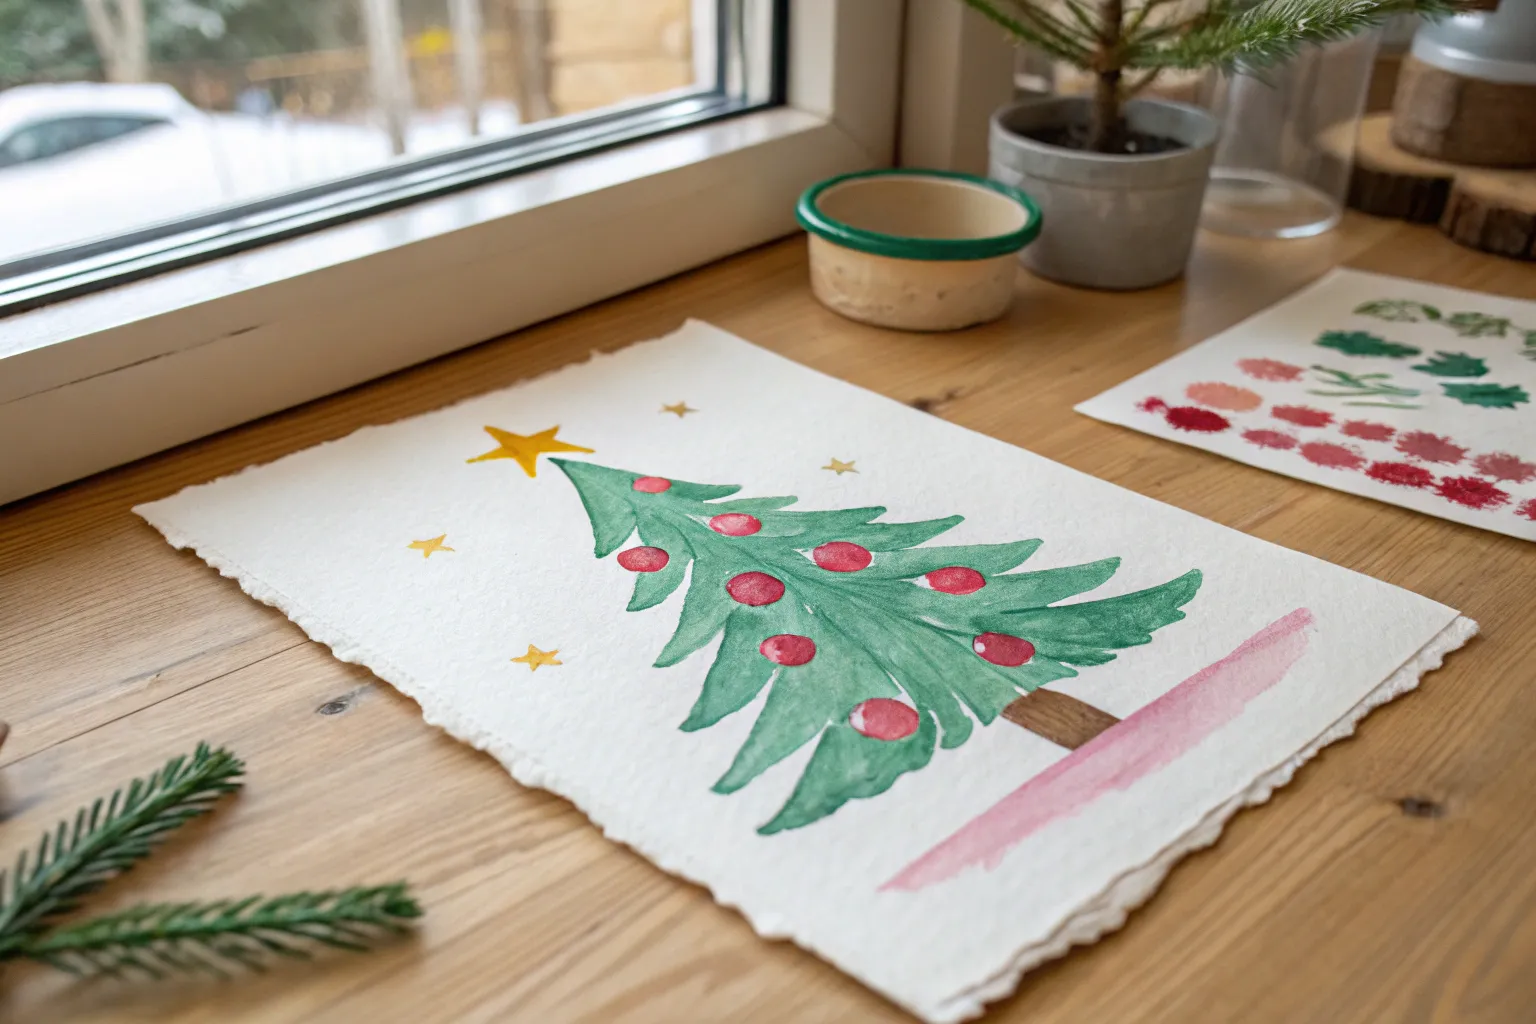
This project creates a stunningly modern Christmas tree using simple geometric touches and a soothing teal and green palette. The result is a crisp, textured holiday card that looks professionally designed but is surprisingly easy for young artists to master.
How-To Guide
Materials
- Heavyweight watercolor paper (thick, textured)
- Watercolor paints (teal, mint green, forest green, pink, gold, brown)
- Fine round paintbrush (size 2 or 4)
- Pencil and ruler
- Gold paint pen or metallic watercolor
- Painter’s tape or masking tape (optional)
- Water cup and paper towels
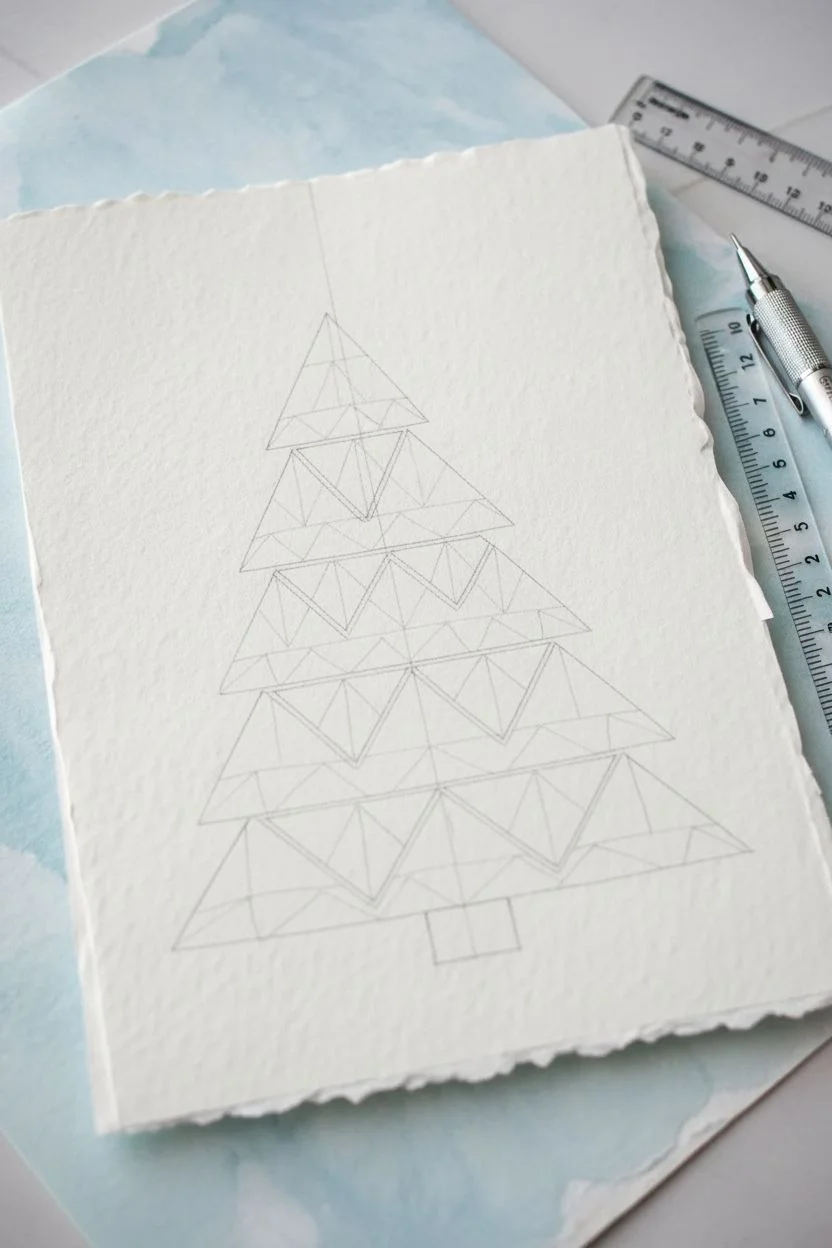
Step 1: Planning and Sketching
-
Prepare the paper:
Start with a high-quality piece of watercolor paper. If you want that lovely deckled edge look seen in the photo, you can carefully tear the paper edges against a ruler instead of cutting them with scissors. -
Draw the central guideline:
Using a pencil and ruler, draw a very faint vertical line right down the center of your page to help keep your tree straight. -
Sketch the triangle frame:
Lightly sketch a large triangle shape that defines the outer boundary of your tree. This won’t be painted, but it helps keep the smaller triangles in check. -
Map out the segments:
Inside your large triangle frame, use your ruler to draw horizontal lines to divide the tree into four or five distinct tiers. -
Create the geometric pattern:
Within each horizontal tier, draw diagonal lines to create the individual smaller triangles. Leave a tiny sliver of white space (a gap) between every single triangle; this white ‘grout’ line is essential for the style.
Clean Lines Pro-Tip
To keep the white gaps perfect, you can use liquid masking fluid or thin strips of masking tape over the lines before painting, then peel them off when dry.
Step 2: Painting the Tree
-
Mix your main teal:
Prepare a watery wash of teal or mint green on your palette. This lighter, cool color will be the primary shade for the majority of the triangles. -
Paint the base triangles:
Fill in about two-thirds of the triangles with your light teal mix. Be very careful to stay inside your pencil lines, preserving those white gaps between shapes. -
Add contrast with forest green:
While the first set is drying, mix a darker leafy green. Paint the remaining empty triangles with this darker shade to create depth and visual interest. -
Let the layers dry:
Pause here and let the entire tree dry completely. If the paint is wet, the decorations we add next will bleed and look messy. -
Paint the trunk:
At the very bottom, paint a small, simple brown rectangle for the tree trunk.
Step 3: Adding Festive Details
-
Top with gold:
Using metallic gold watercolor or a paint pen, draw and fill in a five-pointed star at the very peak of your tree. -
Paint the ornaments:
Dip your smallest brush into bright pink paint. Add a single dot to the center of several triangles. Try to distribute them evenly across the tree, placing some on light triangles and some on dark ones. -
Add snow details:
Using white gouache or a white gel pen, draw tiny snowflake patterns or X-shapes on just the bottom few green triangles to make them look frosted. -
Draw floating snowflakes:
In the background sky area, draw three or four delicate snowflakes using a fineliner, a teal colored pencil, or a very fine brush with teal paint.
Level Up: 3D Sparkle
Make the ornaments pop by gluing small pink sequins, rhinestones, or actual tiny buttons onto the tree instead of just painting dots.
Once the paint is fully dry, you have a crisp, modern masterpiece ready to be gifted or displayed


Red-Nosed Reindeer Portrait
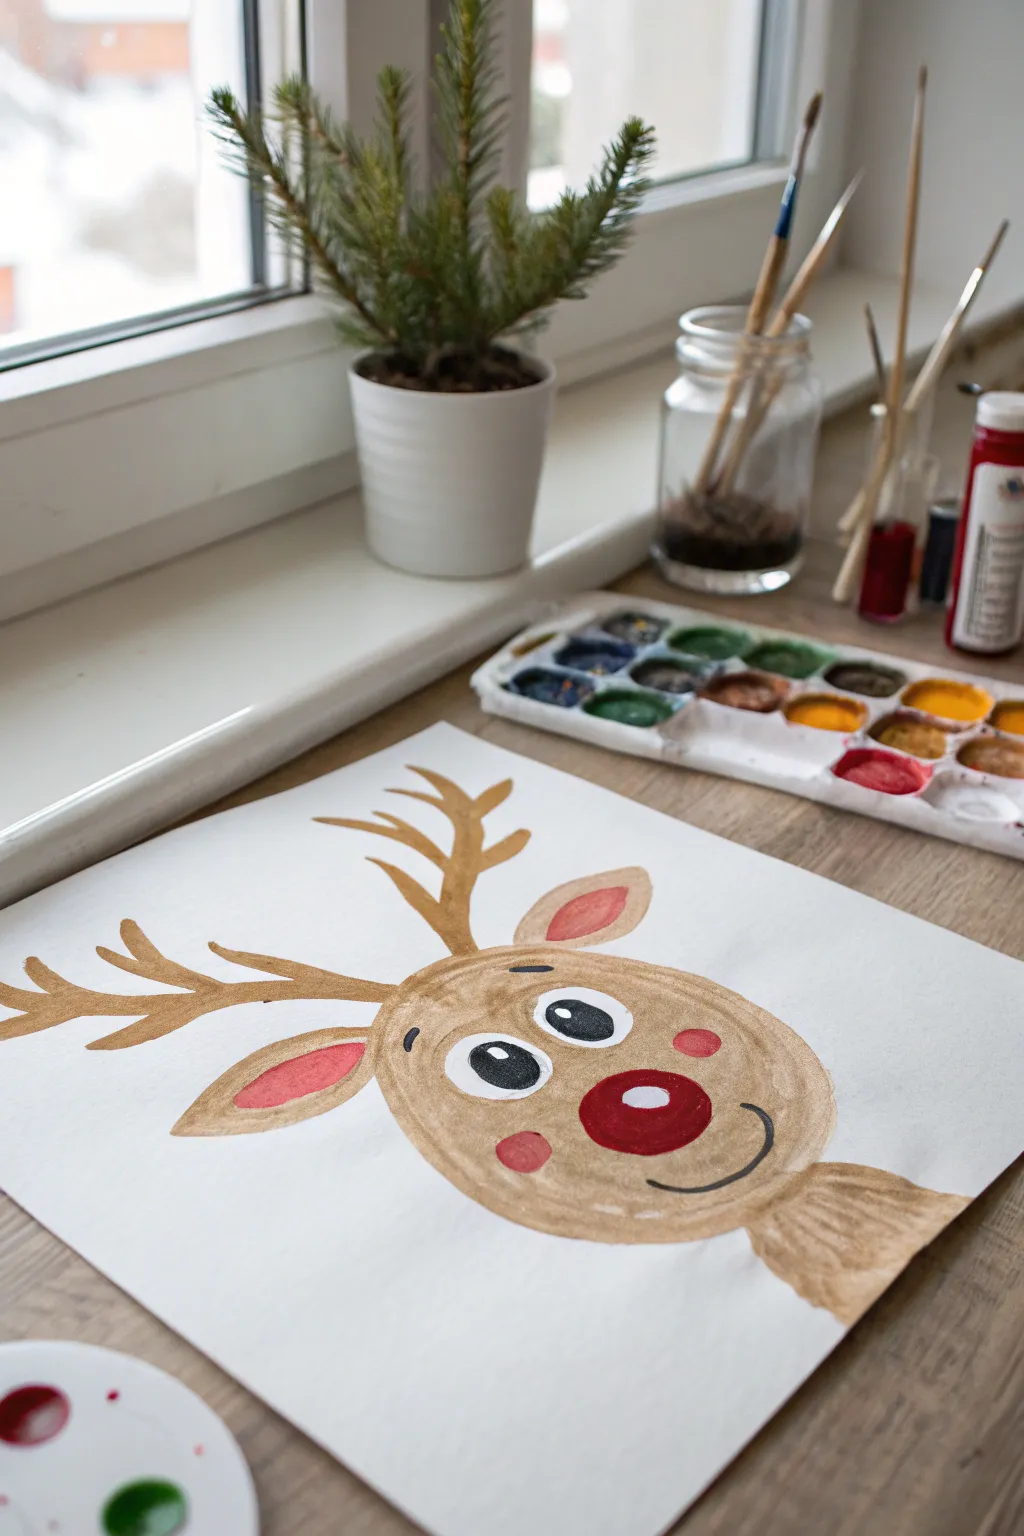
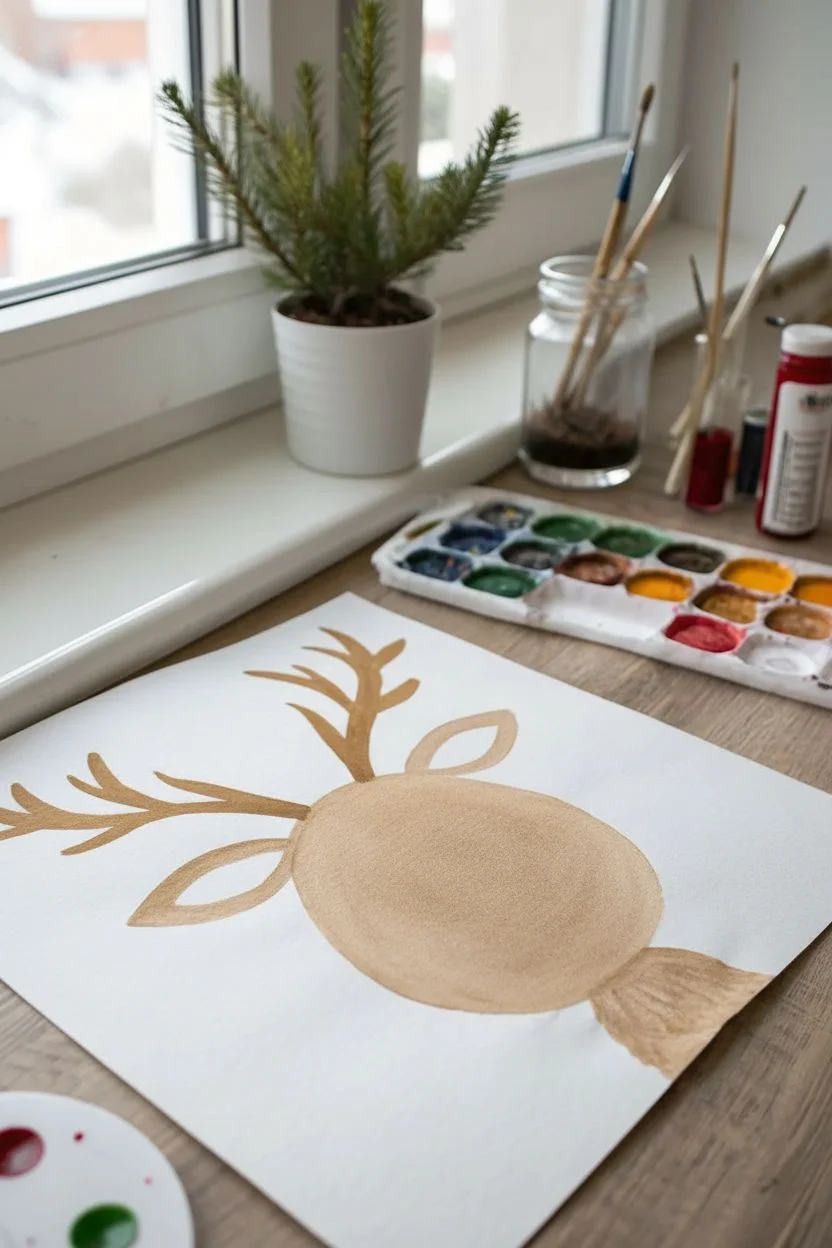
Capture the magic of the season with this sweet, softly painted reindeer portrait that focuses on bold shapes and charming details. Using simple watercolors, you’ll create a heartwarming character with a bright red nose that pops against the gentle brown tones.
Step-by-Step
Materials
- White art paper or watercolor paper (A4 or similar size)
- Watercolor paints (pan set is perfect)
- Round paintbrush (medium size, around #6 or #8)
- Fine detail paintbrush (small size, around #2)
- Cup of clean water
- Paper towels
Step 1: The Basic Shapes
-
Outline the head:
Start by mixing a light to medium brown shade on your palette with plenty of water. Paint a large, wide oval shape in the lower center of your paper to form the reindeer’s head. -
Fill in the face:
Using the same watery brown mix, fill in the oval shape. Keep the strokes loose and don’t worry about perfect coverage; the variation adds texture. -
Add the neck:
Paint a gentle, widening tuft of fur extending from the bottom right side of the head to suggest the neck and shoulder area. -
Form the ears:
Paint two leaf-shaped ears extending from the top sides of the head. I like to angle them slightly outward for a perky look. Leave the centers empty for now. -
Paint the antlers:
Switch to a slightly darker brown mix with less water. Paint two main antler stems growing from the top of the head, then add smaller branches forking off them.
Bleeding Colors?
If the red nose bleeds into the brown face, your base layer wasn’t dry enough. Let it dry completely, then gently dab up the mistake with a damp tissue before repainting.
Step 2: Adding Character
-
Pink details:
Load your brush with a soft pink or diluted red. Carefully paint the inner shapes of the ears and add two small circles on the cheeks for a blushing effect. -
The famous nose:
Clean your brush thoroughly. Pick up a strong, vibrant red paint—try not to dilute it too much so it stays bold. Paint a prominent, large circle right in the center of the face for the nose. -
Highlight the nose:
While the red paint is still wet, you can lift out a tiny spot with a clean, dry brush, or wait for it to dry and add a dab of white paint later for a shine. -
Dry time:
Let the painting sit for about 10–15 minutes. It is crucial that the brown creates a dry surface before you add the black details to prevent bleeding.
Make It Sparkle
For a magical holiday touch, mix a pinch of loose glitter into the red paint for the nose, or use metallic gold watercolor for the antlers.
Step 3: Bringing it to Life
-
Paint the eye whites:
Using white paint (gouache or white watercolor straight from the tube works best here), paint two large oval shapes above the nose. -
Add the pupils:
once the white is dry, switch to your fine detail brush and black paint. Paint large black circles inside the white ovals, leaving them looking toward the left. -
Eye sparkles:
Carefully leave a tiny unpainted white dot inside the black pupils, or add a dot of white paint on top afterward to give the eyes a lively sparkle. -
Draw the eyebrows:
With the fine brush and black paint, make two tiny, floating curved lines above the eyes to give him a surprised expression. -
Create the smile:
Use the fine brush to paint a simple black curved line below the nose, extending slightly up the right cheek for a crooked, happy smile. -
Final touches:
Check your edges. If the antlers look too light, go over them again with another layer of brown to make them stand out against the paper.
Hang this cheerful portrait near a window to let the winter light brighten up your reindeer’s smile


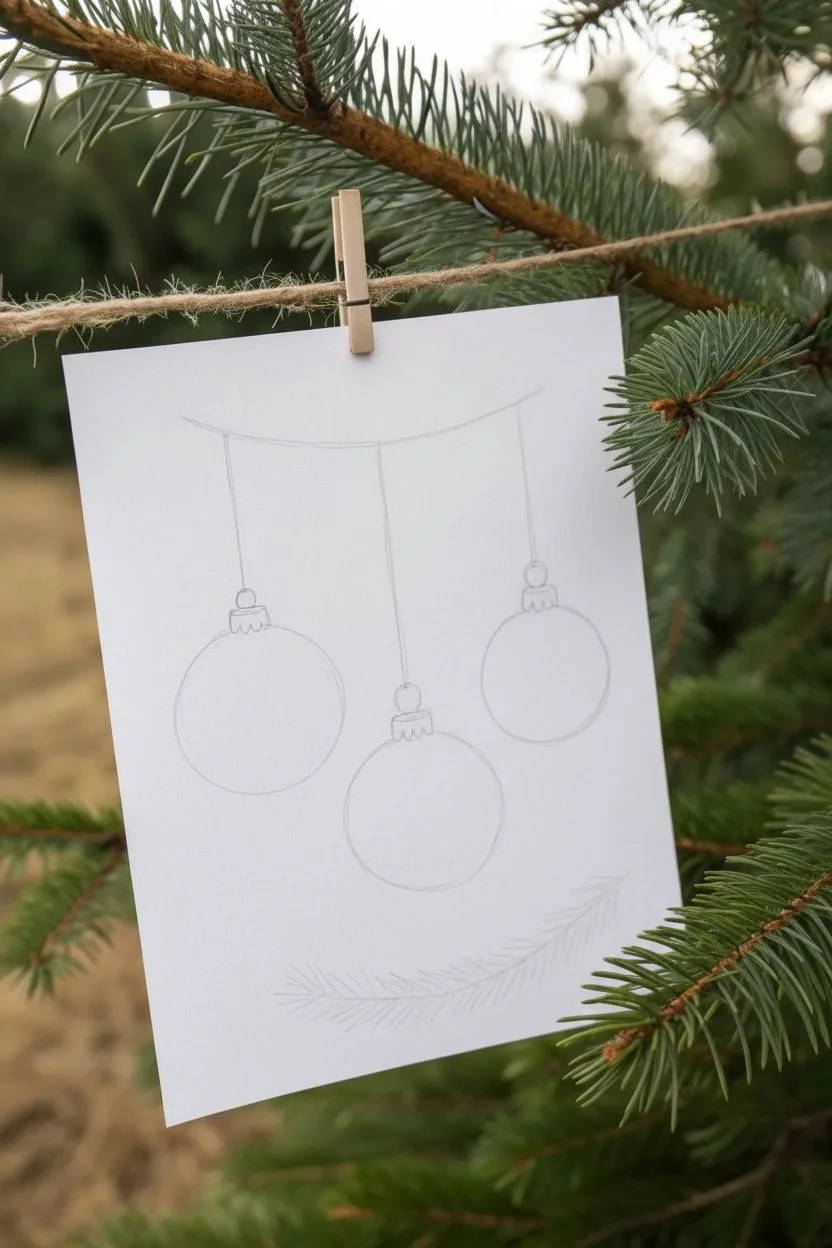
Ornament Baubles on a Branch
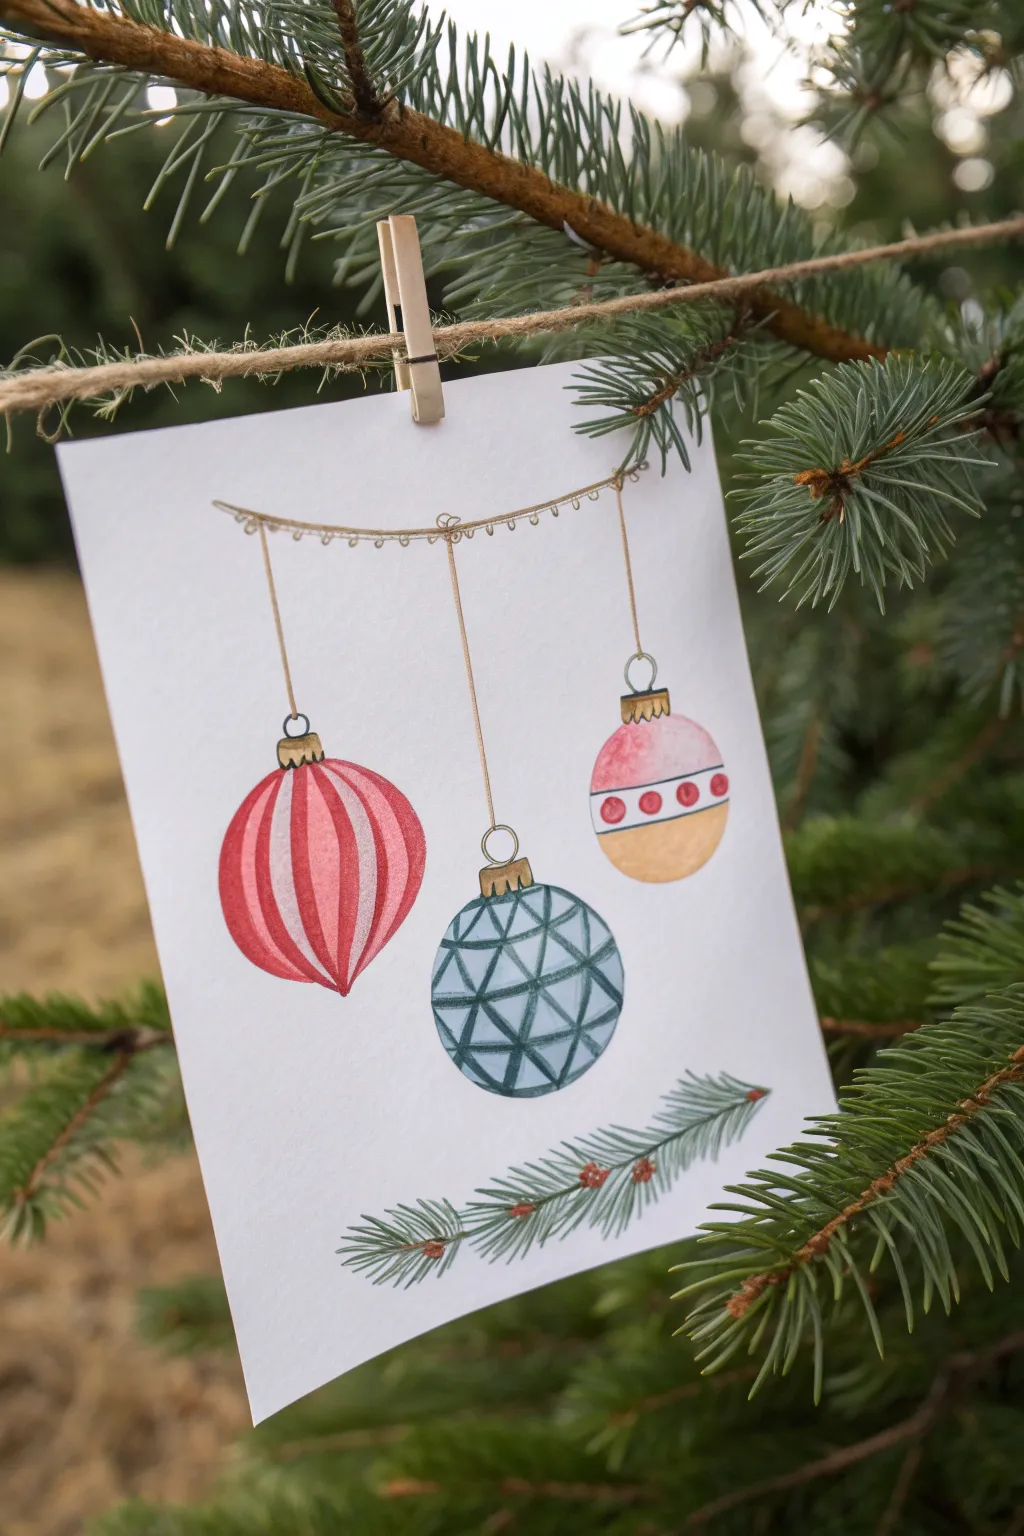
Capture the magic of holiday decorating with this charming watercolor illustration card. Featuring three distinctly patterned baubles and a sprig of pine, this project is perfect for creating personalized Christmas cards or festive wall art.
How-To Guide
Materials
- High-quality watercolor paper (cold press recommended)
- Watercolor paint set (red, blue, pink, yellow ochre/gold, green, brown)
- Fine liner pens (black, 0.1mm and 0.3mm)
- Pencil (HB or H)
- Eraser
- Round watercolor brushes (size 2 and 4)
- Cup of water
- Paper towels
- Ruler (optional)
Step 1: Sketching the Layout
-
Draw the hanging line:
Start by lightly sketching a slightly curved horizontal line across the top third of your paper to represent the string or garland the ornaments will hang from. -
Position the strings:
Draw three vertical lines dropping down from your curved line. Vary the lengths to make the composition interesting—make the middle one the longest. -
Outline the ornament shapes:
At the end of each vertical line, sketch a circle. The middle circle can be slightly larger or smaller depending on your preference, but keep them roughly the same size. -
Add the caps:
Draw a small rectangle or trapezium shape at the top of each circle where it meets the string to represent the metal cap. Add a tiny loop on top for the hook. -
Sketch the bottom branch:
Near the bottom of the page, lightly draw a curved line sweeping upwards to the right. Add small, needle-like strokes coming off it to guide your pine branch painting later.
Keep it Clean
When painting adjacent stripes or sections (like on the blue bauble), let one shape dry before painting the neighbor to prevent colors bleeding.
Step 2: Designing the Patterns
-
Striped bauble sketch:
For the left ornament, draw curved vertical lines following the contour of the circle to create sections, like a beach ball or sliced melon. -
Geometric bauble sketch:
On the middle ornament, draw horizontal bands, then add zigzag lines between them to create a triangulated geometric pattern. -
Polka dot bauble sketch:
Divide the right ornament horizontally. Sketch a band of small circles across the middle section.
Step 3: Adding Color
-
Paint the stripes:
Using a size 2 brush and bright red paint, fill in alternating sections of the left bauble. Leave the white paper showing for the light stripes to create contrast. -
Fill the geometric shapes:
Mix a muted blue-grey color. Carefully fill in the triangles on the middle ornament. You can vary the water saturation slightly between triangles to create a faceted, glass-like look. -
Color the retro ornament:
For the right bauble, wash the top section with a soft pink. Paint the bottom section and the middle band in a golden yellow or ochre. Once the band is dry, paint the small dots red. -
Paint the caps:
Use the golden yellow or a metallic gold paint to color the caps on all three ornaments. -
Create the pine branch:
Switch to green paint. Using short, flicking strokes, paint the pine needles along the bottom guide line you sketched. Add a few tiny dabs of brown for pinecones or woody texture.
Make it Sparkle
After the paint dries, use a metallic gel pen (gold or silver) to add highlights or trace over the ornamental caps for extra holiday shimmer.
Step 4: Inking and Details
-
Dry thoroughly:
Wait until the paint is completely bone-dry. If the paper is cool to the touch, it still needs more time. -
Outline the ornaments:
Using a fine black pen, carefully trace the outlines of your baubles and the patterns inside. Keep your hand relaxed for smooth lines. -
Draw the garland detail:
Trace the top hanging line. Add tiny loops or scallops along the underside of the main string to give it a decorative twisted rope or garland effect. -
String details:
Trace the vertical strings. I like to double up the line very close together to make the string look substantial rather than just a single hair-thin line. -
Erase pencil marks:
Once the ink is fully set, gently erase any visible pencil sketch lines to clean up the finished piece.
Hang your beautiful artwork on the fridge or gift it to a loved one to spread some handmade holiday cheer


Dot-Painted Christmas Lights
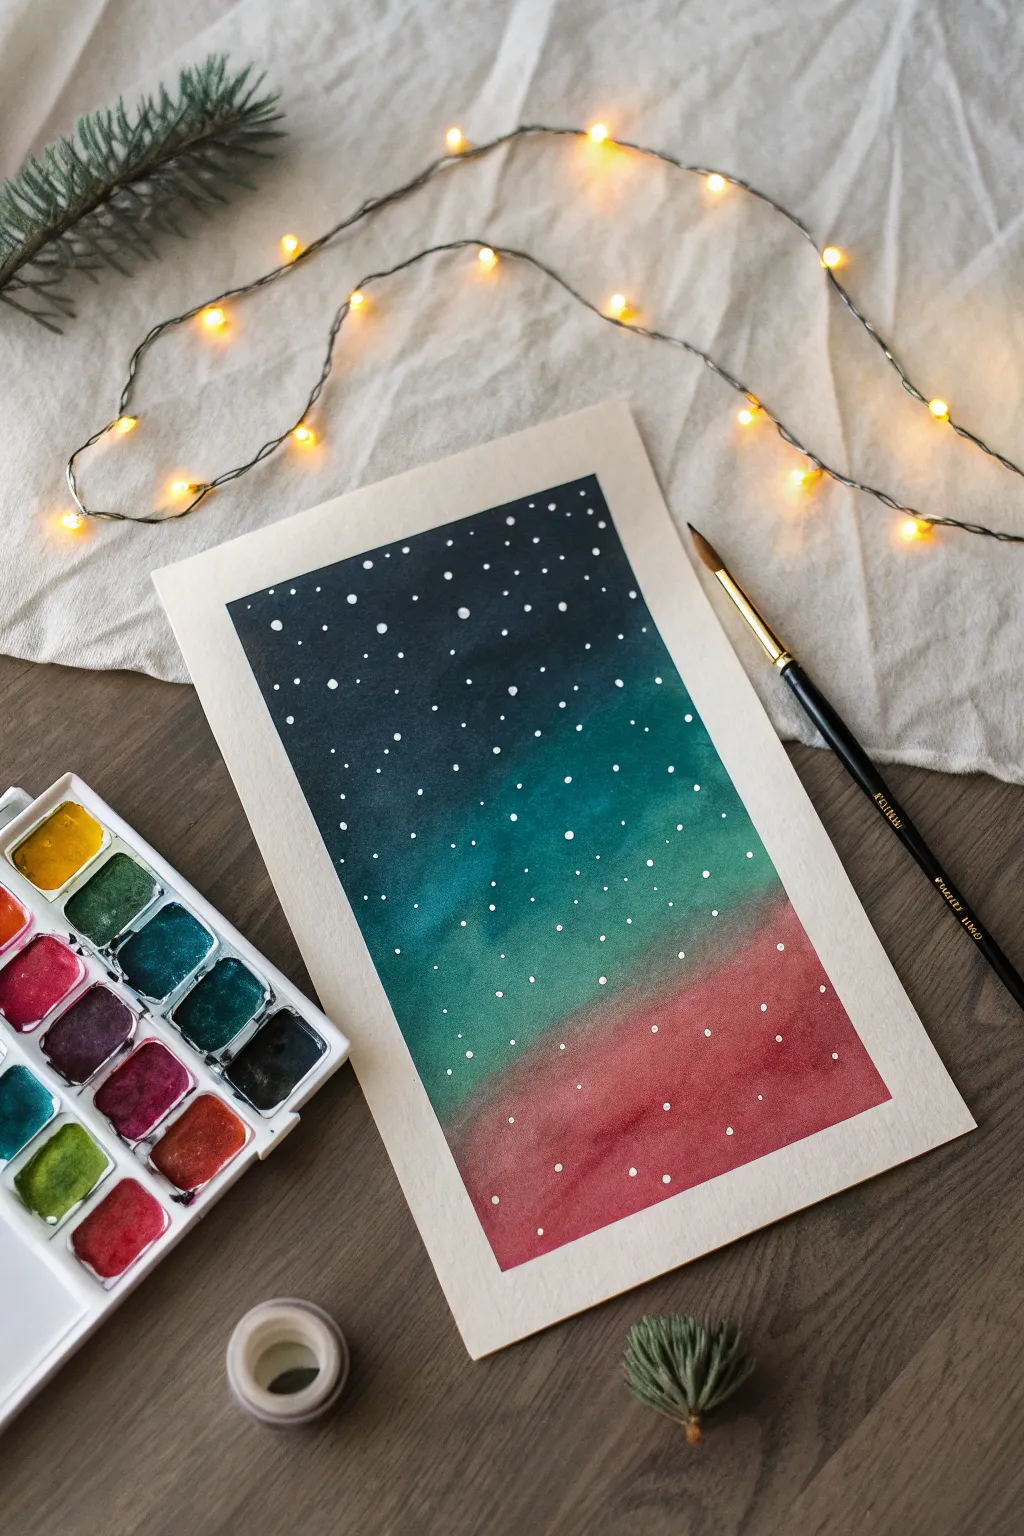
This beginner-friendly watercolor project creates a stunning, moody backdrop perfect for a winter scene or just to admire on its own. By blending deep indigo, emerald green, and muted red, you’ll practice the wet-on-wet technique to achieve a seamless, magical gradient.
How-To Guide
Materials
- Cold press watercolor paper (approx. 5×7 inches)
- Watercolor paints (Indigo/Payne’s Grey, Emerald Green, Alizarin Crimson/Red)
- Round watercolor brush (size 6 or 8)
- Masking tape or Washi tape
- Clean water jar
- White gouache, white ink, or a white gel pen
- Paper towel
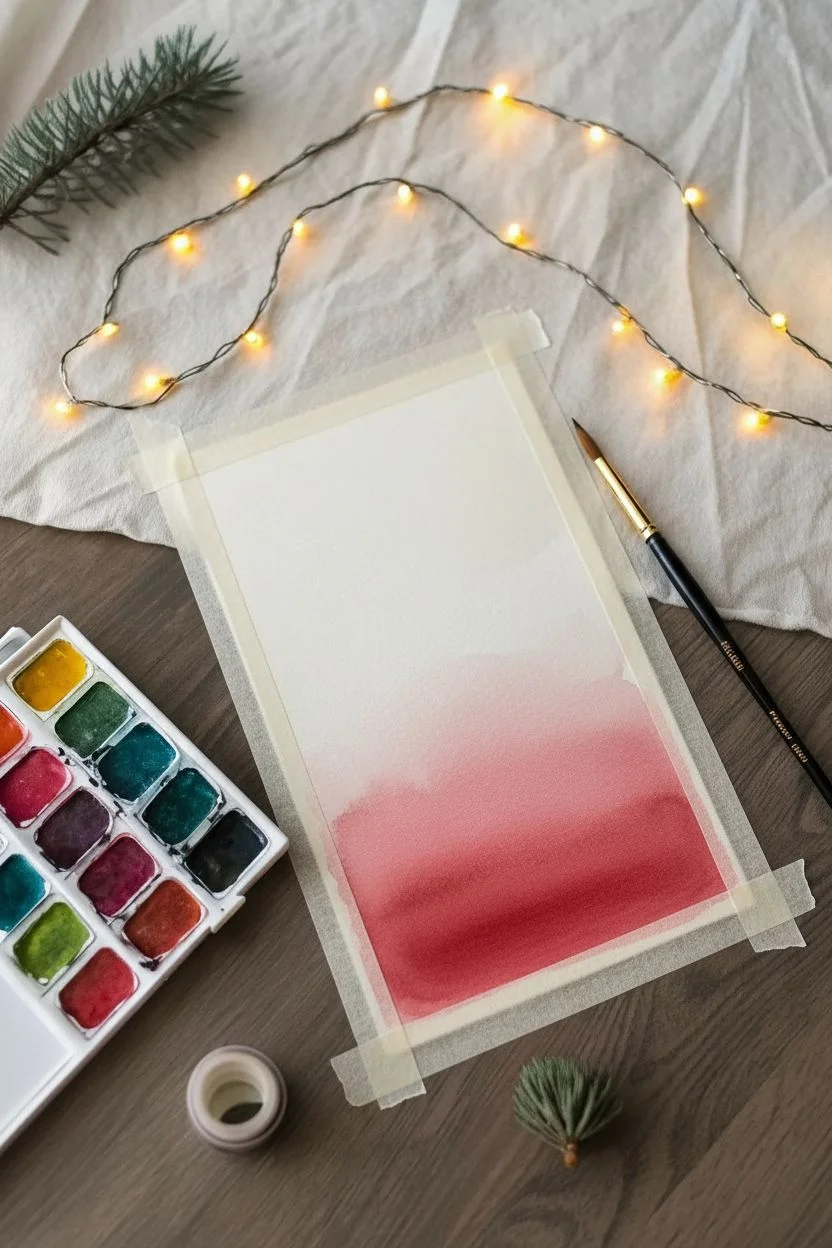
Step 1: Preparation & First Wash
-
Secure the paper:
Tape down all four edges of your watercolor paper to a hard surface or drawing board. This creates the crisp white border seen in the example and prevents the paper from buckling when wet. -
Pre-wet the paper:
Dip your clean brush into water and gently coat the entire surface of the paper inside the tape. You want it damp and glistening, but not forming puddles. -
Start with the base red:
Load your brush with a watered-down red or Alizarin Crimson. I like to start at the very bottom, painting horizontal strokes across the bottom third of the paper. -
Soften the red edge:
Rinse your brush slightly and gently feather the top edge of the red section upward so it fades out, preparing it to meet the next color.
Paint Bleeding?
If paint seeps under the tape, your tape might not be sealed well or the paint was too watery. Next time, run a fingernail firmly along the tape edge before painting.
Step 2: Building the Gradient
-
Introduce the green:
Pick up your emerald or teal green paint. Ensure it has a good pigment-to-water ratio so it’s vibrant. Apply this to the middle third of the paper. -
Blend the transition:
Allow the bottom of the green section to touch the top of the wet red section. Let the water do the work; the colors will bleed into each other naturally to create a soft, muddy transition. -
Apply the dark sky:
Clean your brush thoroughly, then load it with a deep indigo, Payne’s grey, or a mix of black and blue. Paint the top third of the paper. -
Merge the top layers:
Drag the dark blue paint down just enough to meet the green layer. Gently brush back and forth at the seam where they meet to encourage a smooth gradient. -
Monitor the moisture:
If the paper starts to dry too quickly, you might get hard edges. If you see this happening, quickly clean your brush, dampen it slightly, and soften those edges before they set. -
Deepen the colors:
While the paper is still damp, you can drop in more concentrated pigment into the red, green, or blue areas to increase saturation. The paint will spread softly on the wet surface.
Step 3: Finishing Details
-
Let it dry completely:
This is crucial. The paper must be bone-dry before the next step. If it feels cool to the touch, it’s still wet. You can use a hair dryer on a low setting if you’re impatient. -
Prepare the stars:
Dilute a small amount of white gouache or white ink with a tiny drop of water until it has a creamy, milk-like consistency. -
Paint larger stars:
Using the very tip of a small brush or a toothpick, manually place larger white dots randomly across the sky. Cluster a few together for a natural look. -
Add tiny stars:
For the smaller speckles, you can either continue dotting carefully or gently tap a loaded brush against a pencil to splatter tiny droplets over the dark sections. -
Remove the tape:
Once the white dots are completely dry, slowly peel off the masking tape at a 45-degree angle, pulling away from the artwork to ensure a clean edge.
Make it Sparkle
For a magical holiday touch, wait for the painting to dry and add a layer of clear glitter glue or iridescent medium over the dark blue section.
This simple technique creates a beautiful card front or a standalone piece of moody winter art
BRUSH GUIDE
The Right Brush for Every Stroke
From clean lines to bold texture — master brush choice, stroke control, and essential techniques.
Explore the Full Guide
Handprint Christmas Tree

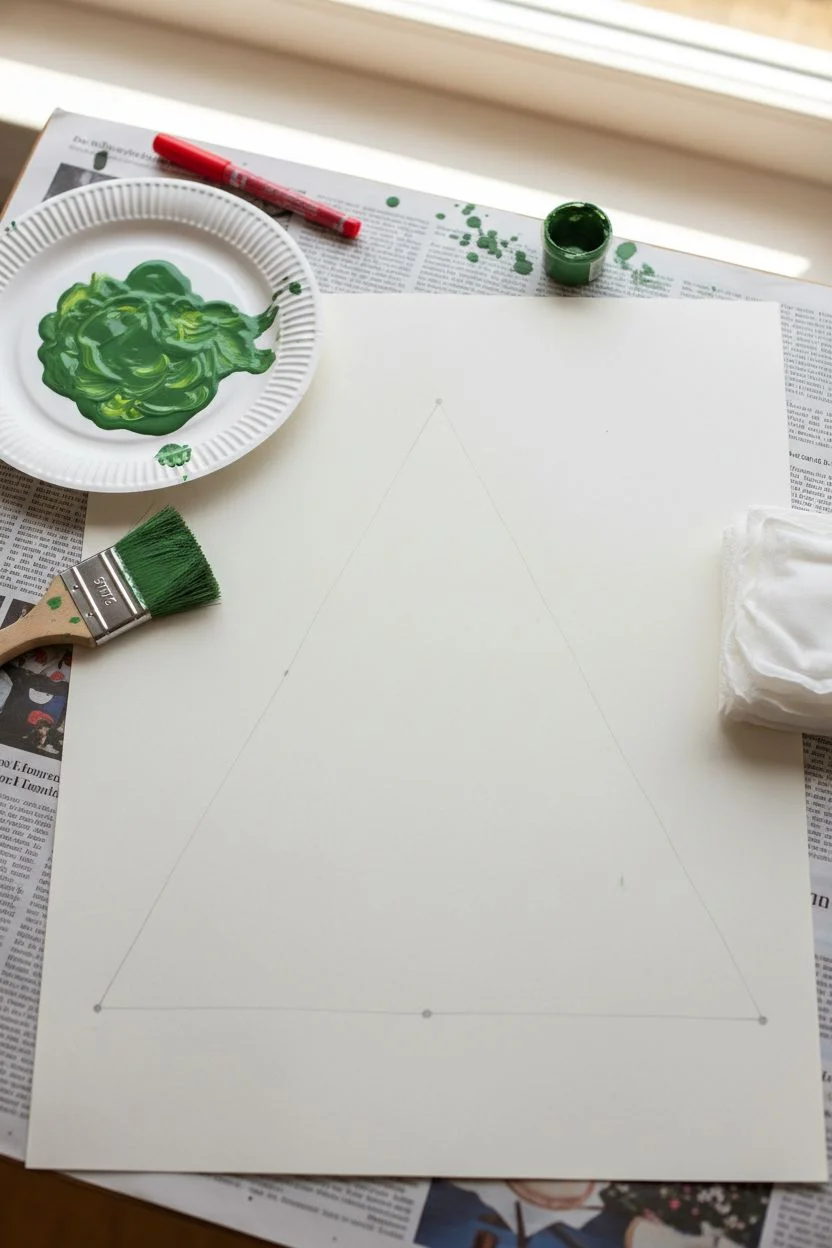
This cherished project transforms simple green handprints into a lush, festive Christmas tree full of personality. With just a few paint colors and a little hand-pressing action, you create a timeless keepsake that captures exactly how small those little hands are this holiday season.
Step-by-Step Guide
Materials
- Large sheet of thick white paper or cardstock (A3 size recommended)
- Green washable tempera or acrylic paint
- Brown acrylic paint
- Gold glitter cardstock or yellow construction paper
- Paper plate or palette for paint
- Medium paintbrush or sponge brush
- Scissors
- Glue stick or craft glue
- Pencil for sketching (optional)
- Wet wipes or paper towels (essential for cleanup)
Step 1: Setting the Stage
-
Prepare the workspace:
Cover your table with newspaper or a plastic cloth, as hand printing can get a little messy. Lay your large white paper flat in the center of the workspace. -
Mix your greens:
Pour a generous amount of green paint onto your paper plate. If you want a more textured, natural look like the example, mix a tiny drop of yellow or white into some parts of the green to create slight variations in shade. -
Plan the structure:
Before painting any hands, visualize a triangle shape on your paper. You might want to make faint pencil dots to mark the bottom width and the top point just to guide your placement.
Smudged Prints?
If a hand slides and smears the paint, don’t panic. Wait for it to dry, then stamp a fresh, darker green print directly over the messy spot to hide it.
Step 2: Constructing the Tree
-
Paint the first hand:
Using the sponge brush, coat the child’s palm and fingers evenly with green paint. Make sure not to put it on too thick, or the print will be a slippery blob instead of showing finger details. -
Create the bottom row:
Start at the very bottom of your imagined triangle. Press the painted hand firmly onto the paper, fingers pointing downward. Lift straight up to avoid smearing. -
Extend the base:
Reload the hand with paint and press it again next to the first print. Repeat this to create a row of about 4 or 5 handprints, forming the wide base of your tree. -
Clean in between:
I usually keep wet wipes right next to me to quickly wipe off excess paint if it starts drying on the skin between prints, ensuring fresh, crisp lines. -
Start the second tier:
Move up slightly for the next row. Position these handprints so they overlap the wrist area of the bottom row just a little bit. This row should have one fewer handprint than the bottom one. -
Continue layering upward:
Keep building the tree upwards, reducing the number of prints in each row (e.g., 4 prints, then 3 prints). Ensure the fingers are always pointing down to mimic hanging pine boughs. -
Form the middle section:
As you reach the middle, the shape should clearly be tapering. Use about two handprints here, angling them slightly inward to help shape the triangle. -
Place the final top print:
For the peak of the tree, place a single handprint right at the top center. This completes your evergreen shape. -
Dry the greenery:
Set the artwork aside for 10-15 minutes to let the green paint dry completely before adding the trunk or star to prevent smudging.
Step 3: Adding the Details
-
Paint the trunk:
Dip a brush into brown paint. Paint a simple, slightly flared rectangle at the bottom center of your tree base. Fill it in solidly to ground the tree. -
Prepare the star:
While the trunk dries, take your gold glitter cardstock or yellow paper. Draw a classic five-pointed star shape on the back side. -
Cut the star:
Carefully cut out your star shape with scissors. Sharp corners look best for that classic Christmas topper look. -
Attach the topper:
Apply glue to the back of your star and press it firmly onto the very top of the tree, slightly overlapping the wrist of the highest handprint. -
Final touches:
Check for any loose edges on the star and smooth them down. Your festive handprint tree is now ready for display.
Golden Glow Tip
For extra holiday magic, sprinkle loose gold or silver glitter over the wet green paint immediately after stamping to simulate sparkling ornaments.
Hang this beautiful collaborative artwork on the wall to enjoy a custom decoration that freezes time for a moment
Wreath With Stamped Greenery
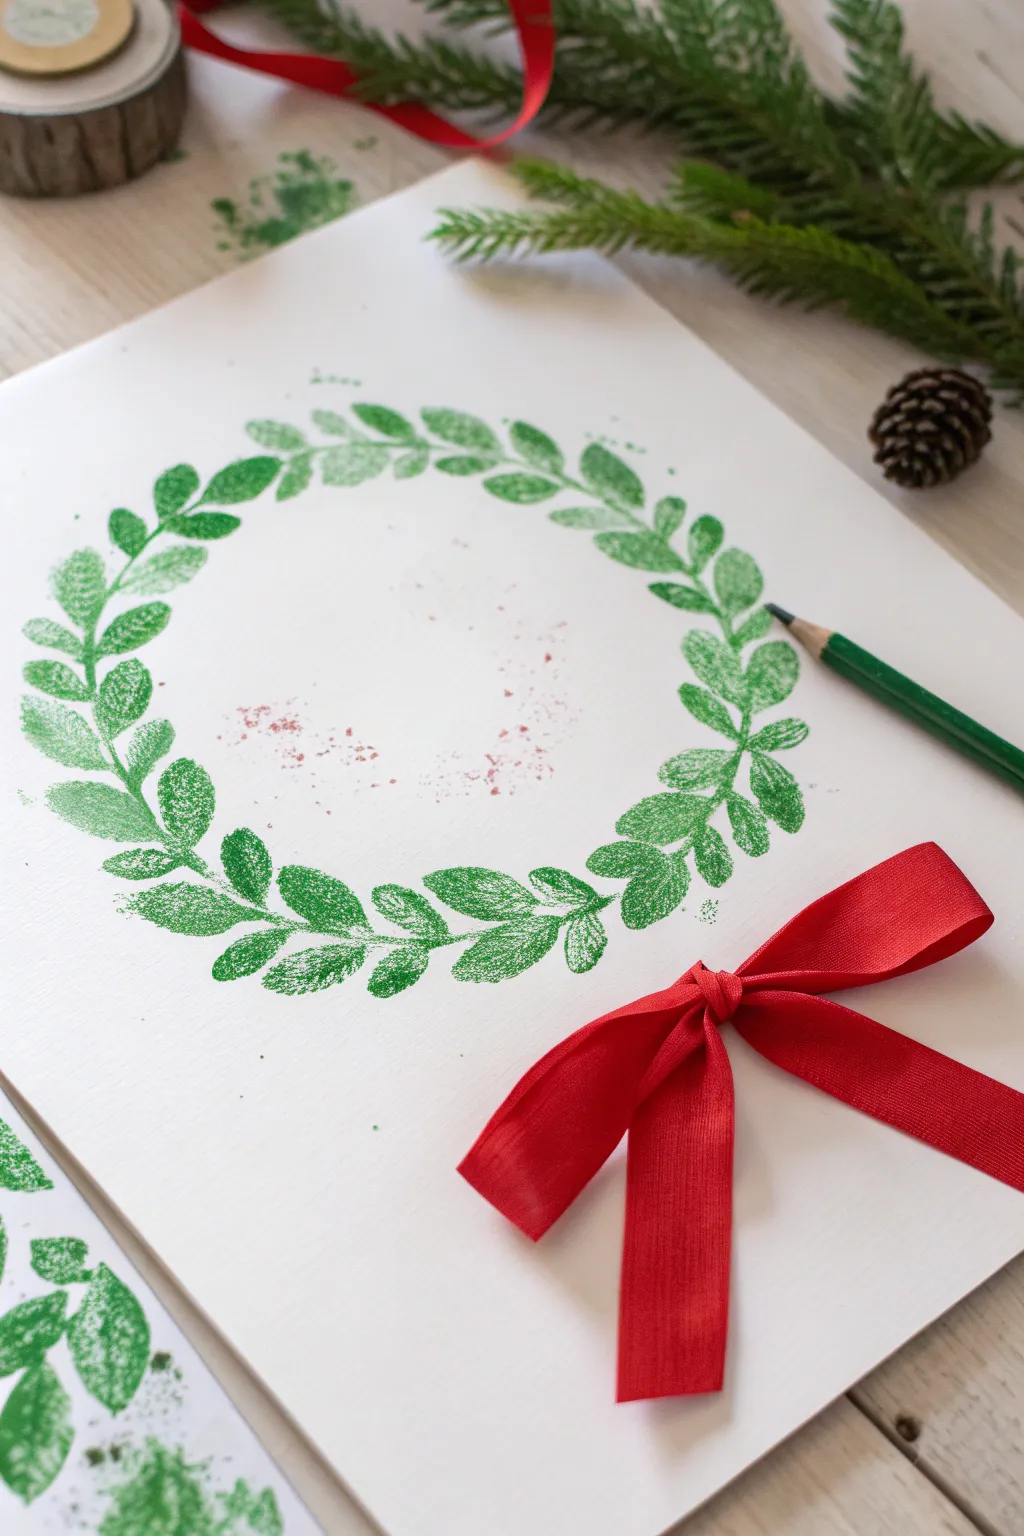

Using nature’s own shapes is a beautiful way to bring the outdoors in, and this stamped wreath project captures that charm perfectly. By simply dipping leaves into paint and arranging them in a circle, you can create a textured, organic design that looks far more complicated than it actually is.
Detailed Instructions
Materials
- Heavyweight white cardstock or watercolor paper
- Green acrylic or tempera paint (a mix of light and dark greens works best)
- Fresh leaves with distinct veins (small, oval shapes are ideal)
- Small paintbrush or foam brush
- Red ribbon (satin or grosgrain)
- Hot glue gun or strong craft glue
- Pencil
- Small bowl or plate for tracing
- Paper towels
Step 1: Preparation
-
Gather your greenery:
Go on a quick nature walk to collect several small leaves. Look for sturdy leaves with prominent veins, as these will leave the best impressions. Fresh leaves work better than dried ones because they are less likely to crumble. -
Prepare your workspace:
Lay down newspaper or a plastic tablecloth to protect your surface. Squeeze a generous amount of green paint onto a palette or paper plate. If you have multiple shades of green, swirl them slightly but don’t mix them completely to add depth. -
Create a guide circle:
To ensure your wreath is perfectly round, place a bowl or small plate upside down in the center of your paper. Make sure you leave enough room at the bottom for the bow. -
Trace lightly:
Using a pencil, very lightly trace around the bowl. Keep this line faint, as you want it to disappear under the paint or be erased easily later.
Smudged Prints?
If your leaf prints look like blobs, you’re using too much paint. Clean the leaf off and try a ‘dry brush’ technique, painting a very thin layer on the veins only.
Step 2: Stamping the Foliage
-
Apply paint to the leaf:
Select your first leaf. Instead of dipping it directly into the paint blob, use a brush to apply a thin, even layer of green paint to the veined side (usually the underside) of the leaf. Too much paint will result in a smudge rather than a detailed print. -
First impression:
Place the painted leaf face-down onto your pencil line. Press firmly all over the back of the leaf—run your finger along the stem and veins to ensure contact—but try not to shift the leaf horizontally. -
Lift and reveal:
Carefully peel the leaf off the paper by lifting the stem straight up. You should see a beautiful, textured print. -
Continue the pattern:
Re-apply paint to your leaf (or use a fresh one) and position the next stamp. Angle the stem slightly inward to follow the curve of the pencil circle. Slightly overlap the previous print to avoid gaps. -
Vary angles:
As you work your way around the circle, slightly rotate the angle of the leaves. Some should point more outward and some inward to mimic the messy, natural look of a real wreath. -
Fill the circle:
Continue stamping until you have completed the full circle. If the wreath looks too thin in spots, go back in with smaller leaves to fill out the shape. -
Add detail:
Step back and look at your composition. If you want added texture, you can dip the very tip of a stiff brush into the paint and lightly dab ‘spatter’ dots around the leaves for an artistic touch. -
Drying time:
Allow the paint to dry completely. Acrylics usually dry fast, but give it at least 20 minutes to prevent smearing during the next steps.
Step 3: Finishing Touches
-
Erase guidelines:
Once the paint is bone dry, carefully erase any visible pencil marks from your initial guide circle. -
Tie the bow:
Take your red ribbon and tie a neat, classic bow. Ensure the loops are symmetrical and trim the tails at an angle or a swallowtail cut for a polished look. -
Attach the ribbon:
Apply a small dot of hot glue or strong craft glue to the back of the bow’s knot. I find that placement is key here; pressing it at the bottom center of the wreath anchors the design beautifully. -
Sign your work:
Don’t forget to sign and date your masterpiece in the corner, especially if this is being made as a keepsake or gift.
Pro Tip: Texture
Use different types of leaves (like fern vs. oak) on the same wreath to create a mixed-greenery look with varied textures and shapes.
Hang your festive artwork on the fridge or frame it for a custom holiday decoration

PENCIL GUIDE
Understanding Pencil Grades from H to B
From first sketch to finished drawing — learn pencil grades, line control, and shading techniques.
Explore the Full Guide
Christmas Stocking by the Fireplace
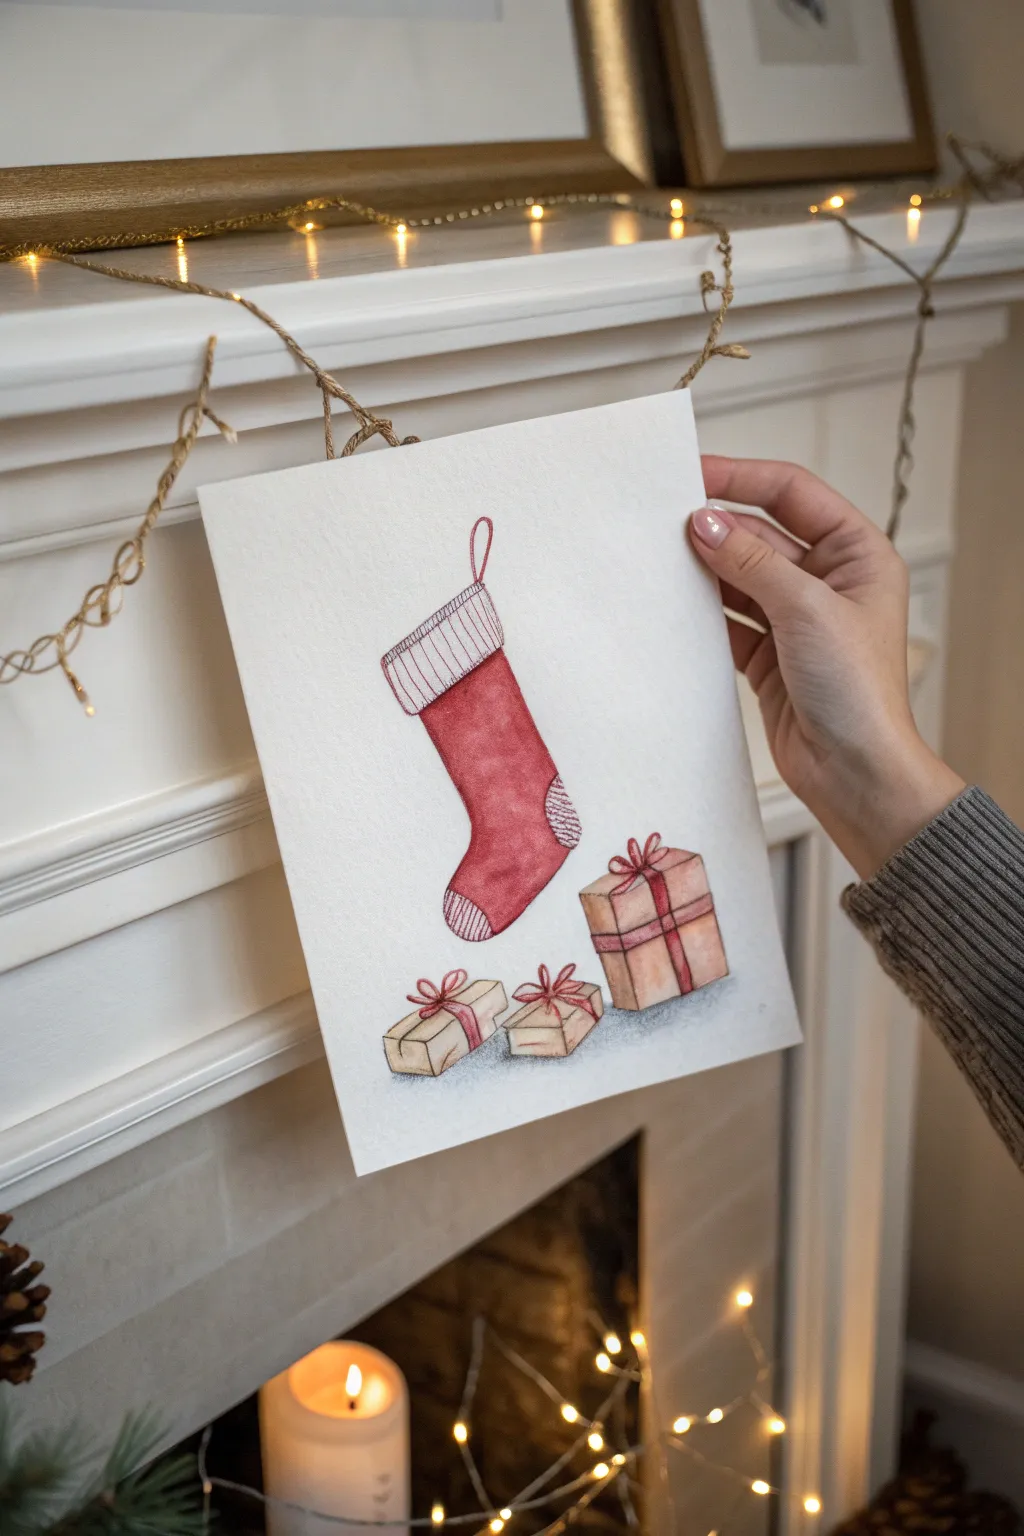

Capture the cozy anticipation of Christmas morning with this charming illustration featuring a classic red stocking and a trio of wrapped gifts. Using a combination of fine liner pens and watercolor washes gives the piece a delightful, storybook quality that is perfect for holiday cards or framed decor.
Step-by-Step Tutorial
Materials
- Cold press watercolor paper (approx. 5×7 or 8×10 inches)
- Waterproof fine liner pen (black or dark sepia, size 01 or 03)
- Watercolor paints (Alizarin Crimson, Burnt Sienna, Yellow Ochre, Paynes Grey)
- Round watercolor brushes (size 4 and size 0)
- Pencil (HB or H)
- Eraser
- Jar of water
- Paper towel
Step 1: Sketching the Layout
-
Map out the stocking:
Start by lightly sketching the stocking shape in the upper center of your paper. Draw an angled rectangle for the cuff, then extend a long, curved sock shape downwards, ending with the toe pointing to the right. -
Add stocking details:
Sketch a small loop at the top of the cuff for hanging. Lightly mark off the heel and toe patches with curved lines to define where the contrasting fabric pattern will go. -
Position the gifts:
Below the stocking, sketch three simple 3D boxes. Place one larger square box to the right and two smaller rectangular boxes to the left. Angle them slightly so they look like they are sitting naturally on the floor. -
Draw the ribbons:
Add cross-shapes on the boxes to represent ribbons. Top each box with a messy, looped bow shape to give them a hand-tied look.
Clean Lines
Work left to right (if you are right-handed) when inking to avoid smudging fresh ink with your hand. A piece of scrap paper under your drawing hand helps too.
Step 2: Inking the Outline
-
Trace the main lines:
Using your waterproof fine liner, carefully trace over your pencil lines. Keep your hand relaxed—a slightly wobbly line adds to the illustrative character. -
Add texture to the cuff:
Draw vertical stripe lines inside the cuff of the stocking and on the heel/toe patches. Don’t make them perfectly straight using a ruler; freehand vertical hatching looks softer. -
Erase pencil marks:
Wait about five minutes to ensure the ink is completely dry, then gently erase all visible pencil sketches to leave a clean black-and-white drawing.
Make it Sparkle
Once the painting is completely dry, add touches of metallic gold paint to the gift ribbons or the stocking cuff for a magical holiday shimmer.
Step 3: Painting the Stocking
-
Base red wash:
Load your size 4 brush with Alizarin Crimson mixed with plenty of water. Paint the main body of the stocking, avoiding the cuff, heel, and toe. Let the color pool slightly near the edges for natural shading. -
Deepen the shadows:
While the red is still slightly damp, drop in a little more concentrated red pigment along the right side and bottom curve of the stocking to create roundness. -
Paint the textured details:
Dilute a tiny bit of red to make a very pale pink wash. Use this to paint alternating stripes on the cuff, heel, and toe patches, leaving white paper stripes in between.
Step 4: Painting the Gifts
-
Wash the boxes:
Mix a warm, neutral tone using Yellow Ochre and a touch of Burnt Sienna. Paint the faces of the gift boxes. I find it helpful to make the side faces slightly darker than the top faces to show dimension. -
Add red ribbons:
Once the box paint is dry, use your small size 0 brush and the red paint to fill in the ribbon stripes and the bows. Be careful to stay inside the intricate lines of the bows.
Step 5: Shadows & Finishing Touches
-
Ground the objects:
Mix a very watery Paynes Grey or diluted black. Paint a soft, undefined shadow beneath the gifts on the ‘floor’ to anchor them so they don’t look like they are floating. -
Enhance shading:
Use the same watery grey to add tiny shadows where the ribbons overlap the boxes and under the stocking’s cuff. -
Final ink details:
After the paint is 100% dry, you can go back with your pen and re-emphasize any lines that got lost under the watercolor, or add tiny hatching lines for extra texture.
Once dry, you can mount this piece on cardstock to create a heartwarming handmade Christmas card
Poinsettia Burst Painting
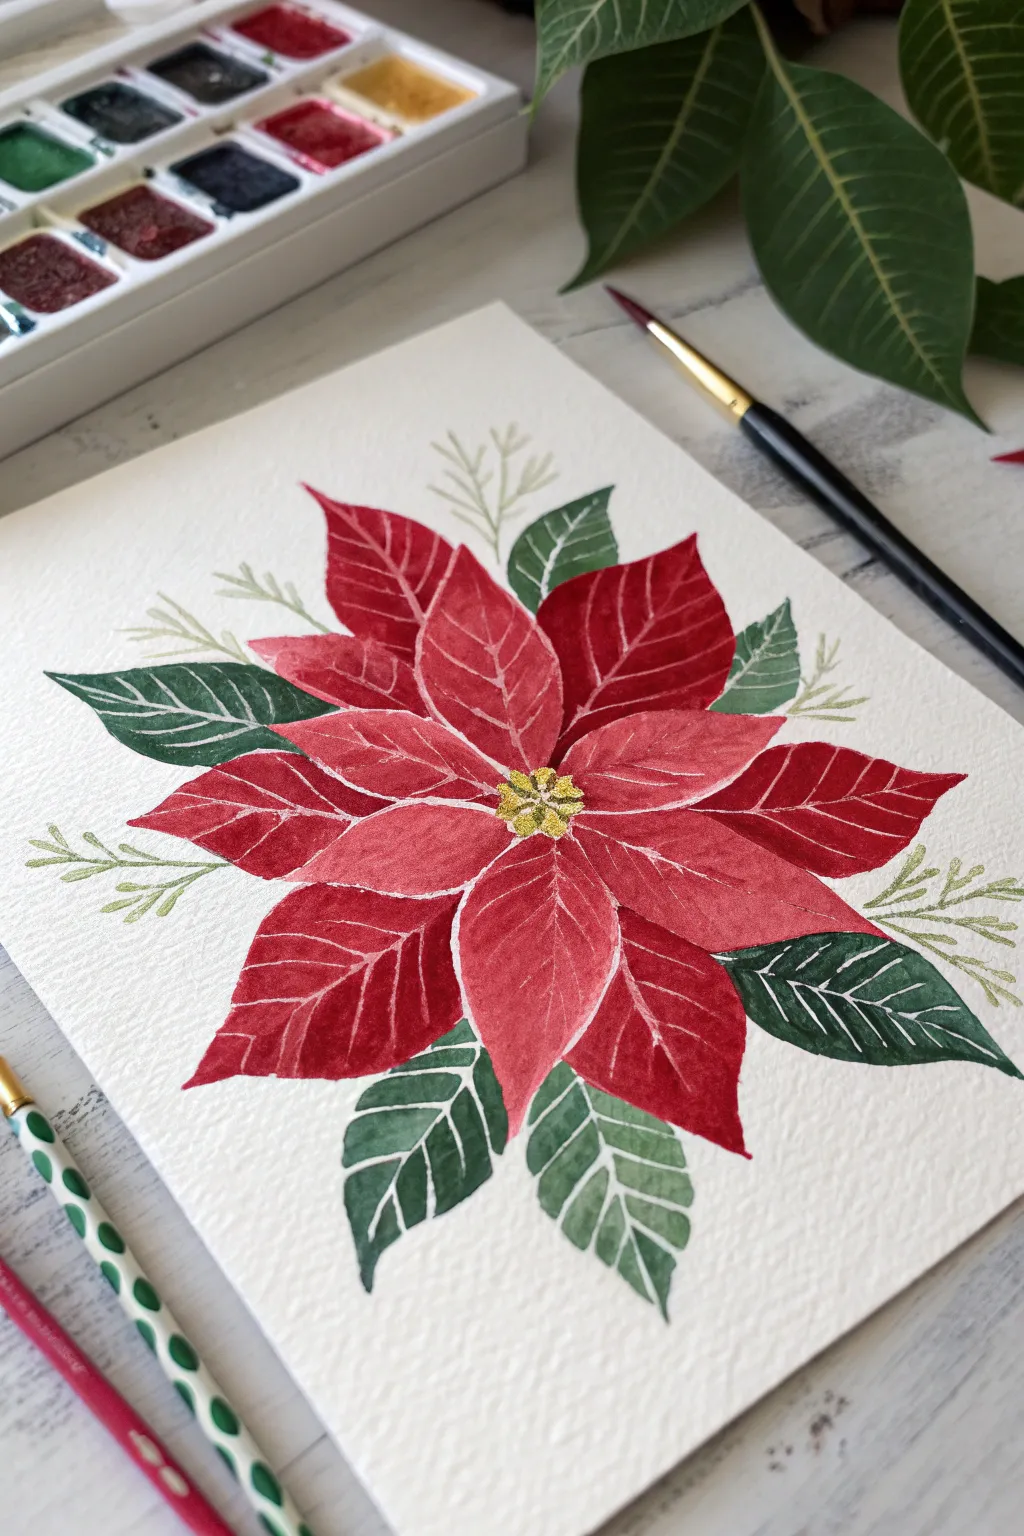
Capture the essence of the holiday season with this vibrant watercolor project that focuses on negative space and bold reds. The resulting poinsettia bursts with festive energy, featuring delicate white veins that are surprisingly easy to achieve.
Step-by-Step
Materials
- Cold press watercolor paper (textured)
- Watercolor paint set (reds, greens, yellow/gold)
- Round brushes (sizes 4 and 8)
- Pencil (H or HB)
- Eraser
- Two jars of water
- Paper towels
Step 1: Sketching the Bloom
-
Center markings:
Begin by lightly marking a small circle in the very center of your paper to act as the flower’s heart. This doesn’t need to be perfect, just a guide for where the petals will originate. -
Primary petals:
Sketch five or six large, pointed oval shapes radiating outward from the center circle. These are your main red petals (bracts). Keep your pencil lines very faint so they don’t show through the translucent paint later. -
Secondary layers:
Draw a second layer of petal tips peeking out from behind the first layer to add fullness. Vary the sizes slightly to make the flower look organic and natural. -
Adding foliage:
Sketch three to four clusters of green leaves around the outer edges of the red petals. Make these slightly broader and more jagged than the smooth red petals. -
Vein mapping:
Draw delicate lines down the center of each petal and leaf, adding branching veins. These lines are crucial because you will be painting *around* them, leaving the white paper visible.
Vein Victory
If painting around the veins is too hard for steady hands, draw the veins with a white crayon or white oil pastel first. This wax resist method repels the watercolor automatically.
Step 2: Painting the Bracts
-
Mixing your reds:
Prepare a puddle of vibrant red paint on your palette. I like to mix a tiny bit of deep crimson into a standard bright red to give it depth without losing its holiday cheer. -
First petal technique:
Load your size 4 brush with red paint. Carefully outline one half of a petal, painting right up to the pencil line of the central vein but not touching it. -
Filling the shape:
Fill in that half-petal with color, keeping the paint wet so it flows smoothly. Then, do the other half of the same petal, leaving a thin sliver of white paper between the two halves to create the vein. -
Working in opposites:
Move to a petal on the opposite side of the flower next. This prevents you from accidentally smudging wet paint with your hand or having two wet petals bleed into each other. -
Completing the red layer:
Continue painting all the red petals, maintaining those thin white gaps for the veins. As the paint dries on some petals, you can add a second layer of slightly darker red near the center for shadow.
Step 3: Leaves and Details
-
Green foundation:
Mix a deep forest green. Using the same technique as the red petals, paint the outer leaves, meticulously leaving the white veins unpainted. -
Adding variety:
While the green paint is still wet on the paper, touch the tip of your brush into a darker blue-green and drop it into the shadow areas near the flower base. -
The golden center:
Once the red petals are fully dry, paint the small center circle with a mix of yellow and gold. Dab the brush to create a textured, pollen-like appearance. -
Background sprigs:
Dilute a sap green or pale olive color with lots of water until it is very transparent. -
Delicate accents:
Using the very tip of your smallest brush, paint faint, wispy springs extending from behind the main flower into the white background. -
Final touches:
Erase any visible pencil lines that weren’t covered by paint, assuming the artwork is completely bone dry.
Festive Sparkle
Once the painting is dry, use a metallic gold gel pen or paint to trace over the yellow center or add tiny dots along the white veins for a magical holiday shimmer.
Now you have a stunning botanical piece ready to frame or turn into a holiday card


Stack of Wrapped Christmas Presents
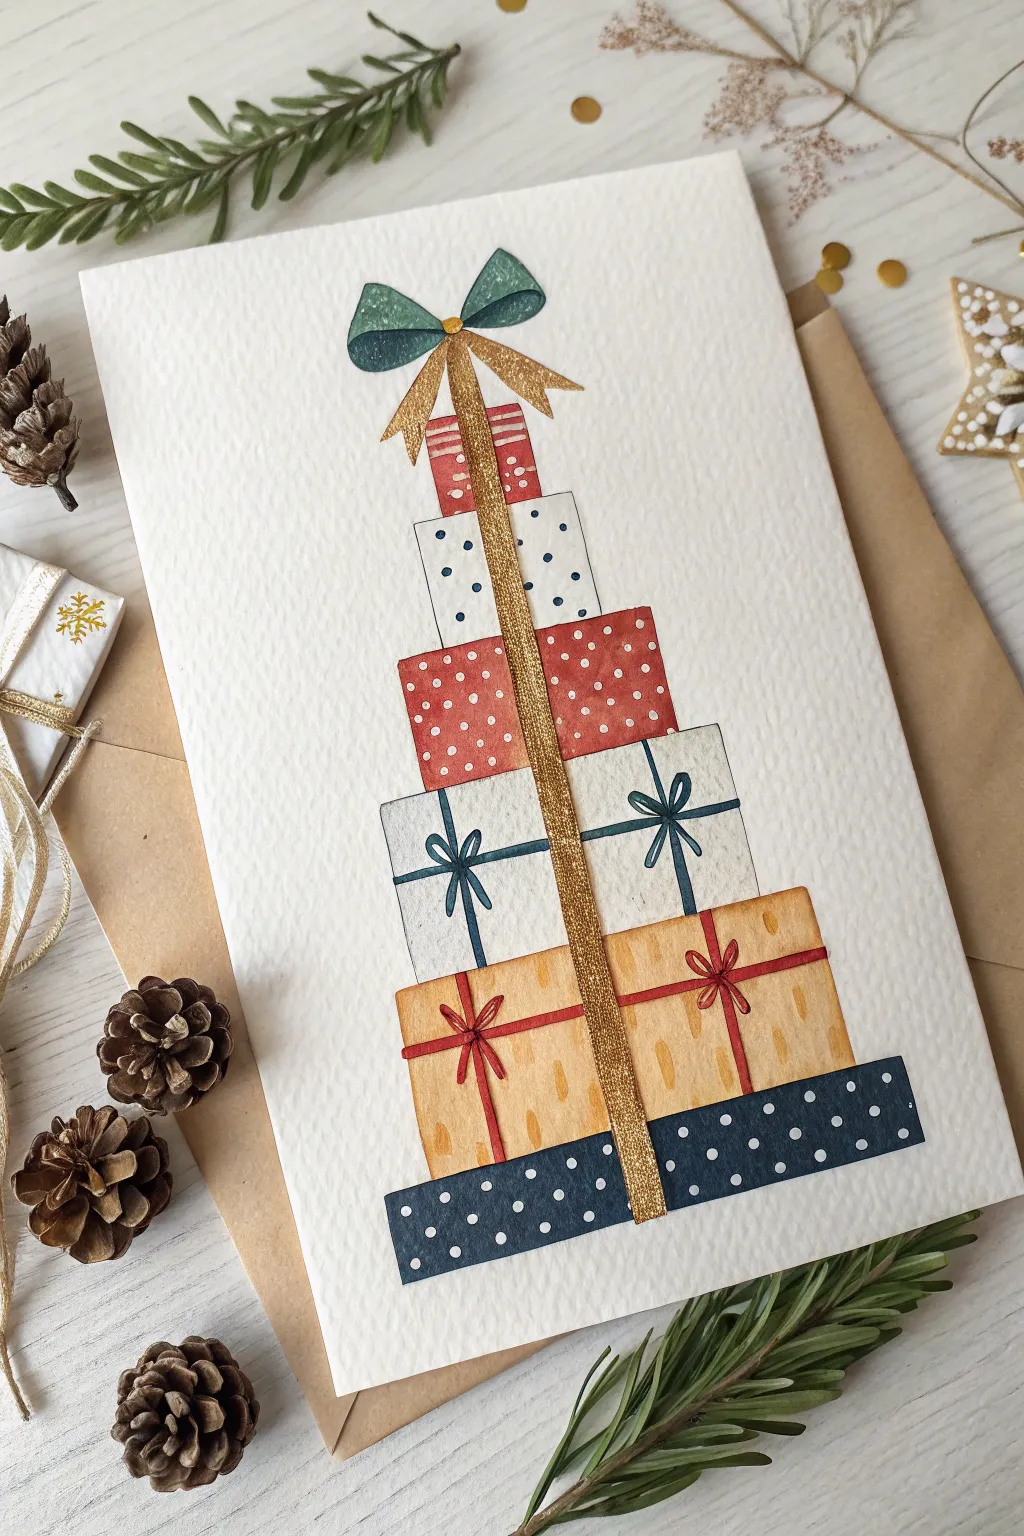
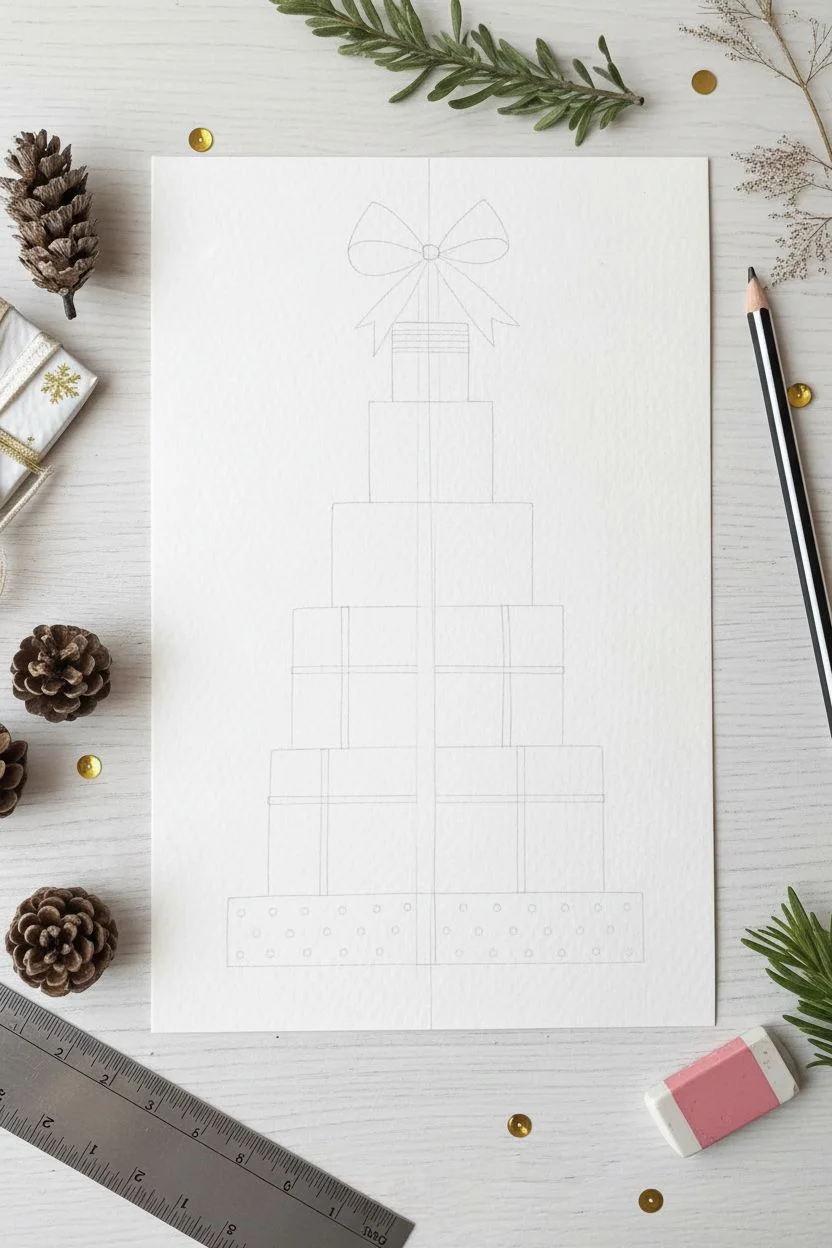
Create a festive Christmas tree shape using a charming stack of wrapped presents in this delightful watercolor project. With playful patterns and a touch of golden sparkle, this card captures the joy of holiday giving in a unique, vertical composition.
Detailed Instructions
Materials
- Cold press watercolor paper (A5 size or folded card)
- Watercolor paints (navy blue, yellow ochre, warm red, cool teal)
- Pencil and eraser
- Ruler
- Fine round brush (size 2 or 4)
- Gold paint (metallic watercolor or acrylic)
- White gel pen or white gouache
- Painter’s tape or masking tape (optional)
- Water jar and paper towels
Step 1: Drafting the Design
-
Set your boundaries:
Begin by lightly marking the center vertical line of your paper with a ruler. This will help keep your tower of gifts straight so it doesn’t look like it’s toppling over. -
sketch the bottom box:
Draw the largest rectangle at the bottom of the page. Make it wide and relatively flat, leaving enough space below it for a small margin. This forms the base of your ‘tree’ shape. -
Stack the boxes:
Working upward, draw four more rectangles, making each slightly narrower than the one below it. The top box should be quite small, creating a triangular overall silhouette. -
Add the bow detail:
At the very top of the smallest box, sketch a large, looped bow. Lightly draw a vertical ribbon line running straight down the center of the entire stack, connecting all the boxes.
Step 2: Painting the Presents
-
Paint the base layer:
Start with the bottom box. Mix a deep navy blue watercolor and fill in the rectangle, carefully painting around the center ribbon strip if you want to keep it pristine, though painting over it is fine since we’ll layer opaque gold later. -
Add warm tones:
For the second box up, use a diluted yellow ochre or mustard tone. Keep the wash fairly wet to let the pigment settle into the paper’s texture. -
Create the middle layer:
Paint the third box with a very pale, watery blue-grey wash. This lighter color helps break up the stack and adds visual breathing room. -
Add a festive red:
For the fourth box, switch to a warm holiday red. I find that dabbing the color in rather than sweeping it creates a nice, uneven texture that looks more hand-painted. -
Top it off:
Paint the tiny top box white or very pale grey. Then, paint the bow loops at the top in a deep teal or forest green shade. -
Dry completely:
Let the entire stack dry thoroughly. If you rush this steps, the colors of the patterns in the next phase might bleed into the background.
Uneven Edges?
If your boxes look wobbly, embrace it! A slightly wonky stack adds charm. Or, use masking tape before painting for perfectly crisp, straight edges.
Step 3: Adding Patterns & Details
-
Detail the navy box:
Using a white gel pen or opaque white paint on a fine brush, add small polka dots across the bottom navy blue box. -
Texture the yellow box:
Mix a slightly darker orange-brown and paint small vertical tick marks or dashes on the yellow ochre box to mimic a wrapping paper pattern. -
Ribbons on the middle box:
With a fine brush and dark teal paint, draw a thin horizontal line across the pale middle box. Add a simple crisscross bow where it meets the center line. -
Dot the red box:
Add white polka dots to the red box just like you did for the bottom navy one, keeping the spacing random for a playful look. -
Finish small patterns:
Add tiny blue dots to the small top box and paint faint red stripes on the tiny red box just beneath the bow. -
Detail the yellow box ribbons:
Using red paint, draw a horizontal ribbon across the yellow box and add a small, simple bow in the center.
Make it Pop
Use actual thin gold ribbon or glitter glue for the central vertical stripe instead of paint to add real 3D texture and extra sparkle to the card.
Step 4: The Golden Touch
-
Paint the main ribbon:
Load your brush with metallic gold paint. Carefully paint the long vertical strip running from the top bow all the way down to the bottom edge of the navy box. -
Add gold tails:
Paint two ribbon tails flowing down from the main top bow using the same gold paint. Let them curl slightly outwards over the top boxes. -
Erase and clean:
Once the gold is completely dry, gently erase any visible pencil lines around the edges of your boxes for a crisp finish.
Now you have a charming stack of painted presents ready to share as a card or keep as seasonal art
Winter Night Sky With Starry Snow
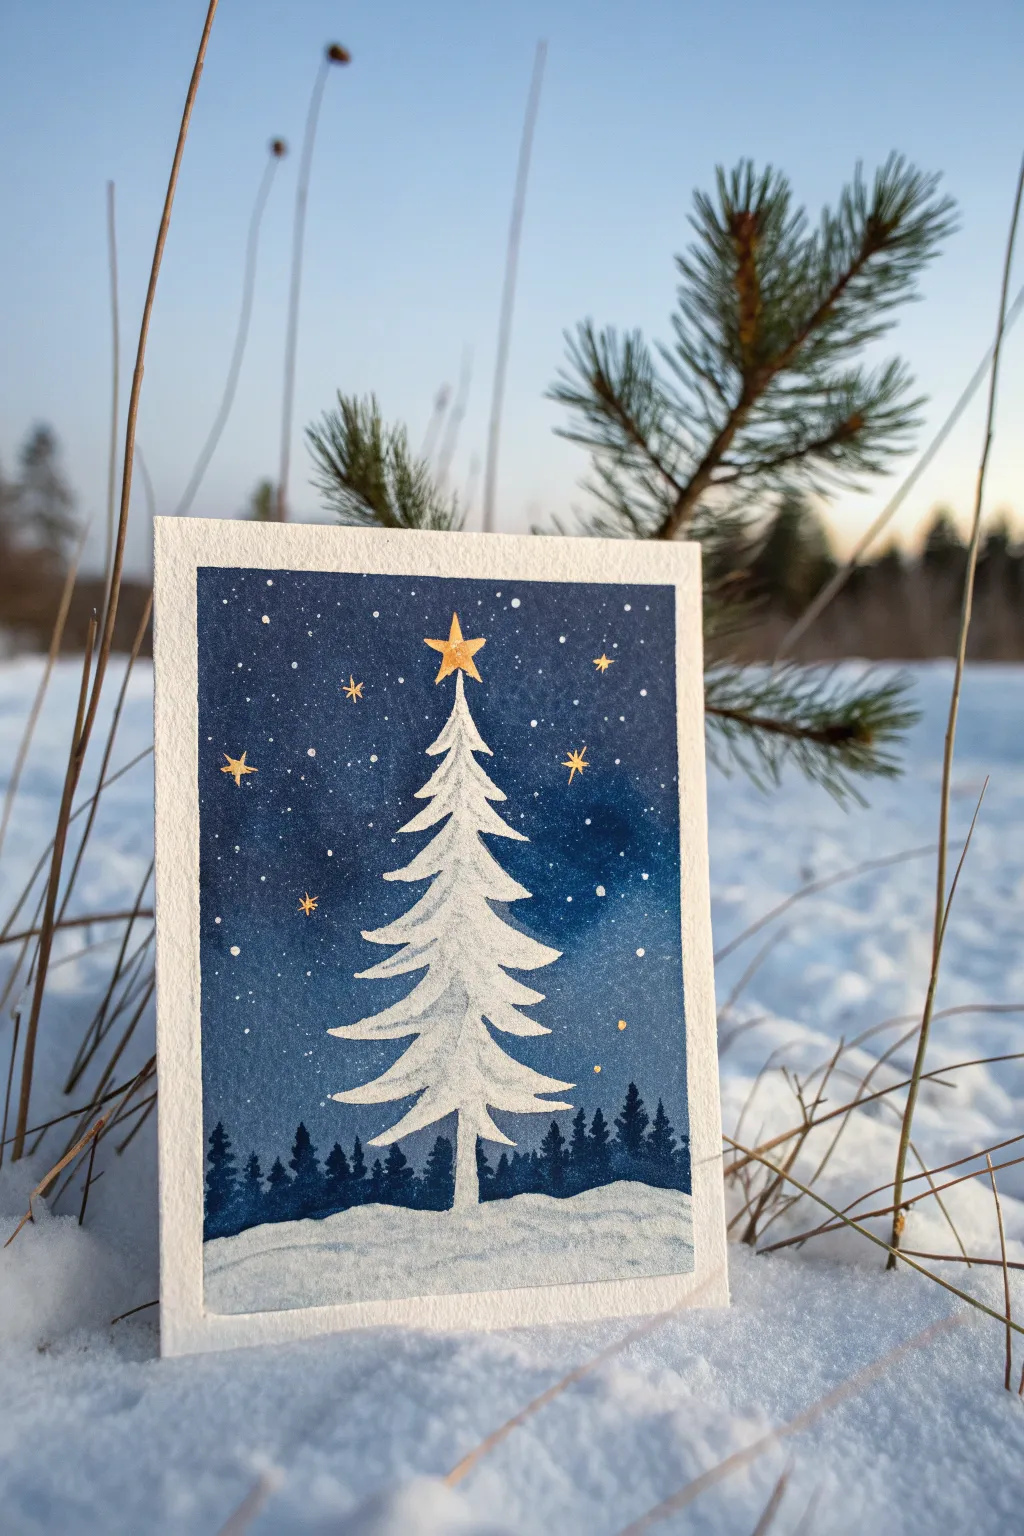
Capture the serene beauty of a winter evening with this elegant watercolor project featuring a stark white fir tree against a deep indigo sky. The contrast between the dark, snowy atmosphere and the glowing gold stars makes for a striking holiday card.
Step-by-Step
Materials
- Cold press watercolor paper (cut to 5×7 inches)
- Masking fluid
- Old paintbrush or rubber styling tool (for masking fluid)
- Watercolor paints (Indigo, Prussian Blue, Black)
- Gold metallic watercolor or gouache
- White gouache or white ink
- Round watercolor brushes (size 4 and size 0)
- Painter’s tape or washi tape
- Jar of water
- Paper towel
- Toothbrush (optional for splatter)
Step 1: Preparation and Masking
-
Tape the Edges:
Begin by taping your watercolor paper to a board or table with painter’s tape. Create a clean border by pressing the tape down firmly along all four sides, leaving about a half-inch margin. -
Sketch the Tree:
Lightly sketch a simple fir tree shape in the center of your paper using a pencil. You don’t need detailed branches yet, just a general triangular guideline and a trunk at the bottom. -
Apply Masking Fluid:
Using an old brush or a rubber tool, fill in the entire tree shape with masking fluid. Be sure to create jagged, branch-like edges as you fill it in so it looks natural when revealed later. -
Mask the Ground:
Apply a strip of masking fluid along the bottom of the paper where the snowy ground will be. You can make the top edge of this snow area slightly uneven to resemble drifts. -
Let it Dry:
Allow the masking fluid to dry completely. It must be dry to the touch before you add any paint, or you risk smearing the mask and ruining your white paper.
Step 2: Painting the Sky
-
Mix Your Colors:
Prepare a rich, dark mixture of Indigo and Prussian Blue. I like adding a touch of Black to the mix to get that deep, midnight sky effect. -
First Sky Wash:
Load your size 4 brush with water and then your dark blue mix. Start painting at the top of the paper, working your way down around the masked tree. -
Deepen the Gradient:
While the paper is still damp, drop in more concentrated pigment at the top and edges to create a gradient that gets slightly lighter towards the horizon line. -
Lift Some Color:
If the area immediately around the tree feels too dark, you can use a clean, thirsty damp brush to gently lift a tiny bit of color, creating a subtle glow effect. -
Allow to Dry:
Let this layer dry completely. The paper should feel flat and room temperature, not cool to the touch.
Torn Paper?
If tape tears your paper, heat it briefly with a hairdryer before peeling. This softens the adhesive for a cleaner removal.
Step 3: Adding Details
-
Paint Distant Trees:
Mix a very dark blue-black color. Using the tip of your brush, paint a silhouette of small pine trees along the horizon line, right above the masked snow area. -
Fade the Trees:
Soften the bottom edge of these silhouette trees so they blend slightly into the horizon line, creating a sense of depth. -
Remove the Masking:
Once the paint is 100% dry, gently rub off the masking fluid with your finger or a rubber cement pickup tool. You should now have a stark white tree and snowy ground. -
Shade the White Tree:
Mix a very watery, pale gray-blue. Use your small brush to add faint shadows to the underside of the white branches to give the tree some volume. -
Add Texture to Snow:
Use the same pale wash to paint subtle ripples in the snow at the base, giving the ground some dimension rather than leaving it flat white.
Make It shine
Use actual gold leaf on the main star instead of paint for a luxurious, reflective finish that catches the light beautifully.
Step 4: Stars and Sparkle
-
Paint the Gold Star:
Load your small brush with gold metallic paint. Carefully paint a five-pointed star on the very tip of the main fir tree. -
Add Larger Stars:
Paint a few scattered four-pointed or five-pointed stars in the sky using the gold paint. Space them out randomly for a natural look. -
Splatter Snow:
Cover the main tree with a scrap of paper to protect it. Dip an old toothbrush or stiff brush into white gouache, then flick the bristles to spray fine white dots across the blue sky. -
Final Touches:
Add a few tiny dots of white gouache with your smallest brush to represent larger, falling snowflakes among the stars. -
Remove Tape:
Slowly peel off the painter’s tape at a 45-degree angle to reveal your crisp, clean white border.
Now you have a peaceful winter scene that radiates calm and holiday spirit
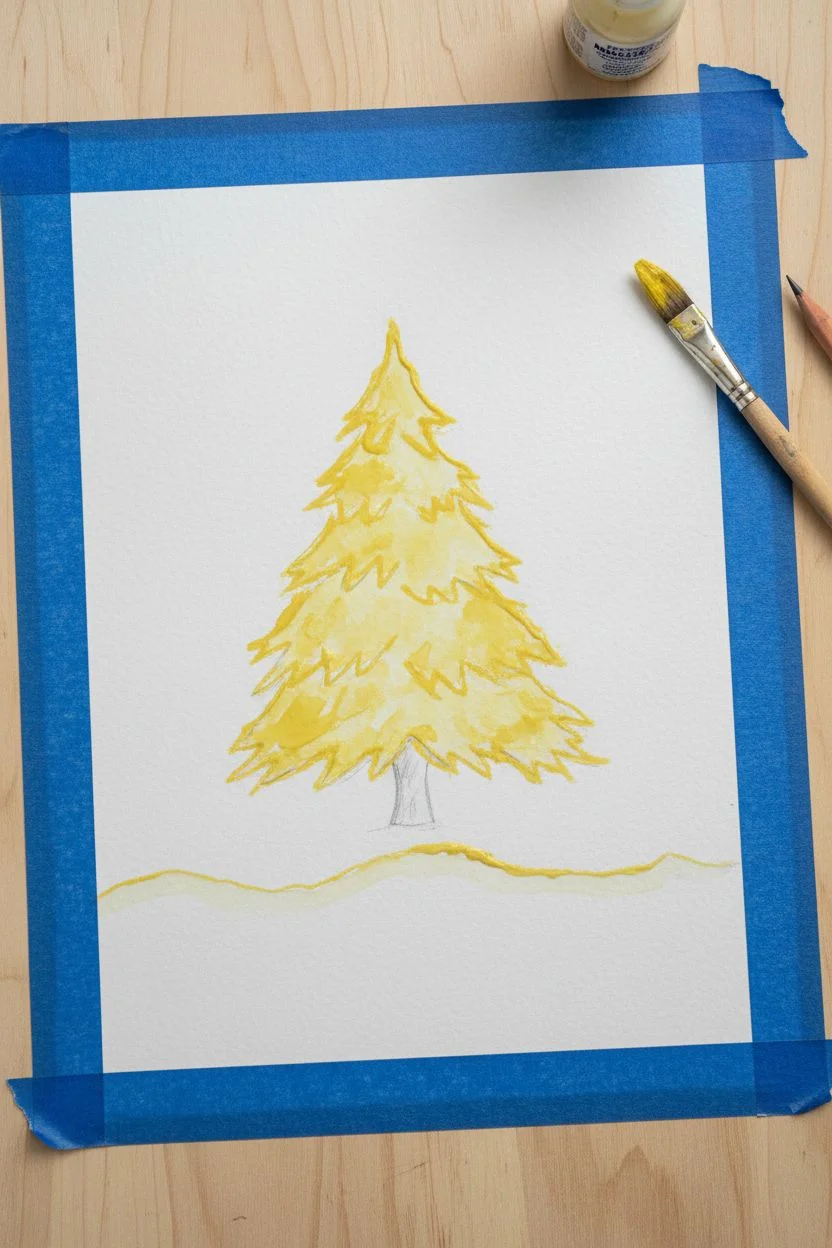
Tree Farm of Overlapping Trees
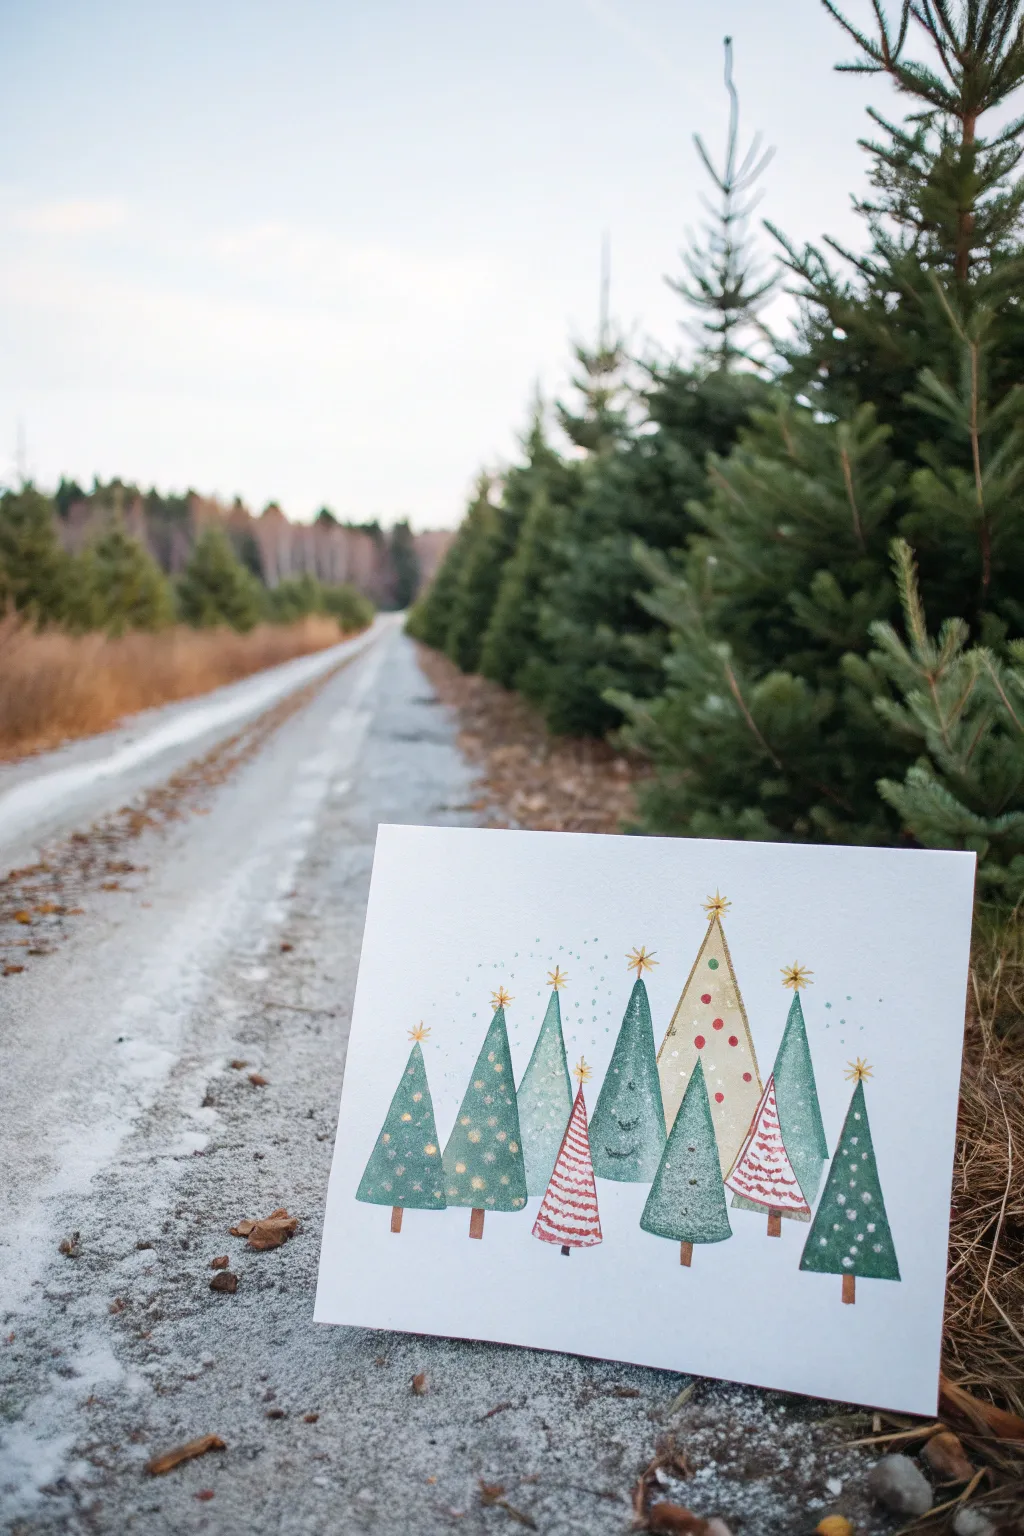
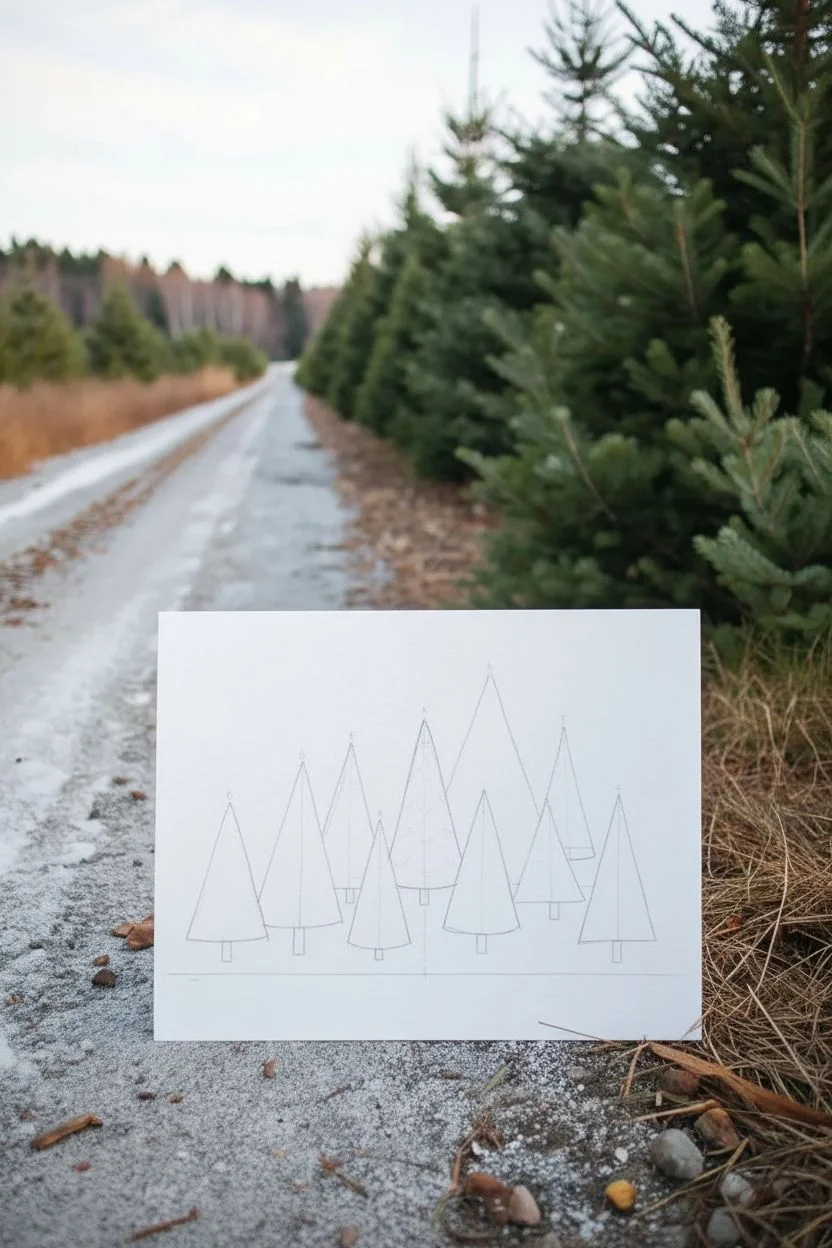
Create a magical winter forest with this simple watercolor project that focuses on geometric shapes and soft textures. The overlapping triangles create depth without needing complex perspective skills, making it perfect for budding artists.
Detailed Instructions
Materials
- Heavyweight watercolor paper (cold press is best)
- Watercolor paints (green palette: sage, emerald, forest green)
- Metallic watercolor or gold maker (for stars and accents)
- Red fine-line marker or pen
- Round watercolor brushes (sizes 4 and 6)
- Flat brush (optional, for crisp edges)
- Pencil and eraser
- Ruler
- Brown watercolor or marker (for trunks)
Step 1: Planning the Layout
-
Set the baseline:
Start by drawing a very faint horizontal line near the bottom of your watercolor paper to serve as the ground level where most trees will sit. -
Sketch the triangles:
Using your ruler, lightly sketch a variety of triangles. Make them different heights and widths to create visual interest. -
Create overlaps:
Draw some triangles clearly in front of others. For the ‘back’ trees, simply stop the lines where they meet a ‘front’ tree so you don’t have to erase later. -
Add a focal point:
Sketch one slightly larger or uniquely shaped triangle (like the tall golden one in the sample) to break up the pattern.
Clean Edges Trick
Use washi tape to mask the sides of your triangles before painting. Peel it off gently when dry for perfectly crisp, professional lines.
Step 2: Painting the Forest
-
Mix your greens:
Prepare three or four different shades of green on your palette. Varying the tone from blue-green to yellow-green helps define each tree. -
Paint the first layer:
Start by painting the non-touching trees first. Fill them in with a flat wash of color, keeping the edges crisp. -
Let it dry completely:
Wait until the first set of trees is bone dry. This is crucial to prevent colors from bleeding into each other. -
paint the overlapping trees:
Fill in the remaining green trees. I like to use slightly darker or lighter shades for adjacent trees so they stand out against each other. -
The golden tree:
Paint your focal tree with a pale gold or beige wash. This creates a lovely contrast against the cool green tones. -
Add texture:
While some paint is still slightly damp on selected trees, dab in a tiny bit of darker pigment or salt to create a mottled, snowy texture.
Step 3: Decorative Details
-
Add tree trunks:
Using a small flat brush or brown marker, paint simple rectangular trunks at the base of each tree. -
Draw the striped trees:
For the small red-accented trees, leave the background white or very pale, and use a fine-line red marker or brush to draw horizontal zig-zags or stripes. -
Add ornaments:
Once the green paint is totally dry, use your gold marker or opaque metallic paint to add dots, garlands, or small ‘x’ patterns on the trees. -
Paint the stars:
Top each tree with a small, radiant star. Use quick, outward flicks of your brush to make them look like they are twinkling. -
Splatter snow:
Dilute some blue-green paint with plenty of water. Tap your brush over the paper to create tiny droplets that look like falling snow in the background.
Bleeding Colors?
If paints run together, you didn’t wait long enough! Use a hair dryer on the ‘cool’ setting to speed up drying between adjacent shapes.
Now you have a serene little forest scene ready to be framed or sent as a holiday card
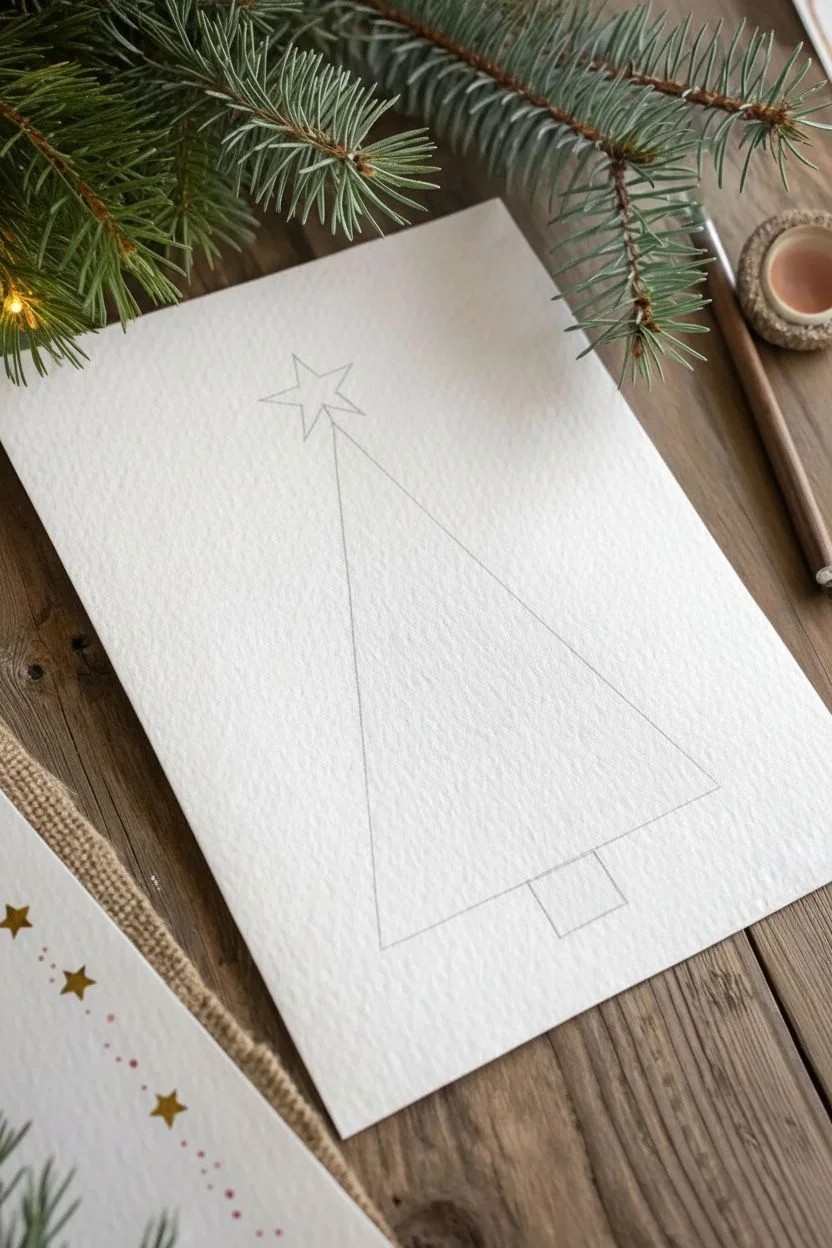
Q-Tip Painted Christmas Tree Dots
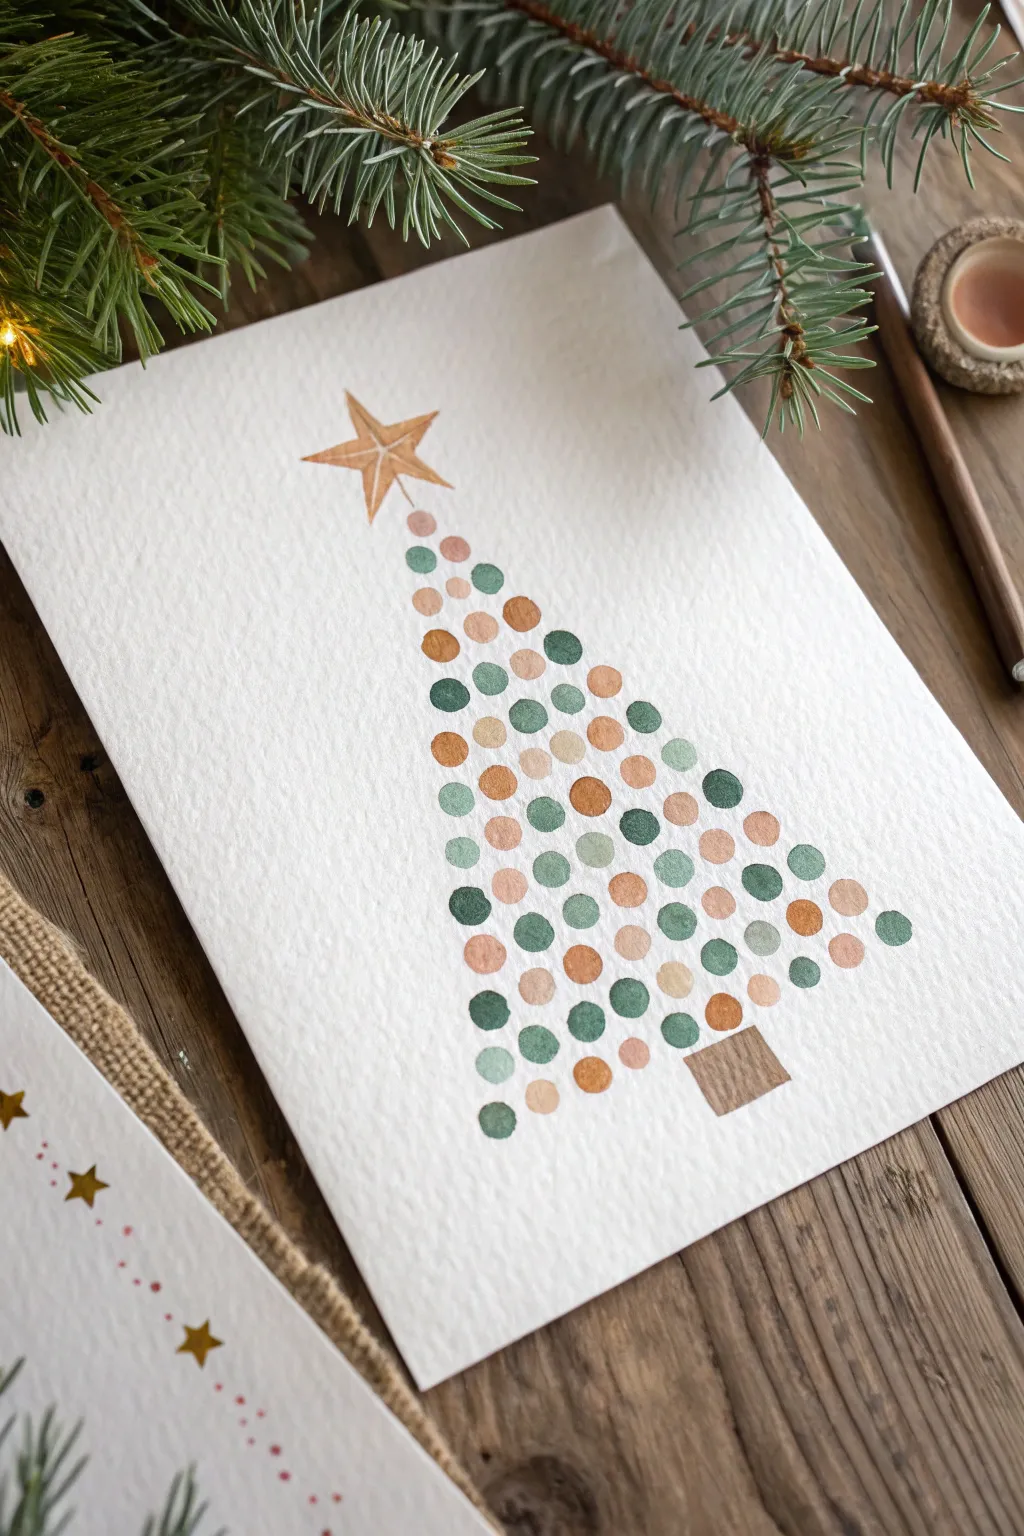
Create a modern, minimalist Christmas tree using nothing but a Q-tip and a simple dotting technique. This watercolor project uses a soft palette of sage greens, earthy coppers, and warm beiges to build a festive shape that is perfect for holiday greeting cards.
Step-by-Step
Materials
- Heavyweight watercolor paper or cold-press cardstock
- Watercolor paints (sage green, forest green, copper/metallic gold, beige/peach)
- Q-tips (cotton swabs)
- Small fine-tip paintbrush
- Pencil and eraser
- Ruler
- Paper towel
- Water cup
Step 1: Preparation & Shapes
-
Prepare your workspace:
Lay down your textured watercolor paper on a flat surface. Ensure your paints are activated with a little water so they are fluid but not too runny. -
Mark the guide:
Using a pencil and ruler, very lightly draw a tall, thin isosceles triangle in the center of your paper. This will serve as the boundary for your tree shape. -
Draw the trunk:
At the bottom center of the triangle, sketch a small, slanted rectangle for the tree trunk. -
Draw the star:
At the very top point of the triangle, sketch a simple five-pointed star.
Fixing “Blobby” Dots
If your dots adhere too much texture or leave lint, dab the Q-tip on a paper towel first. If paint puddles too much, lightly touch a dry paper towel corner to the dot to lift excess liquid.
Step 2: Dotting the Tree
-
Mix your palette:
Prepare four distinct puddles of color: a deep forest green, a soft sage green, a warm beige or peach tone, and a metallic copper or bronze. -
Start at the top:
Dip a Q-tip into your sage green paint. Press it gently onto the paper just below the star to make your first dot. -
Begin the rows:
Move down slightly and stamp two dots for the next row. Allow a tiny bit of white space between them so they don’t bleed together instantly. -
Alternate colors:
Switch to a fresh Q-tip end for the copper paint. Add a copper dot into your pattern in the third row. -
Build the width:
Continue working downward, increasing the number of dots in each horizontal row to fill the triangle width. I like to keep a random rotation of colors to balance the greens and metallics. -
Maintain spacing:
Keep the vertical and horizontal spacing consistent. The dots should look like a grid that forms a triangle, not a solid mass of color. -
Fill the bottom:
As you reach the widest part of the triangle, ensure your bottom row of dots creates a relatively straight line. -
Let it dry:
Allow the dot pattern to dry completely before touching the paper to prevent smudging.
Add Some sparkle
For a magical finish, wait until the paint is dry and add a tiny dab of glitter glue to the center of the metallic copper dots to mimic twinkling ornaments.
Step 3: Painting Details
-
Paint the star:
Using your fine-tip paintbrush and the copper or metallic gold paint, carefully fill in the star shape at the top. -
Add star details:
Once the base layer of the star is damp (not soaking), add a slightly darker line down the center of each point to give it a 3D faceted look. -
Paint the trunk:
Fill in the rectangular trunk at the bottom using a brown or bronzed-beige shade with your brush. -
Erase guides:
Once the entire painting is 100% bone dry, very gently erase any visible pencil lines from your initial triangle guide.
Now you have a charming, handcrafted card ready to share with someone special this holiday season
Tape-Resist Christmas Tree Silhouette
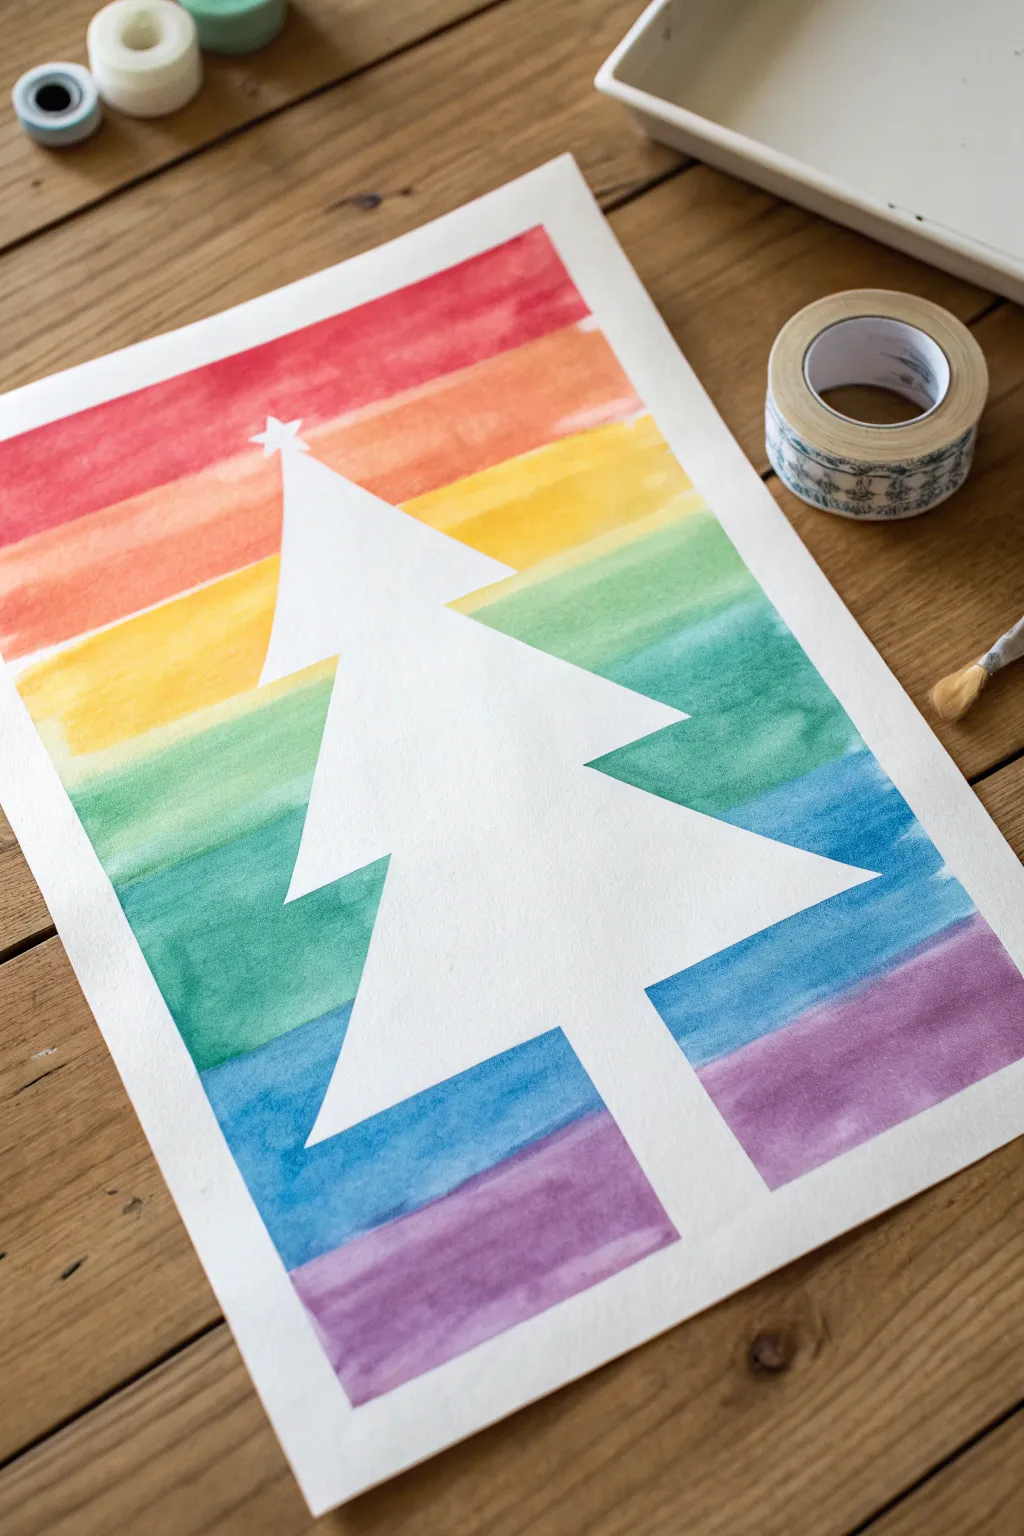
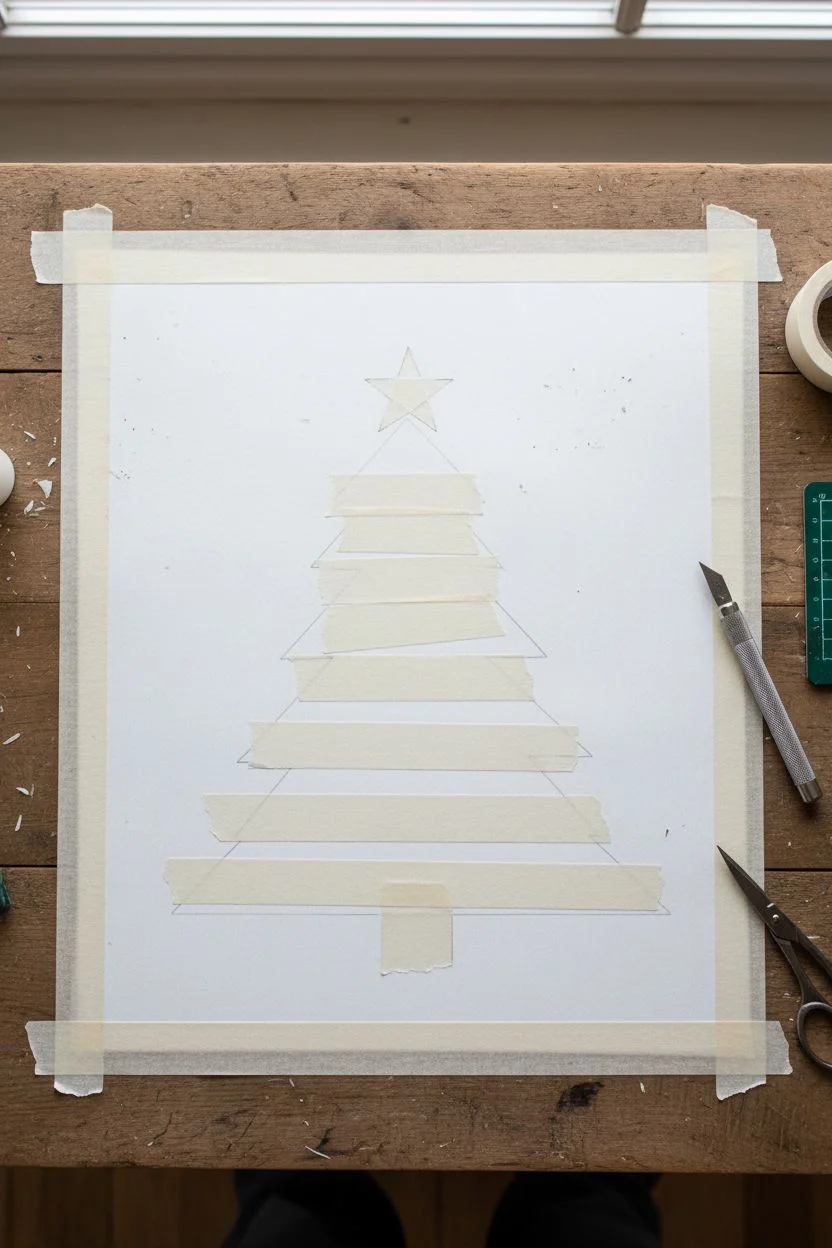
Brighten up your holiday art with this vibrant watercolor project that uses simple masking techniques to reveal a crisp, snowy white Christmas tree. The result is a cheerful, modern silhouette set against bold bands of rainbow color, perfect for homemade cards or festive wall decor.
How-To Guide
Materials
- Thick watercolor paper (cold press recommended)
- Painter’s tape or dedicated masking tape (various widths)
- Watercolor paints or liquid watercolors
- Flat paintbrush (medium to large)
- Pencil and eraser
- Scissors or a craft knife
- Ruler
- Paper towels and water cup
Step 1: Creating the Mask
-
Prepare your paper:
Start by taping down the four edges of your watercolor paper to your table or a drawing board. This creates a clean white border and prevents the paper from buckling when it gets wet. -
Sketch the tree outline:
Using a light pencil, draw a simple, large triangle shape in the center of your paper. Add two or three jagged tiers to the sides to give it a classic pine tree shape, but keep the lines simple. -
Apply the masking tape:
Cover the entire inside area of your tree sketch with strips of masking tape. Don’t worry about the edges matching perfectly yet; just ensure the white paper inside your tree shape is fully covered. -
Trim the shape:
Carefully cut along your pencil lines with a craft knife to remove the excess tape outside the tree shape. Alternatively, you can cut the tape strips to size with scissors before sticking them down to match your drawing. -
Add the star:
Cut a small star shape from a piece of tape or use a star sticker and place it right at the tip of your tree mask. -
Seal the edges:
Run your fingernail or a plastic card firmly along all the edges of your tape mask. This step is crucial to prevent paint from seeping underneath and ruining your crisp white silhouette.
Crisp Edge Secret
For the sharpest lines, paint a thin layer of clear water or white acrylic over the tape edges first to seal them before adding color.
Step 2: Painting the Rainbow
-
Prepare your palette:
Mix up your colors in a palette. You will need a spectrum: red, orange, yellow, green, blue, and purple. Make sure they are watery enough to flow but pigmented enough to be bright. -
Paint the first stripe:
Starting at the very top of the paper, paint a horizontal band of red across the width of the page. Paint right over the tape mask—don’t try to paint around it. -
Blend into orange:
While the bottom edge of the red is still slightly damp, load your brush with orange and paint the next band below it. Let the colors touch slightly so they blend softy without getting muddy. -
Continue the spectrum:
Move down the paper adding yellow, then green. I like to keep my brush strokes moving horizontally to maintain that striped look. -
Finish with cool colors:
Paint the blue band next, followed by purple at the very bottom. Ensure you have covered the entire background area and overlap the tape edges completely. -
Let it dry completely:
Set the painting aside to dry. The paper needs to be bone dry before you attempt the next step. If it feels cool to the touch, it is likely still damp inside.
Step 3: The Reveal
-
Peel the border tape:
Start by removing the tape holding the paper to the table. Pull slowly at a 45-degree angle away from the painting to avoid tearing the paper surface. -
Remove the tree mask:
Very carefully begin peeling up the tape that forms the tree. Start from the bottom trunk area and work your way up to the star. -
Clean up edges:
If any paint seeped under the tape, use a white gel pen or a tiny bit of white acrylic paint to touch up the edges and restore the crisp silhouette. -
Erase pencil marks:
Once you are sure the paint is totally creating dry, gently erase any visible pencil lines that might remain around the white tree shape.
Tearing Paper?
If your tape is ripping the paper upon removal, blast it with a warm hair dryer for a few seconds first to soften the adhesive.
Display your colorful creation in a simple frame or on the fridge to spread immediate holiday cheer


Have a question or want to share your own experience? I'd love to hear from you in the comments below!