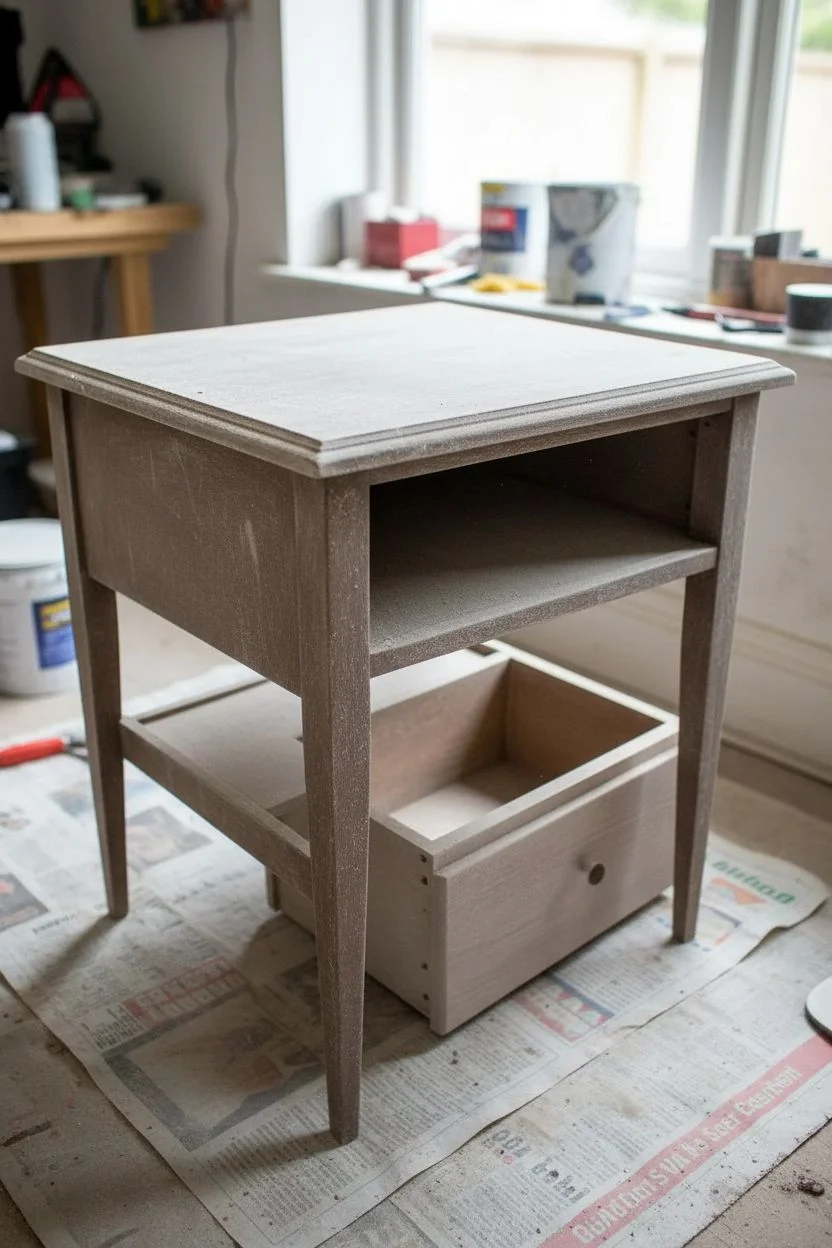
My favorite kind of makeover is the one that takes a tired little end table and turns it into something you can’t stop staring at. Here are my go-to DIY painted end table ideas—from classic, foolproof finishes to artsy techniques that make your table feel truly one-of-a-kind.
Classic Solid-Color Refresh
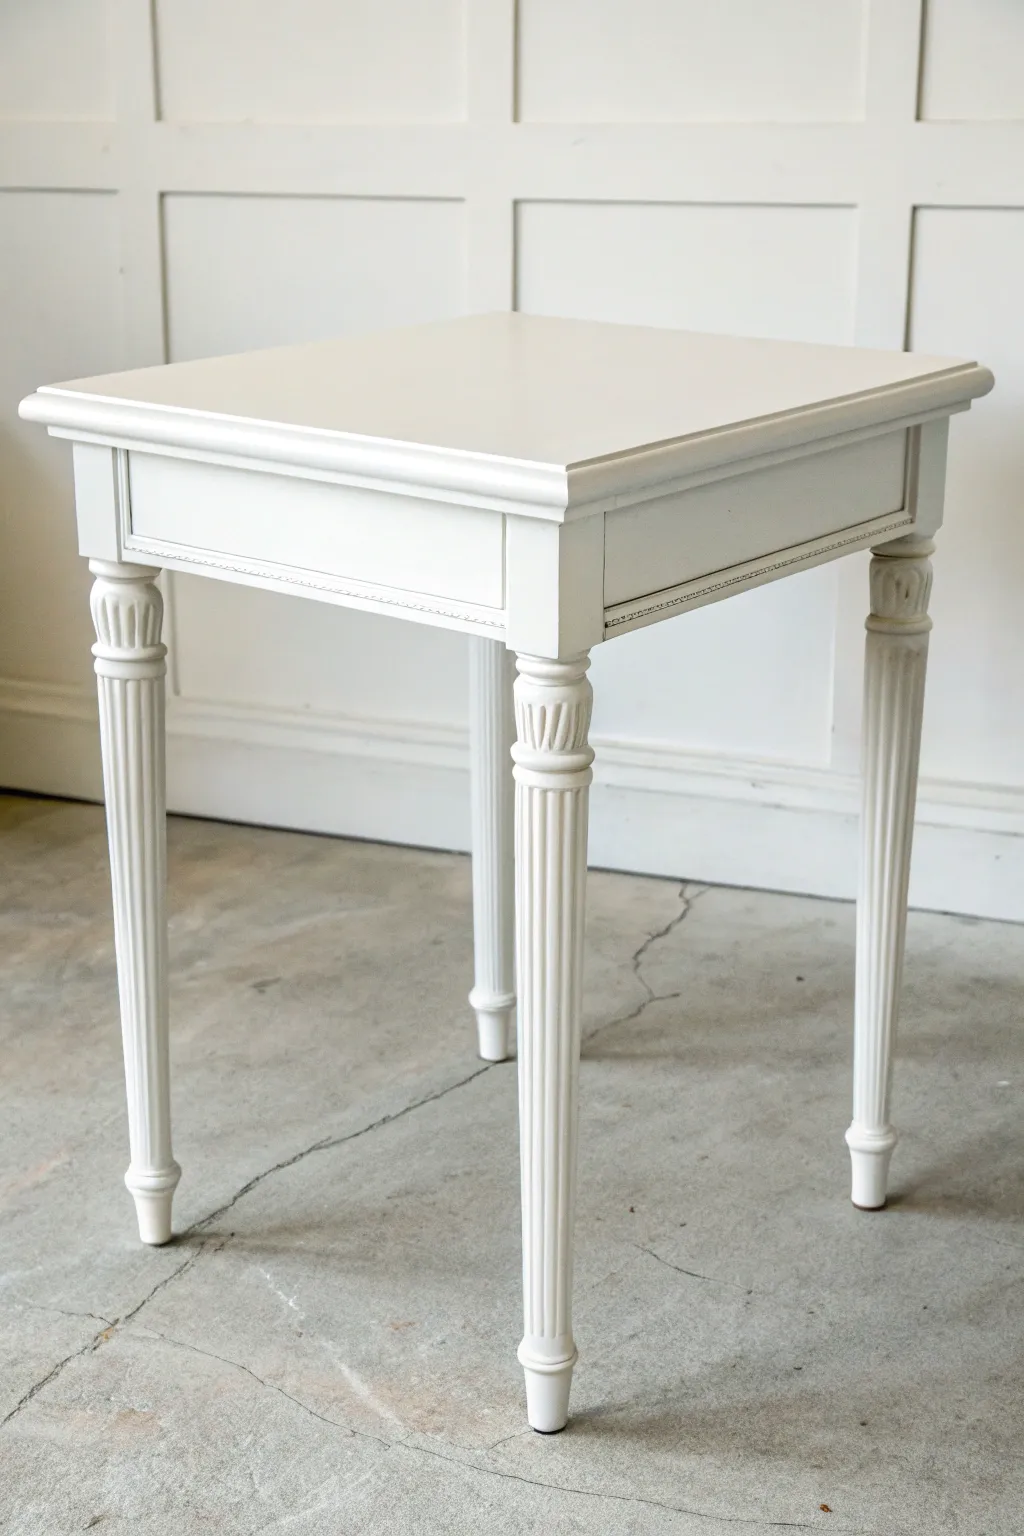
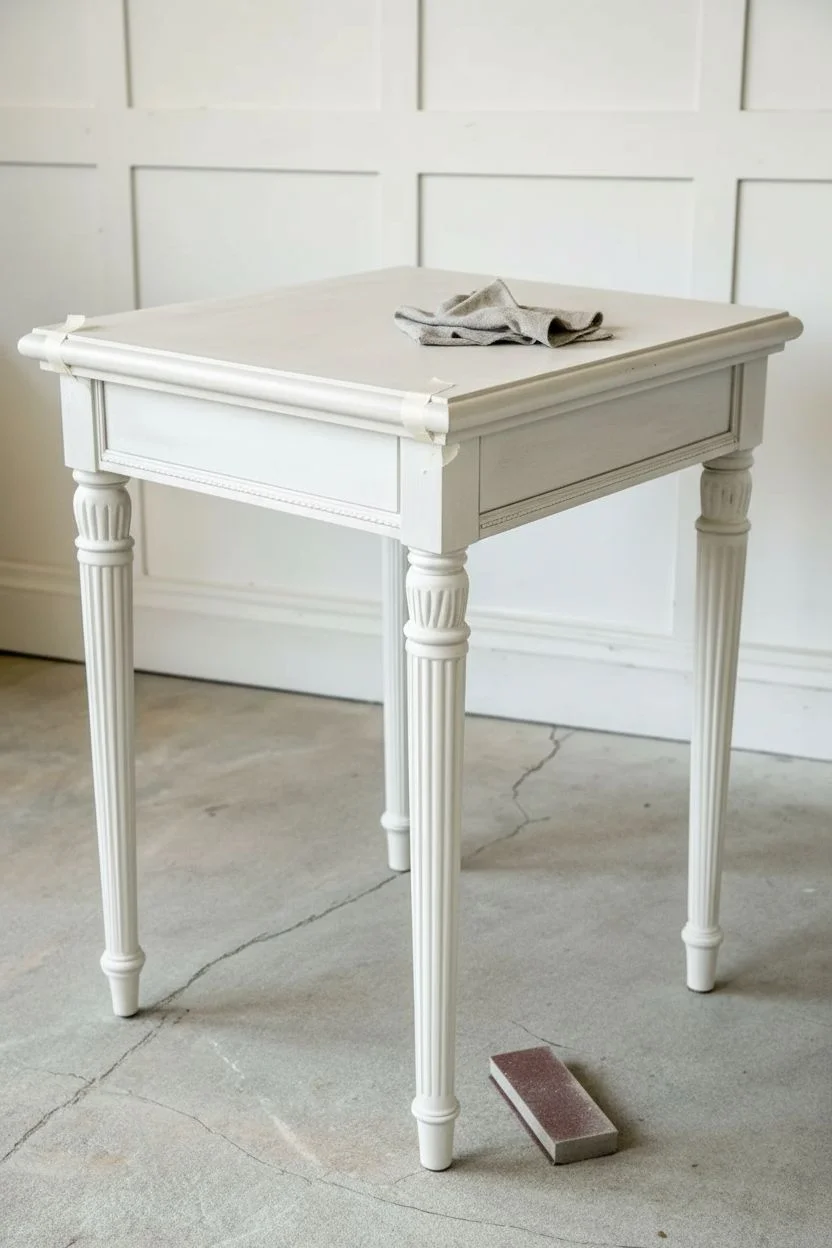
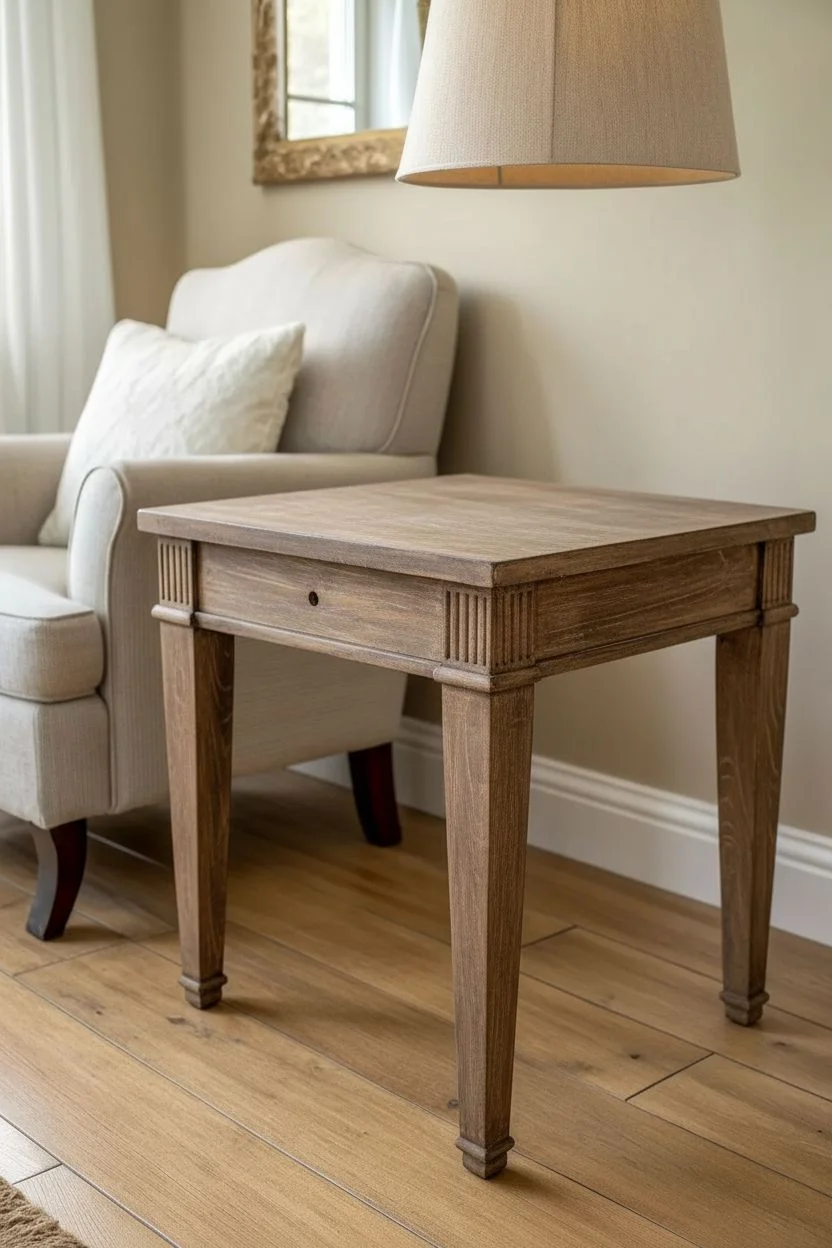
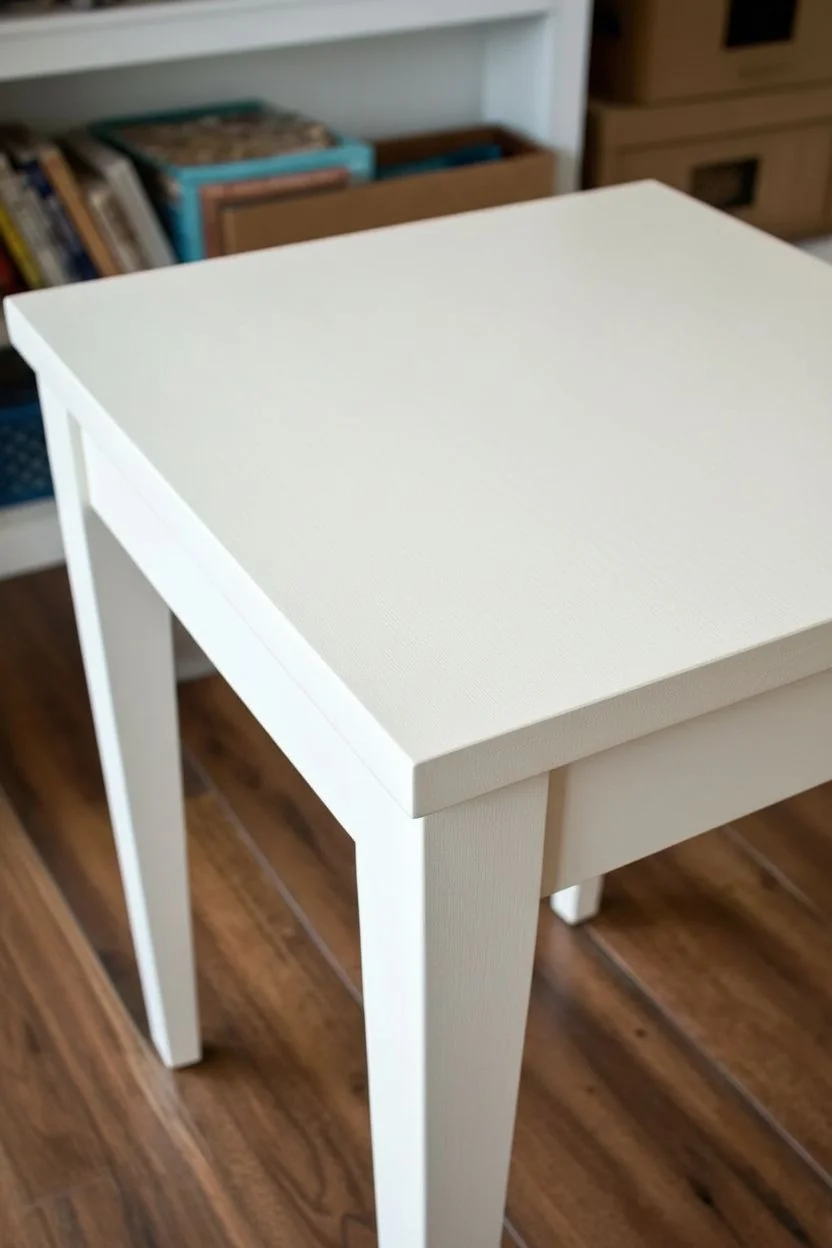
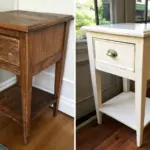
Transform a dated or wooden side table into a timeless piece of decor with a flawless solid-color refresh. This project focuses on achieving a smooth, factory-like finish on intricate details like fluted legs, bringing a touch of clean elegance to any room.
Step-by-Step
Materials
- End table with fluted legs
- Sanding block (medium and fine grit)
- Degreaser or TSP clone
- High-quality bonding primer (stain-blocking)
- Interior Satin or Semigloss Enamel paint (White)
- Small foam roller
- Synthetic angled sash brush (1.5 – 2 inch)
- Tack cloth
- Drop cloth
- Painter’s tape
- Wood filler (optional)
Step 1: Preparation
-
Clean thoroughly:
Begin by removing any dust or grime from the table. Scrub the surface well with a degreaser or TSP substitute to ensure all oils are removed, which is crucial for paint adhesion. -
Assess for damage:
Inspect the table for deep scratches or gouges. If you find any, fill them with a dab of wood filler and let it dry according to the package instructions. -
Scuff sand the surface:
Use a medium-grit sanding block to scuff up the entire piece. You aren’t trying to remove the old finish completely, just dulling the shine to give the new paint something to grip. -
Detail sanding:
Pay special attention to the fluted grooves in the legs. Fold your sandpaper or use a flexible sanding sponge to get inside those crevices without flattening the details. -
Remove dust:
Wipe down the entire table with a clean, damp cloth followed by a tack cloth to pick up every last speck of sanding dust. -
Tape off areas:
If there are any parts you don’t want painted, like hardware or drawer glides, apply painter’s tape carefully now.
Step 2: Priming
-
Apply primer to legs:
Using your angled brush, work a high-quality stain-blocking primer into the fluted legs. I find distinct brush strokes here can be tricky, so keep your coats thin to avoid drips pooling in the grooves. -
Prime flat surfaces:
Switch to a small foam roller for the tabletop and flat sides of the apron. Roll smoothly to create an even base without brush marks. -
Check for bleed-through:
Let the primer dry completely. If you see yellow or pink stains bleeding through the white primer, apply a second coat of stain-blocking primer to those specific spots. -
Light sanding:
Once dry, run a fine-grit sandpaper lightly over the primed surface to knock down any raised grain or fuzz. Wipe clean with a tack cloth.
Sticky Situation
If the drawers stick after painting, run a plain candle or bar of soap along the wooden runners. The wax acts as a lubricant to help them glide smoothly.
Step 3: Painting
-
First coat on details:
Dip your angled brush into the white enamel paint. Start with the legs, painting vertically along the flutes. Use long, single strokes from top to bottom to minimize start-stop marks. -
Watch for drips:
Immediately check the bottom of the routed details and corners for pooling paint. smooth these out with the tip of your brush before they tack up. -
Roll the top:
Pour some paint into a tray and load your foam roller. paint the flat top surface, using light pressure to avoid creating ridges at the edges of the roller. -
Dry time:
Allow the first coat to dry for at least 4-6 hours, or as recommended by your specific paint brand. Do not rush this step, as tacky paint will drag. -
Second coat:
Apply the second coat in the same order—brush the legs and details first, then roll the flat surfaces. This second layer will provide that solid, opaque coverage. -
Final inspection:
While the paint is wet, inspect the piece from different angles in good light to catch any missed spots or sags. -
Curing:
Let the table cure undisturbed for several days before placing heavy objects on it. Enamel paints take time to harden fully.
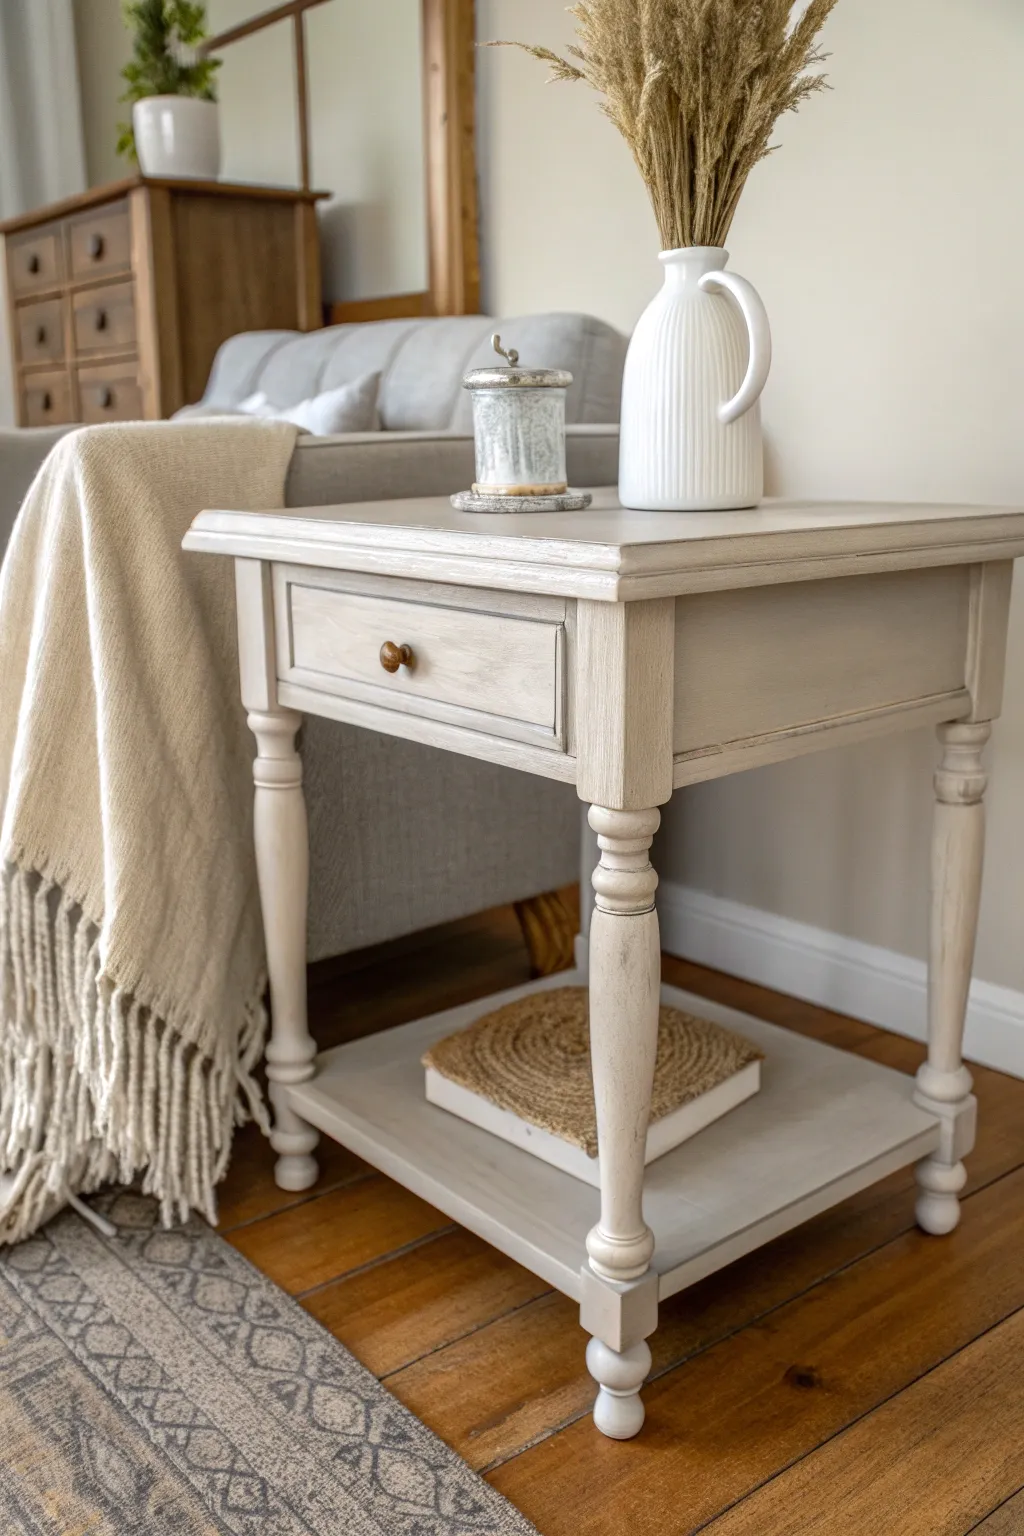
Gage the glaze
For added depth, apply a very subtle grey glaze into the fluted leg grooves, then wipe it back immediately. This highlights the carving without darkening the table.
Now you have a brilliantly refreshed table that looks professionally finished and ready to brighten up your space


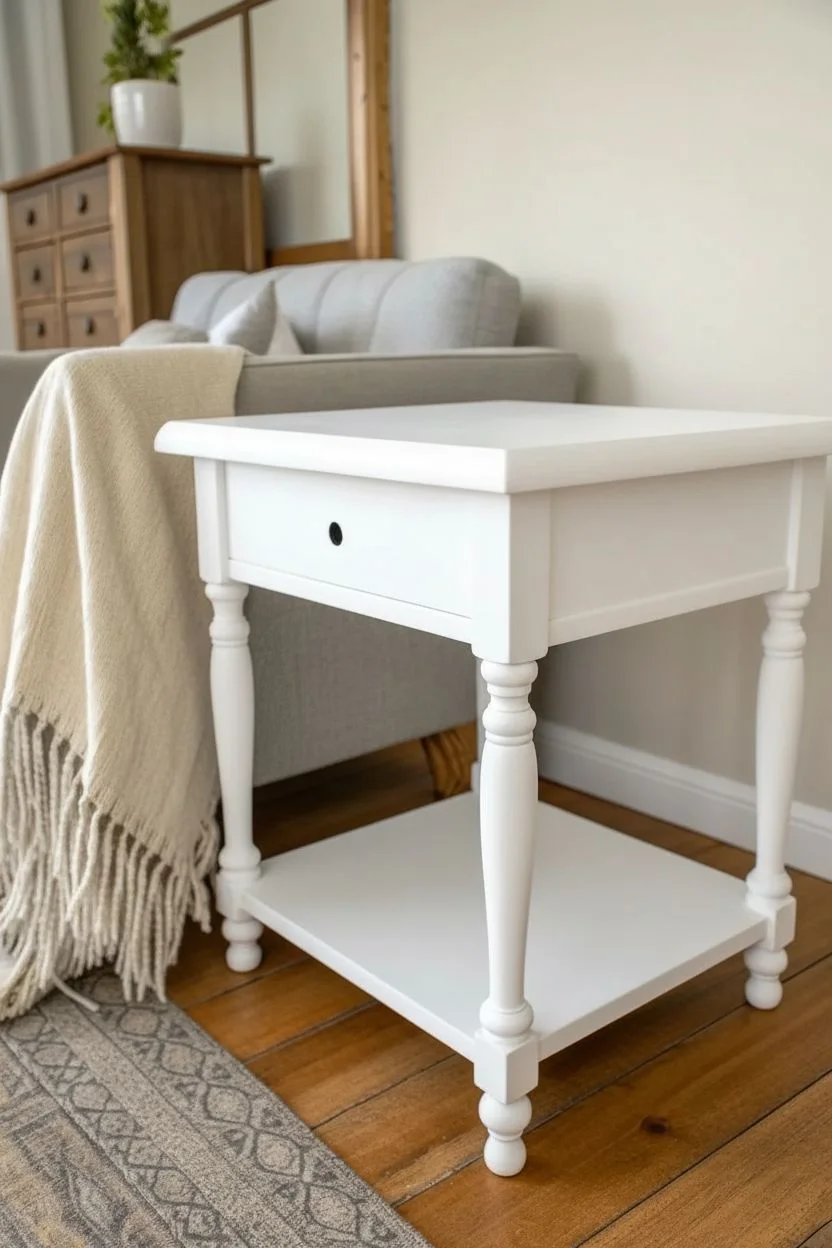
Bright White End Table Makeover
Transform a plain wooden table into a charming vintage-style piece with this heavy distressing technique. By layering bright white chalk-style paint over wood and selectively sanding it back, you’ll achieve that perfectly worn, lived-in farmhouse look.
Detailed Instructions
Materials
- Wooden end table (unfinished or previously finished)
- Medium grit sandpaper (120-150 grit)
- Fine grit sandpaper (220 grit)
- White chalk-style paint (pure white)
- Small round paint brush
- Medium synthetic bristle brush
- Clean lint-free rags
- Clear matte furniture wax
- Wax brush or soft cloth
- Screwdriver (for hardware removal)
- Mild degreaser or TSP alternative
Step 1: Preparation
-
Remove Hardware:
Begin by removing any knobs, handles, or pulls from the drawer using a screwdriver. Keep these screws safe in a small baggie so you don’t lose them. -
Clean the Surface:
Wipe down the entire table with a mild degreaser or TSP alternative to remove oils, dust, and old furniture polish. This step is crucial for paint adhesion. -
Initial Scuff Sanding:
Using your medium grit sandpaper (120-150), give the entire piece a light scuff sand. You don’t need to strip it to bare wood, just rough up the existing finish to give the paint some ‘tooth’ to grab onto. -
Wipe Away Dust:
Use a damp, lint-free rag or a tack cloth to thoroughly remove all sanding dust from the piece.
Step 2: Painting
-
First Coat Application:
Dip your medium synthetic brush into the white chalk-style paint. Apply a thin, even coat over the entire table, painting in the direction of the wood grain. -
Watch the Details:
Use a smaller round brush to get into crevices, like the fluted details on the legs or any carved accents on the drawer front, ensuring total coverage. -
Let Dry:
Allow the first coat to dry completely. Chalk-style paint dries quickly, usually within 30 to 60 minutes. -
Second Coat Application:
Apply a second coat of white paint. This coat provides the solid, bright white opacity seen in the photo. If your paint is thick, you can lightly mist your brush with water to help it flow smoother. -
Final Dry Time:
Let the piece dry thoroughly, preferably for a few hours or overnight, to ensure the paint creates a hard shell before we attack it with sandpaper.
Waxing Wisdom
Work in small sections when waxing. If you apply wax to the whole table at once, it may dry too hard before you can buff it, making your arm work twice as hard.
Step 3: The Distressing Process
-
Focus on Edges:
I like to take a folded piece of 150-grit sandpaper and firmly rub along the sharp edges of the table top. Apply pressure until the white paint wears away and the dark wood underneath peeks through. -
Distress the Legs:
Move to the legs. Sand along the vertical corners and high points of any fluted details. The goal is to simulate natural wear, so focus on areas that would naturally get bumped or rubbed over time. -
Drawer Detail:
don’t forget the drawer front. Sand the perimeter of the drawer face and slightly around the knob hole to create dimension. -
Surface Scratches:
For added character, lightly drag your sandpaper across flat surfaces here and there in the direction of the grain to create subtle ‘scratches’ or worn patches in the paint.
Dark Wax Finish
For an antique look, apply a small amount of dark antique wax into the crevices and corners after your clear wax layer to deepen the shadows.
Step 4: Finishing
-
Clean Up Dust:
Distressing creates a lot of white powder. Vacuum the piece and wipe it down with a damp cloth until no white residue remains. -
Apply Wax:
Load a wax brush or soft cloth with clear matte furniture wax. Massage it into the paint in small circular motions. -
Buff to Sheen:
Let the wax sit for about 15-20 minutes, then buff it vigorously with a clean, dry cloth. This cures the paint and gives it a smooth, professional feel. -
Reattach Hardware:
Screw the knob back onto the drawer. If the original hardware looks too new, consider painting it or replacing it with something vintage.
Place your newly finished table next to a cozy armchair and enjoy the brightness it adds to your room


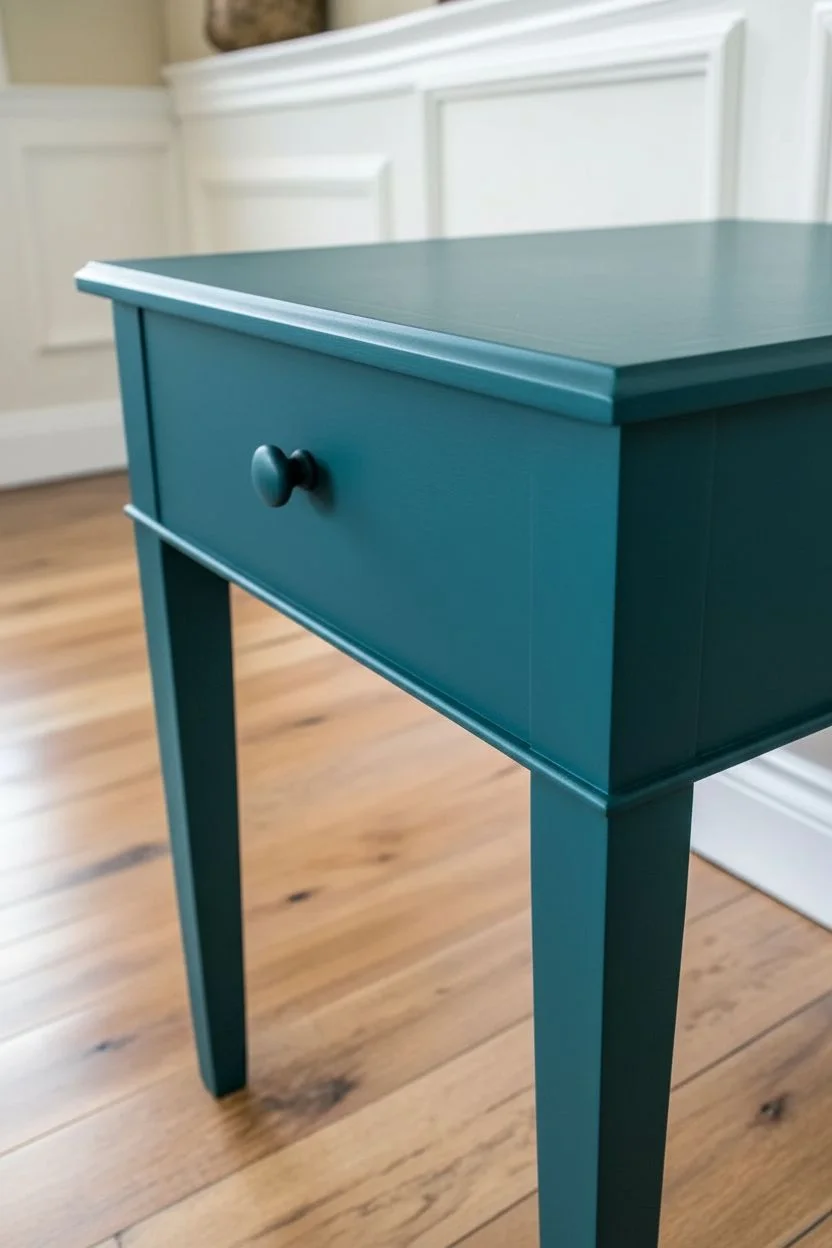
Moody Dark End Table Paint
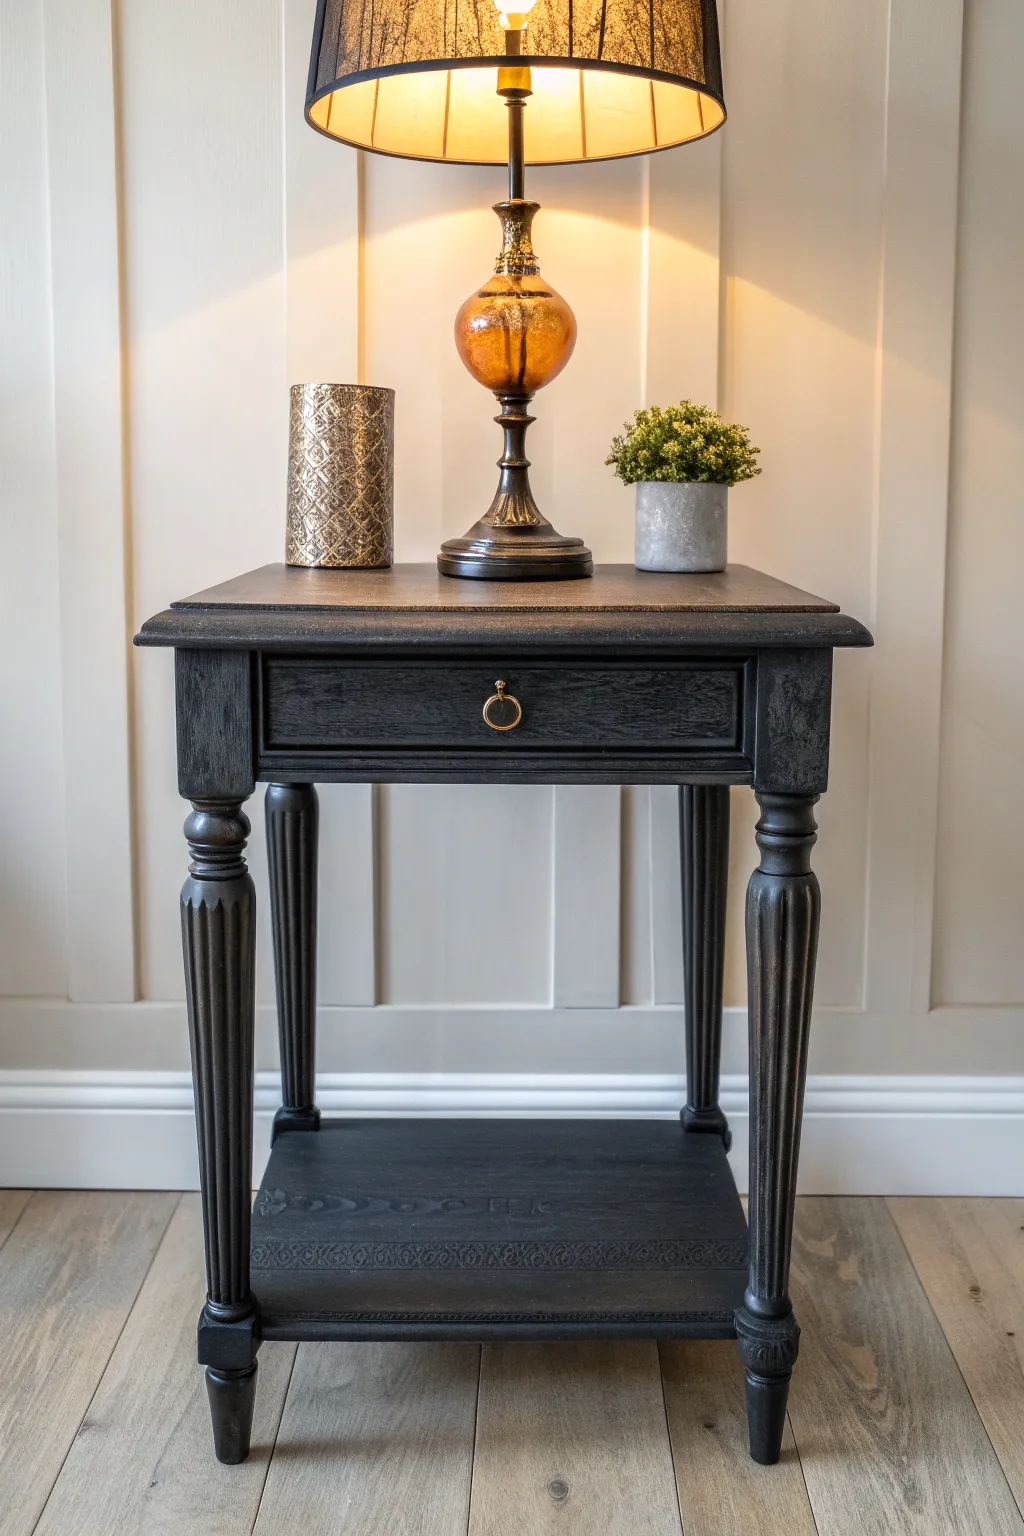
Transform a dated wooden side table into a statement piece of moody elegance with this deep matte black finish. This project relies on fluted leg details and a subtle distressing technique to create a finish that feels timeless rather than stark.
Step-by-Step Tutorial
Materials
- Wooden end table (preferably with fluted legs)
- Medium grit sandpaper (120-150 grit)
- Fine grit sandpaper (220 grit)
- Degreaser or TSP alternative
- Lint-free tack cloth
- High-quality black chalk mineral paint (e.g., Coal Black or similar)
- 1.5-inch synthetic angled sash brush
- Small artist brush
- Black wax or clear furniture wax
- Wax brush or clean cotton rag
- Gold tone drawer pull (ring style)
- Screwdriver
Step 1: Preparation
-
Remove Hardware:
Begin by removing any existing knobs or pulls from the drawer using a screwdriver. Keep the screws in a safe place if you plan to reuse them. -
Clean Thoroughly:
Wipe down the entire piece with a degreasing cleaner or TSP alternative. Old furniture often has built-up oils or polish that can resist paint, so scrubbing well here is crucial. -
Scuff Sanding:
Using the medium grit (120-150) sandpaper, lightly sand the entire surface. You aren’t trying to strip it to bare wood, just breaking the shiny finish to give the paint distinct ‘teeth’ to grip onto. -
Dust Removal:
Vacuum up the sanding dust, then wipe the piece down completely with a tack cloth to ensure a perfectly smooth starting surface.
Step 2: Painting Application
-
First Coat – Legs:
Start by applying your black chalk mineral paint to the fluted legs. Use the angled sash brush to work the paint into the vertical grooves first, then smooth it out with long, upward strokes. -
First Coat – Body:
Continue painting the frame, drawer front, and bottom shelf. Chalk paint is thick, so apply a thin, even layer rather than glopping it on. -
Detail Work:
If your angled brush is missing the deep crevices of the leg turning or the drawer lip, use a small artist brush to dab paint into those tight corners. -
Dry Time:
Allow this first coat to dry completely, usually about 2-4 hours depending on the brand of paint and humidity in your workspace. -
Light Sanding:
Once dry, run a fine grit (220) sandpaper very lightly over the flat surfaces. This knocks down any brush strokes or raised grain for a professional feel. -
Second Coat:
Apply a second full coat of black paint. Focus on full coverage now, ensuring those deep tones are opaque and solid. -
Final Dry:
Let the piece dry overnight if possible. Dark colors take longer to cure, and you want a hard surface before sealing.
Paint Peeling?
If paint lifts while distressing, you didn’t sand or clean enough initially. Spot sand the area, clean with alcohol, and repaint just that patch.
Step 3: Finishing Touches
-
Distressing (Optional):
To match the reference photo’s slight dimension, use fine sandpaper to gently rub the sharp edges of the legs and the drawer corners, revealing just a hint of wood underneath. -
Applying Wax:
Dip your wax brush into the furniture wax. I find black wax deepens the color beautifully, but clear wax works if you want a softer charcoal look. Apply in circular motions. -
Buffing:
Wait about 15-20 minutes for the wax to haze over, then use a clean, lint-free cloth to buff the surface vigoriously. This creates that soft, satin sheen seen in the image. -
Hardware Installation:
Take your gold ring pull and install it in the center of the drawer. The contrast of the bright gold against the matte black is key to this moody aesthetic. -
Style and Staging:
Place the drawer back into the unit. Ensure the bottom shelf is clean and ready for books or decor.
Pro Tip: Fluted Legs
When waxing fluted legs, apply wax sparingly with a brush, then use an old toothbrush to buff the indented grooves where a cloth can’t reach.
Enjoy the sophisticated, grounded energy this dark beauty brings to your living space


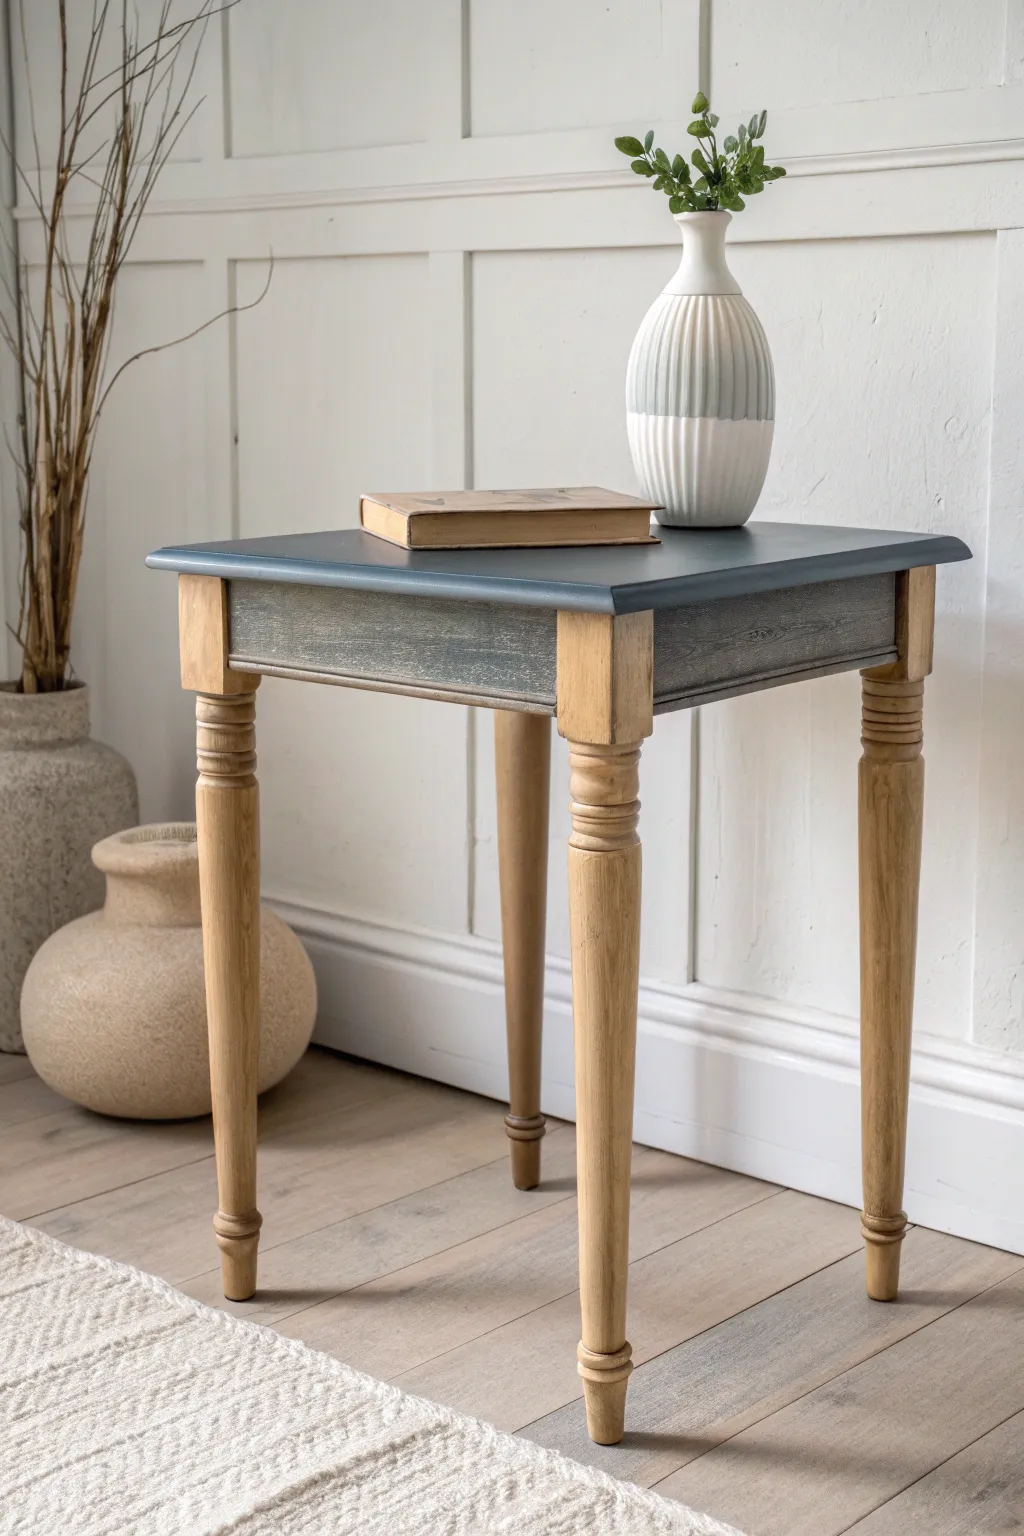
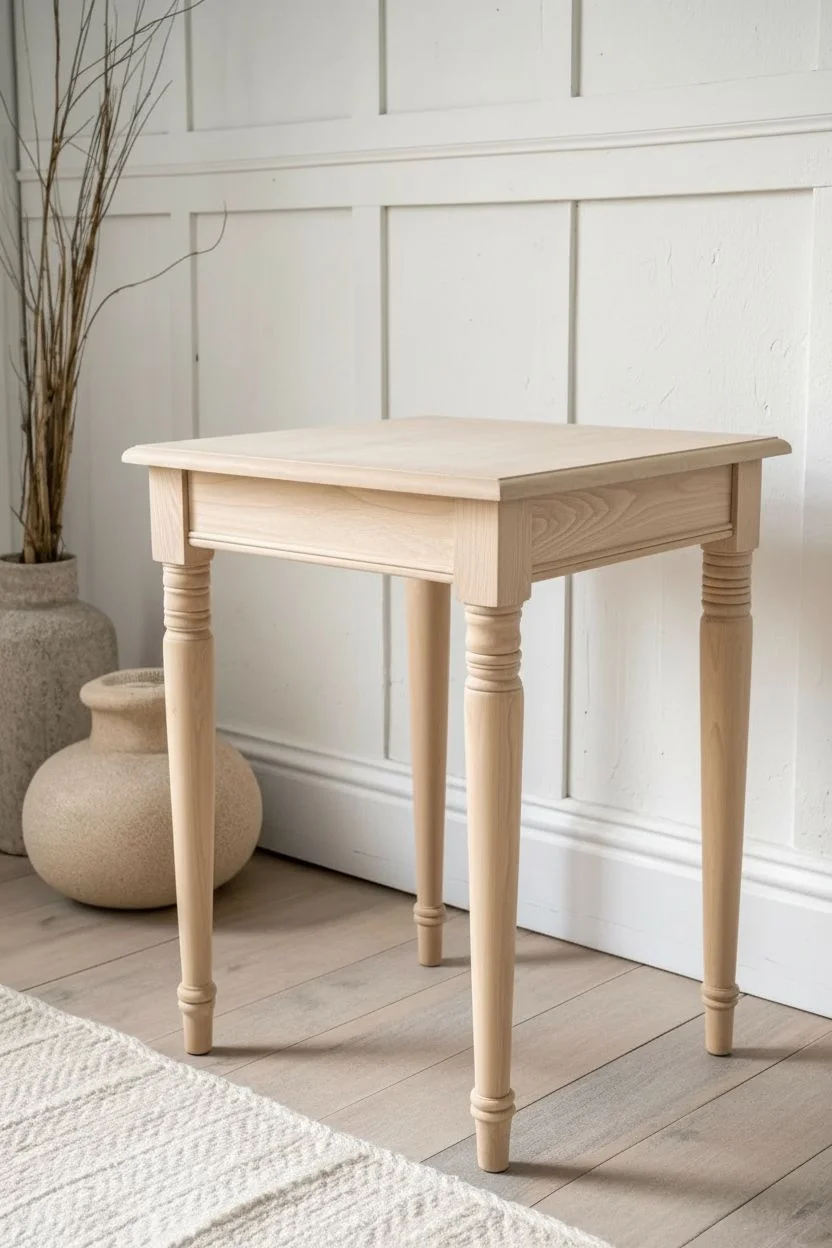
Two-Tone Base and Wood Top
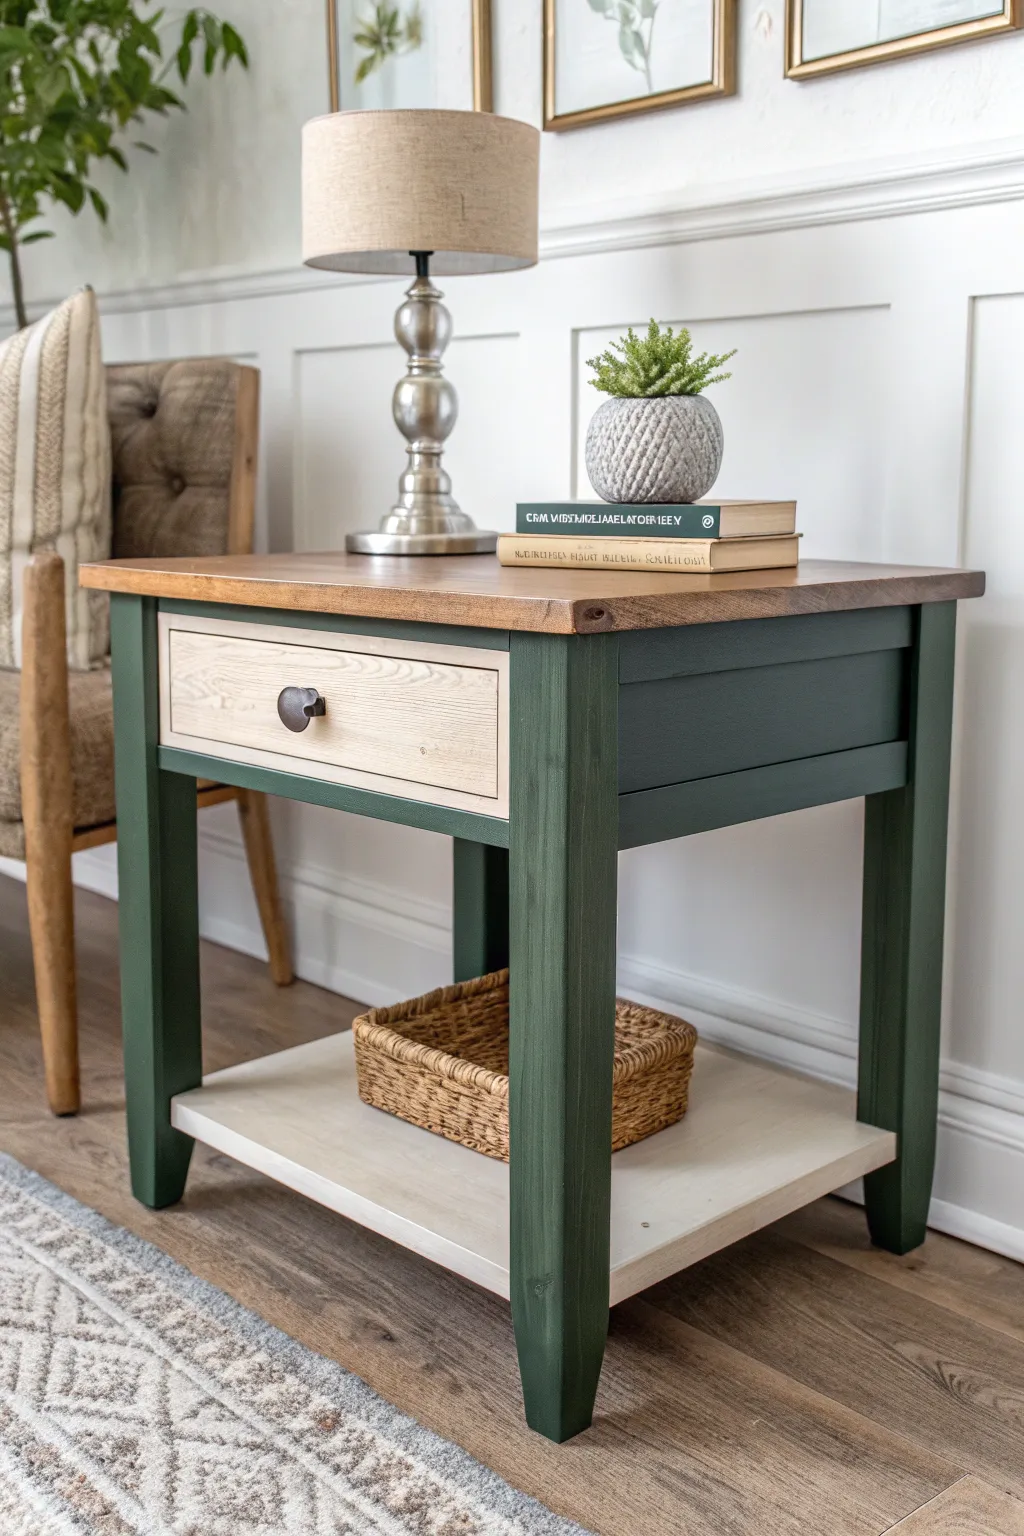
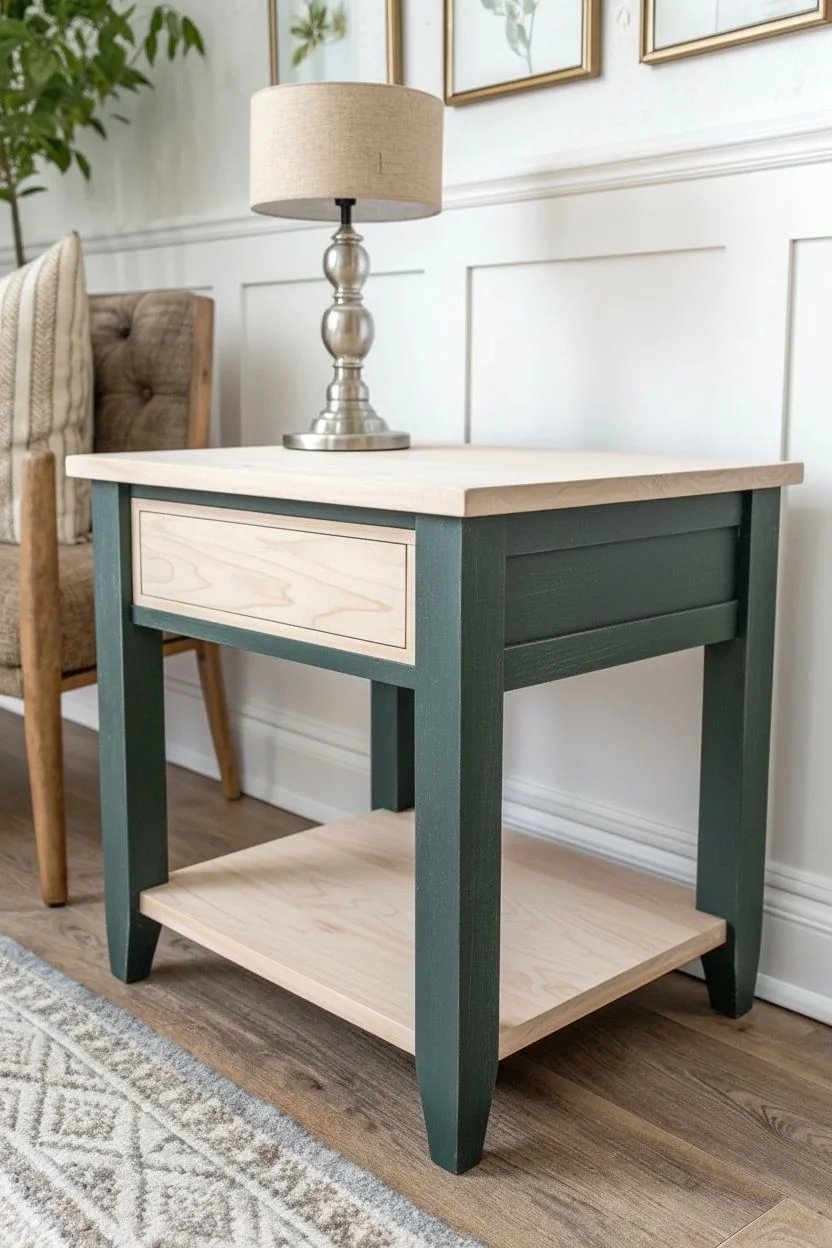
Transform a dated or basic end table into a statement piece by combining deep forest green paint with natural, light wood tones. This project balances rustic charm with modern color for a sophisticated two-tone look.
How-To Guide
Materials
- Solid wood end table with drawer and lower shelf
- Orbital sander with 80, 120, and 220 grit sandpaper
- Power drill
- Deep forest green chalk or mineral paint
- Clear matte polyurethane topcoat
- Dark antique wax (optional for texture)
- Painter’s tape
- Wood stain (e.g., Early American or Provincial)
- Bleaching kit or wood bleach (if needing to lighten the drawer)
- Bronze cup pull handle
- Lint-free rags
- High-quality angled sash brush
- Foam roller for smooth surfaces
- Tack cloth
Step 1: Preparation and Stripping
-
Hardware Removal:
Begin by removing all existing hardware, including the old drawer knob. Store the screws in a baggie so they don’t get lost. -
Initial Sanding:
Using an orbital sander with 80-grit sandpaper, remove the old finish from the top surface, the drawer front, and the lower shelf. These are the areas that will remain unpainted wood. -
Refining the Wood:
Switch to 120-grit and then 220-grit sandpaper on the stripped areas to smooth out the grain and prepare it for staining. -
Scuff Sanding the Frame:
Lightly scuff sand the legs and side panels—the parts intended for paint—using 120-grit paper. You don’t need to strip this to bare wood; just create a ‘tooth’ for the paint to grip. -
Cleanup:
Wipe down the entire piece with a tack cloth or a damp rag to remove every speck of dust. Dust is the enemy of a smooth finish.
Bleach for Contrast
If your drawer wood pulls too red or yellow after sanding, use a two-part wood bleach kit. It removes natural pigment, giving you that pale, raw Scandinavian look.
Step 2: Staining and Wood Treatment
-
Drawer Front Bleaching:
To achieve the light, raw wood look seen on the drawer front in the reference photo, apply a wood bleach solution if your wood is naturally dark or red. Let it dry completely. -
Staining the Top:
Apply a medium-tone stain (like Early American) to the tabletop using a lint-free rag. Wipe with the grain, let it sit for 5-10 minutes, and wipe away the excess. -
Staining the Lower Shelf:
The lower shelf appears lighter in the reference. You can either leave it natural sealed wood or apply a very light ‘whitewash’ stain to differentiate it from the top.
Paint Bleeding?
If green paint bleeds under the tape onto your wood, don’t panic. Gently scrape it off with a razor blade or wrap 220-grit sandpaper around a putty knife for precision removal.
Step 3: Painting the Frame
-
Taping Off:
Once the stain is 100% dry (usually 24 hours), use high-quality painter’s tape to meticulously cover the edges of the tabletop, the shelf, and the drawer cavity to protect them from paint. -
First Coat of Green:
Stir your deep forest green chalk paint thoroughly. Apply the first coat to the legs and frame using an angled sash brush for corners and a foam roller for flat sides. -
Drying and Sanding:
Let the first coat dry for about two hours. I like to run a fine 220-grit sanding sponge excessively lightly over the paint to knock down any raised grain before the next coat. -
Second Coat Coverage:
Apply a second coat of green paint. This deep color usually requires two solid coats for opacity. A third thin coat might be necessary depending on your paint brand. -
Tape Removal:
Carefully peel off the painter’s tape while the final coat is still slightly tacky to ensure a crisp, clean line.
Step 4: Finishing Touches
-
Sealing the Paint:
Apply a clear matte polyurethane or wax over the green painted sections to protect the finish from chips and scratches. -
Sealing the Wood:
Seal the wooden top, drawer front, and shelf with three coats of polyurethane, sanding lightly with 320-grit paper between coats for a professional smoothness. -
Hardware Installation:
Once the sealer has cured (wait at least 48 hours for heavy use), install the new bronze cup pull on the center of the drawer front. You may need to drill a new hole if the spacing differs from the old knob. -
Styling:
Add a woven basket to the bottom shelf to mimic the texture in the photo and provide functional storage.
Now your refreshed end table is ready to serve as a stylish anchor for your living room seating area
BRUSH GUIDE
The Right Brush for Every Stroke
From clean lines to bold texture — master brush choice, stroke control, and essential techniques.
Explore the Full Guide
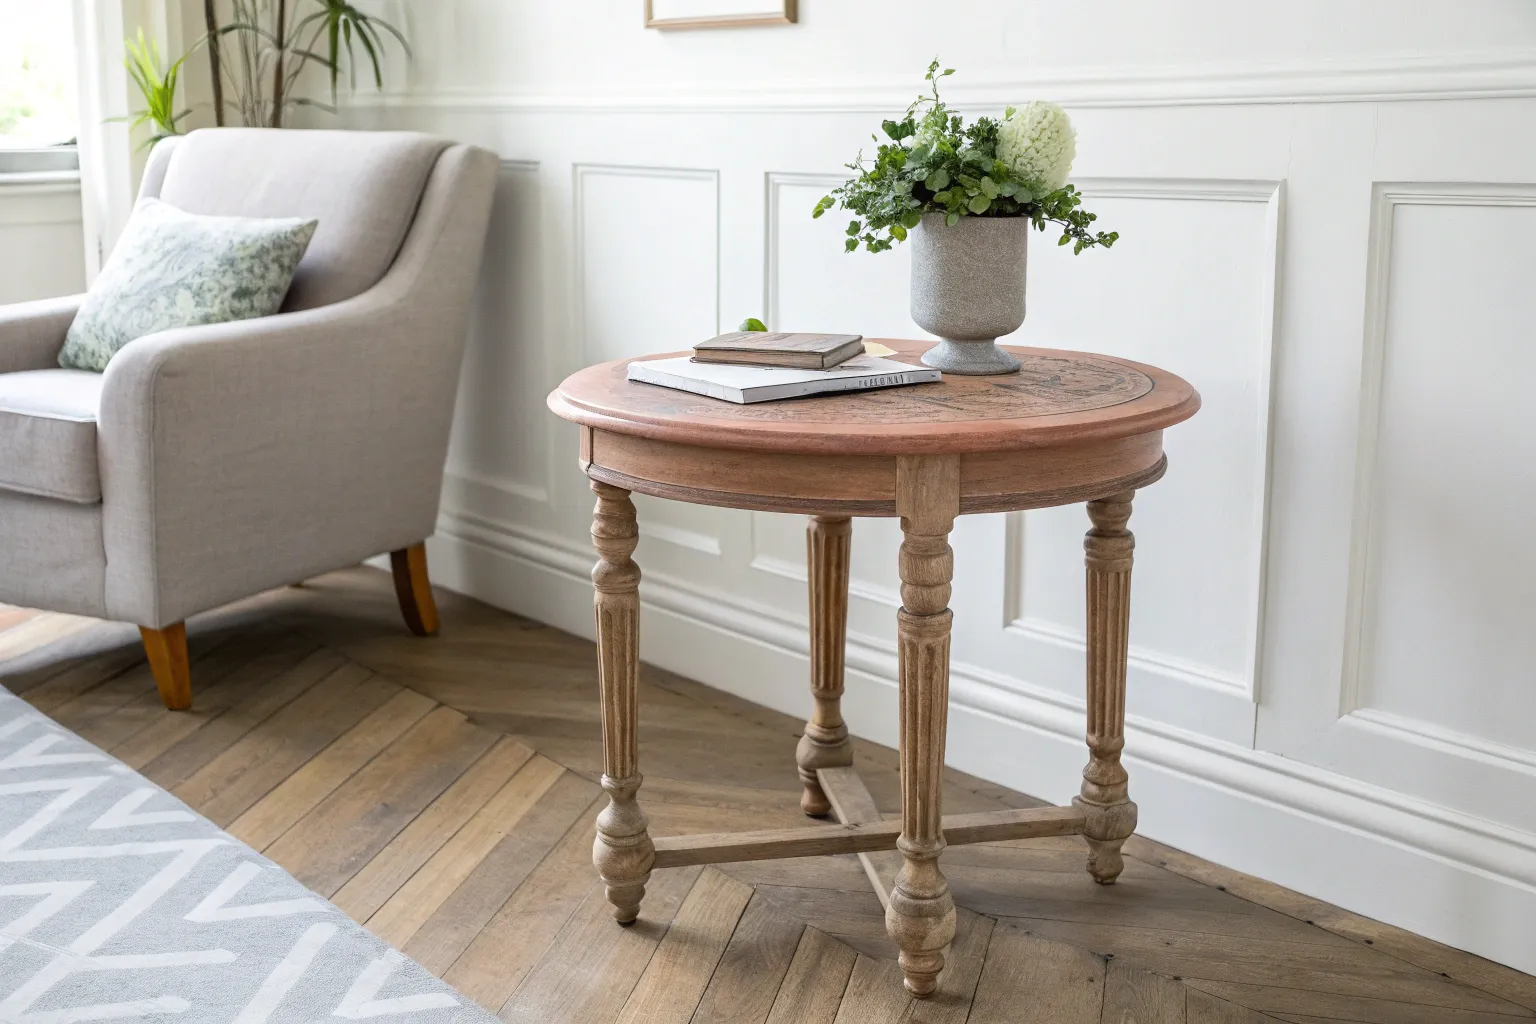
Matte Chalk-Style Finish
Achieve a sophisticated, high-end restoration hardware style with this tutorial, which transforms basic wood into a piece that looks weathered yet refined. The secret lies in layering washes to create depth and adding a subtle painted inlay detail to the tabletop.
Step-by-Step Guide
Materials
- End table with fluted legs and wood texture
- Sanding block (120 and 220 grit)
- Clean lint-free rags
- Mineral spirits or degreaser
- Tan or beige chalk-style paint (base color)
- White or cream chalk-style paint (wash)
- Light gray chalk-style paint (inlay)
- Glazing medium
- Painter’s tape
- Small artist brush
- Matte spray sealer or clear wax
- Chip brush or synthetic bristle brush
Step 1: Preparation & Base Coat
-
Clean the surface:
Before sanding, wipe down the entire table with mineral spirits or a good degreaser to remove furniture polish, oils, and centuries of dust. This prevents driving grime deeper into the wood grain. -
Scuff sand the wood:
Use a 120-grit sanding block to lightly scuff the existing finish. You don’t need to strip it to bare wood, just create enough ‘tooth’ for the paint to adhere. Follow up with 220-grit for a smooth touch. -
Remove sanding dust:
Vacuum the crevices of the fluted legs and decorative trim thoroughly. Wipe everything down with a tack cloth or a damp rag to ensure a pristine surface. -
Mix the base wash:
Dilute your tan or beige chalk-style paint with water. Aim for a 50/50 mix; you want a translucent wash that allows the wood grain to peek through, not an opaque solid coat. -
Apply the first wash:
Brush the watered-down beige paint onto the table, working in small sections. I find it best to brush it on and immediately wipe it back gently with a dry rag to soften the look. -
Dry and repeat:
Let the first coat dry completely. If the coverage is too sheer for your liking, apply a second wash coat using the same wipe-back method to build up that raw wood tone.
Too Opaque?
If your paint wash looks too solid, mist the surface with water immediately and wipe harder with your rag. You can also distress with 220-grit sandpaper afterward to reveal more wood.
Step 2: Creating the Limed Effect
-
Prepare the white glaze:
Mix your white chalk paint with clear glazing medium (or water if you’re comfortable working fast). A 1:1 ratio works well for a subtle, hazy finish. -
Highlight the details:
Brush the white mixture liberally into the fluted grooves of the legs and the decorative beadwork under the tabletop. -
Wipe back the glaze:
Using a slightly damp rag, wipe away the excess white paint from the raised surfaces. The white should remain settled in the deep grooves, highlighting the architectural details. -
Dry brush the flat surfaces:
Dip barely the tip of a dry chip brush into the white paint and offload almost all of it onto a napkin. Lightly drag the brush over the flat surfaces to create a dusty, aged texture.
Step 3: The Faux Inlay Top
-
Tape the perimeter:
Once the base layers are fully cured, use painter’s tape to mark off the outer edge of your table top. Leave about a 2-inch border of the base color exposed around the rim. -
Create the inner box:
Place a second square or rectangle of tape in the center, or simply tape a second border line to create a framed ‘frame’ effect depending on your design preference. -
Seal the tape edges:
Lightly brush a tiny amount of your clear glaze or base color over the tape edges. This bleeds under the tape first and prevents the gray paint from seeping through later. -
Paint the inlay color:
Mix a very watery wash of the light gray paint. Brush this inside the taped-off section to create the illusion of a lighter stone or wood inlay. -
Feather the texture:
While the gray wash is wet, stipple it slightly with a dry brush to give it a stone-like or varying texture, rather than a flat gray block of color. -
Remove tape and detail:
Peel the tape off carefully while the paint is still slightly tacky. If you want a sharper definition, use a small artist brush and the dark gray wash to hand-paint a very thin line separating the border.
Add Dimension
Mix a tiny drop of dark brown or charcoal paint into your wax for the corners and deep crevices. This ‘antique wax’ method adds instant age and depth to the fluted legs.
Step 4: Finishing Touches
-
Final smooth sanding:
Once everything is bone dry, run a high-grit (400 or brown paper bag) sanding pad over the flat surfaces to knock down any raised grain and make it buttery smooth. -
Seal the piece:
Apply a clear matte polycrylic or a clear furniture wax. The matte finish is crucial here to maintain that raw, natural wood aesthetic.
Now you have a custom piece that looks effortlessly elegant and perfectly aged.
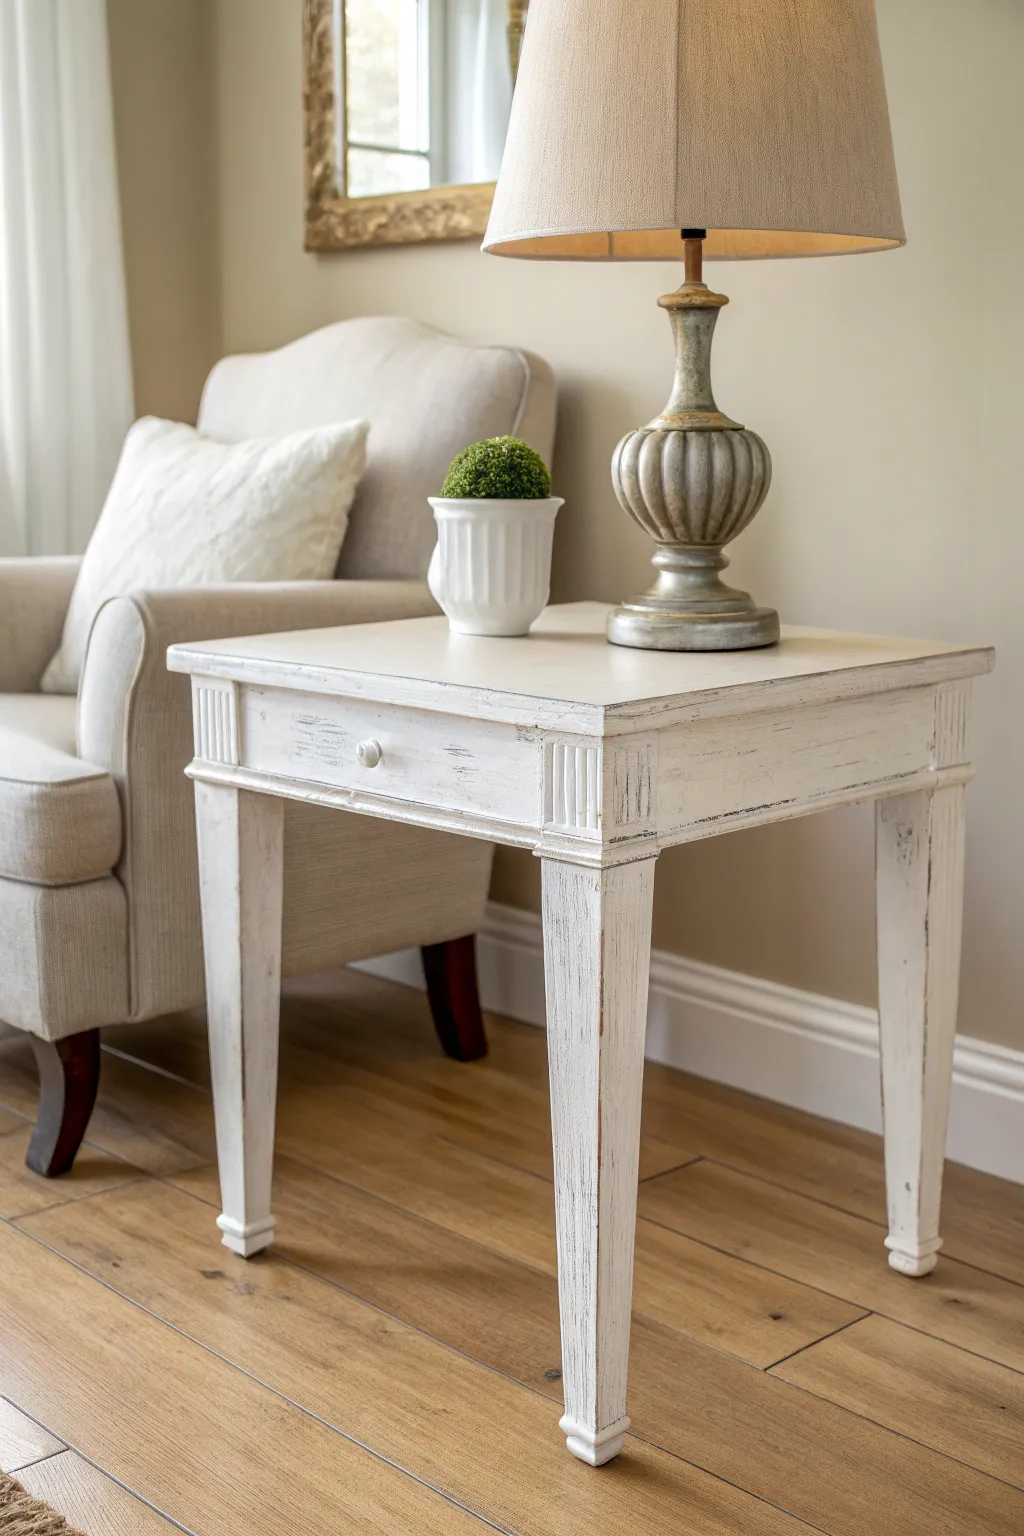
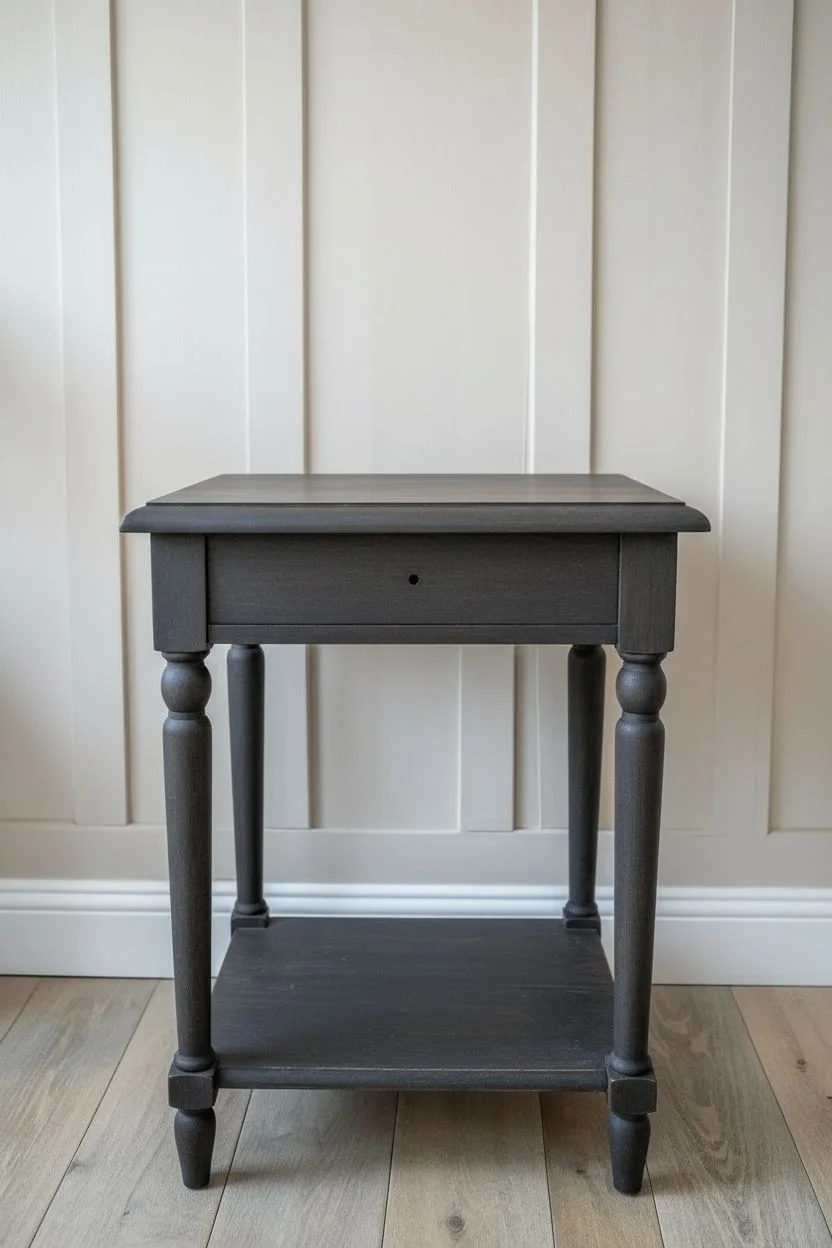
Soft Neutral Greige Palette
Transform a dated-looking wooden side table into a serene statement piece using a soft neutral greige palette. This finish mimics the look of high-end boutique furniture with a smooth, matte texture and subtle antiquing.
Step-by-Step Guide
Materials
- Wooden end table (preferably with turned legs)
- TSP or degreasing cleaner
- Medium grit sandpaper (120-150 grit)
- Fine grit sandpaper (220 grit)
- Tack cloth
- High-quality stain-blocking primer
- Greige chalk-style paint (look for a warm grey-beige blend)
- White or antique white chalk paint (for dry bushing)
- Clear matte wax or polycrylic topcoat
- Dark antique wax (optional for depth)
- Synthetic oval brush
- Lint-free cloth or wax brush
- Painter’s tape
- New hardware knob (antique brass or wood)
Step 1: Preparation
-
Clean thoroughly:
Begin by removing the drawer and unscrewing the old hardware. Wipe down the entire piece, including the legs and underside, with TSP or a degreaser to remove years of built-up oils and dust. -
Scuff sand the surface:
Using your medium grit sandpaper, scuff the entire surface. You don’t need to strip it to bare wood, but you must remove the glossy sheen so the paint adheres properly. -
Address imperfections:
Fill any deep scratches or unwanted hardware holes with wood filler. Once dry, sand these spots flush with the surface. -
Remove dust:
Vacuum the piece thoroughly and follow up with a tack cloth to ensure absolutely no dust remains before painting. -
Apply primer:
Brush on a coat of stain-blocking primer. This is crucial for vintage pieces to prevent wood tannins from bleeding through your beautiful light greige paint later.
Turn it Upside Down
Painting turned legs is tricky. Flip the table upside down on a drop cloth to easily access the underside of the curves and feet without straining your back.
Step 2: Painting & Effect
-
Apply the base coat:
Stir your greige chalk paint well. Apply the first coat using a synthetic oval brush, following the grain of the wood on flat surfaces and dabbling into the crevices of the turned legs. -
Let it dry:
Allow this first coat to dry completely according to the manufacturer’s instructions, usually about 2-4 hours. -
Sand lightly between coats:
Run a fine-grit sandpaper (220) very lightly over the dried paint to knock down any brush strokes, creating a buttery smooth base. -
Apply the second coat:
Apply a second coat of greige paint for full opacity. Pay special attention to the turned legs, ensuring coverage without drips. -
Dry brush highlights:
Dip the very tip of a dry brush into a small amount of white or antique white paint. Off-load almost all the paint onto a paper towel until the brush feels dry. -
Accentuate the details:
Lightly overly the ‘high points’ of the piece with the dry brush—specifically edges, corners, and the curves of the turned legs—to create dimension and a subtle weathered look. -
Distress (Optional):
If you prefer a more rustic look, use fine sandpaper to gently reveal the wood underneath on the edges and corners where natural wear would occur.
Step 3: Sealing & Finishing
-
Apply clear wax:
Using a wax brush or lint-free cloth, apply a thin layer of clear matte wax over the entire piece to seal the porous chalk paint. -
Buff the finish:
Wait about 15-20 minutes for the wax to haze over, then buff it briskly with a clean cloth to create a soft, durable sheen. -
Deepen the shadows:
I like to take a tiny amount of dark antique wax and apply it strictly to the recessed crevices of the turned legs, wiping back the excess immediately to create depth. -
Install the drawer knob:
Once the finish has cured specifically around the drawer front, attach your new hardware knob. An antique brass or small wooden knob complements this palette perfectly. -
Reassemble:
Slide the drawer back into the table and let the piece cure fully for 24 hours before placing any heavy lamps or decor items on the surface.
Help, Paint is Dragging!
Chalk paint can thicken quickly. If your brush is dragging, dip the tips of the bristles in water or mist the paintbrush slightly to help the paint glide smoothly.
Enjoy styling your freshly updated table with soft linens and light ceramics to complete the tranquil vibe

PENCIL GUIDE
Understanding Pencil Grades from H to B
From first sketch to finished drawing — learn pencil grades, line control, and shading techniques.
Explore the Full Guide
Coastal Blue Painted End Table
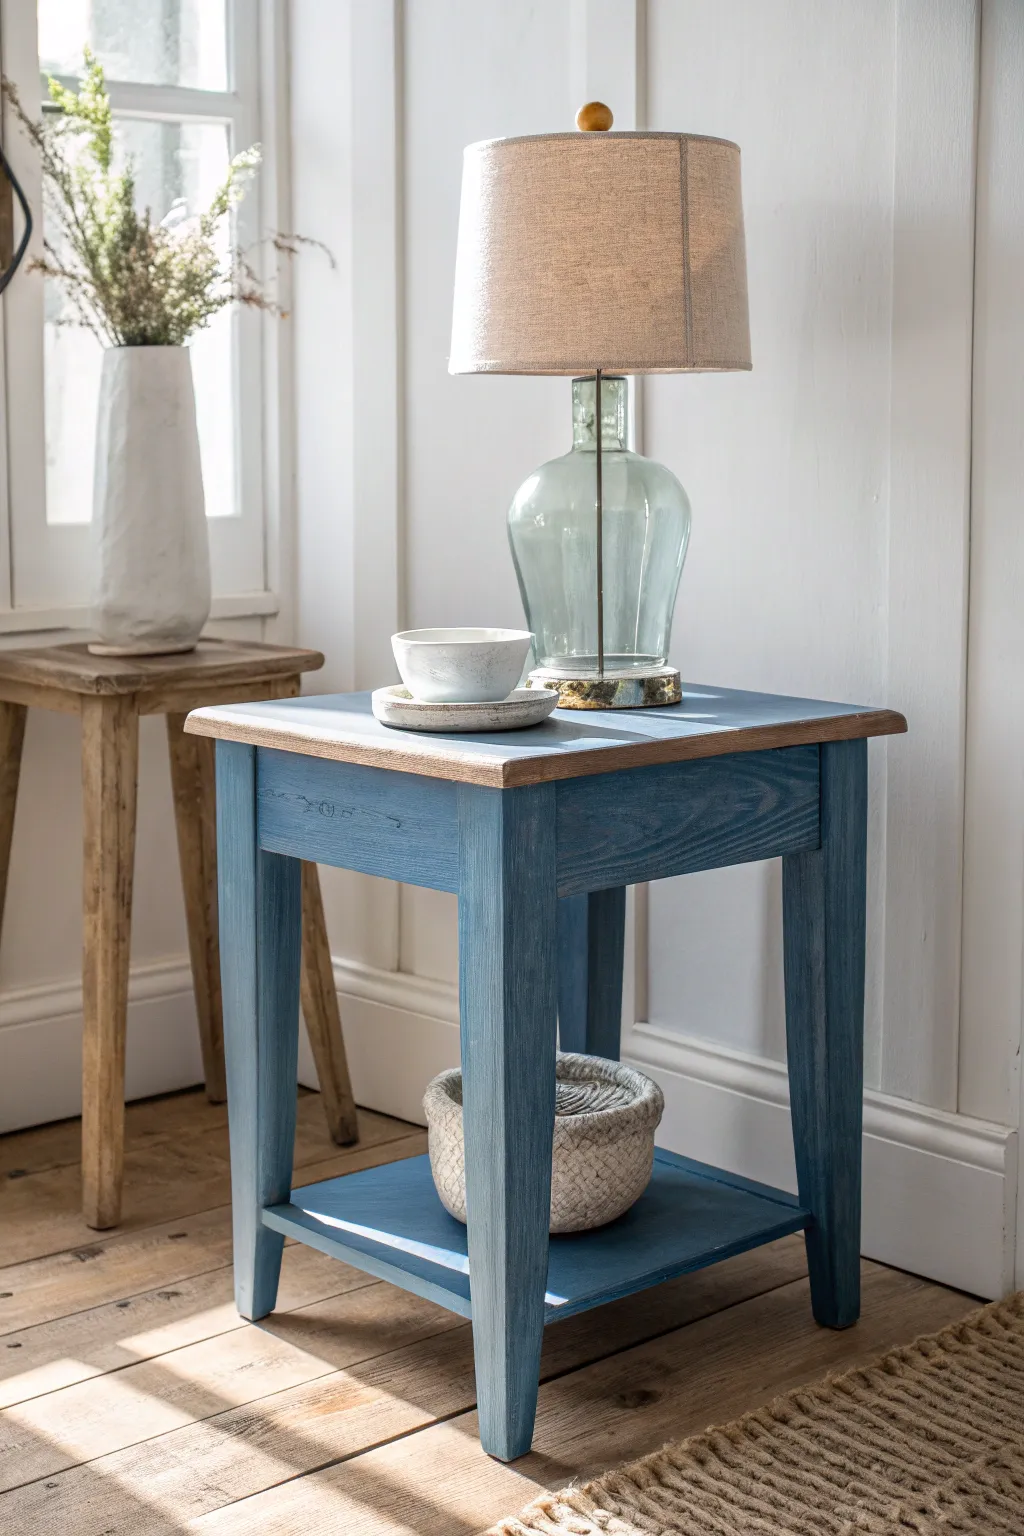

Bring the calming vibes of the coast into your living room with this two-toned end table makeover. By combining a weathered blue base with a natural wood top, you achieve a sophisticated yet relaxed look that feels like a breath of fresh ocean air.
Detailed Instructions
Materials
- Wooden end table (unfinished or needing refinishing)
- Orbital sander with 80, 120, and 220 grit sandpaper
- Chalk-style paint in a medium denim blue
- Water-based matte polyurethane
- Stain in ‘Early American’ or similar warm tone
- Lint-free rags
- Painter’s tape
- Synthetic oval paint brush
- Tack cloth
- Wood conditioner (optional)
Step 1: Preparation & Sanding
-
Clean the Surface:
Before doing anything, wipe down the entire table with a de-greaser or mild soap and water to remove oils and dirt. Let it dry completely. -
Strip the Top:
Using your orbital sander and 80-grit paper, sand the tabletop down to bare wood. You need to remove all existing finish to get that beautiful raw wood look shown in the photo. -
Refine the Grain:
Switch to 120-grit and then 220-grit sandpaper on the tabletop to smooth out the scratches and created a buttery soft surface. -
Scuff the Base:
For the legs and apron (the skirt under the top), you don’t need to reach bare wood if you are using chalk paint. Just give it a good scuff sand with 120-grit paper to help the paint adhere. -
Dust Removal:
Vacuum up the sawdust and run a tack cloth over the entire piece to ensure no debris gets trapped in your finish.
Bleed-Through Blues
If reddish stains appear through your blue paint, tannin bleed is happening. Stop painting, apply a coat of shellac or stain-blocking primer, let dry, then resume painting.
Step 2: Staining the Top
-
Protect the Base:
Apply painter’s tape underneath the lip of the tabletop so stain doesn’t drip onto the apron you plan to paint blue. -
Condition the Wood:
If you are working with soft wood like pine, wipe on a pre-stain wood conditioner. This prevents blotchy patches. -
Apply Stain:
Dip a lint-free rag into your warm-tone stain and wipe it onto the tabletop, moving with the grain. I usually work in small sections to keep a wet edge. -
Wipe Back:
After letting the stain sit for about 3-5 minutes, wipe away the excess with a clean rag. The goal is a light, natural warmth, not a dark brooding mahogany. -
Seal the Top:
Once the stain is dry (usually 24 hours), apply two coats of matte water-based polyurethane, sanding lightly with a high-grit sponge between coats.
Step 3: Painting the Base
-
Tape the Top:
Now, tape off the edge of your freshly stained top to protect it from stray blue brushstrokes. -
First Coat of Blue:
Using a synthetic oval brush, apply your denim blue chalk paint to the legs, apron, and bottom shelf. Paint with the grain for the smoothest finish. -
Dry and Assess:
Let this coat dry for about an hour. Don’t worry if it looks streaky; chalk paint often needs two coats for full opacity. -
Second Coat:
Apply a second coat of blue paint. Watch for drips around the corners of the legs and the turnings. -
Distressing the Edges:
Once dry, take a 220-grit sanding block and gently rub the edges, corners, and raised details. You want to reveal just a peek of the wood underneath to mimic years of use. -
Clear Coat Protection:
Seal the painted sections with the same matte polyurethane or a clear furniture wax. This locks in the color and makes it easy to dust later. -
Final Assembly:
Remove all painter’s tape carefully. If you removed any hardware or disassembled shelves, put everything back together now.
Textured Touch
For a driftwood effect, mix a teaspoon of texture powder into your blue paint. When dry, dry-brush a lighter gray over the blue to highlight the texture.
Now you have a timeless piece that anchors your room with casual coastal charm and sturdy utility
Light Distressing on Edges


Capture the charm of time-worn elegance with this beautifully distressed end table project. By layering a soft, muted blue-grey paint over natural wood and carefully sanding back the edges, you can create a piece that feels both rustic and refined.
How-To Guide
Materials
- Wooden end table (unfinished or stripped)
- Medium-grit sandpaper (120-150 grit)
- Fine-grit sandpaper (220 grit)
- Chalk-style paint (pale blue-grey or sage green)
- Paintbrush (synthetic bristle recommended)
- Clear furniture wax
- Wax brush or lint-free cloth
- Tack cloth
- Dark antique wax (optional for depth)
Step 1: Preparation and Base
-
Clean and sand:
Begin by ensuring your wood surface is clean and dry. Give the entire table a thorough sanding with medium-grit sandpaper to remove any existing glossy finish or rough patches. This gives the paint something to grip onto. -
Remove dust:
Wipe the entire piece down with a tack cloth. It is crucial to remove every speck of sawdust, especially from corners and crevices, to ensure a smooth paint application later. -
Visualize the wear:
Before painting, look at your table’s geometry. Run your hands along the sharp edges, the corners of the legs, and the rim of the tabletop. These are the natural high-traffic areas we will target later.
Oops! Paint Peeling?
If paint peels off in strips rather than sanding to dust, it hasn’t cured long enough. Stop, wait 24 hours, and try sanding again.
Step 2: Painting
-
First coat application:
Dip your brush into the chalk-style paint. Apply the first coat using long, even strokes following the grain of the wood. Don’t worry if it looks slightly streaky; chalk paint often requires two coats. -
Watch the crevices:
Pay attention to the detailed molding on the legs. Use the tip of your brush to push paint into deeper grooves, but avoid letting it pool there, which can lead to unsightly drips. -
Dry time:
Allow this first coat to dry completely. Chalk paint dries relatively fast, usually within 30 to 60 minutes, but check the manufacturer’s instructions to be sure. -
Second coat:
Apply a second coat for full opacity. This layer should cover any wood grain that was still peeking through. I like to keep my brush slightly damp for this step to help the paint flow smoothly. -
Final dry:
Let the piece cure for at least a few hours or overnight. The paint needs to be hard enough to withstand sanding without peeling off in rubbery chunks.
Step 3: Distressing and Finishing
-
Initial edge distressing:
Take a folded piece of 150-grit sandpaper. Gently run it along the sharpest edges of the table top and the corners of the legs. Apply light pressure at first untill you see the raw wood emerging. -
Targeting high points:
Focus sanding efforts on the ‘high points’ similar to the reference image—specifically the ridge of the molding and the vertical corners of the legs. These areas would naturally wear down over decades of use. -
Creating variation:
Vary your pressure. In some spots, sand down cleanly to the wood; in others, leave a scuffed paint look. This irregularity is key to an authentic vintage appearance. -
Flat surface distressing:
Lightly scuff a few random flat areas on the table apron or legs, but keep this very subtle. The goal is to suggest accidental bumps, not leopard spots. -
Smooth the finish:
Switch to 220-grit sandpaper and lightly sand the entire painted surface. This isn’t to remove paint, but to polish it, creating that buttery smooth feel characteristic of quality furniture. -
Clean up again:
Wipe away all the sanding dust with a fresh tack cloth. Any leftover powder will cloud your wax finish. -
Apply clear wax:
Using a wax brush or lint-free cloth, massage a layer of clear furniture wax into the paint. Work in small sections, rubbing it in circular motions like applying lotion to skin. -
Buffing:
Wait about 10-15 minutes for the wax to haze over, then buff vigorously with a clean cloth. This hardens the finish and creates a soft, satin sheen. -
Optional aging:
If you want the exposed wood to look older, lightly dab a tiny amount of dark wax over the distressed edges, then immediately wipe it back. It settles into the grain, mimicking years of dirt accumulation.
Level Up: Wet Distressing
For a softer, smoother edge, use a damp kitchen sponge (rough side) instead of sandpaper to rub away paint while it’s still slightly tacky.
Enjoy the timeless character this simple technique adds to your room


Crisp Painted Stripes
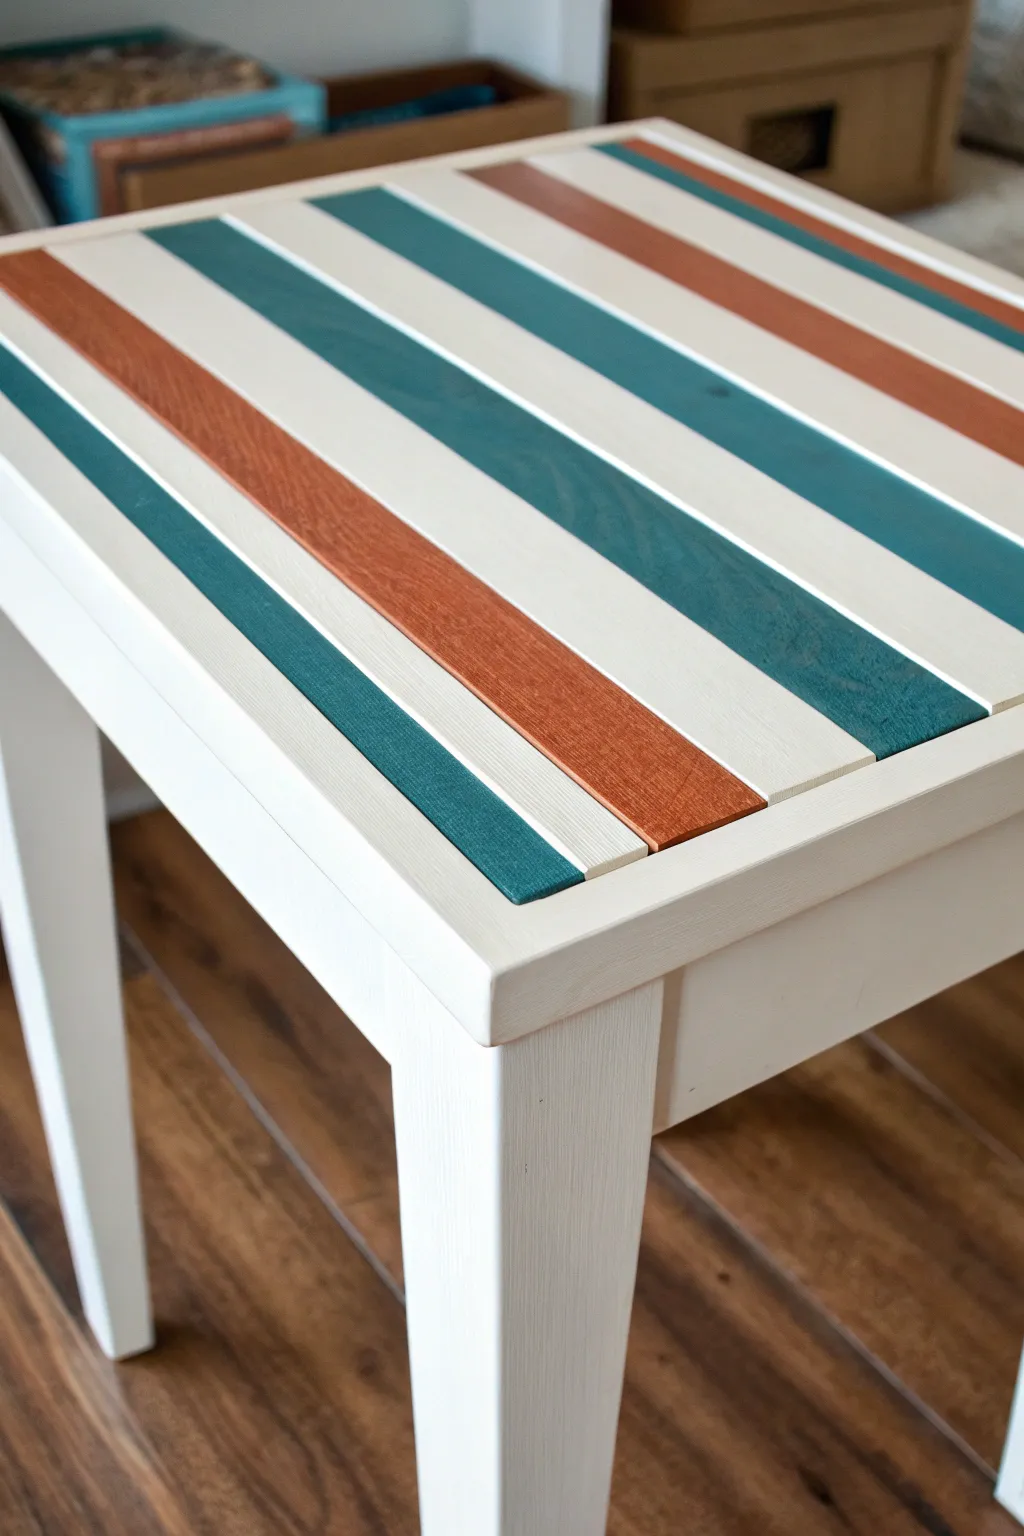
Transform a plain or outdated wooden side table into a crisp, coastal-inspired accent piece using a simple slat technique. This project combines geometric precision with warm, earthy tones like terracotta and deep teal for a look that feels both modern and handmade.
Step-by-Step
Materials
- Simple square wooden side table (unfinished or pre-sanded)
- Wooden lath strips or screen molding (width matches your table size)
- Wood glue
- Pin nails or small finishing nails
- Hammer or pin nailer
- Chalk paint or acrylic latex paint (Cream/White, Terracotta, Deep Teal)
- Painter’s tape (optional)
- Sandpaper (120 and 220 grit)
- Small foam roller
- Synthetic bristle paintbrushes
- Wood filler
- Measuring tape
- Saw (miter saw or hand saw)
Step 1: Preparation and Base Coat
-
Prep the table surface:
Begin by cleaning your side table thoroughly to remove any dust or oils. If the table has a previous glossy finish, give the entire piece a light scuff sanding with 120-grit paper to help the new paint adhere. -
Paint the frame:
Apply your base color (the creamy white) to the legs and the apron of the table. I find that using a high-quality chalk paint offers great coverage without needing a primer, but standard latex works too. -
Apply a second coat:
Once the first coat is dry to the touch, apply a second coat to ensure a solid, opaque finish on the legs. Let this cure fully while you move on to the slats.
Paint Consistency Tip
To mimic the inspiration look where the wood texture shows through, try a ‘wash’ technique. Dilute your acrylic paint with 20% water. It penetrates deeper and acts like a vibrant stain rather than a thick coat.
Step 2: Creating the Slats
-
Measure the table top:
Measure the inside dimension of your table top (if it has a framed edge like the inspiration image) or the full width if you are covering the entire surface. -
Cut the wood strips:
Using your saw, cut your wooden lath strips to the exact length needed. You will need enough strips to cover the entire surface without gaps. -
Dry fit the arrangement:
Lay out all your cut strips on the table surface to ensure they fit snugly. If the last piece is too wide, you may need to rip it down lengthwise or sand the edges for a perfect fit. -
Sand the strips:
Before painting, sand the tops and edges of each individual strip with 220-grit sandpaper to remove rough spots and splinters.
Step 3: Painting the Stripes
-
Plan your pattern:
Decide on your repeating pattern. The inspiration piece uses a sequence: Teal, White, Teal, White, Terracotta, White. Group your slats accordingly on a drop cloth. -
Paint the white slats:
Apply the creamy white paint to the designated slats. Be sure to paint the top face and both long side edges so bare wood won’t peek through the cracks later. -
Paint the teal slats:
Paint your chosen teal strips. For a finish that shows a hint of grain like the photo, you can water down your paint slightly to act more like a solid stain. -
Paint the terracotta slats:
Apply the rusted orange or terracotta color to the remaining strips, ensuring even coverage on the edges. -
Let everything dry:
Allow all the strips to dry completely. If the grain raised during painting, do a very light sanding with a high-grit paper and wipe clean.
Gaps Between Slats?
If your slats aren’t perfectly straight and leave gaps, paint the top surface of the original table the same dark teal color before attaching strips. The shadows will blend in and the gaps won’t be noticeable.
Step 4: Assembly
-
Apply glue:
Starting at one edge of the table, run a thin bead of wood glue along the back of your first painted strip. -
Position the first strip:
Press the strip firmly onto the table top, aligning it perfectly with the edge. This first piece sets the alignment for the whole project, so take your time here. -
Secure the strip:
Use a pin nailer or small finishing nails to secure the strip in place. Two or three nails per strip should be sufficient. -
Continue the pattern:
Repeat the glue-and-nail process with the remaining strips, following your pre-planned color pattern. Push each new strip tightly against the previous one to minimize gaps. -
Fill the nail holes:
If your nails are visible, apply a tiny dab of wood filler. Let it dry, sand it smooth, and touch up with a small artist’s brush and the matching paint color. -
Seal the surface:
To protect your table from coffee cup rings, apply a clear matte polycrylic sealer over the entire top. Use smooth, long strokes to avoid bubbles.
Once the sealer cures, style your refreshed table with a potted plant or a stack of books to highlight those crisp, colorful lines
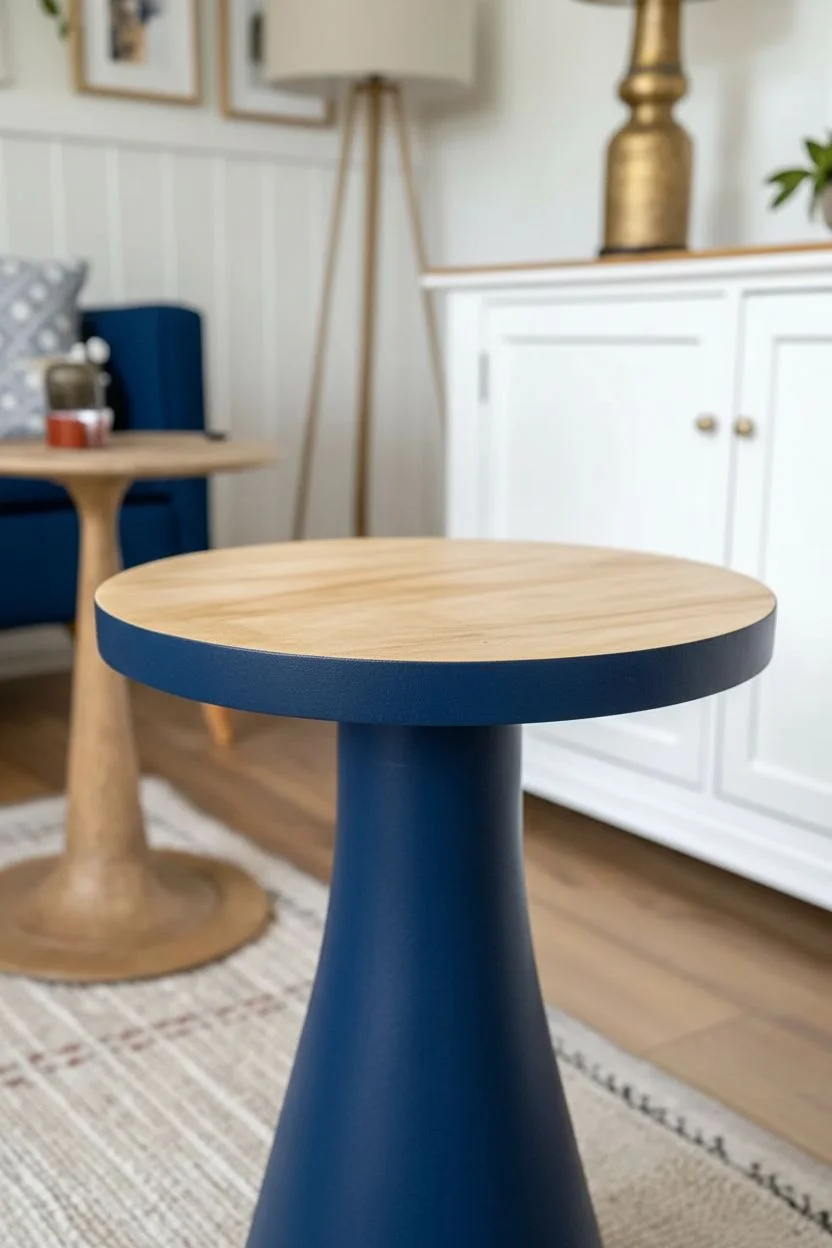
Ombre Fade Down the Legs
Give an old end table a modern farmhouse update with this subtle ombre effect. By blending a solid charcoal top into natural wood legs, you create a sophisticated, grounded piece that feels both rustic and contemporary.
How-To Guide
Materials
- Wooden end table (unfinished or stripped)
- Medium and fine grit sandpaper (120 and 220)
- Charcoal chalk-style paint or dark grey latex paint
- Clear matte polyurethane or wax
- Paintbrush (synthetic bristle)
- Clean rag or lint-free cloth
- Water suitable for diluting paint
- Painter’s tape
- Dark antique wax (optional)
Step 1: Preparation
-
Clean the surface:
Start by thoroughly cleaning your table with a mild degreaser or TSP substitute to remove any oils, dust, or old furniture polish. -
Sand for bare wood:
Since this look relies on natural wood legs, sand the entire piece down to raw wood. Start with 120-grit sandpaper to remove old finishes, then smooth everything out with 220-grit. -
Wipe away dust:
Use a tack cloth or a slightly damp rag to remove every speck of sanding dust, ensuring a smooth base for your paint.
Paint Stripping Woes?
If sanding the intricate leg turnings is too difficult, use a chemical stripper and a wire brush to get the old finish out of the grooves before sanding.
Step 2: Painting the Top
-
Tape the legs:
Apply painter’s tape just below the apron (the skirt piece connecting the legs) to protect the top portion of the legs from the solid paint application. -
Apply first coat:
Paint the flat tabletop surface with your charcoal grey paint. Use long, even strokes following the wood grain for a seamless finish. -
Let it dry:
Allow the first coat to dry completely according to the manufacturer’s instructions, usually about 1-2 hours for chalk paint. -
Add second coat:
Apply a second coat to the tabletop for full, opaque coverage. Don’t worry about the sides (apron) yet; we want those to have a different texture.
Add Metallic Flair
For a luxe touch, rub a tiny amount of gold or bronze gilding wax along the very edge of the tabletop or the ridge of the turned legs.
Step 3: Creating the Washed Apron
-
Dilute your paint:
In a small container, mix a small amount of your charcoal paint with water. Aim for a 50/50 ratio to create a sheer wash. -
Brush the apron:
Brush this diluted mixture onto the wooden apron sections under the tabletop. -
Wipe back:
Immediately use a clean, lint-free rag to wipe off the excess paint from the apron. I like to wipe firmly here to let the wood grain show through the grey tint. -
Feather the edges:
While the paint is still damp, gently feather the color downwards slightly onto the very top of the legs—just a fraction of an inch—to soften the transition.
Step 4: The Ombre Leg Transition
-
Remove the tape:
Carefully peel off the painter’s tape. You might see a harsh line where the tape was. -
Blend the line:
Dip a barely damp rag into your diluted paint water (very lightly) and gently rub the transition line where the apron meets the leg blocks. You want to smudge that hard line so it looks like a natural fade. -
Optional distressing:
Once dry, take fine-grit sandpaper and lightly distress the edges of the table top and the apron to reveal a tiny bit of wood, enhancing the rustic feel.
Step 5: Sealing and Finishing
-
Seal the paint:
Apply a clear matte polyurethane or wax over the painted top and apron to protect the finish from scratches and water rings. -
Seal the legs:
Apply a clear coat to the natural wood legs as well. This will deepen the natural wood color slightly and protect the raw timber. -
Enhance with dark wax:
For extra depth on the apron, apply a tiny amount of dark antique wax into the corners and crevices, then buff it off. This highlights the structure. -
Final cure:
Let the piece cure for 24 hours before placing any heavy objects or decor on top.
Now you have a custom piece that perfectly balances modern color with natural warmth
Hidden Surprise Inside the Drawer
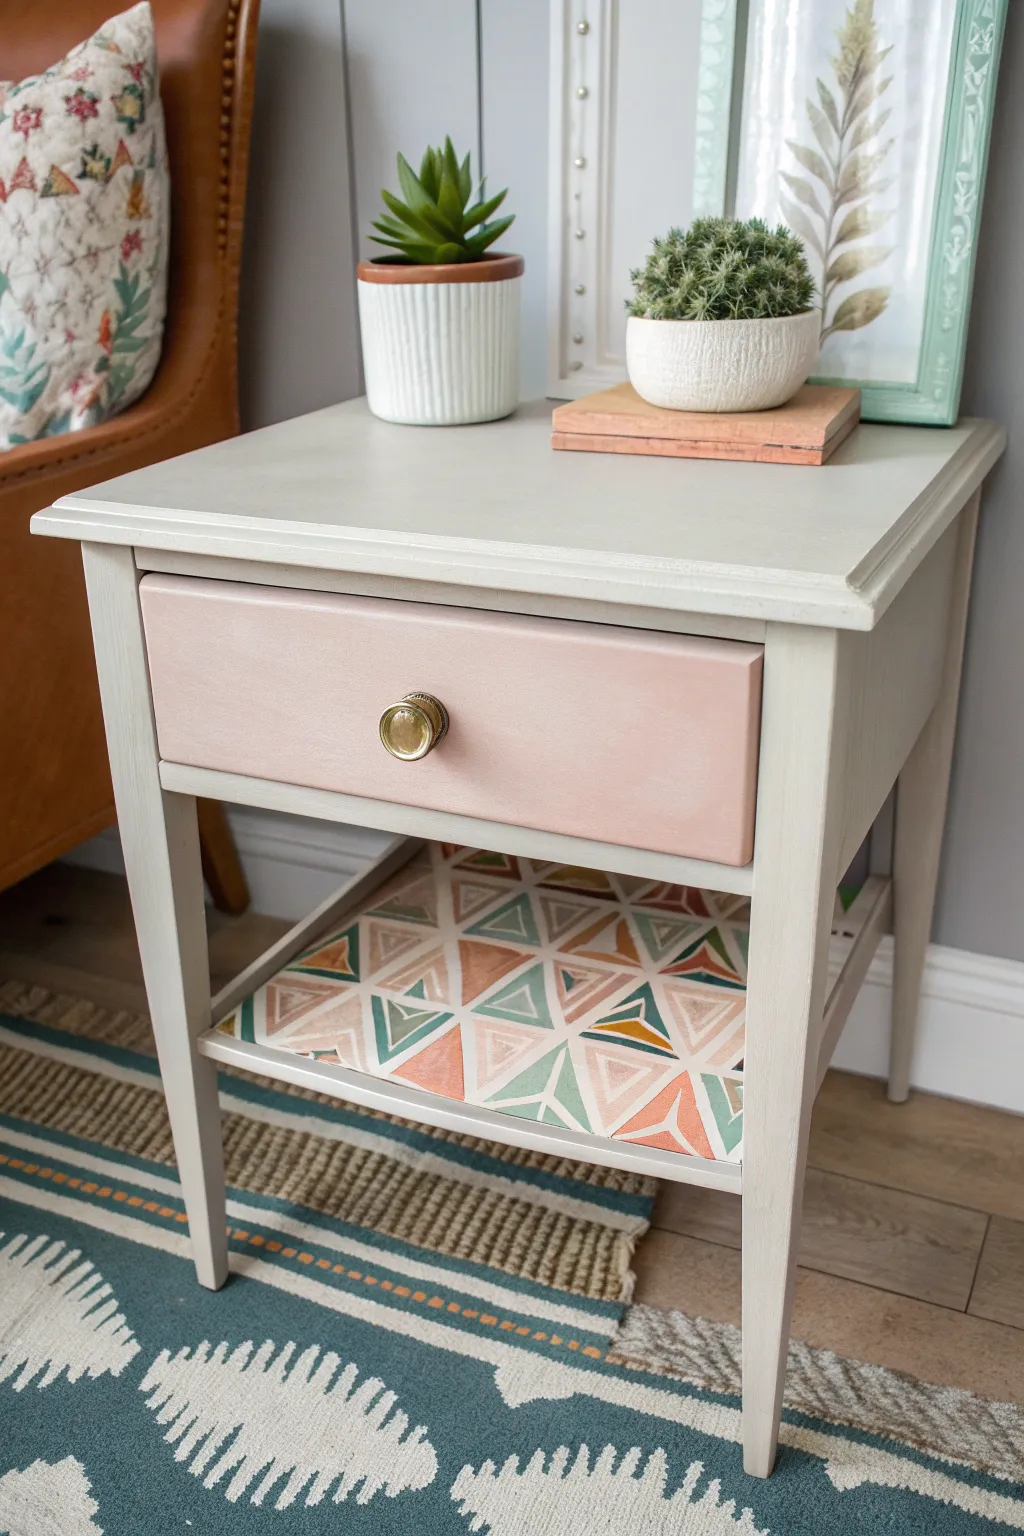
Transform a plain bedside table into a modern statement piece with soft pastel tones and a bold geometric surprise. This project combines classic furniture painting with decoupage techniques to create a custom look that feels fresh and sophisticated.
Step-by-Step Guide
Materials
- Wooden end table with a drawer
- Sandpaper (120 and 220 grit)
- Tack cloth
- Primer (bonding primer recommended)
- Chalk paint or satin finish paint (light grey/beige for the body)
- Chalk paint or satin finish paint (soft blush pink for the drawer)
- Gold drawer knob
- Geometric patterned wallpaper or heavy wrapping paper
- Mod Podge (matte or satin finish)
- Polyurethane topcoat (water-based)
- Paintbrushes (synthetic bristle)
- Foam brush
- X-Acto knife or sharp scissors
- Ruler or straight edge
- Screwdriver
Step 1: Preparation
-
Remove hardware:
Begin by taking out the drawer and unscrewing the old knob. Keep the screw safe if your new knob doesn’t come with one. -
Clean surface:
Wipe down the entire table with a mild degreaser or soapy water to remove dust and oils. Let it dry completely. -
Sand for adhesion:
Using 120-grit sandpaper, scuff sand the entire piece, including the drawer front. You don’t need to strip the old finish entirely, just create a rough surface for the paint to grip. -
Remove dust:
Wipe away all sanding residue with a tack cloth to ensure a flawlessly smooth finish later.
Wrinkle Rescue
If bubbles appear under the paper while decoupaging, prick them gently with a pin and smooth the air out with your finger while the glue is still wet.
Step 2: Painting
-
Prime the surface:
Apply a coat of bonding primer to the table frame and drawer front. This is crucial if the original finish was glossy or laminate. -
Paint the frame:
Once primed, apply your light grey or beige paint to the main body of the table. Use long, even strokes to minimize brush marks. -
Second coat:
Allow the first coat to dry according to the can’s instructions, then apply a second coat for full opacity. -
Paint the drawer:
Paint the drawer front with the soft blush pink shade. I find two thin coats usually look better than one thick one. -
Seal the paint:
After the paint has cured for at least 24 hours, apply a water-based polyurethane topcoat to the painted surfaces for durability.
Step 3: Decoupage Shelf
-
Measure the shelf:
Carefully measure the dimensions of the bottom shelf where the paper will go. -
Cut the paper:
Cut your geometric paper to size. Leave about half an inch of excess on all sides to allow for adjustments. -
Apply adhesive:
Brush a thin, even layer of Mod Podge directly onto the bottom shelf using a foam brush. -
Position the paper:
Lay the paper onto the wet adhesive, starting from one edge and smoothing it down slowly to prevent air bubbles. -
Trim excess:
Use an X-Acto knife and a straight edge to trim the excess paper perfectly flush with the edges of the shelf. -
Seal the paper:
Apply two to three coats of Mod Podge over the top of the paper to seal it, letting each coat dry for 15 minutes in between.
Pattern Play
For a cohesive look, line the inside bottom of the drawer with the same geometric paper you used on the lower shelf.
Step 4: Finishing Touches
-
Install hardware:
Once everything is fully dry, screw the new gold knob onto the center of the pink drawer front. -
Reassemble:
Slide the drawer back into the table frame and check that it glides smoothly.
Now you have a custom piece of furniture that perfectly balances soft color with modern design
Metallic Highlighted Details
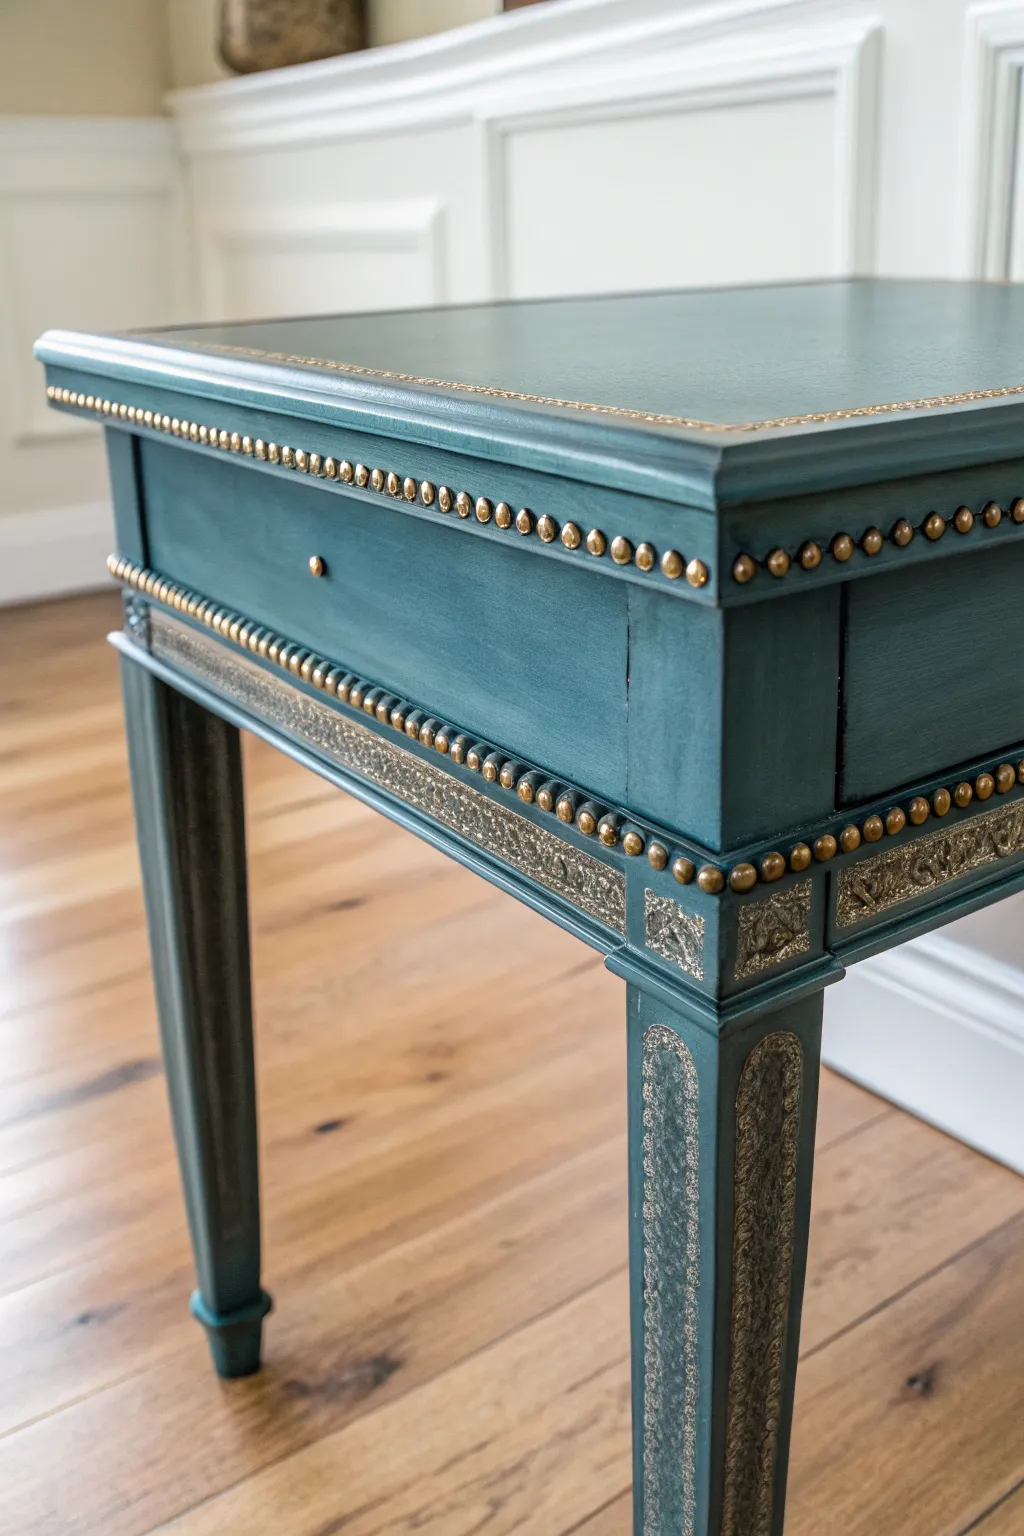
Transform a plain end table into a statement piece with deep teal paint and intricate metallic accents. This project combines classic nailhead trim with stenciled gold details for a high-end, custom furniture look.
Step-by-Step
Materials
- Wooden end table (pre-sanded and cleaned)
- Deep teal chalk paint or latex furniture paint
- Gold furniture wax or gilding paste
- Upholstery tacks or nailhead trim strips (brass finish)
- Small hammer or rubber mallet
- Decorative detail stencil (filigree or scroll pattern)
- Stencil brush or small sponge dauber
- Clear matte polycrylic topcoat
- Lint-free rags
- Painters tape
- Medium-grit sanding block
Step 1: Base Preparation
-
Clean and Sand:
Begin by thoroughly cleaning your table with a degreaser to remove any oils or furniture polish. Once dry, lightly scuff sand the entire surface with a medium-grit block to give the paint something to grip. -
Apply First Coat:
Using a high-quality synthetic brush, apply your first coat of deep teal paint. Don’t worry if coverage isn’t perfect yet; focus on smooth, even strokes in the direction of the wood grain. -
Build Color Depth:
Allow the first coat to dry completely according to the can’s instructions. Apply a second coat to achieve that rich, opaque color seen in the photo. Let this cure for at least 24 hours before moving to the detailed work.
Step 2: Detailing the Apron & Legs
-
Stencil Placement:
Choose a filigree or scroll stencil that fits the width of your table’s lower apron and leg insets. secure it firmly with painter’s tape to prevent slipping. -
Apply Metallic Wax:
Instead of paint, I find using gold gilding wax gives a more authentic, metallic look. Load a very small amount onto a stencil brush or lint-free cloth. -
Stenciling Technique:
Gently swirl or dab the wax through the stencil openings. Use a ‘dry brush’ technique—too much product will bleed underneath. You want a subtle, textured shimmer rather than a thick globs of gold. -
Repeat the Pattern:
Carefully lift the stencil and reposition it to continue the pattern around the apron and down the flat surfaces of the legs. Wipe the back of the stencil occasionally to keep lines crisp. -
Highlight Edges:
Using your finger or a cloth, lightly rub a small amount of gold wax along the sharp corners and beveled edges of the table top. This highlights the architecture of the piece.
Oops! Uneven Stencil?
If gold wax bleeds under the stencil, don’t panic. Wait for it to dry, then use a small artist’s brush and your teal base paint to carefully ‘erase’ the mistake by painting over the excess.
Step 3: Adding the Nailhead Trim
-
Plan Your Spacing:
Measure the top edge of the apron where the studs will go. You can mark light pencil dots every half-inch to ensure even spacing, or use a spacing tool. -
Install Top Row:
Begin gently hammering the gold upholstery tacks along the top rim of the drawer/apron area. If you are worried about damaging the finish, place a soft cloth over the tack head before hammering. -
Install Bottom Row:
Repeat the process for the second row of trim just above the stencil work. Keep your line straight; a crooked line of studs is very noticeable. -
Address Design Elements:
If your table has a drawer, add a single tack or a small gold knob in the center to tie the look together.
Hack: Use Trim Strips
Dreading hammering hundreds of individual tacks? Buy ‘nailhead trim strips’ instead. They come in long rolls where you only nail in every 5th stud, saving time and ensuring straight lines.
Step 4: Finishing Touches
-
Clean Up:
Inspect your work for any stray metallic smudges. These can usually be buffed away with a clean cloth or touched up with a tiny bit of teal paint. -
Seal the Surface:
Apply a clear matte polycrylic topcoat over the entire piece, including the stenciled areas. This protects the wax from rubbing off and shields the table from daily wear. -
Final Cure:
Let the topcoat cure fully before placing any heavy objects on the table surfaces, usually about 48 hours for light use.
Enjoy styling your elegant new table in your living space
Abstract Painted End Table Art Piece

Transform a plain wooden pedestal table into a vibrant statement piece featuring winding vines and stylized leaves. This project combines exposed wood grain with bold navy and rust tones for a look that feels both organic and modern.
Step-by-Step
Materials
- Raw wooden pedestal table (round top)
- Sanding block or sandpaper (120 and 220 grit)
- Pencil
- Navy blue chalk-style paint or acrylic paint
- Rust orange/terracotta acrylic paint
- Cream or off-white acrylic paint
- Small flat tip paintbrush (for leaves)
- Medium round paintbrush (for base coat)
- Fine detail liner brush
- Carving tool or linocut gouge (optional for texture)
- Clear protective topcoat (matte or satin finish)
- Clean rags
Step 1: Preparation and Base
-
Prepare the surface:
Begin by thoroughly cleaning your table to remove dust or oils. If the table has an existing shiny finish, you’ll need to sand the entire piece with 120-grit sandpaper to create a ‘tooth’ for the paint to grip. -
Smooth the wood:
Follow up with a quick pass of 220-grit sandpaper to ensure the surface is smooth to the touch. Wipe away all sanding dust with a damp rag or tack cloth. -
Apply the background color:
Using your medium round brush, paint the entire base (the leg and foot) in a deep navy blue, stopping right where the leg meets the underside of the tabletop. -
Create the table edge:
Continue painting the navy blue along the vertical edge of the round tabletop. Apply a second coat if necessary to get full, opaque coverage, and let this dry completely. -
Natural top technique:
For this design, leave the flat top surface as natural wood. If your table isn’t raw wood, you can paint the top a sand or beige color to mimic the look in the photo.
Oops! Carved too deep?
If you gouge the wood too aggressively, fill the divot with a tiny amount of wood filler. Once dry, dab a bit of paint over it to camouflage the repair.
Step 2: Drafting the Design
-
Sketch the vines:
With a pencil, lightly draw winding vine lines starting from the base and twisting upward toward the tabletop. Continue these lines onto the flat top surface so the design flows seamlessly. -
Draft the leaf shapes:
Draw large, simplified almond-shaped leaves branching off your vines. Vary the sizes, placing some on the vertical base and clustering others across the tabletop. -
Add detail lines:
Inside each leaf shape, sketch a simple center vein line. Don’t worry about perfection; a slightly organic, hand-drawn look adds to the charm.
Step 3: Carving and Definition (Sgraffito)
-
Carve the outlines:
This is where the magic happens on the painted base. Using a linocut gouge or a sharp carving tool, gently carve along your pencil lines on the the navy blue leg to reveal the raw wood underneath. -
Carve the veins:
Carve out the center vein of each leaf on the base as well. This ‘sgraffito’ technique creates a physical texture and a striking outline without needing a brush. -
Clean the grooves:
Use a dry, stiff-bristled brush to sweep away any paint chips or wood shavings from the carving process. -
Outline the top:
Since you can’t carve the unpainted top to show contrast, switch to a fine liner brush and navy paint. Carefully paint thin outlines and center veins for the leaves on the tabletop surface to match the carving style.
Level Up: Metallic Pop
Add a touch of glam by using gold leaf or metallic gold paint for the center veins of the leaves instead of plain wood or navy lines.
Step 4: Adding Color
-
Fill the rust leaves:
Using a small flat brush, paint select leaves in your rust orange or terracotta shade. On the base, paint ‘inside the lines’ of your carved borders. On the top, paint freely inside your painted outlines. -
Add cream accents:
Paint a few sporadic leaves in cream or off-white to balance the composition. I find that leaving some leaves as unpainted raw wood (especially on the tabletop) keeps the design from looking too busy. -
Fill the navy leaves:
On the tabletop only, paint the remaining leaves with the navy blue. This connects the top design visually back to the dark base. -
Refine the edges:
If any paint bled into your carved grooves on the base, use the carving tool one more time to gently scrape it out and re-establish that crisp wood line.
Step 5: Finishing Touches
-
Distress (Optional):
If you want a more weathered look, lightly sand over the painted leaves with 220-grit sandpaper to let a bit of the texture show through. -
Seal the piece:
Once all paint is perfectly dry, apply a coat of clear protective finish over the entire table. A matte polycrylic works best to preserve the natural look of the wood. -
Final cure:
Allow the topcoat to cure according to the manufacturer’s instructions before placing any heavy objects or drinks on the table.
Now you have a stunning, hand-crafted accent table that brings artistic flair to any corner of your room


Have a question or want to share your own experience? I'd love to hear from you in the comments below!