Whenever I’m stuck for sketchbook inspiration, birds pull me right back in—they’re pure shape, gesture, and texture all in one tiny package. Here are my favorite bird drawing ideas (from super classic to delightfully weird) to help you fill a page fast and have fun doing it.
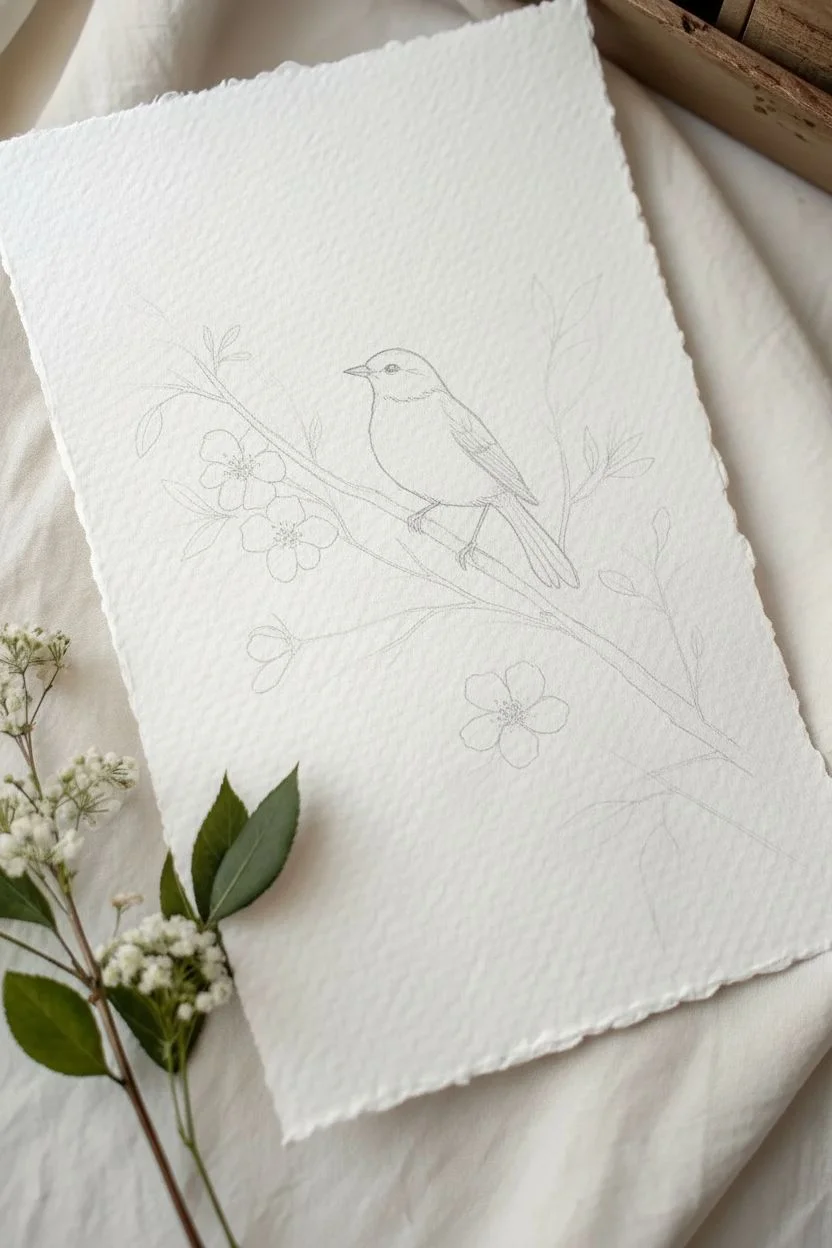
Simple Perched Songbird on a Branch
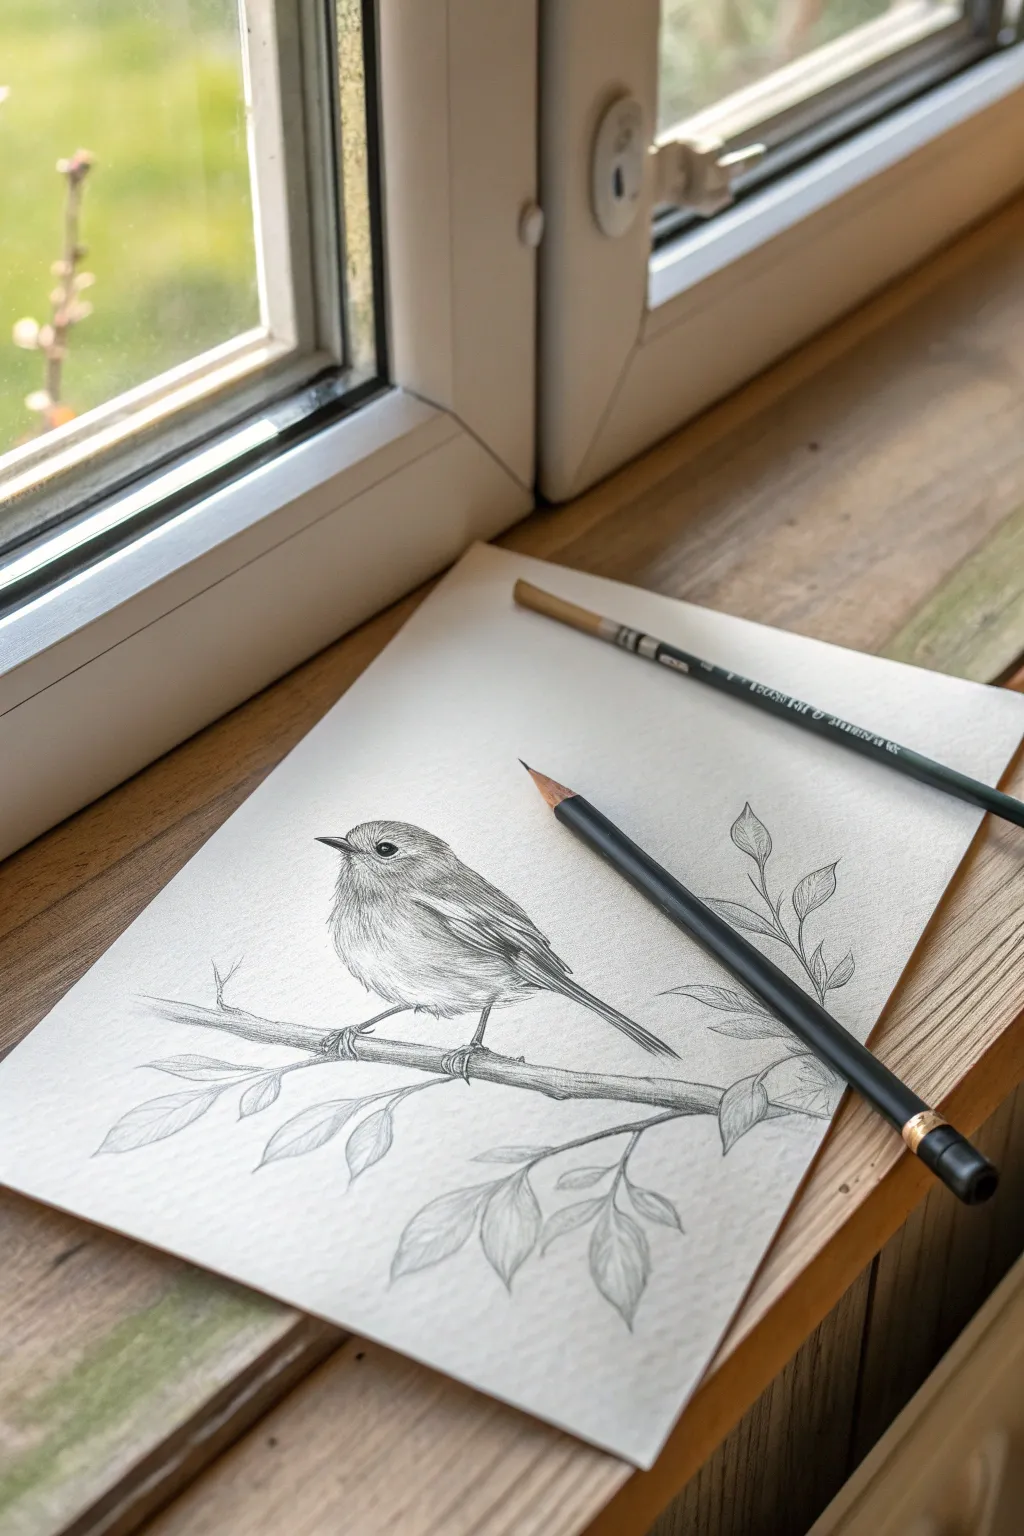
This delicate pencil sketch captures the quiet charm of a small songbird resting on a leafy branch. It features soft shading and precise line work to create a realistic yet gentle illustration perfect for a sketchbook page.
Detailed Instructions
Materials
- Quality drawing paper (medium tooth)
- H pencil (for initial outlines)
- 2B pencil (for shading and details)
- Reference photo of a songbird
- Kneaded eraser
- Pencil sharpener
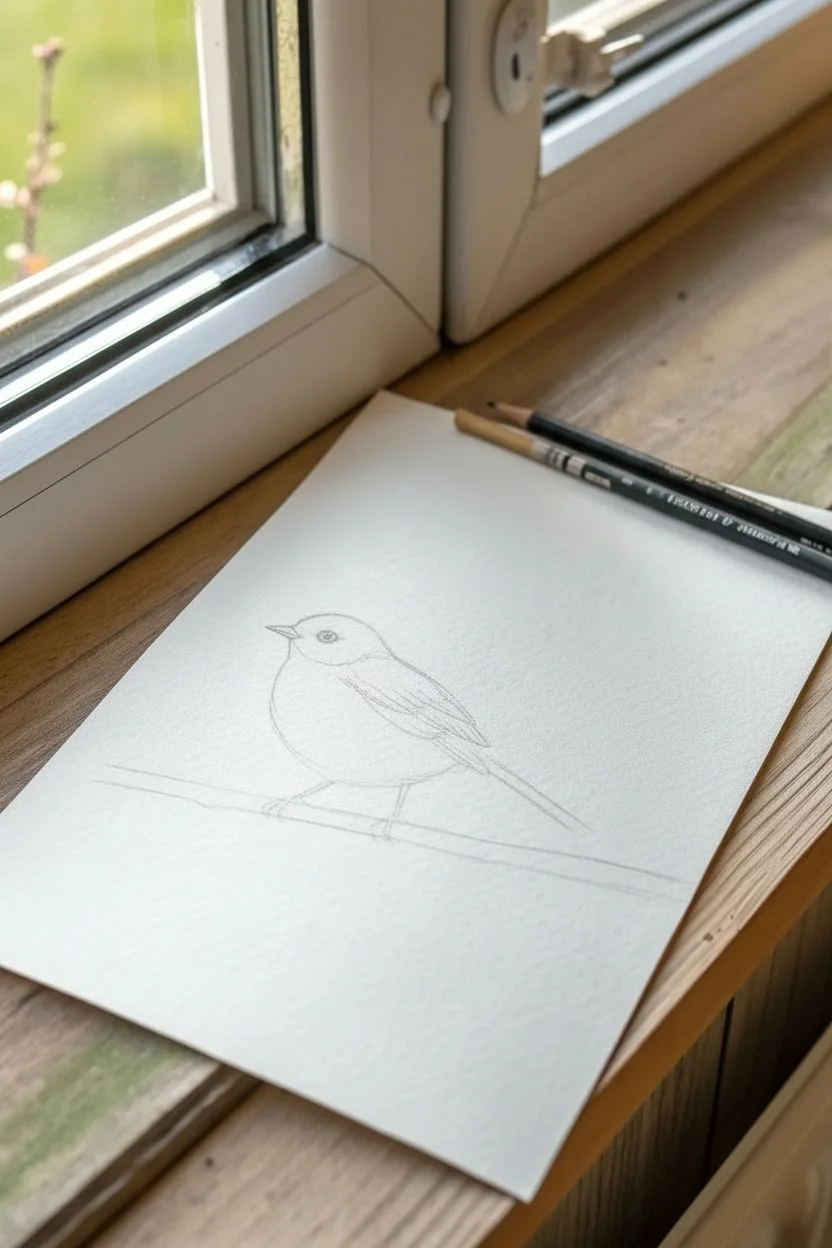
Step 1: Laying the Foundations
-
Map the body shape:
Begin with your H pencil, using very light pressure. Draw a slightly tilted oval for the bird’s body and a smaller circle on top for the head, overlapping slightly to connect them. -
Establish the posture:
Draw a straight, angled line indicating the direction of the tail extending downwards from the back of the oval. -
Sketch the branch:
Lightly sketch a horizontal, slightly curved line passing beneath the body oval to represent the main branch. Add a few branching lines diverting off the main stem where leaves will go later. -
Refine the outline:
Connect the head circle to the body oval with smooth, curved lines to form the neck. Define the beak with a small, sharp triangle pointing left. -
Place the wing:
Draw a teardrop shape on the side of the body oval to represent the folded wing. Its tip should point towards the tail.
Hold it Loose
Grip your pencil further back when shading the belly. A loose grip allows for softer gradients and prevents harsh lines.
Step 2: Adding Detail and Texture
-
Define the eye:
Switch to your 2B pencil. Draw a small, dark circle for the eye, leaving a tiny white dot unshaded near the top for the catchlight, which brings the bird to life. -
Detail the beak:
Sharpen the beak outline. Add a central line to separate the upper and lower mandibles, making the corner of the mouth slightly darker. -
Feather the head:
Using short, flicking strokes, create the texture of feathers around the head and neck. Keep these strokes very small and dense closer to the beak. -
Refine the wing feathers:
Inside the wing shape, draw long, sweeping curves to represent the flight feathers. Layer them so they appear stacked, darkening the edges slightly for depth. -
Shade the belly:
Use the side of your pencil lead to add soft shading to the underside of the bird. I like to keep the chest area lighter to suggest a rounded form. -
Texture the back:
Add slightly darker shading to the bird’s back and the top of the head compared to the belly. Use directional strokes that follow the curve of the bird’s body.
Step 3: Grounding and Foliage
-
Draw the feet:
Sketch thin, curved lines hooking around the branch for the claws. Ensure they look like they are gripping the wood firmly. -
Thicken the branch:
Go back to the branch line and add thickness, making it uneven and textured to resemble bark. Darken the underside of the branch for shadow. -
Add leaves:
Draw leaf shapes attached to the smaller stems. Use simple pointed ovals, adding a central vein line to each. -
Shade the leaves:
Lightly shade one half of each leaf or add subtle veins to give them dimension without distracting from the bird. -
Deepen contrasts:
Review your drawing and darken the deepest shadows—specifically under the wing, beneath the belly, and the pupil of the eye—to make the drawing pop. -
Clean up:
Use your kneaded eraser to lift any stray smudge marks or lighten areas of the belly that became too dark.
Try Watercolor
Once the sketch is complete, add a transparent wash of watercolor over the bird in soft browns or blues for a mixed-media look.
Enjoy the quiet satisfaction of seeing your realistic bird take shape on the paper


Bird in Flight With Outstretched Wings
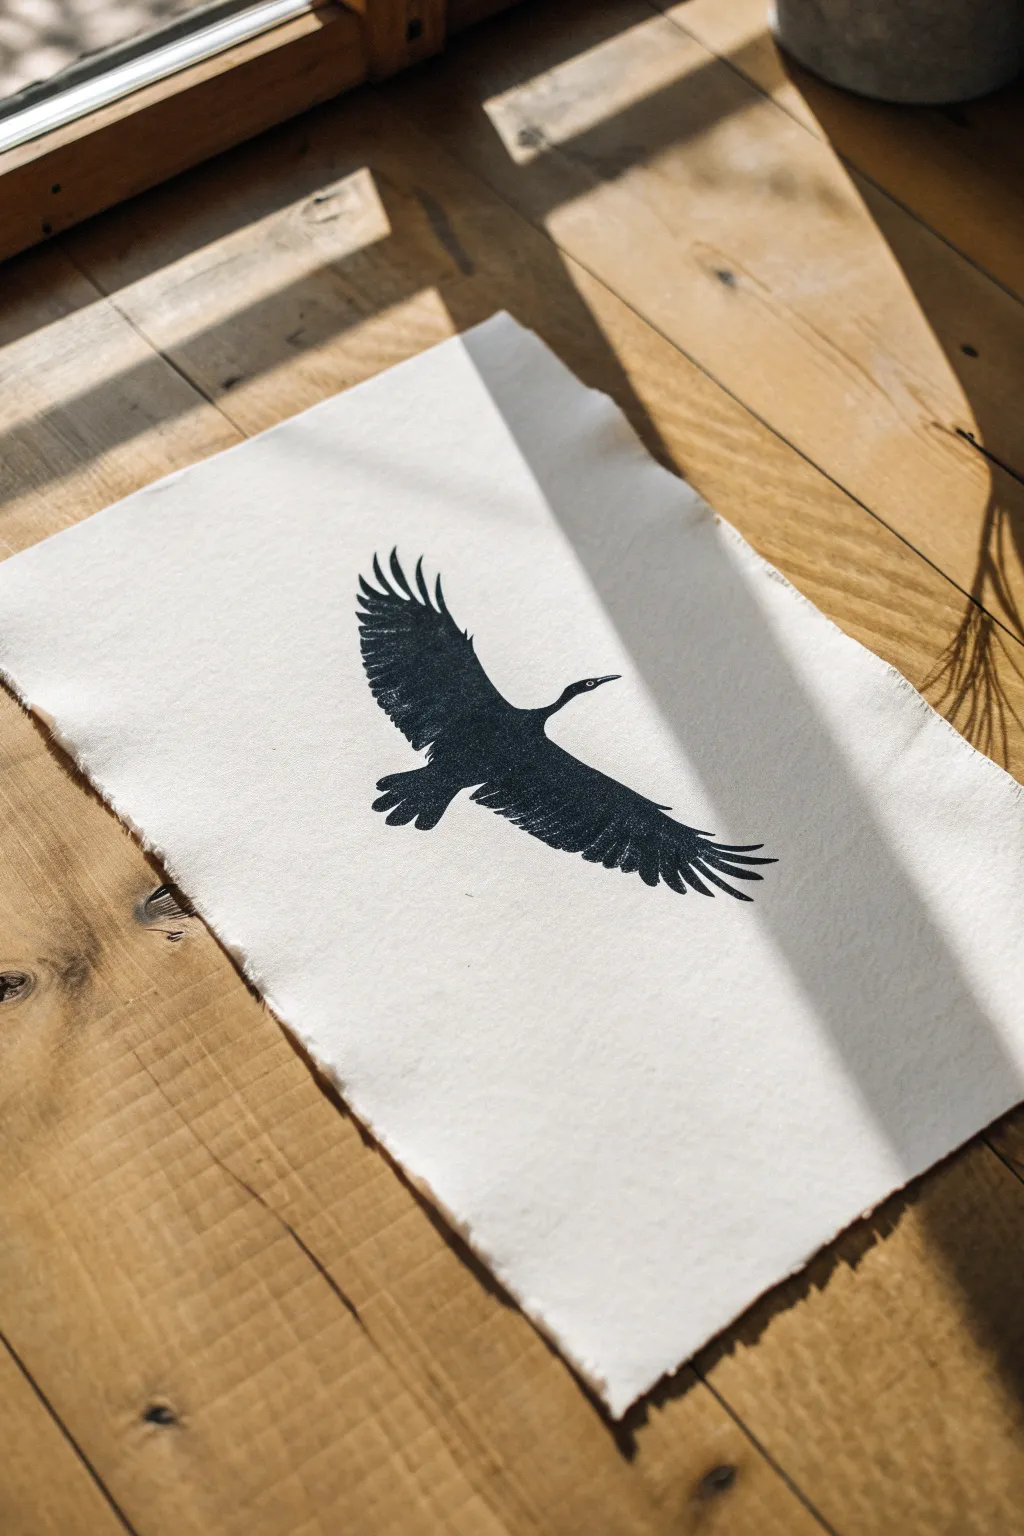
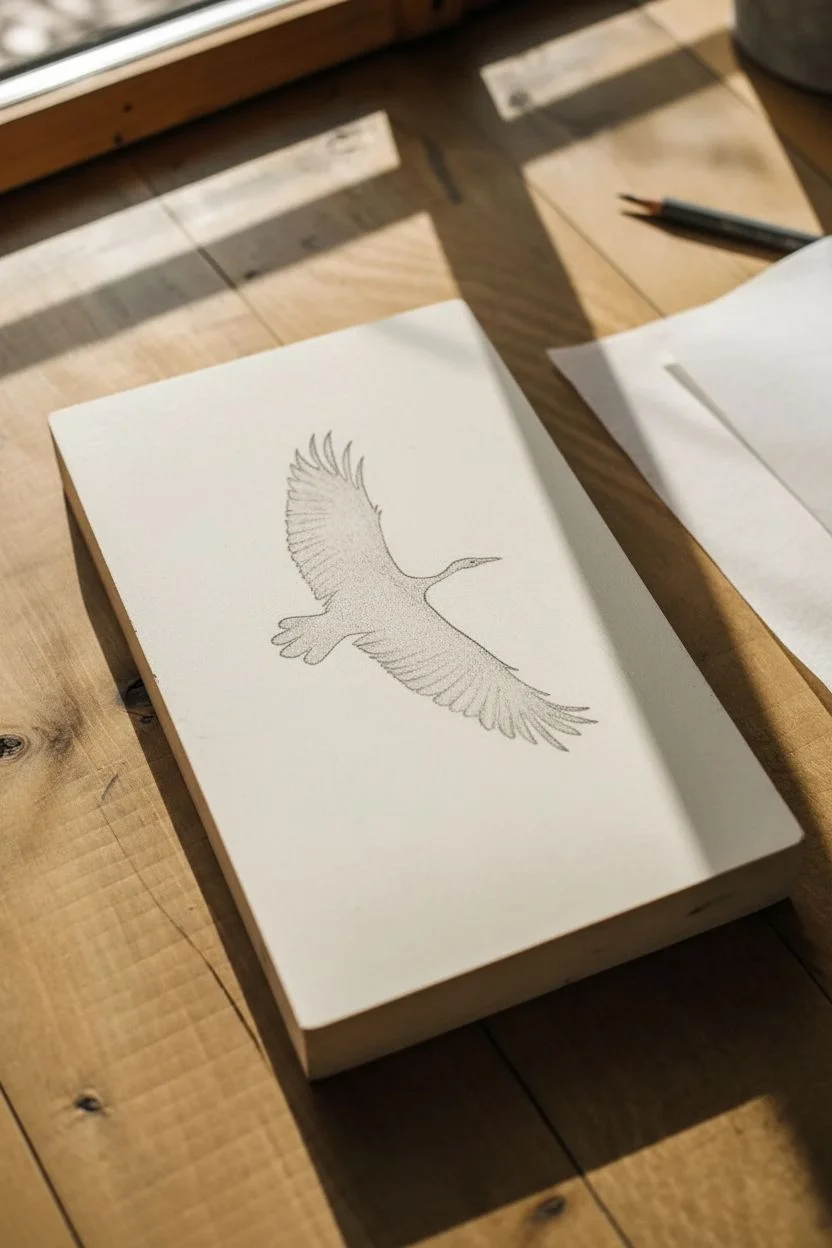
Capture the graceful silhouette of a bird in flight with this bold linocut printing project. The high contrast of black ink against textured paper emphasizes the outstretched wings, creating a striking piece of minimalist art.
Step-by-Step Tutorial
Materials
- Soft linoleum cut block (4×6 or 5×7 inch)
- Linoleum cutter set (V-gouge and U-gouge)
- Black screen printing or block printing ink
- Soft rubber brayer (roller)
- Handmade or cold-press paper with deckle edge
- Tracing paper
- Soft pencil (4B or 6B)
- Glass plate or acrylic sheet for inking
- Baren or wooden spoon for burnishing
Step 1: Preparing the Design
-
Sketch the silhouette:
Start by sketching a bird with fully outstretched wings on a piece of scrap paper. Focus on the jagged edges of the feathers and the long, elegant neck. You don’t need interior details; the silhouette is key. -
Refine the wingtips:
Pay close attention to the primary feathers at the ends of the wings. Draw them as distinct, finger-like shapes to give the impression of air moving through them. -
Transfer to tracing paper:
Place tracing paper over your finalized sketch and trace the outline heavily with a soft pencil. -
Transfer to block:
Flip the tracing paper pencil-side down onto your clean linoleum block. Rub the back of the paper firmly with your fingernail or a spoon to transfer the graphite image onto the lino surface.
Ink Consistency Matters
If your print looks speckled (salty), you need more ink. If the edges are squashed and blurry, you used too much ink. Aim for a satin finish on the roller.
Step 2: Carving the Block
-
Outline the shape:
Using a small V-gouge tool, carefully carve along the very outer edge of your pencil line. Always carve away from your body and keep your non-carving hand behind the blade. -
Carve the wing details:
Work slowly around the individual feathers on the wingtips. These are delicate areas, so use shallow cuts to avoid breaking off the tips of the feather shapes. -
Clear the background:
Switch to a wider U-gouge to remove the large areas of linoleum around the bird. I find it helpful to carve in a radiating pattern away from the bird, though you want to carve deep enough that these texture lines don’t print. -
Refine the edges:
Go back with your smallest cutter and clean up any jagged bits around the bird’s beak and tail feathers to ensure a crisp silhouette. -
Clean the block:
Brush away all linoleum crumbs with a soft brush or cloth to ensure nothing gets stuck in the ink later.
Step 3: Printing the Image
-
Prepare the ink:
Squeeze a small dime-sized amount of black block printing ink onto your glass or acrylic palette. -
Charge the brayer:
Roll your brayer back and forth through the ink, lifting it occasionally to distribute a thin, even layer. It should make a distinctive ‘velcro’ sizzling sound when it’s ready. -
Ink the block:
Roll the inked brayer over your carved block. Apply two to three thin layers rather than one thick gloop, ensuring the entire bird surface is shiny and black. -
Position the paper:
Carefully align your textured paper over the inked block. Once the paper touches the ink, do not shift it or the image will smudge. -
Burnish the print:
Using a baren or the back of a wooden spoon, rub the back of the paper in small circles. Apply firm, consistent pressure, making sure to go all the way to the edges of the wingtips. -
Reveal the print:
Starting at one corner, slowly peel the paper off the block to reveal your stark black bird against the white background. -
Dry the print:
Lay the finished print on a flat surface to dry completely. Oil-based inks can take a few days, while water-based inks might dry in an hour or two.
Deckle Edge Trick
To get the torn ‘deckle’ edge shown in the photo, crease your paper sharply, wet the crease with a paintbrush and water, then gently tear along the wet line.
Hang your print in a spot where the light can catch the texture of the paper and the depth of the ink


Hummingbird Hovering at a Flower
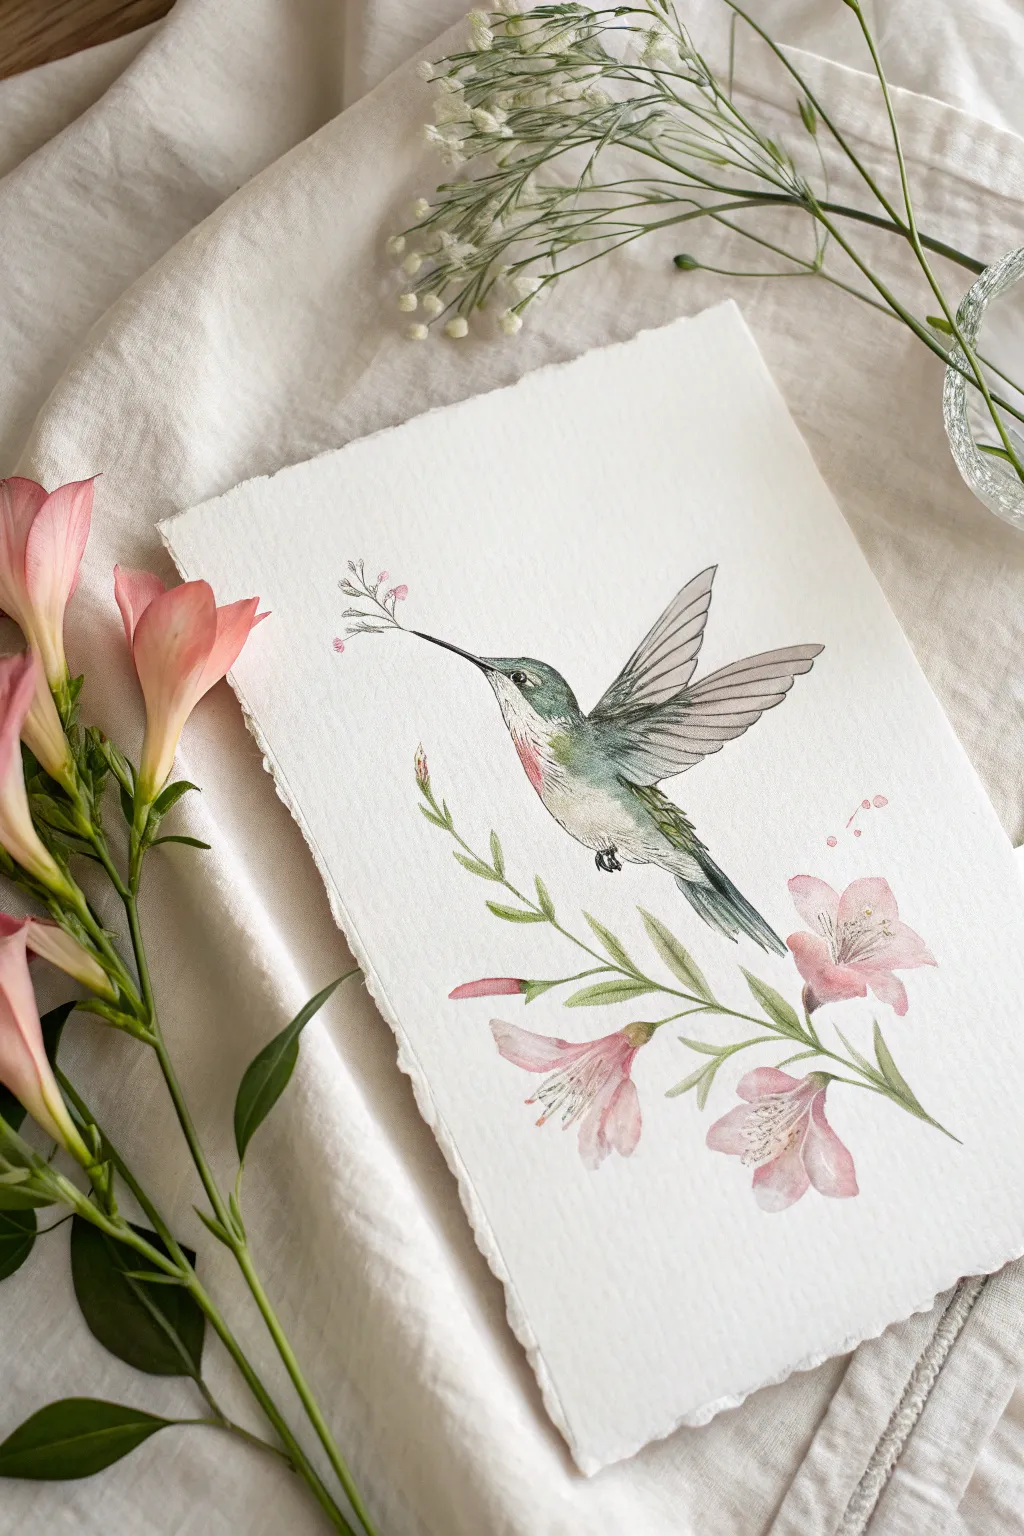
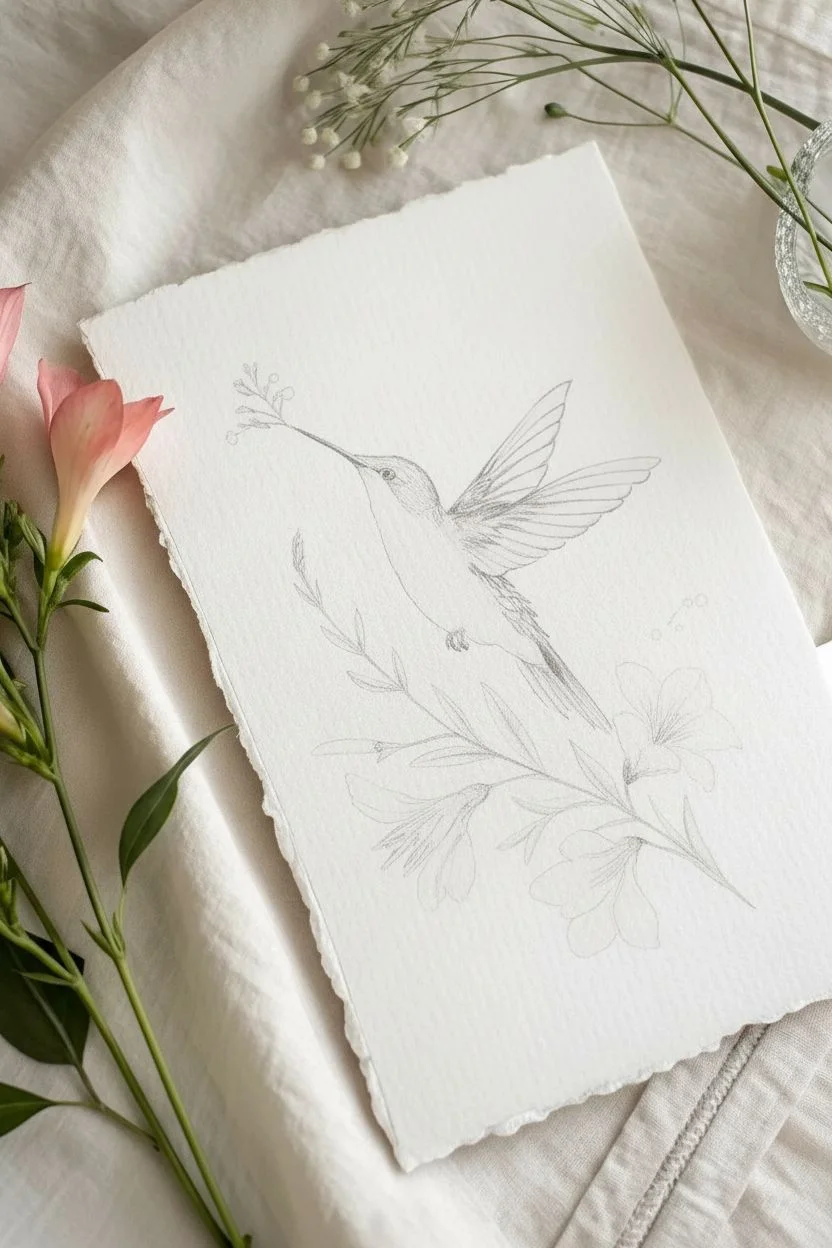
Capture the fleeting beauty of a hummingbird in flight with this gentle watercolor tutorial. Using soft washes and precise details, you’ll create an elegant composition featuring a ruby-throated hummingbird visiting pale pink blooms on textured paper.
Detailed Instructions
Materials
- Cold press watercolor paper (with deckle edge for authentic look)
- H or HB pencil for sketching
- Kneaded eraser
- Watercolor paints (Sap Green, Hooker’s Green, Alizarin Crimson, Burnt Sienna, Payne’s Grey, Rose Madder)
- Round brushes (sizes 2, 4, and 00 for fine details)
- White gouache or white gel pen
- Water cups and paper towels
Step 1: Sketching the Composition
-
Outline the bird:
Begin by lightly sketching the hummingbird’s body shape in the center of your paper. Draw an oval for the body and a smaller circle for the head, connecting them with a gentle curve. -
Add wings and beak:
Extend a long, needle-thin beak pointing diagonally upward to the left. Sketch the wings swept back in a ‘V’ shape, indicating the tiered flight feathers with light lines. -
Draft the floral elements:
Draw a curved stem entering from the bottom right, flowing underneath the bird. Add three main bloom shapes—one facing right, one facing left, and one bud. -
Refine the sketch:
Clean up your pencil lines with a kneaded eraser, lifting away excess graphite until the guide is faint but visible. Add the tiny sprig of flowers held in the beak.
Step 2: Painting the Hummingbird
-
Base wash for the head:
Mix a watery Sap Green with a touch of Payne’s Grey. Apply this as a light wash to the top of the head and back, avoiding the eye area. -
Throat patch (gorget):
While the green is still damp but not soaking, drop in a small amount of diluted Alizarin Crimson mixed with a tiny bit of Grey on the throat area. Let the colors bleed slightly for a soft transition. -
Defining the wings:
Using a size 2 brush and a very pale grey wash, fill in the wing shapes. While wet, use a slightly darker grey to draw thin lines separating the individual feathers. -
Deepening the greens:
Once the first layer is dry, mix a stronger green using Hooker’s Green and Burnt Sienna. Paint short, small strokes on the back to simulate iridescent feathers. -
Detailed facial features:
Use your smallest brush (size 00) and concentrated Payne’s Grey or black to paint the eye, leaving a tiny white speck for the highlight. Carefully paint the long, thin beak. -
Belly and tail feathers:
Keep the belly very light—mostly white paper with faint grey shading. For the tail, use a mix of blue-green and grey to create sharp, downward-pointing feathers.
Edge Control
To get the soft, fuzzy look on the bird’s belly, wet the paper with clean water first, then touch the grey paint to the wet area. The pigment will bloom naturally.
Step 3: Painting the Botanicals
-
Stems and leaves:
Load your size 4 brush with a varied mix of Sap Green. Paint the main curved stem using a continuous stroke, lifting pressure at the end for a tapered look. -
Adding leaves:
Add small, pointed leaves along the stem. Vary the green slightly—adding water to some strokes and more pigment to others—to create depth. -
First layer of petals:
Dilute Rose Madder until it’s a very pale, transparent pink. Fill in the petal shapes of the main flowers, keeping the edges soft. -
Deepening the blooms:
While the pink is still damp, dab a slightly more saturated pink into the center of the flowers and the tips of the petals to create a gradient. -
Tiny beak sprig:
Use the tip of your smallest brush to paint the delicate stem and tiny pink buds held in the bird’s beak.
Deckle Edge
If you don’t have handmade paper, you can create a faux deckle edge by folding your watercolor paper, wetting the fold line, and gently tearing it along a ruler.
Step 4: Refining and Detailing
-
Flower centers:
Once the petals are completely dry, use a fine liner brush with a dark brownish-red to draw delicate stamens and pistils in the center of the pink blooms. -
Feather texture:
I like to return to the bird now with a fairly dry brush to add tiny, scratchy lines on the green back and grey wings, enhancing the sense of texture. -
Splatter effect:
Load a brush with watery pink paint and tap it against another brush handle to create a few subtle splatters near the flowers for an artistic touch. -
Final highlights:
Use white gouache or a gel pen to sharpen the highlights in the eye or add a few bright sparkles to the flower stamens if they got lost in the wash.
Frame your delicate artwork in a simple floating frame to show off those beautiful edges


Owl Face Study With Big Eyes
This tutorial shows you how to capture the piercing gaze and feathery texture of an owl in profile. By mixing graphite with key touches of warm colored pencil, you will create a drawing that feels both classic and vibrant.
Step-by-Step Guide
Materials
- Spiral-bound sketchbook (medium weight paper)
- H and 2B Graphite pencils
- Fine liner pen (black, 0.3 or 0.5mm)
- Colored pencils (Burnt Sienna, Orange/Terracotta, Yellow Ochre)
- Kneaded eraser
- Pencil sharpener
Step 1: Laying the Foundations
-
Outline the head shape:
Begin with a very light H pencil sketch. Draw a sloping curve for the forehead leading into a pointed beak shape, and define the back of the head with a wider, ruffled curve to suggest feathers. -
Place the eye:
The eye is the focal point, so position it carefully. Draw a large, perfect circle roughly in the upper-middle quadrant of the head, leaving space above it for the notable ‘horn’ feathers. -
Define the orbital disc:
Sketch the characteristic facial disc of the owl. Draw a curved line sweeping down from the beak, under the eye, and up towards the ear tufts, creating a distinctive ‘C’ shape that frames the face.
Feather Flow Tip
Always draw strokes in the direction the feathers grow. Near the beak, they grow outward; on the neck, they flow downward.
Step 2: Adding Color to the Eye
-
Initial eye coloring:
Take your yellow ochre colored pencil and fill in the iris completely, avoiding only a small circle for the pupil. Keep the pressure light for this first layer. -
Deepening the iris:
Layer orange or terracotta pencil around the outer edge of the iris to create depth and roundness. Leave the inner ring near the pupil bright yellow to suggest light hitting the lens. -
Drawing the pupil:
Using your black fine liner or a sharp 2B pencil, fill in the pupil with solid black. Leave a tiny, crisp white highlights near the top right of the pupil to give the eye a wet, lively look.
Step 3: Building Texture and Features
-
Refine the beak:
Outline the beak with your fine liner. Shade the underside darkly, fading to a lighter grey at the top curve to show its volume. -
Create the orbital ring:
Use the black fine liner to draw the heavy outline around the eye itself. Make this line thick and broken in places to mimic tiny lashes and skin texture. -
Drafting the ear tufts:
Switch to your coloured pencils. Use the burnt sienna to sketch swift, upward strokes above the eye, forming the long, iconic ‘horns’ or ear tufts associated with this owl species. -
Layering facial feathers:
Around the eye and cheek, lay down a base of light orange or terracotta strokes. Follow the contour of the face—these feathers should radiate outward from the beak area.
Level Up: Texture
Try using a white gel pen to add tiny, singular bright hairs over the darkest neck feathers for incredible 3D realism.
Step 4: Detailing the Plumage
-
Adding dark markings:
Using your 2B pencil or black pen, add the distinctive dark patterns. Draw jagged, vertical stripes down the neck and side of the head, varying the pressure to create thick and thin lines. -
Feather directionality:
Ensure your pencil strokes mimic feather growth. The strokes near the beak should be short and tight, while the strokes near the neck should be longer, looser, and more flowing. -
Mixing mediums:
Overlay graphite strokes on top of your colored pencil areas. This integrates the color, making it look like natural plumage rather than just coloring-book fill. -
Softening the whites:
Leave the area directly under the beak and chin largely white, using only very faint visible pencil strokes to suggest soft, fluffy down feathers. -
Defining the facial rim:
Darken the black outline of the facial disc (the ‘C’ shape created earlier). Use short, dark hatching marks to create a sharp contrast between the pale face and the darker neck feathers.
Step 5: Final Touches
-
Deepen contrasts:
Review your drawing and locate the darkest shadows—usually under the tufts and at the base of the neck. Go over these with a final pass of black ink or heavy graphite. -
Feather tips:
Add tiny, stray marks at the outer edges of the silhouette to break up any solid outlines. This makes the bird look soft and organic. -
Final sign-off:
Clean up any accidental smudges with your kneaded eraser and sign your work near the bottom right, keeping the signature small and delicate.
You have captured the wise spirit of the owl in a beautiful mixed-media sketch
BRUSH GUIDE
The Right Brush for Every Stroke
From clean lines to bold texture — master brush choice, stroke control, and essential techniques.
Explore the Full Guide
Duck Floating on Rippling Water
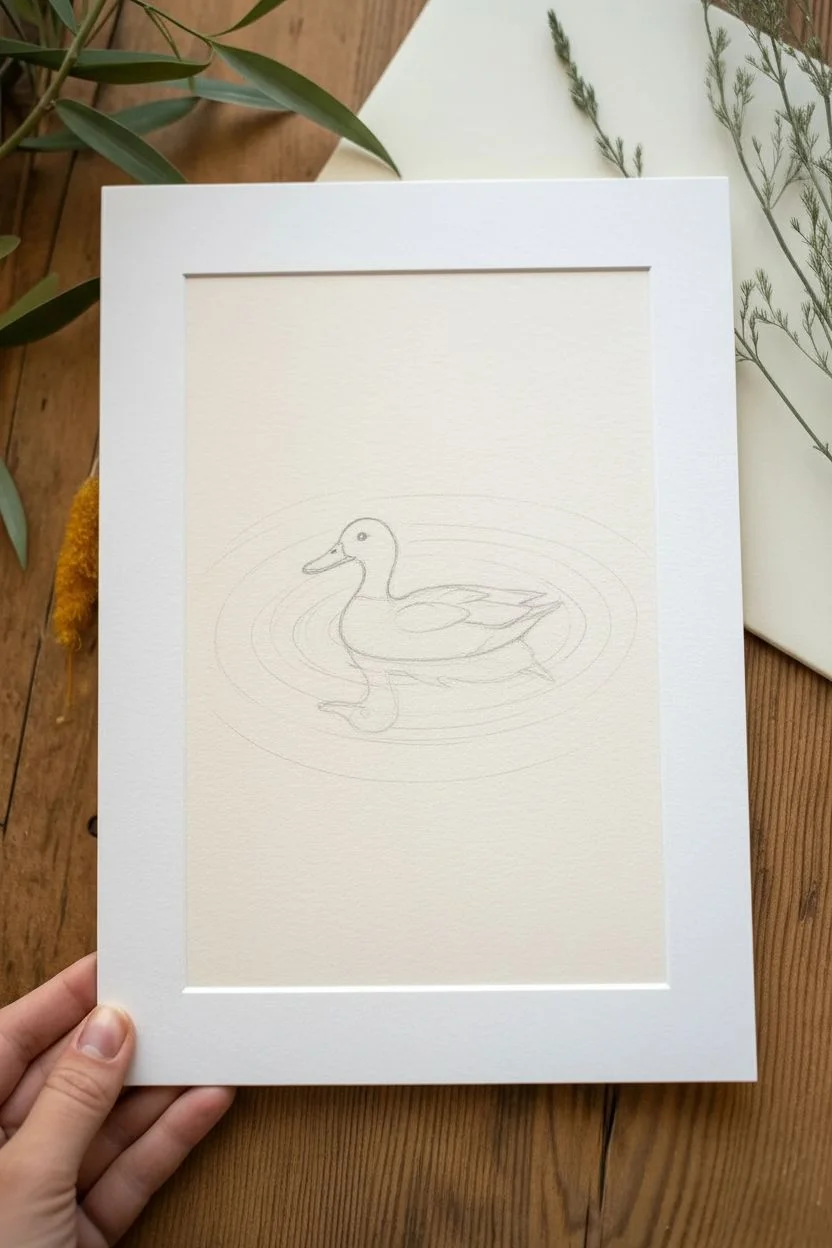
Capture the quiet elegance of a mallard duck drifting on a calm pond with this mixed media illustration. Combining subtle watercolor washes with precise pencil detailing creates a beautiful balance of softness and texture.
Step-by-Step Tutorial
Materials
- Hot press watercolor paper (smooth texture) or mixed media paper
- Pencil (HB for sketching)
- Watercolors (Earth tones: Burnt Umber, Yellow Ochre, Lamp Black, Sepia)
- Fine-tipped brushes (Sizes 0, 2, and 4)
- Colored pencils (Browns, greys, and black)
- Cream or beige toned drawing paper (optional, if painting directly on colored ground)
- White mat board for framing
- Micron pen or fine liner (Brown or Grey, optional)
Step 1: Sketching the Composition
-
Outline the form:
Begin by lightly sketching the basic oval shape of the duck’s body in the center of your page. Add a smaller circle for the head and connect them with a gentle curve for the neck. -
Refine the features:
Sketch the beak, paying attention to its slightly flattened shape. Draw the wing tucked against the side of the body and mark the position of the eye. -
Map the ripples:
Lightly draw concentric ellipses around the duck to represent the water ripples. Keep these lines very faint as they will guide your painting later, but shouldn’t be visible in the end.
Step 2: Layering Color
-
Base wash for the feathers:
Mix a diluted wash of Yellow Ochre and a touch of Burnt Umber. Apply this lightly over the duck’s body, leaving the chest slightly lighter to suggest volume. -
Darker tones:
While the first layer is dry, mix a darker Sepia tone. Use a smaller brush to dab in the darker patterns on the back and wings, letting the paint settle to create a mottled feather texture. -
Head details:
Paint the top of the head with a dark brown-black mix, leaving a distinct light stripe above the eye if you are drawing a female mallard. Fill in the eye with black, leaving a tiny white spot for the highlight. -
Beak coloration:
Paint the beak with a mix of yellow and a tiny bit of grey or green to tone it down. Add a darker shadow along the bottom edge for dimension.
Master the ripples
Keep your hand loose when painting ripples. Broken lines often look more realistic than perfect, continuous circles.
Step 3: Adding Texture and Detail
-
Defining feathers:
Once the watercolor is completely dry, use your colored pencils or a very fine brush to draw individual feather details on the wing and back. Use short, directional overlapping strokes. -
Wing speculum:
If visible in your reference, add the touch of blue or deep purple on the wing feathers, characteristic of mallards, framed by thin white lines. -
Enhancing contrast:
I like to go back in with a sharp dark brown pencil to deepen the shadows under the wing and around the neck to make the form pop.
Muddy colors?
If your feathers look muddy, let layers dry completely between applications. Wet-on-wet is risky for fine details.
Step 4: Creating the Water
-
Reflection base:
Directly under the duck, paint a reflection using a dark greyish-brown mix. Mimic the shape of the duck but distort it slightly with horizontal zig-zag strokes. -
Ripple lines:
Using a very dilute grey-blue wash and a size 2 brush, carefully paint the curved ripple lines you sketched earlier. Vary the line thickness—thicker near the bird, thinner further away. -
Softening edges:
Before the ripple lines dry completely, you can soften some edges with a clean, damp brush to make the water look fluid rather than rigid. -
Reflection details:
Darken the core of the reflection right beneath the bird’s waterline. This anchors the subject and shows the weight of the duck on the water.
Step 5: Finishing Touches
-
Final highlights:
Use white gouache or a gel pen to add tiny highlights to the water ripples if you want extra sparkle found in sunlight. -
Sign and mount:
Erase any remaining stray pencil marks gently. Once fully dry, sign your work subtly in the corner. Place a white mat over the artwork to frame it professionally.
This peaceful duck illustration makes a charming addition to any nature lover’s wall
Flamingo in an Elegant S-Curve Pose
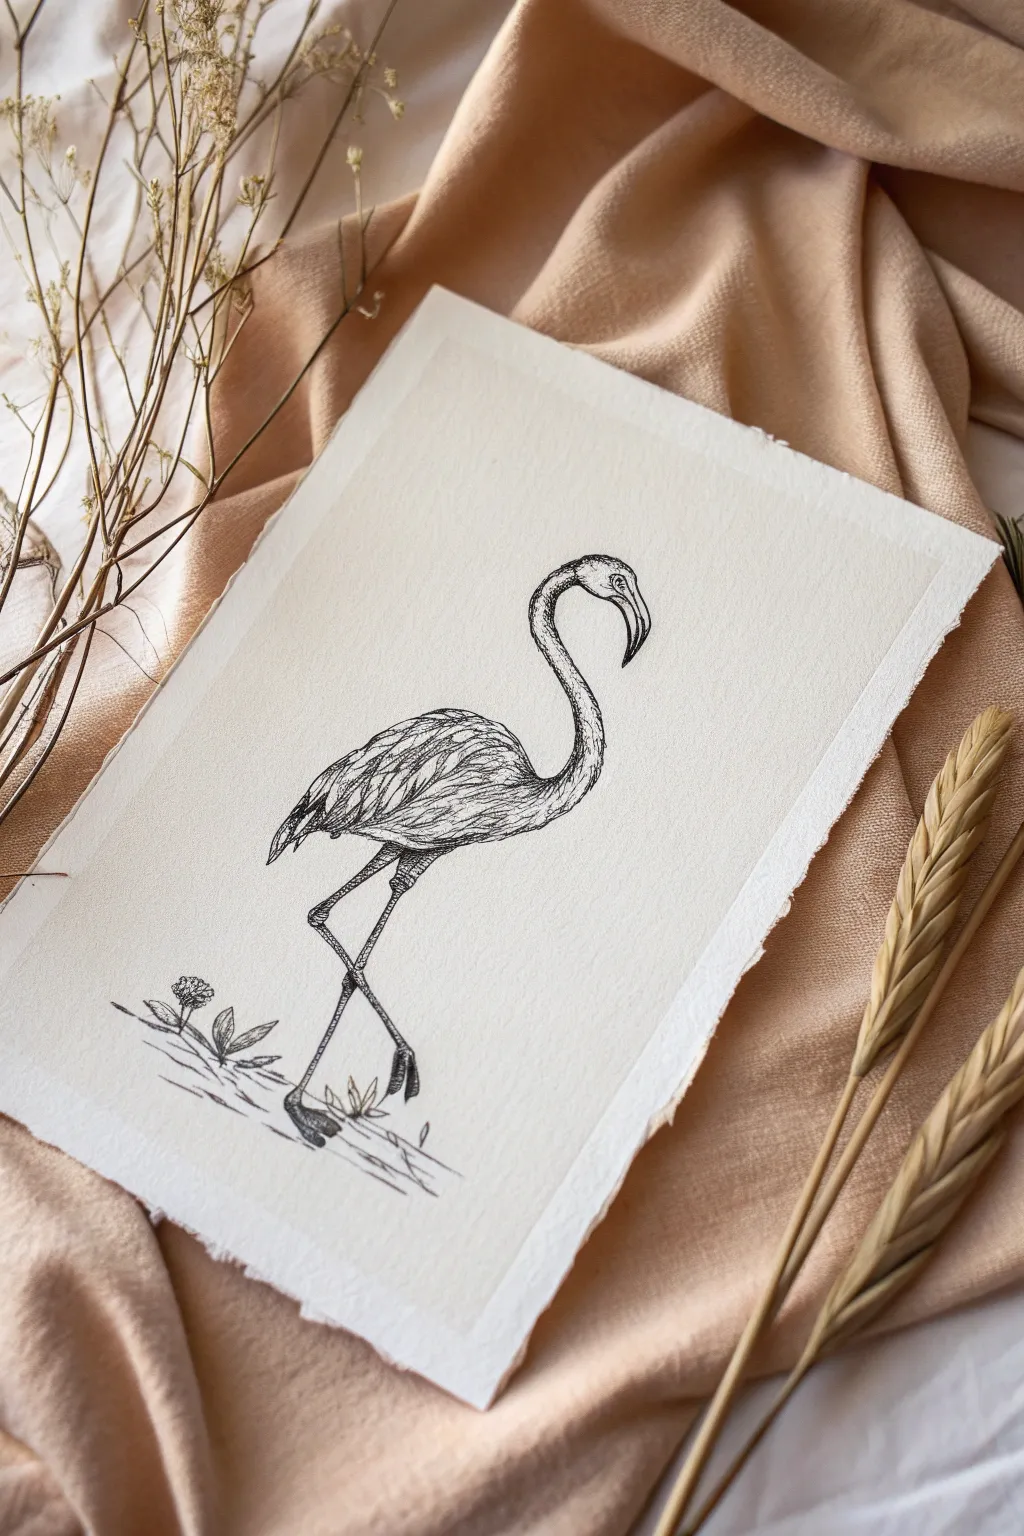
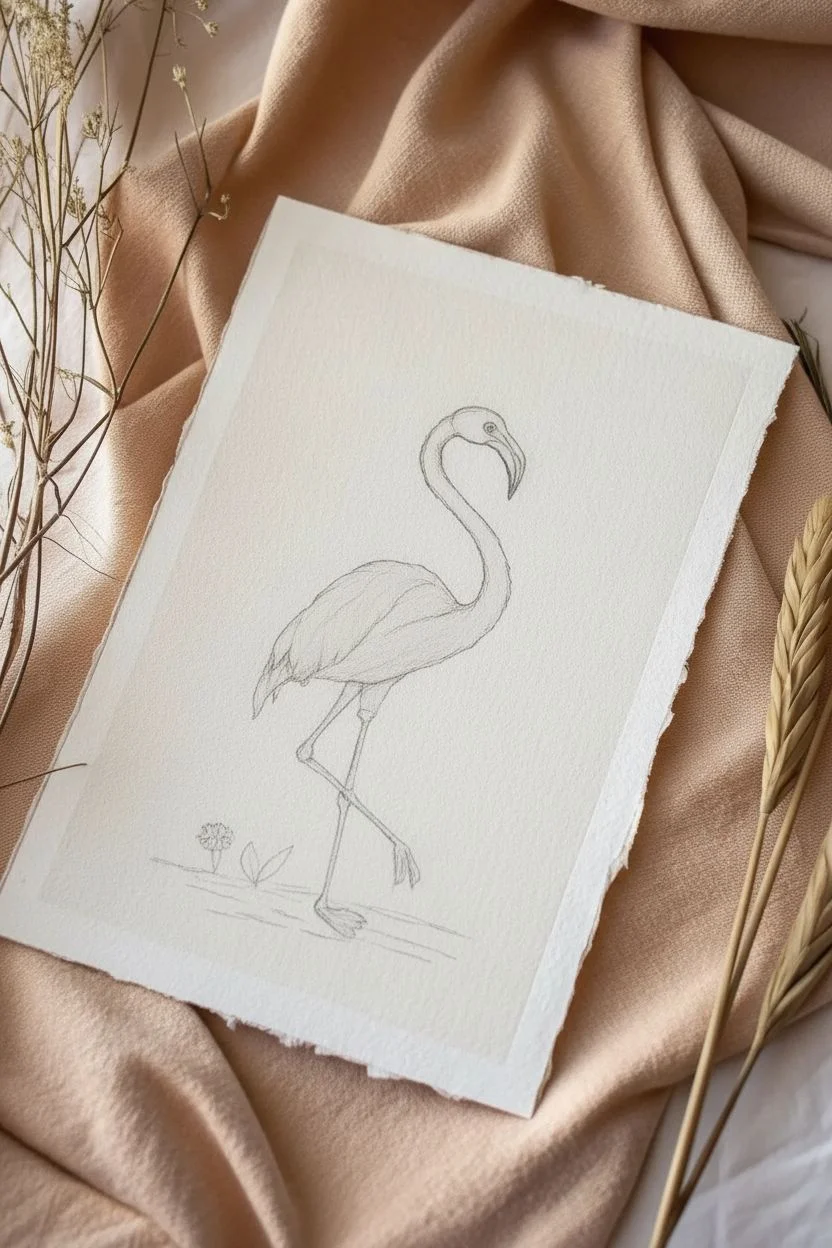
Capture the graceful silhouette of a flamingo with this detailed pen and ink study. Using fine liners on textured paper, you’ll build up layers of hatching to create depth and realistic feather textures.
Step-by-Step Guide
Materials
- Heavyweight drawing paper (cream or off-white with deckle edge)
- HB graphite pencil
- Kneaded eraser
- Fine liner pens (sizes 005, 01, and 03)
- Ruler (optional for ground lines)
- Reference photo of a flamingo
Step 1: Sketching the Framework
-
Establish the S-curve:
Start with a light pencil line that forms a gentle ‘S’ shape. This guide line should flow from the top of the head, down through the neck, and curve into the body, establishing the bird’s iconic posture. -
Block in basic shapes:
Draw an oval for the main body at the base of your S-curve. Add a small circle for the head at the top. Connect these with a thick, curved tube to form the neck. -
Refine the outline:
Using your initial shapes, refine the contour of the flamingo. Pay special attention to the beak, which curves downward sharply, and define the folded wing shape on the bird’s side. -
Add the legs:
Sketch the legs, remembering that flamingos have ‘backward’ bending knees (actually their ankles). Draw one leg straight down and the other bent upward in a classic resting pose. -
Sketch the ground elements:
Lightly pencil in a few jagged lines for the ground, along with small leafy sprouts and a textured flower head to the left to ground the composition.
Uneven Ink Flow?
If your fine liner starts skipping, don’t press harder. Instead, hold the pen more vertically and slow your stroke speed. Pressing hard can damage the delicate nib.
Step 2: Inking the Outline
-
Initial ink outlines:
Switch to your 01 fine liner. Carefully go over your pencil lines to create the permanent outline. Use disjointed, feathery strokes on the body to hint at plumage rather than a solid, hard line. -
Detail the beak:
Outline the beak shape firmly. The tip of a flamingo’s beak is usually black, so you can fill in the very end with solid ink now, leaving a small highlight if desired. -
Erase pencil guides:
Once the ink is completely dry to the touch, gently roll your kneaded eraser over the entire drawing to lift away the graphite, leaving a clean ink framework.
Step 3: Building Texture and Shading
-
Hatching the neck:
With the 005 pen, start adding texture to the neck. Use short, curved hatching lines that follow the form of the neck. Keep the front of the neck lighter to suggest a light source. -
Feathering the body:
Move to the main body. Draw rows of ‘U’ or ‘V’ shaped strokes to simulate layers of feathers. I find it helpful to start near the tail and work forward, layering the strokes like roof shingles. -
Deepening shadows:
Switch to the 03 pen for darker areas. Add density to the underside of the body and the area where the wing folds against the torso. This creates volume and weight. -
Texturing the legs:
Use the 005 pen to add tiny stippling dots and horizontal lines on the legs to replicate their scaly texture. Darken the joints (knees) significantly to make them stand out. -
Refine the wing feathers:
On the wing, draw longer, sweeping lines to represent flight feathers. Ensure these lines flow in the same direction, moving from the shoulder toward the tail tip. -
Detail the eye:
Carefully draw the small, beady eye using the 005 pen. Leave a tiny white speck for the highlight to bring the bird to life, and add small wrinkles around the eye socket.
Add a Splash of Color
For a mixed-media look, use a watercolor brush to add a very faint wash of diluted pink paint over the body feathers once the ink is absolutely waterproof dry.
Step 4: Grounding and Final Touches
-
Ink the ground:
Go back to the ground sketch with your 01 pen. Use quick, horizontal scribbles to suggest water or dirt. Don’t overwork this; keep it loose. -
Draw the flora:
Ink the small plants and the flower head. Use stippling (dots) for the flower center to give it a fuzzy appearance contrasting with the sleek bird. -
Add cast shadows:
beneath the feet and the plants, add some horizontal hatching with the 03 pen. This grounds the subject so it doesn’t look like it’s floating in space. -
Final assessment:
Step back and look at contrast. If the bird looks too flat, add another layer of cross-hatching to the darkest shadow areas under the belly and neck.
Now you have a striking, minimalist piece of nature art ready to frame

PENCIL GUIDE
Understanding Pencil Grades from H to B
From first sketch to finished drawing — learn pencil grades, line control, and shading techniques.
Explore the Full Guide
Penguin With Bold Light-and-Dark Blocks
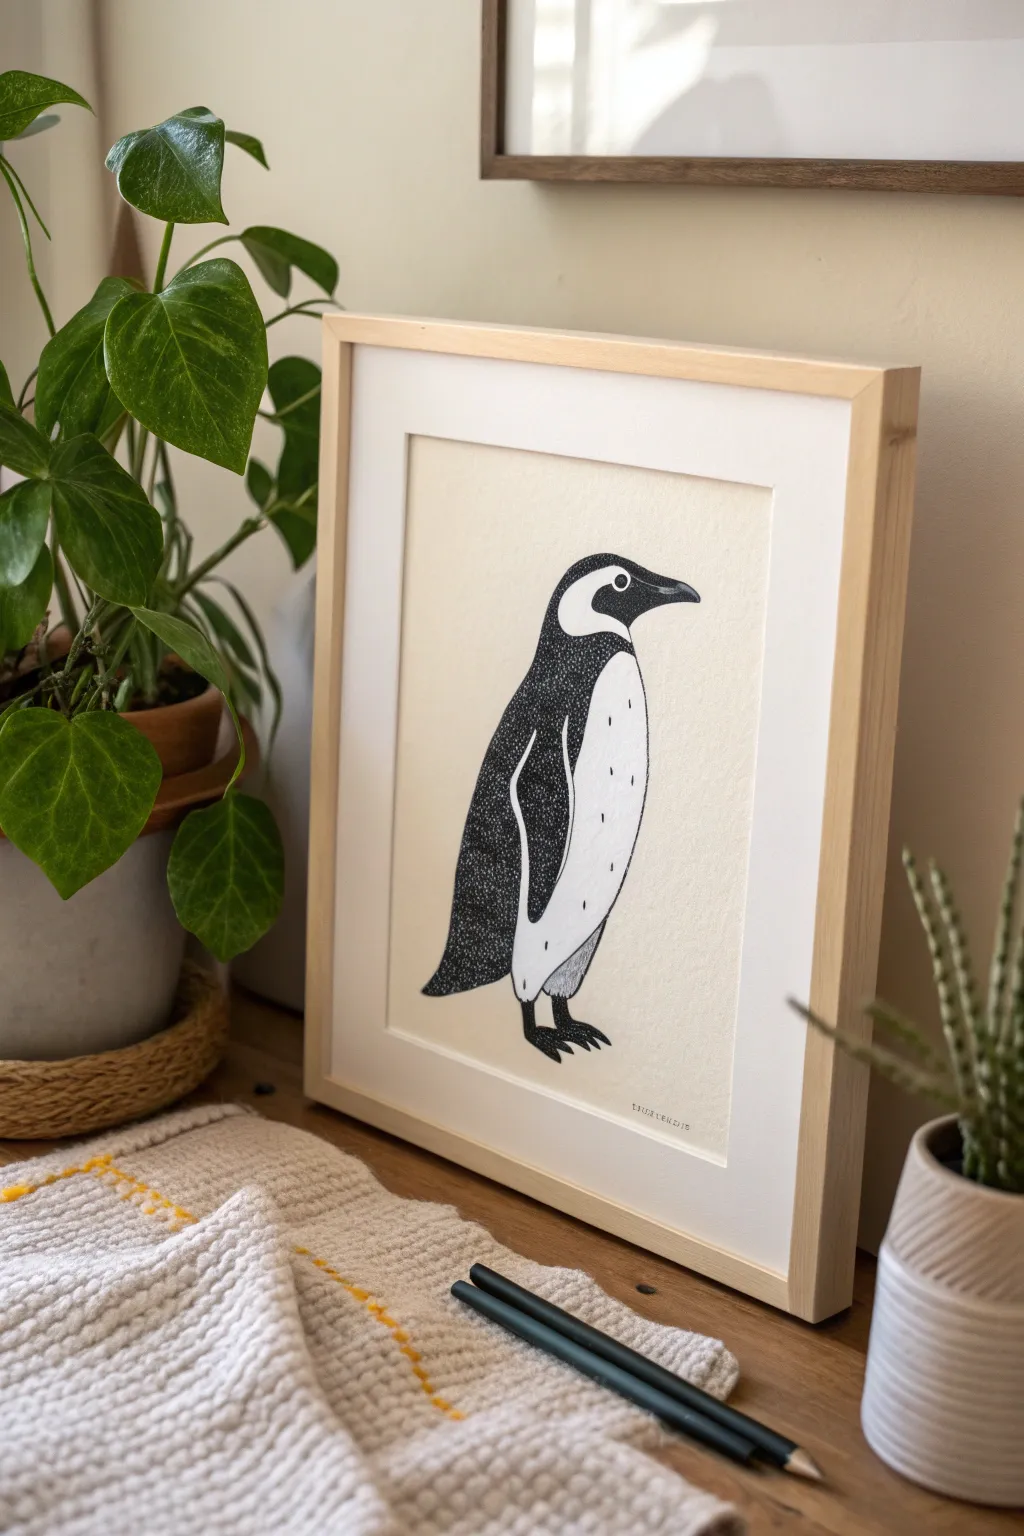
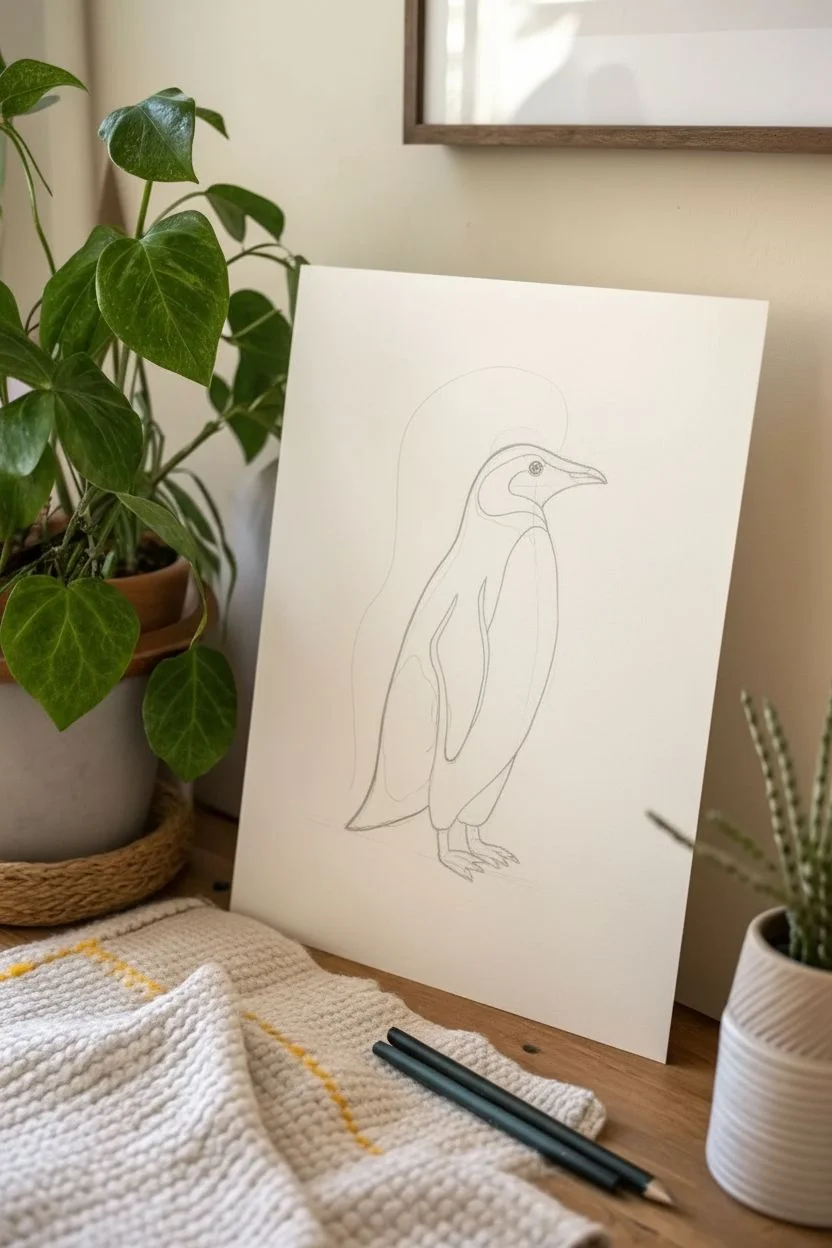
Capture the charming waddle of a penguin using striking high-contrast techniques and delicate stippling. This project focuses on balancing negative space with textured ink work to create a modern, illustrative piece.
How-To Guide
Materials
- Heavyweight drawing paper or mixed media paper (smooth texture preferred)
- Pencil (HB or 2B)
- Kneaded eraser
- Fine liner pens (sizes 005, 01, and 05 or 08)
- White gel pen (optional for corrections)
- Ruler (optional for framing placement)
Step 1: Sketching the Form
-
Establish the curve:
Begin by lightly drawing a long, gentle ‘S’ curve. This will serve as the spine of the penguin, guiding its upright posture and slight backward lean. -
Outline the body:
Draw an oval shape for the main body around the bottom of your S-curve, and a smaller, rounded shape on top for the head. Connect them with a thick neck to form a continuous, sleek silhouette. -
Define the stance:
At the base of the body, sketch two small feet. The far foot should slightly tuck behind the front foot to give the penguin a sense of stability on the ground. -
Add the wing:
Draw a long, paddle-like wing shape starting from the shoulder area. It should hang down comfortably against the body, slightly curved towards the back. Mark out the beak with a pointed, slightly hooked shape. -
Mark color zones:
Lightly sketch the boundary lines that separate the black feathers from the white belly. Pay attention to the distinct curve around the eye and the ‘bib’ area on the chest. Don’t forget the characteristic stripe that runs down the side of the belly.
Step 2: Inking the Details
-
Outline with precision:
Switch to your medium-sized pen (01 or 03). Carefully trace your pencil outline, solidifying the penguin’s final shape. Keep your lines smooth and confident. -
The eye and beak:
Using a finer pen (005), draw the eye. Leave a tiny white highlight circle inside the black pupil to bring it to life. Outline the beak, adding a small line to separate the upper and lower mandibles. -
Fill solid blacks:
Identify the areas that need to be darkest—typically the back of the neck, the very edge of the wing, and the feet. Using your thickest pen (05 or 08), fill these areas in completely solid black. -
Start the stippling:
This is where patience is key. For the main body feathers (the back and the top of the head), instead of coloring them solid black, use your 01 pen to create thousands of tiny dots. Keep them very dense near the edges to mimic shadow. -
Create a gradient:
As you move from the dark back edge towards the center of the wing or body, space your dots slightly further apart. This creates a gradient effect that suggests roundness and texture rather than a flat shape.
Ink Smearing?
Place a scrap piece of paper under your drawing hand. This acts as a shield, preventing oils from your skin transferring to the paper and stopping your hand from smudging wet ink.
Step 3: Refining and Finishing
-
Texture the white feathers:
The belly shouldn’t be stark white. Add a few very sparse, deliberate dots or tiny dashed lines on the white belly area to suggest the texture of feathers without darkening the area. -
The black stripe:
Ink the characteristic horseshoe-shaped stripe on the chest. I find stippling this area heavily, rather than blocking it in solid, gives it a softer, more feathery appearance. -
Grounding the subject:
Add a bit of shadow under the feet using horizontal hatching lines. This ensures your penguin looks like it is standing on a surface rather than floating in space. -
Clean up:
Wait at least 10 minutes for the ink to fully dry. Once you are certain it is dry, gently erase all remaining pencil sketch lines with your kneaded eraser. -
Final assessment:
Step back and look at the contrast. If the dark areas look too washed out, go back in with more stippling to deepen constraints. Use a white gel pen to reclaim any highlights you accidentally covered.
Make it Pop
Instead of black ink for the beak or feet, try using a muted watercolor wash in dusty pink or orange after the ink dries for a subtle splash of color.
Now you have a sophisticated, gallery-worthy penguin illustration ready to frame
Two Swans Making a Heart Shape
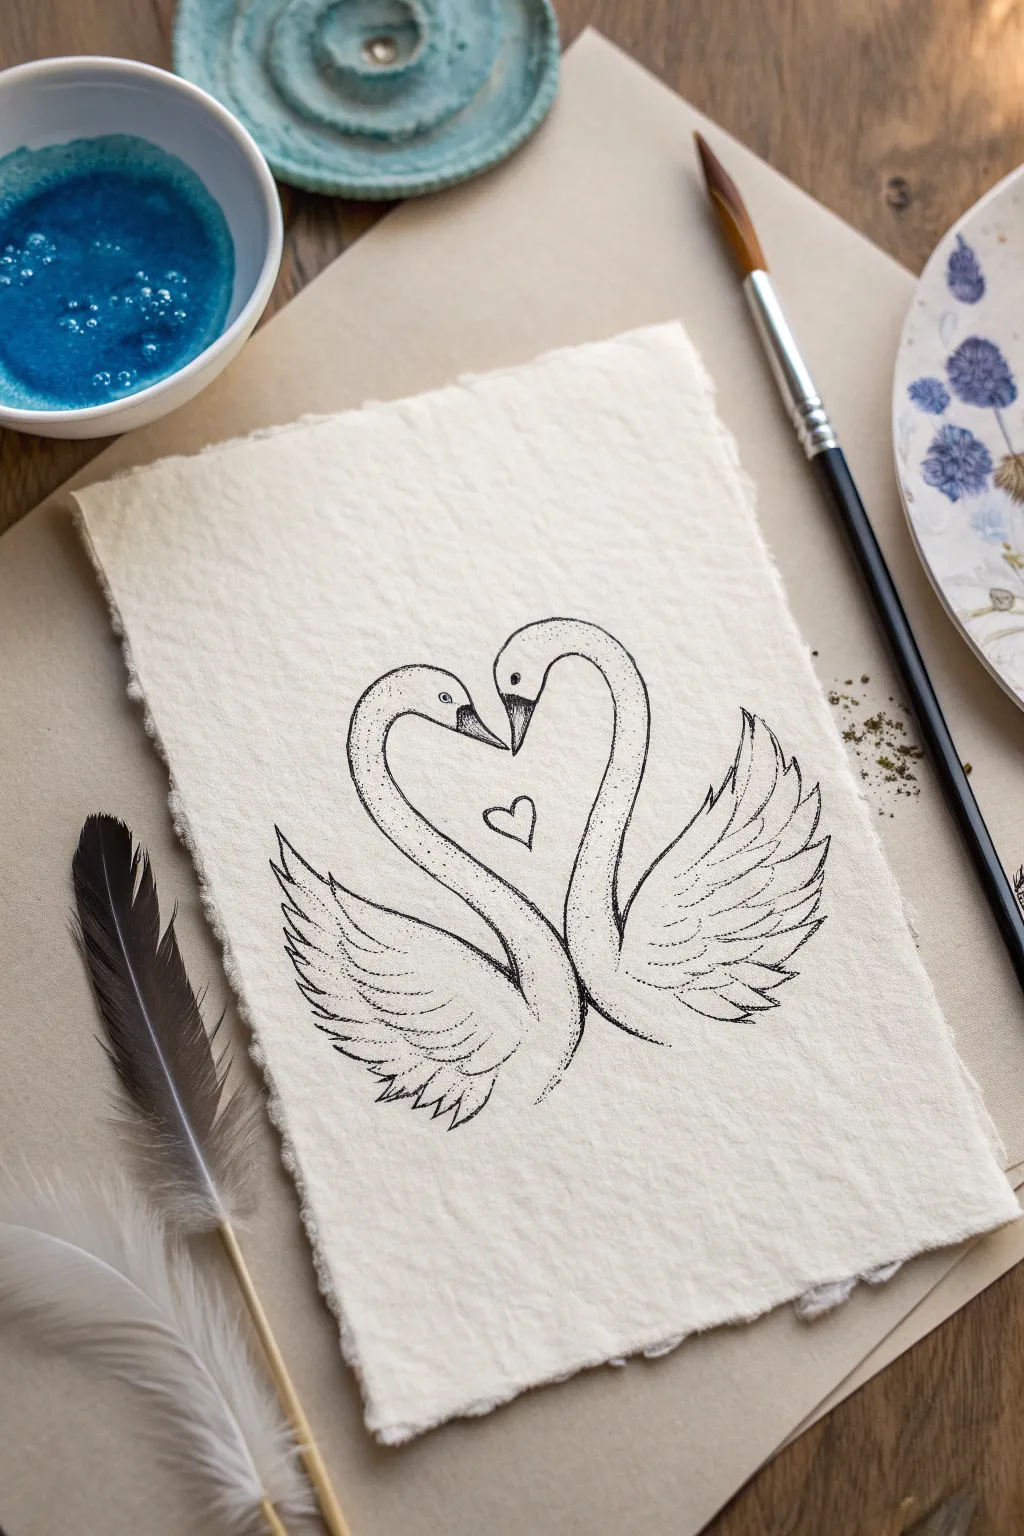
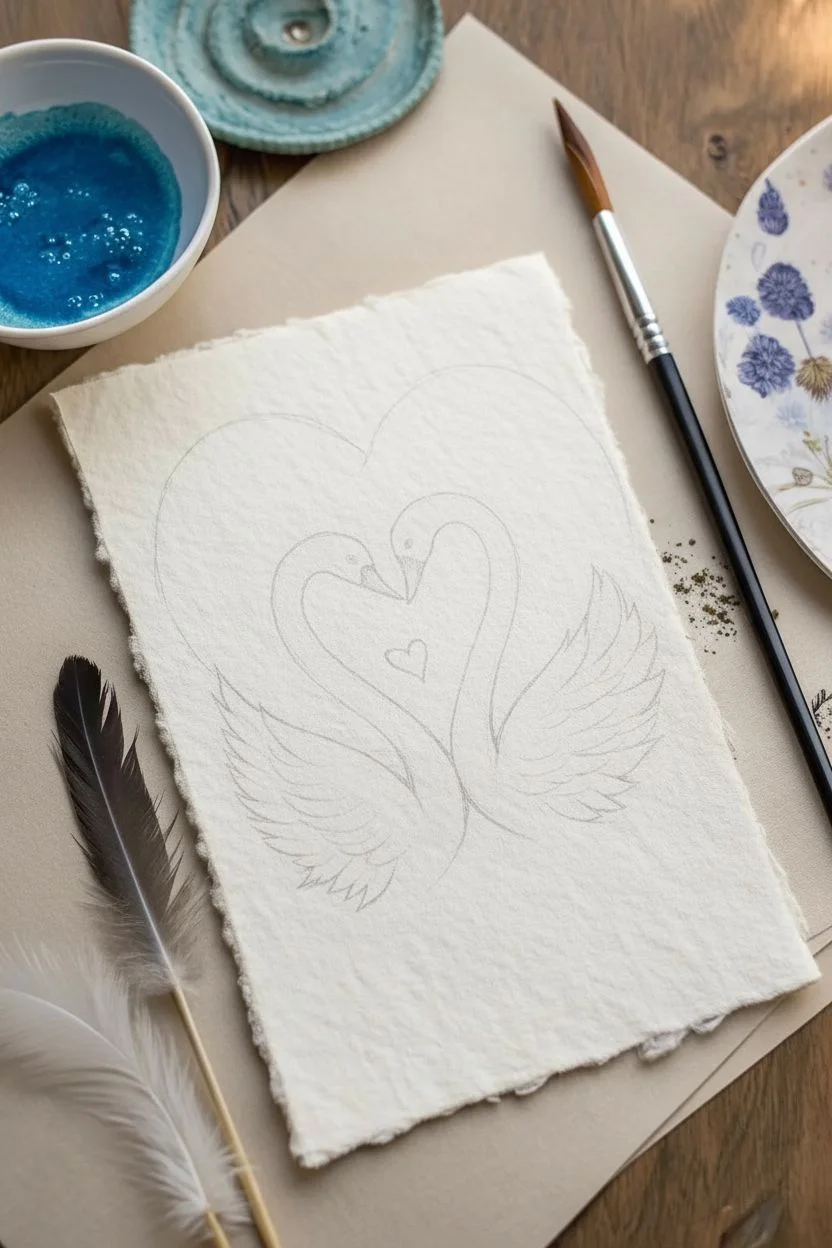
Create a romantic and graceful piece of art with this tutorial on drawing two swans forming a heart. By combining smooth contour lines with delicate stippling techniques, you’ll produce a textured, vintage-style illustration perfect for handmade cards or wall art.
Step-by-Step Tutorial
Materials
- Heavyweight textured paper (deckle-edge watercolor paper or handmade paper recommended)
- Fine liner pens (sizes 005, 01, and 03) in black ink
- HB pencil for sketching
- Soft kneaded eraser
- Optional: White gel pen for highlights
Step 1: Sketching the Composition
-
Define the Heart Shape:
Begin by lightly sketching a large heart shape in the center of your paper using your HB pencil. This will serve as the invisible guide for the swans’ necks and heads to ensure the final negative space is symmetrical. -
Outline the Heads:
At the top cleft of your heart guide, sketch two oval shapes for the swans’ heads facing each other. Their beaks should be pointing downward and almost touching, forming the top point of the inner heart. -
Connect the Necks:
Draw the elongated S-curves of the necks, following the outer curve of your initial heart guide. The necks should naturally widen as they descend towards the body. -
Form the Bodies:
Sketch the bodies as tear-drop shapes at the base of the heart. The bodies should overlap slightly at the bottom point, anchoring the composition. -
Add Wing Outlines:
Extend large, sweeping curves outward from the bodies to indicate the main wings. Create a second, smaller curve inside the first to suggest layers of feathers. -
The Center Detail:
Draw a tiny, simple heart floating freely in the negative space between the two necks to complete the theme.
Step 2: Inking the Contours
-
Refine the Beaks:
Using an 01 fine liner, carefully ink the beaks. Note the distinct black triangular marking near the eye typical of swans. Fill this small area in solid black, leaving a tiny sliver of white for shine if possible. -
Draw the Eyes:
Place a small dot for the eye just above the beak line. Add a tiny circle around it to give the swans a gentle expression. -
Outline the Necks:
Trace over your pencil lines for the necks with the 01 pen. Use a confident, smooth stroke to capture the elegance of the curve without feathering the line yet. -
Define the Wings:
Ink the outer edges of the wings. Instead of a solid line, use jagged, saw-tooth motions at the tips to simulate the texture of individual primary feathers.
Uneven Dots?
If your stippling looks messy, slow down and hold the pen vertically. Slanted strokes create tiny dashes, while a vertical hold creates perfect round dots.
Step 3: Shading and Texture
-
Start Stippling:
Switch to your 005 pen (the finest tip). Begin placing tiny dots along the underside of the swans’ necks. This stippling creates a shadow that suggests roundness. -
Stipple the Heads:
Add a light density of dots on the top of the heads and around the eyes. Keep the center of the face mostly white to act as a highlight. -
Texture the Wings:
Use short, directional hatching lines and dots to follow the curve of the wings. Concentrate your ink near the base of the wing (where it attaches to the body) and let it fade out toward the feather tips. -
Deepen the Shadows:
I like to go back over the ‘elbow’ of the neck and the underside of the body with more dense stippling. The closer the dots, the darker the shadow will appear. -
Detail the Feathers:
Draw faint curved lines inside the wing shape to separate layers of feathers. Use broken lines rather than solid ones to keep the texture soft and airy. -
Center Heart:
Ink the small floating heart in the center. Give it a slightly thicker outline with the 03 pen to make it pop against the delicate bird details. -
Clean Up:
Wait at least 10 minutes for the ink to fully dry. Gently erase all visible pencil marks with the kneaded eraser to reveal the crisp black ink work.
Add a Color Wash
Dilute some watercolor paint (like the blue shown nearby) and dab it loosely over the finished drawing for a soft, dreamy background effect.
Now step back and admire the elegant symmetry of your swan illustration


Bird Silhouettes at Sunset
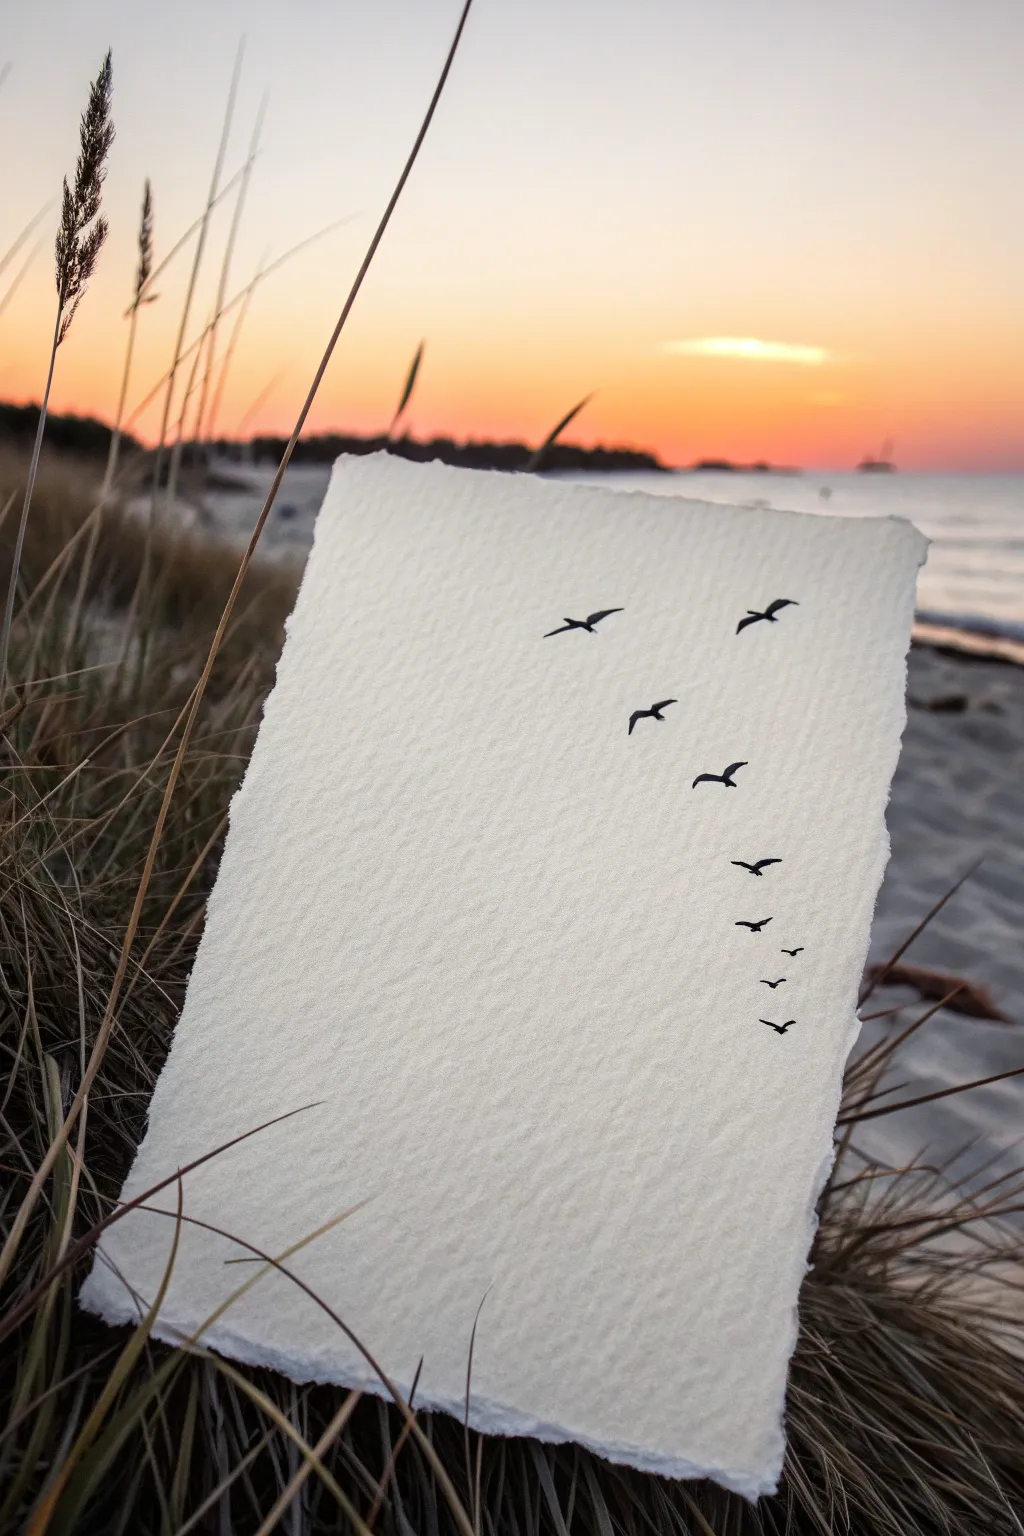
Capture the serene simplicity of birds in flight against a vast sky with this minimalist ink drawing. Using textured watercolor paper with deckled edges gives the piece an organic, handmade feel that perfectly complements the natural subject matter.
Step-by-Step
Materials
- Cold press watercolor paper (300 gsm or heavier)
- Black waterproof fine liner pen (0.3mm or 0.5mm)
- Black India ink or black gouache (optional)
- Small round brush (size 0 or 1, if using ink)
- Pencil (HB or H)
- Kneadable eraser
- Ruler (optional for paper tearing)
- Reference photo of bird silhouettes
Step 1: Preparing the Paper
-
Create deckle edges:
Start by giving your paper that beautiful, rustic look. If your paper doesn’t have deckled edges, you can simulate them. Fold the paper back and forth along the line where you want the edge to be until the fibers weaken. -
Tear the paper:
Carefully tear the paper along the fold. I like to do this slowly to ensure a ragged, uneven edge rather than a clean cut. Wetting the fold line slightly with a clean, damp brush can make tearing easier and softer. -
Flatten the sheet:
If the tearing process curled your paper slightly, place it under a heavy book for an hour to flatten it out before drawing.
Bleeding Ink?
If ink feathers into the paper grain, your paper might be too damp or low quality. Switch to a pigment liner instead of liquid ink, or ensure your paper is 100% dry and sized for watercolor.
Step 2: Planning the Composition
-
Visualize the flow:
Imagine an invisible curved line sweeping from the bottom right towards the top center. This line will guide the placement of your birds, creating a sense of movement and direction. -
Sketch the curve:
Very lightly sketch this guide curve with your HB pencil. Keep your touch feather-light so it doesn’t leave indentations in the textured paper. -
Mark bird positions:
Place small dots or tiny crosses along your guide curve where each bird will go. Space them out, keeping the larger birds at the top and the smaller, more distant birds toward the bottom.
Step 3: Drawing the Birds
-
Outline the lead bird:
Start with the topmost bird. Using your pencil, sketch the silhouette shape. Focus on the wing angle—upward or outstretched—to suggest gliding or flapping. -
Sketch the flock:
Work your way down the line, sketching the remaining birds. Vary the wing shapes slightly for realism; some wings should be fully extended, others bent. -
Refine the sizes:
Ensure the birds gradually decrease in size as they move down the formation. This perspective trick creates depth, making it look like the flock is receding into the distance. -
Check the spacing:
Step back and look at your sketch. The spacing shouldn’t be perfectly even; a little irregularity feels more natural and organic.
Pro Tip: Wing Variety
Avoid the classic ‘m’ shape for every bird. Research ‘gull flight patterns’ to see how wings twist. Drawing one wing thinner than the other simulates banking and turning.
Step 4: Inking the Silhouettes
-
Outline in ink:
Once you are happy with the pencil sketch, take your fine liner or small brush with India ink. Carefully outline the first bird. For textured paper, move the pen slowly to ensure the ink sinks into the valleys of the grain. -
Fill in the shape:
Fill the silhouette completely with solid black. If using a pen, you might need to go over it twice to get a true, deep black without streak marks. -
Sharpen the wingtips:
Pay special attention to the tips of the wings. Use the very point of your pen or brush to taper them off to a sharp, delicate point rather than a blunt end. -
Continue the process:
Proceed to ink the rest of the birds, moving from top to bottom (if you are right-handed) to avoid smudging your fresh ink. I prefer to rotate the paper if it helps me get a better angle on the wings. -
Detail the smallest birds:
For the tiniest birds at the bottom, just a small V-shape or a simple tick mark is often enough to suggest a bird in the distance. Don’t overwork these tiny shapes.
Step 5: Final Touches
-
Let it dry:
Allow the ink to dry completely. India ink dries quickly, but give it at least 15 minutes to be safe, especially on thick, absorbent paper. -
Erase pencil marks:
Gently dab—don’t rub—the area with your kneadable eraser to lift any visible graphite lines. Rubbing too hard on cold press paper can damage the texture. -
Assess contrast:
Look at the drawing from a distance. If any of the blacks look greyish or patchy, add another layer of ink to ensure maximum contrast against the white paper.
Place your finished piece in a simple floating frame to show off those beautiful deckled edges
Birds on a Power Line Composition
Capture the serene simplicity of birds perched on telegraph lines with this elegant ink drawing. Using textured paper and clean silhouette shapes, you’ll create a striking minimalist piece that balances stillness with the movement of flight.
Step-by-Step Guide
Materials
- Deckle-edge watercolor paper (cold press/heavy texture)
- Fine liner pen (size 0.1 or 0.3 for details)
- Brush pen or thick marker (black, archival ink)
- Ruler or straight edge
- Pencil (HB or 2H)
- Eraser
Step 1: Preparation & Layout
-
Paper Selection:
Choose a sheet of heavy cold-press watercolor paper, specifically one with a deckle edge if possible. The rough texture and torn edges are crucial for replicating the rustic, organic feel of the original piece. -
Line Placement:
Position your ruler horizontally across the paper. You will need to plan for two parallel lines. -
First Wire:
Draw the top wire first. Instead of centering it perfectly, place it slightly above the halfway point of the paper. Use your fine liner and ruler to draw a crisp, thin line all the way across. -
Second Wire:
Measure a gap of about 1.5 to 2 inches below your first line. Draw the second parallel wire using the same fine liner. Keep the pressure consistent so both wires look taut and identical.
Step 2: Drafting the Silhouettes
-
Spacing the Birds:
Lightly sketch the positions of your birds with a pencil. Aim for an uneven, natural distribution—cluster a few together on the top wire and leave wider gaps elsewhere to avoid a rigid pattern. -
Body Shapes:
Sketch simple teardrop or oval shapes for the bodies. Notice that the birds aren’t all facing the same way; vary their direction for visual interest. -
Posture Details:
Add small circles for heads. For some birds, tilt the head slightly up or down to suggest they are looking around. -
Flying Figures:
In the upper right corner, sketch two birds in flight. Use a flattened ‘V’ shape for the wings of the lower flyer and a more spread-eagle shape for the higher one to show different stages of a wingbeat.
Ink Bleeding Issues
On soft watercolor paper, ink can sometimes feather or spread. Test your pen on a scrap piece first. If it bleeds, switch to a pigment liner or micron pen instead of a liquid ink flowing pen.
Step 3: Inking & Refining
-
Outlining Bodies:
Switch to your fine liner (0.1 or 0.3). Carefully trace the outline of your first bird on the wire, tapering the body smoothly into the tail feathers. -
Filling the Forms:
Use a brush pen or a thicker marker to fill in the silhouettes solid black. This gives that bold, graphic look. Be careful near the edges to keep the silhouette sharp against the textured paper. -
Adding Tails:
With the fine liner, extend the tail feathers below the wire. A split or fork in the tail adds a nice touch of realism for swallows or finches. -
Defining Beaks:
Add tiny, sharp triangles for beaks. Ink these delicately; a beak that is too thick can make the bird look clumsy. -
Leg Detailing:
Normally you won’t see legs, but ensure the belly of the bird sits directly on the line. If a bird is landing or adjusting, you might draw tiny ticks for claws gripping the wire. -
Inking the Flyers:
Ink the flying birds. Pay attention to the wing tips—taper them to sharp points to convey speed and aerodynamics. -
Texture Check:
Because the paper is rough, your black fill might have tiny white gaps. I usually go back over the bodies a second time to ensure a deep, opaque black.
Level Up: Deckle Edge
To fake the expensive handmade paper look, crease your heavy paper sharply, wet the crease with a damp brush, and slowly tear it apart. This creates a soft, fuzzy ‘deckle’ edge effect.
Step 4: Final Touches
-
Clean Up:
Let the ink dry completely. Smudging is a real risk on textured paper, so give it an extra minute before erasing your pencil guides. -
Wire Connection:
Check where the birds sit on the wire. If the black silhouette accidentally covered the wire line, re-draw the line segment on either side of the bird to ensure continuity. -
Final Assessment:
Stand back and look at the balance. If a section feels too empty, you can always add one more small bird, but remember that negative space is part of the charm.
Frame your new silhouette drawing in a simple black frame to contrast nicely with the textured paper edges
Basic Shape Breakdown Bird Study
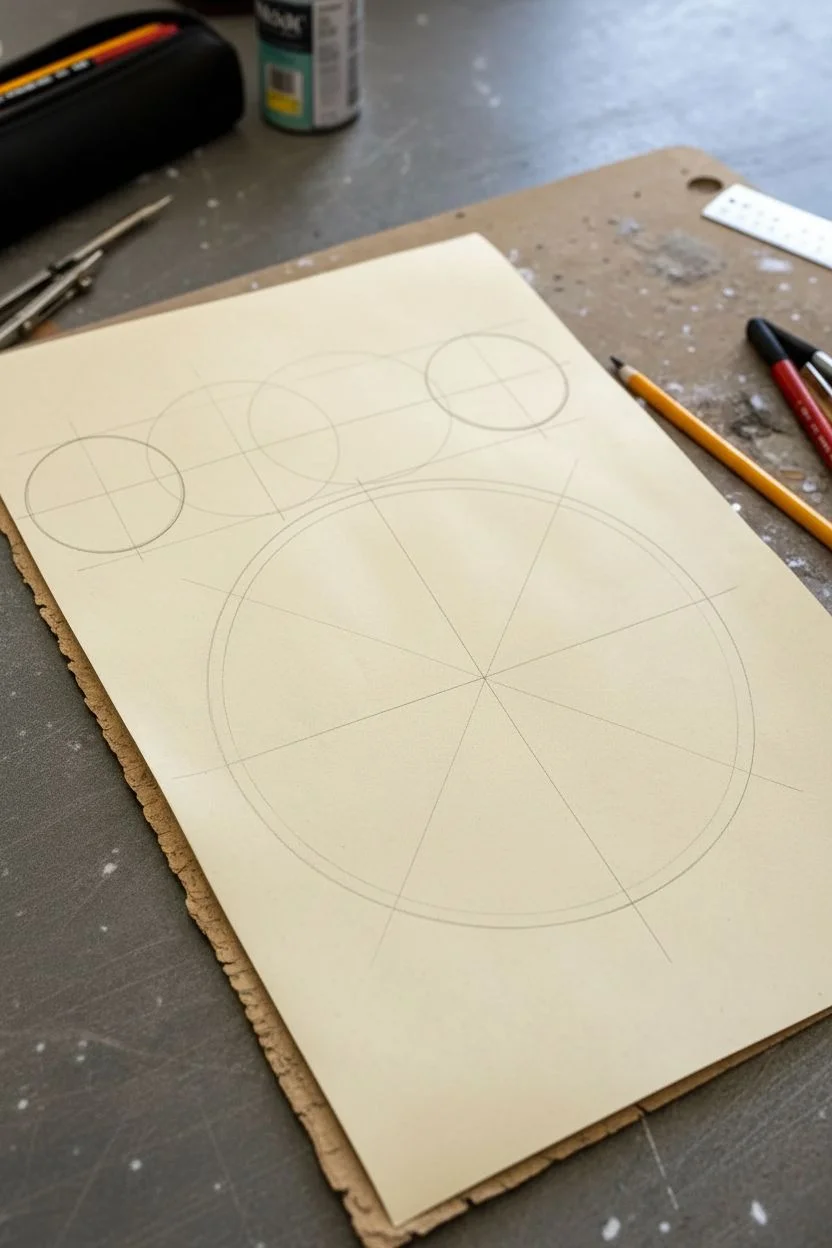
This tutorial guides you through creating a classic bird study that combines technical precision with organic detail. By using a series of intersecting circles and grid lines, you’ll learn to build a realistic crow from simple geometric foundations.
Step-by-Step Tutorial
Materials
- Smooth cream or toned drawing paper
- Graphite pencils (H or 2H for guidelines, HB and 2B for detailing)
- Compass or circle template
- Ruler or straight edge
- Fine-point mechanical pencil (optional for details)
- Kneaded eraser
Step 1: Setting the Geometric Framework
-
Establish the main construction line:
Begin by drawing a faint horizontal line across the upper third of your paper using an H pencil. This will serve as the central axis for your initial circle study. -
Draft the upper circle sequence:
Using your compass, draw three interlocking circles along the horizontal line you just made. Let them overlap significantly, like a tightly packed chain. These are practice forms to warm up your hand and visualize proportion. -
Bisect the circles:
Draw vertical and angled lines through the centers of these upper circles to divide them into quadrants. These ‘crosshairs’ help you understand the volume of the spheres. -
Draw the main portrait circle:
Move to the center of your page. Draw a large, single circle that will encompass the entire body of the bird. This acts as your primary boundary and compositional anchor. -
Add radial guide lines:
Use your ruler to draw radial lines extending from the center of this large circle outward, like spokes on a wheel. Create at least four major dissecting lines to help align the bird’s posture.
Keep it Sharp
For those fine feather details, keep your pencil extremely sharp. A dull point will smudge the texture and ruin the technical, engraved look.
Step 2: Building the Bird’s Form
-
Outline the head and beak:
Start sketching the bird’s head in the upper left quadrant of your large circle. Draw a smooth curve for the skull and extend it into a sharp, slightly hooked beak. -
Define the body axis:
Sketch a diagonal line representing the bird’s spine and underbelly, following one of your radial guide lines. This ensures the bird looks balanced rather than tipping over. -
Block in the wing and tail:
Lightly outline the folded wing shape against the body, then extend long, tapered lines downward to form the tail feathers which should exit the circle’s boundary on the right. -
Sketch the perch structure:
Near the bottom of the large circle, draw a triangular wedge shape for the bird to stand on. Use vertical hatching lines to give this object distinct form and weight. -
Add the legs and talons:
Connect the body to the perch with thin legs. Pay close attention to the grip of the talons, making sure they wrap convincingly around the top edge of the triangular wedge.
Step 3: Refining and Detailing
-
Detail the eye and face:
Switch to an HB or 2B pencil. Draw the eye carefully, leaving a tiny white highlight to show life. Darken the beak, adding a small nostril mark near the base. -
Layer the feathers:
Begin adding texture to the neck and chest using short, dashed strokes to mimic soft feathers. I find it helps to follow the contour of the bird’s body for a 3D effect. -
Structure the wing coverts:
Draw the scalloped patterns of the wing coverts (the smaller feathers near the shoulder). Keep these lines crisp and distinct. -
Define the flight feathers:
Draw the long primary feathers extending toward the tail. Use long, confident strokes that overlap slightly to show how the wings fold. -
Shade the underbelly:
Add light shading to the bird’s belly and under the tail to create volume. Keep your strokes light to maintain the clean, technical look of the drawing. -
Reinforce the perch:
Darken the vertical hatching on the triangular perch. Make the lines closer together on the shaded side to enhance the perspective. -
Final line check:
Go over the main outline of the bird one last time with a harder pressure to separate it from the construction lines. Do not erase the underlying geometry; it is part of the aesthetic.
Historical Vibe
Use tea-stained paper or a sepia-toned pencil instead of grey graphite to give your technical drawing an authentic Da Vinci sketchbook appearance.
Step back and admire how the rigid geometry supports the organic flow of your finished bird study
Beak Shapes From Tiny to Dramatic

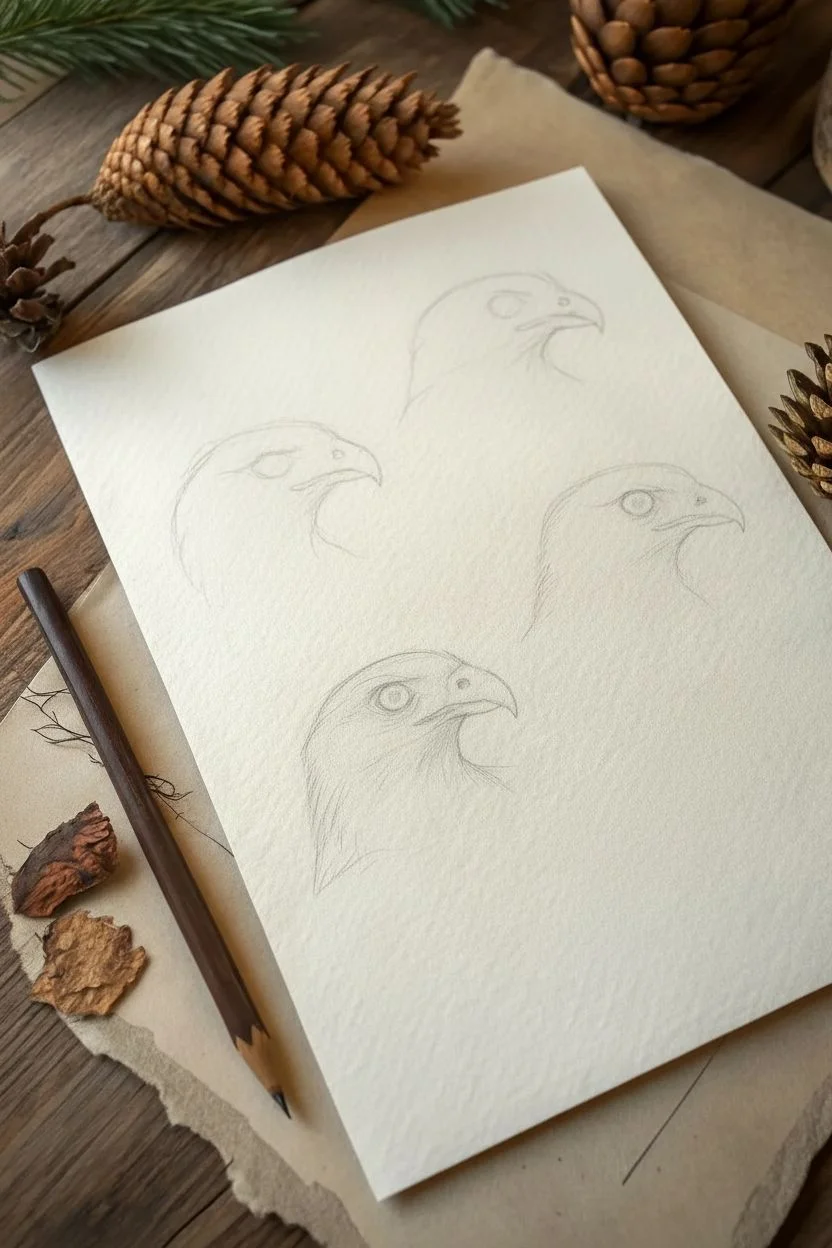
Master the art of observation by drawing four distinct bird of prey profiles on a single page, focusing on the powerful curves of their beaks and expressive eyes. This project uses graphite to capture realistic feather texture and structural anatomy in a clean, scientific illustration style.
Step-by-Step Tutorial
Materials
- Heavyweight drawing paper (smooth or vellum finish)
- Graphite pencils (HB for sketching, 2B and 4B for shading)
- Mechanical pencil (0.5mm) for fine details
- Kneaded eraser
- Blending stump or tortillon
- Pencil sharpener
Step 1: Setting the Composition
-
Visualize the layout:
Imagine your paper divided into four quadrants. You will be placing one bird head in each section, staggering them slightly so they aren’t perfectly aligned, which creates a more organic, sketchbook feel. -
Lightly block in head shapes:
Using an HB pencil with very light pressure, draw a simple oval for the cranium of the top bird. Add a smaller, beak-shaped triangle protruding from the front right side. -
Place the remaining heads:
Repeat this blocking process for the other three birds. Position the middle-left bird facing right, the middle-right bird facing right, and the bottom bird facing right. Keep the shapes loose and ghostly at this stage.
Step 2: Top Bird: The Falcon Focus
-
Define the eye:
For the top bird, draw a circular eye with a distinct highlight (a small white circle) near the top. Darken the pupil significantly. -
Sculpt the beak:
Refine the beak shape to be short and curved. Add the nostril (cere) area near the base of the beak. Ensure the tip hooks downward sharply. -
Feather flow:
With a sharpened 2B pencil, start adding short, directional strokes radiating back from the eye and beak. Keep the feathers on the top of the head short and smooth.
Mastering Direction
Follow the anatomy! Always draw your pencil strokes in the direction the feathers actually grow—from the beak backward comfortably over the skull.
Step 3: Middle Left: The Eagle Eye
-
Brow ridge structure:
For the bird on the left, emphasize a heavy brow ridge over the eye. This gives the eagle its characteristic intense glare. -
Layering the neck:
Draw longer, sweeping strokes for the neck feathers that curve slightly downward. I like to leave some white space between strokes to suggest light catching individual feather clumps. -
Beak gap:
Draw the separation line of the beak, ensuring it curves subtly like a frown, extending back past the nostril area.
Graphite Shine?
If your drawing looks too shiny or metallic from heavy pencil layers, spray it with a matte workable fixative to dull the sheen and protect the art.
Step 4: Middle Right: The Hawk Hook
-
Outline the profile:
Establish a strong contour line from the forehead down to the beak tip. This beak should look robust and thick. -
Texturing the cheek:
Use tiny, dash-like strokes on the cheek area below the eye. Switch to longer, coarser strokes as you move down the neck to differentiate the feather types. -
Deepen shadows:
Use a 4B pencil to darken the area right under the beak and behind the jawline to create depth and separate the head from the neck.
Step 5: Bottom: The Detailed Portrait
-
Large eye placement:
Draw the largest eye of the group here. Make the pupil deep black (4B) and add a distinct ring around the pupil before the outer eye edge. -
Dark plumage patterning:
This bird has darker markings. Use dense, overlapping pencil strokes on the back of the neck and top of the head, creating a high-contrast pattern against the white paper. -
Refining the cere:
Detail the soft skin (cere) at the base of the beak with subtle shading, keeping it lighter than the hard black tip of the beak.
Step 6: Final Polish
-
Clean up edges:
Use your kneaded eraser to lift off any stray sketch lines or smudges around the outside of the drawings. -
Enhance highlights:
If your pencil shading has dulled the eye highlights, tap them with the clean edge of an eraser to make them bright white again. -
Final darks:
Do one last pass with your darkest pencil (4B), reinforcing the pupils and the undersides of the beaks to make the drawings pop off the page.
Now you have a stunning naturalist study that captures the fierce elegance of these birds.
Field Journal Page of Bird Poses
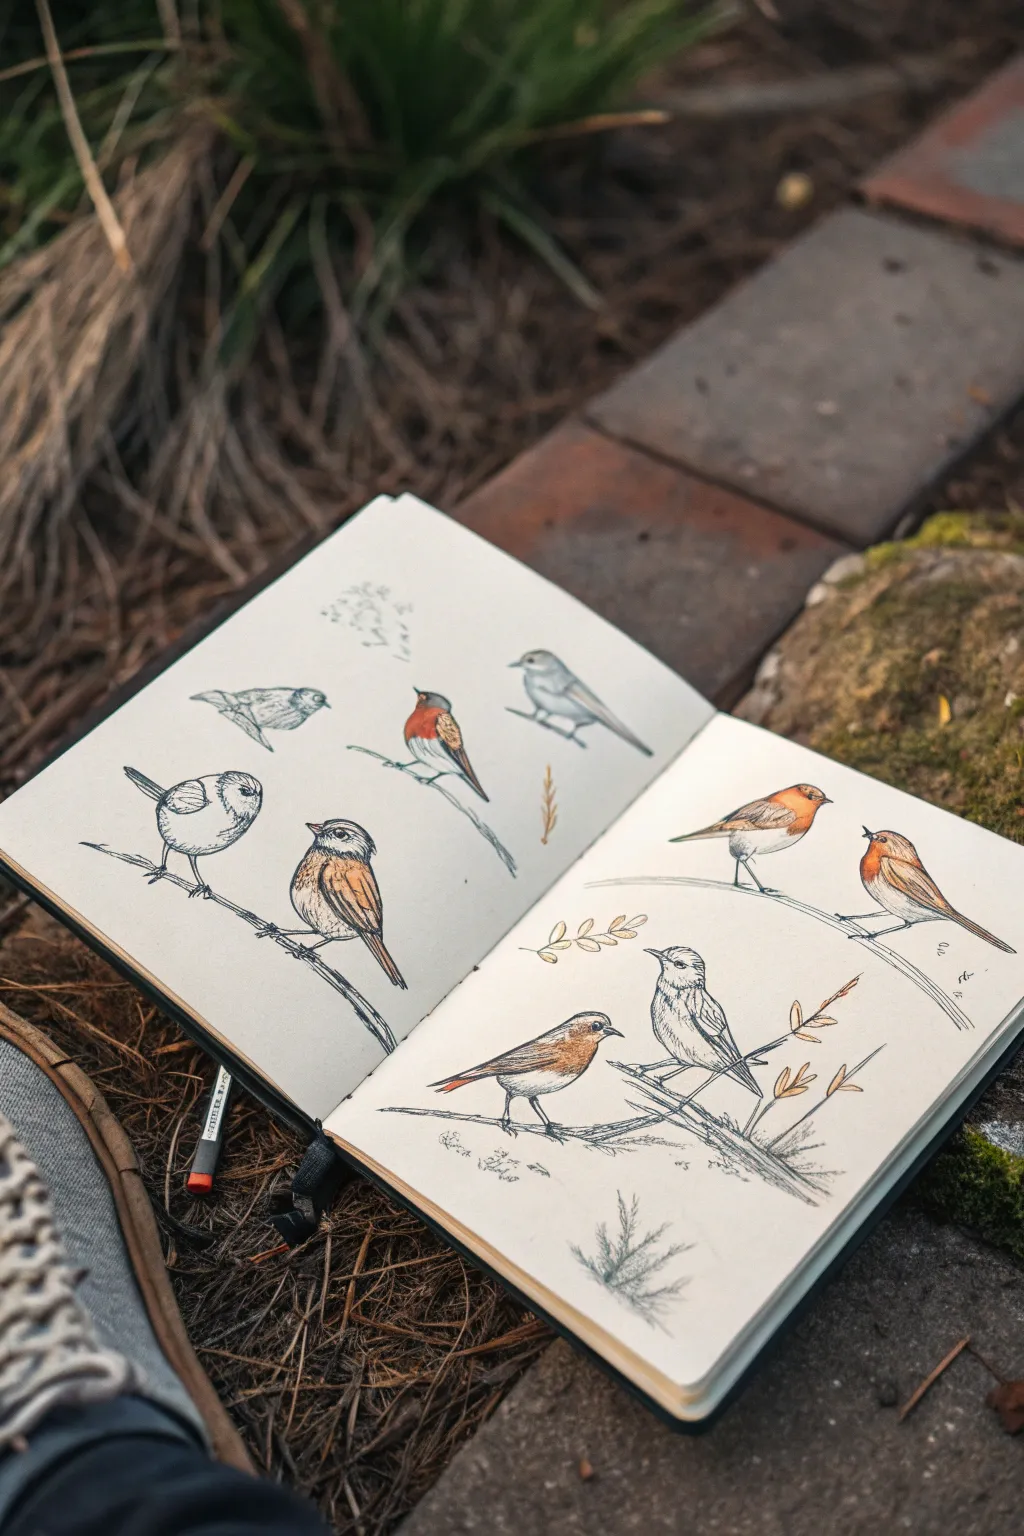
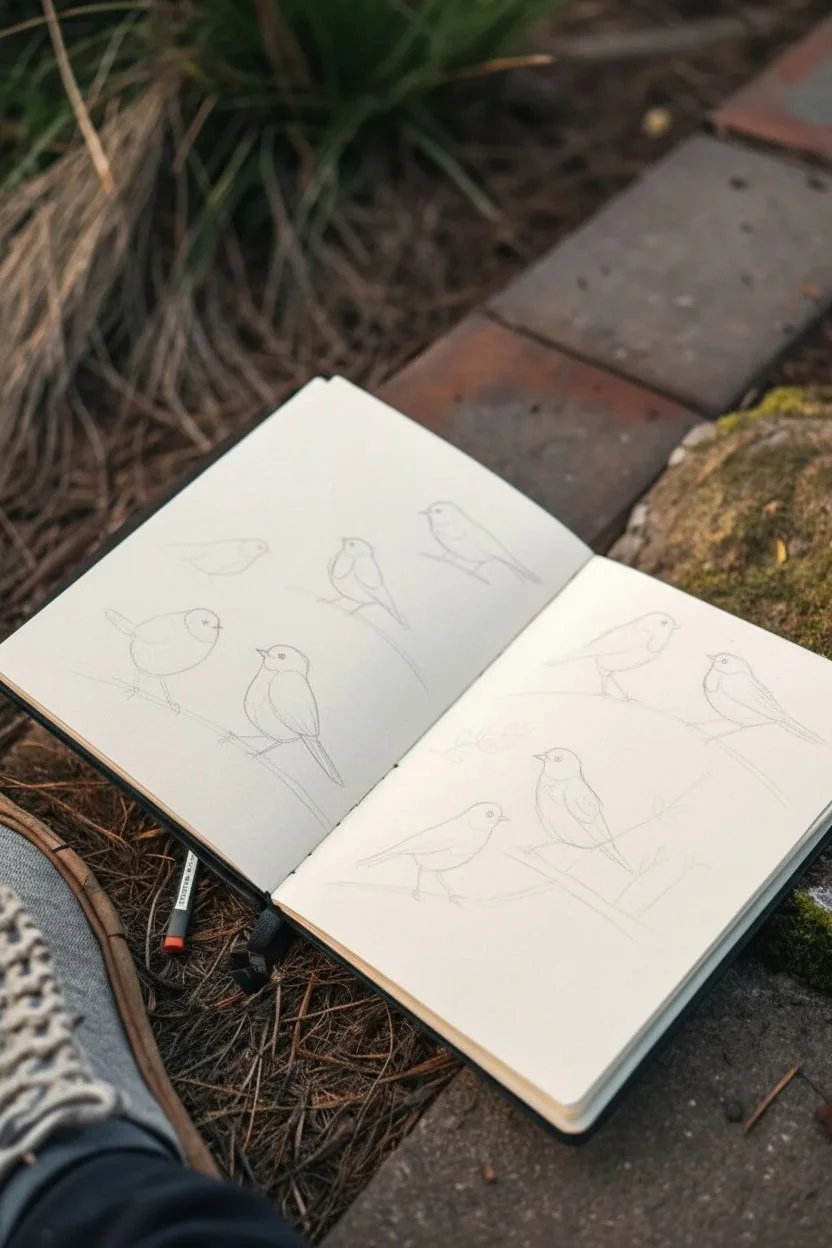
Capture the lively spirit of small garden birds with this mixed-media field journal spread. Merging precise ink lines with loose, earthy watercolor washes creates a study page that feels both scientific and wonderfully artistic.
Step-by-Step Tutorial
Materials
- Hardbound sketchbook (heavyweight mixed-media paper)
- Fine liner pens (sizes 0.1 and 0.3, waterproof)
- Graphite pencil (HB or 2B)
- Watercolor set (focus on burnt sienna, yellow ochre, payne’s grey, and muted greens)
- Small round watercolor brush (size 4 or 6)
- White gel pen (optional for highlights)
- Kneaded eraser
Step 1: Planning the Layout
-
Establish the spread:
Open your sketchbook flat. Visualize the two pages as a single canvas. You want to scatter the bird figures across both pages without overcrowding them, leaving plenty of negative space for the paper to breathe. -
Sketch the gestures:
Using your HB pencil, lightly sketch loose oval shapes to represent the bodies of the birds. Vary the angles—have some facing left, some right, and one or two looking upward or downward to create dynamic movement across the page. -
Add head circles:
Attach smaller circles for the heads. Pay attention to how the head sits on the body; often, small birds look like they have no neck, with the head blending directly into the shoulders. -
Define the tails and beaks:
Draw faint lines indicating the direction of tails and beaks. Keep these gestural at first. Notice how the tilt of a tail can express the bird’s alertness. -
Rough in the perches:
Lightly sketch branches underneath the feet of your birds. These should be diagonal or curved lines that span across the pages, connecting disparate elements and guiding the viewer’s eye.
Step 2: Refining with Ink
-
Outline the contours:
Switch to your 0.1 fine liner. Begin tracing over your best pencil lines. Use broken, feathery strokes for the belly and chest to simulate soft down, and smoother, continuous lines for the beak and wing feathers. -
Detail the eyes:
Draw the eyes carefully, leaving a tiny spot of white paper preserved for the highlight. Rim the eye with a darker line to make it pop, which gives the bird its spark of life. -
Add texture to wings:
In the wing areas, use small, curved hatching marks to suggest layers of feathers. Don’t outline every single feather; just suggest the groups of primaries and coverts. -
Draw the branches:
Ink the branches with a slightly heavier hand or a 0.3 pen. Add knots, rough bark textures, and small offshoot twigs. You can also sketch in simple leaf outlines or seed pods nearby. -
Erase pencil marks:
Wait until the ink is completely dry—really give it a moment—and then gently use your kneaded eraser to lift up the graphite guidelines. This leaves you with clean, crisp illustrations.
Ink Smearing?
If your fineliners run when painting, your pen isn’t fully waterproof. Switch to pigment-based liners or do the watercolor washes first, let them fully dry, and ink over the top.
Step 3: Adding Color Washes
-
Mix your base colors:
Prepare a palette with Burnt Sienna (for the reddish chests), Yellow Ochre (for lighter feathers), and a mix of Payne’s Grey and brown (for wings and shadows). -
Apply the first wash:
Start with the signature orange-red breast patches. Using a watery mix of Burnt Sienna, gently dab color onto the chest area of your most prominent birds. Let the color fade out into white at the belly. -
Painting the wings:
While the chest dries, paint the wings with the grey-brown mix. Keep the wash transparent so your ink lines show through clearly. I find that leaving small gaps of white paper adds to the lively, sketched feel. -
Add depth to the whites:
Use a very diluted grey wash to add shadows to the white underbellies. This gives the birds volume and roundness without looking heavy. -
Color the branches:
Paint the branches with a loose brown wash. If you drew leaves or seeds, touch them with muted greens or golds, keeping the color application quick and spontaneous. -
Final foliage touches:
At the bottom of the page, add faint sketches of grass or pine needles. You can do this with pencil graphite shading or very faint watercolor strokes to ground the composition. -
Review and highlight:
Once everything is dry, assess the contrast. If an eye looks dull, add a tiny dot with a white gel pen to bring back that sharp reflection.
Field Notes Style
Enhance the journal look by writing the date, location, or species name in cursive near the sketches. Add swatches of the colors you used in the corner of the page.
Close your book and enjoy knowing you’ve captured a fleeting moment of nature on paper
Bird With Botanical Branch and Blossoms

Capture the delicate beauty of a finch perched amongst spring blossoms with this watercolor project. The soft pink petals and warm, earthy tones of the bird create a peaceful composition on textured paper.
Step-by-Step Guide
Materials
- Cold-press watercolor paper (300 gsm) with deckled edges
- HB pencil and kneaded eraser
- Watercolors: Burnt Sienna, Yellow Ochre, Alizarin Crimson, Sap Green, Paine’s Grey, and Sepia
- Round watercolor brushes (sizes 2, 4, and 0 for details)
- Clean water jar and paper towels
- Mixing palette
Step 1: Sketching the Composition
-
Outline the Branch:
Start by lightly sketching a diagonal line across the paper from the bottom right to the middle left. Add thickness to create the branch, letting it taper slightly towards the top end. Draw smaller offshoot twigs that will hold the blossoms. -
Position the Bird:
Situate the bird just above the center of the main branch. Draw an oval for the body and a smaller circle for the head. Connect them with smooth lines to form the neck and back. -
Refine Bird Details:
Add the triangular beak, the eye placement, and the folded wing shape along the side. Sketch the tail extending downwards past the branch and draw the tiny feet gripping the wood. -
Add Botanical Elements:
Sketch clusters of five-petaled flowers at various points along the twigs. Add small, pointed oval shapes for the leaves, grouping them near the blossoms.
Muddy colors?
If your bird looks muddy, you likely overworked wet layers. Let layers dry completely before adding texture or new colors to keep tones distinct.
Step 2: Painting the Bird
-
Base Wash for the Chest:
Mix a very dilute wash of Alizarin Crimson and Yellow Ochre to get a soft peach tone. Apply this to the bird’s chest and belly, keeping the edges soft. -
Painting the Head and Back:
While the chest is damp, mix a light grey-brown using Burnt Sienna and a touch of Paine’s Grey. Paint the head and back, allowing the color to bleed slightly into the peach chest for a natural transition. -
Layering Feathers:
Once the first layer is dry, use a size 2 brush to add small, dashed strokes of darker brown (Sepia) on the wings and tail to suggest feather texture. Leave some lighter areas showing through. -
Facial Features:
Using your smallest brush (size 0) and a concentrated mix of Sepia and Paine’s Grey, carefully paint the eye, leaving a tiny white spec for the highlight. Outline the beak and add a dark line through the eye area.
Step 3: Creating the Flora
-
Painting the Branch:
Mix Burnt Sienna with a little Sepia. Paint the main branch, varying the pressure to create thick and thin areas. Drop in darker pigment on the underside of the branch while wet to create shadow and volume. -
Soft Blossom Petals:
Dilute Alizarin Crimson with plenty of water for a pale pink. Paint the flower petals loosely, leaving small white gaps between them to separate the shapes. I like to drop a slightly more saturated pink into the center of the damp petals for depth. -
Painting Leaves:
Use Sap Green mixed with a touch of Yellow Ochre for a fresh spring green. Paint the leaves with single strokes, pressing down on the belly of the brush and lifting at the end to create a point. -
Leaf Variation:
For some variety, mix a darker, cooler green (Sap Green + Paine’s Grey) and paint a few leaves that are in shadow or further back.
Keep it airy
Don’t outline every single petal or leaf with ink or dark paint. Leaving the edges soft and undefined maintains that dreamy, delicate watercolor look.
Step 4: Final Details
-
Flower Centers:
Once the pink petals are completely dry, use a fine brush to dot tiny stamens in the center using a mix of Burnt Sienna and Alizarin Crimson. -
Defining the Bird’s Feet:
Paint the legs and feet using a dark grey-brown. Ensure the toes look like they are wrapping around the branch rather than just resting on top. -
Adding Contrast:
Go back over the branch with your darkest brown to add knots or texture lines. Add tiny stems connecting the flowers to the main branch if any are floating.
Now you have a charming, nature-inspired piece that celebrates the softness of spring
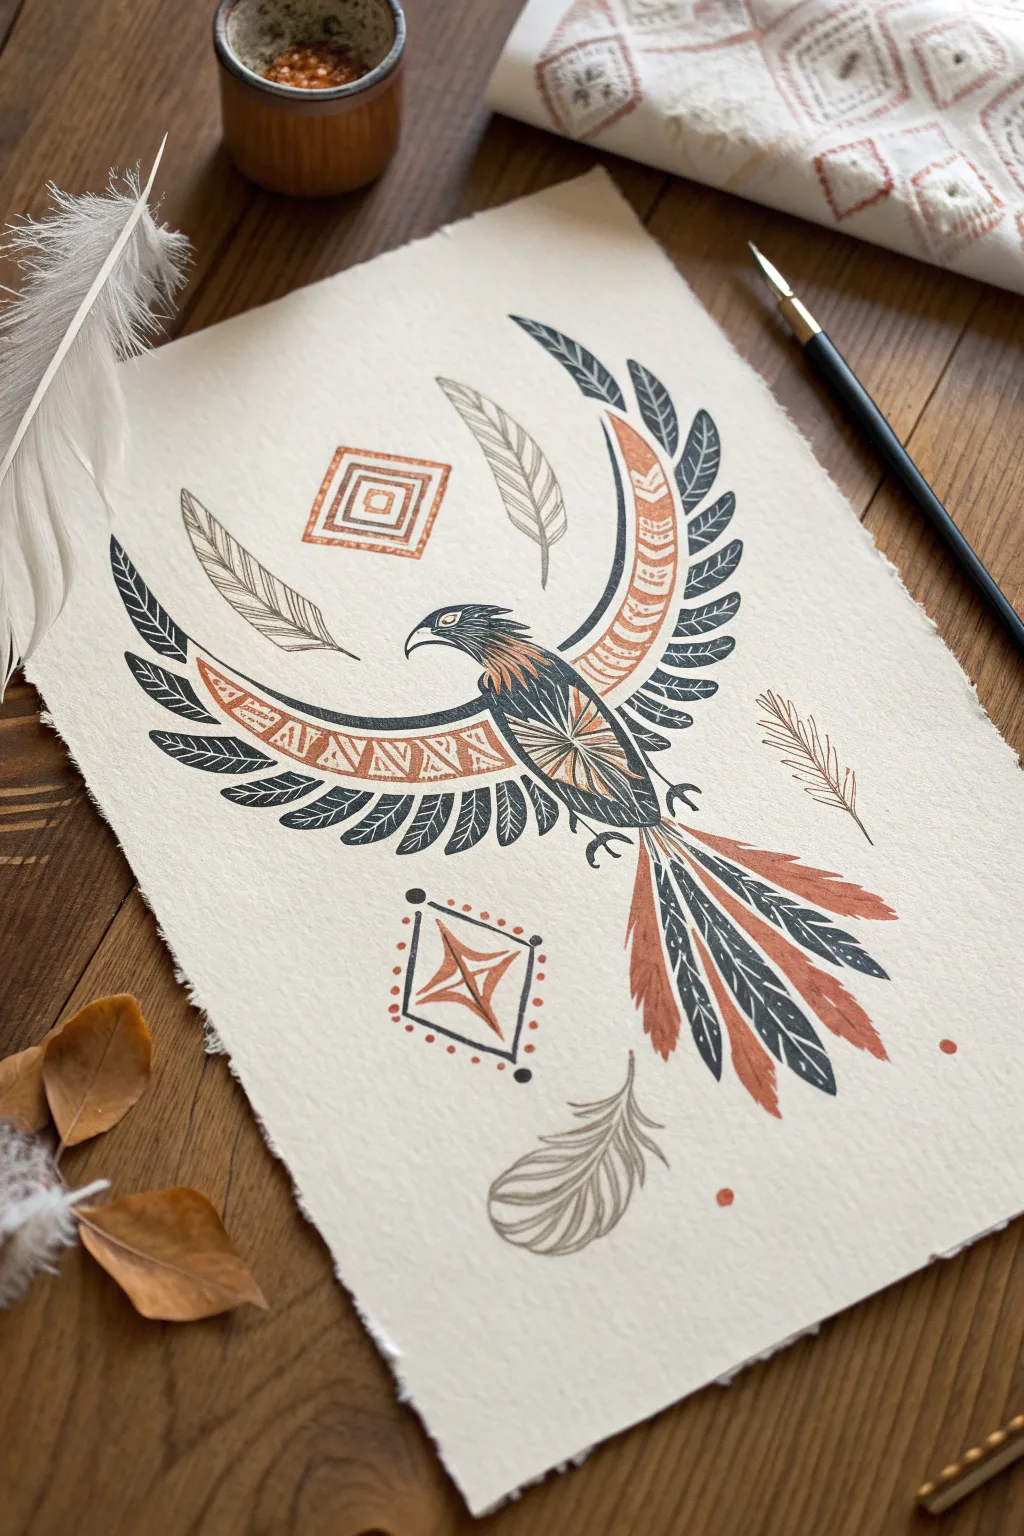
Mythic Bird With Decorative Tail Feathers

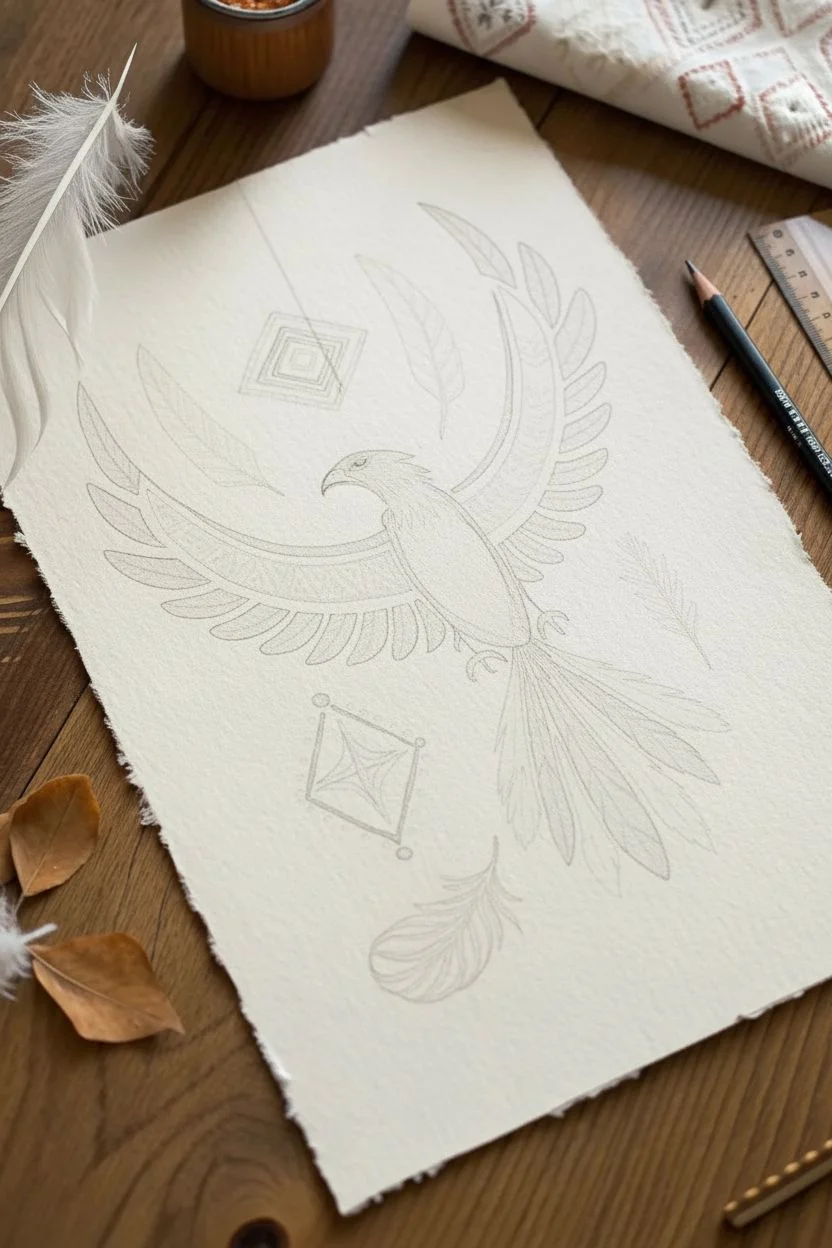
Create a striking piece of folk art with this stylized, mythic bird design featuring geometric patterns and decorative tail feathers. Using a limited palette of burnt orange and deep charcoal on textured paper, you’ll build an image that feels both ancient and refreshingly modern.
Step-by-Step Tutorial
Materials
- Cold-pressed watercolor paper or handmade cotton rag paper (deckle edge recommended)
- Fine liner pens (sizes 005, 01, and 05) in black
- Gouache or acrylic ink in Burnt Sienna or Terracotta
- Gouache or acrylic ink in Charcoal or Lamp Black
- Small round brushes (sizes 0, 2, and 4)
- Pencil (HB or 2H)
- Kneaded eraser
- Ruler
- Mixing palette
Step 1: Drafting the Composition
-
Establish the center line:
Begin by lightly drawing a vertical line down the center of your paper to ensure symmetry. Mark the position for the bird’s head, the sweep of the wings, and the start of the tail feathers. -
Sketch the main body:
Sketch the central oval shape for the bird’s body and a curved hook shape for the beak. Extend curved lines outward for the wing spans, creating a wide ‘U’ shape that curves inward at the tips. -
Outline the geometric elements:
Above the left wing, draw a square turned on its corner (a diamond shape). Below the bird, draw a similar diamond shape. Use your ruler to add the internal geometric lines—concentric squares for the top element and a four-pointed star inside the bottom one. -
Detail the feathers:
Lightly pencil in the long, flowing tail feathers. Add the placement of the three floating feathers—two above the bird and one below. Don’t worry about the intricate patterns yet; just get the main shapes down.
Clean Lines Pro-Tip
For the straight geometric lines, don’t rely on freehand. Use a ruler with a slightly raised edge (like a cork back) to guide your pen without smearing ink underneath.
Step 2: Inking the Black Elements
-
Outline the head and beak:
Load a size 2 brush with black gouache or ink. Carefully paint the silhouette of the beak and the top of the head. Leave a small negative space for the eye to keep it distinct. -
Paint the outer wing feathers:
Starting from the wing tips and working inward, paint the individual feather shapes along the bottom edge of the wings. These should look like elongated teardrops or curved triangles. Keep them solid black for high contrast. -
Fill the central body pattern:
Using a fine liner or a very fine brush (size 0), draw the radiating lines on the bird’s chest and belly. These should fan out from a central point, creating a starburst effect within the dark body shape. -
Detail the tail feathers:
Select specific tail feathers to paint solid black, alternating them with spaces you will fill with color later. Focus on the central, straight feathers for the dark tones. -
Ink the geometric base:
Using a 05 fine liner, trace the outer boundary of the bottom diamond shape and place the small dots at its corners.
Troubleshooting Shaky Hands
If your lines are shaky, try pulling the stroke toward your body rather than pushing away. Exhale slowly as you make the stroke to steady your hand motion.
Step 3: Adding the Terracotta Accents
-
Paint the upper wing panels:
Mix your Burnt Sienna or Terracotta paint to a creamy consistency. Paint the long, curved sections on the upper part of the wings. I find it helpful to rotate the paper to maintain a smooth curve while painting. -
Add wing patterns:
Once the terracotta base is dry, use white gouache or a gel pen to add the tribal zig-zag and triangle patterns over the orange wing sections. Alternatively, if you haven’t painted the base yet, carefully paint the orange around negative white spaces. -
Color the tail feathers:
Fill in the remaining tail feathers with your terracotta mix. This creates a beautiful alternating rhythm with the black feathers you painted earlier. -
Fill geometric motifs:
Paint the internal lines of the top diamond square and the star shape within the bottom diamond. Use a steady hand and a size 0 brush for these fine lines.
Step 4: Final Fine Details
-
Add subtle outlines:
Use your 005 fine liner to add very delicate outlines to the terracotta sections of the wings and the floating feathers. This defines the edges without making them look too cartoonish. -
Texture the floating feathers:
For the loose feathers floating around the bird, use quick, wispy strokes with the fine liner or a dry-brush technique with diluted gray paint to suggest softness and texture. -
Dot work:
Place the final decorative dots around the bottom diamond and near the tail feathers using the terracotta paint. Aim for consistent spacing. -
Erase and clean up:
Wait until the artwork is completely bone-dry. Gently run your kneaded eraser over the entire piece to pick up any visible pencil guidelines.
Now mount your beautiful tribal bird illustration or frame it to add a timeless, artistic touch to your wall.


Have a question or want to share your own experience? I'd love to hear from you in the comments below!