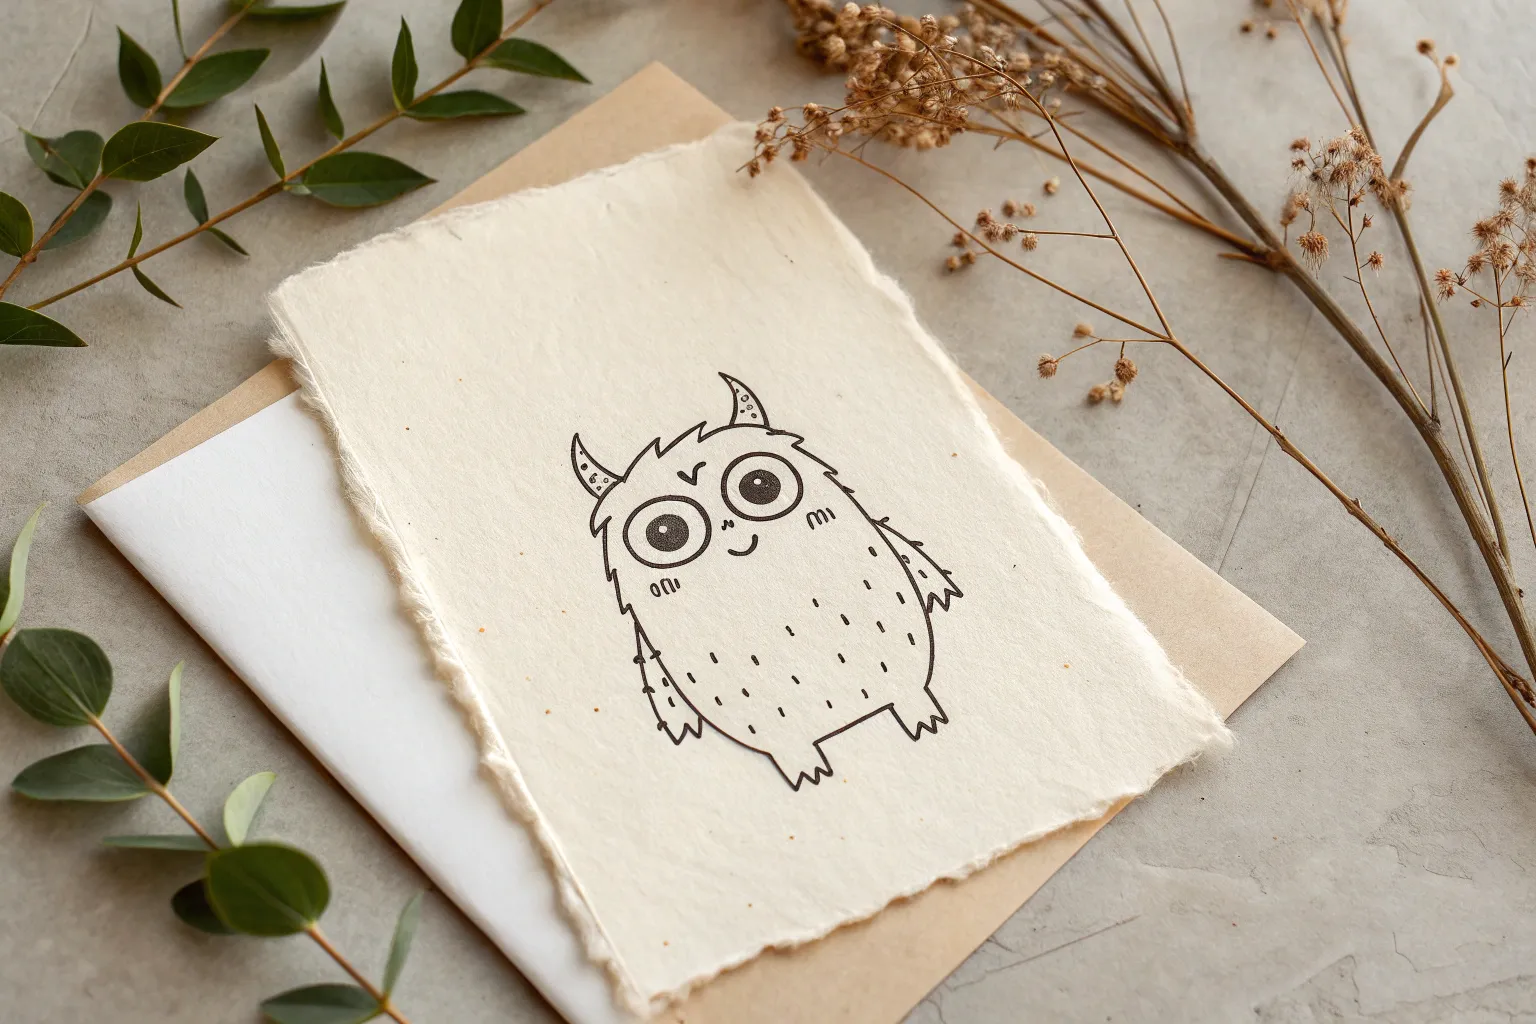
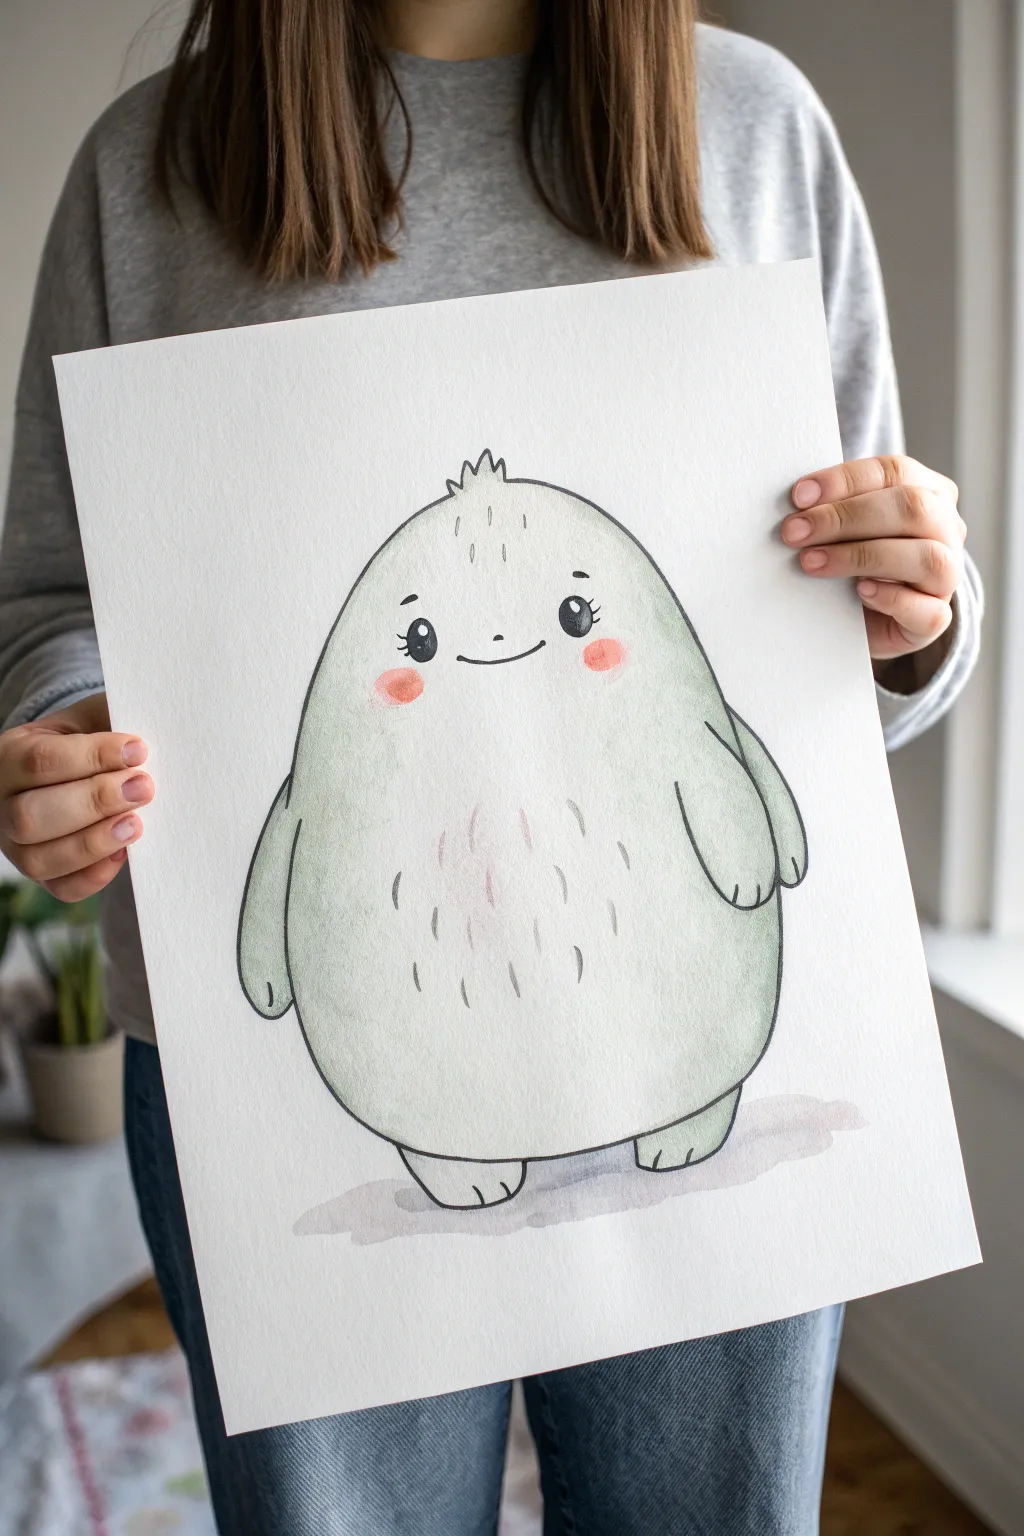
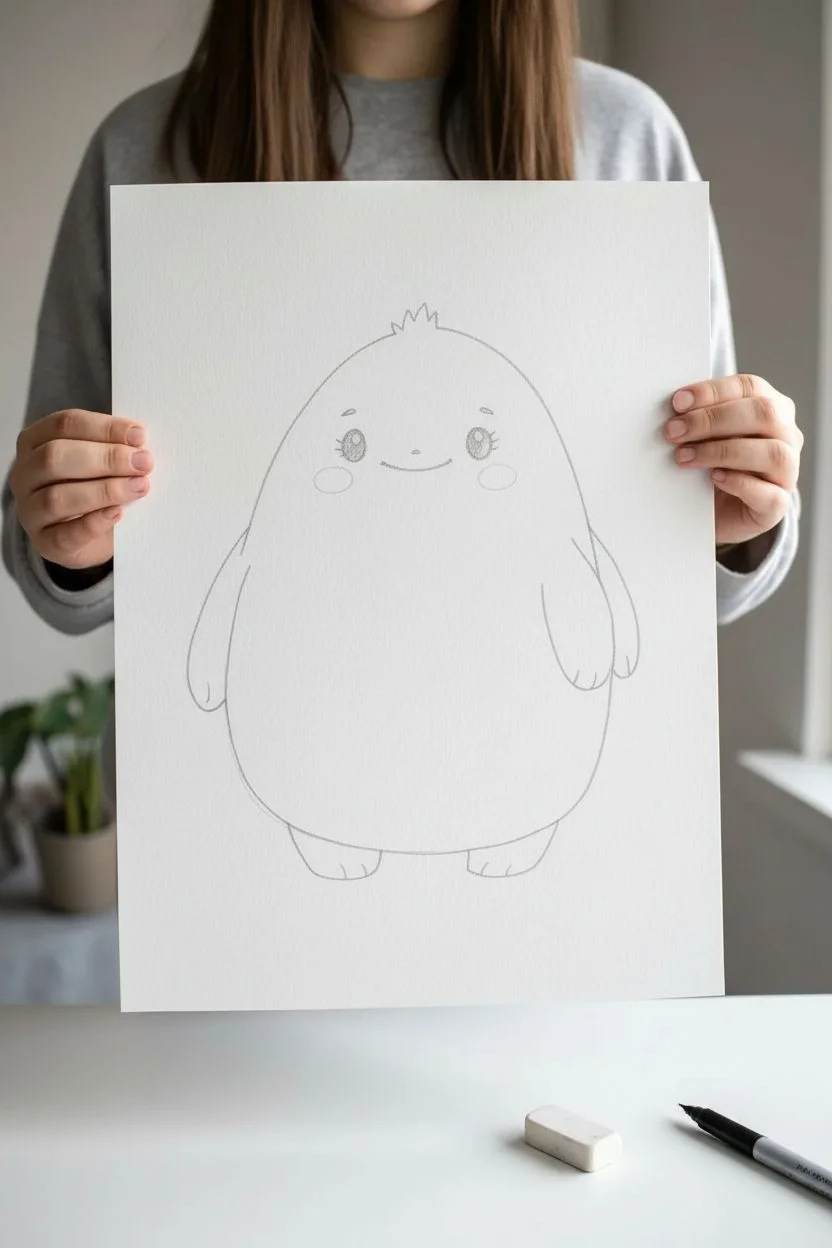
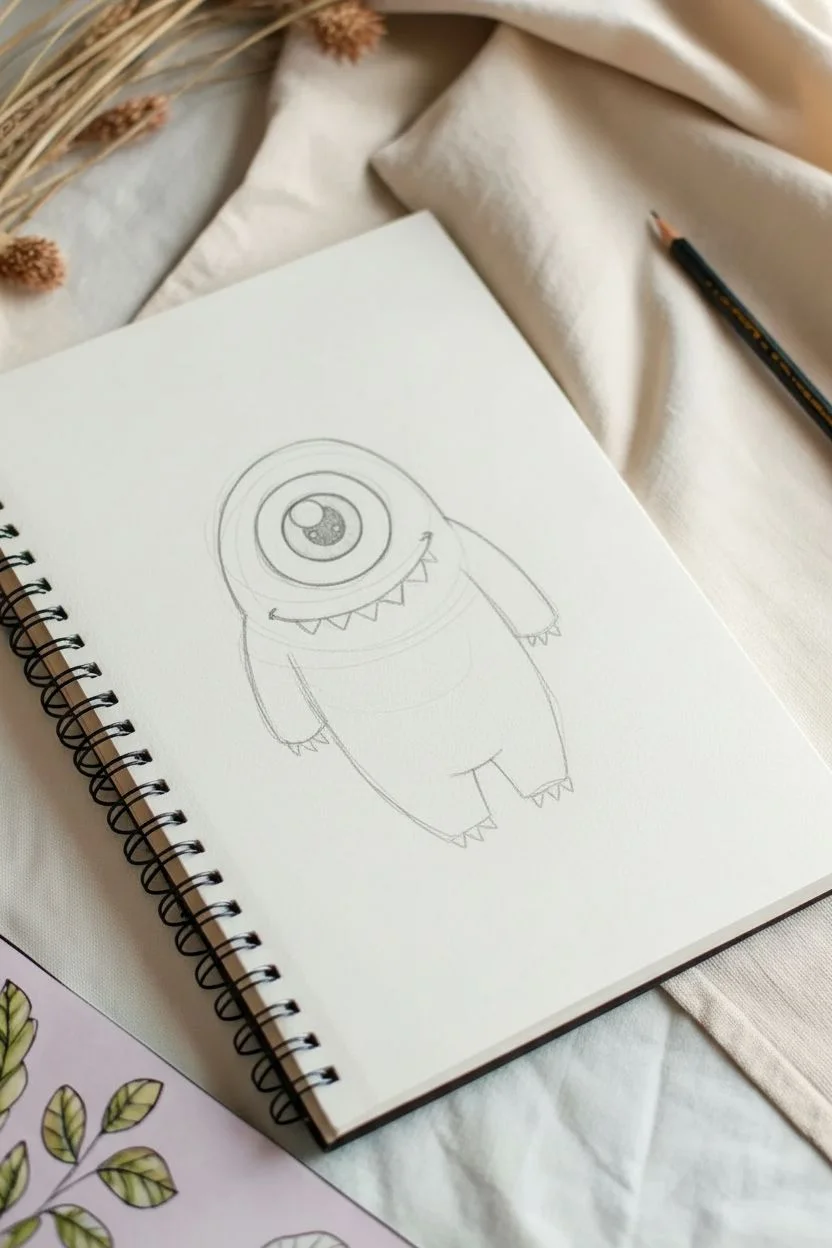
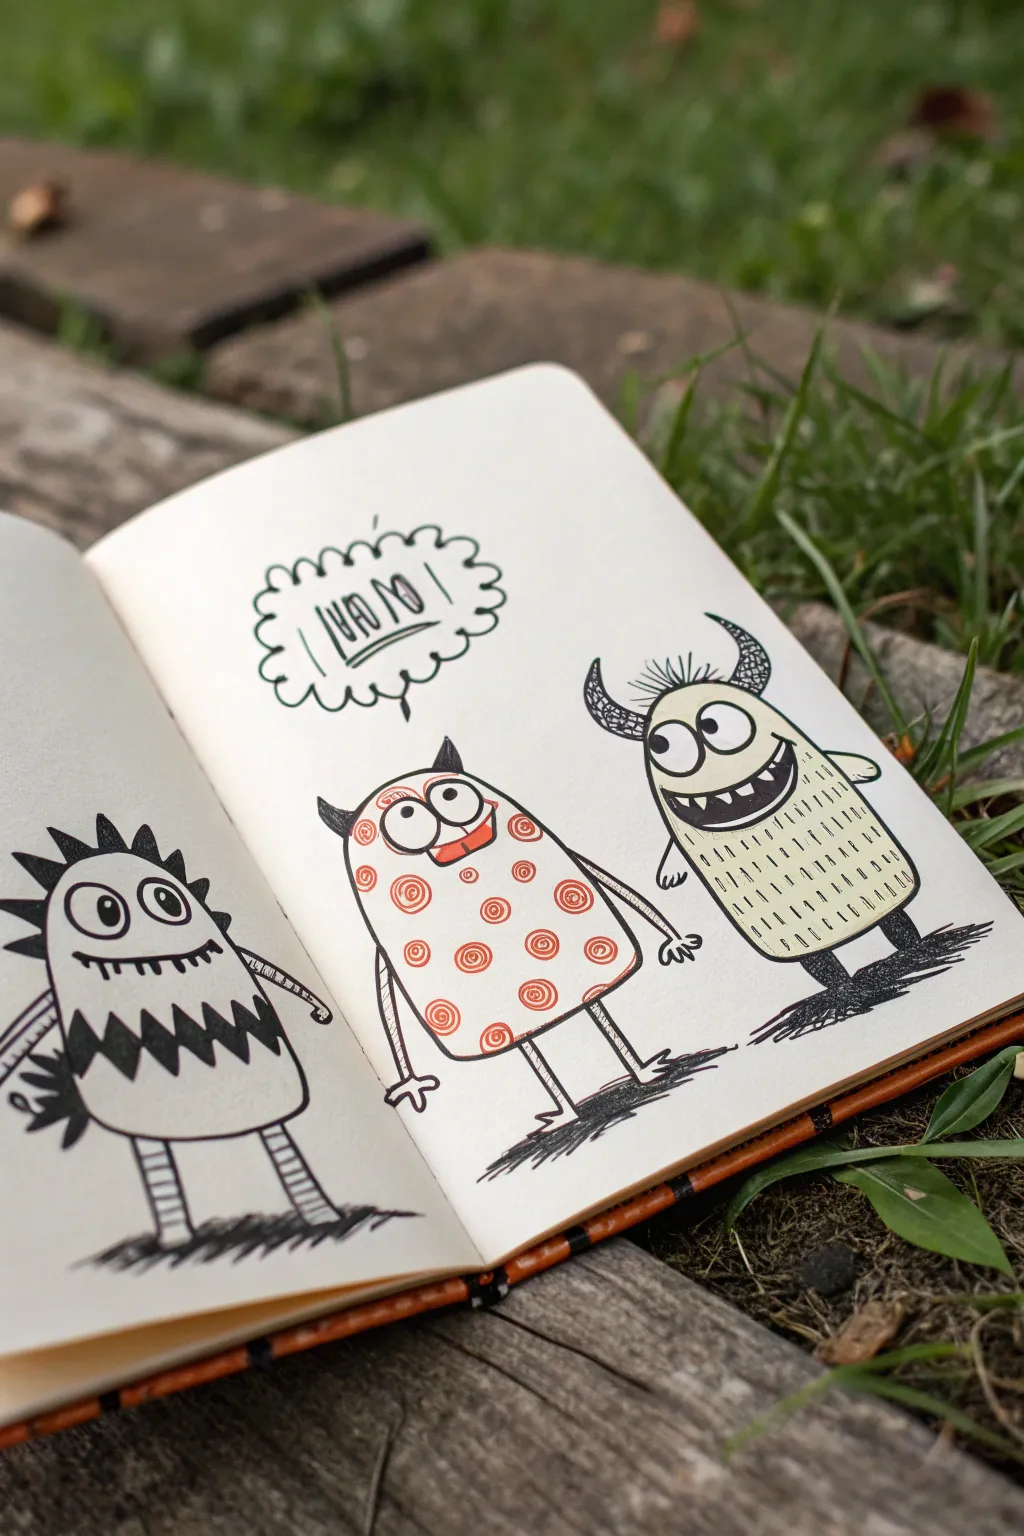
Whenever I’m stuck, I doodle a cute monster—because nothing loosens up your hand like a goofy little creature with a sweet face. In my studio, I keep coming back to simple shapes and friendly features that make monsters feel more like tiny buddies than anything scary.
Quick Cute Monster Doodle Sheet

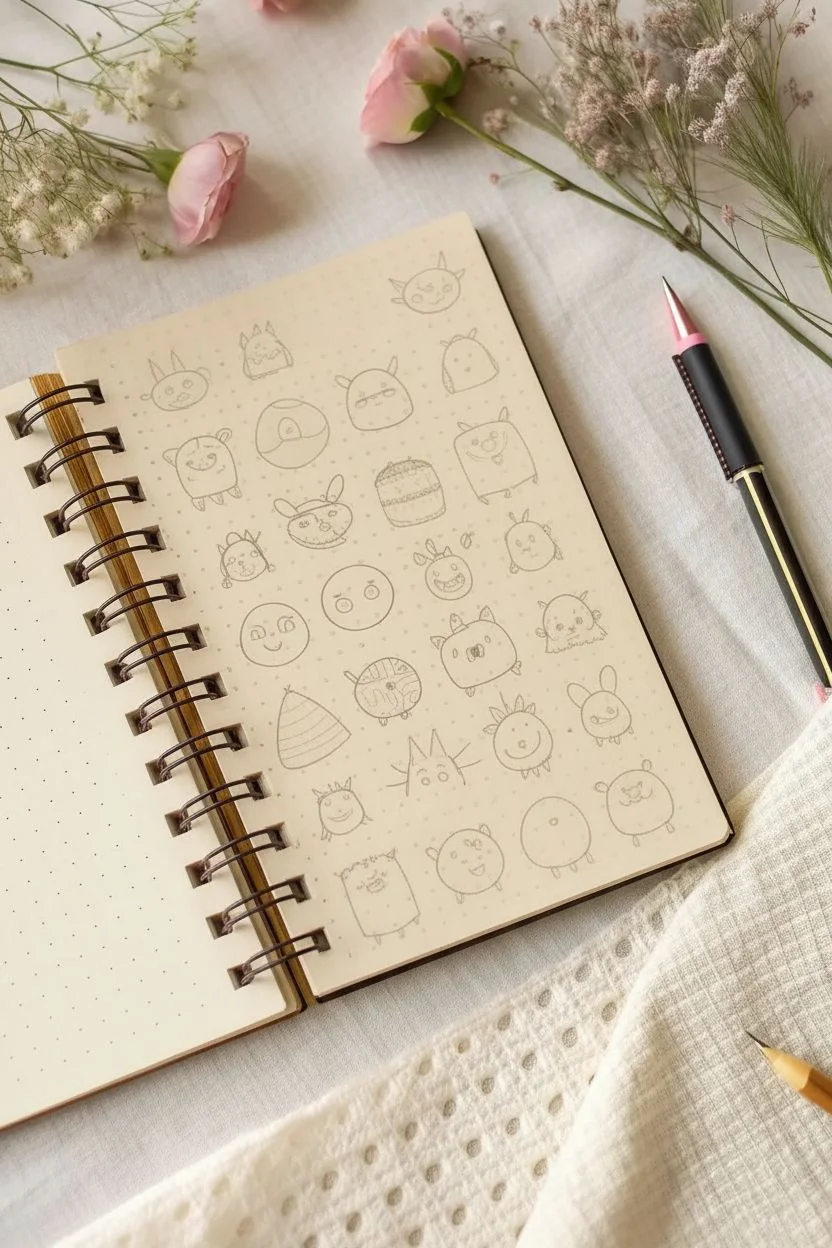
Fill your journal pages with a whimsical menagerie of tiny creatures using nothing but simple shapes and a fine liner. This doodle sheet exercise is perfect for breaking through creative block, turning basic circles and squares into a grid of charming, expressive monsters.
Step-by-Step Tutorial
Materials
- Dot grid notebook or sketchbook
- Fine liner pen (01 or 03 size, black)
- Pencil (HB)
- Eraser
- Pink highlighter or marker (optional)
Step 1: Setting the Grid
-
Establish the layout:
Begin by visualizing a grid on your dot grid paper. You don’t need to draw actual boxes, but mentally spacing your drawings about 4-5 dots apart will keep things neat. The example shows roughly five columns and six rows of characters. -
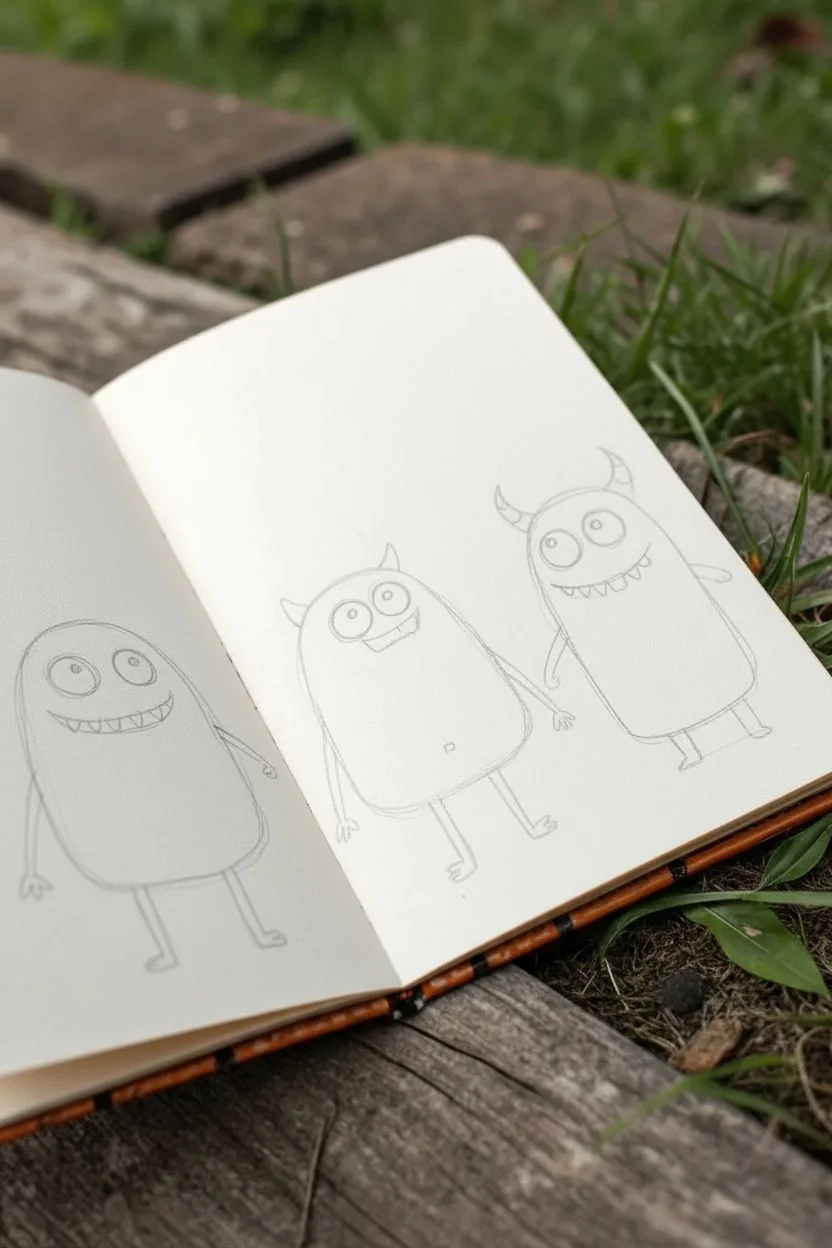
Sketch basic head shapes:
Using your pencil lightly, draw a variety of base shapes for the heads. Start with circles, ovals, rounded squares, and bean shapes. Don’t worry about perfection; wobbly lines add character to monsters. -
Vary the sizes:
Make sure some shapes are slightly wider or taller than others. Include a few semi-circles (domes) and even a triangular shape or two (like the striped cone monster) to keep the visual rhythm interesting.
Placement Pro Tip
Use the dots in your journal as anchoring points. For symmetrical monsters, center the eyes specifically between two vertical rows of dots.
Step 2: Bringing Monsters to Life
-
Inking the first row:
Switch to your fine liner. For the top row, focus on ear variations. Add small pointed horns to a circle for the first creature, and perhaps small triangular ears for the next. Draw the outlines firmly over your pencil sketches. -
Add facial expressions:
Give the first few monsters their personalities. Try wide-set dots for eyes on one, and large circular glasses for another. A simple curved line makes a smile, while a jagged line can create a goofy grin. -
Create body details:
Move to the second row. For square-ish bodies, draw tiny stick legs at the bottom. Experiment with arms—some can be simple ‘U’ shapes on the side of the body, while others might just be little nubs. -
Incorporate textures:
Draw the striped cone monster near the middle left. Create a cone shape and fill it with horizontal stripes, then hash them vertically to create a grid texture. This breaks up the white space. -
The highlight character:
Locate a spot in the second or third row for your ‘feature’ monster. Draw a simple round character here. We will come back to highlight this one later, so keep its lines clean. -
Experiment with features:
As you work down the page, get weirder with the features. Draw a monster with three eyes, or one with antennas ending in little circles. Try drawing a pig-nose snout on a square body for a funny contrast. -
Hair and fur details:
For the bottom half of the page, add some texture to the outlines. Instead of a smooth line, use small jagged strokes to create a furry look for a couple of the monsters. -
Accessories and props:
Give a few characters accessories. Draw a tiny party hat on one, or a little bow. I like to add whiskers to round characters to make them look more cat-like. -
Finalize ink outlines:
Continue until all your pencil shapes have been inked. Add final touches like little belly buttons, spots, or rosy cheeks using small circles or hatch marks.
Step 3: Finishing Touches
-
Erase guidelines:
Wait at least 5-10 minutes for the ink to dry completely. Gently erase all visible pencil marks, being careful not to crumple the paper. -
Add the pop of color:
Take your pink highlighter. Find that ‘feature’ round monster you saved earlier (or pick a favorite) and color a bold circle directly over it. This creates a focal point on the busy page. -
Optional shading:
If you want more depth, use your fine liner to add tiny hatch marks on the bottom right of each character to suggest a shadow.
Smudge Prevention
If your fine liner smudges when erasing, switch to a waterproof pigment liner (like a Micron) or wait significantly longer before erasing pencil lines.
You now have a delightful page of references to use whenever you need a quick doodle for your planner or notes


Blob Buddy Monster
This endearing little monster proves that you don’t need scary claws or teeth to make an impression. With its soft egg-like shape, gentle green watercolor wash, and tiny features, this “Blob Buddy” is perfect for practicing simple character design and wet-on-dry painting techniques.
Step-by-Step
Materials
- Heavyweight watercolor paper (9×12 inches or similar)
- HB pencil for sketching
- Soft eraser
- Fine liner pen (black, water-resistant, size 0.3 or 0.5)
- Watercolor paints (sage green, pink, gray)
- Round watercolor brush (size 6 or 8)
- Small detail brush (size 2)
- Cup of water and paper towels
Step 1: Sketching the Shape
-
Base Outline:
Start by drawing a large, slightly squat egg shape in the center of your paper. The bottom should be wider and flatter than the top to give your monster a grounded, heavy look. -
Add the Tuft:
At the very peak of the egg shape, erase a small section of your line and replace it with three small, jagged zig-zags to create a tiny tuft of hair. -
Draw the Arms:
About halfway down the sides of the body, sketch two simple, sausage-like arms resting against the torso. They should droop downwards, curving slightly inward at the tips. -
Add Little Feet:
At the bottom of the blob, draw two small, rounded rectangles for feet. Keep them close together and simple, just barely peeking out from under the body. -
Map the Face:
Lightly mark the placement for the face. The eyes should sit roughly one-third of the way down from the top. Space them widely apart to enhance the cute factor. -
Refine the Eyes:
Draw two small circles for eyes. Inside each, add a tiny white circle near the top right for a highlight, and add three small eyelashes flicking off the outer corners. -
Mouth and Cheeks:
Draw a tiny, shallow ‘u’ shape right between the eyes for a smile. Lightly sketch oval shapes on the cheeks where the blush will go later.
Uneven Washes?
If your watercolor dries with hard edges or “blooms,” try wetting the paper slightly with clean water before applying paint. This helps the color flow smoothly.
Step 2: Inking the Lines
-
Outline the Body:
Using your water-resistant fine liner, carefully trace over your pencil lines. Use a confident, continuous stroke for the long curves of the body to keep it looking smooth. -
Fill the Eyes:
Inking the eyes requires precision. Color in the black circles completely, being extremely careful to leave those tiny white highlights untouched. -
Add Texture Details:
Add small vertical tick marks on the belly area to suggest fur or texture. Keep these lines short, broken, and random—mostly concentrated in the center chest area. -
Erase Sketches:
Once the ink is completely dry—I usually wait at least five minutes to be safe—gently erase all your underlying pencil marks.
Step 3: Watercolor Washes
-
Mix Your Green:
Prepare a very dilute, watery mix of sage green paint. You want a pale, pastel tone rather than a vibrant saturated color. -
Paint the Body:
Apply the green wash over the entire body, arms, and feet. Work quickly to avoid hard drying lines, but don’t worry if the color isn’t perfectly even; slight variations add character. -
Blush the Cheeks:
While the green is still slightly damp (or dry, depending on how much bleed you want), dab two spots of diluted pink onto the cheek areas. Soften the edges with a clean, damp brush if they look too harsh. -
Belly Texture:
Once the base layer is dry, use a slightly more concentrated pinkish-gray mix to add faint, vertical strokes over the belly fur marks you inked earlier. This reinforces the texture. -
Grounding Shadow:
Mix a light, watery gray. Paint a free-form, irregular puddle shape directly underneath the monster’s feet to ground the character so it doesn’t look like it’s floating. -
Final Touches:
If your main green wash dried too light, you can add a second, very transparent layer to the sides and bottom of the monster to create simple shading and volume.
Accessorize Him
Give your Blob Buddy some personality by drawing holding a small item in one hand, like a balloon, a flower, or a tiny sign with a message.
Enjoy your new, delightfully distinct monster friend and the soft charm it brings to your sketchbook


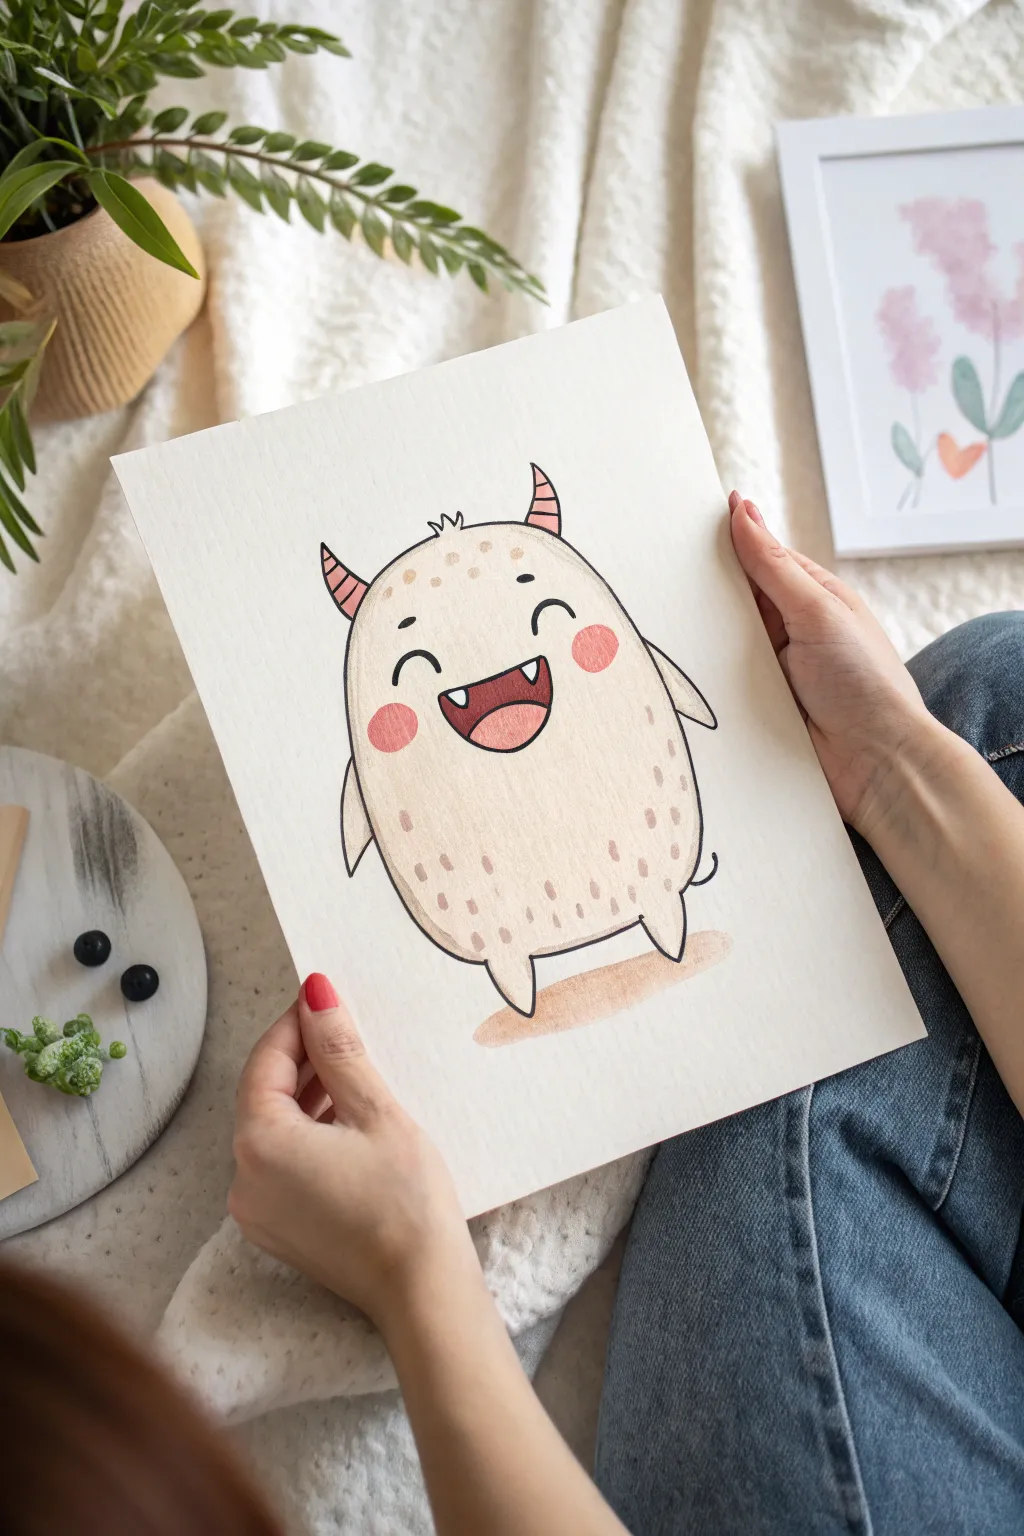
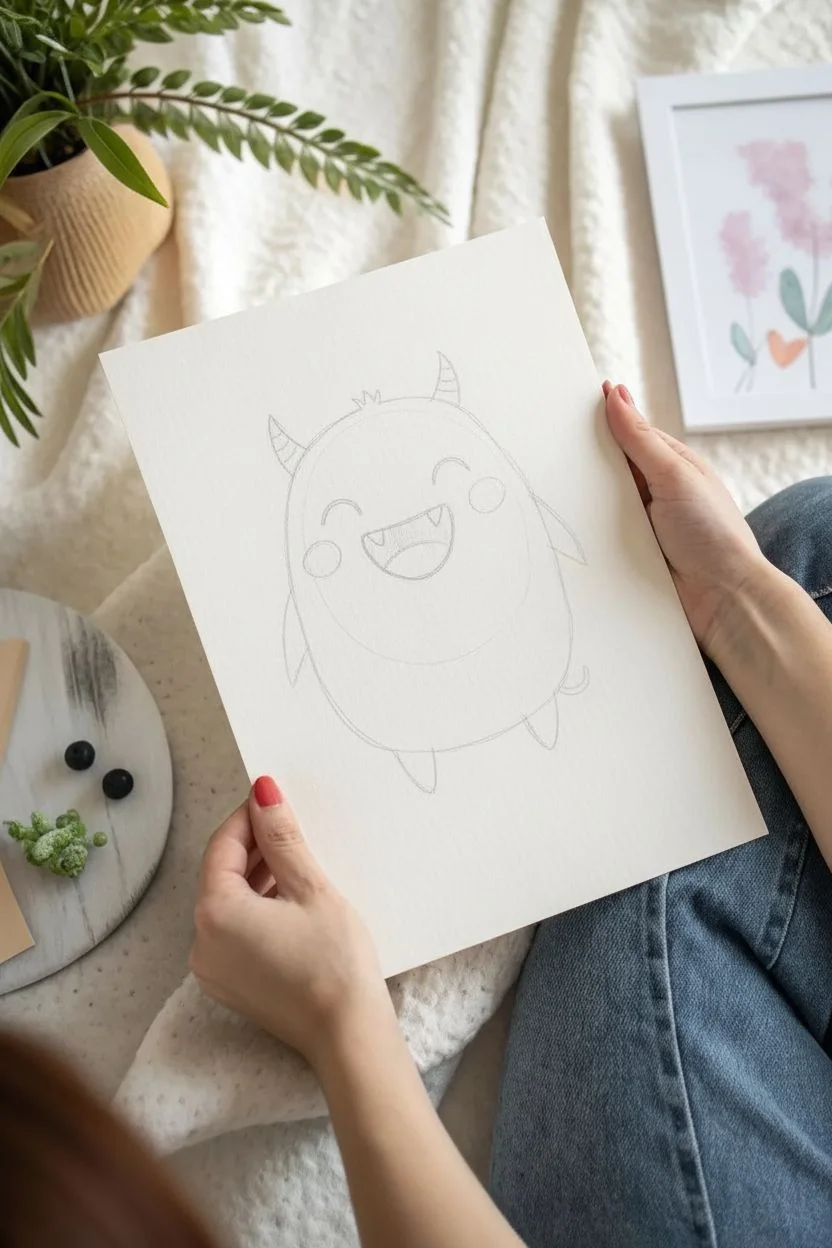
Big-Eyed Cyclops Sweetie
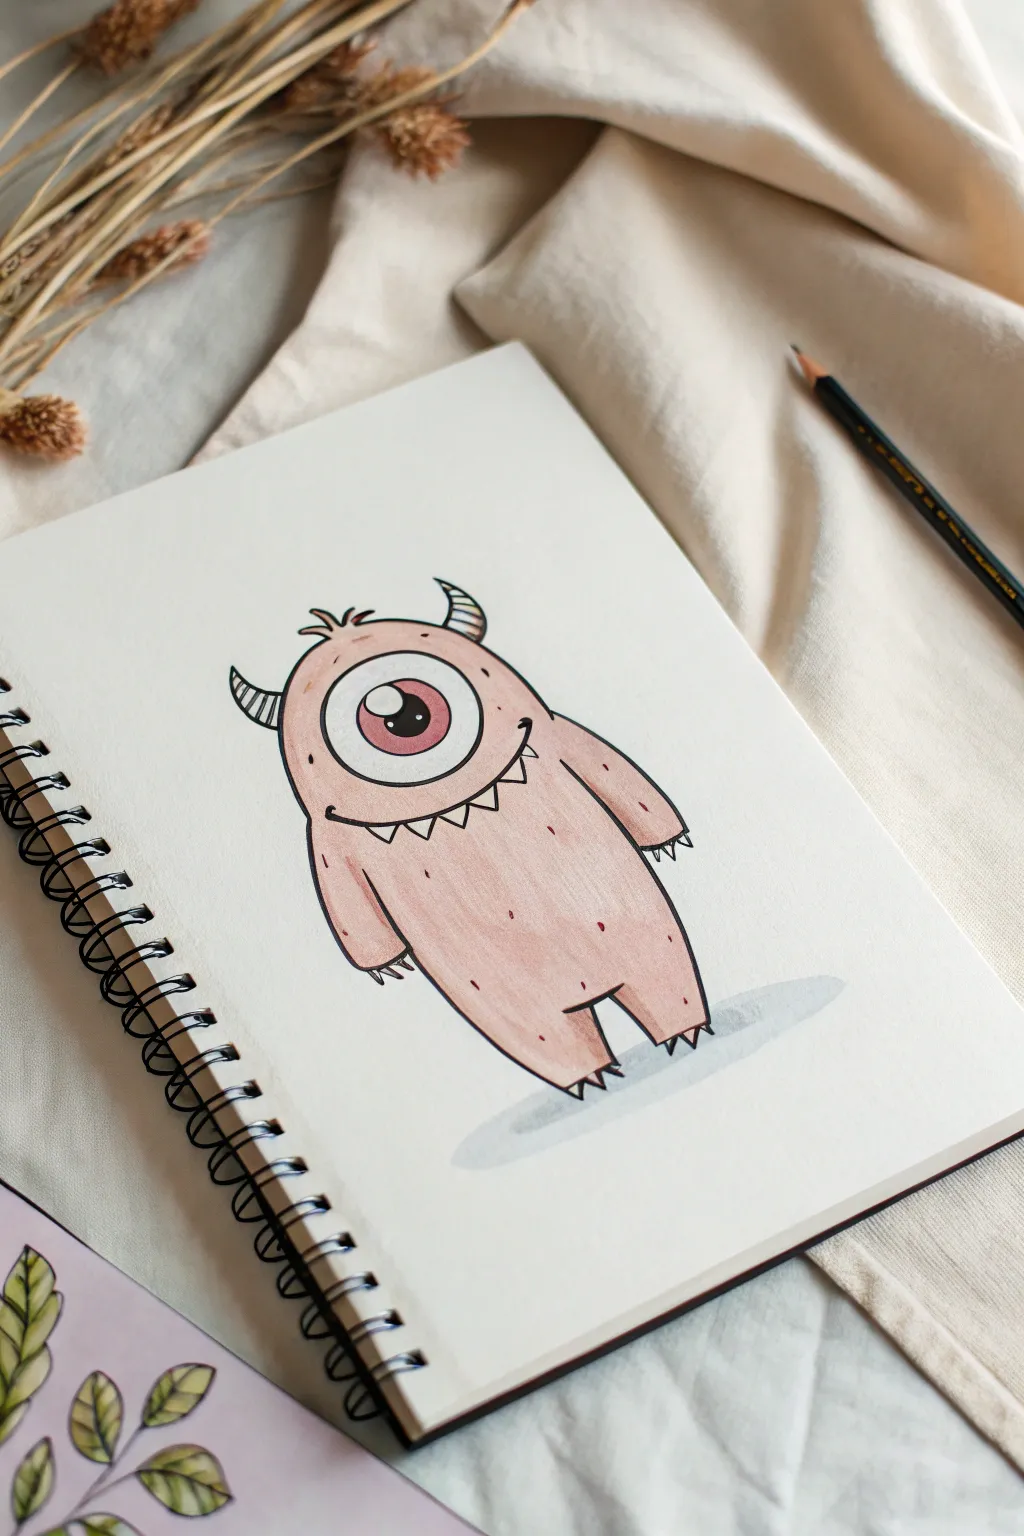
This adorable one-eyed monster combines a friendly, potato-shaped silhouette with charming details like tiny horns and a sweet smile. With its soft pink hue and simple line work, it’s a perfect beginner-friendly character that leaps right off the page.
Step-by-Step Tutorial
Materials
- Sketchbook or drawing paper (heavyweight preferred)
- HB pencil for initial sketching
- Fine liner pen (black, 0.5mm or 0.8mm)
- Alcohol-based markers or colored pencils (pale pink, deep rose, light grey)
- Eraser
Step 1: Sketching the Base
-
Outline the body:
Start by lightly sketching a large, rounded oval shape that stands upright. It should look a bit like a standing potato or a large bean, slightly narrower at the top than the bottom. -
Add the eye shape:
In the upper third of the body, draw a very large circle for the single eye. Inside this, draw a smaller circle for the iris, and a tiny circle within that for the pupil highlight. -
Create the mouth:
Just below the eye, sketch a curved horizontal line for the mouth. Add small, downward-pointing triangles along the bottom of this line to create a row of little teeth. -
Draw arms and legs:
For the arms, draw simple, U-shaped appendages hanging down from the sides of the body. Keep them nestled close. At the bottom of the body, sketch two short, stubby legs with a small gap in between.
Step 2: Adding Details
-
Add horns and claws:
Draw two small, curved horns on top of the head. Then, add three tiny, sharp triangular claws to the end of each hand and foot. -
Refine the eye:
Sharpen the circle of the eye. Add a small ‘shine’ circle in the upper left of the pupil area to make it look glossy later. -
Texture details:
Sketch a few jagged tufts of hair on the very top of the head between the horns to give him a bit of character.
Smudge Alert!
If your fine liner smears when you erase or color, switch to a waterproof archival ink pen, or wait at least 30 minutes before erasing pencil lines.
Step 3: Inking
-
Outline the main shape:
Using your black fine liner, carefully trace over your pencil lines. Use confident, steady strokes for the body outline. I find it helps to pull the pen towards you rather than pushing it away. -
Detail the face:
Ink the eye carefully, making the pupil solid black but leaving the small highlight circle pure white. Ink the teeth and horns. -
Add texture lines:
Draw small stripes on the horns. Add a few tiny dots or specks scattered across the body to simulate fur or skin texture. -
Erase guidelines:
Once the ink is completely dry (wait at least a minute to avoid smudging), gently erase all the underlying pencil sketches.
Accessorize
Give your monster personality by drawing a tiny bow tie, a balloon in one hand, or changing the spot pattern to stripes or stars.
Step 4: Coloring
-
Color the body:
Take your pale pink or salmon-colored marker. Fill in the entire body shape, working in consistent vertical strokes to keep the color even. Avoid the teeth, horns, eye, and claws. -
Shade the body:
Once the base layer is dry, go back with the same pink marker (or a slightly darker shade) and add shading to the right side of the body and under the arms to create volume. -
Color the iris:
Fill in the iris of the eye with a deep rose or magenta color. Leave the sclera (the white part of the eye) uncolored. -
Shadow the eye:
Use a very light grey marker to add a faint shadow to the top curve of the eyeball, just underneath the eyelid area, to make it look spherical. -
Ground the character:
Using a light grey marker, draw a simple oval shadow on the ground beneath the monster’s feet. This prevents your drawing from looking like it’s floating in space.
Now you have a charming little cyclops friend ready to brighten up your sketchbook pages


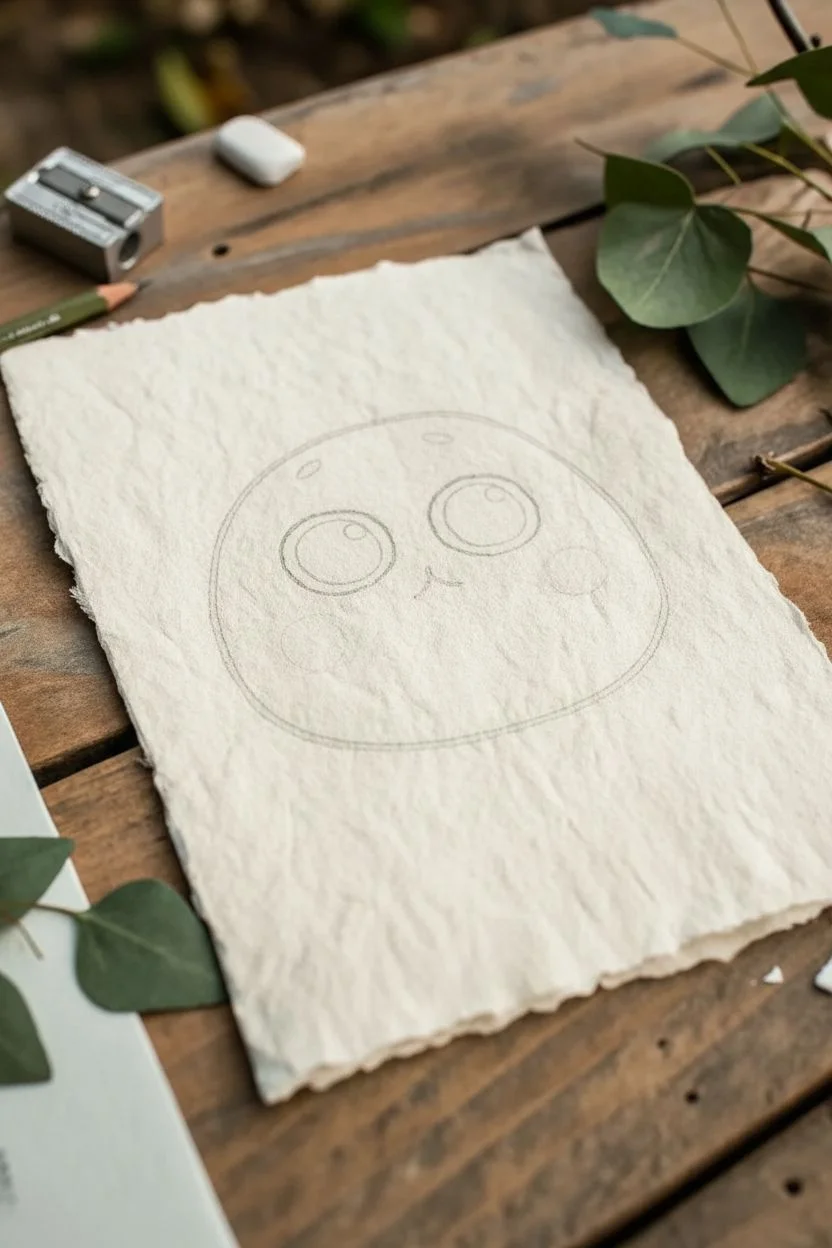
Wide-Set Eyes Derp Monster
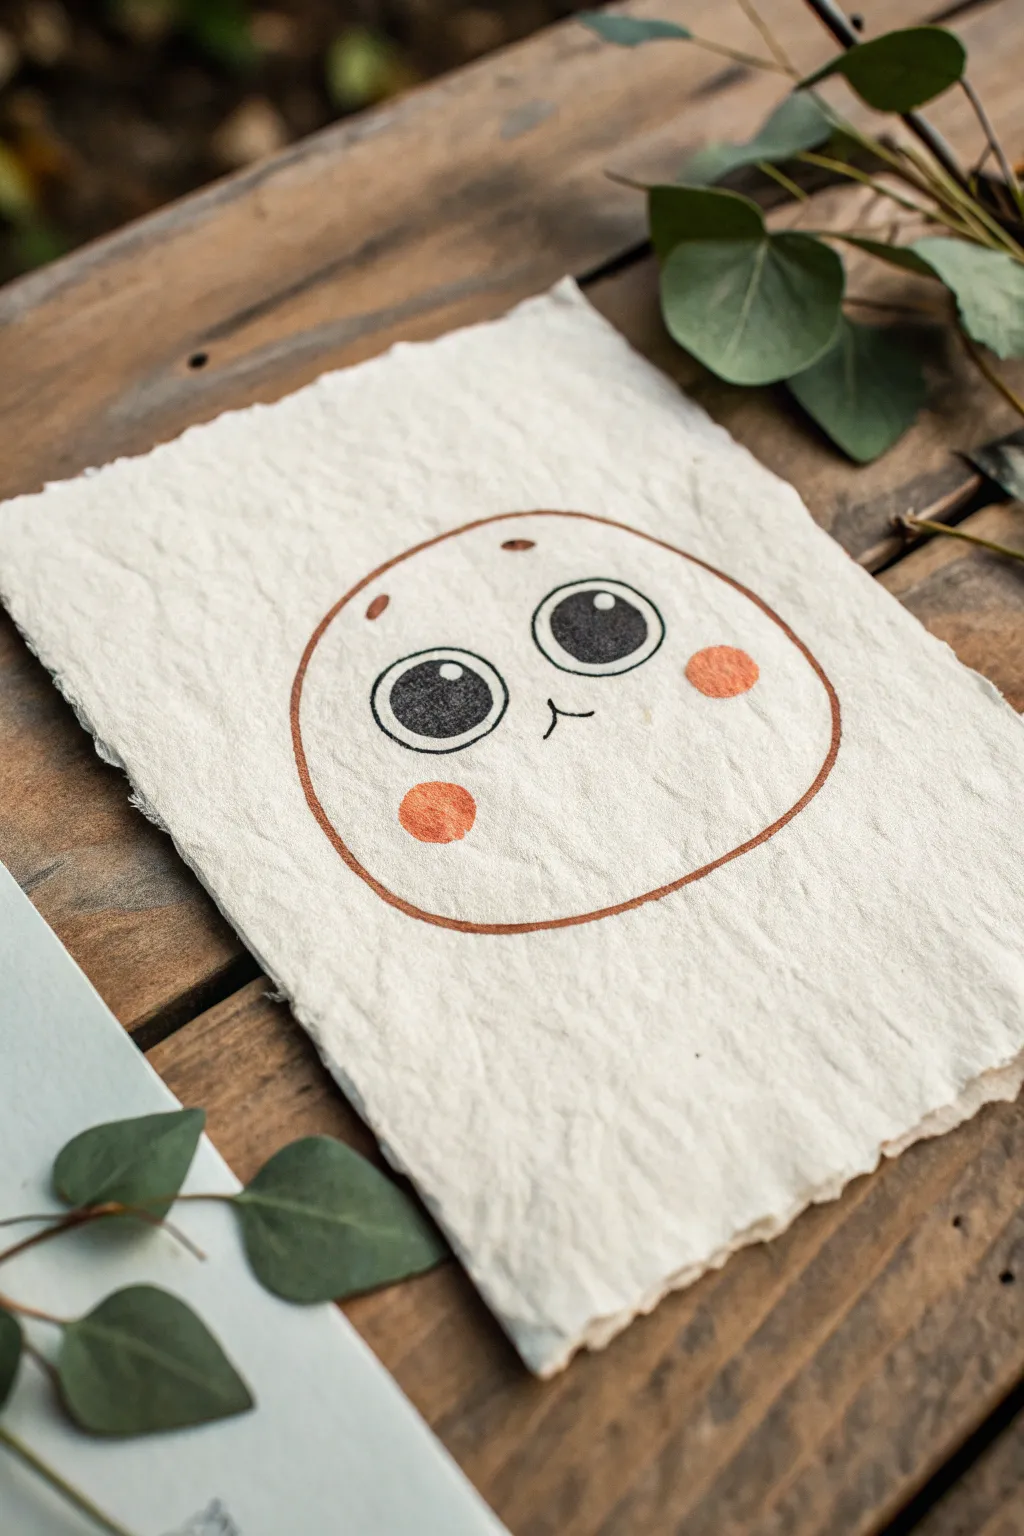
Embrace simplicity with this delightfully awkward monster face, characterized by its wide-set eyes and gentle expression. The charm of this project lies in the combination of clean, minimal lines on beautifully textured, handmade paper.
Detailed Instructions
Materials
- Thick handmade cotton rag paper (deckled edge)
- Fine liner pen (black, 0.5mm)
- Thicker felt-tip marker (black)
- Orange or coral alcohol marker (chisel tip)
- Pencil (HB)
- Soft eraser
- Circular object for tracing (optional)
Step 1: Preparation and Sketching
-
Paper selection:
Choose a sheet of heavy, textured handmade paper. The irregularities and deckled edges are crucial for achieving the organic, rustic look shown in the photo. -
Find the center:
Lightly mark the center of your paper with a pencil to help orient the face symmetrically. -
Sketch the head shape:
Draw a large, imperfect circle for the head using your pencil. It doesn’t need to be geometrically perfect; a slightly squashed oval adds character. -
Position the eyes:
Sketch two large circles for the eyes. Place them relatively far apart—this wide spacing is key to the cute ‘derp’ factor. -
Add facial details:
Lightly pencil in two small, floating eyebrows above the eyes, a tiny inverted ‘Y’ shape for the nose/mouth, and round spots for the cheeks.
Bleeding Lines?
On porous handmade paper, ink can feather. Test your pens on a scrap piece first. If it bleeds, switch to pigment liners or archival ink pens, which tend to hold a sharper edge.
Step 2: Inking the Outline
-
Outline the head:
Using the orange or brown fine liner (or a thin marker), carefully trace over your pencil line for the head shape. Keep your hand steady but allow the texture of the paper to naturally influence the line quality. -
Refine the circle:
If the line looks too thin against the textured paper, go over it a second time to build up a consistent weight. -
Outline the eyes:
Switch to your black fine liner. Trace the outer circles of the eyes carefully. I like to rotate the paper as I draw circles to keep the curve smooth. -
Draw the pupils:
Inside each eye, draw a large pupil, leaving a small white circle near the top left for a highlight catchlight. This spark of life is essential. -
Fill the pupils:
Use the thicker black felt-tip marker to fill in the pupils solid black. The contrast between the dark pupil and the textured paper is striking. -
Add the tiny mouth:
With the 0.5mm black fine liner, draw the small nose/mouth feature in the center. It’s just a tiny vertical line connecting to a small upside-down ‘v’.
Step 3: Adding Color and Finish
-
Color the cheeks:
Take your coral or orange marker and fill in the cheek circles. On this porous paper, dab the marker gently rather than dragging it to prevent the paper fibers from pilling. -
Add eyebrows:
Using the same coral marker color (or a matching fine liner), draw two small, short dashes high above the eyes for the eyebrows. -
Let it set:
Allow the ink to dry completely. Handmade paper can be absorbent, so give it an extra minute to ensure no ink smudges. -
Erase pencil marks:
Gently erase any visible pencil guidelines. Be careful not to rub too hard on the inked areas or rough up the delicate paper surface. -
Flatten if needed:
If the moisture from the markers caused slight buckling, place the finished drawing under a heavy book overnight.
Add Dimension
Use a white gel pen to add extra highlights to the cheeks or a second tiny dot in the eyes. Just ensure the underlying marker ink is 100% dry first.
Now you have a charming piece of art that proves simple shapes can carry a lot of personality

PENCIL GUIDE
Understanding Pencil Grades from H to B
From first sketch to finished drawing — learn pencil grades, line control, and shading techniques.
Explore the Full Guide
Snaggle-Tooth Grin Monster
This adorable little monster is full of joy with its closed eyes and wide, toothy smile. Using simple shapes and soft coloring, you’ll create a friendly creature that looks like it’s just heard a funny joke.
Step-by-Step Tutorial
Materials
- Heavyweight drawing paper or mixed media paper
- Pencil and eraser
- Fine liner pen (black, 0.3mm or 0.5mm)
- Colored pencils (beige/cream, light pink, reddish-pink, light brown)
- Blending stump or tissue (optional)
Step 1: Sketching the Base Shape
-
Draw the main body:
Start lightly with your pencil. Draw a large, slightly elongated oval shape that is wider at the bottom than the top, similar to an egg standing upright. This forms the monster’s chubby body. -
Add little tufts:
At the very top center of the head, erase a small section of your oval line and draw three tiny zig-zag spikes to create a patch of hair. -
Sketch the horns:
On either side of the head, draw two small triangular horns curving slightly outward. Add two horizontal lines across each horn to create stripes. -
Position the arms:
On the sides of the body, draw two small, pointy noodle-like arms. They should hang down but curve slightly away from the body, ending in simple points. -
Draw the feet:
At the bottom of the oval, draw two short, triangular legs that point downwards to support the monster’s weight. -
Add a tiny tail:
On the right side near the bottom, sketch a tiny curved line sticking out to suggest a small tail.
Keep it Friendly
Make the eyes curve upwards rather than downwards. Upward curves read as happy or laughing, while downward curves can look sleepy or sad.
Step 2: Creating the Face
-
Place the eyes:
In the upper third of the face, draw two curved arches for closed, happy eyes. Place them fairly wide apart. -
Draw the mouth shape:
Below the eyes, sketch a wide ‘D’ shape on its side for the open mouth. Make the top line slightly curved downwards and the bottom curve deep and round. -
Detail the grin:
Inside the mouth, draw two small triangles pointing down from the top lip for fangs. Then, draw a curved line along the bottom for the tongue. -
Cheek circles:
Add two oval blush marks on the cheeks, just outside the corners of the smile.
Custom Monster Texture
Instead of dashes for fur, try small ‘v’ shapes for scales or tiny circles for spots to completely change your monster species.
Step 3: Refining and Inking
-
Ink the outline:
Go over your pencil lines with the black fine liner pen. Use a confident stroke, but don’t worry if the line isn’t perfectly smooth—a little wobble adds character. -
Ink the facial features:
Carefully trace the eyes, mouth, and teeth. Thicken the upper curve of the eyes slightly to suggest eyelashes or lids. -
Protect the highlights:
Before coloring, verify your ink is completely dry, then gently erase all remaining pencil marks.
Step 4: Coloring and Texture
-
Base coat:
Using a beige or cream colored pencil, color the entire body lightly. Use soft circular motions to get even coverage without harsh strokes. -
Color the horns and cheeks:
Take a light pink pencil and fill in the blush circles on the cheeks. Use the same pink for the horns, perhaps pressing slightly harder on alternating stripes if you like. -
Fill the mouth:
Color the tongue with a reddish-pink pencil. Fill the back of the throat with a darker brown or dark red to create depth, leaving the fangs white. -
Add fur texture:
With a light brown pencil, draw tiny, short vertical dashes scattered all over the body. Focus more dashes near the bottom and sides to suggest shading and fur texture. -
Shading the body:
Gently layer more beige or light brown along the bottom edge and sides of the monster to give it a 3D, rounded appearance. -
Grounding shadow:
Using a light brown or tan pencil, lightly color a rough oval shape beneath the monster’s feet to ground it, so it isn’t floating in space.
Your happy little monster is now complete and ready to bring a smile to anyone who sees it
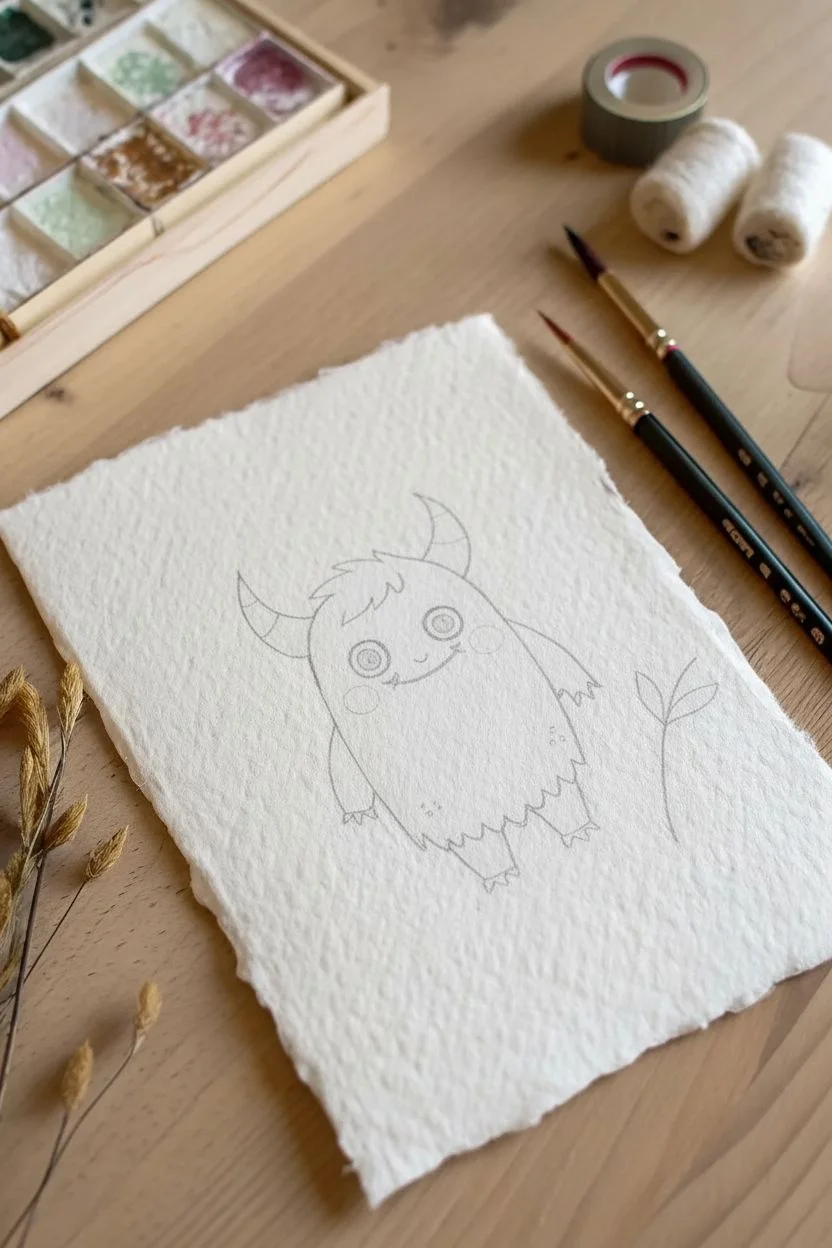
Soft Horn Nubs Monster
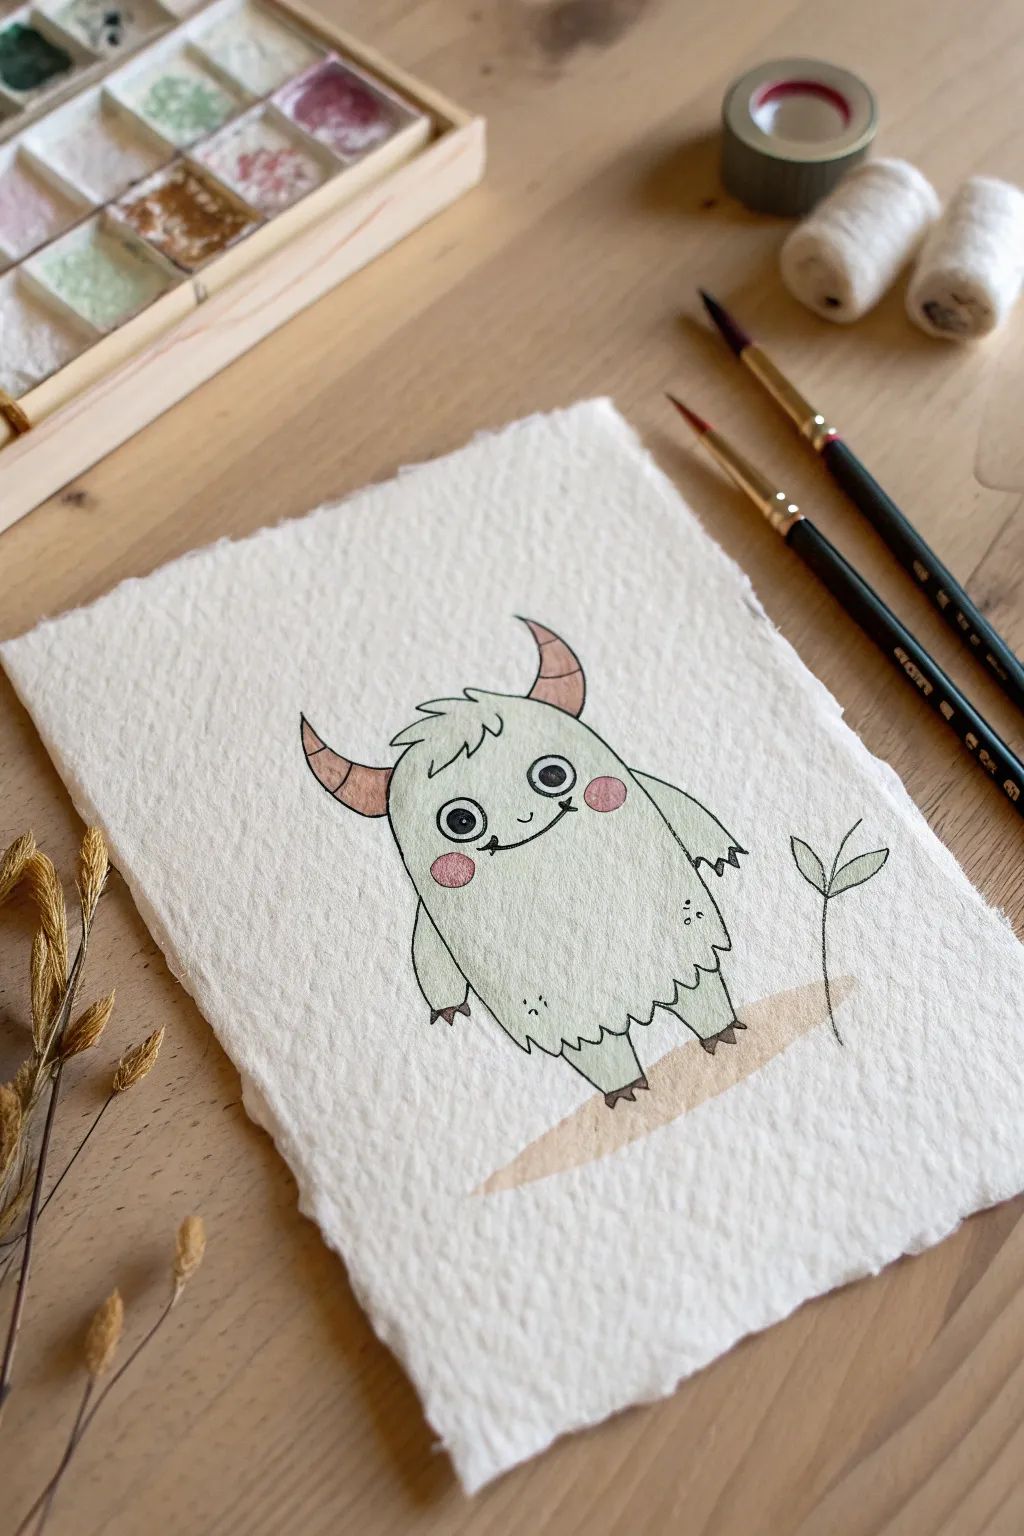
Capture the charm of this adorable monster illustration using gentle watercolor washes and confident ink lines. This project focuses on clean shapes and subtle texturing to create a friendly creature that looks ready for a hug.
How-To Guide
Materials
- Cold press watercolor paper (deckle edge optional)
- Black waterproof fine liner pen (0.3mm or 0.5mm)
- Watercolor paints (Sage Green, Rose/Salmon Pink, Burnt Sienna/Beige)
- Round watercolor brushes (Size 4 and Size 0)
- Pencil and soft eraser
- Clean water and paper towel
Step 1: Sketching the Base Shape
-
Outline the body:
Start lightly with your pencil. Draw a large, slightly irregular bean or gumdrop shape for the monster’s main body. Keep the bottom slightly wider than the top to give it a sturdy stance. -
Add limbs:
Sketch two short arms hanging loosely at the sides. For the legs, draw two chunky stumps at the bottom. Keep the shapes simple and rounded. -
Draft the horns:
Place two curved triangular shapes on the top of the head. These should look like soft nubs rather than sharp spikes, curving slightly outward. -
Face and details:
Position two large circles for eyes in the upper third of the body. Add a small ‘u’ shape for the nose and a wider, slightly crooked line for the smile. Don’t forget the small sprout plant on the right side.
Loose Lines
Don’t try to make the jagged fur lines perfectly uniform. Varying the size and direction of the jagged strokes makes the monster look fluffier.
Step 2: Inking the Character
-
Create the fur texture:
Using your waterproof fine liner, go over the pencil outline of the body. Instead of a solid line, use small, jagged zig-zags to suggest soft fur. Create a distinct tuft of hair between the horns. -
Ink the smooth parts:
Ink the horns and the decorative stripes on them with smooth, solid lines. Do the same for the claws on the hands and feet—little triangles will work perfectly. -
facial features:
Carefully trace the eye circles. Fill in the pupils, leaving a tiny white dot in each for a highlight. Draw the nose, mouth, and small dashes under the eyes for cheeks. -
Background elements:
Trace the small plant with a clean line. For the ground, sketch a simple oval or shape beneath the monster’s feet, but don’t ink the outline of the ground patch itself—that will just be paint. -
Erase guidelines:
Wait a moment for the ink to fully dry, then gently erase all visible pencil marks to ensure a clean surface for painting.
Level Up: Texture
Once dry, use a white gel pen to add tiny dots or patterns on the horns or body for extra magical texture.
Step 3: Adding Watercolor Washes
-
Paint the body:
Mix a diluted wash of Sage Green. Using your size 4 brush, fill in the monster’s body. I like to keep the color slightly uneven to enhance the organic feel of fur. -
Color the horns:
While the body dries, dip your smaller brush into a soft Rose or Salmon pink. Carefully paint the horns, staying within the inked segments. -
Add blushing cheeks:
Dilute that same pink slightly more. Paint two soft circles on the cheeks just under the eyes. If the green body paint is still damp, the pink might bleed slightly, which actually looks quite cute. -
Ground the character:
Mix a very watery Burnt Sienna or Beige. Swipe a loose, horizontal patch under the monster’s feet to create the ground. -
Final plant touches:
Use the leftover Sage Green to paint the leaves of the little sprout, carefully staying inside your ink lines.
Let your artwork dry completely before framing your new little monster friend
BRUSH GUIDE
The Right Brush for Every Stroke
From clean lines to bold texture — master brush choice, stroke control, and essential techniques.
Explore the Full Guide
Wiggly Antennae Alien Monster
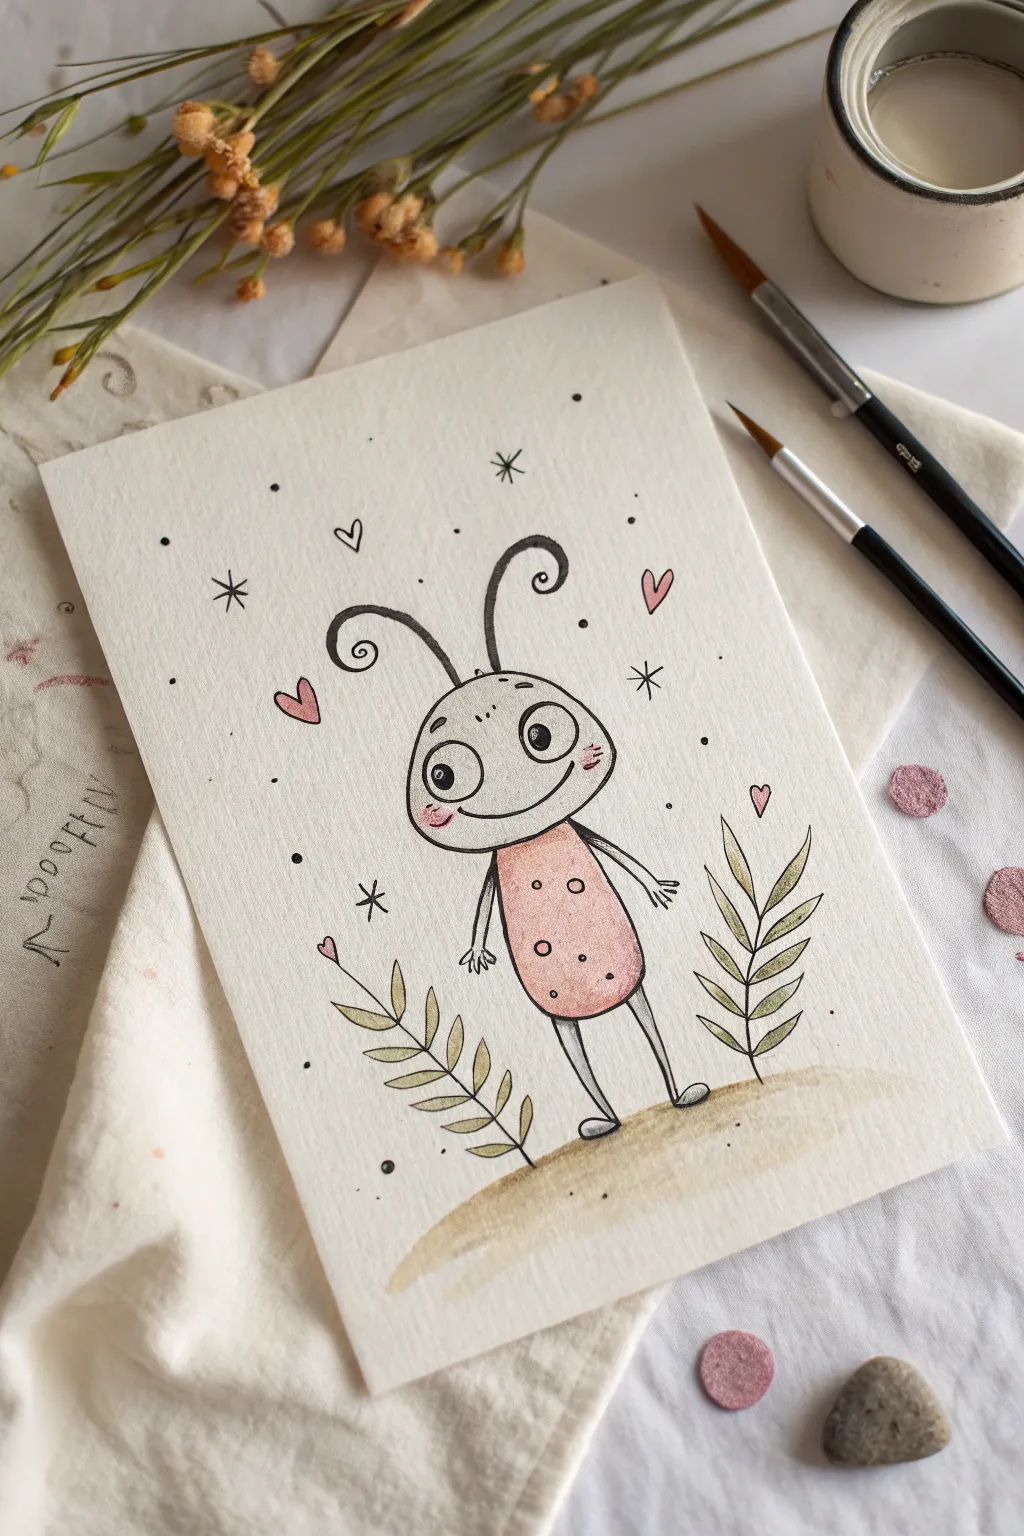
Create a charming little alien character with expressive eyes and curly antennae using simple ink lines and soft watercolor washes. This project combines doodling with gentle painting techniques for a heartwarming, illustrative result.
Step-by-Step Tutorial
Materials
- Cold press watercolor paper (A5 or roughly 5×7 inches)
- Fine liner pen (black, waterproof, size 0.3 or 0.5)
- Watercolor paints (Pink/Salmon, Earthy Green, Ochre/Light Brown)
- Small round paintbrush (size 2 or 4)
- Water jar
- Paper towel
- Pencil and eraser for sketching
Step 1: Sketching the Character
-
Head shape:
Begin by lightly sketching a wide oval shape for the head. It should be slightly flattened at the bottom where it connects to the body. -
Body outline:
Draw a smaller, elongated U-shape directly beneath the head for the body. The proportions should make the head look delightfully oversized compared to the torso. -
Facial features:
Place two large circles for eyes in the middle of the head. Add a simple curved line for a smile, positioning it slightly off-center to give a quirky expression. -
Limbs and extras:
Sketch two thin lines for legs ending in small oval feet. Add thin arms hanging at the sides. Finally, draw two long, curving lines from the top of the head for antennae, curling the ends into spirals.
Step 2: Inking the Lines
-
Main outlines:
Using your waterproof fine liner, trace over your pencil sketch. Keep your hand relaxed; a slightly jittery line adds to the organic, hand-drawn charm. -
Eye details:
Ink the pupils inside the large eye circles. You can fill them in black, leaving a tiny white speck in each for a highlight. -
Antennae definition:
Trace the antennae loops carefully. I like to thicken the line slightly at the very tip of the spiral for visual weight. -
Erase pencil:
Wait a moment for the ink to truly set, then gently erase all visible pencil marks so the paper is clean for painting.
Loose Aesthetics
Don’t try to make the ink lines perfect. Small wobbles or lines that don’t perfectly connect add to the ‘sketchy’ style.
Step 3: Adding Plants & Background Details
-
Leafy sprigs:
Draw two simple plant shapes on either side of the creature. Use a central stem line with small, pointed oval leaves branching off in pairs. -
Ground line:
Instead of a harsh line, simply imagine where the feet land. We will define the ground later with paint, but you can add a few tiny pebbles near the feet with the pen. -
Hearts and stars:
Scatter a few tiny hearts and simple star shapes (asterisks or four-pointed stars) around the head to fill the negative space. -
Texture dots:
Add small stippling dots randomly around the character and background to create a magical, dusty atmosphere.
Smudged Ink?
Check your fine liner needs to be labeled ‘waterproof’ or ‘archival.’ If ink bleeds with water, switch to painting first and inking last.
Step 4: Watercolor Washes
-
Painting the body:
Mix a watery salmon or dusty pink color. Gently fill in the body shape. While it’s still wet, you can drop in a slightly darker pink at the bottom for a gradient effect. -
Cheek blush:
Using a very dilute version of the pink, dab two small circles on the creature’s cheeks, right under the eyes. -
Ground wash:
Mix a light ochre or sandy brown with plenty of water. Paint a quick, loose horizontal stroke beneath the feet to ground the character. -
Leaves:
Paint the leaves with a muted earthy green. Don’t worry about staying perfectly inside the lines; slightly loose coloring looks artistic. -
Floating hearts:
Touch a tiny bit of the pink paint to the floating hearts you drew earlier.
Step 5: Final Touches
-
Body pattern:
Once the pink body paint is completely dry, use your pen or a darker pink colored pencil to draw small circles or polka dots onto the belly. -
Shadows:
Add tiny hatched lines with your pen under the chin and where the legs meet the body to give just a hint of dimension. -
Highlight accents:
If you have a white gel pen, add tiny dots to the cheeks or the top of the antennae curls for a final sparkle.
This little monster is now ready to bring a smile to anyone who sees your sketchbook page
Boxy Patchwork Monster


This adorable little creature combines simple geometric shapes with the soft charm of watercolors. With its boxy body, striped limbs, and friendly expression, it’s a perfect project for getting comfortable with watercolor washes and ink details.
Step-by-Step
Materials
- Cold press watercolor paper (deckle edge optional)
- Pencil (HB or H)
- Kneaded eraser
- Waterproof fine liner pen (black, approx. 0.3mm)
- Watercolor paints (shades of ochre, rust orange, pale green/mint)
- Small round brushes (size 2 and 4)
- Jar of water
- Paper towel
Step 1: Sketching the Shape
-
Outline the head:
Begin lightly in pencil by drawing a wide, rounded rectangle for the head. Make the top edge slightly curved and add two smaller, pointy horn shapes sticking out of the top corners. -
Draw the body:
Attach a larger, slightly taller rectangle directly beneath the head. Round off the bottom corners gently so the monster doesn’t look too rigid. -
Add the limbs:
Sketch two simple, stick-like arms hanging down from the sides of the body, and two legs extending from the bottom. Keep them fairly uniform in width. -
Detail the face:
Inside the head area, draw two large circles for eyes. Add a small oval nose in the center and a wavy or stitched line for the mouth area. -
Mark the patterns:
Before painting, lightly sketch the stripes onto the arms and legs. I also like to draw the central square ‘patch’ on the belly at this stage so I don’t paint over it by mistake.
Step 2: Adding Color
-
Paint the body base:
Mix a watery wash of soft ochre or beige. Gently fill in the main body rectangle, keeping the paint fluid to create that nice, uneven watercolor texture. -
Color the head:
Use a slightly pinker or warmer beige tone for the head area. Let this wash touch the body color while wet if you want them to bleed slightly, or wait for the body to dry for a cleaner edge. -
Paint the stripes:
Using a rust-orange color, carefully fill in alternating stripes on the arms and legs. Leave the white paper showing for the light stripes. -
Fill the belly patch:
Paint the square patch on the tummy with a slightly darker, more saturated orange-brown to make it stand out from the body color. -
Tint the horns:
Switch to a pale mint green wash. Carefully fill in the horns and add a tiny touch of this green to the claws or feet if you like. -
Add blush spots:
While your brush is damp with a reddish-pink hue, dab two circular spots on the bottom corners of the body rectangle for ‘knees’ or decorative spots, and add faint cheek blushes.
Uneven Washes?
Watercolors drying with ‘blooms’ or hard edges is actually desirable here! It adds to the rustic, patchwork charm, so don’t try to make the color perfectly smooth.
Step 3: Inking and Details
-
Wait for drying:
This is crucial—ensure the paper is completely bone-dry before touching it with a pen, otherwise the ink will bleed. -
Outline the eyes:
With your waterproof fine liner, trace the large eye circles. Fill in small black pupils, leaving a tiny white speck in each for a highlight. -
Define the body:
Go over your main pencil outlines with the pen. Use a slightly shaky or broken line style to give it a hand-stitched, organic feel rather than a perfect geometric look. -
Add texture lines:
Draw small vertical hatch marks along the ‘neck’ seam where the head meets the body to resemble fur or a collar ruff. -
Stitch the patch:
Outline the belly patch box. Draw tiny perpendicular hash marks all around the inside edge to make it look like it has been sewn on. -
Detail the horns:
Add small curved horizontal lines across the green horns to give them a ribbed texture. -
Final whimsical touches:
Sprinkle a few tiny circles, dots, or ‘stubble’ marks around the face and body to fill empty space and add character.
Make it a Series
Change the geometric shapes to circles or triangles and swap the color palette to blue and purple to create a whole family of distinct patchwork monsters.
Now you have a charming little pocket monster ready to be framed or given as a card


Mushroom Cap Forest Monster
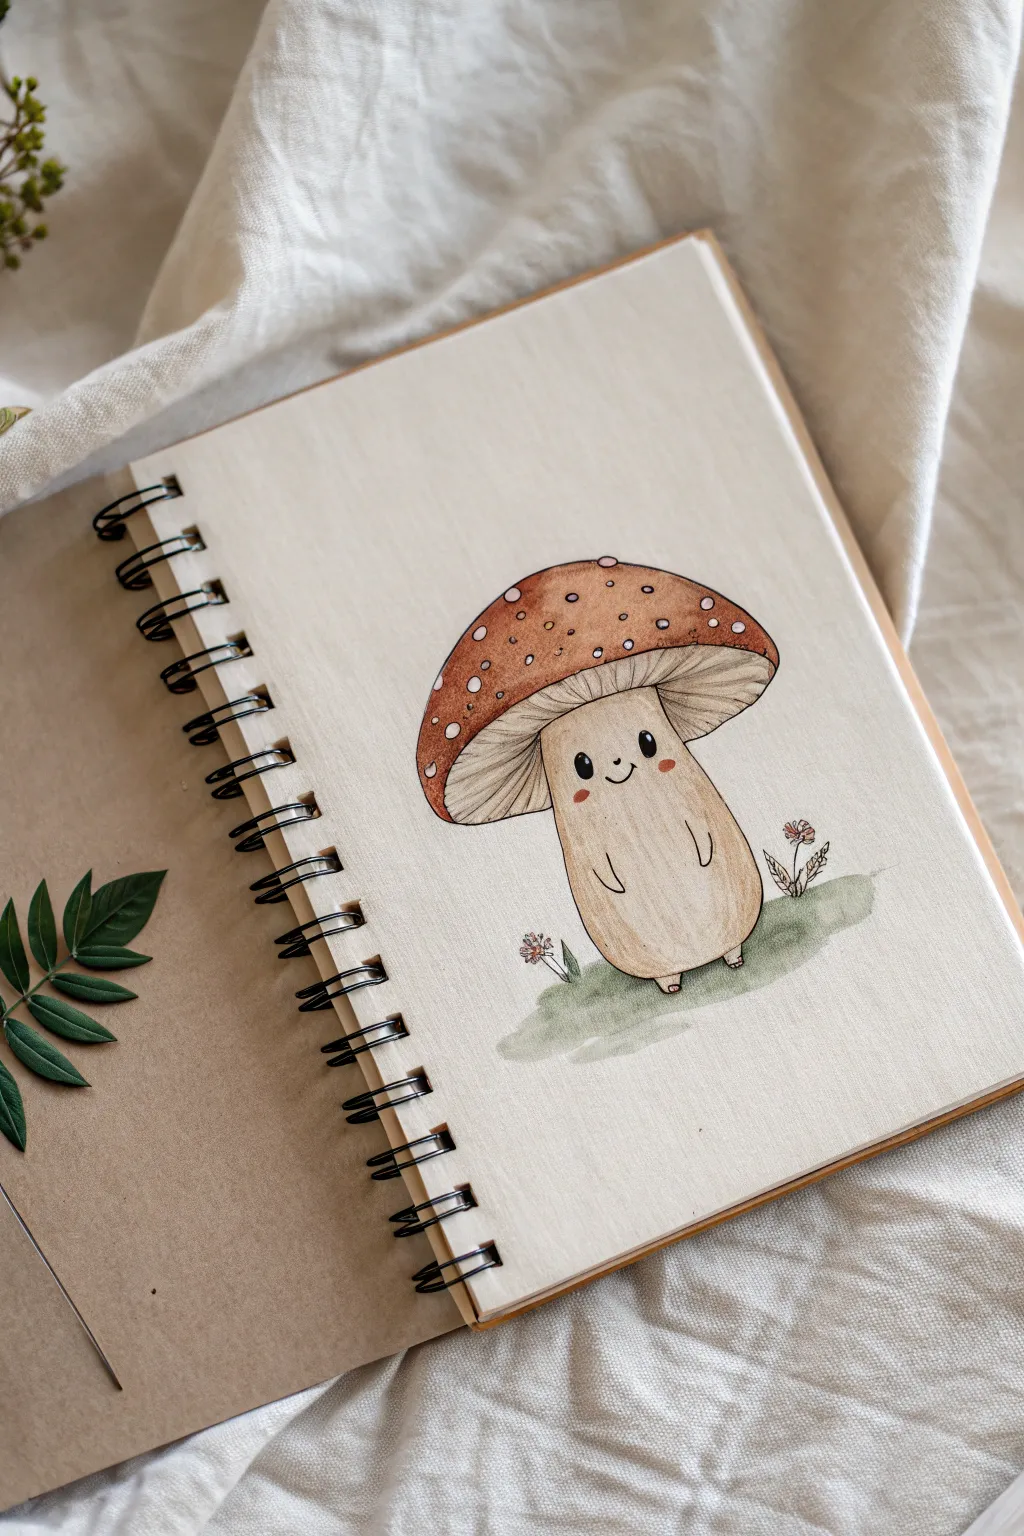

This adorable anthropomorphic mushroom brings a touch of forest magic to your sketchbook, featuring soft watercolor tones and crisp ink lines. The simple shapes and friendly expression make it a perfect beginner-friendly character study for illustration.
How-To Guide
Materials
- Sketchbook with mixed media or watercolor paper
- HB Pencil and eraser
- Fine liner pen (black, waterproof, size 03 or 05)
- Watercolor paints (shades of brown, ochre, soft red, green)
- Small round watercolor brush (size 4 or 6)
- White gel pen (optional for highlights)
- Water cup and paper towel
Step 1: Sketching the Base Shapes
-
Draw the stalk:
Begin by lightly sketching a rounded, oblong shape for the mushroom’s body. It should be wider at the bottom like a pear ensuring it feels grounded and sturdy. -
Add the cap:
Draw a large, wide semicircle sitting atop the stalk. Extend the edges well past the body so it looks like a big, protective umbrella. -
Define the underside:
Connect the outer edges of the cap back to the stalk with a slightly curved line to create the underside where the gills will go. -
Add character details:
Sketch two tiny, simple ovals for feet at the bottom. Add two small curved lines on the belly for arms. -
Sketch the face:
Place the facial features low on the stalk for maximum cuteness. Draw two wide-set eyes, a tiny u-shaped smile, and round cheeks. -
Create the environment:
Lightly indicate a rough patch of ground beneath the feet and sketch simple flower shapes on either side to frame the character.
Keep Those Spots White
If painting around the tiny circles on the cap is too difficult, paint the whole cap red-brown first. Once dry, use a white gel pen or opaque white gouache to add the spots on top.
Step 2: Inking the Outline
-
Outline the main form:
Using your waterproof fine liner, carefully trace over your pencil lines for the cap and body. Break the line slightly at the bottom of the stalk for a more organic feel. -
Draw the gills:
Under the cap, draw fine lines radiating from the stalk outward to the cap’s edge. Keep these lines fairly close together but let them vary slightly in length. -
Ink the face:
Fill in the eyes solid black, leaving a tiny white dot in each for a sparkle if you can, or color it solid and add white later. -
Environment details:
Ink the tiny flowers and grass blades with quick, loose strokes. Don’t worry about closing every shape perfectly. -
Erase pencil lines:
Once the ink is completely dry—wait at least a minute—gently erase all the underlying graphite sketches.
Forest Floor Friends
Expand the scene by drawing a second, smaller mushroom character next to this one, or add a tiny snail climbing up the stalk to give your monster a companion.
Step 3: Adding Watercolor
-
Paint the stalk base:
Mix a very watery, pale ochre or beige. Wash this over the entire stalk body. While it’s wet, drop a tiny bit of darker brown at the bottom and sides for subtle shading. -
Color the cap:
Using a reddish-brown tone, paint the top of the mushroom cap. Leave small circular spots unpainted to act as the white speckles, or paint around them carefully. -
Deepen the cap color:
While the red-brown is still damp, add a slightly darker brown to the bottom edge of the cap to create volume and roundness. -
Shade the gills:
Use a diluted brown-grey wash for the underside of the cap (the gills). Keep this lighter than the top of the cap but darker than the stalk. -
Add blush:
With a tiny amount of diluted pink or red paint, gently dab two rosie circles on the cheeks just below the eyes. -
Paint the grass:
Mix a muted sage green and paint a loose, irregular patch under the feet. I like to keep the edges soft and uneven here to look like watercolor texture. -
Final touches:
Dab a tiny bit of color onto the flower petals. If you colored the eyes solid black, use a white gel pen to add a tiny highlight dot to each eye once the paper is bone dry.
Now your sketchbook has a charming little forest guardian watching over your pages
Heart-Shaped Love Monster
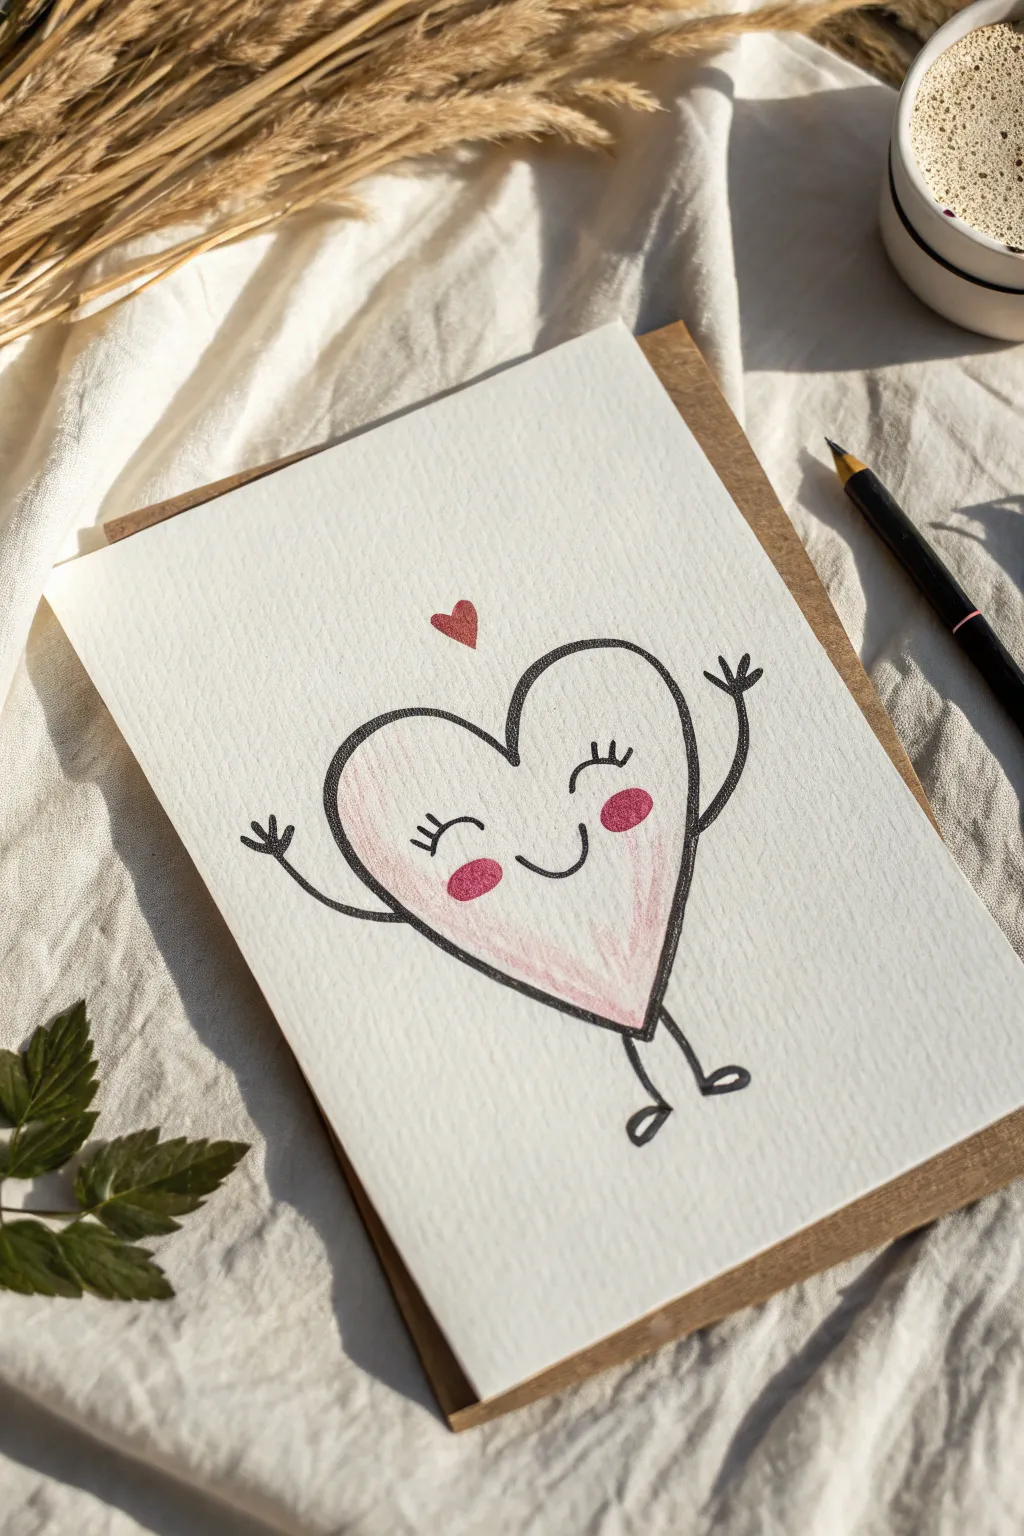

This adorable hand-drawn heart character makes for the perfect homemade greeting card or sweet doodle. With its cheerful expression and simple lines, it’s a wonderfully accessible project for artists of any skill level.
Detailed Instructions
Materials
- Textured watercolor paper or cardstock (rectangular cut)
- Black fine liner pen or thin marker
- Pink colored pencil or crayon
- Red marker or colored pencil
- Kraft paper envelope (optional for presentation)
- Pencil and eraser (for sketching)
Step 1: Sketching the Outline
-
Prepare your paper:
Start with a clean sheet of high-quality watercolor paper or cardstock. The texture adds a nice organic feel to the final drawing. -
Sketch the heart base:
Using a pencil, lightly draw a large, rounded heart shape in the center of your paper. Keep the bottom point slightly softer and rounded rather than sharp. -
Add the arms:
Draw two curved lines extending outward from the sides of the heart, bending slightly upward like the character is cheering. -
Add the legs:
Sketch two short, straight lines coming down from the bottom of the heart for legs. Add small oval shapes at the ends for feet. -
Sketch the face:
In the upper middle area of the heart, lightly mark positions for two eyes and a wide, u-shaped smile.
Step 2: Refining the Lines
-
Ink the main body:
Take your black fine liner pen and carefully trace over your pencil heart outline. A slightly uneven line weight gives it more character. -
Detail the limbs:
Trace the arm lines, adding three small, distinct fingers at the end of each hand. Then ink the straight legs and the loop-like feet. -
Draw the facial features:
Ink the smiling mouth with a confident curve. For the eyes, draw two small upward curves (closed happy eyes) and add three little eyelashes to the outer corner of each. -
Erase pencil marks:
Wait a moment for the ink to dry completely to avoid smudging, then gently erase all your initial pencil sketches.
Texture Trick
Use the side of your colored pencil lead, rather than the tip, when shading the heart’s body. This picks up the paper’s natural grain for a softer look.
Step 3: Adding Color & Details
-
Add the cheeks:
Using a pink colored pencil or marker, draw two distinct oval circles on either side of the smile for rosy cheeks. Fill them in solidly. -
Shade the body:
With a pink colored pencil, gently shade the interior of the heart. I like to keep the strokes vertical and slightly rough, leaving some white space near the top for a highlight effect. -
Draw the floating heart:
Centered just above the main character’s head, draw a tiny heart shape. -
Color the tiny heart:
Fill in the floating heart with a red marker or colored pencil to make it pop against the paler pink of the body. -
Final touches:
Check your black lines. If any look too thin, go over them once more to ensure the character stands out boldly against the textured paper.
Make it Pop
Add glitter glue or metallic ink to the floating red heart for a touch of sparkle. You can also mount the white paper onto brown kraft cardstock for a framed effect.
Now your charming little love monster is ready to brighten someone’s day
Bunny-Eared Monster Pal
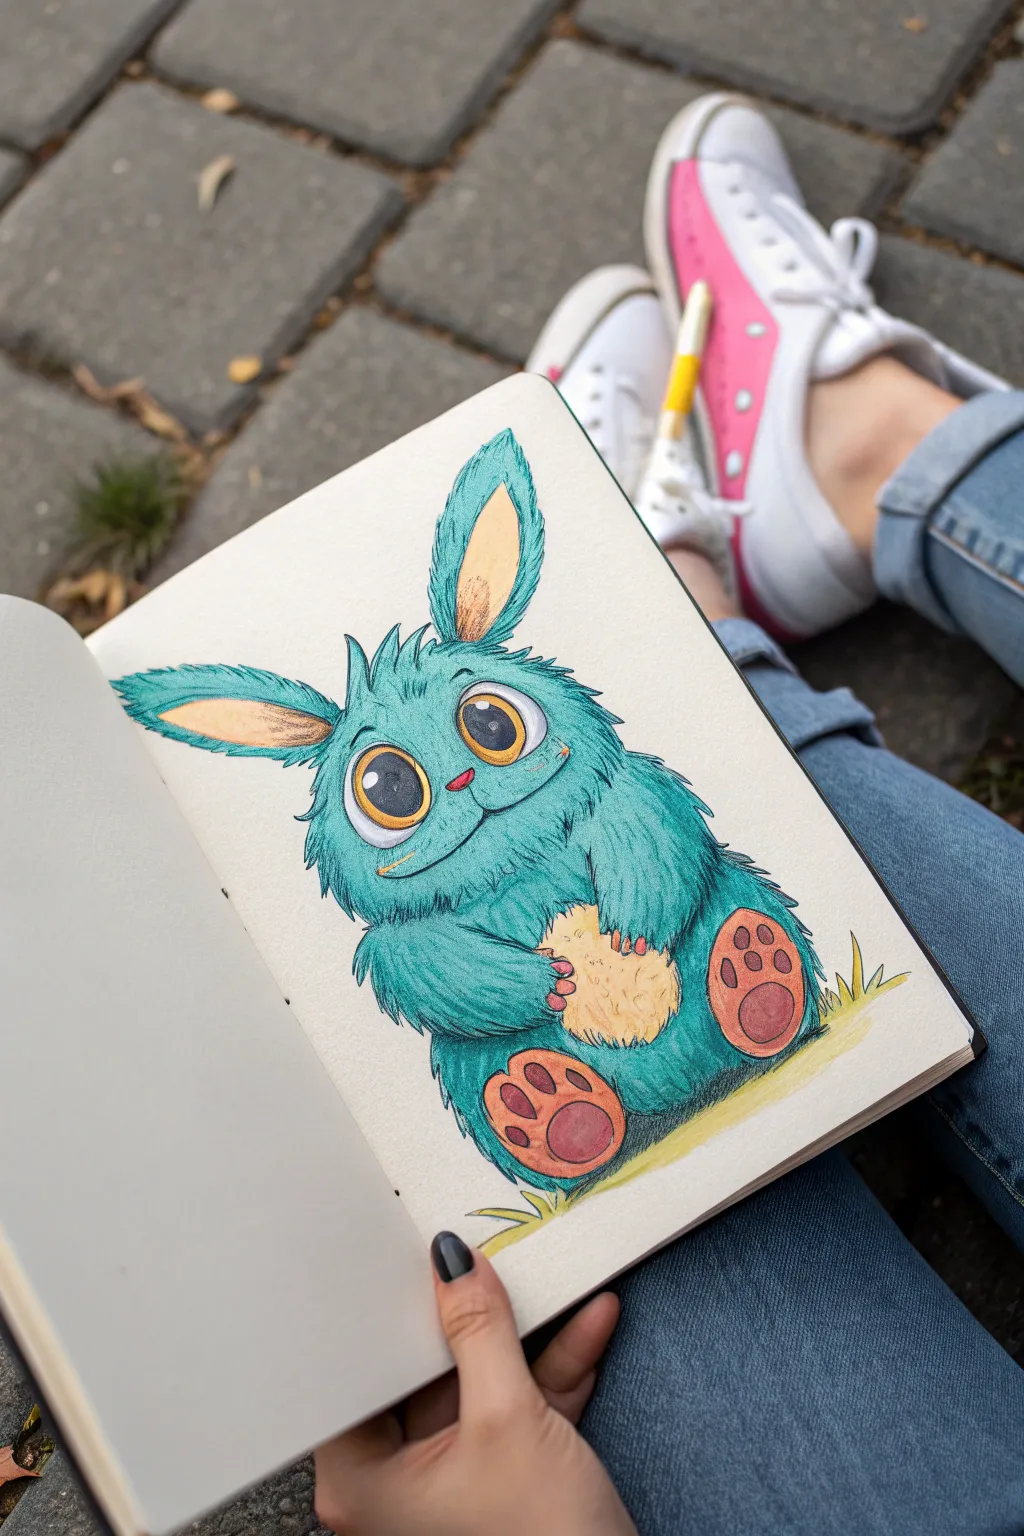
This adorable sketch captures a fluffy, teal creature halfway between a rabbit and a monster, happily clutching a giant biscuit. With its large, expressive amber eyes and soft fur texture, this drawing is perfect for practicing character design and rendering soft surfaces.
How-To Guide
Materials
- Sketchbook with heavy paper (mixed media or bristol)
- Graphite pencil (HB or 2B) for initial sketch
- Kneaded eraser
- Fine-liner pen (black, 0.1mm and 0.3mm)
- Alcohol-based markers (teal, light yellow, soft pink)
- Colored pencils (teal, dark blue, yellow ochre, orange, pink, brown)
- White gel pen for highlights
Step 1: Sketching the Base Shape
-
Draw the body:
Start by lightly sketching a large, rounded pear shape for the monster’s body. The bottom should be wider than the top to give it a squat, seated posture. -
Add the ears:
Attach two long, bunny-like ears to the top of the head. Position the left one pointing outward and the right one standing a bit straighter, but keep the tips rounded, not sharp. -
Outline the face and limbs:
Sketch two very large circles for eyes in the upper third of the face. Add a small smile line between them. Draw stubby arms reaching toward the center of the belly and two large, oval feet sticking out at the bottom. -
Add the biscuit:
Draw a jagged, round shape held between the paws to represent the biscuit or cookie the monster is eating.
Step 2: Inking and Base Color
-
Refine the outline:
Using your fine-liner, go over your pencil lines. Instead of a solid line for the body, use short, flicking strokes to simulate clumps of fur. Keep the lines around the eyes smooth and bold. -
Erase guidelines:
Once the ink is completely dry, gently run your kneaded eraser over the entire drawing to remove the graphite sketch. -
Apply base color:
Fill in the fur areas with a light teal alcohol marker as a base. Use a circular motion to avoid streaks. Color the inner ears and paw pads with a soft pink marker, and the biscuit with a light yellow or ochre tone.
Fur looking flat?
Ensure you are drawing fur in ‘clumps’ rather than individual hairs. Vary the direction of your strokes slightly so they follow the roundness of the body.
Step 3: Rendering Texture and Depth
-
Deepening the fur:
Take a teal colored pencil that matches your marker base. Draw individual fur strands over the marker layer, focusing on shadow areas like under the chin, beneath the arms, and where the legs meet the body. -
Adding shadow definition:
I like to switch to a darker blue colored pencil here to deepen the shadows further. Apply this sparingly in the deepest crevices of the fur to make the teal pop. -
Detailed eyes:
Color the irises with orange and yellow ochre pencils, blending them to create a gradient. Make the pupils pitch black with a marker or heavy pencil, leaving a large white circle for the reflection. -
Paw pad details:
Use a darker pink or reddish-brown pencil to shade the edges of the paw pads on the feet, giving them a slightly three-dimensional, fleshy look. -
Texturing the biscuit:
Use a brown pencil to add small dots and crumbly texture to the biscuit. Shade the underside where the paws hold it to show dimension. -
Grounding shadow:
Add a soft shadow underneath the monster using a light grey or cool blue pencil, and sketch a few simple blades of grass with a yellow-green pencil to place the character in a scene.
Pro Tip: Eye Depth
Add a tiny line of blue or teal reflection at the very bottom of the orange iris, opposite the white highlight. It mimics light passing through the eye.
Step 4: Final Highlights
-
Eye highlights:
Use a white gel pen to add a crisp, bright glint to the eyes. This brings the character to life instantly. -
Fur highlights:
Add tiny ticks of white gel pen on the tips of the ears and the top of the head where the light would hit the fur. -
Final check:
Review your drawing for any areas that need more contrast. Deepen your darks if the monster looks too flat.
Enjoy your new fuzzy friend and try creating different snacks for them to hold next time
Flower Bloom Monster
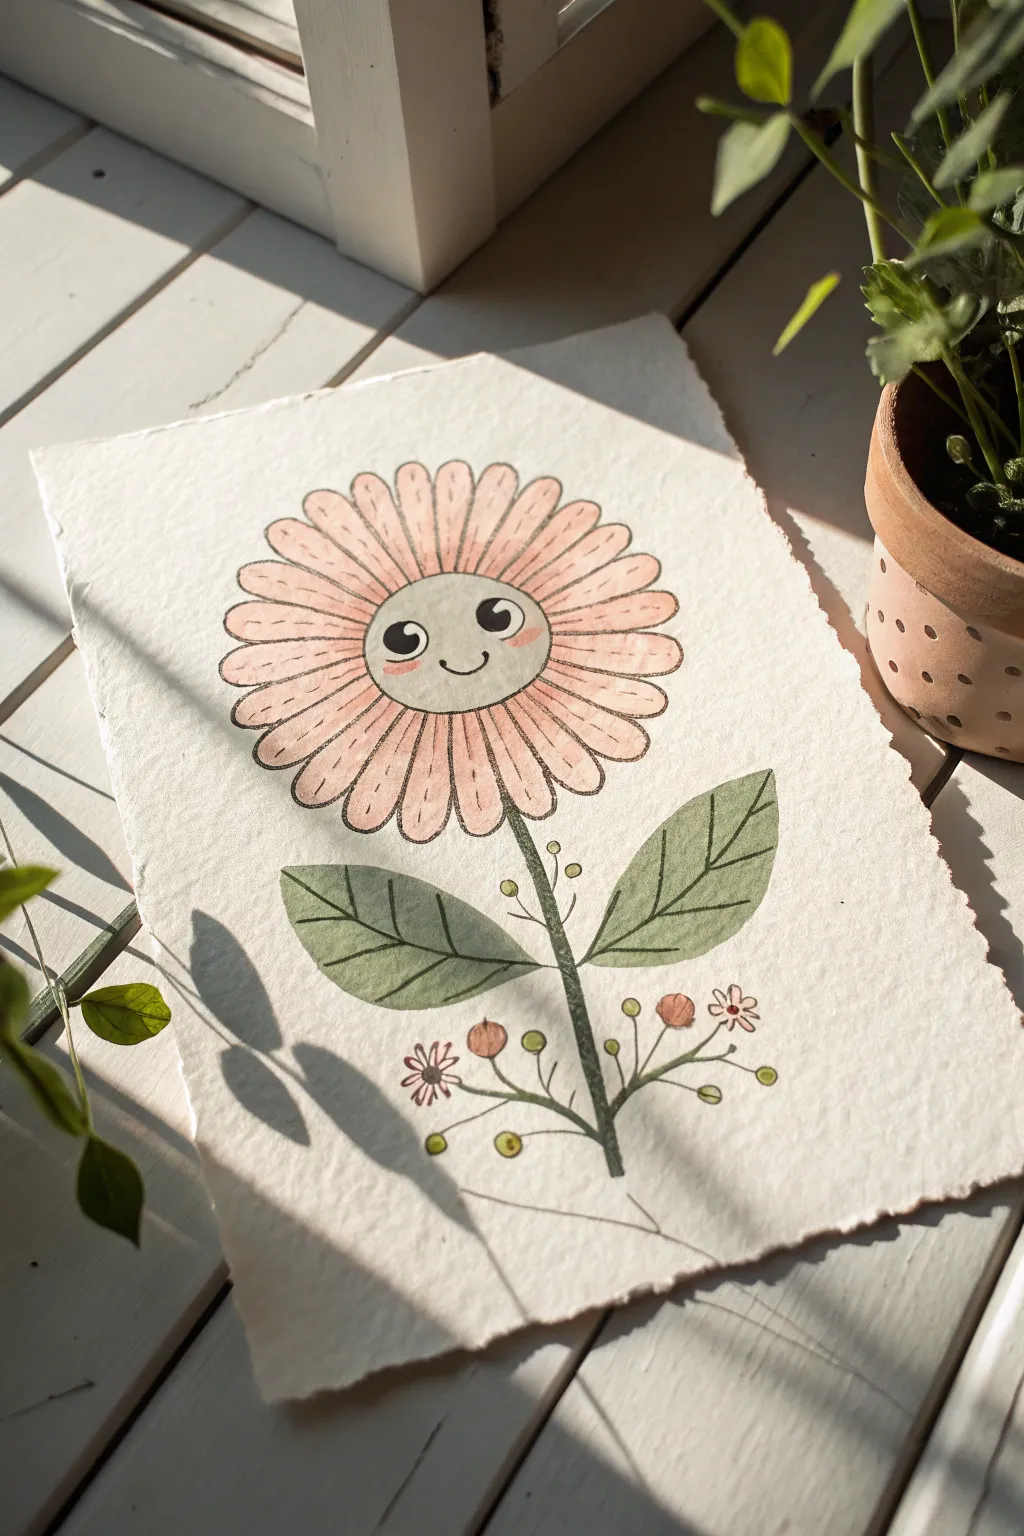
Bring your garden to life with this charming flower bloom character that combines the simplicity of folk art with adorable cartoon features. This project uses watercolor and fine liner pens on textured paper for a warm, handcrafted feel.
Step-by-Step Tutorial
Materials
- Cold press watercolor paper (textured, 300gsm recommended)
- Pencil (HB) and eraser
- Waterproof fine liner pen (black, 0.3mm or 0.5mm)
- Watercolor paints (Pink, Green, Brown/Rust, Yellow Ochre)
- Round watercolor brush (size 4 or 6)
- Small round brush (size 0 or 2 for details)
- Jar of water and paper towels
Step 1: Sketching the Character
-
Center pivot:
Begin by lightly sketching a medium-sized circle in the upper-middle section of your paper. This will be the face of your flower monster. -
Petal guide:
Draw faint radiating lines coming out from the circle to guide your petals, ensuring they stay relatively even in length. -
Petal formation:
Sketch long, oval-shaped petals all around the central circle. They don’t need to be perfectly identical; slight natural variation adds charm to the finished piece. -
Stem and foliage:
Draw a straight vertical line downwards for the stem. Add two large, leaf shapes branching out symmetrically from the middle of the stem—pointed at the tips and rounded near the base. -
Base sprigs:
At the very bottom of the stem, sketch two smaller, delicate branches curving outward. Add tiny circles for berries and small star-shapes for mini flowers on these sprigs. -
Facial features:
Inside the center circle, draw two wide-set oval eyes near the top. Add a small, simple U-curve smile right between them.
Deckled Edge Logic
To get the torn paper look shown in the photo, fold your paper sharply and tear it against a ruler edge instead of cutting with scissors.
Step 2: Adding Color
-
Petal wash:
Mix a watery, pale pink watercolor. Paint the petals, starting from the tip and pulling the color toward the center. It’s okay if the color isn’t perfectly solid; the texture of the paper should show through. -
Face tint:
Use a very diluted wash of grey or cream to lightly tint the face circle, leaving it mostly the color of the paper but distinguishing it from the background. -
Blushing cheeks:
While the face is slightly damp (or dry for more control), dab two small spots of pink just under the eyes for rosy cheeks. -
Greenery:
Mix a muted, earthy green. Paint the stem and the two large leaves. I find that lifting your brush slightly at the end of the leaf stroke helps create a nice tapered point. -
Base details:
Using your smallest brush, paint the tiny berries with a brownish-rust color and the mini flower petals with a touch of diluted pink or rust. -
Drying time:
Allow the entire painting to dry completely. The paper must be bone-dry before you use the ink pen, or the ink will bleed.
Step 3: Inking and Definition
-
Outline the face:
Using your waterproof fine liner, carefully trace the circle for the face. Fill in the pupils of the eyes solid black, leaving a tiny white sparkle in each for life. -
Petal texture:
Outline each pink petal. Add a straight line down the center of each petal, and add tiny dashed lines near the outer tips for texture. -
Leaf veins:
Outline the green leaves and stem. Draw a central vein down each leaf and add diagonal side veins. -
Sprig details:
Trace the delicate bottom branches. Add small dots or circles on the ends of the tiny stems to define the berries. -
Final clean up:
Once the ink is totally set, gently erase any visible pencil marks to leave a clean, crisp illustration.
Change the Mood
Alter the eye shape to change the monster’s personality. Half-lidded eyes look sleepy, while wide circles look surprised.
Display your cheerful flower friend in a simple frame or prop it on a windowsill to brighten up your creative space
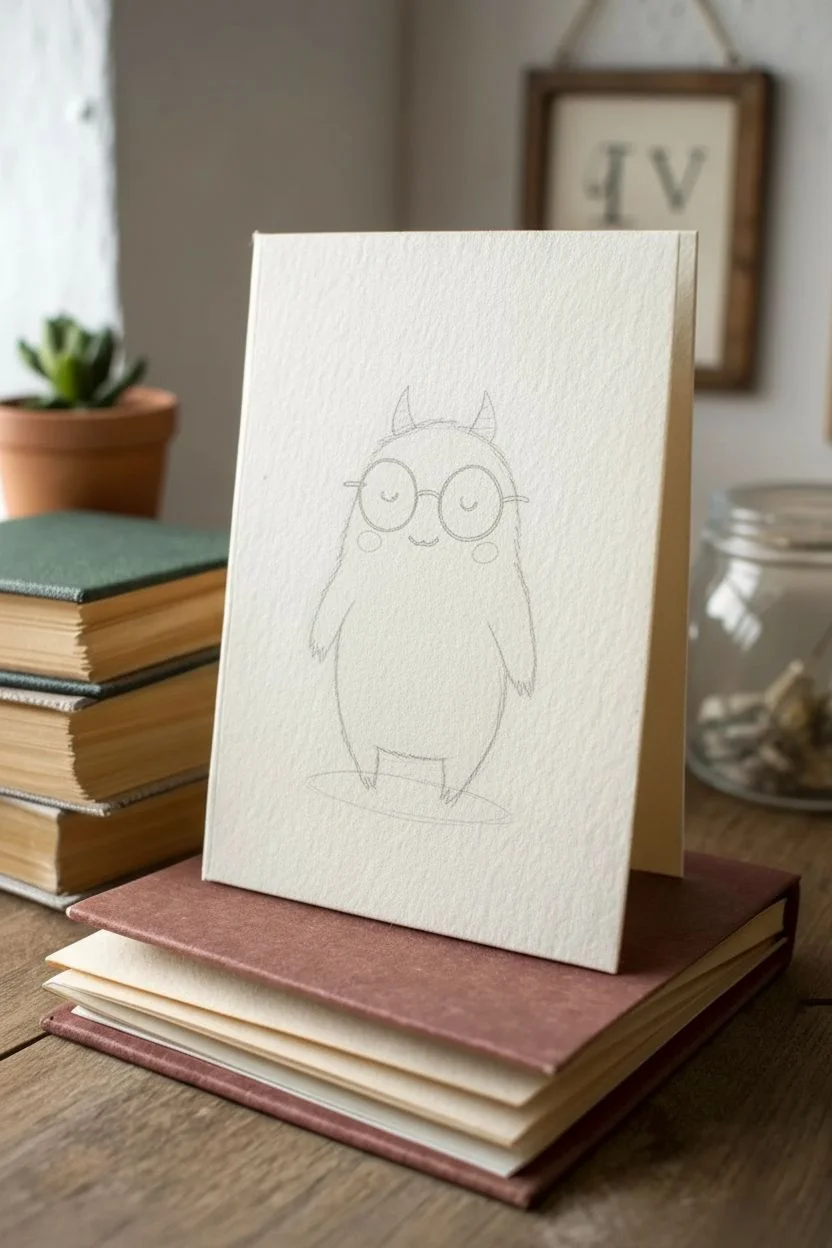
Book-Loving Desk Monster
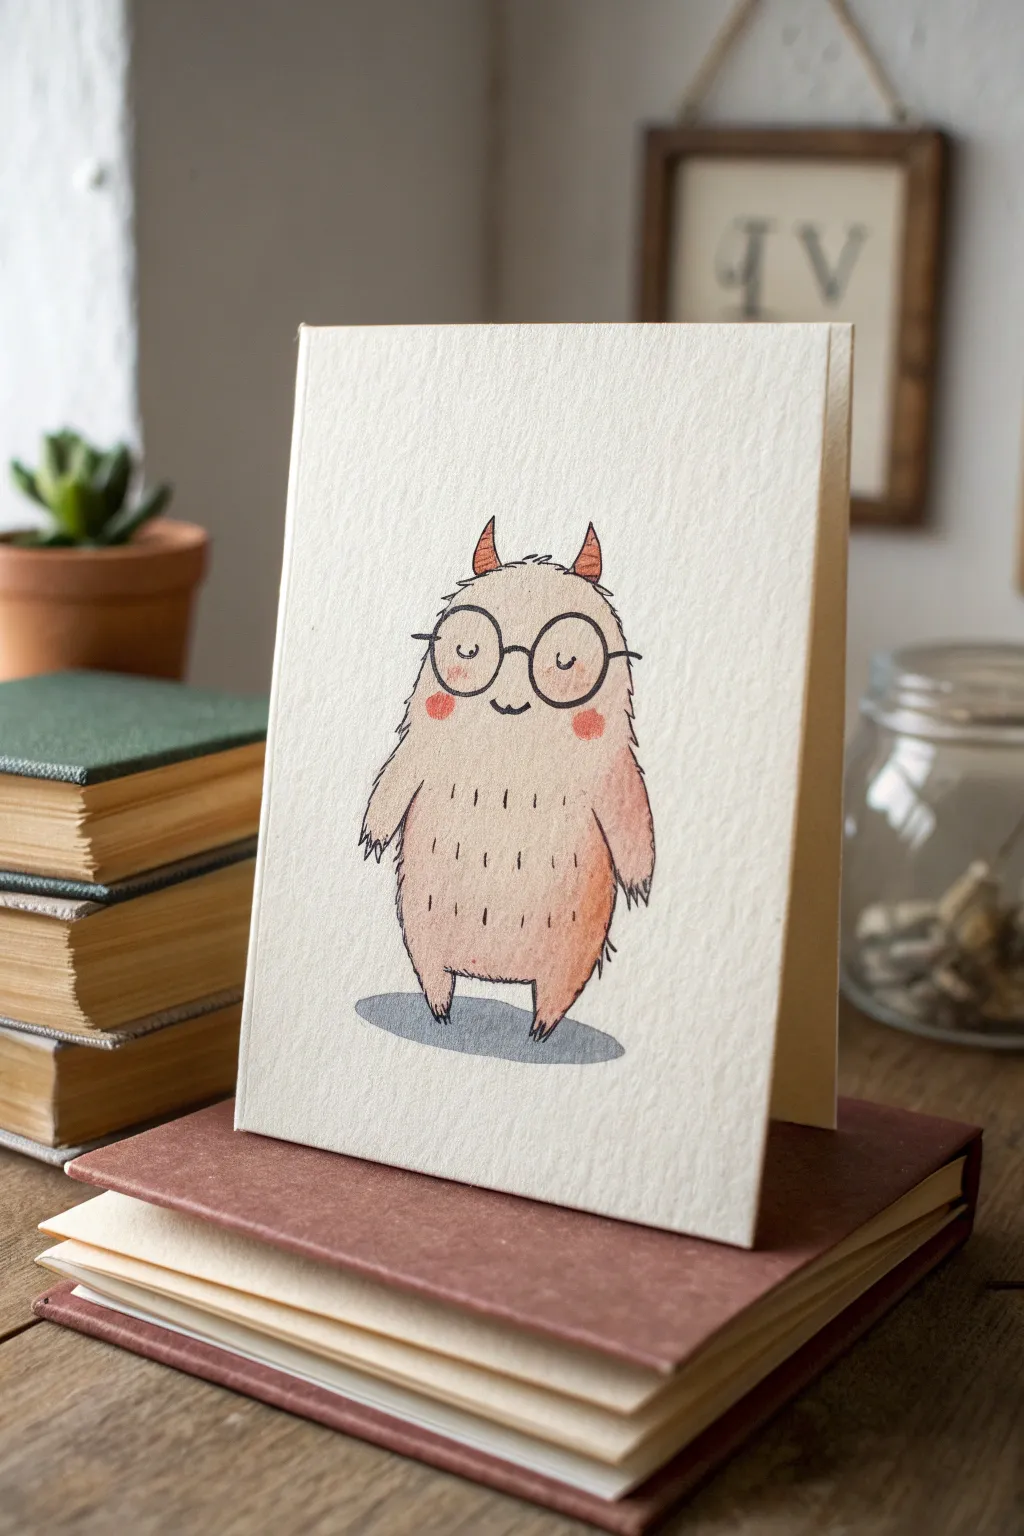
This charming greeting card features a studious little monster with round spectacles and a warm, fuzzy personality. The combination of delicate ink lines and soft watercolor washes creates a textured, vintage illustration style that feels both whimsical and sophisticated.
Step-by-Step
Materials
- Cold press watercolor paper (A5 size, folded to A6)
- Fine liner pen (black, waterproof, size 0.1 or 0.3)
- Watercolor paints (Peach/Buff Titanium, Burnt Sienna, Payne’s Grey, Rose Madder)
- Small round watercolor brush (size 2 or 4)
- HB pencil and soft eraser
- Clean water and paper towel
Step 1: Sketching the Base Shape
-
Outline the body:
Start by lightly sketching a simple, oblong bean shape in the center of your folded card. The top should be slightly narrower than the bottom to give the monster a stable, weighted look. -
Add sensory features:
Draw two large circles near the top quarter for the glasses. Inside, sketch two small U-shapes for closed, happy eyes and a tiny smile right between the lenses. -
Sketch limbs and horns:
Add two small, triangular horns on top of the head. Sketch simple arms hanging by the sides and short, stubby legs at the bottom.
Uneven Wash?
If your watercolor dries with hard edges (blooms), soften them with a clean, damp brush while still slightly wet. If dry, own it as texture—monsters tend to be scruffy anyway.
Step 2: Inking the Character
-
Ink the glasses first:
Using your waterproof fine liner, carefully trace the round glasses first. This ensures they stay perfect circles before you add the fur texture around them. -
Create fur texture:
Instead of tracing the body outline with a solid line, use short, quick flicks of the pen to create a furry edge. Vary the direction slightly to make it look natural and fluffy. -
Detail the face:
Ink the closed eyes, the small nose bridge connecting the glasses, and the little smile. Add the side stems of the glasses disappearing into the fur. -
Define the extremities:
Ink the horns with a solid line. For the hands and feet, draw small, sharp claws (three on each limb) to give him a bit of monster character. -
Add inner texture:
Draw scattered, tiny vertical dashes inside the body area. Focus these towards the bottom belly area to suggest volume and fluffiness. -
Erase pencil lines:
Wait until the ink is completely dry—I usually give it at least five minutes—then gently erase all your pencil sketches to leave a clean black-and-white drawing.
Academic Accessory
Give your monster a personality upgrade by drawing a tiny book tucked under one arm or a bow tie under the chin for that distinguished professor look.
Step 3: Watercolor Application
-
Mix the body color:
Create a very watery mix of Buff Titanium or a pale peach. You want this wash to be transparent so the texture shows through. -
Paint the first wash:
Fill in the monster’s body with the pale wash. Don’t worry if it’s slightly uneven; the variation adds to the watercolor charm. -
Add shading:
While the paper is still slightly damp, drop a tiny bit of Burnt Sienna or a darker tan into the bottom of the belly and along the right side to create a shadow. -
Paint the details:
Use a more concentrated Burnt Sienna or orange-brown to paint the horns. This contrast draws the eye to the top of the character. -
Add the blush:
Using a diluted Rose Madder or soft pink, paint two distinct round circles on the cheeks, just below the glasses. -
Shadow the tips:
Add a touch of darker brown paint to the very tips of the paws and feet to ground the character. -
Cast the shadow:
Mix a watery grey or blue-grey (Payne’s Grey works beautifully). Paint a flat oval shadow underneath the monster’s feet to make him look like he’s standing in a real space.
Now you have a studious little companion ready to decorate your desk or be sent to a fellow book lover
Teacup Surprise Monster
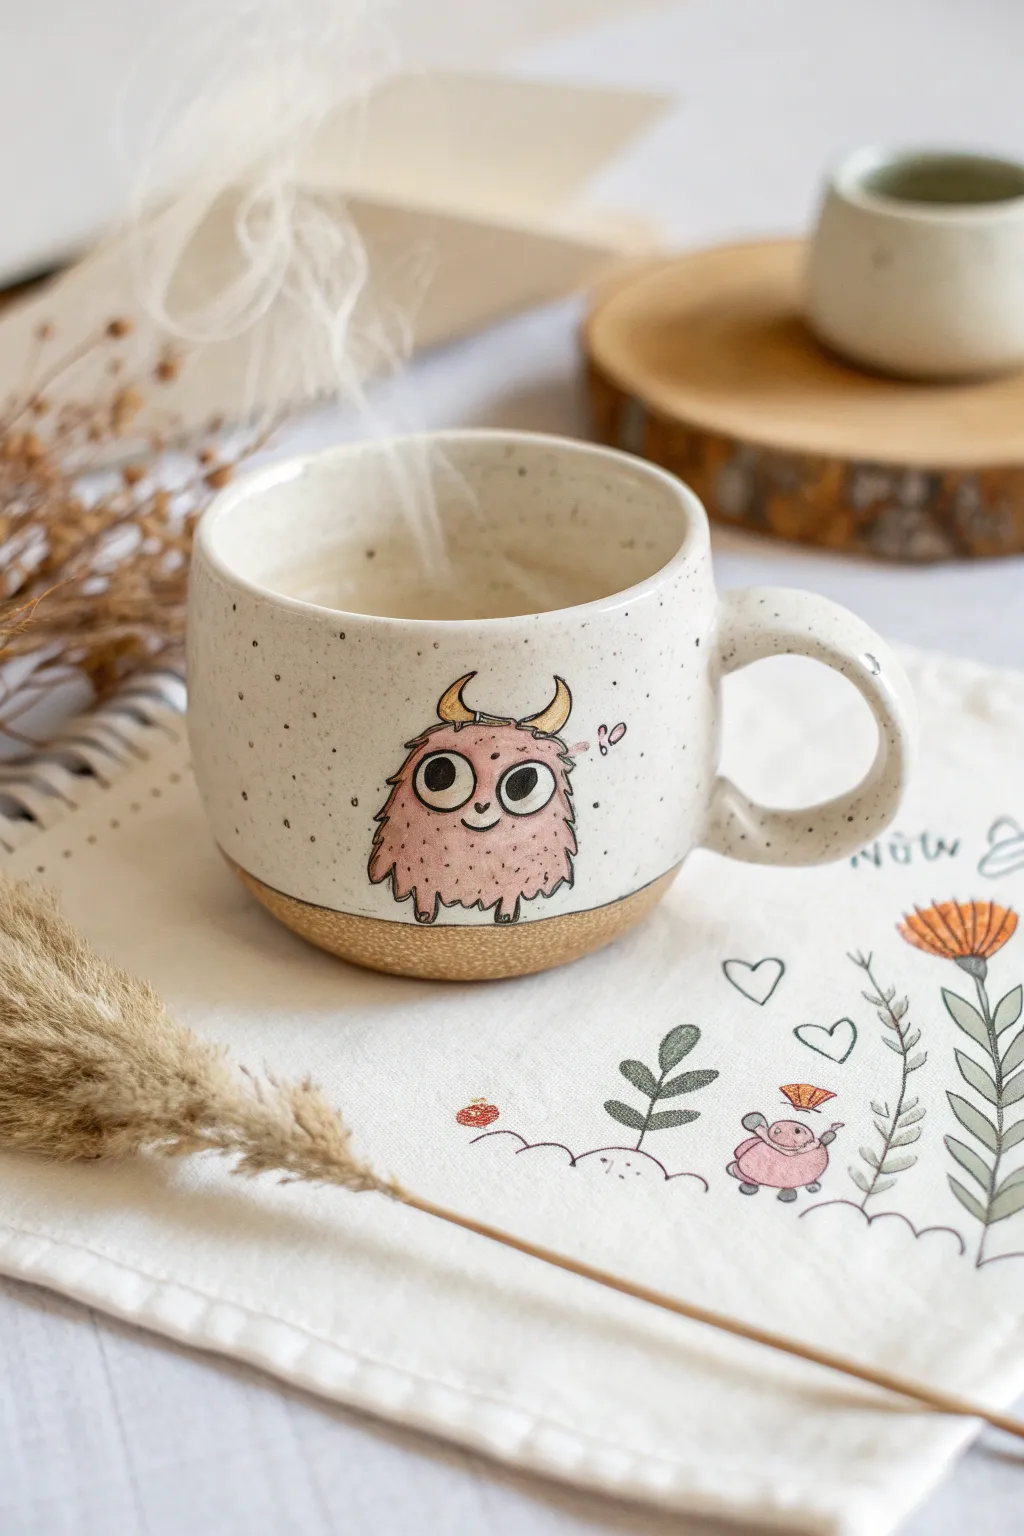
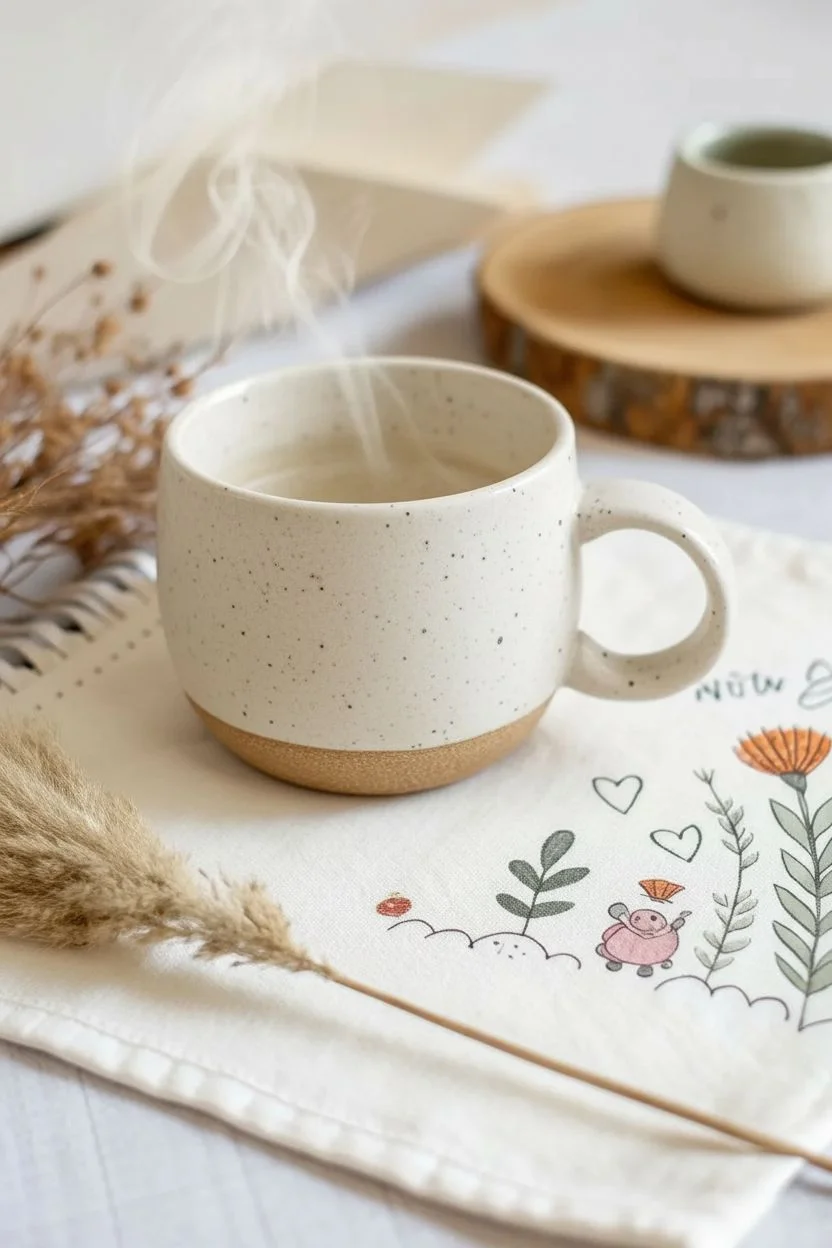
Turn a plain ceramic mug into a cozy companion with this adorable hand-painted monster design. Using simple line work and soft colors, you’ll create a charming speckled teacup that brings a smile to every sip.
Step-by-Step Tutorial
Materials
- Plain cream or speckled white ceramic mug (matte or satin finish works best)
- Pebeo Porcelaine 150 paints (or similar ceramic paint markers)
- Fine point black ceramic outline marker
- Soft pink ceramic paint
- Golden yellow ceramic paint
- Rubbing alcohol and cotton pads
- Fine detail paintbrush (size 0 or 00)
- Oven for curing
- Paper towels
- Masking tape (optional)
Step 1: Preparation and Planning
-
Clean surface:
Before you start, wipe the entire surface of the mug with rubbing alcohol. This removes any oils or fingerprints that could prevent the paint from adhering properly. -
Positioning:
Visualize where you want your monster to sit. He should be centered on the side facing outward when held. If you’re nervous about freehanding, you can lightly sketch the shape with a soft pencil first.
Step 2: Drawing the Monster
-
Outline the body:
Using your fine black ceramic marker, draw a slightly irregular, fuzzy oval shape. Make the lines ragged and jagged rather than smooth to simulate fur texture. -
Add the feet:
At the bottom of the furry oval, draw two tiny, stubby legs with simple claws. Keep them short and cute. -
Draw the eyes:
Place two large circles near the top half of the body. They should almost touch each other. Inside, draw smaller black pupils, leaving a tiny white dot in each for a reflective sparkle. -
Expression details:
Draw a tiny, curved smile right between the eyes. Add small jagged eyebrows floating just above the eyes to give him a surprised or curious look. -
Draw the horns:
Sketch two curved horns coming out of the top of the monster’s head. Imagine crescent moon shapes pointing inward. -
The love note:
Add a tiny heart shape floating to the right of the monster to show he sends his love.
Clean Lines
Keep a cotton swab dipped in rubbing alcohol nearby while drawing. It acts like an eraser for wet paint if your lines go astray.
Step 3: Adding Color
-
Mix the pink:
Squeeze a small amount of soft pink ceramic paint onto a palette. If you only have bright pink, mix in a tiny dot of white to soften it. -
Fill the fur:
Using your fine detail brush, gently fill in the monster’s body with the pink paint. I prefer to use a stippling motion rather than long strokes to maintain that fuzzy texture. -
Avoid the lines:
Be careful not to paint over your black outlines or into the white of the eyes. Leave a tiny gap if necessary; it adds to the illustrated style. -
Paint the horns:
Wash your brush thoroughly, then use the golden yellow paint to fill in the horns. -
Adding texture:
Once the pink base layer is touch-dry, use the fine black marker to add tiny dots, dashes, and extra fur lines right over the color to bring dimension to the coat.
Napkin Match
Use fabric markers on a plain cotton napkin to draw a matching scene, like the flowers shown, creating a complete tea set gift.
Step 4: Finishing Touches
-
Speckle effect:
If your mug wasn’t pre-speckled, load a toothbrush with diluted black paint and run your thumb over the bristles to flick tiny specks across the mug surface. -
Dry thoroughly:
Let the mug sit for at least 24 hours to allow the paint to fully dry before baking. This is crucial for durability. -
Bake to cure:
Place the mug in a cold oven. Set the temperature to 300°F (150°C). Once it reaches temperature, bake for 35 minutes. Turn the oven off and let the mug cool completely inside.
Now fill your new favorite mug with a steaming drink and enjoy the company of your little monster friend
Pattern-Body Monster Mix
This sketchbook spread features a delightful gang of three monsters, each showcasing a unique pattern and personality. Using simple shapes and repetitive motifs like spirals, zig-zags, and dashes, you’ll create a cohesive yet varied monster family.
Step-by-Step
Materials
- Sketchbook or heavyweight drawing paper
- HB Pencil
- Eraser
- Fine liner pen (black, archival ink)
- Thicker marker (black) or brush pen
- Colored pencils or markers (red/orange, light yellow/cream)
Step 1: Sketching the Shapes
-
Plan the layout:
Visualize your page layout. You’ll want one character on the left page and two grouped together on the right page. -
Left monster outline:
On the left page, lightly sketch a large, vertical oval shape. Add two stick legs at the bottom. -
Middle monster outline:
On the right page, draw a slightly squatter, gumdrop-shaped oval for the middle monster. Give it small pointed ears on top. -
Right monster outline:
Next to the middle one, sketch a tall, pill-shaped body. Draw two curving horns sticking out from the top of its head. -
Facial features:
Add large circular eyes to all three. The left and right monsters get wide, toothy grins, while the middle one gets a small rectangular mouth.
Smudge Alert
Wait at least 5 minutes before erasing pencil lines over ink. If your spirals are colored marker, give those extra time or the black can bleed into them.
Step 2: Inking the Left Monster
-
Spiky outline:
Using your fine liner, go over the left oval’s outline but add varying sizes of spikes along the top and left side to give it a fuzzy texture. -
Zig-zag belly:
Draw a bold zig-zag line across the center of its body. Fill in the triangles pointing downward with black ink to create a sharp pattern. -
Striped limbs:
Ink the thin arms and legs, adding horizontal stripes all the way down. Don’t forget the little feet at the bottom. -
Face details:
Ink the eyes and pupils. For the mouth, draw a horizontal line with small vertical dashes for teeth.
Make it yours
Try swapping the patterns! Give the spiky monster spots and the tall monster the zig-zag belly. Mixing and matching textures creates infinite variations.
Step 3: Inking the Right Page Duo
-
Spiral buddy outlines:
Ink the smooth outline of the middle monster. Draw the two pointed ears and stick arms with simple three-fingered hands. -
Spiral pattern:
Inside the middle body, draw scattered spirals. Use a red or orange pen/pencil for these to make them pop against the black ink. -
Tall monster texture:
Ink the tall monster on the right. Instead of a solid line, use small, dashed tick marks all over its body to suggest fur or texture. -
Horns and face:
Ink the curved horns with a cross-hatching pattern. Draw the wide smile and add triangular teeth inside. -
Color accents:
Lightly shade the tall monster’s body with a cream or pale yellow color if desired. Color the middle monster’s tongue red.
Step 4: Final Touches
-
Grounding shadows:
Beneath each monster, use a scribbly, hatching motion with your black pen to create a shadow. This anchors them so they aren’t floating in space. -
Speech bubble:
Above the middle monster, sketch a wobbly, cloud-like speech bubble. Write a fun sound effect inside, like ‘WARP’ or ‘RAWR’, using block letters. -
Clean up:
Once the ink is completely dry, gently erase all your initial pencil guidelines.
Now you have a page full of personality and pattern to start your sketchbook
Glow-In-The-Dark Night Monster
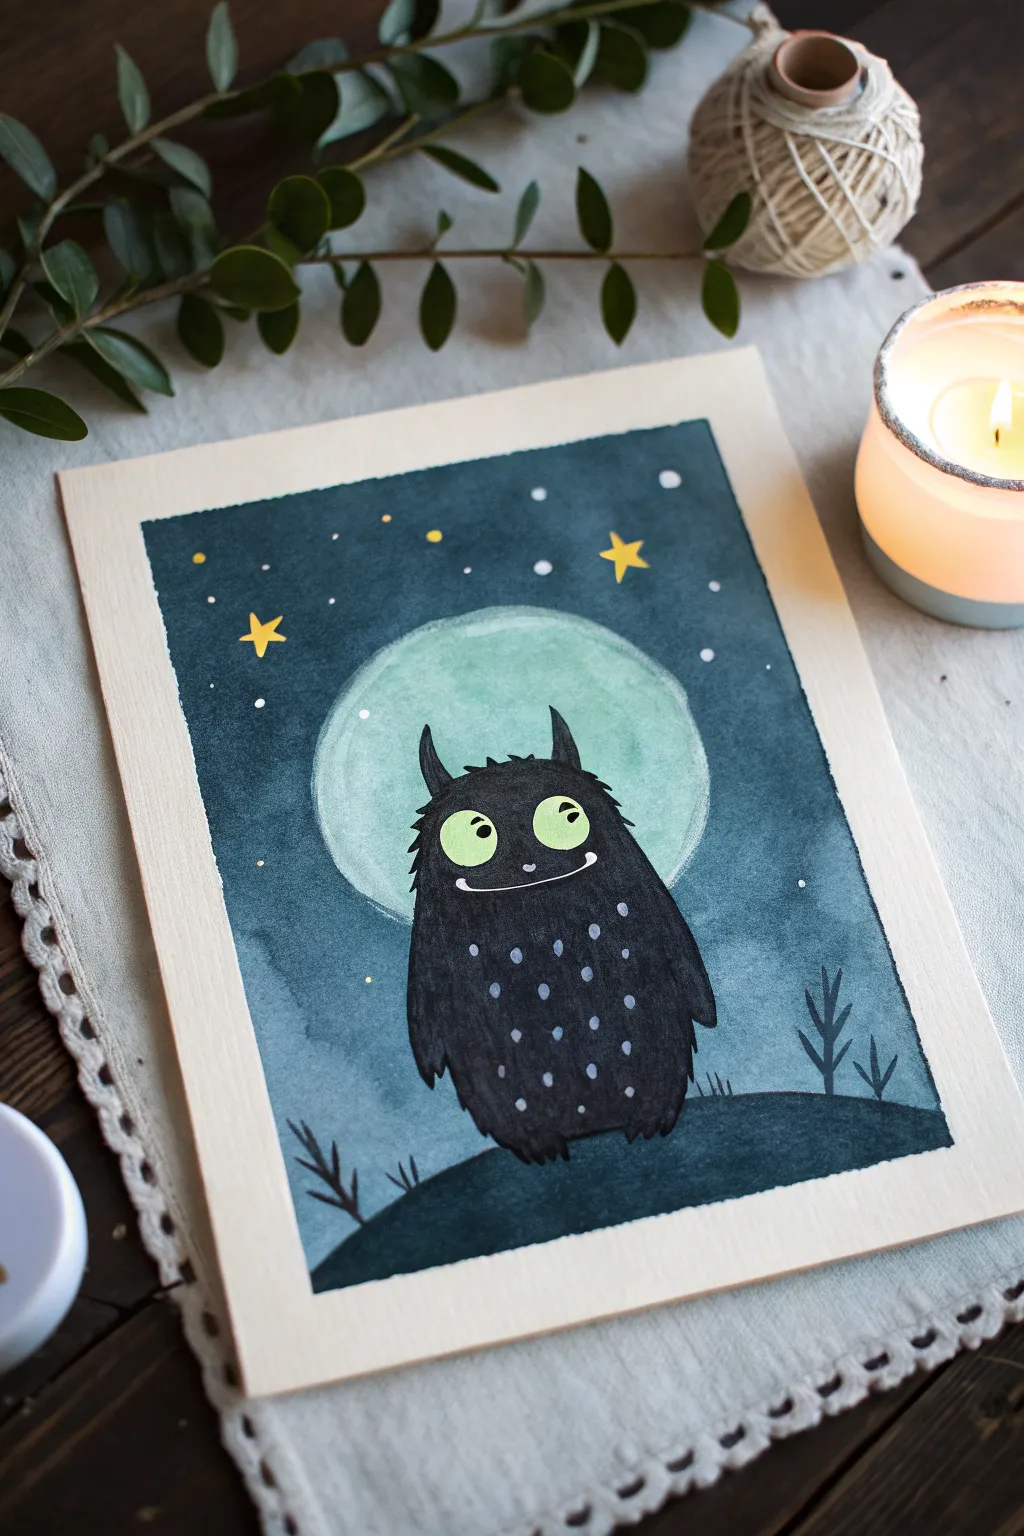
This charming watercolor and ink illustration features a friendly, fuzzy monster basking in the moonlight. The deep indigo sky contrasts beautifully with the pale moon and the character’s bright eyes, making it a perfect project for practicing simple shapes and glowing effects.
Step-by-Step Tutorial
Materials
- Cold press watercolor paper (approx. 5×7 inches)
- Masking tape or painter’s tape
- Watercolors (indigo/Payne’s grey, teal, black)
- Black ink, black gouache, or a very opaque black marker
- White gel pen or white gouache
- Yellow or gold paint pen (or opaque watercolor)
- Assorted brushes (large wash brush, small detail round brush)
- Pencil and eraser
- Compass or round object for tracing
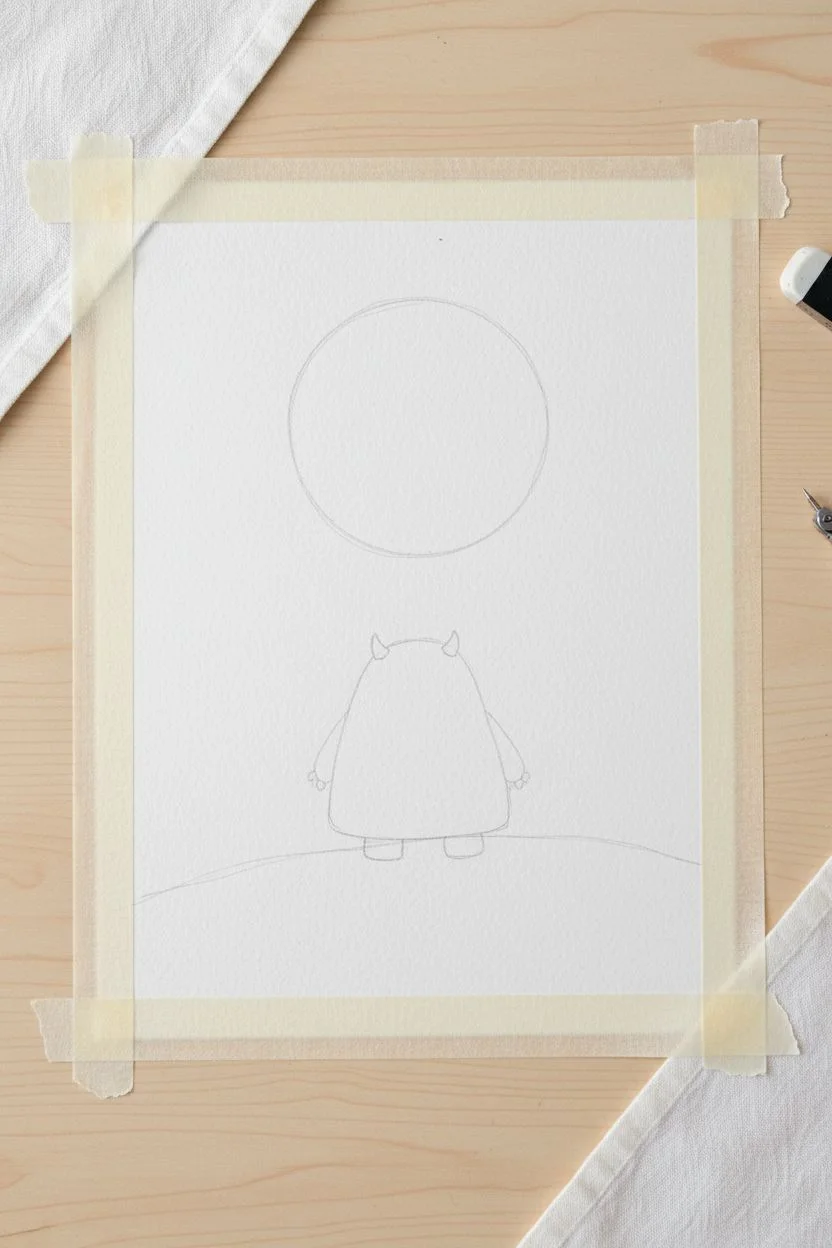
Step 1: Planning and Sketching
-
Tape the borders:
Secure your watercolor paper to a flat surface using masking tape. This creates that clean, crisp white border you see in the final piece. -
Trace the moon:
Using a compass or by lightly tracing a glass, draw a large circle in the upper center of the paper. It should be significant enough to frame the monster’s head later. -
Sketch the landscape:
Draw a gentle, curved hill at the bottom of the page. Make sure the hill overlaps slightly with the bottom of where your monster will stand. -
Outline the monster:
Lightly sketch a gumdrop shape for the monster’s body. It should be centered, with the head overlapping the lower half of the moon circle. Add two small horns on top and simple arms at the sides.
Glow Factor
Mix glow-in-the-dark medium into your moon paint or the monster’s eyes. In daylight it looks normal, but lights out reveals a hidden spooky surprise.
Step 2: Painting the Background
-
Paint the moon:
Mix a very watery, pale teal or mint green. Fill in the moon circle completely. It needs to be quite transparent so it looks luminous. -
Let it dry completely:
Wait until the moon layer is bone dry. If you paint the sky too soon, the dark blue will bleed into your crisp moon shape. -
Mix the night sky color:
Create a deep, dark blue using indigo or Payne’s grey. You want this color to be rich and saturated. -
Fill the sky background:
Carefully paint around the moon circle and the monster’s body shape. Fill the rest of the upper background with your dark blue mix, taking it right to the tape edges. -
Paint the ground:
Use a slightly darker or more opaque version of your sky color (perhaps mixed with a touch of black) to fill in the hill at the bottom.
Uneven Moon Edges?
If your sky paint accidentally bleeds into the moon, wait for it to dry, then use opaque white gouache to clean up the edge before repainting the pale teal tint.
Step 3: Creating the Monster
-
Fill the silhouette:
Using black gouache, ink, or highly concentrated watercolor, fill in the monster’s body shape. Leave two empty circles for the eyes if you are using watercolor; if using gouache, you can paint over them later. -
Add texture details:
While painting the edges of the monster, use small flicking motions with your brush tip to create a ‘furry’ texture rather than a smooth line. -
Paint the eyes:
Once the black body is dry, fill the eye circles with a pale yellow-green. If you painted the body solid black earlier, use opaque gouache for this step. -
Draw the mouth:
Use a fine white gel pen or a thin brush with white paint to draw a wide, silly smile across the face.
Step 4: Illuminating Details
-
Add pupils:
Dot two small black pupils into the green eyes. Placing them closer to the center makes the expression look goofy and friendly. -
Create body spots:
Using your white gel pen or pale grey paint, dab small clusters of dots or ovals onto the monster’s belly to give him a speckled pattern. -
Draw stars:
With a yellow paint pen or gouache, paint two simple five-point stars in the sky. Add smaller white dots around them for distant stars. -
Plant some grass:
Paint simple, dark silhouettes of grass or small alien plants on the hill using your blackest paint. -
Reveal:
Wait until the entire painting is completely dry to the touch, then slowly peel away the masking tape at a 45-degree angle.
Frame your friendly night creature or gift it to someone who needs a little guardian for their room


Have a question or want to share your own experience? I'd love to hear from you in the comments below!