Christmas window drawings are one of my favorite ways to turn plain glass into instant holiday magic with just a few simple lines. Whether you’re using white chalk marker style lines or soft, frosty doodles, you can get a high-impact look even if you’re totally “not a drawer.”
Classic Falling Snowflakes
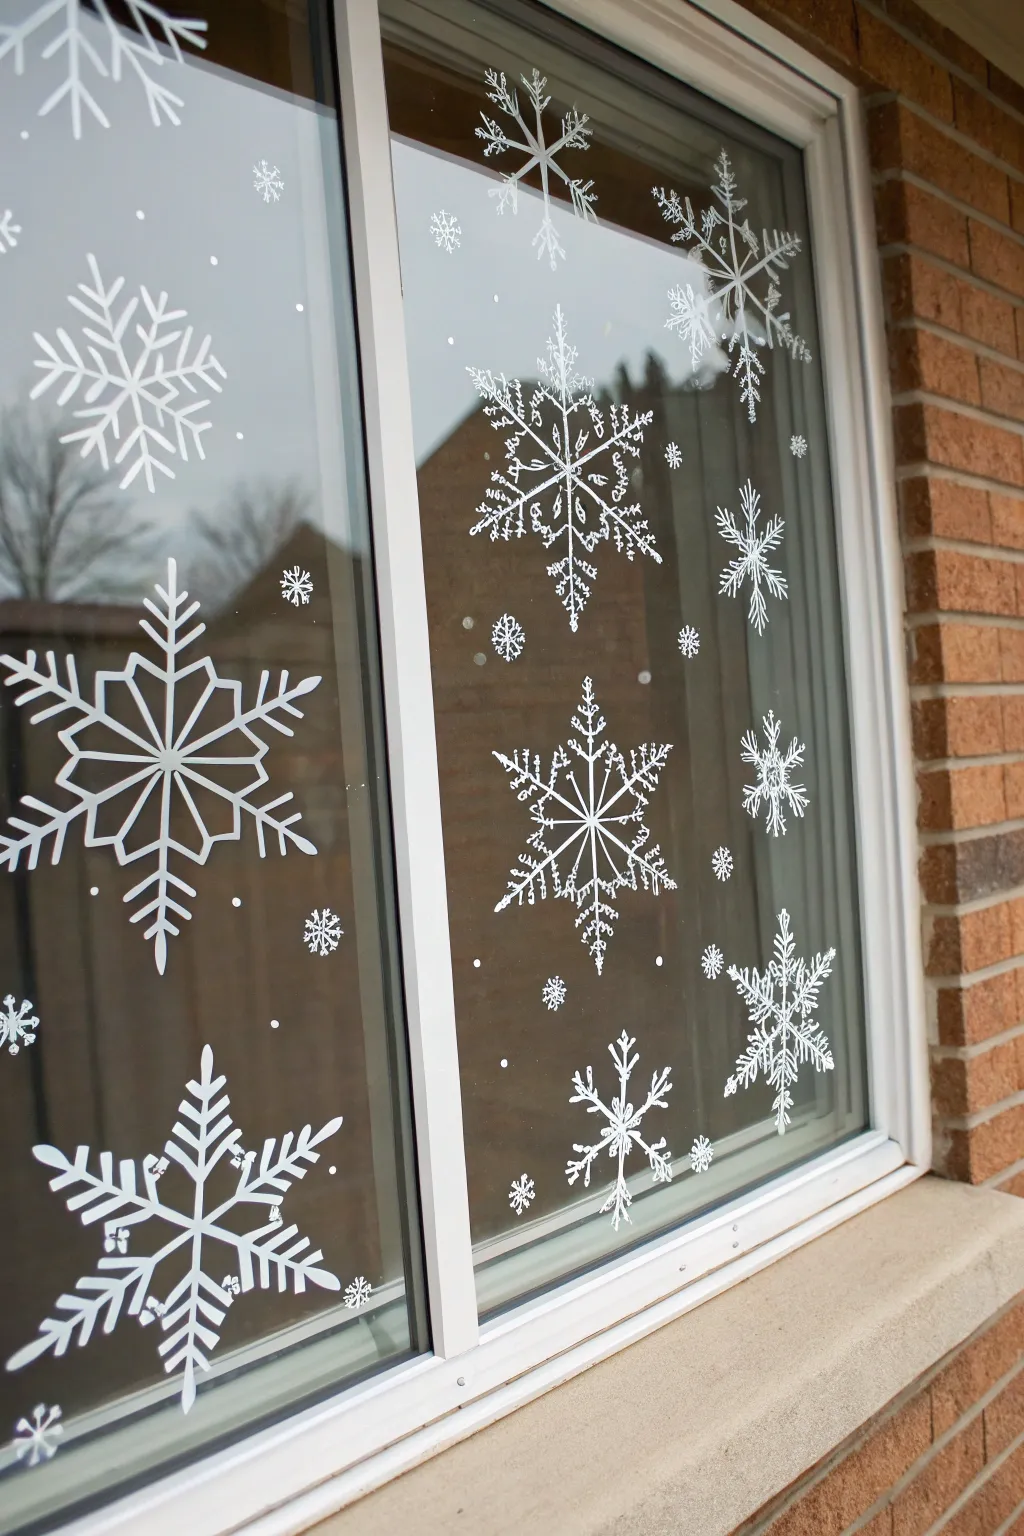
Transform your plain glass panes into a winter wonderland with this elegant and crisp snowflake display. Using white chalk markers, you’ll create a variety of classic six-pointed flakes that mimic the delicate beauty of freshly fallen snow.
Step-by-Step Tutorial
Materials
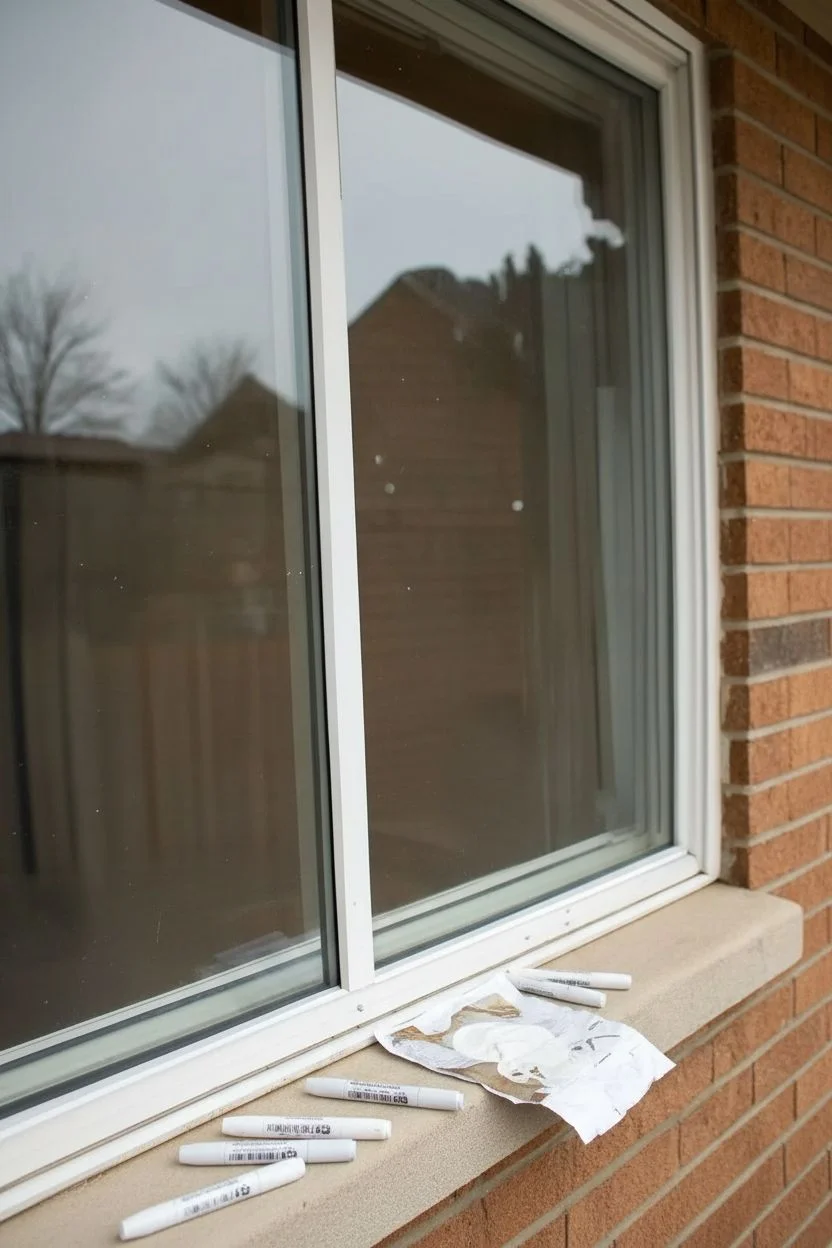
- Glass cleaner (and paper towels)
- White liquid chalk marker (medium tip, approx. 3-5mm)
- White liquid chalk marker (fine tip, approx. 1mm)
- Scrap paper for testing
- Ruler (optional)
- Printable snowflake templates (optional)
Step 1: Preparation and Planning
-
Clean the canvas:
Begin by thoroughly cleaning the window pane inside and out. Any smudges or dust will prevent the chalk marker from adhering smoothly, so ensure the glass is completely dry and streak-free. -
Prime the markers:
Shake your chalk markers vigorously with the cap on. Press the nib up and down on a piece of scrap paper until the white ink flows fully into the tip. -
Visualize the layout:
Look at the window as a whole composition. Imagine where your largest ‘hero’ snowflakes will sit—usually somewhat off-center or staggered—versus where the smaller filler flakes will fall.
Tape It First
Print snowflake patterns on paper and tape them to the OUTSIDE of the glass. You can then trace the lines from the inside for perfect symmetry without guessing.
Step 2: Drawing the Base Structures
-
Start a large flake:
Choose a spot for your first large snowflake. Using the medium tip marker, draw a simple vertical line about 4-6 inches long. -
Create the X shape:
Draw an ‘X’ through the middle of your vertical line. Try to keep the angles even so you have six total arms radiating from the center point. -
Add structural details:
For a classic varied look, some snowflakes can have a small hexagon or diamond shape connecting the arms right at the center hub. This adds instant complexity. -
Branch out arrows:
On each of the six arms, draw V-shaped ‘arrowheads’ pointing outward. I like to space these evenly, perhaps two or three V’s per arm for the largest flakes. -
Connect the tips:
For a more geometric flake, connect the outer tips of the V-shapes with straight lines to form a star-like outline around the center.
Ink Running Dry?
If the marker streaks or fades, pump the nib on scrap paper again. Storing these markers horizontally when not in use helps keep the pigment mixed properly.
Step 3: Adding Variety and Detail
-
Switch to fine detail:
Grab your fine tip marker. On a new snowflake, draw the six main arms again, but this time add tiny, feathery strokes branching off the main lines to mimic crystallization. -
Draw a starburst flake:
Create a medium-sized flake that relies on straight, sharp lines. Instead of soft branches, create a starburst effect by drawing smaller lines radiating from the center between the main arms. -
Incorporate playful dots:
Use the medium tip to dot the very ends of the snowflake arms. This softens the look and adds a finished quality to the sharper lines. -
Vary the sizes:
Draw a few significantly smaller flakes (about 1-2 inches wide) scattered around the larger ones. Use simpler designs for these, like a basic asterisk shape with single cross-hatches.
Step 4: Filling the Atmosphere
-
Create background snow:
In the empty spaces between your structured snowflakes, use the fine tip marker to draw tiny asterisks or simple dots. -
Layer the depth:
Group a few tiny dots together in clusters of three to look like distant flurries. Avoid making these too uniform; randomness looks more natural. -
Review spacing:
Step back about five feet to check the overall density. If a spot looks too empty, add a small, simple six-pointed star rather than a complex flake. -
Refine lines:
Check your larger flakes for any weak or translucent lines. Go over them a second time with the marker if needed to ensure the white is opaque and bright. -
Clean up edges:
If you slipped or made a line too thick, wrap a damp paper towel tightly around your finger or a Q-tip to wipe away the mistake while the ink is still somewhat fresh. -
Final dry:
Let the entire window drawing dry completely for about 10-15 minutes before touching or cleaning near it.
Enjoy the cozy view through your custom winter scene, knowing it cleans off easily when spring arrives


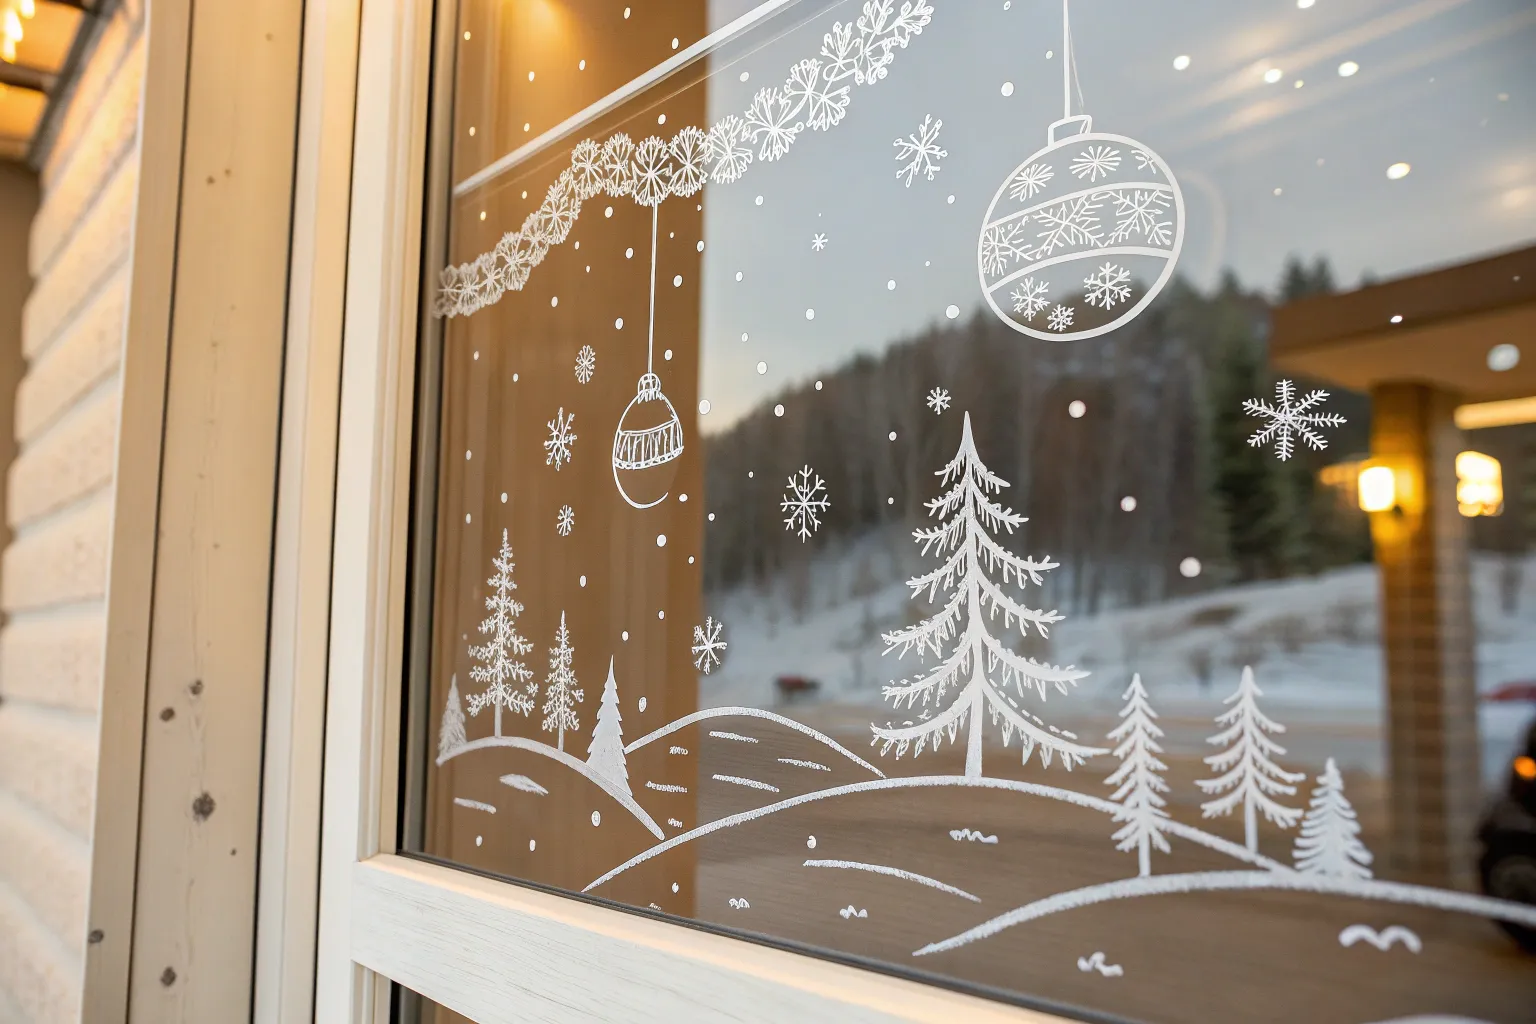
Snowy Village Border Along the Bottom
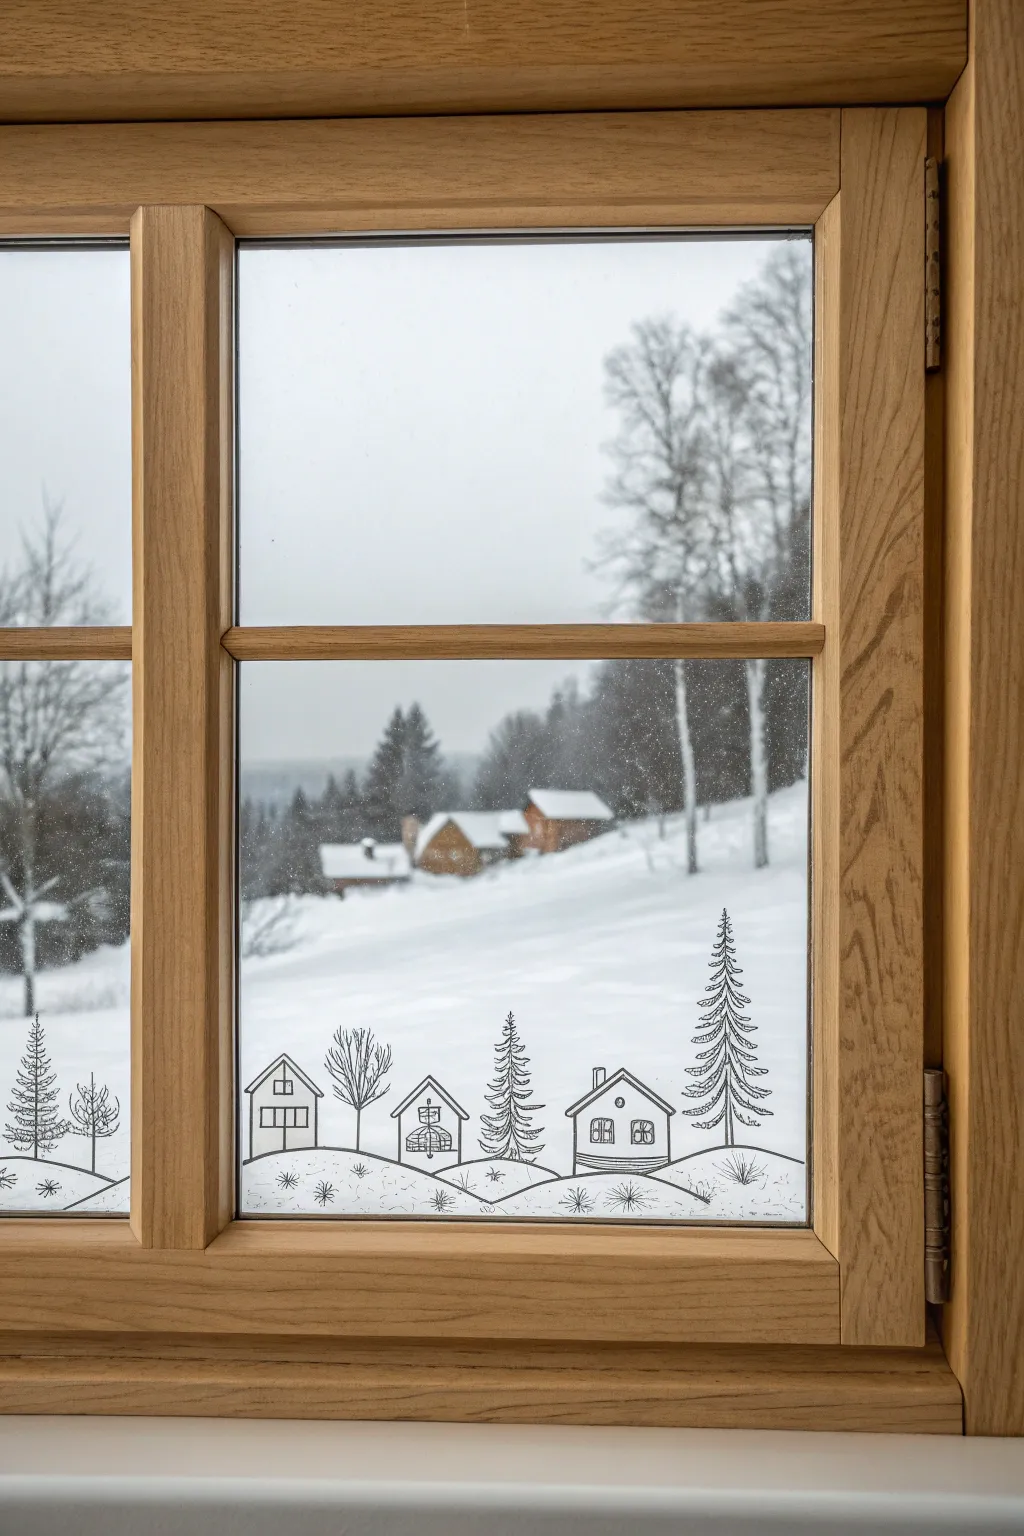
Bring the charm of a winter landscape indoors with this clean, hand-drawn window border. This minimalist project uses simple black line work to create a cozy village scene that perfectly frames the snowy view outside without obstructing it.
Step-by-Step
Materials
- Glass cleaner and lint-free cloth
- Chalk marker (black, fine tip)
- Acrylic paint marker (black, extra-fine tip) – optional for permanency
- Paper and pencil for sketching
- Masking tape or painter’s tape
- Ruler or straight edge
Step 1: Preparation and Planning
-
Clean surface:
Begin by thoroughly cleaning the bottom portion of your window pane. Any dust or grease will prevent the marker from adhering smoothly, so give it a good wipe with glass cleaner and a lint-free cloth. -
Measure the space:
Measure the width of the window pane where you intend to draw. This helps in planning how many houses and trees will fit comfortably without looking crowded. -
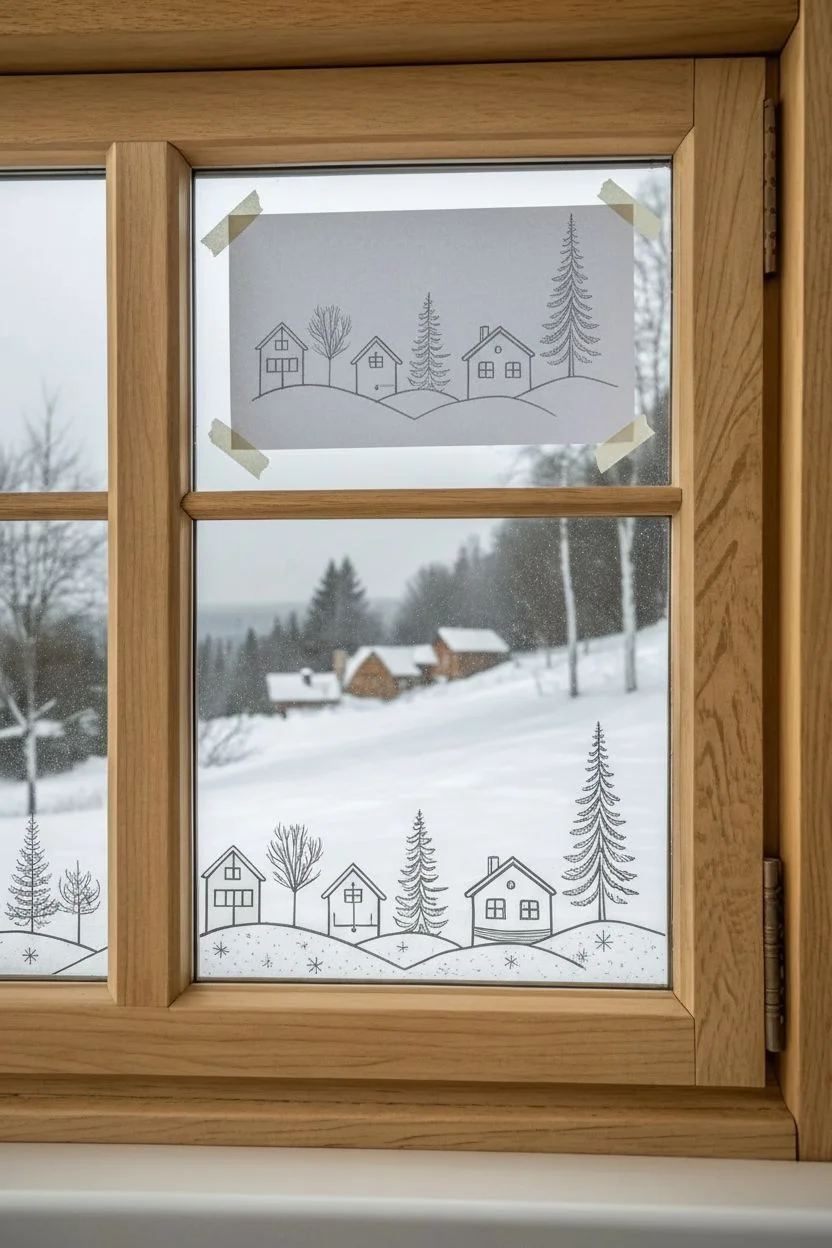
Create a template:
Sketch your design on a strip of paper cut to the same width as your window. Draw a rolling hill line and place three small houses interspersed with trees. -
Refine the sketch:
On your paper template, detail the houses. Give the left house a simple gable roof and four-pane window. The middle house can be smaller with a patterned front, and the right house larger with a chimney and two windows. -
Secure the template:
Tape your paper sketch to the *outside* of the window, facing in. This allows you to trace the design comfortably from the inside without guessing the proportions.
Ink refusing to stick?
If the marker ink beads up or separates on the glass, the window might still be oily. Wipe the area with rubbing alcohol and let it dry completely before trying again.
Step 2: Drawing the Landscape
-
Shake the marker:
Prime your black chalk marker or acrylic paint pen by shaking it well and pressing the nib on a scrap piece of paper until the ink flows consistently black. -
Trace the horizon:
Start by drawing the rolling hills. Create a continuous, curved line that spans the width of the glass, dipping and rising gently to impede the base of your future houses. -
Outline the houses:
Using a steady hand, outline the basic shapes of the three houses. I find it easier to draw the roof peaks first, then bring the walls down to meet the hill line. -
Add architectural details:
Fill in the details for each house. Draw the squares for windows and add crosspieces for the panes. Add the small chimney on the rightmost house. -
Draw the trees:
Between the houses, draw the trees. For the pine trees, start with a vertical trunk line and add downturned, jagged branches. For the deciduous tree (second from left), draw a trunk branching out into a rounded crown of bare twigs.
Step 3: Adding Texture and Detail
-
Detail the evergreens:
Go back to your large pine tree on the far right. Add horizontal hatching or small downward strokes on the branches to give them volume and a needled texture. -
Add ground cover:
Along the hill line, draw small star-burst shapes or tufts of grass. This simple detail grounds the drawing and makes the snow look textured rather than just an empty white space. -
Check density:
Step back a few feet to look at the composition. If the lines look too faint, carefully retrace over them once the first layer is dry to deepen the black tone. -
Clean up edges:
If you made any smudges or have wobbly lines, use a damp cotton swab (if using chalk marker) or a scraper (if using paint) to tidy up the edges for a crisp finish. -
Final touches:
Remove the paper template from the outside of the window. Wipe away any tape residue on the exterior glass so your view is perfectly clear.
Add a snowy effect
Use a white chalk marker to add tiny dots of falling snow in the sky above the houses or to color in the roofs for a snow-capped look.
Enjoy your custom winter view from the warmth of your home


Big Center Wreath Focal Point
Transform your window into a festive masterpiece with this delicate, hand-drawn wreath design. Using simple white lines to mimic the look of etched glass, this project creates a sophisticated focal point that looks beautiful from both inside and out.
Step-by-Step Guide
Materials
- White liquid chalk marker (medium tip)
- White liquid chalk marker (fine tip for details)
- Glass cleaner
- Lint-free cloth or paper towels
- Dry erase marker (light color like light blue or yellow for sketching)
- Paper plate or scrap paper (to prime marker)
- Cotton swabs (for erasing small mistakes)
- Water spray bottle
Step 1: Preparation & Mapping
-
Clean the surface:
Start by thoroughly cleaning the window pane with glass cleaner and a lint-free cloth. Any dust or grease will prevent the chalk marker from flowing smoothly, so ensure the glass is completely dry and streak-free before beginning. -
Establish the shape:
Using a light-colored dry erase marker (which is easier to wipe away than chalk), draw a large circle in the center of your window to serve as your guide. If you aren’t confident freehanding a circle, you can trace around a large serving platter or use the string-and-tape compass method. -
Mark the bow placement:
At the very bottom center of your circle, sketch a rough outline of where the large bow will sit. This ensures you don’t draw leaves in the space reserved for the ribbon later.
Fixing Smudges
Chalk marker not erasing cleanly? If a wet cloth just smears the white ink around, wait for it to fully dry first. Dry chalk flakes off easier than wet ink smears.
Step 2: Drawing the Foliage
-
Prime your marker:
Shake your medium-tip white chalk marker well and press the tip onto a paper plate until the ink flows opaque and steady. Test a line to ensure it isn’t streaky. -
Draw the main stem:
Trace over your dry-erase circle guide with the white chalk marker, starting from just above the bow area and meeting at the top. The line doesn’t need to be perfectly thick; a natural, slightly organic vine look is perfect. -
Start the leaves (left side):
Begin on the left side, slightly above the bow area. Draw elongated, almond-shaped leaves extending outward from the main stem. Keep the leaves pointing upwards towards the top of the circle. -
Add inner details:
Inside each leaf, draw a central vein line and small diagonal veins branching off. This gives the drawing that detailed, engraved look shown in the photo. -
Vary angle and size:
As you move up the left side, slightly vary the angle of the leaves. Some should overlap the main stem, appearing to sit ‘in front’ of the vine. -
Mirror the right side:
Repeat the process on the right side of the wreath, again ensuring the leaves point upward toward the top center. Try to keep the density similar to the left side for balance. -
Top convergence:
At the very top of the wreath, angle the final few leaves on each side so they almost touch or gently cross over each other, closing the circle naturally.
Step 3: Berry Accents
-
Place the berries:
Look for small gaps between your leaf clusters. Draw small circles in groups of two or three attached to thin stems coming off the main vine. -
Add berry details:
To make the berries look dimensional rather than like solid dots, draw a tiny ‘C’ shape or a small dot in the center of each circle. I find this mimics the ‘eye’ of a real berry.
Level Up: Snow Effect
Add a ‘snow’ effect by lightly stippling dots on the top edges of the leaves and bow loops, creating the illusion that snow has settled on the wreath.
Step 4: The Statement Bow
-
Draw the center knot:
Go back to the bottom where you left a gap. Draw a rounded, slightly oval shape for the knot of the bow. -
Create the loops:
Draw two large, floppy loops extending from the knot. Make the top line of the loop slightly curved and the bottom line dip down before returning to the knot. -
Detail the loops:
Add curved lines inside the loops near the knot to suggest wrinkles and fabric folds. This is crucial for making the ribbon look soft. -
Add the tails:
Draw two long ribbon tails flowing down from behind the loops. Give them a wavy, undulating shape as if they are draping naturally. -
Refine the tails:
Finish the ends of the ribbon tails with a ‘V’ cut or a diagonal line. Add a line or two inside the tails to show movement.
Step 5: Cleanup & Finish
-
Erase guide lines:
Once the white chalk is completely dry (give it about 5-10 minutes), use a dry cotton swab to carefully rub away any visible traces of your initial colored dry-erase sketch. -
Sharpen edges:
If any lines look smudge, dampen a cotton swab slightly with water and use it like an eraser to sharpen the edges of your leaves or bow.
Step back and admire your beautiful, frost-like window art that welcomes guests with festive charm.


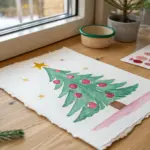
Simple Stylized Christmas Tree
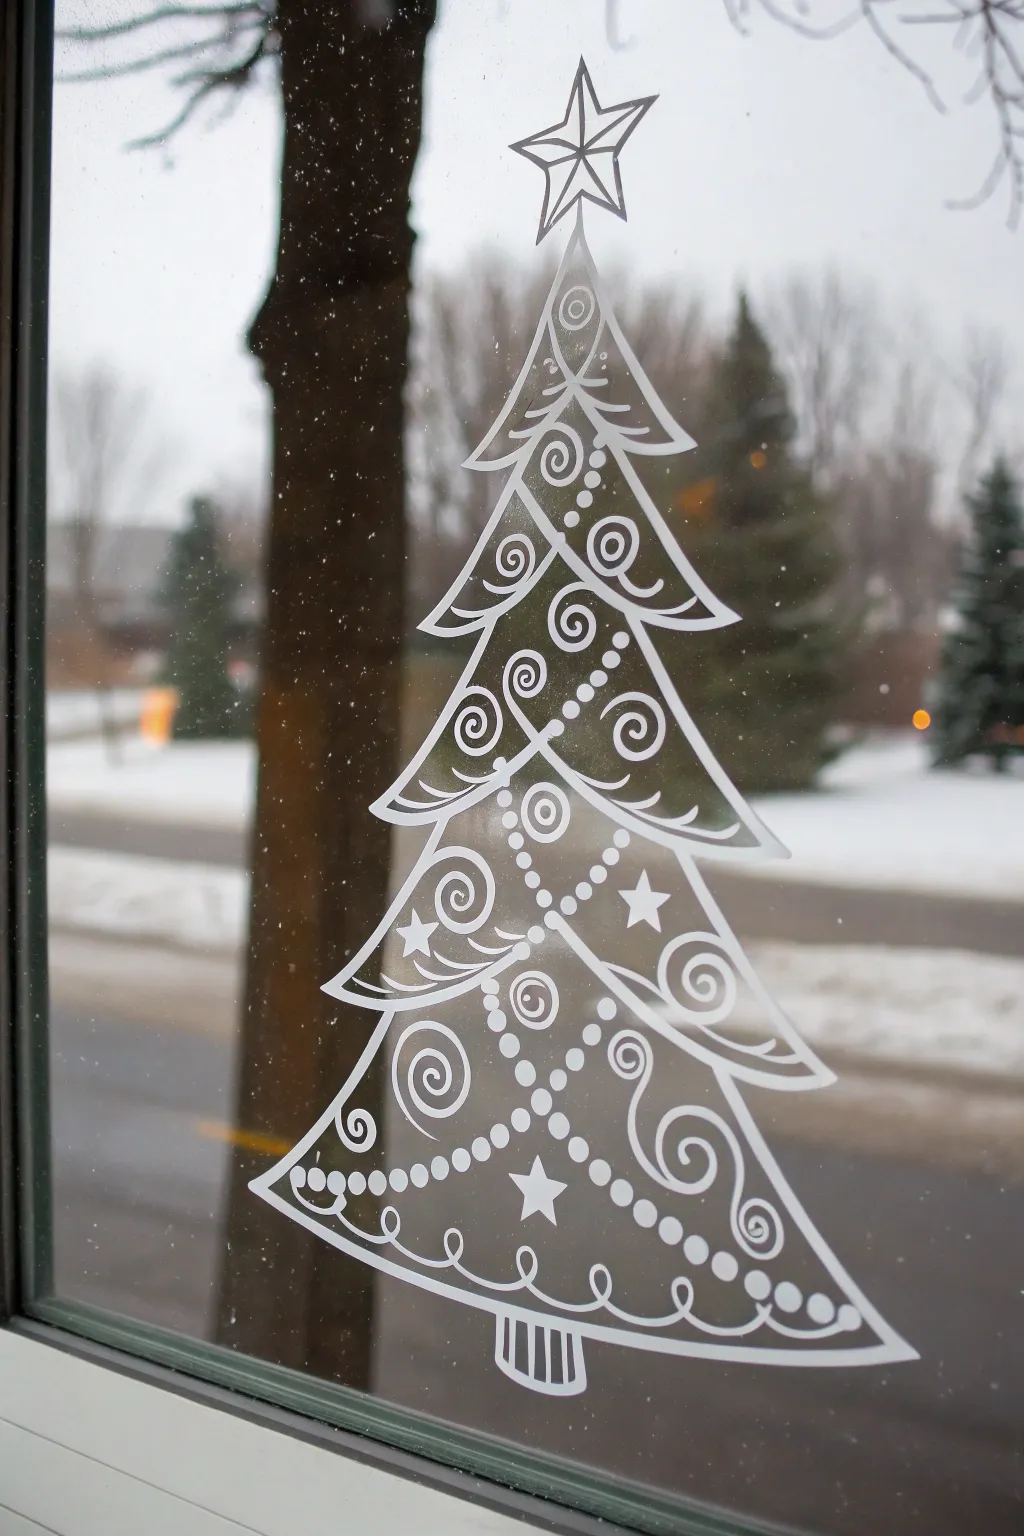
Transform your view into a winter wonderland with this elegant, stylized Christmas tree window drawing. Using simple white ink, you’ll build up layers of swirls, dots, and stars to create a festive focal point that glows against the daylight.
Step-by-Step Guide
Materials
- White liquid chalk marker (medium tip)
- White liquid chalk marker (fine tip)
- Window cleaner
- Lint-free cloth or paper towels
- Ruler or straight edge (optional)
- Masking tape (optional for guidelines)
- Cotton swabs (for cleanup)
Step 1: Preparation & Structure
-
Clean surface:
Begin by thoroughly cleaning the inside of your window. Any dust or fingerprints will prevent the chalk marker from flowing smoothly, so ensure the glass is spotless and completely dry. -
Shake the markers:
Vigorously shake your chalk markers to mix the pigment. I always press the nib down on a piece of scrap paper first to get the ink flowing before touching the glass. -
Mark the height:
Decide how tall you want your tree to be. You can place a small dot at the top center and the bottom center to act as visual anchors, keeping your drawing straight. -
Draw the main star:
Start at the very top anchor point with the medium tip marker. Draw a five-pointed star. Instead of filling it in, draw a second, slightly smaller star inside it, connecting the inner corners to the center point to create a 3D faceted look.
Oops! Wobbly Lines?
Don’t panic if your hand shakes. Wait for the chalk to dry completely (about 2-3 minutes), then use a dry Q-tip to scratch away the uneven edge for a crisp finish.
Step 2: Drafting the Tree Outline
-
Create the top triangle:
Directly below the star, draw a narrow, curved triangle shape for the tip of the tree. Let the bottom edges flick upward slightly, like the skirt of a dress. -
Add the second tier:
Below the first shape, draw a wider tier. Start the lines from slightly inside the previous tier’s bottom corners to make the tree look connected. -
Continue cascading down:
Hatch roughly 4 or 5 tiers total, making each one progressively wider as you move down the window. Maintain those upward-curving ‘skirt’ edges on the bottom of each section. -
Draw the base:
Under the widest bottom tier, add a simple trunk. Draw a short rectangle with curved bottom corners and add vertical stripes inside for texture.
Step 3: Adding Decorative Details
-
Draw large swirls:
Switch to your fine tip marker for intricate work. Inside each tier, draw large key-swirls. These are simple spirals that originate from the center spine of the tree and curl outwards. -
Add secondary curls:
Fill in the empty spaces near the outer edges of the tiers with smaller, loose curls or ‘c’ shapes to add movement to the design. -
Create dotted garlands:
Using the medium tip, carefully dab a line of dots that drapes across the tree tiers like a beaded garland. Vary the size of the dots—larger in the center, smaller at the ends—for a dynamic look. -
Incorporate stars:
Draw small, solid five-pointed stars randomly within the larger tiers. Place one prominently in the center of the bottom-most tier. -
Detail the hem:
Along the bottom line of the lowest tier, draw a looping, scalloped line that mimics a ribbon trim. -
Double-check lines:
Go back over the main outline of the tree tiers with the medium marker to thicken the outer boundary, making the shape pop against the outdoor background.
Make it Sparkle
While the liquid chalk is still wet on the glass, gently blow a pinch of clear or silver biodegradable glitter onto the design for a shimmering, icy effect.
Step 4: Refining & Cleaning
-
Sharpen edges:
If any lines look smudged or uneven, dip a cotton swab in a little water or window cleaner and carefully tidy up the edges. -
Add ‘snow’ highlights:
For a final magical touch, add tiny white dots floating around the outside of the tree to resemble gently falling snow.
Enjoy the cozy view of your frosted artwork whenever look outside this holiday season
BRUSH GUIDE
The Right Brush for Every Stroke
From clean lines to bold texture — master brush choice, stroke control, and essential techniques.
Explore the Full Guide
Hand-Lettered Merry Christmas Greeting
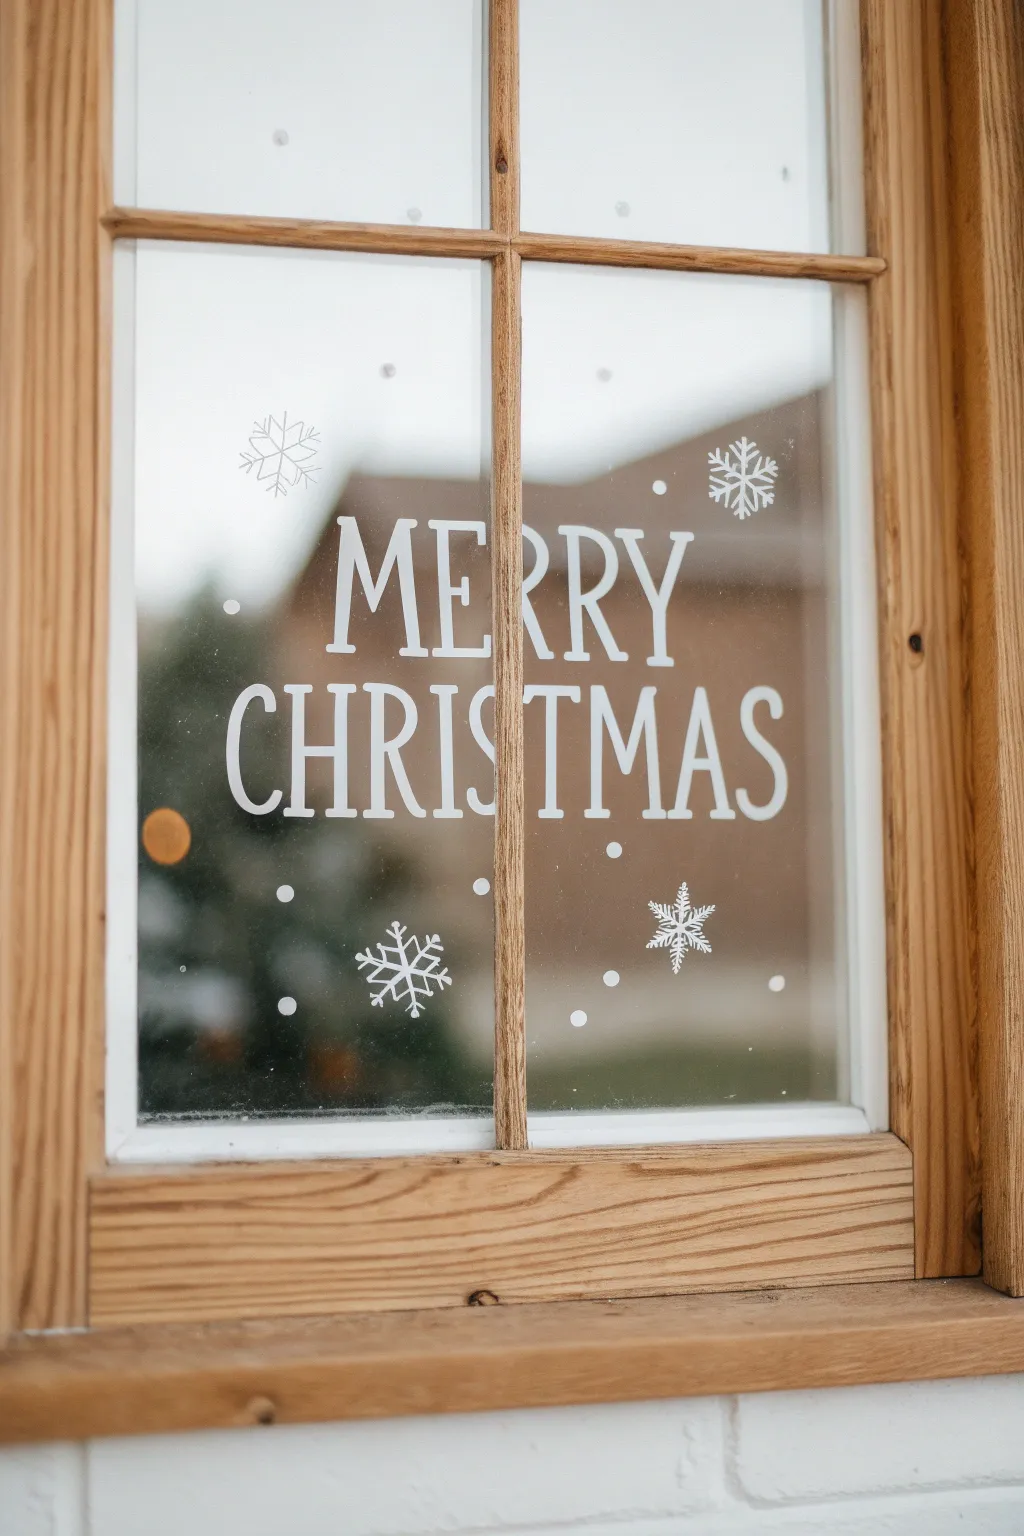
Bring festive cheer to your neighborhood with this timeless window display featuring crisp, white serif lettering and delicate snowflakes. The clean lines and bold typography create a professional look that stands out beautifully against the winter backdrop outside.
Detailed Instructions
Materials
- White liquid chalk marker (broad tip for letters)
- White liquid chalk marker (fine tip for details)
- Glass cleaner and microfiber cloth
- Paper towels
- Painter’s tape or masking tape
- Ruler or tape measure
- Level (optional but helpful)
- Printed “MERRY CHRISTMAS” template (optional)
- Dry erase marker (light color)
Step 1: Preparation & Layout
-
Clean surface:
Start by thoroughly cleaning the inside of your window pane with glass cleaner and a microfiber cloth. Any dust or grease will prevent the chalk marker from flowing smoothly. -
Measure the space:
Find the vertical center of your window pane to ensure the text is perfectly centered. Mark this lightly with a piece of tape or a small dot. -
Create guidelines:
Using a ruler and painter’s tape, mark two horizontal baselines on the exterior of the glass if you can access it, or draw light guidelines on the inside with a dry erase marker. This ensures your words sit straight. -
Prime the marker:
Shake your broad-tip chalk marker vigorously. Press the nib down on a scrap piece of paper or paper towel repeatedly until the white ink flows fully into the tip.
Step 2: Lettering the Message
-
Draft the letters:
Sketch the letters lightly first. If you aren’t confident freehanding, tape a printed template to the outside of the window to trace. I prefer using a dry erase marker for this draft layer since it wipes away easily if I make a mistake. -
Draw vertical strokes:
Starting with the word “MERRY,” use the broad tip marker to draw the thick vertical strokes of each letter first. Keep the pressure consistent for solid, opaque lines. -
Add horizontal strokes:
Connect the vertical lines with your horizontal bars and curves. Since this is a serif font, you can keep these connecting lines slightly thinner if desired, or uniform for a bold look. -
Add the serifs:
Go back to the ends of every stroke and add the small “feet” or serifs. Make them distinct horizontal slabs at the base and top of the letters to match the style in the photo. -
move to the second line:
Repeat the process for “CHRISTMAS” on the lower line. Ensure the ‘C’, ‘S’, and ‘R’ curves are smooth. If the ink looks streaky, let it dry for a minute and apply a second coat. -
Refine the edges:
Inspect your letters. If any edges are ragged, use the fine tip of the marker or a damp cotton swab to sharpen the corners and clean up messy lines.
Ink Flow Issues?
If the marker streaks, store it tip-down for 10 mins. Clean the glass with vinegar water; chemical residues from regular cleaners can sometimes repel liquid chalk.
Step 3: Adding Snowy Details
-
Snowflake skeleton:
Switch to your fine-tip chalk marker. In the open spaces around the text, draw simple ‘X’ shapes crossed with a vertical line to create the six-point base for your snowflakes. -
Detail the flakes:
Add small ‘V’ shapes along the arms of the snowflake skeletons to create the intricate crystal effect. Vary the designs slightly—some can handle more detail than others. -
Placement strategy:
Place larger snowflakes near the corners and gaps, like above the ‘M’ and below the ‘S’, to frame the text without cluttering it. -
Add falling snow:
Using the broad marker again, simply press the tip straight against the glass to create perfect round dots. Scatter these randomly around the text to mimic falling snow. -
Final cleanup:
Once the white ink is completely dry, gently wipe away any visible dry-erase guidelines or tape marks. Step back outside to check your handiwork from the street view.
Add Depth
Once the white ink is fully dry, use a silver or light grey chalk marker to add a thin ‘shadow’ line to the right side of each letter for a 3D effect.
Enjoy the cozy view from inside and the welcoming message you send to passersby
Nativity Silhouette in a Simple Stable
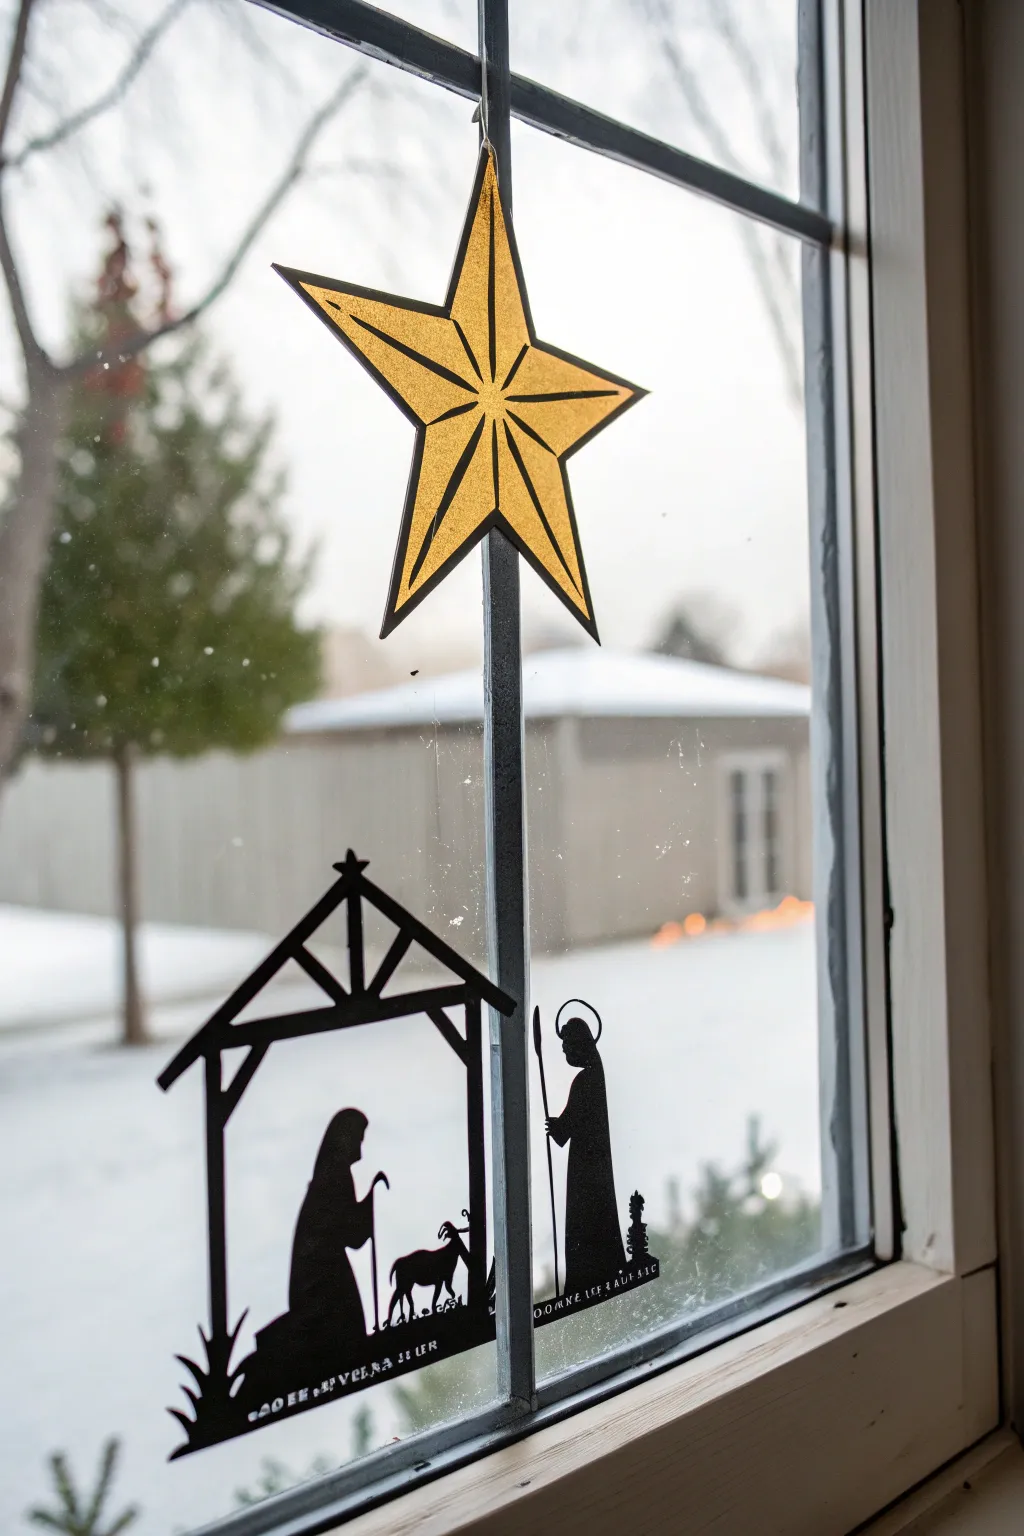
Bring the story of Christmas to your window with this elegant dual-piece display featuring a shimmering gold star guiding the way to a peaceful nativity scene below. The bold black silhouette contrasts beautifully against a snowy backdrop, while the metallic star catches the light for a warm, inviting glow.
Step-by-Step Guide
Materials
- Gold cardstock or metallic gold paper
- Black cardstock or thick construction paper
- Black permanent marker (fine tip)
- Ruler
- Pencil
- Precision craft knife (X-Acto)
- Self-healing cutting mat
- Scissors
- Clear fishing line or white thread
- Clear double-sided tape or adhesive dots
- Clear tape
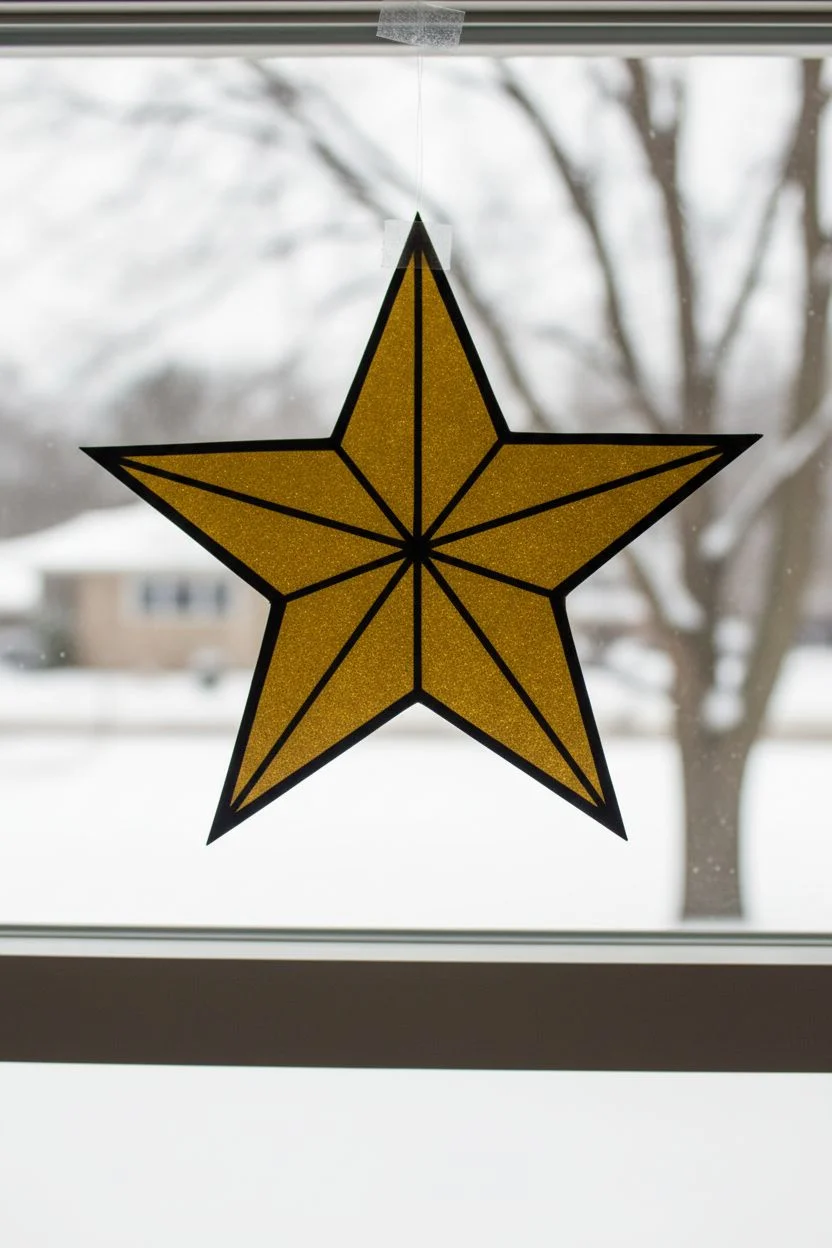
Step 1: Crafting the Guiding Star
-
Draft the star shape:
Begin by drawing a classic five-pointed star on the back of your gold cardstock. Use a ruler to ensure the points are symmetrical and sharp. Aim for a size that will fit nicely in the upper pane of your window, roughly 6-8 inches tall. -
Cut out the star:
carefully cut along your pencil lines using scissors or a craft knife for precision. A craft knife is particularly helpful for getting into the sharp inner corners between the star’s points. -
Add dimension lines:
Flip the star to the gold side. Using your ruler and a black permanent marker, draw straight lines from the tip of each point to the center of the star. These lines create a faceted look. -
Define the valleys:
Draw similar straight lines from the inner corners (the ‘valleys’ between points) to the center. You should now have ten lines meeting in the middle. -
Outline the star:
Trace the entire outer edge of the star with the black marker to give it a finished, bold border that matches the interior lines. -
Attach the hanger:
Cut a length of clear fishing line or white thread. Tape one end securely to the back of the topmost point of your star using clear tape.
Fixing Curling Edges
If your cardstock curls from the window’s cold, apply tiny dots of removable poster putty to the tips of the star and stable roof to hold them flat against the glass.
Step 2: Creating the Nativity Scene
-
Sketch the stable frame:
On a sheet of black cardstock, lightly sketch the outline of a simple open-air stable. Draw a pitched roof with rafters and two supporting posts. Keep the lines straight and structural. -
Draw the figures:
Sketch the silhouettes inside the stable area. On the left, draw a kneeling figure (Mary) facing right. On the right, draw a standing figure holding a staff (Joseph). Add a small animal, like a lamb or donkey, between them. -
Refine the silhouettes:
Thicken your pencil lines to create shapes that are easy to cut. Remember, silhouettes rely on profile views, so ensure the heads and postures are clearly defined. -
Create the base:
Connect the bottom of the figures and the stable posts with a jagged, uneven line to represent straw or ground grass. This single base piece keeps the entire cutout connected. -
Cut the interior spaces:
Place your cardstock on a cutting mat. Use your craft knife to carefully remove the ‘negative space’—the areas between the roof rafters, between the figures, and under the arches. Take your time here; sharp corners make the silhouette look professional. -
Cut the exterior outline:
Once the delicate interior cuts are done, use scissors or your craft knife to cut the final outer perimeter of the entire nativity scene. -
Clean up edges:
Check for any rough paper burrs or pencil marks remaining on your black cardstock. Using a small eraser or gently trimming with the knife cleans these up perfectly.
Step 3: Window Assembly
-
Hang the star:
Secure the top of your fishing line to the top of your window frame with clear tape. Adjust the height so the star hangs freely in the upper pane. -
Prepare the adhesive:
Apply small pieces of clear double-sided tape or adhesive dots to the back of the nativity silhouette. Focus on the wider areas like the figures’ bodies and the base. -
Position the stable:
Press the nativity scene firmly against the bottom of the lower window pane. Ensure the stable posts are vertical and the base aligns with the window sill. -
Final adjustment:
Step back and check the balance. The star should look like it is shining directly down onto the figures below.
Level Up: Stained Glass Effect
Tape colored tissue paper or cellophane behind the open spaces of the stable roof or star to create a glowing ‘stained glass’ look when the sun hits it.
Enjoy the serene view as the winter light illuminates your handcrafted holiday scene

PENCIL GUIDE
Understanding Pencil Grades from H to B
From first sketch to finished drawing — learn pencil grades, line control, and shading techniques.
Explore the Full Guide
Christmas Starburst Sky

Transform your view into a magical snowy scene with this elegant window drawing technique. Using simple white chalk markers, you will create a floating sky of varied stars and crystalline snowflakes that stand out beautifully against the winter landscape outside.
Detailed Instructions
Materials
- White liquid chalk marker (medium tip)
- White liquid chalk marker (fine tip for details)
- Glass cleaner
- Lint-free cloth or paper towels
- Post-it notes or masking tape (for spacing)
- Cotton swabs (for corrections)
- Ruler (optional)
Step 1: Preparation and Planning
-
Clean surface:
Begin by thoroughly cleaning the window pane. Any dust, grease, or fingerprints will prevent the chalk marker from adhering smoothly, so give it a good shine with glass cleaner and a lint-free cloth. -
Prime the markers:
Before touching the glass, shake your chalk marker well to mix the pigment. Press the tip down on a scrap piece of paper until the white ink flows fully into the nib. I always test a line on paper first to ensure there’s no blobbing. -
Visualize the layout:
Look at your window panes. This design works best when elements are scattered randomly but balanced. Mentally mark where you want your largest ‘hero’ stars—usually one or two per pane—so they don’t crowd each other.
Smudge Patrol
Work from the top of the window down to the bottom. This prevents your hand from resting on and smearing fresh wet designs you just finished.
Step 2: Drawing the Starbursts
-
Start with a central cross:
For the large 8-point starbursts, use your medium-tip marker. Draw a simple vertical line about 2-3 inches long, then cross it with a horizontal line of the same length to form a ‘plus’ sign. -
Add diagonal rays:
Draw an ‘X’ through the center of your plus sign. Make these diagonal lines slightly shorter than the vertical and horizontal ones. This variation in length gives the star a more dynamic, twinkling appearance. -
Connect the points:
To create the star body, draw slightly curved lines connecting the tip of each ray to the base of the next ray. You aren’t outlining the whole shape; just connect the inner angles to add volume to the center. -
Fill the center:
Gently shade inside the connected central area to make the star’s core opaque and bright white. Leave the tips of the rays sharp and thin.
Frosty Effect
Lightly smudge the ink with your finger immediately after drawing a star center. This creates a soft, glowing halo effect around the bright white lines.
Step 3: Creating Hanging Ornaments
-
Draw the strings:
Select a few spots near the top of a pane. Using the fine-tip marker and a ruler (or a very steady hand), draw a thin, straight vertical line dropping down from the top edge of the window frame. -
Add the star pendant:
At the bottom of your string line, draw a classic 5-point star. Start with an upside-down ‘V’ and cross through. For a cleaner look, outline the 5-point shape and leave it hollow, or draw lines inside it for a geometric effect. -
Detail the hanger:
The star needs to look attached. Where the string meets the top point of the star, draw a tiny loop or knot to simulate it being tied.
Step 4: Adding Snowflakes
-
Basic snowflake skeleton:
Similar to the starburst, draw a vertical line intersected by two diagonal lines (like an asterisk). Keep these lines lighter and thinner. -
Add branching details:
Along each of the six arms of the snowflake, draw small ‘V’ shapes pointing outward. Add two or three pairs of V’s per arm depending on the size of the flake. -
Embellish the tips:
At the very end of each arm, add a small dot or a tiny diamond shape to finish off the crystalline look.
Step 5: Filler Details and Finishing
-
Scatter small stars:
Look for large empty spaces in your composition. Fill these voids with simple 5-point stars. I like to vary the sizes—some tiny like distant planets, others slightly larger. -
Draw mini-twinkles:
Use the fine point marker to add tiny asterisks (simple cross shapes) and small dots throughout the design. This creates a sense of depth and magic. -
Review and refine:
Step back about five feet to view the whole window. Check for any smudges or lines that look too faint. Go over the main lines of the largest stars one more time to make the white really pop. -
Clean up mistakes:
If any lines are crooked or smudged, dampen a cotton swab with water or glass cleaner and carefully wipe away the error. Dry the spot completely before redrawing.
Enjoy the cozy atmosphere your new snowy window scene brings to the room
Snow Globe Window Scene
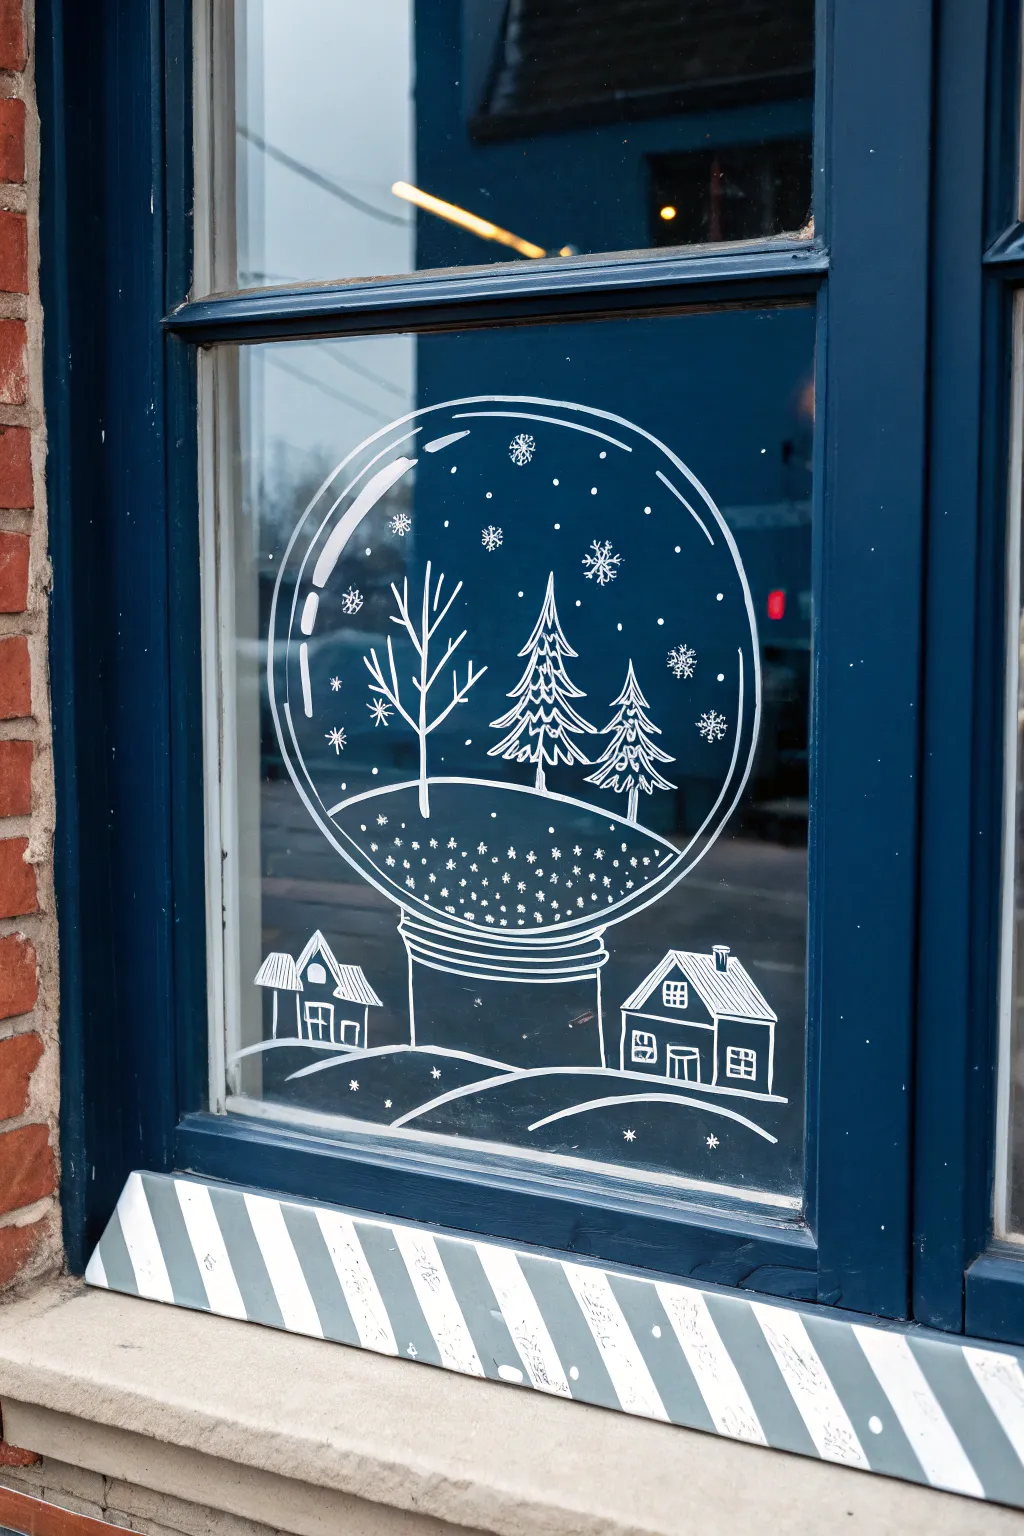
Transform your window into a cozy holiday view with this charming snow globe scene featuring delicate white line art. The design combines a classic snowy forest inside a globe with a quaint village landscape resting below, all drawn directly on the glass for a magical floating effect.
Step-by-Step Tutorial
Materials
- White liquid chalk marker (medium tip)
- White liquid chalk marker (fine tip for details)
- Glass cleaner
- Lint-free cloth or paper towels
- Grid paper or sketchbook (for drafting)
- Painter’s tape (optional, for guidelines)
- Ruler (optional)
Step 1: Preparation & Outline
-
Clean surface:
Begin by thoroughly cleaning the window pane. Remove any dust, grease, or fingerprints with glass cleaner and a lint-free cloth to ensure the chalk marker adheres smoothly. -
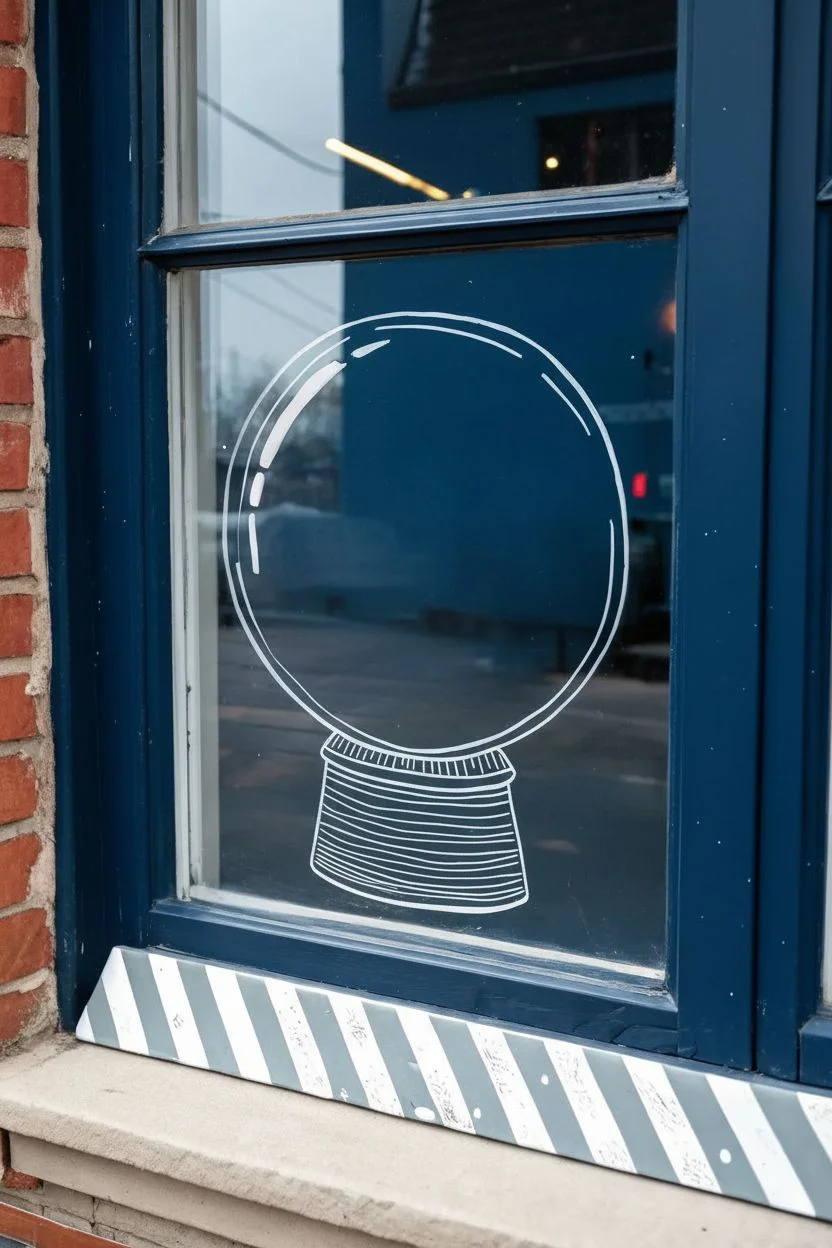
Create the globe shape:
Using your medium tip marker, draw a large circle in the center of the upper portion of the window pane. It doesn’t need to be geometrically perfect; a hand-drawn circle adds charm. -
Add reflection lines:
To make the circle look like glass, add two curved highlight lines inside the circle on the top left side—one longer curve closely following the rim, and a shorter dash below it. -
Draw the base:
Below the circle, draw the globe’s stand. Start with a slightly wider, curved horizontal line just under the globe, then draw a cylindrical shape stretching downward with a few horizontal lines across it for texture.
Clean Lines Pro-Tip
Keep a damp cotton swab or Q-tip handy while you draw. It works like a precision eraser for fixing wobbly lines or sharpening the edges of your snowflakes without smudging the rest.
Step 2: Filling the Globe
-
Define the snow line:
Inside the globe, about a third of the way up from the bottom, draw a curved horizon line to represent a snowy hill. -
Draw the bare tree:
On the left side of the inner hill, use the fine tip marker to draw a deciduous tree. Start with a vertical trunk and branch out into Y-shapes to create varying limb sizes. -
Sketch the pine trees:
To the right of the bare tree, draw two triangular pine trees. Use jagged, downward-sloping zigzag lines to create the evergreen boughs, making the tree on the far right slightly smaller to create depth. -
Add falling snow:
Scatter small details throughout the empty space in the globe. Draw simple asterisks (*) for larger snowflakes and simple dots for distant snow. -
Texture the ground:
Below the tree line inside the globe, create texture by dotting the ‘ground’ heavily. Add tiny x-shapes mixed with the dots to make the snow look piled and fluffy.
Step 3: The Village Scene
-
Outline the rolling hills:
Move to the bottom section of the window. Draw two long, sweeping curved lines that stretch across the width of the pane to create snowy banks. One line should start higher on the left and swoop down, while another creates a foreground hill. -
Construct the left house:
On the left side of the hill, draw a small cottage using simple geometric shapes—a square base with a triangular roof. Add a small chimney and a simple four-pane window. -
Build the right house:
On the right side, draw a slightly larger house. Give this one a pitched roof with cross-hatching to look like shingles. Add a door and multiple windows to make it look inviting. -
Connect the scene:
Ensure the base of your snow globe stand appears to be resting behind or on the top hill line, grounding the floating object into the scene. -
Add final sparkle:
Sprinkle a few more tiny stars or dots around the houses and on the hills to tie the bottom scene together with the magical snow inside the globe.
Level Up: Frosted Look
b lightly dabbing a dry sponge into a puddle of chalk ink and pressing it along the bottom corners of the window pane, you can create a realistic, semi-transparent ‘frosted glass’ texture.
Step back and enjoy the view as your festive illustration glows against the winter sky outside


Negative-Space Christmas Tree Cutout
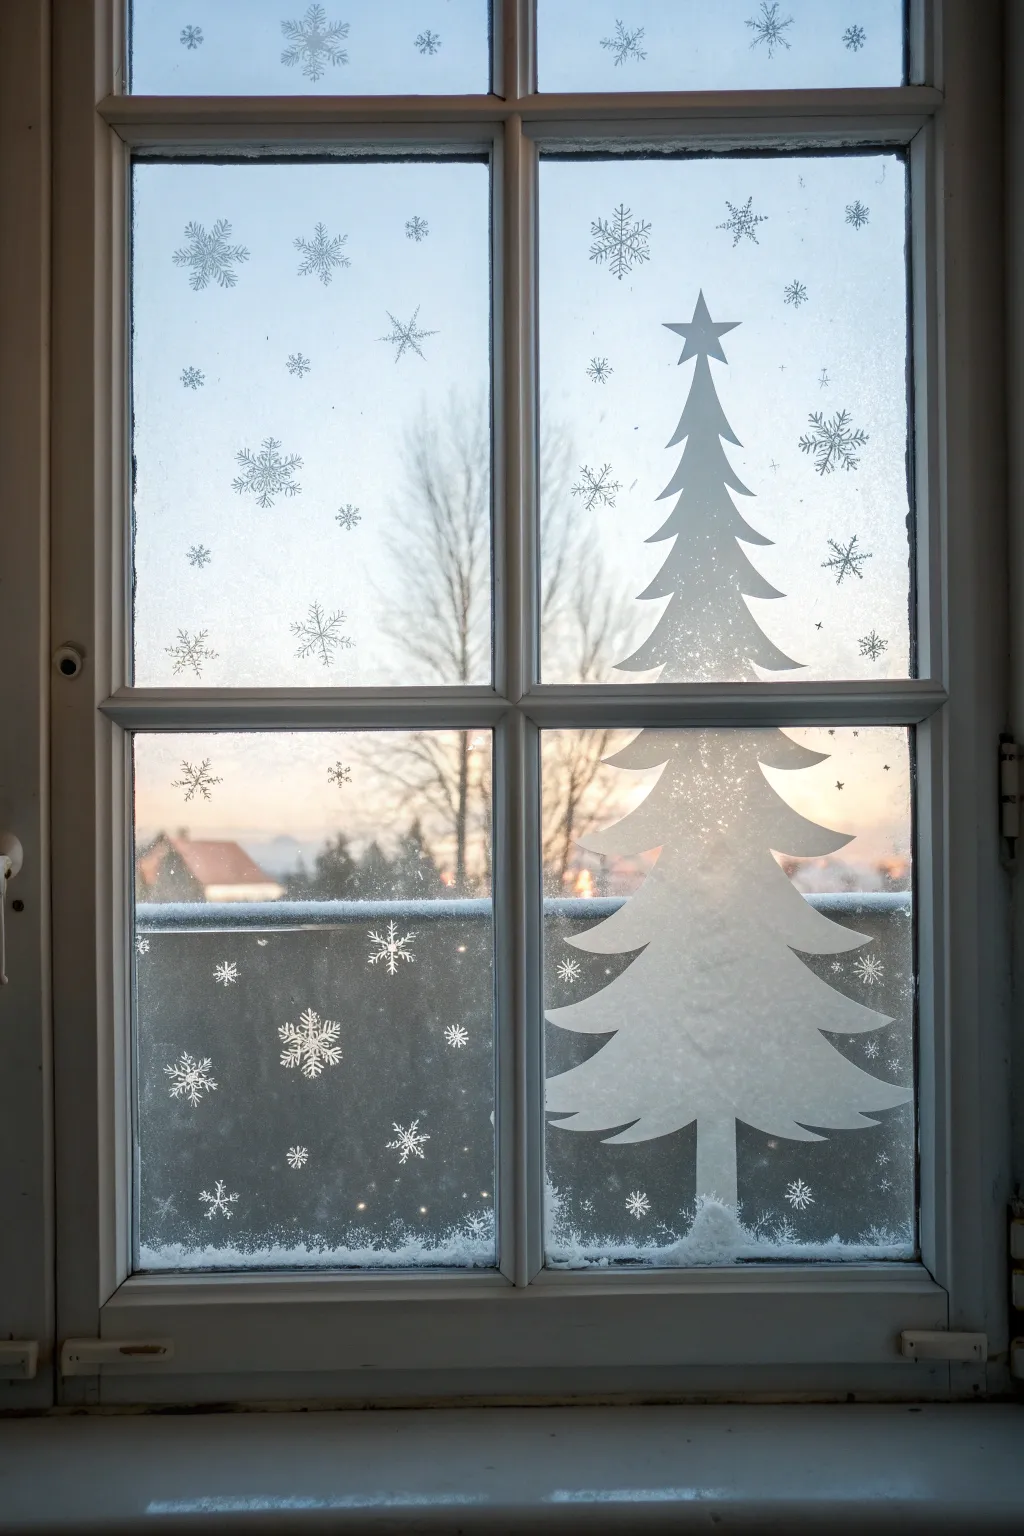
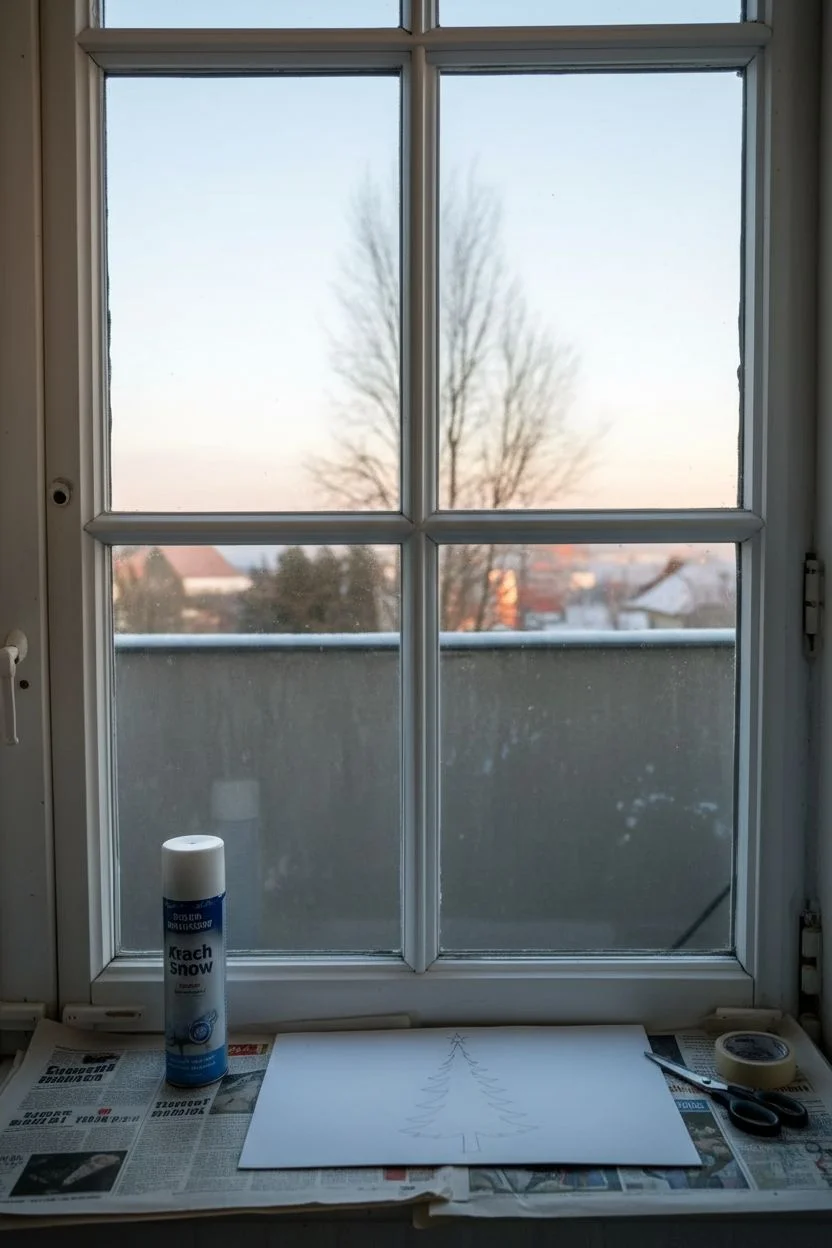
Transform a simple window into a winter wonderland using the clever technique of negative space. By masking off a tree shape and spraying artificial snow around it, you create a striking silhouette that lets the outside world peek through your festive design.
Detailed Instructions
Materials
- Large sheet of paper or cardstock (for the stencil)
- Pencil
- Scissors or craft knife
- Painter’s tape or double-sided repositionable tape
- Artificial snow spray (canned)
- Glass cleaner and microfiber cloth
- Paper towels
- Newspaper or drop cloth (for sill protection)
- Snowflake stencils (optional)
Step 1: Preparing the Surface
-
Clean the glass:
Begin by thoroughly cleaning the window pane where you intend to work. Use a good glass cleaner and a microfiber cloth to remove any dust, fingerprints, or grease, ensuring the tape and snow spray will adhere properly. -
Protect the area:
Lay down newspaper or a drop cloth on the window sill and floor immediately below the window. Artificial snow spray produces a fine mist that settles downwards, so covering the surrounding woodwork is essential for easy cleanup.
Pro Tip: Stickiness
If using paper cutouts for snowflakes, lightly mist the back of them with water instead of tape. The surface tension holds them to the glass just long enough to spray over them.
Step 2: Creating the Tree Mask
-
Draft the tree shape:
On a large sheet of paper or cardstock that fits your window pane’s dimensions, sketch out a classic Christmas tree shape. Draw a solitary star at the very top and tiered branches that swoop upwards at the ends. -
Cut out the silhouette:
Carefully cut out your tree drawing. For this project, the paper cutout itself is the tool we need—you are creating a ‘mask’ to block the snow. -
Refine the edges:
Check your cutout for any jagged edges. Smooth curves work best for the spray to collect around, creating a crisp outline later. -
Apply adhesive:
Place small loops of painter’s tape or small pieces of double-sided repositionable tape on the back of your paper tree. Focus on the tips of the branches and the star to ensure they lay flat against the glass.
Step 3: Application and Frosting
-
Position the mask:
Press the paper tree firmly onto the center of the window pane. Smooth it down from the center outwards to eliminate gaps where spray might sneak underneath. -
Prepare the spray:
Shake your can of artificial snow spray vigorously for the time recommended on the bottle. I always do a quick test spray on a piece of scrap paper to ensure the nozzle is clear. -
Frost the perimeter:
Hold the can about 10-12 inches away from the glass. Spray a light, even layer of snow over the entire window pane, covering both the exposed glass and your paper tree mask. -
Add detail:
Make sure to coat the edges of the paper tree thoroughly. This build-up is what defines the shape once the paper is removed. -
Wait for drying:
Allow the snow spray to dry completely. This usually takes just a few minutes, but checking the can’s instructions prevents smudging your hard work.
Troubleshooting: Dripping
If the spray runs or drips, you are holding the can too close or spraying too heavily in one spot. Wipe it clean immediately with a paper towel and apply lighter, sweeping coats.
Step 4: Adding Snowflakes and Finishing
-
Remove the mask:
Verify the spray is dry to the touch. Gently peel the paper tree off the glass, starting from the trunk and moving upward. Be careful not to scrape the surrounding frost with the paper. -
Clean the negative space:
If any spray seeped under the paper, use a slightly damp cotton swab or the corner of a paper towel to wipe the clear glass inside the tree shape, crisping up the lines. -
Snowflake method A: Stencils:
To add the falling snowflakes around the tree, you can specific snowflake stencils. Hold them against the glass and give a quick burst of snow spray. -
Snowflake method B: Hand-drawn:
Alternatively, if the background spray is light enough, use a fingertip or a dry brush to wipe away small snowflake shapes from the frosted layer, creating negative-space flakes. -
Snowflake method C: Additional stick-ons:
For a very crisp look like the photo, you can apply window-cling snowflakes to the glass *before* spraying the background layer, and peel them off alongside the tree. -
Pile up snow at the bottom:
Finally, spray a heavier concentration of snow along the very bottom of the pane to simulate a snowbank accumulation at the base of the tree.
Enjoy the cozy, silhouetted view as the evening light glows through your clear tree shape
Mini Motifs on Each Window Pane
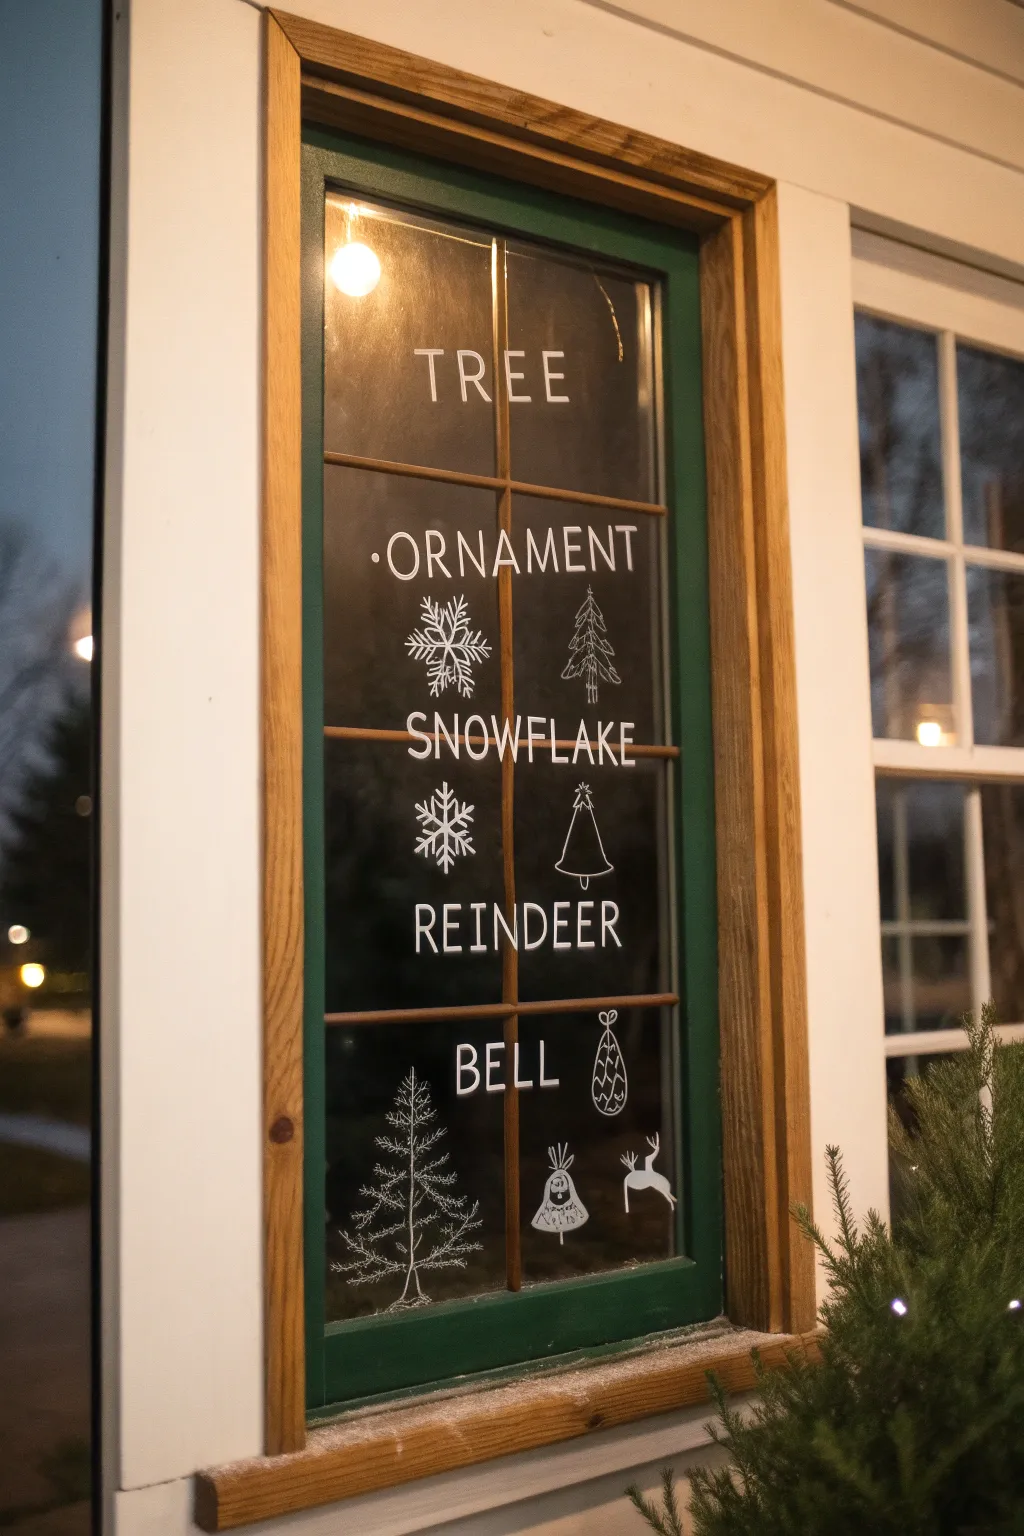
Transform a divided window into a charming holiday checklist using crisp white lettering and simple line drawings. This project turns standard glass panes into a festive display that looks like a vintage Christmas card brought to life.
Detailed Instructions
Materials
- White liquid chalk marker (fine and broad tips)
- Glass cleaner
- Lint-free cloth or paper towels
- Ruler or measuring tape
- Masking tape or painter’s tape
- Paper for sketching
- Pencil
- Cotton swabs
- Water
Step 1: Preparation and Planning
-
Clean the surface:
Start by thoroughly cleaning the window glass on both sides, ensuring there are no smudges or dust that could interfere with the marker adhesion. -
Dry completely:
Use a lint-free cloth to ensure the glass is perfectly dry before you begin drawing. -
Sketch your layout:
Measure your window panes and sketch a rough layout on paper first. Decide which word belongs in which pane to keep the design balanced. -
Plan the text hierarchy:
Map out the words ‘TREE’, ‘ORNAMENT’, ‘SNOWFLAKE’, ‘REINDEER’, and ‘BELL’ so they are centered horizontally within the panes.
Uneven Ink Flow?
If the marker streaks, press the tip on a scrap paper to re-saturate heavily. Verify the glass is not cold or damp condensation-prone.
Step 2: Lettering the Window
-
Mark guide lines:
Use small pieces of masking tape on the outside of the glass (or lightly with the marker) to indicate the baseline for your text to keep it straight. -
Letter the top pane:
Start at the top with the word ‘TREE’. Use a broad-tip chalk marker for clean, capitalized sans-serif letters, spacing them widely for an airy look. -
Continue downwards:
Move to the second row and write ‘ORNAMENT’ across the pane. I find it helpful to write the middle letter first to ensure it’s perfectly centered. -
Complete the text list:
Finish writing ‘SNOWFLAKE’, ‘REINDEER’, and ‘BELL’ in descending order, maintaining consistent font size and style. -
Refine the edges:
Go back over your letters to thicken any thin spots and sharpen the corners of your characters for better legibility from a distance.
Pro Tip: Exterior Guide
Tape your paper sketch on the OUTSIDE of the glass facing in. You can simply trace lines from the inside for perfect placement.
Step 3: Drawing the Motifs
-
Sketch the snowflakes:
Under the word ‘ORNAMENT’ and next to ‘SNOWFLAKE’, draw a large, detailed snowflake. Start with a simple cross and add ‘V’ shapes to the arms. -
Add a classic pine tree:
Draw a small, triangular pine tree shape next to the snowflake. Use jagged or looped lines to suggest branches and texture. -
Illustrate the Reindeer theme:
Near the word ‘REINDEER’, draw a simple triangular tree shape again, perhaps slightly more stylized or abstract to vary the look. -
Draw a leaping deer:
In the bottom right corner, sketch a simple silhouette of a reindeer jumping. Keep the lines fluid and simple rather than trying for realism. -
Add the bottom details:
Draw a large, detailed pine tree in the bottom left corner, using sweeping downward strokes for the branches. -
Draw the bell icon:
Create a hanging bell shape near the bottom center with a small loop at the top and simple internal lines for decoration. -
Include hanging ornaments:
Next to the word ‘BELL’, sketch a teardrop-shaped ornament hanging from a small hook or string.
Step 4: Clean Up
-
Correct mistakes:
Dip a cotton swab in a little water to precisely erase any wobbly lines or smudges without ruining the surrounding art. -
Remove tape guides:
Peel off any masking tape you used for guidelines on the exterior or interior of the glass. -
Final polish:
Give the non-painted areas of the glass a quick buff with a dry cloth if any palm prints appeared during the drawing process.
Step back and enjoy the cozy, hand-drawn charm your window now adds to the neighborhood view
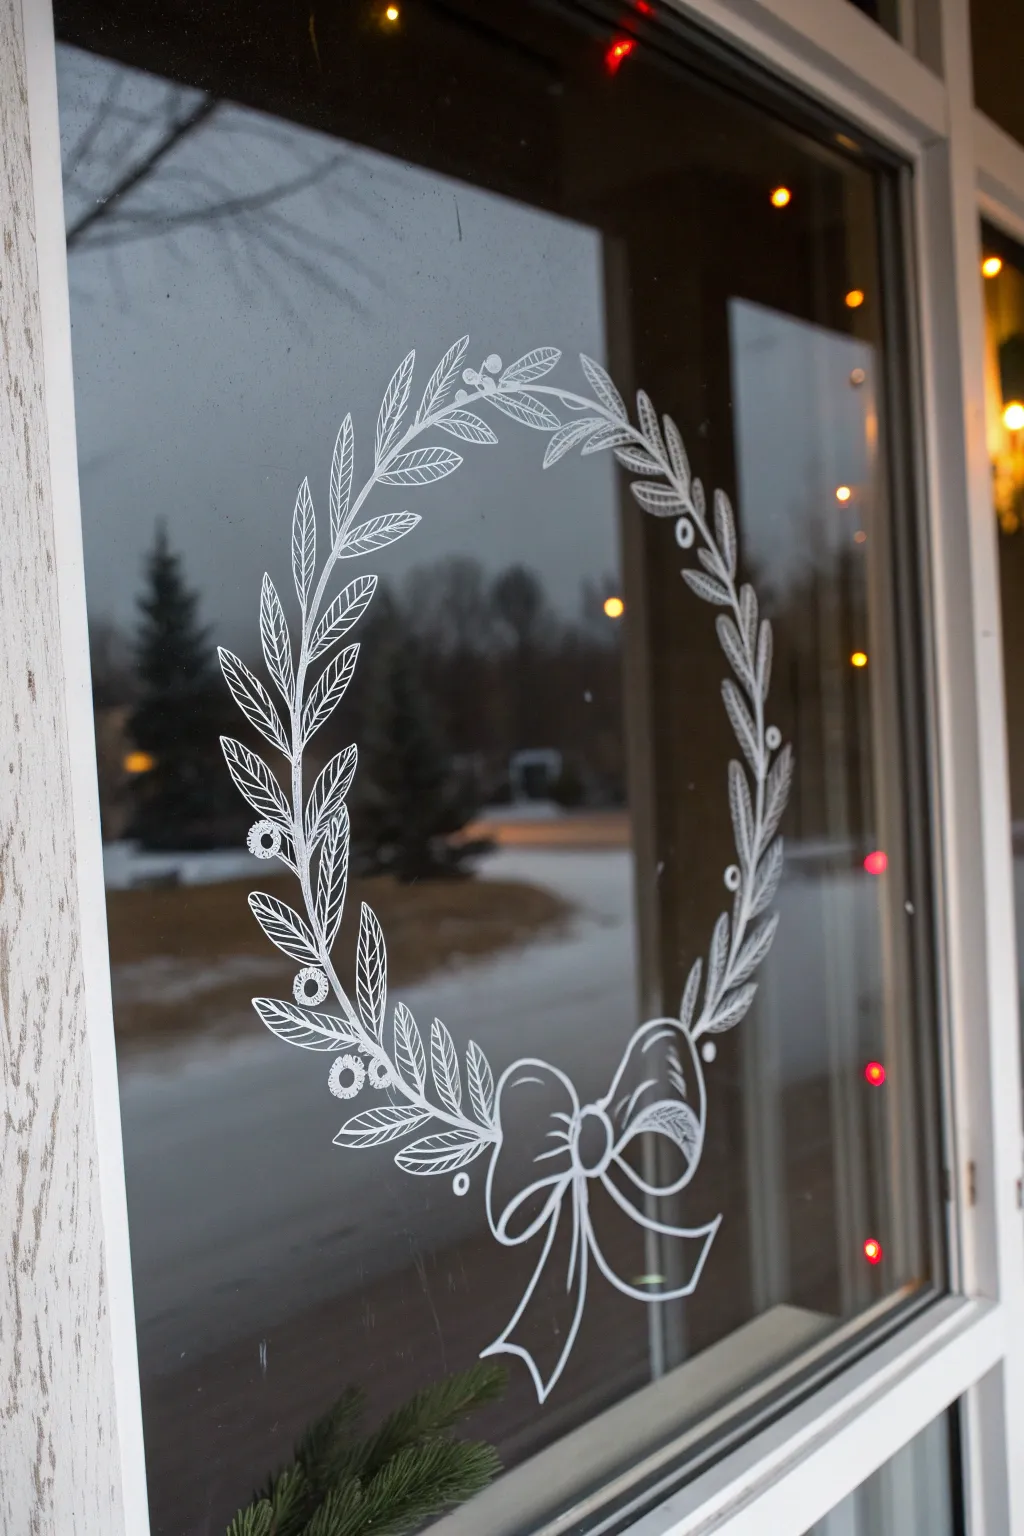
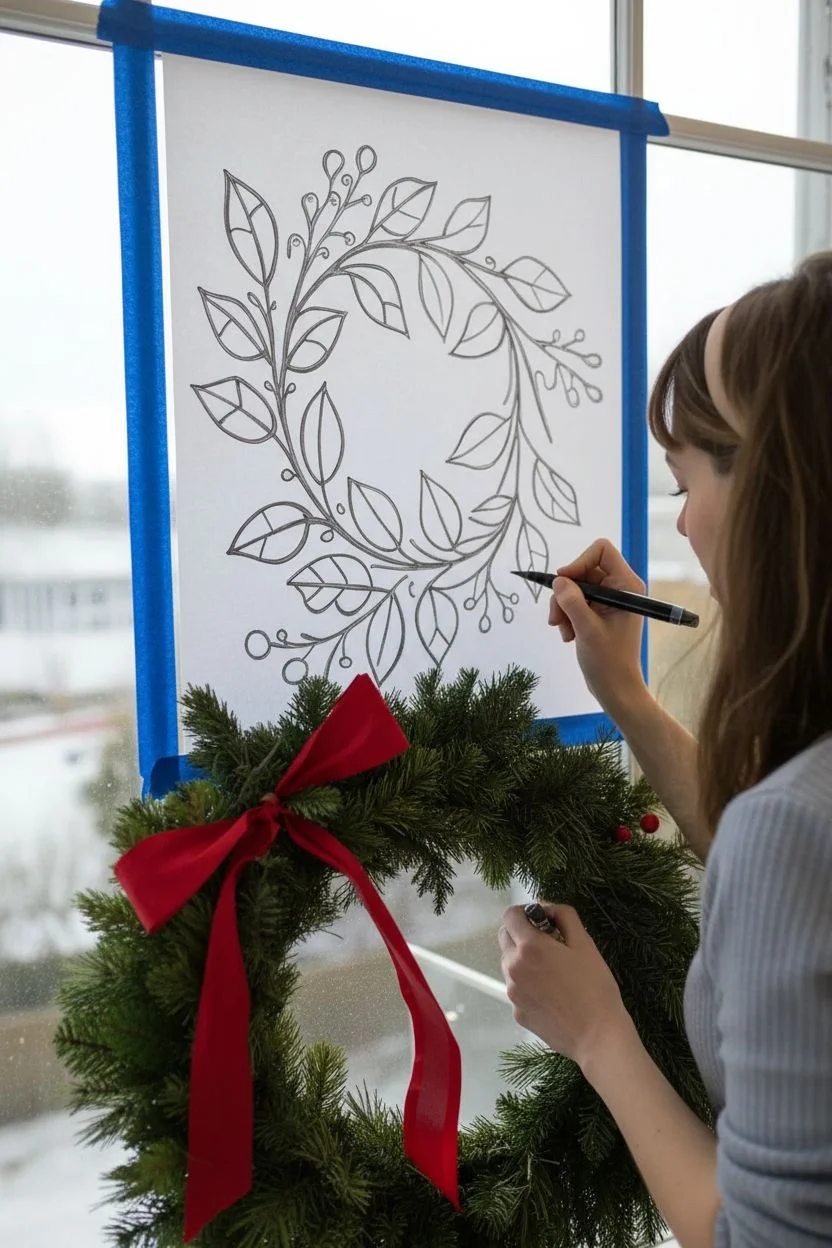
Tracing Hack for Perfect Christmas Line Art
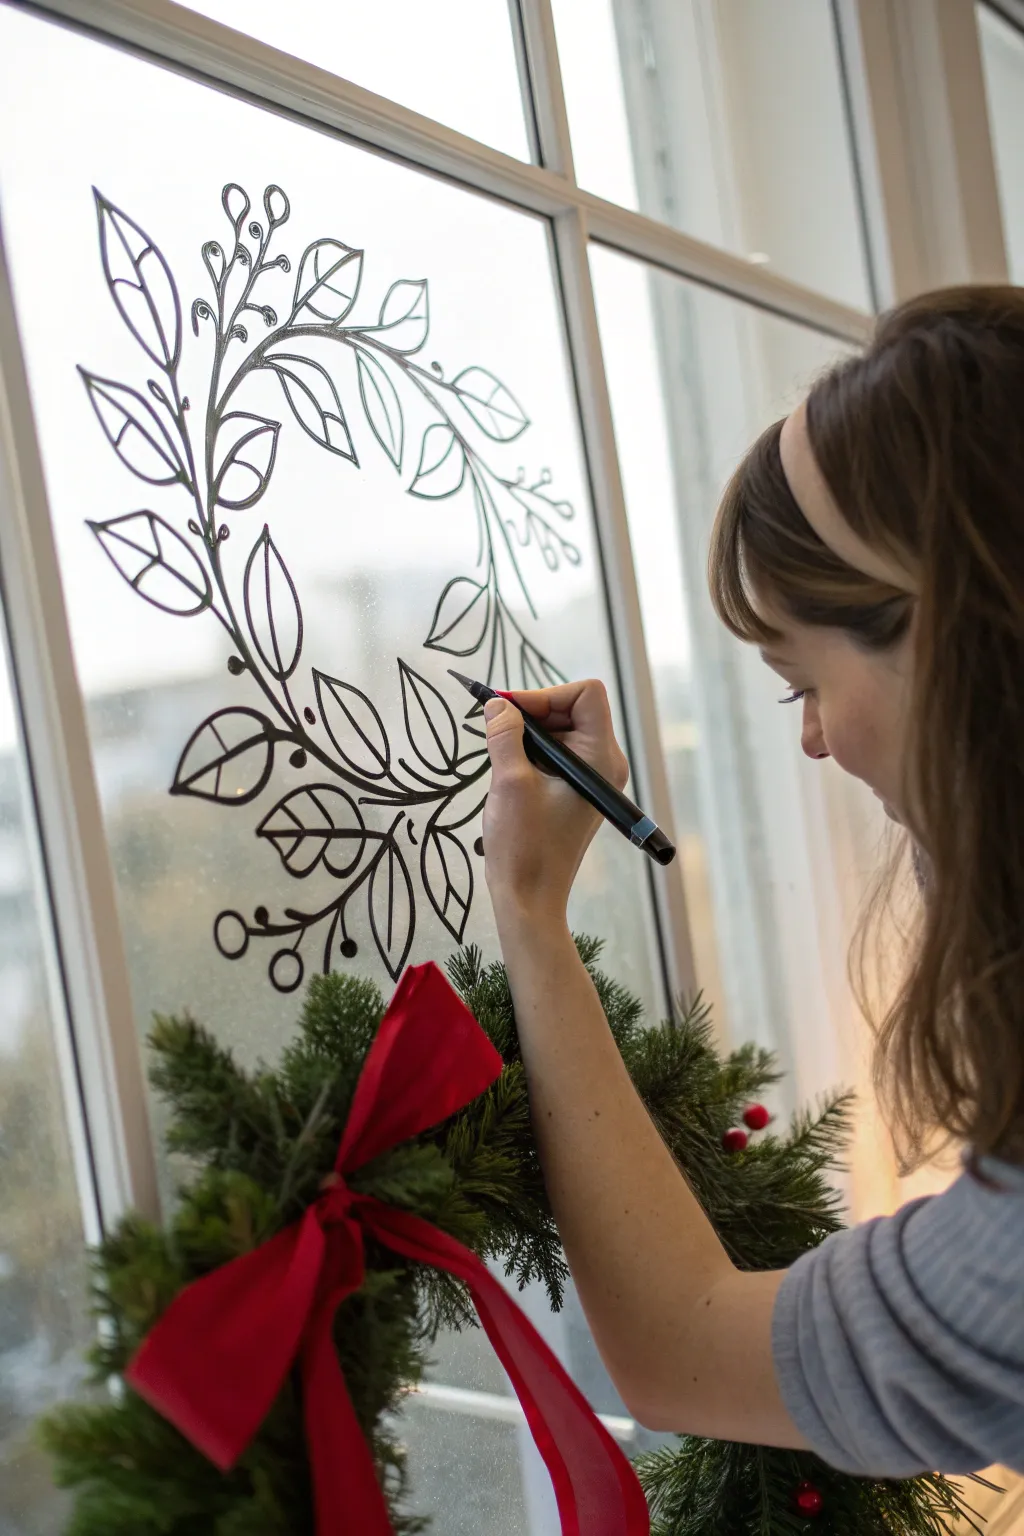
Transform your windows into a winter wonderland with this elegant, botanical line art that mimics the look of vintage etchings. By combining a classic drawing with a physical wreath, you create a stunning, multi-dimensional holiday display that looks professionally done.
Step-by-Step
Materials
- Black chalk marker (fine or medium tip)
- Glass cleaner
- Microfiber cloth
- Printed wreath template (or large sheet of paper)
- Painter’s tape or clear tape
- Graphite pencil (optional)
- Fresh or faux evergreen wreath with red ribbon
Step 1: Preparation and Template
-
Clean the canvas:
Start by thoroughly cleaning the inside of your window pane. Use a glass cleaner and a microfiber cloth to remove all dust, smudges, and fingerprints, ensuring the surface is completely dry before starting. -
Select your design:
Choose a botanical line art design. You can print a large wreath illustration on multiple sheets of paper and tape them together, or sketch your own design on a large piece of poster paper first. -
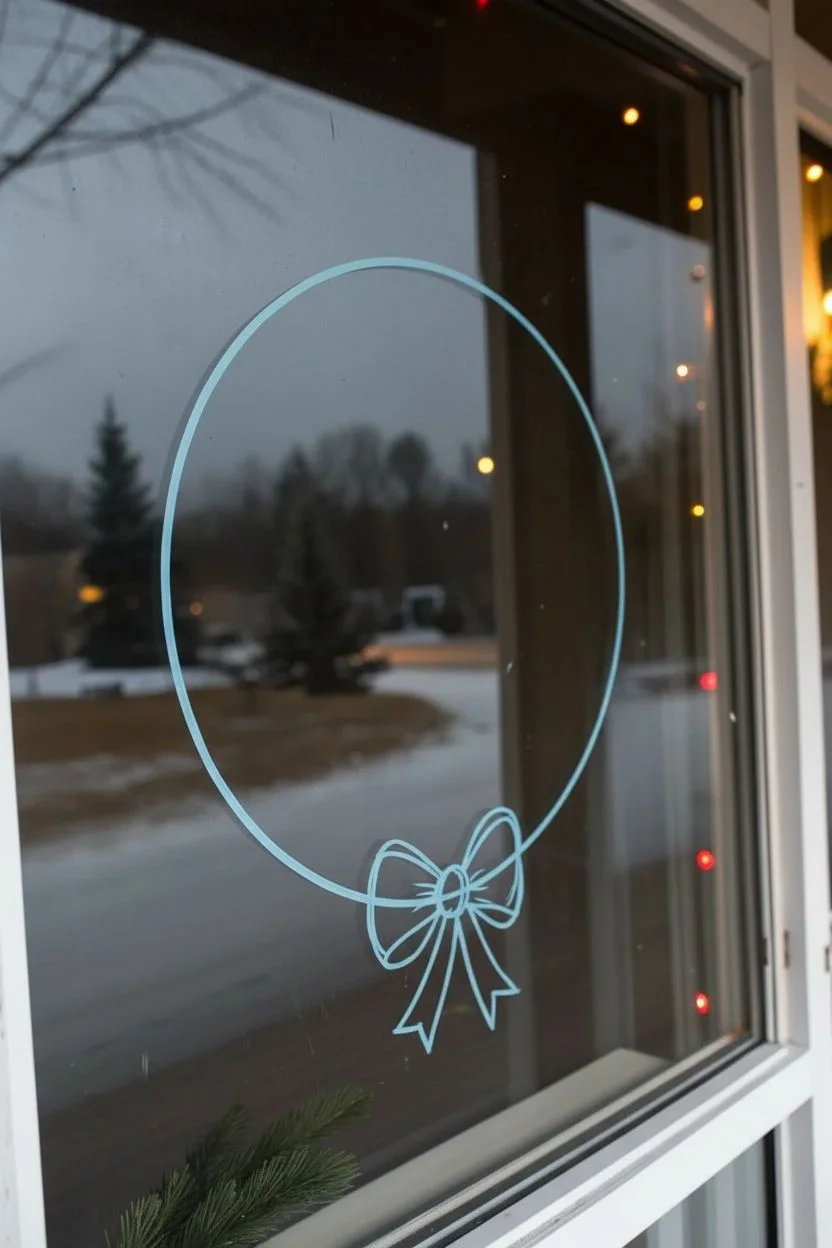
Position the template:
Go outside (or have a helper go outside) and tape your paper template to the *outside* of the window glass. Ensure the design is centered and positioned exactly where you want the final drawing to be on the inside. -
Secure the template:
Use painter’s tape generously to make sure the paper sits flush against the glass. Gaps between the paper and glass can cause a parallax effect, making it harder to trace accurately from the inside.
Step 2: Drawing the Design
-
Prime the marker:
Shake your black chalk marker vigorously to mix the pigment. Press the tip onto a scrap piece of paper repeatedly until the ink flows smoothly and black. -
Start the main stems:
Standing inside, begin tracing the main arched stem of the wreath design. Use a steady hand and long, confident strokes rather than short, sketchy ones for a cleaner look. -
Outline the leaves:
Work your way along the stem, outlining the shapes of the leaves. I find it helpful to start from the stem connection and pull the marker outward toward the leaf tip. -
Add intersecting veins:
Draw the central vein inside each leaf running from the base to the tip. This line adds direction and flow to the botanical elements. -
Detail the leaf segments:
Add the smaller cross-veins or geometric segments within the leaves. Keep these lines slightly thinner if your marker allows, or just use a lighter pressure. -
Incorporate berries:
Trace the small circular berry clusters near the base of the stems. Ensure the circles are closed loops for a tidy finish. -
Add decorative sprigs:
Draw the finer, whispery sprigs that extend outward from the main wreath shape. These delicate lines prevent the design from looking too heavy. -
Check for consistency:
Step back occasionally to view the overall balance. If any lines look too thin or transparent, go over them a second time once the first layer is dry to deepen the black.
Use a Bridge
Rest your hand on a clean cloth or a ‘mahl stick’ while drawing to prevent your palm from smudging lines you’ve already drawn lower on the glass.
Step 3: Finishing Touches
-
Remove the template:
Once you have finished tracing the entire design, head outside and carefully peel off the paper template and tape. -
Clean up edges:
Inspect your work from the inside against the clear daylight. Use a damp cotton swab to erase any slips, smudges, or crooked lines for a crisp finish. -
Hang the physical wreath:
Position your real evergreen wreath below the drawing. You want the top of the greenery to overlap slightly with the bottom of your drawing to create the illusion that the drawing is sprouting from the wreath. -
Fluff the bow:
Adjust the red ribbon on your physical wreath so it sits prominently in the center, anchoring the entire visual composition.
Snowy Highlights
Once the black ink is fully dry, use a white chalk marker to add tiny highlight accents on the tips of the leaves or berries for a frosted, dimensional look.
Now step back and enjoy how the natural light illuminates your artwork throughout the day


Have a question or want to share your own experience? I'd love to hear from you in the comments below!