
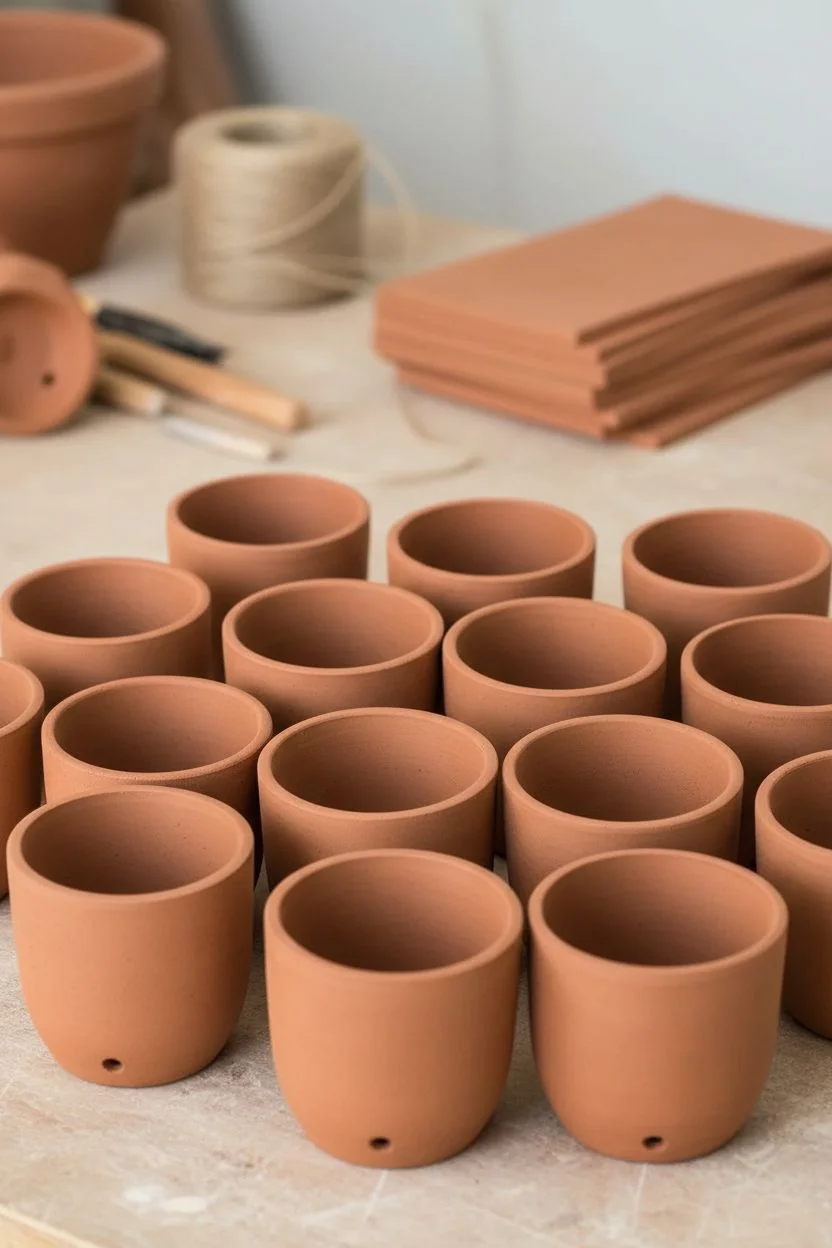
If you’ve ever wished your walls could have more texture than paint alone can give, ceramic wall art is the dream medium. I love how clay catches light, throws tiny shadows, and instantly makes a space feel curated and handmade.
Hand-Painted Ceramic Plates as a Gallery Wall

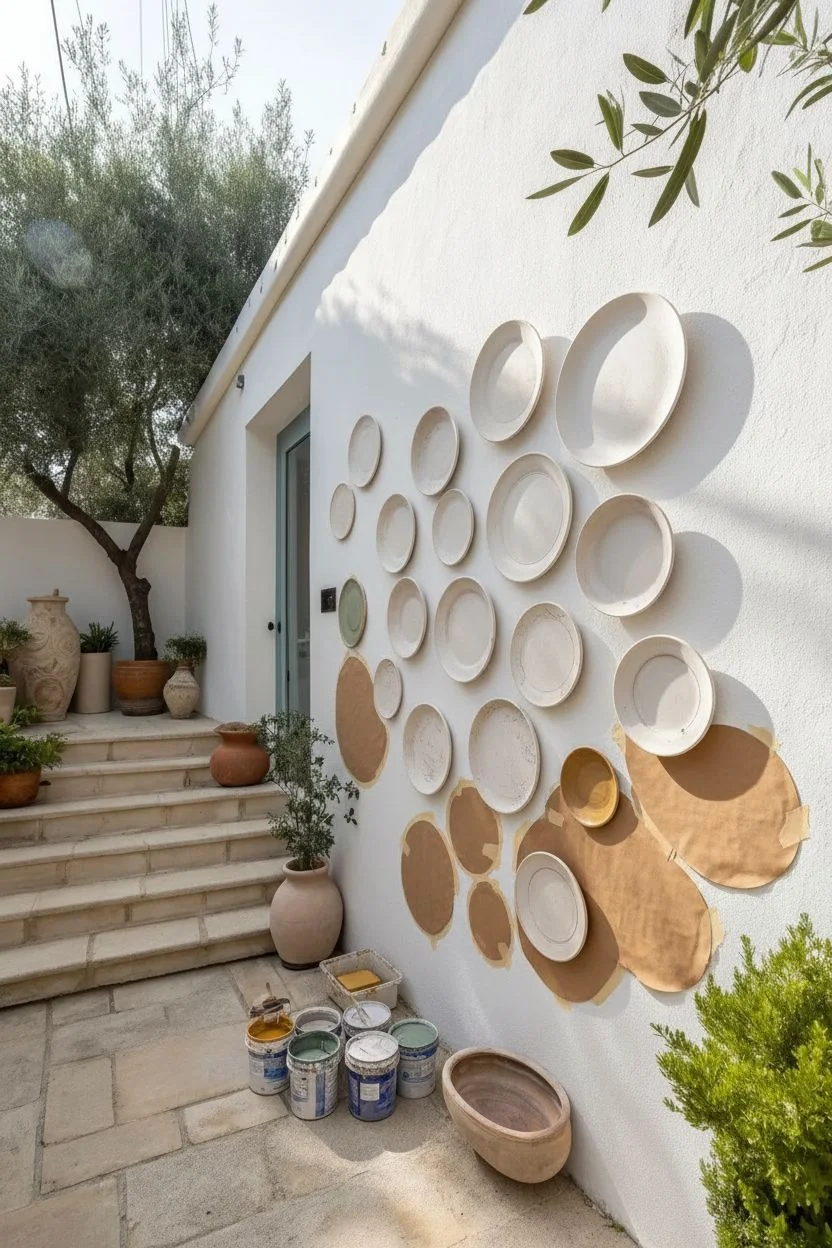
Capture the warmth of a Mediterranean afternoon with this stunning ceramic plate gallery wall, featuring earthy tones of terracotta, sage, and cream. This project involves painting and glazing bisque plates to achieve a cohesive yet eclectic collection that feels collected over time.
How-To Guide
Materials
- Collection of bisque ceramic plates (various sizes and rim styles)
- Underglaze paints (terracotta, sage green, cream, mustard yellow, burnt umber)
- Clear glaze (dipping or brushing formula)
- Sponge (for texture)
- Small liner brush (for fine details)
- Medium round brush
- Pencil (HB)
- Plate hangers (disc style or spring style)
- Kraft paper (for layout)
- Painters tape
- Kiln access (or local pottery studio service)
Step 1: Design & Preparation
-
Source your ceramics:
Gather a variety of bisque-ware plates. Aim for a mix of sizes, ranging from small saucers to large dinner plates, and look for variety in rim depth to create visual dimension. -
Clean the bisque:
Wipe down every plate with a slightly damp sponge to remove any dust from the shelf. This ensures the underglaze adheres properly without crawling. -
Plan your color palette:
Select 3-4 core colors. For this look, focus on unglazed terracotta (just clear glaze over bare clay), soft sage greens, creamy whites, and deep rusty umbers.
Uneven Glaze?
If brushstrokes are visible in your solid colors, try thinning your underglaze slightly with water or using a fan brush for broader, smoother coverage.
Step 2: Painting Techniques
-
Create the solid plates:
For the solid-colored plates (like the large terracotta or sage ones), apply three even coats of underglaze, letting each coat dry until it’s chalky before applying the next. -
Add vintage texture:
On one or two plates, sponge a lighter color over a darker base while the base is still slightly damp to create a weathered, uneven stone look. -
Draft the patterns:
For the patterned plates, lightly sketch your designs with a pencil directly on the bisque. Don’t worry about mistakes; the graphite will burn off completely in the kiln. -
Paint the intricate mandalas:
Using your fine liner brush, paint the detailed geometric or mandala-style patterns. Steadiness is key here, so I like to rest my pinky finger on the plate for balance. -
Incorporate sgraffito details:
For the textured plate centers, paint a solid dark circle, let it dry to a leather-hard feel, and scratch designs through the paint with a needle tool to reveal the white clay beneath. -
Paint the rims:
Define the edges of specific plates by holding a loaded brush steady against the rim while rotating the plate on a banding wheel or lazy susan. -
Glazing and firing:
Once all paint is bone dry, apply a coat of clear glaze. If you want a matte finish on some (like the terracotta ones), leave them unglazed or use a matte glaze. Fire according to your clay body’s specifications.
Step 3: Installation
-
Trace templates:
While your plates are being fired, trace each plate onto kraft paper and cut out the shapes. -
Mock up the layout:
The arrangement in the photo is organic, roughly circular but asymmetrical. Tape your paper templates to the wall, moving them until the ‘cloud’ shape feels balanced. -
Check the spacing:
Ensure there is breathing room between the plates—about 2 to 4 inches creates a relaxed, airy feel rather than a cluttered one. -
Mark the hooks:
Mark exactly where the nail needs to go on your paper templates. Remember that different plate hangers sit at different heights on the back of the plate. -
Attach hangers:
Secure adhesive disc hangers or spring-loaded wire hangers to the back of your finished, fired plates. -
Commit to the wall:
Hammer your nails or hooks right through the paper templates where you marked them. -
Hang and adjust:
Tear away the paper and hang your ceramics. Use a small ball of museum wax or blue tack on the bottom back edge of each plate to keep them perfectly straight.
Level Up: Texture Play
Mix specific ‘crackle’ glazes or special ‘crawling’ glazes on 1-2 accent plates to mimic the look of ancient, weathered pottery found in an archaeological dig.
Now you have a timeless display that brings artisanal charm to your vertical space


Relief Tile Grid With Repeating Texture
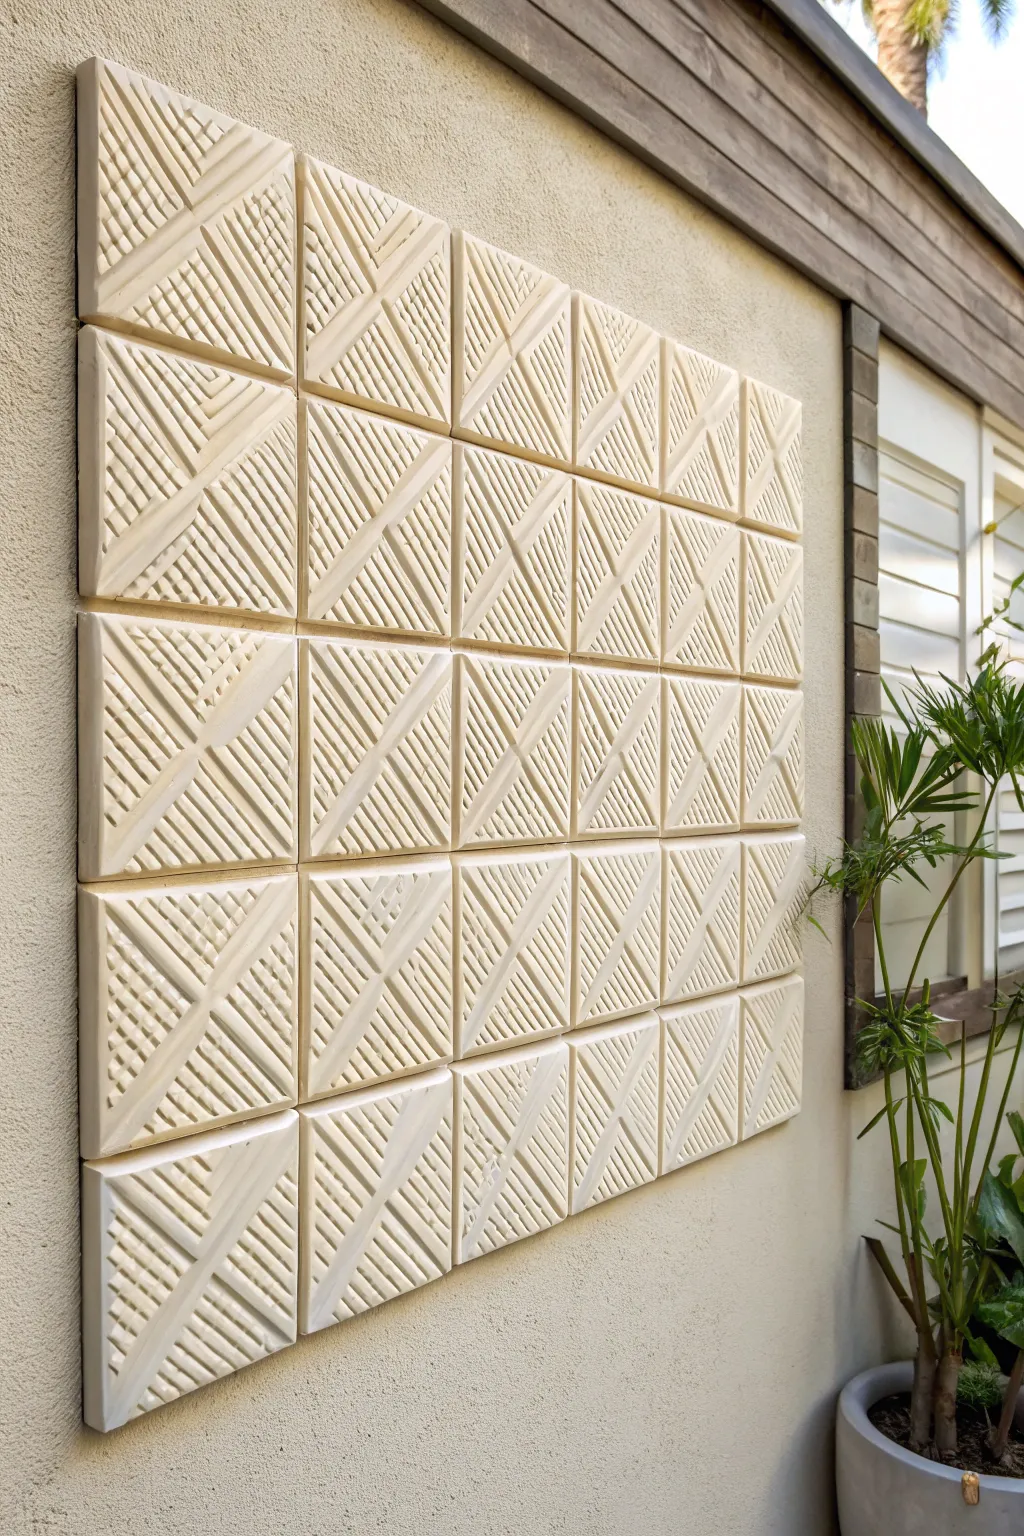
Transform a blank outdoor or indoor wall with this striking grid of textured ceramic tiles. The rhythmic pattern of diagonal ridges creates intricate shadows that shift beautifully throughout the day, adding architectural depth to your space.
Step-by-Step Tutorial
Materials
- High-fire stoneware clay (white or cream)
- Square tile cutter or ruler and knife
- Carving tools (ribbon loop tool or clay carving set)
- Wooden guide rails (slats)
- Canvas working mat
- Rolling pin or slab roller
- Straight edge / metal ruler
- Needle tool
- Sponge
- Exterior-grade tile adhesive (thinset)
- Notched trowel
- Tile spacers (1/8 inch)
- Grout (optional, depending on desired look)
- Kiln access
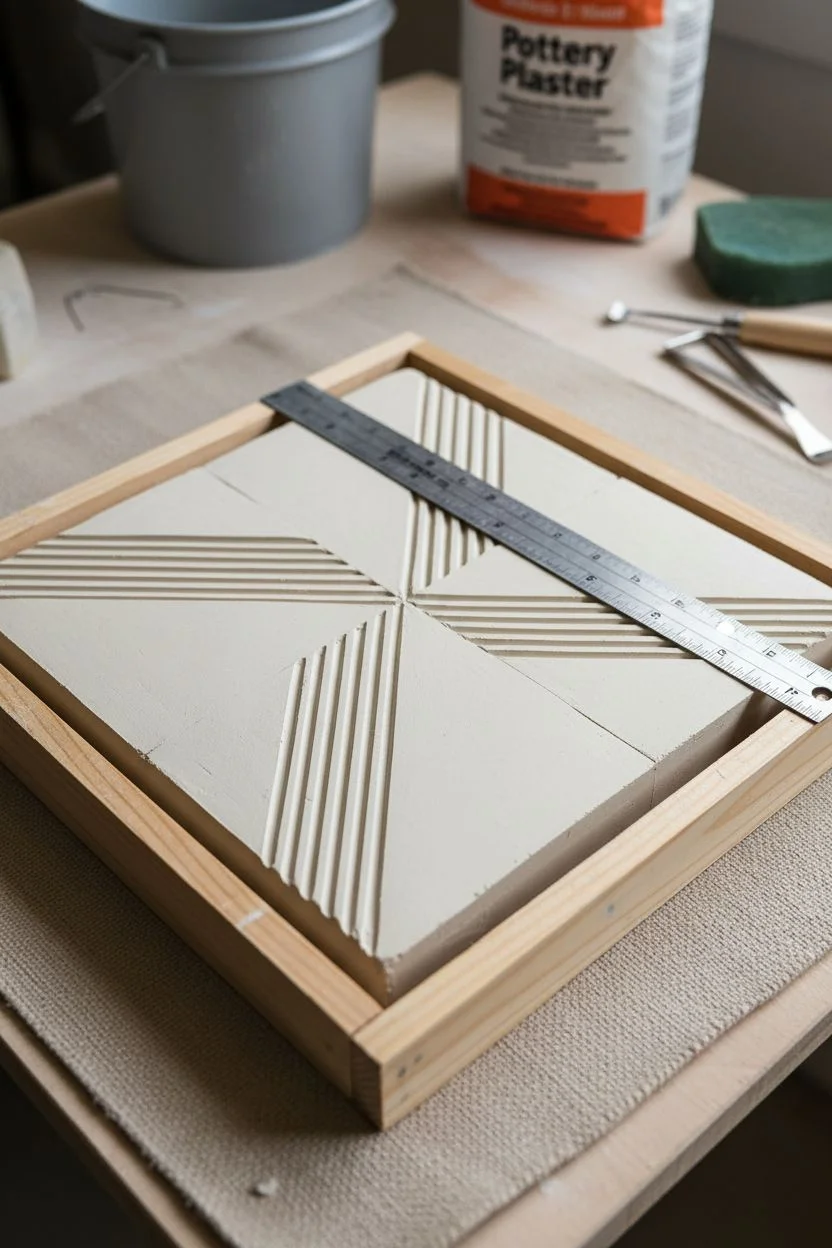
Step 1: Creating the Master Tile & Mold (Optional)
-
Prepare the prototype slab:
If you plan to make many identical tiles, start by creating a single master prototype. Roll out a thick slab of clay (around 1 inch) on a canvas surface. -
Define the shape:
Cut a perfect square, likely 6×6 or 8×8 inches, using a straight edge and knife. Ensure the sides are vertical and clean. -
Mark the quadrants:
Lightly score diagonal lines from corner to corner to create a large ‘X’ across the tile face, dividing it into four triangular sections. -
Carve the relief pattern:
Using a ribbon loop tool, carve parallel grooves into each triangular quadrant. The lines should run perpendicular to the outer edge of the triangle. Ensure the central ‘X’ ridges remain raised and distinct. -
Cast a plaster mold:
Construct a simple wooden box frame around your prototype. Pour pottery plaster over the clay prototype to create a press mold. Allow this to cure and dry completely before use. Alternatively, you can hand-carve every tile individually if you prefer a more organic variation.
Pro Tip: Hidden hanging
Make small keyhole notches in the back of your tiles while the clay is leather-hard. This lets you hang them individually with screws for a removable installation instead of using mortar.
Step 2: Producing the Tiles
-
Prepare clay slabs:
Roll out slabs of stoneware clay to a uniform thickness, slightly thicker than your final desired depth to account for pressing. -
Press or carve:
If using a mold, press the soft clay slab firmly into your plaster mold. If hand-carving specific tiles, repeat the quadrant carving process from phase one for each individual tile. -
Refine the edges:
Release the tile from the mold or finish carving. Use a damp sponge to smooth any sharp burrs on the edges, but leave the textural ridges crisp. -
Create the full set:
Repeat this process until you have enough tiles to fill your desired grid dimensions (e.g., 5 tiles wide by 6 tiles high as seen in the image). Make 3-4 extras to account for breakage. -
Slow drying:
Place the tiles between boards or under plastic to dry slowly. This prevents warping, which is critical for a flat wall installation. I find flipping them daily helps maintain flatness.
Step 3: Firing and Finishing
-
Bisque fire:
Once bone dry, stack the tiles in the kiln for a bisque firing. -
Glazing (or not):
For the look in the photo, leave the clay unglazed (raw) to highlight the natural stone texture, or apply a very matte, transparent glaze. A high-gloss glaze will reflect too much light and obscure the pattern. -
Final firing:
Fire the tiles to maturity (cone 6 or 10) to ensure they are vitreous and frost-proof if installing outside.
Level Up: Oxide wash
Before the final firing, wipe a diluted iron oxide wash over the textured surface and sponge it off the high points. This deepens the grooves and makes the geometric relief pop visually.
Step 4: Installation
-
Prep the surface:
Ensure your wall surface is clean, dry, and flat. Snap a chalk line to establish a perfectly level starting point for the bottom row. -
Apply adhesive:
Use a notched trowel to spread exterior-grade thinset mortar onto the wall area for the first two rows or back-butter individual tiles. -
Set the tiles:
Press the tiles firmly into the mortar. Twist them slightly to ensure good contact, twisting back to align them perfectly. -
Rotate for pattern:
As you place them, orient the tiles so the heavy diagonal dividers create a secondary ‘diamond’ pattern across the intersections of four tiles. -
Space evenly:
Insert small tile spacers (no larger than 1/8 inch) between tiles to keep the grid tight and uniform. -
Continuing the grid:
Work your way up the wall, checking frequently with a level to ensure the grid isn’t drifting. -
Clean and cure:
Wipe any excess mortar off the tile faces immediately with a damp sponge. Let the Installation set for 24-48 hours.
Step back and admire how the sunlight plays across your new architectural feature wall


Mosaic Medallions From Broken Ceramic Pieces
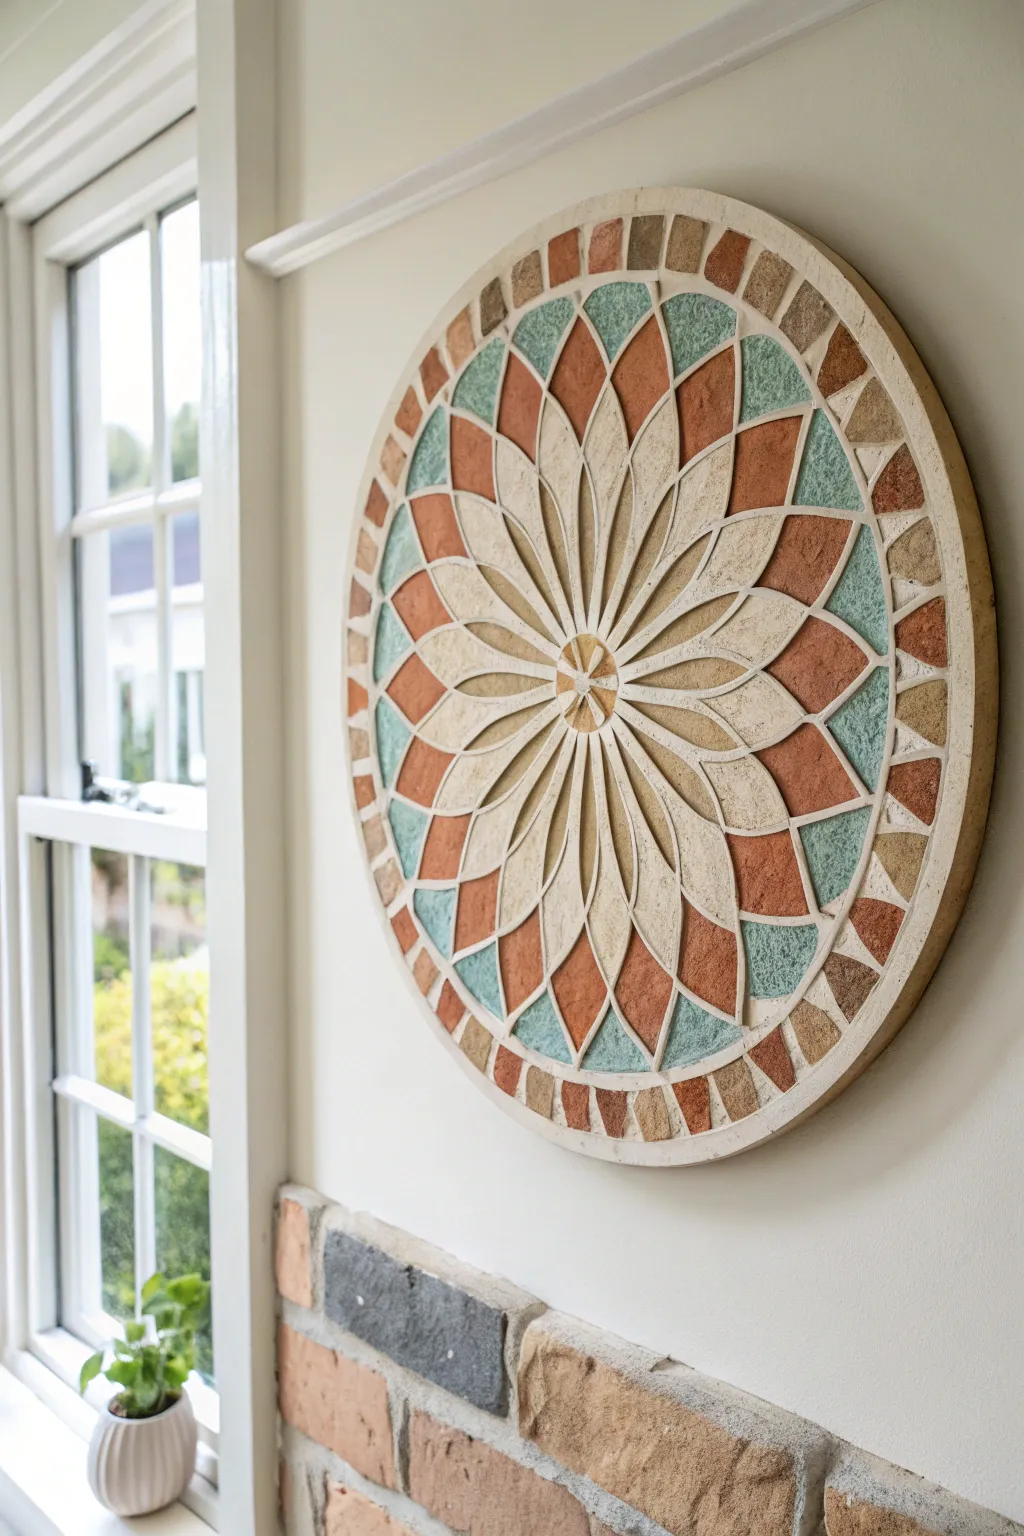
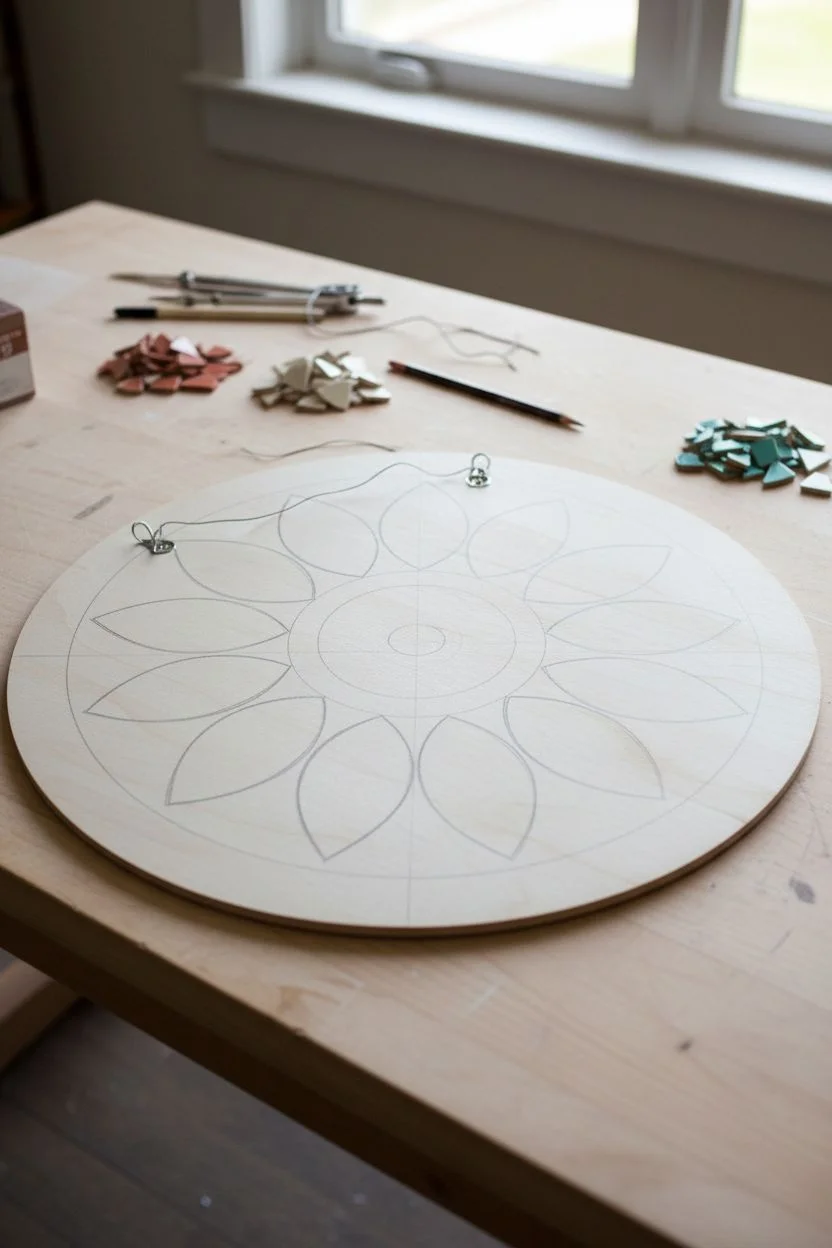
Transform broken shards and tile fragments into a stunning focal point with this meticulously structured circular mosaic. Featuring a soothing palette of terracotta, teal, and cream, this project mimics the look of ancient stone inlays for a sophisticated addition to any wall.
Detailed Instructions
Materials
- Circular plywood or MDF backing board (24-inch diameter)
- Hanging hardware (D-rings and wire)
- Ceramic tiles or stone pieces (terracotta, off-white/beige, teal/sage green)
- Tile nippers (wheeled nippers work best)
- Pencil and compass (or string and pin)
- Tile adhesive (mastic) or clear drying craft glue suitable for ceramics
- Sanded grout (off-white or cream color)
- Grout float or rubber spatula
- Sponge and bucket of water
- Sandpaper (medium grit)
- Sealer (optional, matte finish)
Step 1: Preparation & Design
-
Prep the Backing:
Begin by sanding the edges of your circular backing board to remove any roughness. Before gluing anything, install your hanging hardware on the back; trying to hammer D-rings onto a finished mosaic is a recipe for disaster. -
Draft the Grid:
Use a compass (or a string tied to a pin) to draw faint concentric circles radiating from the exact center. You’ll need a small center circle, a middle field for the main petals, and an outer ring for the border. -
Sketch the Petals:
Lightly sketch the flower petal design within your concentric circles. Aim for 12 to 16 petals depending on your spacing preference, ensuring they are symmetrical. These lines will be your guide for tile placement.
Pro Tip: Consistent Gaps
Keep your spacing between tiles consistent (approx. 1/8 inch). If pieces touch, the design loses definition; too far apart, and the grout dominates the image.
Step 2: Shaping & Adhering Tiles
-
Create the Center:
Start at the very center. Nip small, triangular pieces of beige or cream tile to form the inner starburst. Apply a dab of adhesive to the back of each piece and press firmly into place. -
Form the Cream Petal Outlines:
This design relies on strong outlines. Cut long, slender slivers or curve-shaped pieces from your cream tiles. Glue these along the pencil lines of your main petals to create the ‘skeleton’ of the flower. -
Fill the Inner Petals:
Nip pieces of beige or light stone tile to fill the inner sections of the petals. Fit them tightly against the cream outlines but leave a tiny hairline gap for grout. -
Add Terracotta Accents:
Move outward to the tips of the petals. Cut triangular or diamond shapes from your terracotta/orange tiles. Place these in the ‘V’ shapes created between the petal tips. -
Introduce the Teal:
Fill the remaining voids between the petals with teal or sage green fragments. Use your nippers to carefully shape these pieces so they follow the gentle curve of the petal outlines. -
Construct the Border:
For the outer rim, alternate small trapezoids or rectangles of terracotta and beige tile. Following the curve of the board edge is crucial here for a polished look. -
The Squeeze Test:
Once all tiles are glued, run your hand gently over the surface to ensure no pieces are sticking up higher than others. Let the adhesive cure fully, usually for 24 hours.
Troubleshooting: Sharp Edges
If a cut tile feels dangerously sharp, rub the edge against a simple sanding stone or a piece of medium-grit sandpaper before gluing it down to soften the bite.
Step 3: Grouting & Finishing
-
Mix the Grout:
Mix your sanded grout with water until it reaches the consistency of peanut butter. I find it helpful to let it slake (rest) for about 10 minutes before the final stir. -
Apply Grout:
Scoop a generous amount of grout onto the mosaic. Using a grout float or rubber spatula, spread it across the surface at a 45-degree angle, pushing it deeply into all the crevices. -
Remove Excess:
Scrape off the bulk of the excess grout with the edge of your float. Be careful not to dig grout out of the joints. -
The First Wipe:
Wait about 15-20 minutes until the grout looks hazy. Dampen your sponge (wrung out very well!) and wipe the surface in a circular motion to clean the tile faces. -
Refine the Lines:
Rinse your sponge frequently. continue wiping gently until the tiles are clean and the grout lines are smooth and recessed slightly below the tile surface. -
Paint the Edge:
While the grout is drying, use a small brush to paint the exposed wooden edge of the backing board with a color that matches your grout (cream or off-white) for a seamless transition. -
Final Buff:
Once the grout is completely dry (usually the next day), use a soft, dry cloth to buff away any remaining haze on the tiles.
Hang your beautiful medallion and enjoy the permanent bloom of stone and ceramic on your wall.


Pressed Leaf-Imprint Ceramic Wall Plaques
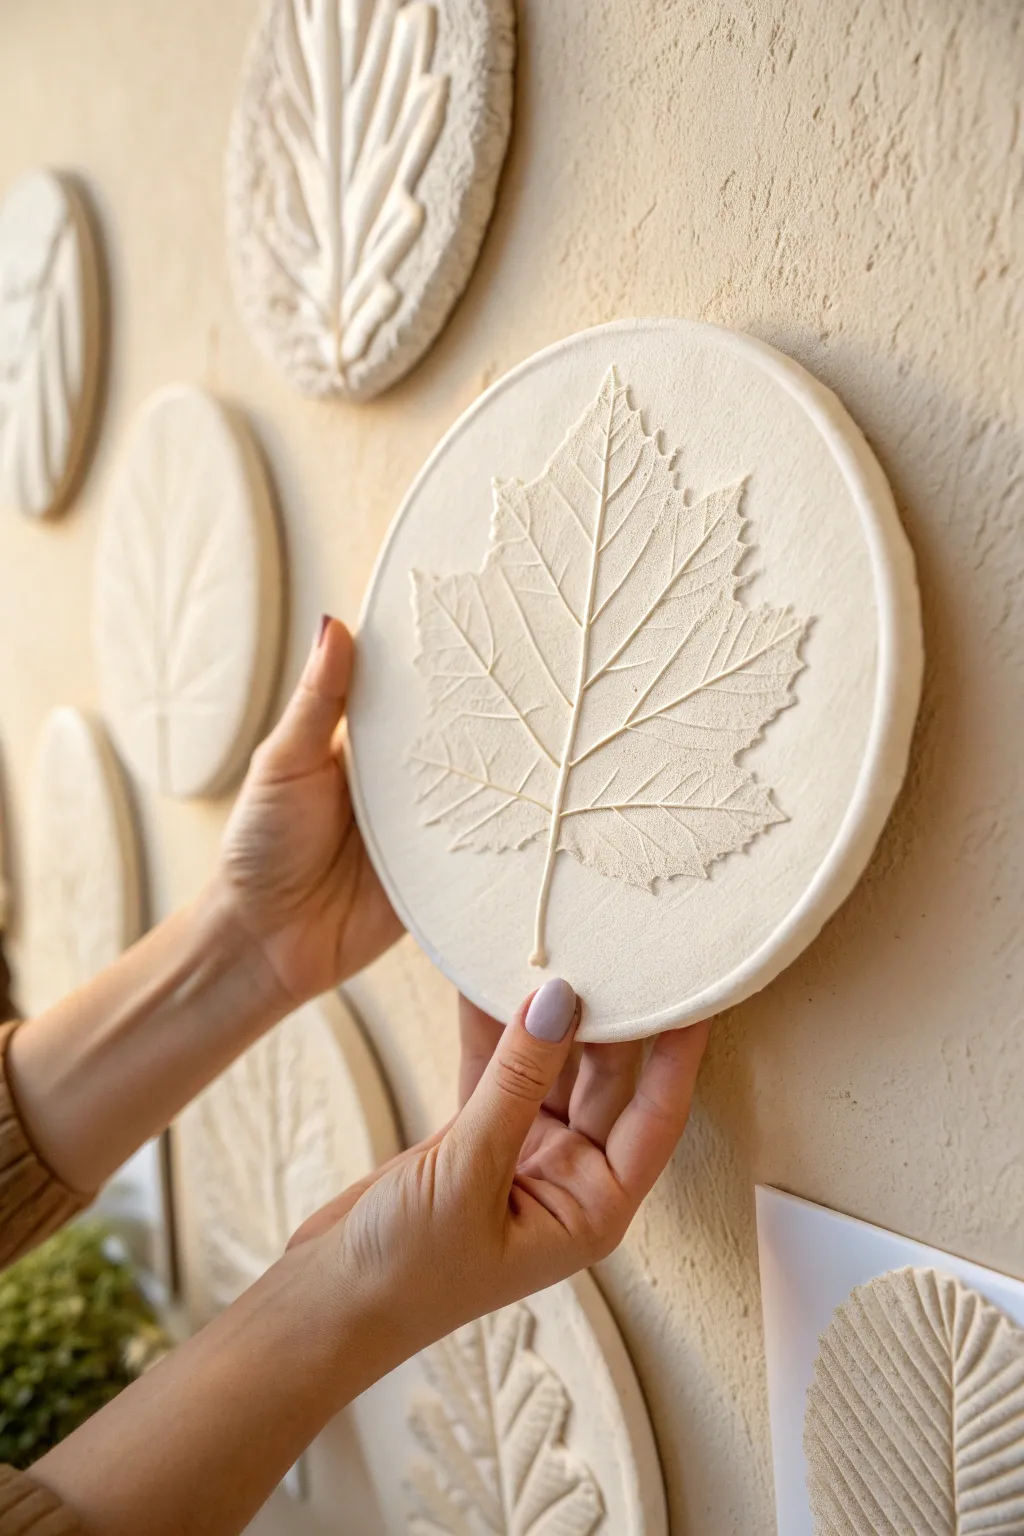
Capture the delicate veins and textures of nature with these stunning monochromatic wall plaques. This project uses a casting technique to create a raised, fossil-like leaf impression on a simple round canvas of plaster or clay.
Step-by-Step Tutorial
Materials
- Modeling clay (oil-based or non-drying)
- Plaster of Paris
- Water
- Fresh leaves with prominent veins (maple, fern, or oak)
- Rolling pin
- Round cookie cutter or circular mold (approx. 6-8 inches)
- Mixing bowl and spoon
- Fine-grit sandpaper
- Tweezers
- Release agent (vaseline or cooking spray)
- Hanging hardware (adhesive disc hangers)
Step 1: Preparing the Negative Mold
-
Condition the Clay:
Begin by kneading your non-drying modeling clay until it is soft and pliable. You want a smooth, slab-like surface without cracks. -
Roll Out the Base:
On a flat work surface, use a rolling pin to flatten the clay into a slab about half an inch thick. Ensure the surface is perfectly level and smooth. -
Select and Prep the Leaf:
Choose a fresh leaf that isn’t too dry or brittle. Place it vein-side down onto the clay slab. The vein side usually has more texture, which translates to a sharper image. -
Press the Botanical:
Gently roll over the leaf with your rolling pin. Apply firm, even pressure to embed the leaf into the clay, ensuring the stem and all edges are pushed down. -
Remove the Leaf:
Carefully lift the leaf stem first. Slowly peel the leaf out of the clay. If small pieces break off, use precision tweezers to remove them without marring the clay surface. -
Set the Boundary:
Place your round cutter or mold ring over the leaf impression. Press it deep into the clay to create a wall that will hold the liquid plaster. Don’t remove the outer clay; it adds support.
Step 2: Casting and Finishing
-
Mix the Plaster:
In a mixing bowl, combine Plaster of Paris and water according to the package instructions. Aim for a consistency similar to pancake batter. -
Remove Air Bubbles:
Tap the mixing bowl gently on the counter to bring trapped air bubbles to the surface before pouring. -
Pour the Cast:
Slowly pour the plaster into the mold ring, directly over the clay impression. Fill it to a depth of roughly 0.5 to 0.75 inches for sturdy wall art. -
Level and Agitate:
Once poured, gently shimmy the work surface or tap the sides of the clay base. This helps the plaster settle into the fine veins of the leaf impression. -
Insert Hanging Mechanism (Optional):
If using a wire loop for hanging, insert it into the wet plaster back now. Otherwise, wait until dry to attach adhesive hooks. -
Allow to Cure:
Let the plaster sit undisturbed. Most plaster sets within 30-60 minutes, but it will feel warm to the touch as it cures. Wait until it is entirely cool and hard. -
Demold the Plaque:
Gently peel away the surrounding clay and lift the plaster disc. Peel the clay slab off the front face of the plaster to reveal the raised leaf design. -
Clean the Details:
Use a small pick or soft brush to remove any flecks of clay stuck in the deep crevices of the leaf veins. -
Sand the Edges:
Take fine-grit sandpaper and smooth the outer rim of the circle to create a clean, professional profile. You can also lightly sand the back if it’s uneven. -
Final Drying:
Let the plaque dry fully in a well-ventilated area for another 24 hours to ensure all internal moisture has evaporated before hanging.
Pro Tip: Release Ease
Before rolling your leaf, lightly dust the clay with talcum powder. This acts as a micro-barrier, helping the leaf peel away cleanly without tearing.
Troubleshooting: Bubbles
Tiny holes in your finished leaf mean air got trapped. To fix, tap the clay mold vigorously right after pouring the plaster to force bubbles up and out.
Now you have a timeless piece of botanical art ready to bring a touch of the outdoors to your interior space
BRUSH GUIDE
The Right Brush for Every Stroke
From clean lines to bold texture — master brush choice, stroke control, and essential techniques.
Explore the Full Guide
One Bold Ceramic Wall Sculpture as a Focal Point
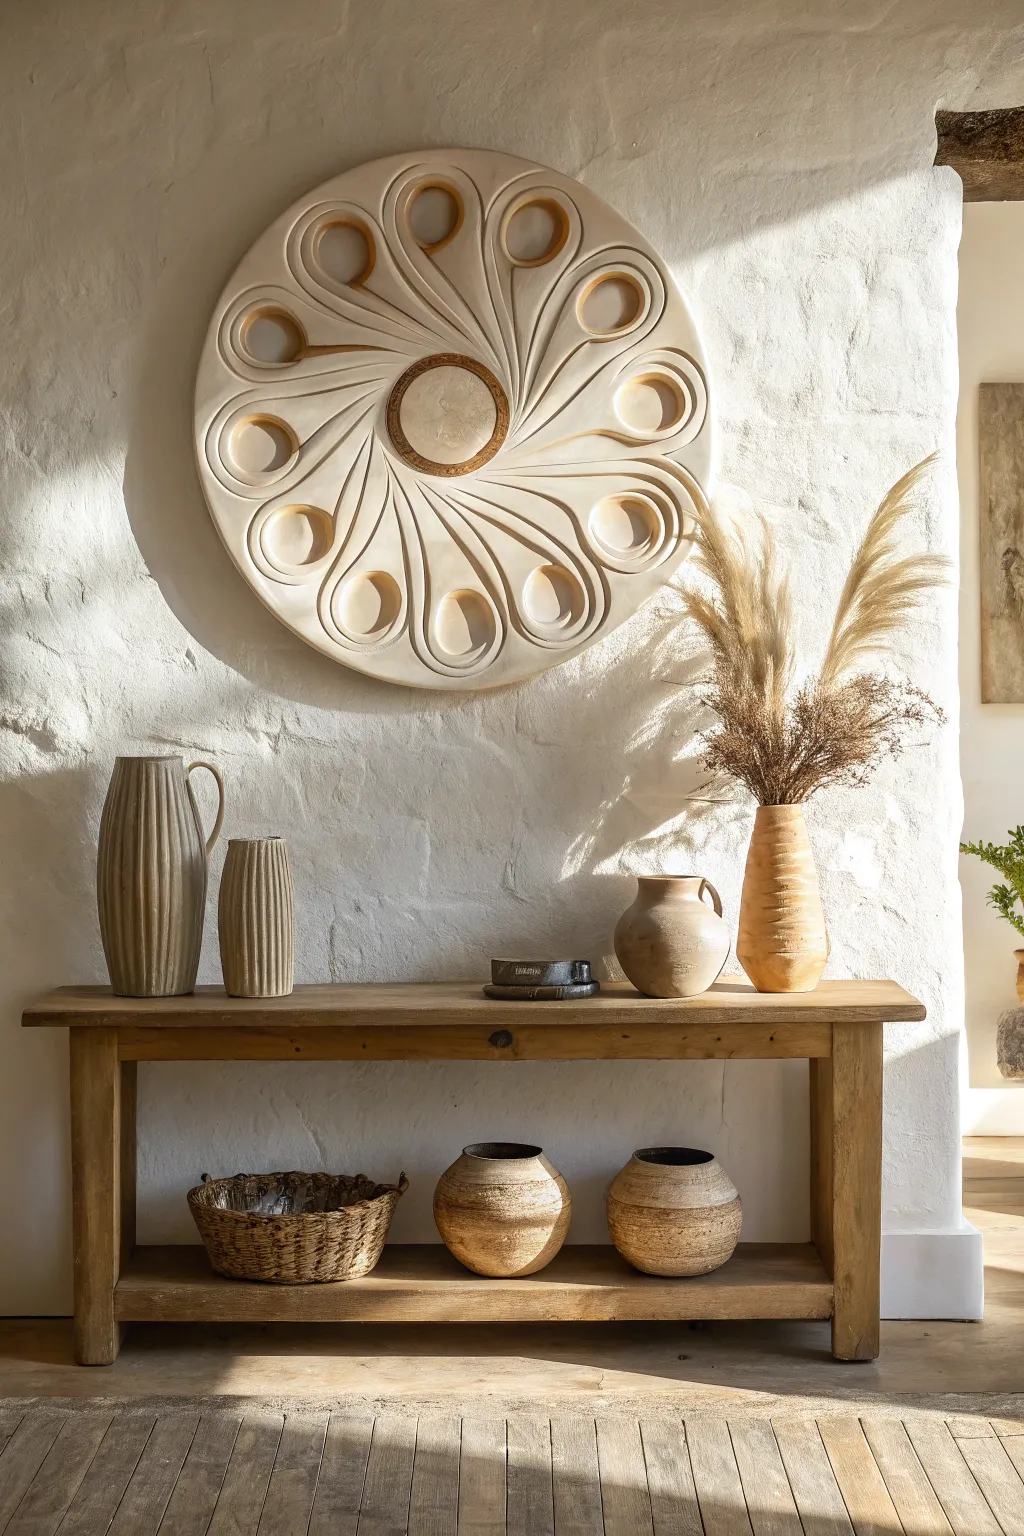
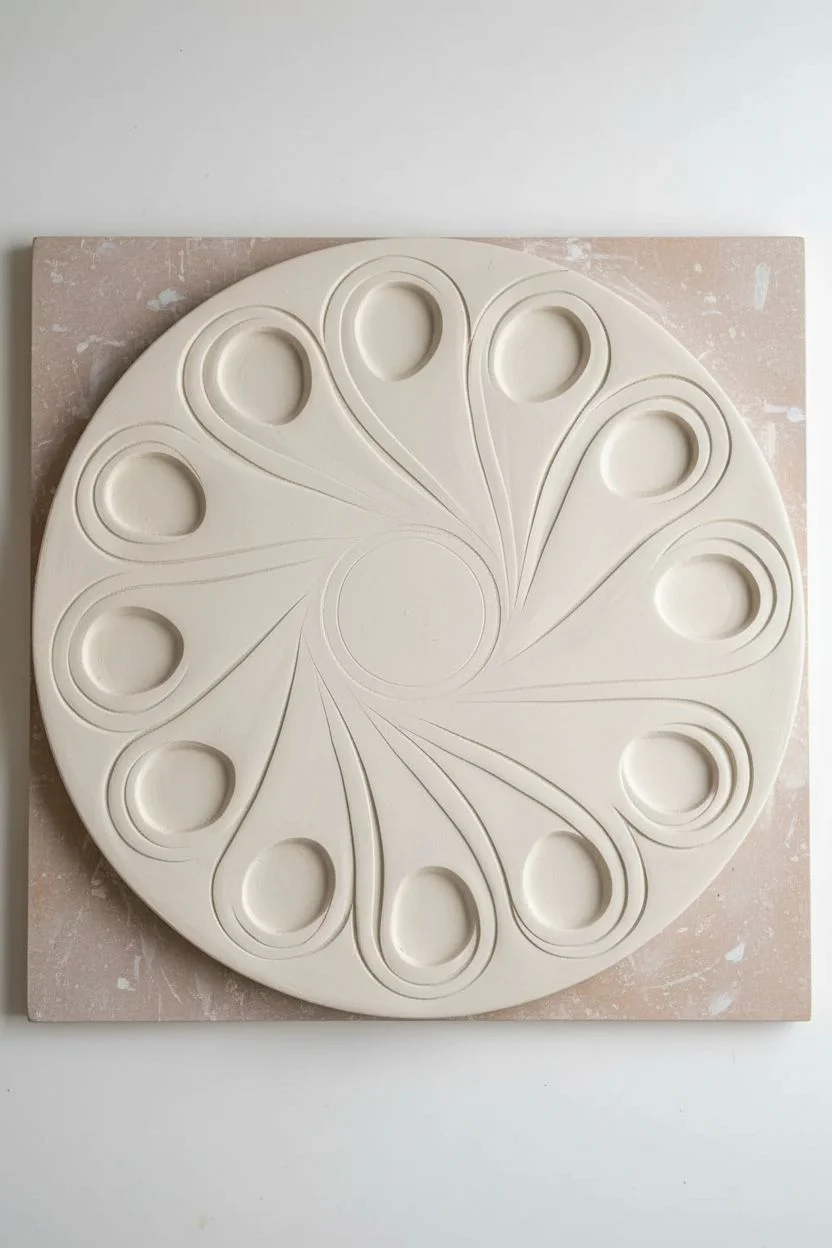
Embody the warmth of the sun in your living space with this striking ceramic relief sculpture. This project focuses on rhythmic, radiating forms and subtle oxide staining to create a modern fossil-like texture that feels both ancient and contemporary.
Step-by-Step Tutorial
Materials
- High-fire stoneware clay (white or light buff, approx. 10-15 lbs)
- Circular bat or sturdy wooden board (at least 24″ diameter)
- Pottery wheel (optional, for the initial slab)
- Heavy rolling pin and slab roller sticks (if hand-building)
- Large and medium loop tools
- Rib tools (rubber and serrated metal)
- Needle tool
- Sponge
- Iron oxide wash or dark ochre underglaze
- Matte transparent glaze (optional)
- Large paintbrush
- Wall hanging hardware (french cleat or heavy-duty wire loop)
Step 1: Planning and Base Formation
-
Prepare the clay slab:
Begin by wedging your clay thoroughly to remove air bubbles. You’ll need a large, substantial slab for this piece. If you have a slab roller, set it to roughly 3/4 inch thickness. Alternatively, use a heavy rolling pin and thickness strips to hand-roll a large, even sheet. -
Cut the perfect circle:
Using a large circular template or by tracing the edge of your bat, cut the slab into a perfect circle, roughly 20 to 22 inches in diameter. Smooth the outer rim with a damp sponge to compress the edges. -
Mark the center:
Locate the exact center of your circle. Use a small lid or cup to impress a light guide circle in the middle, about 4-5 inches wide. This will be the focal point of your radial design. -
Sketch the radiating pattern:
Lightly sketch your design into the wet clay with a dull needle tool. You want to create twelve to fourteen tear-drop shapes that radiate outward from that central circle, curving slightly like turbine blades.
Warp Watch
Large flat slabs love to warp. Dry it specifically on a piece of drywall or plasterboard, which absorbs moisture evenly from the back. Weighting the edges while drying helps too.
Step 2: Sculpting the Relief
-
Define the teardrops:
Using a large loop tool, begin carving away the clay *between* your sketched tear-drop shapes. You aren’t removing the shapes themselves; you are digging out the negative space to make the shapes pop out in relief. -
Hollow the teardrops:
Now, switch focus to the interior of the tear-drop shapes. Use a medium loop tool to scoop out a concave depression inside the head of each drop. Leave a raised rim around the edge of the shape. -
Refine the central hub:
Return to the center circle. Carve a shallow moat around the very edge of the inner hub to separate it distinctly from the radiating petals. Smooth the central dome so it is slightly convex. -
Smooth the transitions:
Use a damp sponge and your fingers to soften all the sharp carving marks. The goal is to make the ridges look organic and fluid, like sand dunes, rather than sharp and mechanical. -
Create the texture:
For the interior of the scooped-out tear drops, I like to use a rib tool or the back of a spoon to burnish the clay very smooth. This contrast between the smooth concave areas and the rest of the piece is crucial essential.
Step 3: Finishing and Firing
-
Slow drying process:
This is the most critical step for large flat pieces to prevent warping. Cover the piece loosely with plastic and let it dry very slowly over 1-2 weeks. Flip it occasionally if possible, sandwiching it between drywall boards to keep it flat. -
Bisque fire:
Once bone dry, load the piece into the kiln for a bisque fire to Cone 04. Ensure it represents flat on the kiln shelf. -
Apply oxide wash:
Mix iron oxide with water (and a little flux if desired). Brush this dark wash into the recessed areas—the centers of the teardrops and the ring around the central hub. -
Wipe back the high points:
Using a damp sponge, wipe the oxide off the raised surfaces. The dark color should remain only in the deep recesses, accentuating the depth of your carving. -
Glaze application (optional):
If you want a sealed finish, apply a thin coat of matte transparent glaze over the entire piece. However, leaving the high points as raw clay creates a beautiful, stony texture. -
Final firing:
Fire the piece again to the maturation temperature of your specific clay body (e.g., Cone 5 or 6 for stoneware). -
Attach hardware:
Once cool, use a high-strength two-part epoxy to attach a heavy-duty hanging cleat to the back of the ceramic disk. Let the epoxy cure fully for 24 hours before hanging.
Gilded Edges
For a luxe upgrade, apply gold leaf or gold luster to the inner ring of the central hub after the final glaze firing to catch the light beautifully.
Hang your stunning relief sculpture in a well-lit spot where the shadows will play across the ridges throughout the day
Monochrome Matte Porcelain Texture Studies
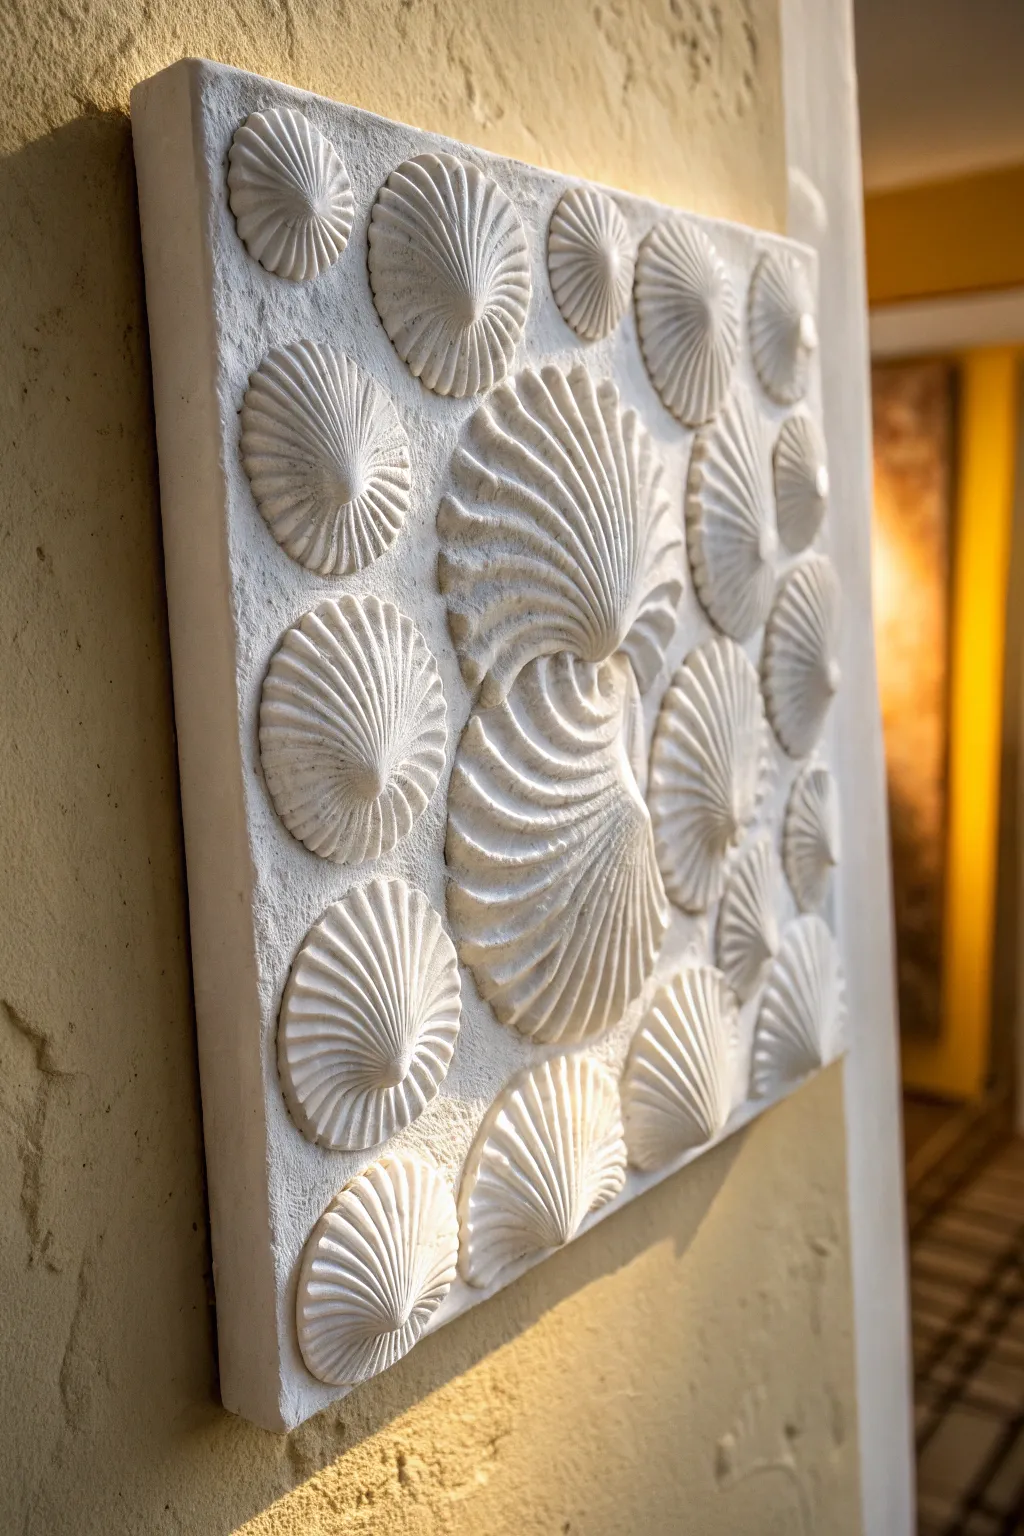
Capture the serene beauty of the ocean with this sculptural porcelain wall art, featuring a rhythmic array of scallop shell impressions. The monochrome matte finish emphasizes texture and shadow, transforming simple clay into a sophisticated texture study.
How-To Guide
Materials
- White porcelain clay body (cone 5-6) or high-quality air-dry clay
- Square wooden panel or canvas board (approx. 12×12 inches)
- Scallop shell molds or varied real scallop shells (cleaned)
- Slip (clay slurry)
- Scoring tool or needle tool
- Rolling pin with guide strips
- Canvas mat for rolling
- Metal rib tool
- Soft sponge
- White gesso or acrylic primer (if using air-dry clay/mounting on wood)
- Matte white spray fixative or porcelain sealer
- Strong craft adhesive (e.g., E6000) if mounting after firing
Step 1: Preparing the Base
-
Prepare the slab:
Begin by wedging your porcelain clay thoroughly to remove air bubbles. Roll out a uniform slab about 3/8-inch thick on your canvas mat. -
Cut to size:
Using a straight edge and a needle tool, cut your slab into a clean square. If you plan to fire this piece as one unit, ensure it fits your kiln shelf. -
Smooth the surface:
Compress the clay surface with a metal rib, dragging it gently across the top to align clay particles and create a pristine, smooth canvas. This step is crucial for preventing warping. -
Texture the background:
To mimic the stone-like texture seen in the reference, gently dab a coarse sponge or crumpled aluminum foil over the entire surface of the slab, creating a subtle, pitted backdrop.
Cracking at seams?
If hairline cracks appear where shells join the base during drying, immediately fill them with a ‘paper clay’ slip (shredded toilet paper mixed into slip) and slow the drying process.
Step 2: Sculpting the Shells
-
Create clay balls:
Roll various sizes of clay balls, ranging from small marbles to golf ball size. You will need about 15-20 depending on your spacing. -
Form the impressions:
Press a clay ball into your scallop shell mold. If using real shells, dust them lightly with cornstarch first, then press the clay firmly into the shell’s interior to pick up the ridges. -
Refine the edges:
Carefully remove the clay shell. Use a damp sponge to smooth any rough edges or fingerprints on the back of the shaped clay. I find this easier to do now while the clay is still plastic. -
Create variety:
Continue forming shells, making sure to vary the sizes. Create one large focal shell for the center, several medium shells, and smaller ones for the periphery. -
Partial drying:
Let the formed shells sit uncovered for about 30 minutes until they are leather-hard but still attachable. This helps them hold their domed shape.
Step 3: Assembly and Finishing
-
Plan the layout:
Arrange your leather-hard shells on the textured slab without gluing them yet. Place the largest shell slightly off-center, then radiate the others outwards in a staggered pattern. -
Score and slip:
Once satisfied with the composition, lift one shell at a time. Score (scratch) the back of the shell and the corresponding spot on the slab. -
Attach the shells:
Apply a dab of slip to the scored areas and press the shell firmly onto the base. Give it a tinyiggle to ensure a vacuum seal forms. -
Clean connection points:
Use a small, damp paintbrush to wipe away any excess slip that oozes out from under the shells -
Slow drying:
Cover the entire piece loosely with plastic sheeting. Allow it to dry very slowly over 5-7 days to prevent cracking, especially where the shells join the base. -
Bisque firing:
Once bone dry, bisque fire the piece to Cone 04. If you want the pure matte porcelain look, you can leave it unglazed and fire it to maturity (Cone 5 or 6). -
Alternative mounting:
If your base slab warps or you prefer a wood backing, fire the shells individually. After firing, glue them onto a painted wooden panel using high-strength adhesive.
Pro Tip: Pure White
For the whitest possible result, use a ‘Super White’ porcelain body. Standard stoneware often fires to an off-white or cream color that lacks that crisp modern feel.
Hang your finished relief where raking light can hit the ridges, bringing the sculptural details to life

PENCIL GUIDE
Understanding Pencil Grades from H to B
From first sketch to finished drawing — learn pencil grades, line control, and shading techniques.
Explore the Full Guide
Wall-Mounted Ceramic Pocket Planters as Living Art
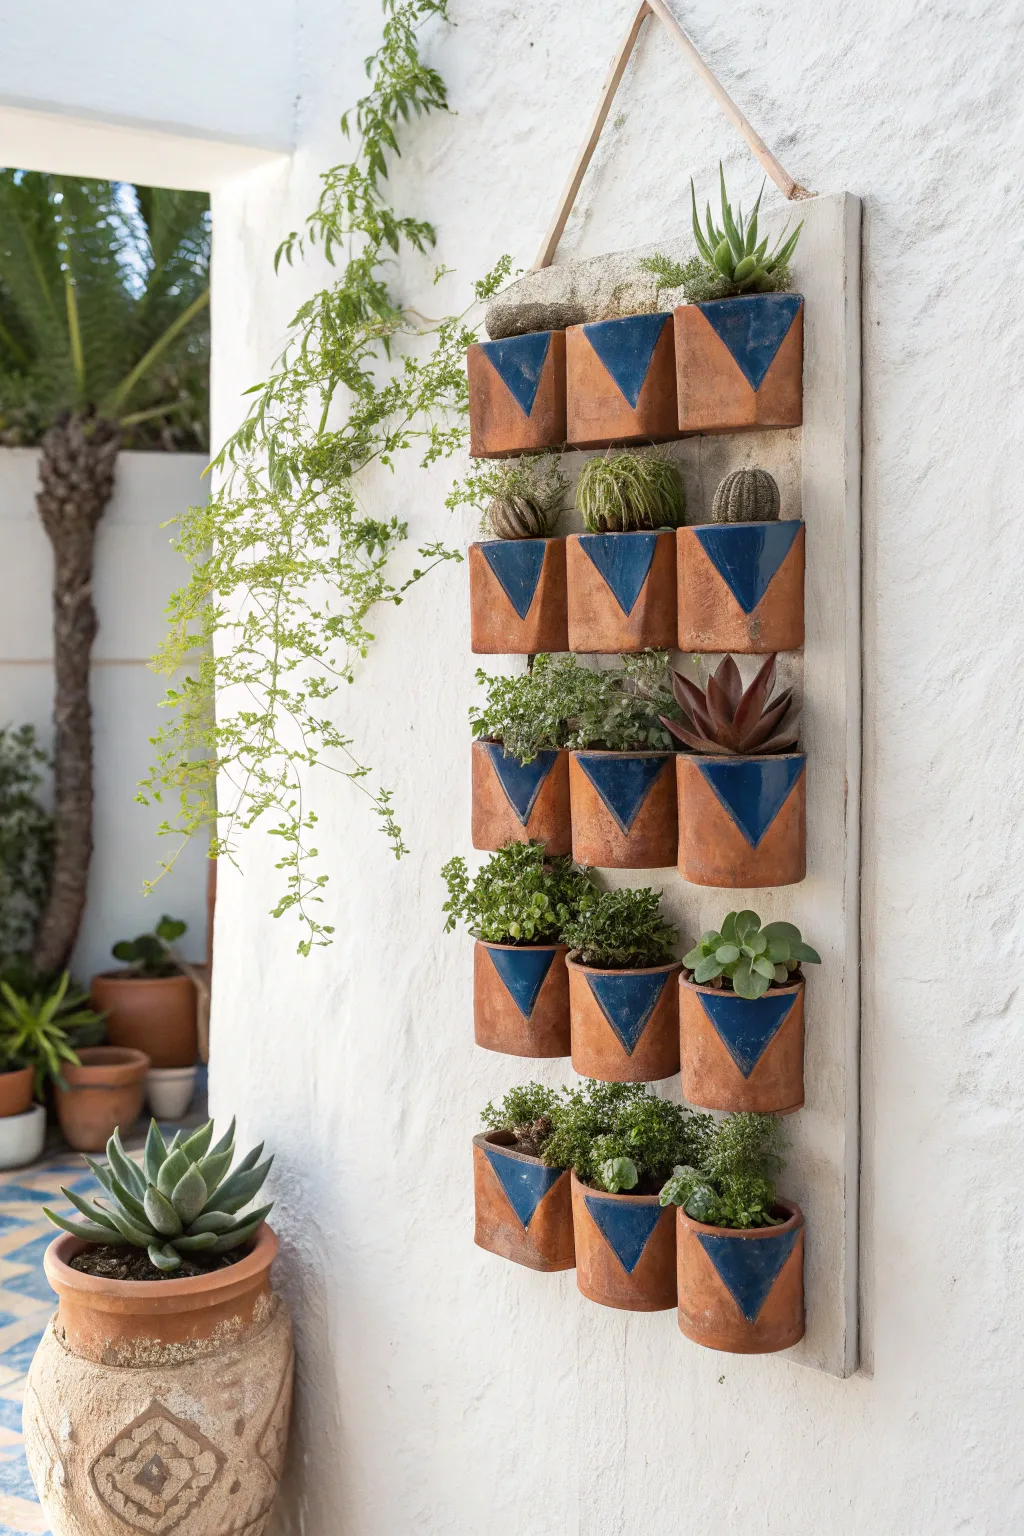
Transform a blank wall into a living masterpiece with this grid of handcrafted terracotta pocket planters. The rhythmic repetition of geometric forms, accented with deep blue glazes, creates a striking backdrop for an array of succulents and spillers.
How-To Guide
Materials
- Earthenware or mid-fire clay (terracotta color)
- Rolling pin and guide strips (3/8 inch thickness)
- Clay slab roller (optional)
- Cardboard or craft foam (for templates)
- Clay knife or needle tool
- Scoring tool (or fork) and slip
- Deep blue ceramic glaze
- Glaze brush
- Large wooden backing board (plywood or reclaimed wood)
- White exterior paint (for the board)
- Industrial strength adhesive (e.g., E6000 or construction adhesive)
- Sturdy rope for hanging
- Drill with bits
- Assorted small succulents and trailing plants
- Potting soil
Step 1: Forming the Pockets
-
Create templates:
Begin by designing your pocket shape on cardboard. You will need a back piece template (a rectangle roughly 4×5 inches) and a front piece template that wraps around. The front piece should look like a U-shape or a trapezoid with curved sides to allow for soil volume. -
Roll out clay slabs:
Roll your terracotta clay into a large, consistent slab about 3/8 inch thick. Using guide strips helps ensure the thickness is uniform, which is crucial for even drying. -
Cut the components:
Using your knife or needle tool, trace around your templates to cut out 15 back rectangles and 15 front pocket shapes. Clean up any rough edges with a damp sponge. -
Assemble the pockets:
Score the side and bottom edges of both the back plate and the front pocket piece. Apply slip to the scored areas. Gently curve the front piece so it bulges outward, pressing the scored edges firmly against the back plate to create a seal. -
Reinforce the seams:
I usually roll a very thin coil of clay and press it into the inside seam where the two pieces join. Smooth this out with a modeling tool to ensure the pocket won’t pop open during firing. -
Add drainage:
Using a small drill bit or hole cutter, puncture a small drainage hole in the bottom of each pocket. This is vital for plant health. -
Dry and bisque fire:
Let the 15 pockets dry slowly under plastic for at least a week to prevent warping. Once bone dry, fire them in a kiln to the bisque temperature appropriate for your clay body.
Slumping Shapes?
If the front pocket sags while the clay is wet, stuff the inside with crumpled newspaper or paper towels to hold the volume until the clay becomes leather-hard.
Step 2: Glazing and Finishing
-
Tape the design:
To achieve the sharp geometric triangle design, use masking tape or specialized glazing tape. Create a ‘V’ shape on the front of each pocket, taping off the areas you want to remain raw terracotta. -
Apply the glaze:
Brush three even coats of deep blue glaze into the ‘V’ area you created. Allow each coat to dry slightly before applying the next. Be careful not to let glaze drip onto the raw areas. -
Remove tape and clean:
Peel off the tape before the final coat is completely bone dry to get a crisp line. Wipe the back of the planter with a damp sponge to minimalize kiln shelf sticking. -
Glaze fire:
Fire the pieces again to your clay’s maturation temperature. The terracotta will deepen in color and the blue will become glossy.
Step 3: Assembly
-
Prepare the backing board:
Cut your wooden board to size, ensuring it is large enough to hold a 3×5 grid with about 1 inch of spacing between pots. Sand the edges and paint it with a rustic white exterior paint. Let it dry completely. -
Drill hanging holes:
Drill two heavy-duty holes at the top corners of the board. Thread a thick, sturdy rope through these holes and knot it securely at the back to create a triangle hanger. -
Layout the grid:
Lay the board flat and arrange your finished ceramic pockets on top. Measure carefully to ensure equal spacing between rows and columns. Mark their positions lightly with a pencil. -
Adhere the planters:
Apply a generous amount of industrial-strength construction adhesive to the back of each ceramic pocket. Press them firmly onto their marked spots on the board. Let the adhesive cure for at least 24-48 hours while the board remains flat. -
Plant:
Once the adhesive is fully cured, hang the board securely. Fill each pocket with a small amount of soil and tuck in your chosen succulents, placing trailing varieties near the top for a cascading effect.
Style Shift
Swap the blue triangle for a half-circle dip or a diagonal stripe. You can also use varying shades of green glaze to create an ombre effect down the wall.
This living wall art brings a sophisticated, handmade charm to any patio or sunroom
Outdoor Garden Wall Tiles That Handle Weather
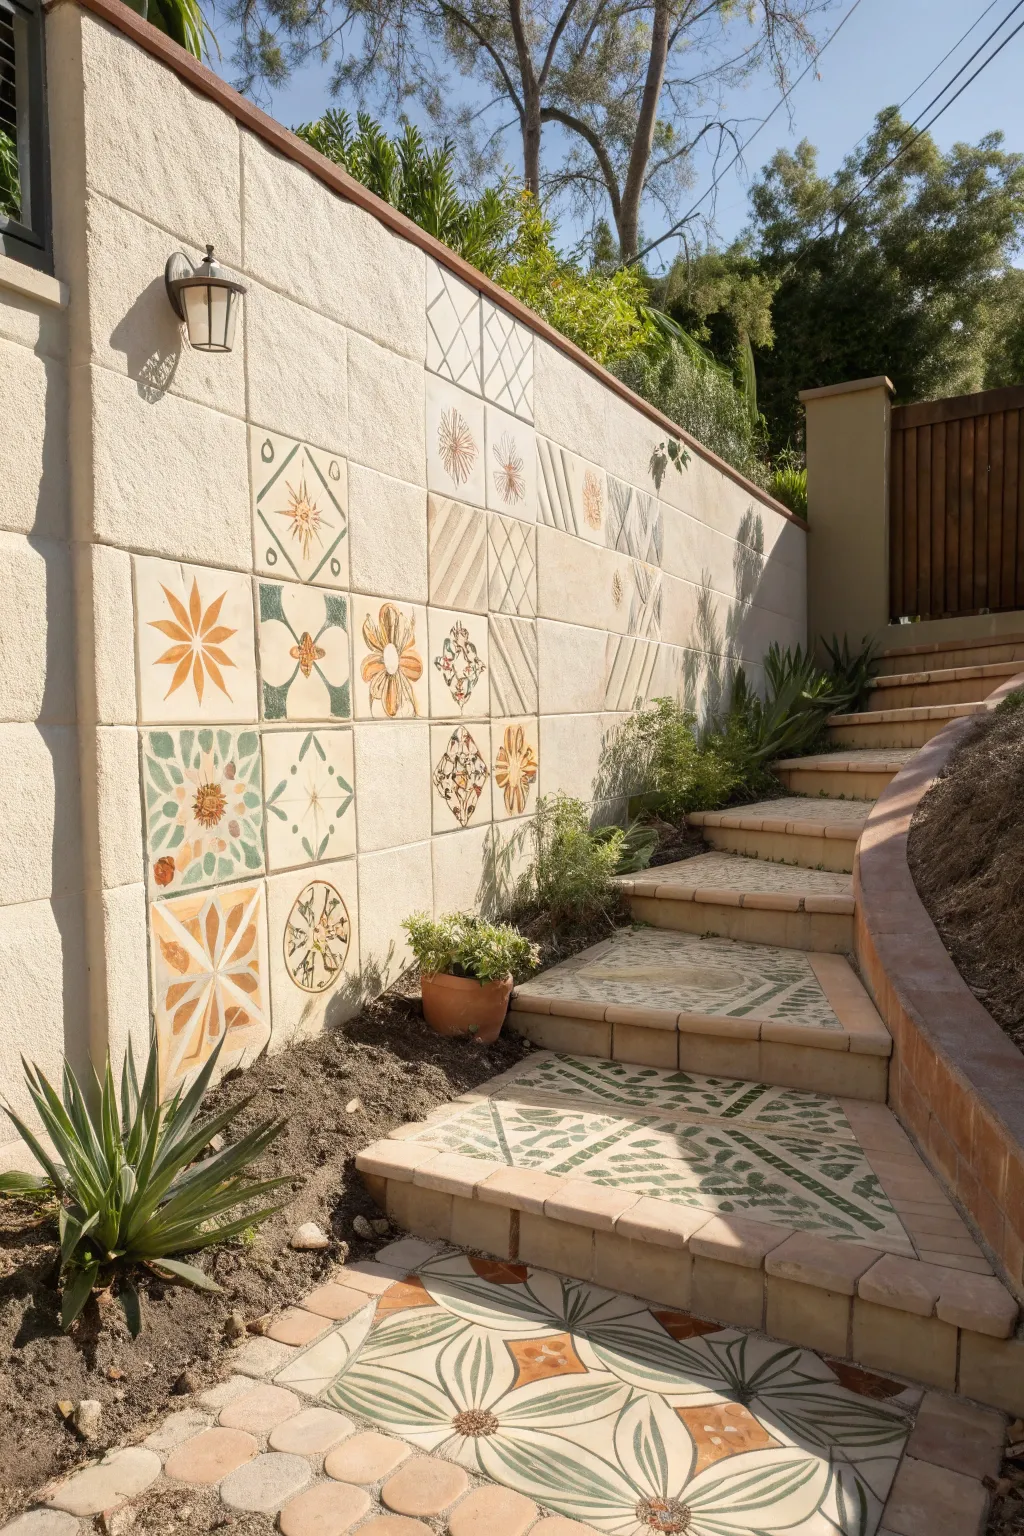
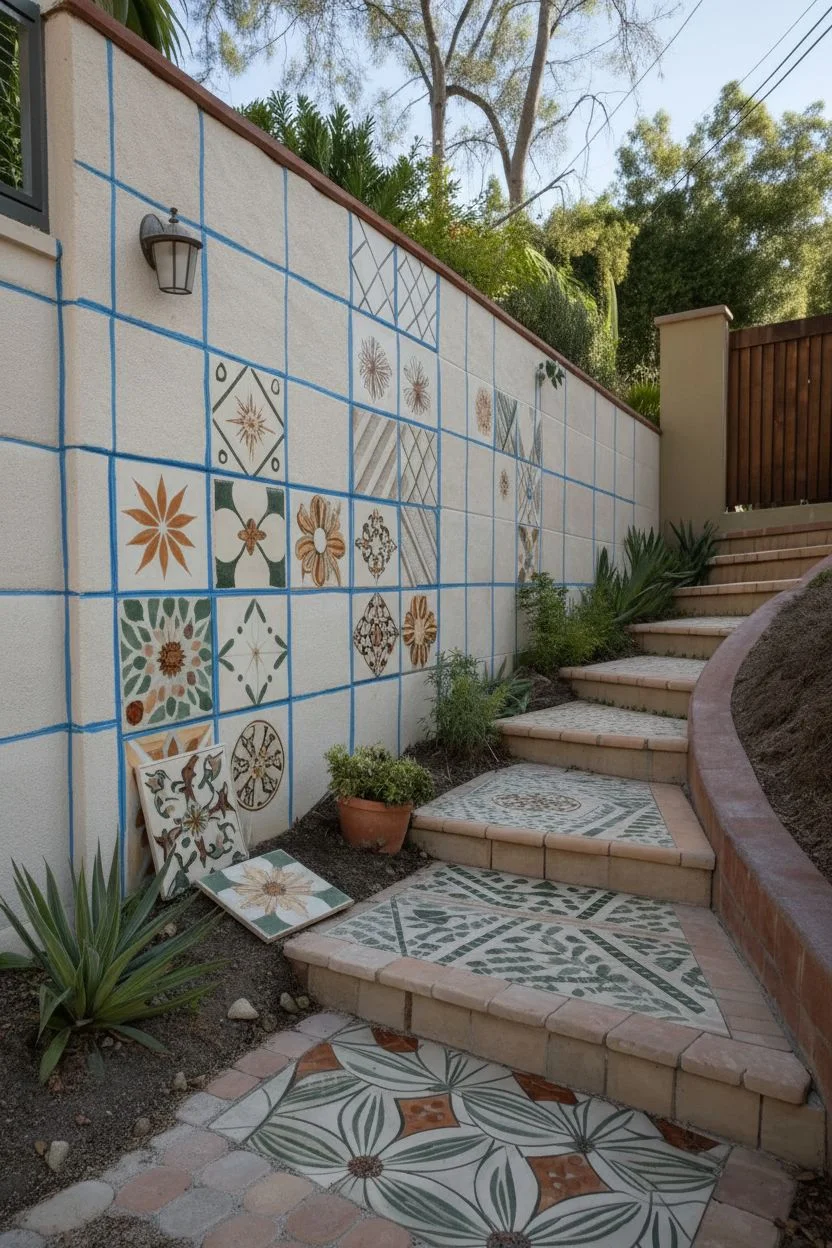
Transform a plain retaining wall and garden steps into a Mediterranean-inspired feature using mismatched decorative tiles and earthy pavers. This project combines patterned ceramic accents with textured stucco to create a warm, inviting pathway that stands up to the elements.
Step-by-Step Guide
Materials
- Decorative ceramic tiles (varying sizes, frost-proof)
- Patterned stair riser tiles (green and terra cotta motif)
- Large format patterned landing tiles
- Concrete retaining wall blocks or existing stucco wall
- Exterior thin-set mortar (polymer-modified)
- Sanded grout (earthy beige or tan)
- Notched trowel (1/4 inch or 3/8 inch)
- Grout float
- Tile spacers
- Wet saw or tile cutter
- Stucco mix (if finishing the wall surface)
- Masonry sealer
- Sponge and buckets
- Level and measuring tape
Step 1: Planning and Layout
-
Assess the Surface:
Ensure your retaining wall and concrete steps are clean, dry, and free of loose debris. If you are working with raw concrete block, wash it down thoroughly; any dust will prevent the mortar from bonding correctly. -
Dry Run the Design:
Lay out your decorative tiles on the ground first to finalize the pattern. I like to mix different sizes—like the large floral squares and smaller geometric diamonds shown here—to create an organic, collected look rather than a rigid grid. -
Mark Reference Lines:
Snap chalk lines on the retaining wall to keep your tile rows straight, particularly if you are creating a grid pattern like the main focal section. Use a long level to ensure vertical alignment so the tiles don’t drift as you work upwards.
Step 2: Tiling the Retaining Wall
-
Mix the Thin-Set:
Prepare your polymer-modified thin-set mortar according to the package instructions. It should have the consistency of peanut butter—thick enough to hold ridges but wet enough to stick. -
Apply Mortar to the Wall:
Using the flat side of your trowel, key a layer of mortar onto the wall section where your main tile grid will go. Then, use the notched side to comb horizontal ridges into the mortar bed. -
Set the Decorative Tiles:
Press the decorative tiles firmly into the mortar, twisting them slightly to ensure good coverage on the back. Insert spacers to maintain consistent gaps for grouting later. -
Create the Stucco Effect:
For the areas surrounding the tiles, you want a textured finish. Apply a designated stucco mix or a thick layer of mortar around the tiles, troweling it to mimic the rough, sandy texture seen in the image. This frames the smooth ceramics beautifully. -
Add Subtle Accents:
Don’t forget the scattered tiles farther along the wall. Embed single tiles or small groups randomly into the stucco sections to draw the eye up the path.
Uneven Wall Surface?
If your existing wall is very bumpy, don’t just add more glue. Use a ‘scratch coat’ of mortar first to level the low spots, let it dry overnight, then proceed with tiling.
Step 3: Tiling the Steps and Landing
-
Cut Tiles for Risers:
Measure the height of your stair risers carefully. Use a wet saw to trim your patterned riser tiles to fit perfectly between the tread overhang and the step below. -
Install Riser Tiles:
Apply thin-set to the back of each cut tile (back-buttering) and press them onto the stair risers. This vertical surface creates a stunning visual leading up the garden. -
Tile the Top Landing:
For the flat landing area at the bottom, spread a consistent bed of mortar. Lay down your large-format patterned tiles, ensuring the pattern aligns across the seams to create the illusion of a single large design. -
Set the Borders:
Frame the landing pattern with smaller rectangular pavers or cut stone pieces to give the edges a finished, professional look.
Tile Pattern Tip
Lay tiles with the pattern flowing ‘up’ the stairs. Orient motifs so they point toward the destination, subtly guiding guests to climb the steps.
Step 4: Grouting and Finishing
-
Allow to Cure:
Let all the tile work sit undisturbed for at least 24 hours. Premature traffic or grouting can shift tiles before the adhesive has fully hardened. -
Mix the Grout:
Mix your sanded grout. Choose a color that complements the stucco—a warm beige or sand tone works best to unify the wall and steps. -
Grout the Joints:
Force the grout into the joints using a rubber grout float held at a 45-degree angle. Move diagonally across the tiles to avoid pulling grout back out of the lines. -
Clean the Residue:
Wait about 20 minutes for the grout to set slightly, then wipe the tile surfaces with a damp (not soaking) sponge. Rinse your sponge frequently to avoid spreading a haze. -
Apply Sealer:
Once the grout has fully cured (usually 72 hours), apply a high-quality penetrating masonry sealer to both the tiles and grout lines. This protects against moisture, algae, and freeze-thaw cycles.
Now you have a stunning, durable garden feature that brings artistry to your backyard landscape


Have a question or want to share your own experience? I'd love to hear from you in the comments below!