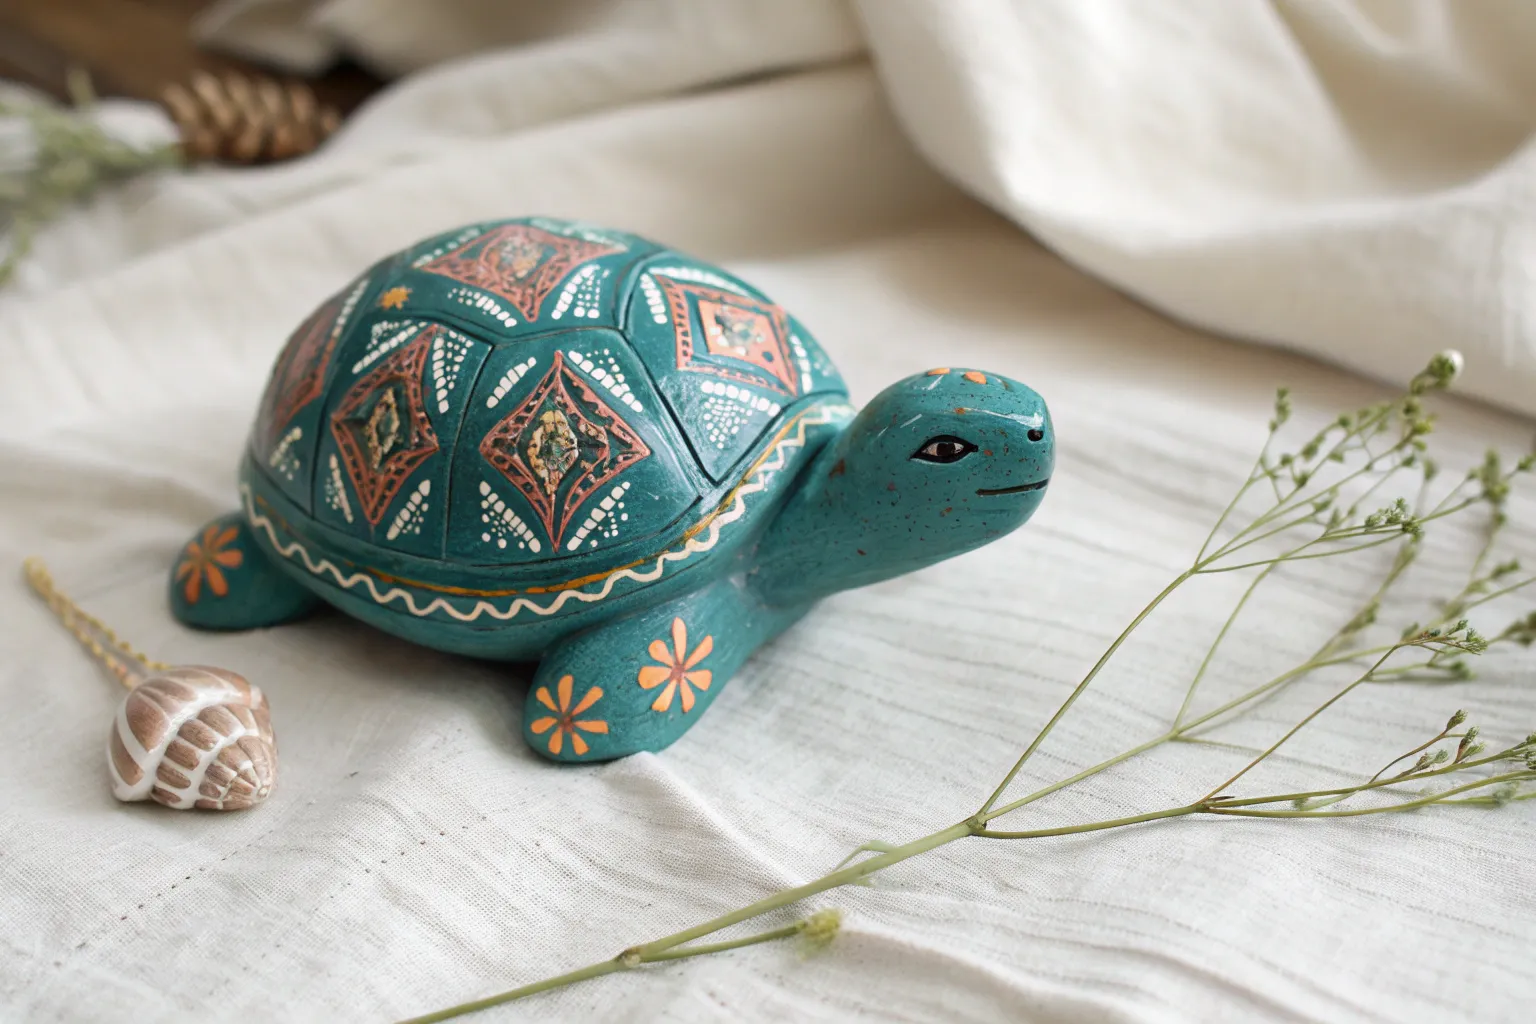
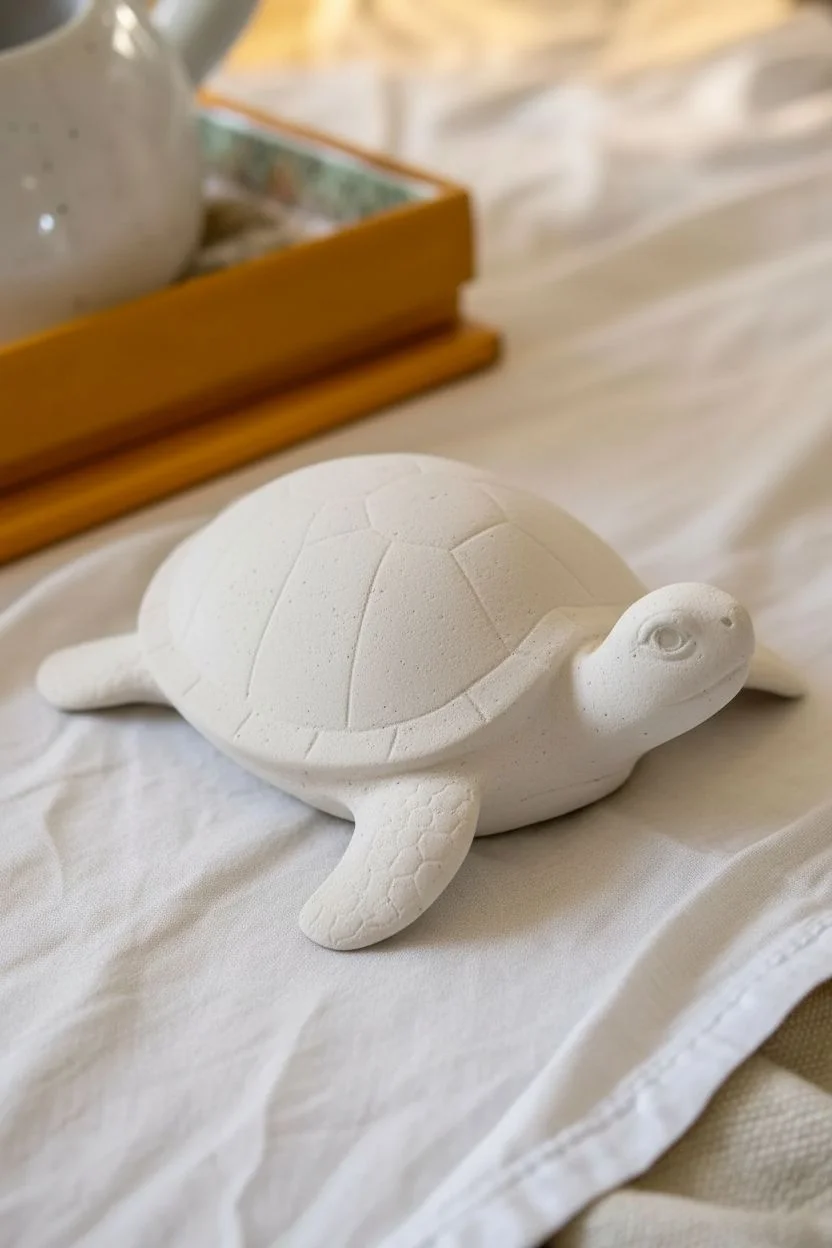
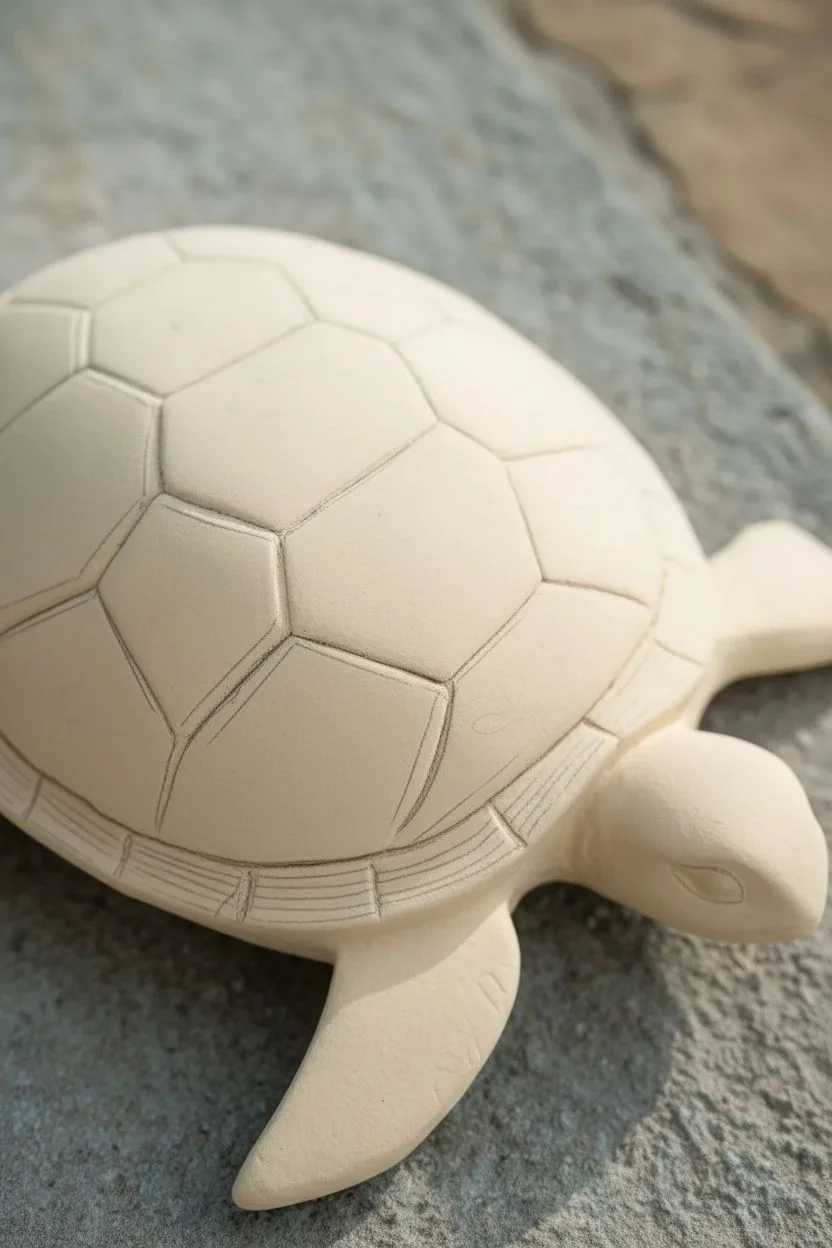
Ceramic turtles are the sweetest little canvases because the shell gives you built-in shapes to play with, and the skin details beg for texture. Here are my favorite ceramic turtle painting ideas—from classic, nature-inspired looks to artsy, unexpected twists.
Realistic Sea Turtle Shell Shading
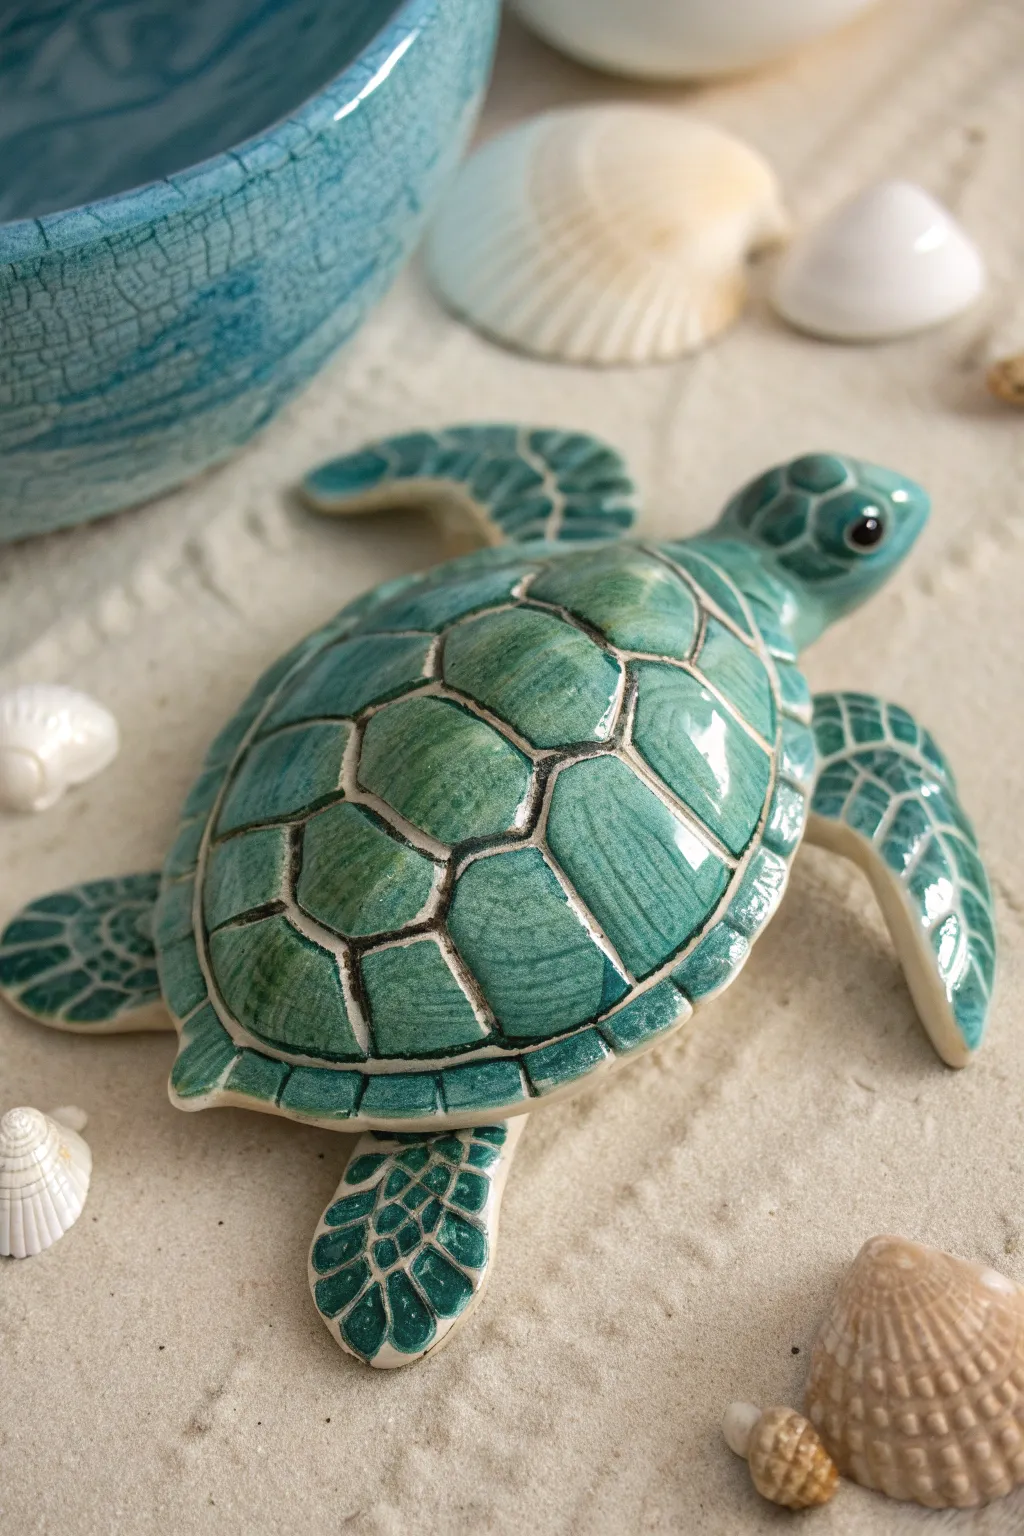
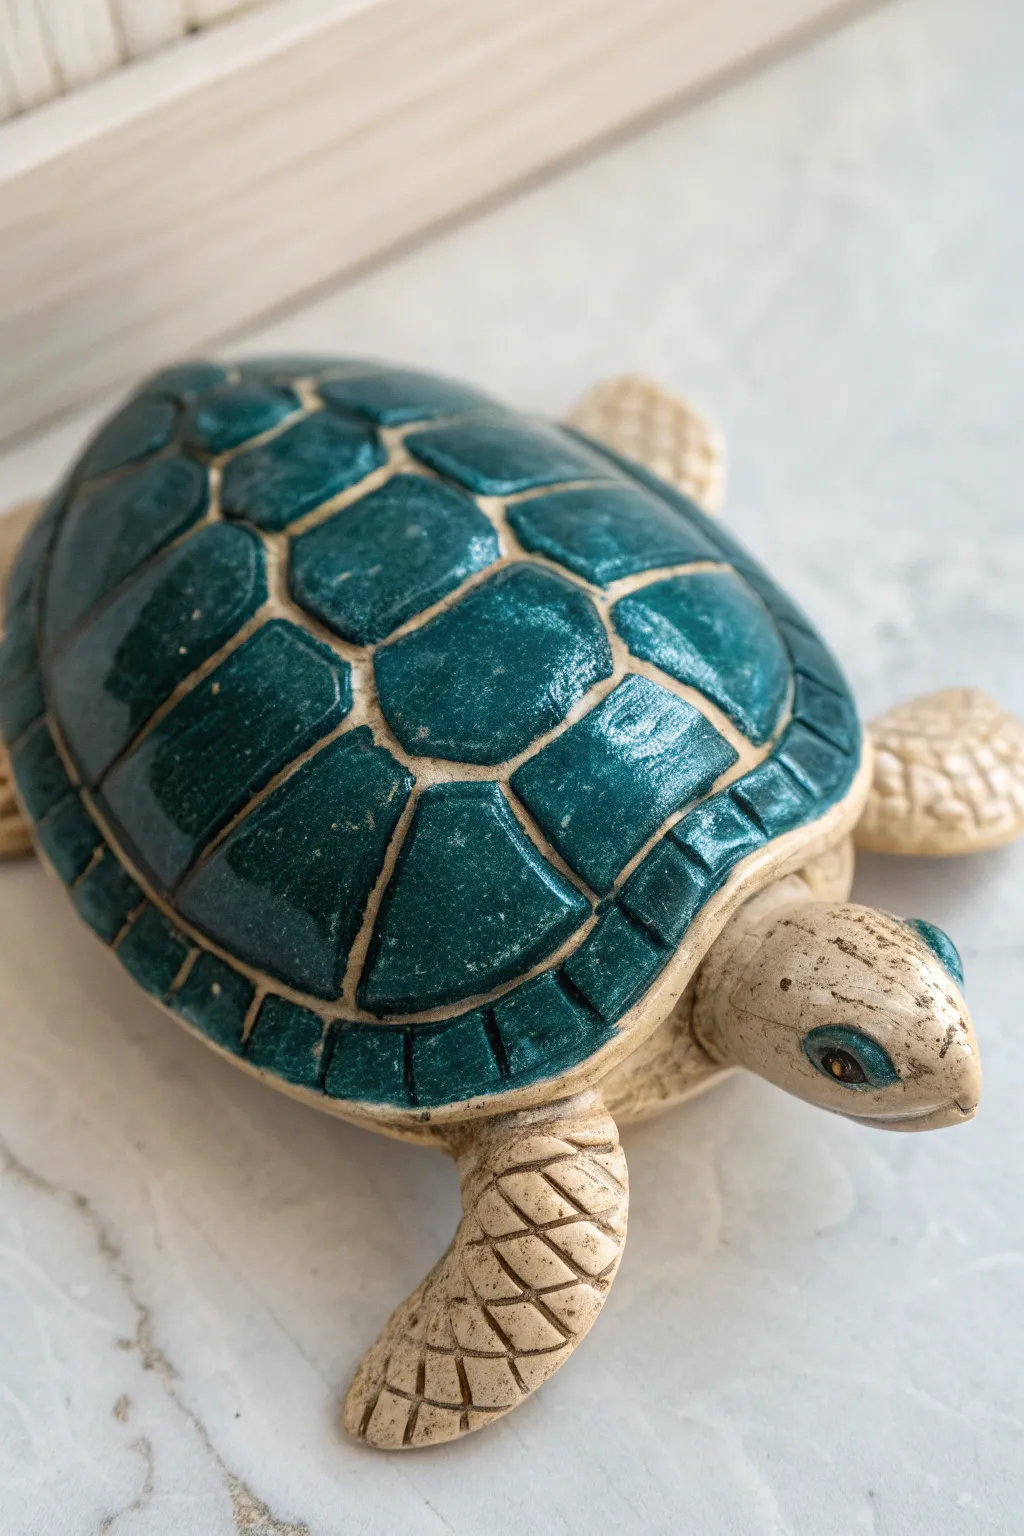
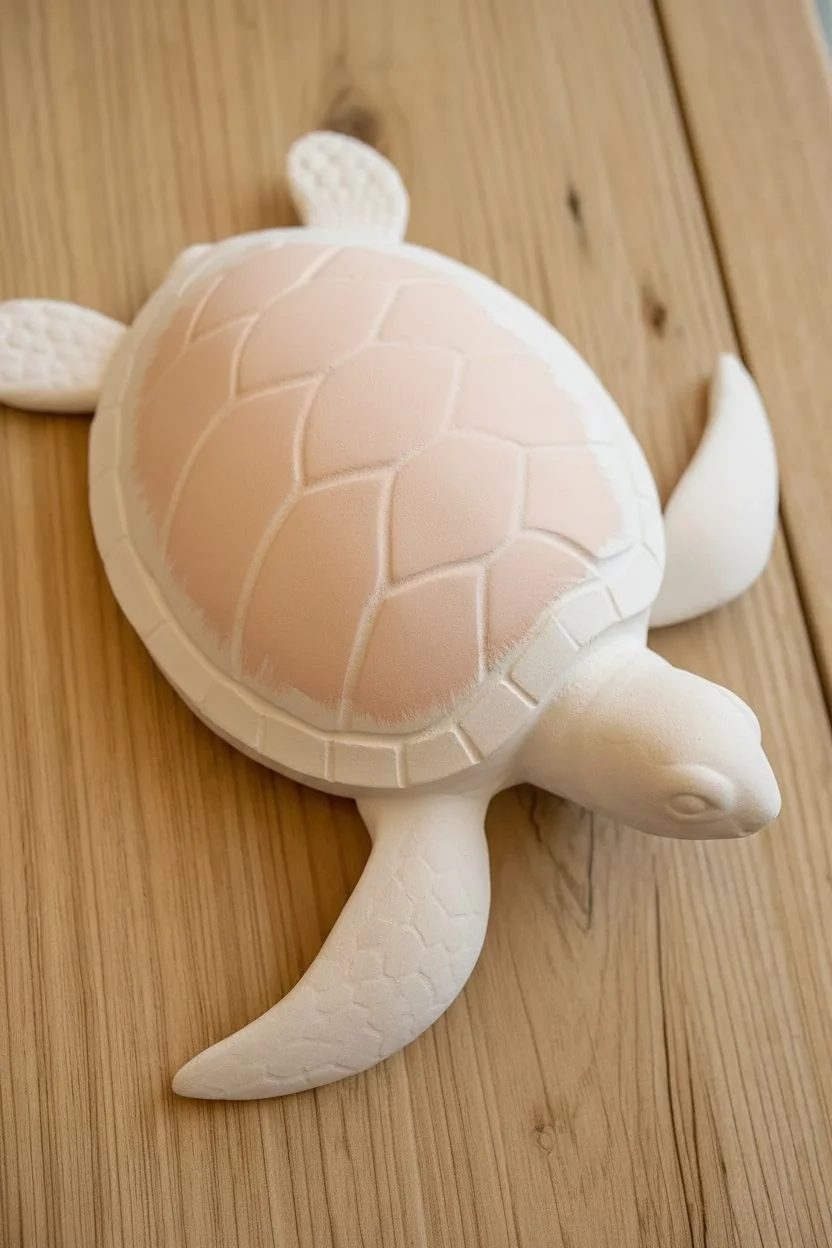
Bring the ocean to your home decor with this beautifully glazed ceramic sea turtle featuring a realistic, crackled shell texture. Using a combination of celadon-style glazes and careful wiping techniques, you’ll achieve that deep, multidimensional emerald green that mimics sea glass.
Detailed Instructions
Materials
- Bisque-fired ceramic turtle
- Underglaze pencil or dark grey underglaze
- Deep teal or emerald green transparent glaze (celadon type)
- Lighter aqua or mint green transparent glaze
- Fine liner brush
- Medium round brush
- Small sponge
- Clean water
- Clear gloss glaze (optional, depending on glaze type used)
- Kiln (or access to a firing service)
Step 1: Defining the Scutes
-
Clean the Bisque:
Start by wiping down your bisque turtle with a damp sponge to remove any dust or oils that might resist the glaze. -
Apply Darker Grooves:
Using a fine liner brush and dark grey underglaze (or a black underglaze wash), carefully paint into the deep grooves separating the shell’s scutes. This creates the foundational definition. -
Wipe Back Excess:
Once the dark lines are touch-dry, pass a slightly damp sponge over the raised surfaces of the shell. You want the dark color to remain only in the deepest cracks, leaving the top of the shell clean bisque.
Glaze Pooling Tip
Don’t smooth out the glaze perfectly. Letting it be slightly thicker in the valleys adds natural depth and color variation after firing.
Step 2: Layering the Shell Colors
-
First Coat of Teal:
Load a medium round brush with your deep teal celadon glaze. Apply a generous coat to the center of each shell segment (scute). -
Add Variation:
While the first coat is still damp, dab a small amount of the lighter aqua glaze onto the edges of the central scutes. This creates a subtle gradient effect. -
Glaze the Flippers:
Move to the flippers. Paint the specific scale patterns with the deep teal glaze, being careful to stay within the raised lines if your mold has texture. -
Highlight the Skin:
For the flipper areas between the scales, use a very watery wash of the lighter aqua glaze or leave it bare bisque if you want high contrast; the image shows a consistent teal coverage, so filling it in fully works best here. -
Drying Time:
Let this first heavy application dry completely. The glaze will look chalky and powdery at this stage.
Step 3: Creating Depth and Texture
-
Second Shell Layer:
Apply a second coat of the deep teal glaze over the entire shell. I find that brushing in a circular motion on the round scutes helps settle the glaze nicely. -
Simulate Crackle:
If your glaze doesn’t naturally craze, you can use a fine liner brush to paint incredibly thin, wandering lines of a slightly darker green shade across a few scutes to mimic natural fissures. -
Recess Shading:
Go back over the groove lines between scutes with a fresh load of glaze. Allowing the glaze to pool slightly in these recesses will create that dark, glass-like outline seen in the photo. -
Head and Eyes:
Paint the head with the same teal glaze. For the eye, use a dot of solid black underglaze. Leave a tiny speck of white bisque showing for a reflection, or add a dot of white glaze on top.
Level Up: Sand Texture
Before glazing, sponge a textured ‘sand’ glaze or speckles onto the very bottom edges of the flippers to make it look like the turtle is crawling on a beach.
Step 4: Finishing and Firing
-
Check the Underside:
Flip the turtle gently and ensure no glaze has dripped onto the footpads or bottom rim. Wipe these areas completely clean with a sponge. -
Top Coat (Optional):
If your colored glazes aren’t glossy by nature, apply a final coat of clear gloss glaze over the entire piece to ensure that “wet” look. -
Firing:
Fire the piece in the kiln according to the specific cone requirements of your chosen glaze (usually Cone 06 or Cone 6). -
Cooling:
Allow the kiln to cool completely before opening. Thermal shock can ruin the crackle effect or crack the piece.
Once cooled, your ceramic turtle will have a stunning, gem-like finish that shines beautifully in the light.

Glossy Shell, Matte Skin Contrast
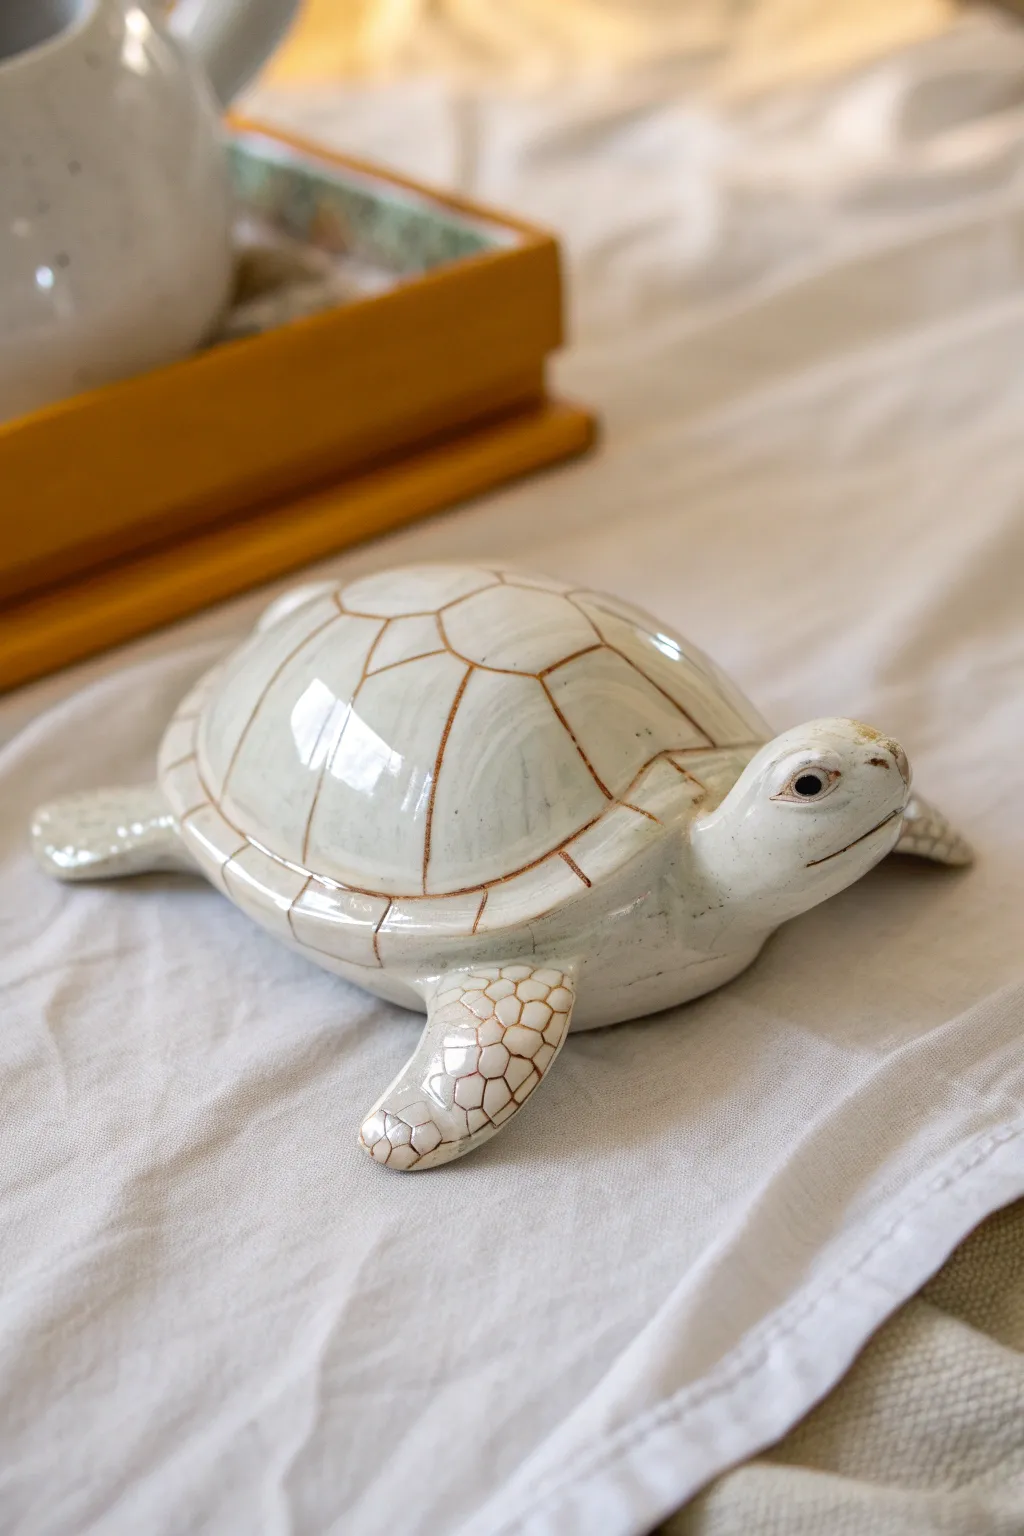
Recreate the sophisticated look of high-end pottery with this technique that emphasizes texture and shine. The finish features a creamy off-white base with warm, rust-colored inlay lines that make the shell segments pop.
How-To Guide
Materials
- Bisque ceramic turtle figurine
- Glossy off-white or cream ceramic glaze (low fire)
- Rust or burnt sienna underglaze or acrylic wash
- Clear high-gloss glaze (if using underglazes)
- Pointed detail brush (size 0 or 1)
- Wide flat brush for base coats
- Damp sponge
- Soft cloth for wiping back
- Kiln (if using ceramic glazes) or spray sealant (if using acrylics)
Step 1: Base Preparation
-
Clean the bisque:
Start by wiping down your ceramic turtle with a slightly damp sponge to remove any dust or kiln wash. This ensures your glaze adheres perfectly to the surface. -
Check for rough spots:
Run your fingers over the shell and flippers. If you find any sharp burrs or rough patches, sand them gently with fine-grit sandpaper and wipe away the dust.
Step 2: Defining the Lines
-
Apply the darker wash:
Using your rust or burnt sienna color, paint into all the recessed lines of the shell and the scale patterns on the flippers. Don’t worry about being messy here; you want the pigment deep in the grooves. -
Let it settle:
Allow this dark undercoat to dry for just a few minutes until it loses its wet sheen but isn’t fully cured. -
Wipe back the excess:
Take a clean, slightly damp sponge and wipe across the surface. Your goal is to remove the dark color from the raised areas (the ‘plates’ of the shell) while leaving the rust color trapped in the recessed lines. -
Refine the details:
I like to use a tighter, slightly wetter cloth wrapped around my finger to clean up the face and smaller scales on the flippers, ensuring the white ceramic shows through clearly.
Clean Lines
If the rust color stains the white areas too much during the wipe-back phase, rinse your sponge frequently. A dirty sponge just spreads the pigment around.
Step 3: Glazing the Shell
-
Mix your cream gloss:
Prepare your creamy off-white gloss glaze. If it feels too thick, thin it slightly with water so it flows smoothly without leaving heavy brushstrokes. -
Apply the first coat:
Using a soft brush, apply a coat of the cream glaze over the entire shell. Be gentle so you don’t reactivate and smear the rust-colored lines underneath. -
Review coverage:
Check that the glaze is pooling just slightly in the corners of the shell scutes, which adds depth, but isn’t dripping. -
Dry and repeat:
Let the first coat dry to the touch, then apply a second coat to the shell to build up that deep, milky opacity.
Gold Highlighting
After firing or sealing, paint a thin line of liquid gold leaf along the very ridges of the shell segments for a luxurious, kintsugi-inspired effect.
Step 4: Finishing the Body
-
Glaze the skin:
Apply the cream glaze to the head and flippers. For the ‘Matte Skin Contrast’ look mentioned in the intro, use a satin or semi-matte version of the cream glaze here, or simply apply fewer coats for a thinner finish. -
Check the eyes:
Use a small detail brush to accidentally remove any cream glaze that pooled in the eye indentation. You want the dark recess to remain distinct. -
Create the eye pupil:
Dot a tiny amount of black glaze or underglaze into the center of the eye for focus. -
Clean the bottom:
Wipe the bottom of the turtle’s feet or base absolutely clean of glaze so it doesn’t stick to the kiln shelf (or work surface). -
Fire or Seal:
If using ceramic glazes, fire in the kiln according to manufacturer instructions (usually cone 06 or 04). If using acrylics, spray the shell with a high-gloss varnish and the body with a satin varnish.
Place your finished turtle near a window where the light can catch the subtle curves of the glossy shell


Dry-Brushed Highlights on Textured Scutes
Transform a plain ceramic bisque turtle into a coastal treasure with this technique that balances high-gloss shine with a textured, antiqued body. The contrast between the slick teal shell and the matte, weathered skin creates a sophisticated finish perfect for bookshelf decor.
Detailed Instructions
Materials
- Ceramic turtle bisque (unpainted figurine)
- Acrylic paints: Teal green (transparent or glaze), Cream/Beige, Dark Brown, Black
- High-gloss varnish or polyurethane sealer
- Matte spray sealer or matte medium
- Synthetic flat brushes (small and medium)
- Small round detail brush
- Clean rag or paper towels
- Water cup and palette
Step 1: Base Bashing the Body
-
Prime the surface:
Ensure your ceramic bisque is free of dust by wiping it down with a slightly damp cloth. If the bisque is very porous, apply a thin wash of water to help the paint flow better. -
Apply the skin tone:
Mix a warm Cream or Beige acrylic paint. Using a medium flat brush, coat the head, flippers, and tail completely. Don’t worry about getting it into the deep crevices perfectly yet, just get good coverage. -
Wash for depth:
Create a watery wash using Dark Brown paint and water (about a 1:4 ratio). Brush this generously over the textured skin areas, specifically the grid pattern on the flippers and the wrinkles on the neck. -
Wipe back:
While the brown wash is still wet, take a clean rag and gently wipe the high points of the skin. This leaves the brown pigment settled into the recessed lines, instantly defining the texture.
Sticky Situation
If your gloss varnish feels tacky even after drying, you likely applied it too forcefully or thickly in humid weather. let it cure for 48 hours in a cool, dry room before handling.
Step 2: The Glossy Shell
-
Define the scutes:
Switch to your Teal Green paint. Carefully paint each individual shell segment (scute). I like to leave the indented lines between them unpainted (showing the raw bisque or a light base coat) to act as natural grout lines. -
Build saturation:
The teal may look streaky at first. Let the first coat dry completely, then apply a second layer to deepen the color and make it opaque. -
Add shell texture:
To mimic the organic look in the photo, lightly sponge or stipple a tiny amount of darker green or black near the center of a few scutes before the teal dries, blending it softly. -
Antique the grooves:
If you accidentally got teal in the cracks, or if they look too stark, run a thin wash of the Cream paint (mixed with a tiny drop of brown) into those grooves to tie the shell back to the body color.
Add Some Age
For a heavily aged look, mix a little burnt umber oil paint with mineral spirits and wash it over the finished (dried) piece, then wipe away. It adds grime to the gloss.
Step 3: Face and Finishing Details
-
Paint the eye socket:
Using your smallest round brush, paint a circle of Teal Green around the eye area to create that distinctive marking shown in the reference. -
Define the eye:
Paint the center of the eye black. Once dry, add a tiny dot of amber or gold for the iris, and a micro-dot of white for a reflection. -
Dirty is good:
Using a very dry brush with a tiny amount of brown paint, lightly scuff the nose and the tips of the flippers. This gives the piece a slightly weathered, less ‘factory-made’ appearance. -
Seal the body:
Apply a matte varnish or sealer over the head and flippers only. This preserves the stone-like texture of the skin. -
Glazing the shell:
This is the most crucial step for the look. Apply a thick coat of High-Gloss Varnish or triple-thick glaze strictly to the teal shell scutes. -
One more coat:
Let the gloss dry fully (it may take a few hours). If it isn’t looking wet enough, add a second coat of gloss. This extreme shine contrasts beautifully with the matte body.
Place your finished turtle near a window where natural light can catch that brilliant glossy shell


Speckled Skin for Scales and Freckles
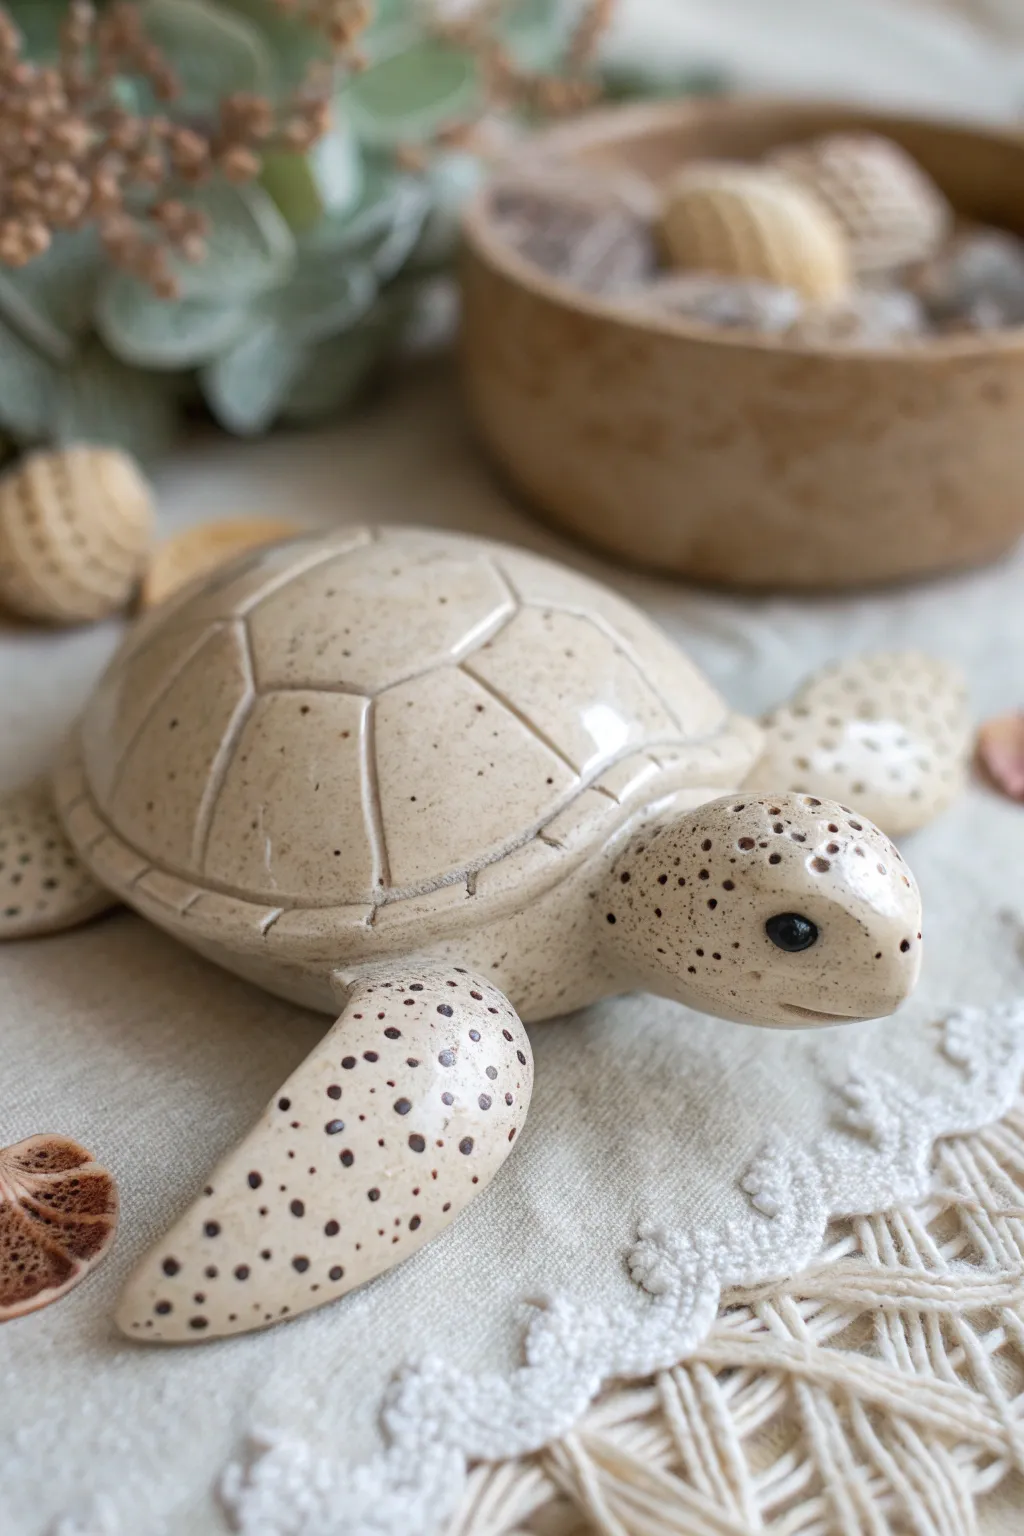
Bring the ocean to your shelf with this charming speckled sea turtle project. By building up subtle layers of cream and tan, then adding distinctive speckles, you will create a ceramic piece that mimics the natural patterns found on real sea turtles.
Step-by-Step Guide
Materials
- Bisque ceramic sea turtle
- Underglaze (Cream/Off-White)
- Underglaze (Light Tan/Beige)
- Underglaze (Dark Brown/Espresso)
- Clear gloss glaze
- Fan brush (medium)
- Round brush (size 4 or 6)
- Detail brush (size 0 or 00)
- Sponge
- Palette
- Water cup
- Kiln (or access to a firing service)
Step 1: Base Coating
-
Clean the bisque:
Start by wiping down your bisque turtle with a slightly damp sponge. This removes any dust from the shelf that might prevent the glaze from adhering properly. -
First creamy layer:
Pour a small amount of your Cream underglaze onto the palette. Using your fan brush or a larger round brush, apply a smooth, even coat over the entire turtle, including the shell and flippers. -
Dry and repeat:
Let this first coat dry until it is chalky and no longer shiny. Apply a second coat of the Cream underglaze to ensure opaque, solid coverage. -
Wait for full opacity:
For a truly solid base color like the one in the photo, I usually recommend a third coat. Let each layer dry completely before adding the next to avoid dragging the previous paint.
Dotting Tool Trick
Don’t have a detail brush? Toothpicks, cotton swabs, and the heads of pins make excellent tools for creating variable dot sizes on the skin.
Step 2: Creating the Shell Definition
-
Prepare the wash:
Mix a small amount of your Light Tan underglaze with water to create a thin, semi-transparent wash. It should have the consistency of skim milk. -
Apply the wash:
Brush this wash over the shell scutes (the plates on the shell). This creates a subtle tonal difference between the shell and the lighter skin. -
Wipe back:
Before the wash dries completely, gently dab the center of each shell plate with a clean, slightly damp sponge. This leaves the tan color in the crevices and edges, highlighting the shell’s texture. -
Deepen the crevices:
Using your size 4 round brush and the un-thinned Light Tan underglaze, carefully trace the ‘grouplines’ between the shell plates to define them clearly.
Smudged a Spot?
If you accidentally smear a brown spot, let it dry completely. Then, gently scratch the mistake off with a craft knife or cover it with the base cream color.
Step 3: Speckling the Skin
-
Map out the pattern:
Look at the reference photo. Notice how the spots are larger on the ends of the flippers and get smaller and denser near the body. -
Start with large spots:
Dip the handle end of your paintbrush into the Dark Brown underglaze. Dot the large spots onto the tips of the front flippers. -
Transition to medium spots:
Switch to your size 0 detail brush. Load it with Dark Brown underglaze and paint medium-sized, slightly irregular dots moving up the flipper. -
Tiny freckles:
Using the very tip of your detail brush, stipple tiny clusters of dots on the turtle’s head, neck, and near the shoulder area. -
Shell speckling:
Add very fine, random speckles to the shell plates as well. Keep these sparse and delicate to let the cream base color shine through. -
Painting the eyes:
Use the Dark Brown or a solid Black underglaze to fill in the eyes. A single, solid dark circle works best for this natural look. -
Eye highlight:
Once the eye paint is dry, use a toothpick to add a tiny dot of white to the upper corner of the pupil for a life-like sparkle.
Step 4: Finishing and Firing
-
Clear glaze application:
Once all your underglaze work is bone dry, carefully apply two coats of clear gloss glaze over the entire piece. Use a soft fan brush to avoid smearing your dots. -
Check for thick spots:
Ensure the clear glaze doesn’t pool too thickly in the crevices of the shell, as this can turn cloudy after firing. -
Fire the piece:
Fire the turtle in the kiln according to the specific cone rating of your clay and glaze (typically Cone 06 or 04 for low-fire earthenware).
Once fired, the glossy finish will make your sea turtle look as if it just emerged from the water, ready to swim across your table
BRUSH GUIDE
The Right Brush for Every Stroke
From clean lines to bold texture — master brush choice, stroke control, and essential techniques.
Explore the Full Guide
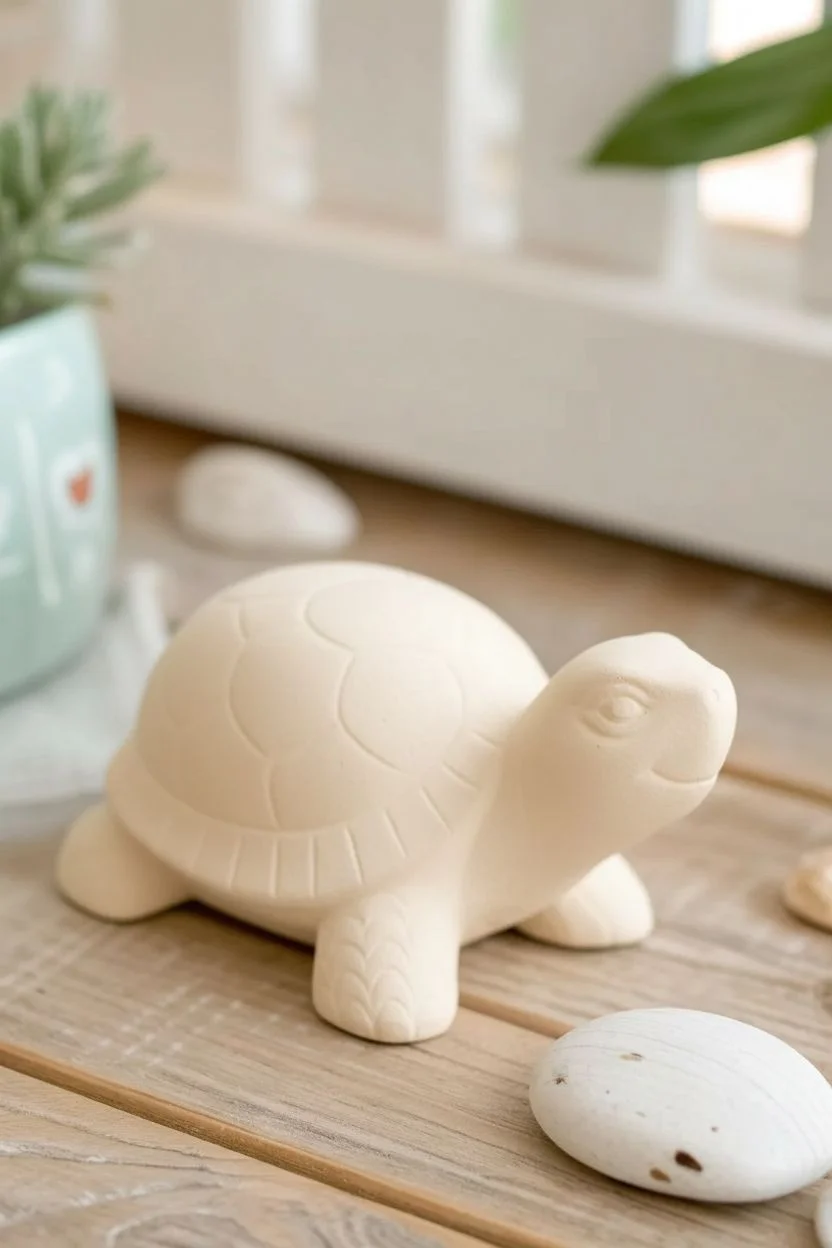
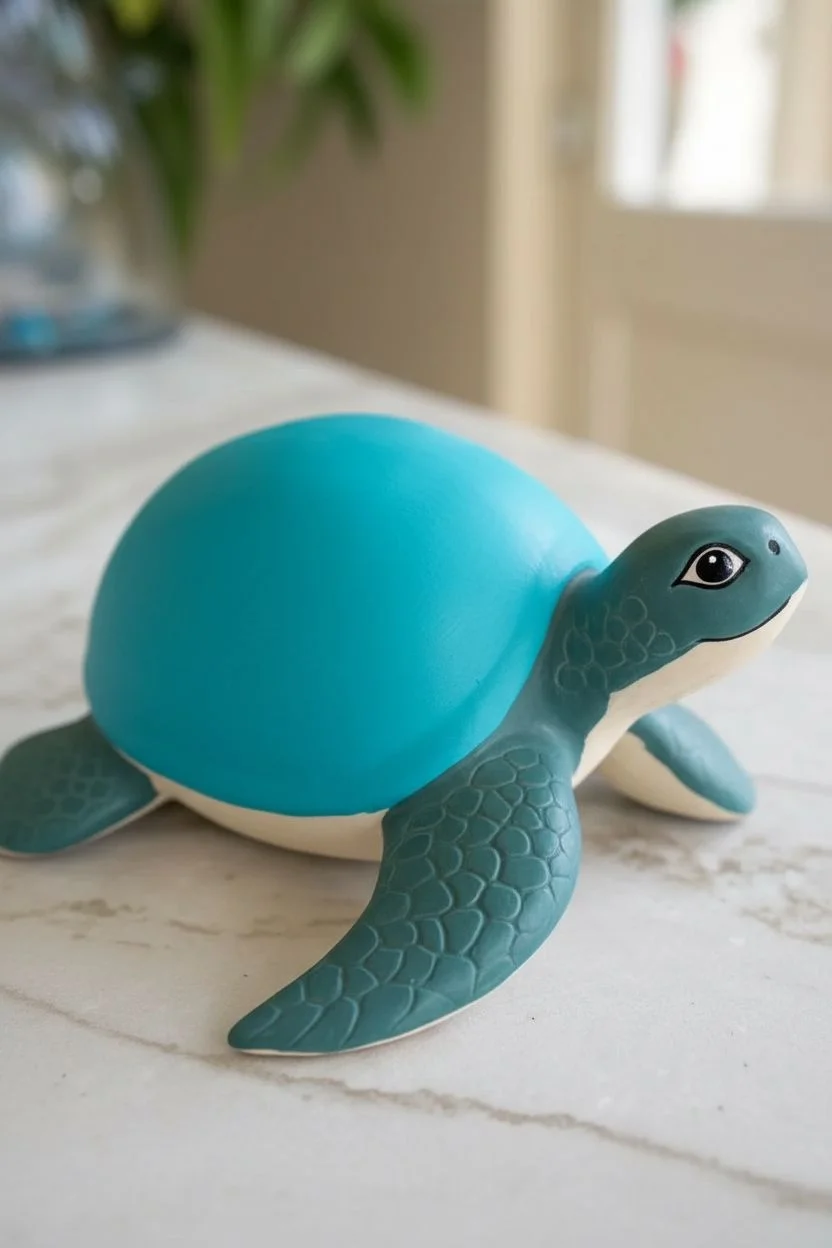
Soft Pastel Turtle for Nursery Decor
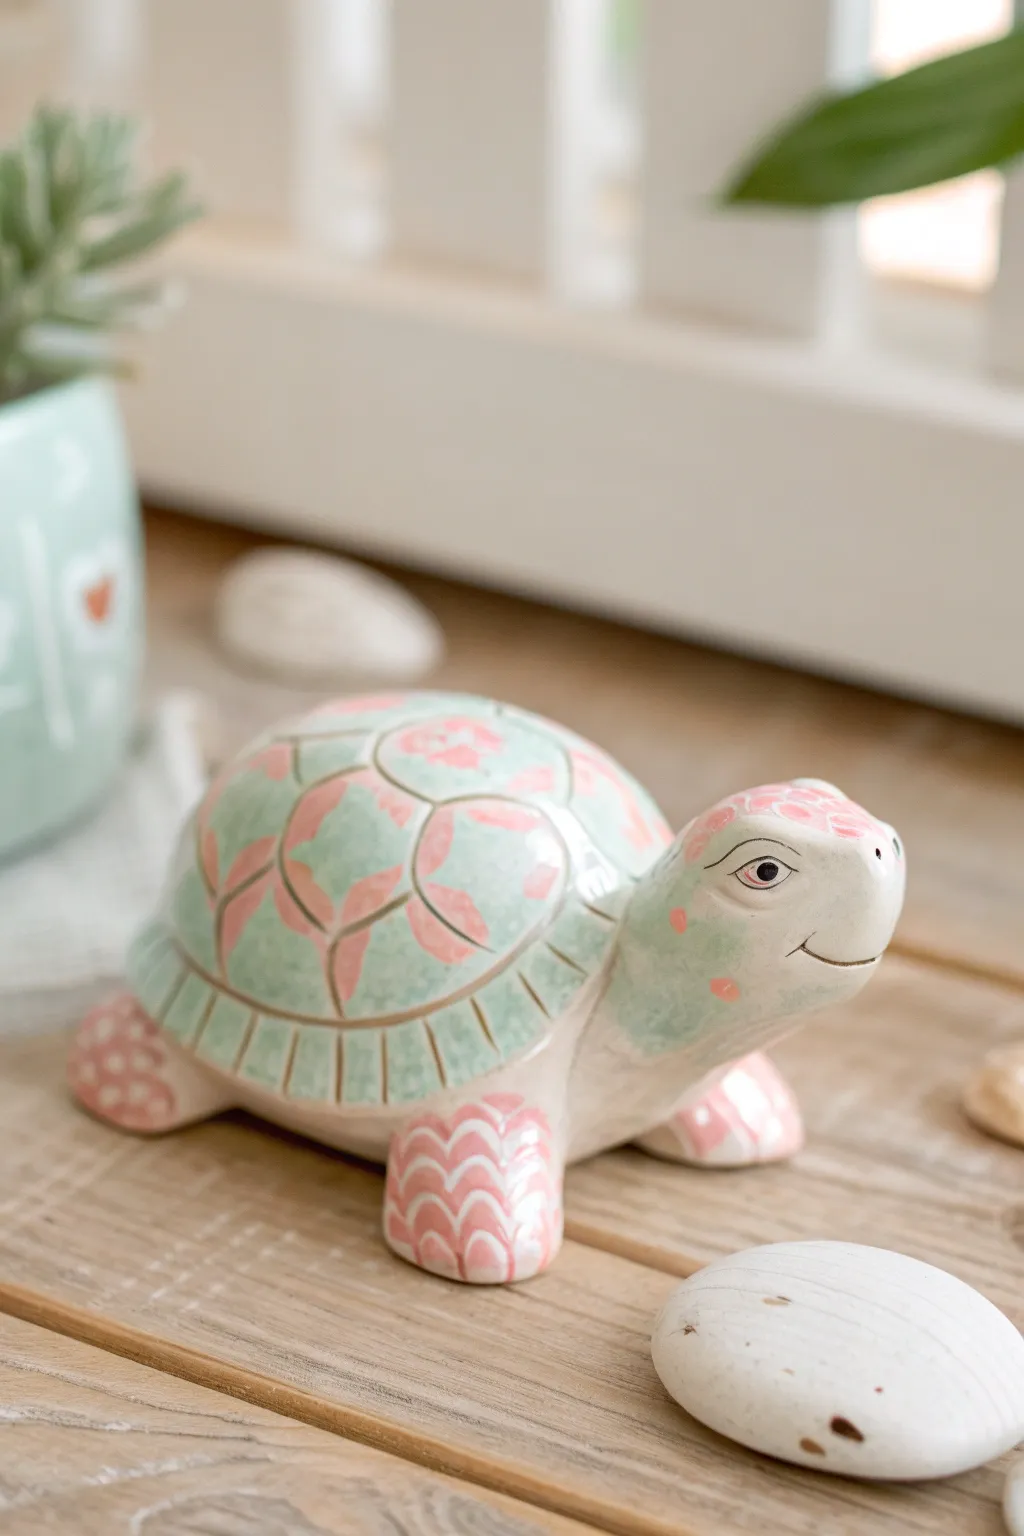
Bring a gentle splash of color to your nursery or garden room with this delightfully soft ceramic turtle. Featuring a dreamy combination of mint green and coral pink on a creamy base, this project focuses on delicate filling techniques and glossy finishing touches.
How-To Guide
Materials
- Unpainted bisque ceramic turtle figurine
- Acrylic paints: Cream/Off-White, Mint Green, Coral Pink, Black
- Gloss glaze (clear acrylic sealer)
- Small round paintbrush (sz 0 or 1)
- Medium flat paintbrush (sz 4 or 6)
- Fine liner brush (sz 000)
- Palette
- Water cup and paper towels
- Soft cloth
Step 1: Base Coating
-
Clean the bisque:
Before dipping your brush, wipe the ceramic turtle down with a slightly damp soft cloth. This removes any ceramic dust that might create a gritty texture under your paint. -
Mix the base tone:
Create a warm, creamy off-white shade. If you only have bright white, add the tiniest dot of yellow ocher or brown to soften it. -
Apply the first base layer:
Using the medium flat brush, coat the entire turtle—shell, head, legs, and underbelly—with the cream paint. Don’t worry if it looks streaky; this is just the foundation. -
Apply the second base layer:
Once the first coat is dry to the touch, apply a second layer of cream. This ensures a solid, opaque background which makes the pastel colors pop later.
Step 2: Painting the Shell
-
Identify the segments:
Look closely at the shell’s raised texture. You will be painting inside the ‘negative space’ between the raised ridges, leaving the ridges themselves the creamy base color. -
Mint green application:
Load your small round brush with mint green. Carefully fill in the larger, main segments of the shell, keeping the paint wet enough to flow but not so runny it drips. -
Coral pink accents:
Switch to coral pink. Paint irregular, organic shapes within those mint green segments. Think of them like soft flower petals or abstract clouds floating on the green. -
Refining the ridges:
If any pastel paint slipped onto the raised ridges, use your fine liner brush with the cream base color to clean up the lines, re-establishing the separation between the plates. -
Painting the rim:
Using the mint green, paint the small rectangular segments along the bottom rim of the shell. Use vertical strokes to mimic the natural texture.
Keep it Clean
Keep a clean, slightly damp brush handy. If you paint over a ridge meant to stay cream, quickly wipe it away with the damp brush before the mistake dries.
Step 3: Head and Leg Details
-
Color washing the head:
Water down a small amount of mint green paint to create a wash. Gently brush this over the back of the head and neck, feathering it out so it fades into the cream face. -
Adding head spots:
Dip the tip of your small round brush into the coral pink. Dab a few soft spots onto the top of the head and cheeks for a playful texture. -
Scales on the flippers:
The legs likely have a scalloped or scale texture. Paint the interior of these scales with coral pink, leaving the raised outlining ridges cream, just like you did with the shell. -
Painting the Eyes:
Using the fine liner brush and black paint, carefully outline the eye shape. Add a solid black circle for the pupil, leaving a tiny speck of white for a highlight. -
Adding the smile:
With the finest liner brush and a steady hand, paint a thin, curved black line for the mouth. Adding a tiny tick mark at the corner gives it that happy expression.
Uneven Coverage?
Pastel colors can sometimes be translucent. If your pink or mint looks streaky, don’t pile on thick paint. Apply multiple thin layers, drying well in between.
Step 4: Finishing and Sealing
-
Final inspection:
Look over the entire piece. I find it helpful to rotate the turtle under a bright light to check for any missed spots or uneven coverage. -
Gloss coat application:
Once the paint is completely cured (wait at least an hour), apply a layer of clear gloss glaze. This mimics the shine of a real wet turtle shell. -
Second coat for extra shine:
For that ultra-glassy look seen in the photo, apply a second coat of gloss glaze after the first one is dry, paying special attention to the high points of the shell.
Now your gentle little friend is ready to add a peaceful charm to your favorite shelf
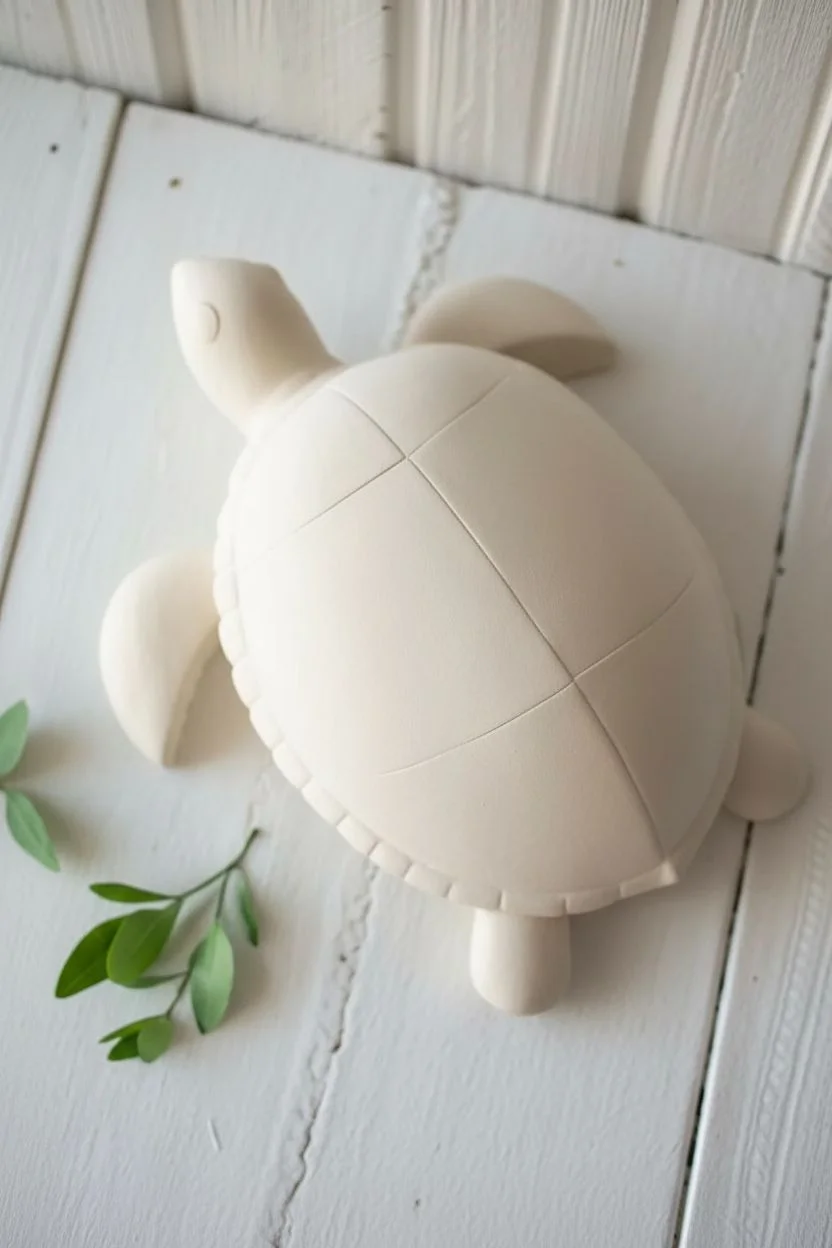
Bright Folk Art Florals on the Shell
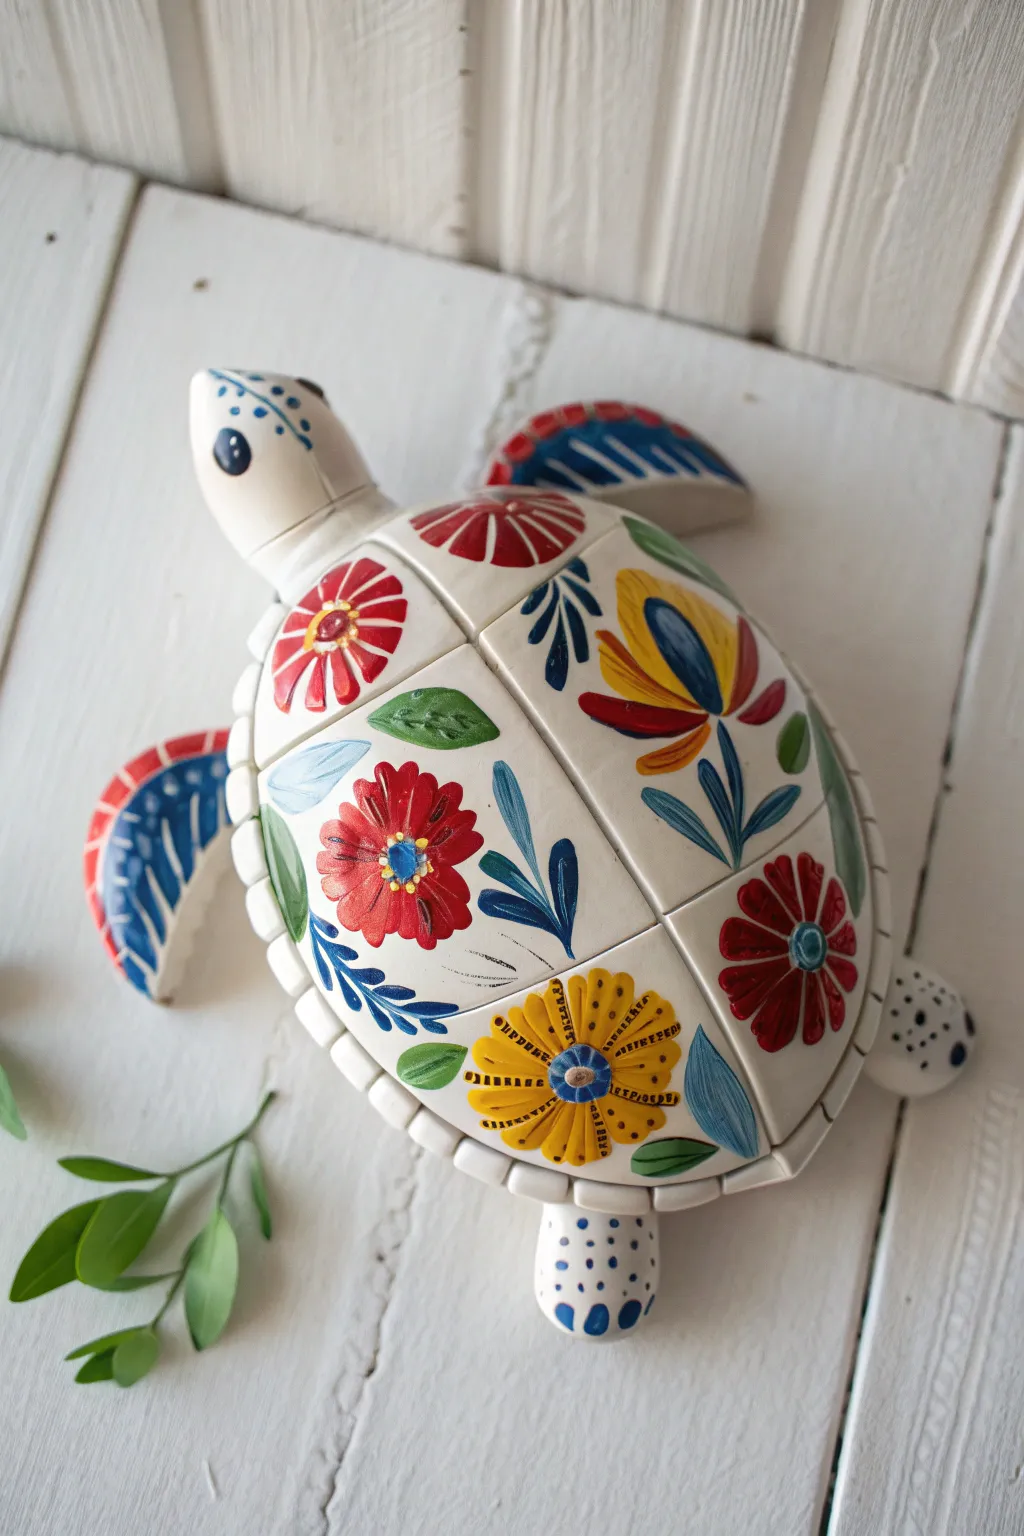
Transform a plain ceramic bisque turtle into a vibrant piece of home decor using traditional folk art motifs. This project combines bold primary colors with an off-white base to create a timeless, handcrafted look perfect for brightening up any shelf.
Step-by-Step
Materials
- Ceramic bisque turtle figurine (with segmented shell design)
- Acrylic craft paints: Cream/Off-White, bright Red, deep Yellow, Navy Blue, Forest Green
- Gloss or satin acrylic sealer/varnish
- Synthetic paintbrushes: Flat shader (size 6), Round (size 4), and a Liner brush (size 0 or 00)
- Palette or paper plate
- Water cup and paper towels
- Pencil (optional for sketching)
Step 1: Base Coating
-
Clean the surface:
Wipe down your ceramic turtle with a slightly damp cloth to remove any dust or ceramic powder. Let it dry completely. -
Apply the base color:
Using a larger flat brush, paint the entire turtle with the cream or off-white acrylic paint. You want a smooth, opaque finish, so apply two to three thin coats rather than one thick one. -
Allow drying time:
Let the base coat dry thoroughly between applications. If the paint is tacky, wait a little longer before handling it to avoid fingerprints.
Brush Technique Tip
For the tear-drop shapes on the blue leaves, press the belly of the round brush down and lift up quickly as you drag to create a sharp point.
Step 2: Painting the Shell Segments
-
Plan the flowers:
Lightly sketch your floral designs onto each shell segment with a pencil. Aim for variety: large full blooms in the center segments and smaller half-flowers on the edges. -
Paint the red flowers:
Start with the bright red paint. On alternating segments, paint large, simple daisy-like shapes. For half-flowers near the head, paint semi-circles with radiating petals. -
Add yellow blooms:
Using your round brush, paint a large yellow flower on one of the lower shell segments. Paint the petals slightly separated to give it a folk-art feel. -
Introduce blue elements:
Mix a playful tulip shape on the side segment using navy blue and yellow for the petals. Also, add blue teardrop shapes as filler leaves around the red flowers. -
Add greenery:
With the forest green paint and a round brush, paint simple leaf shapes tucking into the negative spaces between flowers. I find adding a few small vines helps connect the design visually.
Paint drying too fast?
Acrylics dry quickly on bisque. Mix a drop of fluid retarder or glazing medium into your paint to keep it workable longer for blending.
Step 3: Adding Details and Accents
-
Create flower centers:
Once the base petals are dry, add contrasting centers. Paint blue centers on red flowers, and blue centers on yellow flowers. Add tiny dots of yellow inside the blue centers for extra detail. -
Detail the petals:
Use your fine liner brush and thinned dark paint (or black) to add tiny radiating lines from the center of the yellow flower outwards. This texture mimics embroidery. -
Highlight the leaves:
Add veins to the green leaves using a lighter green or by mixing a tiny bit of white into your forest green. Keep the strokes loose and painterly. -
Define the blue leaves:
On the blue decorative leaves, paint a thin central line in white or light blue to give them dimension.
Step 4: Flippers and Head
-
Paint the front flippers:
Paint a solid red patch near the ‘shoulder’ of the front flipper. Then, paint long, curved blue strokes flowing down the length of the flipper to simulate feathers or texture. -
Decorate the head:
Paint simple black or dark blue eyes. Add a series of small blue dots on the top of the head in a crown-like pattern. -
Pattern the back feet:
For the rear flippers and tail area, keep it simple with polka dots. Dip the handle end of a paintbrush into blue paint and dot it onto the cream surface for perfect circles. -
Clean up lines:
The grooves between the shell segments should remain the cream base color. If you accidentally painted into them, touch them up with your liner brush and cream paint.
Step 5: Finishing Touches
-
Check for gaps:
Rotate the turtle and look for any missed spots or uneven edges. Touch up as necessary. -
Seal the piece:
Once the paint is fully cured (give it at least 24 hours), apply a coat of gloss or satin varnish. This protects the finish and gives the ceramic a professional shine.
Now you have a cheerful, custom-painted turtle that brings a touch of artistic charm to your space

PENCIL GUIDE
Understanding Pencil Grades from H to B
From first sketch to finished drawing — learn pencil grades, line control, and shading techniques.
Explore the Full Guide
Galaxy Shell With Star Splatter

Transform a plain ceramic bisque turtle into a celestial masterpiece featuring deep nebulas and twinkling constellations. This project uses blending techniques to create a seamless transition from deep midnight blue to vibrant galactic purple across the shell.
How-To Guide
Materials
- Ceramic turtle bisque (unglazed figurine)
- Acrylic paints (Midnight Blue, Phthalo Blue, Deep Purple, Violet, Black, Titanium White)
- Flat shader brushes (medium and small)
- Fine detail liner brush
- Small sponge or foam pouncer
- Gloss varnish or polyurethane sealer
- Palette or paper plate
- Cup of water and paper towels
Step 1: Base Coat and Body
-
Prepare the surface:
Wipe down your ceramic turtle with a slightly damp paper towel to remove any dust or ceramic powder. Let it dry completely before starting. -
Mix the body color:
Create a deep, rich navy by mixing Midnight Blue with a tiny drop of Black. The goal is a dark, oceanic color, not pure black. -
Paint the head and flippers:
Using a medium flat brush, apply this dark navy mixture to the head, neck, and flippers. Leave the shell unpainted for now to keep your grip clean. -
Add dimension to the skin:
While the navy is still slightly wet, I like to take a clean, slightly damp brush and gently lift a little paint off the high points of the head and flipper ridges to create subtle highlights. -
Seal the underbelly:
Flip the turtle gently and paint the underside with the same navy mix. Allow these body sections to dry for about 15-20 minutes.
Nebula Muddying?
If your purple and blue paints turn brown or gray when blending, stop immediately. Let the first layer dry completely, then glaze the second color over the top thinly instead.
Step 2: Painting the Galaxy Shell
-
Apply the purple base:
On the shell, identify the central scutes (the plate-like sections). Paint the center of the shell with Deep Purple, brushing it outwards but stopping before you reach the shell’s rim. -
Blend in the blue:
While the purple is wet, paint Phthalo Blue around the outer edges of the purple patches. Use a clean, damp sponge to gently dab where the colors meet, creating a soft, misty transition. -
Darken the rim:
Paint the outer rim of the shell and the spaces between the scutes (the shell lines) with your darkest Midnight Blue mix. Feather this dark color carefully into the lighter blue areas. -
Enhance the nebula effect:
Mix a brighter Violet with a touch of White. Using a dry brush or sponge, lightly dab this lighter color randomly into the center of the dark purple areas to create glowing ‘gas cloud’ effects. -
Refine the shell lines:
Once the nebula blending is dry, use a fine liner brush and the dark navy mix to re-trace the deep grooves between the shell plates, making the segments pop.
Step 3: Stars and Finishing Details
-
Create the eyes:
Paint the entire eye socket black. Once dry, add a thin ring of bronze or dark gold around the iris if desired, and place a tiny white dot in the upper corner for a reflection. -
Paint the primary stars:
Using your finest liner brush and pure Titanium White, carefully hand-paint small four- or five-pointed stars on the most prominent parts of the shell. -
Add distant stars:
Dip the back end of your paintbrush handle into white paint and dot it onto the shell and flippers to create perfectly round, larger stars. -
Create stardust:
Dilute a small amount of white paint with water. Load a toothbrush or stiff bristle brush, and flick the bristles with your thumb to spray tiny misty specks across the darkest blue areas. -
Highlight the body:
Add a few intentional white dots to the top of the head and the tips of the flippers to tie the body into the celestial theme. -
Let it cure:
Allow the entire piece to dry for at least 24 hours to ensure all layers deeply cure before sealing. -
Gloss coat:
Apply a high-gloss varnish over the entire turtle. The gloss is essential here—it deepens the dark blues and makes the white stars pop like distinct lights.
Glow Up
Mix glow-in-the-dark medium into your white paint for the stars. During the day it looks normal, but at night your turtle will act like a real constellation.
Place your finished cosmic turtle near a window where the sunlight can catch the glossy finish and make the stars sparkle
Koi Pond Shell Pattern Illusion
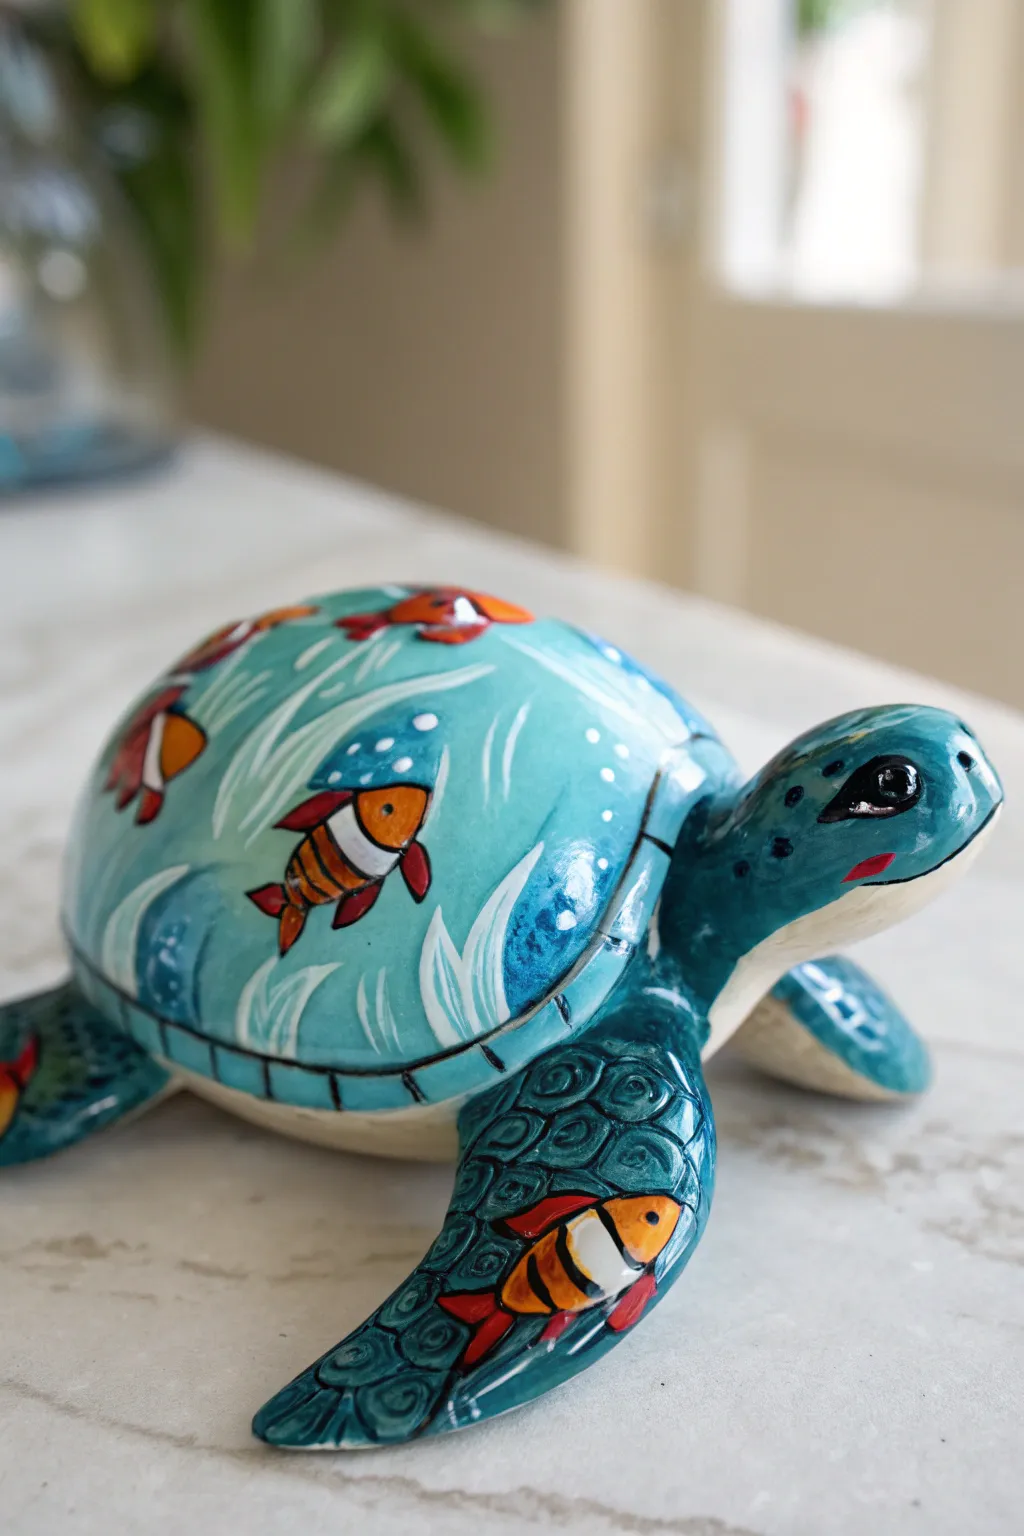
Transform a plain ceramic bisque turtle into a vibrant underwater scene complete with playful clownfish and swirling currents. This project uses clever layering to create the illusion of depth, making your turtle’s shell look like a mini aquarium.
Step-by-Step Tutorial
Materials
- Ceramic bisque turtle figurine
- Acrylic paints (Teal, Light Blue, Dark Blue, Orange, White, Black, Cream/Off-white)
- Small round brushes (Size 0 and 2)
- Medium flat brush
- Fine liner brush
- Gloss varnish or sealer
- Palette
- Water cup
- Paper towels
Step 1: Base Coat and Underside
-
Painting the belly:
Start by flipping the turtle over. Paint the underside and the lower edges of the flippers with a creamy off-white color. Apply two coats for solid coverage, letting the first coat dry completely before adding the second. -
Base shell color:
For the upper shell, mix a vibrant teal using teal and a touch of light blue. Paint the entire domed shell area with this mixture. Don’t worry about the pattern yet; you just want a smooth, solid background. -
Flipper foundation:
Paint the top side of the flippers and the head with a slightly darker blue-green shade to distinguish them from the shell. This helps frame the main artwork.
Step 2: The Underwater Scene
-
Drafting the fish:
Once the teal base is bone dry, lightly sketch simple fish shapes onto the shell with a pencil. Aim for 3-4 fish swimming in different directions. Focus on an oval body shape for now. -
Blocking in orange:
Using a size 2 brush, fill in the fish bodies with bright orange paint. You might need two layers here to make the orange pop against the teal background. -
Adding the stripes:
Paint vertical white stripes on your orange fish bodies. Typically, clownfish have three distinct bands: one near the head, one in the middle, and one near the tail. -
Defining the features:
Switch to your finest liner brush and black paint. Carefully outline the entire fish, the white stripes, and add small fins. Don’t forget a tiny black dot for the eye. -
Creating movement:
Mix a watery light blue or white. Using a long liner brush, paint long, wavy strokes along the shell around the fish to mimic water currents and aquatic grass. -
Adding bubbles:
Dip the non-brush end (the handle) of your paintbrush into white paint and dot onto the shell to create perfect little bubbles rising from the fish.
Fixing Wobbly Lines
If your black outlines get too thick or messy, wait for them to dry fully. Then, use the base teal color to carefully paint over the mistake and reshape the line.
Step 3: Face and Flipper Details
-
Texturing the flippers:
On the darker blue flippers, use a liner brush with black paint to draw a scale pattern. Interlocking semi-circles or U-shapes work best here. -
Highlighting scales:
Inside each drawn scale, add a tiny dab or swirl of lighter teal paint. This gives the skin a bumpy, realistic texture. -
Bonus fish:
If there is space on the larger front flippers, paint a smaller fish following the same steps as the shell: orange blof, white stripes, black outline. -
Facial features:
Paint the eyes with a solid black circle, leaving a tiny white reflection dot near the top. Add a small red curve for the mouth. -
Cheek details:
Add a few small black spots on the turtle’s cheek area and neck to continue the spotted skin texture found on real sea turtles.
Add Clear Dimension
For a 3D water effect, apply a thick drop of UV resin or clear 3D glossy accents over just the bubbles and the fish eyes to make them physically pop out.
Step 4: Finishing Touches
-
Defining the shell segments:
Look at the natural grooves of the ceramic shell. Run a liner brush with thin black paint along the bottom rim of the shell to separate it clearly from the body. -
Final drying:
Allow the entire piece to dry for at least 24 hours. The thick layers on the fish need to be completely set before sealing. -
Sealing:
Apply a high-gloss varnish over the entire painted surface. I like to do two thin coats rather than one thick one to avoid drips. The gloss makes the turtle look wet and newly emerged from the ocean.
Place your finished turtle near a window where the light can catch the glossy finish and bring your painted aquarium to life


Ombre Shell Fade From Center Out
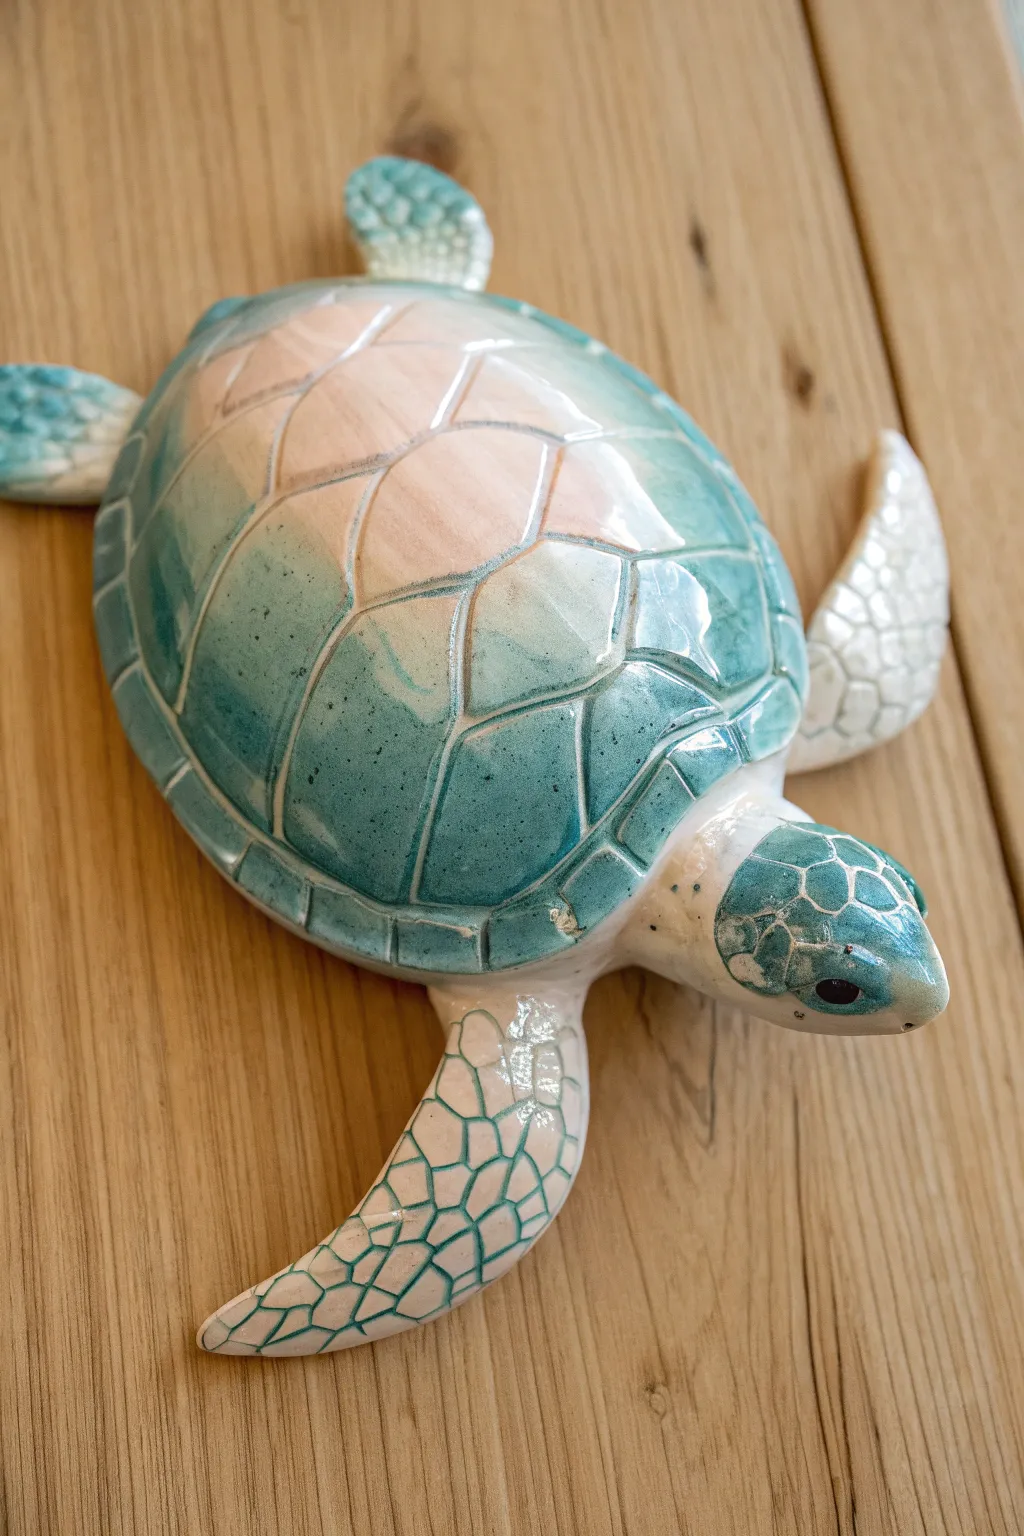
Capture the serene beauty of the ocean with this glazed ceramic project, featuring a shell that transitions from soft sandy peach to deep lagoon teal. The finish simulates the look of sea glass and sunlight refracting through water, perfect for bringing a beachy vibe to your shelf.
Step-by-Step Guide
Materials
- Bisque fired ceramic turtle
- Underglaze pencil or very light pencil
- Cone 06 ceramic glazes: Pale Peach/Shell Pink, Light Turquoise, deep Lagoon Teal, and White
- Fan brush (medium)
- Small round detail brush (size 1 or 2)
- Sponge
- Water cup
- Clean glazed ceramic tile or palette
- Clear dipping glaze (if using non-glossy underglazes)
Step 1: Base Coat & Shell Center
-
Wipe down bisque:
Before you begin, wipe the entire bisque turtle with a damp sponge. This removes any dust from the shelf and prevents the dry clay from sucking the moisture out of your glaze too quickly. -
Apply the center color:
Load your fan brush with the Pale Peach or Shell Pink glaze. Apply a puddle of this color directly to the very center scutes (scales) of the turtle’s shell. -
Blend outward:
While the peach glaze is still wet, gently pull it outward towards the second ring of scutes, but don’t go all the way to the edge. You want the highest concentration of pink in the middle. -
Feather the edges:
Clean your brush and use it slightly damp to feather the edges of the peach glaze so there are no harsh lines where the next color will start.
Fixing Muddy Colors
If blending peach and teal creates an ugly brown, let layers dry between applications. Overlay colors gently rather than mixing wet-on-wet.
Step 2: Creating the Ombre Gradient
-
Start the mid-tone ring:
Switch to your Light Turquoise glaze. Apply this color in a ring around the peach center, allowing it to slightly overlap the wet peach edge. -
Melding the colors:
Use a clean, damp brush to gently tap or cross-hatch where the peach and turquoise meet. The goal is to create a soft transition where they blend into a muddy but pleasant neutral tone. -
Apply the dark edge:
Using the Lagoon Teal, paint the outermost rim of shell scutes and the very edge of the shell skirt. This adds depth and frames the lighter colors. -
Final blending pass:
I like to take a brush with just a tiny bit of water and run it over the transition between the turquoise and the teal to ensure a seamless fade from the center to the edge. -
Second coat:
Once the first layer is dry to the touch (chalky appearance), repeat the process. Most commercial glazes require 3 coats for full opacity, so check your bottle instructions. -
Defining the shell lines:
After your base coats are fully opaque, take a very small detail brush dipped in water. Gently run it through the grooves of the shell to remove excess glaze, revealing the white clay body or thinning the glaze so the lines pop after firing.
Step 3: Flippers and Details
-
Base the flippers:
Paint the legs, head, and tail with 2-3 coats of White glaze. Let this dry completely before moving to the detail work so the colors don’t bleed. -
Drafting the scales:
Using your small round brush and the Lagoon Teal, carefully paint the mosaic-like scale shapes on the flippers. Leave thin white lines between each teal shape to create that reptile-skin look. -
Head detailing:
Continue the mosaic pattern onto the top of the head. For the eyes, use a single dot of solid black underglaze or glaze. -
Cleaning up:
Inspect the underside of the turtle. Use a clean sponge to wipe away any stray glaze drips effectively; otherwise, the turtle will stick to the kiln shelf. -
Final Clear Glaze:
If your colored glazes aren’t self-sealing gloss glazes, apply a coat of clear dipping glaze or brush-on clear gloss over the entire piece to get that wet, shiny look shown in the photo. -
Firing:
Fire the piece in the kiln according to the specific cone rating of your glazes (typically Cone 06 for low-fire earthenware).
Pro Tip: Highlight Pop
Add a tiny speck of white glaze to the black pupil of the eye before firing. This ‘catchlight’ gives the turtle life and expression.
Once fired, the glossy finish will make your ombre blending look incredibly smooth and aquatic
Negative Space Line Art Turtle Shell
Transform a plain ceramic turtle figurine into a striking display piece using high-contrast black line art. This project focuses on drawing clean, geometric hexagons and triangles to mimic a stylized turtle shell pattern.
Detailed Instructions
Materials
- Unpainted ceramic bisque turtle (or a glazed white one)
- White acrylic paint (if starting with un-white base)
- Black acrylic paint or a black oil-based paint marker
- Fine liner brush (size 00 or 000)
- Pencil (HB or lighter)
- Eraser
- Gloss varnish or clear sealer spray
- Paper towel
- Water cup
Step 1: Preparation & Base Coat
-
Clean surface:
Begin by wiping down your ceramic turtle with a damp cloth to remove any dust or oils that might interfere with paint adhesion. -
Apply white base:
If your turtle isn’t already a bright, solid white, apply two thin coats of white acrylic paint. Let the first coat dry completely before adding the second for a smooth, opaque finish. -
Dry thoroughly:
Allow the base coat to cure fully for at least an hour. You need a hard, dry surface to sketch on without gouging the paint.
Wobbly Lines?
If your hand shakes while painting lines, rest your pinky finger on the turtle’s shell for stability, or use a Posca paint pen instead of a brush for better control.
Step 2: Sketching the Grid
-
Center hexagon:
Using a light pencil touch, draw a medium-sized hexagon right in the center of the turtle’s back. This will be the anchor for the rest of your pattern. -
Surrounding shapes:
Sketch a ring of trapezoids or modified hexagons around that center shape. Think of them as puzzle pieces fitting around the middle; they should follow the curve of the shell. -
Outer rim:
Draw a scalloped border around the very edge of the shell. These semi-circles should connect to create a distinct rim separating the top shell from the underbelly. -
Initial refinement:
Step back and look at your pencil lines. If the symmetry feels off, gently erase and adjust now before any permanent ink touches the piece.
Add a Splash of Color
Instead of leaving the gaps white, try filling the double-line channels with a metallic gold or silver paint for a creative ‘kintsugi’ pottery effect.
Step 3: Painting the Lines
-
Main outlines:
Using your fine liner brush or a paint marker, carefully trace over your pencil lines. I prefer to start from the center and work outward to avoid smudging wet ink with my hand. -
Thickening the gaps:
Go back over your main structural lines—specifically the gaps between the shell plates—and thicken them. These should be double lines with a small white gap between them, or thick solid black lines depending on your preference. In the photo, they are distinct double lines. -
Scalloped edge:
Inking the scalloped rim requires a steady hand. Create a ‘U’ shape for each scallop, ensuring they connect seamlessly.
Step 4: Adding Detail Patterns
-
Center dots:
Inside the central hexagon and the shape directly above it, paint a cluster of small black dots. A diamond formation of dots works beautifully here. -
Striated triangles:
In the side panels of the shell, draw small triangles. Fill these triangles with horizontal stripes or lines to add visual weight and texture. -
Flipper details:
Move down to the flippers. On each fliper, paint a simple pattern of 5-7 dots arranged in a circle or scattered artistically. -
Eye details:
Paint two solid black ovals for the eyes. Keep the edges crisp to give the turtle a focused expression. -
Cleanup:
Once the black paint is bone dry, gently erase any visible pencil marks. Be extremely careful not to rub off any paint.
Step 5: Finishing
-
Varnishing:
To get that ceramic glaze look, apply a high-gloss varnish. Brush it on in long, smooth strokes to avoid bubbles. -
Final cure:
Let the varnish dry for 24 hours before handling your new art piece to prevent fingerprints on the tacky surface.
Place your geometric turtle on a shelf where the light can catch its glossy new finish
Hidden Mini Motifs Inside Each Shell Scute
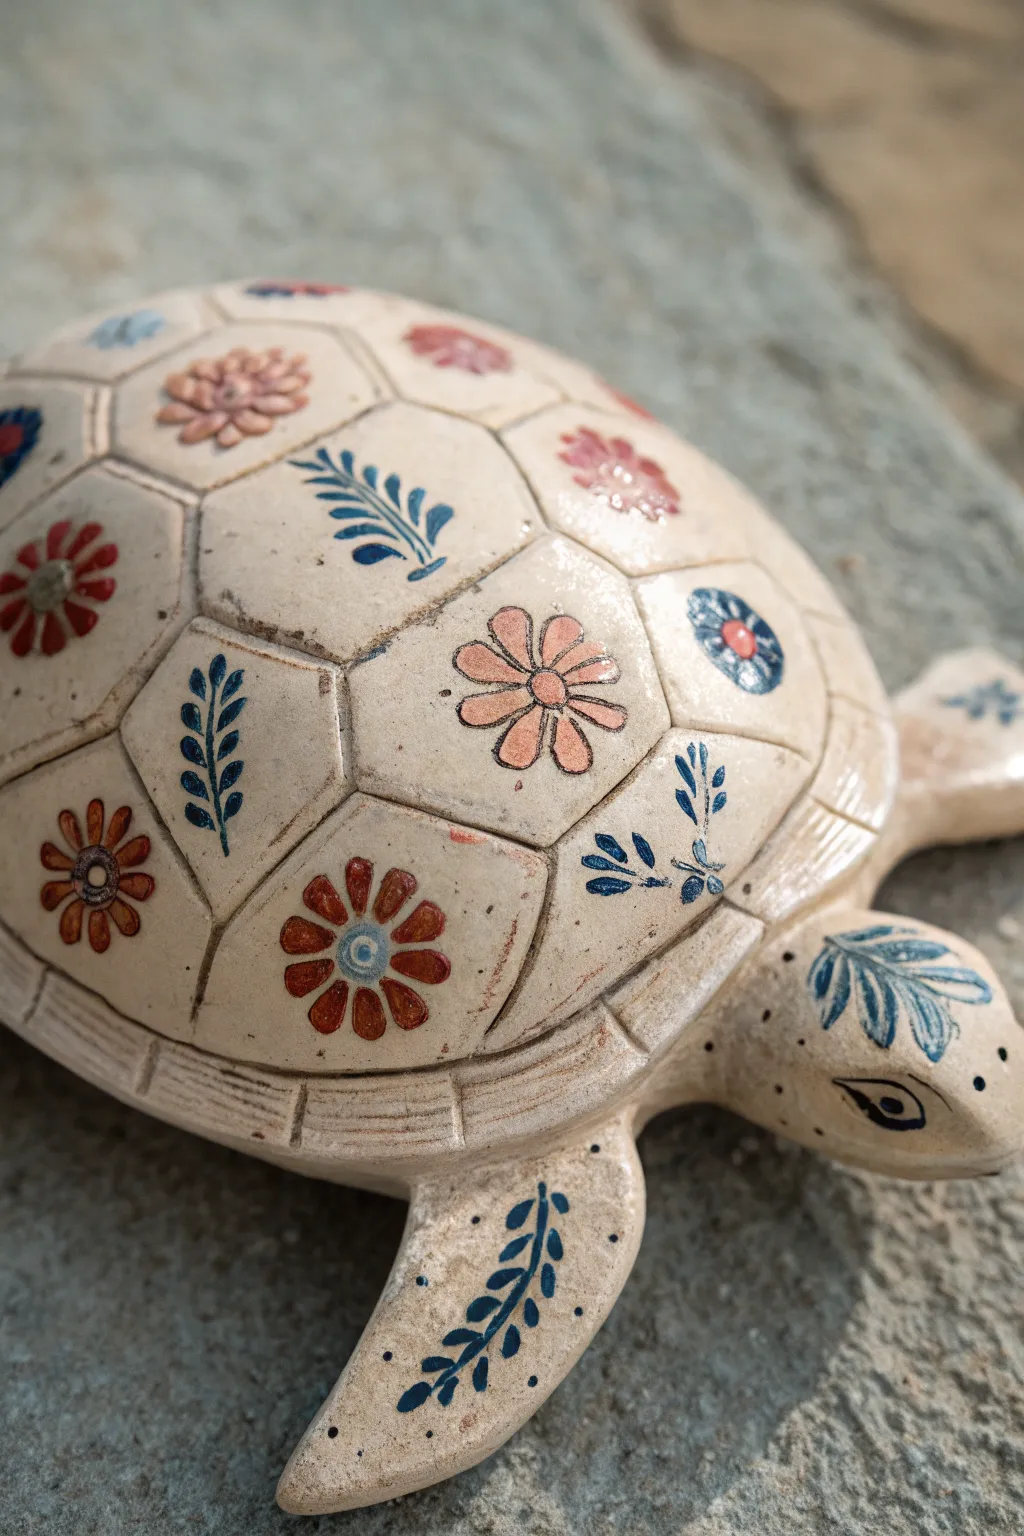
Transform a plain ceramic turtle into a charming piece of folk art by filling each shell segment with delicate botanical motifs. This technique uses a warm, muted palette to create a cozy, vintage aesthetic perfect for garden decor or a bookshelf accent.
Step-by-Step
Materials
- Unpainted bisque or glazed white ceramic turtle
- Acrylic paints (navy blue, terracotta, dusty pink, cream, light blue)
- Fine detail brushes (sizes 0, 00, and 1)
- Glazing medium or clear sealant spray (gloss or satin)
- Pencil for sketching
- Palette or small dish for mixing
- Paper towels and water cup
Step 1: Preparation & Base Coat
-
Clean the surface:
Wipe down the ceramic turtle with a damp cloth to remove any dust or oils. Let it dry completely before starting to paint. -
Assess the base color:
If your ceramic piece isn’t already a warm cream color like the reference, mix white acrylic paint with a tiny drop of yellow ochre or intense beige. Apply an even base coat over the entire turtle and let dry. -
Define the shell structure:
Most ceramic turtles have raised lines defining the scutes (shell segments). If yours are faint, very lightly run a pencil over the grooves to help you visualize the individual ‘canvases’ you’ll be painting on.
Steady Hand Trick
Rest your pinky finger on a dry part of the turtle while painting intricate details. This anchors your hand and gives you much better control over fine lines.
Step 2: Painting the Motifs
-
Plan your pattern:
Visualize an alternating pattern. The reference image alternates between floral blooms and leafy sprigs. Decide which scutes will hold which design to keep the overall look balanced. -
Paint the central daisies:
For the flower motifs, start with the center. Use a dotting tool or the back of your brush to place a small dot of light blue or navy in the middle of a chosen scute. -
Add flower petals:
Using a size 1 brush and your dusty pink or terracotta paint, paint simple, elongated teardrop shapes radiating from the center dot. Keep the petals distinct but close together. -
Create the vine motifs:
On the alternating scutes, use your navy blue paint to create a central curved stem line. Use a swift, light hand to keep the line elegant. -
Add leaves to vines:
Using the very tip of a size 0 brush, press down and lift up along the stem to create small leaf shapes. Vary the direction slightly for a natural look. -
Paint corner sprigs:
Some scutes feature corner details instead of central motifs. Paint tiny, three-leaf sprigs in navy blue emerging from the corners of these segments. -
Layering details:
Once the initial flower petals are dry, add a tiny ring of white or cream dots around the center or inside the petals to add depth and intricacy. -
Highlighting the head:
Move to the turtle’s head. Paint a decorative leafy branch on the top of the head using the navy blue, mirroring the style of the shell vines. -
Defining the eye:
Carefully outline the sculpted eye area with navy blue. Add a defined pupil and a simple eyeliner-like stroke to give the turtle expression. -
Decorating the flippers:
Extend the design to the legs. Paint a long, trailing vine with leaves running down the center of each flipper, following the curve of the limb. -
Add speckling (optional):
To mimic an aged ceramic look, dilute some brown or grey paint significantly with water. Flick a stiff brush over the piece to create tiny, subtle speckles, focusing on the flipper and head areas.
Step 3: Finishing Touches
-
Dry thoroughly:
Allow all paint layers to dry for at least 2-4 hours. Acrylics need to be fully set before sealing. -
Antique the grooves:
I like to mix a wash of water and brown paint, run it into the deep grooves between the shell scutes, and quickly wipe the surface clean. This makes the segments pop. -
Seal the piece:
Apply a clear gloss or satin spray sealant. Several light coats are better than one heavy one to prevent drips and ensure a durable finish for your garden friend.
Go Metallic
Swap the navy blue paint for a metallic gold or copper to outline the flowers and vines. This adds a luxurious, gilded age feel to the folk art style.
Place your beautifully detailed turtle among your potted plants to discover a hidden piece of art in your garden


Have a question or want to share your own experience? I'd love to hear from you in the comments below!