If you’ve got a dresser that feels a little tired, paint is the fastest way to turn it into a piece you actually love seeing every day. Here are my favorite painted dresser ideas—from classic, foolproof makeovers to artsy techniques that make your drawers feel like a mini gallery.
Classic Solid Color Makeover
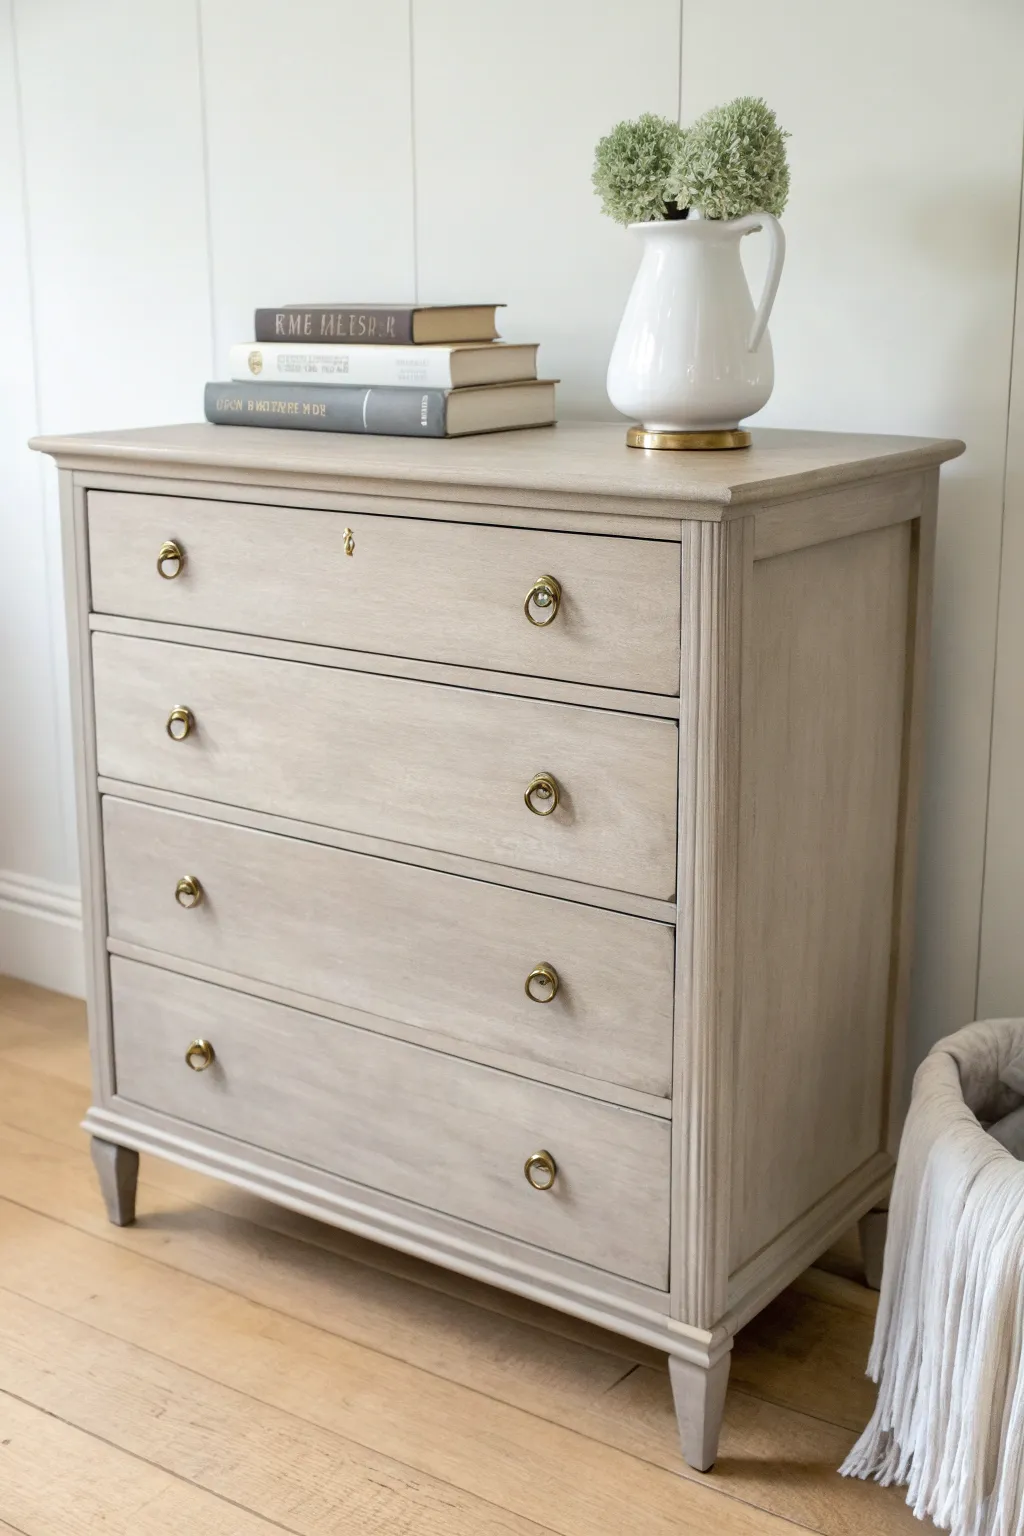
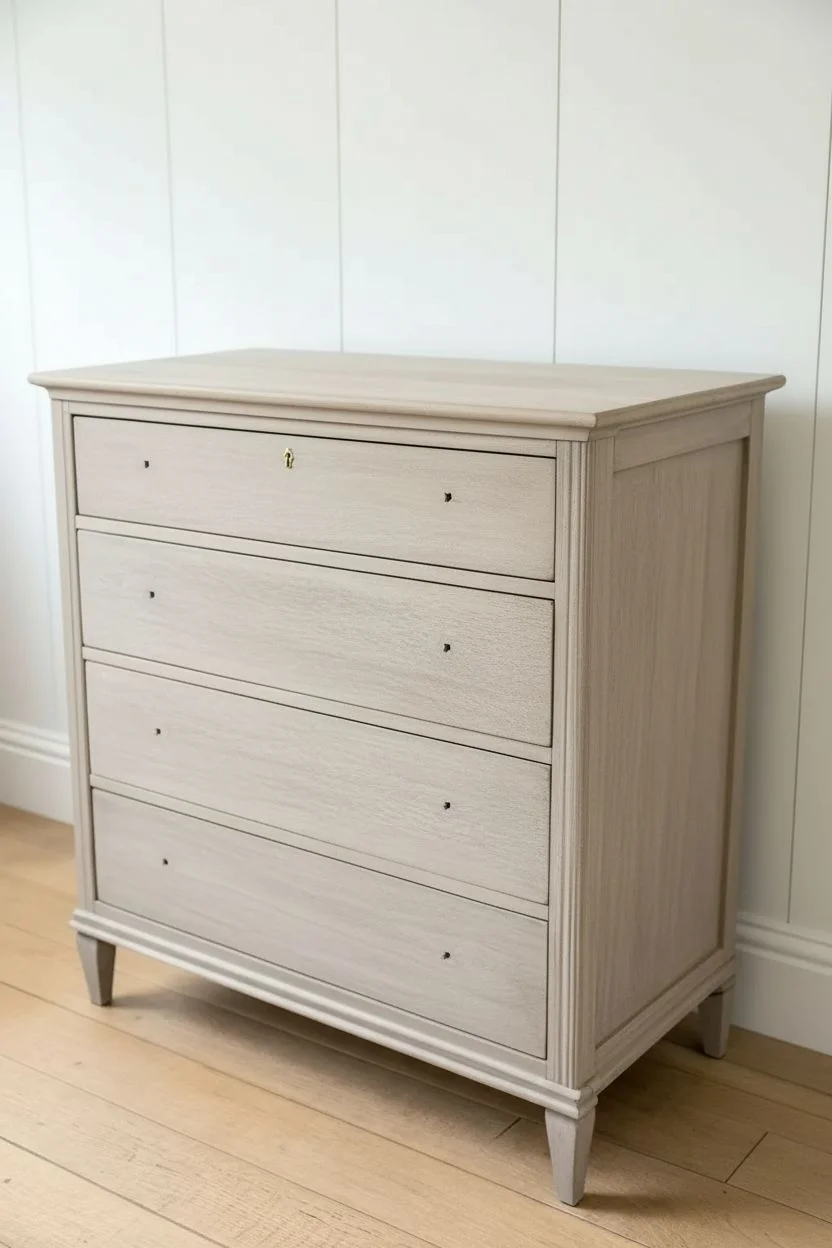
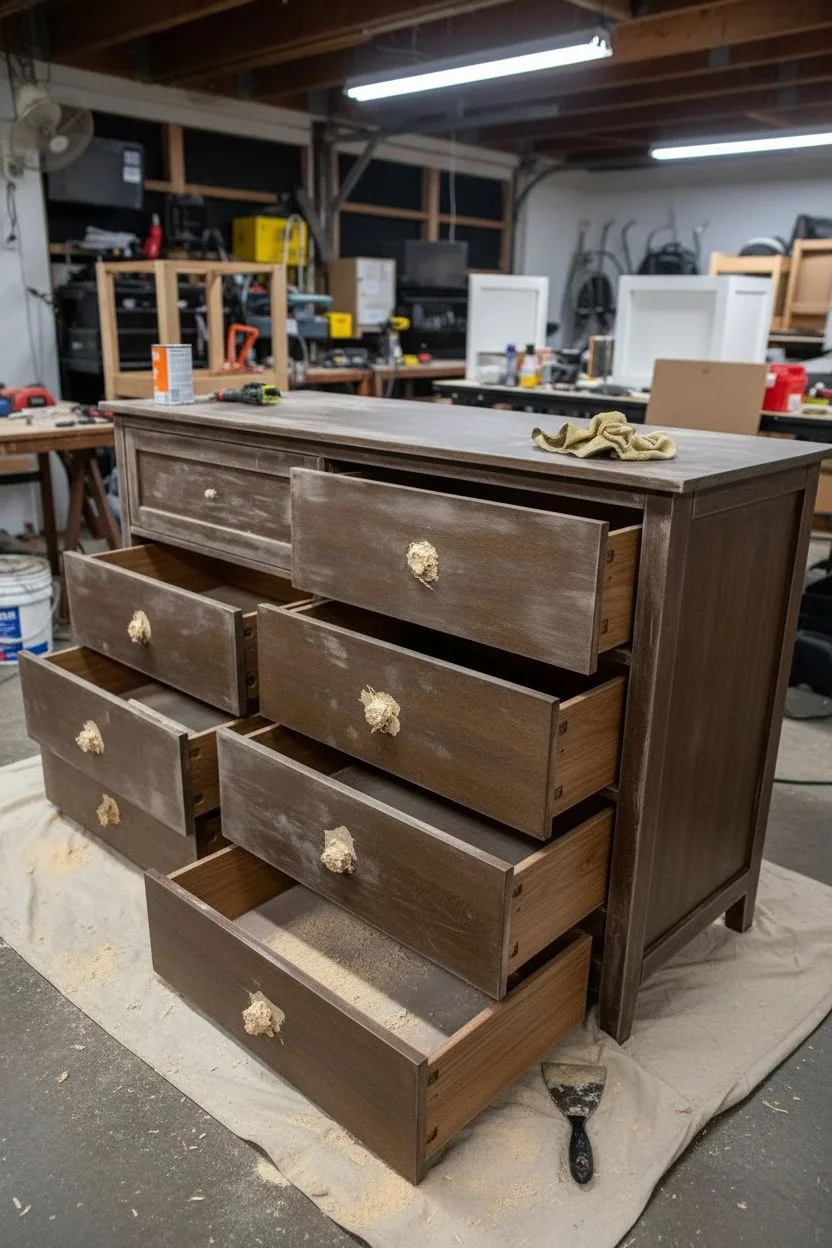
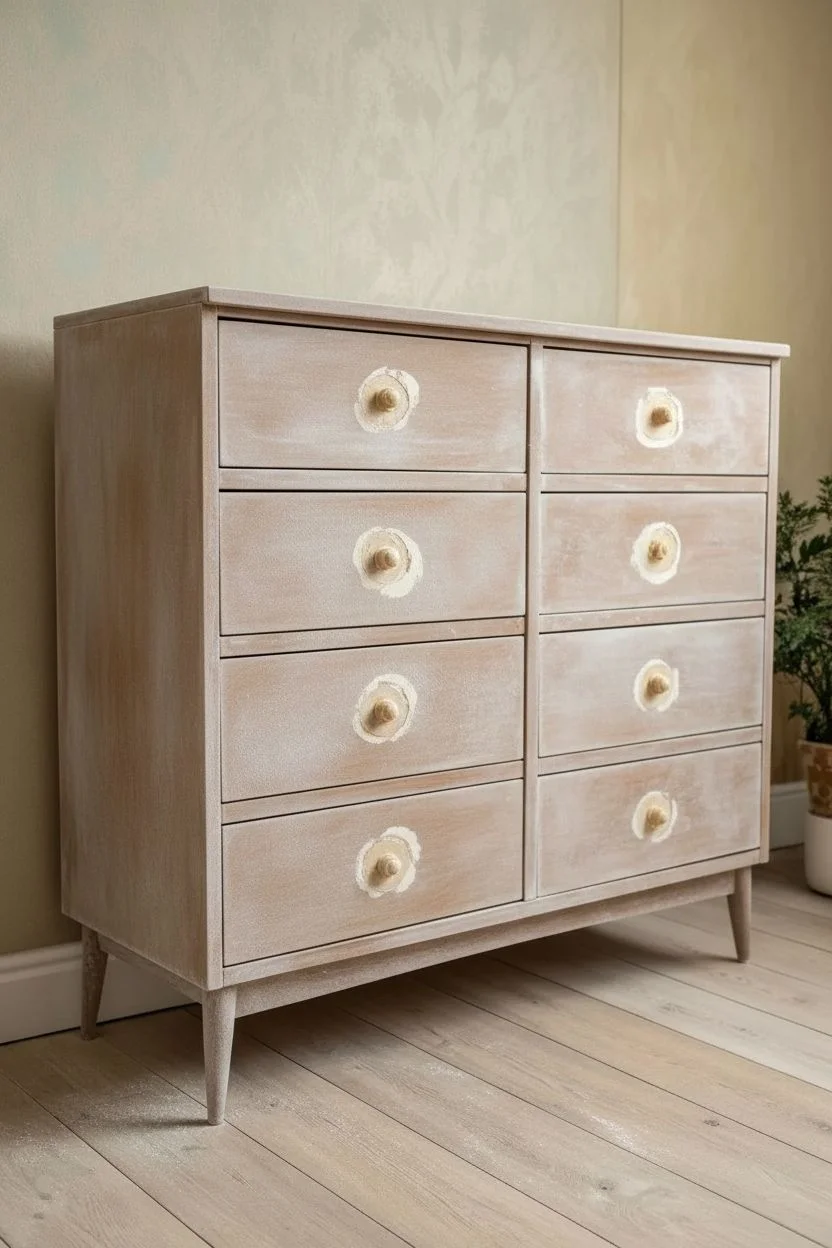
Transform a tired wooden dresser into a serene statement piece with this textured beige-wash technique. The finish mimics the look of raw, bleached wood while adding subtle warmth, perfect for a modern farmhouse or coastal aesthetic.
Step-by-Step Tutorial
Materials
- Wooden dresser (raw or previously finished)
- Medium and fine grit sandpaper (120, 220)
- Electric sander
- Tack cloth
- Wood cleaner/degreaser
- Adhesion primer
- Warm beige chalk paint (e.g., Annie Sloan ‘Country Grey’ or similar)
- White or cream paint for the wash
- Water for diluting
- paintbrush (synthetic)
- Clean, lint-free rags
- Small round brush for details
- Clear matte wax or polycrylic topcoat
- Brass ring pull hardware
- Gold wax (optional for hardware)
Step 1: Cleaning and Prep
-
Remove Hardware:
Begin by removing all existing knobs, handles, and pulls. Keep the screws in a labeled baggie so you don’t lose them. -
Clean Thoroughly:
Wipe down the entire piece with a wood cleaner or degreaser to remove years of polish, oils, and dust. -
Sand the Surface:
Using an electric sander with 120-grit paper, sand down the flat surfaces to remove the old finish. You want to expose as much raw wood grain as possible for this specific look. -
Hand Sand Details:
For the fluted side columns and drawer edges, switch to hand sanding with a sponge or folded sandpaper to get into the crevices without flattening the details. -
Smooth the Grain:
Do a final pass with fine 220-grit sandpaper to smooth out any scratches from the heavy sanding, then wipe everything clean with a tack cloth.
Sticky Drawers?
If paint builds up on the drawer sides making them stick, sand the edges down to raw wood and rub a candle along the runners for smooth gliding.
Step 2: The Beige Base Coat
-
Apply Primer:
Apply a thin coat of adhesion primer. This is crucial if your previous finish had any red tones (like mahogany) to prevent bleed-through. -
Mix Base Color:
Select a warm beige chalk paint. If the color feels too saturated, I sometimes mix in a tiny bit of grey to neutralise it. -
Paint First Coat:
Paint the entire dresser with the beige color using a high-quality synthetic brush to minimize brush strokes. -
Paint Second Coat:
Once dry, apply a second coat for solid, opaque coverage, ensuring you get paint into the fluted grooves on the sides. -
Let it Cure:
Allow the base coats to dry completely, preferably overnight, before moving on to the wash effect.
Step 3: Creating the Washed Effect
-
Create the Wash:
Mix white or cream paint with water in a 1:1 ratio. The consistency should be like skim milk. -
Apply and Wipe:
Work in small sections (like one drawer front at a time). Brush the diluted white wash over the beige paint. -
Drag the Finish:
Immediately use a damp lint-free rag to wipe off most of the wash in long, horizontal strokes. This leaves a white haze in the grain and texture. -
Address Crevices:
Allow slightly more wash to settle into the fluted columns and corners to highlight the architectural details. -
Feather Out:
Check for any hard stop lines where sections meet and gently feather them out with a dry brush while the paint is still damp.
Add Depth
For a more weathered look, lightly sand high points (corners and edges) after the wash dries but before sealing to reveal the beige base underneath.
Step 4: Finishing and Hardware
-
Seal the Work:
Once the wash is bone dry, apply a clear matte wax. Use a wax brush to work it into the surface, then buff with a soft cloth for a subtle sheen. -
Prep Hardware:
If reusing old hardware, clean it well. If it’s too shiny, rub a little gold wax or ‘Rub ‘n Buff’ over it to give it an aged brass look. -
Install Pulls:
Reattach your brass ring pulls. Ensure they are centered and tightened securely. -
Dress the Top:
Place a few neutral accessories on top, like cream pottery or vintage books, to complement your new finish.
Enjoy the calm, sophisticated atmosphere your newly refreshed dresser brings to the room


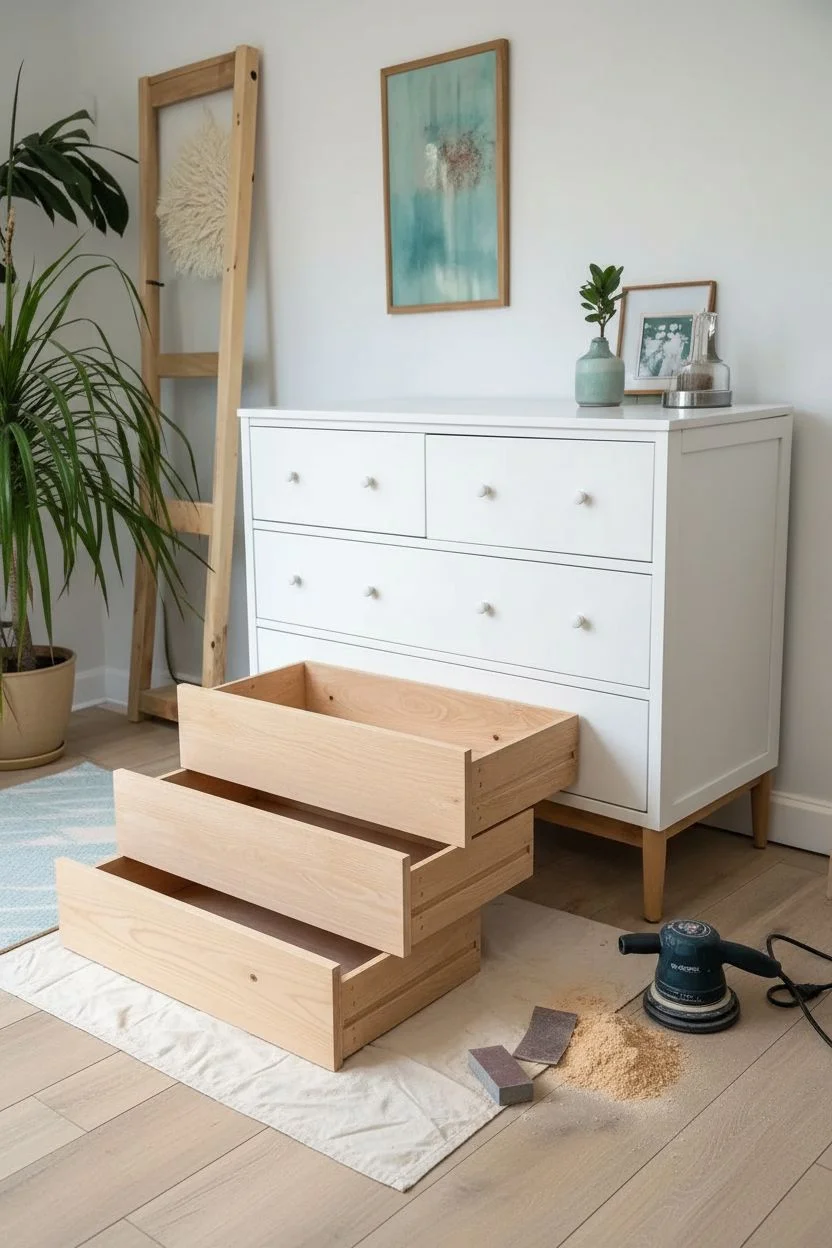
Crisp White With Clean Lines
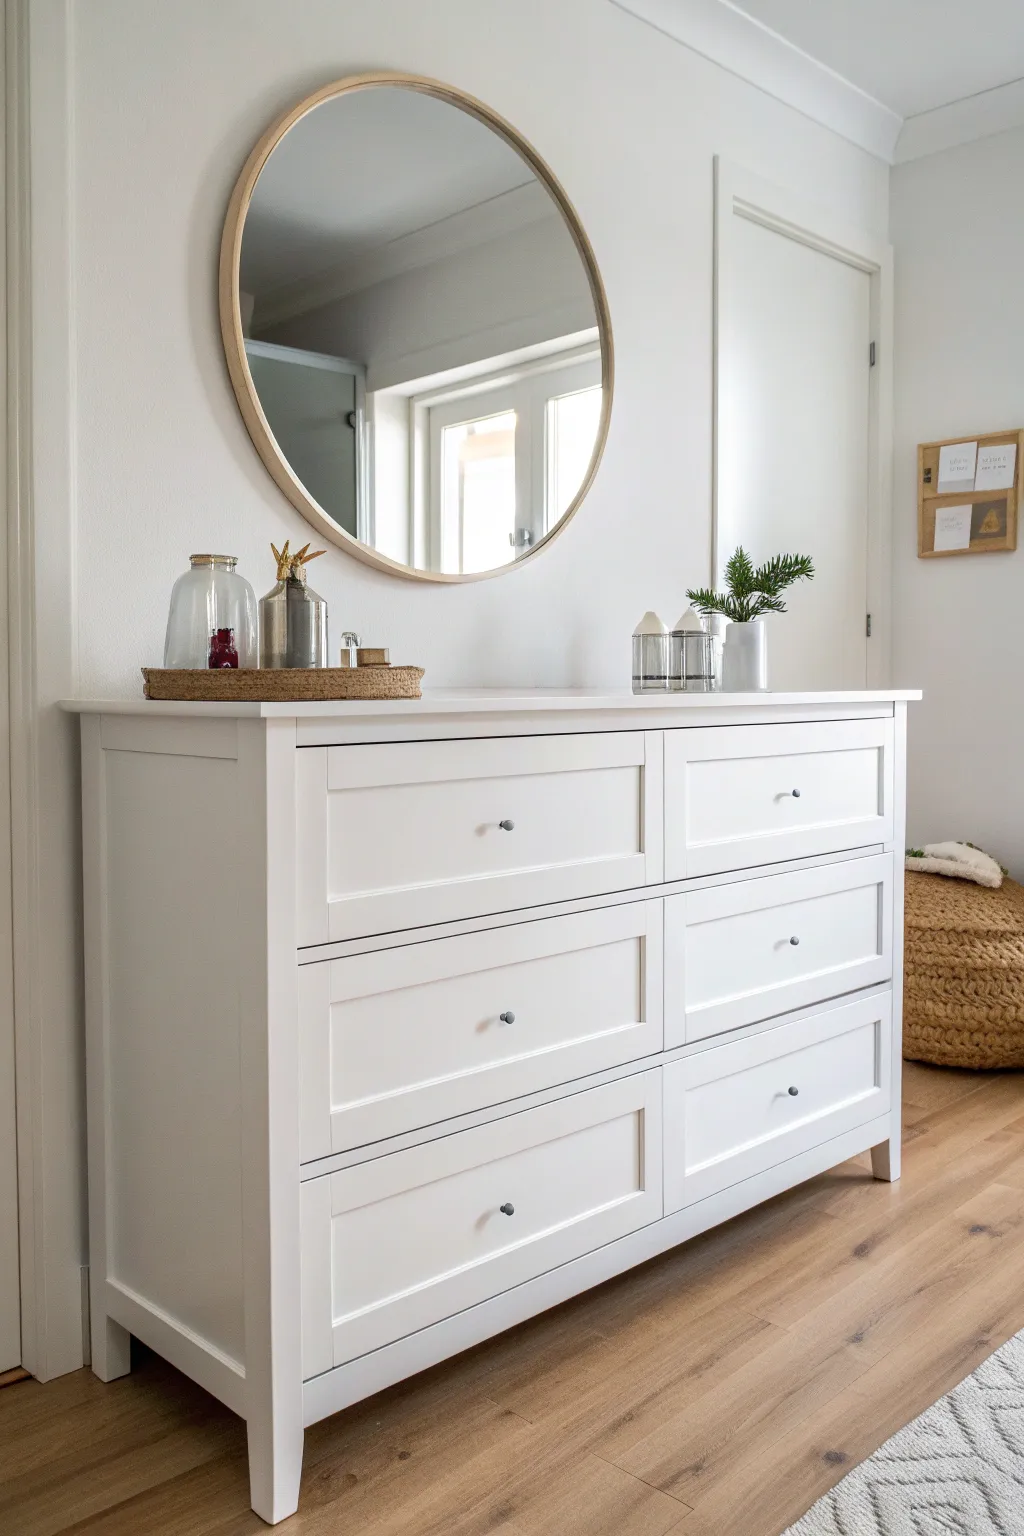
Transform a tired wooden dresser into a beacon of Scandinavian-inspired simplicity with this crisp white refurbishment. By focusing on smooth application and upgrading hardware, you’ll achieve a high-end look that brightens any hallway or bedroom.
Step-by-Step Guide
Materials
- Wooden dresser (flat-front or simple molding)
- Medium and fine-grit sandpaper (120 and 220 grit)
- Orbital sander (optional but recommended)
- Tack cloth
- High-quality bonding primer (oil-based or shellac-based)
- Bright white semi-gloss acrylic urethane paint
- High-density foam rollers
- Angled sash brush (2-inch)
- Wood filler
- Putty knife
- Small round metal knobs (brushed nickel or dark grey)
- Power drill
- Painter’s tape
- Drop cloth
Step 1: Preparation & Repairs
-
Disassemble the piece:
Begin by removing all drawers from the dresser shell. Unscrew and remove the old hardware. If the new knobs require different hole spacing, you will need to address this now. -
Fill hardware holes:
If you are changing the knob placement, fill the old holes with wood filler. Use a putty knife to press the filler firmly into the hole and leave it slightly mounded designated to be sanded flat later. -
Scuff sand the surface:
Using 120-grit sandpaper, thoroughly sand the entire dresser, including the drawer fronts. You don’t need to strip it to bare wood, but the glossy finish must be dulled to create a ‘tooth’ for the primer. -
Smooth the surfaces:
Once the initial sanding is done and wood filler is dry, switch to 220-grit sandpaper. Smooth out the filled holes and give the main flat surfaces a final pass for an ultra-smooth base. -
Clean thoroughly:
Vacuum up the bulk of the sawdust. Finish up by wiping everything down with a tack cloth to catch the remaining fine dust. Any debris left behind will ruin your smooth white finish.
Step 2: Priming for Durability
-
Apply the primer:
Roll on a coat of high-quality bonding primer using a foam roller or a short nap roller. Bonding primer is essential for preventing bleed-through, especially on older wood pieces. -
Detail the corners:
Use your angled sash brush to get primer into the recessed areas and corners where the roller can’t reach. Brush marks are less of a concern with primer, but try to keep it relatively smooth. -
Sand the primer:
Let the primer dry completely according to the manufacturer’s instructions. Once dry, lightly hand-sand with 220-grit paper to knock down any raised grain or texture. Wipe away dust with a tack cloth.
Sticky Drawers?
If drawers stick after painting, rub a plain candle or beeswax along the wooden runners and glides. This reduces friction and gets things moving smoothly again
Step 3: Painting & Finishing
-
First coat application:
Stir your white semi-gloss acrylic urethane paint gently. Pour it into a tray and load your high-density foam roller. Apply the first coat to the large flat surfaces using long, even strokes. -
Detail brushwork:
Immediately follow up with your brush to catch drips in corners or detailed molding. I like to keep a wet edge and work quickly to avoid visible brush strokes as the paint starts to set. -
Dry and light sand:
Allow the first coat to dry fully (usually 4-6 hours). Very lightly sand with fine 320-grit paper if there are any tiny bumps, then wipe clean. This creates that factory-finish smoothness. -
Second coat application:
Apply the second coat of paint just like the first. Ensure full coverage, especially on the drawer fronts which will be the focal point. Let this cure for at least 24-48 hours before handling. -
Mark new hardware spots:
If you filled the old holes, measure and mark the center point for your new single knobs. Use a template or measuring tape to ensure they are perfectly centered on the drawer panels. -
Drill pilot holes:
Using a drill bit slightly larger than your screw width, drill new holes for the hardware. Place a block of scrap wood inside the drawer while drilling to prevent the wood from splintering on the exit side. -
Install hardware:
Insert the screws from the inside of the drawer and twist on your new small, minimal knobs. Tighten them by hand with a screwdriver rather than a drill to avoid damaging the new paint. -
Reassemble:
Slide the drawers back into the dresser casing. Check that they glide smoothly; you may need to apply a little wax to the wooden runners if paint got into the tracks.
Level Up The Look
Line the interior drawers with a soft, patterned contact paper or fabric. A subtle grey geometric print adds a surprising pop of luxury every time you open a drawer
Step back and admire how a simple coat of white paint has completely reinvented your furniture into a piece of modern art


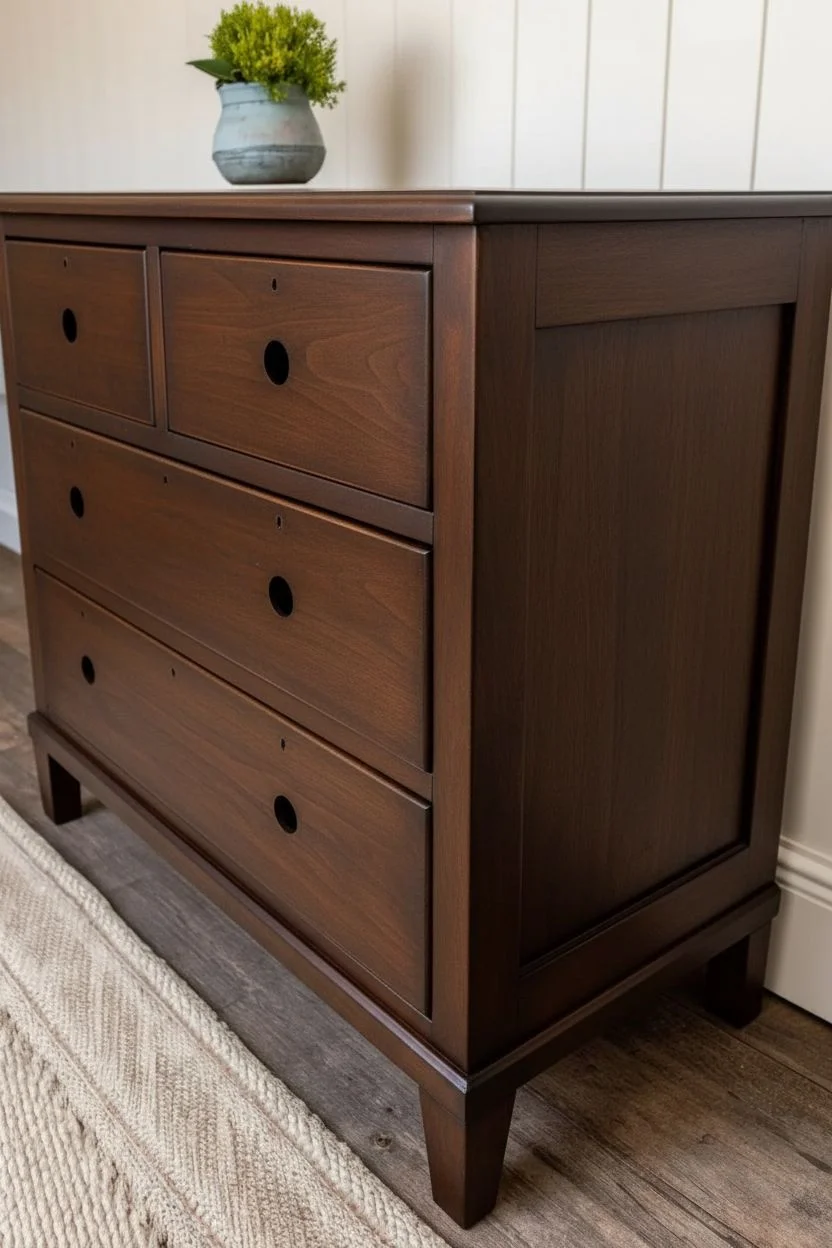
Moody Dark Dresser Paint
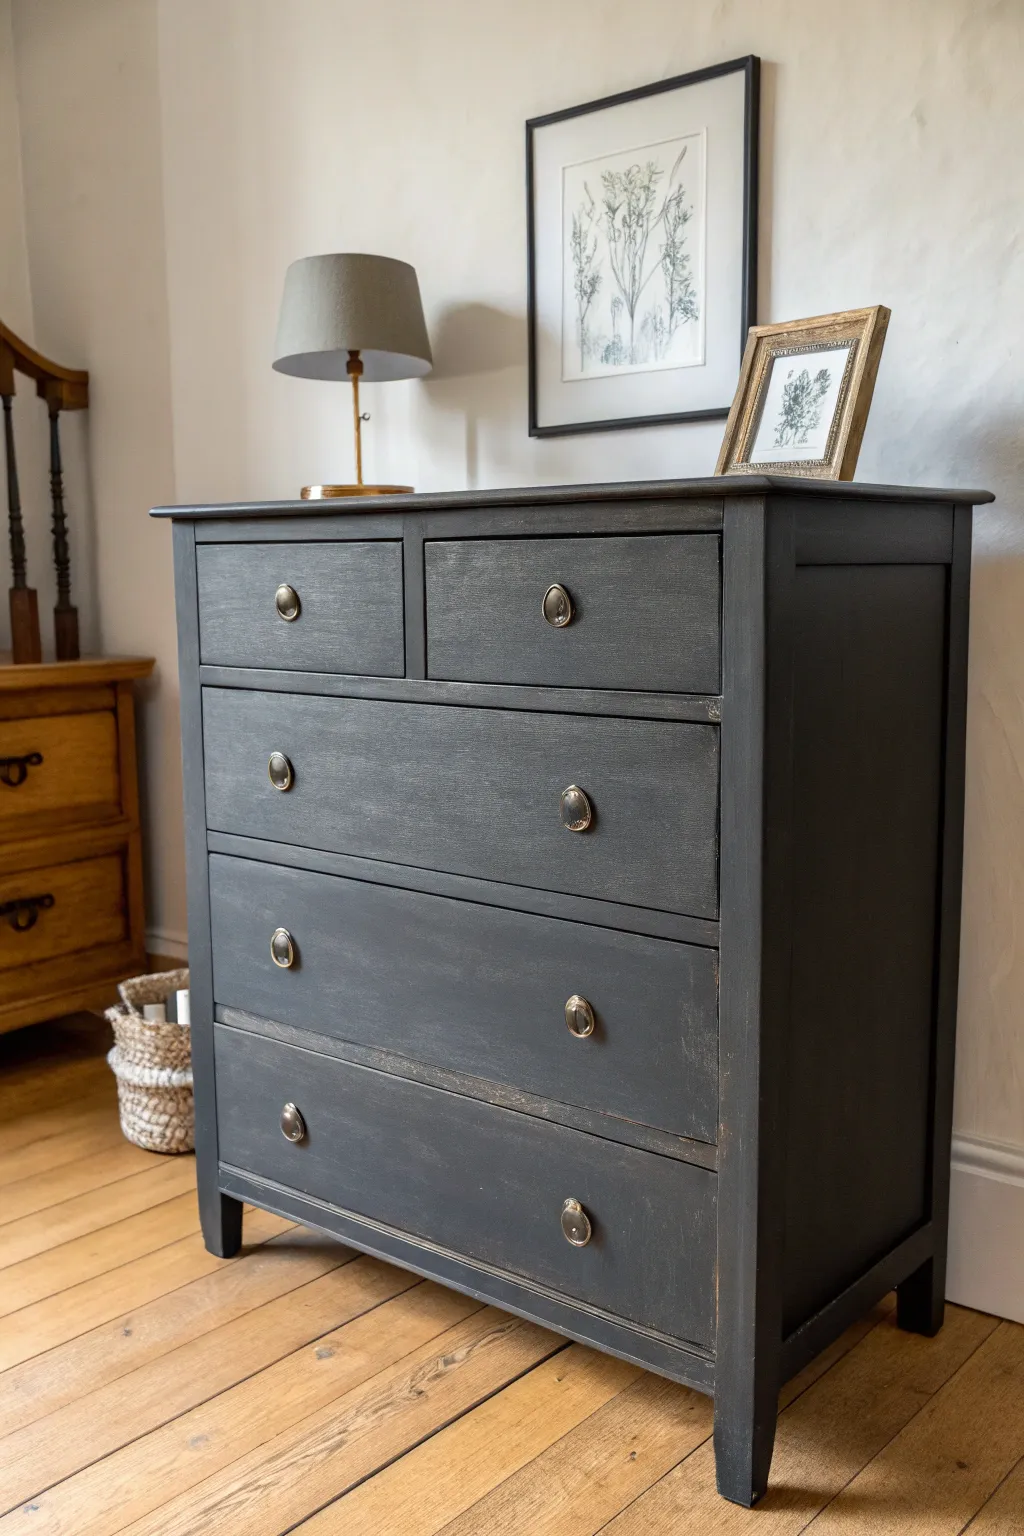
Transform a dated wooden chest into a moody masterpiece with this dark, textured finish that evokes the depth of charcoal sketches. This technique layers matte paint with subtle distressing to create a piece that feels both modern and timelessly grounded.
How-To Guide
Materials
- Used wooden dresser (clean and sturdy)
- Medium-grit sandpaper (120-grit)
- Fine-grit sandpaper (220-grit)
- Mineral spirits or TSP substitute
- Lint-free tack cloth
- Dark charcoal or soft black chalk-finish paint
- Clear furniture wax
- Dark antique wax (espresso or black)
- Paintbrush (oval or round bristle brush preferred)
- Wax brush or clean cotton rags
- Small artist brush for details
- Brass hardware (knobs/pulls)
Step 1: Preparation
-
Remove hardware:
Start by unscrewing all knobs, handles, and pulls. Store them in a marked bag so none of the screws get lost during the process. -
Clean thoroughly:
Scrub the entire dresser using mineral spirits or a TSP substitute to remove decades of furniture polish, oil, and grime. A clean surface is critical for adhesion. -
Remove drawers:
Pull out all the drawers and set them aside. It helps to number the backs with painter’s tape so you know exactly which slot they correspond to later. -
Scuff sand:
Lightly sand the entire exterior surface and the drawer fronts with 120-grit sandpaper. You aren’t trying to strip the wood bare, just roughing it up to give the paint something to grip. -
Dust off:
Wipe away all sanding dust meticulously with a tack cloth.
Wax On, Wax Off
Always apply clear wax BEFORE dark wax. The clear layer acts as an eraser, allowing you to wipe back the dark wax if you apply too much.
Step 2: Painting
-
First coat application:
Apply your first coat of dark charcoal chalk-finish paint. I prefer using a round bristle brush here to work the paint into any existing wood grain or small crevices. -
Wait for drying:
Let this base coat dry completely according to the manufacturer’s instructions, usually about 1-2 hours for chalk styles. -
Second coat:
Apply a second coat of paint for full opacity. Watch for drips along the edges of the drawer openings and smooth them out immediately. -
Check coverage:
Inspect the piece in good lighting. If the dark color looks patchy, a thin third coat might be necessary to get that deep, saturated look. -
Smooth the finish:
Once fully dry, run a piece of 220-grit sandpaper very lightly over the flat surfaces to knock down any brush strokes and create a buttery smooth feeling.
Luxe Liners
Line the drawer interiors with a vintage botanical print paper or a soft velvet fabric to add a hidden pop of luxury when opened.
Step 3: Distressing & Sealing
-
Edge distressing:
Using your fine-grit sandpaper, gently rub along the sharp edges of the top, the corners of the drawer fronts, and the legs. aim to reveal just a hint of the wood underneath for a naturally worn look. -
Clear wax layer:
Apply a coat of clear furniture wax over the entire piece using a wax brush or lint-free cloth. Work in small sections, massaging it into the porous paint. -
Wipe excess:
Wipe away excess clear wax immediately with a clean rag. The surface should feel smooth, not sticky. -
Dark wax accents:
To deepen the moodiness, dip your brush lightly into dark antique wax. Focused mostly on corners and recessed areas, brush it on sparingly. -
Blend the waxes:
Use a clean cloth to buff the dark wax, blending it into the clear wax layer so it creates shadows rather than dark splotches. -
Reinstall hardware:
Once the wax has cured (dried to the touch), reattach your brass hardware. The metallic contrast against the dark matte paint is the finishing touch.
Step back and admire how the dark finish instantly anchors your room with sophistication


Two-Tone Frame and Drawers
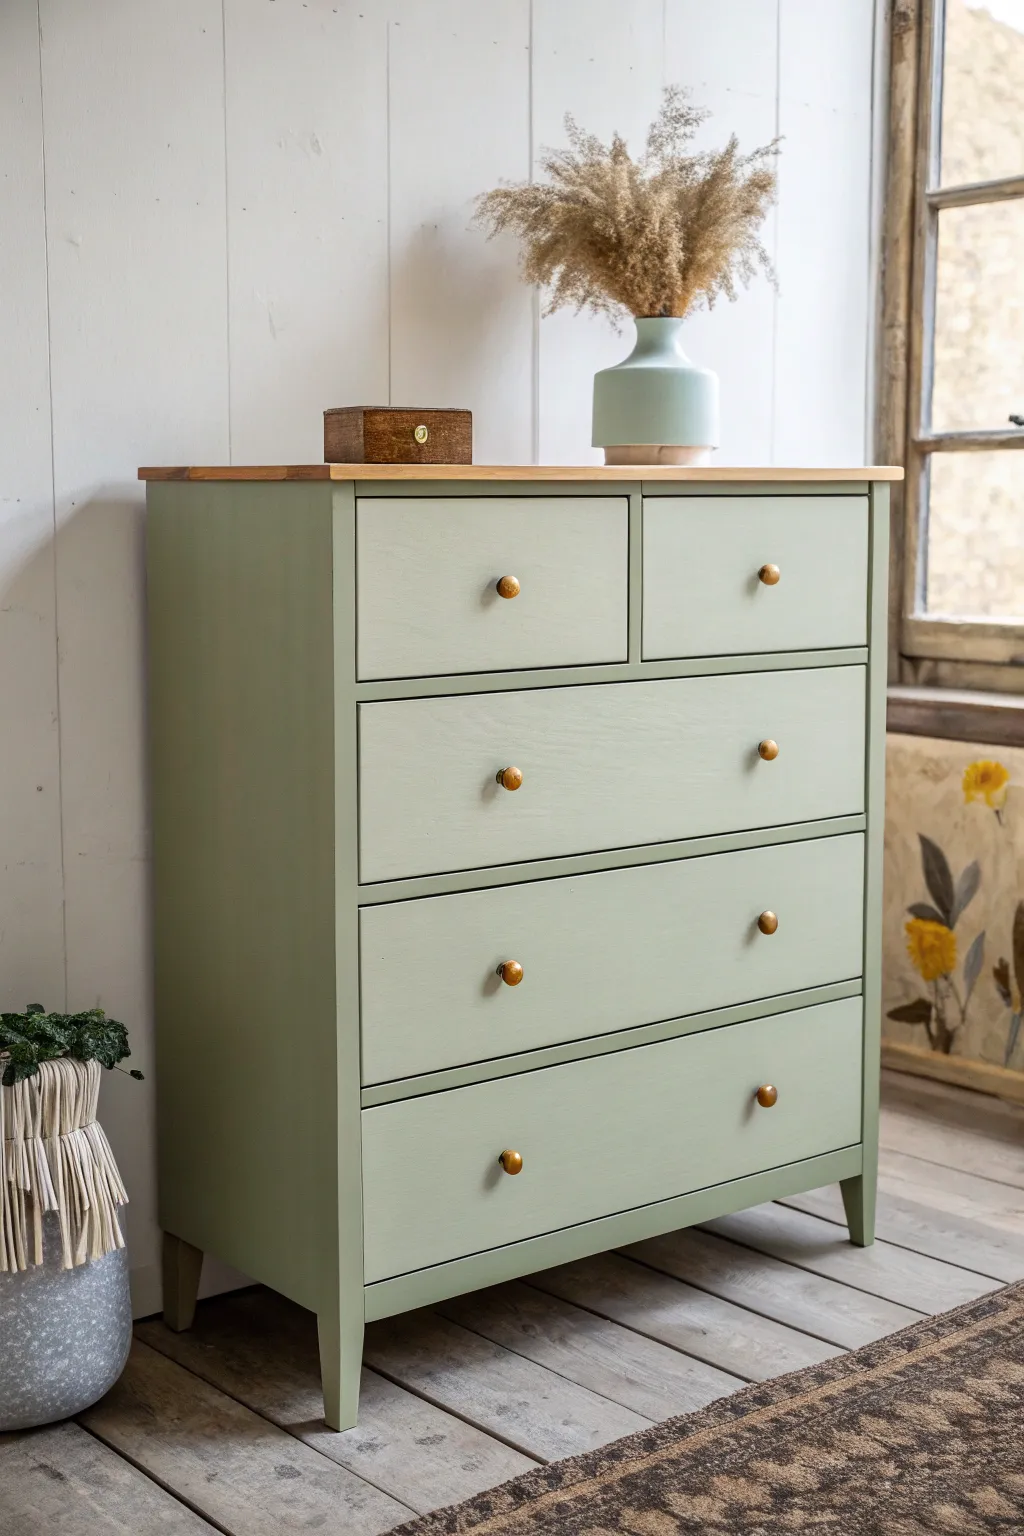
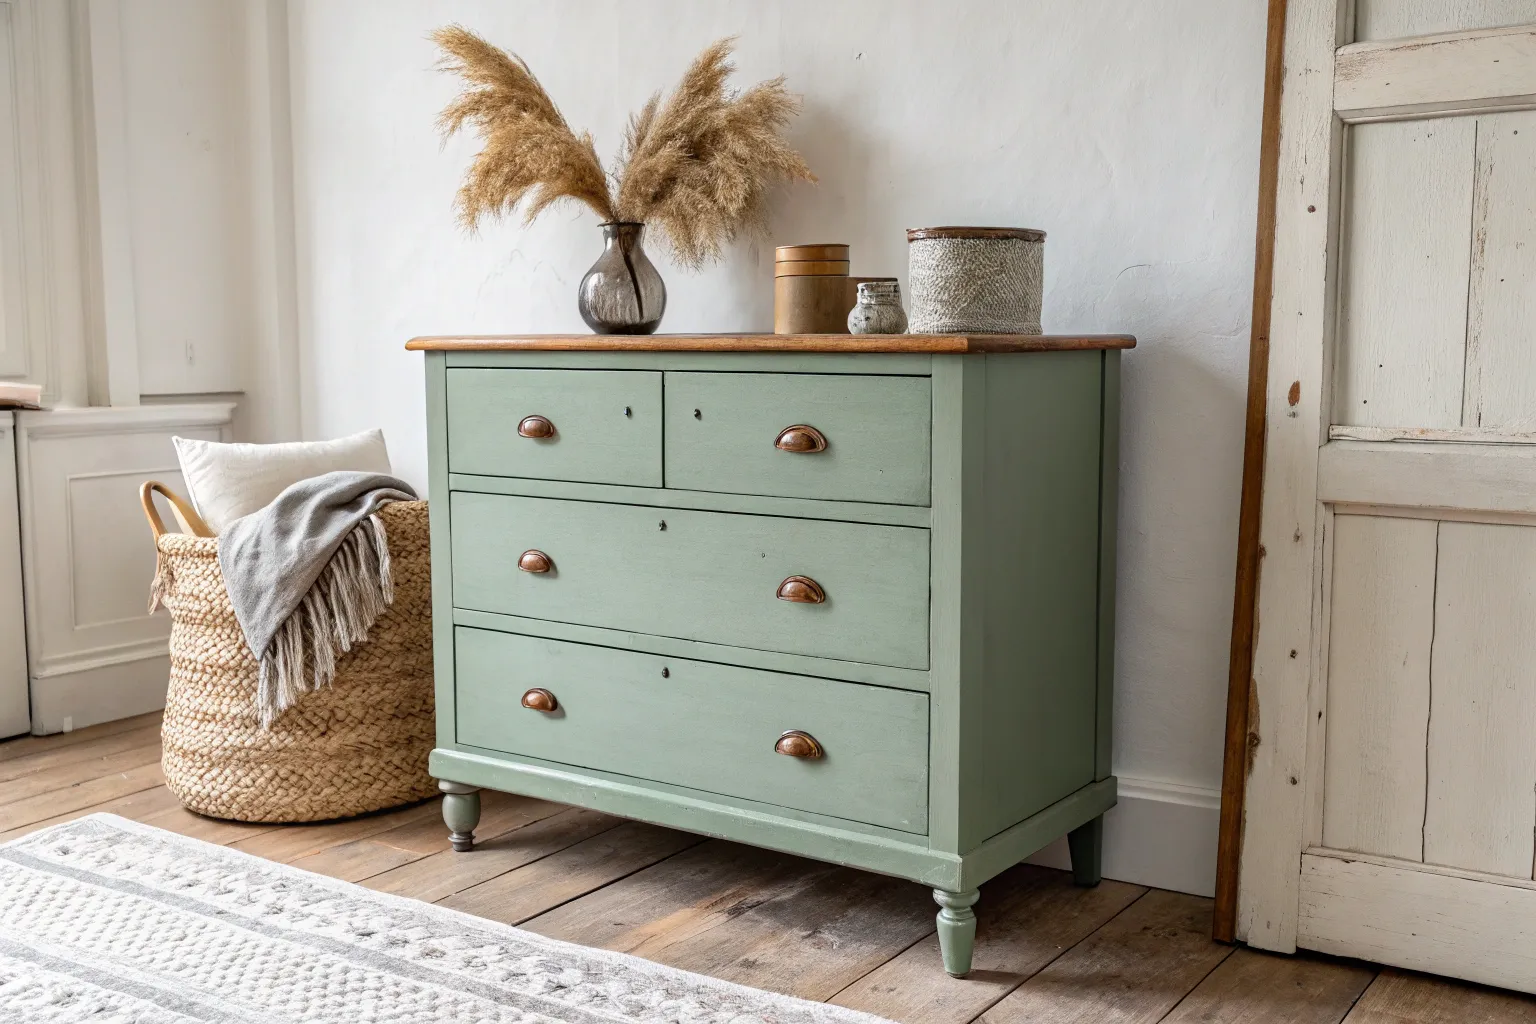
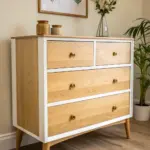
Transform a tired, standard chest of drawers into a serene focal point by pairing a muted sage green body with a warm, natural wood top. This two-tone approach balances modern color with rustic charm, while gold hardware adds just the right touch of elegance.
Detailed Instructions
Materials
- Wooden dresser (raw or to be refinished)
- Medium-grit sandpaper (120-150 grit)
- Fine-grit sandpaper (220 grit)
- Electric sander (optional but recommended)
- Sage green furniture paint (matte or satin finish)
- Stain-blocking primer
- Clear matte polyurethane or furniture wax
- Natural wood stain (like Golden Oak or clear oil)
- Round gold or brass knobs (8 total)
- High-quality synthetic angle sash brush
- Small foam roller and tray
- Painter’s tape
- Clean tack cloths
- Screwdriver
- Drop cloth
Step 1: Preparation & Sanding
-
Remove Hardware:
Begin by removing all drawers from the dresser frame. Unscrew the old knobs or handles and set them aside if you plan to reuse them, though for this look, we will be replacing them. -
Clean Surfaces:
Wipe down the entire piece with a degreaser or mild soap and water to remove oils and dust. Let it dry completely. -
Sand the Top:
Using your electric sander and medium-grit sandpaper, sand the top surface of the dresser down to the bare wood. You want to remove all previous varnish or paint to reveal the natural grain. -
Scuff Sand the Body:
For the sides, front frame, and drawer fronts, you don’t need to strip to bare wood. simply scuff sand these areas with medium-grit paper to create a tooth for the primer to adhere to. -
Dust Clean-up:
Vacuum up the sanding dust, then wipe every surface with a tack cloth to ensure absolutely no dust remains before painting.
Smooth Operator
To prevent drawers from sticking after painting, rub a little candle wax or beeswax along the wooden runners and the bottom edges of the drawers.
Step 2: Staining & Painting
-
Masking:
Apply painter’s tape carefully along the underside of the top edge where the wood meets the frame. This ensures your paint crisp lines and keeps the wood top pristine. -
Priming:
Apply a coat of stain-blocking primer to the body of the dresser and the drawer fronts. I like to use a roller for the flat areas and a brush for corners. -
Treating the Top:
While the primer dries on the body, apply your chosen wood stain or clear oil to the sanded top using a rag. Wipe with the grain and remove excess product after a few minutes. -
First Coat of Green:
Once the primer is cured, apply the first coat of sage green paint. Use the angle sash brush for the frame details and legs, and the foam roller for the drawer fronts to minimize brush strokes. -
Sand Between Coats:
After the first coat is fully dry, lightly hand-sand with 220-grit paper to smooth out any imperfections. Wipe away the dust. -
Second Coat:
Apply a second coat of sage green paint for full, opaque coverage. If the color is still slightly transparent, a third light coat may be necessary.
Drawer Surprise
Line the inside of the drawers with botanical or vintage patterned wallpaper to add a hidden pop of joy every time you open them.
Step 3: Finishing Touches
-
Seal the Top:
Protect your beautiful raw wood top by applying two to three thin coats of clear matte polyurethane. Lightly sand with fine-grit paper between these coats for a professional factory finish. -
Seal the Paint:
If your furniture paint isn’t self-sealing, apply a clear wax or matte topcoat over the green sections to protect against scuffs. -
Remove Tape:
Carefully peel away the painter’s tape. If the paint bridged the gap between the tape and wood, score the edge lightly with a craft knife before pulling to prevent peeling. -
Install Hardware:
Once everything is cured (give it at least 24 hours), attach the new round gold knobs to the drawer fronts. -
Reassembly:
Slide the drawers back into their tracks. Check that they slide smoothly; if paint dripped into the runners, sand it down now.
Step back and admire how this fresh blend of nature-inspired tones breathes new life into your room
BRUSH GUIDE
The Right Brush for Every Stroke
From clean lines to bold texture — master brush choice, stroke control, and essential techniques.
Explore the Full Guide
Natural Wood Top With Painted Base

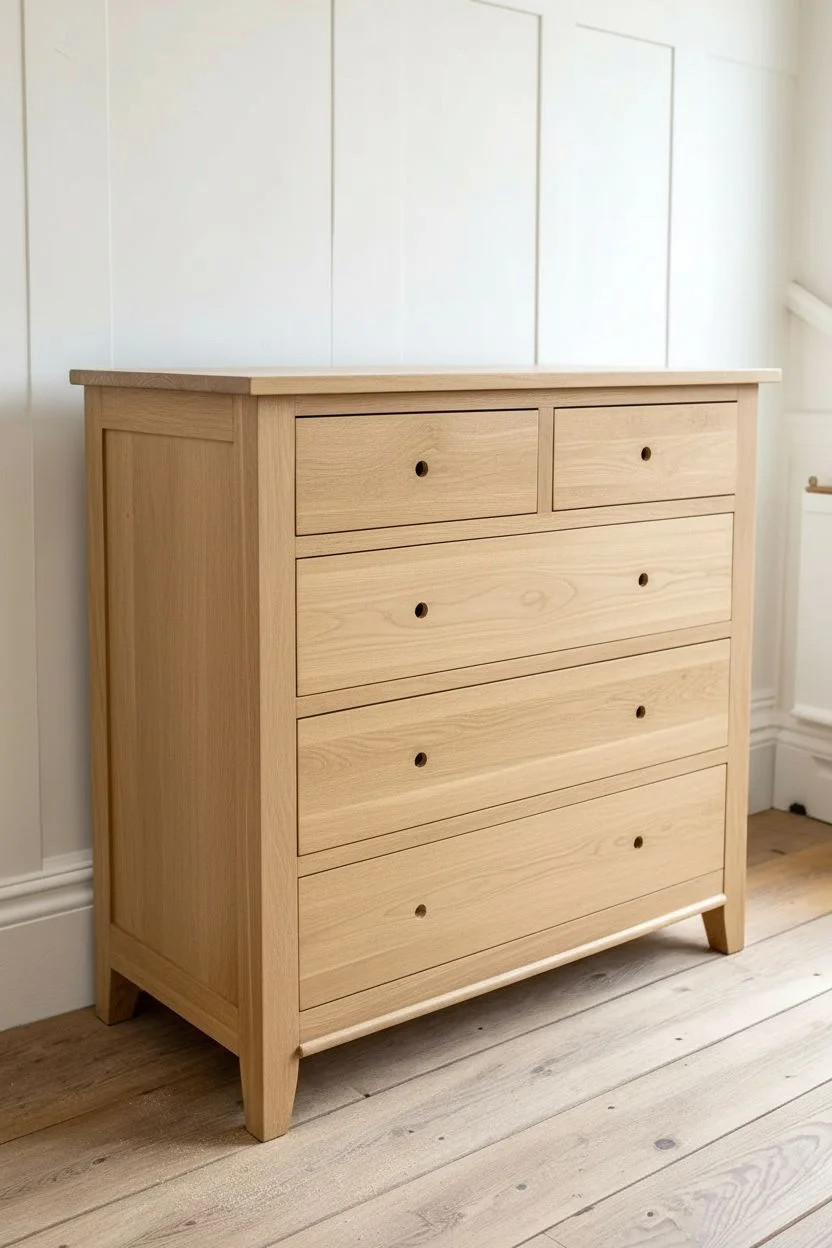
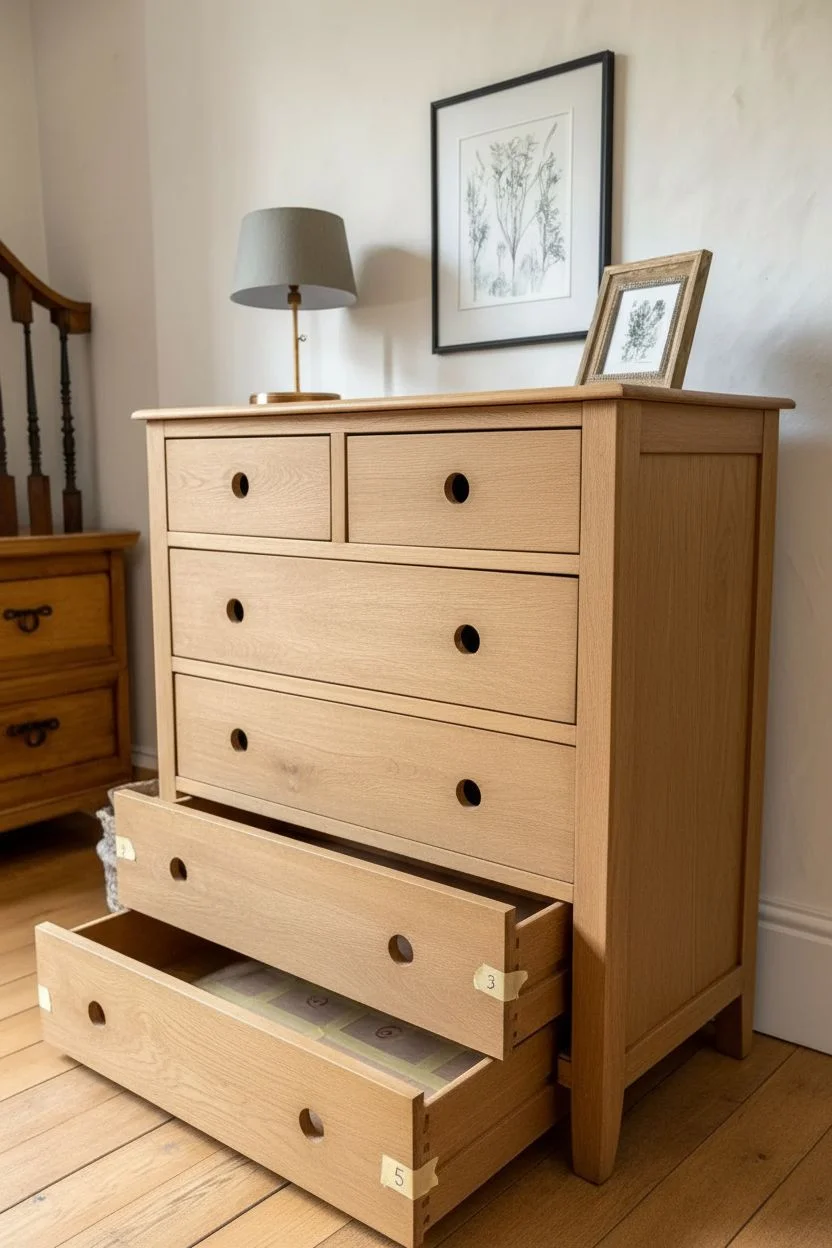
This project transforms a standard chest of drawers into a sophisticated piece by pairing a soft, calming sage green body with the warmth of exposed natural oak. By leaving the top and side panels unpainted, you create a beautiful textrual contrast that feels organic and modern.
Step-by-Step Tutorial
Materials
- Solid wood dresser (untreated or stripped)
- Medium-grit sandpaper (120-grit)
- Fine-grit sandpaper (220-grit)
- Tack cloths
- Painter’s tape (high quality, low-tack)
- Wood stain (natural oak or light walnut)
- Clear matte or satin polyurethane topcoat
- Self-priming furniture paint (Sage Green)
- Angled sash brush (2-inch)
- Small foam roller
- Antique brass cup handles and knobs
- Screwdriver
- Drop cloth
Step 1: Preparation and Sanding
-
Remove hardware:
Begin by removing all drawers from the dresser body. Unscrew and set aside the old handles or knobs. If you are reusing them, keep the screws taped to the hardware so they don’t get lost. -
Clean the surface:
Wipe down the entire piece with a degreasing cleaner or a simple mixture of warm water and mild dish soap to remove years of dust, oils, and furniture polish. Allow it to dry completely. -
Sand the body:
Using 120-grit sandpaper, sand the areas you intend to paint—specifically the drawer fronts and the frame of the dresser. You don’t need to strip it to bare wood, just scuff the surface enough to give the paint ‘teeth’ for adhesion. -
Sand the wood accents:
For the top surface and the side panels that will remain unpainted, sand more thoroughly. Start with 120-grit to remove old finishes, then move to 220-grit for a buttery smooth finish. Remove all dust with a tack cloth.
Step 2: Staining and Sealing the Wood
-
Tape off boundaries:
Apply painter’s tape carefully around the edges of the top and the recessed side panels where the wood meets the areas destined for paint. Press the tape edges down firmly to prevent bleed-through. -
Apply stain:
Using a clean rag or staining sponge, apply your chose wood stain to the top and side panels. Work with the grain, wiping away excess stain after a few minutes to ensure an even, non-blotchy tone. -
Seal the wood:
Once the stain is fully dry, apply a thin coat of clear polyurethane to these natural areas. I find a foam brush works best here to avoid brush strokes. Let it dry, lightly sand with 220-grit paper, and apply a second coat for durability.
Don’t Rush the Cure
Even if paint feels dry to the touch in an hour, it takes weeks to fully cure. Treat the surface gently for the first 21 days to avoid chips or dents.
Step 3: Painting the Body
-
Protect the finished wood:
Wait 24 hours for the topcoat to cure properly. Then, reverse your taping process: cover the edges of your newly stained wood to protect it from stray paint strokes. -
Paint the frame:
Dip your angled sash brush into the sage green paint. Carefully cut in along the corners and edges of the dresser frame. Use long, smooth strokes to minimize texture. -
Roll the larger areas:
For the flat sides of the frame (outside the wood accent panels), use a small foam roller to apply the paint. This ensures a consistent, factory-like finish without bristle marks. -
Paint the drawer fronts:
Painting the drawers separately ensures you don’t paint them shut. Use the roller for the flat surfaces and the brush for any detailed bevels. Apply a thin first coat and let it dry according to the can’s instructions. -
Apply second coat:
Once dry, lightly sand the painted surfaces with fine sandpaper to knock down any bumps. Wipe away dust, then apply a second coat of sage green for full opacity and depth.
Bleeding Lines?
If paint bleeds under the tape onto your wood, don’t panic. Wrap a detail sanding tool or a small block with fine sandpaper and gently sand away the stray paint.
Step 4: Assembly
-
Remove tape:
Ideally, peel off the painter’s tape while the final coat of paint is still slightly tacky. Pull the tape away from the wet edge at a 45-degree angle to get a crisp, clean line. -
Install hardware:
Once the paint has cured for at least 24 hours, attach your new hardware. For this look, use brass cup pulls for the larger drawers and matching knobs for the smaller top drawers. -
Reinsert drawers:
Slide the drawers back into their tracks. If the paint added thickness that makes them stick, rub a little candle wax or bar soap on the runners to help them glide smoothly.
Step back and enjoy the fresh, organic feel this updated furniture piece brings to your room
Soft Pastel Cottage Palette
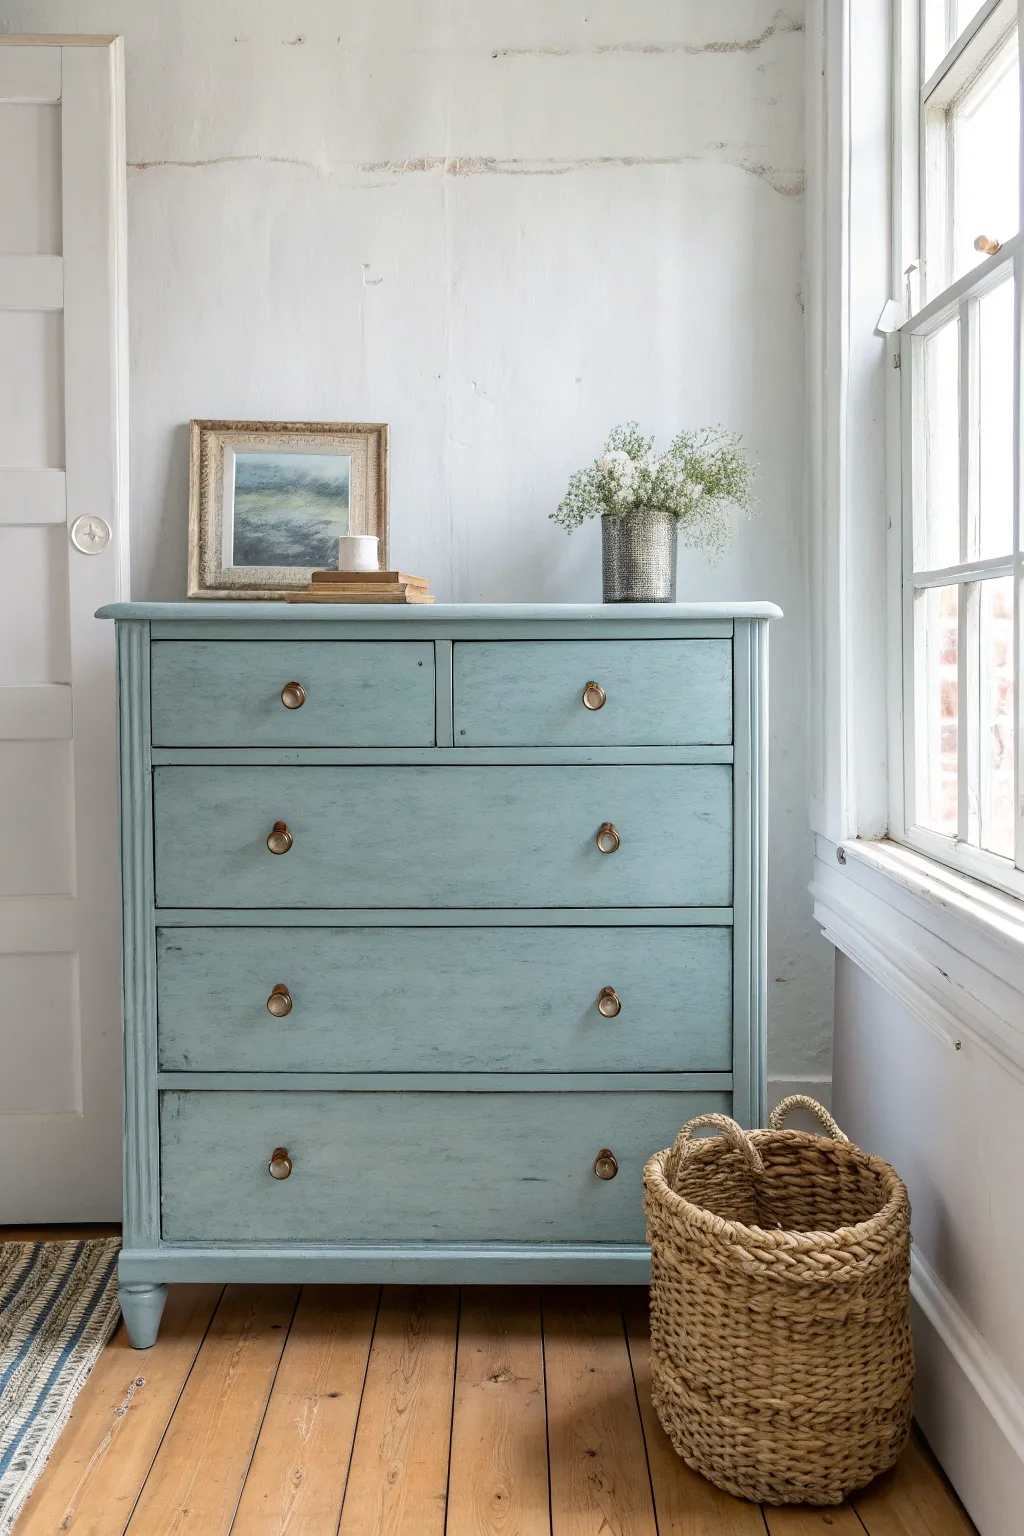
Transform a tired wooden dresser into a charming cottage centerpiece with this soft pastel finish that evokes the airy feel of a seaside retreat. The subtle distressing and matte texture give the piece a sense of history while brightening up any corner of the room.
How-To Guide
Materials
- Vintage wooden dresser
- Sanding block (medium and fine grit)
- Clean lint-free cloths
- Painter’s tape
- Chalk-style paint (Robin’s Egg Blue or Duck Egg Blue)
- High-quality synthetic oval paintbrush
- Clear furniture wax
- Wax brush or soft rag
- Screwdriver
- Wood filler (optional)
- Mild degreasing cleaner
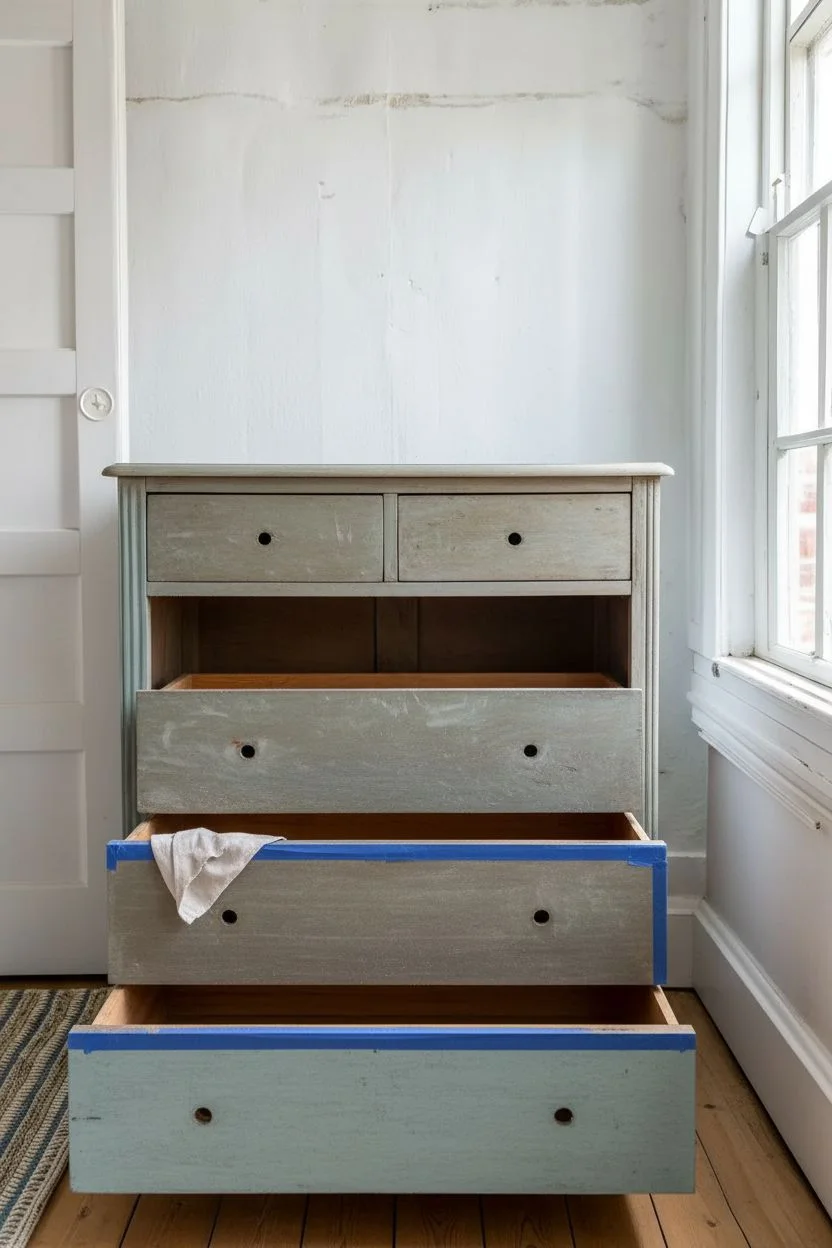
Step 1: Preparation
-
Remove Hardware:
Begin by removing all drawers from the dresser casing. Using a screwdriver, carefully detach all knobs, handles, and any other metal hardware. Store these in a zip-lock bag so nothing gets lost. -
clean surfaces:
Thoroughly wipe down the entire piece, including the drawer fronts, with a mild degreasing cleaner. This removes years of furniture polish, oil, and dust that can repel paint. -
Scuff Sanding:
To help the paint adhere, lightly sand all surfaces you intend to paint with a medium-grit sanding block. You aren’t trying to strip the wood bare, just roughing up the existing shiny finish. -
Dust Removal:
Vacuum up the sanding dust and follow up with a damp, lint-free cloth to ensure the surface is perfectly clean. Let the wood dry completely before moving to the next step. -
Protect Edges:
If you are painting the drawer sides or want to protect the interior tracks, apply painter’s tape to any areas you want to keep raw wood.
Bleed-Through Blues?
If stains or reddish wood tones seep through your wet paint, stop. Apply a coat of clear shellac or stain-blocking primer to seal the wood, let dry, then repaint.
Step 2: Painting
-
First Coat Application:
Stir your chalk-style paint thoroughly. Dip your synthetic oval brush into the paint and apply a thin, even coat to the dresser frame. Work with the grain of the wood for the smoothest finish. -
Painting Drawers:
Move on to the drawer fronts. Paint the edges first, then fill in the centers. Don’t worry if the coverage looks streaky on this first pass; chalk paint is designed to be layered. -
Drying Time:
Allow the first coat to dry according to the manufacturer’s instructions, usually about 1-2 hours depending on humidity. -
Second Coat:
Apply a second coat of paint. I prefer to use slightly less pressure on the brush here to avoid dragging the first layer. This coat should provide full, opaque coverage. -
Check for Drips:
While the paint is still wet, inspect the corners and edges for any drips or pooling paint and smooth them out immediately. -
Final Dry:
Let the piece dry overnight or for at least 4-6 hours to ensure the paint has hardened sufficiently before distressing.
Pro Smooth Finish
Between paint coats, lightly sand the surface with a fine-grit sanding sponge. This knocks down brush ridges and results in a factory-smooth professional finish.
Step 3: Finishing Touches
-
Distressing:
Using a fine-grit sanding block, gently sand the raised edges, corners, and areas where natural wear would occur (like around the knobs). This reveals the wood underneath for that vintage cottage look. -
Smoothing:
Run a very fine sanding sponge lightly over all flat surfaces to knock down any brush strokes and create a buttery smooth texture. -
Wiping Down:
Use a tack cloth or a clean, dry rag to remove all the fine dust created by the distressing process. This step is crucial for a clean wax application. -
Wax Application:
Dip your wax brush into the clear furniture wax. Apply it in small sections using a circular motion, pushing the wax into the porous chalk paint. -
Removing Excess Wax:
Immediately after applying wax to a section, use a clean lint-free cloth to wipe away the excess. Wipe in the direction of the wood grain until the surface no longer feels tacky. -
Buffing:
Allow the wax to cure for about 24 hours, then buff the surface vigorously with a soft clean cloth to achieve a subtle satin sheen. -
Reassembly:
Reattach your hardware. If desired, you can polish the original brass knobs or replace them with new ones to complement the fresh blue paint. -
Install drawers:
Slide the drawers back into their tracks to complete your project.
Enjoy the serene and welcoming atmosphere your newly refreshed dresser brings to your room

PENCIL GUIDE
Understanding Pencil Grades from H to B
From first sketch to finished drawing — learn pencil grades, line control, and shading techniques.
Explore the Full Guide
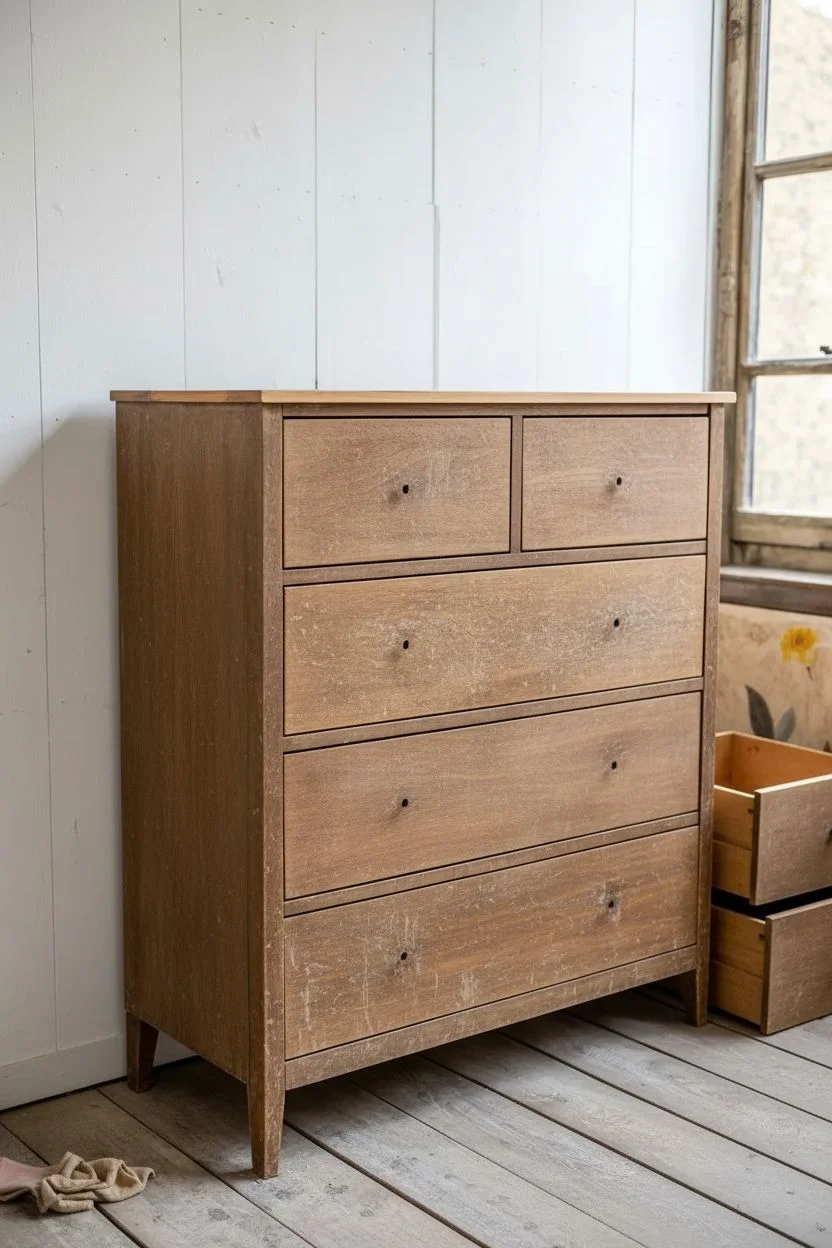
Distressed Chippy Finish Charm
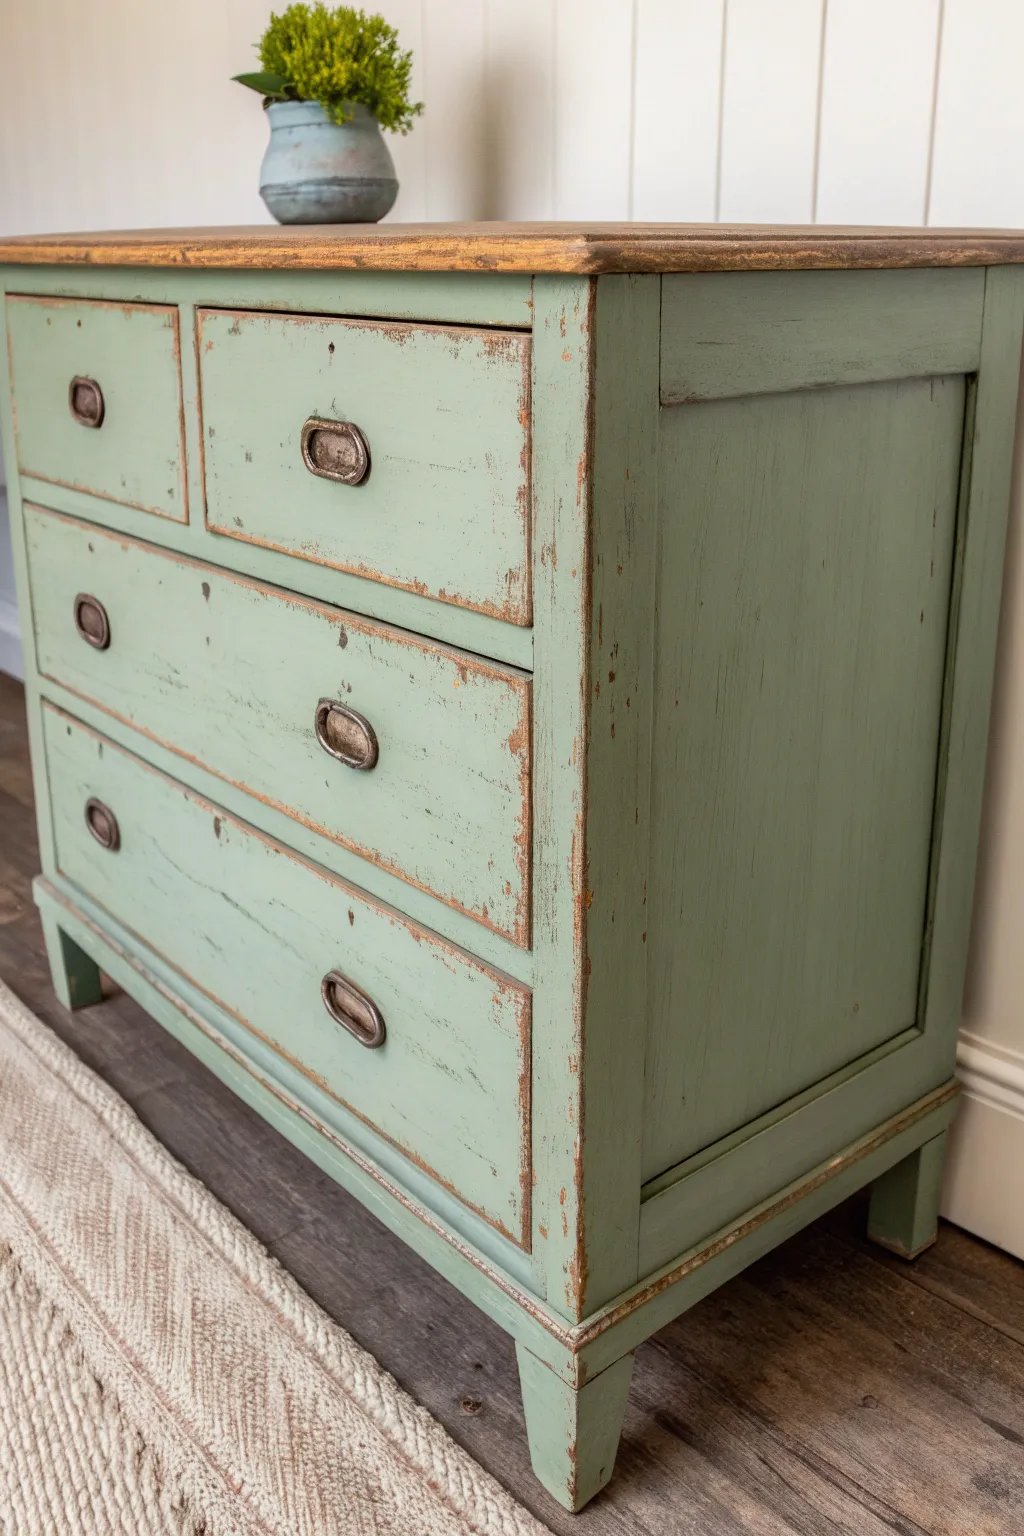
Transform an ordinary wooden dresser into a vintage-style masterpiece with this textured, time-worn finish. By layering milk paint over wax resists, you will achieve an authentic chippy look that reveals warm wood tones beneath a soothing sage green hue.
Step-by-Step Tutorial
Materials
- Wooden dresser (pre-sanded)
- Sage or seafoam green milk paint (powdered)
- Dark walnut wood stain
- Clear furniture wax
- Beeswax puck or candle wax (for resist)
- Medium-grit sandpaper (120-150 grit)
- Fine-grit sandpaper (220 grit)
- Natural bristle paint brush
- Lint-free rags
- Putty knife or paint scraper
- Drawer hardware (antique brass pulls)
Step 1: Preparation and Staining
-
Clean and prep:
Begin by removing all existing hardware from the drawers. Wipe down the entire dresser with a damp cloth to remove dust and grime, ensuring a clean surface for the stain to penetrate. -
Sand the surface:
If the dresser has a previous glossy finish, lightly scuff sand the entire piece with 120-grit sandpaper. You want to open up the wood grain so it accepts the stain evenly. -
Apply the base stain:
Using a lint-free rag, apply a dark walnut stain to the entire dresser. Focus on the edges and corners where distress marks will later reveal this dark underlayer. I find working in circular motions helps work the stain deep into the grain. -
Wipe away excess:
After letting the stain sit for about 5-10 minutes, wipe away any excess liquid with a clean rag. Allow the stain to dry completely according to the manufacturer’s instructions, usually overnight.
Paint won’t chip?
If your paint adheres too well, you likely didn’t use enough wax resist. Create manual distress marks using heavier 80-grit sandpaper on edges.
Step 2: Creating the Chippy Finish
-
Apply the wax resist:
Take your beeswax puck or a simple candle and rub it vigorously along the edges of the drawers, corners of the frame, and random spots on the flat surfaces. These waxed areas will prevent the paint from sticking, creating natural chips later. -
Mix the milk paint:
Mix your powdered sage green milk paint with warm water in a 1:1 ratio. Stir thoroughly until the lumps dissolve, then let it sit for 10-15 minutes to thicken slightly. -
Paint the first coat:
Apply the first coat of milk paint over the entire body of the dresser, painting right over the waxed areas. Don’t worry about perfect coverage; a little transparency adds to the aged effect. -
Dry and repeat:
Let the first coat dry for about an hour. If you want a more opaque color, apply a second coat of paint. The paint may already start cracking or flaking over the wax resist, which is exactly what you want. -
Distress with a scraper:
Once the paint is fully dry, take a putty knife or paint scraper and gently scrape along the edges and flat surfaces where you applied the wax. The paint should flake off in chips, revealing the dark stained wood underneath. -
Sand for texture:
Use 220-grit sandpaper to smooth out the rest of the painted surface. Sand gently over the transition areas between paint and raw wood to soften the jagged edges of the chips.
Add Antique Age
Mix a small amount of dark antiquing wax into your clear wax for the corners and crevices to simulate years of accumulated grime and shadow.
Step 3: Finishing Touches
-
Seal the top:
The top of the dresser in the example is left natural wood. Sand the top surface back down to the stained wood if any paint got on it, or leave it painted if you prefer. Ideally, seal the wood top with a clear matte polyurethane or wax for durability. -
Apply clear wax:
Brush a coat of clear furniture wax over the entire painted body of the dresser. This seals the milk paint, deepens the color, and protects the chippy finish from flaking further than intended. -
Buff to a sheen:
Wait about 15-20 minutes for the wax to haze over, then buff the surface vigorously with a clean, soft cloth. This will create a subtle, satin sheen reminiscent of antique furniture. -
Reattach hardware:
Clean your antique brass pulls or source new vintage-style hardware. Reattach them to the drawer fronts to complete the look.
Step back and enjoy the character of your newly aged piece, which now carries the soulful look of a farmhouse antique
Modern Color-Block Drawer Fronts
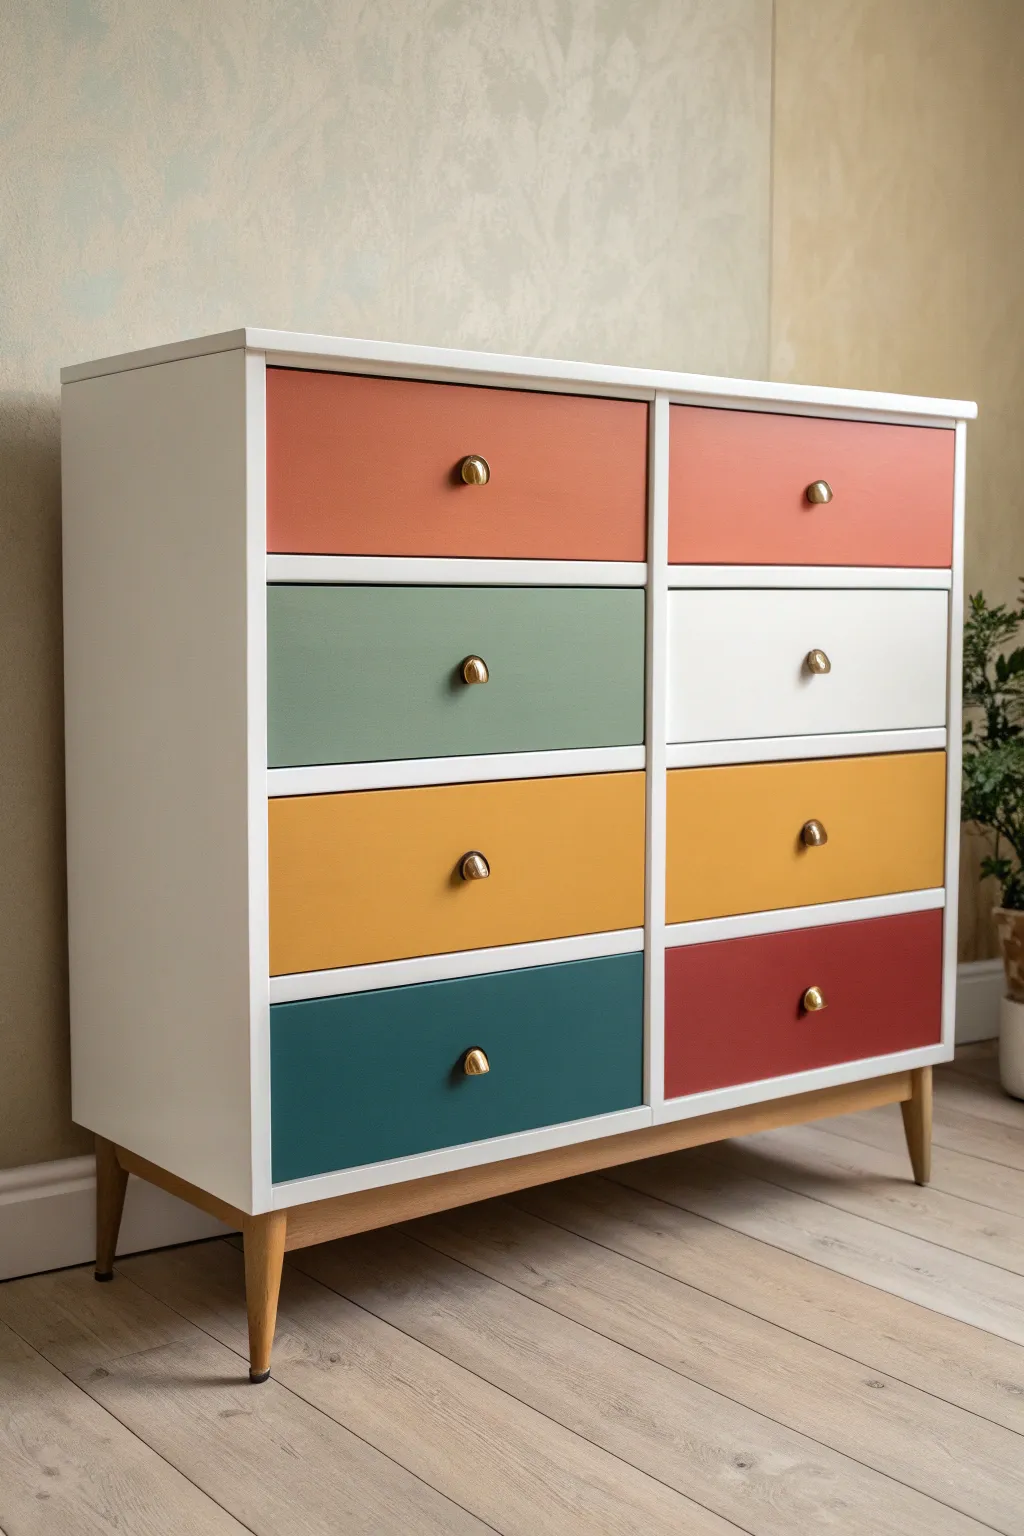
Transform a plain chest of drawers into a vibrant statement piece with this modern color-blocking technique. The crisp white frame makes the warm, earthy tones of terra cotta, sage, mustard, and teal pop, giving the furniture a fresh, custom look.
How-To Guide
Materials
- Wooden dresser (preferably with clean lines)
- Sander or sandpaper (120 and 220 grit)
- Primer suitable for wood/laminate
- Satin finish furniture paint (White)
- Sample pots of latex or chalk paint: Terra Cotta, Sage Green, Mustard Yellow, Teal, Deep Red
- Small foam rollers
- Angled paint brushes (1.5 inch and 2 inch)
- Painter’s tape
- Gold or brass drawer knobs (half-moon shape)
- Drill and drill bits
- Clear matte or satin polycrylic sealer
- Drop cloth
- Tack cloth or lint-free rags
- Screwdriver
Step 1: Preparation & Disassembly
-
Remove hardware:
Begin by removing all the drawers from the dresser frame. Unscrew the existing knobs or handles and set them aside if you plan to reuse the screws, though we will be replacing the knobs. -
Clean surfaces:
Wipe down the entire dresser—frame and drawer fronts—with a degreasing cleaner or a mixture of warm water and mild dish soap to remove oils and dirt. -
Fill holes:
If your new hardware requires single holes but your old handles had two, use wood filler to patch the unwanted holes. Let it dry completely before proceeding. -
Sand the finish:
Lightly sand all surfaces using 120-grit sandpaper. You don’t need to strip it to bare wood, just scuff up the shiny finish to help the primer adhere. -
Smooth and wipe:
Follow up with a quick pass of 220-grit sandpaper for smoothness, then thoroughly remove all dust using a tack cloth. Any leftover dust will ruin your paint finish.
Smooth Operator
Between paint coats, lightly sand surfaces with a crumpled brown paper bag. It smooths nibs without removing paint like sandpaper would.
Step 2: Painting the Frame
-
Tape off legs:
If your dresser has wooden legs you want to keep natural, wrap them carefully in painter’s tape right up to the base of the frame. -
Apply primer:
Roll a coat of high-quality primer onto the main frame and the edges of the drawer fronts. Let this dry according to the manufacturer’s instructions. -
Paint the frame white:
Using a small foam roller, apply your white satin furniture paint to the outer casing and the dividers between the drawers. Long, smooth strokes work best here. -
Second coat:
Allow the first coat to dry fully, then lightly sand with fine grit paper if needed. Apply a second coat of white for solid, opaque coverage.
Sticky Drawers?
If painted drawers stick, rub a plain candle or beeswax along the wooden runners and the sides of the drawer box for effortless gliding.
Step 3: Creating the Color Blocks
-
Map your colors:
Lay your drawer fronts on a flat surface in the correct order. Plan your color layout; I like to balance warm and cool tones, placing the heaviest colors (like deep red or teal) at the bottom. -
Paint the top row:
Start with the top two drawers. Paint one terra cotta and the other a matching or slightly deeper terra cotta shade (or keep them identical for symmetry). Use a dedicated brush or foam brush for each color. -
Paint the middle rows:
Move to the second row with your sage green and white (or cream). For the third row, apply the mustard yellow. Apply thin, even layers to avoid drips. -
Paint the bottom row:
Finish with the darkest colors on the bottom drawer fronts—the deep teal and the rich red. This grounds the piece visually. -
Apply second coats:
Once the first layer is dry to the touch, apply a second coat to all colored drawers to ensure rich, vibrant saturation without streaks. -
Seal the surfaces:
After curing for at least 24 hours, apply a clear polycrylic topcoat to both the white frame and the colored drawer fronts. This protects against scratches and chipping.
Step 4: Reassembly
-
Drill for new hardware:
If you filled old holes, measure and mark the exact center of each drawer front. Drill fresh holes sized appropriately for your new gold knob screws. -
Attach knobs:
Screw in the gold half-moon knobs. Tighten them by hand to avoid stripping the threads or cracking the paint finish. -
Peel tape:
Carefully remove the painter’s tape from the wooden legs. -
Condition legs:
If the legs look dry, rub a small amount of wood wax or hemp oil onto them to revive the natural wood grain and contrast beautifully with the painted body. -
Final install:
Slide the drawers back into their tracks, ensuring the colors are arranged according to your original plan.
Step back and admire how a simple coat of paint has turned a functional item into a stunning focal point


Hand-Painted Florals on Drawers
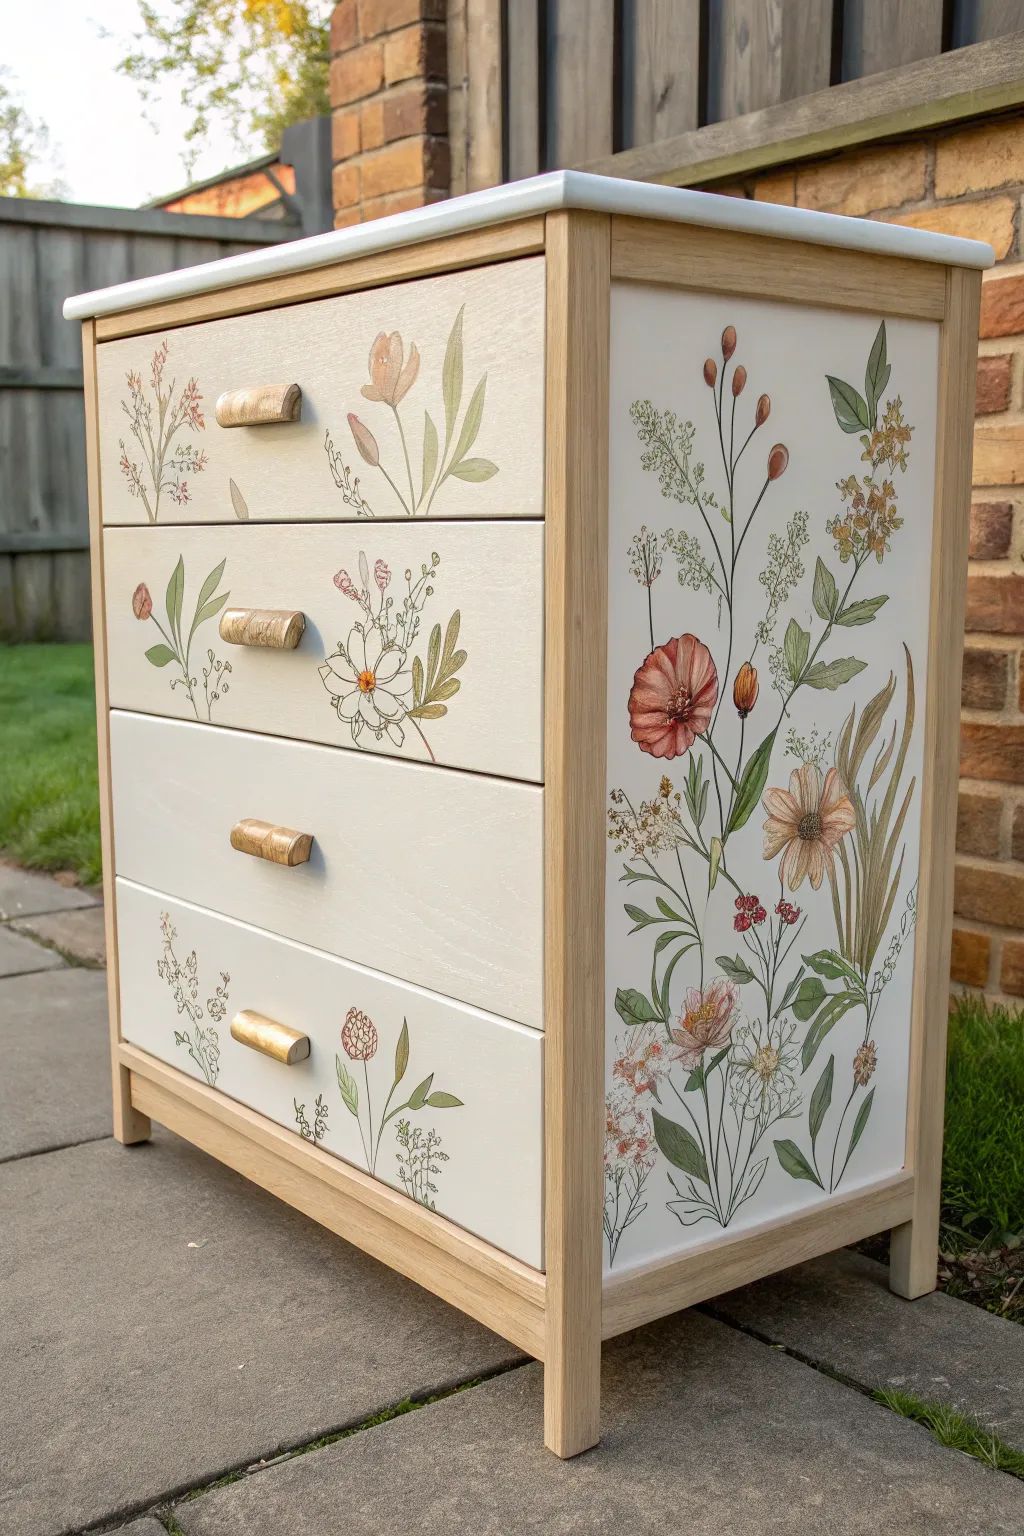
Transform a plain pine dresser into a charming botanical statement piece with this hand-painted floral project. By combining the natural warmth of exposed wood framing with creamy painted panels and delicate wildflower illustrations, you’ll create a furniture piece that feels both rustic and refined.
Step-by-Step Guide
Materials
- Unfinished pine dresser (IKEA Tarva or similar)
- Sandpaper (120 and 220 grit)
- Painter’s tape (high quality)
- Creamy off-white chalk or mineral paint
- Clear matte varnish or polycrylic sealer
- Small round paintbrushes (sizes 0, 2, and 4)
- Acrylic artist paints (forest green, olive green, burnt sienna, yellow ochre, terracotta)
- Pencil
- Gold spray paint or gold wax (for hardware)
- Clean lint-free rags
Step 1: Preparation & Base Painting
-
Disassemble the Furniture:
Begin by removing all drawers from the main frame. Unscrew the existing wooden handles and set them aside for later painting. If the dresser is already assembled, ensure it is clean and dust-free. -
Sand the Surfaces:
Lightly sand the entire piece with 120-grit sandpaper to open up the wood grain, followed by 220-grit for a smooth finish. Wipe away all dust with a tack cloth or damp rag. -
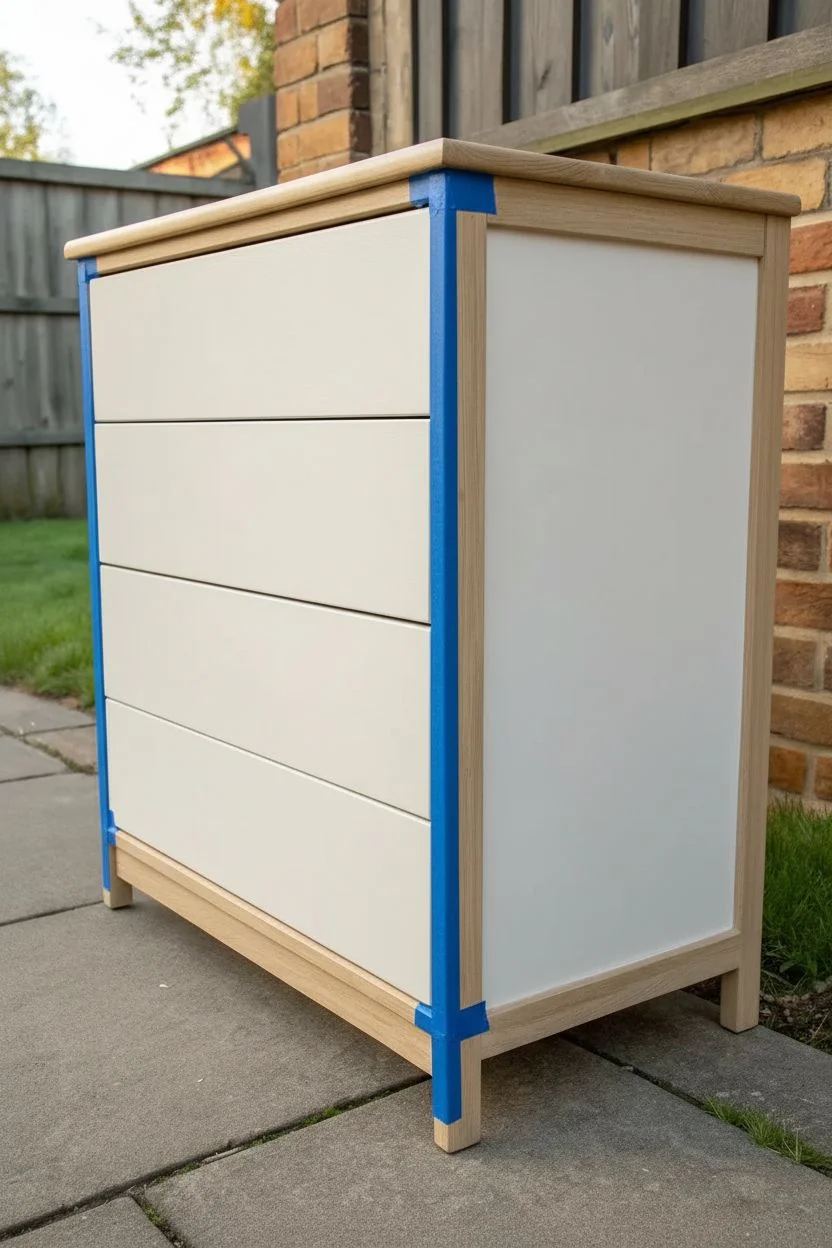
Tape the Frame:
Since we want to keep the frame natural, carefully apply painter’s tape to the wooden edges surrounding the side panels. On the drawers, tape off the top and side edges so only the front face will be painted. -
Apply the Base Coat:
Using a flat brush or roller, paint the drawer fronts and the side panels with your creamy off-white chalk paint. Apply thin, even coats to avoid drips. -
Sand Between Coats:
Once the first coat is dry (usually about 1-2 hours), lightly sand with fine grit sandpaper to remove any brush strokes. Wipe clean and apply a second coat for full opacity. -
Seal the Natural Wood:
While the painted sections dry, simply apply a clear matte varnish or wax to the exposed natural wood frame to protect it without altering the color.
Pro Tip: Watercolor Effect
To get that soft, airy look for the petals, mix a textile medium or glazing liquid into your acrylics. It increases transparency without breaking down the paint binder like water does.
Step 2: Designing the Florals
-
Sketch the Composition:
Lightly draw your floral design directly onto the dried white paint using a pencil. For the side panel, create a large vertical arrangement starting from the bottom. For drawers, I prefer to scatter individual stems or small bouquets off-center for an organic look. -
Paint the Stems and Leaves:
Mix a few shades of green (olive and forest) with a tiny bit of water to improve flow. Using your size 2 brush, paint the main stems following your pencil lines. Keep your hand loose to create natural curves. -
Add Leaf Details:
Use the size 0 brush to add varied leaf shapes. Paint some leaves broad and flat, and others wispy and grass-like using quick, upward strokes. -
Paint the Blooms:
Layer your colors for the flowers. Start with burnt sienna and terracotta for poppy-like blooms, and yellow ochre for smaller wildflowers. Keep the paint slightly translucent to mimic a watercolor effect. -
Add Fine Details:
Once the main flower shapes are dry, go back with a fine liner brush and dark brown or black paint to add stamens, centers of flowers, and tiny definition lines on the petals. -
Incorporate Line Drawings:
To match the botanical illustration style in the photo, leave some flowers as simple outlines without filling them with color. This creates visual interest and lightness.
Troubleshooting: Shaky Lines
If your stems look wobbly, use a long liner brush (called a rigger brush). The long bristles absorb hand tremors and naturally drag behind the handle for smoother curves.
Step 3: Assembly & Finishing
-
Seal the Artwork:
Allow the painted florals to cure for at least 24 hours. Then, apply two coats of clear matte polycrylic over the painted areas to protect your artwork from scratches. -
Finish the Hardware:
Take the wooden handles you removed earlier. You can either leave them raw matching the frame or give them a luxe touch with gold spray paint or gilding wax. -
Reattach Handles:
Once the hardware is dry, screw the handles back onto the drawer fronts. -
Remove Tape and Clean Up:
Carefully peel away all painter’s tape. If any paint bled onto the natural wood frame, gently sand it away with fine-grit sandpaper. -
Final Assembly:
Slide the drawers back into the frame and step back to admire your custom botanical dresser.
Enjoy the gentle, artistic atmosphere this piece brings to your bedroom or hallway
Geometric Lines With Tape Tricks
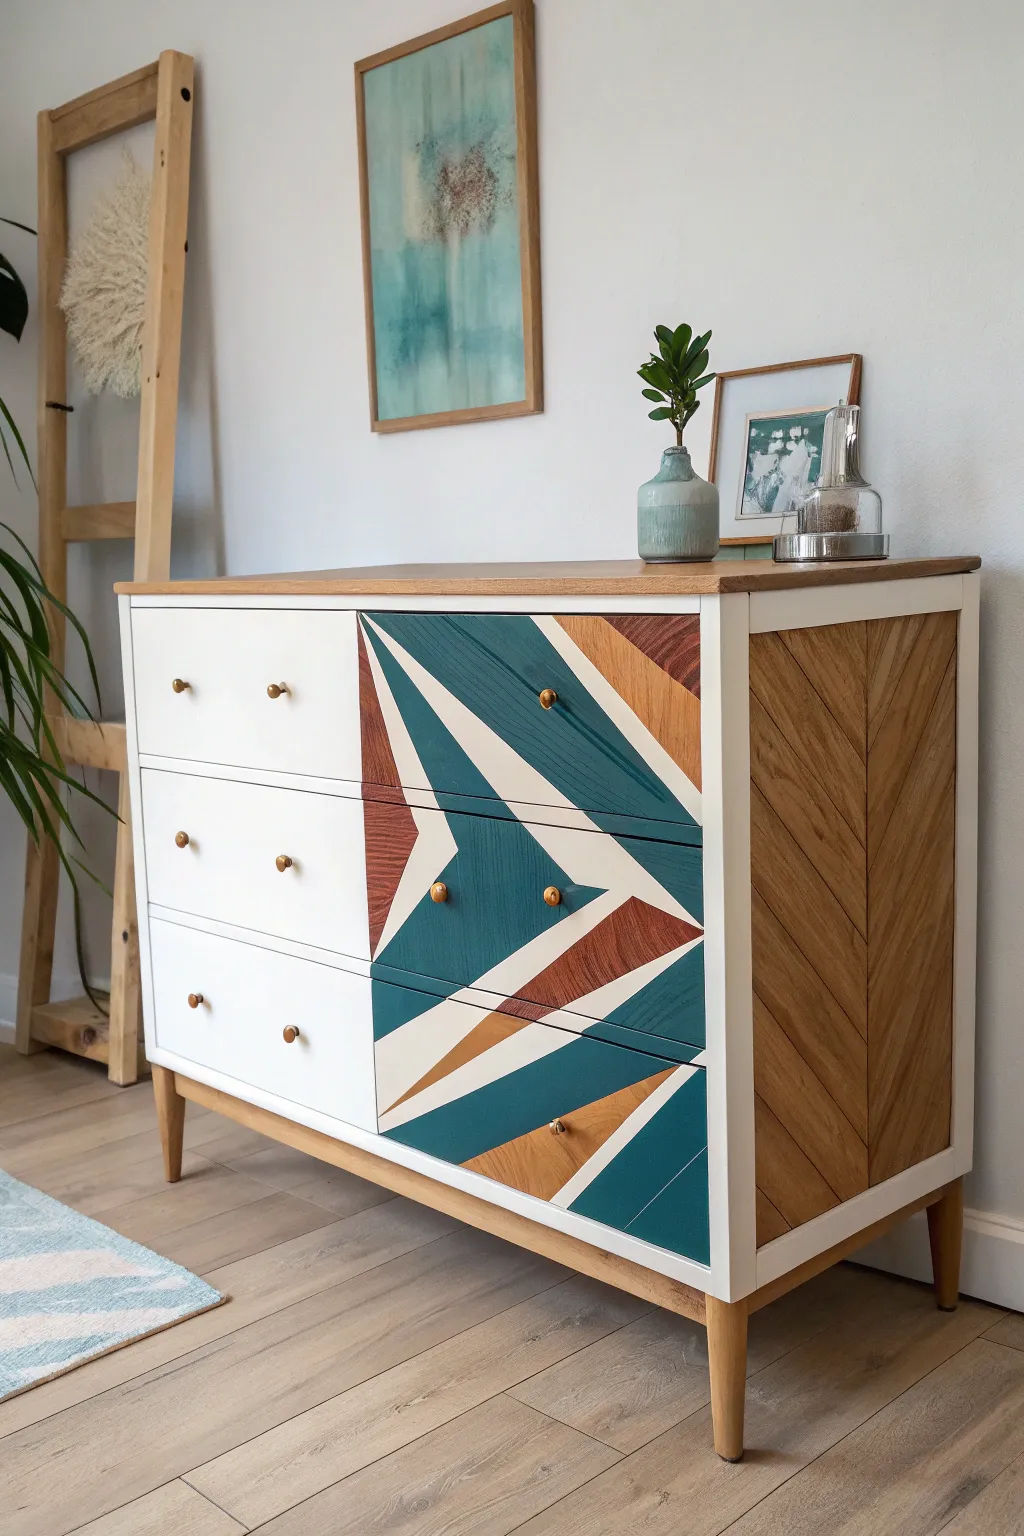
Transform a plain dresser into a modern art piece with this bold geometric design. By combining crisp white paint with natural wood tones and striking teal accents, you’ll create a sophisticated focal point that looks custom-made.
Step-by-Step
Materials
- Dresser (wooden, with flat drawer fronts)
- Sandpaper (120 and 220 grit)
- Orbit sander (optional but recommended)
- Primer (bonding primer suitable for wood)
- White furniture paint (satin or semi-gloss finish)
- Teal/Deep Green furniture paint
- Painters tape (high quality, designated for delicate surfaces)
- Wood stain (medium walnut or similar warm tone)
- Polyurethane topcoat (matte or satin)
- Paint rollers (foam) and small detail brushes
- Measuring tape and pencil
- Gold drawer knobs
- Ruler or straight edge
- Utility knife
Step 1: Prep and Base Framework
-
Disassemble the Furniture:
Begin by removing all drawers from the dresser shell. Unscrew and remove the old hardware, keeping the screws if you plan to reuse them (though new gold knobs are recommended for this look). -
Strip and Sand:
Since this design relies heavily on exposed wood grain, you need to strip the existing finish off the drawer fronts and the side panels completely. Use an orbital sander with 120-grit paper to remove old varnish or paint, then switch to 220-grit for a smooth finish. Scuff sand the frame where you intend to paint white. -
Clean Surfaces:
Wipe down the entire piece with a tack cloth or a damp rag to remove every speck of dust. A clean surface is critical for crisp tape lines later. -
Paint the Frame:
Apply a coat of bonding primer to the main body (shell) of the dresser, avoiding the legs if you want them natural. Once dry, apply 2-3 coats of your white furniture paint using a foam roller for a smooth, brush-stroke-free finish.
Bleeding Lines?
If paint bleeds under the tape, wait for it to dry completely. Then, use a small, stiff brush and a tiny amount of the background color (or wood stain marker) to carefully touch up the edge.
Step 2: Designing the Drawer Fronts
-
Plan the Left Side:
For the three drawers, the left third will be solid white. Measure about 1/3 of the way across the drawer fronts and draw a light vertical pencil line. Mask off the right side (the wood side) and paint the left section white to match the frame. -
Create the Geometric Pattern:
Reinsert the drawers carefully into the dresser to ensure your pattern flows continuously across them. Using your painter’s tape, map out the large triangles and chevrons. The design radiates from the center, creating dynamic wedges. -
Seal the Tape Edges:
Use a credit card or flattening tool to press the tape edges down firmly. I like to apply a very thin layer of clear matte medium or the base color along the tape edge to prevent bleed-under. -
Staining Sections:
Identify the sections that will remain natural wood. Apply your chosen wood stain carefully to these areas. You might need to use a small artist’s brush near the tape lines to avoid splashing onto the white sections. -
Painting the Colors:
Once the stain is dry, mask off the stained areas if necessary or work carefully. Paint the designated geometric sections with your deep teal color. Apply 2-3 thin coats rather than one thick one. -
Removing the Tape:
Pull the tape off while the final coat of paint is still slightly tacky—not wet, but not fully cured either. Pull the tape at a 45-degree angle away from the painted edge for the sharpest line.
Step 3: Side Details and Assembly
-
The Herringbone Side Panel:
The side of the dresser features a recessed panel with a wood herringbone pattern. If your dresser doesn’t have this, you can recreate the look by determining a center vertical line on the side panel. -
Detailing the Grain:
If working with a flat wood panel, use tape to create a chevron or herringbone effect with stain. Apply the stain in diagonal lines meeting at the center seam, alternating the direction to mimic the wood grain layout shown. -
Sealing the Wood:
Apply a polyurethane topcoat over the entire piece, especially the drawer fronts. This protects the painted design and seals the raw wood sections from yellowing or staining. -
Finishing Touches:
Once the topcoat has cured for at least 24 hours, install your new gold knob hardware. Place them strategically—notice how the knobs in the image align with the geometric shapes rather than just sitting in the center. -
Reassembly:
Slide the drawers back into place. Double-check that the geometric lines visually connect across the gaps between drawers.
Metallic Accent
Add thin pinstripe tape in gold or copper along the borders where the teal paint meets the wood. This adds a luxury feel and perfectly complements the gold hardware knobs.
Step back and admire your new statement piece that perfectly balances modern color with natural warmth.
Painted Hardware for a Cohesive Look
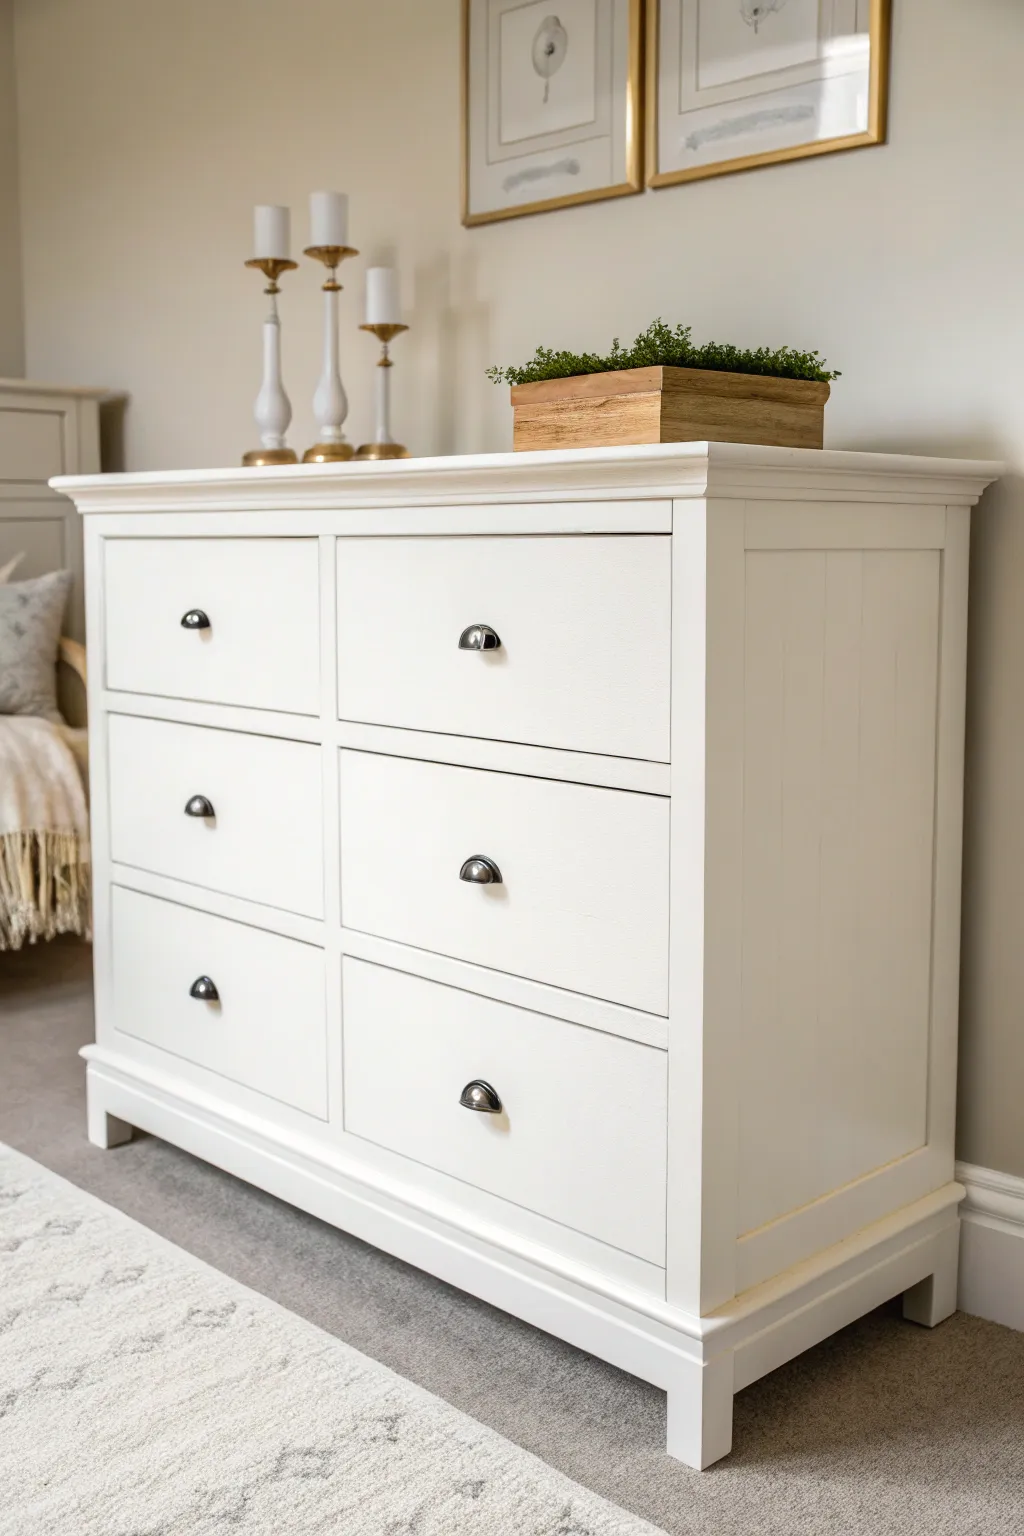

Transform a tired wooden chest into a beacon of modern farmhouse style with this crisp, clean makeover. By pairing a durable, bright white finish with deep, contrasting hardware, you achieve a timeless look that instantly brightens any bedroom corner.
Step-by-Step Guide
Materials
- Dresser (solid wood or veneer)
- Course-grit sandpaper (80-100 grit)
- Medium-grit sandpaper (150-180 grit)
- Fine-grit sandpaper (220 grit)
- Electric orbital sander (optional but recommended)
- Tack cloth or microfiber rags
- Degreaser (TSP or similar cleaning agent)
- Wood filler
- Putty knife
- High-adhesion stain-blocking primer
- High-quality white furniture paint (satin or semi-gloss finish)
- Polycrylic topcoat (clear satin)
- Screwdriver
- Spray primer for metal (if painting hardware)
- Oil-rubbed bronze or matte black spray paint (for hardware)
- 2-inch angled sash brush
- Small foam roller and tray
- Painter’s tape
Step 1: Preparation & Repairs
-
Remove hardware:
Begin by removing all drawers from the dresser frame. Use a screwdriver to detach all knobs, pulls, and any other metal fixtures. Place the screws in a labelled baggie so they don’t get lost during the process. -
Clean thoroughly:
Scrub the entire piece with a degreaser or a TSP solution. Old furniture often harbors oils and furniture polish that can effortlessly ruin a paint job if not removed first. Let it dry completely. -
Fill imperfections:
Inspect the surfaces for deep scratches, gouges, or holes from old hardware if you plan to change the spacing. Apply wood filler with a putty knife, slightly overfilling the hole as the filler will shrink when drying. -
Initial sanding:
Once the filler is dry, sand the filled areas flush. Then, scuff sand the entire dresser with 80-100 grit sandpaper to remove the old finish’s sheen. You don’t need to strip it to bare wood, just create a “tooth” for the primer. -
Smooth sanding:
Follow up with a pass of 150-180 grit sandpaper to smooth out any rough scratches left by the coarser paper. This ensures your final painted surface will feel professional. -
Dust removal:
Vacuum up the bulk of the sawdust, then wipe every inch of the dresser and drawers down with a tack cloth to remove fine particles.
Hardware Grip Trick
Push hardware screws through the bottom of a cardboard box and attach pulls to the top. This holds them upright so you can spray paint all angles easily without touching them.
Step 2: Priming & Painting
-
Apply primer:
Using your foam roller for large flat areas and the angled brush for corners, apply a coat of high-adhesion stain-blocking primer. This is crucial for preventing wood tannins (especially on darker woods) from bleeding through your white paint later. -
Sand the primer:
After the primer has dried according to the can’s instructions, very lightly sand the surface with 220-grit paper. This knocks down any brush strokes or texture. Wipe away the dust again. -
Paint first coat:
Stir your white furniture paint thoroughly. Apply the first coat using the roller for the top and sides, and the brush for the drawer insets and detailed trim. Keep a “wet edge” and avoid overworking the paint. -
Dry and assess:
Allow the first coat to dry fully. White paint often looks streaky after one coat, so don’t worry about coverage yet. Look for any drips and sand them away gently if found. -
Paint second coat:
Apply a second coat of white paint. I prefer to go slightly lighter on the roller pressure for this coat to ensure a super smooth finish. This should provide solid, opaque coverage. -
Apply topcoat:
Once the paint has cured (wait at least 24 hours), apply a clear satin Polycrylic topcoat. Do two thin coats, sanding extremely lightly with 220-grit paper in between, to protect that crisp white finish from yellowing or chipping.
Bleed-Through Blues?
If pink or yellow stains appear through your white primer, stop painting. You need a shellac-based primer (like BIN) to lock in those tannins before continuing.
Step 3: Hardware Transformation
-
Clean hardware:
While the dresser dries, clean the old hardware thoroughly with soapy water and scrub away any grime. Dry them completely. -
Prime metal:
Place the handles on a piece of cardboard in a well-ventilated area. Apply a thin coat of metal spray primer to ensure the new color sticks. -
Spray contrast color:
Once primed, spray the hardware with oil-rubbed bronze or matte black paint. Use short, sweeping bursts to avoid drips. Spray from multiple angles to cover the curves of cup pulls. -
Reassembly:
When both the dresser and hardware are fully cured, reattach the pulls to the drawers and slide the drawers back into the frame.
Step back and admire how a fresh coat of white paint and updated hardware have completely reinvented your space with minimal cost
Metallic Painted Details and Trim
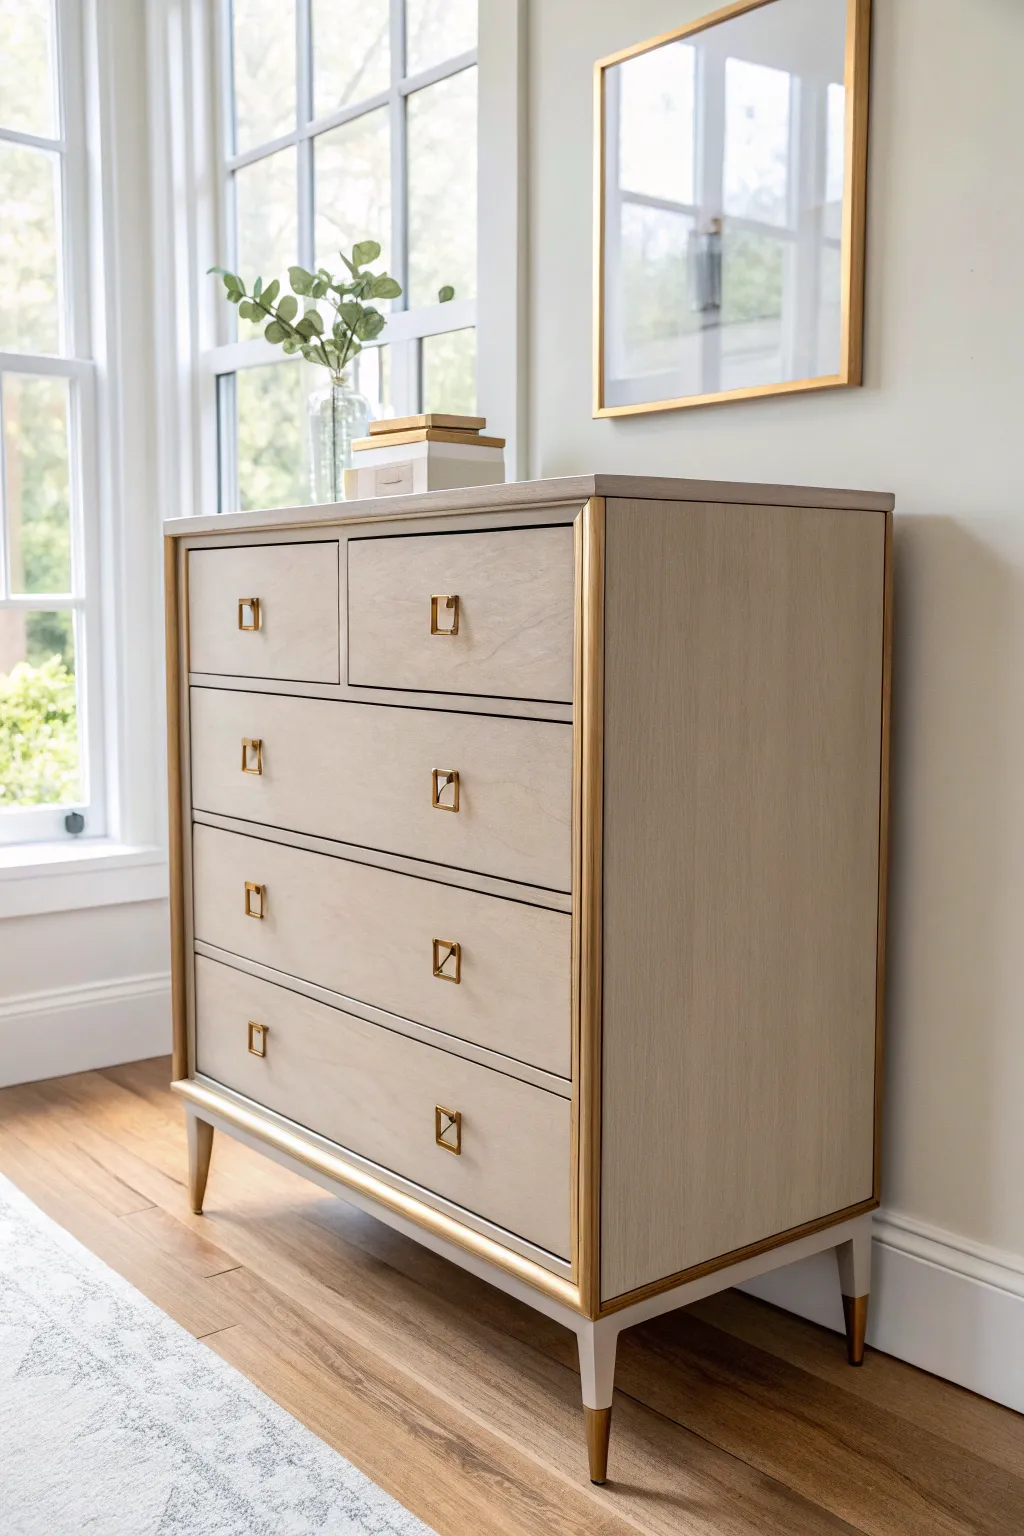
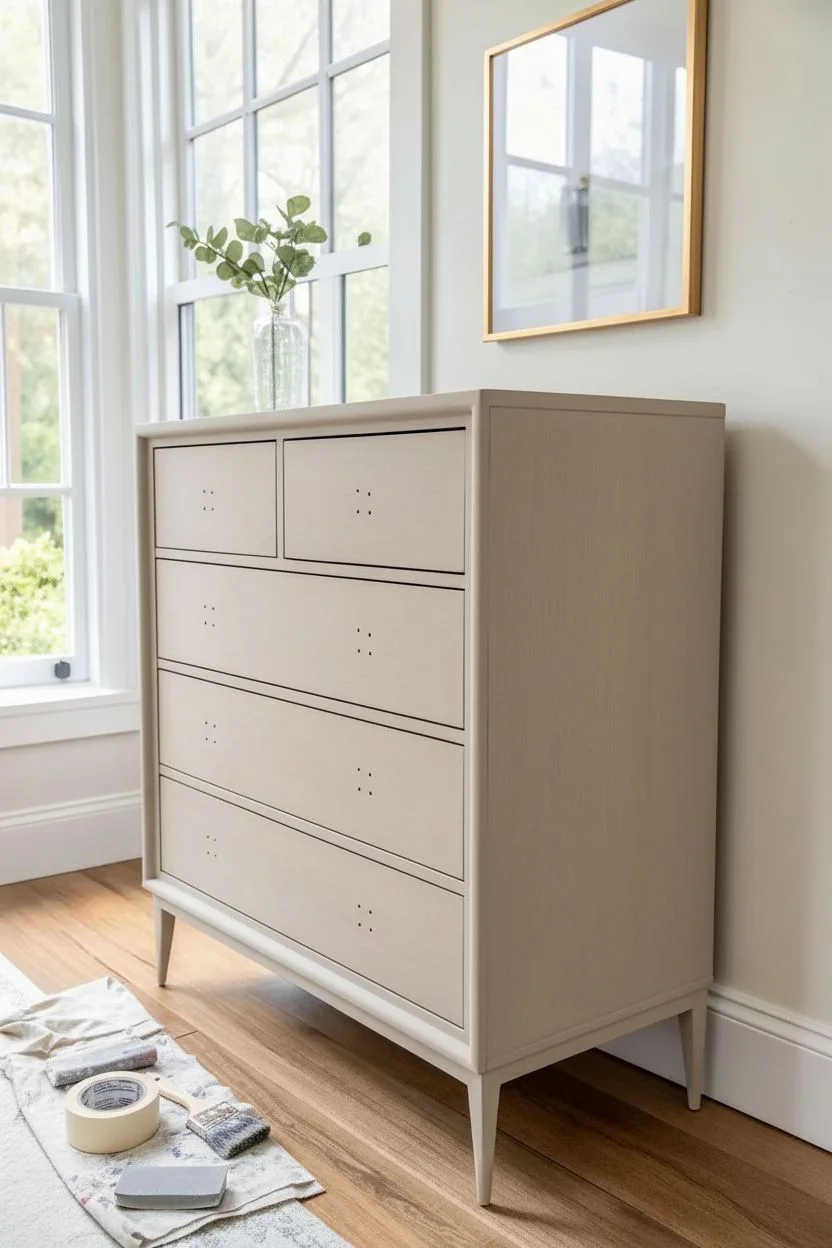
Transform a standard dresser into a high-end statement piece by combining a soft, textured wash with crisp metallic accents. This project focuses on highlighting the structural lines of furniture with gold leaf or metallic paint for a sophisticated, tailored look.
How-To Guide
Materials
- Wooden dresser (prepped and sanded)
- Chalk paint or mineral paint (light beige or ‘greige’)
- Glaze medium (optional, for texture)
- Metallic gold paint (high quality) or gold leaf kit
- Painter’s tape (high adhesion)
- Fine grit sandpaper (220-320)
- Small artist brushes and angled sash brush
- Gold square drop pulls (hardware)
- Polyurethane topcoat (matte or satin)
- Lint-free rags
Step 1: Preparation & Base Coat
-
Remove Hardware:
Start by unscrewing all existing knobs or pulls. Store the screws in a labeled bag so they don’t get lost, though we will be replacing the pulls later. -
Clean and Sand:
Wipe down the entire dresser with a degreaser to remove oils and dust. Lightly scuff-sand the surfaces with 220-grit sandpaper to give the new paint something to grip. -
Apply First Base Coat:
Using an angled sash brush, apply your light beige or ‘greige’ paint to the main body and drawer fronts. Brush in the direction of the wood grain for a natural look. -
Dry and Sand:
Allow the first coat to dry completely according to the manufacturer’s instructions. Once dry, very lightly sand with fine grit paper to smooth out any brush strokes. -
Apply Second Coat:
Paint a second layer of your base color. This ensures solid coverage and depth. Let this cure fully, preferably overnight, before moving to the detail work. -
Create Texture (Optional):
If you want the subtle washed look seen in the photo, mix a small amount of dark glaze with water. Wipe it on and immediately wipe most of it off with a damp rag, leaving just a hint of dimension in the grain.
Clean Lines Pro Tip
Before painting gold, brush a thin layer of your base beige paint over the tape edge. This seals the tape, meaning any bleed-under will match the dresser, keeping your gold line perfect.
Step 2: The Metallic Framework
-
Tape the Boundaries:
This is the most critical step for crisp lines. Apply painter’s tape alongside the vertical corners, the top edge, and the bottom apron where the gold will go. Press the tape edges down firmly with a credit card to prevent bleed. -
Prime the Trim:
If your metallic paint is slightly translucent, paint a thin layer of yellow ochre or primer on the taped-off trim areas first. This boosts the vibrancy of the gold later. -
Paint the Vertical Edges:
Using a small, flat artist brush, carefully apply your metallic gold paint to the vertical corner strips you taped off. I like to use short, even strokes here to avoid pooling paint. -
Paint the Top and Bottom:
Continue the metallic application along the top rim and the bottom skirt of the dresser. Ensure the coverage is opaque; you may need 2-3 thin coats rather than one thick one. -
Peel While Wet:
carefully remove the painter’s tape while the final coat of gold is still tacky. Pull the tape away from the painted edge at a 45-degree angle to keep a razor-sharp line. -
Detail the Legs:
Don’t forget the feet! Free-hand paint the gold accent onto the legs (or tape them off) to create the ‘dipped’ leg effect shown in the image.
Level Up: Gold Leaf
Instead of metallic paint, use gold leaf sheets and sizing glue for the trim. The result is much shinier and has a luxurious, authentic texture that paint can’t quite mimic.
Step 3: Hardware & Finishing
-
Seal the Body:
Apply a clear matte or satin polyurethane topcoat over the beige sections to protect the finish. Use a foam roller for the smoothest application. -
Seal the Metallic (Optional):
Metallic paints can dull if top-coated with water-based poly. If protection is needed, use a solvent-based clear coat or a specific metal sealer on just the gold parts. -
Install New Hardware:
Measure and drill new holes if your new gold square pulls have different spacing than the old ones. Fill old holes with wood filler before painting if necessary. -
Attach Pulls:
Screw in the square gold drop pulls. Ensure they are level and tightened securely. -
Final Polish:
Wipe down the entire piece with a clean, soft cloth to remove any dust from the installation process and admire your work.
Enjoy the luxurious, custom feel this gilded dresser adds to your space
Mural-Style Painted Scene Across Drawers
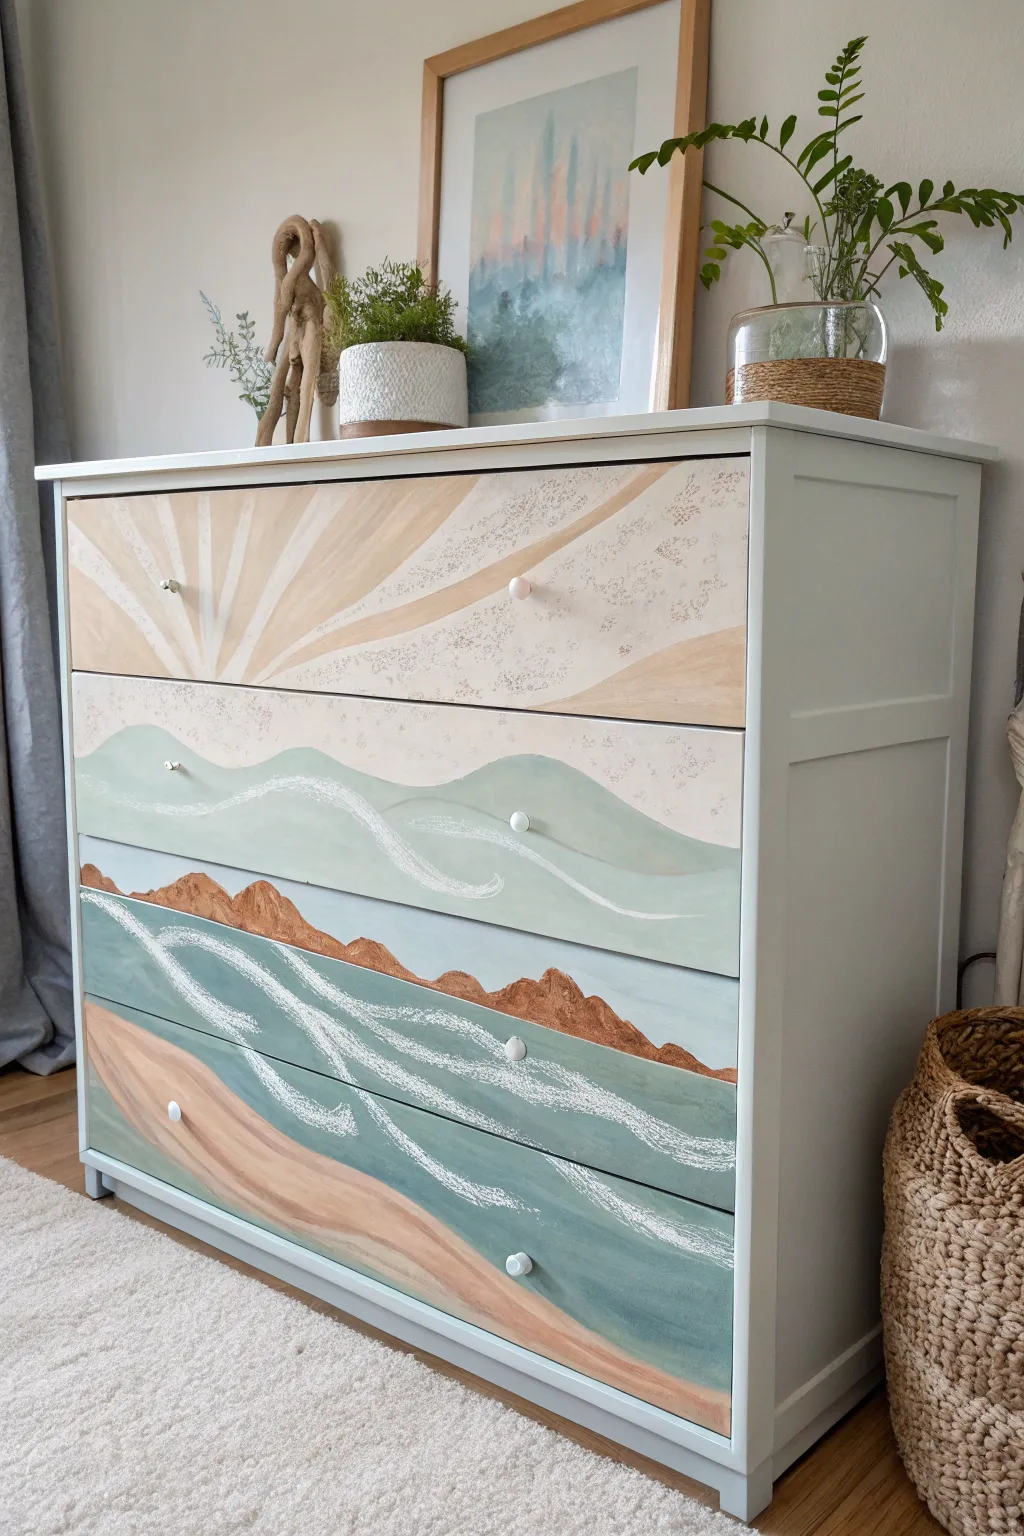
Transform a plain dresser into a stunning piece of statement furniture with this serene landscape mural. Featuring soft sun rays, rolling hills, and crashing waves spanning across four drawers, this project brings a calming, artistic touch to any bedroom.
How-To Guide
Materials
- 4-drawer wooden dresser (cleaned and sanded)
- Primer suitable for wood furniture
- Chalk paint or acrylic paint (Cream/Off-White, Beige/Tan, Sage Green, Teal/Blue-Green, Burnt Sienna/Rust Brown, White)
- Set of paintbrushes (2-inch flat brush, 1-inch angled brush, small detail brush, fan brush)
- Pencil and eraser
- Painter’s tape
- Ruler or straight edge
- Water-based protective topcoat (matte or satin finish)
- New drawer knobs (optional, white ceramic recommended)
Step 1: Preparation & Base Coat
-
Prep the Surface:
Remove all drawers and hardware from the dresser. Clean the surfaces thoroughly with a degreaser to remove oils or dirt, then lightly sand the drawer fronts with medium-grit sandpaper to help the paint adhere. -
Prime the Drawers:
Apply a coat of high-quality primer to the drawer fronts and the frame of the dresser. Let this dry completely according to the manufacturer’s instructions. -
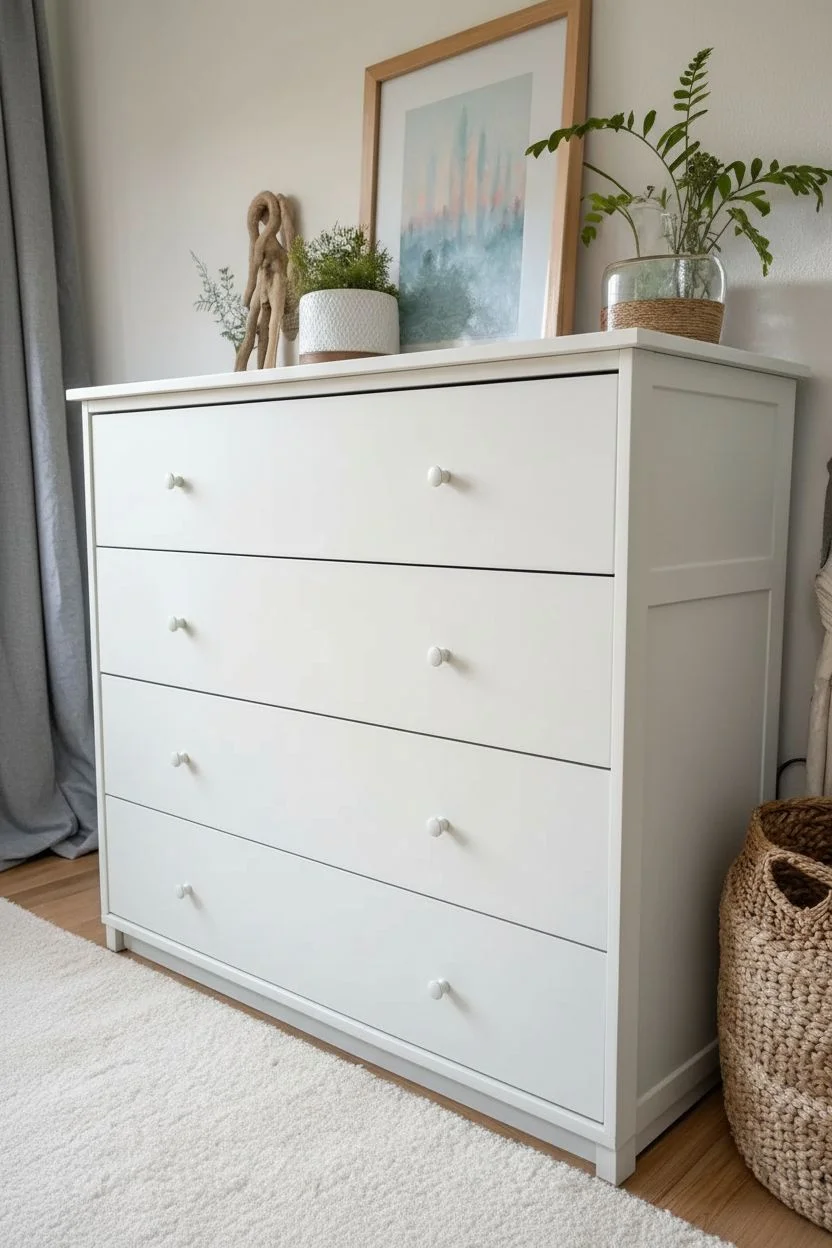
Paint the Frame:
While the drawers are out, paint the main frame (body) of the dresser in a crisp, clean white or very light grey. Apply two coats for solid coverage, letting the first coat dry before adding the second. -
Reinsert Drawers for Sketching:
Once the primer on the drawers is dry, slide them back into the dresser. This is crucial because you need to sketch the design continuously across the gaps to ensure the mural flows seamlessly.
Step 2: Sketching the Landscape
-
Draft the Sun Rays:
On the top drawer, use a ruler to lightly draw a focal point near the bottom left (around where the handle will go). Radiate straight lines outward and upward to create the beams of sunlight. -
Outline the Rolling Hills:
Moving to the second drawer, sketch gentle, wavy lines horizontally across the surface. These curves will become your soft green hills or sand dunes. -
Sketch Mountains and Horizon:
On the third drawer, draw a jagged, irregular line to represent rocky terrain or distant mountains. Below this, draw a straight horizontal line for the water’s horizon. -
Map the Coastline:
Between the third and bottom drawer, sketch a diagonal, curvy line where the ocean meets the sand. This will guide your beach placement on the lowest drawer.
Uneven Gaps?
Painting across gaps is tricky. If the image breaks too much visually, paint the top/bottom edges of the drawer fronts (the thickness part) to match the mural color where they meet.
Step 3: Painting the Scene
-
Paint the Sky and Sun:
On the top drawer, fill in the sky areas with a creamy off-white. Paint the sun rays in a soft beige or tan. You can dry-brush a little white over the tan to soften the edges so the rays don’t look too rigid. -
Fill the Hills:
Paint the rolling hills on the second drawer using sage green. I find that mixing a little white into the green for the ‘distant’ hills creates a nice atmospheric perspective. -
Paint the Mountains:
Use burnt sienna or rust brown for the rocky shapes on the third drawer. Use an angled brush to get crisp edges along the peaks. -
Create the Ocean Base:
Fill the water area on the third and fourth drawers with teal or blue-green paint. Paint the bottom corner of the lowest drawer with a sandy beige to represent the beach. -
Blend the Transitions:
If you have any hard lines between colors (like where the sand meets water), blend them slightly while the paint is still wet for a softer look.
Level Up: Texture
Mix a Texture Additive or Baking Soda into your paint for the sandy beach section. It adds a gritty, realistic feel that contrasts beautifully with the smooth sky.
Step 4: Adding Details & Finishing
-
Add Texture to the Sky:
Dip a stencil brush or an old stiff brush into white paint, off-load most of it onto a paper towel, and stipple (dab) texture onto the sky and beige sun rays to create a speckled, vintage effect. -
Highlight the Hills:
Using a thin liner brush and white paint, add sweeping, curved lines along the tops of the green hills to suggest wind or light hitting the dunes. -
Paint the Waves:
For the ocean, use a small flat brush and white paint to create crashing waves. Use choppy, organic strokes near the shoreline and longer, smoother strokes further out in the teal water. -
Detail the Mountains:
Add shadows to the mountains by mixing a tiny bit of black or dark brown into your rust color and painting usually on one side of the peaks. -
Seal the Artwork:
Once the mural is completely dry (give it at least 24 hours), apply two coats of clear, water-based protective polycrylic. Use a matte finish for a modern look or satin for a slight sheen. -
Reattach Hardware:
Poke through any paint covering the hardware holes. Screw in your knobs—simple white ceramic knobs work beautifully to not distract from the art.
Step back and admire your custom landscape that brings the calm of nature right into your room


Have a question or want to share your own experience? I'd love to hear from you in the comments below!