A ceramic box with a lid is one of my favorite projects because it’s part sculpture, part tiny treasure-keeper. Once you’ve got the basic slab shape working, the lid becomes your playground for texture, color, and personality.
Simple Slab Box With Clean Lines
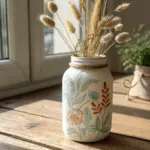
This elegant ceramic box prioritizes clean lines and a soft, organic finish that feels wonderful to the touch. Its beauty lies in the subtle texture of the clay and the gentle, pillowy curve of the lid, perfect for hiding away small treasures.
Step-by-Step Tutorial
Materials
- White stoneware clay with fine grog
- Rolling pin
- Two wooden guide strips (thickness of desired slab)
- Fettling knife or needle tool
- Ruler or square templates
- Serrated rib and rubber kidney rib
- Slip or vinegar
- Small sponge
- Paddle (optional)
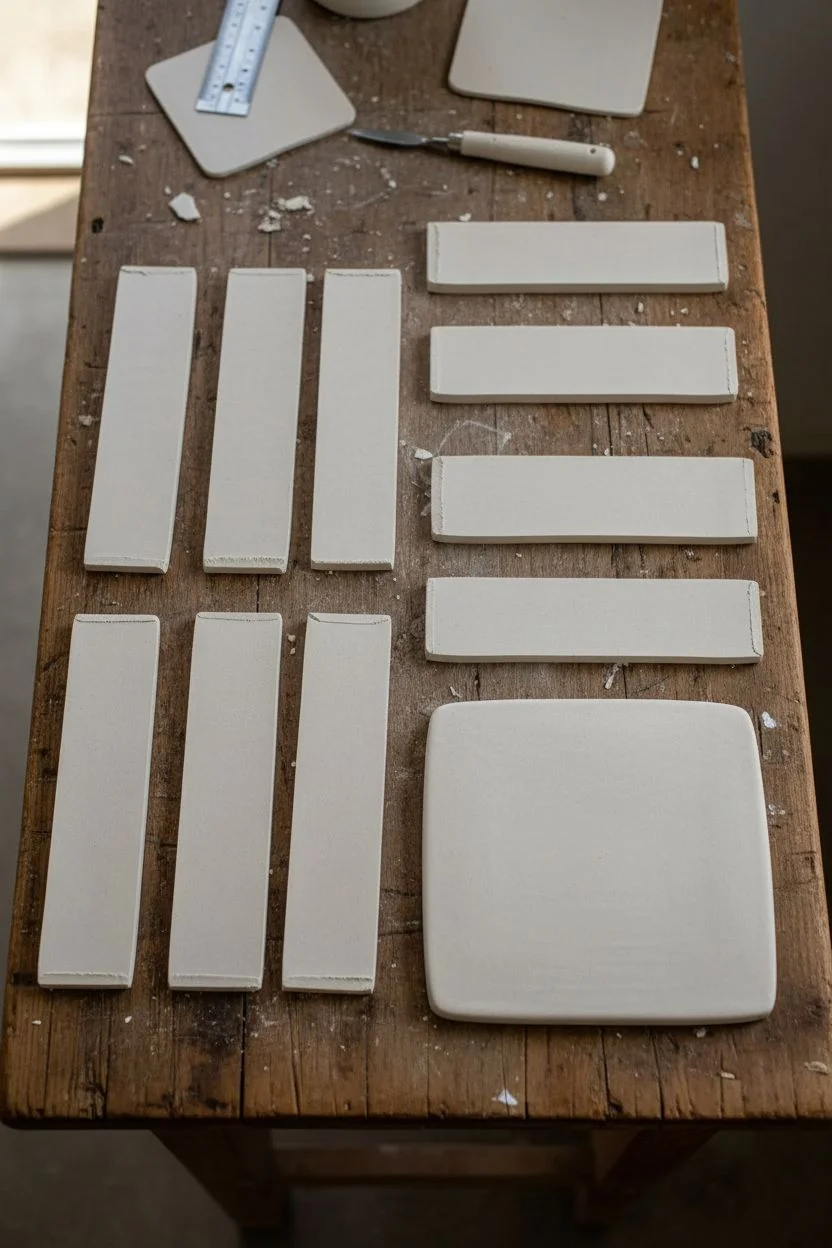
Step 1: Prepping the Slabs
-
Roll out the clay:
Begin by wedging your white stoneware to remove air bubbles. Using your guide strips, roll out a large, even slab of clay approximately 1/4 inch thick being sure to compress the clay on both sides with a rib. -
Measure and cut:
Using a ruler or paper templates, cut out four equal rectangles for the walls and two slightly larger squares for the base and lid while the clay is leather hard. -
Miter the edges:
For seamless corners, cut a 45-degree angle (miter) on the vertical edges of your four wall pieces. This increases surface area for joining and hides the seam.
Clean Seams
For invisible seams, compress the corner joints really well with a wooden paddle after joining. This merges the clay particles and prevents cracking later.
Step 2: Assembling the Box
-
Score and slip walls:
Score the mitered edges aggressively with your serrated rib. Apply slip or magic water to the scored areas. -
Join the walls:
Stand the walls up and press the mitered corners together firmly to form a square. Use a small coil of clay on the interior seams to reinforce the joints, blending it smooth. -
Attach the base:
Score and slip the bottom edge of your wall structure and the perimeter of your base square. Press the walls onto the base. I prefer to paddle the outside gently to ensure a tight bond. -
Refine the shape:
Once assembled, use a soft rubber rib to smooth the exterior walls. Gently round the sharp corners to achieve that soft, organic look seen in the photo.
Step 3: Creating the Lid
-
Form the flange:
Flip your lid slab over. Roll a small coil or cut strips of clay and attach them to the underside of the lid, stepped in slightly from the edge, so they will fit snugly inside the box opening. -
Shape the pillow top:
Turn the lid right-side up. Gently press on the edges and smooth the center with a flexible rib to create a very subtle, convex ‘pillow’ shape rather than a flat plane. -
Make the knob:
Roll a small ball of clay and taper the bottom into a truncated cone shape. The top should be slightly wider than the base for an ergonomic grip. -
Attach the knob:
Score the center of the lid and the bottom of your knob. Join them with slip, cleaning up any excess immediately with a brush.
Textured Touch
Before the clay dries completely, tap the exterior gently with a canvas-wrapped paddle. This adds a subtle fabric texture that catches the glaze beautifully.
Step 4: Finishing Touches
-
Dry slowly:
Place the lid on the box with a piece of paper or plastic in between to prevent sticking. Wrap the whole piece loosely in plastic to let moisture equalize. -
Bisque fire:
Once bone dry, bisque fire the piece to the appropriate cone for your clay body. -
Glaze application:
Apply a satin or matte white glaze. The goal is a velvety finish, so avoid high-gloss glazes that might look too manufactured. -
Final firing:
Fire the glazed piece. If you want the speckled look shown, ensure your clay body has iron flecks or choose a glaze with subtle speckles.
Now you have a serene, functional vessel ready to display on your shelf or gift to a friend


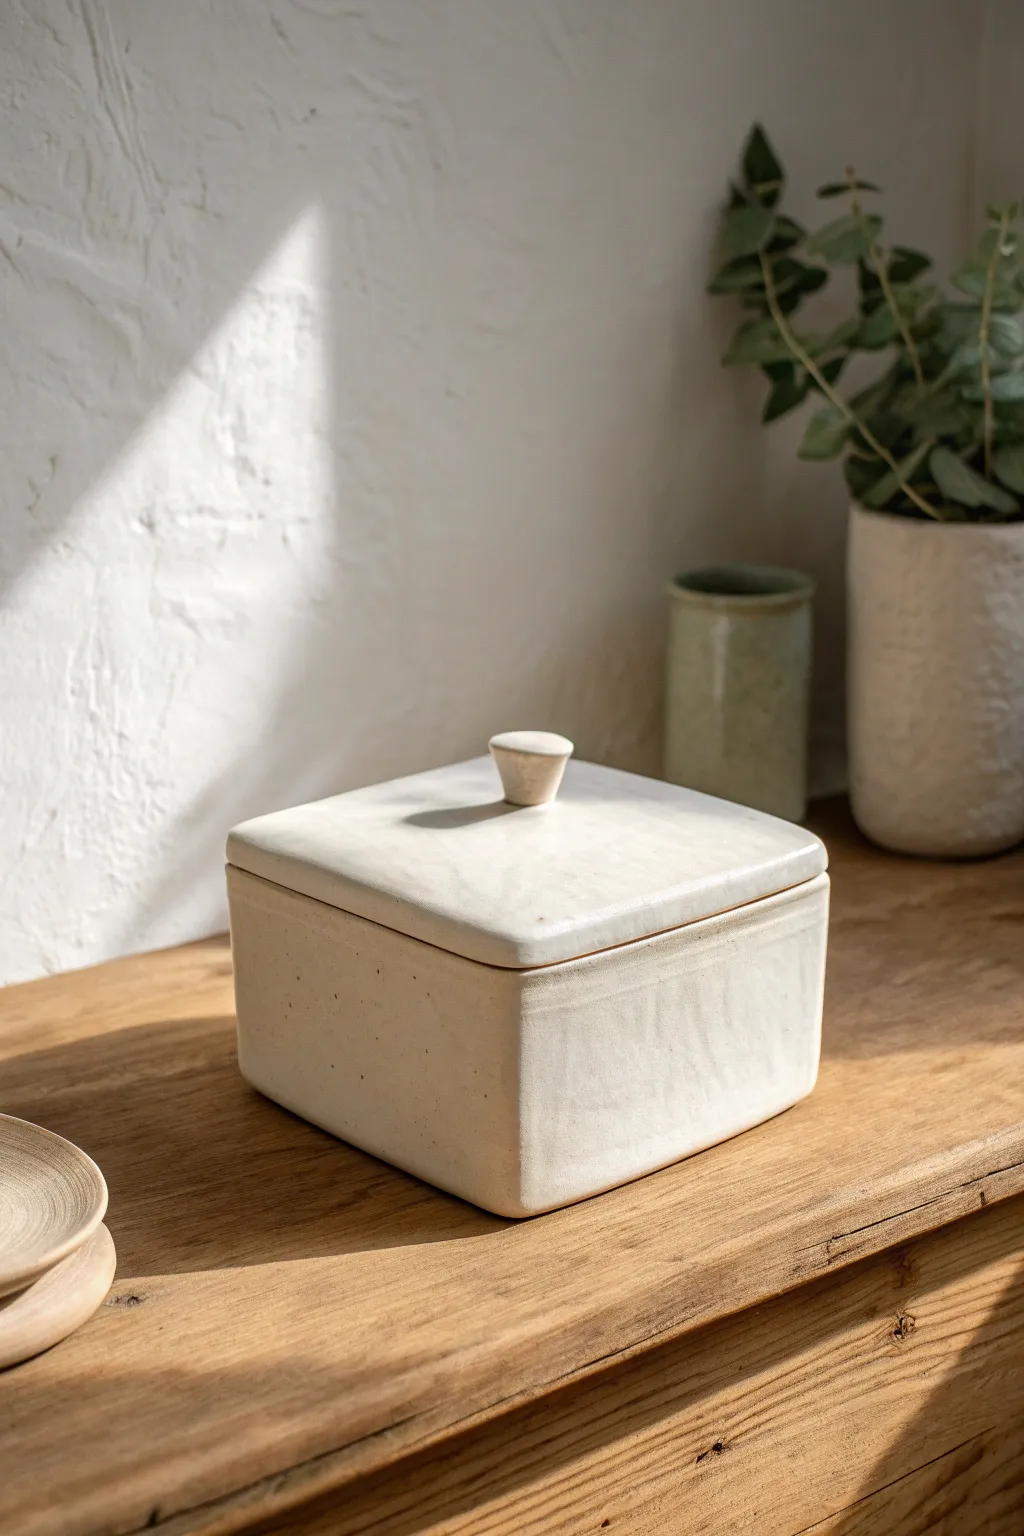
Rounded Corner Box With Soft Edges
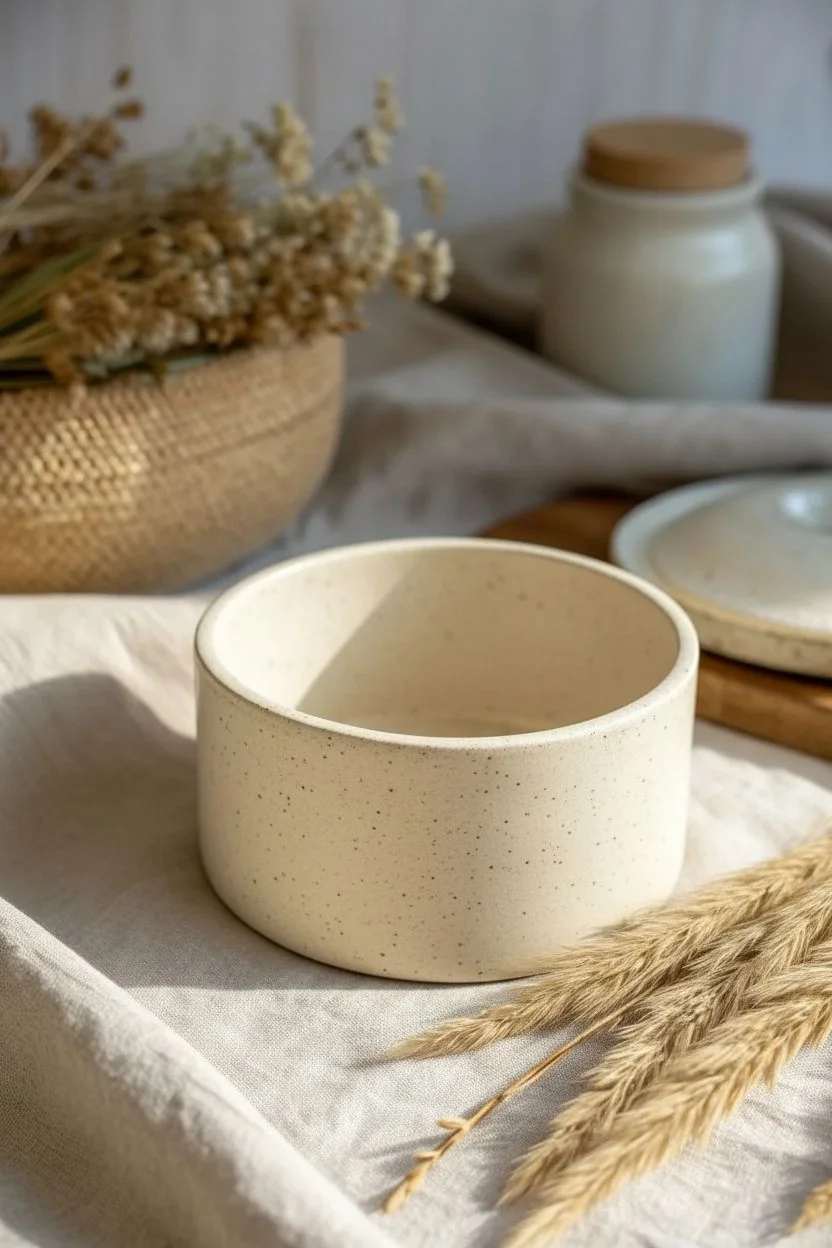
Embrace the beauty of minimalism with this handcrafted ceramic box, featuring a gentle, speckled cream glaze and pleasingly rounded edges. This project focuses on simple slab-building techniques to create a functional piece that feels as soothing as it looks.
Step-by-Step Guide
Materials
- Speckled buff stoneware clay
- Rolling pin
- Canvas working surface or slab roller
- Needle tool
- Fettling knife
- Pottery rib (smooth wood or rubber)
- Scoring tool (or serrated rib)
- Slip (clay and water mixture)
- Circular template (paper or lid)
- Sponge
- Banding wheel (optional but helpful)
- Clear or satin white glaze
Step 1: Creating the Base and Walls
-
Roll the Slabs:
Begin by rolling out your speckled stoneware clay into an even slab, approximately 1/4 inch thick. Compress the slab on both sides with a rib to align the clay particles and prevent warping later. -
Cut the Base:
Using your circular template, cut a perfect circle for the base of your box with a needle tool. Set this aside on a small board. -
Measure the Wall Length:
To determine the length of the wall, measure the circumference of your base circle. I usually add about half an inch to this measurement to create a secure overlap for the seam. -
Cut the Wall Strip:
Cut a long rectangular strip from your slab for the box walls, ensuring the height is consistent—around 3 inches is a good start for this proportion. -
Bevel the Ends:
Slice the short ends of your rectangular strip at a 45-degree angle. Beveling these edges allows them to fit together seamlessly when you curve the clay into a cylinder. -
Score and Slip:
Score the beveled edges of the wall and the outer edge of the circular base. Apply a generous amount of slip to all scored areas. -
Assemble the Cylinder:
Carefully curve the wall strip and attach it to the base, pressing firmly. Bring the beveled wall ends together to close the cylinder. -
Reinforce the Seams:
Use a thin coil of clay along the interior bottom seam and the vertical wall seam. Smooth this coil down with your finger or a modeling tool to ensure a strong bond.
Soften the Look
Use a damp chamois strip on the rim while the wheel spins slowly (or by hand) to get that ultra-smooth, professional rounded edge.
Step 2: Refining and Making the Lid
-
Smooth the Form:
Use a flexible rib to smooth the exterior walls while supporting the inside with your other hand. Remove any harsh angles; the goal is a perfectly round, smooth cylinder. -
Softening edges:
Take a damp sponge and gently round over the top rim of the box. We want to avoid sharp edges to achieve that ‘soft’ look from the photo. -
Create the Lid Slab:
Roll out a second slab for the lid, keeping it slightly thicker than the walls. Cut a circle that is just slightly larger than your box’s rim. -
Form the Flange:
To keep the lid from sliding off, roll a small coil and attach it to the underside of the lid slab. Position it so it fits snugly *inside* the rim of the box. -
Test the Fit:
Place the lid gently onto the box (use a piece of plastic in between if the clay is still very wet) to ensure the flange fits correctly without sticking. -
Add the Nub:
Roll a very small ball of clay and attach it to the exact center of the lid’s top surface. Smooth it down so it looks like a subtle, organic rise rather than a separate handle. -
Final Smoothing:
Once the clay is leather hard, give the entire piece a final burnishing with a soft rib or the back of a spoon to bring out the clay’s natural texture.
Step 3: Firing and Glazing
-
Bisque Fire:
Allow the box and lid to dry slowly and completely before bisque firing them to Cone 04 (or your clay body’s recommendation). -
Glaze Application:
Dip or brush a satin white or clear glaze over the piece. The speckles in the clay body will show through the glaze, creating the texture seen in the image. -
Wipe the Foot:
Clean the bottom of the box and the rim where the lid sits with a sponge to prevent the lid from fusing to the pot during the final firing. -
Final Fire:
Glaze fire the piece to the temperature required by your clay and glaze combination, typically Cone 5 or 6 for stoneware.
Lid Stuck?
If the lid doesn’t fit after firing, use creating grinding paste or sandpaper. Rotate the lid on the box with paste to sand them into a perfect fit.
Place your finished box on a linen cloth to admire the quiet elegance of your work


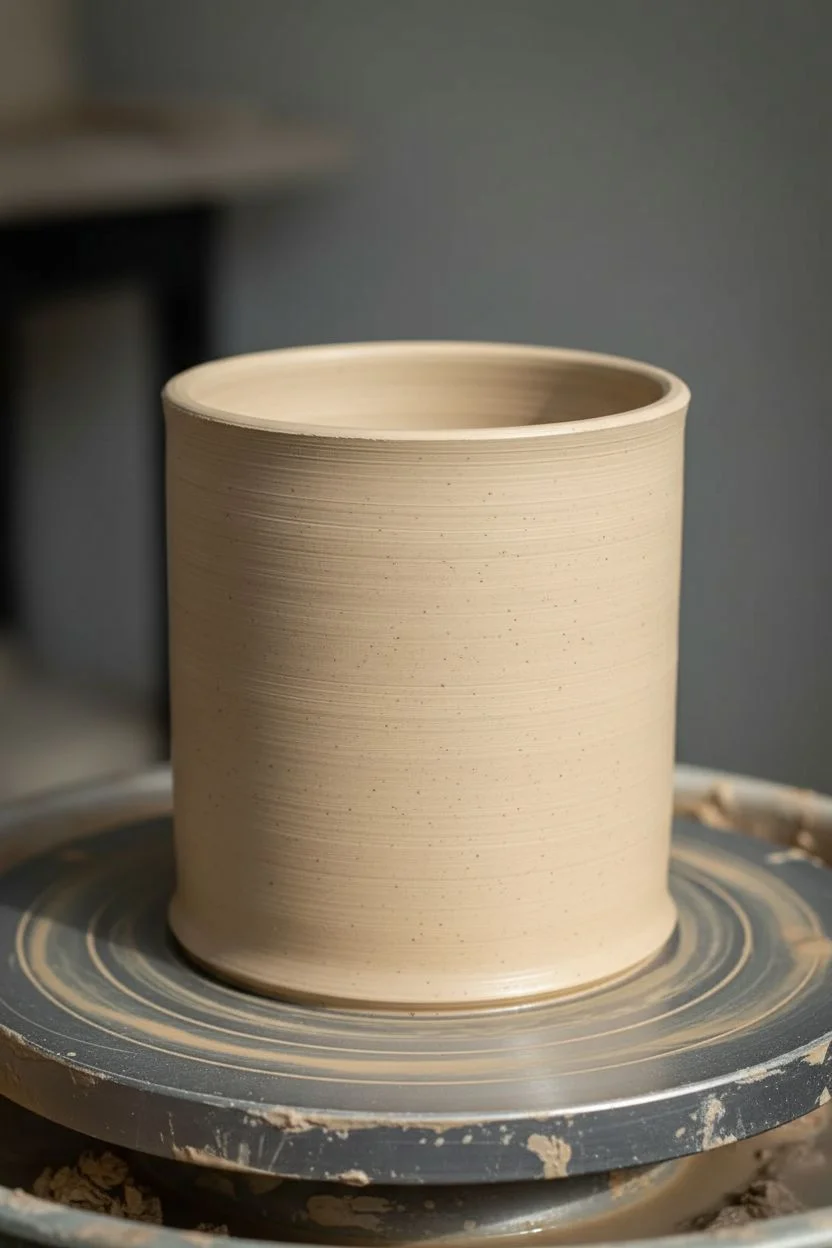
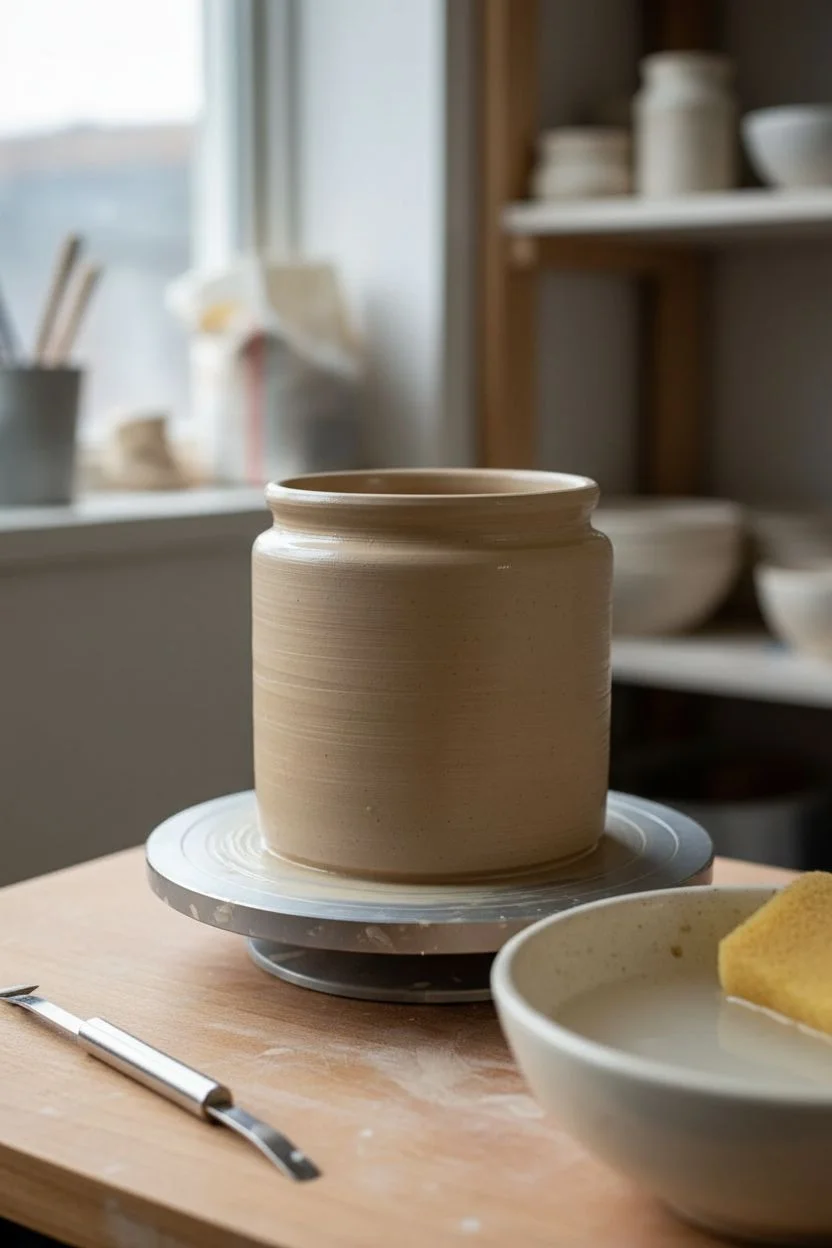
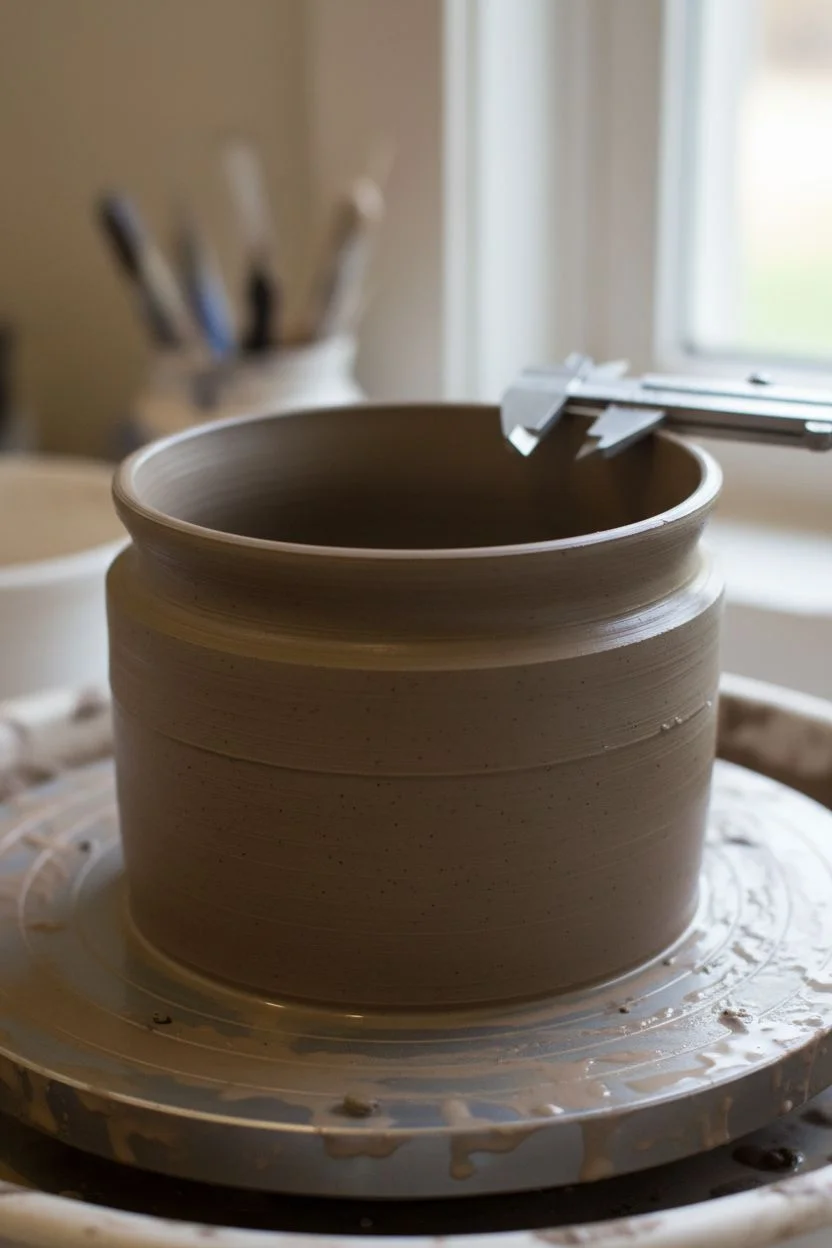
Inside Flange Lid That Actually Fits
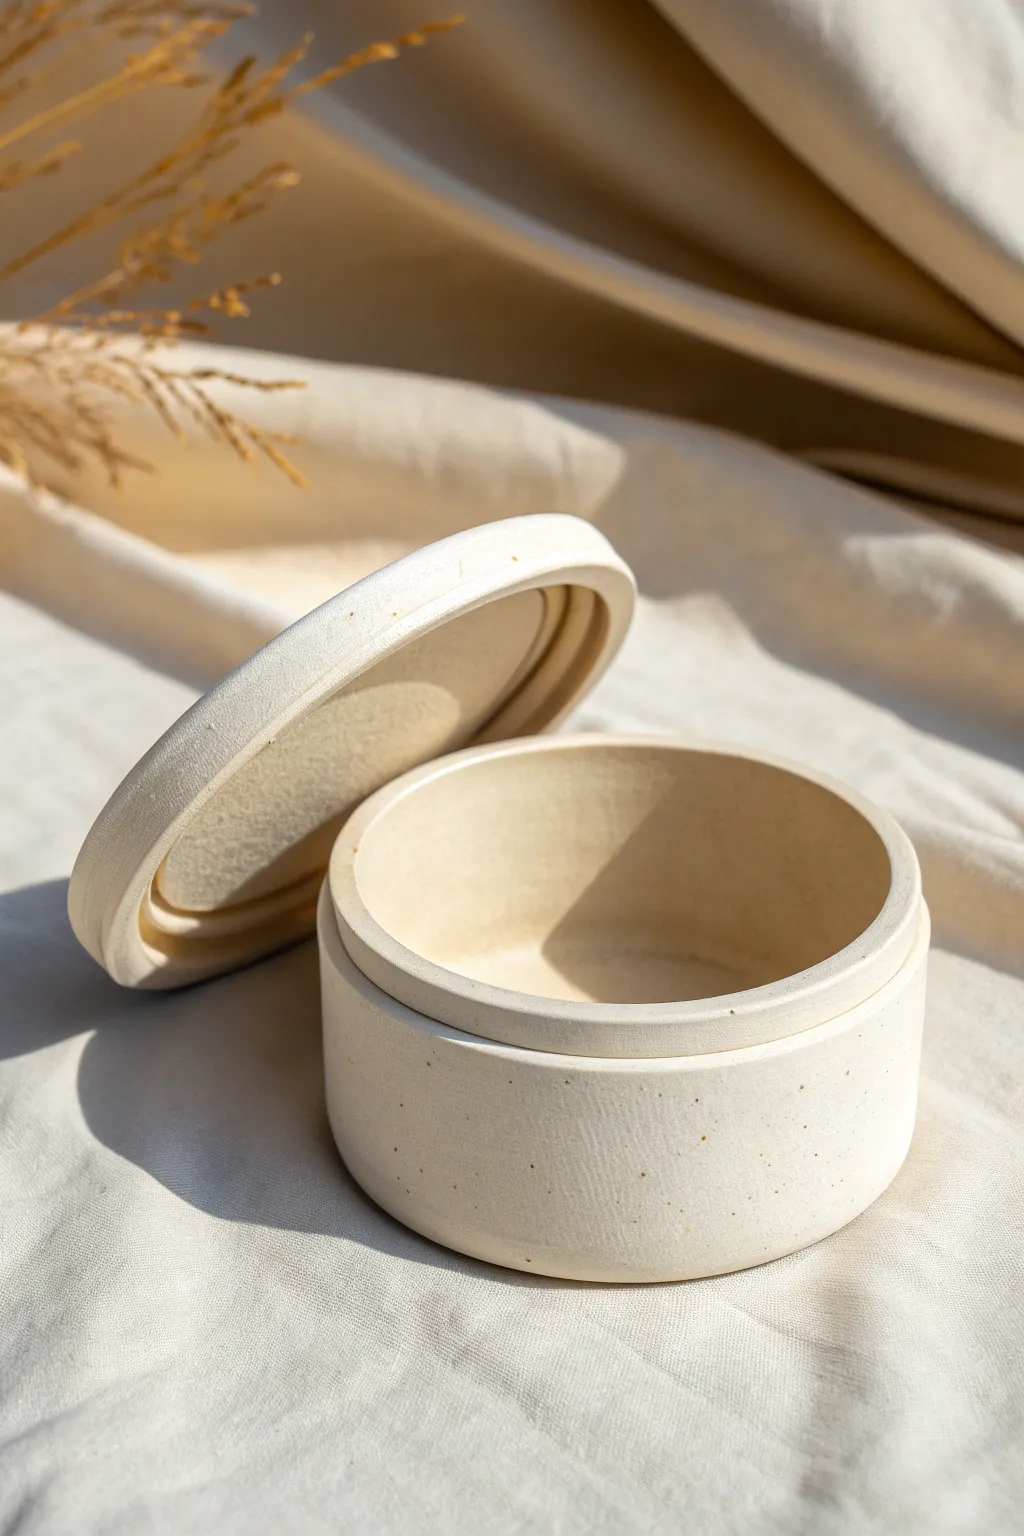
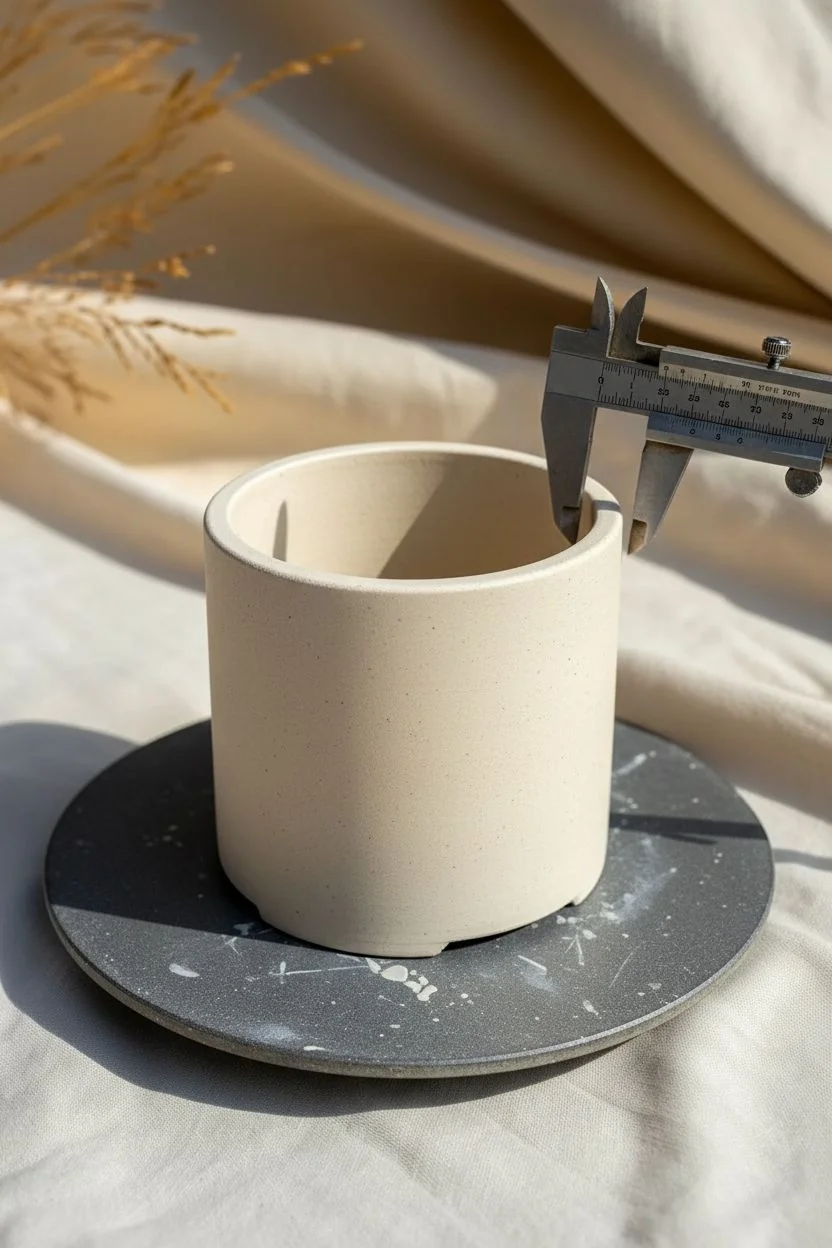
This project produces a minimalist cylindrical jar with a snug inside-flange lid, showcasing the natural beauty of speckled clay. The clean lines and precise fit make it a satisfying challenge for intermediate potters looking to refine their lidded forms.
Step-by-Step
Materials
- Speckled stoneware clay (approx. 1.5 – 2 lbs)
- Pottery wheel
- Throwing sponge
- Pin tool
- Wire cutter
- Wooden rib tool
- Calipers
- Trimming tools
- Bats
Step 1: Throwing the Base
-
Prepare the clay:
Begin by thoroughly wedging about 1 lb of clay to remove air bubbles. Center it on the wheel head, keeping the form relatively low and wide. -
Open the form:
Open the clay down to the bat, leaving about a 1/4 inch thickness for the floor. Compress the floor well with a rib or sponge to prevent S-cracks later. -
Pull the walls:
Pull the walls straight up into a cylinder. Aim for vertical walls with an even thickness. Unlike a bowl, you want this to be a straight-sided column. -
Create the gallery seating:
This style relies on the lid sitting inside the rim, but rather than carving a gallery into the pot’s rim, we will throw a flat, consistent rim and rely on the lid’s flange. Use a wooden rib to square off the rim and ensure the walls are perfectly straight. -
Measure the opening:
Use your calipers to measure the inside diameter of the rim exactly. Lock the calipers in place—this measurement is crucial for the lid. -
Clean and cut:
Use a wooden tool to undercut the base slightly for easier trimming later. Wire off the pot and set it aside to stiffen to leather hard.
Master the Measurements
When throwing the lid flange, always make it slightly wider than your measurement. You can easily trim clay away for a perfect fit, but you can’t put it back.
Step 2: Throwing the Lid
-
Center the lid clay:
Take the remaining clay (smaller amount) and center it low and wide, like a thick hockey puck. -
Establish the width:
Flatten the puck until its diameter matches the *outside* diameter of your jar. You can check this with a second pair of calipers or a ruler if you measured the base jar earlier. -
Define the flange:
Using your thumb or a trimming tool, define a central deeper groove that separates the outer rim from the inner ‘stopper’ part. The vertical wall of this inner section will slide into the jar. -
Check the fit:
Use the calipers (still set to the jar’s *inside* dimension) to measure the diameter of that inner flange wall. I prefer to make the lid flange just a hair wider than the calipers to allow for trimming later. -
Refine the shape:
Smooth the top surface (which is currently facing up). This will actually be the *underside* of the lid. Ensure the flange is deep enough to sit securely. -
Wire off:
Wire the lid off the bat and let it dry to a solid leather hard state alongside the base.
Step 3: Trimming and Fitting
-
Trim the base:
Center the base jar upside down on the wheel. Trim away excess weight from the bottom and refine the profile so the walls are straight and clean. -
Trim the lid top:
Place the lid upside down (flange facing down) onto the wheel. You might need a chuck or to simply center it on the bat if the flange is flat. Trim the ‘top’ of the lid to a slight curve or flat profile as seen in the photo. -
Test the fit:
Gently test the lid on the upright jar. If it doesn’t fit, slowly trim away material from the vertical face of the lid’s flange. Remove tiny amounts at a time. -
Final adjustments:
The fit should be snug but not tight; remember the glaze will add thickness if you glaze the rim (though here we see raw clay contact points). Aim for a fit that doesn’t rattle. -
Smooth the surfaces:
Burnish the outer surfaces with a soft rib or smooth stone if you want that raw, tactile finish shown in the photo. This compresses the particles and gives a slight sheen without glaze. -
Drying:
Dry the lid *on* the jar. This ensures they shrink together and maintain their shape relative to one another. -
Bisque firing:
Fire the piece to bisque temperature (usually Cone 06 or 04). -
Finishing:
For the look in the photo, leave the exterior unglazed (or use a matte transparent glaze) to show off the speckles. Glaze the interior if it will hold food. Fire to maturity (Cone 5/6 or 10 depending on clay).
Lid Rocking?
If the lid rocks, the flange or the gallery seat isn’t level. Use a rasp/surform tool on the leather-hard clay to gently level the high spots.
Enjoy the satisfying ‘clink’ as your precision lid slides perfectly into place


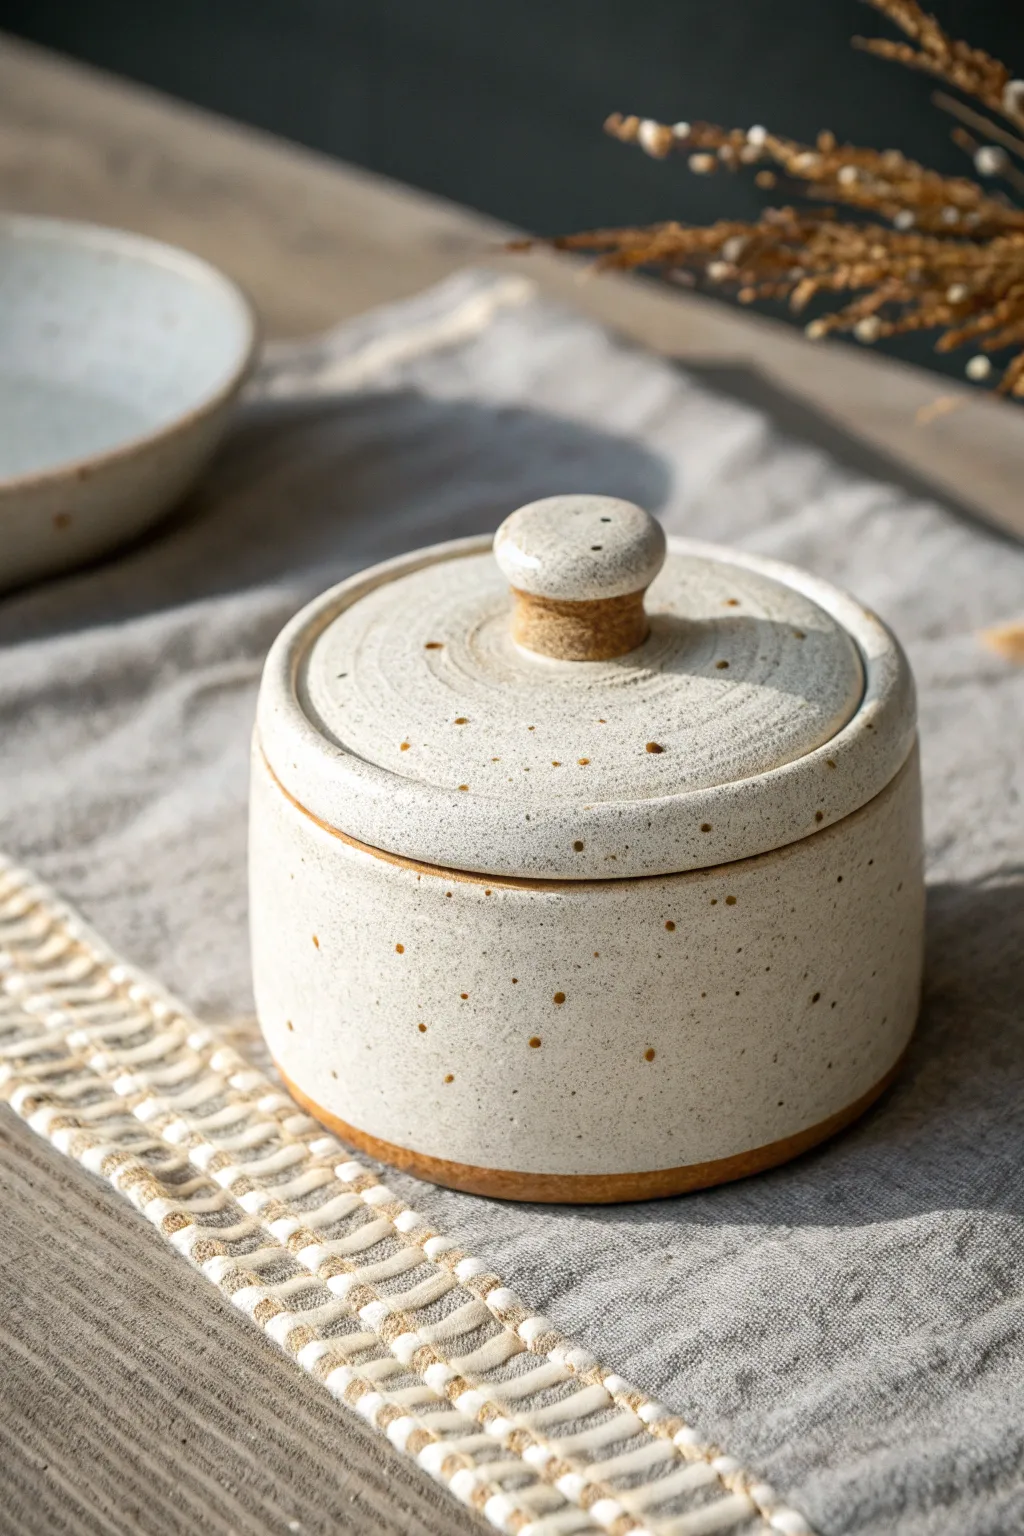
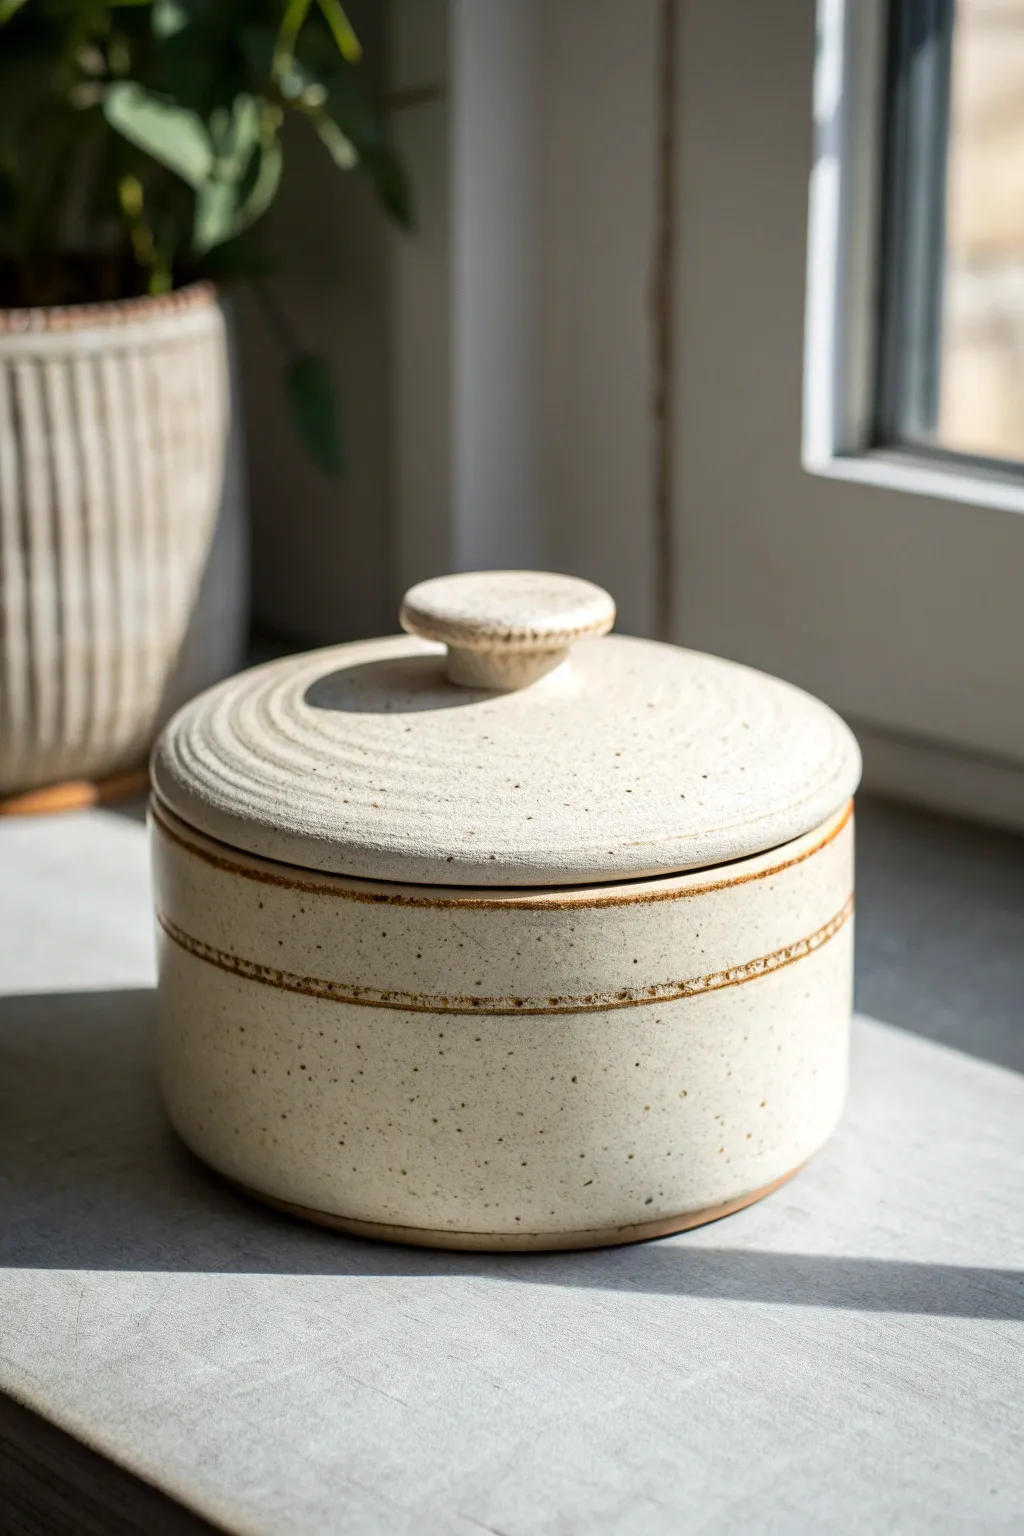
Classic Knob Handle in a Centered Dome
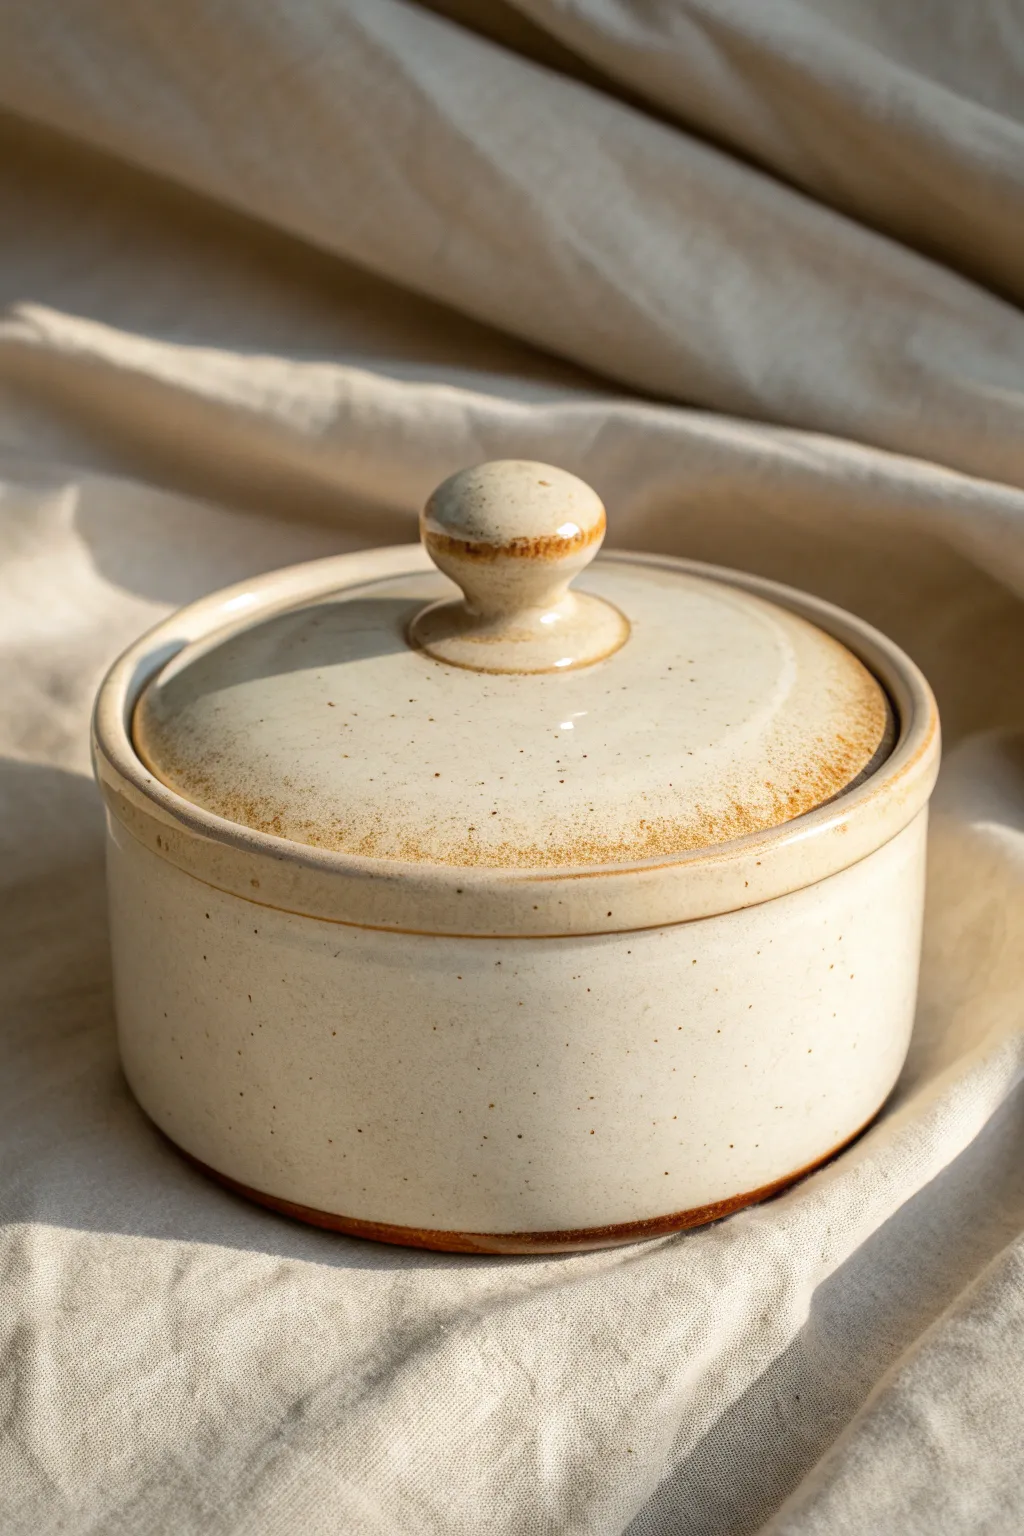
This timeless ceramic box features a warm, creamy speckled glaze that highlights the natural beauty of the underlying clay body. With its snugly fitting domed lid and comfortable knob handle, it is the perfect vessel for storing sugar, jewelry, or precious keepsakes.
How-To Guide
Materials
- Stoneware clay (speckled or buff)
- Pottery wheel
- Throwing sponge
- Needle tool
- Wooden throwing rib
- Wire cutter
- Trimming tools (pear-shaped and loop)
- Calipers
- Cream matte glaze
- Iron oxide wash (optional, for enhancing rim)
- Chamois leather
Step 1: Throwing the Base
-
Center and open:
Start with about 1.5 lbs of clay. Center it firmly on the wheel head and open it up, leaving the floor roughly 1/4 inch thick. Compress the floor with your sponge to prevent S-cracks later. -
Pull the walls:
Pull the clay up into a straight cylinder. Aim for vertical walls rather than a bowl shape. Keep the rim slightly thicker than the walls to provide structural integrity for the gallery. -
Define the shape:
Use a wooden rib on the outside against your inside hand to refine the vertical profile. Ensure the sides are straight and smooth, removing throw lines if you want the sleek finish shown in the photo. -
Create the gallery:
Split the rim using the back of your thumbnail or a wooden tool. Push the inner half down and out slightly to create a ledge (gallery) for the lid to sit on. This ledge needs to be flat and clean. -
Measure:
Use your calipers to measure the exact diameter of the gallery seating area. Lock the calipers in place; you will need this measurement for the lid.
Step 2: Throwing the Lid
-
Throw off the hump:
Center a larger mound of clay. Isolate a small amount at the top—enough for the lid. Shaping lids is often easier when thrown ‘off the hump’ rather than as a single small puck. -
Flatten and measure:
Flatten the isolated clay into a disc. Check the diameter against your locked calipers. You want the lid to be exactly the same size or a hair larger to account for trimming later. -
Shape the dome:
While supporting the underside, gently press the center of the disc down to create a slight curve, mimicking the gentle slope seen in the photo. Keep the rim thick enough to trim later. -
Form the knob:
Instead of attaching a knob later, pull a small amount of clay from the center of your disc upwards. Shape it into a classic mushroom or ball shape, undercutting it slightly for a good grip. -
Cut:
Use a needle tool or wire to cut the lid from the hump. Set it aside to dry to leather-hard.
Lid Too Loose?
If you trim the lid too small, don’t toss it. Wet the gallery of the pot slightly and compress the rim inward with a throwing stick to shrink the opening size.
Step 3: Trimming and Finishing
-
Trim the base:
Once leather-hard, center the jar upside down on the wheel. Trim away excess weight from the bottom and clean up the foot ring. I like to leave a crisp corner at the bottom edge. -
Fit the lid:
Turn the lid upside down and center it (you may need a chuck or a foam bat to protect the knob). Trim the outer edge until it fits perfectly into the gallery of your base. -
Refine the surface:
Clean up any trimming marks with a damp sponge. Run a chamois over the knob and rims to ensure they are buttery smooth to the touch. -
Bisque fire:
Allow both pieces to dry slowly and thoroughly before firing them to cone 04 (or your clay’s bisque temperature).
Add Texture
Before the clay dries, gently press a rasp or serrated rib against the lower centimeter of the jar while it spins. This adds tactile contrast to the smooth glaze.
Step 4: Glazing
-
Wax the contact points:
Apply wax resist to the gallery ledge on the base and the contact ring on the underside of the lid. This prevents the lid from fusing to the jar during firing. -
Dip the base:
Holding the jar by the foot, dip it swiftly into a cream matte stoneware glaze. allow the excess to drip off before turning it right-side up. -
Glaze the lid:
Dip the lid. If the glaze is thick, be careful not to obscure the detail where the knob meets the dome. Wipe any glaze off the waxed areas immediately. -
Accentuate the rims:
To get that toasted edge effect, wipe a very thin sponge damp with iron oxide along the rim of the lid and the base. This mimics the breaking clay seen in the reference. -
Final Fire:
Fire to cone 6 (or your clay body’s maturity). Firing in oxidation typically preserves the creamy white color while still allowing the iron speckles to bleed through.
Place this beautiful jar on your counter and enjoy the satisfaction of that perfect lid fit
BRUSH GUIDE
The Right Brush for Every Stroke
From clean lines to bold texture — master brush choice, stroke control, and essential techniques.
Explore the Full Guide
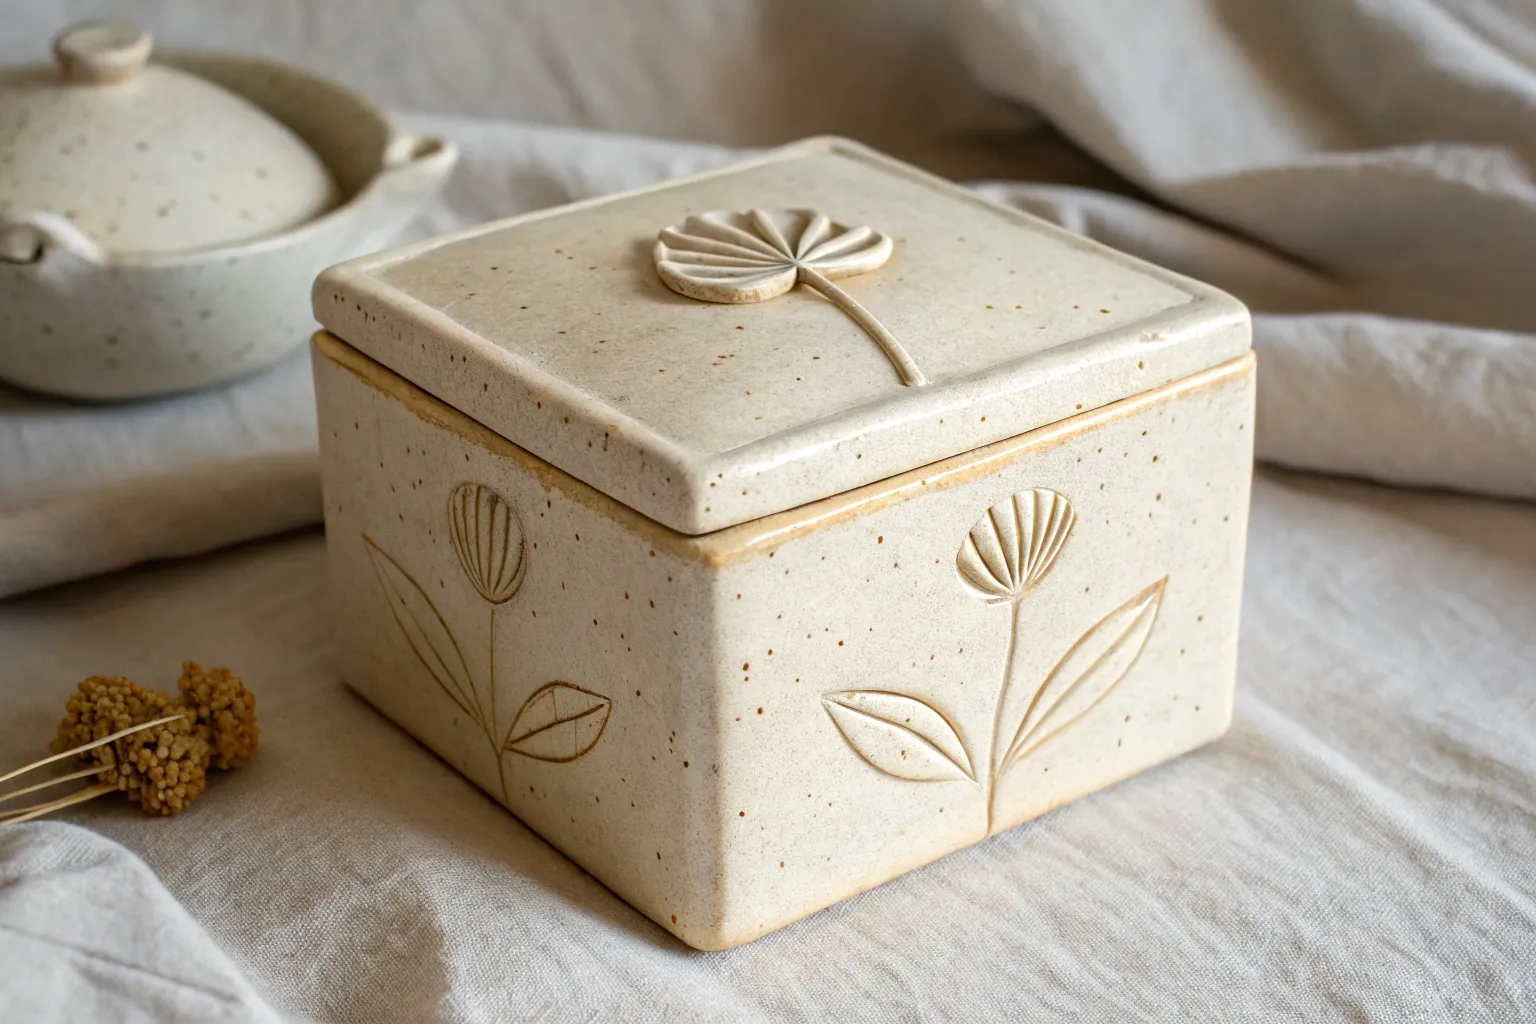
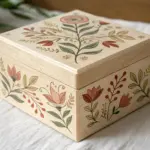
Floral Lid Topper With Carved Petals
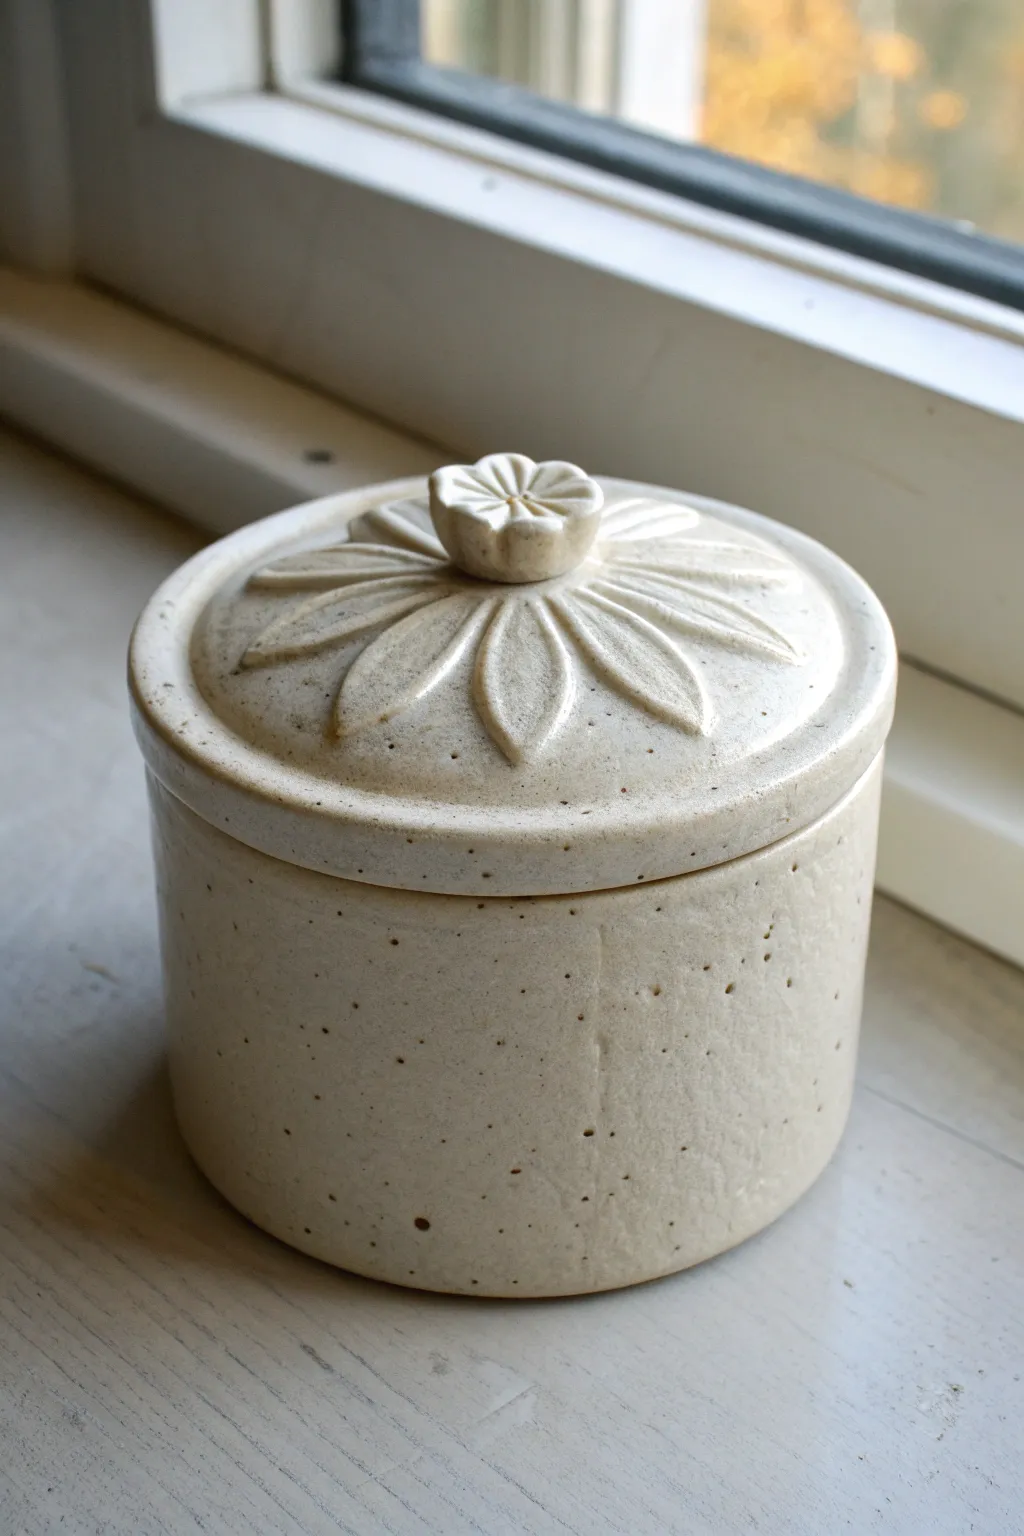
This charming lidded vessel features an elegant floral motif carved directly into the clay surface, topped with a delicate matching finial. The speckled matte cream glaze gives it a warm, organic feel perfect for storing small treasures or jewelry.
Detailed Instructions
Materials
- Stoneware clay body (speckled)
- Pottery wheel
- Throwing tools (ribs, sponge, wire cutter)
- Calipers
- Loop carving tools (small and medium)
- Needle tool
- Scoring tool or serrated rib
- Slip
- Matte cream/white glaze
- Kiln
Step 1: Throwing the Form
-
Throw the Body:
Begin by centering about 1-1.5 lbs of speckled clay on the wheel. Open the form and pull the walls straight up to create a simple cylinder. Aim for vertical walls with no belly. -
Create the Gallery:
At the rim, gently press down and in with a rib or your finger to create a gallery (a small shelf) where the lid will sit. Ensure this ledge is square and clean. -
Measure and Refine:
Use a straight rib to smooth the exterior walls, removing throwing lines for a sleek canvas. Measure the diameter of the gallery shelf with calipers before cutting the pot off the bat. -
Throw the Lid:
Center a smaller amount of clay (approx 0.75 lb). Throw a low, flat disc shape. Use your caliper measurement to ensure the lid’s flange fits perfectly into the cylinder’s gallery. -
Shape the Curve:
While throwing the lid, gently dome the top surface rather than keeping it perfectly flat. This slight curvature adds volume for the petal carving later. Cut it off the hump.
Clean Carving
Carve when the clay is a firm leather hard. If it’s too wet, the tools will drag and distort the shape; too dry, and it will chip.
Step 2: Carving & Assembly
-
Trim the Base:
Once the body is leather hard, center it upside down on the wheel. Trim the bottom flat, creating a neat foot ring or a flat bottom depending on your preference. -
Trim the Lid:
Secure the lid onto the wheel (or in a chuck) to trim away excess weight from the underside. Refine the fit so it sits snugly but comfortably in the pot’s gallery. -
Map the Design:
On the domed top of the lid, lightly scratch a central circle where the knob will go. From that circle, use a needle tool to lightly sketch radial lines marking the center of each petal. -
Carve the Petals:
Using a sharp loop tool, carve out the negative space between your petal outlines. Start shallow and go deeper near the outer edges to create a 3D relief effect. -
Refine the Petal Shape:
With a smaller tool or modeling stick, smooth the edges of each raised petal, ensuring they have a soft, rounded petaloid shape rather than sharp ridges. -
Sculpt the Knob:
Hand-build a small sphere of clay. Flatten it slightly and use a needle tool or small knife to press indentations around the side, creating a tiny flower bud shape. -
Attach the Knob:
Score the center of the lid and the bottom of your flower knob. Apply slip and press the knob firmly into the center of the petals. Clean up any excess slip with a brush. -
Clean Up:
Once bone dry, gently rub the carved areas with a soft scrub pad or finger to remove any sharp burrs or clay crumbs. This ensures the glaze breaks beautifully over the texture.
Step 3: Firing & Glazing
-
Bisque Fire:
Fire the piece to cone 04 (or your clay body’s bisque temperature). Ensure the lid is fired separately or waxed to prevent sticking if you stack them. -
Glaze Application:
Dip the entire piece into a matte cream or satin white glaze. I find that a slightly thinner glaze application helps accentuate the carving details rather than obscuring them. -
Wipe the Foot:
Clean the bottom of the pot and the contact points of the lid and gallery with a damp sponge to prevent the lid from fusing shut during the firing. -
Final Fire:
Glaze fire to cone 5 or 6 (mid-range stoneware). The heat will interact with the iron specks in the clay, pulling them through the light glaze for that signature speckled look.
Color Wash
Apply a dark iron oxide wash to the carved grooves before glazing, then sponge it off. This will darken the recesses and make the petals pop more.
Place your finished box on a sunny windowsill where the natural light can catch the subtle relief of the petals
Geometric Pattern Box With Sgraffito Lines
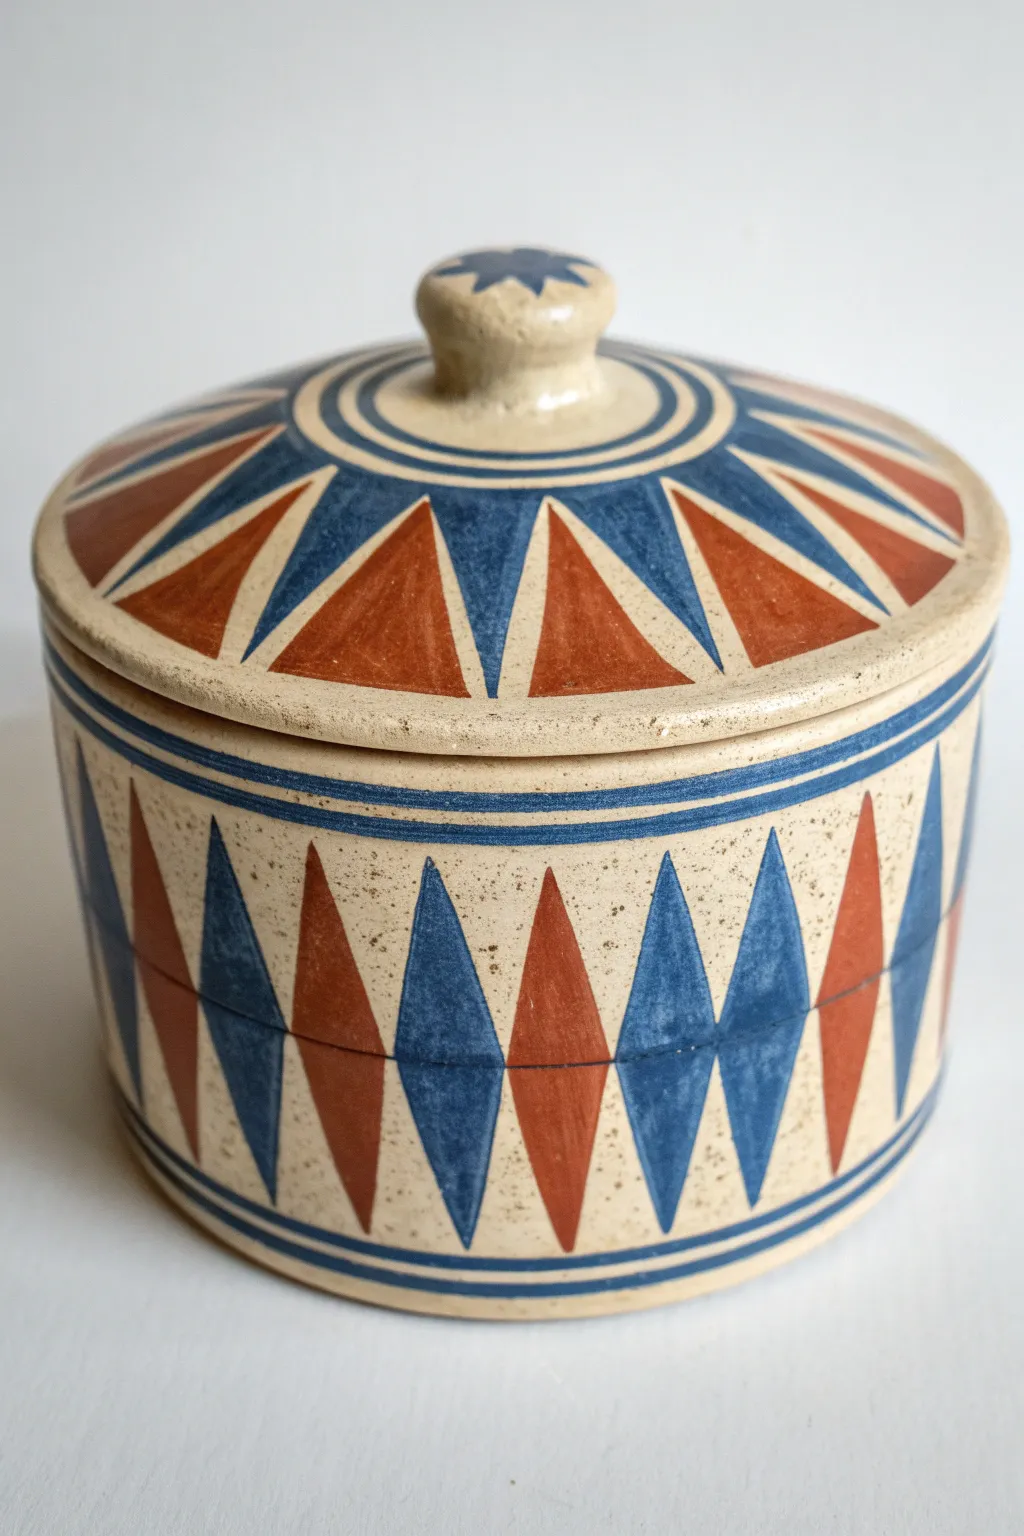

This charming lidded vessel combines a classic cylindrical form with a bold, hand-painted geometric design in rust and cobalt blue. The pattern features striking radiating triangles on the lid and an alternating diamond motif around the body, all accented with subtle sgraffito lines for added definition.
How-To Guide
Materials
- Stoneware clay (speckled or buff)
- Pottery wheel
- Throwing tools (rib, sponge, wire)
- Trimming tools
- Underglazes: Cobalt Blue and Terracotta/Rust Red
- Detail brushes (fine round)
- Banding wheel
- Pin tool or sgraffito tool
- Clear transparent glaze
- Kiln
Step 1: Forming the Vessel
-
Throw the Body:
Center about 1-1.5 lbs of clay on the wheel. Open and pull the walls to form a straight-sided cylinder, approximately 4-5 inches high. Ensure the rim is flat and compressed to accept a lid. Cut it off the bat but leave it to firm up to leather-hard. -
Throw the Lid:
Using a smaller amount of clay (approx 0.75 lb), throw a flat lid. Create a flange underneath that will fit snugly inside the rim of your cylinder. In the center, pull a small, solid knob, shaping it into a rounded button. -
Trim the Pieces:
Once leather-hard, trim the bottom of the cylinder to create a clean foot. Trim the lid if necessary to refine the curve and ensure the knob is smooth and centered. -
Check the Fit:
Test the lid on the box. It should fit securely without wobbling. If it’s too tight, carefully trim the flange; if too loose, you may need to rely on glaze thickness later or remake the lid.
Fixing Smudged Lines
If you paint outside the lines, wait for the underglaze to dry completely. Then, scratch the mistake away gently with an X-Acto knife or sharp tool.
Step 2: Designing the Pattern
-
Mark Guidelines:
Place the box on a banding wheel. With a pencil, lightly mark a horizontal centerline around the exterior wall. This line divides the top and bottom halves of your diamond shapes. -
Divide the Space:
Divide the circumference of the box into an even number of sections (e.g., 12 or 16). Draw vertical tick marks at the top rim and bottom edge to guide your triangle points. -
Map the Lid:
On the lid, draw three concentric circles: one near the knob, one mid-way, and one at the edge. Divide the middle band into radial sections corresponding to the number of triangles you want.
Wax Resist Method
Apply wax resist over your finished underglaze design before dipping in clear glaze. This ensures the geometric shapes stay crisp and unclouded.
Step 3: Painting & Sgraffito
-
Paint the Blue Bands:
Spin the banding wheel and apply a steady band of Cobalt Blue underglaze to the rim of the lid and the upper and lower rims of the box body. I find holding the brush steady while the wheel turns works best. -
Paint the Lid Triangles:
Using a fine brush, fill in the radiating triangles on the lid, alternating between Cobalt Blue and Rust Red. Keep your edges as sharp as possible, pointing inward toward the knob. -
Paint the Body Diamonds:
For the box sides, paint elongated triangles pointing up from the center line and down from the center line to form diamonds. Alternate the colors: a full blue diamond (top and bottom triangle), then a full rust diamond. -
Knob Detail:
Paint a small blue star or flower pattern on the very top of the knob for a finished look. -
Sgraffito Definition:
Once the underglaze is dry to the touch but the clay is still leather-hard, use a pin tool or needle tool to scratch a thin line horizontally through the center of the diamonds. -
Outline Carving:
Continue with the needle tool to gently scratch outlines around the colored shapes if you want to crisp up any messy paint edges or add a white border effect.
Step 4: Firing and Glazing
-
Bisque Fire:
Load the thoroughly dried pieces into the kiln and bisque fire to Cone 04 (or your clay’s specific bisque temperature). -
Clear Glaze Application:
Dip the entire box and lid into a clear transparent glaze. This will seal the underglaze and allow the speckled clay body to show through. -
Wipe the Foot:
Use a damp sponge to completely wipe the clear glaze off the bottom foot of the box and the contact flange of the lid to prevent sticking. -
Final Fire:
Fire the kiln to the maturity temperature of your clay and glaze (typically Cone 5 or 6 for stoneware). Let it cool completely before opening.
Now you have a beautiful, hand-decorated container perfect for storing small treasures or serving dry goods

PENCIL GUIDE
Understanding Pencil Grades from H to B
From first sketch to finished drawing — learn pencil grades, line control, and shading techniques.
Explore the Full Guide
Stamped Texture Box Using Leaves and Lace
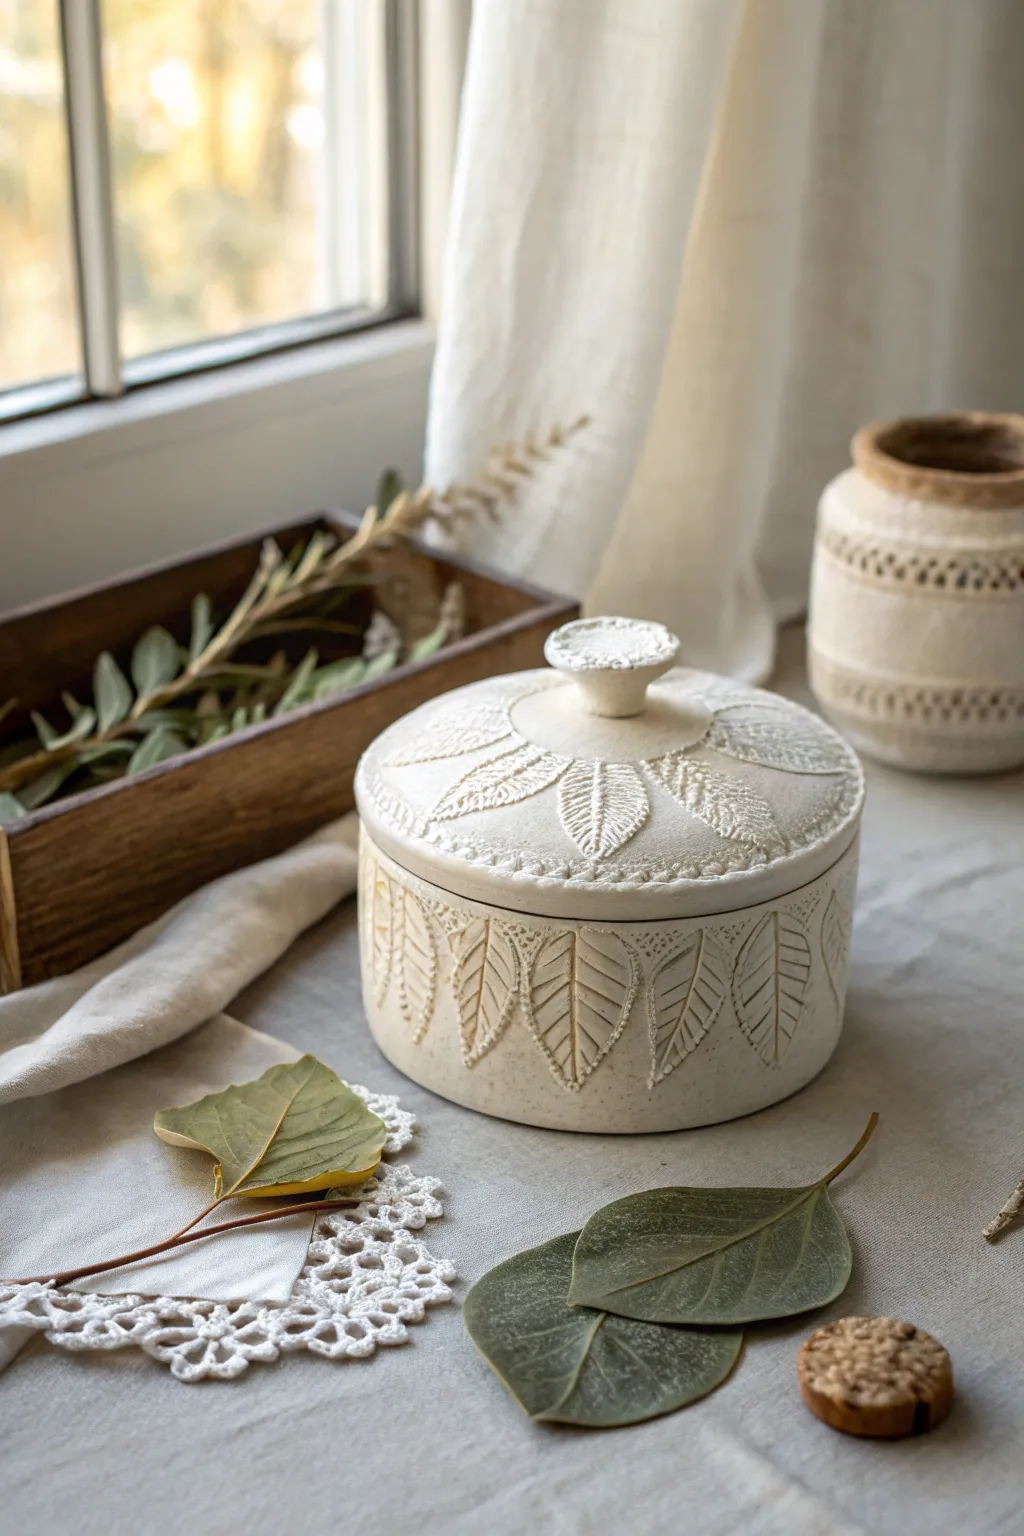
This project captures the delicate textures of the natural world in a functional ceramic vessel. By combining real leaves with lace impressions, we create a soft, rustic white clay box perfect for storing small keepsakes.
Step-by-Step Guide
Materials
- White stoneware clay or air-dry clay (smooth body)
- Rolling pin
- Two long wooden slats (approx. 1/4 inch thick) for depth guides
- Various fresh leaves with prominent veins
- Cotton lace trim or crochet doily pieces
- Circular cookie cutters (one 4-inch, one slightly smaller for the interior rim)
- Needle tool
- Scoring tool or serrated kidney
- Slip (liquid clay)
- Small sponge
- Potter’s knife or fettling tool
- Kiln (if using stoneware) or sealant (if using air-dry)
- Matte white glaze or transparent glaze
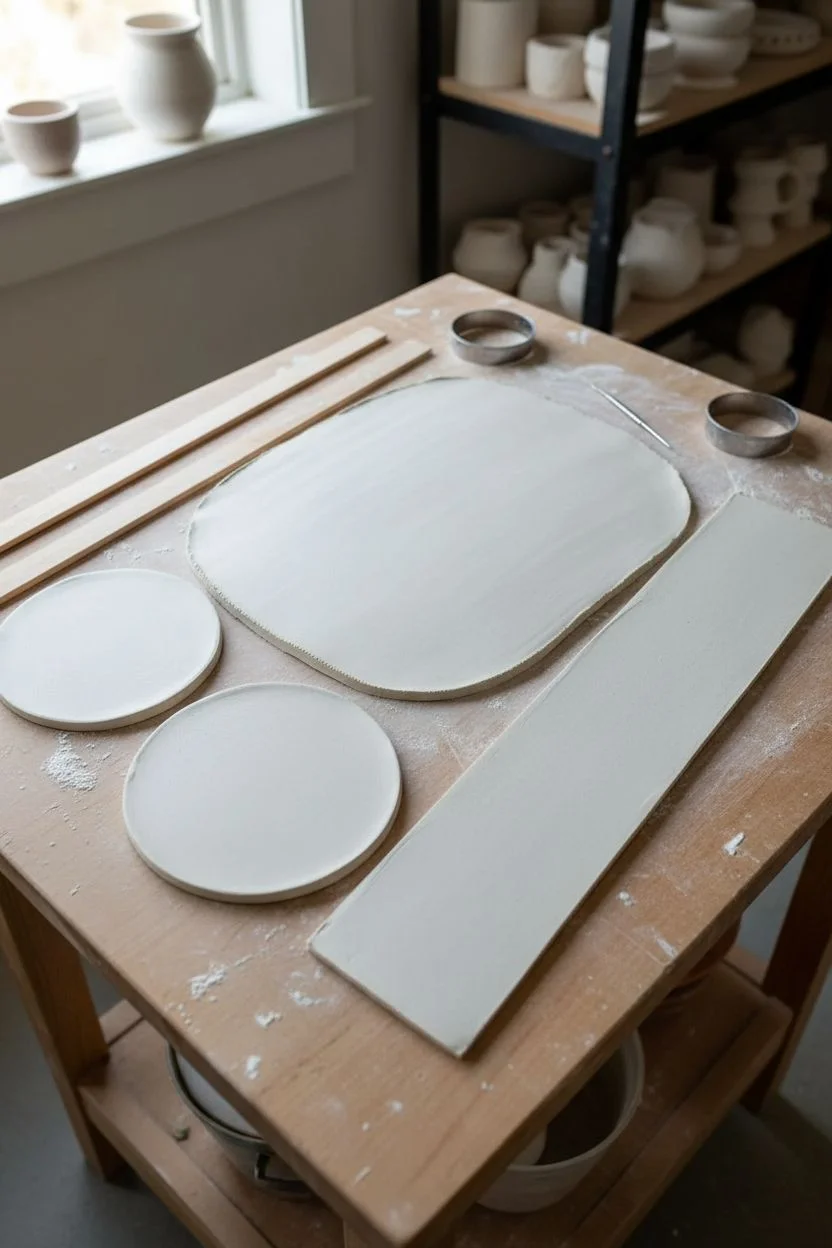
Step 1: Preparing the Slabs
-
Roll the base clay:
Start by wedging your white clay thoroughly to remove air bubbles. Place it between your wooden depth guides and roll it out into a smooth, even slab about 1/4 inch thick. -
Cut the components:
Using your large circular cutter, cut out two circles: one for the base and one for the lid. Next, cut a long rectangular strip for the wall of the box. Measure the circumference of your base circle to ensure the strip is long enough to wrap around it completely with a little overlap. -
Smooth the edges:
Run a slightly damp sponge along the cut edges of all your clay pieces to soften any sharp corners left by the cutter or knife.
Sticky Situation?
If leaves stick to the clay and tear when peeling, let the clay dry for 10-15 minutes before impressing. Waxy leaves like magnolia release easier than fuzzy ones.
Step 2: Impressing the Texture
-
Position the leaves:
Take your rectangular clay strip (the wall piece). Arrange fresh leaves vertically along the strip, ensuring the veiny back side of the leaf faces down into the clay for the best impression. Space them evenly. -
Add lace details:
Just above the tips of the leaves, or between them if you prefer a denser pattern, gently press small pieces of lace or use a lace trim to create a delicate border texture. -
Roll the texture:
Gently roll over the leaves and lace with your rolling pin. Press firm enough to embed the texture but not so hard that you deform the clay slab significantly. Carefully peel away the organic materials to reveal the design. -
Texture the lid:
Repeat the process on the lid circle. Arrange leaves in a radial burst pattern from the center outwards, perhaps adding a lace border near the rim.
Step 3: Assembling the Box
-
Score and slip the base:
Take your base circle and score (scratch) the outer perimeter. Apply a generous amount of slip to the scored area. -
Attach the wall:
Lift the textured rectangular strip and wrap it around the base circle. Score and slip the vertical ends where they meet, overlapping them slightly. Use your fingers or a modeling tool to blend the seam on the inside and outside, being careful not to smudge your exterior leaf texture. -
Secure the bottom seam:
Press the wall firmly onto the slipped base. Use a small coil of clay on the interior bottom seam and smooth it out to reinforce the join, ensuring the box is watertight. -
Refine the shape:
Check that the box is perfectly round. You can gently push from the inside out to correct any flat spots.
Make it Pop
After bisque firing, rub a dark oxide wash (like iron oxide) into the textured grooves and sponge off the surface before glazing to create high contrast definition.
Step 4: Creating the Lid and Knob
-
Form the flange:
To keep the lid from sliding off, you need an inner flange. Roll a small coil or cut a thin strip of clay and attach it to the underside of the lid, inset about 1/4 inch from the edge. Ensure this flange fits snugly inside the box rim. -
Create the knob:
Roll a small ball of clay and flatten it slightly into a mushroom or button shape. I like to press a piece of lace onto the top of this knob to match the body. -
Attach the knob:
Score the center of the lid and the bottom of the knob. Apply slip and press the knob firmly into place. Clean up any excess slip with a brush.
Step 5: Finishing Touches
-
Slow drying:
Cover the box loosely with plastic to allow it to dry slowly. This prevents warping, which is crucial for a fitted lid. -
Bisque fire:
Once bone dry, fire the piece to bisque temperature (usually cone 04) if using ceramic clay. -
Glazing:
Apply a matte white glaze. The glaze should be thin enough to pool slightly in the leaf veins, highlighting the texture, but not so thick that it obscures the details. Wipe back the glaze with a sponge if it looks too heavy. -
Final firing:
Fire again to the maturity temperature of your clay and glaze combination.
Place this beautiful vessel on your vanity or coffee table to bring a quiet, earthy elegance to your space
Mishima Inlay Box With Drawn Patterns
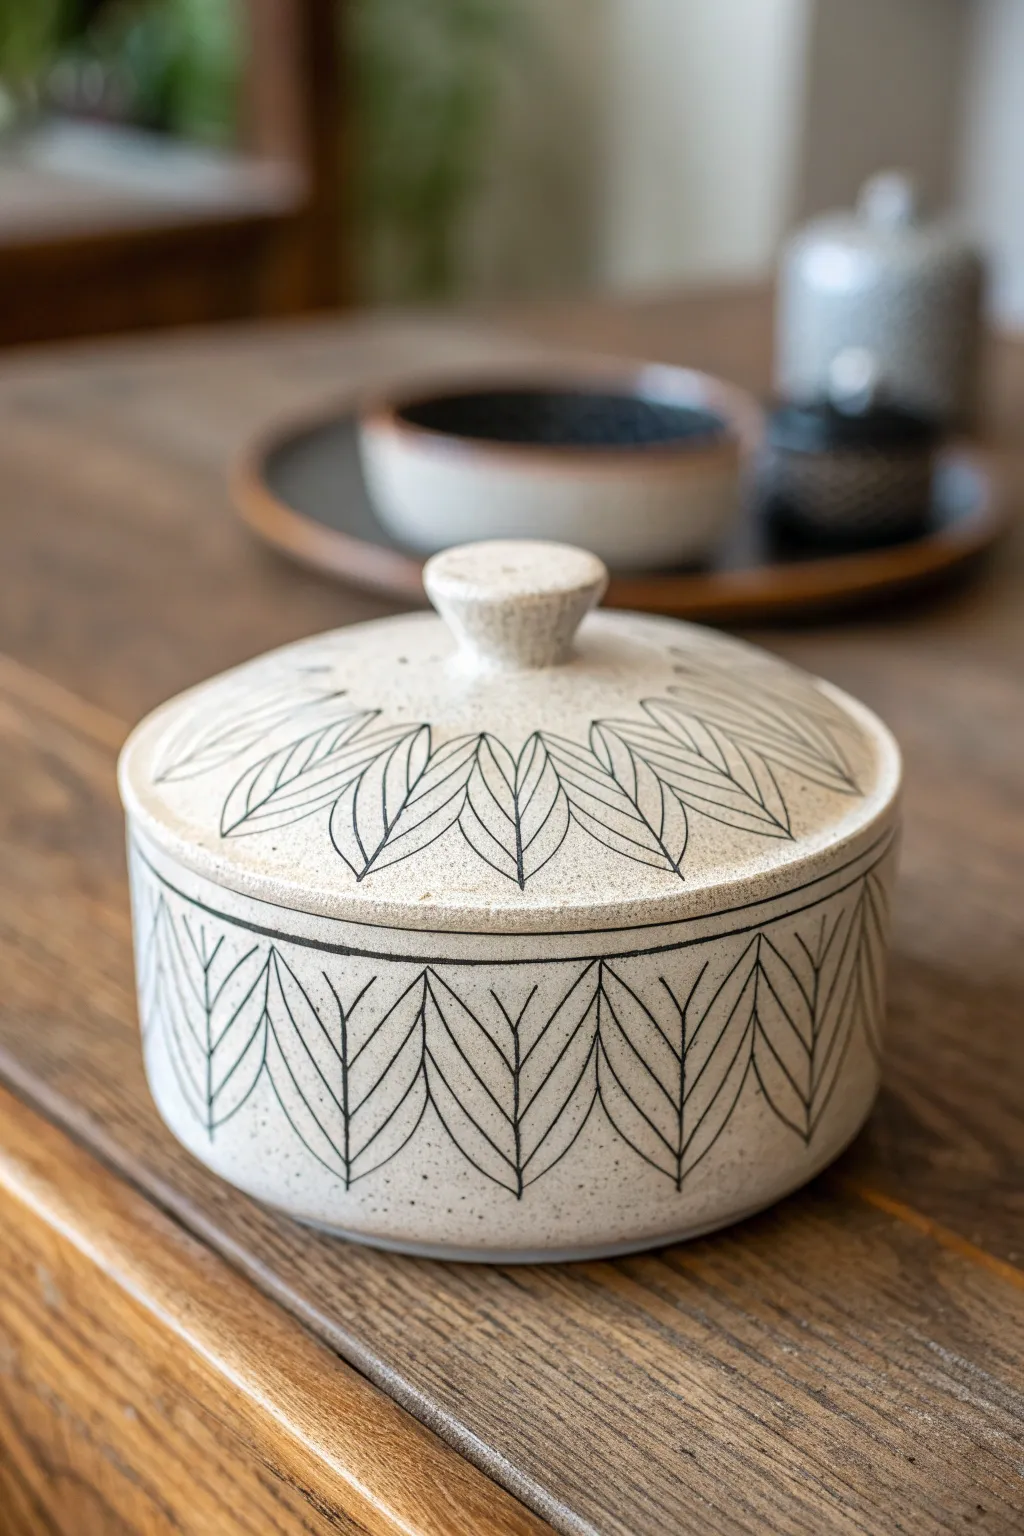
This project showcases the elegant Mishima technique, where intricate black lines are inlaid into a speckled cream clay body to create a stunning botanical design. The result is a smooth, flush surface with a pattern that feels like it grew right out of the pot.
Step-by-Step
Materials
- Speckled buff stoneware clay
- Pottery wheel
- Ribs (wood and metal)
- Needle tool
- Trimming tools
- Small loop tool
- X-acto knife or very sharp carving tool
- Black underglaze (or black slip)
- Paintbrush
- Wax resist (optional)
- Clear matte or satin glaze
- Metal scraper or stiff rib for cleanup
- Sponge
Step 1: Throwing the Form
-
Center and Open:
Begin with about 1.5 to 2 lbs of speckled clay. Center it firmly on the wheel and open the clay wide to establish the floor of your box. -
Pull the Walls:
Pull the walls straight up to create a cylinder. Aim for a height of about 3-4 inches providing a nice canvas for the pattern. Ensure the rim is flat and compressed. -
Form the Gallery:
Using a wooden modeling tool or your finger, split the rim to create a gallery—the little shelf where the lid will sit. Keep this inner flange sharp and well-defined. -
Throw the Lid:
Using a separate smaller ball of clay, throw a lid that fits your measured gallery. Throw it upside down (knob side down) first if trimming later, or throw right-side up with the knob integral to the piece. Measure frequently with calipers. -
Dry to Leather Hard:
Cover both pieces loosely and allow them to dry to a sturdy leather-hard stage. This is crucial for the carving step.
Smudged Lines?
If your black lines look smeared after scraping, let the underglaze dry longer. Scraping while it is still damp drags the pigment across the clay pores rather than slicing it off cleanly.
Step 2: Trimming and Refining
-
Trim the Box:
Center the box upside down on the wheel. Trim away excess weight from the bottom and create a defined foot ring. -
Refine the Lid:
Trim the top of the lid to smooth the curve. If you didn’t throw the knob integrally, attach a small ball of clay now and shape it into a flared knob. -
Final Smoothing:
Wipe the entire surface with a barely damp sponge or a soft rib to remove any grog or throwing lines. The surface needs to be very smooth for the inlay.
Add Subtle Color
Before the final glaze, try painting watered-down watercolor underglaze washes inside the leaves—faint greens or teals look beautiful contained within the black outlines.
Step 3: Mishima Carving and Inaly
-
Draft the Pattern:
Lightly sketch your leaf pattern directly onto the leather-hard clay with a soft pencil. Draw a repeating ‘V’ chevron pattern around the sides and radiating petals on the lid. -
Carve the Lines:
Using an X-acto knife or a very fine carving tool, incise the lines over your pencil marks. You want thin, distinct channels, not deep gouges. Keep the burrs for now or gentling brush them away; I prefer to leave them slightly to catch the slip. -
Coat with Wax (Optional):
For easier cleanup, you can apply a thin layer of wax resist over the surface *before* filling the lines, though classic Mishima often skips this. It helps keep the main clay body clean. -
Apply Underglaze:
Generously paint black underglaze or black slip over all the carved lines. Don’t worry about being messy; you need the liquid to get all the way into the deepest part of the carvings. -
Let it Set:
Allow the underglaze to dry completely until it is no longer shiny.
Step 4: The Reveal
-
Scrape the Surface:
This is the satisfying part. Using a sharp metal rib or a specialized scraping tool, gently scrape away the excess underglaze from the surface. The black should remain only inside the carved lines. -
Wipe Clean:
Follow up with a damp (not soaking) sponge to remove any lingering shadowy smudges of black, revealing the sharp, crisp lines against the speckled clay. -
Bisque Fire:
Once bone dry, bisque fire the piece to Cone 04 (or your clay body’s specifications). -
Glaze and Final Fire:
Dip or spray a clear matte or satin glaze over the entire piece. This protects the inlay without obscuring the drawing or the clay’s natural speckles. Fire to maturity (likely Cone 5/6).
Once fired, you’ll have a timeless vessel perfect for holding small treasures or serving sugar


Stencil Lettering Lid With Personal Words
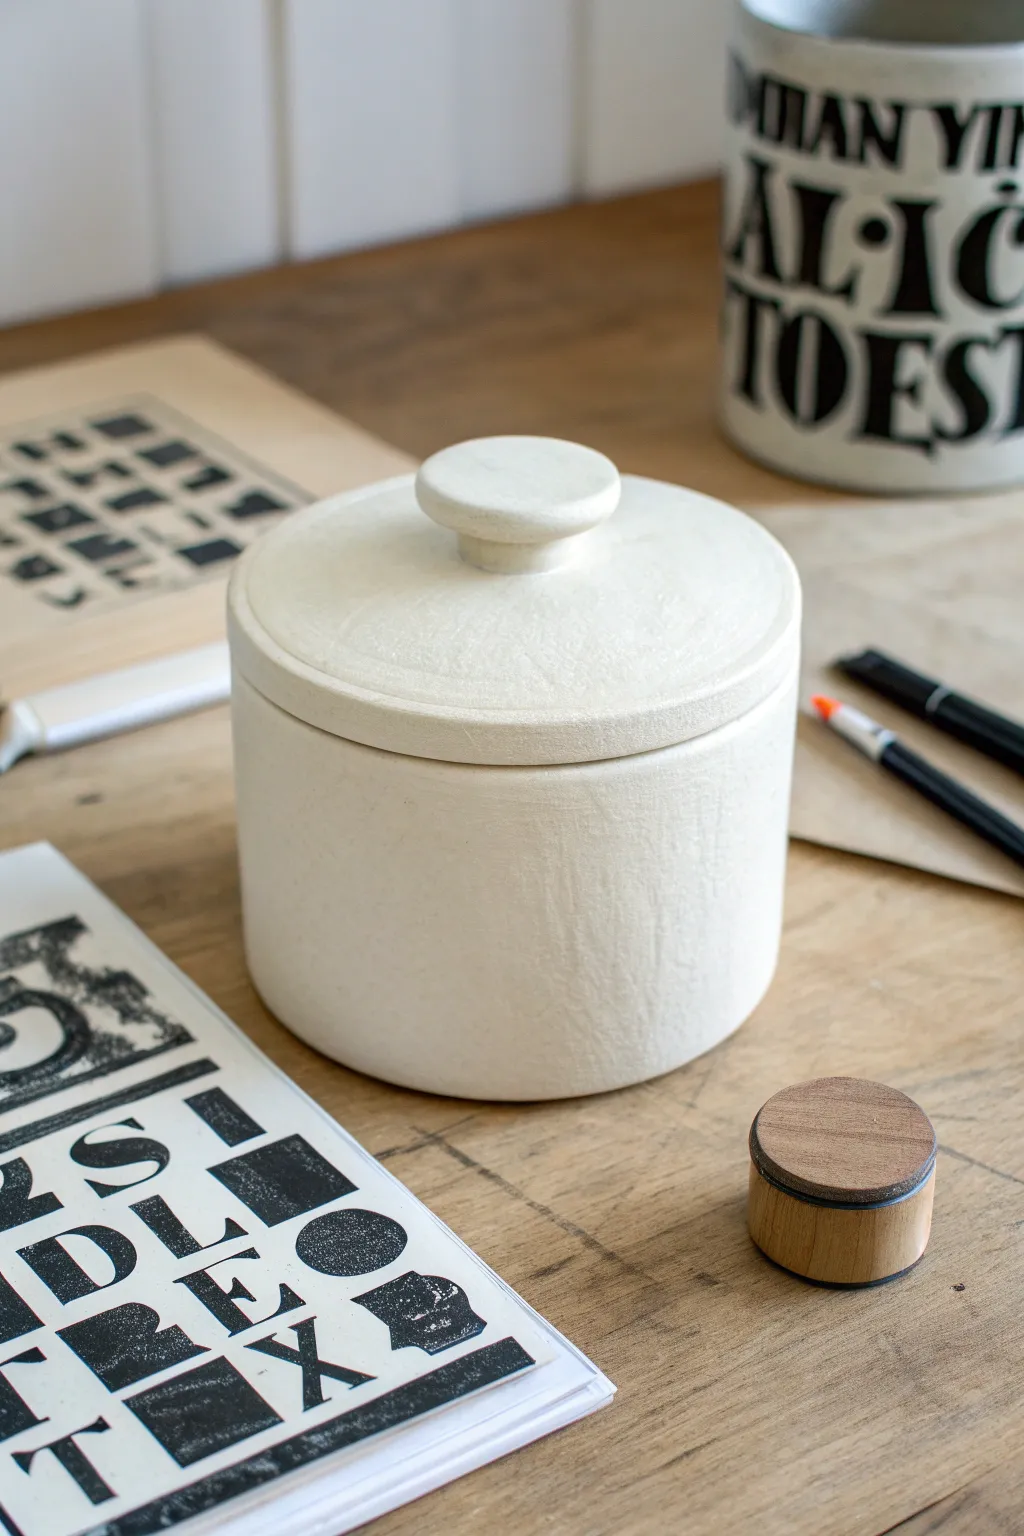
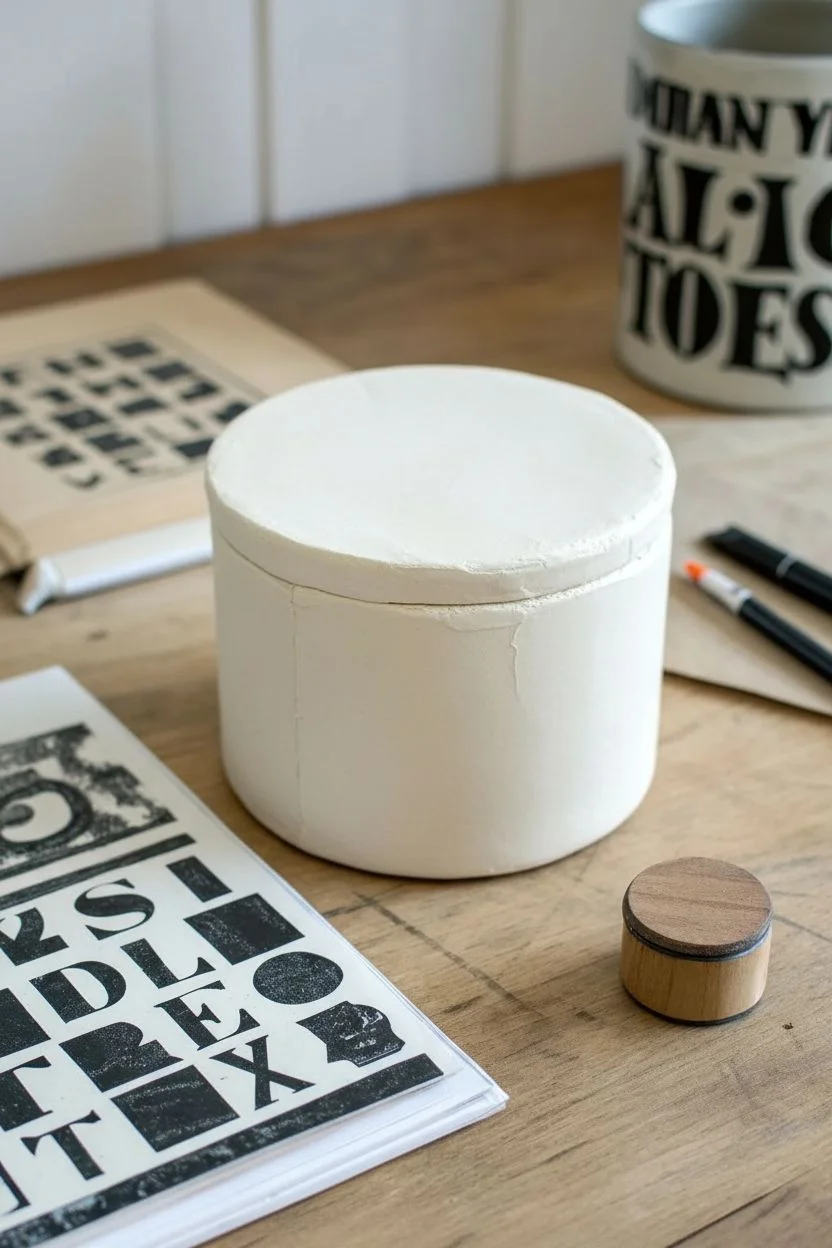
Transform a simple round box into a bespoke ceramic-look treasure holder featuring a subtle, textured finish. This project guides you through creating a clean slate for your personal stencil lettering, achieving that high-end matte pottery aesthetic.
Detailed Instructions
Materials
- Round cardboard or papier-mâché box with lid
- Air-dry clay (white)
- Small rolling pin
- Craft knife
- Sandpaper (fine grit)
- Matte white acrylic paint
- Gesso primer
- Letter stencils
- Stencil brush or sponge dauber
- Black acrylic paint
- Matte sealant spray
Step 1: Preparation & Base Texture
-
Clean surface:
Begin by ensuring your cardboard or papier-mâché box is free of dust or debris. Wipe it down quickly with a dry cloth. -
Prime the box:
Apply a generous coat of Gesso primer to the entire exterior of the box and lid. This helps stiffen the material and provides a good base for the clay texture. -
Roll out clay:
Take a portion of white air-dry clay and roll it out into a thin, even sheet. Aim for about 2-3mm thickness, which is sturdy but not bulky. -
Cover the lid:
Lay the clay sheet over the top of the lid. Gently smooth it down over the edges, pressing firmly to eliminate air bubbles and ensure adhesion. -
Trim excess:
Use a craft knife to carefully trim away any excess clay around the rim of the lid for a clean edge. -
Cover the base:
Repeat the rolling process for the main body of the box. You may need to cut a rectangular strip to wrap around the cylindrical shape.
Step 2: Sculpting Details
-
Smooth the seams:
Where the clay joins on the side of the box, wet your finger slightly and rub the seam in a circular motion until it disappears into the texture. -
Add a handle:
Roll a small ball of clay and flatten it slightly to form a knob. Attach this to the center of the lid using a little water or slip (clay mixed with water) as glue. -
Refine the shape:
Check the fit of the lid on the box. If the clay has made it too snug, gently press the rim inward while the clay is still pliable. -
Create texture:
Instead of smoothing everything perfectly, I like to lightly dab the surface with a damp sponge or a crumpled piece of plastic wrap to give it that organic, stone-like feel. -
Dry completely:
Allow the box to dry fully. This usually takes 24-48 hours depending on humidity. Rotate it occasionally for even drying.
Seamless Clay Tips
Use a tiny bit of water to blend clay seams, but don’t over-wet or the cardboard underneath might warp and lose its shape.
Step 3: Finishing & Stenciling
-
Sand imperfections:
Once bone dry, take fine-grit sandpaper and lightly buff away any sharp ridges or uneven lumps, keeping the overall organic texture intact. -
Base coat paint:
Paint the entire box, inside and out, with a layer of matte white acrylic paint. This unifies the color of the clay and the box base. -
Position stencils:
Select your letters for your personal message. arranging them on the lid or the side of the box. Use low-tack tape to secure the stencil in place. -
Apply lettering:
Dip your stencil brush into black acrylic paint, then offload most of the paint onto a paper towel until the brush is almost dry. -
Dab, don’t brush:
Gently tap the brush straight up and down over the stencil openings. This prevents paint from bleeding under the edges. -
Remove and seal:
Carefully lift the stencil while the paint is still slightly wet. Once fully dry, finish with a light coat of matte sealant spray to protect your work.
Bleeding Paint Fix
If paint bleeds under the stencil, wait for it to dry completely, then touch it up carefully with a small brush and your white base paint.
Now you have a beautifully textured, personalized container ready to hold your small treasures or give as a thoughtful gift
Tape Resist Color Blocks on Box Sides
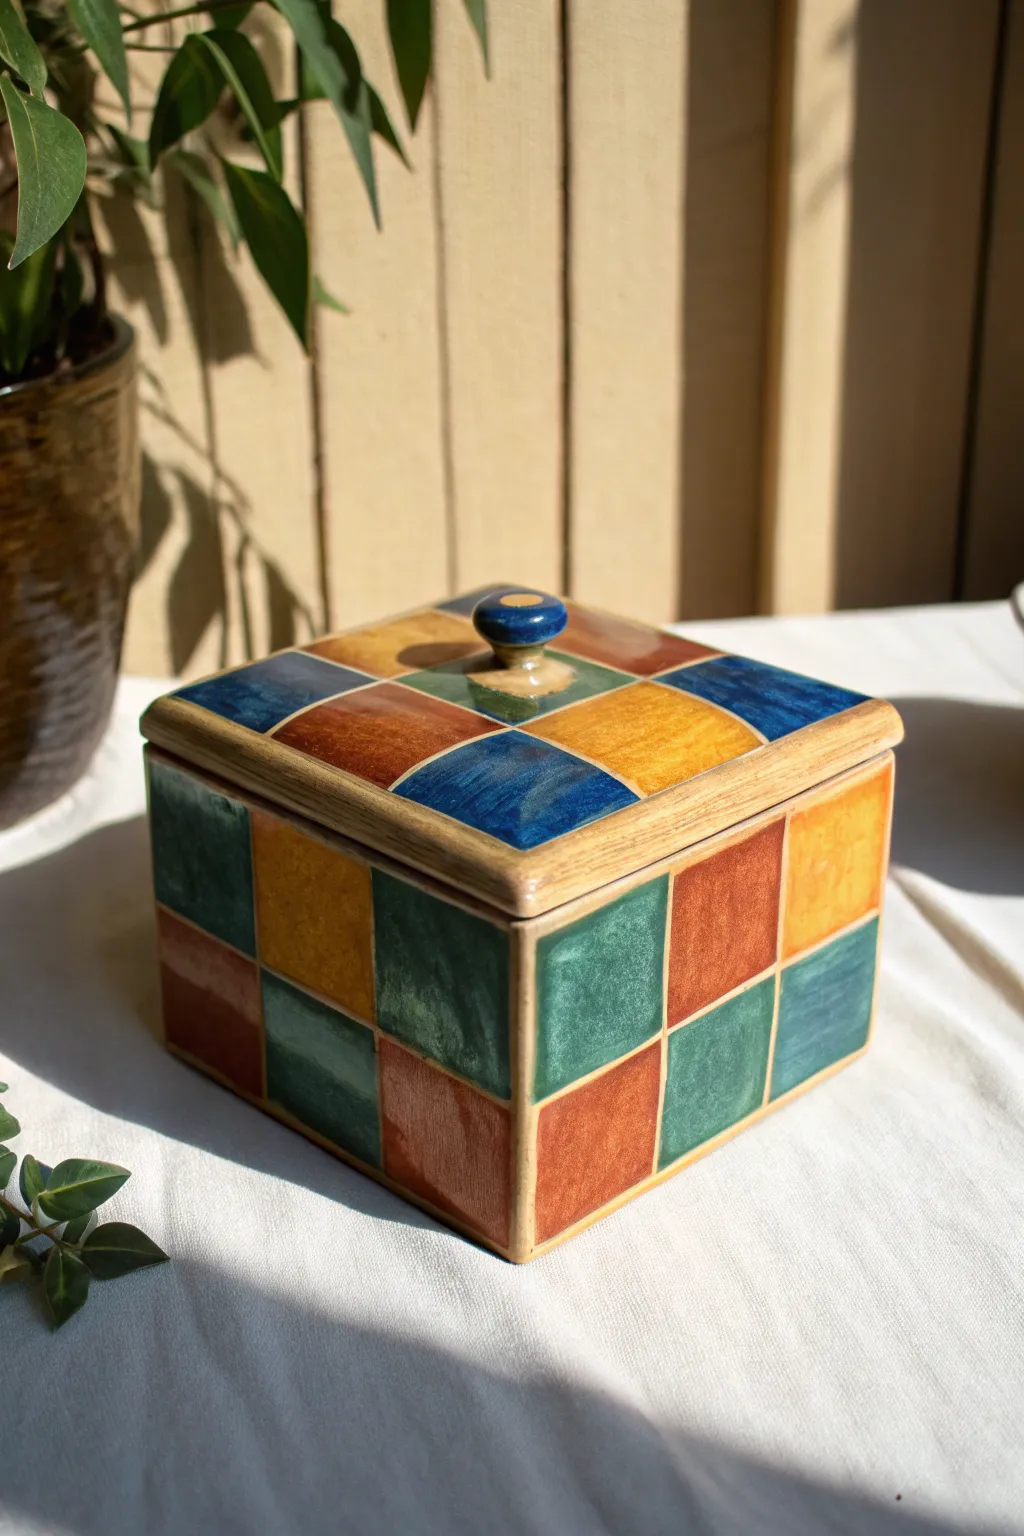
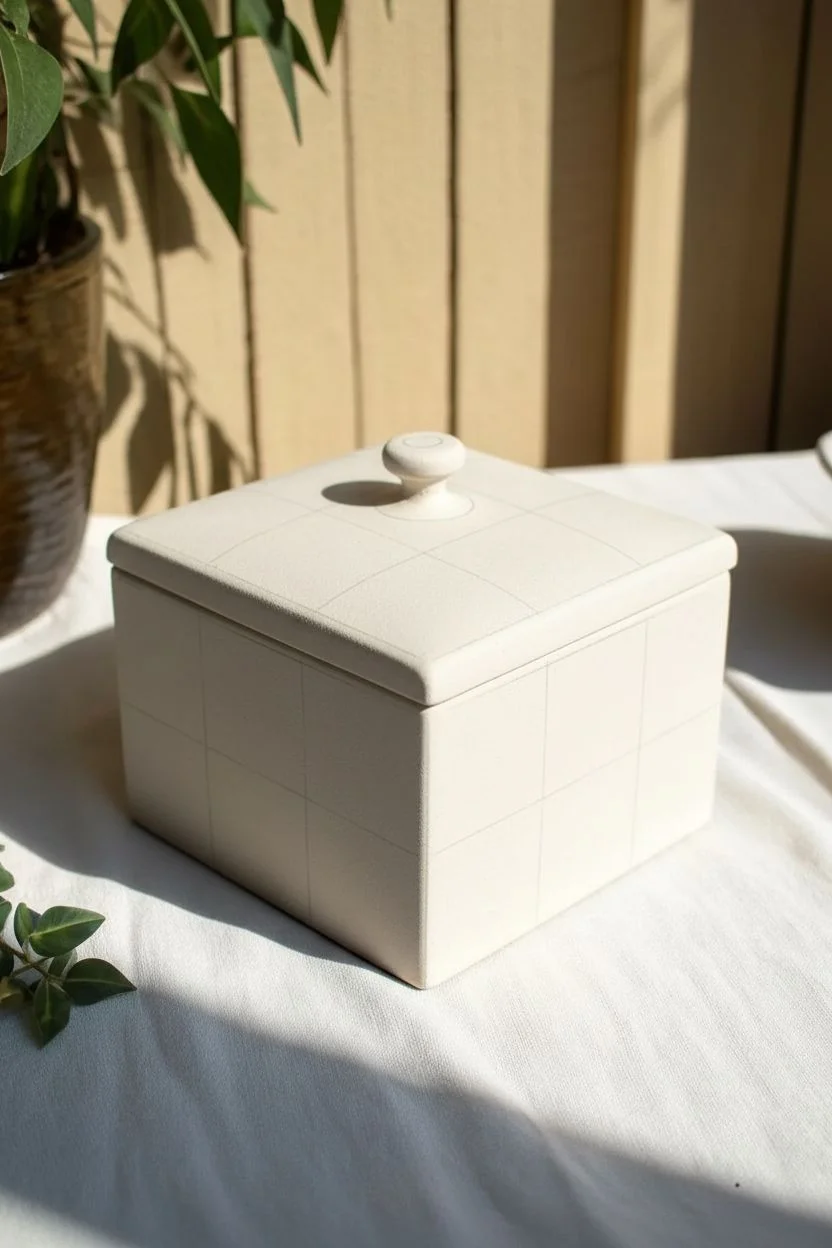
This charming ceramic box features a classic checkerboard design brought to life with warm earthy tones and deep blues. Using a simple tape resist technique, you create clean, crisp lines that make the vibrant glaze colors pop against the raw clay or base color.
Step-by-Step
Materials
- Bisqueware ceramic box (square with lid)
- Glaze tape or automotive striping tape (1/8 inch or 1/4 inch width)
- Ceramic glazes: Mustard Yellow, Deep Teal, Terra Cotta/Rust, and Cobalt Blue
- Soft fan brush
- Small detail brush (round size 2 or 4)
- Damp sponge
- Pencil
- Ruler
- Wax resist (optional)
Step 1: Planning and Surface Prep
-
Clean the bisque:
Begin by wiping down your entire bisqueware box and lid with a damp sponge. This removes any kiln dust that might interfere with glaze adhesion and tape sticking. -
Plan the grid:
Using a ruler and a light pencil touch, mark out a grid on the sides of the box and the top of the lid. For a box this size, a 2×2 grid on the sides works well, creating large, bold squares. -
Map the pattern:
Decide which colors will go where before you start glazing. Assigning colors in a random but balanced way ensures no two identical colors touch, similar to a sudoku puzzle.
Step 2: Applying the Resist
-
Apply vertical tape lines:
Cut strips of your glaze tape and apply them over your penciled vertical lines first. Press the tape down firmly, especially at the edges, to prevent glaze bleeding underneath. -
Apply horizontal tape lines:
Next, lay down the horizontal tape strips. Where the tape crosses, press firmly to seal the intersection. This tape grid will become the unglazed (or base colored) lines separating your colors later. -
Edge the lid:
Don’t forget the lid! Apply tape along the rim and create a matching grid pattern on top to ensure continuity with the box base. -
Mask the knob:
If you want the stem of the knob to remain unglazed or a specific color, carefully wrap a small piece of tape around it now.
Bleeding Glaze?
If glaze bleeds under your tape, let it dry completely. Then, use a sharp needle tool to gently scratch away the excess glaze before firing to restore the crisp straight line.
Step 3: Glazing the Blocks
-
Start with Mustard Yellow:
Select your first color, the Mustard Yellow. Using a small brush, apply the glaze into the designated squares. Apply 2-3 coats, letting each coat dry until it’s no longer shiny before adding the next. -
Apply the Terra Cotta:
Clean your brush thoroughly and move on to the Terra Cotta or Rust color. Fill in the adjacent squares, being careful not to slop glaze over the tape lines too heavily, though the tape protects the separation. -
Add the Deep Teal:
Next, apply the Deep Teal glaze. This cool tone contrasts beautifully with the warm yellow and rust. I find that dabbing the glaze near the tape edges rather than brushing across them helps keep the lines sharper. -
Finish with Cobalt Blue:
Fill the remaining squares with the Cobalt Blue glaze. If you see any pinholes in the glaze, smooth them over gently with your brush tip while the glaze is still damp. -
Glaze the knob:
For the knob, carefully paint the top surface. The example uses a blue top with a yellow rim—you can achieve this by painting the whole top blue and wiping the edge, or using a tiny brush for the detail.
Level Up: Texture
Before glazing, gently carve patterns into specific squares (like dots or waves). The glaze will break over the texture, adding tactile depth to your color blocks.
Step 4: Finishing Touches
-
Remove the tape:
This is the satisfying part. Once the glaze is dry (but not bone dry), gently peel away the tape strips. Pull slowly at a 45-degree angle to avoid chipping the glaze layers you just applied. -
Clean the lines:
The tape removal reveals the raw bisque lines. If any glaze bled under the tape, carefully scrape it away with a cleanup tool or a stiff brush. -
Treat the lines (Optional):
If you prefer a glazed look for the dividing lines rather than raw clay, you can carefully brush a clear glaze or a wash of iron oxide into the grooves now. -
Glaze the interior:
Pour a clear or solid color glaze into the inside of the box. Roll it around to coat the interior surfaces evenly, then pour out the excess. Do the same for the underside of the lid. -
Wipe the foot:
Ensure the bottom of the box and the rim where the lid sits are completely free of glaze so they don’t fuse to the kiln shelf or each other during firing. -
Fire the piece:
Load the pieces into the kiln and fire according to your clay and glaze specifications (likely Cone 5 or 6 for this type of stoneware).
Once fired, you’ll have a beautifully structured box perfect for storing trinkets or serving sugar
Pastry-Inspired Lid With Dripping “Icing”
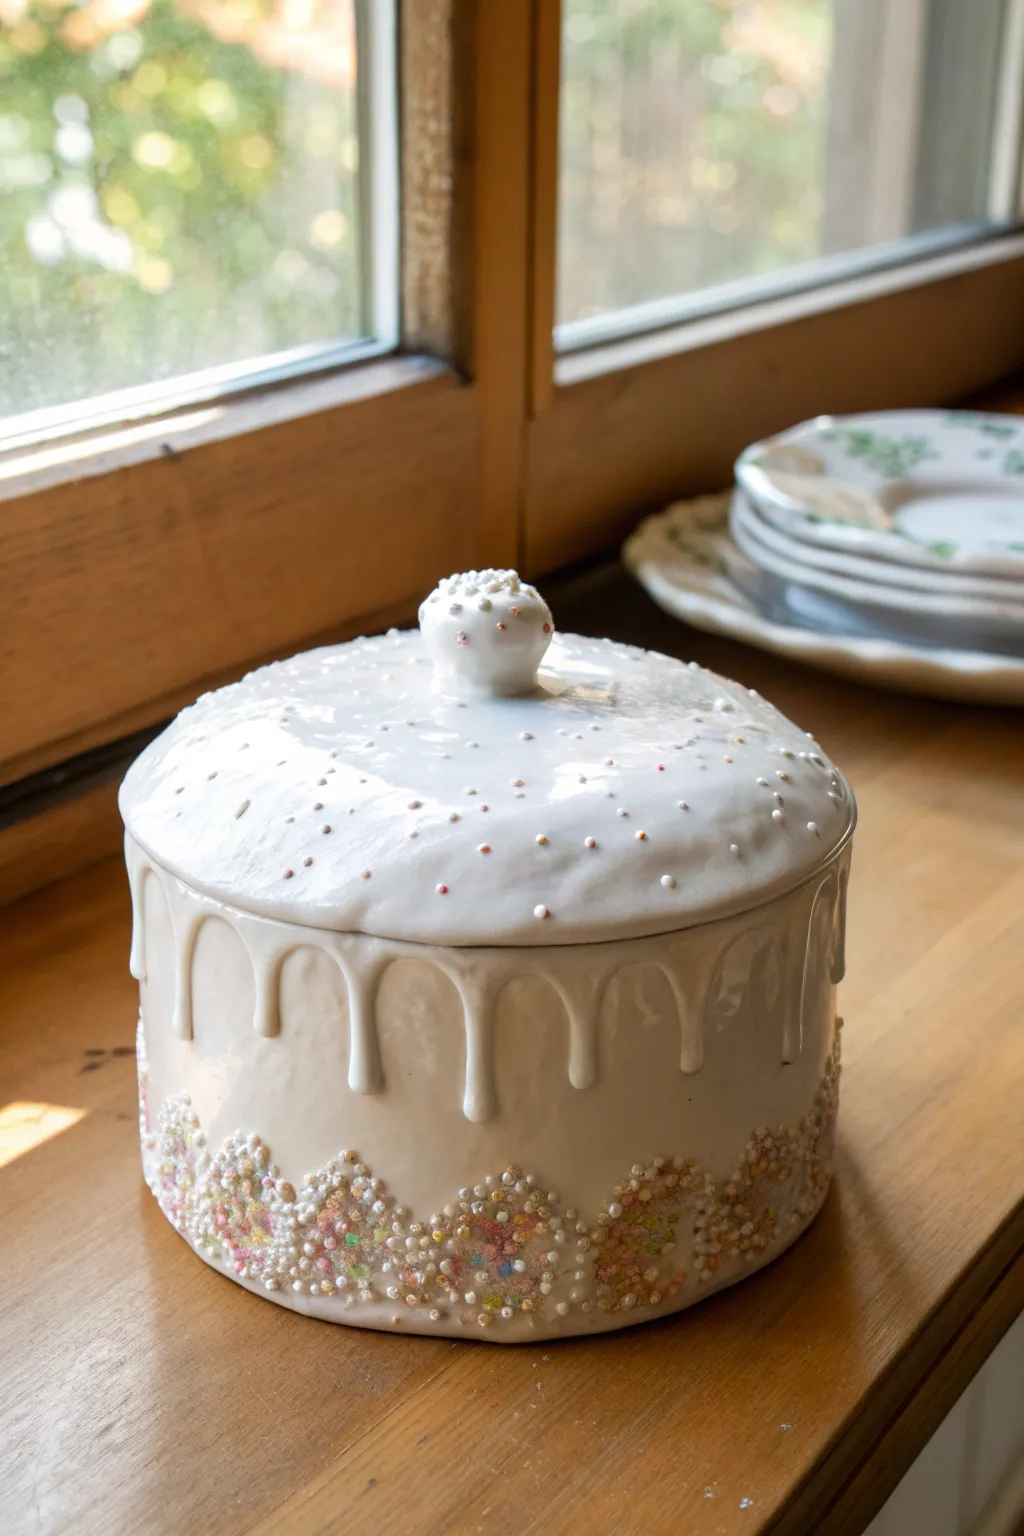
Transform a simple clay vessel into a delectable treat with this pastry-inspired ceramic box. Featuring a glossy, dripping icing effect and a playful sprinkle texture, this functional piece looks good enough to eat.
Detailed Instructions
Materials
- White stoneware or porcelain clay body
- Pottery wheel (or slab roller/rolling pin for hand-building)
- Needle tool
- Rib tool (metal and rubber)
- Trimming tools
- Slip trailer bottle
- White underglaze or opaque white glossy glaze
- Clear glossy glaze (if using underglaze)
- ceramic sprinkles, tiny clay balls, or frit
- Scoring tool
- Sponge
Step 1: Forming the Base and Lid
-
Throw the cylindrical body:
Begin by centering your clay on the wheel. Open and pull the walls to form a straight-sided cylinder approximately 4-5 inches wide and 3 inches tall. Keep the rim slightly thick to support the lid later. -
Refine the shape:
Use a metal rib to smooth the exterior walls, ensuring they are perfectly vertical. Compress the bottom well to prevent S-cracks. -
Create the gallery:
At the rim, gently split the clay or push inwards to create a gallery (a small shelf) where the lid will sit. Ensure this ledge is distinct and flat. -
Throw the lid:
On a separate bat, throw a low, domed lid. Measure frequently with calipers to ensure it fits the gallery of your cylinder. Leave a small knob of clay in the center for the handle, or attach one later. -
Shape the knob:
While throwing the lid, shape the central knob into a rounded, gumdrop-like form. This adds to the confectionary aesthetic. -
Trim the pieces:
Once the pieces are leather hard (firm but still cool to the touch), trim the bottom of the cylinder to create a clean foot. Trim the underside of the lid to remove excess weight.
Slip Consistency
Make your slip thick enough to hold its shape! If it’s too runny, the drips will flatten out. It should feel like cake frosting in the trailer bottle.
Step 2: Adding the Cake Details
-
Prepare the slip icing:
Take some of your white clay body and mix it with water to create a very thick, heavy cream consistency slip. Fill a slip trailer bottle with this mixture. -
Texture the base:
Using a small carving tool or the end of a paintbrush, gently press a scalloped pattern around the bottom inch of the jar’s exterior to define the area for the base sprinkles. -
Apply the textured base:
Brush a layer of slip onto the scalloped area. While wet, press tiny hand-rolled clay balls or coarse ceramic frit into the slip to create a dense, crunchy texture resembling a crust or sprinkle rim. -
Create the drip effect:
Place the lid on the jar (use a piece of paper or plastic between them to prevent sticking). Using the slip trailer, squeeze thick lines of slip along the top edge of the jar’s wall, allowing gravity to pull the trails down into natural-looking drips. -
Build up the icing:
I like to go back and thicken the tops of the drips to make them look voluminous. Add a layer of slip over the entire lid surface as well, smoothing it to look like fondant. -
Add lid sprinkles:
While the slip on the lid is still wet, gently press small indentations or attach tiny clay dots scattered randomly across the surface. Don’t forget to texture the knob with similar small dots.
Step 3: Glazing and Finishing
-
Bisque fire:
Once bone dry, fire the piece to cone 04 (or your clay’s specific bisque temperature). -
Apply base color:
Dip or brush the entire interior and the exterior bare clay sections with a clear glaze or a creamy off-white glaze depending on your preference. -
Paint the sprinkles:
Use fine brushes and various underglaze colors (pinks, blues, yellows) to carefully paint the tiny texture dots on the lid and the dense texture at the base. This is tedious but brings the ‘cake’ to life. -
Glaze the icing:
Apply a glossy, opaque white glaze over the slip ‘drips’ and the lid background. The gloss is crucial to making it look like wet icing. -
Final wipe down:
Check the foot of the pot and the gallery rim. Wipe away any wayward glaze with a damp sponge to prevent the lid fusing to the jar during firing. -
Glaze fire:
Fire the kiln to the maturity temperature of your clay and glaze (typically cone 6 or 10).
Make it a Set
Create a trio of jars in graduated sizes to mimic a tiered wedding cake. You can even vary the ‘icing’ slip color to pastel pink or mint green.
Your finished ceramic box is now ready to hold treats, jewelry, or simply look delicious on your shelf
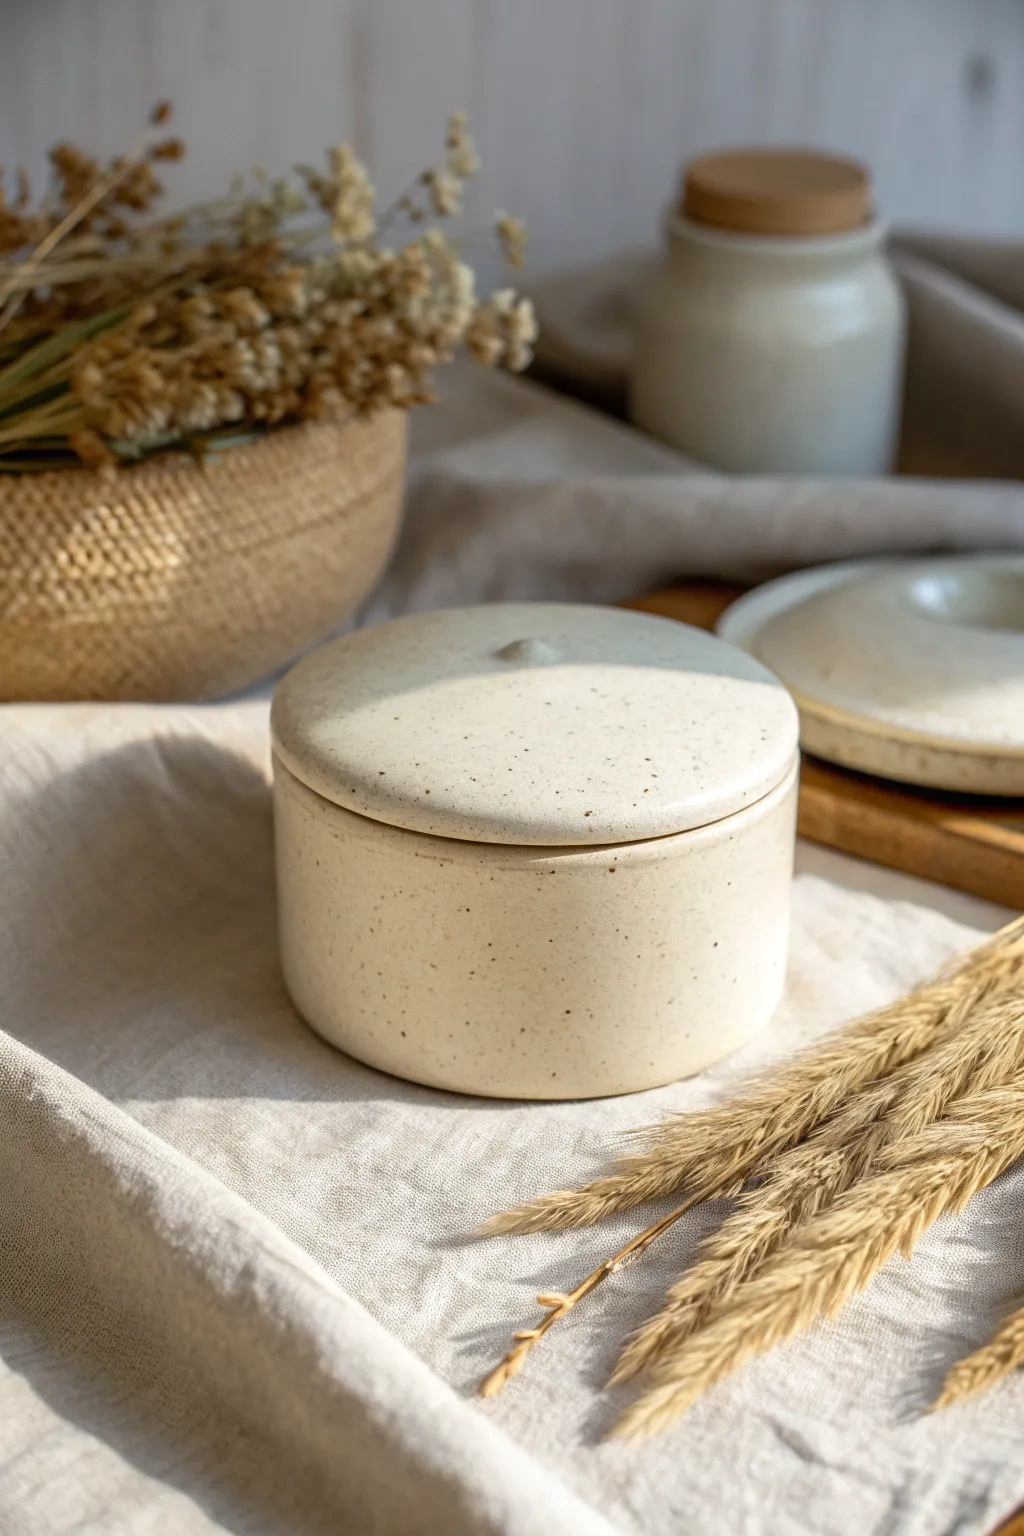
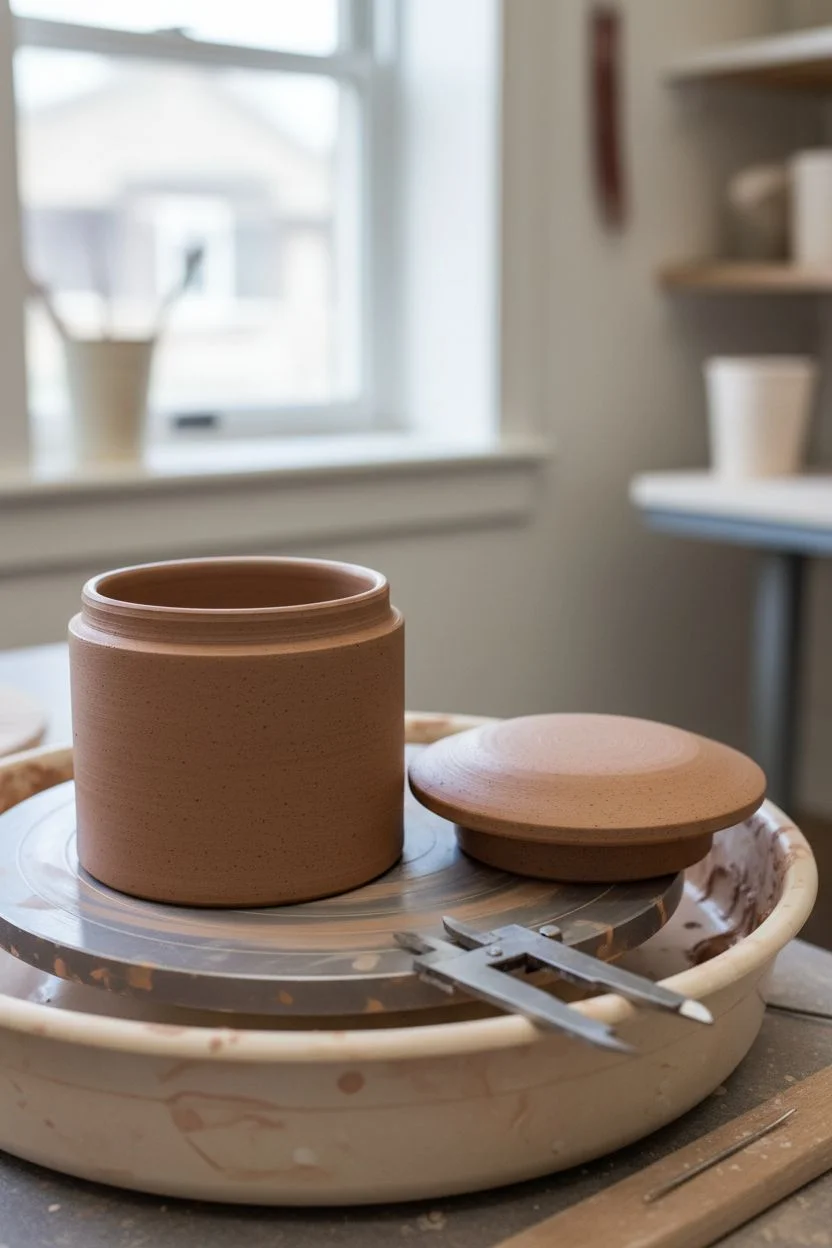
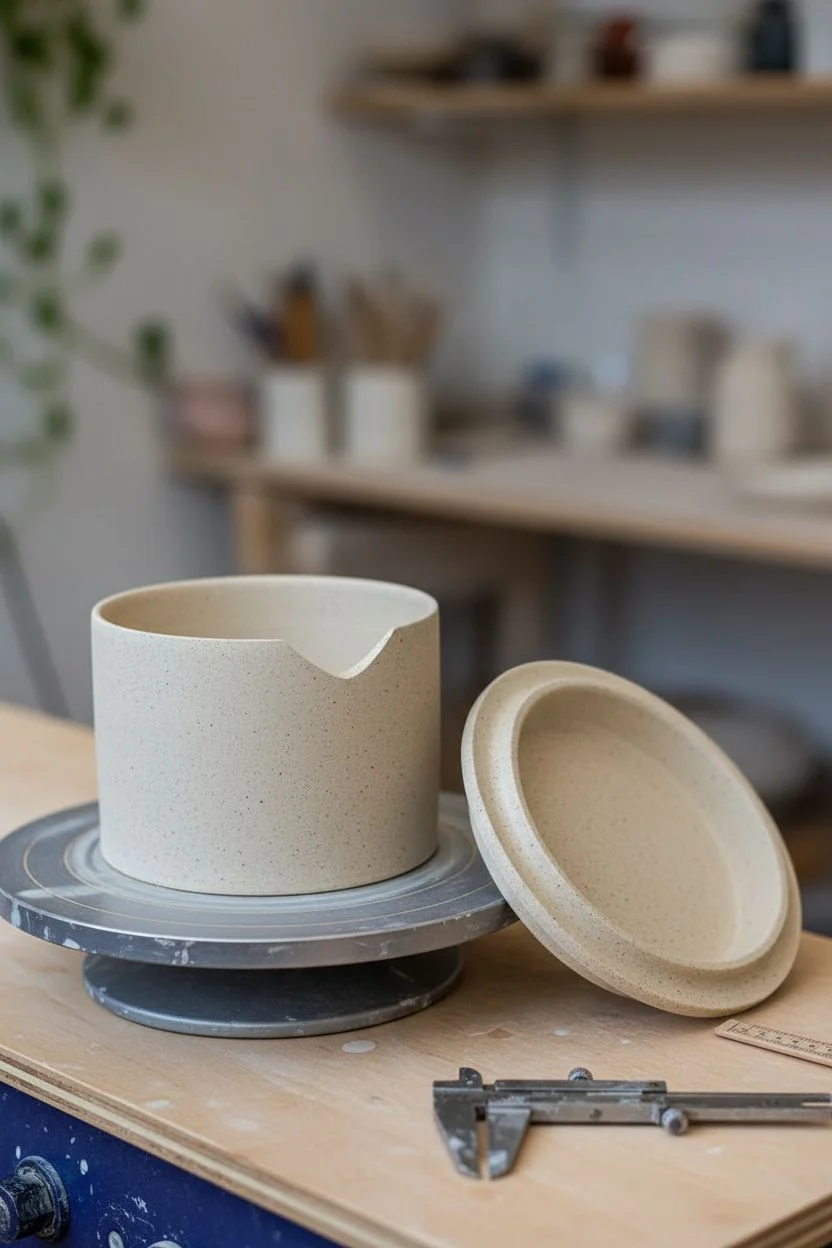
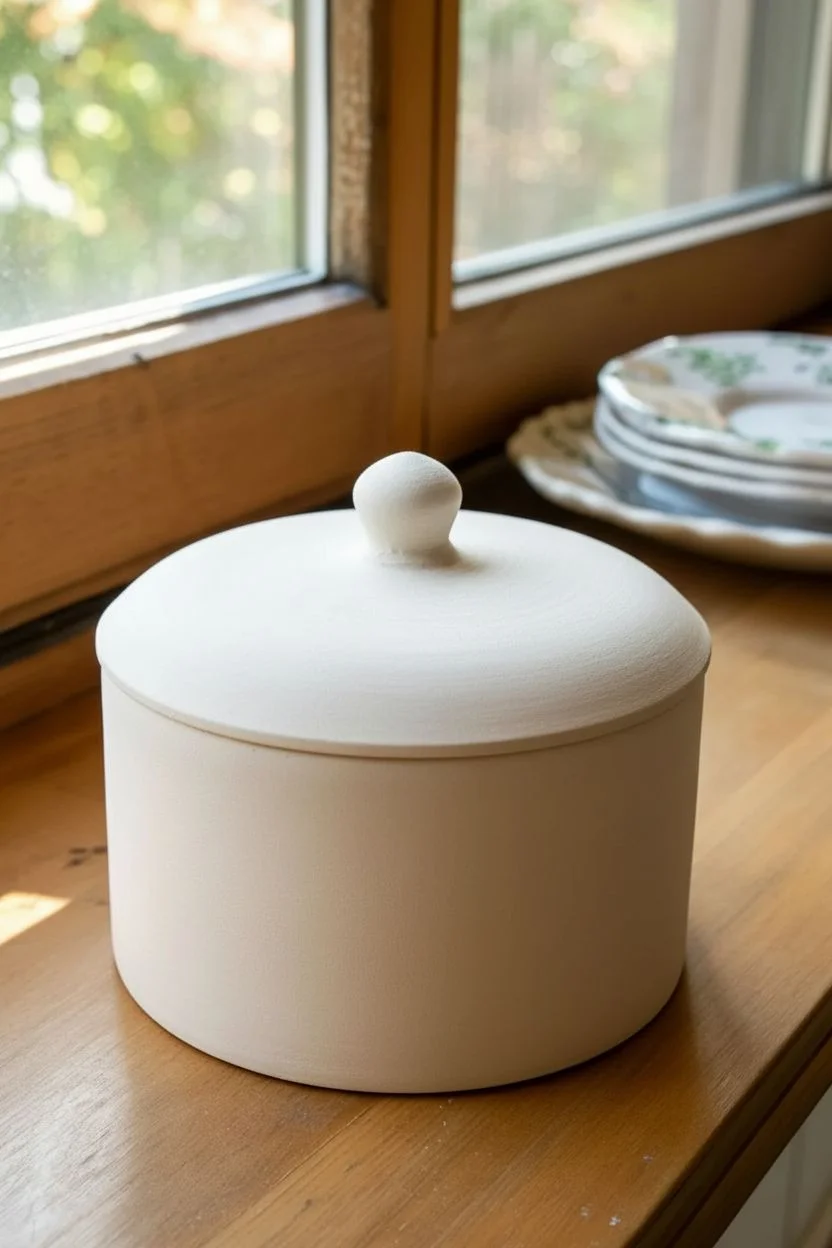
Mini Landscape Lid as a Tiny Diorama
This rustic, lidded jar features a warm, creamy glaze dotted with natural iron speckles, creating a cozy and organic feel. The unglazed base adds a grounding touch of raw clay warmth, making it a perfect vessel for small treasures.
Step-by-Step Guide
Materials
- Stoneware clay (speckled or buff body)
- Pottery wheel
- Throwing tools (sponge, needle tool, rib, wire cutter)
- Trimming tools
- Calipers
- Speckled cream or ‘oatmeal’ matte glaze
- Wax resist
- Kiln
Step 1: Throwing the Body
-
Center the Clay:
Begin with about 1-1.5 lbs of wedged stoneware clay. Center it firmly on the wheel head, ensuring a stable base before opening. -
Open the Cylinder:
Open the clay to create a flat interior floor. Compress the floor with a rib or sponge to prevent future S-cracks. -
Pull the Walls:
Pull the cylinder straight up, aiming for straight, vertical walls rather than a bowl shape. Keep the walls even, about 1/4 inch thick. Leave the rim slightly thicker to support the lid. -
Create the Gallery:
Instead of a simple rim, split the top edge or push slightly inward and down to create a gallery (a small shelf) where the lid will sit. Use a rib to square this off cleanly. -
Measure with Calipers:
Before removing the pot from the wheel, use your calipers to measure the exact diameter of the gallery shelf.
Step 2: Creating the Lid
-
Throw the Lid Upside Down:
Using a smaller ball of clay (about 0.5-0.75 lbs), throw the lid upside down, treating it like a very shallow bowl or plate. -
Match the Measurements:
Using your set caliper measurement, ensure the rim of your lid matches the gallery of your jar. I prefer to make the lid just a hair smaller to account for shrinkage and glaze clearance. -
Trim the Lid:
Once the lid is leather hard, flip it over and center it on the wheel. Trim away excess clay to create a gentle dome shape. -
Add the Knob:
You can either trim a knob directly out of the excess clay or score and slip a small ball of clay onto the center. Shape it into a rounded button or mushroom shape. -
Add Textural Spirals:
While the wheel is spinning slowly, lightly drag a trimming tool from the center knob outwards to create subtle spiral grooves on the lid’s surface.
Lid Fit Perfection
When throwing the lid, measure the jar’s gallery while the clay is wet, then measure the lid while wet. Clay shrinks! Don’t measure a dry jar against a wet lid.
Step 3: Finishing and Glazing
-
Trimming the Jar Base:
Trim the bottom of the jar when leather hard. Create a distinct foot ring, leaving about a 1/4 inch vertical edge at the base revealed. -
Bisque Fire:
Let both pieces dry completely (bone dry) before loading them into the kiln for the bisque firing (usually Cone 04 or 06). check the fit of the lid one last time before firing. -
Apply Wax Resist:
Wax the bottom foot of the jar and the rim where the lid touches. Also wax the underside of the lid rim to prevent the pieces from fusing together in the kiln. -
Glaze Application:
Dip the jar and lid into a speckled cream or matte white glaze. Hold for 3 seconds to get an even coat. Shake off excess drips immediately. -
Clean the Expansion Line:
Wipe back the glaze slightly from the bottom edge to reveal that raw clay styling seen in the photo. Damp sponge works best here. -
Final Fire:
Fire the pieces in the kiln to the maturity temperature of your clay and glaze (typically Cone 5 or 6). Fire the lid on the jar only if you are confident your wax lines are perfect; otherwise, fire side-by-side.
Level Up: Iron Oxide
If your glaze doesn’t have speckles, you can splatter a wash of iron oxide or red stoneware slip over the white glaze with a toothbrush before firing.
Once cooled, your jar is ready to hold tea, spices, or act as a base for your miniature dioramas
Hidden Seam Lid Disguised by Raised Trim
This project features a charming, speckled stoneware jar where the lid’s seating is cleverly integrated into the design, creating a near-seamless look. A subtle raised trim hides the join, giving the piece a cohesive, architectural feel perfect for storing kitchen staples or trinkets.
How-To Guide
Materials
- Speckled buff stoneware clay
- Pottery wheel
- Throwing tools (sponge, rib, intricate wire cutter)
- Trimming tools (sharp loop tool, needle tool)
- Wooden modeling tool
- Calipers
- Batt
- Clear or satin matte white glaze (food safe)
Step 1: Throwing the Gallery Base
-
Center and Open:
Start with about 2-3 lbs of well-wedged speckled clay. Center it firmly on the wheel head and open the clay up, aiming for a floor width of about 5-6 inches. -
Pull the Walls:
Pull the walls up vertically to create a cylinder. Keep the walls relatively thick at the rim—thicker than a standard bowl—because you will need this extra clay to create the gallery for the lid. -
Split the Rim:
Using a needle tool or your thumb nail, gently split the thick rim. Push the inner half down slightly to create a ledge (the gallery) where the lid will eventually sit. The outer wall should remain higher to hide the seam. -
Refine the Seat:
Use a square-edged wooden tool or a rib to sharpen the angles of the interior gallery shelf. It needs to be perfectly flat and 90 degrees to the wall for a good fit. -
Measure with Calipers:
Using calipers, measure the inner diameter of the gallery shelf (not the top rim). Lock this measurement; you’ll need it for the lid. -
Add Texture Detail:
While the wheel is spinning slowly, press a small loop tool or the edge of a rib halfway down the exterior wall to carve a shallow horizontal groove. This decorative band breaks up the vertical space.
Step 2: Creating the Lid
-
Throw the Lid Off the Hump:
Center a new mound of clay. Using your caliper measurement, throw a flat or slightly domed disc that matches the diameter of your pot’s gallery. -
Form the Flange:
Create a vertical flange extending downwards from the underside of the lid disc. This flange will slot inside the jar’s neck to keep the lid stable. -
Throw the Knob:
Instead of attaching a knob later, pull a small amount of clay from the center of your lid mound upwards to throw a sturdy, button-style knob directly integrated into the form. -
Spiral Decoration:
I like to create visual interest here by running a modeling tool from the base of the knob to the edge of the lid while the wheel spins, creating a subtle spiral ridge pattern. -
Cut and Check Fit:
Wire the lid off the hump. If the base is firm enough to support the weight, gently test the fit on the jar. It should slide into the gallery without binding.
Shrinkage Rate Tip
Clay shrinks! If measuring the gallery, make the lid just a hair smaller than your measurement. A lid can be sanded down if too big, but you can’t stretch it if it fires too small.
Step 3: Trimming and Finishing
-
Trim the Base:
Once leather hard, center the jar upside down on a Giffin Grip or clay lugs. Trim away excess weight from the bottom and clean up the foot ring. -
Define the Trim Line:
Revisit that decorative groove on the jar’s body. Use a sharp tool to refine the edges, creating a crisp, raised ‘trim’ effect. You can add texture inside the groove with a chattering tool or simple point markings. -
Trim the Lid:
Place the lid upside down in a chuck or on the jar itself (if sturdy enough) to trim the underside, ensuring the flange is clean and sharp. -
Bisque Fire:
Allow both pieces to dry slowly and completely before loading them into the kiln for a bisque firing. -
Glazing Strategy:
Dip or pour a white satin matte glaze over the entire piece. The speckles in the clay will burn through the glaze, creating the spotted effect. -
Highlighting Texture:
Before firing, gently wipe back the glaze on the sharp edges of the decorative band, the knob, and the spiral ridges on the lid. This exposes the raw toasted clay color, emphasizing the architectural lines. -
Wiping the Gallery:
Crucial step: wipe all glaze off the gallery shelf (on the jar) and the corresponding contact points on the lid to prevent them from fusing together in the kiln. -
Final Firing:
Fire to cone 6 (or your clay body’s maturation temperature) in an oxidation atmosphere.
Warped Lid Fix
If your lid wobbles after firing, apply a dab of grinding paste between the lid and gallery. Spin the lid back and forth manually to grind the high spots down until it sits flush.
Once cooled, your jar is ready to hold cookies, tea, or everyday treasures on your countertop
Have a question or want to share your own experience? I'd love to hear from you in the comments below!