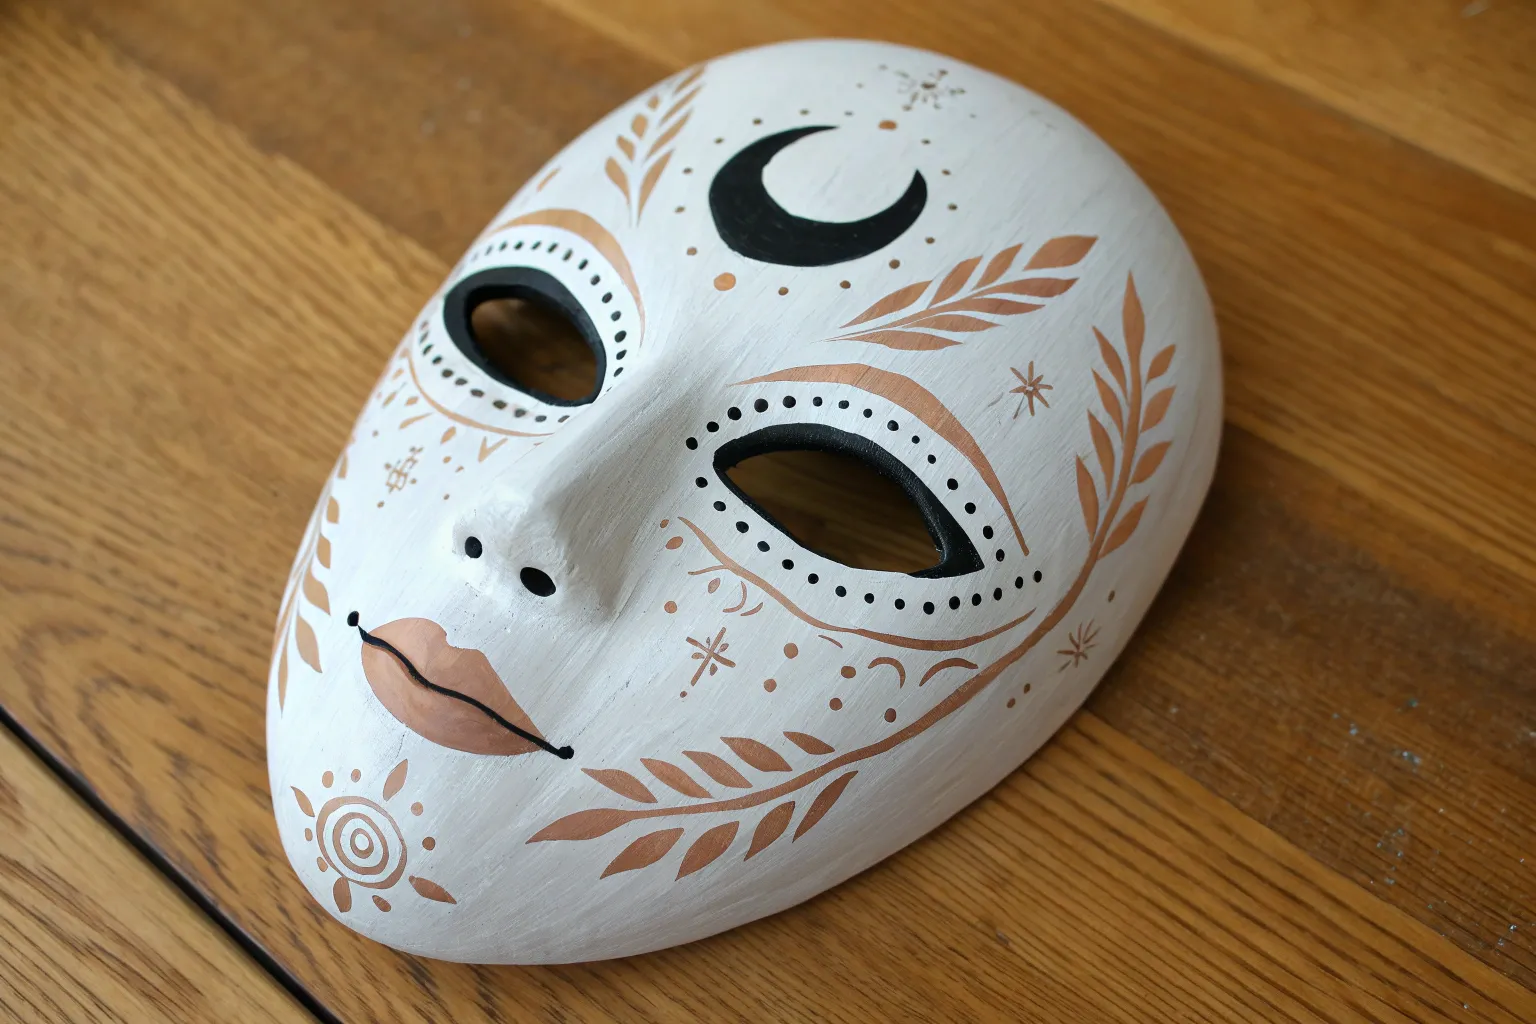
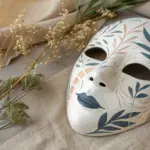
If you’ve got a plain mask (or a face you want to turn into one), Halloween is the perfect excuse to go wild with paint. Here are my favorite Halloween mask painting ideas—starting with the classics and ending with some artsy, make-people-stare illusion looks.
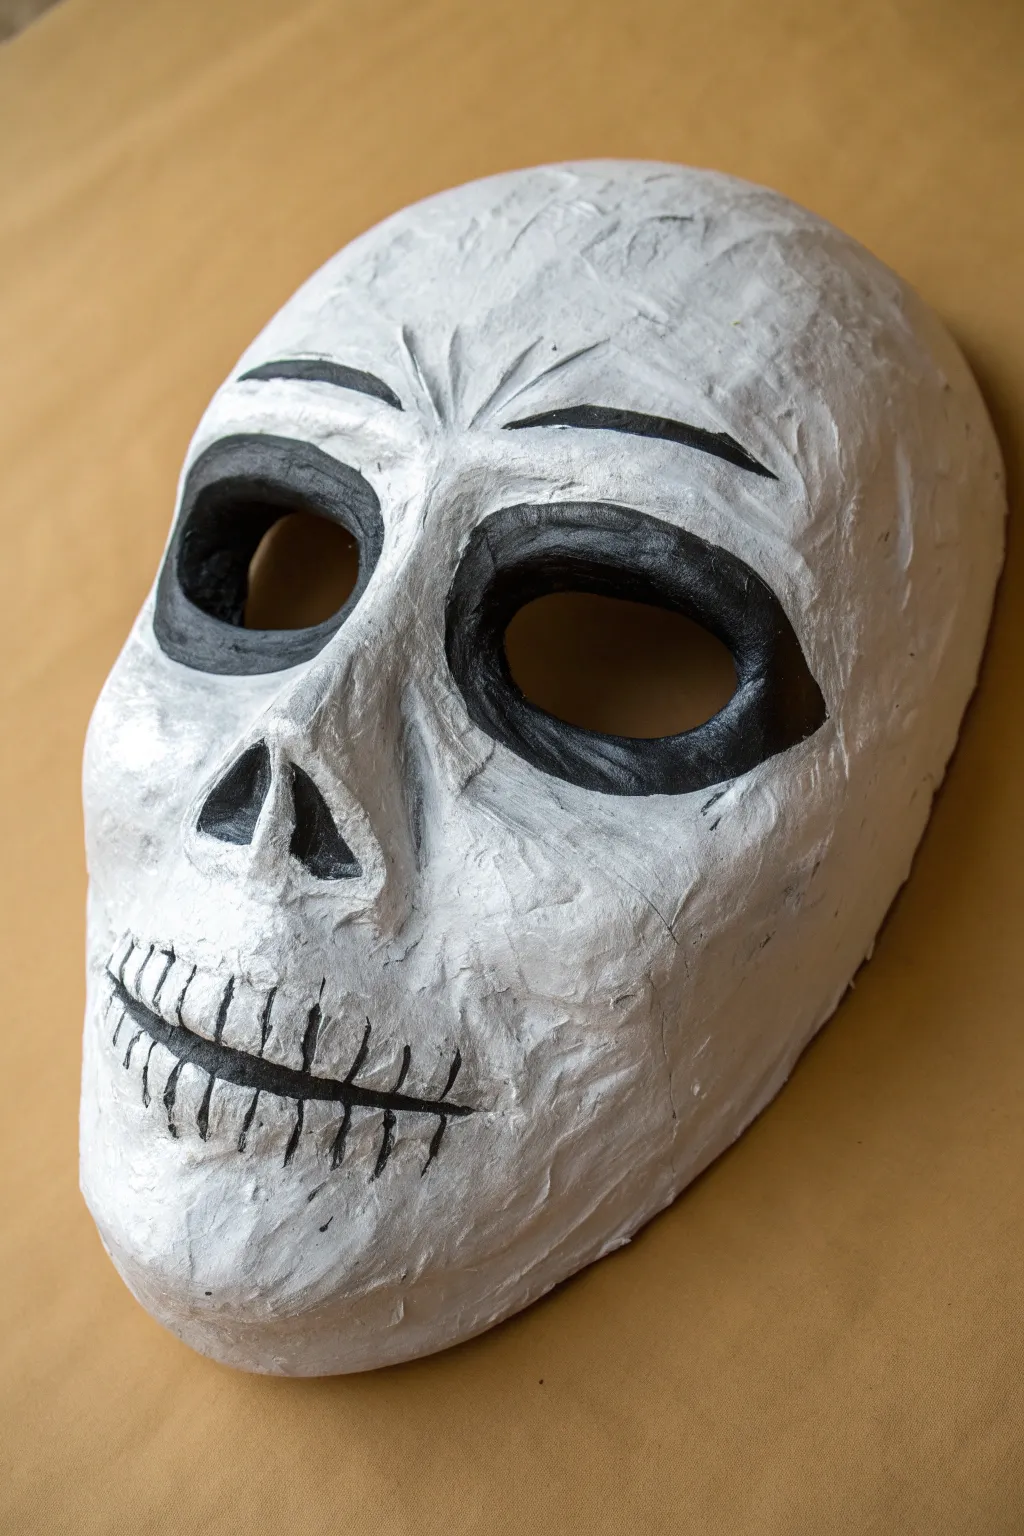
Classic Skull Mask With Deep Shadows
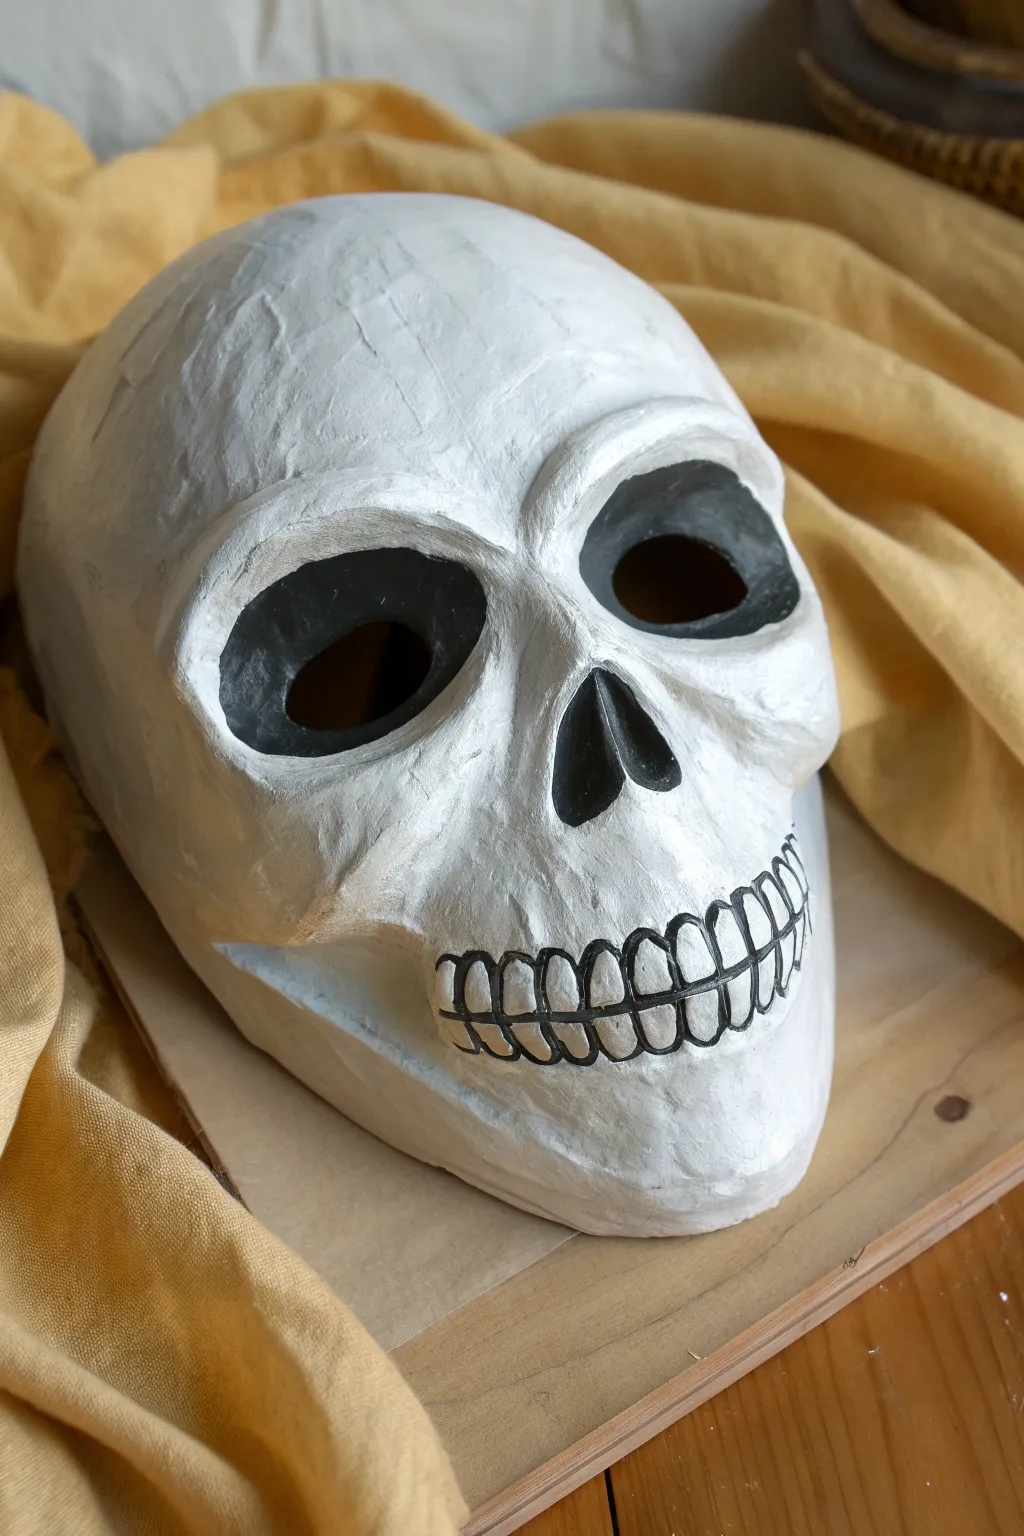
This project creates a striking, minimalist skull mask that relies on texture and stark contrast rather than color. The finished piece features a rugged, paper-based surface with deep, blackened sockets and hand-drawn teeth for a hauntingly classic look.
How-To Guide
Materials
- Blank papier-mâché or paper pulp mask base (skull shape)
- White acrylic paint (matte finish)
- Black acrylic paint
- Medium flat paintbrush
- Small round detail brush
- Fine-point permanent black marker or paint pen
- Sandpaper (fine grit)
- Small mixing tray or palette
- Paper towels
- Water cup
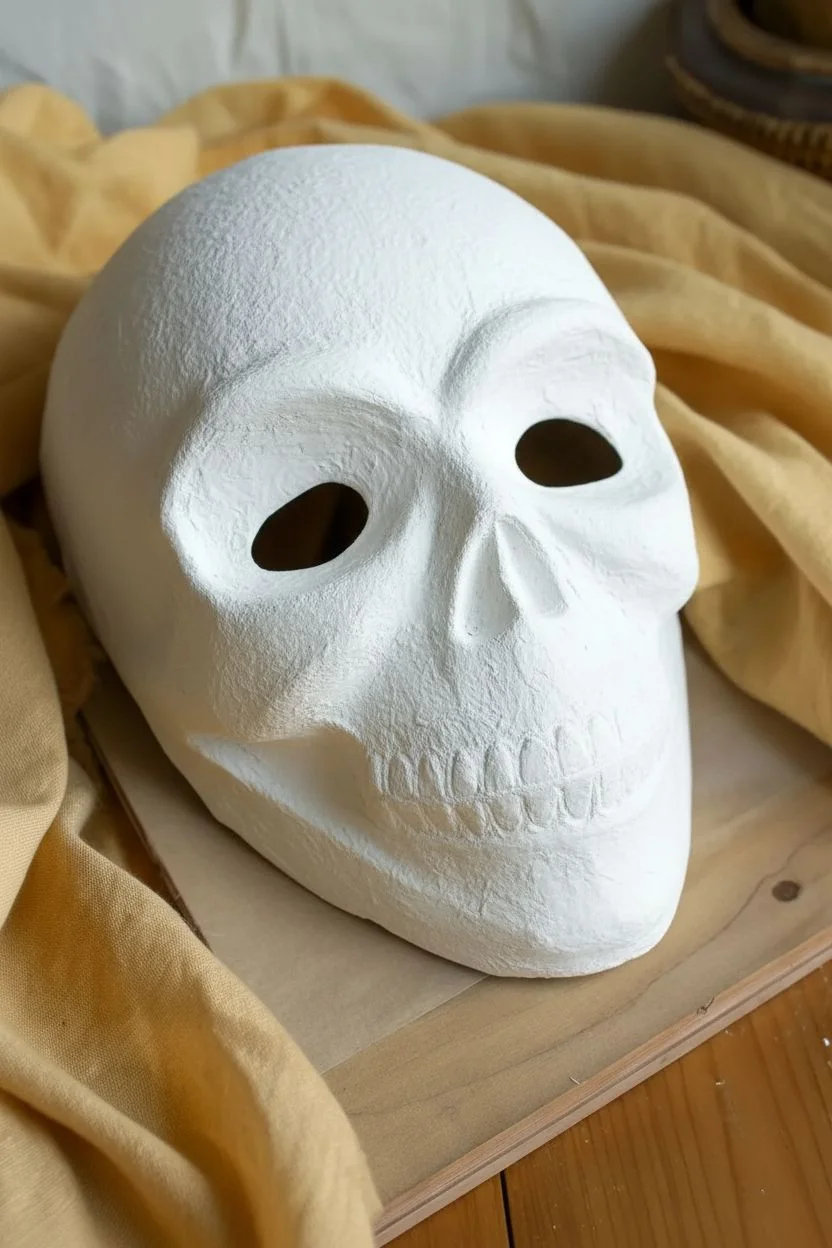
Step 1: Preparation and Base Coat
-
Surface Prep:
Begin by examining your papier-mâché base. If there are any stray bits of paper or overly rough ridges that look unintentional, gently sand them down with fine-grit sandpaper until you have a workable surface. -
Dusting Off:
Wipe the mask down with a dry paper towel to remove any sanding dust. This ensures your paint adheres properly and doesn’t clump up. -
First White Layer:
Using your medium flat brush, apply a generous coat of white matte acrylic paint over the entire front of the mask. Don’t worry about perfect smoothness; the brushstrokes add to the bone-like texture. -
Drying Time:
Allow this first coat to dry completely. If the original brown or gray of the paper base is still showing through significantly, apply a second coat of white. -
Texture Check:
Once fully opaque, look at the surface. The goal is a matte, slightly chalky finish that mimics old bone, so avoid using any glossy sealers at this stage.
Step 2: Deepening the Shadows
-
Mapping the Sockets:
Identify the inner ridgelines of the eye sockets and the nose cavity. You want a sharp delineation between the white bone and the dark hollows. -
Painting the Void:
Switch to a smaller brush loaded with pure black acrylic paint. Carefully paint inside the eye sockets, ensuring you cover the inner rims completely. -
Nasal Cavity:
Paint the inverted heart shape of the nose cavity black. Be precise with your edges here, as this central feature draws a lot of attention. -
Inner Edges:
I find it helpful to rotate the mask while painting the inner edges of the eyes and nose to ensure no white spots are left visible from different angles. -
Creating Depth:
If your mask has deep indentations near the temples or under the cheekbones, you can add a very watery wash of grey, but for this specific high-contrast look, stick primarily to stark black and white.
Dry Brush for Texture
To enhance the ‘bone’ look, lightly drag a nearly dry brush with a tiny bit of grey paint over the raised areas like the brow ridge. This highlights the texture without darkening the mask.
Step 3: Detailing the Grin
-
Penciling the Teeth:
Before committing to ink, lightly sketch a horizontal line across the mouth area with a pencil to mark the separation between upper and lower teeth. -
Marking Individual Teeth:
Sketch vertical lines to define the width of each tooth. Remember that teeth aren’t perfect rectangles; curve the tops near the gum line slightly. -
Inking the Outlines:
Using a fine-point permanent marker or a paint pen, trace over your pencil lines. Keep the pressure consistent for a solid, graphic look. -
Rounding the Shapes:
Draw small arches at the top and bottom of each tooth outline to suggest where the root enters the jawbone. This prevents the teeth from looking like a simple zipper. -
Filling the Gaps:
If there are slight gaps between the teeth in your drawing, fill those tiny triangles with black ink or paint to separate them visually. -
Final Cleanup:
Check the mask for any stray paint smudges. If you made a mistake with the black paint, touch it up with a dab of white once the black is fully dry.
Add a Crackle Finish
Apply a clear crackle medium over the white base coat before adding the black details. As it dries, it will create hairline fractures, making the skull look ancient and brittle.
Now your mask has a stark, graphical quality that looks great hanging on a wall or worn as part of a costume


Jack-O’-Lantern Mask With Carved Grin
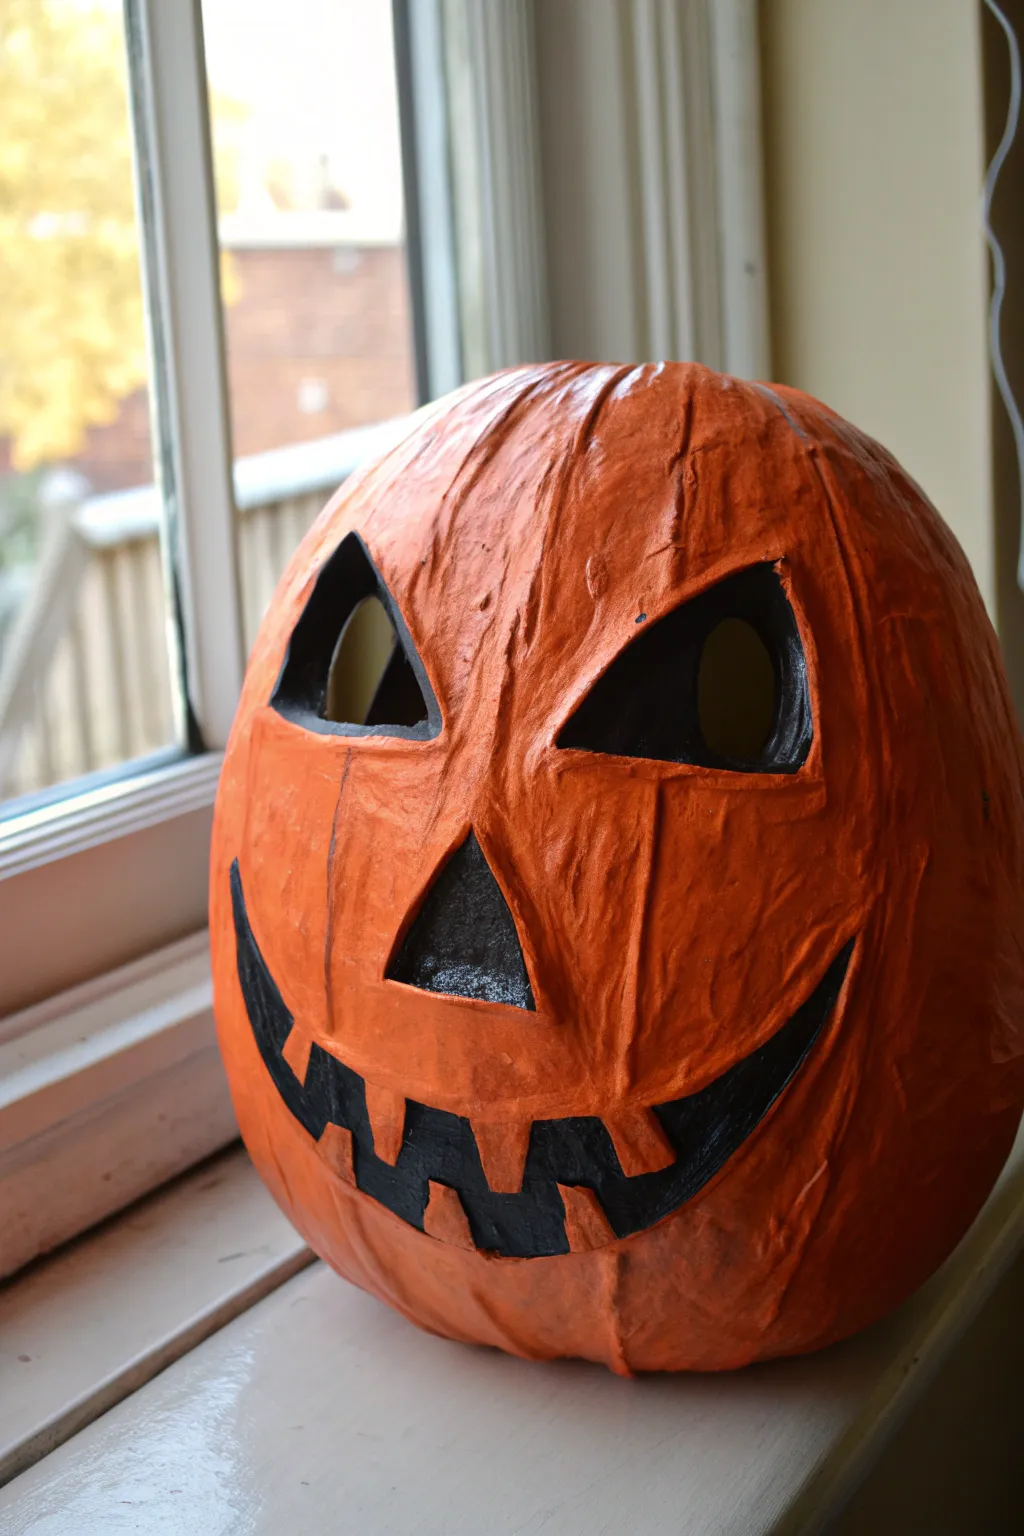
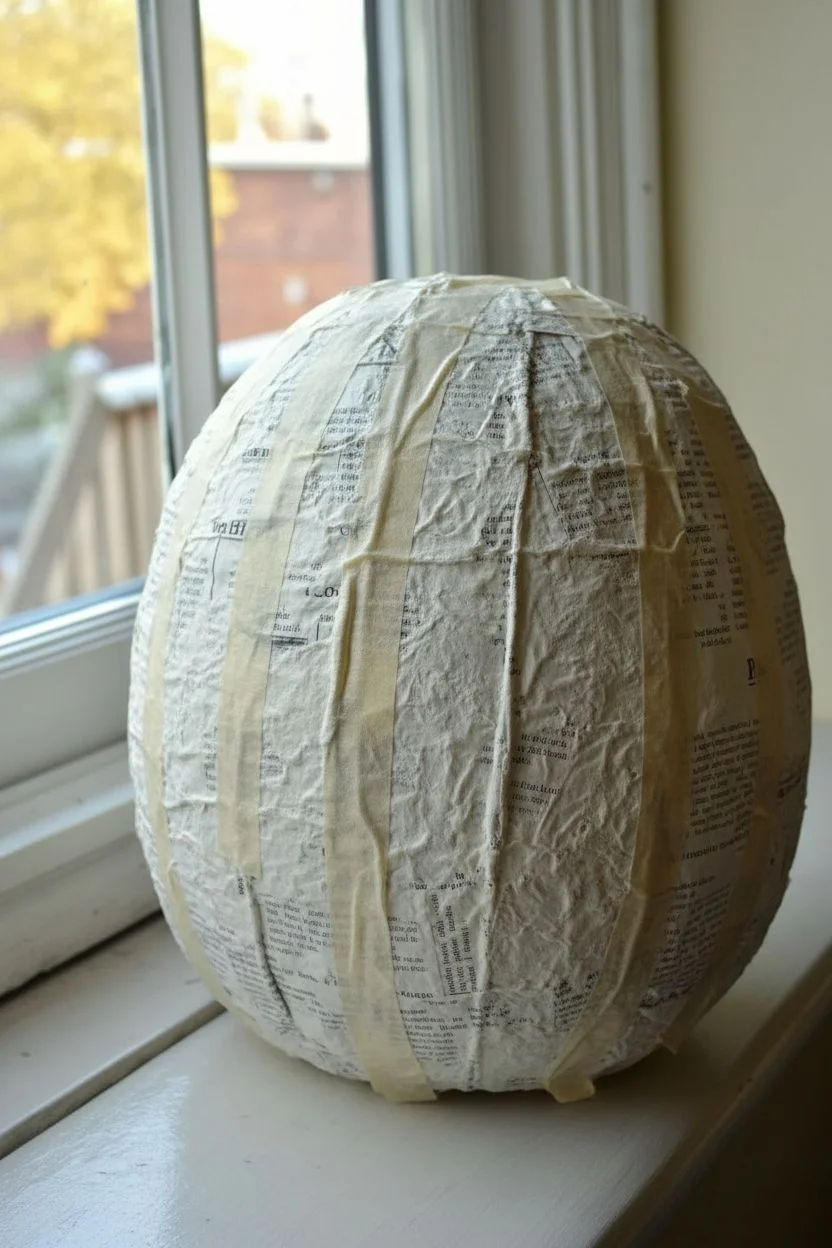
Go beyond a simple face mask with this fantastic papier-mâché project that mimics the organic, uneven texture of a real pumpkin. This lightweight, hollow mask features deep triangular eyes and a jagged smile that looks freshly carved.
Step-by-Step Guide
Materials
- Large round balloon (punch ball size works best)
- Newspaper (torn into strips)
- White flour and water (for paste) or PVA glue
- Cardboard or cardstock
- Masking tape
- Acrylic paints: Bright orange, dark orange/burnt sienna, and black
- Paintbrushes: Large flat brush and medium round brush
- Craft knife or box cutter
- Pencil or marker
Step 1: Building the Form
-
Inflate the Base:
Blow up a large, round balloon to the approximate size of a human head (or slightly larger to accommodate wearing it). Tie it off securely. -
Create the Ribs:
To get that classic pumpkin shape, take long strips of masking tape and run them vertically from the knot of the balloon to the bottom center. Pull slightly tight to indent the balloon, creating the distinctive lobes of a pumpkin skin. -
Mix the Paste:
Whisk together equal parts flour and water to create a smooth, pancake-batter consistency paste. Alternatively, dilute PVA glue with a little water. -
Apply First Layer:
Dip strips of newspaper into your paste, wiping off the excess with your fingers. Lay them smoothly across the balloon, overlapping slightly. -
Build Thickness:
Continue adding layers of papier-mâché until the entire balloon is covered. You will need about 4-5 layers for a sturdy mask. Allow the project to dry completely between major applications (this may take 24 hours).
Step 2: Carving the Features
-
Pop and Cut:
Once the shell is rock hard, pop the balloon inside and pull it out. Cut a large opening at the bottom so you can fit your head inside. -
Sketch the Face:
Use a pencil or marker to draw the classic Jack-O’-Lantern face directly onto the shell. Draw large triangular eyes, a small nose, and a wide, toothy grin. -
Carve the Openings:
Carefully use a craft knife to cut out the eyes, nose, and mouth shapes along your drawn lines. Take your time here, as the dried paper can be tough. -
Add Dimension:
To give the features a 3D ‘carved’ look, I like to paste small strips of paper or tissue over the raw cut edges, smoothing them into the interior of the mask.
Smooth Operator
For a smoother finish before painting, add a final layer using brown kraft paper or white tissue paper instead of newspaper to hide text lines.
Step 3: Painting and Finishing
-
Base Coat:
Paint the entire exterior with a coat of bright orange acrylic paint. You may need two coats to fully cover the newsprint text. -
Add Texture with Shadow:
Mix a darker orange or burnt sienna color. Use a dry-brushing technique to lightly drag this color over the raised wrinkles and bumps of the paper texture, leaving the recessed areas bright orange. -
Define the Ribs:
Paint thin, vertical lines of the darker orange down the indentations you created earlier with the tape to emphasize the pumpkin segments. -
Darken the Interior:
Paint the heavy black outlines around the cut-out eyes, nose, and mouth. Paint the ‘thickness’ of the cut shell black as well to mimic the shadowy interior. -
Final Highlights:
Mix a tiny bit of yellow into your orange and lightly highlight the highest points of the ‘skin’ to make the pumpkin look round and waxy. -
Seal:
Apply a layer of matte or satin varnish to protect the paint and give it a finished, durable pumpkin-skin sheen.
Glowing Grin
Glue layers of yellow or orange cellophane inside the mask over the eyes and mouth openings so light can still shine through if worn.
Now you have a brilliantly expressive pumpkin head that will last for years to come


Creepy Clown Mask With Smudged Details
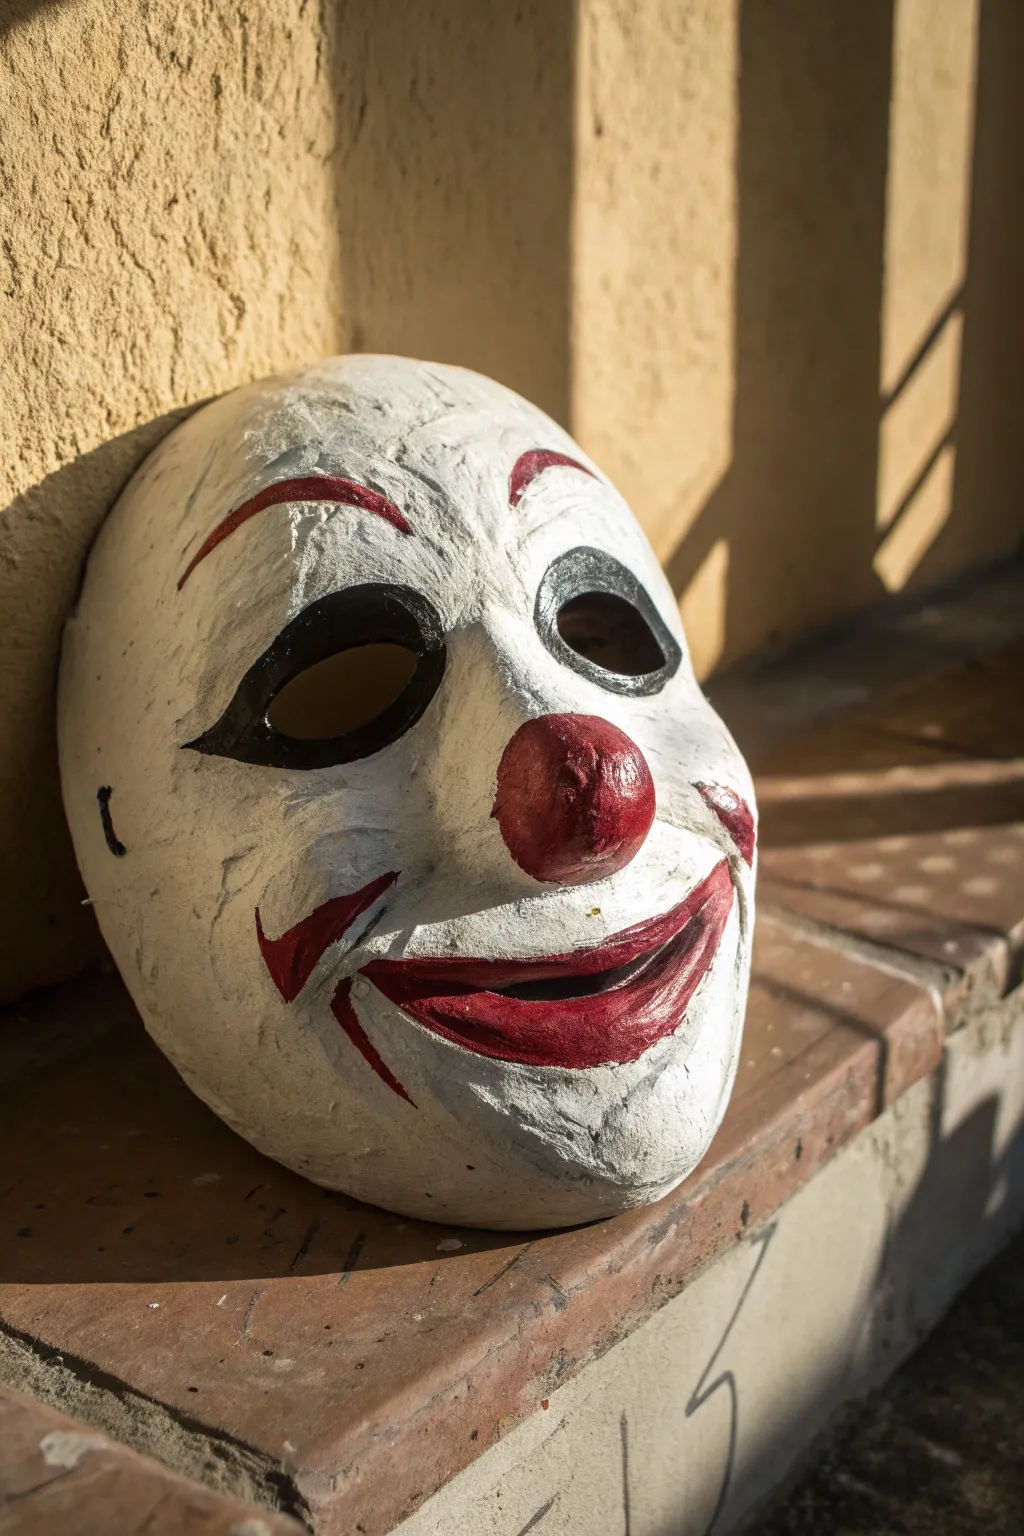
Embrace the eerie, handmade aesthetic of this creepy clown mask, featuring a textured papier-mâché base and unsettled, smudged features. The uneven surface and messy paint application are key to achieving that vintage, forgotten-toy horror vibe.
Step-by-Step
Materials
- Plastic face mold or balloon (base)
- Newspaper torn into strips
- Flour and water (paste) or white PVA glue
- White acrylic paint (gesso is optional but helpful)
- Black acrylic paint
- Red acrylic paint
- Coarse sandpaper
- Medium round brush
- Small detail brush
- Foam ball (small) or crumpled paper for the nose
Step 1: Building the Form
-
Prepare the workspace:
Cover your work area with plastic or old newspapers. This process gets messy, so preparation is key to a stress-free crafting session. -
Mix the paste:
Create a papier-mâché paste by mixing one part flour with one part warm water until it reaches a consistency similar to pancake batter. Alternatively, dilute white PVA glue with a little water. -
Apply the first layer:
Dip strips of newspaper into your paste, removing excess liquid by running the strip between two fingers. Lay them over your plastic mask mold or balloon base, smoothing them down. -
Build the nose:
For the prominent clown nose, cut a small foam ball in half or tightly crumple a ball of newspaper. Tape or glue this onto the nose area of your base before adding more strips. -
Add texture and volume:
Continue adding 4-5 layers of saturated newspaper strips. Don’t worry about keeping it perfectly smooth; the wrinkles and bumps visible in the photo add character. -
Dry thoroughly:
Let the mask dry completely. This can take 24-48 hours depending on humidity. Resist the urge to paint while it’s damp, or mold can form. -
Remove the base:
Once hard as a rock, carefully pop the mask off the plastic mold. If you used a balloon, simply pop it and peel the remains away. -
Refine the shape:
Trim any jagged edges around the perimeter with scissors. Use coarse sandpaper specifically on the nose and cheeks to rough them up further.
Step 2: The ‘Dirty’ White Base
-
Prime the surface:
Coat the entire mask in white acrylic paint. You want thick coverage, but let the brush strokes show to enhance that plaster-like texture. -
Add a second coat:
Apply a second layer of white. If you want it to look older, mix in a tiny drop of yellow or brown to make an off-white, bone-colored shade. -
Create distressing:
While the white paint is tacky, take a slightly damp rag and dab at random spots to create unevenness in the finish.
Soggy mask issues?
If your mask isn’t drying or feels squishy, put it in an oven on the lowest possible setting (door slightly open) for 20 mins, or use a hair dryer.
Step 3: Painting the Features
-
Outline the eyes:
Using black acrylic and a medium brush, paint thick, elongated almond shapes around the eye holes. Extend the outer corners into sharp points like the reference image. -
Paint the nose:
Cover the protruding nose bump with a deep red acrylic. Don’t make the circle perfect; let the edges blur slightly onto the white cheeks. -
Draft the smile:
Sketch a wide, unnatural smile with a pencil first. Following the reference, ensure the smile lines curve sharply upward, almost reaching the cheekbones. -
Fill in the mouth:
Use the red paint to fill in the lips. Paint the top lip slightly thinner and the bottom lip fuller. I like to drag the brush quickly at the corners to create a ‘smear’ effect. -
Create the inner mouth:
Paint a thin black line between the red lips to suggest an open mouth, giving it depth. -
Add eyebrows:
Paint high, arched eyebrows in red. Place them well above the actual eye sockets to give the mask a permanently surprised or manic expression. -
Detail the smudges:
This is crucial: take a nearly dry brush with a tiny amount of red paint and add the ‘scar’ lines on the cheeks. Keep the strokes rough and jagged. -
Final weathering:
Dilute a drop of black paint in water to make a thin wash. Lightly brush this into the deep creases and wrinkles of the papier-mâché, then wipe it off immediately to leave shadows.
Make it glossy
To make the ‘wet’ painted features pop against the matte skin, apply a high-gloss varnish only over the red lips, nose, and black eyes once dry.
Now you have a terrifyingly authentic mask ready to haunt your halloween display


Witchy Green Halloween Mask With Warts
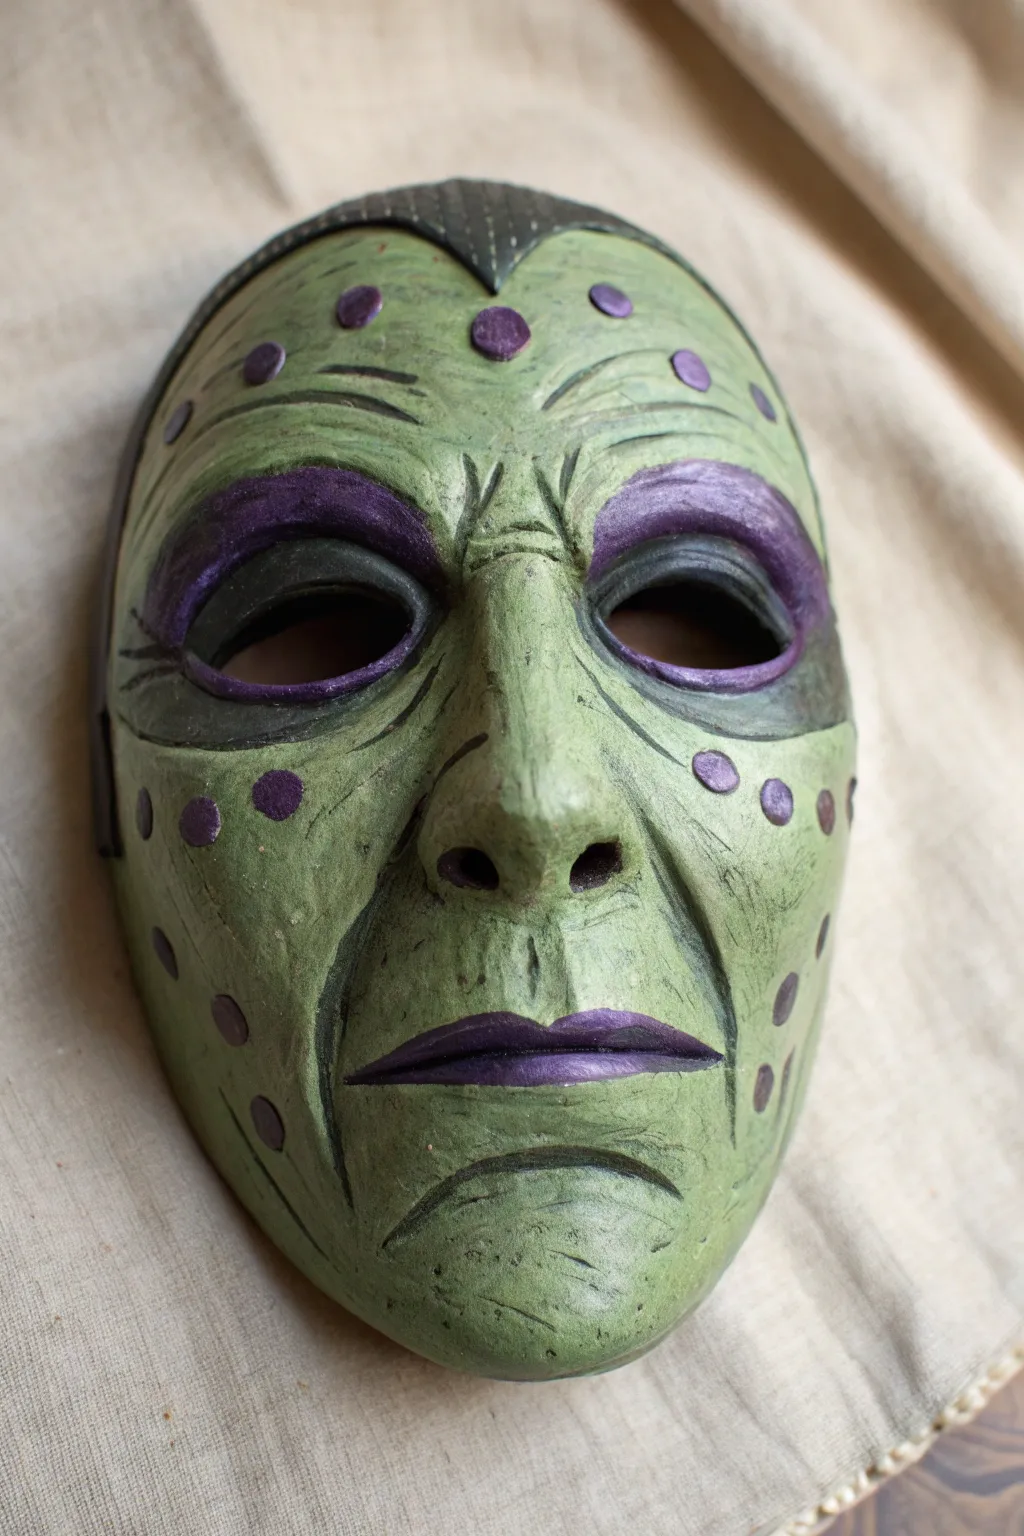
Transform a plain mask base into a deliciously wicked witch visage using texture and clever color layering. This project creates a haggard, wrinkled green skin effect accented by vibrant violet warts and features for a classic, spooky look.
Step-by-Step Guide
Materials
- Hard plastic or paper mache full-face mask base
- Air-dry clay or modeling paste (smooth texture)
- Scoring tool or toothpick
- Acrylic paints: Olive Green, Pale Sage Green, Deep Purple, Black
- Matte varnish or sealant
- Fine-grit sandpaper
- Small round brushes
- Flat shader brush
- Sponge for texturing (optional)
- Water cup and palette
Step 1: Sculpting the Hag’s Visage
-
Base Prep:
Begin by lightly sanding your mask base to help the clay adhere. Wipe away any dust with a damp cloth. -
Adding Volume:
Apply thin layers of air-dry clay over the nose, brow ridges, and chin to exaggerate the features. Build up the nose to be hook-like and prominent. -
Carving Wrinkles:
While the clay is still pliable, use a scoring tool or a simple toothpick to carve deep, sagging wrinkle lines. Focus on the forehead, the corners of the eyes, and deep nasolabial folds around the mouth. -
Creating Warts:
Roll tiny balls of clay, flatten them slightly, and press them firmly onto the mask. Place them irregularly on the forehead, cheeks, and chin for that perfect witchy texture. -
Drying Time:
Allow the clay to dry completely according to package instructions. I prefer to leave it overnight to ensure no moisture is trapped underneath.
Clay Cracking?
If the clay shrinks and cracks while drying, fill the gaps with a paste made of white glue and a little fresh clay, then smooth it over with a wet finger.
Step 2: Painting the Green Skin
-
Base Coat:
Paint the entire mask with a solid coat of Olive Green acrylic. Work the paint into all the deep wrinkles and crevices you carved earlier. -
Highlighting Texture:
Mix a lighter Pale Sage Green. Using a dry-brushing technique, lightly sweep this color over the raised areas—the forehead, nose bridge, chin, and cheeks. -
Wrinkle Definition:
The dry brushing should naturally miss the deep cracks, leaving them dark olive. If you lost some depth, carefully re-line the deepest wrinkles with a bit of watered-down black or dark green paint. -
Weathering:
Use a nearly dry sponge with the faintest amount of black paint to dab selectively around the jawline and temples, giving the skin a dirty, aged appearance.
Grimy Glow-Up
Mix a tiny amount of glow-in-the-dark medium into the pale green highlight paint. Your witch will look even spookier when the lights go out.
Step 3: The Violet Details
-
Blocking the Eyes:
Paint the eyelid area and the heavy brow ridge with Deep Purple. This creates a bruised, sunken look typical of classic witches. -
Painting the Warts:
carefully paint each raised wart with the same Deep Purple. Use a small round brush to keep the edges neat. -
Defining the Lips:
Fill in the lips with purple. Create a sharp cupid’s bow and slightly downturned corners to emphasize a grim expression. -
Adding Dimension to Purple:
Mix a tiny bit of white into your purple to create a lavender shade. Add a small highlight to the center of each wart and the middle of the lower lip to make them look three-dimensional. -
The Widow’s Peak:
Paint a sharp, triangular hairline at the very top of the mask in black or dark grey to suggest a severe widow’s peak hairstyle. -
Shadowing:
Take a very diluted black wash (mostly water) and run it along the edges where the purple meets the green to deepen the contrast. -
Sealing:
Once all paint is bonedry, apply a coat of matte varnish. This protects your paint job and unifies the sheen of the different colors.
Now you have a marvellously menacing accessory ready for your next costume party
BRUSH GUIDE
The Right Brush for Every Stroke
From clean lines to bold texture — master brush choice, stroke control, and essential techniques.
Explore the Full Guide
Vampire Mask With Blood Drips
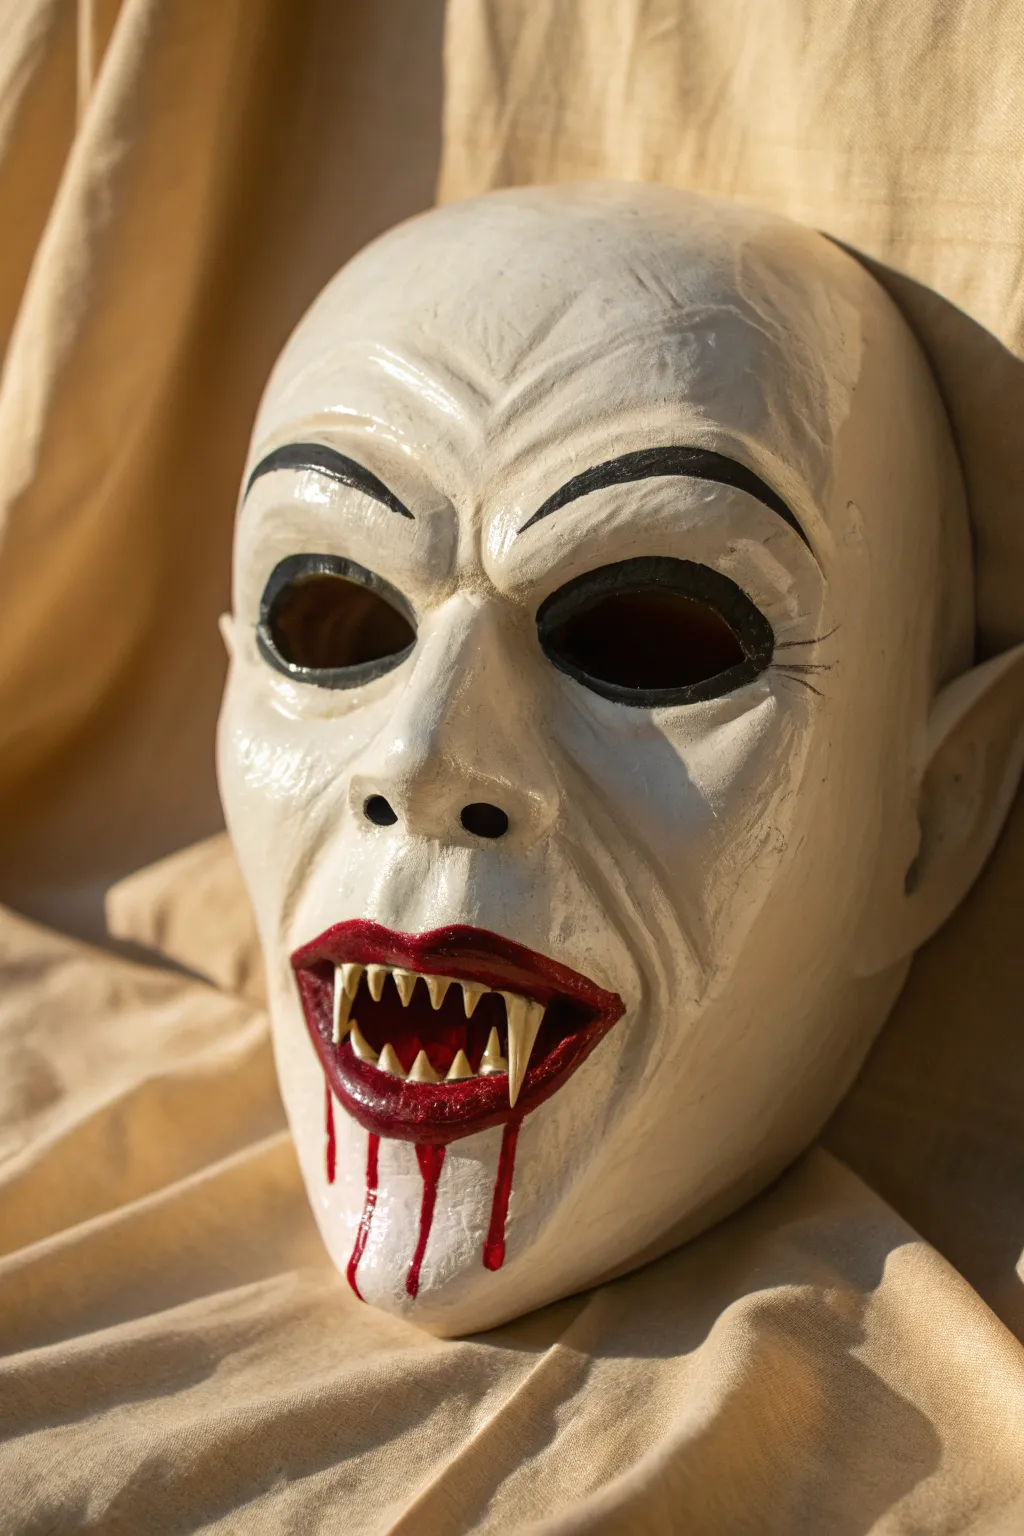
Transform a plain mask blank into a menacing creature of the night with this creepy vampire design. Featuring deep-set eyes, sculpted wrinkles, and fresh blood drips, this project relies on careful shading and bold contrasts to create a frighteningly realistic look.
Detailed Instructions
Materials
- Plastic or papier-mâché full-face mask blank (with pointed ears if possible)
- White gesso or primer
- Acrylic paints: Titanium White, Cream/Off-White, Black, Deep Red, Crimson
- Pencil for sketching
- Fine liner detail brush
- Medium flat brush
- Small shading brush
- High-gloss varnish or clear nail polish
- Matte spray sealant
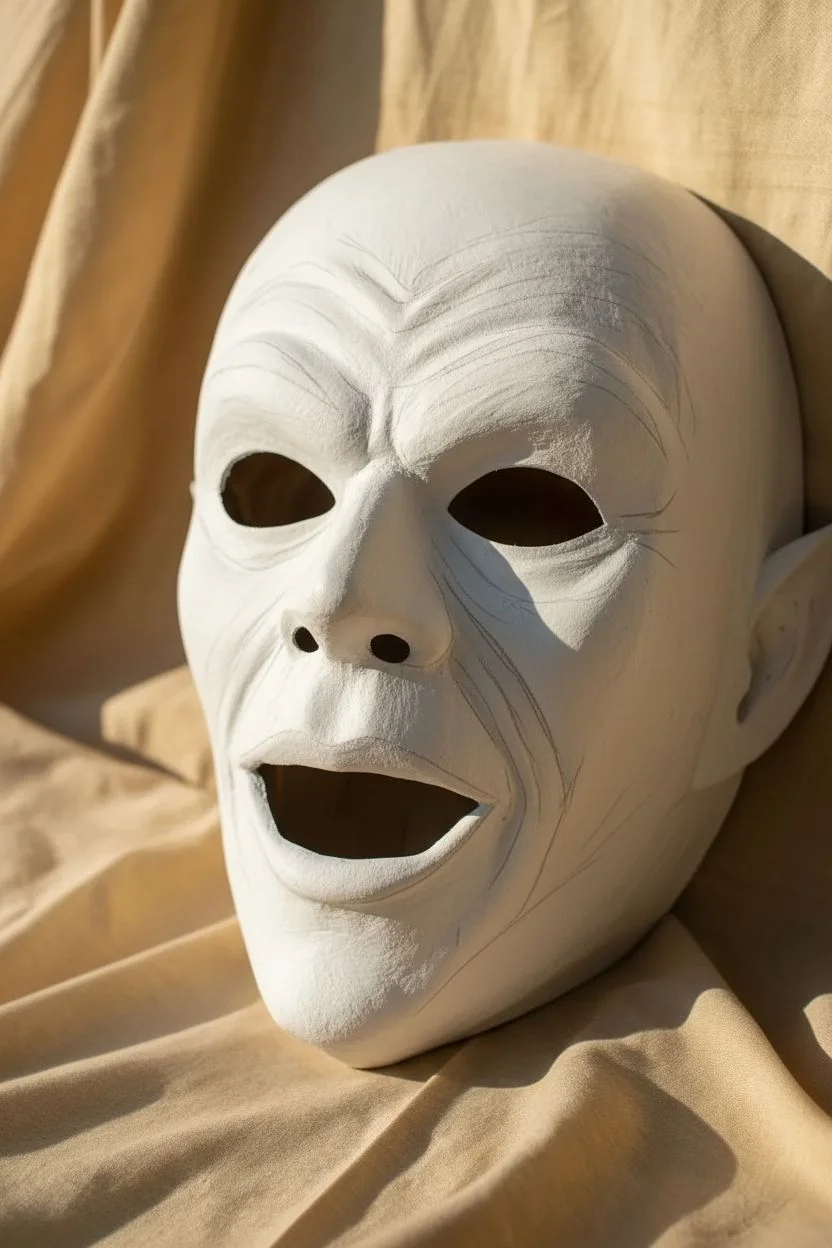
Step 1: Base Coat & Sketching
-
Prime the surface:
Begin by covering the entire mask with a layer of white gesso. This provides a tooth for the paint to grab onto, especially if your mask is plastic. Let this dry completely before moving on. -
Apply the flesh tone:
Mix Titanium White with a very small drop of Cream or Off-White to create a sickly, pale bone color. Apply two thin, even coats over the entire face and ears, allowing the first coat to dry before adding the second. -
Map out features:
Lightly sketch the key facial features using a pencil. Outline the shape of the eyebrows, the wrinkles on the forehead and cheeks, and the gumline inside the mouth where the fangs will sit.
Pro Tip: 3D Texture
For thicker, more realistic blood drips, mix your red acrylic paint with a generous amount of clear school glue or gloss gel medium before applying it to the chin.
Step 2: Shading & Texturing
-
Establish shadows:
Mix a very pale grey wash using water, white, and a tiny speck of black. Using your small shading brush, gently paint into the recesses: the eye sockets, the sides of the nose, and the hollows of the cheeks. -
Detail the wrinkles:
Deepen your grey mix slightly. Use a fine liner brush to trace the pencil lines you drew for the forehead wrinkles and nasolabial folds (the lines running from nose to mouth). This creates the aged, undead texture. -
Refine the brow:
Paint the eyebrows using solid black. Create a sharp arch that follows the sculpted brow bone, tapering off towards the temples for a sinister expression. -
Define the eyes:
Outline the entire eye opening with a thick band of black paint. Keep the line smooth and consistent to create a hollow, sunken appearance. -
Add gentle crow’s feet:
With an extremely fine dry brush and faint grey paint, flick three small lines outward from the corner of each eye to suggest subtle aging.
Step 3: The Mouth & Fangs
-
Paint the lips:
Fill in the lip area with a Deep Red acrylic. Outline the shape carefully, accentuating the cupid’s bow on the top lip to frame the mouth. -
Darken the mouth interior:
Paint the area inside the mouth (around the teeth) completely black. This negative space pushes the teeth forward visually. -
Create the teeth base:
Paint the fangs and smaller teeth with a solid coat of your original off-white base color. -
Stain the teeth:
I like to wash a tiny bit of yellow-brown glaze over the top/root of the teeth near the gums to make them look old and calcium-stained, keeping the tips white and sharp. -
Outline the gumline:
Use your smallest brush and black paint to carefully outline each individual tooth where it meets the red gums, separating them for clarity.
Level Up: Glowing Eyes
Tape small pieces of yellow or red cellophane on the inside of the eye holes. When light hits the mask from behind, the eyes will seem to glow eerily.
Step 4: Bloody Details
-
Start the drips:
Using Crimson paint, create three distinct drip lines starting from the bottom lip. Make the lines wavy and organic rather than perfectly straight. -
Pooling effect:
At the bottom of each drip, paint a slightly larger rounded shape to mimic how blood pools before falling. Do this on the chin for the longest drip. -
Deepen the blood color:
Add a touch of black to your red paint and trace just the very center of your drip lines. This adds depth and makes the fluid look thick and viscous. -
Add wetness:
Once the paint is totally bone dry, brush a high-gloss varnish or clear nail polish strictly over the red lips and the blood drips. This makes them look perpetually wet and fresh. -
Final seal:
Spray the rest of the mask (avoiding the glossy blood) with a matte sealant to protect your hard work.
Now your terrifying creation is ready to haunt the neighborhood on Halloween night
Black Cat Mask With Whiskers and Nose
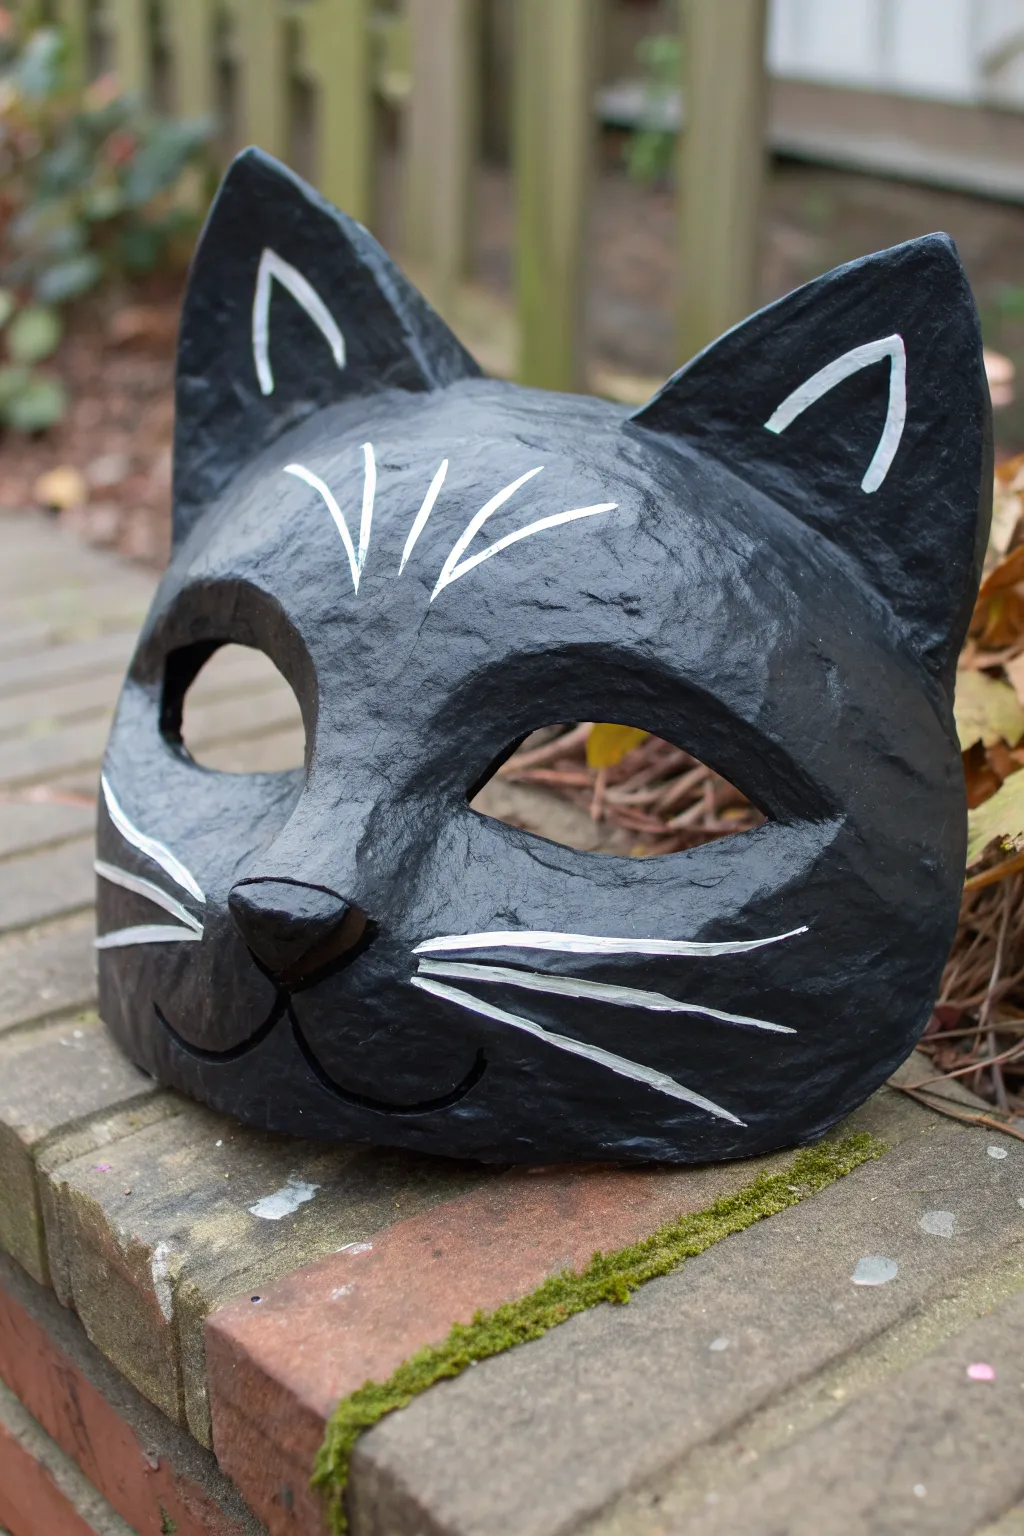
This classic black cat mask features striking white painted details that pop against a textured, matte black background. It’s a perfect Halloween project that balances spooky and sweet, using traditional paper mache techniques for a sturdy, authentic feel.
How-To Guide
Materials
- Plastic cat mask mold (or a plain plastic half-mask)
- Newspaper cut into 1-inch strips
- Paper mache paste (flour and water mixture or white glue and water)
- Cardboard (cereal box thickness)
- Masking tape
- Sandpaper (medium grit)
- Black acrylic paint (matte finish)
- White acrylic paint
- Fine detail paint brush
- Medium flat paint brush
- Satin or matte varnish (optional)
- Scissors
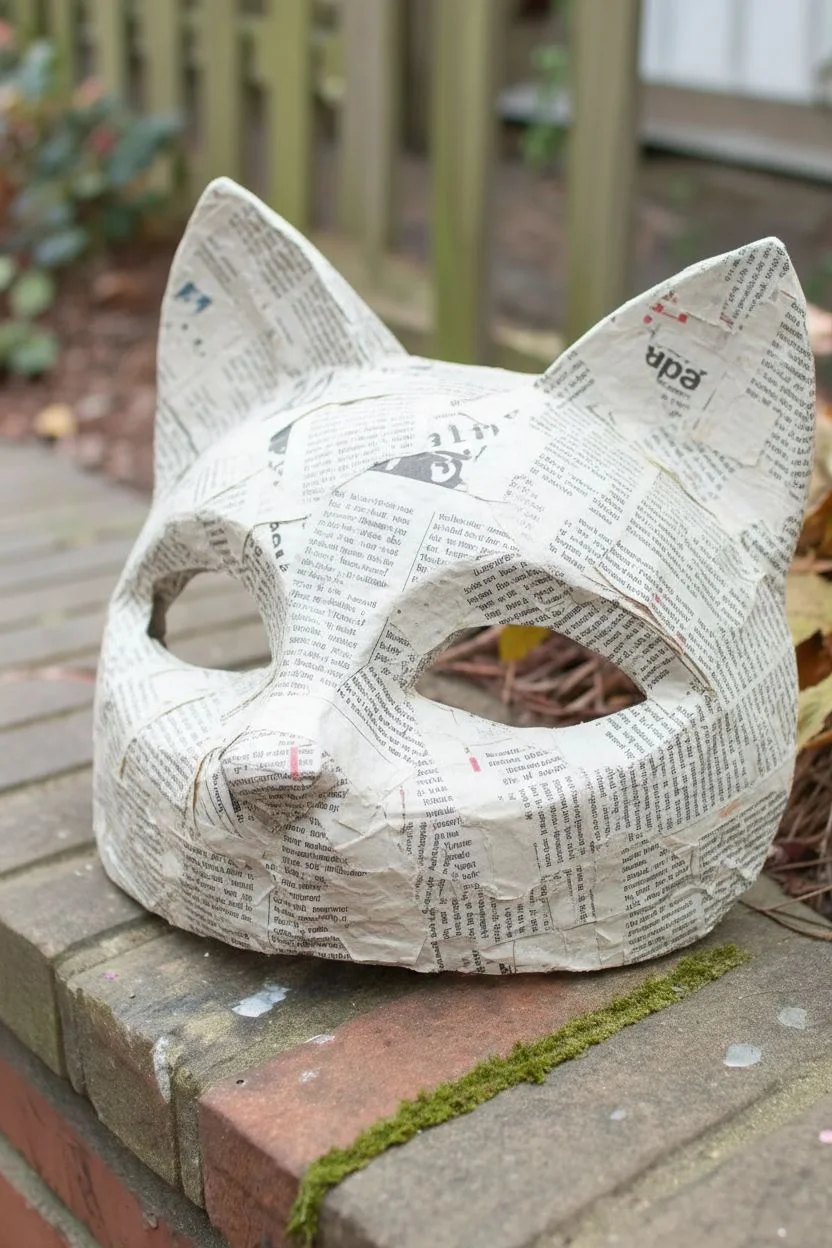
Step 1: Building the Form
-
Prepare the base:
Start with a plastic cat mask form. If your base mask lacks pointy ears, cut two triangles from thin cardboard and tape them securely to the top of the mask form using masking tape to create the cat ear shape. -
Mix your paste:
Create a smooth paper mache paste by mixing one part flour with one part water until it’s the consistency of pancake batter. Alternatively, mix white glue with a splash of water. -
Apply the first layer:
Dip a newspaper strip into the paste, squeegeeing off excess with your fingers. Lay it across the mask form, smoothing it down completely to remove air bubbles. -
Build up coverage:
Continue applying strips in overlapping patterns until the entire front of the mask is covered. I find criss-crossing the strips helps create a stronger bond. -
Reinforce the ears:
Pay special attention to the cardboard ears. Wrap strips around the edges to securely attach them to the forehead area and create a seamless transition. -
Dry and repeat:
Let the first layer dry completely (usually overnight). Apply a second and third layer of paper strips for durability, ensuring each layer is fully dry before adding the next.
Wrinkle Rescue
If your paper dries with huge wrinkles, don’t panic. A quick sanding with coarse sandpaper followed by a focused layer of paste can smooth out major bumps.
Step 2: Sculpting Details
-
Create the nose:
To make the 3D nose, wad up a small ball of paper dipped in paste and press it onto the nose area. Mold it into a triangular shape and smooth strips over it to secure it. -
Add eyebrow texture:
If you want the slightly raised brow ridge seen in the image, layer a few extra folded strips of paper above the eye holes to build up a subtle prominence. -
Final drying time:
Allow the fully sculpted mask to dry for at least 24 hours. The mask should feel hard and room temperature to the touch, not cool or damp.
Pro Tip: Sharper Lines
For the crispest white whiskers, dilute your white acrylic paint slightly with water. Inky paint flows off the brush smoother than thick paint.
Step 3: Painting and Finishing
-
Sand for texture:
Lightly sand any rough ridges or loose paper edges. Don’t make it perfectly smooth; the visible paper texture adds character to the final piece. -
Base coat:
Paint the entire mask, front and back, with matte black acrylic paint. Use your medium flat brush to work the paint into all the little crevices of the paper texture. -
Second coat:
Apply a second coat of black paint to ensure solid, opaque coverage. Let this dry completely. -
Paint ear details:
Using a fine detail brush and white acrylic paint, draw an inverted, open triangle shape on the inside of each ear to define the inner ear structure. -
Add forehead markings:
Paint three to four curved, vertical strokes on the forehead between the ears. These should look like stylized fur tufts, thicker at the bottom and tapering to a point. -
Paint the whiskers:
On each cheek, paint three long, sweeping lines for whiskers. Start near the nose with a slightly heavier pressure and lift the brush as you pull outward to create a tapered end. -
Highlight the nose and mouth:
Paint a thin white line along the curve of the muzzle area to suggest a mouth smile, and add a tiny highlight on the tip of the black nose if desired for depth. -
Seal the mask:
Once the paint is fully dry, apply a coat of matte or satin varnish to protect the surface and keep that rich black color from fading.
Once the varnish sets, you’ll have a charming, handmade disguise ready for a night of trick-or-treating.

PENCIL GUIDE
Understanding Pencil Grades from H to B
From first sketch to finished drawing — learn pencil grades, line control, and shading techniques.
Explore the Full Guide
Bat Mask With Winged Eye Shape
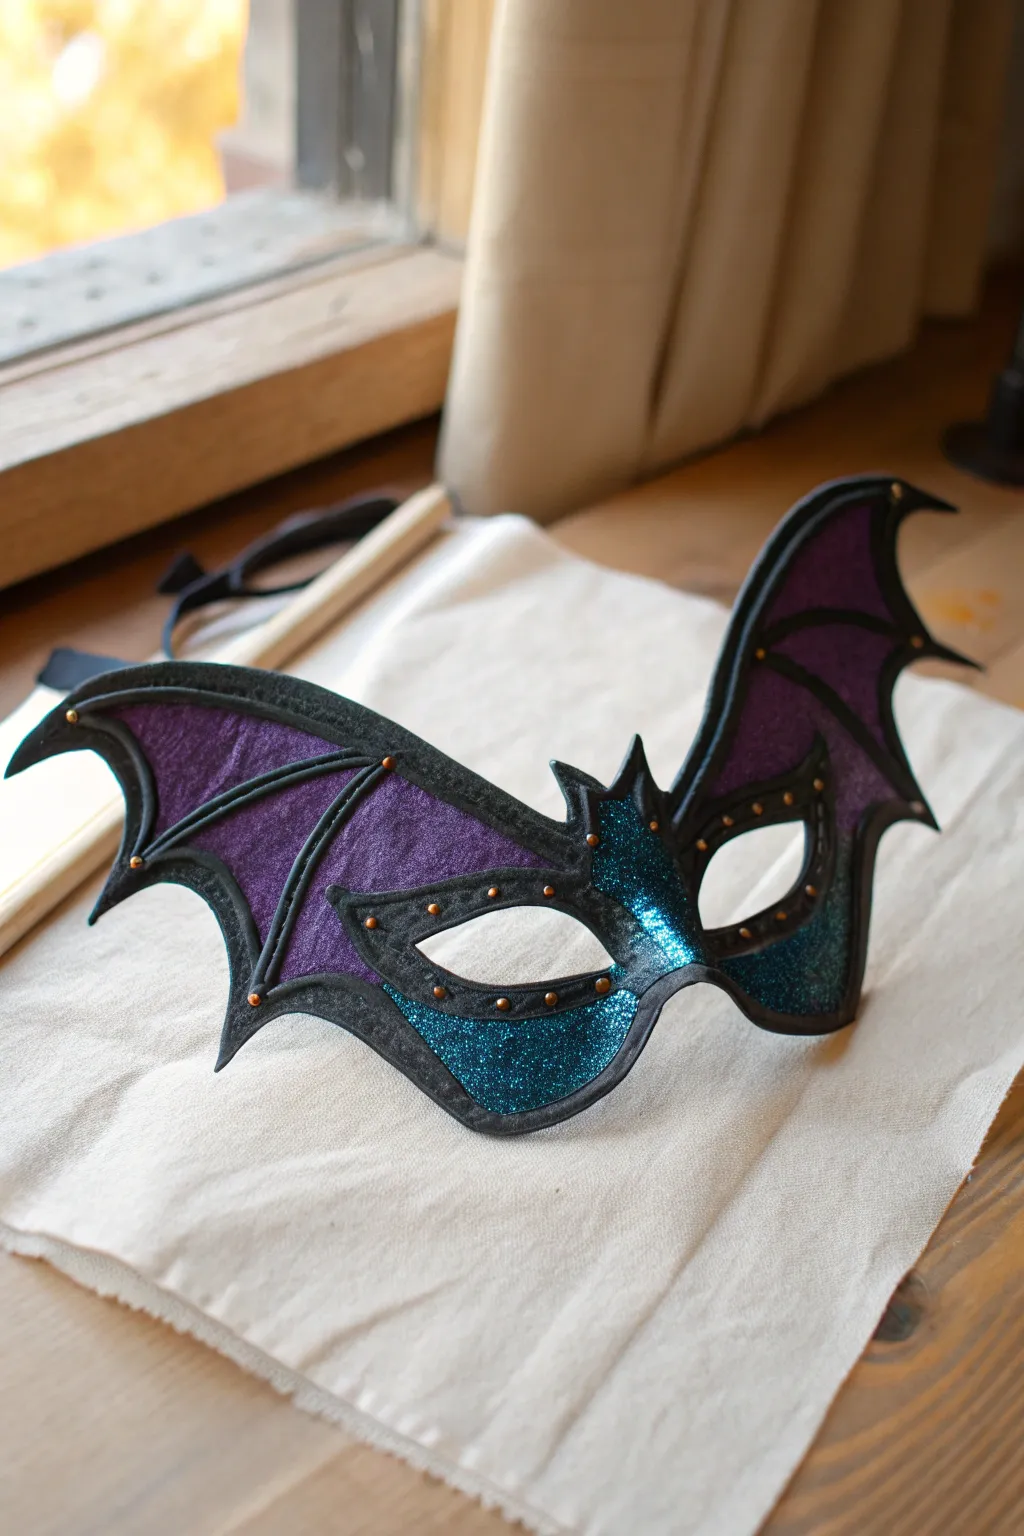
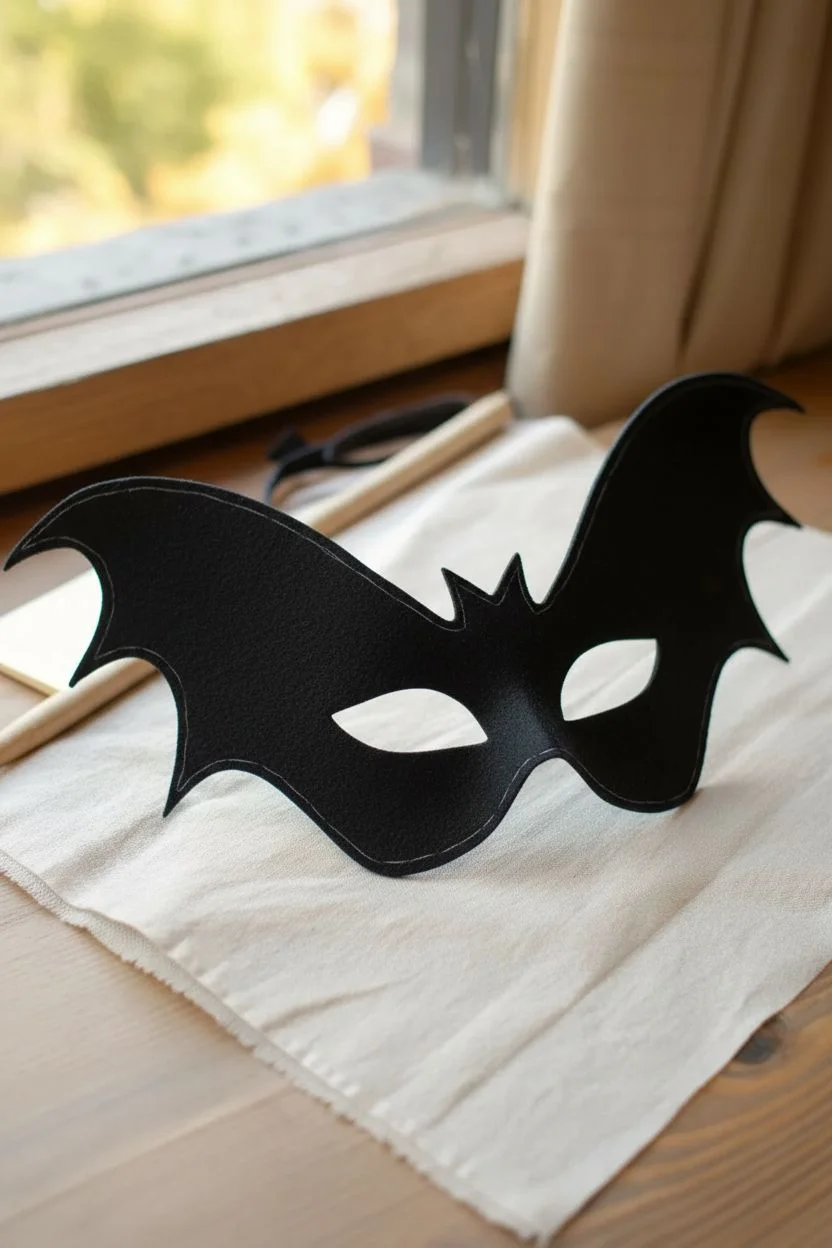
Channel the mystery of the night with this striking bat mask, featuring dramatic winged contours and a dazzling finish. The combination of deep purple felt and sparkling teal glitter creates a luxurious, gothic look perfect for any masquerade or Halloween event.
Detailed Instructions
Materials
- Stiff black felt or craft foam (base material)
- Deep purple felt fabric
- Teal loose glitter (fine grain)
- Mod Podge or quality craft glue
- Fabric scissors (fine-tip recommended)
- Small gold or brass brads (paper fasteners) or studs
- Black piping or black puffy paint
- Elastic cord or ribbon
- Chalk or white pencil for tracing
- Small paintbrush
- Mask template (bat wing shape)
Step 1: Planning and Cutting the Base
-
Create your template:
Sketch a bat shape onto paper first. The key feature is the large, upward-sweeping wings that extend well past the temples and a central body that dips down over the nose. Ensure the eye holes are almond-shaped and tilted upwards. -
Trace the base shape:
Place your paper template onto the stiff black felt or craft foam. Use a white pencil or chalk to trace the outline, marking the outer perimeter and the eye holes clearly. -
Cut the main structure:
Carefully cut out the black base shape. Using sharp, fine-tip scissors is crucial here to get clean points on the wing tips and smooth curves around the eye openings.
Step 2: Adding the Purple Panels
-
Prepare the purple inserts:
Using your original template as a guide, cut shapes from the deep purple felt that correspond to the ‘webbing’ between the bat wing fingers. These should be strictly geometric triangles or curved wedges. -
Check the fit:
Lay the purple felt pieces onto the black base to ensure they fit within the wing areas, leaving a clear black border around the edges for later definition. Trim them down if they overlap the edges. -
Secure the fabric:
Apply a thin, even layer of craft glue to the back of the purple felt pieces and press them firmly onto the upper wing sections of your black base. Smooth out any air bubbles with your fingers.
Uneven Glitter?
If the glitter looks patchy after the first coat dries, simply dab small dots of glue onto the bare spots and re-sprinkle. A second coat adds depth and ensures full coverage.
Step 3: Applying the Glitter Detail
-
Target the glitter zone:
Identify the section of the mask that surrounds the eyes and the central nose bridge. This area will be the focal point for the teal glitter. -
Apply adhesive:
Brush a generous amount of Mod Podge or craft glue onto these specific lower sections. Be careful not to get glue on the purple felt areas you just attached. -
Dust with teal:
Sprinkle the fine teal glitter liberally over the wet glue. I find tapping the container gently gives better control than pouring. -
Shake off excess:
Wait about a minute for the glue to grab the glitter, then gently tap the mask sideways onto a sheet of paper to remove the loose particles. Pour the excess back into your jar.
Iridescent Upgrade
Mix a pinch of silver or holographic glitter into your teal supply before applying. This catches the light differently and gives the mask a magical, shifting color effect.
Step 4: Defining Structures and Hardware
-
Create the skeleton:
To simulate the bones of a bat wing, glue strips of black piping or felt cord along the edges of the purple panels. Alternatively, you can pipe thick lines of black puffy paint to create these raised ridges. -
Outline the full mask:
Continue this raised black lining around the entire perimeter of the mask and surrounding the eye holes. This hides the raw edges of your glitter and purple felt, giving it a professional finish. -
Mark stud positions:
Using a white pencil, make tiny dots along the black ‘bone’ lines where the hardware will go. Space them evenly, focusing on the joints of the wings and around the eye frames. -
Install the studs:
If using brads, poke small holes and insert the brass fasteners, folding the legs flat on the back side. If using stud embellishments, simply glue them firmly onto your marked spots.
Step 5: Final Assembly
-
Seal the glitter:
To prevent shedding, gently dab—do not brush—a top coat of diluted Mod Podge or spray sealer over the glittered areas once the bottom layer is fully dry. -
Attach the strap:
Punch two small holes on the far outer edges of the mask, just behind the glitter area. Thread your elastic cord or ribbon through and knot securely on the backside. -
Comfort check:
Since the back might be scratchy from the brads or stiff felt, glue a backing layer of soft black felt over the reverse side of the mask to sandwich the fasteners and create a smooth surface against your skin.
Now you have a stunning, handcrafted accessory ready to add some mystery to your costume
Half-and-Half Split Monster Mask
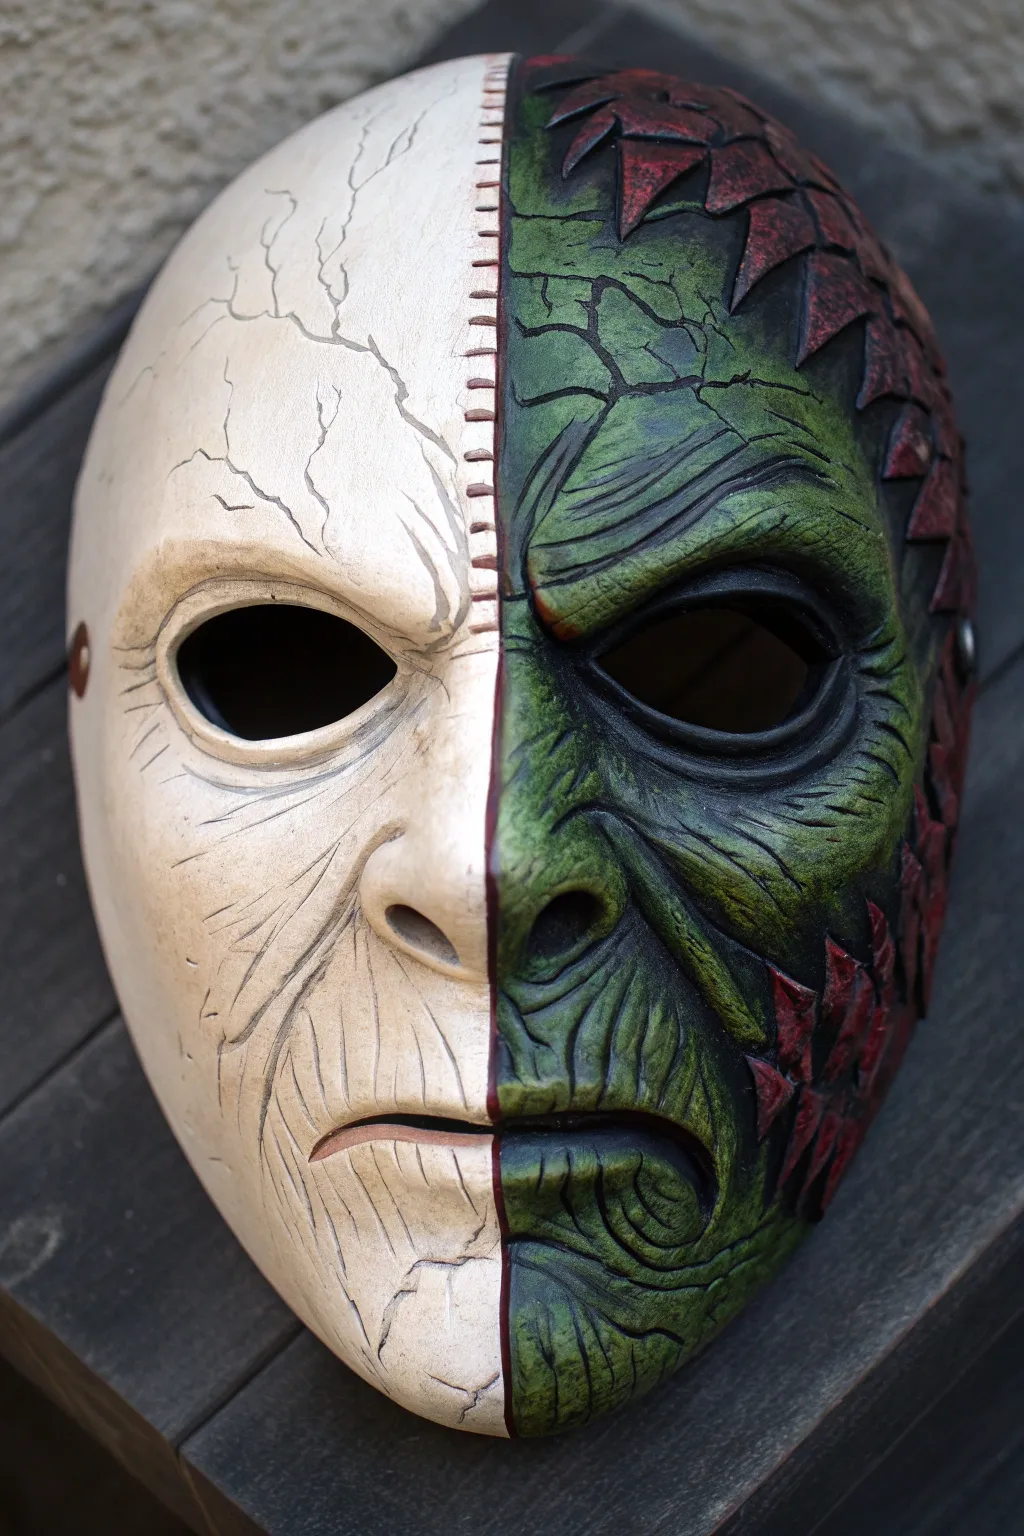
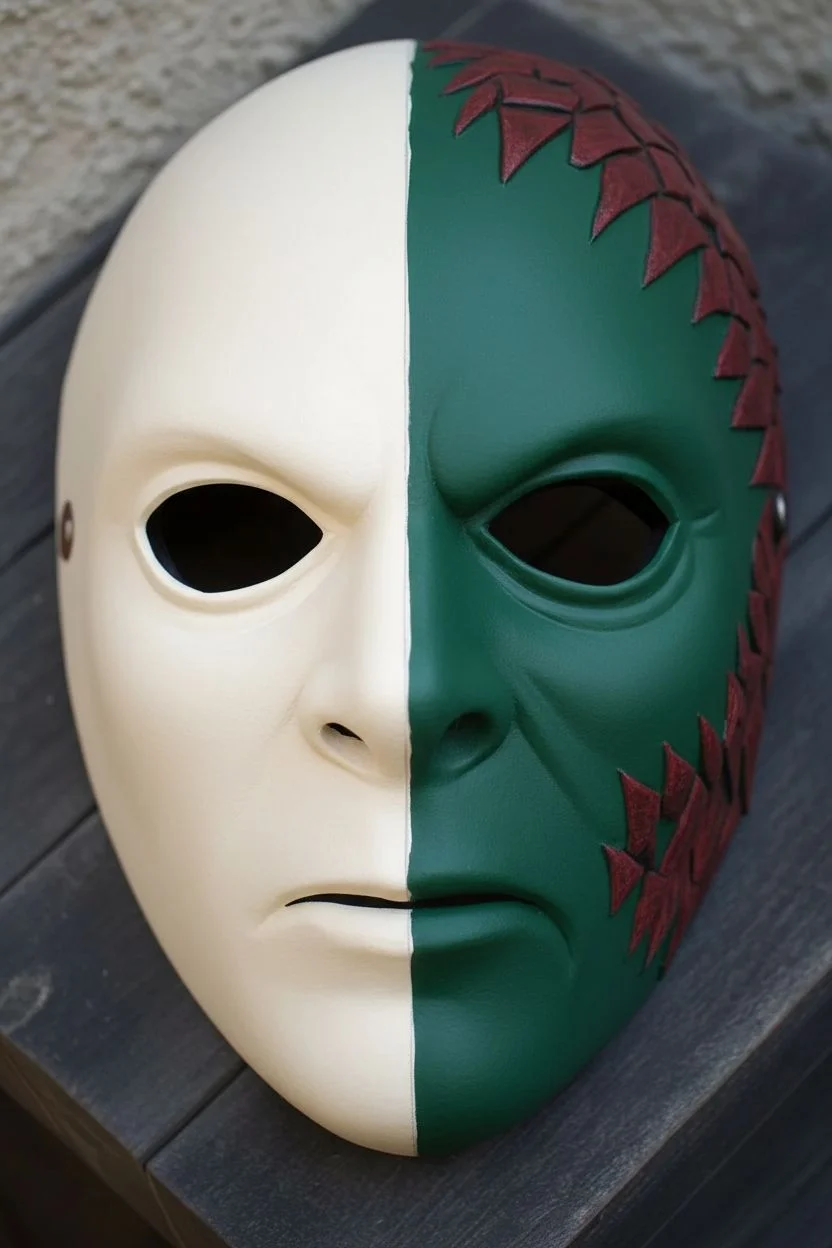
Embrace duality with this striking split-face design that merges a cracked, porcelain-like bone visage with a textured, swampy monster. This project relies heavily on dimensional painting techniques to create the illusion of deep cracks and raised scales on a standard base mask.
Step-by-Step Guide
Materials
- Rigid blank face mask (white plastic or papier-mâché)
- Pencil
- Acrylic paints (Titanium White, Bone/Off-White, Black, Forest Green, Lime Green, Dark Red, Brown)
- Fine detail brushes (00 or 0)
- Flat shader brushes (small and medium)
- Matte sealant spray or varnish
- Water cup and palette
- Paper towels
Step 1: Planning and Base Coat
-
Divide the Face:
Begin by lightly drawing a vertical line down the exact center of the mask with a pencil. This will serve as your boundary between the two creatures. -
Map the Designs:
On the left side, sketch jagged, lightning-bolt style cracks radiating from the forehead and chin. On the right, sketch curved, overlapping wrinkles around the eye and mouth, and draw sharp triangular ‘scale’ shapes along the outer edge. -
Base the Bone Side:
Paint the entire left side with a flat Bone or Off-White acrylic. Apply two thin coats for opaque coverage, letting the first coat dry completely before adding the second. -
Base the Swamp Side:
Paint the right skin sections with a dark Forest Green. For the scales on the outer edge, use a deep, muddy Red mixed with a touch of Brown. Don’t worry about detailing yet; just get the solid colors down.
Mastering the Crack
When painting cracks, vary the line thickness. Press harder for the main fissure and lift the brush creating a whisper-thin line for the tips. A shaky hand actually helps here.
Step 2: Detailing the Bone Side
-
Deepen the Sockets:
Paint the inside rim of the left eye socket black to create depth. Feather this black paint slightly outward onto the bone surface to make the eye look sunken. -
Create the Texture:
Using a very dry flat brush with a tiny amount of grey-brown paint, lightly sweep horizontal strokes across the cheek and chin. This dry-brushing simulates the grain of old bone or wood. -
Paint the Cracks:
Switch to your finest detail brush and black paint slightly thinned with water. Trace over your pencil crack lines with a shaky hand to keep them organic and jagged. -
Highlight the Edges:
To make the cracks look 3D, paint a thin line of pure Titanium White immediately next to each black crack line. This acts as a highlight where the ‘light’ hits the broken edge.
Step 3: Sculpting the Swamp Side with Paint
-
Shadow the Wrinkles:
On the green side, use watered-down black paint as a wash. Apply it over the green skin, letting it settle into the recesses of the mask to create natural shadows. -
Define the Creases:
With undiluted black paint and a fine brush, deepen the lines around the eye, nose, and mouth to simulate heavy, folded skin. -
Highlight the Monster Skin:
Mix Lime Green with a little Forest Green. Dry brush this lighter color over the raised areas of the cheeks and brow. I find this step instantly brings the texture to life by catching the high points. -
Detail the Red Scales:
Outline each red scale on the outer edge with black. Add a little texture inside the scales by stippling darker red or black in the centers.
Paint looking chalky?
If your black shading looks grey or chalky after drying, your paint coverage was too thin. Go back with a second pass of slightly watered-down black to deepen the shadows without losing transparency.
Step 4: The Seam and Finish
-
Paint the Stitching:
Along the central dividing line, paint small, horizontal hash marks using a dark brown or reddish-brown. These represent the heavy stitching holding the two halves together. -
Clean Up Eyes:
Check the eye holes. If messy, repaint the inner rims black to ensure a clean, professional look when worn. -
Seal the Work:
Once all paint is completely dry (give it at least an hour), spray the entire mask with a clear matte sealant. This protects the paint from scratching and unifies the finish.
Now you have a terrifying two-faced creation perfect for haunting any Halloween party


Stitched Mouth Mask Horror Detail
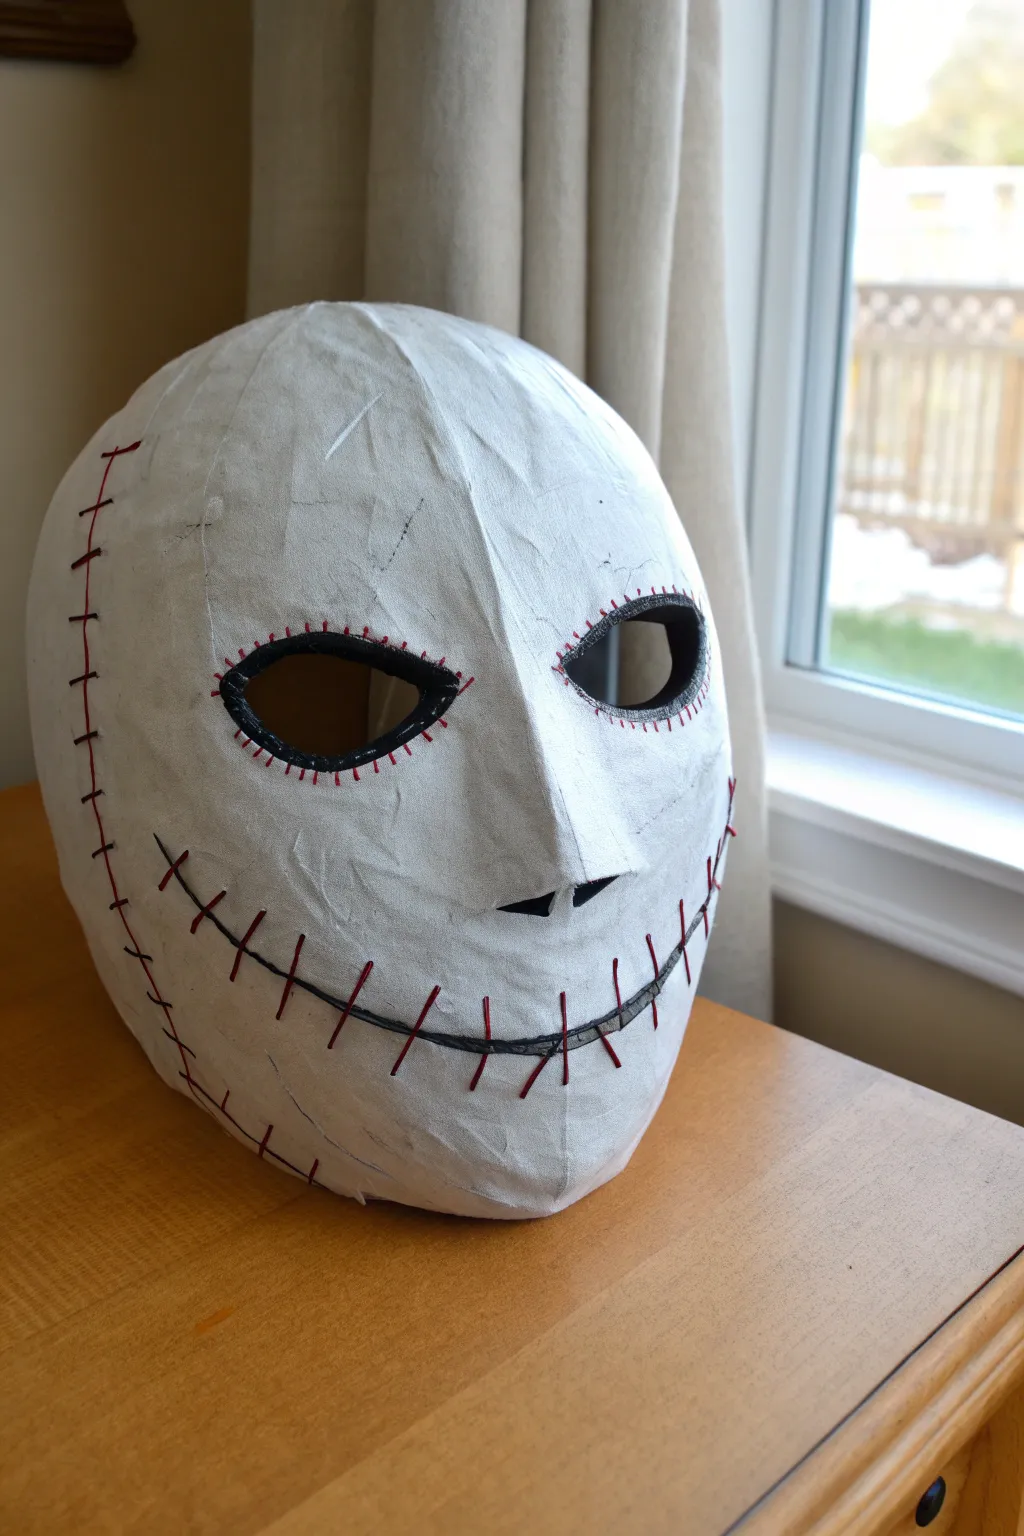
Transform a basic face shape into something truly unsettling with this stitched-mouth design. The stark white texture combined with crude red stitching creates a spooky, asylum-inspired look perfect for a creepy costume.
Detailed Instructions
Materials
- Plastic face mask base (full face)
- Newsprint or paper towels
- White PVA glue (school glue)
- Water
- Gesso or white acrylic primer
- White acrylic paint
- Black acrylic paint
- Dark red acrylic paint (or a red paint marker)
- Fine detail paintbrush
- Medium flat paintbrush
- Pencil
- Sandpaper (fine grit)
Step 1: Building the Textural Base
-
Prepare the adhesive:
Mix your PVA glue with a small amount of water in a bowl until it reaches a milky, brushable consistency. -
Apply the paper layer:
Tear your newsprint or paper towels into medium-sized strips. Dip them into the glue mixture and lay them over the plastic mask base. -
Create surface texture:
As you layer the paper, don’t smooth it out perfectly. Allow small wrinkles and creases to form, as this mimics the look of rough fabric or scarred skin. -
Build up features:
If you want a more defined nose or brow, add a few extra layers of paper in those specific areas to build slight volume. -
Let it cure:
Set the mask aside in a warm, dry area. It needs to be completely hard to the touch, which usually takes overnight.
Use Thread Logic
When painting the red stitches, angle them slightly differently rather than making them perfect railroad tracks. It mimics the chaotic look of a hand-sewn injury.
Step 2: Priming and Base Coat
-
Prime the surface:
Coat the entire dry mask with a layer of gesso. This seals the paper and provides a tooth for the paint to grip. -
Apply base white:
Paint the mask with standard white acrylic paint. You may need two coats to fully cover any newsprint text underneath. -
Preserve the texture:
When painting, use a fairly dry brush technique to avoid filling in all those wonderful little creases you created earlier.
Step 3: Adding the Horror Details
-
Draft the design:
Lightly sketch your design with a pencil. Draw a wide, curved line for the mouth that extends up the cheeks, outline the eyes, and mark the vertical scar line on the side of the head. -
Darken the eyes:
Using a small flat brush and black acrylic paint, outline the eye sockets heavily. Make the line thick and somewhat uneven for a rough, handmade look. -
Draw the mouth line:
Paint the main horizontal mouth slit in loose black. I find that tapering the line to be thinner at the ends makes it look more realistic. -
Paint the side scar:
Add the long vertical line running down the side of the mask in black or dark grey, matching the style of the mouth slit. -
Add subtle weathering:
Dilute a tiny drop of black paint with lots of water. Use this wash to very lightly shadow the nose and deep wrinkles, then wipe most of it away immediately.
Wrinkles Too Flat?
If your paper maché dried too smooth, crumple up a tissue, dip it in glue, and sculpt new raised scar tissue directly onto the dry mask before painting.
Step 4: Stitching it Together
-
Start the stitching:
Switch to your fine detail brush and dark red paint (or a paint marker). Begin making short, diagonal hash marks across the black mouth line. -
Vary the tension:
Make some stitches look ‘tight’ by slightly curving the lines inward, and keep the spacing slightly irregular so it doesn’t look machine-made. -
Stitch the eyes:
Apply smaller red stitches radiating outward perpendicular to the black eye outlines, giving the appearance that the eyes were sewn open. -
Finish the side scar:
Add the final large red stitches across the long vertical scar line on the side of the head. -
Weather the thread:
Once the red is dry, you can dab a tiny bit of watered-down black over the stitches to make the ‘thread’ look dirty and old.
Once the final details are dry, your terrifyingly textured mask is ready to haunt the neighborhood
Hollow Black Eyes Mask For Instant Creeps
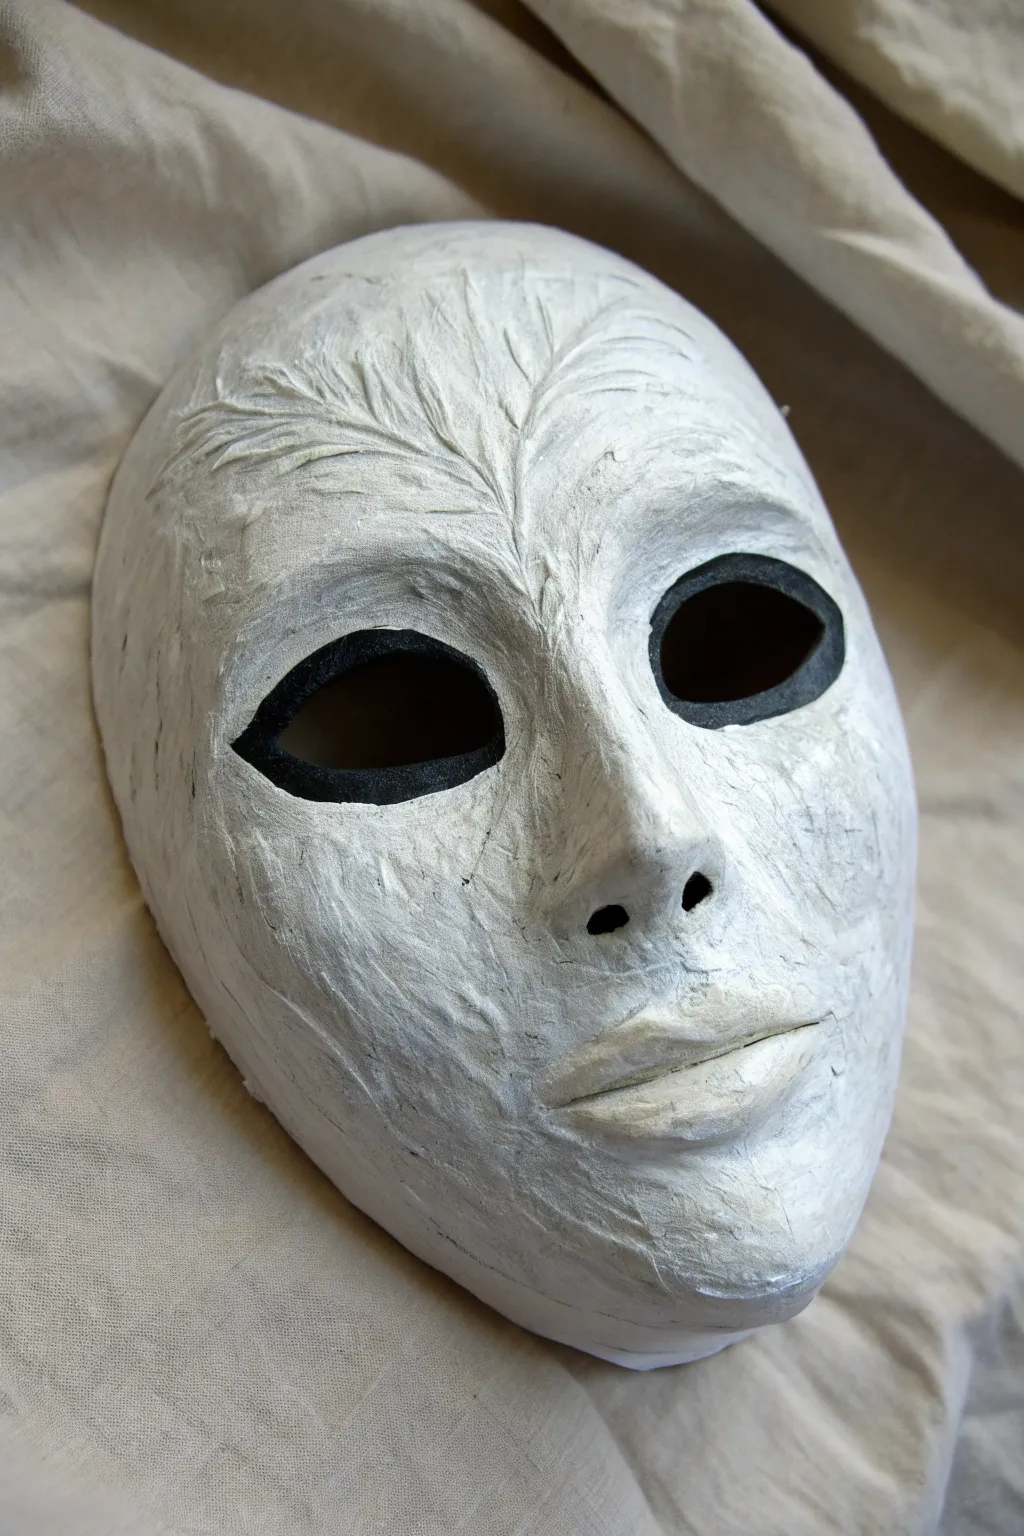
Transform a basic face shape into something unsettlingly timeless with this textured, hollow-eyed design. The stark white finish, reminiscent of old plaster or stone, contrasts sharply with the deep black eye sockets to create an eerie, supernatural gaze.
Step-by-Step Guide
Materials
- Plastic or papier-mâché face mask base
- Air-dry clay or paper clay
- Gesso (white primer)
- Acrylic paint (Titanium White, Mars Black, Burnt Umber)
- Matte mod podge or sealant
- Sculpting tools or toothpicks
- Fine grit sandpaper
- Flat shader brushes (medium and small)
- Water cup and paper towels
Step 1: Building the Foundation
-
Prep the mask base:
Begin with a clean plastic or papier-mâché mask. If the surface is very slick, lightly sand it to help your materials adhere better. -
Apply the clay layer:
Roll out a thin layer of air-dry clay or paper clay (about 1/8 inch thick) and drape it over the mask. Press it firmly to contour against the nose, cheeks, and lips. -
Define the features:
Smooth the clay around the nose and mouth. You want to keep the face remarkably human but slightly stylized, blurring out distinct wrinkles to create a smooth, statue-like appearance. -
Sculpt the forehead texture:
Using a sculpting tool or a toothpick, carve feather-like or vein-like textures radiating from the center of the forehead outward. Press gently to create grooves without cutting all the way through the clay. -
Refine the surface:
Take a damp sponge or finger and lightly run it over the rest of the face. This adds a subtle, organic texture similar to dried plaster rather than perfectly smooth skin. -
Dry completely:
Let the mask sit in a dry area for at least 24 hours. The clay must be fully hardened before painting to prevent cracking.
Uneven Clay Surface?
If the clay dries with unwanted lumps, use fine-grit sandpaper to gently smooth them out before priming. Don’t press too hard or you might lose the intentional texture.
Step 2: The Hollow Eyes
-
Outline the sockets:
For that signature ‘hollow’ look, sketch a wider almond shape around the existing eye holes. The darkness should extend beyond just the pupil area. -
Paint the void:
Using deep Mars Black acrylic, paint the entire interior of the eye sockets you just outlined. Apply two coats to ensure an abyss-like opacity that absorbs light. -
Clean the edges:
If the black paint smudged onto the face, wait for it to dry and then gently scrape it off or paint over it later with white.
Level Up: Aged Cracks
Create tiny hairline fractures by intentionally letting a thick layer of crackle medium dry over the cheeks before the final paint wash.
Step 3: Painting the Texture
-
Prime with Gesso:
Cover all the white clay areas with a coat of gesso. This primes the clay and adds a subtle chalky grit that enhances the stone effect. -
Base coat application:
Apply a solid layer of Titanium White over the entire face, avoiding the black eye sockets. Let this layer dry completely. -
Create a wash:
Mix a tiny drop of Burnt Umber and a drop of Black into a large amount of water. You want a very watery, dirty-looking gray wash. -
Apply the wash:
Brush this watery mix generously over the forehead texture and cheek contours. It should settle into the grooves you carved earlier. -
Wipe back:
Immediately use a clean paper towel to gently wipe the wash off the raised surfaces. The dark pigment will stay in the crevices, revealing the sculpted details. -
Dry brush highlights:
Dip a dry brush into pure Titanium White and wipe most of it off. Lightly whisk the brush over the forehead ridges, nose, and lips to make the high points pop against the shadowed grooves. -
Seal the deal:
Once you are happy with the dusty, ancient look, apply a final coat of matte sealant or Mod Podge. Avoid glossy finishes, as they will ruin the dry, bone-like illusion.
Wear your creation with a hooded cloak to truly disappear into the darkness
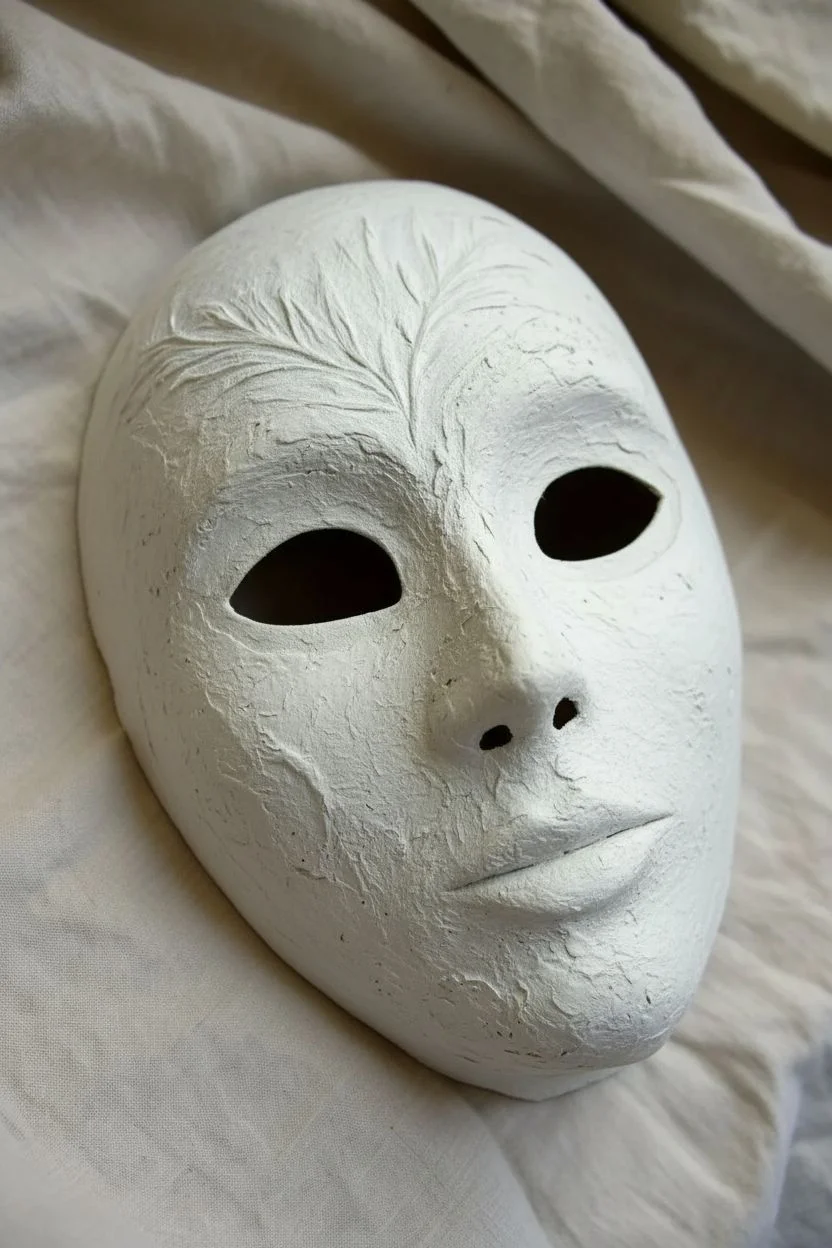
Gothic Vein and Branch Mask Textures
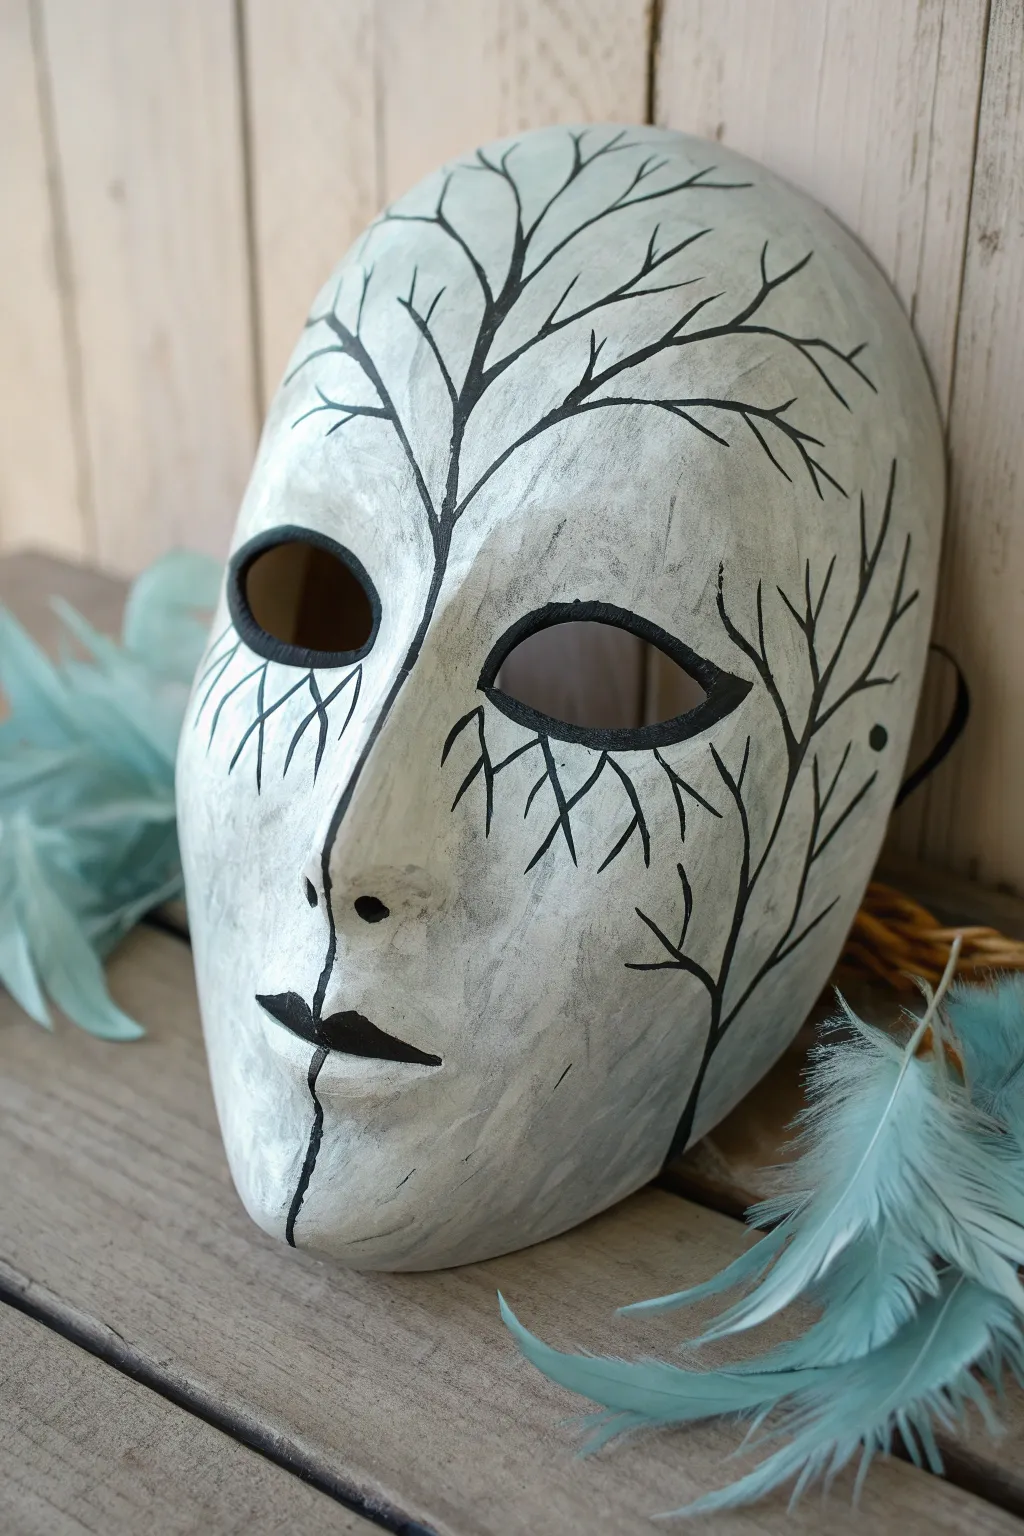
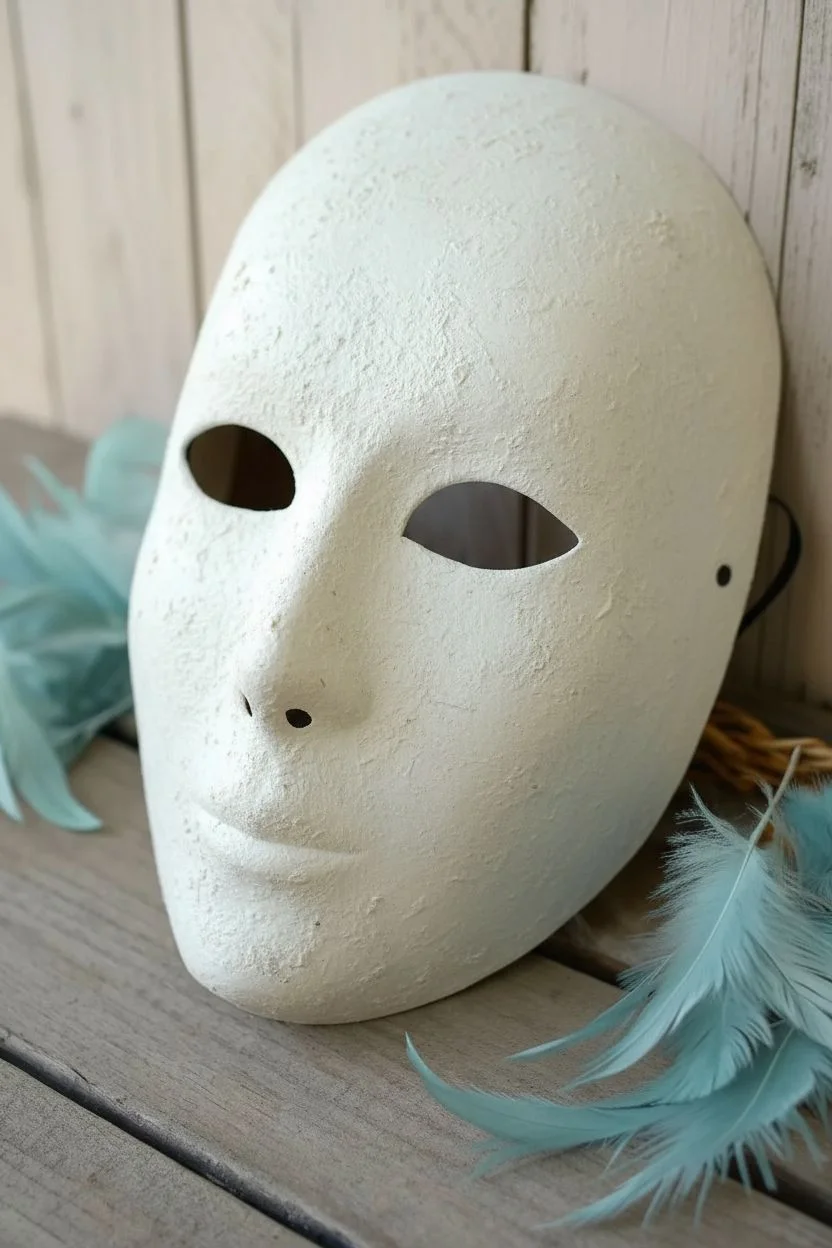
Capture the stark beauty of a winter forest with this hauntingly elegant mask project. By combining distressed, bone-like textures with stark black branch silhouettes, you’ll create a striking accessory perfect for gothic ensembles or spectral costumes.
Step-by-Step Tutorial
Materials
- Blank paper mache or plastic full-face mask
- Gesso or white acrylic primer
- Acrylic paints: Titanium White, Ivory/Cream, Black
- Matte finish clear coat spray/sealer
- Fine-point black permanent marker or liner pen
- Round synthetic paintbrushes (Size 0 or 1 for details, Size 8-10 for base)
- Sponge or textured rag
- Fine-grit sandpaper (optional)
- Pencil
Step 1: Base Preparation & Texture
-
Prime the surface:
Begin by applying a generous coat of Gesso or white primer to the entire mask. If your mask is plastic, lightly sand it first to help the paint adhere. -
Build the base color:
Mix a small drop of Ivory or Cream into your Titanium White to create an off-white, antique bone color. Apply an even base coat to the entire mask. -
Add distressed texture:
While the base coat is still slightly tacky, dab a dry sponge or rag lightly over the surface. This lifts tiny bits of paint and creates a stone-like, uneven texture rather than a perfect glossy finish. -
Create subtle shadows:
Dilute a tiny amount of black paint with plenty of water to make a very thin grey wash. Using your sponge, lightly dab this wash onto the cheeks and forehead to add depth, wiping away excess immediately for a weathered look. -
Dry thoroughly:
Let the mask dry completely for at least an hour. The surface must be perfectly dry before you start the detailed line work.
Shaky Lines?
If painting fine lines is difficult, use a black fine-tip permanent marker instead. It offers more stability than a brush. Just ensure the base paint is 100% dry first.
Step 2: Defining Features
-
Outline the eyes:
Using a small round brush and undiluted black acrylic paint, carefully paint the solid rim around both eye sockets. Ensure the line is opaque and smooth. -
Paint the lips:
Paint the lips solid black. Focus on the sharp ‘M’ shape of the cupid’s bow to give the mouth a defined, dramatic gothic shape. -
Create the chin line:
Paint a single, vertical black line starting from the center of the bottom lip, trailing down to the very bottom edge of the chin. Keep this line slightly organic, not ruler-straight.
Add Dimension
Before sealing, dry-brush a tiny amount of purely white paint over the highest points (nose bridge, brow bone) to make the black branches pop against the background.
Step 3: Branch Structure
-
Sketch the main vein:
Using a pencil very lightly, draw the central trunk line starting at the bridge of the nose and extending upwards into the forehead. -
Map the branches:
Lightly sketch the primary branches radiating outward across the forehead and temples. Think about how lightning or veins split—they should curve naturally, not look like stiff sticks. -
Inking the trunk:
Using a fine liner brush with thin black paint (or a permanent marker for better control), trace your central trunk line. Press harder at the base for thickness and lift off for a taper. -
Extending the canopy:
Draw the long, sweeping branches that reach toward the top of the head. I find it easiest to rotate the mask as I work to keep my hand angle comfortable. -
Adding cheek details:
Create the smaller branch networks under the eyes. These should mimic the veins of a leaf or cracks in porcelain, radiating downwards and outwards across the cheeks. -
Refining the line weight:
Go back over the connection points where branches split. Thicken these joints slightly to make the organic structure look realistic. -
Adding fine twigs:
Switch to your finest brush or the very tip of your marker. Add tiny, wispy twigs coming off the main branches at sharp angles to fill empty spaces.
Step 4: Final Touches
-
Add specific accents:
Place a single small black dot on the nostril area to define the nose slightly without outlining it completely. -
Check symmetry:
Step back and look at the mask. While nature isn’t perfectly symmetrical, the visual weight of the branches should feel balanced on both sides. -
Seal the work:
Once all ink and paint are fully dry, spray the entire mask with a matte clear coat. This protects the delicate branch lines and unifies the sheen of the different paints.
Allow the sealer to cure overnight before attaching ribbons or wearing your haunting creation
Stained Glass Mask Color-Block Style
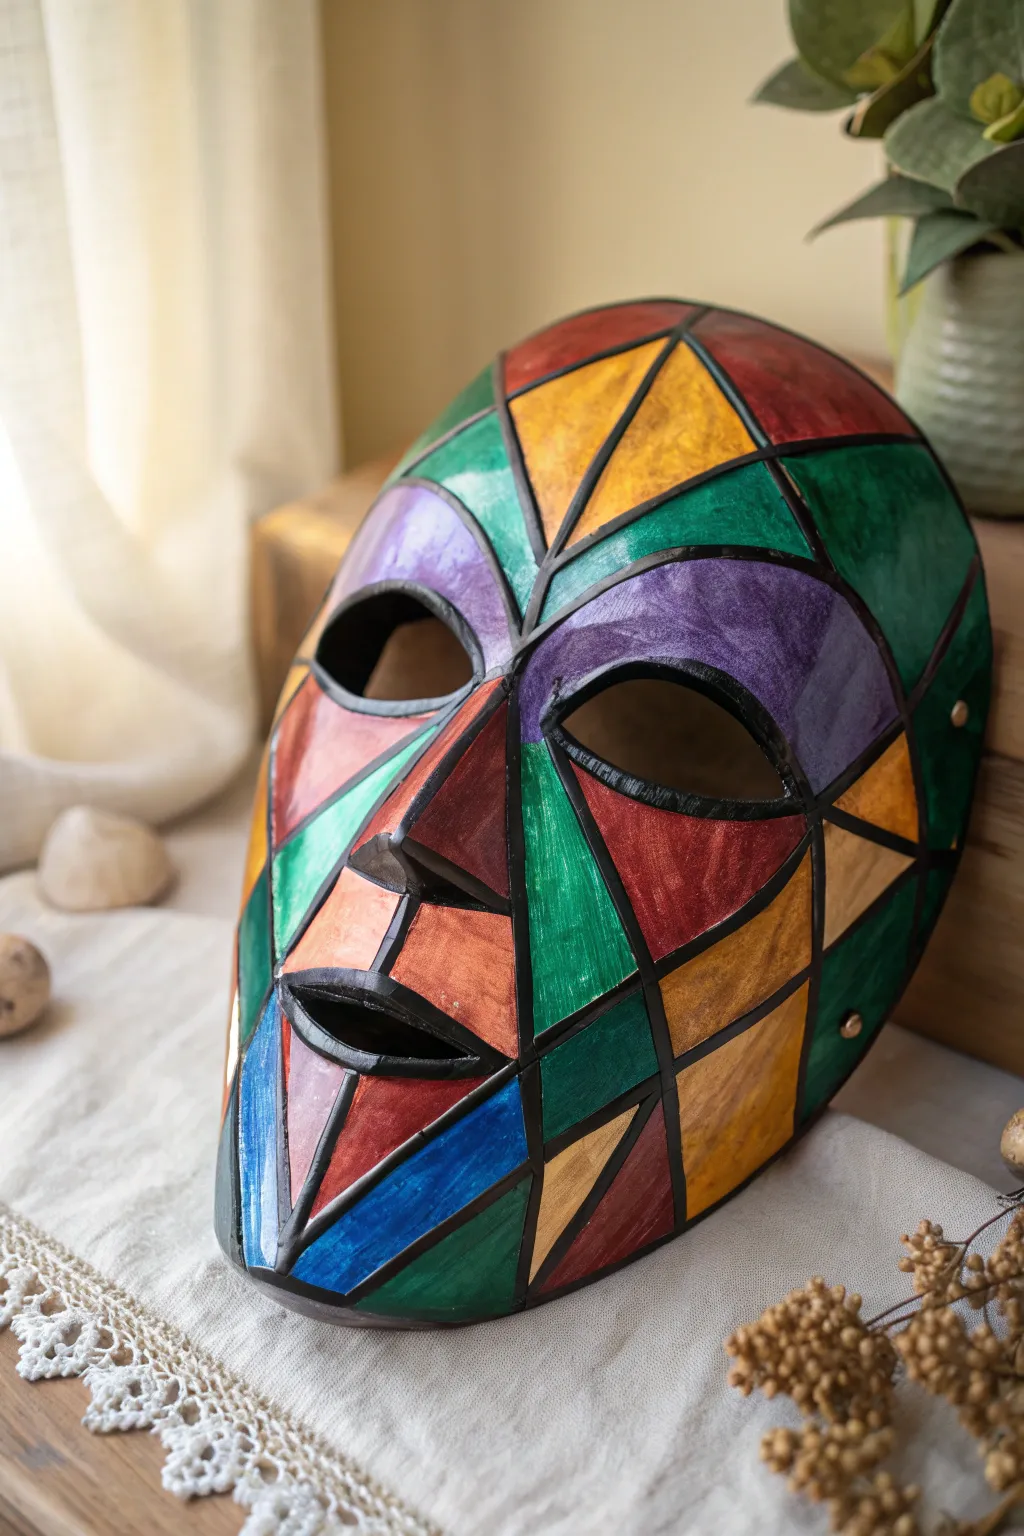
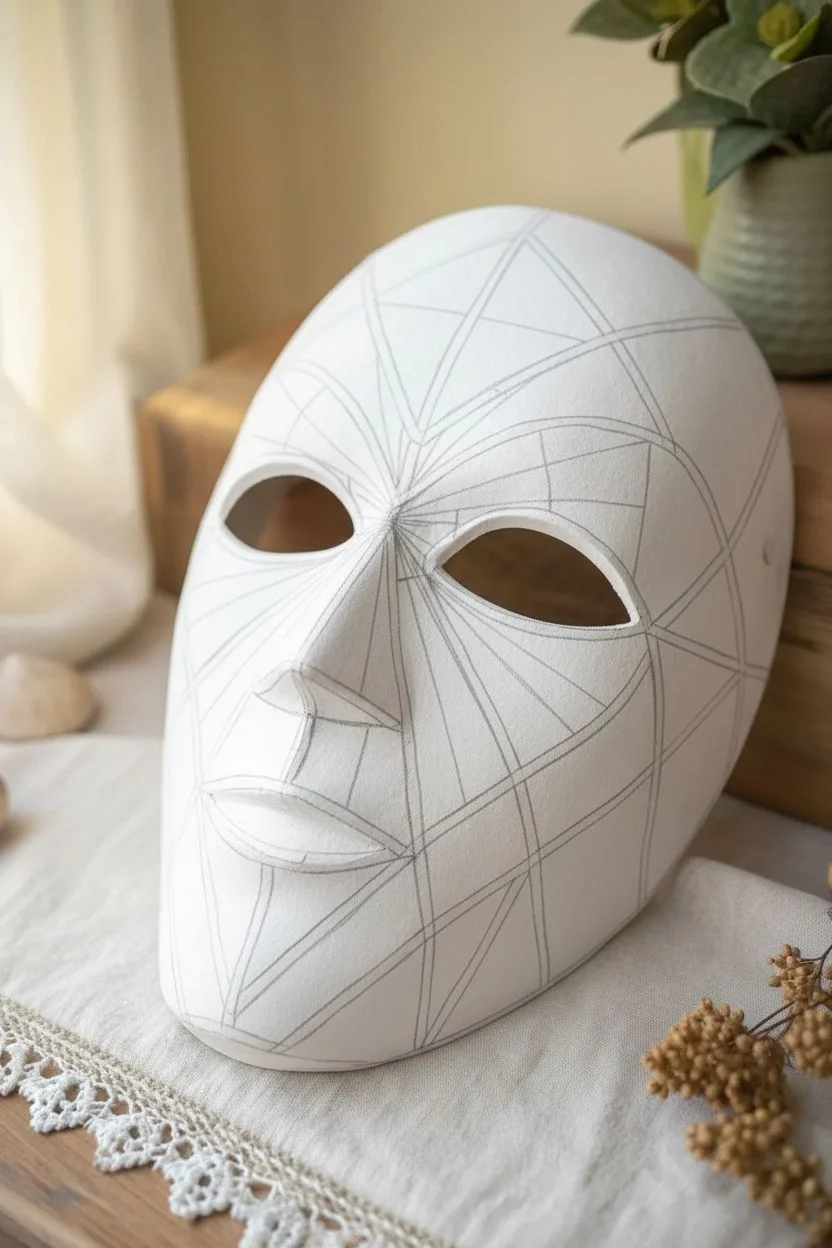
Transform a simple base mask into a striking piece of wearable art that mimics the translucent beauty of stained glass. Bold black outlines define a mosaic of jewel-toned geometric shapes, creating a dramatic color-blocked effect perfect for Halloween or display.
Step-by-Step Guide
Materials
- Blank full-face mask (plastic or paper mache)
- Pencil and eraser
- Black liquid lead liner OR black 3D puff paint
- Acrylic paints (jewel tones: emerald green, deep purple, gold, teal, red, royal blue)
- Small flat brushes and fine liner brushes
- Gloss varnish or decoupage medium (Mod Podge Gloss)
- Palette
- Water cup and paper towels
Step 1: Planning the Grid
-
Prep the Surface:
Ensure your mask base is clean and dry. If using a glossy plastic mask, very lightly sand the surface with fine-grit sandpaper to help the paint adhere better. -
Sketch the Eyes:
Begin your design by drawing outlines around the eye sockets with a pencil. Make these shapes slightly exaggerated and almond-shaped to serve as the anchor for your geometric pattern. -
Draw the Grid Lines:
Using your pencil, draw straight lines intersecting across the face to create a network of triangles and polygons. Start from the nose bridge radiating outward. -
Refine the Shapes:
Continue dividing the larger spaces into smaller geometric chunks. Aim for asymmetry to capture that abstract stained-glass look, ensuring no two adjacent shapes are identical in size.
Step 2: Applying the ‘Lead’
-
Trace with Liner:
Take your black liquid lead liner or 3D puff paint and carefully trace over your pencil lines. The goal is to create a raised barrier that mimics real lead soldering. -
Outline Features:
Pay special attention to the outlines of the eyes, nostrils, and mouth opening. These borders should be slightly thicker to define the facial features clearly. -
Let it Set:
Allow the black liner to dry completely. This creates physical wells for your paint, preventing color bleeding. I find it safest to let this dry overnight to avoid accidental smudges.
Paint Consistency
Mix a tiny drop of water or glazing medium into your acrylics. This makes them slightly translucent, enhancing the realistic stained-glass effect.
Step 3: Adding Jewel Tones
-
First Color Application:
Select a bright yellow-gold paint and fill in a few scattered triangles. Use a small flat brush to work the paint right up to the black ridges. -
Balance the Color:
Switch to a deep purple. Paint sections on the opposite side of the mask to balance the visual weight of the colors. -
Fill with Green and Blue:
Introduce emerald green and royal blue in adjacent sections. Avoid placing the same color right next to itself to maintain the mosaic effect. -
Layering for Opacity:
Depending on your paint quality, you might need a second coat. Let the first layer dry to the touch before adding another to ensure rich, vibrant coverage without distinct brushstrokes. -
Adding Warm Tones:
Fill remaining blank spaces with warm reds and oranges. These hot colors make the cool blues and greens pop by contrast.
Glow Effect
Paint the inside of the mask silver or line it with aluminum foil. When light hits it, the colors will appear more luminous from the reflection.
Step 4: Finishing Glaze
-
Touch Up Lines:
Once the color blocks are fully dry, inspect your black lines. If any paint overlapped onto the ‘lead’, carefully re-trace those segments with your black liner or a fine brush. -
Create the Texture:
To mimic the look of glass, apply a coat of gloss varnish or Mod Podge over just the colored sections. You can dab it on slightly unevenly to simulate hand-rolled glass texture. -
Final Seal:
If you want a uniform finish, coat the entire mask, including the black lines, with a high-gloss spray sealant. This unifies the sheen and protects your work.
Wear your masterpiece with pride or hang it near a light source to enjoy the full effect of the colors
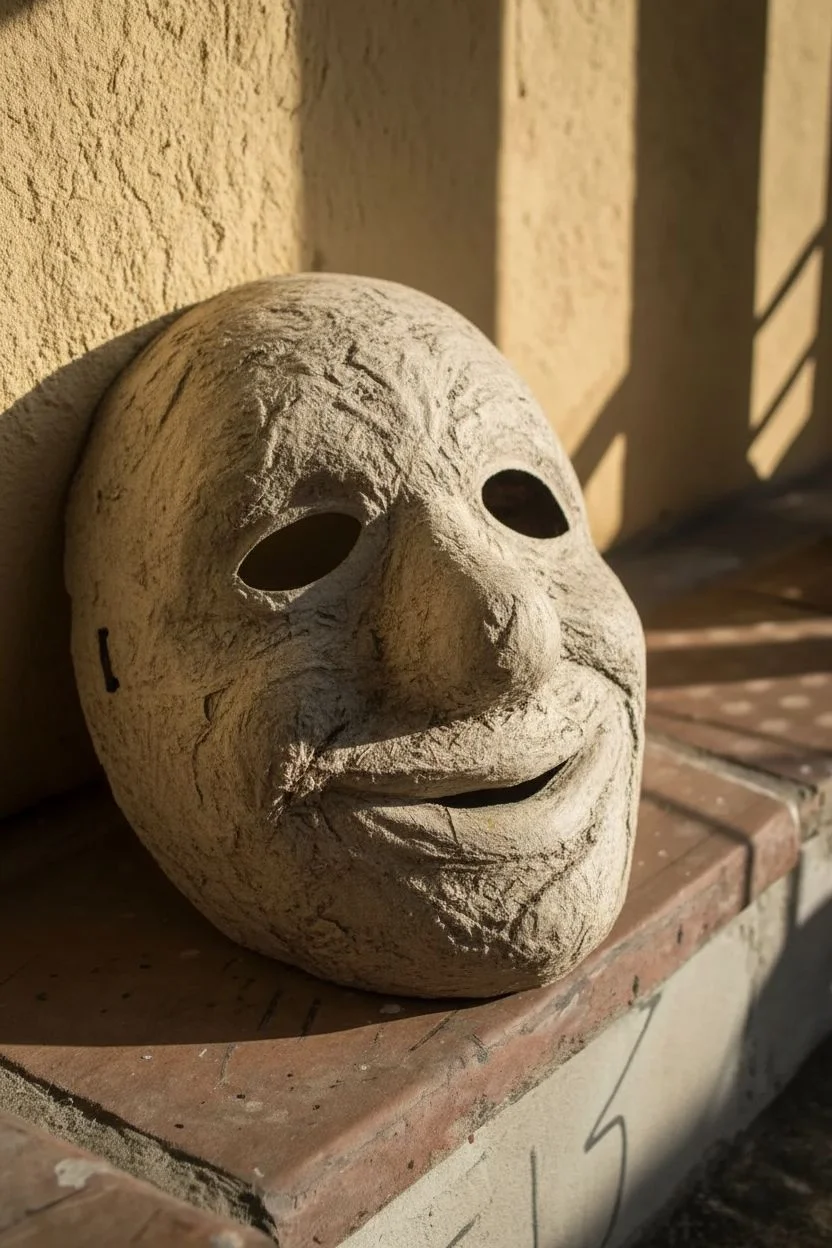
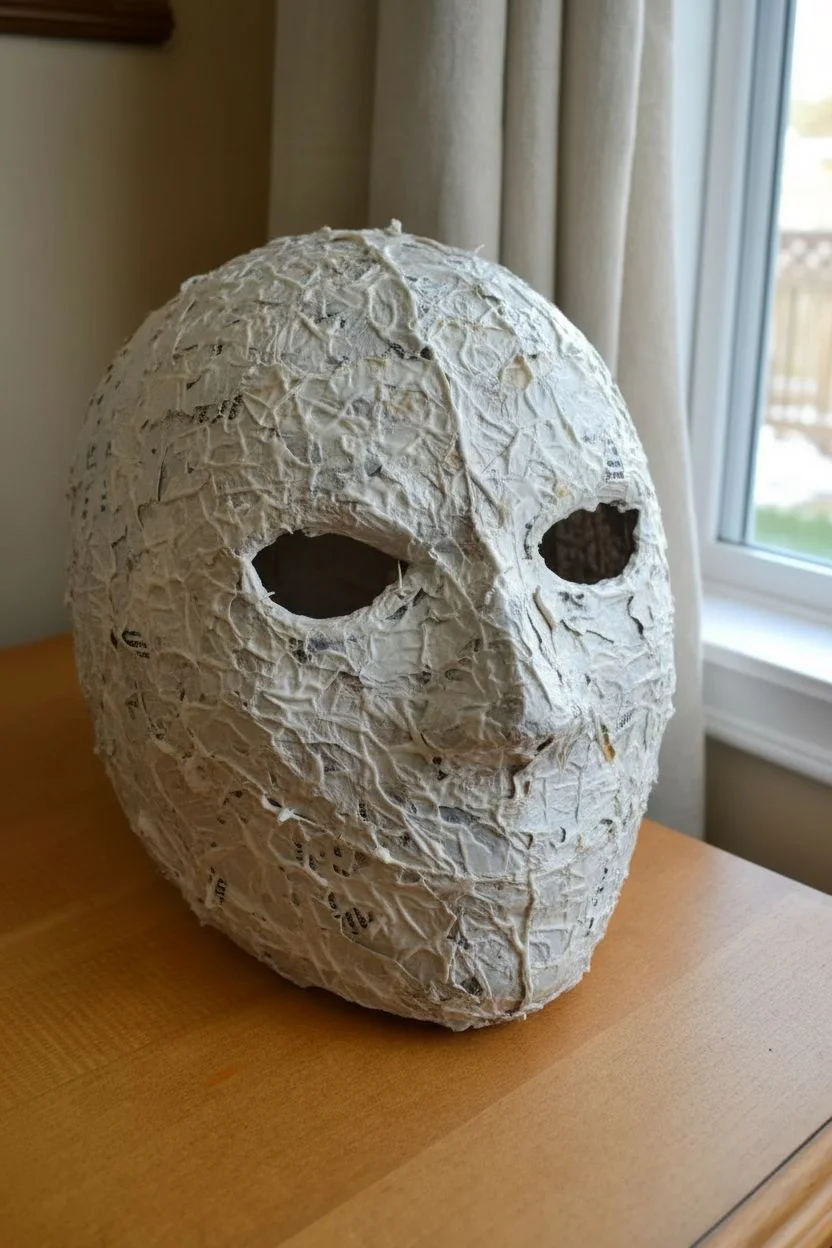
Trompe L’Oeil Torn-Away Mask Effect
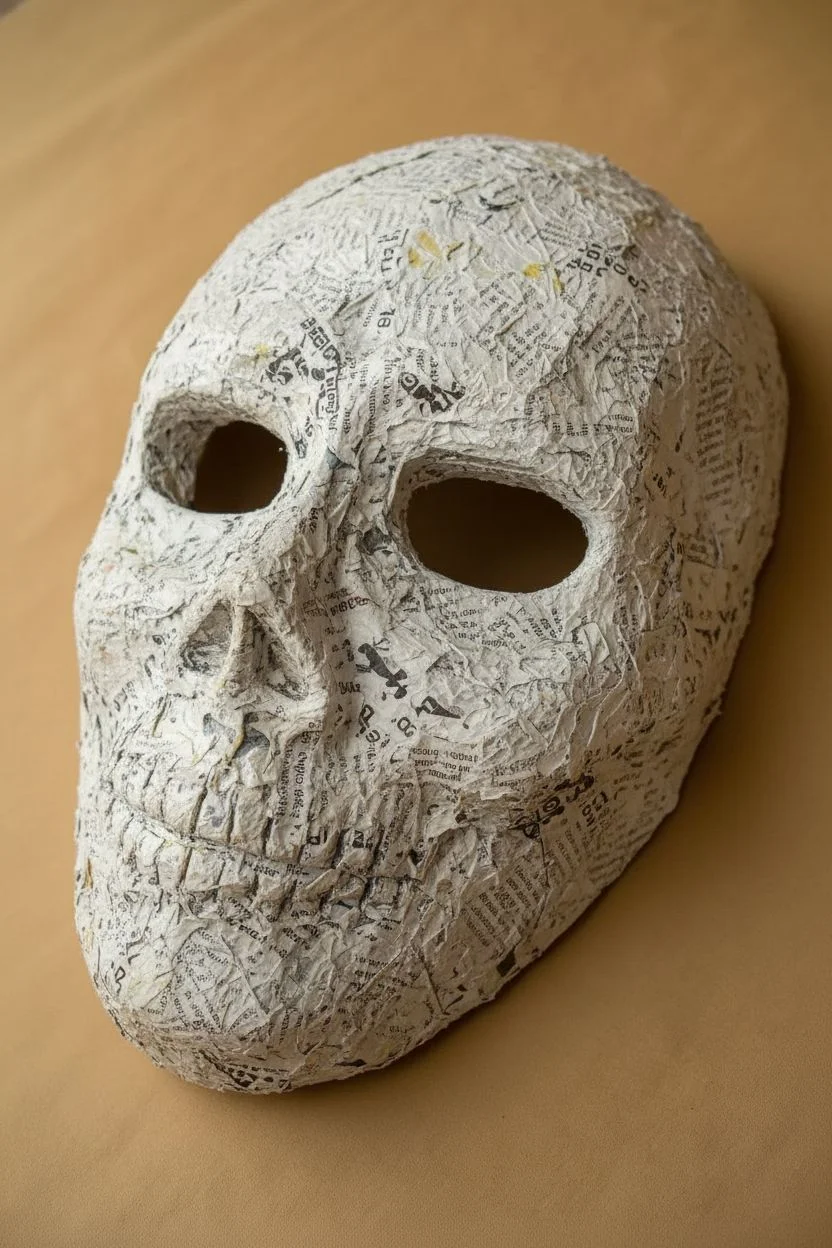
This classic, textured skull mask combines the eerie charm of handmade papier-mâché with bold, skeletal features. The rough, uneven surface gives it an ancient, unearthed bone appearance that looks fantastic as a wall decoration or a haunting costume piece.
How-To Guide
Materials
- Plastic face mask form (as a base)
- Newspaper strips (torn into 1-inch strips)
- White PVA glue or flour-water paste
- masking tape
- Cardboard or aluminum foil (for building up features)
- White acrylic paint or gesso
- Black acrylic paint
- Medium flat brush
- Small detail brush
- Matte clear coat spray (optional)
Step 1: Building the Bone Structure
-
Prep the base form:
Start with a basic plastic mask form. If the eye holes are too small for the skull look, carefully cut them larger with scissors so they appear cavernous and round. -
Sculpt the features:
To move from a human face to a skull, you need to build up specific areas. Bunch up aluminum foil or use shaped masking tape to build up prominent brow ridges above the eyes. -
Refine the nose and cheeks:
Create a triangular nose cavity using rolled foil or cardboard taped securely in place. Build up the cheekbones slightly to give the face a gaunt, skeletal structure. -
Prepare the paste:
Mix equal parts white PVA glue and water, or prepare a flour and water paste until it reaches a pancake batter consistency. -
Apply first structural layer:
Dip strips of newspaper into your adhesive, slide off the excess with your fingers, and lay them over the mask form. Cover the entire mask, including your added foil features. -
Build texture:
I like to slightly crumple the wet paper strips on the second and third layers rather than smoothing them perfectly. This creates that pitted, aged bone texture seen in the photo. -
Shape the nose cavity:
Pay close attention to the nose area; ensure the paper wraps inside the triangular hole to define the hollow nasal cavity. -
Dry thoroughly:
Allow the papier-mâché to dry completely. This usually takes 24 hours, but placing it near a fan can speed up the process.
Wrinkle Power
Don’t smooth your final paper layer! Deliberately wrinkling wet paper creates the natural ridges and crags of old bone without needing to sculpt them.
Step 2: Painting the Void
-
Apply the base coat:
Using a medium flat brush, cover the entire dried mask with white acrylic paint. You don’t need it to be perfectly opaque; let the texture catch the paint. -
Add a second coat:
Apply a second layer of white paint. For a more realistic look, you can mix in a tiny drop of brown or yellow to make the bone look aged, or stick to pure white for a stark contrast. -
Outline the eyes:
Switch to black acrylic paint. Carefully paint the inside rim of the eye sockets. Extend the black paint outward onto the face about half an inch to create a sunken, shadowed look. -
Darken the nose:
Fill the entire triangular nose cavity with deep black paint to create the illusion of a hole. -
Paint the teeth guidelines:
Using a thin brush and black paint, draw a long, slightly curved horizontal line across the mouth area where the teeth will meet. -
Define the teeth:
Paint short vertical lines crossing the horizontal mouth line. Make them slightly irregular and spaced out to mimic separate teeth. -
Add cranium cracks:
Using your finest brush, paint faint, spidery lines radiating from the top center of the forehead to simulate cranial sutures. -
Enhance brow details:
Paint thin, curved lines just above the blackened eye sockets to emphasize the brow ridge structure. -
Final dry brushing:
If you want extra depth, dry brush a very small amount of grey or diluted black over the high points of the texture to make the ‘bone’ look weathered.
Glow Up
Mix glow-in-the-dark medium with your white base coat. Under normal light, it looks like bone, but it will emit a spooky green luminescence in the dark.
Now you have a chilling, durable artifact ready to haunt your wall or complete your costume


Have a question or want to share your own experience? I'd love to hear from you in the comments below!