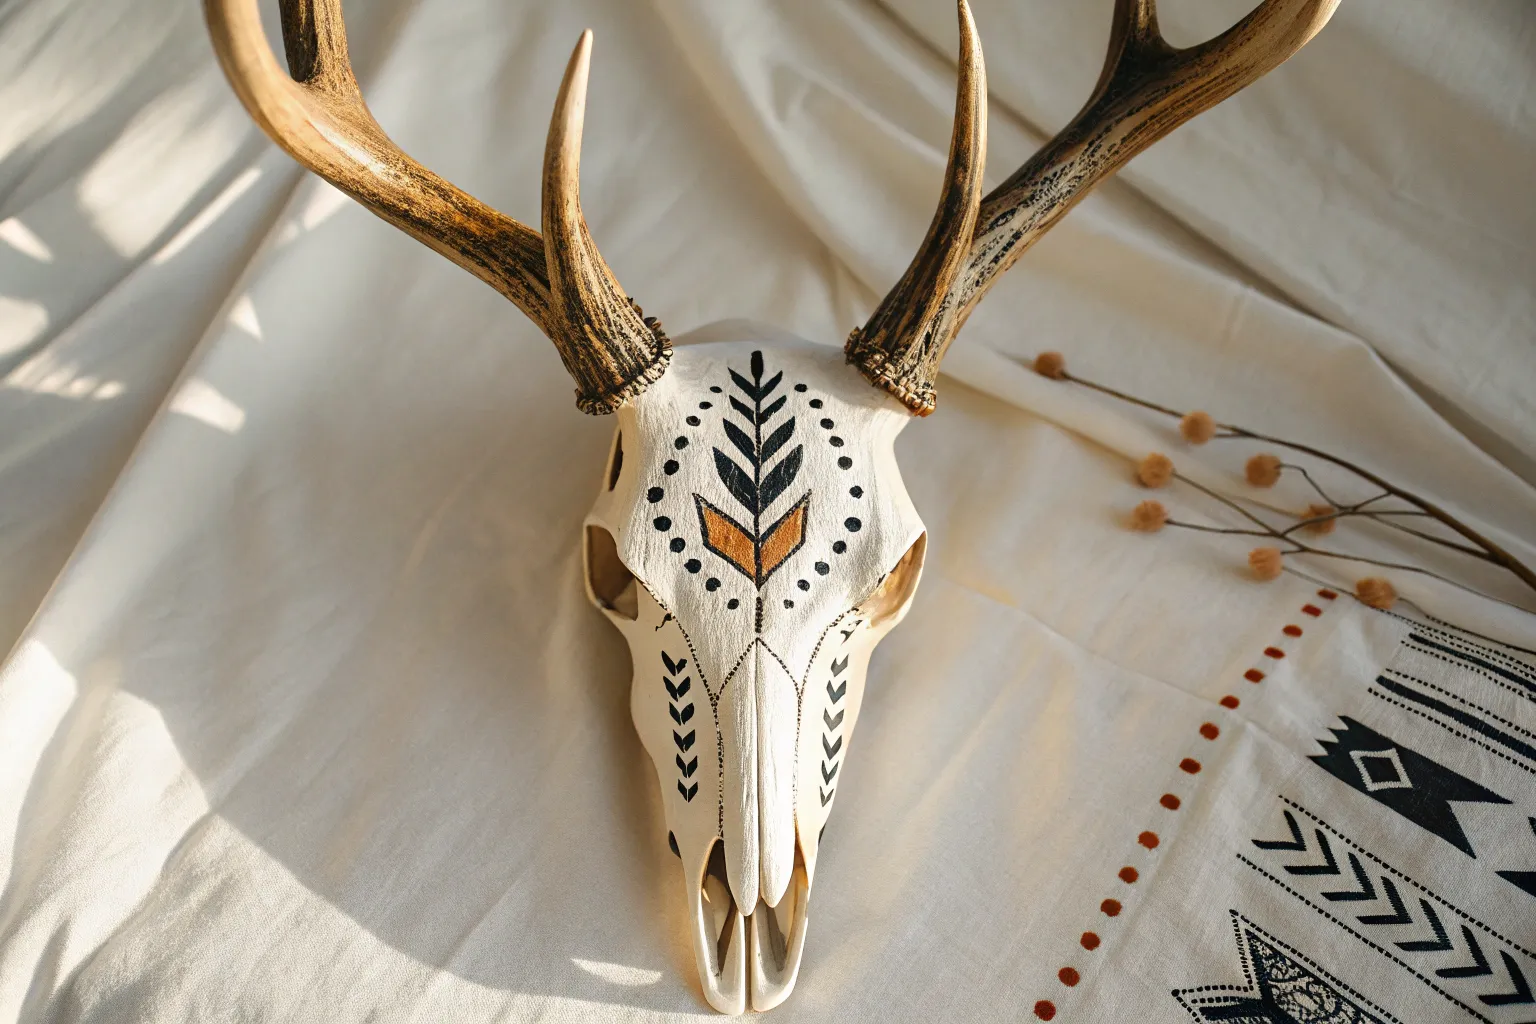
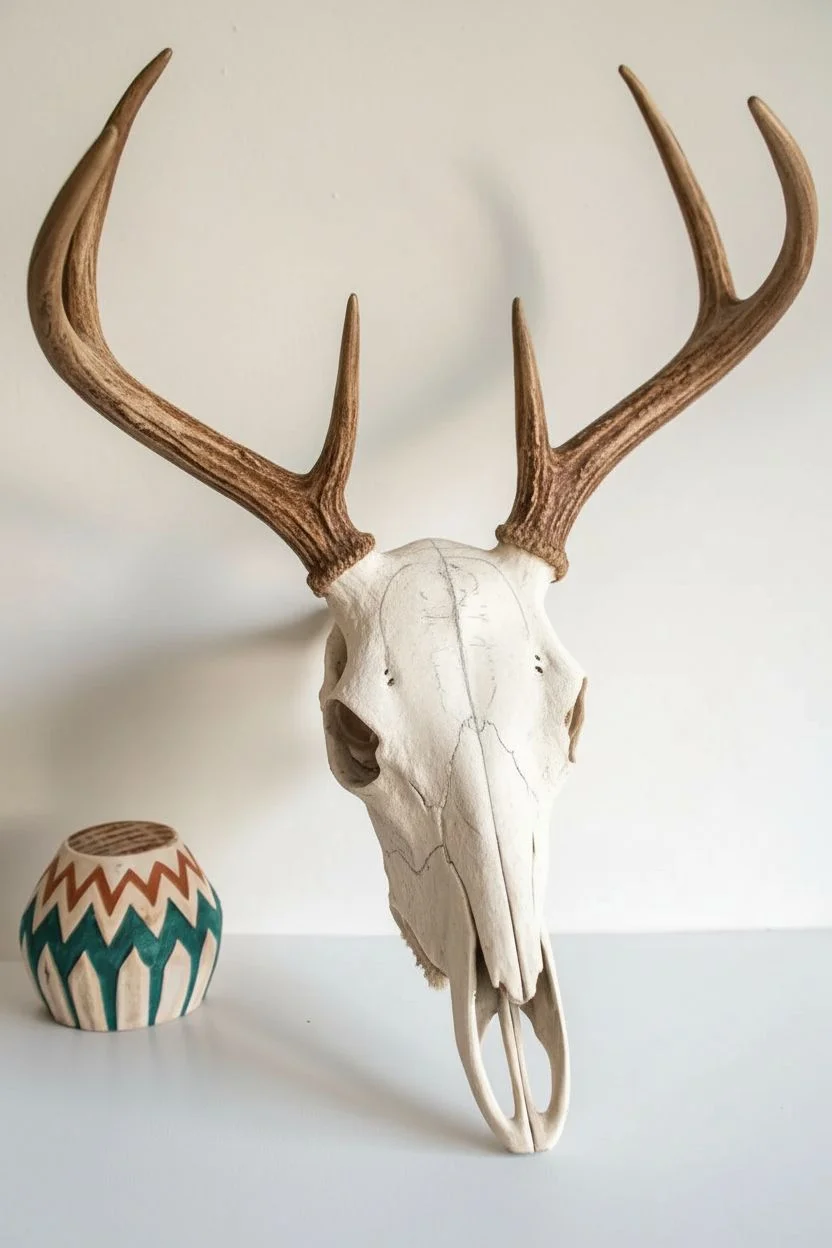
A deer skull is such an unexpectedly beautiful canvas—full of curves, seams, and natural symmetry that practically begs for paint. Here are my favorite painted deer skull ideas that range from classic, nature-inspired looks to bold, artsy statement pieces.
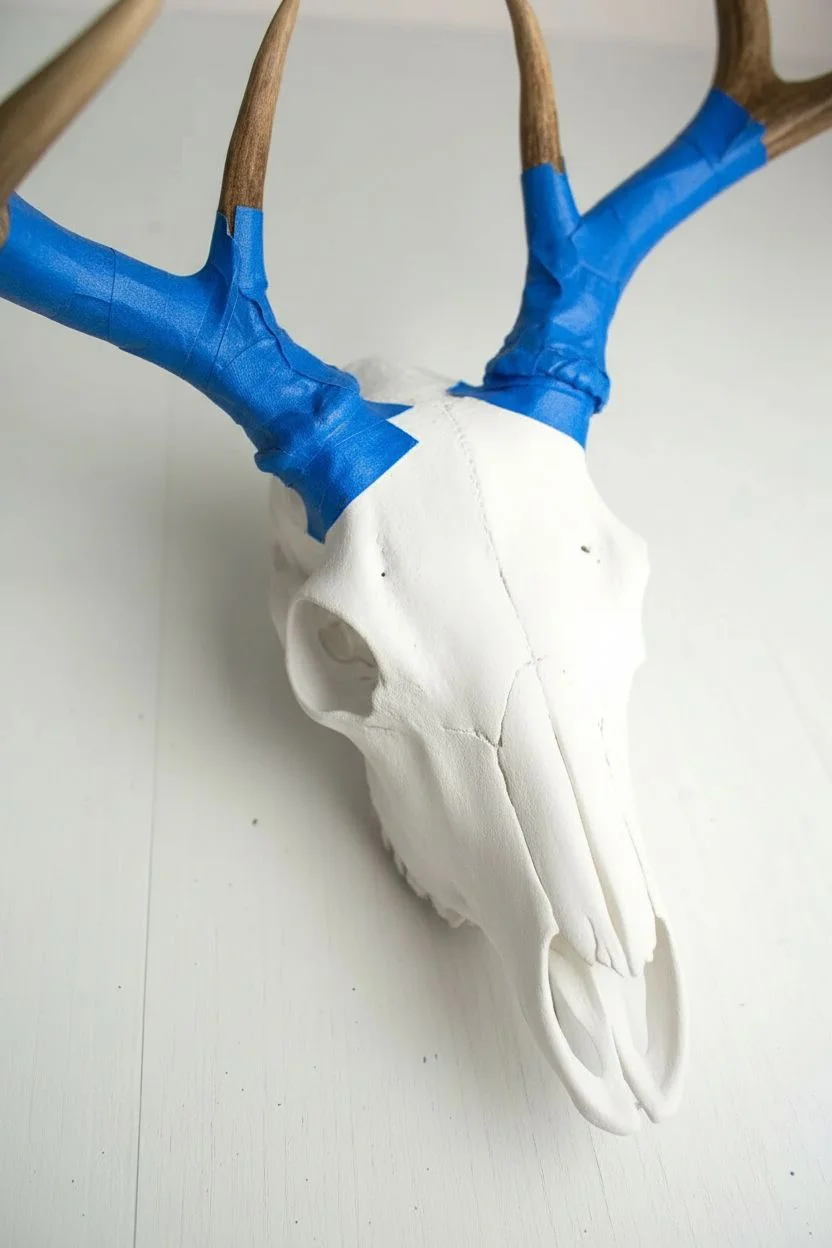
Classic Black-and-White Contrast
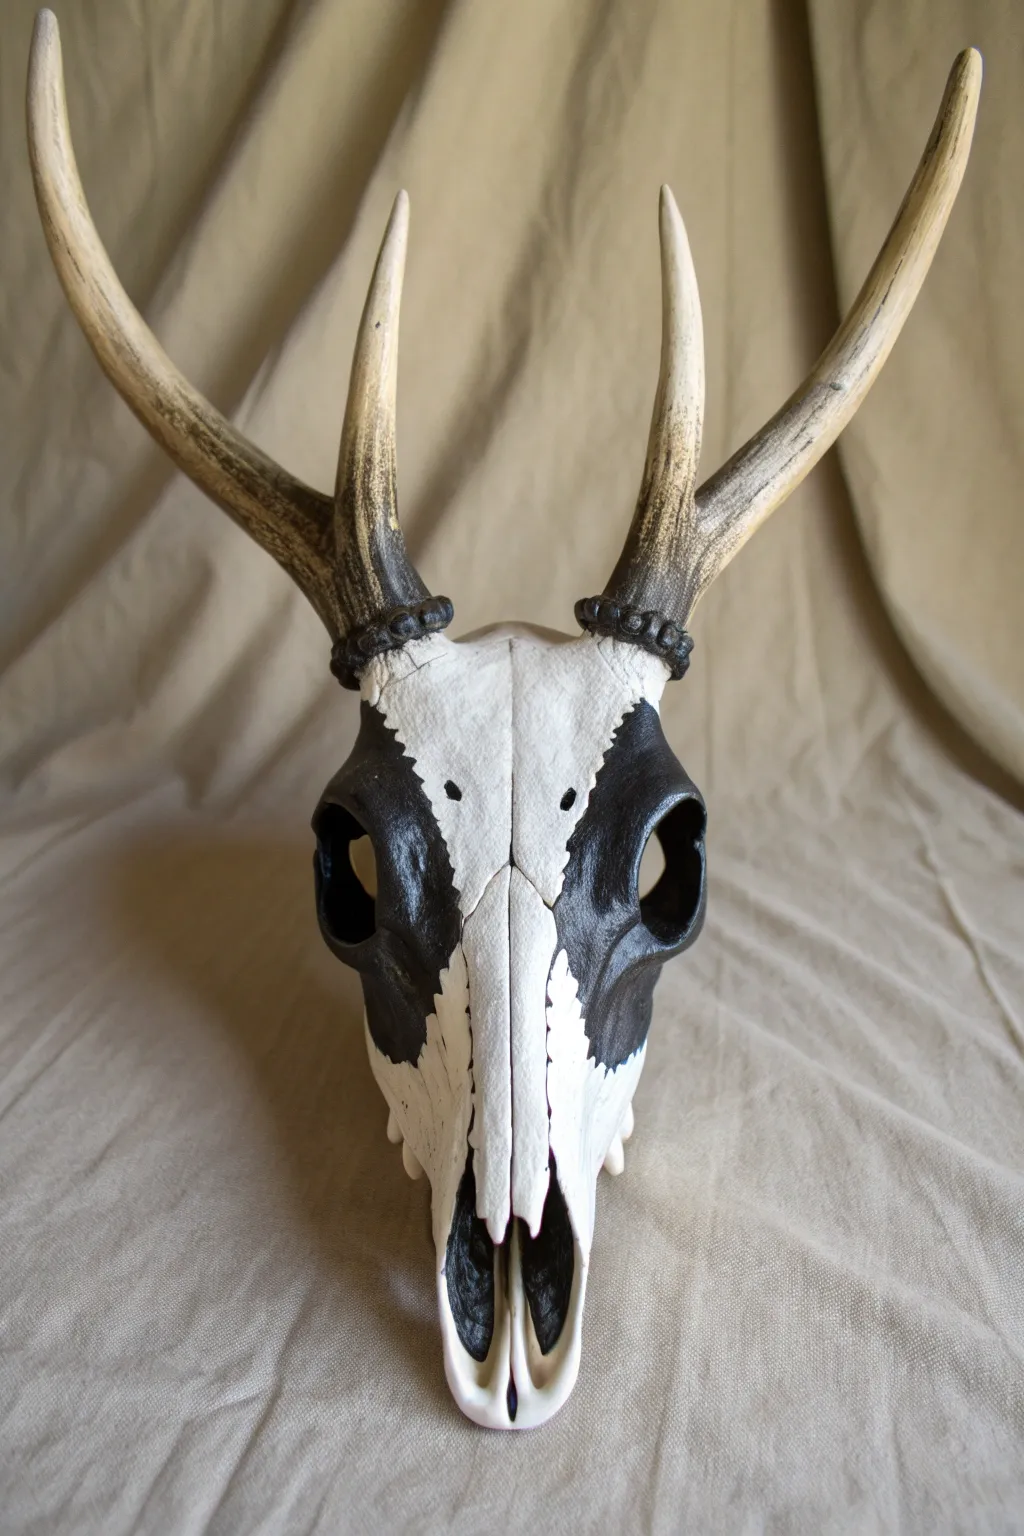
Embrace the striking simplicity of high-contrast design with this black and white deer skull project. The crisp, jagged lines separating the bone-white center from the jet-black sides create a dramatic, modern look that highlights the skull’s natural geometry.
Step-by-Step Tutorial
Materials
- Cleaned and degreased roe deer skull with antlers
- Painter’s tape or masking tape (blue or green)
- Flat white primer (spray or acrylic)
- Matte black acrylic paint
- Small angled shader brush
- Medium flat brush
- Fine detail brush (size 0 or 00)
- Matte clear coat sealer (spray)
- Paper towels
- Aluminum foil
- Pencil (optional)
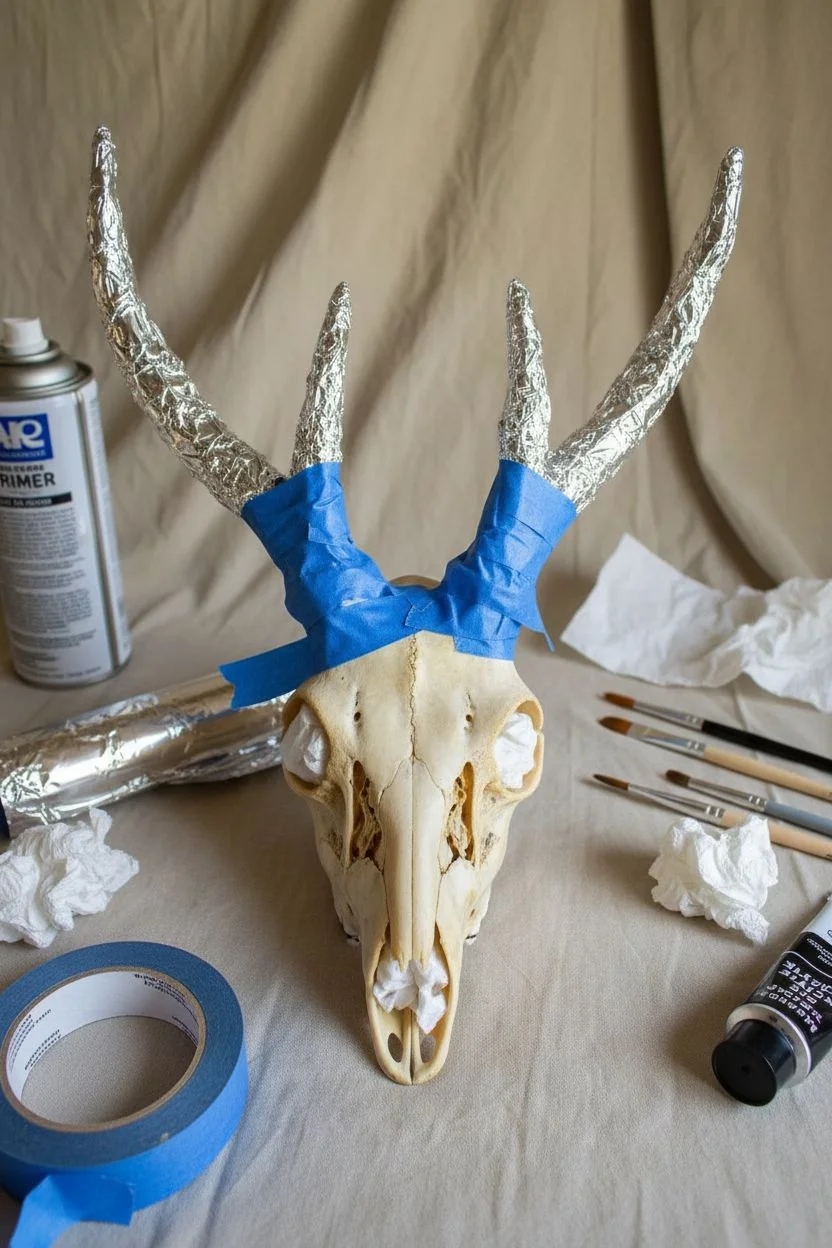
Step 1: Preparation and Masking
-
Clean surface:
Ensure your skull is completely clean, dry, and free of any residual grease or dust. Wipe it down an alcohol wipe if necessary to ensure the best paint adhesion. -
Protect the antlers:
Wrap the base of the antlers, specifically the burrs (the bumpy ring at the bottom), carefully with painter’s tape. You want a tight seal right against the bone so no paint creeps onto the antler. -
Wrap the rest:
Use aluminum foil to cover the upper parts of the antlers to protect them from accidental splashes or overspray. Foil molds easily around the curves. -
Block the cavities:
Stuff small pieces of paper towel into the nasal cavity and the brain cavity at the back to prevent paint from getting inside the delicate interior structures.
Pro Tip: Sharp Points
For the sharpest points on your jagged lines, pull the paintbrush *away* from the white center towards the black area. This creates a fine, tapering tail that looks precise.
Step 2: Base Coating
-
Prime the skull:
Apply a flat white primer over the entire skull. Even if the bone is naturally white, the primer provides a uniform tooth for the black paint and makes the white sections pop. -
Inspect coverage:
Check for any yellowing spots or missed crevices. Apply a second light coat of primer if needed, ensuring the bone texture isn’t obscured by thick paint. -
Let it cure:
Allow the primer to dry completely according to the manufacturer’s instructions. This is crucial—painting over damp primer will cause peeling later.
Step 3: Mapping the Design
-
Visualise the center line:
Locate the natural sutures (the squiggly lines where bone plates meet) running down the center of the nose bridge. This will be your guide. -
Draft the contours:
Lightly sketch your design with a pencil. You want a central white strip that widens at the forehead and tapers down the nose. -
Create the jagged edge:
Instead of a straight line, sketch a serrated, zig-zag pattern along the edges of your central strip. This mimics the natural suture lines and adds visual aggression to the piece.
Level Up: Metallic Accent
Use liquid gold leaf to outline the jagged border between the black and white sections. This adds a luxurious, gilded separator that catches the light beautifully.
Step 4: Painting the Contrast
-
Outline in black:
Using your fine detail brush and matte black acrylic, carefully paint the outline of your jagged design. Focus on getting sharp, crisp points on your zig-zags. -
Fill the eye sockets:
Switch to a medium flat brush to fill in the large areas around the eyes and cheeks with black. Paint inside the eye socket rim for depth, but you don’t need to paint deep inside the hollow. -
Paint the nose sides:
Continue the black paint down the sides of the maxilla (upper jaw area), stopping where the teeth begin or painting up to the gum line depending on your preference. -
Refine the edges:
Go back with your small angled brush to tidy up the border between black and white. If you make a mistake, let it dry and touch it up with a distinct dab of white paint. -
Check symmetry:
Look at the skull head-on to ensure the black areas on the left and right are roughly symmetrical. They don’t need to be perfect mirror images, but they should feel balanced. -
Double down on black:
Apply a second coat of black paint if the first one looks streaky or translucent. I find a solid, opaque black is key to making this graphic style work.
Step 5: Finishing Touches
-
Seal the work:
Once the paint is fully dry, spray the entire skull with a matte clear coat. This protects the paint from dust and handling without adding an unnatural shine. -
Unmask:
Carefully peel away the painter’s tape and aluminum foil from the antlers. -
Clean the burrs:
If any white primer crept onto the burrs of the antlers, use a damp toothpick or a heavy-duty fingernail to gently scrape it off while the sealer is fresh. -
Final inspection:
Give the skull a final wipe with a dry cloth to remove any dust and prepare it for mounting or display.
Hang your finished piece with pride, enjoying the bold statement the monochrome palette brings to your space


Sunset Mountain Scene on the Skull
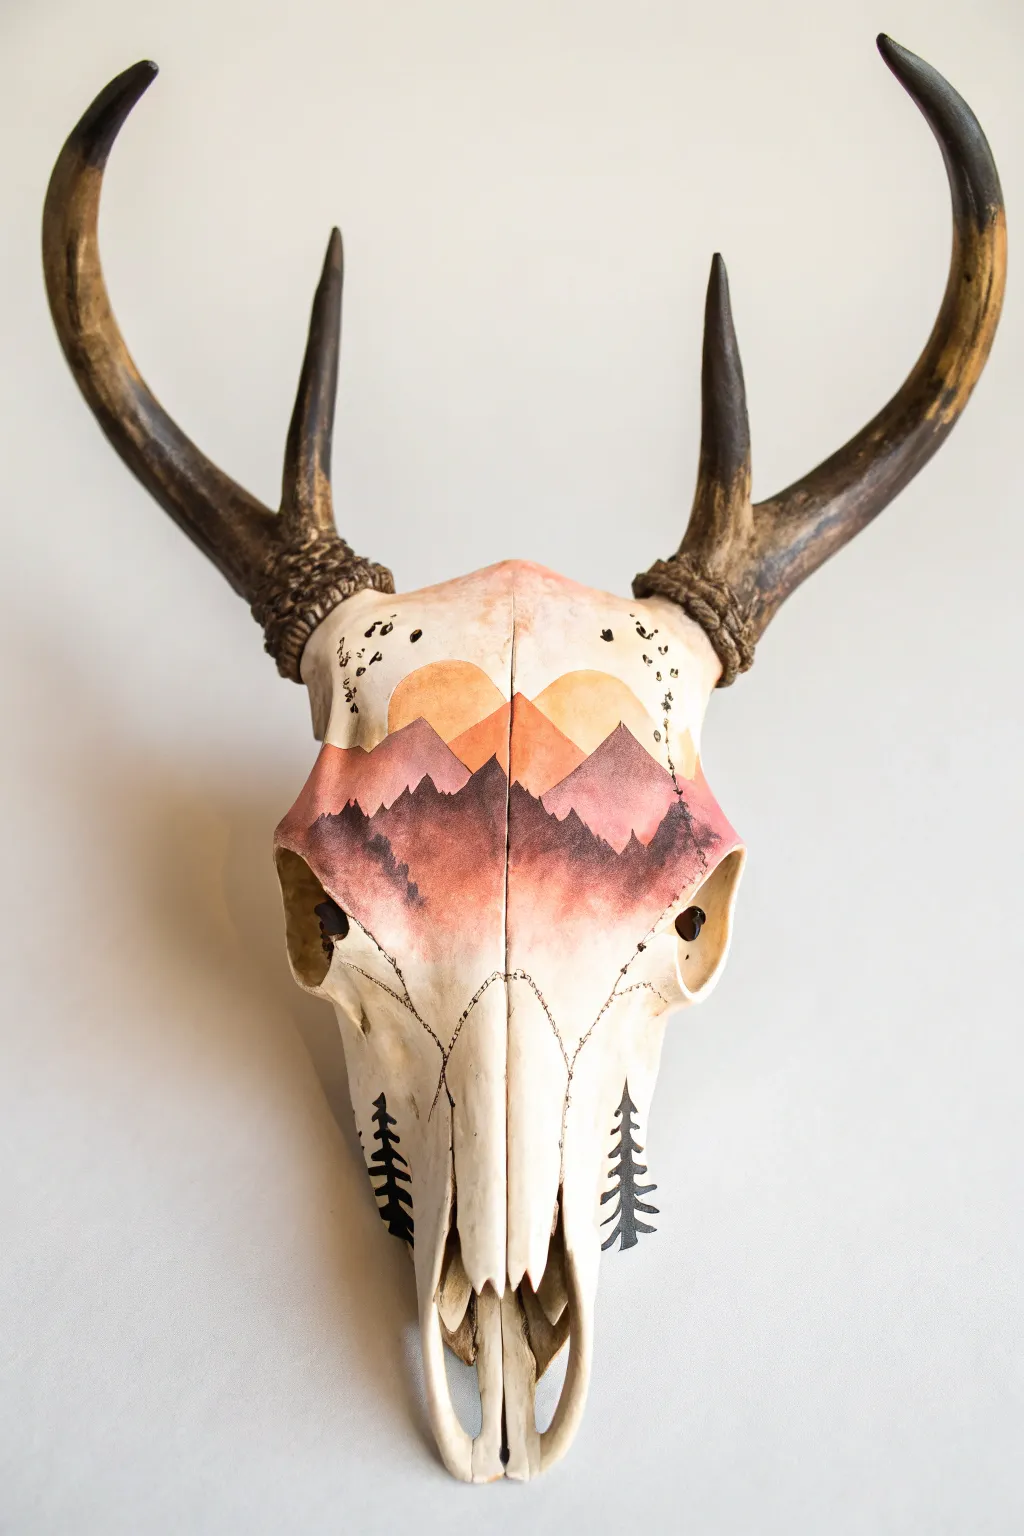
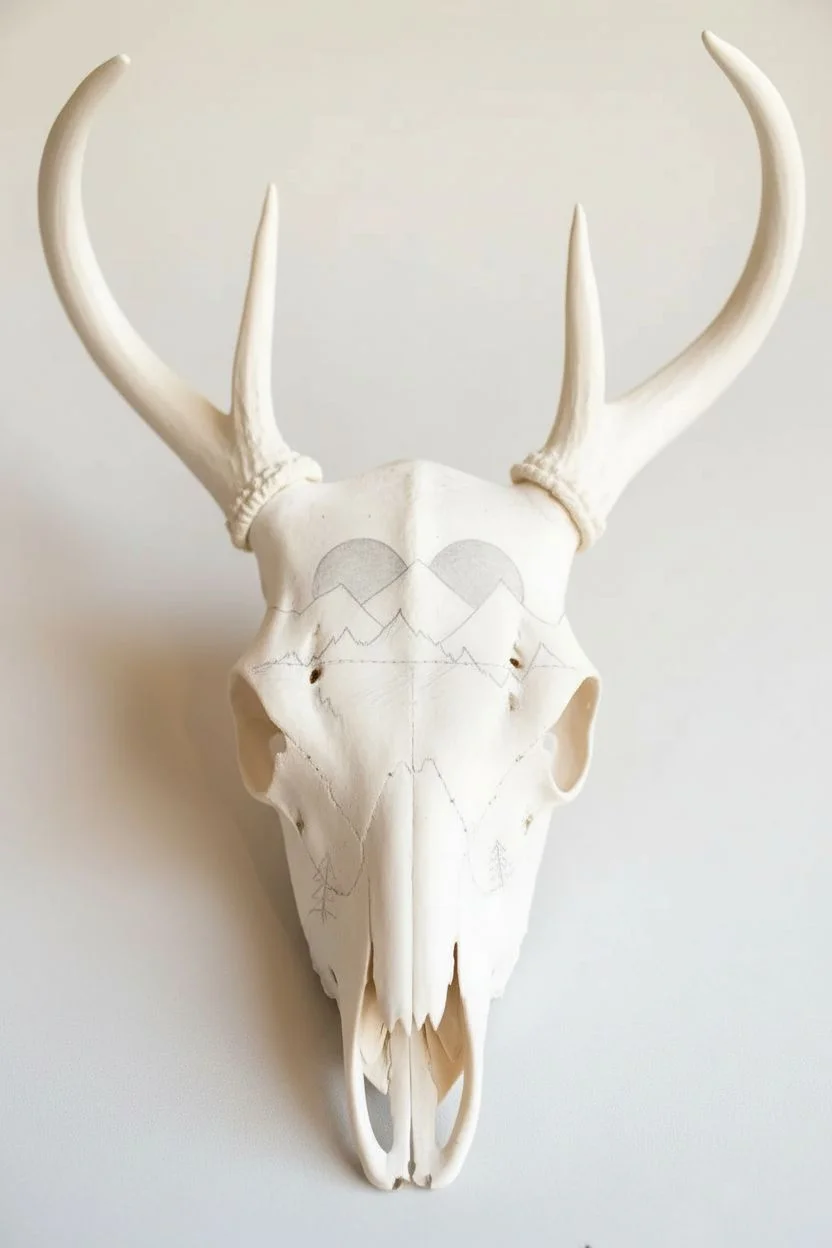
Transform a rustic deer skull into a serene landscape canvas with this mountain sunset design. Featuring warm gradients of peach and rose fading into misty grey peaks, this project balances organic bone texture with clean, illustrative lines.
Step-by-Step
Materials
- Cleaned and whitened deer skull
- Acrylic paints (Titanium White, Naples Yellow, Burnt Sienna, Payne’s Grey, Carbon Black, Crimson)
- Small round brushes (size 0, size 2)
- Wide flat brush (for gradients)
- Fine-point black permanent marker or micron pen
- Natural jute twine or hemp cord
- Hot glue gun and glue sticks
- Pencil and eraser
- Matte clear sealant spray
Step 1: Preparation & Sketching
-
Clean surface:
Ensure the skull is completely clean, dry, and free of any grease or oils. If it’s a raw skull, simple soap and water scrub followed by thorough drying is essential for paint adhesion. -
Plan the horizon:
Using a pencil, lightly sketch the horizon line across the forehead of the skull. Position it roughly halfway between the eye sockets and the antler bases to leave room for the sky. -
Outline the peaks:
Sketch three distinct mountain layers. The foreground should be lowest and jagged, the middle ground slightly higher, and the background peaks the highest and smoothest. -
Mark the sun:
Draw two large semicircles peeking out from behind the background mountains to represent a setting sun. Don’t worry about the crack down the center; use it as a natural divider for your symmetry.
Fixing “Bleed” Lines
If paint bleeds into the skull’s natural cracks or sutures, wait for it to dry, then gently scrape the excess paint out of the crack using an X-Acto knife or a needle tool.
Step 2: Painting the Gradient Sky
-
Mix sky colors:
On your palette, mix a soft peach color using Titanium White causing a touch of Naples Yellow and a tiny dot of Crimson. Create a darker version by adding more Crimson and Burnt Sienna. -
Paint the sun segments:
Fill in the sun semicircles with a flat yellow-orange wash. I like to keep this layer fairly transparent so the bone texture still subtlely shows through. -
Apply the sky base:
Start painting the area above the mountains with your lightest peach mix. Use a damp flat brush to pull the color upwards, fading it out into the natural white of the bone. -
Deepen the gradient:
While the base layer is still slightly tacky, blend your darker rose/sienna mix just above the mountain line, smoothing it upward into the lighter peach create a sunset glow effect.
Step 3: Detailing the Mountains
-
Paint the background peaks:
Mix a muted mauve color using White, Crimson, and a touch of Payne’s Grey. Fill in the furthest mountain range. The color should be lighter to simulate atmospheric perspective. -
Paint the middle ground:
Darken your mauve mix with more Payne’s Grey and Burnt Sienna. Paint the middle range of mountains, ensuring the edges overlap the background layer cleanly. -
Paint the foreground:
Mix a very dark, near-black charcoal color. Paint the closest, lowest mountain range right across the brow ridge. Let all paint layers dry completely before proceeding. -
Add texture:
Using a dry brush technique with slightly lighter grey paint, dab gently onto the dark foreground mountains to create the illusion of rocky texture or trees.
Add Metallic Flair
For a magical touch, use gold leaf or metallic gold paint for the sun instead of flat yellow. It catches the light beautifully against the matte bone.
Step 4: Inking & Finishing Touches
-
Draw the trees:
Using a size 0 brush and Carbon Black paint (or a fine marker), carefully paint silhouette pine trees. Add a few small ones on the mountain ridge, and two large, distinct trees descending down the nasal bone. -
Add flying birds:
With the tip of your finest brush or pen, draw a flock of tiny silhouette birds curving up from the left side toward the right antler base. -
Seal the work:
Once the paint is fully cured, take the skull to a well-ventilated area and apply two light coats of matte clear sealant spray to protect your artwork from dust and fading. -
Wrap the antlers:
Apply a dab of hot glue to the base of one antler burr. Press the end of your jute twine into the glue and begin wrapping tightly upwards. -
Secure the wrap:
Continue wrapping for about 1-2 inches up the antler beam. Cut the twine and secure the end with another small dot of hot glue, tucking it out of sight on the back side. Repeat for the other antler.
Hang your finished piece in a spot with good natural light to highlight the delicate gradients against the bone.


Geometric Pattern in Perfect Symmetry
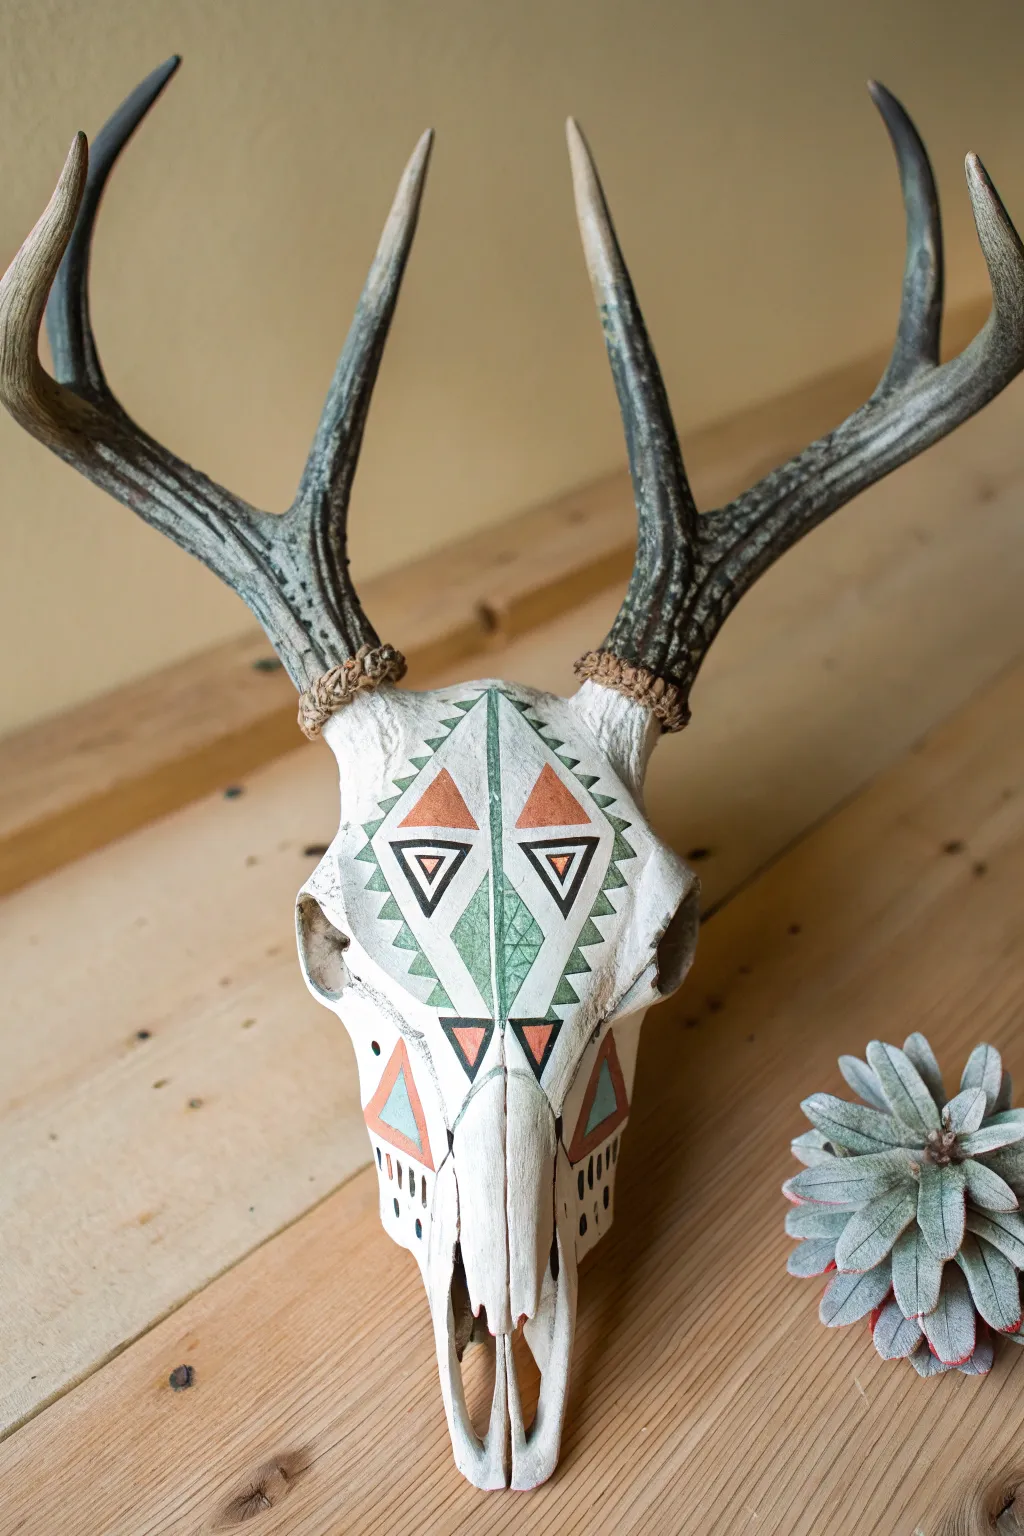
Transform a natural artifact into a stunning piece of southwest-inspired decor with this symmetrical design. The combination of clean white bone, rustic twine, and sharp geometric patterns in teal and terracotta creates a striking focal point for any room.
Step-by-Step Guide
Materials
- Cleaned and bleached deer skull with antlers
- Matte white spray paint (primer + paint)
- Acrylic paints: Teal/Sage Green, Terracotta/Burnt Orange, Black
- Fine-point detail brushes (sizes 0 and 1)
- Flat shader brush (size 4 or 6)
- Painter’s tape or masking tape
- Pencil for sketching
- Ruler or measuring tape
- Jute twine or heavy hemp cord
- Hot glue gun and clear glue sticks
- Clear matte sealer spray
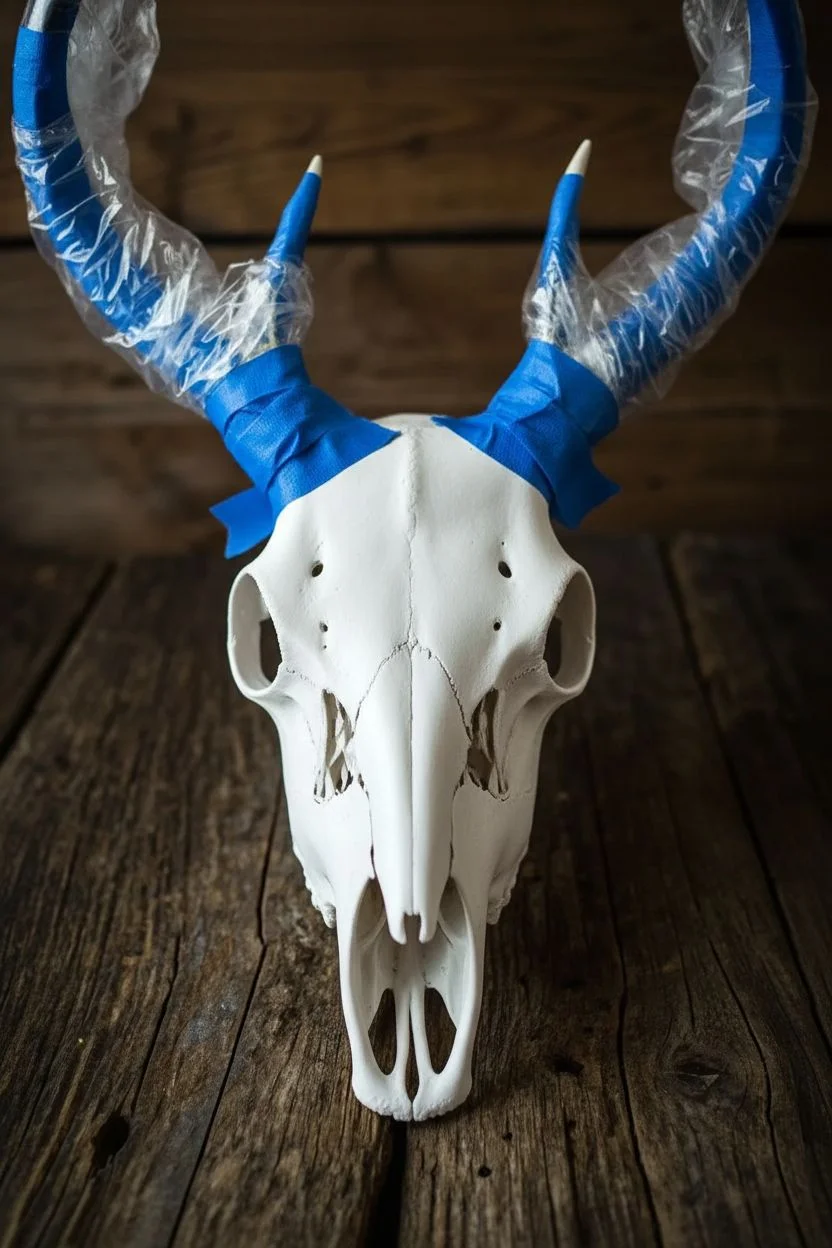
Step 1: Preparation & Base Coat
-
Clean and mask:
Ensure your skull is thoroughly cleaned and free of any grease or loose material. Use painter’s tape to carefully wrap the base of the antlers where they meet the skull to protect them from the white paint. -
Apply base coat:
In a well-ventilated area, spray the entire skull with matte white paint. Apply 2-3 light coats rather than one heavy one to avoid drips, letting each coat dry for about 15 minutes in between. -
Inspect coverage:
Check the deep crevices of the eye sockets and nasal cavity. If the bone color is still showing through, mist these areas lightly again. Let the final coat cure for at least 2 hours or overnight.
Step 2: Drafting the Design
-
Mark the center line:
This design relies on perfect symmetry. Use a pencil and a flexible ruler to lightly draw a vertical line straight down the center of the forehead, bridging the gap between the antler bases down to the nose. -
Outline the main diamond:
Sketch a large diamond shape on the forehead. The top point should sit high between the eyes, and the bottom point should reach the start of the nasal bone. -
Subdivide the diamond:
Divide your main diamond vertically along your center line. Then, sketch internal triangles within the diamond halves to create the Aztec-inspired segmented look shown in the reference. -
Add side details:
Draw the sawtooth borders (small triangles) along the outer edges of the main diamond. Sketch the downward-pointing triangles on the cheekbones and the vertical dash marks near the nose.
Steady Hand Trick
If you struggle painting straight lines on the curved surface, use narrow striping tape to mask off the geometric shapes before painting.
Step 3: Applying Color
-
Paint the teal sections:
Using your flat shader brush or a larger round brush, fill in the central diamond sections with teal or sage green paint. You may need two thin coats for full opacity. -
Add terracotta accents:
Switch to a clean brush and fill in the large upper circular/triangle shapes and the cheek triangles with terracotta orange paint. Keep your edges as crisp as possible. -
Create the black definitions:
Use your finest detail brush (size 0) and black acrylic paint to outline the shapes. I find that bracing my pinky finger against the skull helps steady my hand for these long, straight lines. -
Detail the inner shapes:
Paint the small inner triangles within the orange and teal sections. Add the black borders around the orange shapes to make them pop against the white background. -
Paint secondary patterns:
Fill in the small sawtooth triangles running along the outside edge of the main design in green or black, depending on your preference. Add the vertical dashed lines on the lower snout area. -
Refine the lines:
Once dry, use a very small brush with white paint to touch up any areas where the color may have bled outside your pencil lines, essentially ‘erasing’ mistakes.
Metallic Upgrade
Swap the black outline paint for a metallic gold or copper leaf pen. It adds a luxurious shimmer that catches the light beautifully.
Step 4: Finishing Touches
-
Seal the paint:
Once the acrylics are completely dry (give it an hour), remove the tape from the antlers. Lightly spray the painted area with a clear matte sealer to protect the design from dust and fading. -
Prepare the antlers:
Cut a long length of jute twine. Apply a small dab of hot glue to the back of the antler base, right where the bone meets the horn. -
Wrap the base:
Press the end of the twine into the glue and begin wrapping tightly around the base of the antler. Go around 3-4 times to create a rustic cuff that hides the transition line. -
Secure the wrapping:
Finish the wrap at the back. Apply another dot of hot glue, press the twine end into it, and trim any excess close to the glue so it isn’t visible. -
Repeat wrapping:
Repeat the gluing and wrapping process on the second antler base, ensuring the height and thickness of the twine wrapping match the first side.
Now you have a striking piece of Southwest art ready to mount on your wall or display on a mantle


Gold-Accented Bone Seams
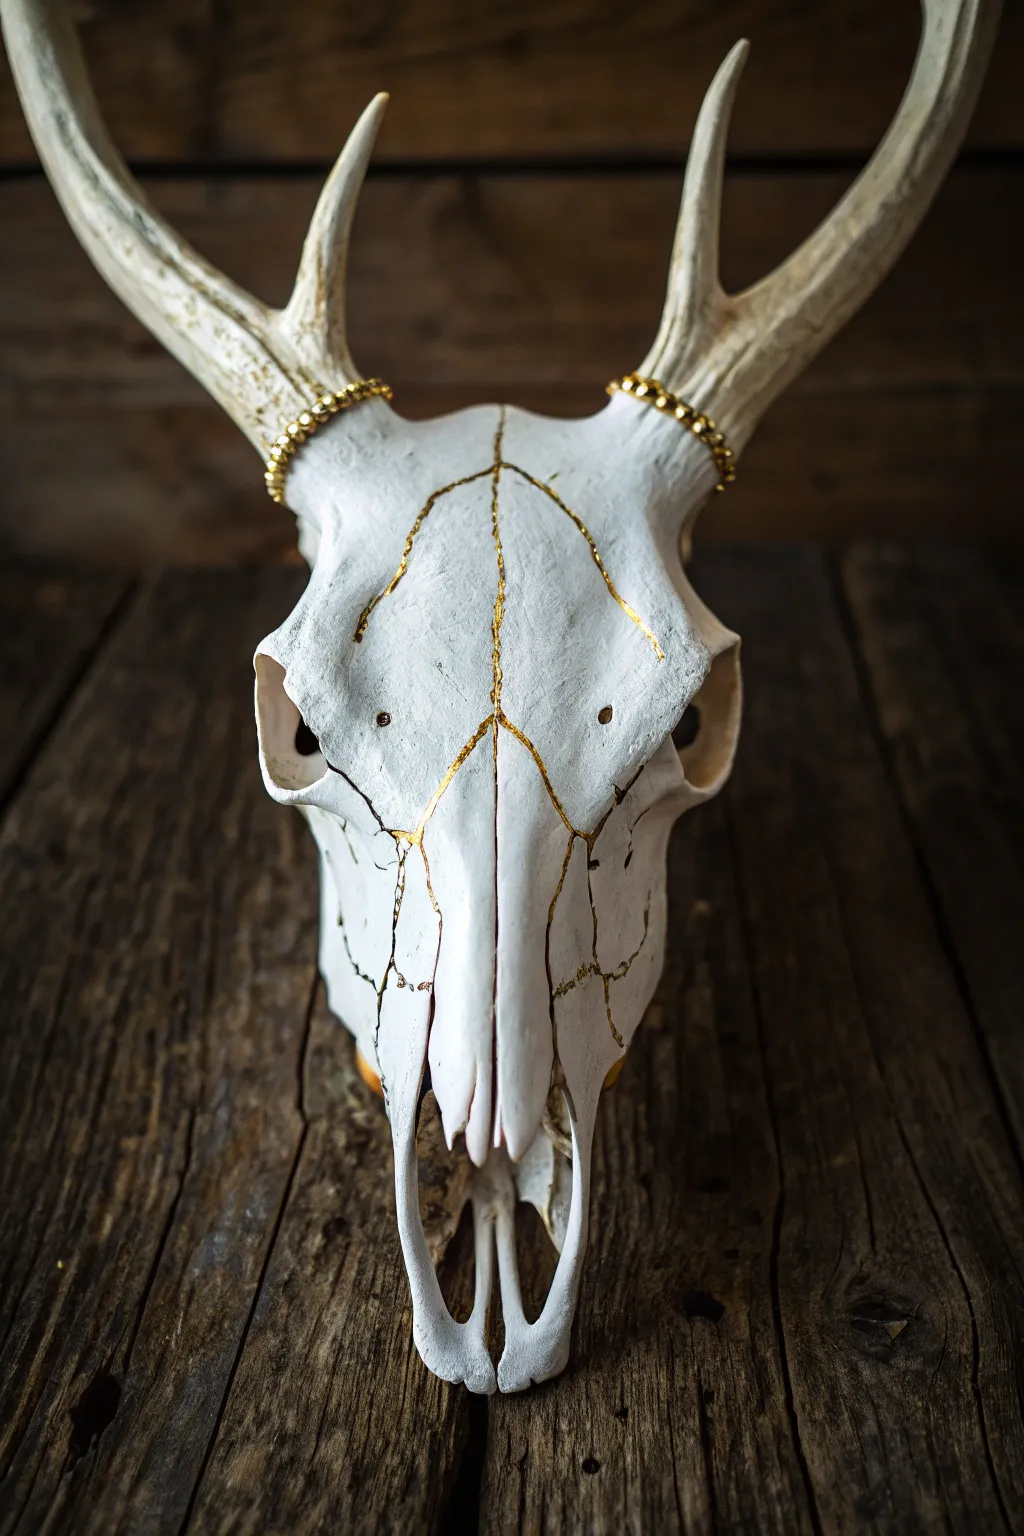
This elegant project transforms a rustic trophy into a piece of modern art by highlighting the natural beauty of the skull’s bone sutures. The striking contrast between the matte white bone, the metallic gold infill, and the warm beaded accents creates a sophisticated centerpiece.
Step-by-Step Tutorial
Materials
- Cleaned deer skull with antlers
- Flat white spray paint (matte finish)
- Painter’s tape
- Plastic bags or foil (for masking)
- Small fine-tip paintbrush (size 0 or 00)
- Metallic liquid gold leaf or high-quality gold acrylic paint
- Gold bead string or gold chain (approx. 4-6mm beads)
- Hot glue gun and clear glue sticks
- Soft cloth or tack cloth
- Fine-grit sandpaper (optional)
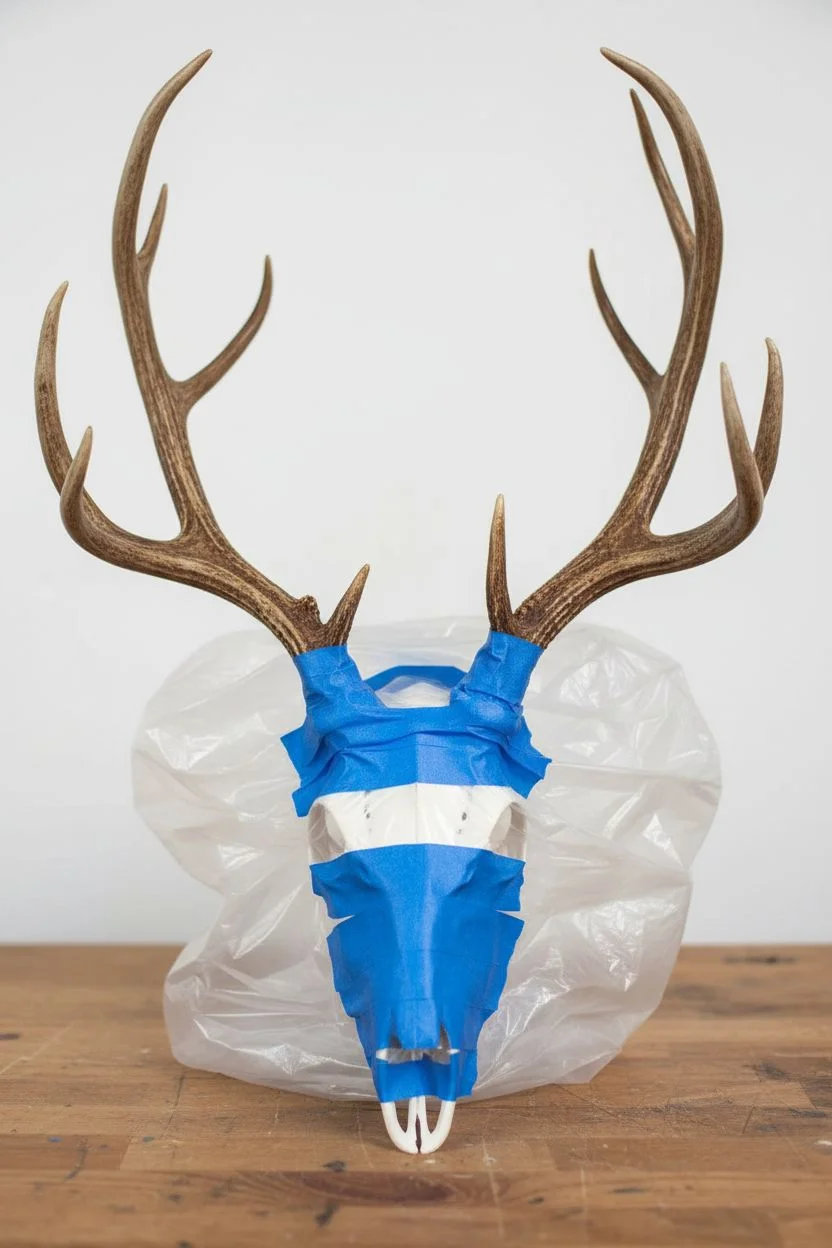
Step 1: Preparing the Canvas
-
Clean the surface:
Ensure your skull is thoroughly cleaned and degreased. If there are any rough patches or lingering debris, lightly sand them down with fine-grit sandpaper, then wipe the entire surface with a tack cloth to remove dust. -
Protect the antlers:
Wrap the antlers tightly with plastic bags or aluminum foil. Secure the wrapping at the very base of the burrs with painter’s tape, ensuring a tight seal so no spray paint creeps onto the natural horn. -
Prime the skull:
Apply a light coat of flat white spray paint to the skull. Hold the can about 10-12 inches away and use sweeping motions to avoid drips. -
Build opaque coverage:
Allow the first coat to dry for 15-20 minutes. Apply a second and, if necessary, a third coat until the bone is completely opaque white with no natural color showing through. -
Dry thoroughly:
Let the skull cure completely before moving to the detailed work. I prefer leaving it overnight to ensure the paint is hard enough to handle without fingerprinting.
Flow Control
If using liquid gold leaf, work quickly as it dries fast. Clean your brush often with mineral spirits to keep the bristles soft for fine lines.
Step 2: Gilding the Sutures
-
Identify your path:
Examine the skull to locate the natural zig-zag suture lines running down the snout and between the eyes. These will be your guides for the gold paint. -
Prepare the gold:
Shake your liquid gold leaf or metallic acrylic paint well. Pour a small amount into a palette or cap. -
Begin the detail work:
Dip your fine-tip brush into the gold. Start at the top center of the skull, carefully tracing the fissures of the bone sutures. -
Let the paint flow:
The goal isn’t just to paint the surface, but to let the paint seep slightly into the cracks. Use a light hand and short strokes, following the erratic natural pattern of the bone. -
Connect the lines:
Work your way down the snout and branching out to the sides. Ensure all the main structural cracks are highlighted to create that fractured, Kintsugi-inspired look. -
Refine edges:
If you slip or make a line too thick, you can touch it up with a tiny bit of white paint later, but try to keep the gold lines organic and varied in thickness. -
Add side details:
Don’t forget the suture lines near the eye sockets and the cheekbones; highlighting these adds pleasing depth to the piece.
Level Up: Kintsugi Style
Add gold leaf flakes randomly on larger flat areas of the skull to enhance the ‘broken and repaired’ aesthetic.
Step 3: Adding the Crown
-
Unmask the antlers:
Carefully remove the tape and protective wrapping from the antlers. -
Measure the base:
Take your gold bead string or chain and wrap it around the base of one antler burr to determine the length needed. -
Cut the beads:
Cut two lengths of the beaded string or chain, one for each antler base. -
Apply adhesive:
Apply a thin bead of hot glue directly to the base of the antler where it meets the skull, working in small 1-inch sections. -
Secure the trim:
Press the gold beads firmly into the glue, encircling the antler base completely. Hold in place for a few seconds until the glue sets. -
Repeat:
Install the beaded trim on the second antler, ensuring the seam where the beads meet is hidden at the back. -
Final inspection:
Check for any hot glue wisps and pull them away. Inspect the gold lines and perform any necessary touch-ups with your fine brush.
Hang your finished piece against a dark or wooden wall to let the bright white and gold details truly shine
BRUSH GUIDE
The Right Brush for Every Stroke
From clean lines to bold texture — master brush choice, stroke control, and essential techniques.
Explore the Full Guide
Gilded Antlers for a Luxe Finish
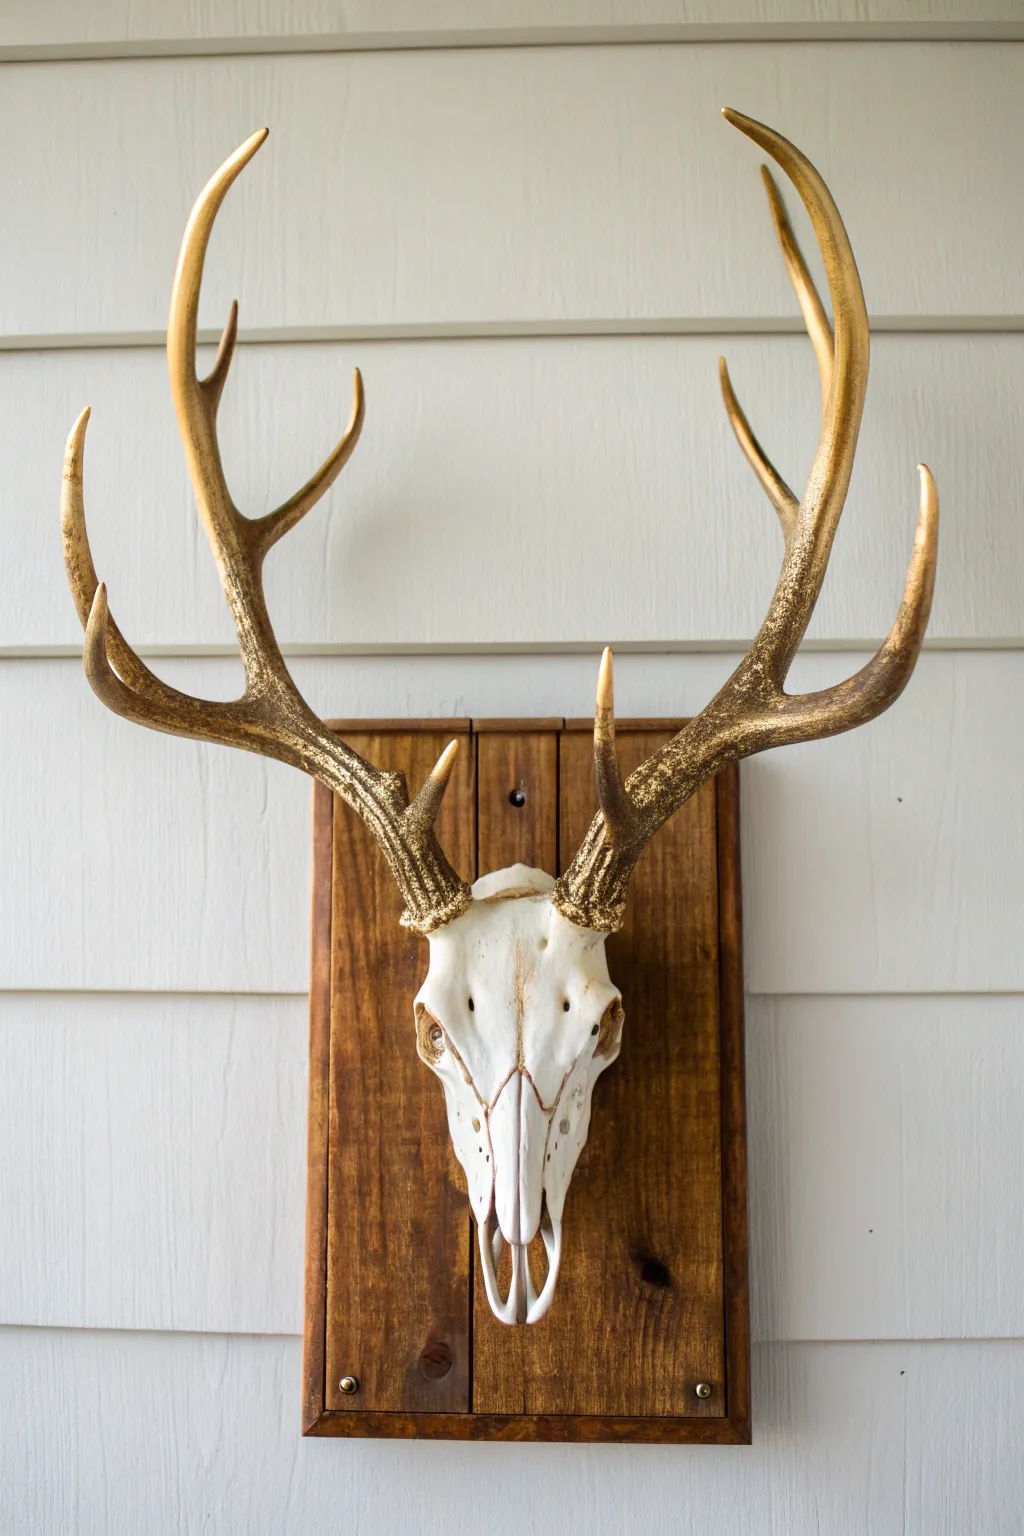
Transform a rustic skull mount into a statement piece of modern decor by adding a touch of metallic glamour. This project features a clean, bleached skull contrasted with brilliant gold-leafed antlers, all mounted on a rich, dark-stained wooden plaque.
Step-by-Step Guide
Materials
- Cleaned deer skull with antlers
- Degreasing dish soap
- Large pot for boiling (optional for final cleaning)
- Volume 40 peroxide cream (from beauty supply store)
- Plastic wrap
- Painter’s tape
- Gold spray paint (metallic finish)
- Fine gold glitter (optional)
- Spray adhesive (if using glitter)
- Clear matte sealant spray
- Wooden plaque
- Dark wood stain (e.g., walnut or espresso)
- Mounting hardware or wire
- Drill with bits
- Small paintbrush
Step 1: Prepping the Skull
-
Initial clean:
Begin with a skull that has already been cleaned of flesh and hide. Scrub it thoroughly with warm water and degreasing dish soap to remove any residual oils or dirt. -
Whitening process:
Apply a generous coat of Volume 40 peroxide cream to the bone areas only, avoiding the antlers completely. Use a small brush to get into the crevices. -
Wait and rinse:
Wrap the skull firmly in plastic wrap to keep the peroxide moist and let it sit for 24 hours. Afterward, rinse purely with water and let the bone dry completely until it is stark white. -
Tape carefully:
I prefer to use high-quality painter’s tape to wrap the base of the pedicles (where the antlers meet the skull). Ensure a tight seal so no paint bleeds onto your fresh white bone. -
Protect the skull:
Cover the rest of the white skull with a plastic bag or paper, taping it securely leaving only the antlers exposed.
Bleed-Through Blues?
If gold paint leaks onto the white bone, don’t panic. Dip a Q-tip in acetone or nail polish remover and gently rub the spot immediately to lift the metallic pigment.
Step 2: Gilding the Antlers
-
Prime the surface:
If your antlers are very smooth, lightly scuff them with fine-grit sandpaper to help the paint adhere. Wipe away dust with a tack cloth. -
Base coat:
In a well-ventilated area, apply a base coat of metallic gold spray paint. Use short, sweeping bursts to avoid drips. -
Layering:
Apply 2-3 additional light coats of gold, allowing about 15 minutes of drying time between each layer for full coverage. -
Adding texture (optional):
To achieve the textured look seen in the photo, spray a light coat of spray adhesive onto the wet paint, then immediately dust fine gold glitter over the antlers. -
Seal it in:
Once the gold layers are fully dry (give it at least an hour), spray the entire antler set with a clear matte sealant to prevent the glitter from shedding and protect the finish. -
Reveal the skull:
Carefully peel away all painter’s tape and plastic covering to reveal the clean contrast between the white bone and gold antlers.
Level Up: Pattern
Instead of solid gold, wrap thin strips of tape around the antlers before painting to create a stunning ‘candy cane’ spiral of natural bone and metallic gold.
Step 3: Mounting the Display
-
Stain the plaque:
Simeultaneously, prepare your wooden plaque. Apply a dark wood stain using a rag, wiping with the grain. Let it penetrate for a few minutes before wiping off excess, then let dry. -
Drill pilot holes:
Mark the center of your plaque where the skull will sit. Pre-drill a hole for your mounting screw to prevent the wood from splitting. -
Attach the skull:
Use a heavy-duty screw or a specific skull mounting bracket. Secure the skull firmly to the wood, ensuring it hangs straight. -
Add detail screws:
For a finished look, add small decorative brass screws or tacks to the corners of the wooden plaque as seen in the inspiration image. -
Final check:
Inspect the entire piece. If any paint bled onto the skull, touch it up carefully with a tiny bit of white acrylic paint.
Hang your new gilded trophy in an entryway or over a mantle to add a sophisticated, rustic-chic focal point to your home
Boho Jewel and Crystal Details
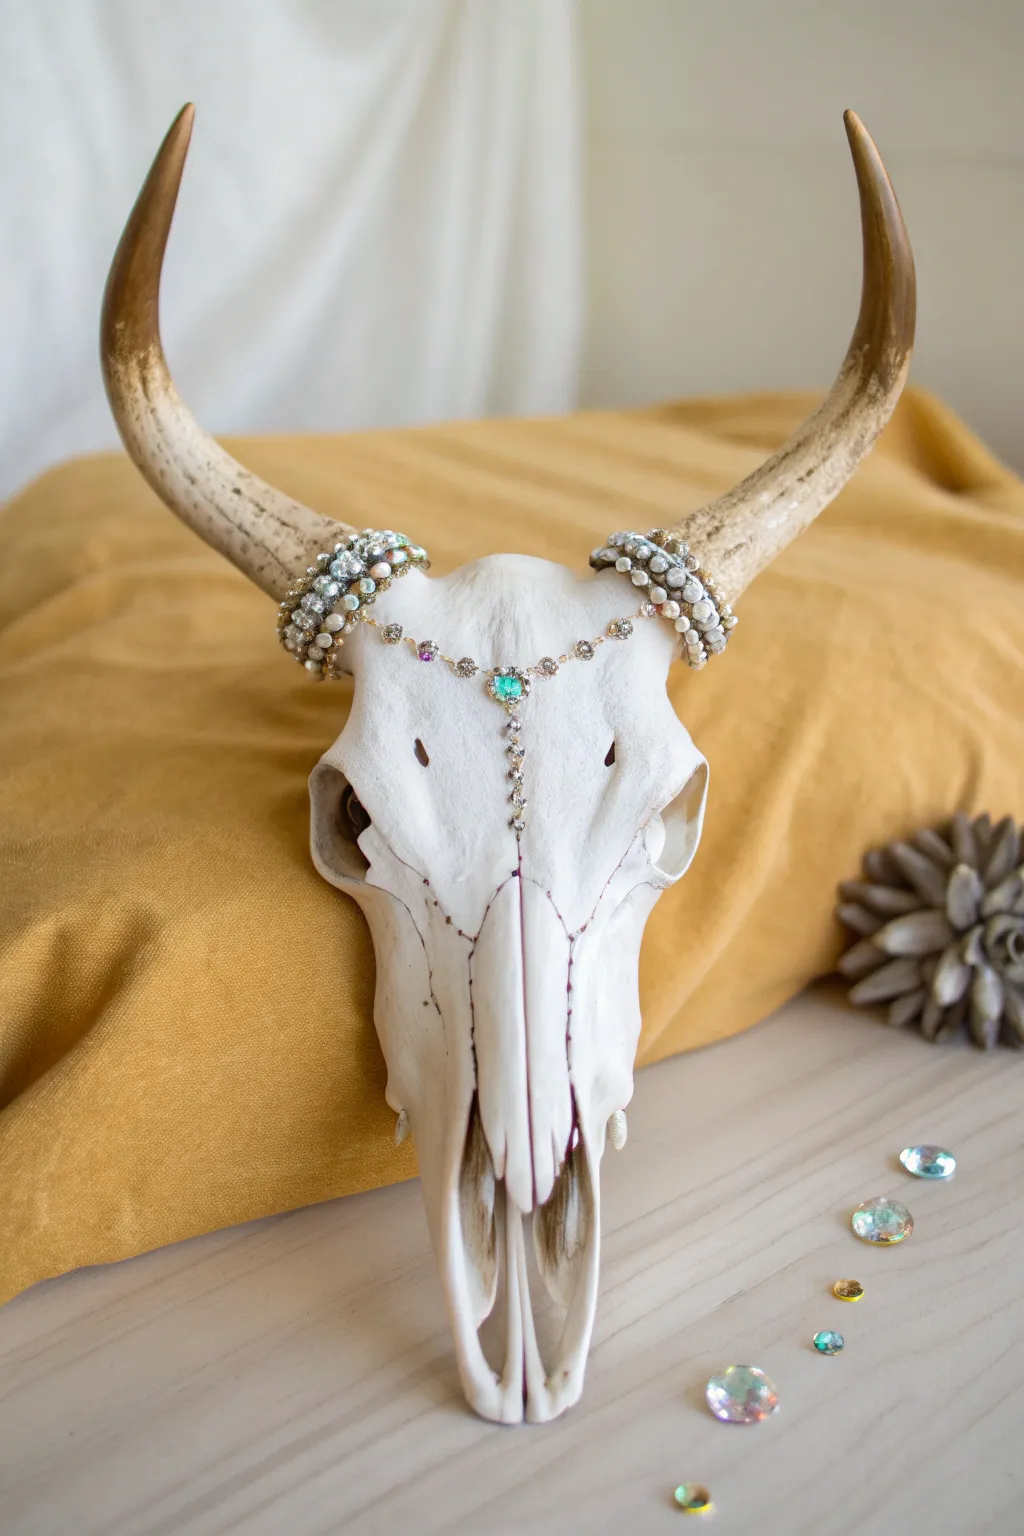
Transform a rustic deer skull into a stunning bohemian centerpiece with touches of gold and dazzling jewelry accents. This project balances the natural texture of bone with the elegance of pearls and rhinestones for a truly luxe finish.
Step-by-Step
Materials
- Cleaned deer skull (preferably a buck with antlers)
- White matte spray paint or acrylic paint
- Gold metallic acrylic paint (Liquid Gold or similar)
- Paintbrushes (flat brush for coverage, fine detail brush)
- Painter’s tape
- Assorted pearl and rhinestone bead strands (elastic or pre-strung)
- Gold chain jewelry piece with central pendant (or loose chain and jump rings)
- Hot glue gun and clear glue sticks
- Jewelry pliers (needle nose)
- Clear sealant spray (matte or satin)
- Isopropyl alcohol and cotton rounds
Step 1: Preparation and Base Coat
-
Clean the surface:
Before painting, ensure your skull is thoroughly degreased and clean. Wipe down the bone surface with isopropyl alcohol on a cotton round to remove any lingering oils or dust that might repel paint. -
Mask the antlers:
Using painter’s tape, carefully wrap the base of the antlers where they meet the skull. Pressed the tape down firmly into the burrs (the bumpy texture at the base) to get a clean line. -
Whiten the bone:
Apply a coat of matte white paint to the entire skull bone. I prefer using a spray paint for an even, airbrushed finish, but white acrylic and a flat brush work well too. Let this dry completely. -
Check for coverage:
Inspect the nooks and crannies inside the eye sockets and nasal cavity. Apply a second coat if the bone’s natural color is still showing through too much. Allow to cure fully.
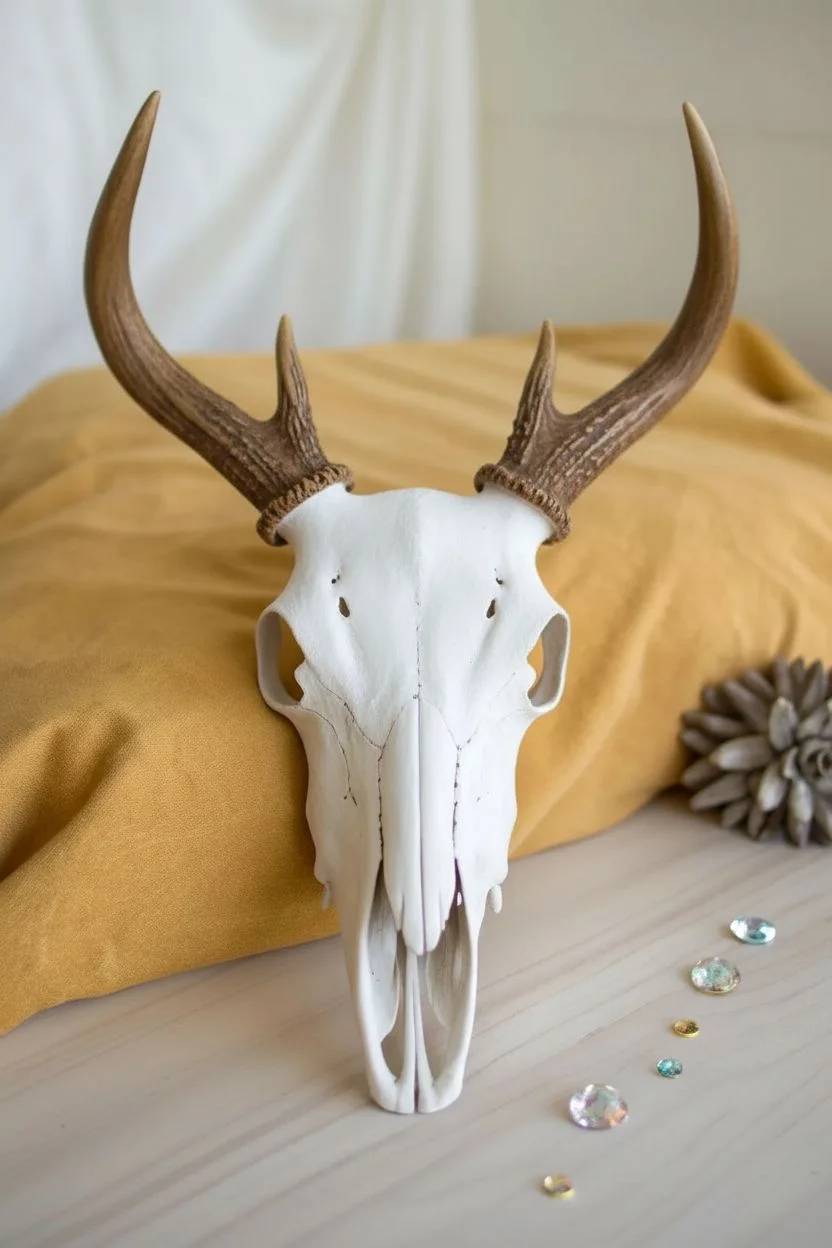
Step 2: Gilding the Antlers
-
Remove the tape:
Once the white paint is bone-dry, carefully peel away the painter’s tape from the antler bases. -
Paint the tips:
Dip a medium brush into your gold metallic paint. Start painting the very tips of the antler tines, brushing downwards about 2-3 inches. -
Create a gradient:
To avoid a harsh line, use a dry-brushing technique as you move down the tine. Wipe most of the paint off your brush and lightly flick gold paint downward so it fades naturally into the unpainted antler color. -
Add base accents:
Take a small detail brush and lightly dry-brush some gold onto the textured burrs at the base of the antlers. This ties the look together without covering the natural bone texture completely.
Glue Gun Pro-Tip
Use a low-temp glue gun for the beads. High-temp glue can sometimes melt the finish on plastic pearls or make the delicate jewelry chain too hot to handle safely while positioning.
Step 3: Jewelry Installation
-
Wrap the antler bases:
Take your strands of pearl and rhinestone beads. Wrap them tightly around the base of the left antler, stacking them to create a chunky, cuff-like appearance. -
Secure the strands:
Apply a small dot of hot glue to the back of the antler base to anchor the start and end of your bead strands. Hold them in place for a few seconds until the glue sets. -
Repeat for symmetry:
Repeat the wrapping process on the right antler base. Try to use a similar mix of pearls and crystals so both sides look balanced, though they don’t need to be identical. -
Measure the central chain:
Drape your gold chain jewelry piece across the forehead of the skull. The central pendant should rest perfectly centered between the eyes, aligned with the nasal suture lines. -
Attach the side chains:
Using your jewelry pliers, attach the ends of the chain to the bead strands you already glued down. You can hook them onto the bead wire or use a tiny dab of hot glue to hide the connection point behind the beads. -
Secure the pendant:
To prevent the central chain from swinging or sitting crooked, place a tiny, invisible dot of hot glue directly under the main pendant gem and press it gently onto the white skull. -
Add the drop chain:
If your jewelry piece has a vertical drop chain extending down the nose (like the reference photo), ensure it follows the center line straight down. Secure the bottom link with a minuscule drop of glue.
Level Up: Gemstone Eyes
For extra drama, fill the deeper recesses of the eye sockets with dark moss or large, raw quartz crystals to give the piece a mystical, gazing quality.
Place your finished skull on a mantel or styled vignette to enjoy its chic, bohemian sparkle

PENCIL GUIDE
Understanding Pencil Grades from H to B
From first sketch to finished drawing — learn pencil grades, line control, and shading techniques.
Explore the Full Guide
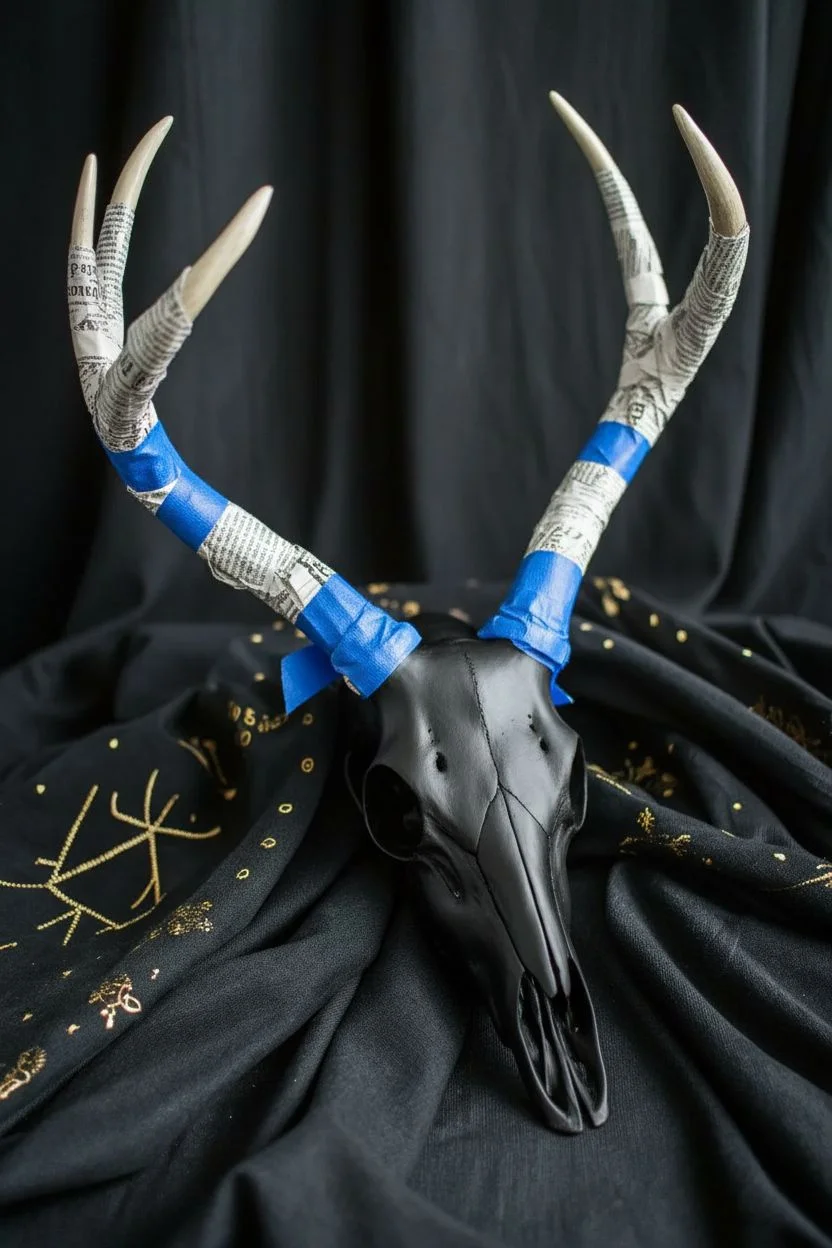
Matte Black Skull With Gold Symbol Accents
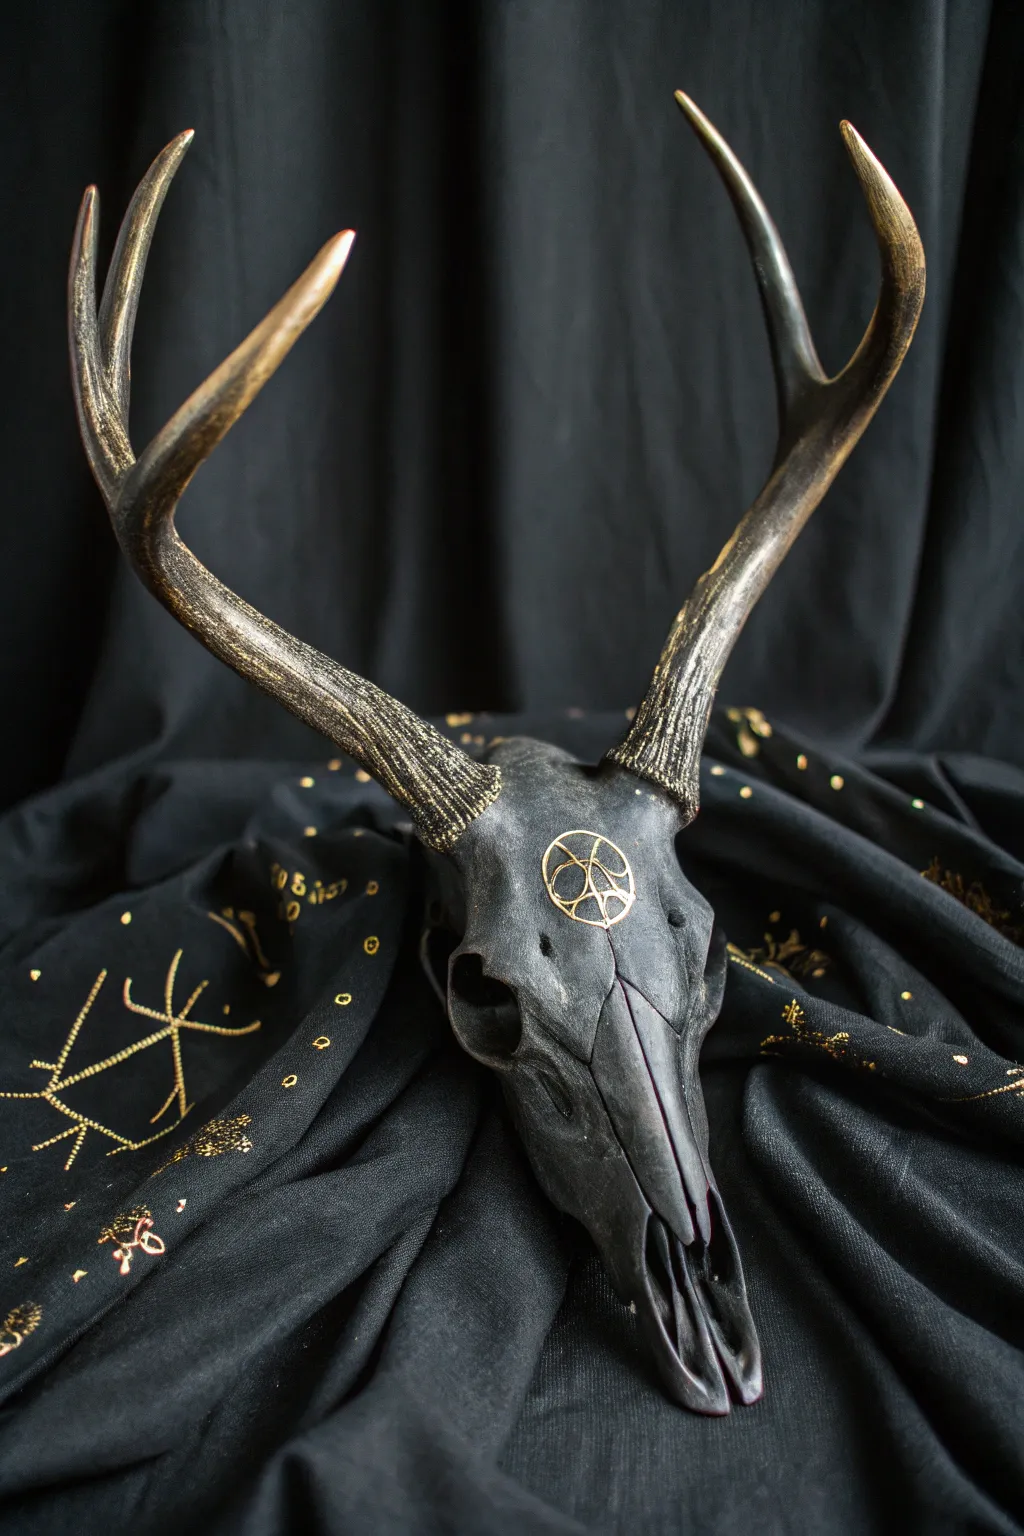
Transform a rustic bone canvas into a piece of dark elegance with this matte black and gold deer skull project. The deep, velvety finish contrasts beautifully with glistening metallic accents, creating a striking centerpiece perfect for gothic decor or an altar space.
Detailed Instructions
Materials
- Cleaned deer skull with antlers attached
- Fine-grit sandpaper (220-grit)
- Painter’s tape or masking tape
- Matte black spray paint (primer + paint combo fits best)
- Gold metallic acrylic paint (rich gold or antique gold)
- Small detail paintbrush (size 0 or 1)
- Medium flat paintbrush
- Gold gliding wax or rubbing buff (optional but recommended)
- Newspaper or drop cloth
- Clear matte sealer spray
Step 1: Preparation & Base Coat
-
Surface Prep:
Ensure your skull is thoroughly cleaned and fully degreased. If there are any rough patches of bone that might disrupt the matte finish, gently sand them down with fine-grit sandpaper, then wipe away all dust with a tack cloth. -
Taping the Antlers:
Since we want the antlers to retain their natural texture but get a metallic treatment later, wrap the base of the antlers specifically where they meet the skull with painter’s tape. You want a clean line separating the skull bone from the antler burrs. -
Protecting the Antlers:
Continue wrapping the rest of the antlers in newspaper and secure with tape. We only want the skull bone exposed to the black spray paint. -
First Coat of Black:
In a well-ventilated area, apply the first coat of matte black spray paint. Hold the can about 8-12 inches away and use sweeping motions to avoid drips. Don’t try to cover everything in one pass; light layers are key. -
Getting into Cavities:
Pay special attention to the nasal cavities, eye sockets, and the underside of the cheekbones. Angle your spray can slightly to mist inside these deep recesses so no white bone shows through. -
Second Coat and Drying:
Once the first coat is dry to the touch (usually 15-20 minutes), apply a second coat to ensure solid, opaque coverage. Let this cure fully for at least 24 hours to achieve that perfect velvety matte look.
Paint Bleed Fix
If black spray paint seeped under the tape onto the antlers, dampen a Q-tip with a tiny amount of acetone or nail polish remover and gently rub the spot immediately to lift the paint.
Step 2: Gilding the Details
-
Reveal the Antlers:
Carefully peel away all tape and newspaper from the antlers. Check the seam where the black paint meets the antler base; if any black leaked through, you can gently scrape it off with a craft knife. -
Choosing the Symbol:
Decide on your forehead symbol. The image uses a geometric pentacle-style sigil. You can lightly sketch your chosen design onto the dried black paint with a white colored pencil or chalk for a guideline. -
Painting the Symbol:
Using your smallest detail brush and metallic gold acrylic paint, carefully trace your symbol. I find that resting my pinky finger on a dry part of the skull stabilizes my hand for these fine lines. -
Building Opacity:
Metallic acrylics can be sheer. Let the first layer of the symbol dry completely, then apply a second layer to make the gold pop against the black background. -
Adding Texture to Antlers:
Dip a dry, stiff brush or your finger into gold gilding wax (or a small amount of gold paint). Lightly brush this over the textured ‘burrs’ at the base of the antlers. The goal is to catch the raised ridges while leaving the crevices dark. -
Highlighting the Tips:
Using the same dry-brush technique, apply gold to the very tips of the antler tines. Blend it downward so it fades gradually into the natural antler color rather than creating a harsh line. -
Sealing the Work:
Once all paint is completely dry, mist the entire skull (avoiding the antlers if you want them to stay natural-feeling) with a clear matte sealer. This protects the black paint from scuffs and keeps the gold symbol bright.
Level Up: Jeweled Eyes
For an extra mystical touch, glue raw quartz crystals or faceted black faux gemstones inside the eye sockets. This adds a spooky, reflective quality that catches the light.
Place your finished skull on a dark cloth and admire the striking contrast you have created
Galaxy Night Sky With Tiny Stars
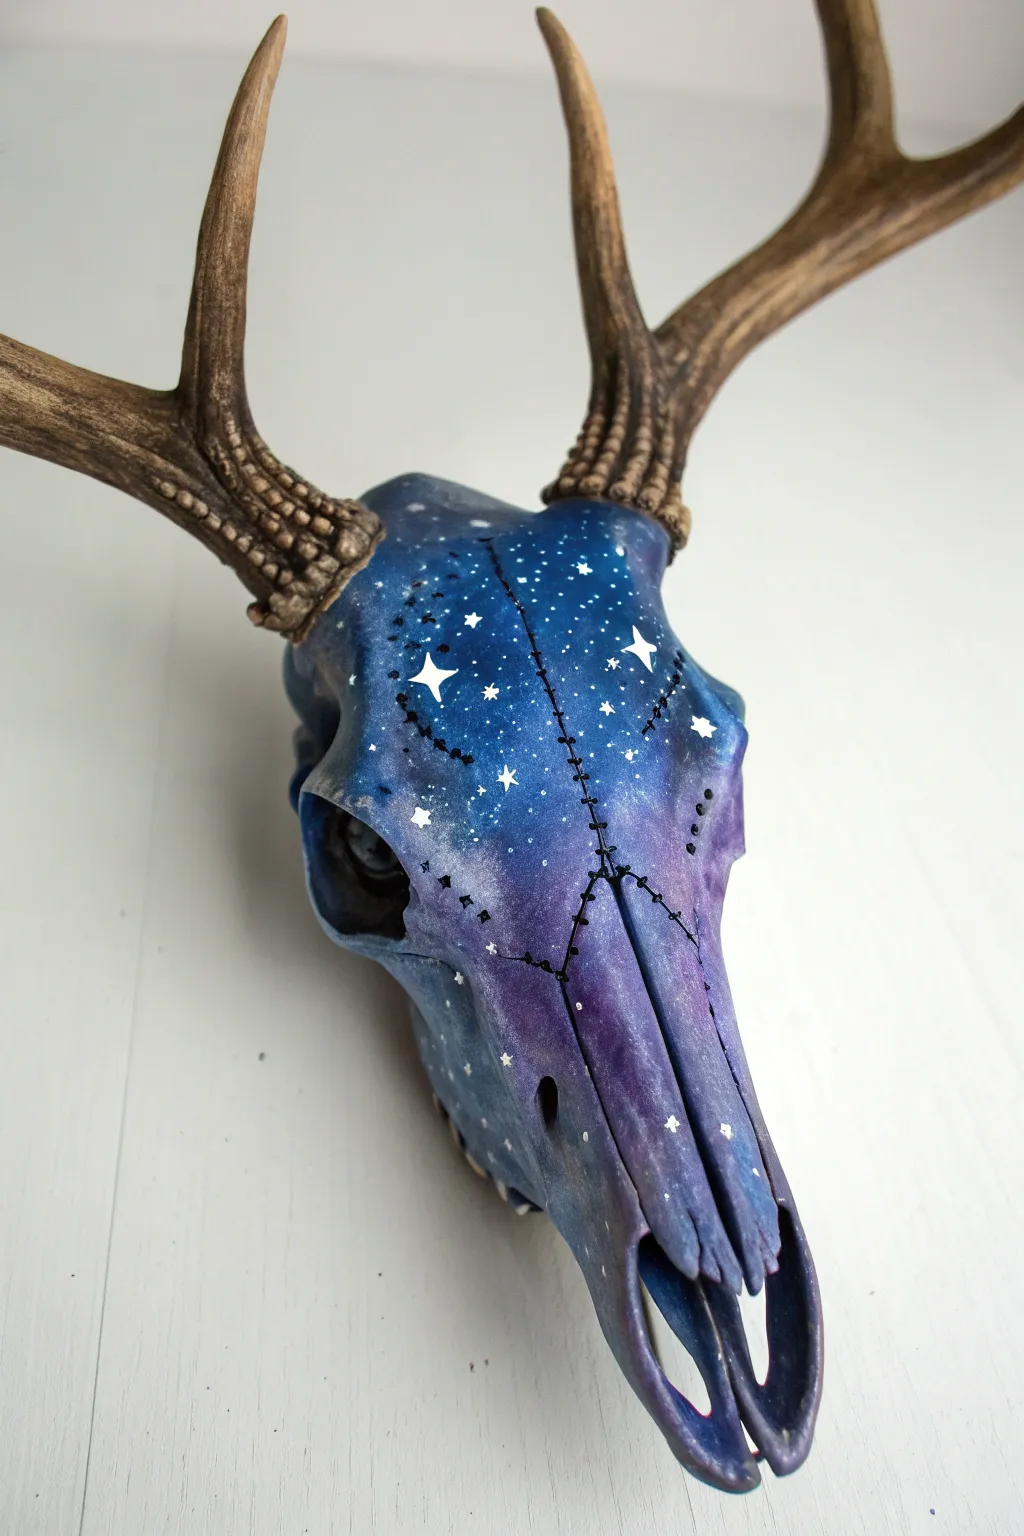
Transform a natural artifact into a celestial masterpiece with this galaxy-themed painting project. The deep blues and purples shift beautifully across the bone, accented by delicate stars and unique stitched detailing.
Step-by-Step Guide
Materials
- Cleaned deer skull with antlers attached
- Painter’s tape
- Acrylic paints (dark blue, royal blue, purple, teal, black, white)
- Black fine-point permanent marker or paint pen
- Assorted paintbrushes (medium flat brush, small detail brush)
- Sponges (makeup sponges or kitchen sponge scraps)
- Matte or satin spray sealant
- Plastic drop cloth
- Palette or paper plate
Step 1: Preparation and Base Coat
-
Clean surface:
Ensure your deer skull is completely clean, degreased, and dry before starting; any residual oils will prevent the paint from sticking properly. -
Protect the antlers:
Carefully wrap the base of the antlers, specifically the burrs (the bumpy texture near the skull), with painter’s tape. You want a crisp line where the bone meets the antler. -
Prime the skull:
Apply a thin base coat of white acrylic paint over the entire skull surface if the bone is discolored; otherwise, you can apply your colors directly to the bone for better absorption.
Step 2: Creating the Galaxy Gradient
-
Start with deep blues:
Squeeze out dark blue and royal blue paint. Using a damp sponge, dab these colors onto the upper forehead area and around the eye sockets. -
Add purple tones:
While the blue is still slightly wet, sponge purple paint onto the nose bridge and sides of the snout to create a soft, blended transition. -
Introduce teal accents:
Dab small amounts of teal in random patches, blending it into the blue and purple edges to add dimension to your nebula effect. -
Darken the shadows:
Mix a tiny drop of black into your dark blue. Use this to deepen the color inside the eye sockets and nasal cavity for a sense of infinite depth. -
Smooth the transitions:
Go back over any harsh lines with a clean damp sponge, gently mottling the colors together until the gradient looks smooth and organic. -
Dry thoroughly:
Allow the gradient layer to dry completely for at least an hour. This prevents your next details from muddying the background.
Pro Tip
When sponging the galaxy layer, don’t overmix the colors on the skull. Let them sit beside each other and overlap slightly to keep the colors distinct.
Step 3: Stars and Details
-
Splatter stars:
Dilute a small mount of white acrylic paint with water until it has an ink-like consistency. -
Flick the paint:
Load a stiff-bristled brush or old toothbrush with the thinned white paint and run your thumb over the bristles to flick tiny specks across the skull. -
Paint larger stars:
Using your smallest detail brush and unthinned white paint, hand-paint a few larger four-pointed stars or clusters for visual interest, specifically on the forehead. -
Draw the suture lines:
Locate the natural suture lines (the cracks) in the skull plate. -
Trace the cracks:
Use a fine-point black marker or paint pen to trace over these natural zigzag lines, making them bold and distinct. -
Add stitch marks:
Draw small horizontal hash marks across the black suture lines, giving the appearance of crude stitching holding the galaxy together. -
Dot details:
Add tiny black dots alongside the suture lines or near the star clusters to add extra texture and contrast.
Level Up
Use metallic gold or silver paint for the stitching lines instead of black to give the piece a magical, alchemical aesthetic.
Step 4: Finishing Touches
-
Seal the work:
Once all paint and ink is 100% dry, take the skull to a well-ventilated area. -
Apply varnish:
Spray the entire painted area with a clear matte or satin sealant to protect the artwork from dust and UV light. -
Remove tape:
Carefully peel off the painter’s tape from the antler burrs to reveal your clean, crisp edge.
Hang your cosmic creation on the wall or display it on a mantel to bring a piece of the night sky indoors


Paint Drip Art for an Edgy Twist
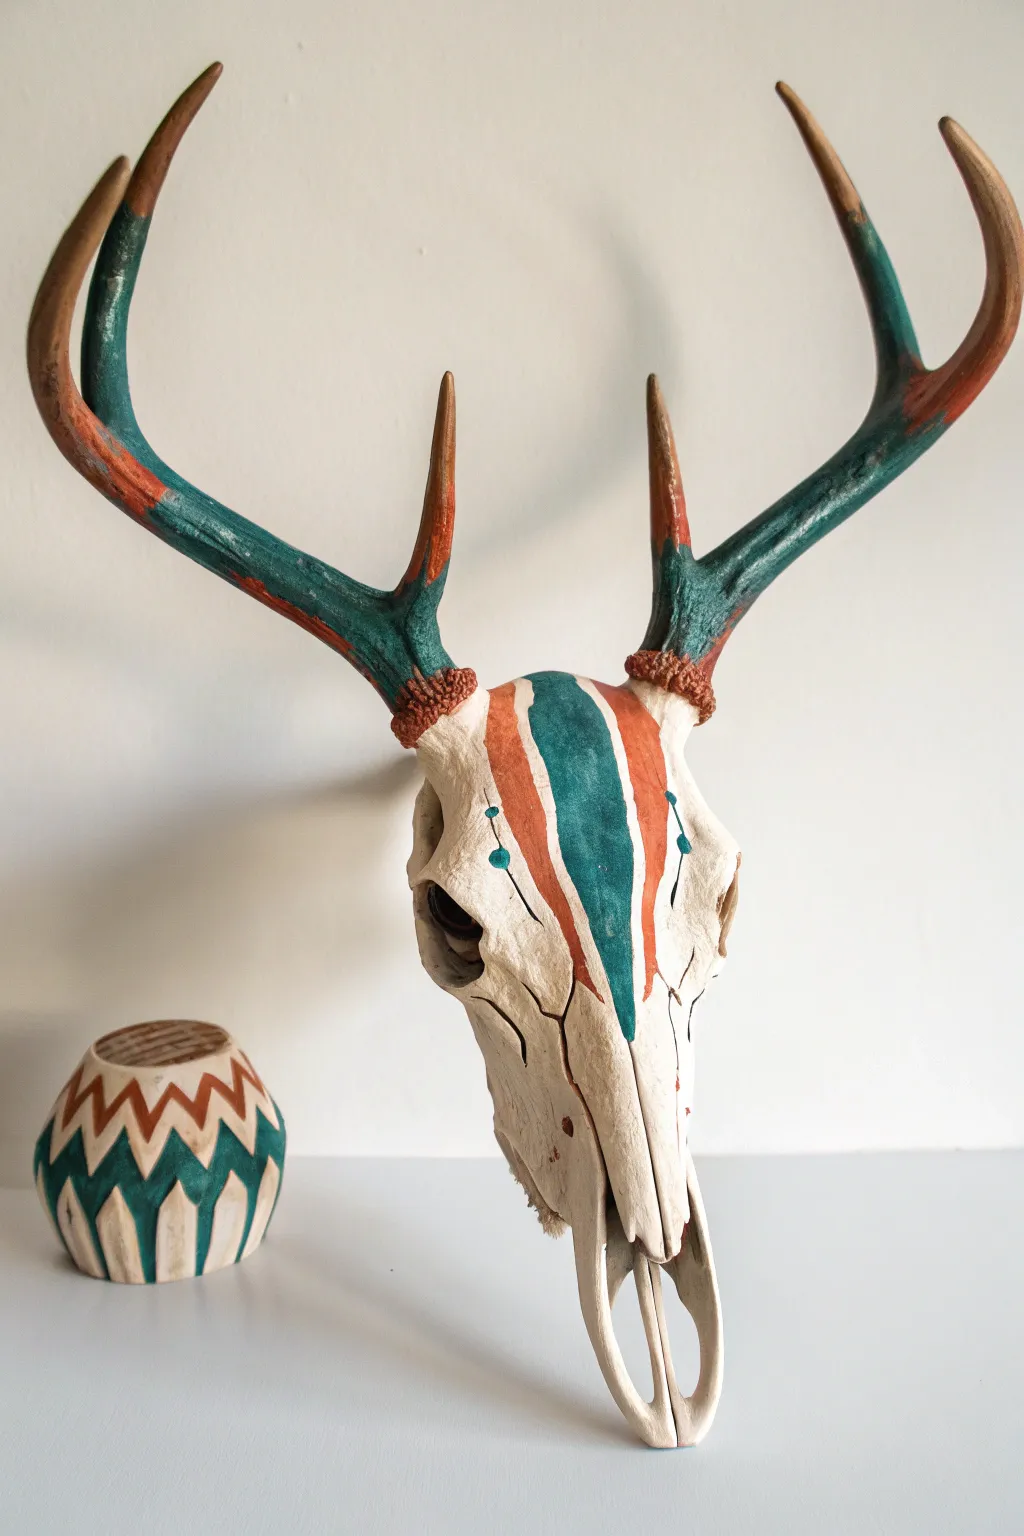
This project transforms a found deer skull into a striking piece of Southwestern-inspired decor using bold teal and rust geometric patterns. The clean lines painted directly onto the bone create a modern yet rustic focal point that pairs perfectly with earthy ceramics.
Detailed Instructions
Materials
- Cleaned and bleached deer skull with antlers
- Acrylic craft paint (Teal/Turquoise)
- Acrylic craft paint (Rust/Terracotta)
- Flat shader brushes (medium and small)
- Small round detail brush
- Painter’s tape (optional but recommended)
- Pencil
- Matte finish clear sealant spray
Step 1: Preparation & Planning
-
Assess the surface:
Ensure your skull is thoroughly cleaned, bleached, and completely dry before beginning; any residual grease on the bone will prevent the acrylic paint from adhering properly. -
Sketch the center stripe:
Using a pencil, lightly mark the boundaries for the central teal stripe running down the forehead. It should start just below the antler base and taper slightly as it moves toward the nose bridge. -
Mark the side accents:
Sketch flanking stripes on either side of the center line for your rust color. Keep these slightly thinner than the main stripe to create visual balance.
Bleeding Lines?
If your paint bleeds into the bone’s porous grain, wipe it instantly with a damp Q-tip. For crisp lines, paint a thin layer of clear matte medium first to seal the specific area.
Step 2: Painting the Skull
-
Fill the center stripe:
Load a medium flat shader brush with teal paint and fill in your central pencil markings. Apply smooth, downward strokes to work the pigment into the porous bone texture. -
Add rust stripes:
Switch to a clean brush and apply the rust-colored paint to the designated areas on either side of the teal stripe. Be careful not to let the wet colors touch. -
Paint the antler base:
Using a smaller brush, stipple the rust color onto the textured burrs (the bumpy base) of the antlers. The stippling motion helps get paint deep into the crevices. -
Add fine details:
With your smallest round brush and teal paint, add small accent dots or thin lines extending from the rust stripes near the eye sockets. -
Dry and recoat:
Let the first layer dry for about 20 minutes. Bone can be absorbent, so apply a second coat to all painted areas to ensure the colors are opaque and vibrant.
Step 3: Antler Accents
-
Base coat the antlers:
Starting from the rust-colored burrs, paint the lower third of the antler beams with teal. Blend the transition slightly where it meets the rust base. -
Add rust tips:
Paint random sections of the antler tines with the rust color, specifically targeting the tips or midway points for an organic, weathered look. -
Distress the paint:
Once the antler paint resembles the photo, take a dry brush with very little paint and scuff the edges to create a worn, rustic finish rather than a perfect factory coating.
Pro Tip: Color Harmony
Match your paint colors to existing decor items, like the ceramic pot in the photo. Mixing a tiny bit of white into your teal can help match weathered pottery glazes perfectly.
Step 4: Sealing
-
Final cure:
Allow the entire skull to dry overnight to ensure all moisture has evaporated from the bone and paint. -
Apply sealant:
Take the skull to a well-ventilated area and apply a light mist of matte clear sealant. This protects the paint from dust without adding an unnatural glossy shine to the bone.
Now you have a stunning, customized art piece ready to mount on your wall


Have a question or want to share your own experience? I'd love to hear from you in the comments below!