When I’m craving hot drawing ideas, I’m really chasing that mix of confidence, softness, and a little mystery. These prompts are all about sensual vibes without needing anything explicit—just smart posing, lighting, and details that feel electric.
Crop Top and Low-Rise Waist Focus
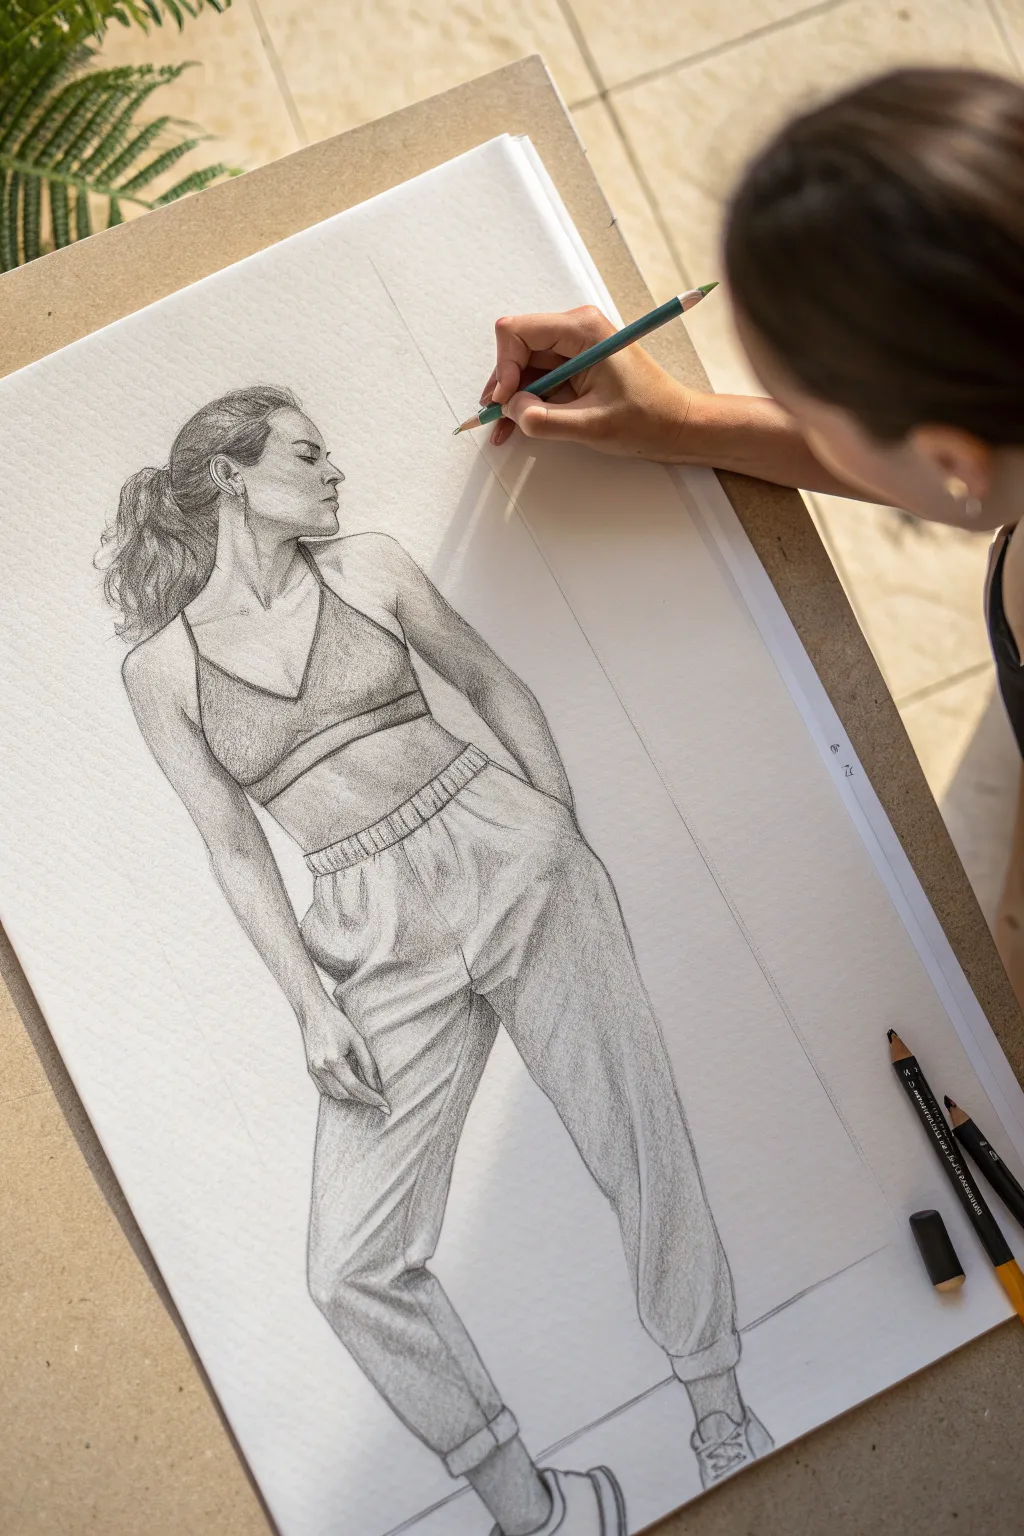
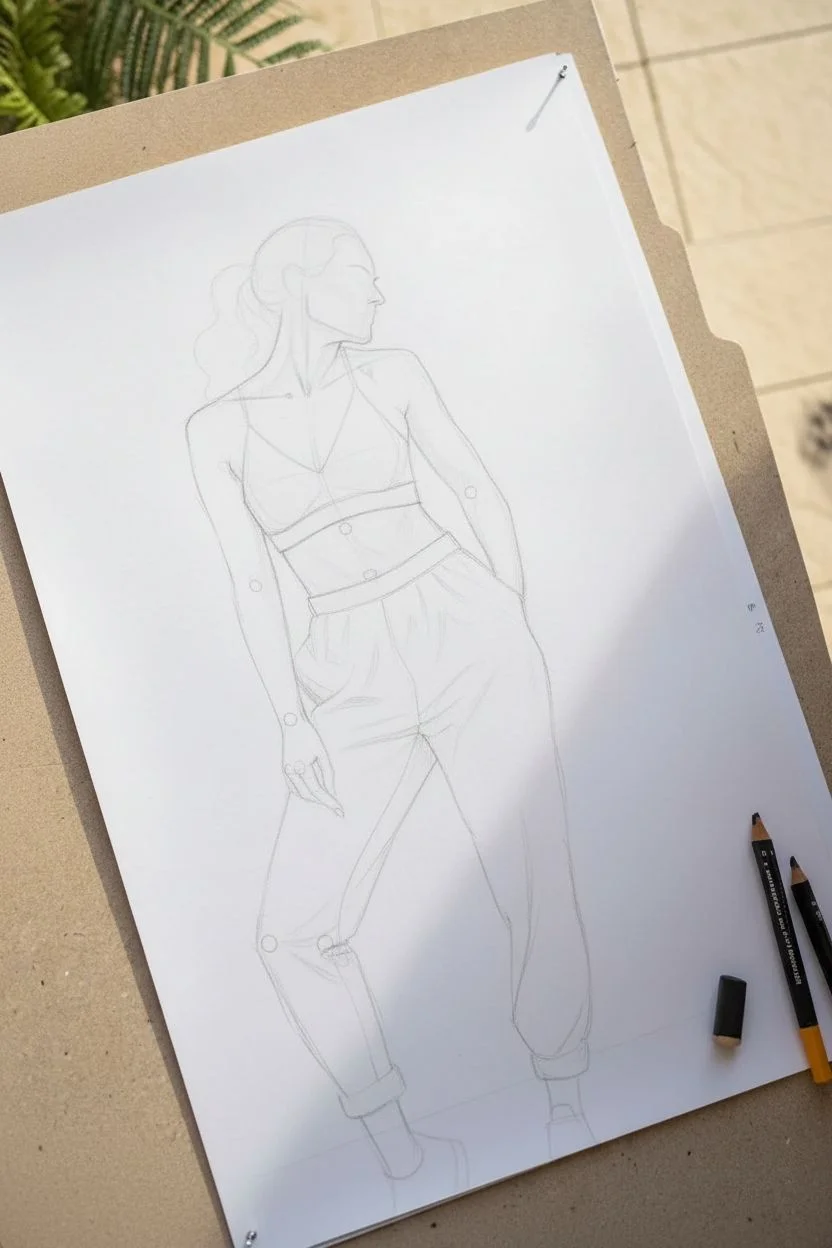
Capture the laid-back vibe of 90s fashion with this realistic pencil drawing focused on capturing fabric folds and confident posture. The interplay between the structured crop top and the relaxed, draped sweatpants offers a fantastic study in different textures and shading techniques.
Step-by-Step Tutorial
Materials
- High-quality drawing paper (smooth or medium tooth)
- Graphite pencils (H range for lines, 2B-6B for shading)
- Kneaded eraser
- Precision eraser pen (optional)
- Blending stump
- Reference photo of similar pose
Step 1: Constructing the Framework
-
Establish the gesture line:
Begin with a very faint, sweeping line of action that starts at the head, curves through the spine, and extends down the weight-bearing leg effectively capturing the model’s stance. -
Map the proportions:
Sketch the basic shapes for the head, ribcage, and pelvis. Pay close attention to the tilt of the shoulders versus the hips; they should oppose each other slightly to create a dynamic ‘contrapposto’ pose. -
Outline the limbs:
Use cylindrical shapes to block in the arms and legs. Mark the joints (elbows, knees, ankles) clearly to ensure the anatomy underneath the clothing feels solid. -
Draft the clothing silhouette:
Lightly sketch the outline of the crop top and the low-rise pants. Focus on where the waistband sits below the navel to emphasize that specific style.
Step 2: Defining the Features
-
Detail the face and hair:
Refine the profile of the face, keeping lines delicate. Sketch the hair in a messy ponytail, using quick, flowing strokes to suggest strands rather than outlining a solid mass. -
Refine the anatomy:
Firm up the lines of the exposed skin—the arms, neck, and midriff. Add subtle indications of muscle tone in the abdomen and collarbone area. -
Structure the waistband:
Draw the elastic waistband of the joggers. I find it helpful to draw vertical tick marks first to guide the gathered fabric texture before connecting them. -
Draw the fabric folds:
Sketch the major folds in the pants. Notice how the fabric bunches at the knees and ankles, and hangs loosely from the hips. Use ‘Z’ and ‘V’ shapes to mimic the heavy cotton material.
Fabric Weight Tip
To make sweatpants look heavy vs. light leggings, rely on angular, hard-edged folds near the ankles rather than soft curves. Gravity pulls heavy fabric straight down.
Step 3: Shading and Texture
-
Base tone application:
Using the side of a 2B pencil, apply a soft, even layer of graphite over the clothing areas to distinguish them from the skin tones. -
Shade the skin:
Add subtle shading to the skin using a harder pencil (like an HB). Focus on the shadows under the jaw, the armpit, and the side of the torso furthest from the light source. -
Deepen clothing shadows:
Switch to a 4B or 6B pencil to darken the deepest creases in the sweatpants and the underside of the crop top. Contrast is key here to make the fabric look three-dimensional. -
Texture the hair:
Darken the roots and the underside of the ponytail. Use a sharp pencil to flick in loose flyaway hairs for realism. -
Blend for softness:
Gently use a blending stump to smooth out the skin tones and the broader areas of fabric. Be careful not to over-blend, as you want to keep some texture in the joggers.
Add a Pattern
Customize the look by drawing a logo on the crop top or adding a side-stripe down the pant leg. You could also render a flannel tied around the waist.
Step 4: Final Details
-
Highlight retrieval:
Take your kneaded eraser and lift out highlights on the upper thighs, the chest, and the tops of the fabric folds. This ‘subtractive drawing’ brings the light back into the piece. -
Detail the shoes:
Sketch the sneakers simply, ensuring they look grounded. Add a small cast shadow underneath the feet to anchor the figure to the page. -
Clean up edges:
Go over the outer contour lines one last time to crisp them up, varying your line weight—thicker in shadow areas, thinner where the light hits.
Step back and admire how the simple clothing elements combine to create a sophisticated figure study


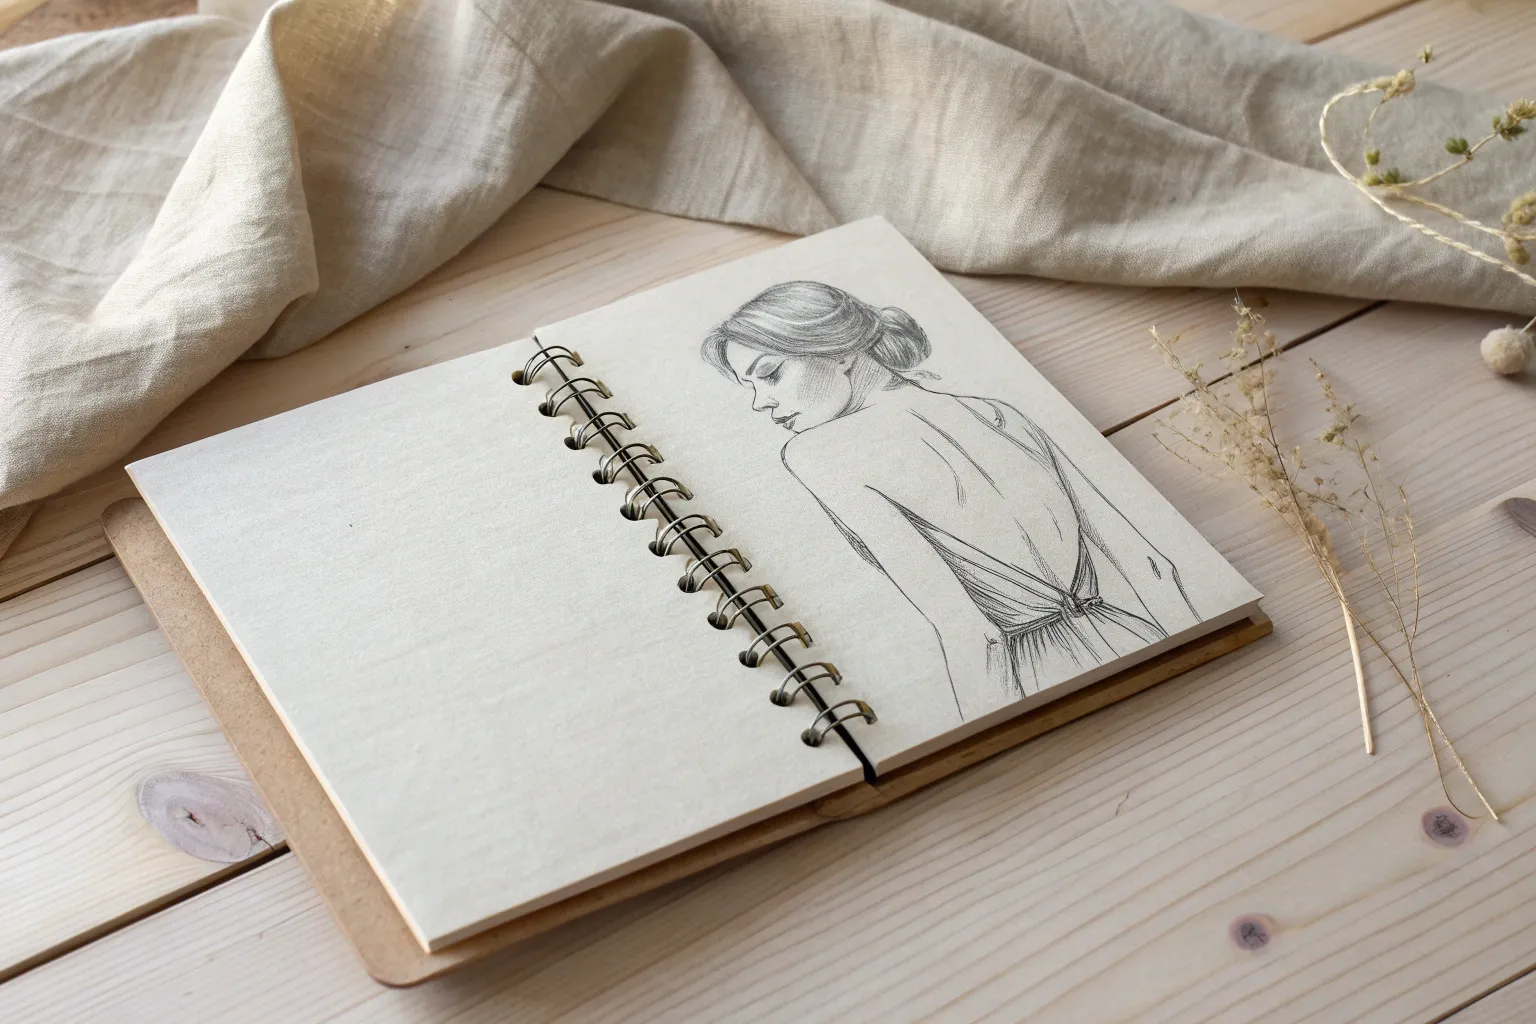
Torso-Only Cropped Composition
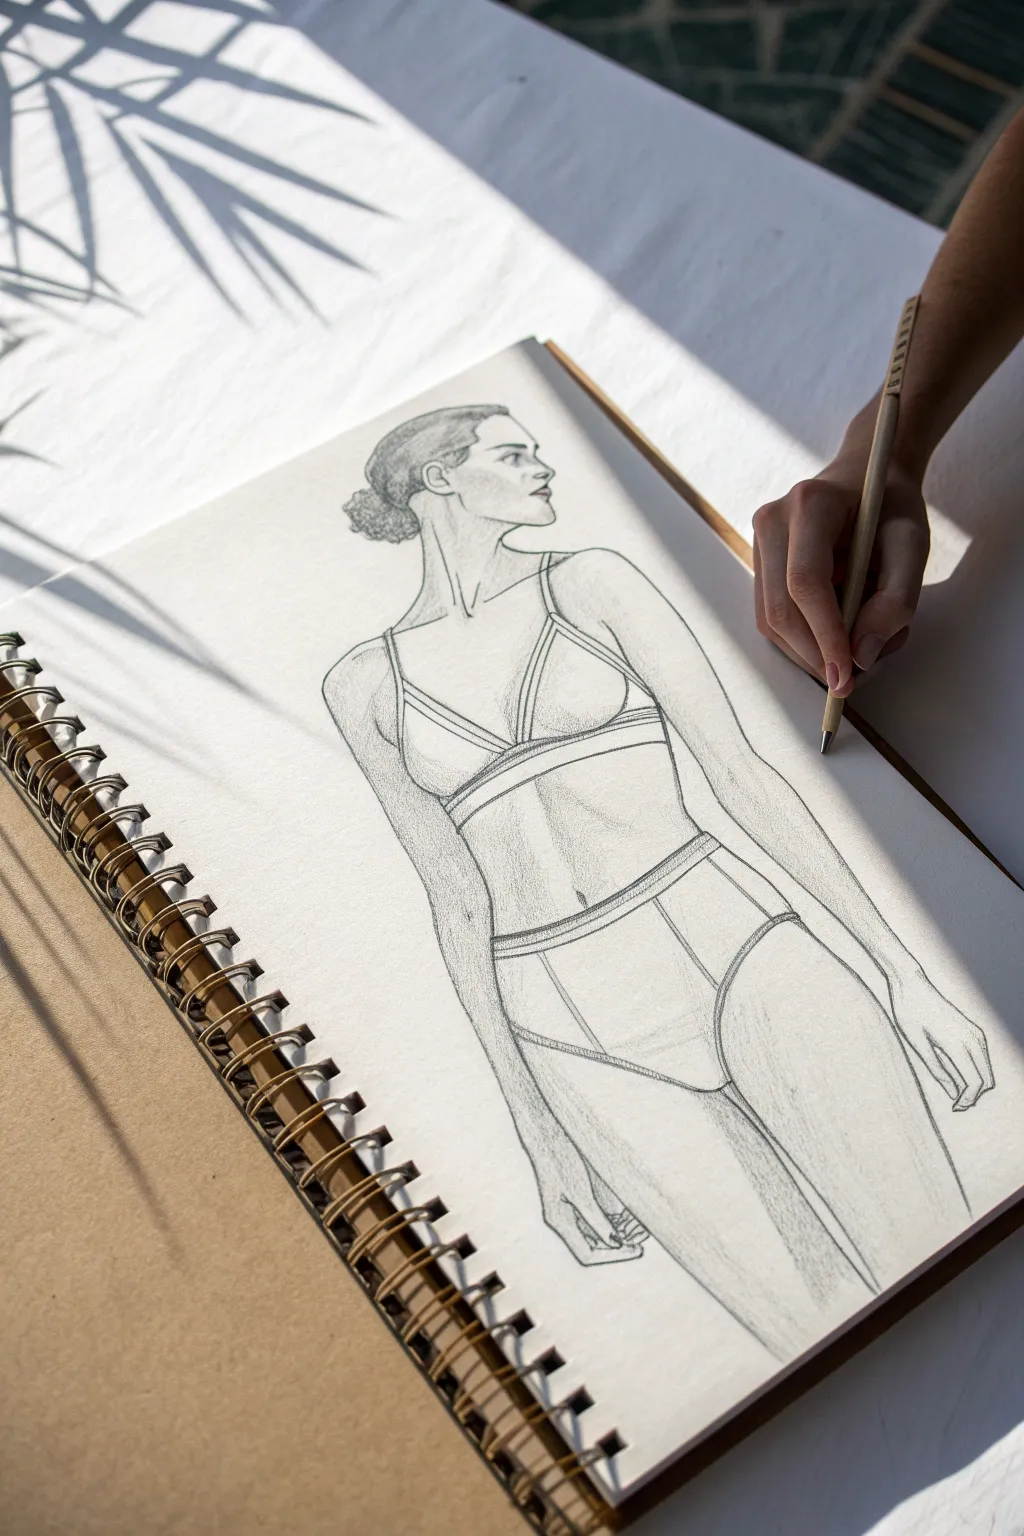
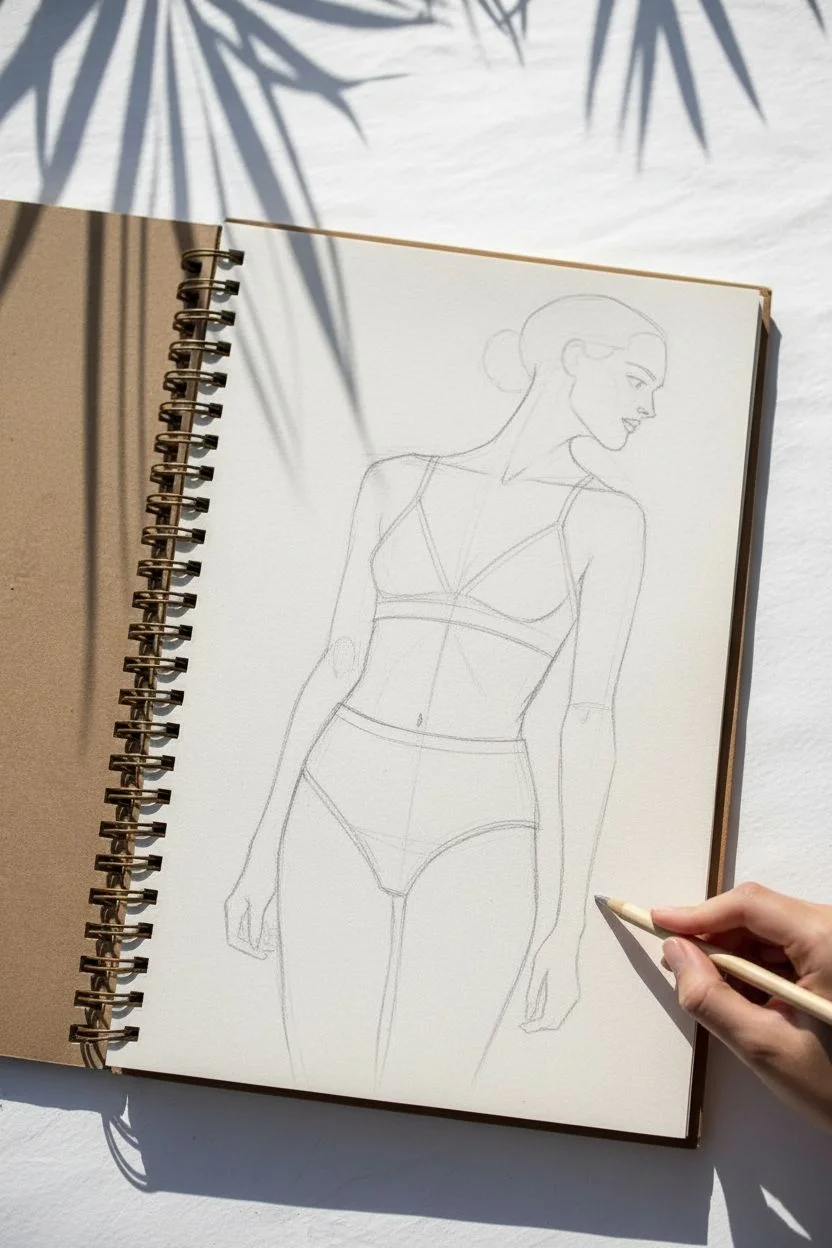
Capture the elegance of the human form with this delicate pencil study focusing on a cropped torso composition. The soft shading and clean lines create a minimalist yet realistic depiction of a figure in simple lingerie.
Detailed Instructions
Materials
- Spiral-bound sketchbook (smooth or bristol paper)
- HB graphite pencil for initial lines
- 2B or 4B graphite pencil for shading
- Mechanical pencil (0.5mm) for fine details
- Kneaded eraser
- Blending stump or cotton swab
Step 1: Structure and Proportions
-
Establish the Head Ease:
Begin lightly with your HB pencil, drawing an oval for the head positioned near the top of the page. Ensure the chin is slightly lifted to create a looking-away pose. -
Map the Neck and Shoulders:
Sketch a long, elegant neck flowing down from the jawline. Extend lines outward for the shoulders, keeping one slightly lower than the other to suggest a relaxed posture. -
Defined the Torso Line:
Draw the central axis of the body. Sketch the curvature of the spine and the waist, noting how the torso tapers in above the hips. -
Outline the Arms:
Block in the arms hanging naturally at the sides. You don’t need perfect detail yet, just capture the gesture and length relative to the torso. -
Draft the Clothing Shapes:
Lightly sketch the outlines of the lingerie. Mark the triangle shapes of the bra and the high-waist line of the briefs, ensuring the fabric follows the curve of the body.
Fixing Stiffness
If the pose looks stiff, check your shoulder alignment. A perfectly straight shoulder line is rare; tilting one side down instantly adds relaxation and life.
Step 2: Refining the Form
-
Detailed Facial Profile:
Switch to your mechanical pencil for precision. Define the profile view of the face, carefully carving out the brow, nose, and lips. -
Hair Texture:
Sketch the hair pulled back into a low bun. Use short, curved strokes to suggest strands being pulled tight against the scalp. -
Clavicle and Neck Muscles:
Add the sternocleidomastoid muscle (the V-shape in the neck) and the clavicles. These anatomical landmarks ground the figure’s realism. -
Finalize Limb Contours:
Darken the outlines of the arms and thighs. Pay attention to the slight indentation at the wrist and the swell of the thigh muscle. -
Detail the Lingerie:
Go over the bra and panty lines. Add double lines to represent seams or elastic bands, giving the garments a structured look.
Step 3: Shading and Depth
-
Base Shading Layer:
Using the side of a 2B pencil, apply a light wash of gray to the shadowed side of the body, particularly under the arm and along the side of the torso. -
Deepening Shadows:
Press harder in the deepest crevices, such as the armpit, the hollow of the neck, and where the clothing meets the skin. -
Adding Volume to the Chest:
Shade gently around the cups of the bra to suggest volume. Keep the center of the chest lighter to show where light hits. -
Blending for Softness:
I like to take a blending stump here and gently smudge the shading on the skin to remove harsh pencil strokes, creating a smooth, skin-like texture. -
Clothing Texture:
Keep the shading on the clothing slightly sharper than the skin to differentiate the materials. -
Highlights and Cleanup:
Use the kneaded eraser to lift pigment from the high points—the shoulder, the bridge of the nose, and the top of the thigh. Erase any stray construction lines.
Add Delicate Details
Enhance the lingerie by drawing tiny scalloped edges or lace patterns along the hems using your finest mechanical pencil lead.
Now you have a refined fashion illustration ready to be framed or kept in your practice journal


Off-Shoulder Sweater and Collarbone Glow
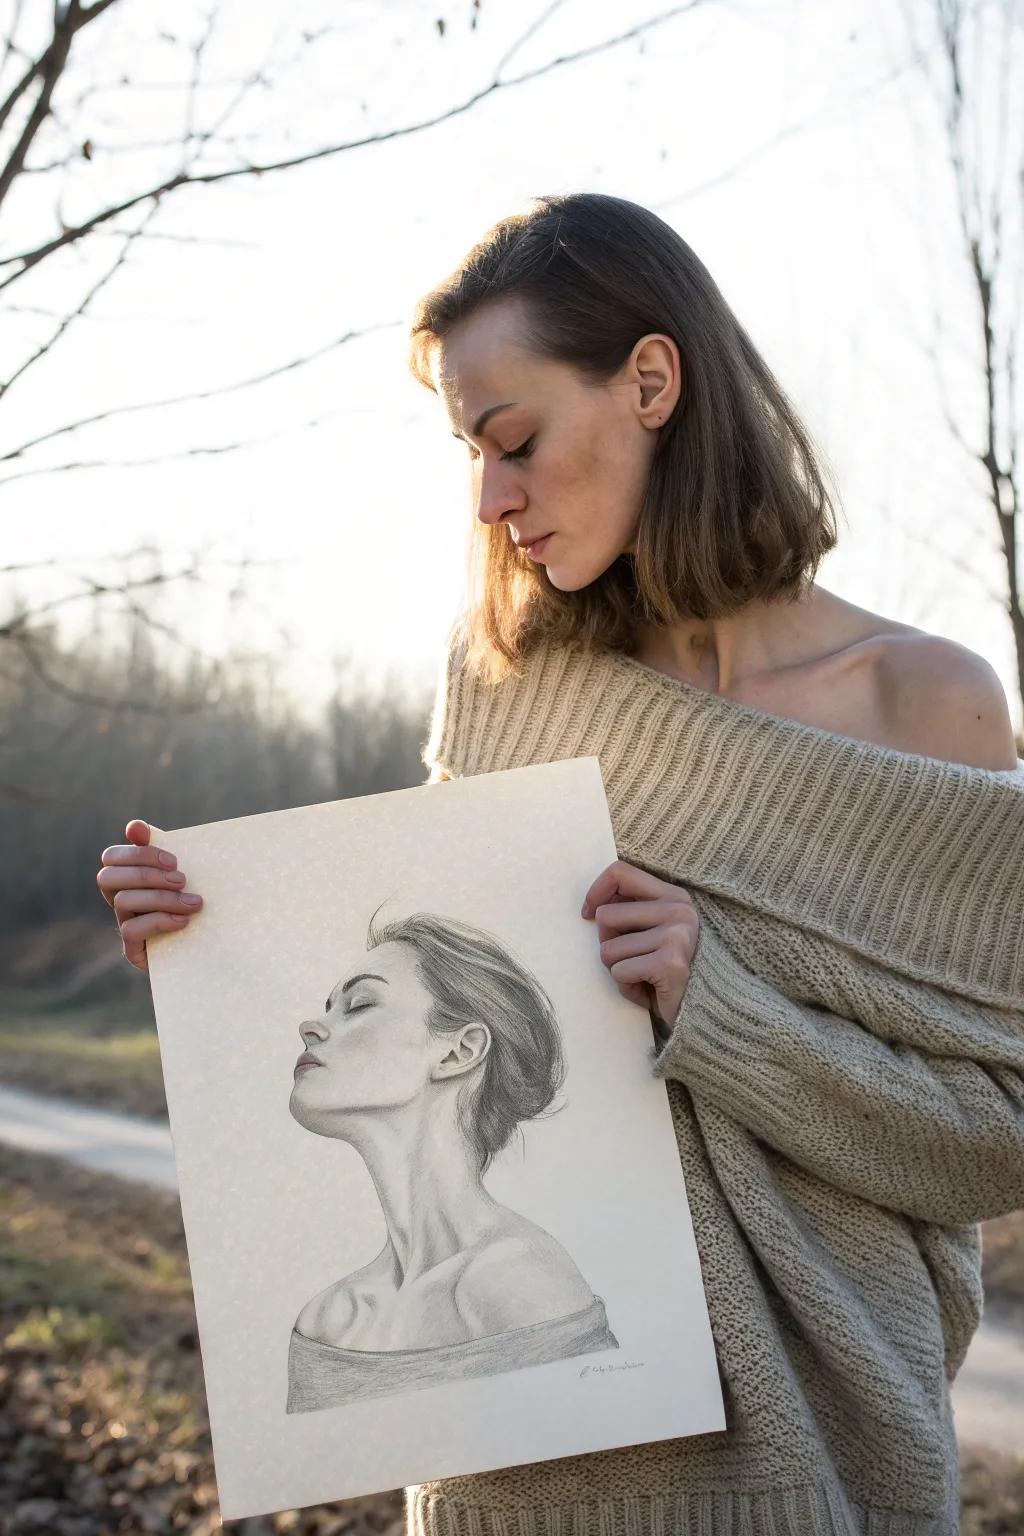

Capture the delicate beauty of a tranquil profile with this realistic graphite study. Focusing on the interplay of light on the collarbone and the soft texture of knitted fabric, this piece is an elegant exercise in anatomical shading.
How-To Guide
Materials
- Smooth heavyweight drawing paper (cream or off-white)
- Graphite pencils (HB, 2B, 4B, 6B)
- Mechanical pencil (0.5mm HB) for fine details
- Kneaded eraser
- Blending stumps (tortillons)
- Tissue or chamois cloth
- Reference photo of a profile pose
Step 1: Structural Foundation
-
Establish the Head Shape:
Begin with a sharpened HB pencil, sketching a light oval for the cranium and a curved line extending down to mark the jawline. -
Map the Facial Features:
Draw faint horizontal guidelines to align the eyes, nose, and mouth. The head is tilted back slightly, so angle your lines upward. -
Refine the Profile Line:
Carefully trace the contour of the forehead, the bridge of the nose, the lips, and the chin. Keep your pressure extremely light so mistakes are easily erased. -
Outline the Neck and Shoulders:
Extend the line from the chin down the neck, emphasizing the stretch of the sternocleidomastoid muscle. Sketch the prominent collarbone and the slope of the shoulders. -
Indicate the Clothing:
Lightly sketch the top edge of the off-shoulder sweater, ensuring it wraps naturally around the deltoids rather than sitting flat.
Smooth Skin Tip
For hyper-smooth skin texture, don’t just use stumps. Wrap a tissue around your finger and buff the graphite in small circles.
Step 2: Detailed Shading
-
Shade the Eye Socket:
Switch to a 2B pencil. Gently shade the recess of the closed eye, darkening the crease of the eyelid and the lash line. -
Sculpt the Nose and Lips:
Add shadows under the nose and the bottom lip. Use a blending stump to soften these transitions, giving the skin a smooth appearance. -
Define the Jawline:
Deepen the shadow underneath the jaw and chin using a 4B pencil. This separation is crucial for pushing the neck back in space. -
Render the Neck Anatomy:
Highlight the tension in the neck. Shade the hollow of the throat and the side of the neck, leaving the main muscle and collarbone lighter to show protrusion. -
Add Hair Texture:
With a mechanical pencil, draw sweeping strokes following the hair’s growth pattern. Start at the hairline and pull back towards the bun. -
Deepen Hair Values:
Layer 4B and 6B graphite in the shadowed areas of the hair, particularly behind the ear and at the nape of the neck, to create volume. -
Create Flyaways:
Use quick, loose strokes to add wispy strands escaping the main hairstyle. I find this really helps the portrait feel alive and less stiff.
Fixing Muddy Values
If shadows look shiny or grey instead of black, you’ve burnished the paper. Dab with a kneaded eraser to lift layers, then re-apply darks.
Step 3: Textile and Final Polish
-
Base Tone for the Sweater:
Ideally, use the side of a 2B pencil to lay down a soft, even grey tone across the shoulder area of the clothing. -
Draw the Knit Pattern:
Use a duller 4B pencil to create soft, repetitive vertical marks that mimic the ribbing of the sweater fabric. -
Shadow the Fabric Fold:
Darken the area where the sweater folds over itself at the top. This cast shadow creates the illusion of thickness in the wool. -
Highlight Removal:
Take your kneaded eraser and pinch it into a fine point or wedge. Lift graphite off the highest points of the cheekbone, nose tip, and collarbone. -
Refine Edges:
Go back over the main profile outline with a sharp pencil to crisp up any lines that got muddy during blending. -
Final Contrast Check:
Assess the darkest darks—the nostril, the corner of the mouth, the deepest hair shadows—and reinforce them with your 6B pencil. -
Sign and Seal:
Add your signature in the corner and, if desired, spray with a workable fixative to prevent smudging.
Step back and admire the quiet emotion you have captured in this delicate portrait


Close-Up Lips and Breathy Expression
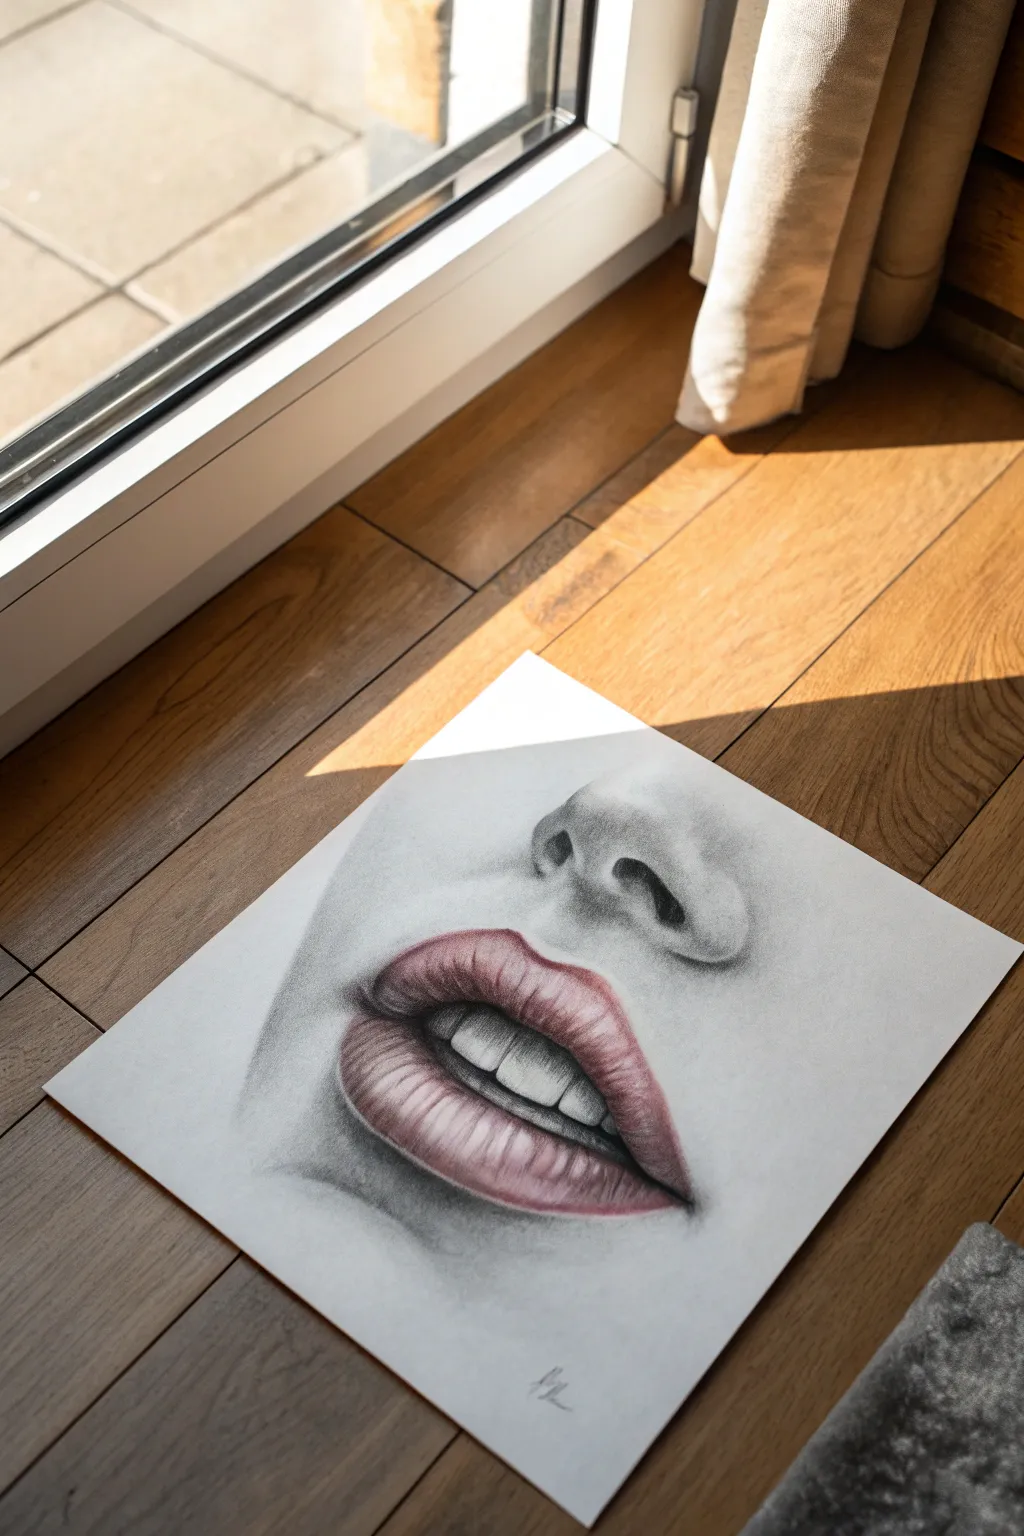
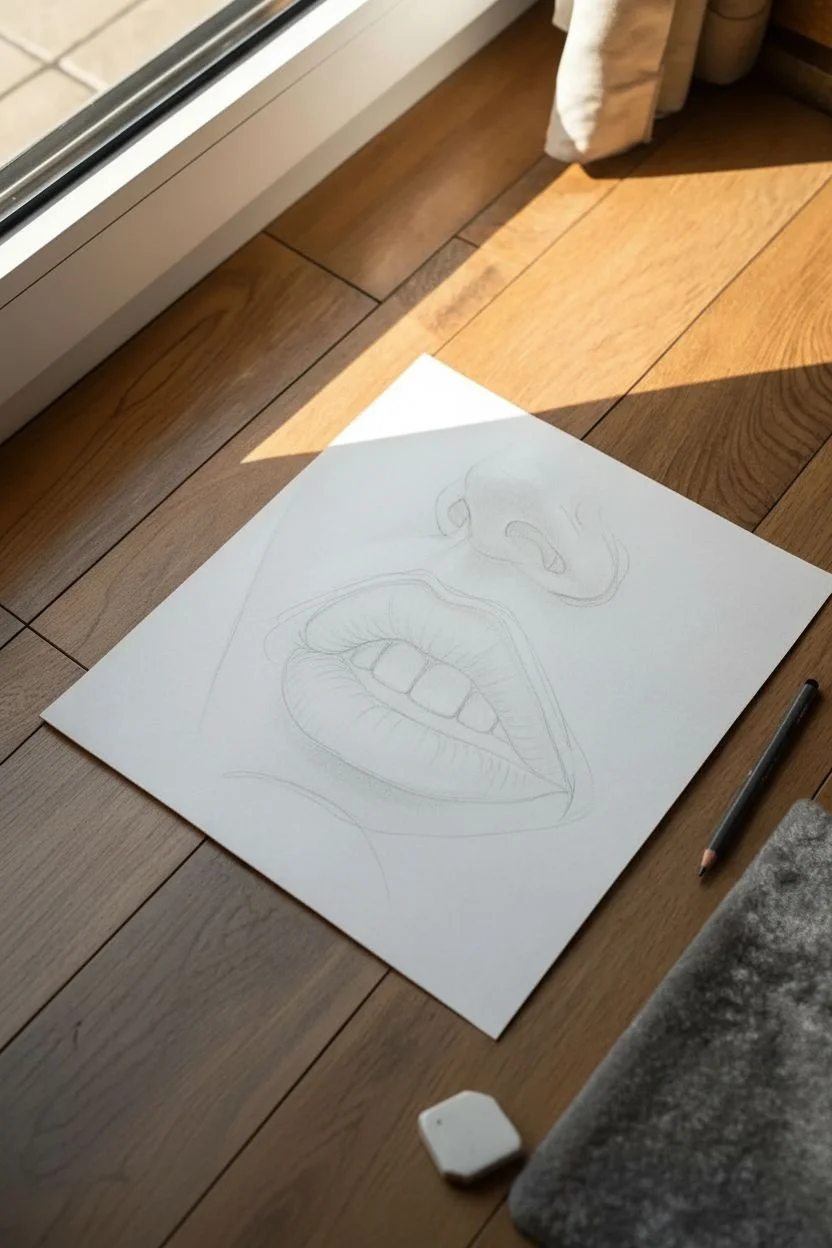
Capture the subtle tension of a parted mouth with this intimate, close-up study in graphite and colored pencil. This project focuses on achieving smooth skin textures and realistic lip contours, perfect for practicing anatomical depth.
Step-by-Step Tutorial
Materials
- High-quality smooth drawing paper (Bristol or hot press)
- Graphite pencils (HB, 2B, 4B)
- Colored pencils (Rose, Carmine, warm grey)
- Blending stumps (tortillons)
- Kneaded eraser
- Mechanical pencil (0.5mm) for details
- Soft tissue for smoothing
Step 1: Initial Sketching
-
Lay out the proportions:
Begin with a very light HB outline. Mark the bottom of the nose, the philtrum (the groove above the lip), and the basic oval shapes of the lips. Keep your lines faint so they don’t show through later. -
Define the mouth opening:
Sketch the inner contours where the lips part. Include the slight curve of the upper teeth, ensuring they sit slightly behind the upper lip to create depth. -
Map the nose structure:
Lightly outline the nostrils and the curve of the nose tip. Instead of drawing hard lines for the nose bridge, just mark where the shadows will fall.
Uneven Shading?
If your skin shading looks scratchy, use a circular motion with a clean tissue. Don’t press too hard, or you’ll burnish the paper and make it shiny.
Step 2: Graphite Shading (Skin & Nose)
-
Initial shading layer:
Using an HB pencil held at a low angle, apply a soft, even layer of graphite over the skin areas around the mouth and nose. Avoiding the highlight areas on the tip of the nose is crucial here. -
Blend the base tone:
Take a soft tissue or a large blending stump and circular polish the graphite into the paper to create a poreless, smooth skin texture. -
Deepen the nostrils:
Switch to a 4B pencil to darken the nostrils. Don’t make them solid black circles; gradient the edges outward so they curve gently into the skin. -
Sculpt the philtrum:
Add subtle shading in the groove between the nose and lip. Darken the center slightly and use your eraser to pull out highlights on the ridges. -
Shadow the corners:
Apply darker graphite shading (2B) to the corners of the mouth and underneath the bottom lip to create the illusion that the lips are protruding from the face.
Level Up: Wet Look
For a glossier lip look, use a white gel pen or white gouache for the highlights. Add tiny dots of white near the lip wrinkles to simulate reflected light.
Step 3: Coloring the Lips
-
Apply the base color:
Lightly shade the lips with a Rose-colored pencil. Follow the curvature of the lips—curved vertical strokes—rather than coloring side-to-side. -
Define the cracks:
Use a sharpened Carmine or darker red pencil to draw the tiny vertical fissures and wrinkles on the lips. Press harder in the center of the lip and lift pressure as you move outward. -
Layering blending:
Go back over your red pencil work with a little graphite or warm grey pencil. This desaturates the pink slightly, making it look more realistic and less like lipstick. -
Darken the inner mouth:
Use your darkest graphite (4B) for the space inside the mouth behind the teeth. This contrast is what makes the teeth look white. -
Shadowing the teeth:
Teeth aren’t stark white. Lightly shade the edges where they tuck under the lip with an HB pencil, leaving the center of each tooth bright.
Step 4: Final Highlights and Details
-
Highlight the lips:
Use a clean kneaded eraser or a white gel pen to add sharp highlights to the fullest part of the lower lip. This mimics moisture. -
Soften the edges:
Check the perimeter of the lips. I find that blurring this line slightly with a stump makes the mouth look integrated with the skin rather than pasted on. -
Refine skin texture:
Lightly tap your kneaded eraser over the cheeks and nose tip to lift tiny specks of graphite, creating a subtle porous texture. -
Final check:
Reinforce the darkest shadow under the lower lip and inside the nostrils one last time to maximize the 3D effect.
Now showcase your drawing in natural light to see those subtle textures really pop
BRUSH GUIDE
The Right Brush for Every Stroke
From clean lines to bold texture — master brush choice, stroke control, and essential techniques.
Explore the Full Guide
Mirror Pose With Reflections and Cropping
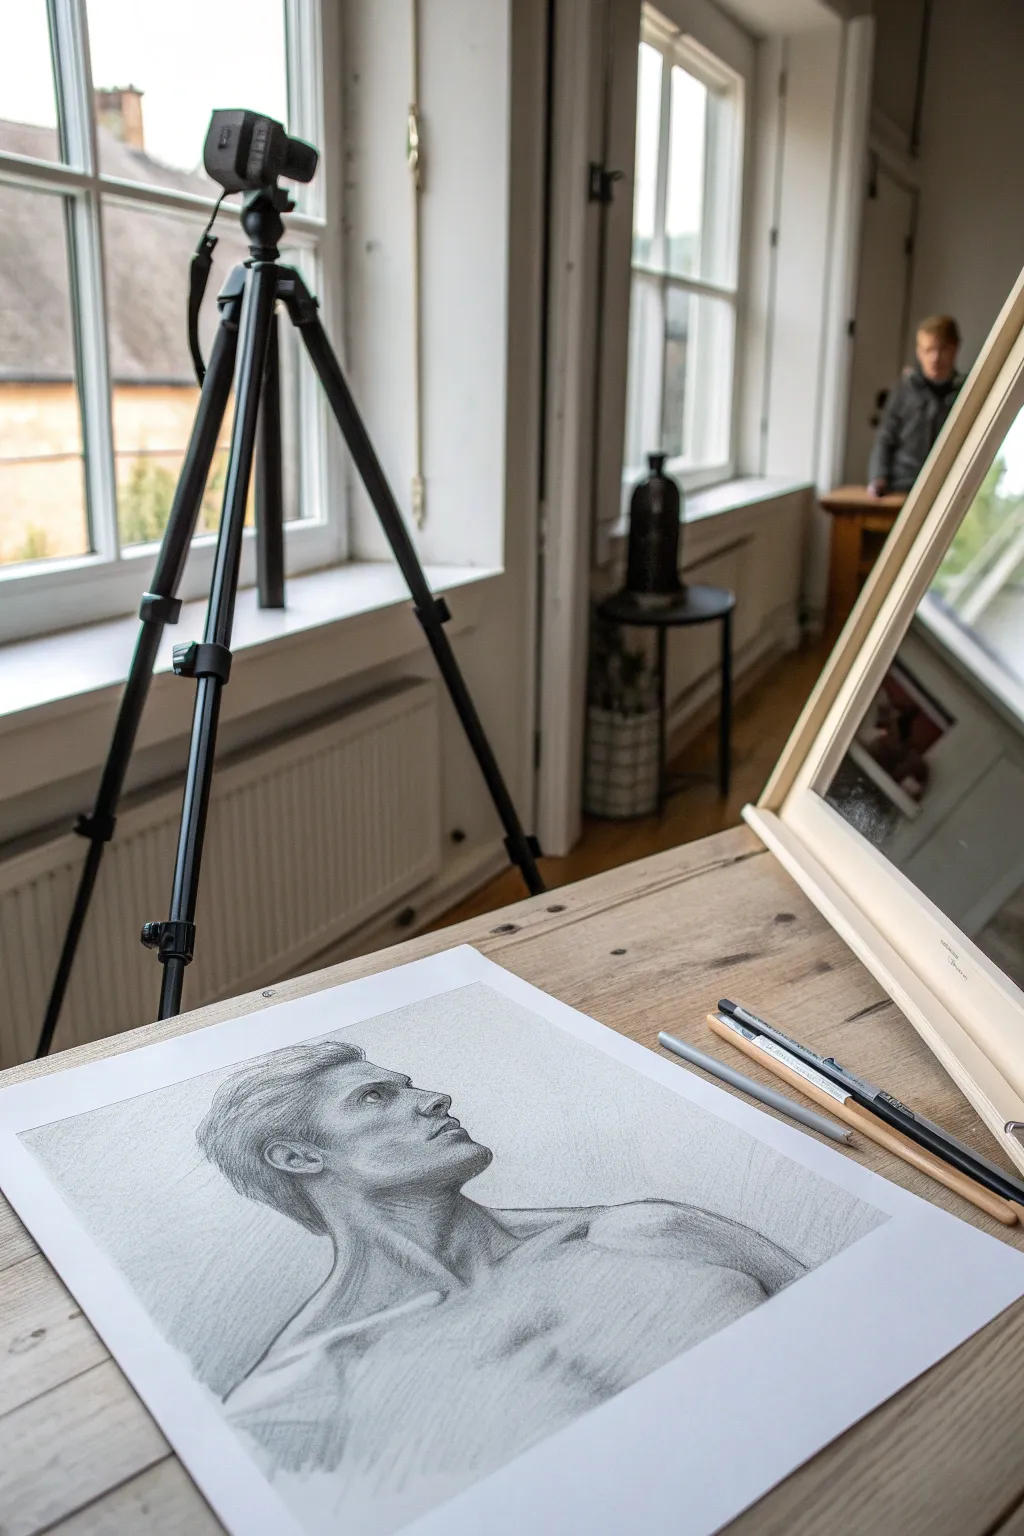
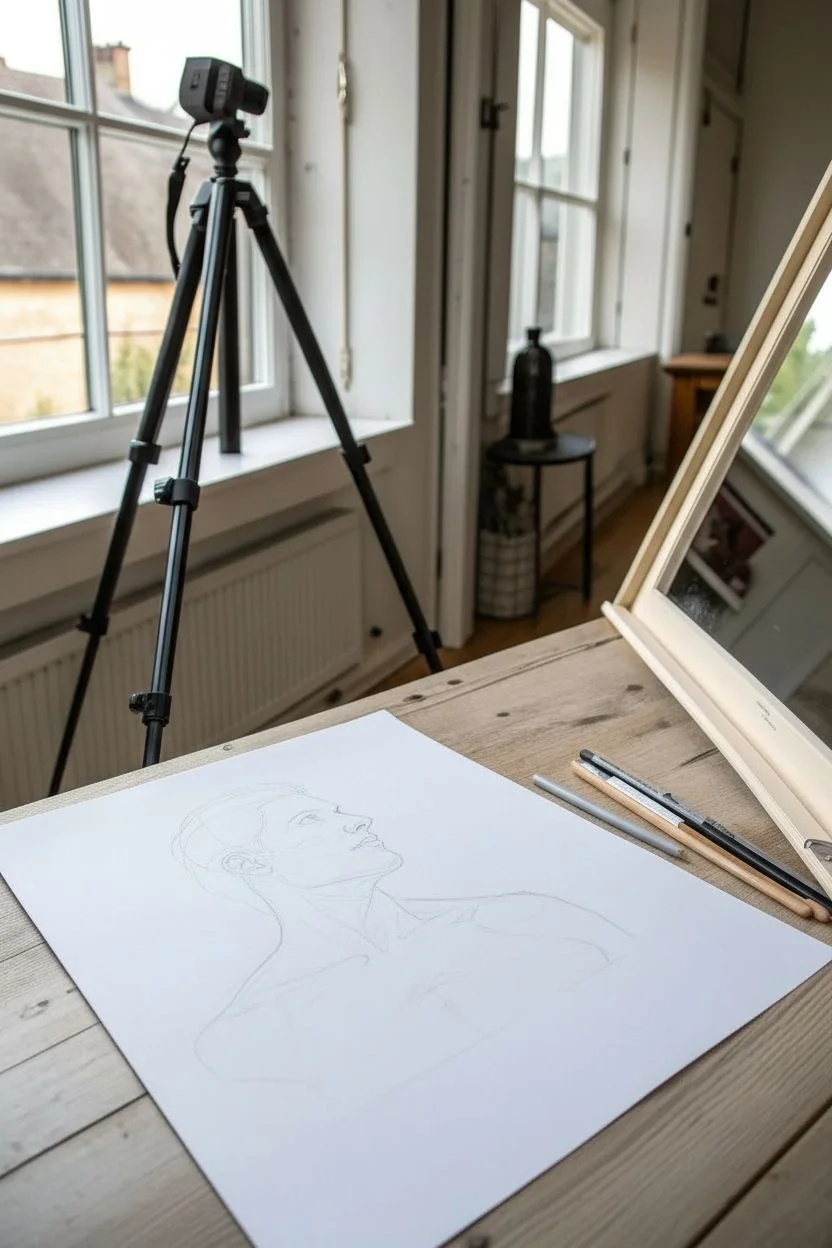
This realistic graphite portrait captures the contemplative profile of a male figure looking upward, rendered with smooth shading and detailed facial features. The project focuses on anatomy, light, and shadow to create a striking three-dimensional effect on paper.
How-To Guide
Materials
- High-quality drawing paper (heavyweight, smooth or medium tooth)
- Graphite pencils (range from 2H to 6B)
- Black fine liner pen (optional for deepest accents)
- Kneaded eraser
- Blending stump or tortillon
- Pencil sharpener
- Reference photo or model
Step 1: Framework and Proportions
-
Establish the Head Shape:
Begin with a 2H pencil to lightly sketch a circle for the cranial mass. Add a jawline extending downwards and connecting to the chin to form the basic profile shape. -
Map Facial Features:
Draw faint guidelines for the eye line, nose base, and mouth. Since the head is tilted back, ensure these lines curve slightly upward rather than remaining perfectly horizontal. -
Define the Neck and Shoulders:
Sketch the long curve of the neck, paying attention to the sternocleidomastoid muscle which runs from the ear down to the collarbone. Sketch the visible shoulder and upper chest area. -
Refine the Profile Line:
Carve out the specific contours of the forehead, the bridge of the nose, the lips, and the chin. Keep your lines light so they can be easily adjusted. -
Detail the Ear and Hairline:
Place the ear between the eye and nose guidelines, slanted slightly back to match the head’s tilt. Lightly outline the general shape of the hair mass without drawing individual strands yet.
Pro Tip: Lost and Found Edges
Don’t outline everything equally. Let the line disappear where the light hits the skin directly (like the bridge of the nose) to create more volume.
Step 2: Shading and Form
-
Start the Eyes and Nose:
Switch to an HB pencil to define the pupil and iris, leaving a small white spot for the highlight. Shade the underside of the nose and the nostril area. -
Develop Skin Tones:
Apply a light base layer of shading across the shadowed side of the face using a B pencil. Focus on the cheekbone hollows, the eye socket, and under the jaw. -
Smooth the Transitions:
Use a blending stump to gently soften your graphite strokes on the skin, creating a smooth, realistic texture. Be careful not to over-blend, or you’ll lose the paper’s tooth. -
Deepen the Shadows:
With a 2B or 4B pencil, darken the area under the chin and the side of the neck to push the form forward. I like to layer this gradually to avoid making it too shiny. -
Sculpt the Muscles:
Add shading to the neck muscles and clavicle area. The light source appears to be coming from the front/top, so keep shadows strongest behind the muscles.
Step 3: Hair and Final Details
-
Block in Hair Values:
Using a broad stroke with a 4B pencil, fill in the darker areas of the hair. Avoid drawing every single hair; think in terms of clumps and ribbons. -
Add Texture to Hair:
Sharpen a 2B pencil to a fine point and add directional strokes to simulate hair flow, primarily at the roots and tips. -
Lift Highlights:
Take your kneaded eraser and shape it into a point. Tap or drag it across the high points of the hair, the tip of the nose, and the cheekbone to pull out bright highlights. -
Refine Edges:
Clean up the outer edges of the silhouette. Use a harder pencil (H) to crispen the profile line if it became fuzzy during blending. -
Final Contrast Check:
Step back and assess your values. Use your darkest pencil (6B) to deepen the pupil, the corner of the mouth, and the deepest neck shadow for maximum impact.
Troubleshooting: Shiny Graphite
If dark areas look shiny or metallic, you’re pressing too hard. Layer soft pencils (4B-6B) gently over time rather than burnishing the paper.
Now step back and admire the soulful expression you have captured on the page


Have a question or want to share your own experience? I'd love to hear from you in the comments below!