If you’re painting a bump to celebrate an it’s a boy moment, the trick is blending clear boy-themed cues with a design that photographs beautifully. Here are my favorite baby boy belly painting ideas—starting with the classics and easing into the more unexpected, artsy concepts.
Baby Boy Name Script Across the Bump
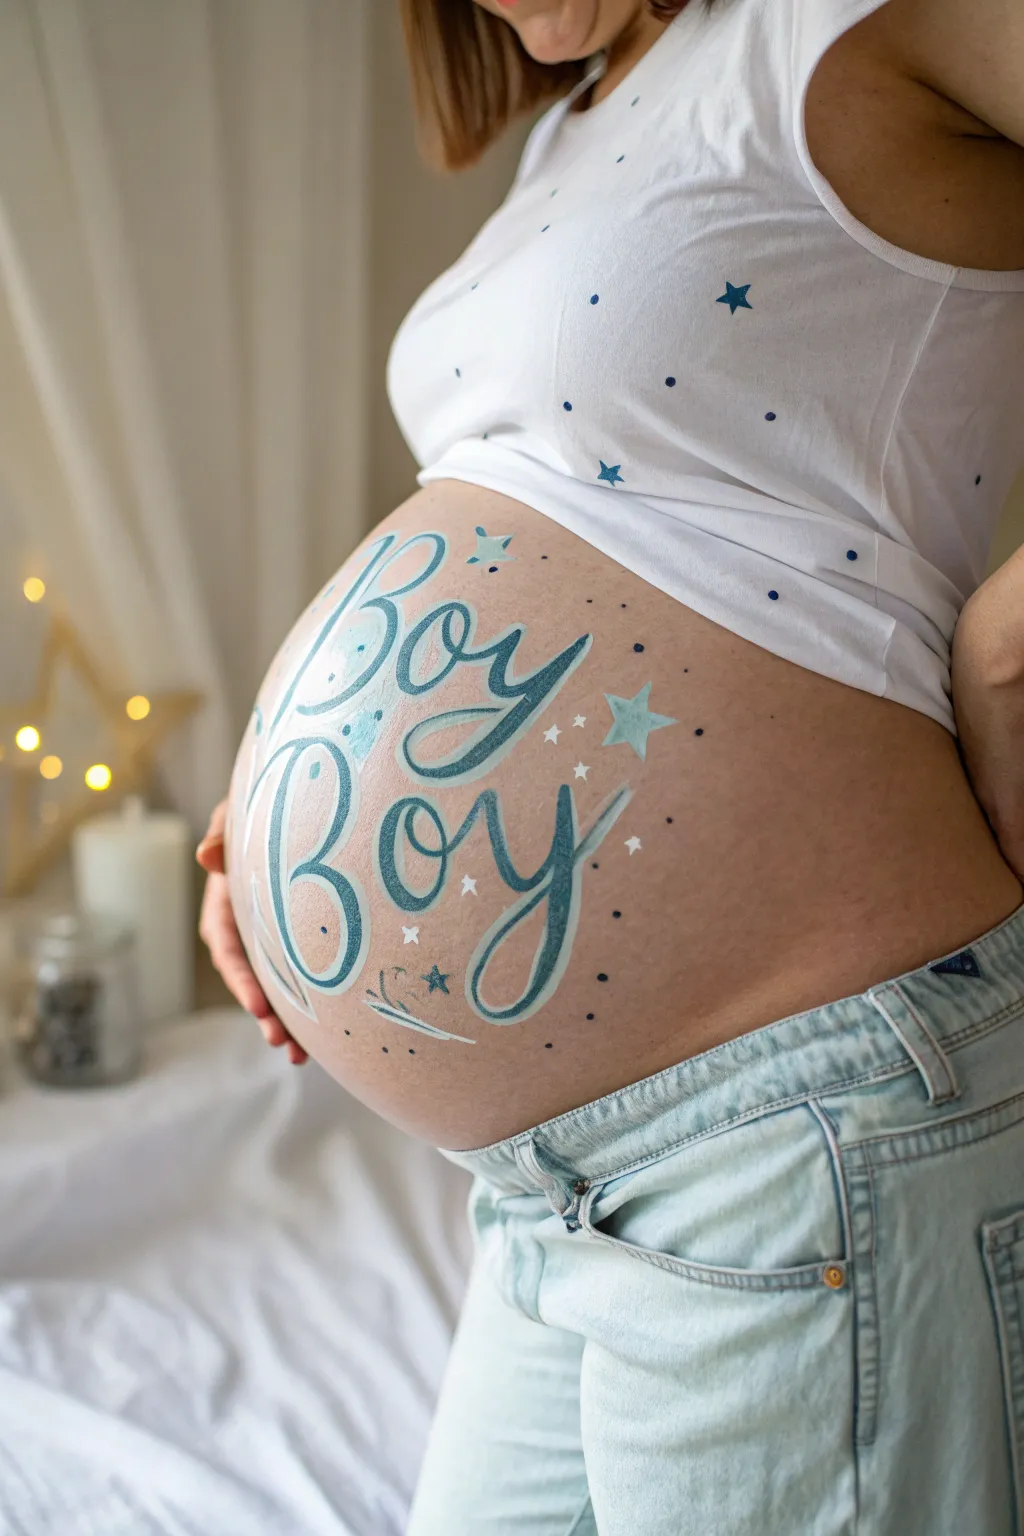
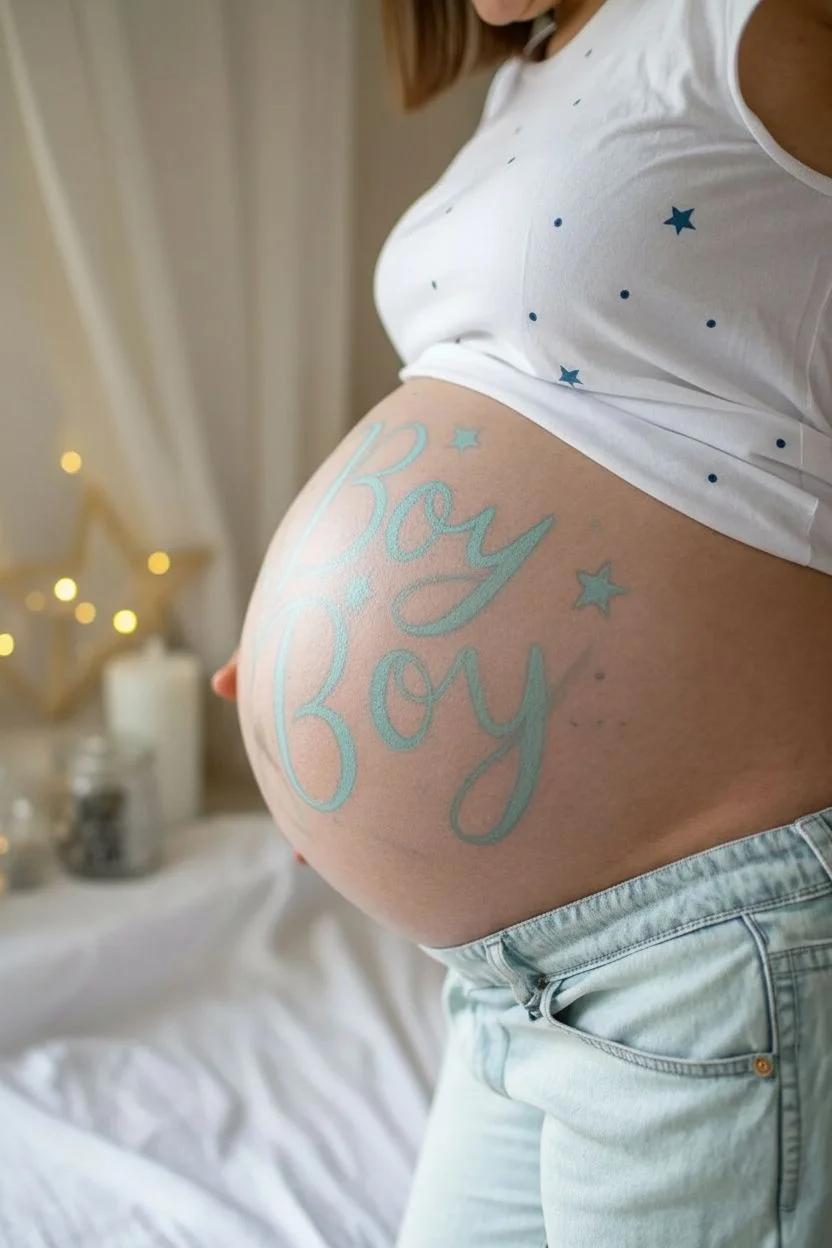
Celebrate your baby boy’s upcoming arrival with this charming and celestial belly painting design. The look features the word ‘Boy’ repeated in an elegant script, accented by dreamy stars and soft highlights for a sweet, photogenic finish.
Step-by-Step
Materials
- Water-activated face/body paint (dark teal or petrol blue)
- Water-activated face/body paint (light baby blue)
- Water-activated face/body paint (white)
- Round synthetic brush (size 4 or 6 for lettering)
- Fine liner brush (size 0 or 1 for details)
- Small flat brush (optional, for stars)
- Cup of water
- Paper towels
- Baby wipes (for quick corrections)
- Mirror (if painting on yourself)
Step 1: Drafting the Layout
-
Clean the canvas:
Start with clean, dry skin free of lotions or oils. This ensures the water-activated paint adheres properly without sliding around. -
Map the spacing:
Visualize the center of the bump. You will be stacking the word ‘Boy’ twice. The top word should curve slightly over the upper prominence of the belly, and the bottom word should mirror that curve underneath. -
Light sketching:
Using a very watery mix of your light blue paint and a fine liner brush, faintly sketch the skeleton of the letters. This ‘ghost outline’ helps you get the positioning right before committing to the darker color.
Steady Hand Trick
Rest your pinky finger gently on the skin as a stabilizer while you paint fine details. This anchors your hand and prevents shakiness for crisp lines.
Step 2: Lettering the Design
-
Load the main brush:
Wet your medium round brush and load it generously with the dark teal or petrol blue paint. You want a creamy consistency—too watery and it will drip; too dry and the edges will be rough. -
Paint the first ‘B’:
Starting near the top left of the bump, paint the large capital ‘B’. Use varying pressure: press down for thick downstrokes and lift up to the tip for thin upstrokes. -
Complete the top word:
Continue painting the ‘o’ and ‘y’ in the same bouncy script style. Extend the tail of the ‘y’ with a decorative flourish that swoops to the left. -
Paint the second ‘B’:
Directly beneath the first word, paint the second capital ‘B’. I find it helps to align the vertical stem of this ‘B’ with the one above it for symmetry. -
Finish the lettering:
Paint the remaining ‘o’ and ‘y’ for the bottom word. This time, swirl the tail of the ‘y’ generously underneath the entire word to frame the bottom of the design.
Step 3: Adding Highlights and Dimensions
-
Create the inner fill:
Switch to your light blue paint. Carefully paint inside the loops of the ‘B’s and ‘o’s, leaving a small gap between this color and the dark outline so they don’t blend together. -
Add white highlights:
Clean your fine liner brush and load it with bright white paint. Add thin ‘shine’ lines on the upper left side of the thick teal strokes to make the letters look wet and dimensional. -
Outline the inner color:
Use the white paint to outline the light blue fill sections inside the letters. This crisp white line separates the two blues and adds a pop of brightness.
Level Up: Glitter Finish
While the paint is still slightly tacky, gently dab cosmetic-grade chunky glitter over the stars or the wettest parts of the letters for extra sparkle.
Step 4: Celestial Details
-
Paint the main stars:
Using light blue paint, add three or four medium-sized five-point stars scattered around the text. Place one near the top right and another near the bottom center for balance. -
Add teal star accents:
With a fine brush and your dark teal paint, add smaller, simple stars or asterisks near the larger light blue ones. -
Sprinkle the stardust:
Dip the back end of a brush handle into the dark teal paint and dot it onto the skin to create perfect circles. Scatter these randomly around the outer edges of the design. -
White starbursts:
Use the fine liner brush and white paint to add tiny cross-shaped sparkles (four short strokes meeting in the middle) in the negative spaces between letters. -
Highlight the stars:
Add a tiny dot or dash of white paint to the center or edge of your larger light blue stars to give them a little twinkle. -
Final review:
Step back and check the overall balance. If any areas look empty, add a few extra dots or a small sparkle to fill the space.
Enjoy capturing some beautiful photos of your newly decorated bump


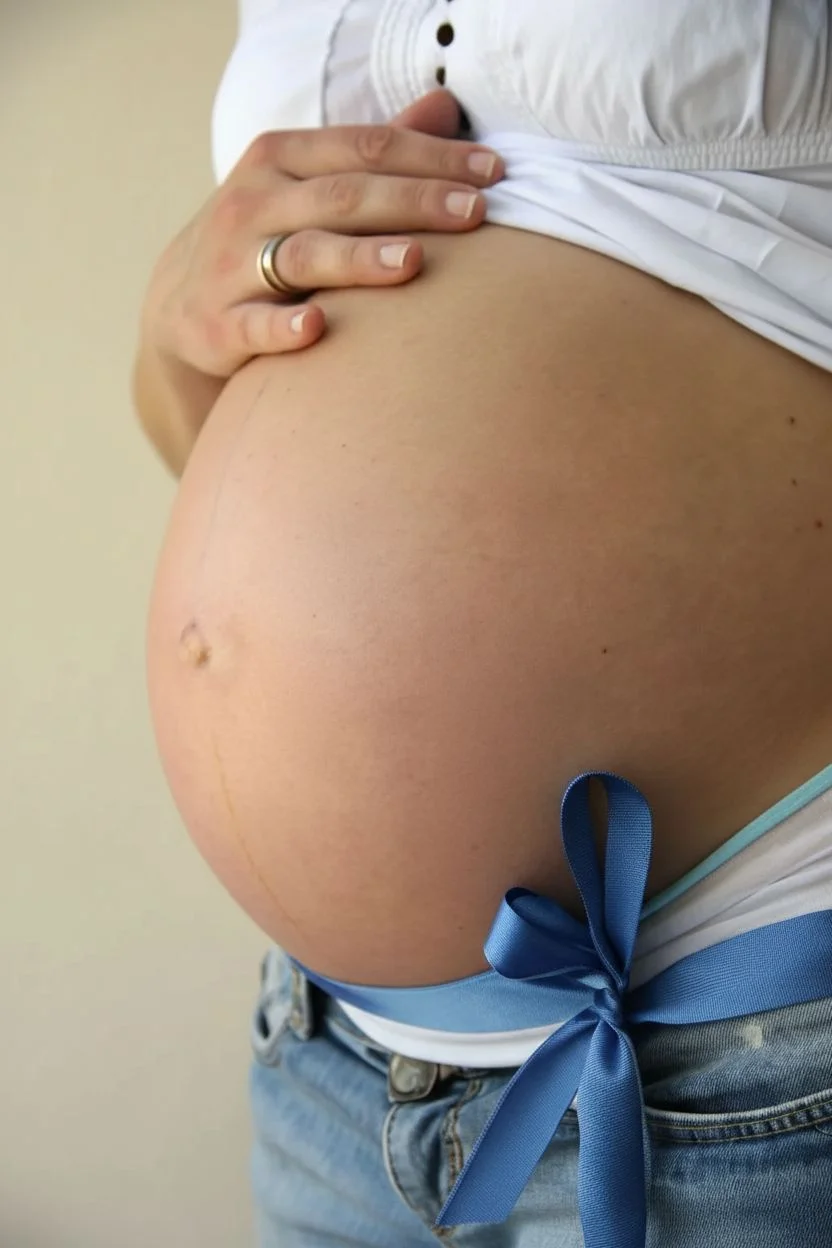
Blue Gift Ribbon Wrap


Transform a belly into the ultimate gift with this realistic blue ribbon wrap design. Using clever shading and highlighting techniques, you’ll create a 3D satin effect that makes the bow look like it’s resting right on the skin.
Step-by-Step Tutorial
Materials
- Water-activated face/body paint (light blue, medium royal blue, dark navy)
- White face/body paint
- Flat brush (3/4 inch or 1 inch)
- Medium round brush (#4 or #6)
- Small detail brush (#1 or #2)
- Cup of water
- Spray bottle (optional)
- Baby wipes or paper towels
Step 1: Laying the Ribbon Foundation
-
Map the center knot:
Start by locating the belly button as your center point. Using your medium round brush and royal blue paint, draw a small, rounded diamond shape directly over the navel area to serve as the knot of the bow. -
Outline the main loops:
From that central knot, sketch two large tear-drop shapes extending upwards and outwards at 45-degree angles. These form the top loops of your bow. -
Add the bottom tails:
Paint two wavy lines dripping down from the knot, creating the tails of the ribbon. Let them curve naturally with the belly’s shape, widening slightly at the bottom ends. -
Draw the wrap-around band:
Imagine a horizontal line cutting through the center. Using the flat brush, paint a continuous blue band extending from the sides of the bow knot toward the hips, wrapping around the curve of the torso. -
Sketch the vertical band:
Create the illusion of the ribbon going underneath the bow by painting a vertical band starting from the top of the belly down to the knot, and then continuing underneath the tails.
Step 2: Creating Texture and Depth
-
Fill the base color:
Load your flat brush with the medium royal blue. Fill in all the outlined ribbon shapes, using smooth, long strokes to mimic the texture of fabric. -
Establish the shadows:
Switch to the dark navy paint on your round brush. Paint along the edges where the ribbon overlaps, specifically under the knot and where the loops gather in the center. -
Deepen the creases:
Add thin lines of navy inside the loops and heavily along the bottom edges of the horizontal band to suggest folding and shadow against the skin. -
Blend the mid-tones:
While the paint is still slightly damp, use a clean, slightly moist brush to soften the transition between the royal blue and the navy shadows, creating a smoother gradient. -
Start the highlights:
Mix a little white with your light blue paint. Apply this lighter shade to the ‘highest’ points of the loops and the center of the ribbon bands where light would naturally hit.
Fixing Smudges
If a line goes rogue, wait for it to fully dry. Then, gently rub it away with a damp Q-tip or wipe edge before repainting the correct line.
Step 3: Refining the Satin Look
-
Paint sheer fabric lines:
Take your smallest detail brush and pure white paint. Draw very thin, scratchy lines along the length of the ribbon texture; this is key for that shiny, semi-transparent organza or satin look. -
Enhance the knot volume:
Add a strong, curved highlight of pure white on the top curve of the center knot to make it pop forward visually. -
Define the edges:
With the dark navy paint again, carefully re-outline the outer borders of the entire bow to clean up any fuzzy edges, making the shape crisp. -
Add cross-hatching:
For extra texture, you can add very faint, cross-hatched lines in white or light blue on the ribbon tails, mimicking the weave of the fabric. -
Final bright spots:
I like to place a few tiny dots or harsh white lines on the curves of the bow’s loops to simulate a glossy reflection.
Metallic Magic
Swap the white highlight paint for a metallic silver or pearl shimmer powder. This creates an incredible luminescent sheen when the light hits the belly.
Step back and admire how this simple design turns a baby bump into a beautifully wrapped present ready for arrival


Peekaboo Baby Boy Inside the Belly
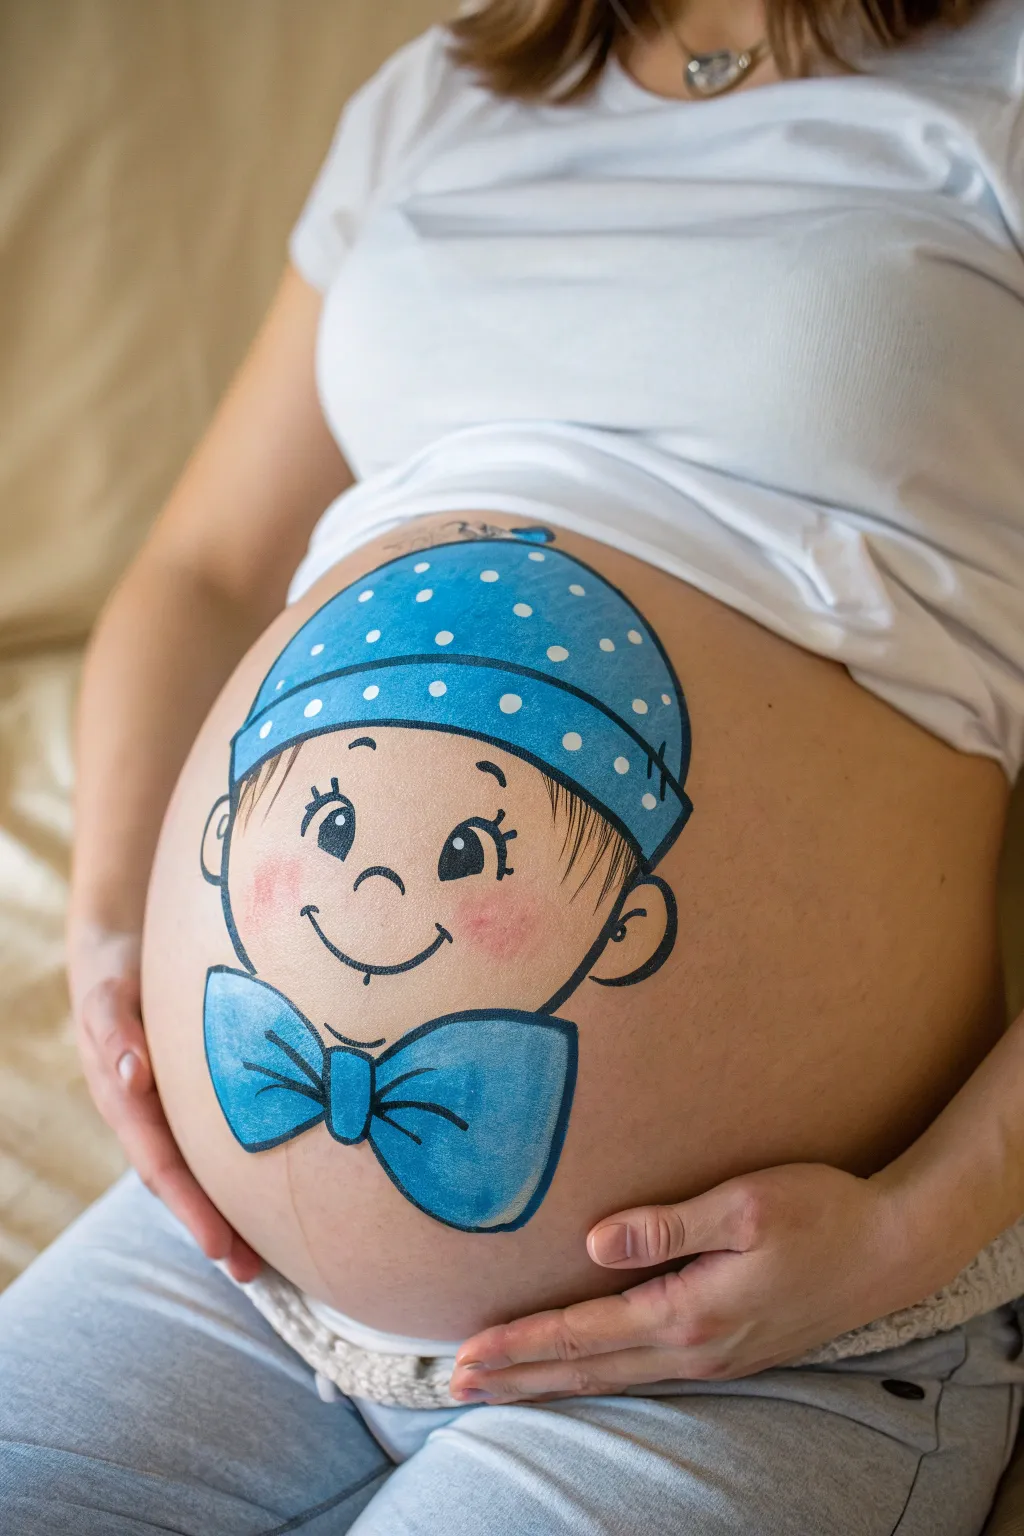
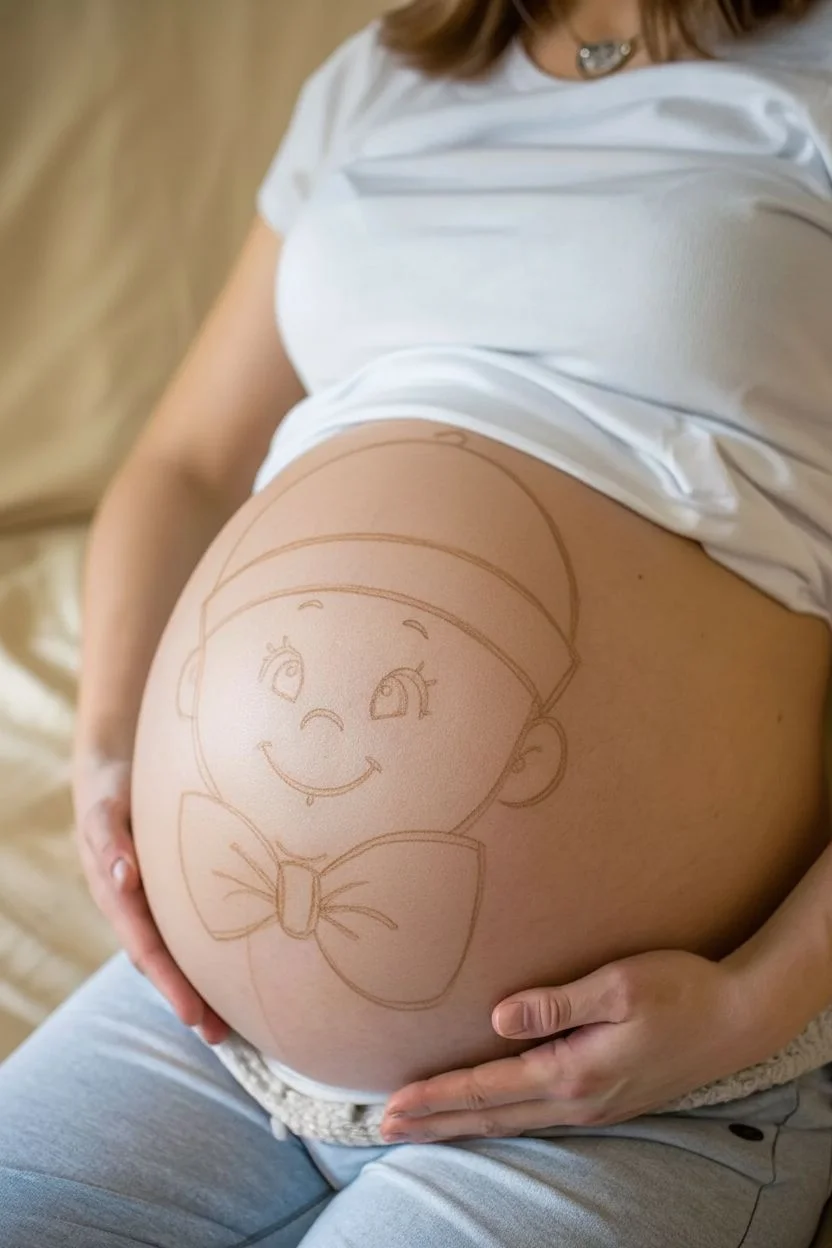
Transform your baby bump into a cheerful character with this adorable belly painting design featuring a boy in a blue dotted cap and matching bow tie. The cartoon-style artwork uses bold outlines and soft shading for a clean, standout look that’s perfect for maternity photos.
Step-by-Step Guide
Materials
- Water-based face/body paint (light blue, dark blue, white, black, light flesh tone, brown, pink)
- Medium round brush
- Fine liner brush
- Flat brush or makeup sponge
- Cotton swabs
- Paper towels
- Small cup of water
- Eyeliner pencil (light brown or white) for sketching
Step 1: Planning and Sketching
-
Clean canvas:
Start with clean, dry skin free of lotions or oils. This ensures the paint adheres properly and lasts longer without smudging. -
Outline the shape:
Using a light brown or white eyeliner pencil, lightly sketch the large circle for the head in the center of the belly. Use the belly button as a central reference point. -
Add features:
Sketch the curved line for the cap brim across the forehead area. Draw the bow tie shape at the bottom of the circle, and mark placement for ears, eyes, and mouth.
Fixing Smudges
If you make a mistake with the black outline, don’t panic. Wait for it to dry completely, then use a damp cotton swab to gently lift the error before repainting.
Step 2: Painting the Base Colors
-
Fill the face:
With a flat brush or damp sponge, fill in the face area (below the cap line) with a light flesh-tone body paint. Apply smoothly to avoid streaks. -
Paint the cap:
Using a medium round brush, fill in the cap area with a vibrant light blue paint. Ensure good coverage, but keep the layer thin enough to dry quickly. -
Fill the bow tie:
Use the same light blue paint to fill in the bow tie shape at the bottom. I find painting from the center outward helps keep the symmetry. -
Let it set:
Allow these base layers to dry for 2-3 minutes. If the paint looks transparent, apply a second thin coat once dry.
Step 3: Adding Details and Shading
-
Create dimension:
Mix a slightly darker shade of blue (or use straight dark blue sparingly). Add shading to the bottom edge of the cap and the creases of the bow tie to give them volume. -
Rosy cheeks:
Lightly load a sponge or brush with pink paint. Dab excess off on a paper towel, then gently stipple pink circles onto the cheeks for a soft blush effect. -
Hair details:
Using a small round brush and brown paint, add hair strands peeking out from under the cap brim. Use flicking motions to make the hair look natural. -
Polka dots:
Dip the handle end of a brush or use a round brush tip with white paint to stamp distinct polka dots all over the blue cap.
Make It 3D
Glue tiny fabric flowers or a real ribbon bow onto the painted bow tie using skin-safe adhesive (like eyelash glue) for a fun, tactile element.
Step 4: Outlining and Finishing
-
Outline the cap:
Load a fine liner brush with black face paint. Carefully outline the entire cap, adding a small curved line on the side for detail. -
Define the face:
Outline the face shape, ears, and ears’ inner details. Keep your hand steady by resting your pinky finger gently on a dry part of the skin. -
Facial features:
Paint the eyebrows, eyes, nose, and smiling mouth with the black liner brush. Add eyelashes for extra cuteness if desired. -
Eye highlights:
Add a tiny dot of white paint inside the black pupils of the eyes. This ‘catchlight’ brings the character to life instantly. -
Bow tie outline:
Outline the bow tie with black. Add crease lines radiating from the center knot to show fabric folds. -
Final check:
Step back and look at the whole design. Touch up any weak lines or missed spots with the appropriate color.
Enjoy showing off your beautifully painted bump and the precious little character smiling back at everyone


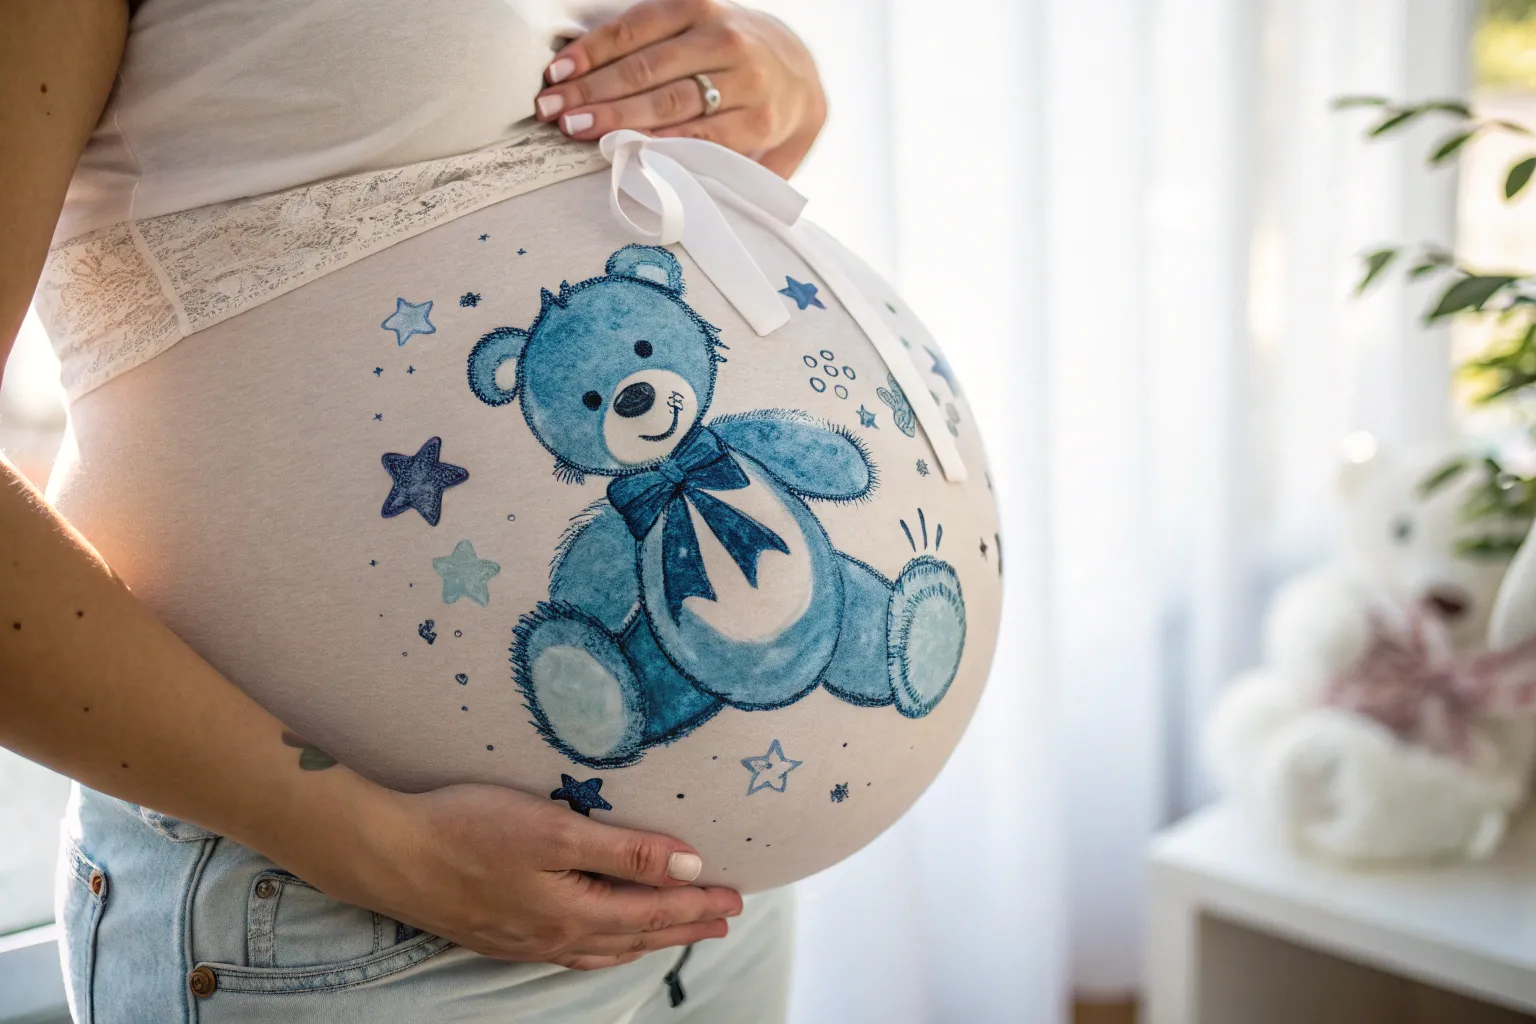
Teddy Bear With a Blue Bow Tie
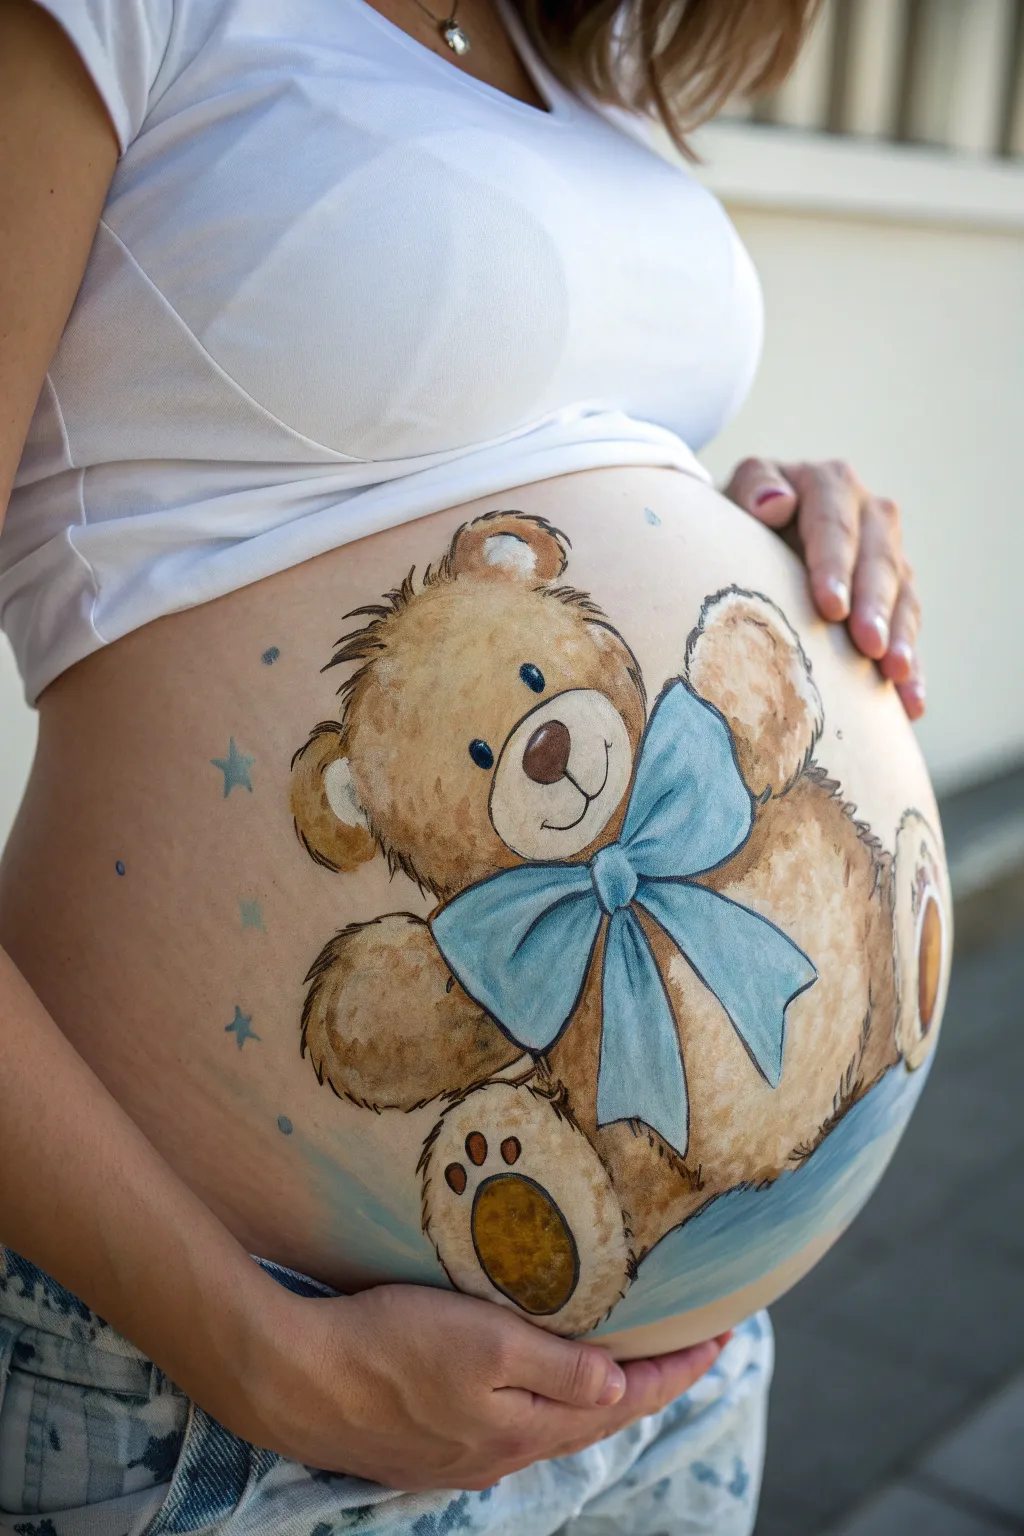
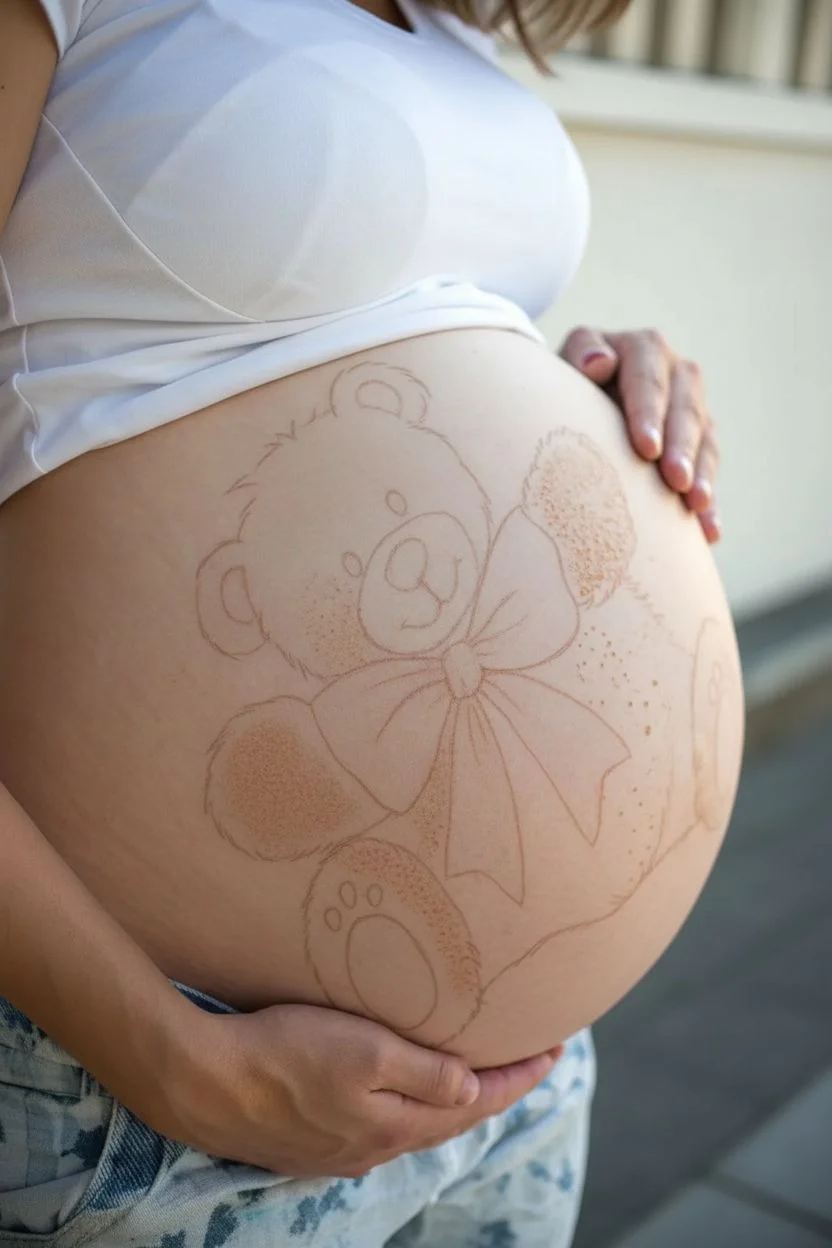
This adorable belly painting features a soft, fuzzy teddy bear sporting a large blue bow, making it a perfect choice for celebrating a baby boy. The gentle shading creates a 3D effect that makes the bear look like it’s giving the bump a warm hug.
Detailed Instructions
Materials
- Face and body paints (water-activated): light brown, medium brown, dark brown, white, black, light blue, medium blue
- High-density sponge
- Flat brush (medium size)
- Round brushes (sizes 2 and 4)
- Detail liner brush (size 1 or 0)
- Small spray bottle with water
- Baby wipes or damp cloth for corrections
- Paper towels
Step 1: Base Sketch & Blocking
-
Outline the bear’s shape:
Start by dipping a thin round brush into diluted medium brown paint. Lightly sketch the outline of the bear directly onto the skin. Draw an oval for the head, a rounded body below it, and circular shapes for the ears and paws. Don’t press too hard; you want these lines to be faint guides. -
Map out the bow:
Sketch a large bow tie shape right under the bear’s chin area. The center knot should be roughly in the middle of the chest, with large loops extending outward to the bear’s shoulders. -
Block in the main fur color:
Using a damp high-density sponge loaded with light brown paint, gently dab color inside your bear outline. Leave the muzzle area (the snout) and the inner ears unpainted for now. This stippling motion with the sponge helps create a fuzzy texture right from the start.
Step 2: Adding Dimension & Details
-
Paint the muzzle and inner ears:
Switch to a clean flat brush and pick up some white paint mixed with a tiny drop of light brown to create a creamy off-white. Fill in the snout area (an oval shape on the lower face) and the insides of the ears. -
Fill the paws:
Use this same creamy off-white color to paint the bottoms of the bear’s feet pads. -
Create shadows:
Take a medium round brush with medium brown paint. Gently paint along the edges of the bear’s body, under the chin, and where the limbs meet the body. I like to feather these strokes inward to keep the ‘furry’ look rather than a hard line. -
Deepen the fur texture:
Load a round brush with dark brown paint. Create short, flicking strokes around the outer edges of the bear to simulate tufts of fur. Add similar small strokes inside the body area to suggest hair texture. -
Paint the bow tie:
Clean your brush thoroughly. Load a medium brush with light blue paint and fill in the bow shape you sketched earlier. Ensure the coverage is solid and opaque. -
Shade the bow:
While the light blue is drying, pick up a slightly darker medium blue on the tip of your brush. Add shadows to the center knot and the folds of the bow loops to give it a 3D fabric appearance.
Pro Tip: Fur Texture
Use a ‘dry brush’ technique for the fur details. Wipe most paint off your brush before adding texturing strokes; this creates a scratchy, realistic hair effect.
Step 3: Final Touches & Accents
-
Outline the bear:
Using your fine detail liner brush and black paint (thinned to an ink-like consistency), carefully trace the outer edge of the bear. Use broken, jagged lines rather than a smooth continuous stroke to mock the texture of fur. -
Define the face:
Paint a round nose in dark brown or black on the top of the muzzle. Paint two small vertical ovals for eyes in black, adding a tiny white dot in each for a sparkle. Draw a simple curved mouth below the nose. -
Outline the bow:
Use the fine liner brush and black paint to outline the bow. Add crease lines coming from the center knot to emphasize the fabric folds. -
Add paw details:
Paint the pad details on the feet. Use dark brown to create the large main pad and three or four smaller toe pads above it. -
Highlighting:
With a clean small brush and white paint, add subtle highlights to the top of the bear’s head, the tips of the ears, and the highest points of the bow loops to make them pop. -
Paint decorative stars:
Around the bear, paint a few simple five-pointed stars using light blue or silver paint. These add a whimsical, dreamy touch to the composition. -
Add ground shading:
To keep the bear from floating, use a watered-down blue or grey paint to wash a soft shadow underneath the bear’s bottom.
Troubleshooting: Smudges
If you smudge a line, don’t wipe it immediately. Wait for it to dry completely, then gently flake it off or paint over it with the background color.
Now you have a sweet keepsake photo opportunity to remember this special time
BRUSH GUIDE
The Right Brush for Every Stroke
From clean lines to bold texture — master brush choice, stroke control, and essential techniques.
Explore the Full Guide
Tiny Baby Boy Feet “Kicking” Illusion
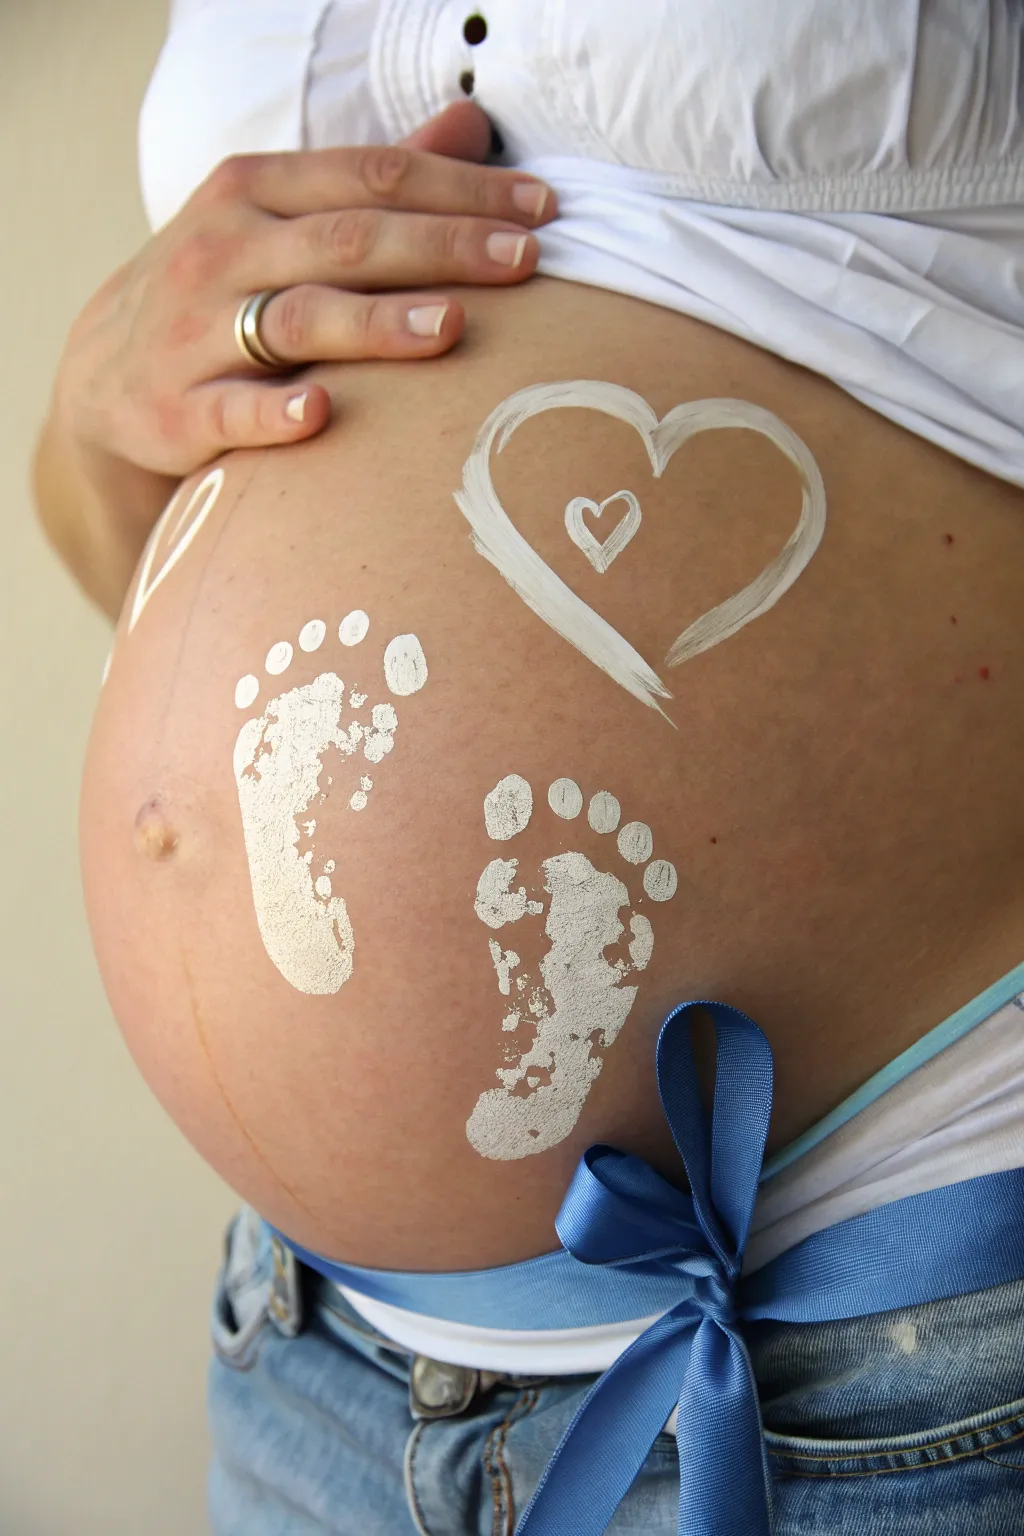
Capture the sweetness of anticipation with this simple yet impactful white body paint design appearing as a soft ‘print’ on the skin. Featuring adorable baby footprints and loving hearts, this look is tied together with a classic blue satin ribbon.
Step-by-Step Tutorial
Materials
- White body paint (water-activated or cream-based makeup suitable for skin)
- Medium round paintbrush
- Small detail paintbrush
- Wide satin ribbon (royal blue or baby blue)
- Clean water cup
- Paper towels
- Mirror (optional, if self-painting)
- Baby wipes (for quick corrections)
Step 1: Preparation & Mapping
-
Clean the canvas:
Start with clean, dry skin free of lotions or oils. Use a gentle wipe to ensure the belly area is prepared, which helps the body paint adhere smoothly without acting hydrophobic. -
Position the ribbon:
Before painting, take your length of blue satin ribbon and tie it snugly but comfortably below the belly curve. Tie a simple bow off to the side (your left or right) and let the ends drape down over the jeans. This establishes your bottom border so you don’t paint too low.
Smudge Control
If paint is cracking, you used too little water. If it’s dripping, you used too much. Aim for a consistency that coats the brush without dripping.
Step 2: Painting the Hearts
-
Load your brush:
Dip your medium round brush into water and swirl it into your white body paint until you have a creamy consistency similar to melted ice cream. It should not be runny. -
Outline the main heart:
Locate a spot on the upper quadrant of the belly, slightly off-center. Paint the left curve of a large heart using a single, confident stroke that tapers at the bottom. -
Complete the heart shape:
Paint the right curve to meet the first stroke at the bottom point. Don’t worry if the lines look a bit painterly or textured; that adds to the charm. -
Add the inner heart:
Switch to a slightly smaller brush or use the very tip of your round brush. Paint a tiny, solid white heart directly floating in the center of the larger heart outline. -
Paint the secondary heart:
On the opposite side of the belly, near the ribs, paint just the outline of the left side of a heart, letting it fade off as if wrapping around the curve.
Step 3: Creating the Footerprints
-
Map the foot positions:
Visualize where the feet should go—usually lower on the belly, angled slightly outward as if the baby is resting vertically. The left foot should be slightly higher than the right for a natural look. -
Paint the left sole:
Using the medium brush, paint a kidney-bean shape for the main part of the foot. To make it look like a stamp or print, dab the brush gently to create texture rather than a solid block of color. -
Leave a gap:
This is crucial for realism: leave a small negative space (unpainted skin) where the arch of the foot would naturally lift off the ground. Paint the heel as a separate oval shape below this gap. -
Connect the sole:
Lightly connect the outer edge of the heel to the upper foot pad with a thin line of paint, maintaining the unpainted arch area on the inner side. -
Add the toes:
Dip your brush again. Paint five small dots or oval shapes above the main foot pad, graduating in size from the big toe (inner side) to the pinky toe. -
Repeat for the right foot:
Move to the lower right side. Paint the second kidney-bean shape and heel, ensuring this foot is angled similarly but mirrored. I find it helps to step back for a second to check symmetry. -
Paint the right toes:
Add the five toes to the right foot, again keeping the big toe on the inside and the smallest on the outside. -
Distress the print:
Take a slightly dry brush or a clean finger and lightly dab at the wet paint on the soles. This removes a little pigment and creates that textured, stamped effect seen in the photo.
Add Some Sparkle
While the paint is still slightly tacky, gently blow some iridescent cosmetic glitter onto the hearts for a magical, shimmering finish.
Step 4: Finishing Touches
-
Check the ribbon:
Readjust the blue ribbon if it shifted during painting. Ensure the bow is fluffy and the ends are lying flat. -
Clean up edges:
If any paint dripped or lines became too thick, wrap a baby wipe around your finger or a Q-tip to clean up the edges for a sharper silhouette. -
Set the paint:
Allow the paint to air dry for about 5 minutes before pulling a shirt over it, although ideally, this is done right before a photo shoot.
Now you have a precious memory of your little one’s first kicks preserved in art
Sports Ball “Future MVP” Belly Art
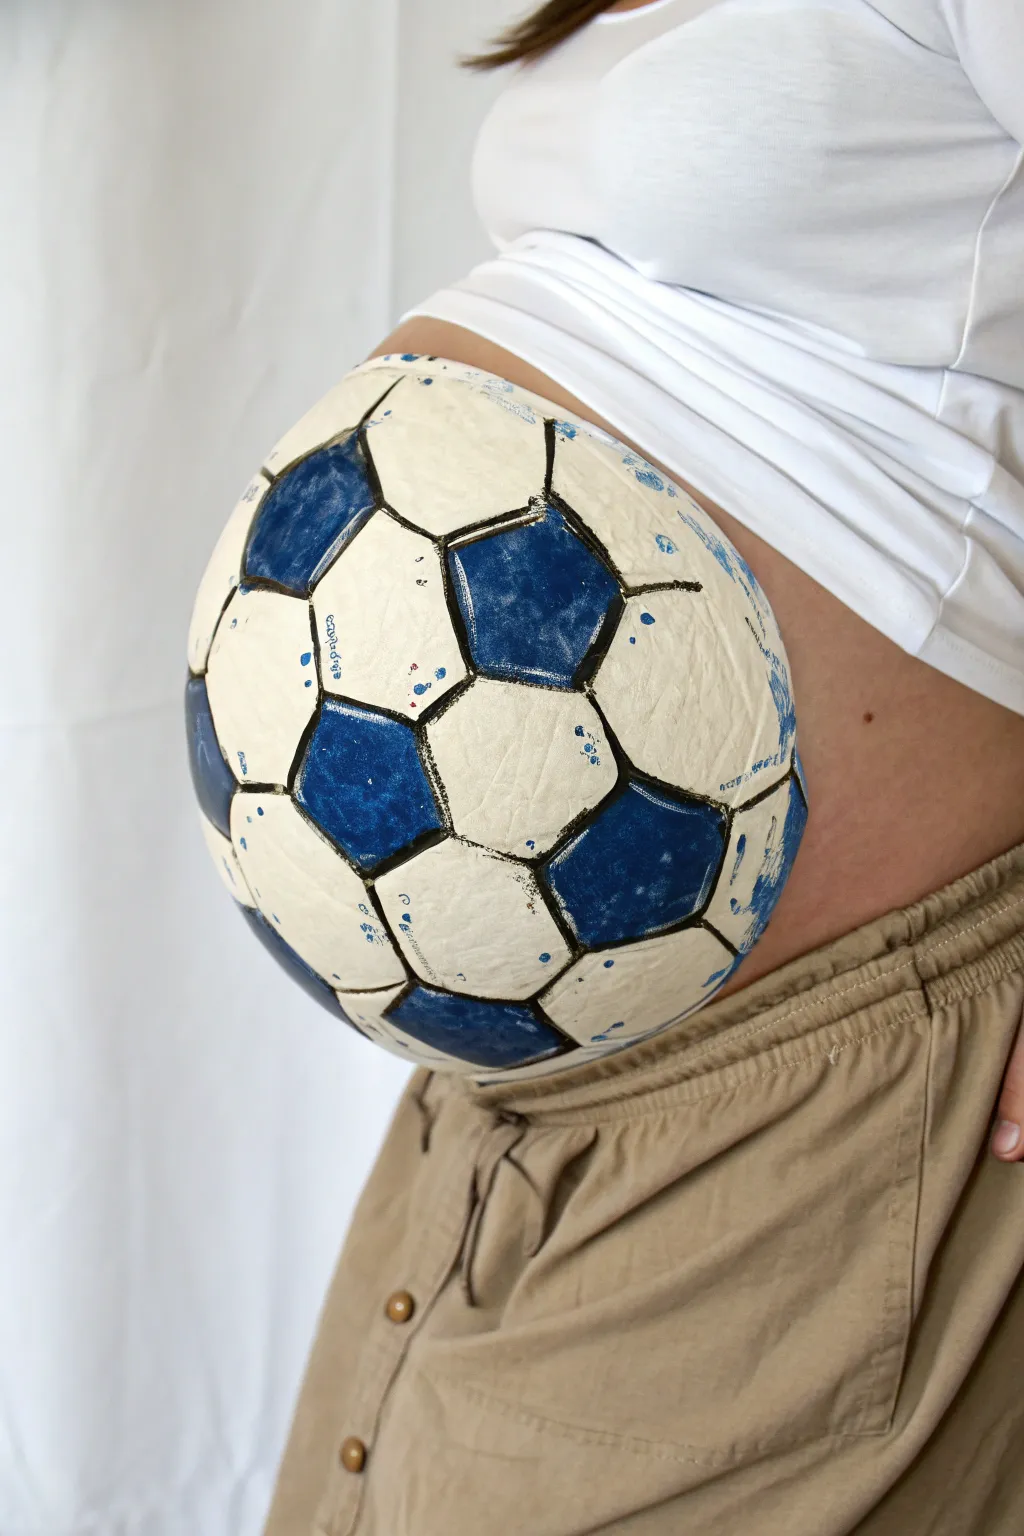
Transform a Baby Bump into a stunning, realistic soccer ball with this clever body painting project. The spherical shape of the belly is perfectly utilized to create a 3D effect, making it a fan favorite for sports-loving families.
Detailed Instructions
Materials
- White body paint (water-based or cream)
- Blue body paint (royal or navy shade)
- Black body paint or eyeliner pencil
- Large flat brush or sponge
- Medium round brush
- Fine detail brush
- Cup of water
- Paper towels or baby wipes
- Reference image of a soccer ball pattern
Step 1: Setting the Base
-
Prep the canvas:
Ensure the skin is clean, dry, and free of oils or lotions to help the paint adhere properly. Have the mother-to-be sit comfortably, perhaps with a pillow behind her back, as she’ll need to remain relatively still. -
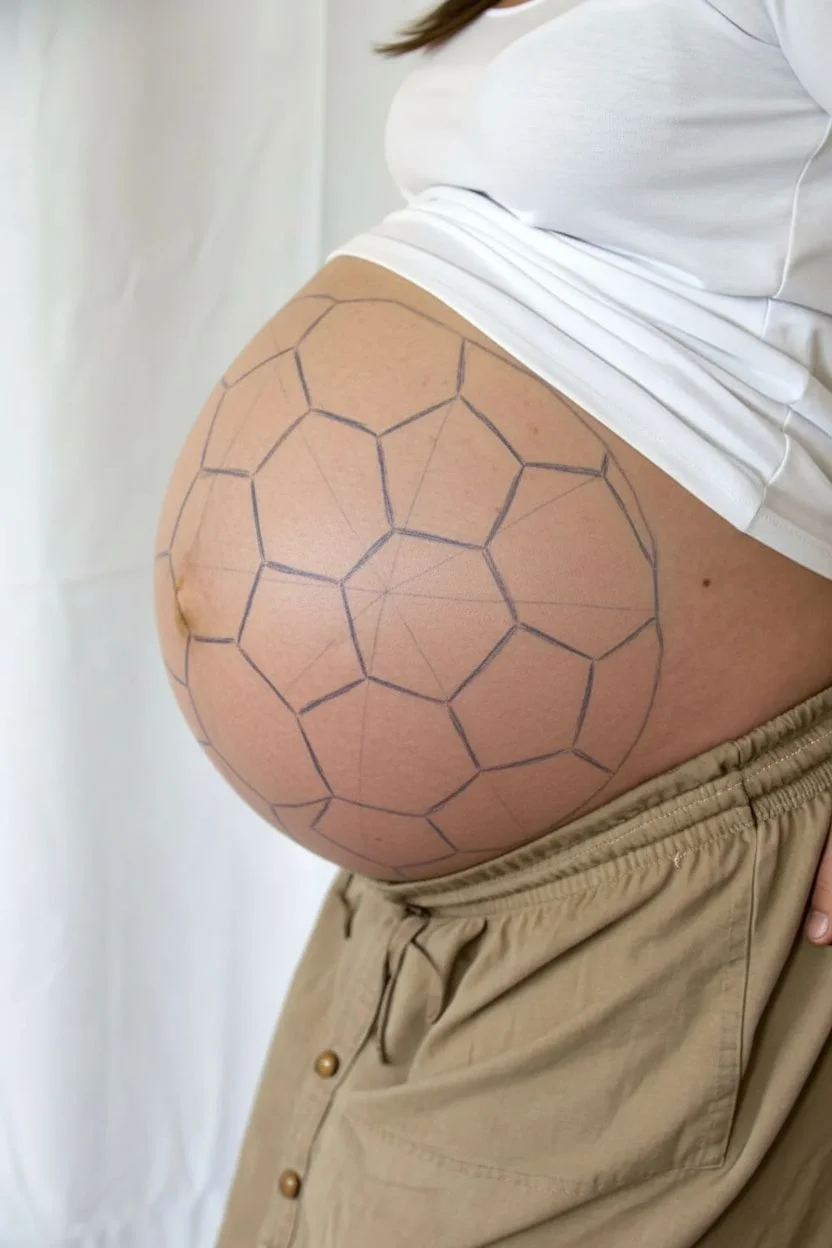
Draft the central pentagon:
Using a fine brush with very diluted blue paint or a light eyeliner pencil, sketch a pentagon (a five-sided shape) right in the center of the belly, around the navel area. -
Map out the pattern:
From each point of your center pentagon, draw a straight line extending outwards. Connect these lines to form hexagons (six-sided shapes) surrounding the central shape. Continue this pattern—surrounding each pentagon with hexagons—until the entire visible curve of the belly is mapped out. -
Check the geometry:
Step back to look at the symmetry. The shapes near the edges of the belly should look slightly stretched or curved to enhance the 3D spherical illusion. Adjust your lines now before applying heavy paint.
Pro Tip: Texture Trick
Use a stipple sponge instead of a regular smoothing sponge when applying the white paint. This leaves tiny pores that perfectly mimic the texture of synthetic leather.
Step 2: Filling with Color
-
Fill the white sections:
Using a sponge or large flat brush, fill in the hexagonal shapes with white body paint. I find that pouncing the sponge creates a nice texture that mimics leather better than long brush strokes. -
Apply the second coat:
Let the white layer dry for a minute or two. Apply a second coat of white if the skin tone is still showing through, ensuring opaque coverage. -
Paint the blue panels:
Switch to your medium round brush and the blue paint. Carefully fill in the pentagonal shapes (the five-sided ones). Start from the center and paint outward toward the lines to keep edges crisp. -
Initial clean-up:
If you accidentally went over the lines, use a damp Q-tip or the corner of a baby wipe to clean up the edges before the paint sets fully.
Level Up: Jersey Match
Paint a small ‘brand logo’ or specific team crest on one of the white panels to match the favorite team of the parents-to-be.
Step 3: Adding Definition and Texture
-
Outline the panels:
Load a fine linear brush with black body paint. Trace over your initial sketch lines to create bold, dark borders between the white and blue sections. Vary the line thickness slightly to make it look organic. -
Create seam details:
To mimic the stitching of a real ball, add tiny, short perpendicular hash marks across the black dividing lines, or create a ‘stitched’ look by painting small ‘v’ shapes along the seams. -
Add texture splatters:
As seen in the reference photo, add some artistic flair. Dip an old toothbrush or stiff brush into diluted blue paint and flick it gently near the edges of the design for a dynamic, paint-splatter effect. -
Enhance with highlights:
Add a few small, bright white strokes inside the blue panels to simulate light reflecting off a shiny surface. This high-contrast trick makes the ball look rounder. -
Add subtle shading:
Using a very diluted black or grey paint, add a thin shadow line just inside the white panels, specifically along the bottom edges of the shapes. This creates depth and makes the panels look padded.
Step 4: Final Touches
-
Dry and set:
Allow the paint to dry completely. If you have setting spray suitable for skin, a light mist can help the design last longer without smudging. -
Clean the periphery:
Use a wipe to clean any stray paint marks on the surrounding skin or clothing line to ensure the ball shape looks distinct and circular against the natural skin.
Once dry, snap some profile photos to really capture the fun, rounded dimension of your new masterpiece

PENCIL GUIDE
Understanding Pencil Grades from H to B
From first sketch to finished drawing — learn pencil grades, line control, and shading techniques.
Explore the Full Guide
Ocean Whale in Blue Watercolor Style
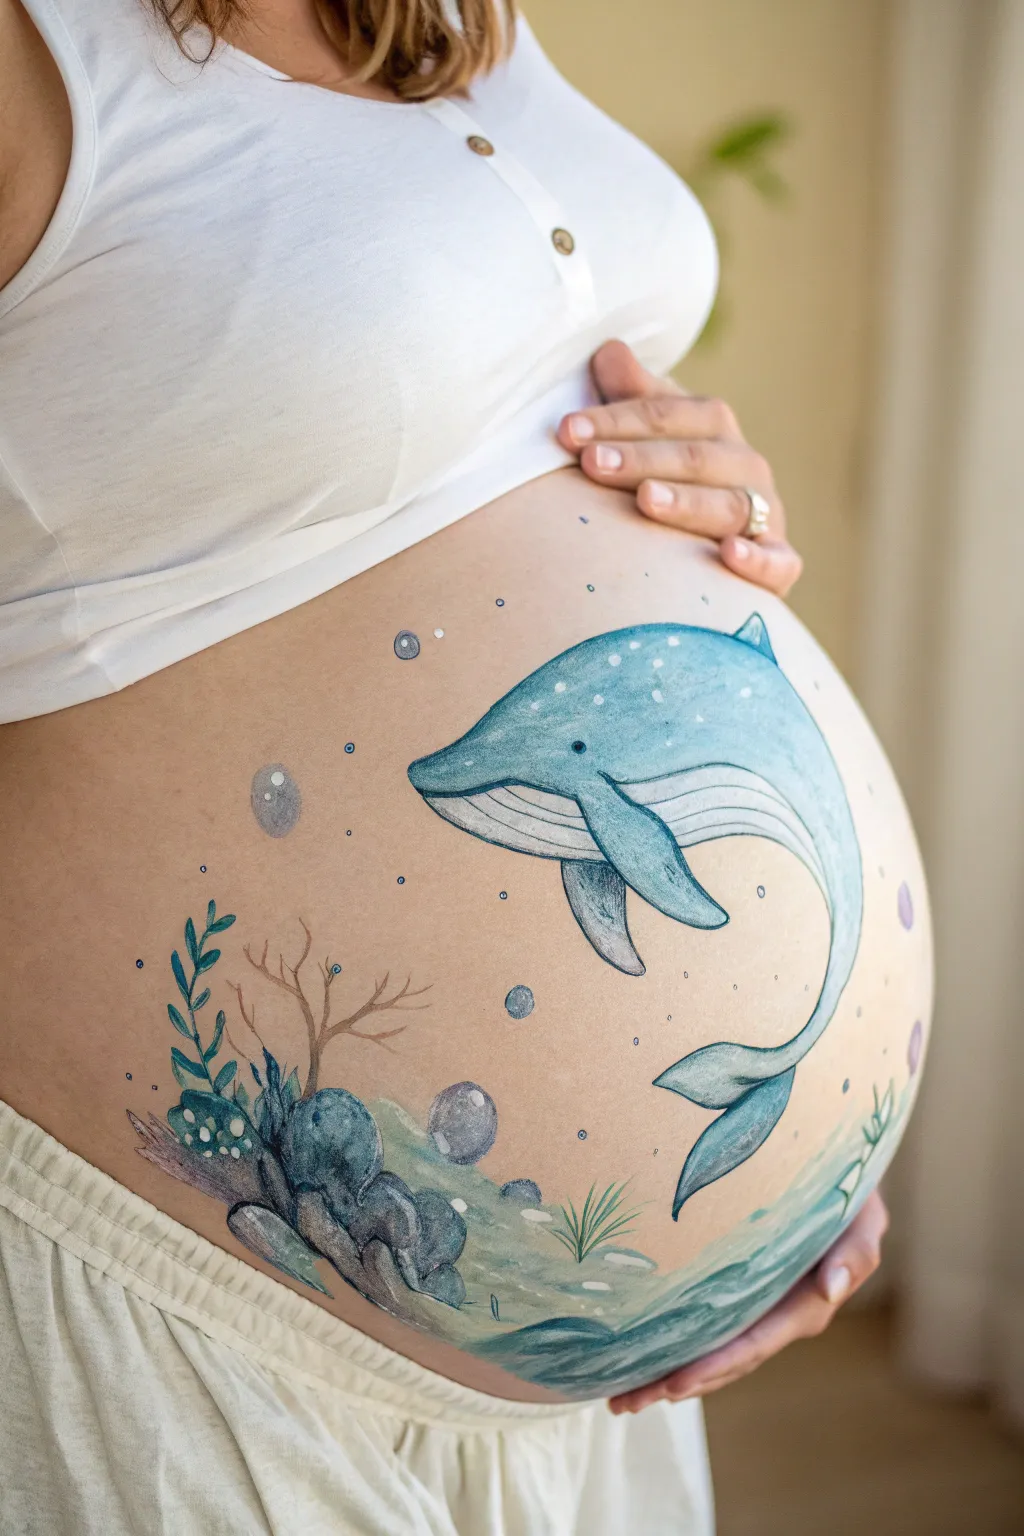
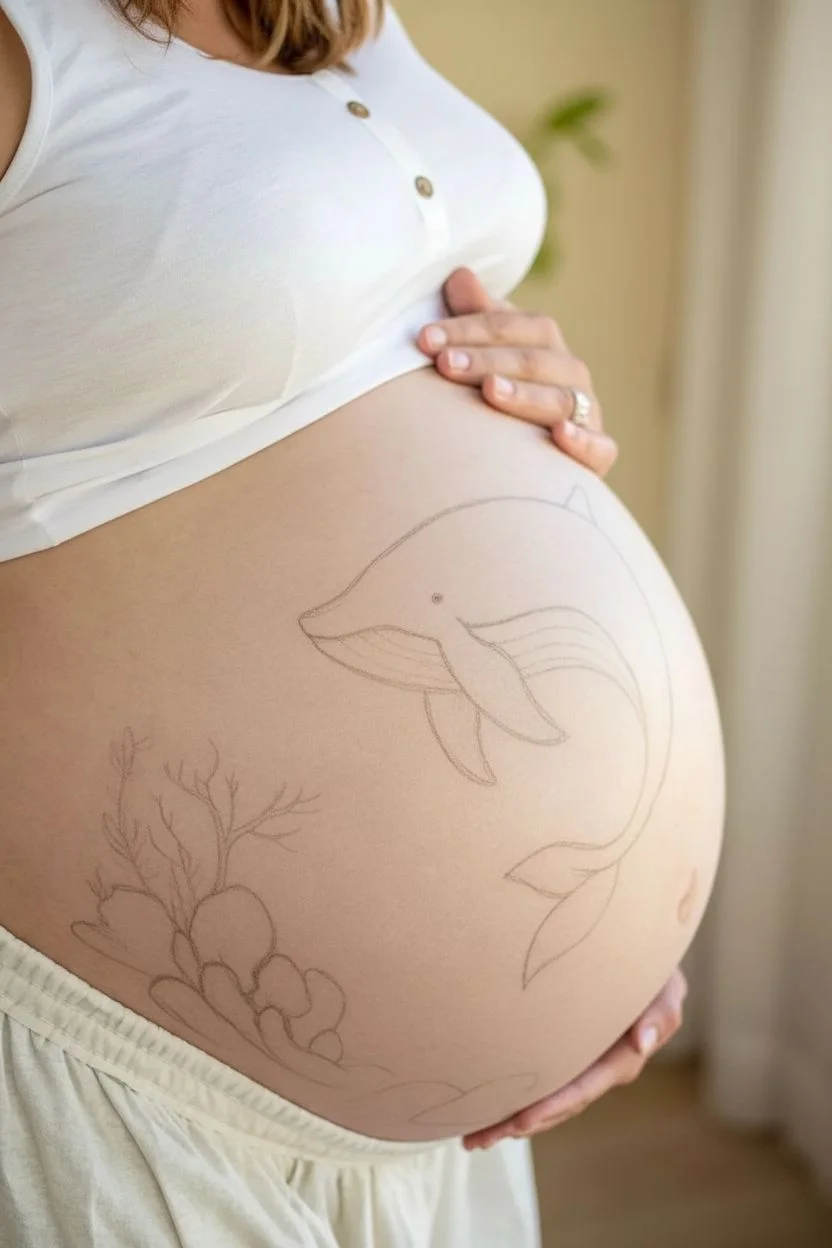
Transform your baby bump into a serene ocean scene with this whimsical whale design. Using soft blue tones and watercolor-style blending, this body art captures the calming movement of the sea, perfect for celebrating a baby boy on the way.
Step-by-Step Tutorial
Materials
- Water-activated face/body paints (teal, navy blue, light blue, white, grey, beige)
- Small spray bottle with water
- Round brushes (sizes 2, 4, and 6)
- Flat brush (size 1/2 inch)
- Makeup sponges or high-density sponges
- Soft eyeliner pencil (grey or light brown) for sketching
- Cup of clean water
- Paper towels
- Baby wipes (for quick corrections)
- Setting spray (optional)
Step 1: Sketching the Layout
-
Clean and prep:
Begin with clean, dry skin free of lotions or oils to ensure the paint adheres smoothly. If the skin feels tight, a very light layer of water-based moisturizer allowed to act for 10 minutes beforehand works well. -
Outline the whale body:
Using a soft grey or light brown eyeliner pencil, lightly sketch the main curve of the whale’s body in the center-right area of the bump. Start with the rounded head and swoop down towards the tail. -
Add fins and tail:
Sketch the large pectoral fin extending downward from the body, the dorsal fin on top, and the fluke (tail fin) curling upwards near the bottom right. -
Mark the seabed:
Lightly trace the placement of the rocks and sea plants on the lower left side, creating a diagonal flow that opposes the whale’s movement.
Watercolor Technique
To get that translucent look, dilute your body paint more than usual. Test the opacity on your hand first; it should be like tinted water, not thick cream.
Step 2: Painting the Ocean Elements
-
Base coat for the whale:
Load a medium round brush with a mix of light blue and teal. Fill in the top half of the whale’s body, keeping the paint fairly watered down to mimic a watercolor texture. -
Create the underbelly:
Switch to a very pale grey or watered-down white for the whale’s throat grooves and belly area. Blend the edge where the blue meets the white while the paint is still slightly damp for a soft transition. -
Paint the seabed foundation:
Use a sponge dabbed in muted greens and teal to gently stipple the area at the bottom left where the rocks will sit. This creates a soft, sandy ocean floor effect. -
Block in the rocks:
Using a flat brush and dark grey mixed with a touch of blue, paint the basic shapes of the rocks in the bottom left corner. -
Add foliage:
With a thin round brush (size 2), paint the seaweed fronds growing out from the rocks using a deep teal or sea green. Use quick, upward strokes to make them look flowy.
Step 3: Detailing and Depth
-
Define the whale’s features:
Using a fine liner brush and navy blue, carefully outline the whale, but keep the line weight distinct—thicker in shadow areas and thinner on top. -
Add throat grooves:
Paint thin, curved lines along the white underbelly using a diluted grey to create the distinctive texture of a humpback or blue whale. -
Texture the skin:
I like to take a slightly dry sponge or an old brush with white paint and lightly dab the top of the whale’s back to create speckles and skin texture. -
Enhance the rocks:
Add shadows to the crevices of the rocks with black or deep navy, and highlights on the tops with white to give them dimension. -
Paint the coral branch:
Using a light brown or beige paint, add the delicate branching coral structure rising from behind the rocks.
Add Some Shimmer
Wait for the paint to dry, then pat a translucent iridescent loose cosmetic glitter over the whale’s back to mimic wet skin catching the sunlight.
Step 4: Atmosphere and Bubbles
-
Create large bubbles:
Paint several circles of varying sizes around the whale and rocks. Fill them lightly with a watery white or very pale blue, leaving the centers mostly transparent. -
Add bubble highlights:
Place a crisp white dot and a curved reflection line on the upper left side of each bubble to make them look spherical and shiny. -
Scatter small bubbles:
Use the tip of a small brush or a dotting tool to add tiny blue and white dots drifting upward, simulating fizz or distant bubbles. -
Add subtle water movement:
Paint very faint, sweeping curved lines in the background using extremely diluted blue paint to suggest currents without overpowering the main subjects. -
Final highlights:
Add a tiny white gleam to the whale’s eye (which should be a small black dot) to bring the creature to life. -
Set the design:
Once everything is completely dry, you can lightly mist with a setting spray if you need the design to last for a photoshoot.
This beautiful artwork creates a loving memory of your pregnancy journey.
Blue Balloon Bouquet Announcement
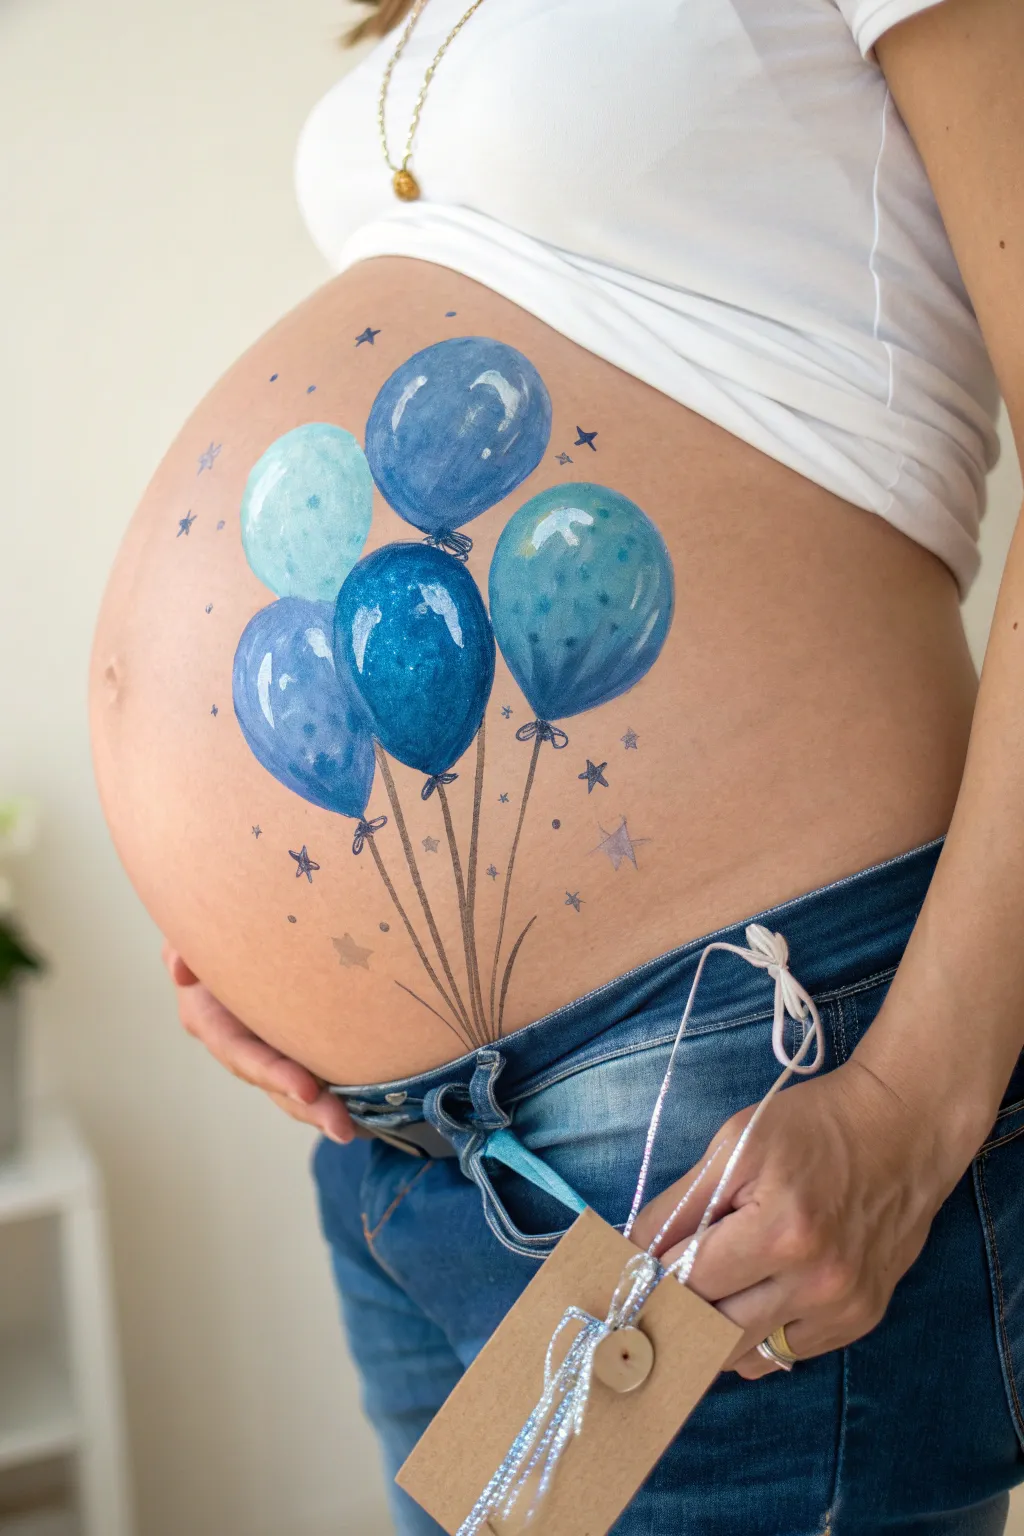
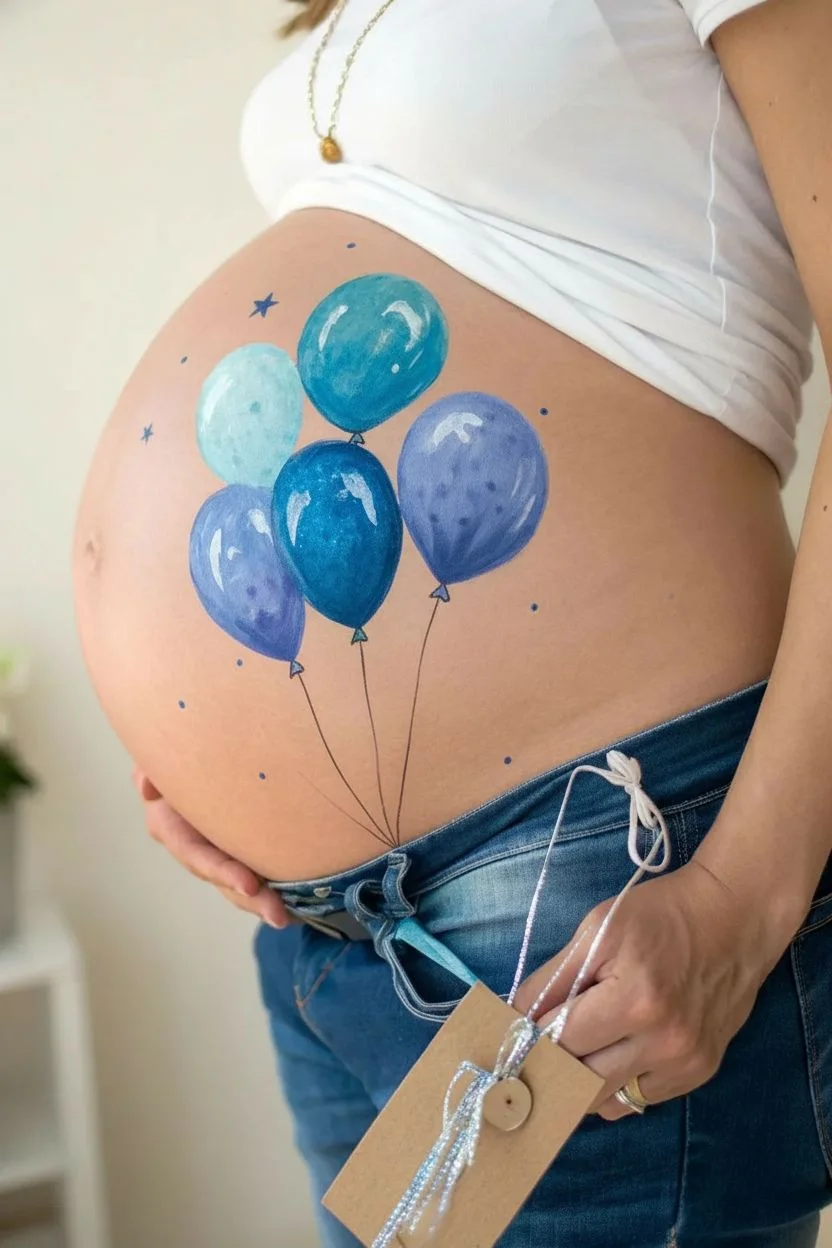
Celebrate the impending arrival of a baby boy with this charming and dreamy belly painting design. Featuring a translucent cluster of balloons in varied blue hues and accented by delicate stars, this artwork perfectly captures the lightness and joy of a new beginning.
Step-by-Step Guide
Materials
- Face and body paints (water-activated) in: dark blue, royal blue, sky blue, white, and black
- Round brushes (sizes 2, 4, and 6)
- Small filbert brush (optional, for blending)
- Fine detail liner brush (size 0 or 1)
- Cup of water
- Spray bottle with water (for wetting paints)
- Paper towels or sponge (for clean up)
- Biodegradable glitter (optional)
Step 1: Painting the Balloons
-
Map the layout:
Visualize the placement first. You want a cluster of about five distinct balloons situated slightly off-center on the belly. Using a very diluted light blue paint and a number 4 round brush, faintly outline five overlapping oval shapes to guide your composition. -
Fill the base coat:
Start with the top-most balloon. Mix a medium sky blue and fill in the shape using the size 6 round brush. Don’t worry about perfect opacity; a slightly watery application helps mimic the semi-transparent look of latex balloons. -
Add varied blue tones:
Move to the adjacent balloons. Paint the one to the right in a slightly darker, muted teal-blue. For the left balloon, mix a very pale pastel blue. Using different shades for each balloon creates depth and visual interest. -
Paint the bottom balloons:
Fill in the bottom two balloons. Make the central-bottom balloon a vibrant royal blue to anchor the design, and the left-bottom balloon a medium periwinkle shade. Ensure the edges are crisp and round. -
Create shadows:
Once the base layers are dry to the touch, take a slightly darker shade of each balloon’s base color. Using a damp size 4 brush, sweep this shadow color along the bottom and right edges of each oval to create a 3D spherical effect. -
Blend the shadows:
While the shadow paint is still slightly wet, use a clean, damp brush to soften the inner edge of the shadow, fading it toward the center of the balloon so it doesn’t look like a harsh line. -
Add highlights:
Load a number 2 brush with opaque white paint. Add the primary reflection mark—a curved comma shape or soft oval—on the upper left side of each balloon (opposite your shadow). This indicates the light source and really makes them pop. -
Detail with secondary highlights:
Add smaller, subtler white reflections on the right side within the shadowed area to simulate the glossy latex surface reflecting ambient light. Keep these markings faint. -
Add texture:
To mimic the speckled texture seen on the rightmost balloon, tap the tip of a dry brush lightly into darker blue paint and stipple it over the dry base coat before adding the final highlights.
Highlight Pro-Tip
For the most realistic shine, don’t use pure water for highlights. Mix white paint with a tiny drop of mixing liquid to keep it opaque over the blue base.
Step 2: Strings and Details
-
Paint the knots:
Using a thin liner brush and dark grey or black paint, carefully draw a small, tied knot at the very bottom center of each balloon oval. Keep these tiny and precise. -
Draw the strings:
Load your liner brush with a watery consistency of dark brown or black paint. With a steady hand, pull long, thin lines cascading down from each knot toward the bottom of the belly. I find it help to exhale slowly while pulling these long lines to keep them steady. -
Converge the strings:
Guide all the string lines so they meet and overlap near the pubic bone area, looking as though they are being held or tied together in a bunch. -
Add distinct stars:
Using the dark royal blue paint and a small round brush, paint five-pointed stars scattered around the balloons. Vary their sizes, placing some near the balloons and others further out. -
Create background twinkle:
Mix a soft lavender or greyish-blue. Paint fainter, looser star shapes and tiny cross-hatched sparkles interacting with the darker stars to create atmospheric depth. -
Add minuscule dots:
Dip the very tip of your smallest brush or the back end of a brush handle into dark blue paint. Dot tiny specks around the balloon cluster to act as distant confetti or stardust. -
Final highlights:
Add a tiny white dot to the center or tip of the prominent dark stars to make them twinkle. If desired, you can press a small amount of cosmetic glitter onto the wettest parts of the balloons for extra shimmer.
Quick Fix: Smudges
If you smudge a line, don’t wipe it! Wait for it to dry completely, then use a damp Q-tip to gently lift the mistake without ruining the base layer.
Step back and admire how this sweet bouquet brings a colorful celebration to the baby bump


Zipper Reveal With Baby Boy Surprise
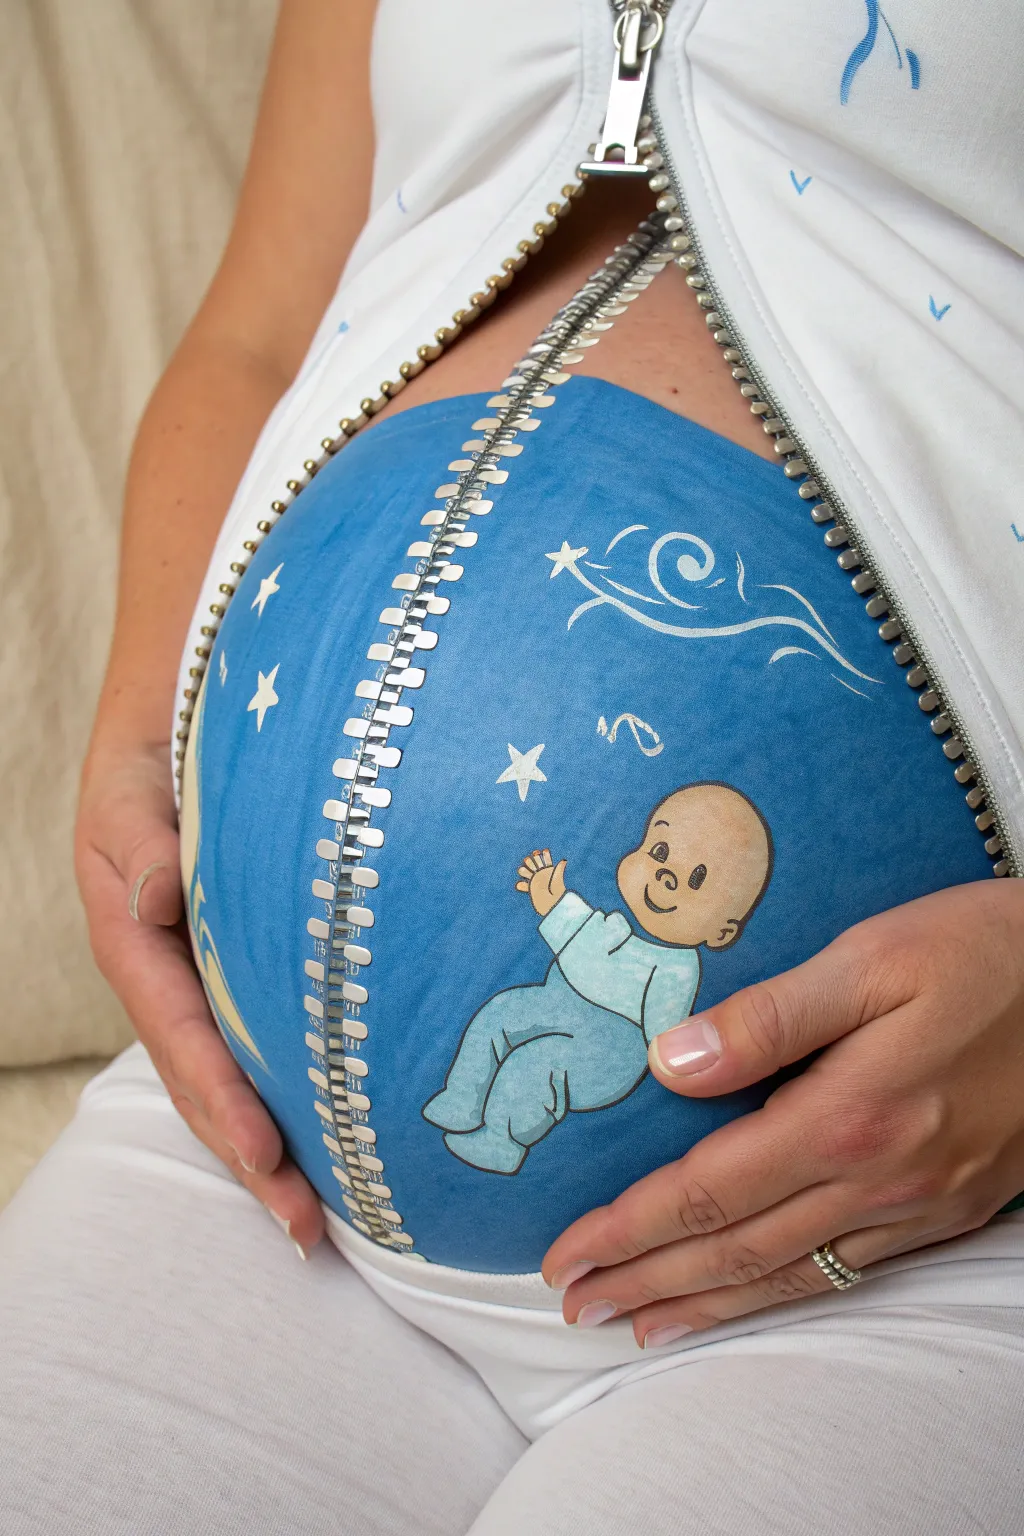

This playful belly painting creates the whimsical illusion of a zipper opening up to reveal a starry blue sky and a cute baby boy waiting inside. It’s a fantastic, slightly surreal design that makes for memorable maternity photos.
Step-by-Step
Materials
- Face and body paints (water-based) in light blue, dark blue, white, metallic silver, and skin tones
- High-density makeup sponges
- Flat brushes (medium size)
- Fine liner brushes (for detailing)
- Spray bottle with water
- Baby wipes (for quick corrections)
- Setting spray (optional)
Step 1: Creating the Sky Base
-
Outline the Opening:
Begin by using a thin brush and a very faint wash of light blue paint to sketch a large, teardrop-like shape on the belly. This will serve as the opening for our zipper visual. -
Fill the Background:
Load a sponge with a mix of medium and light blue paint. Gently stipple the paint inside your outlined shape to create a textured, sky-like background. I find that dabbing rather than stroking gives a nicer, clouded finish. -
Add Depth:
While the base is still slightly damp, take a clean sponge with a touch of darker blue. Dab it around the very edges of the blue shape to create a shadow effect, making the ‘interior’ look deeper.
Sponge Tactics
Cut your round makeup sponges in half. The sharp cut edge is perfect for creating clean lines when stamping the zipper teeth shapes, saving you time outlining.
Step 2: Painting the Zipper
-
Draw the Zipper Teeth:
Using a flat brush loaded with metallic silver paint, start creating the zipper teeth along the outer edge of your blue shape. Paint small, rectangular blocks perpendicular to the edge, spacing them evenly. -
Refine the Teeth:
Once the silver blocks are dry, use a fine liner brush with black or dark grey paint to outline each tooth. Add a tiny line in the center of each silver block to mimic the interlocking mechanism. -
Add Highlights:
With a fine brush and white paint, add a tiny dot or line of highlight to the top corner of each zipper tooth. This makes the metal look shiny and realistic. -
Create the Zipper Pull:
At the very top of the opening (near the sternum), paint the zipper slider and pull tab using the silver paint. Make it look as if the zipper has just been pulled down to that point. -
Shadowing the Zipper:
Use a diluted grey or brown paint to add a drop shadow underneath the zipper teeth on the skin side. This lifts the zipper off the skin surface visually.
Step 3: Creating the Baby
-
Sketch the Baby:
Using a thin brush and a skin-tone color, lightly outline the baby’s head and hands inside the blue field. Position the baby slightly off-center for a dynamic composition. -
Fill the Skin:
Fill in the face shape and hands with your chosen skin tone paint. Let this layer dry completely before adding features to avoid muddying the colors. -
Paint the Outfit:
Use a light blue or teal paint to fill in the baby’s onesie. Keep the edges clean where the clothes meet the skin tone. -
Outline Features:
Switch to your finest liner brush and black paint. Carefully outline the baby’s head, ears, and outfit. Draw the simple facial features—eyes, a small nose, and a smiling mouth. -
Add Clothing Details:
Use a slightly darker shade of blue to add small crease lines on the onesie, simulating folds in the fabric around the arms and legs.
3D Effect
Glue actual fabric zipper tape along the painted edge using skin-safe body glue (spirit gum) for a mixed-media 3D effect that looks incredibly real in photos.
Step 4: Final Flourishes
-
Paint the Stars:
Dip a small brush into creamy white paint. Add several five-pointed stars scattered across the blue background. -
Add Swirls:
Paint delicate white swirls or wind gusts near the top of the opening to enhance the dreamy, sky-like atmosphere. -
Highlight the Eyes:
Place a teeny tiny dot of white in the baby’s eyes to bring the character to life and add a sparkle. -
Clean Up Edges:
Use a damp cotton swab or the corner of a wipe to clean up any stray paint marks around the outside of the zipper on the bare skin. -
Final Check:
Step back and look at the design as a whole. Reinforce any black outlines that might have faded during the painting process.
Once the paint is dry, you have a stunning and artistic reveal that celebrates the little one on the way
Modern Minimal Line Art With a Blue Pop
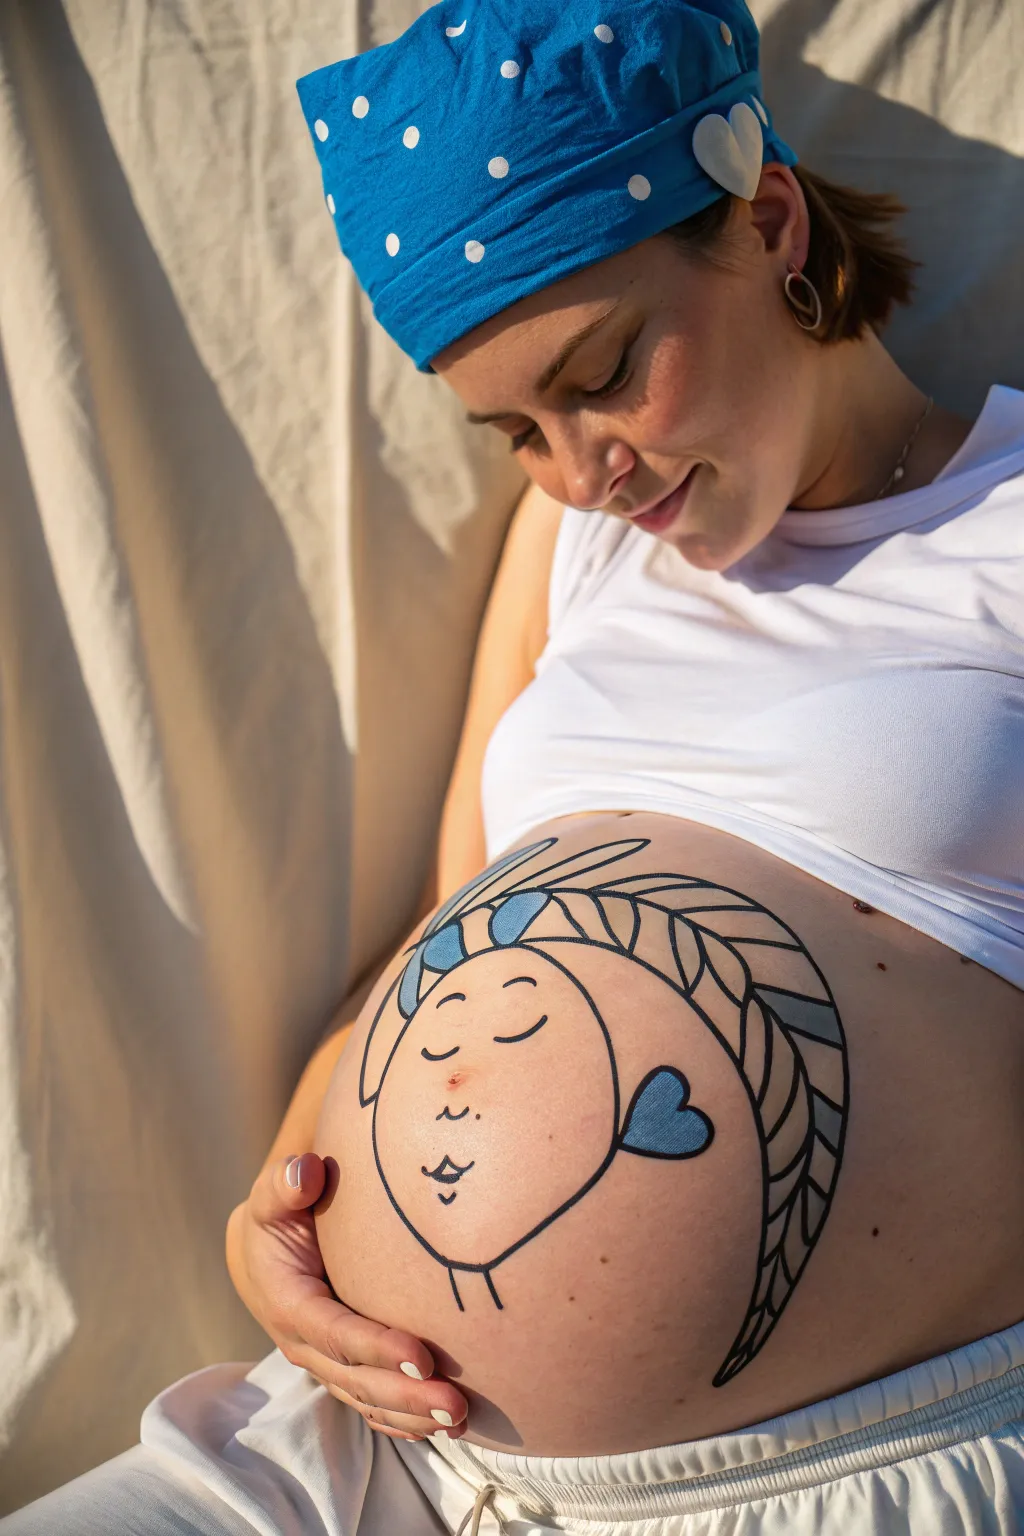
Capture the sweetness of anticipation with this clean, minimalist line art design. This look features a charming cartoon-style face defined by smooth black contours and brightened with simple pops of sky blue.
How-To Guide
Materials
- Water-based body paint (Black)
- Water-based body paint (Sky Blue)
- Fine liner brush (size 0 or 1)
- Medium round brush (size 4 or 6)
- Small cup of water
- Paper towels
- Baby wipes (for cleanup)
- Mirror (optional, for self-painting)
Step 1: Planning and Base Shape
-
Clean the canvas:
Start with clean, dry skin on the belly. Ensure no heavy lotions or oils are present, as these can make the water-based paint bead up or slide around unnecessarily. -
Visualize the oval:
Visualize a large, tilted oval shape centered on the belly. This will form the main outline of the character’s face. If you aren’t confident freehanding, you can use a very faint wash of light blue to mark the top and bottom boundaries first. -
Draw the main face outline:
Load your fine liner brush with black paint. Dilute it slightly so it flows like ink. Start from the bottom chin area and paint a smooth, continuous curved line upwards to define the left side of the face.
Clean Lines
If your black lines look shaky, your paint might be too thick. Dilute it with a drop of water until it has the consistency of ink for smoother strokes.
Step 2: Facial Features
-
Add the closed eyes:
Find the center point of the face. Paint two small, downward-curving arcs for the closed eyelids. I find it helps to keep them widely spaced to give the character a peaceful, dreaming expression. -
Paint a tiny nose:
Just below the midpoint between the eyes, place a tiny, simple dot or a specialized small ‘L’ shape for the nose. Keep it minimal. -
Create the mouth:
Paint a small, puckered mouth shape. It looks a bit like a tiny bird taking flight—a small curve with a little dip in the center to suggest pursed lips blowing a kiss. -
Add rosy accents (optional):
While this design is strictly minimal, you can add three tiny freckle dots on the cheeks if you want a little extra detail, though the original keeps it clean.
Step 3: Hair and Headpiece
-
Outline the headband:
Above the eyes, draw a curved line stretching across the top of the forehead area. This acts as the bottom edge of the hair/headband. -
Sketch the hair curve:
Extend a long, sweeping line from the top of the head down the right side of the belly. This large curve represents a long braid or flow of hair, tapering off near the bottom side of the bump. -
Segment the hair:
Using the fine liner, draw internal curved lines within that large shape to create segments. These lines should mimic the weaving pattern of a braid or strands of hair. -
Add the stray strands:
At the very top, paint two large, loop-like shapes sticking up, resembling playful strands of hair or feathers tucked into a band. -
Draw the neck:
At the very bottom of the chin, add two short, simple vertical lines to suggest a tiny neck. This grounds the floating head.
Make It Yours
Swap the blue paint for lavender or soft sage green to match the nursery theme, or add a second heart on the other cheek for symmetry.
Step 4: The Blue Pop
-
Fill the heart detail:
Switch to your medium round brush and load it with the sky blue paint. Locate the cheek area on the right side and paint a solid blue heart. -
Outline the heart:
Once the blue paint is touch-dry, use the fine liner and black paint to outline the heart, connecting it to the main face line so it looks like a decoration or cheek marking. -
Color the hair segments:
Select specific segments of the hair braid to fill with blue. Don’t color them all; alternate them or choose random sections to maintain that modern, graphic look. -
Accent the top loops:
Fill the smaller sections of the top hair loops with blue as well. Ensure the coverage is opaque—you might need a second coat of blue if the skin shows through. -
Final line check:
Go back over any black outlines that might have been covered by the blue paint. Re-defining these lines makes the whole design pop against the skin. -
Dry and seal:
Let the entire design dry completely for about 5 minutes. Avoid covering it with clothing immediately to prevent smudging.
Enjoy capturing this serene moment with a design that is both playful and strikingly modern


Have a question or want to share your own experience? I'd love to hear from you in the comments below!