Hallways can feel like in-between spaces, but a mural turns that quick walk-through into a little art moment. I love how hallway murals add depth, mood, and personality without taking up a single inch of floor space.
Misty Landscape for Instant Depth
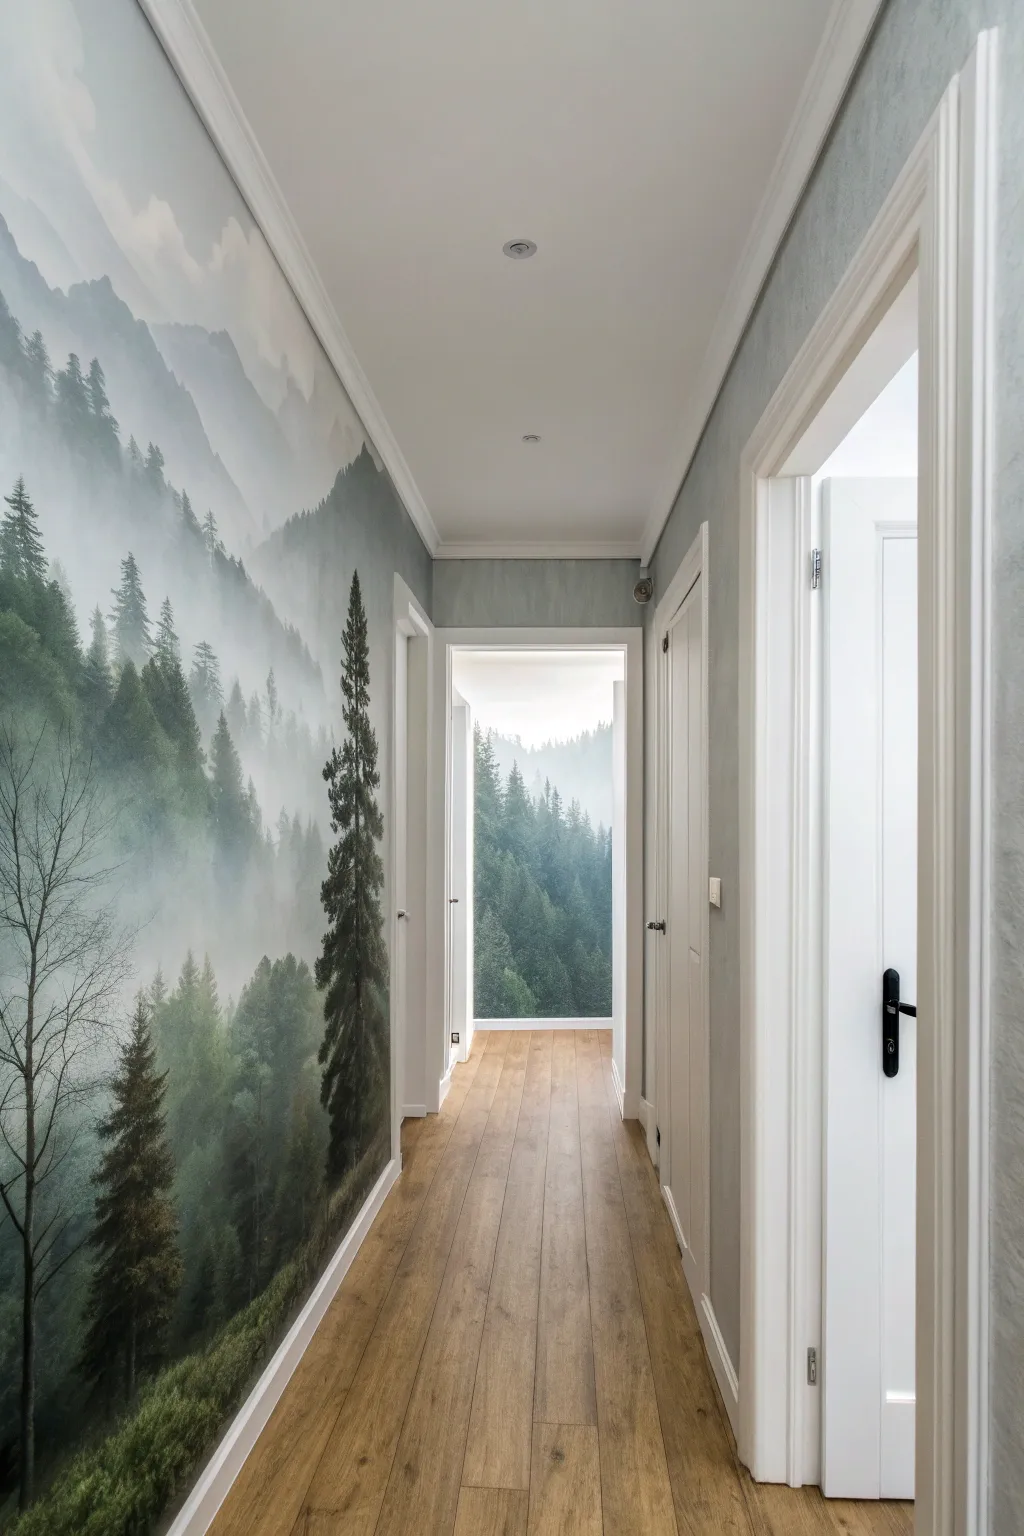
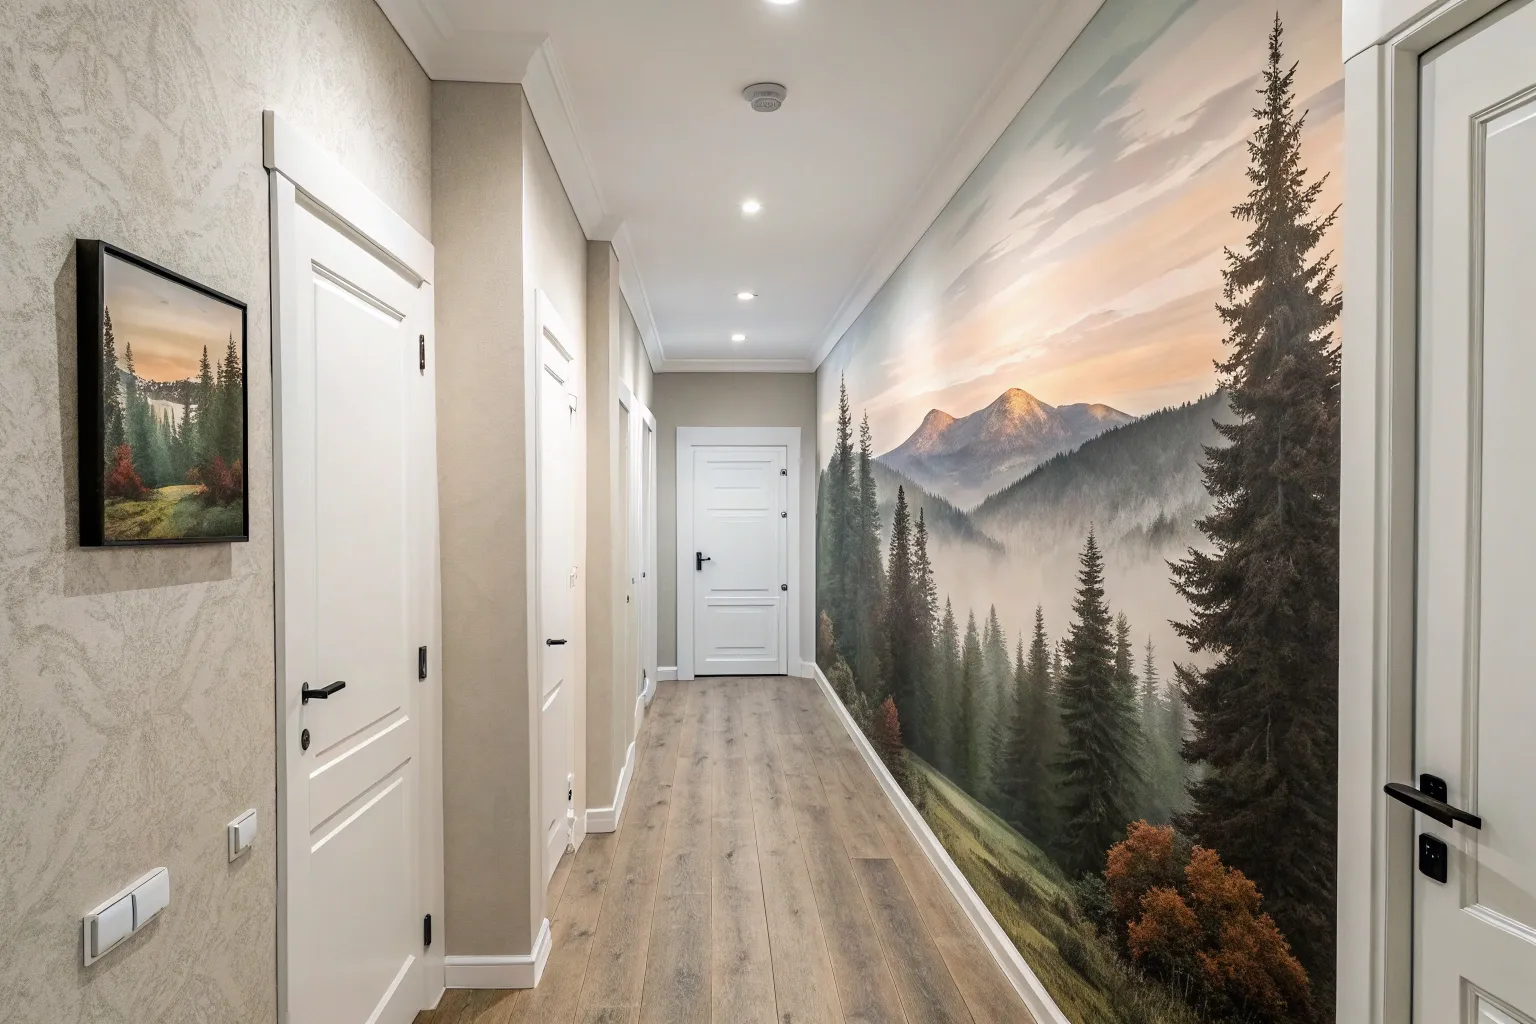
Transform a narrow hallway into an expansive, foggy wilderness with this immersive mural installation. The cool tones and depth of the misty forest scene instantly push back walls, making tight spaces feel open and breathing.
How-To Guide
Materials
- Pre-pasted or paste-the-wall forest mural wallpaper (custom sized)
- Wallpaper paste (if not pre-pasted)
- Spirit level or laser level
- Plumb line
- Wallpaper smoothing tool
- Sharp utility knife with snap-off blades
- Tape measure
- Seam roller
- Step ladder
- Sponge and bucket of clean water
- Drop cloth
- Painter’s tape
Step 1: Preparation & Planning
-
Measure the space:
Before ordering your mural, measure your hallway wall’s height and total length precisely at three points: left, middle, and right. Use the tallest and widest measurements, adding at least 2 inches (5cm) of overage to both dimensions to account for uneven walls. -
Prepare the surface:
Clear the wall of any nails, hooks, or switch plate covers. Fill holes with spackle and sand them smooth once dry. Clean the wall thoroughly with sugar soap or a gentle detergent to remove grease and dust, ensuring the adhesive bonds properly. -
Prime the wall:
If your wall is freshly painted or very absorbent, apply a coat of wallpaper primer. This allows you to slide the panels into position easier without the paste drying instantly. -
Mark your starting line:
Don’t trust the corner to be straight. Measure the width of your first wallpaper panel out from the corner, subtract about an inch, and use your spirit level or laser level to draw a strictly vertical plumb line at this mark. This straight line will guide your entire installation.
Shrinking Seams?
If gaps appear between panels as they dry, paint the wall behind the seams a dark grey color before hanging the paper. This hides the white wall if the paper shrinks slightly.
Step 2: Applying the Mural
-
Set up your station:
Lay out your panels on a clean floor in the correct order to double-check the pattern match. I find it helpful to number them lightly on the back in pencil if they aren’t already marked. -
Apply adhesive:
For paste-the-wall murals, roll the paste directly onto the wall surface, covering slightly more area than the width of the first panel. Be generous but even to avoid dry spots. -
Hang the first panel:
Align the right edge of your first panel with your drawn pencil plumb line. Let the excess paper overlap slightly at the ceiling and at the corner on the left. Smooth it down gently with your hands. -
Smooth out bubbles:
Use your smoothing tool to work from the center of the panel outwards. Apply firm but gentle pressure to push air bubbles out to the edges. Wipe away any excess paste from the front of the paper immediately with a damp sponge. -
Trim the excess:
Once the panel is secure, use your sharp utility knife and a straight edge guide to trim the excess paper at the ceiling and baseboard. Change your blade frequently to prevent tearing the wet paper.
Step 3: Seamless Transitions
-
Align the second panel:
Apply paste for the next section. Butt the second panel up against the first, matching the tree branches and mist lines precisely. Do not overlap the seams unless your specific mural instructions require it. -
Work the seam:
Once aligned, use a seam roller to gently press the edges together. This ensures they don’t curl up later and makes the transition invisible. -
Continue down the hall:
Repeat the process for remaining panels. As you approach the end of the longer wall, maintain your pattern match even if it means wasting a significant strip of paper at the very end. -
Handle door frames:
When you encounter a doorway, hang the full sheet of paper over the opening. Feel for the edge of the frame underneath and make a diagonal relief cut toward the corner of the frame. This releases tension and allows you to trim precisely around the molding. -
Address the far wall:
To create the infinite depth effect shown in the image, apply a matching section of the mural to the visible back wall of the adjacent room. Ensure the horizon line (where the mist meets the trees) matches the height of the hallway mural for a continuous look.
Level Up: 3D Effect
Install a very slim, vertical warm-white LED strip hidden behind the doorframe trim nearest the mural. This specific side-lighting enhances the misty texture.
Step 4: Finishing Touches
-
Re-smooth and check:
Go over all seams and edges one last time. If you spot a stubborn bubble that won’t smooth out, prick it with a fine pin and press the air out. -
Clean up details:
Reattach your switch plates. For a truly professional look, you can cover the switch plates with scraps of the mural paper, matching the pattern exactly so they disappear. -
Style the space:
Keep the hallway minimalist to let the mural be the hero. Install soft, recessed lighting or a simple runner rug that complements the wood tones in the tree trunks.
Enjoy the serene atmosphere of your new forest walk every time you pass through the hall


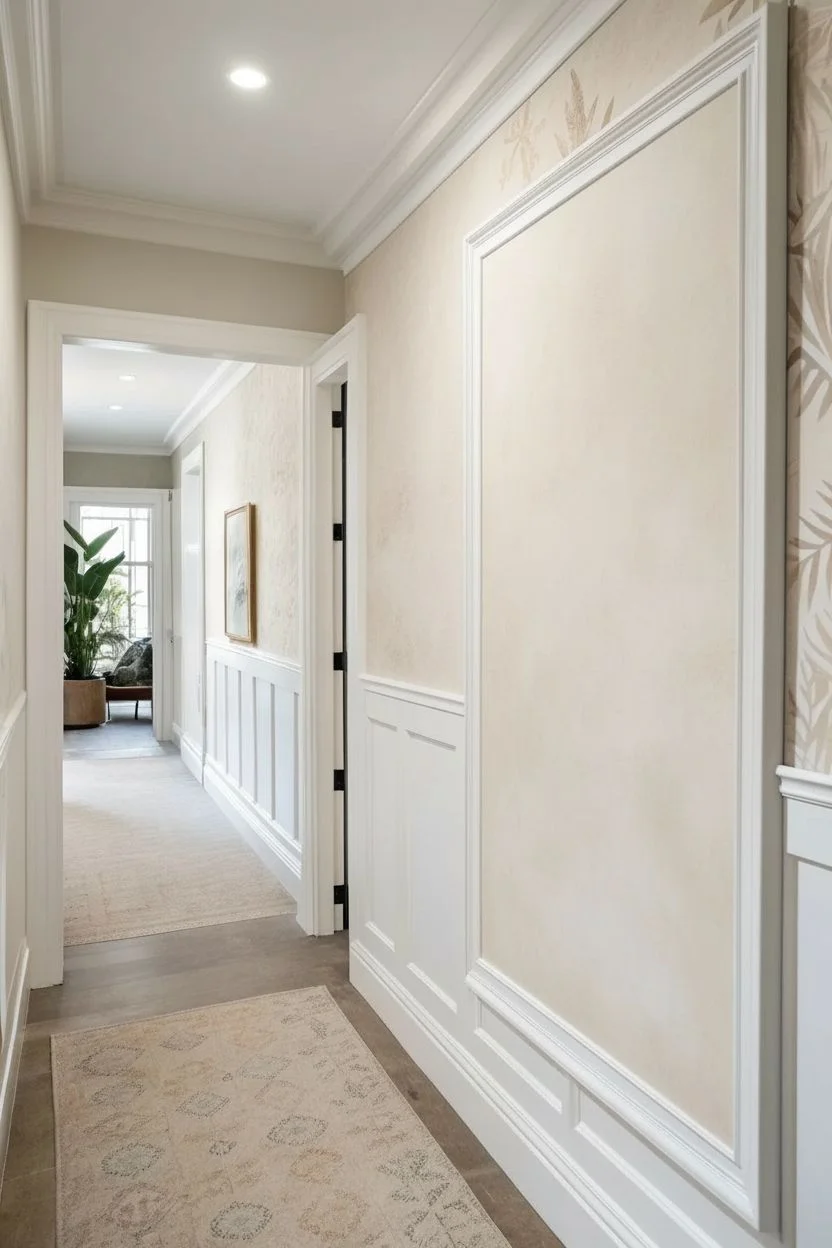
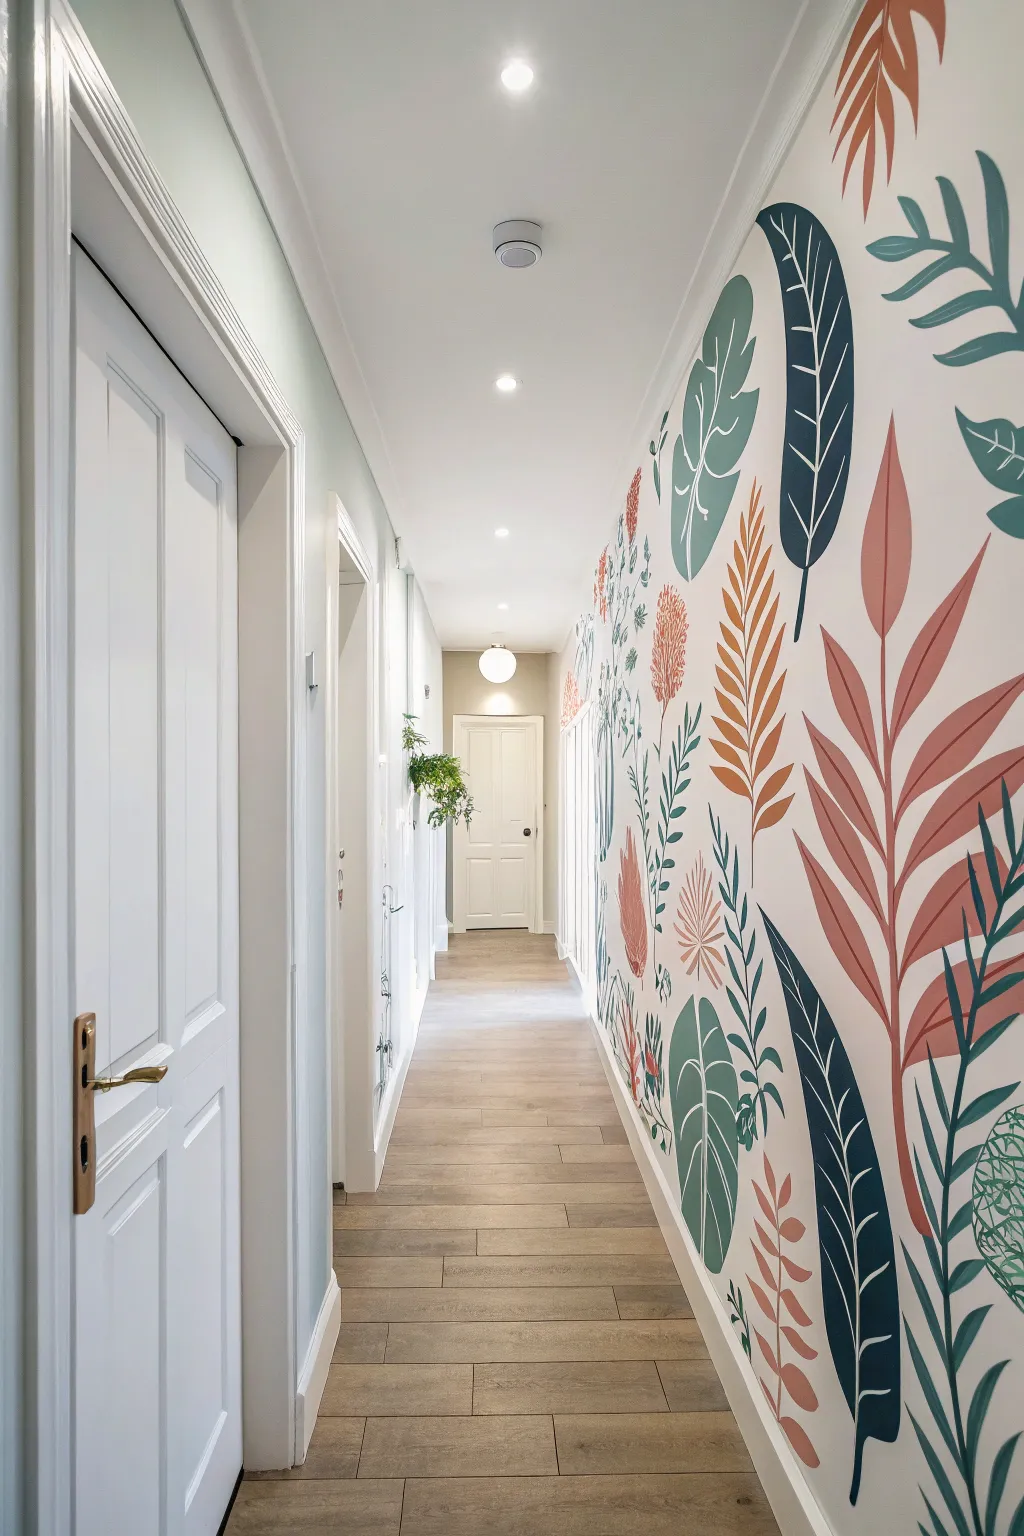
Oversized Botanical Wall Garden
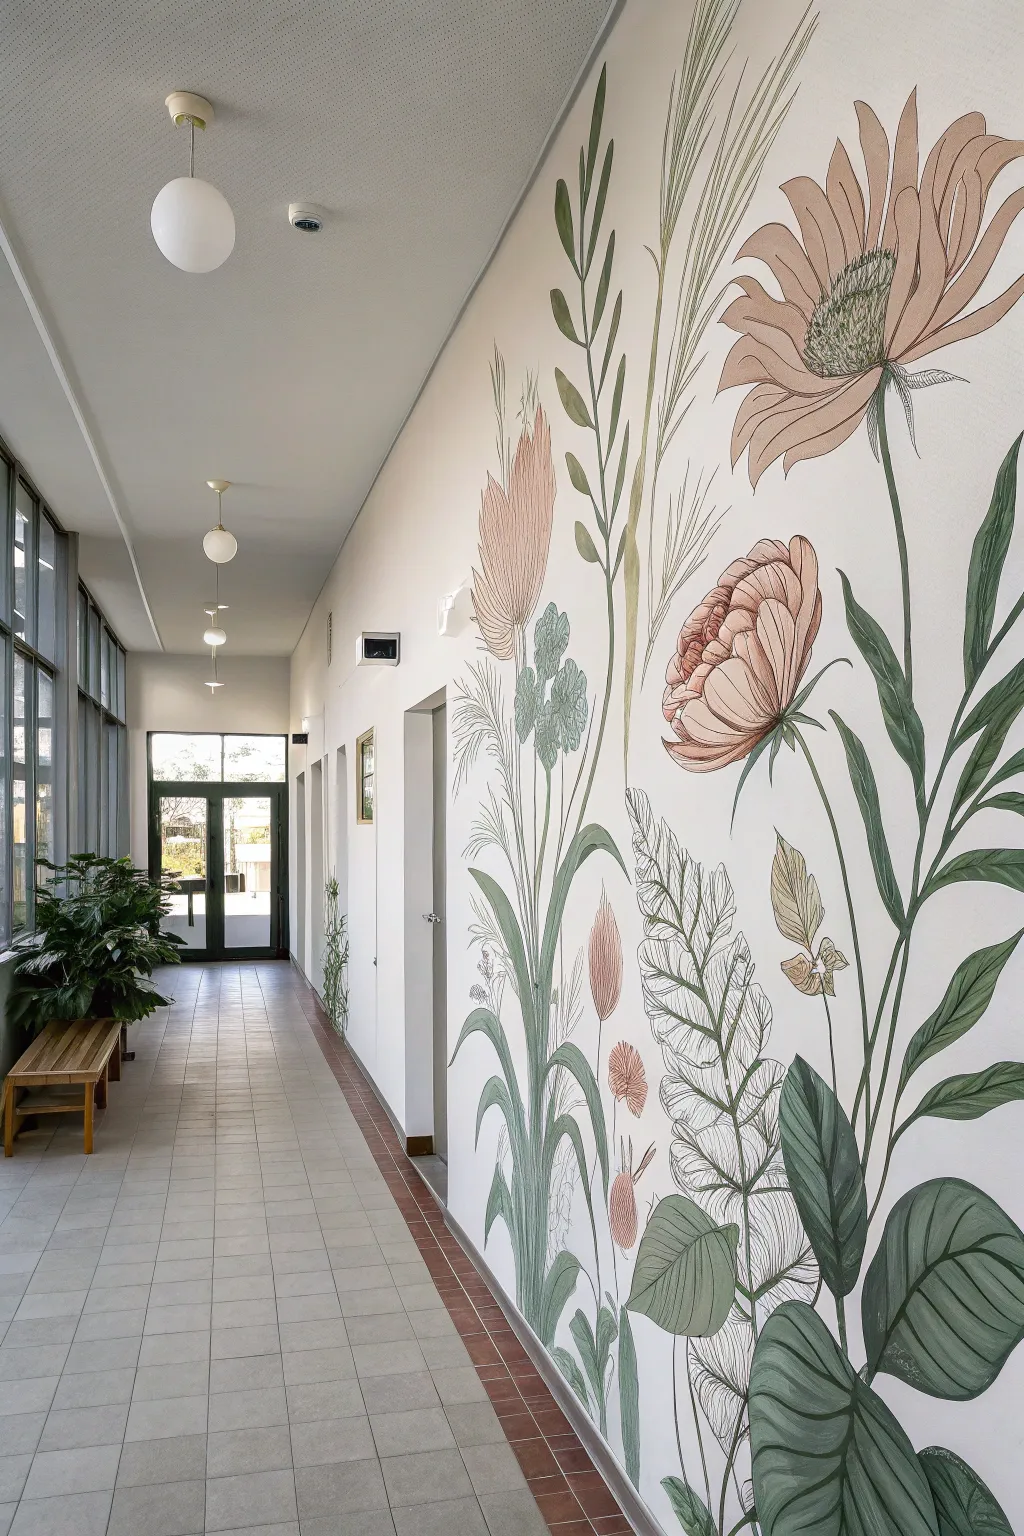
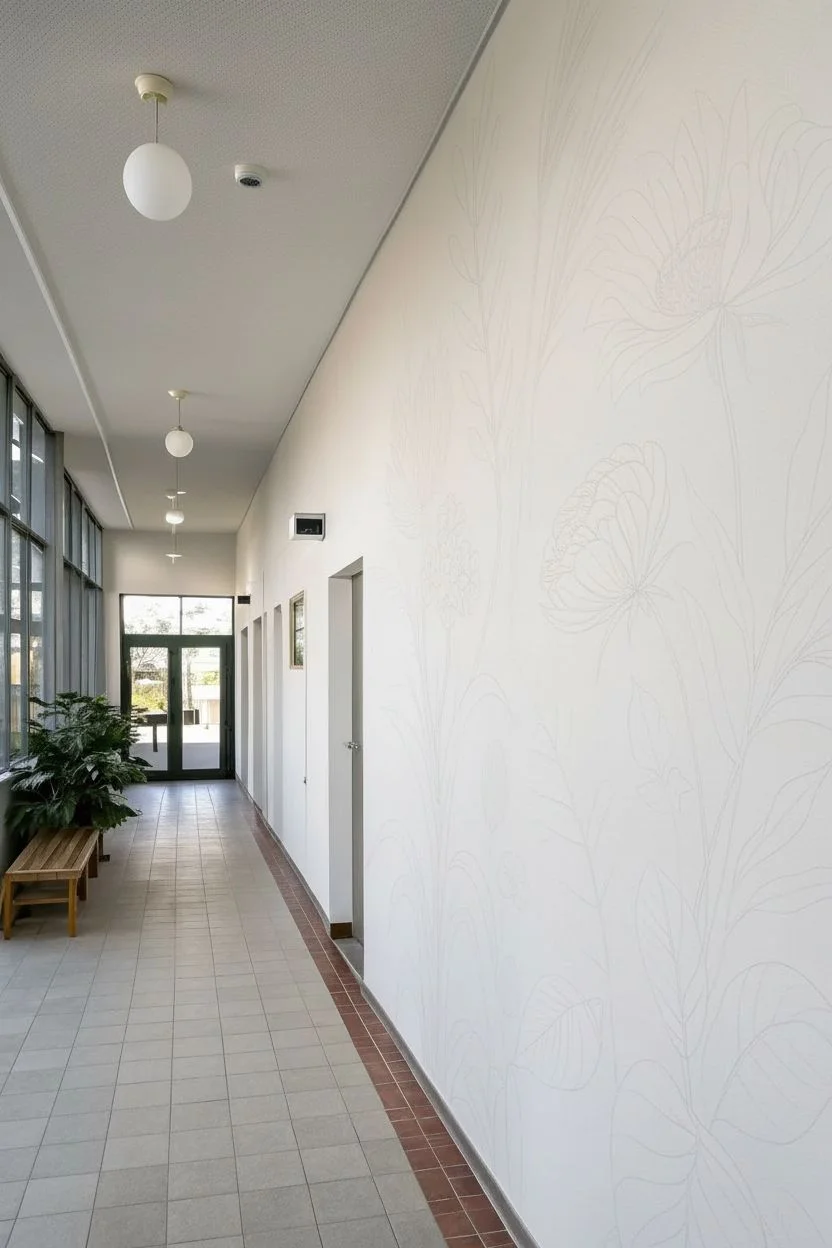
Transform a plain hallway into an oversized garden study with this delicate, illustrative mural. Using a palette of sage greens and dusty pinks, you’ll create soaring botanical forms that feel like a giant page from a vintage scientific textbook.
Step-by-Step Guide
Materials
- Interior latex paint (eggshell or satin finish) in white/cream for base
- Acrylic paints (Sample pots work well): Sage green, hunter green, blush pink, dusky rose, light grey
- High-quality angled sash brush (2-inch)
- Set of round artist brushes (sizes 4, 8, and 12)
- Fine liner brush (size 0 or 1) for detailing
- Projector (optional but recommended) or grid paper
- Graphite pencil and eraser
- Painter’s tape
- Drop cloth
- Step ladder
- Mixing cups or palette
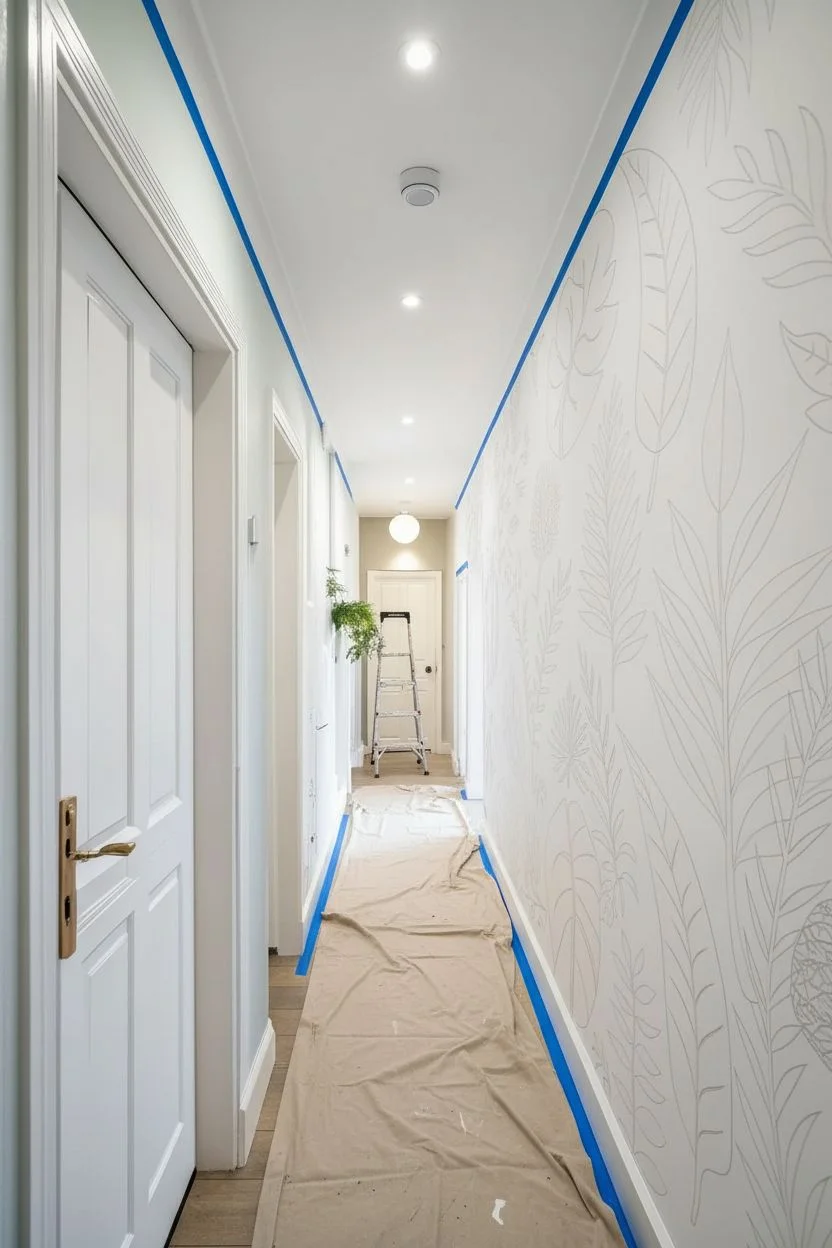
Step 1: Preparation & Sketching
-
Prepare the canvas:
Begin by cleaning your wall thoroughly to remove dust and grease. If the existing paint creates a poor contrast or is glossy, apply a fresh coat of a warm, creamy white eggshell paint to serve as your paper-like background. Let this cure for at least 24 hours. -
Design your layout:
This mural relies on verticality. Sketch your design on paper first, focusing on tall, reaching stems that originate from the bottom of the wall. Ensure you have a mix of broad leaves, feathery foliage, and large focal blooms like the sunflower-style and peony-style flowers shown. -
Transfer the design:
For the most accurate scale, I find using a digital projector connected to a laptop or phone is easiest. Project your sketch onto the wall and lightly trace the main outlines with a pencil. If drawing freehand, focus on the sweeping curves of the stems first.
Wobbly Lines?
If your hand shakes during fine line work, thin your paint slightly with water or a flow improver. The paint will drag less, giving you smoother, longer lines.
Step 2: Blocking in Color
-
Mix your greens:
Create three shades of green: a pale, dusty sage for background foliage, a mid-tone olive for stems, and a deep hunter green for the foreground leaves. Mixing a tiny dot of red into your greens will desaturate them for that vintage look. -
Paint the stems:
Using a size 12 round brush or the angled sash brush for thicker areas, paint the long, vertical stems. Keep your strokes smooth and confident to mimic natural growth. Don’t worry about perfect opacity yet; a little transparency looks like watercolor. -
Fill the large leaves:
Block in the shapes of the large, low leaves using your darkest green. Keep the edges relatively crisp. For the lighter, feathery foliage higher up, switch to your pale sage mix and use lighter pressure. -
Base coat the blooms:
Mix a soft blush pink and a warmer, brownish-peach. Paint the silhouettes of the flower petals. The sunflower shape gets the brownish-peach, while the cup-shaped flower gets the blush pink. Apply flat color here, leaving space for details later. -
Add secondary foliage:
Look for the fern-like elements and the clover shapes in the design. Paint these in a muted blue-grey or very pale green to create depth, making them look like they are sitting ‘behind’ the main stems.
Step 3: Detailing & Line Work
-
Mix the liner color:
To achieve the scientific illustration style, you need a dark, defining line. Do not use pure black; instead, mix dark green with a bit of dark grey or brown for a softer, organic outline. -
Outline the petals:
Using your size 0 or 1 liner brush, carefully outline the petals of your pink flowers. Add delicate internal lines that curve with the shape of the petals to suggest volume and texture. -
Create leaf veins:
On the large dark green leaves, use a lighter green mix or your dark liner mix (depending on the leaf style) to draw the central vein and branching veins. Keep these lines thin and tapering. -
Texture the flower centers:
For the center of the daisy-like flower, stipple small dots of dark green and brown over a lighter green base. This mimics the seed head texture effectively. -
Add the ‘sketch’ elements:
Notice how some leaves in the reference image are just outlines without color fill. Choose a few clustered leaves or fern fronds and paint only their outlines with your fine brush. This adds an artistic, unfinished sketchbook quality. -
Enhance shading:
Mix a slightly darker version of your petal colors (dusty rose for the pink flowers). Apply this selectively at the base of the petals and where petals overlap to create shadow. -
Final graphical touches:
Step back and look for balance. If an area feels empty, add a few floating seeds or very thin, wispy grass lines in a pale tan color to fill the negative space without adding visual weight.
Paint Consistency
For the ‘watercolor’ look, use a glaze medium or water to thin acrylics. This allows the white wall to shine through the leaves, creating luminosity.
Step back down the hall to admire how your new botanical garden brings life and height to the space


Classic Black-and-White Line Mural
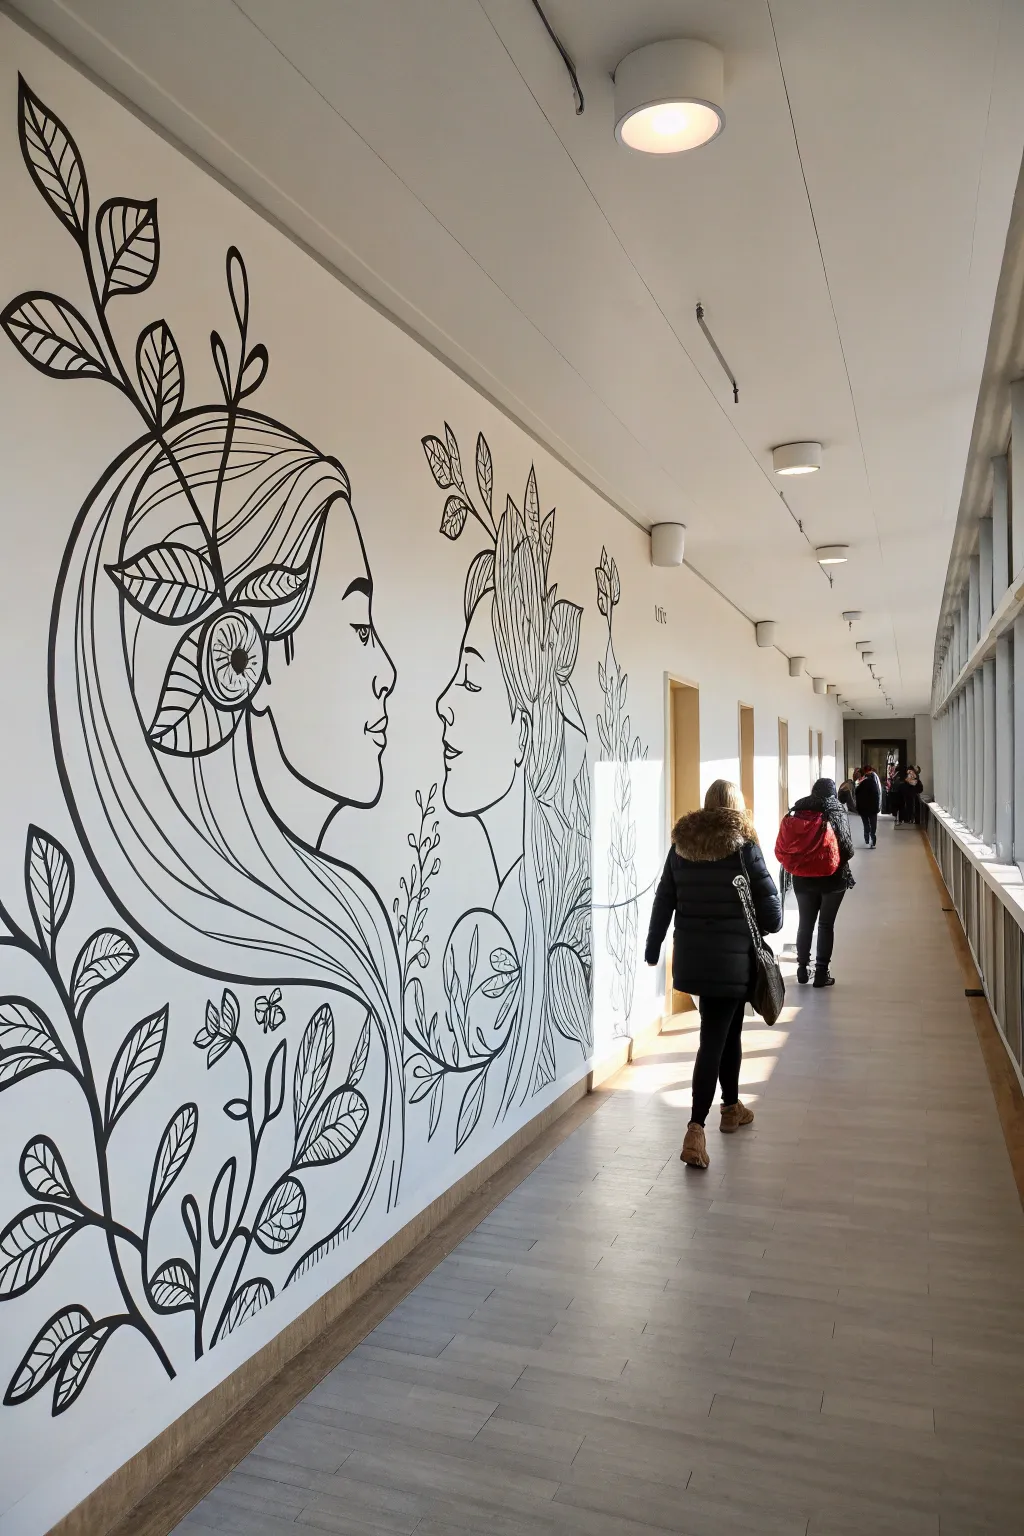
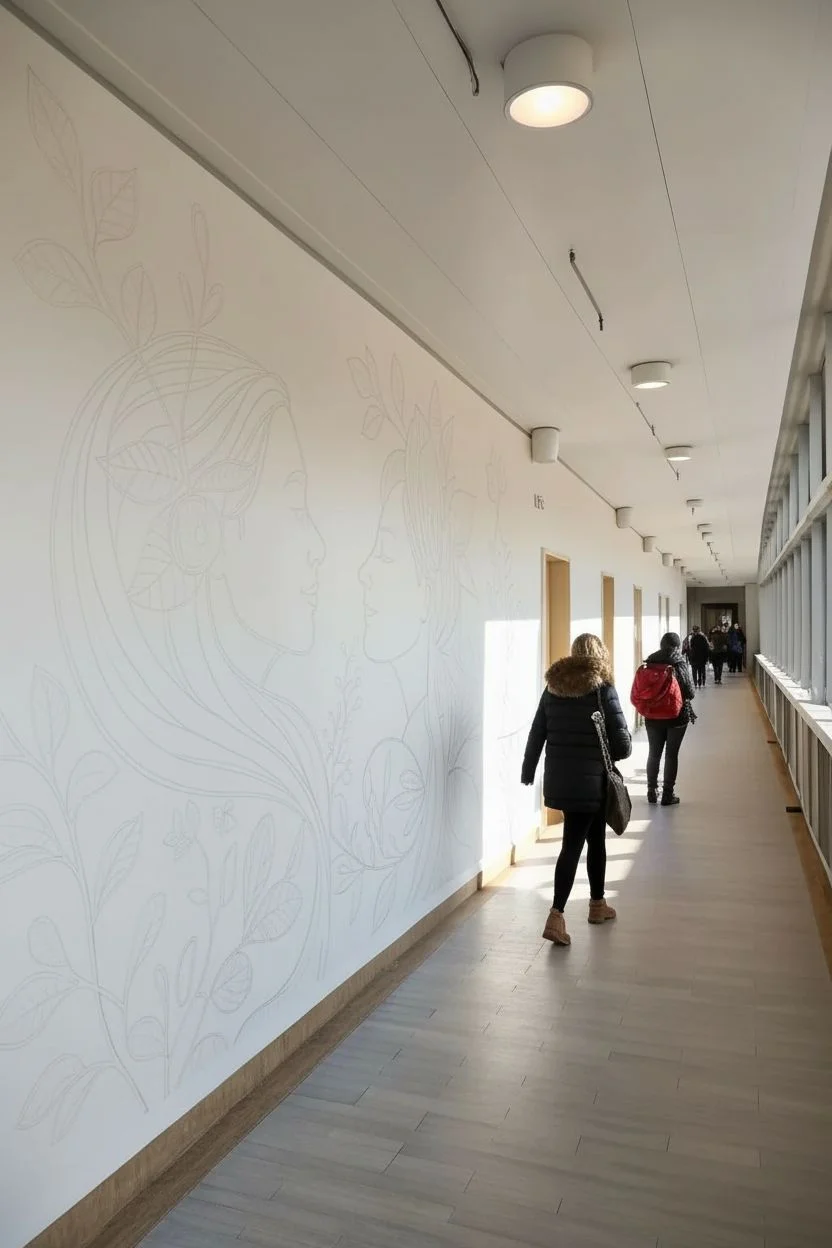
Transform a plain white hallway into an illustrative storybook scene with this striking black-and-white line art mural. Featuring large-scale profiles of women intertwined with flowing hair and botanical elements, this project relies on clean lines and negative space for maximum impact.
Step-by-Step
Materials
- High-quality interior latex paint (White) for base coat
- High-quality interior latex or acrylic paint (Black) for lines
- Graphite pencils (HB and 2B)
- Large eraser
- Overhead projector or digital projector
- Computer or tablet for image preparation
- Assorted round brushes (Sizes 4, 8, and 12)
- Painter’s tape
- Drop cloths
- Ladder or step stool
- Rags and water container
Step 1: Preparation & Design
-
Prep the canvas:
Begin by cleaning the hallway wall thoroughly to remove dust and grease. Patch any holes or imperfections with spackle and sand smooth once dry. -
Apply the base coat:
Paint the entire wall with a fresh coat of high-quality white interior latex paint. This ensures a crisp, clean background that makes the black lines pop. Let it dry completely for at least 24 hours. -
Source your artwork:
Select line art imagery featuring feminine profiles and organic shapes. You can draw your own design digitally or scan a sketch. Ensure high contrast so the lines remain distinct when enlarged. -
Set up the projection:
Position your projector in the hallway. Adjust the distance until the image is projected at a life-size scale, filling the wall height comfortably while leaving some breathing room at the top and bottom. -
Trace the primary outlines:
Turn off the hallway lights to see the projection clearly. Lightly trace the main contours of the faces, hair, and major leaves using a graphite pencil. Keep a light touch so mistakes can be easily erased.
Smooth Operator
Add a tiny drop of water or flow improver to your black acrylic paint. This helps the brush glide for those long hair strands without stopping.
Step 2: Refining the Sketch
-
Step back and assess:
Turn the lights back on and the projector off. View the sketch from a distance to ensure the proportions look natural and the composition flows well down the hall. -
Fix sketching errors:
Use your eraser to clean up any confusing lines or double-tracings. I often find this is the best time to manually adjust hair curves to better fit the specific wall dimensions. -
Detail the botanical elements:
Freehand any additional leaves or vines to fill empty negative spaces. The goal is to make the hair transition seamlessly into the botanical motif.
Step 3: Painting the Line Work
-
Load your medium brush:
Dip a size 8 round brush into your black paint. The consistency should be fluid enough to glide but thick enough to be opaque in one stroke. -
Start with confident strokes:
Begin painting the main outlines of the faces. Use your arm, not just your wrist, to create long, smooth curves for the jawlines and profiles. -
Vary line weight:
Switch to a larger size 12 brush for the thickest sections of hair. Press down harder at the start of a curve and lift up as you taper off to create dynamic, calligraphic lines. -
Fill the eyes:
Switch to a smaller size 4 brush for delicate details like eyelashes and pupils. Carefully fill in the pupils, leaving a tiny white dot unpainted to act as a highlight for liveliness. -
Leaf detailing:
Return to the size 8 brush for the leaves. Paint the outer stem and leaf shapes first, then go back in to add center veins and texture lines. -
Connect the flowing hair:
Paint the long, sweeping strands of hair that connect the figures to the floral elements. Ensure these lines look continuous, even if they pass behind a leaf. -
Check for opacity:
Once the first pass is dry to the touch, inspect your black lines. If any areas look gray or streaky, carefully apply a second coat to achieve a solid, deep black.
Level Up: Accent Colors
Pick one small element, like the lips or specific leaves, and paint them in a single metallic gold or deep red for a stunning pop of interest.
Step 4: Finishing Touches
-
Erase pencil marks:
Wait until the paint is absolute bone-dry (I usually wait overnight just to be safe). Gently erase any visible graphite lines that weren’t covered by paint. -
Clean up edges:
If you accidentally smudged black outside the lines, use a small flat brush with white paint to touch up and ‘erase’ the mistakes. -
Seal the mural (optional):
If this is a high-traffic hallway, consider applying a clear, water-based matte varnish over the painted areas to protect them from scuffs.
Enjoy the dramatic transformation of your corridor as the flowing lines guide you through the space


Geometric Blocks That Stretch the Space
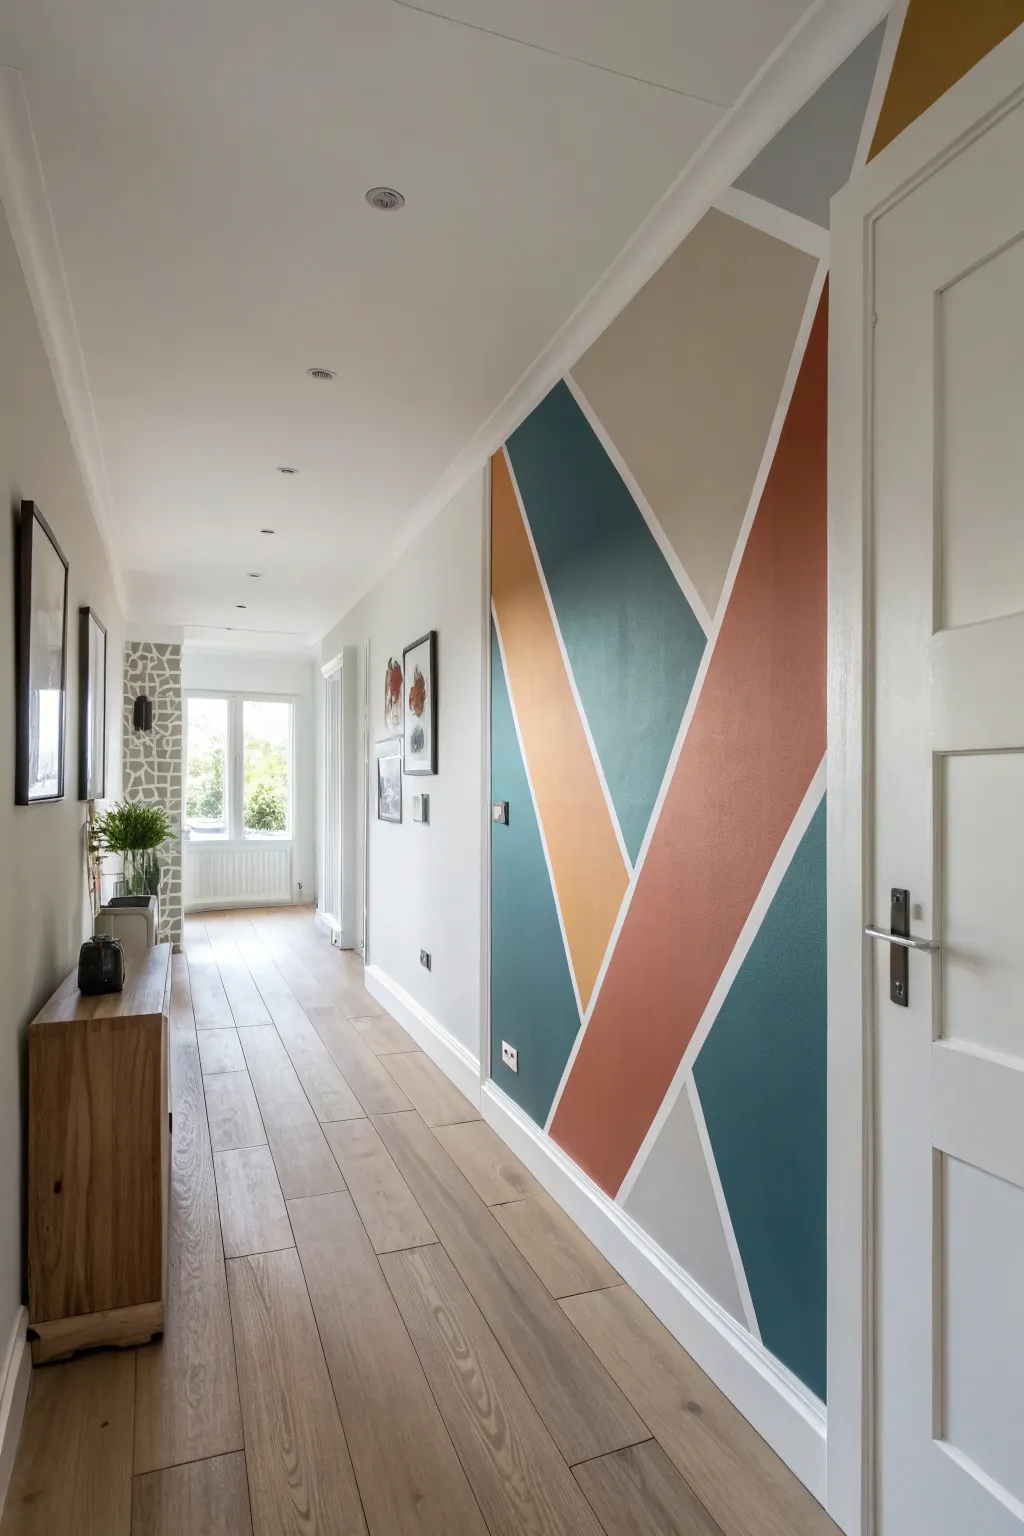
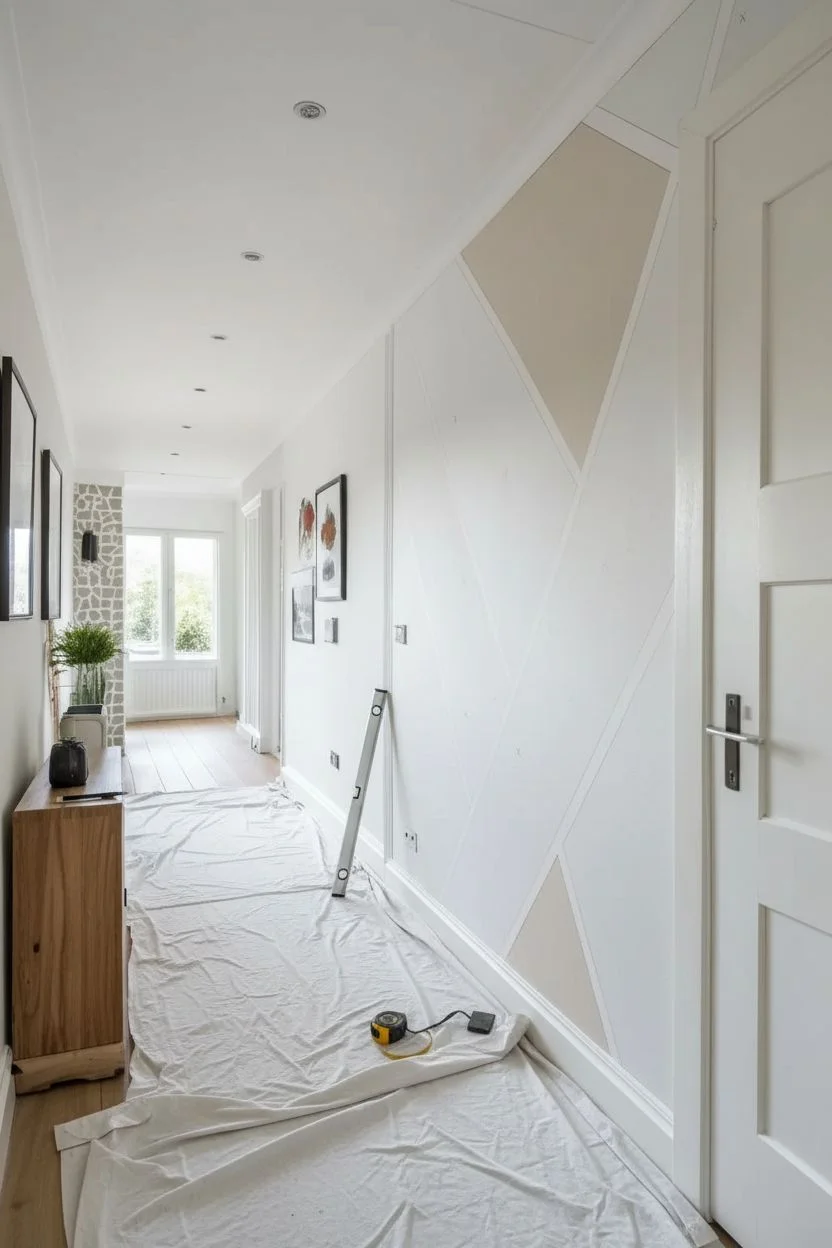
Transform a plain hallway wall into a dynamic focal point with this bold, intersecting geometric mural. By using crisp white lines to separate blocks of teal, terra cotta, ochre, and grey, you create an optical illusion that adds depth and modern flair to narrow spaces.
Step-by-Step Tutorial
Materials
- Interior emulsion paint (Teal/Dark Green)
- Interior emulsion paint (Terra Cotta/Rust)
- Interior emulsion paint (Ochre/Mustard Yellow)
- Interior emulsion paint (Light Grey)
- Interior emulsion paint (Light Beige/Tan)
- Interior emulsion paint (White/Base wall color)
- High-quality painter’s tape (1-inch or 1.5-inch width)
- Laser level or long spirit level
- Pencil
- Tape measure
- Small foam rollers (4-inch size)
- Angled sash brush (2-inch)
- Drop cloths
- Paint tray
- Damp cloth for clean-up
Step 1: Preparation and Mapping
-
Clear and Prep:
Remove any artwork or switch plates from the wall. Wipe the surface down with a damp cloth to remove dust, ensuring the tape adheres perfectly later. Lay down your drop cloths to protect the flooring. -
Base Coat Application:
If your wall isn’t already white, paint the entire wall with a fresh coat of white paint. This white base will eventually become the crisp lines between your geometric shapes. Let this dry completely—I recommend waiting at least 24 hours so the tape doesn’t peel it off. -
Plan Your Shapes:
Visualize the large ‘V’ shapes and intersecting diagonals shown in the image. Lightly sketch the main anchor points of the design with a pencil. Notice how the large central ‘V’ is formed by the ochre and orange shapes meeting near the bottom third of the wall.
Seal for Sharpness
Always paint over your tape edges with the BASE wall color first. This creates a barrier that prevents the colored paint from bleeding underneath, guaranteeing razor-sharp lines.
Step 2: Taping the Geometry
-
Tape Main Lines:
Apply your painter’s tape over your pencil marks. Start with the longest lines first, like the large diagonal dividing the teal and orange sections. Press the tape down firmly along the edges. -
Create Intersections:
Continue taping out the shapes. Where lines intersect, run the tape all the way across. Remember, the width of the tape represents the white space that will remain unpainted. -
Seal the Tape Edges:
This is the most crucial step for crisp lines. Take your white base paint and brush a thin layer over the edges of the tape. This seals any tiny gaps; if paint bleeds, it will be white-on-white, leaving the color lines perfectly sharp later. -
Let Sealant Dry:
Allow the sealing coat to dry fully. It usually takes about 30-60 minutes depending on humidity.
Level Up: Metallic Pop
Replace the standard light grey paint with a metallic silver or soft gold paint for one of the smaller geometric sections. It catches the hallway light and adds a luxury feel.
Step 3: Applying Color
-
Mark Colors:
Before opening paint cans, take small pieces of tape and stick them in each section, labeling them with the intended color (e.g., ‘Teal’, ‘Rust’, ‘Grey’). This prevents accidental mix-ups once you start rolling. -
Start with Teal:
Pour the dark teal paint into your tray. Using a small foam roller, fill in the large geometric sections designated for this color. Use the angled brush to cut in carefully near the ceiling and floor trim. -
Apply Terra Cotta:
Wash your roller or switch to a fresh one. Apply the rust/terra cotta paint to the large diagonal stripe that dominates the right side of the design. Two light coats are better than one heavy coat here. -
Add Accents:
Move on to the ochre/mustard yellow section on the left side. This brightness balances the darker tones. Ensure consistent coverage right up to the tape edge. -
Roll the Neutrals:
Fill in the remaining top section with beige and the bottom corner with light grey. These neutrals help ground the vibrant colors. -
Second Coats:
Inspect your work. Darker colors like the teal and rust often need a second coat to look solid and rich. Apply necessary second coats once the first layer is dry to the touch.
Step 4: The Reveal
-
Timing the Removal:
Don’t let the paint dry completely before removing the tape. It’s best to peel it off while the final coat is still slightly tacky—usually about an hour after painting. -
Peel Carefully:
Slowly pull the tape away from the wall at a 45-degree angle. Keep a steady pace to ensure clean lines. -
Touch Guys:
Once the tape is gone, examine your white lines. If any color bled through (though the sealing step helps prevent this), use a tiny artist’s brush and white paint to tidy up the edges. -
Reinstall Hardware:
Wait for the mural to cure fully (overnight is best) before screwing switch plates back on or moving furniture back into place.
Enjoy walking through your vibrant new space knowing you created that professional finish yourself
BRUSH GUIDE
The Right Brush for Every Stroke
From clean lines to bold texture — master brush choice, stroke control, and essential techniques.
Explore the Full Guide
Wainscoting + Mural Above for Durability
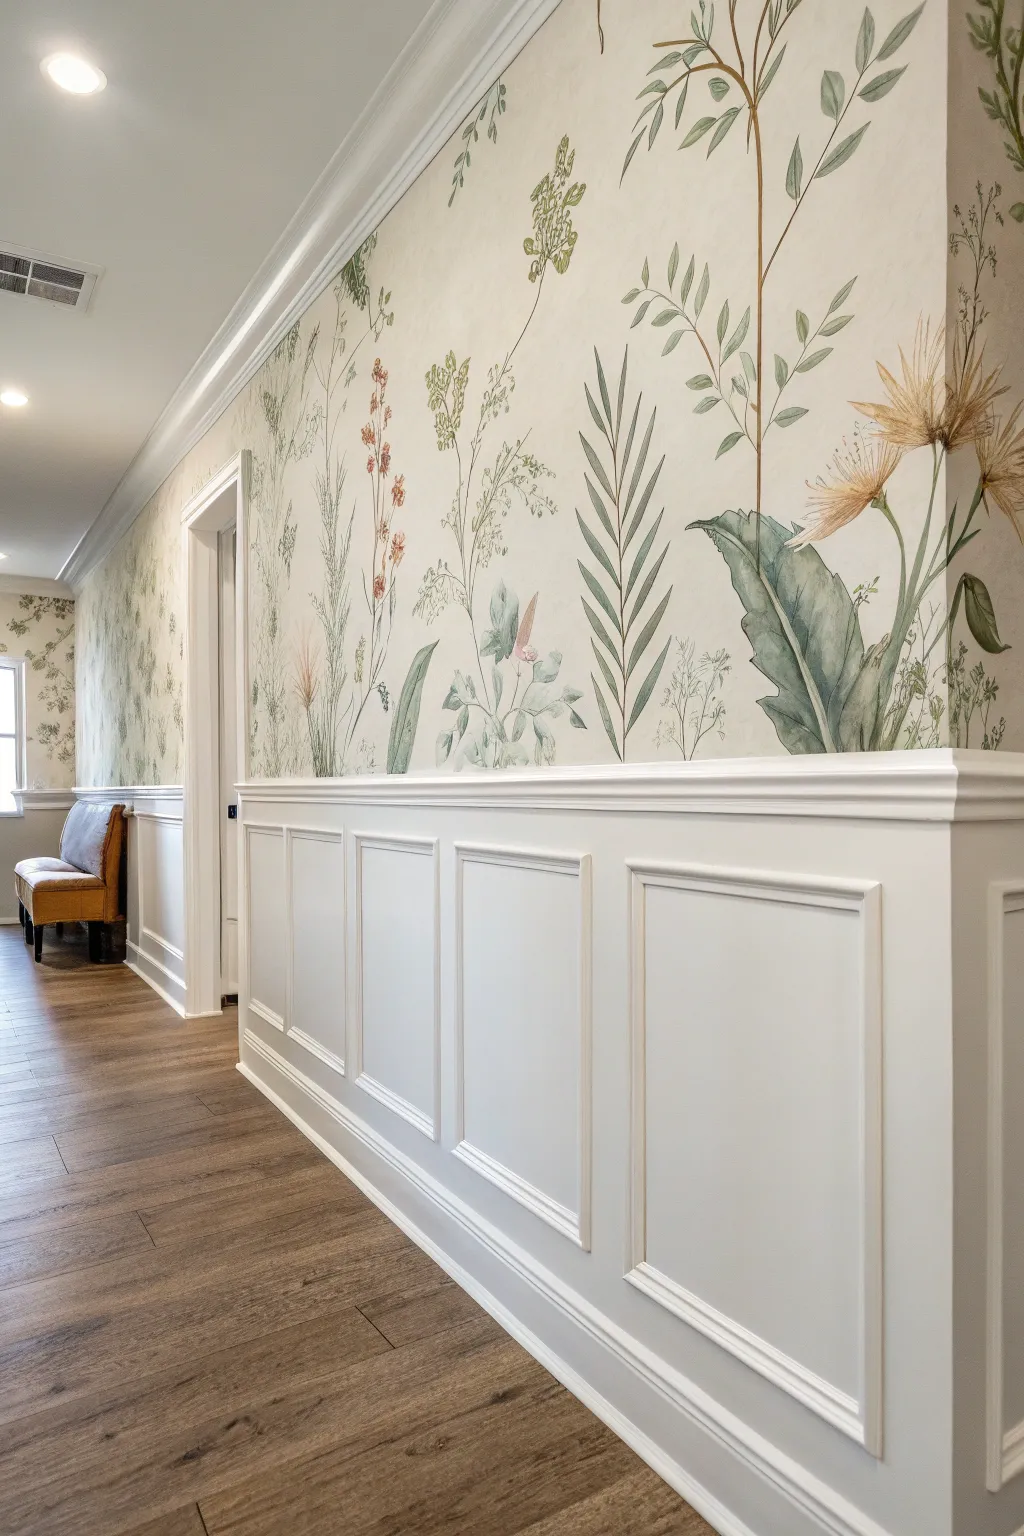
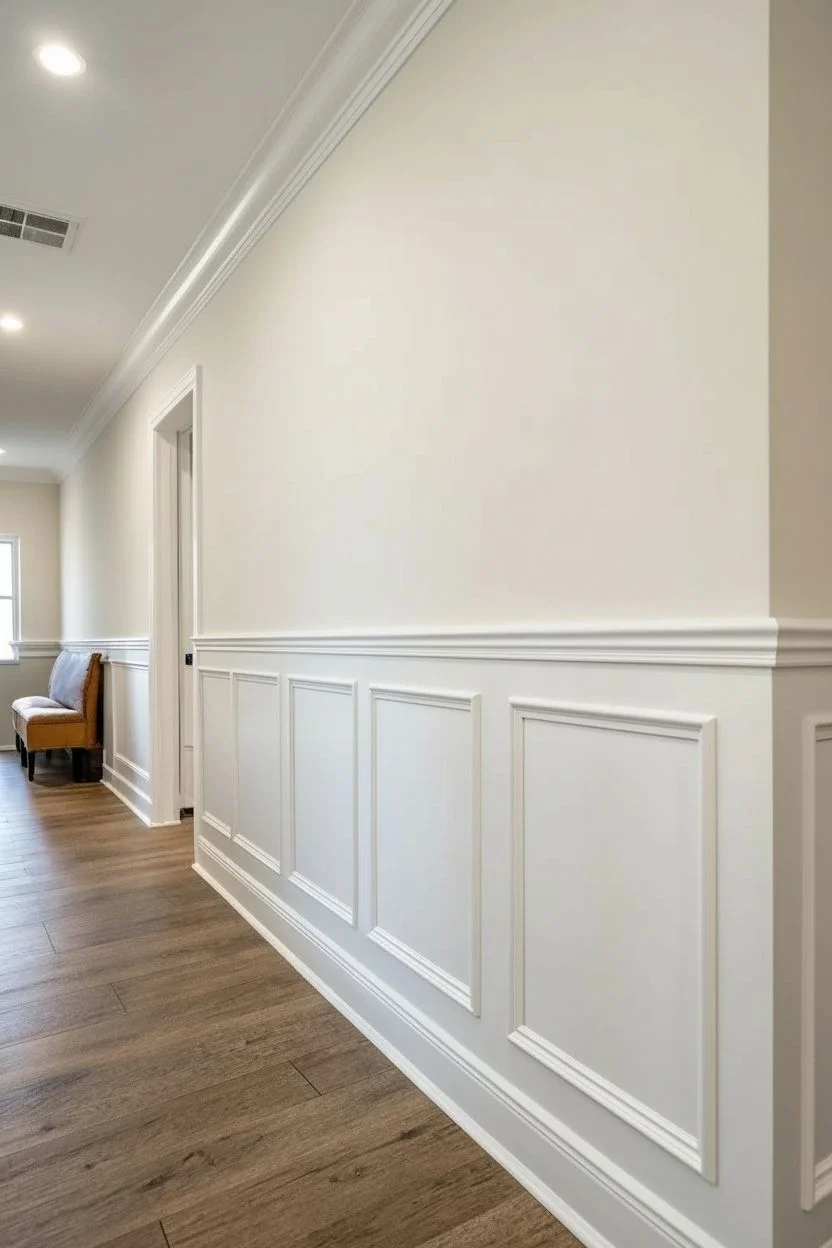
Transform a plain hallway into an elegant garden walk by combining classic wainscoting with a delicate, hand-painted botanical mural. This project pairs structural woodwork with soft, watercolor-style florals for a sophisticated and durable finish.
Detailed Instructions
Materials
- Pre-primed wainscoting panels (picture frame moulding style)
- Chair rail moulding
- Baseboard moulding
- Construction adhesive
- Pin nailer or finishing nails
- Wood filler and sandpaper
- Painter’s tape
- Interior latex paint (white for wainscoting)
- Interior latex paint (creamy off-white for upper wall base)
- Acrylic mural paints (sage green, olive, deep green, muted pink, ochre, brown)
- Glazing medium (to create watercolor effects)
- Assorted synthetic brushes (rounds #4, #8, #12 and flats)
- Pencil and eraser
- Drop cloths
- Caulk and caulk gun
- Level and measuring tape
Step 1: Installing the Wainscoting
-
Prep the layout:
Measure your hallway wall height and decide on the wainscoting height—usually about one-third of the way up the wall (32-36 inches). Mark this line level across the entire length of the hallway using a long level or laser level. -
Install base and chair rail:
Cut your baseboards and chair rail moulding to length. Secure the baseboard first using construction adhesive and a pin nailer. Then, align the top of your chair rail with your level line and install it similarly. -
Plan the boxes:
Calculate the spacing for your picture frame boxes. Aim for consistent spacing (about 3-4 inches) between boxes and above/below the rails. Lightly mark the box positions on the wall with a pencil. -
Attach the moulding:
Cut your picture frame moulding pieces with 45-degree mitered corners. Assemble the frames on the floor first if helpful, or nail them directly onto the wall following your pencil guides. Use adhesive for extra hold. -
Fill and seamless:
Fill all nail holes with wood filler and caulk the seams where the moulding meets the wall. Once dry, sand the filler smooth to ensure a professional, built-in look. -
Paint the woodwork:
Tape off the wall just above the chair rail. Paint the entire lower section—baseboards, flat wall area, and moulding—with a durable semi-gloss or satin white latex paint. Apply two coats for full coverage.
Step 2: Painting the Botanical Mural
-
Base coat application:
Paint the upper wall section with a creamy off-white or light beige interior latex paint. This provides a warm, antique parchment background for the botanicals. Let this dry completely, preferably overnight. -
Sketch the composition:
Lightly sketch your botanical design using a pencil. Focus on tall, vertical stems that reach upward, interspersed with leafy fronds and occasional blooms. Keep the composition airy; don’t overcrowd the stems. -
Mix your glazes:
Mix your acrylic paints with the glazing medium. You want a 1:1 or 1:2 ratio of paint to medium to achieve semi-transparent, watercolor-like washes rather than opaque blocks of color. -
Paint main stems:
Using a #8 round brush and a brownish-green glaze, paint the primary vertical stems. Use long, confident strokes, lifting pressure at the ends to create tapered tips. -
Layer in greenery:
Switch to varying shades of green (sage, olive, deep forest) for the leaves. I like to paint some leaves wet-into-wet, adding a drop of darker green into a wet lighter leaf to create natural shading. -
Add large focal leaves:
For the larger tropical-style leaves, use a wider flat brush. Sweep the brush in curves to mimic the vein structure, keeping the edges soft. Dilute the paint further here to let the wall color peek through slightly. -
Paint the florals:
Introduce color with the flowers. Use ochre and muted pink for the blooms. Keep strokes loose and expressive—dab the paint on rather than filling in rigid outlines to maintain that illustrative quality. -
Detail work:
With a fine #4 liner brush, add delicate details like stamens, thin tendrils, or fine veins on the leaves. Use a darker brown or deep green for contrast. -
Review and refine:
Step back to view the hallway as a whole. Fill in any empty gaps with faint, watery ‘ghost’ leaves (highly diluted paint) to add depth without adding visual weight.
Mural Flow Tip
Vary stem heights to avoid a uniform ‘fence’ look. Let some leaves overlap the chair rail visually by painting right down to the trim edge.
Level Up: Texture
Sponge a very subtle, darker beige glaze over the background before painting plants to give the wall an aged, parchment-like texture.
Now you have a hallway that feels like a permanent, peaceful garden walk every time you pass through
Framed Mural Panels with Trim Molding
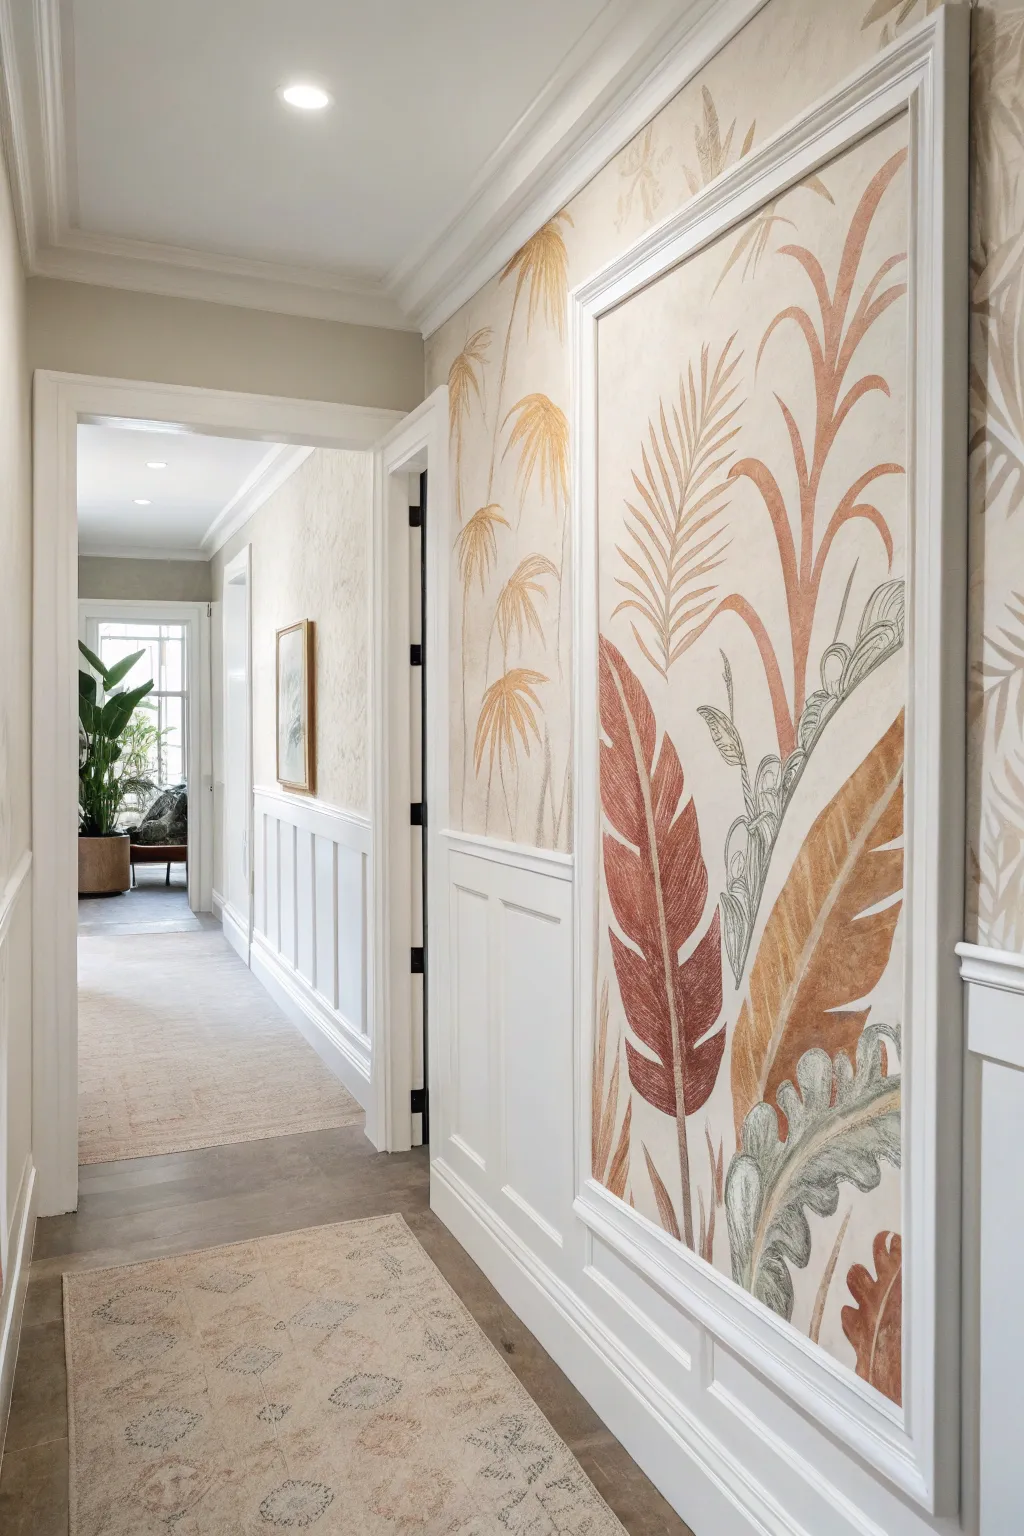
Bring the warmth of a conservatory into your hallway with this sophisticated framed mural project. By combining traditional wainscoting techniques with a stylized, earthy botanical painting, you can create a feature wall that feels timeless and bespoke.
Step-by-Step Guide
Materials
- Primed pine molding strips (1×2 or similar picture frame molding)
- Miter saw and box
- Construction adhesive and finishing nails
- Wood filler and sandpaper
- Interior acrylic latex paint (stark white for trim)
- Matte interior background paint (warm cream or light beige)
- Acrylic artist paints (terracotta, sage green, muted ochre, burnt sienna, deep green)
- Glazing medium
- Assorted brushes (2-inch flat brush, round brushes sizes 6-10, filbert brushes)
- Pencil and eraser
- Painter’s tape
- Chalk or transfer paper (optional)
- Clear matte varnish
Step 1: Preparing the Canvas
-
Measure and mark:
Begin by determining the dimensions of your framed area. This mural sits above wainscoting, so measure the space between the chair rail and the crown molding, leaving an equal border of wall space on all sides for a balanced look. Use a level and pencil to mark the rectangle where your molding will go. -
Install the frame:
Cut your molding strips to size using a miter saw at 45-degree angles. Attach the molding to the wall using construction adhesive and finishing nails. This physical frame acts as the boundary for your artwork. -
Prep the surface:
Fill any nail holes or corner gaps with wood filler. Once dry, sand smooth. Paint the molding and the wall area inside the frame with a base primer to ensure a consistent texture. -
Apply background color:
Paint the area inside the frame with your warm cream or light beige background color. Use a roller for the center and a cutting-in brush for the edges near the molding. Apply two coats if necessary for solid coverage. -
Texture the background (Optional):
To mimic the aged fresco look seen in the photo, mix a small amount of glazing medium with a slightly darker beige paint. Use a sea sponge or a dry brush to lightly dab and swirl this mixture over the background, creating subtle cloudy variations.
Muted Palette Tip
To keep colors cohesive, mix a tiny drop of your background wall color into every single paint color you use. This harmonizes the mural with the room instantly.
Step 2: Sketching the Design
-
Plan the composition:
Sketch your botanical design on paper first. Note how the main energy flows upward. The design features large, sweeping leaves—some fern-like, some broad and paddle-shaped—anchored at the bottom and reaching toward the top corners. -
Transfer to wall:
Lightly sketch the main stems and leaf outlines onto the wall using a pencil. If you aren’t confident freehanding, you can project the image or use large transfer paper. Keep the lines faint so they don’t show through the final paint.
Fixing Wobbly Lines
Line look shaky? Don’t stress. Wait for it to dry, then use the background color to ‘cut in’ and reshape the line from the outside. Thinner is often better.
Step 3: Painting the Botanicals
-
Mix your palette:
Prepare your acrylic colors. You want muted, earthy tones rather than bright tropical neons. Mix your terracotta with a touch of white to soften it, and desaturate your greens with a little brown or red. -
Paint the main stems:
Using a round brush, paint the central stems of the large plants. Use a confident, sweeping motion to capture the organic curve of the plant life. A brownish-red tone works well here to ground the composition. -
Block in base shapes:
Fill in the large leaf shapes with flat color first. Use the terracotta for the tall, feather-like leaves and the sage green for the lower, broader foliage. Don’t worry about perfect blending yet; just get the color on the wall. -
Add dimension with wash:
Once the base coat is dry, mix your paint with a little water or glazing medium to create a semi-transparent wash. Layer a slightly darker version of the same color over one side of the leaves to suggest shadow and curvature. -
Detail the veins:
I like to switch to a fine liner brush here. Use a darker shade of the leaf color (or a contrasting cream color) to paint the central veins and the fine lines radiating outward on the feathery leaves. -
Create the ‘faded’ effect:
To achieve that vintage illustrations look, dry-brush a little of your background cream color over parts of the leaves. This makes the mural feel like it’s part of the wall texture rather than a sticker sitting on top.
Step 4: Finishing Touches
-
Refine the edges:
Go back with a small brush and your background wall color to tidy up any edges where the leaf paint may have strayed outside your intended lines. -
Clean the trim:
If any mural paint got onto the white molding frame, touch it up now with your semi-gloss trim paint for a crisp, professional border. -
Seal the work:
Protect your mural with a coat of clear matte varnish. This will unify the sheen of the different paints and protect the artwork from dust and scuffs, especially important in a high-traffic hallway.
Step back and admire how this elegant botanical panel transforms your hallway into a grand gallery space

PENCIL GUIDE
Understanding Pencil Grades from H to B
From first sketch to finished drawing — learn pencil grades, line control, and shading techniques.
Explore the Full Guide
Watercolor Wash Clouds for a Dreamy Hall
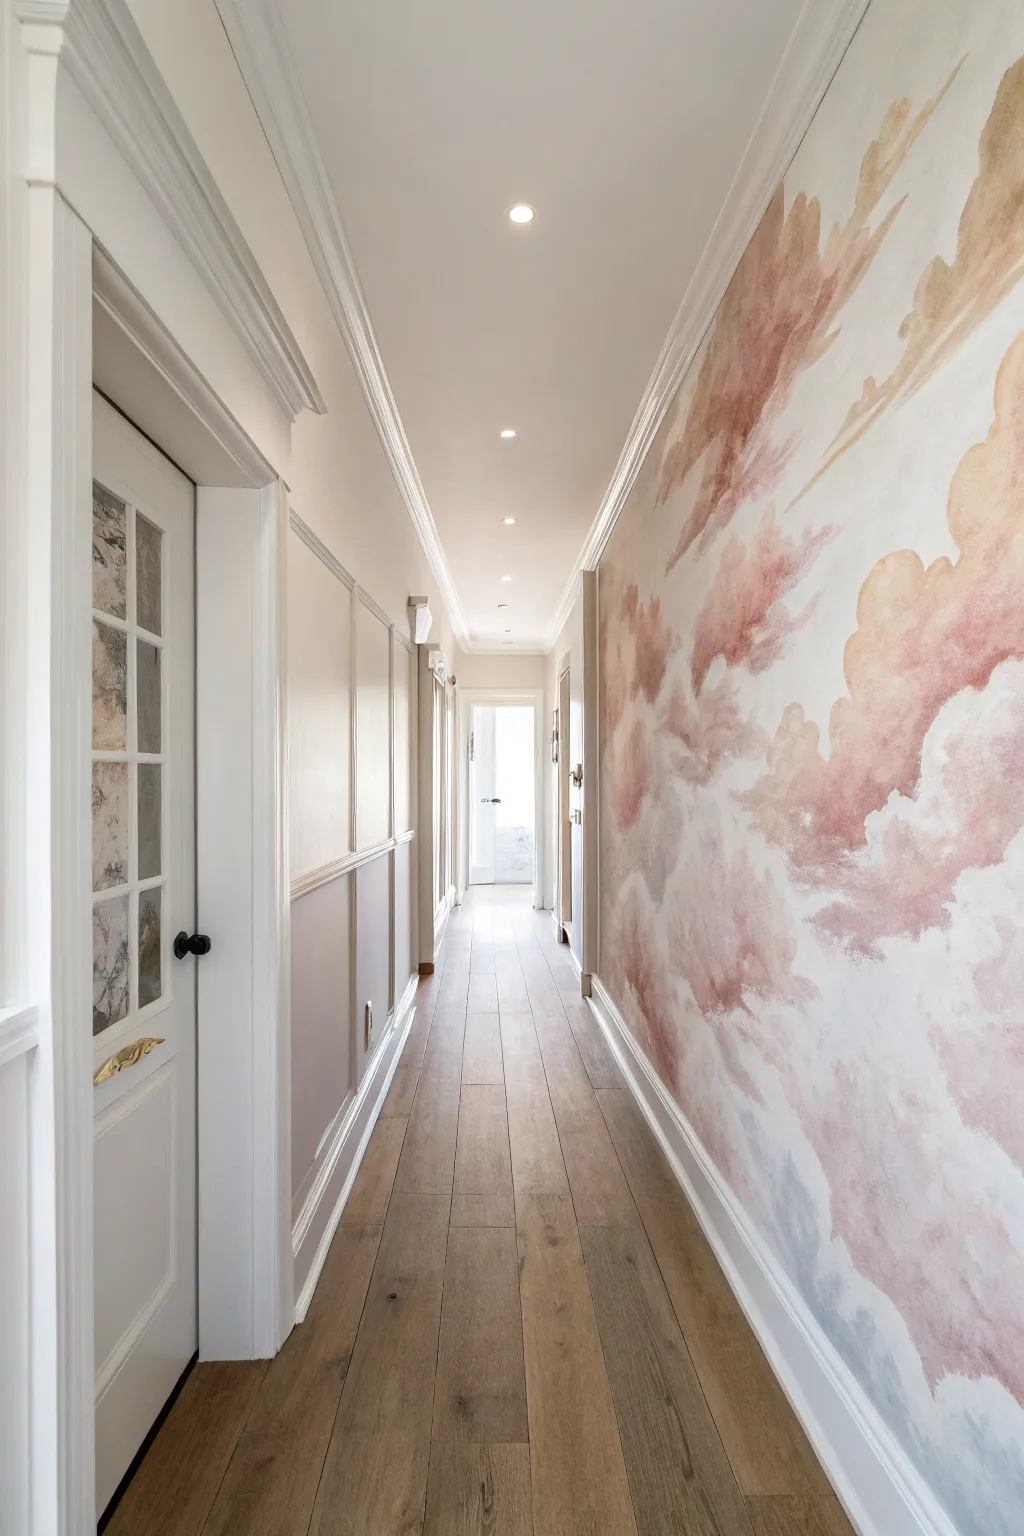
Transform a blank hallway into a dreamy cloudscape with this soft, watercolor-inspired mural technique. Using diluted acrylics and natural sponges, you will layer warm pinks, peaches, and sandy tones to create an airy, floating atmosphere that expands the feeling of space.
Detailed Instructions
Materials
- Interior latex paint (Eggshell or Matte – Pure White for base)
- Acrylic paints or latex samples (Dusty Pink, Terracotta, Warm Beige, Slate Blue)
- Glazing medium (clear)
- Large sea sponges (natural, varying sizes)
- Synthetic bristle brushes (2-inch and 4-inch)
- Clean cotton rags
- Water buckets/containers for mixing
- Painter’s tape
- Drop cloths
- Ladder or step stool
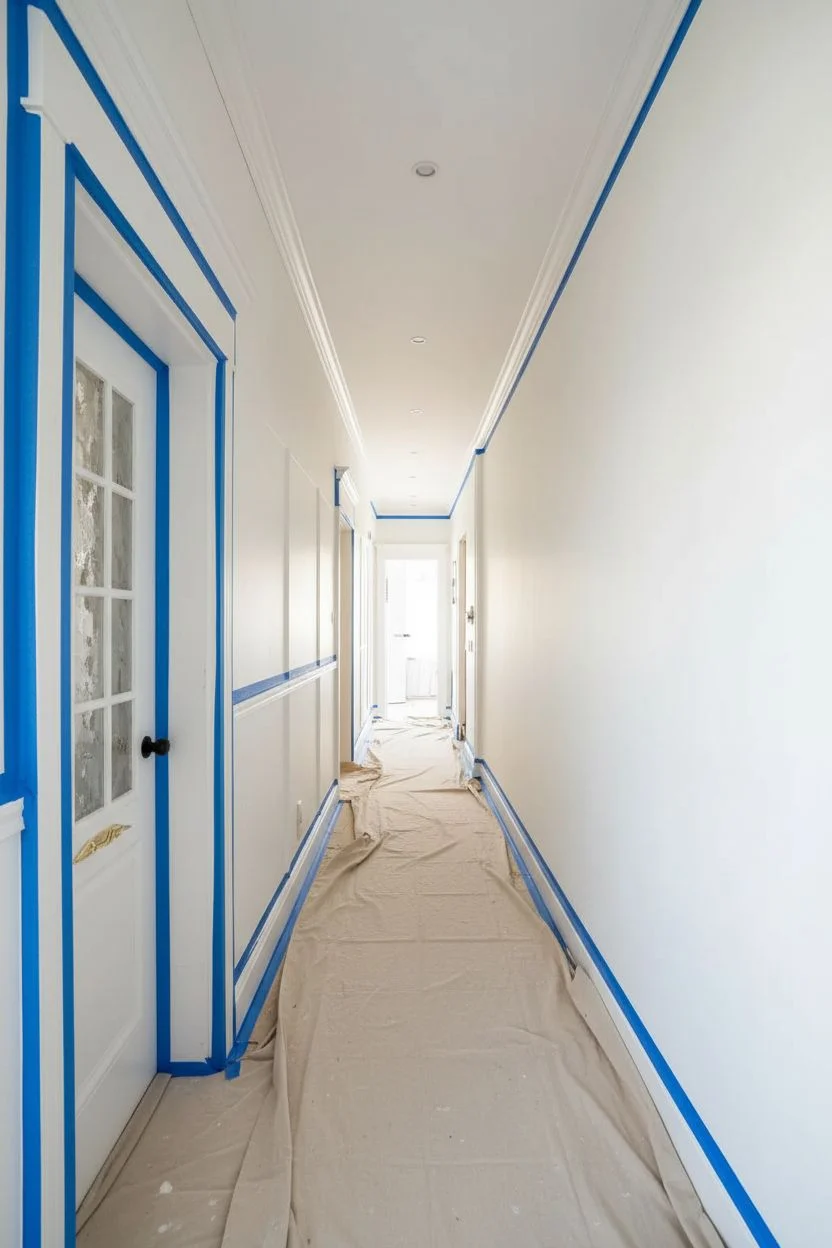
Step 1: Preparation and Base Coat
-
Prep the workspace:
Clear the hallway floor and lay down drop cloths to protect your hardwood or carpet. Use painter’s tape to mask off the ceiling line, baseboards, and any adjoining door frames to ensure crisp edges. -
Prime the wall:
Apply a fresh coat of pure white interior latex paint (matte or eggshell finish works best for a watercolor look). This bright white background is essential for the translucent colors to glow properly. -
Mix your glazes:
In separate containers, mix your colored paints with glazing medium and a splash of water. You want a ratio of about 1 part paint to 4 parts glaze/water. The consistency should be thin and runny, like heavy cream or watercolor paint.
Step 2: Drafting the Shapes
-
Plan the composition:
Step back and visualize where the largest cloud clusters will go. In the reference image, the clouds drift diagonally upward, leaving plenty of negative white space. -
Sketch lightly:
Using a very diluted mixture of the beige paint and a small brush, lightly outline the general organic shapes of the clouds directly on the wall. Keep these lines incredibly faint so they disappear later. -
Wetting the wall:
working in 4-foot sections, use a clean damp sponge or large brush to lightly wet the area of the wall inside your sketched cloud shape. This helps the paint feather out softly.
Sponge Technique Tip
Always tear your sea sponge in half to create a jagged, uneven inner surface. Using a flat, store-bought edge creates unnatural patterns, while the torn inside mimics organic cloud fluff perfectly.
Step 3: Layering the Clouds
-
Apply the first color wash:
Dip a sea sponge into your lightest pink glaze. Dab off excess onto a rag, then press it gently onto the dampened wall area. Use a twisting motion to create random, organic textures rather than a stamp pattern. -
Soften the edges:
Immediately use a clean, damp rag to blot the edges of the paint you just applied. This feathering technique prevents hard lines and mimics the diaphanous look of real clouds. -
Introduce warm tones:
While the pink is still tacky, introduce the warm beige or terracotta glaze in the lower or shadowed parts of the cloud shape. Let the wet glazes bleed into each other slightly on the wall. -
Build darker depth:
Once the first layer is dry to the touch, mix a slightly more saturated version of the terracotta or dusty pink. Apply this sparingly to the bottom edges of the clouds to give them volume and weight. -
Add cool shadows:
I like to use a tiny amount of the slate blue glaze mixed with plenty of clear medium. Apply this very faintly in the deepest recesses or ‘troughs’ between cloud puffs to create contrast against the warm pinks.
Level Up: Metallic Drift
Mix a small amount of pearlized or gold mixing medium into your final white highlight layer. It adds a subtle shimmer that catches the hallway light as you walk past, mimicking sunlight.
Step 4: Refining and Blending
-
dry brush blending:
Take a large, dry 4-inch brush and very lightly sweep it over the transition areas where color meets white wall. This ‘wisps’ the paint out further, creating that drifting smoke effect. -
Layering for opacity:
Step back to assess the density. If some areas look too sheer, dab on another layer of the main pink tone, focusing on the center of the cloud masses. -
Defining the highlights:
If you’ve lost some definition, mix a semi-opaque white glaze. Sponge this onto the very tops of the clouds to bring back the bright, sun-hit highlights. -
Connect the shapes:
Ensure the mural flows cohesively down the hall. Use very watery beige glaze to create faint bridges or trails of mist connecting larger cloud bodies. -
Final assessment:
Walk the length of the hallway. Look for any edges that appear too hard or ‘stamped’ and soften them with a damp rag while checking for color balance. -
Seal (Optional):
Because this is a hallway, you may want to protect your work. Once cured for 48 hours, apply a clear matte water-based polycrylic varnish to protect the delicate glaze layers. -
Clean up:
Remove the painter’s tape carefully. Pull the tape away from the wall at a 45-degree angle to ensure a clean, sharp line against the ceiling and trim.
Enjoy the serene, sky-high feeling every time you walk down your hallway
Coastal Horizon to Calm the Walk-Through
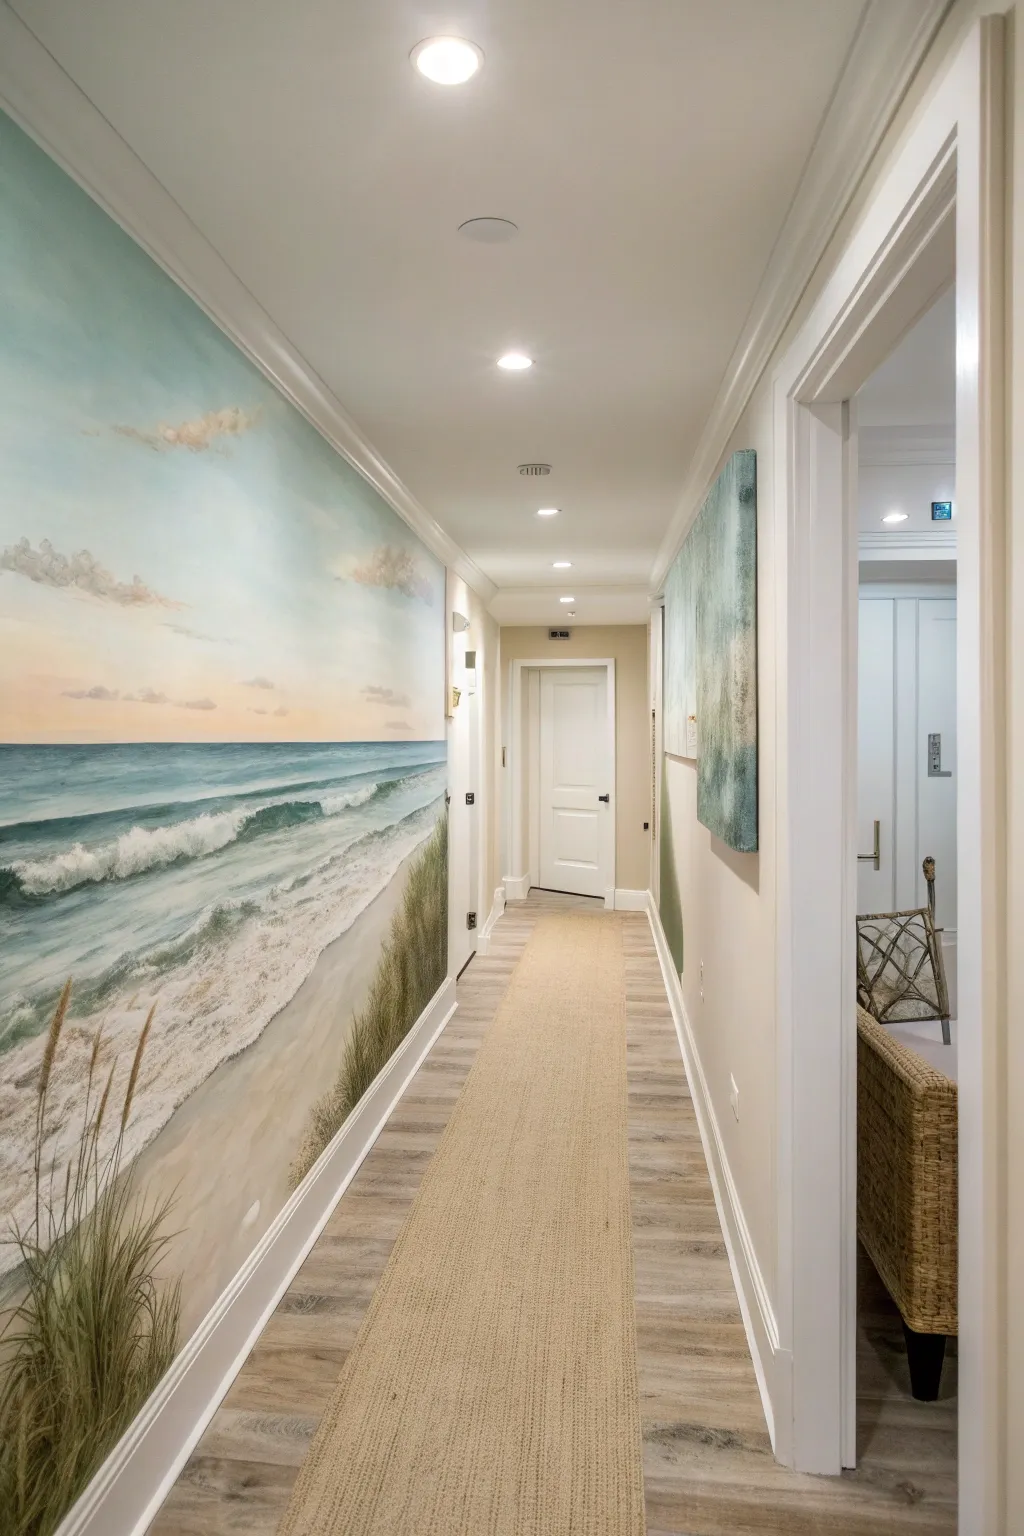
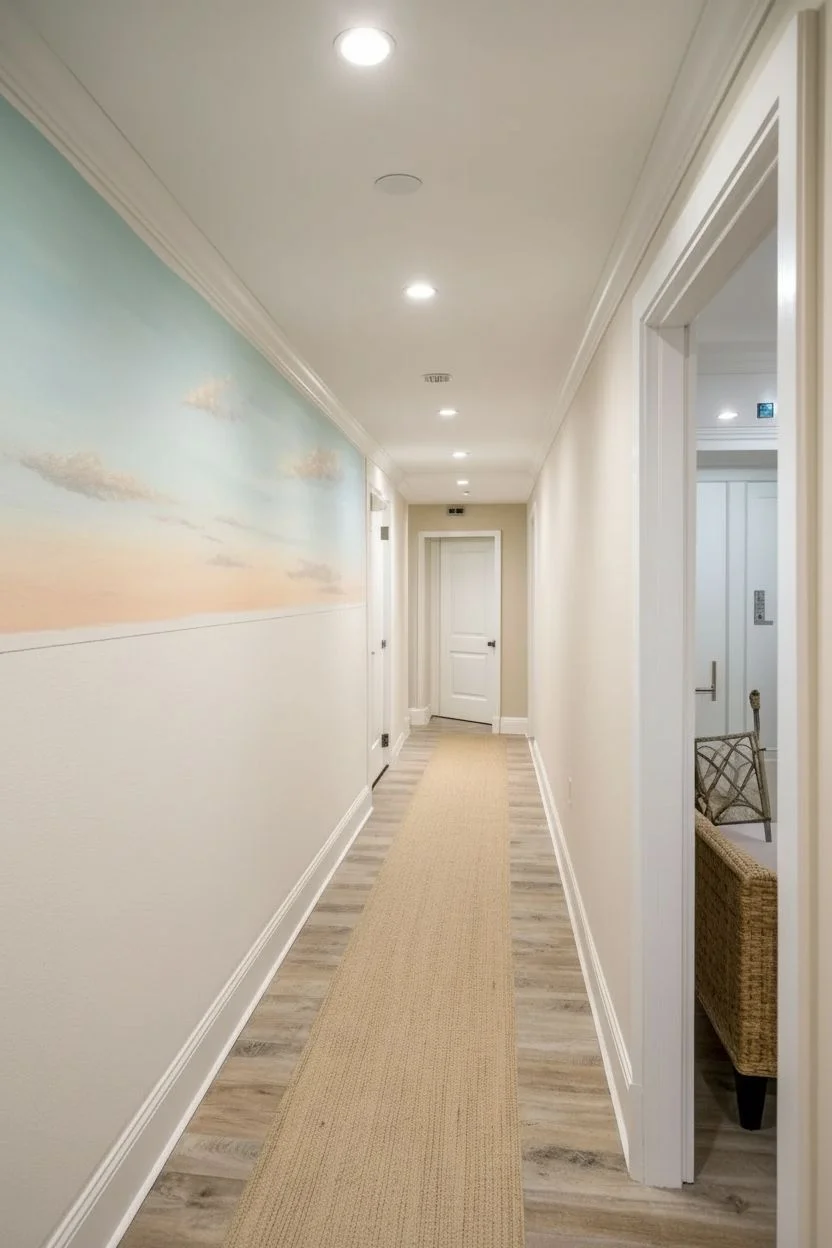
Transform a narrow hallway into a boundless beach escape with this immersive, panoramic mural project. Featuring rolling waves, textured sand dunes, and a soft sunset sky, this large-scale painting brings the calming rhythm of the ocean right into your home.
Step-by-Step Tutorial
Materials
- Interior acrylic latex paint (White, Beige, Light Blue, Teal, Navy Blue, Peach, Cream)
- Glazing medium
- Painter’s tape
- Drop cloths
- Sandpaper (220-grit)
- Wide wall paintbrushes (4-inch)
- Assorted artist brushes (fan brushes, round brushes)
- Sea sponge or rag (for texture)
- Trowel or palette knife (optional for texture medium)
- Chalk or pastel pencil (light gray)
- Stepladder
- Matte clear topcoat (polycrylic)
Step 1: Preparation & Sky Base
-
Prepare the canvas:
Clear the hallway wall completely. Remove outlet covers and patch any holes. Clean the surface with a mild degreaser and lightly sand it to ensure the paint adheres well. Mask off the ceiling, baseboards, and adjacent door frames with high-quality painter’s tape. -
Establish the horizon line:
Measure about one-third of the way up from the floor. Use a level and a chalk line or pencil to draw a straight horizontal line across the entire length of the wall. This divides your sea from your sky. -
Paint the upper sky:
Mix a pale blue with a touch of white. Using a large roller or wide brush, paint the upper third of the wall, fading the color out as you move downward toward the horizon. -
Blend the sunset gradient:
While the blue is still slightly tacky, introduce a soft peach or cream color near the horizon line. Use a large, dry brush to blend the meeting point of the blue and peach, creating a seamless, hazy transition. -
Add cloud wisps:
Dip a rag or sea sponge into a mix of white and cream paint. Dab lightly onto the sky area to create soft, low-hanging clouds. Soften the edges with a dry brush so they look windswept rather than stamped.
Step 2: Ocean & Waves
-
Block in the deep ocean:
Below the horizon line, paint a band of deep navy blue roughly 6-12 inches wide. Ensure the line against the sky is crisp and straight. -
Create the mid-water transition:
Mix teal with the navy blue. Paint the section below the deep ocean, blending the colors wet-on-wet to simulate the changing depth of the water. -
Paint the wave structure:
Switch to a lighter turquoise for the breaking wave area. Use horizontal strokes that slightly curve upward to imply the movement of water rushing toward the shore. -
Add the whitecaps:
Using a bright white paint and a rough bristle brush, stipple the tops of the turquoise waves. Drag the brush diagonally downward and back to create the ‘spray’ effect of crashing water. I find adding a little glazing medium helps the white flow more naturally over the blue. -
Detail the foam trails:
Paint thin, lace-like patterns of seafoam in the shallow water area using a fine liner brush and watered-down white paint. These should look like stretched ovals moving toward the sand.
Uneven Horizon Line?
If your horizon line wobbles, place a strip of painter’s tape across the dry sky area. Paint the ocean up to the tape edge, let dry, and peel for a razor-sharp line.
Step 3: Sand Dunes & Finishing Touches
-
Paint the wet sand:
Where the water meets the shore, paint a band of darker beige. Blend this into the water’s edge to make the sand look saturated and reflective. -
Fill the dry beach:
Paint the remaining bottom section of the wall with a warm, light beige. Use a dabbing motion or a sponge to give the sand a grainy texture rather than a flat finish. -
Sketch the grass placements:
Using your chalk, lightly sketch where the tall dune grasses will grow in the foreground. Vary their heights and group them in clumps for realism. -
Paint the dune grass base:
Mix an olive green with a bit of brown. Using a fan brush or a long liner brush, paint long, sweeping strokes upward from the bottom edge. Flick your wrist at the end of the stroke to taper the grass blades. -
Add grass highlights:
Mix a lighter ochre or yellow-green. Add a second layer of grass blades over the dark ones to create depth and dimension, simulating sunlight hitting the vegetation. -
Add seed heads:
Dab the tips of the tallest grasses with a small, fluffy brush and tan paint to create the fuzzy seed heads typical of sea oats. -
Seal the mural:
Once the entire mural has cured for at least 48 hours, apply a clearer water-based matte polycrylic over the wall to protect the artwork from scuffs and fading.
Level Up: 3D Texture
Mix clean sand or texture gel into your beige paint for the dune area. It creates actual grit on the wall that catches the light like a real beach.
Step back and enjoy the permanent vacation view you have created in your own home


Abstract Marble Swirls with Metallic Accents


Transform a plain hallway into a luxurious gallery space with this large-scale fluid art mural. Featuring sweeping currents of black, white, and grey highlighted by striking veins of metallic gold, this project brings the movement of stone to your walls.
How-To Guide
Materials
- High-quality interior latex paint (Eggshell or Satin): White, Black, Dark Grey, Light Grey
- Metallic Gold leaf paint or liquid gilding
- Clear acrylic glazing medium
- Assorted synthetic brushes (2-inch sash, 3-inch flat, and fine detail liners)
- Natural sea sponge or wool sponge
- Painter’s tape
- Drop cloths
- Plastic paint trays and mixing cups
- Spray bottle with water
- Soft rags or lint-free cloths
- Pencil and eraser
Step 1: Preparation and Planning
-
Prep the surface:
Begin by cleaning the wall thoroughly to remove dust and grease. Apply painter’s tape to the ceiling line, baseboards, and any adjacent door frames to protect them from wayward strokes. Lay down drop cloths to catch drips. -
Sketch the flow:
Stand back and visualize the movement of the marble. Lightly sketch the major ‘veins’ and flow lines using a pencil. Aim for large, sweeping S-curves rather than small squiggles to mimic the scale of natural stone. -
Map out color zones:
Mark which areas will be predominantly dark (black/charcoal) and which will remain airy and white. This roadmap prevents you from getting lost once the painting begins.
Stay Fluid
Keep a spray bottle of water handy at all times. If a transitioned area looks too stiff or brushy, a quick mist and a dab with a sponge can instantly soften it back into a natural fluid look.
Step 2: Creating the Marble Base
-
Mix your glazes:
In separate containers, mix your paint colors with the acrylic glazing medium. A ratio of 1 part paint to 4 parts glaze works well to create translucency. Keep some paint unthinned for opaque sections. -
Apply the lightest tones:
Start by brushing the white and light grey glazes onto the wall in the designated light areas. Use large, sweeping arm movements to keep the energy dynamic. -
Introduce the darks:
While the lighter layer is still tacky, begin applying the black and charcoal glazes in the dark zones. Overlap the edges slightly with the wet light areas. -
Soften the transitions:
Take a clean, damp sea sponge or a large dry brush and gently feather the edges where the black meets the white. The goal is a smoky, soft transition rather than a hard line. -
Add water for organic movement:
Mist sections lightly with your spray bottle. This encourages the glazes to run and drip in controlled ways, mimicking sedimentary layers. Catch excessive drips with a rag. -
Build depth with layering:
Once the first layer is dry, come back in with your darker unthinned paints to deepen the blackest parts of the swirl. This creates a sense of depth, creating a ‘void’ effect.
Adding Real Texture
Mix a small amount of fine sand or marble dust into your white base paint for the initial layers. This physical texture adds incredible realism when the light hits the wall.
Step 3: Refining the Details
-
Define the veins:
Using a smaller brush, paint thinner, more defined lines of dark grey and black through the lighter areas. Tremble your hand slightly as you pull the brush to create jagged, natural-looking veins. -
Create secondary veins:
Feather these veins out using a dry brush, pulling the color away from the line to make it look like it’s bleeding into the stone. -
Enhance the whites:
Bring back pure white paint to highlight areas adjacent to the darkest veins. High contrast is key to the marble look.
Step 4: The Golden Touch
-
Plan the gold placement:
Identify the most dynamic curves of your composition. The gold should act as a highlight, following the main ‘rivers’ of the design. -
Apply the liquid gilding:
Using a fine liner brush or a small angled brush, apply the gold paint. Vary the pressure—press down for thick sections and lift for hairline fractures. -
Add texture to the gold:
I like to dab a dry brush over parts of the wet gold to break it up, making it look like mineral deposits caught in the rock rather than a painted stripe. -
Step back and assess:
Frequently step back 10 feet to check the balance. If a gold section feels too heavy, glaze over parts of it with a translucent grey to push it ‘under’ the surface. -
Final touches:
Remove the painter’s tape carefully while the final touches are still slightly flexible to ensure clean lines.
Enjoy the sophisticated drama your new stone-inspired masterpiece brings to your home
Archway Illusion to Add Architecture
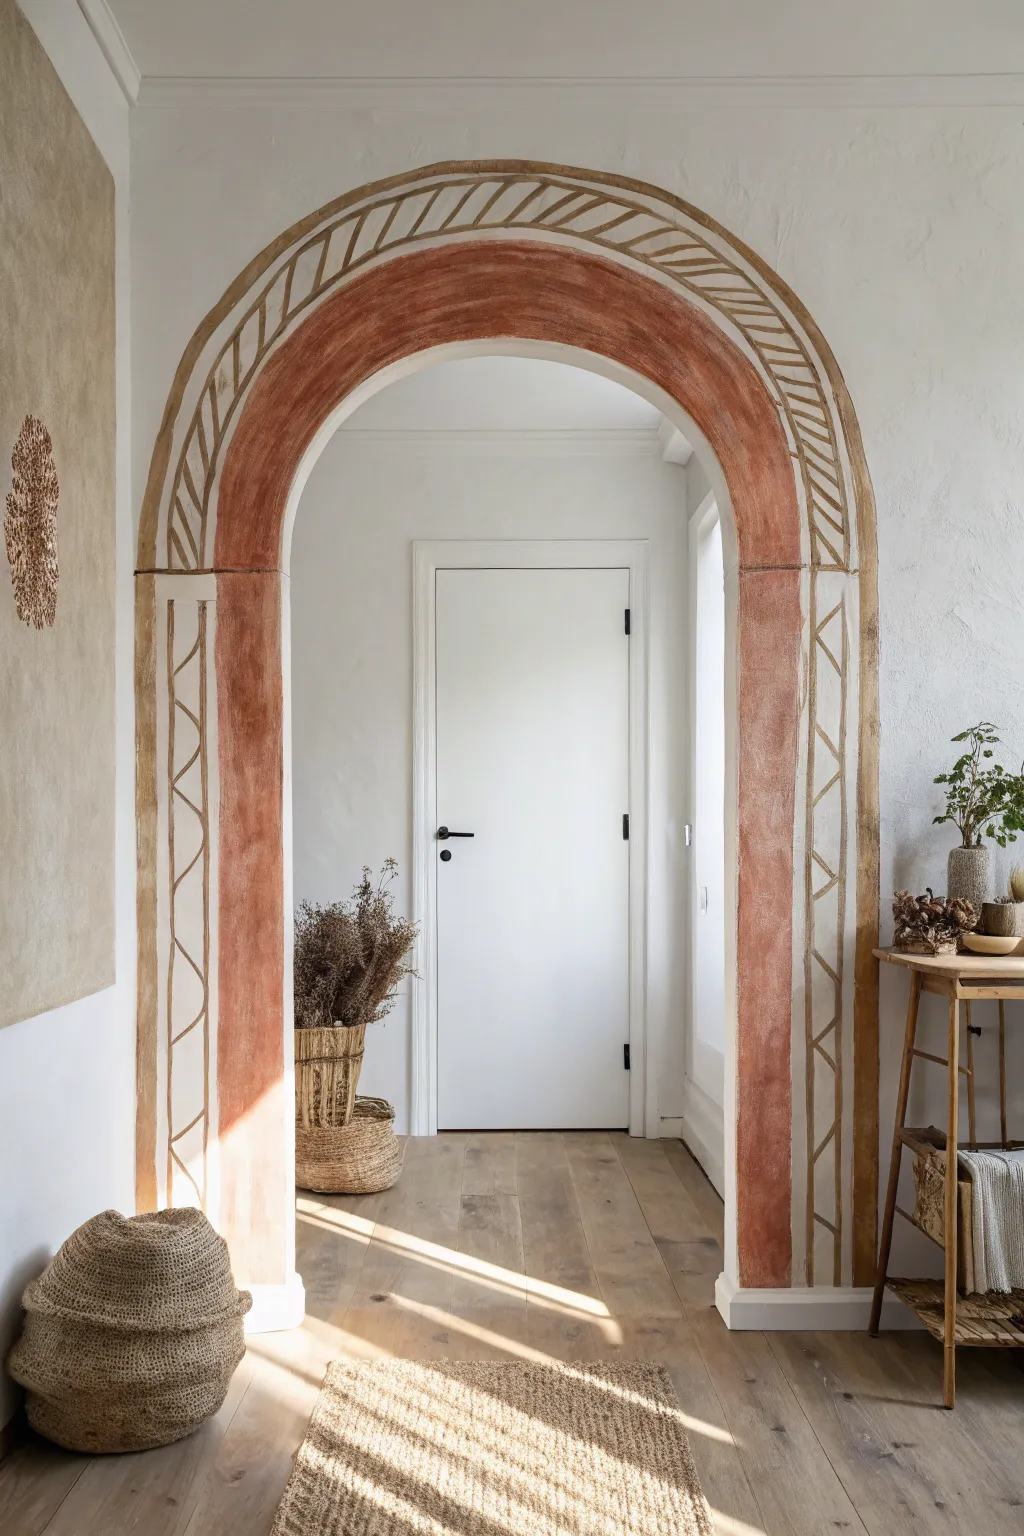

Transform a plain hallway passage or doorway into a stunning architectural feature using nothing but paint. This mural mimics the look of aged terracotta and plaster moulding to add convincing depth and Mediterranean warmth to your home.
Detailed Instructions
Materials
- Painter’s tape (multi-surface)
- Pencil
- String or twine
- Measuring tape
- Level
- Interior wall paint (creamy white base)
- Terracotta or warm rust-colored paint
- Tan or deep ochre acrylic paint
- Small flat artist brush (1/2 inch)
- Medium round artist brush
- Small roller (optional for base)
- Clean rag or sponge
- Step ladder
Step 1: Planning the Structure
-
Measure the opening:
Begin by measuring the width of your doorway or hallway opening. Determine the center point at the top of the door frame and mark it lightly with a pencil. -
Visualize the heights:
Decide how high you want your arch to go and how wide the ‘columns’ on the sides should be. A width of about 6-8 inches for the columns usually feels substantial enough without dominating the wall. -
Mark the vertical lines:
Using your level and a pencil, draw two vertical lines on each side of the opening to define the outer and inner edges of your faux columns. These lines should extend from the floor up to where the curve of the arch will begin. -
Create a compass:
Tie a piece of string to a pencil. Hold or tape the free end of the string at the center point you marked earlier. Enhance the stability by having a friend hold the string point while you draw. -
Draw the main arch:
Extend the string to match the outer width of your columns and draw a large semi-circle. Shorten the string to match the inner width and draw a second, smaller concentric arch.
Wobbly Arches?
If your hand-painted arch curve looks uneven, don’t repaint. Instead, widen the outer border line slightly in the thinner areas to visually correct the weight without losing the handmade charm.
Step 2: Painting the Base & Texture
-
Tape the boundaries:
Apply painter’s tape along the straight vertical outer edges you drew. For the curved top, you can carefully tape small overlapping pieces or rely on a steady hand later. -
Block in the main color:
Dip a medium brush into your terracotta or rust-colored paint. Paint the main body of the arch—the space between your outlines—using rough, vertical strokes. -
Create a wash effect:
While the paint is still wet, I like to dampen a rag and lightly rub areas of the paint to thin it out. This exposes some of the white wall underneath, creating a weathered, plaster-like effect. -
Soften the edges:
Don’t aim for perfectly crisp lines on the inner and outer boundaries. A slightly jagged, freehand edge mimics the organic look of old stone or chipped plaster. -
Let it dry completely:
Allow this base layer to cure for at least 2-4 hours before adding the intricate details.
Step 3: Adding Architectural Detail
-
Outline the structure:
Using a small flat artist brush and the tan/ochre paint, carefully paint a thin border along the inner and outer edges of your terracotta arch shape. This acts as the ‘frame’ for your moulding. -
Draw the capital line:
Where the vertical column meets the curved arch, paint a horizontal line across the terracotta width. This mimics the ‘capital’ or impost block found in classical architecture. -
Sketch the column pattern:
Lightly sketch a zigzag or diamond pattern down the center of the vertical terracotta sections using a pencil. -
Paint the column diamonds:
Trace over your pencil zigzags with the tan paint. Keep your hand loose; these lines represent carved stone, so minor imperfections add to the realism. -
Mark the voussoirs:
Along the upper curved arch, paint evenly spaced angled lines (hash marks) within the tan border you created earlier. These represent the individual wedge-shaped stones, or voussoirs, of the arch. -
Add the outer rim:
Paint a second, thinner arch line about an inch above the main structure using the tan paint. -
Connect the rim:
Add diagonal hash marks connecting the main arch to this new outer rim line, creating a rope-like or dentil moulding effect. -
Final weathering:
Mix a tiny amount of water into your tan paint. Use the rag to dab this diluted mixture sporadically over the finished design to dirty it up and unify the layers. -
Remove tape and inspect:
Peel off any tape carefully. Step back and look for areas that seem too ‘new.’ If needed, lightly sand spots with fine-grit sandpaper for extra patina.
Mix Your Media
For a grittier, real stone texture, mix a teaspoon of baking soda into your base terracotta paint. It creates a subtle 3D grain that catches the light beautifully.
Step back and admire how a simple paint application has given your hallway a sense of history and grandeur
Stairwell-Continuing Mural for Flow
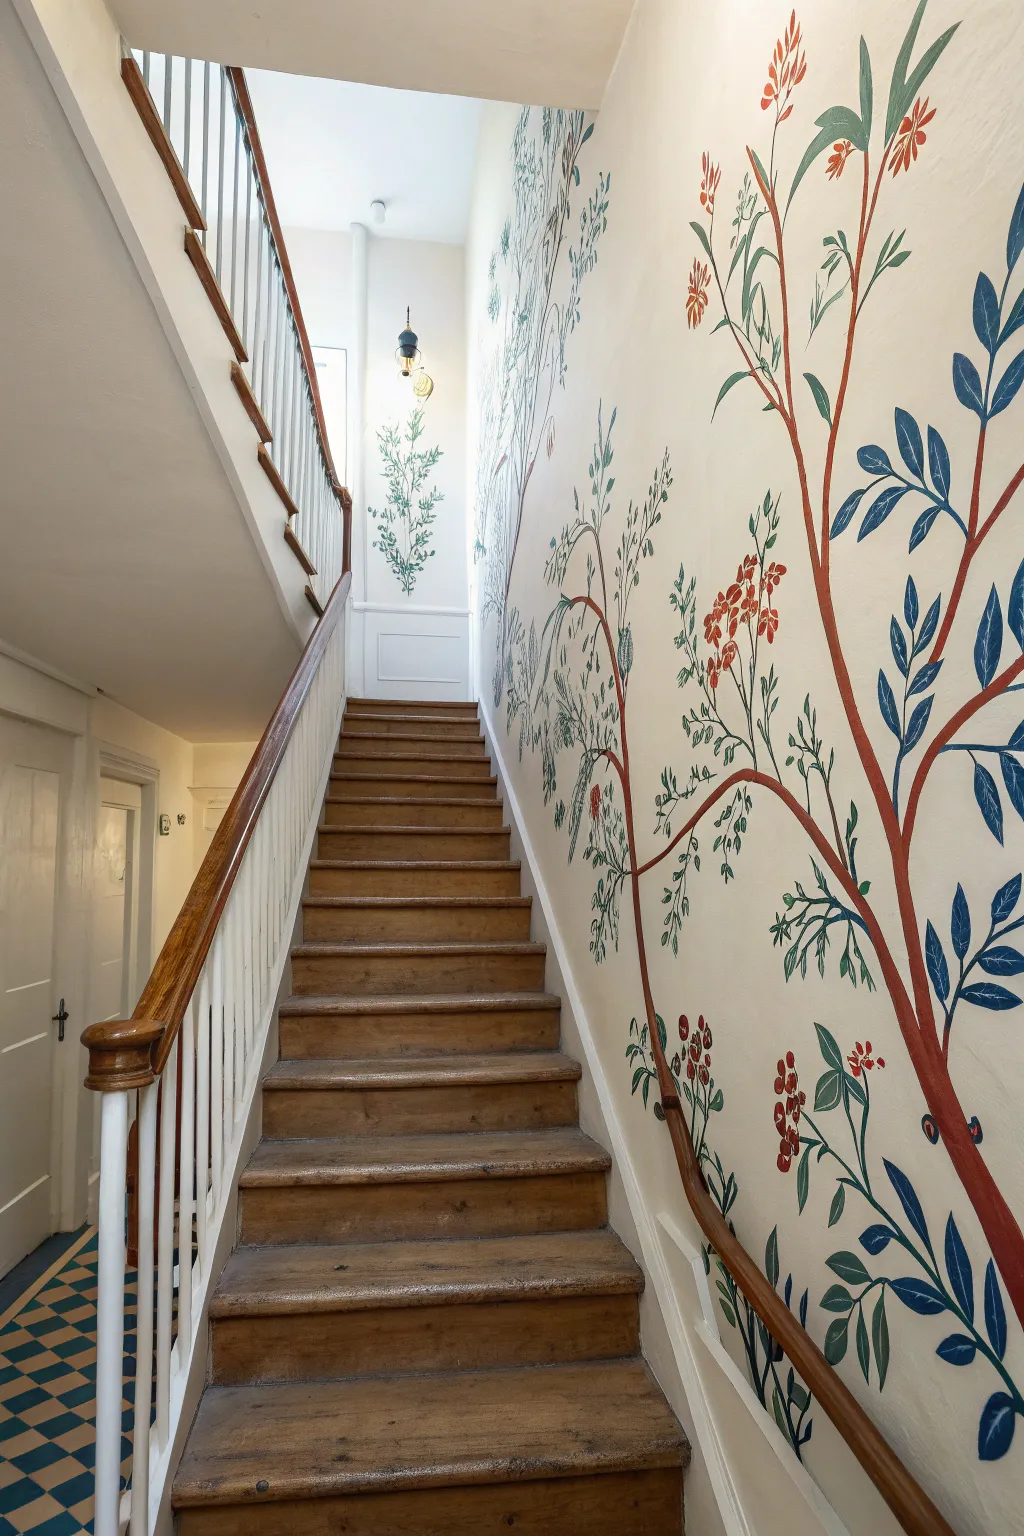
Transform a plain transitional space into a storybook garden with this floor-to-ceiling botanical mural. Featuring winding red-brown vines and stylized blue foliage, this project creates a sense of upward movement that perfectly complements a staircase’s architecture.
Step-by-Step
Materials
- Interior latex paint (eggshell or satin finish: off-white for base)
- Acrylic paints or high-quality latex samples (colors: terracotta red, deep navy blue, sage green, forest green)
- Pencils (HB or softer)
- Large eraser
- Assorted round brushes (sizes 4, 8, and 12)
- Liner brush (size 0 or 1 for fine details)
- Painter’s tape
- Drop cloths
- Step ladder
- Mixing palette or paper plates
- Cup of water and rags
Step 1: Preparation and Planning
-
Prepare the surface:
Clean your stairwell walls thoroughly to remove dust and handprints. If the existing paint is dark or glossy, apply a fresh coat of off-white eggshell primer and paint to create a neutral canvas that allows the mural colors to pop. -
Protect the area:
Lay down drop cloths on the stairs, securing them with painter’s tape to prevent slipping. Tape off the baseboards, handrails, and ceiling line to ensure crisp edges. -
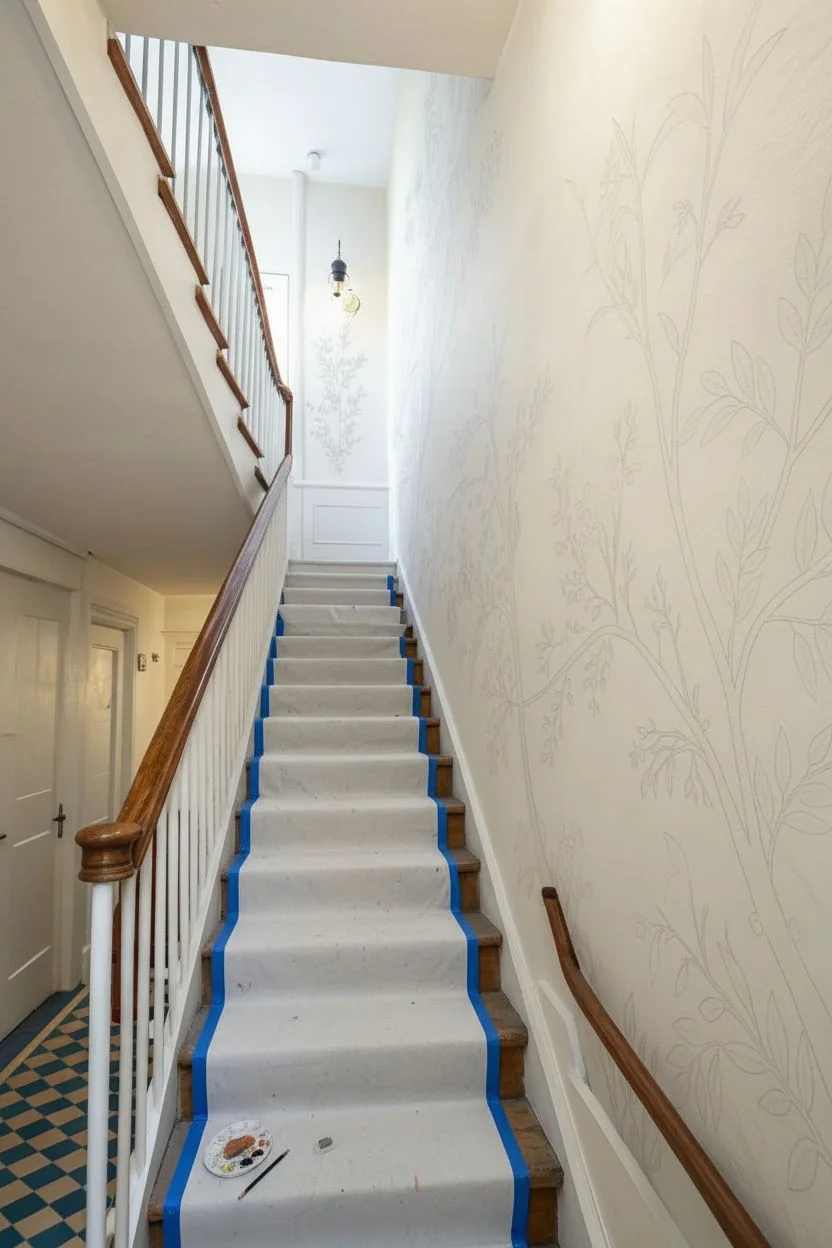
Sketch the main structure:
Using a pencil, lightly sketch the primary ‘trunks’ or main vines. I recommend starting from the bottom of the stairs and drawing long, winding lines that reach upward and branch out organically. Keep the lines somewhat wavy to mimic natural growth.
Natural Flow Tip
Don’t overthink symmetry. Real plants grow towards light perfectly imperfectly. If your hand shakes, turn that wobble into a knot in the wood or a bend in the vine.
Step 2: Painting the Structure
-
Mix the trunk color:
Create a warm, reddish-brown hue by mixing terracotta paint with a touch of brown. You want a color that contrasts well with the wall but feels earthy. -
Paint the main stems:
Using a size 12 round brush, follow your pencil lines to paint the main trunks. Vary the pressure on your brush—press harder for thicker sections near the bottom and lighter for thinner branches near the top. -
Add secondary branches:
Switch to a size 8 brush to add smaller offshoot branches. These should angle upwards and outwards from the main stems, creating a lattice-like structure for your leaves. -
Let the structure dry:
Allow the red-brown stems to dry completely before moving on to foliage. This usually takes about an hour depending on humidity and paint thickness.
Opacity Issues?
If your blue or red paint looks streaky or translucent on the first pass, don’t keep brushing it while wet. Let it dry completely, then apply a second coat for solid, bold color.
Step 3: Adding Foliage and Details
-
Plan leaf clusters:
Lightly mark where your major leaf clusters will go. Notice how the original design alternates between large, bold leaves and smaller, delicate sprigs. -
Paint large blue leaves:
Load a size 8 brush with deep navy blue paint. Paint simple, almond-shaped leaves attached to the thicker branches. Use a single stroke method: press down at the base of the leaf and lift as you pull outward to create a point. -
Add variance with green:
Mix a muted sage green. Paint smaller, fern-like clusters on the lower branches or interspersed between the blue leaves. This variation adds depth and prevents the pattern from looking too repetitive. -
Create berry clusters:
Using the terracotta red color (or a slightly brighter shade), use the tip of a size 4 brush to dab small clusters of dots near the ends of finer branches. These mimic berries or flower buds. -
Detail the leaves:
Once the blue leaves are dry, you can use a liner brush with a slightly lighter blue or white to add tiny veins, though the style here works beautifully with solid silhouetted shapes too. -
Fill gaps:
Step back and assess the composition. If there are large empty spaces, add floating sprigs or smaller independent plants rising from the ‘ground’ (skirting board level) to balance the visual weight.
Step 4: Refining and Finishing
-
Clean up lines:
Use your wall base color and a small angles brush to touch up any accidental drips or ragged edges on the vines. -
Erase guidelines:
Once the paint is fully cured (give it at least 24 hours just to be safe), gently erase any visible pencil marks. Be careful not to rub the fresh paint too vigorously. -
Remove tape:
Peel off the painter’s tape slowly at a 45-degree angle. This ensures you don’t pull any paint off the baseboards or trim.
Now you have a stunning, custom piece of art that turns a functional stairwell into a charming journey
Dark and Moody Florals for Jewel-Box Drama
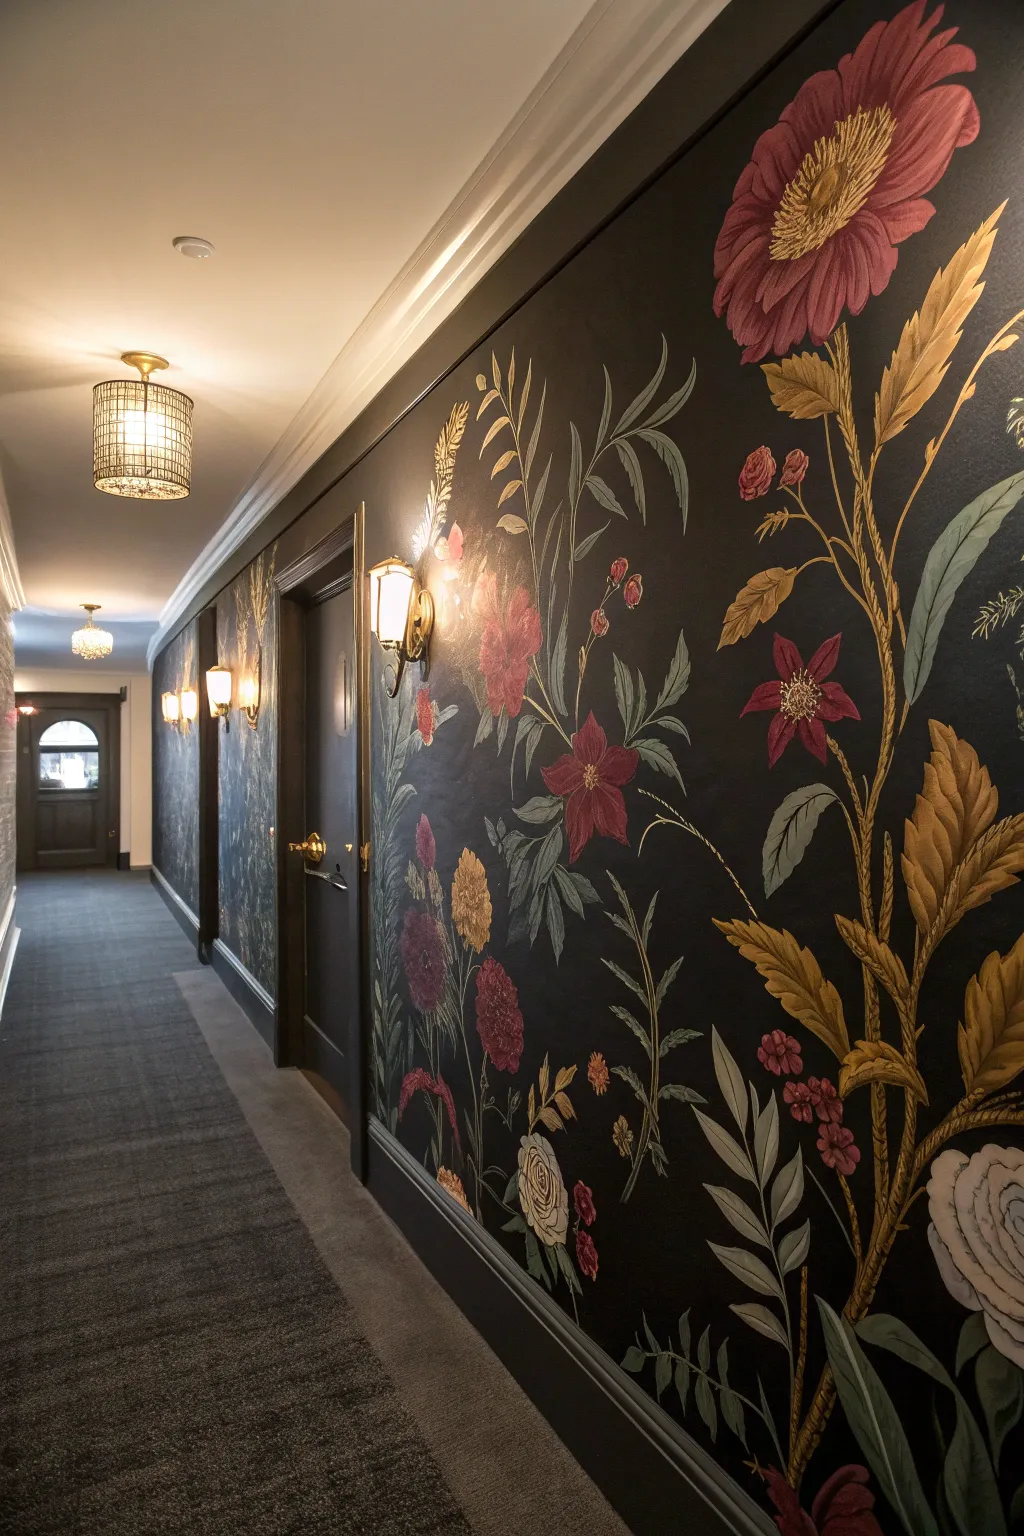

Transform a plain hallway into an opulent, immersive experience with this dark floral mural technique. The contrast of rich jewel tones against a matte black background creates a stunning depth that feels both vintage and thoroughly modern.
Detailed Instructions
Materials
- Matte black interior latex paint (high quality)
- Painter’s tape and drop cloths
- Projection device (or large-scale floral stencils)
- Acrylic paints (Burgundy, Gold Ochre, Sage Green, Dusty Rose, Cream, Burnt Umber)
- Glazing medium
- Assorted synthetic brushes (1-inch flat, #6 round, #2 liner)
- Chalk or pastel pencils (white or light grey)
- Step ladder
- Satin varnish (optional)
Step 1: Preparation & Base Coat
-
Clean and prep:
Begin by thoroughly cleaning the walls with a mild degreaser or TSP substitute to ensure perfect adhesion. Patch any holes and sand smooth. -
Mask the trim:
Apply painter’s tape carefully along the ceiling line, baseboards, and door frames. Lay down drop cloths to protect your flooring. -
Apply the darkness:
Roll on the matte black base coat. This step is crucial; you want a velvety, solid background. Apply two coats, allowing at least 4 hours of drying time between them. -
Check coverage:
Inspect the wall under bright light to ensure no patches are showing through. The magic of this mural relies on the darkness being absolute and uniform.
Step 2: Designing the Composition
-
Select your botanicals:
Choose high-resolution botanical illustrations. Look for a mix of large focal flowers (peonies, dahlias) and sprawling fillers (ferns, vines) to create movement. -
Project the design:
Set up a projector to cast your chosen floral arrangement onto the black wall. Adjust the scale so the flowers are larger than life—drama is key here. -
Trace the outlines:
Using a white chalk pencil or pastel, lightly trace the projected shapes. Focus only on the main silhouettes and key internal lines like major veins or petal overlaps. -
Establish flow:
If you don’t have a projector, sketch freehand using large sweeping motions to mimic vines climbing upward. I like to start from the bottom corners and work towards the center.
Chalky Residue?
If chalk marks adhere too stubbornly to matte paint, use a kneaded eraser instead of a wet cloth to lift the dust without creating muddy smears on your dark wall.
Step 3: Painting the Botanicals
-
Block in base colors:
Mix your acrylics with a small amount of water to improve flow. Block in the main shapes with flat color—deep burgundy for petals, olive green for leaves. Don’t worry about shading yet. -
Layer the leaves:
For the foliage, mix a sage green and a darker forest green. Paint the leaves using long, fluid strokes. Add touches of burnt umber to the stems to ground them against the black. -
Add floral depth:
On the flower petals, apply a mid-tone color. While wet, blend in a darker shade near the center/base of the petal and a lighter tint at the edges to create volume. -
Highlighting gold accents:
For the wheat-like sprays and fern tips seen in the image, use Gold Ochre mixed with a touch of cream. Use a round brush to dab textures, mimicking pollen or seeds. -
Refining the details:
Switch to a #2 liner brush. Add fine veins to the leaves and delicate striations to the petals using a lighter version of your base colors. -
The glazing technique:
To achieve that ‘old master’ painting look, mix a tiny drop of black or brown paint with glazing medium. Lightly brush this over the shadowed areas of the flowers to knock back the brightness. -
Pop the whites:
For white flowers (like the bottom right rose), use cream rather than stark white. Add grey-blue shadows to give it a realistic, spherical form.
Pro Tip: Perspective
Make the mural feel endless by wrapping vines around corners or door frames. Painting partial leaves ‘entering’ from the edges suggests a wider garden beyond the wall.
Step 4: Finishing Touches
-
Erase guidelines:
Once the paint is completely dry (give it overnight to be safe), use a damp cloth to gently wipe away any visible chalk lines. -
Touch up the black:
Inspect the edges of your flowers. If you colored outside the lines, use a small angled brush and your wall color to ‘cut in’ and sharpen the silhouettes. -
Seal (Optional):
If this is a high-traffic hallway, apply a clear satin water-based varnish over the painted florals only for protection, leaving the background matte.
Step back and admire how a simple coat of paint has turned a transition space into a destination worthy of an art gallery
Whimsical Storybook Nature Trail
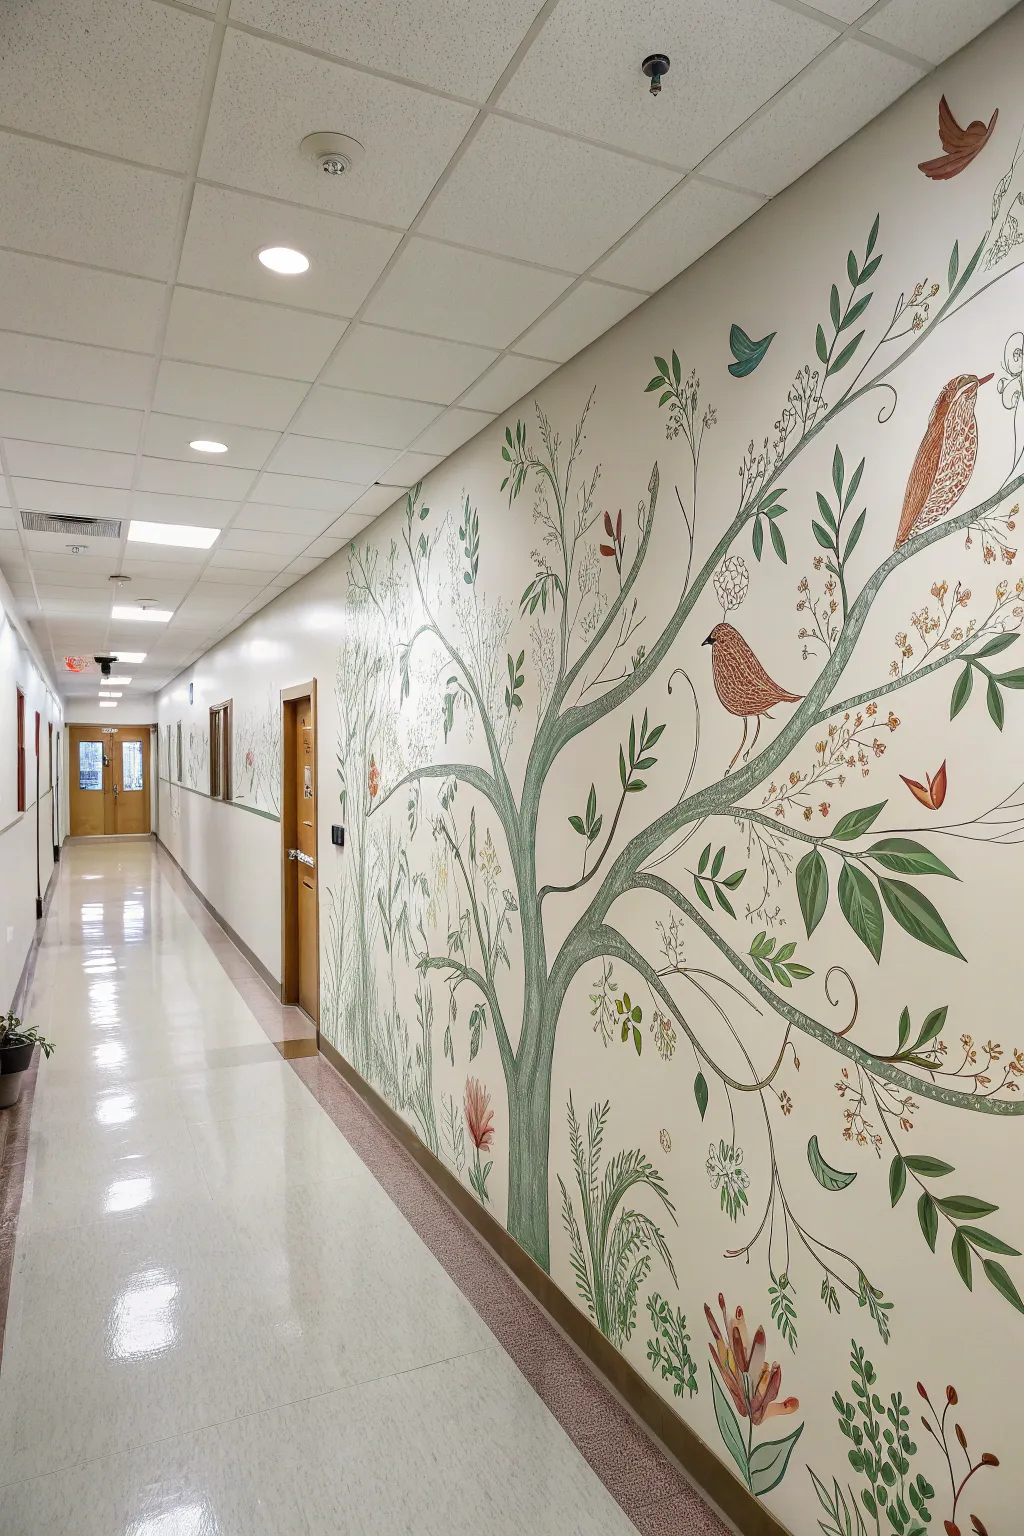
Transform a sterile hallway into an enchanting woodland walk with this delicate, illustrative mural. Featuring organic, climbing branches filled with stylized birds and soft flora, this project uses a muted, natural palette to create a calming atmosphere perfect for passage spaces.
Step-by-Step Tutorial
Materials
- Interior semi-gloss or satin latex paint (ivory/cream for base wall)
- Acrylic mural paints or high-quality latex samples (sage green, forest green, muted terracotta, brownish-grey, dusty pink)
- Assorted brush set: Angled sash brush (2 inch), round brushes (sizes 4, 6, 8), liner brush (size 0 or 1)
- Chalk or watercolor pencil (light grey)
- Painter’s tape and drop cloths
- Stepladder
- Small plastic cups or palette for mixing
- Soft rag or sponge
Step 1: Preparation and Base
-
Clean the Surface:
Begin by thoroughly cleaning the hallway wall with a mild TSP substitute or warm soapy water to remove dust and oils. This ensures your paint adheres properly and lasts longer. -
Protect the Area:
Tape off the baseboards, door frames, and ceiling edges with painter’s tape. Lay down drop cloths along the entire length of the hallway to catch any accidental drips. -
Apply the Base Coat:
Using a roller, apply two coats of an ivory or warm cream semi-gloss latex paint. Let this dry completely—usually at least 4 hours—before starting any sketch work.
Pro Tip: Transparency
For this watercolor-like aesthetic, dilute your acrylics with a little glazing medium. This makes the paint semi-transparent, allowing layers to overlap beautifully like ink.
Step 2: Sketching the Composition
-
Plan the Tree Structure:
Lightly sketch the main tree trunk positions using contrasting chalk or a watercolor pencil. Start from the bottom corner and allow the main branches to arc gracefully upward and outward, mimicking the natural reach of a growing tree. -
Add Secondary Branches:
Extend thinner offshoot branches from your main trunks. Keep the lines wavy and organic rather than straight; think about how vines twist and turn. -
Outline Major Elements:
Roughly mark the placement of larger leaves and the birds. You don’t need detail yet, just circles or ovals to ensure your composition feels balanced along the wall.
Troubleshooting: Shaky Lines
If your long branch lines look shaky, try supporting your painting hand with your pinky finger against the wall, or use a mahl stick to steady your arm while working.
Step 3: Painting the Foliage
-
Base the Branches:
Mix a muted brownish-grey color. Using a 1-inch brush or large round brush, fill in the tree trunks and main branches. Keep the paint relatively thin so the texture of the wall helps create an organic wood grain look. -
Refine Line Weights:
Switch to a size 6 round brush to taper the ends of the branches. I find dragging the brush quickly at the end of a stroke helps create that natural, thinning tip. -
Paint Large Leaves:
Using sage green and forest green, paint the larger, prominent leaves. Use a single stroke method: press down on the brush to widen the stroke and lift up to create a point. -
Add Leaf Details:
Once the green leaves are dry, take a liner brush with a lighter green or cream mix to add delicate veins. This illustrative style relies on simple line work rather than complex shading. -
Create Ferns and Grasses:
Near the base of the wall, paint clusters of tall grasses and fern-like fronds using varying shades of green. Use quick, upward flicking strokes to give them energy and lift.
Step 4: Adding Life and Detail
-
Paint the Birds Base:
Fill in the bird silhouettes with a flat coat of muted terracotta or warm brown. Let this layer dry completely. -
Detail Feathers:
Using a fine liner brush and a darker brown or cream, add stippled dots, dashes, and small scallops to the bird bodies to suggest feathers and wings. -
Illustrate Floral Accents:
Using a dusty pink or coral shade, paint small blossoms and buds on the tips of thinner branches. Keep these shapes loose and painterly. -
Add Dainty stems:
With your thinnest liner brush and watered-down dark grey paint, add very fine stems connecting the flowers and berries. These should be extremely delicate lines. -
Incorporate Texture:
For the airy, background foliage, use a dry-brush technique with very pale grey-green paint to create soft, textured clusters that look like distant leaves or baby’s breath. -
Final White Highlights:
Go back in with pure white or very light cream to add tiny highlights on the birds’ eyes and the tips of the most prominent leaves to make them pop. -
Clean Up:
Once fully dry, wipe away any visible chalk lines with a damp sponge and slowly peel up the painter’s tape.
Enjoy the peaceful journey your hallway now offers every time you walk through
Cityscape Silhouette for Graphic Impact
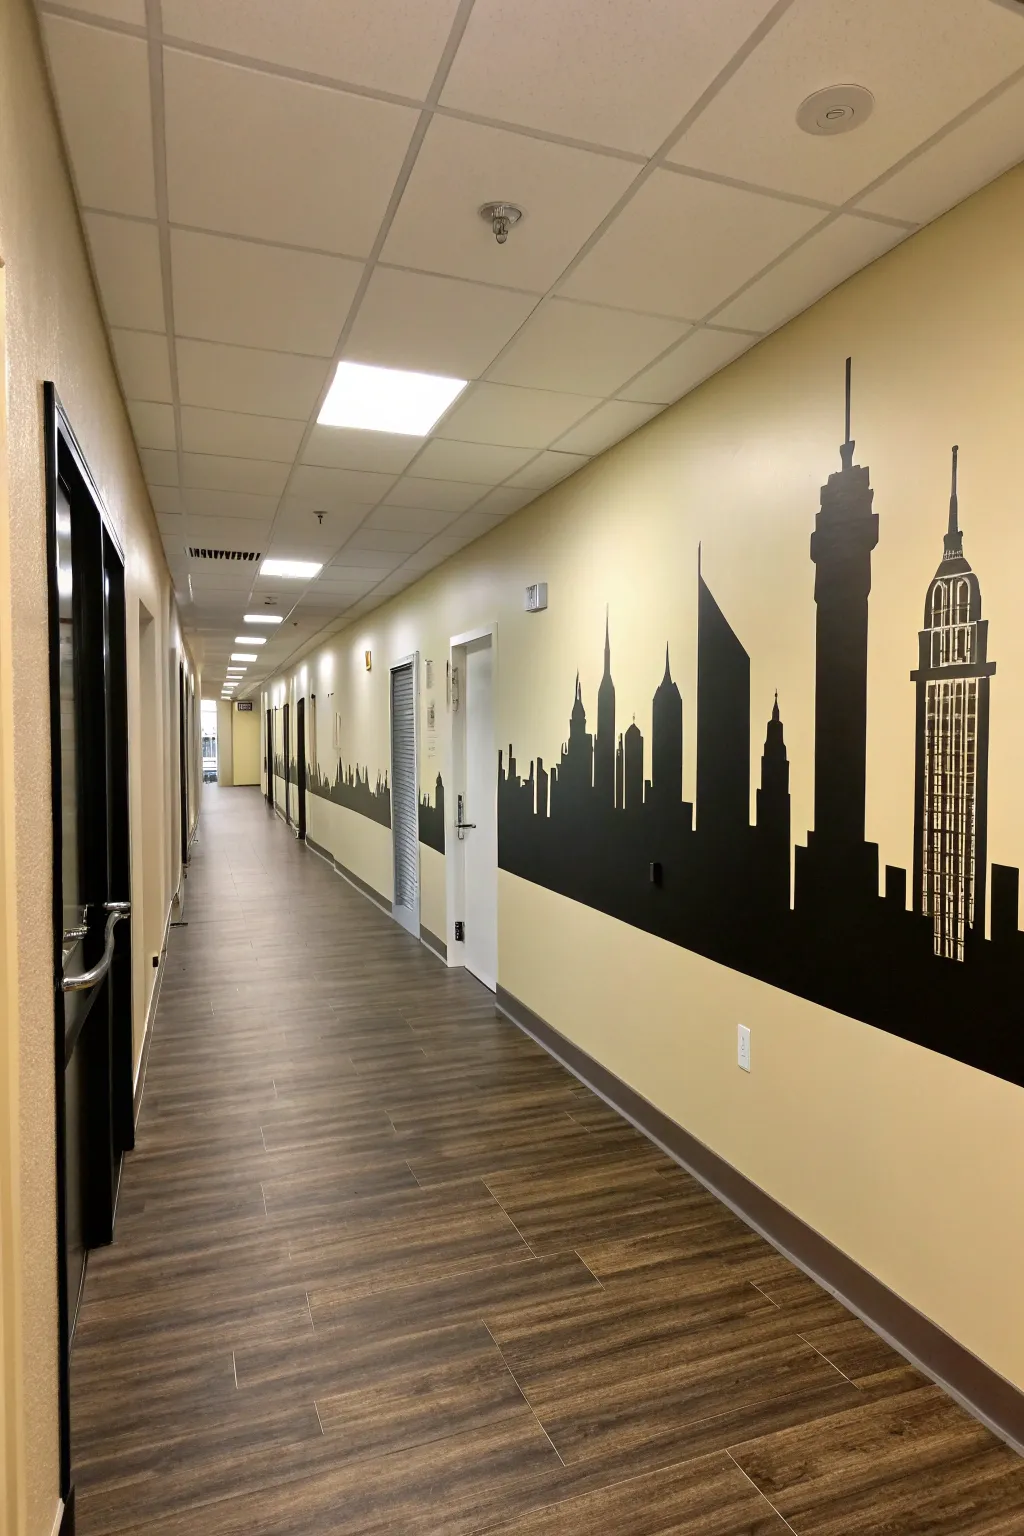
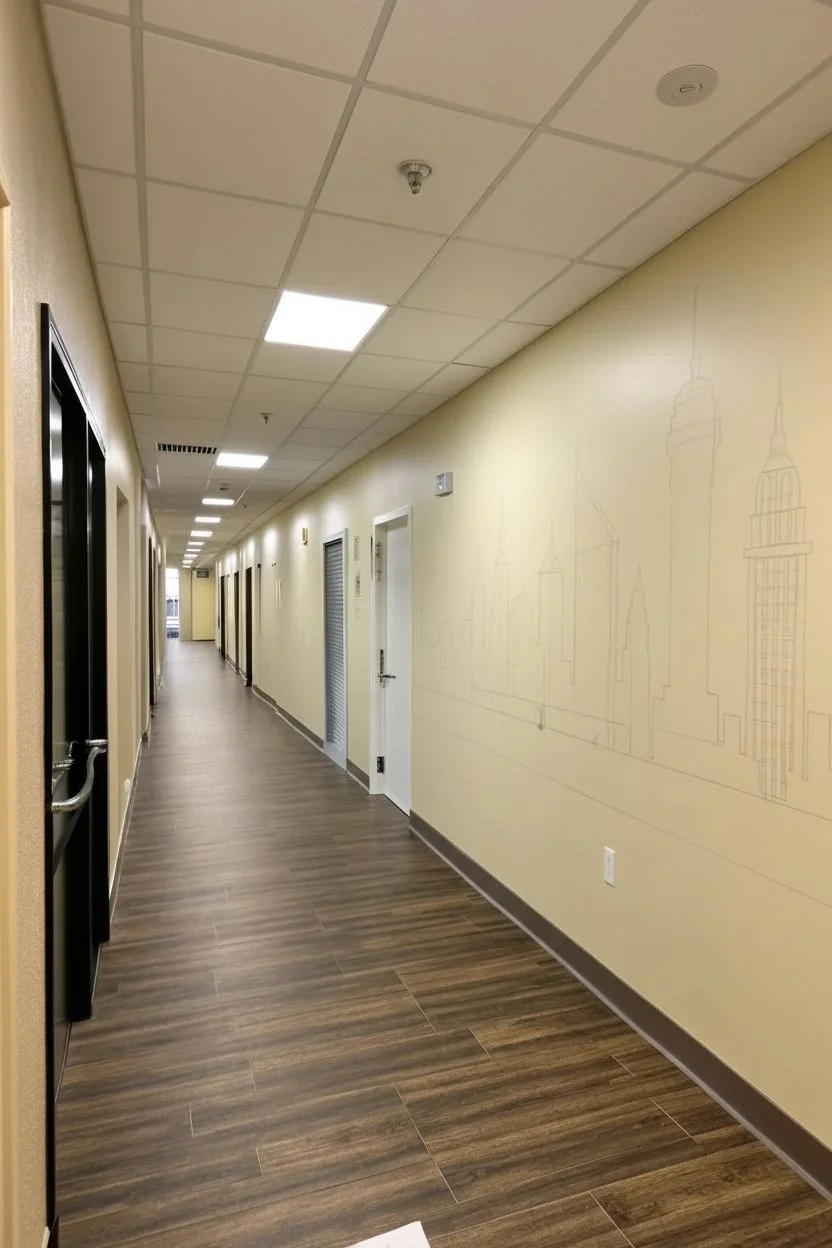
Transform a blank hallway into a bustling metropolis with this striking, high-contrast cityscape silhouette. This graphic skyline design adds depth and architectural interest to long corridors without overwhelming the space, creating a modern and sophisticated atmosphere.
Step-by-Step
Materials
- High-quality interior painter’s tape (blue or green)
- Black semi-gloss or satin interior latex paint
- Measuring tape and pencil
- Laser level (optional but highly recommended)
- Small foam roller (4-inch) and handle
- Detail paint brush (angled sash brush and small artist brush)
- Drop cloth
- Damp rag for clean-up
- Cityscape reference images or stencils (optional)
- X-Acto knife or utility knife for trimming tape
Step 1: Preparation & Layout
-
Prepare the Surface:
Begin by cleaning the wall thoroughly with a mild detergent and water solution to remove any dust or oils that interfere with paint adhesion. Let the wall dry completely before starting. -
Establish the Horizon Line:
Decide on the height of your main skyline base. I usually place this about 3 to 4 feet from the floor for a hallway. Use a laser level or a measuring tape and level to mark a faint horizontal pencil line continuously down the entire length of the hallway. -
Sketch the Skyline:
Using a pencil, lightly sketch the outlines of your buildings above the horizon line. You can freehand famous skyscrapers like the Empire State Building, or use a projector to cast an image onto the wall for tracing if you aren’t confident drawing freehand. -
Vary Height and Shape:
Ensure visual interest by varying the heights and roof shapes. Alternate between pointed spires, flat tops, and stepped designs. Leave small gaps of negative space (the wall color) between some buildings to define them.
Bleed-Through Blues?
If black paint bleeds under the tape, don’t panic. Wait for it to dry completely, then use a small flat artist brush and your original wall color to neatly ‘erase’ the mistake.
Step 2: Taping & Masking
-
Tape the Base Line:
Apply a strip of painter’s tape directly below your main horizon line to protect the lower wall area if you want a clean separation, though in this design, the black extends all the way down. If you want the black to go to the floor (as shown), mask off the baseboard molding carefully. -
Outline Straight Edges:
Use painter’s tape to mark out the long vertical sides of the rectangular buildings. This ensures crisp, perfectly straight lines that are hard to achieve by hand. -
Cut Detailed Shapes:
For complex shapes like spires or antennas, apply a wider patch of tape to the wall, sketch the shape onto the tape, and carefully cut out the negative space with an X-Acto knife, pressing lightly to avoid damaging the drywall. -
Seal the Tape Edges:
Run your finger or a plastic smoothing tool firmly along all tape edges. To prevent bleed-through, you can paint a very thin layer of the *existing wall color* over the tape edge first; this seals the tape so the black paint won’t seep under.
Pro Tip: Light Touch
When painting near the tape edge, don’t overload your brush or roller. Pushing too much paint against the tape edge forces liquid underneath. Use multiple thin coats instead.
Step 3: Painting the Silhouette
-
Cut In Edges:
Using your angled sash brush, carefully paint the outlines of the buildings. For the detailed areas meant to look like windows or internal structures (like on the skyscraper on the right), use the small artist brush to paint the negative space lines. -
Fill Large Areas:
Once the detailed edges are established, use the 4-inch foam roller to fill in the main bodies of the buildings. A foam roller provides a smooth finish without too much texture. -
Apply Second Coat:
Black paint can sometimes look streaky after one pass. Allow the first coat to dry for at least 2-4 hours, then apply a second coat to ensure a deep, opaque solid black. -
Handle Door Frames:
When your mural encounters a door frame, carefully paint up to the trim. Use a small brush to get a clean line where the wall meets the casing.
Step 4: Finishing Touches
-
Remove Tape While Tack-Free:
The best time to remove tape is when the paint is dry to the touch but not fully cured—usually about an hour after the final coat. Pull the tape slowly at a 45-degree angle away from the painted edge. -
Touchups:
Inspect your edges. If any paint bled under the tape, use a tiny artist brush and the original wall color to clean up the lines. Conversely, fill in any black spots you missed. -
Add Window Details:
For the specific look of the lighted skyscraper on the right, you have two options: either mask off the grid lines before painting (as done in the taping phase), or paint the building solid black first and then use a white paint pen or a thin brush with the wall color to draw the window grid over the dried black paint.
Step back and admire your custom urban landscape that brings dynamic energy to your home.
Ceiling Spillover for a Wraparound Moment
Transform a plain corridor into a lush, illustrated pathway with this large-scale botanical mural. Featuring oversized stylized leaves in a calming palette of teal, coral, and deep navy, this project brings vibrant energy to transitional spaces without overwhelming them.
How-To Guide
Materials
- Interior latex paint (white base)
- Sample pots of latex paint (teal, sage green, navy blue, coral pink, terracotta)
- Pencil and large eraser
- Painter’s tape
- Drop cloths
- Assorted angled sash brushes (1.5 inch and 2 inch)
- Small round artist brushes (size 4 and 8) for details
- Paper plates or palette
- Ladder or step stool
- Level and measuring tape
- Projector (optional but recommended)
Step 1: Preparation and Layout
-
Clear and Prep:
Remove any existing artwork or hardware from the hallway wall. Clean the surface thoroughly with a mild detergent solution to remove dust and grease, ensuring the paint adheres properly. Tape off baseboards, door frames, and the ceiling line. -
Base Coat Application:
If your hallway isn’t already a crisp, clean white, roll on a fresh coat of high-quality white interior latex paint. This high-contrast background is essential for making the botanical colors pop. Let this dry completely, ideally overnight. -
Design Planning:
Sketch your leaf layout on paper first. Aim for a mix of leaf shapes: large pinnate leaves (feather-like), broad Monstera-style leaves, and smaller fern sprigs. Vary the heights and angles to create a natural, organic flow that draws the eye down the hall. -
Sketching the Mural:
Lightly draw your design onto the wall using a pencil. If you aren’t confident freehanding, use a projector to cast your sketch onto the wall and trace the outlines. I like to stand back frequently during this phase to check the overall balance.
Uneven Coverage?
If lighter colors like coral or sage look streaky after one coat, don’t overwork the wet paint. Let it dry completely, then apply a second thin coat for a solid, professional finish.
Step 2: Painting the Foliage
-
Mixing Your Palette:
Pour your paint colors onto paper plates. You want a distinct palette: a deep navy for contrast, a dusty coral for warmth, a mid-tone teal, and a soft sage green. Keep a wet rag nearby for quick cleanups. -
Blocking in Large Shapes:
Start with the largest leaves first. Using a 2-inch angled sash brush, fill in the broad shapes of the biggest leaves. Don’t worry about the stems or veins yet; just focus on getting solid, opaque coverage within your pencil lines. -
Working in Sections:
Move down the hallway in 3-4 foot sections. This prevents you from leaning into wet paint. Paint all the leaves of one color in that section before switching brushes, or deliver a random mix if you prefer a more eclectic look. -
Adding the Navy Contrast:
Paint the dark navy leaves next. These act as visual anchors. Use the angled brush to create sharp, crisp points at the tips of the leaves. High contrast is key here, so apply a second coat if the first looks streaky. -
Filling with Mid-Tones:
Fill in the remaining medium-sized leaves with your teal and sage green paints. Ensure these leaves overlap or nestle near the larger ones to avoid awkward empty gaps.
Step 3: Details and Refining
-
Painting Stems:
Switch to your smaller sash brush or a large round artist brush. Paint the long, sweeping stems connecting your leaves to the bottom of the wall (or imaginary ground line). Keep your hand loose to create elegant curves rather than stick-straight lines. -
Adding Veins:
Once the base leaf colors are fully dry, use a small round brush (size 4) and white paint to add the central veins and ribbing detail. This “negative space” technique gives the mural its illustrative, graphic quality. -
Layering Elements:
For a sense of depth, you can paint a few smaller fern-like sprigs in the foreground. I prefer doing these last to fill any negative space that feels too empty. -
Touch Guys:
Walk the length of the hallway with your white base paint and a small brush. Clean up any edges where the colored paint may have engaged in a little unauthorized wandering outside the pencil lines. -
Erase and Clean:
Gently erase any visible pencil marks that weren’t covered by paint. Peel off the painter’s tape slowly at a 45-degree angle to ensure crisp edges at the ceiling and baseboards.
Sharp Tips
To get those perfect pointed leaf tips, press the brush firmly at the base of the leaf and lift pressure gradually as you pull toward the tip, flicking your wrist at the very end.
Step back and enjoy the vibrant, artistic journey you’ve created right in your own home
Painted “Gallery Lighting” Highlights
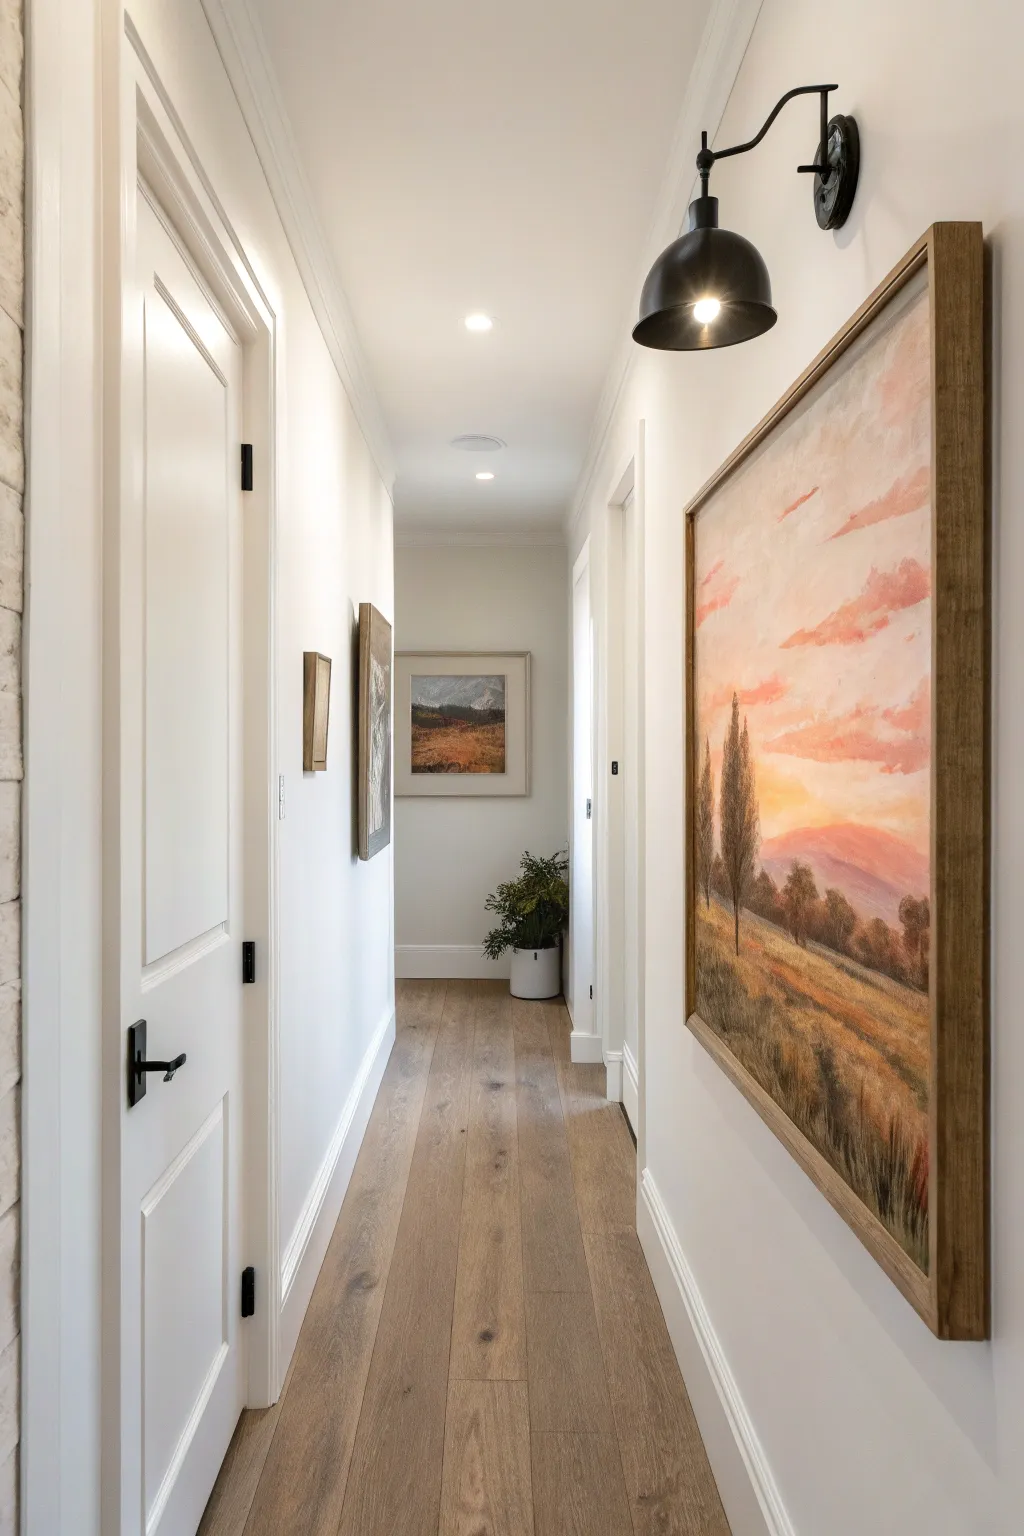
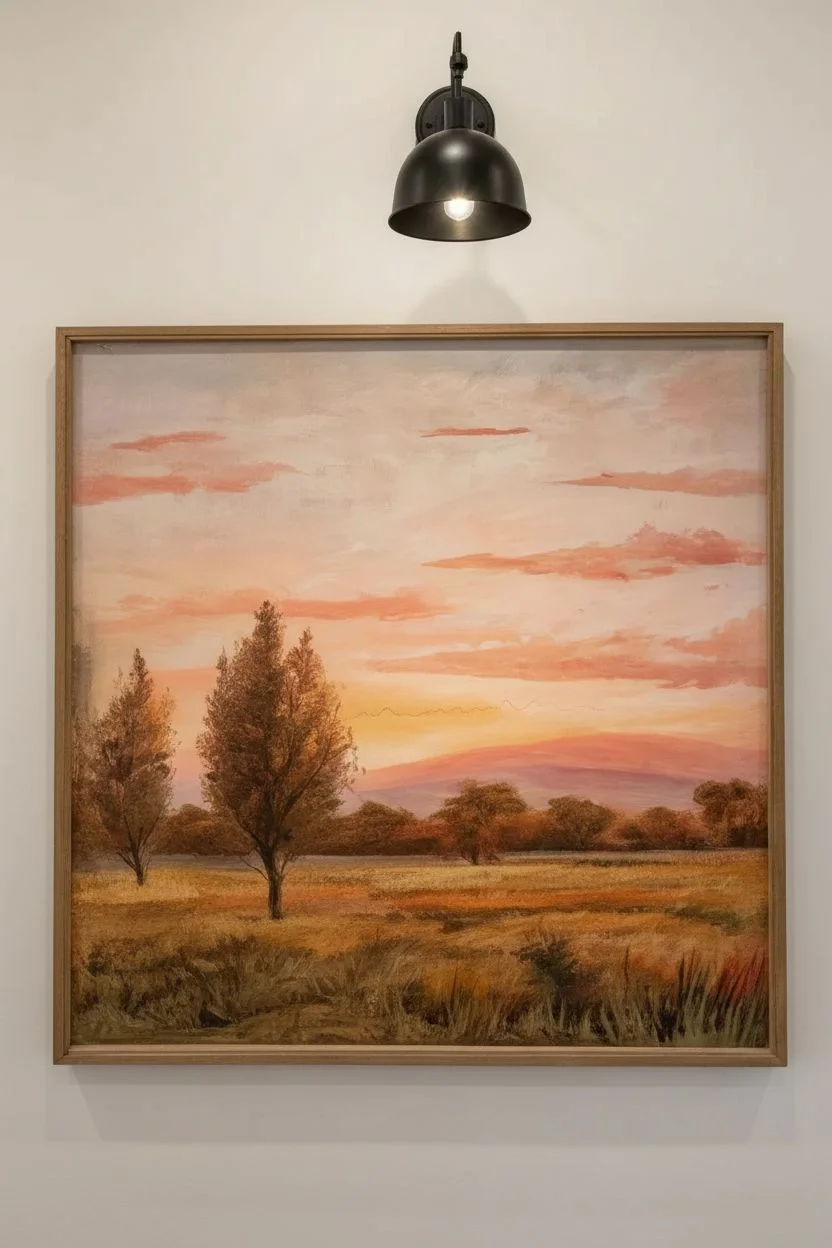
Capture the serene warmth of a Tuscan-inspired sunset with this textured landscape painting project. Using layers of acrylics to build depth in the rolling hills and soft clouds creates a peaceful, gallery-worthy statement piece for your hallway.
Step-by-Step Tutorial
Materials
- Large stretched canvas (24×36 inches or similar)
- Acrylic paints (Titanium White, Yellow Ochre, Burnt Sienna, Burnt Umber, Alizarin Crimson, Ultramarine Blue, Cadmium Orange)
- Assorted brushes (large flat wash brush, medium filbert, lush fan brush, fine liner)
- Palette knife
- Water container and paper towels
- Wooden floating frame (optional, for finishing)
Step 1: Sky and Atmosphere
-
Prime the Surface:
Begin by applying a thin wash of Burnt Sienna diluted with water over the entire canvas to tone it. This warm undertone will help the sunset colors glow later on. Let this base layer dry completely. -
Establish the Horizon:
Around the lower third of the canvas, lightly sketch a horizon line. It doesn’t need to be perfectly straight; a gentle slope suggests rolling terrain. -
Paint the Upper Sky:
Mix Titanium White with a tiny touch of Ultramarine Blue and Alizarin Crimson to create a pale, cool lavender-grey. Apply this to the top corners of the sky using your large flat brush. -
Blend the Sunset Gradient:
While the paint is still wet, mix a soft peach color using White, Yellow Ochre, and a dot of Cadmium Orange. Blend this from the horizon line upward into the cooler sky color, creating a seamless gradient. -
Add Cloud Formations:
Load a filbert brush with a mix of Alizarin Crimson, Orange, and White. Dab in loose, horizontal cloud shapes, keeping the edges soft. I like to smudge the bottom edges slightly with a dry brush to make them look windswept.
Muddy Colors?
If your colors turn brown or gray while blending wet-on-wet, let the first layer dry completely before adding the next. This keeps hues crisp and distinct.
Step 2: Creating the Landscape
-
Block in Distant Mountains:
Mix a hazy purple using Ultramarine Blue, Alizarin Crimson, and plenty of White. Paint the distant mountain shape along the horizon line, keeping the color pale to suggest atmospheric perspective. -
Layering the Mid-Ground Hills:
Create an olive-brown tone using Yellow Ochre and a touch of Burnt Umber. Paint the rolling hills just below the mountains, allowing some of the warm undertone to peek through for texture. -
Foreground Field Base:
For the closest field section, mix Yellow Ochre, Burnt Sienna, and a little White. Apply this color boldly with a large brush, using diagonal strokes that follow the slope of the land. -
Adding Vegetation Texture:
Switch to a fan brush or an old, splayed bristle brush. Dip it into a mix of Burnt Umber and Burnt Sienna. Tap lightly across the mid-ground to suggest clusters of bushes and smaller trees. -
Painting the Focal Trees:
Mix a dark, rich brown-black using Burnt Umber and Ultramarine Blue. Using a medium filbert brush, paint the tall, cypress-style trees on the left side. Use upward strokes, tapering slightly at the top.
Step 3: Details and Finishing Touches
-
Adding Tree Definition:
On the sun-facing side (right side) of your dark trees, add subtle highlights with a mix of Burnt Sienna and Olive Green to give them volume. -
Highlighting the Grass:
Take your palette knife with a mix of Yellow Ochre and White. Gently scrape it over the texture of the foreground field to create the illusion of sunlit stalks of dry grass catching the light. -
Deepening Shadows:
Glaze a thin transparent layer of Burnt Umber at the very bottom corners of the canvas. This vignette effect draws the viewer’s eye up toward the glowing sunset. -
Refining Clouds:
Go back to the sky and add pure touches of pale pink or orange to the undersides of the clouds for extra vibrancy. -
Final Assessment:
Step back and check your values. If the distant mountains feel too dark, glaze over them with a very watery white wash to push them further into the distance.
Add Gilded Glow
Mix a small amount of iridescent gold medium into your yellow ochre paint for the foreground grass highlights. It will catch the light beautifully in a hallway.
Once dry, frame your masterpiece in a natural wood floating frame to complete the rustic, elegant look
Hidden-Nook Trompe L’Oeil Doorway Scene
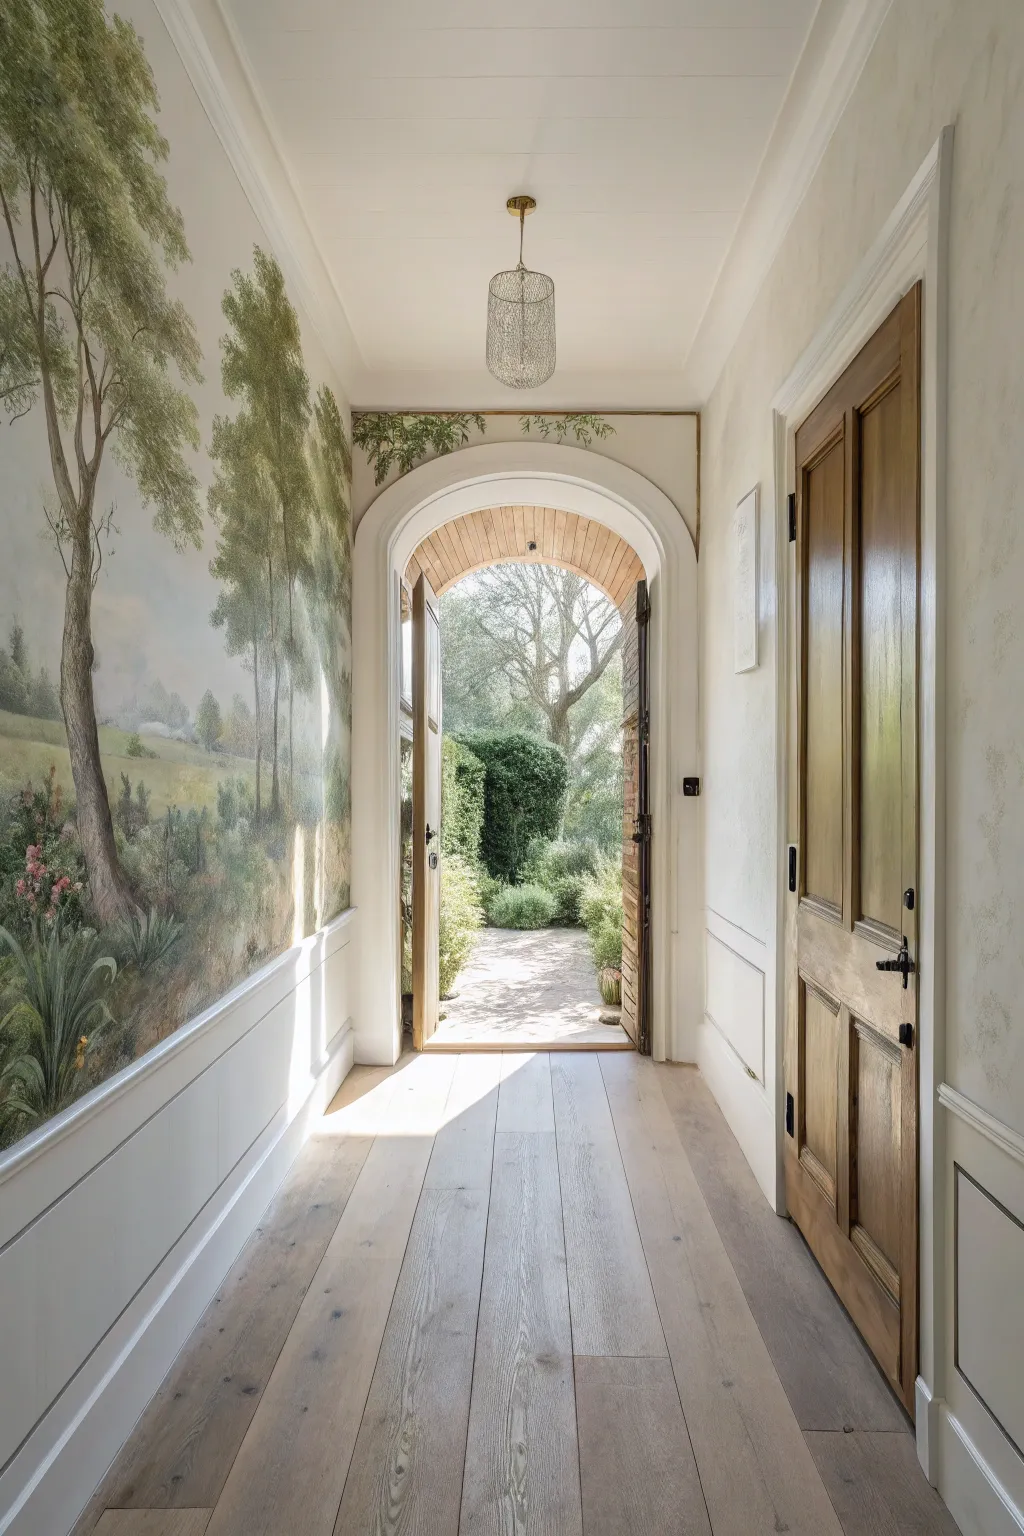
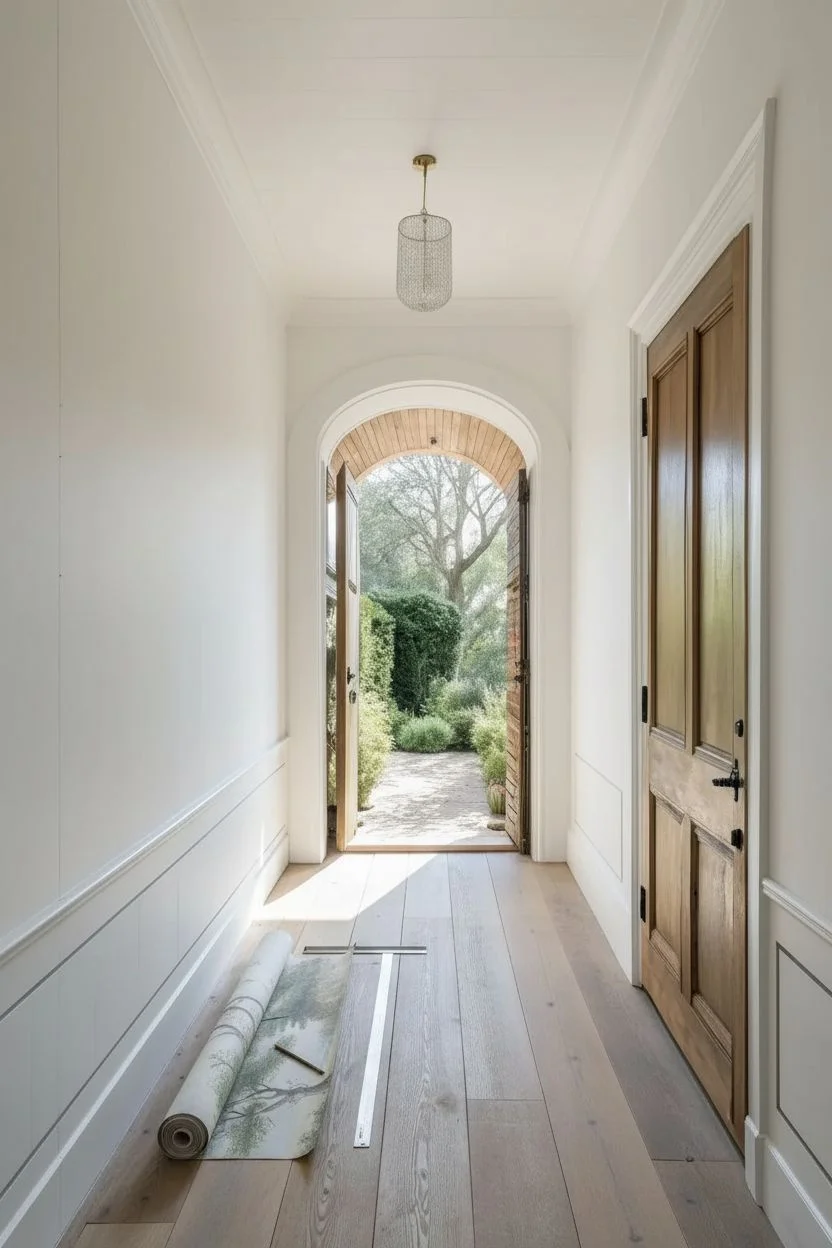
Transform a narrow hallway into a sprawling countryside vista with this immersive, floor-to-ceiling mural project. By blending a pastoral landscape painting with existing architectural details like wainscoting, you create a seamless illusion of depth that expands the space dramatically.
Step-by-Step
Materials
- High-quality canvas mural paper or pre-pasted wallpaper panels
- Wallpaper paste (if not pre-pasted)
- Smoothing brush or wallpaper smoother
- Sharp utility knife with extra blades
- Metal straight edge or ruler
- Measuring tape
- Level or laser level
- Sponge and bucket of clean water
- Seam roller
- Drop cloth
- Ladder or step stool
- Primer (optional, for wall prep)
- White semi-gloss paint (for wainscoting touch-ups)
Step 1: Preparation & Planning
-
Measure the canvas area:
Begin by measuring the precise height from the top of your wainscoting or chair rail to the ceiling molding. Measure the full length of the hallway wall to determine the total square footage needed for your mural design. -
Select your scene:
Choose a panoramic landscape image that features strong vertical elements, like the tall trees shown here, to emphasize ceiling height. Ensure the horizon line in the image sits at a natural eye level relative to your hallway. -
Prep the surface:
Clean the wall area above the wainscoting thoroughly to remove dust or grease. If the wall is a dark color or has patches, apply a coat of white primer to ensure the mural colors pop and adhere properly. -
Create a plumb line:
Using your level or laser level, draw a faint vertical pencil line about 20 inches from the left corner. This guide is crucial for hanging the first panel straight, which dictates the alignment of the entire scene.
Seamless Illusion
Paint the ceiling a soft, sky-white tone to visually blend with the top of the mural’s ‘sky,’ making the trees appear to stretch infinitely upward.
Step 2: Installation
-
Cut panels to size:
Lay your mural panels out on a clean floor to check the pattern match. I find it helpful to number them lightly on the back in pencil. Trim the top and bottom excess, leaving about 2 inches of overhang on both ends for safety. -
Apply adhesive:
If using traditional paper, apply a generous, even layer of wallpaper paste to the back of the first panel using a roller. Book the paper (fold it paste-to-paste) and let it rest for the manufacturer’s recommended soaking time to activate. -
Hang the first panel:
Align the edge of your first panel with your plumb line. Smooth the paper onto the wall from the center outwards using your smoothing brush to push out air bubbles. -
Match the seams:
Apply the next panel, carefully sliding it into place to match the tree branches and horizon line exactly. Butt the seams together tightly without overlapping; a seam roller helps flatten these edges so they disappear. -
Continue down the hall:
Repeat the process for remaining panels. Wipe away any excess glue immediately with a damp sponge—dried glue can leave shiny spots on your matte forest scene. -
Handle corners and edges:
When you reach the end of the wall or the door frame, press the paper firmly into the corner or crease suitable for trimming.
Bubbles Won’t Budge?
Small bubbles often shrink and vanish as paste dries. If a large one persists after 24 hours, prick it with a fine needle and smooth it flat.
Step 3: Trimming & Finishing
-
Trim the excess:
Use your metal straight edge and a fresh, sharp utility knife blade to trim the excess paper at the ceiling line and along the top of the wainscoting. Change blades often to prevent tearing damp paper. -
Detail around molding:
If your mural meets intricate crown molding, take your time cutting small relief slits to help the paper lay flat before making the final precision cut. -
Seal the edges:
Check all edges, especially near the wainscoting cap. If any edges lift, apply a tiny bit of seam adhesive with a small brush and press down firmly. -
Integrate the look:
Assess the transition between the mural and the white paneling below. If there are tiny gaps, a thin bead of paintable caulk can hide imperfections and make the artwork look like it was painted directly on the plaster. -
Final wipe down:
Gently wipe the entire mural surface with a clean, damp sponge to remove any residual paste haze. Let the wall dry completely for 24 hours.
Step back and enjoy your private indoor forest walk, no matter the weather outside


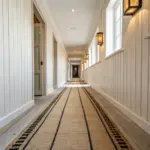

Have a question or want to share your own experience? I'd love to hear from you in the comments below!