When I’m craving a little more meaning in my art time, I lean into imagery that feels like a bridge between my inner world and the universe. These spiritual painting ideas are meant to spark that quiet, glowy feeling—whether you paint super detailed or keep it wonderfully simple.
Create a Mandala for Calm Focus
This serene mandala project combines precise ink lines with warm, layered watercolor washes in shades of terracotta and sand. The design features a central floral star bursting outward into intricate, scalloped layers that mimic the organic beauty of a blooming flower.
Step-by-Step
Materials
- High-quality watercolor paper (140lb/300gsm cold press)
- Fine liner pens (black, sizes 0.1, 0.3, and 0.5)
- Compass with extension bar
- Protractor
- HB pencil and good quality eraser
- Ruler
- Watercolor paints (Burnt Sienna, Yellow Ochre, Sepia, and a touch of Grey)
- Round watercolor brushes (sizes 2 and 4)
- Gold metallic paint or gel pen (optional)
Step 1: Setting the Foundation
-
Find your center:
Begin by marking the absolute center of your watercolor paper. This single point will anchor the entire symmetry of your design. -
Draw the grid:
Using your compass, draw a series of light concentric circles. You’ll need a small central circle (about 1 inch diameter), followed by four progressively larger rings spaced about 0.5 to 1 inch apart to guide the petals. -
Establish floral symmetry:
Use your protractor to divide the circle into 8 equal sections (45 degrees each). Draw light pencil lines radiating from the center to the edge to create your ‘slices’. -
Sketch the central star:
In the smallest central circle, sketch an 8-pointed star or flower shape. Each petal should align with one of your radial guidelines.
Step 2: Drafting the Design
-
Create the second layer:
Around the central star, draw a band of small, intricate shapes—think of them as seeds or stamens—enclosed within a double-ring border. This creates a visual separation before the larger petals begin. -
Draft the main petals:
In the next ring outward, sketch 8 large, rounded petals. Let the tips of these petals touch the guideline of the circle. Inside each petal, draw a smaller, teardrop shape. -
Add detail to the main petals:
Fill the ‘negative space’ between the main petals with triangular peaks or smaller secondary petals to ensure the mandala feels full and connected. -
Construct the outer scallops:
For the outermost layer, draw large, sweeping pointed arches that connect the tips of the previous layer. These should have a slight ‘ogee’ curve to them, elegant and sharp at the tip. -
Refine pencil lines:
Review your pencil sketch. Lighten any heavy lines with a kneaded eraser so they won’t show through the watercolor later.
Uneven Petals?
Don’t panic if symmetry slips. Use the ‘corrective thickness’ technique: slightly thicken the outline on the smaller petal to match the visual weight of the larger one.
Step 3: Inking the Structure
-
Outline main shapes:
Switch to your 0.5 pen. Carefully trace the major outlines of the petals and the central star. Keep your hand steady and breathe out as you draw long curves. -
Add fine details:
Using the 0.1 pen, draw the intricate fill patterns. Add small circles inside the bands, fine lines inside the petals (hatching), and delicate dots around the outer perimeter. -
Thicken key lines:
Go back with a 0.5 or 0.8 pen to thicken specific structural lines, particularly the rings separating the layers, to add contrast and depth. -
Erase guidelines:
Wait at least 15 minutes for the ink to be aggressively dry. Gently erase all remaining pencil grid lines.
Add Metallic Magic
Trace over the innermost detail lines with a gold gel pen after the watercolor dries. It catches the light beautifully when the artwork is viewed at an angle.
Step 4: Adding Color
-
Mix your palette:
Prepare a watery mix of Burnt Sienna for a terracotta look, and a pale Yellow Ochre for the lighter areas. Test the colors on a scrap piece of paper first. -
Paint the outer petals:
Start with the large outer petals. Apply a wash of Burnt Sienna near the base of the petal and blend it out to clear water at the tips for a gradient effect. -
add contrasting grey:
For the layer just inside the large petals, use a very diluted grey or sepia wash. This cool tone contrasts beautifully with the warm earth tones. -
Highlight the center:
Paint the central star petals with the Yellow Ochre mix, keeping it transparent enough that the paper texture shines through. -
Final decorative touches:
Once the paint is fully dry, use the gold pen (or a dot of thick Burnt Sienna paint) to add small accent dots at the very tips of the outer petals and in the center of the artwork.
Step back and appreciate the calming rhythm of the shapes you have created on the page


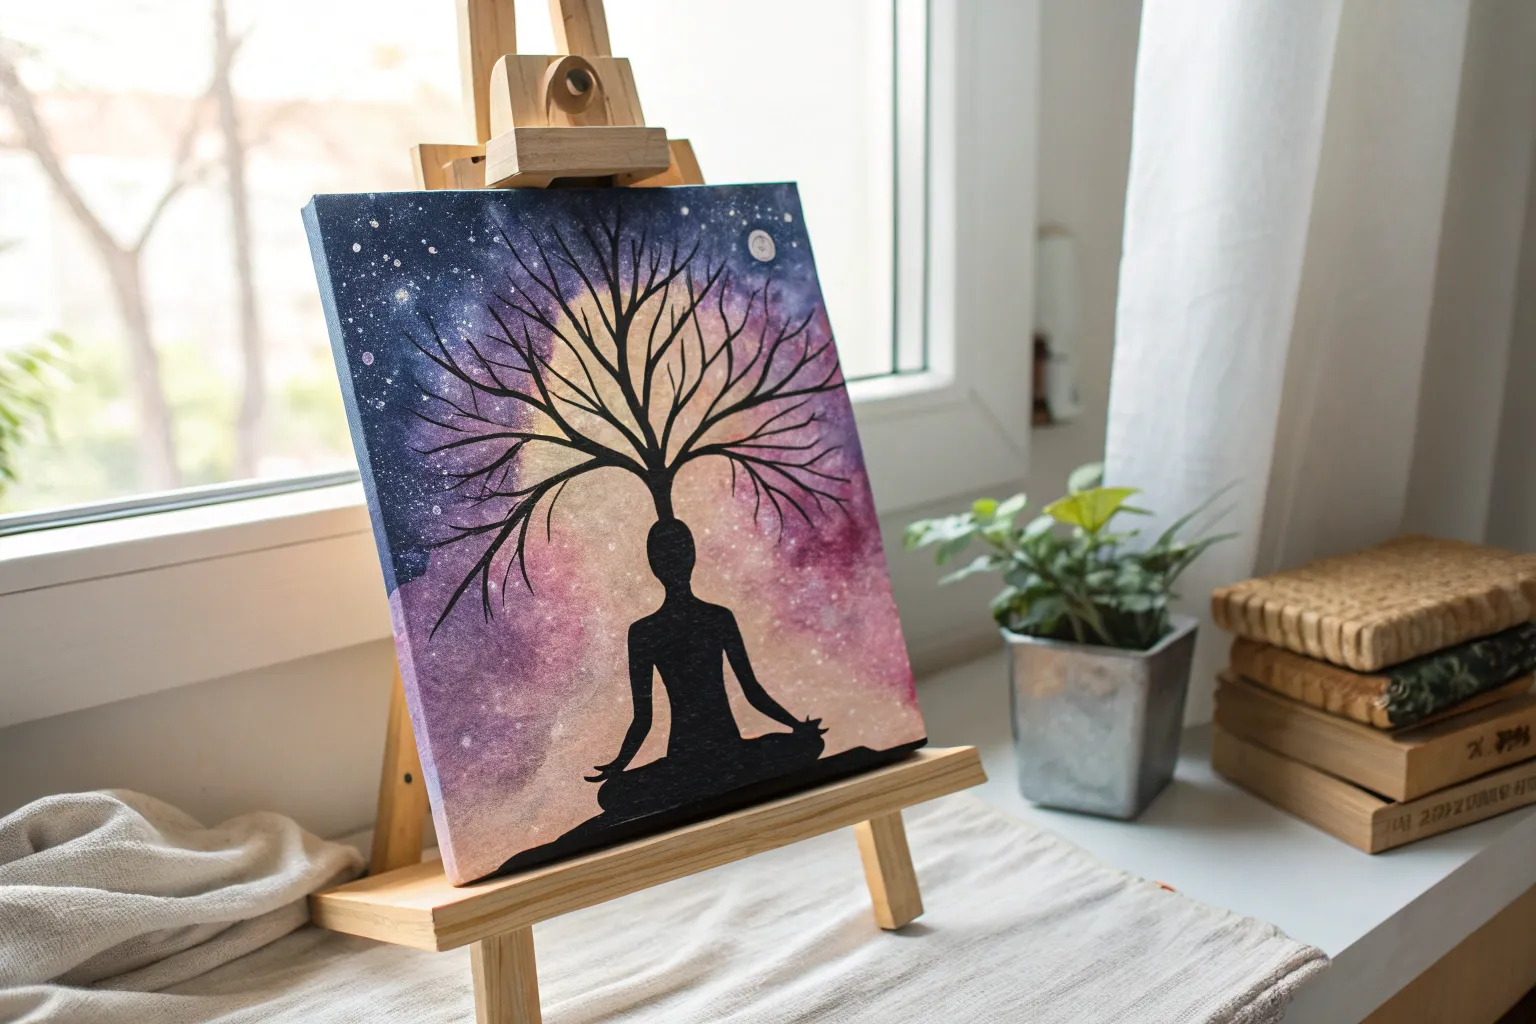
Silhouette a Meditating Figure With an Aura
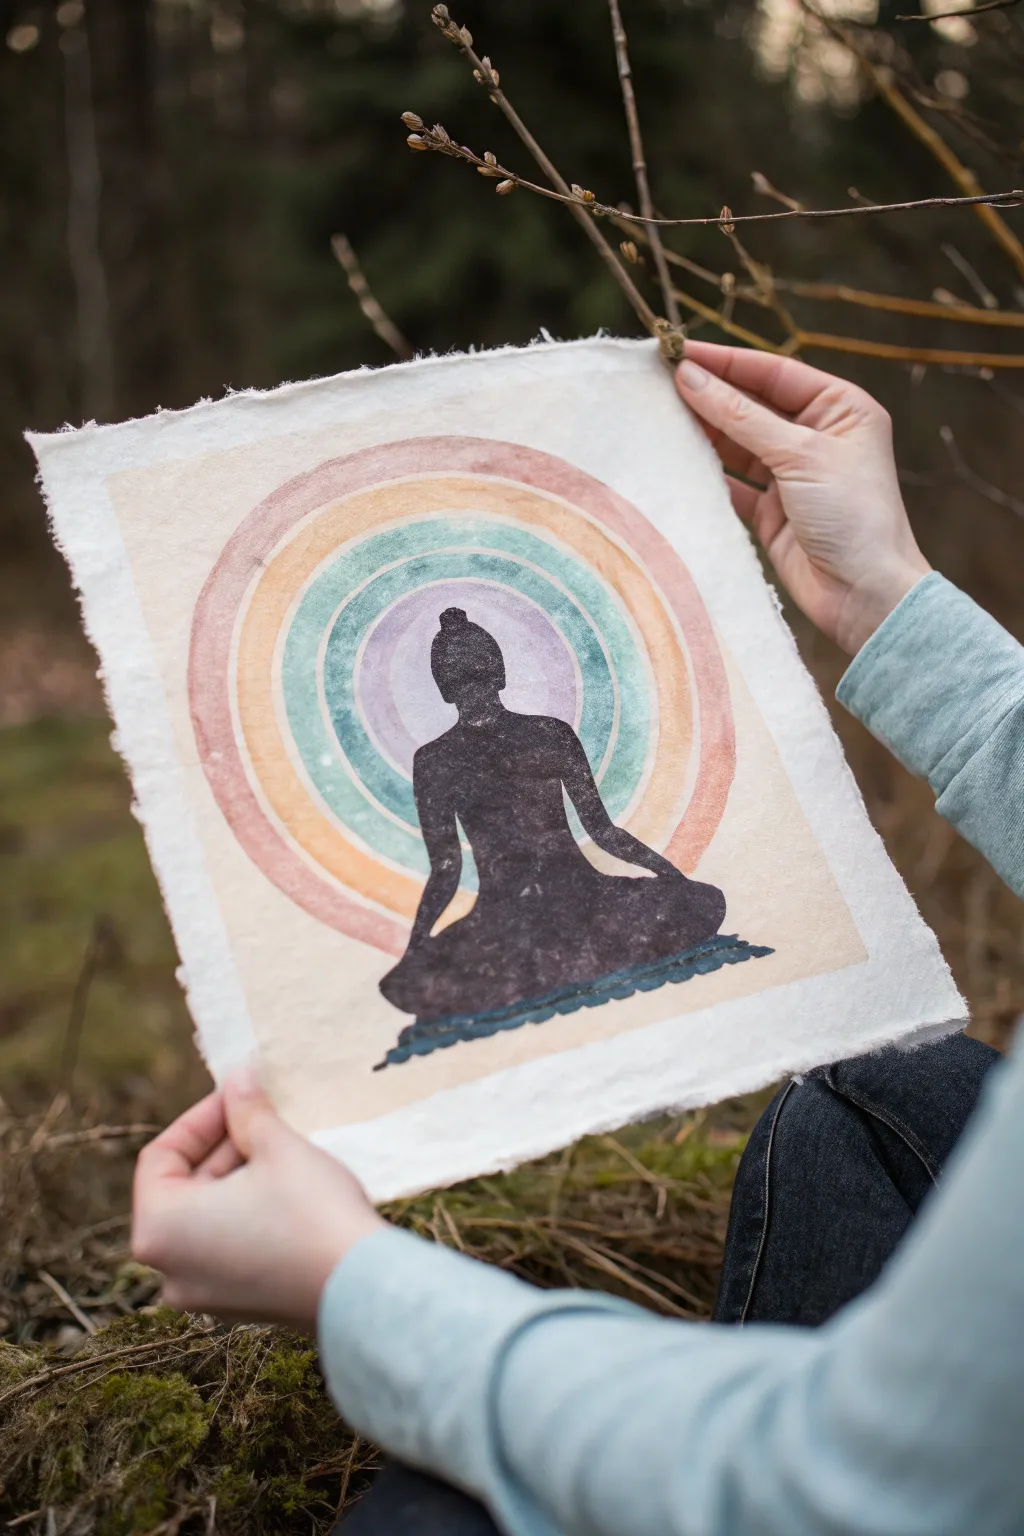
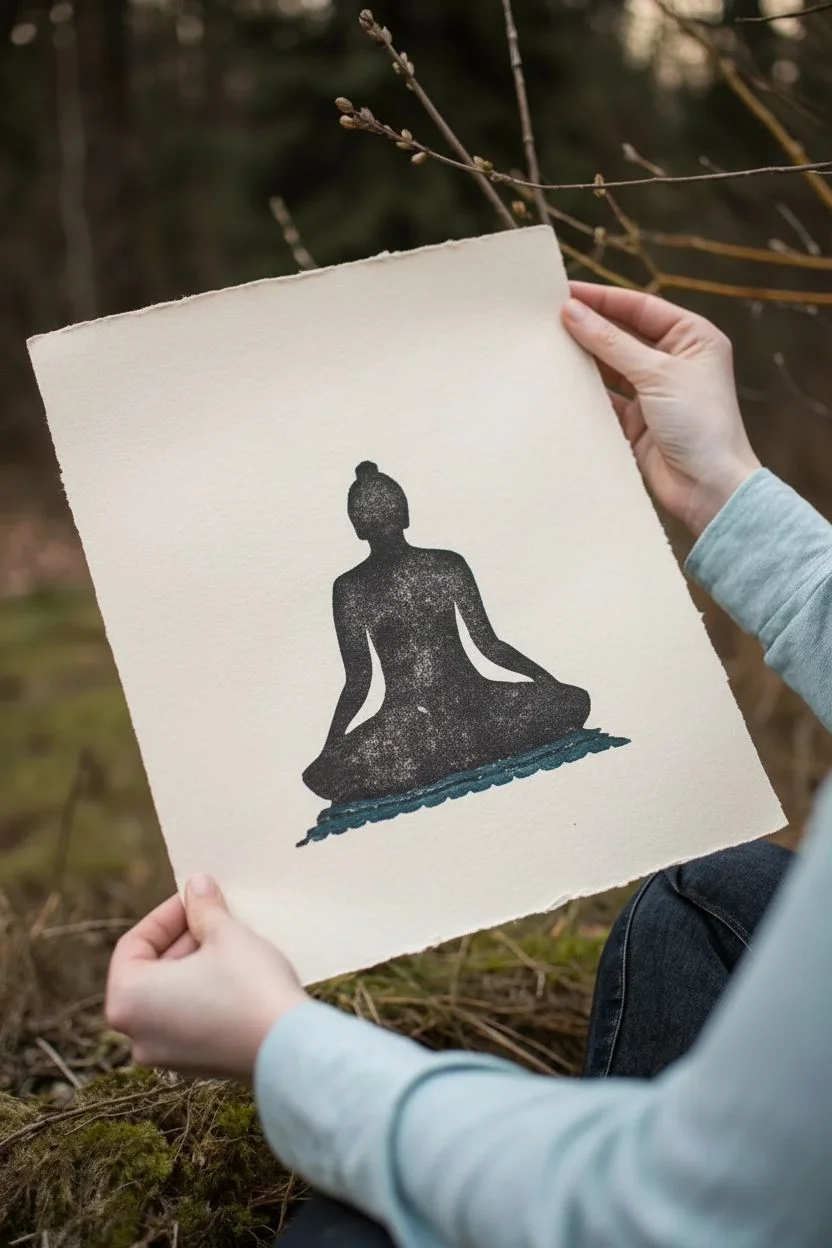
Center your creative energy with this serene printmaking project, featuring a silhouetted meditating figure embraced by concentric circles of calm color. The hand-pressed nature of this artwork, combined with the textured, deckled-edge paper, gives it a wonderfully grounded and organic feel.
How-To Guide
Materials
- Linoleum block (soft-cut or traditional)
- Linocut carving tools (V-gouge and U-gouge)
- Block printing ink (black, violet, blue, green, yellow, orange, red)
- Brayer (rubber roller)
- Baren or wooden spoon (for burnishing)
- Handmade or heavy cotton rag paper with deckled edges
- Pencil and eraser
- Tracing paper
- Glass or acrylic sheet (for rolling ink)
- Masking tape
Step 1: Design and Carving
-
Sketch the silhouette:
Begin by sketching a simple meditating figure on paper. Focus on the identifiable outline—the ‘lotus’ leg position, straight spine, and top knot—rather than internal details, as this will be a solid silhouette. -
Transfer to block:
Trace your final sketch onto tracing paper. Flip the tracing paper over onto your linoleum block and rub the back to transfer the graphite so the image is reversed on the block. -
Carve the outline:
Using a fine V-gouge tool, carefully carve away the linoleum immediately surrounding your figure’s outline. This establishes a clean edge for your silhouette. -
Clear the background:
Switch to a wider U-gouge to clear away the rest of the negative space around the figure. You want the figure to be the only raised surface left on this specific block. -
Create the aura block:
For the rainbow aura, you have two options: either carve a separate block with concentric rings, or, for the look in the photo, painting the rings directly is often easier. However, if you want a true print, carve a second block with just the concentric rings, leaving a blank space in the middle for the figure.
Clean Lines Pro-Tip
When carving the silhouette, slightly angle your V-gouge *away* from the figure line. This creates a pyramid-shaped base for your print surface, making it stronger and preventing the edges from crumbling.
Step 2: Printing the Aura
-
Prepare the paper:
Place your handmade paper on a flat, clean surface. I suggest taping down the corners lightly so it doesn’t shift during the multi-step process. -
Mix your colors:
Squeeze out small amounts of your rainbow colors (purple, blue, teal, yellow, pale orange, terracotta) onto your glass palette. You want muted, earthy versions of the colors rather than neon brights. -
Paint the rings:
To achieve the specific transparent, watercolor-like texture seen in the photo, apply the ink or paint directly to the paper using a brush rather than printing a block. Start with the smallest purple ring in the center. -
Expand the circle:
Work your way outward, painting concentric rings of blue, green, yellow, and orange. Leave a tiny sliver of the cream paper showing between each ring to keep the colors distinct. -
Add texture:
If painting, use a fairly dry brush technique to mimic the distressed look of a print. Let this background layer dry completely before moving on.
Level Up: Gold Leaf
Add a touch of divine light by applying a small amount of gold leaf to the center of the figure’s chest or the top knot after the black ink has fully dried.
Step 3: Printing the Figure
-
Ink the silhouette:
Squeeze a line of black block printing ink onto your palette. Roll your brayer back and forth until it has a velvety, even texture, then roll it over your carved figure block. -
Add the base:
Before printing, check your block design. If you want the textured ground beneath the figure (as seen in the image), create a small separate undulating shape or paint it directly on the paper in dark teal/black. -
Align the block:
Carefully hover your inked block over the dried colorful aura. aim to center the figure so the head sits within the purple/blue central rings. -
Press and burnish:
Place the block down decisively. Use a baren or the back of a wooden spoon to rub firmly in circular motions over the back of the block (or paper, if you placed paper on top) to transfer the ink. -
The reveal:
Lift one corner of the block to check the ink coverage. If it looks patchy, lay it back down and rub some more. When satisfied, peel the block away to reveal your meditating yogi.
Display your finished piece in a floating frame to show off those beautiful deckled edges


Paint a Chakra Color Light Column
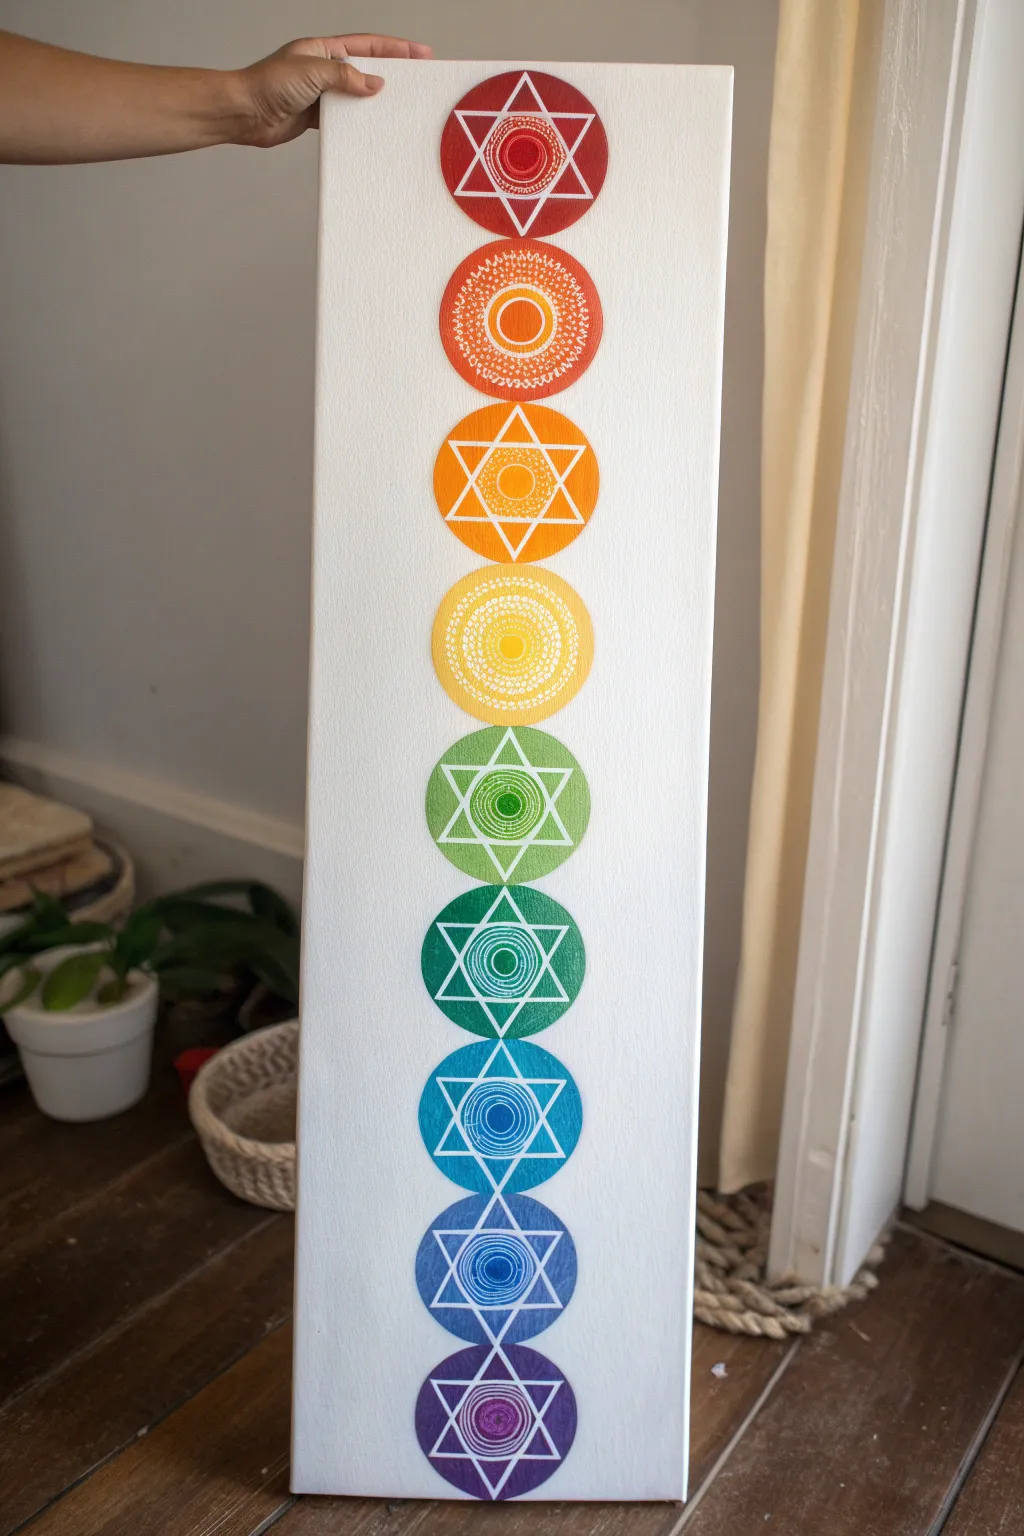
Create a stunning column of energy for your space with this vertical canvas painting. Featuring nine vibrant, hand-painted chakra symbols in a gradient from earthy roots to spiritual crown, this piece combines geometric precision with detailed dot work.
Step-by-Step
Materials
- Tall vertical canvas (e.g., 10×30 or 12×36 inches)
- Acrylic paints (Red, Orange, Yellow, Green, Teal, Blue, Indigo, Violet, White)
- Compass or circular stencils (approx. 3-4 inch diameter)
- Ruler
- Pencil
- Fine liner brush (size 0 or 00)
- Flat shader brush (size 6 or 8)
- White acrylic paint pen (fine tip)
- Palette for mixing
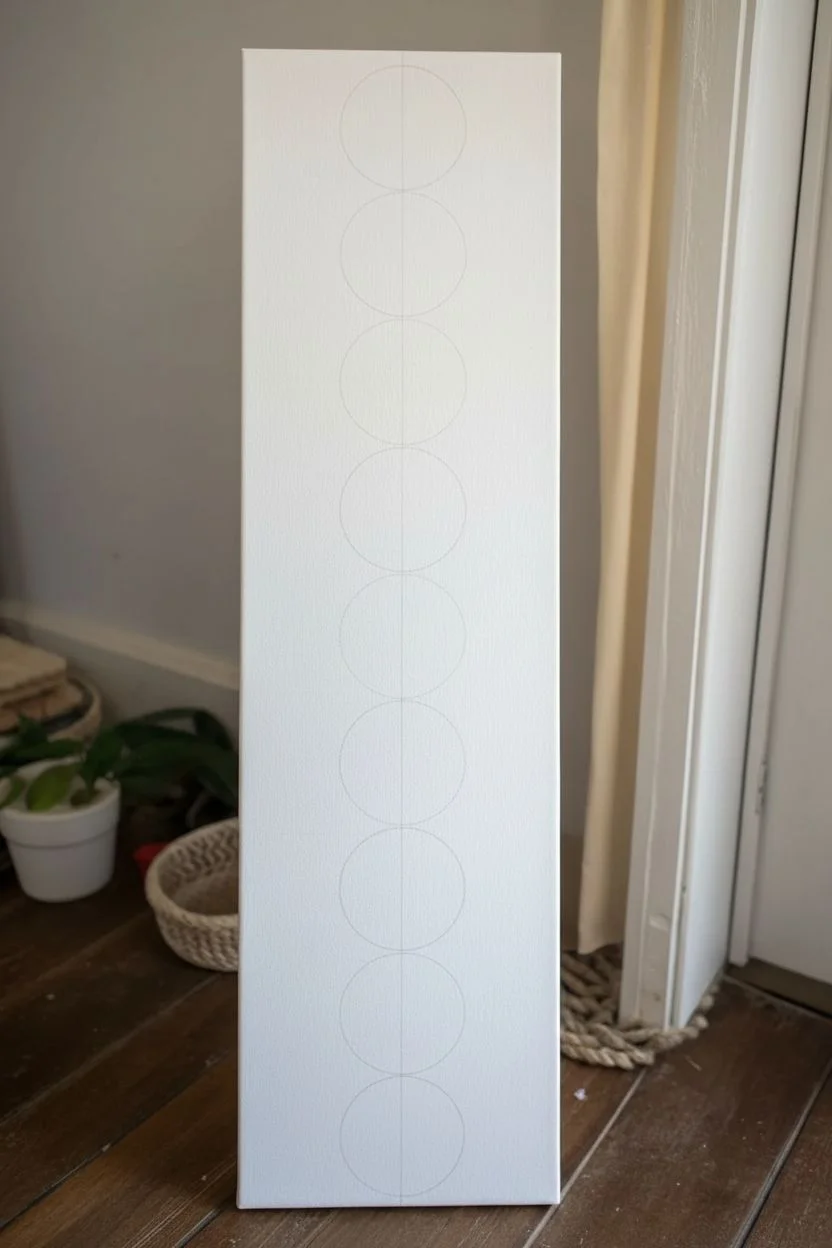
Step 1: Planning and Layout
-
Prepare the Canvas:
Start with a clean, white-primed canvas. If needed, apply a fresh coat of white gesso to ensure a smooth, bright background for your colors. -
Measure the Vertical Axis:
Using your ruler, lightly mark a vertical line down the exact center of the canvas. This guideline ensures your column remains perfectly straight. -
Calculate Spacing:
Count nine positions for the circles. Measure the total height of your canvas and divide it to space nine circles evenly, leaving a small gap (about 0.5 to 1 inch) between each one. -
Sketch the Circles:
Use a compass set to your desired radius (e.g., 1.5 inches) or a circular object to trace nine circles along your center line. Press lightly with your pencil so lines can be erased later.
Step 2: Painting the Base Colors
-
Mix Your Gradient:
Arrange your acrylics on the palette. You’ll need distinct shades for each of the nine circles: Red, Red-Orange, Orange, Yellow, Yellow-Green, Green, teal/Blue-Green, Blue, and Violet. -
Paint the Top Circle:
Fill the top circle with your boldest Red. Use the flat shader brush to get crisp edges, carefully following your penciled circumference. -
Continue the Gradient Down:
Work your way down the column, painting each subsequent circle its respective color. Clean your brush thoroughly between colors to keep the hues vibrant and muddy-free. -
Apply a Second Coat:
Once the first layer is touch-dry, examine the opacity. I usually apply a second coat to ensure the colors are solid and rich, hiding the canvas texture. -
Let it Cure:
Allow the entire canvas to dry completely, ideally for at least an hour. The paint must be hard before you start drawing geometric details on top.
Steady Hand Trick
Rest your pinky finger on a dry part of the canvas while using the liner brush. This anchors your hand, giving you much better control for straight lines.
Step 3: Detailing the Symbols
-
Draft the Hexagrams:
For circles 1, 3, 5, 6, 7, 8, and 9 (counting from top), lightly sketch a six-pointed star (two intersecting triangles) inside the color block. -
Draft the Mandala Circles:
For the 2nd (Red-Orange) and 4th (Yellow) circles, sketch concentric rings inside the main circle instead of stars. These serve as guides for your dot work. -
Outline in White:
Using a fine liner brush with thinned white paint or a white paint pen, trace over your star sketches. Keep your hand steady to create sharp, crisp geometric lines. -
Add Inner Circles:
Inside the center of every star, paint a small, solid white ring or spiral. This unifies the design across the different colors. -
Detail the Mandala Circles:
For the two non-star circles, use the paint pen or a small dotting tool to create rings of tiny white dots. Vary the size of the dots for visual interest. -
Refine the Edges:
Go back with your white paint pen and neaten up any intersections on the stars where the triangles overlap. -
Erase Guidelines:
Once the white paint is completely dry (give it plenty of time to avoid smearing), gently erase any visible pencil marks from your initial layout. -
Seal the Artwork:
Finish by applying a clear matte or satin varnish to protect the paint and give the colors a unified sheen.
Add Some Sparkle
Mix a tiny amount of iridescent medium or metallic gold paint into your colored circles for a subtle shimmer that catches the light.
Hang your finished piece vertically to bring a sense of balance and color alignment to your room


Build a Tree of Life With Visible Roots

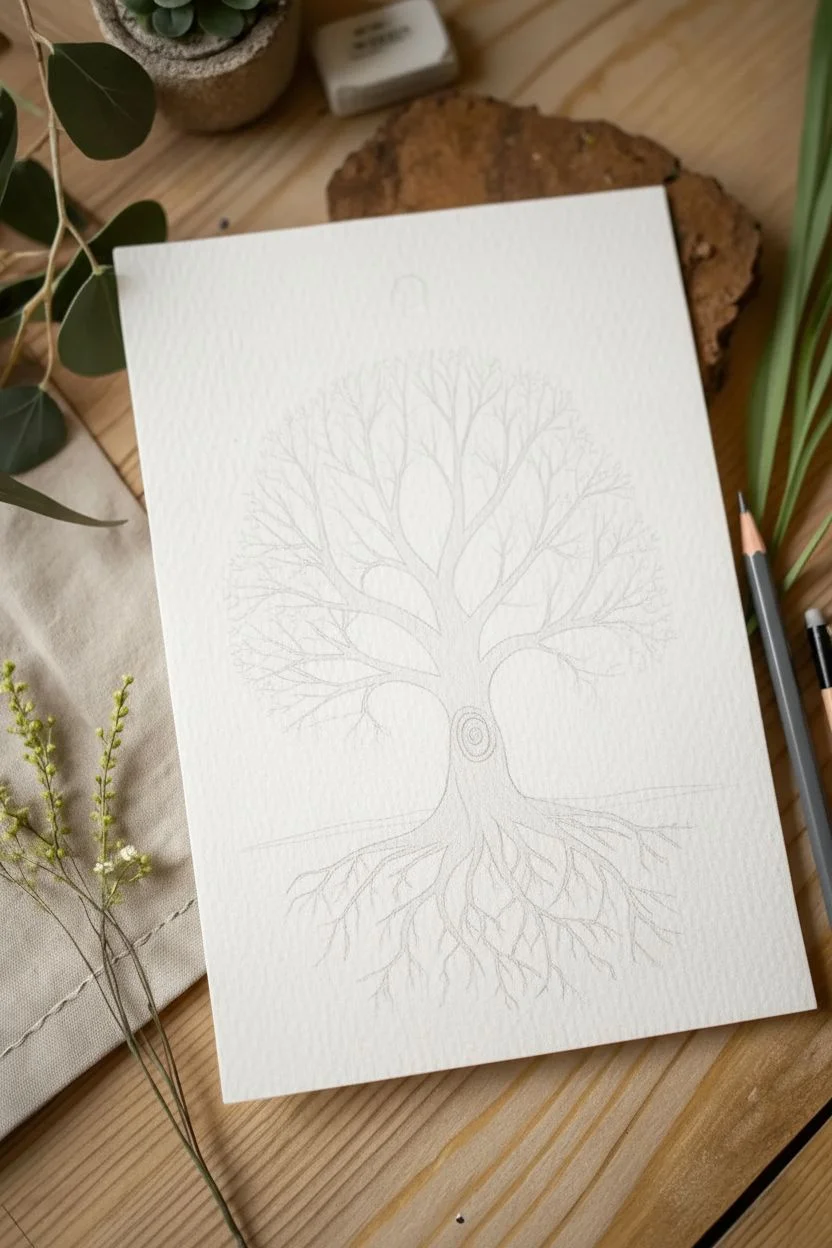
This delicate artwork balances the earthly and the celestial, depicting a tree with an intricate root system that mirrors its canopy against a field of stars. The piece uses fine lines and soft watercolor washes to create a symbol of connection and growth on textured paper.
Step-by-Step Guide
Materials
- Cold-pressed watercolor paper (300 gsm)
- Fine liner pens (brown, black, 0.1mm – 0.3mm)
- Watercolor paints (Burnt Sienna, Sap Green, Yellow Ochre, metallic gold)
- Small round watercolor brushes (sizes 0 and 2)
- Pencil (HB or H)
- Kneaded eraser
- Compass or circular object (optional)
Step 1: Drafting the Skeleton
-
Establish the horizon:
Begin by lightly drawing a faint horizontal line about one-third of the way up from the bottom of your paper. This will serve as the ground level where the trunk meets the earth. -
Sketch the trunk:
Draw the central trunk shape, making it slightly wider at the base and tapering as it moves upward. In the center of the trunk, sketch a small circle or oval where the focal knot will eventually go. -
Map out the branches:
Extend lines upward from the trunk to form the main branches. Aim for a rounded, canopy-like shape, keeping the lines flowing and organic rather than rigid and straight. -
Mirror the roots:
Below the horizon line, draw the root system. Try to mirror the general shape of the canopy above, creating a sense of balance as above, so below. -
Add celestial details:
Lightly sketch small stars scattered around the canopy. At the very top center, mark the position for the compass-like sun symbol.
Step 2: Inking the Structure
-
Outline the trunk:
Using a brown fine liner pen, carefully trace over your pencil lines for the trunk. Use broken or slightly wavy lines to suggest the texture of bark. -
Detail the spiral knot:
Inside the oval on the trunk, draw a tight spiral pattern. This adds a spiritual focal point representing growth and energy. -
Drawing the branches:
Work your way up the branches, allowing them to split into finer and finer twigs. Keep your hand loose to create natural-looking variations in thickness. -
Root detailing:
Ink the roots with the same brown pen. Emphasize the downward flow, letting the tips of the roots fade out into fine points rather than blunt ends. -
Erase pencil marks:
Once the ink is completely dry (give it a few minutes to avoid smudging), gently lift away the graphite sketch with a kneaded eraser.
Uneven Ink Flow?
If your fine liner skips over the textured paper, slow down your stroke speed. Working too fast on cold-pressed grain can cause gaps; a deliberate pace ensures solid lines.
Step 3: Adding Life with Color
-
Base wash for wood:
Dilute Burnt Sienna with plenty of water to create a pale transparent wash. Paint over the trunk, roots, and main branches, staying loosely within the lines. -
Deepening the bark:
While the first layer is still slightly damp, drop concentrated brown paint into the shadowed areas—under the branches and along the sides of the trunk—to add volume. -
Leafing the canopy:
Mix a light, watery Sap Green. Using the tip of your smallest brush, dab tiny irregular dots and clusters along the ends of the upper branches to represent young leaves. -
Grounding the tree:
Apply a very faint wash of green across the horizon line you established earlier. Fade the edges out quickly so it looks like a soft patch of grass rather than a hard line.
Make It Magical
Use metallic watercolor gold for the roots and the spiral knot. When the light hits the painting, the ‘life force’ of the tree will shimmer against the matte bark.
Step 4: Celestial Embellishments
-
Inking the compass:
With a black fine liner, draw the geometric symbol at the top. Create a circle, then add the cardinal points extending outward, mixing sharp lines with small decorative dots. -
Painting the stars:
Use a mix of Yellow Ochre or metallic gold paint to fill in the stars scattered around the tree. I like to vary the orientation of the stars so they look like they are twinkling. -
Final decorative touches:
Add tiny dots of gold or brown ink floating among the leaves and roots to create a magical, pollen-like atmosphere. -
Review and refine:
Step back and assess your work. If any branches look disconnected, extend the fine lines to meet the foliage, or darken the trunk spiral if it needs more contrast.
Display your finished Tree of Life in a simple frame to remind yourself of your own deep roots and upward growth
BRUSH GUIDE
The Right Brush for Every Stroke
From clean lines to bold texture — master brush choice, stroke control, and essential techniques.
Explore the Full Guide
Blend a Galaxy Background Behind a Quiet Scene
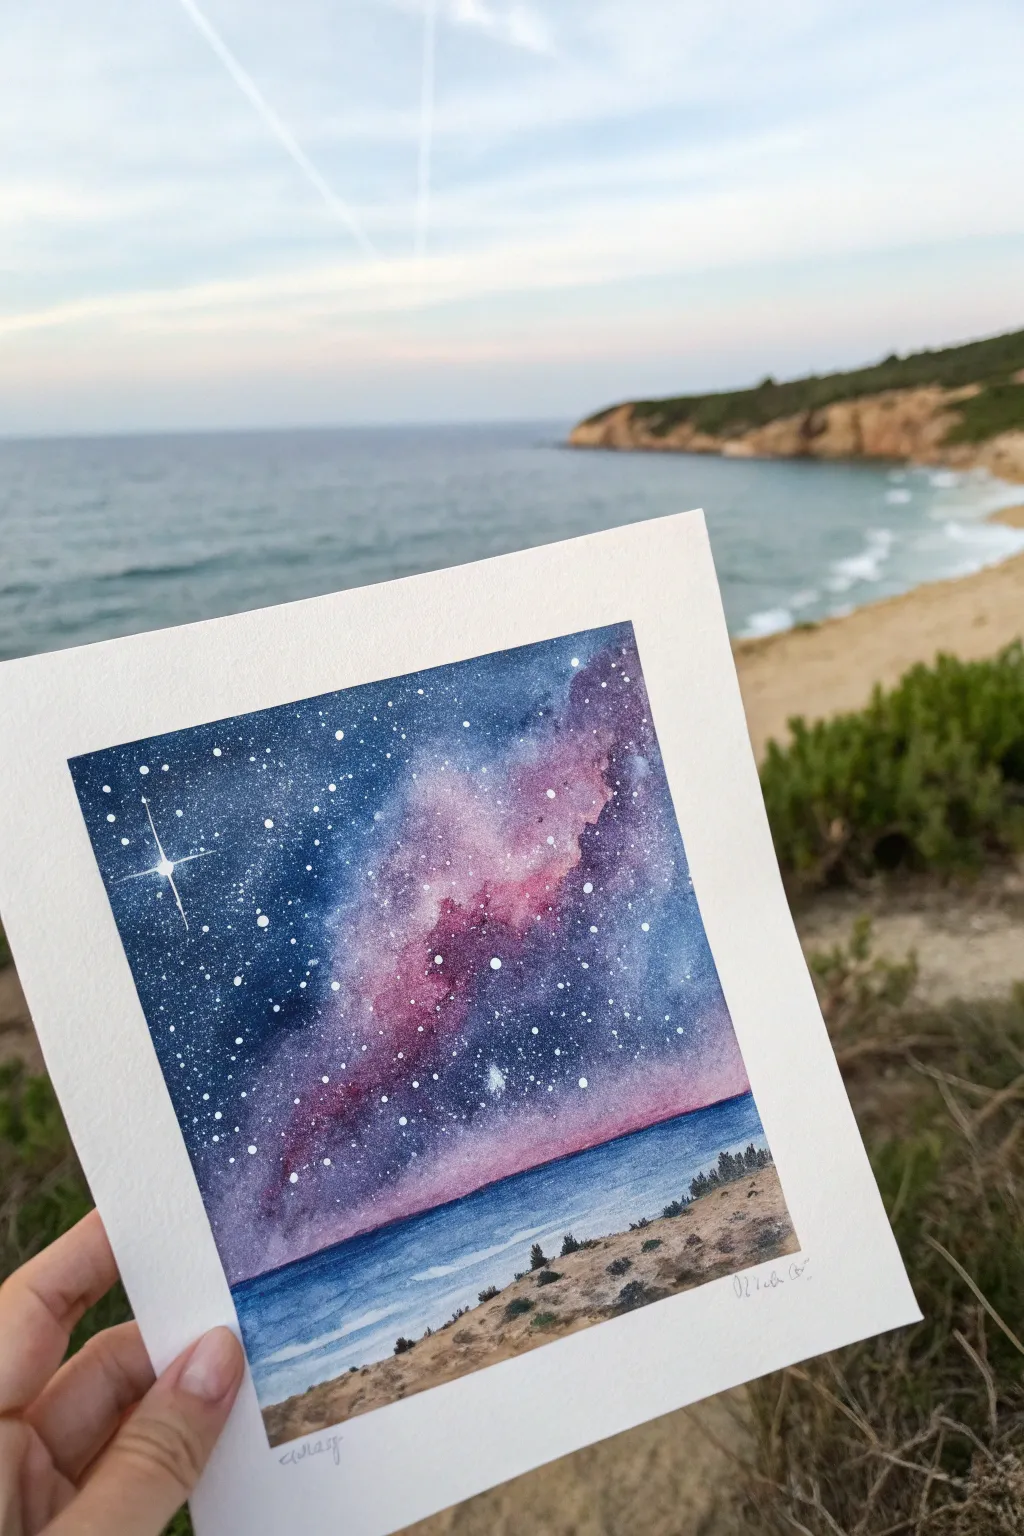
Merge the infinite wonder of space with earthly serenity in this watercolor project. You will learn to use wet-on-wet techniques to paint a vibrant galaxy sky that fades gently into a peaceful beach landscape.
How-To Guide
Materials
- Cold press watercolor paper (300 gsm)
- Masking tape suitable for paper
- Watercolor paints: indigo, prussian blue, alizarin crimson/magenta, violet, ochre, burnt umber
- White gouache or white ink
- Round brushes (sizes 2, 6, and 10)
- Two jars of water
- Paper towel
- Old toothbrush (optional)
Step 1: Setting the Scene
-
Tape the edges:
Secure your watercolor paper to a board using masking tape. This creates the crisp white border seen in the final piece and prevents the paper from buckling when wet. -
Sketch the horizon:
Lightly draw a straight horizontal line about one-quarter of the way up from the bottom. This separates the sky from the sea. Below that, sketch a gentle, uneven diagonal line for the sandy dunes.
Starry Splatter Tip
Test your splatter technique on scrap paper first. The consistency of the white paint determines dot size: thicker paint makes larger stars, wetter paint makes a fine mist.
Step 2: Painting the Galaxy Sky
-
Wet the sky area:
Using your largest brush and clean water, wet the entire sky area down to the horizon line. The paper should glisten but not have puddles. -
Lay the milky way base:
While the paper is wet, drop in a diagonal swath of diluted pink or magenta across the center. Keep the edges soft and feathery to suggest nebulas. -
Deepen the cosmos:
Surround the pink area with violet and indigo. Allow the colors to bleed slightly into the pink, but try to preserve the brightness of that central nebula stripe. -
Maximize contrast:
Drop concentrated Prussian blue and Indigo into the corners and top edges of the sky. This dark frame makes the central galaxy colors pop. -
Add the stars:
Once the sky involves a slight damp sheen (not bone dry), create stars. Cover the beach area with a paper towel. Load a brush or toothbrush with white gouache and flick bristles to splatter tiny white dots across the dark blue areas. -
Create the North Star:
Select a spot in the darker blue area. With a fine detail brush and white gouache, paint a slightly larger dot. Drag four thin lines outward from the center to create a cross shape. -
Let the sky dry completely:
Wait until the paper is cool to the touch and completely dry before moving to the ocean layer to prevent unwanted bleeding.
Step 3: The Silent Sea
-
Paint the horizon line:
Using a flat or round brush, paint a straight, sharp line of medium-blue across the horizon. I like to use a slightly lighter blue than the sky’s darkest point. -
Create a gradient:
Pull that blue paint downward, diluting it with water as you get closer to the shore. The water should be palest near the sand. -
Suggest waves:
While the water layer is still damp, lift a horizontal line of pigment near the shore with a clean, thirsty brush to suggest gentle sea foam.
Trouble: Blooms in Sky?
If cauliflower-like ‘blooms’ appear in your sky, it means you added water to drying paint. Don’t panic; blend them into cloud shapes or cover them with extra stars.
Step 4: Grounding the Landscape
-
Paint the dunes:
Mix yellow ochre with a touch of burnt umber. Paint the sand dune area in the foreground, dabbing the brush to create texture rather than smooth strokes. -
Add shadows:
While the ochre is damp, drop small amounts of darker brown on the shadowed side of the dune humps to give them volume. -
Plant the vegetation:
Mix a dark green-brown. Using your smallest brush, paint tiny vertical flicks along the top ridge of the dunes to represent coastal scrub bushes. -
Detail the foreground:
Add a few scattered darker dots and specks in the lower sand area to mimic rocks and debris. -
The reveal:
Ensure the painting is 100% dry. Slowly peel the tape away at a 45-degree angle to reveal your crisp, professional edges.
Now you have a serene piece of art that reminds you to look up at the stars wherever you are
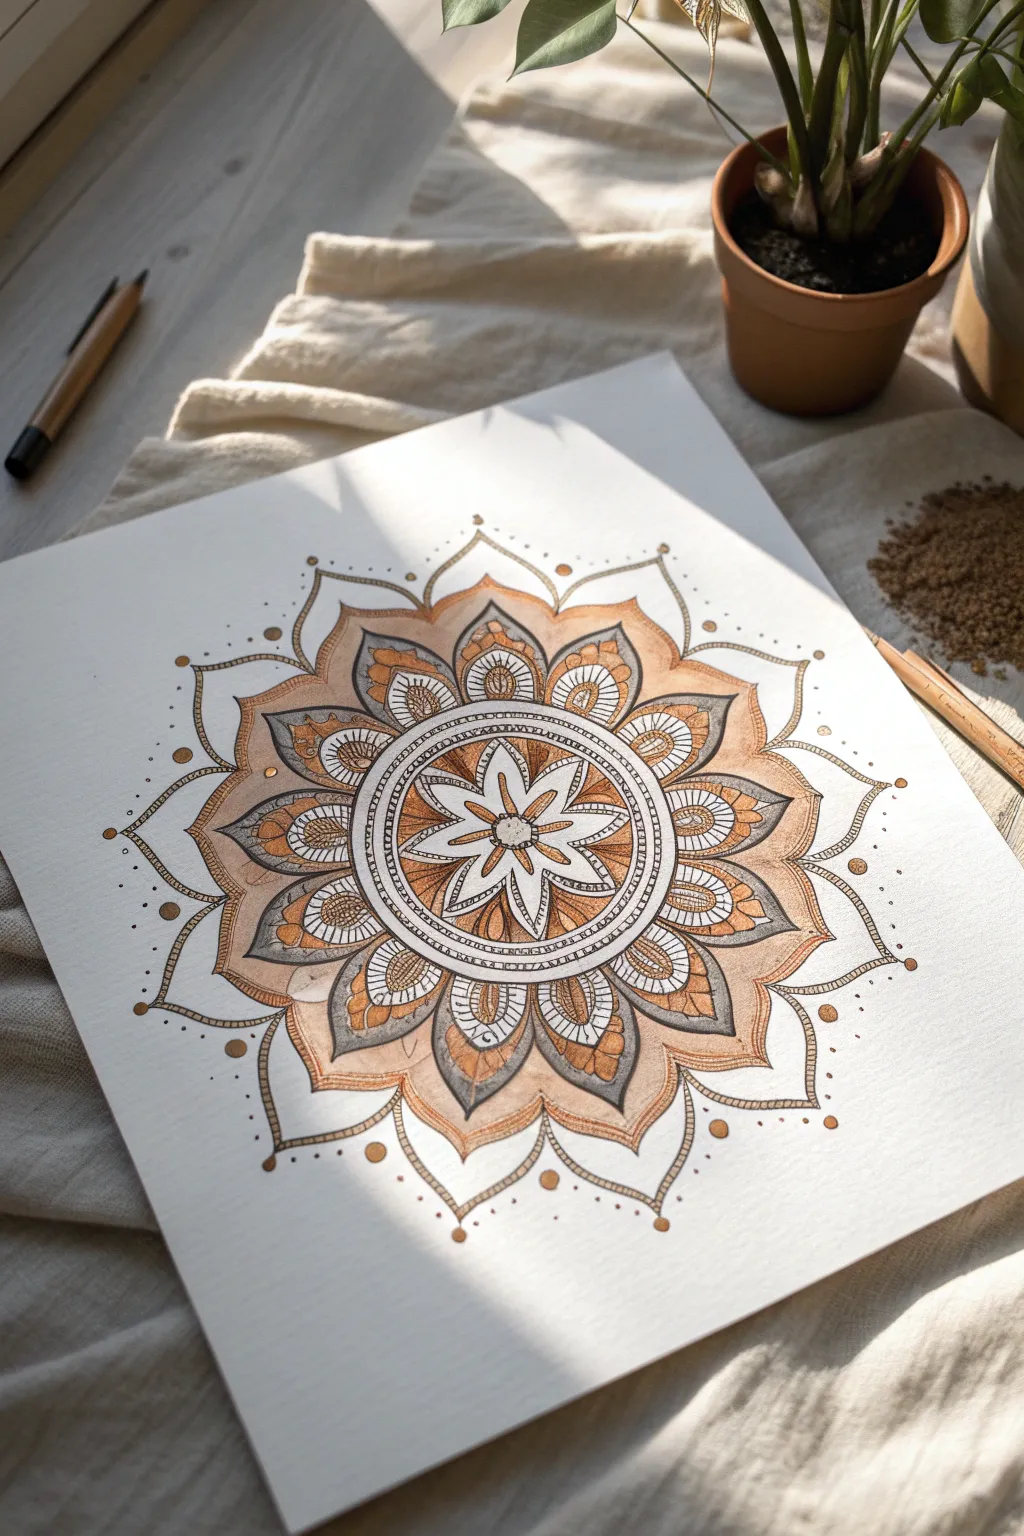
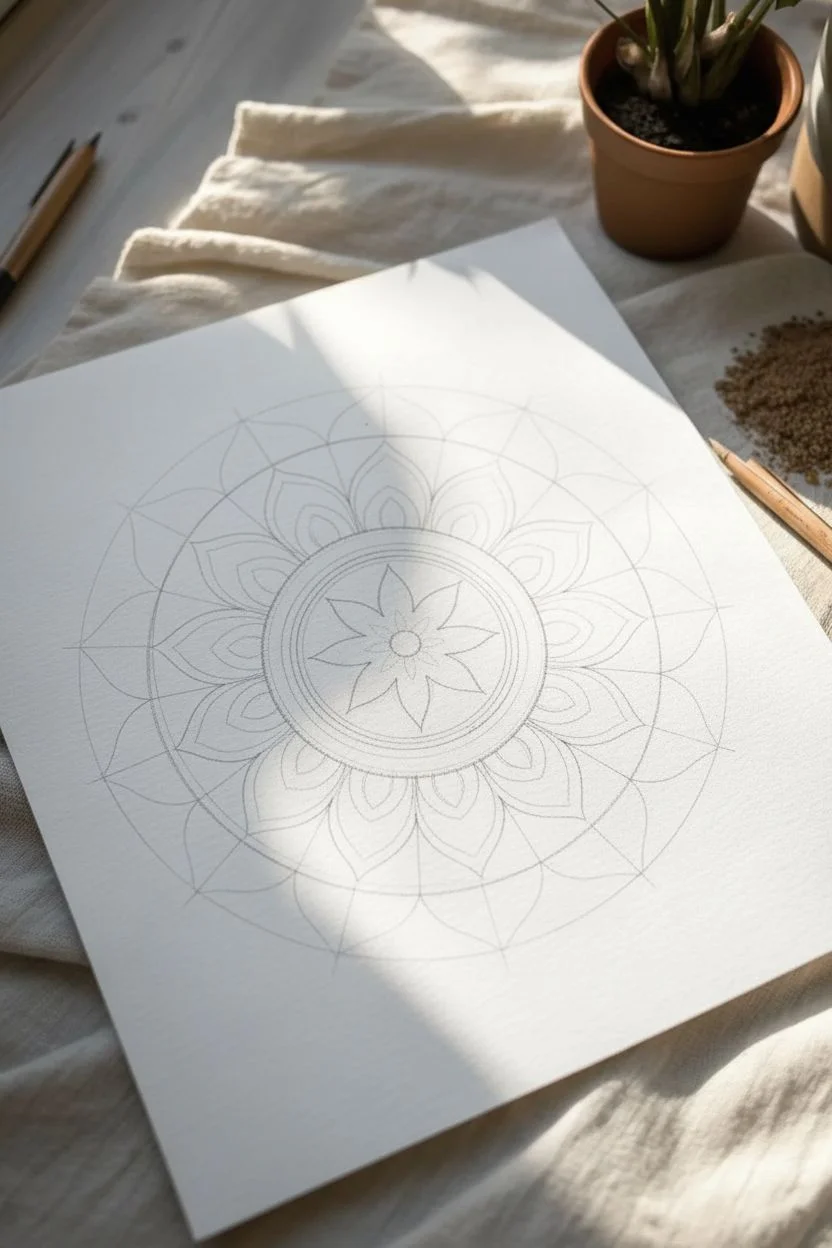
Use Sacred Geometry as a Glow Map
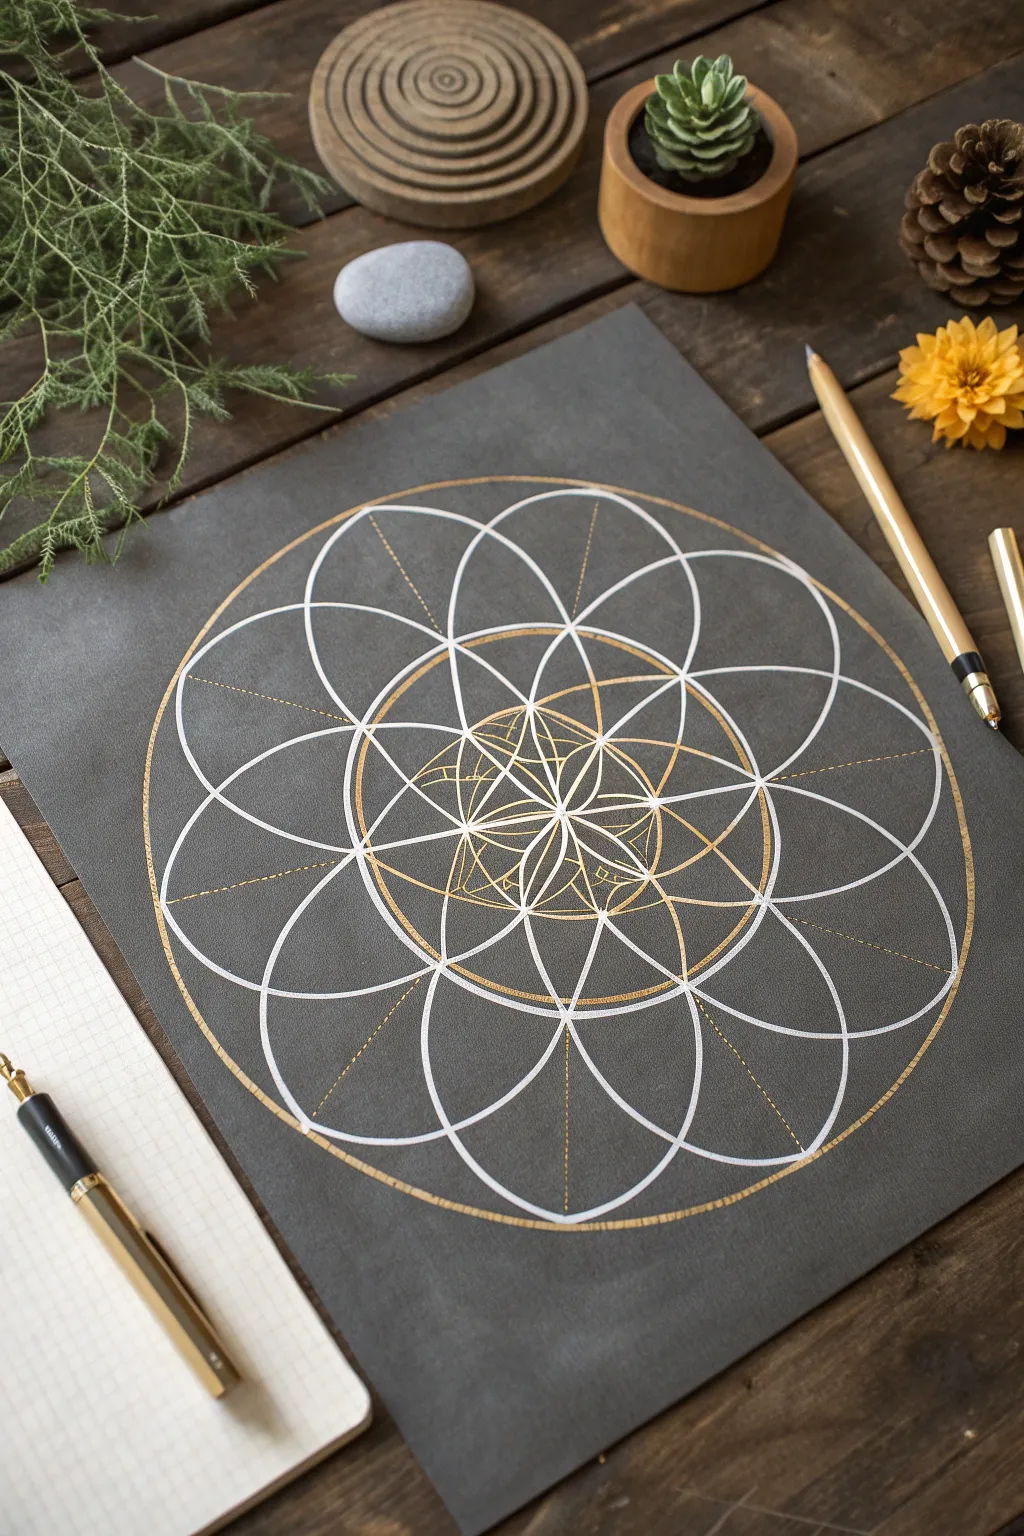
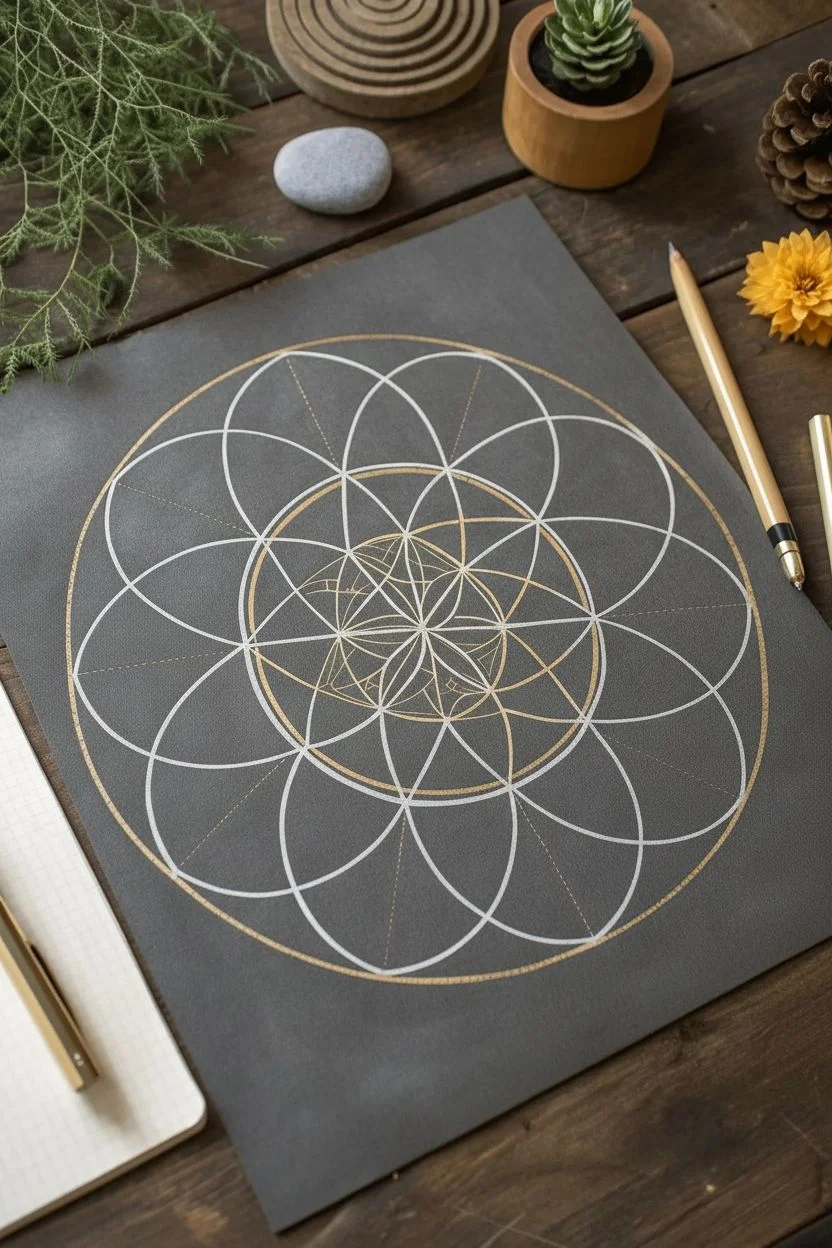
Center your mind and steady your hand with this meditative sacred geometry project. Using striking white and gold ink on dark paper, you’ll construct a complex, harmonious mandala based on the classic ‘Seed of Life’ pattern.
Step-by-Step Guide
Materials
- High-quality black or dark grey cardstock (smooth finish)
- Compass with a universal adapter or lead holder
- White gel pen or fine white paint marker (0.5mm)
- Gold metallic gel pen or fine gold paint marker
- Ruler (clear acrylic works best)
- Pencil (H or HB hardness)
- Eraser
- Protractor
Step 1: Setting the Foundation
-
Find the center:
Begin by finding the exact center of your dark cardstock. Use your ruler to lightly mark an ‘X’ or draw faint vertical and horizontal axes with your pencil. This central point is the anchor for the entire structure. -
Draw the central circle:
Set your compass to a radius of approximately 1.5 to 2 inches (depending on your paper size). Lock it in place securely so it doesn’t slip. Place the needle on your center point and draw the first circle lightly in pencil. -
Create the first ‘Seed’ petals:
Move the compass needle to any point on the circumference of your first circle. Draw a second circle. The two intersection points created will serve as anchor points for the next steps. -
Complete the inner flower:
Place your needle on an intersection point you just created and draw another circle. Continue this process around the central circle until you have a six-petaled flower shape in the middle. This is the classic ‘Seed of Life’. -
Expand the grid:
To create the larger, outer loops seen in the artwork, extend your pattern outward. Use the existing intersection points on the outer edge of your flower to draw a second layer of surrounding circles. Keep your compass radius exactly the same.
Clean Arcs
Attach your gel pen directly to the compass using masking tape if you lack a universal adapter. This ensures perfect circles without shaky freehand tracing.
Step 2: Inking the Structure
-
Outline the primary curves:
Switch to your white gel pen. Carefully trace over the large, outer petals that form the main twelve-pointed starburst shape. I like to rotate the paper rather than my hand to keep the curves smooth. -
Draw the perimeter circle:
Using a gold metallic pen attached to your compass (or tracing carefully), ink the large outer circle that encapsulates the entire design. This acts as a boundary for your mandala. -
Add the inner gold circle:
Adjust your compass to a smaller radius that touches the inner intersection points of the large petals. Ink this circle in gold, creating a warm ring that separates the inner complexities from the outer loops. -
Inking the central flower:
Return to the center of the design. Use the white pen to trace the six central petals, but only the parts that fall *inside* the gold ring you just drew. This creates a layered, woven effect.
Step 3: Detailing and Embellishment
-
Create radial guides:
Use your ruler and pencil to lightly draw straight lines from the center point out through the tips of each petal. These will serve as guides for the golden dotted lines. -
Add golden dotted rays:
With your gold pen, standard ruler, and a steady hand, draw dashed or dotted lines along your radial guides. Start from the inner gold ring and extend them outward to the perimeter circle. -
Intricate center work:
The very center needs special attention. Using the gold pen, draw tiny geometric details inside the innermost petals—small triangles or arcs that highlight the intersection points. -
Reinforce the white lines:
Go back over your primary white curves with a second pass if the ink looks translucent. The contrast against the dark paper needs to be crisp and opaque. -
Clean up:
Allow the ink to dry completely—give it at least 30 minutes to be safe. Gently erase any visible pencil marks, being careful not to smear the metallic ink.
Cosmic Depth
Use a white colored pencil to lightly shade the inside of the petals, fading out from the center. This adds a subtle 3D glow effect against the dark paper.
Step back and admire the perfect symmetry of your creation as the light catches the metallic gold details

PENCIL GUIDE
Understanding Pencil Grades from H to B
From first sketch to finished drawing — learn pencil grades, line control, and shading techniques.
Explore the Full Guide
Paint Energy Swirls as Prana or Chi
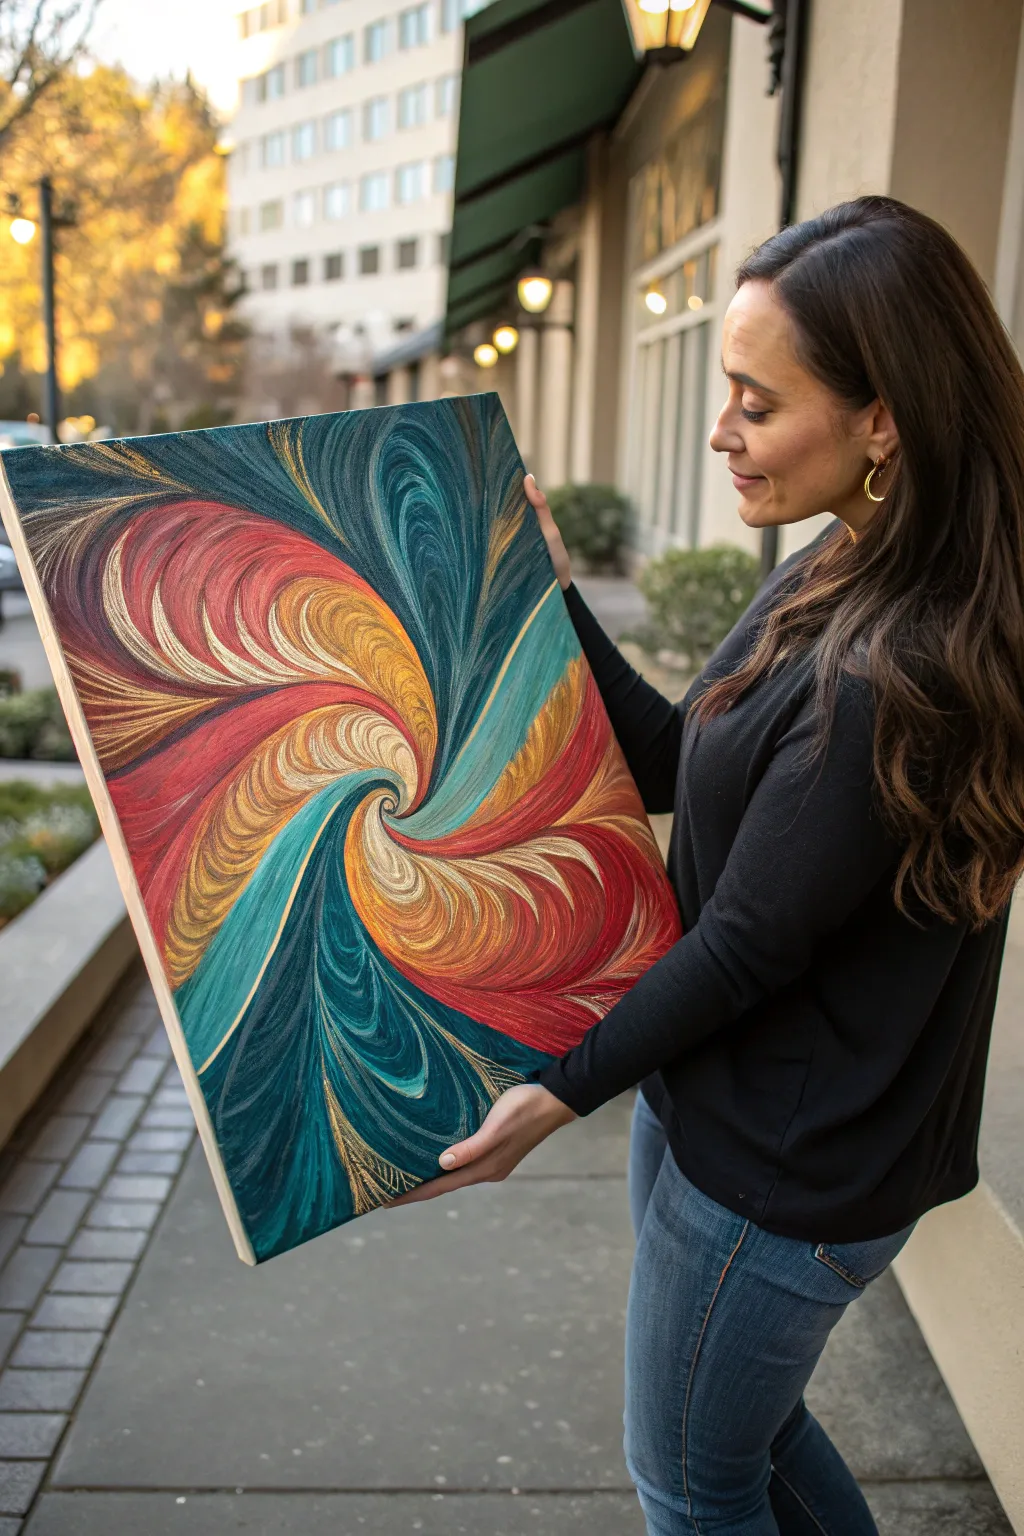
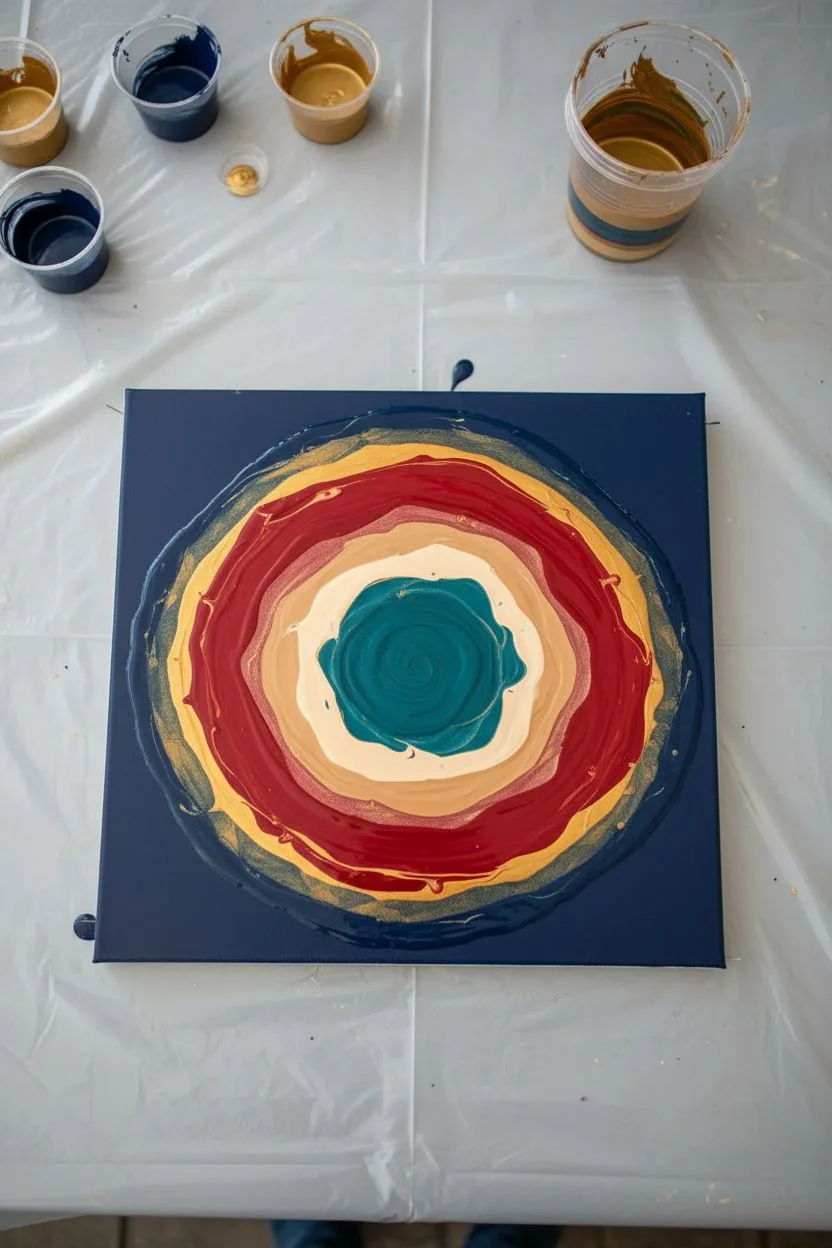
Capture the dynamic flow of spiritual energy with this mesmerizing acrylic pour painting, featuring feathery striations of teal, crimson, and gold spiraling from a central vortex. This technique creates organic, vibrating patterns that perfectly visualize the concept of Chi or Prana moving through space.
Step-by-Step Tutorial
Materials
- Large rectangular stretched canvas (e.g., 20×30 inches)
- High-flow or soft body acrylic paints (Deep Teal, Navy Blue, Crimson Red, Gold Metallic, Cream/Beige)
- Pouring medium (Floetrol or dedicated gloss medium)
- Silicone oil (optional, avoiding for this specific feathery look is better)
- Large plastic cup for layering paint
- Stirring sticks
- Canvas push pins or cups (to elevate the canvas)
- Drop cloth or plastic sheeting
- Varnish (gloss finish)
- Gloves
Step 1: Preparation and Mixing
-
Prepare your workspace:
Lay down your plastic sheeting on a level surface. This project gets messy, so ensure you have ample coverage. Insert push pins into the corners of the back of your canvas to elevate it off the table. -
Mix your paints:
In individual cups, mix each paint color with your pouring medium. A standard ratio is 1 part paint to 2 parts medium, but adjust until the consistency resembles warm honey. It should flow off the stick in a continuous stream without breaking. -
Check consistency:
Ensure all colors have the exact same consistency. If one is too thick, add a tiny splash of water. If too thin, add more paint. This uniformity is crucial for keeping those tight, distinct lines seen in the reference. -
Layer the primary cup:
Take your large clean cup. Tilt it slightly and pour a small amount of Navy Blue down the side. Follow specifically with Gold, then Crimson, then Cream, then Teal. Repeat this layering order carefully until the cup is full. -
Layering technique:
Do not stir the large cup. Pour the layers gently down the side so they sit on top of each other rather than mixing into a muddy color.
Muddy Colors?
If your colors are blending into grey instead of staying distinct, your paint was likely too thin. Aim for a texture like warm honey next time, and don’t over-tilt.
Step 2: The Ring Pour
-
Begin the pour:
Position the cup over the very center of the canvas. Begin pouring slowly in a tiny, tight circular motion. You want the paint to land in the center and ring outward like tree rings. -
Create the spiral:
As you continue pouring, keep your hand steady and your circles tight. The paint will expand outward, pushing the previous rings toward the edges of the canvas. -
Finishing the cup:
As you reach the end of the paint in the cup, create a final small swirl in the center and quickly catch the last drip with your hand or a cup to prevent a random splatter. -
Observe the pattern:
I like to pause here for a moment. You should see concentric rings of color sitting like a puddle in the middle of your canvas.
Step 3: Tilting and Stretching
-
The first tilt:
Gently lift the canvas. Slowly tilt it toward one corner. Watch how the rings stretch into the elongated, feathery shapes seen in the photo. Do not let the paint run off the edge just yet. -
Return to center:
Bring the weight of the paint back to the middle of the canvas. This re-centering prevents the pattern from getting too distorted on one side. -
Tilt to opposite corners:
Tilt the canvas toward the opposite corner, again stretching those circular rings into long, sweeping curves. Allow the paint to begin flowing over the edges now. -
Covering the corners:
Work your way around to all four corners. If the paint is struggling to reach a corner, you can use a finger to touch a bit of wet paint to the dry corner; this helps pull the flow across. -
Final composition check:
Look at the composition. Tilt slightly to position the ‘eye’ of the spiral exactly where you want it—slightly off-center often looks most dynamic.
Add Celestial Sparkle
While the paint is still wet, gently blow some dry gold glitter or mica powder into the darkest blue sections for a starry, cosmic energy effect.
Step 4: Drying and Sealing
-
Inspect edges:
Run a finger along the underside of the canvas frame to remove drips. This prevents the paint from pulling excessively as it dries. -
Drying process:
Let the painting sit undisturbed for at least 48 to 72 hours. Acrylic pours dry slowly, and moving it too soon can shift the pattern. -
Apply varnish:
Once fully cured (wait 2-3 weeks for total cure), apply a coat of gloss varnish. This will make the metallic gold pop and give the teal and crimson a deep, wet look.
Hang your finished energy swirl in a meditation space to remind you of the constant flow of the universe
Make a Third-Eye Symbol in a Star Field
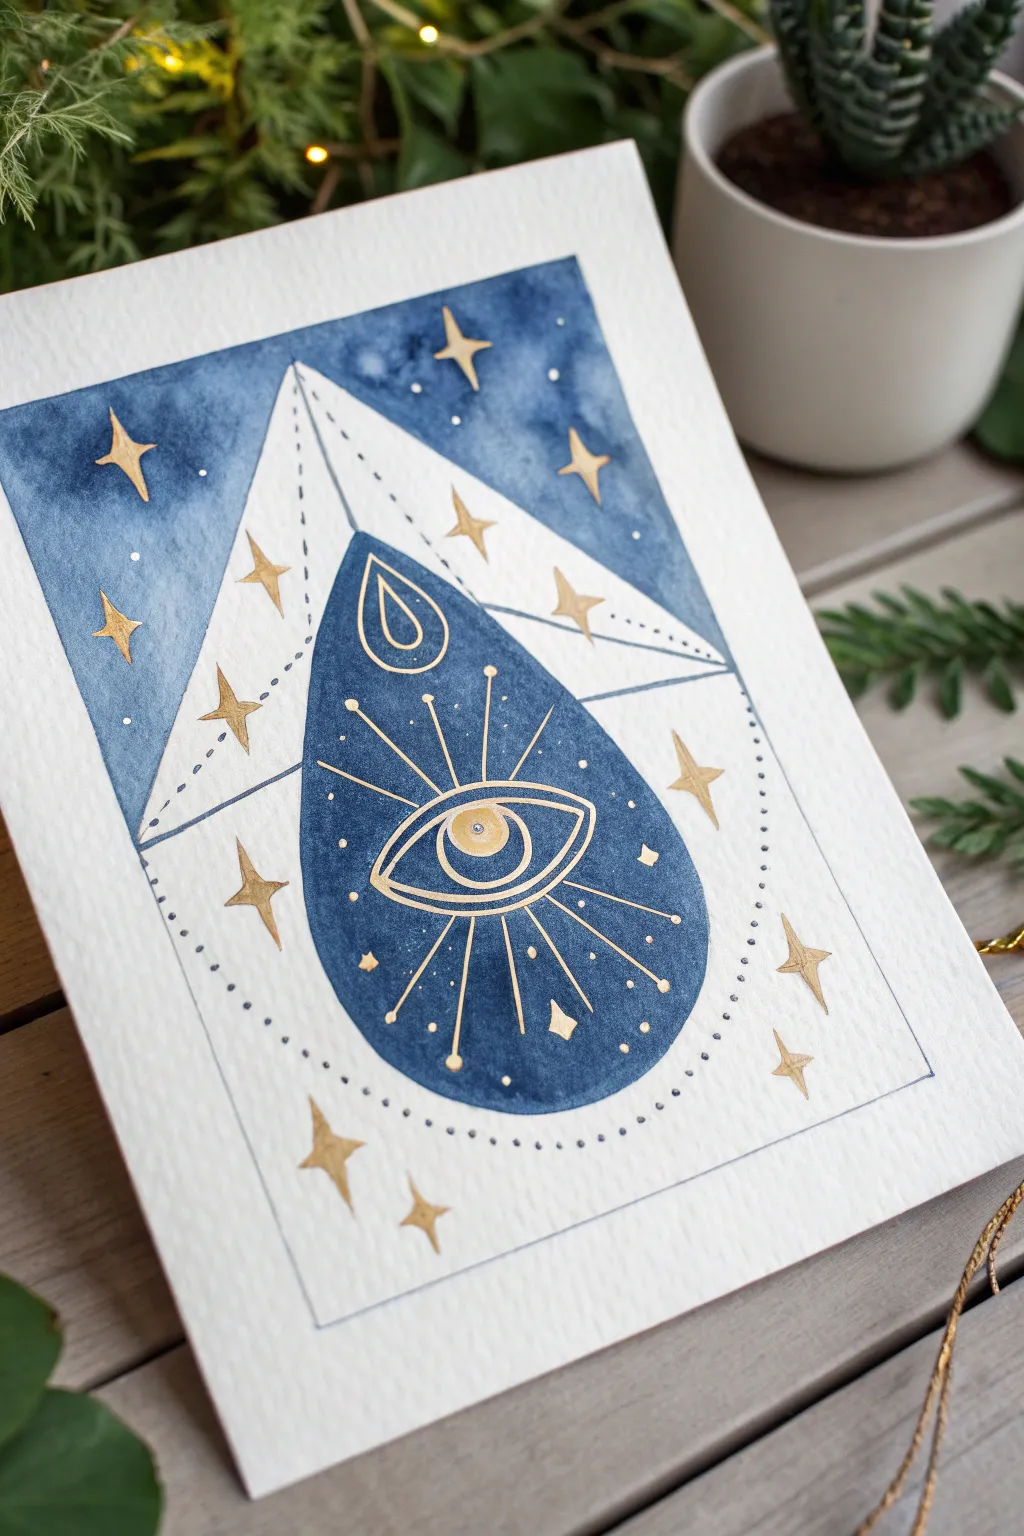
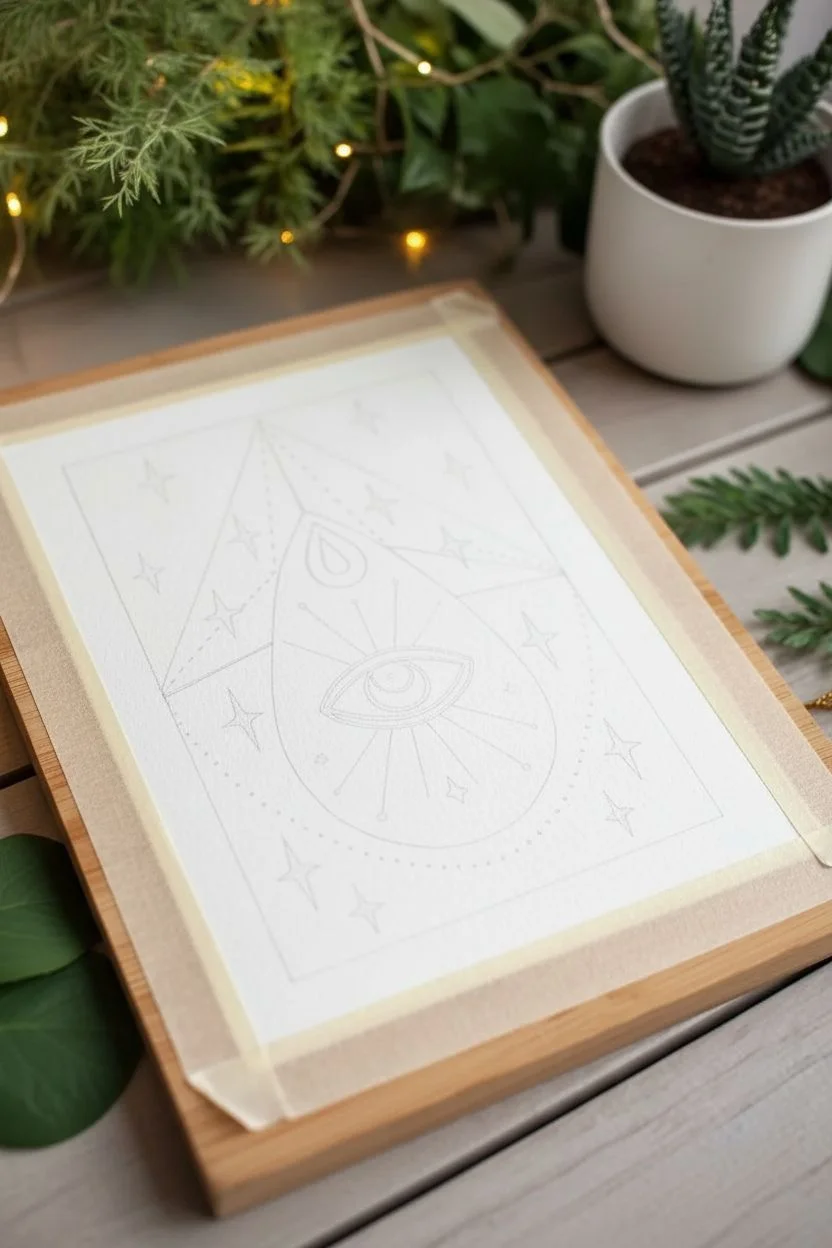
This celestial artwork combines deep indigo watercolor washes with brilliant gold accents to create a mystical third-eye emblem. The finished piece feels like an ancient tarot card or a window into a starry galaxy, perfect for your altar or meditation space.
Step-by-Step
Materials
- Cold press watercolor paper (300 gsm)
- Indigo watercolor paint
- Gold metallic gouache or gold ink
- Pencil (HB or 2H)
- Ruler
- Fine liner brush (size 0 or 00)
- Round watercolor brush (size 4 or 6)
- White gel pen (optional)
- Masking tape
Step 1: Planning the Geometry
-
Prepare your paper:
Tape down all four edges of your watercolor paper to a board. This creates the crisp white border seen in the final piece and prevents buckling. -
Sketch the main rectangle:
Using a ruler and a light pencil touch, draw a central rectangle leaving a wide margin around the edges. -
Draft the triangle:
Visualize an upside-down ‘V’ or triangle shape within the top half of your rectangle to create the ‘mountain’ peaks. The tip should touch the top center of your rectangle. -
Draw the central tear:
Sketch a large, prominent teardrop shape in the center. It should overlap the bottom of your triangle shape. Keep your lines faint so they can be erased later. -
Add celestial details:
Lightly mark positions for the larger four-pointed stars inside the triangle and around the bottom border. A simple cross shape is enough for a guide.
Paint Bleeding?
If gold spreads into the blue, the watercolor wasn’t dry enough. Wait longer, or use a hair dryer on low heat to speed up the process.
Step 2: Painting the Cosmos
-
Mix your indigo:
Prepare a rich puddle of indigo watercolor. You want a high pigment-to-water ratio for that deep, night-sky look. -
Paint the background sky:
Carefully paint the area inside the top rectangle but *outside* the triangle shape. Use the wet-on-dry technique to get distinct edges. -
Create texture:
While the indigo is still wet, you can drop in tiny touches of clear water or a slightly darker blue to create a ‘blooming’ texture that mimics clouds or nebulae. -
Fill the central teardrop:
Moving to the center, fill in the large teardrop shape with the same deep indigo. Be very precise with your edges here, as this is the focal point. -
Let it dry completely:
This is crucial. The paint must be bone-dry before you add the metallic layer, or the gold will bleed into the blue.
Step 3: Gilding the Vision
-
Outline the eye:
Using your fine liner brush and gold ink, draw the almond shape of the eye in the center of the indigo teardrop. -
Add the iris and pupil:
Paint a gold circle for the iris, leaving a tiny negative space or using a dot of darker paint later for the pupil. -
Radiate light:
Draw straight gold rays extending outward from the eye to the edge of the teardrop. Vary the lengths—some long, some short. -
Paint the stars:
Fill in your sketched stars with gold. Create the four-pointed ‘compass star’ shape by drawing a cross and then curving the inner corners slightly inward. -
Define the structure:
Use a pen or very fine brush to draw the thin lines defining the triangle and the dotted arc that frames the bottom of the teardrop. -
Add stardust:
Scatter tiny gold dots throughout the indigo sky and the teardrop to represent distant stars. -
Final touches:
Once fully dry, remove the tape to reveal the clean border. I like to add a tiny dot of white gel pen to the center of the eye pupil for a spark of life.
Make it Sparkle
Mix a tiny pinch of iridescent medium into your indigo paint before applying. The background will shimmer subtley when caught in the light.
Hang your finished piece in a spot where it catches the morning light to see the gold shimmer truly come alive


Paint a Serene Divine Face With Closed Eyes
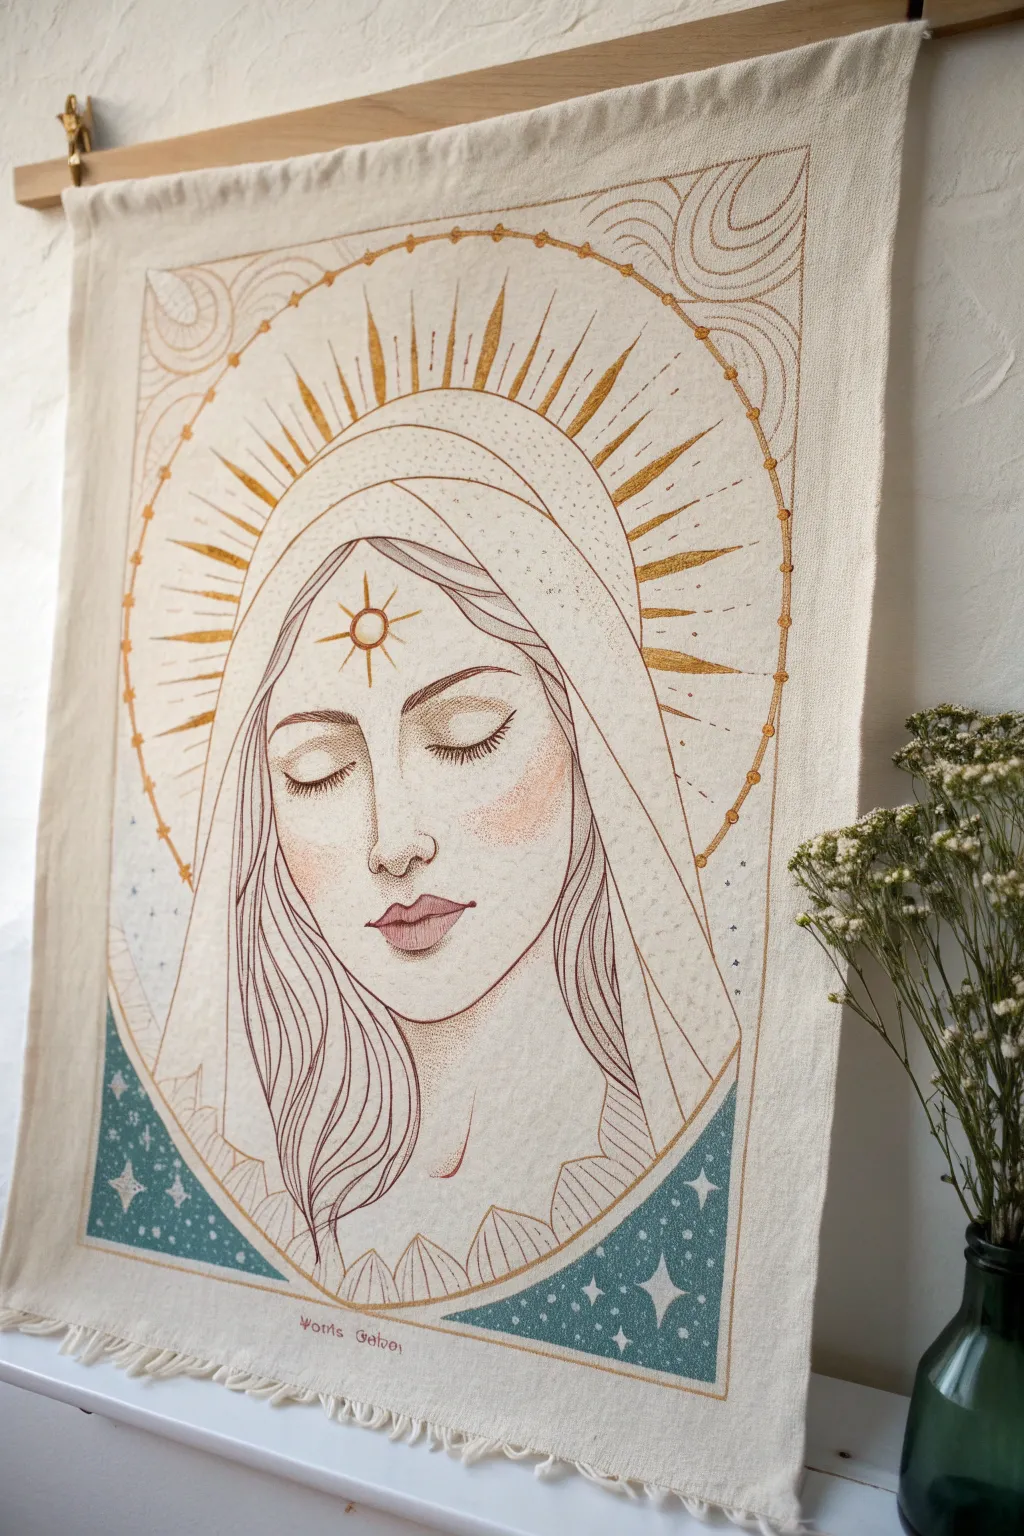
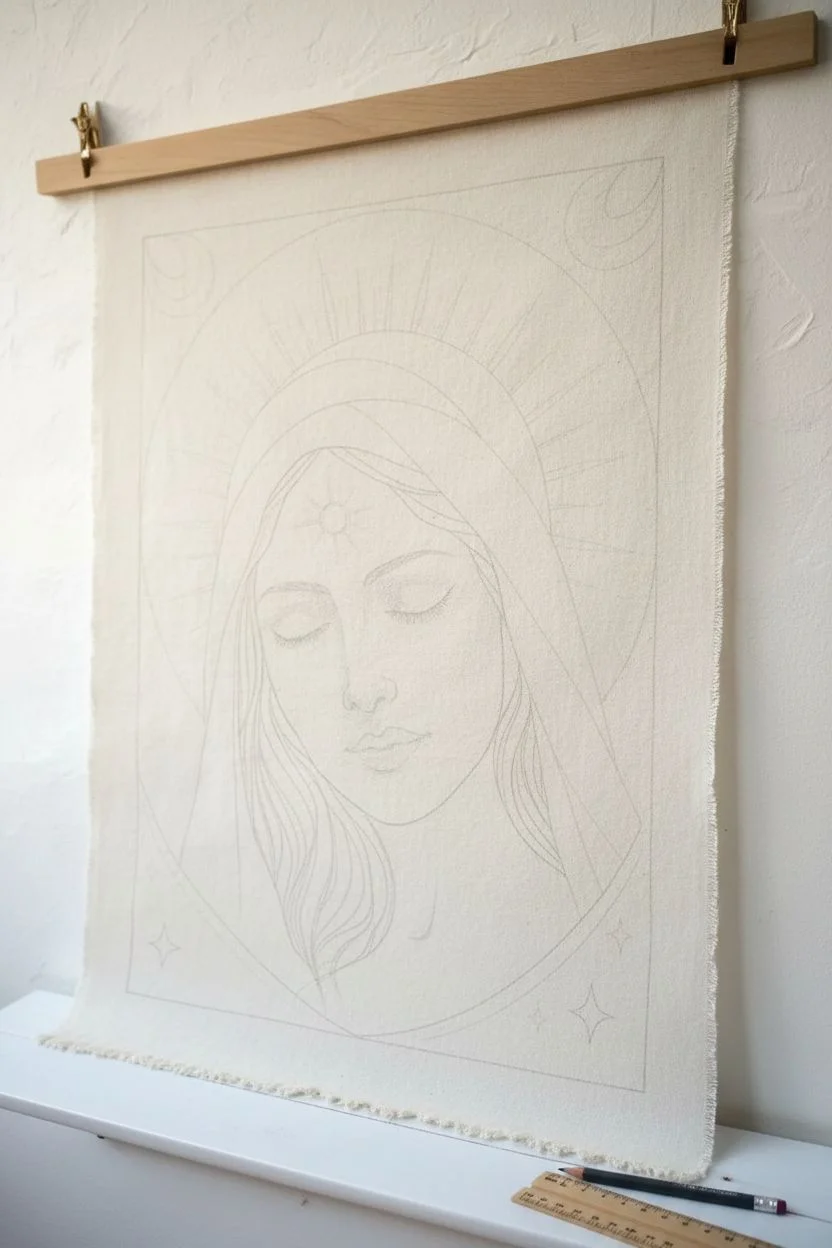
Channel serenity into your space by creating this ethereal fabric wall hanging featuring a divine face and celestial motifs. The finished piece combines delicate line work with soft earthy tones on unbleached cotton for a timeless, spiritual aesthetic.
Step-by-Step Guide
Materials
- Unbleached cotton or linen fabric (approx. 18×24 inches)
- Wooden dowel or poster hanger frame
- Fabric markers (fine tip: dark brown, gold, black)
- Fabric paint (metallic gold, teal/deep blue, pale peach)
- Fine detail paintbrushes (sizes 0 and 00)
- Pencil and eraser
- Ruler
- Iron and ironing board
- Reference sketch or carbon transfer paper
- Fray check or sewing machine (for hem)
Step 1: Preparation & Sketching
-
Prepare the fabric:
Cut your unbleached cotton to your desired size (suggested 18×24 inches), leaving an extra inch on the top and bottom if you plan to sew a hem. Iron the fabric completely flat to ensure a smooth drawing surface. -
Finish the edges:
Create a raw fringed edge by pulling loose threads at the bottom, or sew a clean hem. For the top, create a loop for your dowel or verify it fits your poster hanger. -
Draft the layout:
Using a ruler, lightly mark a rectangular border about 2 inches from the edges. This will frame your artwork. Inside this, sketch a large oval that will serve as the halo. -
Sketch the face:
In the lower center of your oval, lightly sketch the face. Focus on symmetry—draw a vertical centerline first. Position the closed eyes, the nose, and the lips. Add the hood draping around the head. -
Refine celestial details:
Sketch the sunburst rays extending from the head. Add the starburst symbol on the forehead and the crescent moon shapes or clouds in the upper corners.
Uneven Fabric Texture?
If the fabric weave is too rough for fine pens, place a piece of smooth cardstock underneath the fabric while drawing. This provides a hard surface and stabilizes the cloth for cleaner lines.
Step 2: Line Work
-
Outline the face:
Using a fine-tip dark brown fabric marker, carefully trace over your pencil lines for the facial features. Use a light hand for the eyelashes to keep them delicate. -
Detail the hair:
Draw flowing, wavy lines for the hair coming out from under the hood. Vary the line spacing to create texture and volume. -
Outline the hood and halo:
Continue with the brown marker to outline the draped hood and the large circular halo. I find that breaking the line slightly in places makes it look more organic and like a vintage etching. -
Add gold accents:
Switch to a gold metallic marker or gold fabric paint with a fine brush. Trace the sun rays radiating from the head and the small star on the forehead. -
Create the border:
Outline the main rectangular frame and the decorative geometric corners.
Step 3: Painting & Shading
-
Add cheek color:
Dilute a tiny amount of pale peach fabric paint with water. Gently wash it onto the cheeks for a subtle blush effect. Less is more here; you want a watercolor look. -
Paint the lips:
Fill in the lips with a slightly more saturated peach or soft terracotta tone. Keep the edges soft. -
Fill the lower corners:
Mix a deep teal or dusty blue fabric paint. Fill in the triangular sections at the bottom corners of the frame. This grounds the image and provides contrast. -
Add stars to the background:
Once the teal paint is dry, use your white or silver fabric paint (or a gel pen) to draw tiny four-pointed stars and dots over the teal sections. -
Highlight the halo:
Enhance the halo by adding small gold dots along the circular line. Paint the thicker parts of the sun rays with metallic gold paint for visible shimmer. -
Stipple shading:
To create dimension without heavy painting, use your fine brown marker to add stippling (tiny dots) under the chin, around the nose, and in the shadow of the hood.
Use a Lightbox
Can’t draw freehand? Print the design on paper first. Tape it to a window or lightbox, tape your fabric over it, and trace the design lightly with a pencil before inking.
Step 4: Finishing Touches
-
Set the ink:
Allow the piece to dry for at least 24 hours. Once dry, heat-set the ink and paint by ironing on the reverse side of the fabric (check your specific paint instructions). -
Erase guidelines:
Gently erase any remaining visible pencil marks. Be careful not to smudge the ink if it isn’t fully set. -
Mount the artwork:
Slide your wooden dowel through the top loop or clamp the fabric into the poster hanger. Attach a cord for hanging.
Hang your beautiful new artwork in a quiet corner to inspire daily moments of peace
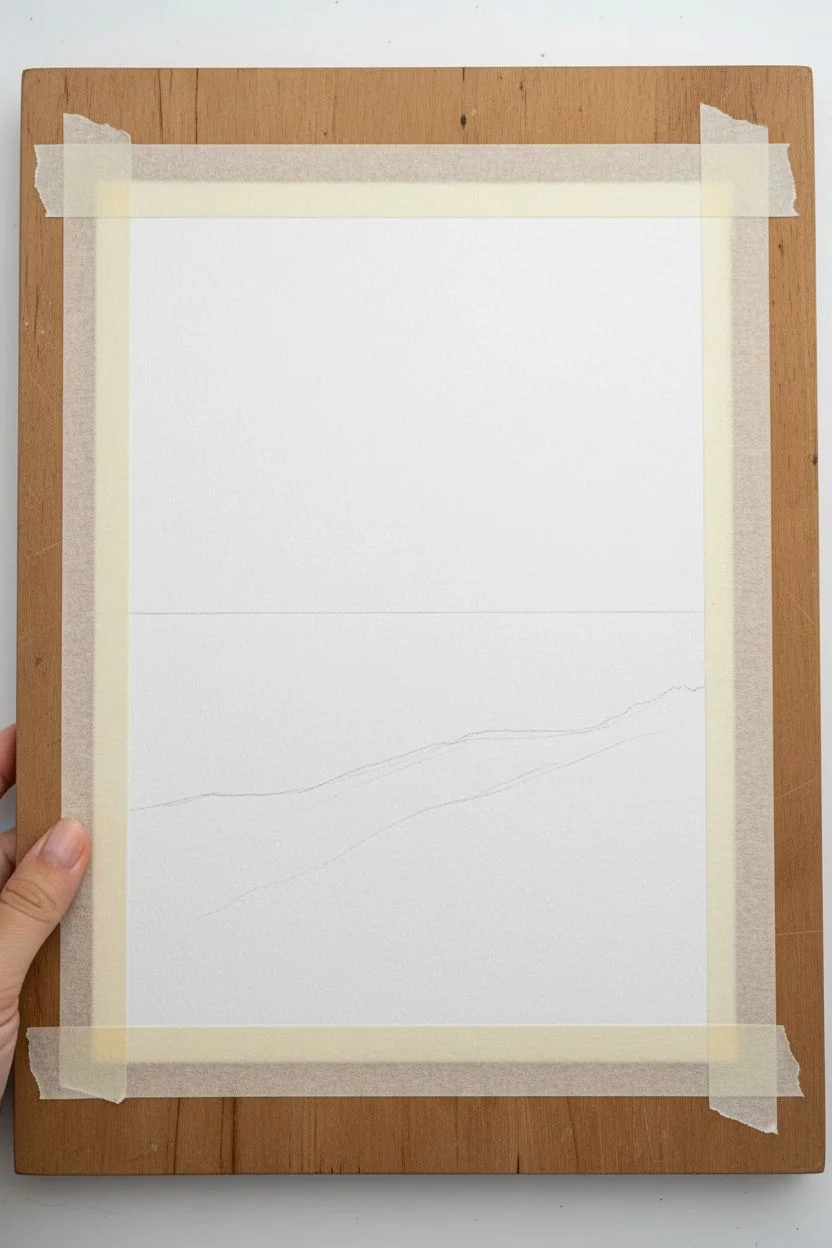
Show an Ascension Path Toward a Bright Portal
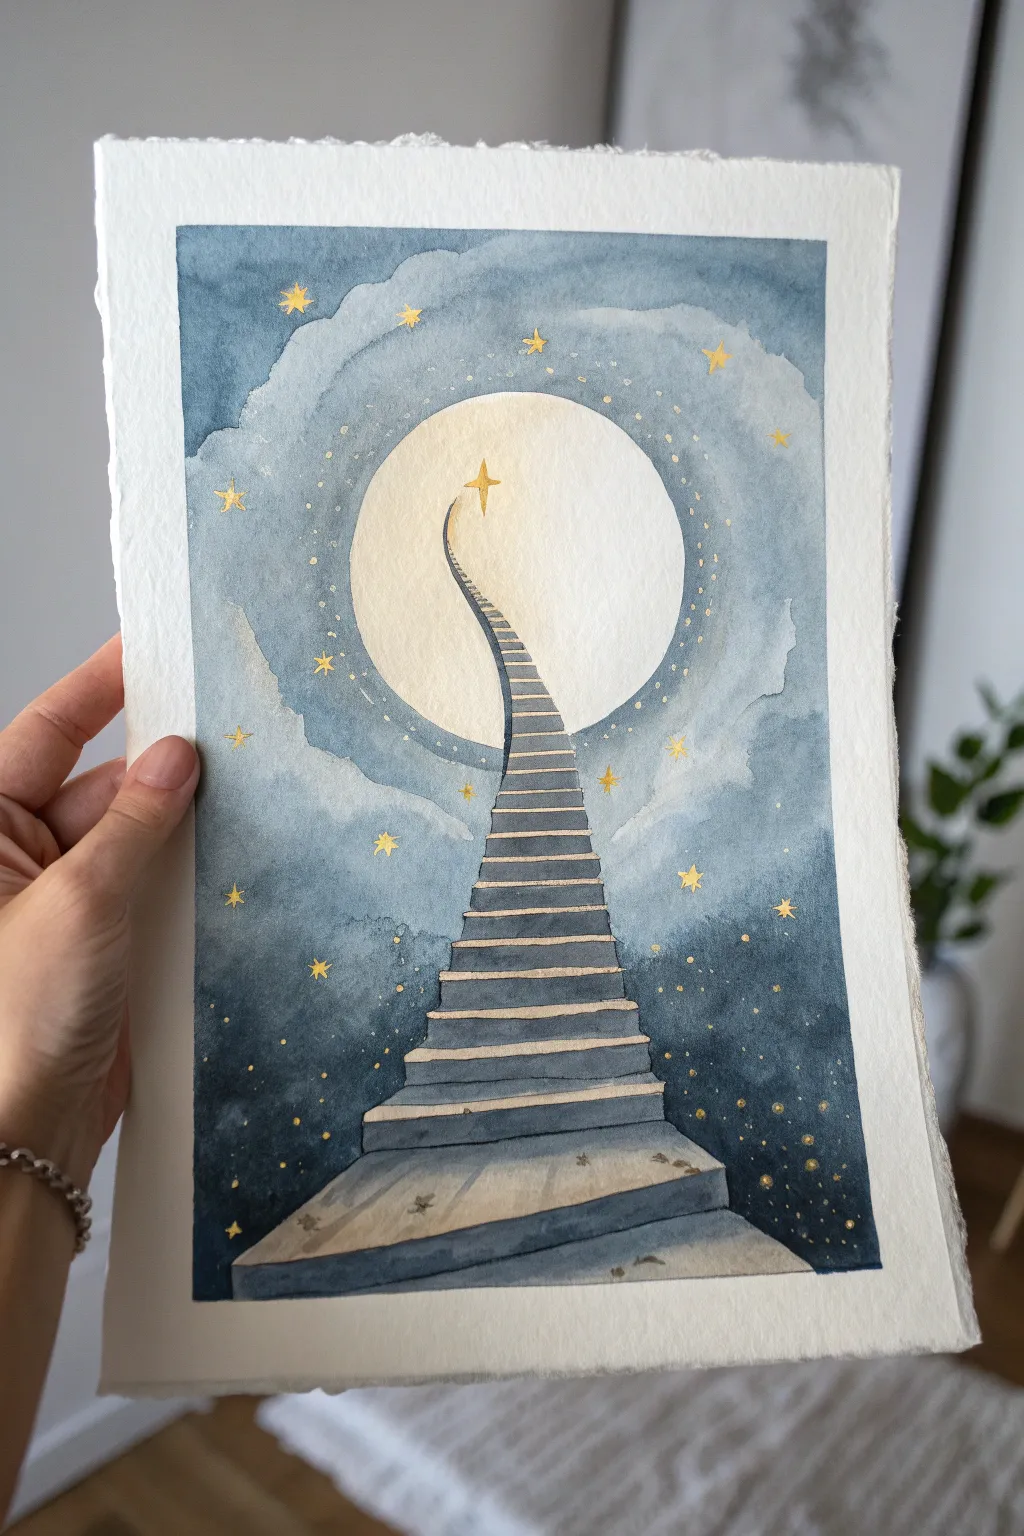
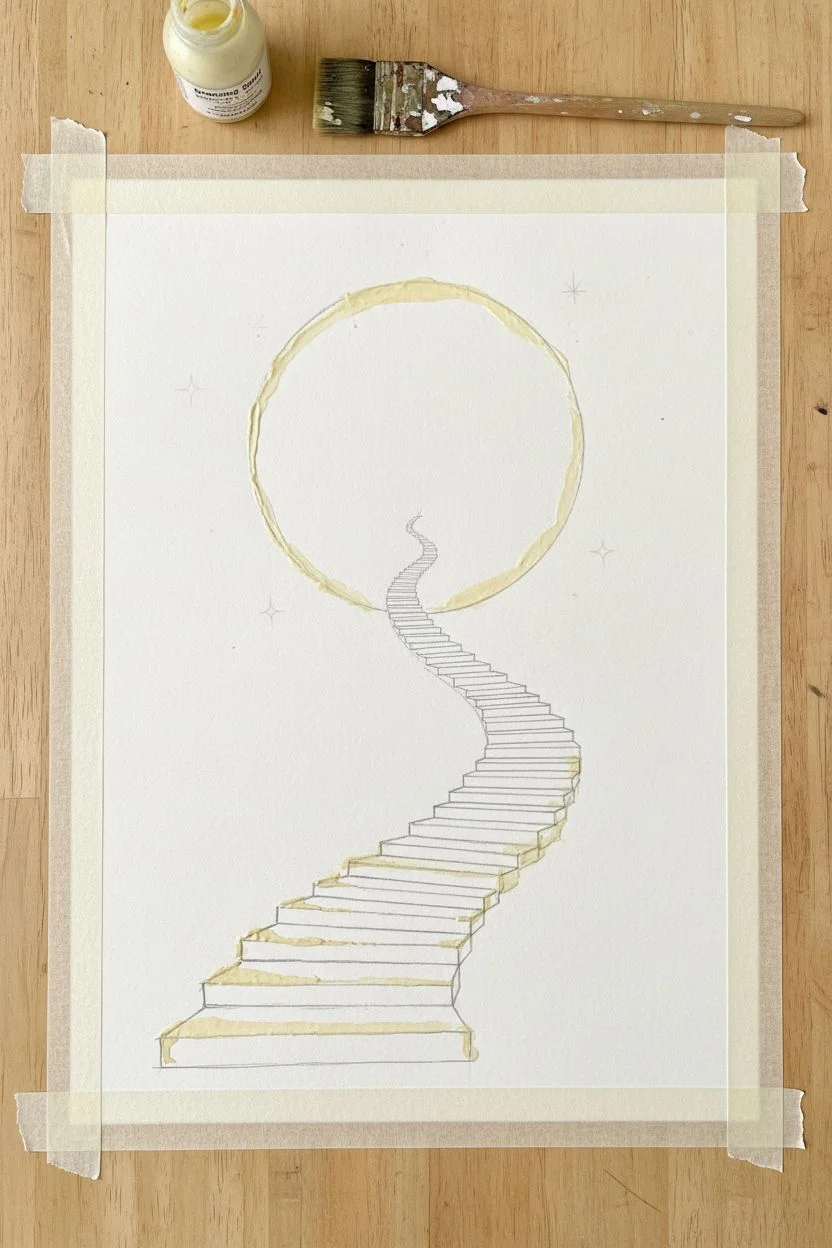
Capture the magic of ascension with this dreamy watercolor piece, featuring a winding stone staircase leading straight into a luminous full moon. The contrast between dark indigo clouds and the pale, warm moon creates a striking portal enhanced by delicate golden details.
Detailed Instructions
Materials
- Cold Press Watercolor Paper (300gsm, 100% cotton recommended)
- Watercolor Paints: Paynes Gray, Indigo, Sepia, Yellow Ochre, Burnt Umber
- Gold Metallic Watercolor or Gouache
- Masking Fluid (drawing gum) and old brush
- Round Brushes (sizes 2, 6, and 10)
- Pencil (HB) and Kneaded Eraser
- Painter’s Tape
- Two jars of water and paper towels
Step 1: Preparation and Sketching
-
Secure the paper:
Tape down all four edges of your watercolor paper to a board. This prevents buckling and creates that crisp white border seen in the reference image. -
Draw the moon:
Lightly sketch a large circle in the upper center of the page. You can trace a bowl or use a compass to get it perfectly round, but keep the pencil lines faint so they don’t show through the paint. -
Sketch the stairs:
Draw the staircase starting wide at the bottom center and narrowing drastically as it curves upward into the moon. Add horizontal lines for the steps, spacing them closer together as they ascend to create perspective. -
Protect the moon:
Apply masking fluid carefully over the entire moon circle and drawn stars. I also like to mask the top edges of the stairs to keep them crisp. Let this dry completely before painting.
Uneven Wash?
If your sky dries with unwanted hard lines, re-wet the entire area gently with a large soft brush and drop in more pigment. Keep the paper wet until you finish blending.
Step 2: Painting the Atmospheric Sky
-
Wet-on-wet base:
Wet the entire sky area around the stairs with clean water. While wet, drop in a very pale wash of Indigo mixed with plenty of water to establish the lightest sky tones. -
Deepen the cosmos:
While the paper is still damp, charge in stronger concentrations of Indigo and Paynes Gray at the corners and bottom edges. Let the paint bloom naturally to create a cloud-like texture. -
Define the clouds:
Use a thirsty, semi-dry brush to lift out pigment in circular motions around the moon. This ‘lifting’ technique creates the soft, glowing halo effect in the clouds. -
Add texture:
While the dark paint is settling, splatter a few drops of clean water onto the dark areas. This creates ‘cauliflowers’ or blooms that look like distant nebulae. -
Let it dry completely:
Wait for the sky to be bone dry. If the paper feels cool to the touch, it’s still damp. Use a hairdryer on a low setting if you’re impatient.
Add a Human Element
Paint a tiny silhouette figure standing at the bottom of the stairs looking up, or ascending midway, to add a sense of scale and personal journey to the piece.
Step 3: Painting the Staircase
-
Remove masking:
Gently rub away the masking fluid from the stairs (keep the moon masked for now) using your finger or a specialized rubber pickup tool. -
Base layer for stone:
Mix a watery grey using Paynes Gray and a touch of Sepia. Paint a flat wash over the entire staircase structure. -
Shadows and dimension:
Once the base is dry, use a smaller brush to paint the vertical ‘riser’ of each step with a darker grey-blue mix. Leave the horizontal ‘tread’ lighter to show where the light hits. -
Adding cracks and age:
With a fine liner brush and concentrated Sepia, add tiny cracks, chips, and texture marks on the larger bottom steps to give the stone an ancient feel. -
Side shading:
Glaze a transparent layer of Indigo on the very bottom left and right sides of the stair structure where it meets the dark sky, blending it out so the stairs seem to emerge from the darkness.
Step 4: The Moon and Magic Details
-
Reveal the moon:
Remove the masking fluid from the moon circle. Use an eraser to gently lift any pencil lines that remain visible. -
Warm glow:
Paint a very dilute wash of Yellow Ochre over the moon. While wet, lift a tiny highlight in the center with a paper towel and glaze a faint grey shadow on the bottom right edge for volume. -
Celestial accents:
Using your gold metallic paint, carefully paint in the stars. Focus the largest star at the very top of the staircase. -
Gold dust ring:
Paint tiny gold dots in a circular formation surrounding the moon, varying the size of the dots to create a shimmering aura. -
Final highlights:
Add thin lines of gold along the very edge of select steps, particularly the ones closest to the moon, to suggest the stone is reflecting the celestial light.
Peel off the tape carefully to reveal those crisp edges and enjoy your journey to the stars
Try a Minimal Meditative Void With One Light Source
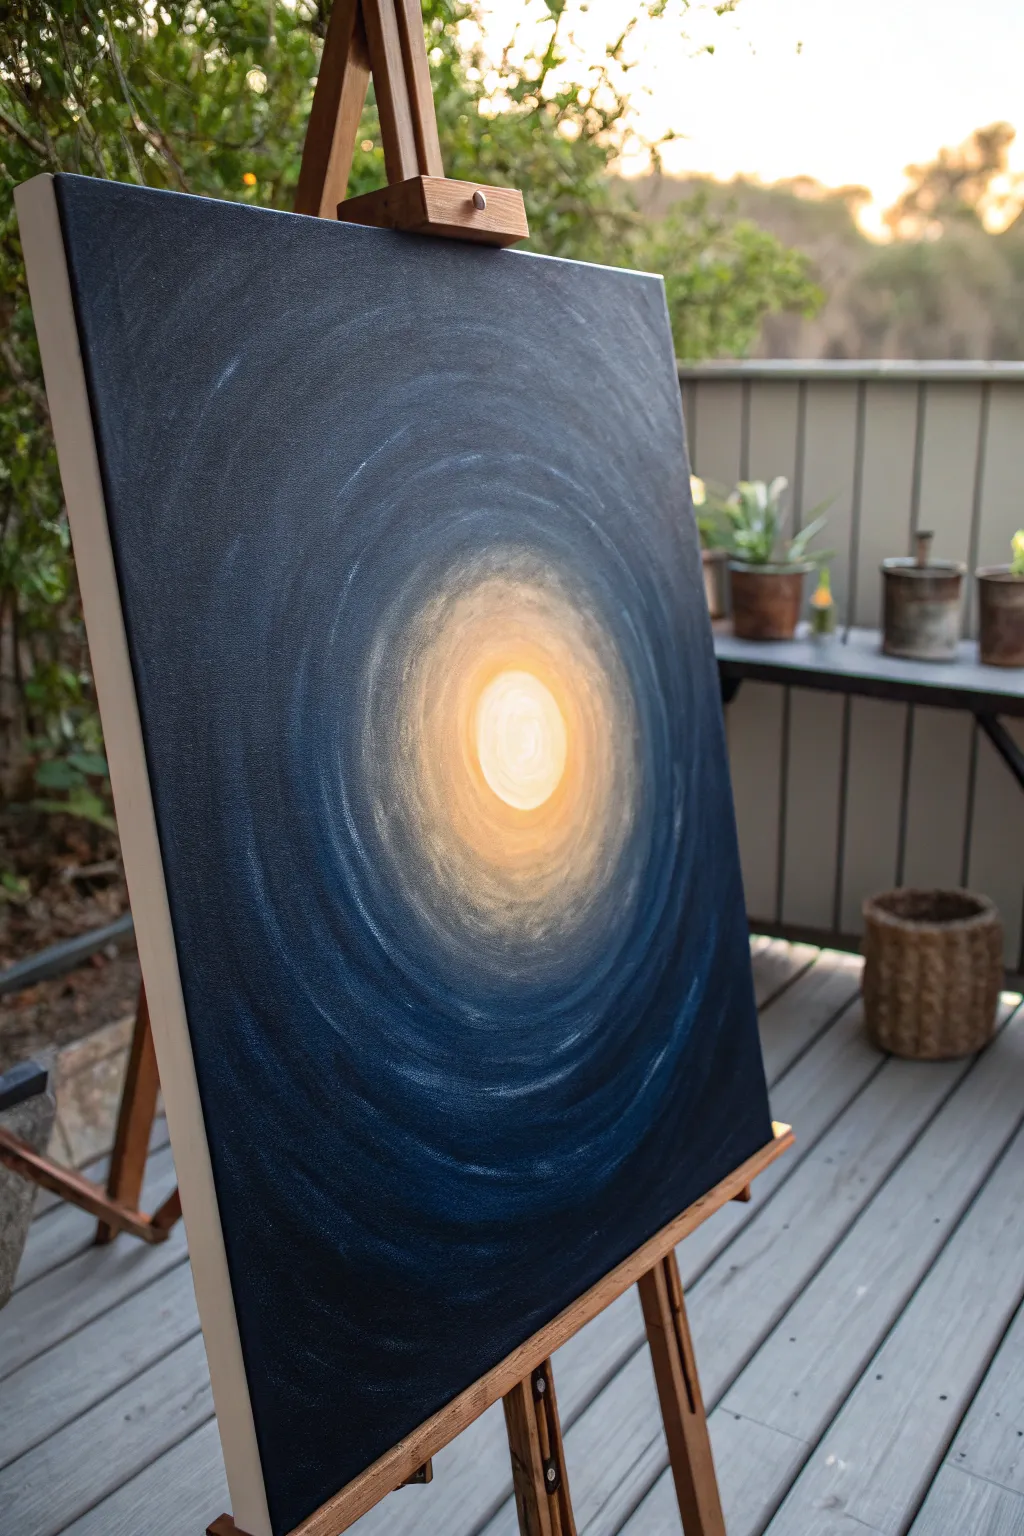
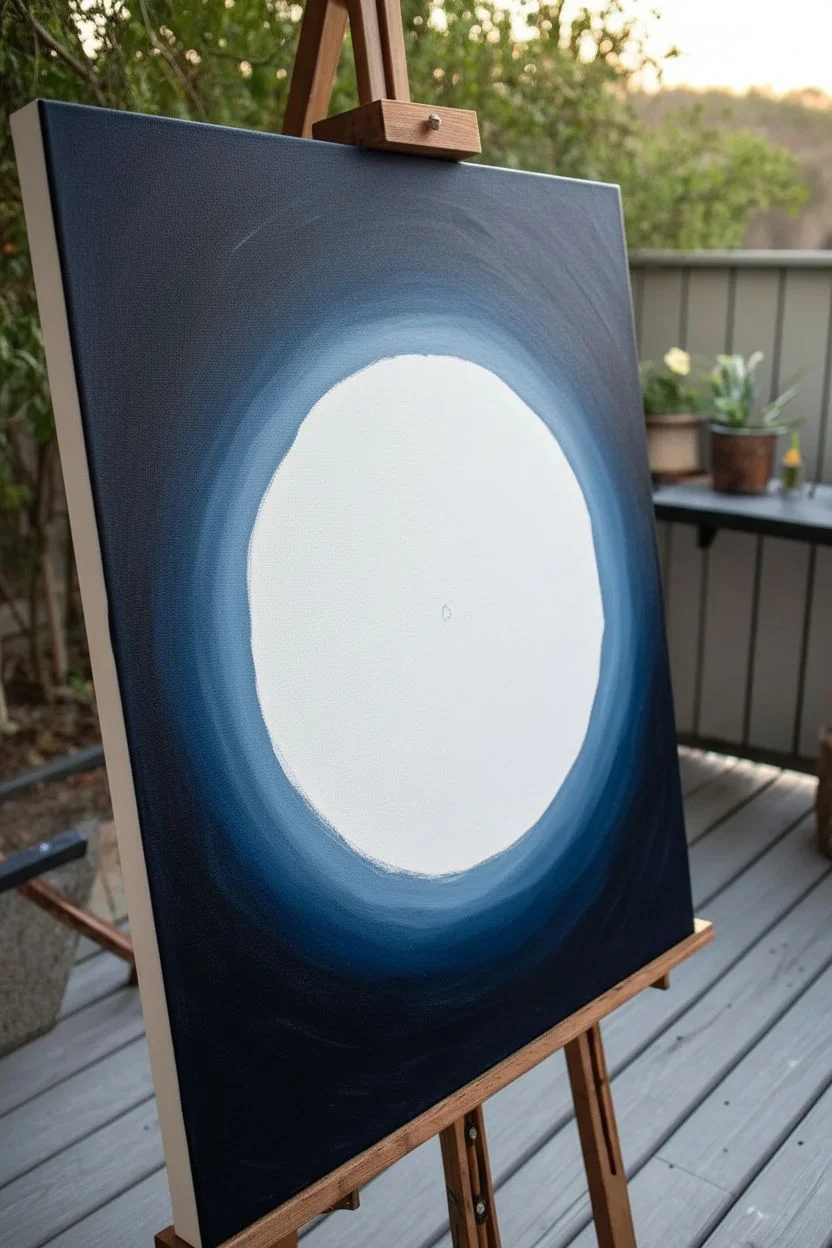
This meditative painting features a swirling, deep blue abyss that gently draws the eye toward a glowing, solitary light source at the center. By layering acrylics and focusing on circular motion, you will create a piece that feels both expansive and introspective.
Step-by-Step
Materials
- Large stretched canvas (e.g., 24×36 inches)
- Acrylic paints: Mars Black, Phthalo Blue (or Prussian Blue), Titanium White, Yellow Ochre, Cadmium Yellow
- Large flat brush (2-3 inch)
- Medium round brush
- Small detail brush
- Palette knife (for mixing)
- Water container
- Paper towels
- Easel
Step 1: Setting the Foundation
-
Prepare the center:
Begin by marking the absolute center of your canvas with a very light touch of pencil or chalk. This point will anchor the entire composition. -
Mix the deepest darks:
On your palette, mix a substantial amount of Mars Black with Phthalo Blue. You want a color that looks almost black but has a rich, cold blue undertone when light hits it. -
Apply the outer edges:
Using your large flat brush, fill the four corners and the outermost edges of the canvas with this dark blue-black mixture. Leave the large central circular area bare for now. -
Create the transition zone:
Mix a little more Phthalo Blue and a tiny touch of Titanium White into your dark mixture. Paint a ring just inside the dark corners, blending the wet edges together so the transition is soft.
Step 2: Creating the Spiral
-
Establish the movement:
Switch to a medium brush. With your dark blue mixture, start painting concentric circles or loose spirals working from the dark edges inward. Use definitive, sweeping strokes that mimic the rotation of a galaxy. -
Lighten the mixture:
As you spiral closer to the center, gradually mix in small amounts of Titanium White to your blue. The color should shift from midnight blue to a dusty denim shade. -
Dry brush texture:
I like to use a slightly dry brush here to let the varying values of blue scratch over the canvas texture. This enhances the feeling of movement and depth. -
Approach the light:
Stop your blue spiral about 4-5 inches from the center point. You should now have a tunneling effect of dark blue fading into a medium, hazy blue. -
Soft blending:
While the paint is tacky, use a clean, dry soft brush to lightly feather the boundaries between the dark and medium blue rings to remove harsh lines.
Fixing “Green” Mud
If blending blue and yellow turns green, let the blue layer dry 100% first. Apply a barrier ring of white over the blue edge, dry that, then apply your yellow. This keeps colors distinct.
Step 3: Igniting the Light Source
-
The golden halo:
Clean your brushes thoroughly. Mix Yellow Ochre with a generous amount of Titanium White. Paint the ring immediately surrounding the empty center, blending it slightly outward into the lightest blue. -
Intensify the glow:
Mix Cadmium Yellow with White. Apply this inside the ochre ring, working in tight circular strokes. The transition from the cool blue to warm yellow should look somewhat misty. -
The core:
For the absolute center, use almost pure Titanium White with just a whisper of yellow. Paint a solid circle in the middle. -
Radiating light:
Take a clean, dry brush and very gently drag from the white center outward into the yellow and ochre rings. This simulates light rays breaking through the atmosphere.
Level Up: Cosmic Dust
For a starry effect, load a stiff brush with watered-down white paint. Flick the bristles to spatter tiny stars, focusing them on the outer dark edges to look like a distant galaxy.
Step 4: Refining the Atmosphere
-
Enhance the spiral:
Mix a very watery glaze of white and blue. Use a thin brush to add faint, wispy lines spiraling through the dark blue outer areas, following your original brushstrokes. -
Deepen the contrast:
If the outer corners dried too light, apply a second coat of pure Mars Black mixed with blue to ensure the vignetting is dramatic. -
Final glow adjustments:
Step back and assess the light. If the transition from blue to yellow looks green (a common issue), wait for it to dry completely, then glaze over the transition area with a thin layer of Titanium White before reapplying the yellow.
Hang this piece in a quiet corner to serve as a daily reminder of focus and inner calm
Create a Protective Circle Around a Portrait
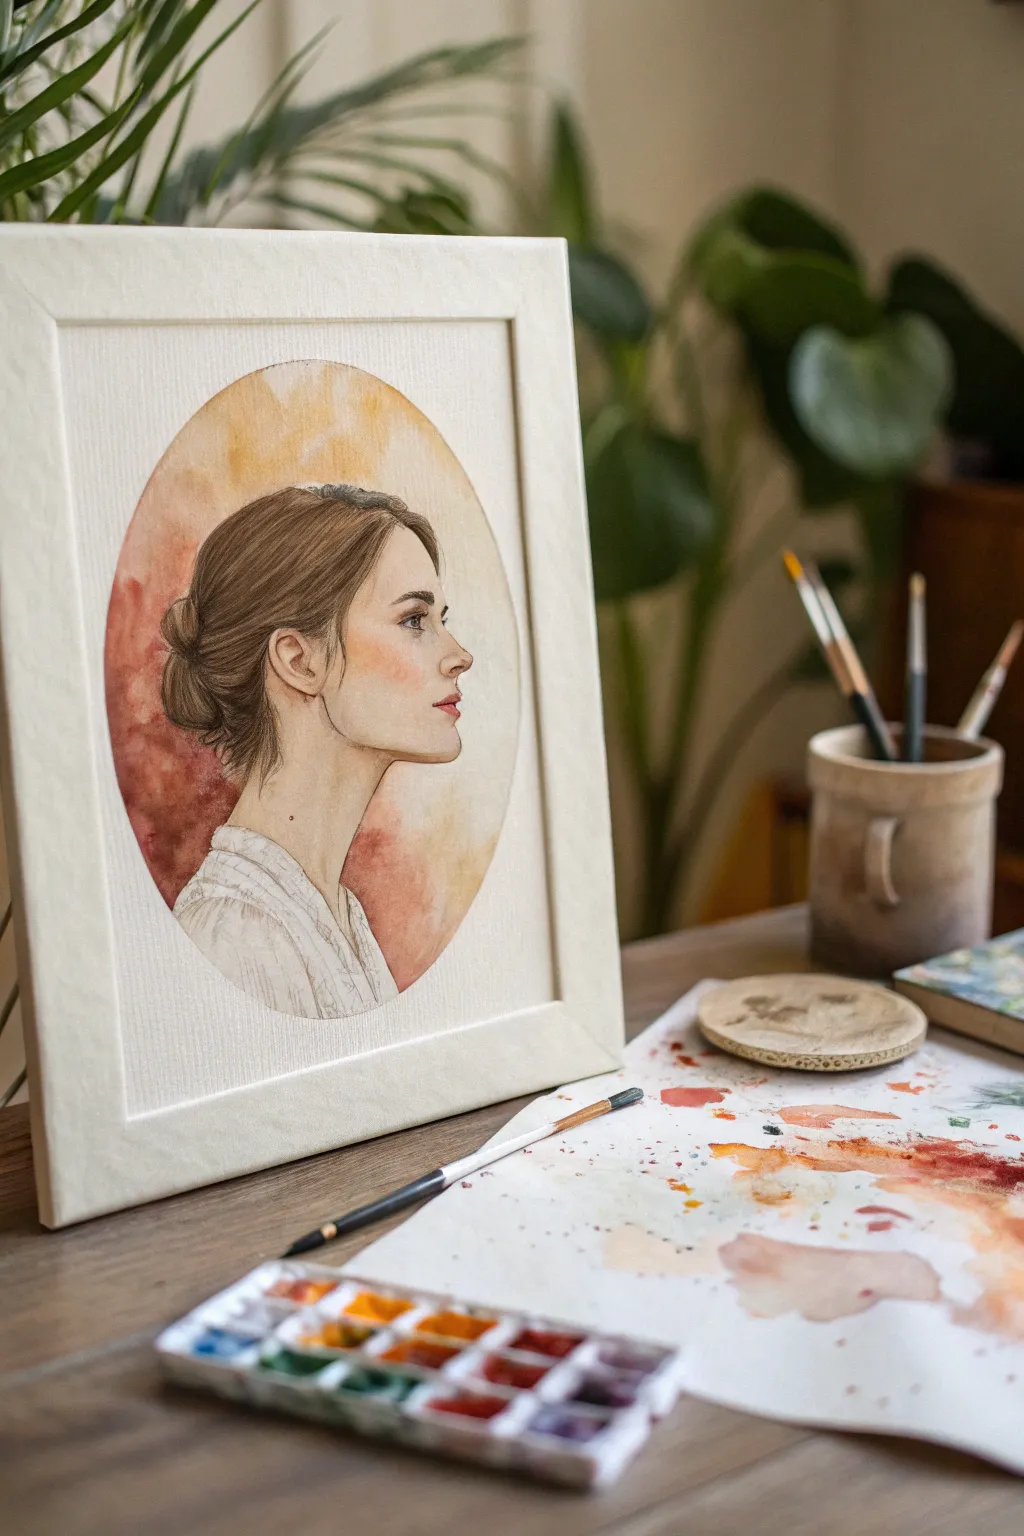
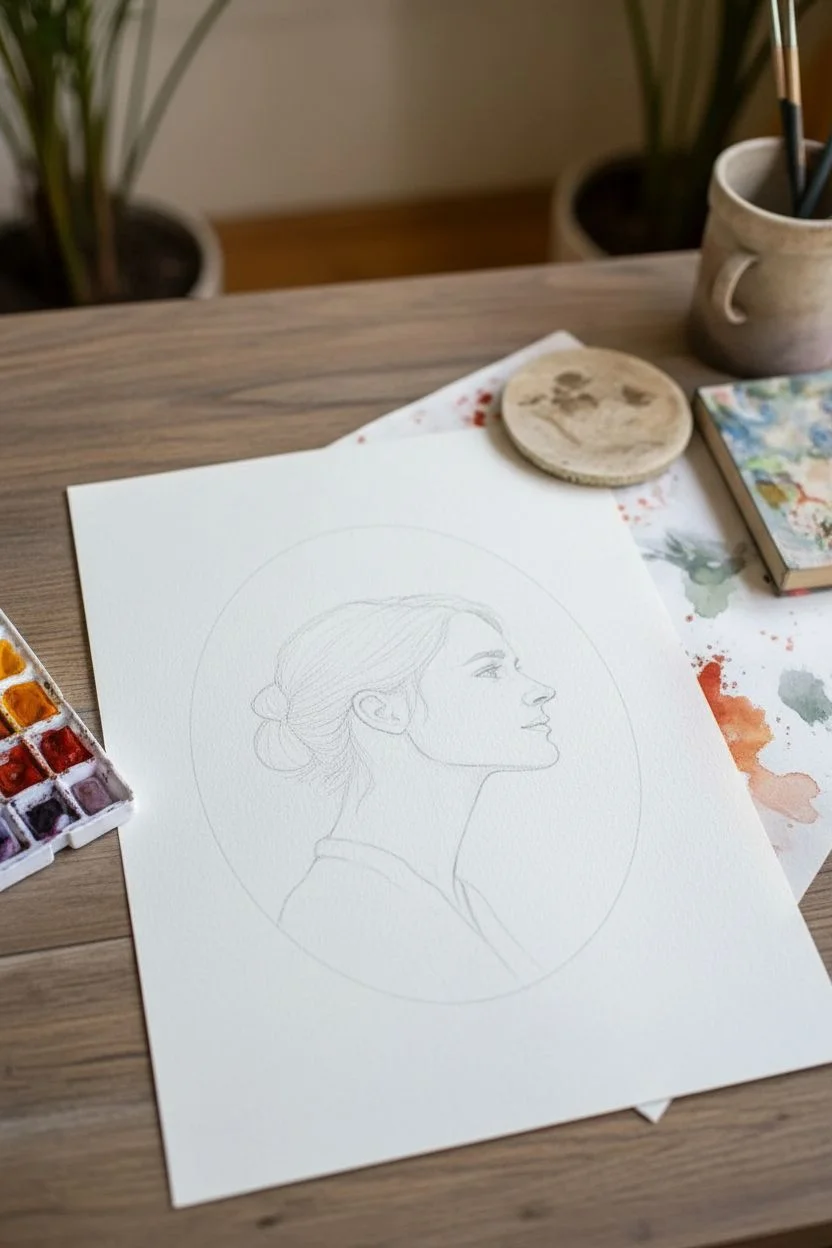
Capture the essence of protection and inner peace with this delicate watercolor portrait set within a spiritual circle. By confining the subject to an oval vignette with warm, glowing washes, you create a sense of intimacy and safeguarded energy.
How-To Guide
Materials
- Cold press watercolor paper (300 gsm)
- Watercolor paints (Yellow Ochre, Burnt Sienna, Alizarin Crimson, Ultramarine Blue, Burnt Umber)
- Pencil (HB or 2H)
- Kneaded eraser
- Oval template or compass
- Round watercolor brushes (Size 2, 6, and 10)
- Fine liner brush (Score 0 or 00)
- Masking tape
- Palette
- Two jars of water
- Paper towels
Step 1: Drafting the Foundations
-
Define the boundary:
Begin by lightly drawing a large oval in the center of your paper. This will serve as the ‘protective circle.’ Everything outside this line will remain pure white, creating a natural matte effect. -
Sketch the profile:
Inside the oval, lightly sketch the woman’s profile. Focus on the gentle slope of the nose and the jawline. Don’t press too hard; you want these lines to be barely visible under the translucent paint later. -
Refine the hair:
Sketch the mass of the hair, pulling it back into a low bun. Indicate the flow of the strands but don’t draw every single hair yet. -
Detail facial features:
Add the eye, eyebrow, and lips. Pay close attention to proportions—the top of the ear should align roughly with the eye. -
Clean up:
Use your kneaded eraser to tap over the sketch. You want to lift off excess graphite so only a faint ‘ghost’ of the image remains.
Step 2: Creating the Glow
-
Wet-on-wet background:
Using your largest round brush, wet the area inside the oval *behind* the head with clean water. Be careful not to paint over the face sketch. -
Drop in color:
While the paper is wet, drop in washes of Yellow Ochre near the top and transition into Burnt Sienna and Alizarin Crimson near the bottom left. Let the colors bleed naturally. -
Soften edges:
Before the paint dries, ensure the color fades softly toward the face but stays crisp against the oval’s outer boundary. -
Base skin tone:
Mix a very dilute wash of Yellow Ochre and a tiny touch of Alizarin Crimson for the skin. Apply this evenly over the face and neck, avoiding the eye and highlights on the nose.
Muddy colors?
If your background wash looks muddy, you likely over-blended. Let the colors mix themselves on the wet paper. Don’t go back in with a brush once the water starts to dry.
Step 3: Defining the Portrait
-
Deepening shadows:
Once the base layer is bone dry, mix a slightly darker skin tone using Burnt Sienna. Paint the shadow under the chin, inside the ear, and the hollow of the eye socket. -
Painting the hair base:
Mix Burnt Umber with a touch of Ultramarine Blue for a rich brown. Paint the hair shape in a solid, medium-value wash, leaving a few tiny gaps for highlights. -
Adding the blush:
While the cheek area is dry, wet a small circular patch on the cheekbone with clear water. drop in a concentrated touching of Alizarin Crimson or Rose Madder to create that soft, spiritual flush. -
Facial details:
Switch to your size 2 brush. Carefully paint the iris, the lash line, and the nostril using a dark brown mix (not black). Keep the touch light. -
Lip color:
Paint the lips with a soft pink-red mix. I prefer to make the upper lip slightly darker than the lower lip to suggest volume.
Pro Tip: Clean edges
To get that perfect oval shape, cut a hole in a piece of loose paper or contact paper to use as a stencil. Paint through the hole to ensure the background stays perfectly contained.
Step 4: Texturing and Finishing
-
Hair texture:
Using the fine liner brush and a dark mix, paint individual strands of hair flowing back into the bun. Focus on the direction of growth, especially near the ear and nape of the neck. -
Clothing sketch:
For the blouse, use a very watery grey or diluted Burnt Umber. Use loose, sketchy strokes to suggest folds and fabric texture without filling it in solid. It should look ethereal. -
Refining the boundary:
Check the edge of your oval background. If it looks uneven, carefully use a damp brush to smooth the transition or add a tiny bit more pigment to sharpen the perimeter line. -
The protective seal:
Finally, step back and look at the composition. If the background feels too light, add a second glaze of warm colors to intensify the ‘aura’ around the profile.
Frame your piece in a simple setting to let the warmth of the protective circle truly shine
Let Breath Marks Guide an Abstract Prayer Painting
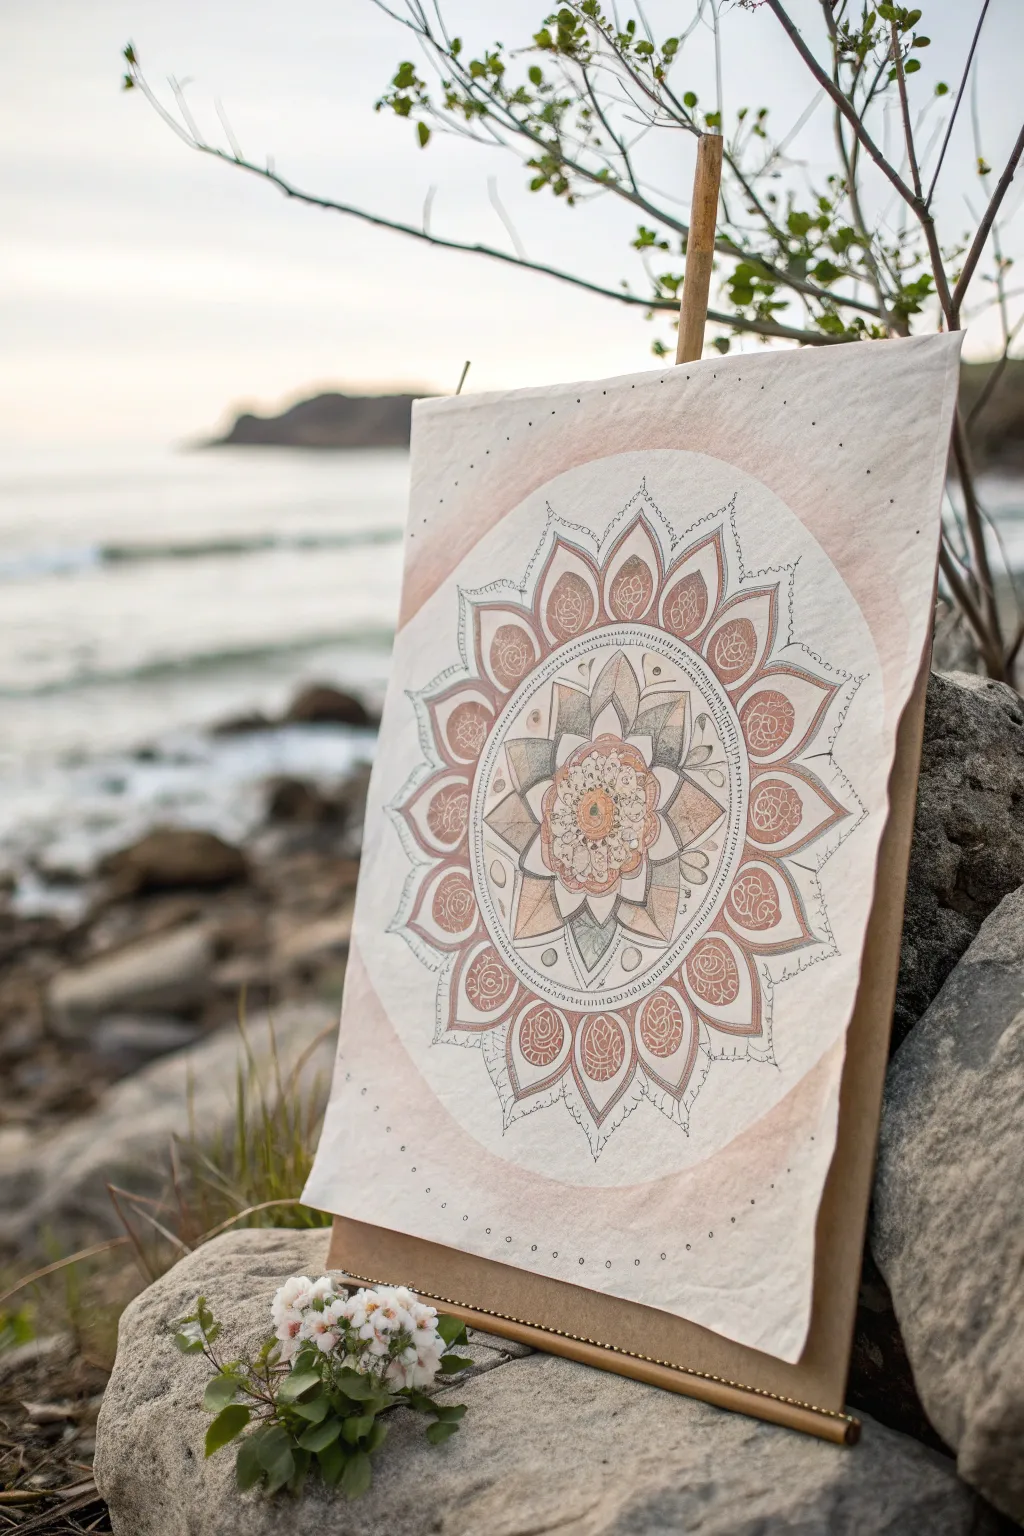
Create a centering visual meditation with this lotus-inspired mandala, combining structured geometry with organic, flowing lines. The piece uses soft washes of terracotta and sage green against precise ink detailing to evoke a sense of calm resilience.
Detailed Instructions
Materials
- High-quality watercolor paper or mixed media paper (lightly textured)
- Pencil and eraser
- Compass and ruler
- Fine liner pens (black or sepia, sizes 0.1, 0.3, and 0.5)
- Watercolor paints (Terracotta/Burnt Sienna, Sage Green/Sap Green, warm beige)
- Round watercolor brushes (size 4 and size 0 for details)
- Wooden backing board or thick cardboard
- Masking tape or clips
Step 1: Setting the Geometry
-
Establish the Center:
Begin by finding the exact center of your paper. Make a small mark. Using your compass, draw a series of light concentric circles expanding outward. These will guide the layers of your mandala petals. -
Create Radial Guides:
Use a protractor and ruler to lightly draw lines radiating from the center like wheel spokes. Divide the circle into 8, 12, or 16 equal sections depending on how dense you want your petal symmetry to be. -
Sketch the Core:
In the innermost circles, sketch a small, intricate flower center using tiny U-shapes and dots to represent stamens and pollen textures. -
Draft the Petal Layers:
Working outward, sketch the contour of your lotus petals. Let them span across your concentric guide circles. The inner petals should be smaller and more pointed, while the outer ring should be large and broad. -
Add Decorative Borders:
Between the main petal layers, designate thin circular bands for decorative patterns. Fill these lightly with repeating motifs like tiny circles, spirals, or hash marks.
Step 2: Inking the Structure
-
Outline the Primary Shapes:
Switch to your 0.3 or 0.5 fine liner. Trace your main pencil lines for the petals and circular borders. Keep your hand relaxed to allow for slight organic variations in the line weight. -
Detail the Petals:
Inside the large outer petals, draw intricate interior designs. You might add a smaller, teardrop shape inside each petal, filling it with a woven or rose-like doodle pattern. -
Add Texture with Stippling:
Use your finest 0.1 pen to add shading. Instead of hatching, try stippling (tiny dots) at the base of the petals to create depth and shadow. -
Refine the Edges:
Add tiny serrations or ruffled edges to the outermost petal tips to make them look more botanical and less geometric. Erase all pencil guidelines gently once the ink is totally dry. -
Create the Breath Marks:
Around the outermost edge of the mandala, add a very faint, dotted circle or a series of tiny dashes. These represent the ‘breath’ of the piece, expanding outward.
Breathe Through the Ink
Match your pen strokes to your breathing. Inhale as you lift the pen, and exhale slowly as you draw a curve. This turns the process into a calming ritual.
Step 3: Adding Color Washes
-
Mix Your Palette:
Prepare watery washes of your paint. You want a very transparent terracotta or peach tone, a muted sage green, and a pale sandy beige. -
Wash the Background Ring:
Paint a wide, circular band around the outside of the mandala using the terracotta wash. Keep the edges soft and uneven for a rustic feel. -
Tint the Petals:
Apply the peach/terracotta wash to the tips of the large outer petals and the central flower. I prefer to drop the color in wet-on-wet so it bleeds softly toward the center without hard edges. -
Introduce Green Tones:
Use the sage green to fill the secondary layers of petals or leaves near the center. Keep the color application light and somewhat patchy to maintain an aged, vintage look. -
Deepen the Center:
Add a slightly more saturated dot of orange or brown to the very center of the mandala to draw the eye inward. -
Add Final Accents:
Once the first layers are dry, you can glaze a tiny bit of darker color into the crevices between petals to pop the 3D effect.
Antique Effect
Stain your paper with strong tea or coffee and let it dry completely before starting. This gives the mandala an ancient, parchment-like warmth immediately.
Step 4: Finishing Touches
-
Dotted Perimeter:
Using a dark pen or a fine brush with dark paint, add a ring of deliberate, widely spaced dots far outside the main design to frame the painting. -
Mounting (Optional):
If displaying on an easel or board, use clips or tape the paper to a wooden backing board to keep it flat and supported.
Now step back and enjoy the peaceful rhythm creating this piece has brought to your day
Paint a Dream Portal With Floating Symbols
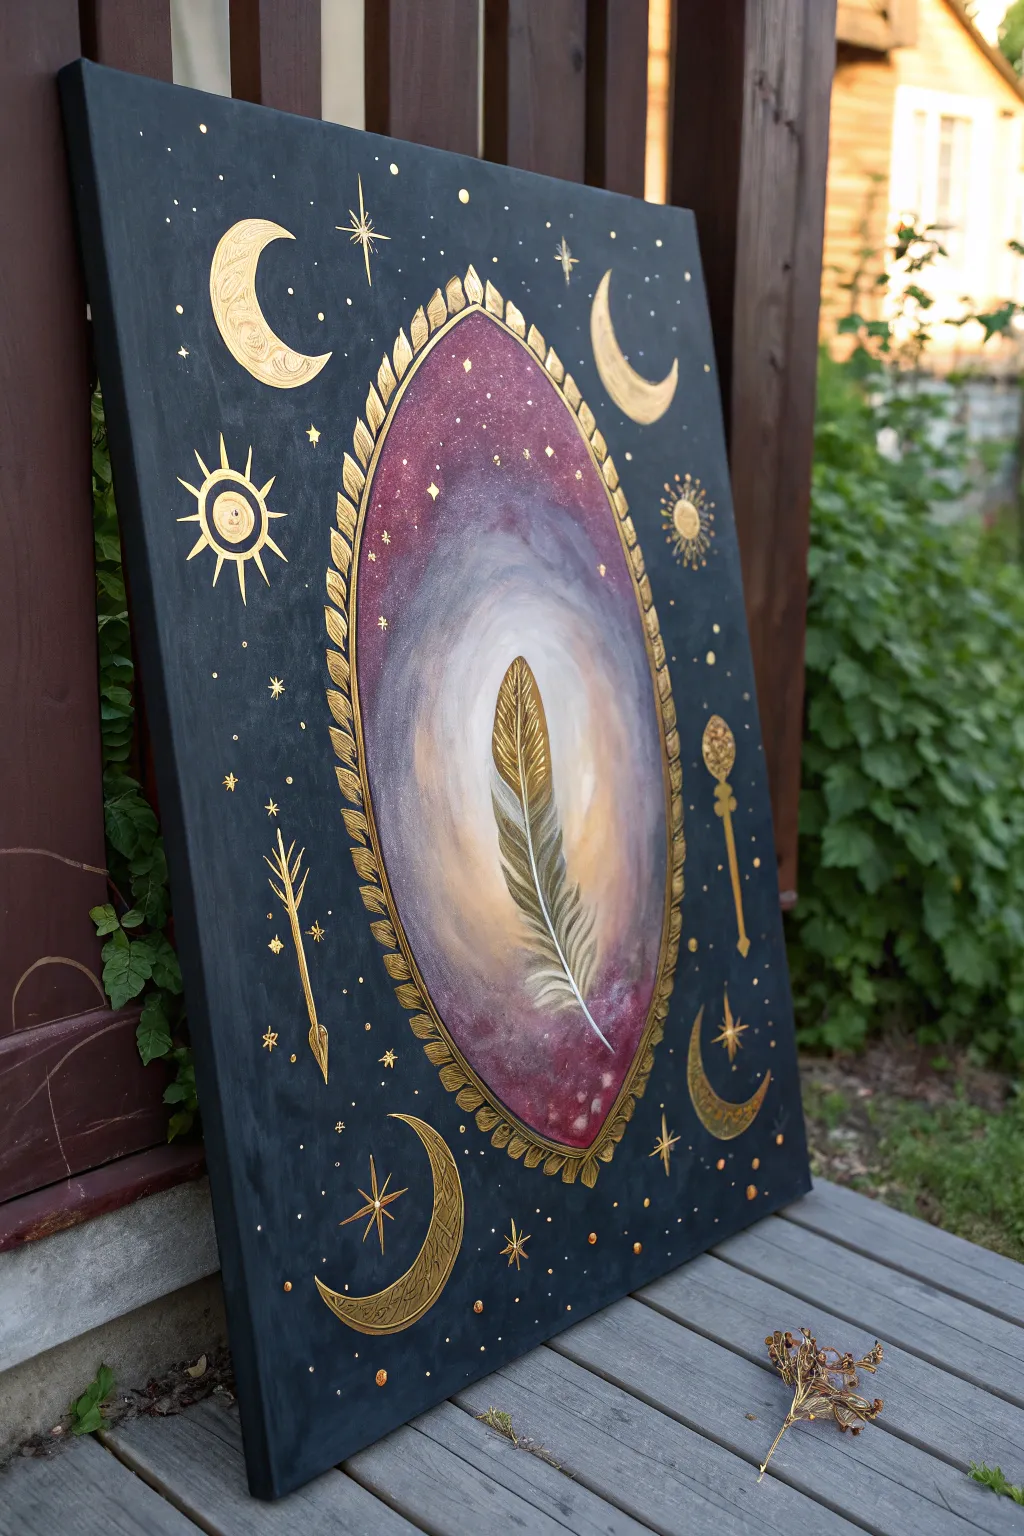
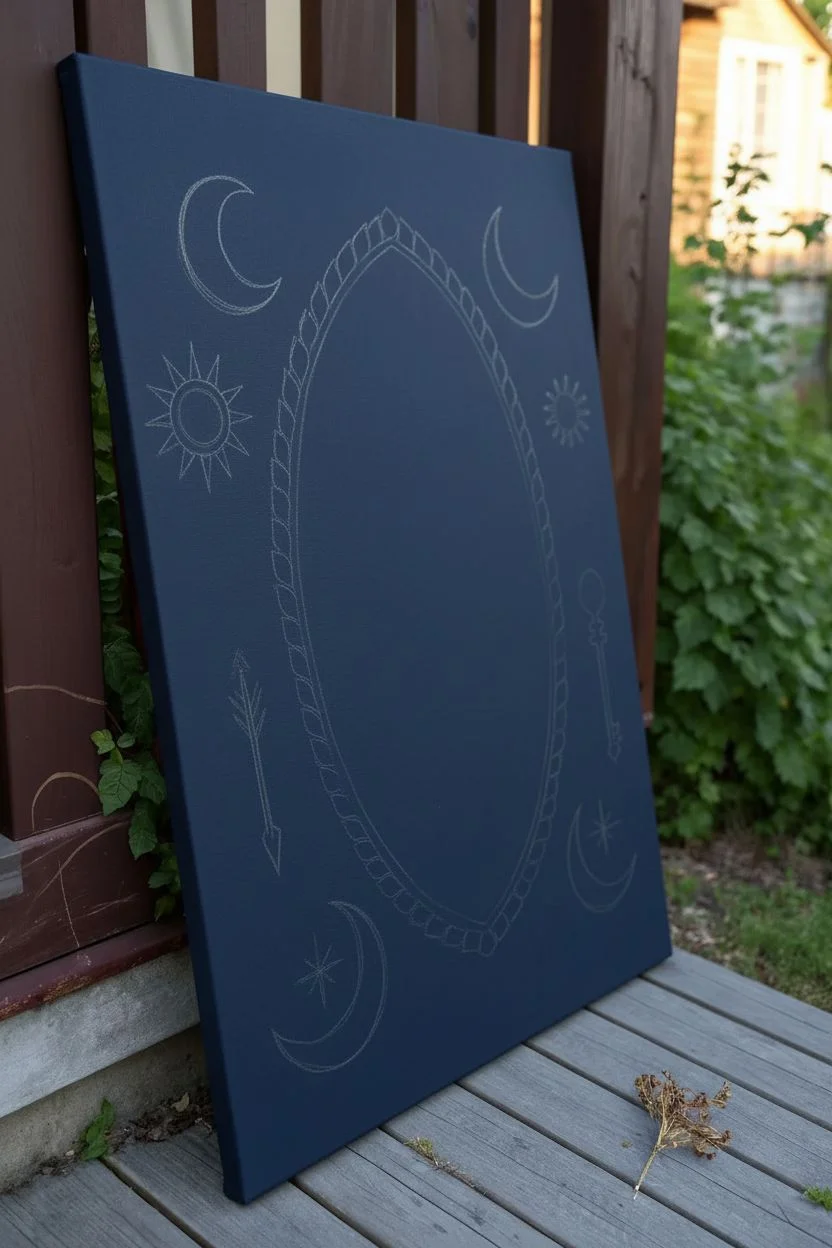
Create a mystical focal point for your space with this celestial-themed acrylic painting. It features a glowing central portal housing a delicate feather, framed by intricate gold leaf symbols against a deep midnight background.
Step-by-Step Guide
Materials
- Large stretched canvas (e.g., 20×28 inches)
- Acrylic paints: Midnight Blue, Black, Titanium White, Magenta, Purple, Ochre
- Gold metallic acrylic paint
- Gold leaf sheets and gilding adhesive (size)
- Flat shader brushes (large and medium)
- Small round detail brushes (sizes 0 and 1)
- Chalk or pastel pencil for sketching
- Ruler
- Oval stencil (optional)
Step 1: Setting the Scene
-
Prime the Background:
Mix Midnight Blue with a touch of Black to create a deep, rich navy. Cover the entire canvas with this mixture using a large flat brush, ensuring you paint the sides for a finished look. Let this base coat dry completely. -
Sketch the Composition:
Using a light-colored chalk or pastel pencil, lightly draw a large vertical mandorla (an almond-shaped oval) in the center of the canvas. This will be your main portal. -
Draft Floating Symbols:
Around the central oval, sketch your celestial elements. Place crescent moons in corners, a sun burst on the left, and smaller items like an arrow and key. Use a ruler to help align geometric elements like the sun rays.
Make It Shine
Mix a tiny amount of iridescent medium into your white paint for the portal’s center. It makes the glow shift subtly as you walk past the art.
Step 2: Creating the Portal
-
Base the Portal Interior:
Fill the almond shape with a wash of Purple mixed with a little Magenta. Keep your brush strokes loose and radiating outward from the center. -
Build the Glow:
While the purple is still slightly tacky, blend in Titanium White mixed with a tiny drop of Ochre right in the center. Use a dry brush technique to soften the transition from the bright center to the darker purple edges, creating a vignetted glow effect. -
Smooth the Gradient:
Work back and forth between your purple mix and the white center with a clean, soft brush to ensure there are no harsh lines. The goal is an ethereal, misty appearance. -
Add Stardust:
Once the portal background is dry, flick a toothbrush loaded with watered-down white paint restricted only to the purple area to create tiny distant stars.
Step 3: The Feather Focal Point
-
Outline the Feather:
Using a small round brush and diluted Ochre paint, sketch the spine and basic shape of the feather floating vertically in the center of the glowing portal. -
Block in Color:
Fill the feather shape with a mix of White and Ochre. Make the top tip glittery gold and the bottom softer white. -
Detail the Barbs:
With your smallest detail brush (size 0) and dark grey paint, create fine, diagonal strokes outward from the spine to mimic the separation of feather barbs. Add pure White highlights on the edges to make it pop against the glow.
Messy Edges?
If your gold paint bleeds into the blue background, wait for it to dry fully. Then, use the original navy mix to adhere a clean ‘cut in’ line and cover mistakes.
Step 4: Gilding and Geometry
-
Paint the Portal Frame:
Use metallic gold paint to create the leaf-like border around the central oval. Paint small, repeating leaf shapes that point outward, overlapping slightly like a laurel wreath. -
Gold Leaf Preparation:
For the larger symbols (moons and sun), apply a thin layer of gilding adhesive inside your sketched outlines. Let it sit for about 15-20 minutes until it feels tacky but not wet. -
Apply the Gold Leaf:
Gently press gold leaf sheets onto the tacky adhesive. Use a soft, dry brush to rub the gold leaf into place and sweep away the excess flakes. -
Refine the Symbols:
If you don’t use gold leaf, paint the moons and sun with multiple coats of metallic gold paint for opacity. Add spiral textures inside the moons using a fine liner brush and slightly diluted brown paint for contrast. -
Add Decorative Lines:
Paint the finer symbols—the arrow, key, and small stars—using metallic gold paint. Use the ruler again for the straight shafts of the arrow and key. -
Final Cosmic Details:
Dot the dark blue background with tiny specs of white and gold using the handle end of a paintbrush to create a field of stars surrounding the main symbols. -
Seal the Work:
Once absolutely dry (give it at least 24 hours), apply a clear gloss varnish to protect the metallic elements and unify the sheen of the canvas.
Hang your new portal in a quiet corner to inspire calm and imaginative dreams


Have a question or want to share your own experience? I'd love to hear from you in the comments below!