If you’ve ever stared down a blank page and felt your brain go totally quiet, you’re not alone—I still get that sometimes. These acrylic painting background ideas are my favorite “step zero” tricks for building color, texture, and mood fast, even when you don’t feel like drawing anything yet.
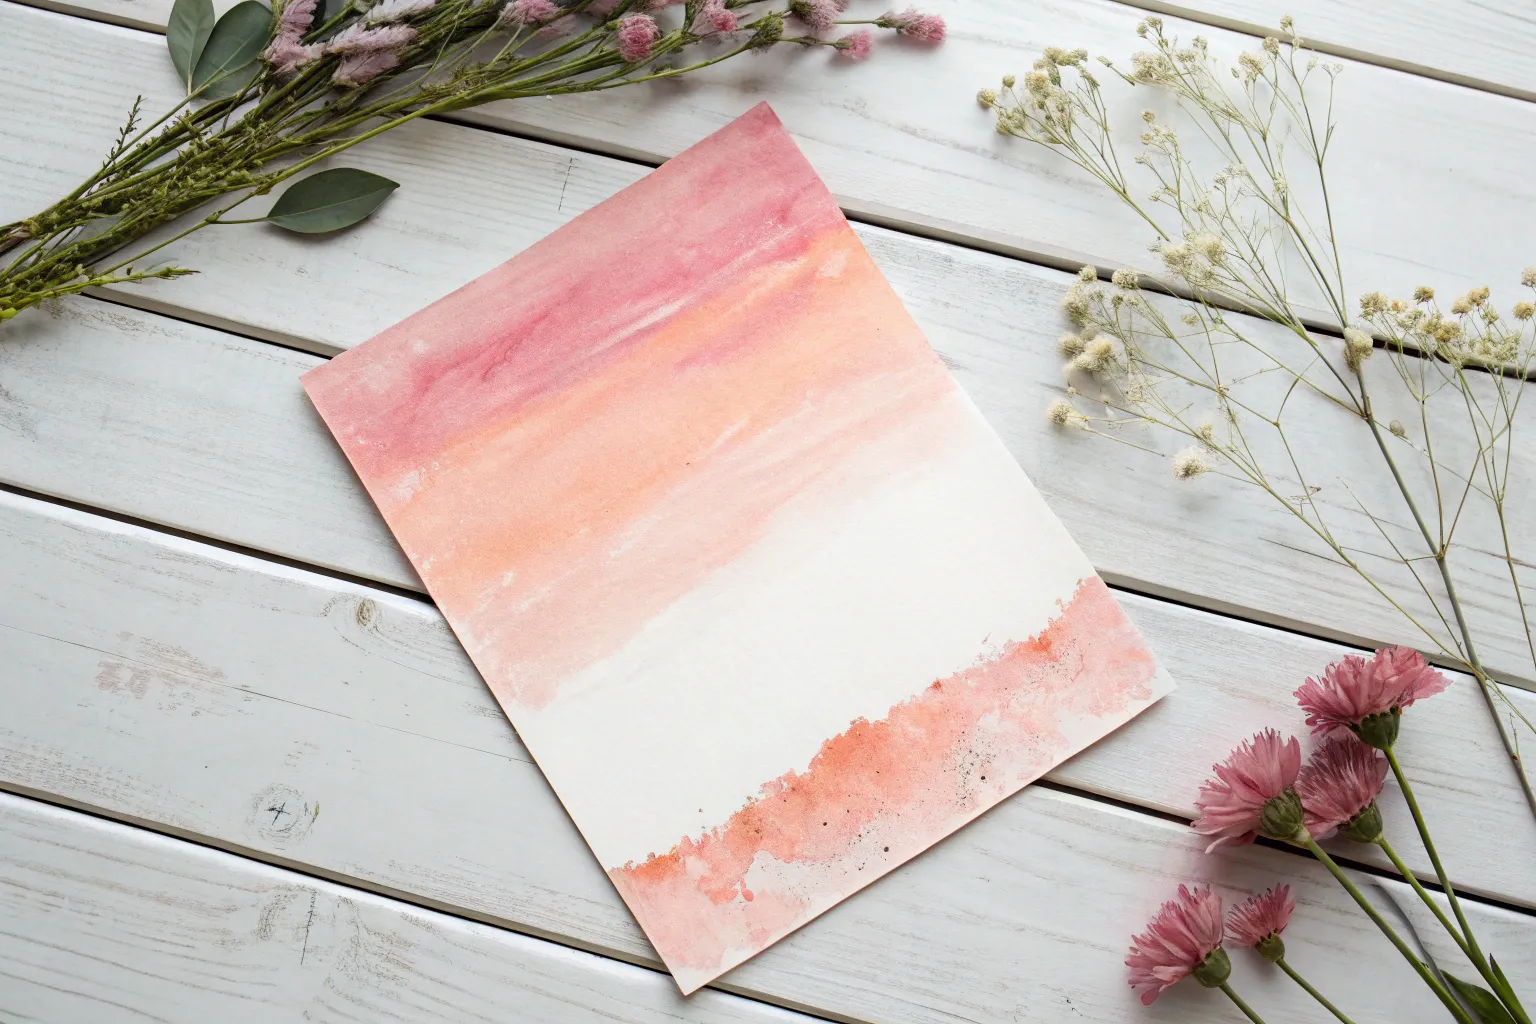
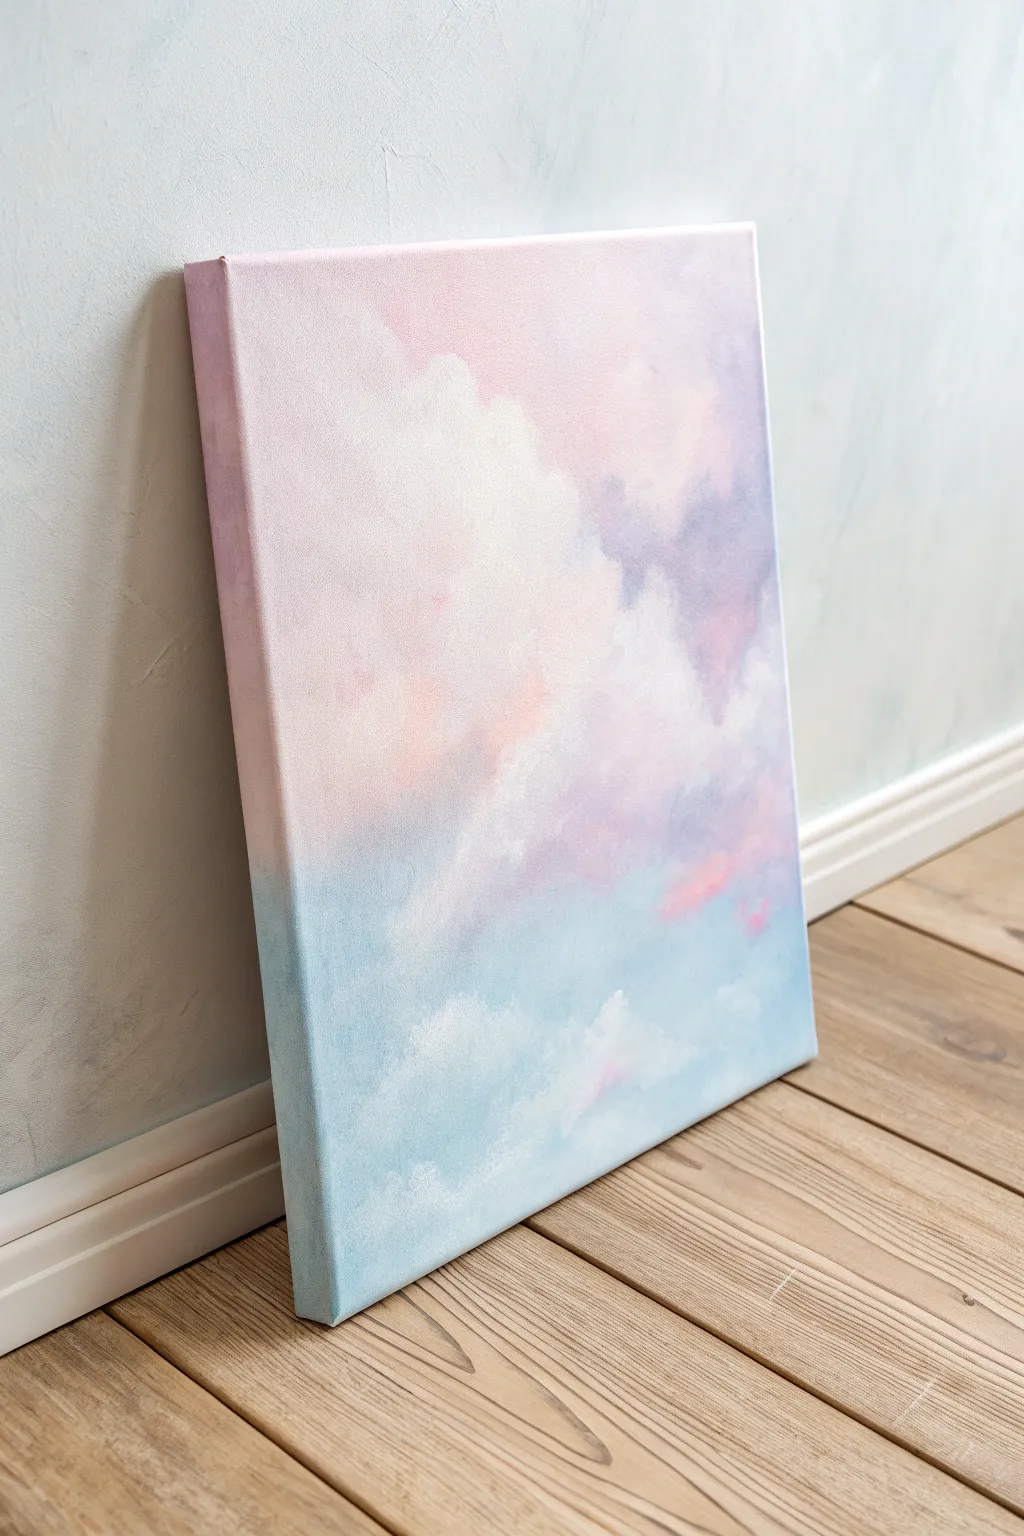
Smooth Sunset Gradient Wash

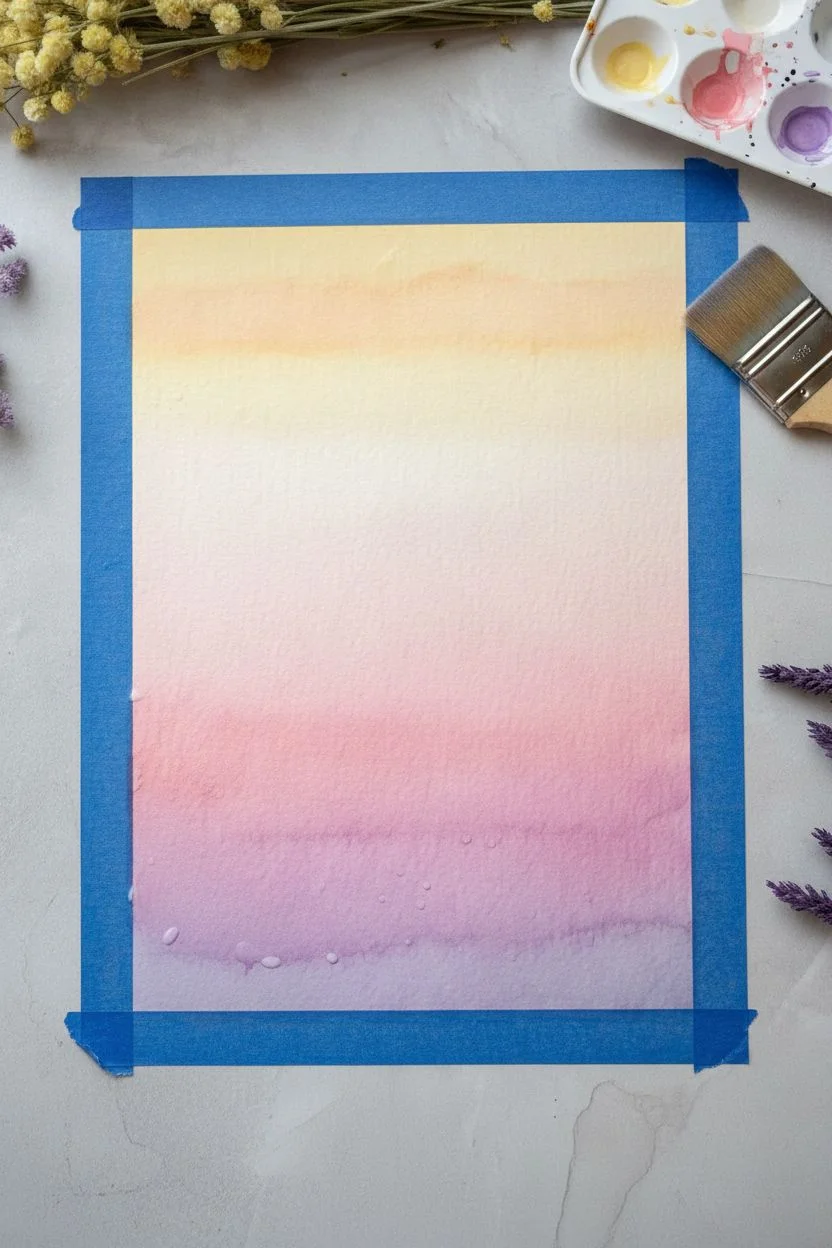
Capture the fleeting magic of twilight with this serene, smooth gradient wash. By blending soft acrylics from a warm buttery yellow into a deep, calming violet, you’ll create a seamless transition that perfectly mimics a fading sunset sky.
Step-by-Step
Materials
- High-quality watercolor paper (cold press, at least 140lb/300gsm)
- Acrylic paints (Titanium White, Primary Yellow, Magenta or Alizarin Crimson, Dioxazine Purple)
- Acrylic fluid medium or flow improver
- Large flat wash brush (1-inch or larger)
- Clean water container
- Paper towels
- Painter’s tape or masking tape
- Palette or mixing plate
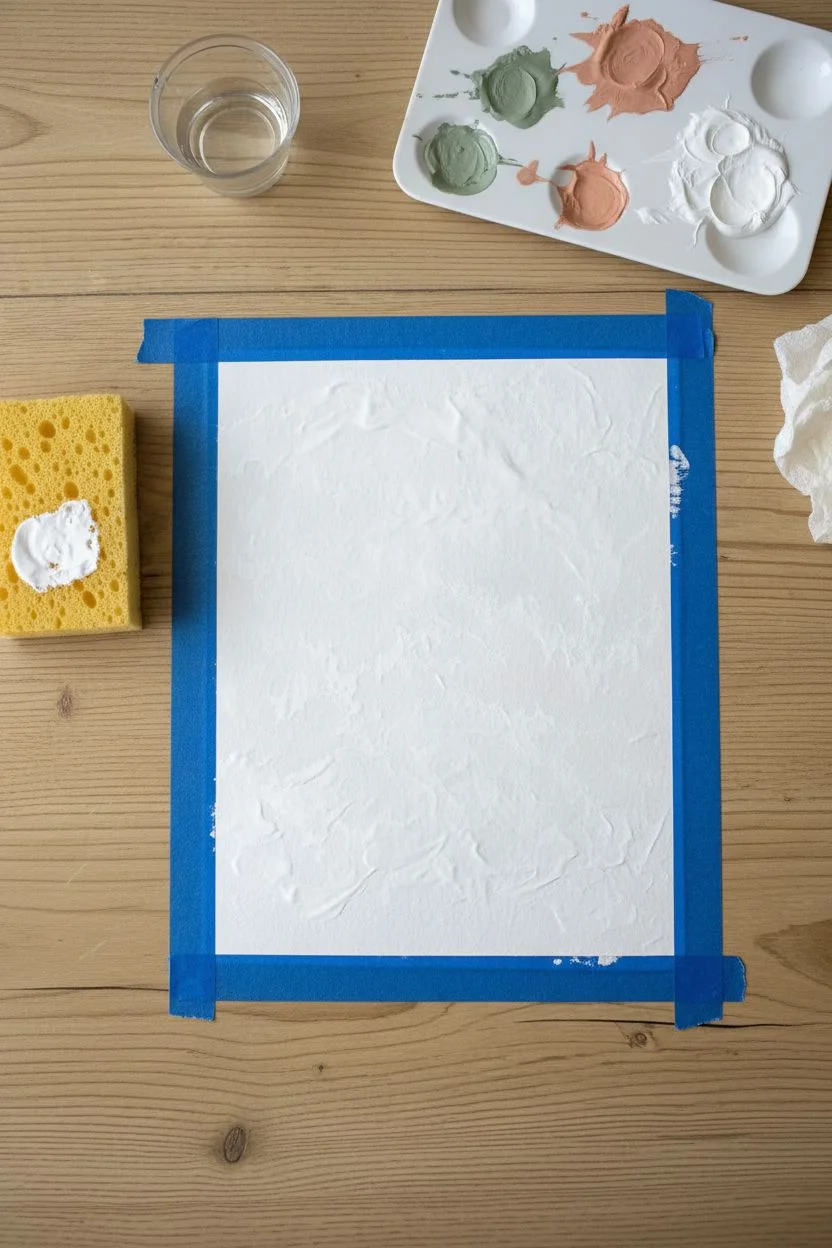
Step 1: Preparation and Palette
-
Secure the paper:
Begin by taping down all four edges of your paper to a flat, sturdy surface using painter’s tape. Press the edges of the tape down firmly to prevent paint from seeping underneath, which ensures that crisp, professional white border shown in the finished piece. -
Pre-mix the yellow tone:
On your palette, mix a small amount of Primary Yellow with a generous helping of Titanium White. You want a soft, pastel butter-yellow rather than a harsh primary color. Add a few drops of fluid medium to thin it out to a watercolor-like consistency. -
Create the mid-tone pink:
In a separate spot, mix your Magenta with white to create a soft coral-pink. Again, thin this significantly with water or flow improver until it is nearly transparent and flows easily. -
Prepare the violet base:
Finally, mix a very dilute wash of Dioxazine Purple. Because acrylics dry darker, keep this mix quite pale and watery initially; you can always add saturation later. -
Dampen the paper:
Take your large clean brush and brush clear water across the entire surface of the paper. You want the paper seemingly damp and cool to the touch, but not glistening with puddles of water.
Fixing Hard Lines
If paint dries with a harsh line, re-wet the area slightly with clear water and gently scrub with a soft brush to reactivate and smooth the edge.
Step 2: Top-Down Gradient Application
-
Apply the yellow wash:
Dip your wide brush into the pale yellow mixture. Start at the very top edge of the paper and sweep horizontally back and forth, bringing the color down about one-third of the page. Let the bottom edge of this stripe stay wet and ragged. -
Introduce the pink:
Rinse your brush slightly (but not fully) and pick up the coral-pink mixture. Start painting just below where the solid yellow section ends, allowing the brush to overlap the wet yellow edge. -
Blend the transition:
Clean your brush, keeping it damp. Gently brush horizontally back and forth over the area where the yellow meets the pink. The wet paints will naturally bleed into each other, creating a soft orange transition. -
Extend the pink section:
Continue bringing the fresh pink wash down the page until you have covered the middle third of your paper. Keep your strokes horizontal and consistent. -
Add the purple base:
Rinse your brush thoroughly and load it with the pale violet wash. Apply this to the bottom third of the paper, working from the bottom edge upwards toward the pink. -
Merge pink and purple:
Where the pink and purple meet, use that same clean, damp brush technique to soften the hard line. Allow the colors to mingle on the paper texture.
Step 3: Refining and Drying
-
Assess the saturation:
Acrylic glazing looks lighter when wet. If the colors look too faint, wait for this first layer to dry completely (about 10-15 minutes) and then prepare to glaze a second layer. -
Glaze the bottom:
To get that deeper purple at the very bottom shown in the reference, mix a slightly stronger purple ratio. Apply a second thin layer only to the bottom 2 inches of the paper. -
Feather the edge:
Using a clean, damp brush, feather the top edge of this new purple layer upwards so it disappears seamlessly into the lighter pink section without leaving a stripe. -
Deepen the pink (optional):
If the middle section needs more warmth, apply a very watery wash of pink over the center, blending outwards in both directions. -
Let it cure:
Step away and let the painting dry completely undisturbed. I usually give it at least an hour to ensure the paper lies flat again before touching the tape. -
Reveal the border:
Carefully peel away the painter’s tape. Pull the tape away from the center of the painting at a 45-degree angle to prevent tearing the paper surface.
Silhouette Finish
Once fully dry, use black ink or opaque black acrylic to paint a silhouette of trees, power lines, or mountains along the bottom edge.
Enjoy the calming process of watching your colors merge into a perfect sunset sky


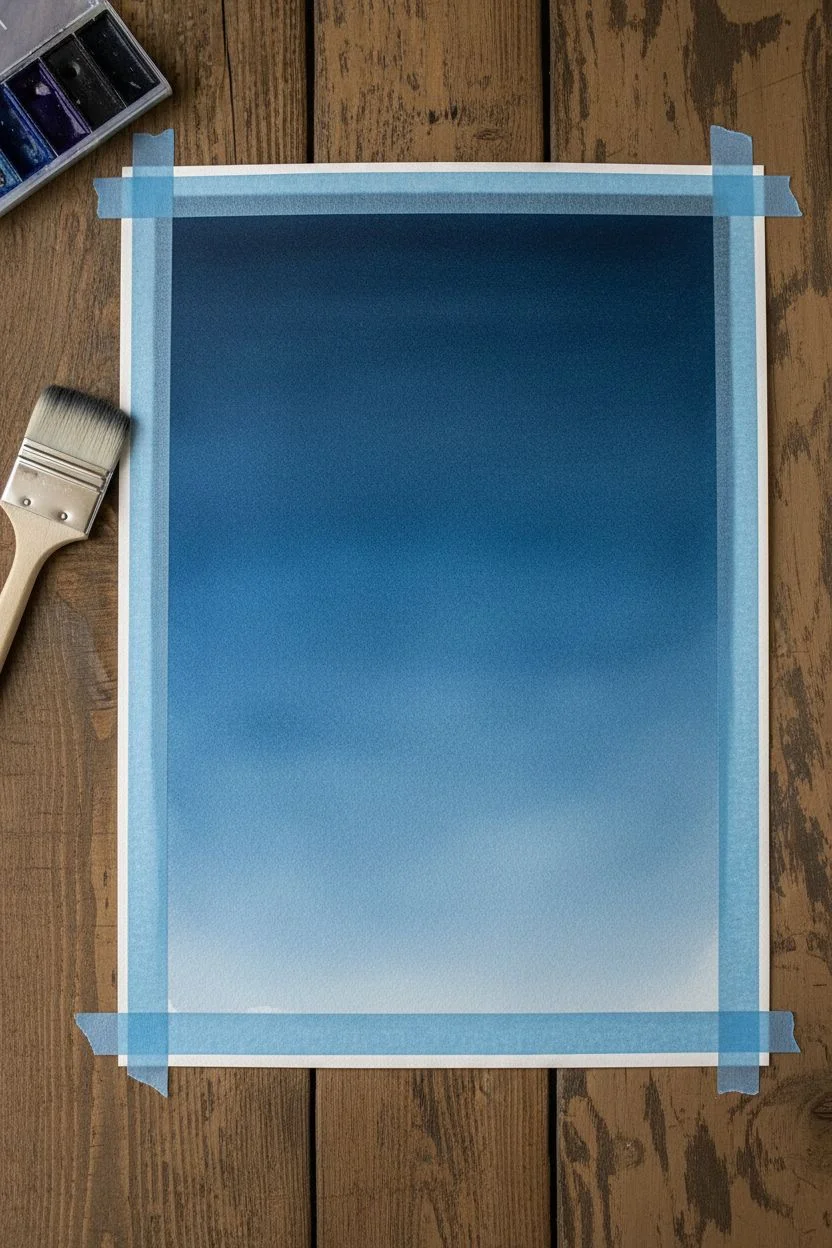
Cool Ocean Ombre Blend
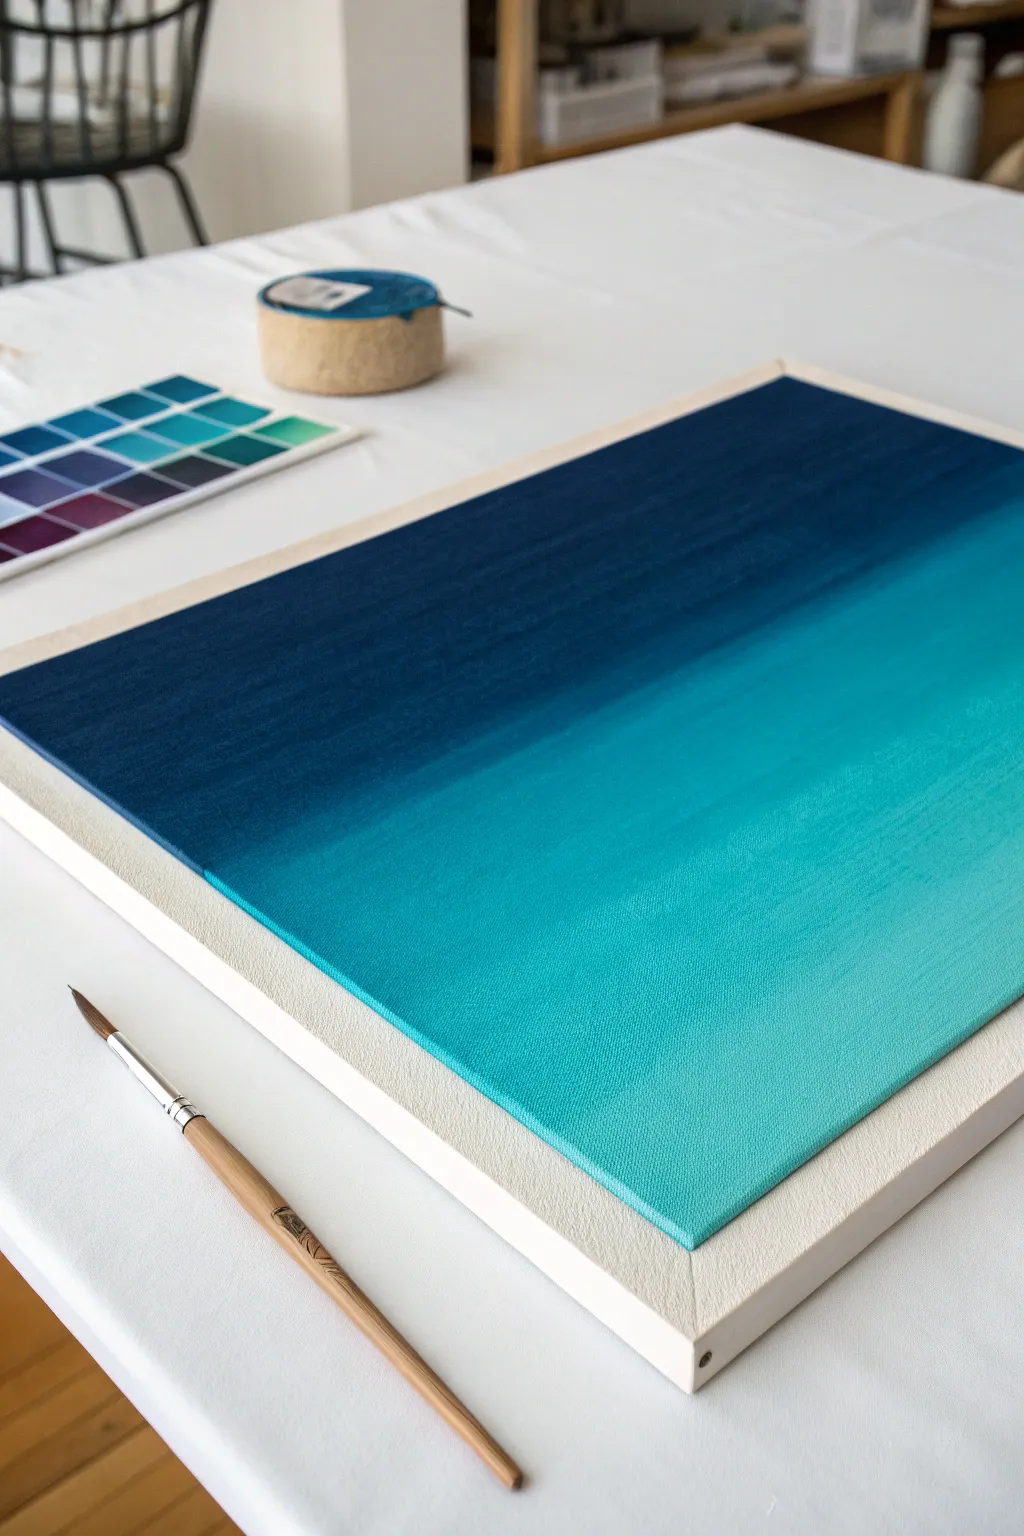
Capture the serene depth of the sea with this crisp, modern gradient painting. By blending deep navy into vibrant turquoise, you’ll create a soothing minimalist piece with clean, professional edges.
Step-by-Step Guide
Materials
- Stretched canvas (rectangular)
- Masking tape or painter’s tape
- Heavy body acrylic paint: Navy Blue or Payne’s Grey
- Heavy body acrylic paint: Phthalo Blue
- Heavy body acrylic paint: Teal or Turquoise
- Heavy body acrylic paint: Titanium White
- Wide flat synthetic brush (1 inch or larger)
- Palette or mixing plate
- Jar of water
- Paper towels
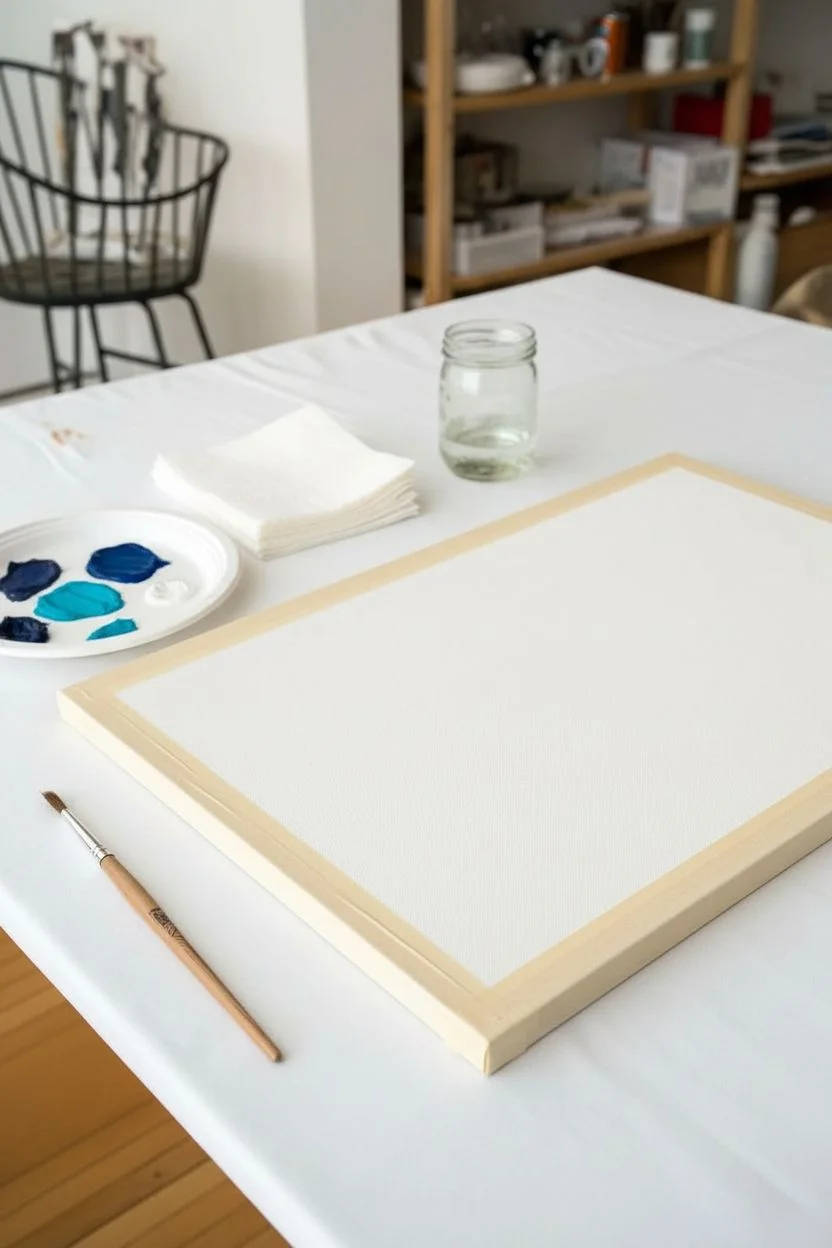
Step 1: Preparation
-
Clean the surface:
Wipe down your canvas with a clean, dry cloth to ensure there is no dust or lint that could get trapped in your paint layers. -
Apply the border tape:
Carefully apply masking tape along all four edges of the canvas face. Aim for a border width of about 1 to 1.5 inches to create that professional framed look seen in the photo. -
Seal the tape edges:
Press down firmly along the inner edge of the tape with your fingernail or a palette knife. This step is crucial to prevent paint from bleeding under the tape. -
Pre-mix your gradient palette:
Squeeze out your paints onto the palette. You will need a pure Navy, a mid-tone mix (Phthalo Blue mixed with a touch of Navy), a bright Turquoise, and a very light tint (Turquoise mixed with White).
Step 2: Painting the Gradient
-
Start with the darkest tone:
Dip your wide flat brush into the Navy Blue. Apply a thick, even band across the top third of the taped area using horizontal strokes. -
Add the mid-tone:
Without cleaning the brush perfectly (a little residual Navy is okay), pick up the Phthalo Blue. Paint the middle section of the canvas, overlapping slightly with the bottom of the Navy section. -
Blend the upper transition:
While the paint is still wet, use long, horizontal strokes to feather the Navy and Phthalo Blue together where they meet. I like to work quickly here to ensure a seamless fade. -
Apply the teal base:
Rinse your brush thoroughly and blot it dry. Pick up the Turquoise paint and apply it to the bottom third of the canvas, overlapping with the mid-tone blue above it. -
Blend the lower transition:
Working horizontally again, brush back and forth between the Phthalo Blue and Turquoise sections until the line disappears into a soft gradient. -
Check for smoothness:
Look at the canvas from an angle to check for brush marks. If needed, use a clean, slightly damp brush to lightly sweep across the entire surface to smooth out textures. -
Let the first layer dry:
Allow this base layer to dry completely. Acrylics dry darker, so don’t worry if it looks slightly different while wet.
Keep it Wet
Keep a misting spray bottle handy. A light spritz of water over the canvas keeps the acrylics wet longer, giving you more time to perfect that seamless blend.
Step 3: Refining and Finishing
-
Apply a second coat:
Repeat the painting process with a second layer. Gradients often look streaky after one coat; the second pass will make the colors opaque and rich. -
Intensify the bottom highlights:
For the very bottom edge, mix a little Titanium White into your Turquoise. Blend this into the bottom-most area to create that glowing, sunlit water effect. -
Final smooth out:
Do one last set of long, continuous horizontal strokes across the wet paint to ensure the transition is perfectly buttery and smooth. -
Wait for partial drying:
Let the painting sit until it is dry to the touch, but not fully cured—usually about 20 to 30 minutes depending on humidity. -
Peel the tape:
Slowly peel the masking tape away from the canvas at a 45-degree angle. Pulling it away while the paint is slightly flexible helps prevent chipping. -
Touch up edges:
If any paint bled through, use a small detail brush and white acrylic (or your canvas primer) to tidy up the white border.
Add Texture
Before the paint dries, tap a crumpled paper towel gently over the transition areas to create a foamy, sea-spray texture instead of a smooth gradient.
Now you have a stunning piece of ocean-inspired art ready to hang or lean against your studio wall


Soft Pastel Cloudy Background
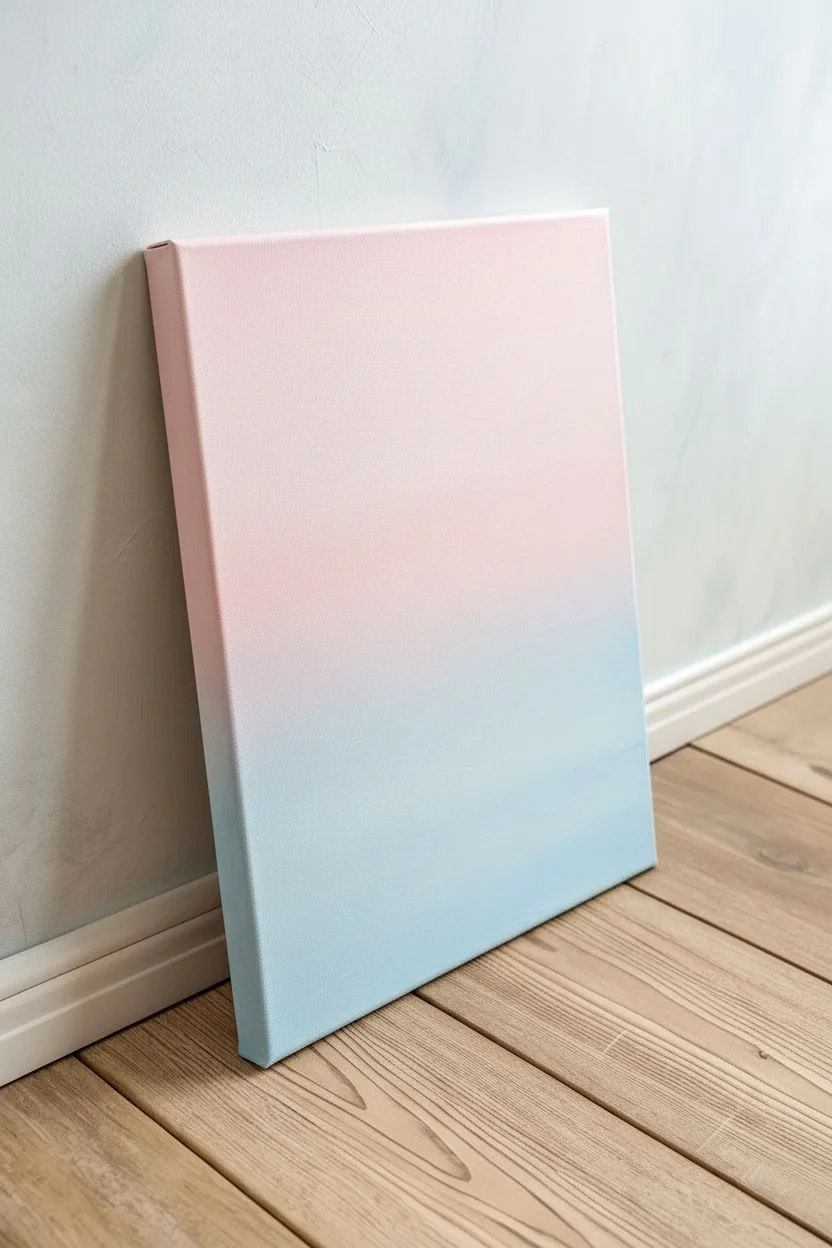
Create a dreamy atmosphere with this soft, cloudy canvas that looks like a piece of the sunset sky brought indoors. The gentle gradient from powder blue to cotton-candy pink makes for a calming and sophisticated background piece.
How-To Guide
Materials
- Stretched canvas (12×16 or similar size)
- Acrylic paints (Titanium White, Cerulean Blue, Alizarin Crimson, Dioxazine Purple)
- Slow drying medium or retarder
- Large flat paintbrush (1-2 inch)
- Medium filbert brush
- Small round blending brush or makeup sponge
- Palette or paper plate
- Cup of water and paper towels
Step 1: Setting the Sky Base
-
Prepare the canvas:
Start with a clean, white canvas. If your canvas isn’t primed, apply a coat of gesso and let it dry completely to ensure smooth blending later. -
Mix the base blue:
On your palette, mix a large amount of Titanium White with a tiny dot of Cerulean Blue. You want a very pale, baby blue shade. -
Apply the bottom gradient:
Using the large flat brush, paint the bottom third of the canvas with your pale blue mix. Use long, horizontal strokes to get even coverage. -
Mix the transition pink:
Clean your brush. Mix Titanium White with the smallest touch of Alizarin Crimson to create a soft pastel pink. -
Paint the upper section:
Apply the pink mix to the top two-thirds of the canvas. While the paint is still wet, bring it down to meet the blue section. -
Blend the horizon:
Where the pink and blue meet, use a clean, slightly damp brush to gently brush back and forth horizontally. This creates a soft, violet-tinged transition area rather than a hard line.
Pro Tip: The Scumble
Use a dry brush with very little paint to ‘scumble’ (lightly drag) color over dry layers. This creates an airy, misty texture perfect for distant clouds.
Step 2: Building the Clouds
-
Mix cloud white:
Prepare a pile of pure Titanium White mixed with a drop of slow-drying medium. This is crucial for keeping the edges soft. -
Establish main cloud structure:
Using the filbert brush, tap in the large, central cloud mass diagonally across the pink section. Use a dabbing motion to create organic, fluffy shapes rather than painting solid lines. -
Soften edges immediately:
Before the white paint dries, use a dry, clean blending brush to gently swirl the edges of your white shapes into the background pink. The centers should remain opaque white, but the edges should be misty. -
Add shadow tones:
Mix a light lavender using White, a speck of Blue, and a speck of Purple. Apply this sparingly to the bottom and right sides of your cloud formations to give them volume. -
Blend the shadows:
Use your blending brush to gently integrate the lavender shadows into the white clouds and the pink background. I like to use a circular scrubbing motion here for extra softness. -
Highlight the tops:
Load your brush with thick, pure White. Dab highlights onto the top-left edges of the clouds where the imaginary light source hits. -
Create lower wisps:
In the lower blue section, add smaller, fainter clouds using a watered-down white. These should be very transparent and barely there. -
Add pink reflections:
Mix a slightly more vibrant pink and dab small touches into the lower blue clouds or near the bottom ‘horizon’ line to tie the color palette together. -
Final softening:
Step back and look for any harsh edges. If you find any, use a very slightly damp clean brush to lightly glaze over them and push them back into the distance. -
Paint the edges:
Don’t forget to wrap your painting around the sides of the canvas. Extend the blue, pink, and cloud shapes onto the edges for a finished, gallery-ready look.
Troubleshooting: Stuck Paint
If acrylics dry too fast while blending, lightly mist the canvas with water from a spray bottle. This reactivates the paint just enough to smooth out choppy strokes.
Once dry, hang this peaceful skyscape in a bedroom or office for an instant breath of fresh air


Sponge-Dab Mottled Wash
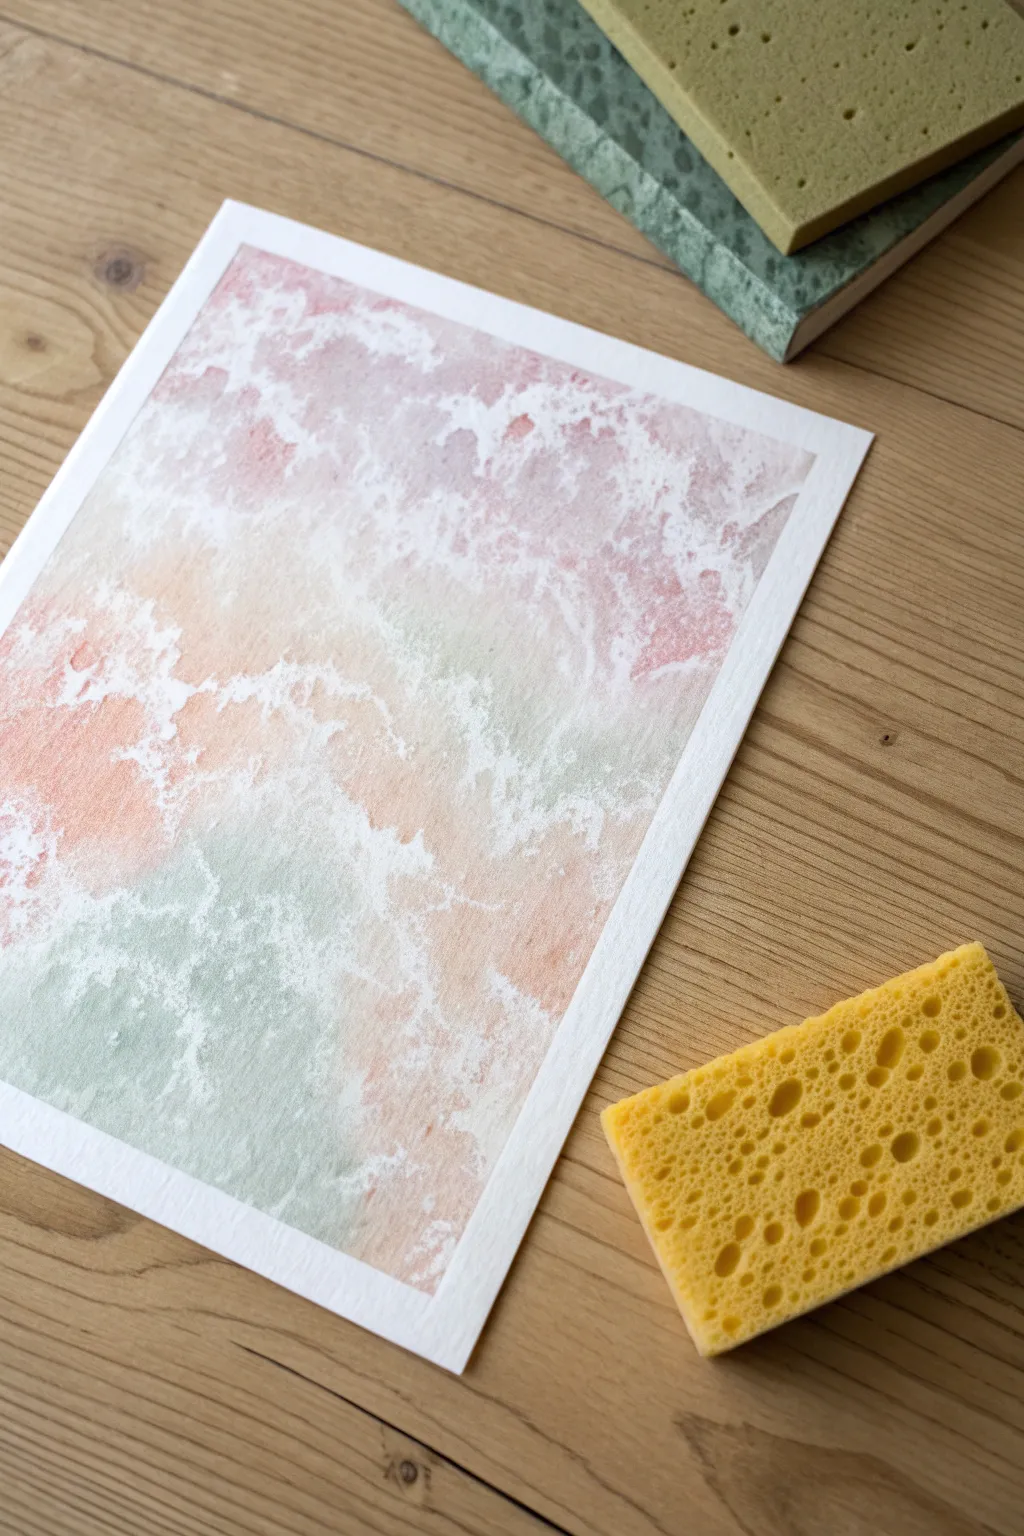
Achieve a soft, dreamy aesthetic reminiscent of sea foam or weathered stone with this clever sponge-dabbing technique. By layering translucent washes and lifting pigment away, you create a complex, mottled texture that makes a stunning backdrop for lettering or mixed media art.
Step-by-Step Guide
Materials
- Heavyweight watercolor or mixed media paper
- Acrylic paints (muted peach, sage green, dusty rose, white)
- Natural synthetic sea sponge
- Yellow cellulose kitchen sponge
- Container of clean water
- Palette or mixing plate
- Paper towels
- Painter’s tape (optional, for taping down paper)
Step 1: Preparation and Base Layer
-
Surface Prep:
Begin by taping down your paper to a flat work surface. This prevents buckling when the paper gets wet, which is crucial for this technique involving multiple watery layers. -
Palette Setup:
Squeeze out small amounts of your acrylic colors: sage green, muted peach, dusty rose, and a generous amount of white. Keep them separate on your palette for now. -
Creating a Glaze:
Mix a small amount of water into your white paint to create a milky consistency. You want it thinner than heavy body paint but not as fluid as watercolor. -
First Splash:
Dampen your cellulose kitchen sponge and squeeze it out until it is barely moist. Dip it into the watery white mix. -
Initial Application:
Lightly dab the white across the paper. You don’t need full coverage; random patches of white will help create depth later.
Muddy Colors?
If colors turn gray/brown, you’re over-blending wet paint. Allow one color patch to dry slightly before sponging a neighbor color next to it.
Step 2: Building Color and Texture
-
Mixing Pastels:
Take your sage green and mix it with a touch of white to soften it. Ensure this mixture is also somewhat fluid by adding a drop of water. -
Green Sections:
Using a clean corner of your sponge or a sea sponge, dab the green mixture onto the bottom left and random spots in the center. Use a pouncing motion rather than dragging. -
Peach Tones:
Prepare your peach color similarly, softening it with white and water. Apply this to the middle sections, letting it slightly overlap the green areas to encourage interesting blends. -
Rose Accents:
Add the dusty rose tones primarily to the top right corner and scattered edges. This creates a diagonal flow of color across the page. -
Blending While Wet:
While the paints are still tacky, take a clean, slightly damp sea sponge and gently press over the transition lines where colors meet. This blurs hard edges.
Sponge selection matters
Natural sea sponges provide organic, irregular holes. Synthetic kitchen sponges create uniform, square patterns. Tear pieces off a kitchen sponge to rough up the edges.
Step 3: The Lift-Off Technique
-
Adding Water Droplets:
This is the magic step. While the paint layer is semi-dry (not wet, but cool to the touch), flick clean water droplets over the paper using your fingers or a brush. -
Wait and React:
Let the water sit for about 15-30 seconds. The water will re-activate the acrylic slightly, especially if you used thinner layers. -
The Lift:
Take a dry paper towel or dry cellulose sponge and firmly press straight down onto the wet spots. Do not rub. Lift straight up. -
Reveal Texture:
You should see the pigment lift away, revealing the white paper or lighter underlayer beneath, creating that distinctive ‘sea foam’ look. -
Final White Dabs:
If you want more texture, dip your sea sponge into thick, undiluted white paint. Blot most of it off on a towel until the sponge is almost dry. -
Highlighting:
Very gently dab this dry sponge over the lightest areas of your painting to enhance the mottled, frothy effect on top of the colors. -
Drying:
Allow the entire piece to dry completely. If the paper has buckled slightly, you can place it under a heavy book once it is 100% dry.
Now you have a beautifully textured, serene background ready for your next artistic layer
BRUSH GUIDE
The Right Brush for Every Stroke
From clean lines to bold texture — master brush choice, stroke control, and essential techniques.
Explore the Full Guide
Quick Paint Swipe Strata
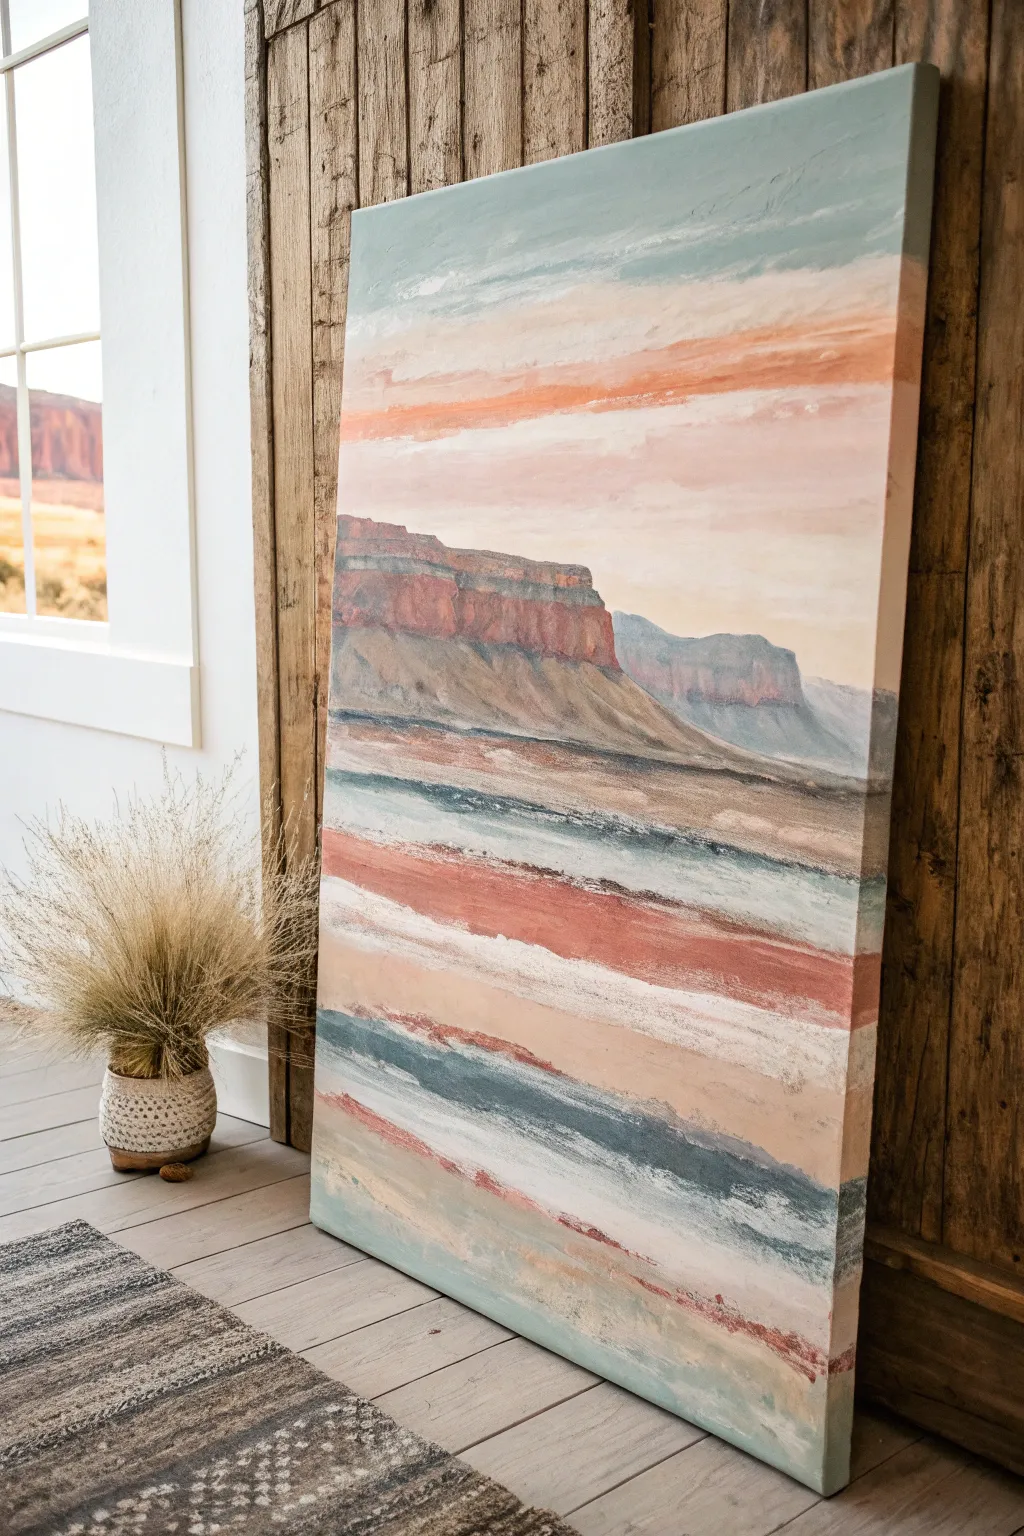

Capture the serene beauty of the American Southwest with this layered acrylic landscape. By combining structured dry-brush techniques with loose, swiping motions, you’ll create a piece that feels both grounded and abstractly ethereal.
Step-by-Step
Materials
- Large stretched canvas (at least 24×36 inches)
- Acrylic paints: Burnt Sienna, Terra Cotta, Red Oxide, Unbleached Titanium, Ultramarine Blue, Teal or Turquoise, and Titanium White
- Wide flat brush (2-3 inch)
- Medium flat synthetic brush
- Palette knife (large, trowel style)
- Spray bottle with water
- Paper towels or cotton rag
- Easel or flat working surface
Step 1: Setting the Atmosphere
-
Sky Base Layer:
Begin at the top third of your canvas. Mix Titanium White with a tiny touch of Teal to create a very pale, dusty blue. Apply this using your large flat brush in long, horizontal strokes. -
Adding Warmth to the Sky:
While the blue is still slightly tacky, mix a pale peach color using Unbleached Titanium and a drop of Terra Cotta. Streak this loosely into the sky area, allowing the brush to run dry to create wispy cloud-like textures. -
Establish the Horizon:
Decide where your horizon line will sit—roughly one-third down from the top works well. Paint a hazy, soft transition using a mix of Unbleached Titanium and a whisper of Burnt Sienna to warm up the air just above the land.
Step 2: Forging the Mesas
-
Mountain Silhouette:
Using your medium flat brush and a mix of Red Oxide and Burnt Sienna, block in the main mesa shape. Keep the top edge relatively flat but rugged, distinctive of canyon geology. -
Adding Dimension:
Create a shadow tone by mixing your red earth colors with a touch of Ultramarine Blue. Apply this to the vertical faces of the mesa to suggest distinct cliffs and crevices. -
Distant Peaks:
For the mountains further back in the distance, use a cooler, paler grey-blue mix. This atmospheric perspective pushes them into the background. Keep edges softer here. -
The Slope:
Drag the earth tones downwards from the base of the cliffs using a dry brush technique. This simulates the scree and sloping dirt found at the bottom of mesas.
Muddy colors?
If your swipes are turning brown, you are over-blending. Wipe your large brush clean between every single pass. The goal is to drag the paint, not mix it on the canvas.
Step 3: The Strata Technique
-
Preparation for Swiping:
The bottom half of the painting relies on the ‘swipe’ technique. Mix ample amounts of your key colors: Teal/White mix, Deep Terra Cotta, Cream, and a dark Blue-Grey. -
Apply Paint Thickly:
Starting just below the mesa, apply a thick horizontal band of the dark Blue-Grey directly onto the canvas with a palette knife or brush. -
The First Swipe:
Immediately take your large, clean flat brush (damp but not dripping) and drag it horizontally across the wet paint band. Do not overwork it; let the streaks happen naturally. -
Layering Colors:
Move down an inch or two. Apply a band of the Terra Cotta paint. Leave uneven gaps of canvas showing between this and the previous layer. -
Creating the Blend:
Fill the gap with a band of Unbleached Titanium. Now, use your large brush to swipe across all three bands, allowing the edges to blur and marry into one another. -
Adding Texture:
If the layers look too smooth, lightly spritz a section with water and drag the palette knife over it to scrape back down to the canvas weave in spots. -
Continuing the Descent:
Continue this banding process down the canvas. Alternate between cool teal/greys and warm terra cotta/creams to mimic the strata of sedimentary rock. -
The Foreground:
As you reach the very bottom, use lighter, sandier colors. I like to keep the strokes very loose here to ground the viewer.
Add grit texture
Mix a little sand or pumice gel into your Terra Cotta paint for the mesa cliffs. This physical texture will catch the light and make the rock formations feel real.
Step 4: Final Details
-
Highlights:
Once the main layers are dry, take pure Titanium White on a dry brush. Lightly graze the tops of the mesa and the upper edges of the paint ‘strata’ bands to catch imaginary sunlight. -
Deepening Shadows:
Enhance contrast by adding thin, broken lines of dark Burnt Umber or deep dull blue in the crevices of the textured swipe areas. -
Assessment:
Step back five feet. If any horizontal band feels too solid, break it up with a perpendicular scrub of a complementary color or a quick scrape of the knife.
Hang your finished piece in a well-lit room to let those natural earth tones warm up the space
Masking Tape Geometric Panels
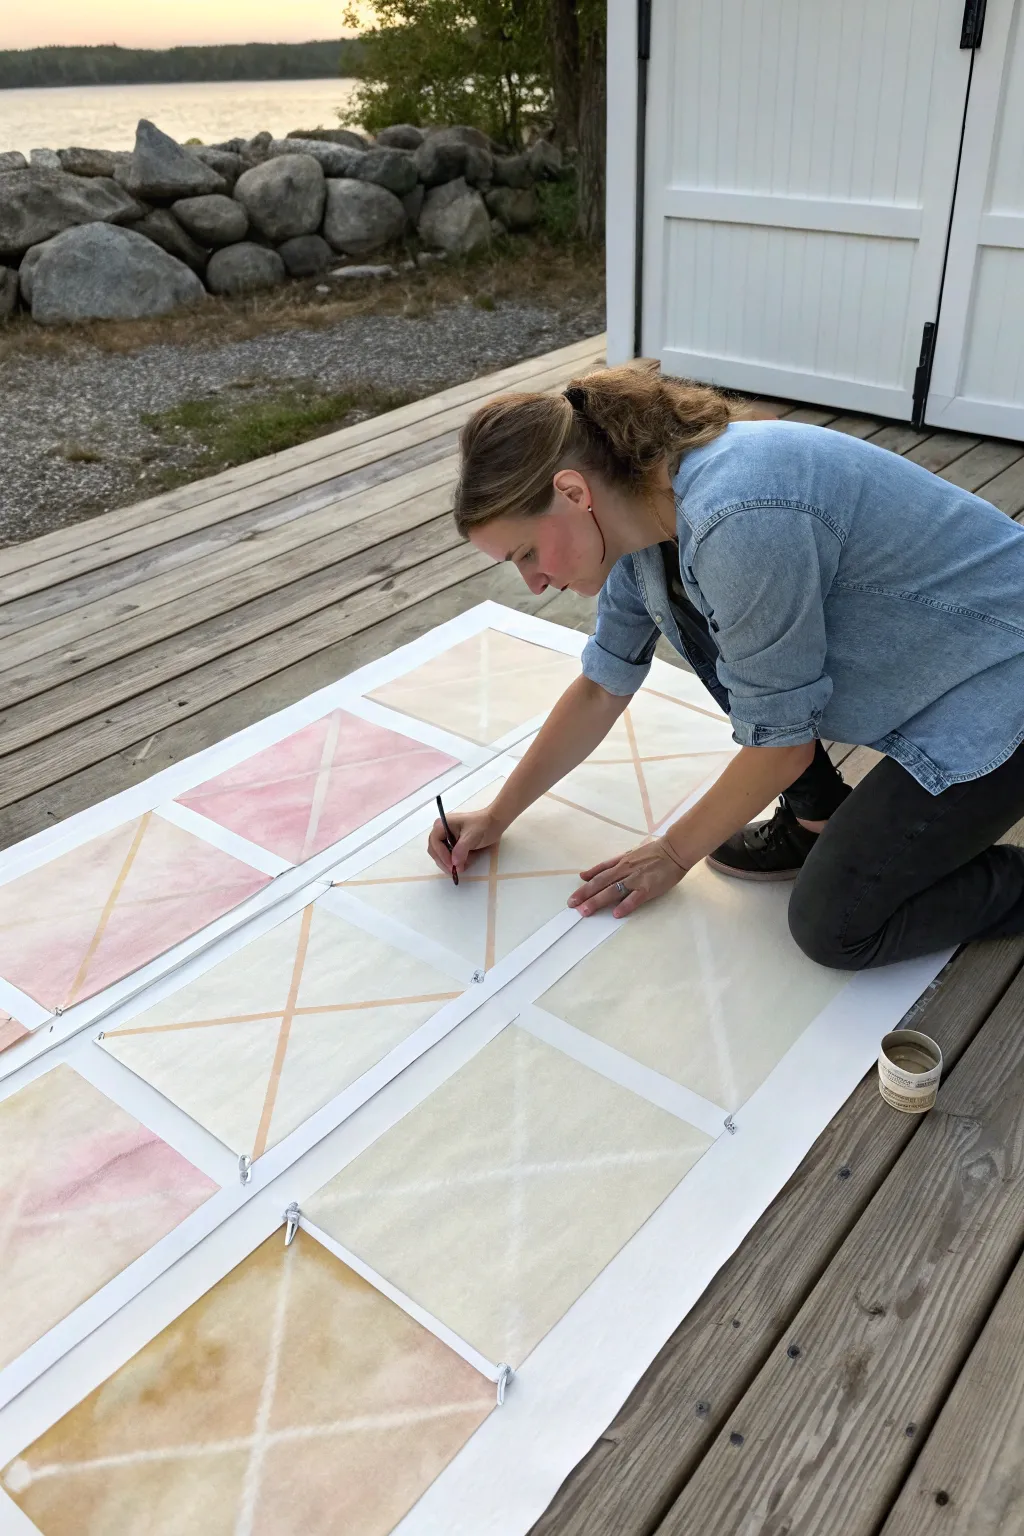
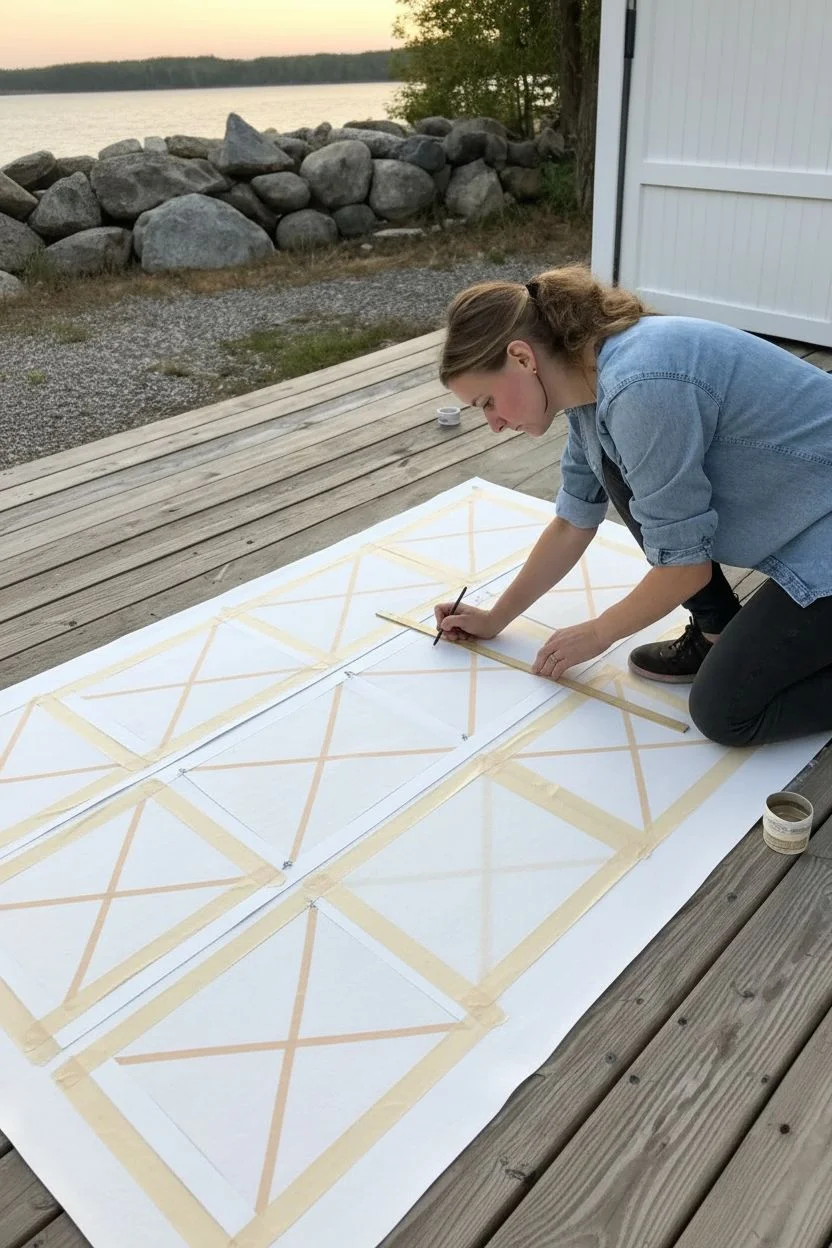
Create a stunning, large-scale background featuring geometric elegance and soft, atmospheric color transitions. By combining simple masking techniques with watered-down acrylic washes, you can achieve a sophisticated, structured look that retains an organic, painterly feel.
Detailed Instructions
Materials
- Large canvas, heavy watercolor paper, or prepared drop cloth
- Gesso (if painting on raw canvas or fabric)
- Painter’s tape or dedicated masking tape (various widths)
- Acrylic paints (Soft Pink, Ochre, Cream, White)
- Water containers for diluting paint
- Large flat brushes or foam brushes
- Ruler or straight edge
- Pencil
Step 1: Preparation & Masking
-
Prime the Surface:
If you are working on unprimed canvas or fabric, apply a coat of gesso first to ensure your paint doesn’t soak straight through. Let it dry completely. -
Grid Layout:
Using a pencil and a long straight edge, lightly mark out a grid of large, equal rectangles across your entire surface. Leave a gap of about 1-2 inches between each rectangle for the borders. -
Tape the Grid:
Apply masking tape over your pencil lines to create the crisp white borders between your panels. Press the edges down firmly to prevent paint bleed. -
Create the X Pattern:
Find the center point of each rectangle. Run strips of tape from corner to corner within each box to create a large ‘X’ shape. -
Seal the Tape:
For razor-sharp lines, I assume a little bleed might happen, so I paint a very thin layer of matte medium or white paint over the tape edges first. This seals the tape so your color won’t seep under.
Step 2: Painting the Washes
-
Mix Color Washes:
Dilute your acrylic paints with water until they reach a consistency similar to heavy cream or skim milk, depending on how transparent you want the color. -
Test Consistency:
Test your wash on a scrap piece of paper. It should flow easily but still hold its pigment intensity. -
First Panel Layer:
Start with your lightest color (like cream or pale ochre). Apply the wash over an entire rectangular section, painting right over the ‘X’ tape. -
Working Wet-in-Wet:
While the first color is still damp, introduce a second color (like the soft pink) into parts of the panel to create a gentle ombré effect. -
Varying the Grid:
Don’t make every panel identical. Paint some panels primarily pink, others ochre, and mingle them in others to keep the eye moving across the piece. -
Texture Building:
Use your brush to dab or absorb excess pools of water in certain spots. This creates that lovely, clouded texture seen in the final result. -
Repeating the Process:
Continue until all rectangular panels are filled with color. Ensure the paint is applied evenly near the tape edges.
Use Acrylic Glazing Medium
Instead of water, mix paint with glazing liquid. It increases transparency and gives you longer working time to blend colors seamlessly.
Step 3: Finishing Touches
-
Let it Dry:
Allow the paint to dry completely. Acrylic washes can feel dry to the touch but still be damp underneath, so give it at least an hour. -
The Reveal:
Slowly and carefully peel back the tape. Pull at a 45-degree angle away from the painted area to ensure crisp lines. -
Touch Ups:
If any paint bled through, use a small brush with white acrylic or gesso to tidy up the white geometric lines.
Stitch the Details
Once dry, use embroidery floss to stitch over the white X lines or along the borders for incredible texture and a mixed-media finish.
Step back and admire the clean, modern structure contrasting with your organic paint application

PENCIL GUIDE
Understanding Pencil Grades from H to B
From first sketch to finished drawing — learn pencil grades, line control, and shading techniques.
Explore the Full Guide
Simple Galaxy Night Sky Background
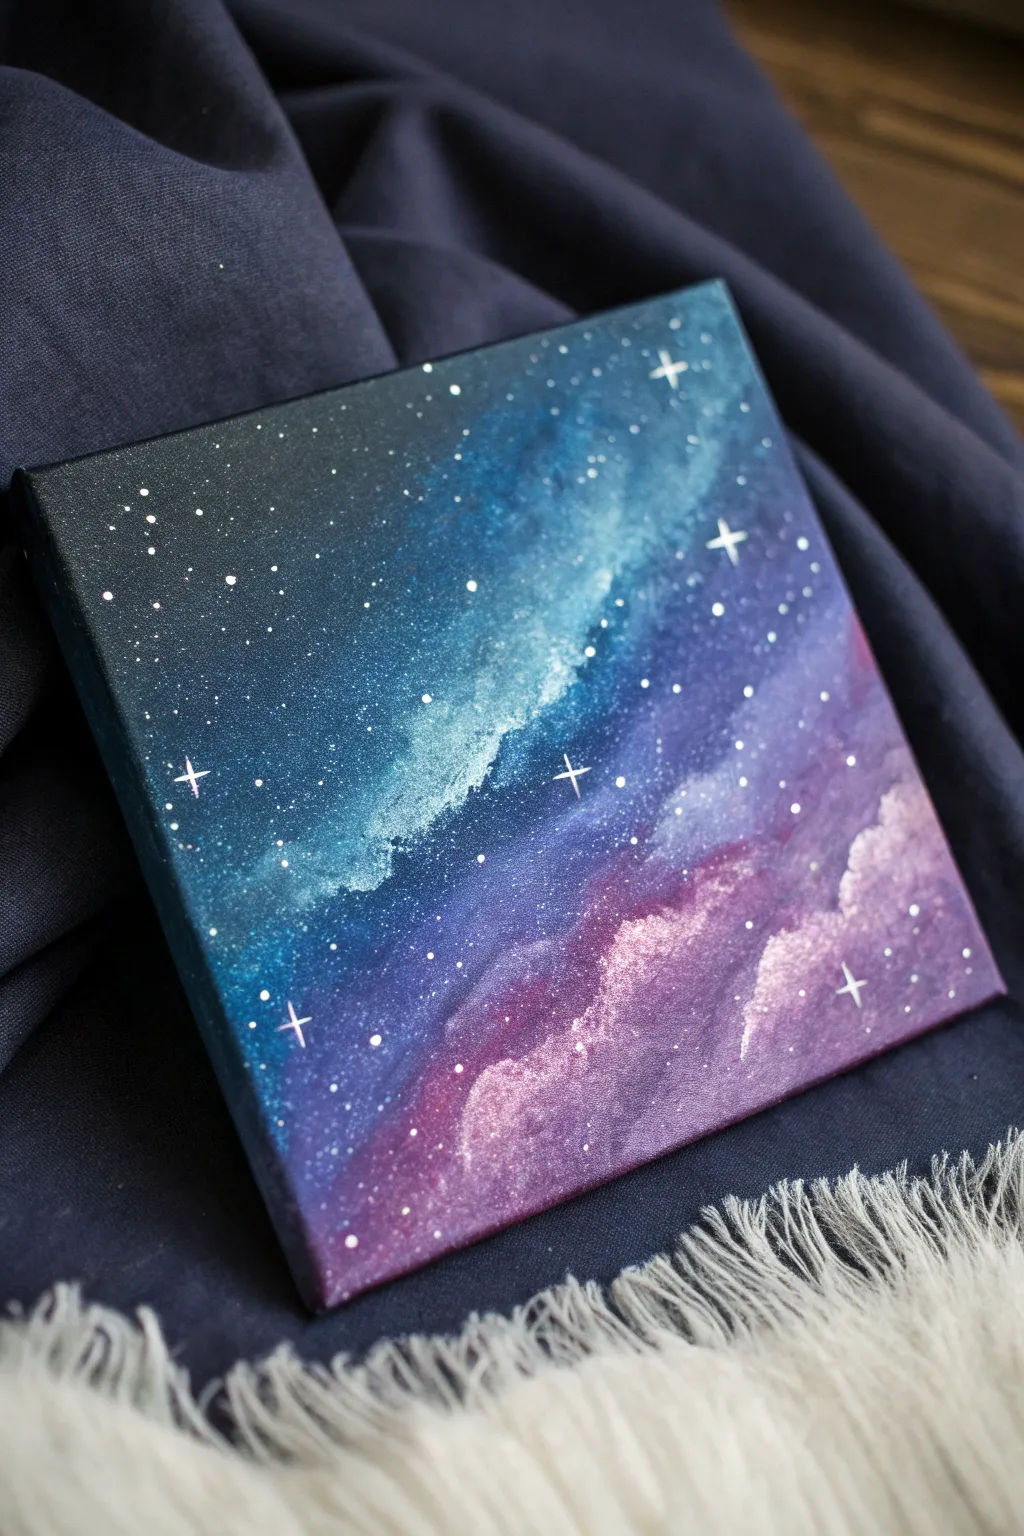

Capture the magic of deep space on a small canvas with this vibrant galaxy painting. You’ll master smooth gradient blending and texture techniques to create a dreamy nebula effect transitioning from deep teal to mystical purple.
Step-by-Step Tutorial
Materials
- Small square canvas or canvas board (e.g., 6×6 inches)
- Acrylic paints: Black, Pthalo Blue, Teal/Aqua, Purple/Violet, Magenta, and Titanium White
- Flat shader brush (medium size)
- Small round brush (size 1 or 2)
- Detail liner brush (size 000)
- Old toothbrush (optional)
- Sponge or scrunched paper towel
- Palette
- Cup of water and paper towels
Step 1: Base Gradient
-
Prime the darks:
Start by mixing a small amount of black with your Pthalo Blue to create a very deep midnight blue. Apply this to the top left corner of your canvas using the flat brush, bringing it diagonally down about one-third of the way. -
Transition to teal:
Without cleaning your brush thoroughly, pick up pure Teal or Aqua paint. Blend this into the wet midnight blue edge, working diagonally towards the center. The leftover dark paint on the brush helps create a seamless mid-tone transition. -
Shift to purple:
Clean your brush completely. Mix a deep violet shade and apply it to the bottom right corner, painting diagonally upwards to meet the middle section. -
Create the blend:
Where the teal and purple meet in the middle diagonal, brush them lightly back and forth into each other. If it looks muddy, rinse your brush and use a tiny bit of fresh paint to re-establish the colors. -
Smooth it out:
While the paint is still damp, engage in soft, sweeping strokes across the entire diagonal gradient to remove harsh brush marks. Let this base layer dry completely before moving on.
Step 2: Nebula Clouds
-
Sponge preparation:
Take your sponge or a small piece of scrunched-up paper towel and dampen it slightly. It should be moist but not dripping. -
Lighten the teal:
Mix a lighter version of your teal by adding a touch of white. Dab your sponge into this mix, then blot excess paint onto your palette until the texture is faint. -
Dab the nebula:
Gently sponge this lighter teal diagonally across the existing teal section, concentrating on the transition zone. Instead of a solid line, create irregular, cloud-like patches. -
Add purple brightness:
Repeat the process with a lighter mix of Magenta and White. Sponge this softly into the lower purple section, allowing some areas to remain dark for depth. -
Cloud highlights:
Using an almost dry sponge with very nearly pure white paint, tap tiny highlights into the center of your brightest nebula clouds. This adds that glowing, ethereal quality.
Paint the Edges
For a professional finish, wrap the dark blue gradient around the sides of the canvas. This creates a gallery-ready look without needing a frame.
Step 3: Starfield Details
-
Mix star paint:
Dilute a small amount of Titanium White with water until it reaches an ink-like consistency. It needs to be fluid enough to splatter. -
Splatter stars:
Dip an old toothbrush or a stiff brush into the watery white paint. Hold it over the canvas and flick the bristles to spray a fine mist of stars across the galaxy. I find testing the spray on a scrap paper first prevents big accidental blobs. -
Paint larger stars:
Using your smallest round brush, manually dot a few slightly larger stars randomly throughout the composition to vary the star sizes. -
Create the glimmer:
Switch to your fine liner brush for the ‘twinkle’ stars. Choose about 3-5 of your larger dots to transform. -
Cross shapes:
Paint a simple cross shape through the chosen white dots. Keep lines thin and taper the ends so they fade out. -
Final highlights:
Add a tiny, concentrated dot of pure white in the absolute center of your cross shapes to make them pop.
Muddy Colors?
If your teal and purple create a brown mess where they touch, let the first layer dry. Apply a thin glaze of white over the transition, dry it, then re-blend colors on top.
Step back and admire your personal window into the universe
Star Splatter Over Deep Gradient
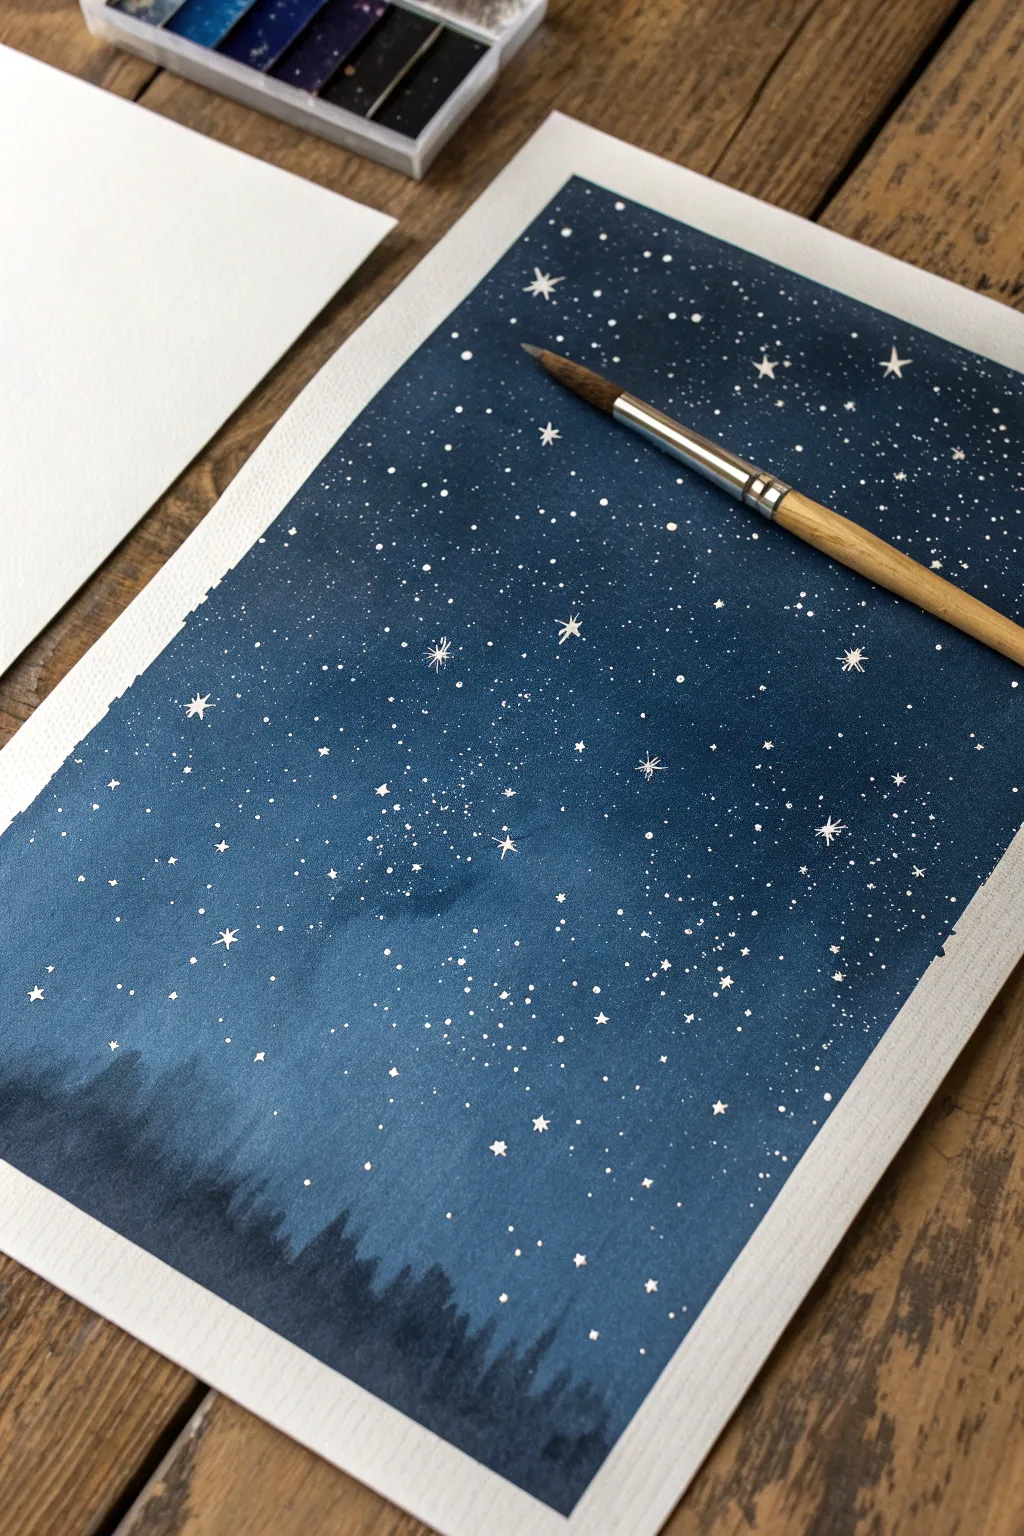
Capture the magic of a clear midnight sky with this deep, moody gradient technique. Using a blend of rich blues and a controlled splatter method, you’ll create a vast, starry expanse that sits beautifully above a silent forest silhouette.
Step-by-Step
Materials
- Heavyweight watercolor paper or mixed media paper (300 gsm recommended)
- Painter’s tape or masking tape
- Acrylic paints (Phthalo Blue, Prussian Blue, Black, White)
- Flat wash brush (1 inch)
- Small round detail brush (size 0 or 1)
- Old toothbrush or stiff bristle brush
- Jar of water
- Paper towels
- Palette or mixing plate
Step 1: Preparation and Base Layer
-
Secure the paper:
Tape down all four edges of your paper to a flat, hard surface using painter’s tape. This prevents the paper from buckling when wet and creates a crisp white border around your finished piece. -
Mix your deepest blue:
On your palette, mix a generous amount of Prussian Blue with a touch of Black. This will be the darkest part of your sky at the very top of the painting. -
Mix a transition blue:
Create a second pool of color using Phthalo Blue. You can add a tiny drop of white to make it slightly lighter than the deep mix, but keep it rich and saturated. -
Apply the top layer:
Using a wet flat wash brush, load up the dark Prussian Blue/Black mix. Paint horizontal strokes across the top third of the paper, ensuring full coverage. -
Begin the gradient:
Without rinsing your brush thoroughly, pick up the Phthalo Blue. Paint across the middle section of the paper, slightly overlapping with the dark top section. -
Blend the transition:
Clean your brush and leave it damp. Gently sweep back and forth over the line where the two blues meet to blur the hard edge. I find that working quickly while the paint is still wet is key for a seamless blend. -
Fade to the horizon:
Dip your brush in clean water and drag the Phthalo Blue section down towards the bottom third of the paper. As the paint runs out and dilutes with water, the sky will naturally become lighter near the horizon. -
Let it dry completely:
Allow the background gradient to dry fully. Acrylics dry quickly, but if the paper feels cool to the touch, give it a few more minutes. The surface must be bone dry before the next steps.
Step 2: Adding the Stars
-
Prepare the star paint:
Dilute a small amount of white acrylic paint with water. It should be the consistency of heavy cream or ink—thin enough to splatter but thick enough to stay opaque. -
Test the splatter:
Dip a stiff brush or old toothbrush into the thinned white paint. Test it on a scrape piece of paper first by running your thumb across the bristles to flick droplets. -
Create the galaxy:
Hold the brush over your dried painting. Flick the bristles to spray fine white dots across the upper two-thirds of the sky. Vary the density, making some areas clustering closer together like the Milky Way. -
Paint larger stars:
Switch to your small detail brush (size 0). Dip it into undiluted white paint and carefully place larger, individual dots randomly among the splatter for variety. -
Add twinkling stars:
Select a few of the larger white dots. With the very tip of your detail brush, pull tiny lines outward from the center—up, down, left, and right—to create four-pointed twinkling stars.
Splatter Control
If you are getting streaks instead of dots, your white paint is too thick. Add water drop by drop until it flicks easily off the bristles.
Step 3: The Forest Silhouette
-
Mix the forest color:
Mix a color that is slightly darker than your sky background. Use Black mixed with a little Prussian Blue so it looks like a deep shadow rather than flat black ink. -
Dilute for a watercolor effect:
Add a good amount of water to this dark mix. You want a semi-transparent wash that mimics the look of distant, misty trees. -
Paint the tree line:
Using a medium round brush, paint an irregular, jagged line across the very bottom of the paper. Let the watery paint bleed slightly into the paper texture for a soft, out-of-focus look. -
Add definition:
While the first layer is still damp, dab slightly more concentrated dark paint into the base of the trees. This grounds the forest and adds depth. -
Peel the tape:
Once the entire painting is completely dry, slowly peel away the painter’s tape at a 45-degree angle to reveal your clean edges.
Metallic Magic
Mix a tiny amount of iridescent medium or silver paint into your white star mixture. The stars will shimmer subtly when usage catches the light.
Step back and admire the depth of your own personal galaxy painted on the page


Stencil Lift-Back Patterned Ground
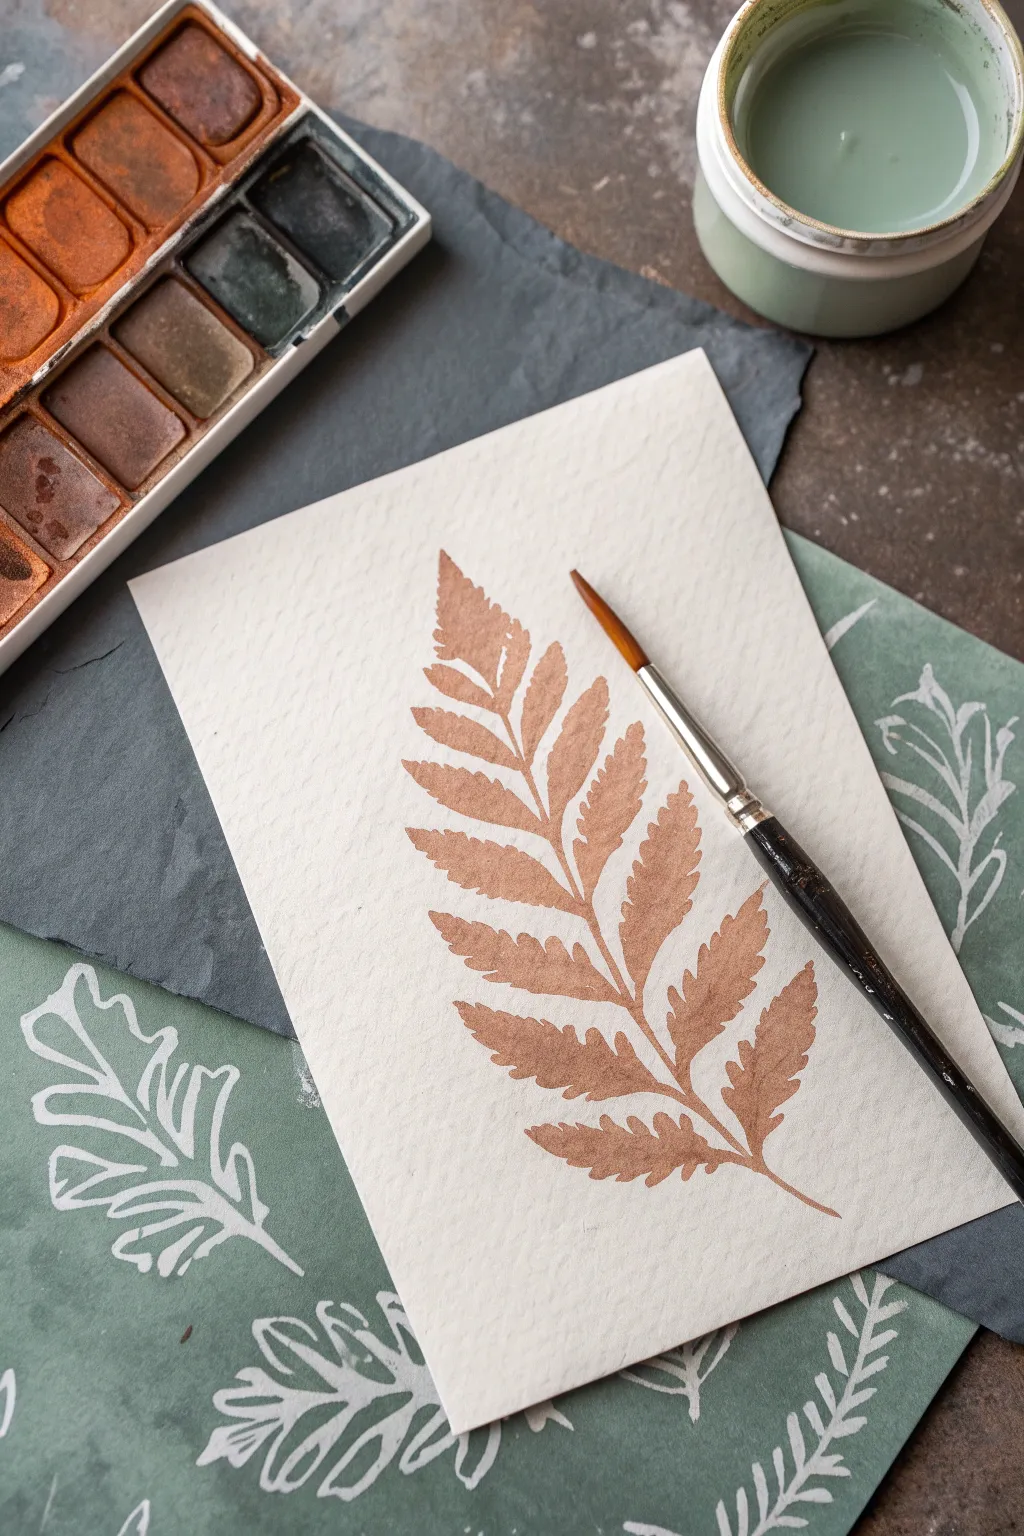
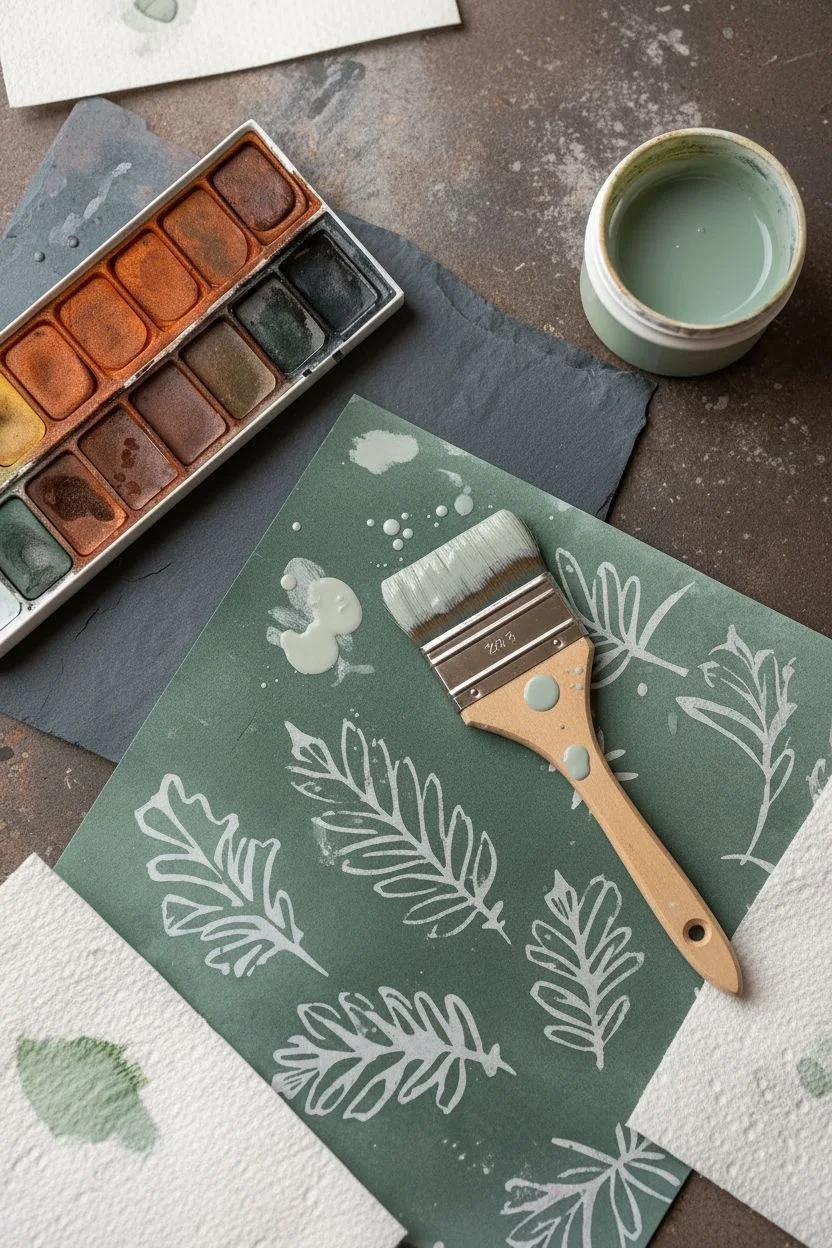
Capture the delicate beauty of botanical prints with this stencil lift-back technique. By combining fluid acrylics or watercolors with a simple resist method, you can create a gorgeous, negative-space pattern that feels both organic and modern.
Step-by-Step Tutorial
Materials
- Heavyweight watercolor paper (300 gsm or similar)
- Deep green acrylic paint or fluid acrylic ink
- Leaf stencils (or masking fluid/frisket film to cut your own)
- Flat wash brush
- Detail round brush (size 2 or 4)
- Red-brown watercolor or diluted acrylic (burnt sienna/sanguine hue)
- Palette tray
- Paper towels
- Water cup
Step 1: Creating the Patterned Ground
-
Prepare the base:
Cut your green background paper to size. This will serve as the decorative surface underneath or as a practice ground for the resist technique. -
Lay down the resist:
Place your leaf stencils firmly onto the green paper. If you don’t have stencils, you can paint leaf shapes using masking fluid or cut shapes from masking tape. Press the edges down securely to prevent paint from seeping underneath. -
Apply the background wash:
Mix a diluted wash of white acrylic or a very pale grey. Using a broad brush or sponge, gently dab over the stenciled area. -
Lift and reveal:
Once the paint is tacky but not fully dry, carefully lift off the stencil or peel away the masking fluid. You should see crisp, negative-space leaves against your green background, similar to the pattern visible beneath the main artwork. -
Let it cure:
Set this patterned sheet aside to dry completely while you prepare for the focal painting.
Bleeding Edges?
If paint bleeds under your stencil, use a “dry brush” technique with very little paint loaded, or switch to spray adhesive on the back of the stencil for a tighter seal.
Step 2: Painting the Focal Fern
-
Select paper:
Choose a high-quality sheet of cold-press watercolor paper. The texture adds character to the simple subject. -
Mix the earthy tone:
In your palette, mix a warm, reddish-brown hue. I like using Burnt Sienna with a touch of Red Oxide. If using acrylics, dilute heavily with water to achieve a watercolor-like transparency. -
Outline the stem:
Using your fine round brush, paint a thin, slightly curved central line to act as the fern’s spine (rachis). Keep the pressure light for a delicate line. -
Block in leaf shapes:
Starting near the bottom, paint the individual leaflets (pinnae) extending outward from the spine. Painting these as simple, elongated triangular shapes first helps get the proportions right. -
Refine the edges:
Go back over each leaflet while the paint is still wet. Add small jagged details to the edges to mimic the serrated texture of a real fern. -
Vary tonal depth:
Drop a little more concentrated pigment into the areas where the leaves meet the stem. This wet-on-wet technique adds natural depth and prevents the image from looking flat. -
Taper the tip:
As you move toward the top of the fern, make the leaflets progressively smaller and shorter, ending with a single small point at the apex. -
Check symmetry:
Ferns aren’t perfectly symmetrical, so don’t worry if one side is slightly different. In fact, slight imperfections make it look more organic. -
Add stem separation:
Ensure there is a tiny gap of negative space or lighter color between opposite leaflets where they join the stem, keeping the structure airy. -
Final touches:
Once the main shape is dry, use the very tip of your brush to sharpen any blurry edges or deepen the color at the very base of the stem.
Add Vintage Texture
Before painting the fern, lightly stain the white paper with tea or coffee to give it an aged, parchment-like antique look that complements the brown paint.
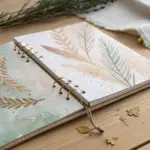
Display your finished fern study on top of your patterned background for a layered, nature-inspired presentation


Have a question or want to share your own experience? I'd love to hear from you in the comments below!