When you want an anniversary painting that feels wildly meaningful but still totally doable, simple shapes and bold contrast are your best friends. I’m sharing my favorite easy anniversary painting ideas that look romantic and polished, even if you’re just getting comfy with a brush.
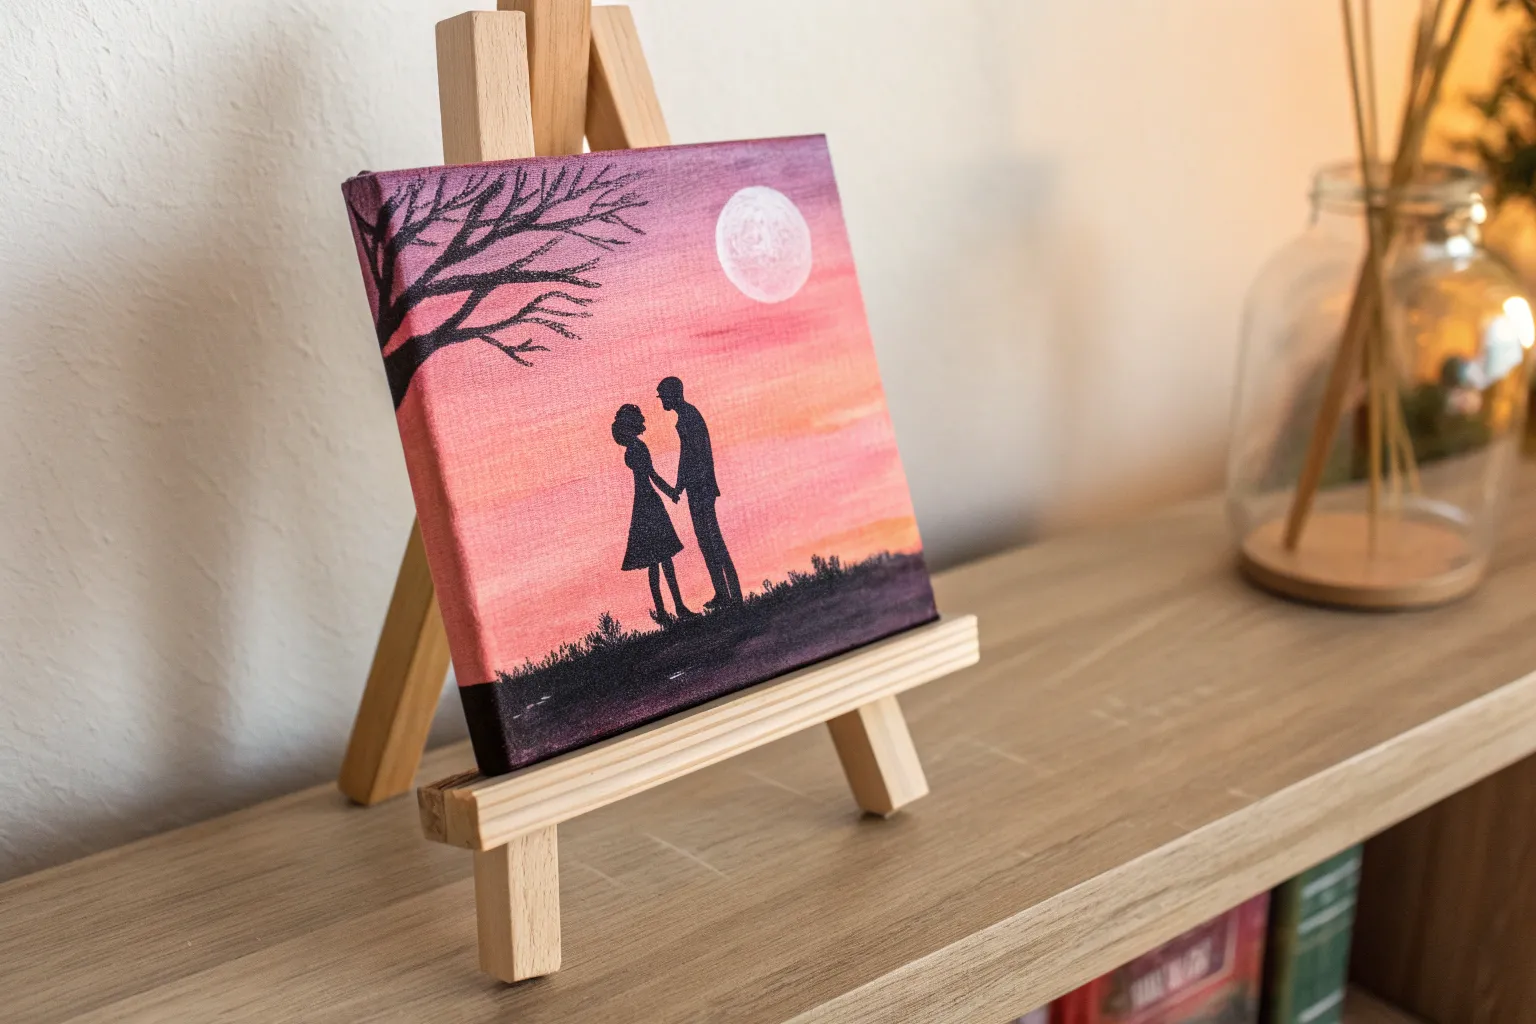
Silhouette Couple at Sunset
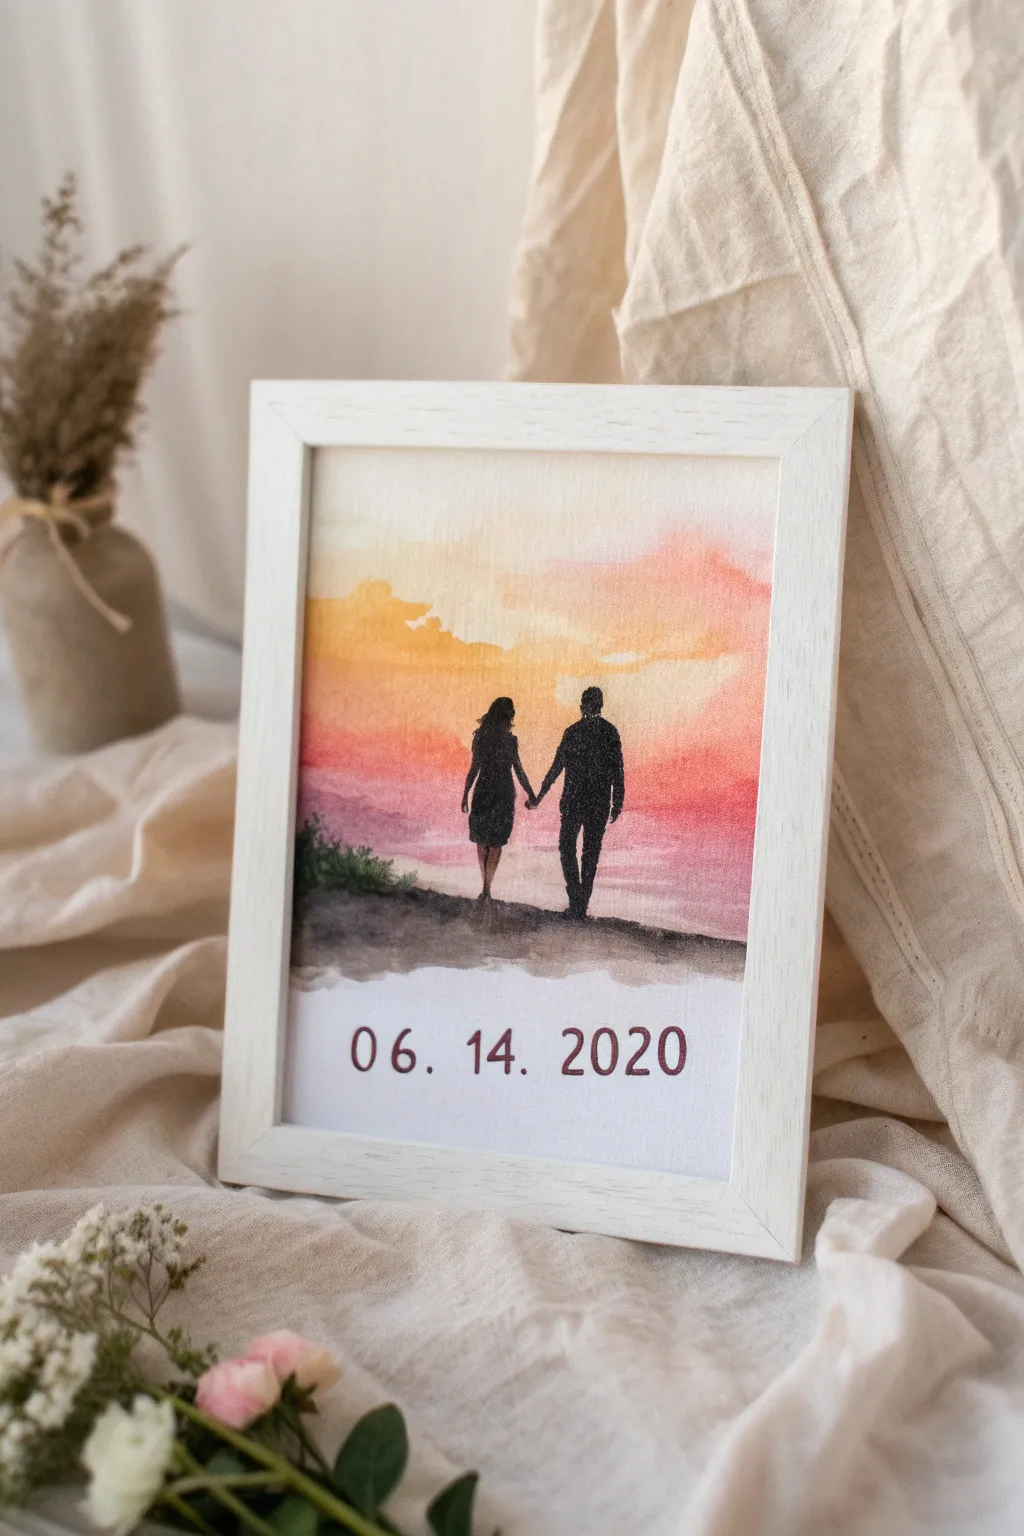
Capture the warmth of your special day with this romantic watercolor-style silhouette painting. Featuring a glowing sunset gradient and crisp black figures, this personalized artwork makes for a timeless and heartfelt anniversary gift.
Step-by-Step Tutorial
Materials
- Heavyweight watercolor paper or canvas sheet (8×10 inch)
- Watercolor paints (Yellow ochre, orange, red, magenta, purple)
- Black acrylic paint or black India ink
- Flat wash brush (1 inch)
- Round detail brush (size 0 or 1)
- Pencil and eraser
- Masking tape
- Water cups and paper towels
- Printed reference photo of a couple walking
- Ruler
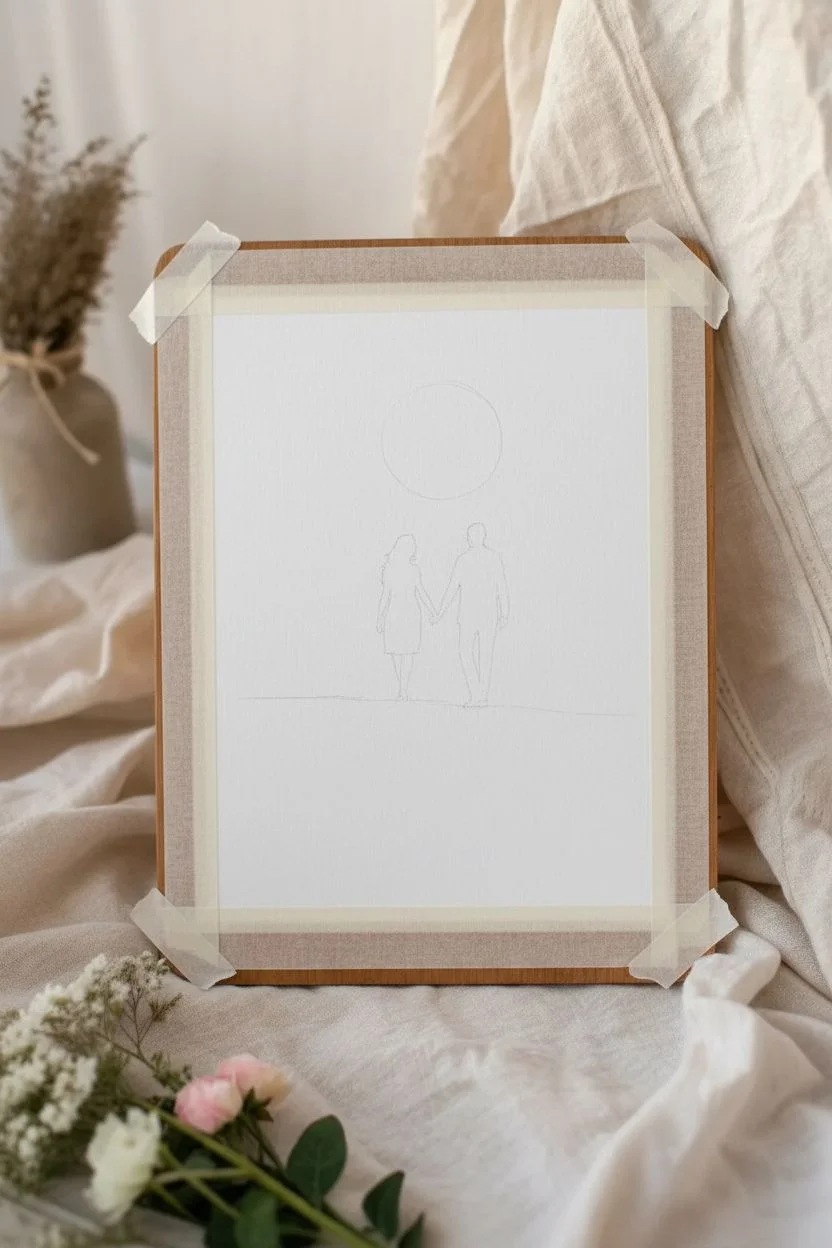
Step 1: Preparation and Sketching
-
Secure the paper:
Tape your watercolor paper down to a hard board using masking tape. This prevents the paper from buckling when it gets wet and creates a clean white border around your painting. -
Establish the horizon:
Using a ruler, lightly draw a horizon line about one-third of the way up from the bottom of the paper. This will separate your sky from the ground. -
Sketch the figures:
Lightly sketch the outline of the couple holding hands. Don’t worry about facial details or clothing textures; focus entirely on the outer shape, as this will eventually be filled in solid black. -
Create a painting guide:
I find it helpful to lightly circle where the ‘sun’ is coming from behind the couple to remember which areas should be lightest.
Step 2: Painting the Sunset Sky
-
Wet the sky area:
Using your large flat brush and clean water, gently wet the entire sky area above your horizon line. The paper should be damp and glistening, but not hold standing puddles of water. -
Apply the yellow glow:
Load your brush with diluted yellow ochre. Start painting right above the horizon line where the sun would be brightest, letting the color bleed softly upward. -
Blend in orange tones:
While the yellow is still wet, mix a soft orange. Apply this above and around the yellow section, using horizontal strokes to simulate clouds. -
Add pink and magenta:
Move further up the sky with pink and magenta tones. Allow these to touch the wet orange paint so they blend naturally, creating a seamless gradient. -
Deepen the edges:
Add a touch of purple to your magenta mix and apply it to the very top corners of the sky to create depth and frame the light source. -
Let the sky dry:
Allow the sky layer to dry completely. This is crucial; if you paint the foreground too soon, the black might bleed into your beautiful sunset.
Pro Tip: Masking Fluid
For a super crisp silhouette, apply liquid masking fluid over your pencil sketch before painting the sky. Rub it off once the sky is dry to reveal clean white paper.
Step 3: Creating the Ground and Silhouette
-
Paint the ground texture:
Mix a watery grey-brown wash. Paint the ground area below the horizon line using loose, uneven strokes to mimic terrain or sand. Darken the area closest to the bottom edge. -
Add gentle foliage:
Use the tip of a smaller brush to dab some darker grey-green texture on the left side of the horizon line to suggest distant bushes or grass. -
Outline the figures:
Once everything is bone dry, switch to your black acrylic paint or ink. Using your finest detail brush, carefully trace the pencil outline of your couple. -
Fill in the silhouette:
Fill the inside of the outline with solid black paint. Apply two coats if necessary to ensure it is completely opaque against the colorful background. -
Review edges:
Clean up any rough edges on the silhouette to ensure the figures look sharp and distinct against the soft background.
Troubleshooting: Bloems
If cauliflower-like blooms appear in your sky, you added water to drying paint. Don’t fight it—let it dry, then gently glaze over it with a slightly damp brush to soften.
Step 4: Adding the Date
-
Mark the text placement:
Measure the center point below the painted ground area. Use a ruler to ensure your date will be perfectly straight. -
Pencil in the numbers:
Very lightly print the anniversary date. Check the spacing between numbers to ensure it looks balanced. -
Paint the text:
Using a steady hand and a small round brush (or a fine-tip paint marker/pen for easier control), trace over your pencil lines with a dark brown or reddish-black color. -
Frame the piece:
Once fully dry, remove the tape and place the artwork in a simple white frame to let the colors pop.
Hang this personalized piece in a spot that catches the light and enjoy the romantic reminder of your special date


Couple Dancing Under the Stars
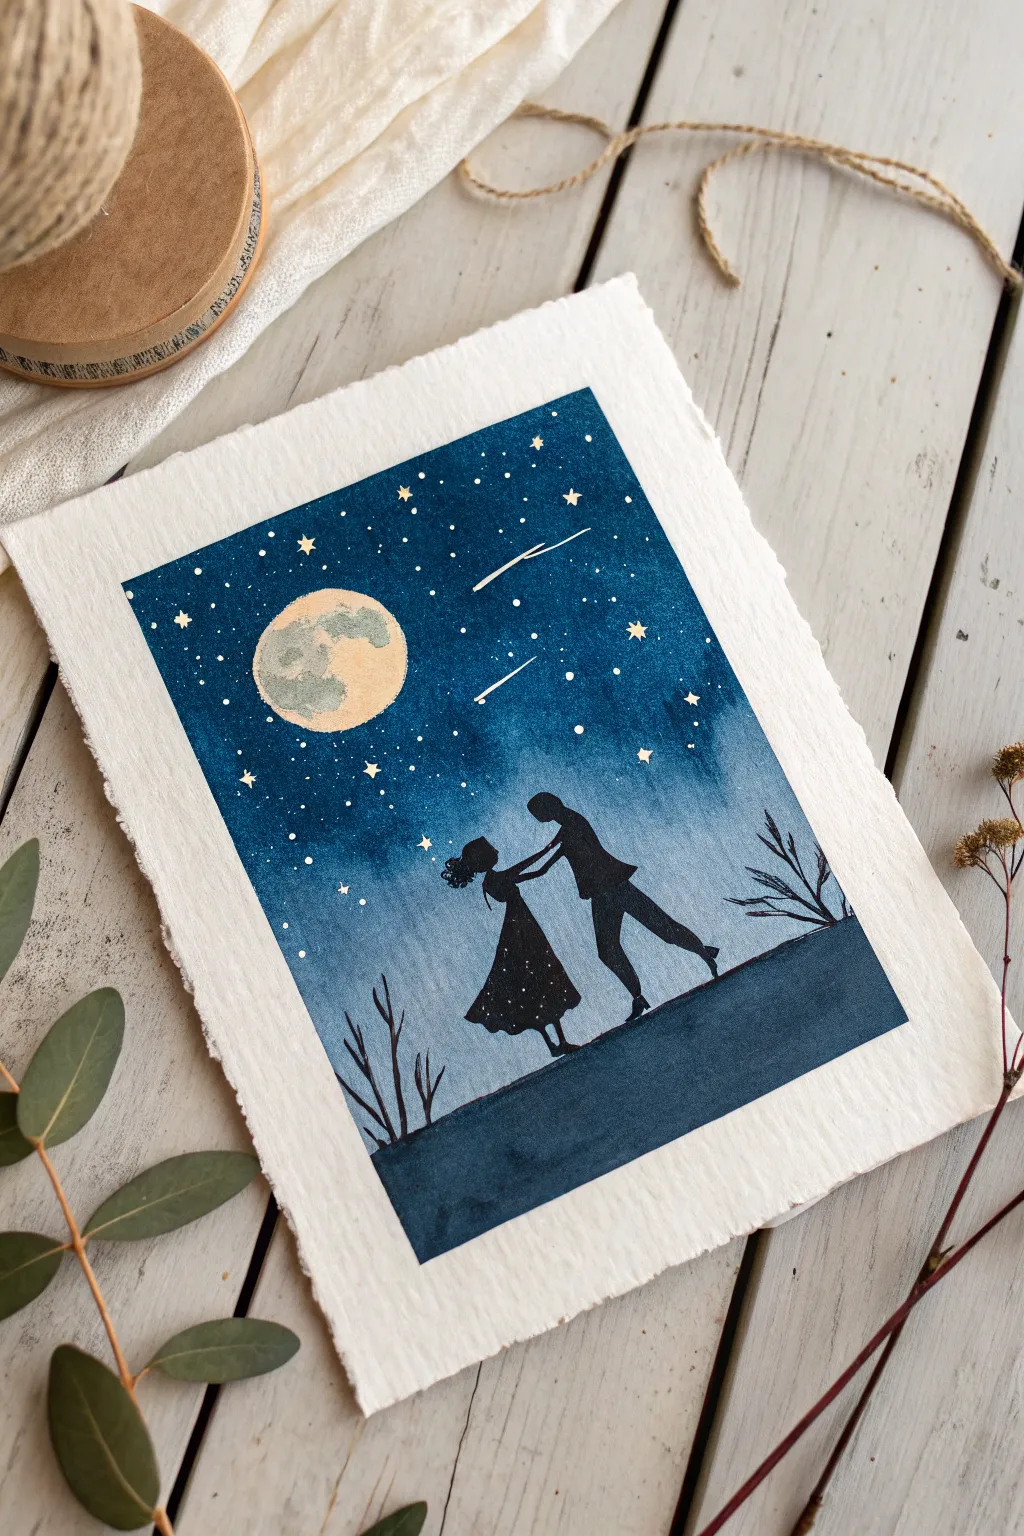
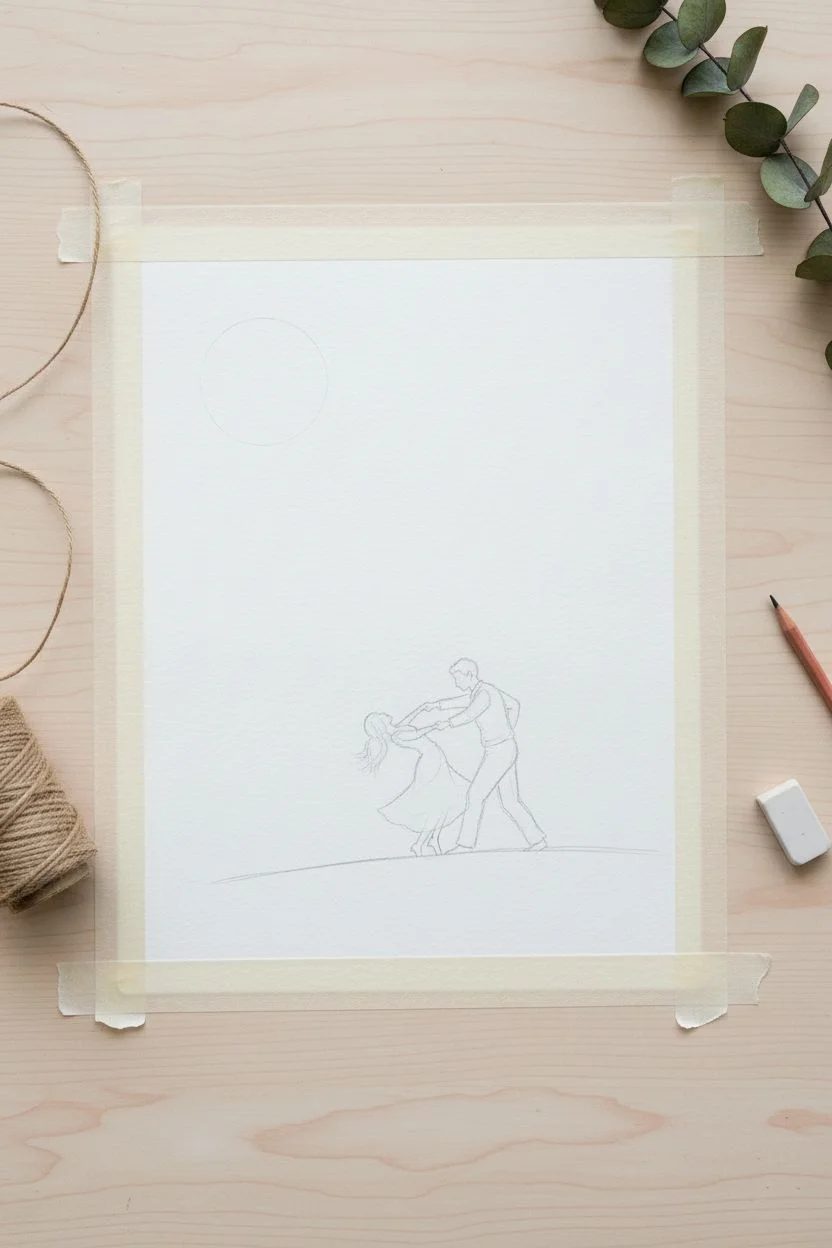
Capture the magic of an eternal dance with this enchanting watercolor silhouette painting. Featuring a celestial night sky and the delicate outlines of a couple in motion, this piece makes for a heartfelt anniversary gesture.
Detailed Instructions
Materials
- Cold press watercolor paper (deckled edge optional)
- Watercolor paints (Indigo, Prussian Blue, Paynes Gray, Black)
- White opacity paint (Gouache or Bleed Proof White)
- Gold metallic paint or gold paint pen
- Round watercolor brushes (sizes 2, 6, and 10)
- Detail liner brush
- Pencil and eraser
- Masking tape
- Paper towels and water jars
Step 1: Preparation & Sketching
-
Secure the paper:
Tape down your watercolor paper to a board on all four sides. Leave a border of about 1 inch to create that float-mounted look later, or tape directly to the edge if you plan to cut it down. -
Sketch the moon:
Using a roll of tape or a compass, lightly trace a perfect circle in the upper left quadrant for the moon. Keep the pencil lines very faint so they don’t show through later. -
Outline the figures:
Lightly sketch the silhouette of the dancing couple near the bottom center. Focus on the gesture—the arched back of the girl and the forward lean of the boy—rather than tiny details, as this will be filled in with black. -
Add the ground:
Draw a gently sloping horizon line beneath the couple’s feet, creating a hill for them to dance on.
Clean Lines Pro Tip
For the crispest moon edge, apply masking fluid over the moon area before painting the blue sky. Peel it off once the sky is 100% dry to reveal pristine white paper.
Step 2: The Night Sky
-
Wet the sky area:
Using your largest clean brush, apply a layer of clean water to the entire sky area, carefully painting *around* the moon circle and the couple’s silhouette. The paper should be glistening but not forming puddles. -
Apply the base blue:
Load a size 10 brush with Prussian Blue. Start near the top and drop the color onto the wet paper, letting it flow downwards. As you get closer to the horizon line, dilute the paint with more water to create a lighter, misty effect. -
Deepen the cosmos:
While the paper is still wet, introduce concentrated Indigo or Paynes Gray to the very top edges and corners. Tap the color in gently; the wet-on-wet technique will help it diffuse into the lighter blue seamlessly. -
Create texture:
Let the sky dry until it loses its sheen but is still damp. Splatter a tiny bit of clean water droplets onto the paint to create ‘blooms’ that look like distant nebulae. -
Dry completely:
Allow the sky layer to dry fully. If the paper feels cool to the touch, it’s still wet. I often use a hairdryer on a low setting here to speed things up.
Step 3: The Moon & Stars
-
Paint the moon base:
Mix a very pale wash of yellow ochre or cream. Fill in the moon circle. While wet, drop in tiny touches of light grey to suggest craters and surface texture. -
Splatter the stars:
Load a stiff brush or a toothbrush with white gouache diluted slightly with water. Flick the bristles to spray a fine mist of stars over the blue sky area. -
Add focal stars:
Using your smallest detail brush or a gold paint pen, manually draw larger 5-point stars and a few small dots throughout the sky for variety. -
Draw shooting stars:
With white gouache or a white gel pen, draw two or three distinct shooting stars. Start with a thin line that tapers off into the distance.
Level Up: Date Night
Hide the couple’s anniversary date or initials inside the craters of the moon or within the constellation pattern in the sky for a personalized hidden message.
Step 4: Silhouettes & Details
-
Fill the ground:
Mix a strong, opaque black using watercolor or ink. Fill in the ground area below the horizon line first to establish the base. -
Paint the couple:
Switch to a size 2 or liner brush. Carefully fill in the couple’s sketch with solid black. Use the tip of the brush for delicate areas like the clasped hands and the girl’s windswept hair. -
Add dress details:
Once the black silhouette of the dress is dry, use a white gel pen or a tiny dot of white paint to add ‘sparkles’ or a floral pattern to her skirt, making it look translucent against the background. -
Frame with flora:
Using the liner brush and black paint, add simple, twig-like dried grass silhouettes emerging from the ground on the left and right sides to frame the scene. -
Gold accents:
As a final touch, add tiny dots of gold inside the larger stars or carefully outline the moon’s rim with a faint gold line for extra shimmer.
Remove the tape slowly to reveal your crisp edges and frame this celestial memory for a gift that speaks volumes


Park Bench Love Scene
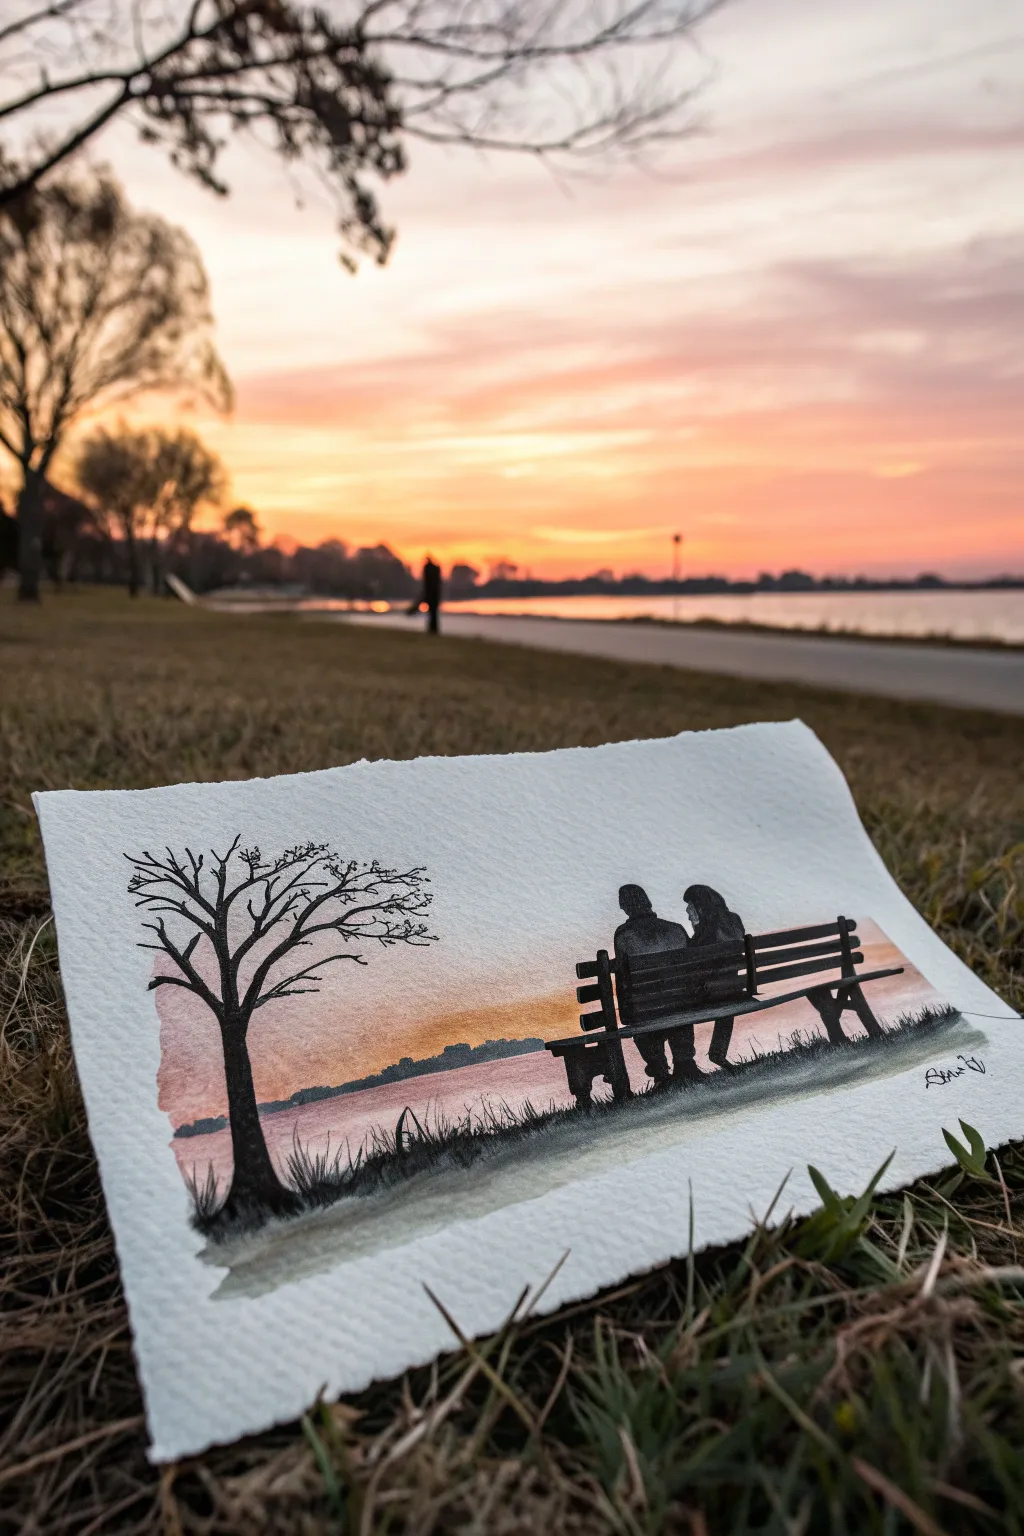
Capture a quiet, romantic moment with this beginner-friendly watercolor project. Using simple silhouette techniques against a vibrant sunset wash creates a mood of peaceful togetherness perfect for an anniversary gift.
Step-by-Step Tutorial
Materials
- Cold press watercolor paper (300gsm)
- Watercolor paints (Yellow Ochre, Alizarin Crimson, Burnt Sienna, Payne’s Grey or Black)
- Flat wash brush (3/4 inch)
- Small round detail brush (size 0 or 2)
- Masking tape
- Pencil and eraser
- Paper towel
- Jar of clean water
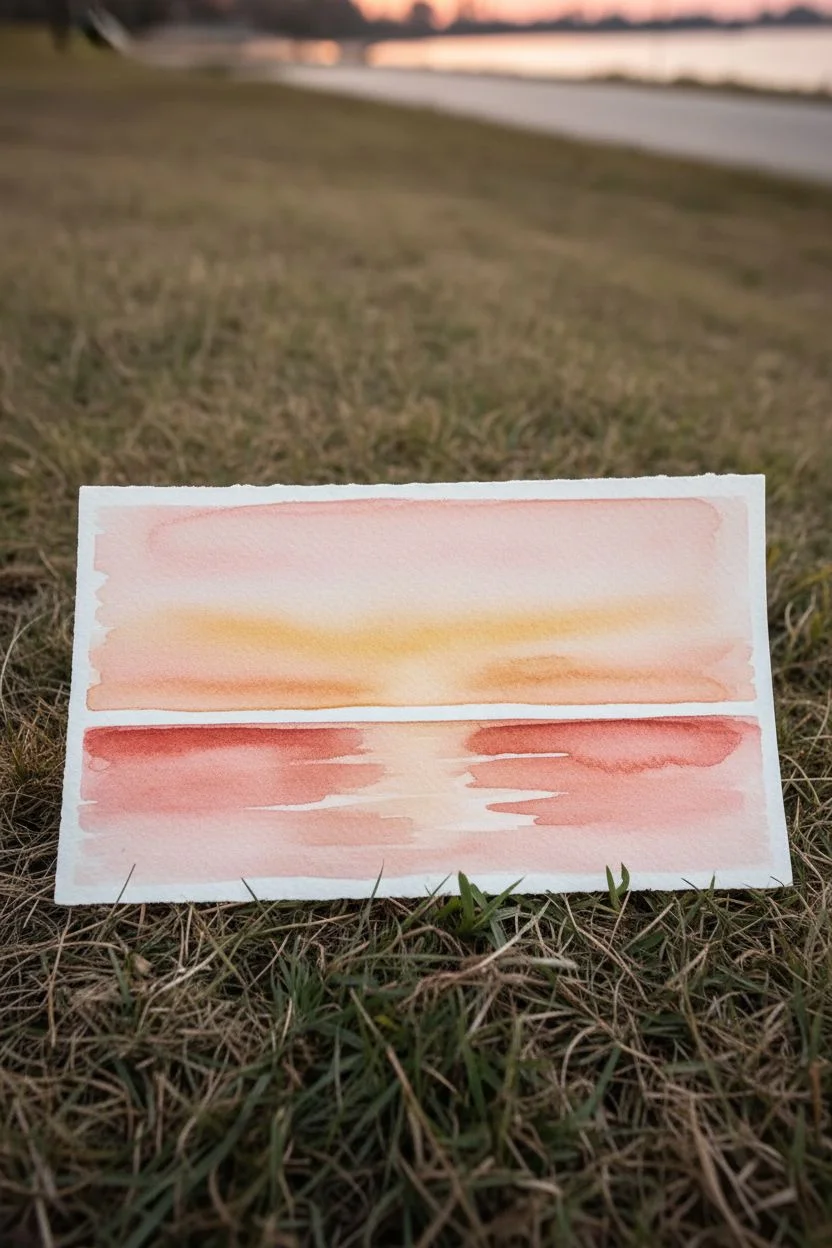
Step 1: Creating the Sunset Base
-
Prep the paper:
Begin by tearing your watercolor paper to size if you want those charming deckled edges shown in the photo, or simply cut a rectangular piece about 5×7 inches. -
Wet the sky area:
Dip your flat wash brush in clean water and dampen the paper from the top edge down to about the bottom third. You want the paper glistening but not swimming in puddles. -
Apply the glow:
While the paper is wet, load your brush with a watery mix of Yellow Ochre. Gently sweep it horizontally across the middle section of your wet area to represent the setting sun. -
Add warmth:
Clean your brush slightly and pick up a touch of Alizarin Crimson mixed with the yellow. Blend this soft orange-pink hue just below and slightly above your yellow band. -
Paint the water reflection:
Using the same pink-orange mix, paint horizontal strokes in the bottom third of the paper to suggest water reflecting the sky. Leave some white space between the sky and water for the horizon line. -
Let it dry absolutely completely:
Setting the painting aside to dry fully is crucial here as damp paper will make your sharp silhouette lines bleed.
Step 2: Sketching the Scene
-
Draft the horizon:
Lightly sketch a straight horizon line across the painting where the sky meets the water using a pencil. Keep it faint. -
Outline the bench:
Draw the basic shape of a park bench on the right side. Focus on the horizontal slats of the backrest and the vertical legs. -
Add the figures:
Sketch the outline of two people sitting close together. Don’t worry about facial features; just focus on the shapes of their heads and shoulders, leaning slightly into each other. -
Position the tree:
On the left side, lightly draw a vertical trunk line that branches out near the top, balancing the composition against the bench.
Clean Lines Tip
If your hand is shaky, use a black fine-tip waterproof pen for the bench and figures instead of a brush. It gives ultimate control.
Step 3: Painting Silhouettes
-
Mix your darks:
Create a rich, dark color using Payne’s Grey or Black. I prefer adding a tiny touch of Burnt Sienna to the black to warm it up so it doesn’t look too flat. -
Paint the distant land:
Using a slightly diluted version of your dark mix, paint a thin, uneven strip along the horizon line to represent distant trees or land across the water. -
Fill in the couple:
Switch to your small round brush. Carefully fill in the shapes of the two figures with your solid dark paint, ensuring the edges are crisp against the sunset background. -
Define the bench:
Paint the horizontal slats of the bench. Leave tiny gaps of the background color showing between the slats and the people to define the structure clearly. -
Create the tree trunk:
Paint the tree trunk on the left, making it thicker at the base and tapering as it goes up. Use the tip of your brush to drag out fragile, thin branches reaching toward the sky. -
Add grassy details:
Using quick, upward flicking motions with your smallest brush, paint grass blades along the entire bottom edge to ground the scene. -
Add the signature:
Once everything is dry, sign your name in the corner with a fine liner pen or your smallest brush.
Make it Personal
Customize the silhouette! Add a small dog sitting next to the bench or change the figures’ hair shapes to match the real couple.
Now you have a touching handmade tribute to love that captures a serene moment in time


Swing Under a Tree Silhouette
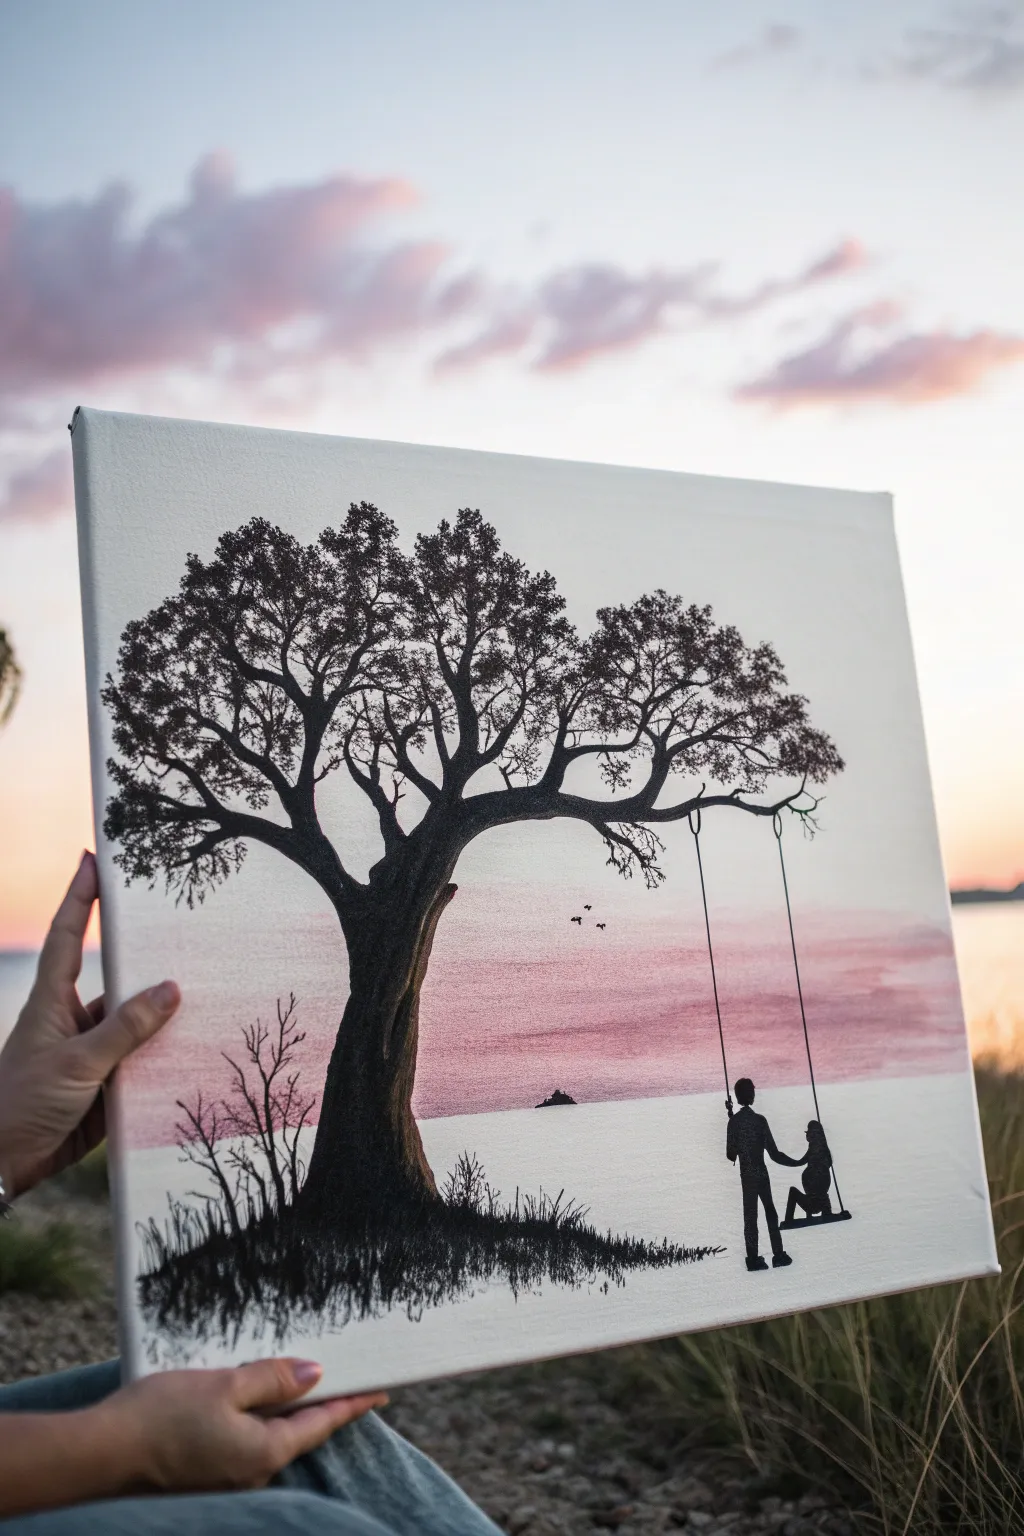
Capture the romance of a sunset stroll with this striking silhouette painting. By combining a soft, blended acrylic wash background with crisp black details, you’ll create a sentimental piece perfect for celebrating an anniversary.
How-To Guide
Materials
- Stretched canvas (16×20 inch recommended)
- Acrylic paints: Titanium White, Rose Pink, light Purple/Lavender, Black
- Wide flat brush (1-2 inch) for background
- Medium round brush
- Fine liner brush (0 or 00 size)
- Pencil and eraser
- Palette
- Water cup and paper towels
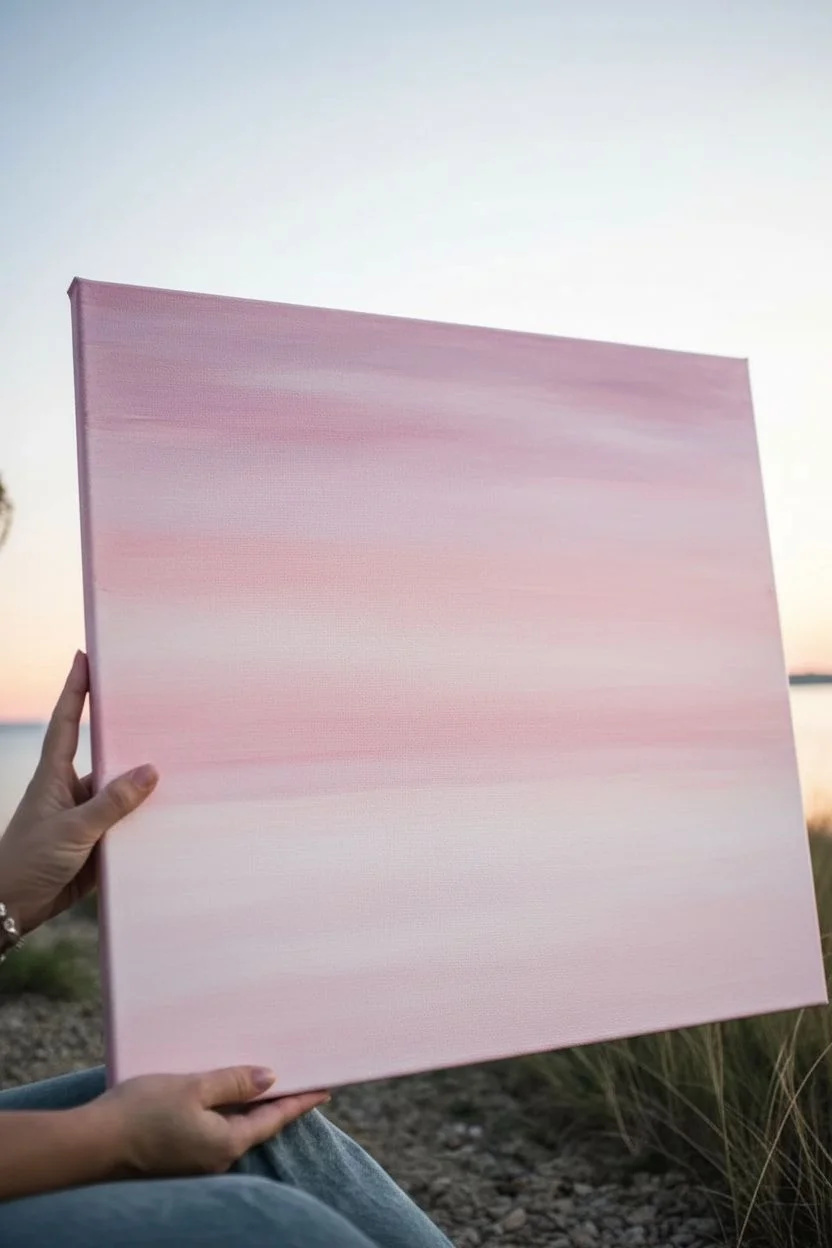
Step 1: Painting the Sunset Background
-
Prepare the Horizon:
Visualize where your horizon line will be—aim for the lower third of the canvas to leave plenty of room for the tree. You can lightly mark this with a pencil if you wish, but keep the line very faint so it doesn’t show through the paint. -
Mix the Sky Colors:
On your palette, prepare your sky gradients. You’ll need a pure white, a very pale pink (mix white with a tiny dot of rose), and a soft lavender-pink. Keeping the colors light is key to making the black silhouette pop later. -
Apply the Base Wash:
Starting from the bottom section (the water area), paint a solid layer of white mixed with the tiniest hint of pink. Use your wide flat brush and horizontal strokes to keep it smooth. -
Create the Horizon Band:
Just above your horizon line, introduce the stronger Rose Pink. While the white paint below is still slightly wet, blend the pink upwards, fading it out as you go higher up the canvas. -
Add Purple Accents:
Near the top of the canvas and slightly into the pink band, blend in your light Purple/Lavender tone. I like to use a clean, slightly damp brush to soften the transition between the pink and purple so there represent no harsh lines, mimicking clouds. -
Dry Completely:
Let the background dry fully. Silhouette painting requires a bone-dry surface, otherwise, the black paint will muddy the pretty sunset colors. Wait at least 30-45 minutes.
Step 2: Sketching the Composition
-
Outline the Land:
Using a pencil, lightly sketch a sloping hill on the left side, tapering off towards the center-right. This provides the anchor for your tree. -
Draft the Tree Trunk:
Sketch a thick, sturdy trunk rising from the hill. As it moves upward, split it into two or three main large branches that curve outward, creating a canopy shape. Don’t worry about tiny twigs yet. -
Position the Swing:
Draw two long vertical lines dropping from a sturdy right-side branch. At the bottom, sketch the small rectangular seat. -
Sketch the Figures:
Draw the simple outlines of the couple. Place one figure standing on the ground pushing the swing, and the other seated on the swing board. Focus on their shapes rather than details like faces or clothes.
Use a Sponge
For the leaves, try using a small piece of natural sea sponge dipped in black paint. Dab gently to create varied, organic leaf patterns faster than a brush.
Step 3: Painting the Silhouette
-
Block in the Ground:
Switch to your medium round brush and load it with pure Black acrylic. Fill in the hill shape you sketched at the bottom left. Create a grassy texture by flicking the brush tip upward along the top edge of the hill. -
Paint the Trunk:
Fill in the tree trunk with solid black. Ensure the edges are crisp. As you move up into the main branches, switch to a smaller brush to maintain control over the tapering width. -
Stipple the Leaves:
This is the most important texture technique. Take an old, slightly frayed brush or a harsh bristle brush. Dip it sparingly into black paint—remove excess on a paper towel so it’s almost dry. Tap (stipple) the brush rapidly over the branch ends to create the illusion of clusters of leaves. -
Connect the Canopy:
Ensure your leaf clusters connect naturally to the branches. If a cluster looks ‘floating,’ add a fine twig connecting it back to the main structure. -
Detail the Swing Ropes:
Use your finest liner brush and water down the black paint slightly so it flows like ink. Paint the two ropes of the swing with slow, steady vertical strokes. -
Paint the Figures:
Carefully fill in the outlines of the couple with the liner brush. Pay attention to the interaction—make sure the standing figure’s hand connects visually with the seated figure’s back or the swing rope. -
Add Final Details:
Paint a tiny silhouette of a distant island or ship on the horizon line using the very tip of your brush. Add three small ‘v’ shapes in the sky for distant birds. -
Final Grass Textures:
Return to the grassy hill and add a few taller blades of grass or weeds poking up near the base of the tree using the liner brush to add depth to the foreground.
Personalize the Date
Carve a small heart with initials or a specific anniversary date into the black tree trunk using a white gel pen or fine white paint for a hidden detail.
Hang this romantic scene on a well-lit wall where the contrast can really shine
BRUSH GUIDE
The Right Brush for Every Stroke
From clean lines to bold texture — master brush choice, stroke control, and essential techniques.
Explore the Full Guide
Love Birds and Together Since
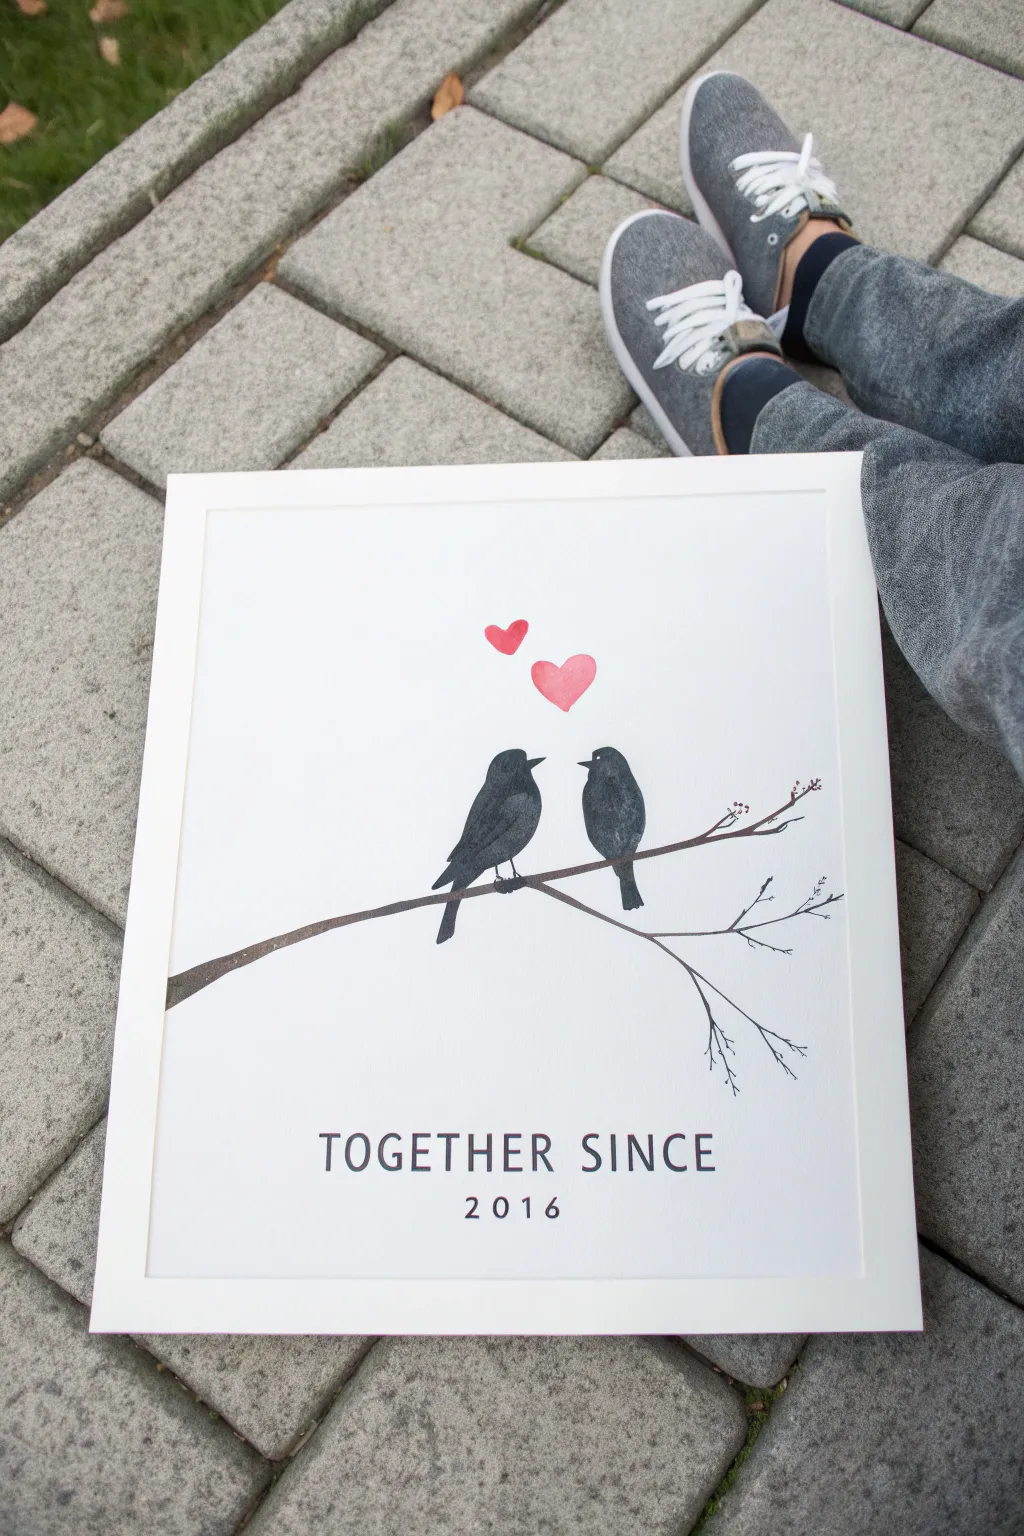

Celebrate your special date with this charming minimalist artwork featuring two silhouettes of birds sharing a quiet moment. The high-contrast design combined with soft watercolor textures makes for a sweet, modern addition to your home decor.
Detailed Instructions
Materials
- High-quality watercolor paper or heavy cardstock (white)
- Black acrylic paint or India ink
- Watercolor paints (red and pink)
- fine-tip paintbrush (size 0 or 1)
- Medium round paintbrush (size 4 or 6)
- Pencil and eraser
- Ruler
- Letter stencils or stamps (optional)
- Black fine-liner pen or charcoal pencil
- Picture frame with mat
Step 1: Sketching the Layout
-
Establish the composition:
Begin by lightly marking the center of your paper. Use your ruler to draw a very faint horizontal guide about one-third up from the bottom where the branch will sit to ensure your composition is balanced. -
Draw the branch:
Sketch a long, slightly curved line for the main branch extending from the left edge toward the right. Add a few smaller, delicate offshoot twigs near the end for natural detail. -
Outline the birds:
Lightly sketch two bird shapes sitting on the branch. Make one slightly larger than the other if desired, ensuring they are facing each other. Focus on simple, rounded clean lines for their bodies and small triangular beaks. -
Position the hearts:
Draw two small heart outlines floating above the space between the birds’ heads. Arrange them so one is slightly higher and smaller than the other to create a sense of movement. -
Mark the text guidelines:
Use your ruler to draw very faint parallel lines near the bottom of the page where your text will go. This is crucial for keeping your lettering perfectly straight.
Step 2: Painting the Artwork
-
Paint the branch base:
Using a thin brush and watered-down black acrylic or brown watercolor, carefully follow your pencil line for the branch. Keep the stroke slightly uneven to mimic the texture of wood. -
Refine the twigs:
Switch to your finest brush tip to paint the delicate offshoots at the end of the branch. Let the paint taper off naturally at the tips. -
Fill the bird silhouettes:
Mix a deep, solid black using acrylic or India ink. Carefully fill in the bird outlines, working from the center outward to the edges to maintain a crisp silhouette. -
Add texture to the birds:
I like to dab the wet paint gently with a dry brush or sponge before it fully dries to give the birds a slightly feathery, organic texture rather than a flat plastic look. -
Paint the hearts:
Wet your brush with clean water and pick up a soft red or pink watercolor. Fill in the heart shapes, perhaps letting the color be slightly more translucent than the birds for a soft, romantic effect. -
Add berries (optional):
If you sketched small berries on the branch tips, dot them in with a tiny amount of red paint using the very tip of your brush. -
Dry thoroughly:
Allow the painting to dry completely. This is vital before adding text to prevent smudging your crisp white background.
Uneven Coverage?
If the black paint looks streaky, let the first coat dry completely. Apply a second thin coat perpendicular to the first stroke for a solid, opaque silhouette.
Step 3: Adding Text and Finishing
-
Draft the lettering:
Lightly pencil in the words ‘TOGETHER SINCE’ and your specific year on the bottom guidelines. Check the spacing to ensure the text is centered relative to the birds. -
Ink the letters:
Go over your pencil letters with a black fine-liner pen or a steady hand and a small brush. A sans-serif font keeps the look modern and legible. -
Clean up sketch lines:
Once the ink is 100% dry, gently erase all remaining pencil guidelines, being careful near the painted areas. -
Frame the piece:
Place your finished artwork into the frame, ensuring it is centered within the matting for a professional gallery look.
Personalize It
Use a metallic gold pen for the date or add tiny initials inside the hearts for a hidden personal detail that makes the gift extra special.
Hang your creation on a prominent wall or gift it to your partner as a timeless reminder of your journey.
Minimal Line Art Couple Portrait
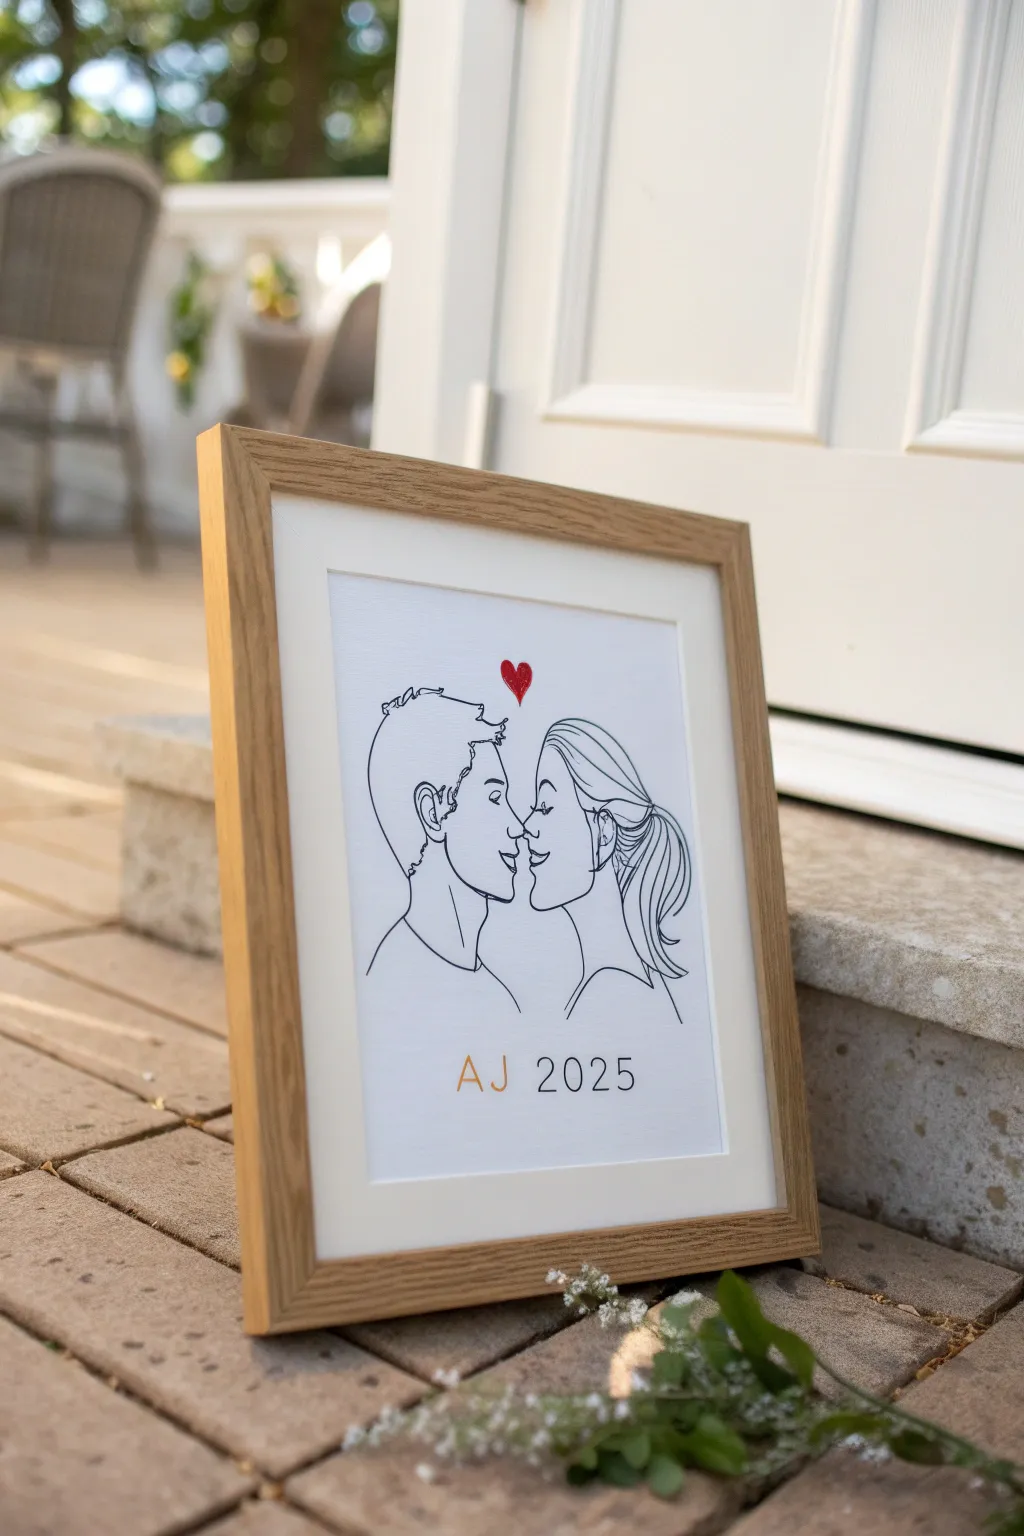
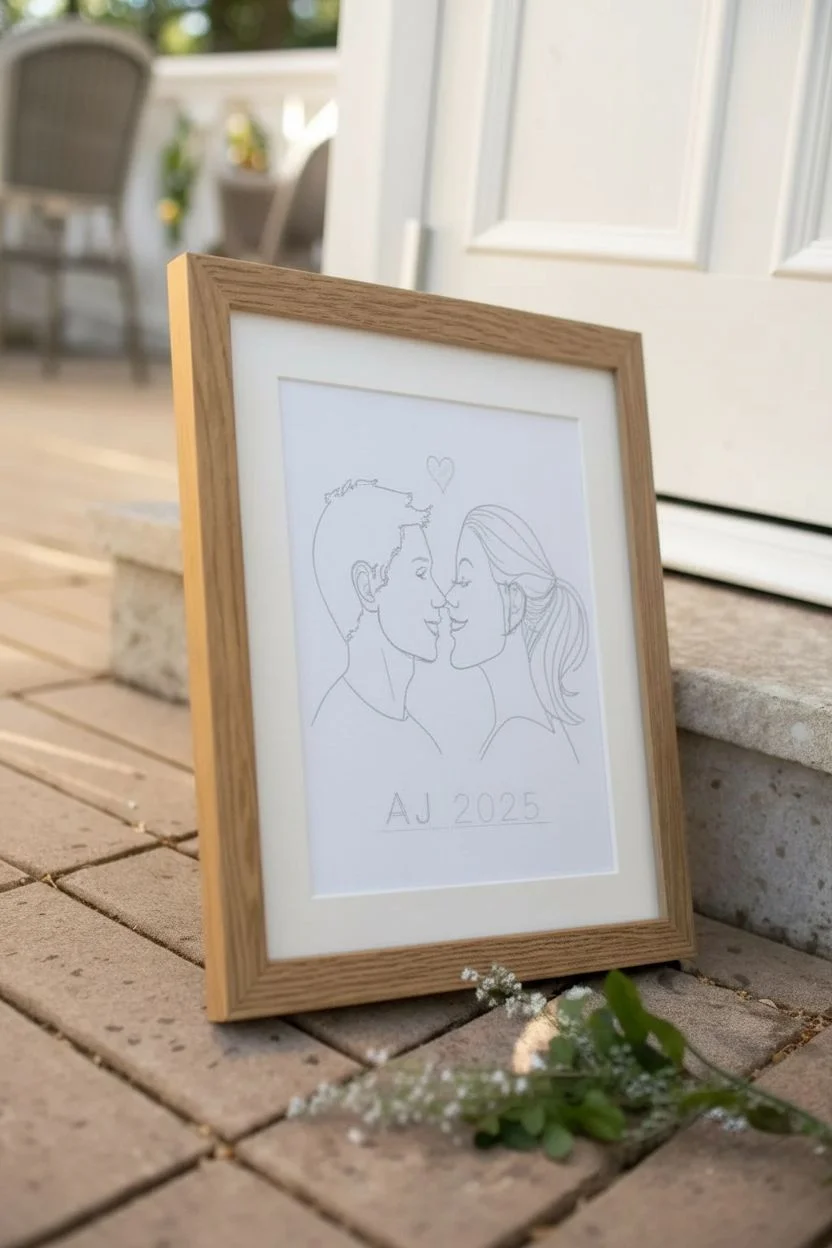
Capture the simple essence of a special connection with this sleek and modern line art portrait. Using minimal strokes and plenty of white space creates a sophisticated, gallery-worthy look that is surprisingly achievable for beginners involving just a steady hand and a reference photo.
How-To Guide
Materials
- High-quality white cardstock or heavy drawing paper (smooth finish)
- Fine-tip black ink pen (archival quality, size 05 or 08)
- Pencil (HB or 2H)
- Eraser (kneaded preferred)
- Red marker or colored pencil
- Gold or metallic marker (optional for text)
- Ruler
- Reference photo of a couple in profile
- Tracing paper or light box (optional but helpful)
- Light wood frame with matting
Step 1: Preparation and Sketching
-
Select your reference:
Choose a clear profile photo of the couple. The best photos for this style show distinct facial features from the side, like the nose and chin, without hair obscuring the view. -
Simplify the image:
Before drawing, mentally trace the main lines. Ignore shadows and small details like eyelashes or individual hair strands. You are looking for the ‘contour’—the outer edge that defines the shape. -
Draft the layout:
Lightly mark the center of your paper to position the faces. Leave ample white space around the edges to maintain that airy, minimalist aesthetic. -
Sketch the profiles:
Using your pencil very lightly, draw the profiles facing each other. Focus on one continuous flow for the forehead, nose, and chin. Keep the lines smooth and confident rather than sketchy. -
Add hair details:
Sketch the hair shapes. Instead of drawing every strand, block out the hair mass with a few flowing curves. Notice how the ponytail in the example is just a few sweeping loops. -
Refine the connection:
Draw the neck and shoulder lines to ‘ground’ the figures. Ensure the figures look like they belong together but aren’t overcrowding the center. -
Place the heart:
Sketch a small, floating heart centered directly above the space between their foreheads. This acts as the focal point connecting the two figures.
Smoother Lines
If freehand drawing feels too risky, print your reference photo, tape it to a bright window, and tape your art paper over it. Use the window as a lightbox to trace the main contours perfectly.
Step 2: Inking and Finalizing
-
Test your pen:
On a scrap piece of the same paper, test your black ink pen to ensure the flow is consistent and doesn’t bleed. A size 05 or 08 micron pen works wonderfully here. -
Ink the faces:
Start tracing over your pencil lines with black ink. Commit to the line; move your arm, not just your wrist, to get smoother curves, especially around the jawline. -
Ink the hair:
Go over the hair lines. Varying the pressure slightly can add a nice organic feel to these thicker shapes compared to the delicate facial features. -
Draw the heart:
Switch to a red marker or colored pencil to fill in the heart. If using a marker, dab it gently to avoid picking up paper fibers. -
Add text guides:
Using a ruler, lightly pencil a straight baseline near the bottom of the paper for your text. -
Letter the dedication:
Pencil in initials (like ‘AJ’) and a date (like ‘2025’). Use a clean, sans-serif font style to match the modern drawing. -
Ink the text:
Trace the text. I sometimes like to use a gold or bronze metallic pen for the initials to add a subtle pop of elegance, while keeping the year in black. -
Erase guidelines:
Wait at least 15 minutes for the ink to fully cure. Then, gently erase all pencil marks with a kneaded eraser to leave a pristine white background. -
Frame the piece:
Place your artwork into a light wood frame. Using a mat (mount) adds professional breathing room and elevates the simple line work.
Make it Luxe
Instead of red marker for the heart, use gold leaf adhesive and a small scrap of gold foil. The touch of real metallic texture makes a simple line drawing feel like an expensive commissioned piece.
Now you have a timeless, elegant keepsake that celebrates love through simple, beautiful lines

PENCIL GUIDE
Understanding Pencil Grades from H to B
From first sketch to finished drawing — learn pencil grades, line control, and shading techniques.
Explore the Full Guide
Pour-Painted Heart With Silhouette Overlay
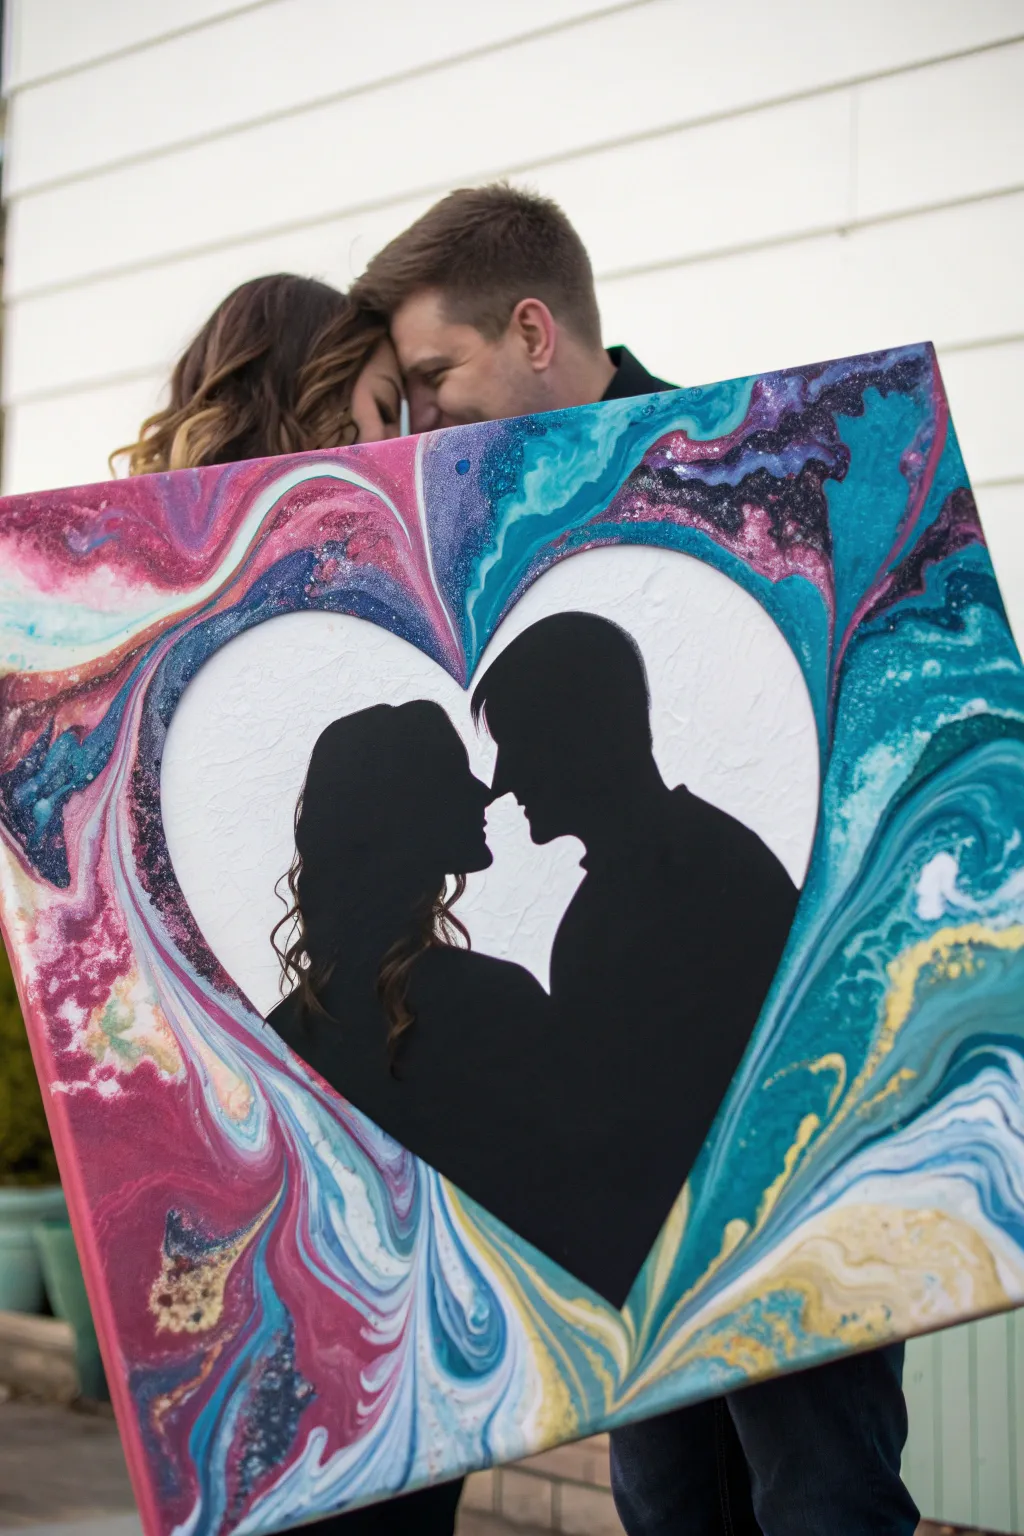
Immortalize your love story with this stunning mixed-media canvas that combines the wild beauty of acrylic pouring with a crisp, minimal silhouette. It creates a bold, contrasting artwork where a chaotic galaxy of color frames a tender moment frozen in time.
Step-by-Step Tutorial
Materials
- Large stretched canvas (square or rectangular)
- Acrylic fluid paints (pink, teal, white, deep purple, gold)
- Pouring medium
- Silicone oil (optional for cells)
- Contact paper or adhesive vinyl sheets
- Black acrylic paint (heavy body)
- Fine detail paintbrushes
- Medium flat paintbrush
- Exacto knife or cutting machine (like Cricut)
- Painter’s tape
- Printed profile photo of the couple
- Gloss varnish (spray or brush-on)
- Plastic cups and stir sticks
Step 1: Preparation & Masking
-
Capture the profile:
Take a photo of you and your partner facing each other in the desired pose against a plain, light-colored wall. High contrast helps later. -
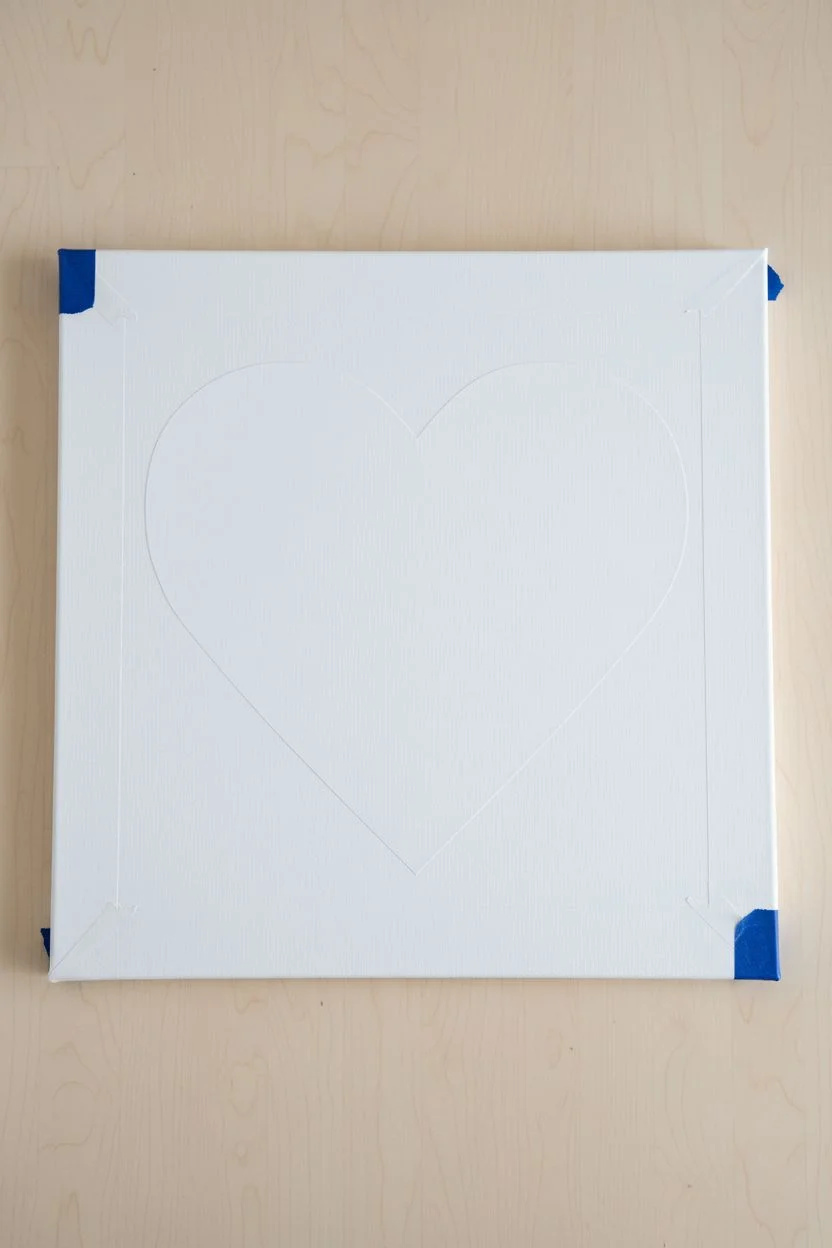
Create the heart mask:
Cut a large heart shape out of adhesive vinyl or contact paper. This needs to be big enough to fill the center of your canvas, leaving a generous border for the paint pour. -
Apply the heart mask:
Center the vinyl heart on your white canvas and press it down firmly. Pay special attention to the edges; run your fingernail or a credit card along the rim to compel a tight seal so paint won’t bleed underneath. -
Protect the edges:
Apply painter’s tape to the back edges of the canvas frame to keep the underside clean from dripping paint.
Clean Lines Hack
Before pouring, brush a thin layer of clear matte medium over the edge of your heart sticker. This seals the edge so any paint bleed will be clear, not colored.
Step 2: The Fluid Pour
-
Mix your paints:
Prepare your colors by mixing acrylic paint with pouring medium in separate cups. Aim for a consistency like warm honey. I like to add a drop of silicone oil to the teal and purple for interesting cellular effects. -
Layer the dirty pour cup:
In a single large cup, layer your colors one by one. Don’t stir. Alternate darks and lights—pour pink, then white, then teal, then gold—to create separation. -
Pour around the heart:
Slowly pour the paint mixture onto the canvas, focusing entirely on the area *outside* the heart sticker. You can do a ‘ring pour’ or simply meander the stream around the negative space. -
Tilt and stretch:
Gently tilt the canvas in various directions to spread the paint to the corners and edges. Let the paint flow over the edge of the heart sticker slightly to ensure full coverage, but try not to drown the center. -
Let it cure:
Allow the painting to dry completely on a flat, level surface. Because poured paint is thick, this can take 24 to 48 hours. Do not rush this step.
Step 3: The Silhouette Detail
-
Remove the mask:
Once the paint is bone dry, carefully peel away the vinyl heart sticker to reveal the pristine white canvas underneath. If there are any jagged edges, you can touch them up with white acrylic. -
Prepare the silhouette:
Print your profile photo to a size that fits comfortably inside the white heart. Cut out the couple’s shape to use as a stencil, or transfer the outline using carbon paper. -
Transfer the outline:
Lightly trace the outline of the couple onto the white heart section using a pencil. Keep your lines faint so they are easier to cover later. -
Block in the black:
Using heavy body black acrylic paint and a medium flat brush, fill in the large central areas of the silhouette. -
Detail the edges:
Switch to a fine detail brush to carefully paint the facial profiles, hair strands, and edges. Sharp, clean lines are crucial here for the silhouette effect to work. -
Second coat:
Apply a second coat of black paint if necessary to ensure it is opaque and solid.
Glitter Galaxy
While the poured paint is still wet, sprinkle ultra-fine iridescent glitter into the dark purple or teal sections to mimic a starry night sky effect.
Step 4: Finishing Touches
-
Seal the work:
Once the black paint is fully dry, apply a coat of gloss varnish over the entire canvas. This unifies the sheen of the poured section and the silhouette. -
Clean up the back:
Remove the tape from the back of the canvas to reveal clean edges, making it ready for hanging.
Hang your masterpiece in a prominent spot where the swirling colors can catch the light and remind you of your bond


Have a question or want to share your own experience? I'd love to hear from you in the comments below!