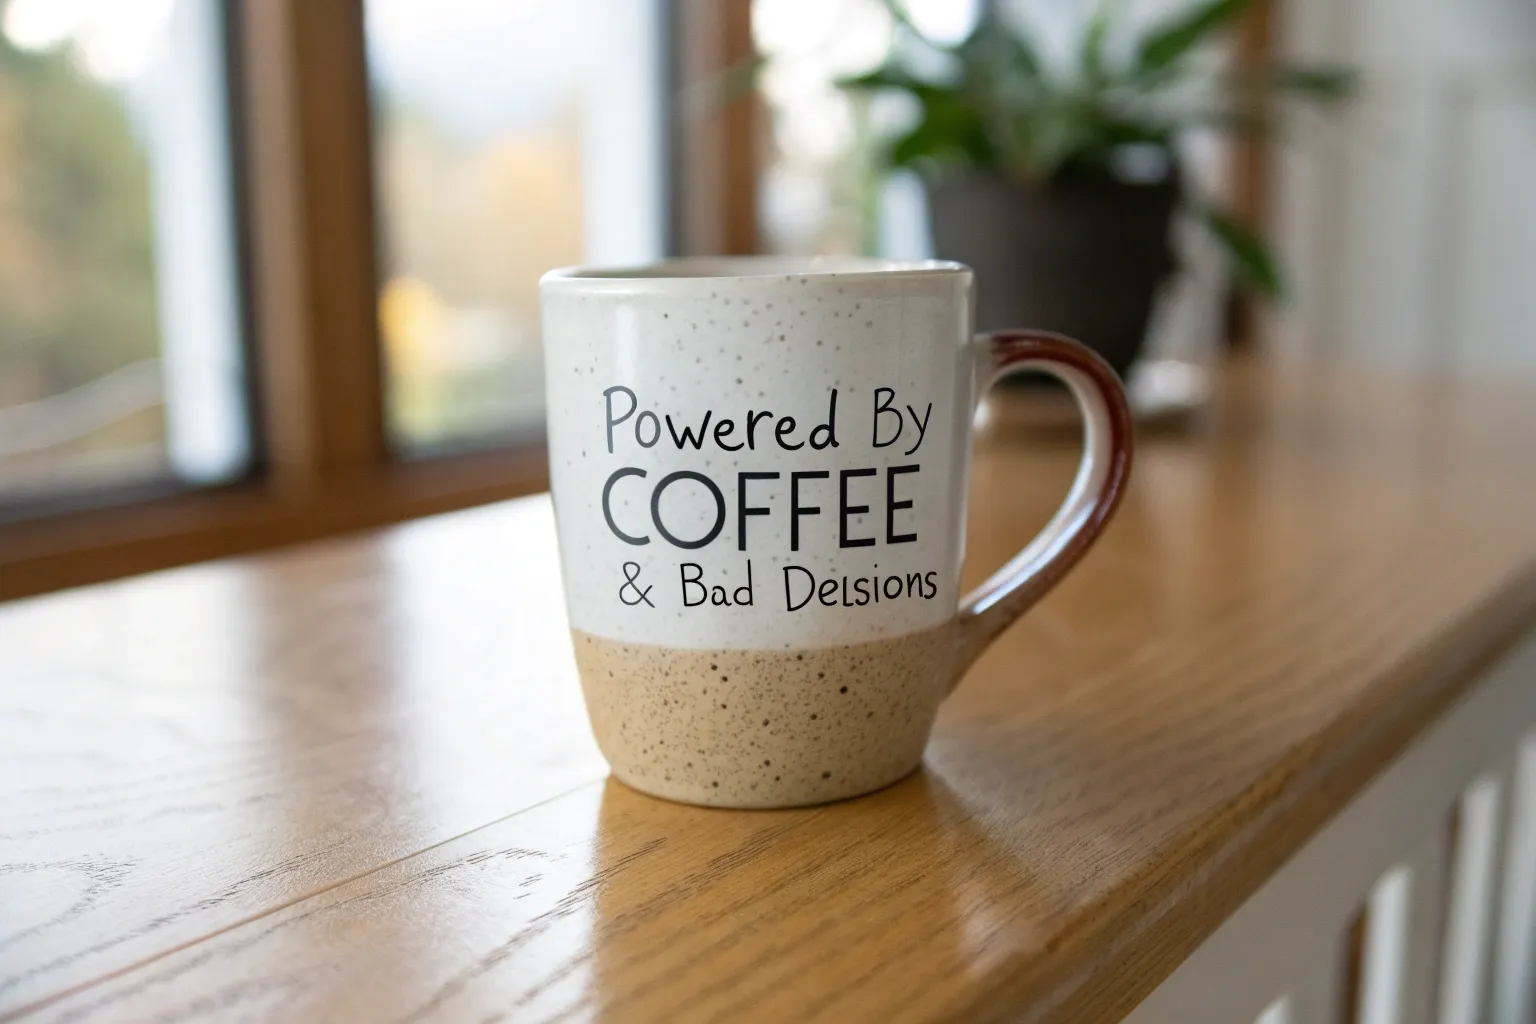
A blank ceramic mug is basically a tiny stage for a good joke, and I love how a few bold lines can turn your morning drink into a giggle. Here are my go-to funny mug painting ideas that stay super doable, even if you’re working with simple brushes or paint pens.
Grumpy Morning Face
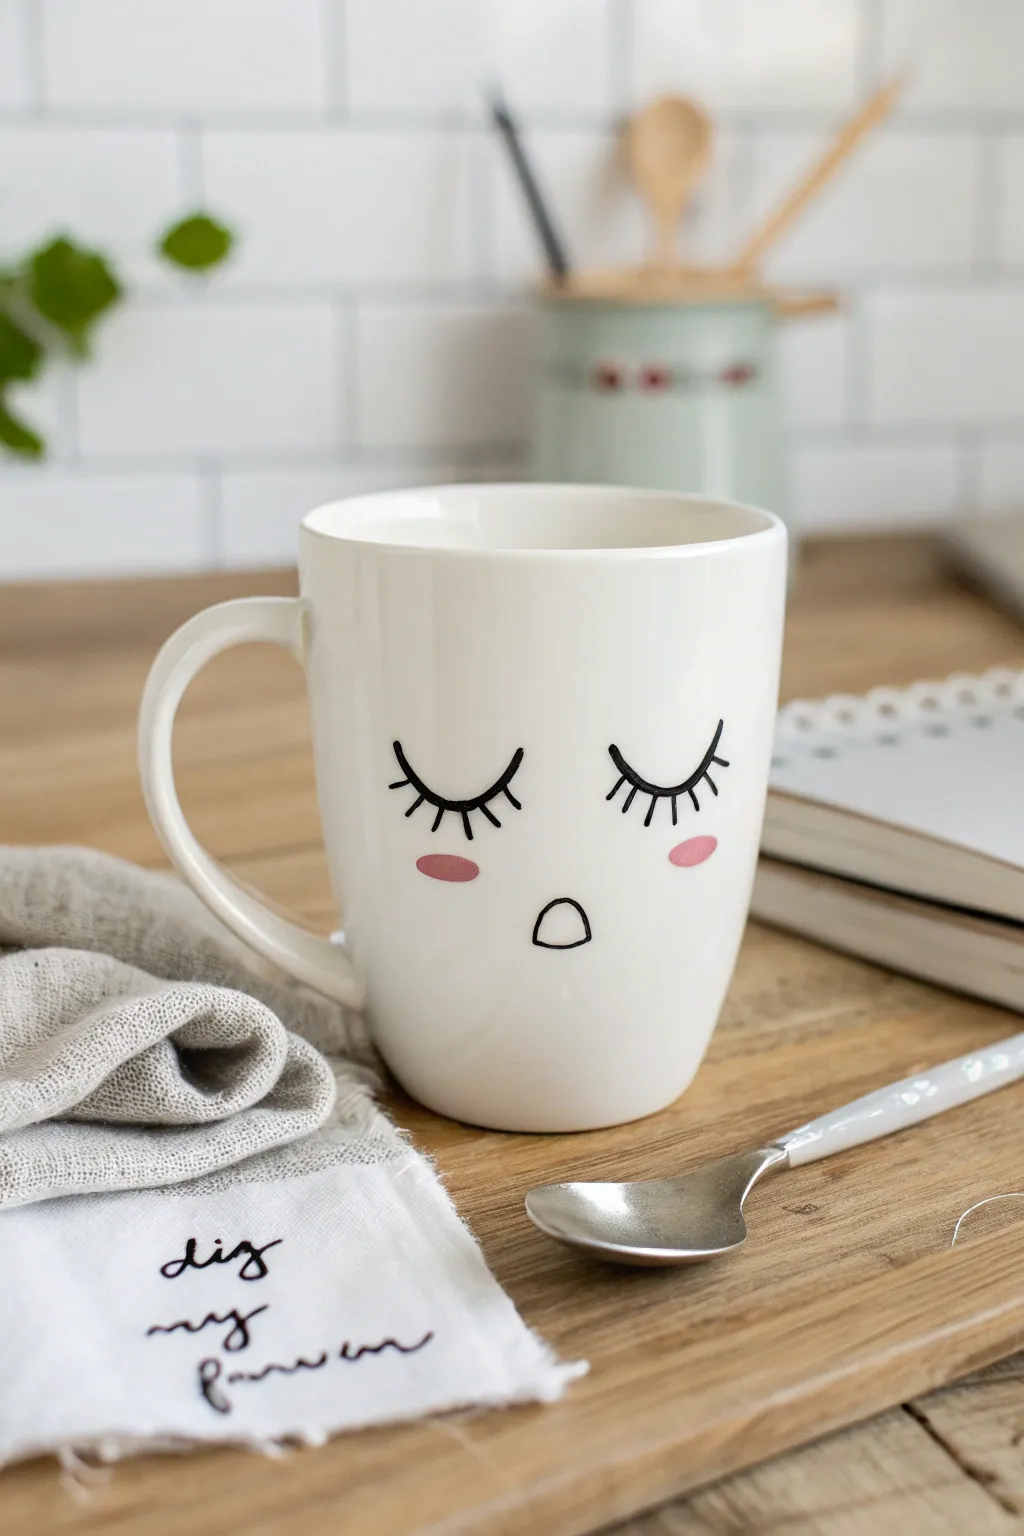
Give your morning coffee a relatable personality with this sleepy, slightly grumpy face design. Using just a few simple strokes and minimal colors, you can transform a plain white mug into a charming desk companion that perfectly captures the mood before that first sip of caffeine.
Step-by-Step Guide
Materials
- Plain white ceramic mug (straight sides work best)
- Rubbing alcohol and cotton pads
- Black porcelain paint marker (fine point) OR black oil-based Sharpie
- Pink porcelain paint or marker (soft pastel shade)
- Small round detail brush (if using paint)
- Pencil (optional)
- Oven (for curing)
Step 1: Preparation
-
Clean surface:
Before you start, make sure the mug is pristine. Wipe the entire surface with rubbing alcohol on a cotton pad to remove any oils or fingerprints, which could prevent the paint from sticking. -
Dry completely:
Let the alcohol evaporate completely. Avoid touching the area where you’ll be drawing with your bare hands from now on. -
Plan position:
Visualize where the face will go. You want it centered on the side facing out when held. I find it helps to hold the mug naturally to see exactly where the focal point should be.
Oops! Made a mistake?
If the paint is still wet, quickly use a Q-tip dipped in rubbing alcohol to erase the error. Once baked, the design is permanent!
Step 2: Drawing the Eyes
-
Sketch lightly:
If you’re nervous, lightly sketch the design with a regular pencil. The graphite will likely burn off in the oven or wipe off easily. -
Draw the left lid:
Using your black porcelain marker, draw a downward-curved arc for the left eyelid. Think of it like a ‘U’ shape turned upside down, but slightly flatter. -
Draw the right lid:
Draw a matching arc on the right side. Try to keep them level with each other, leaving a comfortable space in between for the nose area, although this design skips a nose entirely. -
Add center lashes:
Starting on the left eye, draw a short straight line extending down from the very center of the arc. -
Add side lashes:
Add two more lashes to the left and right of that center lash, fanning them out slightly along the curve. Repeat this lash pattern on the right eye. -
Thicken the lashes:
Go over the lashes one more time if you want them to look bold and cartoonish, ensuring the connection point to the eyelid is crisp.
Pro Tip: Longevity
Even after baking, hand-washing your artistic mugs is always safer than the dishwasher to keep those lashes looking sharp.
Step 3: Adding the Mouth & Cheeks
-
Outline the mouth:
Center your marker below the eyes. Draw a small, slightly flattened circle or ‘D’ shape lying on its flat side to create that groggy, open-mouthed expression. -
Check symmetry:
Take a step back and look at the face. The mouth should form a triangle shape with the two eyes above it. -
Paint cheeks:
Dip your small brush into the pink porcelain paint (or use a pink marker). Place two small, horizontal ovals directly under the outer edge of each eye. -
Verify opacity:
If the pink looks streaky, let it dry for a few minutes and add a very thin second coat for a solid pastel look.
Step 4: Curing the Design
-
Dry time:
Let the mug sit undisturbed for at least 24 hours. This air-drying phase is crucial before baking. -
Load the oven:
Place the mug in a cold oven. Do not preheat the oven, as the sudden temperature change could crack the ceramic. -
Bake:
Turn the oven on to 350°F (176°C). Once it reaches temperature, bake for 30 minutes. -
Cool down:
Turn the oven off and leave the mug inside until the oven is completely cool. This gradual cooling prevents cracking.
Enjoy your new custom mug and let it do the talking for you on those early mornings


Cute Animal With a Snarky Speech Bubble
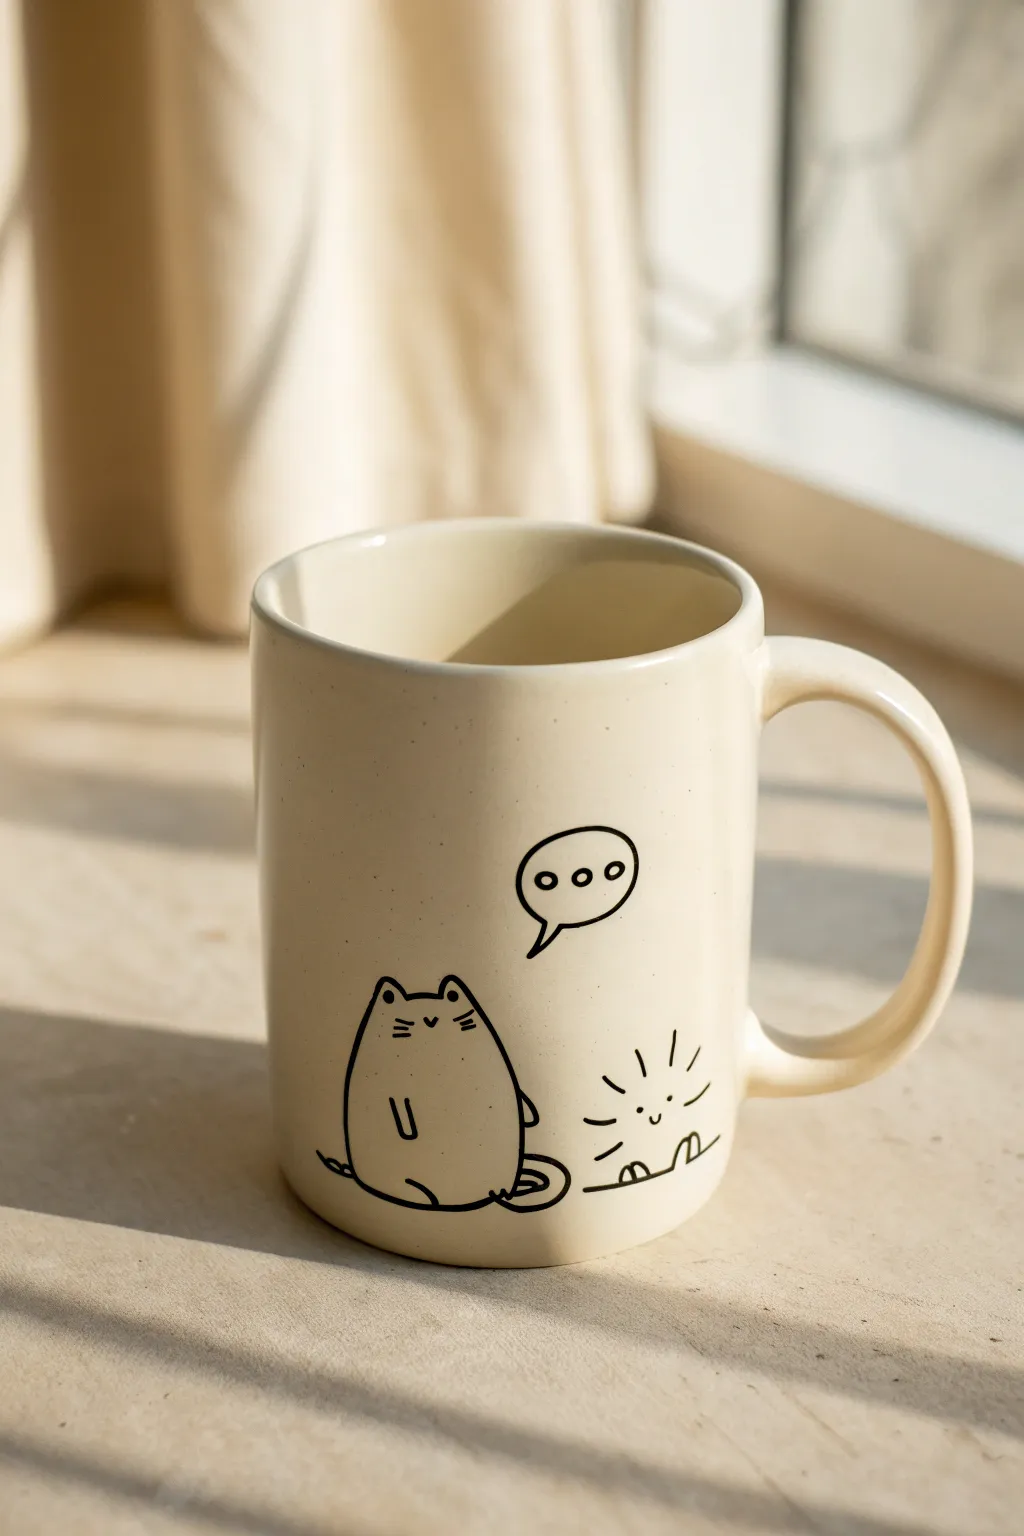
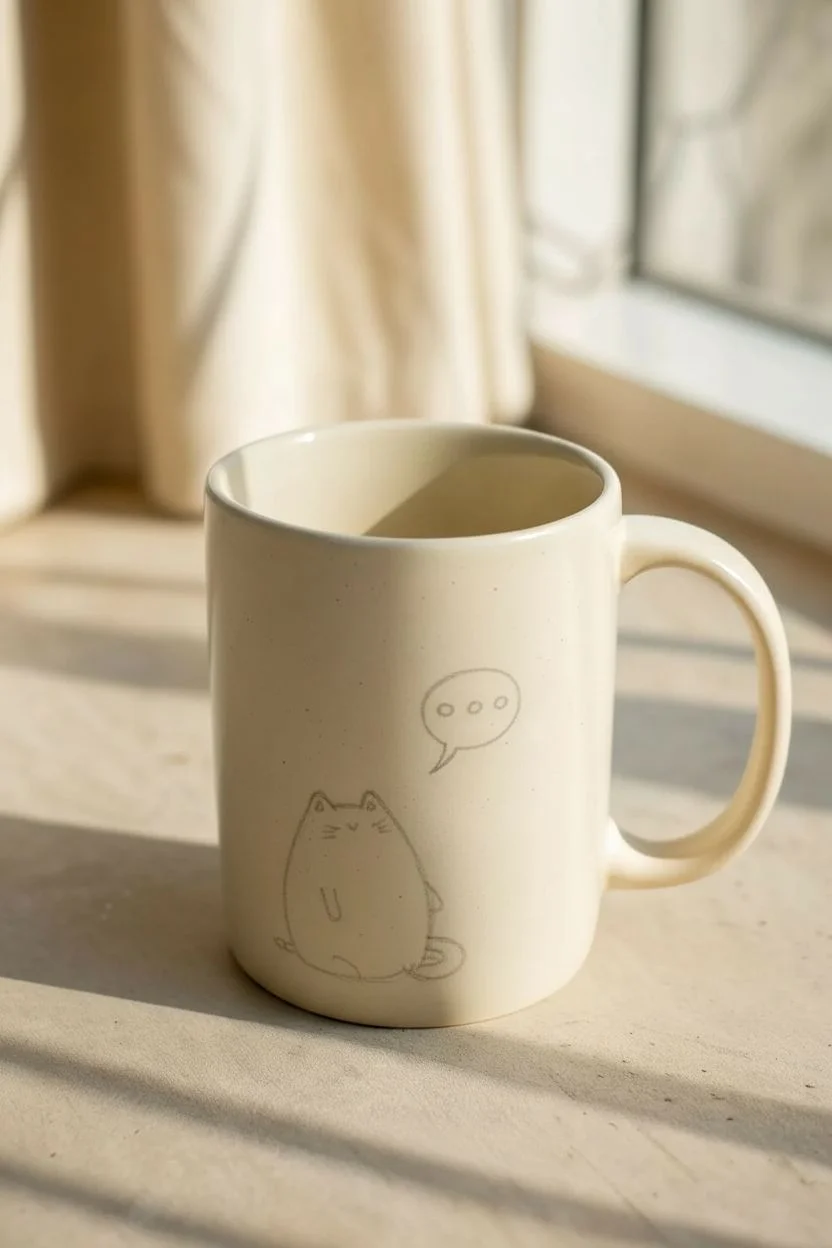
Sometimes the loudest statement is saying nothing at all, perfectly captured by this minimalist cat design. Using simple linework on a creamy beige mug, this project features a delightfully rotund feline giving the silent treatment via an empty thought bubble.
How-To Guide
Materials
- Plain beige or cream ceramic mug
- Black oil-based paint marker (fine tip)
- Black porcelain paint pen (extra fine tip)
- Rubbing alcohol
- Cotton pads
- Graphite transfer paper (optional)
- Pencil and scrap paper
- Oven (for curing)
Step 1: Preparation & Sketching
-
Clean the Surface:
Before making a single mark, wipe down the entire exterior of your mug with rubbing alcohol and a cotton pad. This removes invisible finger oils that prevent paint from sticking. -
Draft Your Design:
Sketch the cat on a piece of scrap paper first to get the proportions right. You want a pear-shaped body that sits low and wide, looking nice and heavy. -
Test the Placement:
Hold your sketch against the mug to check the sizing. The cat should sit near the bottom left, leaving room for the speech bubble above and to the right. -
Transfer or Freehand:
If you aren’t confident freehanding, tape a small piece of graphite paper behind your sketch and trace over the lines lightly onto the mug surface.
Step 2: Drawing the Cat
-
Outline the Body:
Using your black porcelain paint pen, start at the ears. Draw two small triangles, then sweep down in a continuous curve to form the left side of the body. -
Complete the Shape:
Draw the right side, mirroring that curve but adding a small bump for the hip before rounding out the bottom to connect the two sides. Keep your wrist loose for smoother lines. -
Add the Tail:
At the bottom right of the cat, draw a curled tail. Think of it like a cinnamon roll shape lying flat on the ground, tucking slightly behind the body. -
Draw the Face:
Place two small dots for eyes wide apart near the top of the head. Add a tiny ‘v’ shape between them for the nose. -
Whiskers and Feets:
Add two short horizontal lines on each cheek for whiskers. Near the bottom center of the body, draw a small ‘U’ shape for the front paws.
Oops! Smudged Ink?
Don’t wipe wet ink with a cloth! Wait for it to dry completely, then gently scratch the mistake off with a toothpick or a craft knife blade for a clean removal.
Step 3: Adding Details
-
Create the Speech Bubble:
floating above and to the right of the cat’s head, draw an oval. Add a small lightning-bolt style tail pointing down toward the cat. -
The Ellipsis:
Inside the bubble, carefully draw three small open circles. Keeping them hollow rather than filled in adds to the comic-strip style. -
Sun Detail:
To the right of the cat, near the mug’s base, draw a small semicircle rising from the ‘ground’. Add a cute smiley face inside it. -
Rays of Light:
Finish the scene by drawing short, radiating lines coming off the sun semicircle to suggest glowing warmth.
Make it Yours
Instead of dots, write a short snarky word inside the bubble like ‘Nah’ or ‘Nope’ to give the cat a specific attitude tailored to your morning mood.
Step 4: Finishing Up
-
Clean Up Mistakes:
If a line went wobbly, use a damp cotton swab (or one dipped in alcohol if the paint is dry) to gently wipe it away before redrawing. -
Dry Time:
Let the mug sit undisturbed for at least 24 hours. The paint needs to fully set before baking. -
Bake to Set:
Place the mug in a cold oven. Turn the heat to 350°F (176°C) and bake for 30 minutes once it reaches temperature. Turn the oven off and let the mug cool completely inside.
Enjoy sipping your coffee in companiable silence with your new feline friend


Doodle Monster Wraparound
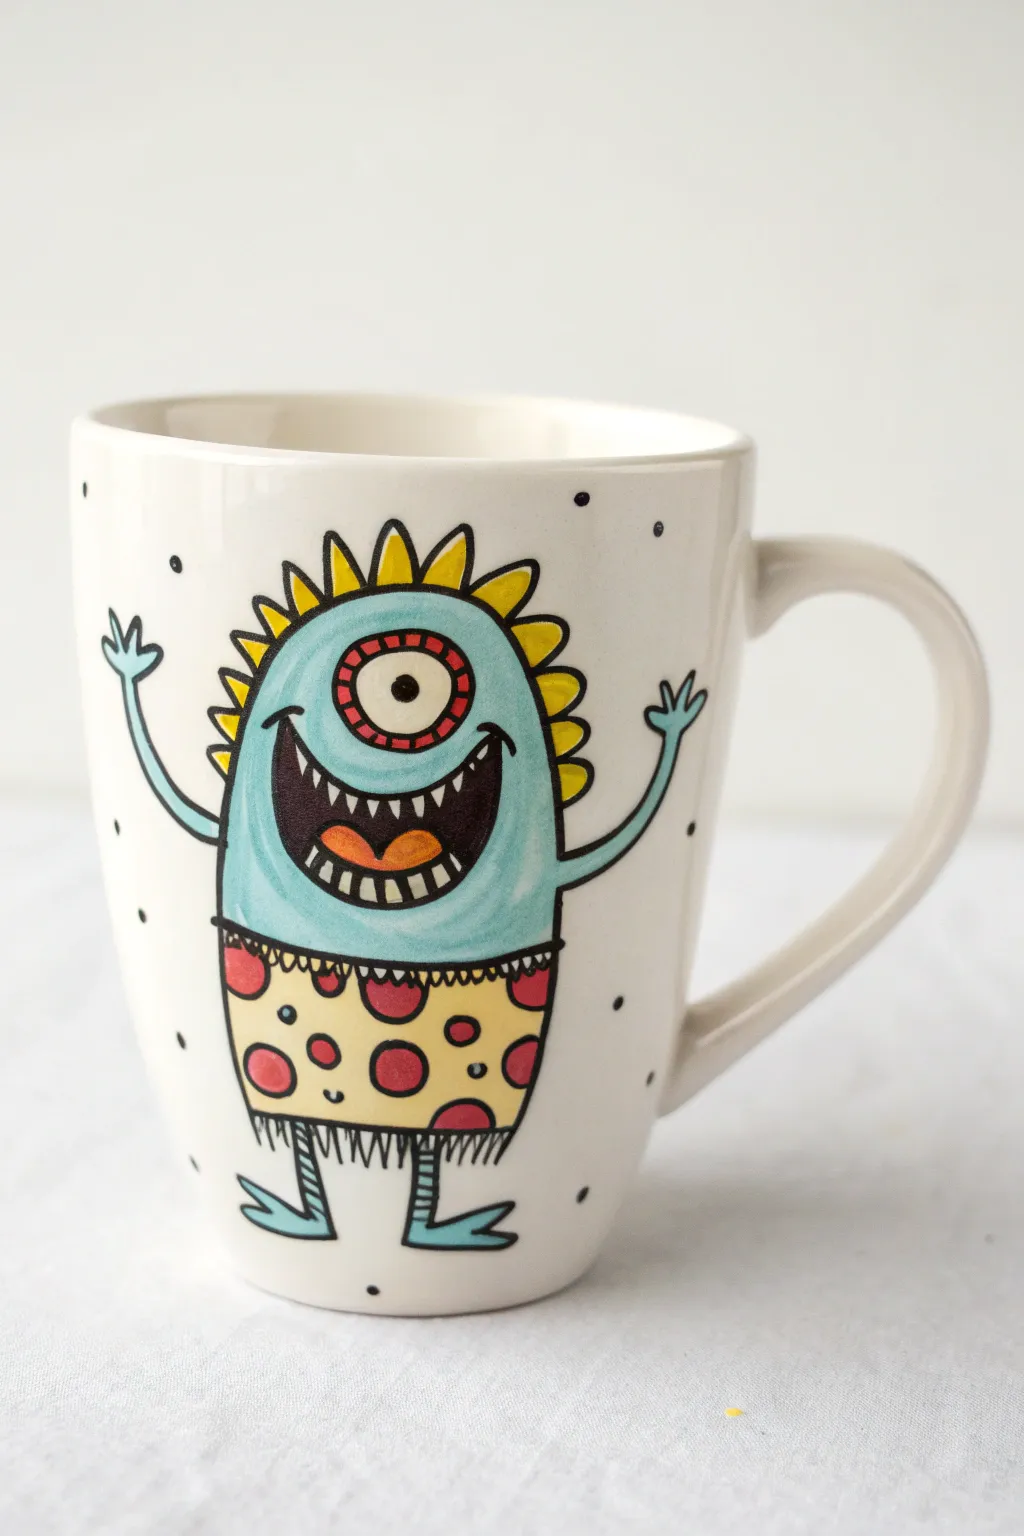
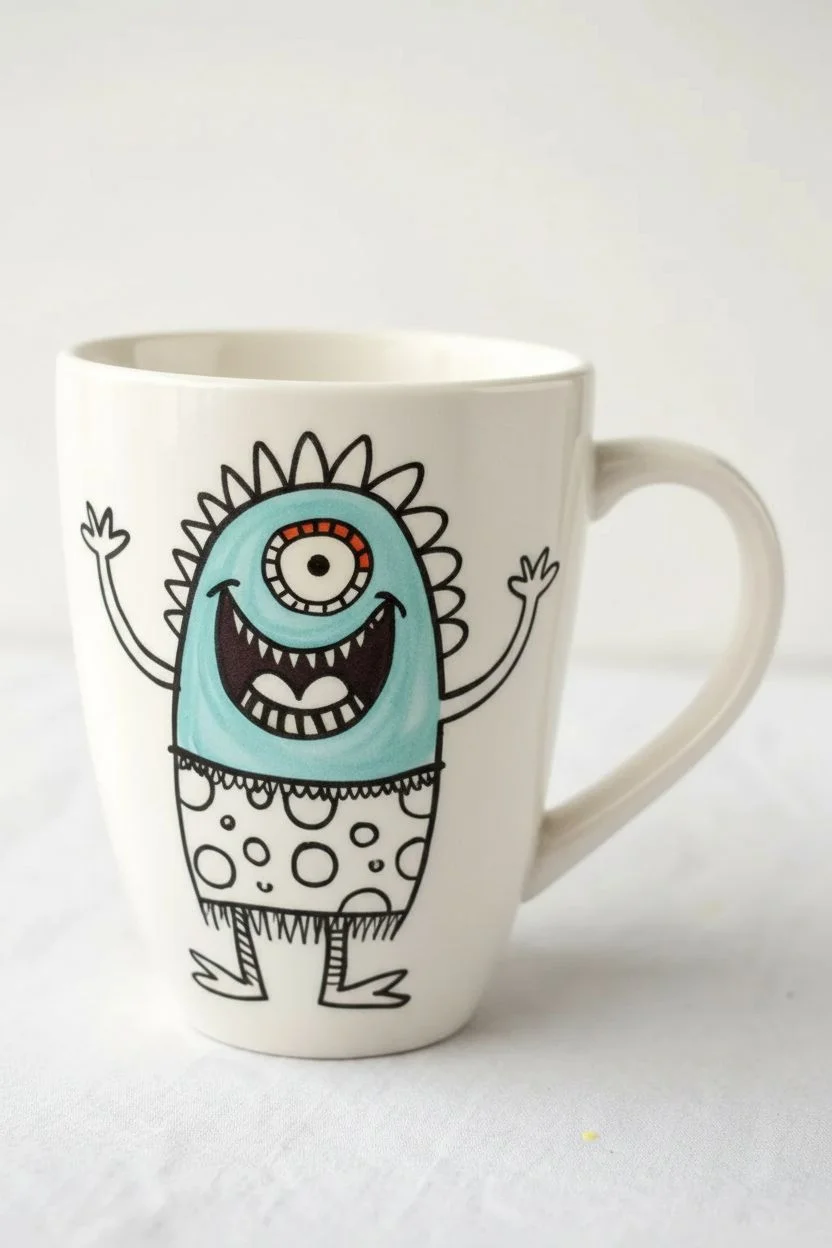
Transform a plain white mug into a cheerful morning companion with this vibrant, doodled monster design. Featuring a delightful one-eyed character with polka-dot shorts and yellow spikes, this project uses simple shapes and bold outlines for a cartoonish finish.
Step-by-Step Tutorial
Materials
- plain white ceramic mug
- black ceramic paint marker (fine tip)
- ceramic paint markers (light blue, yellow, red, orange)
- rubbing alcohol
- cotton pads
- pencil (optional)
- oven (for baking)
Step 1: Preparation and Outline
-
Clean surface:
Before starting, wipe the entire outer surface of the mug with rubbing alcohol on a cotton pad to remove any oils or fingerprints. This ensures the paint adheres properly. -
Sketch the body:
Using a pencil lightly (if desired) or going straight in with your black marker, draw a large, rounded rectangle shape for the monster’s body. The bottom should be slightly flatter than the top. -
Add arms and legs:
Draw two thin, curved lines extending from the sides for arms, ending in three-fingered hands raised in a ‘wave.’ Add two stick legs at the bottom with three-toed feet pointing outward. -
Draw the shorts:
Divide the lower third of the body with a slightly curved horizontal line to create the waistband. Add a jagged, fringe-like line just below the bottom of the body to suggest the hem of the shorts. -
Create the face:
Draw a large circle in the upper half for the single eye. Inside, add a smaller circle for the pupil. Below the eye, draw a wide, enthusiastic grin with a curved line, adding jagged teeth and a tongue inside the open mouth.
Clean Lines
Keep a Q-tip dipped in rubbing alcohol nearby while drawing. It acts as a perfect eraser for smudges or wobbly lines before the paint sets.
Step 2: Adding Color
-
Fill the body:
Take your light blue ceramic marker and fill in the upper body section, carefully working around the eye and mouth. You might need two coats for opaque coverage. -
Paint the spikes:
Using the yellow marker, draw a series of triangular spikes along the top and sides of the monster’s head, resembling a mohawk. -
Color the shorts:
Fill the shorts area completely with yellow paint. Let this base layer dry for a few minutes before adding details on top. -
Detail the face:
Color the tongue orange. Add a thin ring of red around the pupil of the eye for a pop of contrast, leaving the outermost ring of the eye white. -
Add pattern to shorts:
Once the yellow base is dry, use the red marker to add large polka dots scattered across the shorts.
Make it a Set
Create a matching set by changing the body color and expression for each mug—try a grumpy green monster or a sleepy purple one.
Step 3: Refining Details
-
Outline everything:
Go back over your initial black lines with the fine-tip black marker to make them crisp and bold. Trace the spikes, the body, and the facial features. -
Define the mouth:
Fill in the empty space inside the mouth (around the teeth and tongue) with solid black to give the grin depth. -
Add eye details:
Draw small spoke-like lines inside the red ring of the eye. Color the pupil black, leaving a tiny white dot for a highlight. -
Detail the shorts:
Add small black scalloped lines along the waistband. Draw tiny circles or bubbles between the red polka dots for extra texture. -
Texture lines:
Add short vertical hatch lines on the legs to simulate socks or hairy legs. I like to add a few small polka dots freely floating in the background around the monster to balance the composition. -
Bake to set:
Allow the mug to dry for 24 hours. Then, place it in a cool oven, set the temperature to 350°F (176°C), and bake for 30 minutes. Let it cool completely in the oven before removing.
Now you have a dishwasher-safe doodle mug that is sure to bring a smile to your morning coffee routine


Tiny Hands Hugging the Mug
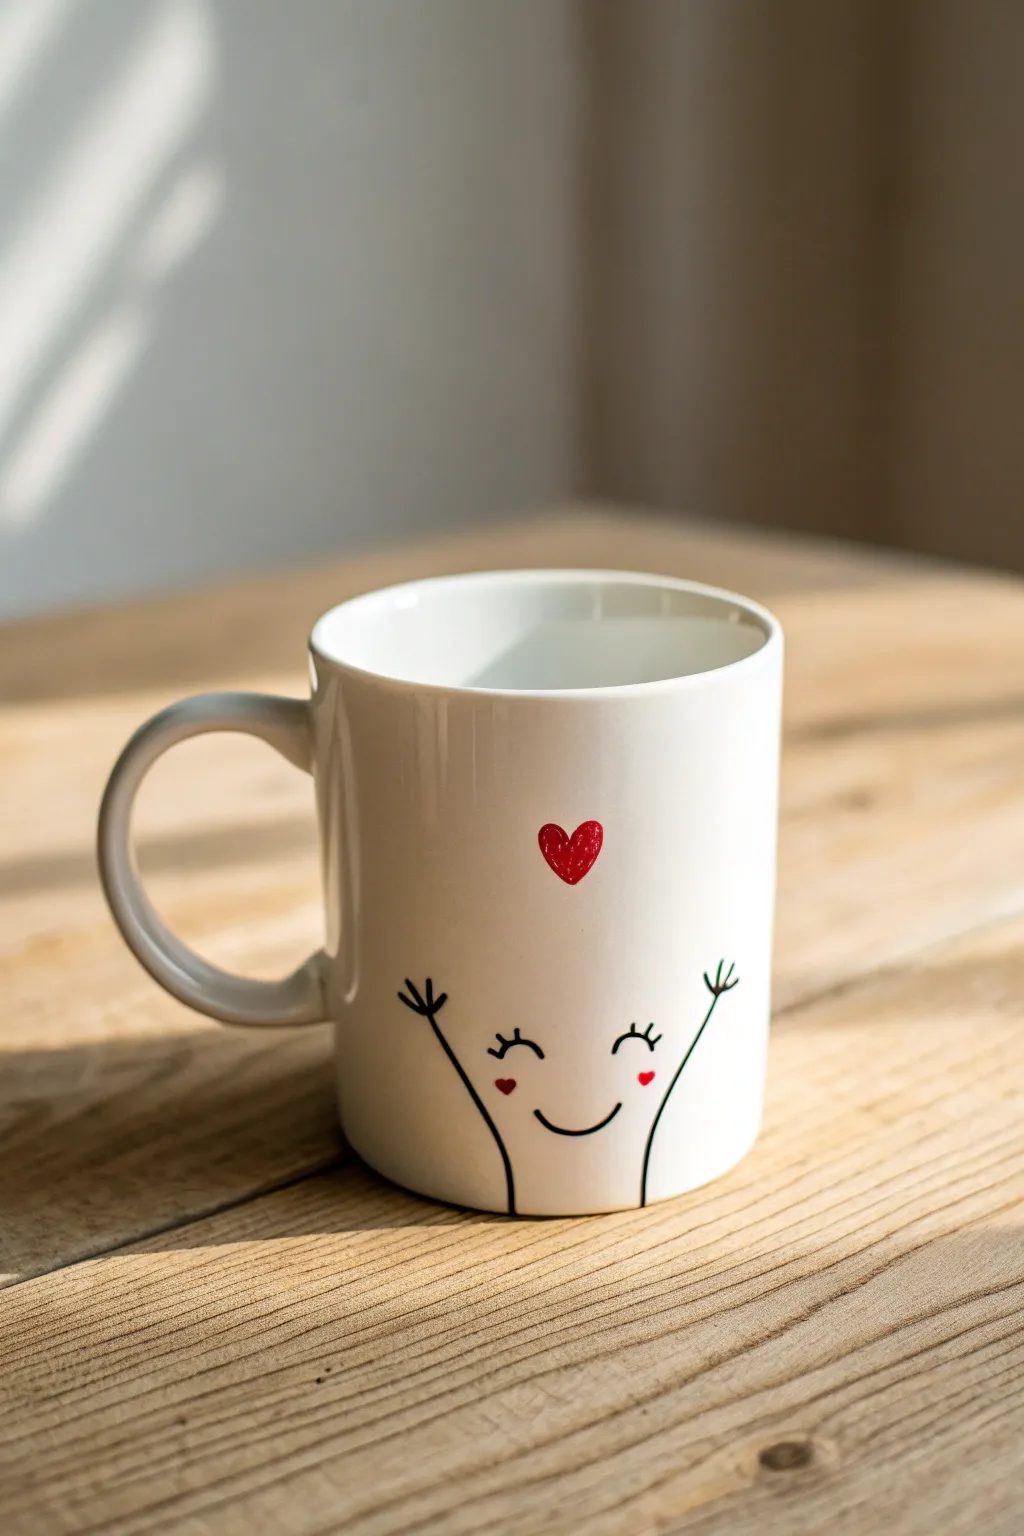
Bring a little love to your morning coffee with this incredibly sweet and simple design. Featuring spindly arms wide open for a hug and a floating heart, this minimalist drawing uses negative space perfectly to create a cheerful companion for your desk.
Step-by-Step
Materials
- White ceramic mug (clean and dry)
- Black oil-based paint marker (fine tip)
- Red oil-based paint marker (fine tip)
- Rubbing alcohol
- Cotton pads
- Pencil (optional, for sketching)
- Oven (for baking/setting the paint)
Step 1: Preparation & Planning
-
Clean the Surface:
Before you start, wipe down the entire outer surface of the mug with rubbing alcohol on a cotton pad. This removes any invisible oils or fingerprints that might prevent the paint from sticking properly. -
Let it Dry:
Wait a few moments for the alcohol to completely evaporate. The surface should be bone dry before your marker touches it. -
Visualize the Center:
Identify the center of the mug face opposite the handle (or wherever you want the face to look out). This imaginary centerline helps keep the features symmetrical.
Pro Tip: Marker Flow
Shake your paint pens vigorously before starting and press the nib on a scrap paper to get the ink flowing smoothly. This prevents sudden blobs of paint on your ceramic surface.
Step 2: Drawing the Happy Face
-
Draw the Smile:
Using the black fine-tip marker, draw a simple, gentle ‘U’ shape for the smile. I like to keep it fairly small and centered on the lower half of the mug face. -
Add the Eyes:
Place two small, downward-curving arcs slightly above the smile for the closed eyes. Ensure they are spaced evenly apart. -
Detail the Lashes:
Carefully flick the marker upward three times on each eye arc to create tiny, cute eyelashes. -
Sketch the Cheeks:
Switch to your red marker. Draw two very tiny hearts right under the eyes at the corners of the smile to act as blushing cheeks. Fill them in completely.
Step 3: Adding the Arms & Heart
-
Position the Left Arm:
Switch back to the black marker. Starting near the bottom edge of the mug, draw a curved line sweeping upward and slightly outward to the left. -
Draw the Left Hand:
At the top of that line, draw three to four small lines radiating outward to represent little fingers waving hello. -
Position the Right Arm:
Repeat the process on the right side. Start near the bottom edge, mirroring the left curve, sweeping upward and outward to the right. -
Draw the Right Hand:
Add the radiating finger lines to the tip of the right arm, trying to keep them at relatively the same height as the left hand. -
Add the Main Heart:
With the red marker, draw a medium-sized heart floating directly above the center of the face. This is the focal point, so take your time to get the shape nice and plump. -
Fill the Heart:
Color in the main heart solidly with the red marker. If the color looks streaky, let it dry for a minute and add a second layer for opacity.
Troubleshooting: Streaky Red
Red pigment is often translucent. If the heart looks streaky, don’t press harder. Let the first coat dry fully (10 mins), then gently layer a second coat on top.
Step 4: Fixing & Baking
-
Clean Up Mistakes:
If any lines went astray, dip a cotton swab in a little rubbing alcohol and carefully wipe away the error. Do this while the paint is still wet for easiest removal. -
Dry Time:
Allow the mug to sit undisturbed for at least 24 hours. This lets the paint cure on the surface before baking. -
Oven Setup:
Place the mug into a *cold* oven. Do not preheat the oven, as the sudden temperature change can crack the ceramic. -
Bake the Design:
Set the oven to 350°F (175°C). Once the oven reaches temperature, bake for 30 minutes. -
Cool Down:
Turn the oven off and leave the mug inside until the oven has cooled completely back to room temperature.
Now you have a heartwarming custom mug ready for gifting or keeping your coffee warm
BRUSH GUIDE
The Right Brush for Every Stroke
From clean lines to bold texture — master brush choice, stroke control, and essential techniques.
Explore the Full Guide
Food Character With Attitude
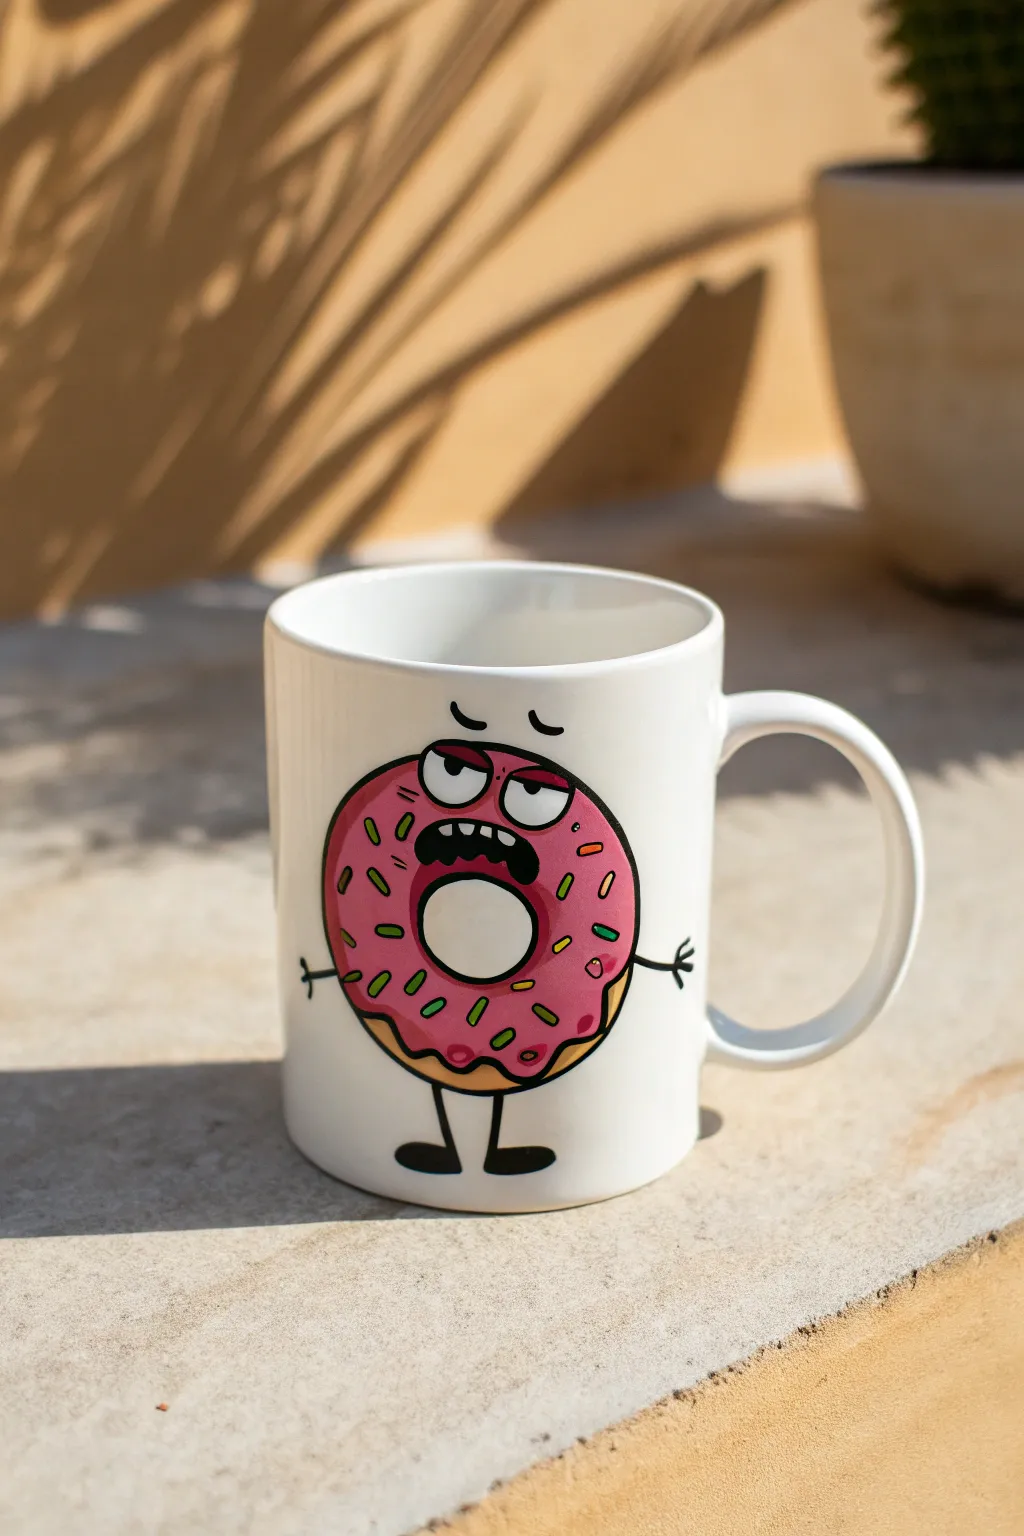
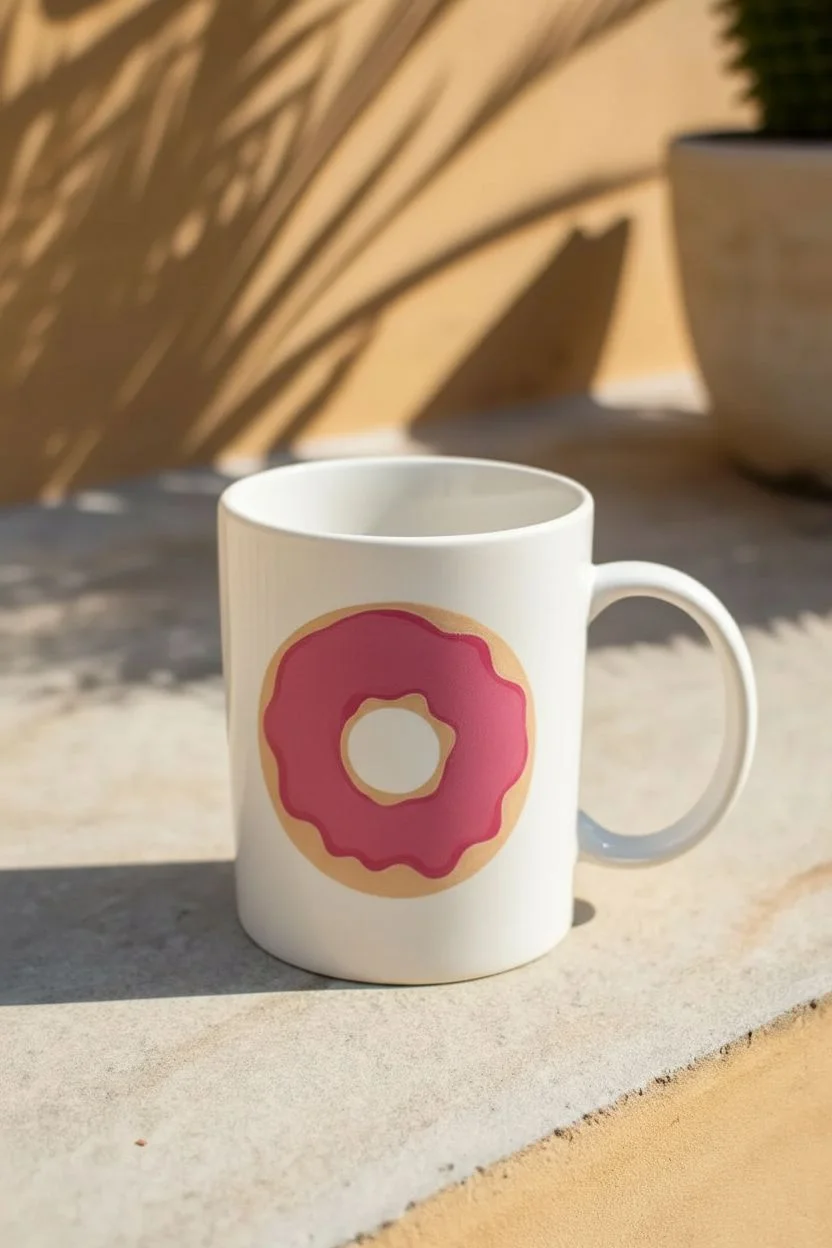
Transform a plain white mug into a hilarious morning companion with this sassy donut character. This design features a bold pink frosting and an unmistakably unimpressed expression that perfectly captures that “don’t speak to me until I’ve had coffee” energy.
How-To Guide
Materials
- Plain white ceramic mug
- Ceramic or porcelain paints (Pink, Black, White, Beige/Tan, Yellow, Green)
- Small flat brush
- Fine liner brush (size 0 or 00)
- Medium round brush
- Rubbing alcohol and cotton pads
- Oven (for curing)
Step 1: Preparation & Base Shape
-
Clean surface:
Wipe the mug surface thoroughly with rubbing alcohol. This removes any oils or dust that might prevent the paint from adhering properly. -
Outline the donut:
Using a very fine brush and diluted beige paint, lightly sketch a large circle for the donut’s outer edge and a smaller circle in the center for the hole. -
Paint the dough:
Fill in the sketched donut shape with the beige/tan paint. Don’t worry about being perfect, as the frosting will cover most of it. -
Add the frosting outline:
With pink paint, draw a wavy, uneven line inside the beige circle to act as the melted frosting edge. Leave a rim of beige visible at the bottom. -
Fill the frosting:
Use a medium round brush to fill the frosting area with pink paint. You may need two coats for a solid, opaque look; let the first coat dry for 15 minutes before adding the second.
Fixing Shaky Lines
If your black outlines look shaky, wait for them to dry completely. Then, use a toothpick to gently scratch away the uneven edges to sharpen the line.
Step 2: Facial Features
-
Paint the eyes:
Once the pink base is fully dry, paint two white semicircles near the top center of the donut for eyes. Make the left eye slightly larger for a cartoony feel. -
Add eyelids:
Paint flat pink eyelids over the top third of the white semicircles to create a bored, heavy-lidded look. -
Creating the mouth:
Paint an oblong kidney-bean shape in black right below the eyes. This will be the open mouth. -
Teeth details:
Using your finest brush and white paint, carefully add a jagged line of teeth inside the top edge of the black mouth shape.
Step 3: Fine Details & Outlines
-
Outline the body:
Switch to black paint and your thinnest liner brush. Carefully outline the entire outer edge of the donut and the inner donut hole. -
Define the frosting:
Outline the wavy pink frosting line where it meets the beige dough. -
Outline facial features:
Outline the eyes, eyelids, and mouth area with thin black lines to make them pop against the pink background. -
Pupils and brow:
Dot two small black pupils looking upward or sideways. Add floating black eyebrows above the donut shape and smaller furrow lines between the eyes for extra attitude. -
Add sprinkles:
Using green and yellow paint, add small dashes all over the pink area for sprinkles. Vary the angles so they look scattered. -
Limbs:
Draw simple black stick lines for arms extending from the sides. Finish with three small fingers on each hand. -
Legs and feet:
Paint two vertical lines for legs at the bottom, finishing with oval-shaped black feet.
Level Up: 3D Texture
Use ‘puffy’ ceramic paint for the pink frosting layer. It will rise slightly when baked, giving the donut a realistic, raised texture
Step 4: Finishing
-
Clean up:
If you made any stray marks, use a damp cotton swab or a toothpick to gently scrape them away before the paint sets. -
Curing:
Follow the instructions on your specific paint brand to cure the mug. Usually, this involves baking it in a cool oven that heats up to 300°F-350°F for about 30 minutes.
Enjoy your morning coffee with a mug that understands exactly how you feel about waking up early
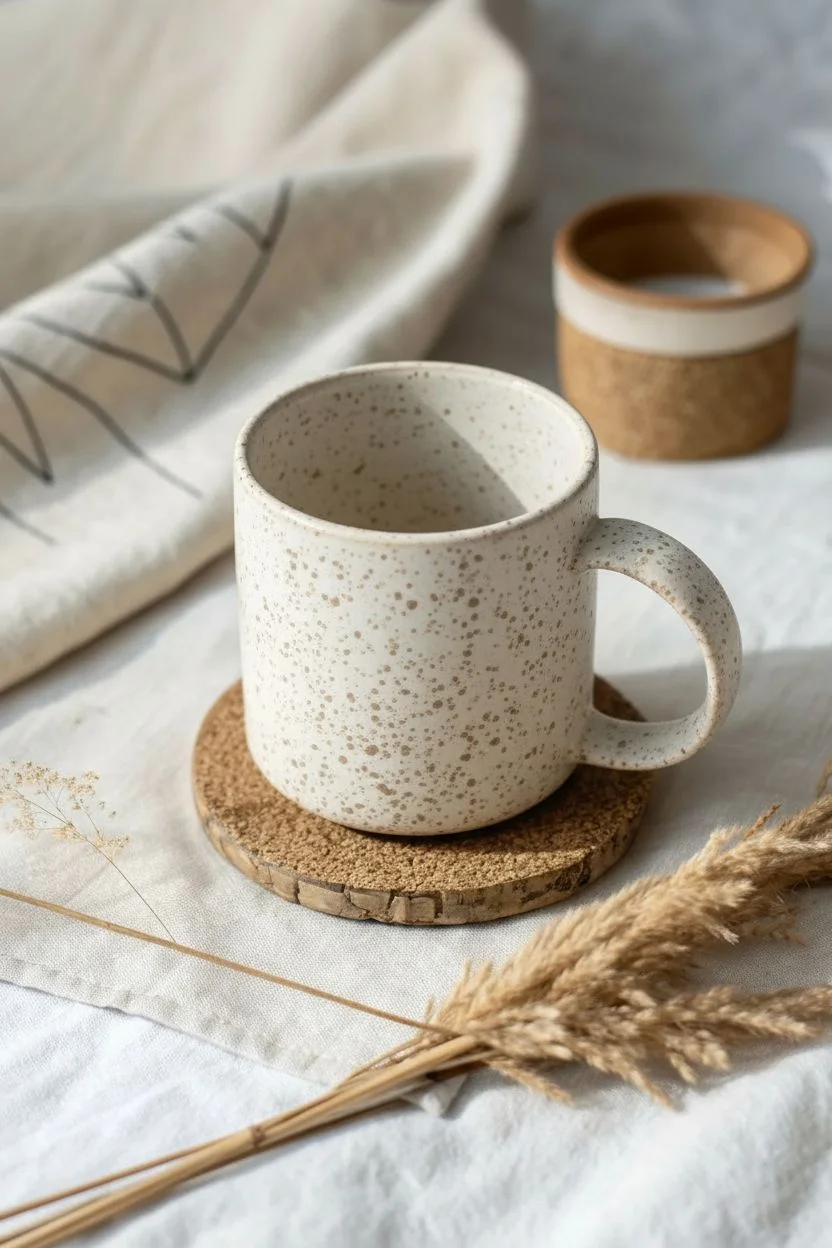
Expectation vs. Reality Doodles
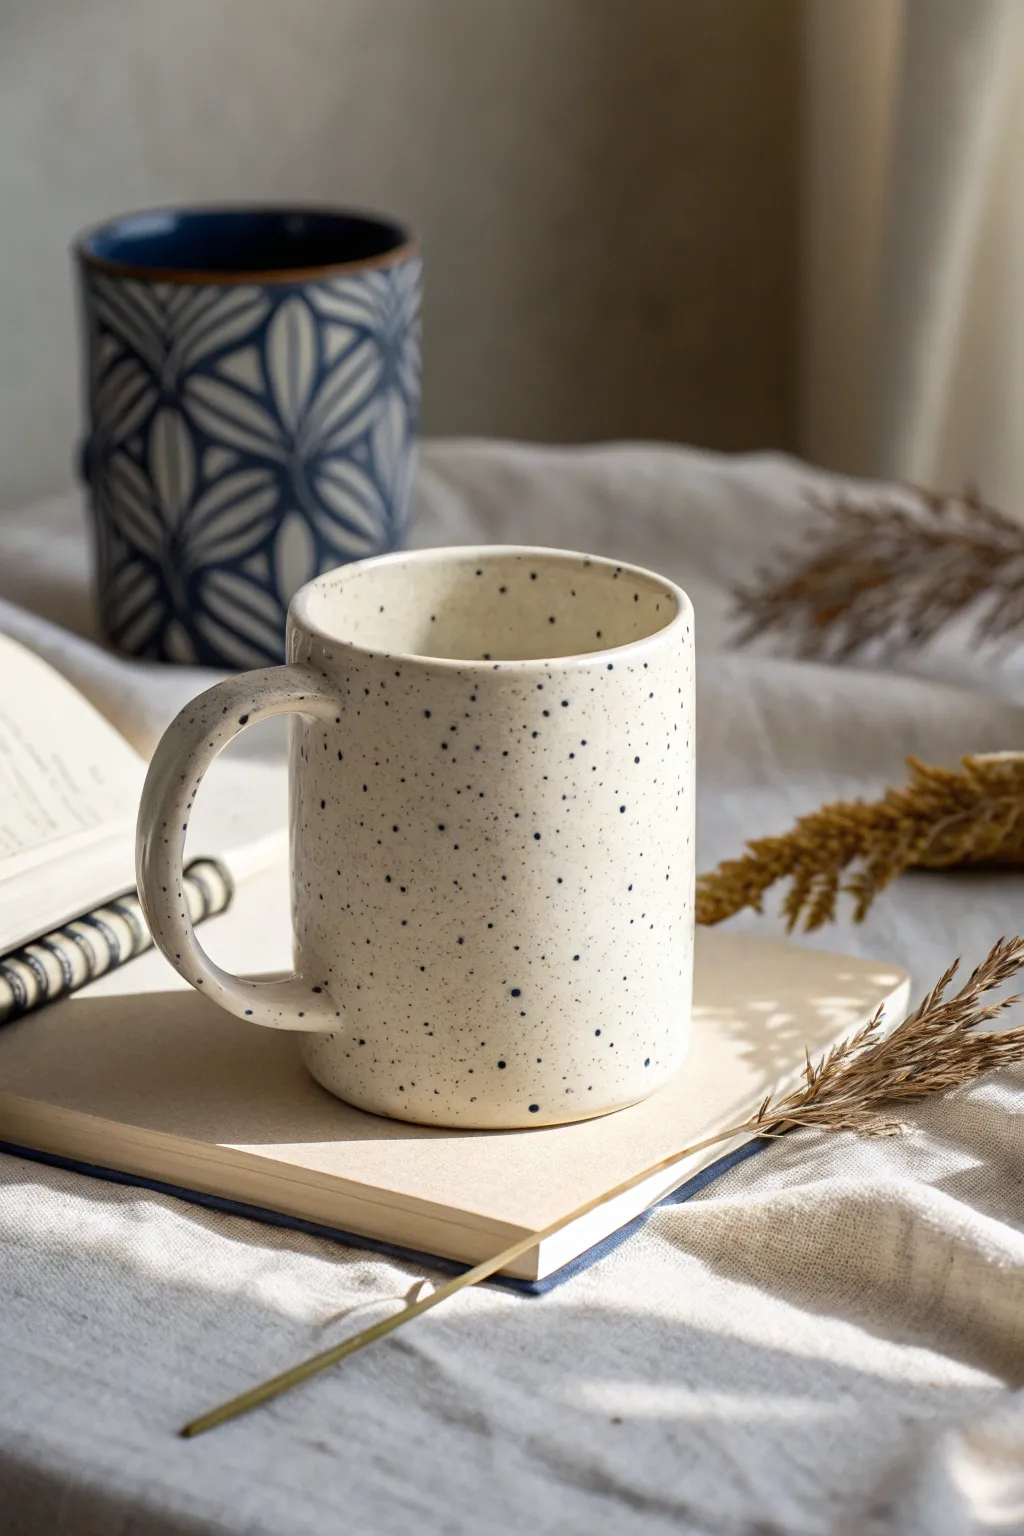

Achieve that trendy, high-end handmade pottery look without needing a kiln or a pottery wheel. This faux-speckle technique transforms a plain thrift store mug into a modern, artisanal-style piece with minimal effort.
Detailed Instructions
Materials
- Plain white ceramic mug (matte or glossy)
- Pebeo Porcelaine 150 paint (Anthracite Black or Deep Blue)
- Rubbing alcohol
- Cotton pads
- Old toothbrush (stiff bristles works best)
- Cardboard box or drop cloth
- Paper plate or palette
- Water based polyurethane sealer (optional for display-only mugs)
- Oven for curing
Step 1: Preparation
-
Clean surface:
Begin by thoroughly washing your mug with warm soapy water to remove any grease or price tag residue. -
Degrease:
Wipe the entire outer surface of the mug with a cotton pad soaked in rubbing alcohol. This is crucial for paint adhesion, so don’t skip this step. -
Setup workspace:
Set up a splatter station. Place a large cardboard box on its side or lay down a generous drop cloth, as this technique is messy by design and paint will fly.
Too Many Blobs?
If you get a large, unsightly drip instead of a speck, quickly wipe it away with a damp Q-tip before it dries. You can re-speckle that area instantly.
Step 2: Applying the Speckles
-
Prepare paint:
Squeeze a dime-sized amount of porcelain paint onto your paper plate. You want a dark blue or soft black often found in stoneware clay. -
Dilute slightly:
Add just a drop or two of water to thin the paint slightly. It should be fluid enough to flick, but not so runny that it drips down the mug. -
Load the brush:
Dip your toothbrush into the paint mixture, ensuring only the tips of the bristles are coated. Tap off the excess on the plate first. -
Test run:
Practice your flicking motion on a piece of scrap paper inside your box. Run your thumb across the bristles to spray the paint forward. -
First pass:
Hold the mug inside the box with one hand and the toothbrush in the other. Aim the brush about 6 inches away from the surface and flick the bristles. -
Rotate and repeat:
Turn the mug slightly and flick again. I like to vary my distance occasionally—closer for larger dots, further away for a fine mist. -
Handle coverage:
Don’t forget the inside of the handle and the rim area. Angle your brush carefully to get specks into these harder-to-reach spots. -
Review density:
Place the mug down and step back. Look for any bald spots where the speckles are too sparse and give them a targeted flick. -
Clean the rim:
If you plan to drink from this mug, use a damp cloth to wipe the paint off the top ½ inch of the rim for a clean lip line.
Pro Tip: Layering
Use two slightly different shades—like charcoal and navy—applied in separate layers to create visual depth that mimics real stoneware clay bodies.
Step 3: Curing and Finishing
-
Dry time:
Let the paint air dry for at least 24 hours. The paint must be fully dry to the touch before baking. -
Cold oven start:
Place the mug into a cold oven. Do not preheat the oven, as thermal shock can crack the ceramic. -
Bake:
Turn the oven to 300°F (150°C). Once it reaches temperature, bake for 35 minutes. -
Cool down:
Turn the oven off and leave the mug inside until it is completely cool. This helps the paint set permanently. -
Final check:
Once cool, your mug is technically dishwasher resistant on the top rack, though gentle hand washing will preserve the speckles longest.
Enjoy your customized faux-stoneware mug with your morning coffee

PENCIL GUIDE
Understanding Pencil Grades from H to B
From first sketch to finished drawing — learn pencil grades, line control, and shading techniques.
Explore the Full Guide
Secret Punchline on the Bottom
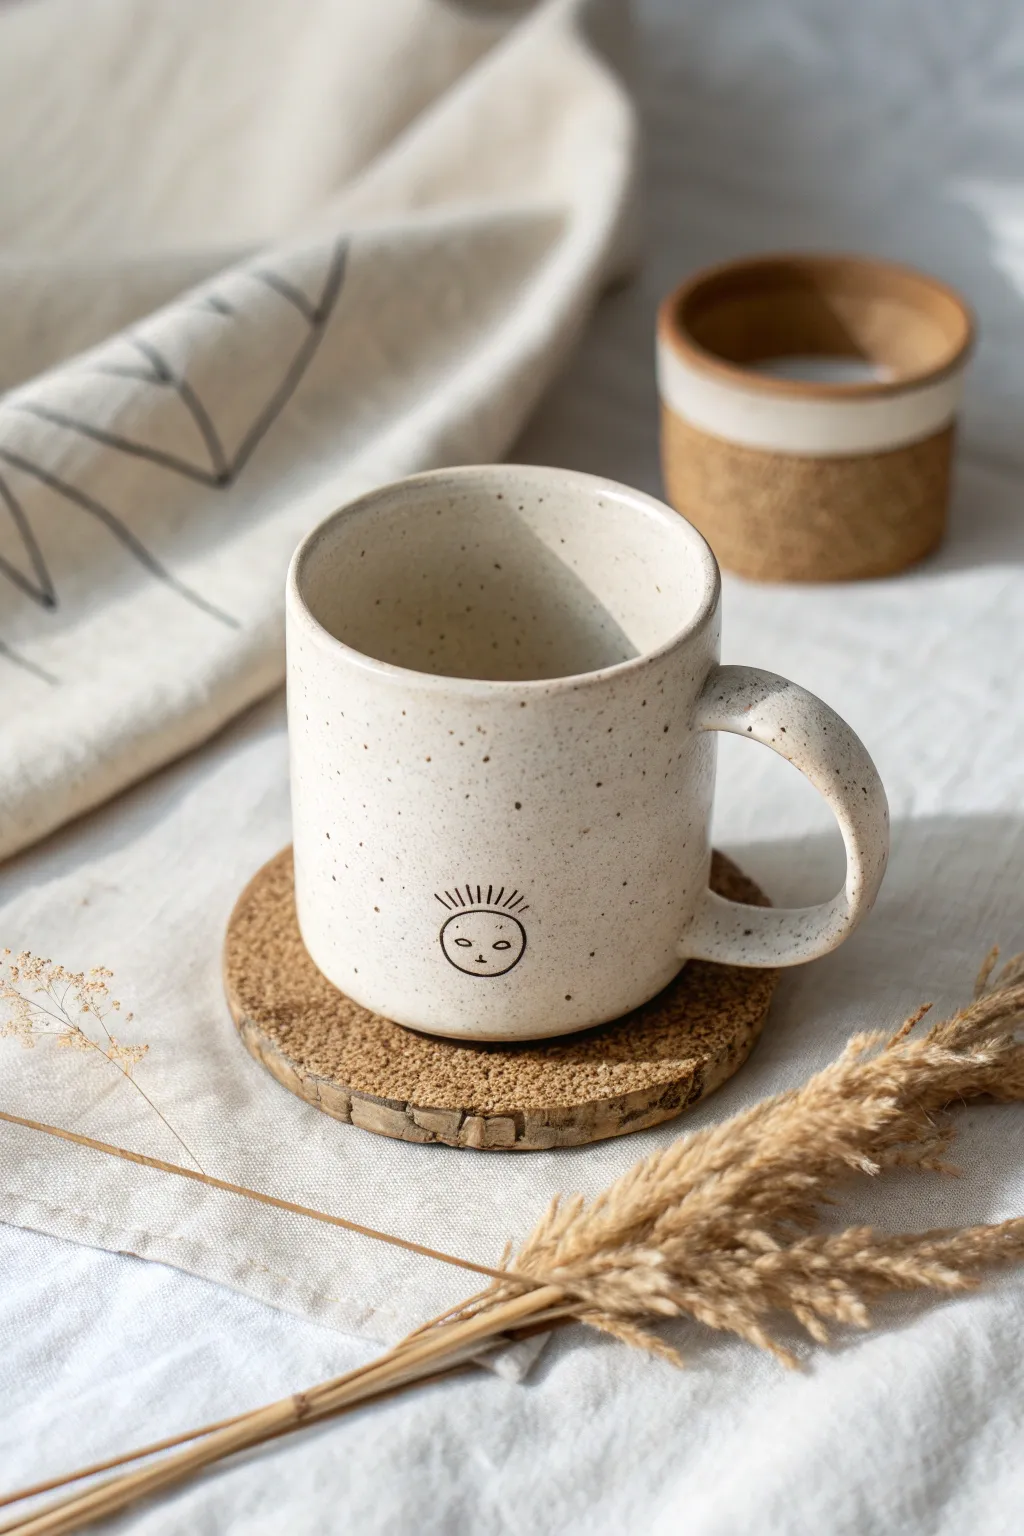
Capture a bit of whimsy with this minimalistic, speckled mug design featuring a tiny, expressive face. The charm lies in the simplicity of the line art against a textured, stone-like background, making it a perfect project for beginners wanting a modern ceramic look.
Step-by-Step
Materials
- Plain white ceramic mug (straight or slightly tapered sides)
- Pebeo Porcelaine 150 paint (Anthracite Black or similar dark charcoal)
- Pebeo Porcelaine 150 paint (Taupe or Beige for speckles)
- Fine liner brush (size 00 or 000)
- Old toothbrush or stiff bristle brush
- Rubbing alcohol
- Cotton pads
- Palette or small dish
- Domestic oven
Step 1: Preparation & Speckling
-
Clean the surface:
Before you begin any painting, wipe the entire mug down thoroughly with rubbing alcohol on a cotton pad. This removes invisible oils or fingerprints that could prevent the paint from adhering properly. -
Mix the speckle color:
Squeeze a small amount of the Taupe or Beige porcelain paint onto your palette. If it feels too thick for spattering, add a singular drop of water or thinner, but keep it mostly opaque. -
Load the brush:
Dip the tips of an old toothbrush or a stiff bristle brush into the paint. Test the spray on a piece of paper first to gauge the density. -
Apply the speckles:
Run your thumb across the bristles to flick tiny dots of paint onto the mug. Aim for an uneven, organic distribution, focusing slightly more density near the rim and handle for a natural pottery look. -
Clean up large globs:
If you accidentally create a large splatter instead of a fine mist, quickly wipe it away with a damp Q-tip or a corner of paper towel while it is still wet. -
Let the speckles dry:
Allow the speckled base layer to dry completely to the touch, usually about 30 minutes, so you don’t smudge it while drawing the face.
Clean Lines Pro Tip
Can’t get a steady hand with a brush? Use a porcelain paint marker with a 0.7mm tip instead. Shake it well and depress the nib on paper first to get the flow started.
Step 2: Drawing the Character
-
Position the face:
Ideally, place the face low on the mug, about a half-inch to an inch from the bottom edge. This negative space above the drawing is key to the minimalist aesthetic. -
Outline the head:
Using your fine liner brush and the Anthracite Black paint, draw a small, slightly flattened circle. It doesn’t need to be geometrically perfect; a hand-drawn wobble adds character. -
Add the hair:
Paint 5 to 7 short, vertical radiating lines emerging directly from the top of the circle. Keep them evenly spaced but varying slightly in length. -
Paint the eyes:
Inside the circle, place two small almond shapes for eyes. If you make them wide-set, the character looks more innocent. -
Add the nose:
Between and slightly below the eyes, add a tiny dot or a very small vertical dash for the nose. -
Draw the mouth:
Finish the expression with a straight horizontal line below the nose. This deadpan expression is what makes the design funny. -
Refine lines:
Check your lines for consistency. Since porcelain paint can be translucent, you might want to carefully go over the black lines a second time for a bolder look.
Step 3: Baking & Setting
-
Drying time:
Let the painted mug sit for at least 24 hours. This air-drying period is crucial for the paint to settle before heat setting. -
Oven loading:
Place the mug into a cold oven. Do not preheat the oven, as the sudden temperature change could crack the ceramic. -
Bake the design:
Set the oven to 300°F (150°C). Once the oven reaches temperature, bake for 35 minutes. -
Cool down:
Turn the oven off and leave the door closed. Let the mug cool down completely inside the oven before removing it.
Level Up: Hidden Text
Add the ‘punchline’ of the joke on the very bottom of the mug (the exterior base) so the drinker only reveals the secret message when they tilt the cup back to finish.
Now you have a charming, understated art piece that makes your morning coffee rituals just a little more amusing


Have a question or want to share your own experience? I'd love to hear from you in the comments below!