
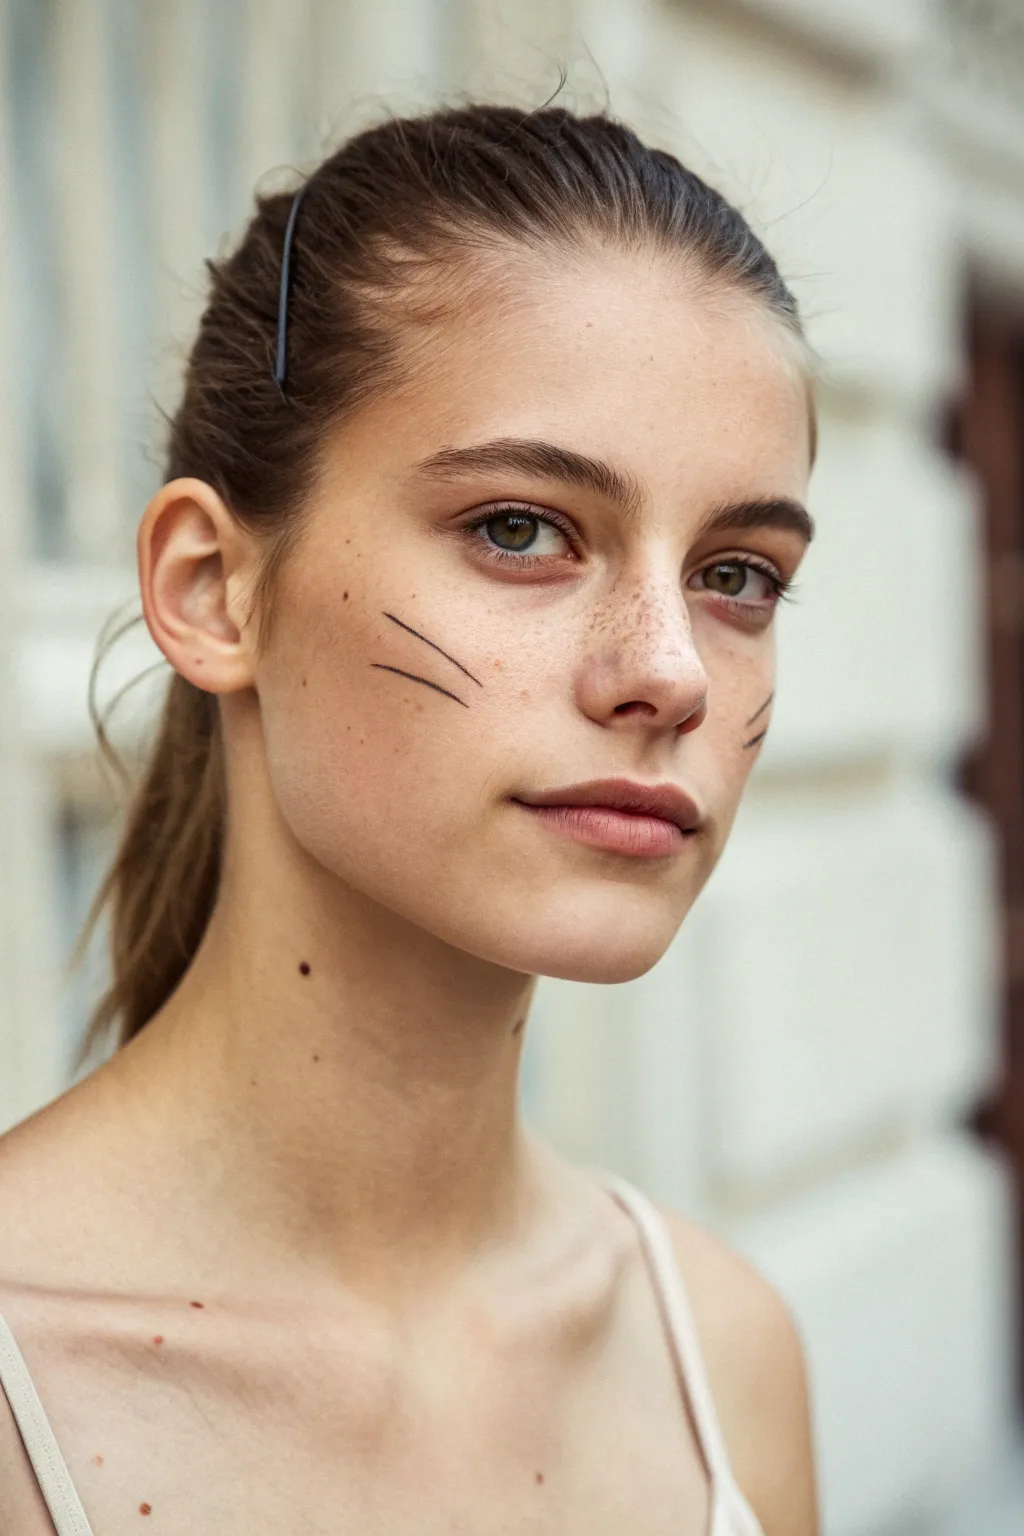
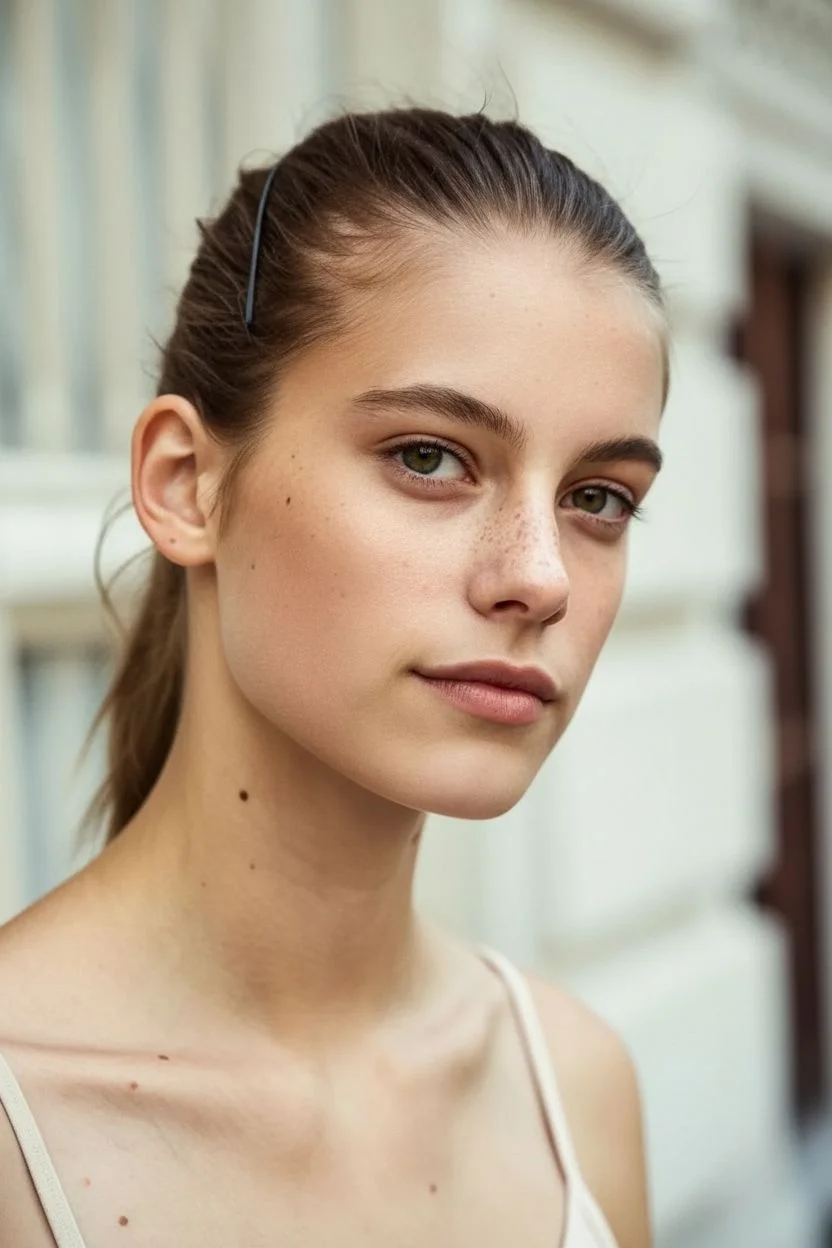
When you need simple small face paint ideas, think tiny “sticker” designs that look adorable but only take a minute or two. I lean on quick cheek art, clean outlines, and a few white dot highlights to make even the simplest shapes feel extra special.
Classic Starburst Cheek
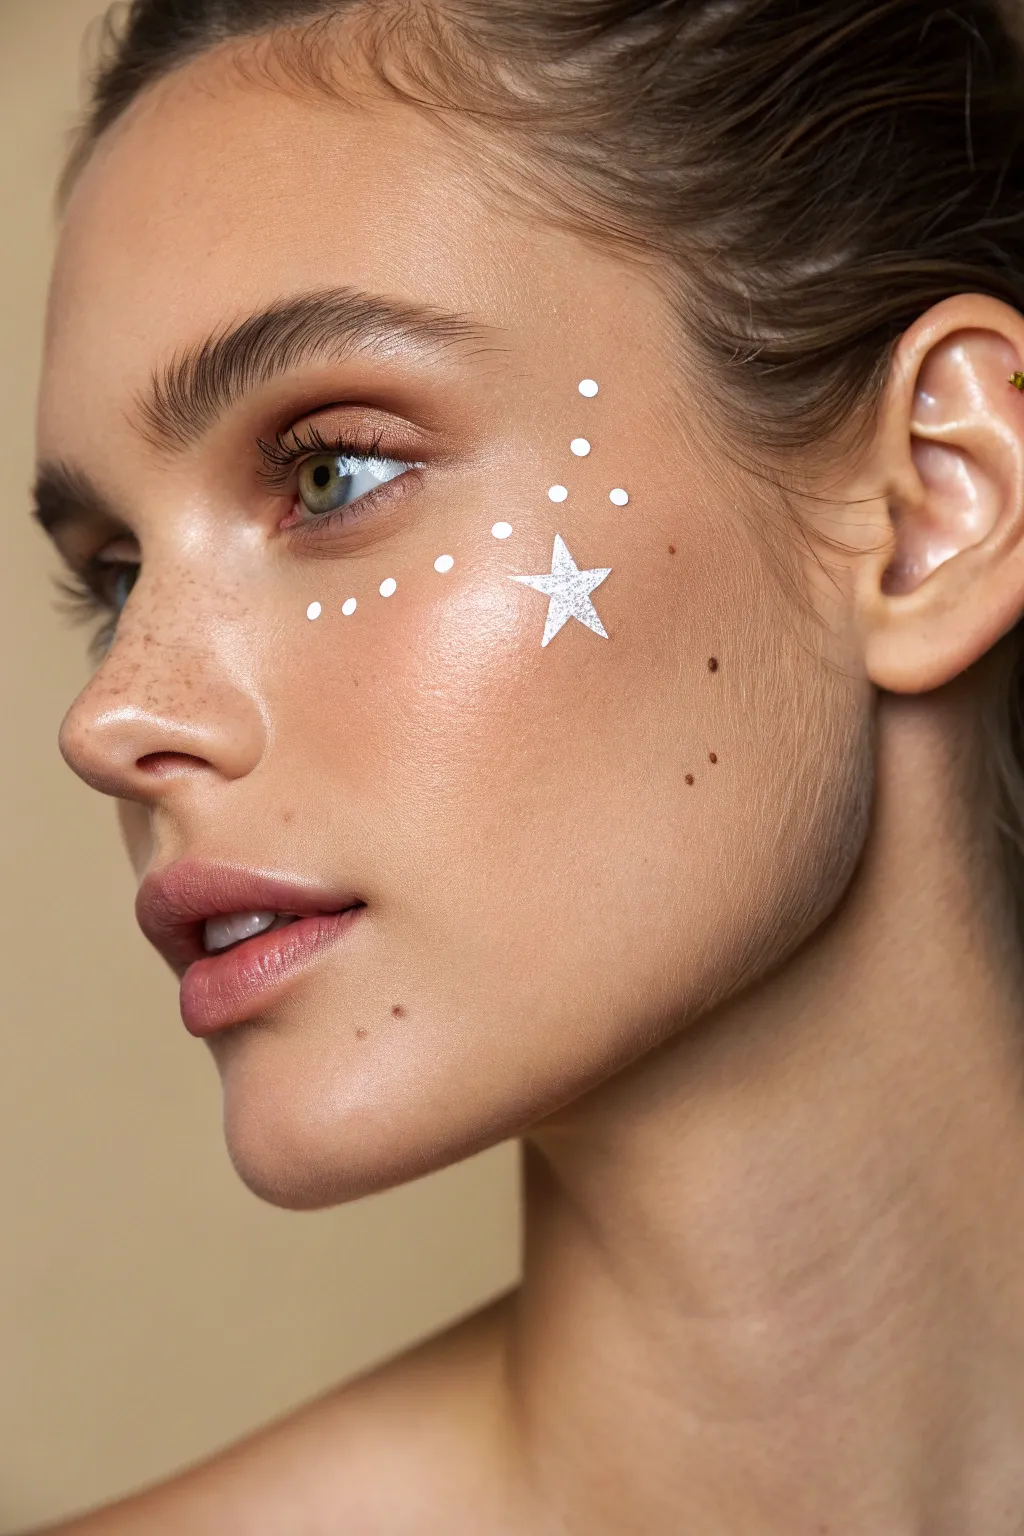
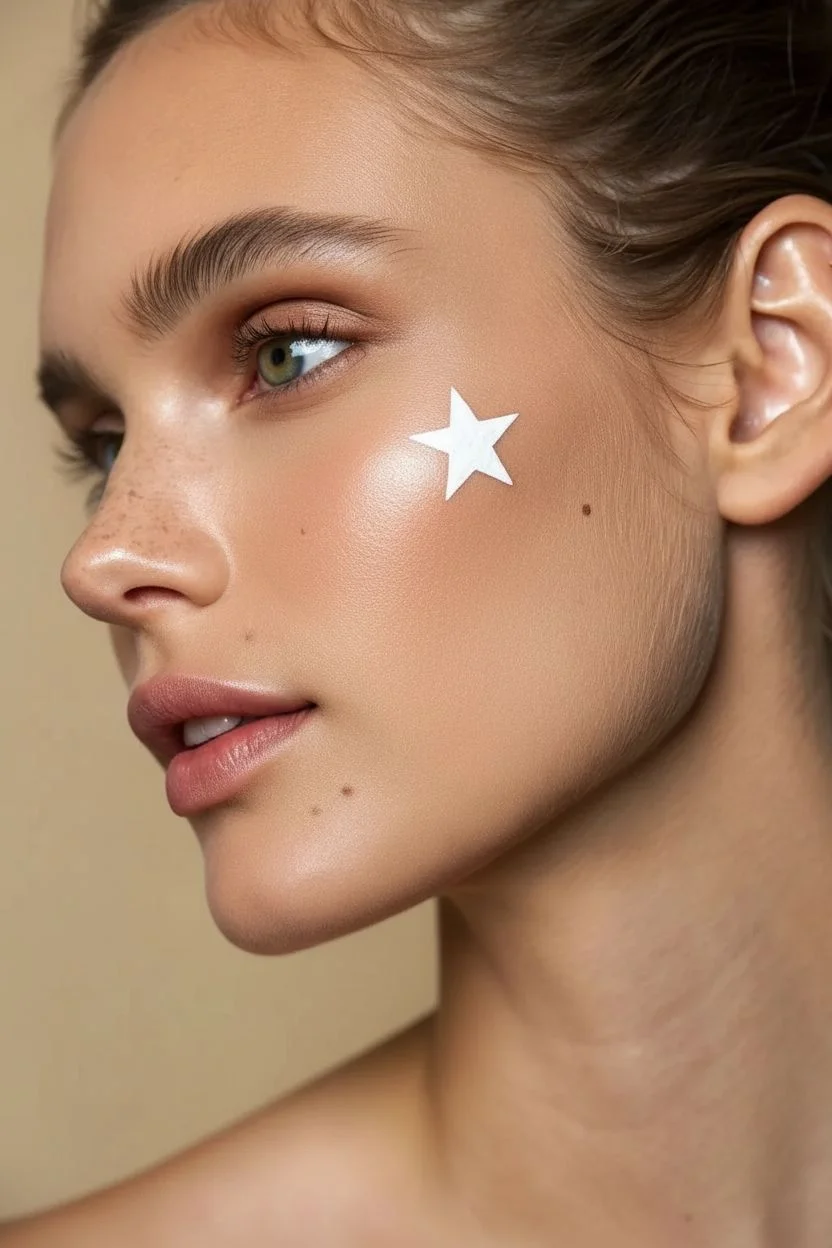
Embrace a touch of magic with this minimalist and elegant design. A single radiant white star anchors a constellation of delicate dots that sweep upwards, highlighting the cheekbone and eye for a look that’s both festive and sophisticated.
Step-by-Step
Materials
- High-quality white face paint (water-activated or cream)
- Small round brush (size 1 or 2)
- Detail brush (size 0 or 00, optional for finer points)
- Cup of water
- Paper towels
- Makeup setting spray (optional)
- Small cosmetic sponge (for cleanup)
Step 1: Preparation & Base
-
Clean the canvas:
Start with clean, dry skin. If you are wearing foundation or other makeup, ensure it is set so the face paint doesn’t slide around. -
Activate the paint:
Dip your small round brush into the water and mix it into the white face paint. You want a creamy consistency, similar to melted ice cream, to ensure opaque coverage. -
Test the consistency:
Do a quick test swipe on the back of your hand. The white should be solid and not translucent stripes. If it’s too watery, mix more paint; if too dry, add a drop of water.
Uneven Dots?
If brush dots are tricky, use the handle end of your brush! Dip the wooden end into the paint and stamp it onto the skin for perfectly round, uniform circles.
Step 2: Painting the Main Star
-
Locate the focal point:
Identify the highest point of the cheekbone, roughly in line with the outer corner of the eye. This is where the main star will sit. -
Draw the top point:
Using the tip of your round brush, press down lightly and flick upward to create a sharp, vertical point for the star’s top arm. -
Draw the bottom point:
From the same center, pull a stroke straight down. I find it helpful to make this bottom arm slightly longer than the top for a stylish look. -
Add horizontal arms:
Draw the left and right arms of the star, crossing through the center. Keep them relatively symmetrical. -
Fill the center:
Gently connect the inner corners of the arms to create a solid 4-point star shape. Fill in any gaps in the middle with a bit more white paint. -
Refine the edges:
If the points aren’t sharp enough, use the very tip of your detail brush or a clean, damp cotton swab to tidy them up.
Step 3: Adding the Constellation
-
Start the dot trail:
Reload your brush with fresh paint. Begin placing dots starting near the inner nose/cheek area, moving outward toward the star. -
Vary the sizes:
Press slightly harder for larger dots and barely touch the skin for tiny ones. This variation adds depth. -
Curving under the eye:
Create a gentle curve of dots that sweeps underneath the eye area, acting as a bridge to the star. -
Surround the star:
Place a few medium-sized dots immediately around the star itself, as if it’s emitting sparks. Don’t overcrowd it; let the star breathe. -
Extend upward:
Continue the trail of dots moving up from the star towards the temple and outer eyebrow. -
Add floating accents:
Place two or three larger, distinct dots higher up on the temple area to balance out the composition. -
Double check symmetry:
Step back and look in the mirror. You aren’t aiming for a perfectly straight line, but a natural, pleasing curve. -
Final touches:
If any white looks streaky after drying, carefully dab a second layer of paint just on those spots to maximize brightness. -
Set the look:
Once completely dry (which takes about a minute), a light misting of setting spray can help the design last longer without smudging.
Sparkle Boost
While the white paint is still wet, gently tap a tiny amount of cosmetic-grade iridescent glitter onto the center of the star for added dimension and shine.
Now you have a heavenly highlight that brightens your entire expression


Tiny Heart Cluster
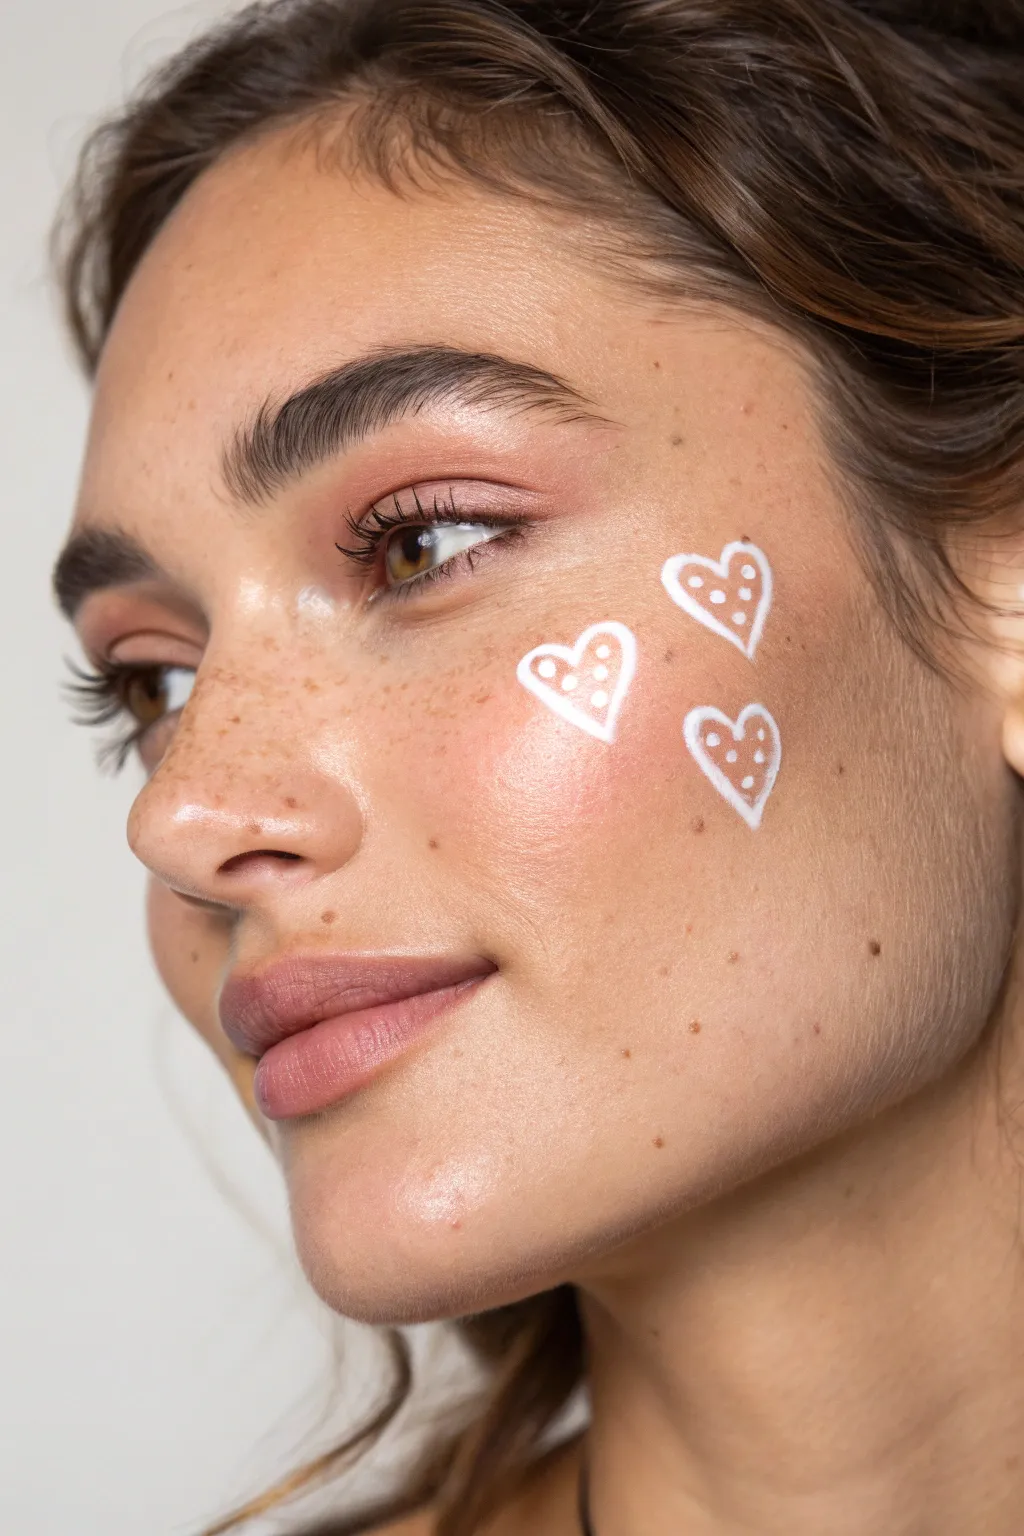
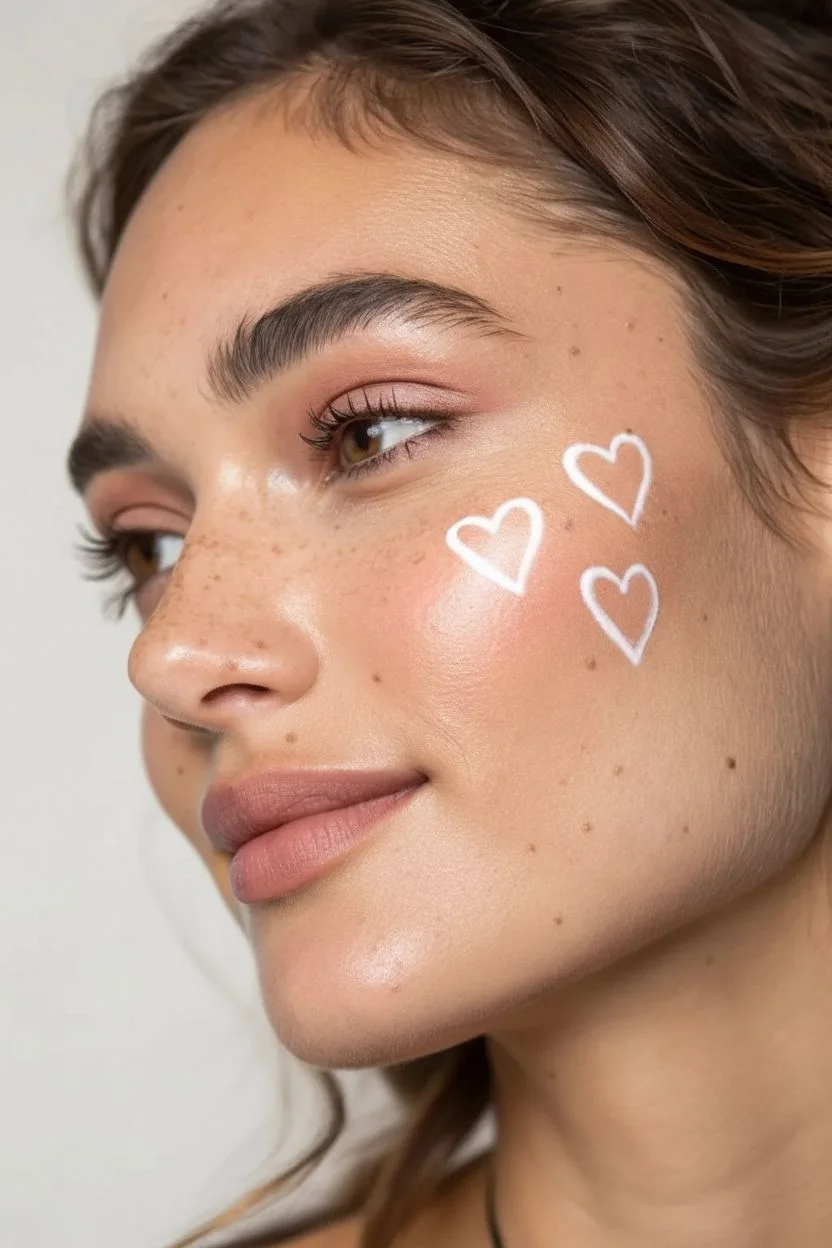
Embrace a sweet, minimalist aesthetic with this cluster of delicate white heart doodles. Perfect for festivals or a fun brunch, these airy, polka-dotted hearts add a touch of whimsy without overpowering your natural features.
Step-by-Step Guide
Materials
- White liquid eyeliner (felt tip or brush tip)
- OR White face paint
- Fine detail brush (size 0 or 00, if using face paint)
- Micellar water and cotton buds (for clean-up)
- Setting spray (optional)
Step 1: Preparation and Placement
-
Prep the canvas:
Start with your usual skincare and makeup routine. If you wear foundation, ensure it has been set with a little powder so the face paint or liner grips well without sliding. -
Visualize the cluster:
Look in the mirror and decide where your three hearts will sit. Aim for the high point of your cheekbone, angling them slightly upwards towards your temple to lift the face. -
Check brush consistency:
If using face paint, wet your brush and load it with white paint until it has an inky, milky consistency. If it’s too thick, the lines will crack; too thin, and they’ll drip.
Steady Hand Trick
Rest your pinky finger against your cheek or chin while painting. This creates a stable anchor point, stopping your hand from shaking while you draw the fine outlines.
Step 2: Painting the Outlines
-
Draft the first heart:
Start with the highest heart in the cluster. Using the very tip of your liner or brush, draw the left curve of the heart, starting from the center dip and pulling down to the point. -
Complete the shape:
Draw the right curve to meet the bottom point. Don’t worry if it’s not perfectly symmetrical; a hand-drawn look is part of the charm. -
Position the second heart:
Move slightly lower and towards the center of your face. Draw the second heart here, angling it slightly differently than the first to create dynamic movement. -
Add the third heart:
Place the final heart below the second one, forming a loose triangle arrangement. I usually make this one ever so slightly smaller to balance the composition. -
Refine the edges:
Go back over any lines that look faint or broken. The white outline should be opaque and crisp against your skin tone.
Make it Sparkle
For a festival vibe, replace the painted white dots inside the hearts with tiny self-adhesive rhinestones or use lash glue to attach real glitter flakes.
Step 3: Adding Details
-
Start the stippling:
Now for the texture. Inside the first heart, gently press the tip of your brush or liner to create a small dot. -
Fill the space:
Continue adding dots inside the outline. Keep them spaced out so your skin shows through in between—this keeps the design looking light and airy rather than solid. -
Vary the pattern:
When moving to the second and third hearts, try to stagger the dots so they don’t look like a rigid grid. Random placement often looks more organic. -
Let it set:
Allow the white design to dry completely for about a minute. Try not to smile too big during this part to prevent the wet paint from creasing.
Step 4: Finishing Touches
-
Clean up edges:
If any lines went rogue, dip a cotton bud in micellar water and carefully erase the mistake, then tap a little concealer over the spot if needed. -
Lock it in:
Give your face a spritz of setting spray. Make sure to hold the bottle at arm’s length so the droplets don’t run the face paint.
Now you have a lovely, custom accessory that highlights your cheekbones


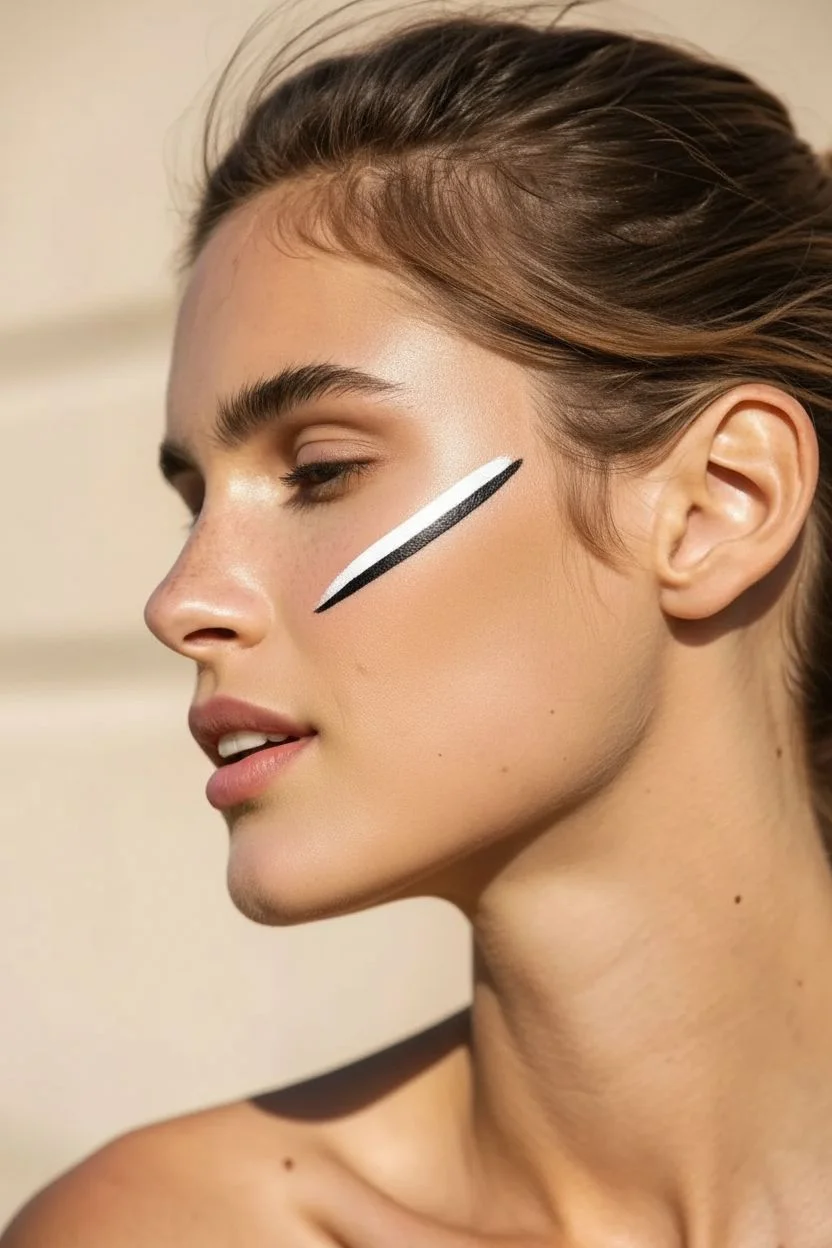
Mini Cat Whiskers and Nose
This ultra-simple face paint design captures the essence of a cat look without the need for full coverage, making it perfect for subtle costuming or a high-fashion edge. The focus is on precision with delicate, thin black lines that mimic whiskers against fresh, natural skin.
Step-by-Step Guide
Materials
- Black liquid eyeliner or water-activated face paint
- Fine liner brush (size 0 or 00, if using face paint)
- Micellar water and cotton buds (for cleanup)
- Light moisturizer
- Clear brow gel (optional)
- Setting spray (optional)
Step 1: Preparation
-
Cleanse and Prep:
Start with a freshly washed face. Use a gentle cleanser to remove any oils, which will help the lines stay crisp. Pat your skin dry with a clean towel. -
Hydrate the Base:
Apply a very light layer of moisturizer. Allow it to absorb fully for about 5 minutes so the skin isn’t slippery when you start drawing. -
Groom Brows:
Since this look is so minimal, groomed brows frame the face well. I like to brush them upward with a spoolie or a touch of clear brow gel for a neat, feathery appearance.
Oops! Shaky hands?
If you mess up a line, wait for it to dry completely before scratching it off with a dry spoolie or Q-tip. Wet wiping spreads the black pigment.
Step 2: Drafting the Whiskers
-
Visualize Placement:
Look straight into a mirror. Identify the apples of your cheeks. You want the whiskers to start slightly outward from the apple, roughly aligned with the outer corner of your nose, but a few centimeters away. -
Check Symmetry:
Use the handle of your brush or a pencil to lightly mark imaginary starting points on both sides to ensure they are level with each other.
Level Up: Faux Freckles
Enhance the natural vibe by dotting faux freckles across the nose bridge using a brow pencil, blending them with a fingertip for a soft finish.
Step 3: Painting the Lines
-
Load the Brush:
If using water-activated paint, dip your fine liner brush in water and swirl it into the black paint until you have an inky consistency. If using liquid eyeliner, simply uncap the pen. -
Anchor Your Hand:
Rest your pinky finger gently on your chin or jawline. This anchors your hand and prevents shakiness while drawing fine lines. -
Draw the First Top Whisker:
Start on one cheek. Place your tip down and swiftly flick the brush outward and slightly downward towards your ear. The line should be about 1.5 to 2 inches long. -
Keep Pressure Light:
Apply slightly more pressure at the start of the stroke and lift the brush gradually as you pull away to create a tapered, sharp end. -
Draw the First Bottom Whisker:
Place your brush about a centimeter below the starting point of your first line. Draw a second line parallel to the first, following the same angle and length. -
Repeat on the Other Side:
Move to the opposite cheek. Replicate the top whisker first, aiming for symmetry in angle and length. It helps to step back from the mirror to check the balance. -
Complete the Set:
Draw the final bottom whisker on the second cheek, maintaining that parallel spacing. Don’t worry if they aren’t mathematically perfect; natural asymmetry adds charm.
Step 4: Refining and Setting
-
Clean Up Edges:
Dip a cotton bud in a tiny bit of micellar water. If any line looks too thick or blunt at the end, gently swipe the tip to sharpen it. -
Sharpen the Starts:
If the starting points of the whiskers look bulbous, use the clean side of the cotton bud to carefully square them off or taper them inward. -
The Nose Detail (Optional):
While the look in the image keeps the nose bare, you can add a tiny black dot or heart on the tip of the nose for a cuter variation. -
Set the Look:
If you need this to last all day, close your eyes and mist a light setting spray over your face, holding the bottle at arm’s length to avoid smudging the ink.
Enjoy your effortlessly cool and modern take on the classic cat costume


Simple Paw Print Stamp
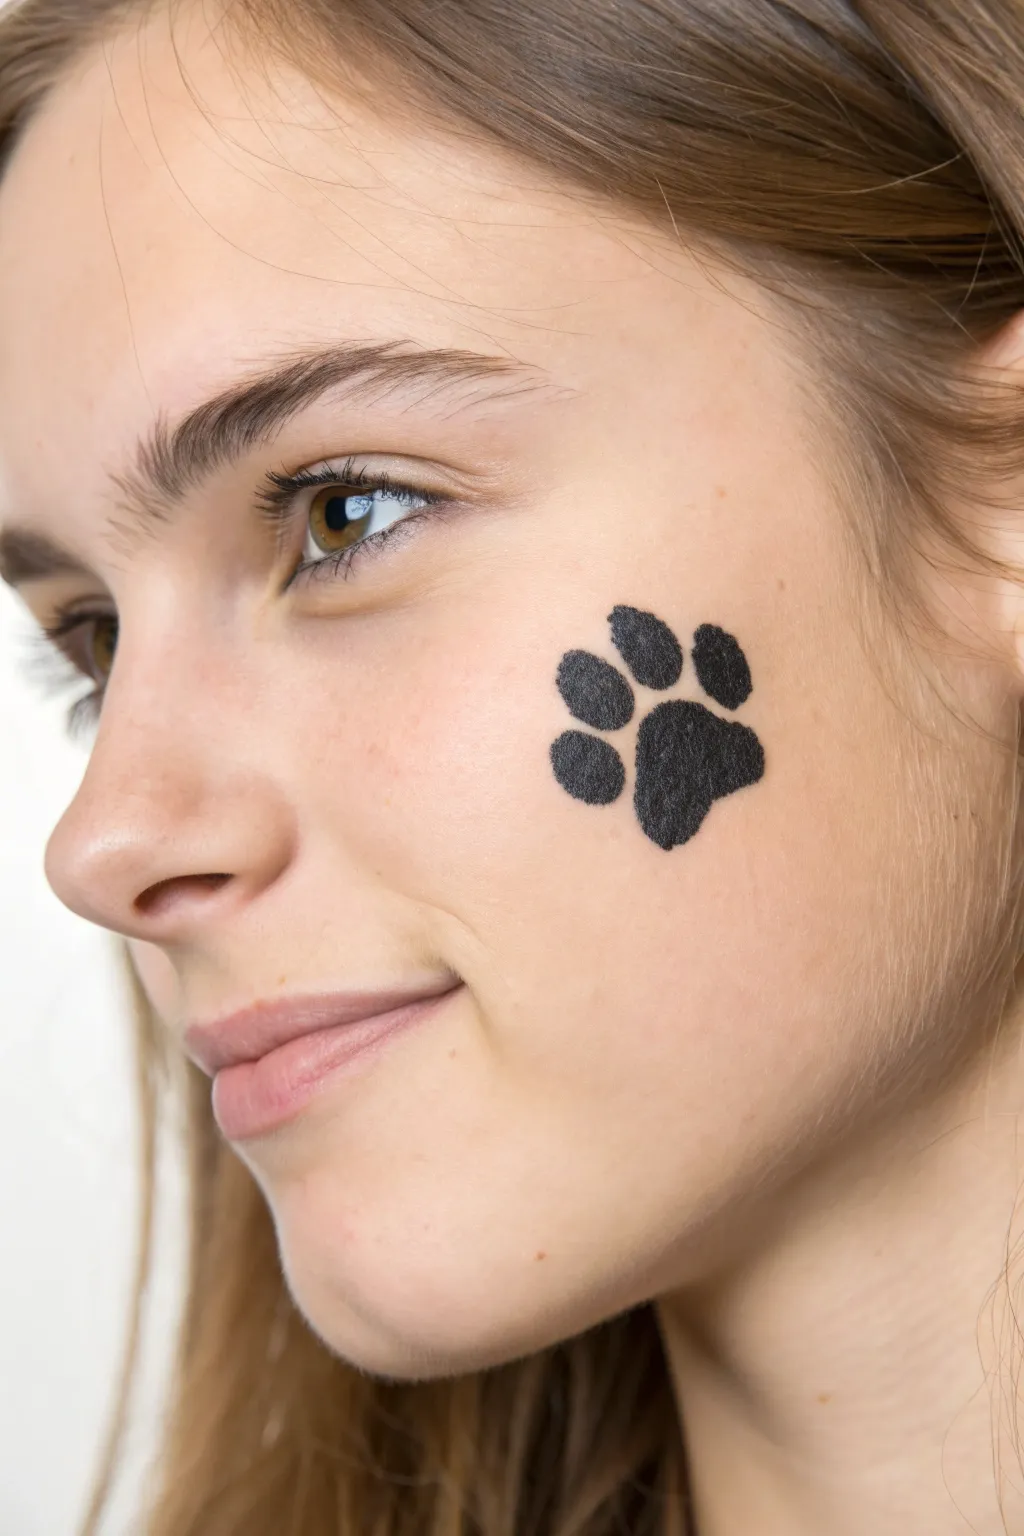
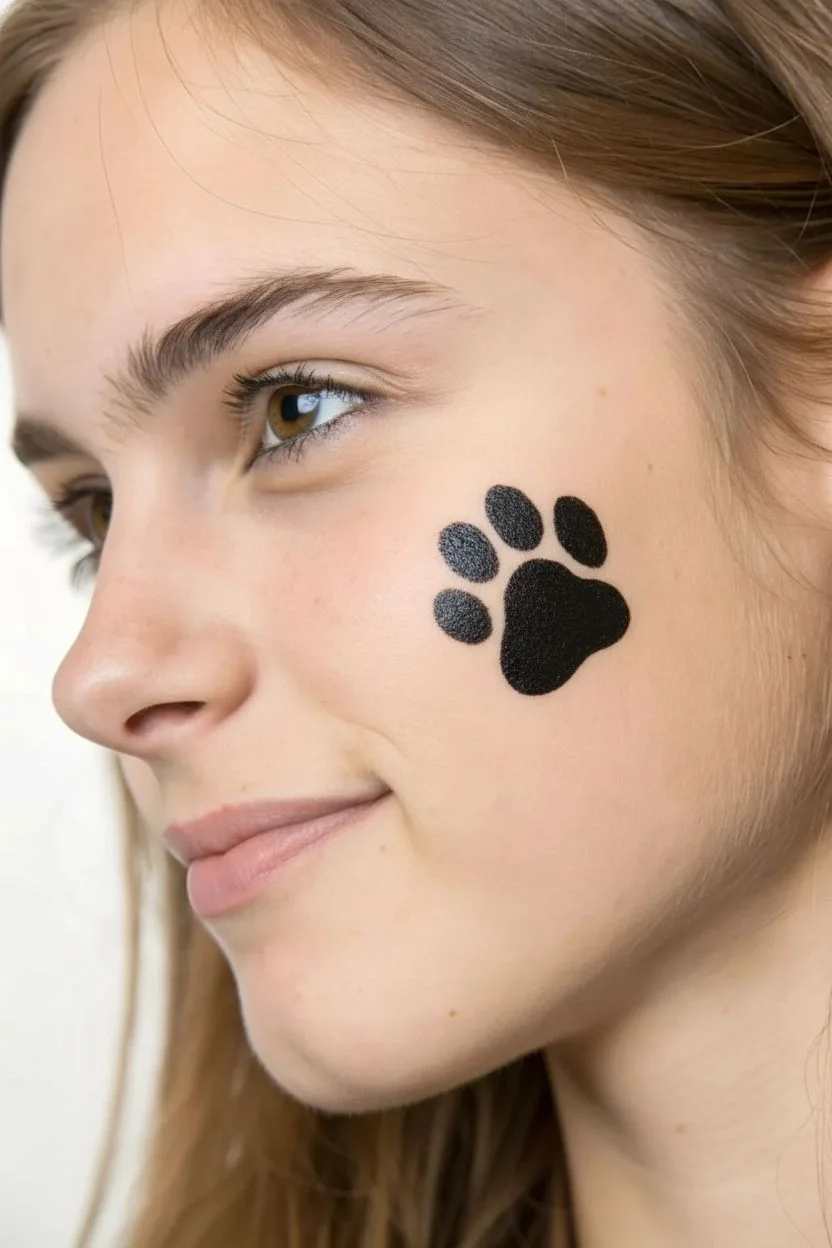
This minimalist black paw print is a classic, understated design that sits perfectly on the apple of the cheek. Its crisp, solid silhouette adds a playful touch without overwhelming the face, making it an ideal choice for quick festival looks or subtle costume accents.
Step-by-Step Tutorial
Materials
- Black face paint (water-activated or cream)
- Small round brush (size 2 or 4)
- Medium round brush (size 6) for the main pad
- Clean water for rinsing
- Paper towel or sponge for blotting
- Makeup remover wipes (for corrections)
Step 1: Preparation & Mapping
-
Clean the canvas:
Start with clean, dry skin on the cheek area. If the subject is wearing foundation, ensure it is set with powder so the face paint adheres properly without sliding. -
Positioning:
Visualize where the paw print will sit. Aim for the apple of the cheek, slightly towards the outer edge, ensuring it isn’t too close to the nose or eye. -
Activate the paint:
Dip your medium round brush into clean water and swirl it into your black face paint cake. You want a creamy, ink-like consistency that isn’t too runny to prevent drips.
Step 2: Painting the Main Pad
-
Start the center pad:
Using the medium brush, press the bristles down gently onto the cheek to form a rounded shape. This will be the large, central pad of the paw. -
Define the bottom edge:
Drag the brush slightly downwards and outwards to create the characteristic triangular bottom of the main pad. It should look a bit like an inverted, soft heart or triangle with rounded corners. -
Fill opacity:
Go back over the main pad shape to ensure the black is solid and opaque. If using a cream paint, stipple it on; for water-activated, use smooth strokes. -
Smooth the edges:
Use the tip of the brush to clean up any ragged edges on this main shape, making sure the curves are smooth and defined.
Uneven Edges?
If your circles look shaky, try spinning the brush handle between your fingers as you lift it off the skin. This twirling motion helps keep the oval shape crisp and perfectly rounded.
Step 3: Adding the Toes
-
Switch brushes:
Swap to your smaller round brush (size 2 or 4). This gives you better control for the smaller toe details. -
Load the small brush:
Prepare the brush with the same creamy black paint consistency, ensuring the bristles are tapered to a nice point. -
First toe placement:
Place the first toe directly above the center of the main pad, leaving swirling space between them. Press down purely to create an oval shape. -
Create the oval:
Wiggle the brush slightly while pressed against the skin to widen the oval if needed, then lift off cleanly. -
Second toe (left):
Move slightly to the left of the center toe. Angle this toe slightly outward, following the natural curve of a paw. Press, wiggle slightly, and lift. -
Third toe (right):
Mirror the previous step on the right side. Place this toe symmetrically to the left one, angling it outwards to the right. -
Fourth toe (far left):
Add the final toe on the far left, lower down near the curvature of the main pad. This should be slightly smaller than the top three. -
Checking balance:
Step back and look at the design. The toes should arch over the main pad. I usually check here if any toe needs to be slightly enlarged to match the others.
Add Some sparkle
Before the black paint dries completely, sprinkle a tiny pinch of cosmetic-grade biodegradable glitter over the wet paint. It adds a festive shimmer without changing the design.
Step 4: Final Touches
-
Refine the shapes:
If any of the ovals look too jagged, carefully use the very tip of your small brush to round them out. -
Correct inconsistencies:
If the black looks patchy in any areas, dab a tiny bit more paint on top to make it solid black. -
Clean up fallback:
Dip a cotton swab in makeup remover or water to erase any accidental smudges outside the lines. -
Allow to dry:
Let the paint sit undisturbed for about 60 seconds. Water-activated paints dry quickly to a matte finish.
Now you have a charming paw print that adds instant character to your look
BRUSH GUIDE
The Right Brush for Every Stroke
From clean lines to bold texture — master brush choice, stroke control, and essential techniques.
Explore the Full Guide
Quick Tiger Scratch Stripes
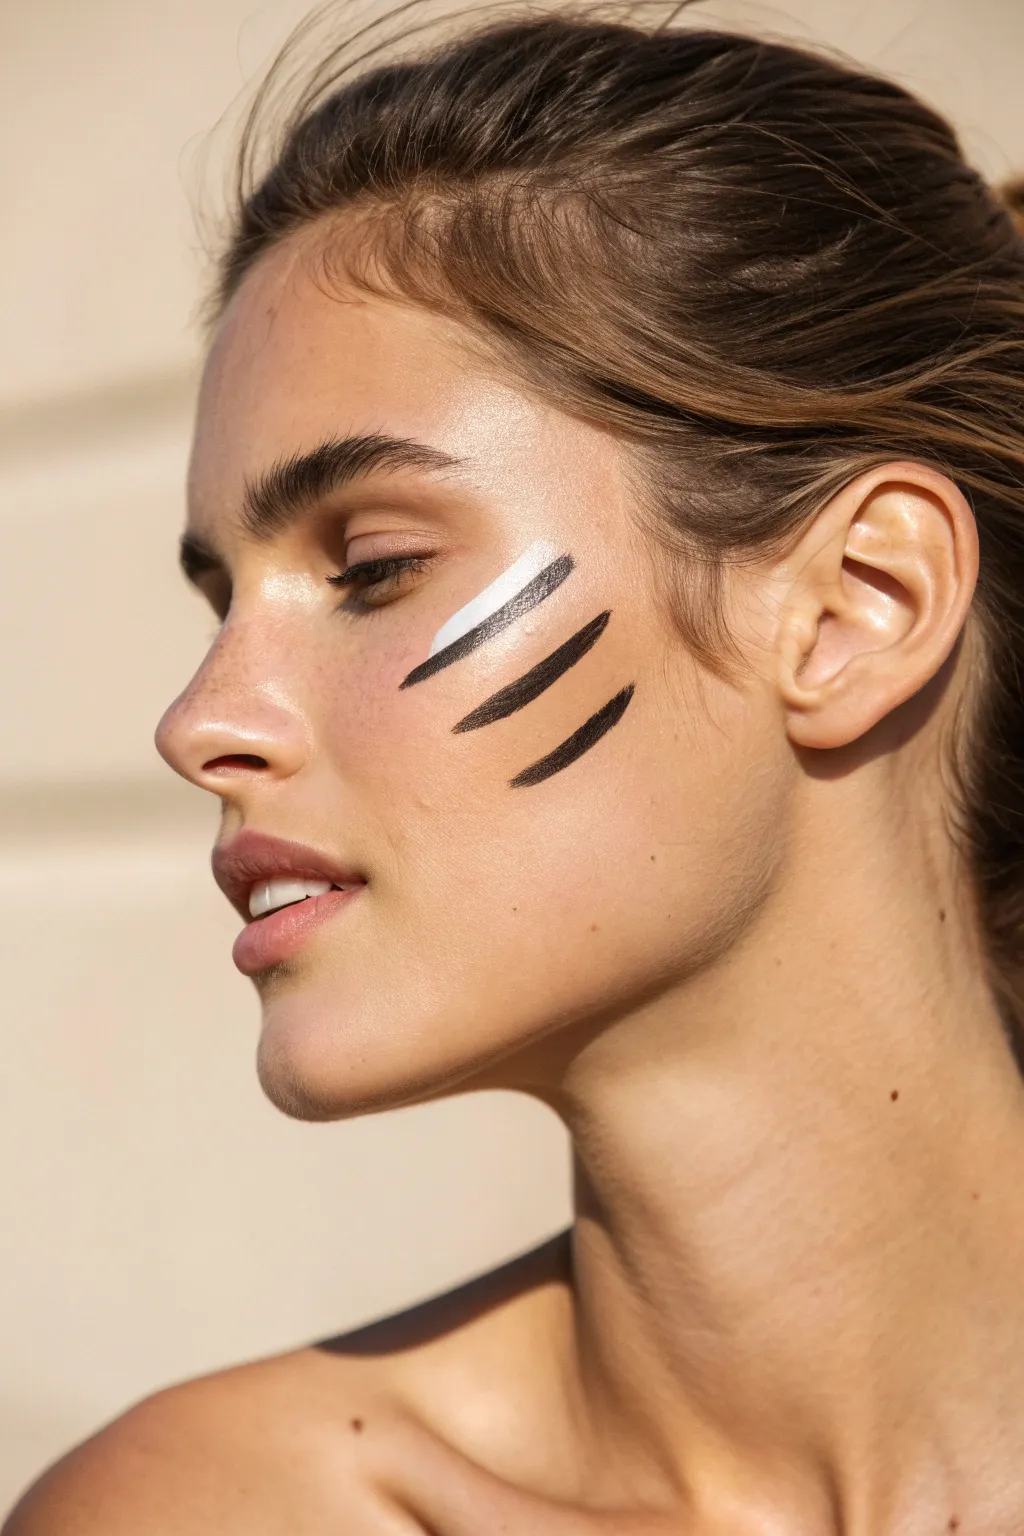
Embrace your wild side with this minimalist take on tiger stripes, perfect for a subtle yet striking costume accent. This quick design uses high-contrast black and white face paint to create a dimensional scratch effect on one cheek.
Detailed Instructions
Materials
- White cream face paint or stick
- Black cream face paint or stick
- Small angled brush (if using pot paint)
- Fine liner brush (optional for detailing)
- Setting powder
- Makeup sponge (for cleanup)
- Small cup of water
Step 1: Preparation
-
Cleanse the Canvas:
Start with clean, dry skin on your cheek area. If you are wearing foundation, make sure it is set so the face paint glides over it smoothly rather than mixing with it. -
Position the Angle:
Visualize the placement first. You want the stripes to angle diagonally upwards from the apple of your cheek towards your temple, following your natural bone structure.
Clean Edges
For ultra-sharp tips on your stripes, use a bit of concealer on a flat brush to ‘carve’ out the tails after painting.
Step 2: The Top Stripe
-
Load the White:
Load your brush or applicator stick with a generous amount of white face paint. You want high opacity for this first highlight. -
Paint the Highlight:
Starting near the top of your cheekbone, draw a diagonal stroke about 1.5 inches long. Press down slightly at the start and lift off at the end to taper the tail. -
Add the Shadow:
Clean your brush thoroughly or switch to a black stick. Draw a thin black line directly underneath the white stroke you just created. -
Connect the Lines:
Ensure the black line hugs the bottom edge of the white line perfectly with no skin showing between them, creating a single two-toned stripe.
Step 3: The Middle Stripe
-
Spacing Check:
Leave a small gap of skin, roughly the width of a pencil, below your first two-toned stripe. -
Start the Stroke:
Using just the black paint now, beginning slightly further back than the first stripe, place your brush against the skin. -
Create the Shape:
Pull the brush diagonally upward, parallel to the first stripe. This stripe should be slightly longer than the first one. -
Refine the Taper:
As you reach the end of the stroke near the hairline, lift your pressure gradually to create a sharp, pointed tail.
Add Some Glam
Press cosmetic glitter over the black stripes while the paint is still wet for a sparkling party look.
Step 4: The Bottom Stripe
-
Final Placement:
Move down another pencil-width distance for the final stripe. -
Anchor the Line:
Start this line slightly further forward on the cheek than the middle one, creating a staggered effect. -
Draw and Lift:
Draw your final black diagonal line. I find a swift motion helps keep the line smoother than going slowly. -
Check Symmetry:
Step back and look in the mirror. Use a damp cotton swab or sponge to clean up any rough edges or blunt tips to ensure they look sharp.
Step 5: Finishing Touches
-
Set the Paint:
Once the paint is tacky or dry, lightly dust translucent setting powder over the stripes to prevent smudging throughout the day. -
Enhance Contrast:
If the white has become dull, carefully dab a tiny bit more white pigment on the very center of the top stripe to make it pop.
Now you are ready to prowl with this chic and simple feline design
Little Ladybug Dot
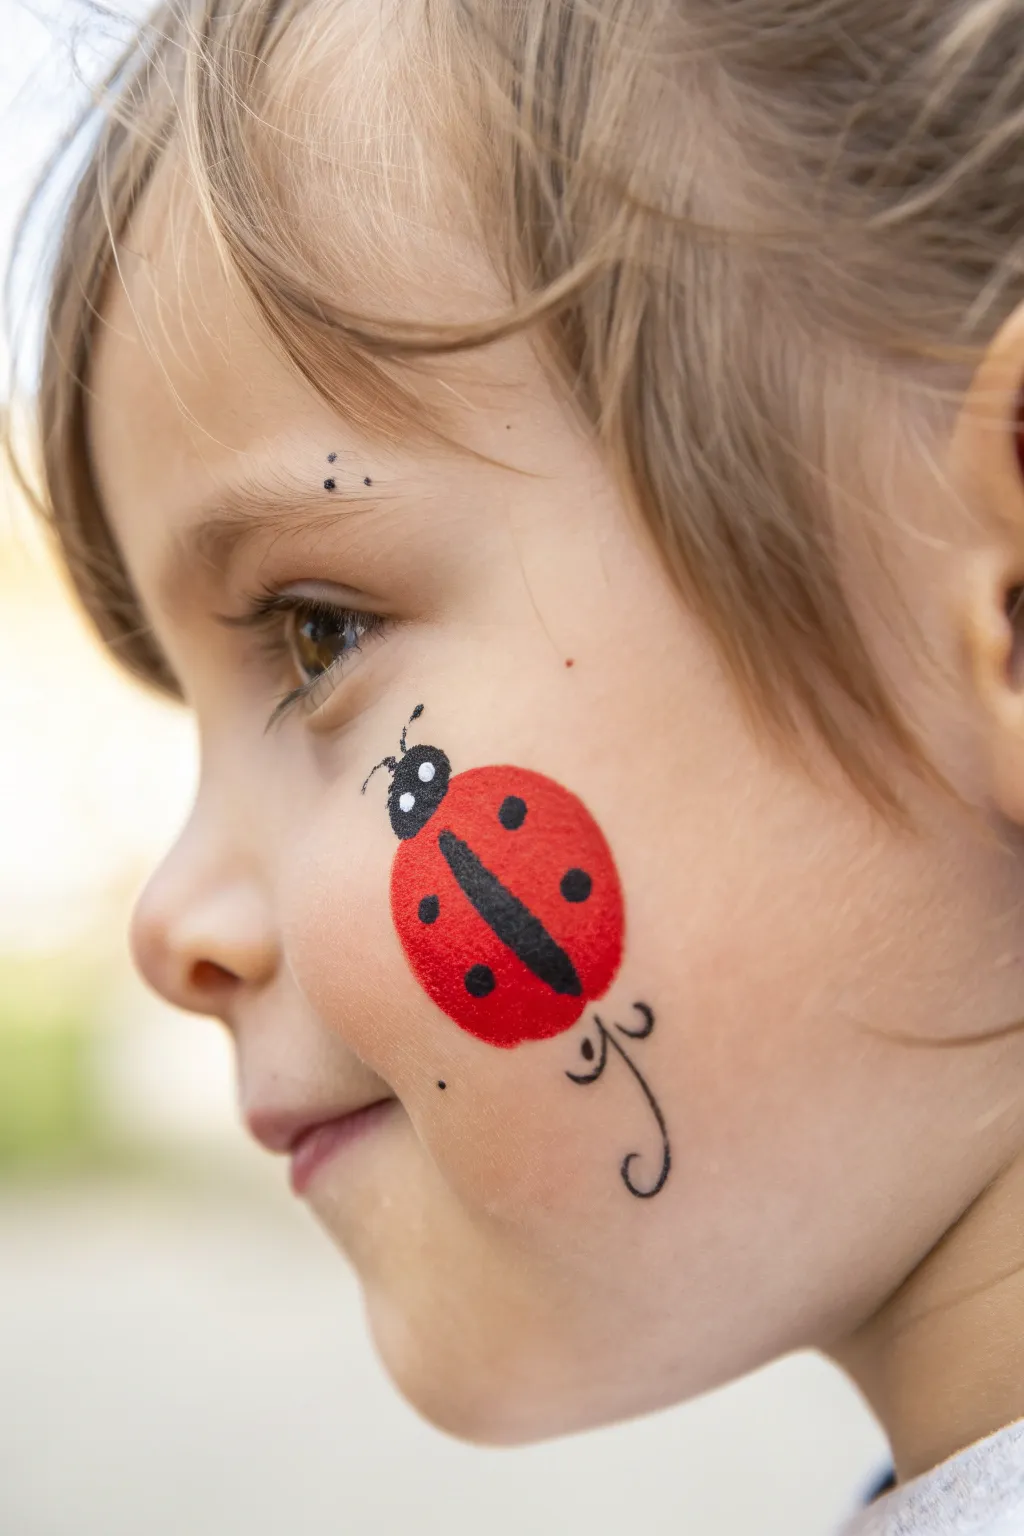

This sweet, minimalist ladybug design sits perfectly on a little cheek, adding a pop of color without overwhelming the face. It combines simple geometric shapes with delicate line work for a playful, garden-inspired look.
How-To Guide
Materials
- Red face paint (high-quality, water-based)
- Black face paint or detail liner
- White face paint for highlights
- Medium round brush (size 4 or 6)
- Fine detail brush (size 1 or 0)
- Cup of water
- Paper towel or sponge
Step 1: Painting the Body
-
Load your brush:
Start by wetting your medium round brush and loading it generously with bright red face paint. You want a creamy consistency so the color applies opaquely in one go. -
Base shape:
Position the brush on the apple of the cheek. Paint a solid red oval or slightly flattened circle. It doesn’t need to be huge—about an inch and a half wide is perfect for a subtle look. -
Fill and smooth:
Ensure the red fill is even. If you see streaks, gently dab over them with the tip of the brush while the paint is still wet to smooth out the texture. -
Let it set:
Wait a moment for the red base to dry. It should look matte and not shiny before you add the next layer, otherwise the colors might muddy together.
Clean Lines Pro-Tip
For the crispest black lines, roll your wet brush tip on your palette to form a needle-sharp point before touching the skin.
Step 2: Adding Defintion
-
Switch to black:
Clean your brush thoroughly or switch to a fine detail brush loaded with black face paint. You need a sharp point for the upcoming steps. -
Create the head:
At the top-left edge of your red oval (angled towards the eye), paint a smaller, black semi-circle or oval shape. This forms the ladybug’s head. -
Draw the center line:
Starting from the base of the black head, draw a distinct black line down the center of the red body. Make it slightly thicker in the middle to suggest the separation of the wings. -
Add the spots:
Using the very tip of your detail brush, press down gently to create 4-5 small black dots on the red wings. Try to place them symmetrically on either side of the center line.
Step 3: Fine Details
-
Antennae:
From the top of the black head, use your finest brush to flick two tiny, curved lines upward for the antennae. I find a quick, light hand works best here to keep the lines crisp. -
Flight trail:
This is the signature whimiscal touch. From the bottom of the ladybug, paint a curved, looping black line that trails downwards, ending in a tiny curl. -
Decorative ticks:
Add two tiny tick marks near the start of the flight trail to give it a sense of motion or fluttering. -
White highlights:
Clean your fine brush completely and load it with white paint. Add two tiny white dots inside the black head to look like eyes or light reflection. -
Eye accents (optional):
For extra framing, add three tiny black dots just above the eyebrow or near the temple to balance out the cheek design.
Smudge Rescue
If the black paint bleeds into the red, wait for it to fully dry. Then, use a damp cotton swab to lift the mistake before reapplying.
Now you have a delightful little garden friend ready to brighten up the day

PENCIL GUIDE
Understanding Pencil Grades from H to B
From first sketch to finished drawing — learn pencil grades, line control, and shading techniques.
Explore the Full Guide
Busy Bumblebee Oval


This whimsical design features a cartoony bumblebee buzzing away from a soft, white painted patch on the cheek. It’s a sweet, gentle look that combines opaque, creamy whites with bold black linework and bright pops of yellow.
Detailed Instructions
Materials
- High-quality white face paint (water-activated cake)
- Bright yellow face paint
- Black face paint (liner consistency)
- Round synthetic face paint brush (size 4 or 6)
- Fine liner brush (size 1 or 2)
- Small cup of clean water
- Paper towels or a soft sponge
Step 1: Setting the Background
-
Load your white paint:
Dip your medium round brush (size 4 or 6) into water and swirl it into your white face paint cake until you have a creamy, lotion-like consistency. -
Create the base shape:
On the apple of the cheek, paint an irregular, cloud-like oval shape. The edges don’t need to be perfect; use soft, dabbing motions to create texture rather than a solid block of color. -
Feather the edges:
While the paint is still slightly damp, gently dab the edges of your white patch to make it look a bit fluffy or disconnected, creating that ‘cloud’ effect. -
Add floating highlights:
Paint two small, curved white commas just outside the main white patch to suggest movement or extra fluffiness.
Step 2: Painting the Bee Body
-
Sketch the outline:
Switch to your fine liner brush loaded with thin, inky black paint. Draw a small oval shape diagonally across the white background patch. -
Draw the head:
At the front (upper left) of the oval, draw a smaller semi-circle for the bee’s head, connecting it seamlessly to the body. -
Add the stripes:
Using the same black liner brush, carefully paint two curved black stripes vertically across the bee’s body. -
Fill with yellow:
Clean your brush thoroughly or switch to a clean one. Load it with bright yellow face paint and fill in the spaces between the black stripes and the head area. -
Detail the face:
Once the yellow is dry, use a tiny dot of white paint to create an eye on the black head, then add a miniscule black dot in the center for the pupil. -
Give it antennae:
With your liner brush and black paint, draw two delicate, curved antennae sprouting from the top of the bee’s head.
Creamy is Key
For the white background patch, ensure your paint is creamy, not watery. This prevents drips and creates that nice, opaque coverage seen in the photo.
Step 3: Wings and Final touches
-
Outline the wings:
Using the black liner brush, draw two teardrop-shaped wings attached to the top of the bee’s back. Overlap them slightly for depth. -
Color the wings:
Fill the wings with white face paint. I like to let the black outline dry fully first so the white stays crisp and doesn’t turn gray. -
Add the stinger:
Paint a very small, sharp black triangle at the very back of the yellow body for the stinger. -
Create the flight trail:
Starting from under the bee, paint a series of small black dashes that curve downward and toward the jawline. -
Vary the dashes:
Make the dashes slightly irregular in spacing and angle to give the flight path a buzzing, energetic feel. -
Final check:
Look for any patchiness in the yellow or white areas and carefully touch them up with a second coat if needed.
Smudged Black Lines?
If your black outlines bleed into the yellow, your yellow paint was likely too wet. Wait for the base colors to be touch-dry before adding linework.
You now have a charming little buzzing friend to brighten up your day
Mini Sports Ball Icon
Show off your team spirit with this crisp, minimalist basketball icon painted right on the cheekbone. The clean white outlines against the warm orange fill create a graphic, sticker-like effect that is modern and sporty.
Step-by-Step Guide
Materials
- White face paint or eyeliner pot (high opacity)
- Orange face paint (bright, warm tone)
- Detail brush (size 0 or 00)
- Fine round brush (size 2)
- Small shading brush (optional)
- Small cup of water
- Cotton swabs (for cleanup)
- Setting spray (optional)
Step 1: Prepping the Base
-
Cleanse the area:
Start with a clean, dry cheek. Usually, I wipe the area specifically with a cotton pad to remove any natural oils or moisturizer that might cause the paint to slide. -
Optional pale base:
Look closely at the photo—there is a very subtle, sheer wash of pale paint underneath the basketball to make the spot glow. Using a slightly damp sponge or finger, dab a tiny amount of pale cream paint where the ball will sit.
Steady Hands
Rest your pinky finger gently on the model’s chin or jawline while painting the circle. This creates an anchor point for stability.
Step 2: Drafting the Shape
-
Outline the circle:
Load your fine round brush (size 2) with the white face paint. Paint a perfect circle on the high point of the cheekbone. Keep the consistency creamy, not watery, for sharp edges. -
Refine the circle:
If your circle looks a bit wobbly, use the very tip of the brush to thicken the line slightly to correct the shape. -
Draw the center line:
Paint a curved line running horizontally through the middle of the circle, dipping slightly downwards to create a 3D effect. -
Add the vertical curve:
Paint a vertical curved line intersecting the horizontal one. Imagine following the curve of a real sphere rather than a flat straight line. -
Create the side curves:
Add the two characteristic curved lines on the sides of the ball shape, angling them to meet the outer circle edge. This completes the classic basketball skeleton.
Team Colors
Swap the traditional orange for your favorite team’s colors, or do a half-and-half design to represent a specific jersey.
Step 3: Filling with Color
-
Load the orange paint:
Clean your brush thoroughly or switch to the detail brush (size 0). Load it with bright orange face paint. -
Fill the top section:
Carefully paint the orange inside the top-left section of the grid. Work slowly right up to the white lines, but don’t overlap them. -
Continue filling:
Move clockwise to the next section, filling it with solid orange color. The white lines act as a barrier, like a coloring book. -
Complete the orange fill:
Fill in the remaining bottom sections. Ensure the orange looks opaque; you might need a second layer once the first one is touch-dry. -
Spot check:
Look for any gaps between the orange and white. Gently tap in a tiny bit more orange if you see skin showing through.
Step 4: Refining and detailing
-
Retouch the white lines:
The orange paint might have accidentally smeared onto your white grid. Clean your detail brush and reload it with fresh white paint. -
Sharpen the grid:
Go over the internal white lines again to make them crisp and bright white, covering any ragged orange edges. -
Thicken the outer rim:
Trace over the exterior circle one final time. A slightly thicker outer rim makes the design pop and look like an appliqué. -
Add faux freckles:
Using the very tip of a dirty brush (or mix a tiny bit of orange with skin tone), dot three or four faint orange specks near the nose bridge for a playful touch -
Optional texture:
For a hyper-realistic look, you can stipple the orange paint very lightly with a dry sponge before it fully dries to mimic leather texture. -
Final dry:
Let the design sit for a full minute without moving the face too much to prevent cracking. -
Set the look:
Mist a light layer of barrier spray or setting spray over the cheek to keep the lines sharp all game long.
This sporty little accent adds just the right amount of fun to your game day look without covering your whole face in paint


Crescent Moon and Stars
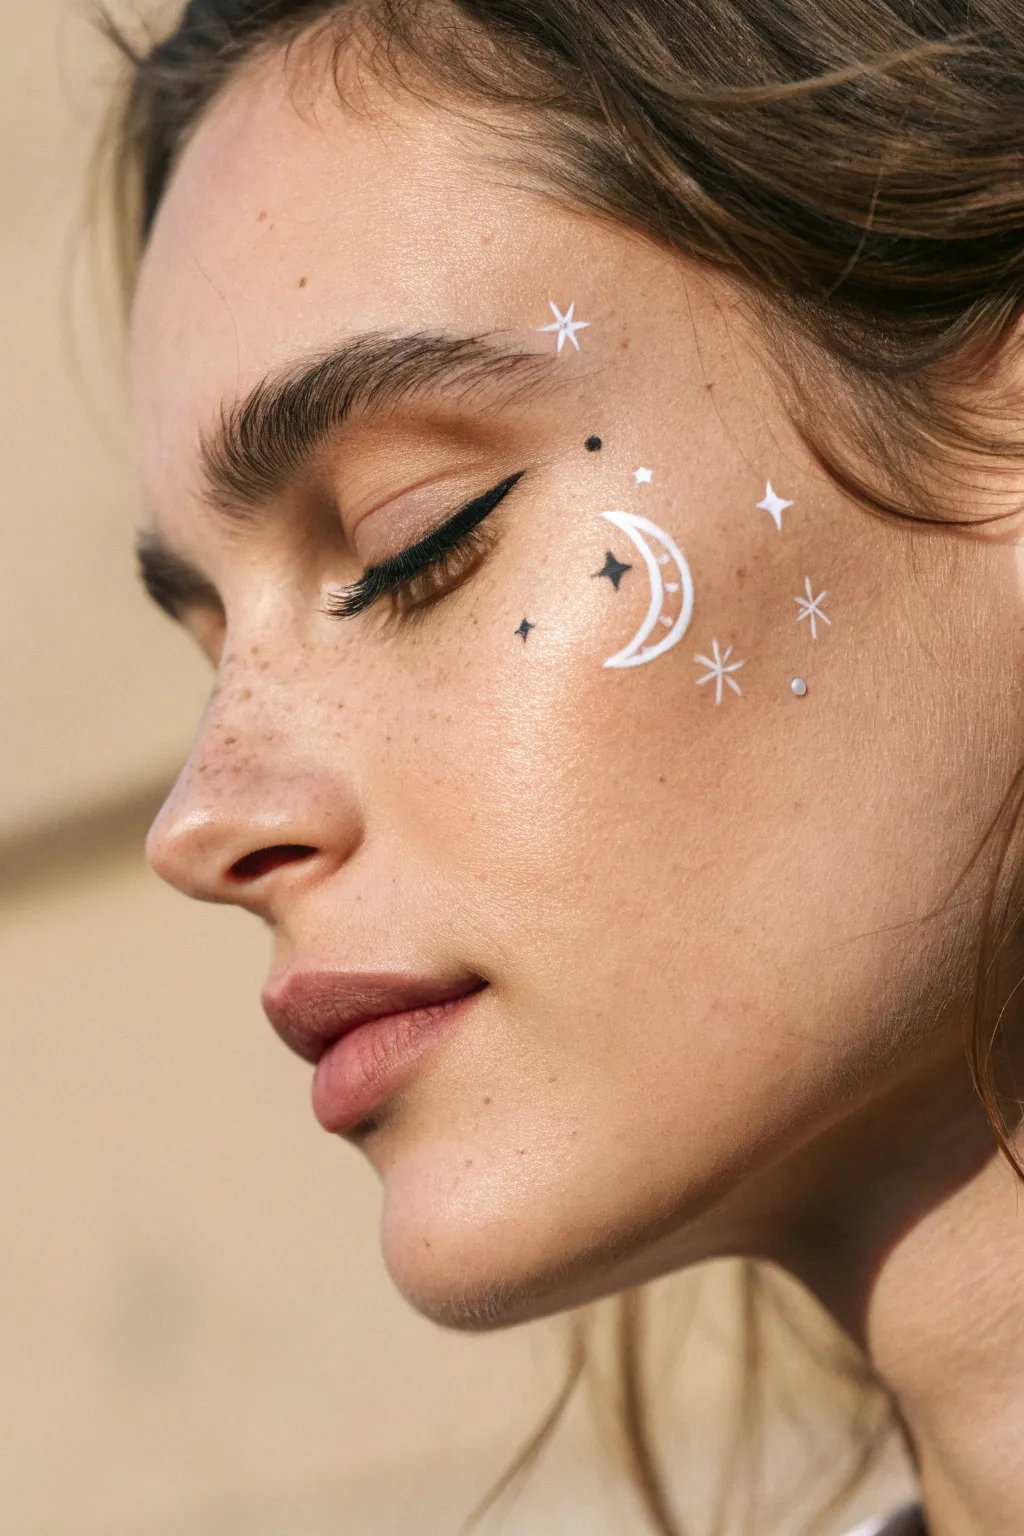
Embrace a dreamy, starry-eyed look with this delicate celestial face paint design. Featuring a crisp white crescent moon surrounded by dainty stars and dots, this minimalist style perfectly complements a natural freckled complexion.
Detailed Instructions
Materials
- White liquid eyeliner or white water-activated face paint
- Black liquid eyeliner (fine felt tip)
- Fine detail brush (size 0 or 00, if using face paint)
- Small rhinestones (optional)
- Eyelash adhesive (if using rhinestones)
- Foundation or tinted moisturizer (optional base)
- Cotton swabs and makeup remover (for clean up)
Step 1: Base and Eyes
-
Prep the canvas:
Start with clean, moisturized skin. Apply a light layer of tinted moisturizer or foundation if desired, but let your natural freckles show through for that effortless look. -
Define the lash line:
Using your black liquid eyeliner, draw a classic winged liner along the upper lash line. Start thin at the inner corner and gradually thicken towards the outer edge. -
Create the wing:
Flick the eyeliner upwards at the outer corner to create a sharp wing. Keep the line smooth and crisp to anchor the rest of the celestial design.
Clean Lines
If your hand shakes, rest your pinky finger on your cheek as a stabilizer while drawing the fine lines of the stars.
Step 2: Painting the Moon
-
Outline the crescent:
Locate the high point of your cheekbone just below the outer corner of your eye. Using white liner or white face paint on a fine brush, carefully draw the outer curve of a crescent moon shape. -
Close the shape:
Draw the inner curve to connect the two points of the crescent. I find it helpful to make the middle section slightly thicker, tapering to sharp points at the tips. -
Refine the lines:
Go over your white lines a second time if needed to ensure the white is opaque and bright against your skin tone. -
Add moon details:
For a stylized touch, draw two short, horizontal tick marks across the body of the crescent moon, giving it a whimsical, illustrated feel.
Glow Up
Add a swipe of holographic highlighter over the cheekbone before painting to make the white moon pop even more.
Step 3: Adding the Stars
-
Draw the main star:
Using the same white liner, create a four-pointed star (a simple cross shape) slightly above and behind the moon, near your temple. -
Add secondary stars:
Paint another four-pointed star below the moon and slightly forward on the cheek. Keep the lines thin and delicate. -
Create the sunbursts:
Draw two eight-pointed stars (a cross with an ‘X’ over it) further back towards the hairline to vary the celestial shapes. -
Introduce contrast:
Switch back to your black liquid eyeliner. Draw a tiny, solid black four-pointed star nestled inside the curve of the white moon. -
Add a tiny black star:
Place a very small black four-pointed star just in front of the moon, towards the nose.
Step 4: Finishing Touches
-
Sprinkle the dots:
Using the white liner, dot a few tiny specks around the moon and larger stars to look like distant stardust. -
Add black accents:
Add one or two tiny black dots near the top of the design, close to the eyebrow, to balance the contrast. -
Highlight the brow:
Draw a small white four-pointed star right at the tail end of your eyebrow. -
Apply a rhinestone:
For extra sparkle, adhere a single small rhinestone using a dot of eyelash glue. Place it low on the cheek, amidst the star cluster. -
Check symmetry:
Step back and look in the mirror. Use a cotton swab dipped in remover to clean up any smudge edges for a pristine finish.
You now have a dreamy, ethereal look perfect for festivals or just brightening up a Tuesday
Abstract Paint-Splatter Freckles
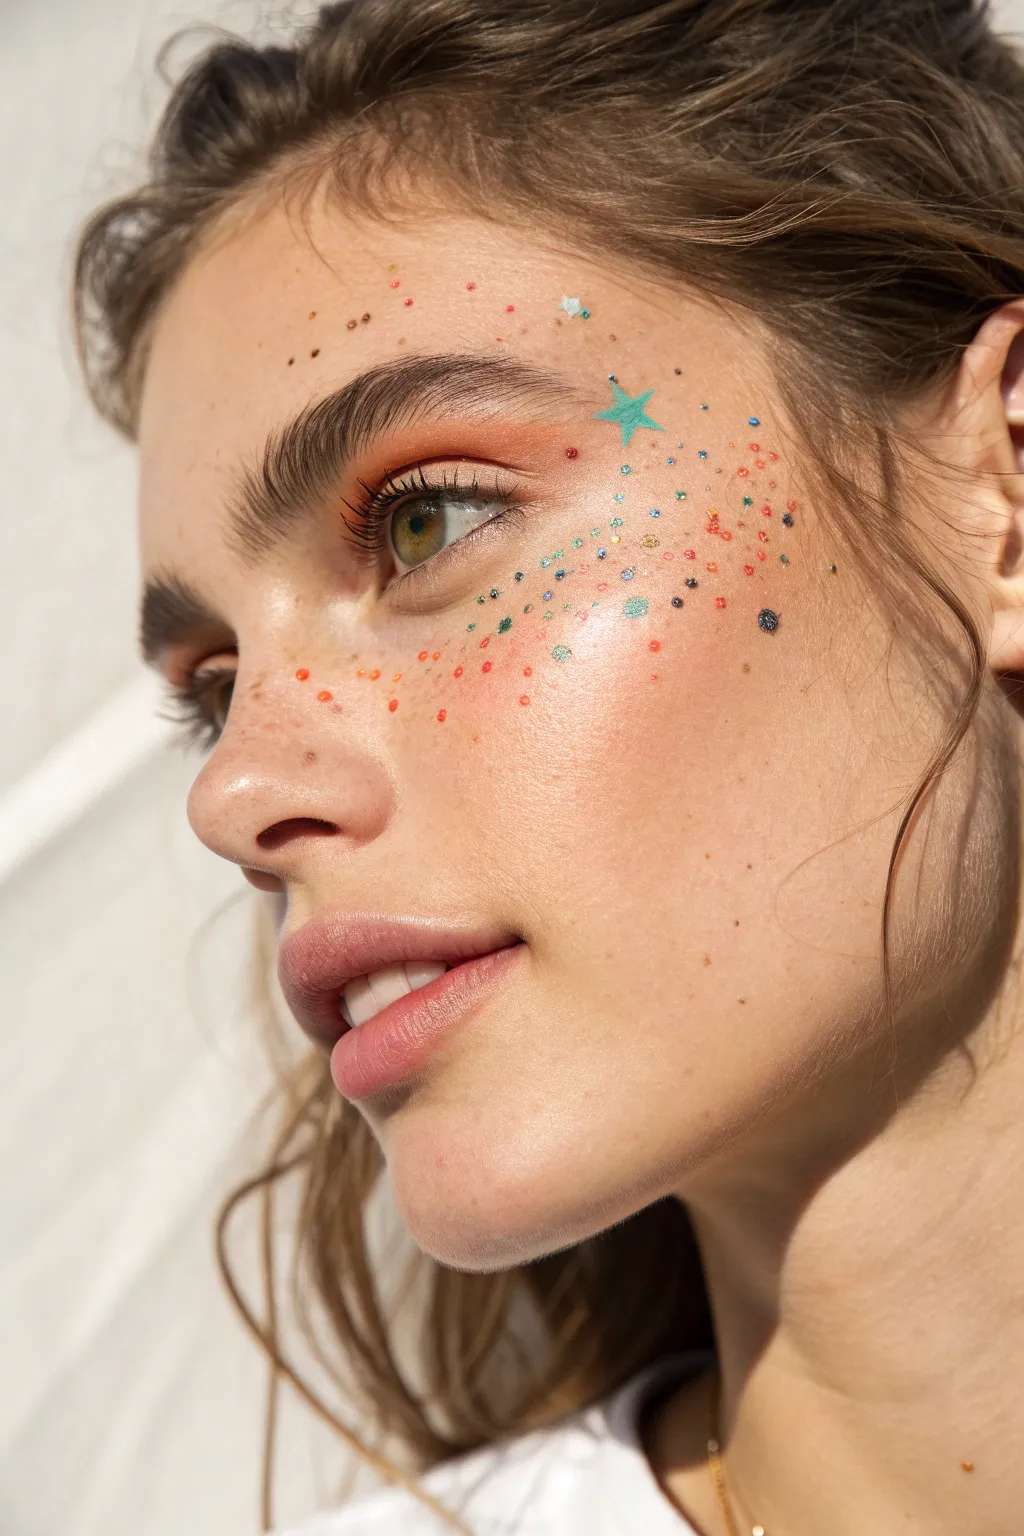
Transform your everyday makeup into a celestial masterpiece with these playful, abstract paint-splatter freckles. Combining warm sunset hues with cool turquoise accents and a touch of sparkle creates a whimsical look that sits perfectly between festival-ready and editorial chic.
Step-by-Step Tutorial
Materials
- Warm orange eyeshadow (matte)
- Small fluffy blending brush
- Water-activated face paints (turquoise, bright orange, red, navy blue)
- Fine detail brush (size 0 or 00)
- Dotting tool or toothpick
- Cosmetic glitter glue or clear lash glue
- Chunky cosmetic glitter (teal/silver mix)
- Setting spray
- Mascara (black)
- Brow gel (clear or tinted)
Step 1: Base and Eyes
-
Prepare the canvas:
Start with clean, moisturized skin. Apply your usual foundation and concealer for an even base, keeping the finish fresh and dewy rather than completely matte. -
Groom the brows:
Brush your eyebrows upward using a brow gel to create a fluffy, natural look that frames the face without being too heavy. -
Apply the wash of color:
Using a fluffy blending brush, sweep a warm orange matte eyeshadow across your entire eyelid. -
Extend the warmth:
I like to blend this same orange shadow slightly outward onto the temples and lightly across the bridge of the nose, creating a sun-kissed base for the freckles. -
Define the lashes:
Apply a coat or two of black mascara to top and bottom lashes to define the eyes without overpowering the colorful details.
Toothpick Technique
For the tiniest, most precise micro-dots, use the very tip of a wooden toothpick instead of a brush. It gives you perfect control over size and placement.
Step 2: Painting the Constellations
-
Mix your paints:
Activate your face paints with a small amount of water until they reach a creamy, opaque consistency. -
Start with orange dots:
Dip a fine detail brush or dotting tool into the bright orange paint. Create small, random clusters of dots across the cheeks and nose bridge. -
Add red accents:
Switch to red paint and add fewer, slightly smaller dots interspersed among the orange ones to create dimension. -
Paint the star:
Using the turquoise paint and your finest brush, carefully draw a five-pointed star near the temple or upper cheekbone. -
Fill the star:
Gently fill in the star shape with the turquoise paint, ensuring the edges remain crisp and sharp. -
Add cool-toned speckles:
Clean your tool and use the turquoise paint to add tiny speckles radiating outward from the star and mixing into the warm freckles. -
Create depth with blue:
Using a navy blue paint, add very tiny, sparse dots. These darker points act as contrast against the bright colors. -
Vary the sizes:
Ensure your dots vary in size—some should be pinpoint small, others slightly larger—to mimic the organic randomness of a splatter effect.
Paint Too Sheer?
If your dots look watery or transparent, let your paint palette dry for a minute after adding water. A paste-like texture gives better opacity than a liquid one.
Step 3: Finishing Touches
-
Prepare for sparkle:
Dab tiny dots of glitter glue or clear lash glue randomly among your painted freckles, focusing on the cheekbone area. -
Apply glitter:
Use a damp brush or your finger to press chunky cosmetic glitter onto the glue spots. The light catching these adds a magical quality. -
Highlight the skin:
Tap a liquid highlighter onto the high points of the cheeks, right over some of the freckles, to make the skin look glassy and hydrated. -
Set the look:
Close your eyes and mist the face with a setting spray to lock the paints and powders in place for long wear. -
Lip color:
Finish with a natural, sheer pink or nude lip gloss to keep the focus on the intricate cheek art.
Now you are ready to show off your artistic, star-dusted complexion


Have a question or want to share your own experience? I'd love to hear from you in the comments below!