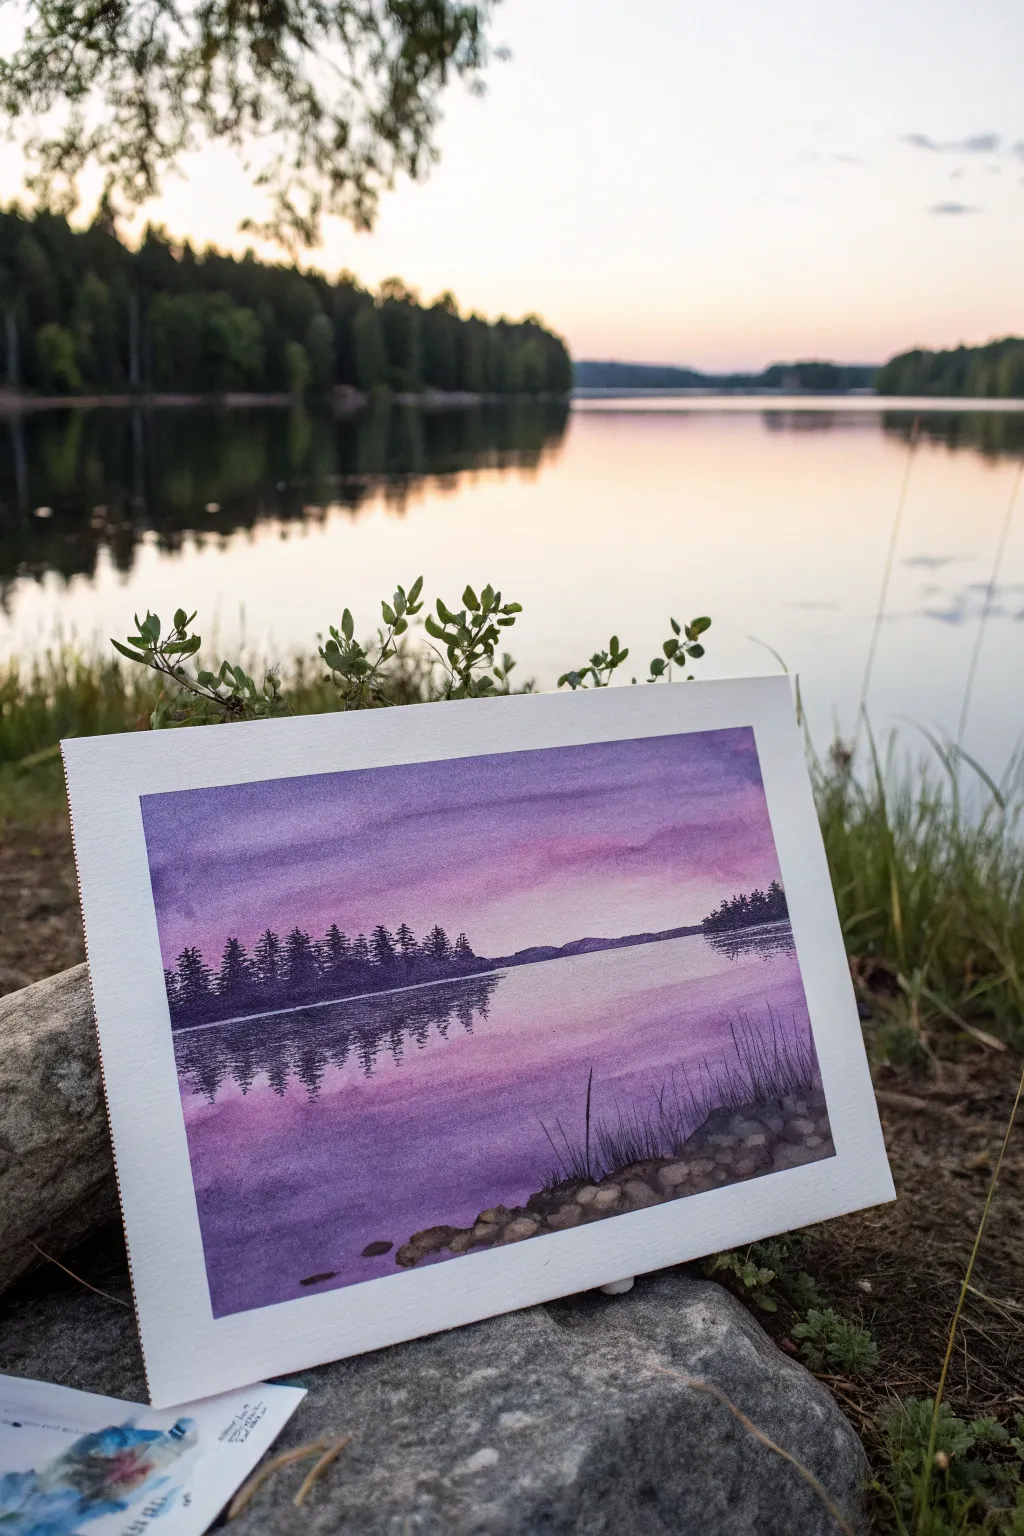
If you’re craving a color that instantly feels calm, mysterious, and a little magical, purple is always a good idea. Here are my favorite purple painting ideas—starting with the classic twilight scenes and drifting into more playful, unexpected directions.
Purple Twilight Gradient Sky
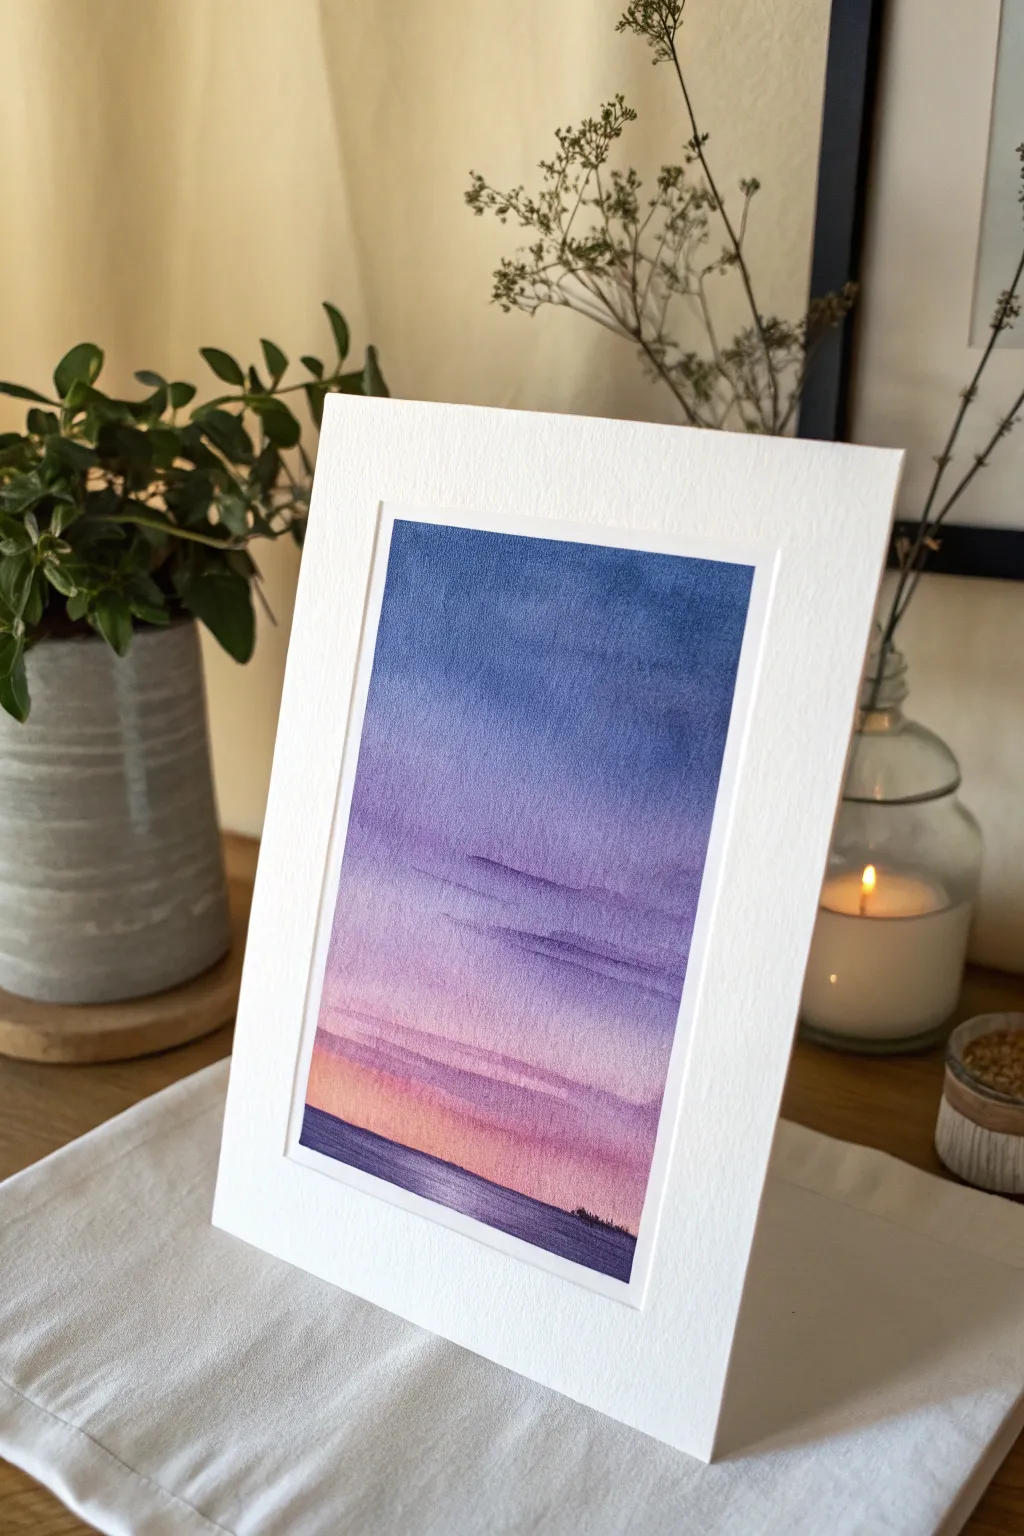
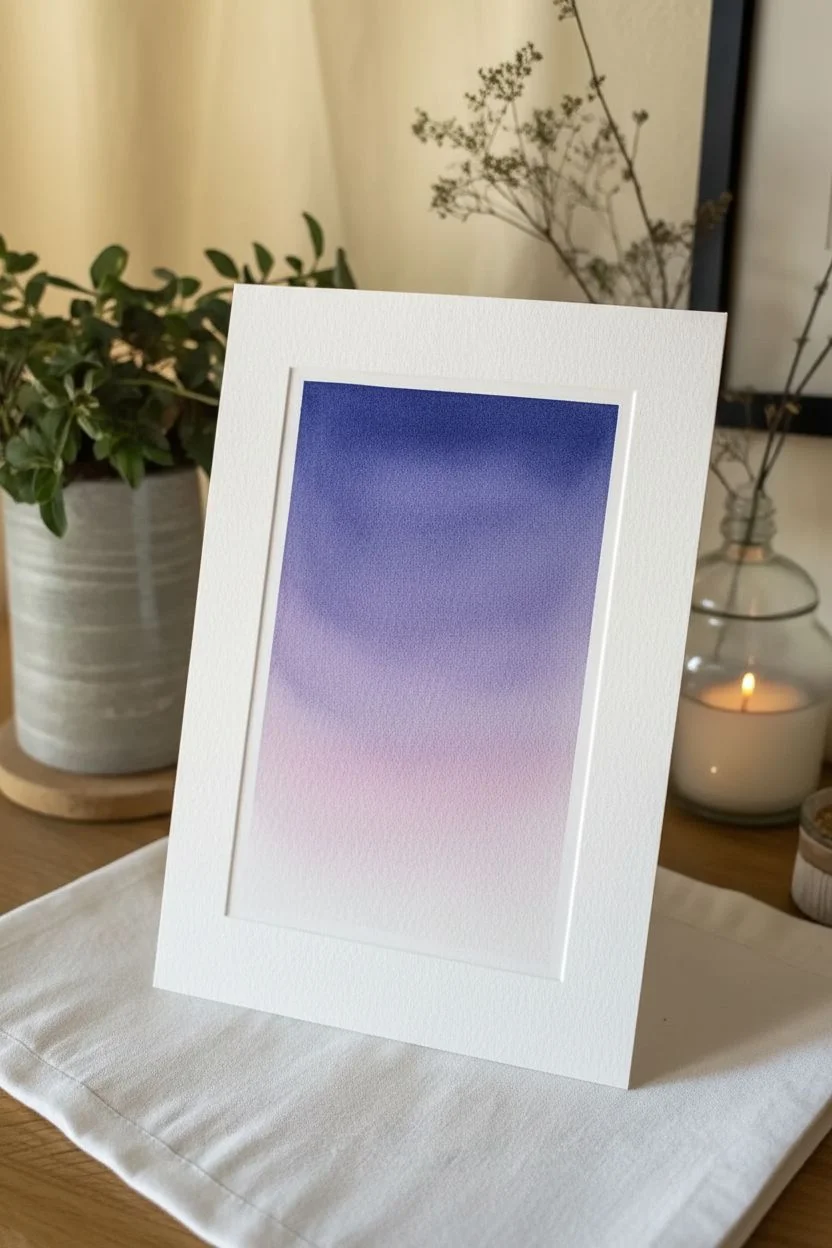
This serene watercolor project captures the quiet magic of twilight, where the sky transitions from deep indigo to a soft, glowing peach. It relies on a simple yet effective wet-on-wet gradient technique to achieve that seamless, dreamy atmosphere perfect for framing.
Step-by-Step
Materials
- Cold press watercolor paper (300 gsm)
- Painter’s tape
- Flat wash brush (1/2 inch or 3/4 inch)
- Round brush (size 4 or 6)
- Watercolor paints: Indigo, Violet/Purple, Rose Madder, Yellow Ochre
- Two jars of water
- Paper towels
- A mount board or backing board
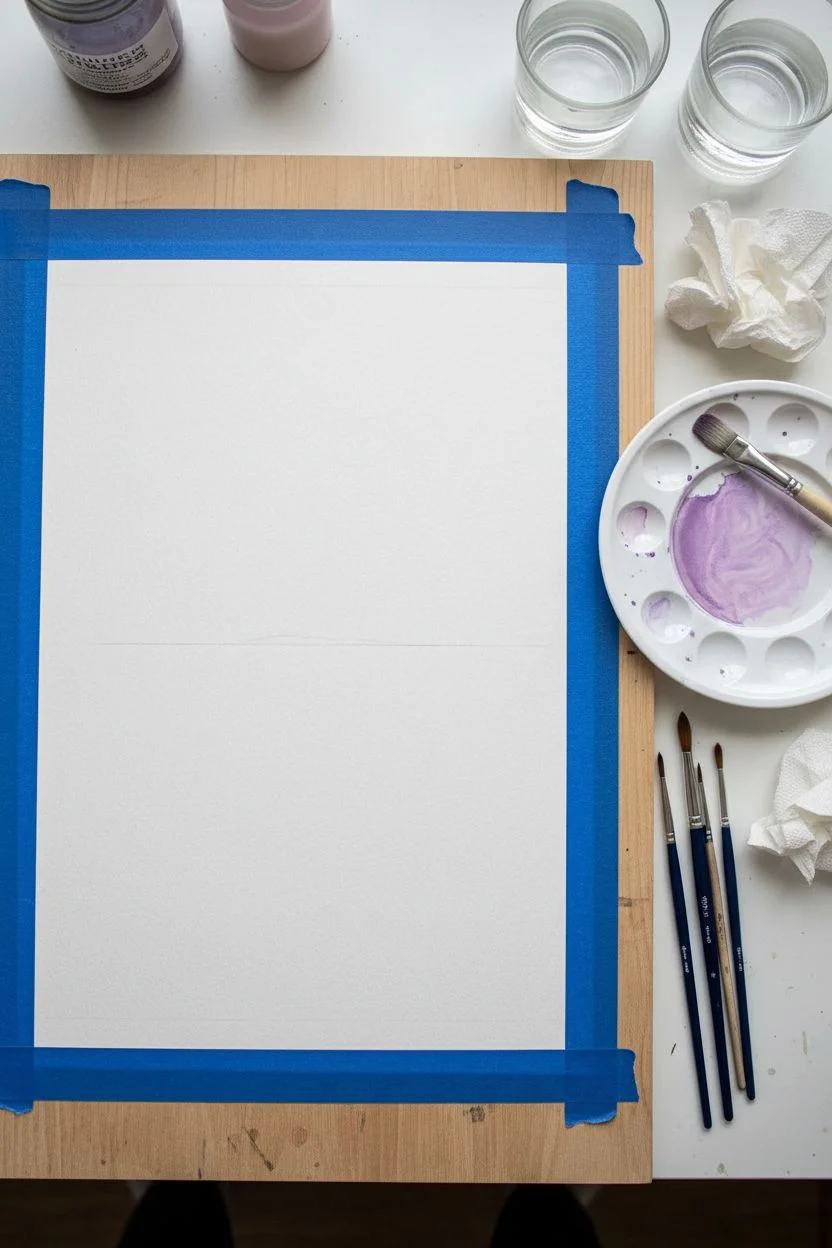
Step 1: Preparation and Base Gradient
-
Secure the paper:
Tape your watercolor paper down firmly onto your board on all four sides. This ensures a clean white border and prevents the paper from buckling when we apply heavy water. -
Pre-wet the sky area:
Using your large flat brush and clean water, dampen the entire paper area except for the bottom half-inch where the water line will eventually be. The paper should glisten but not have standing puddles. -
Mix the top color:
Create a rich, dark mixture using Indigo and a touch of Violet. You want this pigment to be strong and saturated to anchor the top of the sky. -
Apply the zenith:
Load your flat brush with the dark Indigo mix and apply it horizontally across the very top of the paper. Let gravity help pull the pigment down slightly if you have an easel, or tilt your board. -
Introduce the purple:
Clean your brush slightly and pick up pure Violet. Blend this into the bottom edge of the Indigo while the paper is still wet, working your way down about a third of the page. -
Soften the transition:
Dilute the Violet on your brush with a little water to create a lighter lavender tone. Continue painting downward, allowing the color to fade naturally as you approach the lower third.
Tape Technique
To prevent paper tearing, heat the painter’s tape with a hair dryer for a few seconds before peeling it off. This softens the adhesive.
Step 2: The Glowing Horizon
-
Add warmth:
Rinse your brush thoroughly. Mix a very watery wash of Rose Madder with a tiny hint of Yellow Ochre to get a sunset peach tone. -
Blend the horizon:
Apply this peach color starting from the bottom of your sky area, brushing upward to meet the fading lavender. Let the colors bleed into each other slightly for a soft, hazy look. -
Lift excess moisture:
If you notice any pools of water forming at the taped edges, gently wick them away with the corner of a paper towel to prevent ‘blooms’ from back-running into your smooth sky. -
Initial dry:
Let this main gradient layer dry completely. The paper must be bone dry before adding the cloud details to prevent them from blurring into a shapeless blob.
Starry Night
Once the sky is totally dry, flick a toothbrush loaded with white gouache over the indigo section to create a field of early evening stars.
Step 3: Clouds and Silhouette
-
Mix cloud shadow color:
Create a muted purple-grey by mixing your Violet with a tiny touch of the Indigo and a lot of water. It should be semi-transparent. -
Paint horizontal streaks:
Using the round brush, paint thin, elongated horizontal streaks across the middle and lower sections of the sky. Keep your hand loose to mimic drifting strata clouds. -
Soften edges:
Immediately after painting a cloud streak, use a clean, slightly damp brush to run along just the top edge of the cloud, softening it into the background. I like to keep the bottom edge sharper for definition. -
Paint the water line:
Mix a dense, dark color using Indigo and Violet—less water this time for opacity. -
Define the horizon:
Paint a straight horizontal strip across the very bottom of the paper for the distant water or land silhouette. -
Add distant texture:
While the horizon strip is wet, you can drop in tiny dots of darker pigment to suggest distant trees or ripples, but keep it minimal. -
Final dry:
Allow the painting to dry fully before carefully peeling off the tape at a 45-degree angle.
Now you have a tranquil twilight scene ready to bring a sense of calm to any room


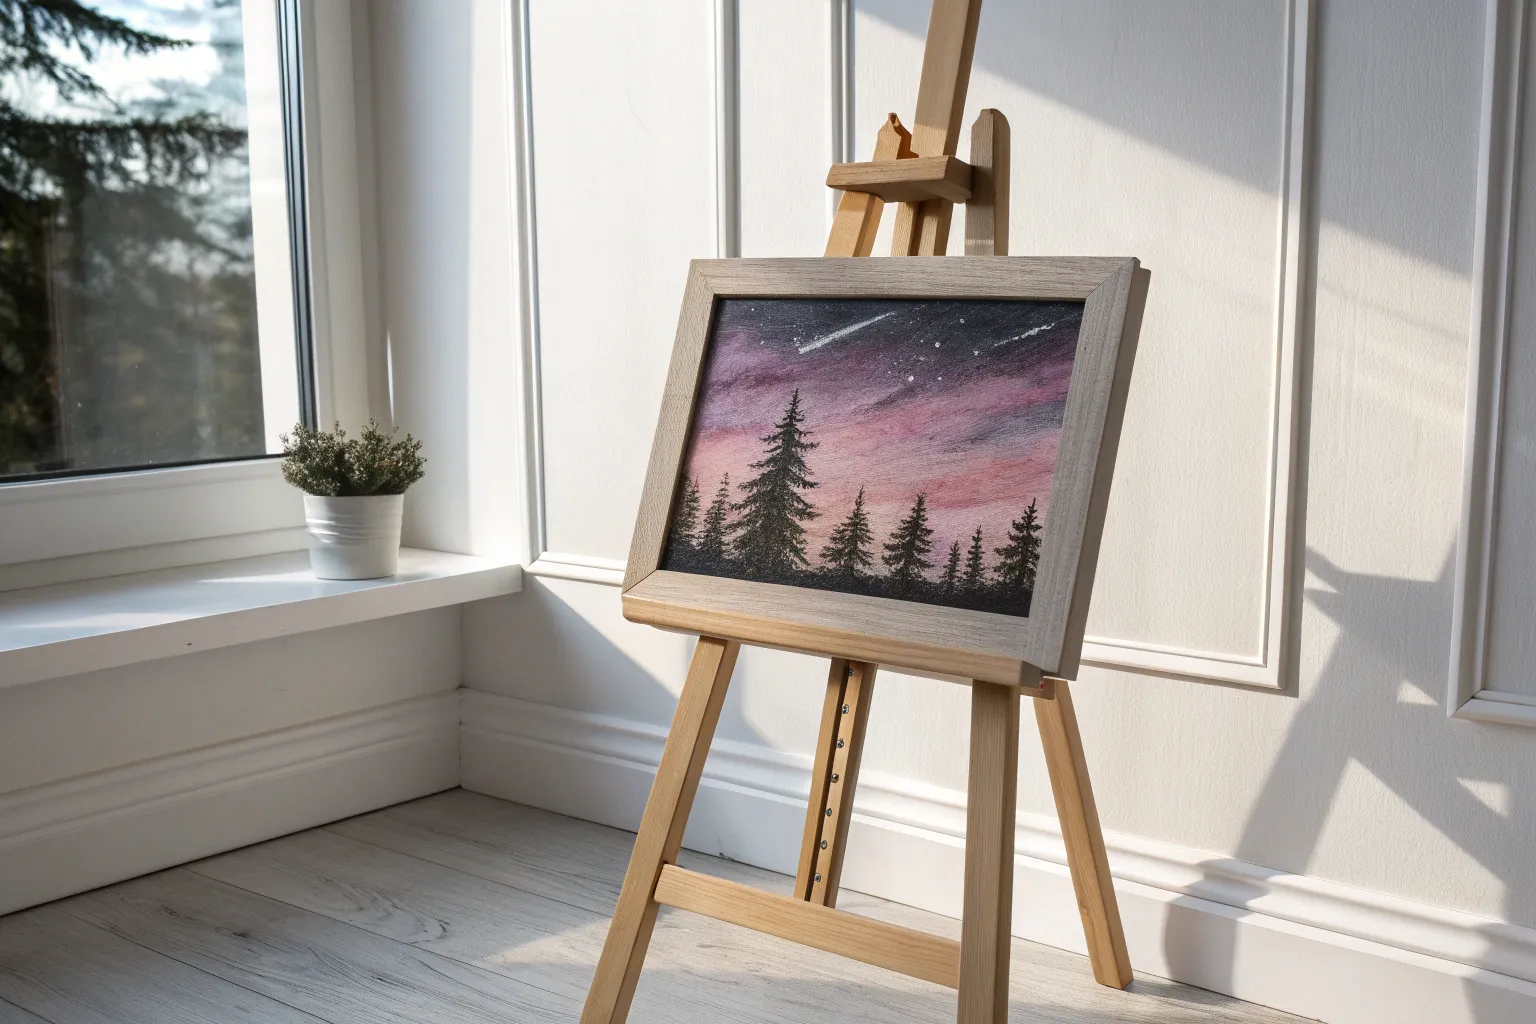
Silhouetted Pine Trees at Dusk


Capture the serene beauty of a twilight forest with this atmospheric watercolor piece. The gradient of deep violets fading into soft pinks creates a stunning backdrop for the crisp, silhouetted pine trees in the foreground.
Detailed Instructions
Materials
- Cold press watercolor paper (300 gsm)
- Painter’s tape or wash tape
- Watercolor paints (Violet/Purple, Magenta/Rose, Indigo/Payne’s Grey, Black)
- Large flat wash brush
- Medium round brush (size 6 or 8)
- Small liner or detail brush (size 0 or 1)
- Jar of clean water
- Paper towels
- Palette for mixing
Step 1: Setting the Sky
-
Prepare the paper:
Begin by taping down all four edges of your watercolor paper to a board or table. This creates that crisp white border and prevents the paper from buckling when wet. -
Pre-wet the surface:
Using your large flat brush and clean water, apply an even coat of water across the entire sky area, stopping about a third of the way up from the bottom where the darkest trees will be. -
Apply the darkest sky color:
Load your brush with a deep violet or purple. Start at the very top of the paper effectively painting a horizontal band. The wet paper will help the paint spread naturally. -
Transition to mid-tones:
Mix a slightly lighter purple or dilute your current mix with a touch of water. Paint the next horizontal section down, slightly overlapping with the top band to encourage blending. -
Introduce warmth:
Switch to a magenta or rose tone. Apply this below the purple section, blending upwards slightly. This creates the ‘sunset’ glow effect near the horizon line. -
Fade to light:
For the area just above the tree line, use very diluted pink or almost clear water to fade the color out to a soft, glowing white or pale pink. -
Create distinct clouds:
While the sky is still damp but not soaking wet, load a medium round brush with a slightly thicker mix of purple. Gently drag horizontal, irregular strokes across the upper sky to suggest drifting clouds. -
Dry completely:
This is crucial. Let the background dry 100% before moving on. If the paper is cool to the touch, it’s still wet. You can use a hairdryer on a low setting to speed this up.
Fixing “Blooms”
Did water create cauliflower-like marks in your sky? This happens if you add water to drying paint. Embrace it as cloud texture, or gently lift wet pigment with a dry brush.
Step 2: Layering the Forest
-
Mix shadow colors:
Create a transparent dark grey using indigo or a mix of purple and black. It should be dark, but more watery than your final black layer. -
Paint distant trees:
Using the medium round brush, paint a jagged, uneven tree line near the bottom horizon. These should be short and lack simpler detail, appearing ‘foggy’ or far away. -
Add mid-ground trees:
While the distant layer is drying, mix a slightly darker, more opaque version of your shadow color. Paint a second row of slightly taller trees in front of the first layer. -
Form the main silhouettes:
Now, switch to your darkest black paint. It should be a creamy consistency, not too watery. Use the tip of your brush to draw a straight vertical line for the trunk of the large focal tree on the right. -
Detail the main tree:
Starting from the top of the trunk, dab your brush downward and outward to create pine branches. Keep the strokes irregular and jagged—nature isn’t perfectly symmetrical. -
Fill the lower branches:
As you move down the trunk, make the branches wider and denser. I usually leave small gaps near the trunk where the sky shows through to keep it looking realistic. -
Add secondary trees:
Paint two or three medium-sized black pine trees on the left side to balance the composition. Use the same jagged dabbing motion for the needles. -
Ground the forest:
Fill in the very bottom of the painting with solid black to connect the trees and create the dark forest floor. -
Refine with details:
Use your smallest liner brush to add tiny, sharp tips to the tops of the trees and extending from the ends of the branches for a finer texture. -
Reveal:
Once the black paint is completely dry, slowly and carefully peel away the painter’s tape at a 45-degree angle to reveal your clean white borders.
Starry Night Upgrade
Once the sky is dry but before painting trees, splatter white gouache or opaque white watercolor from a toothbrush to create a field of stars.
Now you have a tranquil twilight scene ready to frame or gift to a nature lover


Misty Purple Mountain Layers
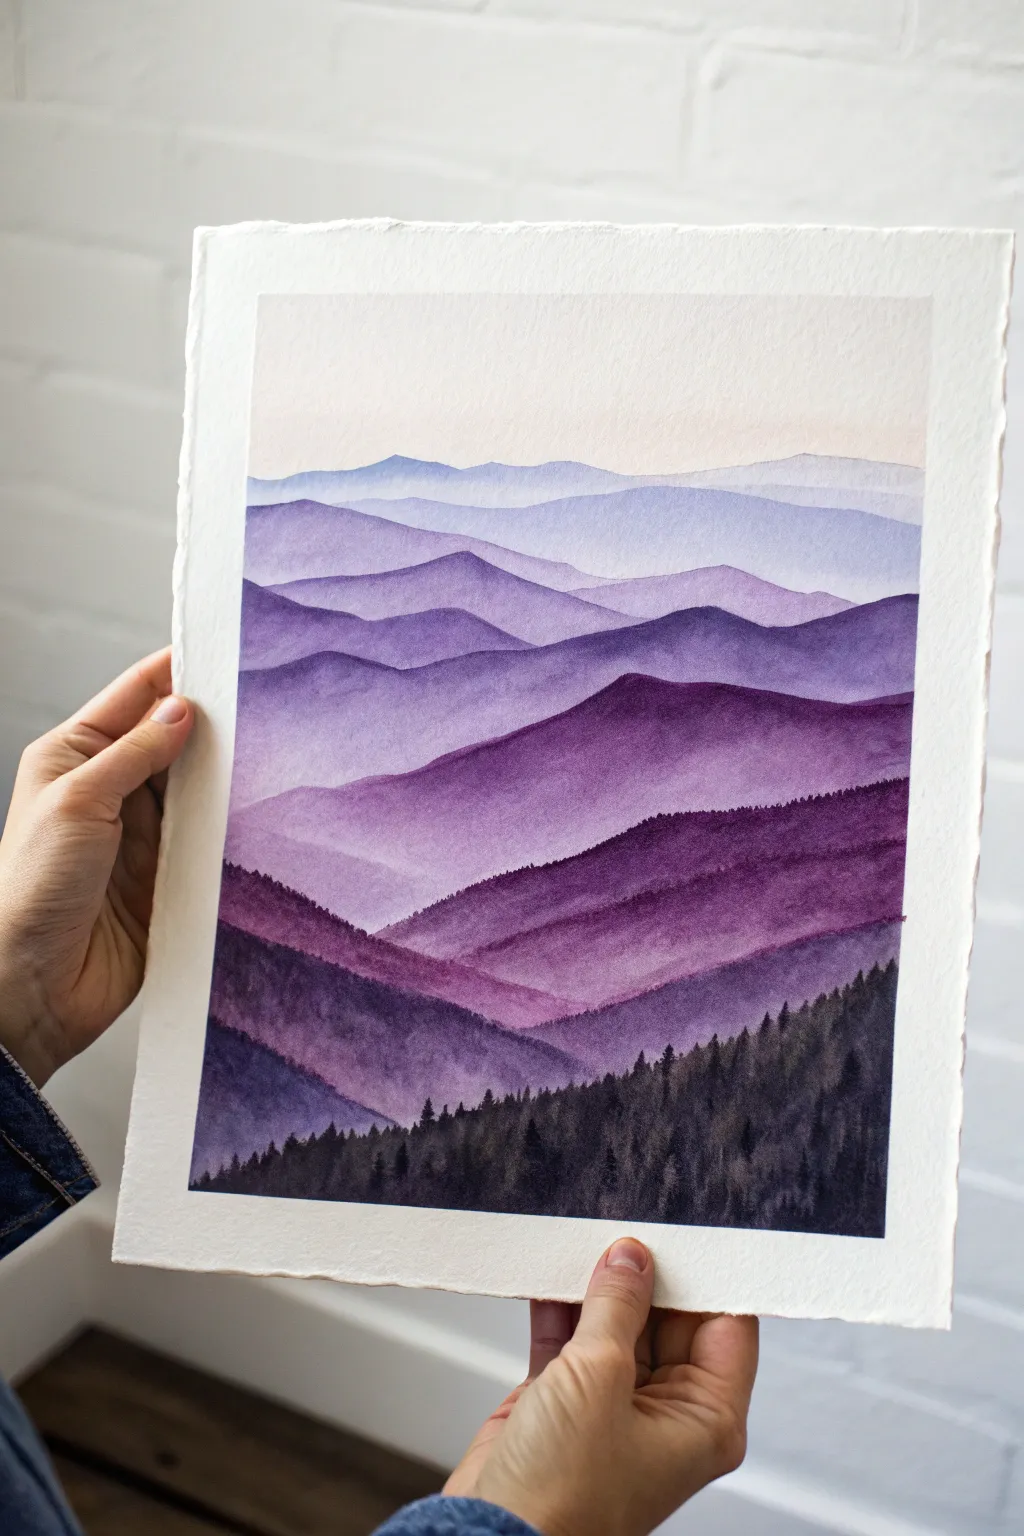
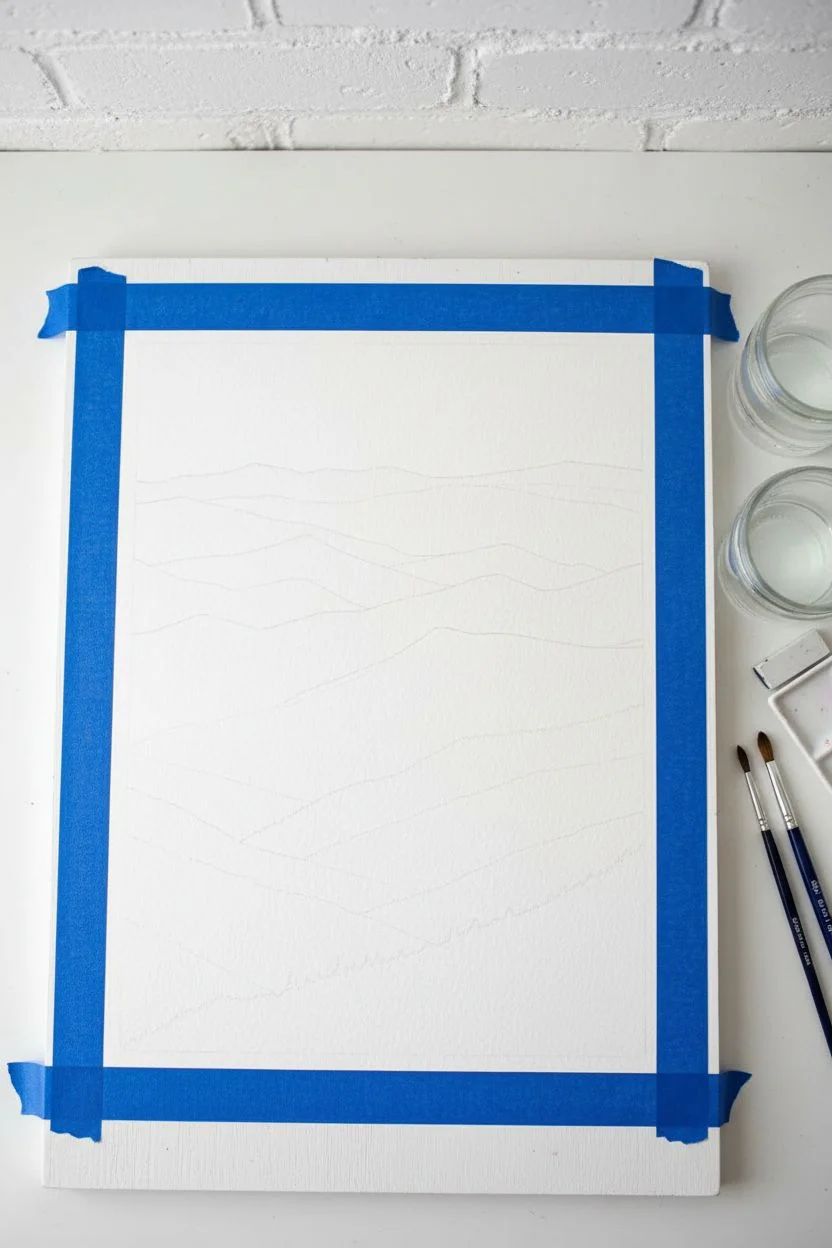
Capture the serene beauty of rolling mountain layers with this watercolor project that relies on atmospheric perspective. By gradually darkening your purple mix as you move from background to foreground, you will create a stunning illusion of depth.
Step-by-Step
Materials
- Cold Press Watercolor Paper (300 gsm)
- Watercolor Paints (Purple Lake, Payne’s Grey, Ultramarine Blue, Alizarin Crimson)
- Round Brushes (Size 6 or 8 for washes, Size 2 for details)
- Flat Wash Brush (1 inch)
- Masking Tape or Washi Tape
- Pencil and Eraser
- Two Jars of Water
- Paper Towels
- Mixing Palette
Step 1: Preparation & Sketching
-
Prepare the paper:
Begin by taping down your watercolor paper to a board to prevent warping. If you want the deckled edge look shown in the photo, you can skip taping the edges, but be mindful of water control. -
Sketch the ridge lines:
Lightly sketch the outlines of your mountain ranges. Draw about 5-6 distinct layers, starting from a high horizon line and zig-zagging down to the bottom. Keep the lines faint so they don’t show through the transparent paint.
Fixing Water Blooms
If paint dries with a ‘cauliflower’ edge, wait for it to fully dry. Then, gently scrub the hard edge with a damp stiff brush to soften it, or glaze a darker layer over it to hide the texture.
Step 2: Painting the Background
-
Mix the sky wash:
Create an extremely dilute wash of water with a tiny hint of Alizarin Crimson or a warm pink. The goal is a barely-there glow for the sky. -
Paint the sky:
Using your flat brush, wet the sky area first with clean water, then drop in your pale pink wash. Let it fade to white near the top of the first mountain range. Allow this to dry completely. -
Mix the furthest mountain color:
Mix a very watery, pale lavender using Purple Lake and plenty of water. It should be transparent and light. -
Paint the first range:
Paint the silhouette of the furthest mountain range. Keep the bottom edge of this shape soft by adding jagged water strokes or letting it fade out if you want a misty look, though a hard edge works well for clear days.
Creating Depth
Remember the rule of atmospheric perspective: objects become lighter, bluer, and less detailed the further away they are. Keep your foreground warm and dark, and your background cool and pale.
Step 3: Building the Middle Layers
-
Darken the mixture:
For the second range, add a touch more Purple Lake and a tiny bit of Ultramarine Blue to your mix. It should be slightly darker than the previous layer. -
Paint the second layer:
Once the first layer is dry, paint the second mountain shape. Often, painting right over the bottom of the previous layer is fine since watercolors are transparent, but try to respect the ridge line carefully. -
Create variation:
As you move to the third and fourth layers, introduce more heavy pigment. I find that adding a dot of Payne’s Grey starts to desaturate the purple nicely, making it look more like distant rock. -
Wet-on-wet texture:
While the third layer is still damp, you can drop in slightly darker purple pigment near the peaks and let it bloom downward. This adds subtle texture without drawing specific details. -
Continuing down:
Repeat this process for the next two layers. Each layer must be completely dry before starting the next one to avoid the paint bleeding into the layer above it (unless you want a blurred effect).
Step 4: The Foreground & Details
-
Mix the deepest shadow color:
For the closest mountain layer just before the trees, use a saturated mix of Purple Lake and Payne’s Grey. This needs to be much darker to bring it forward visually. -
Paint the foreground ridge:
Apply this dark purple mix to the lowest mountain shape. While it is wet, you can lift out a few spots with a thirsty brush to suggest mist in the valleys. -
Prepare the tree line color:
Mix your darkest value yet: a dense combination of Payne’s Grey, a touch of Purple Lake, and perhaps a bit of burnt umber or dark green if you want an earthy tone. It should look nearly black. -
Start the tree line:
Switch to your Size 2 detail brush. Along the very bottom edge of the paper, begin painting vertical strokes to suggest pine trees. -
Detailing the trees:
Use the tip of the brush to create the delicate tops of the fir trees. Vary the heights so the forest line looks natural and not like a fence. -
Fill the bottom:
Fill in the solid mass of the forest below the intricate tree tops. Ensure this dark mass grounds the entire composition. -
Final touches:
If I notice any hard water lines where I didn’t want them, I gently scrub them with a damp, stiff brush. Let the entire piece dry completely before removing tape or handling.
Once dry, frame your artwork to highlight those beautiful gradient layers


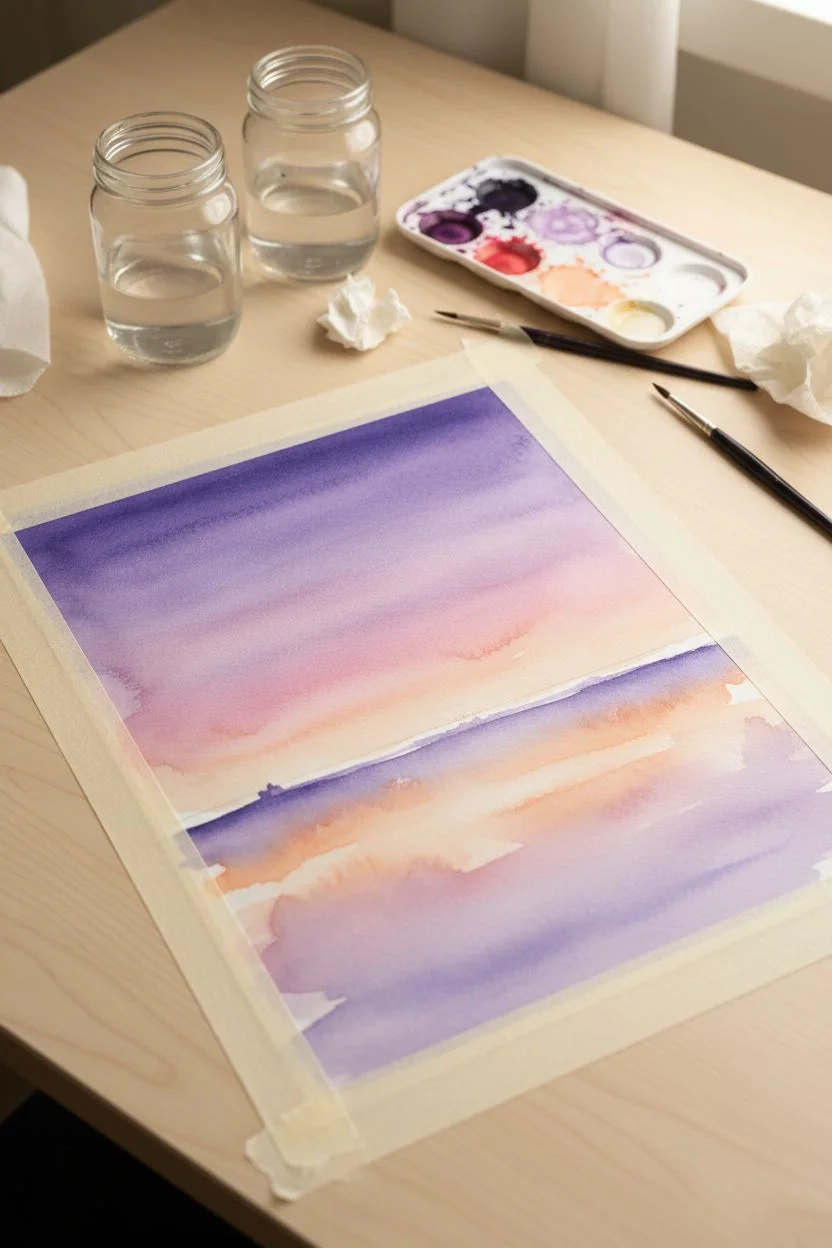
Lavender Field at Sunset

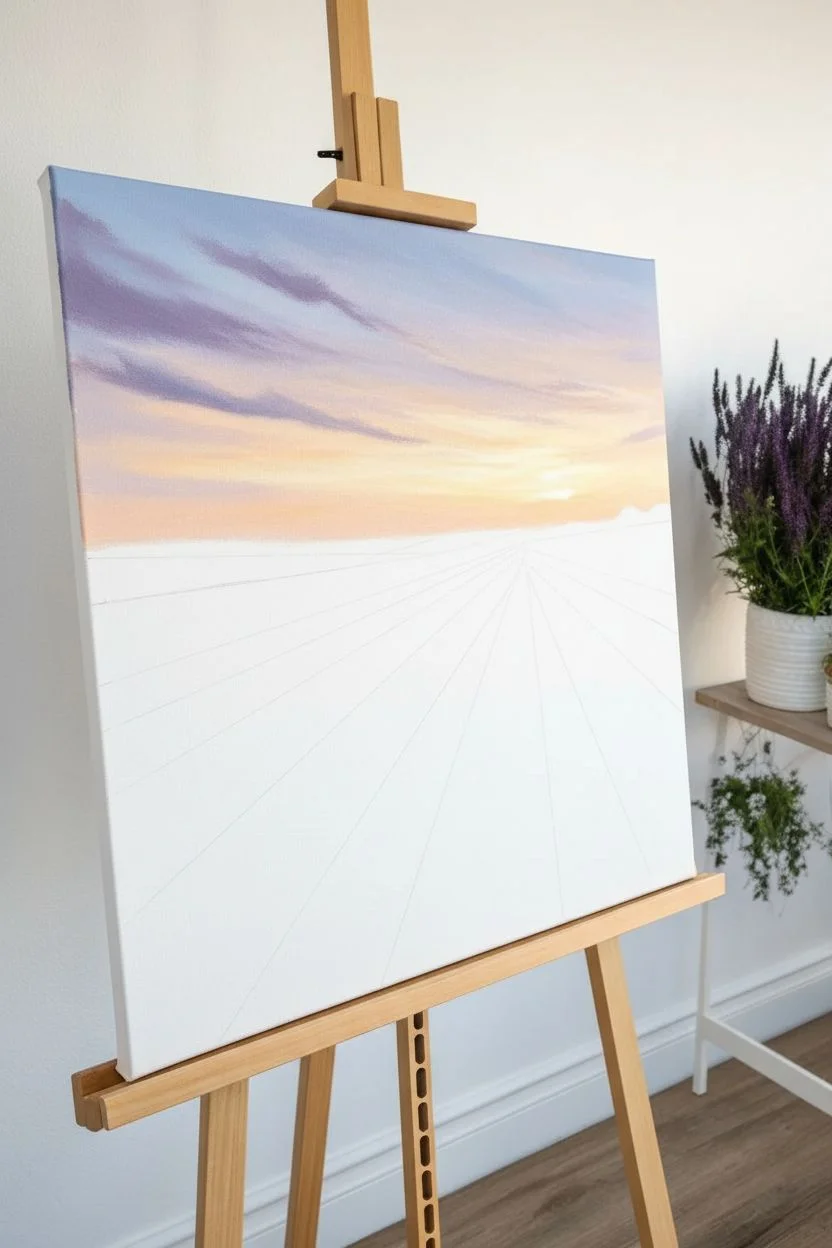
Capture the breathtaking warmth of a sunset over rolling rows of lavender in this acrylic painting project. You will focus on creating depth through perspective lines and balancing warm sky tones with cool floral hues.
Detailed Instructions
Materials
- Stretched canvas (e.g., 16×20 inch)
- Acrylic paints: Dioxazine Purple, Ultramarine Blue, Titanium White, Cadmium Yellow Medium, Cadmium Orange, Burnt Sienna, Burnt Umber, Sap Green, Hooker’s Green
- Large flat brush (for sky)
- Medium filbert brush (for mid-ground)
- Small round brush (size 2 or 4)
- Fan brush (optional, for texture)
- Palette knife
- Water cup and paper towels
- Easel
Step 1: Planning and Sky
-
Establish the horizon:
Begin by lightly sketching a horizon line about one-third down from the top of the canvas using a pencil or a brush with diluted Burnt Sienna. This keeps the focus heavily on the expansive field. -
Draft the perspective lines:
Sketch the converging lines of the lavender rows. Start from the bottom corners and edges, angling them all toward a single vanishing point near the center-right of the horizon. -
Block in the sky gradient:
Mix a soft pale blue using Ultramarine Blue and Titanium White. Apply this to the top corners of the sky area, blending downwards. -
Add the sunset warmth:
While the blue is still slightly wet, blend in a mix of Cadmium Yellow and White near the horizon. Transition smoothly between the blue and yellow by adding a touch of Cadmium Orange to create a soft, glowing peach tone in the middle sky. -
Paint the clouds:
Mix Dioxazine Purple with a little White and a touch of Orange to dull it down. Use the corner of your flat brush to sweep in diagonal, wispy cloud formations stretching across the top left, mimicking the wind direction.
Step 2: Mid-Ground and Trees
-
Layer the distant hills:
Create a hazy purple-grey color using Dioxazine Purple, White, and a tiny dot of black or blue. Paint the distant hills along the horizon, keeping the edges soft to suggest atmospheric depth. -
Paint the solitary tree trunk:
Using Burnt Umber and a small round brush, paint the silhouette of the main tree on the left side. Don’t worry about leaves yet; just focus on the winding, organic shape of the trunk and main branches. -
Foliage stippling:
Mix Sap Green with a little Burnt Umber for a dark base green. Use an old round brush or a fan brush to stipple the canopy of the tree. I like to tap the brush gently to leave gaps, letting the sky peek through. -
Tree highlights:
Mix Sap Green with Cadmium Yellow. Lightly dab this lighter green onto the right side of the tree’s foliage to indicate where the setting sun is hitting the leaves.
Pro Tip: Atmospheric Haze
Add more white to your colors as you paint objects further away. The lavender in the distance should be paler and bluer than the vibrant purple in the foreground.
Step 3: The Lavender Rows
-
Underpainting the earth:
Mix Burnt Sienna with a little White and Orange to create a warm, reddish soil color. Paint the triangular strips of dirt between the lavender rows, making sure they get narrower as they recede toward the horizon. -
Base layer for lavender:
Mix a dark purple using Dioxazine Purple and Ultramarine Blue. Fill in the rows of lavender with this dark shade. This will serve as the shadow color deep inside the bushes. -
Mid-tone texture:
Lighten your purple mix with Titanium White. Using a filbert brush, dab vertical, short strokes along the tops of the lavender rows. Follow the perspective lines carefully. -
Foreground detail:
In the immediate foreground at the bottom of the canvas, switch to a smaller brush. Paint distinct, individual stalks and flower spikes using a lighter lavender mix to show texture. -
Adding foliage base:
Mix Hooker’s Green with a little purple to darken it. Dab this color at the very bottom of the lavender bushes in the foreground where the stems meet the dirt. -
Sunlit highlights:
Mix a very pale lilac using mostly White and a tiny bit of Purple and Pink. delicately touch the tops of the lavender rows on the right side of each mound, mimicking the directional light from the sunset.
Level Up: Texture Gel
Mix heavy body gel medium into your foreground purple paint. Use a palette knife to apply it, creating actual raised bumps that mimic the texture of flower buds on the canvas.
Step 4: Final Touches
-
Brighten the sun:
Using pure Titanium White with just a speck of Yellow, add a small, intense circle for the sun just above the horizon line on the right, blending it slightly outward into the sky. -
Soil texture:
Mix a sandy beige color. Lightly dry-brush this over the reddish earth paths to simulate gravel and dry dirt texture. -
Final contrast check:
Darken the shadows under the front-most lavender bushes with deep purple or indigo to make the bright tops pop.
Step back and admire the calm, radiant landscape you have brought to life on your canvas
BRUSH GUIDE
The Right Brush for Every Stroke
From clean lines to bold texture — master brush choice, stroke control, and essential techniques.
Explore the Full Guide
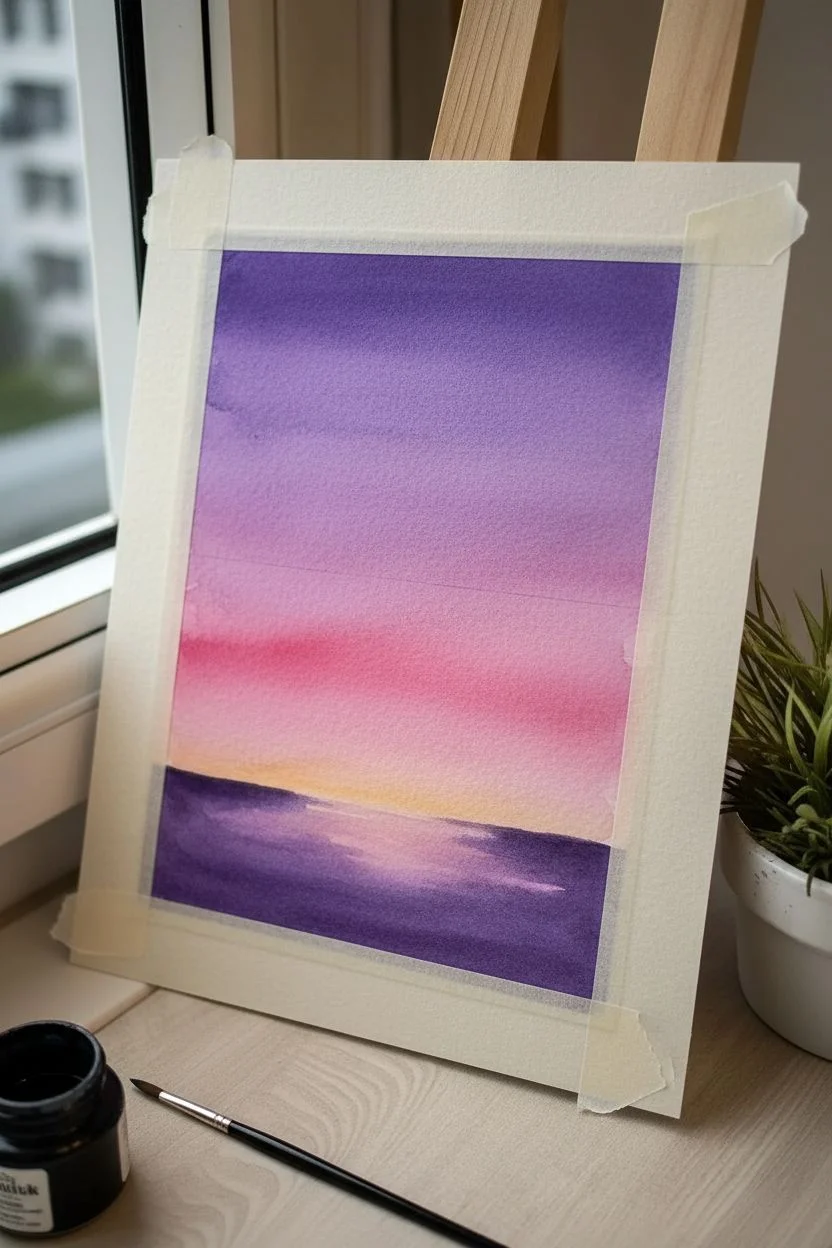
Purple Ocean Horizon Glow
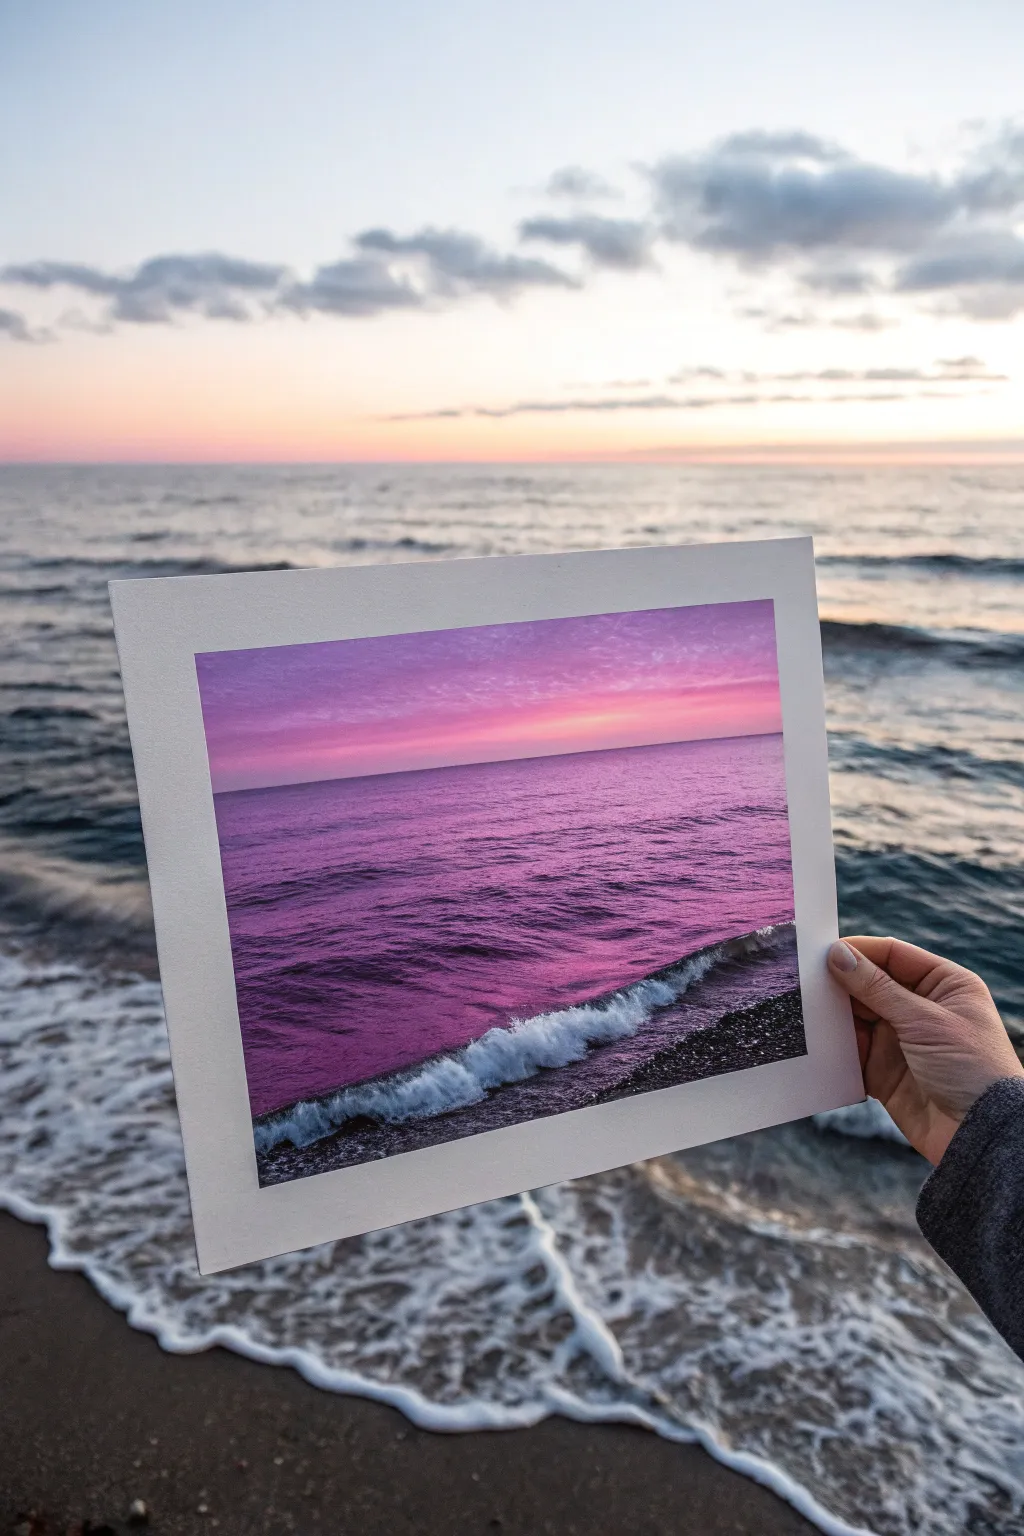
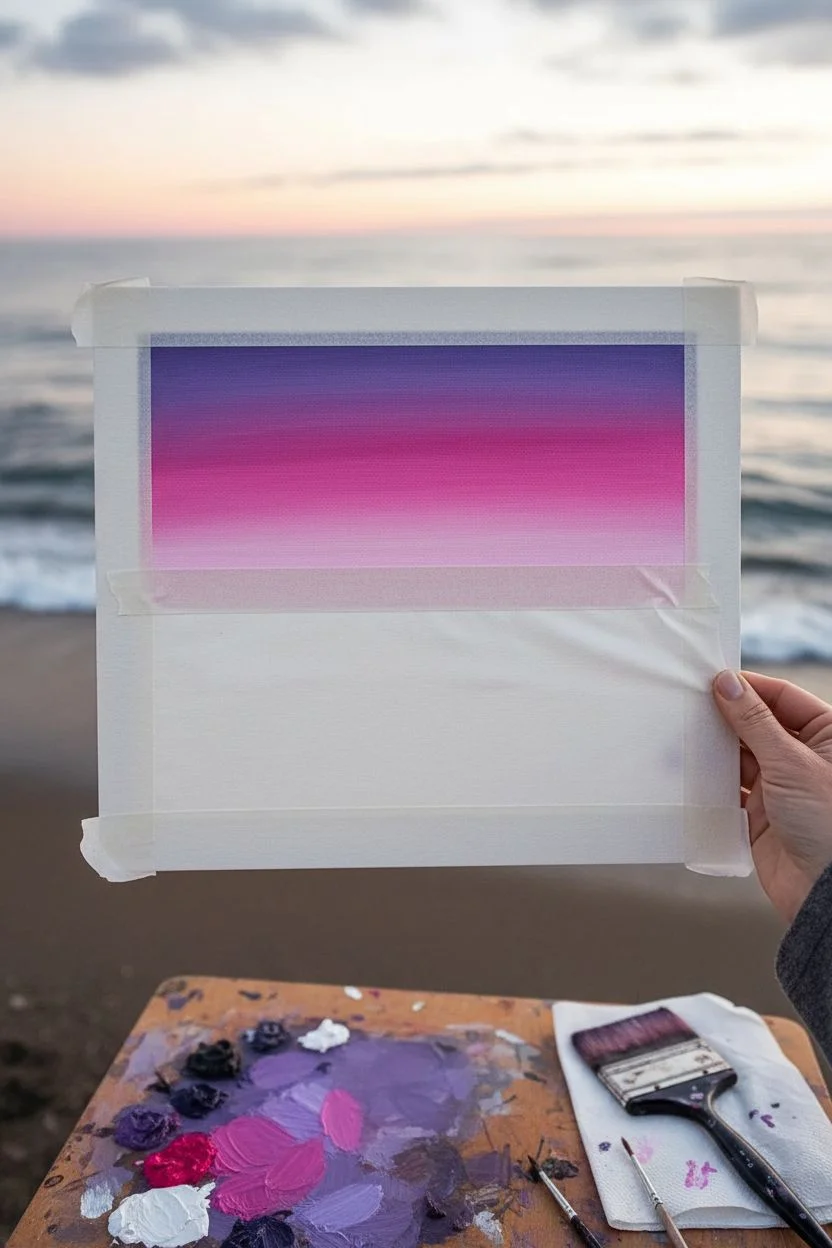
Capture the serene beauty of twilight with this vibrant acrylic painting that transforms a standard ocean view into a dreamlike purple paradise. Perfect for beginners, this project focuses on blending gradients and capturing the movement of breaking waves.
How-To Guide
Materials
- Acid-free watercolor paper or canvas board (approx 8×10)
- Masking tape
- Acrylic paints: Titanium White, Ultramarine Blue, Magenta/Rose, Dioxazine Purple, Black
- Flat shader brushes (large and medium)
- Small round detail brush
- Fan brush (optional)
- Palette for mixing
- Cup of water and paper towels
Step 1: Setting the Scene
-
Tape margins:
Begin by taping down all four edges of your paper to a flat surface. This not only keeps the paper from buckling but creates that crisp white border seen in the final piece. -
Define the horizon:
Use a ruler and a strip of masking tape to create a perfectly straight horizon line across the middle of your paper (or slightly above center). Tape right over the bottom ‘water’ half to protect it while you paint the sky first. -
Mix sky colors:
Prepare a gradient palette: mix a deep purple (Dioxazine + White), a vibrant magenta-pink, and a very pale, almost white pink for the horizon line.
Step 2: Painting the Sky
-
Apply the horizon glow:
Start at the tape line with your palest pink mixture. Use long, horizontal strokes to lay down a band of light right where the sun would have just set. -
Add the middle sky:
While the pale pink is still wet, introduce the vibrant magenta above it, blending the two colors where they meet to create a soft transition. -
Deepen the upper sky:
Finish the top section with your deep purple mix. Blend downwards into the magenta. Step back to ensure the gradient looks smooth from dark purple to bright pink. -
Add cloud texture:
Dip a scrunched-up paper towel or a dry stiff brush into a tiny bit of darker purple and dab lightly across the upper sky to suggest wispy, high-altitude clouds. -
Reveal the water:
Once the sky is completely dry to the touch, carefully peel off the horizon tape. Re-apply a piece of tape over the painted sky to protect your horizon line.
Clean Lines Pro-Tip
Before painting the sky, run a fingernail or credit card firmly over the tape edges. This seals them tight and prevents paint from bleeding underneath.
Step 3: Creating the Deep Ocean
-
Mix water tones:
Create a rich, dark purple by mixing Dioxazine Purple with a touch of Ultramarine Blue. Isolate a separate pile and add a tiny bit of Black for the shadows in the waves. -
Base coat the water:
Using a flat brush, paint the water area with your main purple mix. Use horizontal strokes, but allow them to be slightly choppier than the sky to mimic texture. -
Darken the horizon:
Paint a thin, darker line right against the horizon tape using the deep purple blend. This adds depth and simulates distance. -
Add wave shadows:
While the base is wet, streak in lines of your darkest purple/black mix horizontally. These represent the troughs of the waves further out to sea. -
Highlight the swells:
Mix a lighter lavender tone and gently streak it on the tops of the swells to catch the imaginary light from the sky.
Level Up: Metallic Glint
Mix iridescent medium into your white paint for the wave foam. It catches the light and makes the water look wet and shimmering.
Step 4: The Crashing Wave
-
Block the foreground:
At the bottom right corner, paint a dark, almost black strip representing the wet sand or pebbles where the wave breaks. -
Paint the foam base:
Using a round brush and pure Titanium White, paint the jagged, irregular shape of the crashing wave. Keep the top edge rough and spray-like. -
Texture the foam:
Use a dry brush or stippling motion (tapping the brush straight down) to make the white paint look frothy and aerated. -
Add transparency:
Mix a very watery purple glaze and lightly brush it over the bottom edge of the white foam where it meets the sand. This makes the water look thin and transparent as it recedes. -
Final reveal:
Let the painting dry completely before slowly peeling off the border tape at a 45-degree angle to reveal your clean edges.
Now you have a stunning twilight seascape that captures the magic of the golden hour in vivid purple hues
Violet Lake Reflections
Capture the serene beauty of twilight with this monochromatic watercolor landscape. Using varying shades of purple, you’ll create a misty, reflective lake scene that perfectly mirrors the tranquility of a quiet evening.
Step-by-Step Tutorial
Materials
- Cold Press Watercolor Paper (approx. 9×12 inches, taped down)
- Watercolor paints: Dioxazine Purple, Ultramarine Blue, Alizarin Crimson, Lamp Black (or Payne’s Gray), Burnt Sienna
- Flat wash brush (3/4 inch or 1 inch)
- Round brushes (sizes 4 and 8)
- Rigger brush or fine liner brush
- Masking tape
- Clean water cups
- Paper towels
- Palette for mixing
Step 1: Setting the Scene
-
Tape the borders:
Begin by securely taping down all four edges of your watercolor paper to a board. This not only creates that crisp, professional white border shown in the image but also keeps the paper flat when we add water. -
Establish the horizon:
Lightly sketch a horizontal line across the paper, positioning it just slightly below the center. Keep this line very faint; it’s just a guide for where the distant trees and water meet. -
Mix your twilight purple:
Create a large puddle of a medium-tone purple. I like to mix Dioxazine Purple with a touch of Alizarin Crimson to warm it up. Dilute this with water until it’s a soft lavender color.
Fixing Water Blooms
If cauliflower-like blooms appear in your sky, you likely added water to semi-dry paint. You can’t erase them, so embrace the texture—turn them into clouds by lifting slight edges with a thirsty brush.
Step 2: The Sky and Water Wash
-
Wet the sky area:
Using your large flat brush and clean water, dampen the paper from the top edge down to the horizon line. The paper should glisten but not have standing puddles. -
Paint the upper sky gradient:
Load your flat brush with the purple mix. Start at the very top of the paper deeply pigmented, and paint horizontal strokes downward. As you move down, add a little water to your brush to lighten the color, creating a gradient that fades near the horizon. -
Paint the water refection:
While the sky dries, repeat the process for the water below the horizon line. However, start with a lighter wash near the horizon and darken just slightly as you move towards the bottom edge. Leave the very bottom foreground area unpainted for now. -
Add streak details:
While the wash is still damp (not soaking), take a slightly stronger purple mix on a round brush. Gently sweep a few horizontal lines across the sky and water to suggest clouds and ripples. Let the paper dry completely.
Pro Tip: Depth Perception
Make distant trees look further away by adding more water to your dark mix. The trees on the far right should be lighter and bluer than the stark, dark trees on the left.
Step 3: The Tree Line
-
Mix a dark silhouette color:
Combine Dioxazine Purple with Lamp Black or Payne’s Gray. You want a very dark, rich color that is almost black but retains a hint of purple harmony. Ensure this mixture is creamy, not watery. -
Establish the distant shore:
Using a size 4 round brush, paint a thin, uneven line directly on top of your pencil horizon line. Vary the thickness slightly to suggest uneven terrain. -
Paint distant trees:
On the left side of the painting, use the tip of your brush to tap in vertical shapes for pine trees. Keep them jagged and organic. Make the trees tallest on the left edge and taper them down smaller as they move toward the center. -
Paint the right peninsula:
Add a smaller cluster of trees on the right side of the horizon line to balance the composition. These should look further away, so keep them shorter and less detailed.
Step 4: Reflections and Foreground
-
Create tree reflections:
Immediately after painting a section of trees, clean your brush and leave it just barely damp. Drag the dark pigment from the bottom of the tree line vertically downward into the water. -
Distort the reflections:
Using horizontal strokes with a damp brush, blur the edges of these vertical reflections to mimic the movement of water. The reflection should be roughly the same height as the trees above it. -
Paint foreground rocks:
Mix Burnt Sienna with a little purple for a brownish-grey tone. Paint rounded rock shapes along the bottom right corner of the paper. Vary the sizes, overlapping them slightly. -
Add shadows to rocks:
Once the base rock color is dry, use your dark purple/black mix to paint shadows beneath and between the rocks. -
Detail with tall grass:
Switch to your rigger or fine liner brush. Load it with dark paint and flick quick, upward strokes from the rocky area. These represent tall grasses or reeds growing at the shoreline. -
Final touches:
Assess the painting for any needed contrast. You might add a few very thin horizontal lines in the water with a diluted purple to suggest surface tension. -
Reveal the border:
Wait until the painting is 100% bone dry. Gently peel the tape away at a 45-degree angle to reveal your crisp white edges.
Step back and admire the peaceful, monochromatic atmosphere you’ve captured in your violet landscape.

PENCIL GUIDE
Understanding Pencil Grades from H to B
From first sketch to finished drawing — learn pencil grades, line control, and shading techniques.
Explore the Full Guide
Moonlit Purple Night Scene
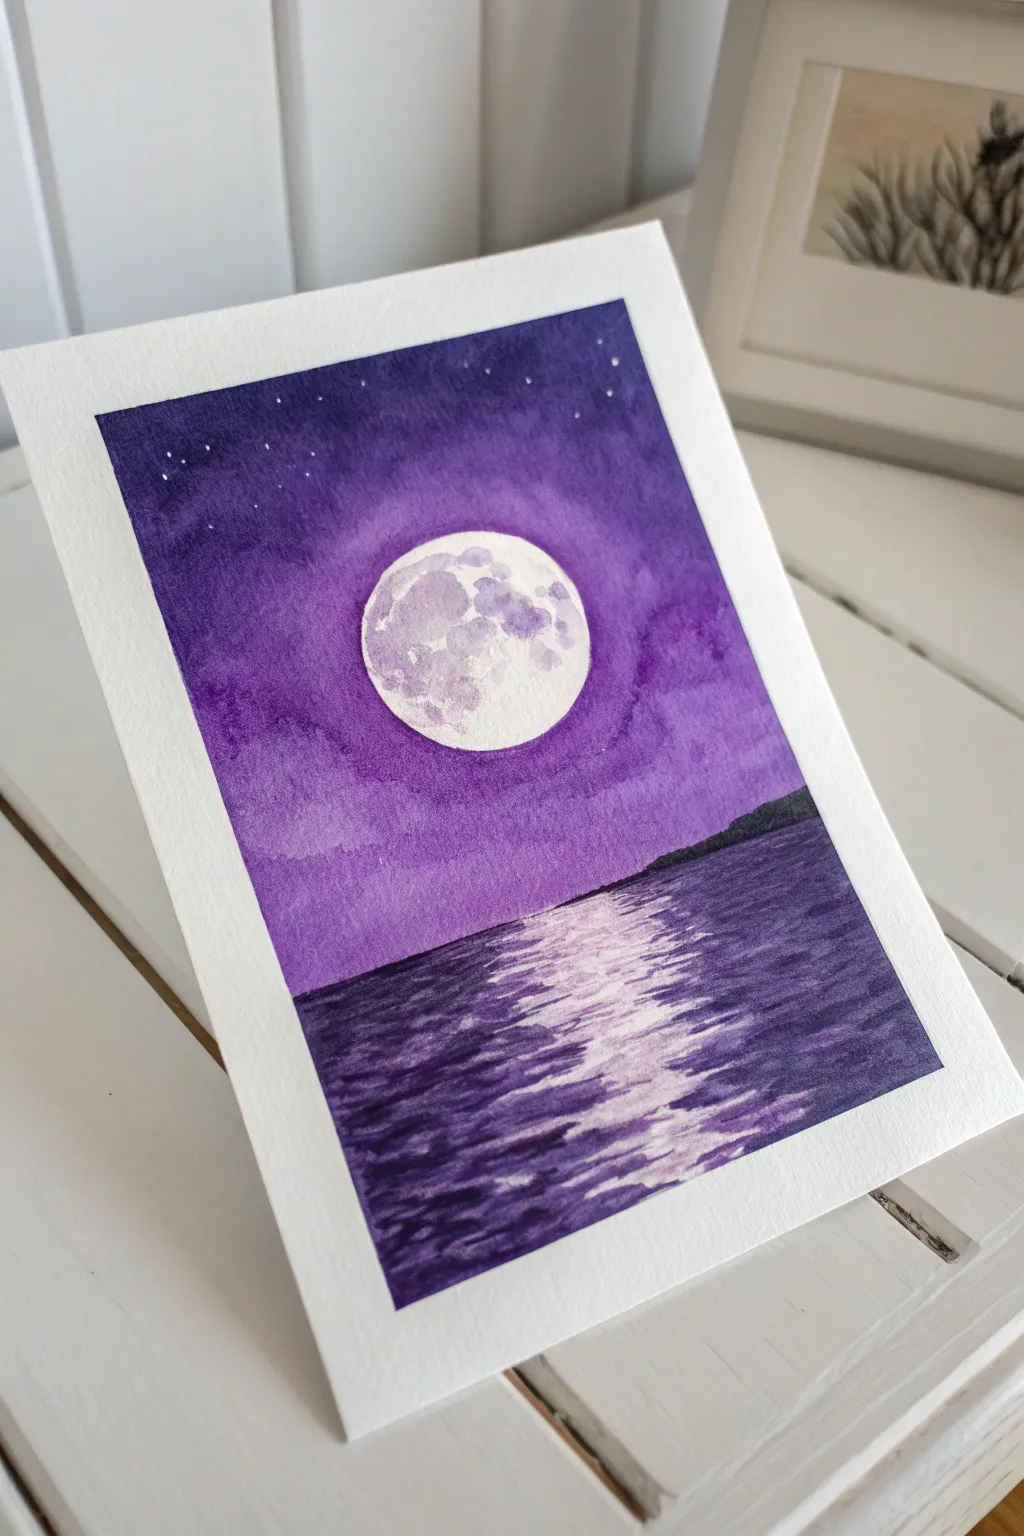
Capture the serene beauty of a full moon glowing over calm waters with this monochromatic watercolor study. Using layers of rich violet and deep indigo, you’ll create a striking contrast between the luminous moon and the shadowy depths below.
Step-by-Step
Materials
- Cold Press Watercolor Paper (300 gsm)
- Painter’s Tape or Masking Tape
- Watercolor Paints (Purple, Indigo/Payne’s Gray, White Gouache or Bleedproof White)
- Round Watercolor Brushes (Size 8 and Size 2)
- Pencil and Round Object (for tracing moon)
- Clean Water
- Paper Towels
- Tissue
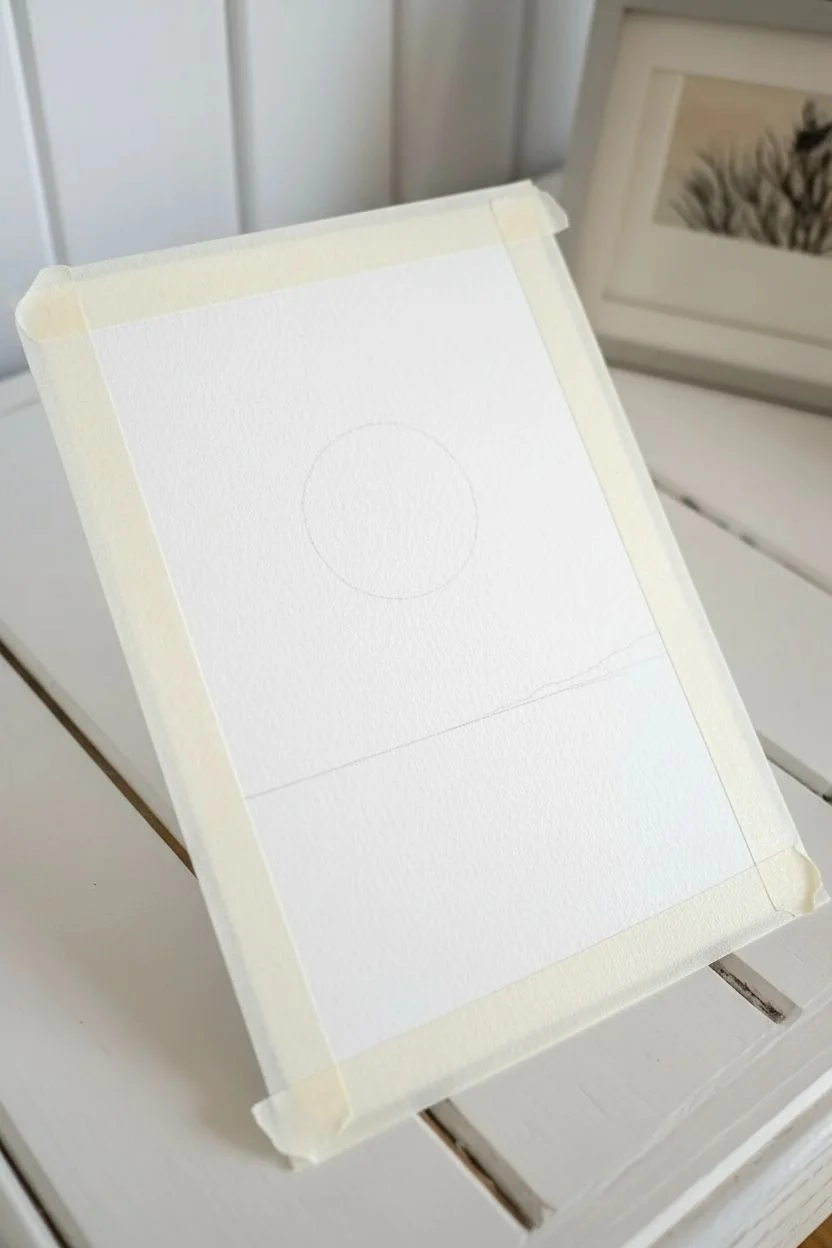
Step 1: Preparation and Sketching
-
Tape the Edges:
Begin by taping down all four edges of your watercolor paper to a board or table. Press the tape firmly to ensure a crisp, clean white border when you peel it off later. -
Outline the Moon:
Place your small round object (like a coin or small lid) in the center-upper third of the paper. Lightly trace a circle with a pencil. Keep the line faint so it disappears under the paint later. -
Define the Horizon:
Draw a faint horizontal line about one-third of the way up from the bottom of the paper to separate the sky from the water. Don’t worry about making it perfectly straight; water often has movement.
Pro Tip: Masking
If painting around the moon circle is difficult, use masking fluid to cover the moon before you start painting and rub it off at the end for pure white paper.
Step 2: Painting the Sky
-
Wet the Sky Area:
Using your larger brush and clean water, wet the entire sky area around the moon. Carefully paint around the pencil circle—do not get the inside of the moon wet yet. The paper should be glistening but not pooling. -
First Purple Wash:
Load your brush with a watered-down medium purple. Drop this color into the wet sky, starting near the top and working down. The color will naturally bleed and soften on the damp paper. -
Deepen the Night Sky:
While the paper is still wet, pick up a more concentrated, darker purple mix. Apply this to the top corners and edges of the sky to create a vignette effect, drawing the eye toward the center. -
Create the Glow:
Rinse your brush and dry it slightly so it is damp but clean. Gently lift a little paint away from the immediate edge of the moon circle to create a soft, glowing halo effect around it. -
Add Cloud Textures:
Mix a slightly darker purple-indigo shade. While the wash is still drying, paint horizontal, uneven streaks across the lower sky to suggest wispy clouds. Let the wet-on-wet technique soften the edges for you. -
Drying Time:
Allow the sky section to dry completely before moving on. The paper must be bone dry to prevent the dark water color from bleeding upwards.
Level Up: Starry Glow
While the sky is slightly damp, lift tiny dots of paint with a clean, dry brush tip before splattering white. This creates soft, glowing stars beneath the sharp white ones.
Step 3: Painting the Water
-
Base Water Layer:
For the water, mix a deep, dark purple—almost black (mix purple with Payne’s Gray or Indigo). Start painting from the horizon line downwards, using horizontal strokes. -
Reserve the Reflection:
As you paint the water, leave a central column directly under the moon unpainted or very lightly painted. This negative space will become the bright moonlight reflection. -
Add Wave Details:
Using the dark purple mix and the tip of your brush, paint thin, horizontal lines cutting into the white reflection area from the sides. Variation in line length makes the water look rippled. -
Deepen the Foreground:
Make your paint mix even darker for the bottom of the paper. Apply this to the foreground water to add depth and perspective, blending it upwards into the mid-water area. -
Horizon Line Definition:
Use your smallest brush and the darkest paint mix to carefully paint the distant land silhouette along the horizon line, covering the separation between sky and water.
Step 4: Details and Moon
-
Texture the Moon:
Rewet the inside of the moon circle slightly. Drop in very diluted, pale purple or gray splotches to mimic craters. Keep this extremely subtle; you want the moon to remain mostly white. -
Enhance the Reflection:
If your reflection looks too stark, you can glaze a very watery, pale purple over parts of the white water area to integrate it better with the surroundings. -
Add Stars:
Dip a small brush into white gouache or undiluted white watercolor. Tap the brush handle against another brush to splatter tiny stars across the upper dark purple sky. I usually cover the water area with scrap paper to avoid getting stars in the ocean. -
Individual Stars:
For specific placement, use the tip of your size 2 brush and white paint to dot a few prominent stars in the darkest corners of the sky. -
The Reveal:
Wait until the painting is 100% dry. Then, carefully peel off the masking tape at an angle, pulling away from the painting to reveal your crisp, professional border.
Frame your moonlit masterpiece and enjoy the tranquil atmosphere it brings to the room
Starry Purple Galaxy Wash


This project captures the mesmerizing depth of a galaxy using a wet-on-wet watercolor technique. By blending deep indigos, violets, and rose hues, you’ll create a soft, nebulous background that sets the stage for a sprinkling of bright white stars.
How-To Guide
Materials
- Cold press watercolor paper (300 gsm recommended)
- Painter’s tape or masking tape
- Watercolor paints (Indigo, Purple, Magenta/Rose, Phthalo Blue)
- Clean water in two jars
- Large round brush (size 10 or 12)
- Small detail brush (size 0 or 1)
- White gouache or white gel pen
- Paper towels
- Board or hard surface for taping
Step 1: Preparing the Base
-
Secure the edges:
Begin by taping down all four sides of your watercolor paper to a board. Press the tape edges firmly to ensure a crisp, clean border when you peel it off later. -
Wet the surface:
Using your large round brush, apply a clean wash of water across the entire paper surface. The paper should be glisten with moisture but shouldn’t have standing puddles.
Step 2: Creating the Galaxy Wash
-
Start with light hues:
Load your brush with a diluted magenta or rose color. Drop this pigment into the center and slight off-center areas of the wet paper, letting it bloom naturally. -
Introduce mid-tones:
Pick up a rich purple shade. Apply this around the edges of the pink areas, allowing the colors to touch and bleed into one another without completely overtaking the pink. -
Add depth with blue:
While the paper is still wet, introduce a phthalo blue or deep ultramarine into the corners and outer edges of the composition. -
Darken the cosmos:
I like to mix indigo with a touch of purple for the darkest sections. Apply this concentrated dark mixture to the very corners and edges to create a vignette effect, pushing the focus to the lighter center. -
Tilt the board:
Gently pick up your board and tilt it slightly in different directions. This encourages the pigments to mingle and creates those soft, cloud-like transitions typical of a galaxy. -
Lifting color:
If an area gets too dark, clean your brush, dab it on a paper towel until damp, and gently lift some pigment off the paper to reclaim the lighter nebulous shapes. -
Wait for drying:
Let the painting dry completely. This is crucial—if the paper is damp, your stars will blur. It should feel room temperature to the touch, not cool.
Bleeding Edges?
If paint bleeds under the tape, use a slightly damp, stiff brush or a ‘magic eraser’ sponge to gently scrub away the unwanted paint once dry.
Step 3: Adding the Stars
-
Prepare opaque white:
Squeeze out a small amount of white gouache. Add a tiny drop of water so it has a creamy consistency, thick enough to be opaque but fluid enough to flick. -
Flick the stars:
Load a medium brush with the gouache. Hold it over the painting and tap the handle against another brush to splatter fine white dots across the dark background. -
Paint varying sizes:
Use your smallest detail brush or a white gel pen to manually add a few larger, distinct dots for variety among the splatter. -
Create starbursts:
Select a few of the larger dots to turn into twinkling stars. Paint a vertical line through the center, followed by a horizontal crossing line. -
Refine the glimmer:
Add tiny diagonal strokes between the main cross lines on your biggest stars to create an eight-point glimmer effect. -
Final touches:
Check the balance of your sky. If there are empty patches, add a few tiny pin-prick stars with the tip of your brush or pen to fill the void.
Pro Tip: Texture
While the galaxy wash is still wet, sprinkle a tiny pinch of table salt onto the darkest areas. Let it dry fully, then brush it off for a starry texture.
Step 4: Finishing Up
-
Dry completely:
Allow the white gouache or ink to dry fully. This usually takes just a few minutes. -
The reveal:
Ideally, peel the tape away from the paper at a 45-degree angle, pulling slowly to reveal those crisp white margins.
Enjoy the peaceful process of watching your own private galaxy emerge from the colors


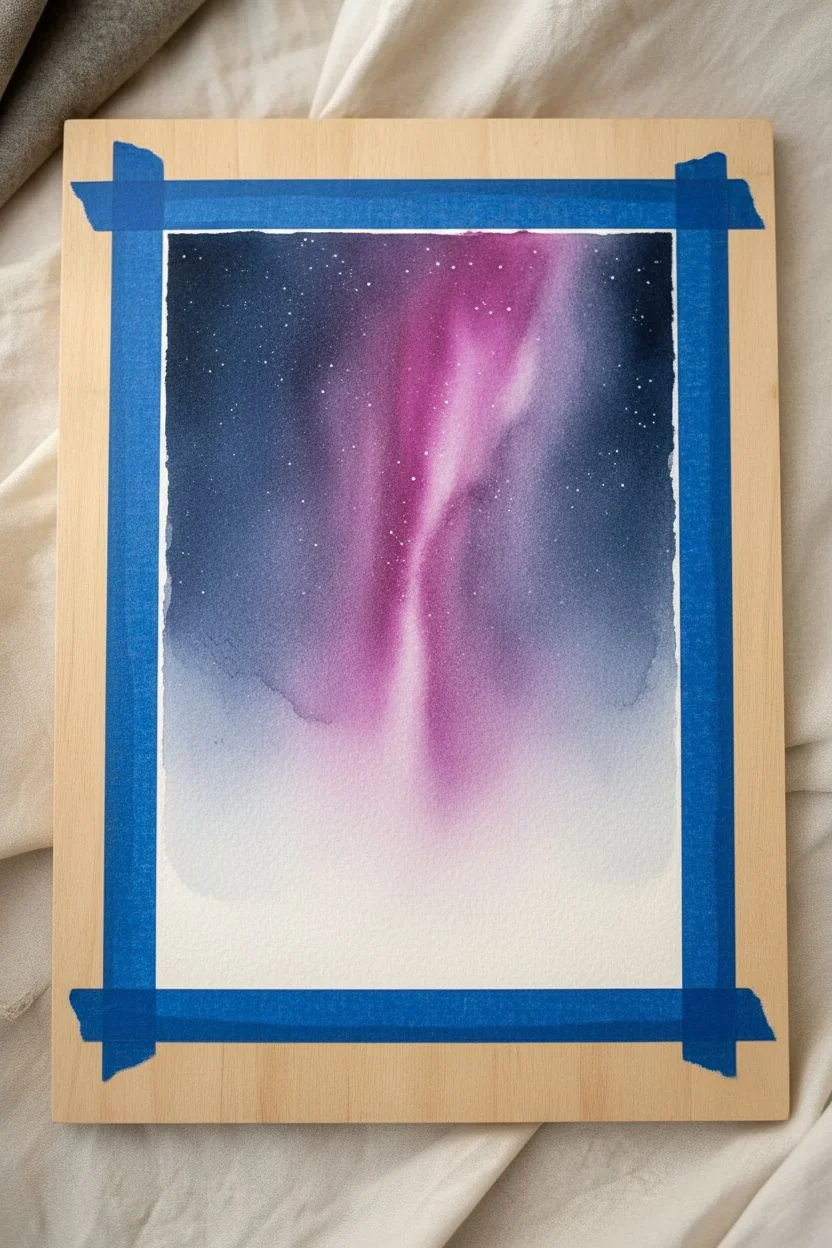
Purple Aurora Over a Dark Ridge
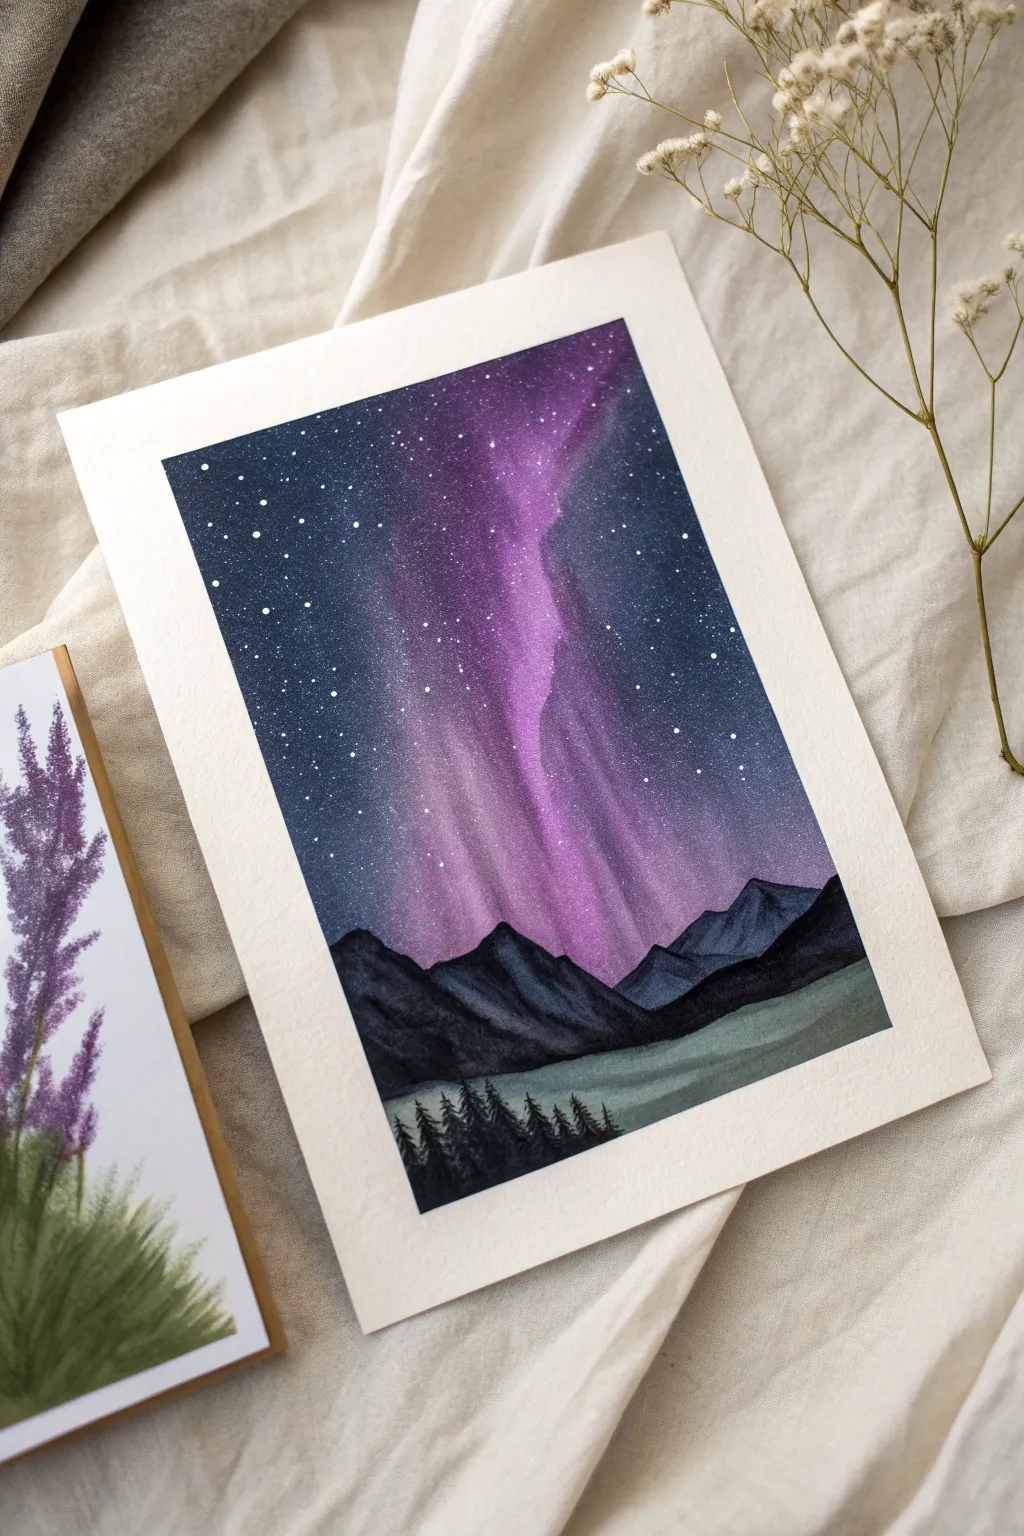
Capture the ethereal glow of the northern lights with this moody watercolor landscape. By layering deep indigos with vibrant purples, you’ll create a celestial scene that feels both expansive and intimate.
Step-by-Step
Materials
- Cold press watercolor paper (300 gsm)
- Painter’s tape
- Watercolor paints (Indigo, Payne’s Gray, Dioxazine Purple, Magenta/Rose, White Gouache)
- Brushes: Large wash brush, medium round brush (size 6 or 8), small detail brush (size 0 or 1)
- Clean water jar and paper towels
- Old toothbrush (optional for stars)
- Palette for mixing
Step 1: Setting the Sky
-
Prepare your canvas:
Tape down all four edges of your watercolor paper to a solid board using painter’s tape. This prevents the paper from buckling during heavy washes and creates that crisp white border. -
Wet the sky area:
Using your large wash brush, apply a clean coat of water to the top two-thirds of the paper where the sky will be. You want the paper glistening but not swimming in puddles. -
Drop in the purple core:
While the paper is wet, load a medium round brush with a vibrant mix of Magenta and Dioxazine Purple. Paint a loose, vertical column slightly off-center, letting the color bleed naturally into the wet paper. -
Add the deep night sky:
Mix a strong concentration of Indigo and a touch of Payne’s Gray. Paint the outer edges of the sky, blending inward toward the purple streak. Leave the area immediately surrounding the purple lighter to make it glow. -
Refine the gradient:
Clean your brush and wipe it slightly dry. Gently soften the transition edge where the dark blue meets the purple light. If the purple feels too faint, carefully drop in more pigment while the paper is still damp. -
Strengthen the contrast:
Add a second layer of your darkest Indigo mix to the top corners and edges to create a vignette effect, ensuring the aurora looks bright by comparison. -
Create the stars:
Once the sky is *completely* dry, mix a small amount of white gouache with water until it’s the consistency of milk. Load an old toothbrush or stiff brush and flick the bristles to spray tiny stars across the sky. I like to manually dot a few larger stars with a detail brush for variety.
Wet-on-Wet Timing
Work fast on the sky! If the paper starts drying while you’re blending the purple and blue, stop immediately. Adding water to half-dry paint causes ‘cauliflowers’ or blooms.
Step 2: Painting the Landscape
-
Sketch the ridgeline:
Lightly pencil in the jagged outline of the mountains about one-third up from the bottom. -
Paint the distant mountains:
Mix a diluted wash of Payne’s Gray with a hint of Indigo. Paint the mountain shapes, keeping the color somewhat translucent to suggest atmospheric distance. Let this layer dry. -
Add mountain shadows:
Using a more concentrated Payne’s Gray, paint the shadow sides of the peaks. Use jagged strokes to mimic rocky terrain. -
Create the mist or water:
Below the mountains, apply a horizontal wash of muted green-gray (mix a tiny bit of yellow or green into your gray mix). Keep this horizontal and smooth to represent a calm lake or low-lying mist. -
Paint the foreground slope:
At the very bottom left, paint a dark, almost black slope using a thick mix of Payne’s Gray and Purple. This grounds the composition. -
Detail the treeline:
Switch to your smallest detail brush. Using your darkest black-blue mix, paint tiny vertical lines along the bottom ridge. -
Form the pine trees:
Flick the brush downward and outward from those vertical lines to create the texture of pine branches. Vary the heights to make the forest look natural. -
Final touches:
Check your contrast. If the mountains have faded too much upon drying, add a final glaze of dark blue to deepen them. -
Reveal the border:
Wait until the painting is bone dry—touch it with the back of your hand to be sure. Peel the tape away slowly at a 45-degree angle to reveal the clean edges.
Level Up: Reflection
If painting water, drag some of the purple and indigo sky colors vertically down into the lake area while it’s wet to create a soft, mirrored reflection of the aurora.
Now you have a stunning piece of atmospheric art that brings a quiet winter night into your home
City Skyline in Purple Evening
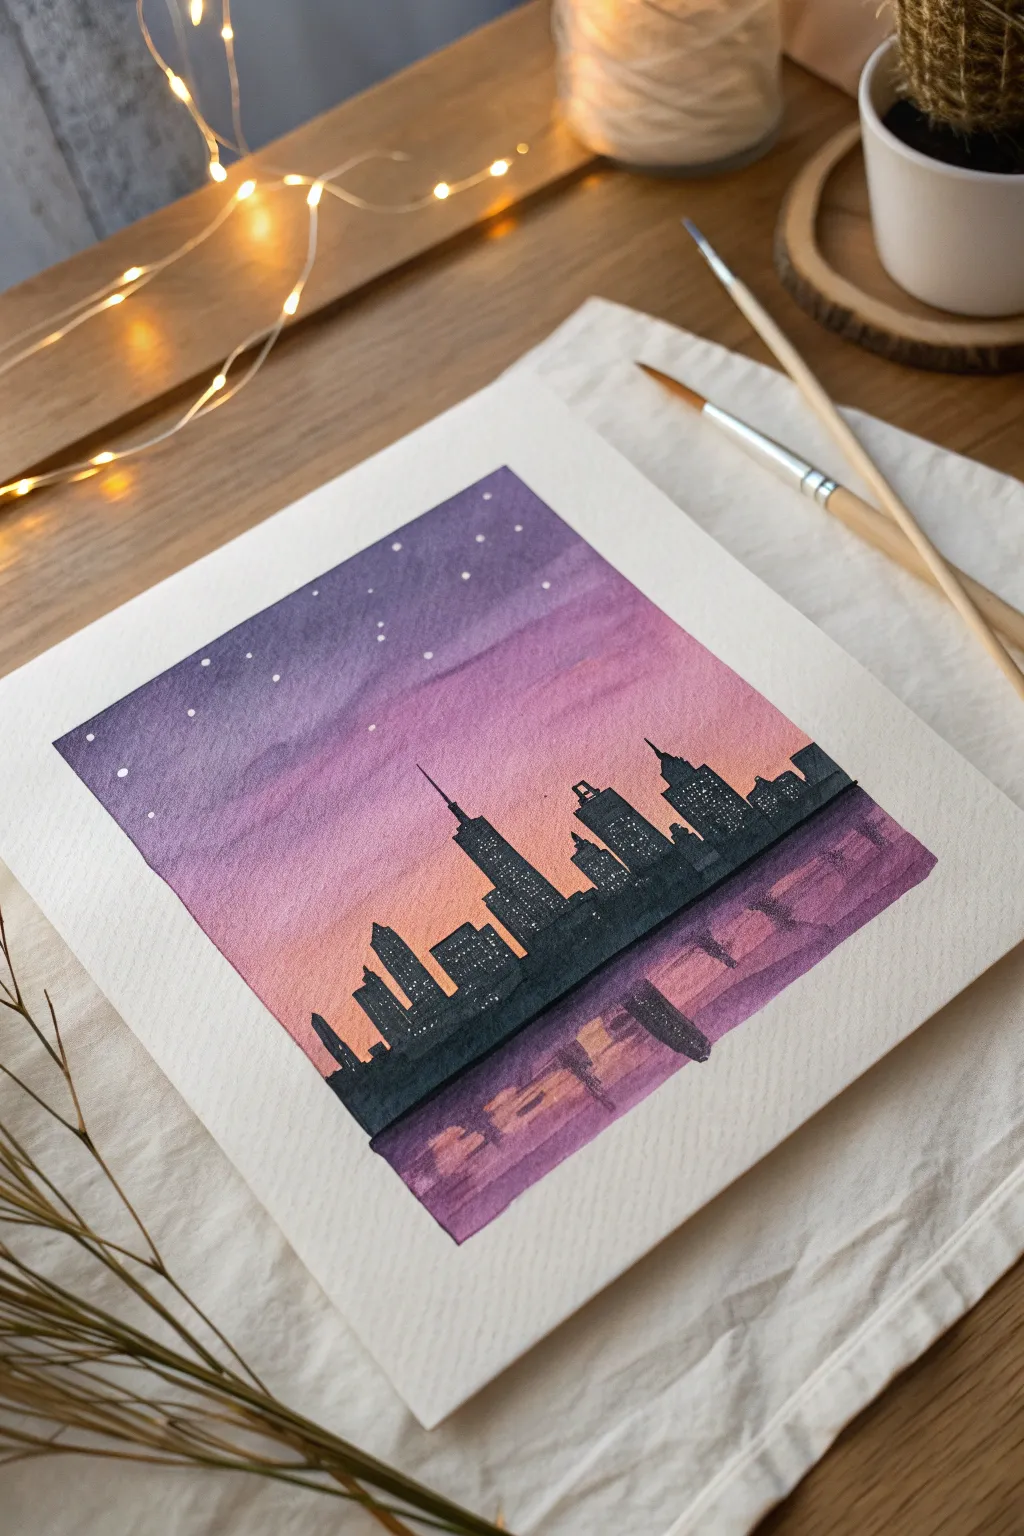
Capture the magic of twilight in the city with this dreamy watercolor project featuring a striking gradient sky and crisp urban silhouette. The blend of deep purples and soft peaches creates a serene evening mood, perfectly mirrored in the water below.
Step-by-Step Tutorial
Materials
- Cold press watercolor paper (300 gsm)
- Masking tape (for clean borders)
- Watercolor paints (Purple Lake, Dioxazine Purple, Alizarin Crimson, Cadmium Orange, Indigo or Black)
- Flat wash brush (3/4 inch)
- Round detail brushes (size 0 and 2)
- White gel pen or gouache
- Pencil and ruler
- Two jars of water
- Paper towels
Step 1: Setting the Scene
-
Tape the borders:
Secure your watercolor paper to a flat, hard surface using masking tape. Press the edges down firmly to ensure crisp, clean white borders when you peel it off later. -
Draft the horizon:
Using a ruler, lightly draw a straight horizontal line across the lower third of the paper. This will separate your sky from the water. -
Prepare the wash:
Pre-mix your gradient colors on your palette. You’ll need a deep violet for the top, a mid-tone purple-pink for the middle, and a warm peachy-orange for the horizon.
Wet-on-Wet Timing
Work quickly on the sky gradations while the paper is wet. If the paper starts to dry, stop blending to avoid “cauliflower” blooms and hard edges.
Step 2: Painting the Gradient Sky
-
Wet the paper:
Use your flat wash brush to apply a thin, even coat of clean water to the sky area (above your pencil line). The paper should glisten but not have puddles. -
Apply the dark violet:
Load your brush with the deepest purple shade. Start at the very top edge and paint horizontal strokes, moving downward about a third of the way. -
Blend the mid-tones:
Pick up your purple-pink mix and blend it into the wet violet edge, continuing your downward strokes. Let the colors bleed naturally into each other. -
Add the warm horizon:
Rinse your brush slightly and switch to the peach/orange tone. Paint this near the horizon line, blending upward into the purple to create a seamless sunset effect. -
Paint the reflection base:
While the sky is drying, dampen the water area below the horizon line. Replicate the sky colors in reverse order (peach at the top, purple at the bottom) using loose horizontal strokes. -
Let it dry completely:
Allow the paper to dry fully. If you touch it and it feels cool, it’s still wet. This step is crucial before adding the silhouette.
Metallic Magic
Swap the white paint for metallic gold or silver watercolor for the stars and window lights. It adds a subtle, luxurious shimmer when the light hits.
Step 3: The Urban Silhouette
-
Mix the shadow color:
Create a very dark, opaque mix using Indigo or Black with a tiny touch of purple to harmonize with the sky. You want a creamy consistency, not watery. -
Outline the buildings:
Using your small round brush, carefully paint the tops of the buildings first. Vary the heights and shapes—some pointed spires, some flat roofs, some stepped skyscrapers. -
Fill the silhouette:
Fill in the rest of the buildings down to the horizon line with the dark paint. Ensure the bottom edge is strictly straight against your pencil line. -
Add window details:
While the black paint is still wet (or after drying, if using a white gel pen later), lift out tiny specks of paint with a dry brush or dot on white lights to mimic illuminated windows.
Step 4: Reflections and Stars
-
Paint the water reflection:
Dilute your black silhouette mix with water to make it semi-transparent. Paint a mirrored, slightly distorted version of the skyline directly below the horizon. -
Create ripples:
Use a clean, damp brush to gently lift horizontal lines through the wet reflection paint. I find this creates the perfect illusion of shimmering water movement. -
Add the stars:
Once everything is bone dry, take your white gel pen or a fine brush with white gouache. Dot tiny stars in the darker, upper portion of the purple sky. -
The reveal:
Slowly peel away the masking tape at a 45-degree angle to reveal your crisp white frame.
Step back and admire how contrast transforms simple colors into a glowing city evening
Telephone Wires Across a Violet Sky
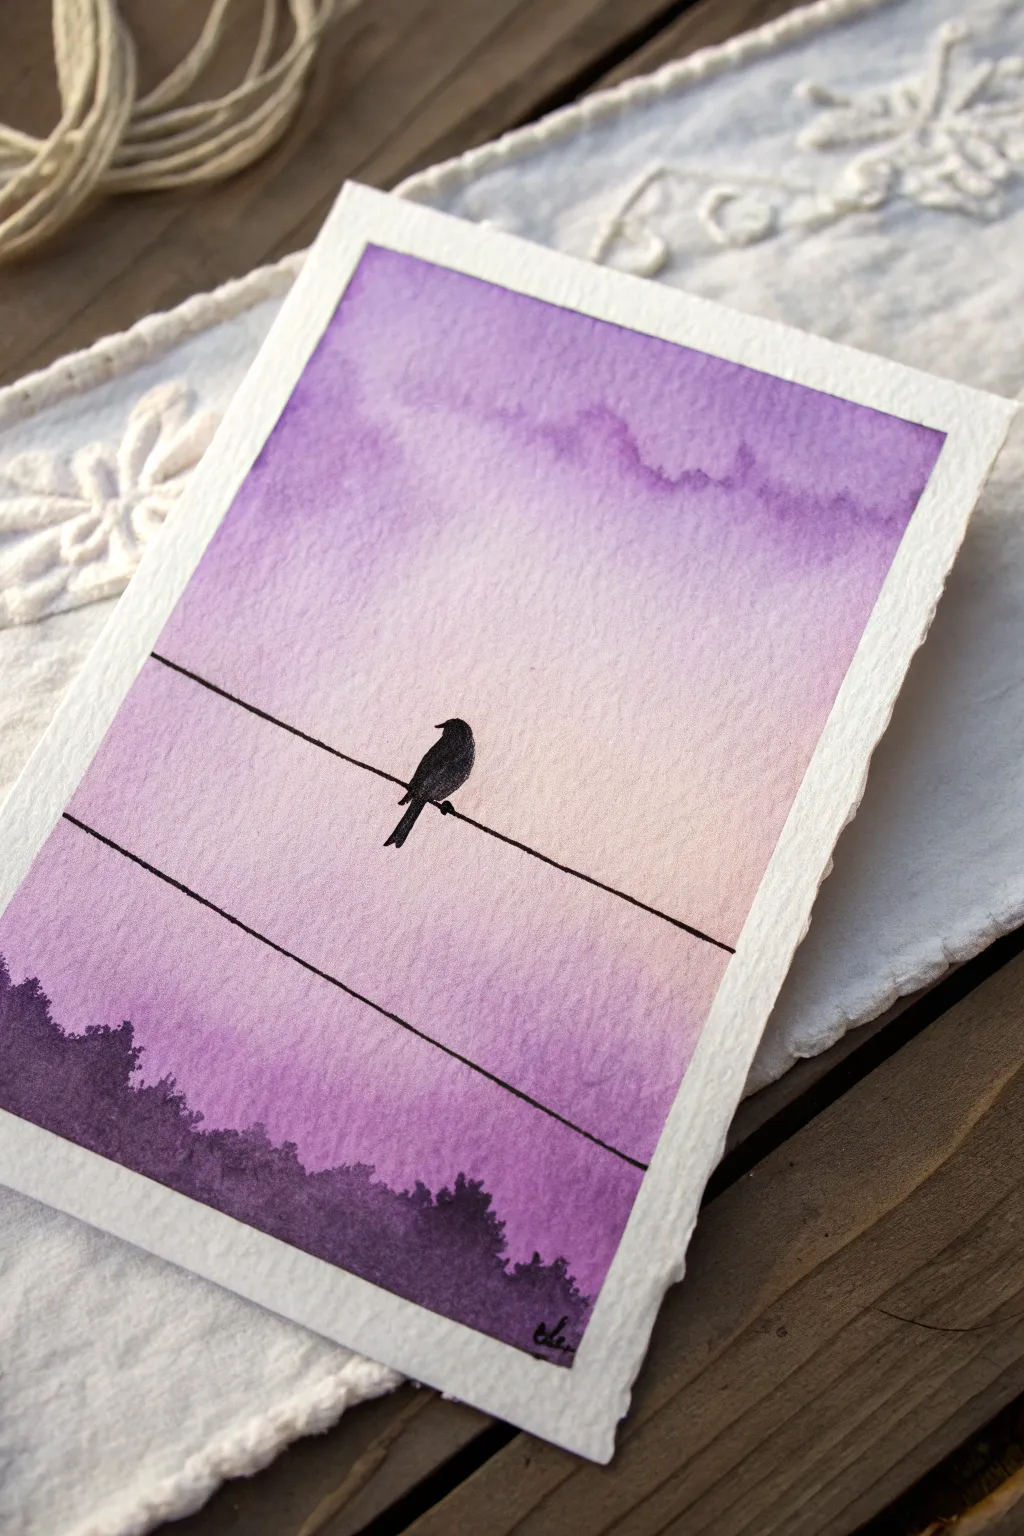
Capture the quiet beauty of dusk with this minimalist watercolor piece featuring a solitary bird on a wire. The soft, bleeding gradient of purple hues creates a dreamy backdrop that makes the stark black silhouettes pop with striking contrast.
Detailed Instructions
Materials
- Cold press watercolor paper (approx. 5×7 inches)
- Masking tape
- Watercolor paints: Purple (dioxazine violet), Ultramarine Blue, Alizarin Crimson, and a touch of Black
- Black ink or a fine-tip black waterproof pen
- Flat wash brush (3/4 inch or 1 inch)
- Small round brush (size 2 or 4)
- Clean water and mixing palette
- Straight edge or ruler
Step 1: Painting the Sky
-
Prepare the Surface:
Begin by taping down all four edges of your watercolor paper to a board or table to prevent buckling and create a crisp white border. -
Mix Your Purples:
Create a puddle of rich purple paint on your palette. For variation, mix a second puddle with a bit more blue, and a third with a touch of crimson for warmth. -
Wet the Paper:
Using your large flat brush, apply a clean coat of water across the entire sky area, stopping about an inch from the bottom edge. -
Apply the Initial Wash:
Load your flat brush with the main purple mix and sweep it across the top of the paper, letting the color flow downward. -
Fade the Gradient:
As you move down the paper, rinse your brush slightly to dilute the pigment. This creates a lighter, mistier look towards the horizon. -
Add Cloud Textures:
While the paper is still wet (wet-on-wet), drop in concentrated purple pigment near the top right to suggest soft, diffuse clouds. -
Create the Horizon Glow:
Near the bottom third of the sky, introduce a very watery, pale pink-purple wash to mimic the faint glow of sunset. -
Dry Completely:
Let the background wash dry fully. The paper must be bone dry before adding any sharp details.
Step 2: Adding the Silhouette Details
-
Paint the Treeline:
Mix a very dark purple (almost black) by adding a little ultramarine and black to your purple base. Use the round brush to tap in an irregular treeline along the bottom edge. -
Vary the Heights:
Ensure the treeline isn’t perfectly straight; make some sections taller and bushier to create organic interest. -
Draw the Wires:
Using a straight edge and a fine black pen (or a very steady hand with a rigger brush), draw two diagonal lines stretching across the middle of the sky. -
Position the Bird:
Choose a spot on the top wire—slightly off-center works best for composition—to place your bird. -
Draft the Shape:
Lightly sketch the oval body and head of the bird with a pencil if you’re nervous, or go straight in with black ink. -
Fill the Silhouette:
With black ink or opaque paint, fill in the bird’s shape, ensuring the edges are crisp against the soft sky. -
Add the Tail:
Extend a long, thin tail downwards, crossing over the wire slightly to anchor the bird in space. -
Finishing Touches:
Once the ink is dry, sign your name in the bottom corner using a small pen. -
Reveal the Border:
Carefully peel away the masking tape at a 45-degree angle to reveal the clean white edges.
Bleeding Lines?
If the black ink bleeds into the sky, the paper wasn’t fully dry. Blot immediately with a tissue and wait longer before re-drawing.
Add More Birds
Create a flock by adding several smaller bird silhouettes at different intervals along the lower wire to balance the composition.
Step back and admire the peaceful solitude of your twilight scene
Palm Tree Silhouettes in Purple Sunset
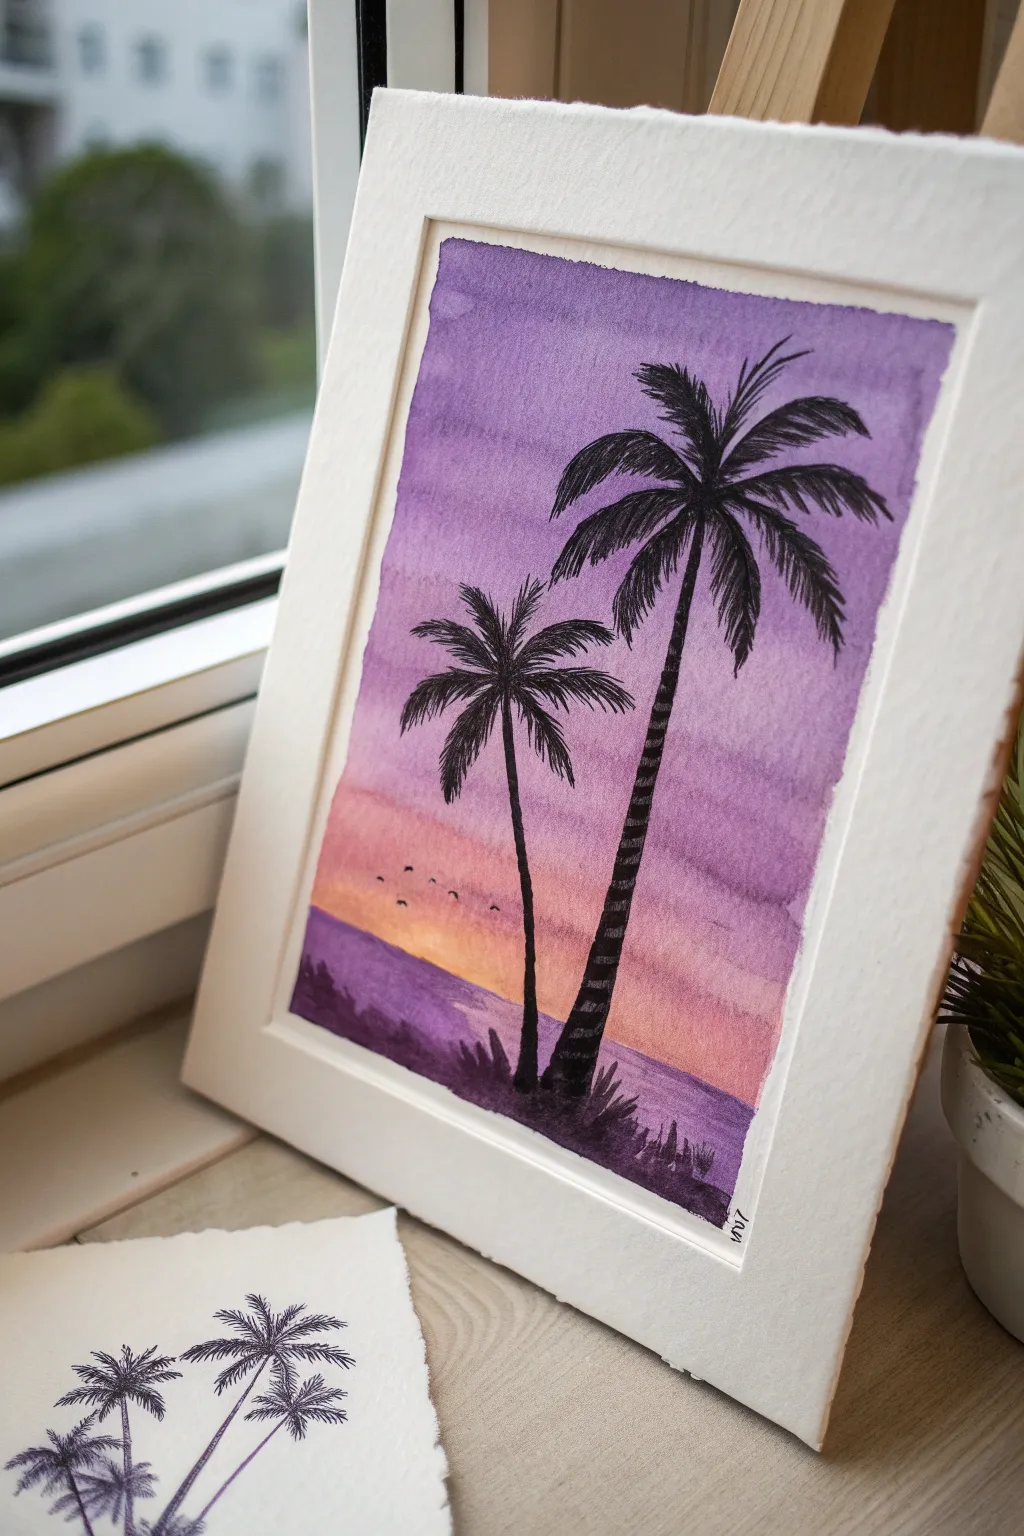
Capture the magic of a tropical evening with this vibrant watercolor and ink painting, featuring sleek palm silhouettes against a gradient purple sky. This project combines simple wet-on-wet washes with precise detailing for a striking contrast.
How-To Guide
Materials
- Cold press watercolor paper (300gsm)
- Watercolor paints (Purple, Magenta/Rose, Yellow Ochre/Orange, Indigo)
- Black waterproof ink or black gouache
- Flat wash brush (3/4 inch)
- Small round detail brush (size 0 or 1)
- Masking tape
- Paper towels
- Two jars of water
- Pencil and eraser
Step 1: Painting the Sunset Background
-
Prepare your paper:
Tape down all four edges of your watercolor paper to a board using masking tape. This creates a clean white border and prevents the paper from buckling when wet. -
sketch the horizon:
Lightly draw a horizontal line about one-third of the way up from the bottom of the paper. This will separate your sky from the sea, but keep the line very faint so it doesn’t show later. -
Wet the sky area:
Using your large flat brush and clean water, apply a generous even coat of water to the entire sky area above your horizon line. The paper should glisten but not have puddles. -
Apply the top sky color:
Load your brush with a rich purple watercolor. Start painting at the very top of the paper, using horizontal strokes. Let the color flow downwards, but stop about halfway down the sky. -
Blend in the middle transition:
Wash your brush swiftly and pick up a rose or magenta shade. Blend this into the bottom edge of the purple while everything is still wet, pulling the color further down towards the horizon. -
Add the sunset glow:
Clean your brush again and switch to a warm yellow or light orange. Paint this right along the horizon line, carefully blending it upward into the pink. The wet paper will help create a soft, seamless gradient. -
Create the water:
While the sky dries slightly, paint the water area below the horizon line. Use a mix of purple and a touch of indigo for a darker, deeper tone than the sky. Apply it in horizontal strokes, leaving the area near the horizon slightly lighter to reflect the sunset. -
Let it dry completely:
If you try to paint the trees now, the ink will bleed. Wait until the paper is bone dry and flat to the touch before moving on.
Wet-on-Wet Wisdom
Work quickly while the paper is wet for the sky gradient. If edges start drying, don’t add water or you’ll get ‘blooms’ or cauliflower marks.
Step 2: Adding the Silhouette Details
-
Sketch the tree placement:
Use a pencil to very lightly mark where your two palm trees will stand. Place the taller one on the right and a slightly shorter, curved one on the left for balance. -
Paint the main trunks:
Switch to your small detail brush and black ink or gouache. Paint the trunks starting from the bottom up, lifting pressure as you reach the top so they taper naturally. -
Add texture to the trunks:
I like to give the trunks a segmented look by adding tiny, jagged notches along the sides as I paint the black line, mimicking the rough texture of palm bark. -
Start the palm fronds:
For the taller tree, paint 5-7 curved lines radiating outward from the top center point of the trunk. These are the spines of your palm leaves. -
Flick the leaves:
Using short, quick flicking motions, paint the individual leaves hanging down from each spine. Keep your brush strokes loose and jagged to look organic. -
Complete the second tree:
Repeat the process for the smaller tree on the left. Make sure the fronds overlap slightly with the sky but don’t look identical to the first tree. -
Add distant birds:
paint tiny ‘m’ shapes in the distance just above the horizon line to suggest a flock of birds flying toward the sunset. -
Ground the trees:
At the base of the trunks, paint a small mound of dark land. Use short, upward strokes to create grass textures and small bush silhouettes to anchor the trees to the ground. -
Final reveal:
Once the black ink is completely dry, slowly peel off the masking tape at a 45-degree angle to reveal your crisp white borders.
Metallic Magic
Add a thin line of gold metallic paint along the horizon water line or on the edges of the palm fronds for a shimmering sunset effect.
Now you have a serene tropical sunset that beams with color and contrast


Have a question or want to share your own experience? I'd love to hear from you in the comments below!