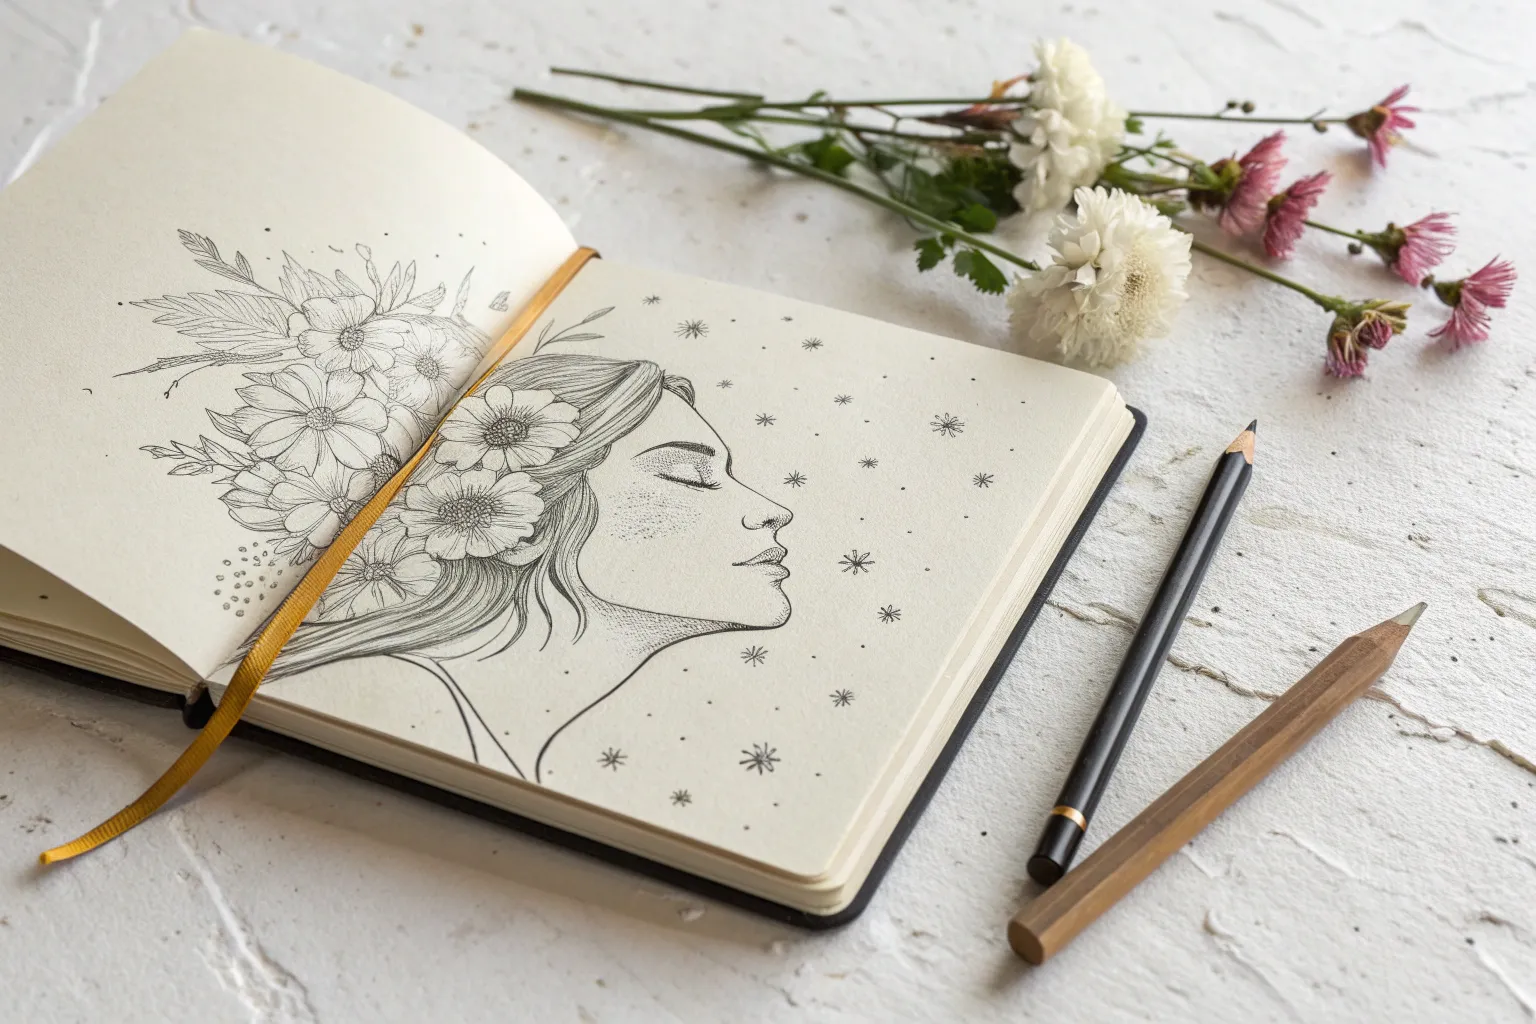
When you want a drawing to feel truly deep, it helps to think in visual metaphors instead of literal scenes. I like to start with one emotion and build a simple symbol around it until it feels like you’re peeking into someone’s inner world.
Split Portrait With a Hidden World
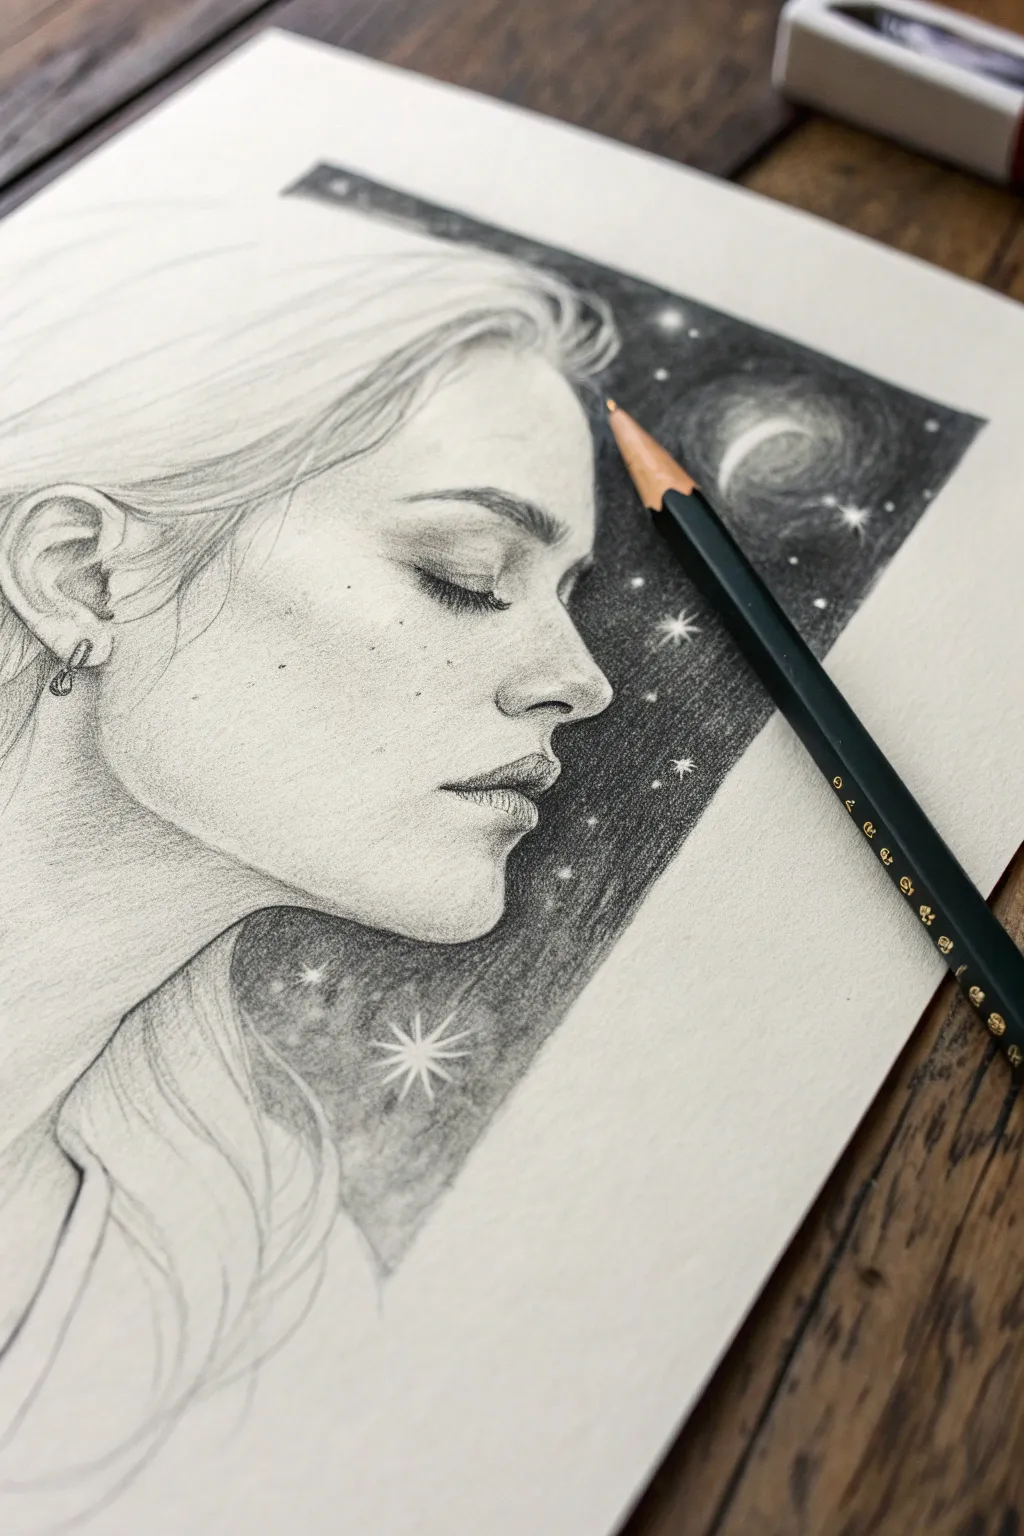
This evocative drawing combines a delicate realistic portrait with a dreamlike window into the cosmos. By contrasting the soft, light shading of the face against a deep, star-filled rectangle, you create a striking split-reality effect.
How-To Guide
Materials
- High-quality drawing paper (smooth or vellum finish)
- Graphite pencils (HB, 2B, 4B, 6B)
- Mechanical pencil (0.5mm HB for fine details)
- Kneaded eraser
- Precision eraser (for stars)
- Ruler
- Blending stump or tissue
- White gel pen (optional, for bright stars)
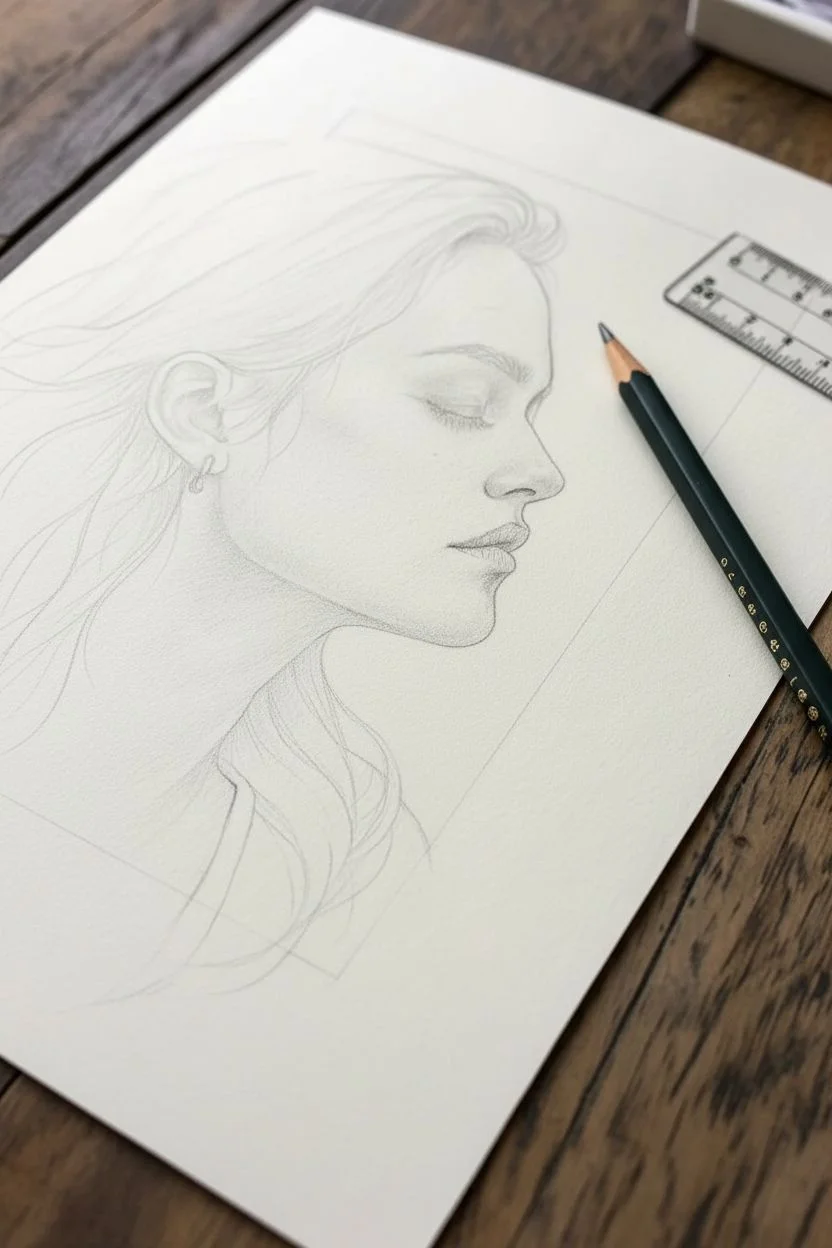
Step 1: Drafting the Composition
-
Sketch the profile:
Begin with a faint HB pencil to outline the side profile of a woman’s face. Focus on placements for the eye, nose, lips, and jawline, keeping the lines very light so they can be adjusted or erased later. -
Define the rectangular frame:
Using a ruler, lightly draw a rectangular box behind the head. The left edge should cut vertically through the back of the head/neck area, and the top and bottom edges should extend past the hair. This box will contain the night sky. -
Map hair flow:
Sketch the hair loosely. Allow strands on the left side to flow naturally outside the rectangular boundary, while the hair on the right (the top and back) stays mostly contained or merges with the dark background.
Protect your work
Place a clean sheet of scrap paper under your drawing hand. This prevents the oils in your skin from smudging the heavy graphite of the night sky onto the clean white face.
Step 2: Shading the Portrait
-
Start with the eye:
Using a sharp 2B or mechanical pencil, detail the closed eyelid and thick lashes. Add delicate shading in the crease of the eye to give it depth, ensuring the lashes curve naturally. -
Contour the face:
Switch to an HB pencil for skin tones. Apply very light hatching around the cheekbone, temple, and jawline. I prefer to use a blending stump here to smooth the graphite into a soft skin texture. -
Define features:
Darken the nostrils and the line between the lips using a 2B pencil. Add subtle shading to the upper lip and the shadow beneath the lower lip to create volume. -
Add texture and freckles:
To make the skin look realistic, gently tap your pencil tip to create faint freckles across the nose and cheek. Keep them irregular in size and spacing. -
Detail the ear and earring:
Draw the intricate folds of the ear with careful shading. If adding an earring, keep the highlights crisp and clean to mimic metal.
Step 3: Creating the Celestial Background
-
Establish the dark void:
This is the most time-consuming part. Use your 4B and 6B pencils to fill in the rectangular space around the face. Press firmly to get a deep, rich black, but be careful not to smudge it onto the face. -
Create the gradient:
The background shouldn’t be pitch black everywhere. Near the nape of the neck and lower hair, lighten the pressure slightly to create a misty or nebulous effect. -
Blend the darkness:
Use a tissue or clean blending stump to smooth out the dark graphite, pushing it into the grain of the paper for a solid, velvety look. -
Lift out the moon:
Identify where you want the crescent moon. Use your kneaded eraser to lift the graphite away in a curve shape. Refine the edges with an HB pencil to make craters or glow. -
Add the stars:
Use a precision eraser or the sharp edge of a regular eraser to ‘draw’ stars by removing small dots of graphite. For brighter stars, create a cross-hatch starburst shape. -
Enhance sparkles:
If your eraser isn’t creating bright enough stars, use a tiny dot of white gel pen for the centers of the biggest stars to make them pop.
Uneven background tone?
If the black background looks scratchy, apply layers in circular motions rather than back-and-forth strokes. Cross-hatching repeatedly before blending builds a smoother solid tone.
Step 4: Refining and Hair
-
Draw individual strands:
Return to the hair with a sharp 2B pencil. draw long, sweeping lines that follow the direction of growth. Some hairs should cross over the dark background, appearing white (negative space) or light grey. -
Clean the edges:
Use a ruler and eraser to sharpen the outside edges of the rectangular frame. A crisp edge is crucial to contrast with the organic shapes of the face. -
Final contrast check:
Deepen the darkest parts of the background one last time to ensure the profile silhouette stands out clearly against the stars.
Step back and admire how the sharp geometric frame highlights the softness of the portrait


Burnout Candle Head
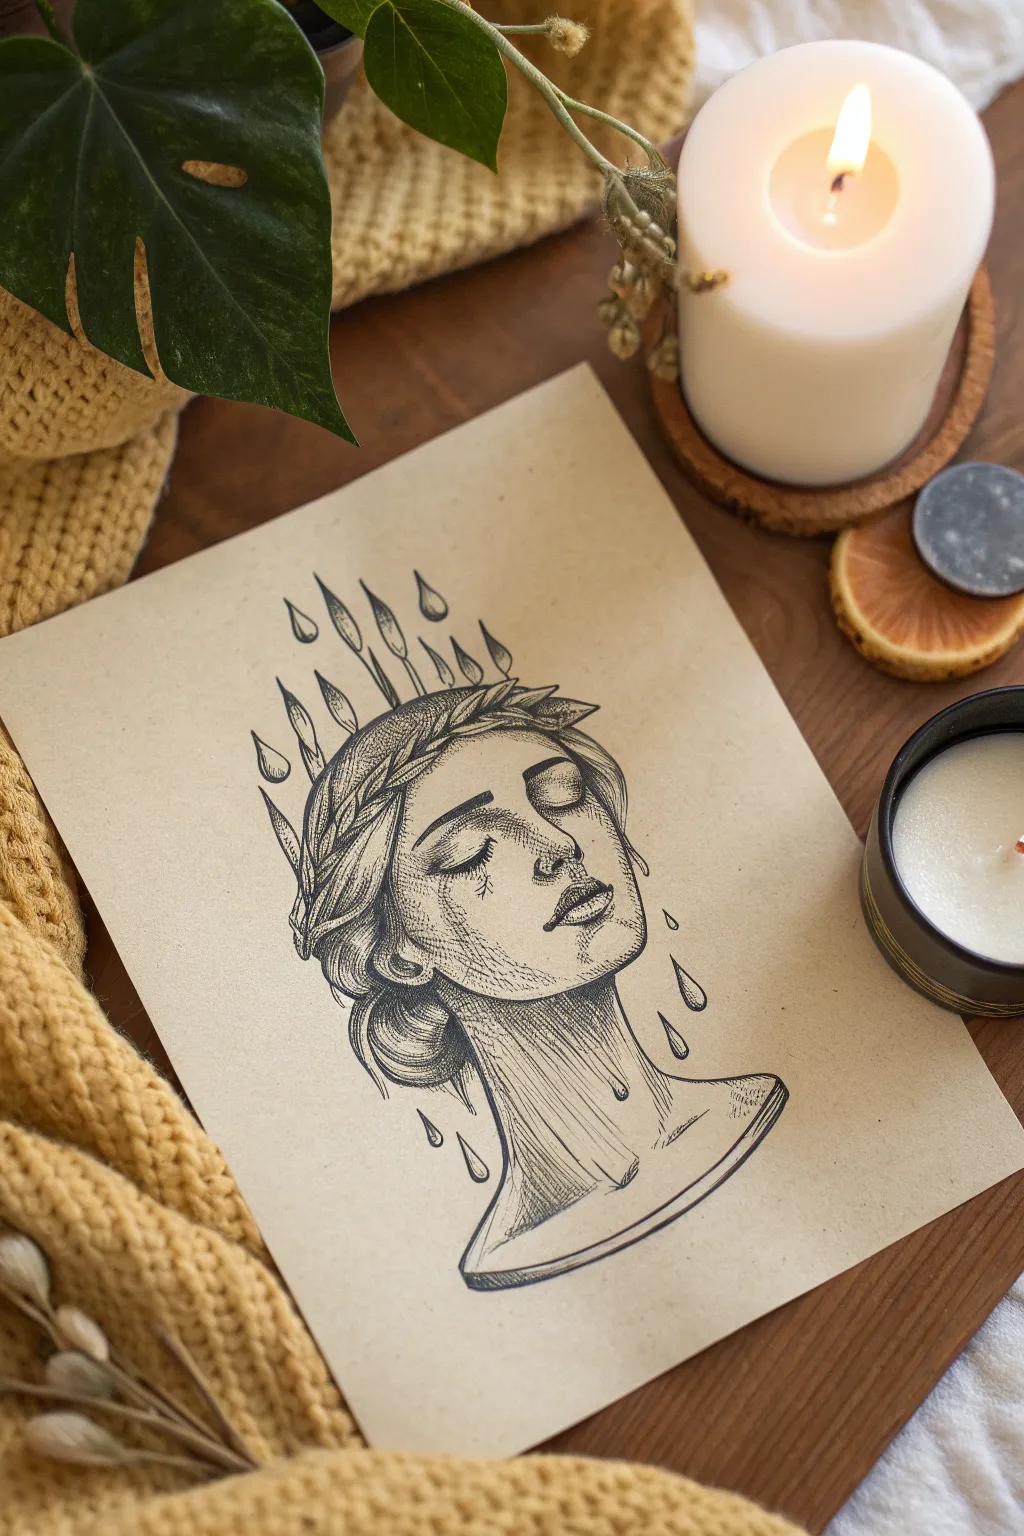
Capture the poignant feeling of burnout with this surreal ink illustration featuring a serene face crowned by dripping candles. Using stippling and hatching techniques on toned tan paper gives the piece an antique, contemplative atmosphere that perfectly matches the subject matter.
How-To Guide
Materials
- Tan or kraft toned mixed-media paper (A5 or A4 size)
- HB graphite pencil
- Kneaded eraser
- Fine liner pens (sizes 0.05, 0.1, 0.3, and 0.5 black)
- White gel pen (optional for highlights)
- Ruler (optional for reference guidelines)
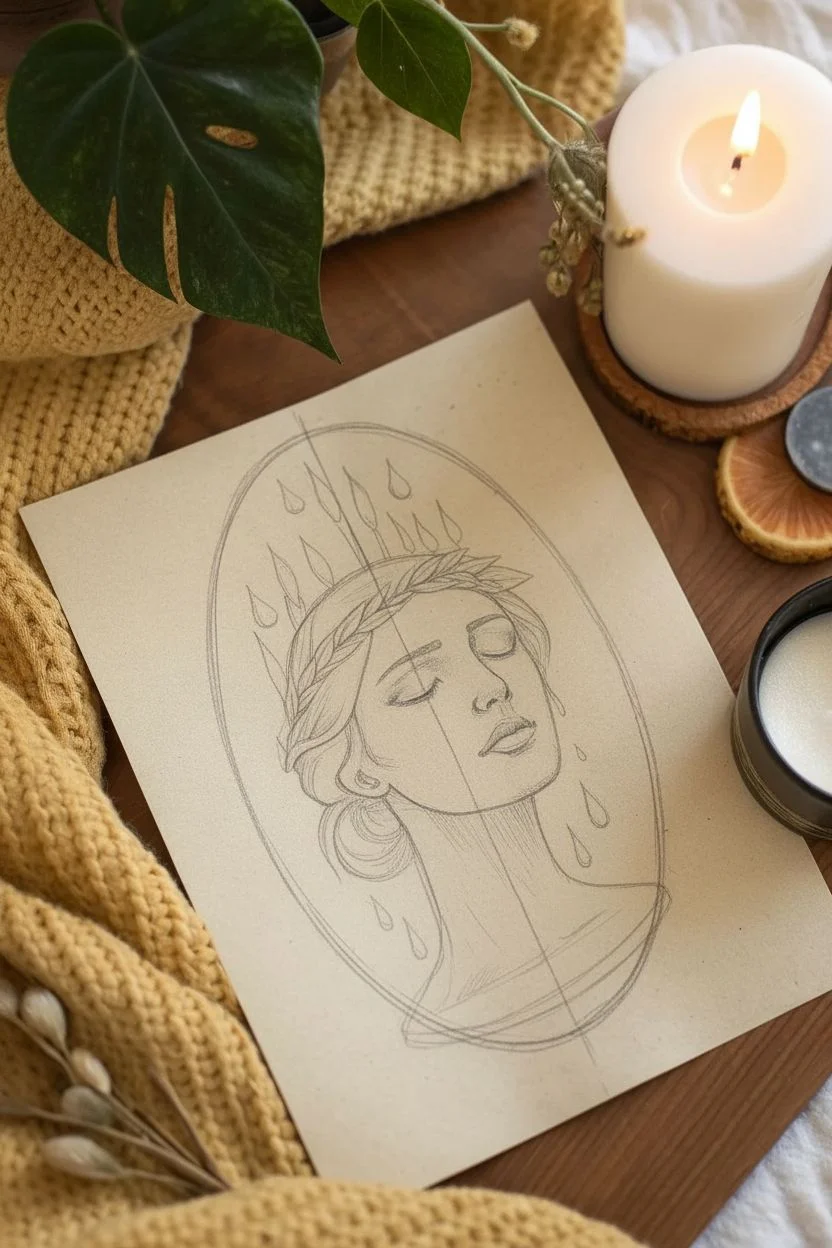
Step 1: Drafting the Base
-
Create the framework:
Begin by sketching a loose oval for the head on your tan paper. Mark out a centerline for the face, tilting it slightly upwards to mimic the figure’s lifted chin. -
Outline the neck and shoulders:
Extend two curved lines down for the neck. Instead of drawing full shoulders, curve the base line to create the effect of a classic sculpted bust or statue. -
Sketch facial features:
Place the eyes (closed slits), nose, and mouth along your guidelines. The expression should be peaceful but heavy; keep the eyes closed with visible eyelids. -
Add the crown structure:
Lightly sketch a braided wreath sitting on the forehead. Above this, draw several vertical shapes resembling candle flames or reeds radiating outward from the head. -
Design the droplets:
Draw teardrop shapes floating around the head—some near the ‘flames’ and others dripping down the neck—to symbolize melting wax or tears.
Ink Confidence
Don’t rush the hatching! Fast strokes look messy. Slow, deliberate lines create that vintage engraving look that fits this style perfectly.
Step 2: Inking the Outlines
-
Define the main contour:
Using a 0.3 pen, carefully go over your pencil lines for the face profile, neck, and hair. Don’t worry about being perfectly smooth; a little texture adds character. -
Detail the hair and wreath:
Switch to a 0.1 pen to draw individual strands within the hair bun and the braided texture of the wreath band. Keep your strokes curved to follow the form of the head. -
Ink the candles and drops:
Outline the flame-like shapes and the floating droplets with the 0.3 pen. Ensure the bottom heavy curve of each drop is smooth to give it weight. -
Erase guidelines:
Once the ink is completely dry, gently run your kneaded eraser over the entire drawing to lift the graphite sketches.
Golden Glow
Use a metallic gold gel pen or paint marker to fill in the flame shapes or the dripping wax for a striking contrast against the black ink.
Step 3: Shading and Texture
-
Apply initial hatching:
Take your 0.05 or 0.1 pen and start adding diagonal hatching lines on the shadowed side of the face—under the chin, the side of the nose, and the eye sockets. -
Stipple the skin:
I find stippling really brings this piece to life. Add tiny dots (stippling) on the cheeks and forehead to create a soft gradient shadow, concentrating them where the skin turns away from the light. -
Darken the hair:
Use the 0.5 pen to fill in the deepest shadows of the hair and the spaces between the braids. Leave some areas of the tan paper showing for highlights. -
Deepen neck shadows:
Create long, vertical hatching lines down the neck with the 0.1 pen. Cross-hatch closer to the jawline to emphasize the depth of the shadow under the chin. -
Texture the candle flames:
Add small lines inside the flame shapes to suggest energy or flickering motion. Shade the bottom of the floating droplets to make them look three-dimensional. -
Final heavy outlines:
Use the 0.5 pen to re-trace the very outer edge of the bust and the main droplets. This line weight variation will make the drawing pop off the page.
This contemplative piece serves as a beautiful reminder to slow down before you melt away


The Inner Library Skull
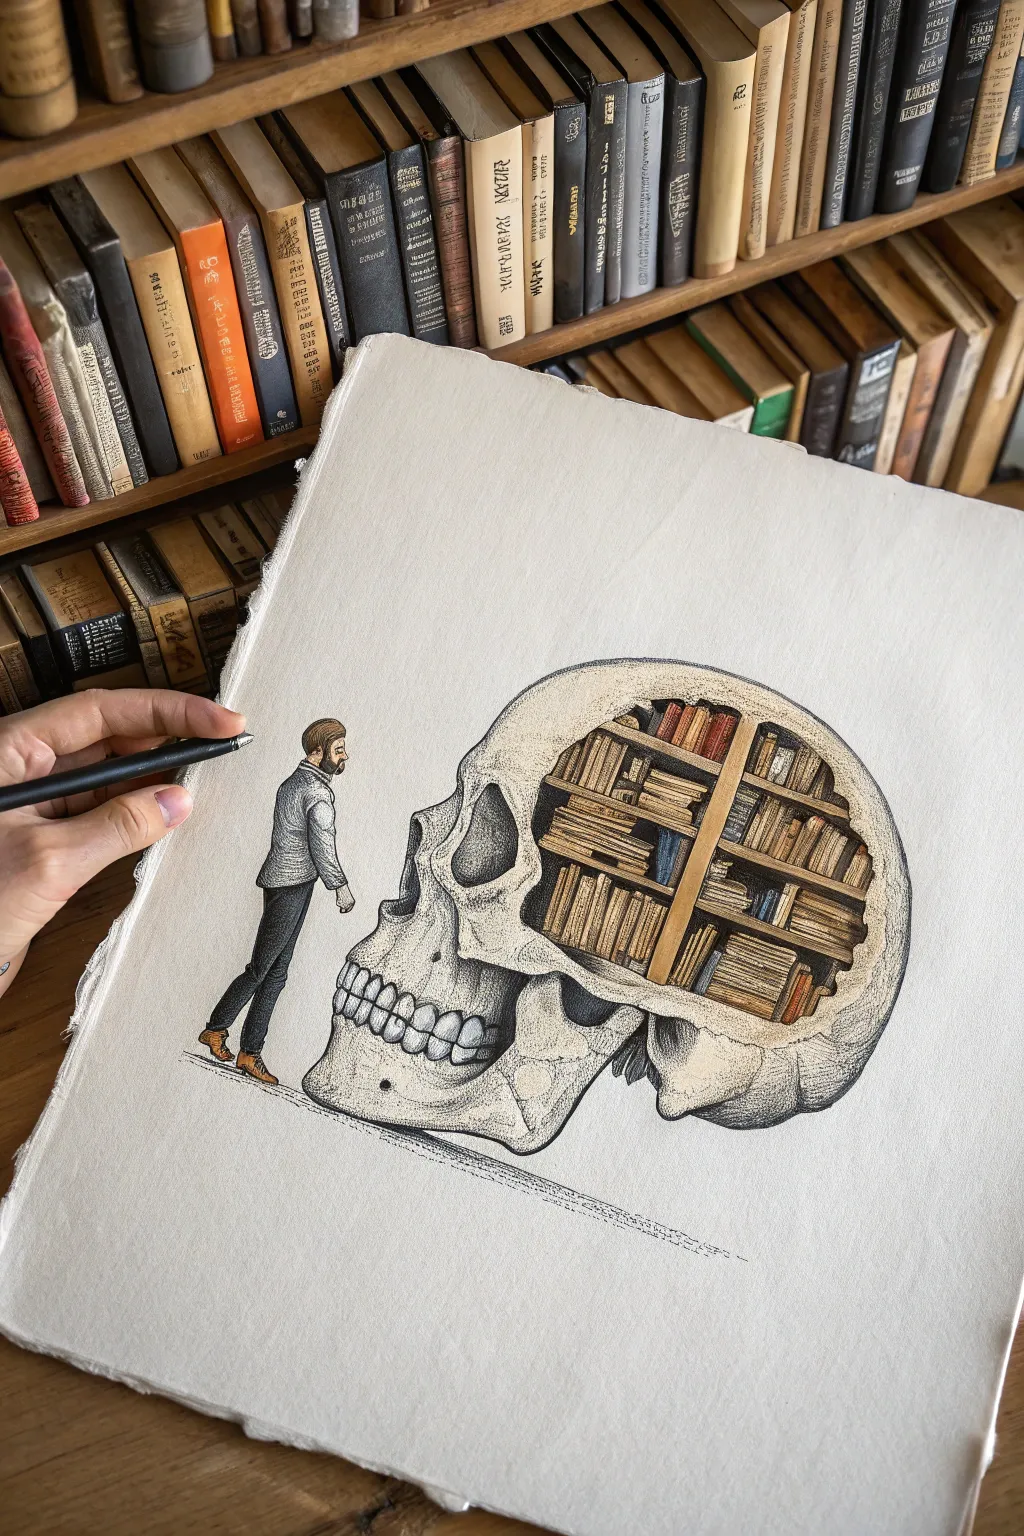
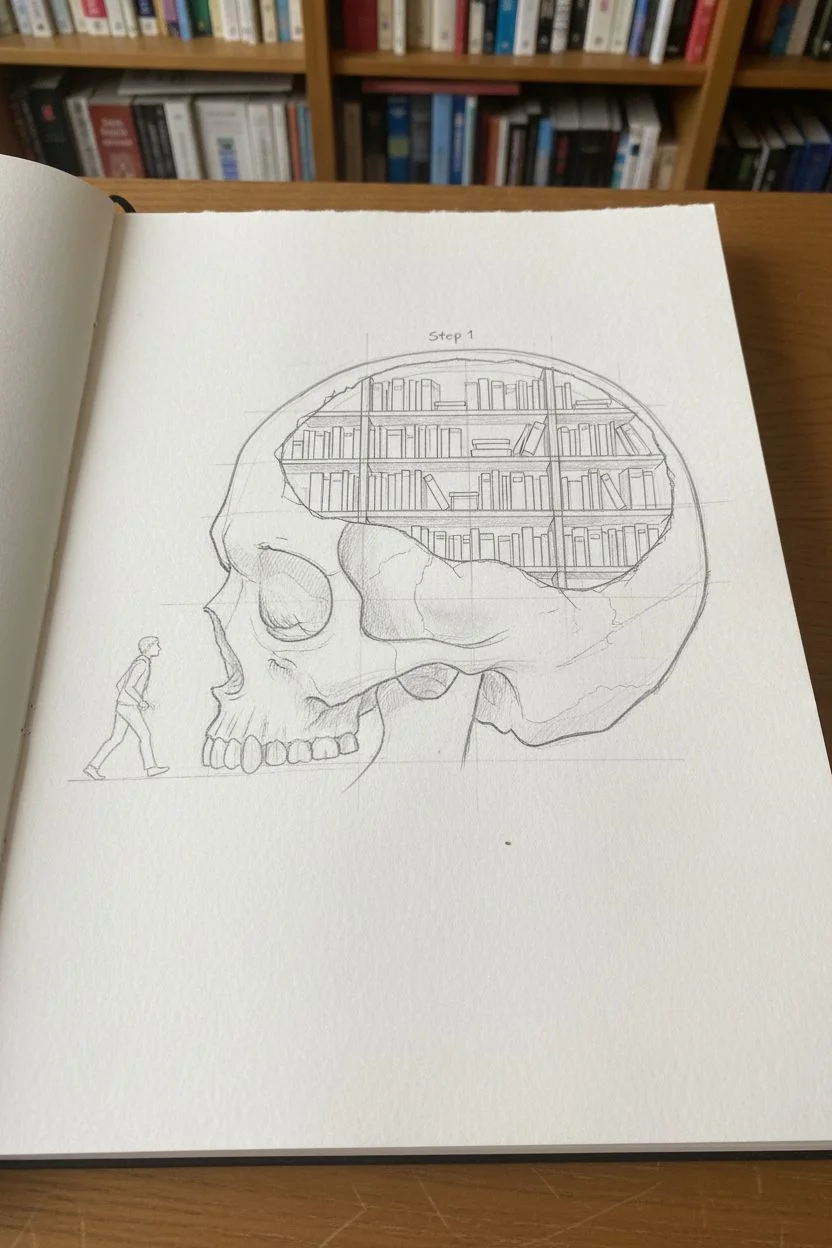
This surreal illustration merges anatomy with architecture, depicting a tiny figure venturing into a giant skull that houses a cozy, warm-toned library within its cranium. The piece combines precise line work with soft coloring to create a conceptual metaphor for knowledge and the mind.
Step-by-Step Tutorial
Materials
- High-quality watercolor paper or mixed media sketchbook
- Pencil (HB or 2B) and eraser
- Fine liner pens (sizes 0.05, 0.1, and 0.3, black)
- Colored pencils (ochre, browns, burnt sienna, slate grey)
- Watercolor paints (optional, for softer shading)
- Small round brush (if using watercolor)
- Ruler
Step 1: Sketching the Framework
-
Outline the Skull Shape:
Begin by lightly sketching the large profile of a human skull. Focus on the rounded cranial curve and the jutting jawline. Don’t worry about perfect anatomical correctness yet; just get the main volume on the paper. -
Define the Cutout:
Draw a large, organic kidney-bean shape removing the back upper portion of the skull. This is where the internal library will live. Frame this area with a ragged, uneven edge to make it look like broken bone. -
Sketch the Bookshelves:
Inside the cutout area, use your ruler to sketch the vertical and horizontal lines of the wooden shelving units. They should follow the curve of the skull slightly to feel integrated. Fill the shelves with varied rectangular blocks to represent rows of books. -
Position the Figure:
To the left of the skull, sketch a small human figure in profile. He should be walking upwards on an invisible incline that leads towards the skull’s nasal cavity. Keep his posture purposeful, leaning slightly forward.
Uneven Ink Flow?
If your fine liner skips over pencil lines, the graphite might be too waxy or thick. Lightly dab the sketch with a kneadable eraser to lift excess graphite before you start inking.
Step 2: Inking the Details
-
Ink the Books:
Switch to your 0.1 fine liner. Go over the books on the shelves, varying their heights and thicknesses. Leave small gaps between some books and tilt a few to make the library feel used and realistic. -
Detail the Wood and Bone:
Ink the structural beams of the bookshelf. For the skull’s edge surrounding the library, use a shaky, stippled line to suggest the porous texture of bone marrow. Use the 0.3 pen for the main outline of the skull to give it weight. -
Texture the Skull Surface:
Using the 0.05 pen, add stippling (tiny dots) specifically around the eye socket, the nasal cavity, and the jaw connection. This creates depth and shadow without using solid black. -
Refine the Traveler:
Carefully ink the small man. Pay attention to his clothing folds—drawing wrinkles at the elbows and knees adds movement. Give him a small beard and defined hair appropriately sized for the tiny scale. -
Erase Guidelines:
Once the ink is completely distinct and dry to the touch, gently erase all the graphite pencil marks to reveal a clean black-and-white illustration.
Step 3: Adding Color and Depth
-
Color the Wood:
Take a light brown or ochre colored pencil. Fill in the wooden vertical beams of the bookshelf. Press harder on the edges of the beams to create a 3D effect. -
Illuminating the Books:
Color the book spines. I find that sticking to a warm, earthy palette—reds, oranges, browns, and muted yellows—gives the interior a cozy, ‘old library’ feel. Leave the page edges white or cream. -
Shading the Skull:
Use a slate grey or very light black pencil to add shadows to the skull. Focus on the eye socket, the underside of the cheekbone, and the teeth. Keep the shading light; the skull should remain mostly the color of the paper. -
Coloring the Figure:
Color the man’s trousers dark grey and his shoes brown. Use a light wash or pencil for his shirt to separate him from the stark white of the background paper. -
Final Contrast:
deepen the darkest shadows inside the library shelves (behind the books) with a dark brown or black pencil. This high contrast makes the books pop forward. -
Grounding Shadow:
Add a faint, horizontal hatched shadow line under the skull and the man’s feet. This anchors them in space so they don’t look like they are floating.
Add a Hidden Title
Make the drawing personal by writing tiny, legible titles on the spines of the larger books. You can include your favorite classics or names of people you know.
Now you have a thought-provoking piece that beautifully illustrates the world inside our heads


Portrait Made of Handwritten Confessions
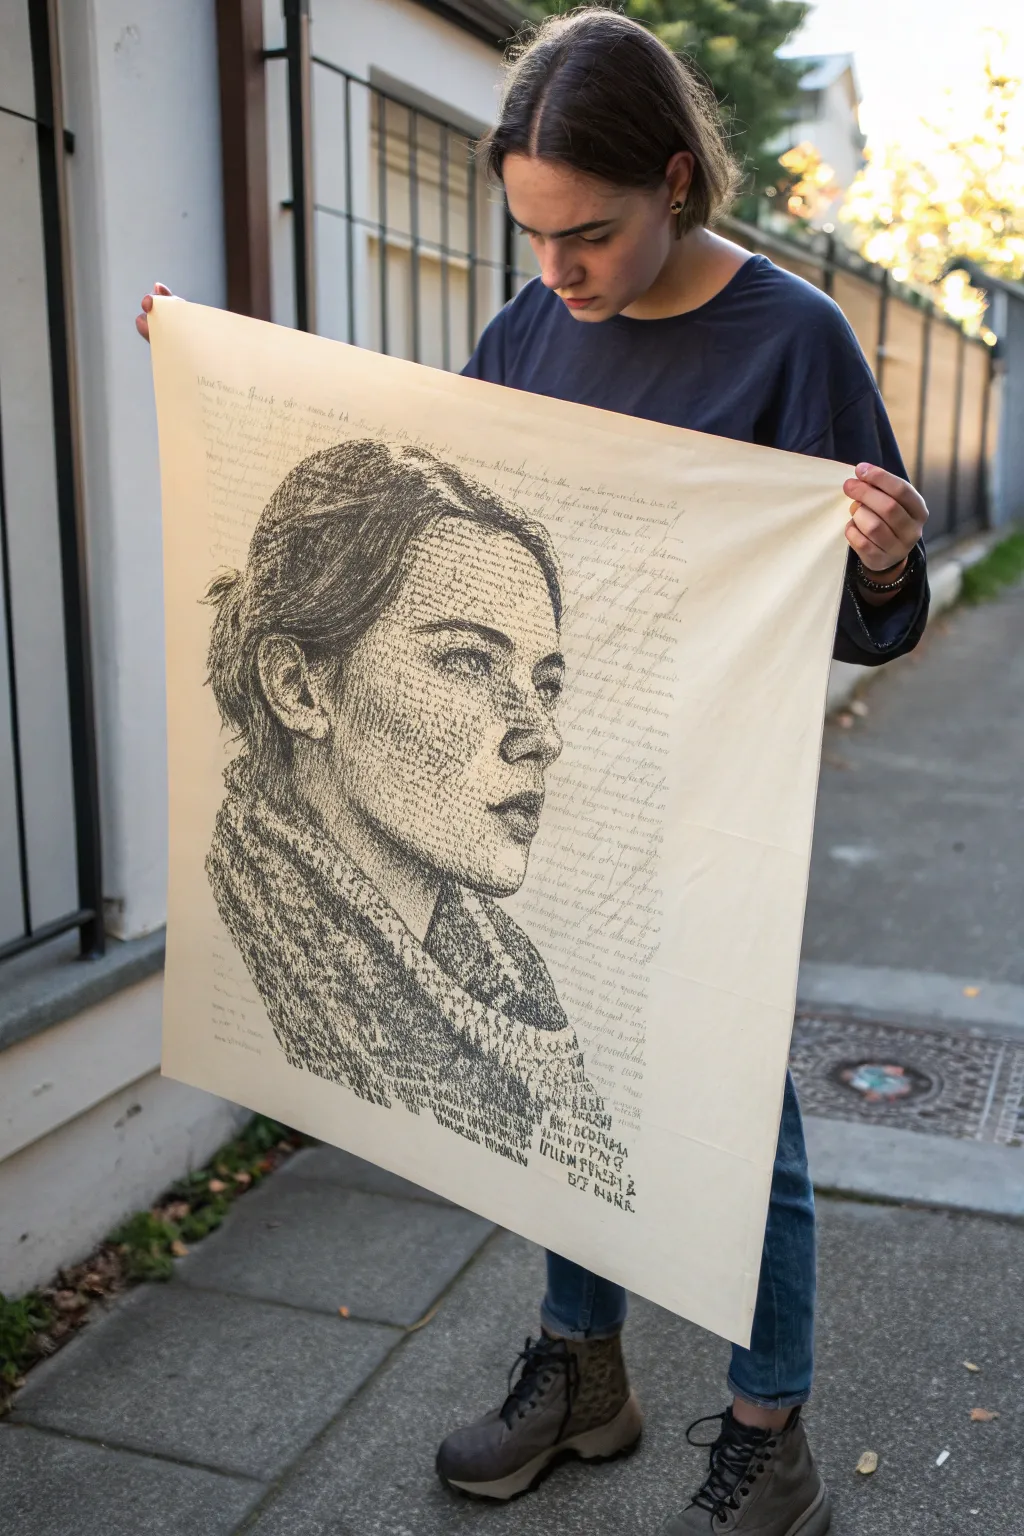
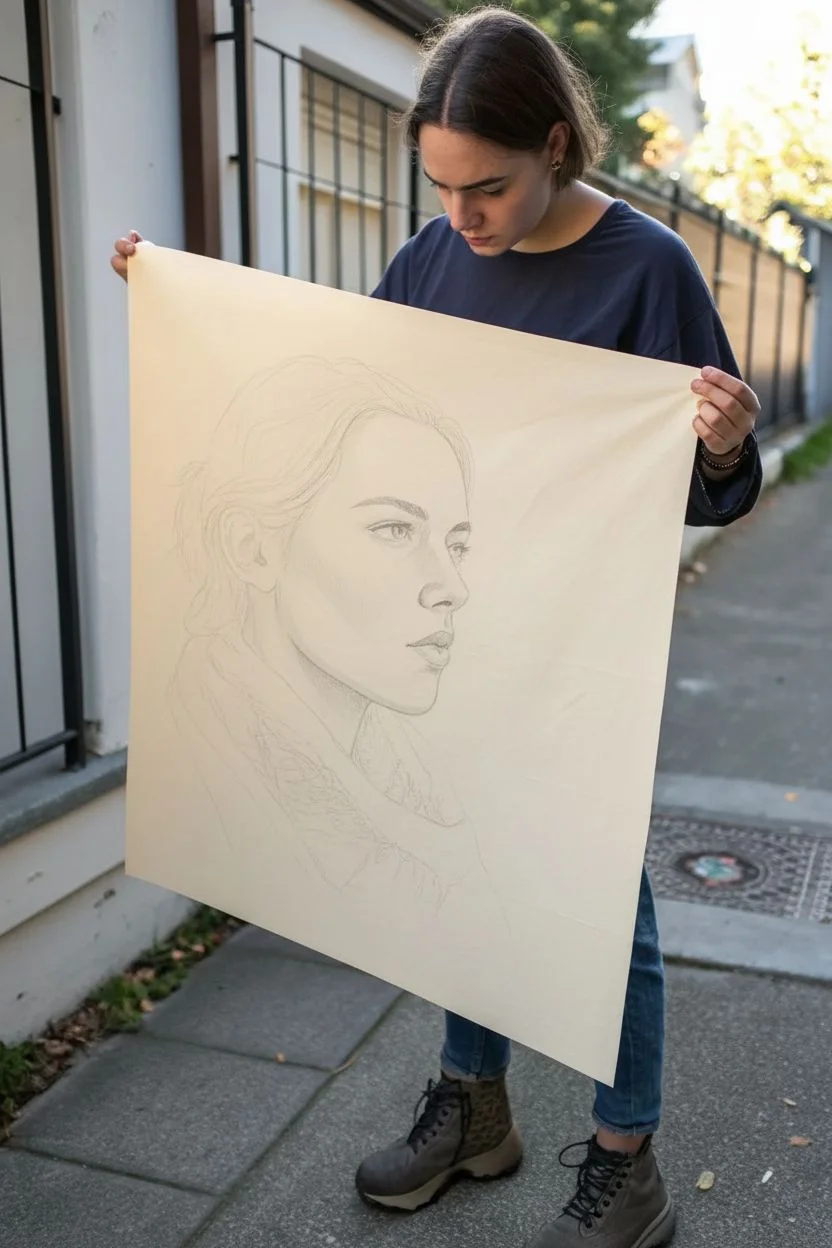
This evocative project transforms personal stories into visual art by using handwritten text to build light and shadow. The result is a striking, sepia-toned portrait where the very words themselves sculpt the features of the subject.
Detailed Instructions
Materials
- Large sheet of cream or parchment-colored paper (A2 or larger)
- Black fine-liner pens (sizes 0.05, 0.1, and 0.3mm)
- Graphite pencil (HB or 2B)
- Kneaded eraser
- Source photo for the portrait
- Light box or bright window (optional but helpful)
- Personal text, poems, or ‘confessions’ to transcribe
Step 1: Preparation & Mapping
-
Select your source image:
Choose a portrait photo with high contrast. Strong shadows and highlights are crucial because you won’t be drawing lines, but rather clusters of words. A 3/4 profile like the example works beautifully to show depth. -
Create the base sketch:
Lightly sketch the outline of the face, hair, and clothing onto your large cream paper using an HB pencil. Keep these lines incredibly faint; they act merely as boundaries for your writing and shouldn’t be visible in the end. -
Map the tonal values:
Look at your reference photo and identify the darkest areas (under the chin, the pupils, the hair folds). Lightly outline these ‘shadow zones’ on your paper so you know where the text needs to be densest.
Pro Tip: Density Control
To get lighter skin tones without darker ink, switch to a grey fine-liner or simply space your letters much wider apart, almost dotting them.
Step 2: The Writing Process
-
Start with the eyes:
Begin writing closest to the focal point. Use your finest pen (0.05mm) to write tiny, illegible sentences that curve around the iris. I find starting here anchors the whole piece emotionally. -
Build the darkest shadows:
Switch to a slightly thicker pen (0.1mm or 0.3mm) for the deep shadows, like the nostrils, pupils, and deep neck folds. Here, overlap your words. Write a sentence, let it dry for a second, and write another directly over it to create a near-black texture. -
Follow the contours:
This is the most critical technique: do not write in straight horizontal lines. Curve your sentences to follow the shape of the cheekbone, the roundness of the chin, or the wave of the hair. The text direction dictates the volume of the face. -
Create mid-tones:
For the skin and softer shadows, spread your handwriting out. Keep the letters small but leave more ‘breathing room’ between lines. The cream paper showing through creates the mid-tone value. -
Handling the hair:
Hair text should flow in long, sweeping streams. Use heavier pressure and denser writing at the roots and where the hair tucks behind the ear, feathering it out towards the highlights. -
The scarf texture:
If your subject is wearing textured clothing like the knit scarf in the example, change your writing style. Use jagged, tight, scribbly handwriting to mimic the rough texture of wool, creating a visual contrast against the smooth writing on the skin.
Level Up: Hidden Messages
Highlight specific words in red ink throughout the portrait to form a secret ‘meta-poem’ that can only be read when looking closely at the texture.
Step 3: Background & Final Touches
-
Add atmospheric background text:
Surround the head with faint, horizontal lines of text that fade out as they reach the paper’s edge. This suggests a narrative environment without distracting from the main face. -
Erase guidelines:
Once the ink is completely dry—wait at least an hour to be safe—gently roll a kneaded eraser over the pencil marks to lift them without smudging your ink work. -
Evaluate contrast:
Step back five feet. If the face looks flat, go back in with your 0.3mm pen and darken the core shadows again by layering more text. Deepening the darks makes the highlights pop. -
Incorporate illegible artistic text:
At the bottom or corners, feel free to add larger, more abstract blocks of text or ‘stamped’ looking letters to give the piece a journalistic or archival feel.
Now you have a deeply personal portrait that invites the viewer to lean in and read between the lines


Have a question or want to share your own experience? I'd love to hear from you in the comments below!