If you’re in the mood to make something sweet and meaningful, heart designs are the fastest way to get there. I pulled together my favorite heart design ideas that work beautifully as little gifts, keepsakes, and easy home decor you’ll actually want to display.
Watercolor Heart Ombre Wash
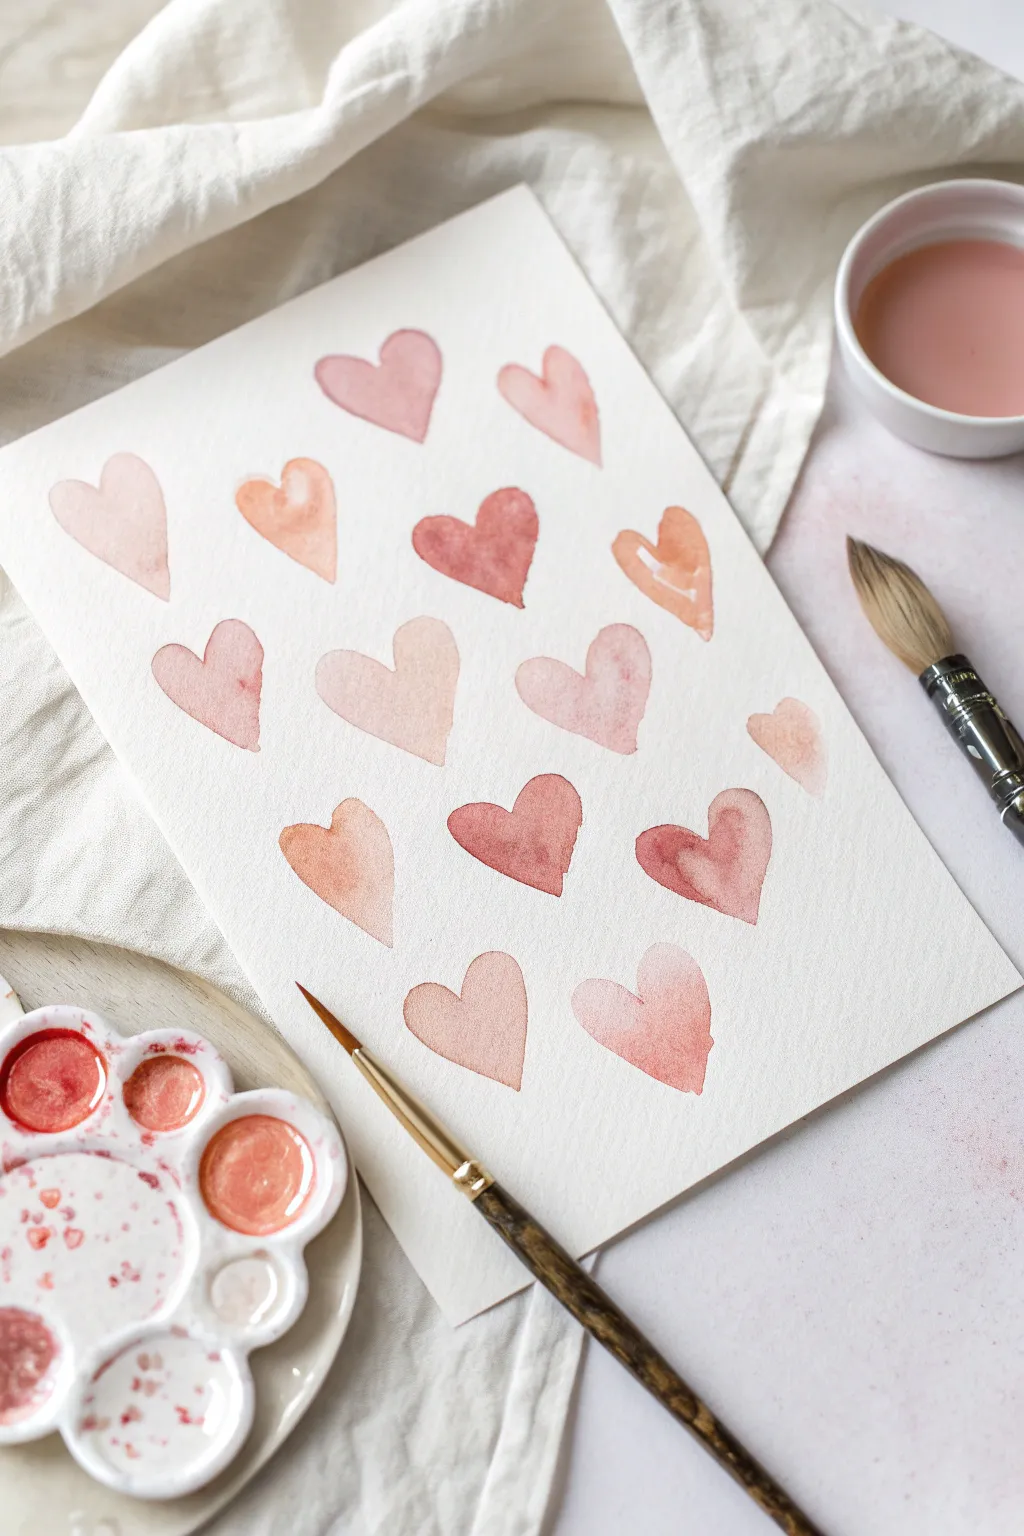
Create a charming collection of soft, romantic hearts using simple watercolor techniques that emphasize the beauty of blending and flow. This project captures the delicate nature of watercolors with a palette of warm pinks, peaches, and reds, perfect for handmade cards or framed art.
Step-by-Step
Materials
- Cold press watercolor paper (140lb/300gsm)
- Watercolor paints (shades like Alizarin Crimson, Opera Pink, Burnt Sienna, and Yellow Ochre)
- Round watercolor brush (size 6 or 8)
- Ceramic or plastic watercolor palette
- Two jars of water (one for clean, one for dirty)
- Paper towel or cloth for blotting
- Washi tape or masking tape (optional, to secure paper)
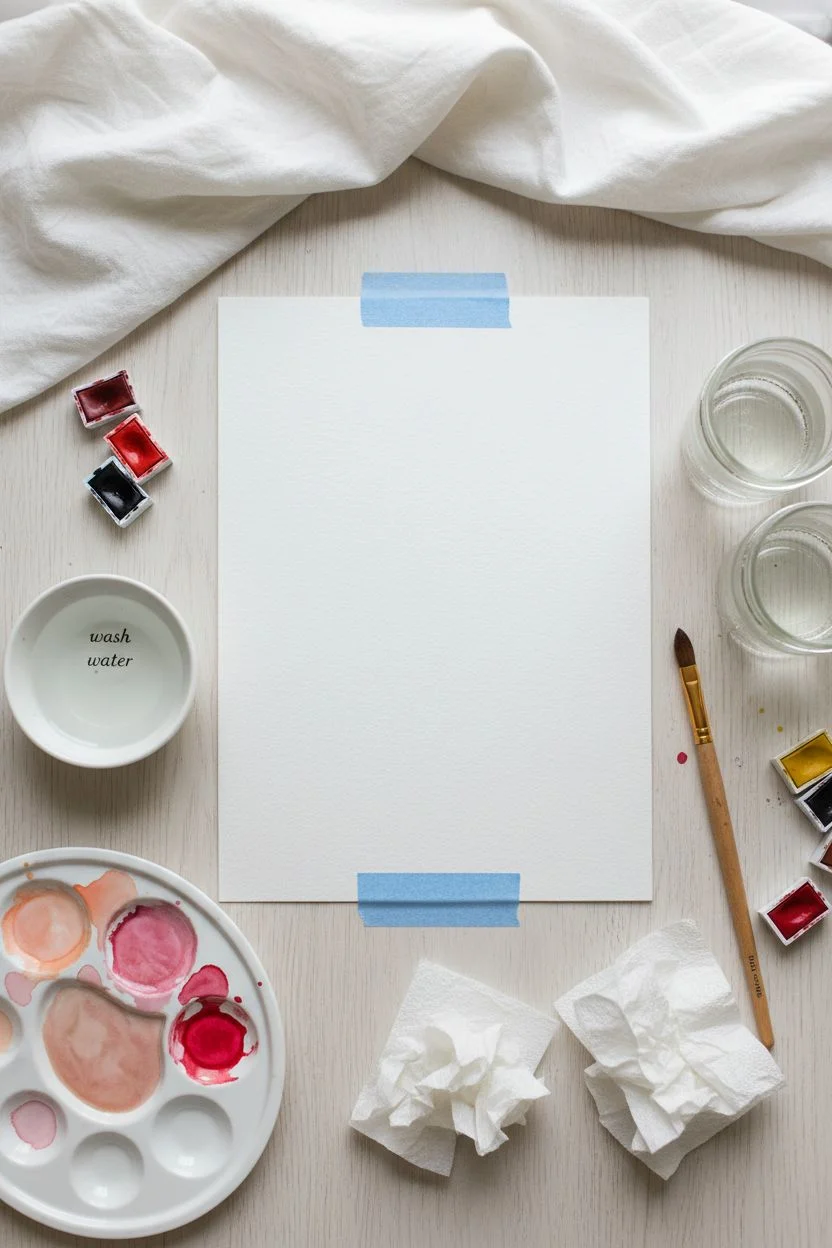
Step 1: Preparation & Color Mixing
-
Prepare your workspace:
Set up your watercolor paper on a flat surface. If your paper tends to buckle, you might want to tape down the edges with washi tape, though for loose studies like this, un-taped paper works fine too. -
Awaken your paints:
Spritz your watercolor pans with a little water to soften the pigment. This makes it easier to pick up rich, saturated color immediately. -
Mix your base palette:
In your palette wells, mix three distinct puddles of color. Create a soft peach (mix pink with a touch of yellow), a dusty rose (pink with a tiny dot of brown), and a classic crimson red. Ensure these puddles are juicy and fluid, not dry or pasty. -
Create a wash water:
Designate one small dish or a corner of your palette for clean water. You will use this to thin out your pigments as you go to create lighter values.
Fixing cauliflower blooms
If a watermark blooms where you don’t want it, your paint was too dry when you added water. Gently re-wet the entire heart with a damp brush to smooth it out.
Step 2: Painting the Hearts
-
Start the first heart:
Load your round brush with a medium concentration of the dusty rose color. Lay down a curvy stroke for the left lobe of the heart. -
Complete the shape:
Without cleaning your brush, pick up a tiny bit more water or a slightly different shade (like the peach) and paint the right lobe, letting the two strokes meet at the bottom point. -
Encourage the bleed:
If the center where the lobes meet hasn’t blended on its own, gently touch the wet paint with the tip of your brush to encourage the colors to swirl and mix naturally. -
Vary paint consistency:
For the next heart, use a very watery mix of paint. This will create a transparent, ethereal look that contrasts beautifully with darker hearts. -
Create a ‘bloom’ effect:
Paint a heart using a solid, darker red color. While it is still glossy and wet, drop a tiny bead of clean water or a lighter color into the upper corner of the heart. Watch as it pushes the pigment away, creating a cauliflower-like texture. -
Work in columns or rows:
Proceed to fill the page, spacing the hearts roughly evenly but keeping the placement organic. Don’t worry about perfect alignment; the charm is in the handmade feel. -
Mix on the paper:
For a two-toned heart, paint one half with pure pink and the other half with the peach mixture. Let them touch while wet so they form a seamless gradient right on the page. -
Lift color for highlights:
If a heart looks too dark or heavy, rinse your brush, blot it until it’s just damp, and gently ‘lift’ some pigment from the center of the heart to create a highlight.
Pro Tip: The thirsty brush
Use a ‘thirsty’ (clean, damp) brush to soften hard edges immediately after painting. This creates that fluffy, cloud-like gradient seen in the lighter hearts.
Step 3: Refining & Drying
-
Add darker accents:
Look for hearts that are drying but still slightly damp. Drop a rapid touch of concentrated, dark pigment into the bottom tip or along one edge to add dimension and shadow. -
Create ‘hard edges’:
Allow some hearts to dry completely before painting a neighboring heart. If they accidentally touch when wet, they will bleed together; spacing them out or waiting helps maintain crisp edges. -
Fill the gaps:
Review your overall composition. Add smaller, fainter hearts in any large empty spaces to balance the layout without overcrowding it. -
Check for puddles:
If any hearts have large pools of water sitting on top, use the corner of a paper towel or a dry brush to soak up the excess so the paper doesn’t warp excessively. -
Final drying time:
Let the paper sit undisturbed until it is completely bone dry. Watercolor often dries lighter than it looks when wet, so don’t be surprised if the colors soften.
Once dry, frame your beautiful study of hearts or scan them to create your own digital patterns


Simple Outline Heart Line Art


This beginner-friendly sketching project focuses on the elegance of simple lines and negative space. Using just a pencil and paper, you’ll create two distinct heart variations—one utilizing concentric echoes and another featuring a delicate centerpiece—that look effortlessly chic.
Step-by-Step Tutorial
Materials
- Spiral-bound sketchbook (smooth white paper)
- Standard HB or No. 2 pencil (sharpened)
- Eraser (kneaded or plastic)
- Mechanical pencil (optional, for finer details)
Step 1: The Concentric Heart
-
Map the shape:
Begin near the top center of your page. Lightly sketch the basic shape of a heart, tilting it slightly to the left for a more dynamic look. Keep this initial line very faint so it can be adjusted easily. -
Refine the outer edge:
Once you are happy with the tilt and curve, darken your line slightly. Aim for a ‘lob-sided’ aesthetic where the left hump is slightly smaller or tighter than the sweeping right side, giving it a playful, hand-drawn feel. -
Start the inner echo:
Draw a second heart shape inside the first one. Instead of keeping the spacing perfectly even all the way around, allow the lines to get closer together near the bottom point and the top cleft. -
Add the third layer:
Draw the smallest, third heart inside the second one. Follow the same principle: let the gap between lines be wider on the curves of the lobes and tighter near the sharp points. -
Thicken the lines:
Go over all three outlines with firmer pressure. I like to re-trace the lines a few times loosely to give them a sketchy, organic texture rather than a rigid geometrical one. -
Emphasize the pinch points:
Darken the areas where the three hearts meet at the bottom point and the top crevice. This adds a sense of depth and draws the eye to the key structural parts of the shape.
Step 2: The Floating Heart in Heart
-
Position the large heart:
Move to the lower right area of your page. Draw a large, single-line heart. Make this one wider and fuller than the first design to create visual contrast. -
Create the dip:
Ensure the center dip (the cleft) is sharp and definite. Let the right lobe stretch out a bit further than the left to maintain that casual, handwritten style. -
Darken the perimeter:
Trace over your outline with deliberate strokes. The line quality should look graphite-grey and slightly textured, so don’t be afraid to press down to deposit more graphite. -
Locate the center:
Visually identify the middle of your large heart. You don’t need to measure—in fact, placing it slightly off-center often looks more artistic. -
Draw the tiny heart:
In that central space, sketch a very small, floating heart. Keep its proportions similar to the large outer frame. -
Refine the tiny heart:
Carefully define the outline of this miniature heart. Because it’s small, keep your pencil tip sharp here to avoid shading the inside by accident. -
Clean up:
Use your eraser to remove any stray sketch marks or smudges around the main shapes, leaving the background crisp and clean.
Clean Lines Pro-Tip
Rotate your sketchbook as you draw the curves. Pulling the pencil toward your hand usually creates smoother, more confident arcs than pushing it away.
Level Up: Ink It
Trace over your final pencil lines with a fine-liner pigment pen (0.5mm). Wait for the ink to fully dry, then erase the pencil for a graphic art print look.
You now have a beautifully simple page of heart studies that celebrates the charm of hand-drawn imperfection


Pattern-Filled Heart Shape (Checks and Stripes)
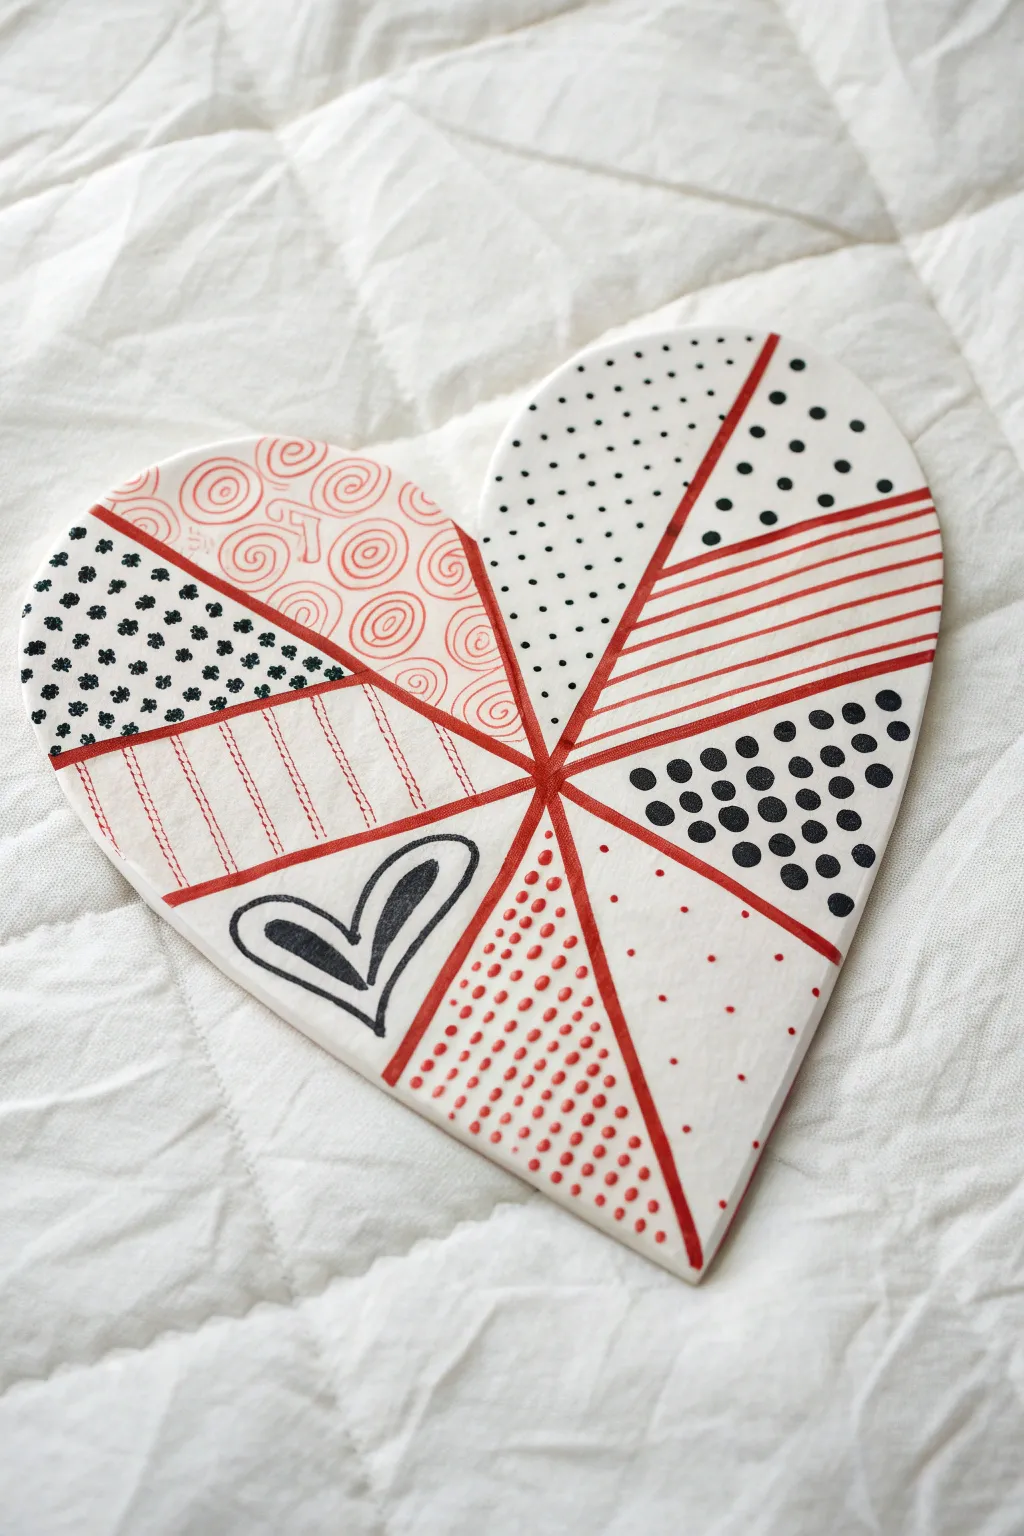
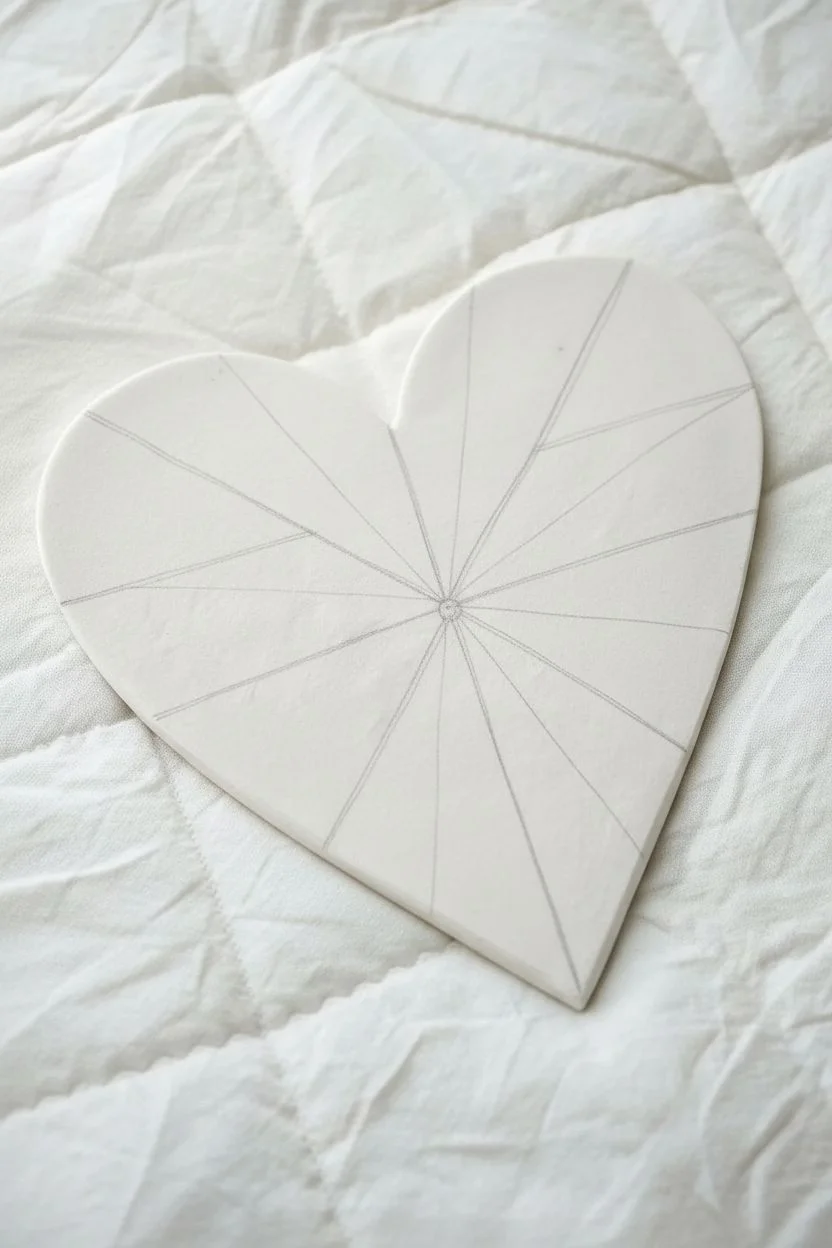
Transform a simple ceramic or wooden heart into a striking piece of decor using a geometric segmentation technique. This project combines classic red and black patterns to create a dynamic, modern look perfect for Valentine’s Day or year-round display.
Step-by-Step
Materials
- Unfinished white ceramic or wooden heart plaque (approx. 6-8 inches)
- White acrylic paint (if using wood)
- Red fine-point permanent marker or paint pen (oil-based works best on ceramic)
- Black fine-point permanent marker or paint pen
- Ruler or straight edge
- Pencil
- Eraser
- Clear sealant spray (gloss or matte)
Step 1: Preparation and Base
-
Prepare the surface:
Ensure your heart shape is clean and dry. If you are using a wooden cutout, apply two coats of white acrylic paint to create a bright, smooth background, sanding lightly between coats for the best finish. If using ceramic, wipe it down with a little rubbing alcohol to remove oils. -
Find the center point:
Using your pencil and ruler, lightly mark a small dot roughly in the noticeable center of the heart shape. This doesn’t need to be mathematically perfect, but it will serve as the anchor for all your radiating lines. -
Draft the segments:
Place your ruler on the center dot and draw a straight line outward to the heart’s edge. Rotate the ruler slightly and draw another line. Continue this process until you have about 10-12 wedge-shaped segments radiating from the center like a sunburst.
Step 2: Creating the Framework
-
Trace the main lines:
Take your red paint pen or marker and carefully trace over your pencil lines. These red lines form the bold skeleton of the design, so keep your hand steady and maintain consistent pressure. -
Thicken the borders:
Go back over your red lines a second time to thicken them slightly. This adds definitive separation between the patterned sections and makes the design pop visually. -
Let the framework dry:
Give the red lines a few minutes to dry completely to avoid smudging them while you fill in the detailed patterns.
Ink Smearing?
If you accidentally smudge wet ink, wait for it to fully dry. Then, use a white paint pen to carefully color over the mistake. Let dry, and redraw the pattern.
Step 3: Adding the Patterns
-
Start with the black dots:
Choose a segment near the top right. Using the black marker, fill this wedge with medium-sized polka dots. Try to stagger them slightly rather than placing them in perfect grid rows for a more organic feel. -
Draw red stripes:
Move clockwise to the next segment. Use your ruler and the red marker to draw horizontal stripes. Vary the thickness of the stripes or keep them uniform, depending on your preference. -
Add large black polka dots:
In the next segment down, create a bold contrast by drawing much larger black circles. Fill them in completely with the black marker. -
Incorporate sparse red dots:
For the bottom right segment, keep it simple. Use the red marker to place tiny, sparse dots widely spaced apart. This negative space helps balance the busier sections. -
Create the red stipple gradient:
Moving to the bottom center wedge, use the red marker to create rows of small dots. I like to pack them tighter near the center point and space them out as they move toward the edge, creating a subtle gradient effect. -
Draw the focal heart:
In the bottom left section, draw a stylized heart using the black marker. Outline it first, then add a second, thicker outline around it to give it emphasis against the white background. -
Stitch design:
For the segment on the middle left, draw vertical red lines. Then, add small perpendicular dashes across them to mimic a ‘stitched’ fabric look. -
Black clover pattern:
In the far left segment, draw small clusters of three or four black dots to resemble little clovers or flowers. Repeat this pattern densely to fill the space. -
Red swirls:
Finally, fill the top left segment with loose, hand-drawn red spirals. Vary the size and direction of the swirls to create a playful, energetic texture. -
Center fill:
Use the main thick top-center segment (if you have one remaining) or the very center point to add simple black stippling (tiny dots) to act as a focal anchor.
Add Metallic Flair
Replace one of the colors (like the red dividing lines) with a gold or silver leafing pen. This adds a sophisticated shimmer that catches the light beautifully.
Step 4: Finishing Touches
-
Erase pencil marks:
Once you are absolutely certain all ink is dry, gently run your eraser over the design to remove any visible pencil guidelines. -
Seal the artwork:
Take the heart to a well-ventilated area and apply a light coat of clear sealant spray. This protects the marker from fading and gives the ceramic or wood a professional sheen.
Display your finished heart proudly on a shelf or wall to add a touch of graphic love to your space


Button Heart Collage
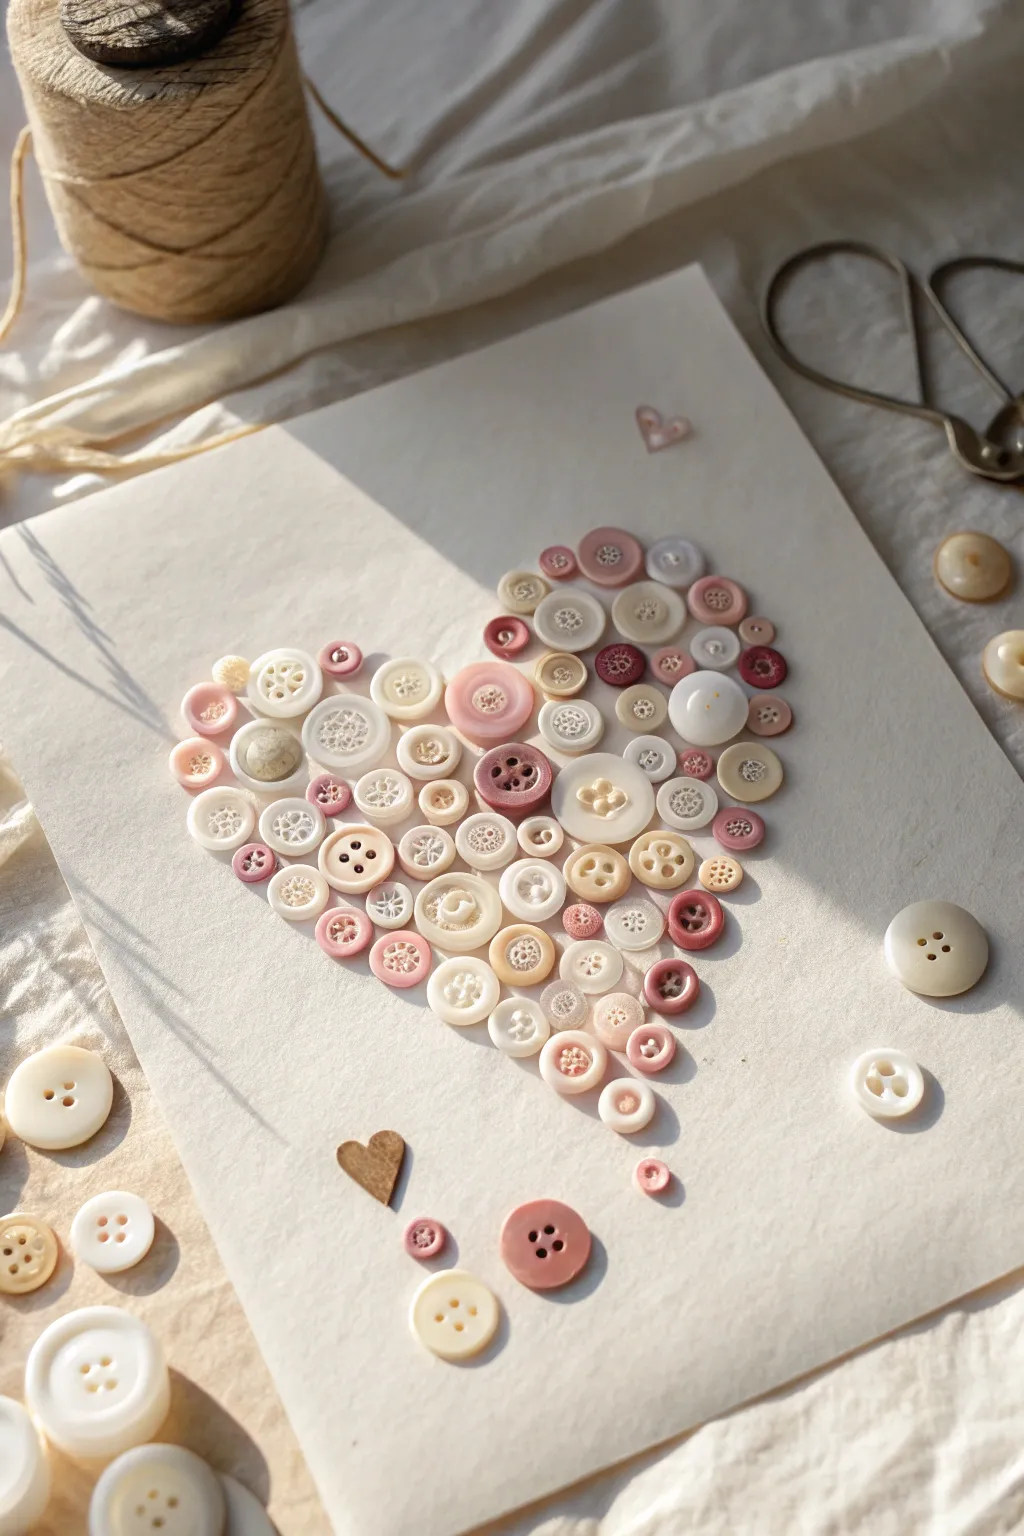
Transform a collection of spare buttons into a charming piece of wall art that radiates warmth and nostalgia. This delicate mosaic uses a soft palette of creams, pearlescents, and dusty pinks arranged on textured paper to create a sweet, romantic centerpiece.
How-To Guide
Materials
- A mix of vintage and reproduction buttons (sizes 5mm to 20mm)
- Color palette: cream, bone white, pearl, blush pink, and dusty rose
- Heavyweight textured cardstock or watercolor paper (cream or off-white)
- Clear-drying craft glue (like tacky glue or a strong clear adhesive)
- Pencil
- Tweezers
- Small heart-shaped wooden veneer embellishment (optional)
- Small scissors (optional, for trimming paper)
Step 1: Preparation and Sorting
-
Gather the palette:
Begin by sorting through your button collection. You are looking for a very specific soft color range: mostly creamy whites, ivories, and pearlescents, accented with blush pinks, dusty roses, and perhaps one or two deep maroon buttons for contrast. -
Check for variety:
Ensure you have a good mix of sizes. You’ll need a handful of larger ‘statement’ buttons (around 15-20mm) to anchor the design, many medium standard shirt buttons, and plenty of tiny 5-8mm buttons to fill gaps. -
Select paper:
Choose a high-quality, heavyweight paper as your base. A textured watercolor paper or a heavy cardstock in a warm cream tone works best to complement the vintage vibe. -
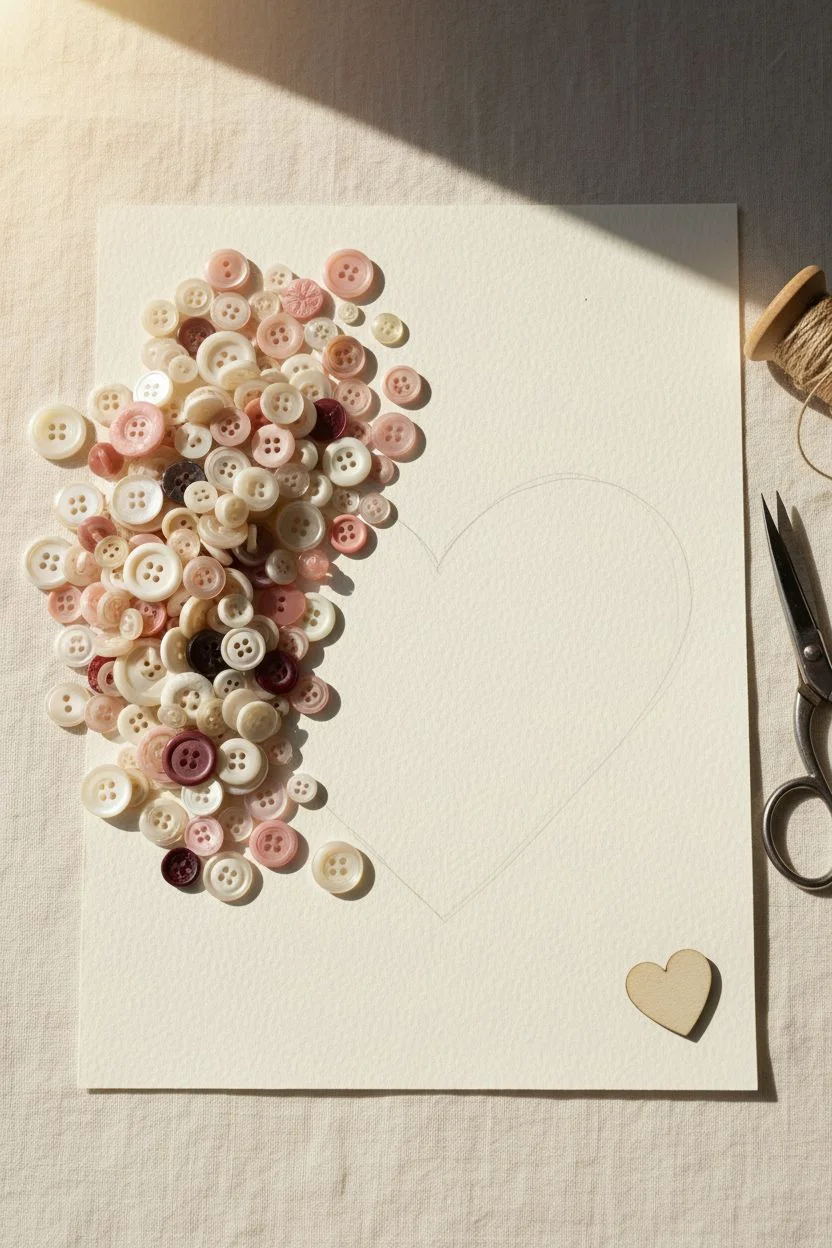
Draw the guide:
Lightly sketch a heart shape onto your paper using a pencil. Keep the lines very faint so they can be easily erased or covered later. Make sure the heart is centered and sized appropriately for your button supply—usually about 4 to 5 inches wide.
Sticky Situation?
If glue oozes through the buttonholes and dries shiny, use a matte varnish or a tiny dab of matte clear nail polish over the hole to dull the shine and hide the mistake.
Step 2: Creating the Layout
-
Do a dry run:
Before gluing anything, place your buttons onto the paper without adhesive. This dry arrangement is crucial for balancing the colors and sizes. -
Place the anchors:
Start by positioning your largest buttons first. Scatter them relatively evenly across the heart shape so the visual weight is balanced. -
Distribute the pinks:
Take your pink and dusty rose buttons and distribute them among the creams. Avoid clumping all the colored buttons in one spot; you want a speckled, confetti-like effect. -
Fill the edges:
Pay special attention to the outline. Use medium-sized buttons to define the curves of the heart lobes and the sharp point at the bottom. -
Mind the gaps:
Look for empty spaces between the larger buttons. Fill these voids with your tiniest buttons. I find that layering a tiny button slightly over the edge of a larger one can add nice dimension, though keeping them flat is easier for framing. -
Refine the shape:
Step back and look at the heart. Adjust the buttons at the very top indentation and the bottom tip to ensure the heart shape reads clearly. -
Add floating accents:
Select 3-5 buttons to scatter loosely around the main heart, making the design look less rigid. Place a few near the bottom right and perhaps one near the top right. -
Incorporate charms:
If you have a small wooden heart veneer or a unique shaped charm (like the tiny heart outline shown in the inspiration), place it near the bottom or top as a special accent.
Go 3D
Create a rich, layered effect by stacking tiny buttons on top of larger, flat buttons. This works best if you plan to frame the piece in a shadow box rather than a standard frame.
Step 3: Gluing and Finishing
-
Begin gluing:
Once you are happy with the arrangement, start gluing one button at a time. Pick up a button, apply a small dot of clear-drying tacky glue to the back, and press it back into its spot. -
Use tweezers:
For the tiny buttons, tweezers are a lifesaver. They keep sticky fingers away from the paper and allow for precise placement. -
Work in sections:
I usually start from the top left lobe and work my way down, lifting one button at a time so I don’t lose the overall design. -
Check for ooze:
Be careful not to use too much glue, as it can squeeze up through the buttonholes. If this happens, use a clean toothpick to wipe it away before it dries. -
Secure the strays:
Don’t forget to glue down the scattered ‘floating’ buttons and any wooden charms you placed outside the main heart shape. -
Erase guidelines:
Once the glue is fully dry (give it at least an hour), gently erase any visible pencil lines from your initial sketch. -
Final inspection:
Gently tilt the paper to ensure no buttons are loose. If one slides, add a fresh dot of glue and press firmly.
Allow your artwork to cure overnight before placing it in a frame to display your handcrafted creativity
BRUSH GUIDE
The Right Brush for Every Stroke
From clean lines to bold texture — master brush choice, stroke control, and essential techniques.
Explore the Full Guide
Torn-Paper Heart Collage Layers
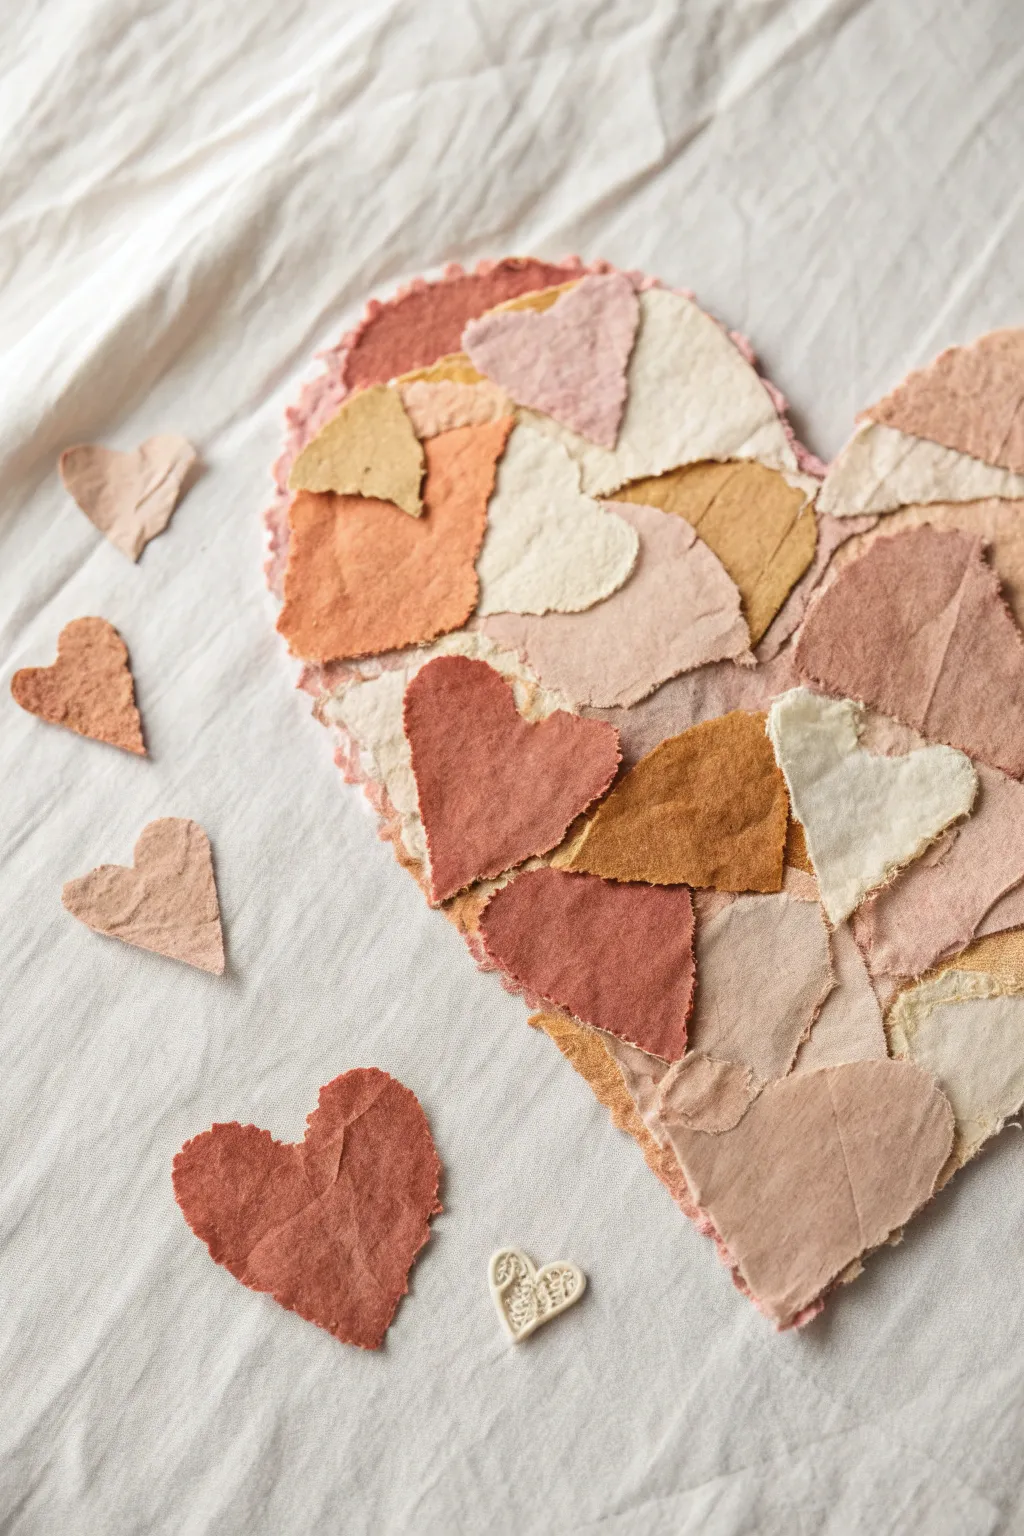
Create a rustic, sentimental piece of art using layers of torn, handmade-style paper in warm, earthy tones. This collage technique relies on overlapping textures and intentionally jagged edges to build a large, cohesive heart shape that feels soft and organic.
Step-by-Step Guide
Materials
- Heavyweight cardstock or watercolor paper (for the base)
- Assorted handmade or mulberry papers (rust, terra cotta, beige, cream, soft pink)
- Pencil
- PVA glue or matte gel medium
- Small paintbrush (for glue application)
- Scissors (optional, for initial shaping)
- Tweezers (optional, for placement)
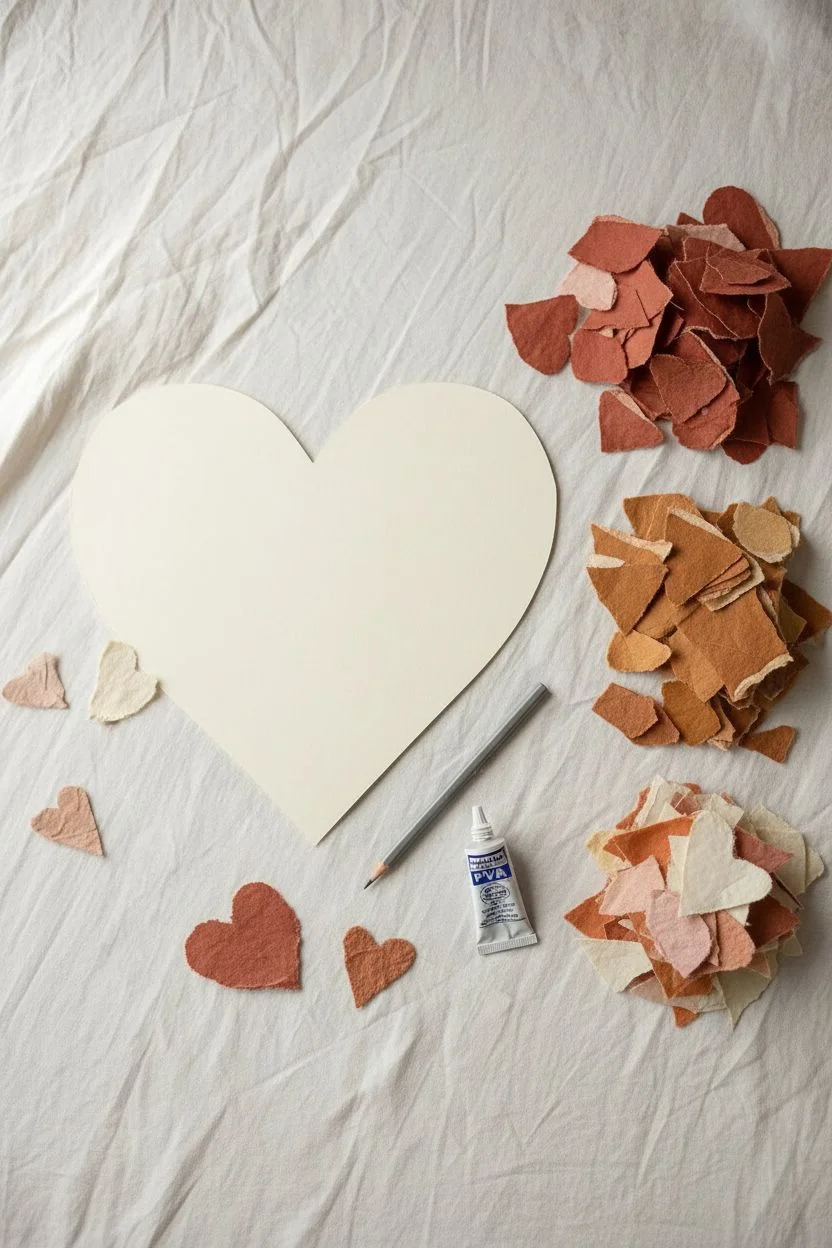
Step 1: Preparation & Base
-
Create the base:
Start by drawing a large, symmetrical heart shape onto your heavy backing paper or cardstock using a pencil. This will serve as your guide for the collage boundary. -
Cut the foundation:
Cut out the large drawn heart shape. Unlike the top layers, this edge can be clean-cut, as it will be covered by the torn paper pieces later. -
Select your palette:
Gather your collection of handmade papers. Aim for a cohesive palette of warm neutrals—think coffee, clay, blush, and old book pages. The variation in texture is key here.
Tearing Pro-Tip
Dampen the line you want to tear with a wet paintbrush or Q-tip first. The water softens the fibers, giving you a much fuzzier, more delicate deckled edge on thicker papers.
Step 2: Creating the Torn Pieces
-
Tearing technique:
Take a sheet of your colored paper and gently tear it into irregular shapes. You want soft, fuzzy edges rather than sharp cuts. I find pulling the paper slowly away from me creates a nice feathered edge. -
Shape specific pieces:
While many pieces can be abstract blobs, try to tear a few distinct heart shapes of varying sizes. These will act as focal points within the larger collage. -
Size variety:
Ensure you have a mix of sizes. You’ll need larger pieces (about 2-3 inches) for the main fill and smaller scraps (under 1 inch) to fill gaps. -
Sort by color:
Group your torn pieces into piles by color. This helps when arranging the collage so you can ensure an even distribution of tones without clustering all the dark rust colors in one spot.
Level Up: Distressed Look
Immerse your paper scraps in strong black tea or coffee and let them dry before gluing. Crumple them while wet for intense wrinkles and an instant vintage, aged effect.
Step 3: Assembling the Collage
-
Dry run arrangement:
Before gluing anything, lay your larger torn pieces onto the heart base. Roughly plan where the key colors will sit to create a balanced composition. -
Start from the edge:
Begin gluing pieces around the perimeter of the heart base first. Let the torn edges overhang the cardstock base slightly to hide the sharp cut edge underneath. -
Layering inward:
Apply a thin layer of PVA glue or gel medium to the back of a paper piece and press it down, working from the outside edges toward the center. -
Overlap generously:
Ensure each new piece overlaps the previous ones significantly. You want to build physical depth and ensure no background white space peeks through the seams. -
Add focal hearts:
Take those specific heart-shaped pieces you tore earlier and place them on top of the background layers. These look great slightly off-center or nestled in a cluster. -
Mix textures:
If you have paper with distinct textures—like crinkled mulberry or smooth kraft—alternate them side-by-side to create visual interest.
Step 4: Refining & Finishing
-
Check the edges:
Examine the outer perimeter. If the overhang is too messy, carefully tear away the excess, maintaining that soft, deckled look rather than cutting it straight. -
Fill the gaps:
Look for any flat or empty-looking areas. Use your smallest torn scraps to bridge gaps or add a pop of contrasting color purely for dimension. -
Press and seal:
Once everything is placed, you can gently press the entire project under a heavy book (with a protective sheet of wax paper) to ensure it dries flat. -
Create scattered hearts:
With your leftover paper flexibility, tear 3-5 small standalone hearts. These can be scattered around the main artwork for photography or styling. -
Final texture check:
Gently ruffle the edges of the top-most layers with your fingernail. This slight lift adds to the tactile, 3D effect of the finished piece.
Display your textured heart in a shadow box frame to let the beautiful layers catch the light and cast soft shadows
3D Paper Strip Heart Garland
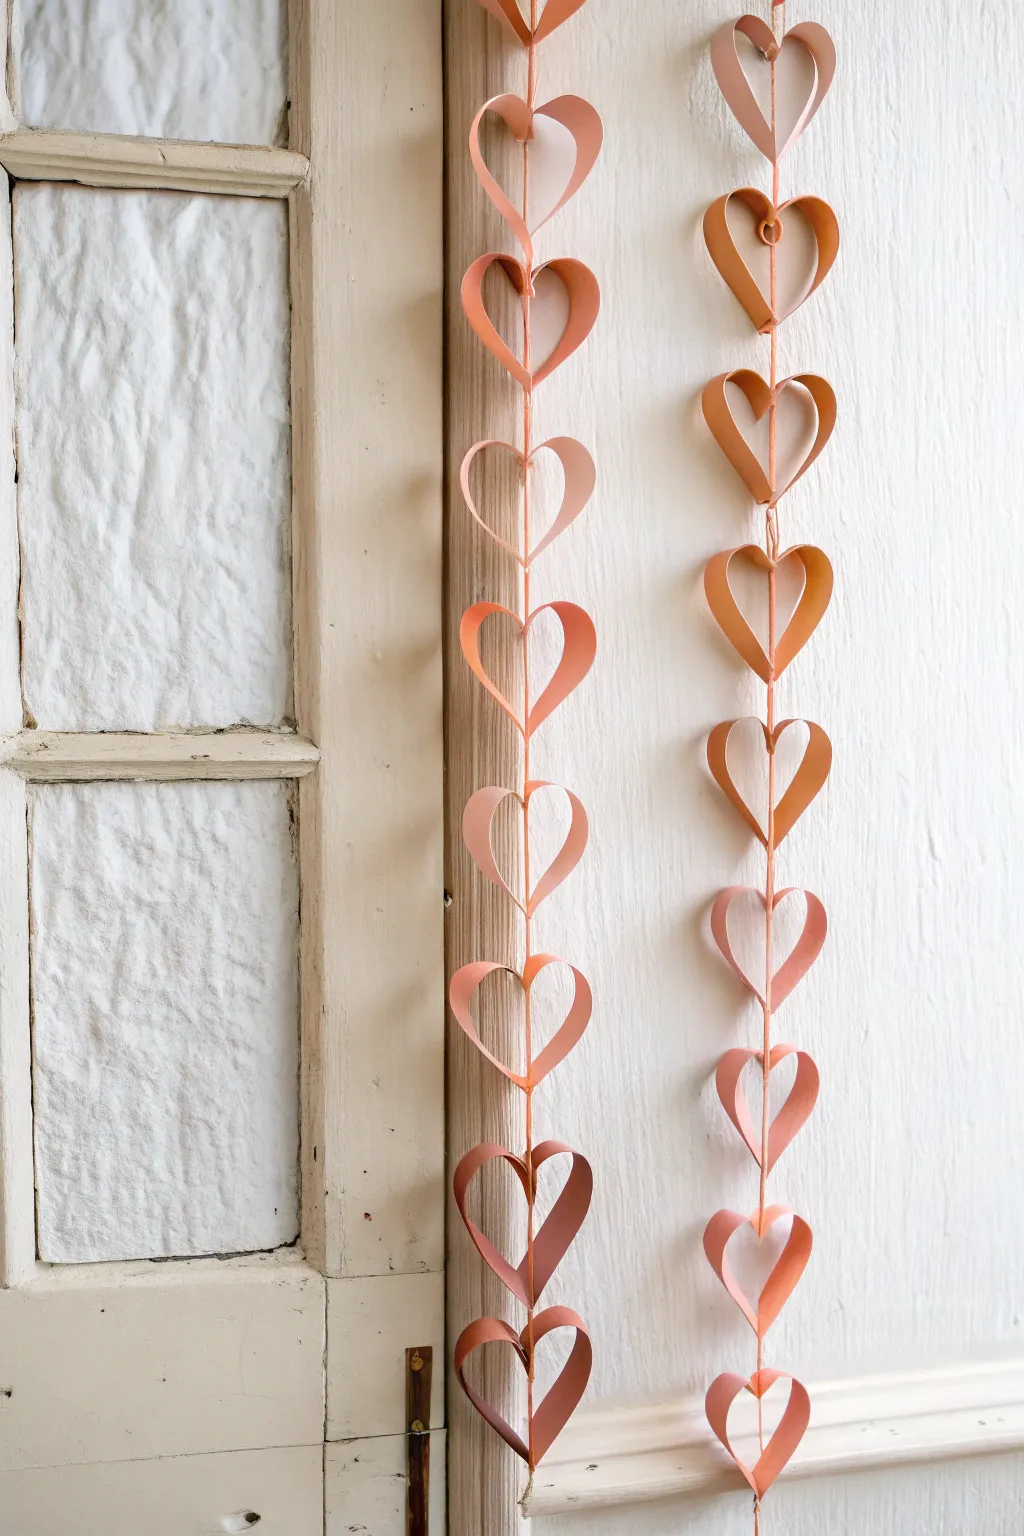
Transform simple paper strips into an elegant cascade of three-dimensional hearts with this charming garland project. The design creates a lovely airy effect as the hearts seem to float effortlessly on a single string, perfect for adding a soft, romantic touch to any doorway or window frame.
Step-by-Step Tutorial
Materials
- Cardstock or heavy construction paper (in shades of peach, coral, and terracotta)
- Paper trimmer or scissors
- Ruler
- Baker’s twine, embroidery floss, or strong thin string (white or matching color)
- Strong craft glue or a glue stick
- Sewing needle (large eye)
- Stapler (optional, for speed)
- Double-sided tape (optional alternative to glue)
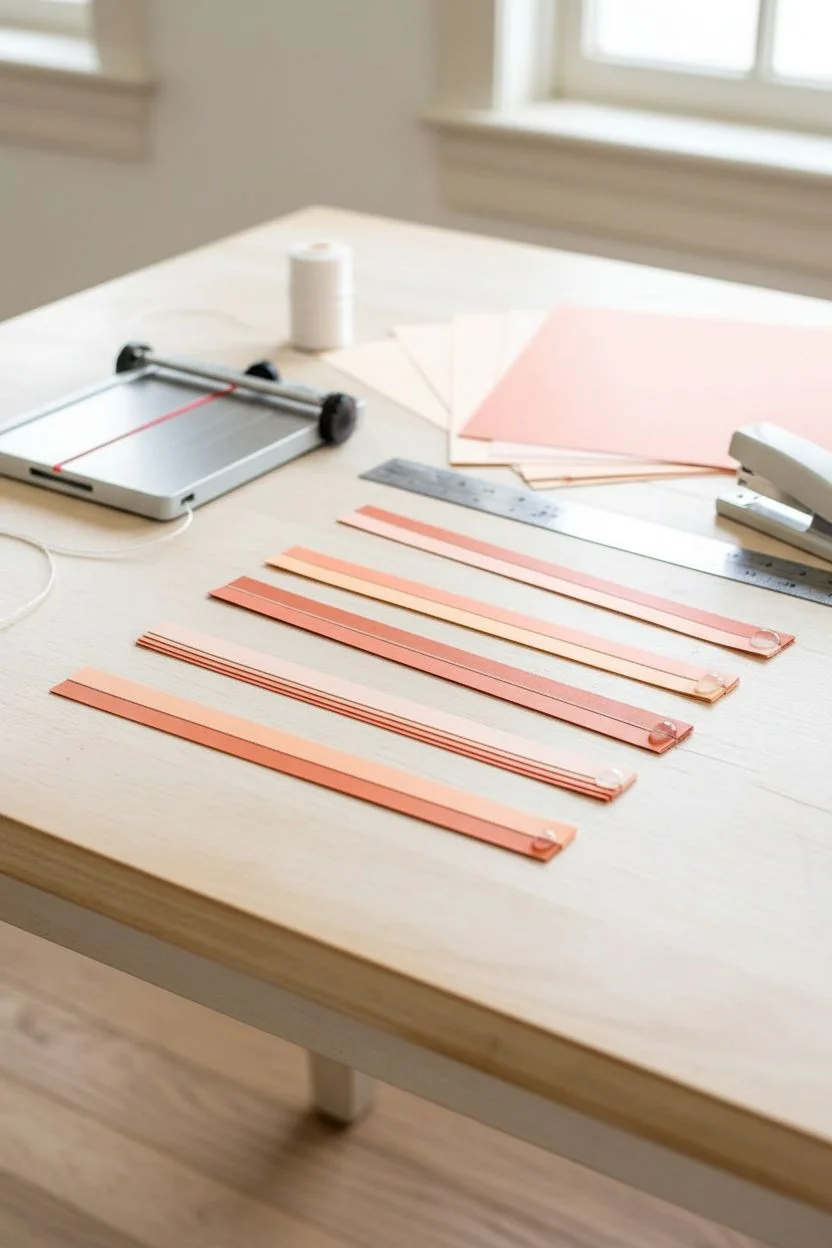
Step 1: Preparing the Strips
-
Select your palette:
Choose 2-3 shades of paper in the same color family (like the warm peaches and dark corals shown) to create depth and visual interest. -
Measure the width:
Mark your paper to cut strips that are approximately 1 inch wide. Uniformity is key here for a polished look. -
Cut the strips:
Using a paper trimmer to ensure straight lines, cut out a large batch of strips. You will need two strips for every single heart on the garland. -
Determine length:
Cut these strips to about 11 inches long. If you want varied heart sizes, you can cut some shorter sets at 9 inches or longer sets at 12 inches.
Step 2: Forming the Hearts
-
Stack the strips:
Take two strips of the same color and stack them perfectly on top of one another. -
Join one end:
Apply a small dot of glue or a strip of double-sided tape to the very bottom edge of the stack to bond the two strips together at one end only. Let this dry completely if using liquid glue. -
Bend the curves:
Pull the two loose top ends outward and downward, curving them away from each other to form the top arches of the heart. -
Secure the point:
Bring the loose ends back together at the bottom, overlapping them with the glued end you created in the previous step. You should now see the heart shape. -
Fasten the shape:
Glue or staple these ends together at the point to lock the heart shape in place. Repeat this process until you have all your hearts formed.
Straight Hanging Hack
If your hearts twist too much, add a tiny clear bead or a small dab of hot glue inside the heart’s bottom point to add weight, helping the garland hang vertically straight.
Step 3: Stringing the Garland
-
Prepare the string:
Cut a length of twine or string about 12 inches longer than your desired garland drop height. -
Thread the needle:
Thread your string through a needle with a large eye. -
Tie the bottom knot:
Tie a secure double knot at the very end of your string. This will catch the bottom-most heart. -
Pierce the first heart:
Push the needle up through the center of the bottom point of your first heart, and then straight up through the indented center top of the heart. -
Position the heart:
Slide the heart all the way down to rest on the bottom knot. -
Spacing knots:
Decide on your spacing pattern; about 2-3 inches between hearts looks balanced. Tie a knot in the string at this measured distance above the previous heart. -
Add the next heart:
Thread the next heart onto the string just like the first one, letting it slide down until it hits the new knot. -
Continue building:
Repeat the knot-and-thread process, alternating your paper colors to create an ombre or random pattern, until the garland reaches your desired length. -
Tie off the top:
Once the final heart is in place, tie a loop at the top of the remaining string for easy hanging.
Layered Love
Create a ‘nested’ effect by cutting slightly shorter strips in a contrasting color and creating a smaller heart inside the larger one before stringing them.
Hang your finished garland near a light source to enjoy the beautiful shadows the 3D shapes cast against the wall

PENCIL GUIDE
Understanding Pencil Grades from H to B
From first sketch to finished drawing — learn pencil grades, line control, and shading techniques.
Explore the Full Guide
Pop-Up Heart Card Surprise
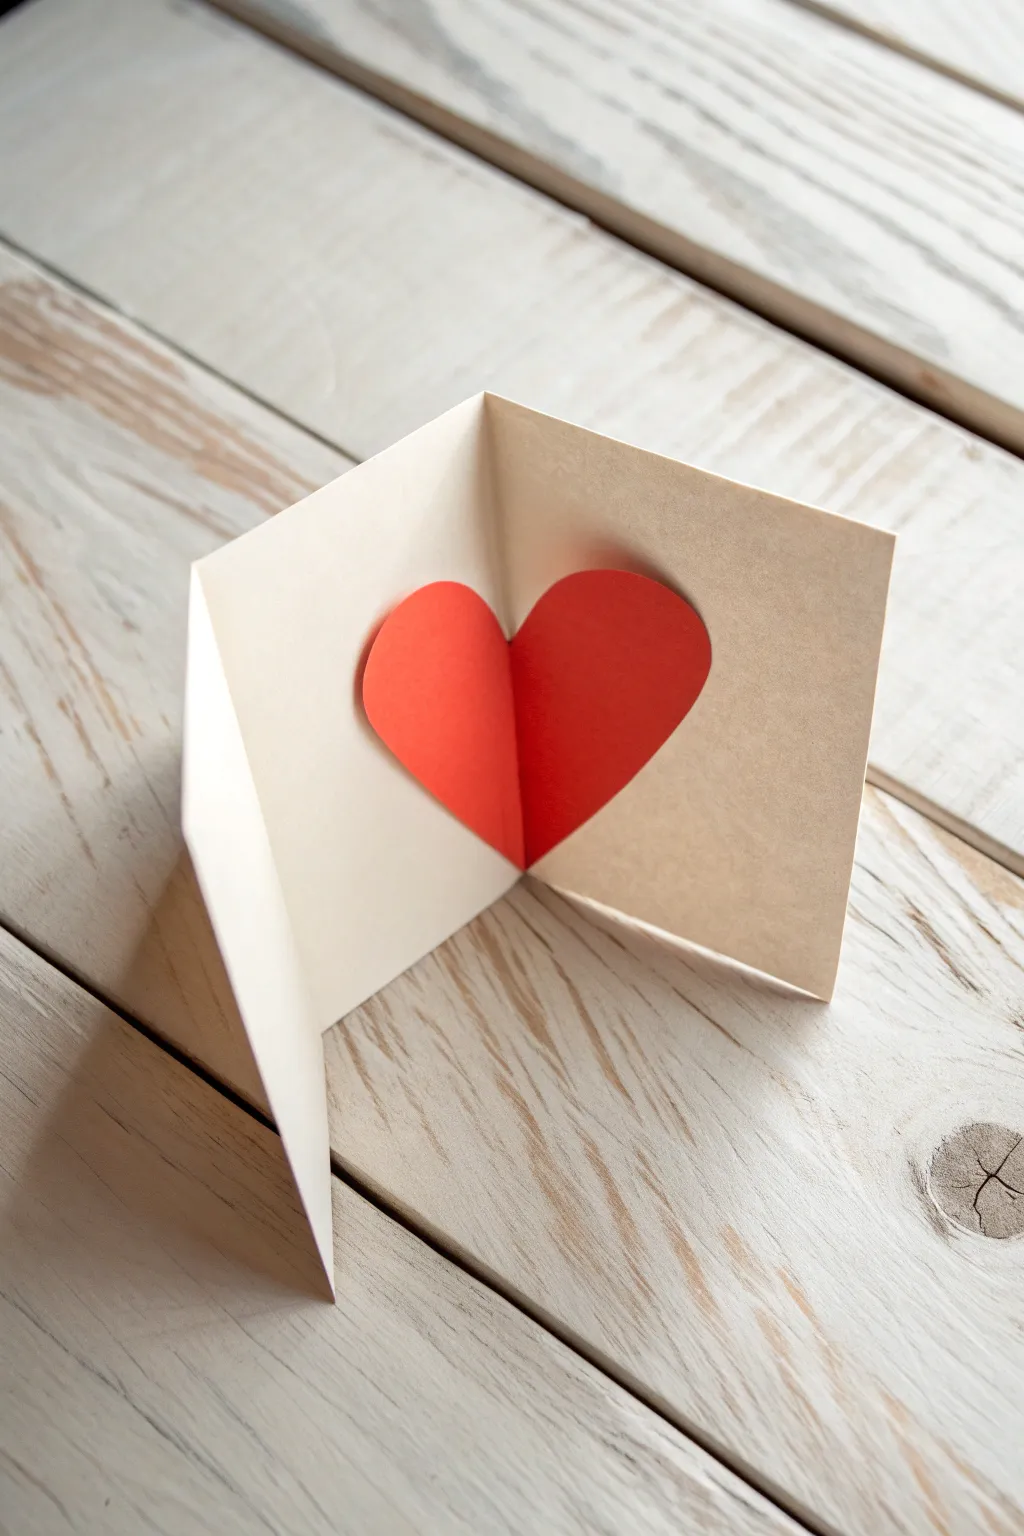
This elegant little project transforms a simple piece of cardstock into a striking 3D display of affection. With its clean lines and clever folding technique, the bright red heart appears to float within the beige card structure, creating a modern and heartwarming surprise.
How-To Guide
Materials
- Beige or cream cardstock (heavier weight works best)
- Red construction paper or cardstock
- Pencil
- Scissors
- Glue stick or double-sided tape
- Ruler
- Bone folder (optional but recommended)
Step 1: Preparing the Card Base
-
Cut the base:
Start by cutting a rectangular strip of your beige cardstock. For the look in the photo, aim for dimensions where the length is roughly double the height, perhaps 4 inches by 8 inches. -
Mark the center:
Using your ruler and pencil, lightly mark the exact center line across the width of the rectangle. This will be your main fold. -
Create the main fold:
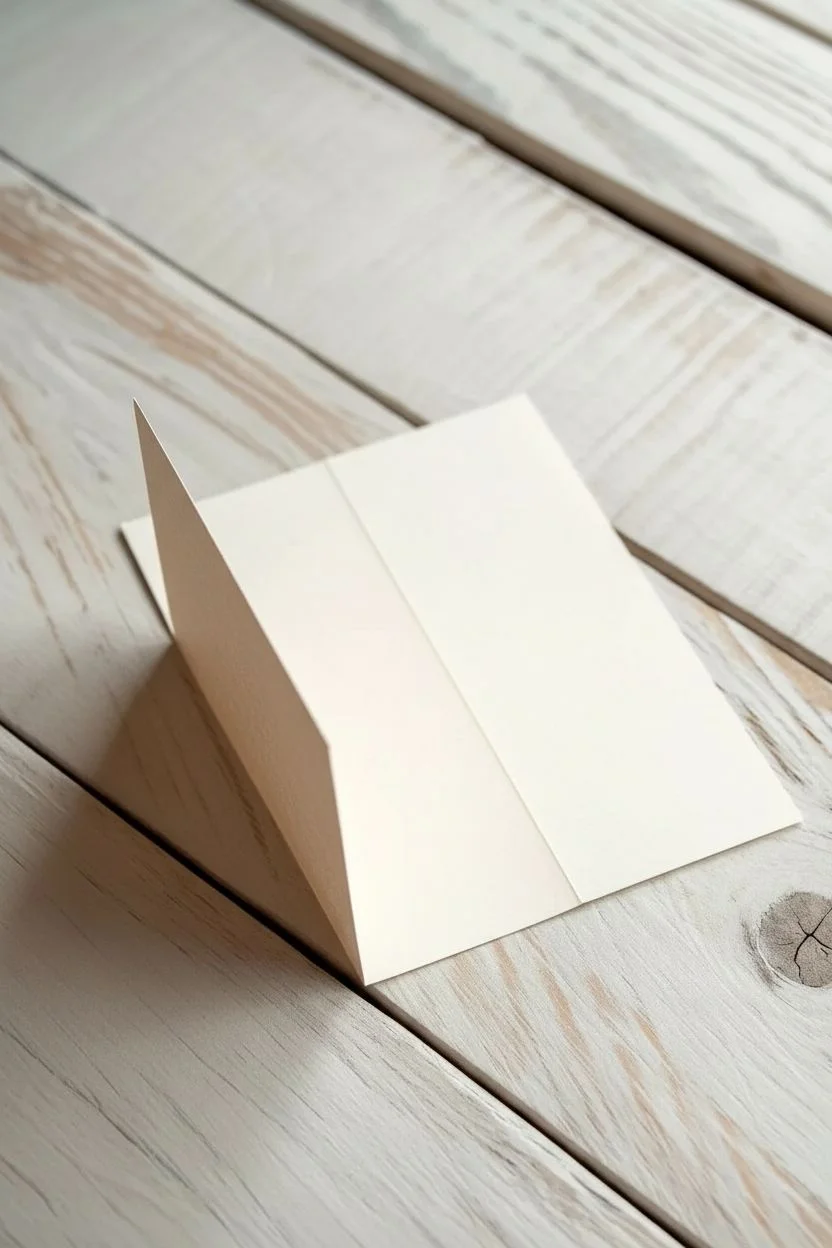
Fold the cardstock in half along your marking. Use a bone folder or the back of your fingernail to crease it sharply, then unfold it so it lays flat again. -
Plan the pop-up panel:
This specific design has an unusual structure where one side is folded back on itself to create a stand. On just the left half of your unfolded card, measure exactly halfway between the center crease and the left edge. -
Fold the stand leg:
Fold the left edge inward towards the center crease, stopping at the mark you just made. Crease this fold firmly. This creates the zigzag ‘Z’ shape visible on the left side of the photo which allows the card to stand upright.
Clean Creases
To avoid cracking thick cardstock when folding, lightly score your fold lines with a dull knife or empty ballpoint pen before bending the paper.
Step 2: Crafting the Heart
-
Prepare red paper:
Take your red paper and cut a small rectangle that is roughly the size you want your finished heart to be. -
Fold for symmetry:
Fold this red rectangle in half vertically. This ensures that both lobes of your heart will be perfectly identical. -
Draw the outline:
Starting from the folded edge, draw half a heart shape. Make sure the curves are full and the bottom point is sharp. -
Cut the heart:
While keeping the paper folded, cut along your curved line. Open it up to reveal your symmetrical heart shape. -
Create the center crease:
Refold the heart along that central line to strengthen the crease. This crease is vital because it needs to align perfectly with the fold of the card.
Texture Twist
Use textured watercolor paper for the base and glossy photo paper for the heart to create a sophisticated contrast between matte and shine.
Step 3: Assembly and Finishing
-
A dry run:
Place your heart inside the main center fold of the beige card to check the positioning. The heart’s fold should nest directly into the card’s fold. -
Apply adhesive:
Apply a thin, even layer of glue to the back of the left half of the red heart. I find a glue stick prevents the paper from warping better than liquid glue here. -
Attach the left side:
Carefully align the heart’s center crease with the card’s center crease and press the glued left side down onto the beige card. -
Apply second adhesive:
Apply glue to the back of the right half of the red heart. -
Attach the right side:
Instead of pressing the heart down, I prefer to close the beige card onto the heart. This ensures the best possible alignment and prevents bubbling. -
Press and hold:
Keep the card closed and press firmly over the area where the heart is glued. Hold it for a moment to let the adhesive set. -
Clean up:
Open the card carefully to test the pop-up. If there are any pencil marks visible from your initial measuring, erase them gently now. -
Final shaping:
Stand the card up by adjusting the ‘Z’ fold on the left side. The heart should pop forward slightly as the card opens to a 90-degree angle.
Place your finished card on a desk or windowsill where the light can catch the vibrant red heart
Fingerprint Heart Keepsake Art
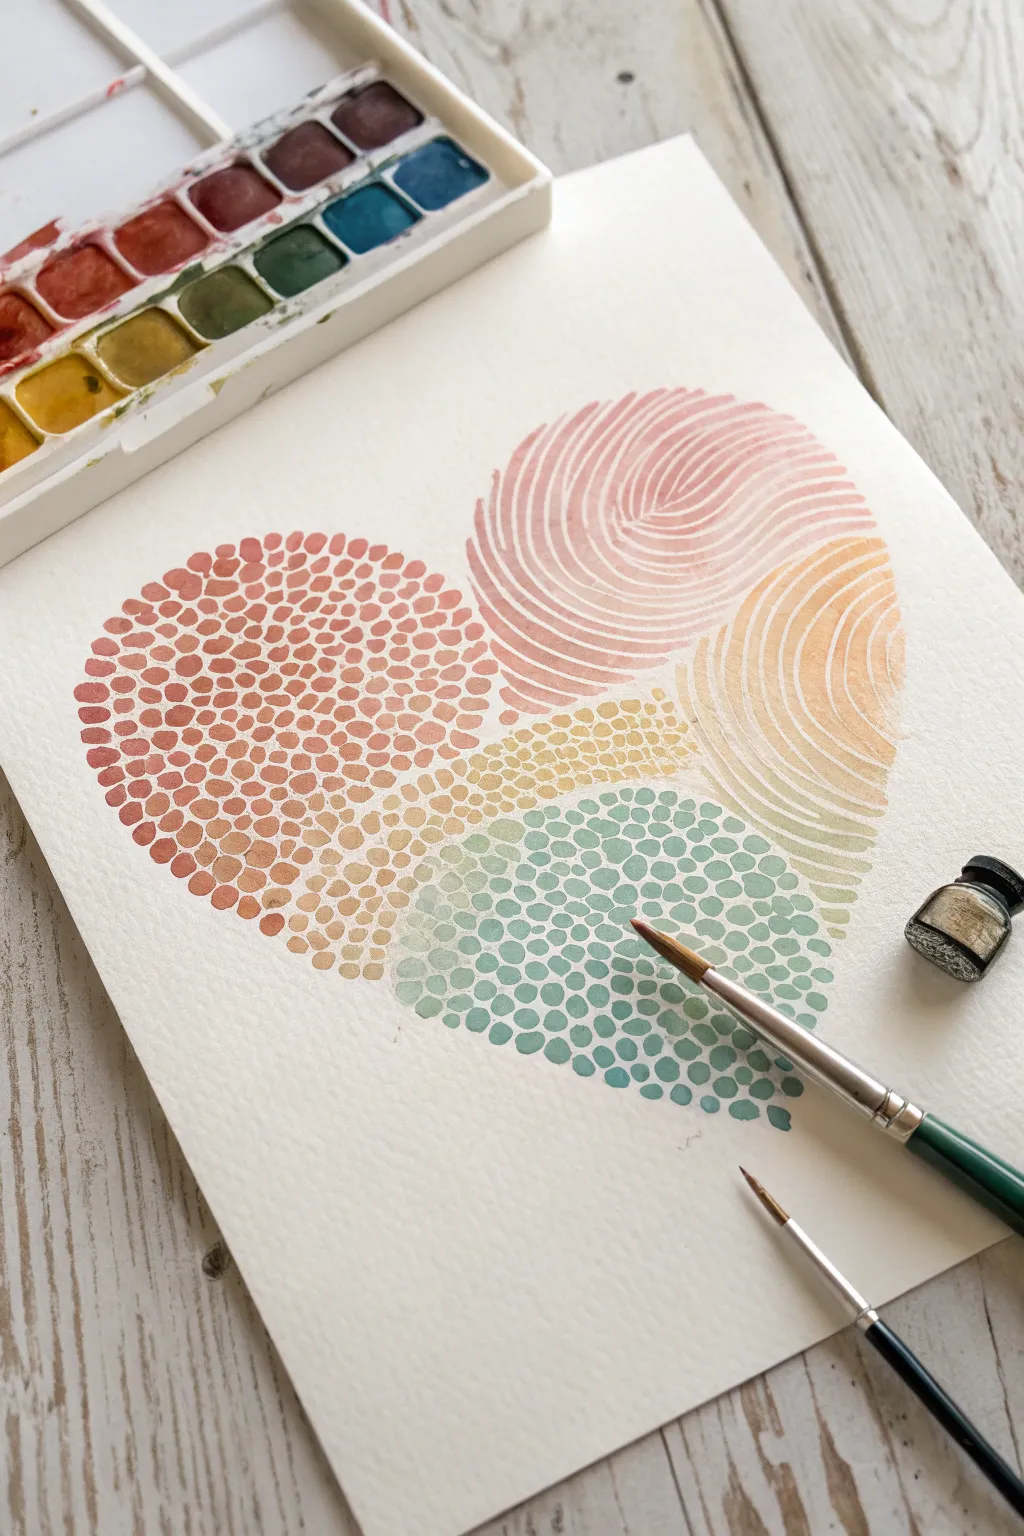
This delicate artwork reimagines the classic heart shape using intricate textures that mimic fingerprints and organic cells. By combining soft watercolor gradients with repetitive patterns, you’ll create a modern, abstract piece that feels deeply personal and handcrafted.
Step-by-Step
Materials
- Cold-pressed watercolor paper (300 gsm)
- Watercolor pan set (reds, oranges, yellows, greens, blues)
- Small round brushes (size 0, 1, or 2 for detail work)
- Pencil (HB or H)
- Kneaded eraser
- Jar of clean water
- Paper towel or rag
- Palette or ceramic plate for mixing
Step 1: Planning the Composition
-
Lightly sketch the outline:
Begin by very lightly sketching a large heart shape in the center of your paper. Keep your pencil pressure minimal so the graphite doesn’t show through the translucent paint later. -
Divide into sections:
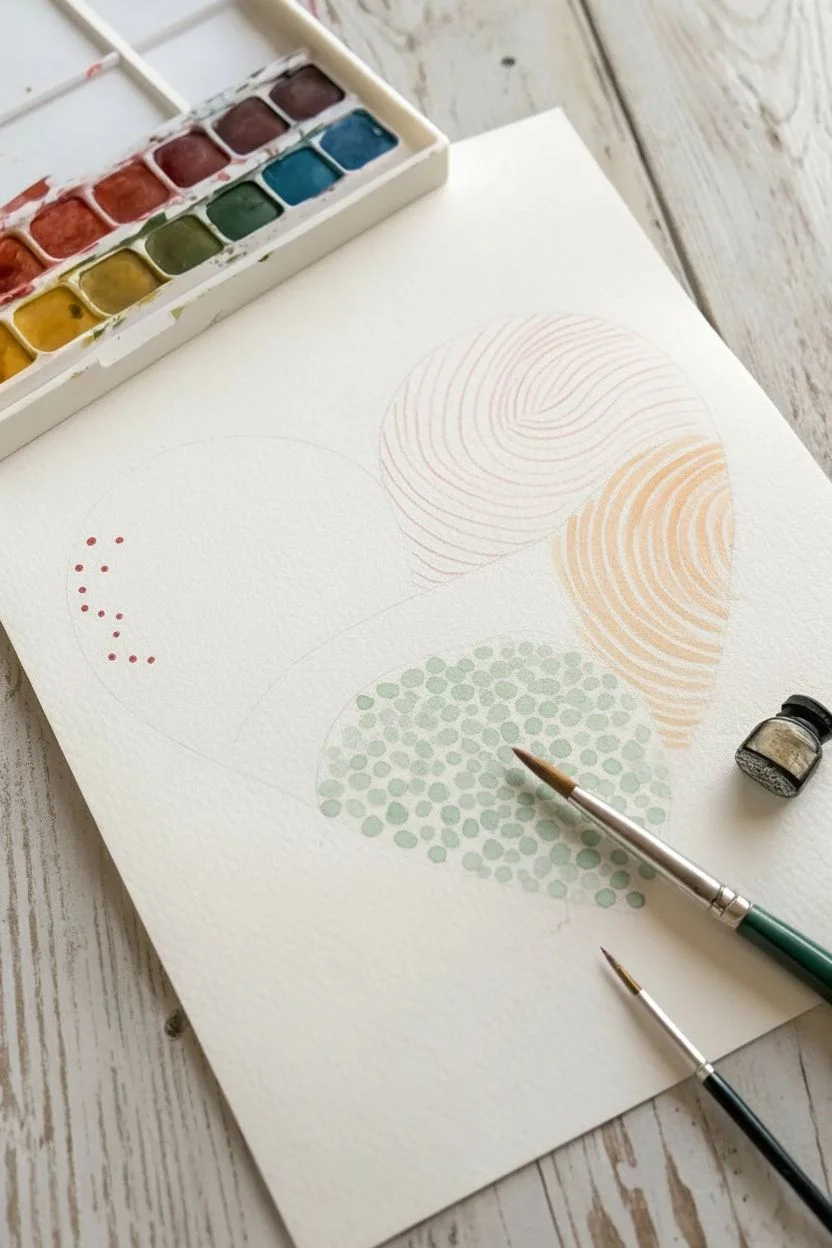
Visualize the heart divided into four distinct organic quadrants. You don’t need to draw heavy lines, but mark where the top left (red dots), top right (pink lines), bottom right (orange/yellow lines), and bottom center (green dots) sections will meet. -
Soften the sketch:
Roll your kneaded eraser over the entire sketch. You want the lines valuable only as a faint guide that will disappear once you start painting.
Step 2: Painting the Fingerprint Patterns
-
Mix your pink gradient:
Start with the top-right lobe. Mix a watery, pale rose color. You want the paint fluid enough to flow but pigmented enough to show distinct lines. -
Create the first thumbprint curves:
Using your finest brush (size 0 or 1), paint thin, concentric curved lines starting from the center of this section. mimic the ridges of a fingerprint by keeping spacing tight but consistent. -
Transition the color:
As you move toward the outer edge of this section, dip your brush into a slightly more orange-tinted wash to create a subtle gradient effect within the lines themselves. -
Start the second fingerprint section:
Move to the middle-right section. This area uses yellow-orange tones. Paint similar concentric curves, but angle the ‘whorl’ differently so it looks like a separate print pressing into the heart. -
Fade the lines:
As you paint these lines downward toward the bottom tip of the heart, gradually lighten your paint mixture with water so the pattern feels soft and airy.
Bleeding Colors?
If your dots merge, your brush is too wet. Blot it on a paper towel before painting. Ensure sections are fully dry before painting adjacent ones to keep lines crisp.
Step 3: Stippling the Cellular Sections
-
Prepare the red mosaic:
For the large top-left section, mix a gradient of terracotta and brick reds. Instead of lines, we will fill this space with small, irregular pebble shapes or dots. -
Begin dotting:
Start stippling from the outer edge, keeping your creating small, tightly packed circular shapes. Don’t make them perfect circles; organic, stone-like shapes look more natural. -
Manage the negative space:
Leave a tiny hairline fracture of white paper between each dot. This ‘grout’ line is crucial for keeping the colors distinct and preventing a muddy blob. -
Shift the color temperature:
As you work your way inward toward the center of the heart, gradually introduce a little yellow-ochre to your red mix. This creates that lovely warm transition seen in the example. -
Paint the bottom green section:
Mix a soft sage or sea-foam green for the final bottom-center section. Use the same stippling technique here, painting small, pebble-like dots. -
Blend the boundaries:
Where the green section meets the orange/yellow lines, be very careful not to overlap wet paint. Let the shapes kiss without touching to maintain the mosaic effect. -
Refine the edges:
Look at the overall heart shape. If any edges look too jagged, add a few tiny dots or short lines to specific areas to round out the silhouette. -
Add final contrast:
I like to go back in with a slightly more saturated version of my colors and darken just a few random dots or lines to give the piece depth and visual interest.
Add Metallic Flair
Once fully dry, use metallic gold watercolor or ink to add a few accent dots or trace over select fingerprint lines for a subtle, shimmering highlight.
Allow the piece to dry completely before framing this modern take on traditional heart art


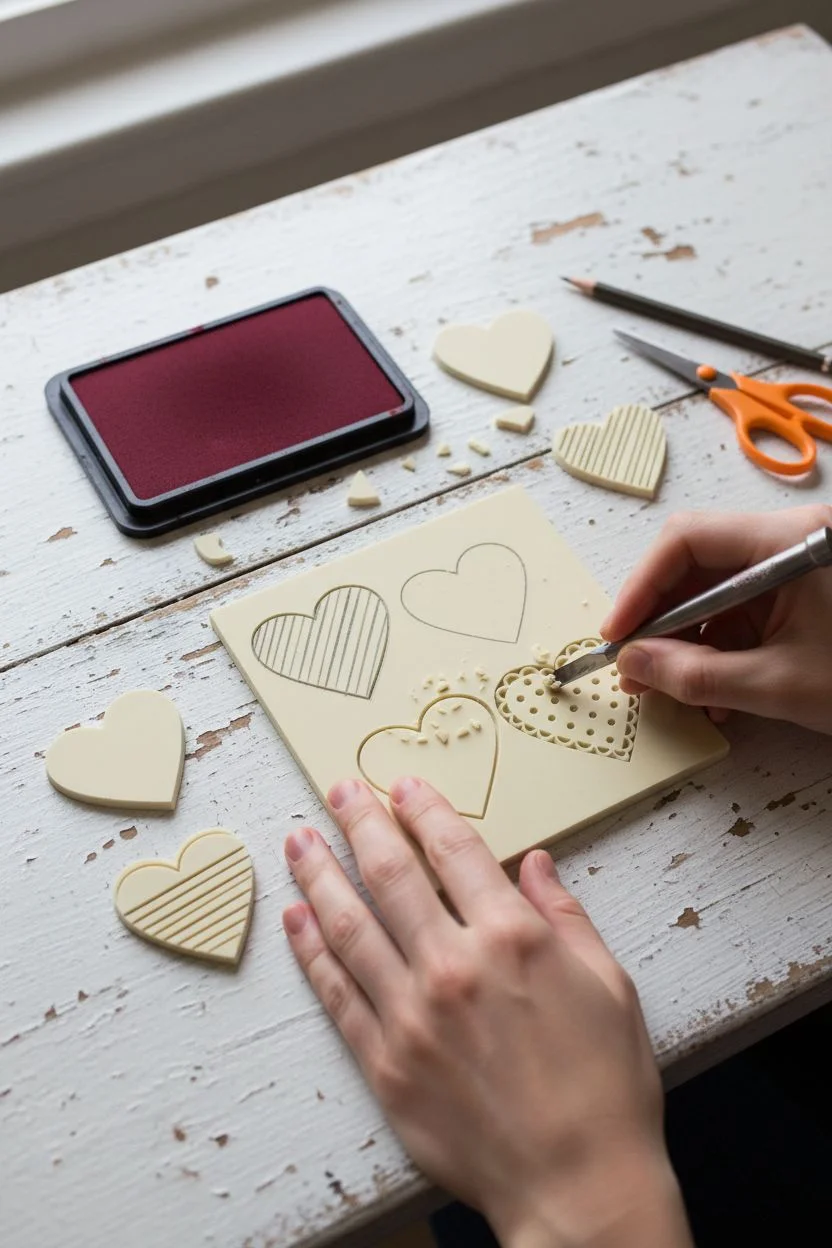
Stamped Heart Pattern Wrap
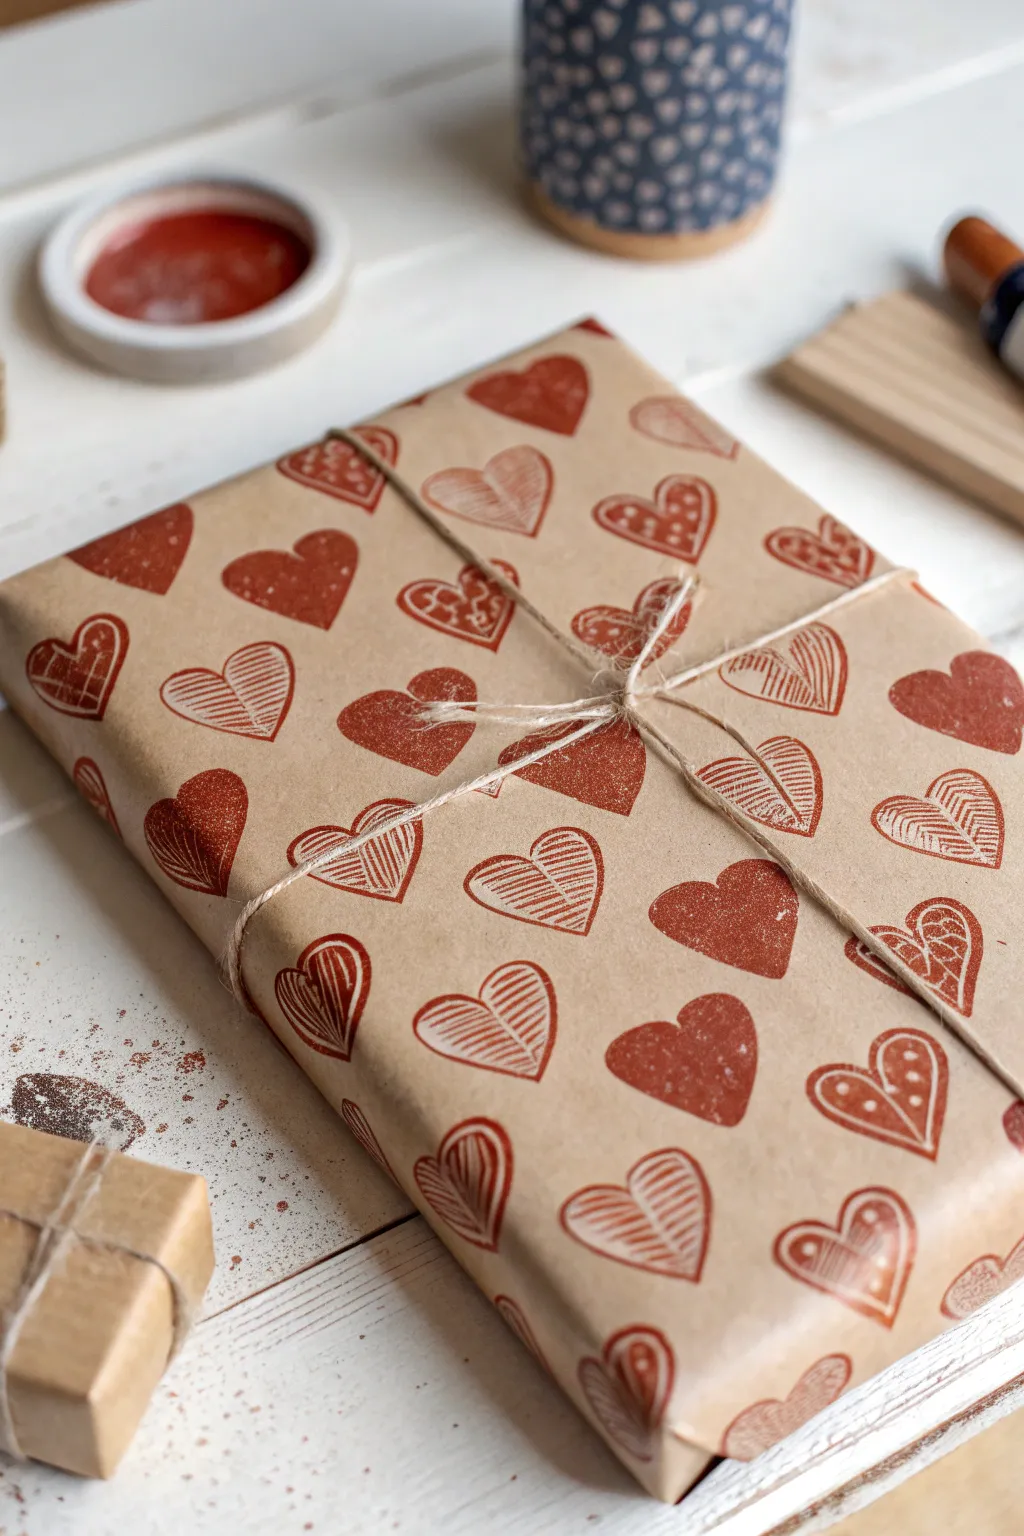
Transform plain brown paper into a thoughtful, personalized gift wrap using simple hand-carved stamps. The warm red ink against the kraft background creates a cozy, rustic aesthetic perfect for Valentine’s Day or anniversaries.
How-To Guide
Materials
- Roll of brown kraft wrapping paper
- Soft rubber carving block or large erasers
- Linoleum carving tool (v-gouge)
- Pencil
- Deep red or terracotta ink pad
- Jute twine
- Scissors
Step 1: Carving the Stamps
-
Sketch your designs:
Using a pencil, draw three or four heart shapes onto your rubber carving block. Aim for slightly different sizes to create visual interest. -
Define the variations:
Decide on a pattern for each heart. Leave one plain for a solid stamp, draw diagonal stripes on another, and perhaps add small dots or a scalloped detail to a third. -
Carve the outlines:
Take your carving tool and carefully trace the outer perimeter of each heart first, carving away the excess rubber so the shape stands in relief. -
Carve the internal patterns:
For the striped heart, gently carve thin lines across the surface. Remember that whatever you carve away will remain the color of the paper, while the raised parts will hold the ink. -
Cut out the stamps:
Use scissors or a craft knife to cut the individual stamps apart from the main block so you can handle them easily.
Uneven Ink Texture
Don’t worry if the ink isn’t solid! That slightly patchy, textured look is part of the charm of block printing on textured kraft paper.
Step 2: Creating the Pattern
-
Prepare the paper:
Roll out a large sheet of kraft paper on a flat, hard surface. You can use masking tape on the corners to keep it from curling up while you work. -
Test your ink:
Press one of your stamps onto the ink pad and do a test print on a scrap piece of paper to check the coverage and color density. -
Start stamping centrally:
Begin in the middle of your sheet and work outwards. Press the stamp firmly onto the ink pad, then onto the paper. -
Rotate through designs:
Alternate between your solid, striped, and dotted heart stamps to create a varied, dynamic pattern. -
Vary the rotation:
Don’t keep all hearts perfectly upright. Twist your hand slightly left or right for random stamps to give the paper a whimsical, tumbling effect. -
Fill the gaps:
Work your way to the edges of the paper. I find it helpful to let some hearts go off the edge of the paper to make it look like a continuous professional print. -
Let it dry completely:
Allow the ink to dry for at least 15-20 minutes to prevent any smudging when you wrap the gift.
Preventing Smudges
If you are left-handed, stamp from right to left (or vice versa for righties) so your hand doesn’t rest on wet ink as you move across the sheet.
Step 3: Wrapping and Finishing
-
Wrap the box:
Place your gift box in the center of the paper and wrap it tightly, securing the flaps with clear tape or double-sided tape for a seamless look. -
Measure the twine:
Cut a long length of jute twine, enough to wrap around the box multiple times. -
Tie the bundle:
Wrap the twine around the box, crossing it underneath and bringing it back to the top. Wrap it around a second time for a sturdier look. -
Secure the knot:
Tie a simple, tight knot in the center where the twine crosses. -
Finish with a bow:
Complete the look by tying a simple bow. Trim the tails of the twine if they are too long, but leave a little length for that rustic charm.
Now you have a beautifully wrapped gift that shows how much care you put into every detail
Yarn-Wrapped Cardboard Heart
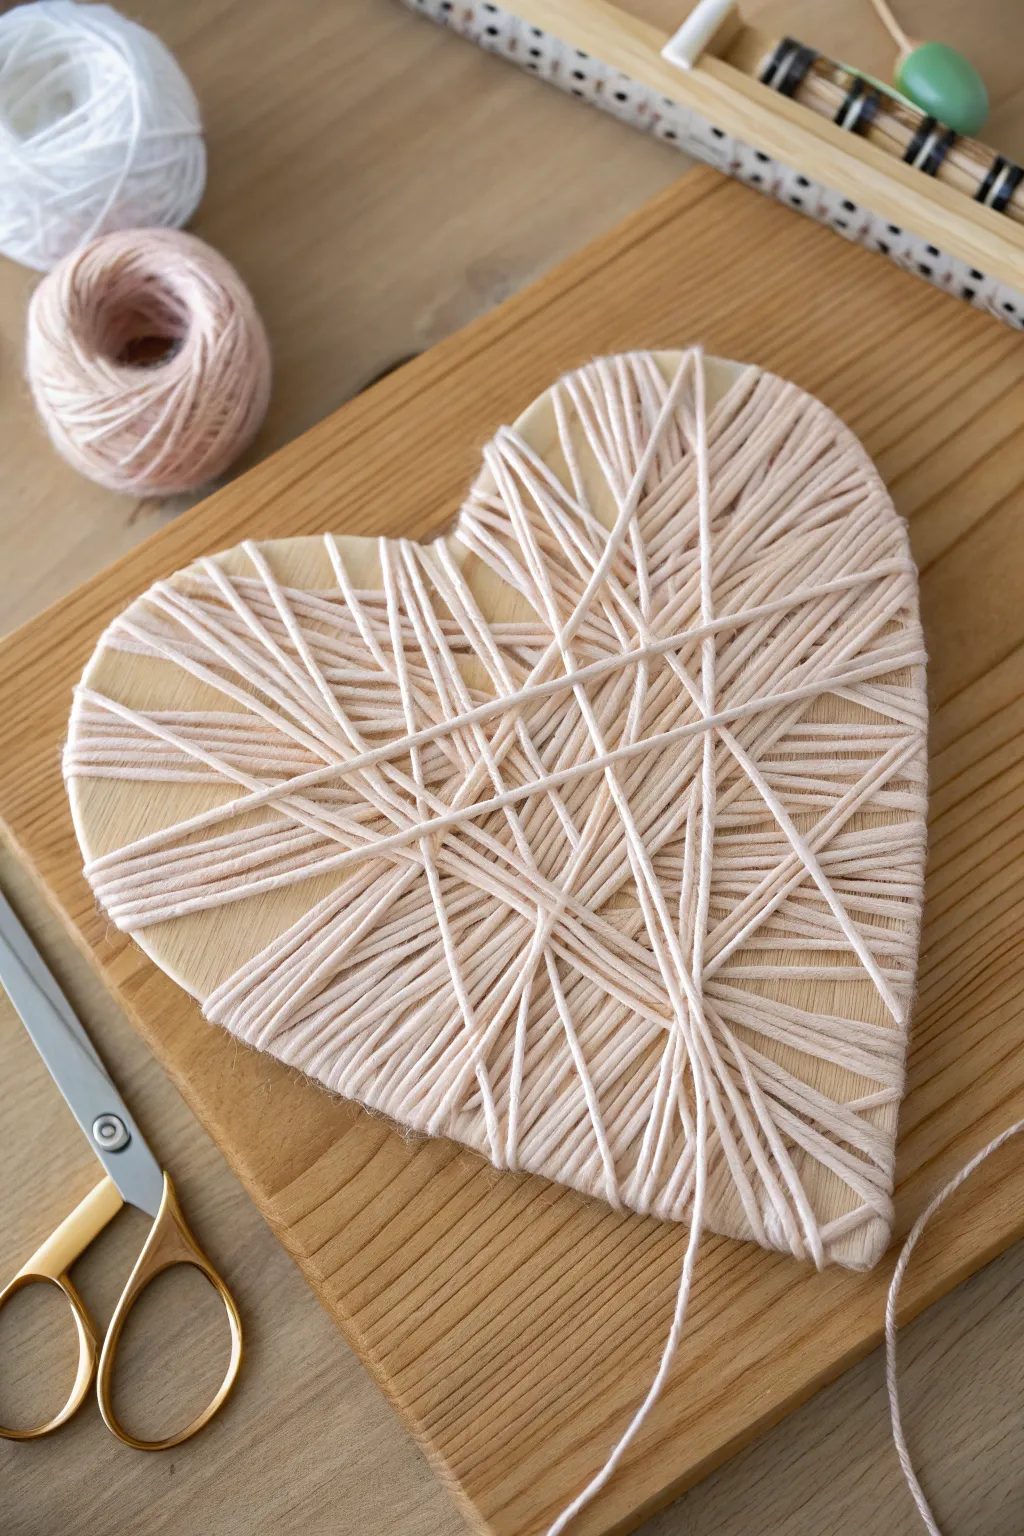
Create a charmingly textured decorative piece by wrapping soft pink yarn around a sturdy heart-shaped base. This project balances raw materials with delicate fiber for a cozy, handmade aesthetic perfect for gifts or home decor.
Step-by-Step
Materials
- Sturdy cardboard or wooden heart cutout (approx. 6-8 inches)
- Light pink or oatmeal-colored yarn (medium weight/worsted)
- Scissors
- Clear craft glue or hot glue gun
- Tape (masking or scotch)
- Pencil (optional, for tracing)
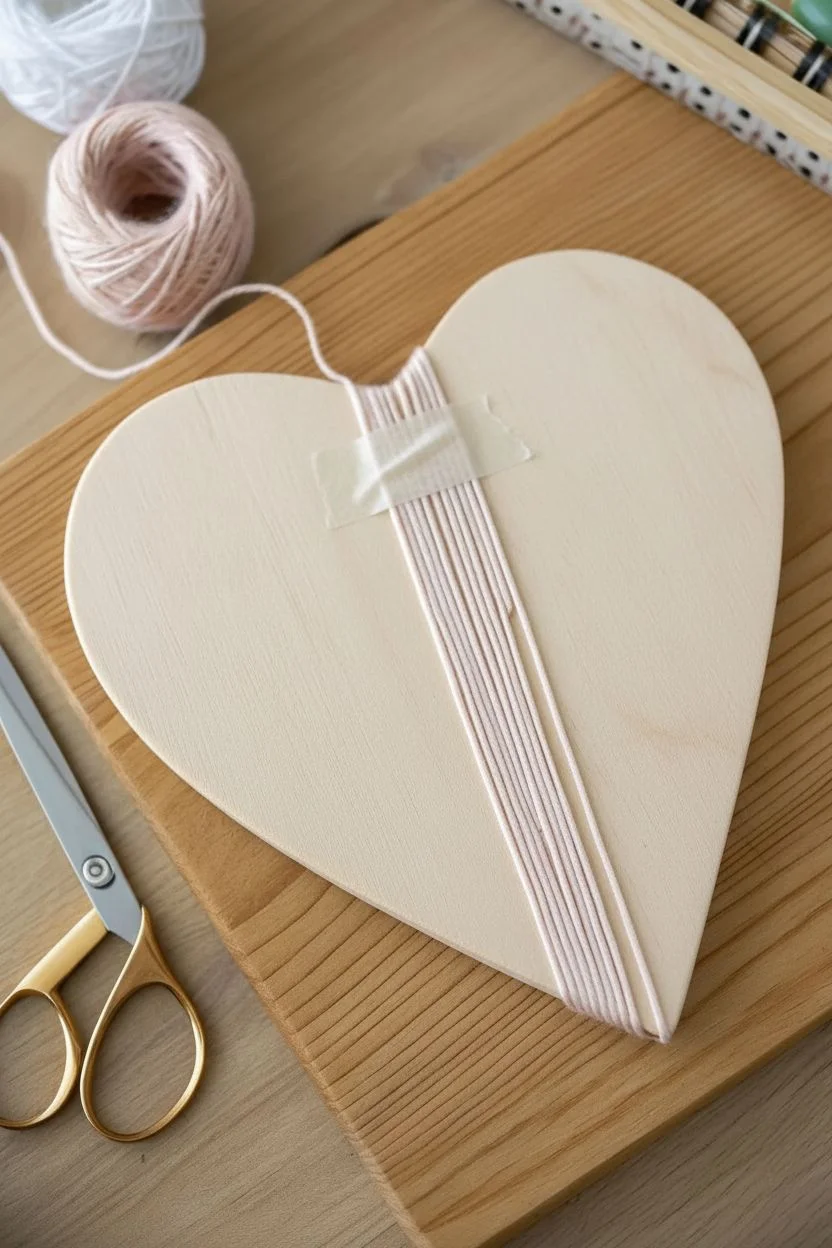
Step 1: Preparing the Base
-
Select your base:
Choose a pre-cut wooden heart or cut your own from thick, corrugated cardboard. If using cardboard, you may want to glue two layers together for extra stiffness, as the yarn tension can bend flimsy cardstock. -
Smooth the edges:
Run your finger along the rim of your heart. If there are any jagged cardboard bits or rough wood splinters, sand them down lightly or trim them with scissors to prevent the yarn from snagging later. -
Secure the yarn start:
Flip the heart to what will be the back side. Take the end of your yarn and tape it firmly near the center of the heart. Using tape here is better than a knot, as it keeps the back flatter.
Sticky Situation
Apply double-sided tape or a few swipes of glue stick over the flat surface of the cardboard before you start wrapping. This helps the first layer grip instantly.
Step 2: Initial Wrapping Layer
-
First vertical wrap:
Bring the yarn to the front and pull it straight down to the bottom point of the heart. This establishes your first anchor line. -
Create the foundation:
Wrap the yarn around the back and bring it up again, crossing slightly to the left or right. Continue making 5-6 large, vertical wraps to secure the yarn to the shape. -
Managing tension:
Pull the yarn taut, but not so tight that it warps the cardboard base. You want the strings to lie flat and straight like violin strings. -
The tricky dip:
When wrapping near the top ‘dip’ of the heart, I like to use a tiny dot of glue on the back edge to keep the yarn from sliding down the slope toward the center.
Step 3: Building the Pattern
-
Start diagonal crossing:
Begin changing your angle. Instead of going straight up and down, pull the yarn from the top left curve down to the bottom right edge. -
Opposite diagonal:
Now cross from the top right curve down to the bottom left edge. These X-shapes are crucial for covering the central area of the heart. -
Covering the edges:
Focus specifically on the outer rim for a moment. Wrap shorter segments that hug the curves of the heart to ensure the harsh edge of the cardboard is softened by the fiber. -
Horizontal fill:
Run a few strands horizontally across the widest part of the heart. This creates a visually interesting contrast against the vertical and diagonal lines. -
Check for spacing:
Pause and look at your heart. The goal isn’t 100% coverage—seeing peeks of the wood or cardboard underneath adds to the rustic charm shown in the photo.
Slipping Shoulders
If yarn keeps sliding off the rounded ‘shoulders’ of the heart, create small notches in the cardboard edge with your scissors. The yarn will sit securely in these grooves.
Step 4: Final Details
-
Layering up:
Continue wrapping randomly, aiming to build up bulk in the center where the strands naturally overlap. This gives the heart a nice 3D domed effect. -
Parallel grouping:
Try simple grouping techniques where you lay 2 or 3 strands right next to each other in parallel lines before switching angles again. -
Securing the end:
Once you are happy with the density, cut the yarn, leaving a 2-inch tail. -
Tucking the tail:
Flip the heart over to the back. Use a tapestry needle or the tip of your scissors to tuck the tail under a tight cluster of existing yarn strands. -
Final glue point:
Add a small dab of glue to the tucked end on the back to ensure it doesn’t unravel over time.
Now you have a beautifully textured heart ready to lean on a shelf or hang on a wall
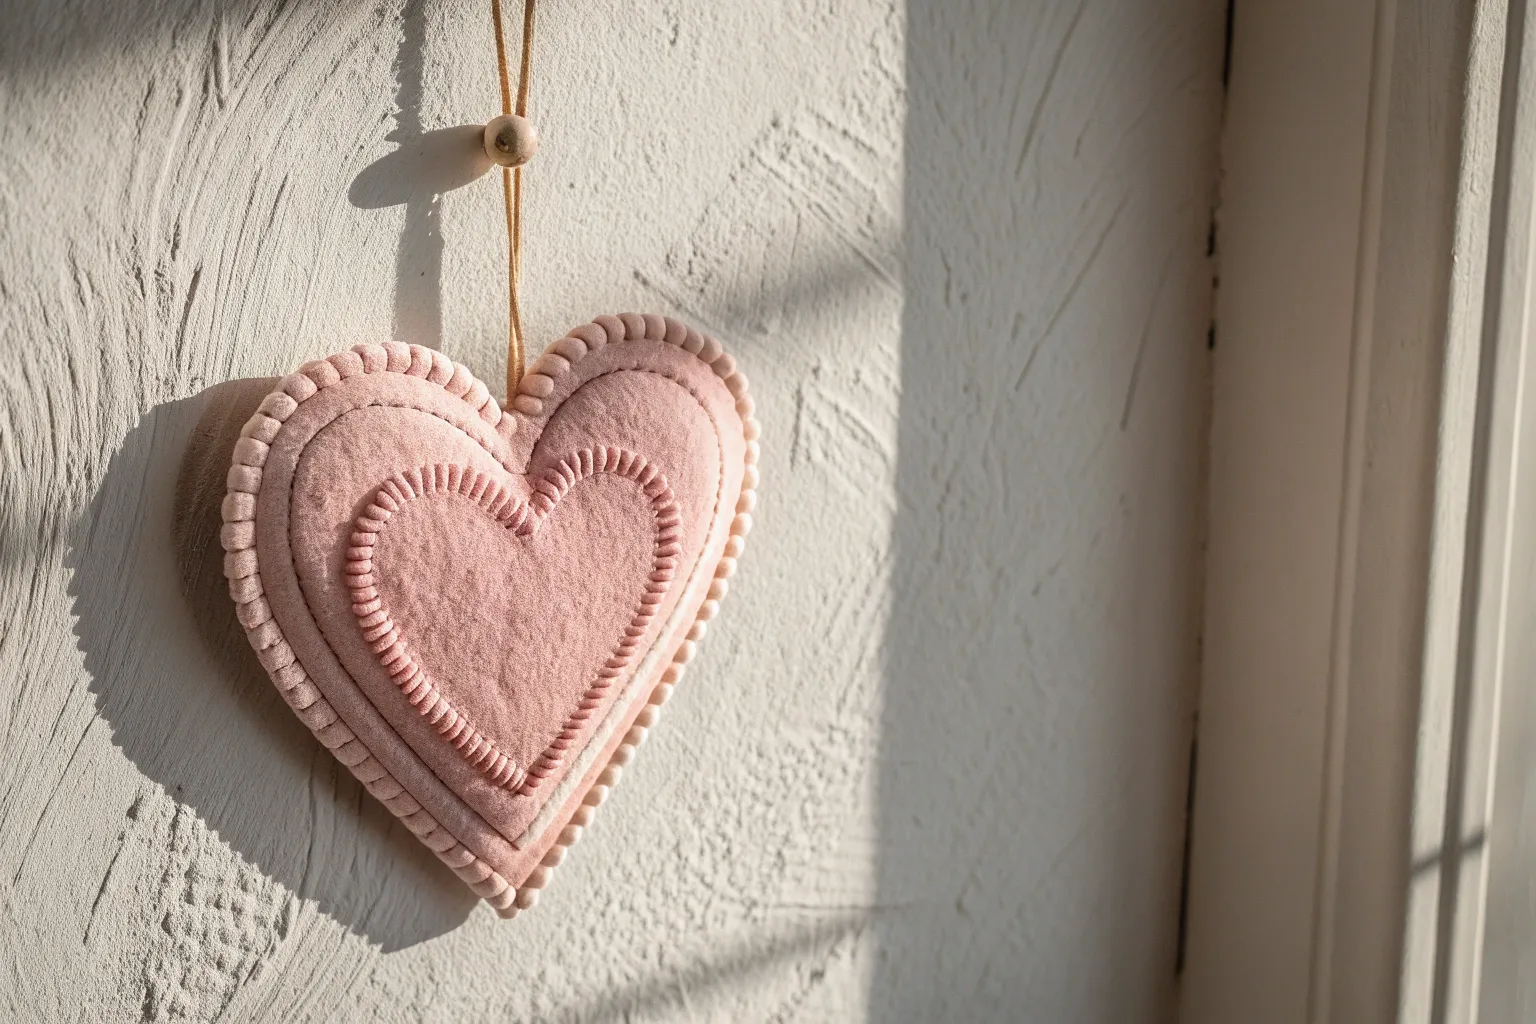
Stitched Felt Heart Ornament
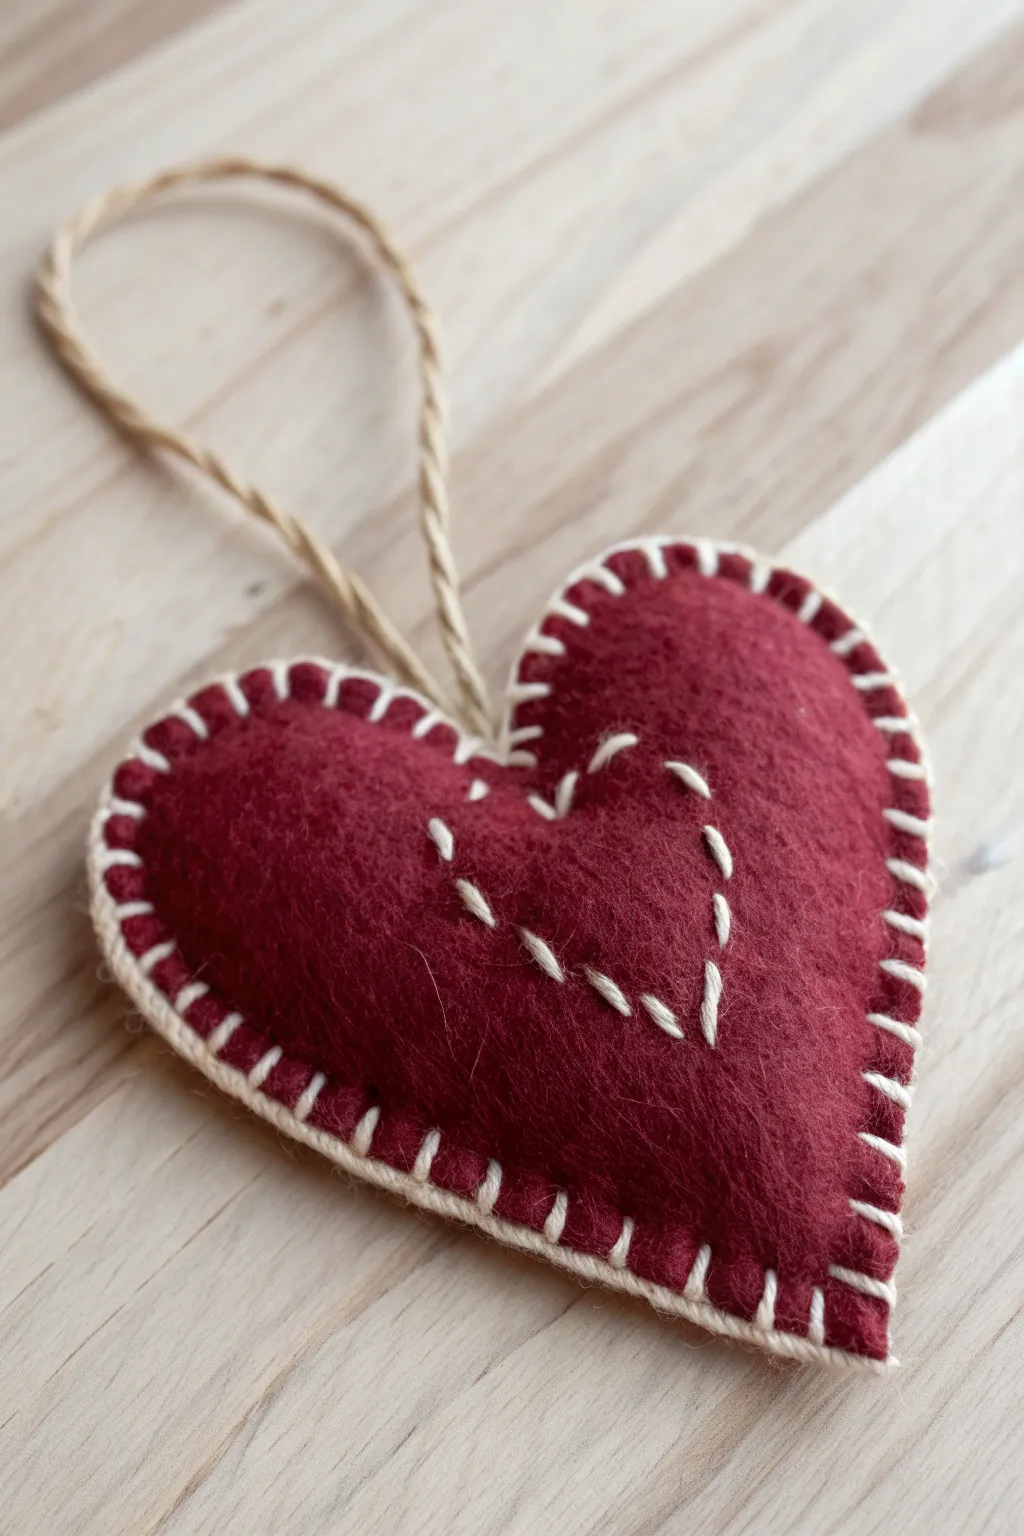
Bring a touch of cozy charm to your decor with this handmade felt heart ornament. Featuring a rich burgundy hue and contrasting white stitching, it combines simple blanket stitches with a sweet inner heart motif for a timeless, rustic look.
Step-by-Step Guide
Materials
- Deep red or burgundy wool felt sheets (approx. 2mm thick)
- Cream or off-white embroidery floss or thick cotton thread
- Natural jute twine or thick hemp cord
- Polyester fiberfill stuffing
- Paper and pencil (for template)
- Scissors (fabric and paper)
- Embroidery needle (with an eye large enough for your thread)
- Straight pins
Step 1: Preparation and Cutting
-
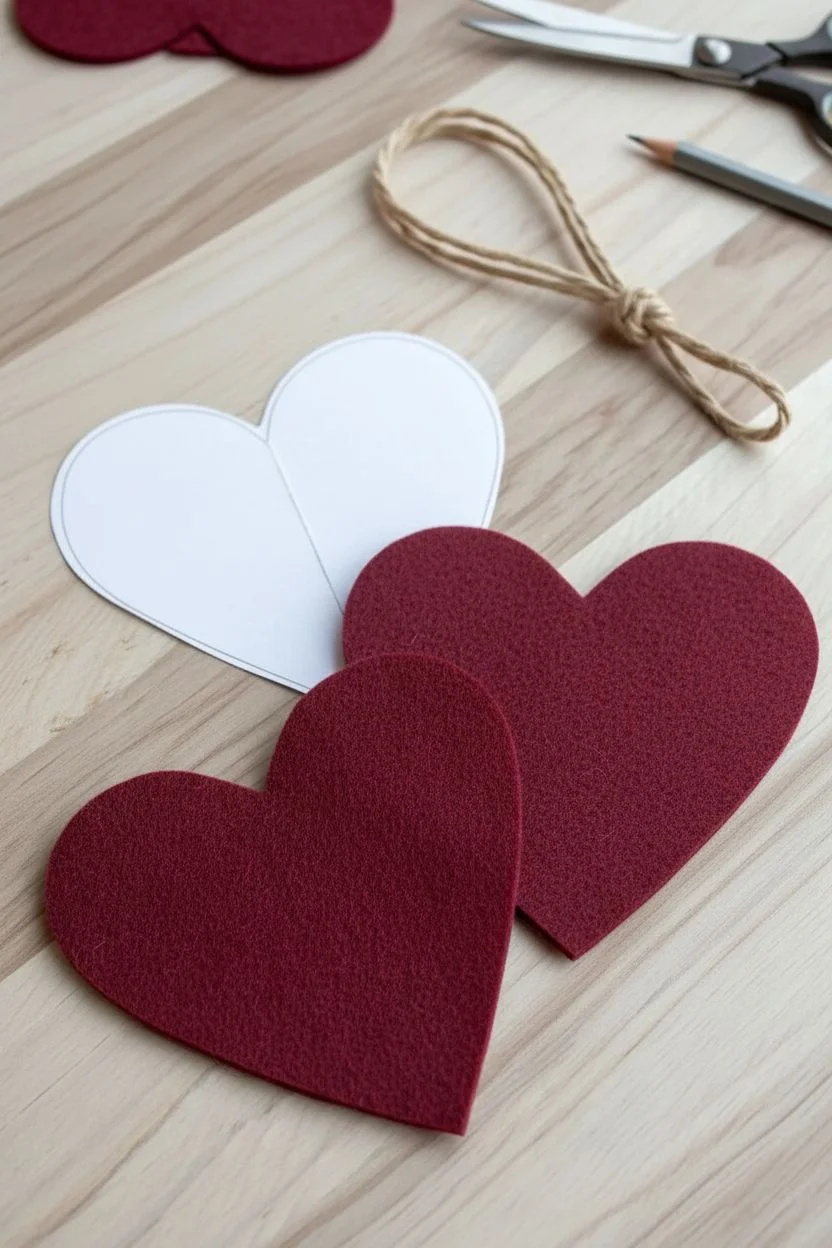
Create the heart template:
Start by drawing a simple, symmetrical heart shape on a piece of bright white paper. Aim for a width of about 3 to 4 inches for a standard ornament size. Fold the paper in half vertically before drawing to ensure both sides are perfectly mirrored, then cut it out. -
Trace onto felt:
Place your paper template onto the burgundy felt sheet. Depending on the thickness of your felt, you can pin it in place or trace the outline lightly with a pencil or chalk. You will need two identical heart pieces for one ornament. -
Cut the felt shapes:
Using dedicated fabric scissors for a crisp edge, carefully cut out both felt hearts. Try to keep your cuts smooth and continuous to avoid jagged edges that might show later. -
Prepare the hanger:
Cut a length of jute twine, roughly 6 to 8 inches long depending on how low you want the ornament to hang. Fold it in half to form a loop and knot the two loose ends together securely.
Step 2: Stitching the Detail
-
Plan the inner heart:
Take just the top layer of your felt heart. Using a light pencil or disappearing ink pen, lightly sketch a smaller heart shape in the center. This will guide your decorative running stitch. I find drawing this freehand adds to the rustic charm, but stencils work too. -
Thread the needle:
Cut a length of cream embroidery floss. If using standard 6-strand floss, use all six strands to get that chunky, visible stitch look seen in the photo. Thread your needle and knot the end. -
Stitch the inner motif:
Begin stitching from the back side of the felt layer to hide the knot. Follow your drawn line with a simple running stitch (up and down), keeping the stitch length fairly consistent—about a quarter-inch long for each dash. -
Secure the thread:
Once the inner heart outline is complete, bring the needle to the back side of the fabric and knot it securely. Trim the excess thread.
Uneven Stitches?
If your spacing is inconsistent, lightly mark small dots along the edge of the felt with a pencil before sewing to use as a guide for needle placement.
Step 3: Assembly and Edging
-
Sandwich the layers:
Align the top heart (with the embroidery) over the bottom heart (plain). Ensure the edges match up perfectly. -
Insert the loop:
Place the knotted end of your jute loop between the two felt layers at the very top center indentation of the heart. The loop should stick out the top; the knot should be hidden inside. -
Begin the blanket stitch:
Thread your needle with a new, long piece of cream floss. Start your whip stitch or blanket stitch near the bottom point of the heart. Hide the starting knot between the two layers of felt. -
Stitch around the perimeter:
Working your way around the edge, push the needle through both layers of felt from front to back, looping the thread over the edge to create that classic finished look. Keep your spacing consistent, roughly a quarter-inch apart. -
Secure the hanger:
When you reach the top where the jute loop is, stitch straight through the jute cord itself if possible, or tightly around it, to anchor it firmly into the felt seam. -
Pause for stuffing:
Continue stitching down the other side until you have an opening of about 1.5 inches left unsewn. Do not cut your thread yet. -
Stuff the heart:
Take small tufts of polyester fiberfill and push them into the heart through the opening. Use the blunt end of a pencil or a chopstick to push stuffing into the curves and the point. -
Check the plumpness:
Fill the heart until it looks rounded and holds its shape, but avoid overstuffing, which can cause the felt to buckle or the stitches to pull too tight. -
Close the seam:
Resume stitching across the opening, tucking in any stray fibers as you go, until you meet your starting stitch. -
Finish and trim:
Knot the thread discreetly, run the needle back into the center of the heart, pulling the knot slightly inside, and snip the thread close to the surface so the tail disappears inside.
Use Quality Felt
Use a wool-blend felt rather than cheap acrylic craft felt. It holds stitches better without tearing and has a lush, fuzzy texture that looks much more professional.
Hang your finished heart on a tree or door handle to add a warm, handcrafted sentiment to your home
Pressed-Flower Heart Frame
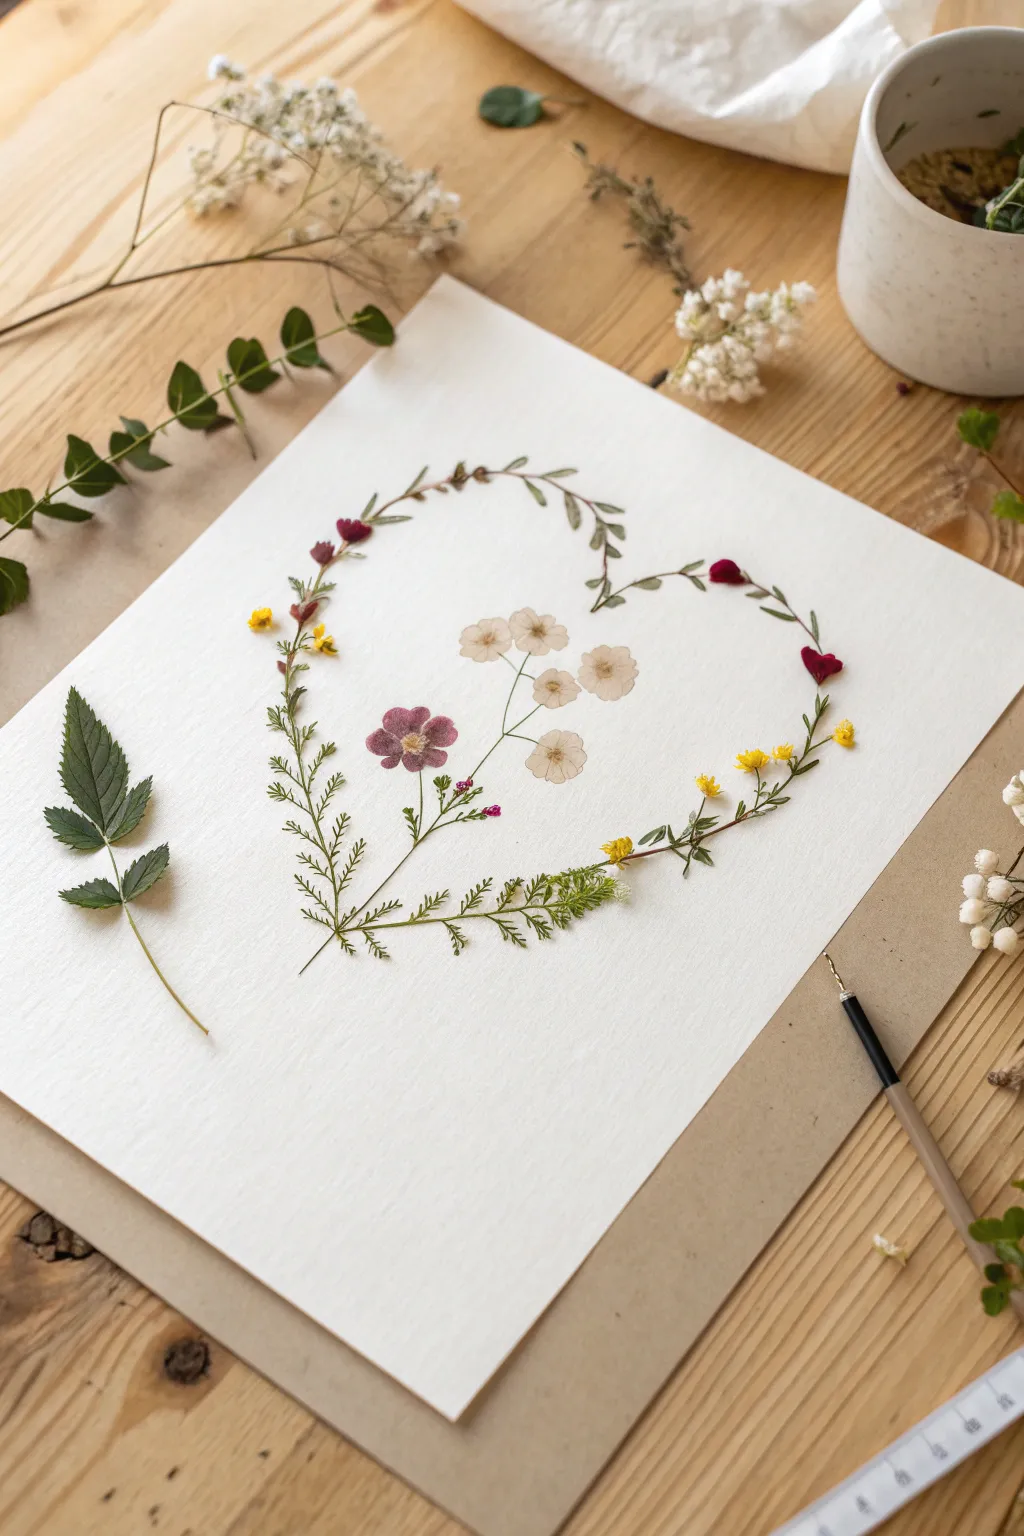

Create a delicate, everlasting tribute to nature with this pressed flower art piece. Using wispy stems, tiny blooms, and a thoughtful layout, you’ll form an airy heart shape that feels both organic and structured.
How-To Guide
Materials
- High-quality white art paper or cardstock (A4 or similar size)
- Heavy kraft cardboard or backing board
- Assorted pressed flowers (small white blossoms, burgundy accents, yellow florets)
- Pressed greens (e.g., small fern fronds, eucalyptus leaves, thin curving stems)
- Fine-point tweezers
- PVA glue or specialized floral adhesive (clear-drying)
- Small paintbrush or toothpick for glue application
- Pencil (H or HB for light lines)
- Clean eraser
- Paper towels
Step 1: Preparation & Mapping
-
Prepare your canvas:
Begin by mounting your white art paper onto the heavy kraft backing board. This provides stability for the delicate botanicals. Ensure the paper is smooth and free of dust. -
Sketch the guide:
With a very light touch, use your pencil to draw a faint heart outline on the paper. This line is purely for guidance, so keep it barely visible; you want to avoid erasing heavily later. -
Select your materials:
Lay out all your pressed materials on a separate surface. Group them by type: wispy ferns for the base, curving stems for the upper arches, and colorful blooms for accents.
Tweezer Technique
Grip stems near the center of gravity, not the tip, to prevent snapping brittle dried plants. Use the flat side of the tweezers to press petals down gently.
Step 2: Forming the Outline
-
Anchor the bottom point:
Start at the very bottom tip of the heart. Choose two small, fern-like green sprigs that mirror each other. -
Glue the base:
Using a toothpick or fine brush, apply tiny dots of glue to the back of the fern stems. Place them so their stems cross slightly at the bottom point, creating a V-shape that follows your pencil line upward. -
Establish the left curve:
Select a long, thin stem with small leaves. Check the curve against your pencil drawing. If the stem is too straight, gently flex it to create a natural bow before gluing. -
Attach the left side:
Glue this stem so it continues the line from the bottom fern, moving up the left side of the heart. -
Establish the right curve:
Repeat the process for the right side using a similar thin, leafy stem. I maintain visual balance here but avoid perfect symmetry to keep the organic feel. -
Close the top arches:
Complete the heart shape by placing thinner, more delicate stems at the top arches, bringing them down to meet in the ‘dip’ of the heart. Ensure the tips touch or overlap slightly.
Step 3: Adding Blooms & Details
-
Place the focal point:
Before gluing, dry-fit the central floral cluster. Position a larger, purplish-pink flower slightly off-center inside the heart, paired with a spray of white blooms. -
Secure the center:
Once you like the arrangement, glue the central stems down. These should look like they are ‘growing’ upward from the bottom point of the heart. -
Add color accents:
Using your tweezers, pick up tiny yellow florets and small burgundy buds. Place these sporadically along the green heart outline to add pops of color. -
Layering for depth:
Tuck a few very small leaves underneath or over the existing stems on the outline. This overlapping technique hides step connections and makes the vine look continuous. -
Final inspection:
Look for any gaps in the heart shape. Fill bare spots with tiny individual leaves or single petals, applying glue sparingly. -
Clean up:
Wait for all glue to dry completely transparent. Then, gently erase any visible pencil marks, being extremely careful not to snag the delicate dried petals.
Framing Tip
To prevent flowers from fading or molding, use UV-protective glass and ensure the frame is sealed primarily against humidity.
Once dry, your botanic heart is ready to be framed in wood or floated between glass for a stunning display
Quilled Paper Heart Swirls
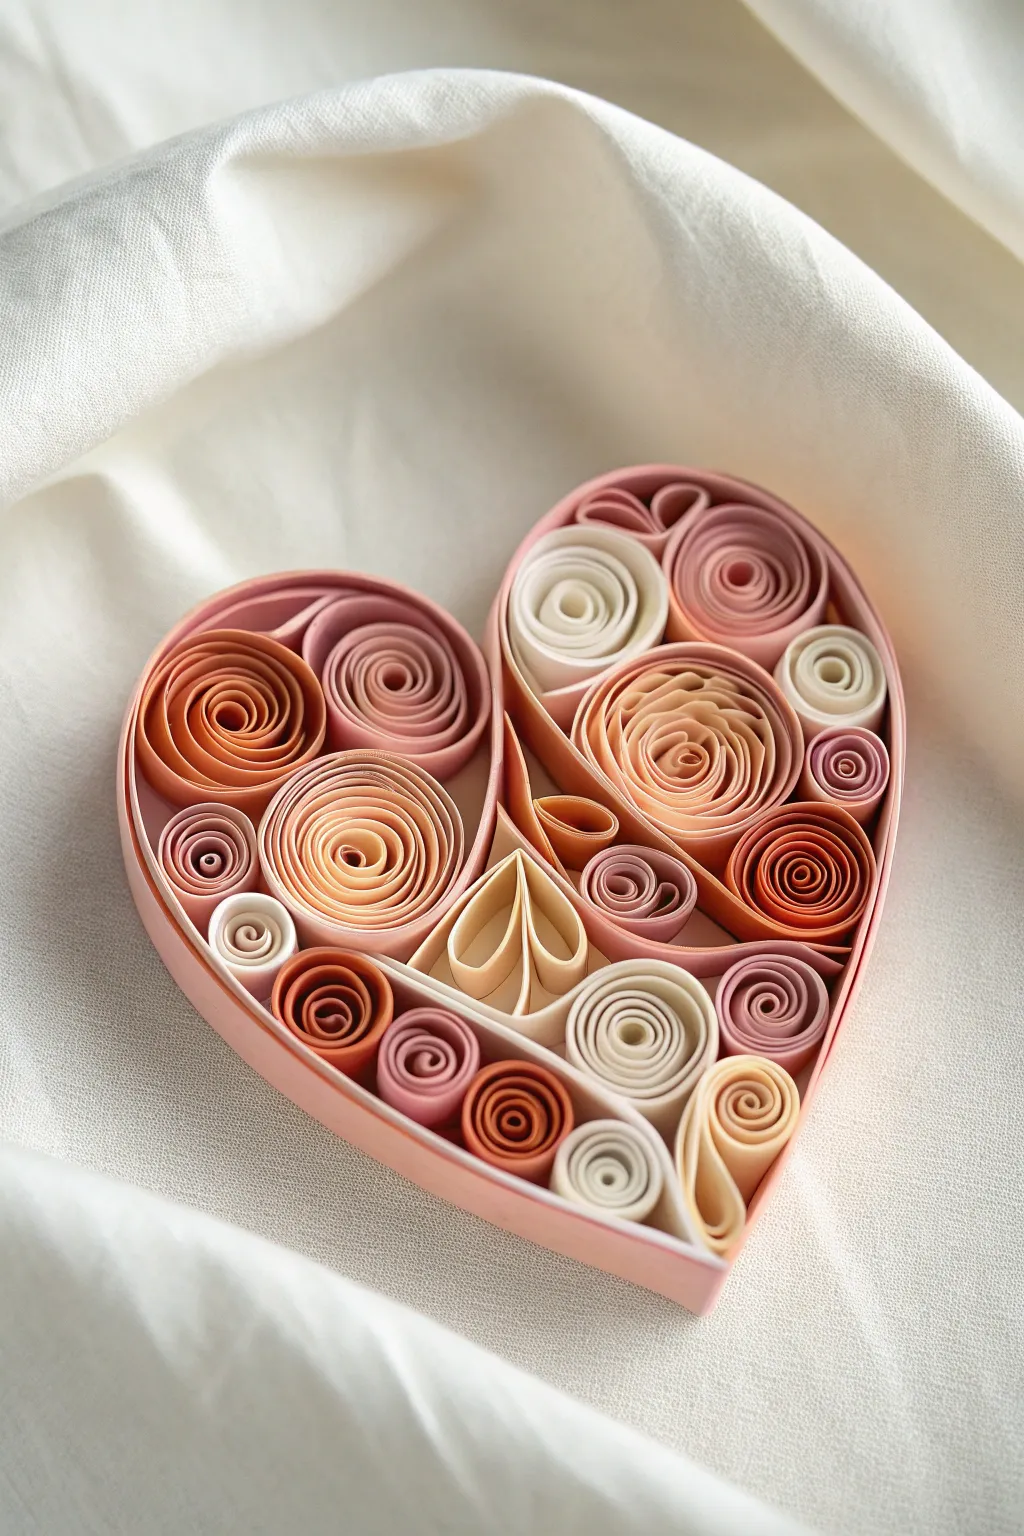
This elegant paper craft features a monochromatic palette of blush, terracotta, and soft creams swirled into organic shapes. The result is a texturally rich, framed heart that looks intricate but relies on simple, repeating rolling techniques suitable for beginners.
Step-by-Step Tutorial
Materials
- Quilling paper strips (10mm width recommended for depth)
- Color palette: dusty rose, peach, cream, terracotta, maroon
- Cardstock (heavyweight) in light pink for the frame
- Quilling slotted tool
- Precision white craft glue with fine tip
- Scissors
- Creating the heart frame template (printable or hand-drawn)
- Tweezers
- Corkboard and pins (optional for shaping)
Step 1: Available Foundation
-
Create the Outer Frame:
Cut a long strip of heavy pink cardstock, approximately 1-inch wide. Form this strip into a heart shape. If the strip isn’t long enough, overlap and glue two strips together seamlessly. -
Secure the Shape:
Apply a thin line of glue along the bottom edge of your cardstock heart and adhere it to a backing sheet of white cardstock or foam board to create a shallow tray. Let this dry completely before filling. -
Inner Dividers:
Cut smaller lengths of the same pink cardstock. Gently curve them to create the internal swooping lines seen in the design—specifically, the large curve that separates the left lobe from the center. -
Glue the Skeleton:
Fit these divider strips inside the heart frame. Use tweezers to hold them in place while the glue sets, creating distinct compartments for your different coil colors.
Unruly Coils?
If your coils are springing open too much or unevenly, try a ‘coil sizing guide’ (a ruler with different sized holes) to hold them at the exact diameter while the glue dries.
Step 2: Rolling the Elements
-
Standard Loose Coils:
Insert a peach strip into your slotted tool and roll tightly. Remove the tool and let the coil expand slightly in your fingers before gluing the end. Create about 5-6 of these in varying sizes. -
Large Rose Scrolls:
Start a coil but keep it very loose. For the large focal ‘roses’ (like the big peach one on the right), glue two strips together end-to-end before rolling to get extra volume. Allow it to unspool significantly before securing. -
Teardrop Shapes:
Roll a cream-colored strip into a loose coil. Pinch one side firmly to create a point. We will use two of these creates the central abstract shape near the bottom. -
Tight Accents:
Create several very tight rolls using dark terracotta and maroon strips. Do not let these expand; glue the end immediately after rolling for dense, dark punctuation marks. -
Elongated Scrolls:
For the bottom right corner, make a cream coil and pinch it into a ‘paisley’ or curved teardrop shape to fit the tapered bottom of the heart.
Step 3: Assembly & Composition
-
Anchor the Big Blooms:
Begin placing your largest loose coils. Put the large peach scroll in the upper right quadrant and the large terracotta scroll in the upper left. Apply glue only to the bottom edge of the paper coil. -
Fill the Gaps:
Nestle the medium-sized pink and mauve coils around the larger ones. I find it helpful to dry-fit them first to ensure they sit snugly against each other without deforming. -
Create the Focal Center:
Place the two cream teardrops in the bottom center, pointing upwards, to create that unique tulip-like negative space structure. -
Add Contrast:
Insert the darkest tight rolls into the smallest gaps. These act like shadows and add visual depth to the lighter arrangement. -
Shape Adjustment:
If a coil doesn’t quite fit a corner, gently squeeze it into an oval or semi-circle shape before gluing. The paper is forgiving and can be molded to fit the frame’s curvature. -
Final Density Check:
Look for any visible backing paper. If you see gaps, roll tiny ‘filler’ coils (half-strip lengths) to plug the spaces, ensuring a lush, solid appearance. -
Protecting the Piece:
Once all glue is dry, you can lightly mist the piece with a matte spray fixative to prevent the paper from absorbing moisture over time.
Add Sparkle
For a glamorous twist, brush a tiny amount of pearl dust or gold watercolor paint onto the very top edges of the darker terracotta coils to catch the light.
Now you have a stunning, textured heart that makes a perfect shadow I prefer box gift or wall hanging display
String Art Heart Nail Pattern

This classic string art project combines rustic warmth with modern geometric lines to create a beautiful piece of dimensional decor. The crisp white thread pops against the natural wood grain, forming an intricate web that adds texture and visual interest to any wall or shelf.
Step-by-Step Guide
Materials
- Square wood block (approx. 8×8 inches, 1-inch thick)
- Small brass or gold round-head nails (approx. 1 inch long)
- White cotton string or embroidery floss
- Hammer
- Paper
- Pencil
- Scissors
- Tape
- Sandpaper (medium grit)
Step 1: Preparation & Layout
-
Prep the Surface:
Before starting, ensure your wood block is smooth. Briefly run medium-grit sandpaper over the face and edges to remove any splinters, then wipe it clean with a dry cloth. -
Create the Template:
Take your sheet of paper and cut it to the same size as your wood block. Fold the paper in half vertically to find the center line. -
Draw the Heart:
Draw half of a heart shape starting from the fold line. This ensures perfect symmetry when you unfold it. Cut along your drawn line and unfold to reveal your heart template. -
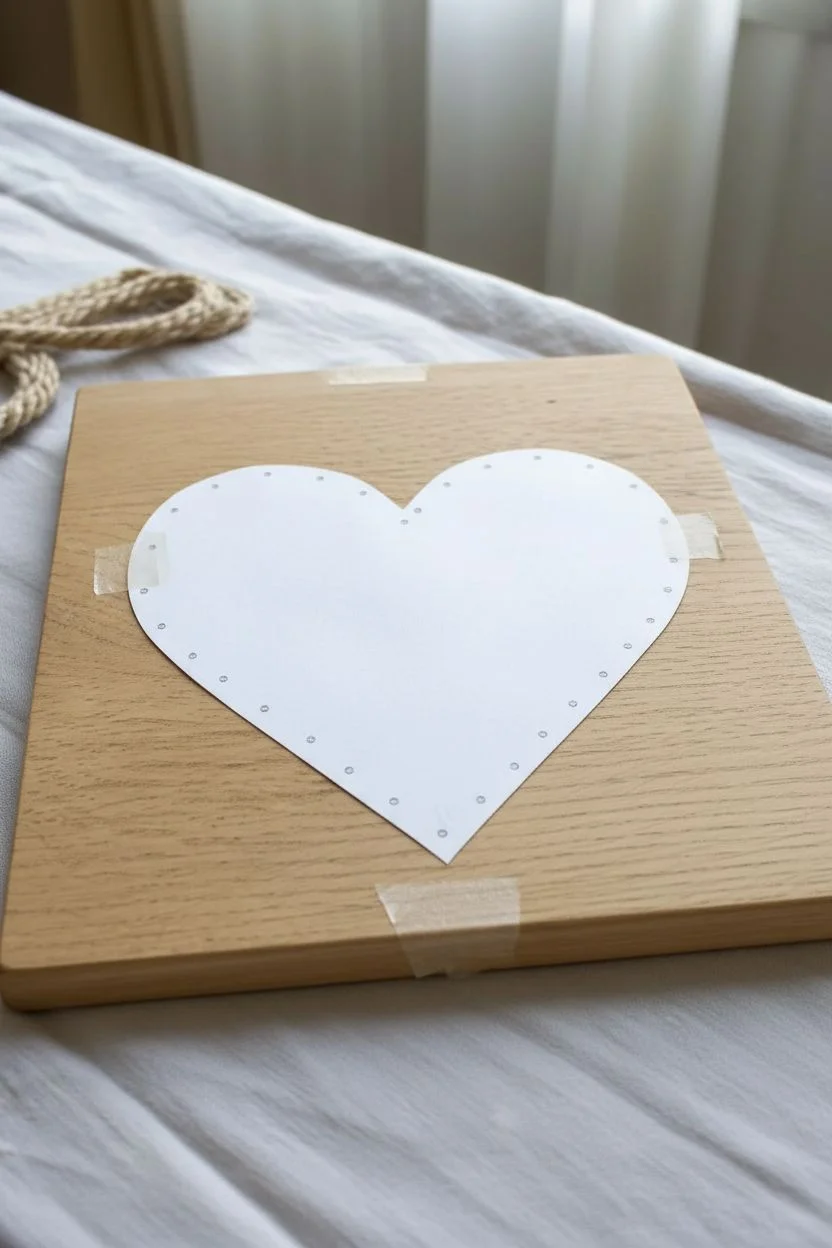
Secure the Template:
Center your paper heart on the wooden board. Once you are happy with the placement, use small pieces of tape to secure it so it doesn’t shift while hammering. -
Mark Nail Points:
Using your pencil, lightly make small dots along the perimeter of the paper heart about 1 centimeter (or roughly 1/2 inch) apart. Try to keep this spacing consistent for the best result.
Step 2: Creating the Framework
-
Hammer the First Nail:
Start at the bottom point of the heart. Hold a brass nail perpendicular to the wood and hammer it in firmly, leaving about half of the nail shaft exposed above the surface. -
Complete the Outline:
Continue hammering nails into each mark you made along the perimeter. Work your way around slowly; I find it helpful to rotate the board as I go to maintain a comfortable angle. -
Check Nail Height:
Once all nails are in, look at the board from the side. Tap down any nails that seem taller than the rest to ensure they are all leveled. -
Remove the Paper:
Gently rip the paper template away from the board. You may need to use tweezers or the tip of a pencil to slip out any small paper scraps caught under the nail heads.
Straight Nail Hack
Hold the nail in place with a pair of needle-nose pliers or a clothespin while hammering. This saves your fingers and keeps the nail perfectly upright.
Step 3: Stringing the Design
-
Anchor the String:
Tie the end of your white string tightly around the bottom-most nail with a double knot. Trim the short tail of the string close to the knot so it doesn’t show. -
Start the Geometric Pattern:
Pull the string taught and cross it over to a nail on the opposite side of the heart. Loop the string once around that nail head to secure it. -
Randomize the Connections:
Continue crossing back and forth across the heart shape. Don’t worry about following a specific sequence; the beauty of this design lies in random, intersecting lines. -
Fill the Gaps:
Look for areas that seem empty. Guide your string specifically to nails in those sparse sections to create density and balance in the webbing. -
Create the Border:
Once the center looks nicely filled, bring the string to the perimeter. Wrap the string from one nail to its immediate neighbor, continuing all the way around the outline to create a solid white border. -
Secure the End:
Finish by returning to your starting nail (or any nail that feels secure). Tie a tight double knot around the nail shaft. -
Final Trim:
Snip the excess string carefully. You can add a tiny dab of clear craft glue to the final knot to prevent it from unraveling over time.
Uneven String Tension?
If your string sags, don’t unravel everything. Simply pull the slack toward the nearest nail, wrap it around the head an extra time, and continue tautly.
Hang your new dimensional heart on the wall or lean it on a dresser to add a lovely handmade touch to your room
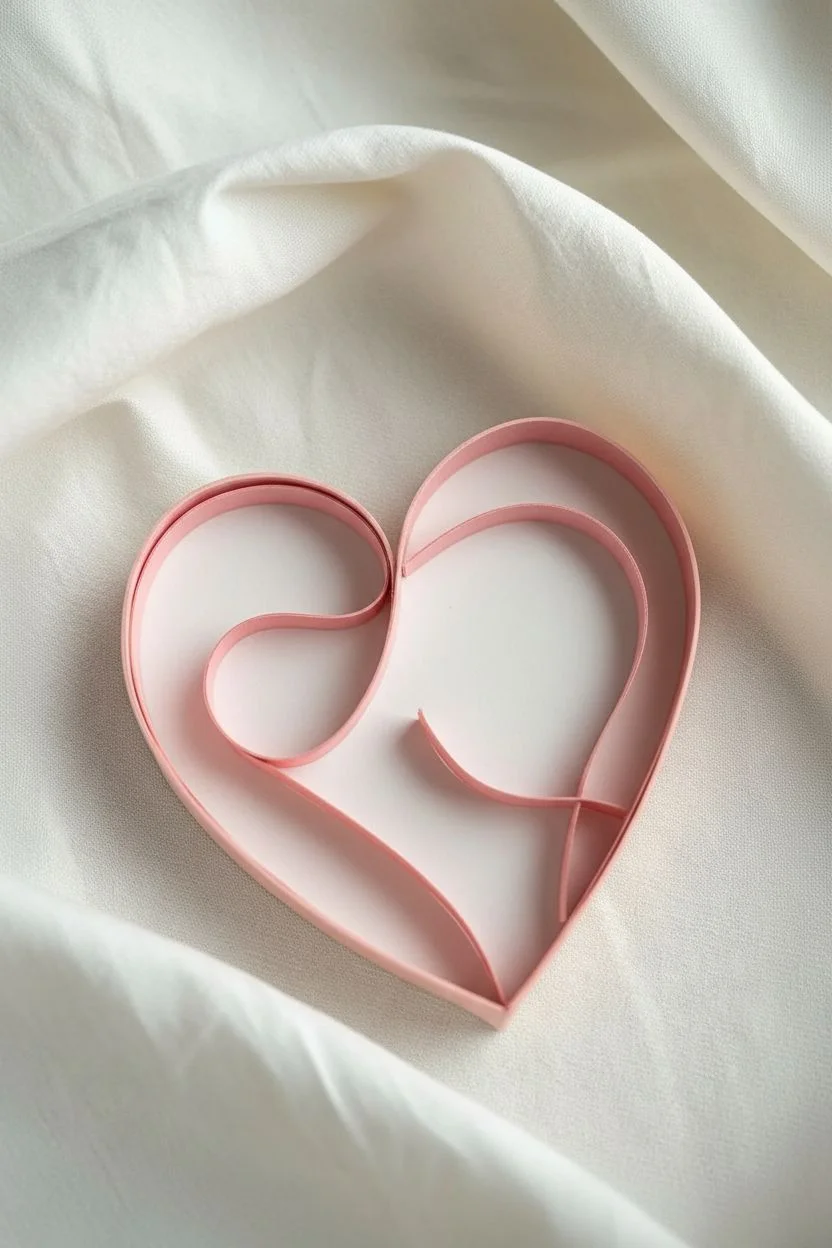
Mixed-Material Hanging Heart Mobile
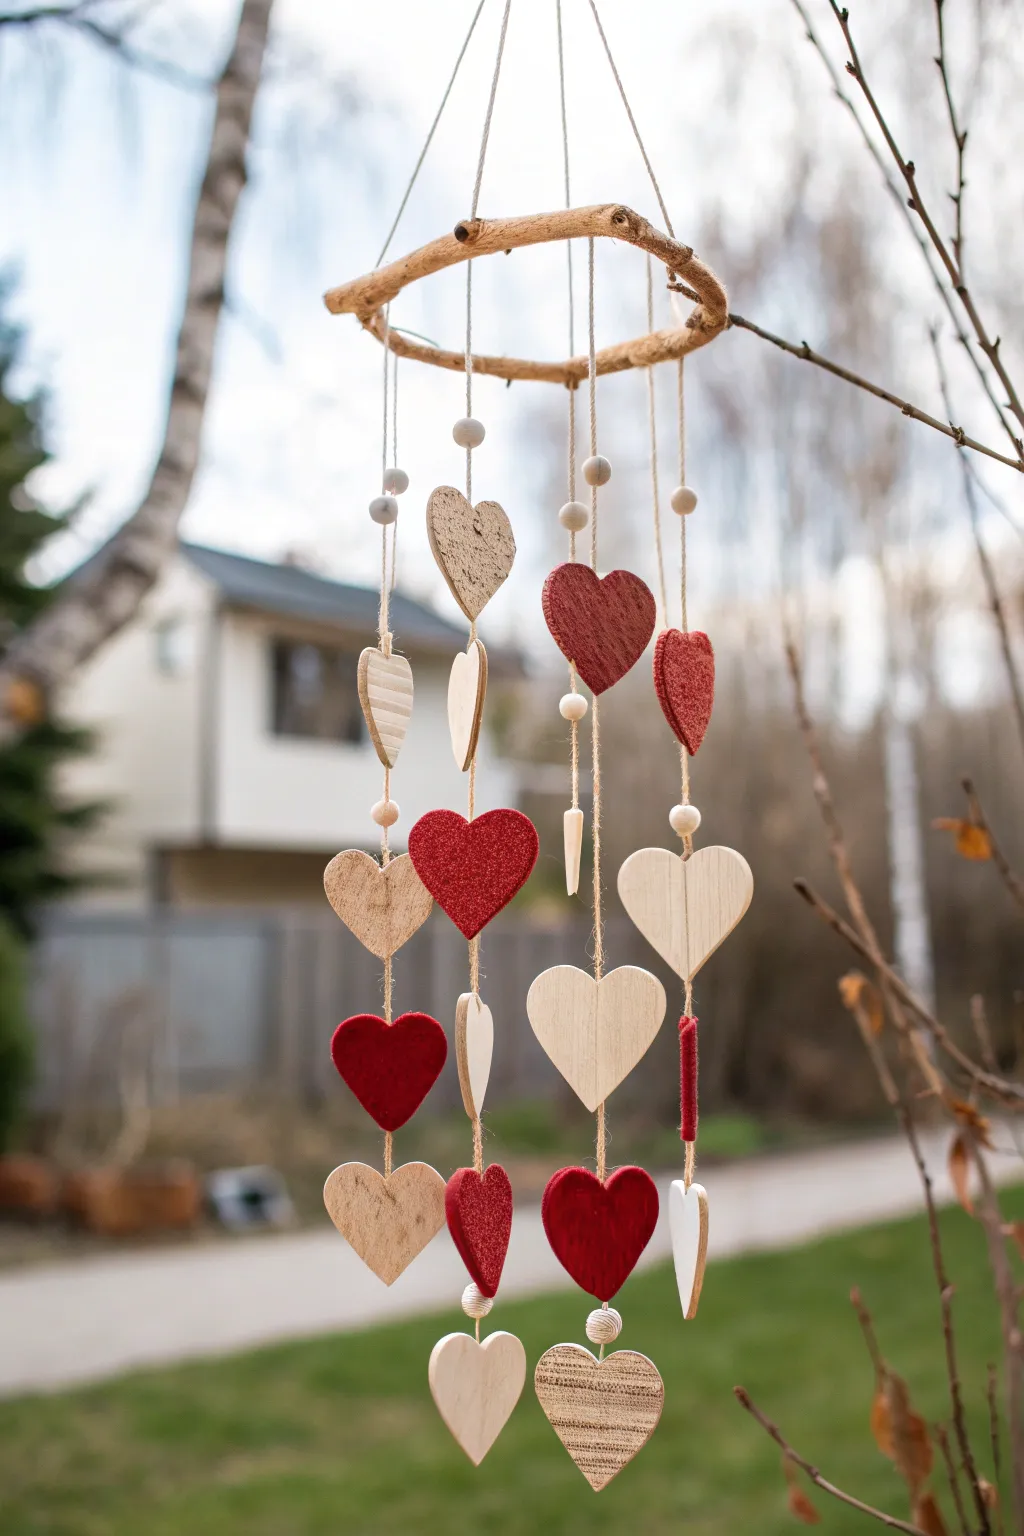
Bring a touch of romance to your home or garden with this charming mobile, featuring hearts in varying textures and warm hues. The combination of natural wood, soft felt, and simple string creates a delightful visual rhythm as it sways in the breeze.
Detailed Instructions
Materials
- A sturdy, natural branch hoop or a flexible branch bent into a circle (approx. 8-10 inches diameter)
- Wooden hearts in assorted sizes (some plain, some textured)
- Red and white felt fabric
- Thick cardboard or thin balsa wood (for backing felt hearts)
- Natural jute twine or hemp string
- Small wooden beads (natural and white painted)
- Hot glue gun and glue sticks
- Scissors
- Drill with a tiny bit (if wooden hearts aren’t pre-drilled)
- Needle with large eye (for threading felt)
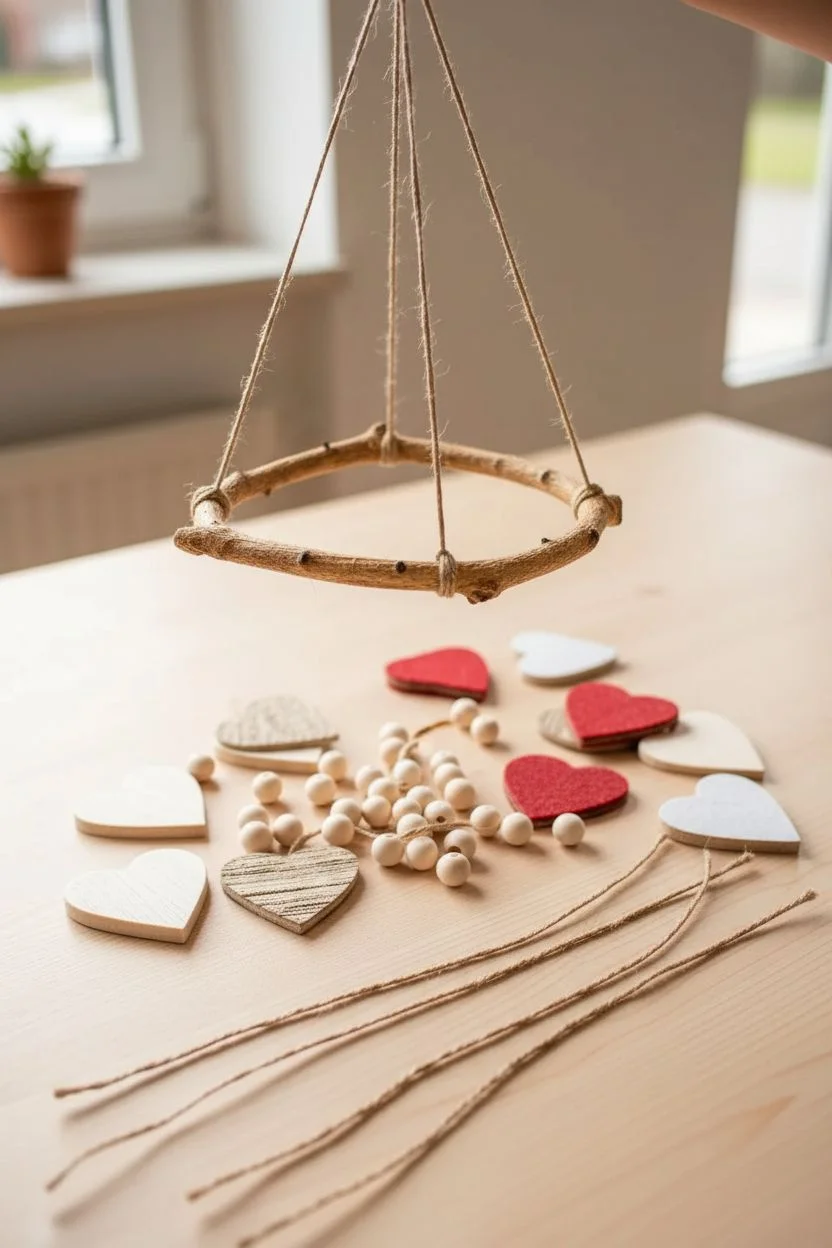
Step 1: Preparation & Base Construction
-
Select your materials:
Gather a mix of wooden heart shapes. For visual interest, ensuring you have a variety of styles: smooth plywood hearts, rustic bark-textured hearts, and thicker carved wood pieces. -
Create the felt hearts:
Cut heart shapes out of your red felt to match the size of some of your wooden pieces. To give them the structure seen in the image, glue the felt onto cardboard or thin wood cutouts of the same shape so they hang flat and don’t flop over. -
Prepare the hoop:
If you are using a straight flexible branch, soak it in water until pliable, bend it into a circle, and wire the ends together until dry. Alternatively, clear a pre-made grapevine wreath of excess twigs to create a clean, single-loop frame. -
Top hanging strings:
Cut three equal lengths of twine, about 12 inches long. Tie one end of each string to the wooden hoop at equal intervals (imagine a clock face at 12, 4, and 8). -
Secure the hanger:
Gather the three loose ends of the top strings together in the center. Knot them securely into a loop for hanging, ensuring the hoop sits level when suspended.
Natural Texture Hack
To mimic the textured hearts in the photo without buying expensive supplies, glue coarse sandpaper or birch bark scraps onto plain cardboard cutouts.
Step 2: Assembling the Strands
-
Plan the layout:
Lay out your hearts on a table in vertical columns to visualize the final look. Aim for 4-5 distinct vertical strands, varying the order of red felt, plain wood, and textured wood to create a balanced, staggered pattern. -
Cut the drop strings:
Cut 4-5 lengths of twine for the vertical strands. Make them varying lengths between 18 and 30 inches to create the cascading effect evident in the photo. -
Start the first strand:
Tie a knot at the very bottom of your first string. Thread a large textured wooden heart or a bead to act as the anchor weight. -
Add spacing beads:
Thread a small wooden bead onto the string and slide it down. I find adding a tiny drop of hot glue inside the bead helps keep it fixed at the exact height you want, acting as a stopper for the heart above it. -
Attach the hearts:
Thread or glue your hearts onto the string. For thin wooden hearts with holes, thread the twine through. For solid pieces or the felt-backed hearts, apply a line of hot glue to the back (or between two felt layers) and press the string into it. -
Vary the spacing:
Leave about 3-4 inches of empty string between each heart element. This negative space is crucial for the mobile’s light, airy feel. -
Mix elements:
Continue building the strand, alternating between red hearts, pale wood hearts, and decorative beads. Don’t be afraid to add unique elements like the ‘sandwich’ style flat hearts or thicker 3D wooden contours.
Step 3: Final Assembly
-
Complete all strands:
Repeat the assembly process for the remaining strands, ensuring no two strands are identical. Check that the bottom-most hearts sit at different levels. -
Attach to hoop:
Tie the top of each finished strand onto the wooden hoop. Space them evenly around the circumference. -
Secure the knots:
Once you are happy with the positioning, place a small dab of hot glue on the knots at the hoop to prevent them from sliding or unraveling. -
Trim excess:
Snip off any loose string ends near the knots for a tidy finish. -
Balance check:
Hang the mobile up temporarily. if it tilts, create balance by gluing small extra beads or metal washers to the back of hearts on the lighter side until it hangs straight.
Twisting Trouble?
If your flat hearts spin too much when hung, glue a second identical heart on the back to sandwich the string. The symmetry helps stabilize the spin.
Hang your beautiful creation near a window or on the porch to enjoy the gentle movement of love in the air


Have a question or want to share your own experience? I'd love to hear from you in the comments below!